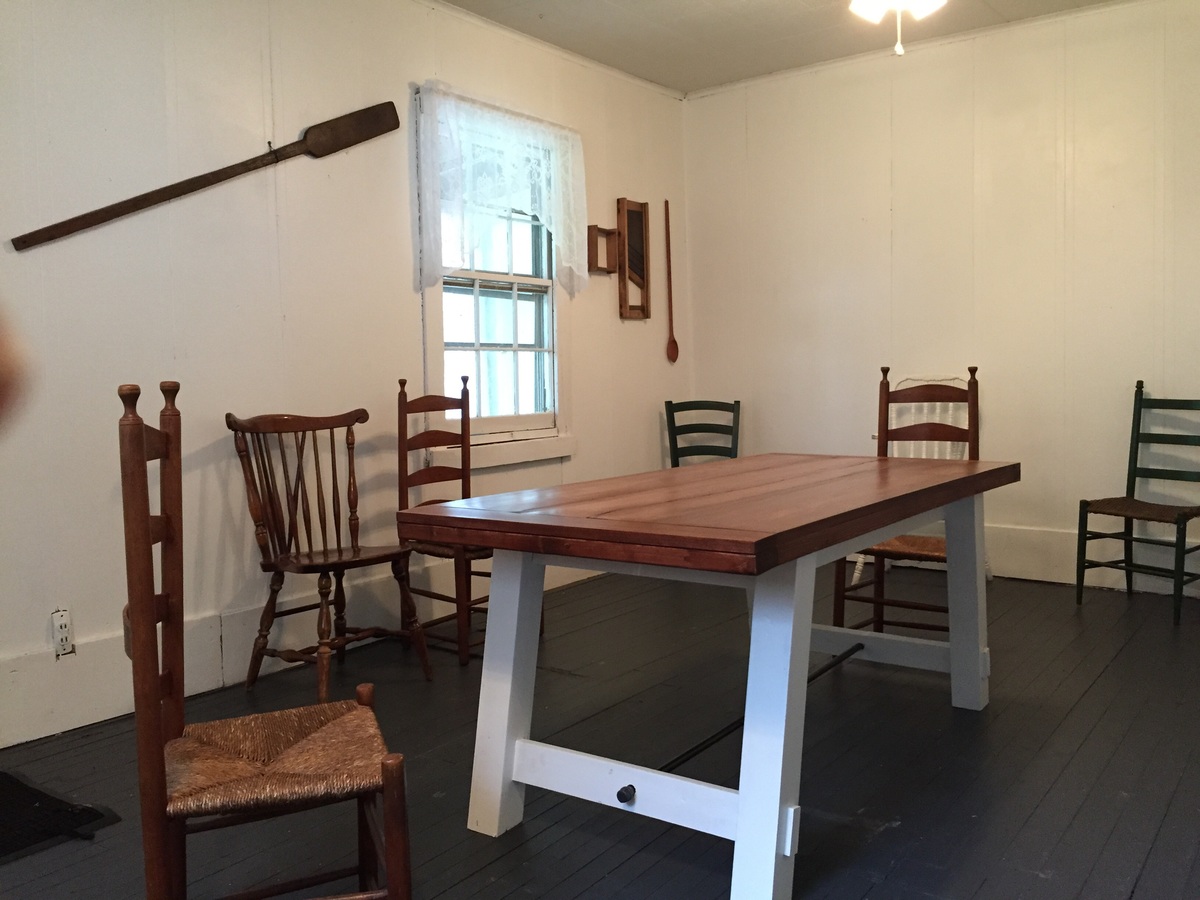
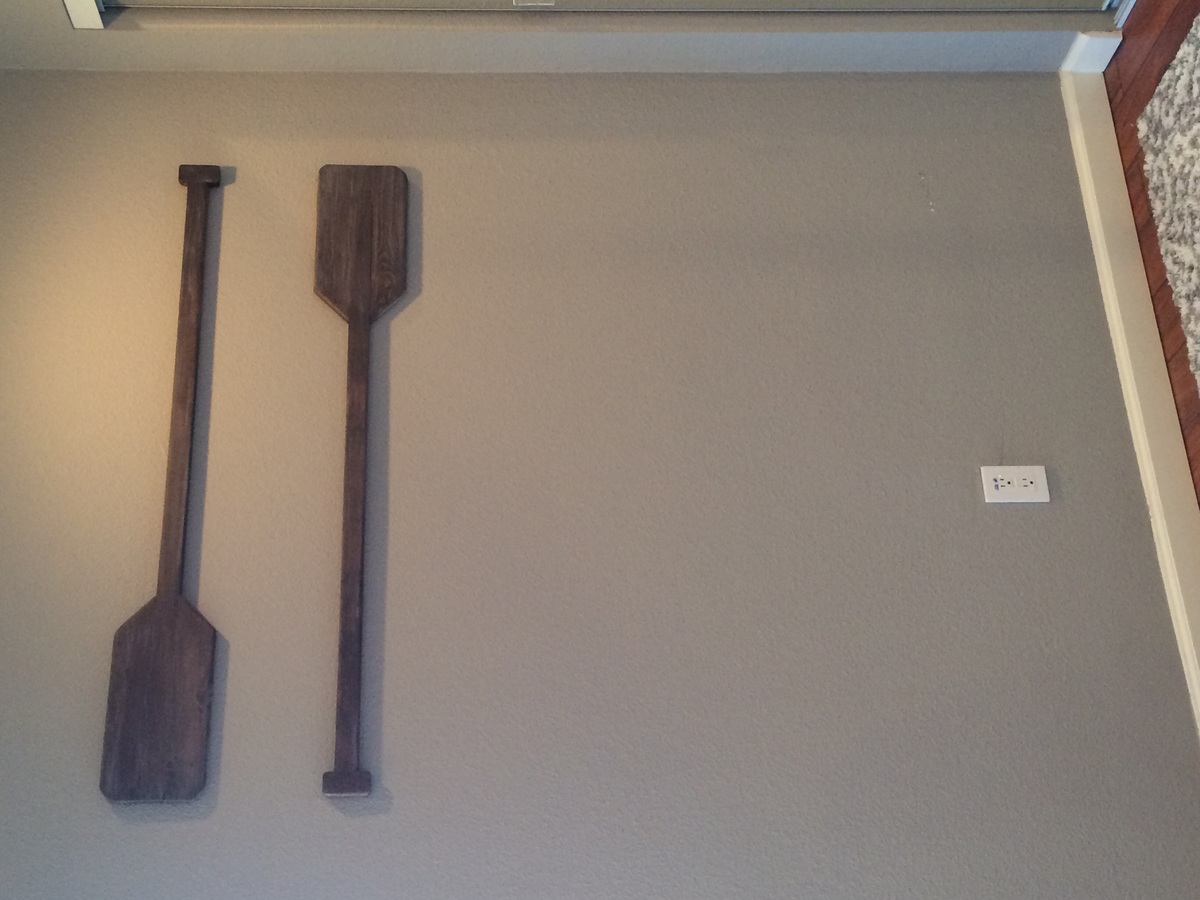
Community Brag Posts

Tall trellis from coat tree plans

Submitted by bar1812 on Thu, 06/25/2015 - 18:38

I could not find a big enough, awesome enough trellis in stores, so I built my own out of cull lumber [the stuff on super-clearance no one else wants] for about $12 and a left-over post pocket. Thanks for the inspiration!!

Estimated Time Investment
Afternoon Project (3-6 Hours)
Finish Used
ebony stain and spar varnish to hold up to the elements
Recommended Skill Level
Beginner

Comments

My first project - Doll bunk bed!

Submitted by mdoody65 on Sun, 01/14/2018 - 11:41

I wanted to do something special for Christmas for my 4 year old daughter. I have no real experience so this was one big lesson. The site and the photos from others made it feel so doable... I got it done in time and we finally painted it. My daughter picked all the colors and we painted it together the last few cold weekend days. What a great experience. Thank you for making DIY  feel so doable... now I’m completely hooked and her twin brother told me he wants to build a chair with me.. but a big one ... uh oh. 

Recommended Skill Level
Beginner

My take on the chicken coop design

Submitted by Anonymous (not verified) on Thu, 12/30/2021 - 13:01

When we became accidental chicken owners, we had to build a coop fast. I found the plans for Ana’s replica of the Williams Sonoma chicken coop and got to work. They were very easy to follow and easy to modify to fit our own needs and aesthetic. We decided to enlarge the coop and remove the planter in the original plans do we could accommodate more chickens while keeping the original footprint. Instead of plywood, we used cedar reclaimed from an old fence we had recently replaced. We also enlarged the rear door to make clean out as easy as possible. I cut pieces of corrugated plastic that fit inside the door and windows to winterize the coop when temps drop below freezing. The run is designed to follow the shape of the coop and is large enough to give our 5 chickens plenty of space. The planter box runs the length of the chicken run, providing some plants to munch on inside and shady vines that will eventually cover the outside. Thanks for the awesome plans!

Comments

Pallet Shelves

Submitted by karahart on Wed, 05/11/2011 - 09:16

I made these two pallet shelves to go in my living room to hold all of our magazines, coasters, and remote controls that were constantly getting left all over the place. They've been there for almost a year now, and they work so well!

Estimated Cost
Free!
Estimated Time Investment
An Hour or Two (0-2 Hours)
Finish Used
I added stain that I had on hand to the edges of the pallet shelf, and added a coat of polyurethane for protection.
Recommended Skill Level
Starter Project

Clothesline Frame

Submitted by DogDoc25 on Sun, 07/07/2013 - 22:13

I did this project as a Father's Day gift for my dad who is a photographer and has lots of pictures! I plan on making another one for my house because I like it so much. Mine took longer than it should have because I made a few mistakes, like not making sure the pocket holes were facing the right way before I screwed the main frame together. I also accidentally measured and drilled in the twine screws on the wrong side and had to fix that. So if i had done everything right the first time, this project would have only taken a few hours to complete. Fun and easy to do!

Estimated Time Investment
Afternoon Project (3-6 Hours)
Finish Used
Jacobean Minwax- 1 coat of pre-stain, then 1 coat of jacobean. still need to apply the satin finish.
Recommended Skill Level
Beginner

kids picnic table

Submitted by Annie D on Mon, 06/29/2015 - 17:05

This was a lot of fun to build. Took a few hours while kids napped plus a few more after bedtime.

Built from Plan(s)
Estimated Cost
$45
Estimated Time Investment
Afternoon Project (3-6 Hours)
Finish Used
Exterior green paint
Recommended Skill Level
Beginner

Garage makeover

Submitted by aderosa on Wed, 01/17/2018 - 11:05

Inspired by the ryobi dream workshop.  Shelving unit and the feed carts are complete.  Still working on the the organization of all our stuff!

Estimated Time Investment
Weekend Project (10-20 Hours)
Recommended Skill Level
Beginner

Comments

Farmhouse rustic L shaped desk

Submitted by Devorlast on Sun, 01/02/2022 - 17:34

This was my second project. My Wife asked me for a desk and gave me a pintrest link, except that they had no dimensions, cut list or even material list. I found some youtube vids that covered same type desk and made my own plans.
Again, the whole thing was made with table saw and battery powered drill. Well, not counting the sander and hand plane.
I was initially going to provide the plans, material list, cut list etc but a lot of the cuts were done by eyeball and I don't wish the pain of doing this project without a miter saw on my worst enemy...
Overall it came out a lot better then I thought it would considering my lack of experience and "know how". Table top is held together using pocket holes and wood glue, the article on Ana's website about table tops helped me a ton!
As for stains its cherry on the bottom and aged white on the top. The 4x4's that I used for the base were of some red hued wood so the cherry color blended them with the white wood 2x4's that make up the decoration supports.
If you have any questions feel free to ask, this was my second project and I learned a lot of do's and dont's.

Total cost ~$200.
Total time, for me it was about 30 hours over two weeks, if you know what you doing and got the right tools probably half of that.

Comments

My first Easy Build Headboard, King Size

Submitted by andreak on Thu, 05/12/2011 - 16:15

This was my first project and it come out beautifully. I did learn a valuable lesson - if you are going to build something in the basement, make sure it fits up the stairs. Not sure if you can tell from the picture but this ended up 6 inches shorter than the plans. Can wait to find my next project!

Estimated Cost
$150
Estimated Time Investment
Day Project (6-9 Hours)
Finish Used
MinWax Wood Finish Red Mahogany 25 - Minwax Polyurethane
Recommended Skill Level
Beginner

Miniature kitchen for a 2nd birthday

Submitted by lswenson on Fri, 07/03/2015 - 14:41

I made this for my son's second birthday last year.

I made a few changes to the plans. Instead of a shelf in the oven, I put in a wire cooling rack to resemble a oven rack. I put knobs on the back of the stovetop instead of the lower front. I added doors to the lower half on the sink.

The sink is a 9" loaf pan. The stove knobs and faucet were salvaged.

Toy food and realistic pots and pans are from IKEA.

Estimated Time Investment
Weekend Project (10-20 Hours)
Recommended Skill Level
Intermediate

Modified Miter Saw Cart

Submitted by DavidH on Fri, 01/19/2018 - 20:56

I started with the basic plans and dimensions, then made it my own from there. I added a center shelf, used regular (cheap) hinges and a removable brace instead of the shelf brackets, with stop blocks on the brace cleats to help easily center them. Added 2x4s on the sides to mount the hinges and let the wings fall flush, 2x4s on the bottom to mount 4” casters, 1/4” plywood backing, and 1x3 trim on the front for aesthetics and as a lip to hold items in place. The backing completely covers the lower shelf, and I left a gap to run cables through in the upper shelf backing. Velcro strips on the back hold the wing braces when they’re not in use.  Even though it’s plywood, I sanded everything thoroughly to reduce splinters and snags. 


Built from Plan(s)
Estimated Cost
$100-$125
Estimated Time Investment
Weekend Project (10-20 Hours)
Finish Used
Unfinished
Recommended Skill Level
Beginner

Comments

nzmitchell11

Sat, 02/03/2018 - 08:22

Hi there. I’m planning to use Ana White’s plan to build this miter saw cart but I like some of your alterations like with adding the 2x4s to allow the leaves to fall flush and the 2x4s at the bottom to attach the casters. How did you attach the casters? I have ones similar to yours- plate casters with 4 holes. Did you use bolts or screws? 

Coffee Bar with diy barn door

Submitted by dnieves33 on Tue, 01/11/2022 - 08:57

Built this coffee bar with the diy barn door hardware. Wife loves it. This is made of about 80% reused / repurposed wood. Thank you Ana for the great videos and simple to follow plans.

Comments

Reclaimed Wood Headboard - Florida Style

Submitted by millpherd on Tue, 05/17/2011 - 11:13

After moving to Miami from a Log Cabin in Western Pennsylvania, I wanted to have a bedroom that was decorated very "Miami." The best option was to build a bed and finish it myself. The body of the headboard is whitewashed and the trim is a cactus gel stain. Thanks Ana!

Estimated Cost
$125.00
Estimated Time Investment
Weekend Project (10-20 Hours)
Finish Used
White washed and gel stain.
Recommended Skill Level
Starter Project

Hannahs Barbie house

My wife wanted me to make this. The frame was meant to be coated in polyurethane but as the wood did not look the best, i painted it. I think the colours work quite well.
The stairs are different, i wanted something unique for those.
My daughter loved it as it was a birthday present for her.
The project took about 3 weeks in the evenings after work for a couple of hours most days.

Estimated Time Investment
Weekend Project (10-20 Hours)
Finish Used
Paint, Polyurethane, Wallpaper
Recommended Skill Level
Intermediate

Outdoor Server/Cooler

Submitted by NJ_DIY on Mon, 07/06/2015 - 20:32

My wife wanted an outdoor server for our back deck. I did so, but decided to add some flare. I built it so the top comes off and a cooler is exposed for our drinks. And to not waste any wood, you turn the top around and I painted with Chalkboard paint so she could write up a menu. Added some color she would like, found a tutorial on chevron, add a few accessories, and viola!

Estimated Cost
$75
Estimated Time Investment
Week Long Project (20 Hours or More)
Finish Used
Benjamin Moore Tropicana Cabana, Polycrylic
Recommended Skill Level
Intermediate

Pantry Bin Storage

Submitted by vendo on Tue, 01/18/2022 - 10:21

I used Shelf Help for the plywood pieces, then planked the sides with some 1x's, and added a face frame for the top edge. Casters allow for it to be moved easily and cleaned under. This is a great way to add extra storage under the pantry shelves and this design is super easy to modify for any size and height!

Comments

Pottery Barn Benches with X Table...Modified

Submitted by AJW on Thu, 05/19/2011 - 13:18

Pottery Barn Bench: Length Modified and utilized 2-1x6s for seat. X Table: Length Modified, utilized a 6x6 for the stretcher and drilled a hole through both the 1 top material and 6x6 stretcher beam. Holds the Pottery Barn umbrella real well. All made of Cedar and painted for good measure. Everything counter sunk and plugged, sanded to high heavy and ready to last.

Estimated Cost
$350
Estimated Time Investment
Week Long Project (20 Hours or More)
Finish Used
Oil based primer with 2 coats of acrylic over top.
Recommended Skill Level
Intermediate

Built two queen sized farmhouse beds for my daughters.

Submitted by bh2469 on Sat, 07/13/2013 - 13:11

Decided to build beds for my two daughters. We went with two queen sized farmhouse beds that I hope they can keep with them for a very long time. I used joist hangers and attached the head board and foot board so that they could be disassembled easily for moves. The beds came out great and I painted them using Chalk Paint. The project took about three weekends to complete.

Built from Plan(s)
Estimated Cost
$500
Estimated Time Investment
Week Long Project (20 Hours or More)
Finish Used
Annie Sloan Chalk Paint
Recommended Skill Level
Beginner

Comments

Farmhouse Storage Bed with Geometric Pattern

Submitted by dmcarwin on Fri, 07/10/2015 - 10:15

I have always loved Ana's Farmhouse bed, so when she came out with the Farmhouse bed with storage drawers I knew it was the perfect solution for our small master bedroom. Ana's plans were awesome and made this an easy build. I wanted my bed to be a little unique so I tried a geometric pattern for the head board and foot board and I LOVE it! I also decided to make my slats removable for easy access to under the bed storage and this is one of my favorite features of the bed! I think my husband and I just found a new spot for hiding christmas presents! :) Check out my blog post for all the details and loads of photos!

Estimated Cost
I am thinking around $300 for the bed with materials and stain and poly.
Estimated Time Investment
Week Long Project (20 Hours or More)
Finish Used
I used Minwax pre wood conditioner and Mixwax Jacobean for the main bed and drawers. For the geometric inlay I used Minwax Natural Stain. I also did there coats of poly sanding with 400 grit in-between coats for a nice smooth finish.
Recommended Skill Level
Intermediate

Comments