Community Brag Posts
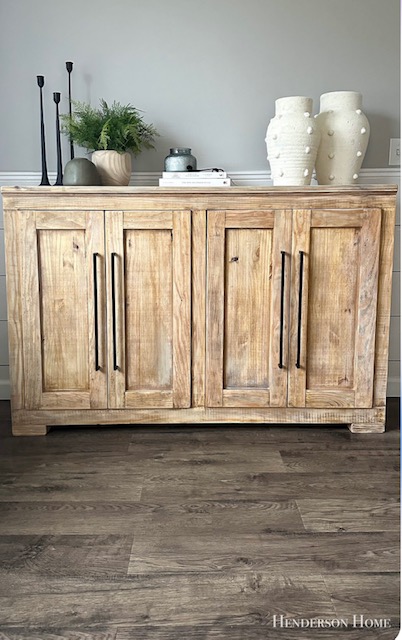
Sideboard Cabinet by Henderson Home
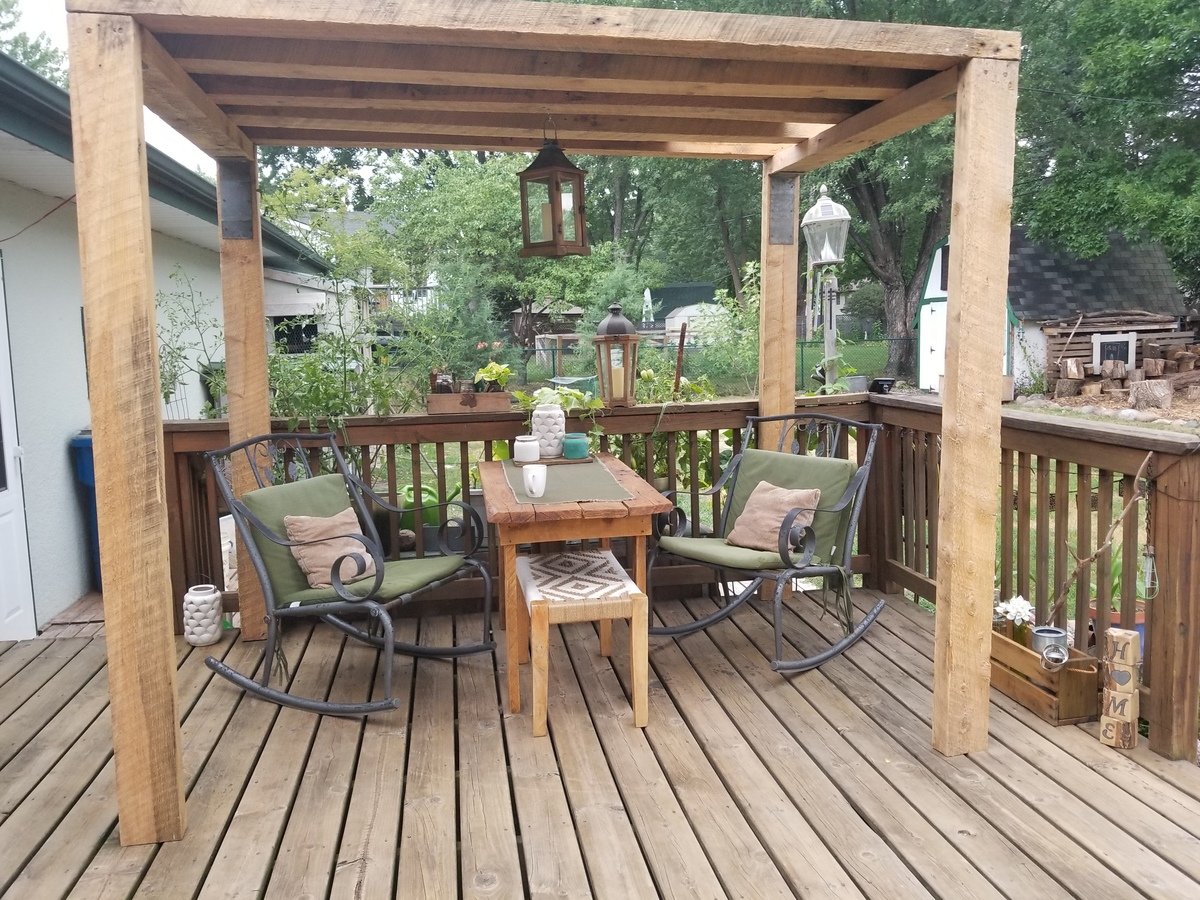
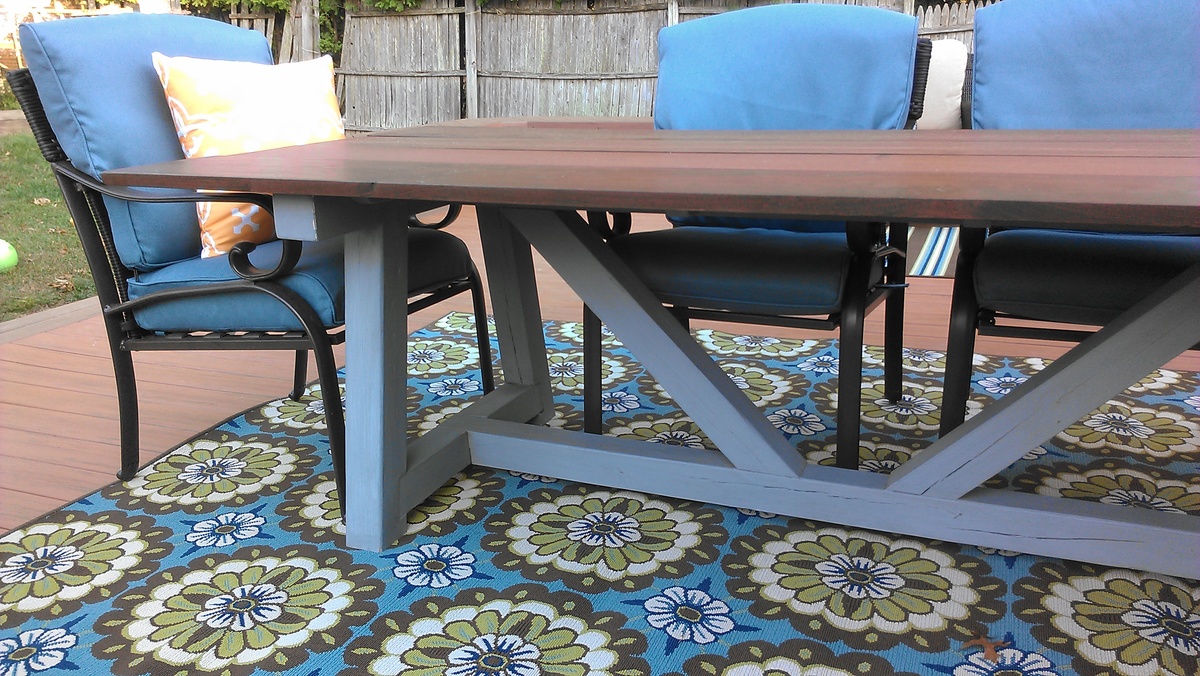
outdoor sectional
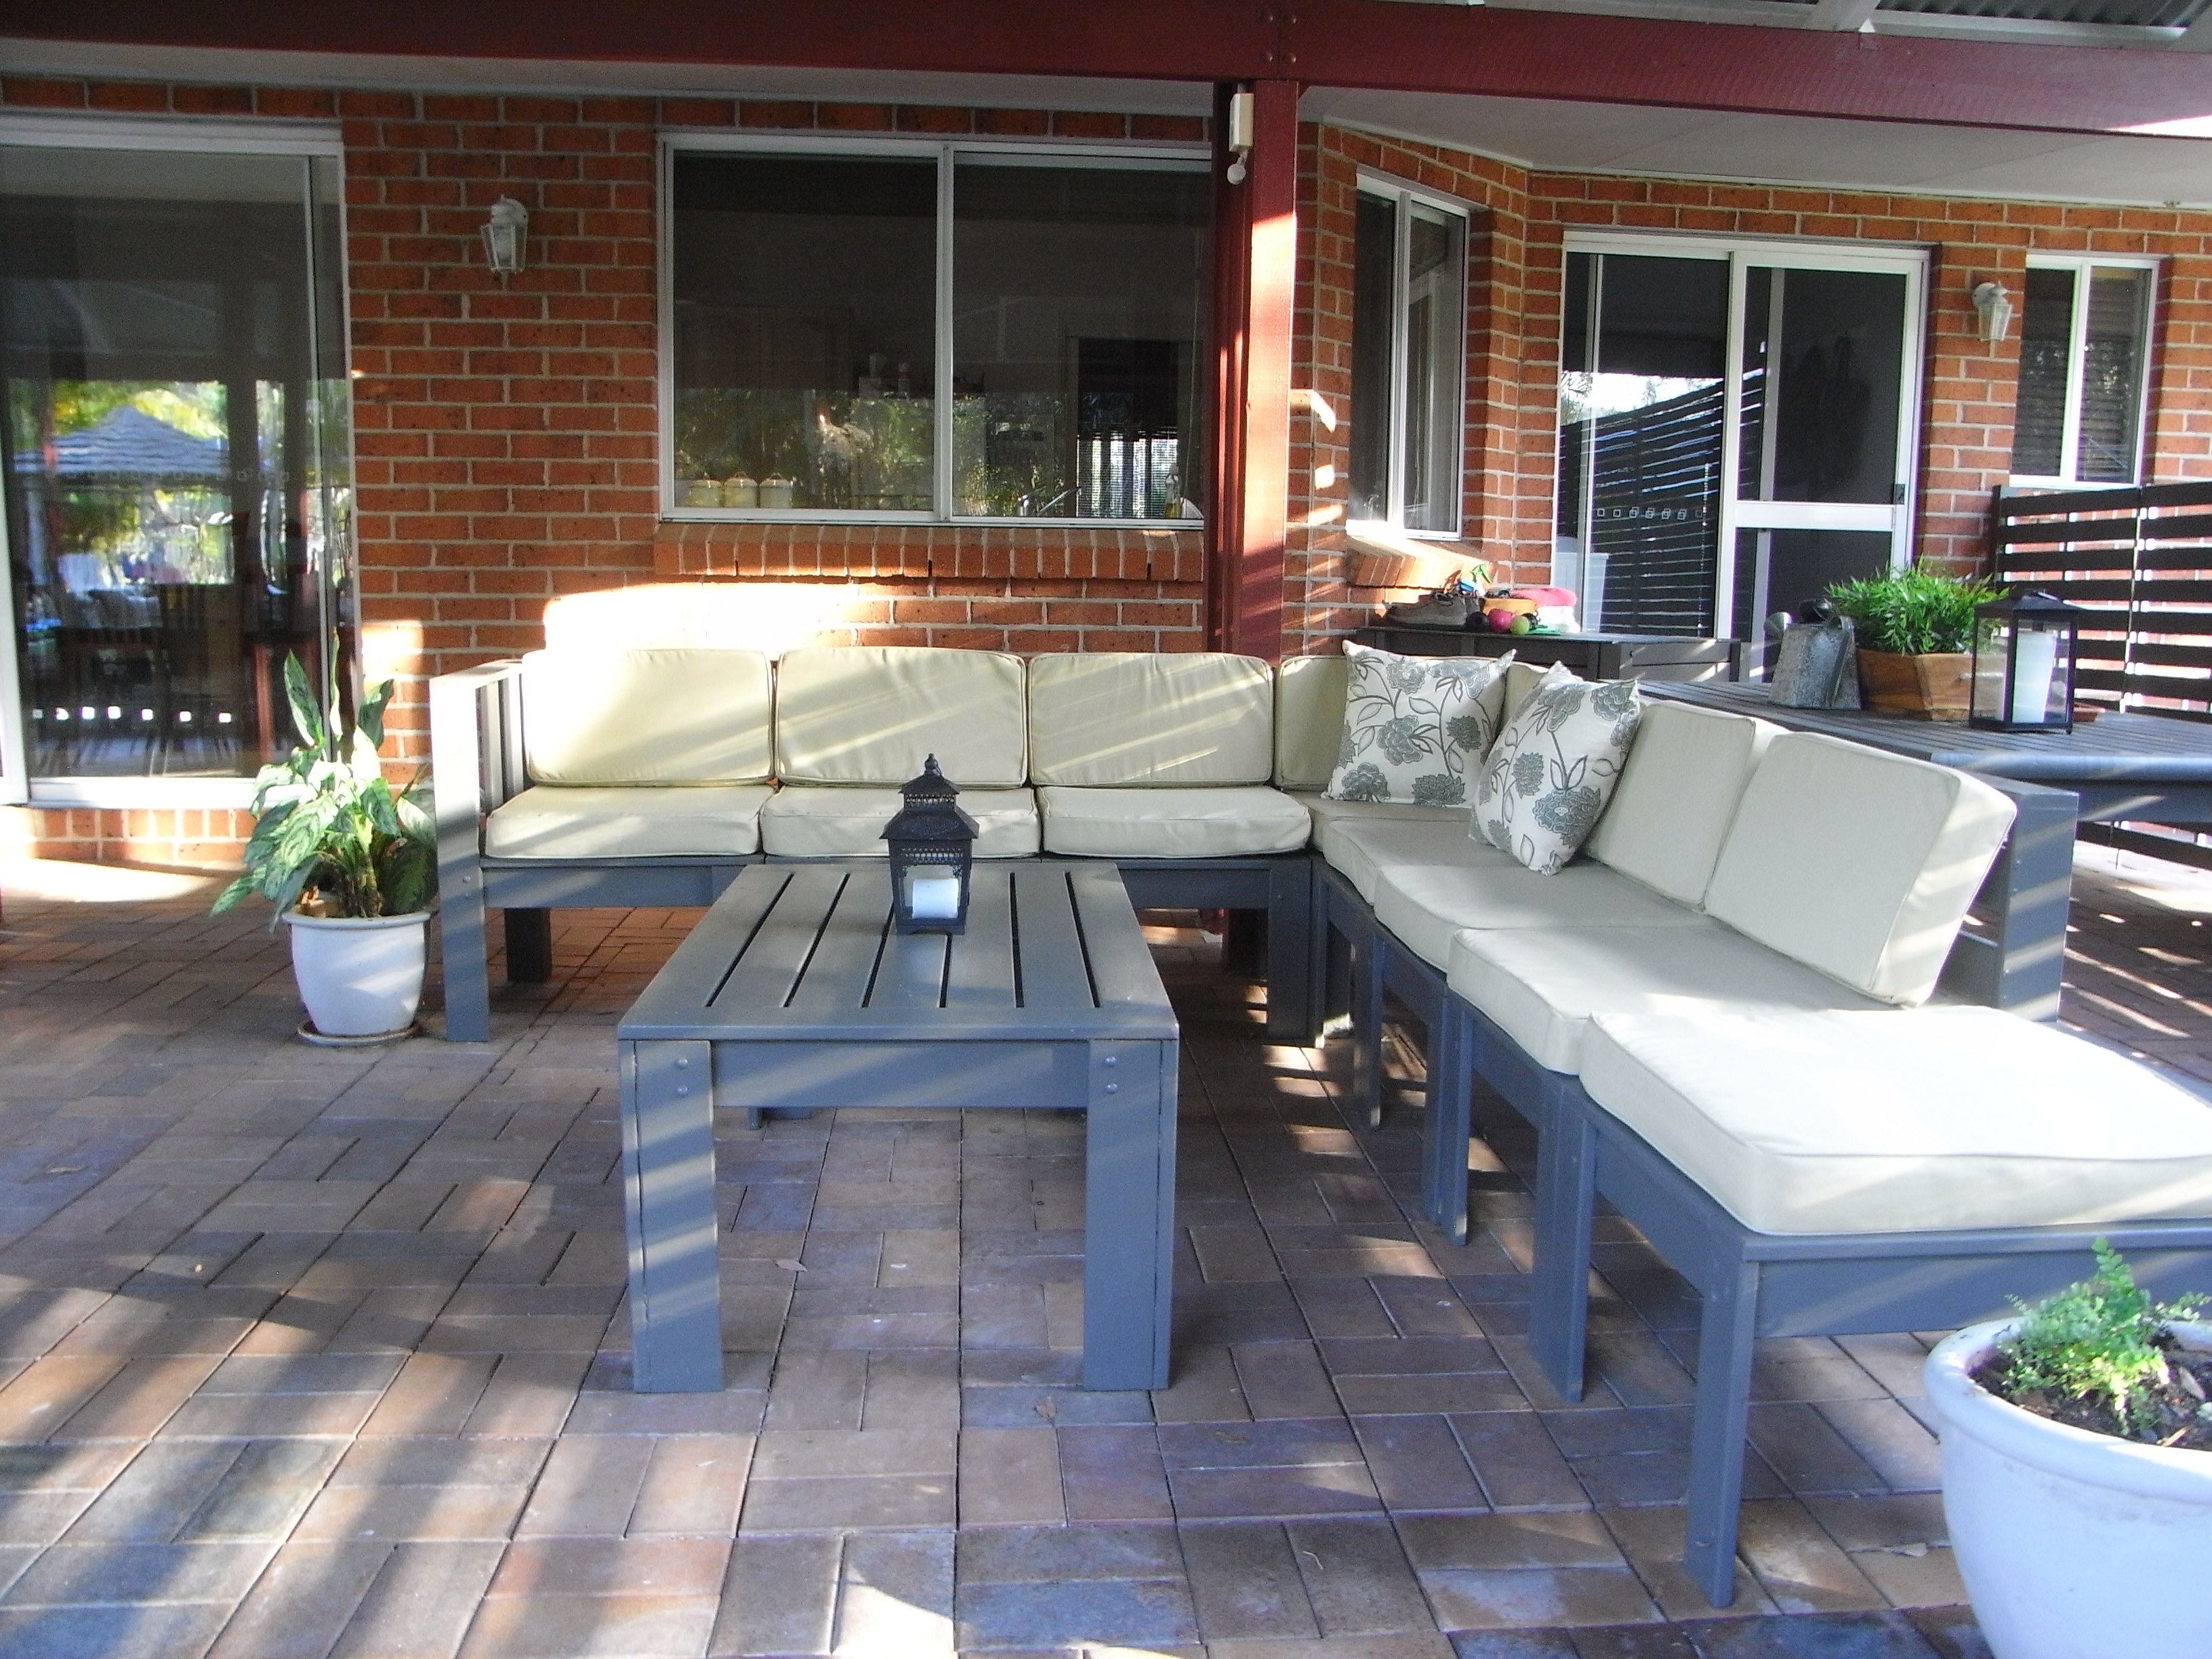
we put a few bolts in the legs for a bit of added strength, and extra back supports.
Recommended Skill Level
Intermediate
Comments
Fri, 06/08/2012 - 09:49
Hi there! Love it! We built
Hi there! Love it! We built one of these too but cannot find cushions for the back, considering it's rather short. Any advice or did you make them?

Tue, 07/17/2012 - 23:24
Hi, only just checked
Hi, only just checked messages. I got the cushions from and outdoor furniture supply store off ebay Australia. They are replacement ones for a manufactured style of setting they sold, but worked perfectly for the sectional.
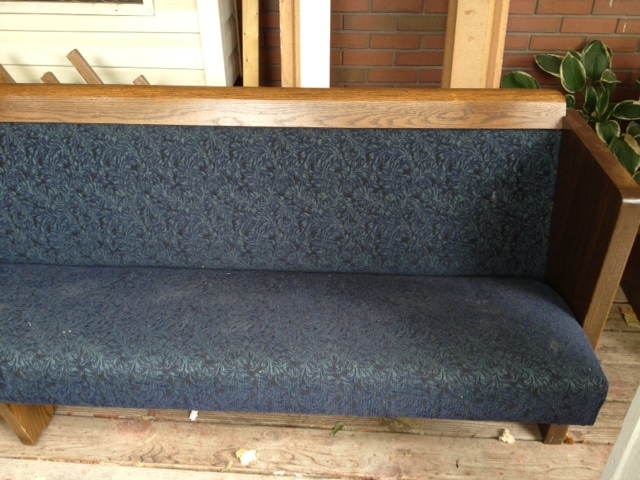
Old church pew makeover.
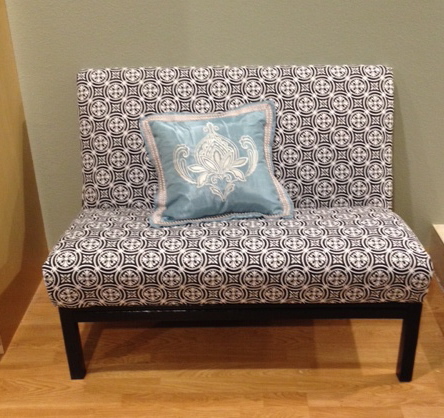
My church was getting new pews and asked if anyone wanted the old ones so I decided to take one and see what I could do with it! The second picture is what it used to look like. I had to take it all apart and cut it to the shorter size that I wanted. I then recovered it with some fabric I found for about $10. I then made legs out of a 2x4 and supported the legs with some 2x2 across the front, back and sides. I painted them with some black primer/paint that I had. This was so fun to do because I had to figure it out as I went along. It was a bit of a challenge at times and I learned a lot from this project. I really love the finished product.
Estimated Cost
$15
Estimated Time Investment
Day Project (6-9 Hours)
Finish Used
Black primer and paint.
Recommended Skill Level
Beginner
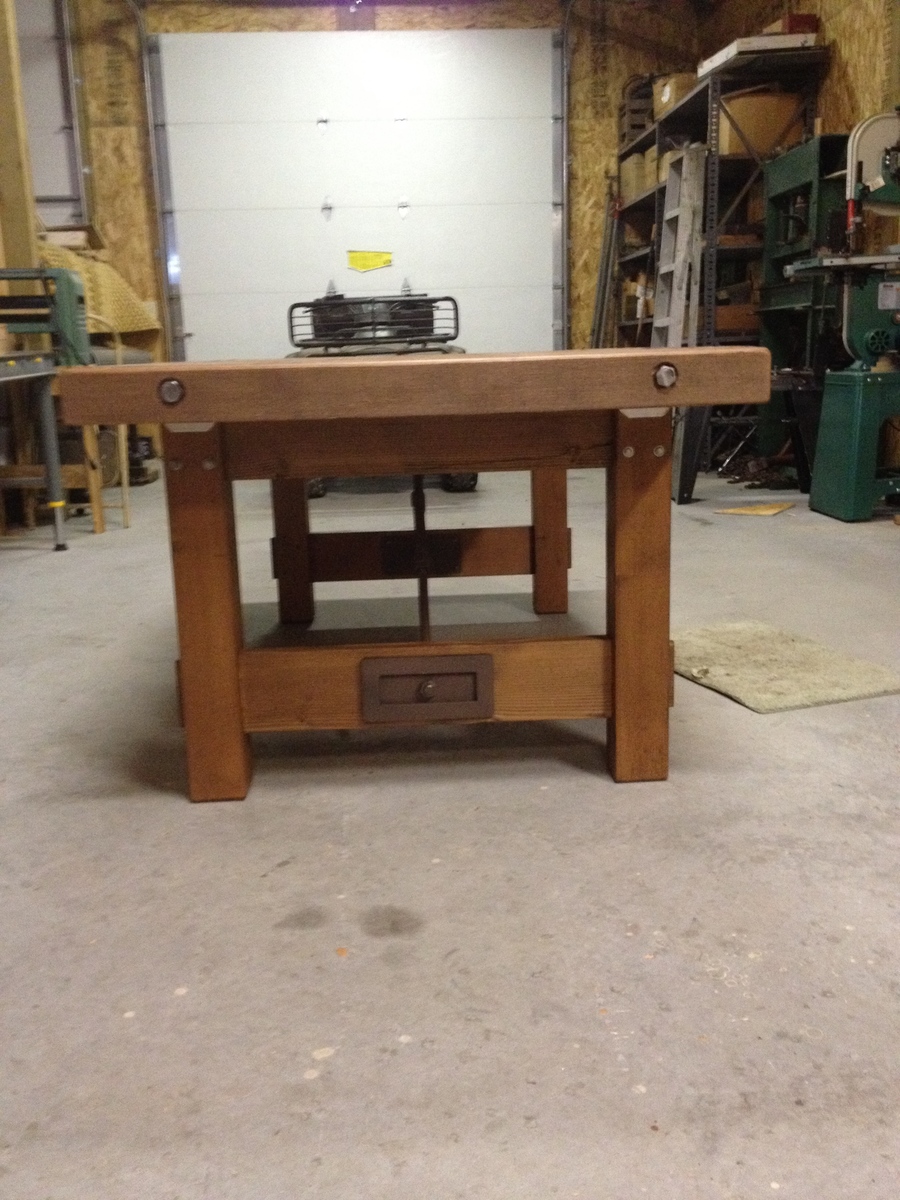
Rustic X Small Rolling Kitchen Island

Good tips from everyone. We added a 2x4 (hidden under the top) to have added saftey feature to ensure my kids wouldnt pull out the drawer.
Estimated Cost
$150
Estimated Time Investment
Weekend Project (10-20 Hours)
Finish Used
weathered walnut and poly clear
Recommended Skill Level
Beginner
Epoxied Craft Table
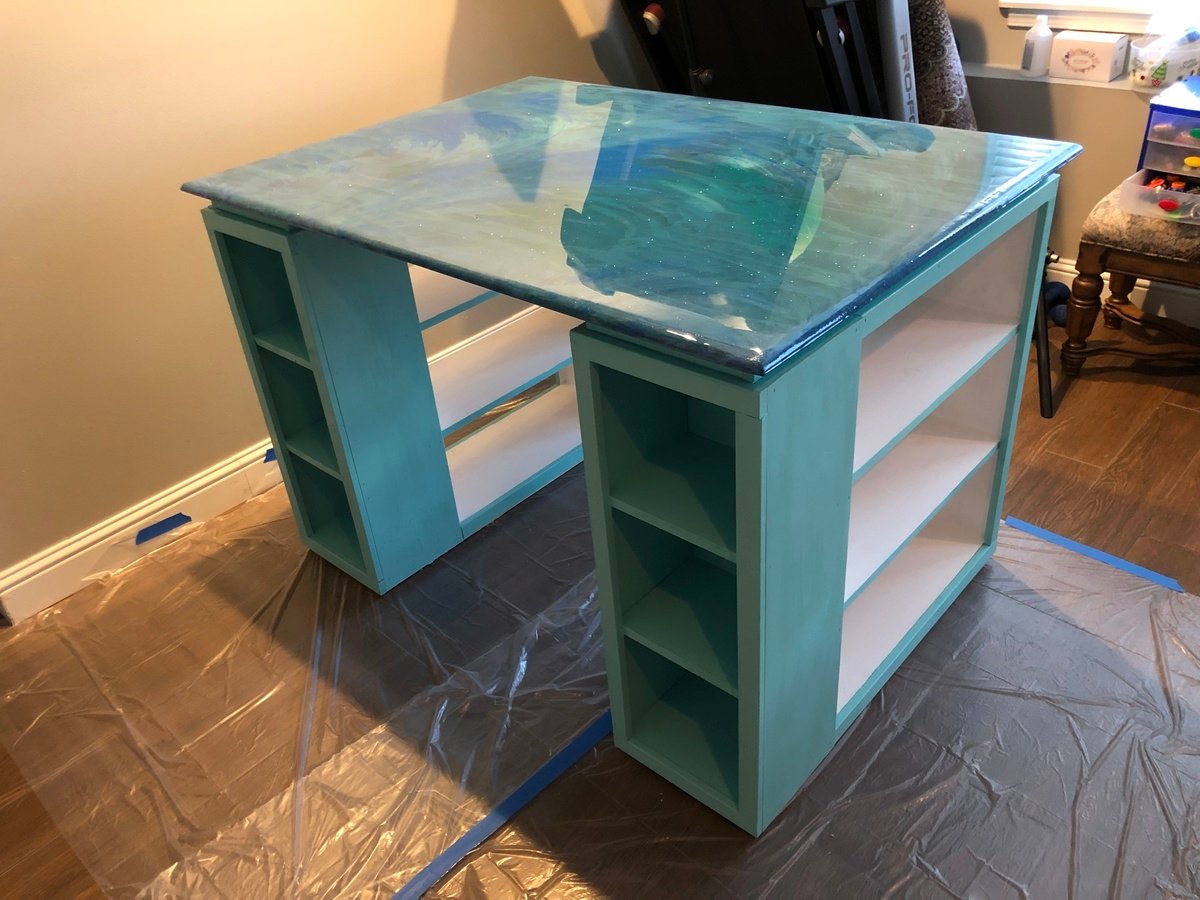
I built this table for my wife. I added a 1/4 round to the edge of the table. She did all of the finish work including the top which is Unicorn Spit and epoxy. I turned out really nice. Thanks for the plans!
Estimated Time Investment
Week Long Project (20 Hours or More)
Finish Used
Unicorn Spit, epoxy and interior paint
Recommended Skill Level
Intermediate
Comments
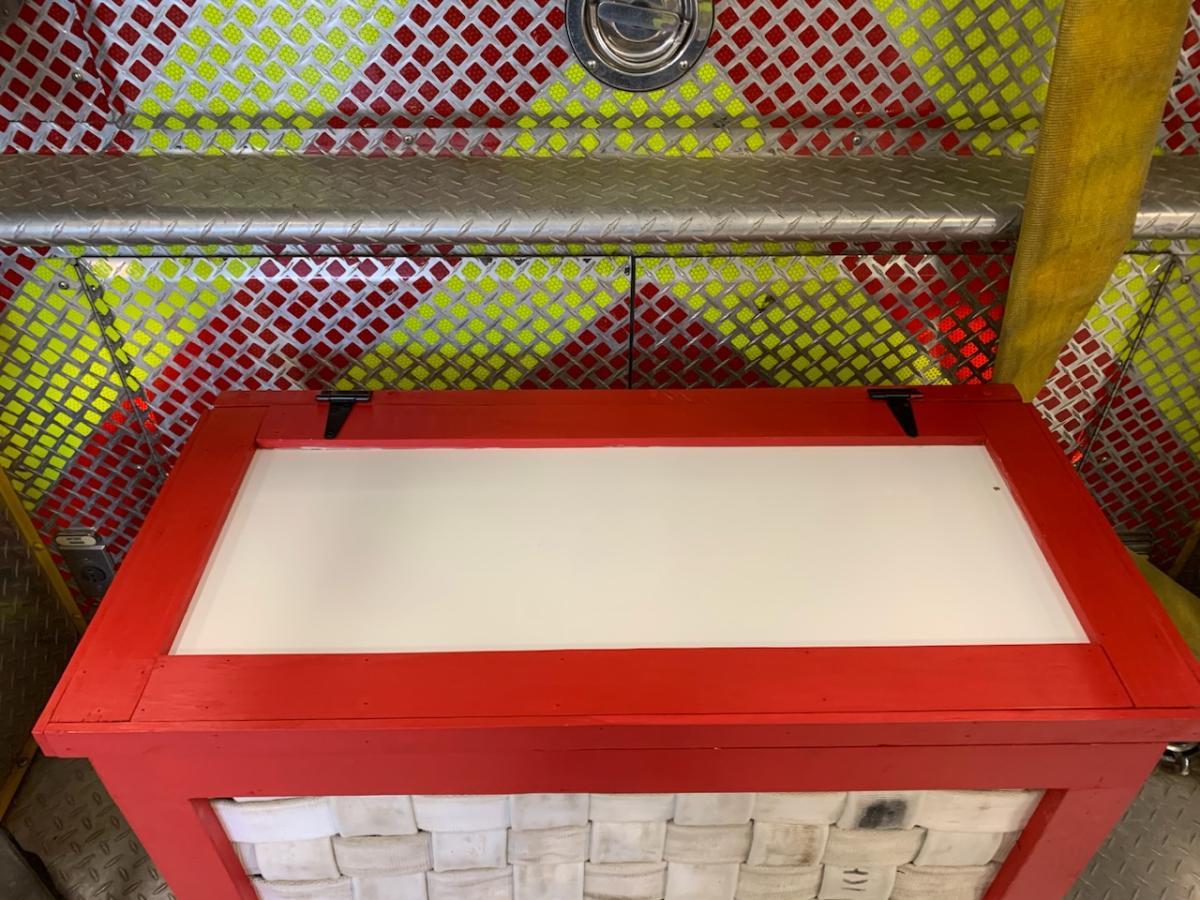
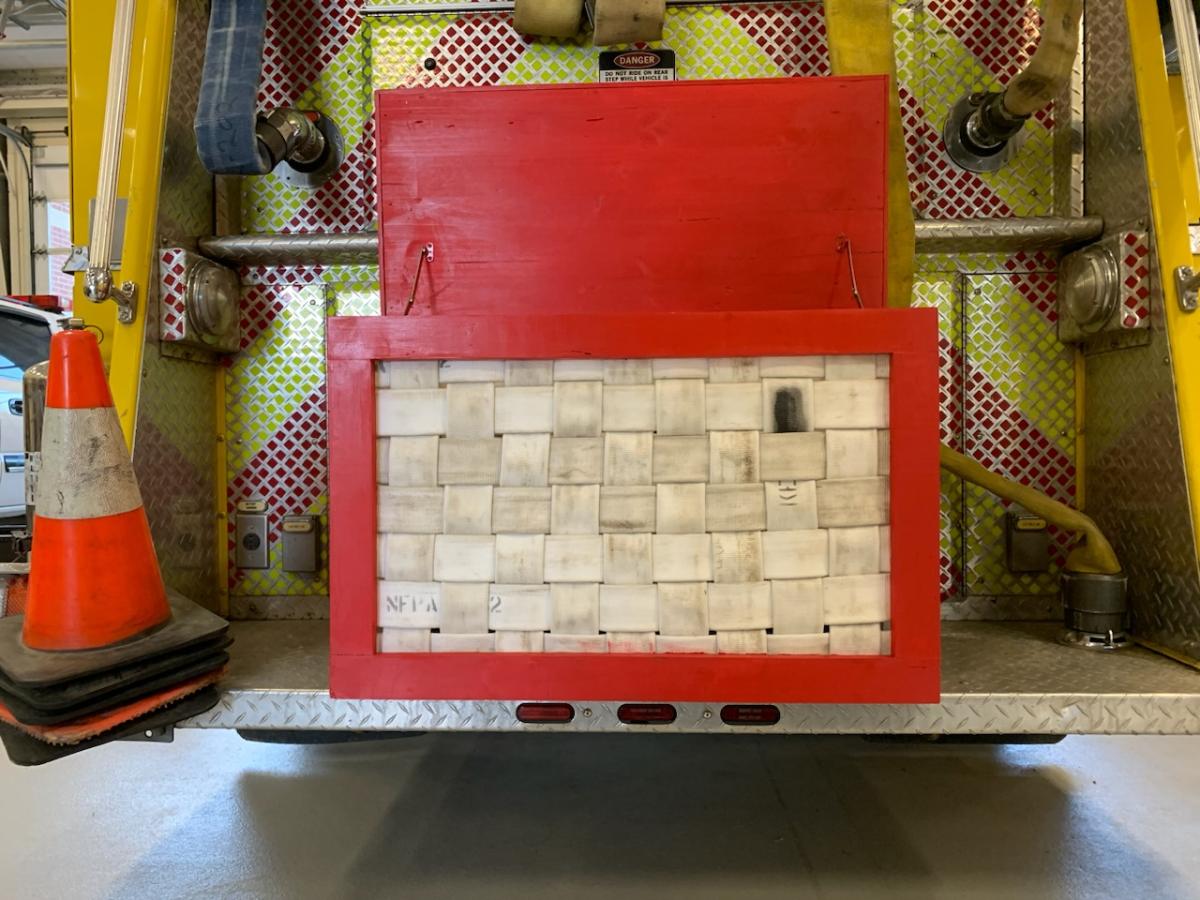
Farm House Toy Box
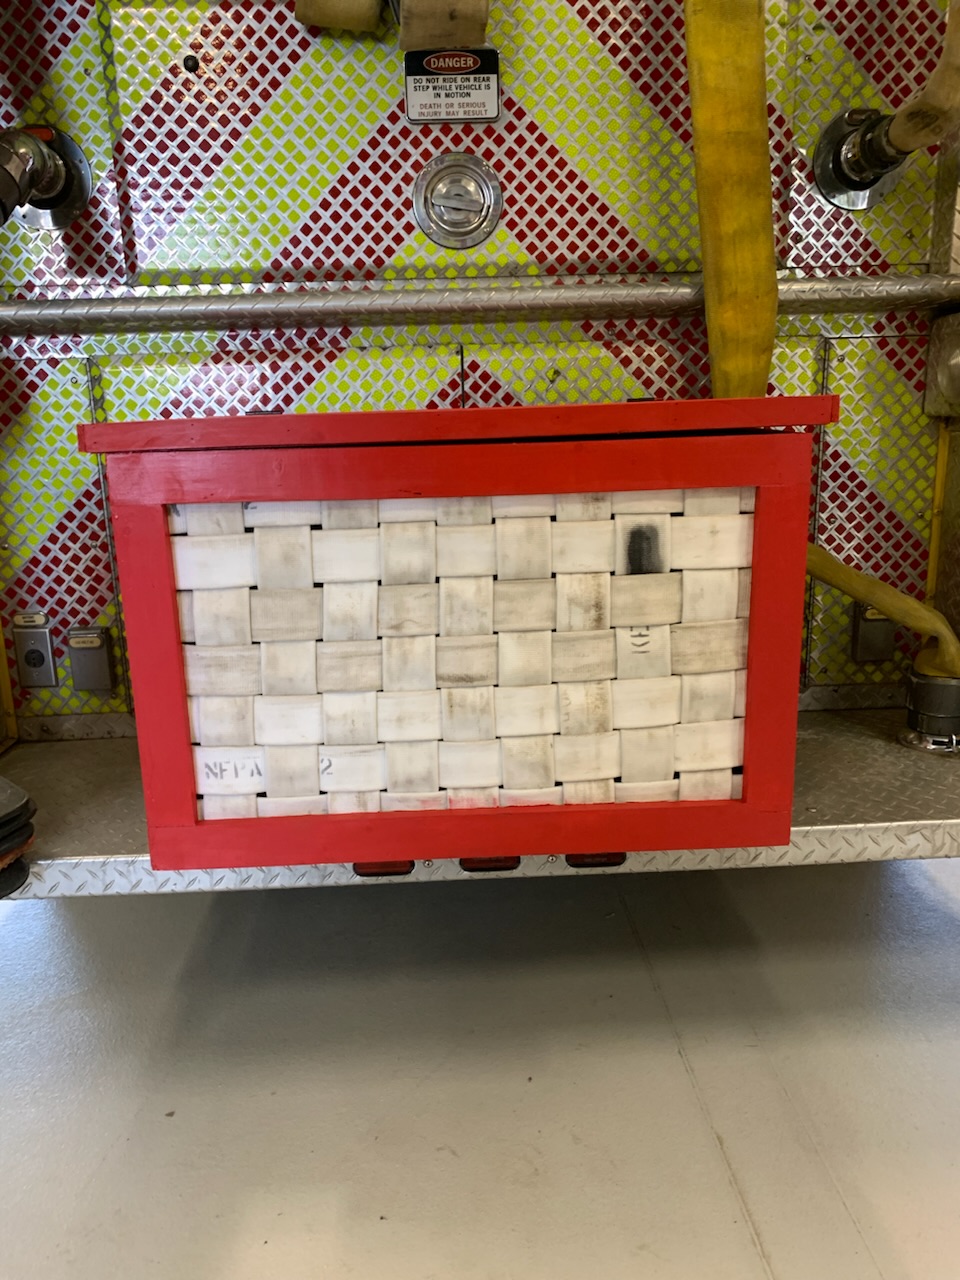
Made this using your farm house toy box plans. Modified slightly as I incorporate old firefighter equipment into most of my projects. Built the frame but instead of slats used retired fire hose. Complete with a white board on the lid. Plans were perfect and allowed me to easily modify to get the result I wanted.

Comments
Sat, 02/04/2023 - 22:03
Super cool!
Love the material repurpose, looks fantastic, thanks for sharing!
Media Console
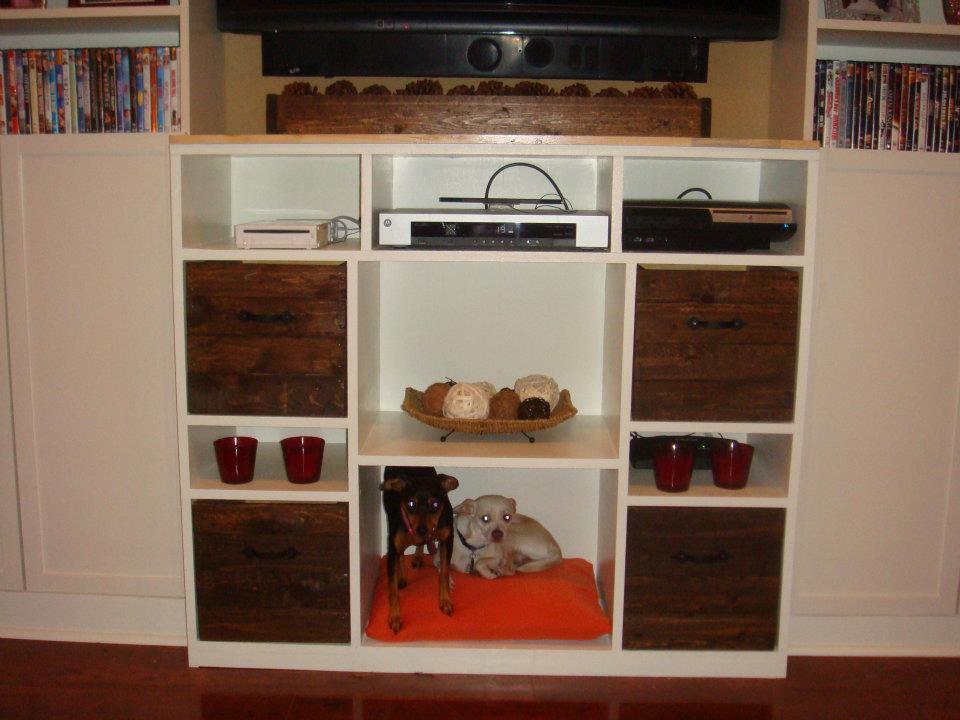
I used the plans Ana offered as a starting off point for this project. I loved the photos of the exact plans, but it was too long and too short for the space I wanted to fill. I ended up building pull out drawers from pallets instead of installing the apothecary drawers in the plans. I used the bottom cubby to place a dog bed (which they love) and still have one one bin to build to fill the center hole. I used a solid piece of butcher block style wood on the top that I sealed Polyerathane. Thanks Ana!
Built from Plan(s)
Estimated Time Investment
Weekend Project (10-20 Hours)
Recommended Skill Level
Intermediate
Comments
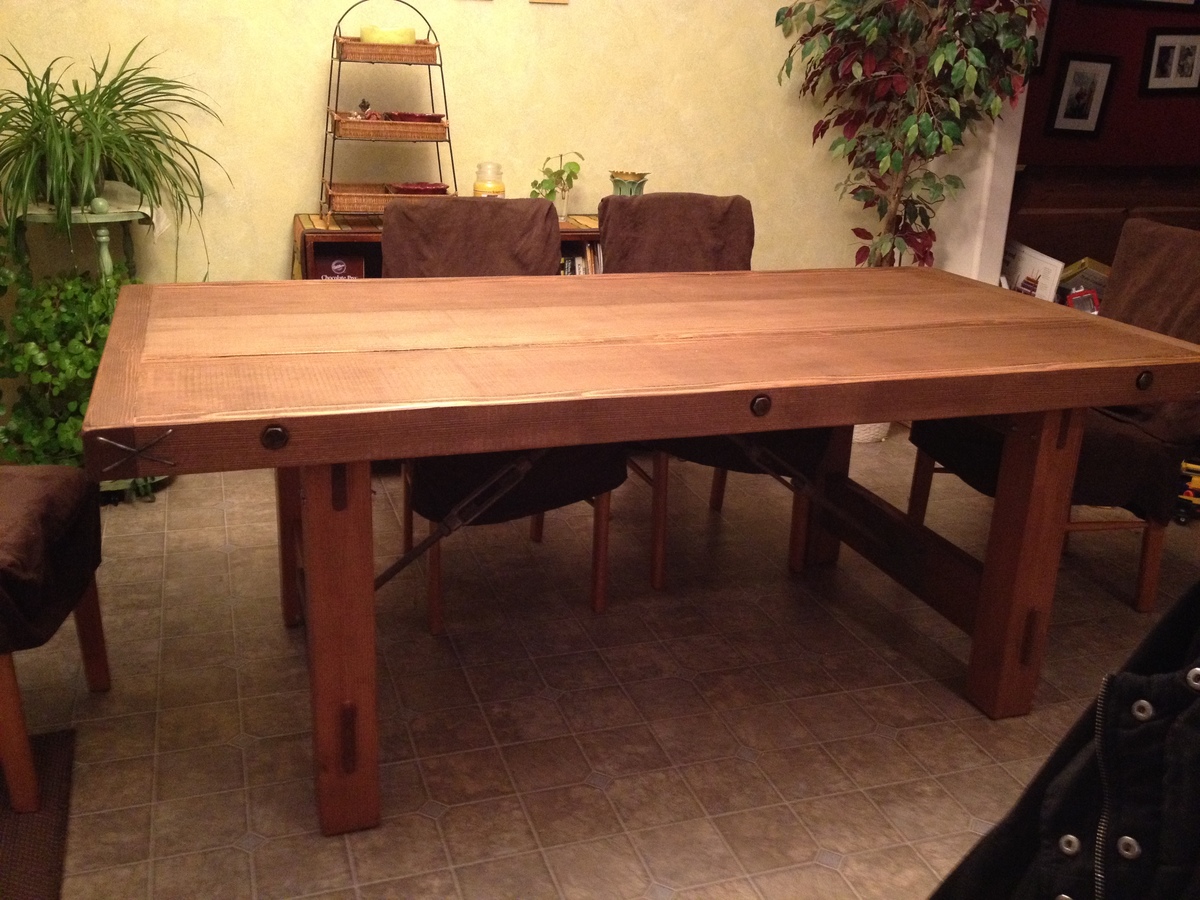
Husky Farmhouse Table
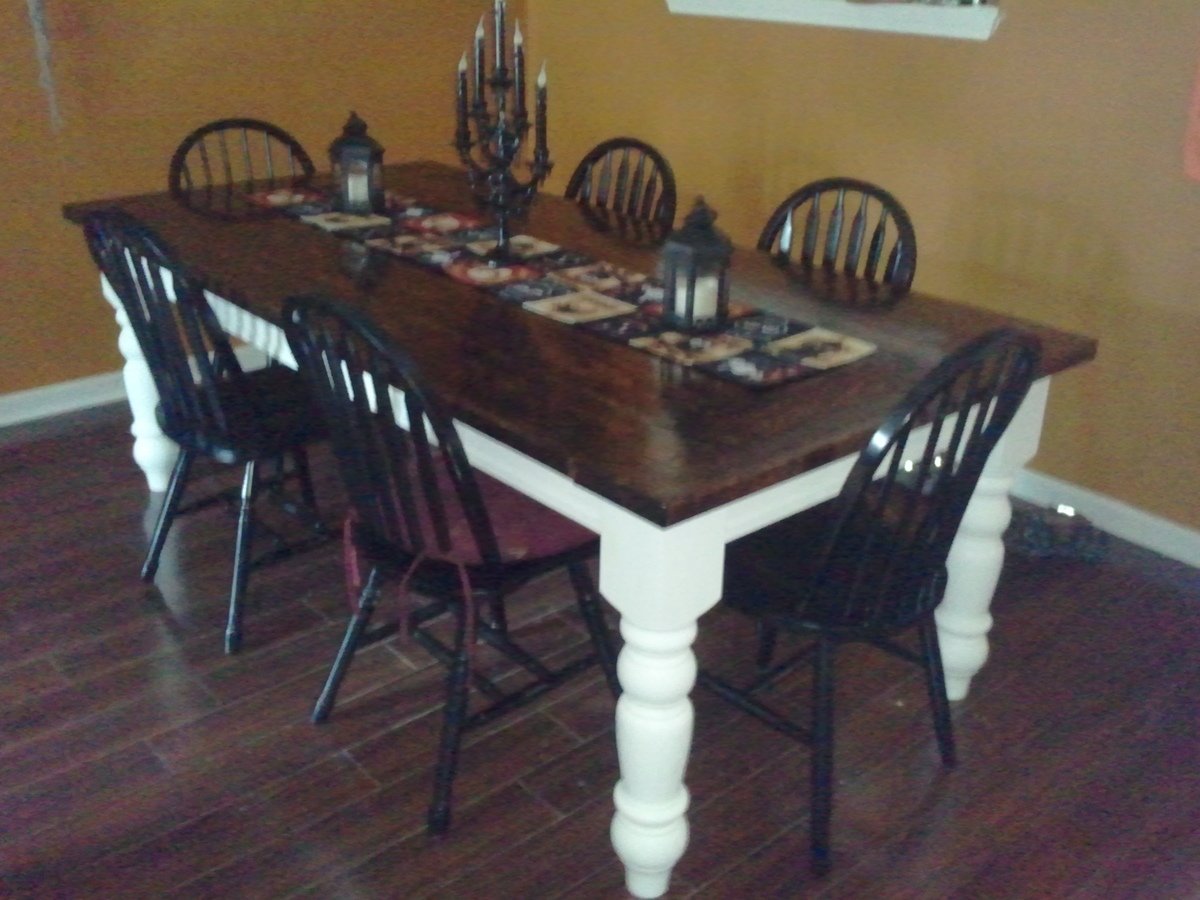
I loved the husky farmhouse talbe and after using a small round dining table for years, I figured it was time to get a larger table. What a great build! I definitely appreciate Ana's plans and ideas. I finished it right before Halloween as you can see and my 4 yr old son loves the new table for our sit down meails.
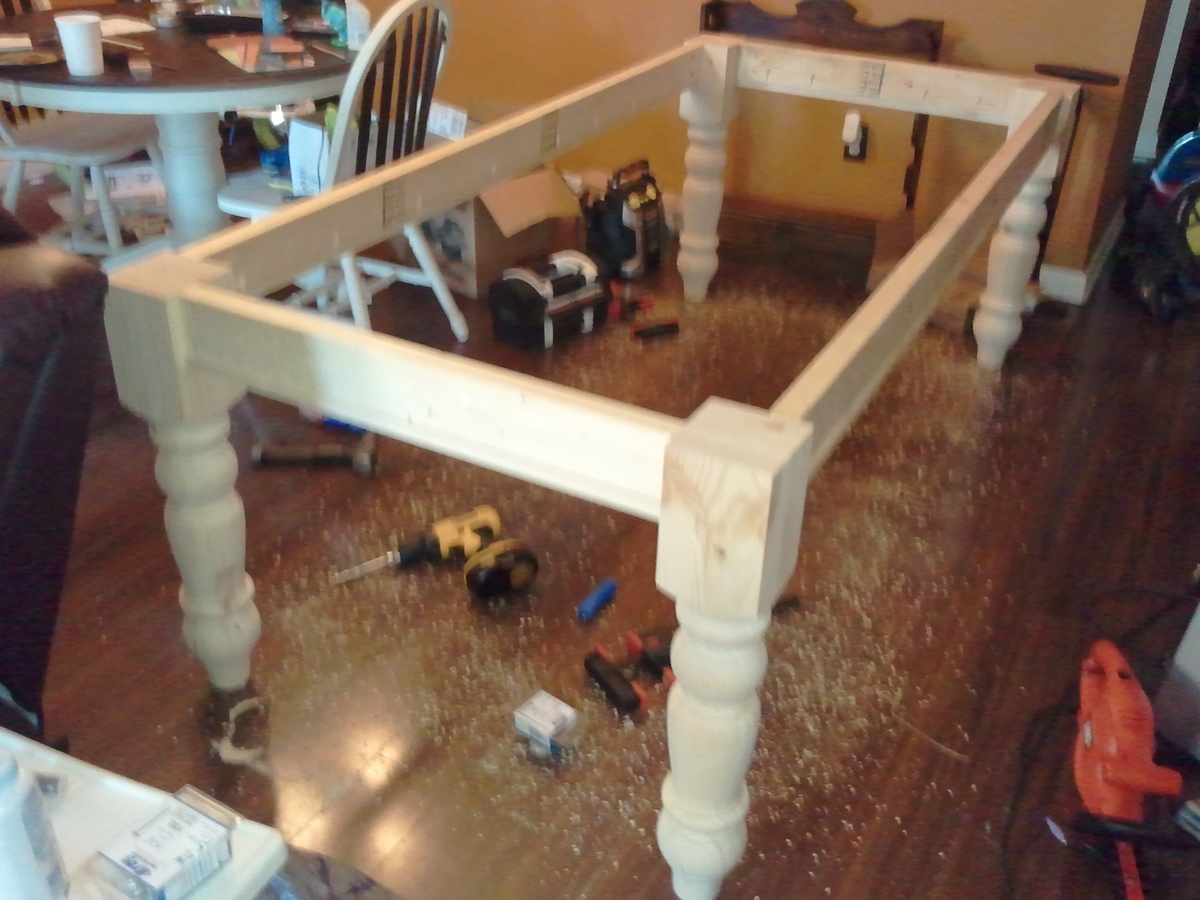

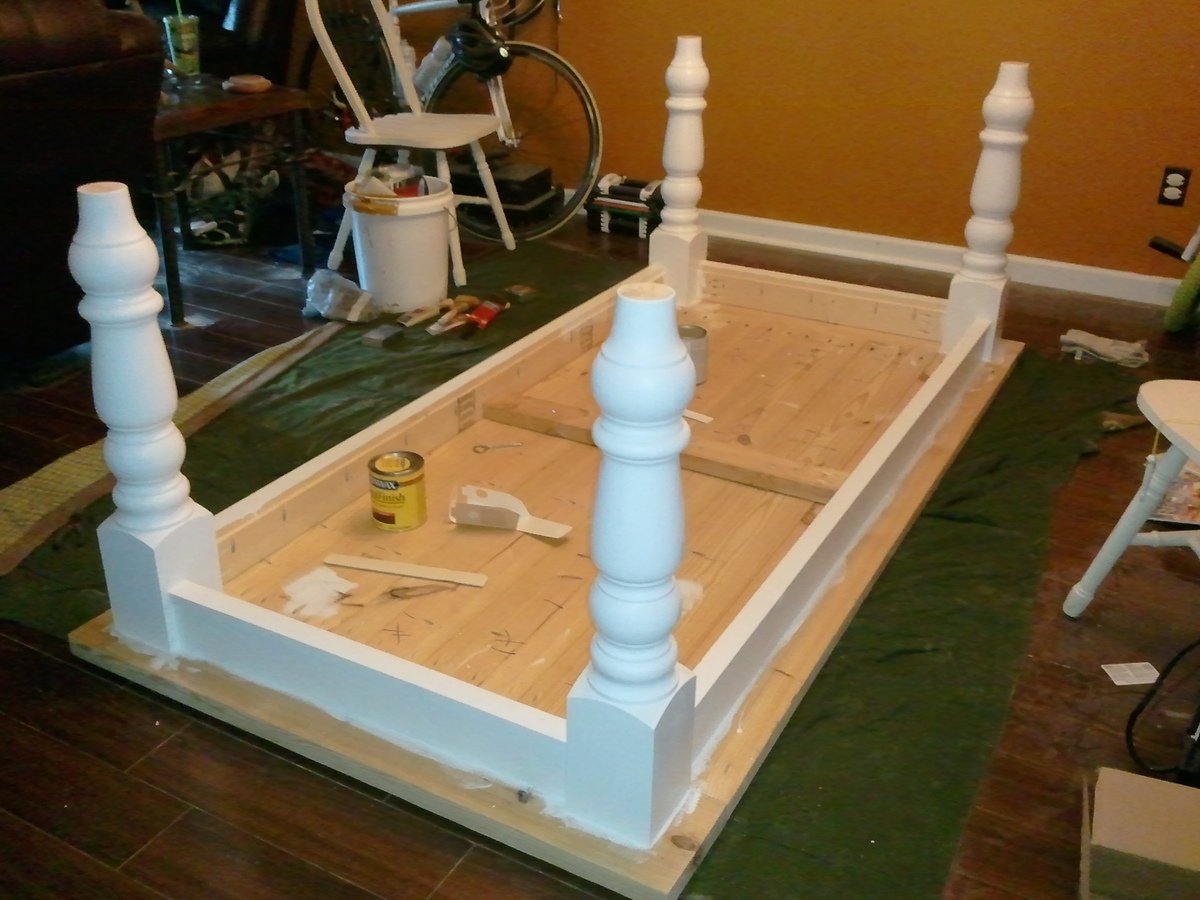
Built from Plan(s)
Estimated Cost
$350
Estimated Time Investment
Week Long Project (20 Hours or More)
Finish Used
Minwax Dark Walnut stain, White primer/paint in one, Minwax fast drying polyurethane
Recommended Skill Level
Beginner
Comments

Thu, 10/17/2013 - 09:28
Thank you Ana! Its been a
Thank you Ana! Its been a great addition to my home! =)
Tue, 07/07/2015 - 00:27
love this table
I love this table and i am trying to find a cheap way to get a dining room set( chairs will be bought and stanined). My husband is good a building things, my only concern how do you get all that detail into the legs of the table? Is there anyway you can pre-buy them made? We don't have a wooden lathe to do anything intricate.
Thanks if you can advise
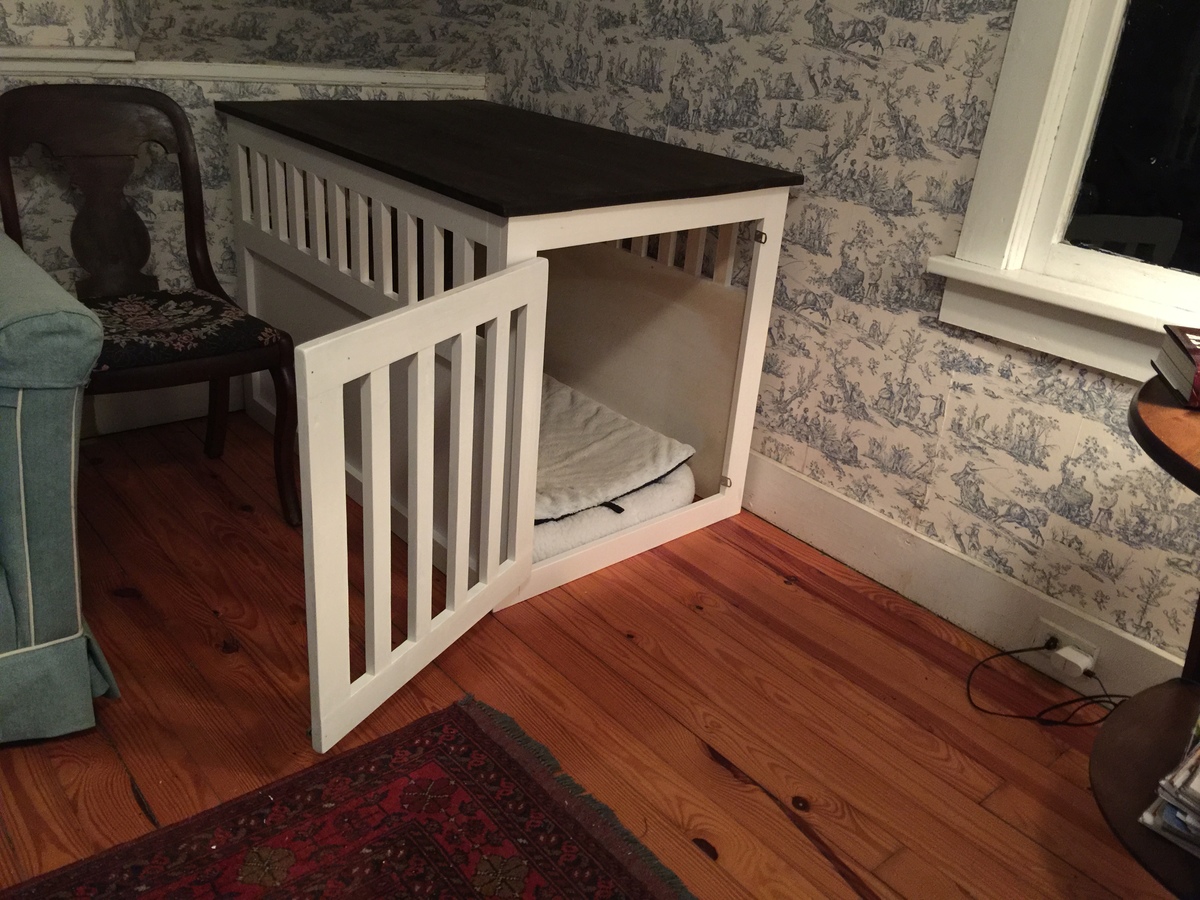
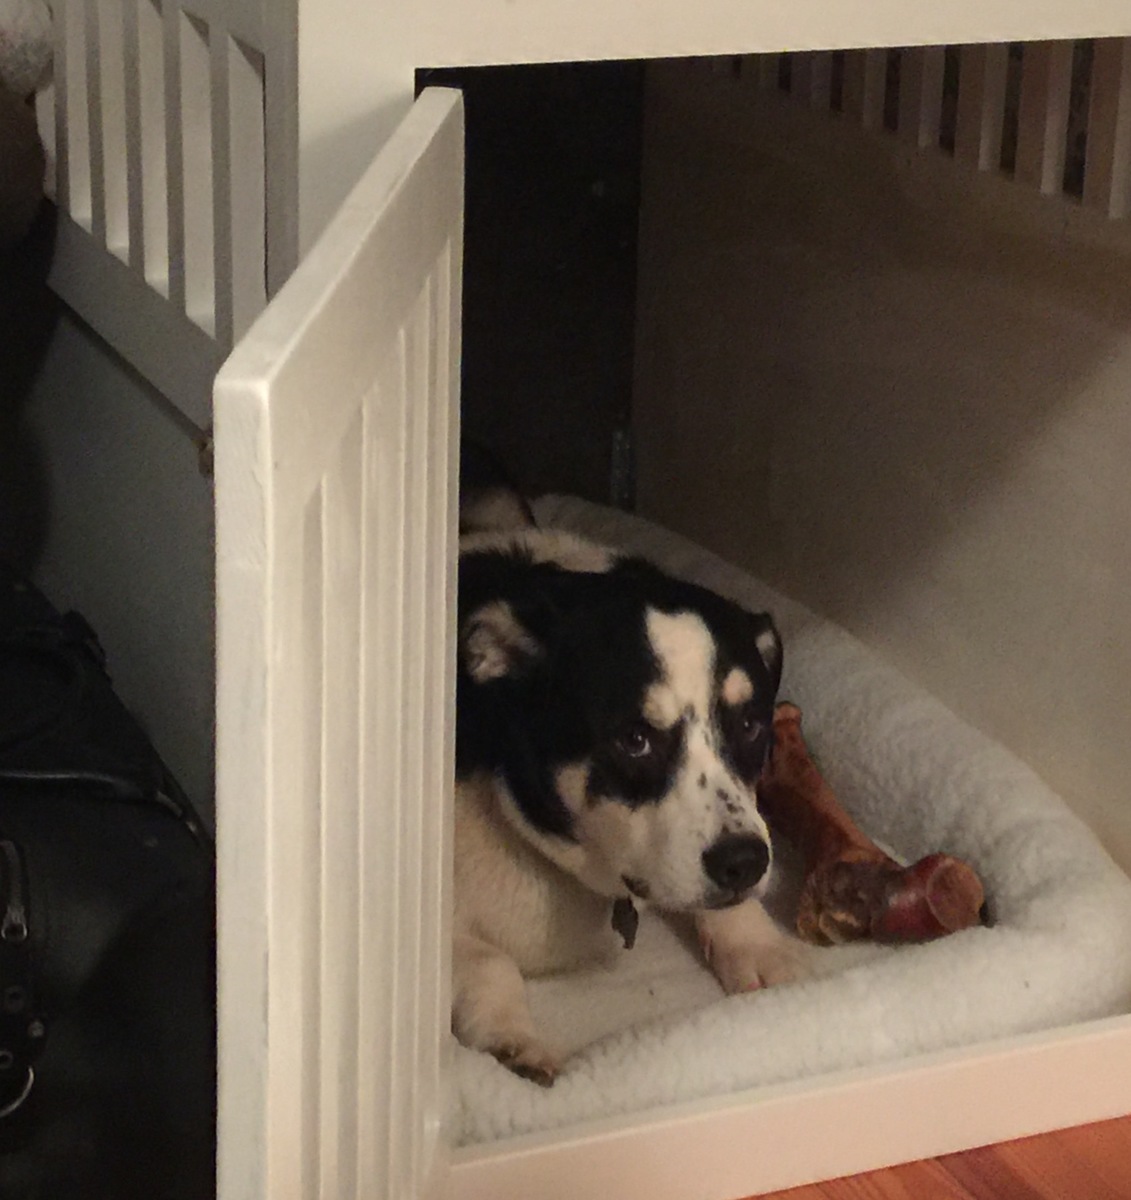
Extra-Large Wood Pet Kennel End Table
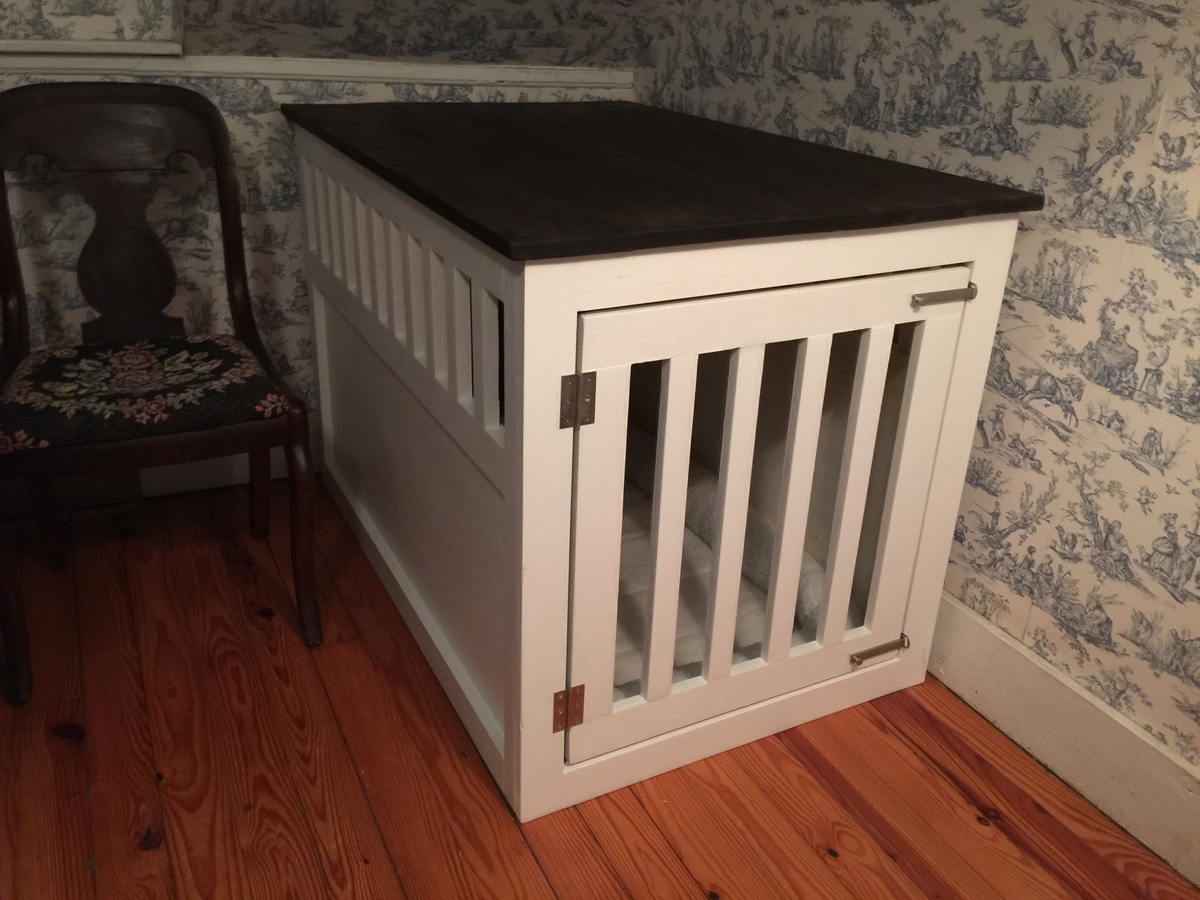
I followed Ana's plan exactly, but increased the dimensions to the standard XL crate size (42L x 28W). The base is painted gloss white and the top is stained espresso.
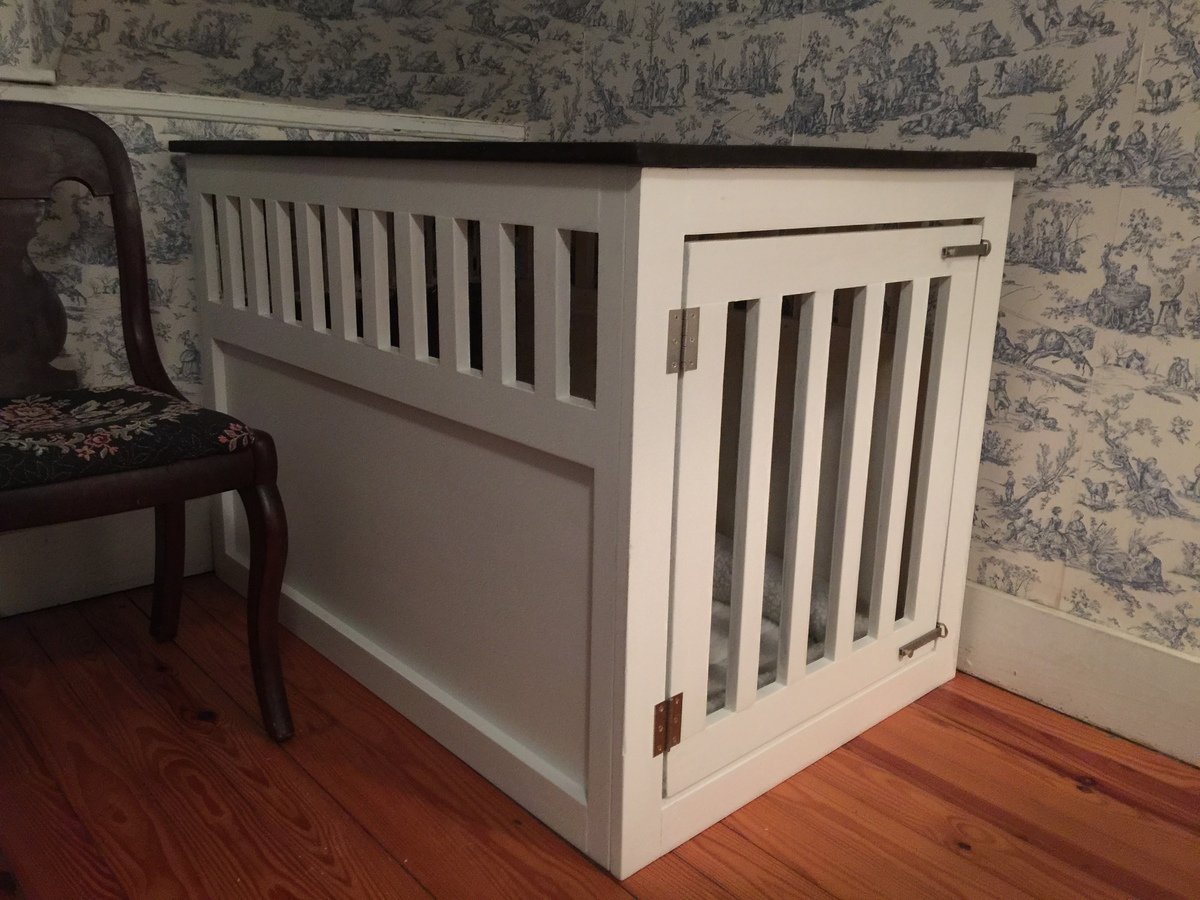
Built from Plan(s)
Estimated Time Investment
Week Long Project (20 Hours or More)
Finish Used
Gloss latex for the base and Minwax espresso stain on the top.
Recommended Skill Level
Intermediate
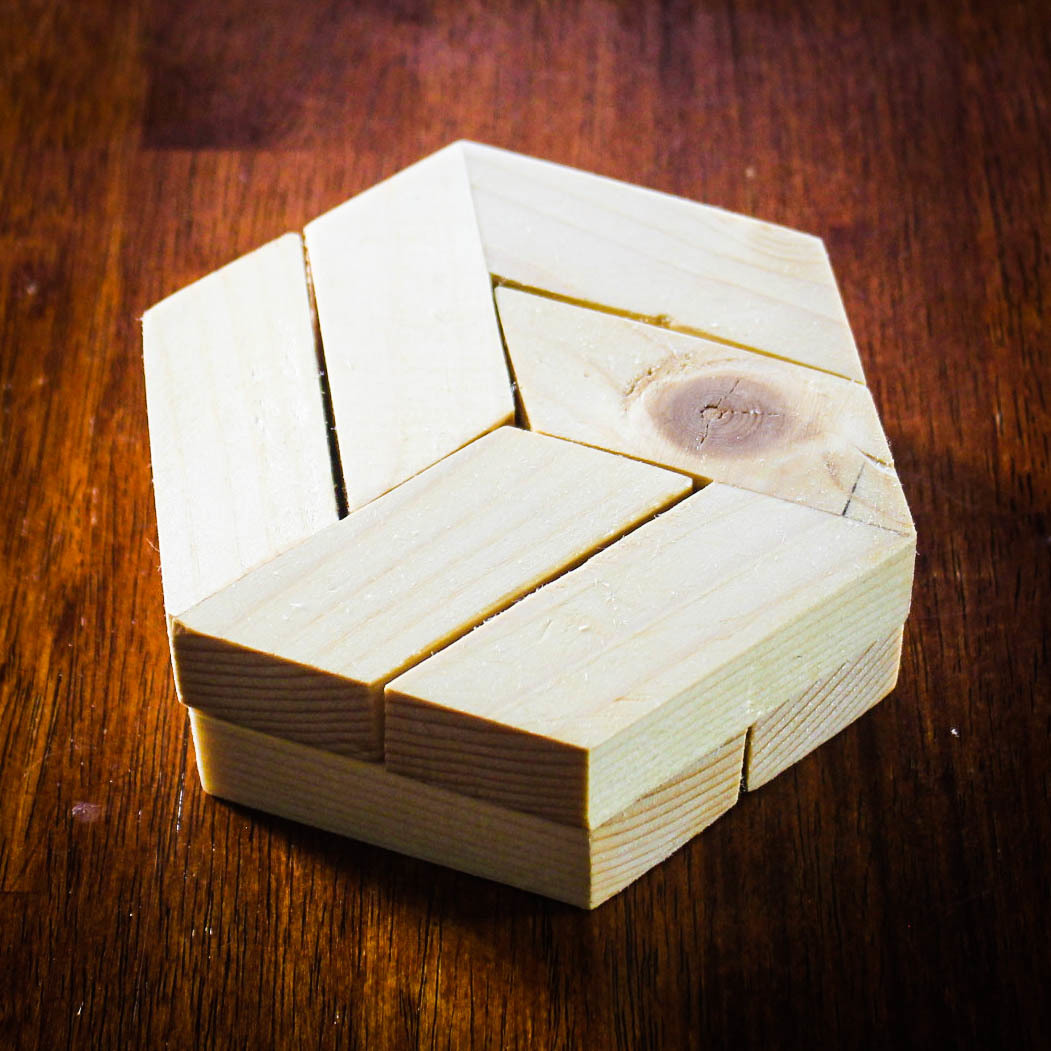
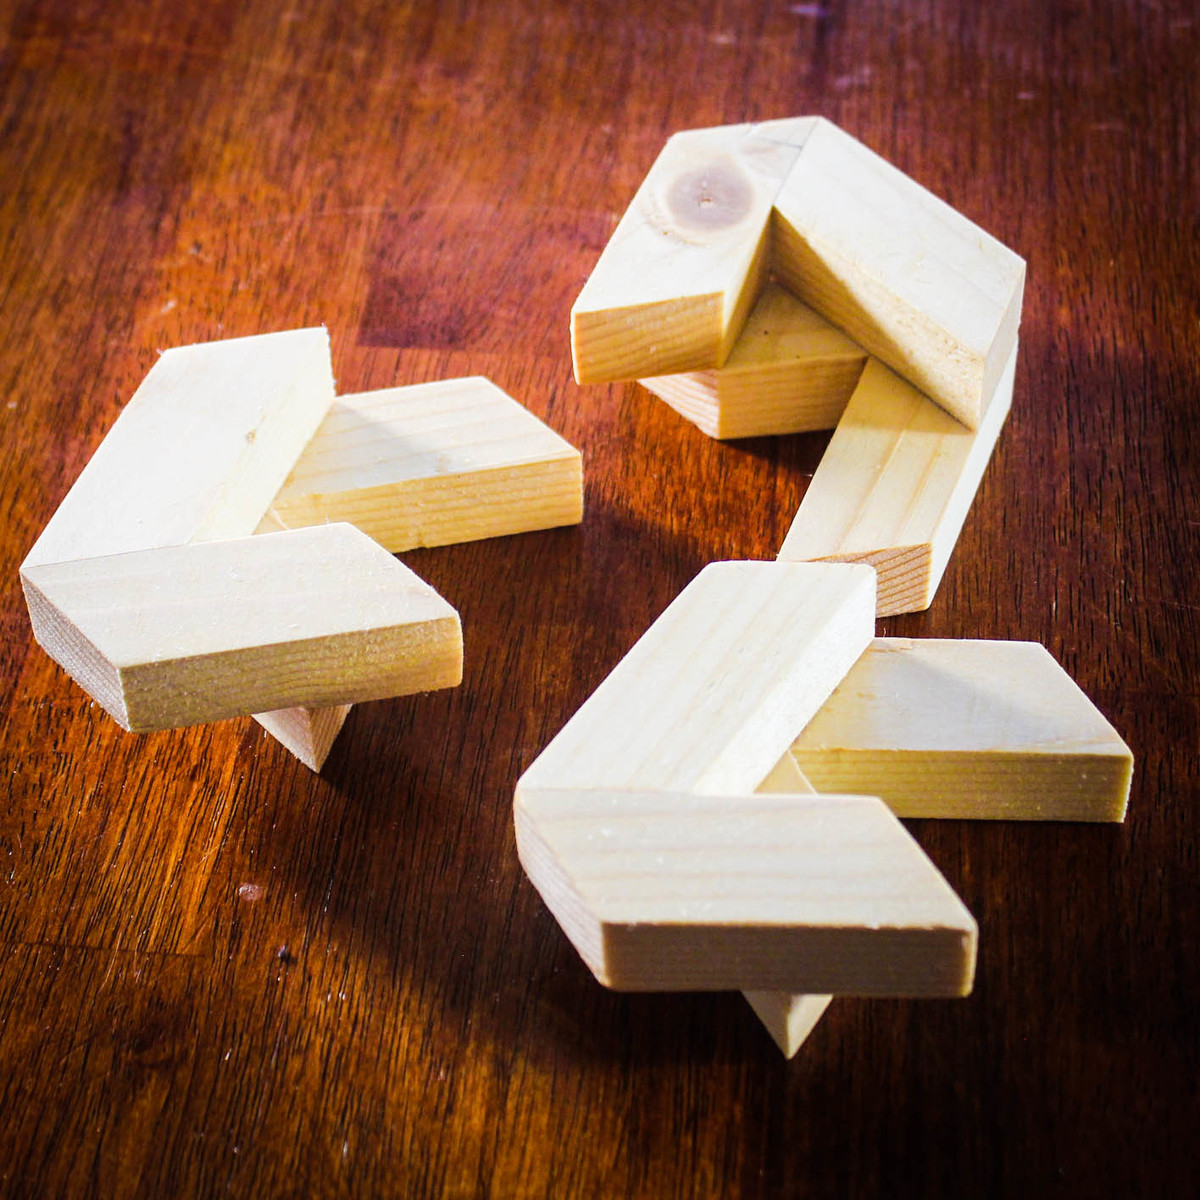
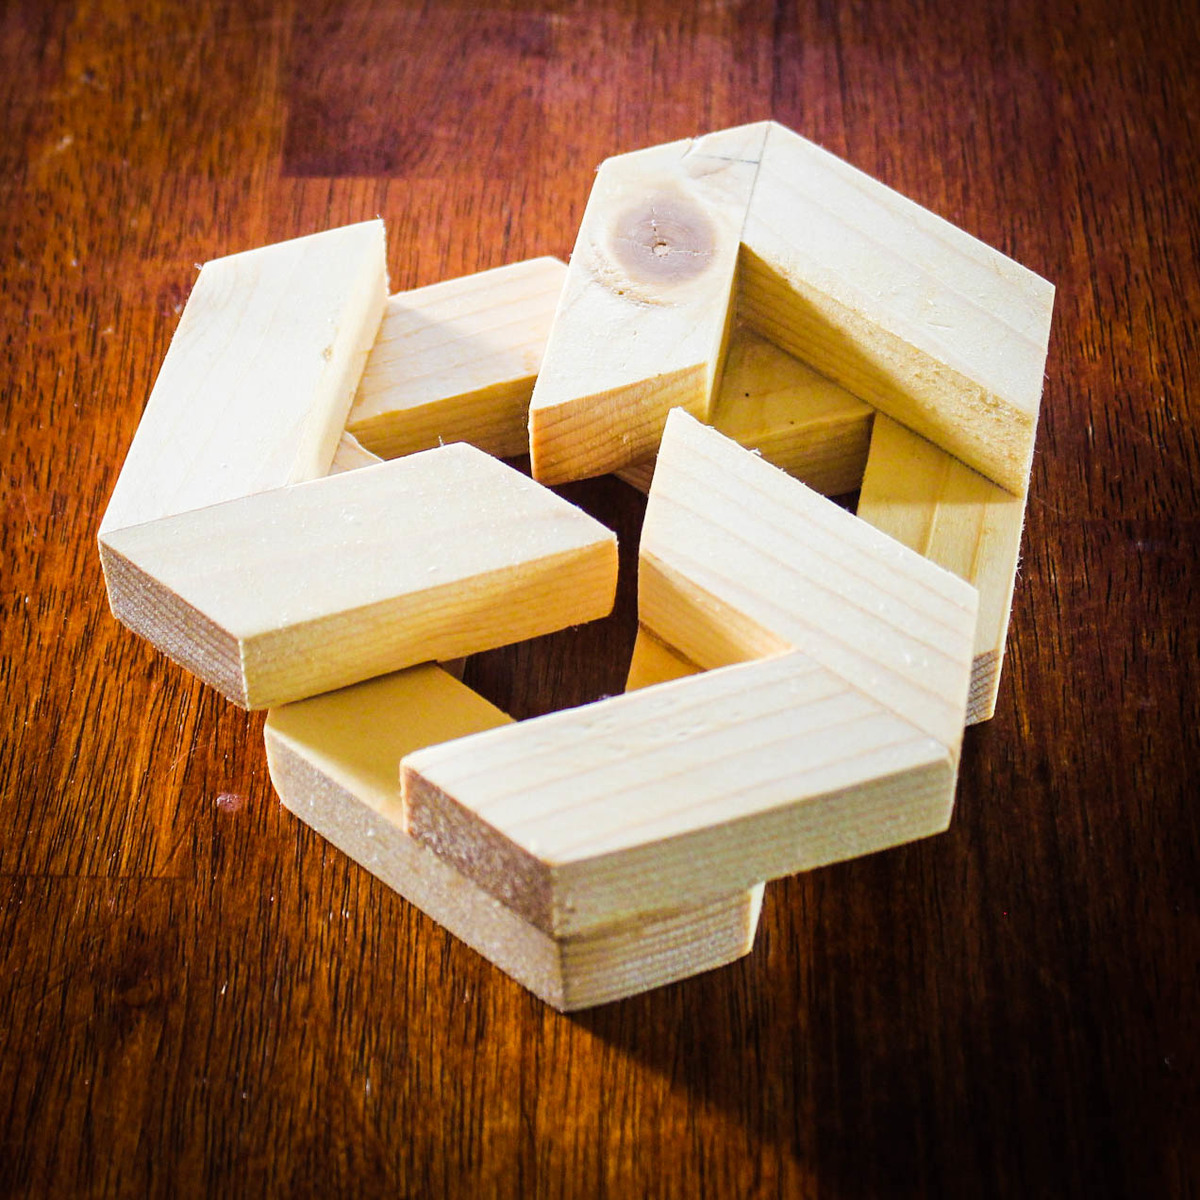
Hexagon Puzzle

This is a fun and simple project to make. It consists of 12 pieces that are all the same size. The pieces are glued together to make 3 assemblies. Getting it apart or putting it together is the challenge. As always, there is a trick.
Build Instructions: https://www.instructables.com/id/Hexagon-Puzzle/
Solution: https://youtu.be/QUmHdIprCl0
Estimated Cost
$1
Estimated Time Investment
An Hour or Two (0-2 Hours)
Finish Used
None
Recommended Skill Level
Beginner
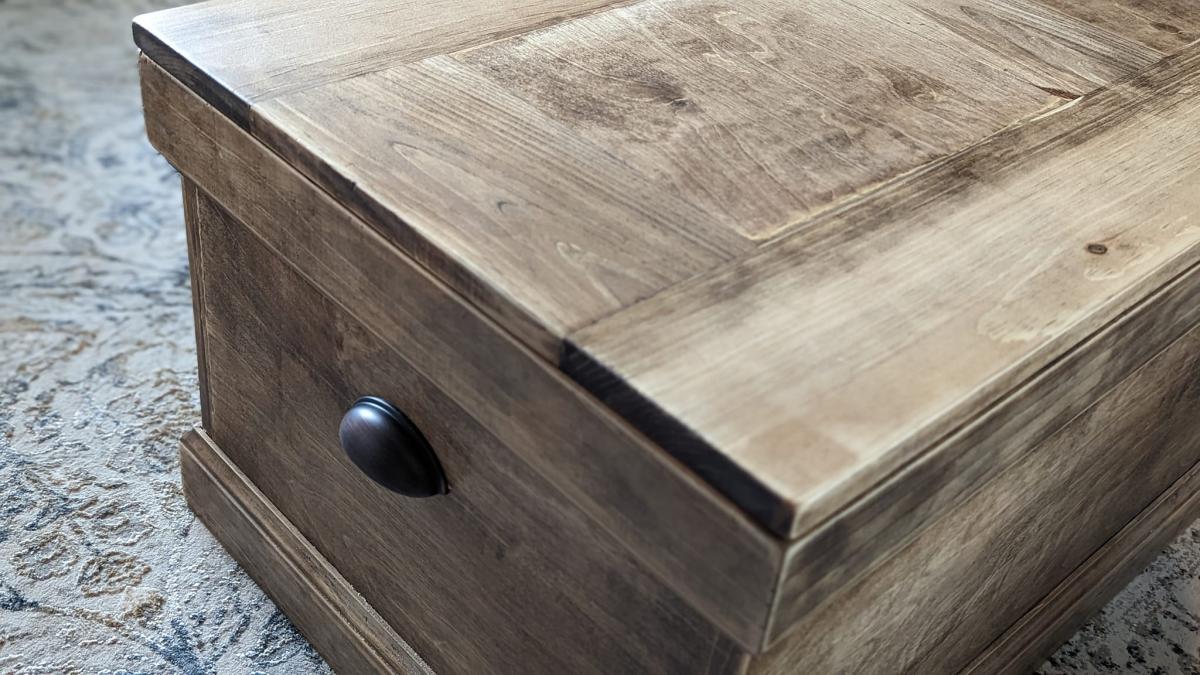
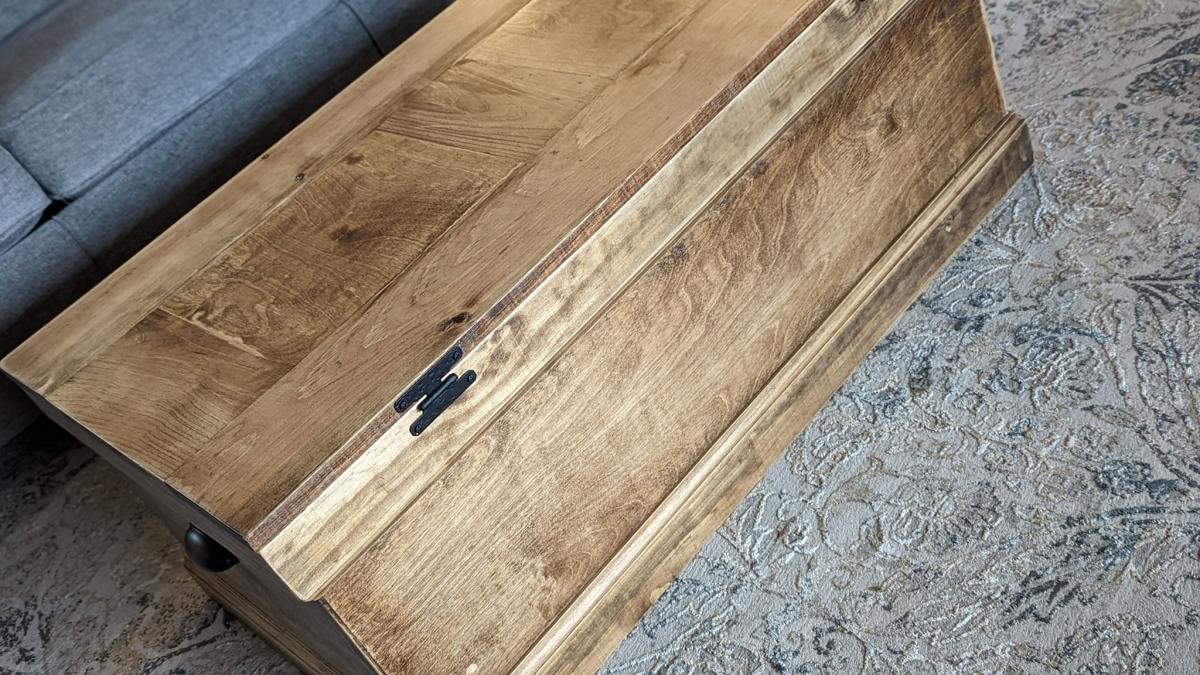
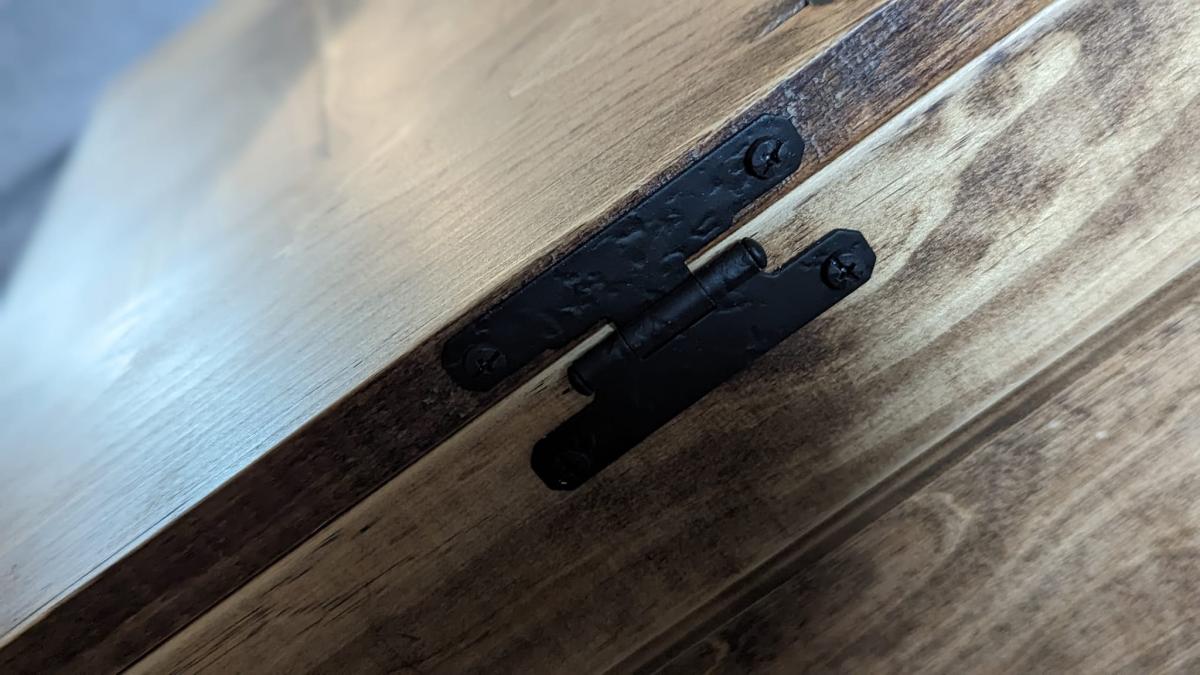
Becca Trunk

Thank you Ana for your detailed plans. Always so easy working on your projects.
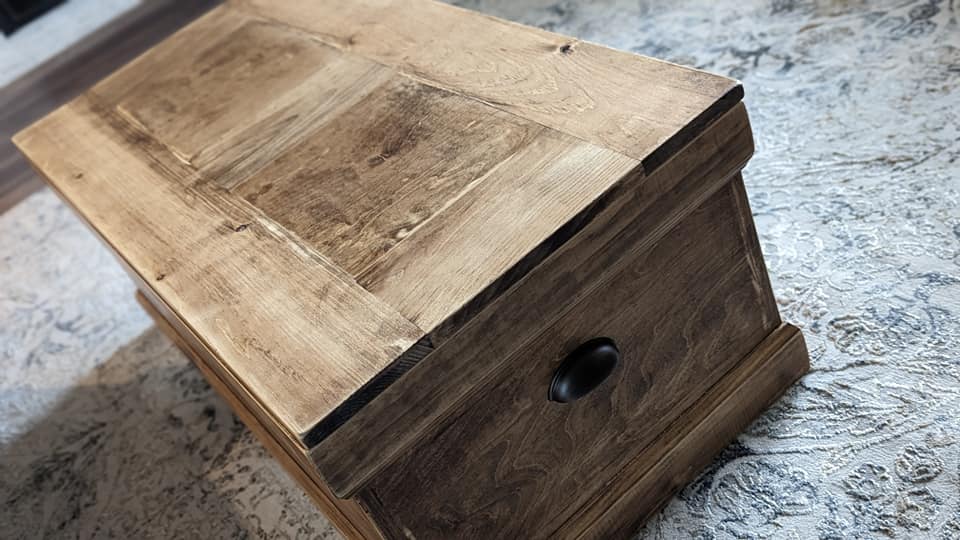
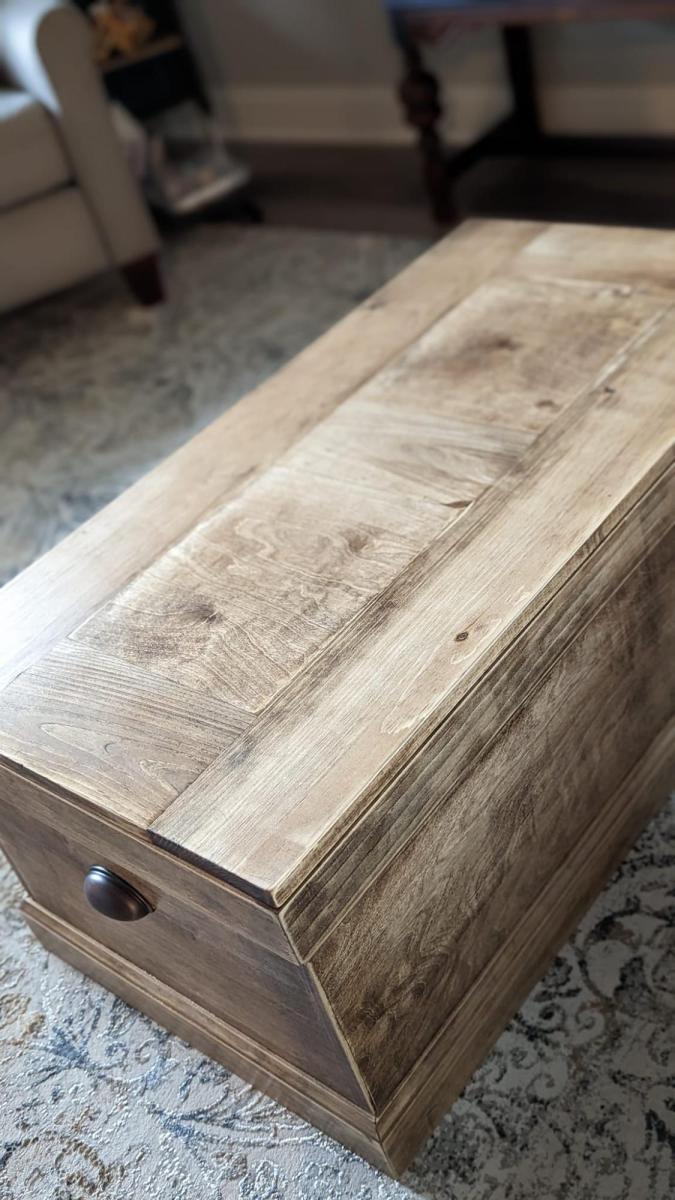
Built from Plan(s)
Comments
Fri, 02/10/2023 - 09:11
Gorgeous Trunk!
This is so pretty, love the finish! Thank you so much for sharing.
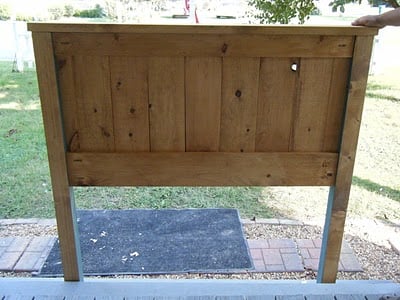
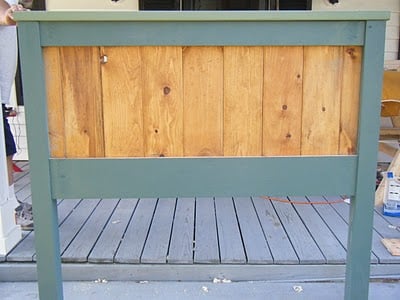
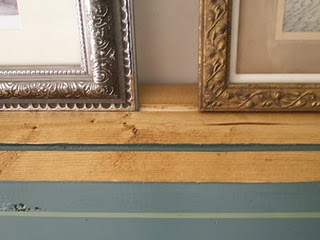
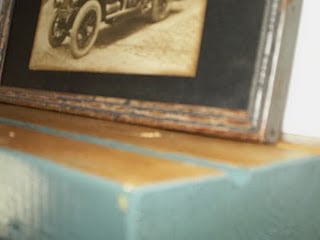
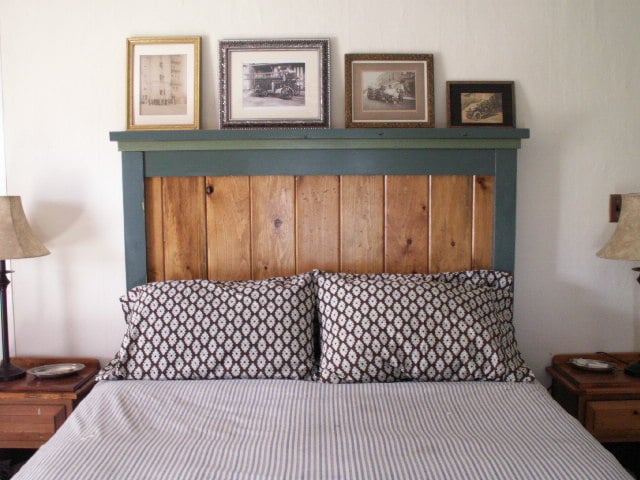
Queen Farmhouse Headboard
We eventually will build the rest of the bed, but for now we needed a headboard. Hubby helped me with this one, since it was large, I loved having an extra pair of hands. This headboard is reversible, so if our tastes change, we can unbolt it and flip it over to the side that is just stained and polyurethane. Pretty neat! This headboard is extra tall, because we have our bed frame up on risers, and we wanted a picture shelf but didn't want it interfering when we sat up in bed to read or what-not. Hubby used the router to make grooves in the top before we attached it, so our pictures wouldn't be crashing down on our head! Our metal bed frame comes just shy of the outer edge of the legs of the headboard, so when we build the rest of the bed, the side rails will meet the edge exactly. We placed the headboard behind the bed frame to mark where to drill the bolt holes and attached the headboard to the frame with 4 inch long, quarter inch wide bolts with washers and nuts. Two on each side.
Built from Plan(s)
Estimated Cost
$50-$60 just paint and lumber. We had some supplies left over from previous projects, including screws and the ship-lap boards.
Estimated Time Investment
Weekend Project (10-20 Hours)
Finish Used
We painted and distressed the boards, then applied stain to the distressed parts. We coated the entire thing with three coats of polyurethane.
Recommended Skill Level
Intermediate
Comments
Sat, 10/22/2011 - 20:35
I love the plate rail detail on the top edge...
and the reversible idea is great.
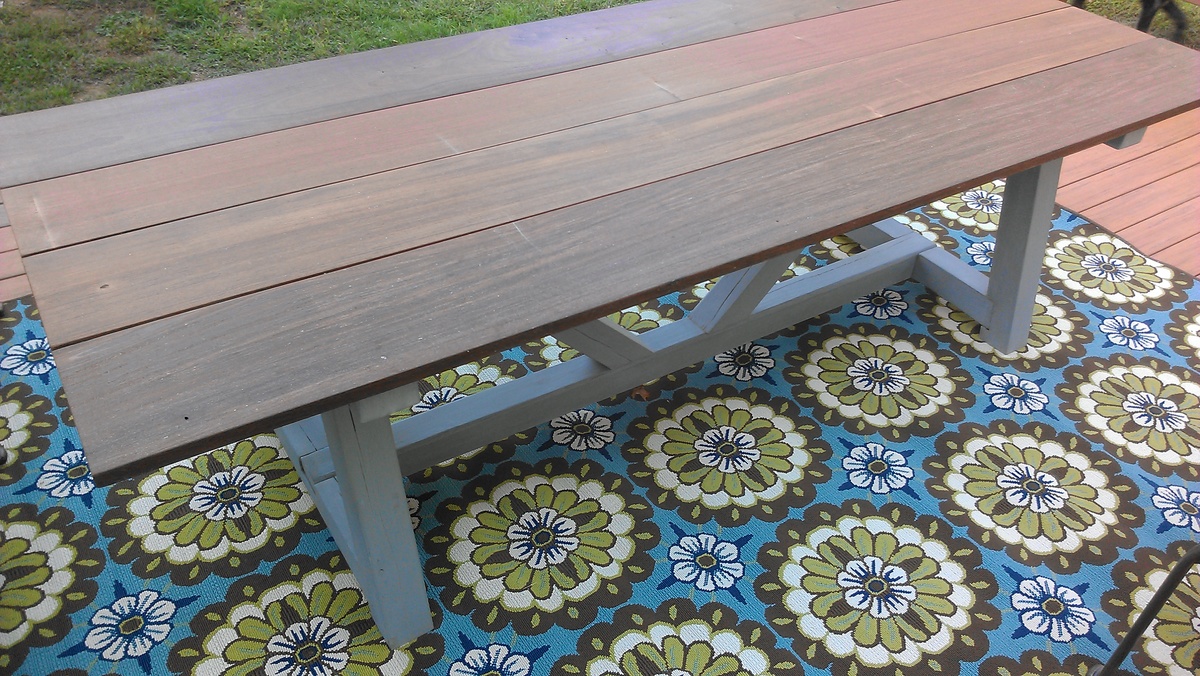
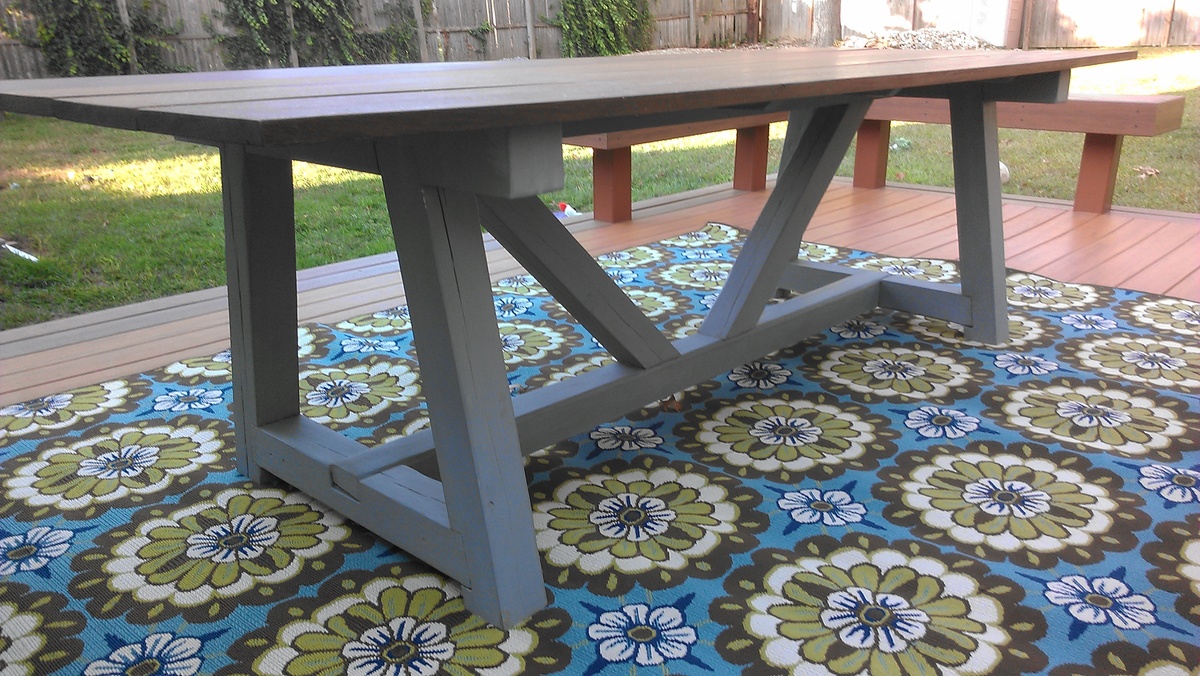
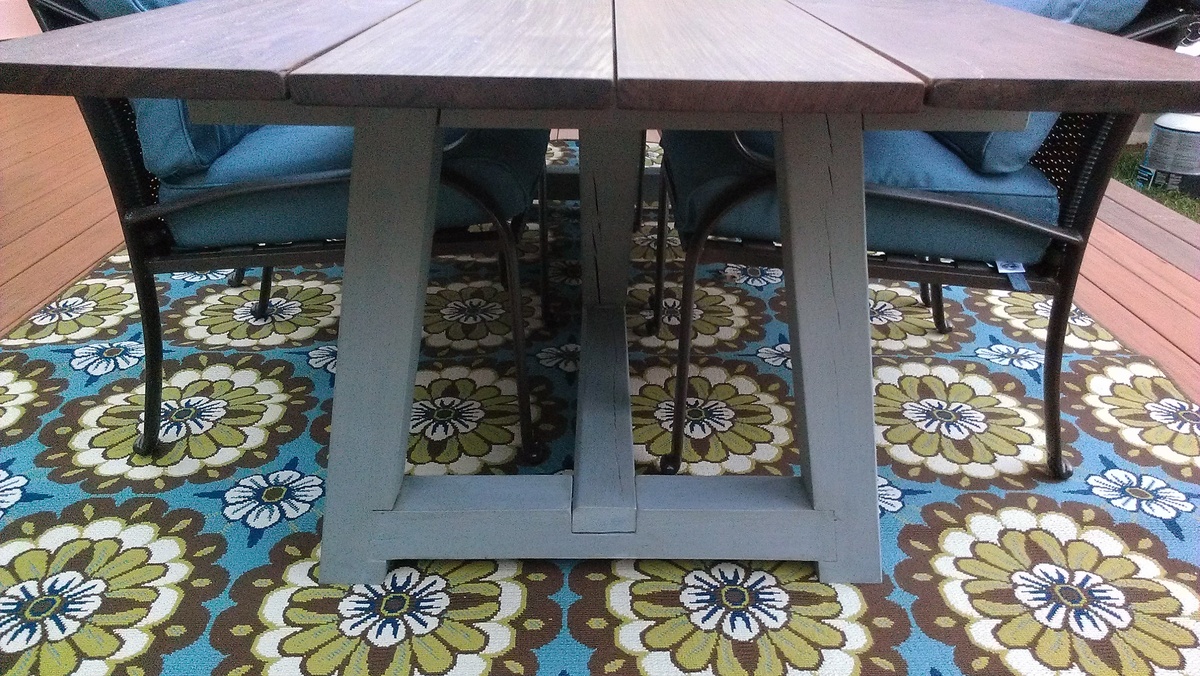
Outdoor Providence Table
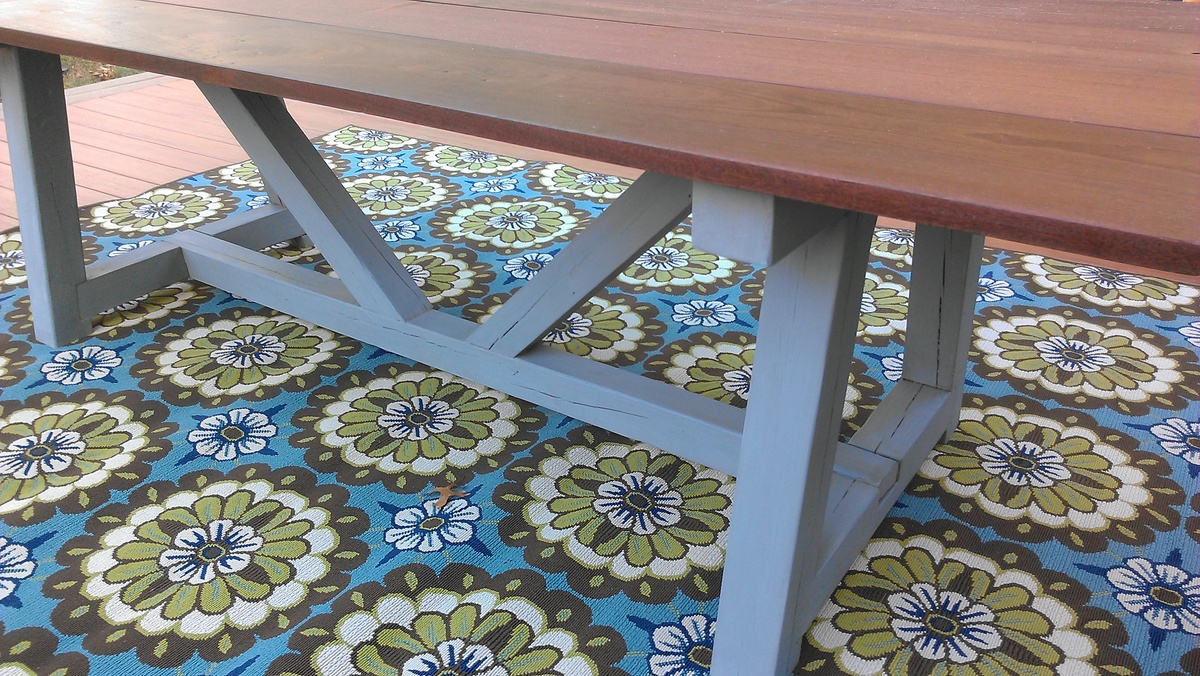
This was my first attempt at building a piece of furniture. It's an outdoor table based on the providence table plans. I used old 4x4 pressure treated posts from part of my fence that was no longer needed for the base. The posts were fit together using lap joints and secured using fastenlok screws. The base was then painted with french grey chalk paint (first time experimenting with chalk paint) and then covered with a thin coat of brown briwax. The top is made of 8 foot by 1 inch ipe boards that are 4 different widths but the overall width is about 42 inches. The ipe was purchased rough sawn and needed to be planed to uniform thickness. I used a natural stain meant specifically for ipe and other tropical hardwoods.
Built from Plan(s)
Estimated Cost
$220 for me - 200 for ipe boards, 20 for paint, 4x4 posts free
Estimated Time Investment
Weekend Project (10-20 Hours)
Finish Used
French grey chalk paint and briwax for base. Natural tropical hardwood stain for top.
Recommended Skill Level
Beginner
Benchright Knockoff
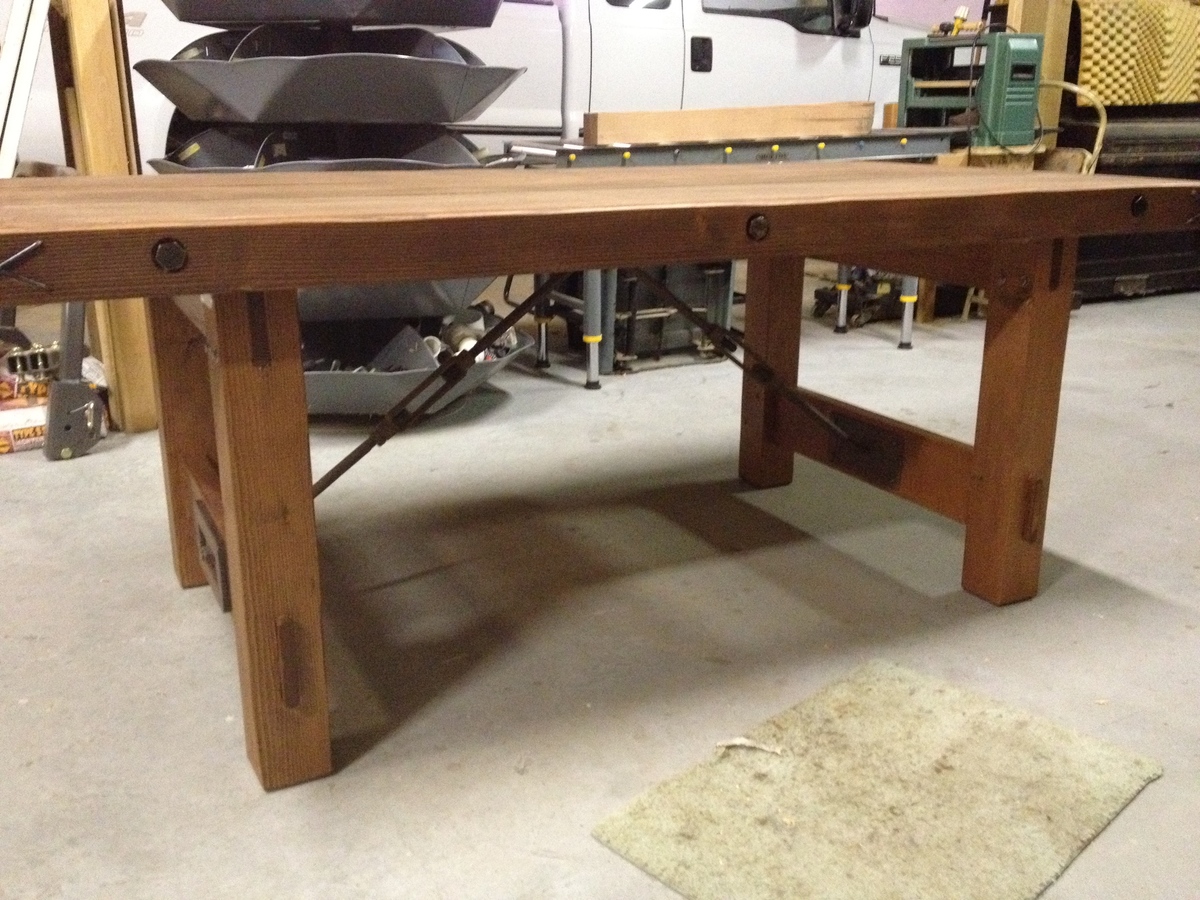
My dad actually built this. I had been drooling over the table at Pottery Barn for two years but couldn't afford the $3000 price. Found the plans here and gave it to him with adjustments on the turnbuckles underneath. I wanted the V shape instead of straight across. The tabletop was obtained from an old wood bridge in Eastern WA. I love, love, love this table. The materials cost was $250. The labor was my birthday present. ![]()

Built from Plan(s)
Estimated Cost
$300
Estimated Time Investment
Week Long Project (20 Hours or More)
Finish Used
Min wax Special Walnut stain, water-based Poly to seal
Recommended Skill Level
Intermediate
My daughters platform bed
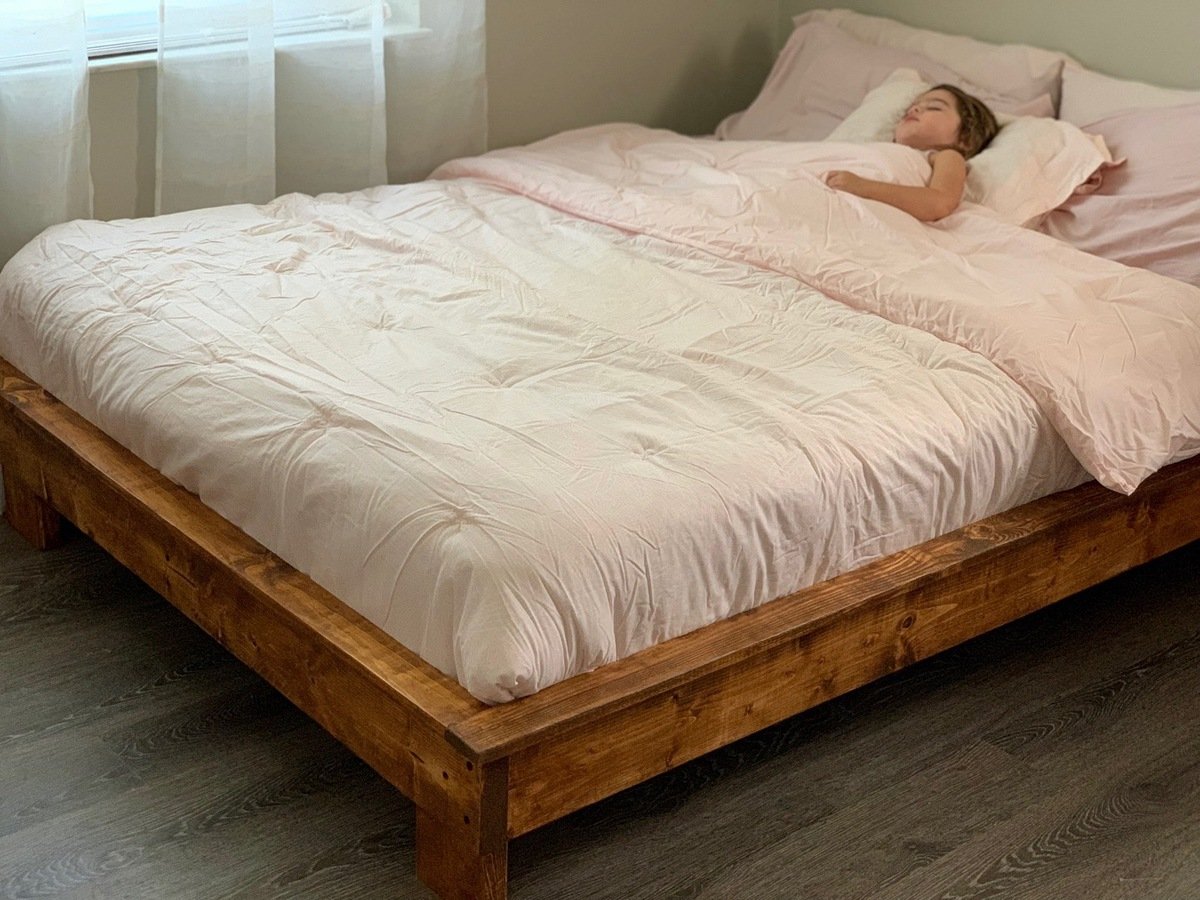
I’m in love with how well this bed turned out. Modified by using a 2x4 for middle support and 1x4’s for slats. It was less money and felt better for support.

Built from Plan(s)
Estimated Cost
$150
Estimated Time Investment
Weekend Project (10-20 Hours)
Finish Used
Early American stain & matte poly
Recommended Skill Level
Beginner
1st furniture piece
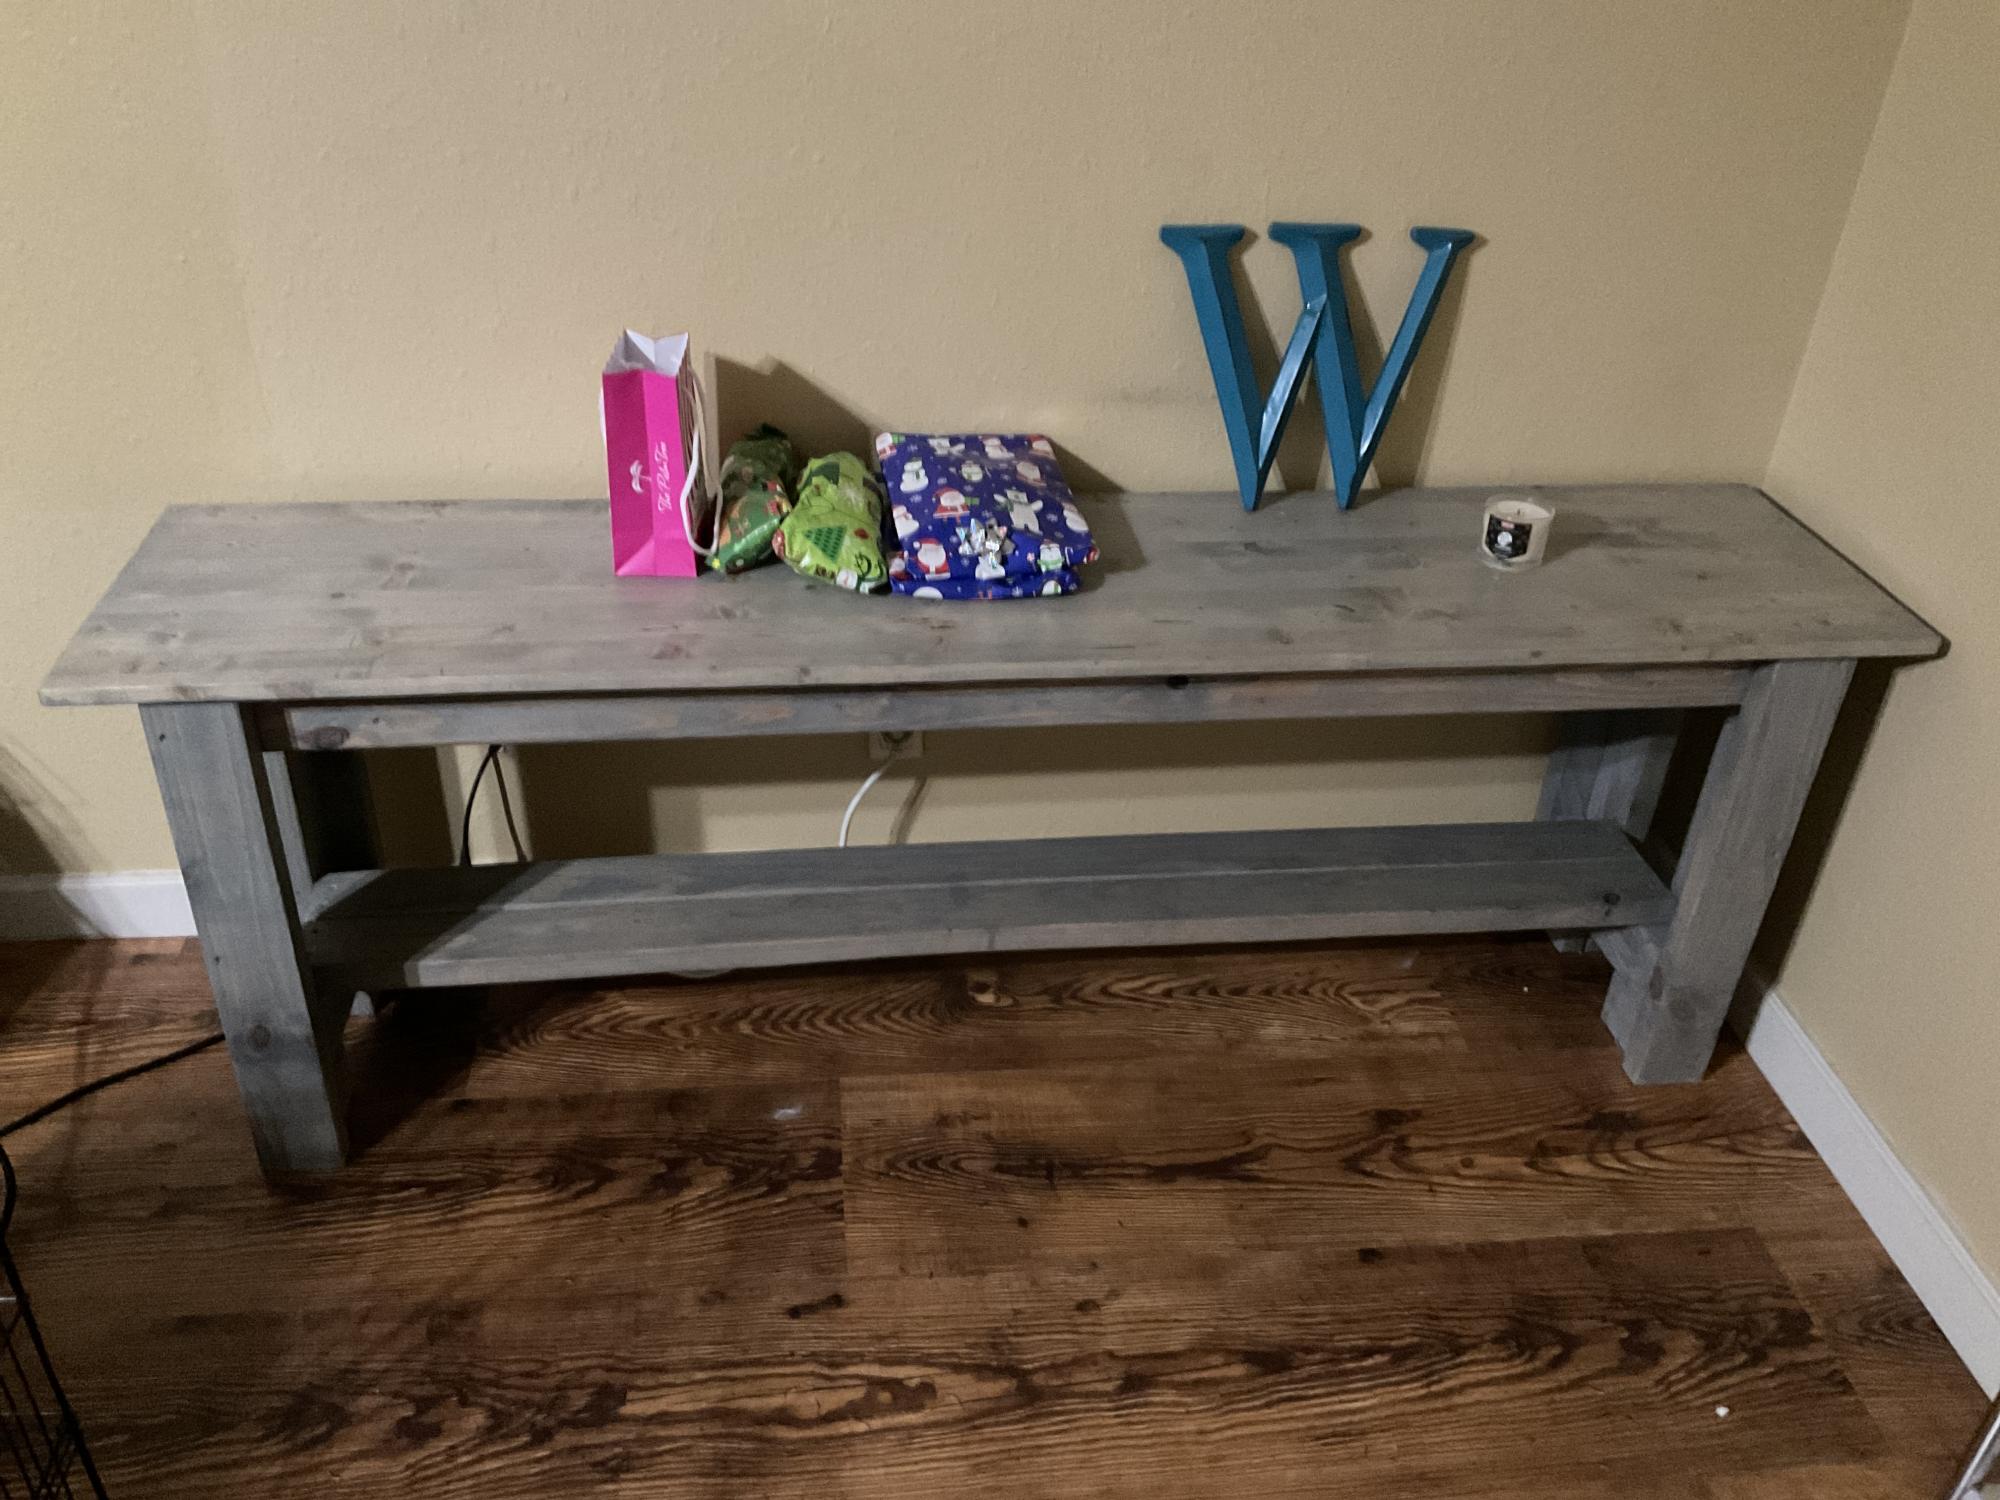
I used your sturdy workbench idea and made it a nice table for behind our couch.
Built from Plan(s)
Entertainment Center Build
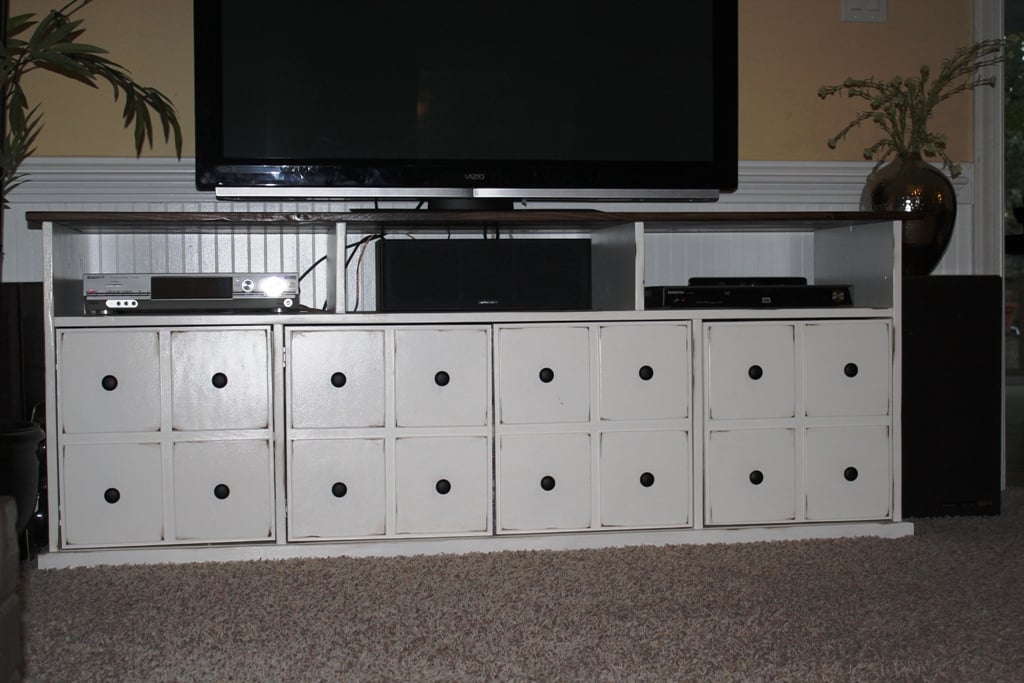
I have always loved the entertainment center from Pottery Barn. When I saw that the sale price was still $900, I knew my husband and I could build it for way cheaper. This took about a week (with a lot of breaks) and the total cost was around $250. I think the biggest expense was the all the knobs, but I feel like they make the piece!
Built from Plan(s)
Estimated Cost
$250
Estimated Time Investment
Weekend Project (10-20 Hours)
Finish Used
Top is Dark Walnut Stain, Bottom is Antique White Paint
Recommended Skill Level
Intermediate
Comments
Sun, 04/08/2012 - 23:53
Nice!!
It looks great!! My OCD is totally soothed by your perfectly spaced faux drawer fronts!! From looking closer at your pic I can see that you made all doors instead of drawers and doors. I want to do the same. It also looks like you used a different type of hinge than suggested. Any reason for that? Do you have shelves in all 4 spaces? Would you mind adding a few more detailed pictures, maybe with your doors open? Or just giving some more details to what you did differently would help.
Dress Up Storage & Puppet Theater
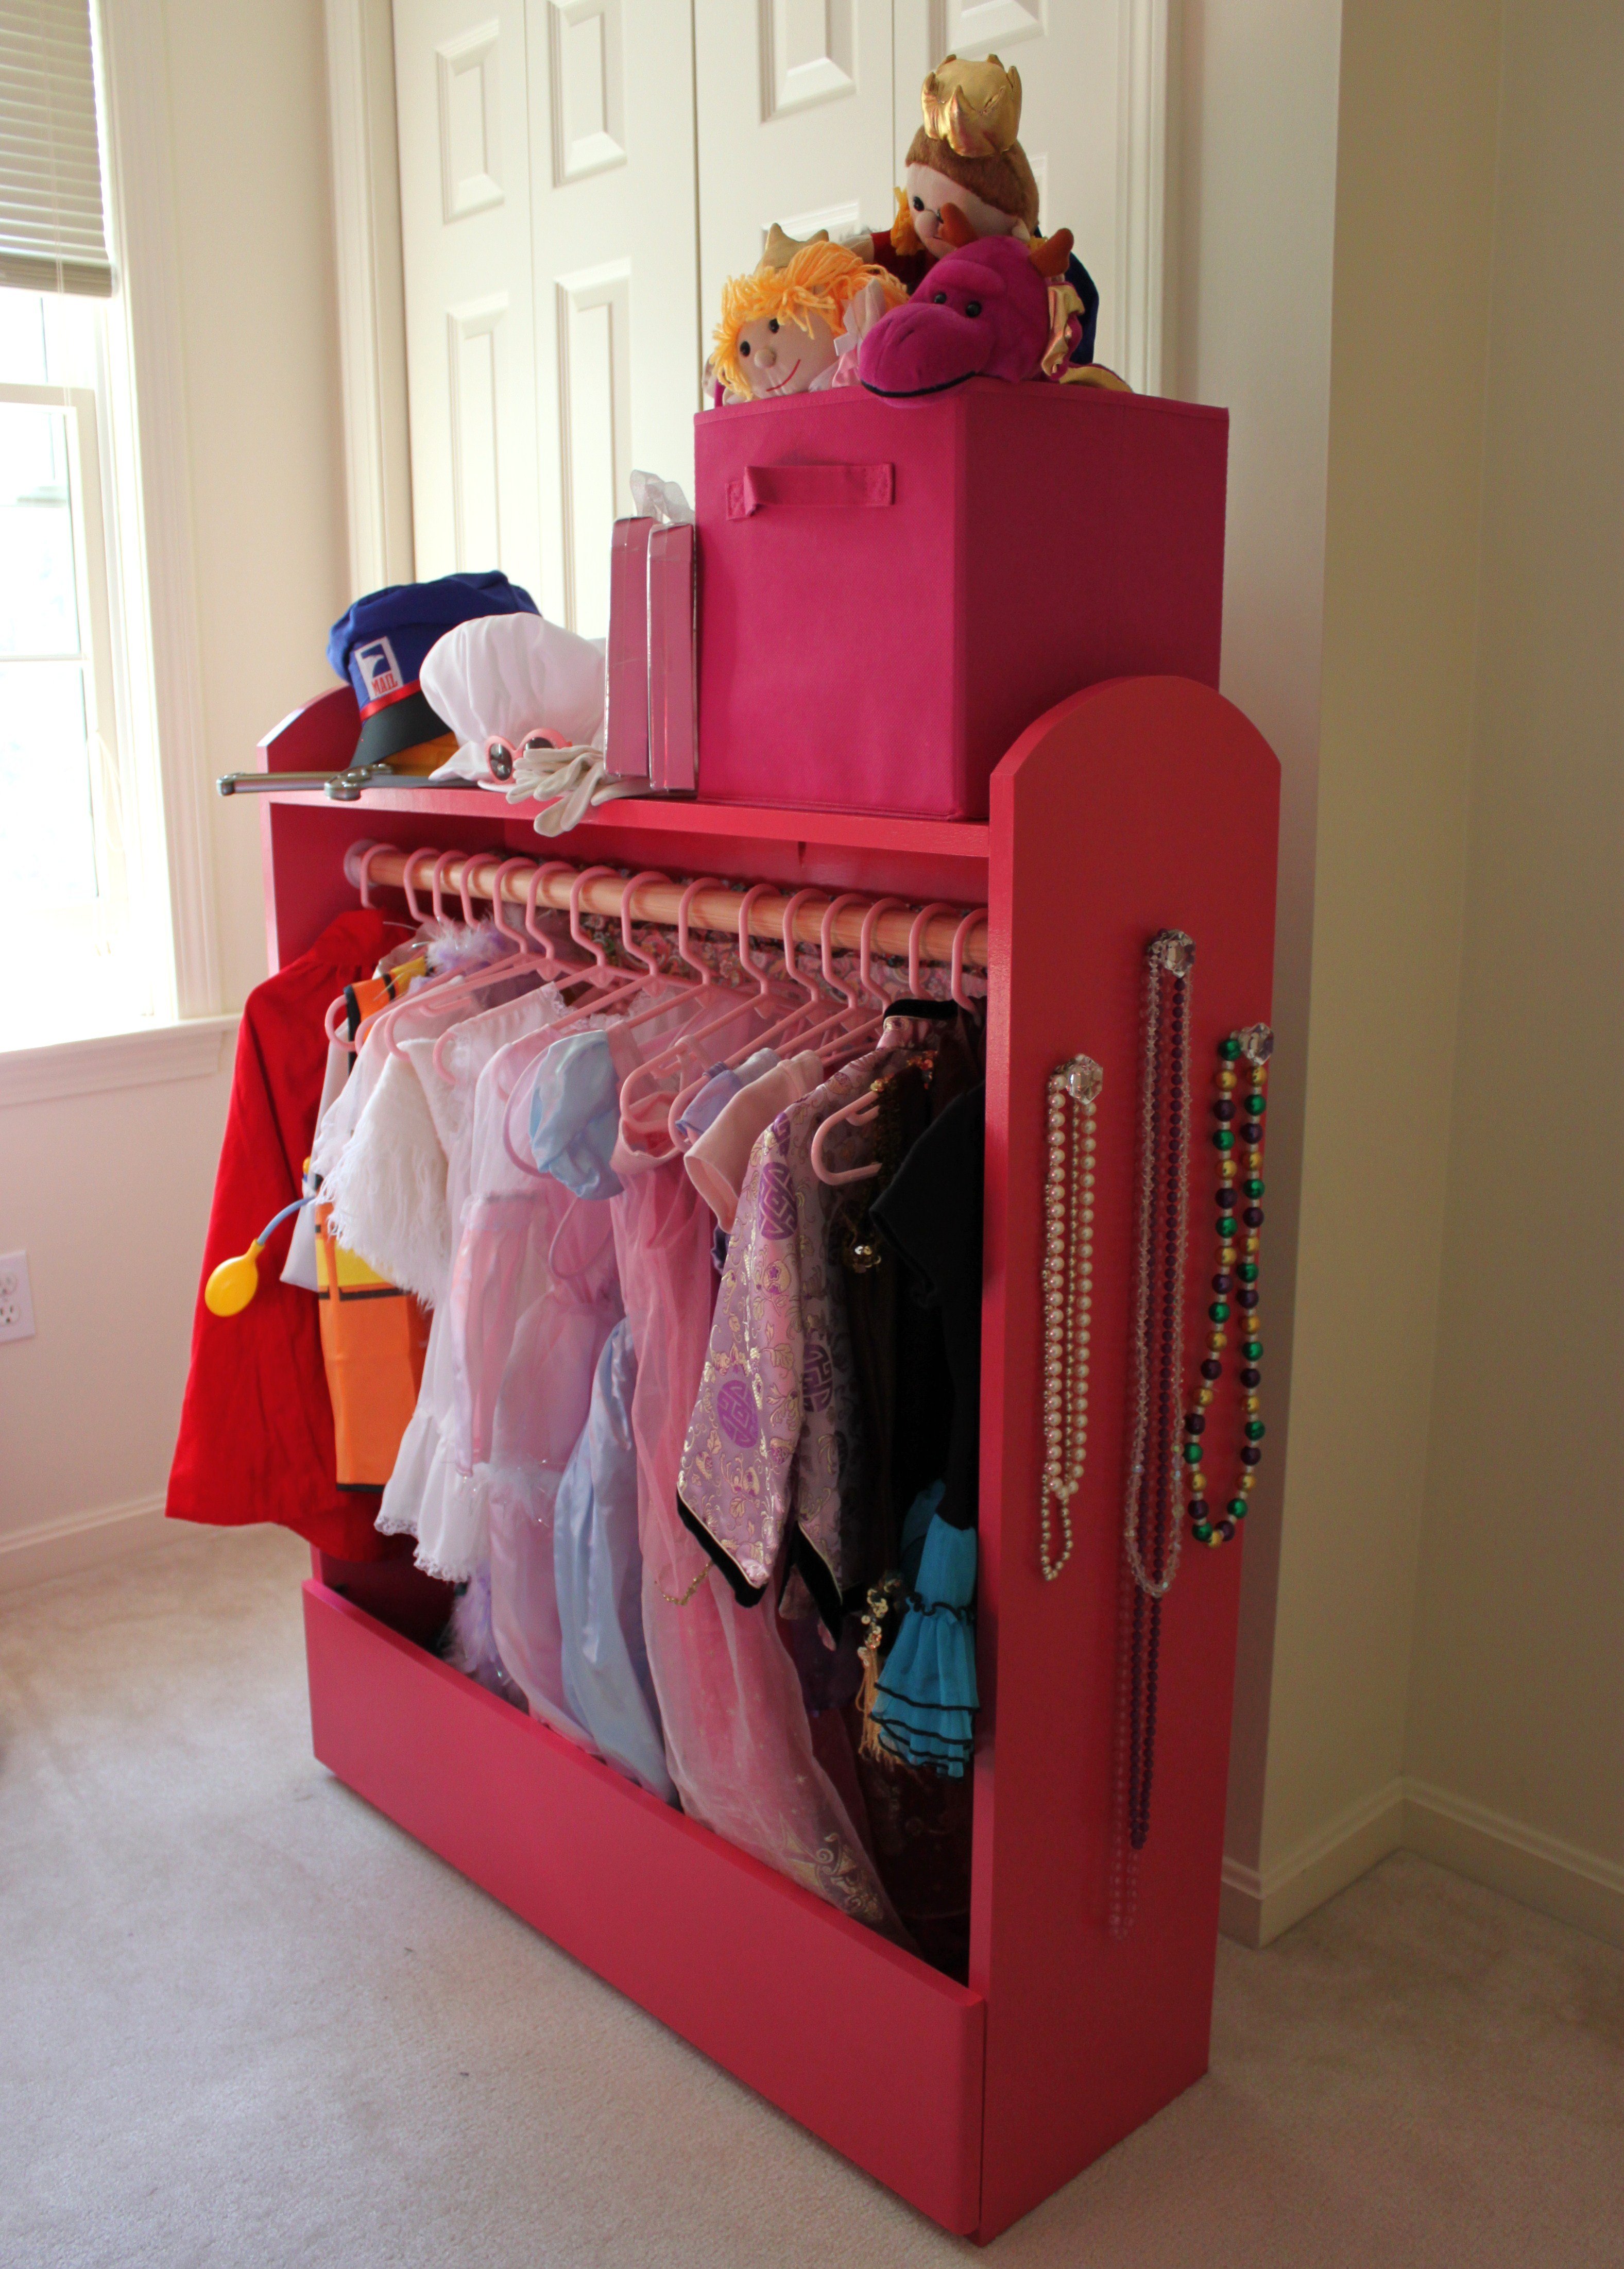
This is a great way to double up on space & creativity! My dad and I built this dress up storage/puppet theater for my daughters using Ana White's plans with added inspiration from The Picky Apple's post about their own top shelf and theater hacks - you can view it here: http://www.thepickyapple.com/blog/2011/03/24/dress-up-storage-bin-and-p…. We added hinges and magnetic catches to the front so that the storage center can be turned around and opened to lay flat for access to the puppet theater.
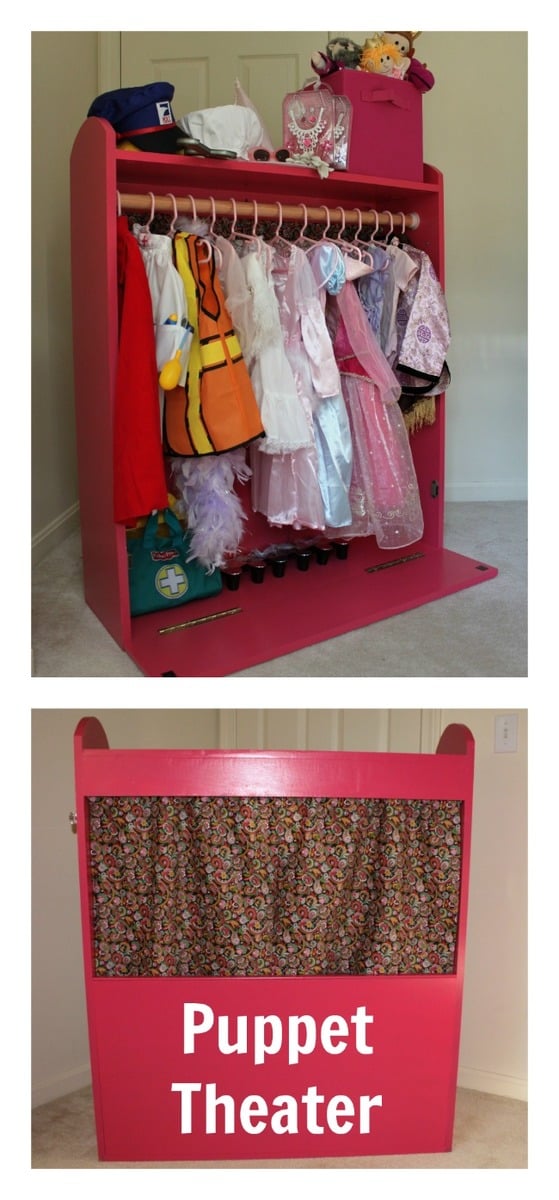
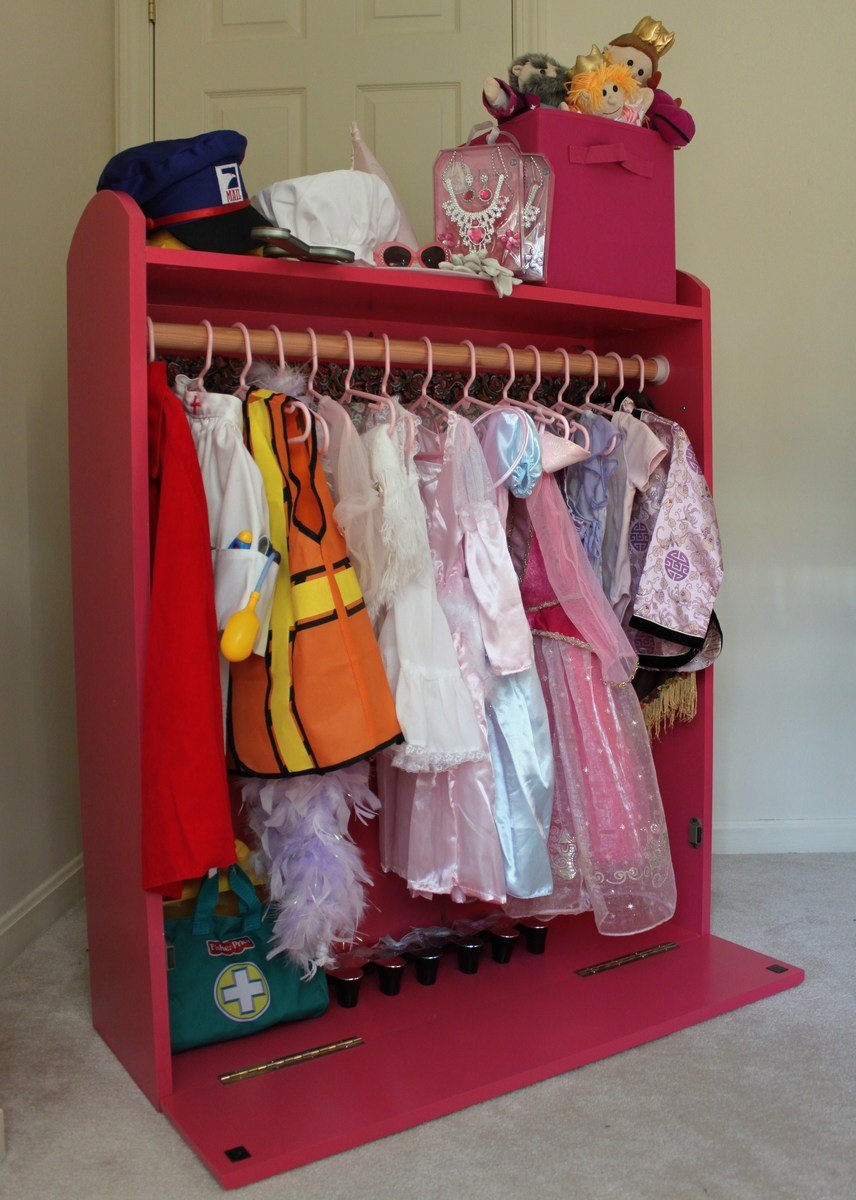
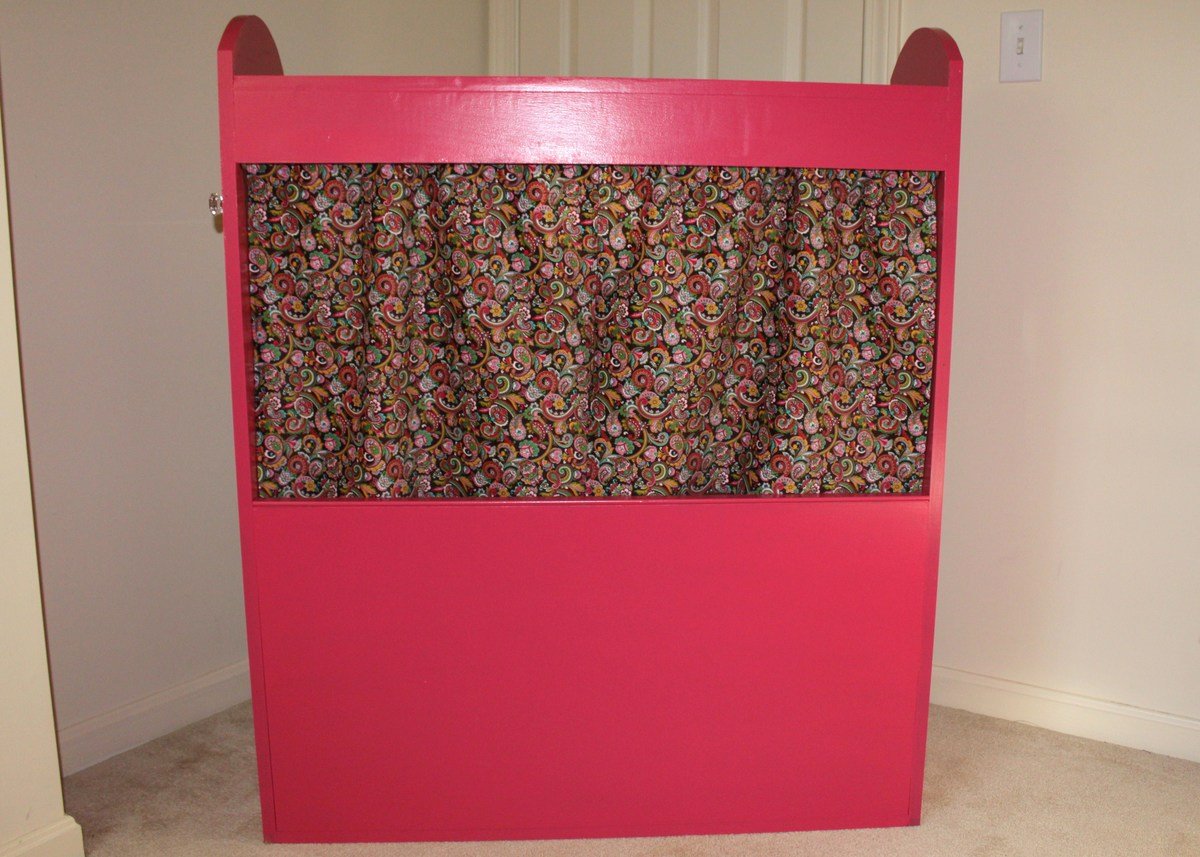
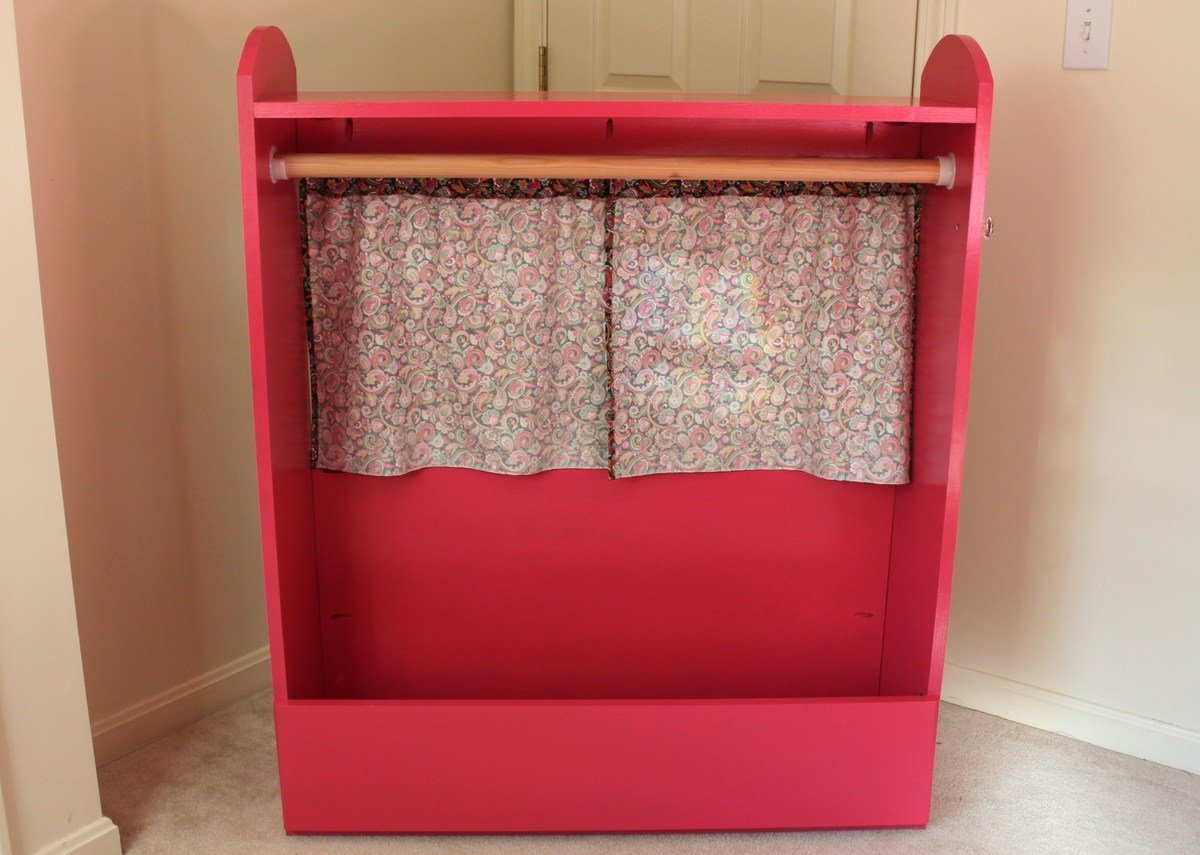
Built from Plan(s)
Estimated Cost
$50
Estimated Time Investment
Day Project (6-9 Hours)
Finish Used
primer then two coats of Valspar semi-gloss (in some pink I can't for the life of me remember or find the chip for!)
Recommended Skill Level
Beginner
Comments
Sun, 10/04/2015 - 12:44
Exact measurements?
Hi, I read you tweaked the plan and then did not know the dimensions of anything in the beginning. Have you gotten them since?
rustic baby crib
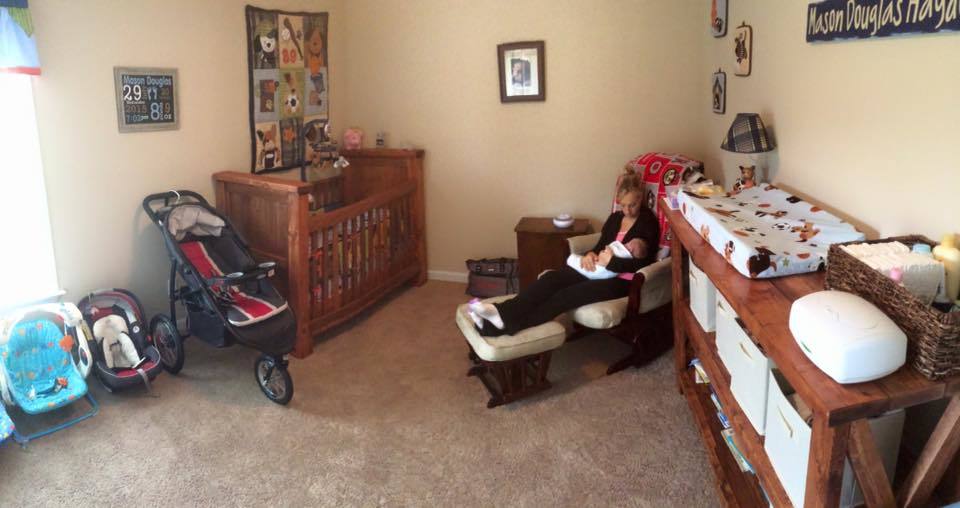
my wife and I had our first son, Mason, over the summer and I was in love with the idea of building his crib. It was a lot more work than I had anticipated but it was well worth the hard work. it came out beautifully. I made a 2X4 spacer that we can remove as he gets older to lower the mattress height. i used all pine lumber for the crib.
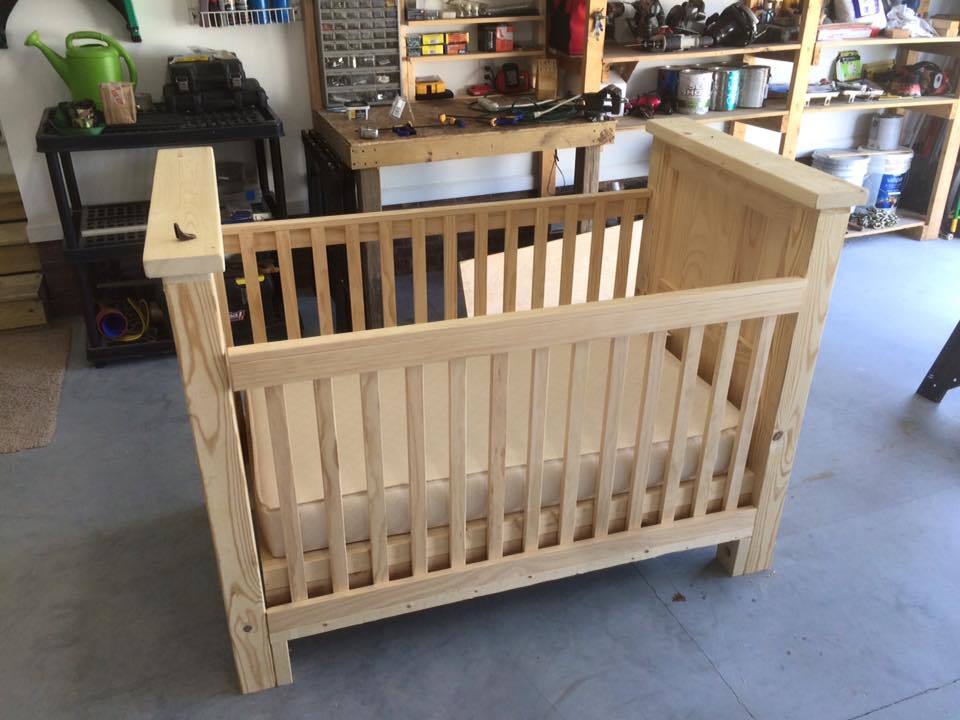
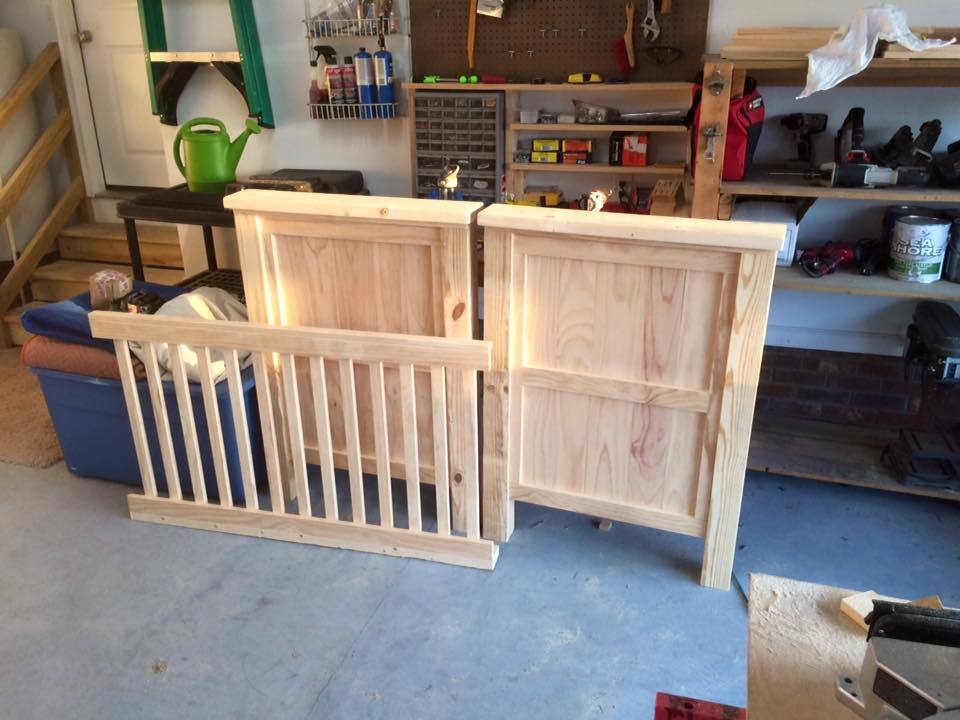

Built from Plan(s)
Estimated Cost
$250
Estimated Time Investment
Week Long Project (20 Hours or More)
Finish Used
rustoleum American walnut
Recommended Skill Level
Intermediate
Workbench modified with casters
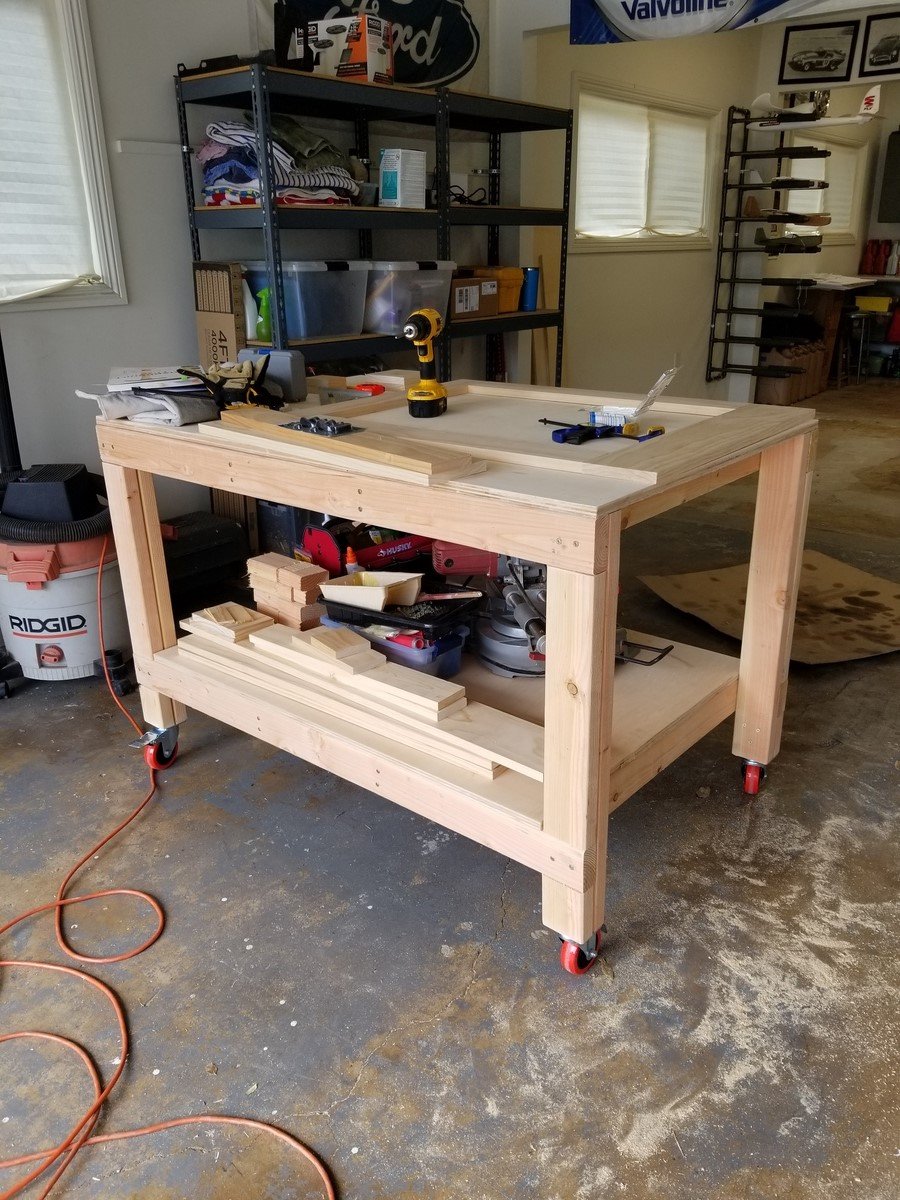
I love this workbench! I added casters so I can move it around the garage, outside, wherever it's needed. I just took 4 inches off the bottom of the legs. My hubby is admiring my handy work and planning on making one for himself.
Built from Plan(s)
Estimated Cost
$130
Estimated Time Investment
Afternoon Project (3-6 Hours)
Finish Used
None
Recommended Skill Level
Beginner
Comments
Wed, 01/25/2023 - 14:31
So Pretty! Question:
Love this with the casters! So beautiful. I'm new here and wondering at what point you took 4 inches off the legs. Did you build the table and then just cut off the legs? Or did you adjust the measurements of the cuts? Thanks in advance! :)
Mon, 01/30/2023 - 02:32
4-inch is only the height of the wheel itself.
The overall height of a 4-inch caster wheel is a little over 5 inches with the mounting bracket, so that also needs to be taken in to consideration. 2nd photo shows the overall dimensions, but to me the bracket and brake area appear to be a bit more than 1.03 inches. https://amzn.to/3DkMKzB
I think the best bet would be to have and measure the overall wheel height, prior to measuring and cutting the lumber.