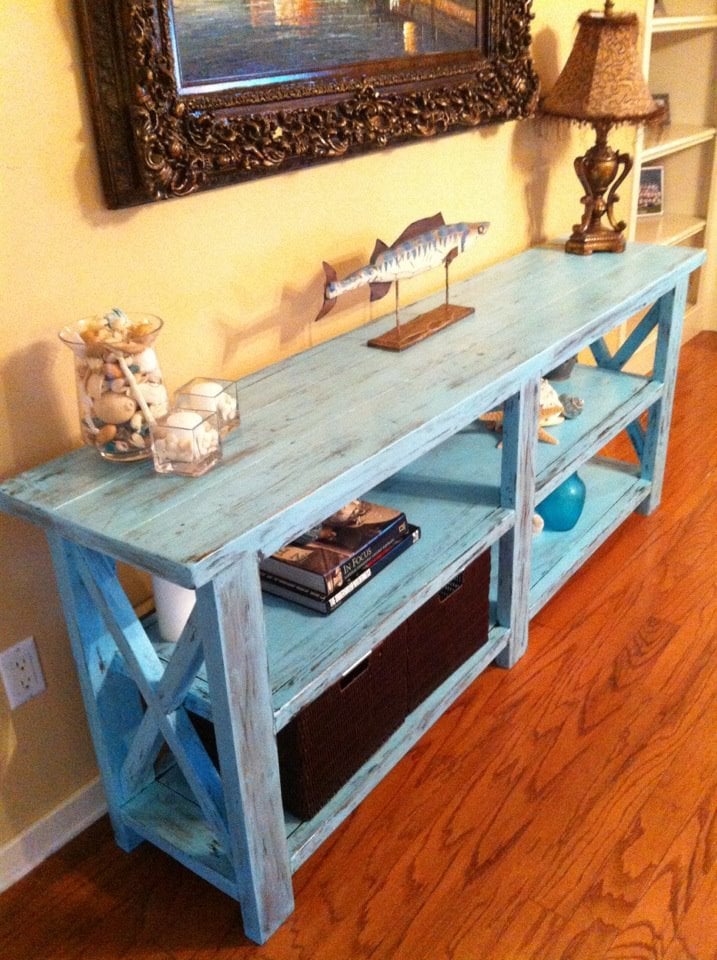
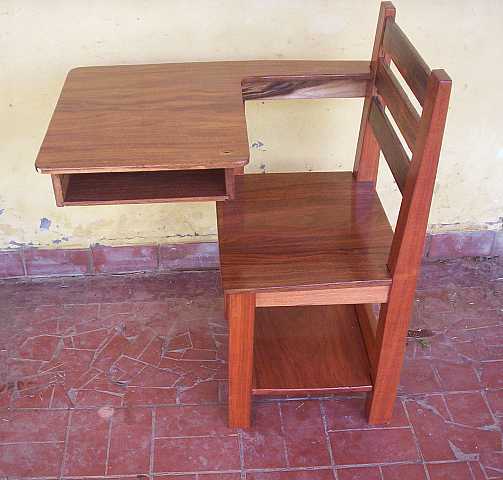
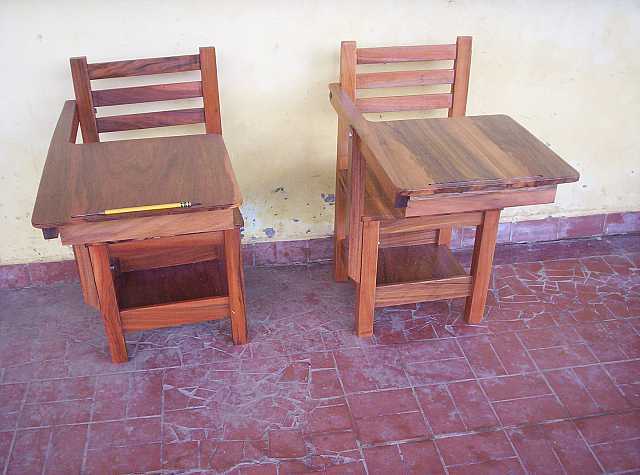
Community Brag Posts

Kids table and benches

Submitted by dhoop31 on Sun, 10/15/2017 - 06:03

Built this with matching benches that will store underneath the table completely.  Thanks for the great ideas!!

Estimated Time Investment
Weekend Project (10-20 Hours)
Finish Used
none
Recommended Skill Level
Beginner

My entry way bench in Hickory

Submitted by Anonymous (not verified) on Sat, 10/23/2021 - 15:07

The Shelf Help app helped me customize this to my space, the plans were excellent. Thank you!

Built from Plan(s)

Comments

Our bathroom step stool

I looked everywhere for a two-step wooden step stool and just could not find one.  The ones the kids were using to try and reach the sink to wash their hands, just wasn't cutting it.  I have tons of scraps (from many other Ana projects), so I thought I would make my own little stool.

The building part was pretty straight forward and I'm glad to have a stool that doesn't wobble. I sanded all the edges down so it looked worn.  I decided to experiment with the finish as I have a big cabinet that I'm getting ready to finish and I don't want to experiment on that one.  :)  I recently downloaded the recommended "Creating Your Masterpiece" by Shaunna West (see the ad to the right of this post) and was inspired to try something out of my comfort zone.

So, for the finish, I first used Miniwax Hickory gel stain.  After that was dry, I used the Behr paint I had leftover from my bathroom walls and dry brushed it on.  I had never done this technique before, so I started on the underside of the stool.  I'm glad I did because I got much better at the dry brushing as I went on.  It is definitely a tough technique to use in corners and where the wood meets at a 90 degree angle.  That's why it looks so much better on the treads and flat side of the stool.  After the paint dried (about 10-20 minutes), I took a medium to finer grit sanding block and sanded in a circular motion.  I even had little hands helping (note picture). Finally, I used the Miniwax Paste Finishing Wax.  I was unsure that I was using it correctly as it goes on very thin and it was hard to see where I applied it.  After letting that dry for about 15 minutes, I buffed it out with a clean cloth.  I could really see it start to shine up (just like a car wax).  I love the feel of the wax and I hope it holds up over time.  I do realize that I will need to re-coat on the stool treads, but that's fine with me.

Estimated Cost
Scraps used . . . . estimated at less than $10
Estimated Time Investment
An Hour or Two (0-2 Hours)
Finish Used
See notes in the summary
Recommended Skill Level
Starter Project

Square Fancy X Farmhouse Picnic Table and Benches

Submitted by MicheleV on Sun, 06/09/2013 - 16:25

When we resurfaced our deck last year we had to remove the built-in benches due to code regulations, so I knew I would get to make new benches this year. We wanted them to be a flexible size so we could rearrange the deck easily for eating, entertaining, enjoying the sun and the shade. Based on the size and shape of our deck, a square table for 6-8 people was going to be the best option.

After looking at a couple design plans, I decided to combine a few plans to get exactly what we wanted. To get a mid-sized square table I used the leg structure of the Fancy X Table with the construction method and the stability from 2x6s of the Square Pedestal Table. The top is joined from seven 45.5" lengths of 2x6 and two lengths of 2x4s. It ends up being 52.5" square. It is snug for eight people, but comfortable for six. We didn't end up using the skirt boards so there would be more knee room. The base is mounted on the diagonal for the same reason.

For the benches, I used the supports from the Fancy X Benches, with the bordered top from the Triple Pedestal Farmhouse Bench, since it would match the table top better. The benches are 48" long, and only two supports were used for each, inset 5" from the end of each bench. Likewise, I used a single stretch of 2x4s for the seats rather than seam them in two parts like the 106" long original plans. I did add an extra 2x2 support board under the seat platform to keep the 2x4s even over time. Overall, I made five benches - four for around the table and one for next to the BBQ. They are blue so they provide some color against the brown deck and green tree tops that surround the deck.

For both the table and the benches, I pre-stained the surfaces that make up the inside of the Xs. It made it easier to get good coverage there.

I also made a quick flip-down BBQ prep station, on similar lines to the Flip-down Wall Art Desk out of two 5/4x6 and two 5/4x4 cedar boards. The shelves are on adjustable pegs.

The costs broke down - with all hardware, screws, putty, sandpaper, stain, etc. - as: $90 for BBQ station (lots of hardware), $200 for 5 benches, and $155 for the table. I did a lot of sanding and filling to get the rough 2x4s smooth. In the end, there was about 50 hours in the benches, and 20 in the table. The BBQ station was less than a day, including mounting.

Estimated Cost
$450
Estimated Time Investment
Week Long Project (20 Hours or More)
Finish Used
Benjamin Moore Semi-Solid Arborcoat in Spanish Moss (table and drop-front BBQ station) and Spellbound (benches)
Recommended Skill Level
Intermediate

Comments

Rustic DVD/Bookshelf

Thanks to Ana White and Lady Goats for the idea from their prior plans on the Rustic X Bookshelf. The bookshelf is 6ft tall and the shelf height is perfect for DVDs or books.

Estimated Time Investment
Weekend Project (10-20 Hours)
Recommended Skill Level
Beginner

Tiny Home:)

Submitted by Anonymous (not verified) on Fri, 11/05/2021 - 13:32

After watching your tiny home builds we decided to build our own. It's almost complete:)

Comments

James & Libby's Library

My first project! It turned out pretty well, although I had some trouble hammering the nails in straight! It cost me a little more because I used fir instead of pine - there weren't any straight pine boards. I also used a 1x3 for the bottom, becuase it's along James' bed and I didn't want him banging his head if they stuck out too much. Perfect for his Thomas trains!


The wall I wanted them on is a little less than 8', so I cut 18" off both and now have two more little shelves to go somewhere, yay!

Built from Plan(s)
Estimated Cost
$25 for both
Estimated Time Investment
An Hour or Two (0-2 Hours)
Finish Used
Some random white trim paint
Recommended Skill Level
Starter Project

Planter Box with Finials

It didn't take me long at all to make these. I enjoyed making them and all my neighbors love them. They have a nice amount of space. I actually had to make mine smaller than the instructions. I had most of the wood on hand.

Built from Plan(s)
Estimated Cost
$7/box
Estimated Time Investment
An Hour or Two (0-2 Hours)
Recommended Skill Level
Starter Project

Rocking Moses Basket Stand

This was one of those "Labor of Love" projects. I was nervous about the rockers but the hardest part about them was getting the ends rounded perfectly. I didn't scribe the legs, instead I cut and assembled both sides and then laid them up against my rocker 1x4s. I marked where the legs met the rockers and then cut the rockers leaving the areas where the legs met at full width. Made it much easier. I also rough cut the rockers and used my orbital sander to bring the wood down to my pencil lines. I had the rockers clamped together for the entire sanding/cutting process. I love the silky smooth finish of the milk paint and hope my nephew and his wife love the finished cradle as much as I do. Thanks for a wonderful project Ana!!

Built from Plan(s)
Estimated Cost
$75 with basket and bedding.
Estimated Time Investment
Weekend Project (10-20 Hours)
Finish Used
Minwax Jacobean under Miss Mustard Seed Milk Paint in Eulalies Sky. Distressed so that stain shows through in natural wear spots. Finished with 2 coats of hemp oil.
Recommended Skill Level
Intermediate

Comments

danicarby

Thu, 05/14/2015 - 13:20

This will be such a wonderful-thoughtful gift for your nephew! The best gifts are those that are made (with love)! :)

2x4 Rustic Outdoor Bench

Submitted by Anonymous (not verified) on Thu, 11/09/2017 - 09:46

Submitted by Carla Santiago on Facebook - 


We did a bench, I got your plans off Pinterest. We just put a slight slant to the back and we love it. Thanks for the great plans.

Built from Plan(s)
Recommended Skill Level
Beginner

Kitchen Island, Trash Can Storage

Submitted by Anonymous (not verified) on Thu, 11/11/2021 - 21:46

I absolutely love this kitchen island/trash storage/prep station. I had so much fun building this with my father in law who is a professional carpenter. I had built several other projects, but with this project and his help, I feel that I can finally say I am an "advanced" builder :)

I had so much fun with this, and I can't believe how it turned out.

Comments

Small Dog Bed

My mom really wanted me to build her a bed for her dog and was coming to visit in a week, so I jumped on the project immediately.  (Although it is for her pup, mine is modeling the bed:-).)  I took the Farmhouse Doll Bed plan and used that as a base for a modified version.  I went to Joanns and grabbed a standard 15"x17" piece of 2" medium density foam for about $5 and built around it.  Instead of using the 1x3s for the headboard, I used 9 1x2s to even out the space.  This was also my first time ever sewing, so that was probably the most time consuming part of the project!  (That's what took it over the edge from being an "hour or two project" to an "afternoon project".)  I also modified the plans for Ana's Outdoor Cushions to fit the smaller piece of foam.  (I fell in love with the dog fabric from Tonic Living, so I HAD to make my own!)  I finished it off with 2 coats of spray paint.

Estimated Cost
$25 - including foam and fabric for cushion
Estimated Time Investment
Afternoon Project (3-6 Hours)
Finish Used
2 cans of Rustoleum Spray Paint in Antique White
Recommended Skill Level
Beginner

Child Size Beach Chair

Submitted by sueslager on Thu, 06/13/2013 - 13:08

This project goes together very easily. Had my adult son come by and make it for his daughter.

Did make one adjustment ... the supporting bar on the small frame ... the one that determines the opening angle ... at 6" the chair was too open ... at 6 1/2" it was more comfortable for the little ones. We used glue and air-gun brads for joining ... once dry I was able to sit in the chair without collapse!

Estimated Cost
$10
Estimated Time Investment
An Hour or Two (0-2 Hours)
Finish Used
ace hardware, clark & kensington, pale purple
Recommended Skill Level
Starter Project

Colorful Sandbox with Benches

I needed a sandbox for my little guy and came across these plans about a year ago. Needing some basic woodworking tools I put it off for a bit until I got a circular saw for Christmas. Come May I figured it was a good time to get this done.

The plan was easy to follow, and it went together quickly. The only time consuming part was waiting for the paint to dry. Since this was going to be outdoors I wanted to make sure it got treated in some way. I saw similar colors from another brag post and decided to roll with that. I also added landscape fabric to the bottom to prevent weeds from growing in.

Built from Plan(s)
Estimated Cost
$75 - $100
Estimated Time Investment
Weekend Project (10-20 Hours)
Finish Used
Olympic and Valspar exterior paints.
Recommended Skill Level
Beginner

Chunky Media cabinet

Submitted by redhead_61 on Tue, 12/05/2017 - 22:43

This was loosely based on one of the media cabinets on this site.  I built it to fit this spot exactly and used many of the same design elements as in the Leighton media Suite I built several years ago.  One thing I want to mention I did with this design that is a FABULOUS idea in all media units.  Inset the back of your lower section.  I hate not being able to run the top of my "counter" flush with the wall because the back of my unit or bookcase is running into all the plugs in the outlet.  I left a little larger of an overhang than I normally wood to clear the baseboards and I inset the backing of this peice about and inch inward to leave lots of room for all the chords to just hang there but be hidden.  They are much more accessible and now the top of my unit is flush to the wall.  

Estimated Cost
$80
Estimated Time Investment
Weekend Project (10-20 Hours)
Finish Used
Acrylic hard finish white paint.
Recommended Skill Level
Intermediate

Rolling shelf turned laundry cart

Submitted by makermave on Sun, 11/21/2021 - 16:17

This is my first build! It came together really easily. I modified the dimensions to fit my space. I didn’t add the black pipes, simply because I couldn’t find all the pieces, or the corner brackets, and I think it looks great without them. I added a handle (a towel bar I found on Etsy) to pull it in and out. I used rough cut cedar, and have not finished it. I’m not sure if I will. I wanted to spray paint the wheels, but the person that helped me attach them (a.k.a. my dad) was ready to to help me before I had them painted! But I love it, and it really adds functionality and stoage to this little gap between our washers and dryers.

Built from Plan(s)

Comments

My version of the $10 ledge shelf

Submitted by JennyG on Tue, 04/05/2011 - 14:38

I built these shelves and wasn't pleased with the finished look. We went back and added a small piece of crown molding. It made the difference I was looking for.

Estimated Cost
$10
Estimated Time Investment
An Hour or Two (0-2 Hours)
Finish Used
black paint & a can of clear gloss spray paint from another project
Recommended Skill Level
Beginner

Foldable Farmhouse Table 2

I recently published my first foldable farmhouse table last week here: http://ana-white.com/2013/06/foldable-farmhouse-table The first one I made was very heavy because I used 2x6 tops and 4x4 legs. I decided to make another one that would be lighter and easier to transport. The plans are basically the same just instead I used 1x6 for the top and put 2x4s together for the legs. I also shorted the length by about a foot. The only issue with making the table shorter length is that the legs don't fold completely flush. You could easily make the legs short enough to fold flush, but then the table was a little too short from the ground up for us. The same as before I simply used kreg joints to join the top boards together. I then made a 2x4 frame and attached it to the bottom. I made each of the legs separately by joining 2x4s together and sanding everything down. Everything was stained before putting the legs on using Miniwax Dark walnut stain. I used 2 coats of Miniwax water based clear coat to seal it. A notch was cut out on each of the bottom 2x4 supports on the legs and I glued in a small piece of wood cut to size. These are so I can put in a 2x4 support board under the table so that the legs do not fold in on themselves when it is standing up. The legs are just attached using door hinges you can buy in packs in the hardware section. Be careful when screwing into the 1x6 top not to use too long of screws or else you will over screw and have them come through into your table top. Table design was by Amber Veatch Designs and photographed by Andi Mans Photography

Estimated Cost
120.00
Estimated Time Investment
Day Project (6-9 Hours)
Finish Used
Sand to finish and then used Miniax dark walnut stain followed by Miniwax water based clear coat.
Recommended Skill Level
Beginner

Comments

Freddyflis

Tue, 07/07/2015 - 06:41

We have built something very similar and we have a good bit of wobble at the top, even though the stretcher down the center of the table is holding solid in there and secred with clasps. Were thinking of some sort of sliding pin into the top of the leg to the apron. Anyone run into this before?

Seasonal And Holiday

Super-Cool Pencil Holder

Submitted by JoanneS on Wed, 05/20/2015 - 19:56

Isn't this the coolest pencil holder EVER?! Hubby made this from a landscape timber with the drill press. Love how you can see through the holes in the bottom!

He used a hole saw attachment on the drill press, after cutting the block of wood down with the miter saw. This one is the prototype, from scrap wood. I'm thinking this would be absolutely gorgeous in Cedar! This received a quick sanding and 2 coats of clear water based poly.

As soon as he teaches me how he did this, I'm going to post the plan for 'Dan's Super-Cool Pencil Holder!' Thanks Honey! :)

Estimated Cost
0
Estimated Time Investment
An Hour or Two (0-2 Hours)
Finish Used
sanded with fine grit sandpaper, 2 coats of clear poly, sanded between coats.
Recommended Skill Level
Beginner

Comments

JoanneS

Thu, 06/04/2015 - 15:10

Thanks! I'm looking forward to trying this on my own too. Hubby came up with another technique that I think will be easier for me - using a 2" forstner bit and a regular drill. Hopefully I'll get to experiment with that this weekend, and I'll be sure to post process pictures. :)

Bench

I needed a place for my kids to put their shoes so I shrunk the plan for the X Console and made it fit my entry way. I love it!

Built from Plan(s)
Estimated Cost
$60
Estimated Time Investment
Weekend Project (10-20 Hours)
Finish Used
Paint, stain, and Kilz Sealer
Recommended Skill Level
Beginner

Christmas Tree Shelf

After watching Ana's video I decided to try to build the Christmas tree shelf this year in time for the season. It worked out alright. The build is straight forward. Doesn't take long and it's a fun seasonal project. Now I just have to figure out what to put on it.

Built from Plan(s)

Comments