Rustic X Desk
Base was completely made from reclaimed 2x4's. Desktop made from Oak plywood
We enlisted help from my brother-in-law to build the dollhouse for our daughter last Christmas. He also painted the floors, stairs, and roof. I spent many nights after the kids were in bed "wallpapering" the walls with various scrapbook paper.
I love this house and it's something that will last for many years. Even better, both of our daughters love it and so do their friends.
I started with the potting bench by Between Naps. I made it longer and taller (for my dad). There is a tool holder along one side and I added a sink, for washing the veggies newly harvested from our garden. We ran the water from our house faucet and will blow out water for winter. All that's left is running a pipe from the drain to leach out across the perimeter of the garden. Most of the lumber was given to me (pressure treated even). And I bought the sink from a junk guy for $50. My dad was so impressed and I think it may be my best present project ever. I can't believe I made that! Oh yeah, the end caps have solar lights, nighttime gardening! Ya never know!
Thu, 07/17/2014 - 12:05
That is awesome! I want a sink for my garden (and a cooktop for outdoor canning) so I am very jealous. :)
I had shown this plan earlier on to my bf, telling it I really like it and it would be so much cheaper to make our future rustic dining table on our own instead of buying it. He seemed reluctant.... And then, 2 months later, I come back from my parent's house in the evening to find that he has built me my rustic dining table just as I had wished!
Sun, 10/23/2016 - 11:20
This is absolutely gorgeous! Is it a reclaimed wood dining table? What a wonderful suprise! What's next? :)
My first carpentry effort; thanks Ana for the great plans!
I modified Ana's plans to fit the triptych art I created. I used a combination of this plan and her Wall Frames plan from her book. She wan't kidding when she said these frames were versatile. I plan on applying the same concept to a leaning wall mirror.
For a step by step tutorial on the modifications to this plan as well as how to create the triptych art, visit the blog http://thepursuitofhandyness.com/diy-triptych-art-custom-frames/
My boyfriend and I made this farm style table based on plans from Ana's site. We LOVE it. We wanted it to appear rustic with natural woods tones so we used Special Walnut Stain, Poly, and Light Brown Briwax. Even though it looks raw, its silky smooth to the touch.
Thanks for posting these plans! We already on to our next project. We have the wood purchased for the rustic coffee table and console table, and I have my eye on the farmhouse bed frame and a set of night stand tables.
Kate
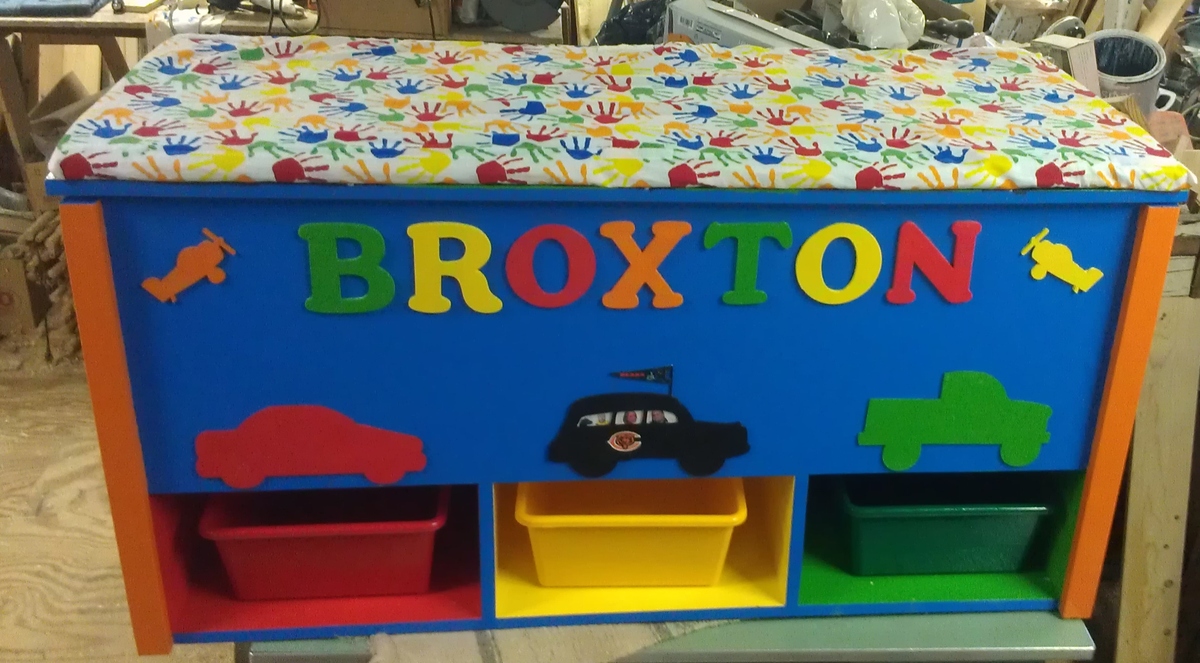
My grandson needed a toy box and we really liked this plan. We changed the dimensions a little, made it taller and a bit wider. My husband built the box and did the basic painting. I made the cushion for the top. When the cushion is removed (it Velcros to the top) there is a hand painted matchbox car town and roads. I painted places my grandson knows, like his house, grandparents houses, mom's and dad's work, McDonalds, wal-mart and general places like airport, gas station, fire house, etc. We used stay tension support hinges to make sure it was safe for our little one, yes they are expensive, but they are my grandson's fingers. Everyone loves it. The vehicle in the center(black) matches their car. I put pictures of my son-in-law, daughter, Broxton, and their dog, Briggs in the windows. And decorated it with my son-in-law's favorite team "the bears".
Tue, 09/25/2012 - 11:49
That's cool! Makes me wish I was a kid again, or had a kid at that age.
I took plans from the Rhyan console table and just added a couple extra cabinets. This was a tough project but it came out great. I bought the wood at a local mill and all the hardware is from Home Depot
I adjusted the measurements to fit the space.
I finished this coffee table for my cousin’s living room. This was a really fun build and i was actually able to complete it with wood I had left over from other projects. The only money I had to spend on this one was for the paint she wanted that would match her other furniture. I love this website and the plans provided make it easy to get projects done.
I'm going to build a second one but it looks like both dogs are enjoying this one I was even able to get them to get in it together when it wasn't too hot :-)
This is my first project from your website and it was really interesting I ended up modifying the plans a little. For the modifications the back panel was pre-drilled and attached with bolts and t-nuts to allow me to easily remove when the weather starts to get cold and put in insulation... Order clean it. It's a very good size dog house and I really enjoyed this project! Thank you so much for your contributions to those that have never actually worked on anything like this before.
Cathleen
I was looking for a neat bookshelf for my craft room. I found this plan and loved it! I like that I can always add smaller shelves for more eclectic-ness when I'm ready. I'll readily admit that this is pretty basic in comparison to the author's creation, but it works in the room and it works with the other furniture that I already have.
I really like that this is a huge bookcase..that's exactly what I was looking for to house fabric (I'm a quilter) and all my books. Looking forward to filling it!
My husband really wanted our sectional couch, but we had the hardest time finding a coffee table that worked with it. I went back to the store that we bought it at to see what they suggested, and they showed me a $700 that I fell in love with. Since I was not spending $700 on it, I did some research. Found these plans that were almost my dream coffee table, the only difference was the wood border around the outside. So my husband and I modified the plans a little and got to work! We made it the exact dimensions of the coffee table I wanted and are absolutely in love with our final product!
My front closet was transformed into a mudroom. Hidden storage is a genious idea. Thank you Ana!!! It wasn't easy though.
Awesome plans, Ana. Had to fight with not being able to get nice straight 1”x2” boards, and refused to go buy anything bigger to rip from. But overall, it turned out super nice and my granddaughter loved it. Already have a request for another one from her cousins 😊
Hi,
My name is Bas and I am presenting my first project to you.
I am new to this website and after I saw all the beautiful handmade furniture I could not wait to get started. It started a few weeks ago, when I bought a single tablesaw for five dollars at a garage sale. Never having done anything with wood before I was pretty curious how I would be able to do this.
I started off a few nights ago by buying materials that are described on the shop list.
I had to work at night in a dark garage as I work during the day which made it a bit more challenging than expected.
I just made sure to take my time and to do it step by step which in the end worked out great. I am very happy with the results and it's definitely a great addition to our home.
I've had a friend ask me to build her one as well, which I can't wait to start building.
Please let me know if you have any questions or feedback. Thanks to Ana White and all those others that have inspired me so far.
Bas
Mon, 10/01/2012 - 20:35
That looks really good! I would never have guessed this is your first project.
Made this desk custom for a friend and I am so happy with how it came out. Took around 4 days with finishing. I didn't put a back on it because drilling those holes for cords always goes rather splintery. If he wants a back we can easily put it on. The top ended up having strange coloring with the Dark Walnut stain, I think because of the wood filler, but I like it because it gives it a rustic old world kind of look. I saved a lot of money by hounding the scrap bin at Home Depot several times a week, looking for wood on Craigslist, and raiding my leftover stash. I modified the side so there was a tower partition and a shelf on shelf pins- courtesy of Kreg shelf pin jig. I used moulding I had sitting around to cover the exposed edges of plywood.
I was in need of two more parson chairs. So, I thought that I could maybe buy them from the same place I originally purchased my set, but they only had something close. I don’t mind mismatch when it reasonably works together. These did not. So I started my search…. Anything I liked was either out of stock, or way too expensive. I’ve been making and updating a few furniture pieces lately, but never made any chairs or stools. Why not? I guess I thought that they were too intimidating. I started doing some research on the web and learned that they are intimidating. But then there is a very talented person out there by the name of Ana White. She has plans for a parson chair that really made me say that this is not as hard as I thought. So I used her plans as a basis for my own. I used left over pieces of wood I had from another project. So why not try one and if it works I’ll do the second one.
I did however make a few changes to make it my own.