Kids storage step stool
![](/sites/default/files/3154815072_1347386131.jpg)
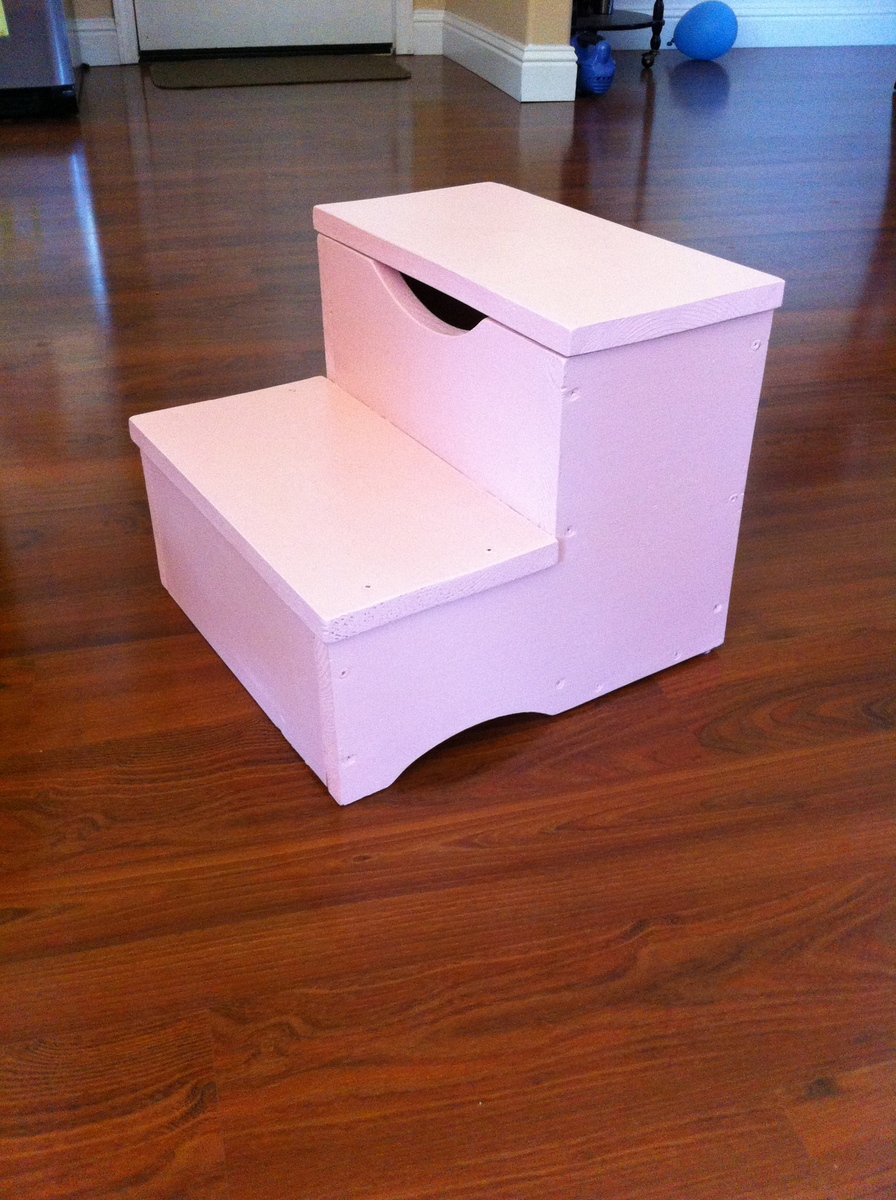
My first project from this site. My 3 year old daughter uses it every day. BTW...she picked out the color and she helped me paint it. gotta love pink?
This was my first project from Ana's site. I wanted something simple and cheap to make, so all in all, this project was very simple.
I think I will paint instead of stain next time though as the quality of the wood I purchased from Home Depot wasn't the best.
Very happy with it though, and I'm planning on making more.
We needed a mini kitchen for our guest cottage and the Grandy console was the perfect fit. I adjusted the shelf height to fit a mini fridge and microwave. Love it!
These were so easy to build and look amazing! The only challenge was finding cushions. Finally found the 25x25 cushions at Lowe’s.
DIY Wood Barn Door
The Swede in Norway
I love the 20 second tidy up coffee table, and thought it would really help with our living room storage issue. I stenciled the inside for a cool look and added some handles from Martha Stewart that I found at Home Depot. I built the base and sides out of #2 pine, and made the top of Poplar for more long lasting durability (though it did bump up the price a lot!) I am so happy I spent the money on the Kreg drill system, it really made things so much easier. This was my first building project, but I think it turned out really well!
My wife had purchased a few antique printing press trays a few years ago to use to display family keepsakes. She also wanted a sofa table for the Living Room so I combined the two concepts into one table. I used the Rustic X Console table concept and modified it to fit my space and added the drawer compartments for the trays to slide into. I added two glass pieces to the top and there you have a sofa/display table. I used pine boards, hammer to distress the piece, Early American stain and a couple of coats of poly for the finish. The glass pieces we the biggest expense at $50. The table itself was built for around $55 before the glass was added.
My husband and father-in-law built this crib over many weekends. They decided against using pine since it is soft. Instead they used maple and the materials cost far more than the $50-100 estimate. The finished project is beautiful and is lovingly referred to as the bomb shelter because it is so sturdy and heavy.
They made it so the mattress could be raised and lowered as well as easily converted into a toddler bed. They used the crib mattress as a starting point to adjust the plans to ensure there would be no gaps between the sides of the crib and the mattress.
They used a router to put a dado at the top and bottom of the sides so the slats fit into the slot instead of just butting against the top of the rail in order to minimize the number of nail holes and create a nicer fit. They used one solid piece of maple plywood at the ends of the crib because there is a lot of temperature variation where we live resulting in a lot of expansion and contraction and they wanted to make sure that didn't cause any gaps.
I made this outdoor sofa on a weekend.
I built this for my grandsons first birthday! I added a hydraulic shock from Lowe’s. It was really stiff and it took two cabinet door magnets to hold it shut. The name board is from my great grandfathers saw mill from the farm my dad still lives on. I do hope he enjoys it as much as me and my dad enjoyed building it for him!!
Chappy
We combined two projects into one area to create a wonderful spot for reading to the grand kids.
I used 4 board instead of 6 for the seating to fit the cushions i have and i changed the plan a little bit so all my cushions would fit in it. I also made it 2" higher, i just thought it would be more comfy for my 6 feet 4" husby. Took me 5 hours to do the whole sectional all by myself. I found the cushion at target at 70% sale so each of them cost me 9$ instead of 32$. I have not stained it yet, but will do with a sico brown outdoor stain.
One of my first bigger projects. Added a sink by framing it out with 2x4s before adding the top on.
I used 1 10 ft long 2x6 and 3 8 ft long 3x6 along with recommend 2x4’s and had enough material. Fun build made for brother in law, 2nd person really helped for step 7.
Thank you Ana for these plans!
This is a wonderful sandbox for toddlers, my kids love it. I build it a couple months ago, and it's gotten quite a bit of use already. So far it's even stood up to them jumping on it when it's closed, which is the only thing I was worried about. ;)
I'm not an experienced builder but i built this in an afternoon with the kids playing around in the yard with me, so this was a great project for me!
I used Minwax Polyshades, a stain and seal in one to finish this project. (I thought that would be a neat idea to skip a step, but I should have known that's usually a bad idea) I noticed that it didn't turn out to be nearly as dark as I expected and though I like how it turned out on this project just as well. I don't think that I'd buy another can when this one is used up.
I used the 2x4 modified plan to make these, minus the corner section which I took the back off of and converted it to an end table. I also modified that end table to have a "cooler box" in it. We have used this for 2 years and its still as strong as the day it was built, finally got cushions last week and it looks even better. I have had several friend and family ask when I am going to build theirs.
We wanted this beautiful bed for a guest room, but the room was a little small to have the large four posts so I modified it to make all 4 posts shorter - but otherwise the plans are the same. I used miniwax dark walnut stain and 2 coats spray polyurethane, followed by light 220 sanding and then 1 coat paint on semi-gloss polyurethane. I also lightly distressed the wood prior to staining with chisels, screws, hammering etc.
Loved this plan! I felt it needed one extra 2x4 for a slat, but the rest was great!
Finally finished my outdoor space just in time for the start of summer! Thank you for sharing the plans and instructions. I also made the beginner dining table for my outdoor eating space.
This project was a lot of fun for me and my husband. Extremely simple. We bought a 1x12x4 for $6.42 and spent about $3.00 for stencils, the rest we had on hand. We cut the 1x12 into the two 1x12x11.5 (for the sides) and then cut one piece in 1x12x18 (for the bottom) we decided not to cut it into two 1x6s because they would practically be touching each other anyways. We did not put wheels on the bottom either, as it is going on a shelf in our laundry room.