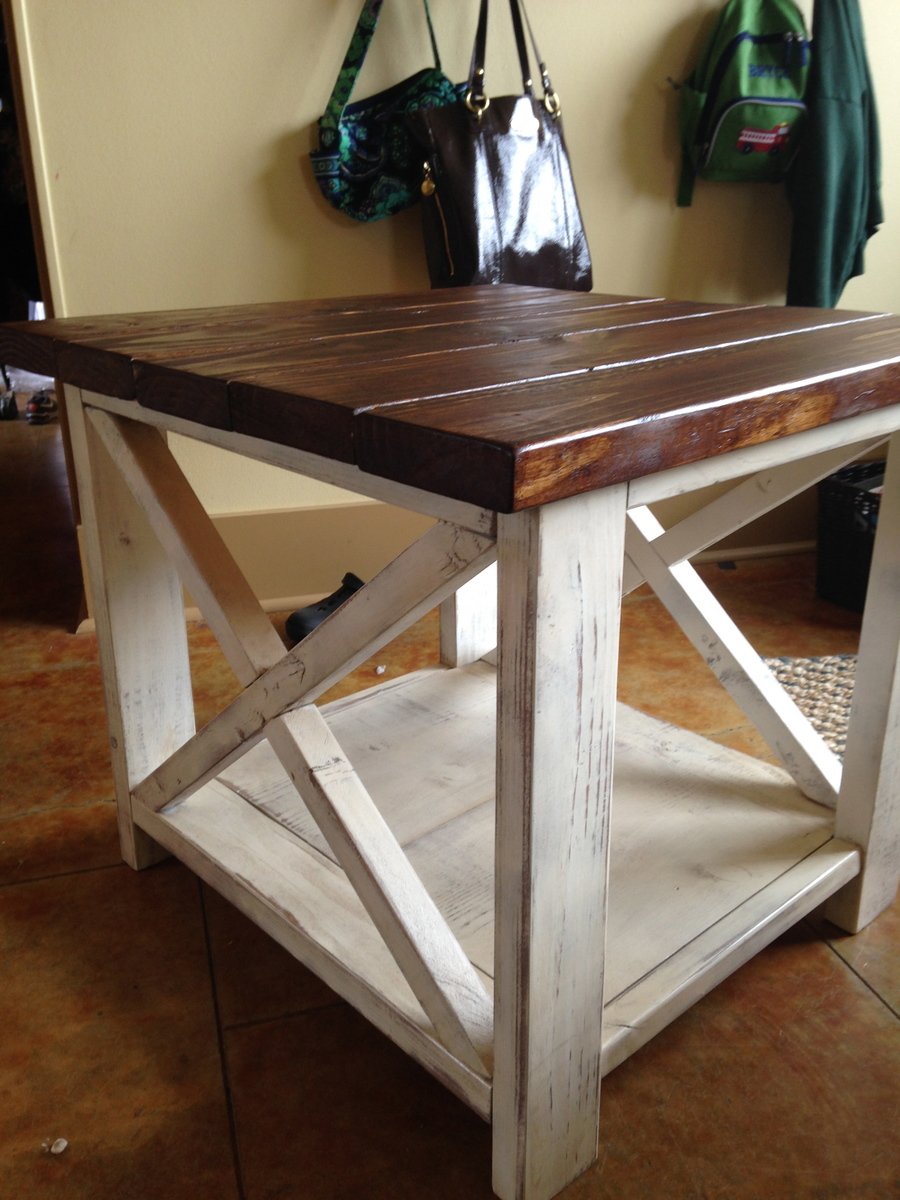
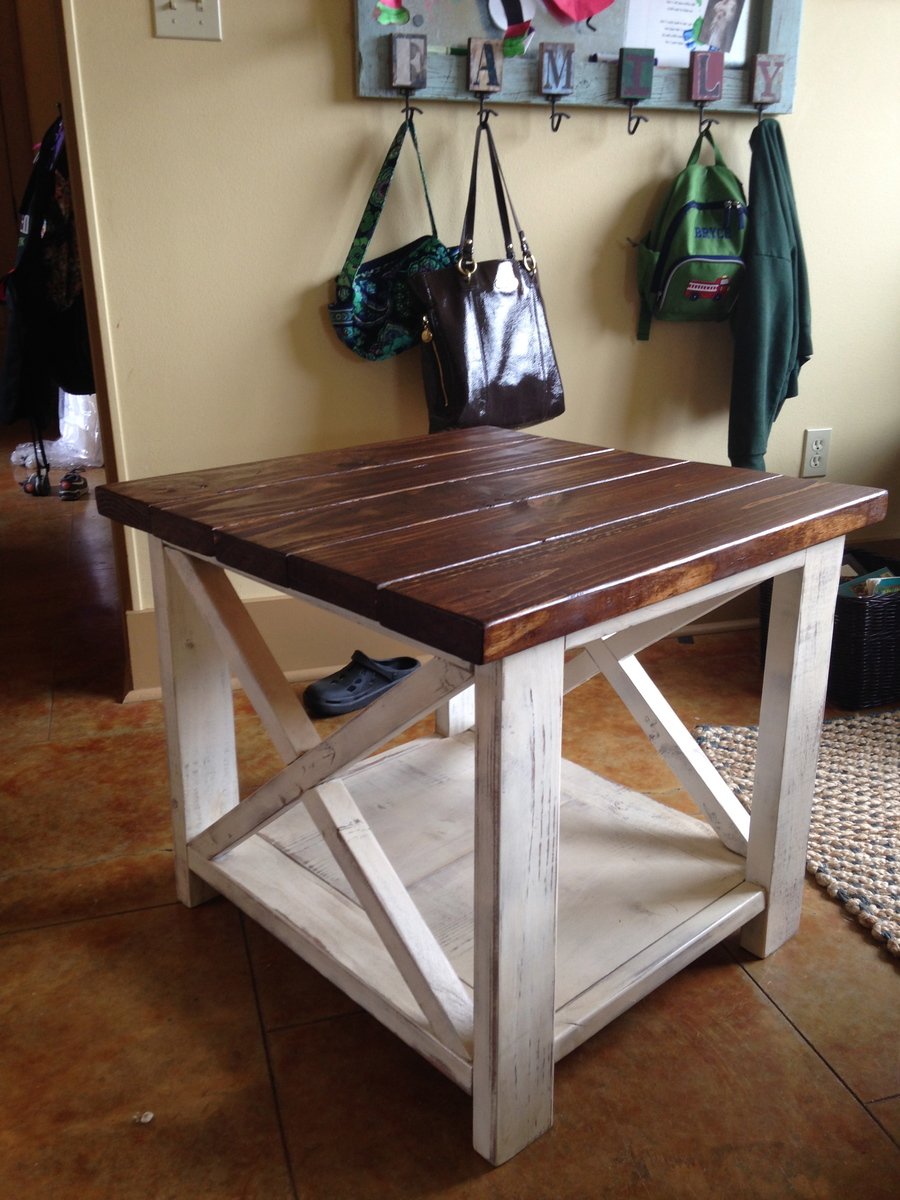
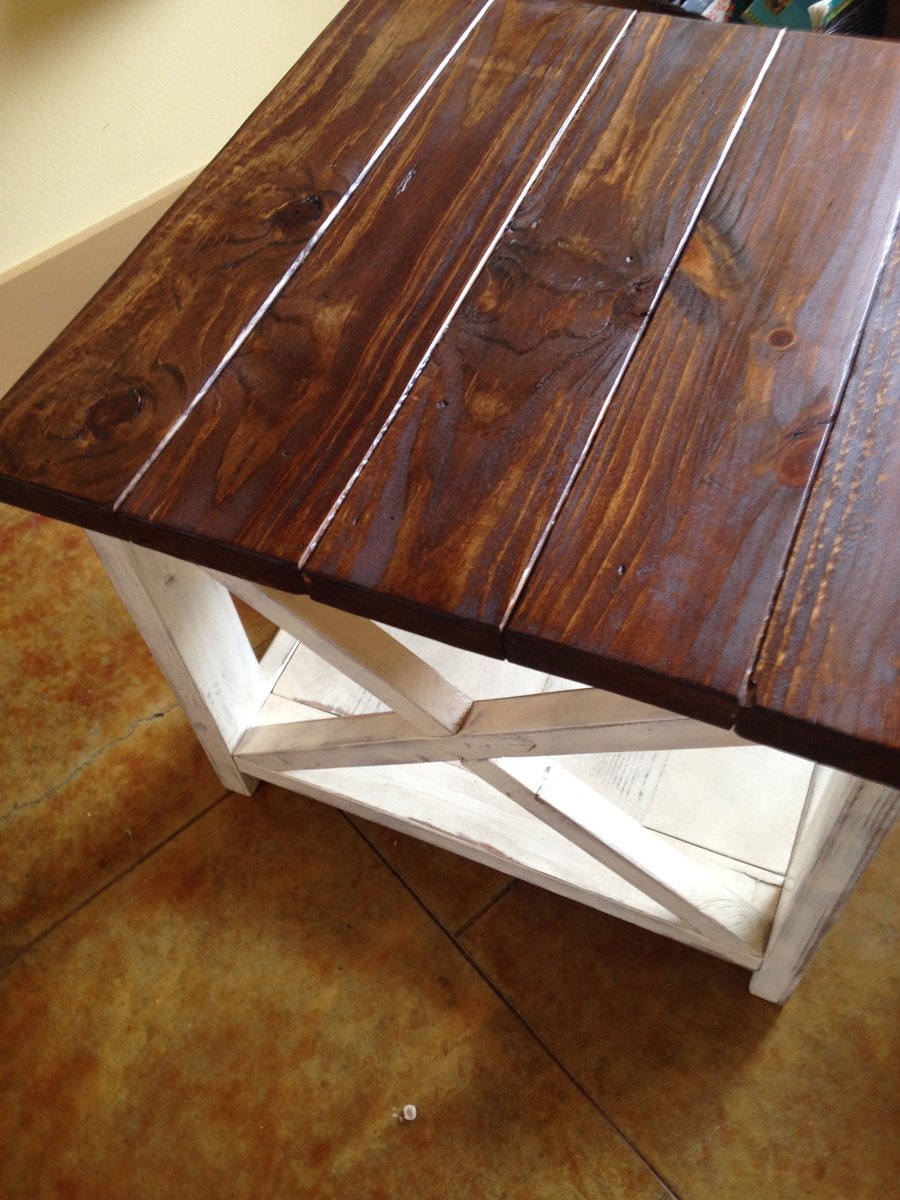
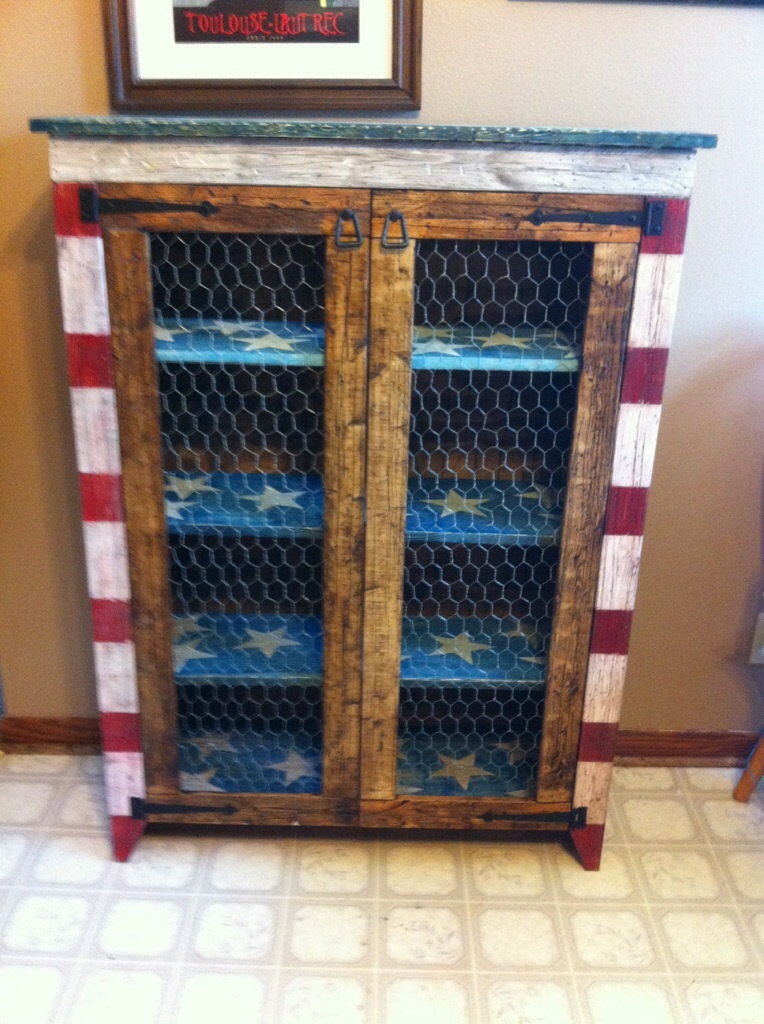
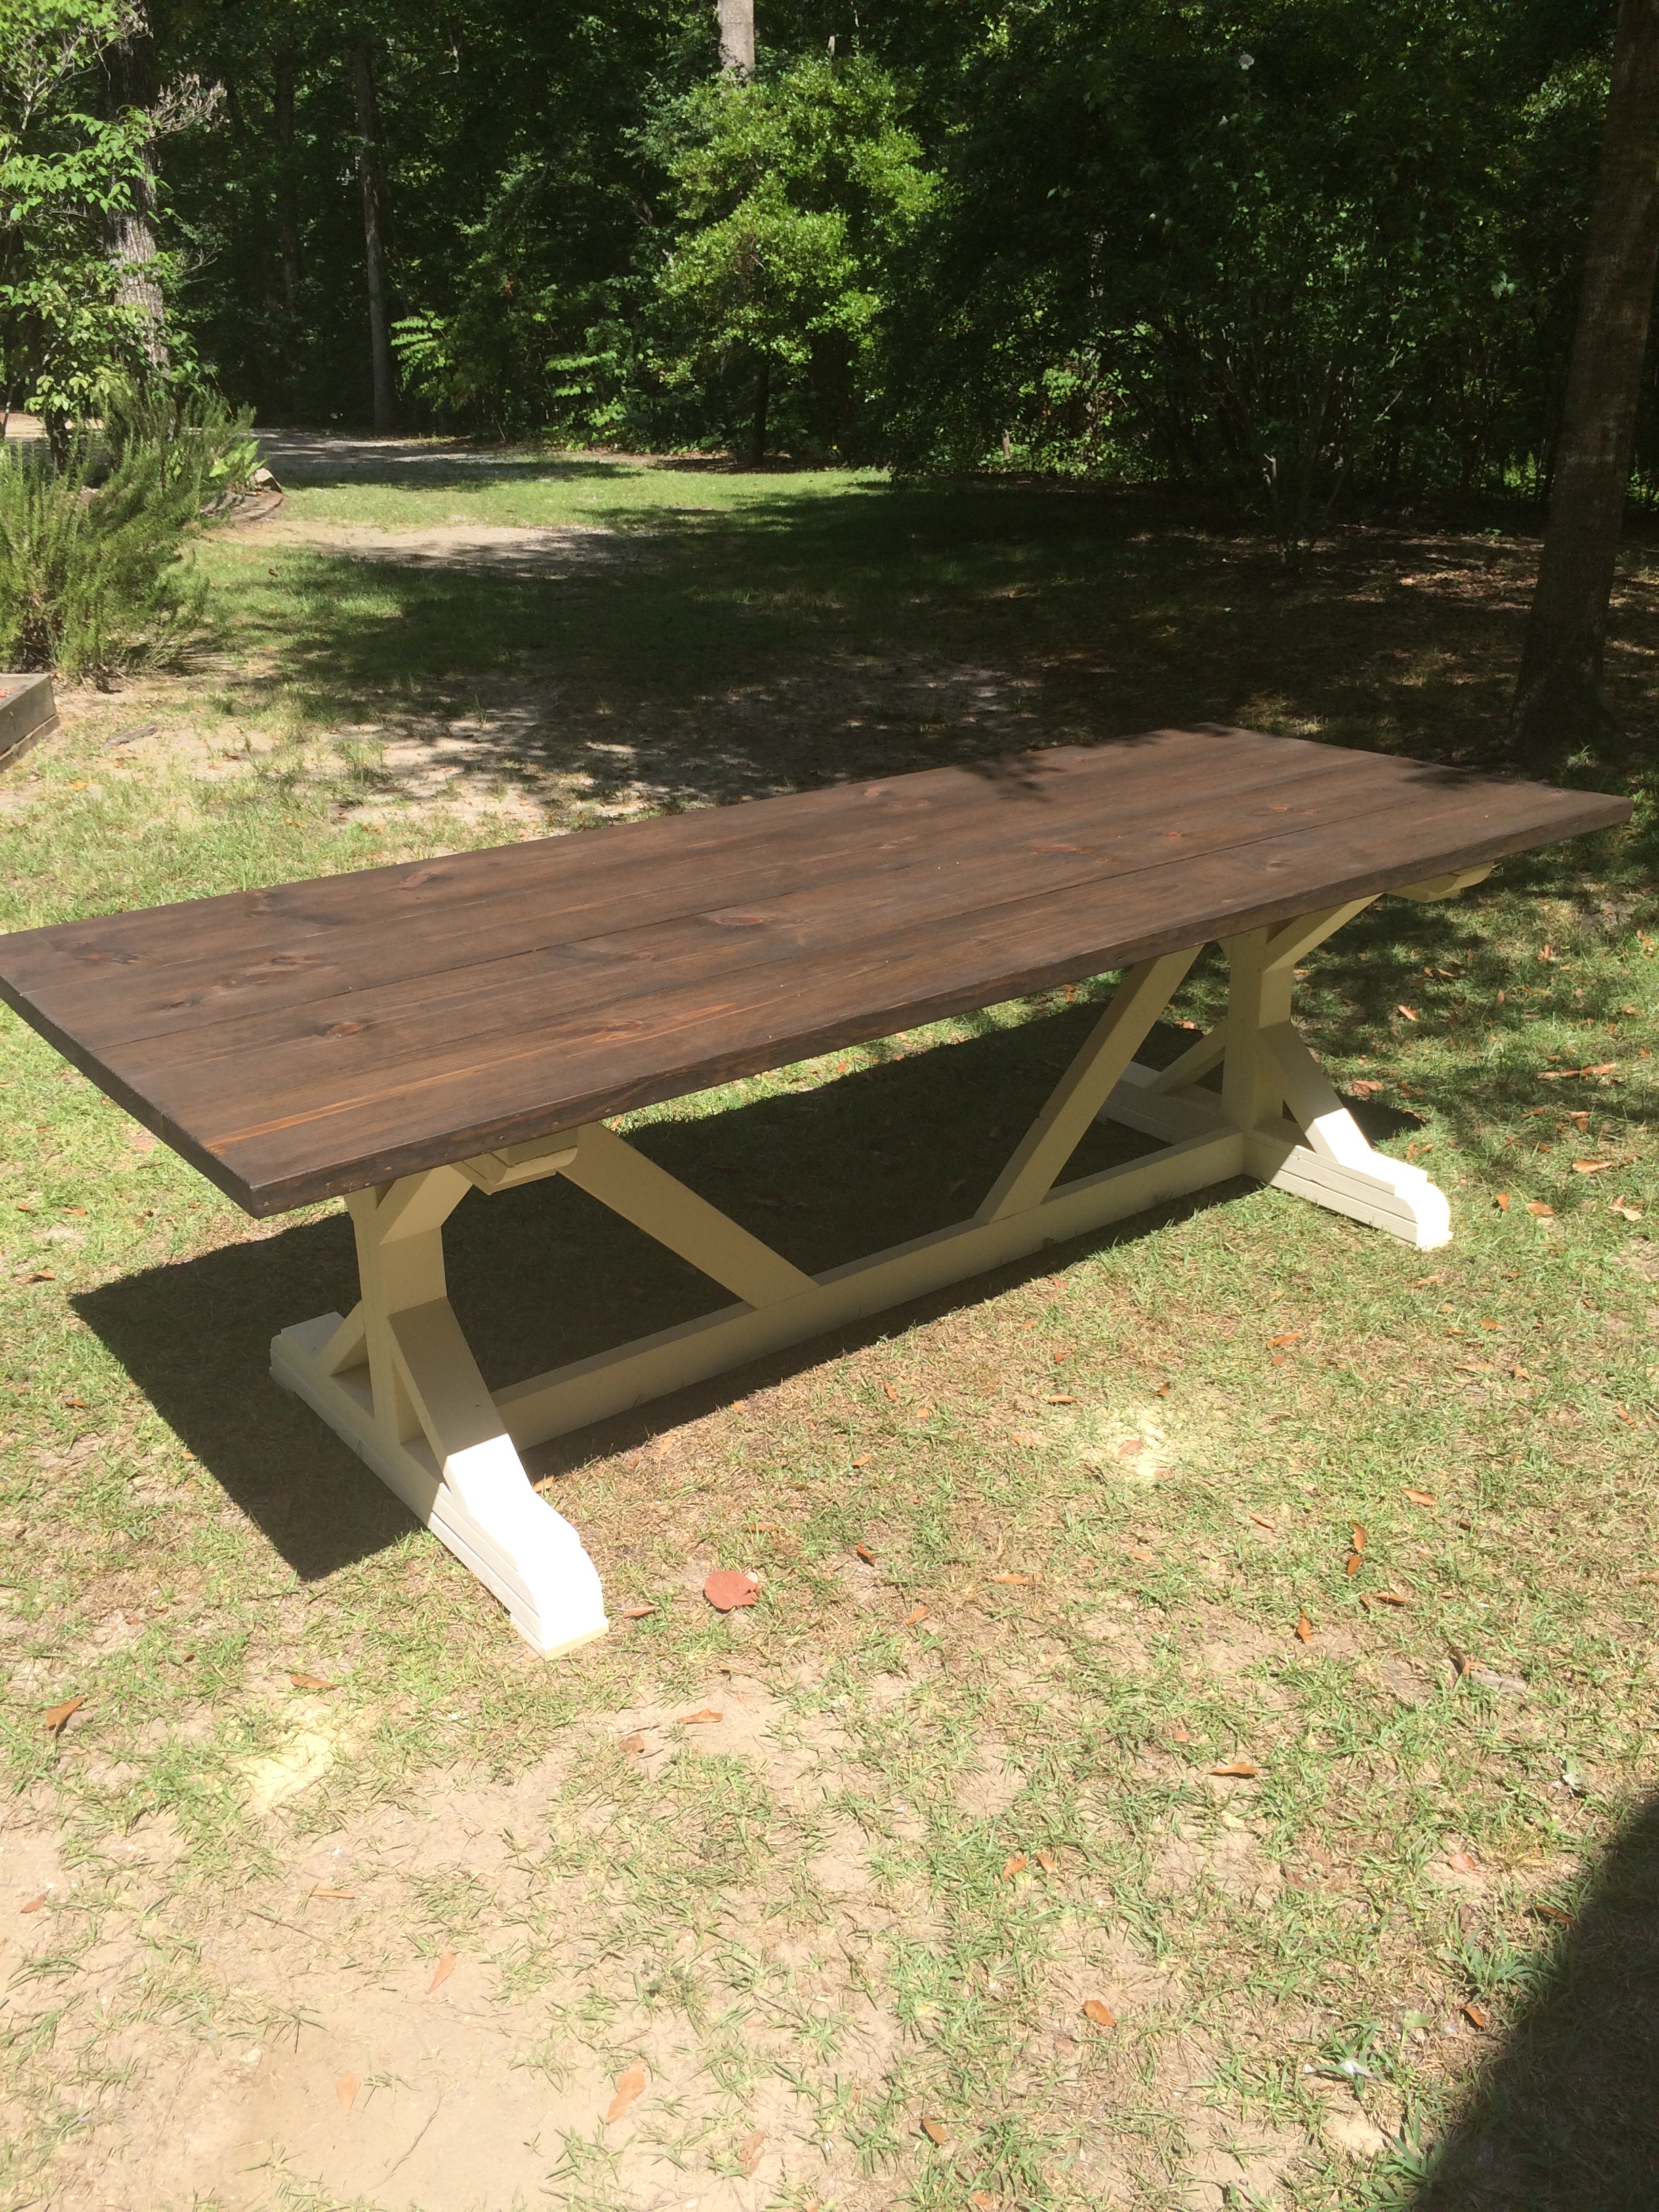
Community Brag Posts

Big Crate Shoe Box (A Test in Bri-wax)

Submitted by Joni on Fri, 07/13/2012 - 11:03

I needed a large box to use at the base of my stairs for shoe storage, so this is it! I made 2 compartments, and put handles on the side for easy moving. Being solid wood, this thing is heavy and a lot larger than it looks.

I wanted to do Bri-wax as a test on a smaller project before possibly messing up a larger one. Bri-wax advised me to wait a week to let the stain 'cure' prior to using the product. The stain was beautiful prior to using Bri-wax, but didn't look nearly as good when the wax took off some of the stain and kind of changed the color. I love the look of the Bri-wax finish, but probably won't be using it again (unless the finish has been cured for a long time). Bri-wax also told me not to use it over varnish or poly, as it would damage that surface. I would be interested in hearing from you guys who have used it successfully on top of other finishes.

Finish Used
Mixture of Minwax Water-based stain in American Walnut & Ebony, followed by Bri-Wax in Light Brown and Tudor Brown (3 coats)
Recommended Skill Level
Beginner

Comments

American Herit…

Sat, 07/14/2012 - 21:00

Hello Joni,
I've used Briwax over a clear, satin poly finish without any damage, though typically, I apply a 100% Briwax finish on the majority of my pieces as I prefer the natural finish and find it's complimentary to the reclaimed wood I use.
Simply a personal preference.
Looking at your other projects want to commend you on your table too. Nice color distinction and accents. Very nice!

Mike

Ladder Tote Storage

Submitted by Anonymous (not verified) on Thu, 02/15/2024 - 10:21

storage for totes - can be made to accommodate any size totes - just adjust the measurements basically it is "ladders " 2x4s for legs 2x2s for "runs" 2x4s across the bottom & top this is in a basement with short ceilings so if you have a taller space you can go taller or you can go shorter.

Best Chairs Ever!

Submitted by Anonymous (not verified) on Tue, 06/09/2020 - 18:16

I made these modern Adirondack chairs for our business in Anchorage. GREAT and easy to build design by Ana - we upgraded the arms to tapered 2x6 and they're awesome!

Mobile Workbench with Drawers

Submitted by Anonymous (not verified) on Fri, 03/22/2024 - 08:08

I recently had a workshop built and I have been trying to now work on the furniture for it. My first project was this workbench inspired by the plans "garage workshop workbench". I added drawers on each side and will probably end up adding a shelf in the open area as well after letting my kids finish decorating the top. It's already a nice addition and I may build a smaller version for my garage. I added casters and have the option to roll the table around or have it stationary.

Tonie

Laundry Pedestal

Submitted by Kamoanui on Tue, 06/30/2020 - 09:42

This was quick build. First time for us using trim, so we wasted a few feet getting the angles right. We attached the legs directly to the frame, and did not use the metal brackets. We also did not build the floor frame. We measured how high/wide the laundry baskets ($3/piece at Target!) were, and made it to fit them. We added a piece of rubber mat to the top (bought at Lowe's). A few weeks later we helped our daughter and son in law build one for their new house!

Estimated Cost
$40
Estimated Time Investment
Afternoon Project (3-6 Hours)
Finish Used
White satin paint
Recommended Skill Level
Beginner

Laundry Room Storage and Organization

Submitted by Anonymous (not verified) on Thu, 06/20/2024 - 10:33

When looking for ideas/plans for designing my mudroom I came across Ana’s plans for the bench with drawers. I’ve NEVER built anything like it, or cabinetry, or anything like that type of stuff, but with her videos and plans I was able to design my own layout and make it all completely by hand and by myself. I’m in love with how it turned out!! Her designs/plans are so easy to follow and customize!! I can’t wait to do more in my house.

Mikishea Mauss on Facebook

Built from Plan(s)

Puppet theater

Submitted by petera on Fri, 12/28/2012 - 12:03

I was able to use the lemonade stand plans for GRACE'S TOWN to make a puppet theater for my kids.

Estimated Cost
$50
Estimated Time Investment
Weekend Project (10-20 Hours)
Finish Used
Minwax golden oak stain
Recommended Skill Level
Beginner

Two-tone Large Cube Shelf

Submitted by Anonymous (not verified) on Tue, 02/21/2017 - 09:43

Large cube shelf made to fit 13" cubes or milk crates, for my two and a half year old son. For the larger cubes, I added 2" to the measurements for each cube, so 6" to the horizontal and 4" to the vertical measurements. Total shelf measures 46.5" wide by 35" high by 13.5" deep.

Built from Plan(s)
Estimated Cost
$75
Estimated Time Investment
Day Project (6-9 Hours)
Finish Used
Body: white latex primer, two parts paint to one part water.
Trim: special walnut stain
Everything: Minwax Paste Wax
Recommended Skill Level
Intermediate

Adirondack chairs

Submitted by Anonymous (not verified) on Sun, 01/17/2021 - 18:39

Thanks for the awesome plans Anna! God bless.

Eddie Jimenez

Comments

Seasonal And Holiday

Floating bench for entryway alcove

Submitted by msantos116 on Tue, 02/23/2021 - 11:20

I was looking for some inspiration to clean up our small entryway room in our Cape Cod style home in Worcester, Massachusetts that was typically used for recycling and dirty shoes. These plans were very easy to follow and really spruced up the room quite a bit.

I used standard pine 2x4's for the frame and 1 inch boards for the bench platform and upper shelf features. The platform consists of four boards (3 1x6 boards and 1 1x5 board) that were glued together and sanded down. This was finished with Minwax Colonial Maple stain (a few coats), a couple coats of satin polyurethane, and then sanded down for a nice smooth finish.

I used a couple of 2x4's behind the vertical face below the shelf, giving it some depth and better stability.

Cast iron hooks were found on etsy, ebay, and Amazon.

Estimated Cost
$75-$100
Estimated Time Investment
Weekend Project (10-20 Hours)
Finish Used
Minwax Colonial Maple stain
Minwax satin polyurethane
Automotive turtle wax for a smooth shine
Recommended Skill Level
Beginner

Outdoor 2x4 Sofas

Submitted by Anonymous (not verified) on Mon, 04/24/2017 - 07:11

Super simple build! Thanks for the plans!

Built from Plan(s)
Estimated Cost
$120 for wood (per sofa), $12 for screws, $25 for water seal, $150 for cushions (per sofa)
Estimated Time Investment
Day Project (6-9 Hours)
Finish Used
Sanded with 120-grit sandpaper, two coats of Thompson's Water Seal (transparent).
Recommended Skill Level
Beginner

Comments

Farmhouse Dining Set

Submitted by Nor7 on Wed, 03/18/2015 - 10:22

This was a bit more work than I anticipated but I think it turned out great. The quoted buy list was a little off so I had to make an additional trip to the hardware store.

I used the Fancy X Table plan and the Fancy X Bench plan to make this set. Since I wanted it only 6' long I had to do some modification to the plan but not much.

I also designed the table top into two pieces that fastened together through the center piece so I could take it apart easily and fit it though a standard door.

Estimated Cost
$120 (since there were two benches and the table). I found the wood in my area to be a little more expensive than quoted on the plan. Particularly the 2x10's.
Estimated Time Investment
Week Long Project (20 Hours or More)
Finish Used
MinWax - Dark Walnut. To get the finish even I had to invest ALOT of time into sanding. I had to use 60 grit in some spots to even out the factory cuts but most of it I was able to go over with just 220 grit. DON'T FORGET TO SAND THE ENDS!
Recommended Skill Level
Intermediate

Comments

MrCoffee

Wed, 03/18/2015 - 13:35

Wow, this table and bench set came out awesome. I love the finish. What you ended up creating having only spent $120 is incredible when you think about how much these things cost in a furniture store. Good work.

Wine oak barrel Adirondack chair

Submitted by Medickep on Thu, 05/30/2013 - 12:11

I got some oak barrels from a local vineyard and decided to try making some adirondack chairs. It was harder than I thought it would be, but well worth it!! The stain was a little darker than I thought it be, but it's rubbing off on me!

predrill, predrill, predrill, and learned a valuable lesson in predrilling, as solid wood under strain cracks easy when using 2 1/2" deck screws!

I need to whip out the nice camera and stop using my cell phone for finished products!

Estimated Cost
Around 100.00 dollars per chair (depends on cost of barrel!)
Estimated Time Investment
Weekend Project (10-20 Hours)
Finish Used
I used Cabot's Australian timber oil. Not the cheapest product out there, but they actually recommend one coat only and no sanding necessary for future coats. Once it stops beading water, just clean the chair and than reapply! It penetrates deep and forms a wax protective layer that repels water! This is why I chose not to varnish the item!!
Recommended Skill Level
Intermediate

Comments

spiceylg

Fri, 05/31/2013 - 05:16

I never heard of using wine barrels in this way! I love it. It came out fabulous!

Medickep

Fri, 05/31/2013 - 05:34

Thanks you. People make a lot of stuff out of wine barrels. Chairs, stools, Tables, candle holders, and even serving platters!

Joni

Fri, 05/31/2013 - 06:57

This is awesome! Very cool design. It looks very comfortable! Thanks for the tip on the Australian timber oil; I never knew what would be the best finish for an outdoor piece.

Joni

Fri, 05/31/2013 - 07:03

This is awesome! Very cool design. It looks very comfortable! Thanks for the tip on the Australian timber oil; I never knew what would be the best finish for an outdoor piece.

Medickep

Sat, 06/01/2013 - 11:38

It is very comfortable, especially with a glass of wine. I chose the finisher I did because I live in Oregon with a lot of rain!!

Why does everyone's post, including my own show up as duplicate?

Medickep

Sat, 06/01/2013 - 11:38

It is very comfortable, especially with a glass of wine. I chose the finisher I did because I live in Oregon with a lot of rain!!

Why does everyone's post, including my own show up as duplicate?

acd4476

Sun, 07/21/2013 - 17:05

Awesome chairs! Beginning to think I need to make some as well. Did you have plans for this project or follow a generic adirondack chair plan?

Foldable Farmhouse Rustic Dining Table

My wife wanted a portable farmhouse style rustic dining table that she could take to photoshoots and other events. I started with a top made with 2x6s and make the legs with 4x4s and the rest with 2x4s. Stain is dark walnut with a clear coat on top.

The legs are attached with door hinges and can fold into the top for more portable use. There is also a board that can be inserted in the bottom slots so that when in use the legs can not fold in.

So far the rustic dining table is working out great, although this table is VERY HEAVY and needs 2-3 strong people to carry it around. I have also made a lighter version using 1x6 tops and all 2x4 frame and legs.

Photos courtesy of Jennifer Blair Photography Designed by Amber Veatch Designs

Estimated Cost
150.00
Estimated Time Investment
Weekend Project (10-20 Hours)
Finish Used
Miniwax Dark Walnut
Recommended Skill Level
Intermediate

Comments

Juanita_r

Wed, 06/12/2013 - 04:15

Oh I really hope that you are able to put these modified plans up!!! A foldable farmhouse table.... what will they think of next!

Unicorn1960

Sat, 10/22/2016 - 17:21

I cannot find the plans for the tiny house drawers any where.  Can someone please point me in the right direction.  Thank you! 

Channing Bookcase

Submitted by FrankJr on Sun, 06/28/2015 - 13:42

We needed a bookcase to fill a void in our living room and this was it. I altered the dimensions to increase the height to 72.5". I also added crown molding to the top which turned out nice. I used the same Bombay mahogany stain suggested by a previous post.

Built from Plan(s)
Estimated Cost
$150
Estimated Time Investment
Weekend Project (10-20 Hours)
Recommended Skill Level
Beginner

Super Hero House

Submitted by carongirls on Sun, 08/11/2013 - 13:48

This was hard for me because I am horrible at using the jigsaw. If I do another one I'll probably not do as many door openings.
It took longer than expected due to filling in all the pocket holes an waiting for the wood filler to dry.
My grandson loves it, he didn't care about my mistakes on it.

Built from Plan(s)
Estimated Time Investment
Weekend Project (10-20 Hours)
Finish Used
None
Recommended Skill Level
Beginner

Ladder shelf

Submitted by mltdblack on Tue, 10/16/2018 - 19:58

My kids desperately needed storage for their bathroom. The vanity is separate from their toilet and tub/shower. They were always forgetting to grab a towel before bath time. When I saw the wooden ladder shelf I thought it was perfect for the space. The only problem I had was figuring out the angle and height to place the supports on the front legs. With the help of my husband and a level it was a breeze. Once again it took longer for me to apply the finish than it did to build. 

Built from Plan(s)
Estimated Cost
Not real sure. I had most of the lumber on hand.
Estimated Time Investment
Weekend Project (10-20 Hours)
Finish Used
Rust oleum Dark Walnut
Recommended Skill Level
Intermediate

5 Board Bench

Submitted by truckrun on Tue, 09/17/2013 - 20:50

I was looking for a plan for a 5 board bench so naturally I came to your site. I made your basic design but made it a little bit smaller in all dimensions and I put a half inch split down the middle of the top. I built it out of pine and painted it flat black. I gave the legs and underneath 3 coats of satin polyurethane and the top and sides received 5.

You can follow the build on my blog at :
http://funwithwoodworkingtoo.blogspot.com/2013/09/project-how-to-build-…

You can also watch a video of the build on my YouTube page at:
http://youtu.be/1_hz2n7v9ss

Thanks for the free plans!

Estimated Time Investment
Day Project (6-9 Hours)
Finish Used
MINWAX water based satin polyurethane
Recommended Skill Level
Beginner
Back