Community Brag Posts

Living Room Wall Makeover

Submitted by djolly1231 on Sun, 05/30/2021 - 10:36

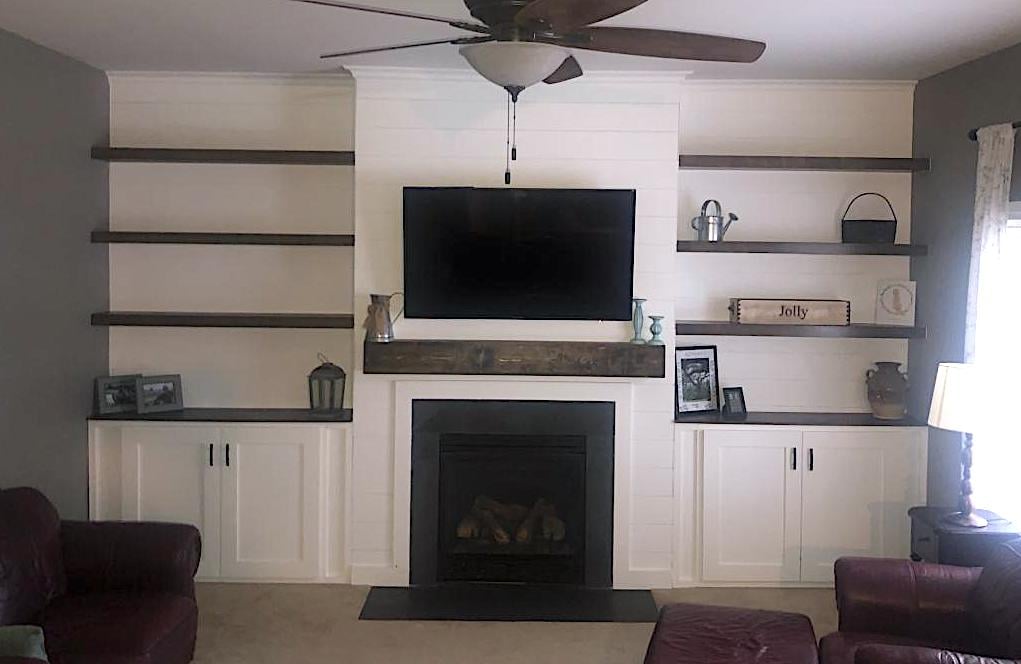
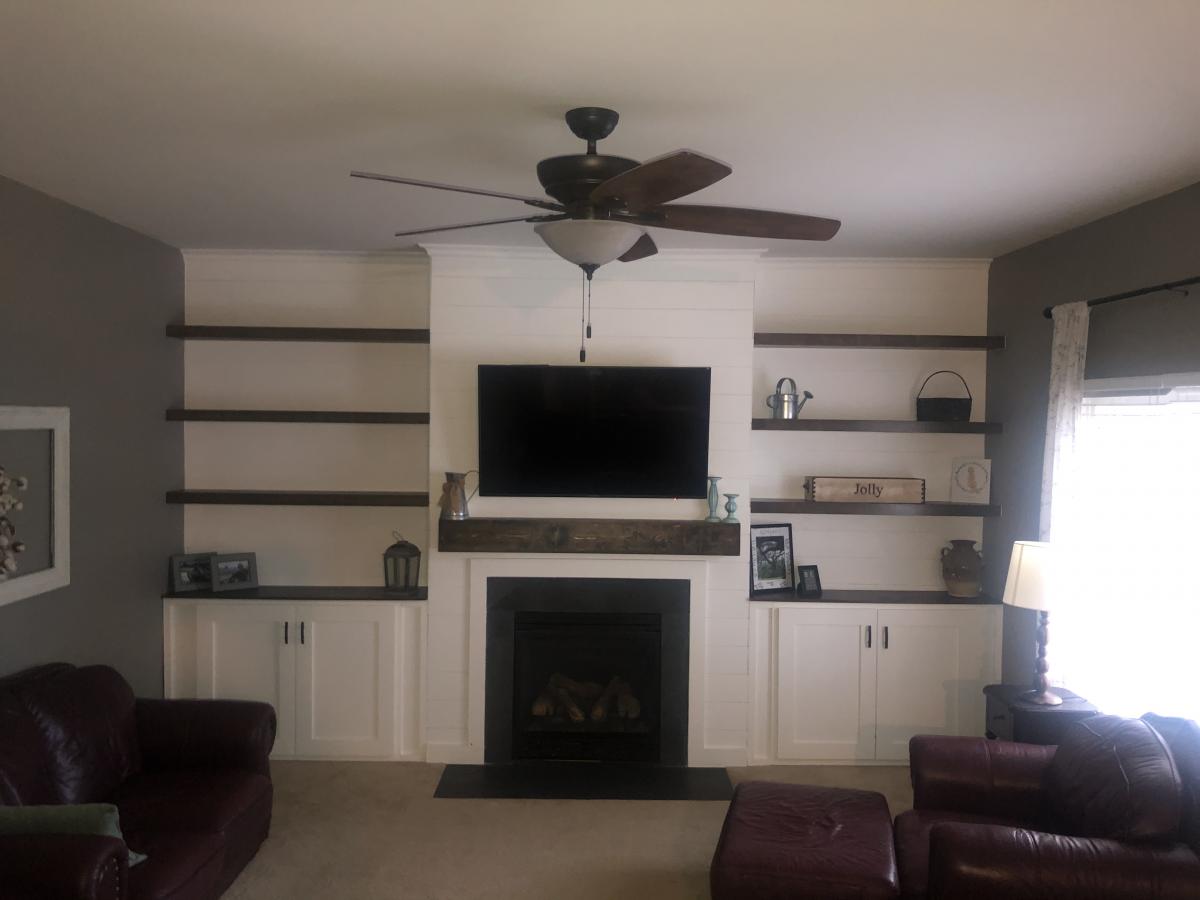
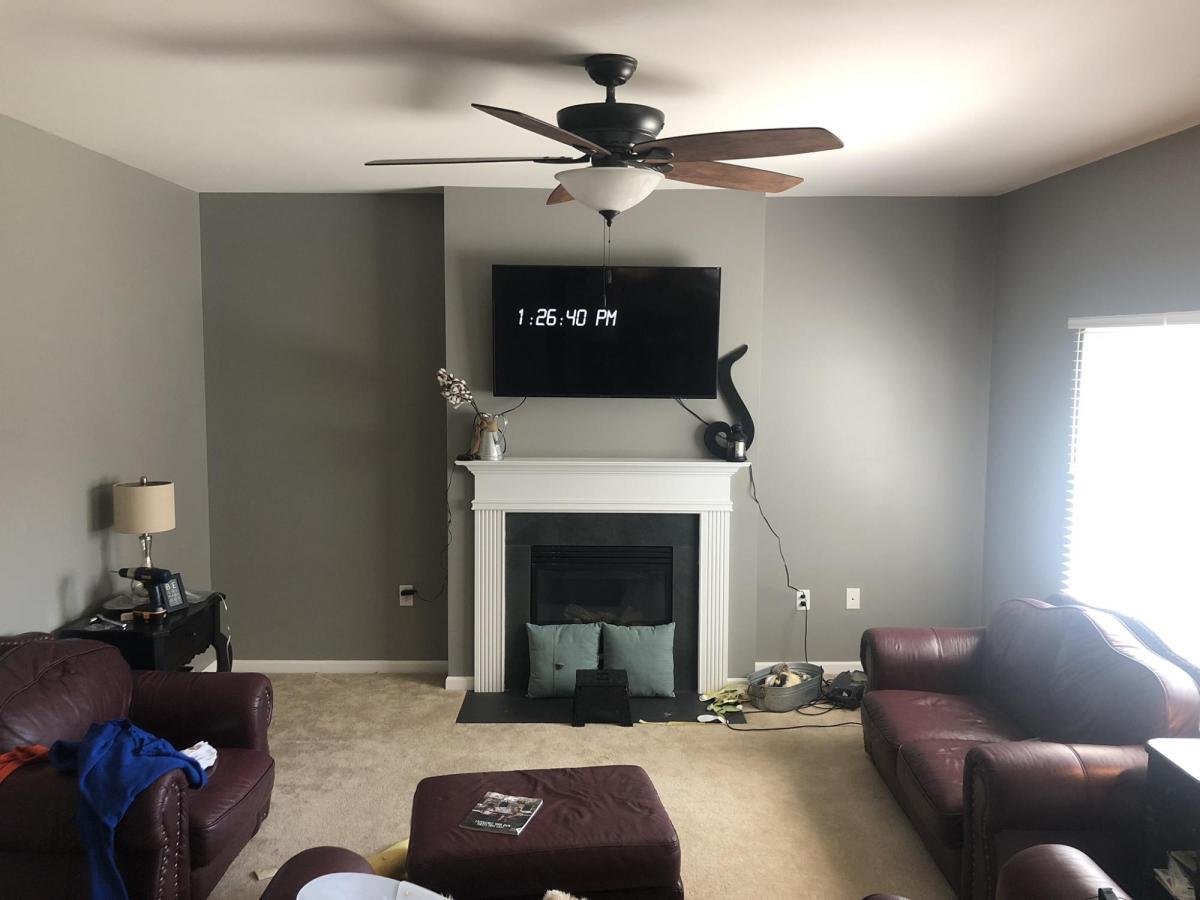
We have lived in our home for 2 yrs now and have been trying to figure out what we wanted to do with the plain boring wall with cords handing from out behind the tv due to no power outlet on that wall. We finally decided to do the whole wall in shiplap but the the cost of lumber going through the roof I went with 1/4 underlayment that I had ripped down to 6in strips at my local hardware store. I cut them down to size with my miter saw the painted them white before I attached them to the wall with 1 1/4 brad nails and used nickels for my space in between each row. The cabinets are 36 in tall. The carcass is made fro 3/4 in MDF and the face frames are made from 1x3 pine and attached with wood glue and brad nails. Cabinet doors are made from 1x4 pine for the frame and 1/4 underlayment for the center. I used my hand router to route out a 1/4 deep groove for the center to drop into the frame I used wood glue and brad nails to attach it to the frame and filled in any gaps with paintable caulk. They are attached to the studs in the wall with 3 in wood screws. The mantle is made from 1x6 pine boards and attached to a wall bracket made from 1x6 that are attached to the wall in each stud with 3 in wood screws. The mantle is attached with wood glue and 1 1/4 brad nails. The shelves were made out of 1/2 Poplar 4x8 plywood sheet ripped down to size. The wall brackets are made from 1x2 pine attached to studs with 3 in wood screws. And the shelves are attached with wood glue and 1 1/4 brad nails. I added 3 1x2 spacers to each shelf between the top and bottom board to prevent them from sagging before attaching the face of the shelves with wood glue and 1 1/4 in brad nails. This project took about a month to complete because I worked on it during free time. Also this was the first major build I have ever done so I was also learning along the way. Some parts were frustrating but most of it was fun and a great learning experience. Also this project evolved as I was building it. My wife loves the finished product. Now it’s time to find my next project.

Estimated Cost
500
Estimated Time Investment
Week Long Project (20 Hours or More)
Finish Used
Dark walnut stain. Valspar Ultra in eggshell and ultra white for the color of the cabinets , shiplap and crown
Recommended Skill Level
Intermediate

Comments

DIYGina

Tue, 12/05/2023 - 11:47

Surprisingly makes your living room appear so much larger compared to the before picture! Thank you for sharing your photos with us and congrats on a great result!

Cedar Fence Picket Planter

Submitted by MMTruncale on Sun, 04/07/2013 - 18:31

I'm still getting to know my Compound Miter Saw, so I wanted to get another small project under my belt. Not to mention I had a whole other picket and a half left over from yesterday's project. This just seem to be the perfect project to do. And needed since we actually needed a few more planters.

Estimated Cost
$1
Estimated Time Investment
An Hour or Two (0-2 Hours)
Finish Used
Left it natural.
Recommended Skill Level
Starter Project

Flip Top Storage Bench

Submitted by rherlein on Sun, 02/22/2015 - 10:22

This was very easy but was still one of my favorite builds.  I used oak for the bench top and poplar for the rest.  I used the pocket hole jig and gorilla wood glue and it is incredibly rigid and sturdy.  I changed the height to 24 inches so I could raise the shelf platform up to 10 inches from the floor.  This allowed me to place shoes under and on the shelf.  I stained with polyshades mission oak and added an additional coat of satin polyurethane.

Estimated Cost
$80-$100
Estimated Time Investment
Afternoon Project (3-6 Hours)
Finish Used
Minwax Polyshades- Mission Oak / Minwax Satin Polyurethane
Recommended Skill Level
Beginner

Armless Patio sectional

Submitted by Anonymous (not verified) on Mon, 05/22/2017 - 17:25

I made this for my outside patio but since completing the project, it's been raining. So, it's inside the screen porch for the time being.


Estimated Cost
$60 for wooden chairs $240 for cushions
Estimated Time Investment
Week Long Project (20 Hours or More)
Finish Used
Semi transparent stain
Recommended Skill Level
Beginner

Rustic Display End Tables

Submitted by Anonymous (not verified) on Sun, 06/06/2021 - 18:09

These rustic display end tables were built using the “Rustic X End Table” plan, with an added twist! The fronts and two sides are all glass enclosed with barn wood backdrop and bottom.

Built from Plan(s)
Estimated Time Investment
Weekend Project (10-20 Hours)
Finish Used
Minwax Classic Gray with Polycrilic Clearcoat
Recommended Skill Level
Intermediate

Rhyan coffee table with our own twist

Took us about 2 weeks from start to finish but we could only work on it about an hour a day. We also had some issues with the stain. We were going for an aged look and weren't happy with the colors so we layered different stains till we were happy. Hardware is from Martha Stewart. Over all, the table wasn't that hard, but I would definitely advise measuring and cutting as you go, because of all the drawers, the slightest mis-measurement can put the whole thing off. You can see better pics at facebook.com/oldsouldesigns. Absolutely love the end result and so do our customers!

Built from Plan(s)
Estimated Cost
$100
Estimated Time Investment
Weekend Project (10-20 Hours)
Finish Used
Miwax provincial, covered with minwax sun bleached, and topped with a natural reddish stain (can't remember)
Recommended Skill Level
Intermediate

Comments

Farmhouse Table

Submitted by Anonymous (not verified) on Thu, 05/25/2017 - 19:12

I've been needing a patio table for some time and this fit what I needed. Ready for next project!


Estimated Cost
$125
Estimated Time Investment
Week Long Project (20 Hours or More)
Finish Used
Minwax espresso finish
Behr hemisphere blue
Polyurethane
Recommended Skill Level
Intermediate

Doll crib

Submitted by DWolf on Sat, 04/13/2013 - 15:46

After building the playhouse loft bed recently, I whipped up the fancy doll crib for my daughter. My mother made a beautiful pillow and quilt to match the one of my daughter's bed.

Built from Plan(s)
Estimated Cost
$13
Estimated Time Investment
Afternoon Project (3-6 Hours)
Finish Used
White all purpose paint
The tiny rails are a bit tricky to paint. A paint sprayer would definitely help!
Recommended Skill Level
Beginner

Growth Chart Ruler

Submitted by pde00311 on Mon, 03/02/2015 - 07:40

I followed the instructions at 517 creations to make this: http://517creations.blogspot.com/2011/04/ruler-growth-chart-pottery-bar…. It was relatively quick and easy project that I made to chart my daughter's growth on her second birthday (and our little ones' future birthdays). I printed the numbers off my computer, made an indent with ball point-pen and then traced with a paint marker. It took a little patience and concentration, but I drew the lines and numbers without barely making a smudge.  

Built from Plan(s)
Estimated Cost
$20
Estimated Time Investment
Afternoon Project (3-6 Hours)
Finish Used
Minwax Ipswich Pine with Minwax Polyurethane
Recommended Skill Level
Beginner

Comments

Fun father son project

Submitted by Anonymous (not verified) on Mon, 05/29/2017 - 16:01

Plans make this a fairly easy project. Im looking forward to making a dresser to match as time allows. The bed ends up being a bit higher than i expected but still very happy with it. This made for a good 4 day father son build. 

Estimated Cost
750
Estimated Time Investment
Week Long Project (20 Hours or More)
Recommended Skill Level
Intermediate

Electronics workstation desk from RusticX plans

Submitted by Anonymous (not verified) on Sat, 06/19/2021 - 20:37

Base desk for workstation. Will probably add a "hutch" at some point.

Comments

X Rustic Coffee Table

Submitted by csmark on Sun, 04/14/2013 - 20:04

X rustic coffee table

Estimated Time Investment
Day Project (6-9 Hours)
Finish Used
Vinegar/Steel wool stain
Recommended Skill Level
Starter Project

Firetruck bedbunk ! Special thanks to Ana white and Jeff.

Submitted by Will-I-am on Tue, 03/03/2015 - 13:29

This Firetruck bed was made from the plans from Ana white !
We did some little modifications to it.
All sizes where changes to cm instead of inches (we live in the Netherlands, so no American sizes will do here, since all sizes are different.)

Al the electric is 12 volt, and everything works with the key.
Put away the key, and there will be no electricity... :)

it was a hard work (about 1,5 week) but its worth it.

The bed is made out of MDF. The structur inside is pine (so it can keep a big time of weigh)


Built from Plan(s)
Finish Used
Paint,
Recommended Skill Level
Intermediate

Comments

Narrower Farmhouse Table and Bench

Submitted by c-e-fogus on Wed, 04/17/2013 - 05:42

I made this to fit an empty wall in the kitchen. It's an additional work space not really an eating space. I made the table smaller 6ft. by 22.5 inches. I decided to use 2-1X11's for the top instead of smaller boards. I figured less boards to join left me less room for error! I measured my dimensions for the smaller table and then built a matching bench also. One thing I did different on these plans was that I used pocket holes underneath to attach almost all my boards so I wouldn't have any outside nail holes to fill. If you are planning on doing some building and don't have a Kregg Jig or similar tool I would definitely recommend one! I got a mini version and I've used it a ton already. Also if you are thinking about making this table I would consider using 1X4's or cutting down a 1X6 into a 4 or 5 to make the aprons a little smaller. There is not much leg room between the top of the bench and the apron of the table. Overall I loved this project.

Built from Plan(s)
Estimated Cost
$50 plus supplies
Estimated Time Investment
Weekend Project (10-20 Hours)
Finish Used
Minwax Golden Pecan stain. It brought out beautiful yellow tones in the wood I didn't know were there. I finished it with 3 coats of Minwax Clear Satin Polyurethane with a light sanding with 220 sandpaper between coats.
Recommended Skill Level
Beginner

Comments

Laqrry St Croix

Mon, 12/21/2015 - 07:06

for the information on the apron. I have been looking at this plan and apron depth was a concern. Now I know.

Rustic Book Shelf

Submitted by mtairymd on Sat, 03/07/2015 - 13:52

This is a matching book shelf to the 55-fancy-x-desk.

Build Instructions:

http://www.instructables.com/id/Rustic-Book-Shelf-or-TV-stand/

Estimated Cost
$50
Estimated Time Investment
Weekend Project (10-20 Hours)
Finish Used
PolyShades Classic Black Satin Stain and Polyurethane from Minwax
Recommended Skill Level
Beginner

Comments

Modified to Personalize

Submitted by Anonymous (not verified) on Mon, 06/05/2017 - 09:29

I probably took this project on at a bad time (final semester of college, planning to move for my first job, and getting married) but this was my wedding present to my wife. I modified the plans and made everything (except for the drawer boxes) out of white oak cut from my father in law's farm. The headboard, footboard, and drawer faces are edge glued planks. I made the corner posts by gluing 2x4s together (actual dimension of the post is 3x3). I used threaded inserts to make it come apart into 4 pieces (headboard, footboard, and drawer boxes). This thing is HEAVY (the headboard alone probably weighs ~150lbs) I learned a lot during this project and these planse were a great guideline!

Estimated Time Investment
Week Long Project (20 Hours or More)
Finish Used
Minwax English Chestnut (233). I used a basic brush on polyurothane. Knowing what I know now, I would probably go back and use General Finishes. I used a combination of seal-a-cell and and Arm-R-Seal. I used that combo on a crib I build a few months ago and I am really happy with the look and durability of the finish.
Recommended Skill Level
Intermediate

Emerson Change Table

Submitted by Craig McC on Tue, 03/10/2015 - 12:07

This is my first wood project. Thanks Ana for the plan. My wife and I will enjoy the dresser.

Estimated Time Investment
Weekend Project (10-20 Hours)
Recommended Skill Level
Beginner

Comments

Farmhouse Desk

Submitted by MacandFab on Sun, 08/01/2021 - 04:49

My wife needed a desk to work at home from and nothing on the retail market interested us, so I offered to build one. I followed the plans for a Farmhouse Desk, but with a change for the top. I chose a pre-sanded 3/4" red oak top and trim to cover the plywood edges. We didn't want the lips or edges that may show up using the planned 1x6" planks. The desktop measures 31.5 x 71.5" which is large, but allows for a lot of work to be accomplished. I added a grommet hole for the wires and a 3 1/8" hole for a desktop outlet with 2 USB's, 1 USB-C and two regular outlets. I also added a 9-input power strip / surge protector on the underside of the desk that the desktop outlet plugs in to. So only the power strip plugs into the wall and everything is surge protected.

It took me 4 weeks and about 25 hours, as I made it around my work schedule and family life.

Built from Plan(s)
Estimated Cost
$250
Estimated Time Investment
Week Long Project (20 Hours or More)
Finish Used
Desktop: Minwax Espresso Stain

Base: Valspar All-weather White Solid Exterior Stain
Recommended Skill Level
Beginner

Comments

4x4 truss beam table concrete top with benches

Submitted by upnarms on Sat, 03/14/2015 - 12:20

Douglas Fir 4x4 truss beam table, made from the listed plans (modified for a 72" table top and concrete used for the top).  Also, added steal gusset plates with lag bolts to replicate appearance of exposed truss beams.  Used pocket screws in conjunction with lag bolts.  Benches were altered with half-lap joints for strength (very time consuming).  Concrete table top made with Quikrete countertop mix (charcoal powder pigment added), an aluminum "M" inlay, and slurry coated with a lighter gray grout to fill in bugholes/ voids.


Table was fairly easy- hard part was finding straight wood (mostly green DF is sold near me, so some beams would warp beyond suitability as they dried).  I had to purchase a few extras to get the pieces correct.  If KD is available, go with that.  I was able to find KD DF at another hardware store for the benches.


Concrete was a PITA.  I never worked with concrete before. Watched a million youtube videos, read countless blogs, etc.  So much good info out there and I probably over-researched it.  I despise concrete, now (the mixing/ pouring/ screeding/ and weight) but I LOVE the result.


The project was my secret excuse to buy tools Ive always wanted.


If I wouldve been able to work straight through, I think I couldve completed this in a month.  The table and benches were a couple of weekends worth.  The concrete took most of my time with making melamine molds, special ordering the bags, renting the mixer, waiting it to cure, polishing and filling the top, etc.  A wood top wouldve cut down on the overall time considerably.


If you do a wood top (as I did for my benches), either use some type of joiner to get the board edges perfectly squared against one another with no gaps, OR leave gaps big enough between boards to let crumbs fall through, OR (this is what I did for my benches) I used a super clear (Lexel) caulk for the seams of the boards and then went over it after it dried with the satin polycrylic to take away any gloss.  Now all those crumbs dont get wedged between the boards.  They wipe away with ease.


Finally, I used heavy duty felt (4x6") from the local HD at $2.50 a pair.  Cut them to size and used the self-adhesive WITH gel superglue to put on bottom of bench and table legs.  A must.

Estimated Cost
Materials-

DF beams for table- $70
DF wood for benches- $100
Concrete, pigment, grout, melamine form molds- $250
Misc hardware- $50
Stain and clear finish- $20

Custom steel gusset plates and aluminum inlay letter- $150
Concrete Mixer rental- $40

I purchased several tools for this, as I did not own them before. I know I will use them for several projects in the future, so to me it was well worth the investment. I was able to make the table and benches with tools for under $1200. Not bad, considering the table without benches is sold at a retailer for $3000. I obtained a better finished product, customized, with some nice new tools for less than half. Plus I got to learn A TON!

I bought the following tools:
Kreg HD jig
Sliding compound miter saw (12")
orbital polisher/ sander (7")
random orbit handheld sander (5")

The concrete added the extra expense of diamond polishing pads as well.
Estimated Time Investment
Week Long Project (20 Hours or More)
Finish Used
Minwax natural stain, Minwax Polycrylic satin. I used one coat of natural stain. I wanted it to be light, but finished. I love the way the natural finish came out. I wasn't going to put any clear on it, as I did not want any sheen. However, I have children and the wood wouldve been dirty by the second day. The Polycrylic satin was amazing. Not as shiny as I was afraid of. Much more forgiving than semi gloss or gloss. Three coats applied with foam brushes. Lay it on, dont brush it on to avoid bubbles. Go slow and smooth. Dries nice. I did 2 coats, then a very light sanding with 220, just to get rid of the roughness. One coat after that and done.
Recommended Skill Level
Intermediate

Comments

upnarms

Mon, 03/16/2015 - 10:57

The top was made from nearly 4 bags of counter top mix. I did create a lip by placing an insert in the mold, taking out a bit of weight, while giving it a 2" profile edge. It's about 300lbs still! I had 3 people help me lift it into place.

petesveen

Tue, 03/17/2015 - 07:26

Nice job on the concrete top! Turned out great and coordinates well with the base. Cheers! - DIY Pete

Faux Driftwood Finish Media Console

Submitted by Anonymous (not verified) on Sun, 06/11/2017 - 19:37


My girlfriend requested I make this stand for our TV which is 46". (It looks like something she wanted from a furniture store that was being sold for around $1,100.)  I followed the plan, but customized the size. My table is 60" long and 24" high.


We wanted to make a weatherbeaten "driftwood" look. The Classic Gray was darker and had more opacity with one coat than expected, so we stopped at one coat.  Classic Gray is a lot "cooler" in tone before the clear coats, because the clear polyurethane I used  has a warm tint to it. (In the future, I also want to try the crystal clear Minwax Polycrylic, which would not warm the tone of the gray.) After the stain, we added some brown dry brushstrokes to make it look rustic or aged. 

I lightly sanded between each of the clear coats. Two coats on the under parts and three coats on the top. 

I added felt pads that I cut to fit to protect our floors from scratching. 

The wood is part pine and part common board. 

Girlfriend loves it! It is a huge hit. Lots of compliments from neighbors as I worked, too. 

Built from Plan(s)
Estimated Cost
$100
Estimated Time Investment
Weekend Project (10-20 Hours)
Finish Used
Sanded to 220

1 application of Minwax pre-stain Wood Conditioner

1 coat Minwax Wood Finish Penetrating Stain, color Classic Gray

Dry brushstrokes of Martha Stewart Vanilla Bean Multi-Surface Satin Acrylic Craft Paint at edges (color is a neutral grayish brown)

2 coats of Minwax Polyurethane, Clear Satin
Recommended Skill Level
Beginner

Small cedar shed

Submitted by sarusso82 on Sun, 08/08/2021 - 05:41

First shot at using plans from Ana, and thought it was great! Can’t wait to try another!

Built from Plan(s)
Estimated Cost
500
Estimated Time Investment
Weekend Project (10-20 Hours)
Recommended Skill Level
Beginner

Comments