Community Brag Posts

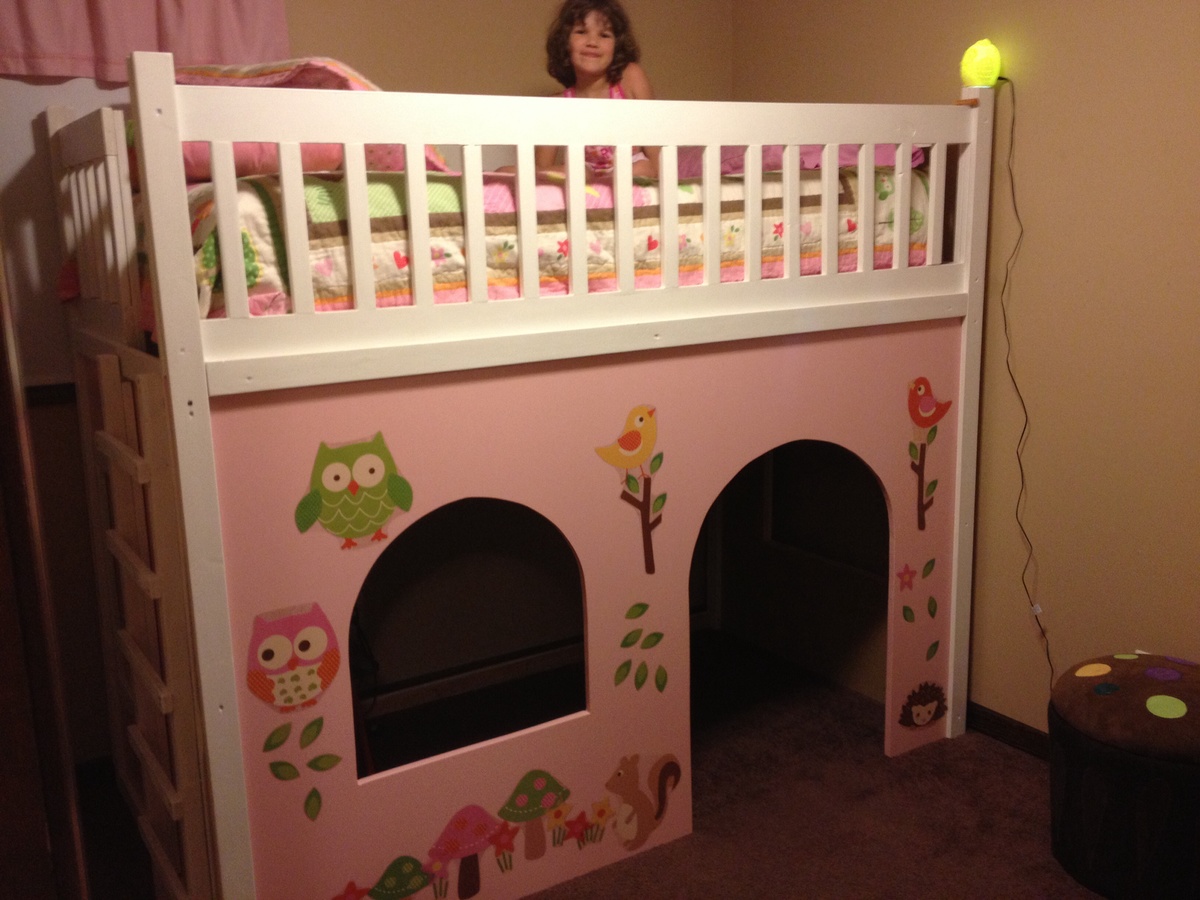
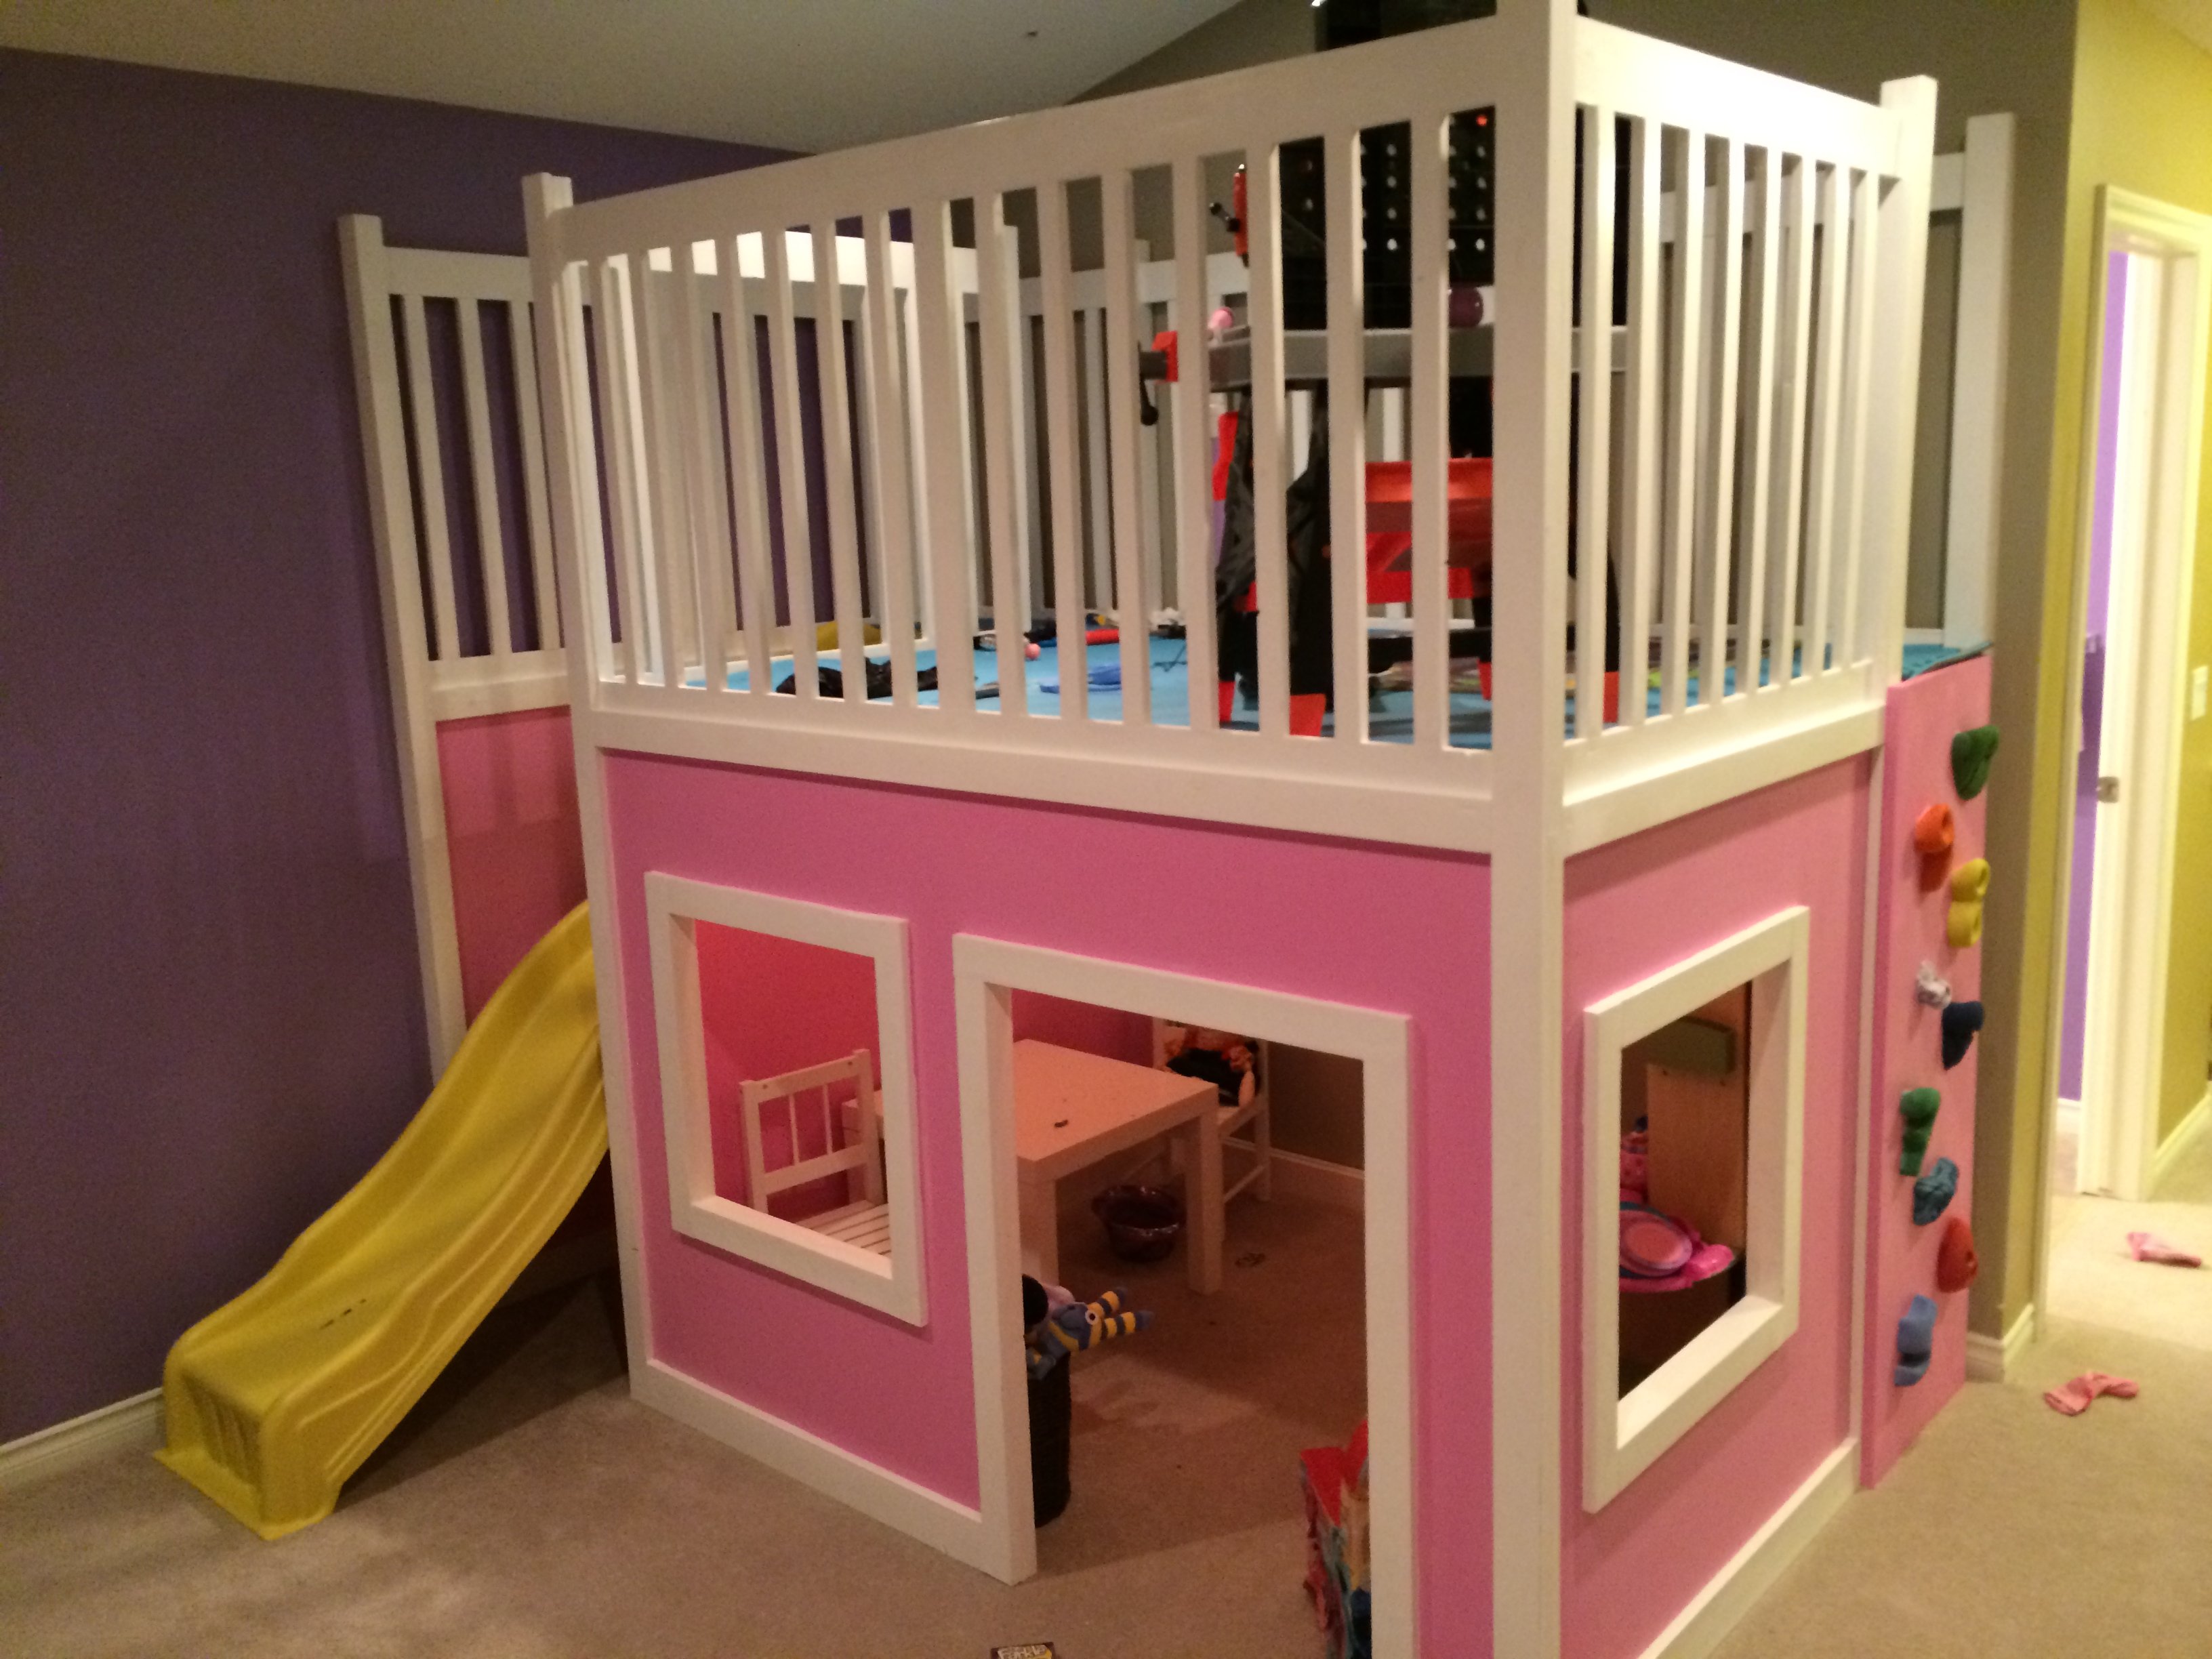
Loft bed with platform

Submitted by jbar1981 on Wed, 10/09/2019 - 13:03

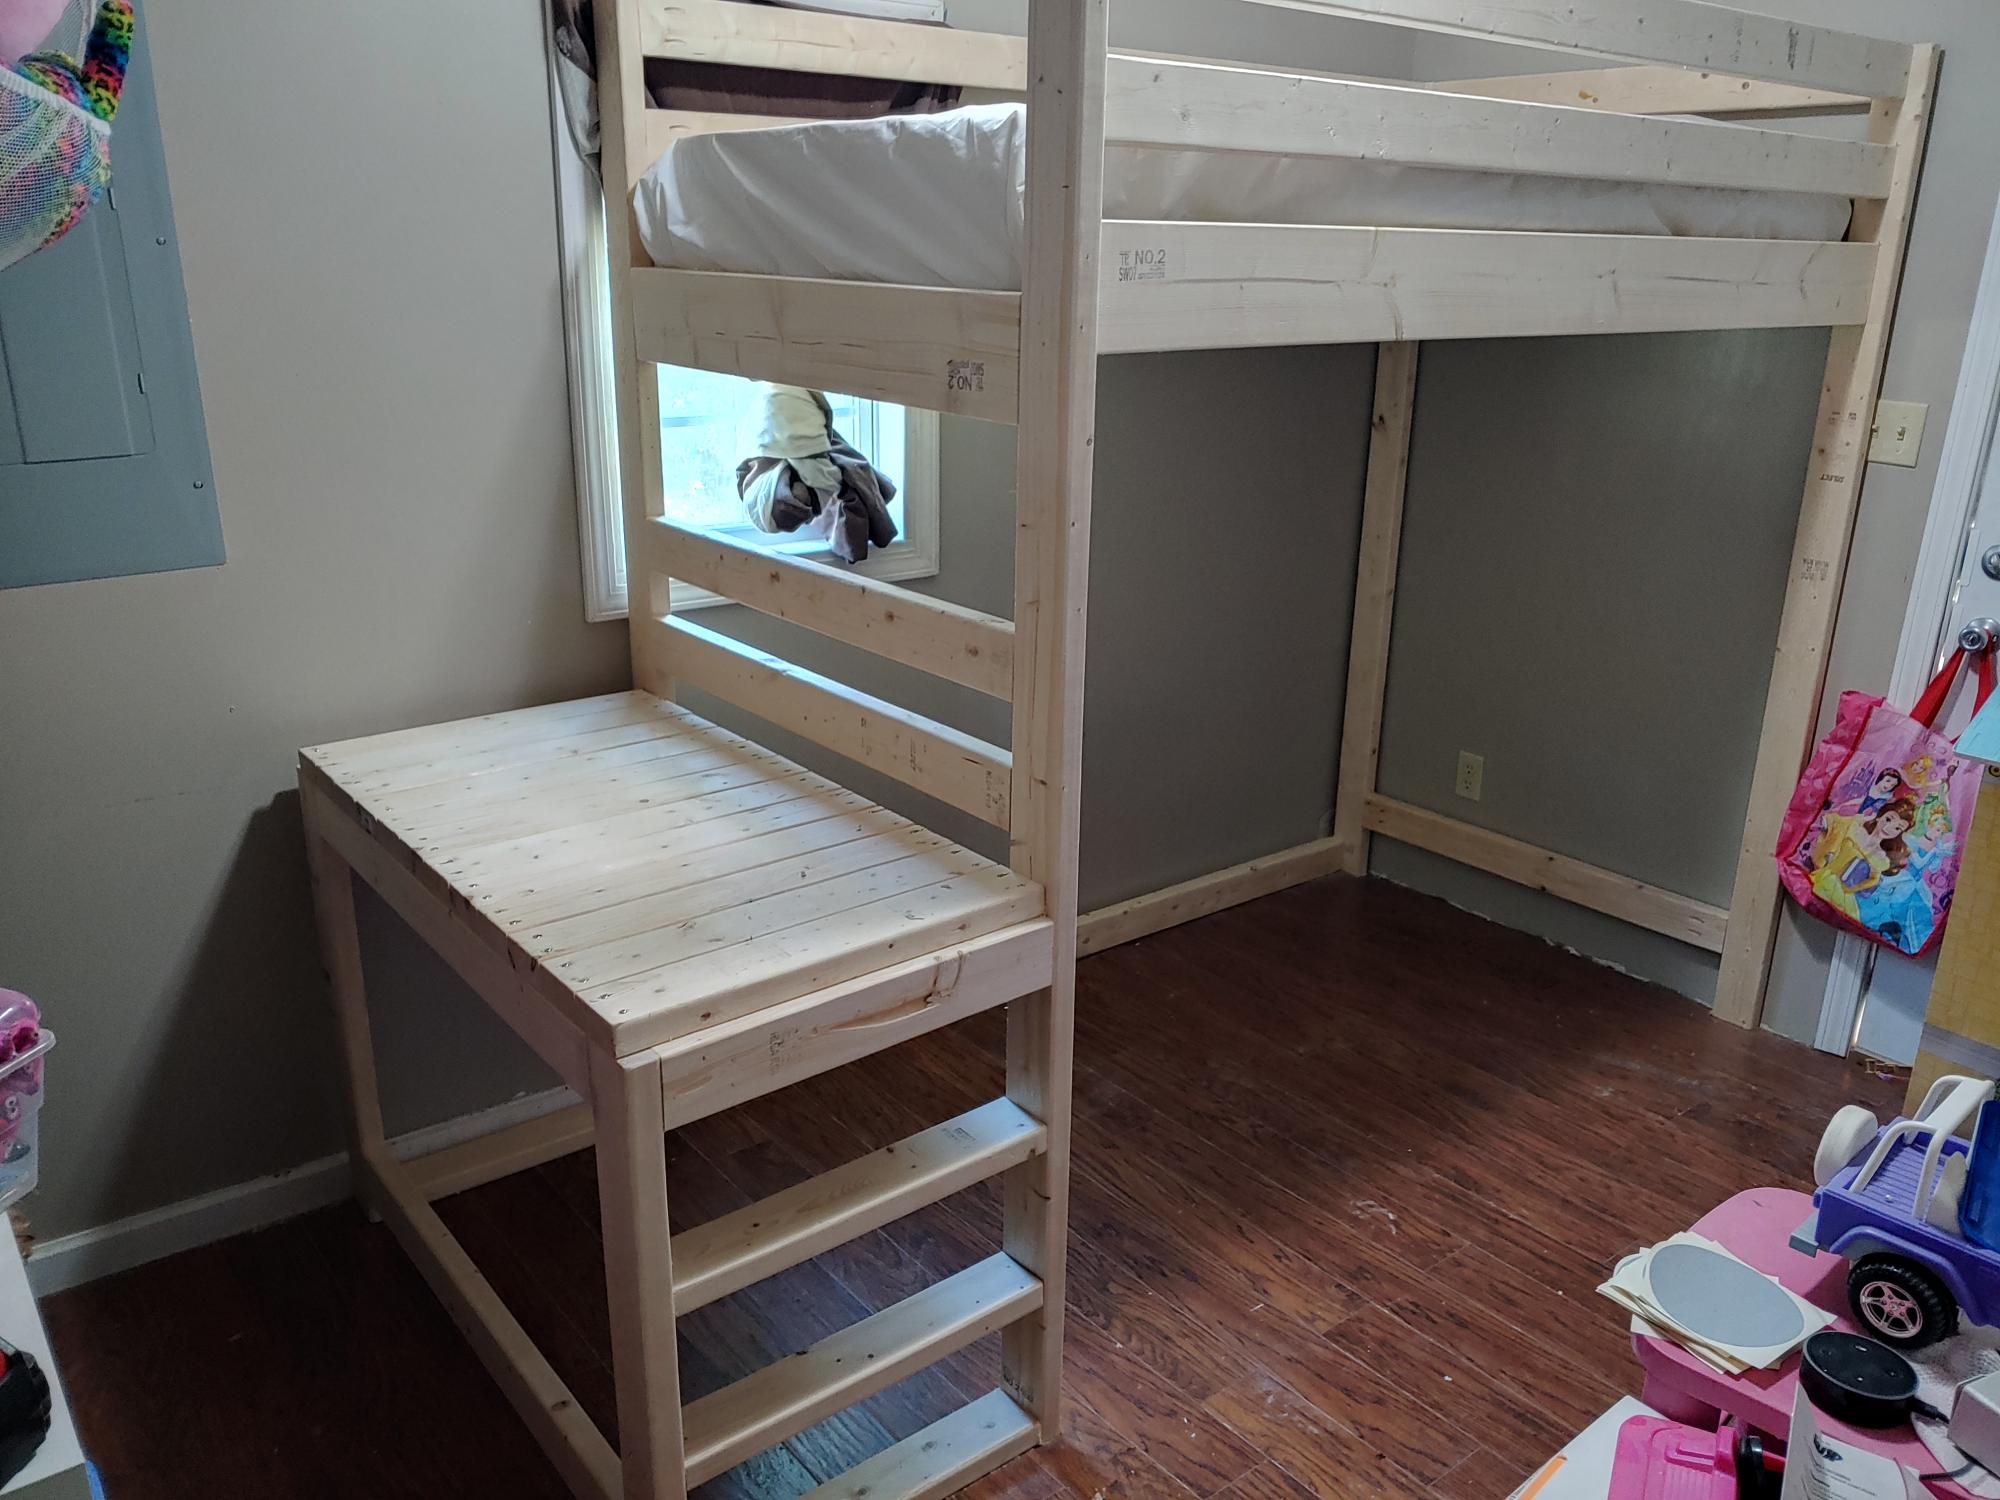
I modified a few things to fit my needs. I did a small ladder instead of steps to save room. I added a 2x4 down the middle with brackets to add extra strength for mattress area. I used my kreg drill bit to make holes for the 2x2 to also help with strength. I am a big guy and the bed was solid so no issues with weight. I added 8 inches to the main post to add height underneath for a doll house, book shelf and some other things my wife wanted under there. Excellent plans and my daughter loves it. 

Estimated Cost
200.00
Estimated Time Investment
Weekend Project (10-20 Hours)
Finish Used
Nothing yet
Recommended Skill Level
Intermediate

Farmhouse Toddler Beds

Submitted by nmnguyen7 on Mon, 02/13/2012 - 07:13

I built this pair of toddler beds for my 2.5 year old twins. I used the original plans for one bed and the modified plans for the other (we have two different size mattresses, it turns out!). Both were a very straight-forward build, thanks to Ana White's plans! I love how they turned out. The kids picked the colors and were thrilled to see their favorite colors on their beds! Can't wait to start my next project!

Built from Plan(s)
Estimated Time Investment
Weekend Project (10-20 Hours)
Finish Used
Kids picked the paints- used water-based satin paint, distressed lightly, then water-based satin poly.
Recommended Skill Level
Beginner

Comments

Brandy (not verified)

Fri, 02/17/2012 - 16:42

I love the way these turned out. Thanks for your picture! Im planning to build these for my twin boys :)

nmnguyen7

Thu, 02/23/2012 - 07:31

Thank you for the kind words! We are very pleased with how they turned out... and extremely surprised at how sturdy they are! I lay with each of the kids at night (just for a few minutes at bedtime) with no problem. Every toddler bed we researched prior to building these had a weight limit of 50lbs! These can hold my 200lb husband with no problem.

Loft bed playhouse

Submitted by Woolfee on Mon, 12/23/2013 - 04:31

Followed the plans except for the rounded window and door. I love the cozy look!

Built from Plan(s)
Finish Used
Paint and wall stickers. Paint color is My Fair Lady by Behr.
Recommended Skill Level
Beginner

My first build!!!!

Submitted by Anonymous (not verified) on Thu, 03/03/2016 - 12:44

This was my very first build and I loved it. I used rough cut oak that I got from my grandparents woods when it was destroyed in a storm. I spent a few hours planing and sanding but it was time well spent. I plan on making the fort bed next.

Built from Plan(s)
Estimated Time Investment
Weekend Project (10-20 Hours)
Finish Used
Minwax antique walnut stain followed by hand rub satin poly.
Recommended Skill Level
Beginner

Comments

Ana White

Thu, 03/03/2016 - 13:52

That is ONE awesome first build! Can't wait to see your next project, thanks for sharing!

Garden Potting Bench

Submitted by Anonymous (not verified) on Sun, 07/02/2023 - 11:18

Potting bench. I had some pressure treated darker wood around and used that for the legs and frame. Pine for much of the rest. Stained the frame cherry. Polycyclic for the pine and the frame. Three times. Lots of compliments. Highly functional as well!

$10 ledge and first build with a kreg jig!

$10 ledge and first build with a kreg jig!

Built from Plan(s)
Estimated Cost
$8..97 (had 10% off coupon from Lowes!)
Estimated Time Investment
An Hour or Two (0-2 Hours)
Finish Used
Valspar Satin Paint in Buckeye Brown
Recommended Skill Level
Starter Project

Comments

claydowling

Sun, 02/19/2012 - 18:31

It looks nice. And having seen how much these shelves cost in the stores, it's good to be able to build your own.

Super Easy Little Adirondack Chair

Submitted by ElizSteph on Wed, 12/25/2013 - 18:47

To help keep things aligned, in between step 4 and 5 I cut a 15” temporary support and attached it to the back of the stringers, opposite the front apron and then removed when finished attaching chair back. I used Silhouette Cameo vinyl cutter to make the stencils for the name and logo. Home Depot can mix Glidden paint in official campus colors.

Built from Plan(s)
Estimated Cost
$40
Estimated Time Investment
Day Project (6-9 Hours)
Finish Used
Glidden paint from Home Depot which offers official campus colors. Stencils for logo and childs name were cut with Silhouette Cameo vinyl cutter.
Recommended Skill Level
Beginner

Sectional

Submitted by Anonymous (not verified) on Sun, 03/06/2016 - 13:20

Here is the outdoor sectionAL I built with redwood.

Estimated Cost
250.00
Estimated Time Investment
Weekend Project (10-20 Hours)
Finish Used
Redwood stain
Recommended Skill Level
Beginner

Comments

Fancy X Farmhouse table and bench

Submitted by Anonymous (not verified) on Wed, 10/16/2019 - 09:09

Used the fancy X farmhouse table plan with slight modifications. I decided to use a 4X4 vs two 2X4 as the main leg for the base. I thought it would provide more strength for my final product. Did the same on the bench. Then i moved the support and brace over and added an additional one to provide extra support for the concrete top and trough i made. All in all the base and the bench came out beautiful and am so over the moon with them both! It was my first project I have done (very ambitious I know) but now I am hooked!

Estimated Cost
350
Estimated Time Investment
Week Long Project (20 Hours or More)
Finish Used
Cabot Gold Pre-Tinted Sunlit Walnut Transparent Exterior Stain and Sealer
Recommended Skill Level
Intermediate

Plant Ladder Shelf

Submitted by Anonymous (not verified) on Wed, 07/05/2023 - 09:13

I made this a planter as a gift to the superintendent in the building were I live. It was absolutely free for this dedicated man who keep the building clean and help all the residents by repairing their units. It was a way to say thank you and it always feels good when I or you do something positive.

John

Kitchen Island w/ Corian

I used the plans for Michaela's Kitchen Island, more or less, but scrapped the top. Instead of wood, I went with a piece of Corian that I got very, very cheap at a local recycled building materials store. It was not that much more expensive than using wood, believe it or not. It's also easier to work with than wood, at least for this project. We even had enough left over for 2 large cutting boards.

Built from Plan(s)
Recommended Skill Level
Intermediate

Comments

Rhyan Console Table

Submitted by rocorama on Sat, 12/28/2013 - 12:21

I loved the plans for the Rhyan Console Table. I made adjustments to fit my media equipment and 60" flat screen (51" W X 18" D). I used select pine and 3/4" White Oak plywood. The finish is Verathane "Ebony' with Varathane Satin Finish. I couldn't be happier with how the project turned out. It matches the finish of my speakers.

Estimated Cost
$80
Estimated Time Investment
Weekend Project (10-20 Hours)
Finish Used
Verathane Ebony Stain and Verathane Satin Polyurethane Spray.
Recommended Skill Level
Beginner

Farm table kitchen Nook Bench

Submitted by Anonymous (not verified) on Thu, 03/10/2016 - 12:41

Inspired by one of your older farmhouse tables, then my wife found a pottery barn type farmhouse, few tweaks later I ended with this. Then decided we needed a bench for the kids so built in a corner bench and then made the cushions. Lots of good meals to come. Email me at [email protected] if any questions.

Estimated Cost
$350
Estimated Time Investment
Weekend Project (10-20 Hours)
Finish Used
Mahogany gel stain, 3 coats of satin finish poly (min wax)
Recommended Skill Level
Intermediate

Bed and night stands from plans on this site

Submitted by Anonymous (not verified) on Sun, 10/20/2019 - 18:02

Bed and night stands build with plans from Ana White. Both projects were finished using age accelerator and weathered gray stain. Time and coat estimations include both night stands and the full sized bed.

Estimated Cost
300
Estimated Time Investment
Weekend Project (10-20 Hours)
Finish Used
Age accelerator and weathered gray stain.
Recommended Skill Level
Intermediate

Recycled Pallet wood coffee table.

My wife wanted to change up the living room a little bit. Being in the military we move around a lot and our furniture seems to never fit in the next house we move into. So I decided to build a little smaller coffee table and end table. Cool part is if you look on craigslist, people are always giving away pallets for free on there. I took Anna's Bristol Outdoor Side Table design and extended it and added longer legs. Hopefully you all like.

Built from Plan(s)
Estimated Cost
Free wood, money spent for stain $8.00
Estimated Time Investment
Afternoon Project (3-6 Hours)
Finish Used
MinWax Poly/Stain Mix
Recommended Skill Level
Beginner

Comments

Guest (not verified)

Mon, 02/27/2012 - 09:30

Great project. Thank you for serving your country and all of us in it. We appreciate you.

RNorman (not verified)

Mon, 03/05/2012 - 05:48

Had the same idea with some fenceposts we tore down. built it 3:5 ratio width:length and trying to paint a decent looking Texas flag on it.

God bless and stay safe!

Playhouse Loft Bed

Submitted by dryton1 on Mon, 12/30/2013 - 09:46

We built this kids playhouse for our 4 year old daughter for Christmas. We modified it from the playhouse loft bed with stairs, only we made it bigger and instead of stairs we installed a slide. Also rather than a ladder we put in a rock wall.

Built from Plan(s)
Estimated Cost
$400
Estimated Time Investment
Week Long Project (20 Hours or More)
Recommended Skill Level
Beginner

Farmhouse X Table

Submitted by Anonymous (not verified) on Sun, 03/13/2016 - 10:31

Pine wood with 2 coats of Minwax Mahogony Gel-Stain and 2 coats Minwax Semi-Gloss Polyurethane.

Built from Plan(s)
Recommended Skill Level
Intermediate

12ft farmhouse bench

I was asked to surprise someone with a 12 ft. bench. After searching and searching I found a plan I really liked, but I felt it just wasn’t enough. I modified the plans to give it a little more of a farmhouse look. I also had to double the size of the original plans.

Estimated Cost
$40
Estimated Time Investment
Afternoon Project (3-6 Hours)
Finish Used
I sanded with 220 grit sandpaper. I then added a coat of pre-stain. After letting it dry, I stained it with English Chestnut from Minwax, and I finished it by putting on a glossy coat of polyurethane.
Recommended Skill Level
Intermediate
Back