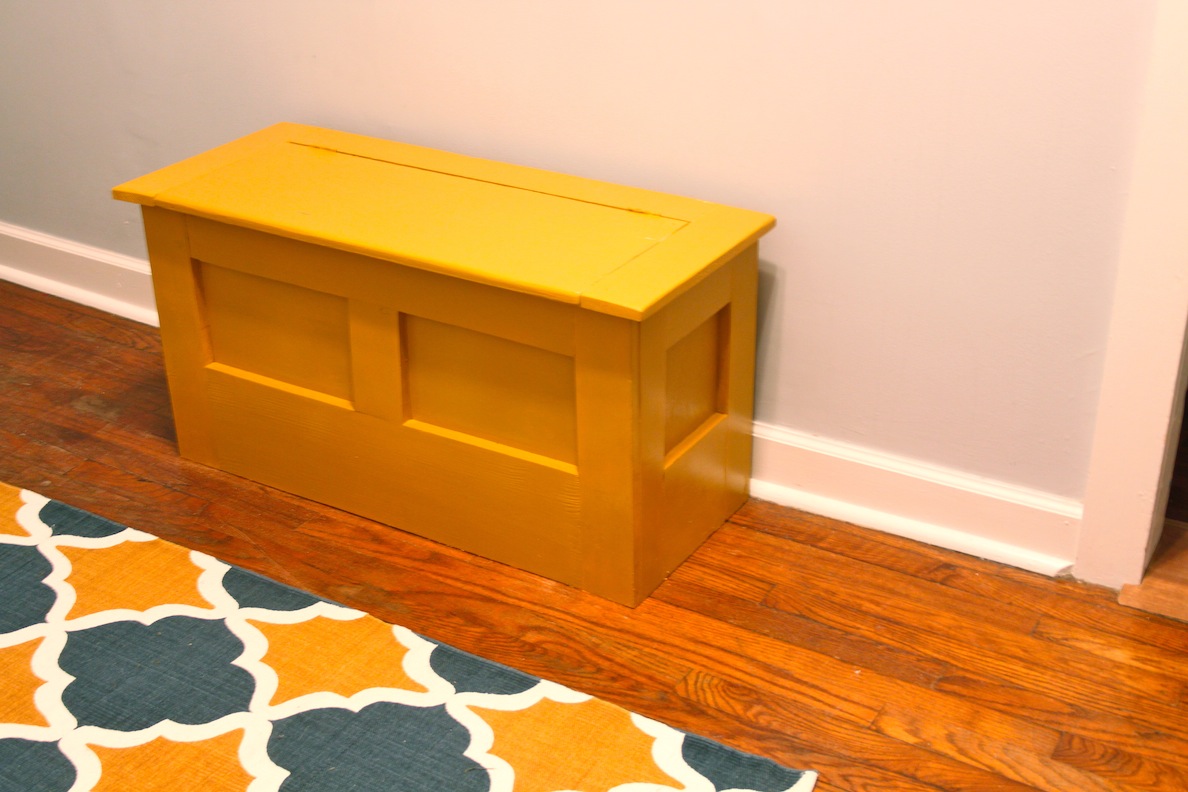
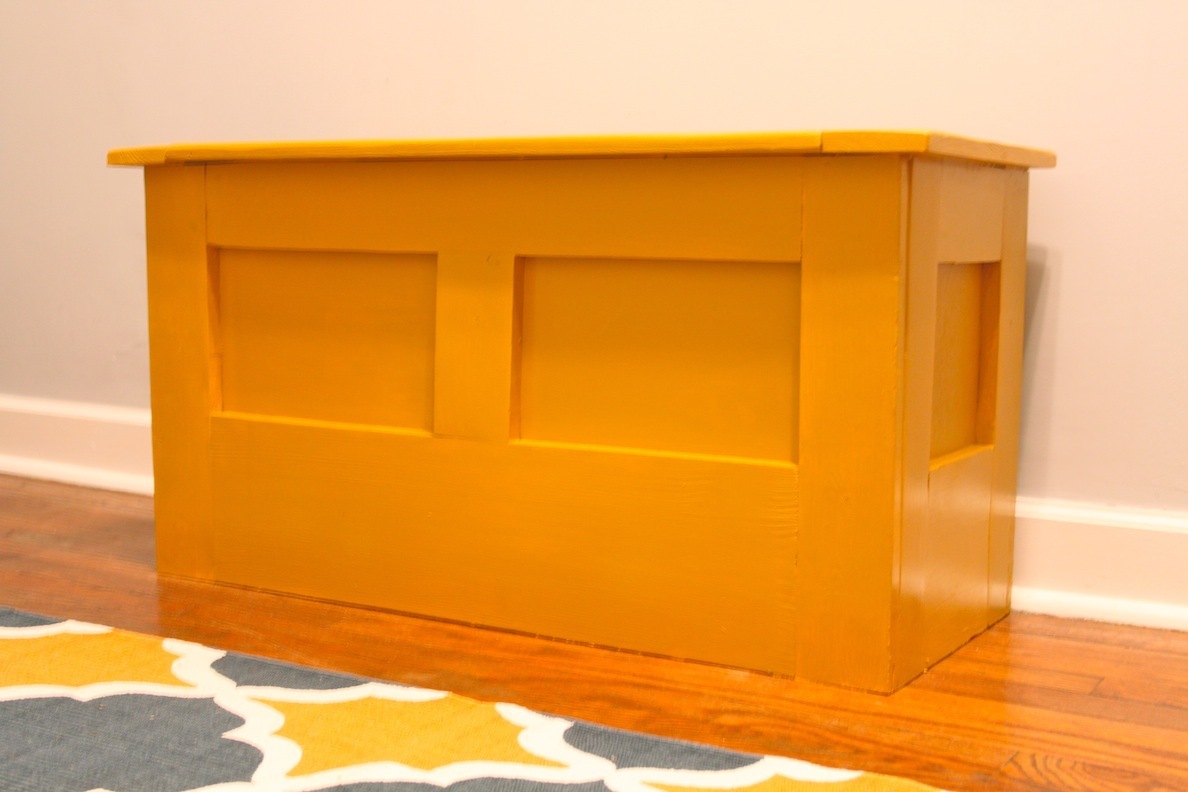
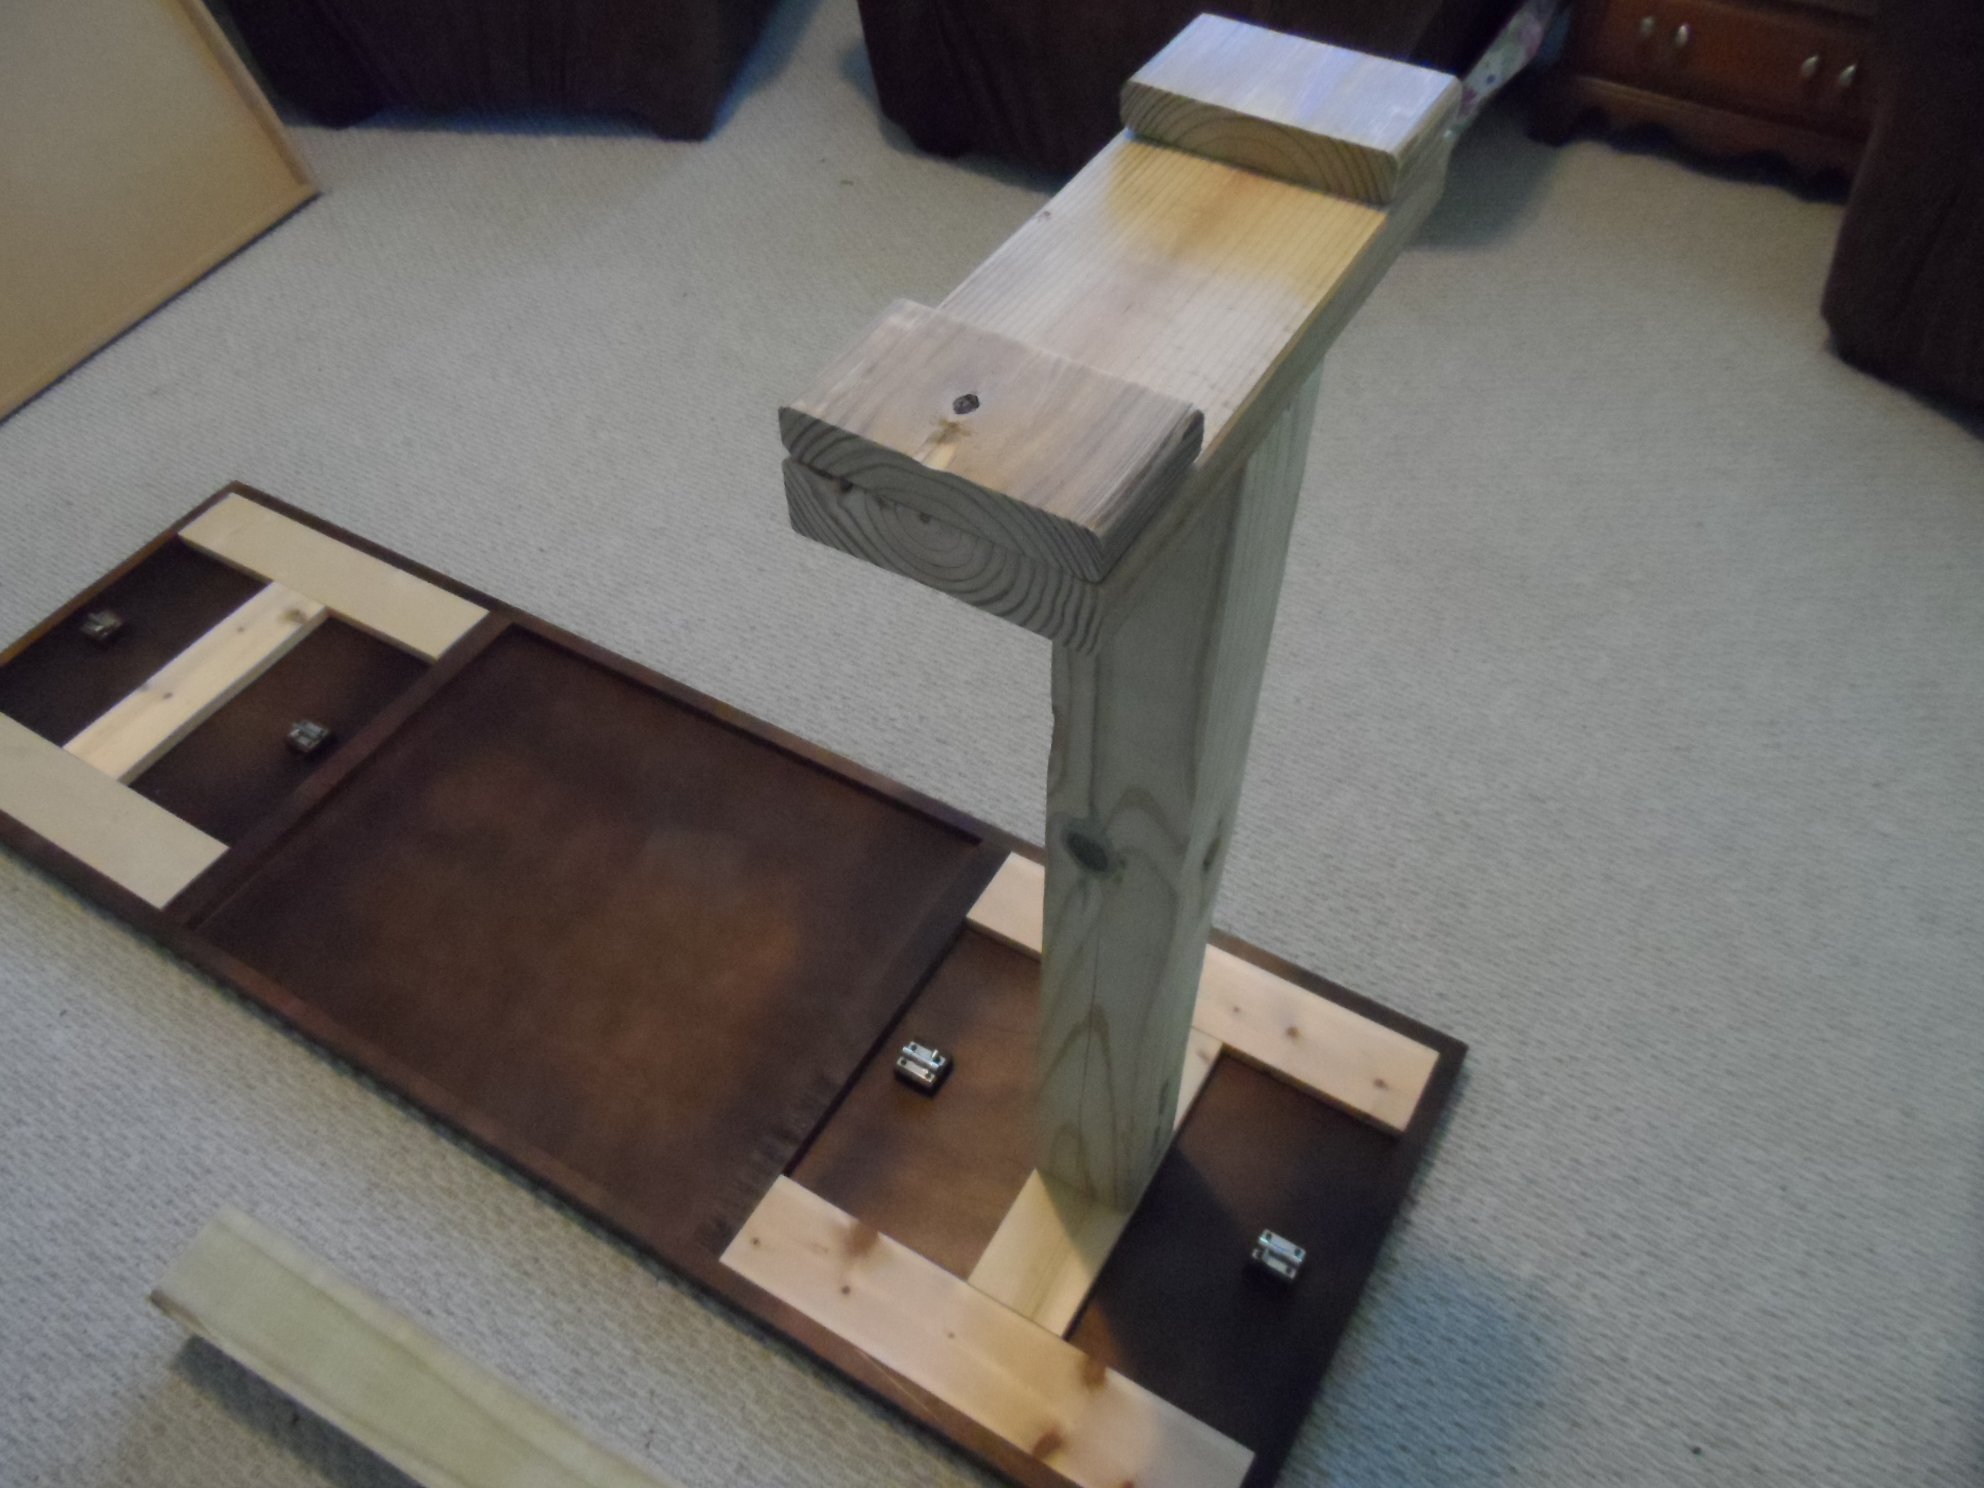
2x4 Hall Tree

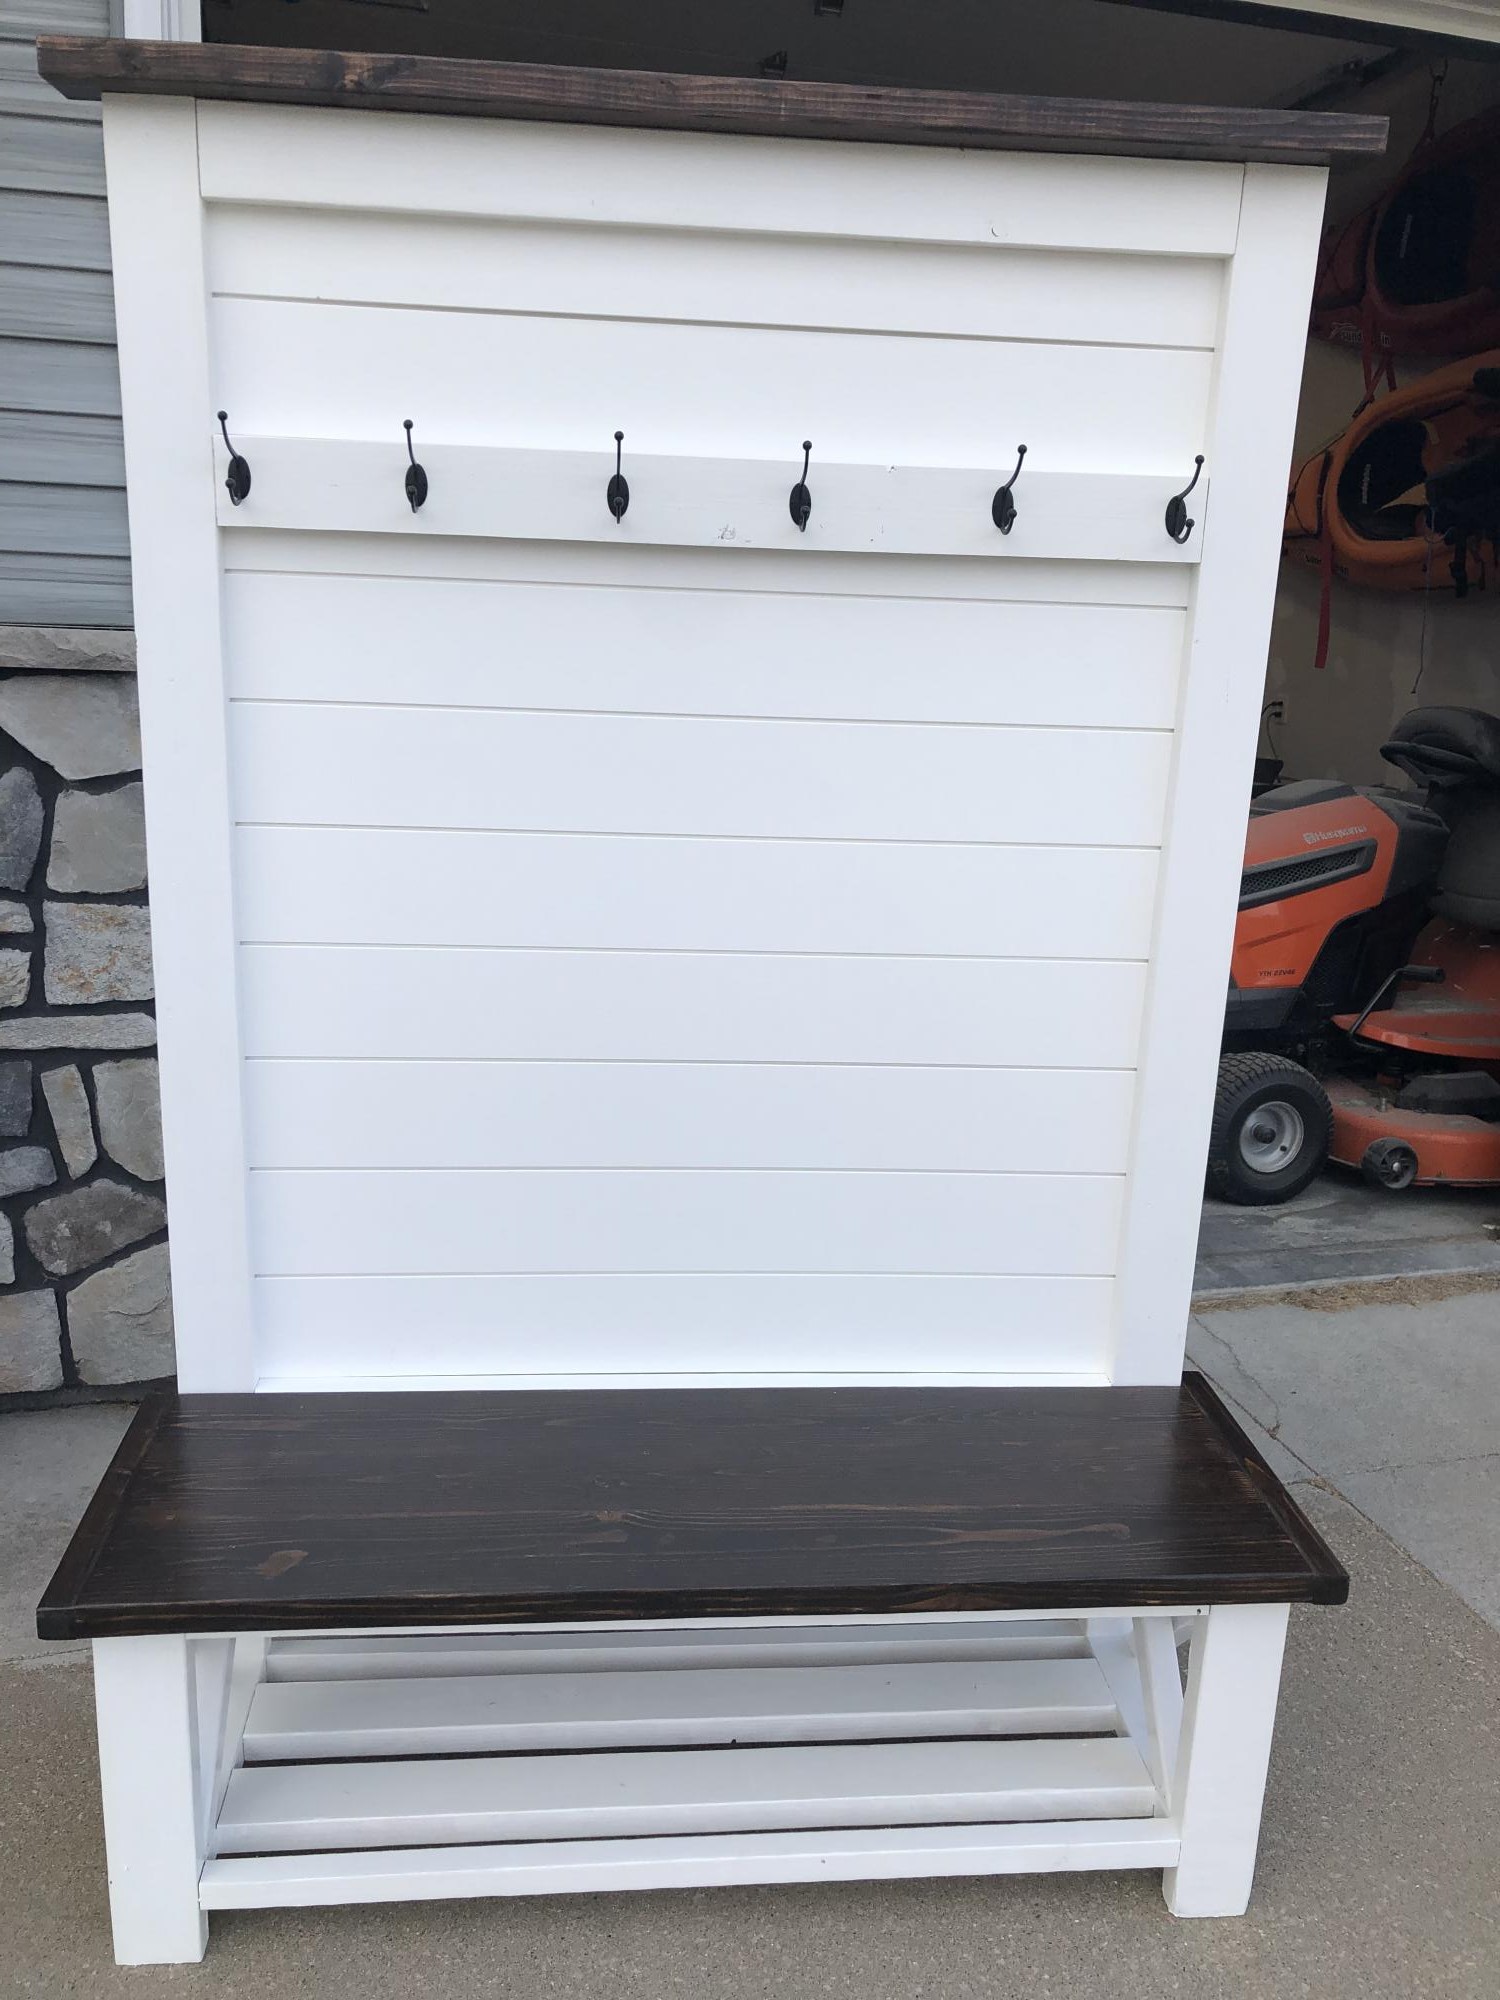
Farmhouse Hall Tree by Leila Adams
Built from Plan(s)
Farmhouse Hall Tree by Leila Adams

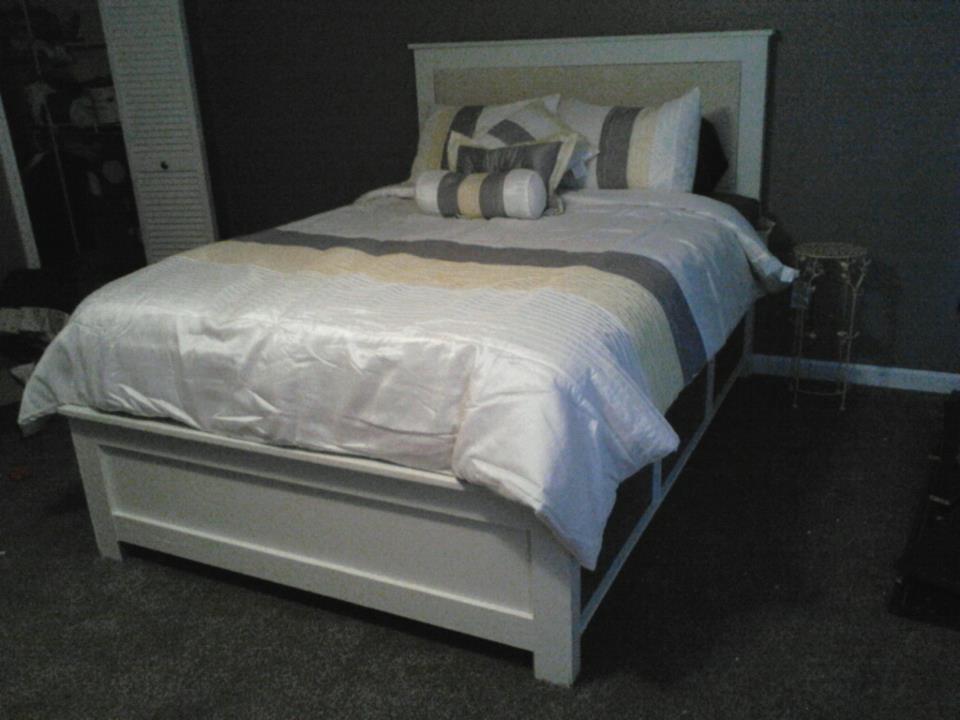
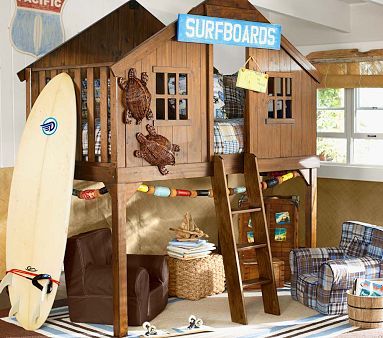
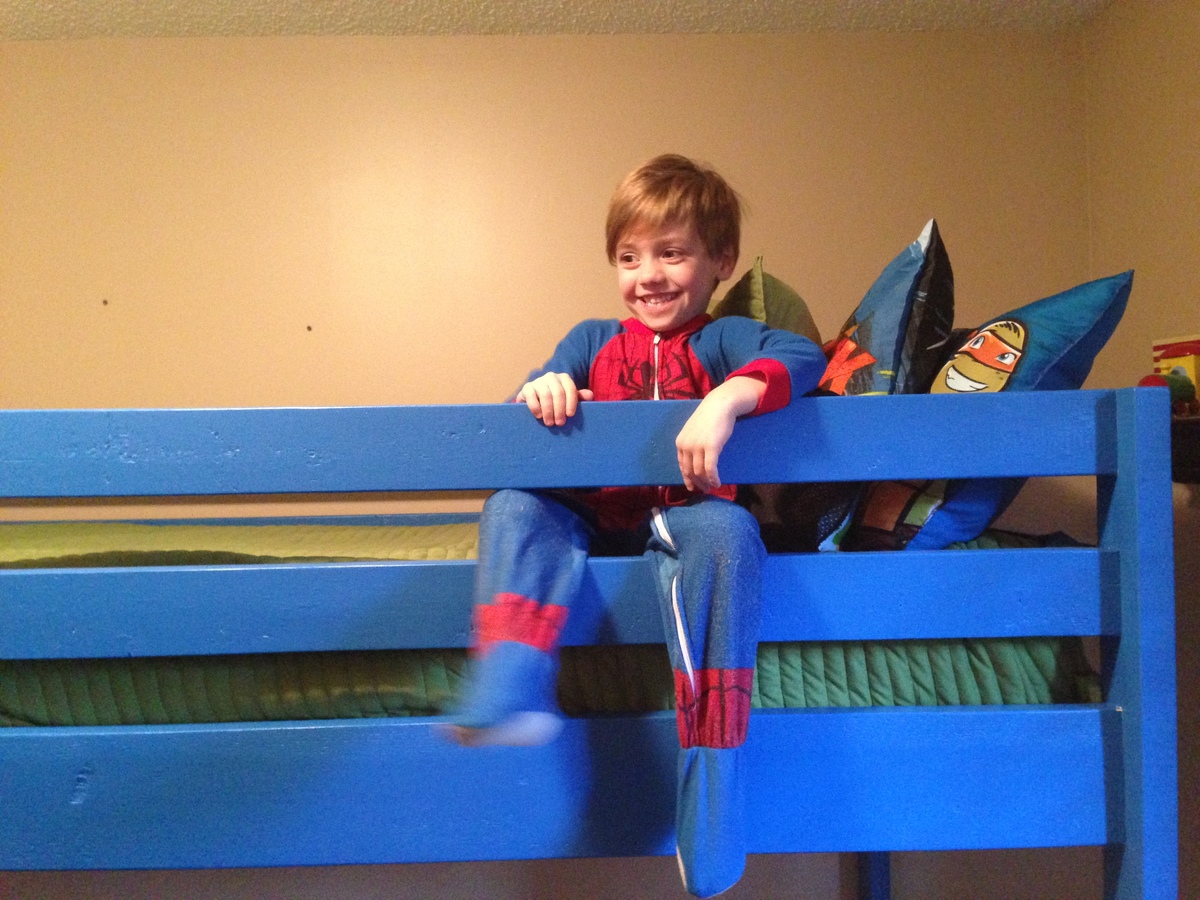
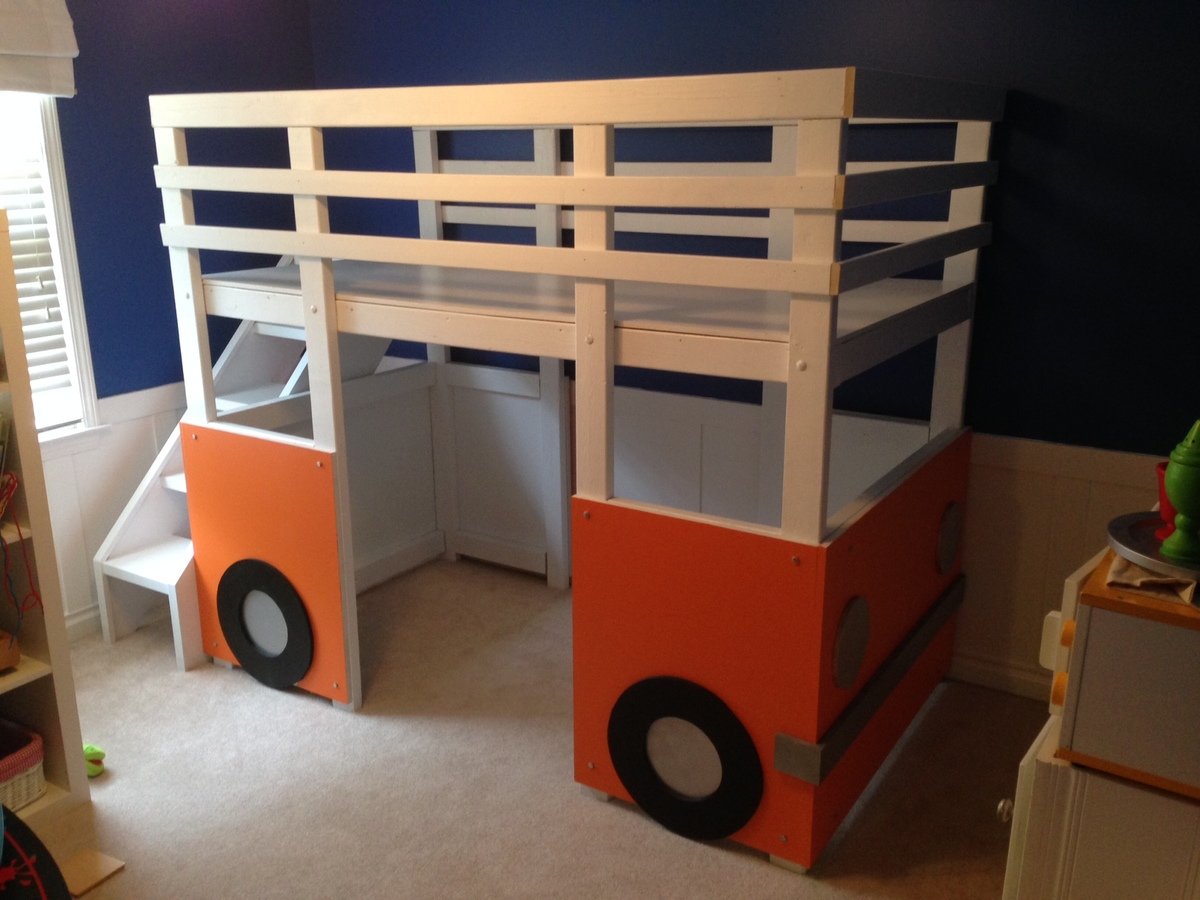
My buddy wanted this bed from Pottery Barn Kids but didn't want to spend $1300. It cost him $250 in materials and i built it for $300. So you DIY'ers could do it for $250. We also adjusted the size to fit a full size mattress.
Sun, 09/23/2012 - 14:42
Both my boys want to sleep up top I have a nice corner window seal that I'd like to put the l shaped loft at mid height double twin any suggestions also would like the entry on both ends so my 9 yr old can descend without waking my middle son would like a detachable slide in the middle
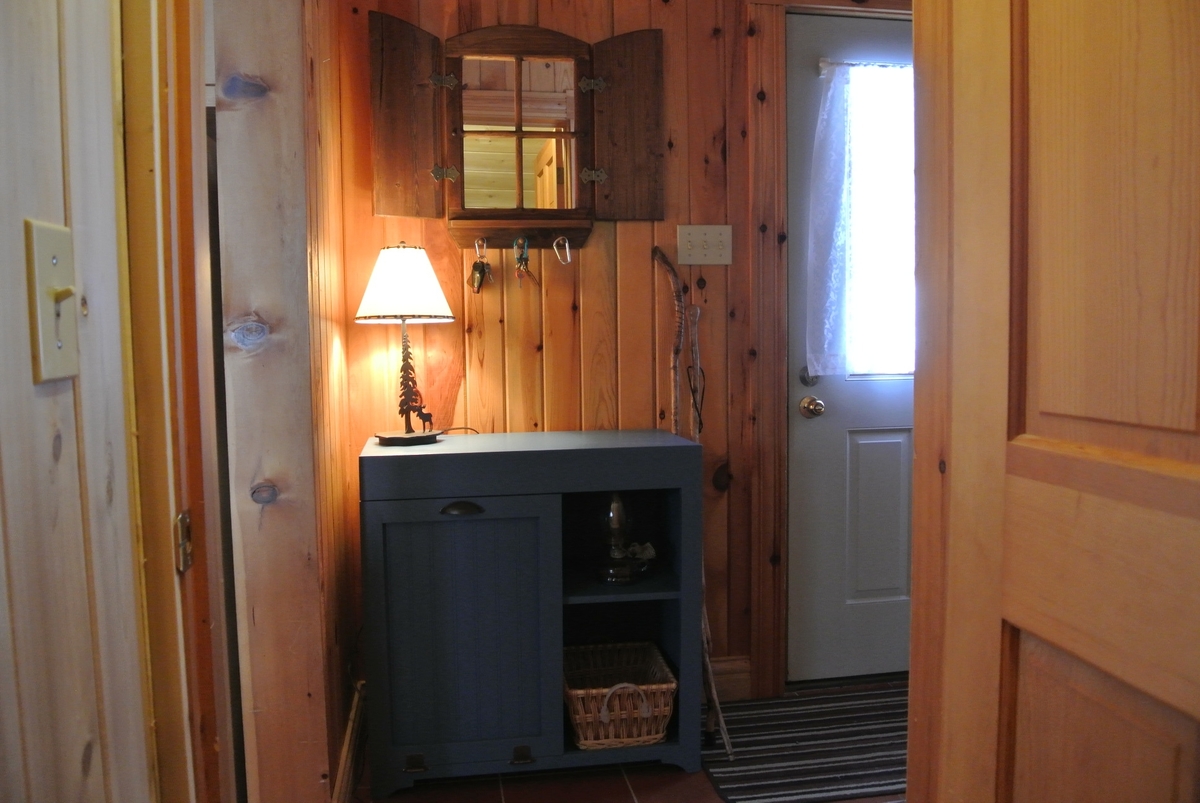
This is my attempt at Ana's recycle console project from her new book "The Handbuilt Home". I made a couple of small changes to the pattern but for the most part stayed on course with her plans.
This piece of furniture is now being used at our cottage. I used 3/4 inch birch plywood for the cabinet and shelf and i used 1/2 inch MDF for the foldout compartment. I decided to use the MDF as it was a bit lighter than the plywood so not as much weight on the door when tilting it out.
The color is from Martha Stewart and is called Cayman Blue.

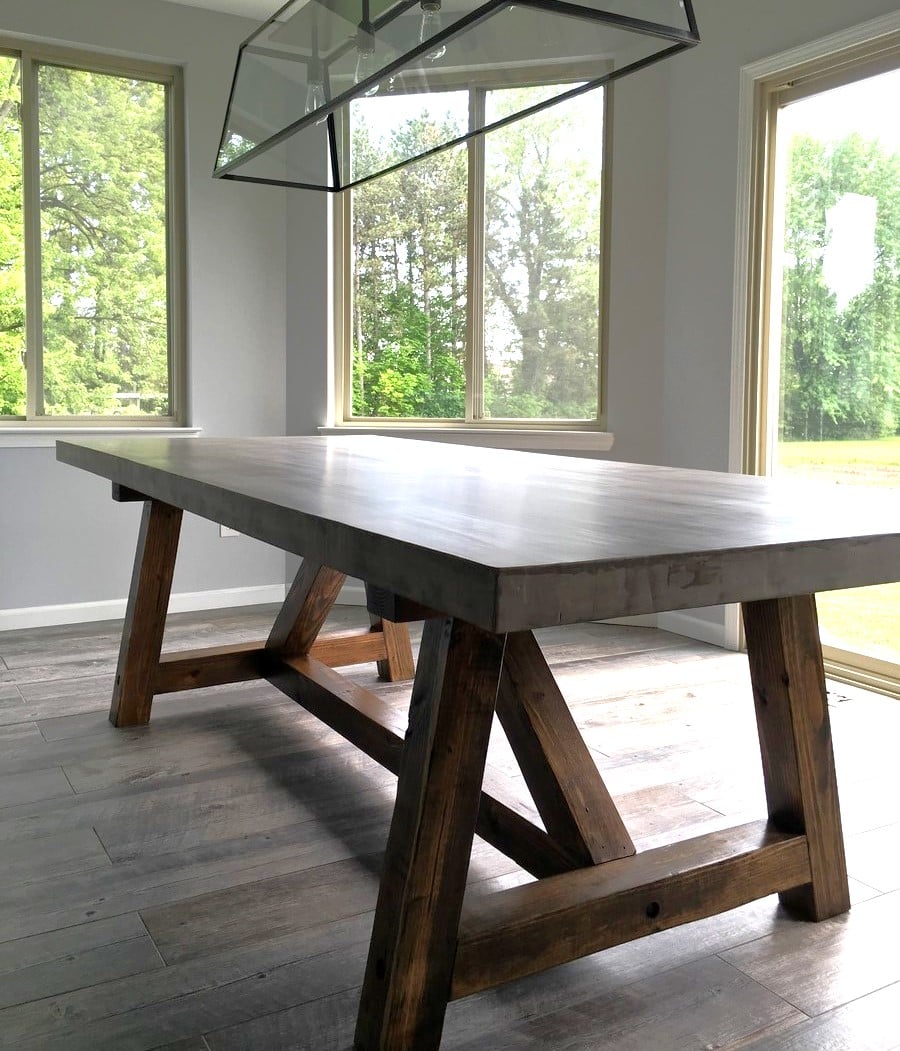
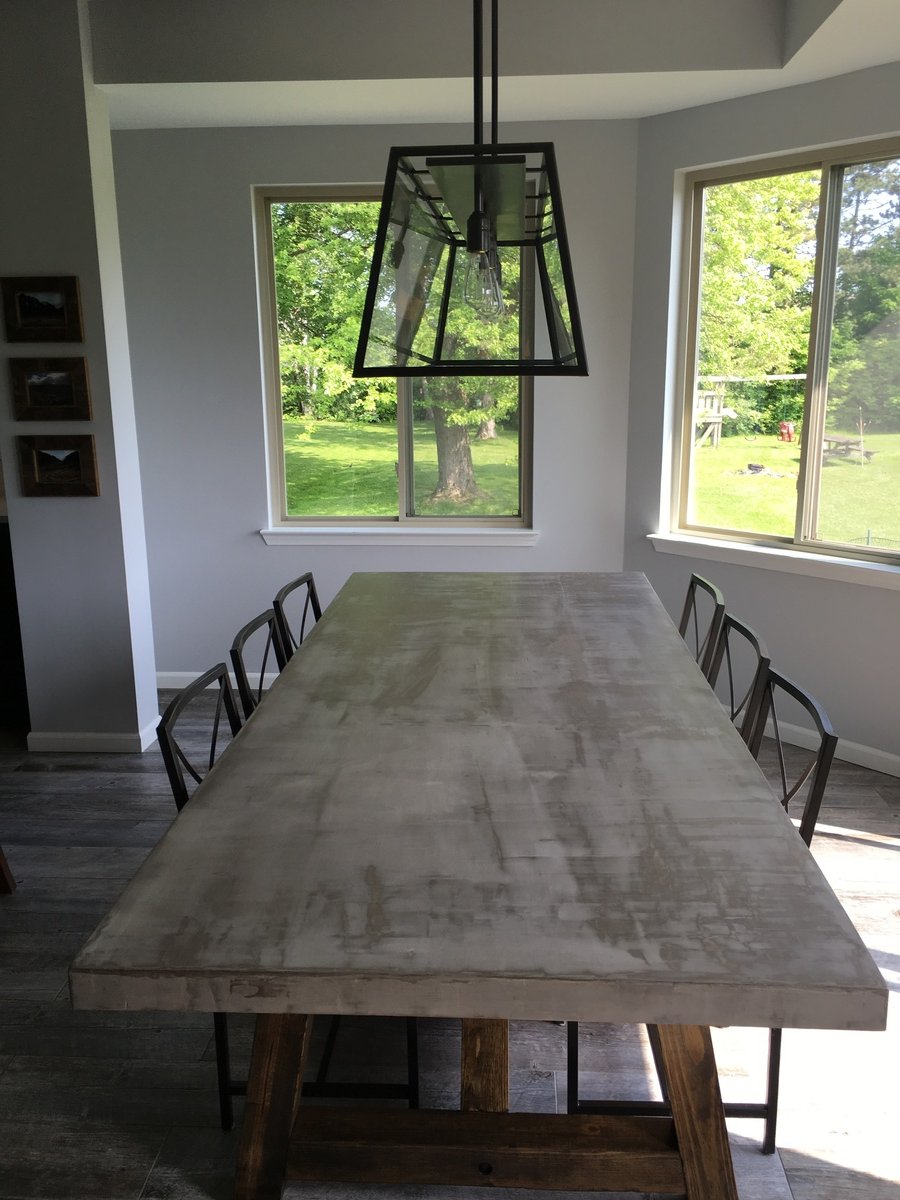
Instead of a wood top I used 2x 3/4" sheets of plywood plus 1/2" backer board to create a thicker top and used Ardex feather finish cement in 4 coats sanded and finished with Mexeseal sealant, recommended 4 coats of semi-gloss plus 2 coats of satin to get a matte finish (recommended by manufacturer) I followed the concrete countertop blog from "Young House Love" but used a different sealant when I contacted the safe coat manufacturer and they recommended their Mexeseal product.
I made this for a cousin, but now I think I am going to need to make one for myself too! I used shiplap for the back instead of plywood. It cost a little more but was less effort than cutting the lines into the plywood. Plus it was already finished.
It took about 2 hours to build it. We have a large family, so we put 2 extra legs on each, just in case. We had problems with the hinges. I think we bought 3 or 4 different hinges before we found something that worked for us. But the end result was wonderful!
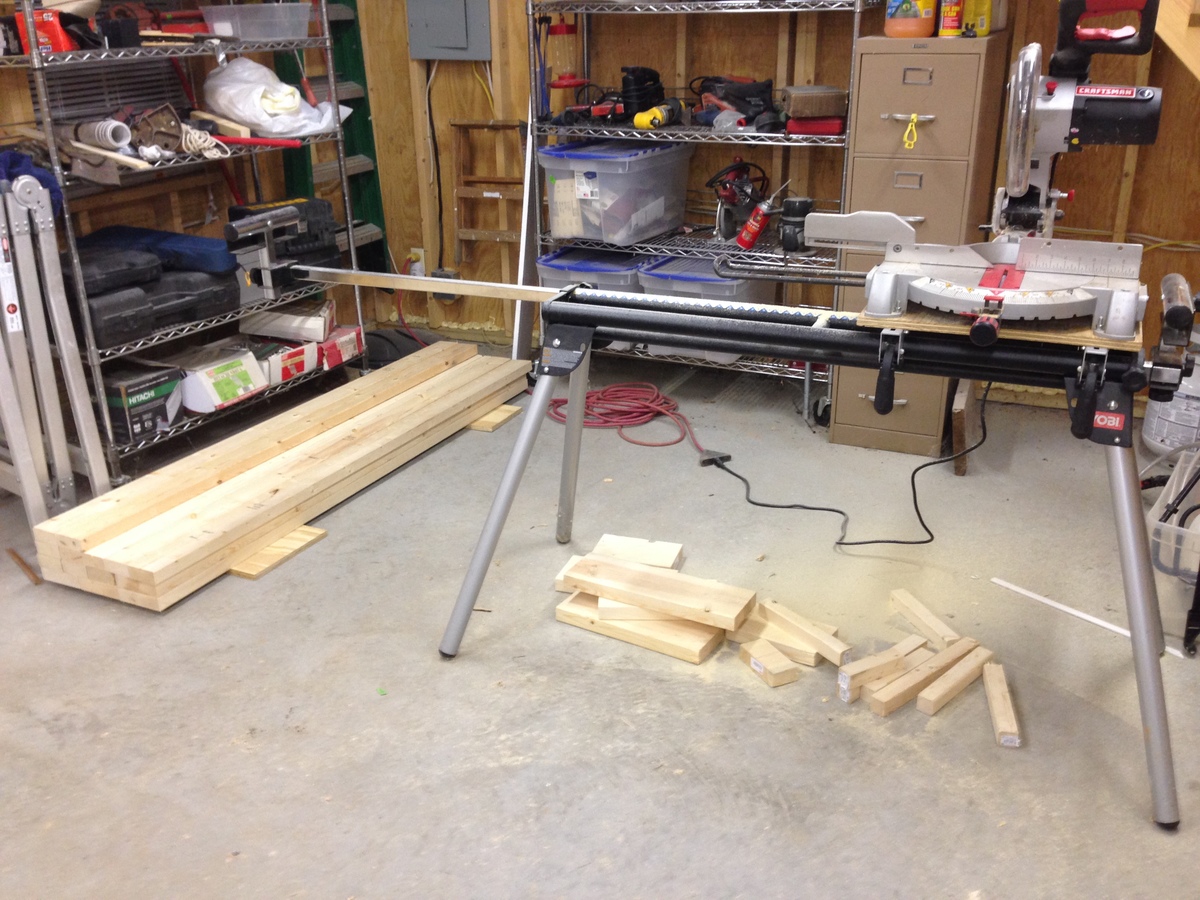
I built 2 beds by doubling the purchase list, then cutting 2 of everything. The hardest part was figuring out what to cut from each piece of wood. It would have been nice to have a detailed cut list so it would be easier to not waste any wood. As it turned out, I needed to purchase one extra 2x4 to finish the job. Not too much trouble. To cut cost, I bought 2x4 studs and had to dig through a half of a pallet of them at Lowes to find the straight ones, and even then some still had a bit of a twist. It's hard to find straight 2x4's.
On the landing, I predrilled countersunk screw holes about 3/4" deep, then after attaching them, I cut plugs, glued them in and sanded it down to a smooth finish. After paint, you can't tell how they are attached.
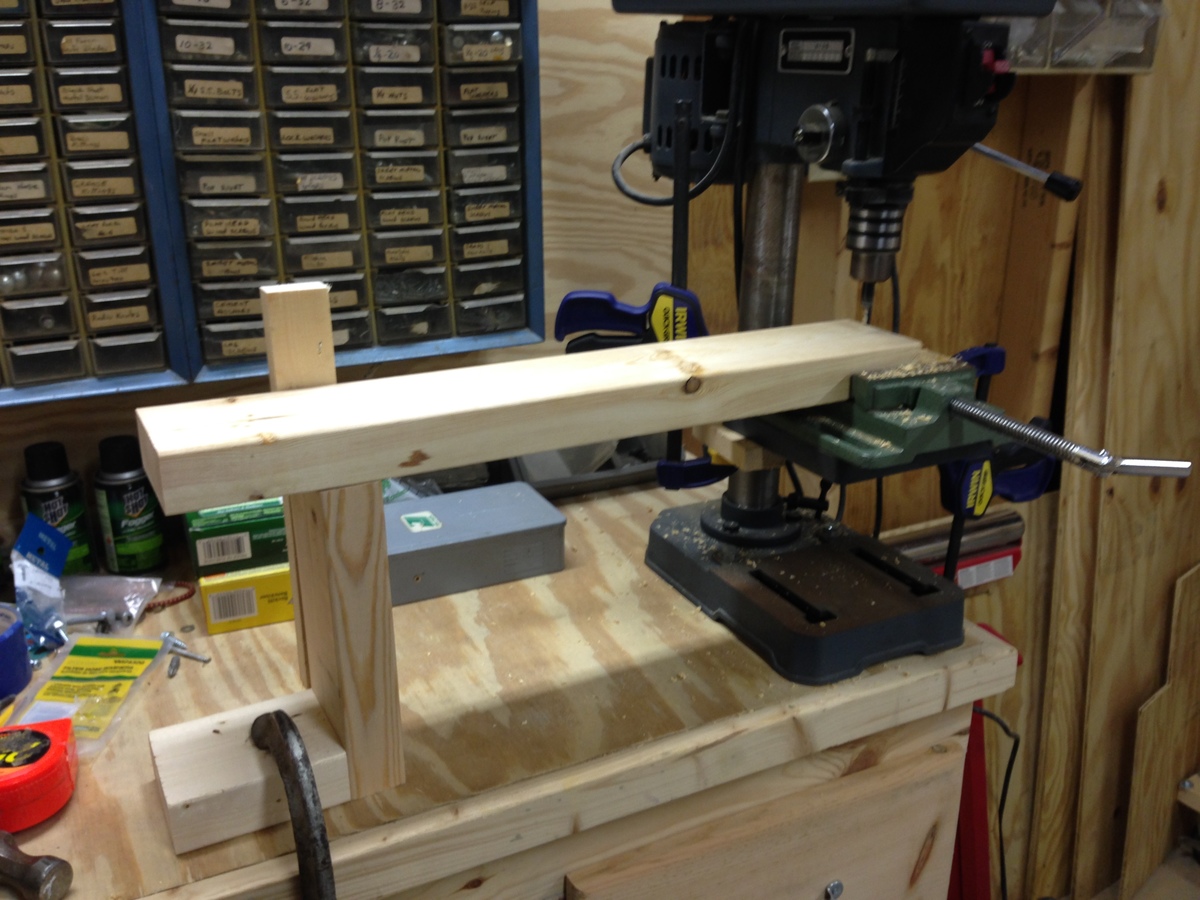
Having a chop saw stand was great because I could set up a cut length and then quickly cut all the boards I needed for that length. I also used a jig for my drill press and set up to drill all the holes at one time for the landing boards.
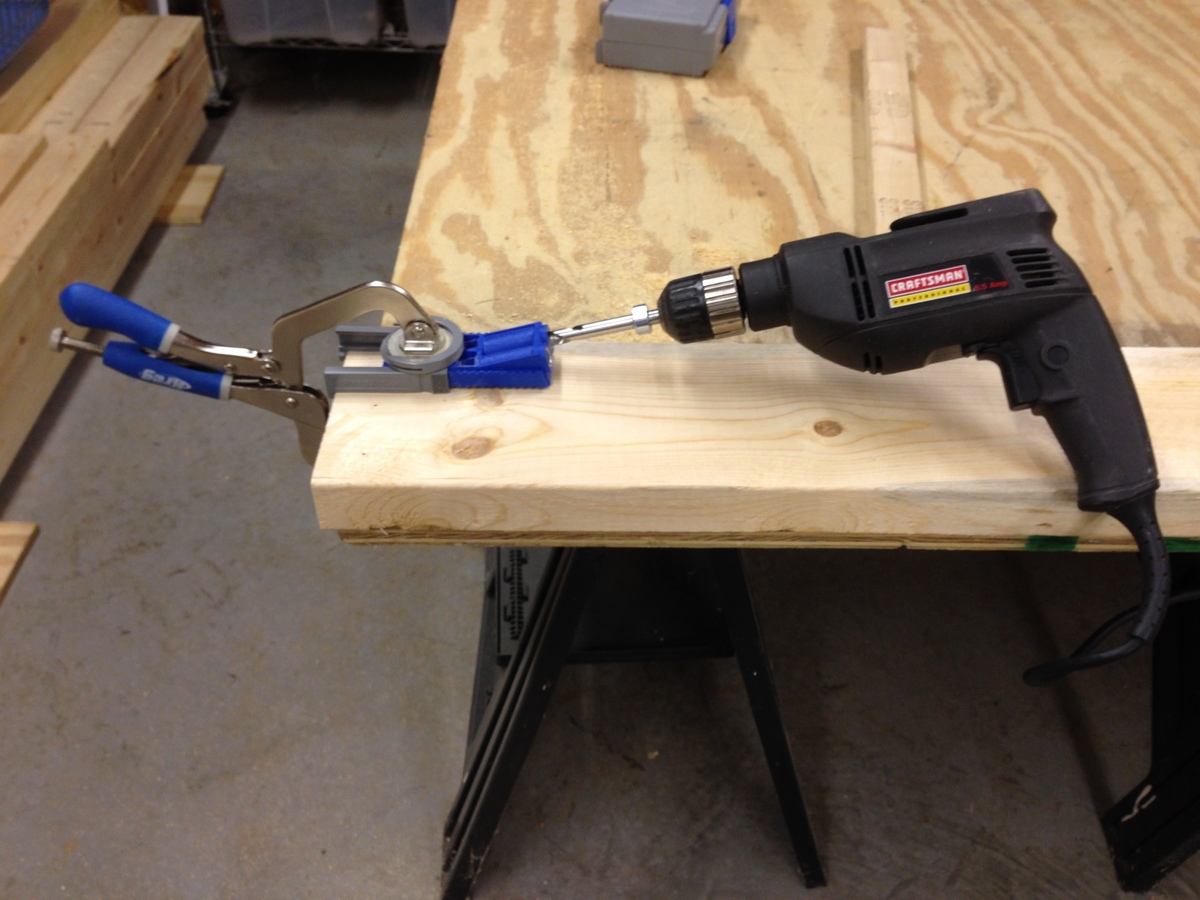
The KREG pocket hole joint works wonderfully well in this application. Just make sure you get the right length and diameter screws. The first box of screws I bought were too big around to fit the hole drilled.
As you can see, there are two happy kids that never want to get down off of their beds.
Thanks for the plans, it was a great experience.
Andy
Tue, 03/11/2014 - 12:23
I found this free cut optimizer tool online, it can break down optimal combination of cuts per board. Just make sure you put it some kind of "Width allowance cutting a kerf", so that it includes what you lose at each cut. You also just have to do one type of board at a time (like 1x2s) but you can put in different board lengths so that it'll tell you how to best use scrap. It's a nice tool.
In reply to Cut Optimizer Tool by balloongal247
Wed, 03/12/2014 - 08:27
Thanks so much. I should have thought about that as there are so many tools available on the web. I'm going to be building more of these so that will come in handy.
I modified the plans to have three compartments instead of four. Also, the hardware was a challenge. Tip: use a wheel that has an internal bearing.

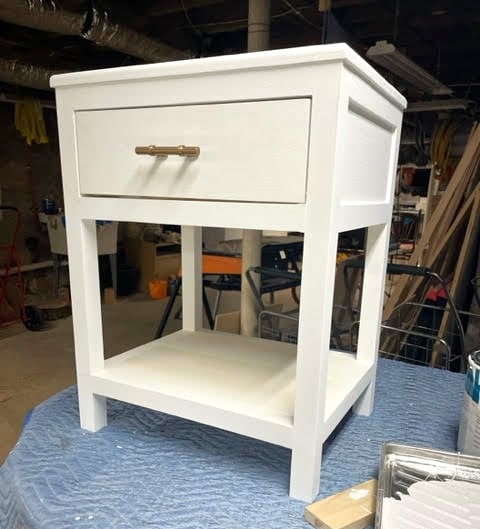
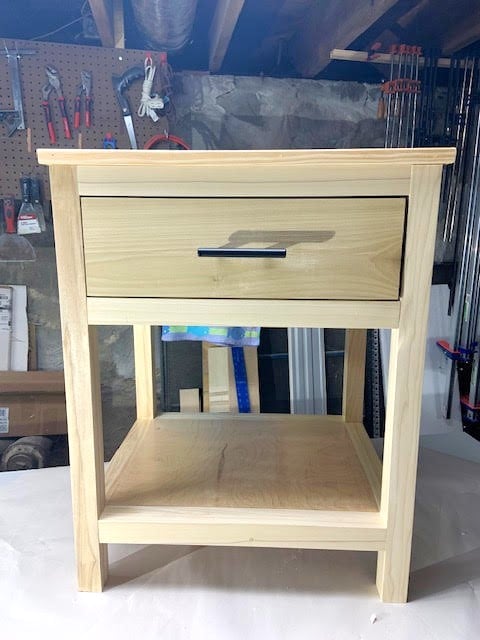
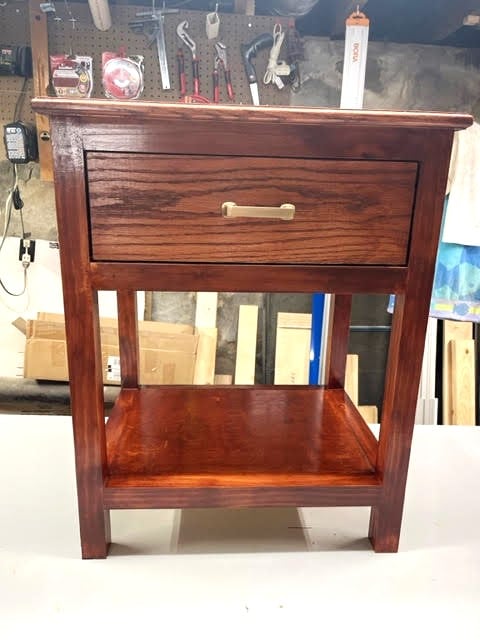
Each nightstand features different hardware and finish.
I've been looking for a bench for our hallway for months and have yet to find one I love, but I did fall in love with Mimi's Storage Bench and Hall Tree.
I was determined to make this bench for free. My husband scavenged construction sites for salvage and brought me home quite a bit of scrap. Once I had a nice assortment of boards, I began the job of making them fit the specs. This was much more time consuming than purchasing boards that were the right size to start with. I got quite familiar with the planer (I had to plane down 2x's to 1x's) and even faced the terrifying table saw to rip a few boards down to size.
The lid was made from an old shelf and the inside panels are an old painting from art school--on masonite--that I finally brought myself to part (with). I already had the paint left over from a table I made over, so that was also free!
It didn't take much convincing to get my husband to pick up a pockethole jig. He's been wanting one himself. It was actually a lot more fun and much easier to use than I expected.
Overall, I'm very pleased with the way it turned out. It's made out of some pretty rough wood, so there are a few holes I'll go back and fill in the future--or maybe not. There are also some rough spots and less-than-true boards, but not bad for a free piece of furniture.
This was my first big woodworking project. It was a lot of fun and I gained a lot of knowledge and confidence that I'll use to build more ambitious projects in the future. I think woodworking is actually easier than sewing because boards generally don't stretch, shift, snag, and unravel while you're working.
I plan to scale this plan down, add some safety hinges, and notch the board under the front of the lid to make a bench/toy box for my little girl's room.
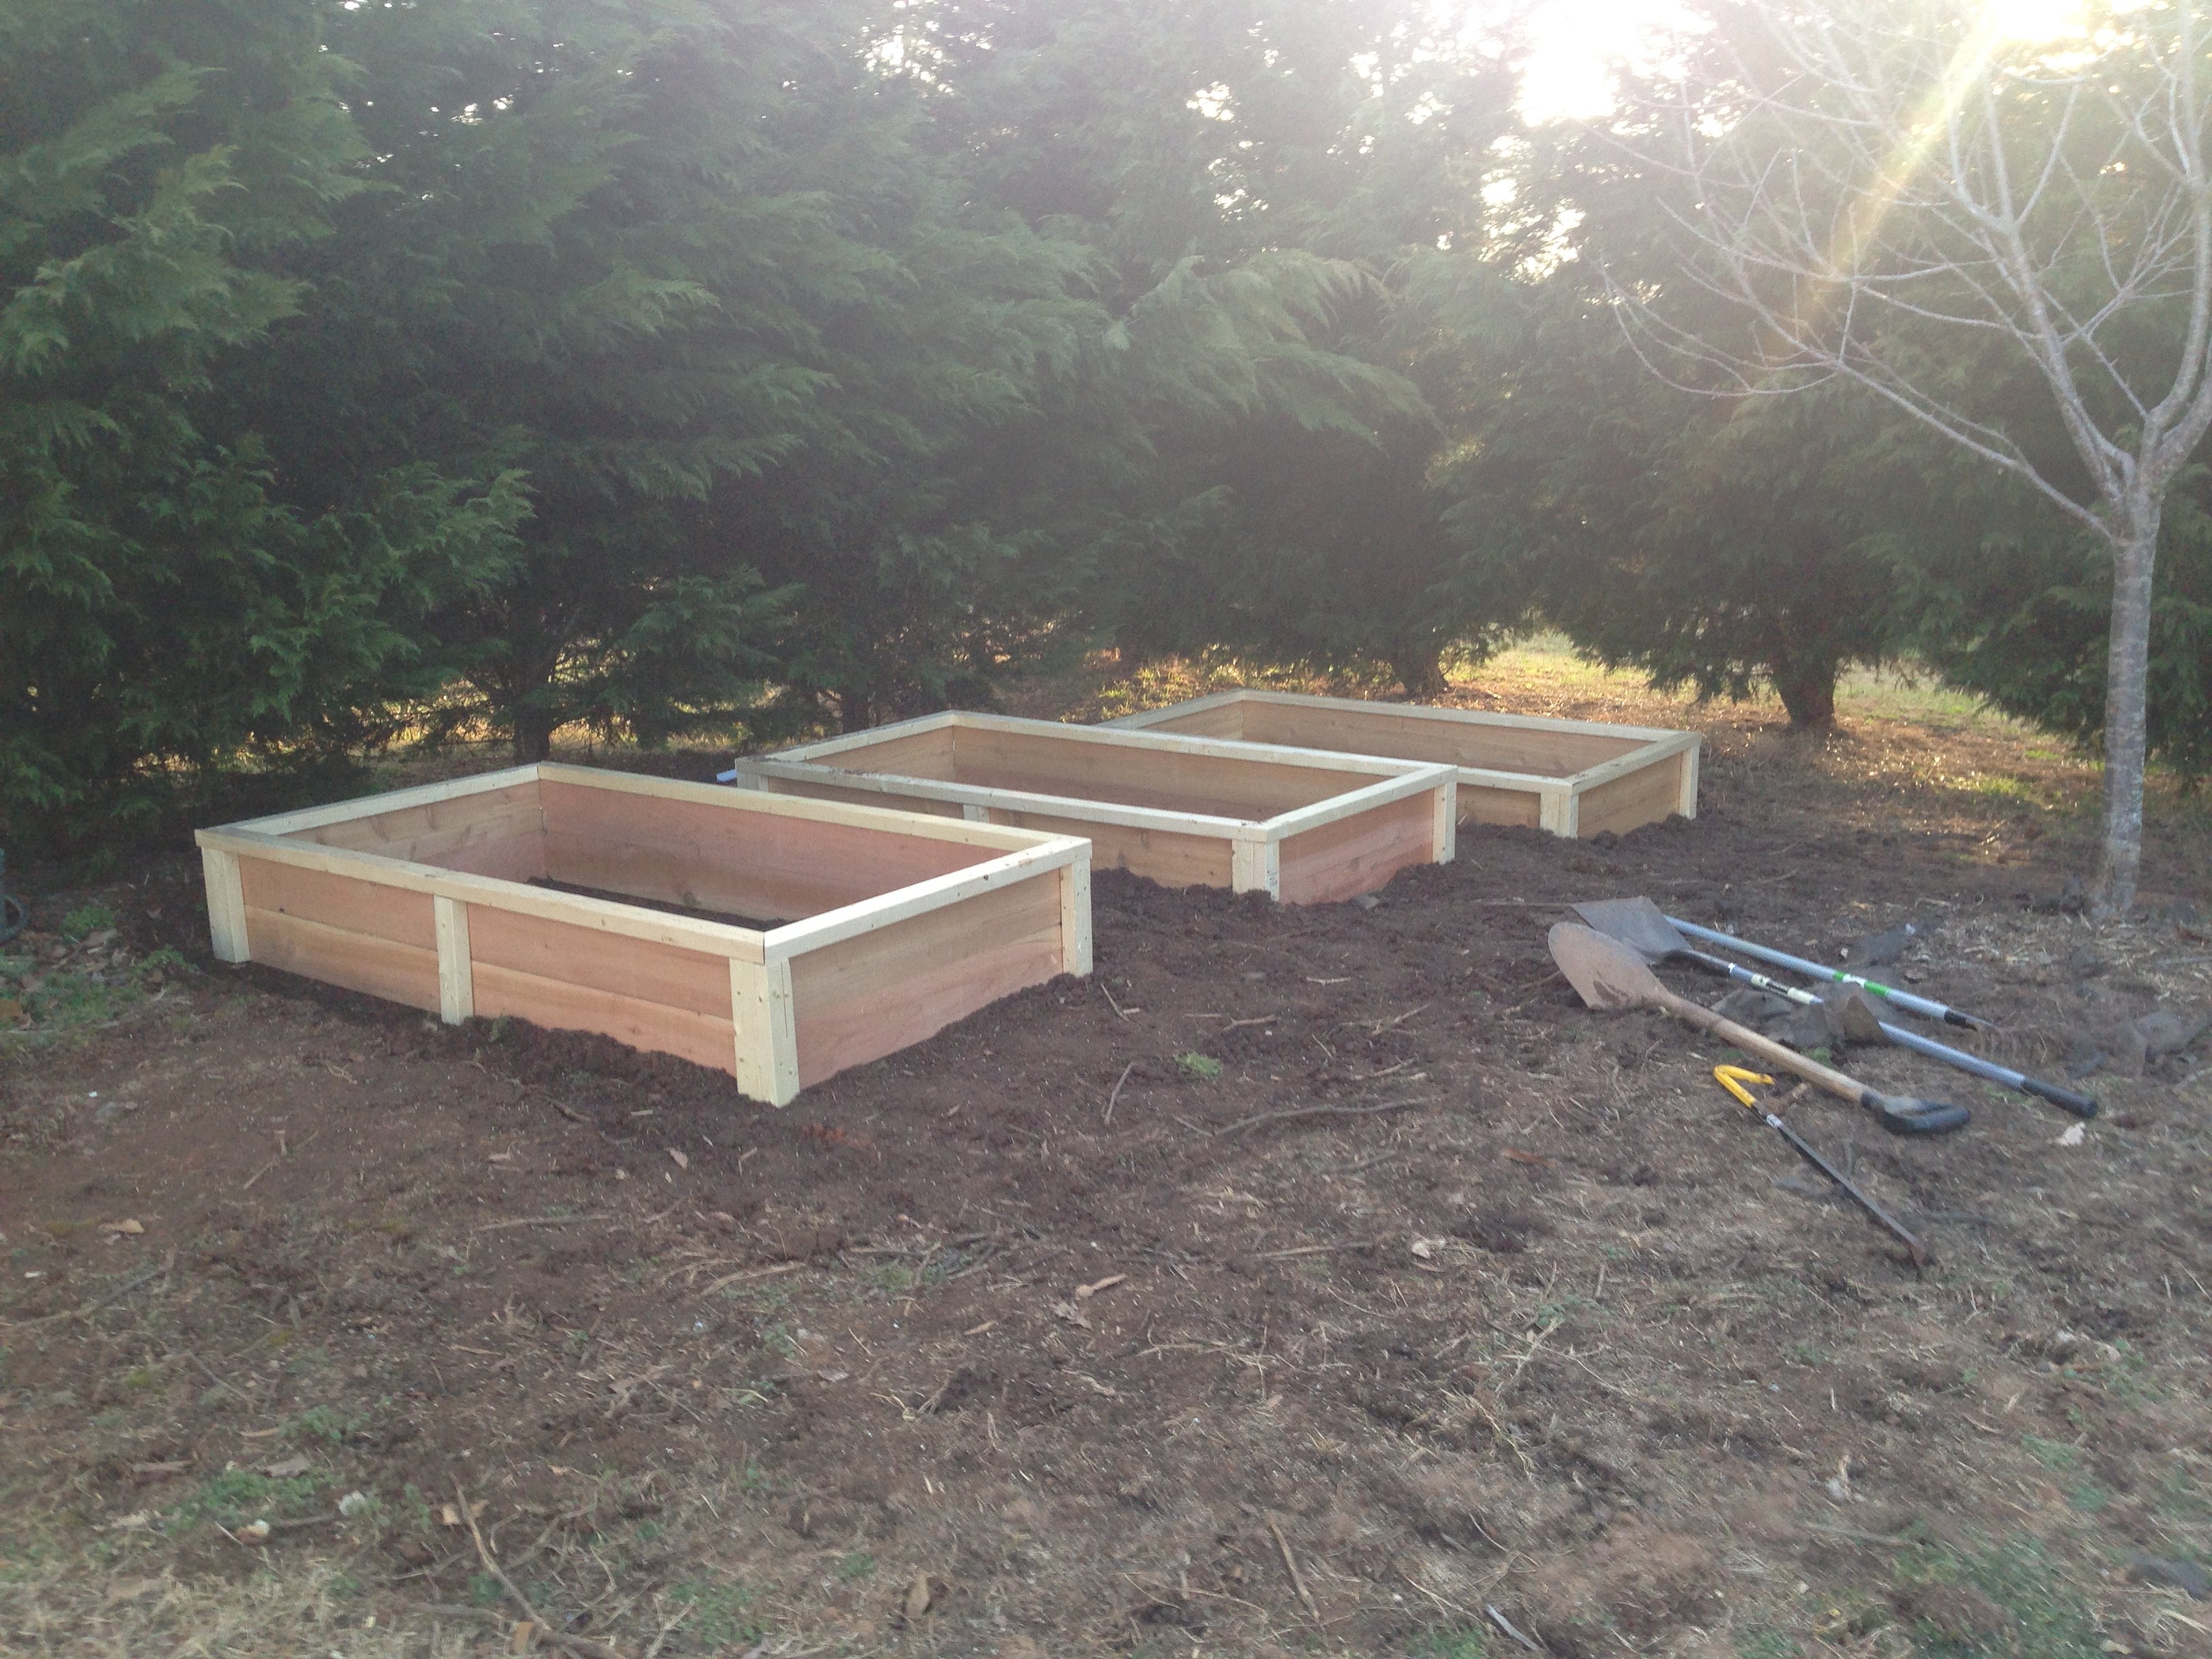
Using Ana's 10 dollar raised garden planter box idea, I made my own using the cedar fence boards and then used 2 x 3 x 8 studs for the L corner supports and mid center support along with top rail. This photo is the first 3, I will have a total of 6 boxes. Will post more as I progress.
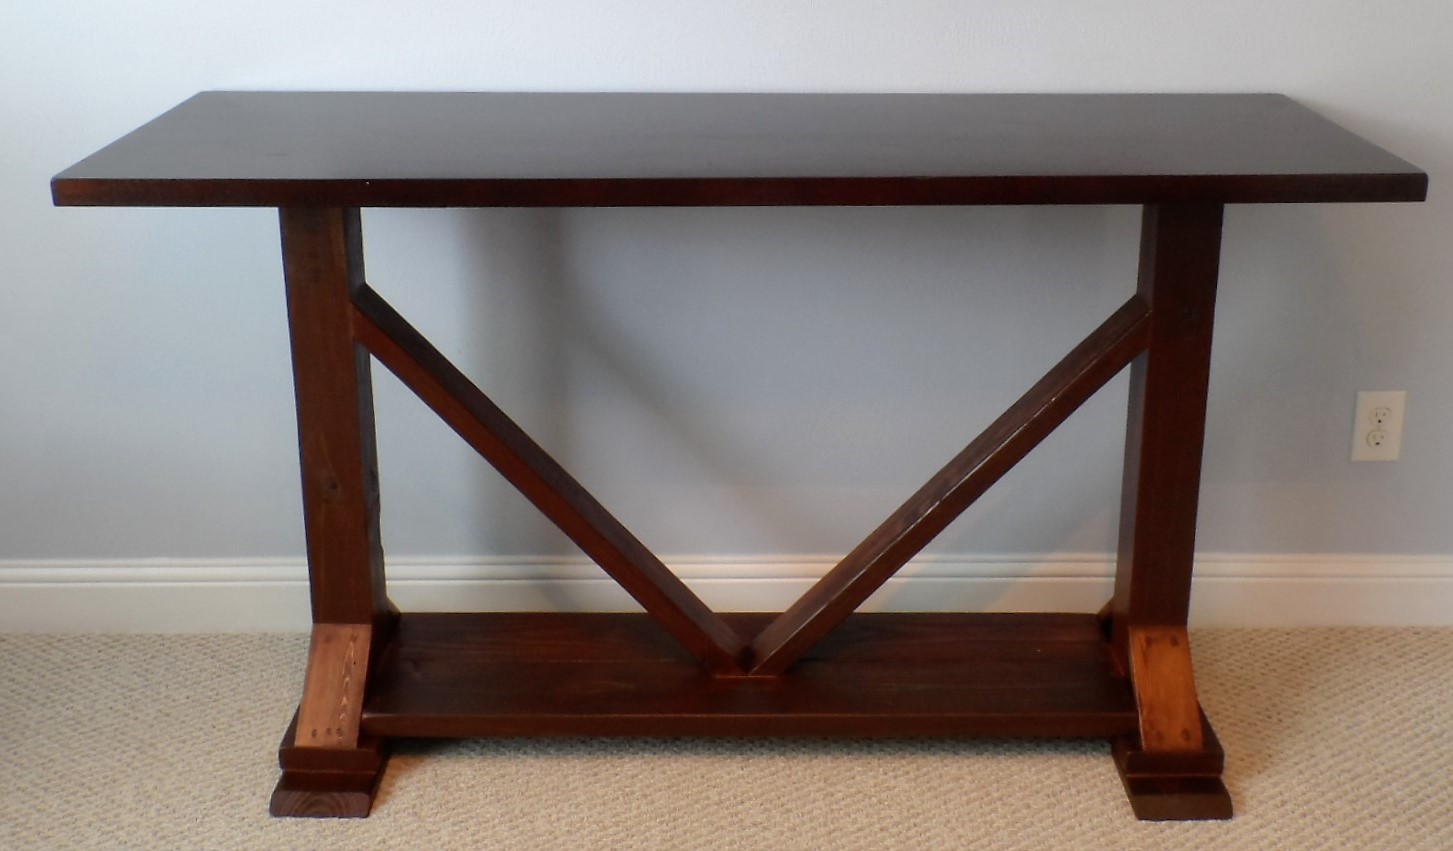
I had been looking for a console table that would compliment my dining table for months. Nothing I found was really working out, but these plans are perfect. The only problem was that I couldn't get the stacked look to work well with the tabletop I had because of the way the apron is made.
Still I love the way it turned out and am glad I found these plans. I also made it taller than a normal console table so it can be multi-purpose for us.
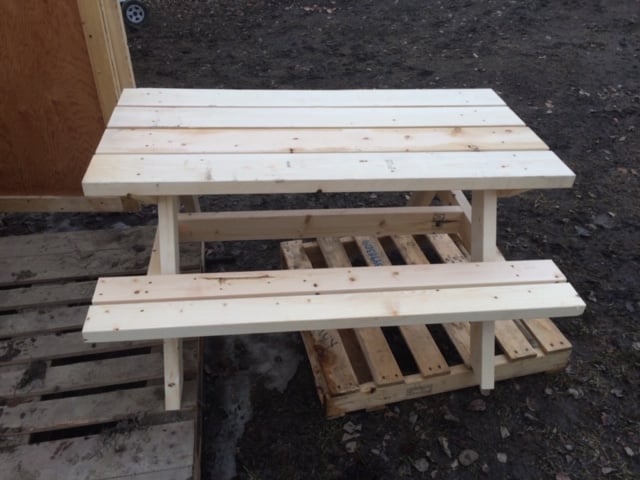
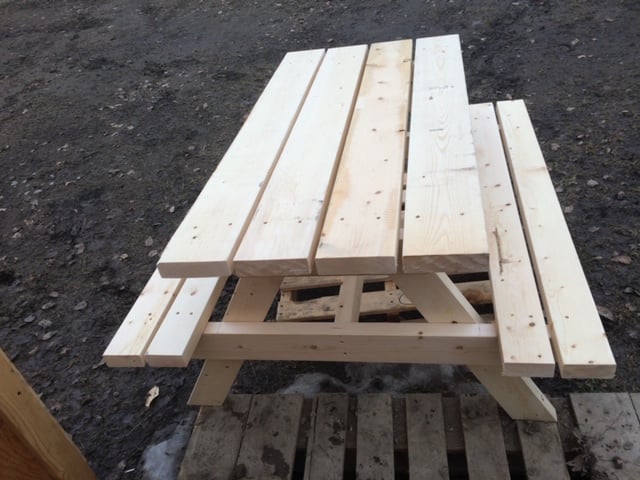
When my kids were stuck between that "baby" picnic table, and the "real" picnic table, we found the plan for this! It was the perfect size, and was a great addition to our backyard!
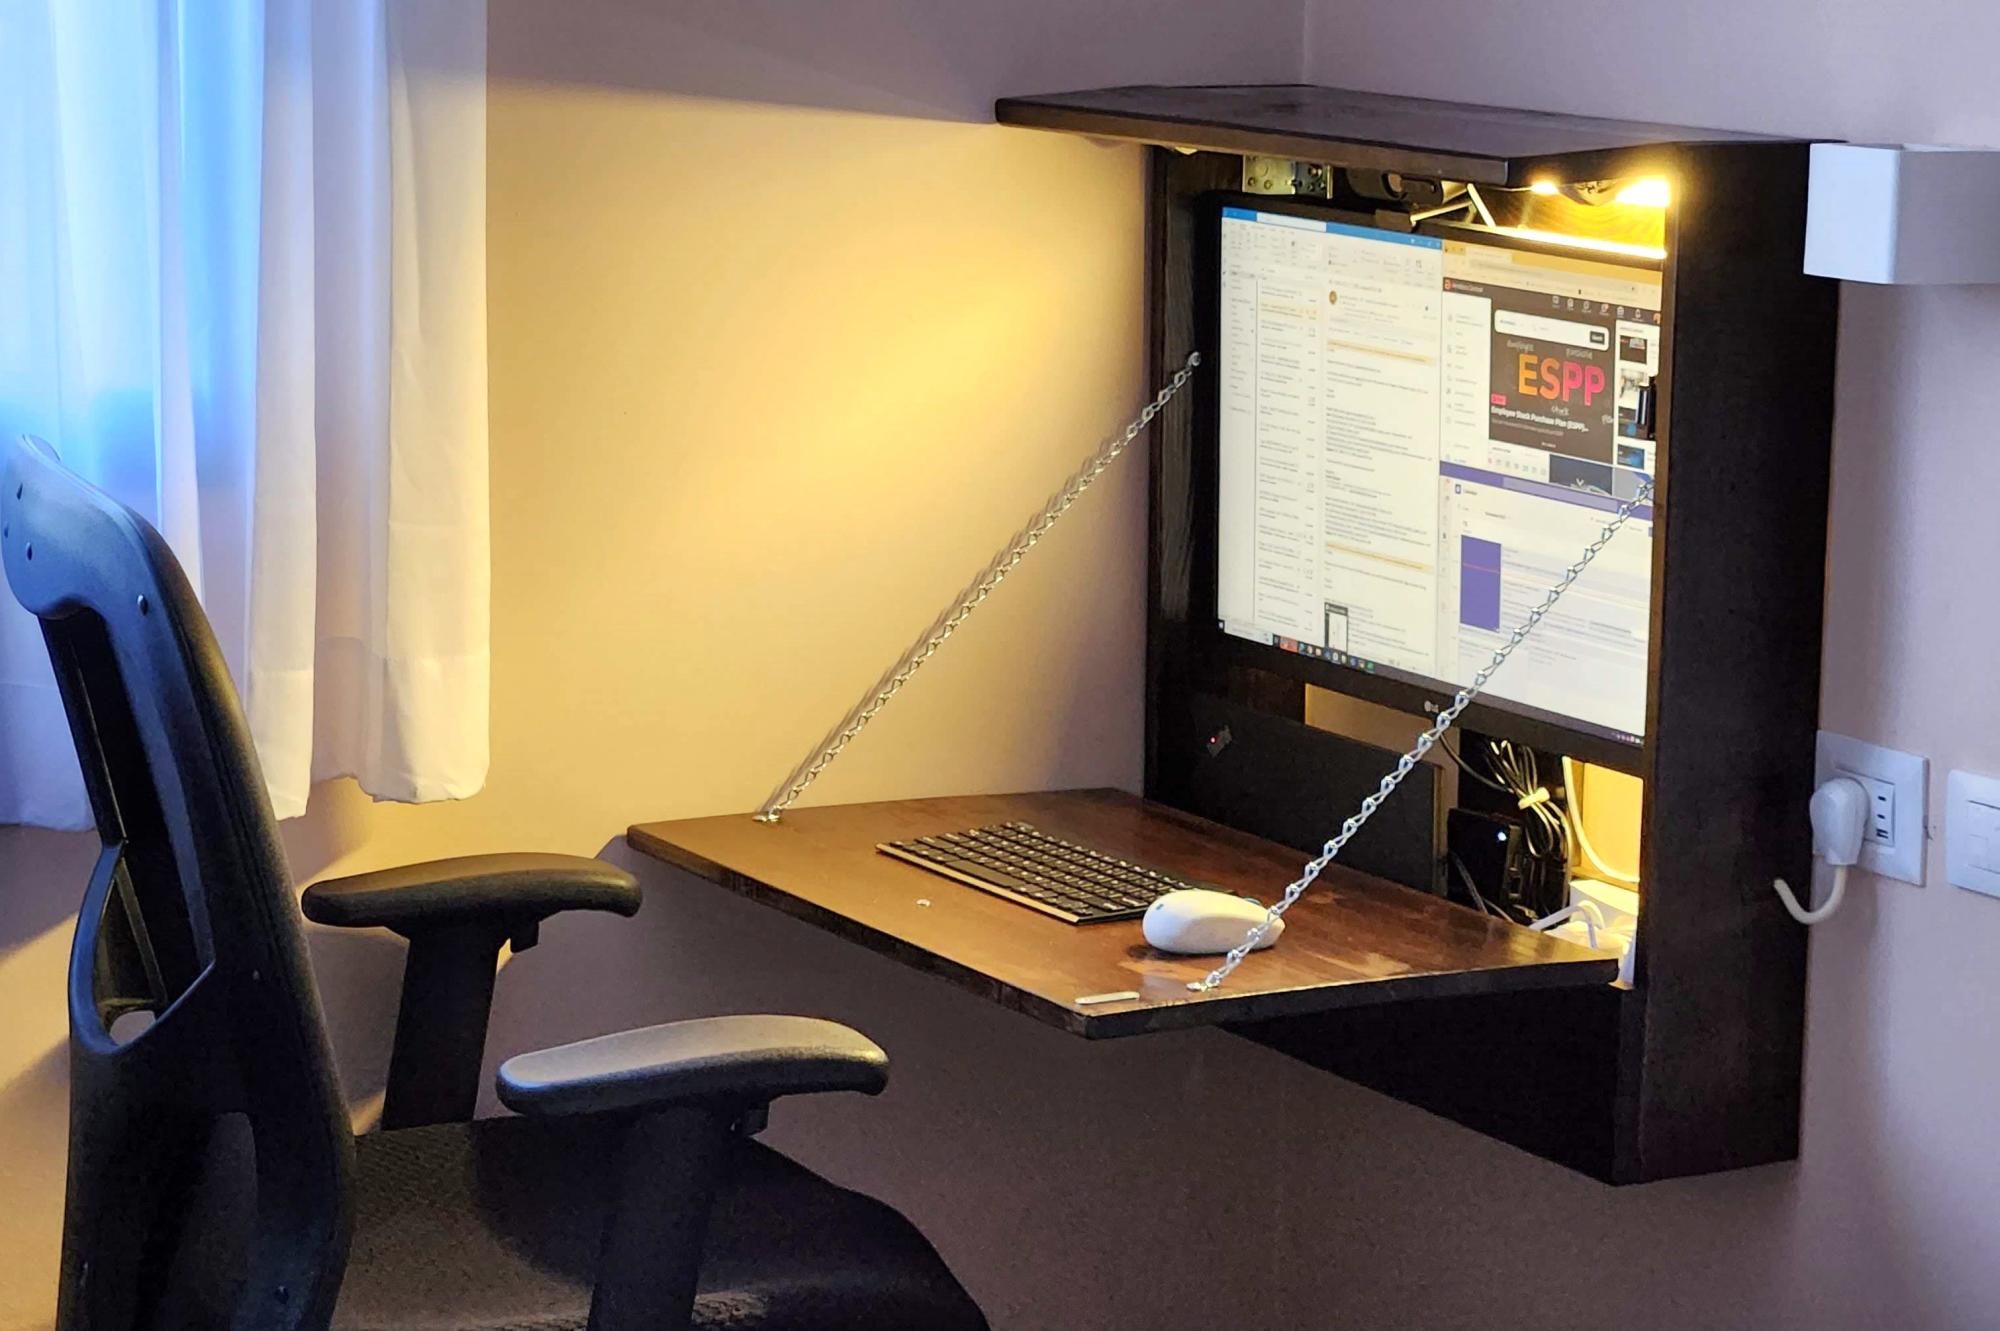
I built this fold-up desk, out of sheer necessity. It's rather unassuming when closed, yet fully functional when open, with built-in power outlets and light, a large screen, a nook for the laptop and the chargers, etc. It's tailored to my needs and specific size limitations, but I think you could make a great general plan of it for anyone needing a small-space hideaway desk.

Although not taken directly from your plans, it was highly inspired by ideas from this great website. Thanks Ana for putting such a great DIY resource together.
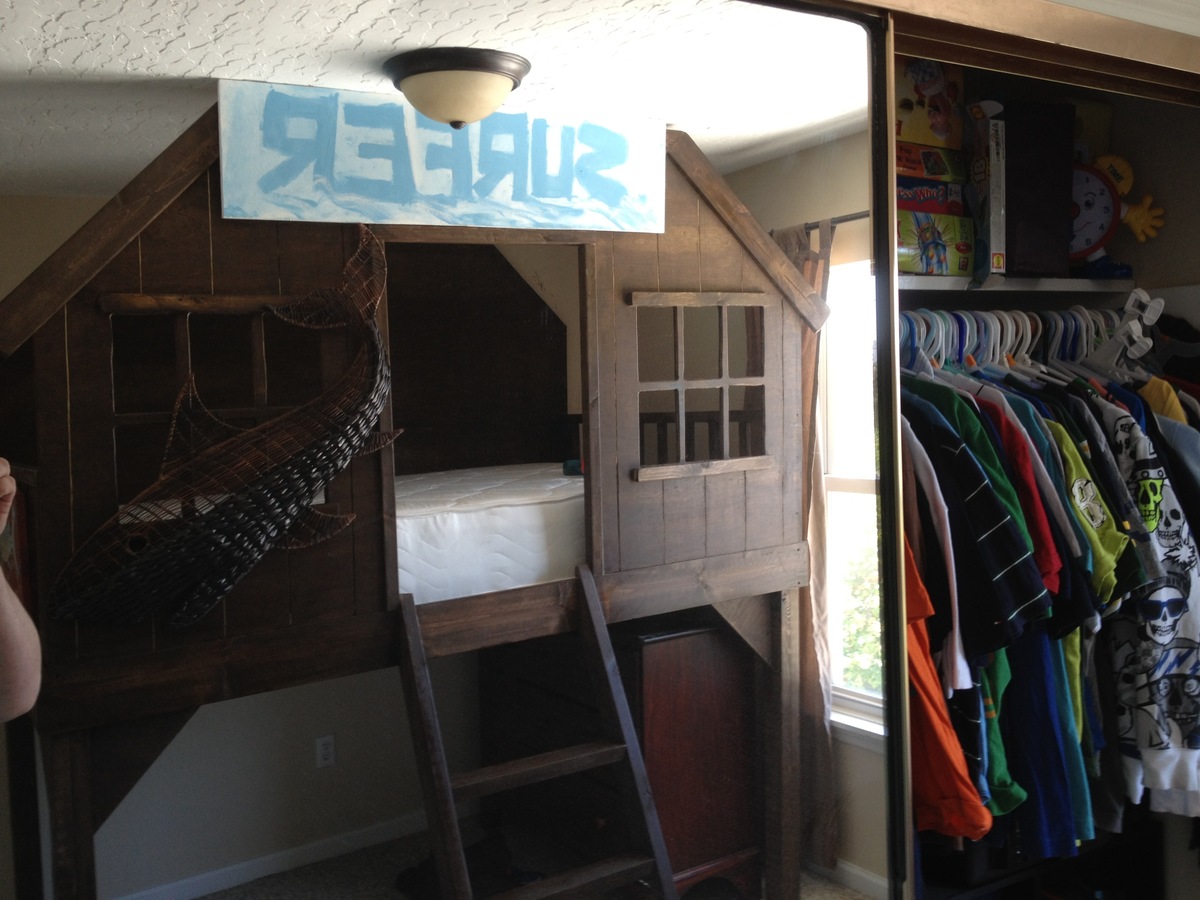
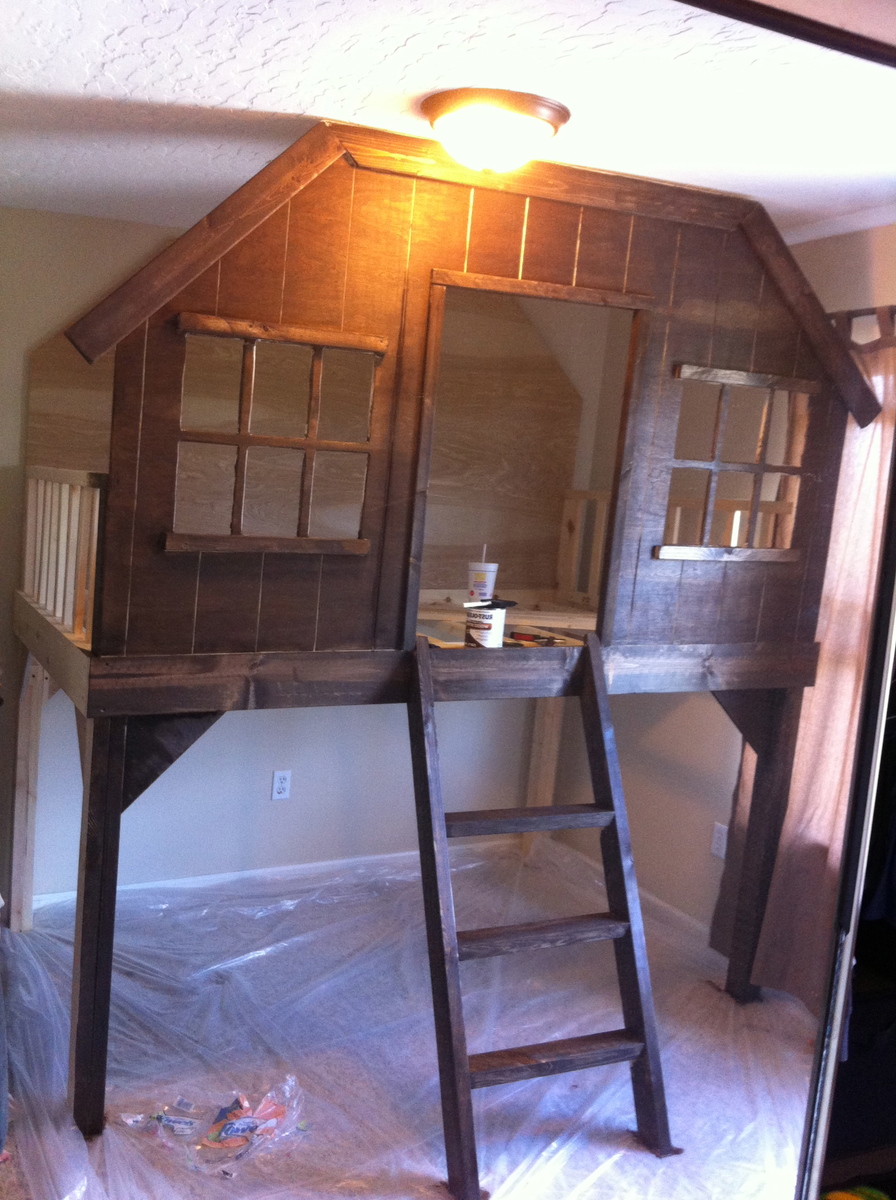
This is a simple, great looking loft bed.
Made with basic tools -> circular saw, drill, jig saw, and pocket hole jig. Lumber was all standard MDF sheet, 2x4s, 1x2s and 2x2s.
I would estimate total cost around $225 or so including all hardware, lumber, paint, etc.
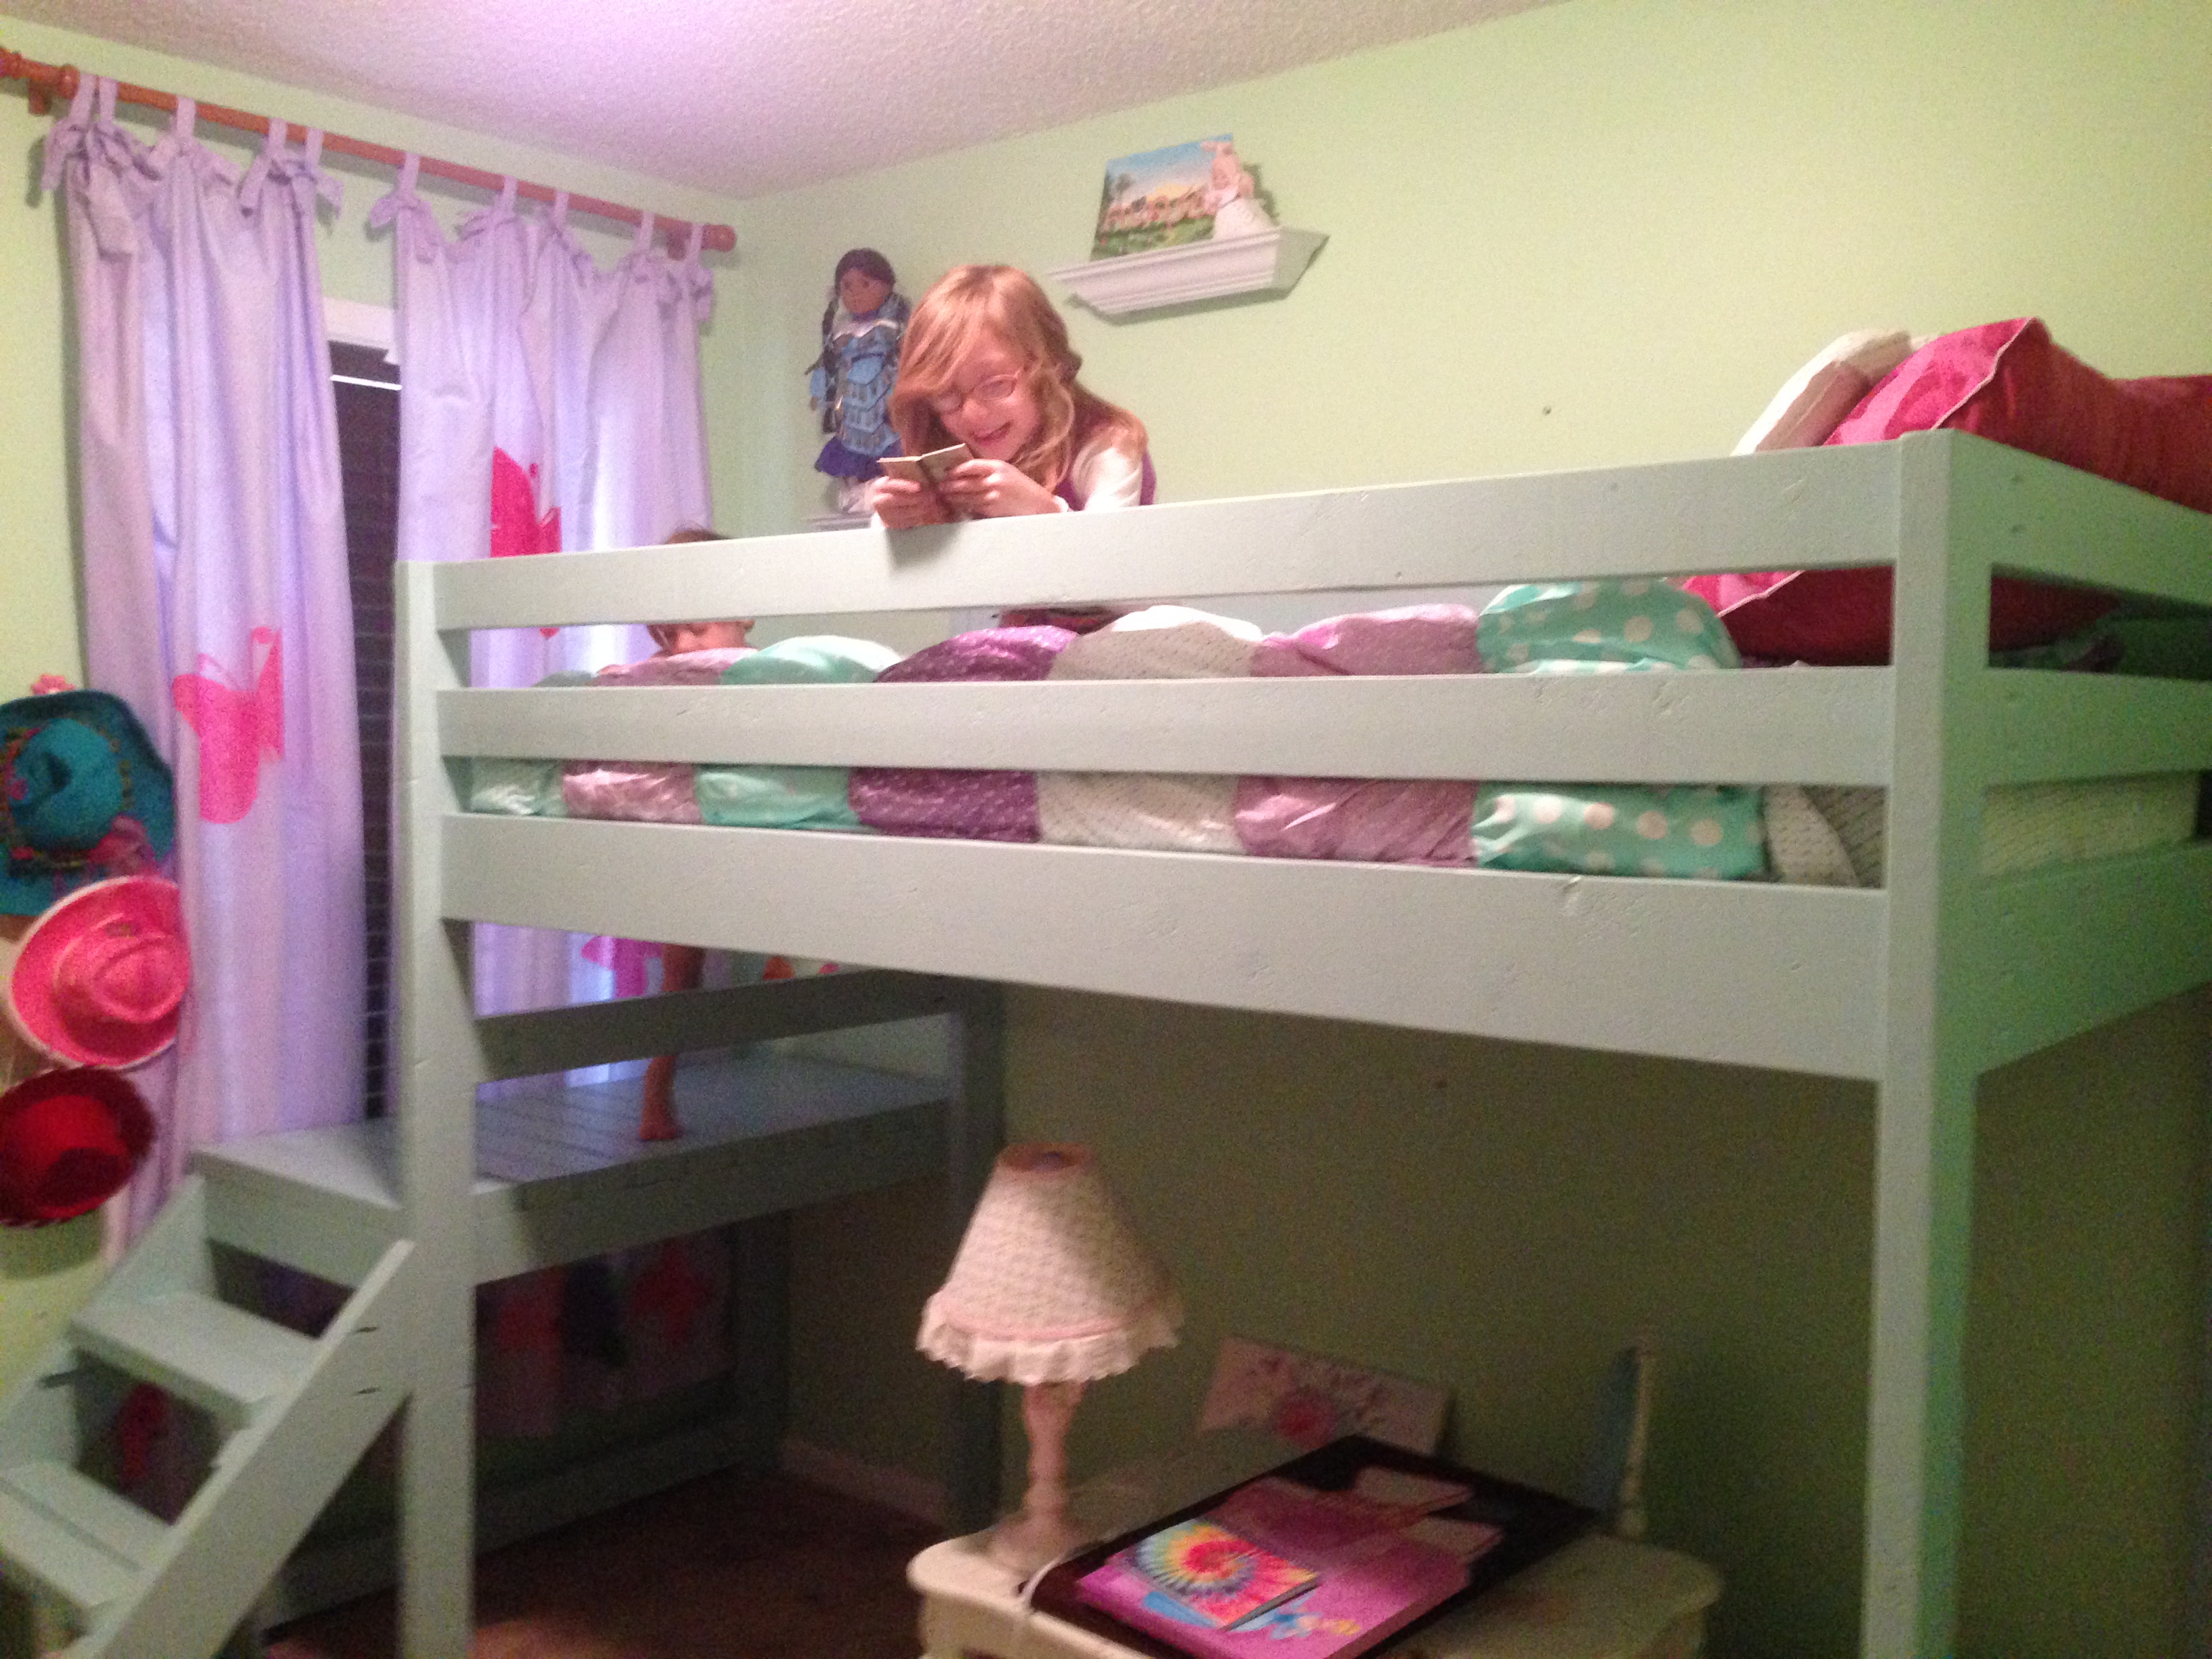
My son is 3, so I designed a set of stairs. They can easily be removed in a year or so and replaced with a ladder.
Next up is a cottage style loft bed for his twin sister!
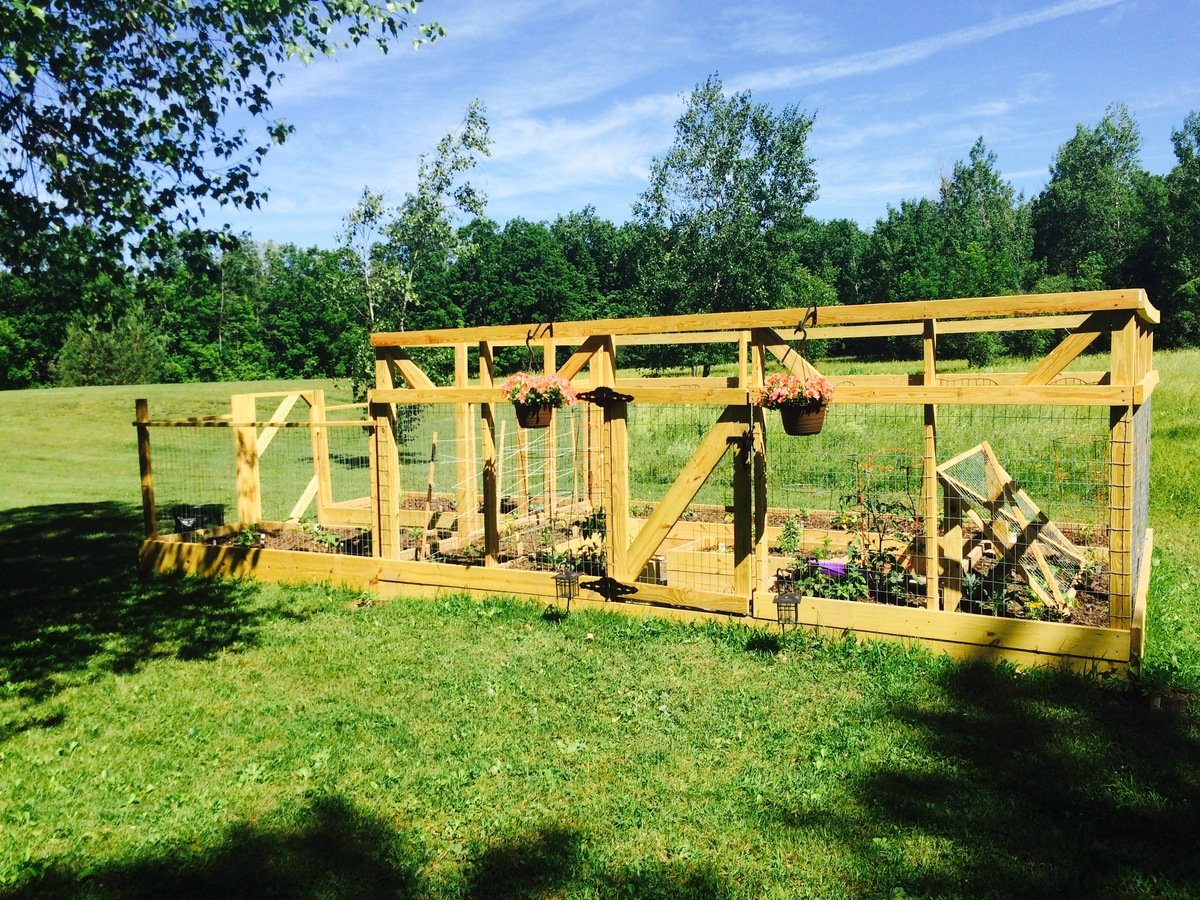
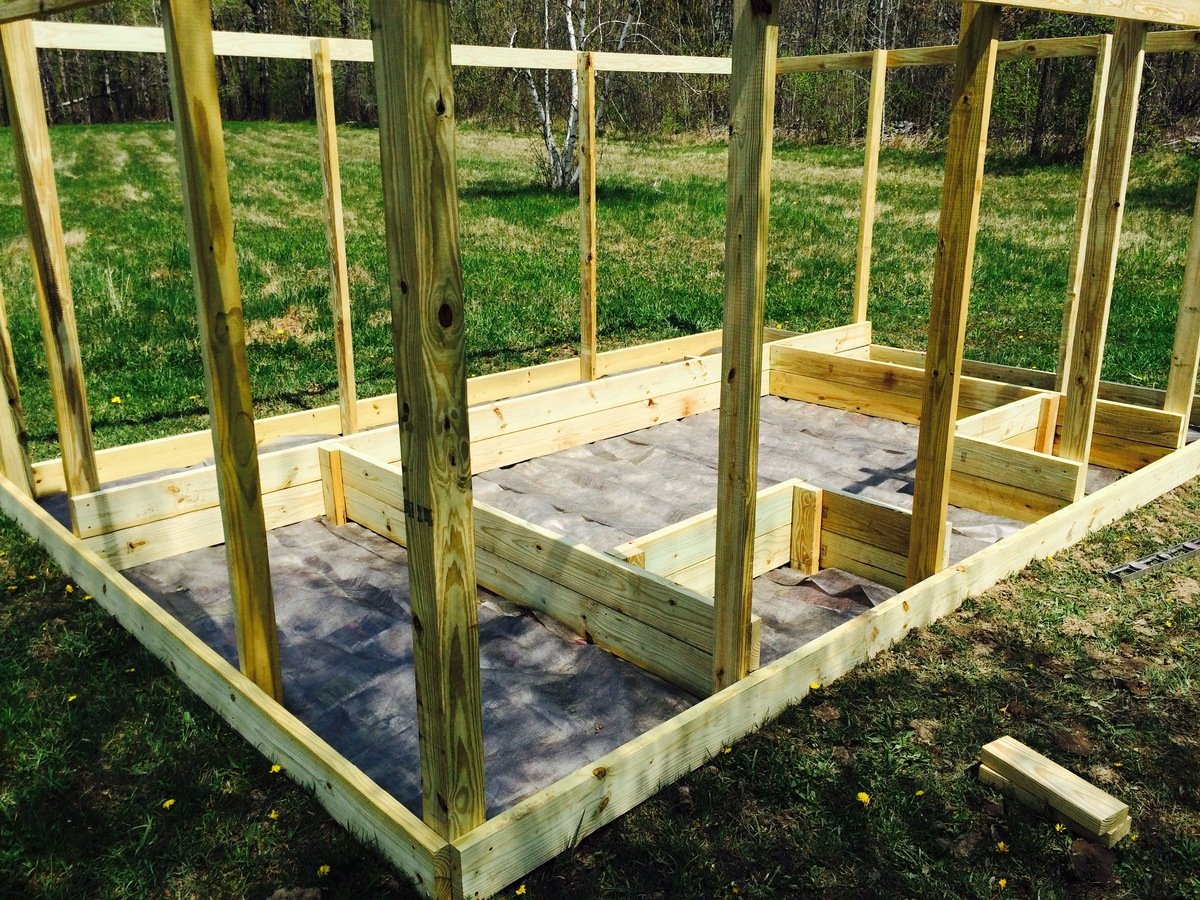
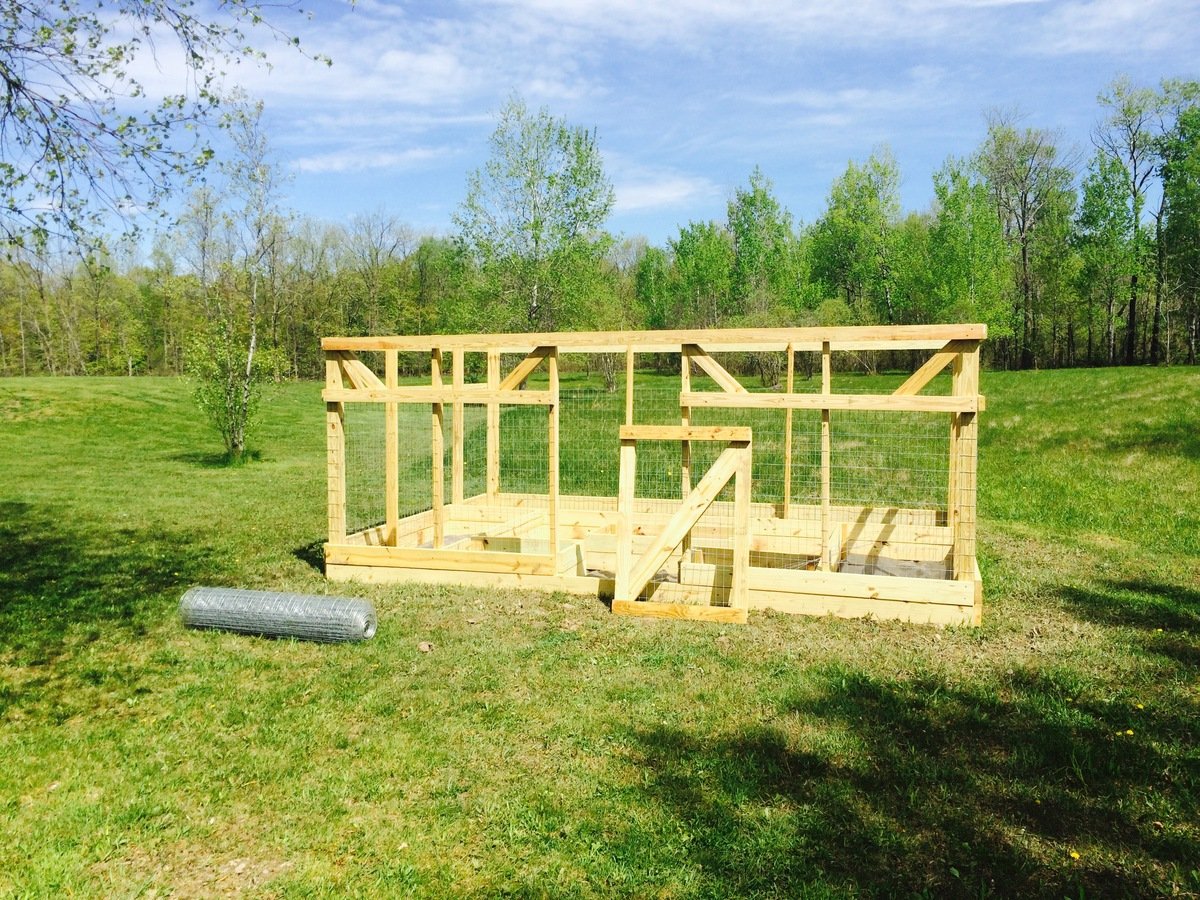
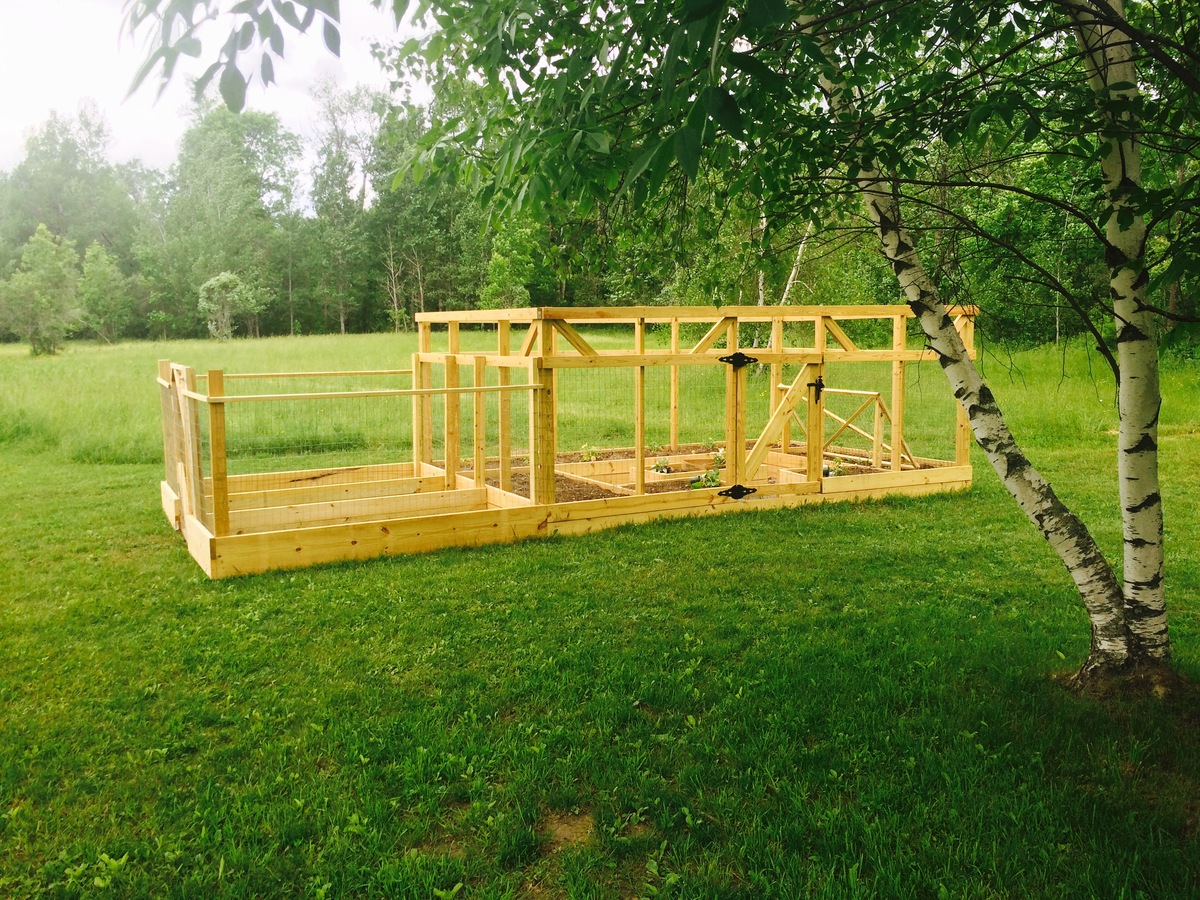
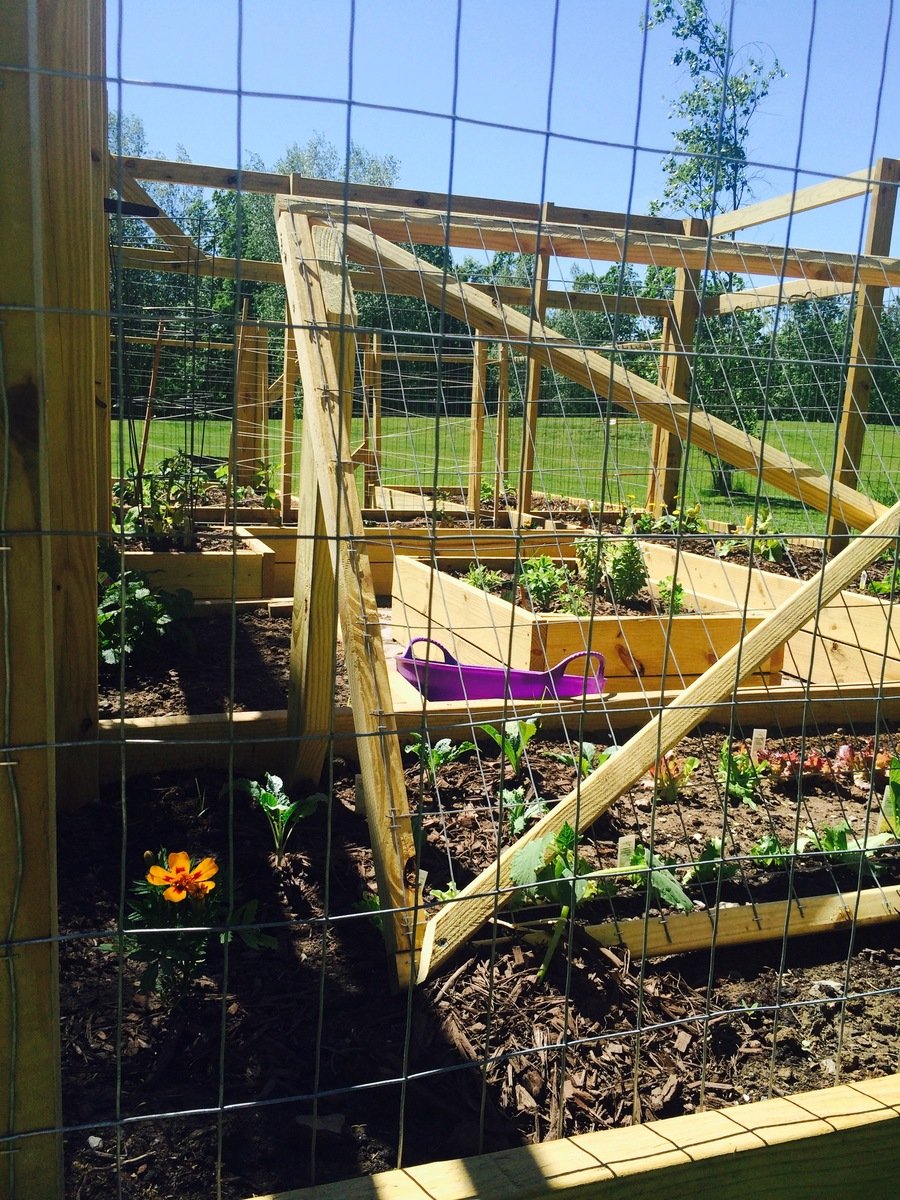
With lots of deer, rabbits, coyotes, and the occasional bear, garden enclosures are a must in our area (although I am not sure they will really help if a bear decides they're interested in our food). As our old garden enclosure was falling down due to the high winds and a quite a few winters in upstate New York, my mom found a horseshoe shaped garden with rasied beds that she loved. So, after searching around for a good plan, I found Ana White's collaboration with Home Depot for this enclosure.
While the original plan was far too small for our needs, I was able to expand the length of the enclosure creating enough room to add two small beds on either side of the door and a center bed, which is perfect for herbs. The build was not difficult as I was able to do most of it by myself (with the exception of contructing the frame and attaching the door) and I am sure this would go much quicker with an extra set of hands. As I did not have a large chunk of time to devote to this project, it did take me quite some time stretched over a few weeks. Nonetheless, I am very happy with how it turned out.
After construction, my family got a little garden happy and decided we wanted to plant even more vegetables than we had originally planned. So, we created a much simpler but nonetheless less pest-proof enclosure for two more beds to the left of our original project (shown in the photos).
Although this was an expensive project (exact price is unkown), it is quite sturdy and we expect it to last a long time and provide lots of vegetables. We added some hanging baskets for decoration and decided next year we will add some morning glories around the outside corners for some extra shade during the afternoons. Some minor alterations also included a latch that allows us to open and close the door from both sides, we actually picked up a gate latch kit for this part of the project, and using welded wire fencing instead of chicken wire. While the welded wire added to the cost, it will hold up better to the wind and snow and is still protective enough to keep out our main predators.
Thanks so much for the plans Ana! In the begining, our neighbors joked we were building a guest house :). I have included some photos from throughout the build as well.

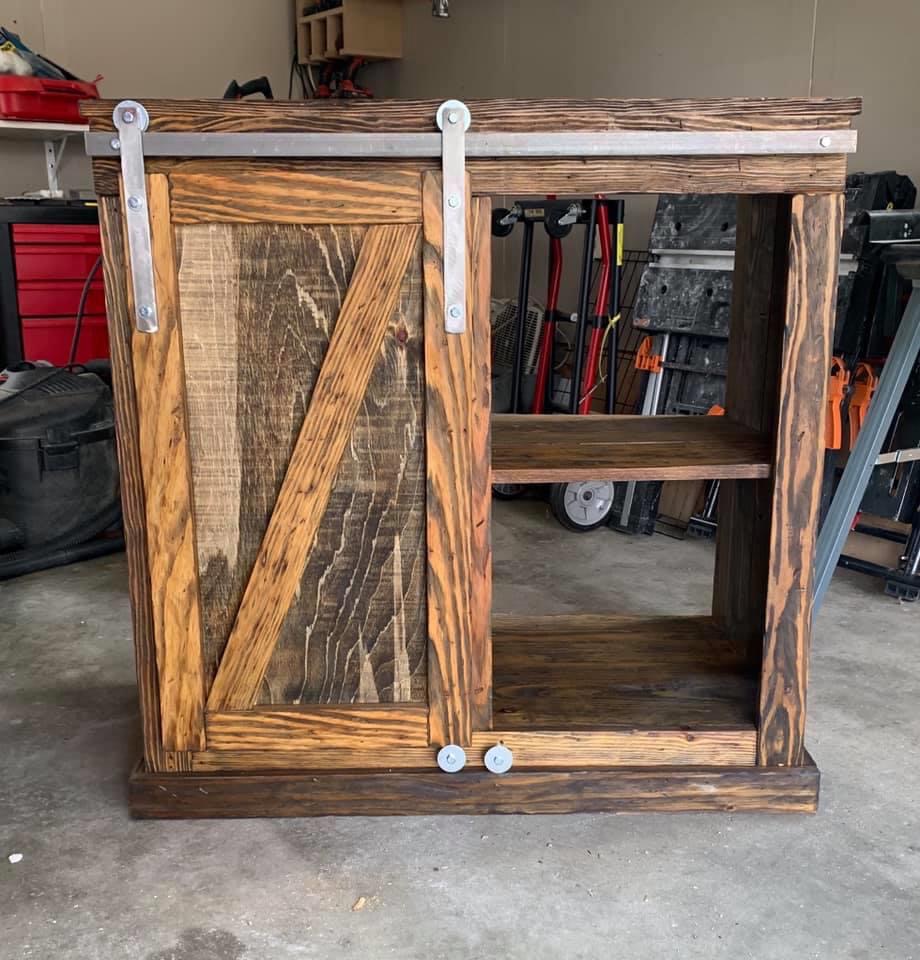
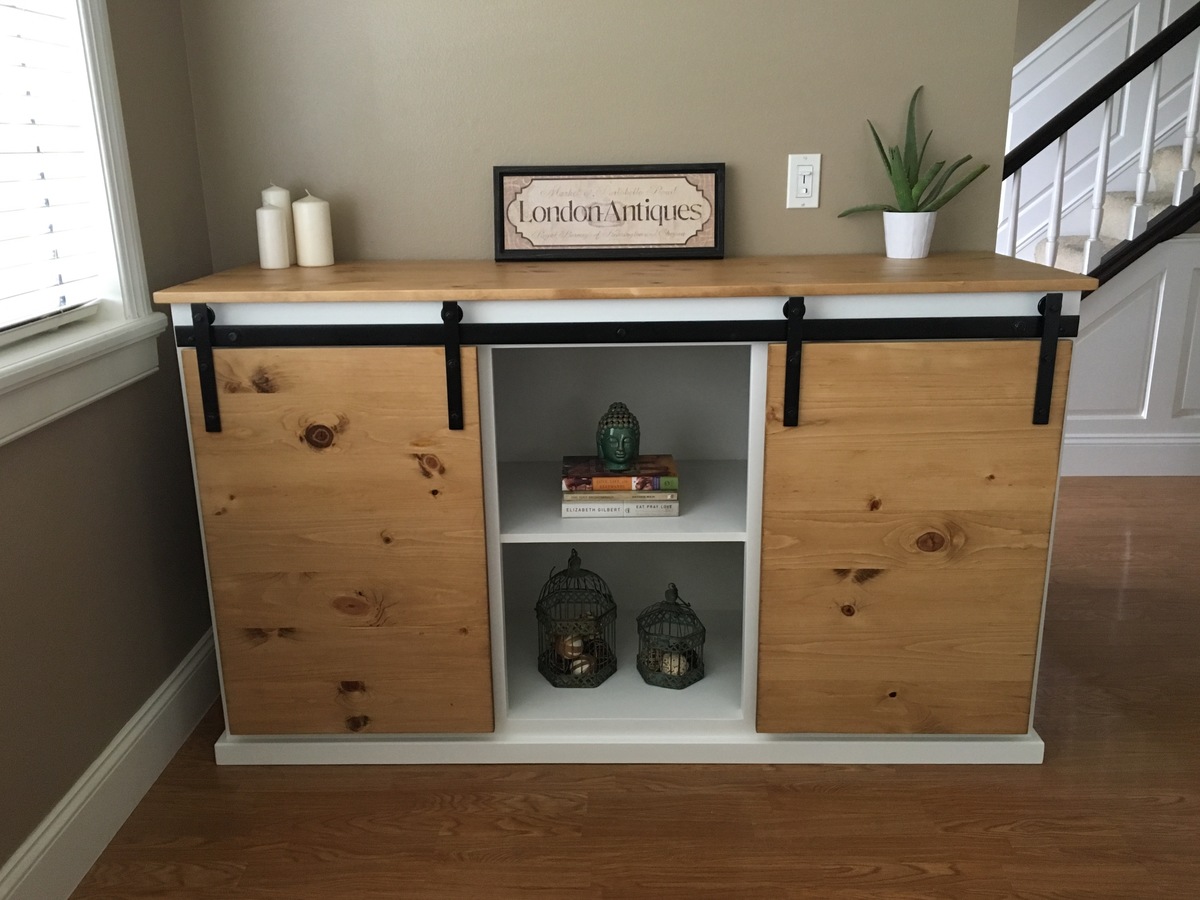
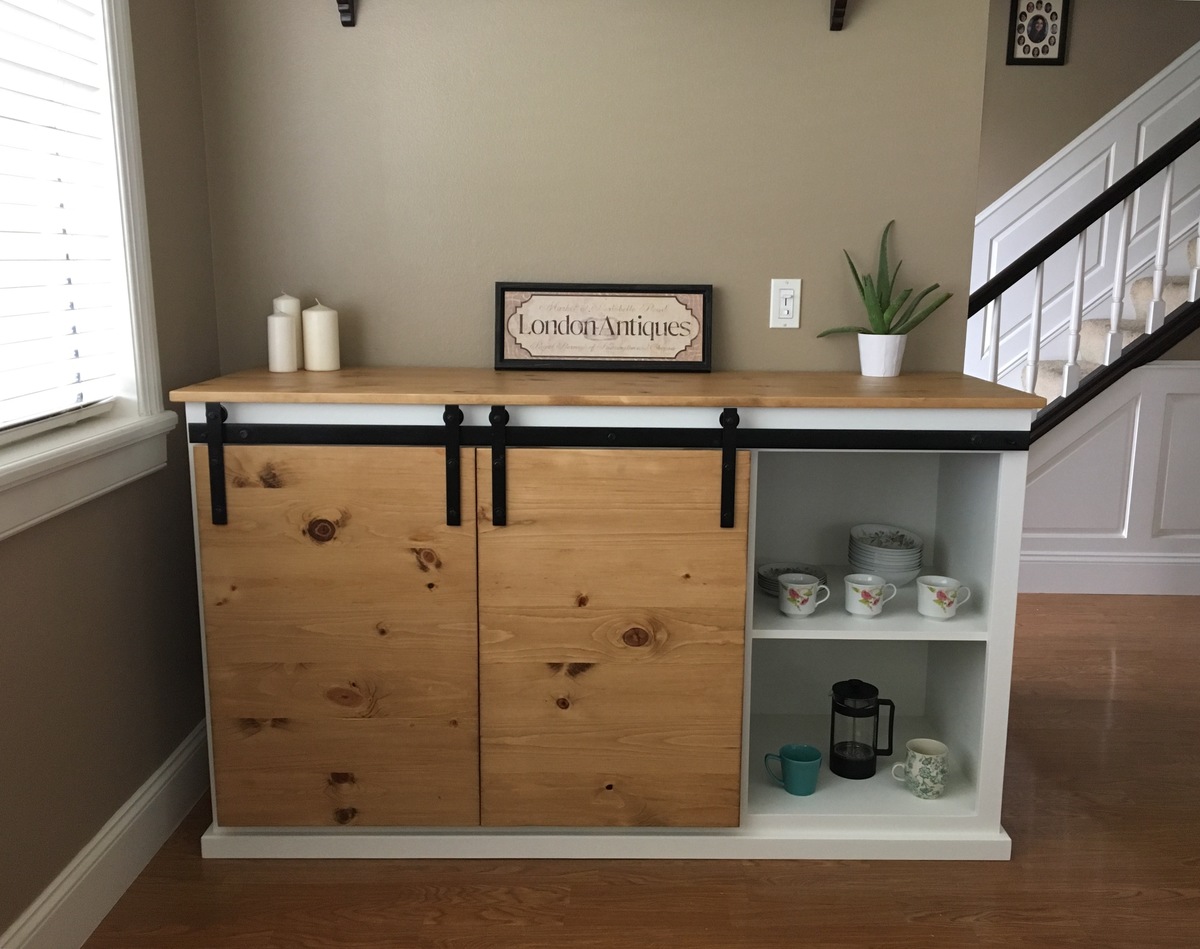
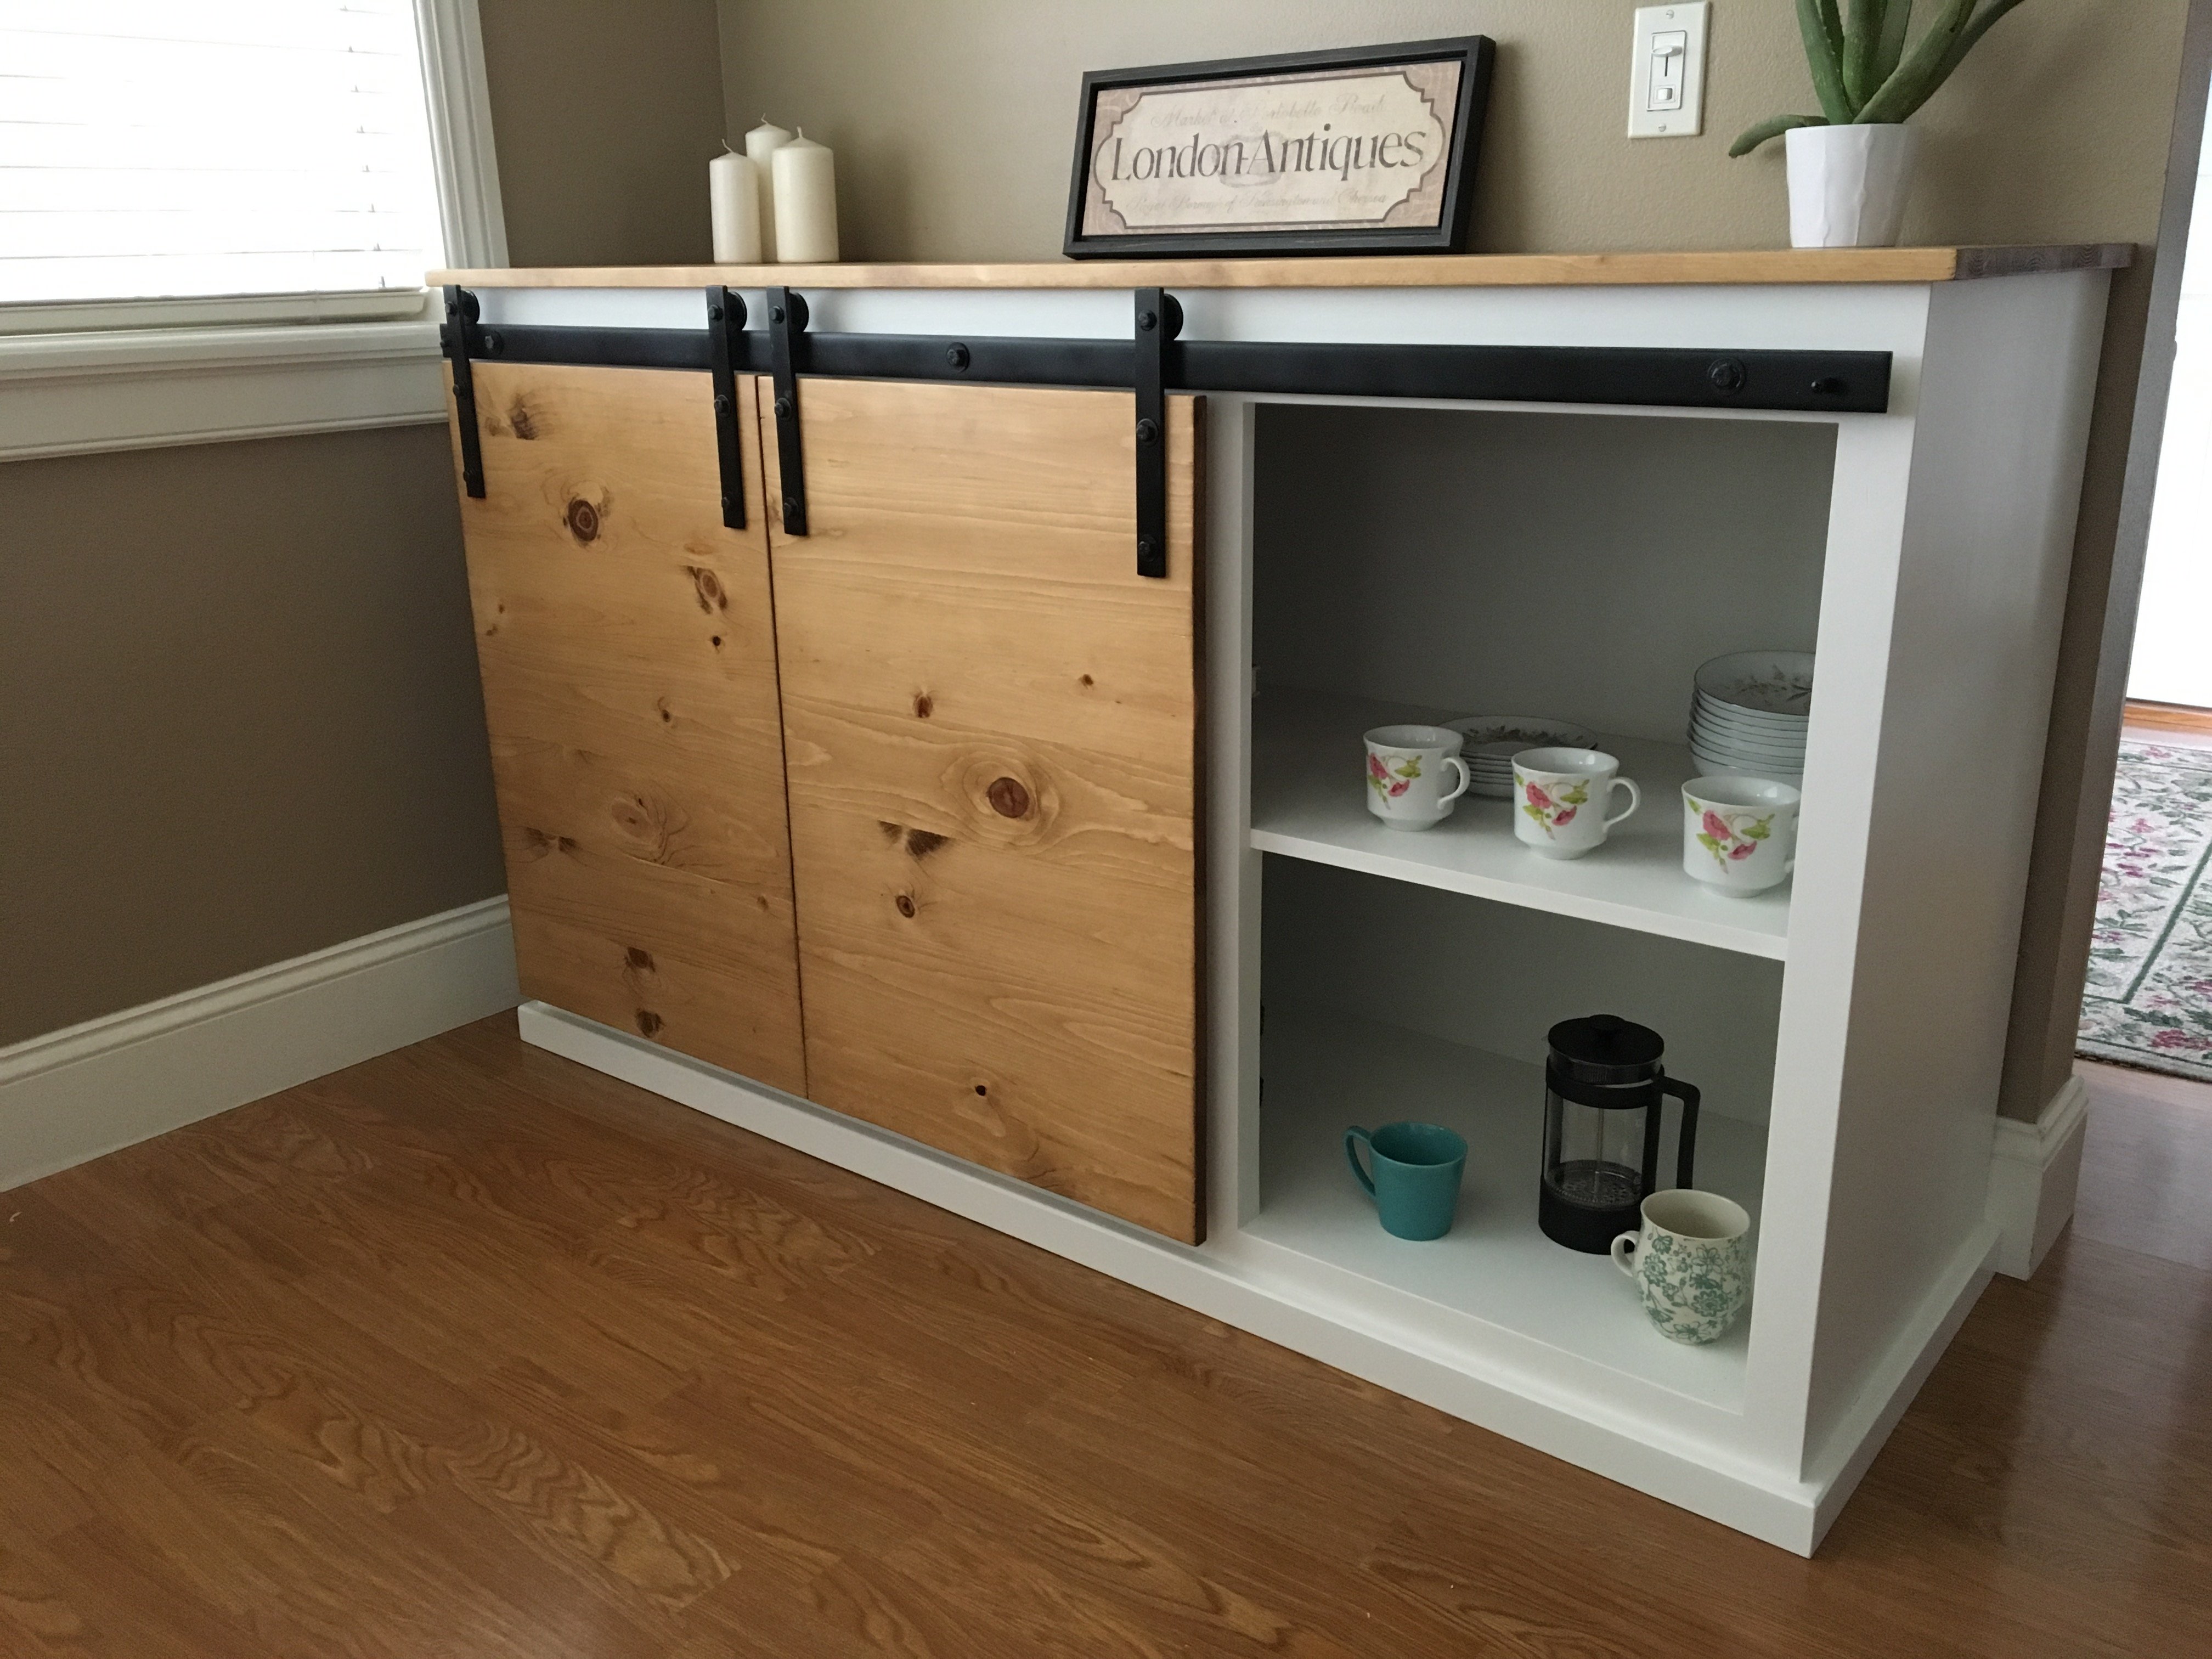
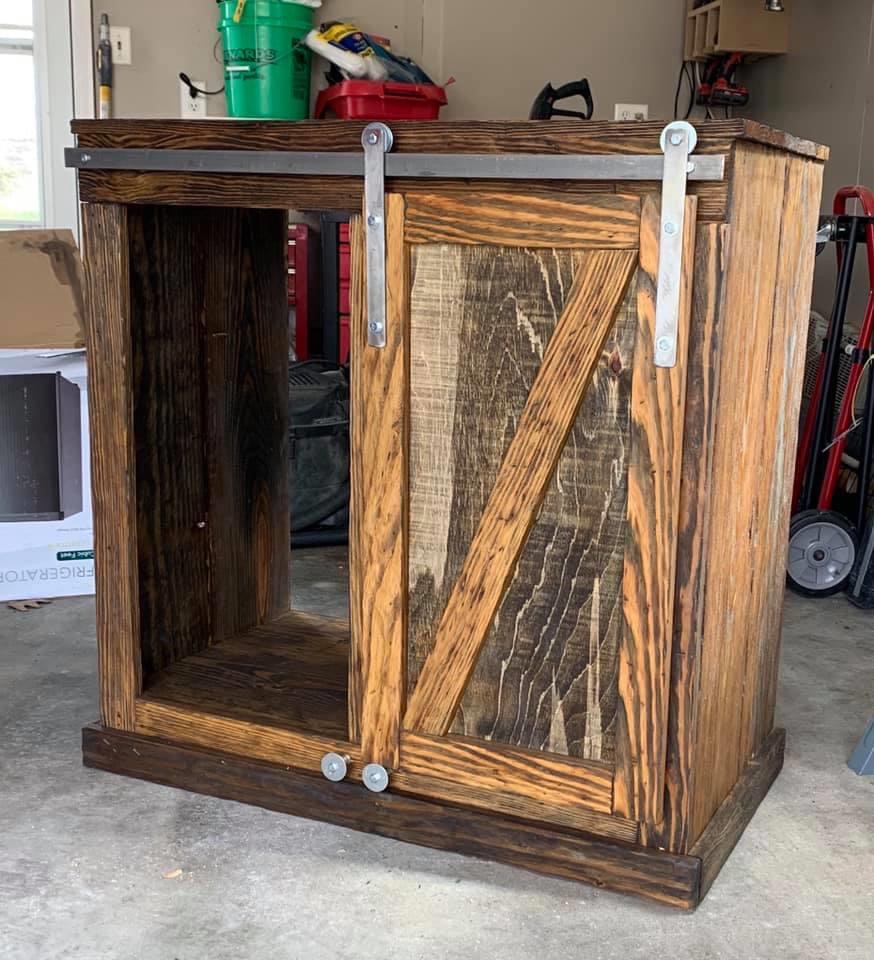
I used the plans for the mini frig/microwave cabinet. I modify the length and width because of the scrap wood I used. The wood I used was from our basement stairs that we retreaded. I used a cup wire brush on the wood to give it the rustic look. The barn door hardware was from Ana’s tutorial video (turned out great). First coat of stain was honey oak, I left it on for a couple of minute then wiped it off. Second coat was ebony, same technique as the first coat. Once the stained dried used a spray matte poly on the top, did 4 coats, sanding with a 800 grit between coats. Hope you’ll like it
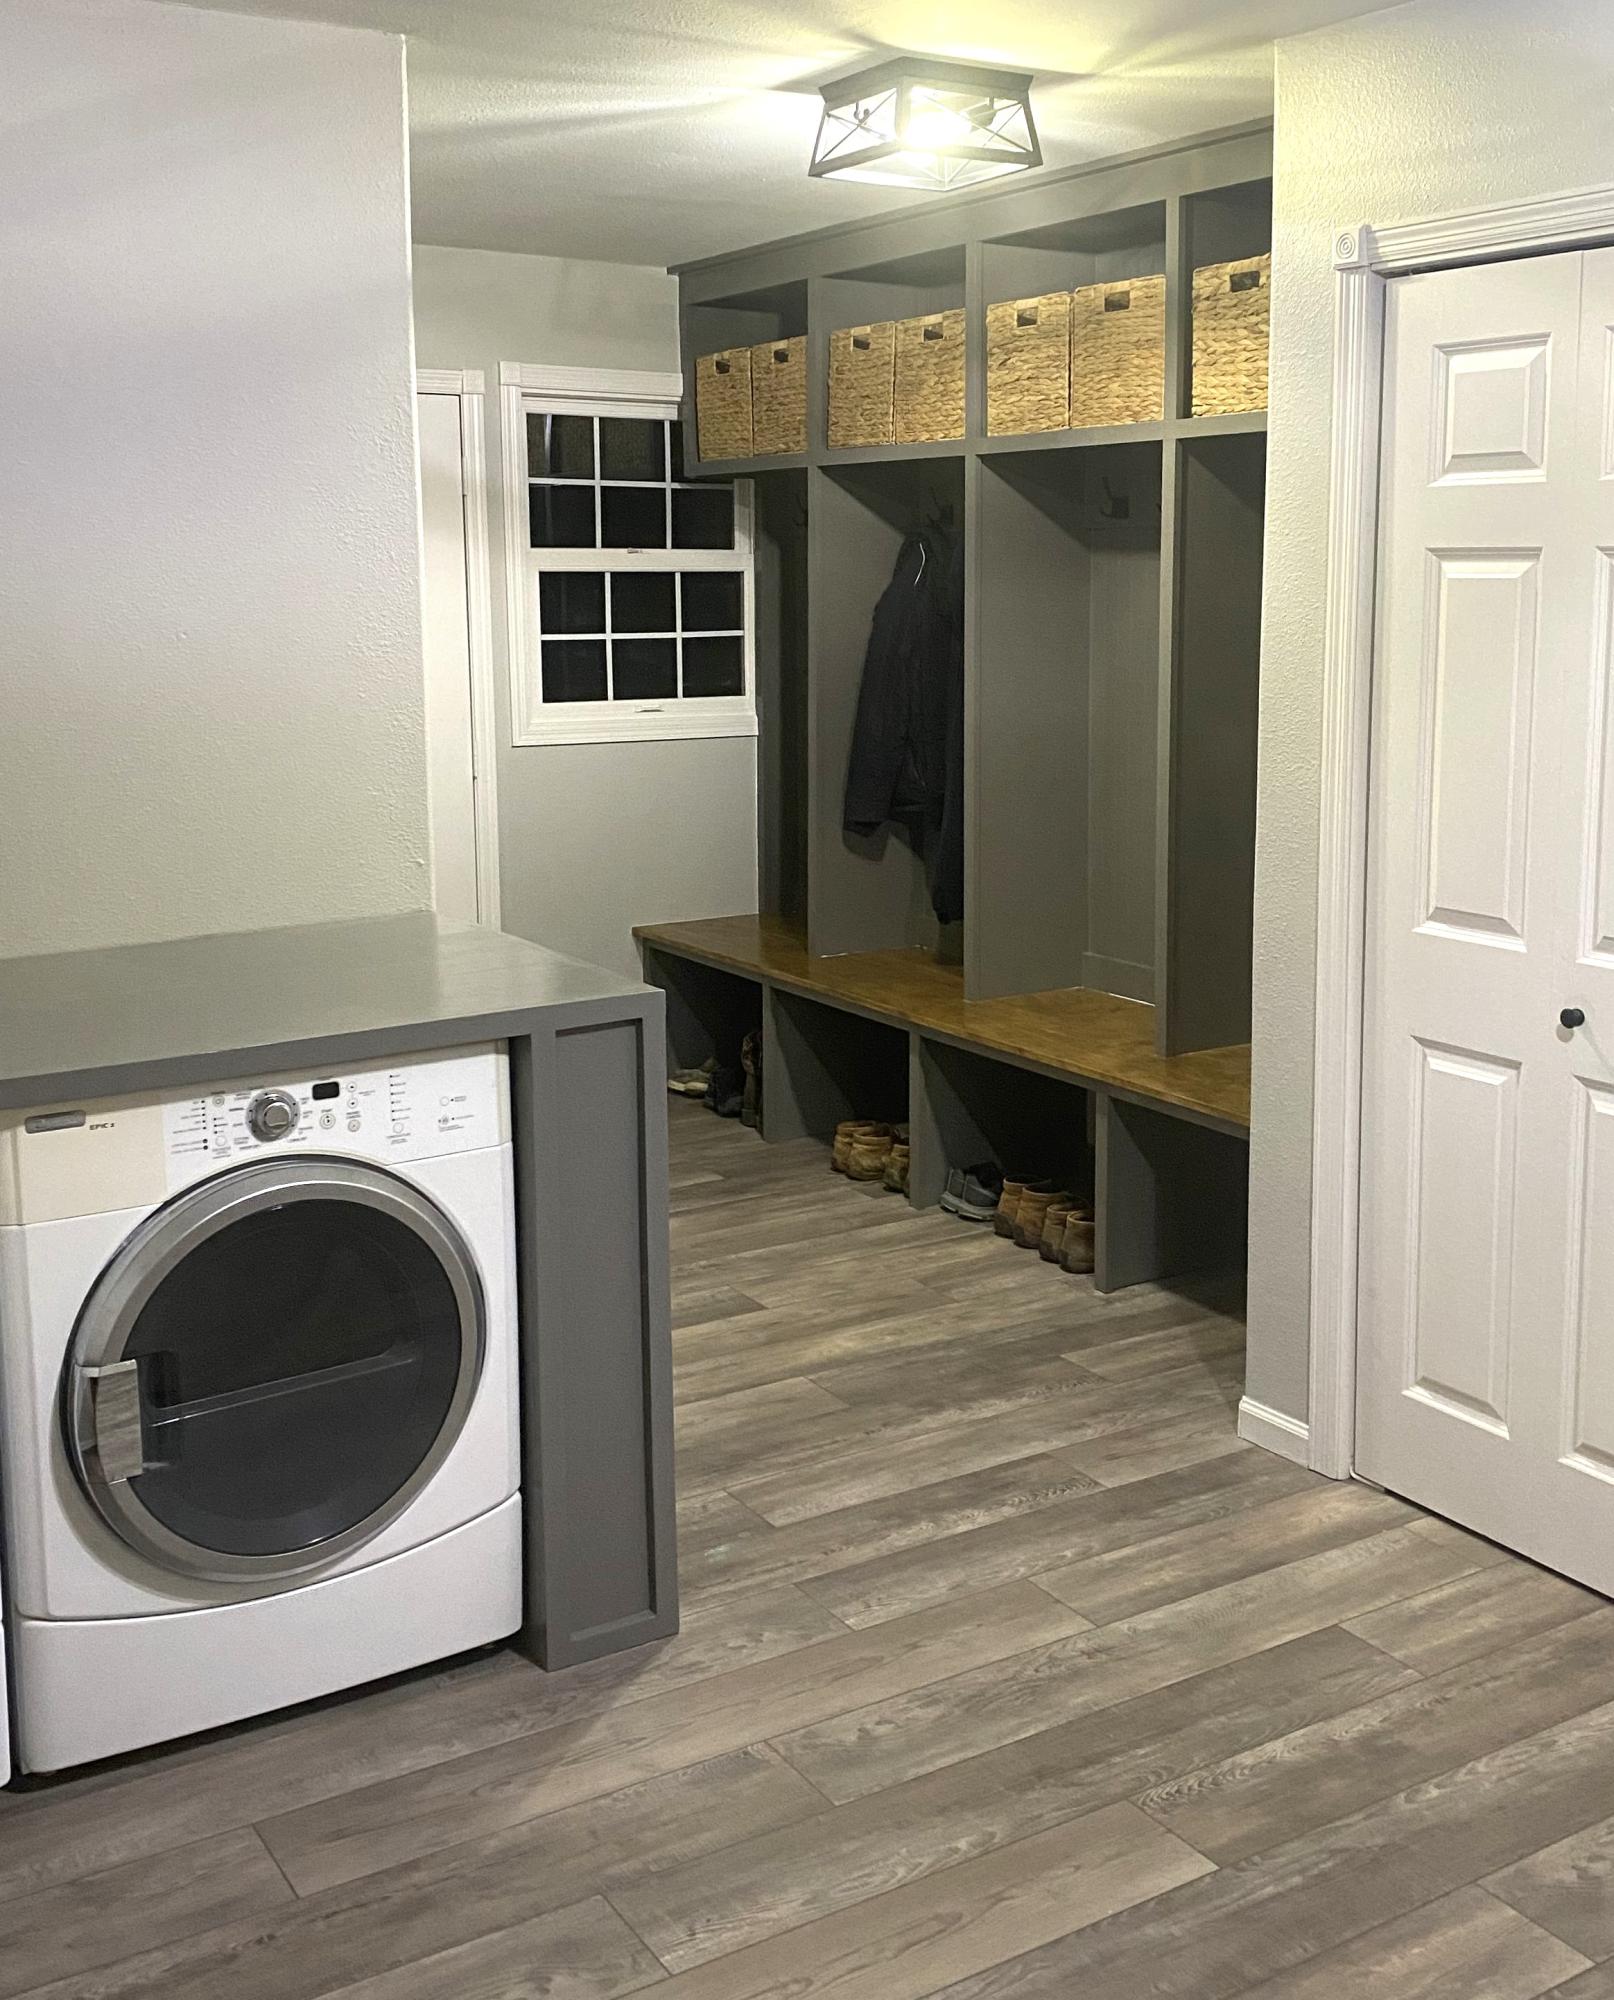
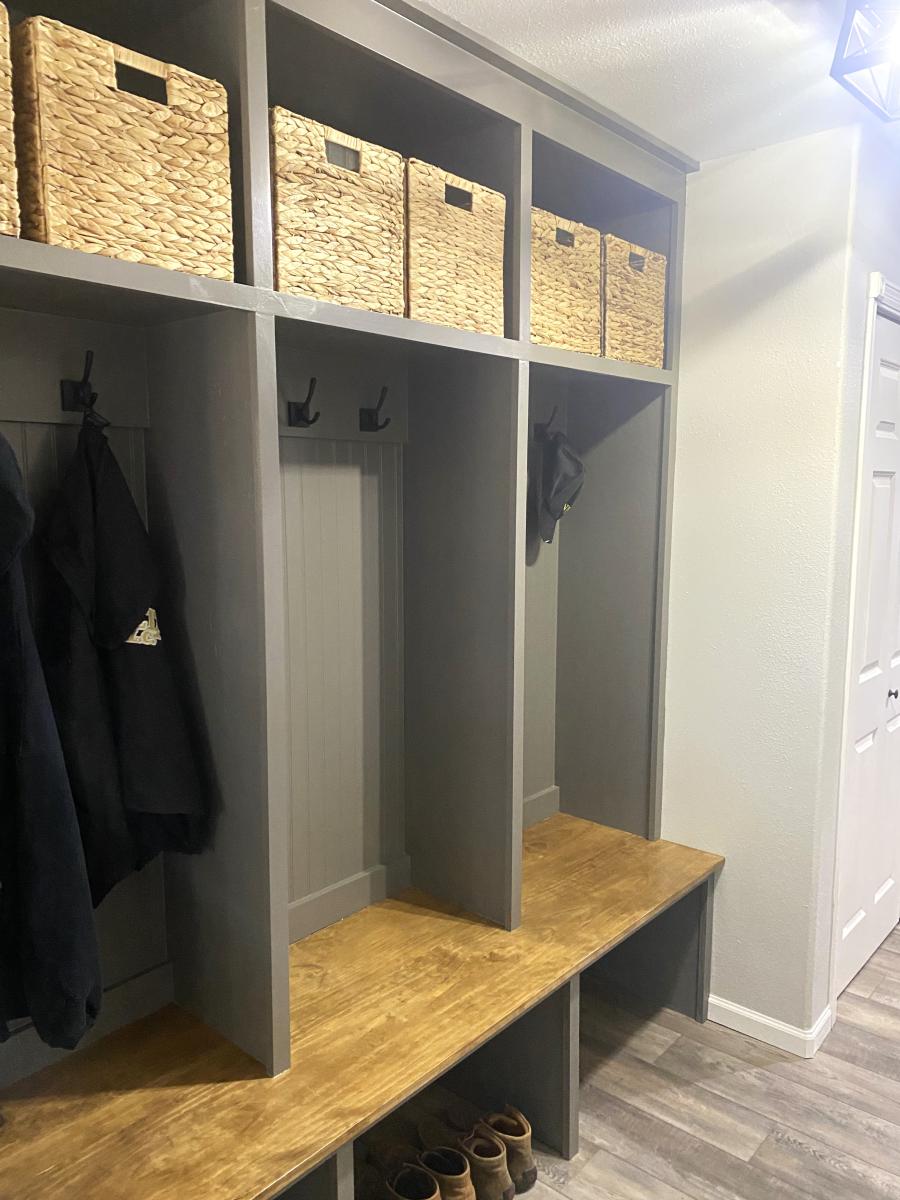
Laundry Mudroom Storage
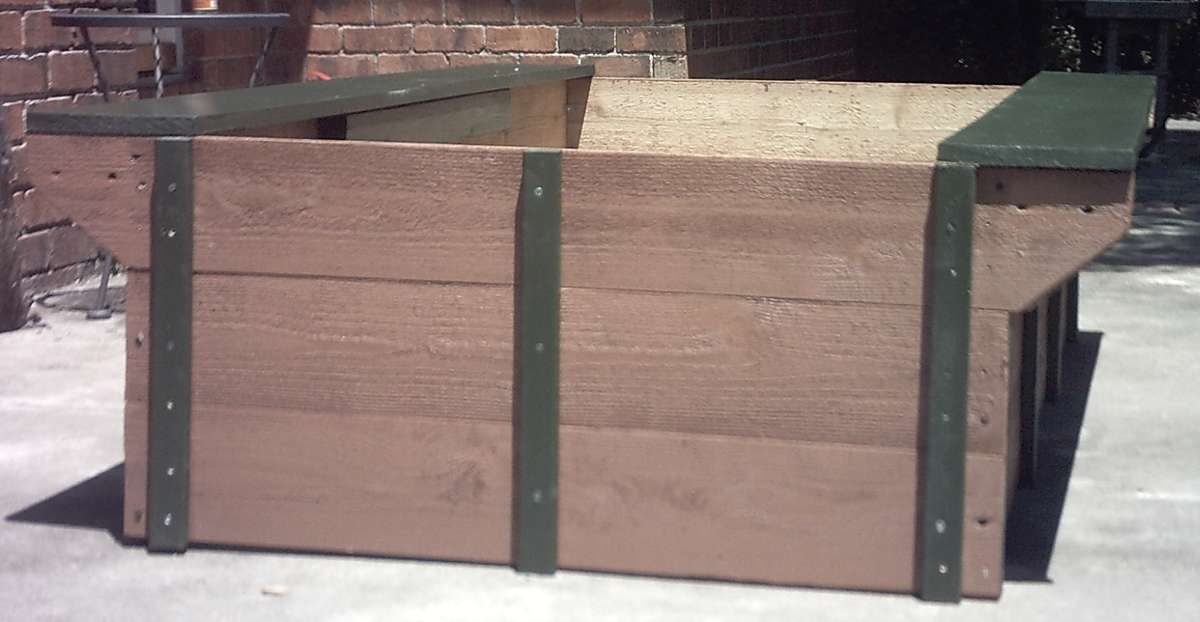
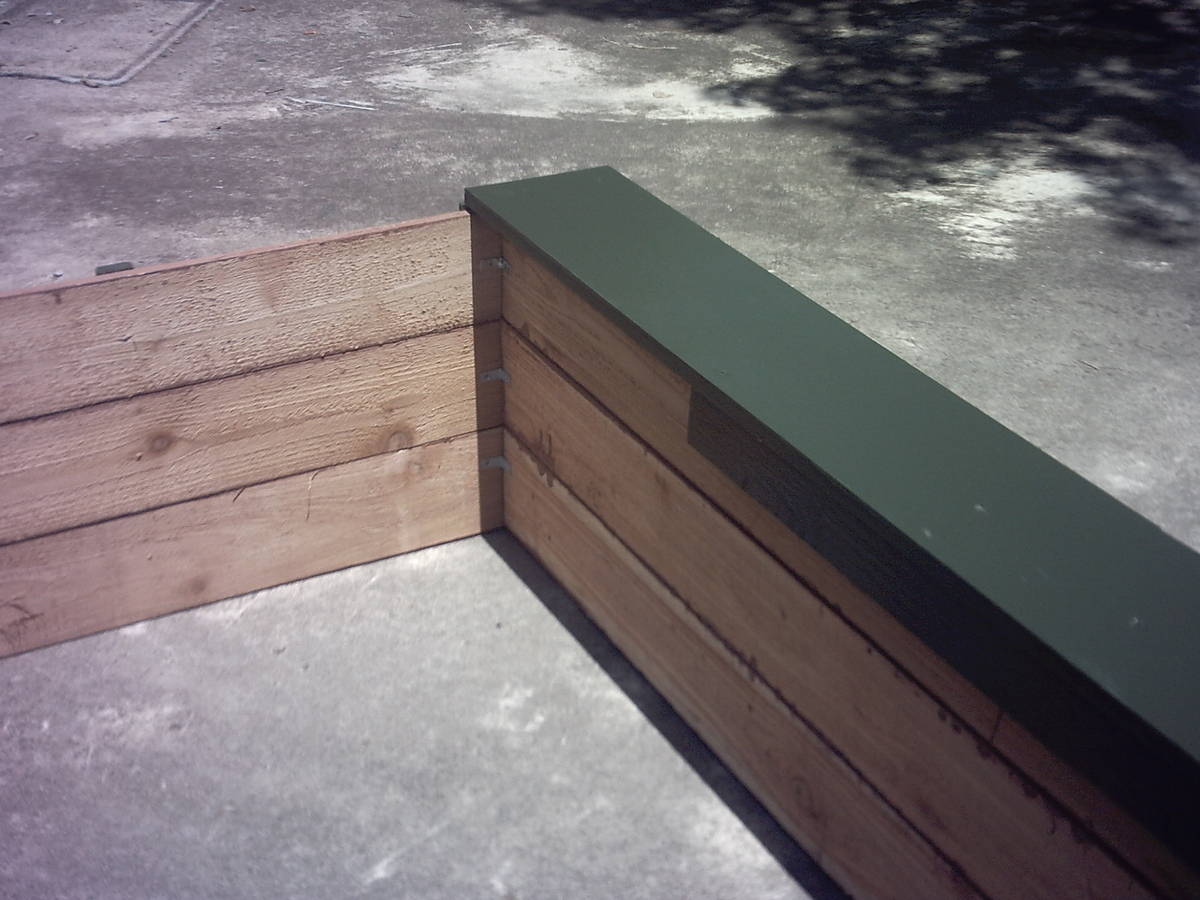
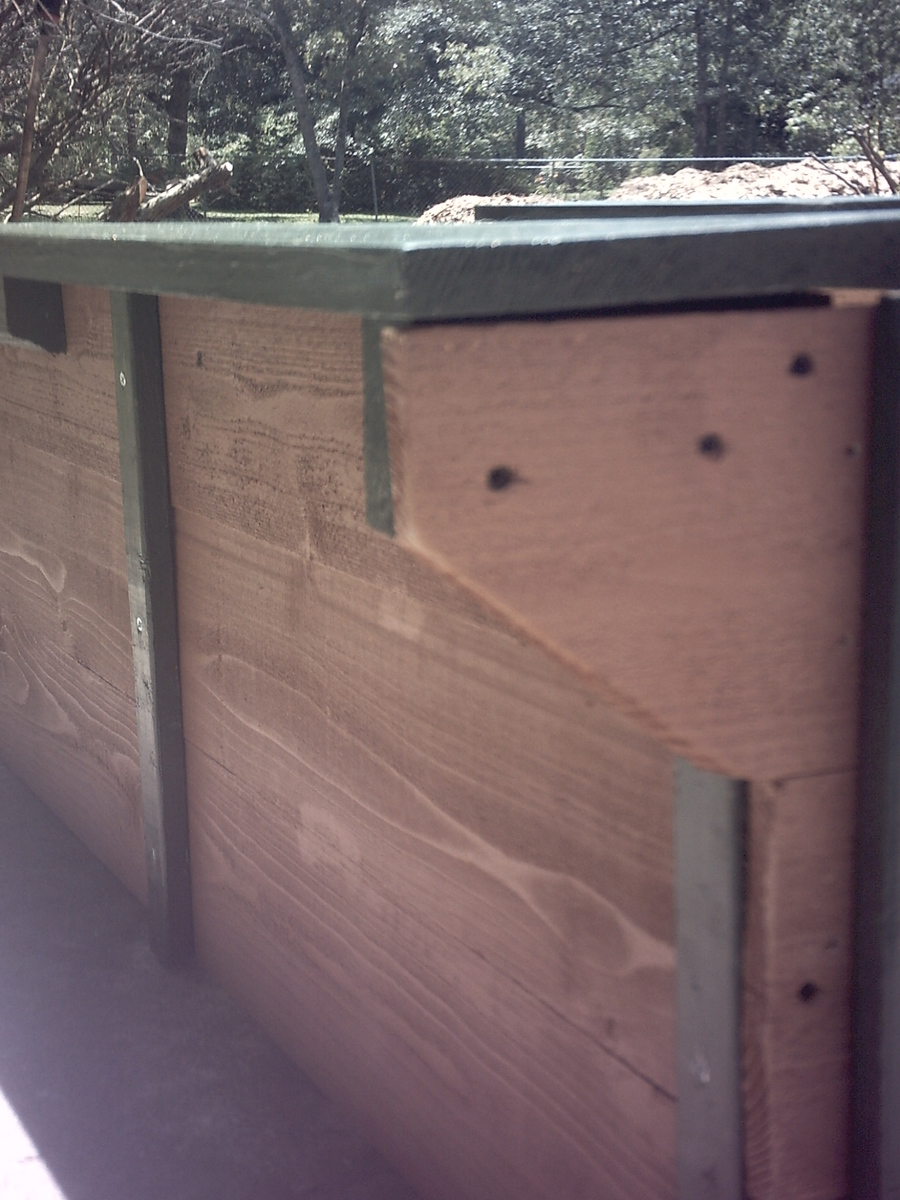
This box is 3 boards high (cedar dog-eared fence pickets), using the full length of the pickets for the sides and 1/2 the length of the boards for the ends. The dog ears were removed with a pull saw before painting and construction.
A 12ft, 8 inch wide, pressure treated pine plank was used to create a bench shelf along the sides. The plank was halved to create 2 benches. Small, 1 x 2s hold all three boards flush to form the sides. Segments of 2 x 4's were secured to create braces that hold the benches. The upper level of the end boards are longer than the bottom two and serve as additional support for the ends of the pine bench boards.
Wood screws were used for assembly. Corner brackets reinforce the interior corners for added stability. All exterior boards were painted before assembly.
The bed interior is 17" deep 33" wide x 71" long.

Mon, 06/04/2012 - 12:10
Love it! As I get older I am looking more and more at switching my garden space over to raised beds. The added bench is a great idea.
In reply to Love it! As I get older I am by Pam the Goatherd
Mon, 06/04/2012 - 16:14
This one is a gift, but left me wishing it were mine. It looks so inviting that one of my sons asked for his own gardening space and started drawing up plans.
Thankfully, it's easy enough to put together with interruptions. I have lots of interruptions. I did the cutting in one session, the painting in another, the assembly third and then some final touch ups with the paint.
The cedar smells WONDERFUL. The benches are narrow but sturdy enough to handle my dangerous curves *cough* *smile*
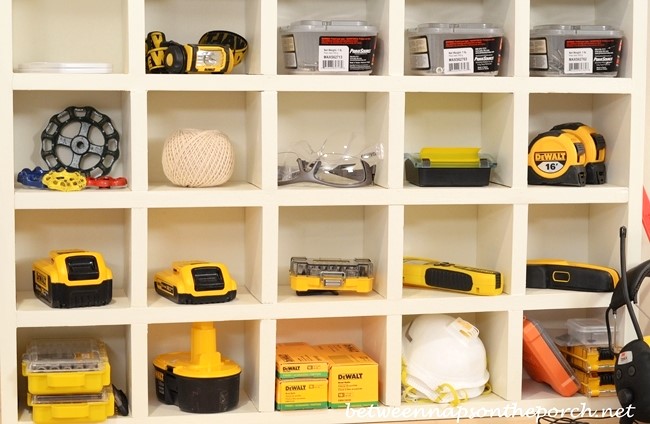
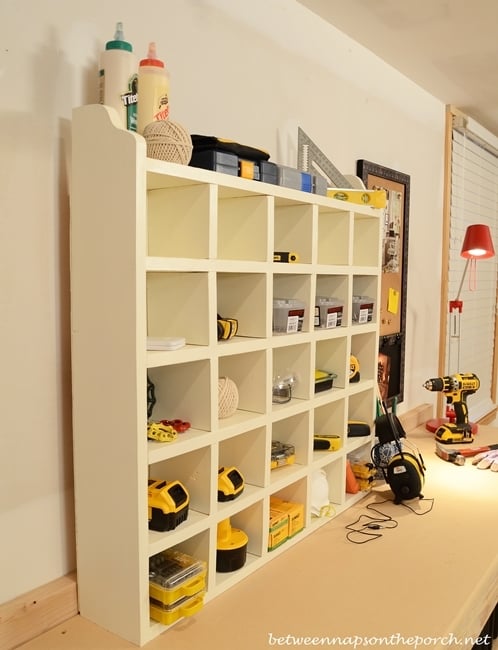
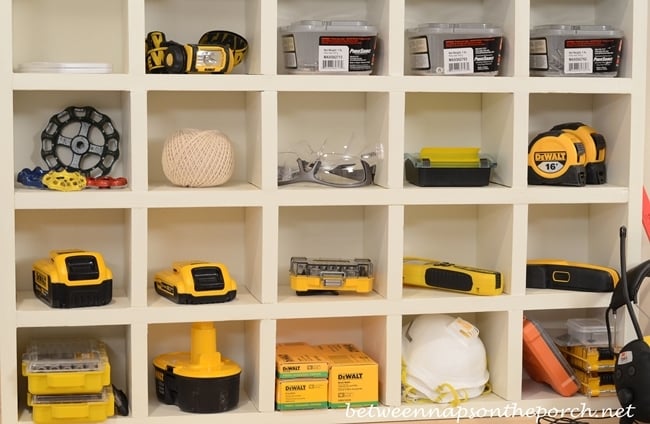
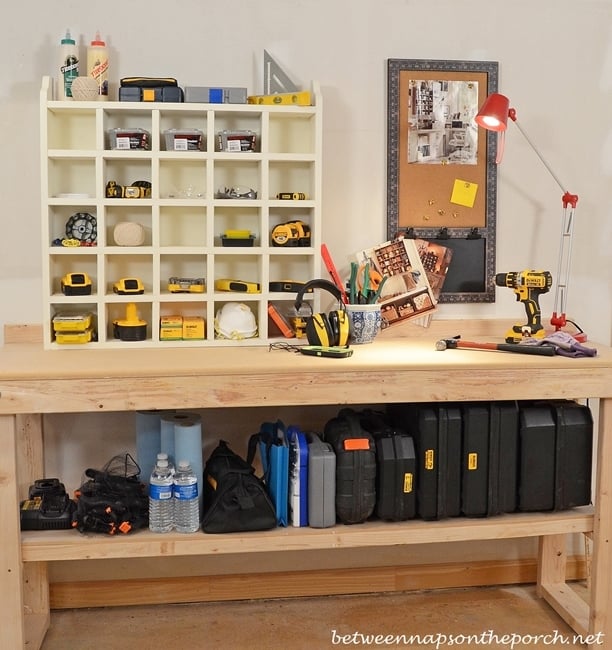
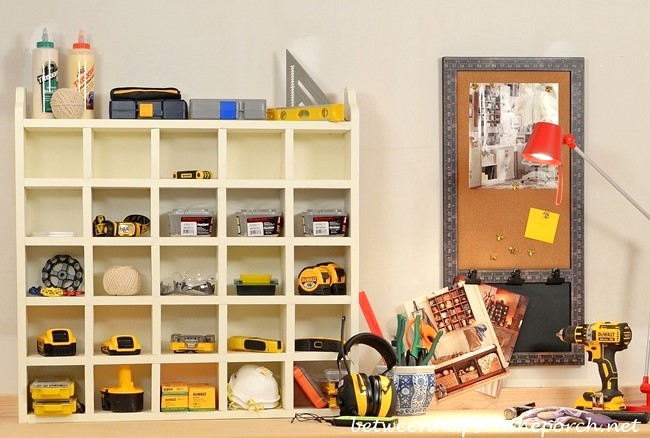
This cubby organizer is great for storage, displaying collectibles or as an advent calendar. I'm using mine in my mini-workshop for storing tools and supplies I use frequently when woodworking. Tutorial can be found at my blog here: http://betweennapsontheporch.net/build-a-cubby-organizer-pottery-barn-i… Thanks Ana for supplying the plans!