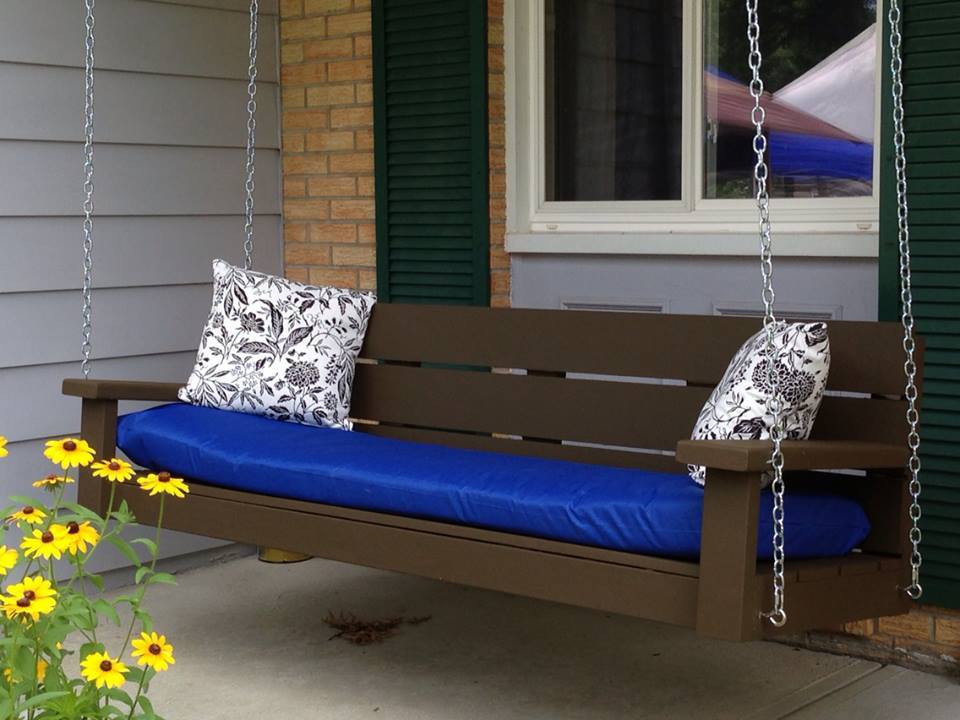
Wine barrel wooden Sign
A gift for my daughters birthday a wine barrel stave stained and hand painted with saying using gold craft paint
I used the altered 2x4 plans to save money. This project was completed over 4 weekends (8 hours a weekend) working primarily by myself. I recommend having someone help you if at all possible. The pillows/cushions are Threshold Deep Seating from Target @ $17.99 a piece.
Thu, 07/16/2015 - 09:41
This is a beautiful sectional. We are trying our hand at it ourselves. Can you post the plans for the table pictured with the sectional? I really like the size. Thanks
Was able to plan out and cut every piece before drilling pocket holes and assembling. Made it even easier by using the vertical spindles on the ends. We absolutely love having this to separate the two living spaces.
Thu, 02/08/2018 - 10:18
Such a good idea to have the two living spaces in one, I love this! Great job, thank you for sharing!
Thanks so much for these plans. I looked at dozens of Adirondack plans but 99% of them had tricky cuts requiring templates and more perfection than I wanted to give.
These are very straight-forward. I removed an old deck last year and saved all the 2x6 decking. I used those for this build. Ripped some down to 2x4’s but left the rest as-is for wider arm rest and seat/back boards. Everything came together perfect. Took me longer than I’d like to admit on the first, but the second went quick.
Can’t wait to drink a few beers in these chairs.
Thanks again,
Taylor Jones
Memphis,TN
Sun, 01/30/2022 - 18:44
WOW, way to go, thank you for sharing your sweet chairs!
I used the classic bunk bed plans and resized them to fit a toddler mattress and to keep the height about four inches shorter. My kids love them and we are very happy with the result. I'm glad to share the measurements with anyone who is interested. This was a first project for me, but I had a much more experienced friend helping. If you're interested in plans you can find my explanation here https://warburtonshome.blogspot.com/2017/10/toddler-bunk-beds-diy.html
This is a modified swing project. I made the back a little higher, used a 2 x 6 for the arm rest and made the arm rest longer than the support. The only change I would make is to keep the arm rest in line with the back of the swing instead of centering to keep the chain from rubbing.
My 5 year old daughter and I worked on this project and it only took a day or two. I had most of the wood needed already that the previous owner of our house left. The most expensive part was the chain and hardware to hang it.
The swing is the same color that my shutters will be painted. My oldest daughter made the cushion and throw pillows.
This was our first Ana White project, and inspired us to continue building!
I was going to make the Farmhouse Table but then, after seeing the cost of oak lumber, decided to make this table from a sheet of oak plywood, and some thin oak edging glued and nailed to the edge. I picked up some nice steel inserts to use in corners to attach the legs (from http://www.rockler.com/steel-threaded-inserts-select-size). Fun and easy project!
Used the Lego table plans to create a place for my kids to build their legos. I added lego plates on the doors and inside for them to build on and added some color.
We had been using my wife's great grandmother's bedroom set for years. It has become increasingly noisy and we were in the mood to change the style of our bed. Recently I had picked up 5-6 pallets to use and I befriended the manager of a sawmill. He let take scrap would from his burn pile and gave me 5 10-12 foot boards that were going to be also thrown out due to various problems. All the wood was pine and the only thing I had to purchase was wood filler, nails, screws, and stain. I used 2-2x4s instead of 4x4s and my bed frame was built with 1x6s, 5s, 7s. I just used what I had left over from the rest of my planks.
Easy to build, and I have made several now.
My husband bought me a new compound miter saw and impact driver for our 5th anniversary, so I immediately came here to pick out my first project. I decided on the Super Easy Little Adirondack chair. I bought $6 worth of rough sawn pine lumber. I dug through piles and piles to find pieces that weren't cracked or warped. Then I sanded it and oiled it with teak oil, before cutting and constructing. After it was put together, I applied two more coats of oil and then hand-rubbed it to finish. Additional pictures show it before last two coats of oil, and also a before and after of the wood prior to and after sanding and applying the preliminary oil finish. Also added a couple with a cute model in the chair... I am listing this as a one-day project because of the type of wood and finish that I chose. If you bought nicer wood, it probably wouldn't take that long!
I used both the $1 dollar cedar planter plan and the square planter with finals to come up with this design.
It's made from 1x6's and 2x2's. The finished box is about 16" x 16" on the top. They were pretty easy to put together. If you want more info check out my blog post.
My son went off to college and left me with a lot of free time...decided to try woodworking. After finding plans for a farmhouse table on this website I had to give it a try. I started with rough sawn cherry lumber and alter the measurements to fit my dining area. I learned a lot while building this project and am ready to try a new one now. Thank you so much for your information and website Ana. I will certainly be a frequent visitor!!!
Second project ever! Came out pretty nice in my opinion!
Mon, 04/04/2022 - 07:32
It looks fantastic, thank you so much for sharing!
This was my first project. I made it tall so we could work standing, and made it longer so that two of us could work at the same time. The top of the bench was made from 1" MDF to ensure that it wouldn't sag with the extra length.
I meant to put in an extra shelf on each side, but I forgot to get the extra cuts done at the hardware store (oops).It's hard to find a pocket hole jig in the UK, so I opted for a combination of countersunk screws and dowels.
Thanks for the plans, Ana!
This project was PERFECT for using reclaimed pallet wood! I ripped some of the larger pieces on my table saw to make 2x2's and 1x3's for the frame, and also ripped 1x2's to frame out the top (as posted by Infarrantly Creative). I had to alter the dimensions a bit so it would fit between the door and the chimney on my porch. Total cost was for the Kreg screws, gel stain and the acrylic finish I have yet to apply. Will be making a matching one for the other side of my porch very soon. Thank you, Ana!
Pergola is 10x12 made of all cedar except posts. Posts were 6x6 brown wood then covered in 1x6 cedar. Slats on top were attached using L brackets. Stained the same year.
Oh boy did my kids squeal when they saw their chairs! I followed Ana's plan on these chairs and used some leftover pink paint from one of the walls in my daughter's room on the pink chair, and mixed left over paint from my son's room for the green chair. I wasn't sure what I was going to do for the personalization until I found the crown and animal wood pieces at the local craft store, then it all just kind of came together. I'm very pleased with how sturdy the chairs are and how happy they are making kids!
We (my husband and I) were in desperate need of a better work space, and this was perfect.
Mon, 07/22/2013 - 20:47
I'd love for you to share how you got that beautiful color! I'm using an espresso stain right now. I've put on 3 coats of stain and still have light spots!
In reply to Really pretty finish by sgilly
Tue, 07/23/2013 - 07:14
What species of wood and what stain? I used red oak, which apparently is one of the easiest woods to stain. I really didn't have to do anything except sand.
Tue, 07/23/2013 - 07:21
I use birch in most of my projects. Usually, I can get a decent color from the stain. But, I'm thinking that this last batch of plywood wasn't the best. Also, I've never used General finish stains. I might try that next time.
I think I'm going to sand again, add another coat of stain, and if it's still a hot mess I'm thinking I'll mix some color into the poly and try to even out the color with the sealer. I don't have any idea if that will work - I'm not a finisher, but my husband used to do something he called "fogging", where he'd tint the sealer (Lacquer, in his case) with the color and as he sprayed the finish on it blended the colors.
Thanks for the response.
Tue, 07/23/2013 - 08:39
I *love* GF stains - I was really hesitant to try it because of the higher price point, but I just can't go back to Minwax. I'm forever spoiled. Well, the water based ones, that is - I tried a Minwax gel stain and actually got decent results, but I think their water-based stains are crap. I'm just lazy and don't want to go through the extra effort in using oil-based, though I acknowledge their durability is superior.
I'd be interested in knowing how your technique works out, as I don't have a lot of experience with stain - just wood conditioner, stain, poly. I've heard of using sealers and mixing ingredients but have been too afraid to try it myself. Good luck!