Community Brag Posts

The Distressed Crate

Submitted by bewweb on Tue, 06/26/2012 - 07:22

Personalized distressed crate.

Built from Plan(s)
Recommended Skill Level
Beginner

Comments

spiceylg

Tue, 06/26/2012 - 08:05

Love this! Did you sister go crazy over it? I would have!

Farmhouse Dining Table

I started to make these tables and post them on my local classified ad. In the past few months i have made half a dozen tables. They seem to be pretty popular. The great plans on this site have helped me make a bit of extra income to support my tool addiction.

The tables are made from framing grade lumber from blue box store. I take each piece and cut it to rough length and run it through a joiner and planner to get it nice and square and smooth to start with. I cut everything to final dimension and start the glue up.

I wanted a nice flat and clean top for these tables so having straight and square lumber helps. To make the top I edge glue the boards together and clamp. No screws or anything else required. The breadboard ends are attached with a few pocket screws.

The table joints are are done using pocket hole screws and glue. I have trouble finding 4x4 in my area so I make the legs using two 2x4's glued together. I use 3 pocket screws per joint (skirt attaches to the legs). For the cross beams, i use a dado blade to notch out the legs and cross stretchers. I find this is the most accurate and quick way to go. The cross stretchers are attached with glue and screws, and the screw holes are filled with 3/8 pine dowels and cut flush.

Once the table is all assembled, I run it through a course of sanding from 80 grit up to 220 grit with an orbital sander. Then its time to start the finishing. I use minwax pre-stain conditioner to help it absorb evenly, then 2-3 coats of minwax stain of choice. I then use 3-5 coats of minwax wipe on poly. I find this stuff to be great. It goes on with a rag, no drip marks and provides a very smooth finish.

Each table takes about 25 hours to complete.

Estimated Cost
$200.00
Estimated Time Investment
Week Long Project (20 Hours or More)
Finish Used
Minwax stains with wipe on high gloss poly
Recommended Skill Level
Intermediate

Faux Fireplace & Manel with Herringbone Firebox

Submitted by Anonymous (not verified) on Wed, 07/13/2016 - 19:52

I used the plans as a jumping off point and made adjustment accordingly.  I didn't want the wall to show through, so I made a firebox from wooden door shims laid out in a herringbone pattern.  Some of the shims were left natural, while randon ones were whitewashed.  The entire fireplace was painted using Behr paint in Polar Bear White.

Estimated Cost
$200.00
Estimated Time Investment
Afternoon Project (3-6 Hours)
Finish Used
Semi Gloss Latex Paint
Recommended Skill Level
Beginner
Seasonal And Holiday

Deck chairs

I Love the modern look of these chairs but definitely felt a little uncomfortable without the back rest so decided to add a little more back rest.

Great plan and easy directions to follow - my first wood working project.

Estimated Cost
$60
Estimated Time Investment
Afternoon Project (3-6 Hours)
Finish Used
Readyseal dark walnut stain and seal
Recommended Skill Level
Beginner

Comments

Ladder Shelf

Submitted by Robinwood on Sat, 06/30/2012 - 21:38

My daughter has me building again. She needed shelves for beside her computer desk so I suggested this ladder shelf. I altered the plan a little to add a top shelf and since it had to fit under some existing wall shelves, I shortened the height a little.

She is really into the brown paint lately, so as much as I would have loved to paint this in a bright color like Ana's, I painted it brown as she asked. I love this plan though, so I will probably build one for my bathroom.

Estimated Time Investment
Afternoon Project (3-6 Hours)
Recommended Skill Level
Beginner

Grill-side storage chest

Submitted by CSaintD on Thu, 04/17/2014 - 09:54

I built this chest from the birds and soap wooden cooler plans. I have a Traeger Pellet grill and wanted a place to store my pellets as well as serve as a side-table for my grill. I love how this turned out. I modified the plans to make the chest deeper so I could insert two 5 gallon Home Depot buckets (to store the pellets in). I used redwood deck balusters for the legs and pine for the rest of the chest. The paint is a sample I got from Lowes on sale, then I sprayed the whole thing with Spar Varnish - which I hope will protect it from the sun. The little cat-hook thing on the front is cast iron - a gift from my sister. Then I put some hooks on the side to hold my BBQ tools and voila!
It took me a lot longer to make this than I expected, as I got ill in the middle of the project and had to wait to finish it up. This is the first thing I've made like this and I'm very proud of it!
Thanks so much for the plans Ana and birds and soap.

Built from Plan(s)
Estimated Time Investment
Week Long Project (20 Hours or More)
Finish Used
I used a "sale" paint sample (Hotel Saint Frances Sangre De Cristo) from Lowes and spar spray varnish. I painted the pieces before I assembled it, then sprayed spar varnish on the base and top separately, then attached the top with basic outside hinges from HD.
Recommended Skill Level
Beginner

Comments

Sliding door console

Submitted by Anonymous (not verified) on Sat, 07/16/2016 - 20:37

Sliding door console with homemade sliding door hardware. 

Built from Plan(s)
Estimated Cost
$300
Estimated Time Investment
Weekend Project (10-20 Hours)
Recommended Skill Level
Beginner

Comments

Modern Farmhouse Bed

My daughter needed a new bed frame because her box spring broke so it no longer fit on the metal frame. This bed was perfect for what she needed. However, I needed to add one more 1x6 to the headboard. Didn’t realize that until I had the bed together. Will add it later.

Built from Plan(s)
Estimated Cost
Can’t remember
Estimated Time Investment
Afternoon Project (3-6 Hours)
Finish Used
Minwax Classic Gray Stain
Recommended Skill Level
Beginner

easy Kitchen Island

I needed mine to move so I added some castors to the bottom. It is my bakery cart! I also had hubby put a double towel rack on it for my flour clothes. Thanks so much for the plans! This is my first project and I loved doing it! Hubby got me the Kreg Jig and it was a breeze. I even used that for the top!!

Built from Plan(s)
Estimated Cost
$90
Estimated Time Investment
Day Project (6-9 Hours)
Finish Used
Dark Walnut Stain, Flat white paint
Recommended Skill Level
Beginner

Kids Picnic Table

Submitted by camaca on Sat, 04/19/2014 - 15:48

This has been my biggest build yet, and I am so pleased with it! It's adorable, and the color is perfect! It wasn't too hard to build and the plan was very easy to follow.

Built from Plan(s)
Estimated Cost
$40 with paint
Estimated Time Investment
Afternoon Project (3-6 Hours)
Finish Used
Primed with interior/exterior white primer and painted with Valspar Exterior Satin in Parakeet Green. I am so in love with this fun color!
Recommended Skill Level
Beginner

Nice little sofa

Submitted by emilacious on Mon, 05/11/2020 - 17:32

Made from the 2x4 outdoor sofa plans. Needed to make some outside furniture for our deck. 2x4 treated wood bench with a valspar stain. Free handed the end table with 2x4s, 2x6s and 2x2s. Also added height to the back by an additional 2 2x4s and had added some 2x4s perpendicularly for support. Added 3 6inch wood screws in the additional 2x4s vertically so it all ties in together. Made the measurements to fit the cushions. And added some outside throw pillows I found for $6 each

Built from Plan(s)
Estimated Cost
$50
Estimated Time Investment
Day Project (6-9 Hours)
Finish Used
Valspar exterior semi stain
Recommended Skill Level
Beginner

Modern Farmhouse Nightstands

Submitted by Anonymous (not verified) on Tue, 01/09/2024 - 08:28

I downloaded th minimalist modern nightstand plans nearly a year ago and just got around to building them last week. Actually I modified them quite a bit because I had a small space to work with and because I wanted them to follow the design theme of some of the other furnishings and features I had made for my basement renovation. In particular I changed the top and made it out of oak stair treads. I also added pop-up electrical/USB sockets as well. I really appreciate the sequencing in the plans. Though I made some dimensional and design plans, I followed the sequencing steps. It made the project much easier to complete-particularly the drawer construction and fitting. If I had done it on my own, I would probably have permanently installed the middle shelf before fitting the drawer which would have made fitting the drawer and drawer front much harder. Thanks for teaching me that.

Craig Holstedt

Comments

Replacement Bathroom Vanity

Submitted by Jake on Fri, 07/06/2012 - 08:25

Great and easy build from Ana. I made it to replace a vanity made of fake wood that falls apart when it senses water. No changes to the design. I used the "European" hinges and all I can say is that they are great but it is learning experience getting them to work properly. Thank goodness for the adjustments the hinge allow.

Built from Plan(s)
Estimated Cost
$35 including hinges
Estimated Time Investment
Day Project (6-9 Hours)
Finish Used
Entire vanity is primed and one coat of good quality satin white paint (Ben Moore). I then added two more coats to the exterior.
Recommended Skill Level
Intermediate

Comments

Doll Bed

Submitted by nickdevos on Tue, 04/22/2014 - 13:52

I saw the doll bed post that Ana had done and wanted to try and make one for my daughter out of scrap wood I had laying in the garage. I basically used the picture from her post for the idea and pieced everything together. Then grandma got involved and made the little pillow and blanket to top it off, my daughter loves it.

Estimated Time Investment
An Hour or Two (0-2 Hours)
Finish Used
After the project was all put together I just spray painted it with white and then put on a coat of poly.
Recommended Skill Level
Beginner

From Dumpster to Wine Buffet

Submitted by Anonymous (not verified) on Sat, 07/23/2016 - 11:24

This piece was headed to the dumpster when I rescued it, the top drawer was chipped and broken.

The drawers have such beautiful curves, so I removed the broken one and the 2nd one and reused it elsewhere. A beautiful coat of teal paint, changed out the knobs for eclectic vintage glass knobs and added wine glass holders, finished it  by wrapping stripped fabric around thin plywood for the backdrop.

It is perfect for storing my summer entertaining dishes in the sunroom.

Estimated Cost
Paint $30.00 for gallon, you don't need a gallon I used on other projects
Vintage glass knobs $20.00
Fabric $8.00
Wine Glass holder $10.00
Estimated Time Investment
Weekend Project (10-20 Hours)
Finish Used
Sanded down old varnish and stain. Washed completely to prep for primer paint, then 2 coats of the teal paint. Let dry for a week then added the plywood fabric wrapped sides and back, last I added the wine glass holders to the underside of the top.
Recommended Skill Level
Beginner

Elevated bed with storage

Submitted by Anonymous (not verified) on Wed, 05/13/2020 - 13:15

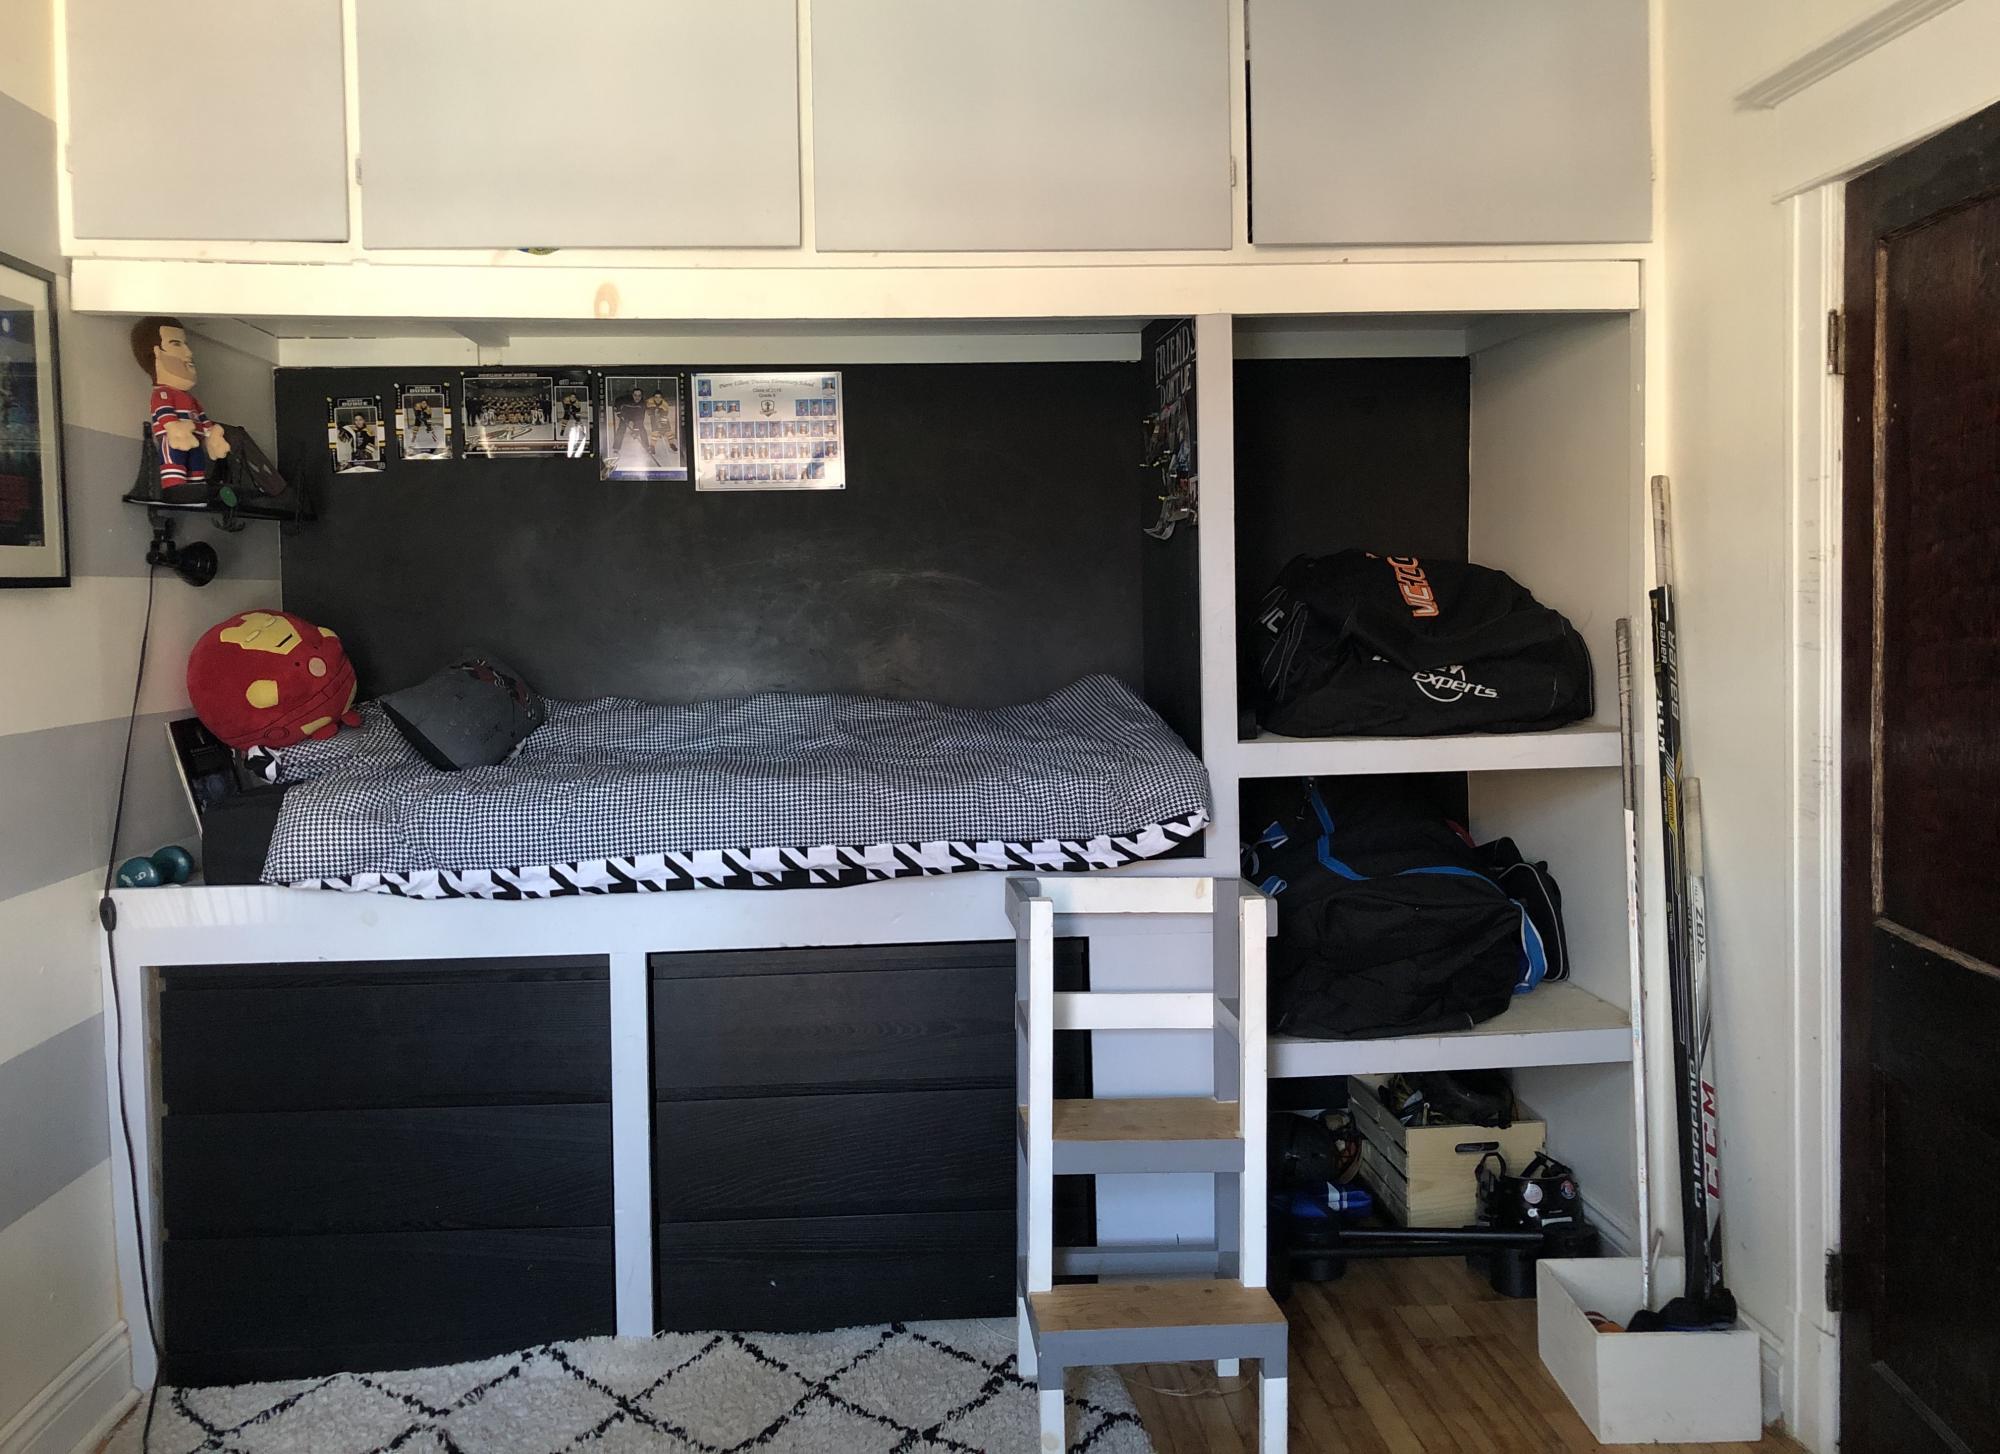
In this small teen bedroom (9-5' large), we had to fit clothes storage as well as room for the family hockey bags.
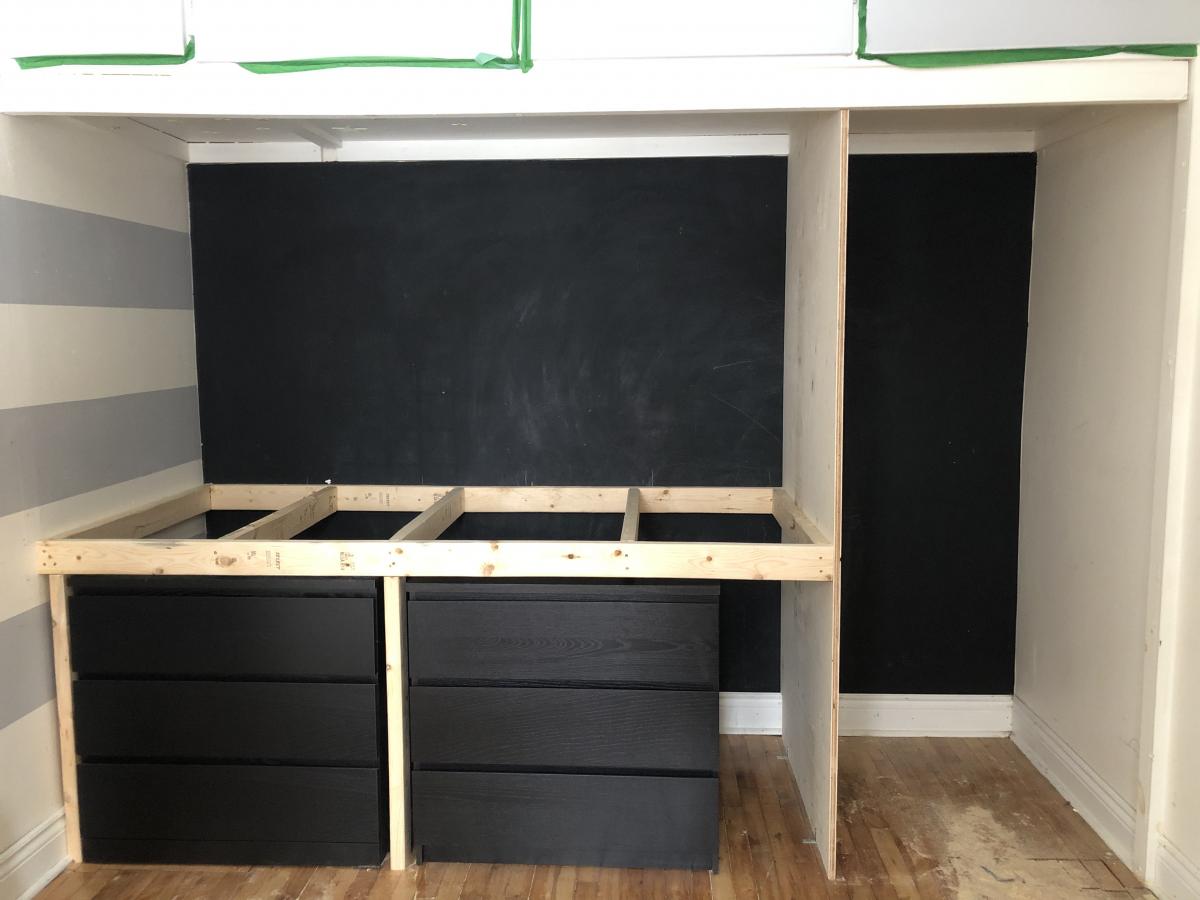
We decided to use 2 IKEA MALM dressers (one of which we already had) and we built a platform to elevate the bed. The space under the bed could then fit the 2 dressers.

After having measured the length of a single standard mattress, we used the remaining space to create very large shelves in order to place the hockey bags. We designed them open so that my 2 sons can come back from their hockey practices and drop their bag. We also made sure to not put the shelves too high so they can easily access them.

The upper storage (cupboards) were already existant in the house. They add even more storage.

The bed part is 6-7' long x 3-4' large
The locker part is a bit less than 3 feet long and 3-4' large

The little stool used to get up on the bed is a kitchen stool that we reused. It is movable.

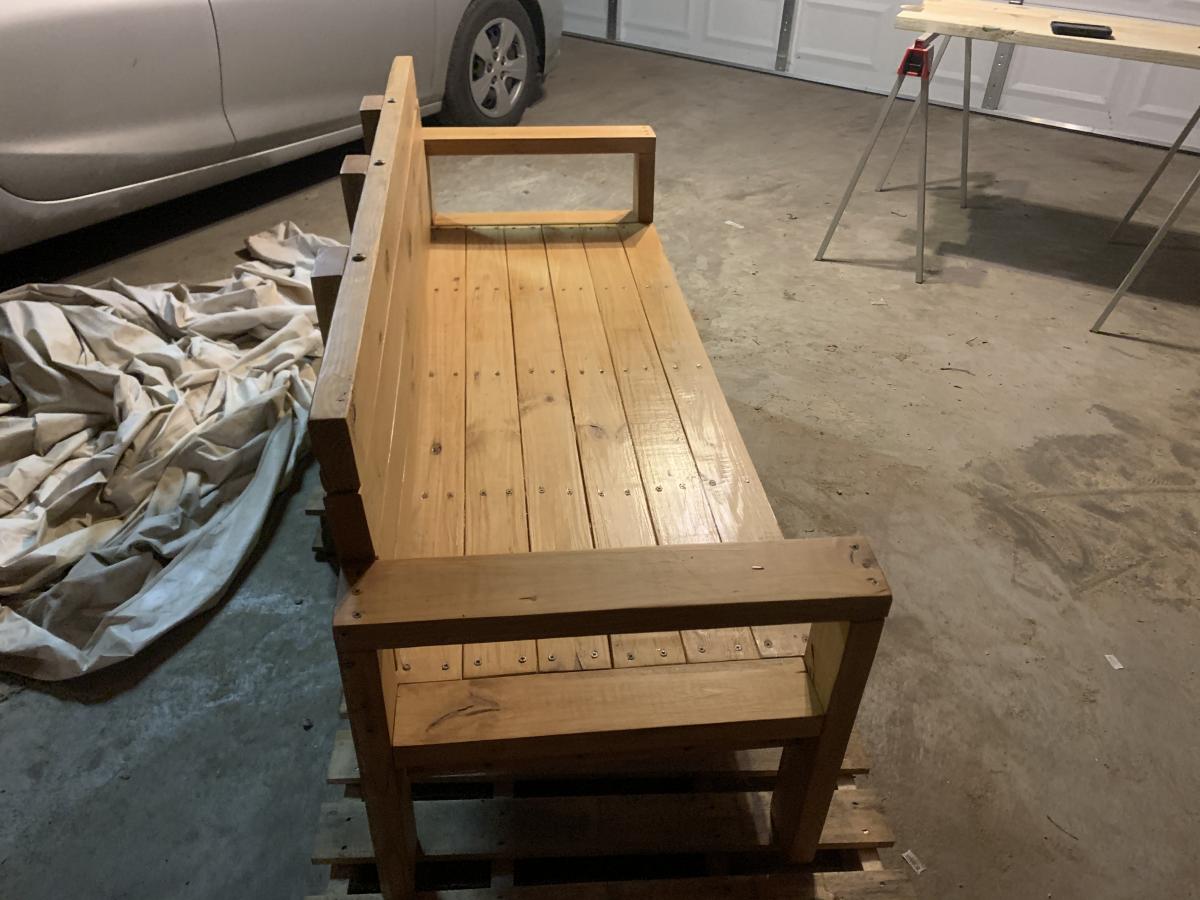
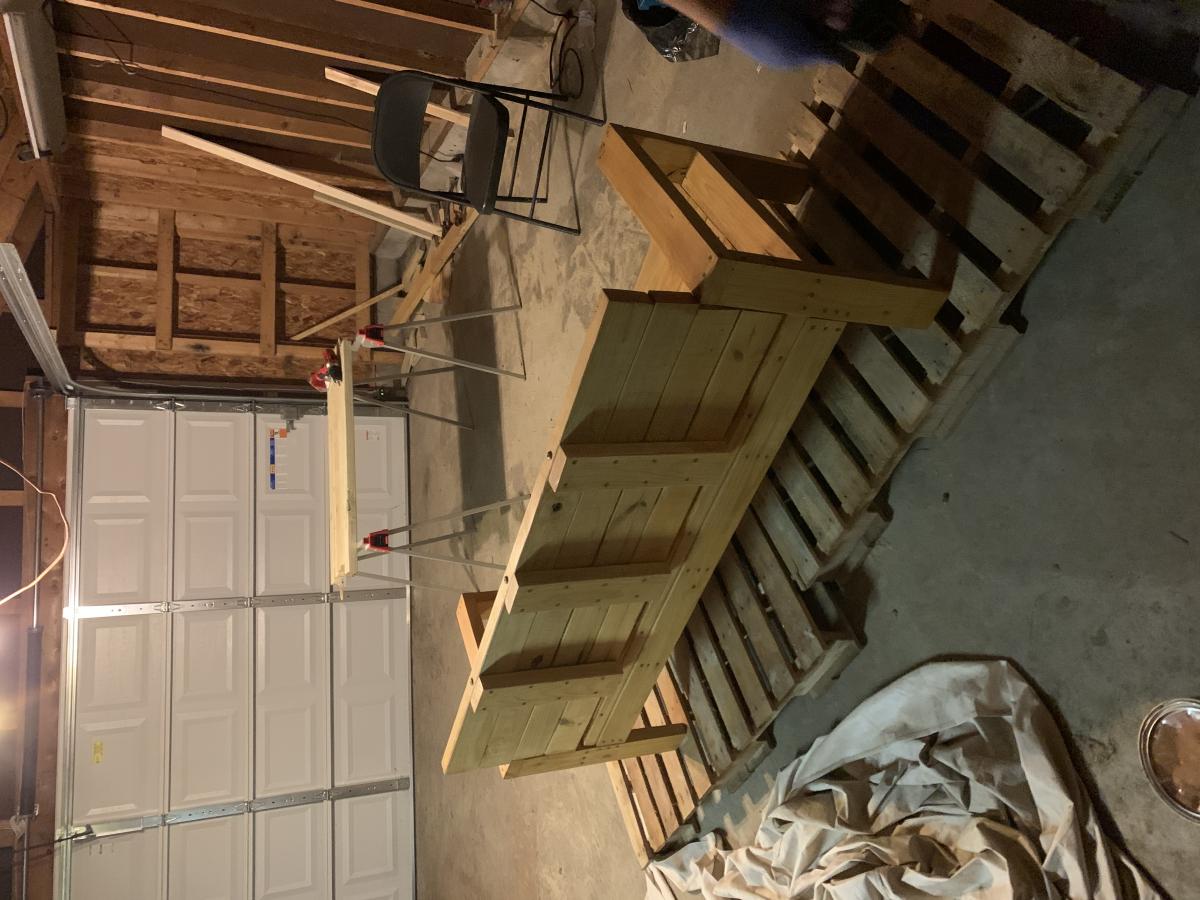
Once the structure of the elevated bed was built, we finished the bedspring with a plywood sheet.

The rough 2 x 4 and plywood sheets that were used for the structure were then covered with nicer flat and smooth pine planks and mouldings, then painted grey. It makes for a nicer finish on the outside. But first of all, those mouldings hide the gaps between the dressers and the structure.

The cost of this project was very low: 264$ of wood + nails from Home Dépôt

PS: if you understand french there is a video on my blog that explains the building process in details.

Thank you !

Estimated Cost
270$
Estimated Time Investment
Day Project (6-9 Hours)
Finish Used
Grey paint
Chalboard black paint for the back of the wall and side plywood
Recommended Skill Level
Intermediate

My first coffee table

Submitted by JoshC on Sat, 07/07/2012 - 16:31

This is my first attempt at a coffe table. I used 1 5/8 inch screws, wood glue,and finish nails. I decided to use oak because someone gave it to me.

Estimated Cost
around $20 but I got the wood for free
Estimated Time Investment
Weekend Project (10-20 Hours)
Finish Used
3 coats of Merlot stain and 2 coats of poly.
Recommended Skill Level
Beginner

Comments

JoshC

Mon, 07/09/2012 - 15:47

This is my first stained piece of furnature. I got the wood for free and didnt want to paint over the grain of the wood. This was also my Mother's Day gift to my mom so I wanted it to turn out perfect. She seemed to love it and I am pretty happy with how it turned out. Thanks Ana for all the great tips and ideas.

Back