Community Brag Posts
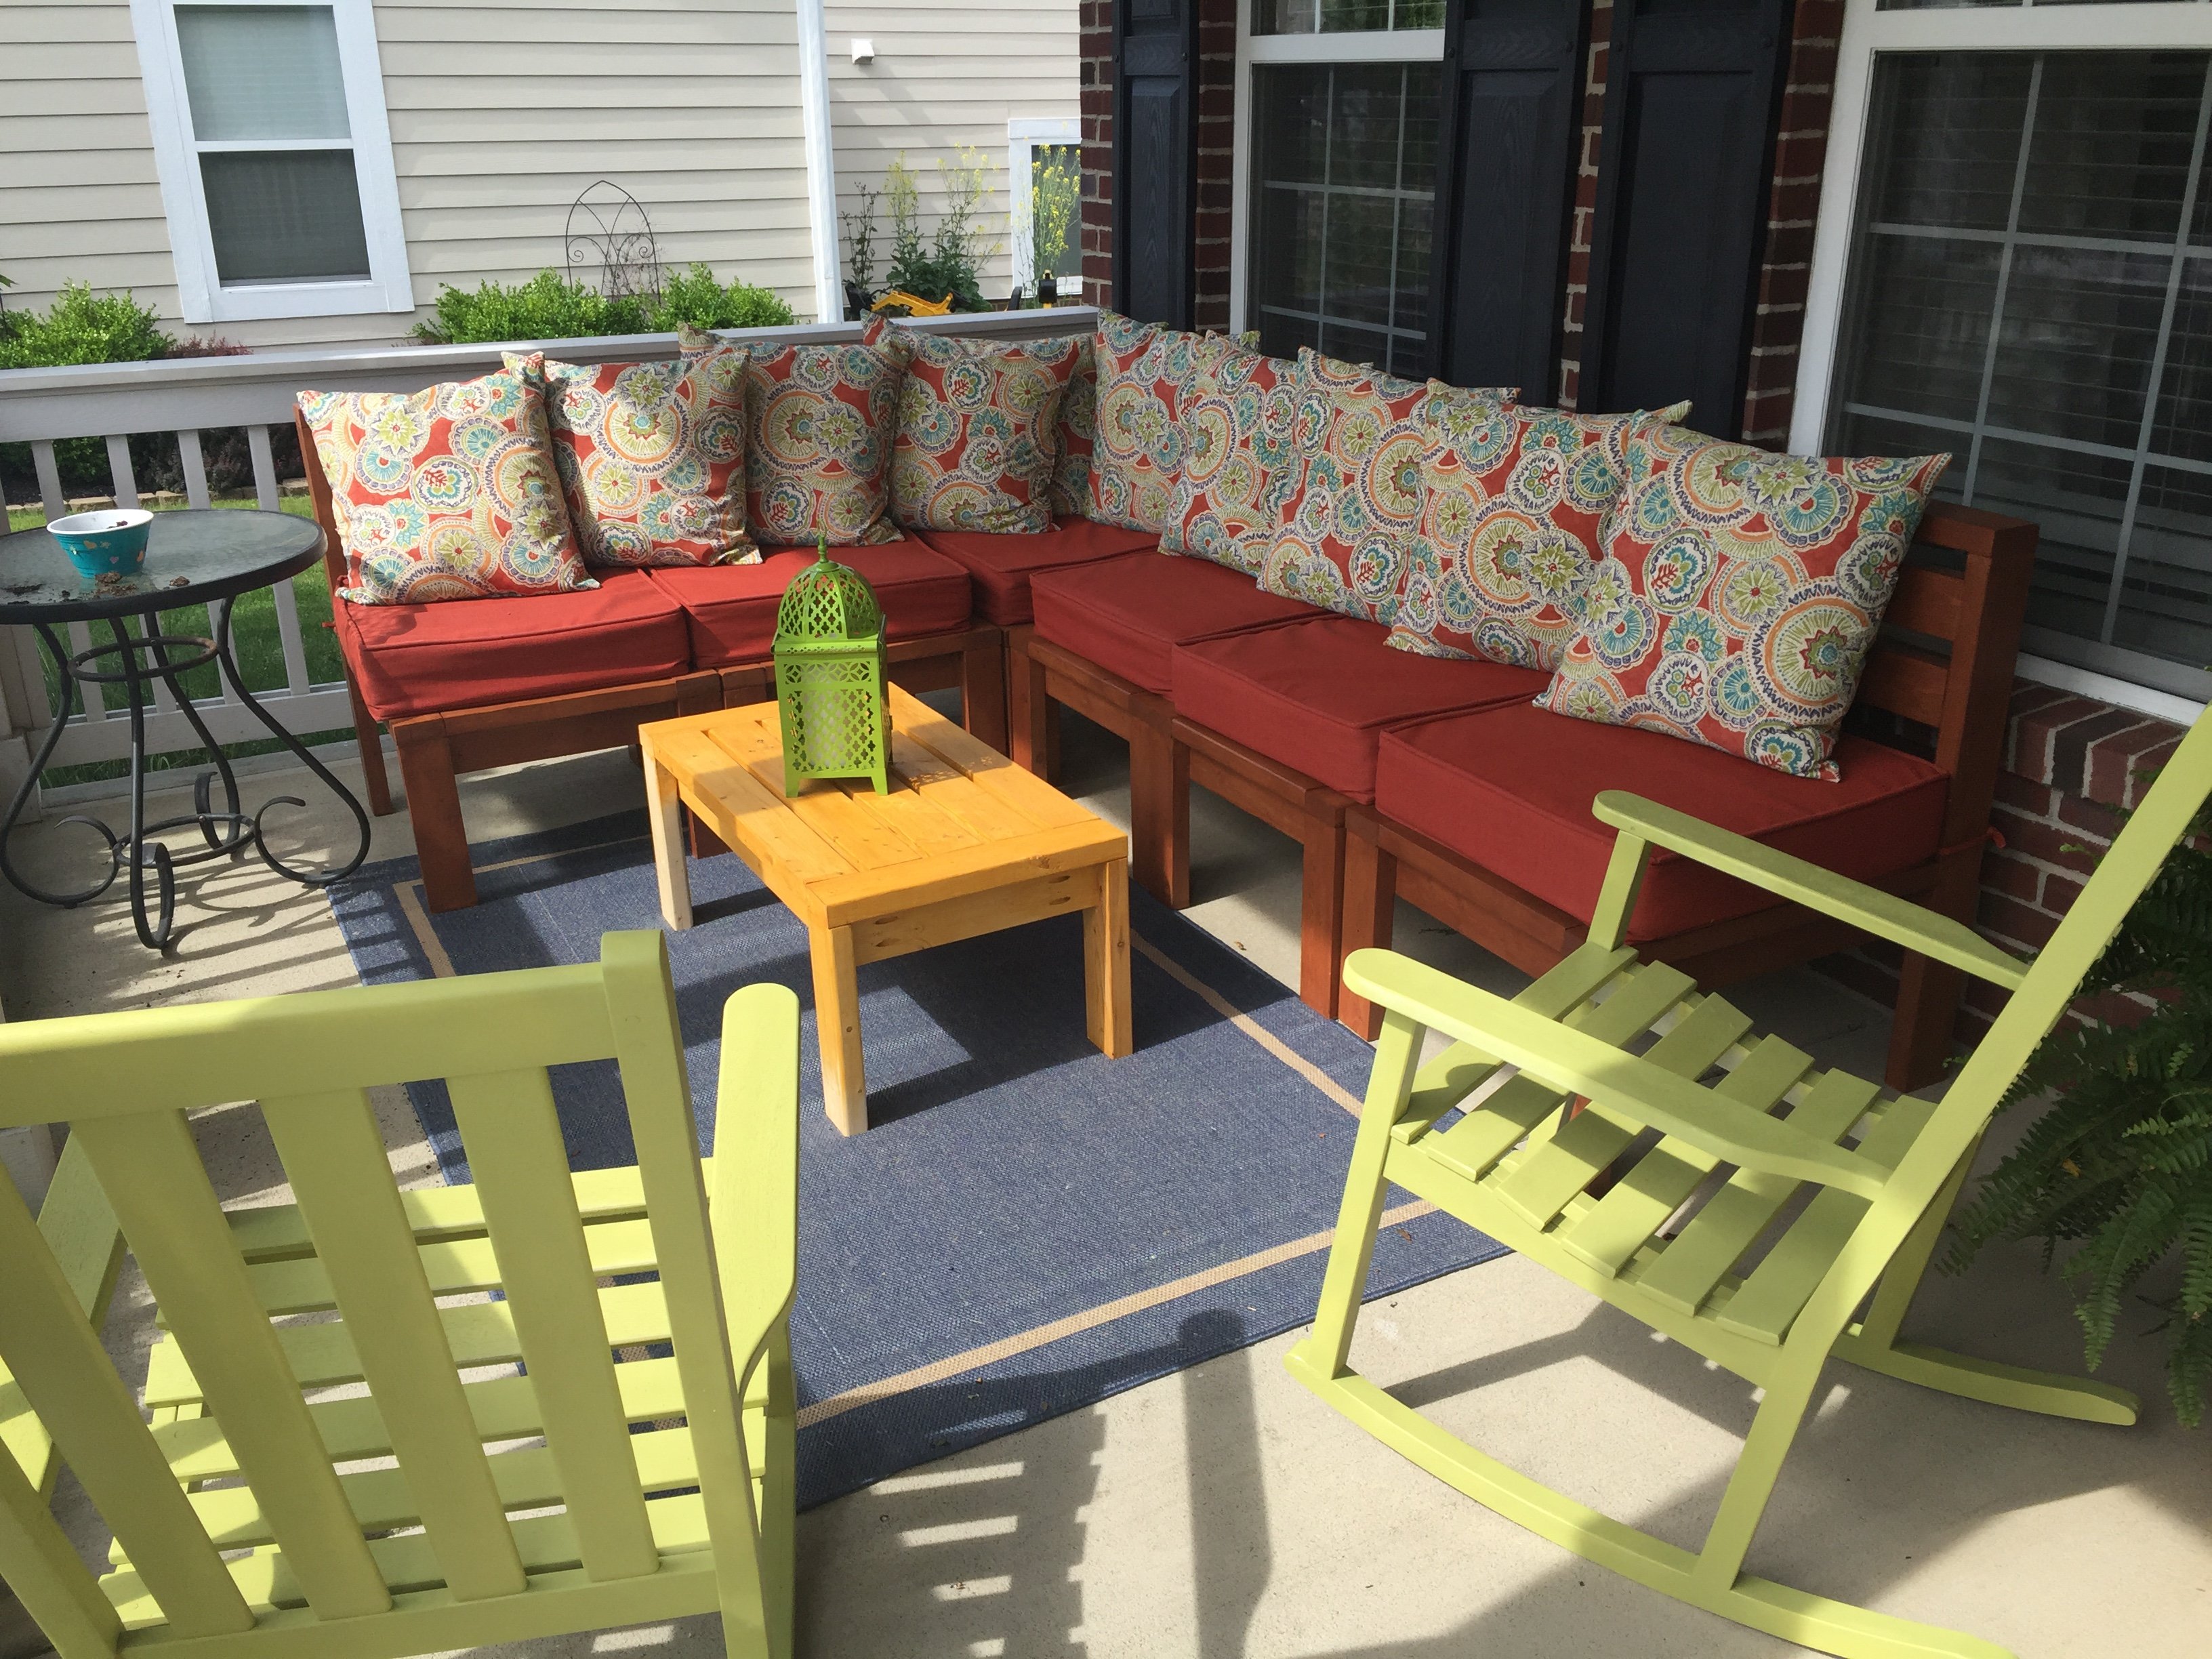
Wadsworth patio
This is my first time trying something like this and it went great. I did mine with 2x4's. Thanks for all the great information. This took me a week, but I was only able to work on it during nap times for my baby. Uninterrupted it would of taken a weekend. The only negative thing is now my wife wants me to tackle a Farmhouse Table with benches. Pics soon to come of that I'm sure. Thanks again!
Built from Plan(s)
Estimated Cost
13 dollars for each chair, and 17 for the corner piece.
Estimated Time Investment
Weekend Project (10-20 Hours)
Finish Used
Thompsons Water seal and stain Autumn Brown.
Recommended Skill Level
Beginner
Adirondack Chairs with Shared Table
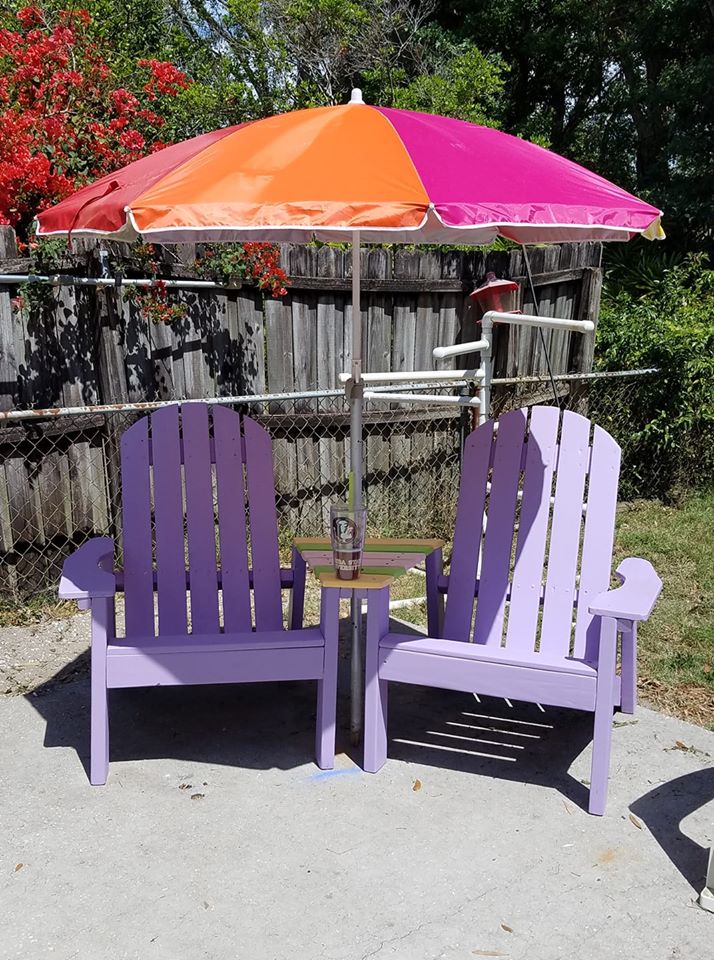
Love, love, love this plan! Easy to understand and build...it was sanding all the parts that took forever! ;-) It's been on my build list for a couple of years, and now looks great by my pool. I did use a more traditional arm style for the chair's 2 arms. I added the "table" between the 2 chairs by using scrap 1x4s, aligning them for spacing then used a chalk line, from corner of back arm 2x2/2x4 connection to the front 2x2/2x4 connect, and snapped a cut line. I then used a 1-1/2" hole saw and drilled a hole opening for the umbrella.
Thanks Ana! This is the second Ana White project I've tackled for the pool deck.
Built from Plan(s)
Estimated Cost
Under $35 as I had some scrap 2x4s and 1X4s I recycled and used paints I already had
Estimated Time Investment
Weekend Project (10-20 Hours)
Finish Used
Behr 2-in-1 satin latex paint in various colors. I used 2 coats.
Recommended Skill Level
Beginner
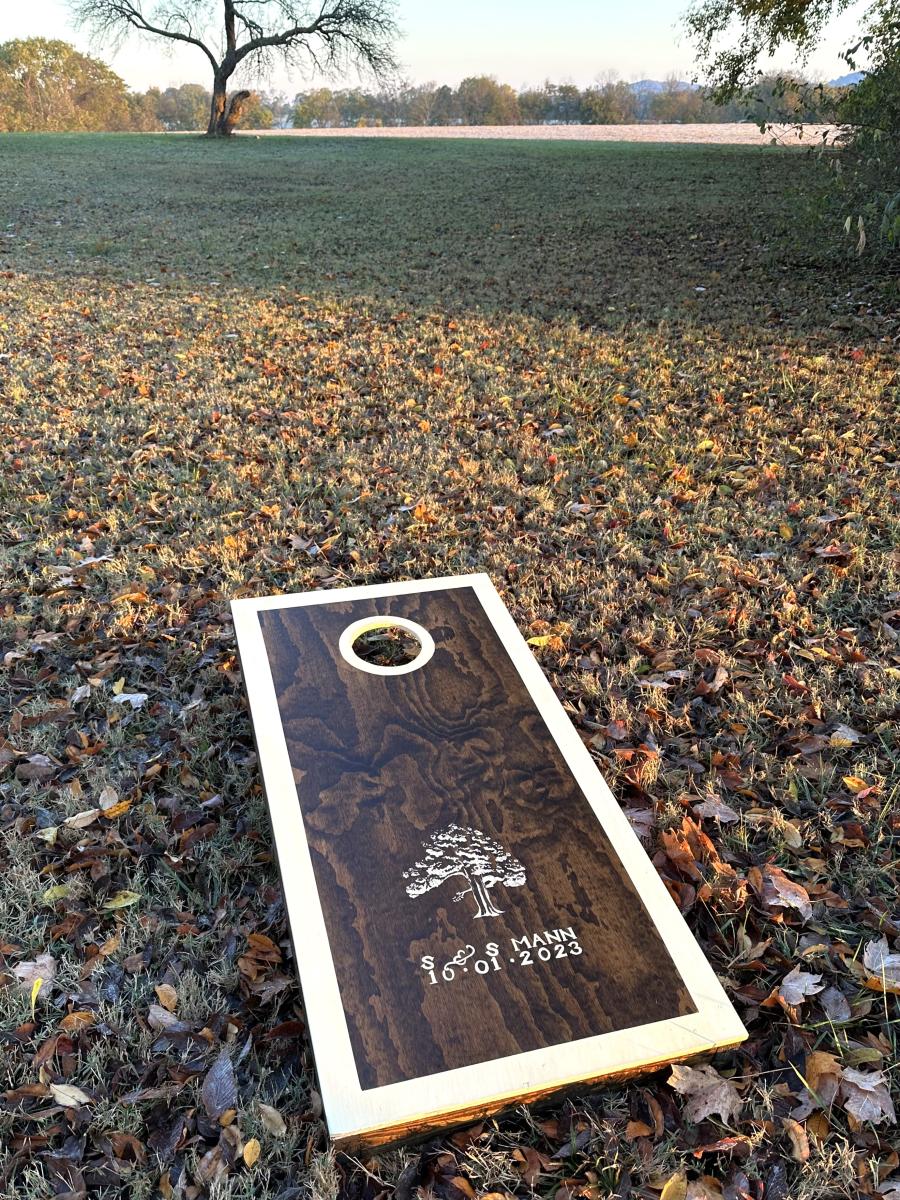
Cornhole Boards for Wedding

Had to share the results from your plans for corn hole boards! I made them for our wedding. This was a great first project after watching my dad in his workshop when I was younger. These were so fun and easy, and our guests loved them!
Built from Plan(s)
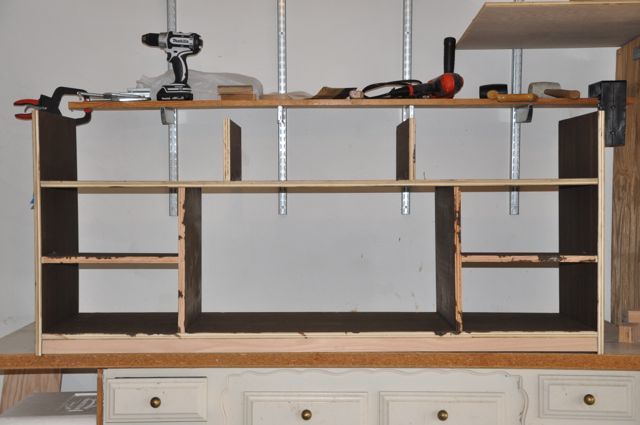
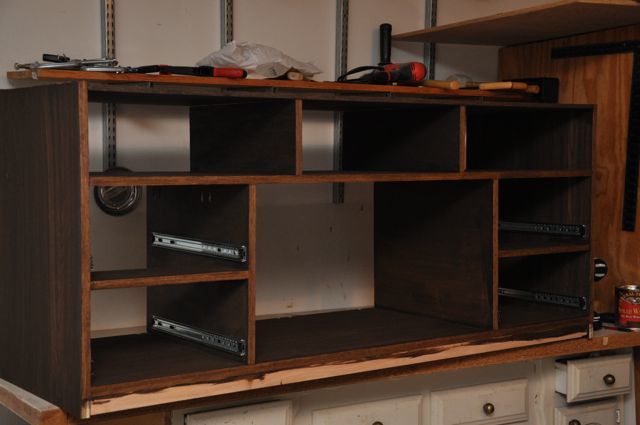
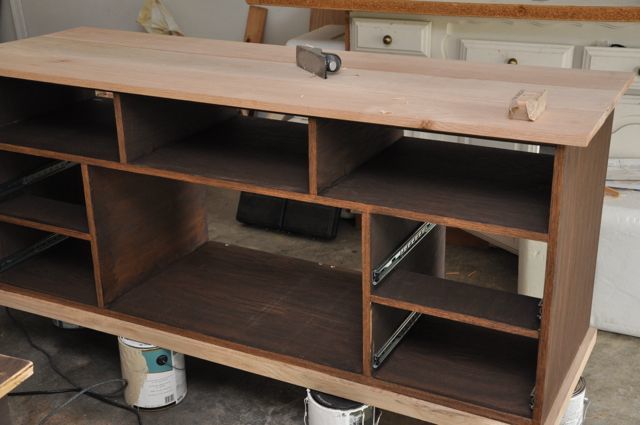
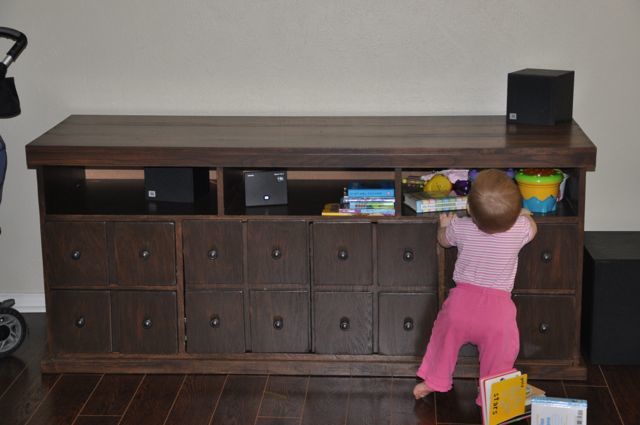
Apothecary Media Cabinet
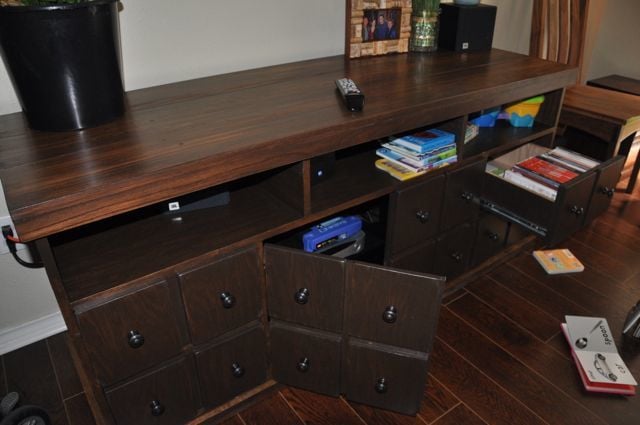
This was our first wood-working project, and it was a BIG one. I think it took us about 50 hours, though we did add a couple complicating steps into the process. We installed full-extension drawer glides and stained instead of painting. Both of those added significantly to our time. We also added a lip around top solid wood planks to give it a more solid look, so of course that added to our time.
The plans were great, though we had a tough time keeping everything square. Our cabinet doors were 1 inch thick (1/2 inch door, plus 1/2 inch facade drawer fronts), and that made it almost IMPOSSIBLE to find hinges that would work with the cabinet doors. Cabinet hinges come ready to fit 3/4 inch doors OR whatever-thickness door with a 3/8 inch routed edge. So I ended up having to purchase some really heavy-duty specialized hinges from our specialty woodworking store, and those cost about $18/pair.
We're really happy with how it turned out, and it suits our needs great. See our process on my blog below.
Built from Plan(s)
Estimated Cost
$650
Estimated Time Investment
Week Long Project (20 Hours or More)
Finish Used
We sanded down to 200 grit, then applied General Finishes "American Walnut" oil-based stain. We applied it with a sponge brush, left it on for about 15 minutes, and then wiped off with a clean rag. We applied 6 layers of General Finishes "Arm-R-Seal", sanding with 600-grit between the 4th and 5th layers and once again after the 6th layer.
Recommended Skill Level
Intermediate
Comments

Mon, 05/21/2012 - 09:34
First project?
Wow, you are ambitious for a first project and it came out great! Adorable, model, too, even from the back side, lol!
In reply to First project? by spiceylg
Mon, 05/21/2012 - 10:31
First Project
Yes - ambitious or foolish... one of those is the right word to describe it. But thanks! I'm happy with it and with the little model, too :).
Now I need chairs!

The top was made from big box 2x12s and after an exhausting search for untreated 4x4 lumber, I decided to use reclaimed beams.


Estimated Cost
$450
Estimated Time Investment
Week Long Project (20 Hours or More)
Finish Used
Black tea, steel wool and vinegar mixture, clear paste wax mixed with Tudor brown briwax - 1 part brown to 10 parts clear, finished with liming wax.
Recommended Skill Level
Beginner
Comments
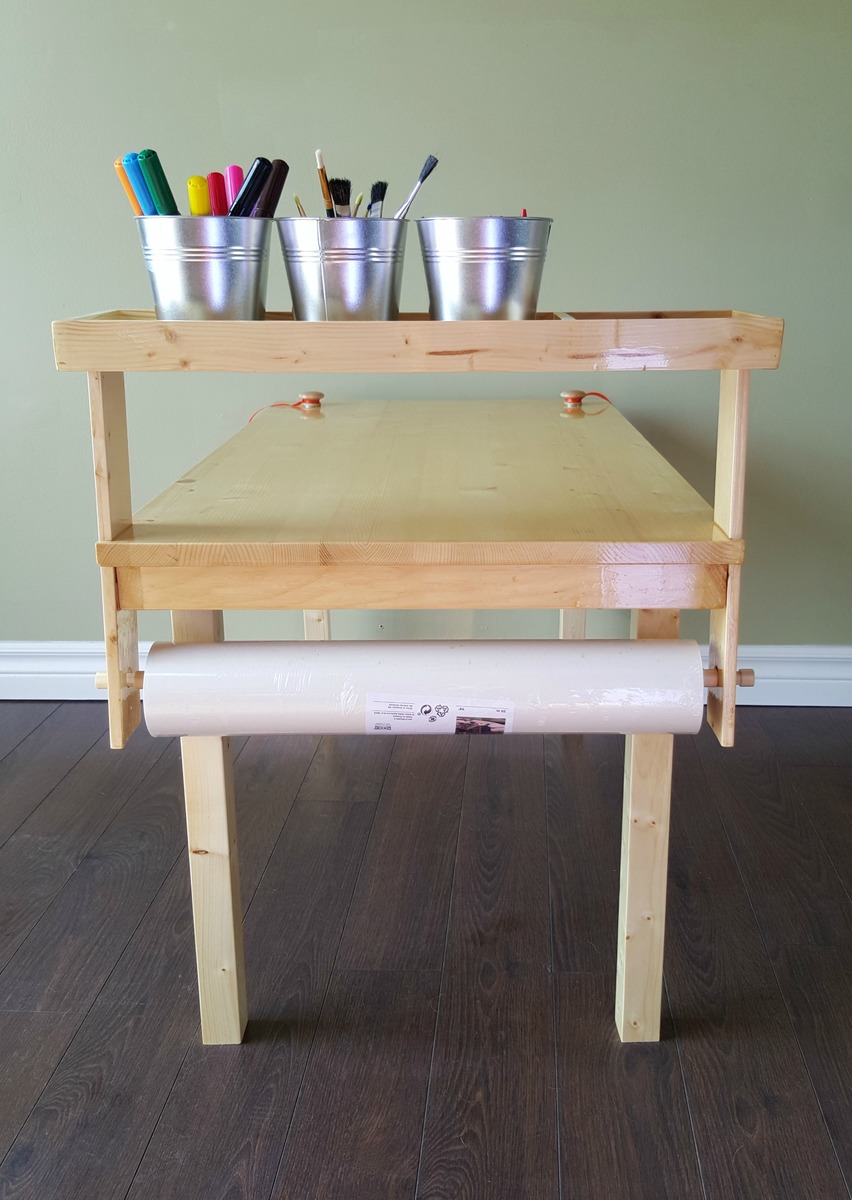
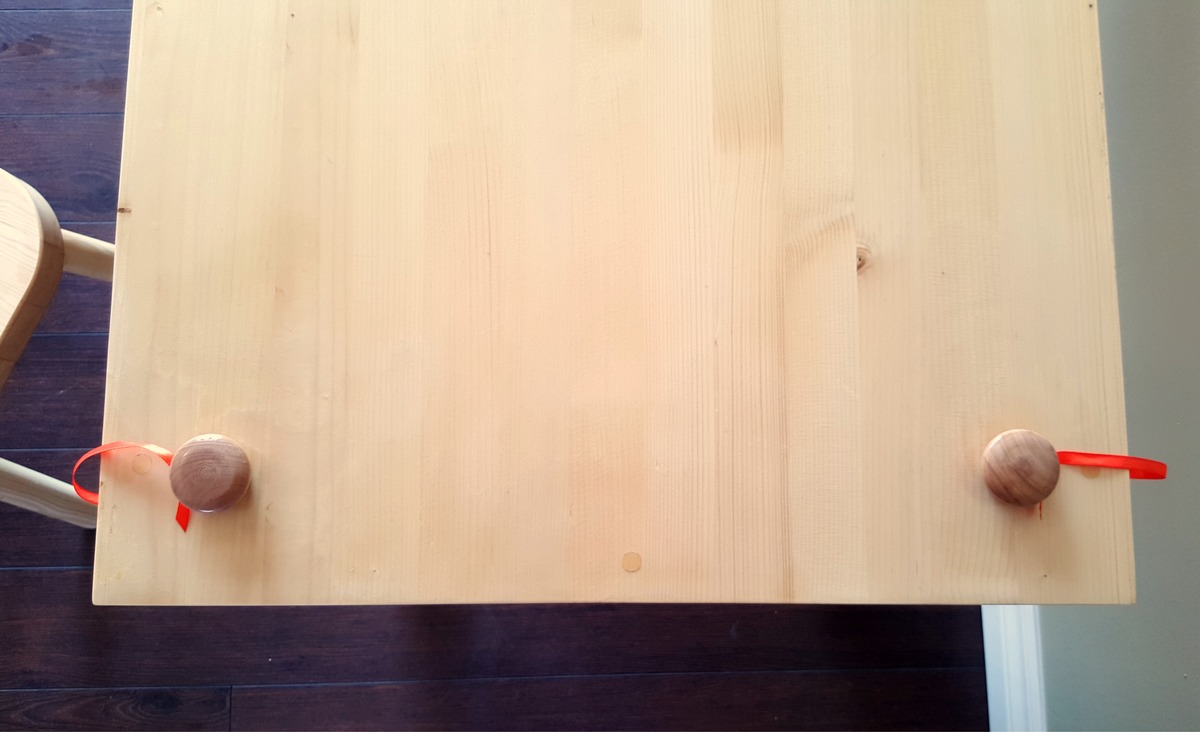
Children's Craft Table with Attached Paper Roll
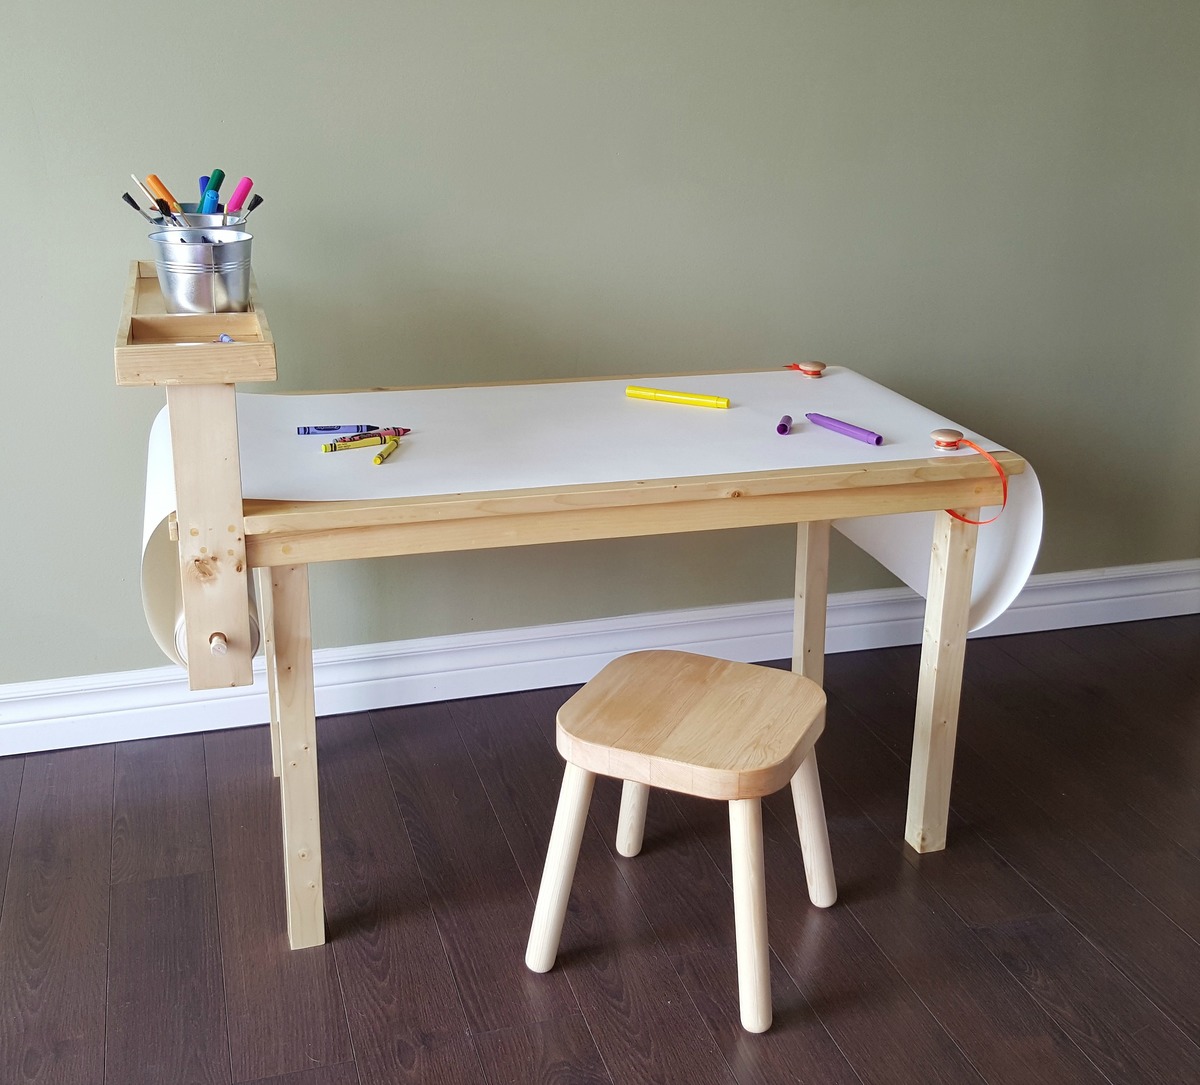
This table was a birthday gift for my 3-year old cousin. It was fun to brainstorm ideas to get it exactly the way we wanted it instead of buying one pre-made. Once we had our plans it was an easy build, done over a weekend. A full list of materials as well as step-by-step instructions can be found in the blog post linked. The top is a 20x36 pine shelf board with a 1x2 pine apron attached underneath. There are vertical support boards to hold a raised tray for supplies, and to hold the paper roll under the table. Note that the table legs are inset at one end to accommodate the paper roll. We added two magnets to the face of the table and tied two knobs (with metal washers glued on) to the underside. The paper can then be sandwiched between the magnet and the metal and won't move around while the artist is at work. It's our favorite feature! There are also magnets glued to the inside bottom of the tray to hold the buckets in place and keep them from being knocked over easily. This project was so much fun! I love having the chance to share it with you all!


Estimated Cost
$70
Estimated Time Investment
Weekend Project (10-20 Hours)
Finish Used
Minwax polyurethane in clear semi-gloss. Lightly sanded between coats. Sanded with ultrafine steel wool before final coat. Note that the polyurethane may discolor the wood putty and make it stand out.
Recommended Skill Level
Beginner

Customized Adirondack Chair
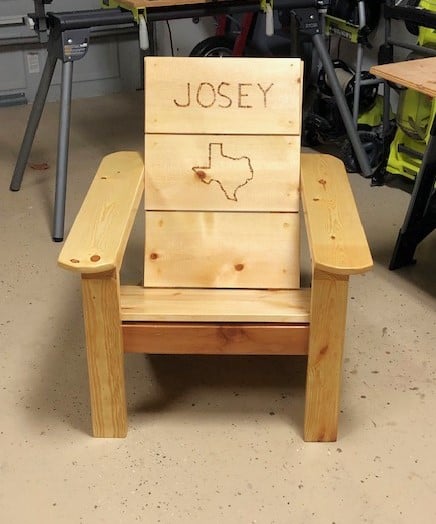
Adirondack Chair made in Texas. Ana, great plans and fun to build. Added arm rests and used soldering iron to burn in map of Texas and the name of the recipient!
Dave Jerger
Built from Plan(s)
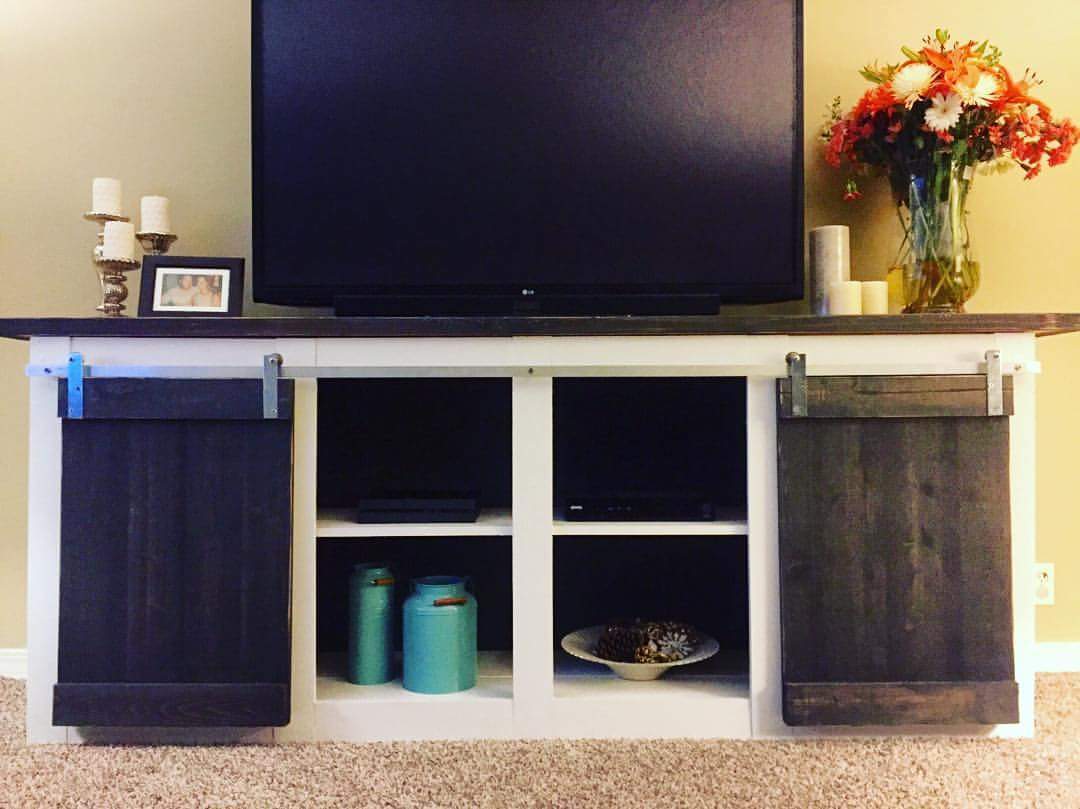
Media Console
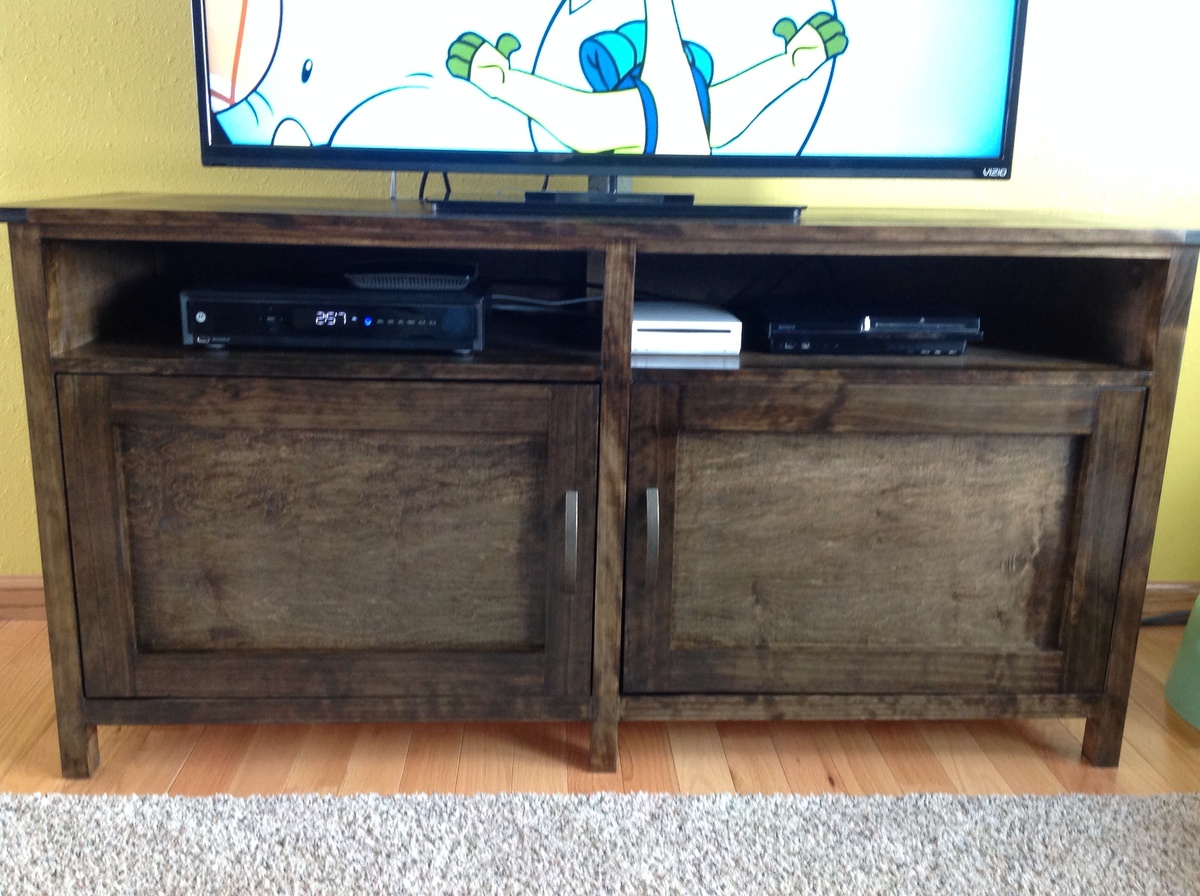
Worked on this very casually and intermittently for about 3-4 weeks, though I would consider it a weekend project if you have all materials and tools necessary to complete, and a couple full days to devote to the project. With 2 young kids at home, I was only able to get an hour here and there at a time in my shop to work. I decided to leave off the top flip-down style doors, as our cable box requires line-of-sight to work, and my wife wasn't crazy about having to open those any time we were going to watch television.
I was a bit uneasy about the weight of the top, especially once the tv was placed, without any support bracing directly under the top-center piece of plywood. To add a bit of support, I added a 1x3 brace, attaching it between the tops of the 2 center legs, flush to the underside of the top. Completely hidden, and added just enough peace of mind for me to put my new tv on it, worry free.
Materials: I used maple hardwood plywood, and select grade pine for the finish/edge pieces. I found that polycarbonate sheeting was pretty expensive at my local hardware store, plus I had to special order an opaque finish, so I finished my doors with 1/4 plywood that I had left over from the back panel. I used 4 different grit levels of sandpaper (120, 220, hand sanded with 320, and then used 400 between coats of poly). Minwax Dark Walnut stain and 2 coats of clear satin polyurethane. Kreg jig is a must for a project like this, would have been lost without mine! I love that all the hinges and screws are hidden!
I'm planning to build the matching media towers from this collection next.
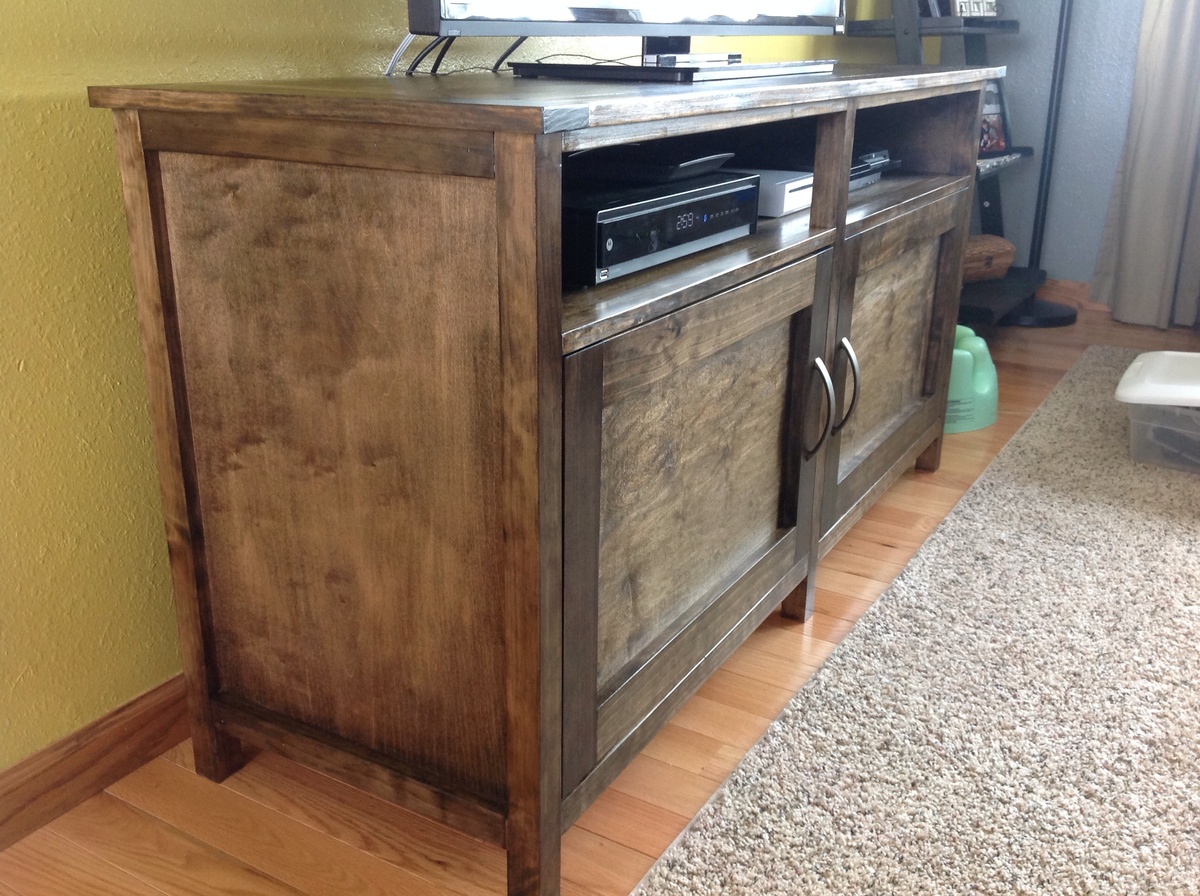
Built from Plan(s)
Estimated Cost
$200-$250
Estimated Time Investment
Weekend Project (10-20 Hours)
Finish Used
2 coats Dark Walnut stain - Minwax
2 coats clear satin polyurethane (400 grit hand sand between coats) - Minwax
2 coats clear satin polyurethane (400 grit hand sand between coats) - Minwax
Recommended Skill Level
Intermediate
Comments
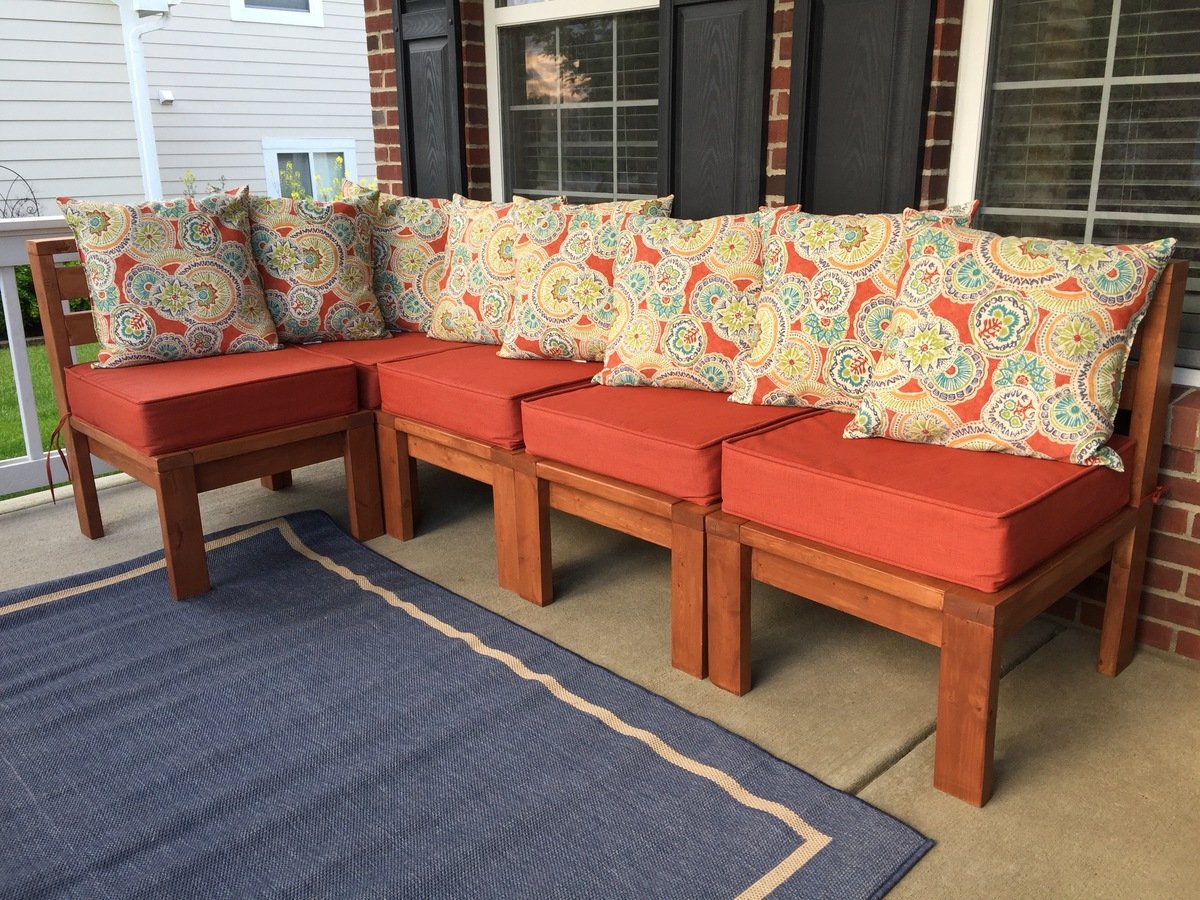
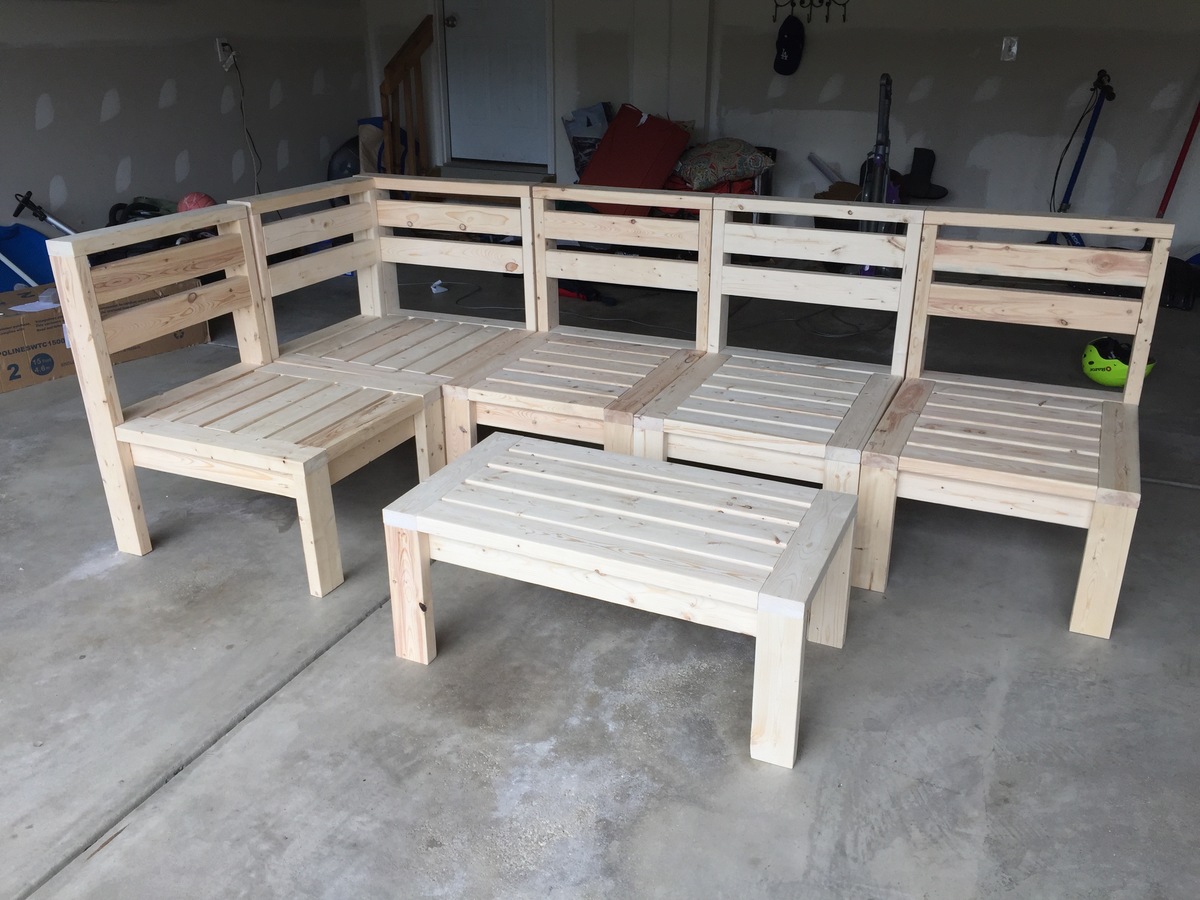
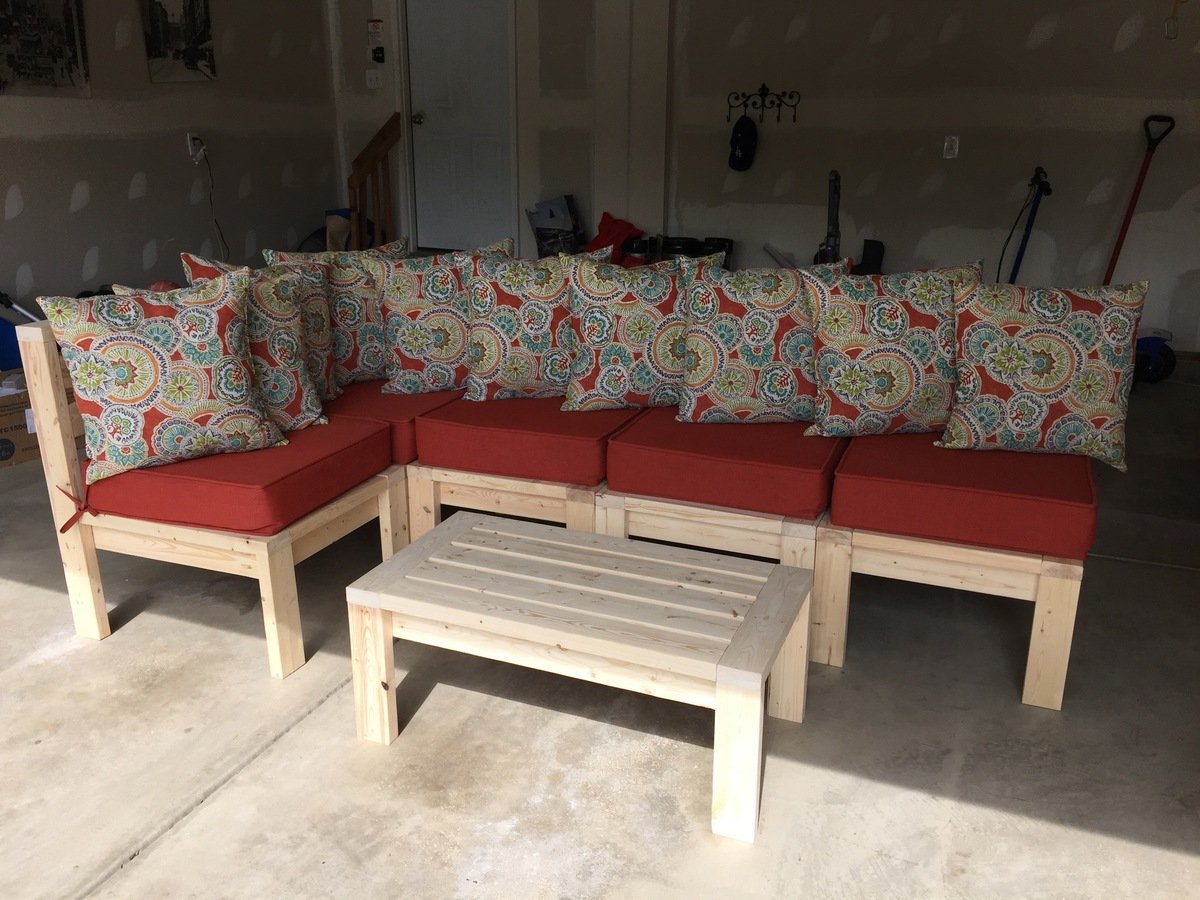
Modified Outdoor Sectional
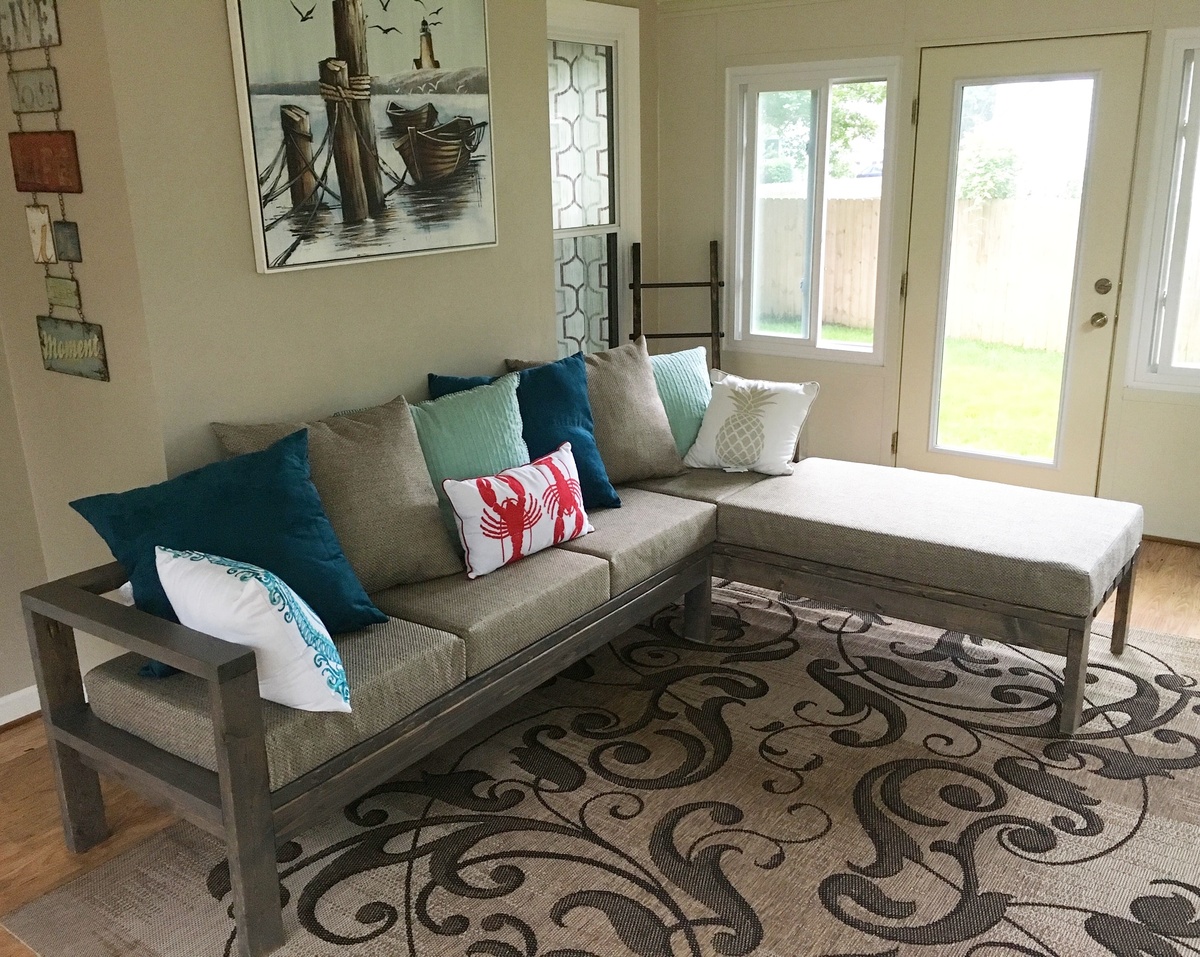
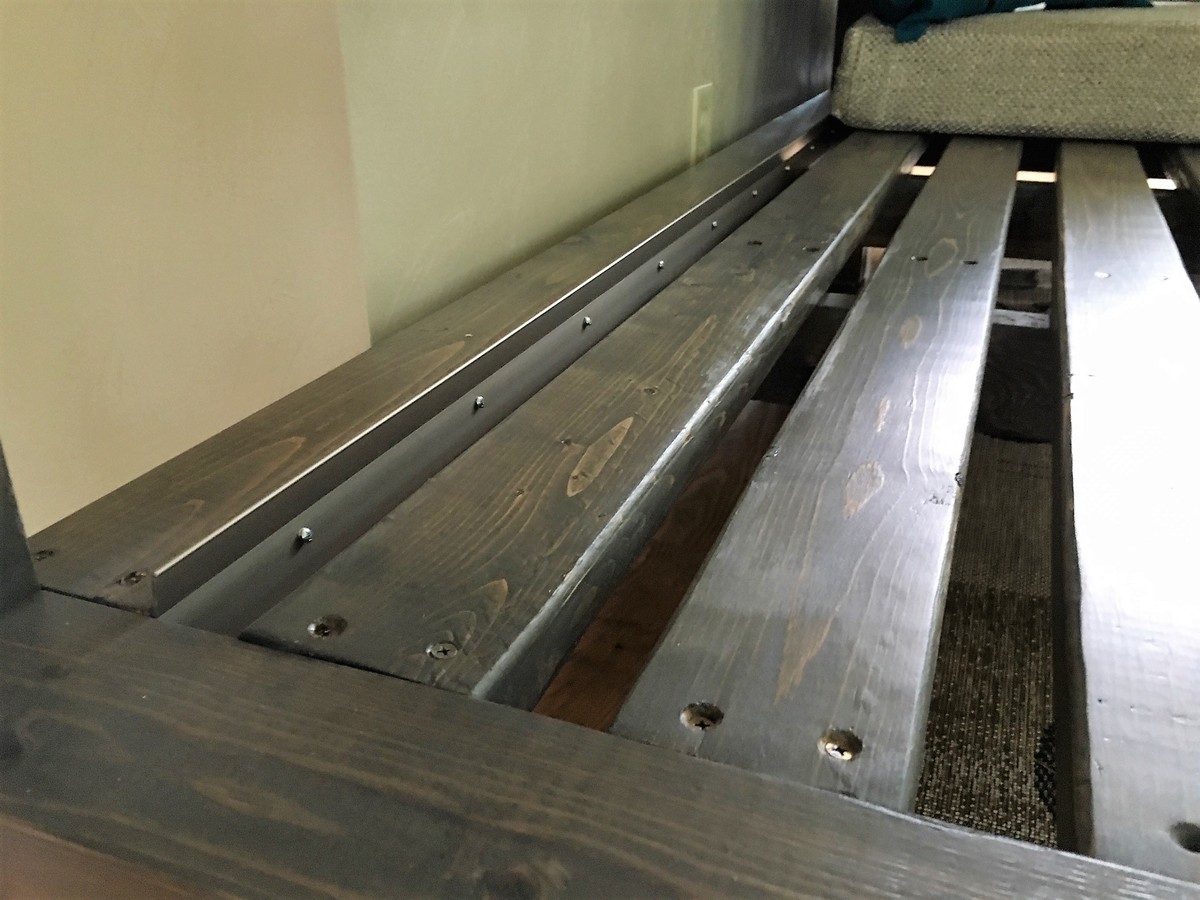
Modified one of the couch pieces so that the back rest only went as far as the depth of the adjacent couch; thereby making the rest of the couch a chaise. Cushions were custom made (walked into local fabric store and asked for a referral). Cushions were sliding out the back; but my build partner came up with a genius solution - used inexpensive metal threshold material and screwed it to the back seat slat. Works like a champ and looks nice too!
Built from Plan(s)
Estimated Time Investment
Weekend Project (10-20 Hours)
Finish Used
Minwax pre-conditioner, 1 light coat Minwax Jacobean, 1 coat Minwax Classic Gray, 2 Coats Minwax Polycrylic.
Recommended Skill Level
Beginner
Comments
Roll Away Workbench with Miter Saw Stand
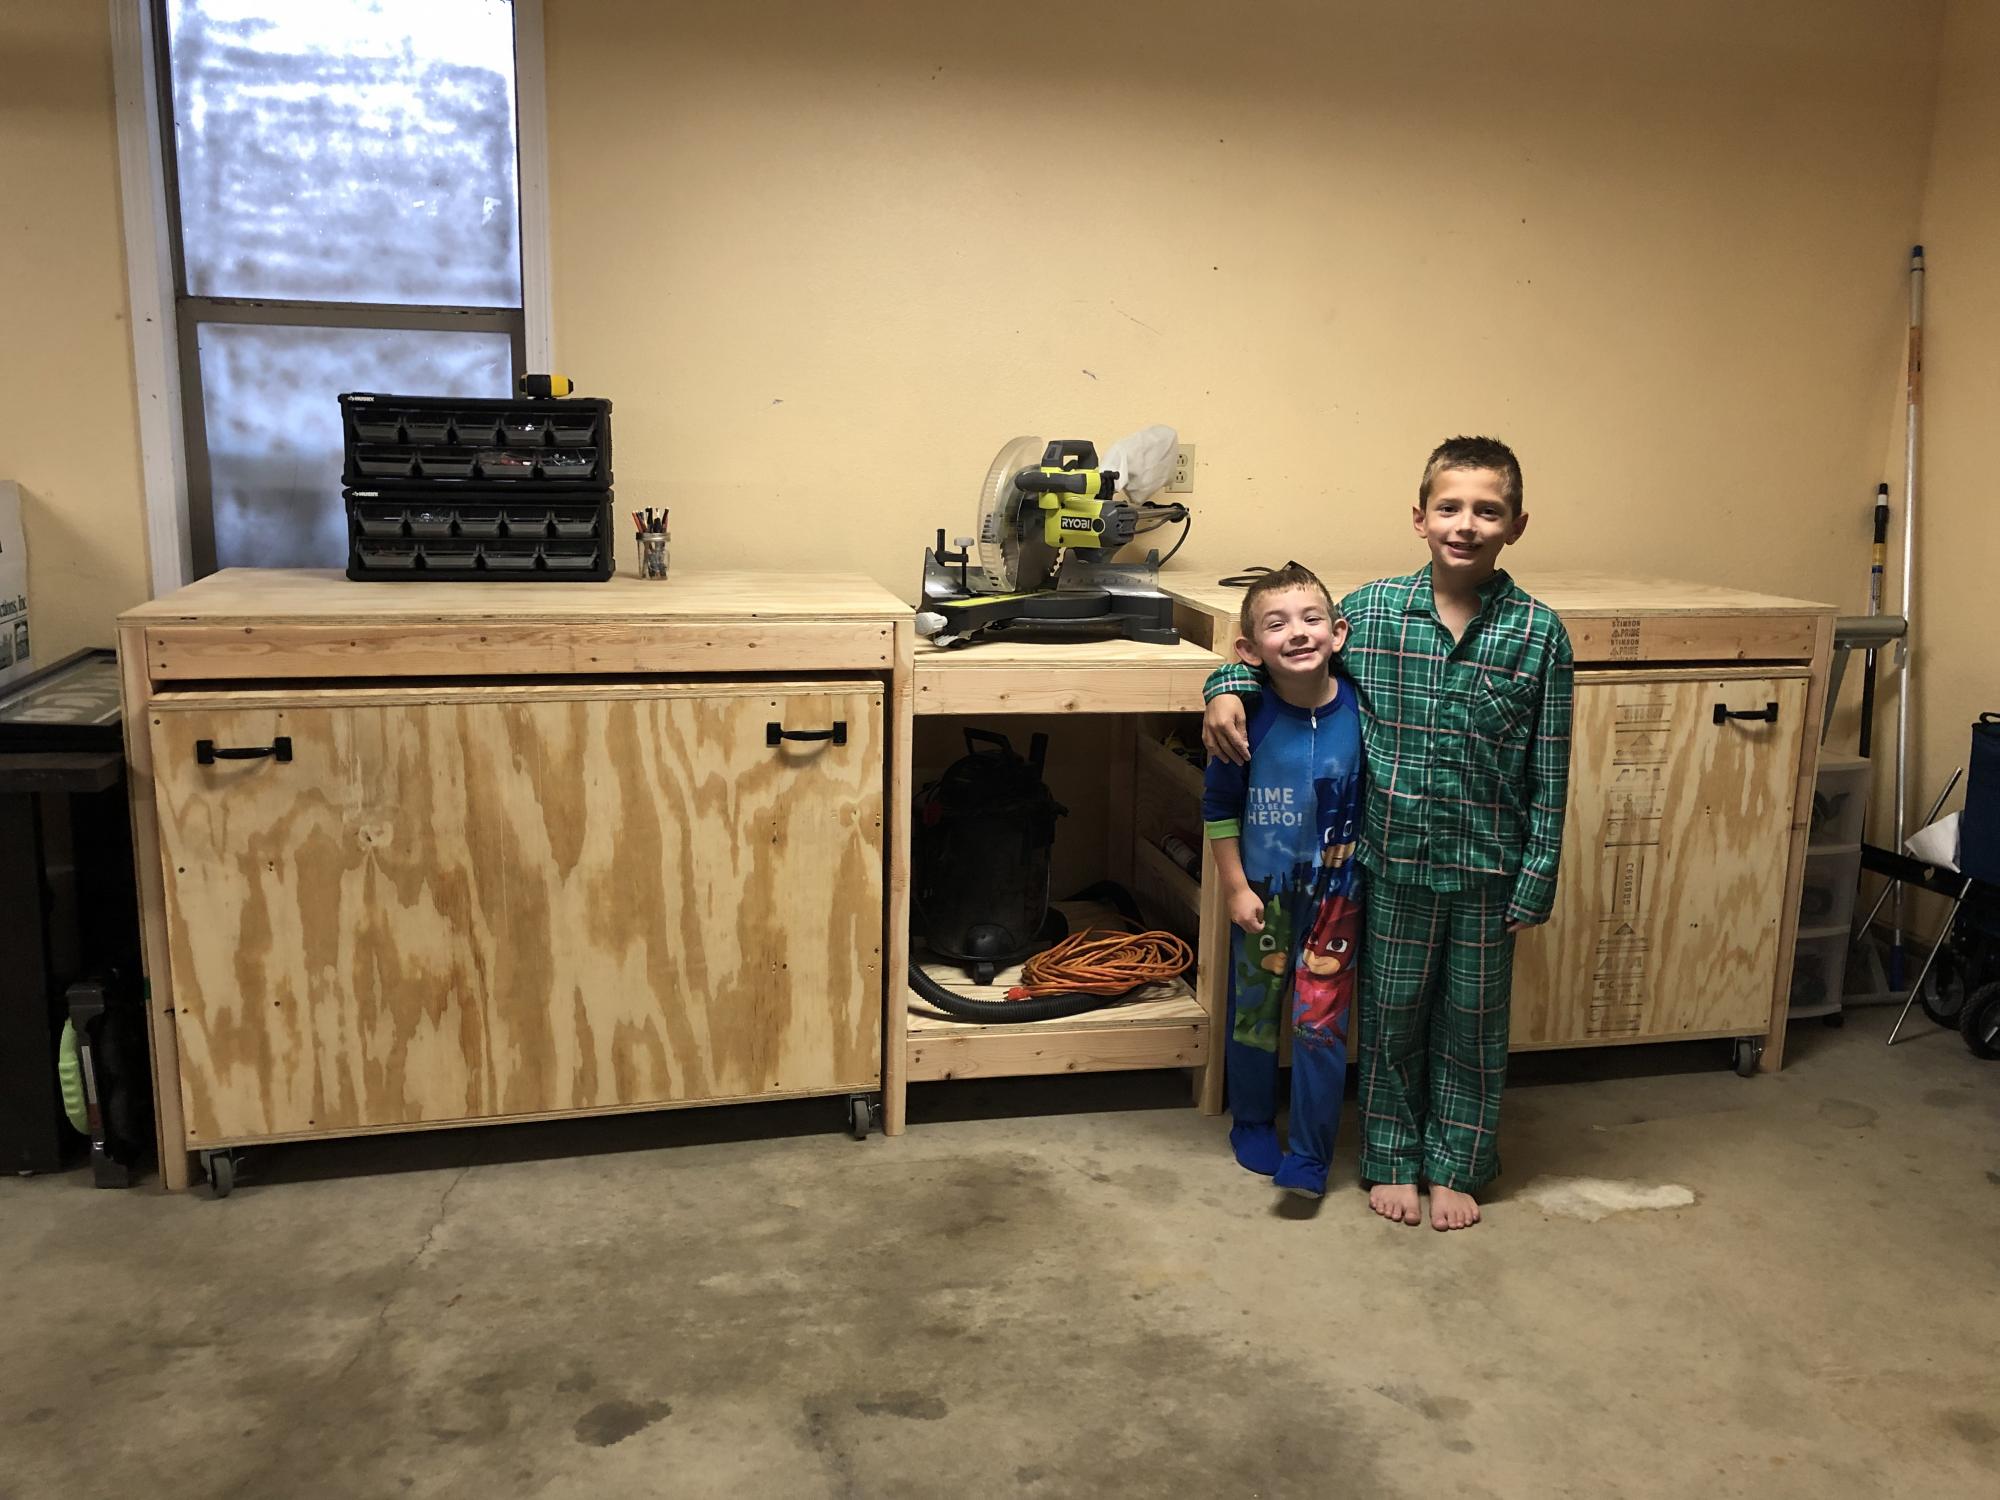
After collecting my tools, I needed a place to store them that would protect them. I had already had two jigsaws break because I was storing them in a rubbermaid tote. When I saw this plan I knew it was going to be perfect for my shop. My husband was supper happy because I would finally have a central spot for my workshop. My boys were happy to help when they could.
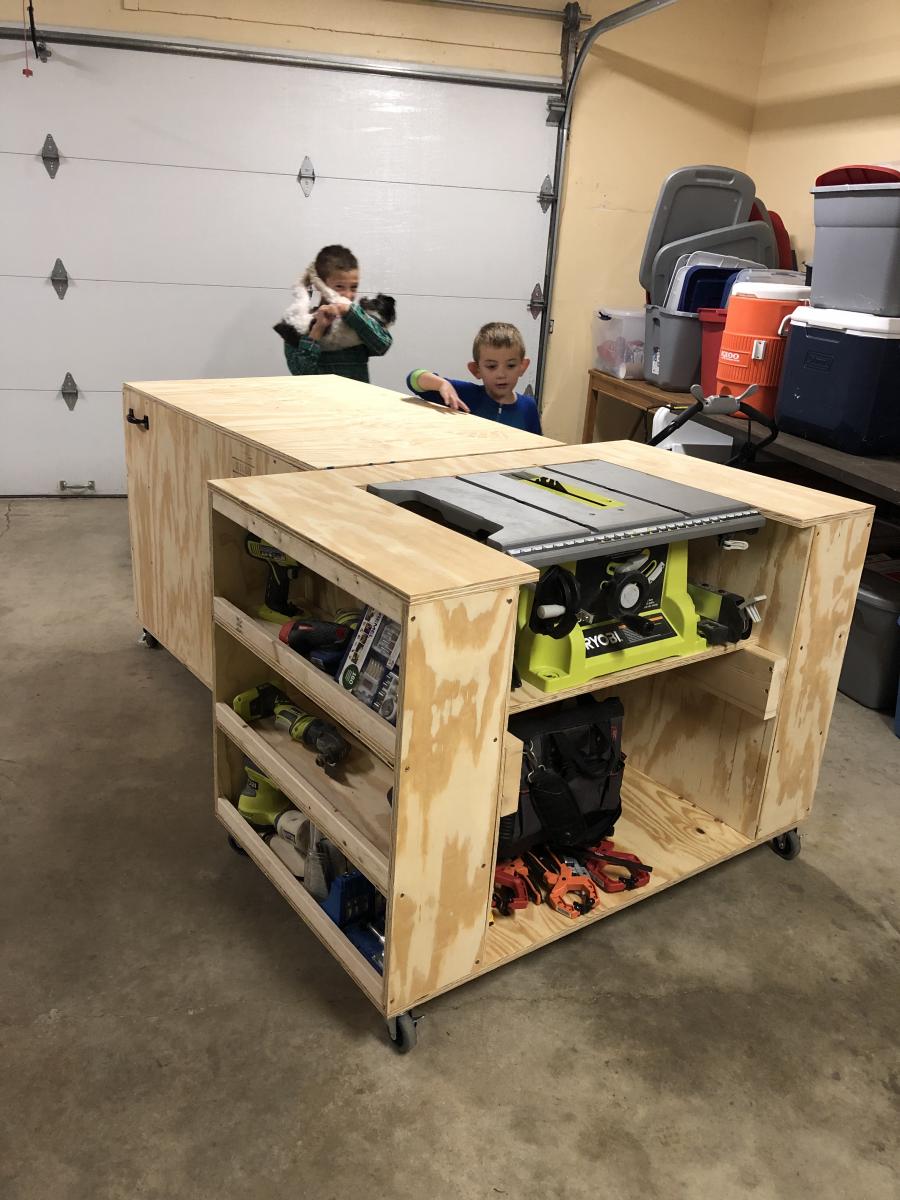

Built from Plan(s)
Estimated Time Investment
Week Long Project (20 Hours or More)
Craft Table
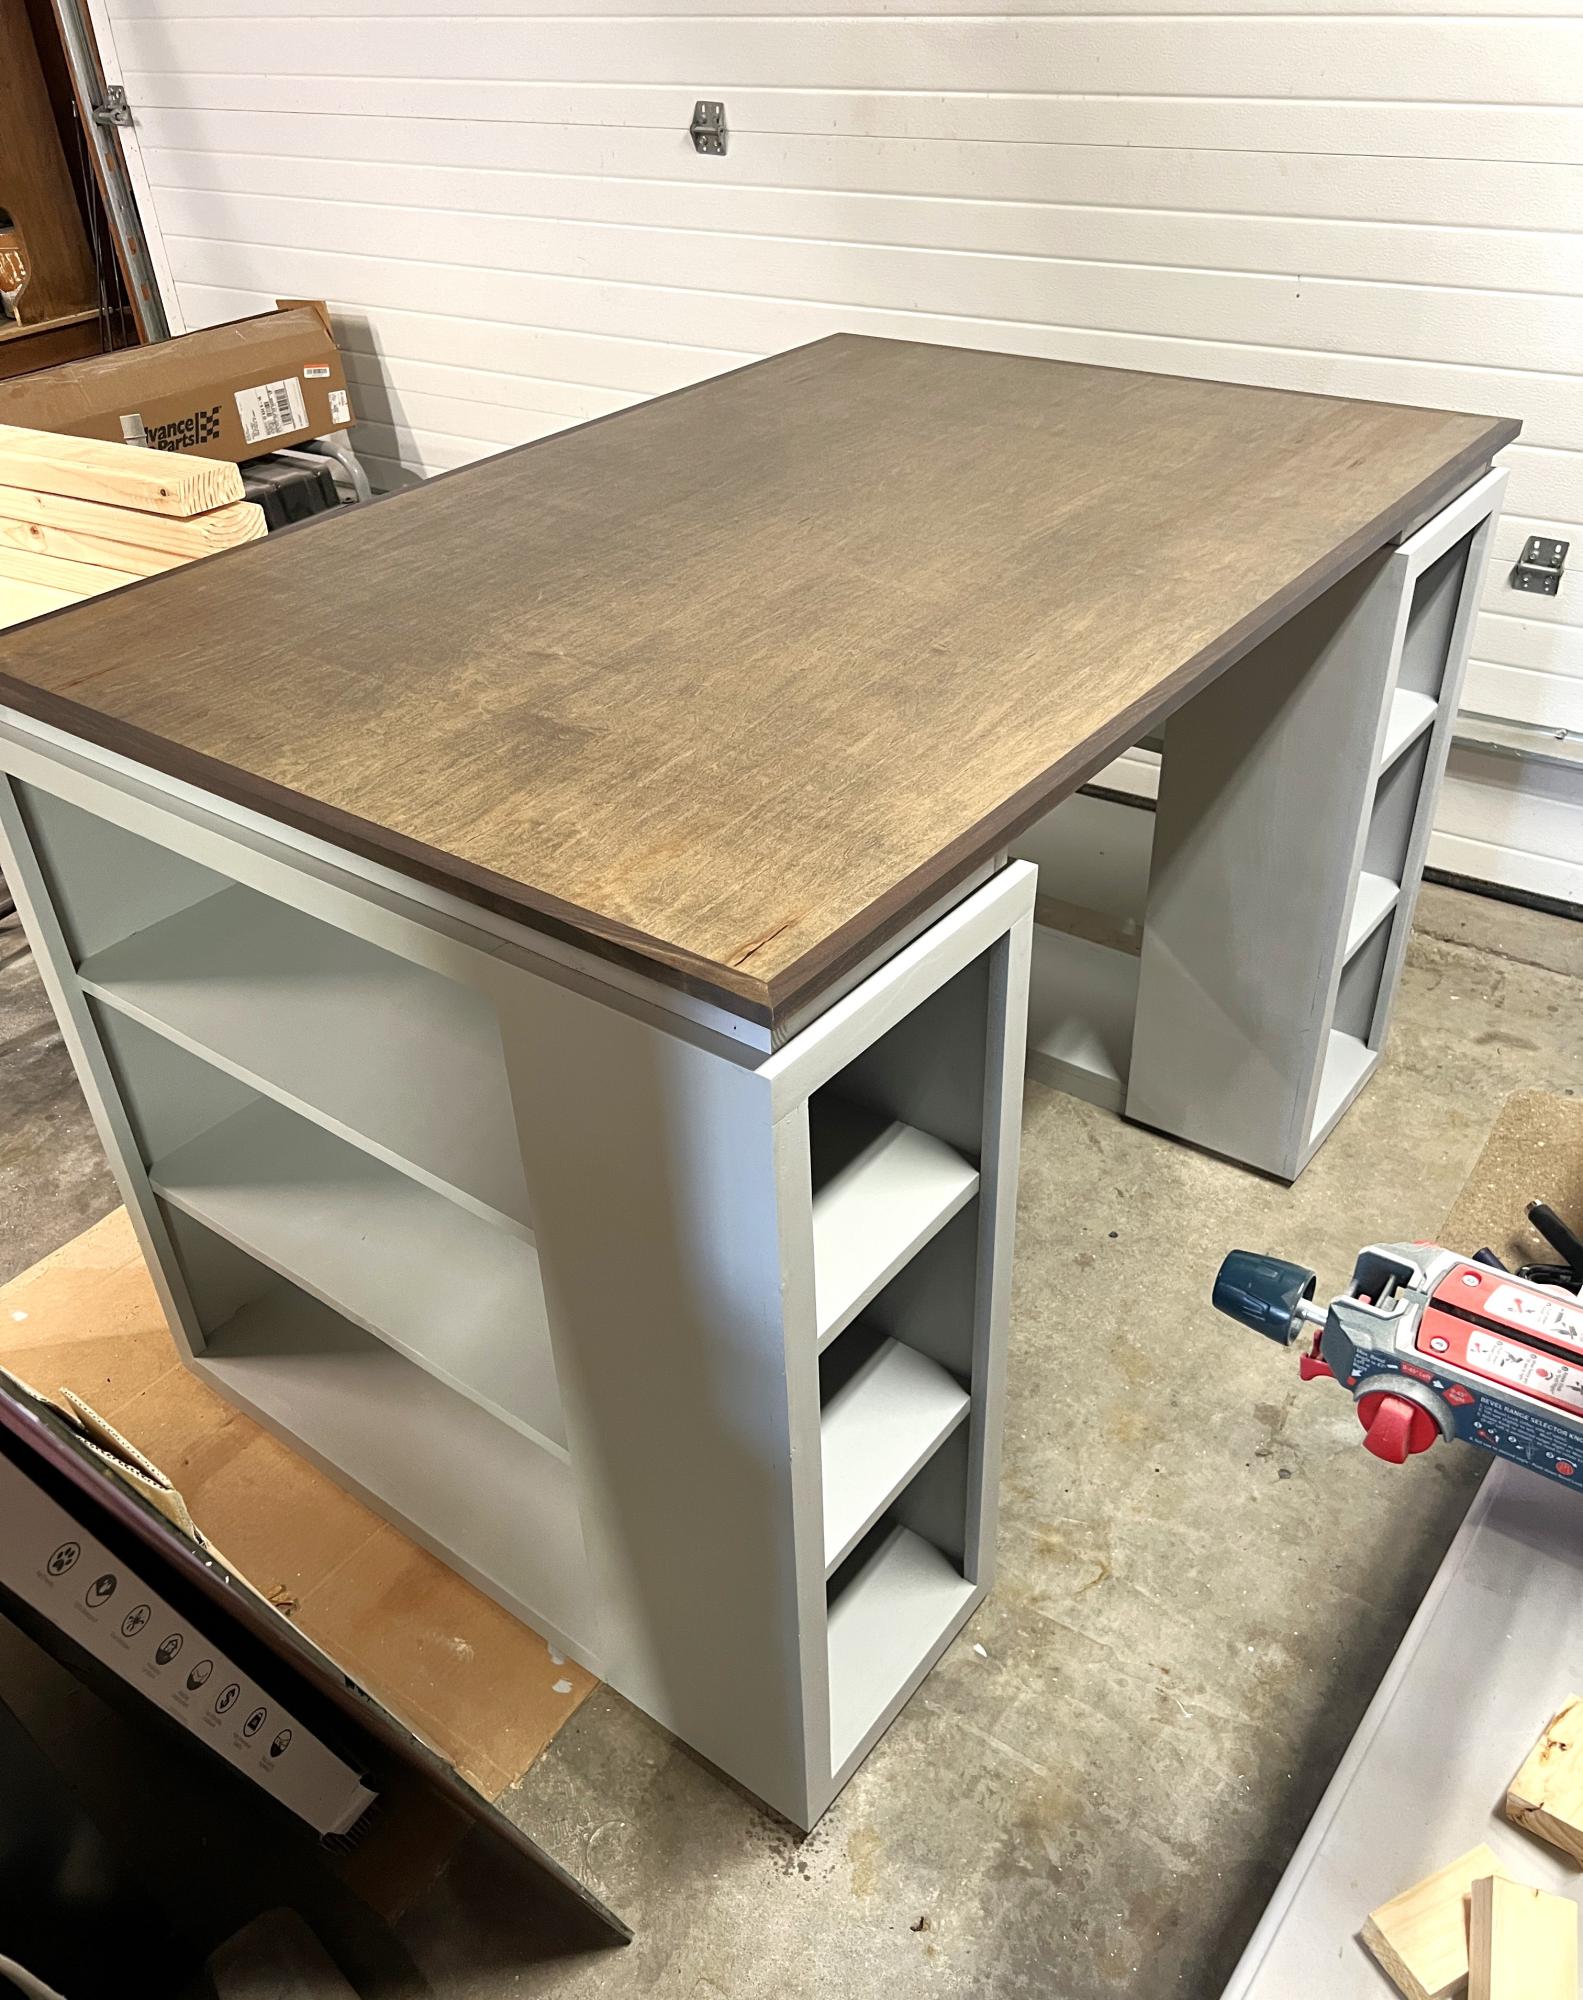
Maple top plywood wrapped with walnut trim. Stain is minwax aged barrel. Warm satin polyurethane finish.
Built from Plan(s)
Easy Kitchen Island Plans
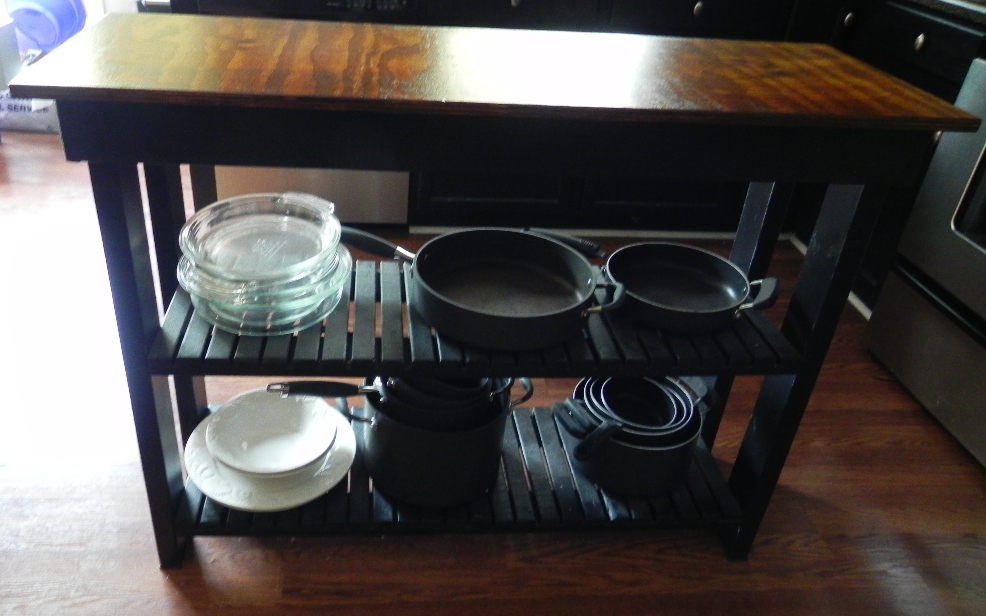
We made the top a solid piece, so we wouldn't have to deal with food getting in the cracks.
We modified the measurements to fit our space, it measures 48" w x 16" d x 36" h. I absolutely love this island!
Built from Plan(s)
Estimated Time Investment
An Hour or Two (0-2 Hours)
Finish Used
legs painted black, top stained mahogany
Recommended Skill Level
Beginner
Comments

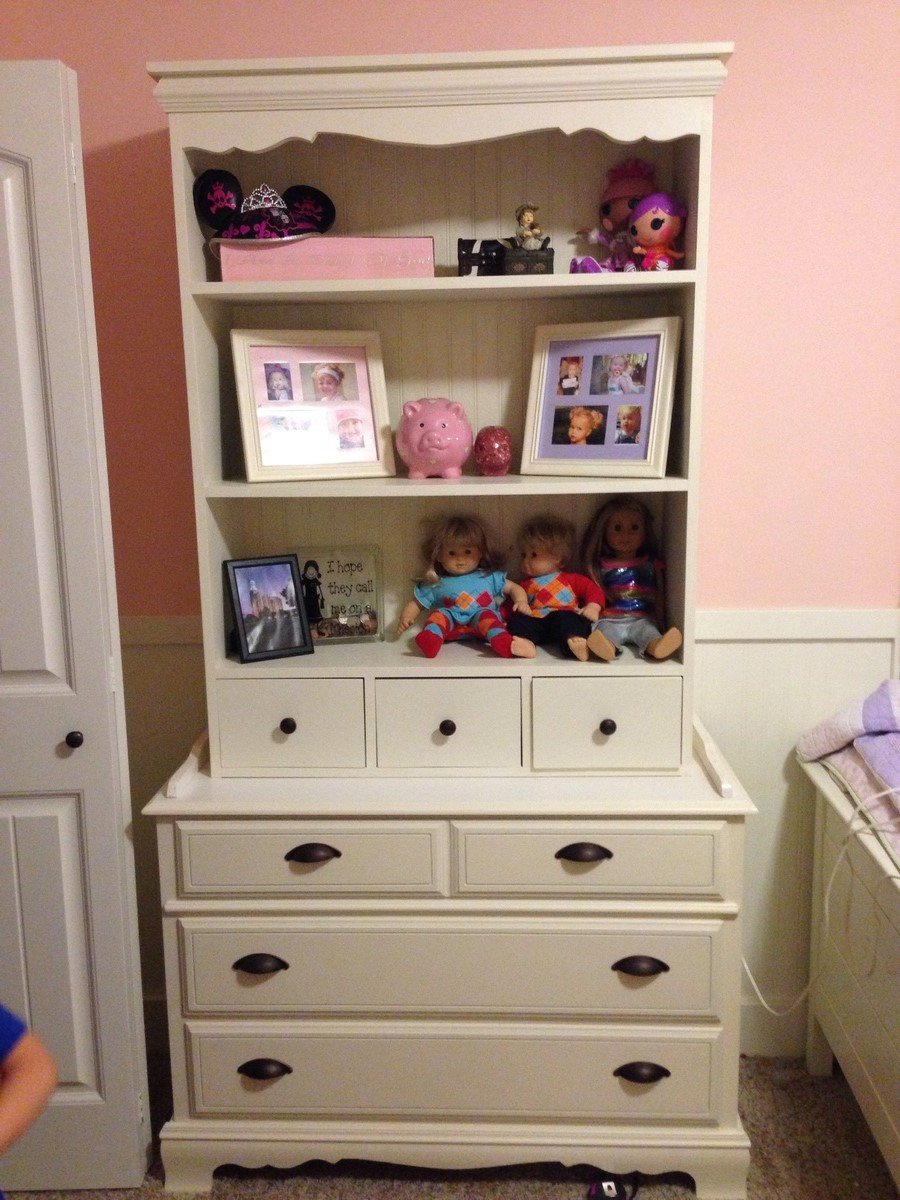
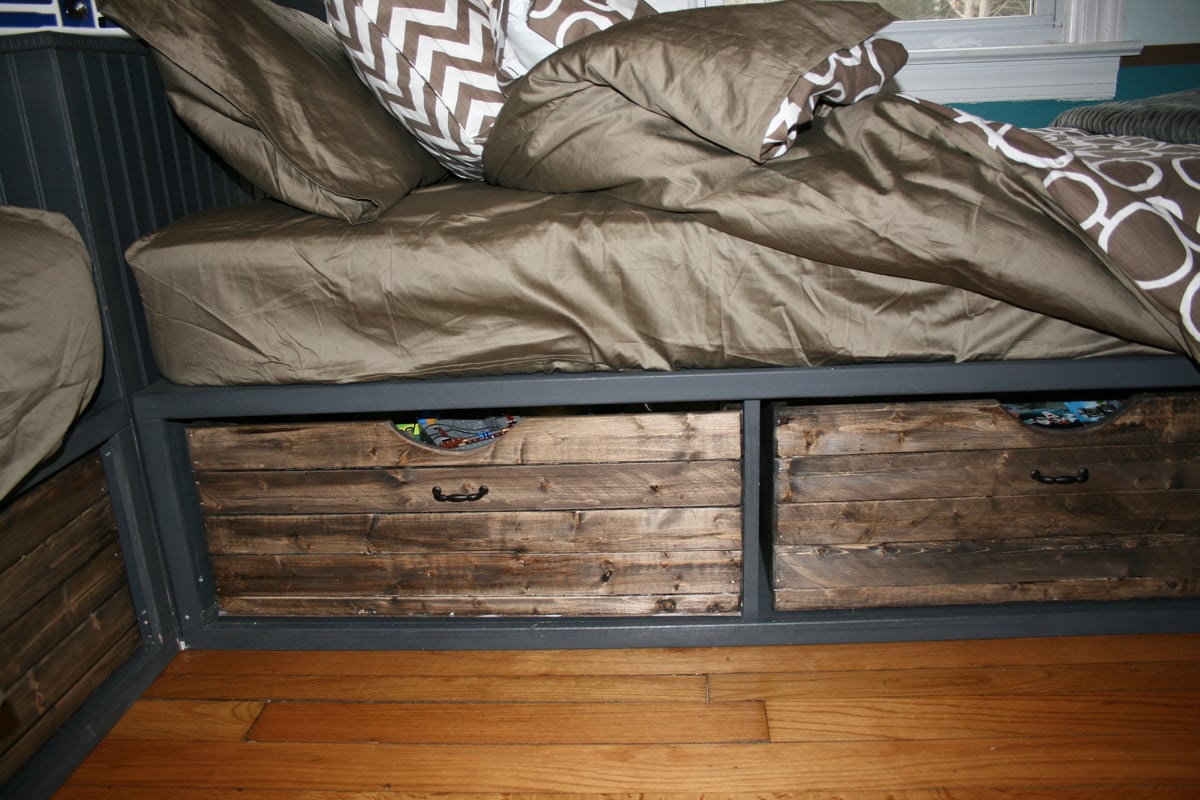
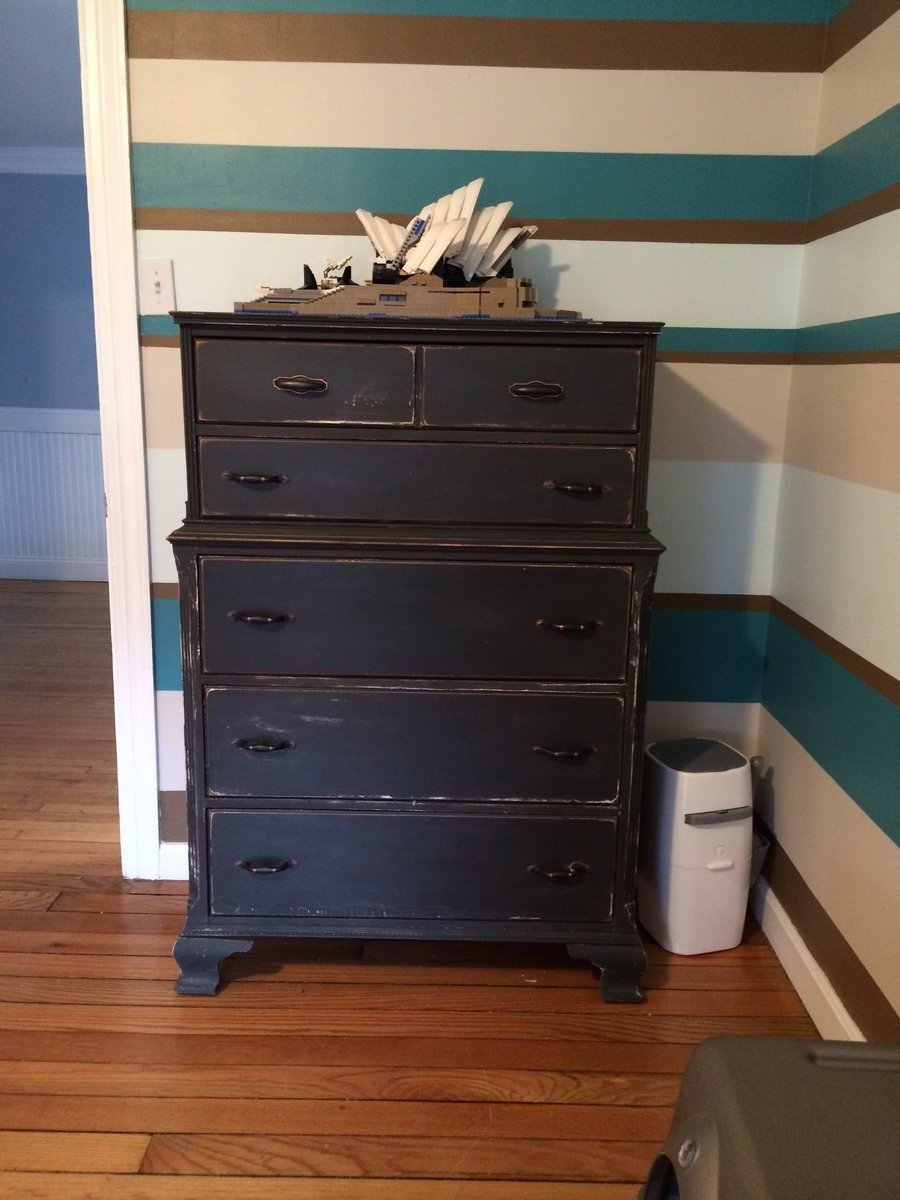
Corner hutch and twin storage beds
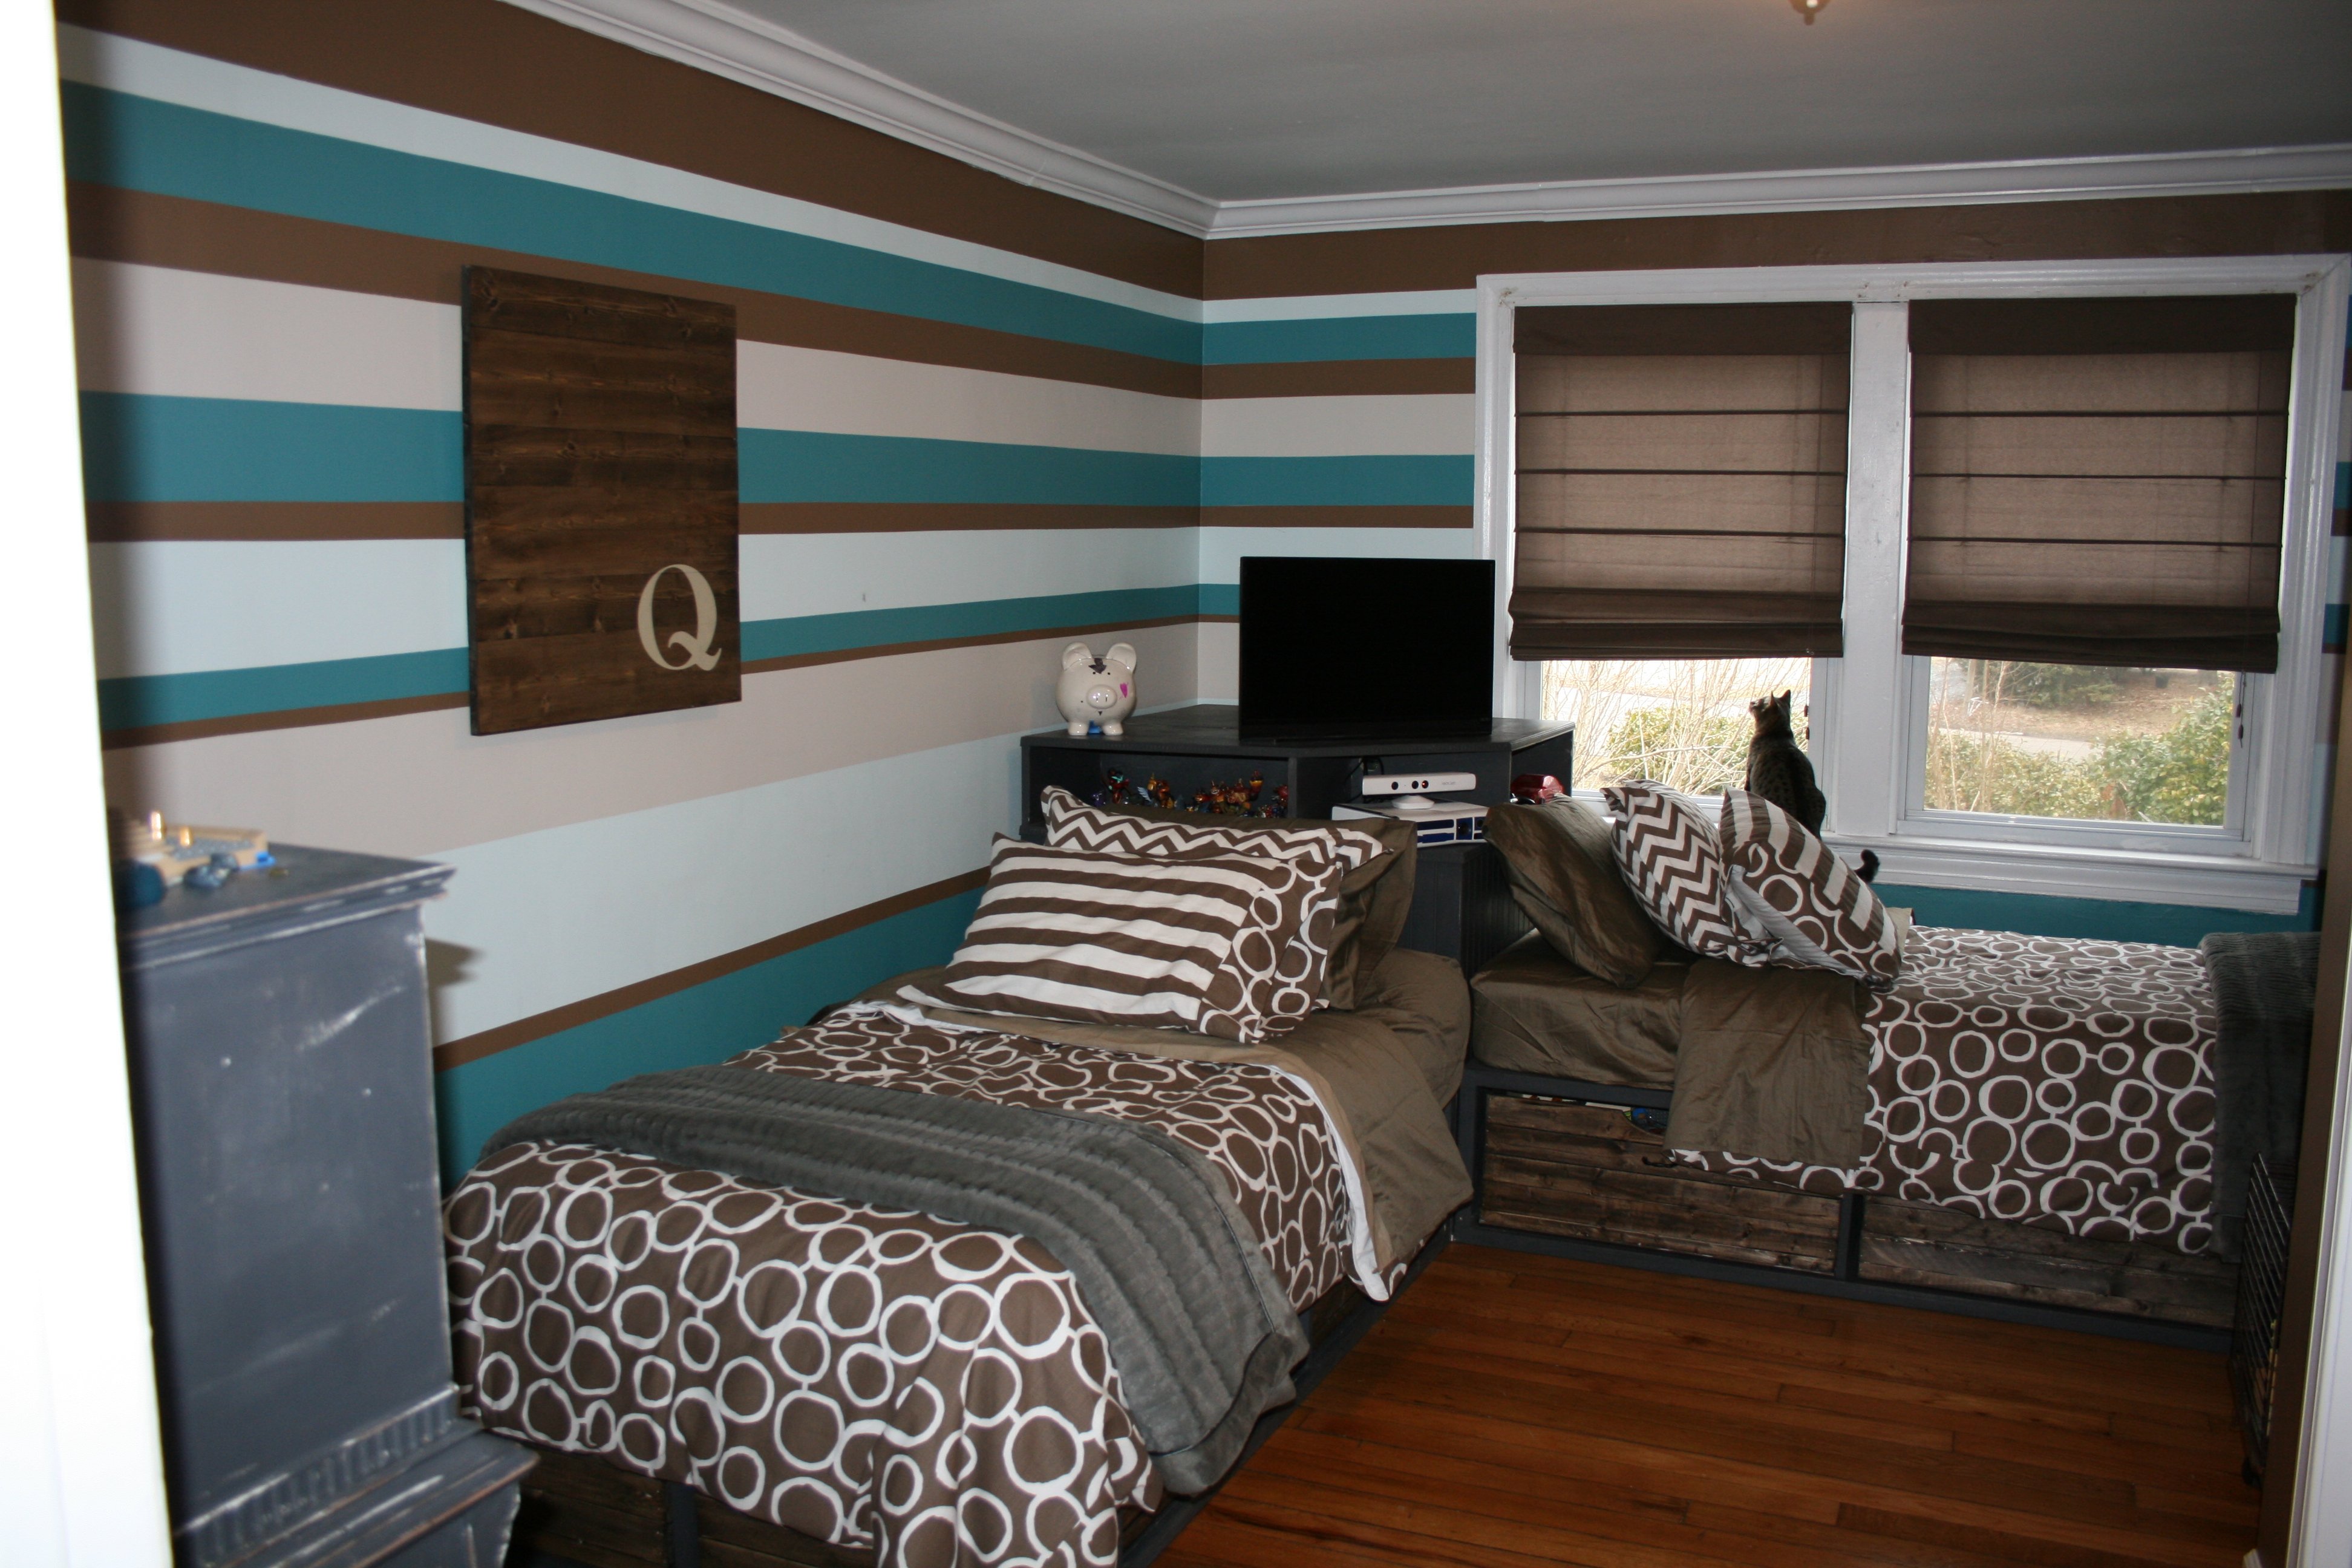
This was my first build and it took me about a week to finish. My son has an L shaped room due his closet being the laundry room. This plan was perfect for his room and provided tons of storage. I could not find baskets that I liked so I just made bins using 1x2 for front and backs, left over scraps for sides and 1/4 plywood for bottoms then stained them. The approx cost for each bin was 5 dollars. I made my own chalk paint and painted them the same as the antique dresser i found on craigslist that I refinished.

Built from Plan(s)
Estimated Cost
450.
Estimated Time Investment
Week Long Project (20 Hours or More)
Finish Used
Chalk paint recipe using Behr flat primer/paint= 4 parts paint-1 part water-1 part plaster of paris. Finished with a coat of wax.
Recommended Skill Level
Beginner
Comments
Rustic X coffee table

My first project and I love how it turned out
Built from Plan(s)
Estimated Time Investment
Weekend Project (10-20 Hours)
Finish Used
Drift wood stain on top, cotton white chalk paint on base
Recommended Skill Level
Beginner
Bunbed
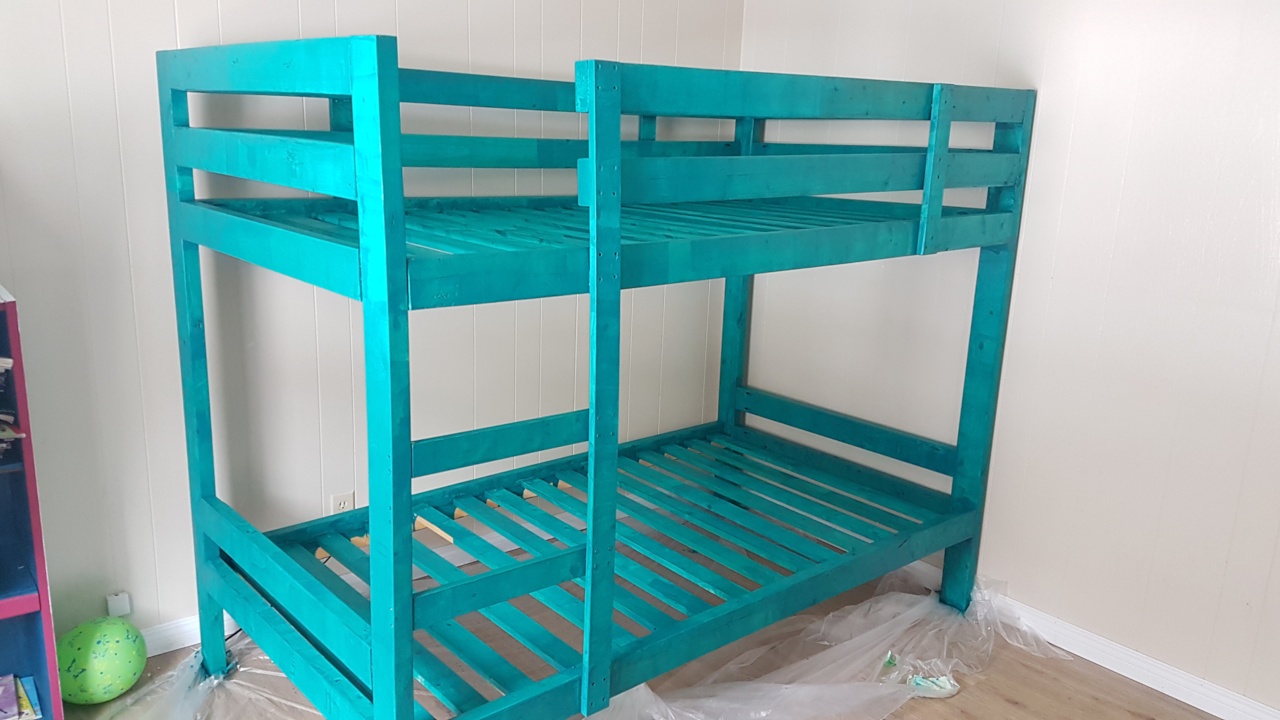
This was my second Ana White project and I LOVE IT. In the picture you only see the first coat of paint. This bunk bed is so heavy duty, even I can sleep with my girls in there in case they need me - we love it
When I built it I did not have a Kreg Jig yet so I bought a teeny tiny little one hole pocket hole thing- so it took me propably an hour longer than it should have... now with the real deal Kreg bam I'm laughing!!!
I already have three friends wanting me to build them one too (there is no store here to buy bunkbeds... everything is with shipping and we live remote in Dawson City so there is A LOT of shipping cost...
I buy the way could not find this awesome plan online but I have Ana White's "The Handbuilt Home" Book where it is in!
Estimated Cost
I paid for wood (it's expensive up north - 200 CAD)
Estimated Time Investment
An Hour or Two (0-2 Hours)
Finish Used
whatever our hardware store offered haha, we do not have a choice up here
Recommended Skill Level
Beginner
2 Person Adirondack

A customer asked me to make them two singles and a double. Unfortunately, not as comfortable as the single chair. There’s nowhere to put one of your arms. If I do another double, I’ll add an arm rest in the center. The middle is supported by a double 30 degree leg.
Built from Plan(s)
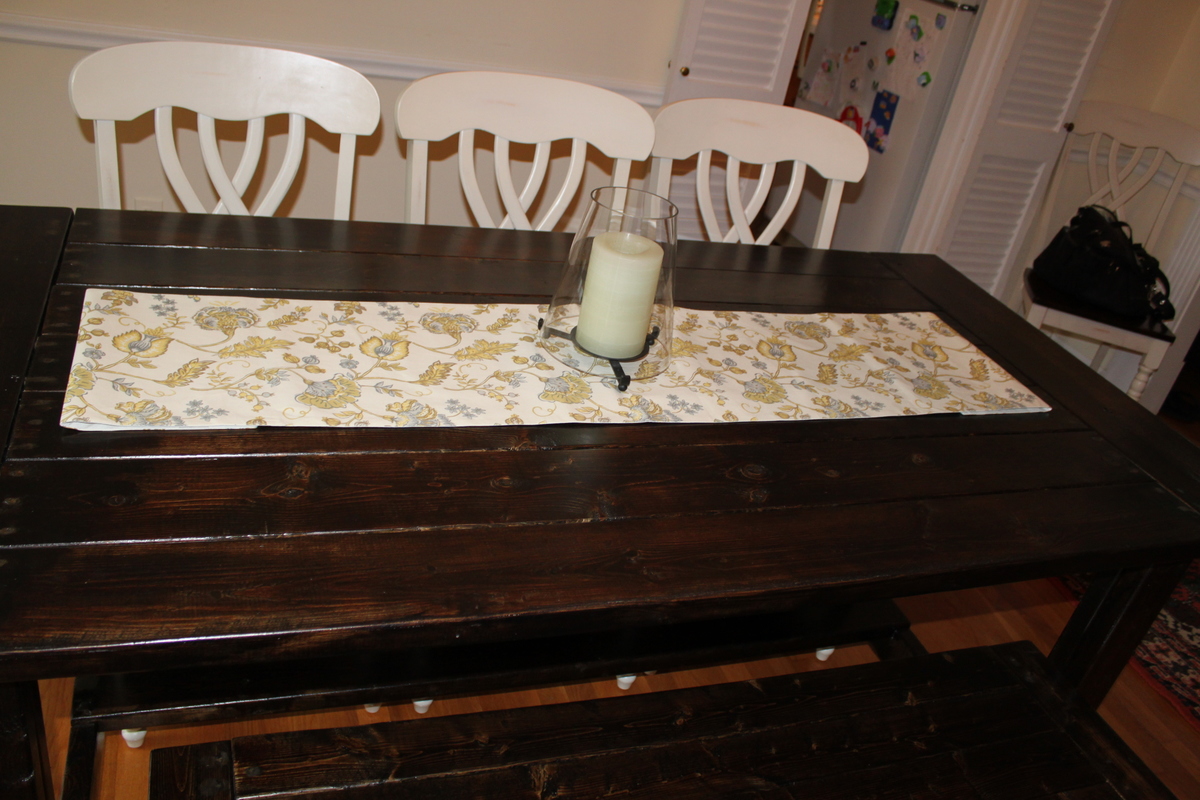
Farmhouse Table - My first project!
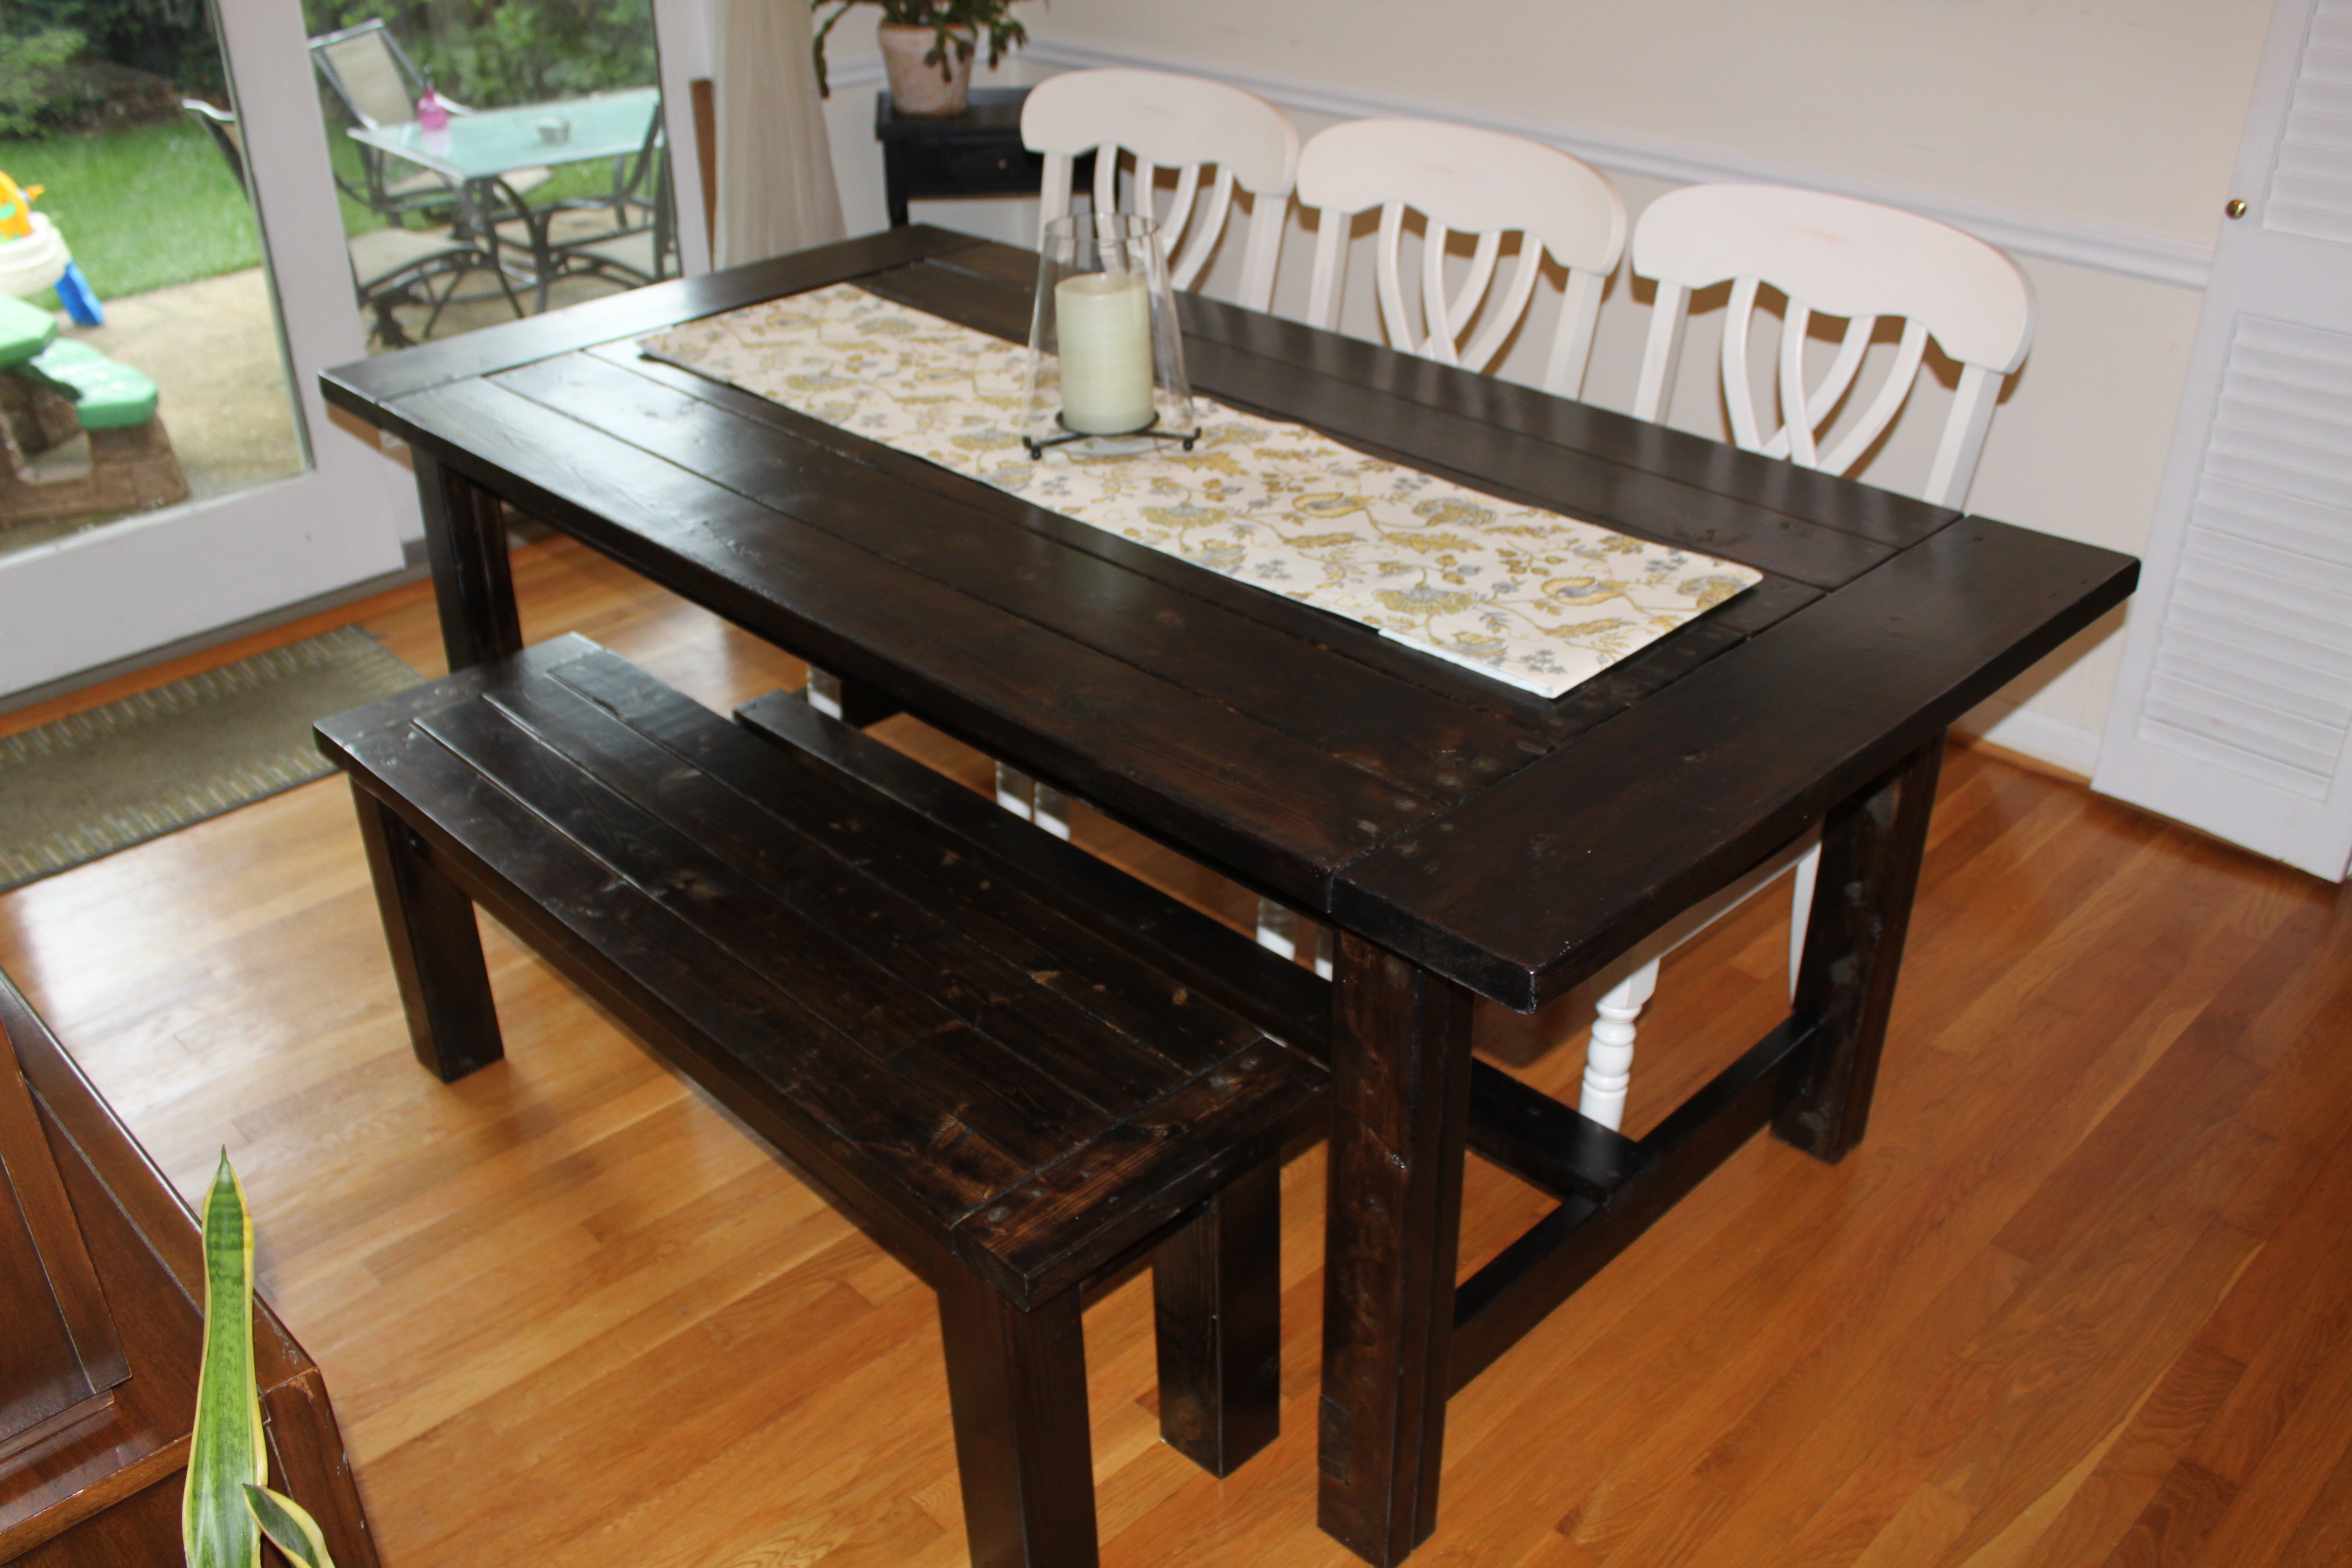
I followed Ana's plans for the farmhouse table and bench. This was my first project and it turned out really well! The flash makes some of the table top look discolored but it does not look like that in person - just a weird flash thing I think :)
The project took me about a week - table and bench and I only worked on it during nap times and when the kiddos went to sleep! The original plan was for a 96 inch table - I shortened mine to 75 inches to fit our dining room.
A great dining room table for us and it cost around $200 for both table and bench.
I am so proud that I actually built something that my family can use and I get so many compliments on!
Thanks, Ana!!!
Built from Plan(s)
Estimated Cost
$200
Estimated Time Investment
Weekend Project (10-20 Hours)
Finish Used
minwax in jacobean plus a polycrylic finish (3 coats)
Recommended Skill Level
Beginner
Wooden Illusion

I found a picture of this online but couldn't find the instructions on how it was built. With some trial and error, I recreated the illusion.
Watching the video is the easiest way to see how it works. I've included a drawing which is linked in the video description.
https://www.youtube.com/watch?v=b3vbaZP2cL8
Build Instructions:
http://www.instructables.com/id/Wooden-Illusion/
Estimated Time Investment
An Hour or Two (0-2 Hours)
Finish Used
None
Recommended Skill Level
Starter Project
Comments

Barn door console
Built this over the better part of 3 days
Built from Plan(s)
Estimated Time Investment
Weekend Project (10-20 Hours)
Recommended Skill Level
Intermediate