Community Brag Posts

Freestanding Closet for Narrow Room
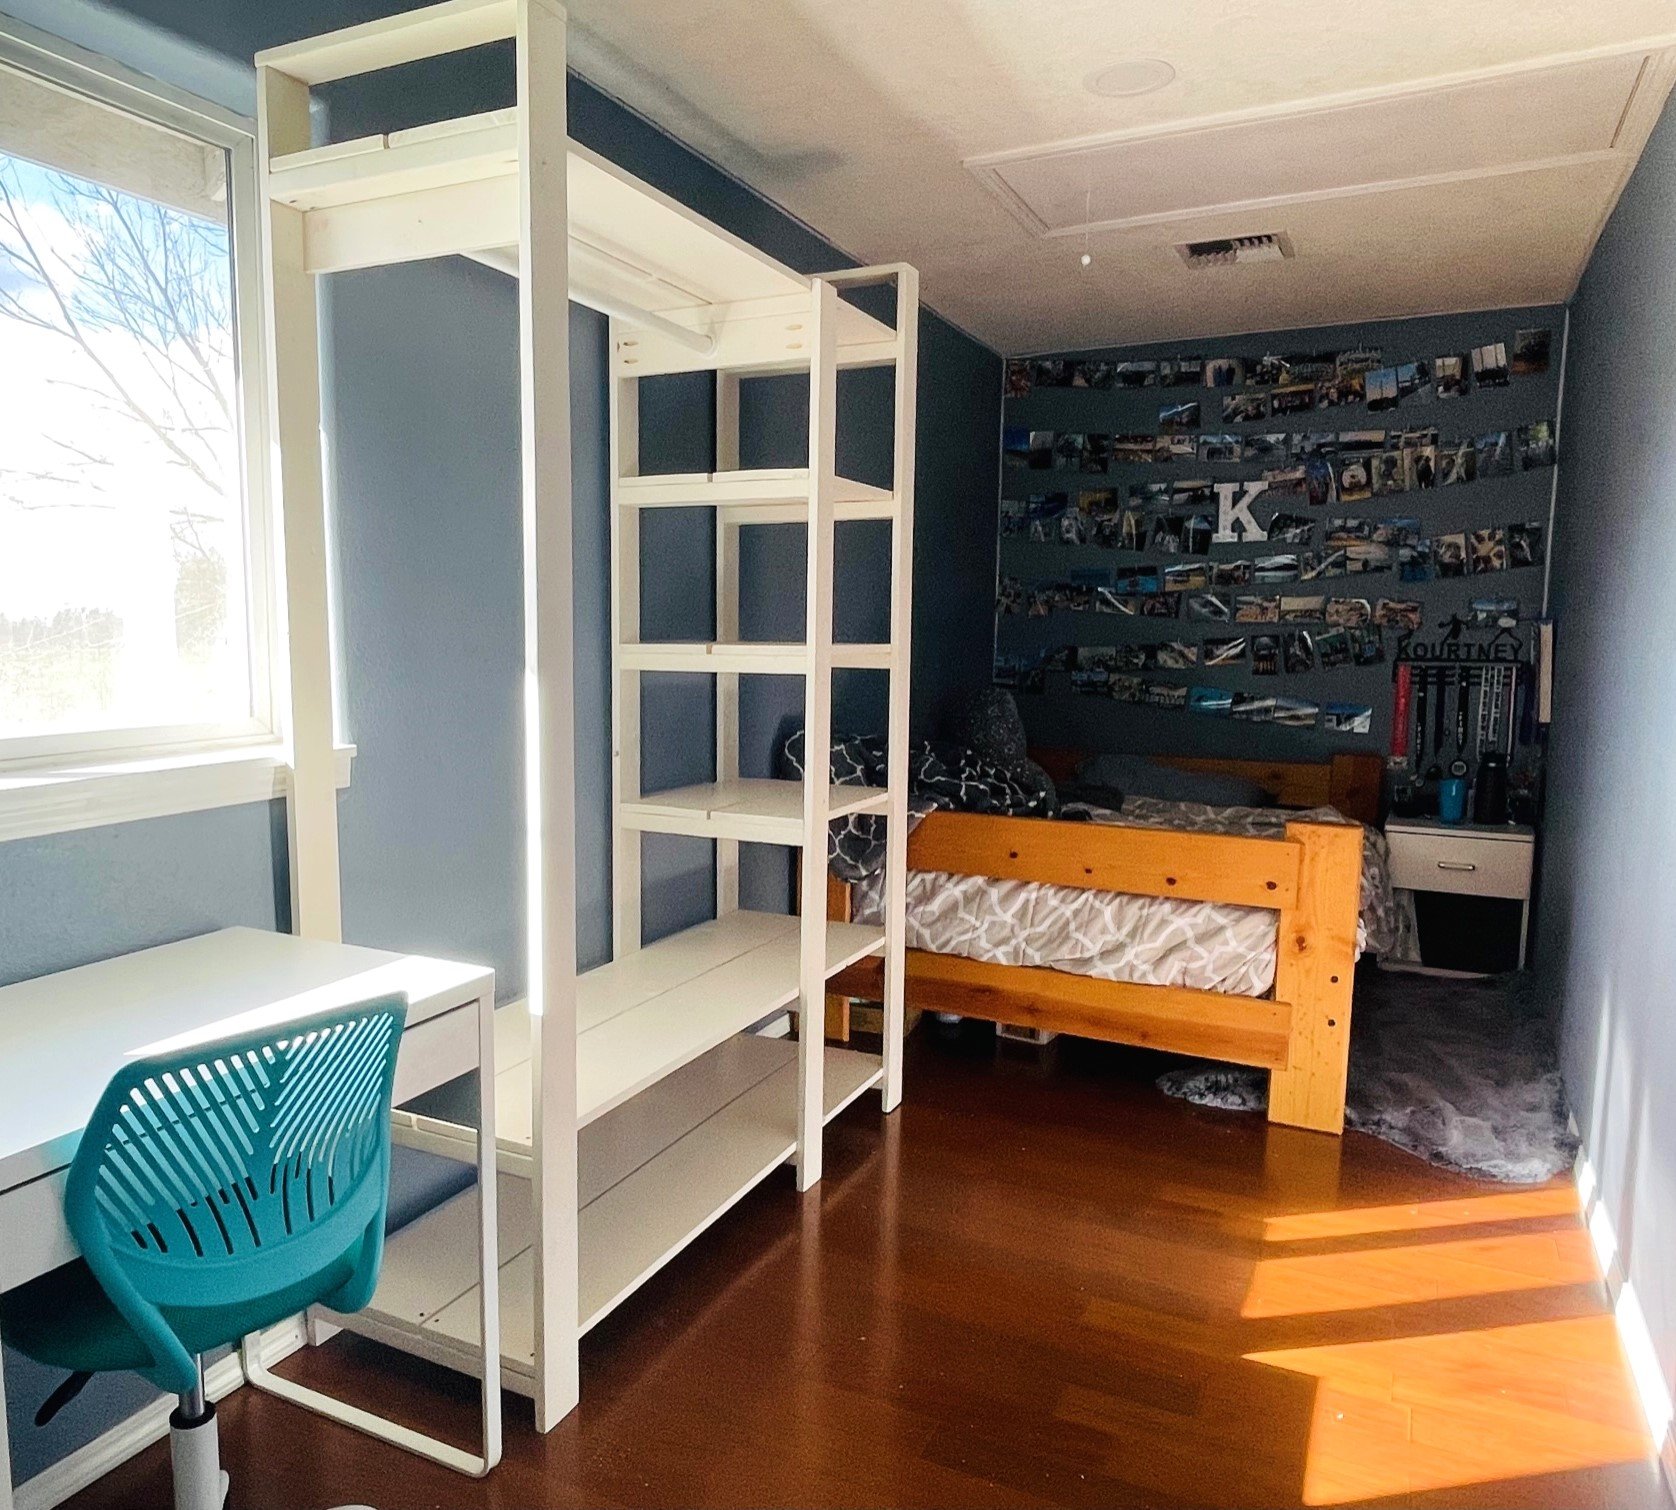
My friend asked if I could build a closet for her daughters narrow room, this worked perfect. I have used this plan many times now and each outcome is different and customized for the space.
Built from Plan(s)
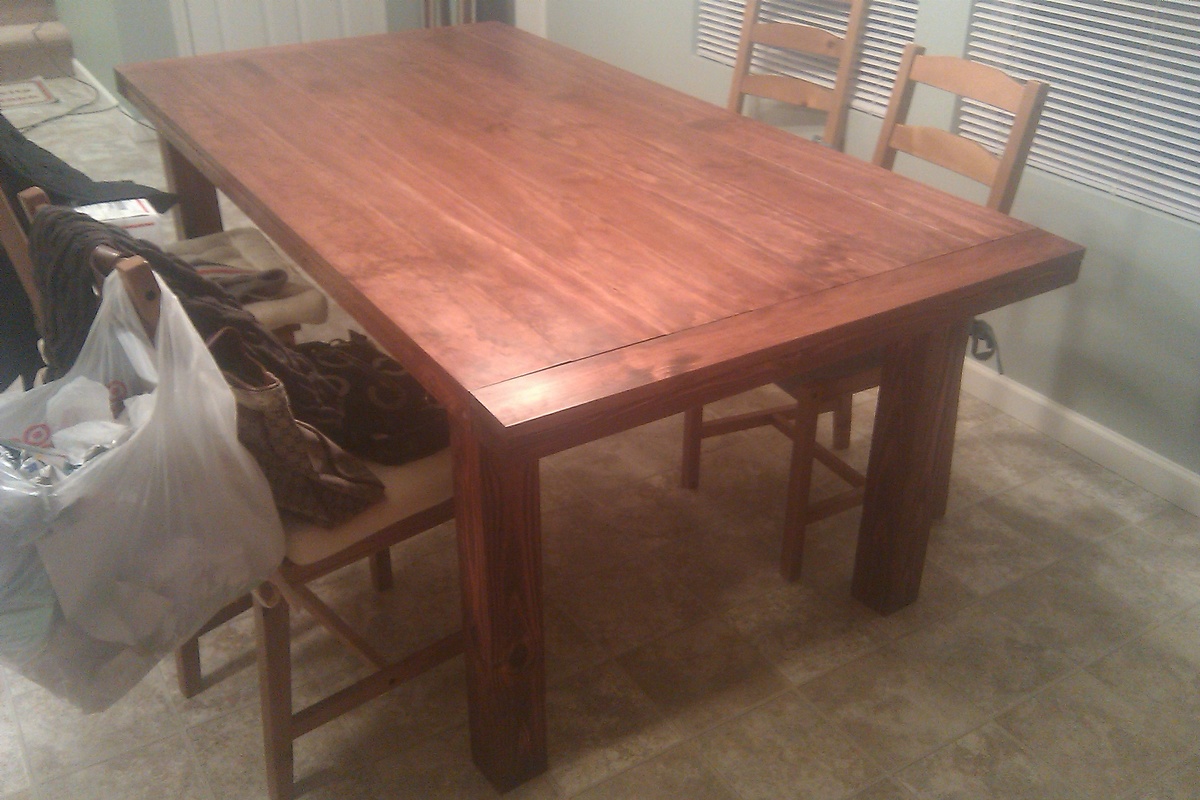
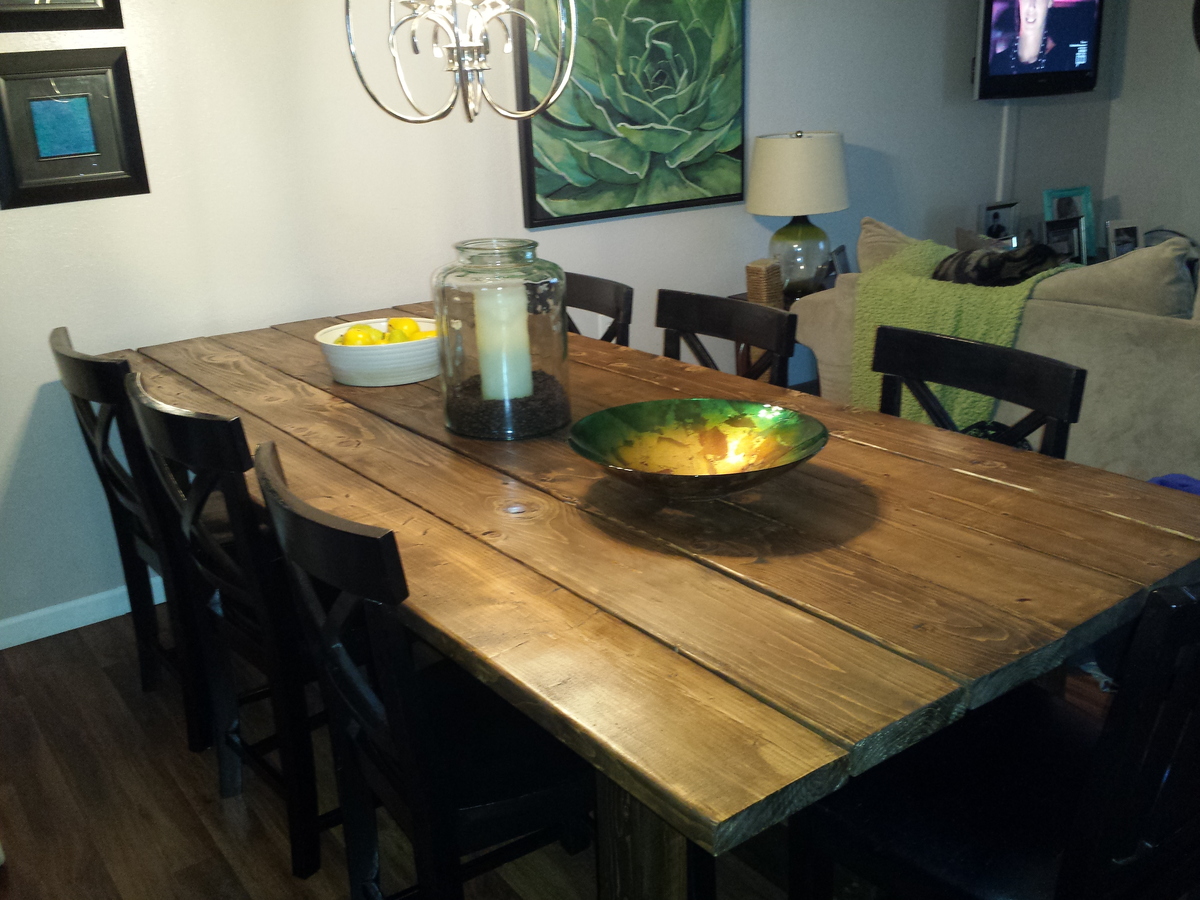
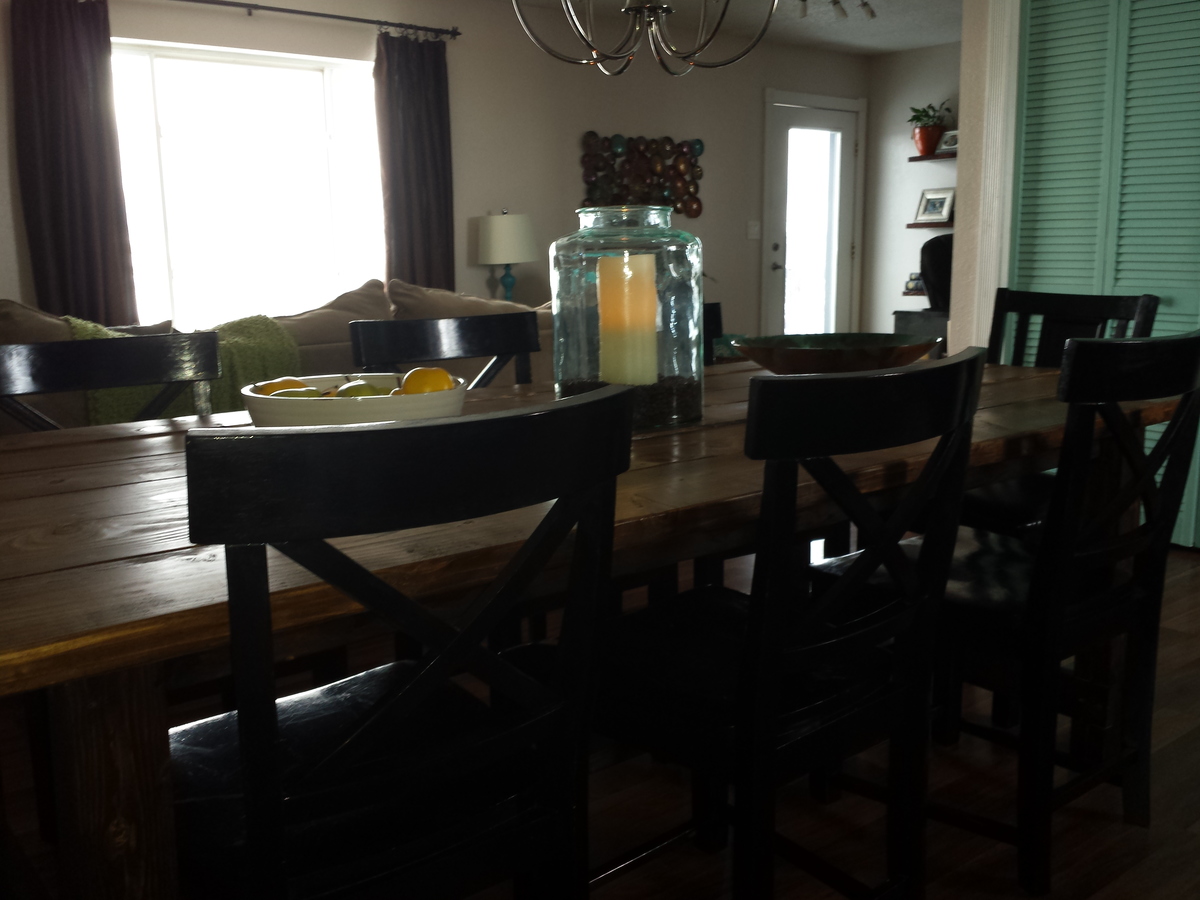
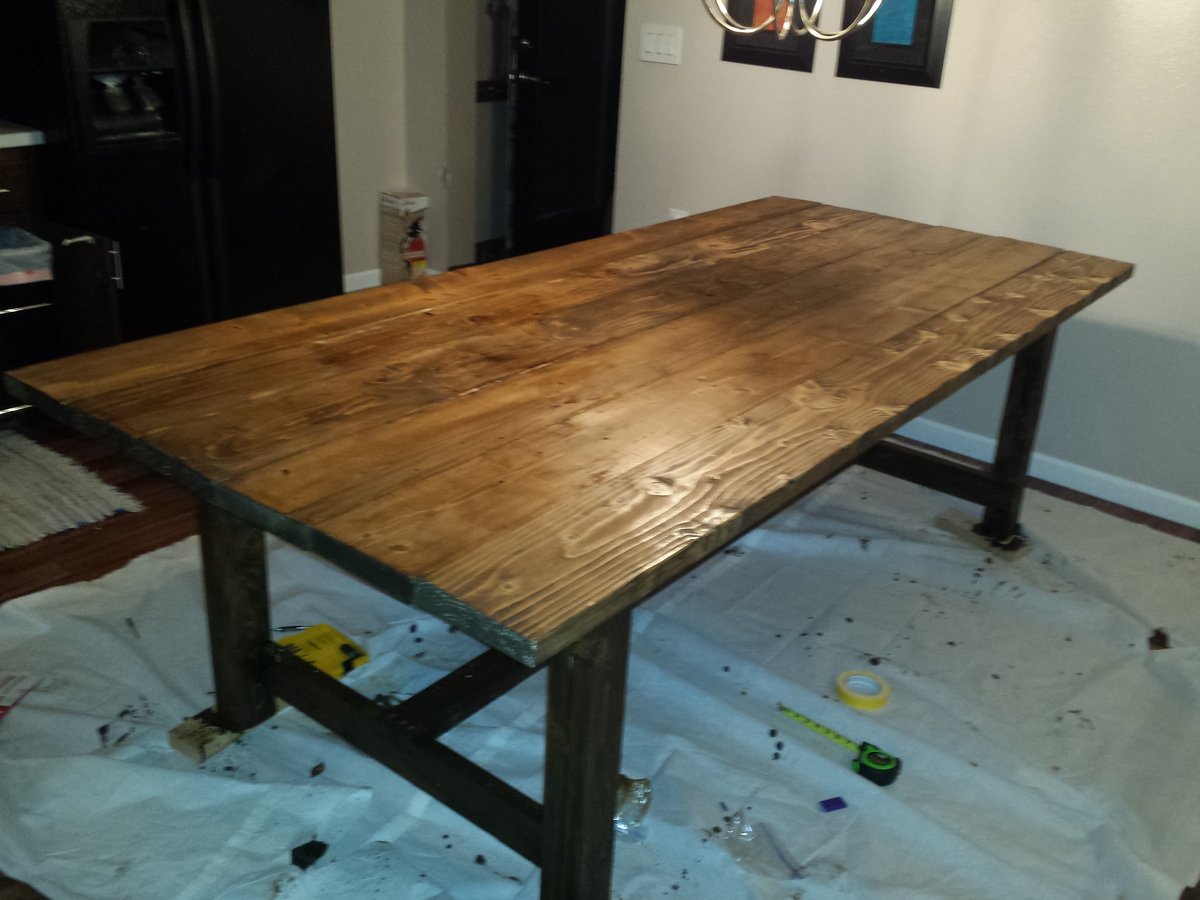
My Modern Farmhouse Table
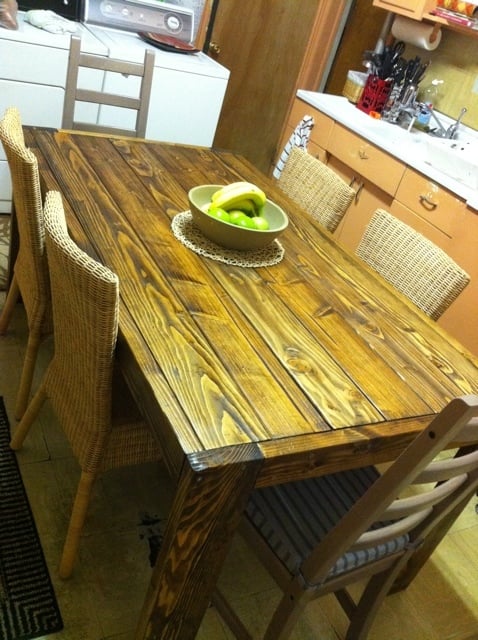
Started on Saturday Afternoon around 5pm and finished building on Sunday, sanding on Monday, stain and poly on Tuesday and we ate Thanksgiving Dinner on it on Thursday. All that is left is the wood putty! Not perfect but VERY happy with it :)
Built from Plan(s)
Estimated Cost
$70
Estimated Time Investment
Weekend Project (10-20 Hours)
Finish Used
Minwax Providence Stain & Satin Poly
Recommended Skill Level
Beginner
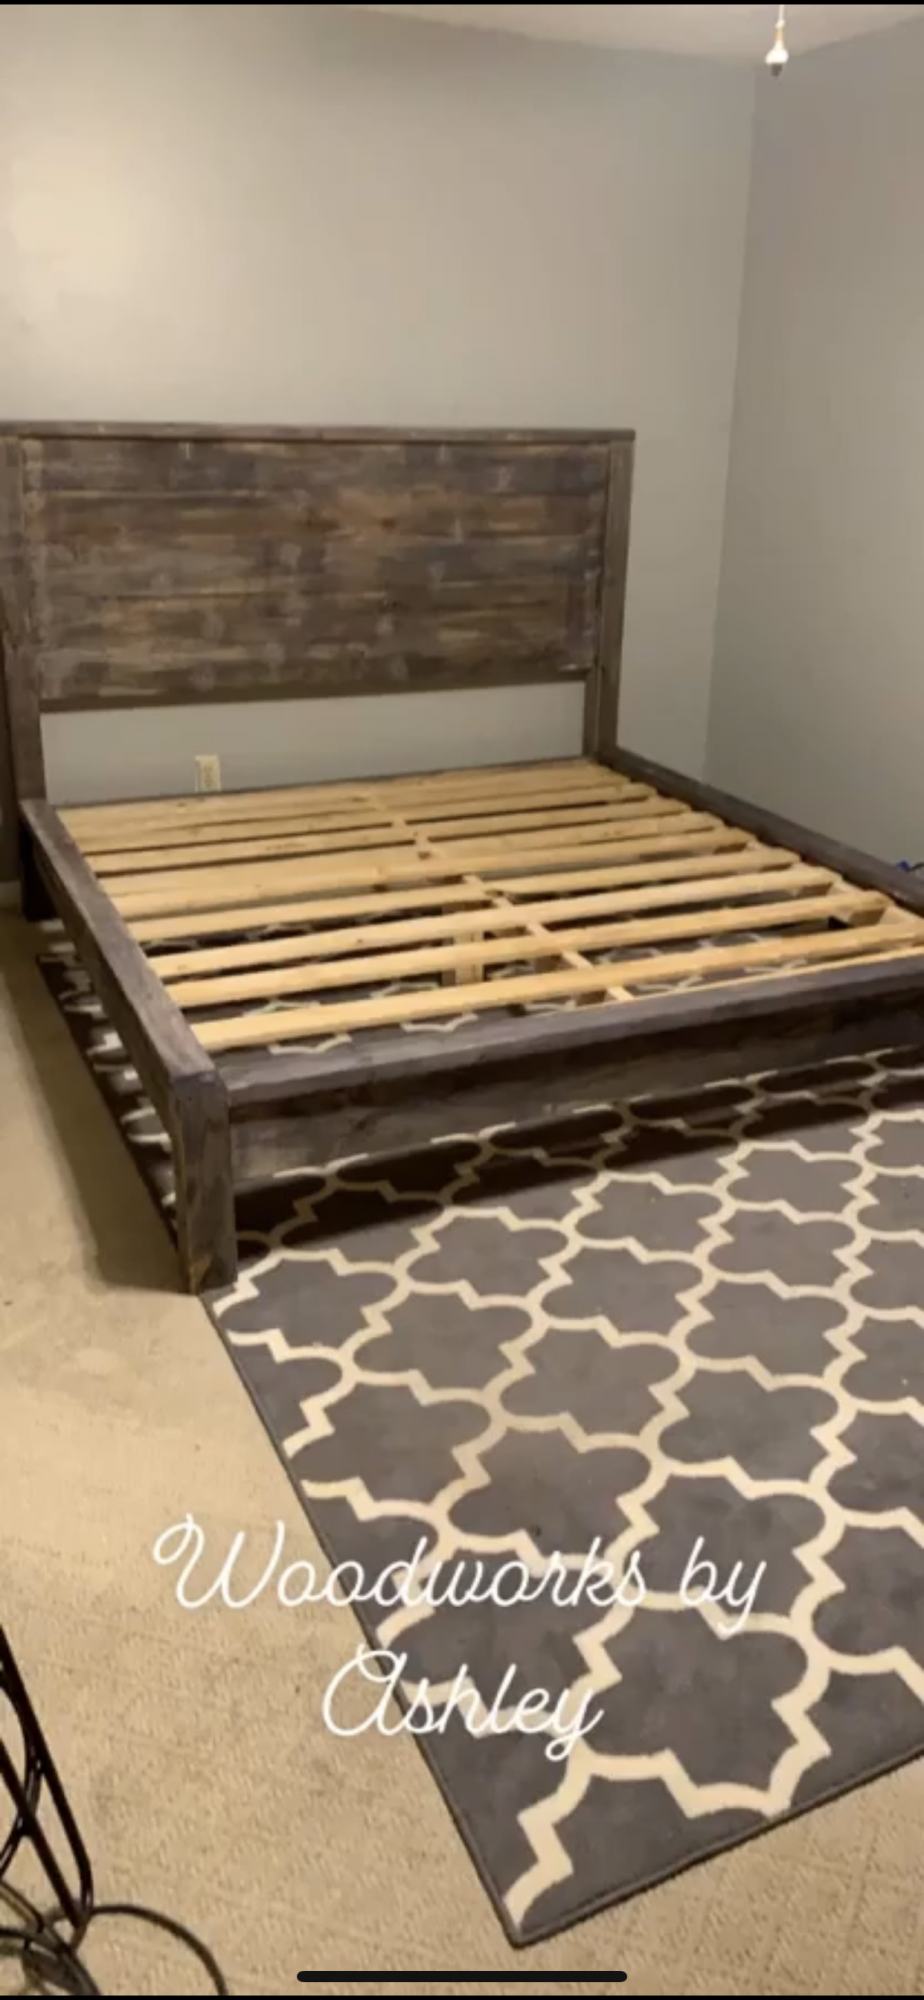
Coastal Kentwood Bed

This bed was built based on the Kentwood bed plans. The are a few adjustments to the size, and slats were used instead of the vertical trim pieces. The 54 slats were cut from 2- 50 count bundles of 48" lath boards. The side rails were re-purposed from an old King size waterbed.


Built from Plan(s)
Estimated Cost
$100.00
Estimated Time Investment
Weekend Project (10-20 Hours)
Finish Used
DIY Chalk paint using Behr's Silver Polish. Finished with a clear wax.
Recommended Skill Level
Intermediate
Comments

My wife and I built an outdoor bench!

Ana sent us the plans for this bench and it worked out great!
Built from Plan(s)
Estimated Cost
$125
Estimated Time Investment
Weekend Project (10-20 Hours)
Recommended Skill Level
Intermediate
Comments

Mon, 06/03/2019 - 11:34
This looks awesome! Thank…
This looks awesome! Thank you so much for sharing, great job! I love the table in the middle
Thu, 09/16/2021 - 06:32
Building plans
How can I get plans for this? I love the idea and want to build these for my fire station.
We love our mini bedside tables
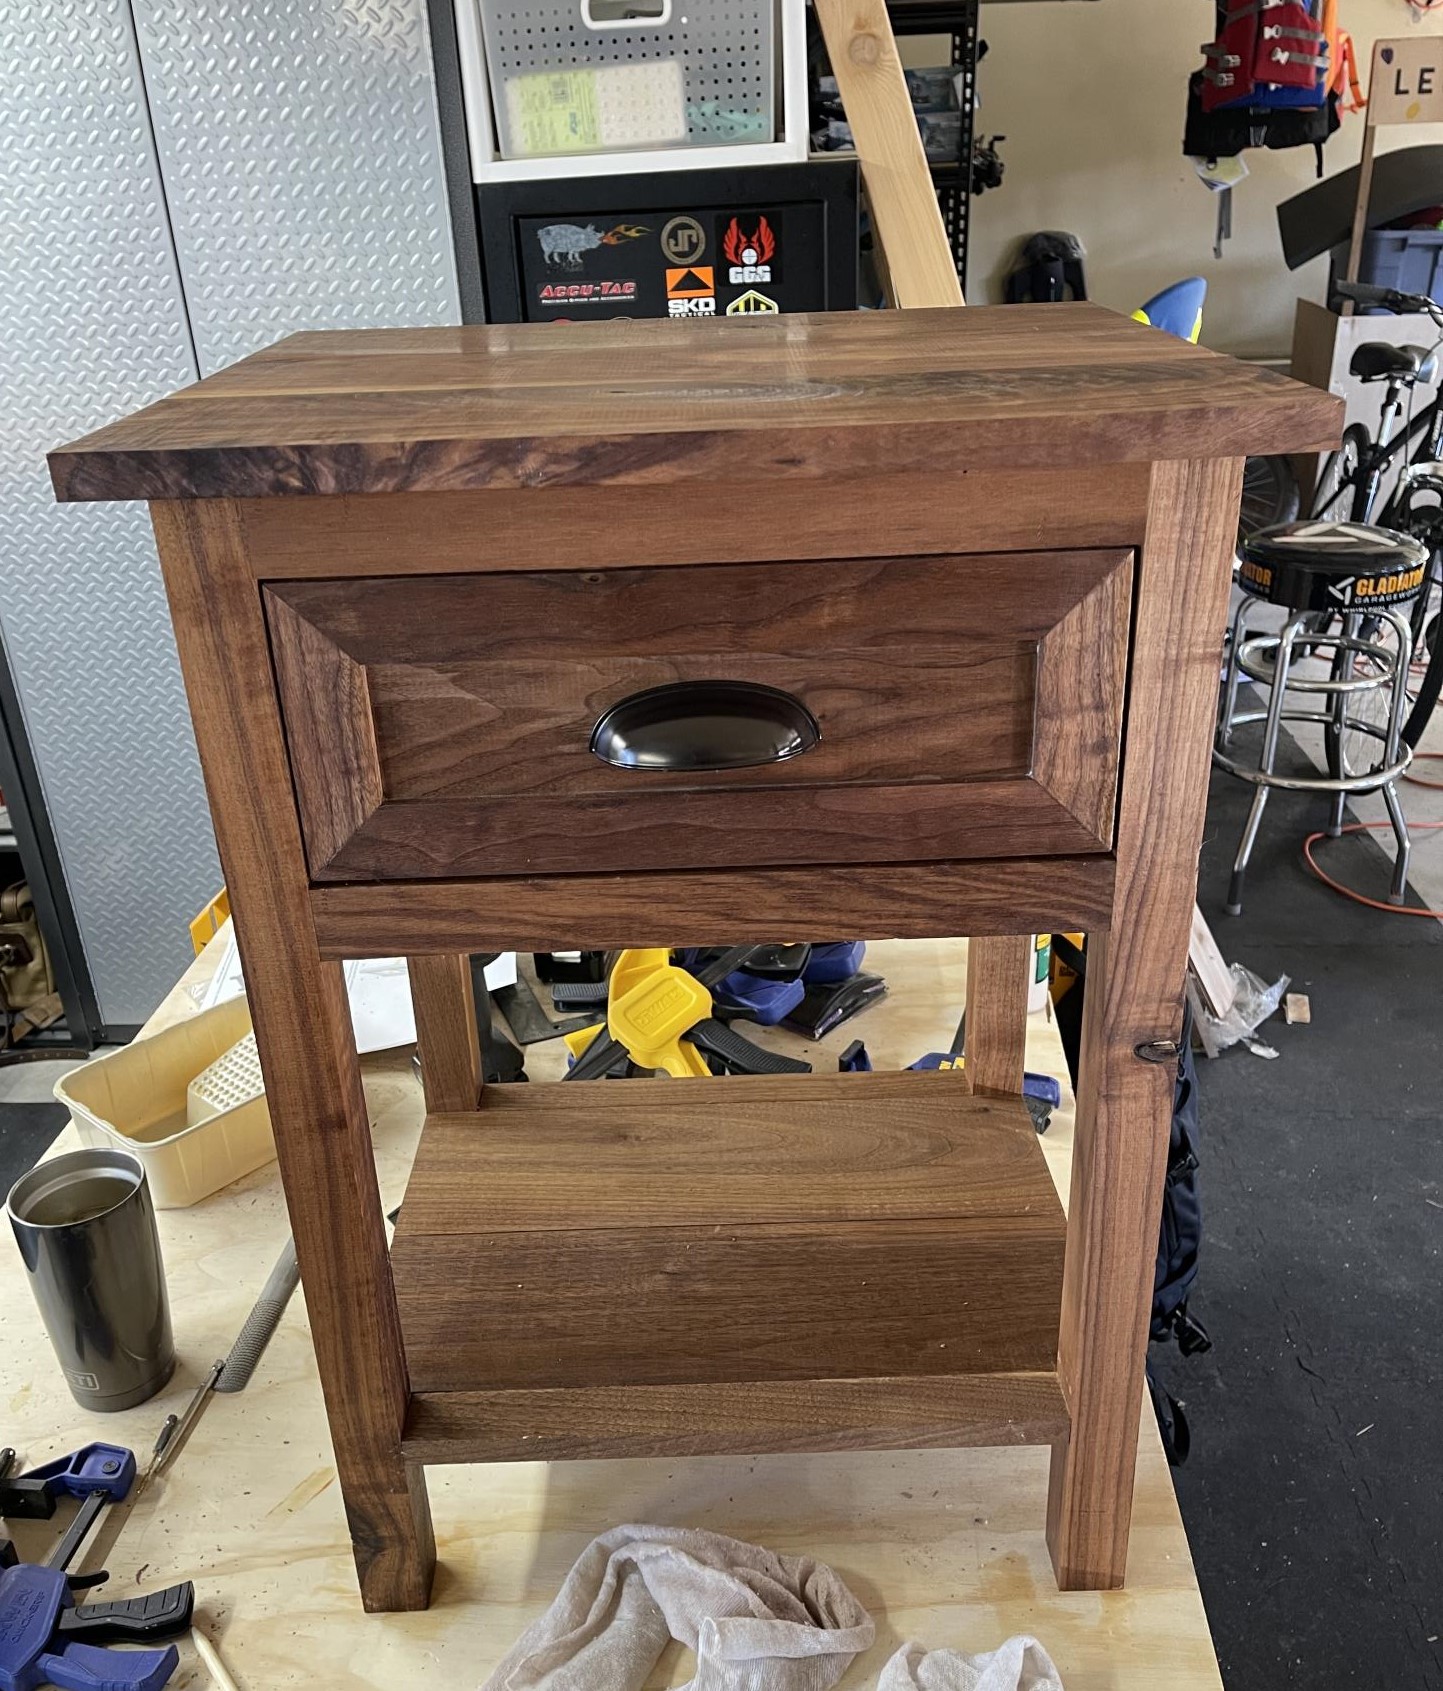
The sublime beauty of the natural wood grain upstages my (considerably) modest skill but we are very happy with our nightstands. Thanks so much for the plans! Rendered in Walnut with Tung Oil finish. Slight modification in dimensions and drawer facing.
Built from Plan(s)
Comments
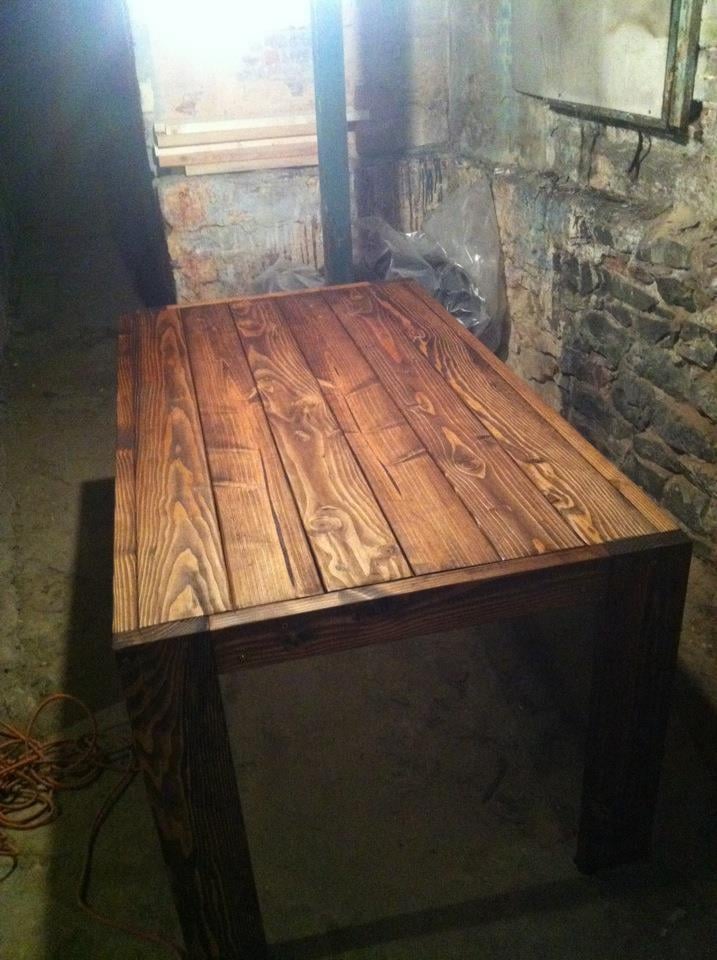
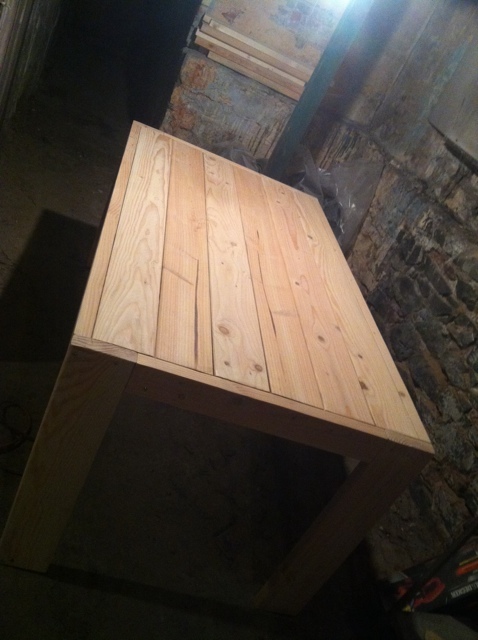
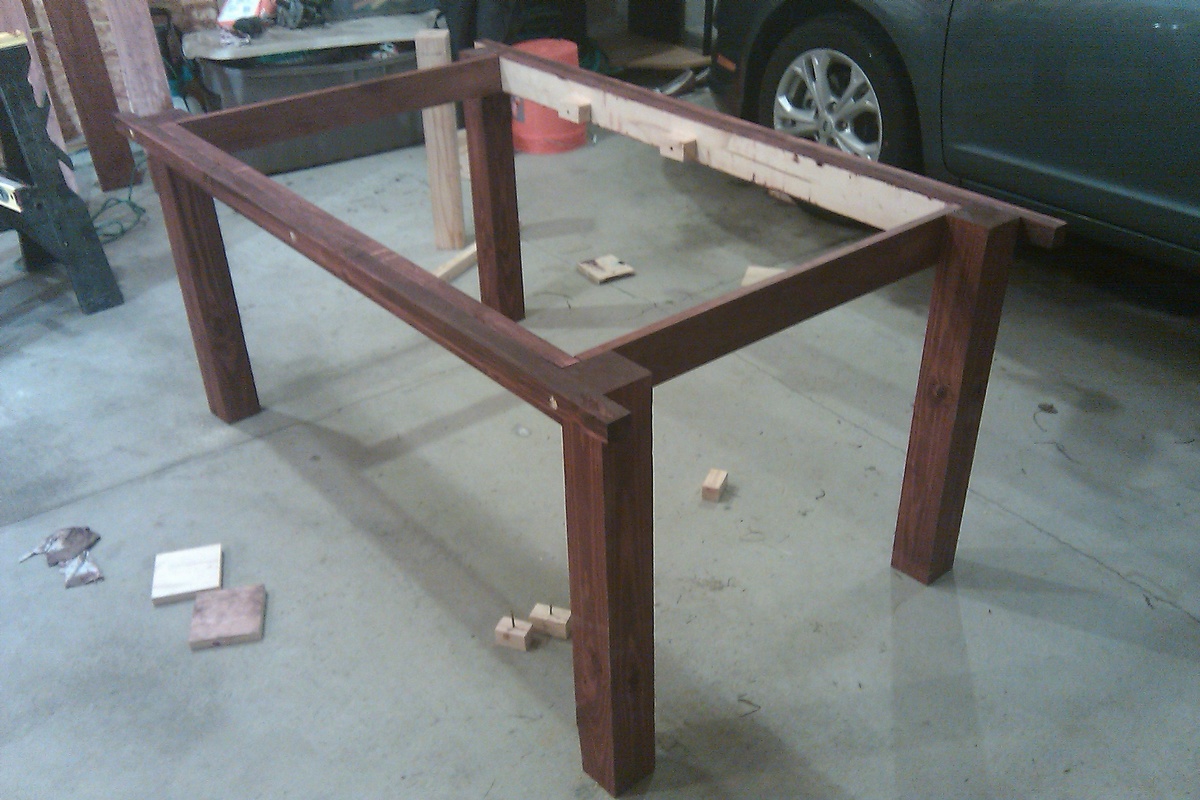
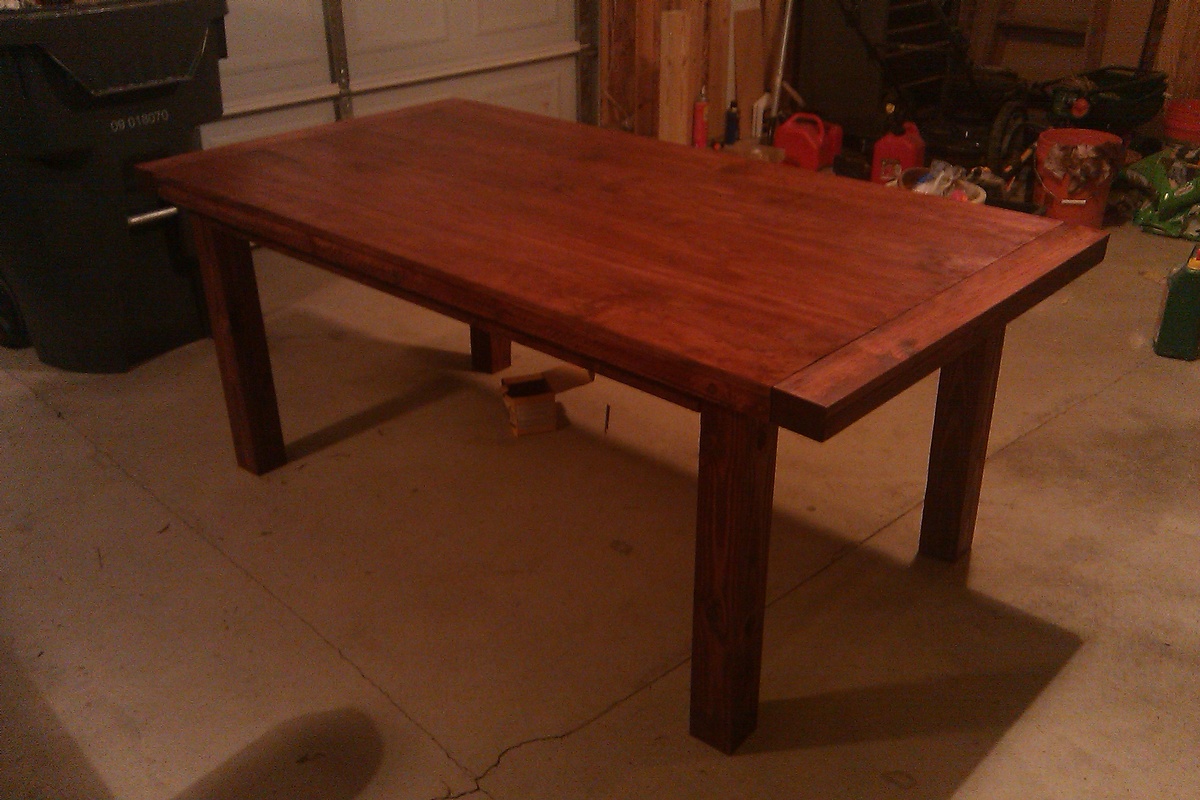
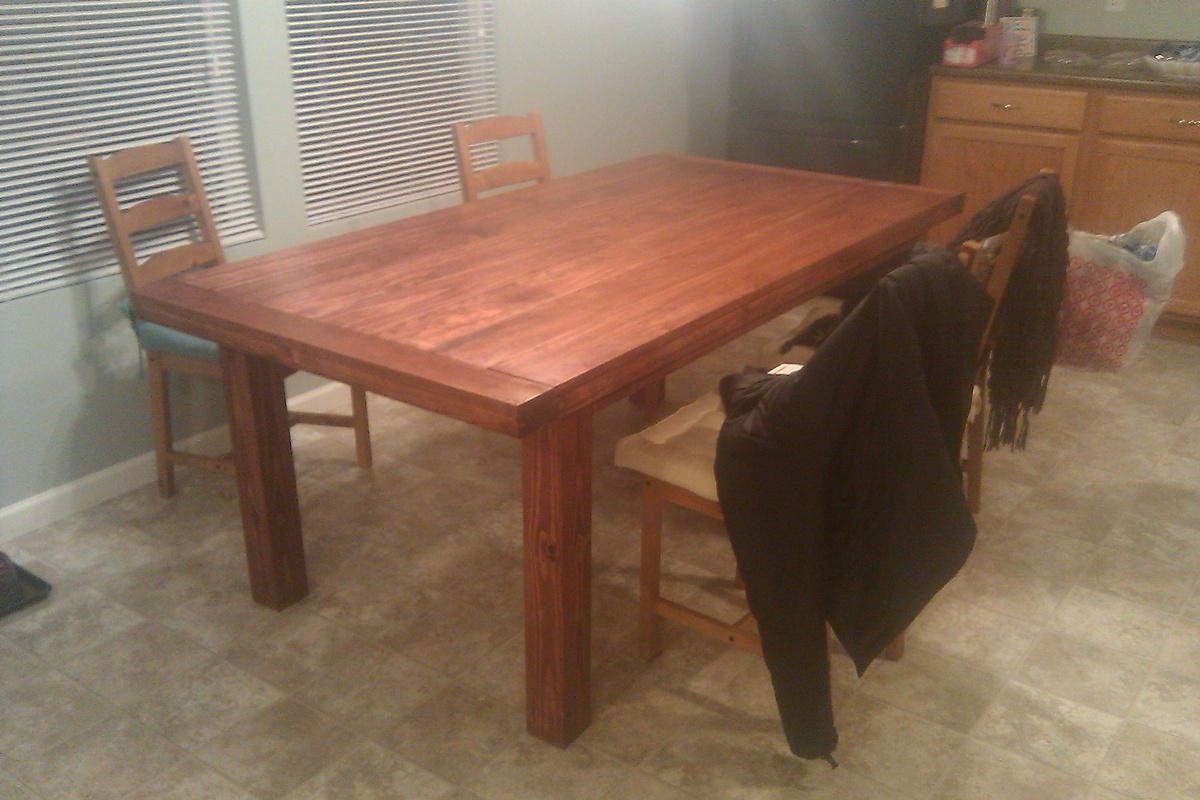
Kitchen Table
Well, this is my second project and was built to replace the first one I did about 2 years ago.
Two summers ago I built the Modern Farm Table and, quite frankly, screwed it up. I rushed that job, not taking the time to be selective about my lumber and forgetting to heed the old axiom of "measure twice, cut once". In short, the table turned out 27" wide and the the table-top surface was as uneven as a highway's rumble strips. Yeah. I know. A sad showing on my part.
This project was a different story. I took my time; and by time I mean it took about 10 hours total, including 3 trips to Home Depot to buy things that I didn't take into consideration (like mineral spirits for brush clean up after polyurethane).
Anyway, this table is a mix between a regular Tryde Table and the Benchwright Table. I liked the thick, heavy look of the Benchwright Table's top, but did not want to sacrifice the ends' leg space by including the trestle.
So, this is pretty much a Tryde Table, with the faux-thick top of the Benchwright and 4" x 4" legs. I used Select Appearance Pine for the top boards. I did this more to ensure I got straight edges than for the surface finish quality. But I like the end result.
Dimensions: 74 1/4"L X 38.5"W X 30"H
Lumber: 4" X 4" legs, S4S 1" pine boards top, 2" X 4" aprons.
Finish: Red Mahogany
Cost: $160
Total time: 10 hours.

Built from Plan(s)
Estimated Time Investment
Day Project (6-9 Hours)
Finish Used
Red Mahogany
Recommended Skill Level
Beginner
Comments
Mon, 12/05/2011 - 17:28
Excellent job!
You should be proud of yourself for not only doing a wonderful job on this table but for trying again! I love Ana's site because it allows each of us to begin small and build (no pun intended) bigger and more complicated as we learn!
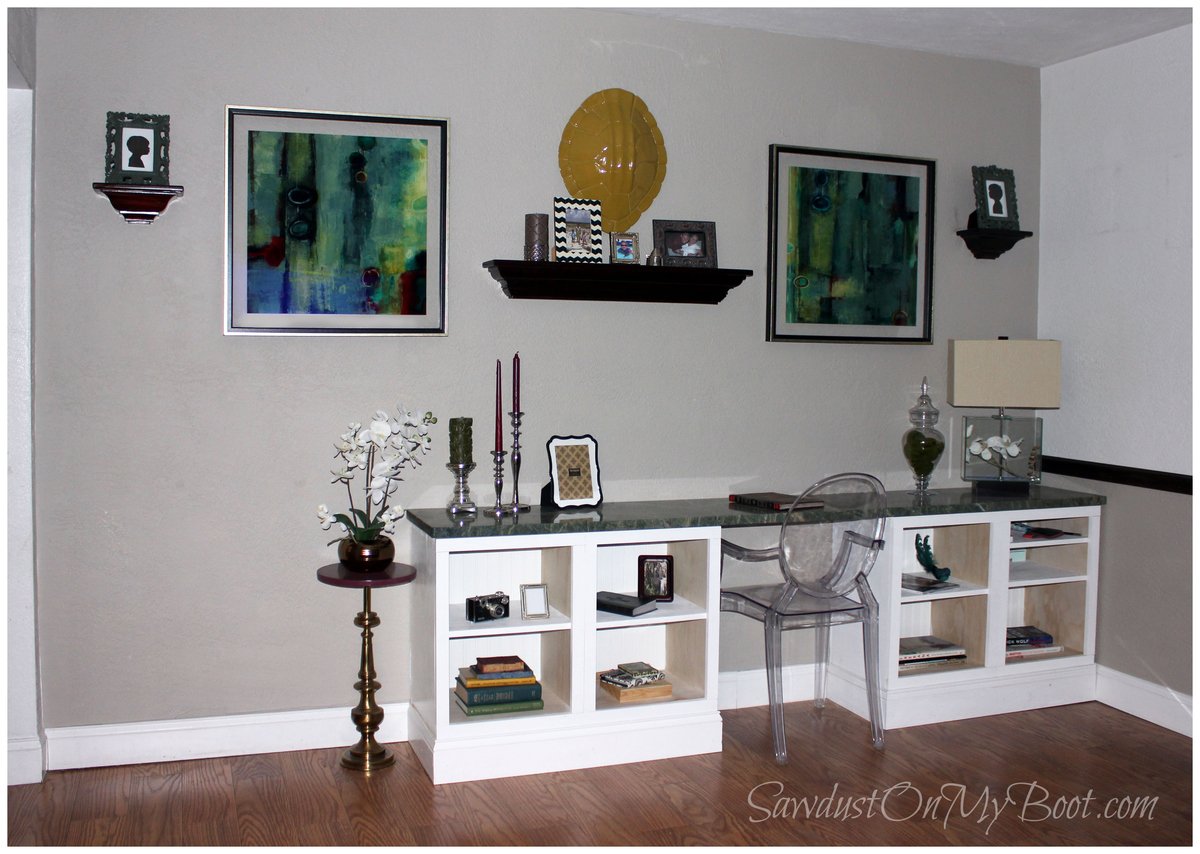
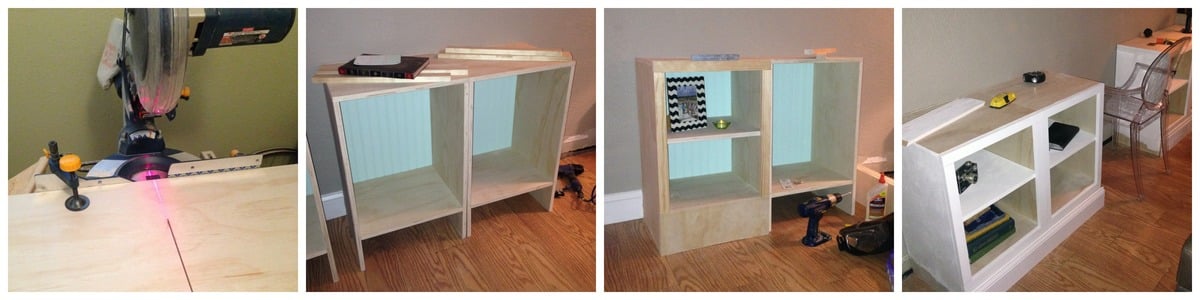
Built-In Desk
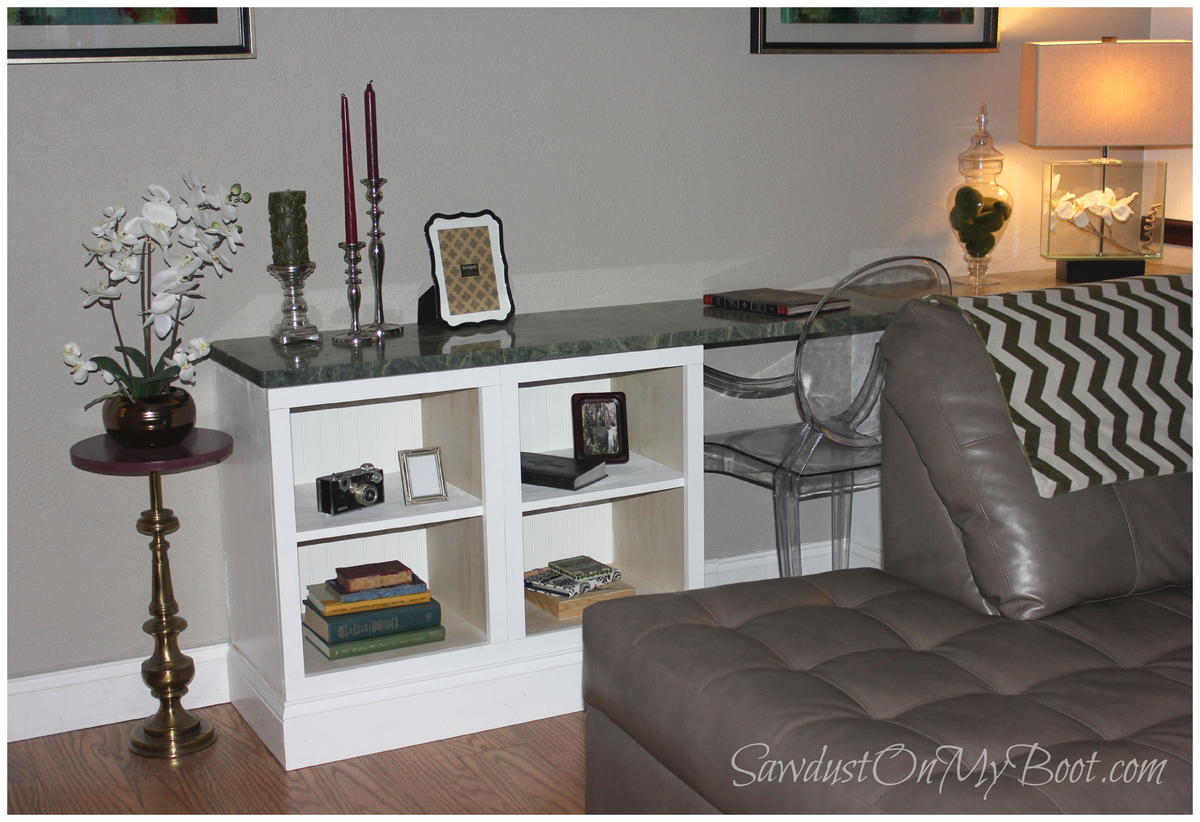
Hi there! I made a built-in desk for our long rectangular living room using a granite top on 4 cabinets... modified from a simple base cabinet plan. It was a blast to build & my family really enjoys it! :D
Built from Plan(s)
Estimated Time Investment
Weekend Project (10-20 Hours)
Finish Used
Latex paint
Recommended Skill Level
Intermediate
Princess Dress-Up Closet
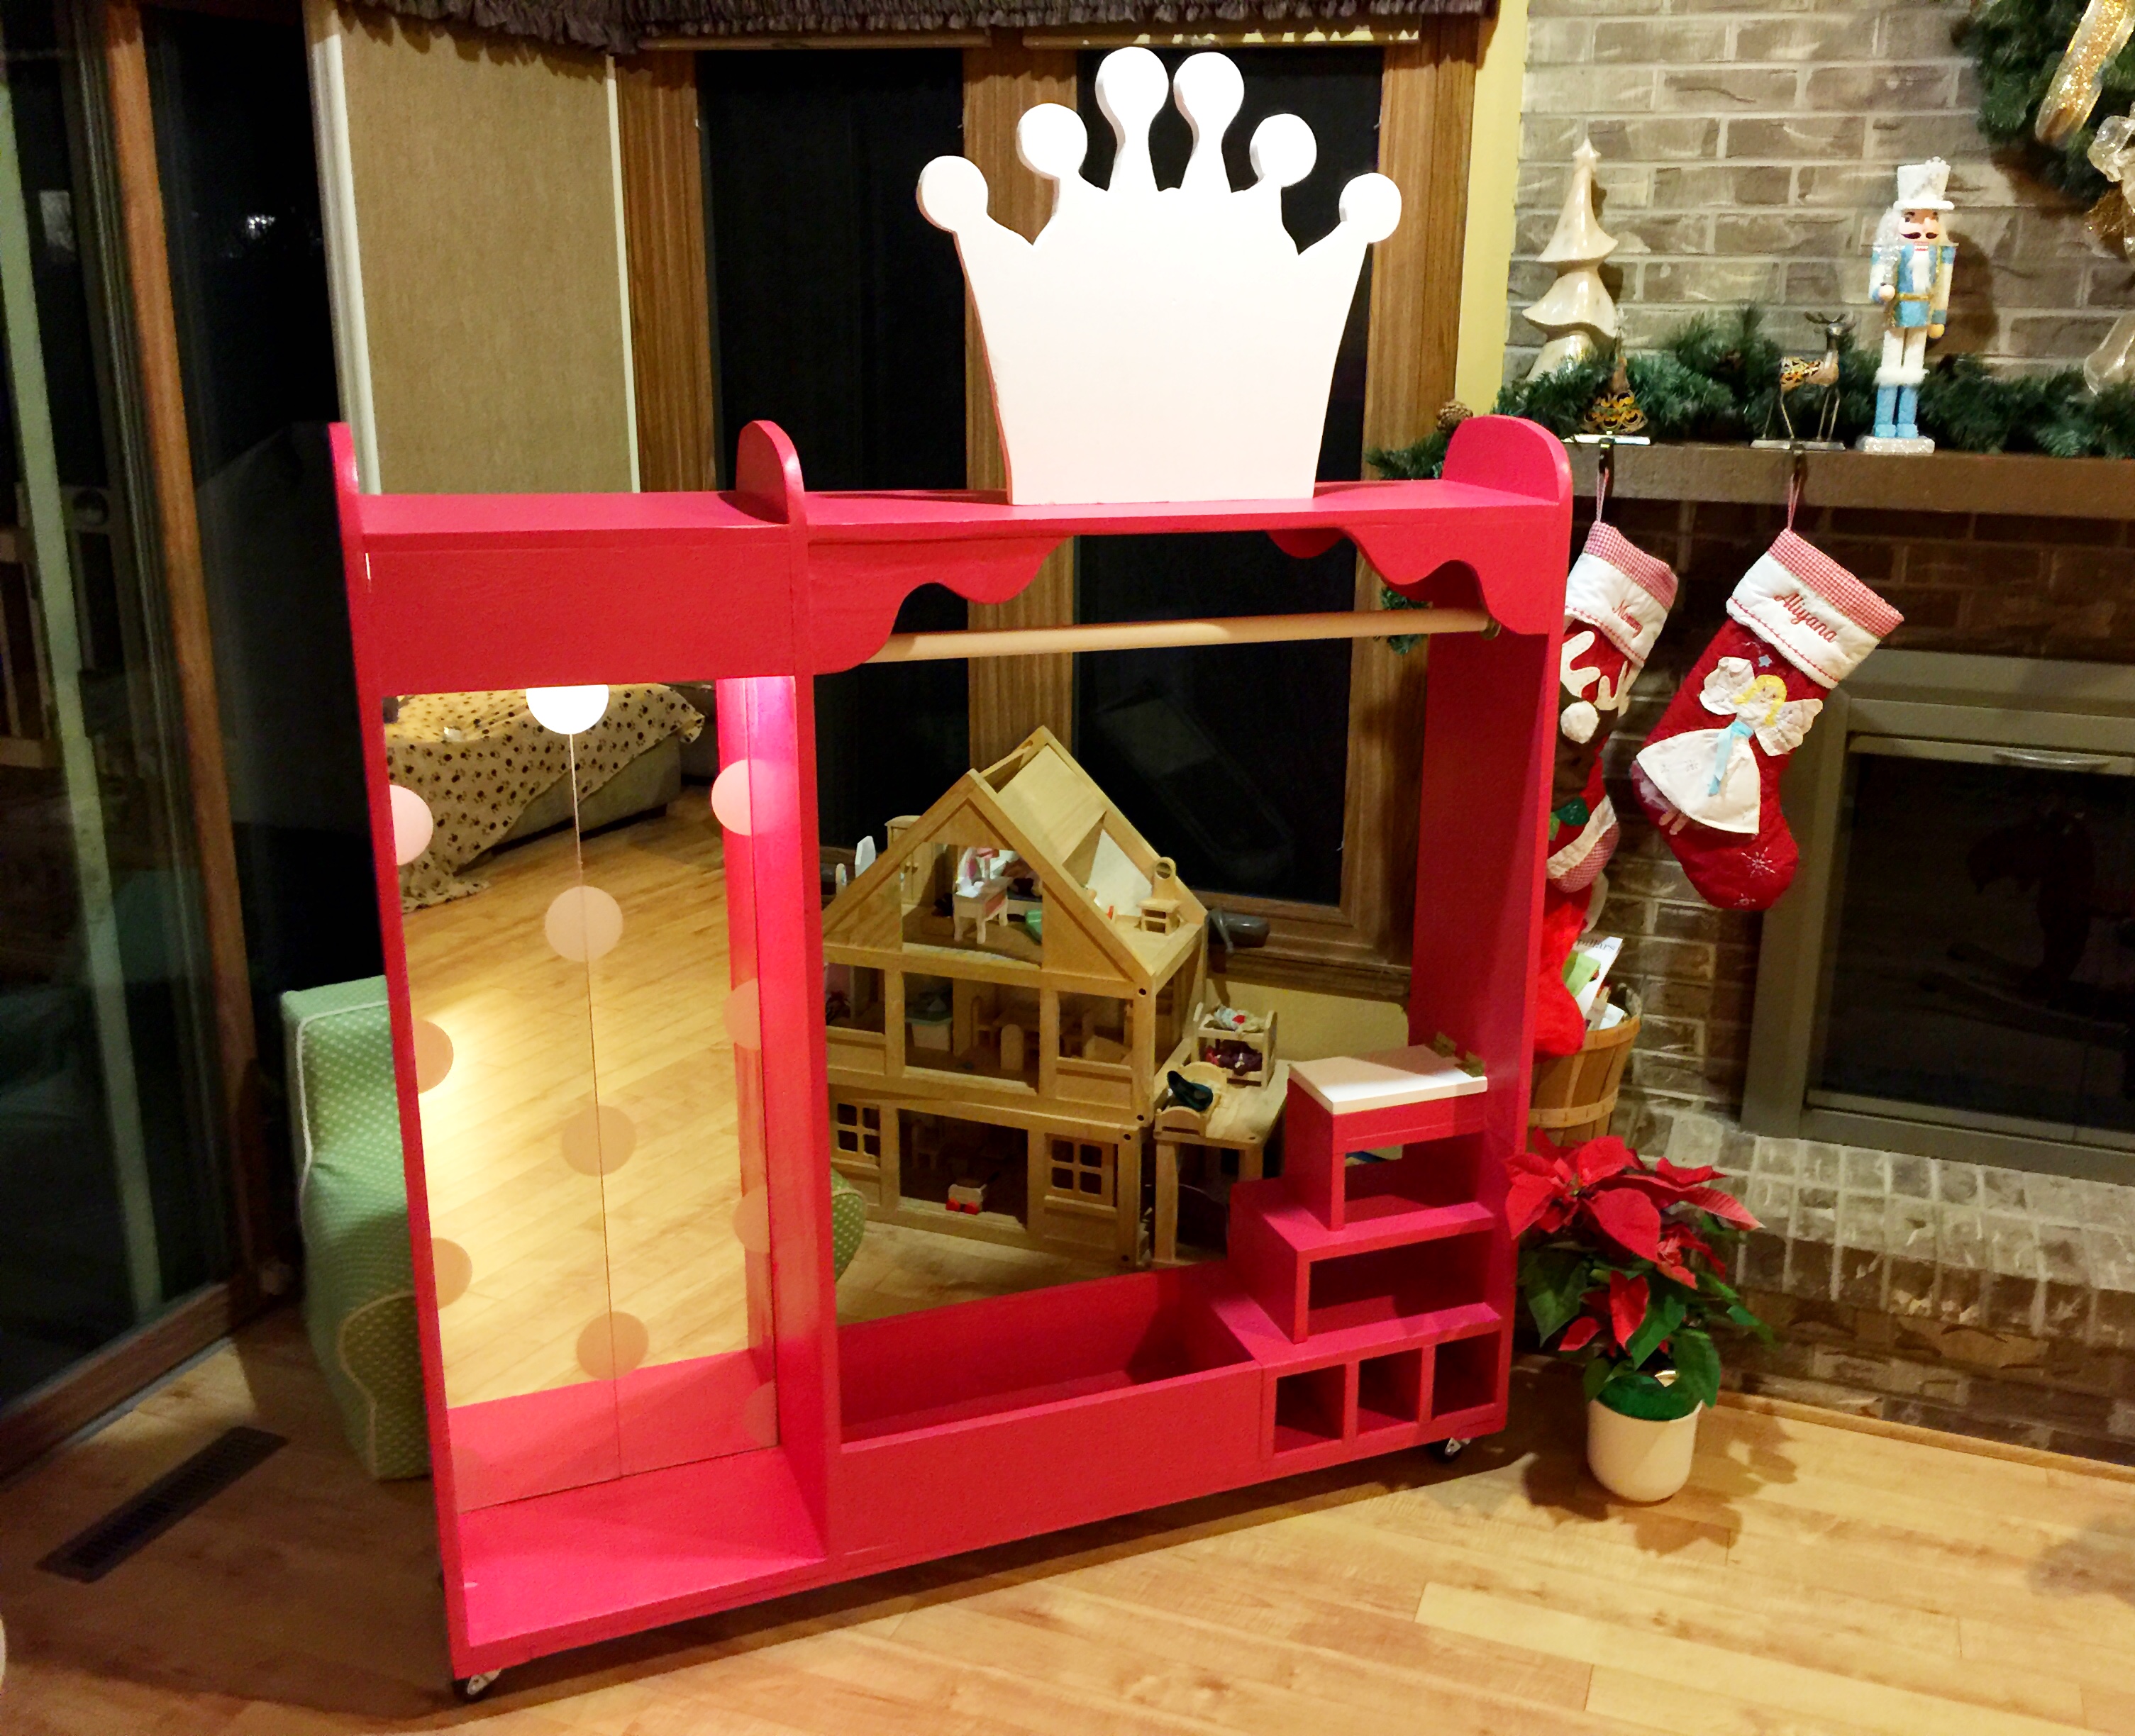
With my 3 1/2 year old girl who is really in a princess dress-up phase (and a 1 year old girl who likes to tag/crawl along), my Christmas present to them was a big hit. I first bought the two mirrors at IKEA and then modified the design around them, with added cubbies and shelves for princess shoes and tiaras, as well as a secret jewelry compartment. I built the decorative crown with different pieces of scrap wood. In all honesty, the modifications made it a little back-heavy and wobbly, so I ended up attaching it to the wall in the basement (which was probably a good idea anyway).
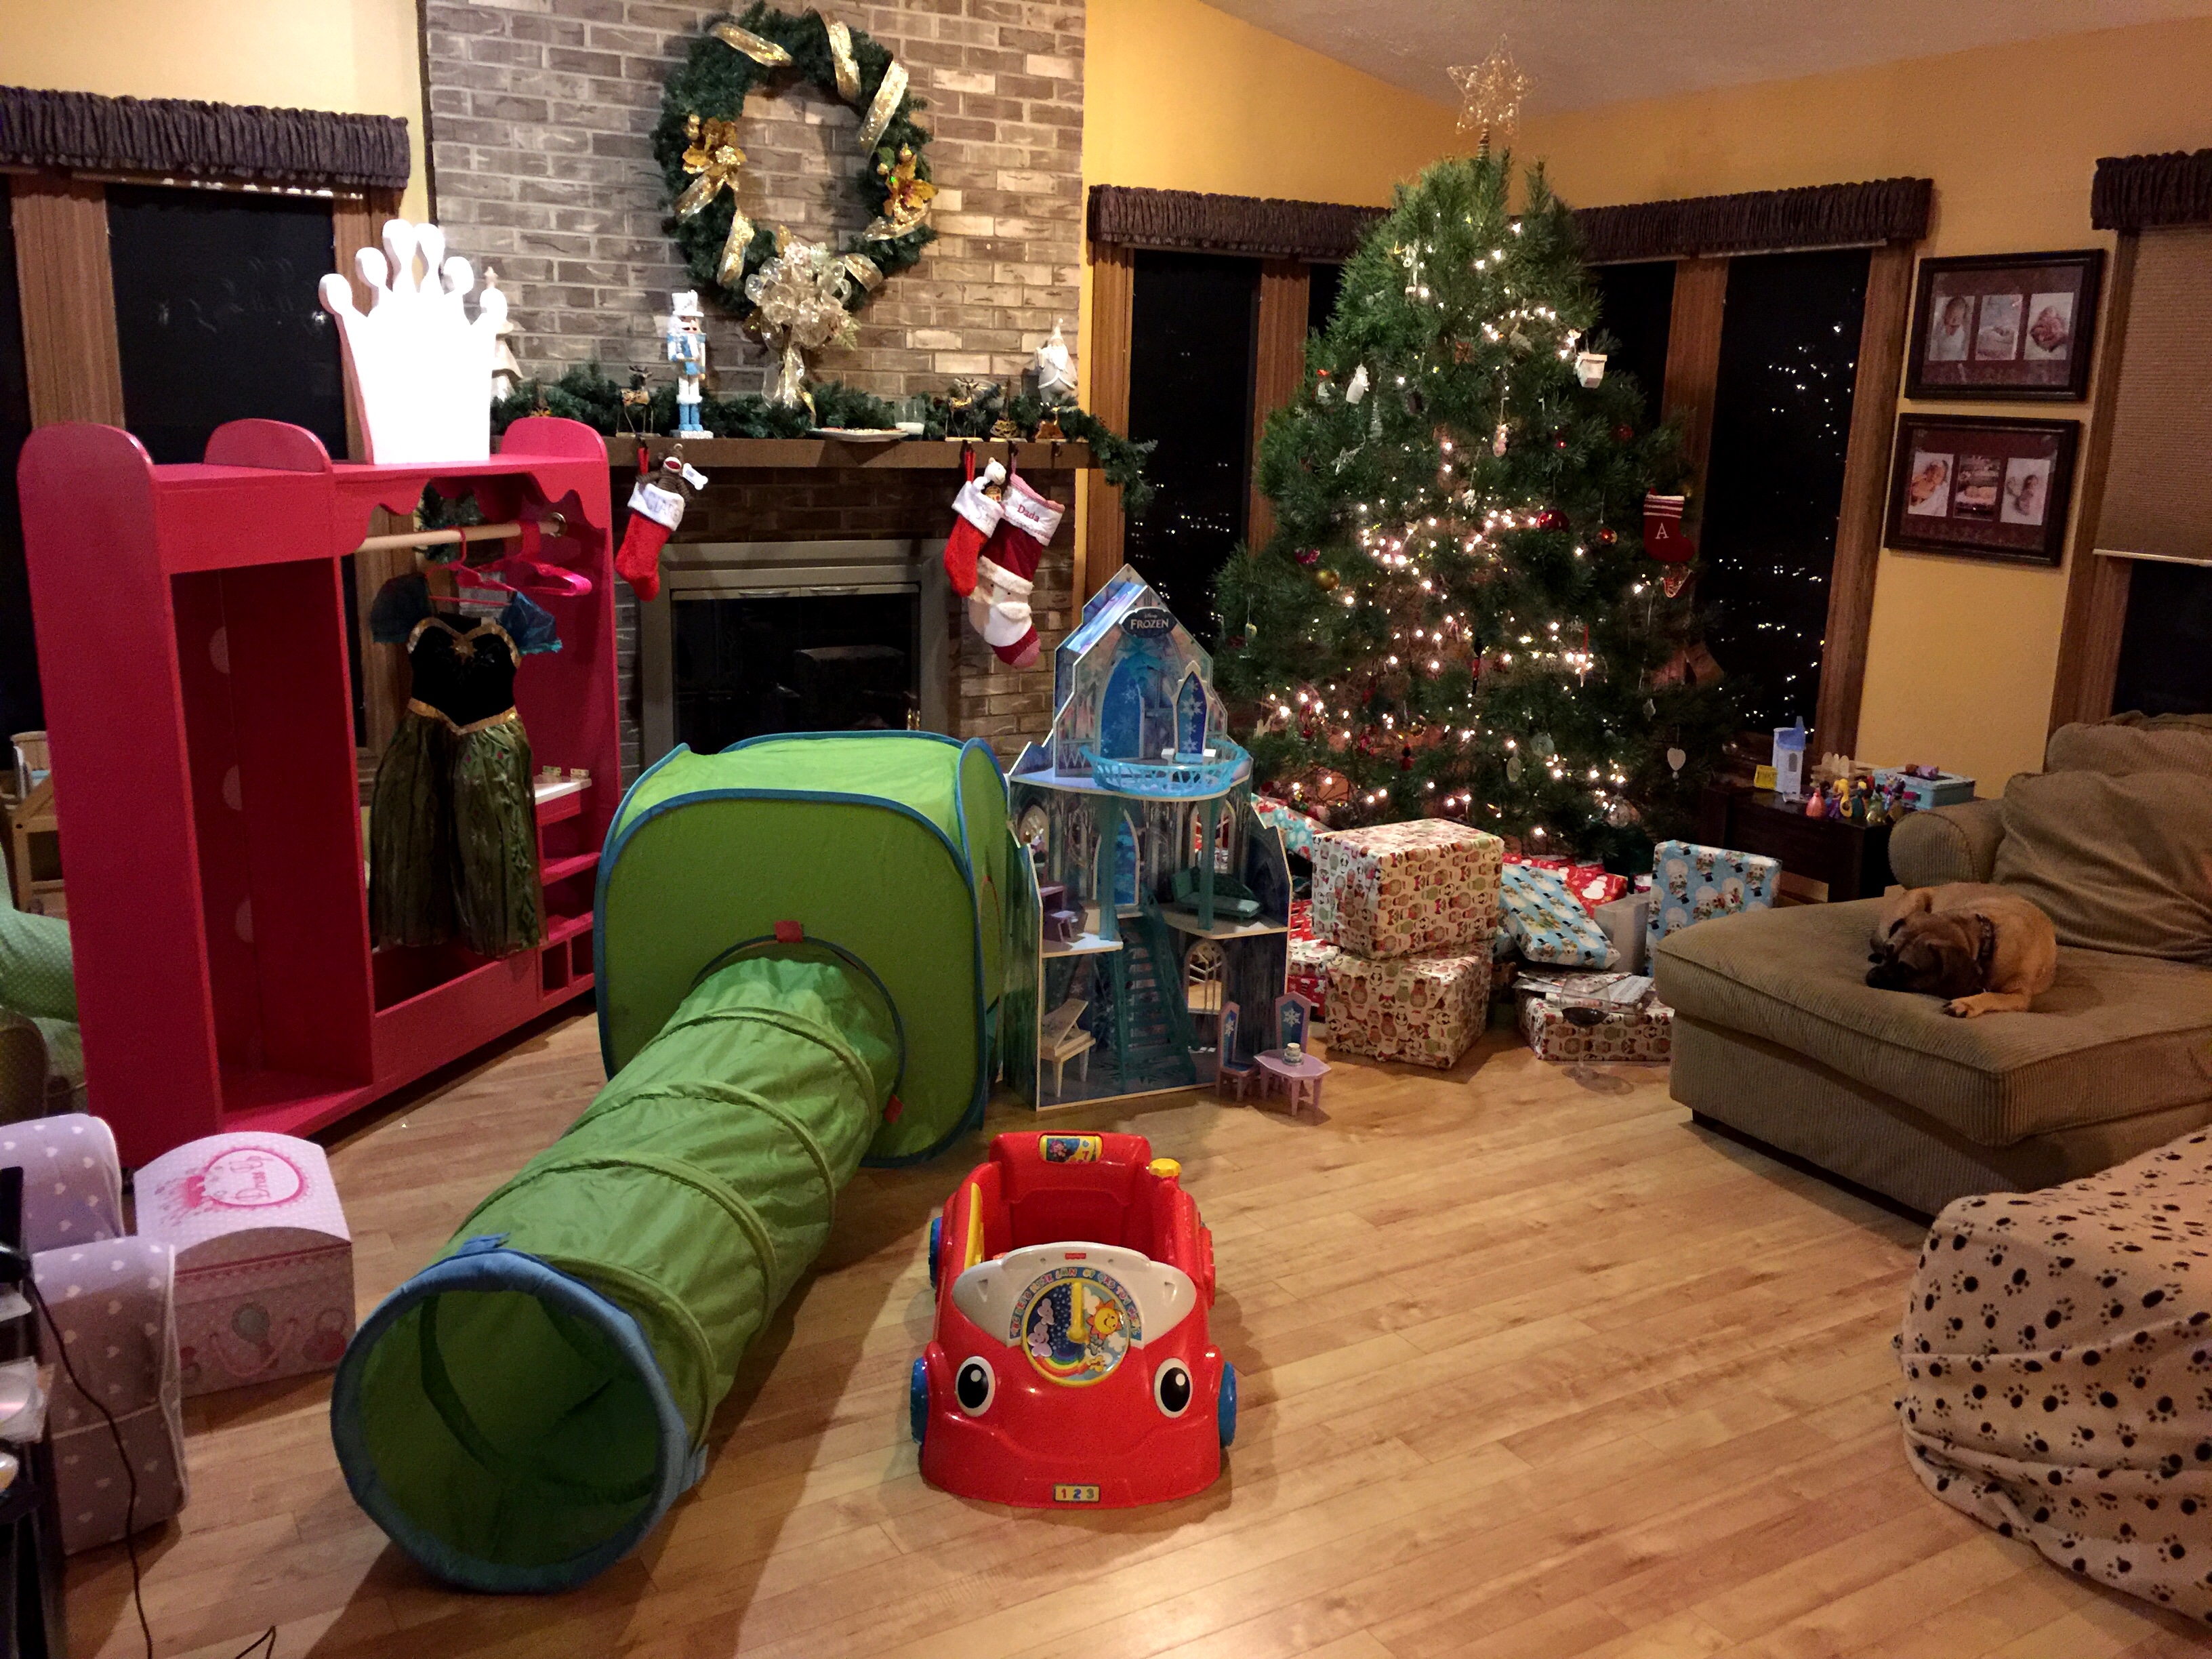
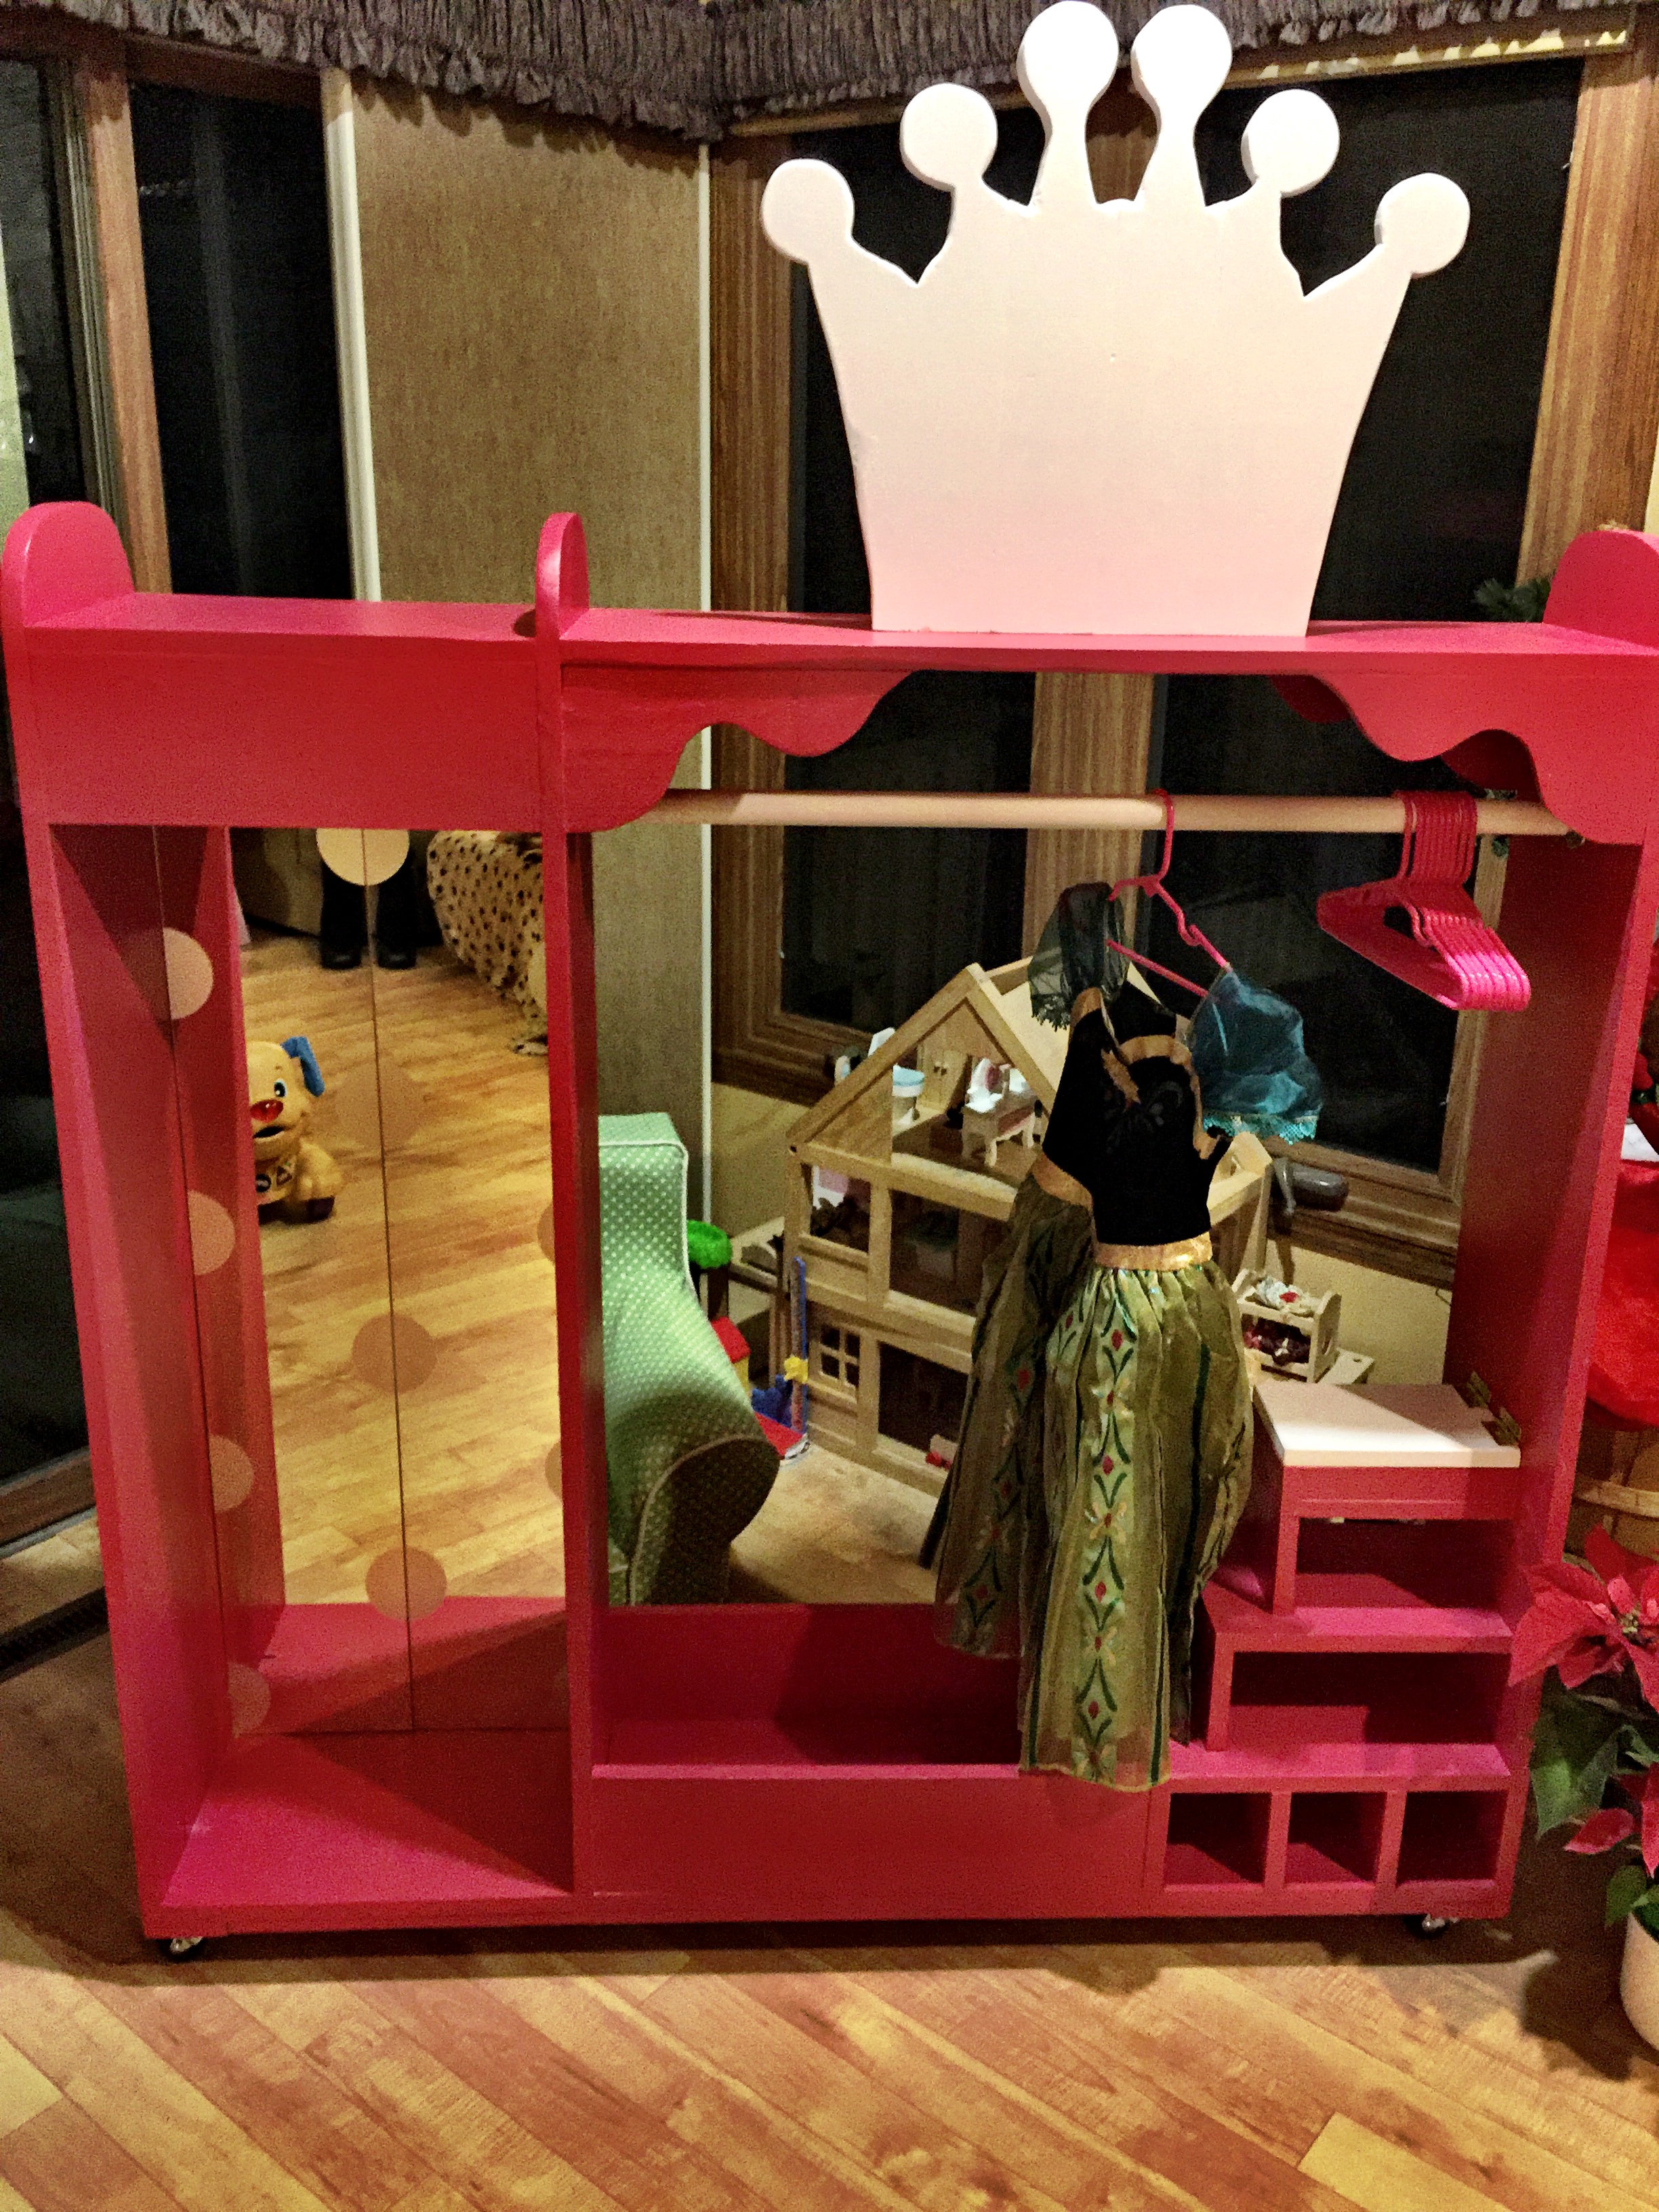
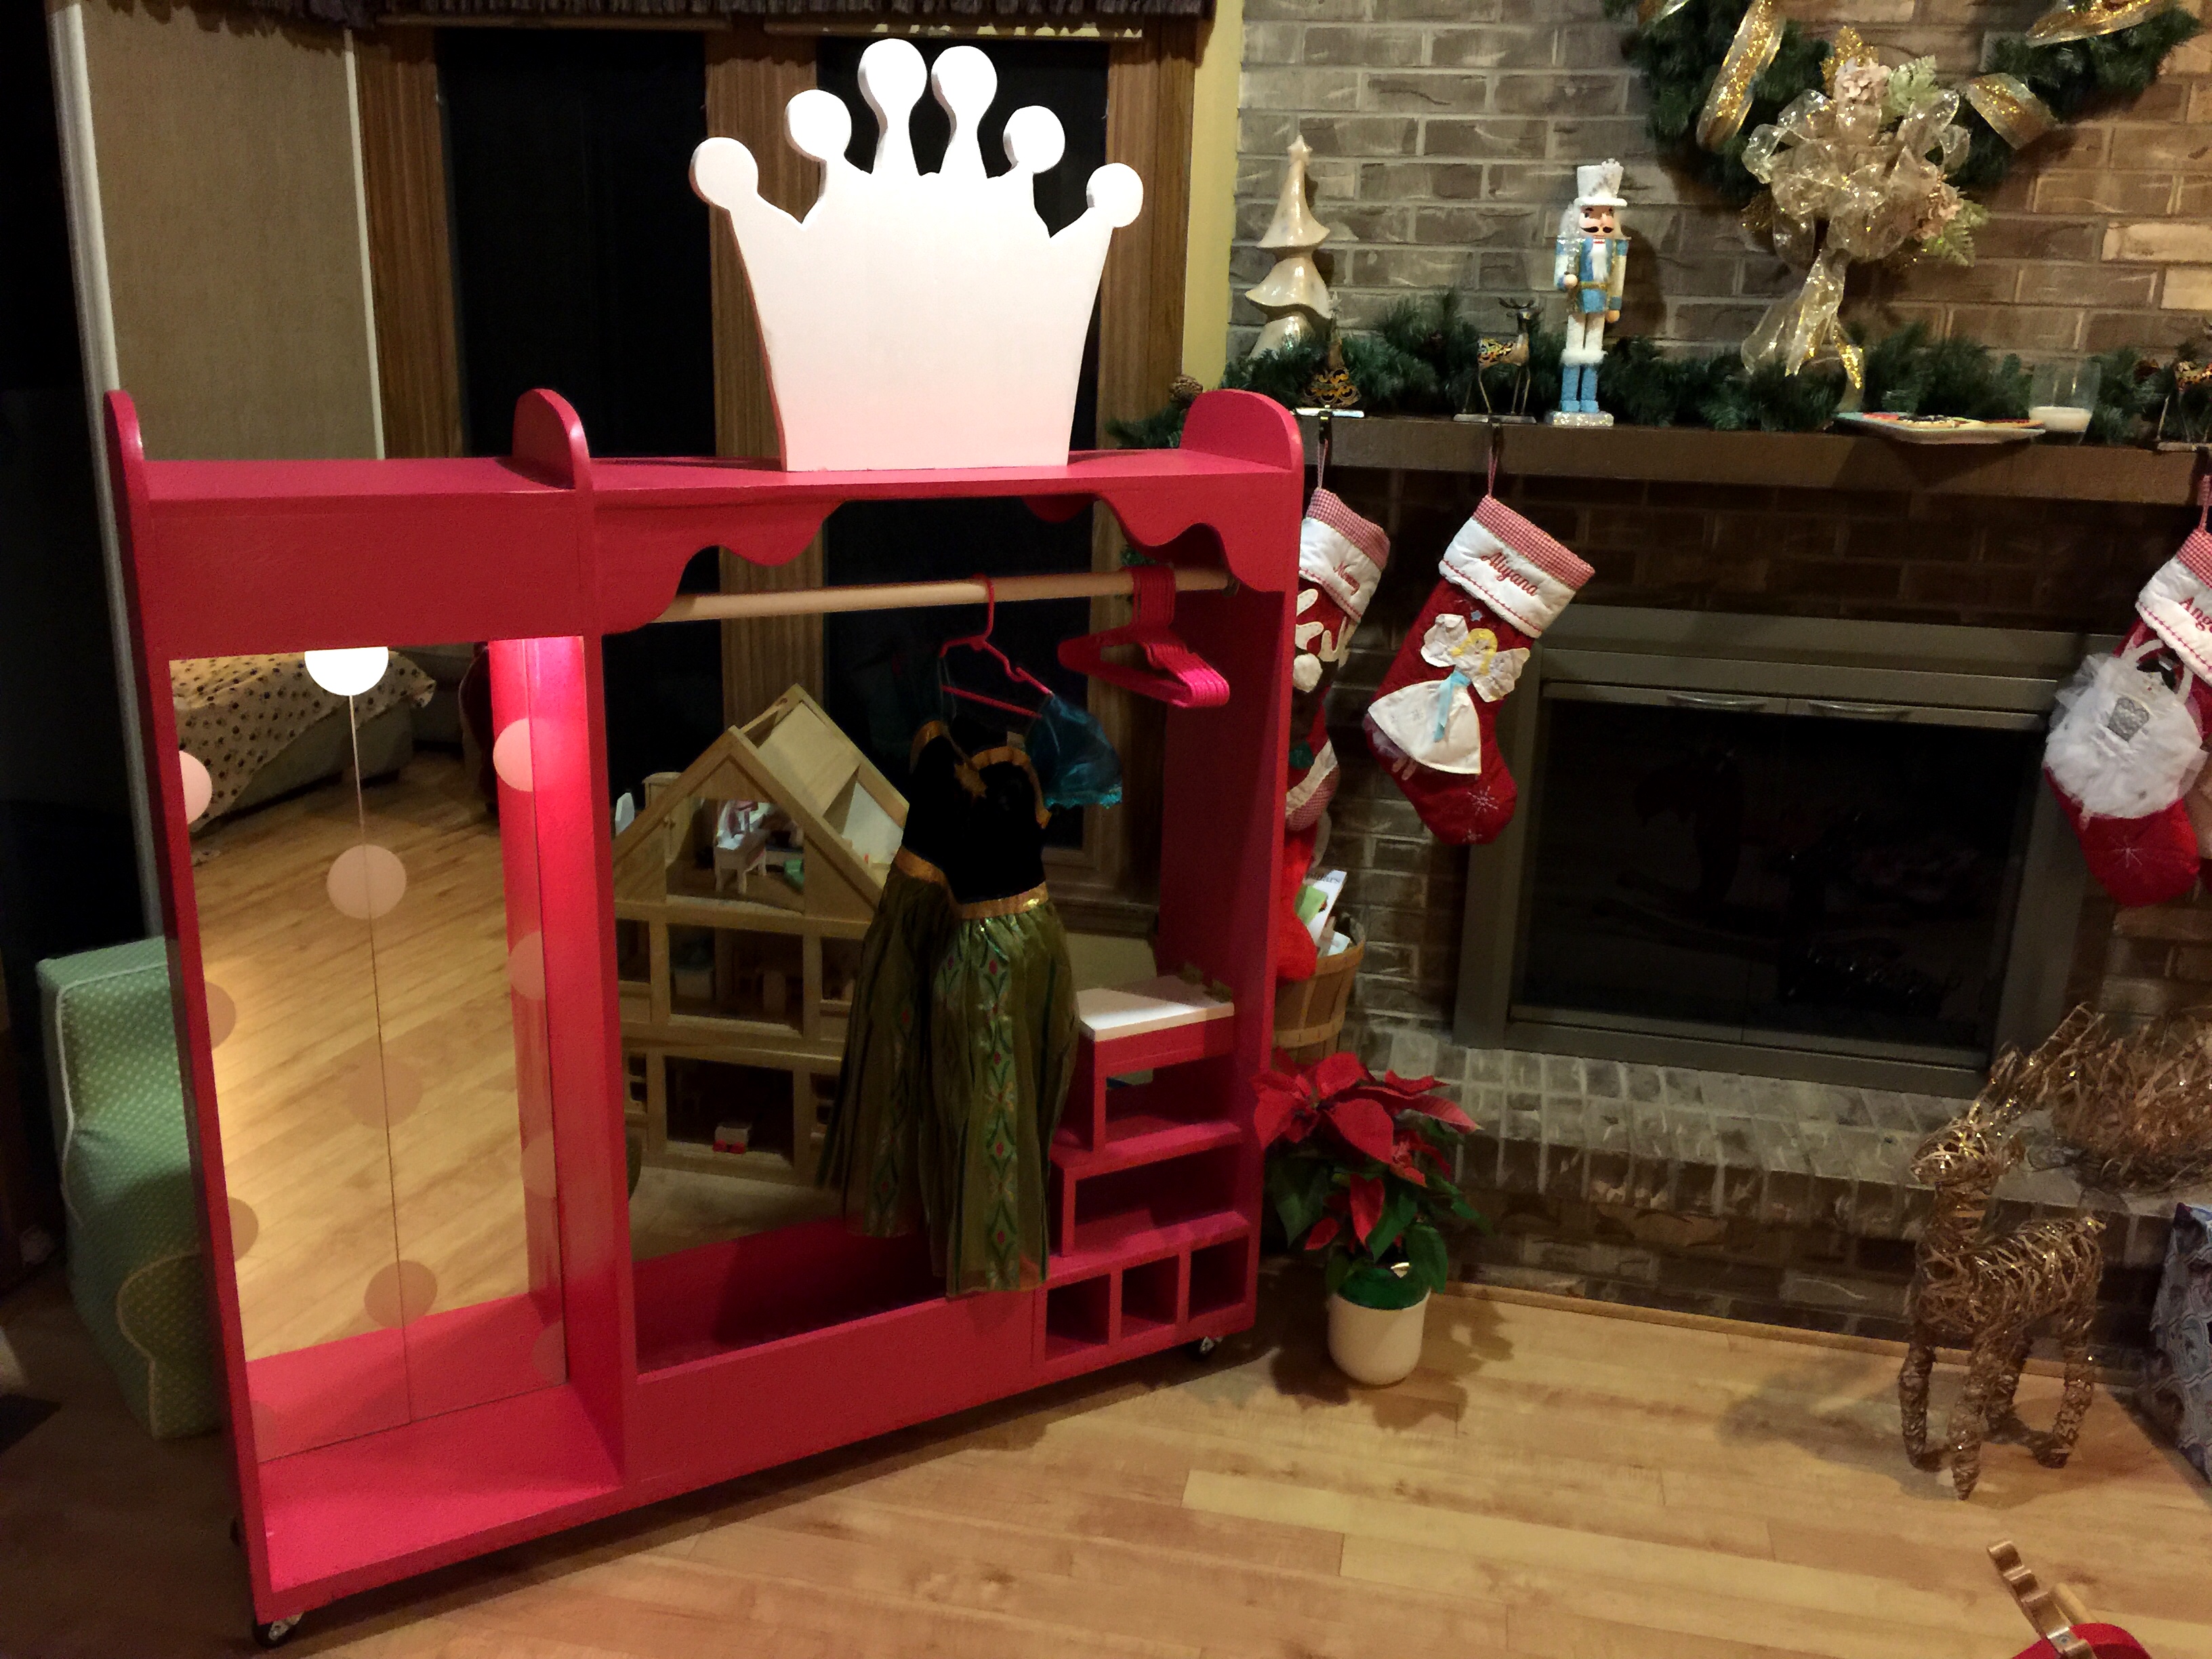
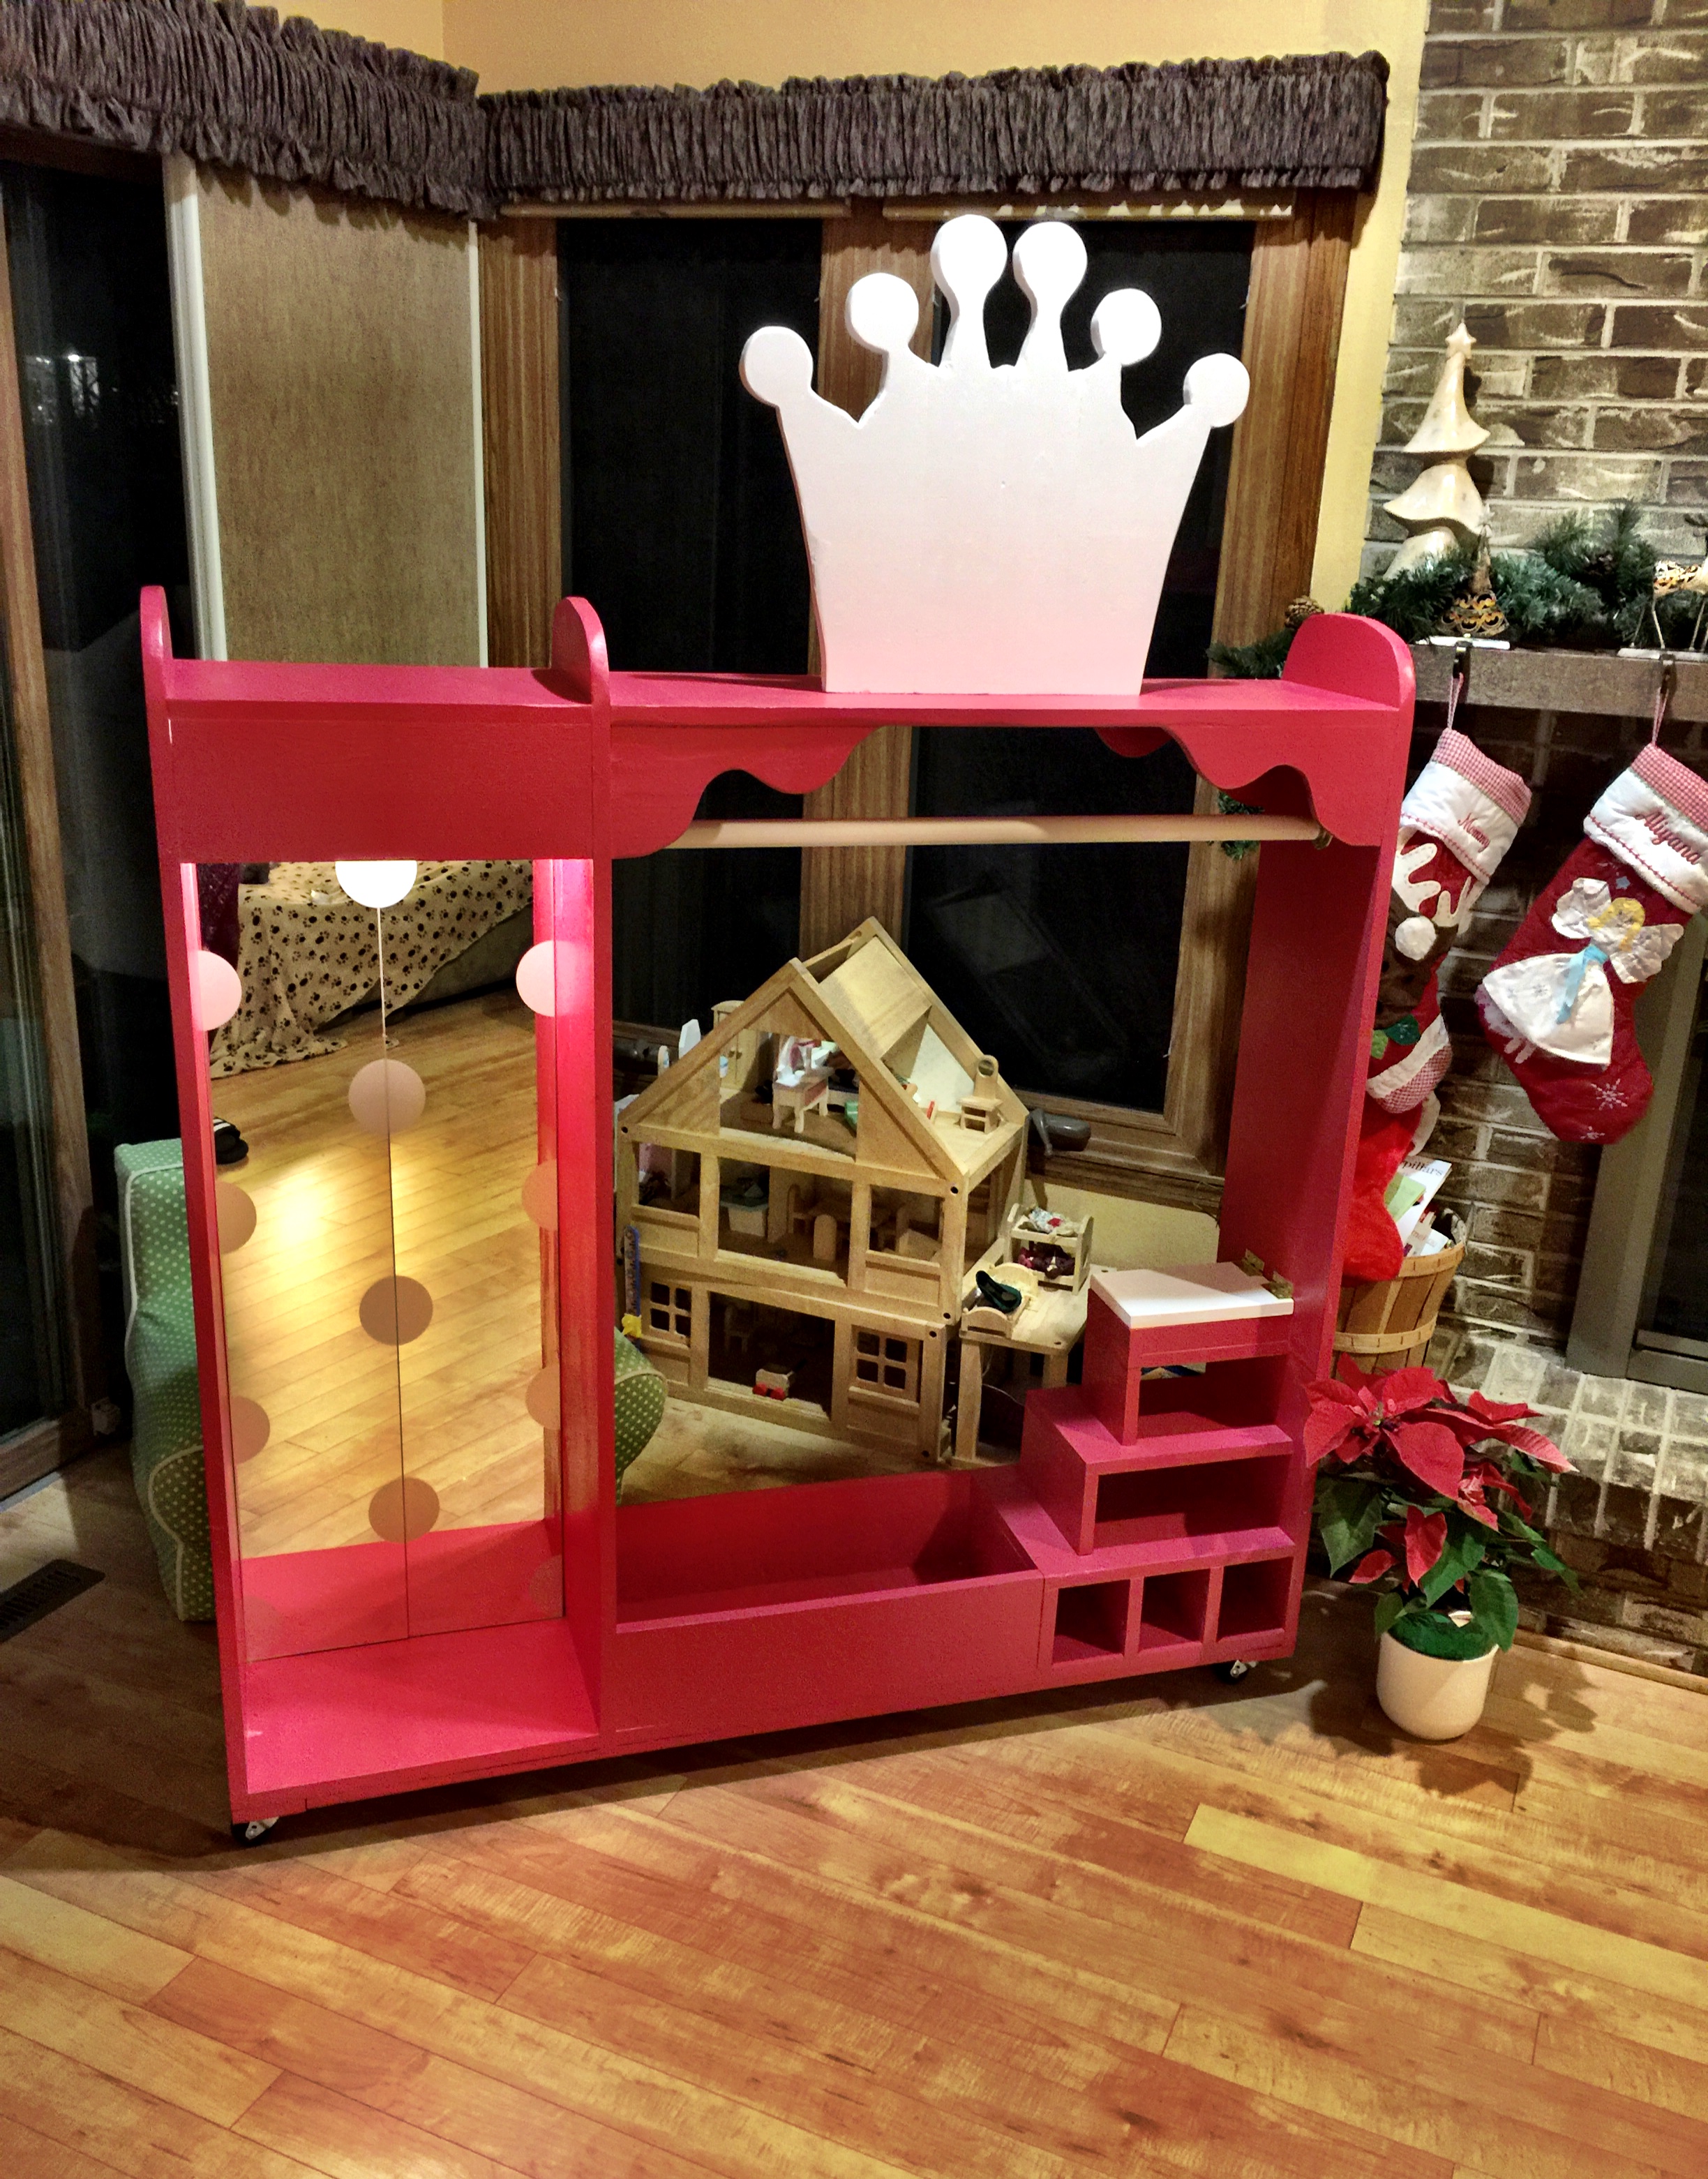
Built from Plan(s)
Estimated Cost
$75
Estimated Time Investment
Weekend Project (10-20 Hours)
Finish Used
Behr Glamorous paint and off-white paint with coats of polycrylic; Mirrors and Motion Sensor overhead light bought at IKEA
Recommended Skill Level
Intermediate
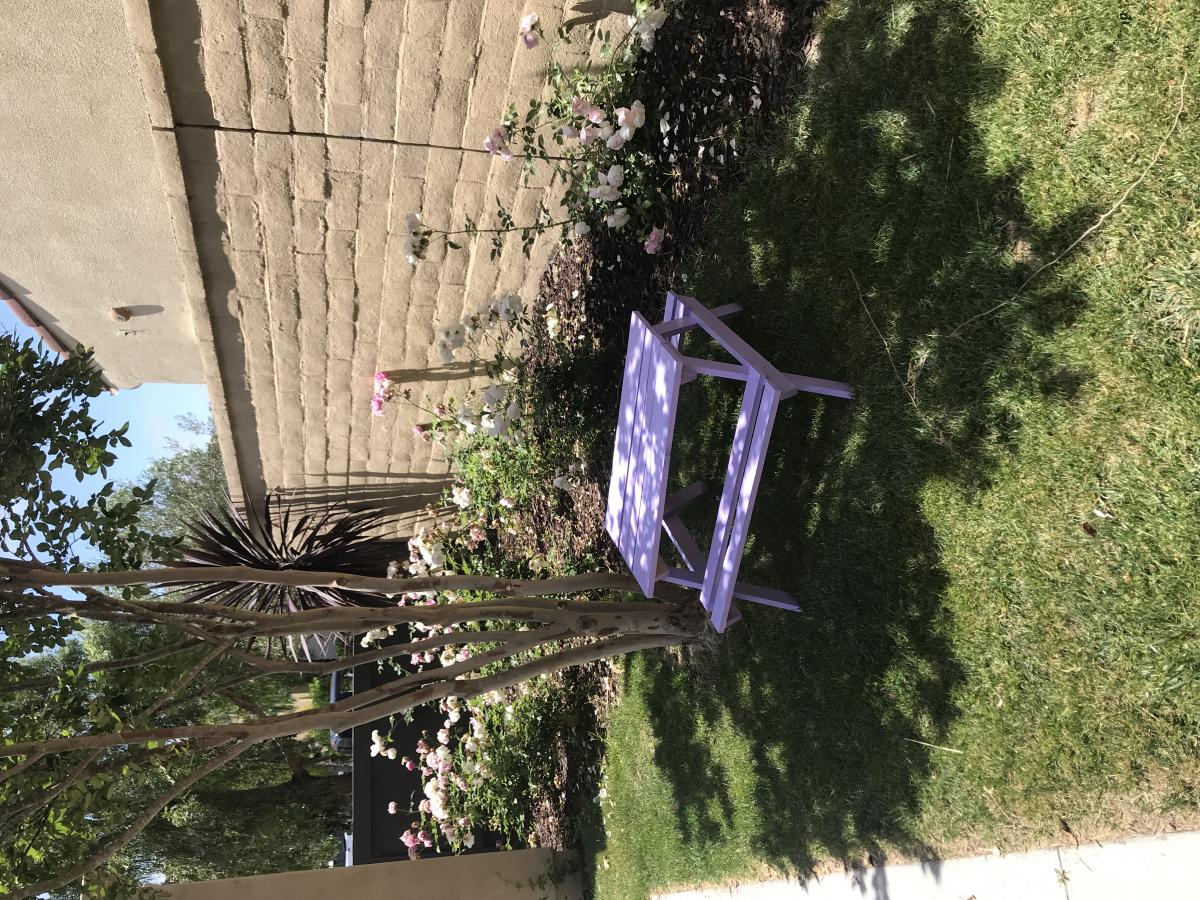
Little Kids picnic table
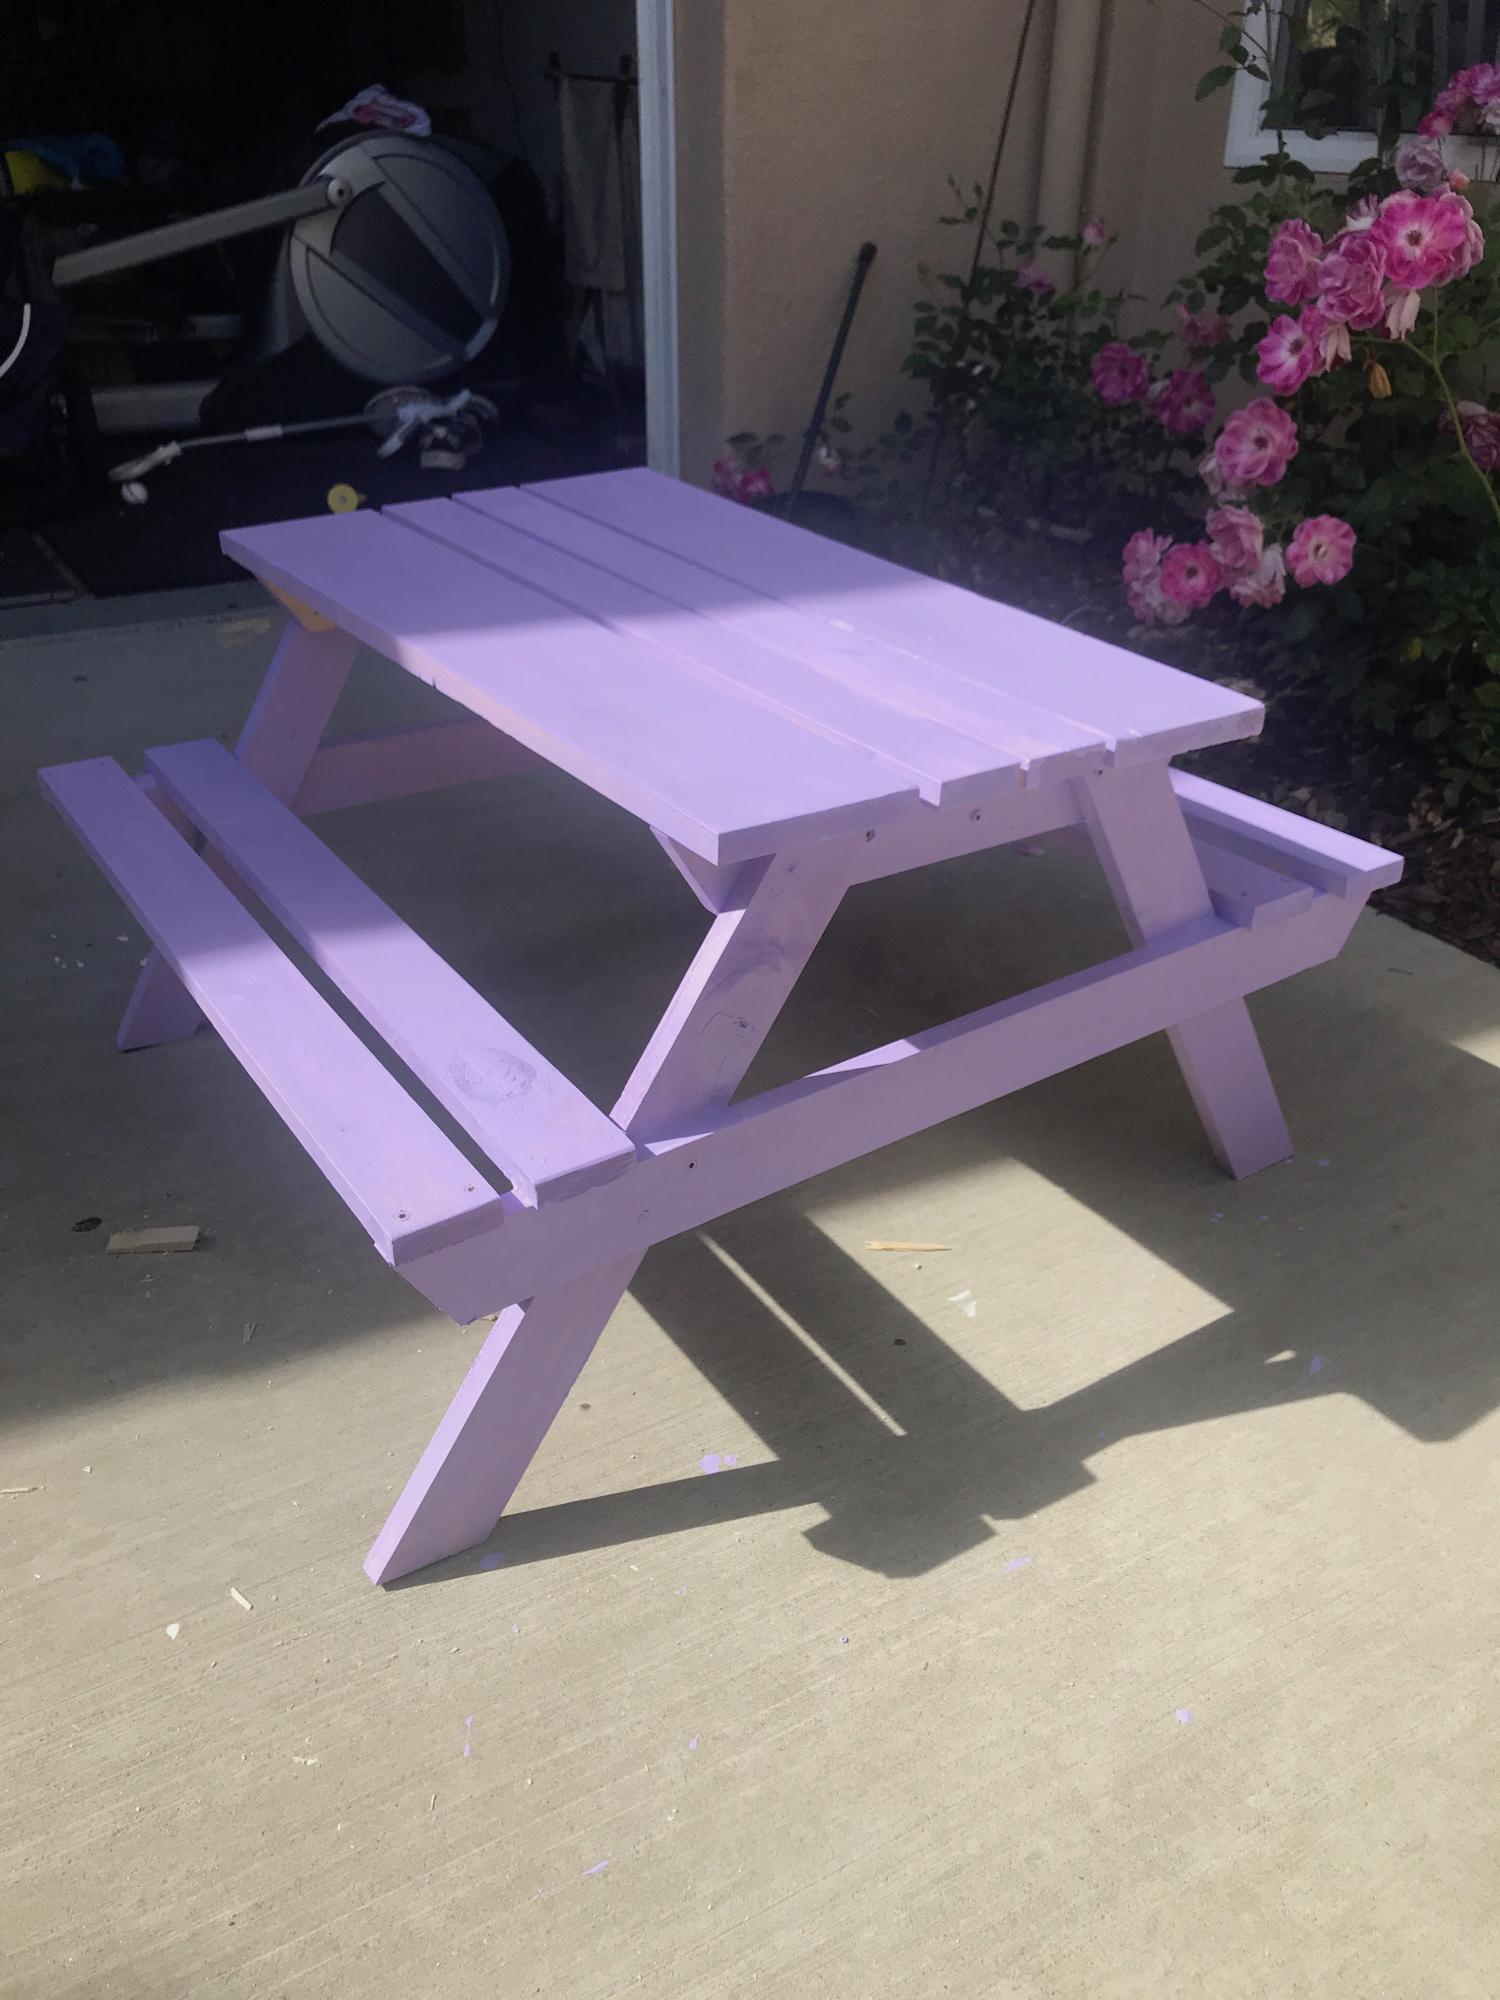
Built this in a few hours. Was a fun build and was all from wood I had sitting around. My daughter requested purple and I happened to have some oops purple I picked up at Home Depot for 50 cents so it was a very affordable project that the girls love!
Built from Plan(s)
Estimated Time Investment
Afternoon Project (3-6 Hours)
Finish Used
Purple Behr oops paint
Recommended Skill Level
Beginner
Simplified barn door console
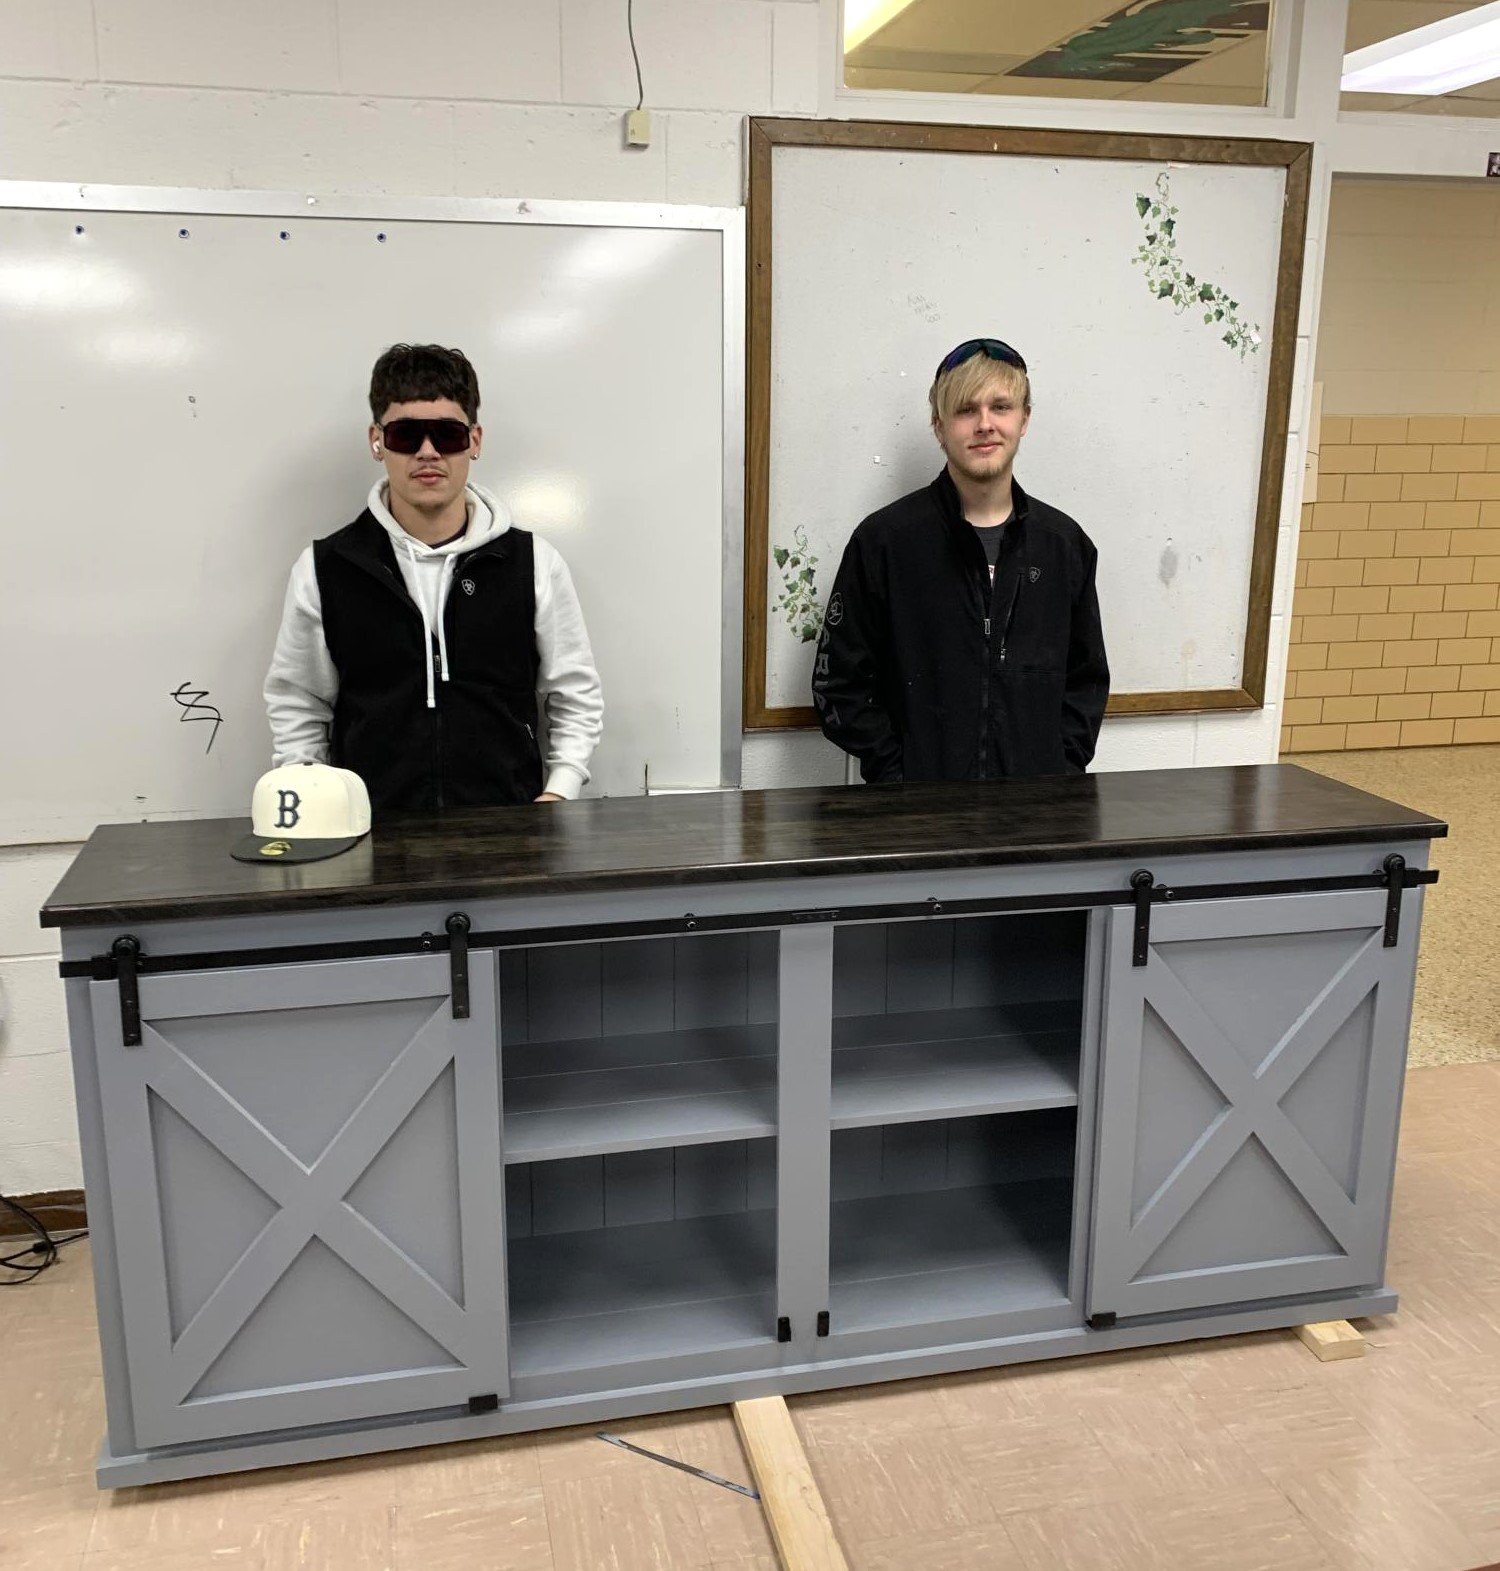
Another project my high school shop class is building from an Ana White plan. The top is maple that has been stained black and then poly.
Built from Plan(s)
Comments
Mon, 03/27/2023 - 15:32
Love these student projects!
Thanks for sharing these, please email us at [email protected] so we can give credit when sharing!
Farmhouse table
We originally re-sized these plans smaller to make a worktable for my office. Once that was built and we realized that we actually could make a table, we decided to make the full sized version. It turned out beautifully! A couple of clients have actually asked if they could pay us to make them one! Thank you, Ana, for the plans. :-)
Estimated Cost
$110
Estimated Time Investment
Weekend Project (10-20 Hours)
Finish Used
Cabot walnut with semi-gloss poly
Recommended Skill Level
Starter Project
Rustic planked wood sideboard
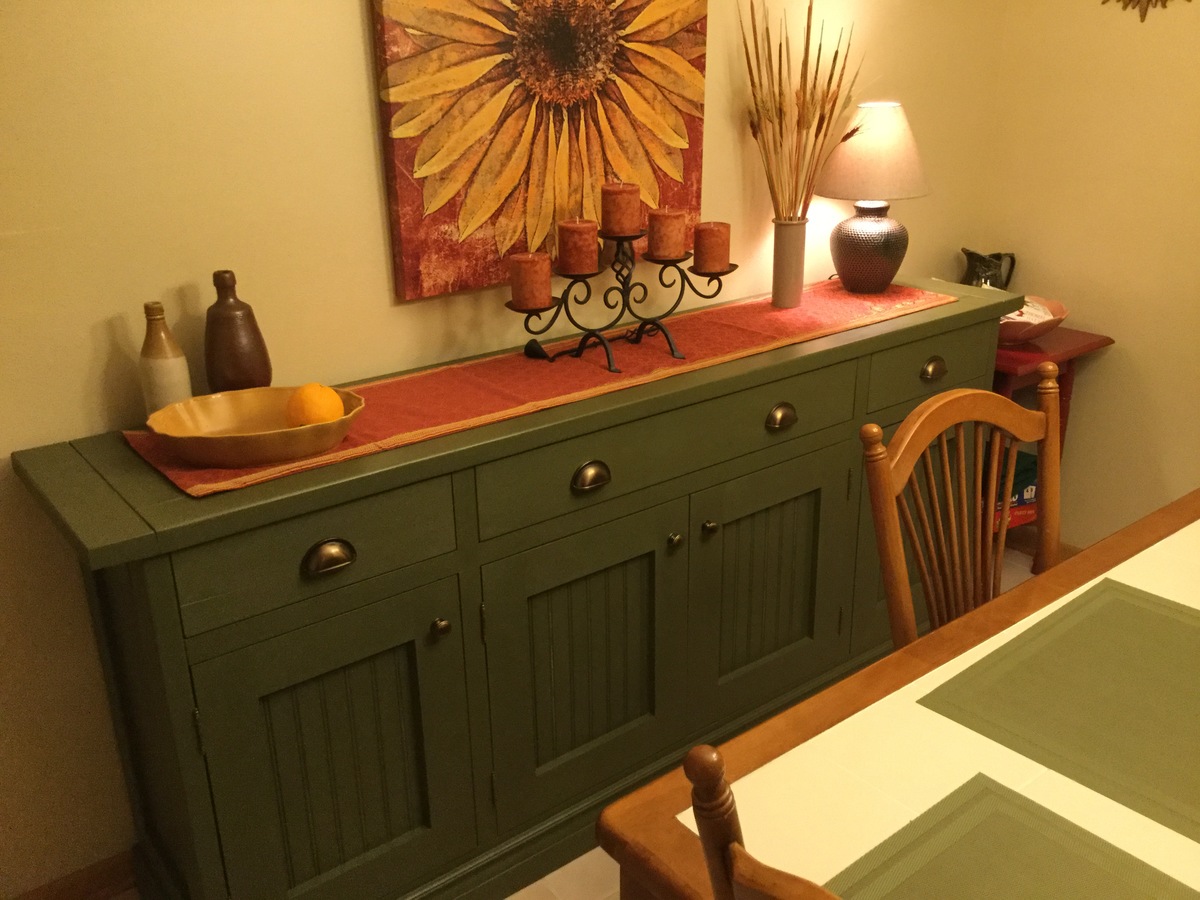
This is my first attempt a making furniture. I enjoyed the process.
Built from Plan(s)
Estimated Cost
About $250. I used Annie Sloan paint and wax. They are expensive but very good finishing products for this type of work.
Estimated Time Investment
Week Long Project (20 Hours or More)
Finish Used
Annie Sloan chalk paint - olive green (2 coats) and clear wax.
Recommended Skill Level
Intermediate
Comments
Thu, 04/15/2021 - 09:30
Broken Link
Unable to open the pdf for this plan, can someone fix this or provide new link? Thank you!!


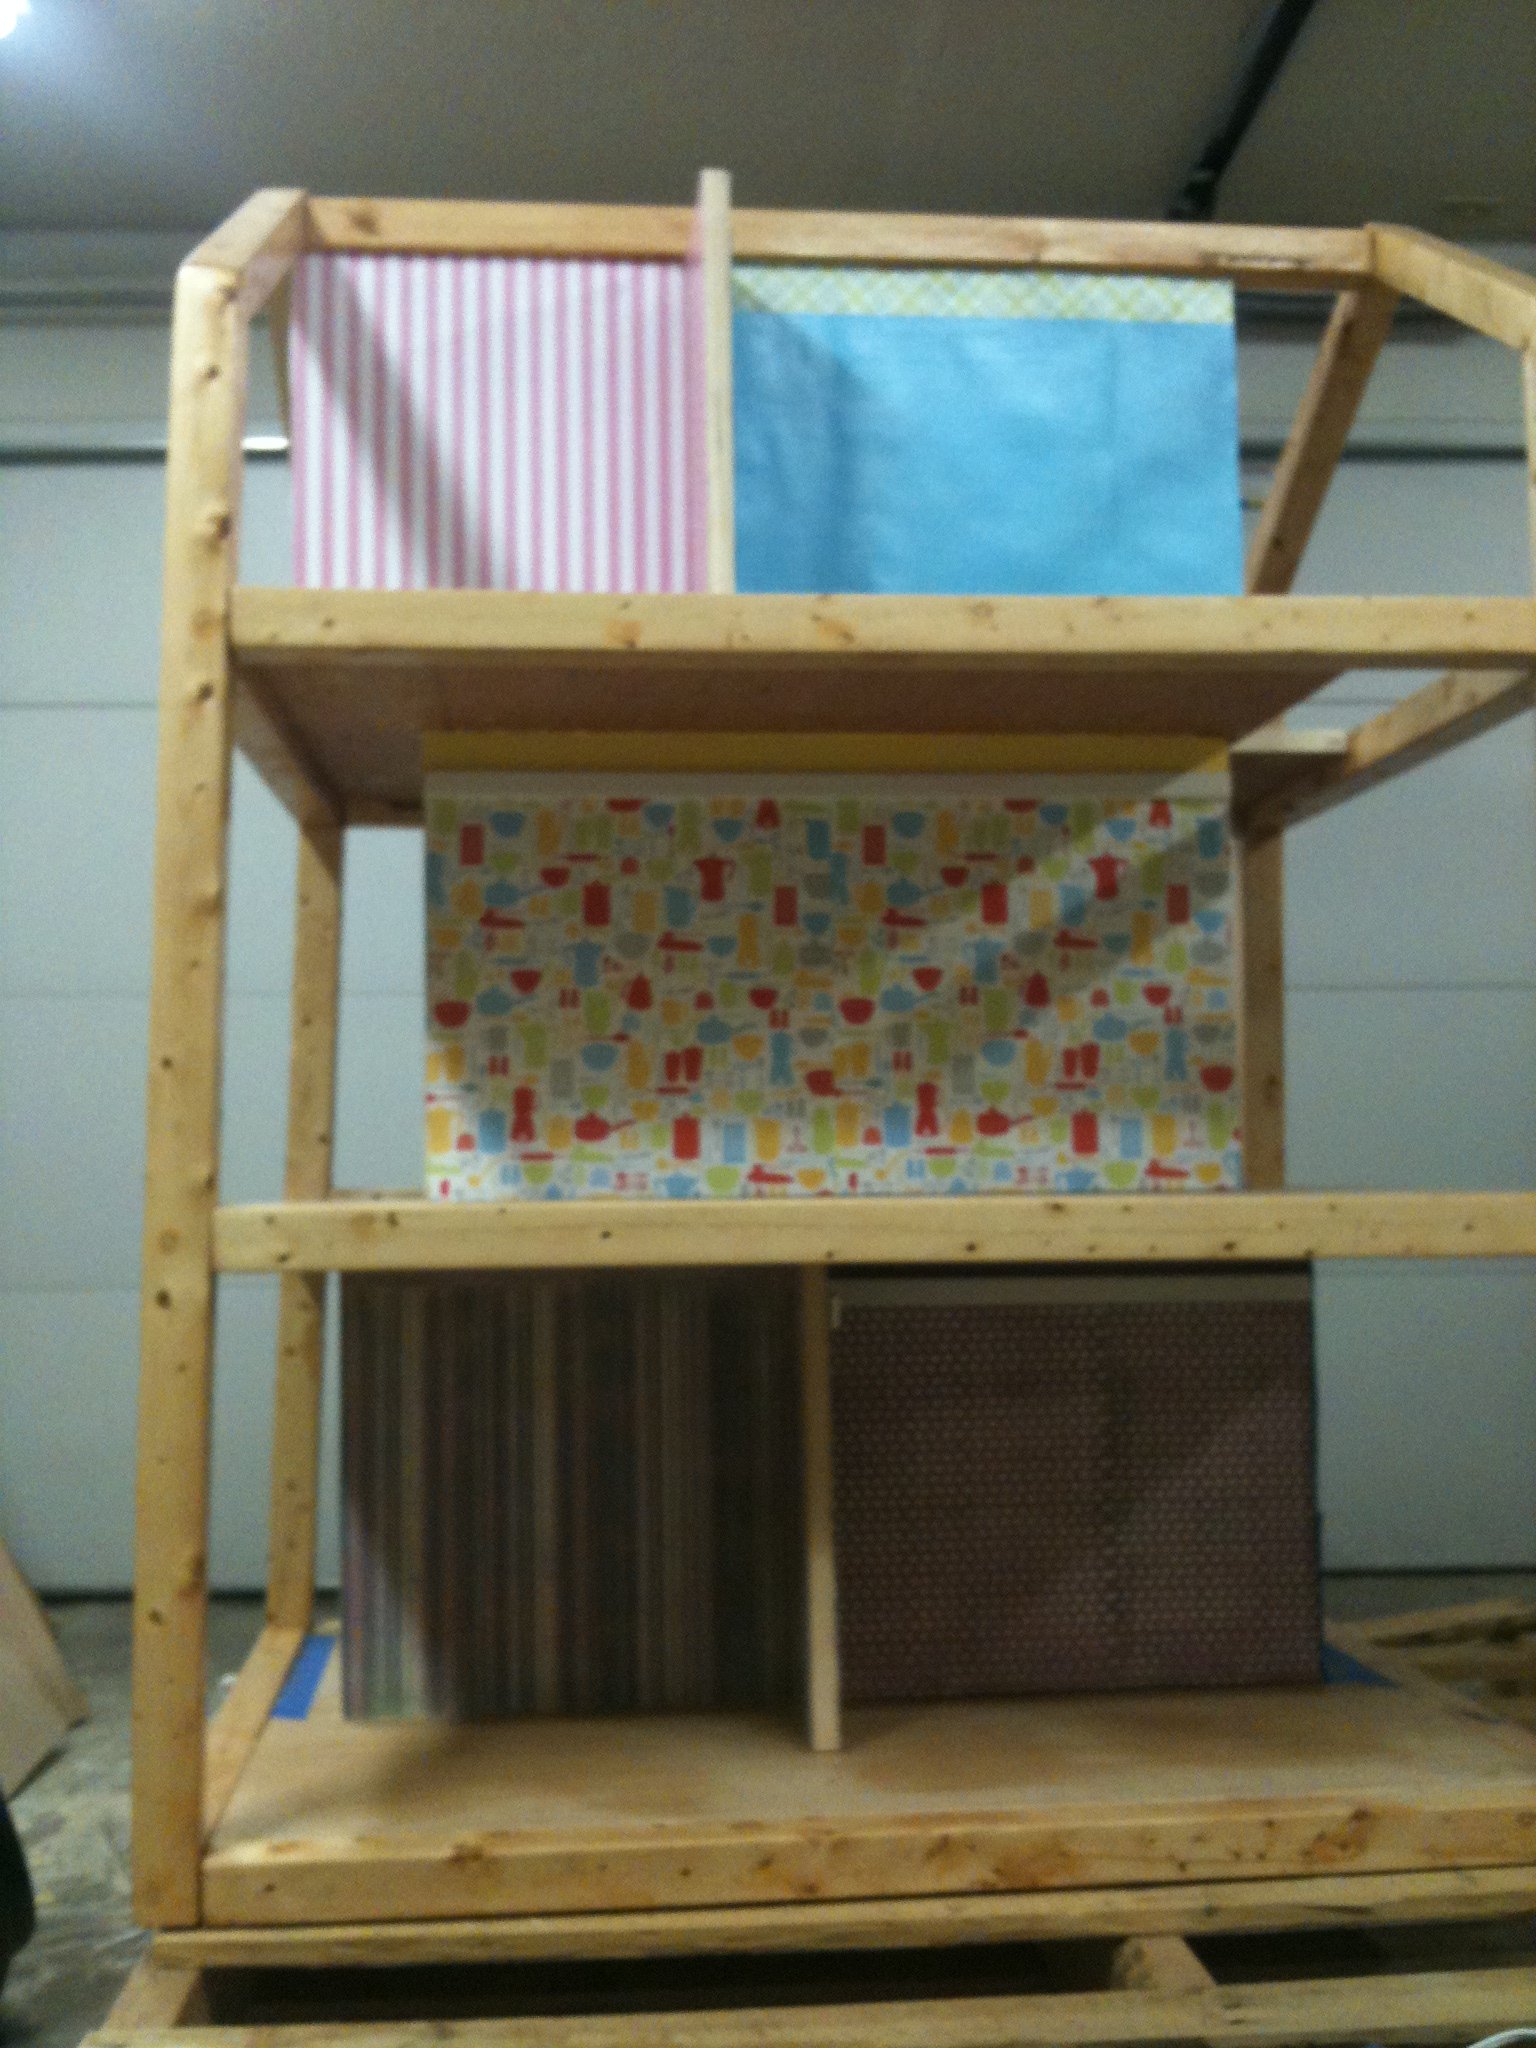
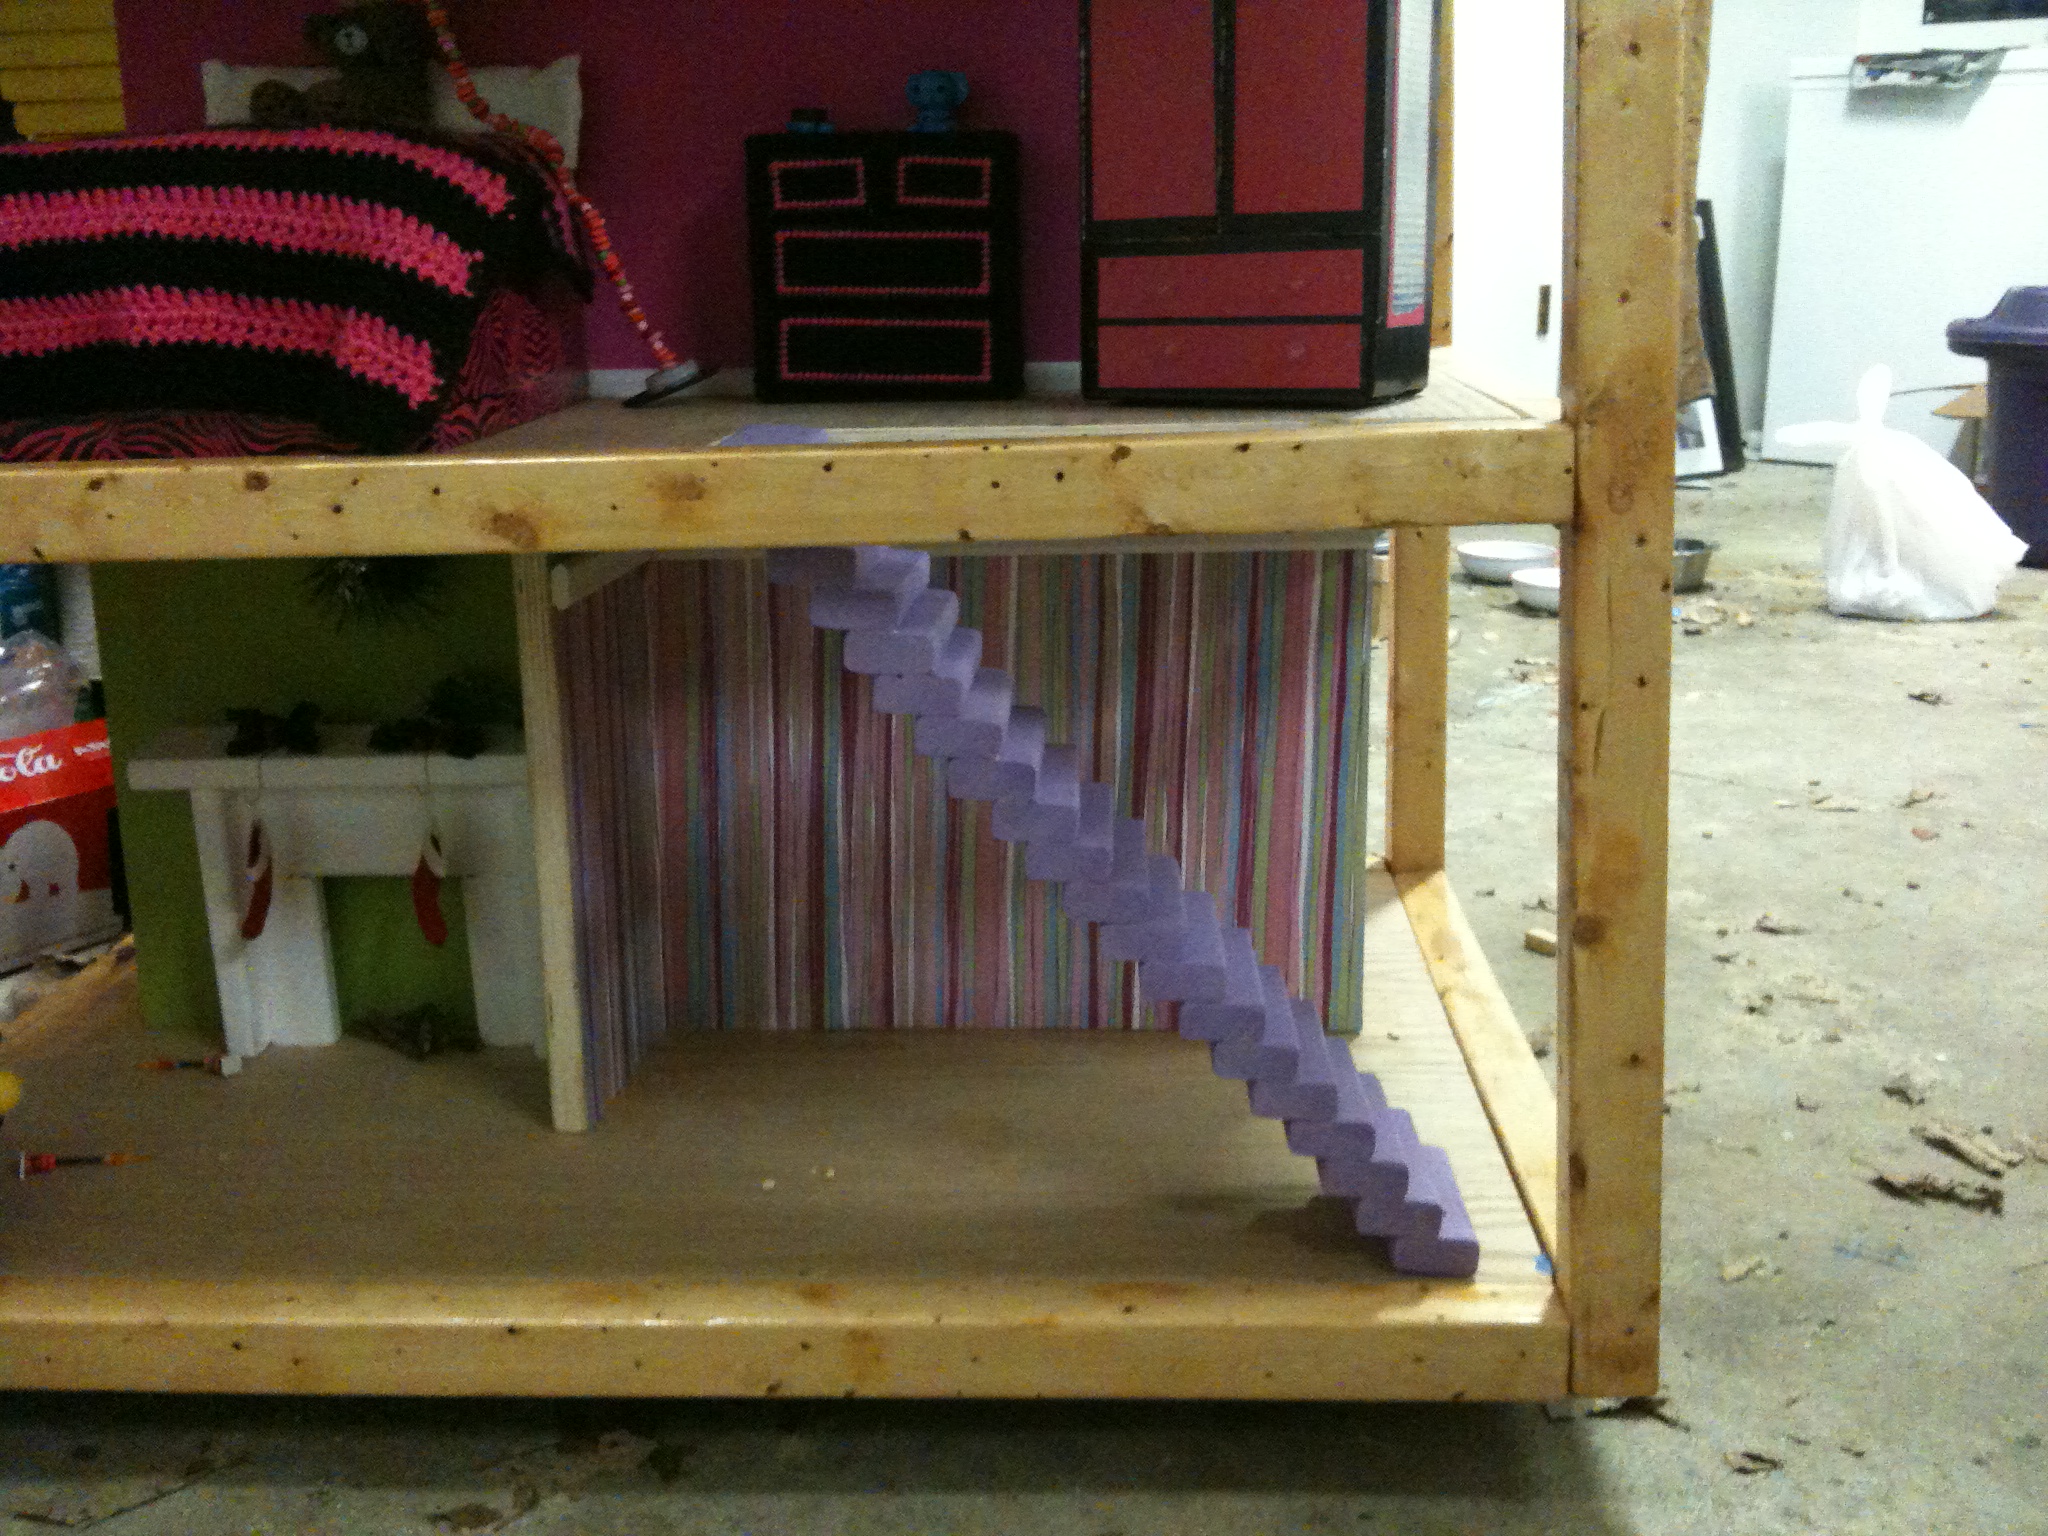
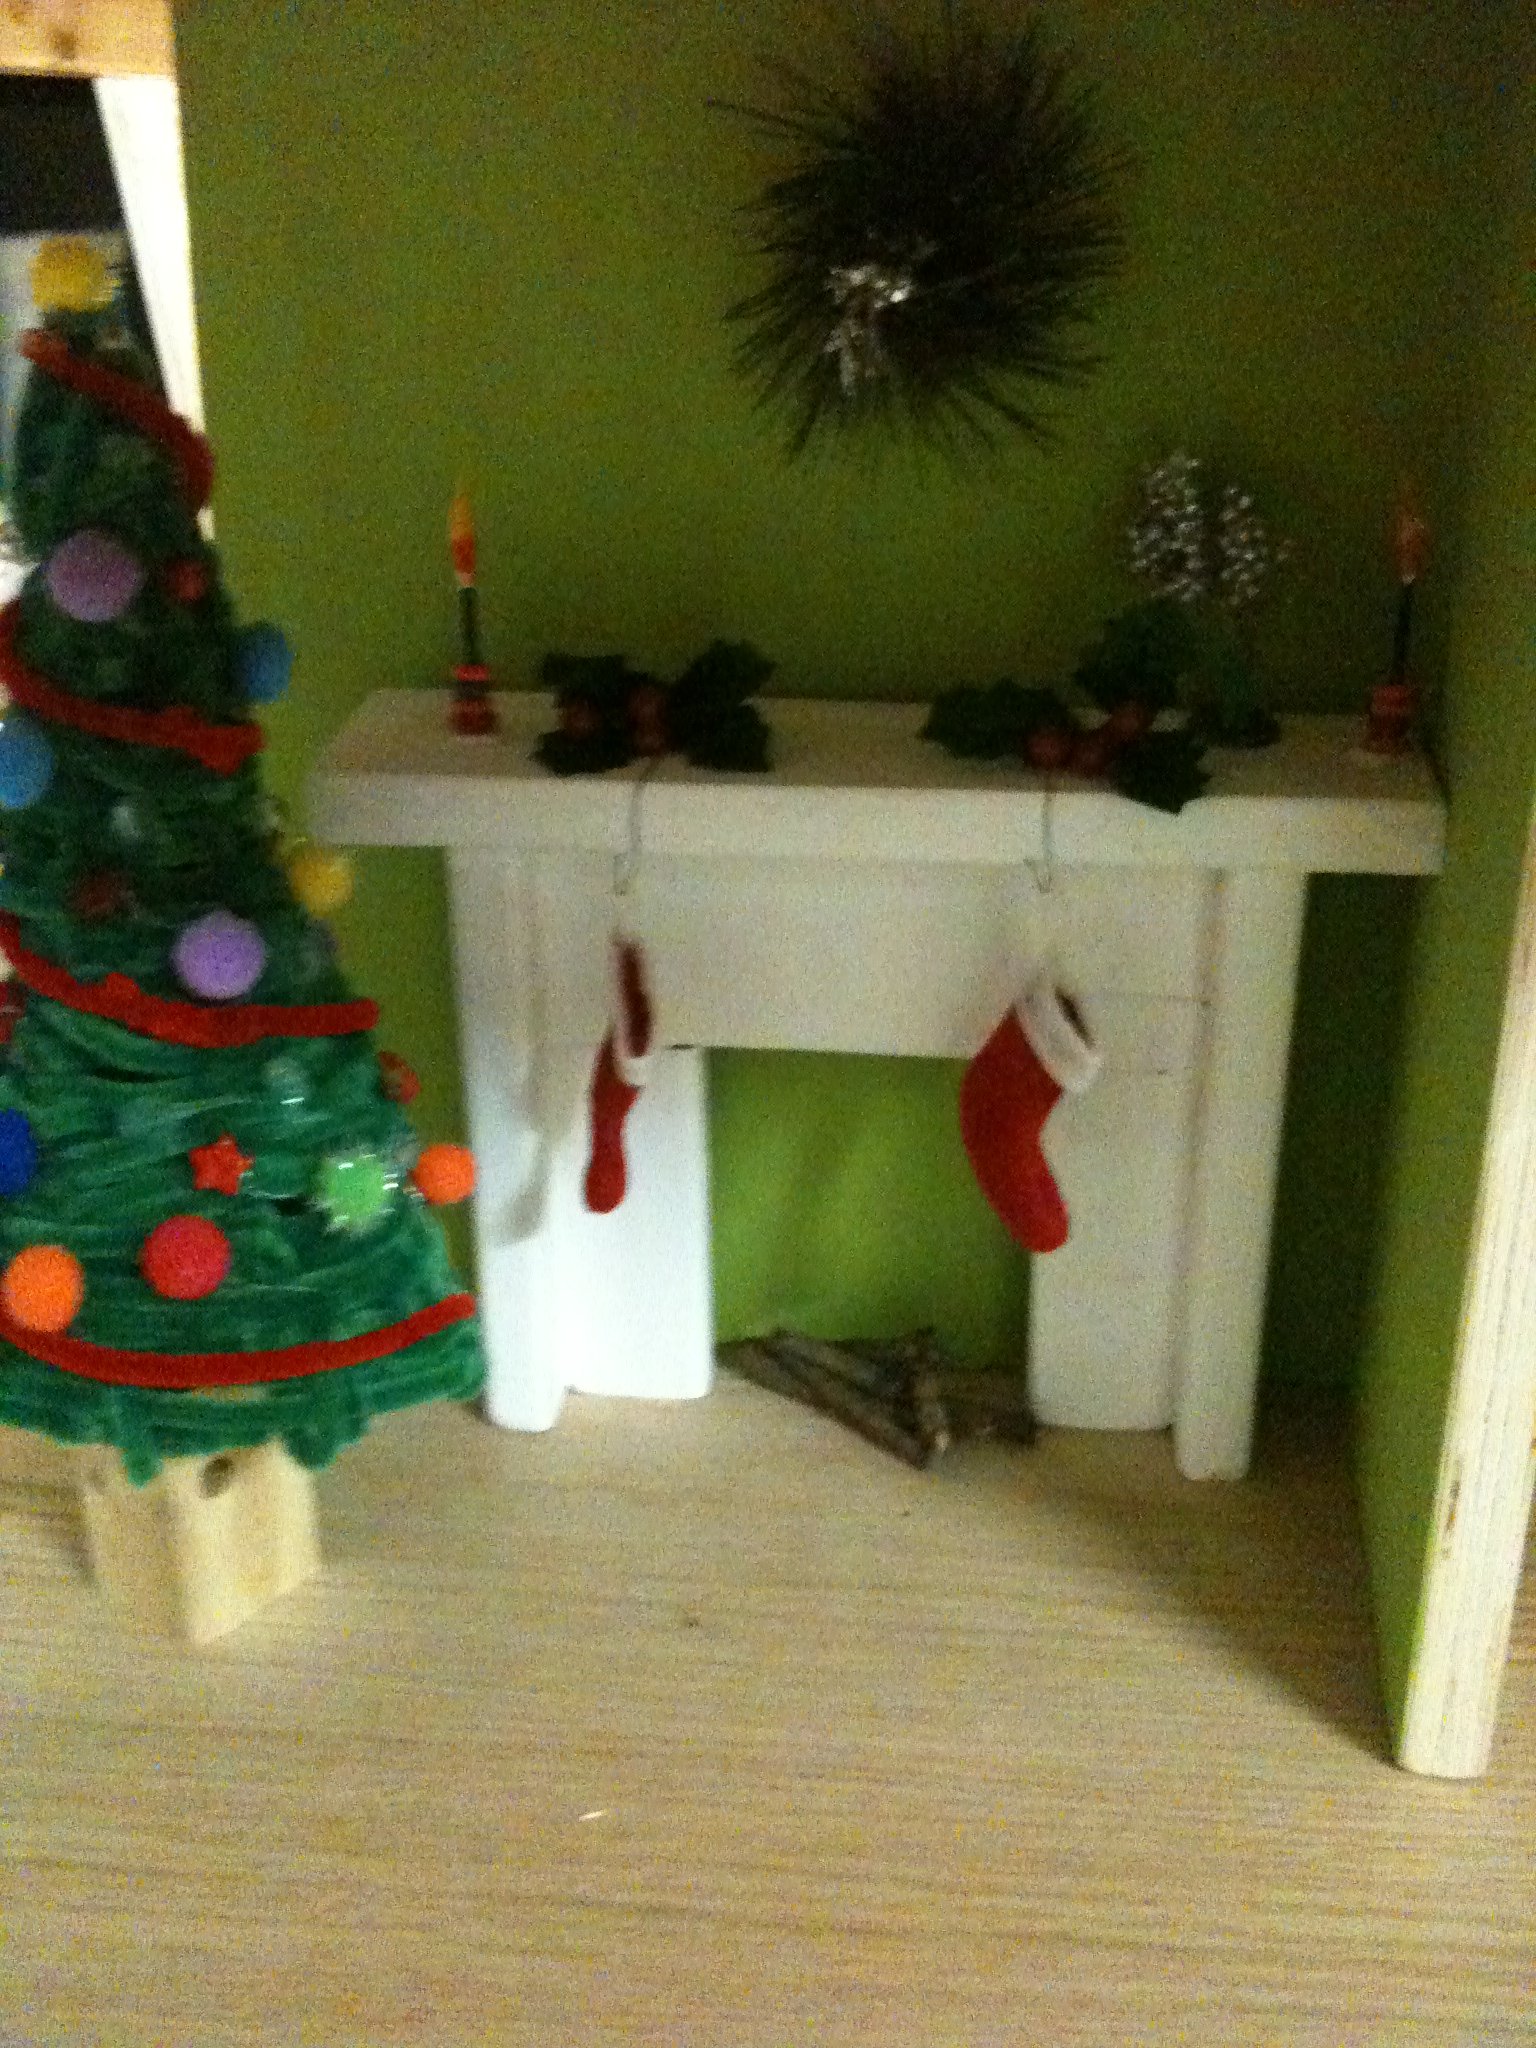
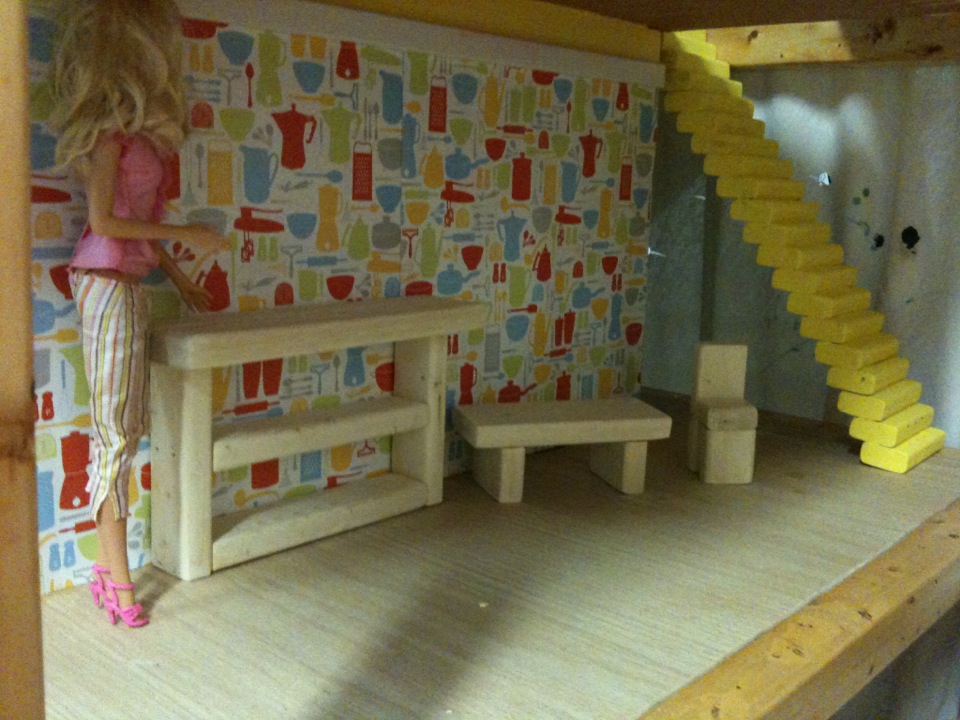
Tori's Dream Dollhouse
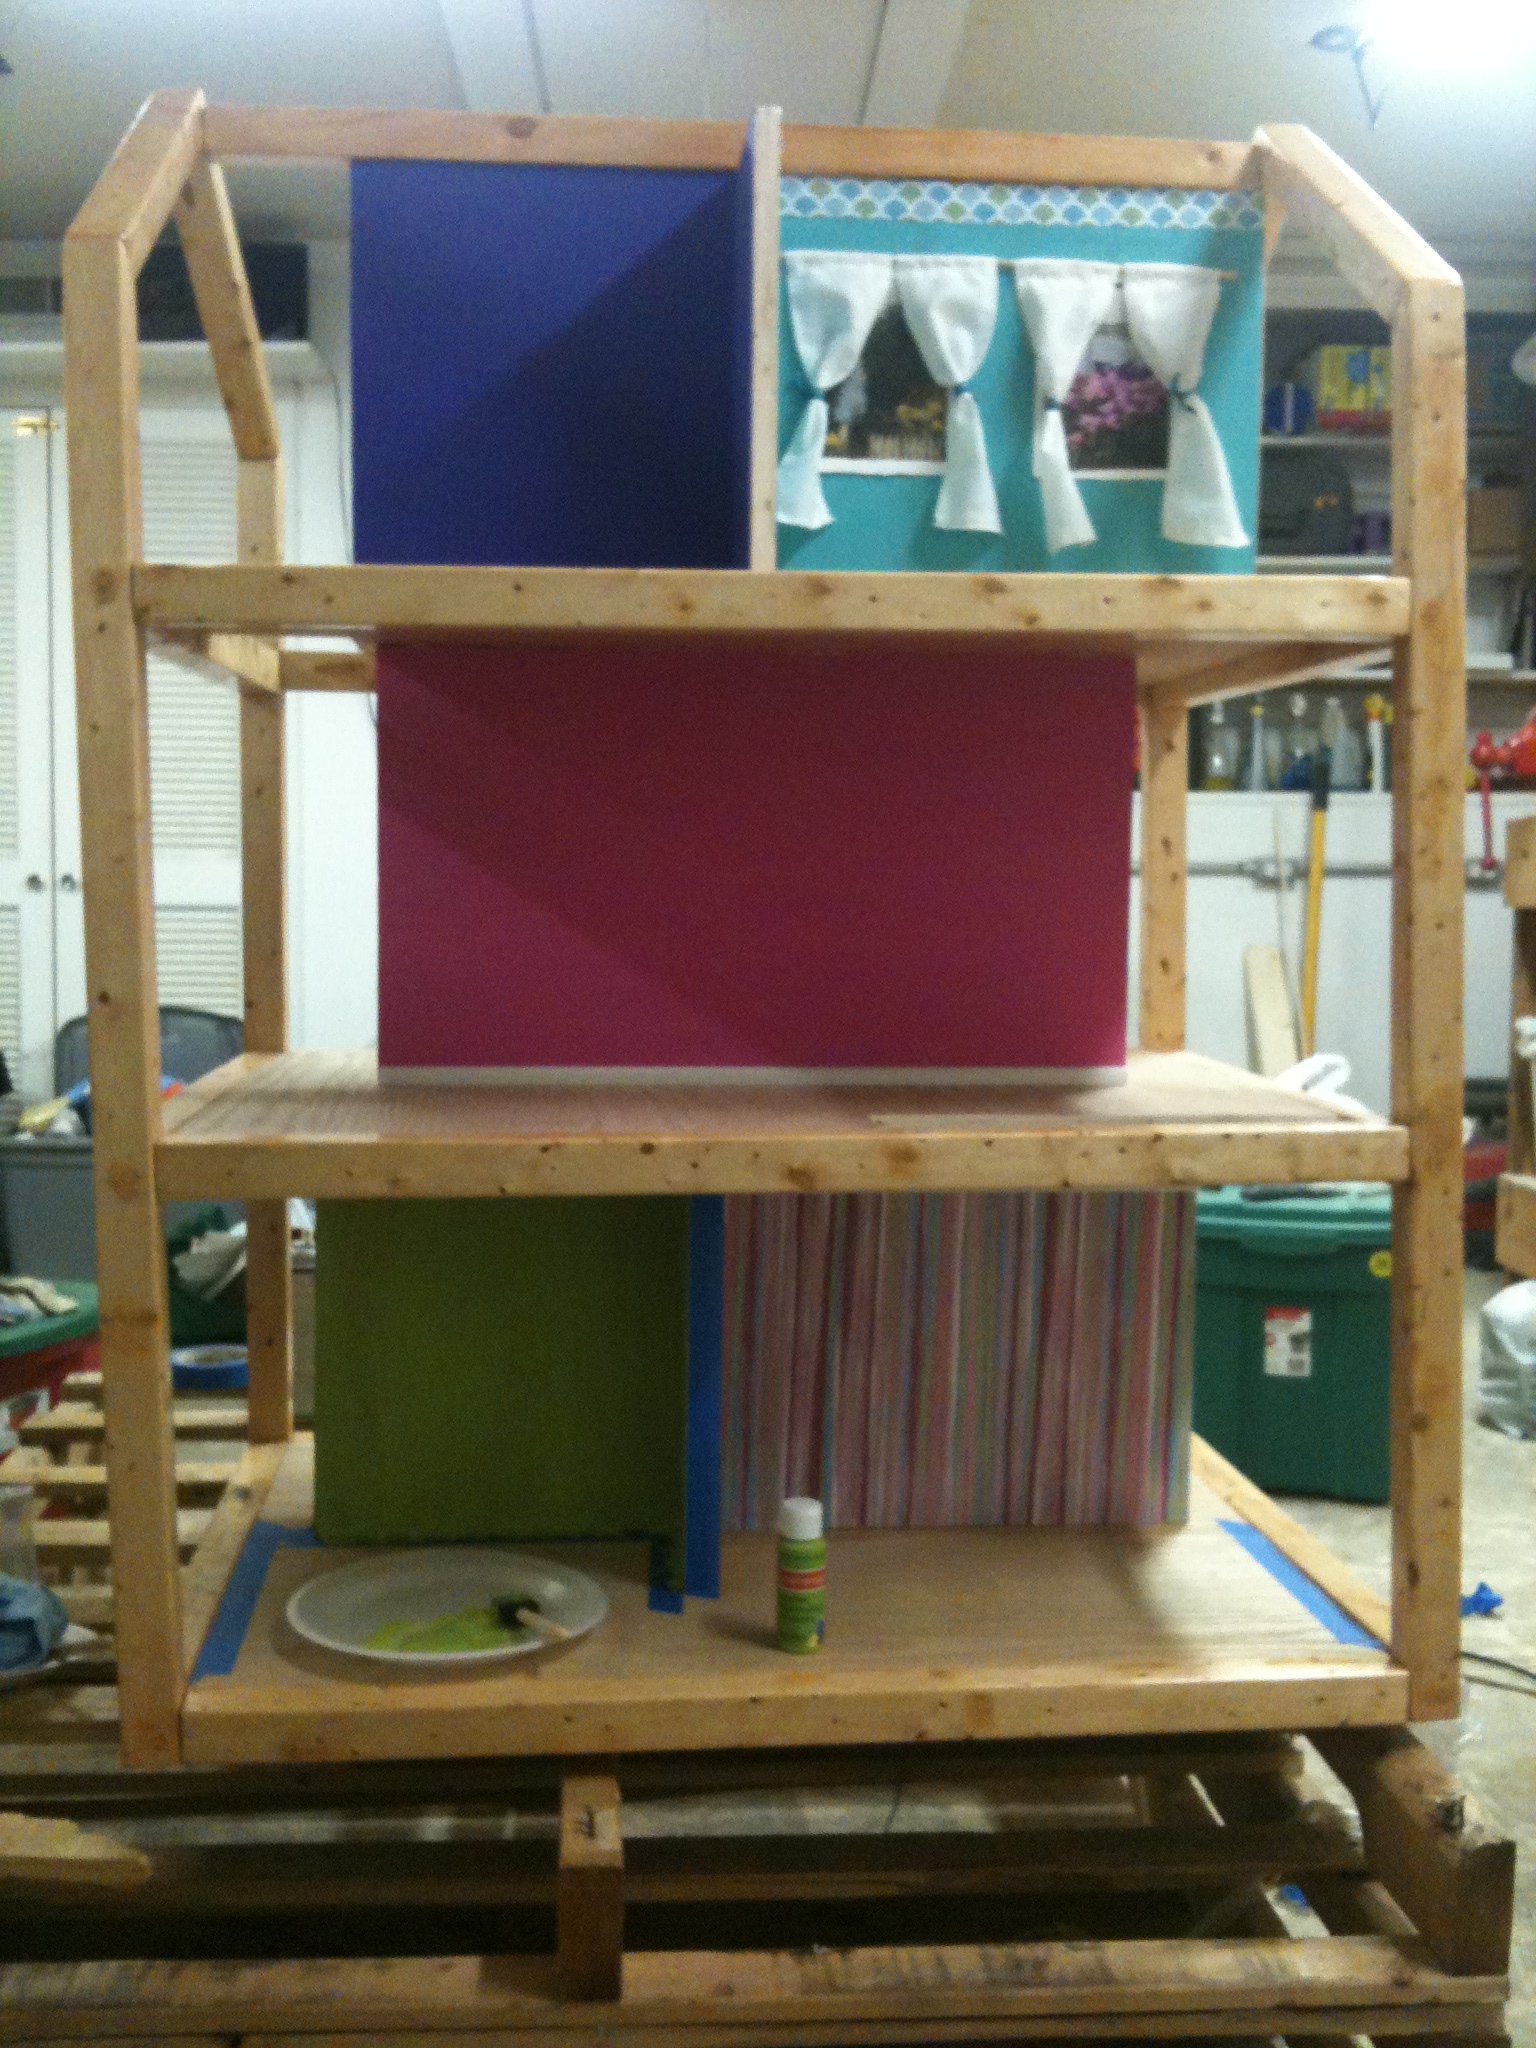
We had a blast making this dollhouse for Christmas!
It was a pretty easy build. I was nervous about the angles at first but it ended up being easy. I think the hardest part was choosing colors!
We used very thin trim to make crown moulding and floor board trim too. I think that makes it look more "real". THis picture was before we installed the stairs... The worst part of the stairs was sanding all those stinking pieces! Otherwise it was a piece of cake!
For furniture I have used a lot of scrap 1x2 and 1x3 and kept it very basic and simple. For details and fun stuff, I have used the amazing blog MyFroggyStuff.blogspot.com. SHe takes items you were about to toss out and makes them into Barbie treasures. Truly amazing stuff!

Built from Plan(s)
Estimated Cost
$100 (including decorating)
Estimated Time Investment
Weekend Project (10-20 Hours)
Finish Used
I used Minwax on the 2x2s. I can't remember the color but it's very light, barely darker than the unfinished pine.
For everything else, I used craft paint because it comes in small bottles for under a dollar and I wanted to go very colorful. Some rooms are wallpapered with very thick scrapbook paper. I tried mod podge but it wrinkled a lot. So instead I used spray adhesive to stick it down and then only mod podged OVER it and then sealed it with a spray sealer.
For everything else, I used craft paint because it comes in small bottles for under a dollar and I wanted to go very colorful. Some rooms are wallpapered with very thick scrapbook paper. I tried mod podge but it wrinkled a lot. So instead I used spray adhesive to stick it down and then only mod podged OVER it and then sealed it with a spray sealer.
Recommended Skill Level
Intermediate
Comments
Sat, 12/17/2011 - 12:30
Tori's Dream Dollhouse
Wow!This is absolutely amazing. Tori is going to have an amazing Christmas this year!
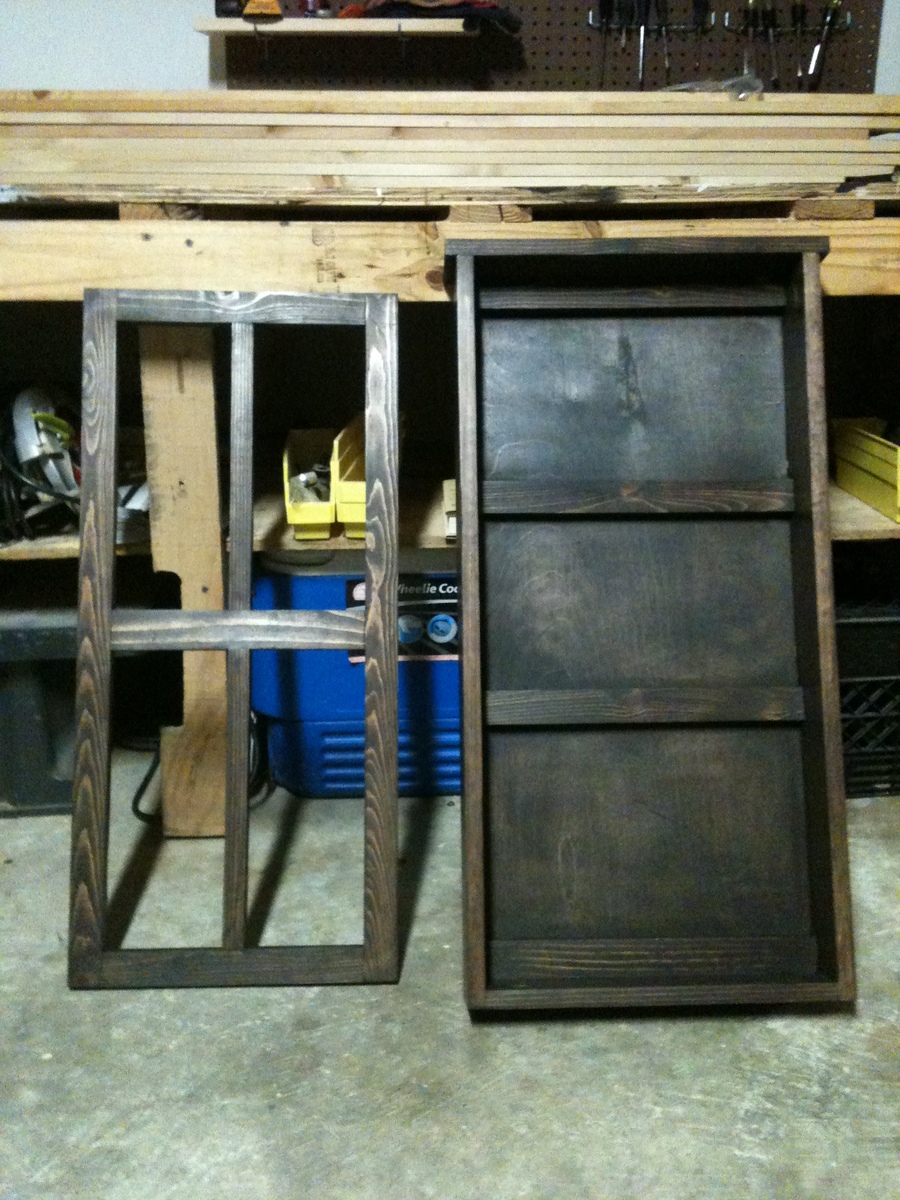
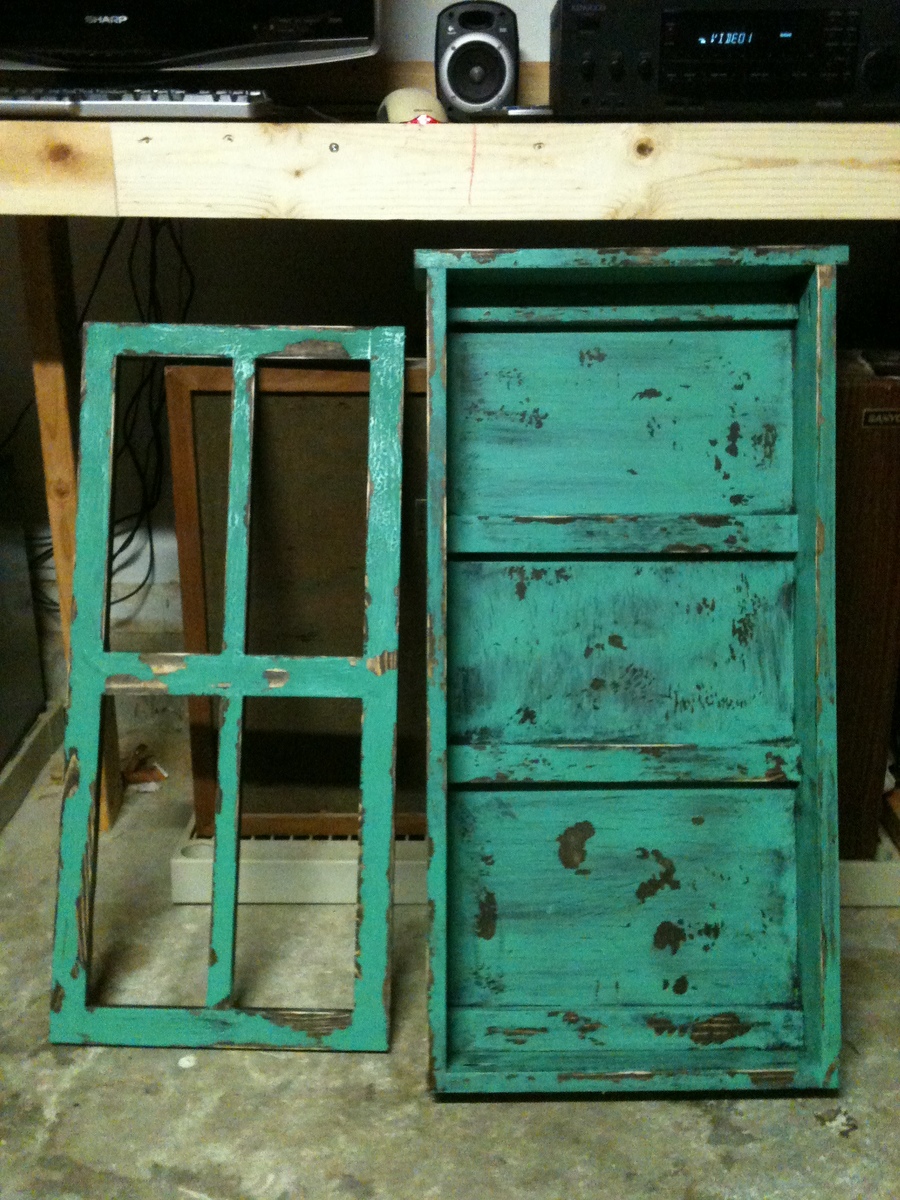
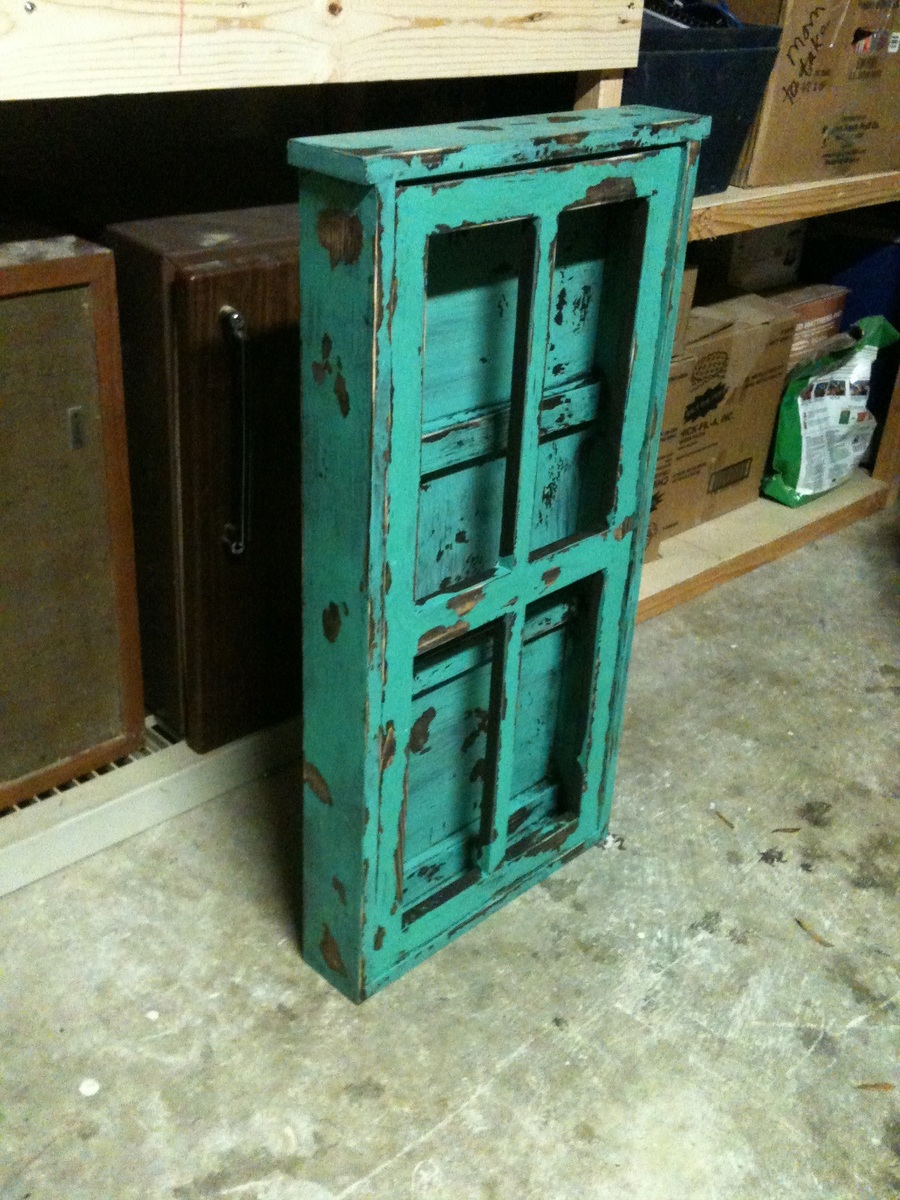
wall jewelry cabinet
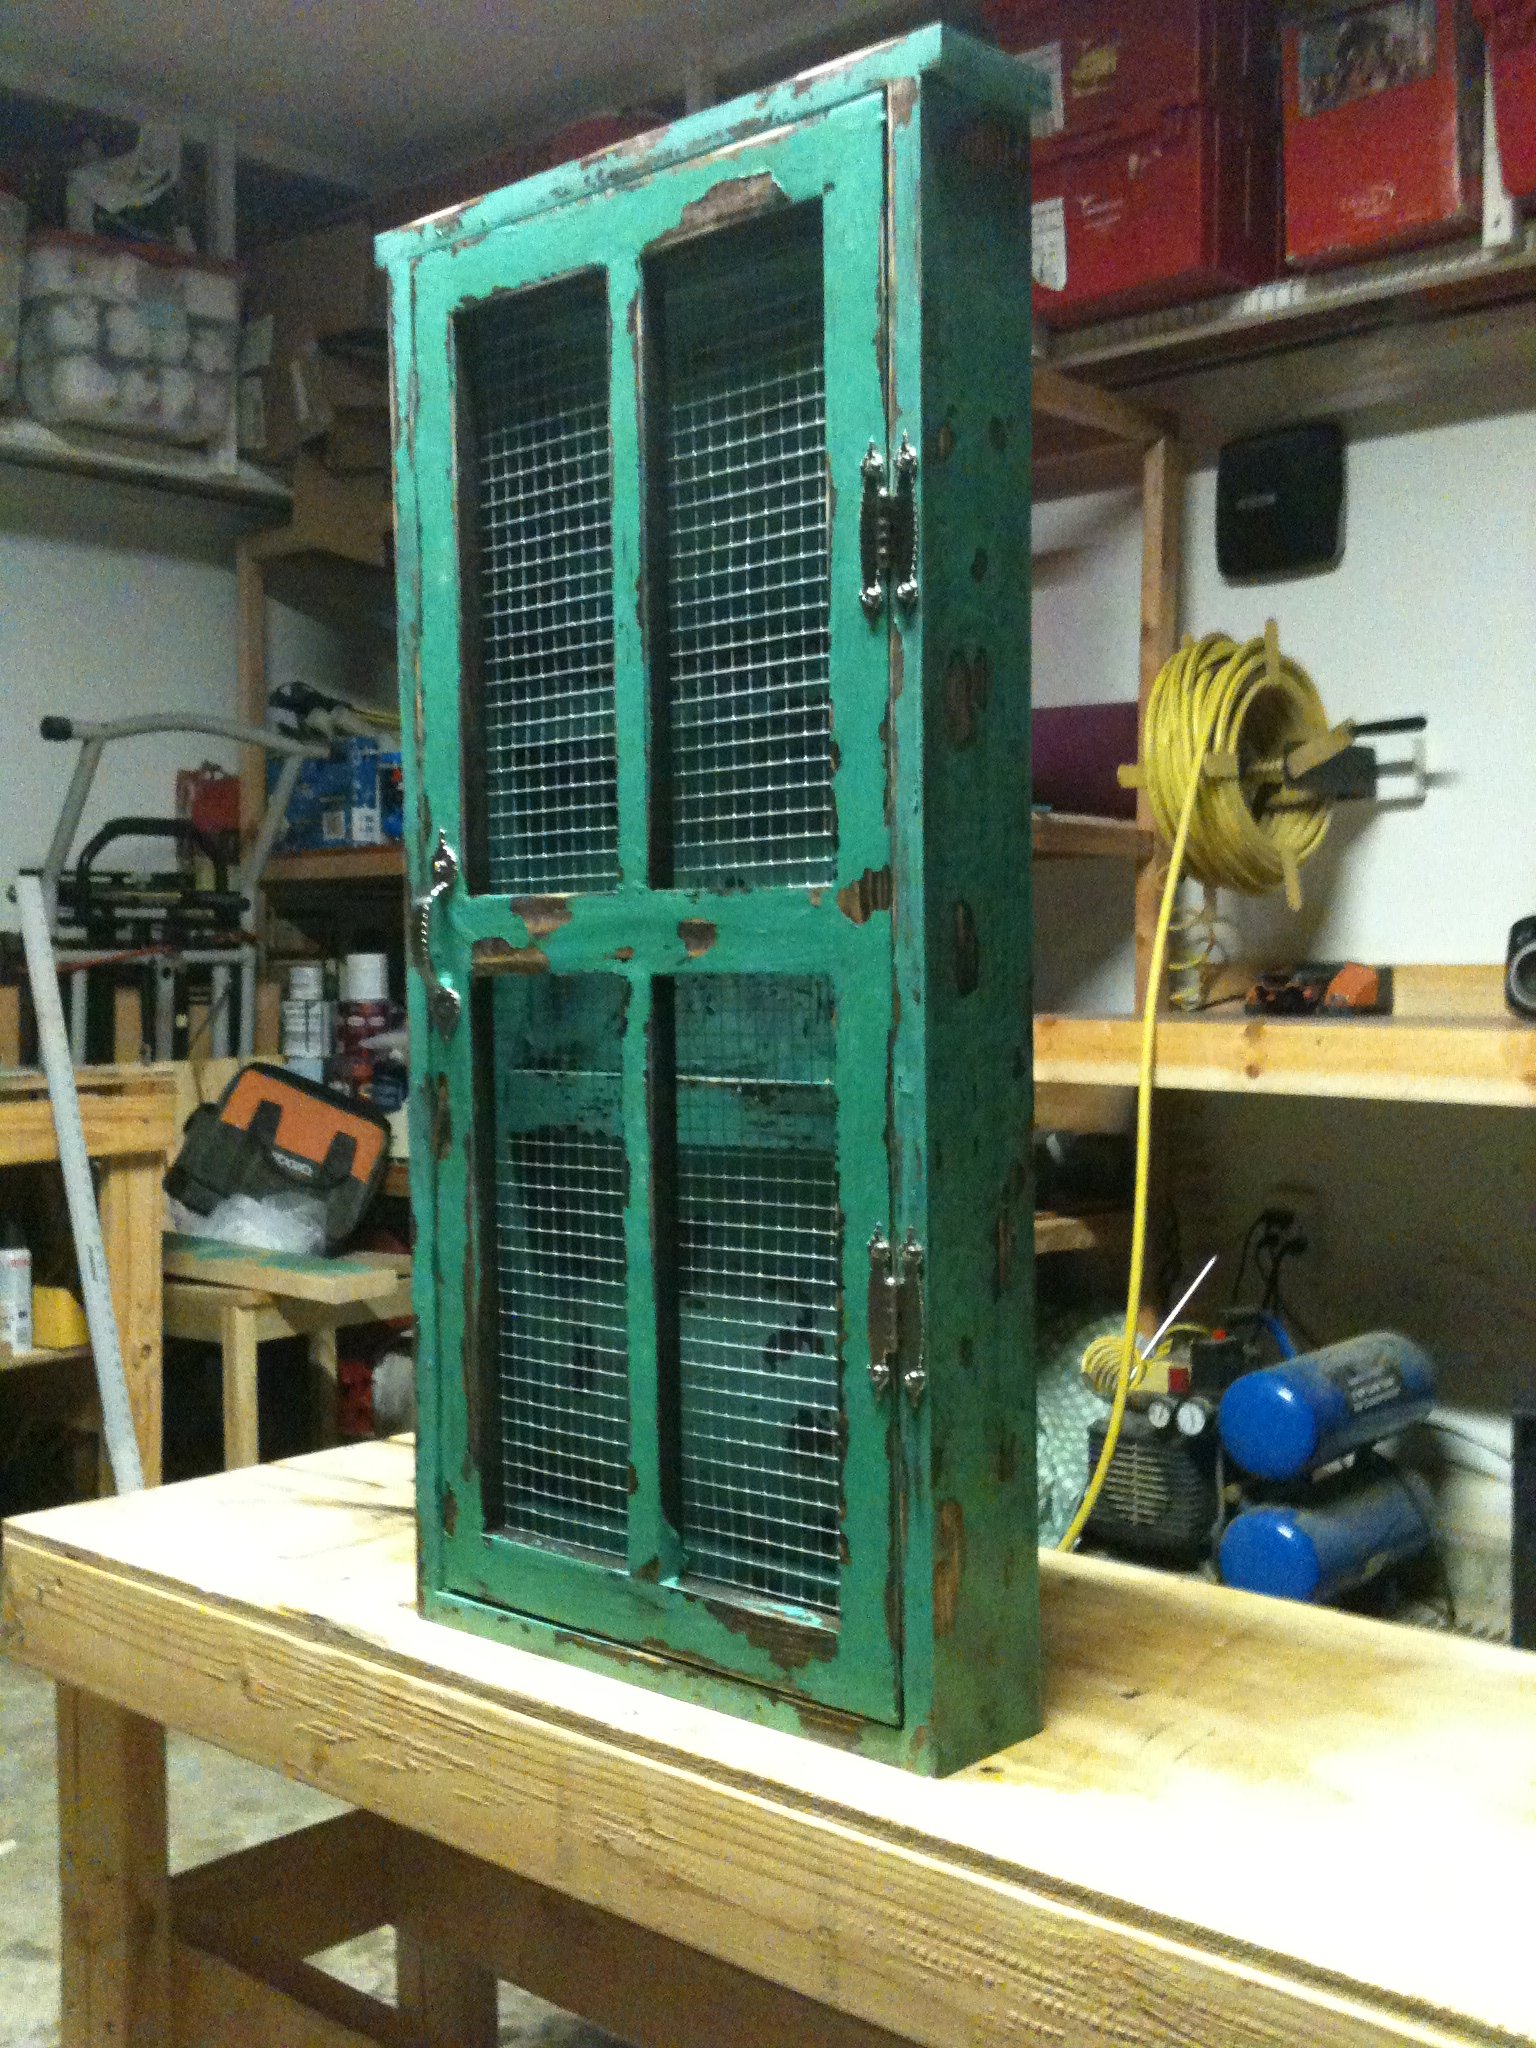
I wanted to get my wife something nice for are wedding anniversary and couldn't find anything i thought she would like. so browsing this site I seen this and new she would love it. I hope you guys love it to.
Built from Plan(s)
Estimated Cost
$60
Estimated Time Investment
Afternoon Project (3-6 Hours)
Finish Used
stain, school house glue and paint
Recommended Skill Level
Beginner
Comments

Thu, 11/07/2013 - 19:07
Beautiful and Rustic!
This project looks great. I love how the finish turned out!
Val
artsybuildinglady.blogspot.ca

Thu, 11/07/2013 - 19:21
Beautiful!
What a great project! You did a beautiful job, and the finish is fab!

Sat, 11/09/2013 - 17:53
Superb finish
The finish on this looks excellent. How did you manage such an authentic worn look? Also, how did you attach and finish the mesh inserts? We have no use for this piece right now, but it looks so good that I just want to go start making one straight away.....!
Sat, 11/09/2013 - 19:23
Finish
After construction
step 1 - stain the whole cabinet and wait for it to dry
step 2 - brush on Elmers school glue all over the project and wait for it to get tacky ( look on youtube for crackle paint effect)
step 3 - Lightly paint on color
Step 4 - dry the project with a blow dryer and watch it crackle
step 5 - I used a orbital sander and just went crazy hitting it all over ripping and peeling the top coat of paint.
I attached the mesh with a staple gun I think on the next one I am going to use stained glass instead of the mess though.
Oak Coffee Table
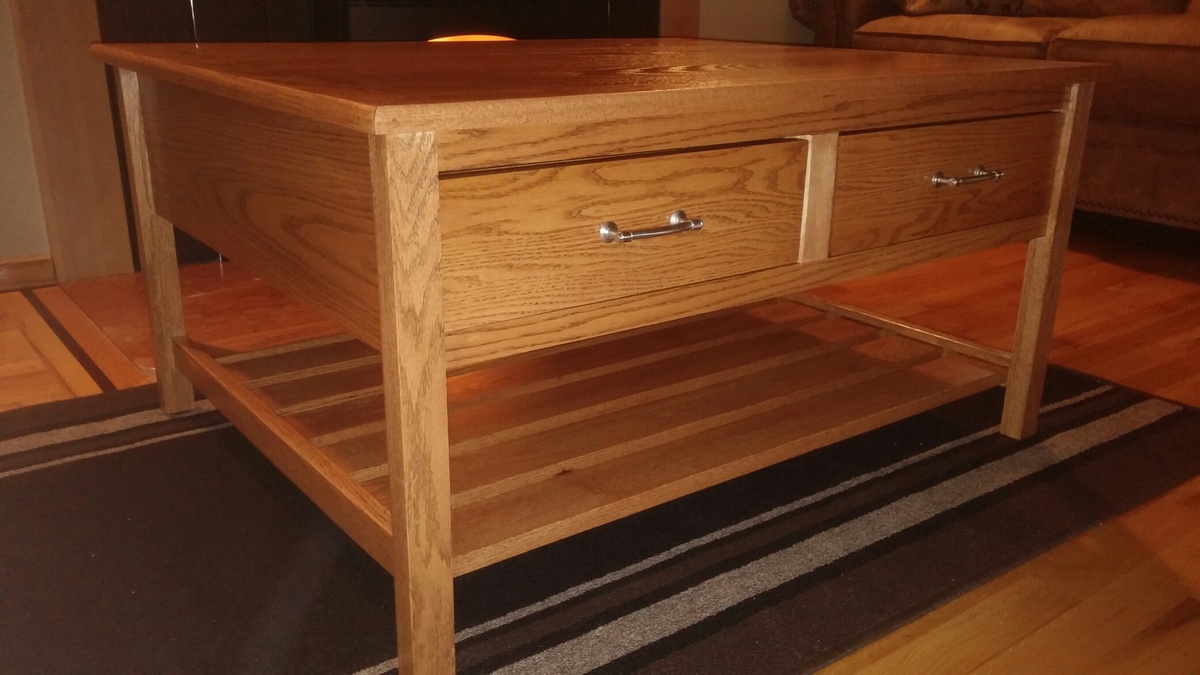
I made this table entirely from oak. It was somewhat more expensive than other projects I've done but my wife wanted a new coffee table so I thought why not go for it. I found hard wood to be much easier to work with than other wood. I like how it turned out. I used "Mom's Train Table" plan but added two 22 inch deep draws. A little extra storage is always a good thing!
Built from Plan(s)
Estimated Cost
300.00 dollars Boy, solid oak does not grow on trees!
Estimated Time Investment
Week Long Project (20 Hours or More)
Finish Used
Minwax wood conditioner, Minwax cherry satin Stai , Minwax polyurethane.
Recommended Skill Level
Intermediate
2x4 outdoor sofa
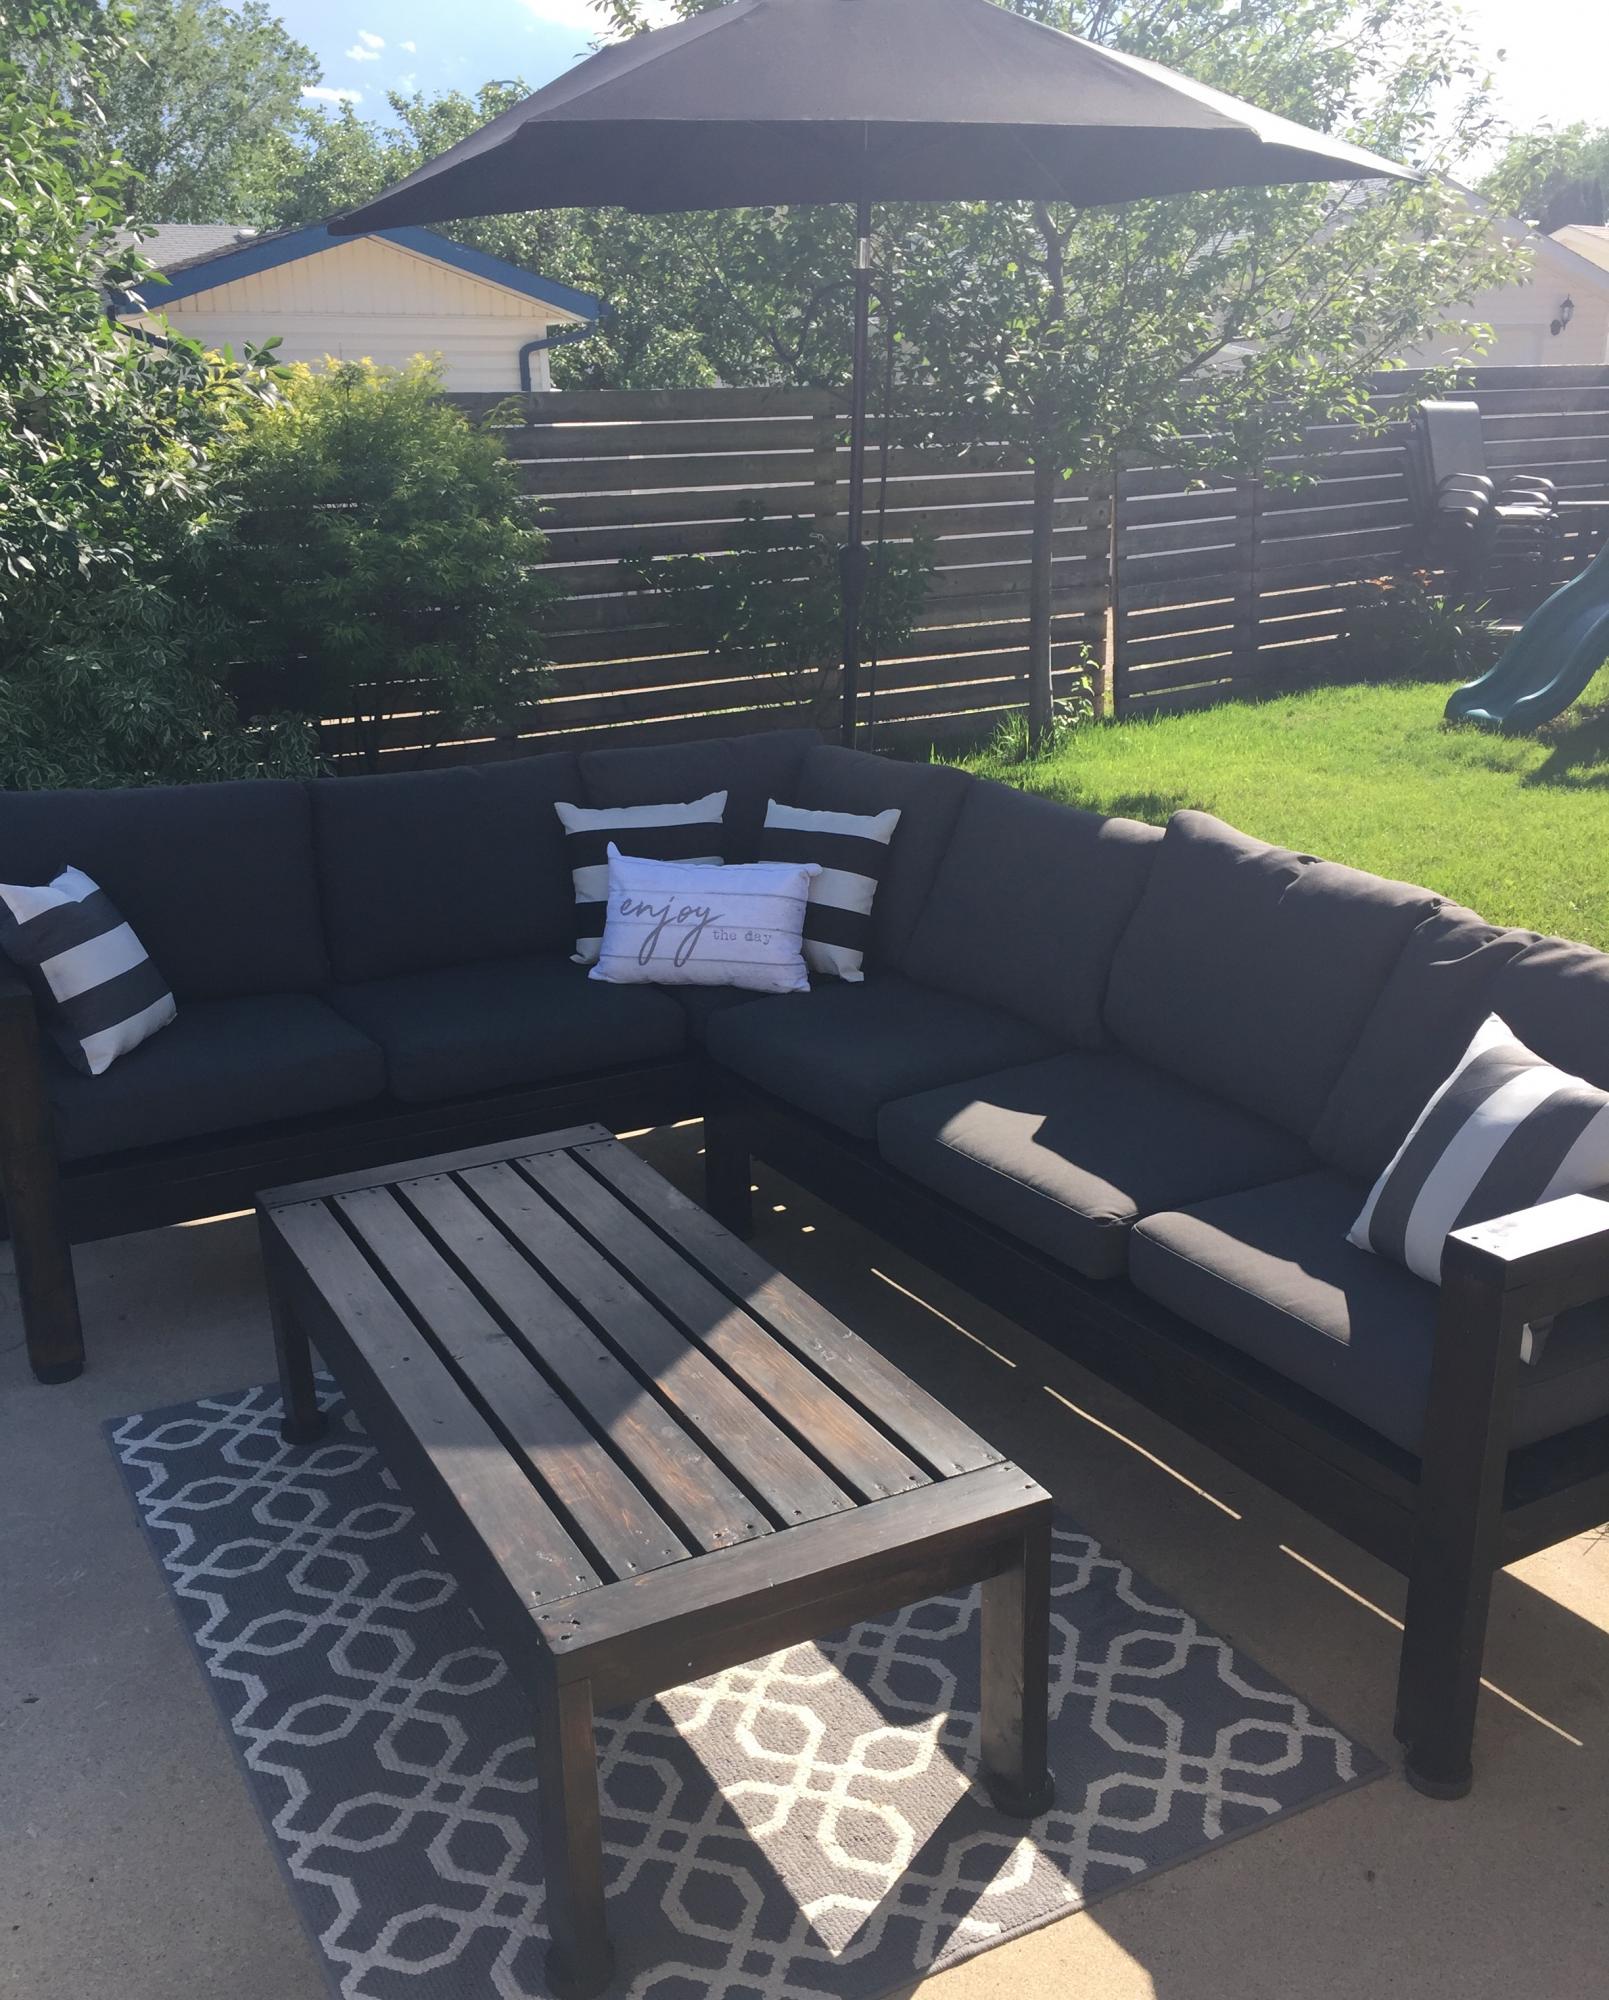
This was so fun to build!! We finished in two days and then I took many more days to stain and varnish🤪 The plans were easy to follow and the finished furniture was just what we’d hoped for. We bought our cushions from Ikea and they fit perfectly to Ana’s dimensions - we didn’t make any modifications.
Canadian DIYers - Hockey pucks under the legs of the furniture to keep all the rain we’ve had from soaking up into the wood 🇨🇦 🏒🇨🇦
Built from Plan(s)
Estimated Cost
$150 for the wood and screws
$700 for the cushions
$50ish for stain and varnish
$700 for the cushions
$50ish for stain and varnish
Estimated Time Investment
Weekend Project (10-20 Hours)
Recommended Skill Level
Beginner
Comments
Mon, 06/07/2021 - 21:39
Are these the 24 3/8 x 24 3…
Are these the 24 3/8 x 24 3/8 cushions at Ikea? I am just starting this project and was going to extend the length to 74" instead of 72". But yours seems to fit just fine as is.
Cheers!

Doll Bed & Bedding
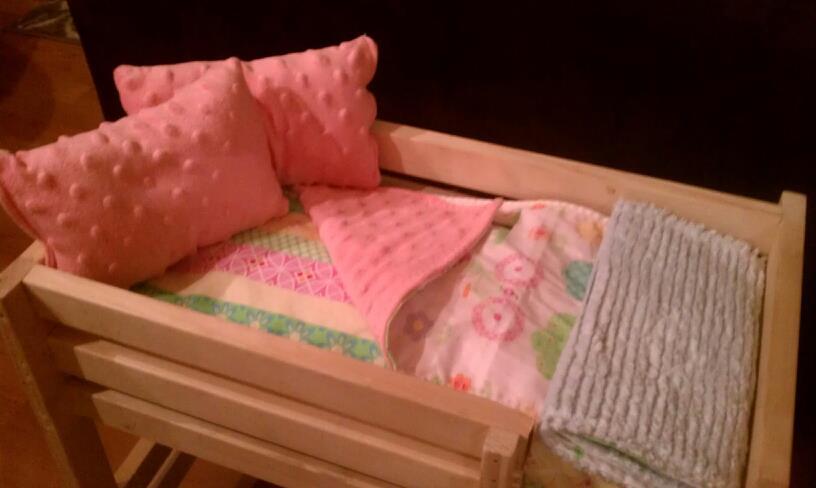
I was shocked at how easy this all came together! Hubby built the bunks, I made the bedding. Both mattresses, quilts and pillows came together in under 2 hours!!! I kept right on sewing and made a matching pillow for my daughter's bed, and a tote bag for myself!
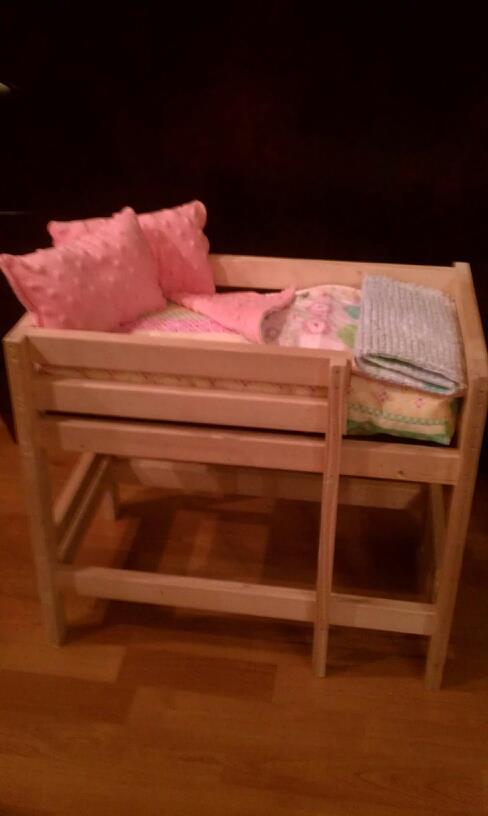
Built from Plan(s)
Estimated Time Investment
Afternoon Project (3-6 Hours)
Recommended Skill Level
Beginner