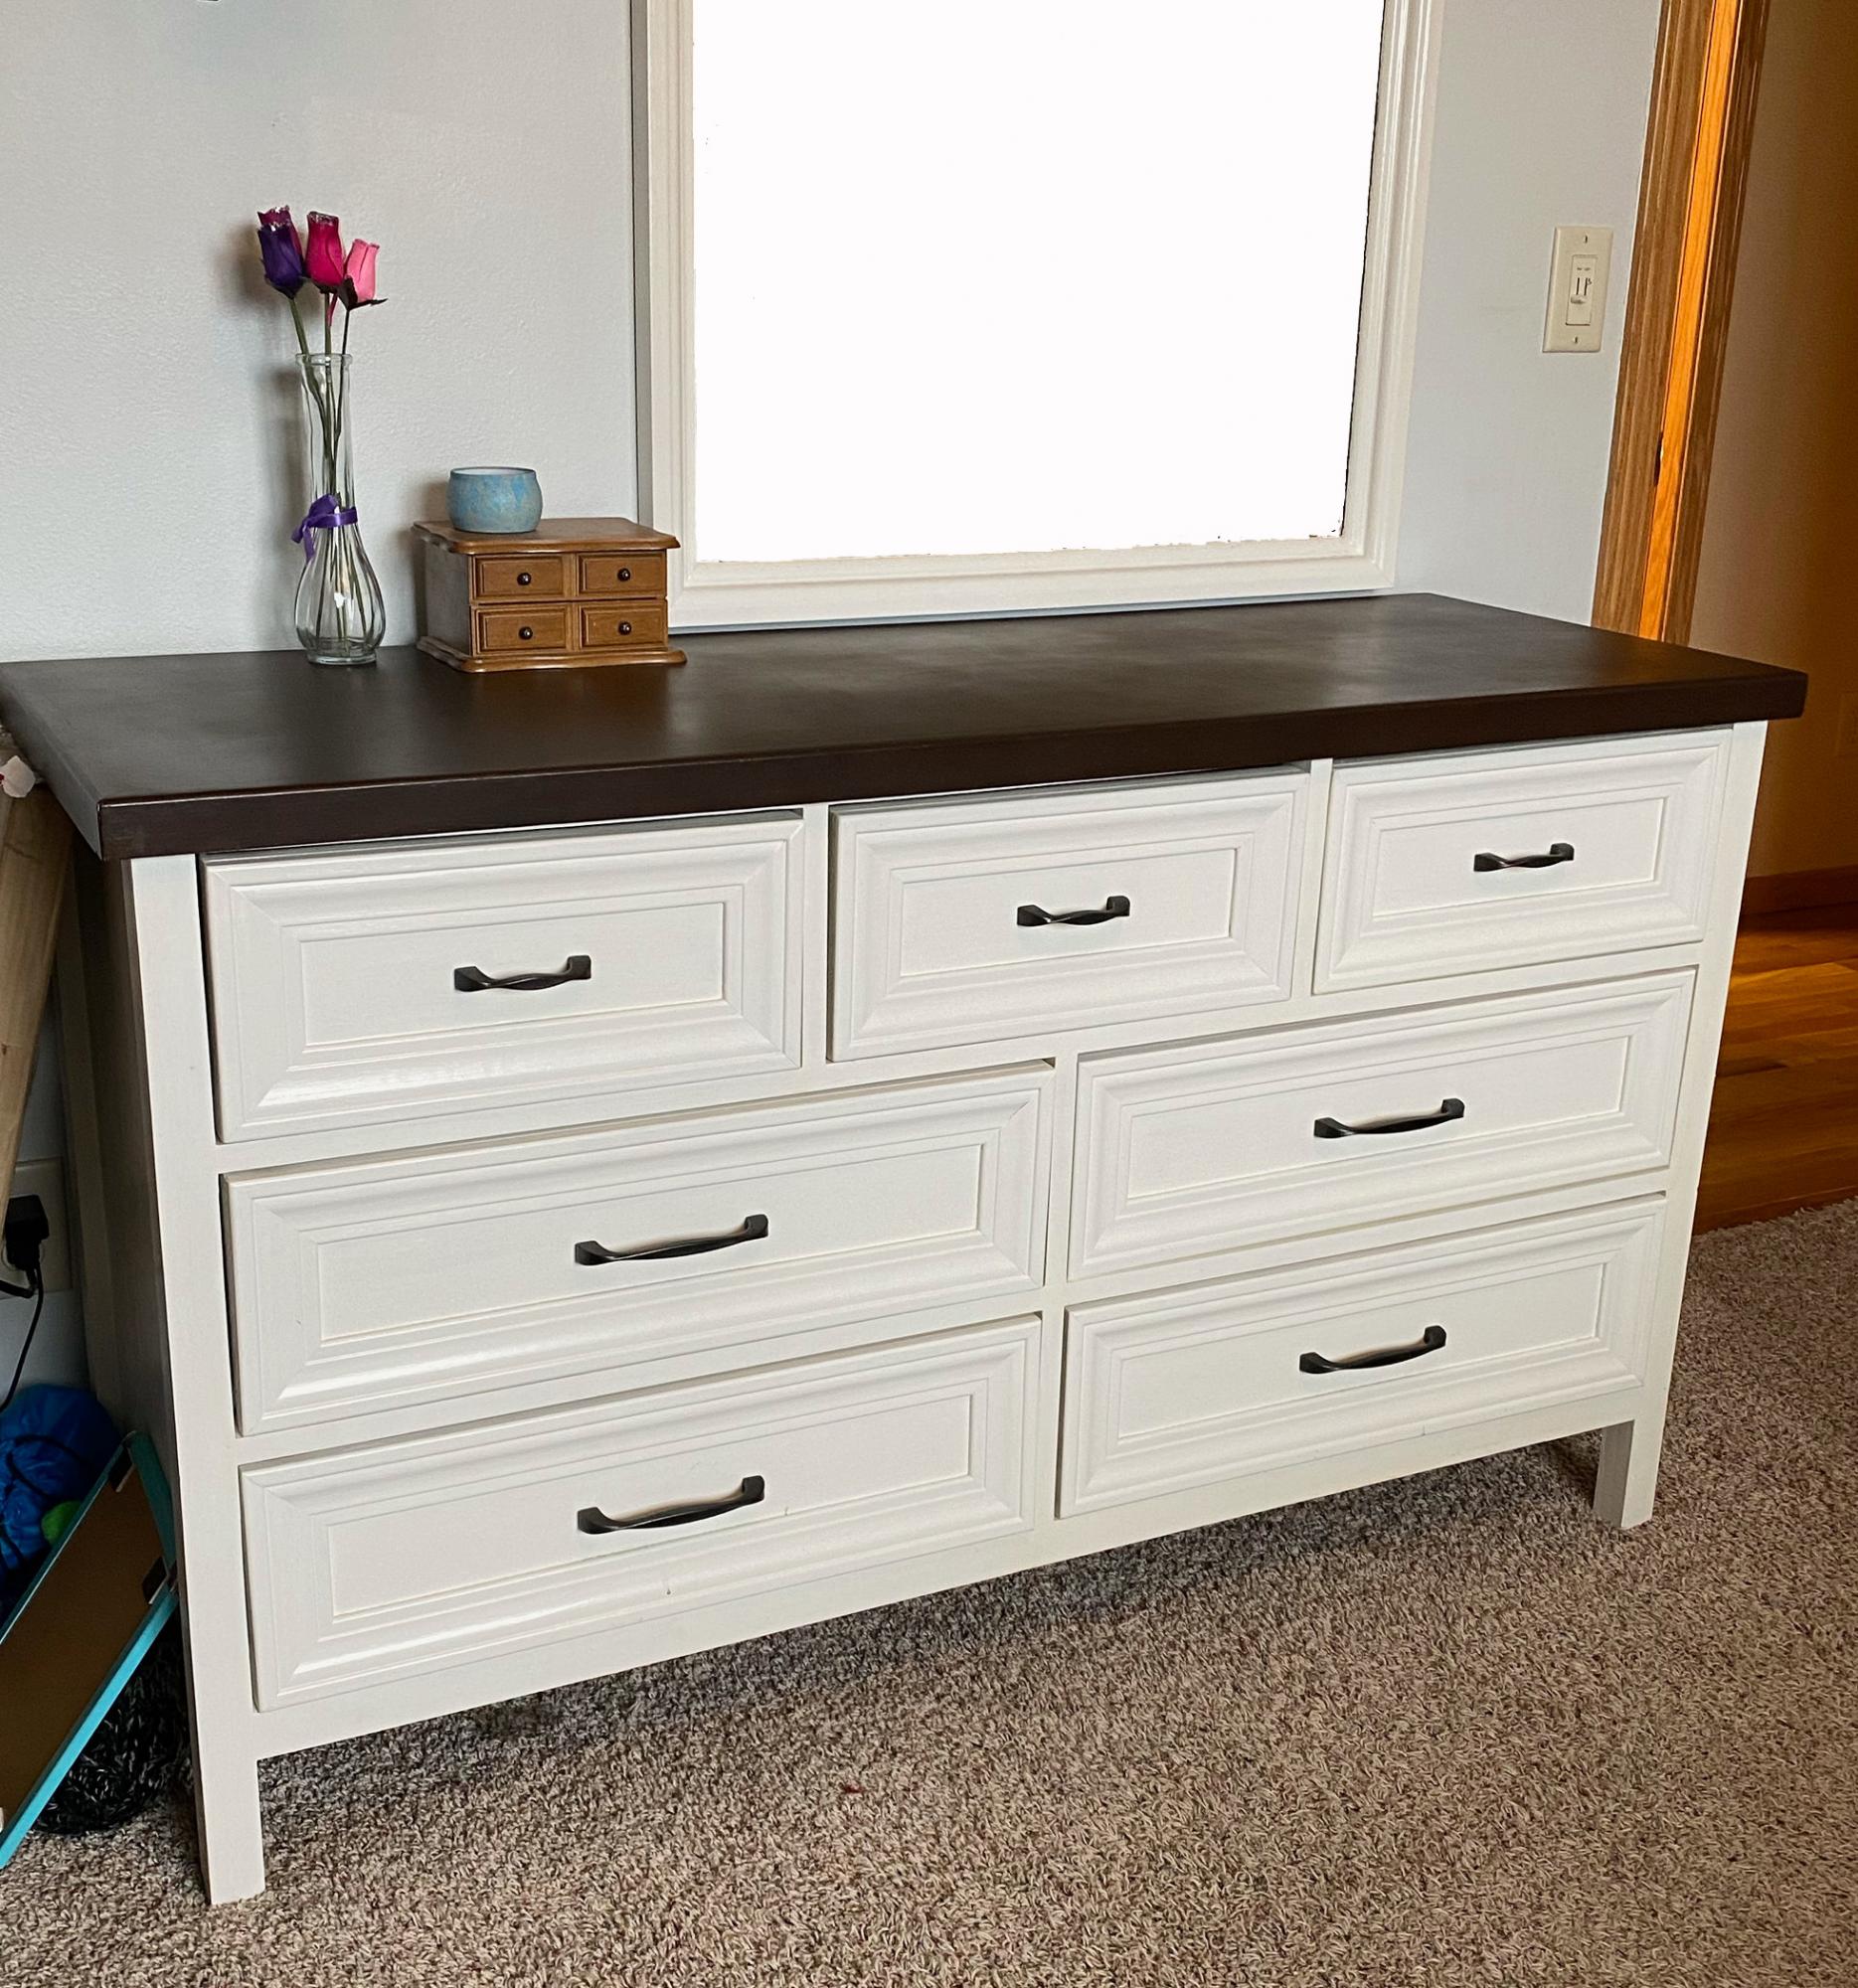
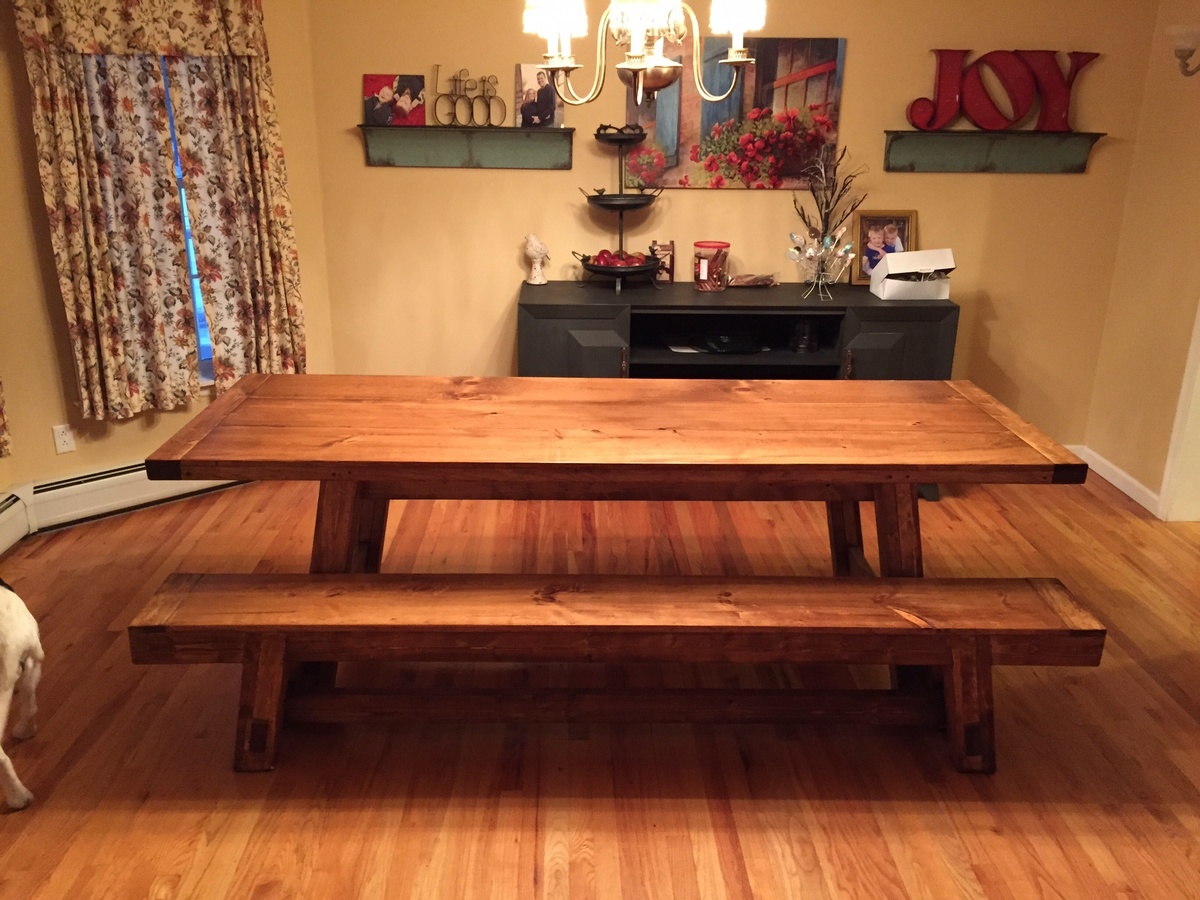
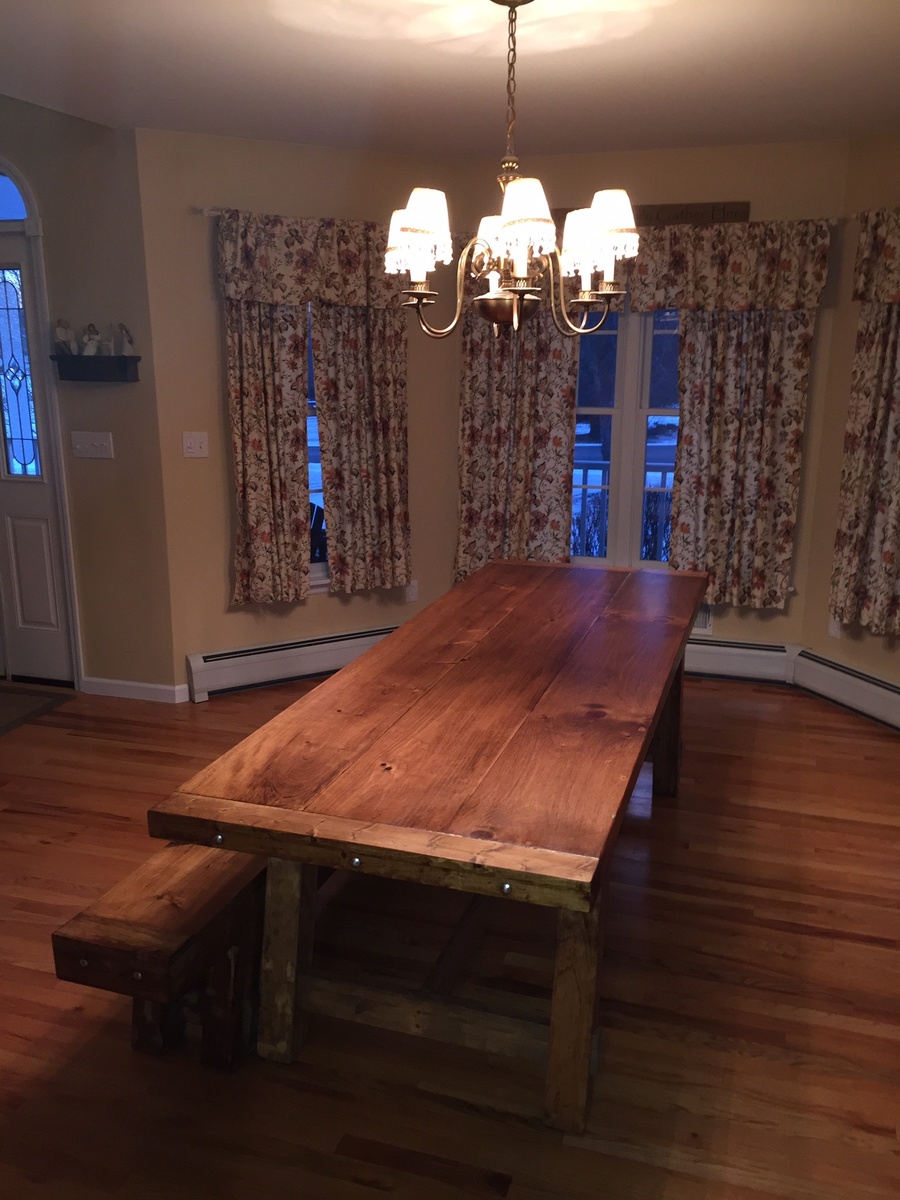
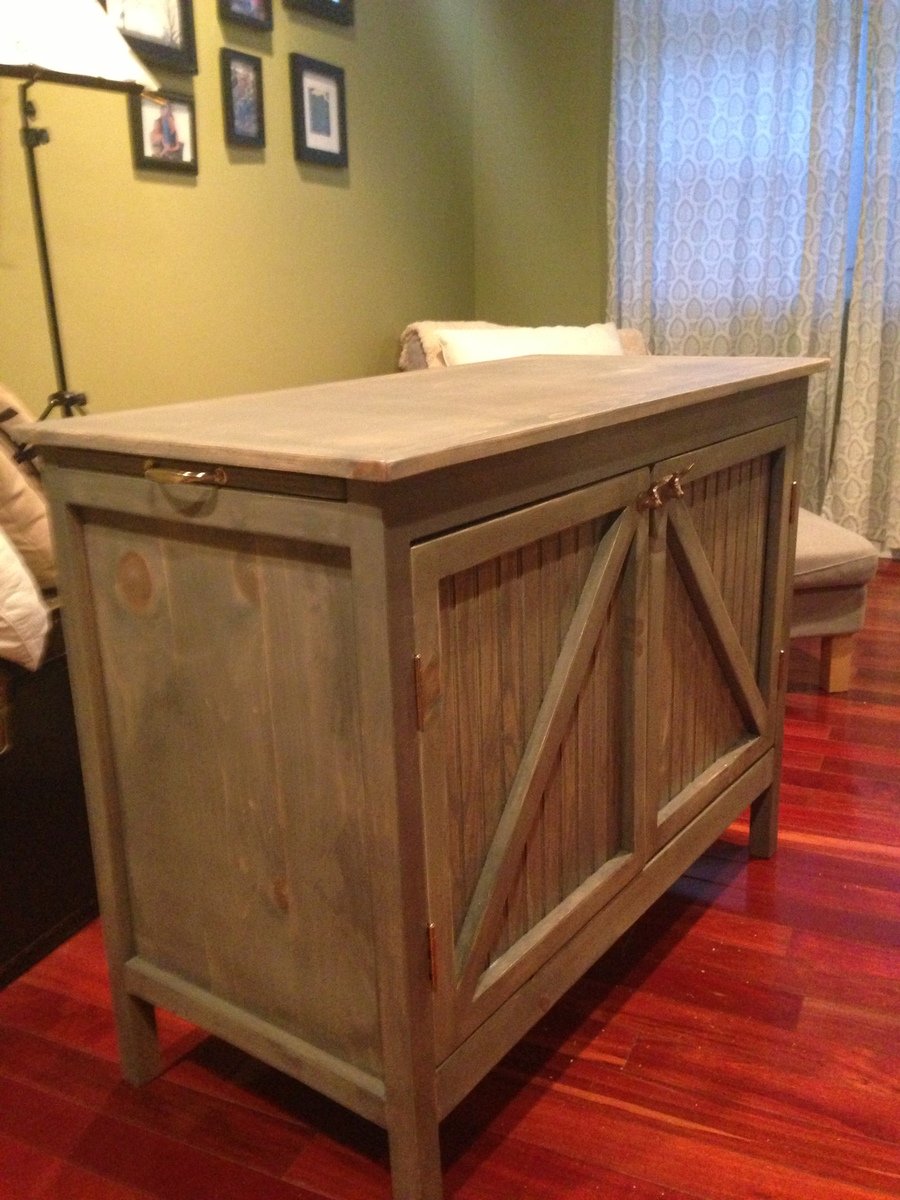
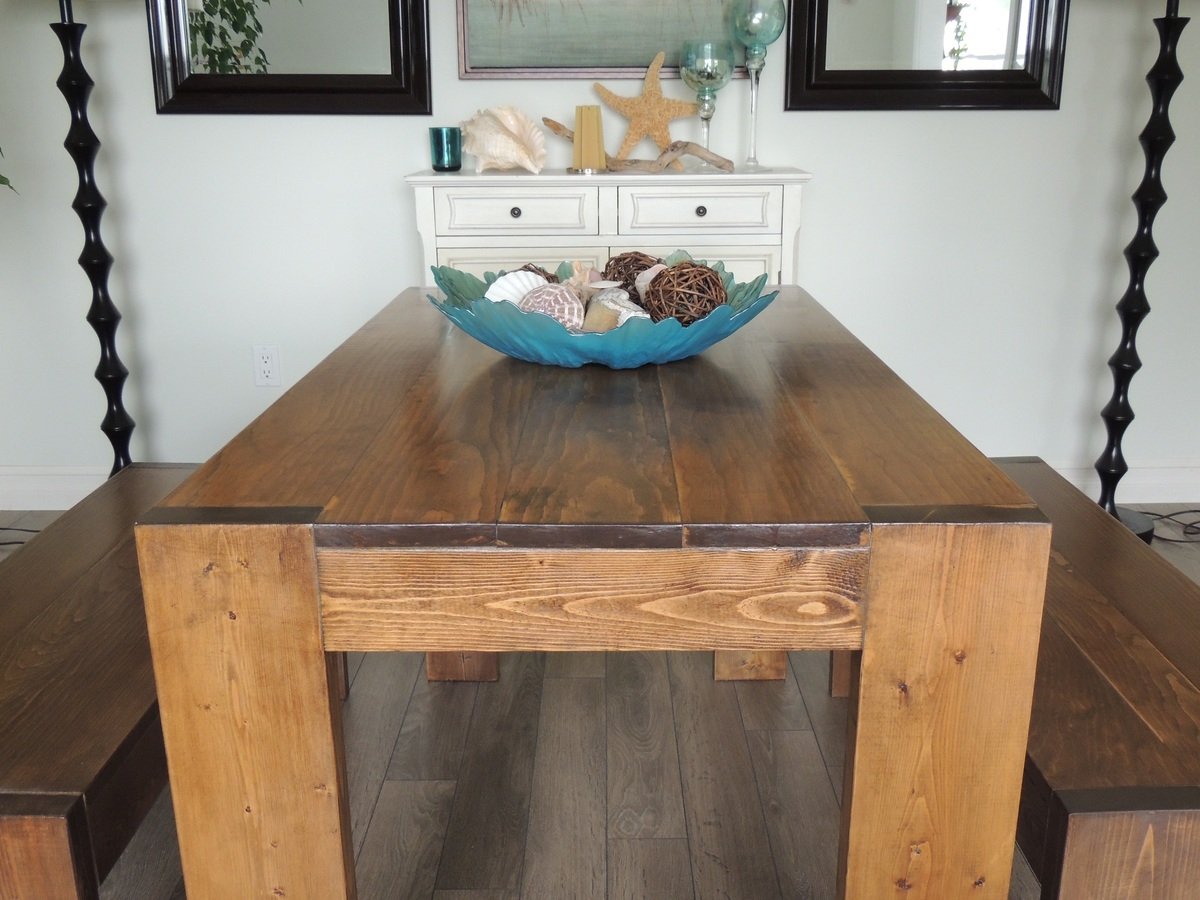
Community Brag Posts

Modern Farm Table

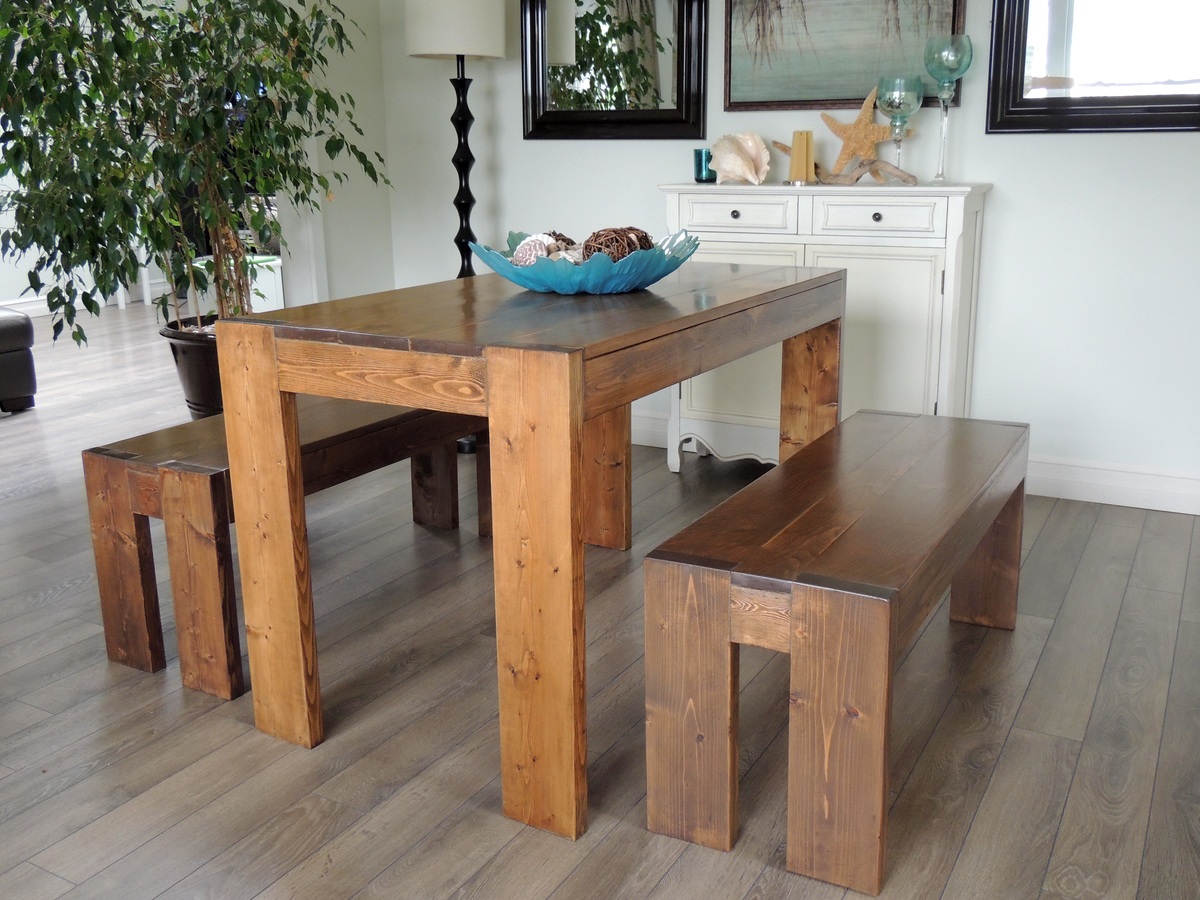
This was my third project. The building is now getting very easy, it's the finishing that's the hard part. For some reason the wood wasn't taking in the stain very well even though I followed the right steps. Condition, sand, and then stain. In the end after many applications I was or I should say my sister who I was making it for was happy. I had to modify the size to make it fit in her space.

Estimated Cost
I really have to start keeping track, I didn't. Maybe between 150 and 200 with all the stains.
Estimated Time Investment
Weekend Project (10-20 Hours)
Finish Used
I used minwax conditioner before sanding and minwax stains. Special walnut,weathered oak, and pickled oak. I started with the special walnut followed by a coat of weathered oak then the pickled oak. I wasn't happy with it at that point so I put another coat of sw and honestly I lost track. When I was finally happy with it I put a top coat of minwax spar urethane.
Recommended Skill Level
Beginner

Modified Pipe Bed

Submitted by Dina3 on Mon, 04/03/2017 - 10:24

This was a collective project that involved my Husband, son and I. We built two of these and modified the bed by going away with the footboards being that these beds were for our teenage sons. We also had to cut the wood for the headboards to 37 1/2" in order to make them fit with the split ring hangers. They LOVE their new beds! And so do we! They are so cool! 

Estimated Time Investment
Week Long Project (20 Hours or More)
Finish Used
Varathane Stain and Polyurethane - Early American.
Recommended Skill Level
Beginner

Outdoor Toys Contained

Submitted by lmflerlage on Mon, 02/22/2021 - 12:32

I love this dual outdoor seating plus toy storage bench. I lengthened the plans so I needed to add some additional support for the lid. I also decided to go with a rope pull which is easier for the kiddos to utilize.

Estimated Cost
$40
Estimated Time Investment
Day Project (6-9 Hours)
Finish Used
Cedar finish
Recommended Skill Level
Beginner

Comments

Flat Book Shelves

Submitted by amberhibbs on Thu, 02/28/2013 - 18:18

I built these shelves with my husband while super pregnant out of scraps I had leftover from the Dream Dollhouse and painted them with some leftover paint from another project. We used a finish nail gun and they went together really quickly.

If I was going to do it again I would skip the top rail. It makes big books more likely the lean out over the edge unless you keep if full.

Estimated Cost
Free
Estimated Time Investment
An Hour or Two (0-2 Hours)
Finish Used
I gave it two or three coats of Glidden Brilliance Parchment White in Semi-Gloss.
Recommended Skill Level
Starter Project

Armoire DIY

I had an empty space in my Mudroom so I decided to build an armoire (fancy name for cabinet) to store the vacuum and some other items.

Check out my blog for more details:

http://www.woodworkingfourdummies.com/blog/armoire-diy


thanks,

Ian

Estimated Cost
Arpoximately $ 200
Finish Used
MinWax Dark Walnut and Polyurethane
Recommended Skill Level
Intermediate

Comments

Vintage bar stool (unfinished for now)

Submitted by Anonymous (not verified) on Thu, 04/06/2017 - 07:05

We just moved into a Victorian farmhouse, circa 1875. The kitchen is being remodeled to include a 6 foot island and we needed some stools for it. So I plan to make either three or five more and finish them in flat black paint with satin poly to seal. Pretty quick and easy build and I think I'll change the back rest slightly on each one, just for fun!

Built from Plan(s)
Estimated Cost
$50-100
Estimated Time Investment
Day Project (6-9 Hours)
Recommended Skill Level
Beginner

Kendal Wide Dresser

Submitted by JameyD on Sun, 02/28/2021 - 09:33

I built a dresser for my daughter using Ana White's Kendal dresser plan and modifying the drawer fronts to be recessed using simple trim boards.

Estimated Time Investment
Weekend Project (10-20 Hours)
Recommended Skill Level
Intermediate

Comments

Rhyan Console TV Table

Submitted by stacynabby on Sat, 03/02/2013 - 19:27

Modified slightly from the Rhyan Console design to include glass front doors so I could display some books and have remote access to my electronics for the TV.

Estimated Cost
$70
Estimated Time Investment
Weekend Project (10-20 Hours)
Finish Used
Minwax Red Oak
Recommended Skill Level
Intermediate

Comments

The Best Baby Shower Gift EVER! Thank you!

A gift for a dear friend that I wanted to show how much I appreciate her and how happy we were for her beautiful family. She requested a lighter finish but had no idea what we were doing until the day. Everyone loved it and her beautiful daughter "slept" in this every night beside her and her husband's bed. The hardest part really was making the rockers. I hadn't done much with the kreg jg plugs at the time but I would definitely recommend using them. 

Built from Plan(s)
Estimated Cost
$50 with the basket
Estimated Time Investment
Afternoon Project (3-6 Hours)
Finish Used
Cabot Limed Oak
Recommended Skill Level
Intermediate

My Planter From Your Plans

Submitted by Anonymous (not verified) on Sun, 04/09/2017 - 07:07

I changed it by adding the top mitered slats and stained it with Thompson clear water seal. Used "A" grade cedar from a local mill. Thank you so much for the inspiration. 

Bob Johnson

Lebanon, TN

Estimated Cost
$40
Estimated Time Investment
Afternoon Project (3-6 Hours)
Finish Used
Thompsons Water Seal - Clear
Recommended Skill Level
Beginner

Log cabin loft

Submitted by Anonymous (not verified) on Wed, 04/12/2017 - 17:30

We modified the ladder that was suggested.  Ours is removable and angled so our little guy doesn't get too adventurous without supervision.  We also added a "roof" to his log cabin.    

Estimated Time Investment
Weekend Project (10-20 Hours)
Finish Used
Wallpaper for the log cabin look. (Not easy but worth it)
Recommended Skill Level
Beginner

Ultimate roll away workbench

Submitted by jkjackson on Sun, 03/14/2021 - 09:09

This was the perfect solution for our small (single garage bay) work space! I added a drop leaf shelf from some scrap in front of the miter saw to create a surface for clamping. I also added 3 ToteScan QR code stickers to each cart (one for each side shelf and the center space) that allow me to create a searchable inventory, complete with pictures, to allow me to find less frequently used things faster.

Estimated Cost
$450
Estimated Time Investment
Weekend Project (10-20 Hours)
Finish Used
None
Recommended Skill Level
Intermediate

Comments

How to Add Trim to a Window

Submitted by efmolly on Fri, 03/08/2013 - 07:38

I recently added wood frames and trim to the windows in my bedroom. I simply finished nailed 1 x boards over the drywall frame, and trimmed out with casing. Unfortunately, I did have a lot of leftover scrap since I had to buy 8ft boards and my windows are only 5ft tall. I would recomend buying 6ft boards unless your windows are wider/taller than 6 ft.You can read a more detailed description on my blog http://pneumaticaddict.blogspot.com

Estimated Cost
$120 for 5 windows
Estimated Time Investment
Afternoon Project (3-6 Hours)
Finish Used
semi-gloss latex paint
Recommended Skill Level
Beginner

Dining table

This was a fun starter project. Took one Saturday to build. A few week nights to finish. 

Estimated Cost
Table-$240
Bench-$90
Estimated Time Investment
Weekend Project (10-20 Hours)
Finish Used
Golden oak stain- 3 coats
Clear poly with a light sanding between each coat(220 grain)
Recommended Skill Level
Beginner

Comments

My first project

Submitted by Anonymous (not verified) on Sat, 04/15/2017 - 12:35
My first wood working project. I'm quite pleased, even though it's not perfect. I plan on making 3 more to match! 
Estimated Cost
$15
Estimated Time Investment
An Hour or Two (0-2 Hours)
Recommended Skill Level
Starter Project

Long Sideboard

Submitted by Anonymous (not verified) on Tue, 03/16/2021 - 22:34

Prices for sideboards are high! And it's impossible to find one wider than 72". I have a kitchen window that's eight feet (96") wide. I wanted a sideboard for my patio that's just outside our window. I needed it to be as wide as the window. So I used the plans for the shanty sideboard and altered them to widen the sideboard to 96". I routed out hidden handles in the top piece of each door and used hidden hinges to keep a clean look.
I created three sections with the middle one wide enough to store four wooden folding chairs on horizontal slides covered with felt. In the two end sections, I added short drawers to easily store things like charcoal and spa supplies.
I finished the piece in dark walnut and had a granite countertop installed to finish it off.

The plans were easy to adjust to my needs and easy to build. The hardest part was making the end pieces fit my slightly angled patio floor while keeping the sideboard level. I had a fun time using Kregg fasteners to assemble the front and sides.

Built from Plan(s)
Estimated Time Investment
Weekend Project (10-20 Hours)
Finish Used
Old Masters Gel Stain - Espresso
Recommended Skill Level
Beginner

Comments

Dave Hopkins

Fri, 04/09/2021 - 11:35

When I uploaded this, I must have not seen the place for my name.
I had fun working with the plans and altering them to meet my unusual length. Having to build it for a slightly slanted patio was also challenging.
This was one of those projects where once I finished it and started using the sideboard, I asked myself why I hadn't built it ten years ago!

Changing Table with weathered stain

I used the weathered stain on pine wood. It came out nice. I would recommend not to use the spray on sealant as this is a big piece of furniture.

Built from Plan(s)
Estimated Cost
$175
Estimated Time Investment
Week Long Project (20 Hours or More)
Finish Used
classic gray minwax
Recommended Skill Level
Intermediate

Comments

DIY Ceiling tile art

My friend had a few leftover ceiling tiles from her new kitchen and I put them to good use. For almost a year, they hung, attached to a simple 2x4 frame. 

You can see it in our <a href="http://www.lifewithfingerprints.com/2014/08/back-to-school-dinner-2014…">Back-to-school dinner</a>.

But the edges were rough and it looked unfinished and not quite what I needed for the space. So the ceiling tiles received a makeover.

I built a large frame using 1x4 and 1x3 boards. Using my Kreg jig I made a large rectangle with the 1x4s and then made it look more substantial and thicker by adding 1x3s.


Of course after making the frame, it sat in the office as I debated stain or paint. Once I settled on paint, it sat for another two weeks while I figured out a color. I ended up going to my paint stash and picking up the color I originally used for the <a href="http://www.lifewithfingerprints.com/2013/04/diy-barn-door.html">barn door</a> (I decided against it because I wanted the door to have a little punch!). The color wasn't great for the door, but it was perfect for the frame. 


Estimated Time Investment
Afternoon Project (3-6 Hours)
Finish Used
Painted finish
Recommended Skill Level
Beginner

Comments

Garden Space ~Happy Place

Submitted by Tbacks on Tue, 04/18/2017 - 15:20

We used 2x8x8 lumber and 2x4s to make 2x6 garden beds and a 1x6 trellis bed.  We utilized Simpson Strongtie braces to hold the corner joints firmly together.


love this garden!!!  Thank you Anna!!!

Estimated Cost
$150
Estimated Time Investment
Weekend Project (10-20 Hours)
Recommended Skill Level
Beginner

x frame coffee table

fun table from the X Series

Built from Plan(s)
Estimated Time Investment
Day Project (6-9 Hours)
Recommended Skill Level
Beginner

Comments

Courtlh

Sat, 03/30/2013 - 22:59

I was wondering what stain you used? I have a lot of douglas lying around and like the way it turned out!

Aesimpson

Tue, 01/27/2015 - 11:49

Approximate cost for this project? Thank you for the help! :)

jlynchtx

Fri, 01/05/2018 - 23:13

i am thinking about building one of these myself soon. Have you noticed any warping or cracking since you built it?