Community Brag Posts

Little Girl Make Up Vanity

Submitted by akwebb3 on Tue, 08/03/2021 - 13:43

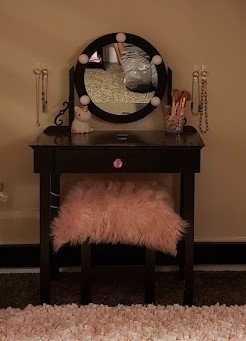
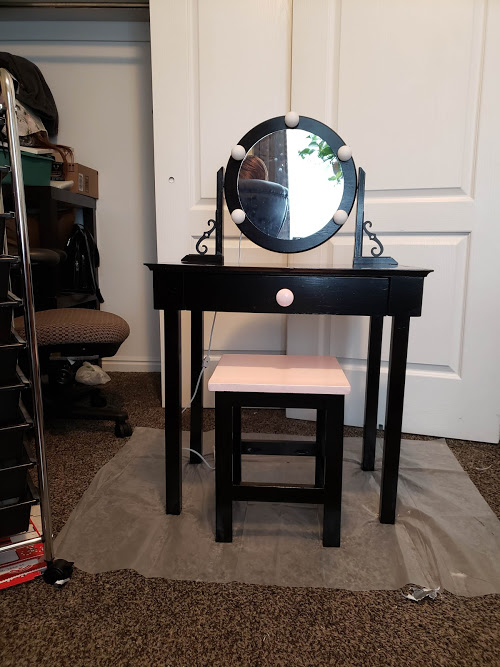
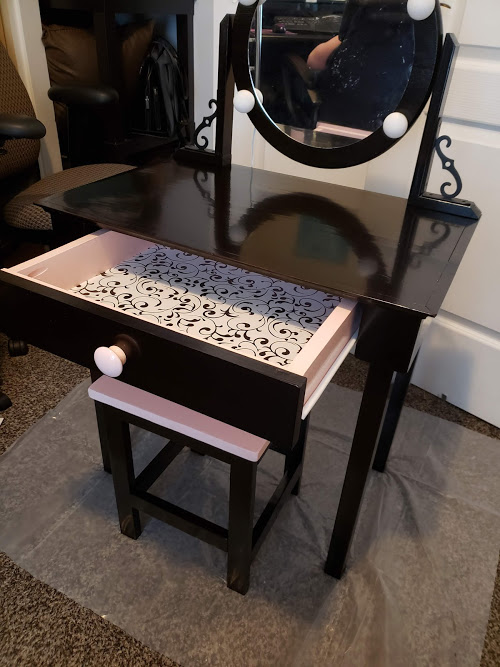
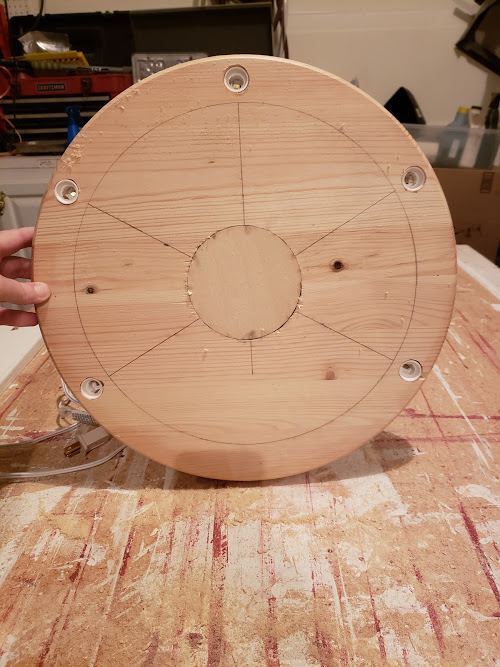
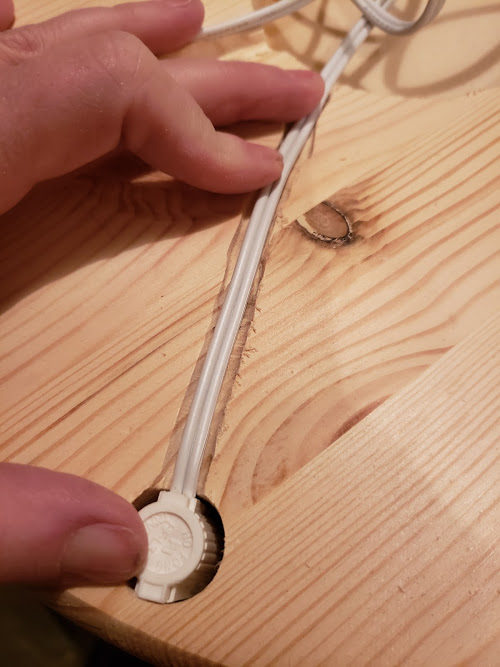
I made this little vanity as a gift for my grand-daughter for Christmas. I pretty much followed the plan for most of it. I didn't use stair balusters and just used 2x2's and created my own light up mirror. I bought a round piece of wood from Lowes then drilled holes spaced evenly around the edge so it looked the way I wanted. Then used a string of Christmas Village house lights that I found at Walmart. I used my Dremel to carve out a pathway in the back for the excess cord to lay in then inserted the lights into the drilled holes. I wanted to use plastic bulbs for safety reasons so I went with an LED bulb that I found on Amazon. But those didn't have that nice globe look so I used some ping pong balls and an exacto knife to cut out a small circle just large enough to fit the base of the bulb and attached those. So the lights are completely safe as they are all plastic and won't heat up since they are LED. I just used some scrap wood that I had on hand to make a little seat and bought a small piece of faux fur fabric to lay over the top for a more fancy look.

Built from Plan(s)
Estimated Time Investment
Weekend Project (10-20 Hours)
Recommended Skill Level
Beginner

Comments

My Outdoor Table!!

This is my wonderful Outdoor Dining Table!!

My husband's first project and I couldn't be more pleased with the end result.

Thanks Anna White for your EASY to follow instructions!

Built from Plan(s)
Estimated Time Investment
Weekend Project (10-20 Hours)
Recommended Skill Level
Beginner

hanging daybed

Submitted by cableslack on Sun, 03/15/2015 - 08:58

I really liked and wanted to build the hanging daybed.  Then I needed somewhere to hang it.  Then I wanted to use it during the day (Northeast Brasil - Sun is brutal)

Built using massaranduba wood (Father in law has a woodshop) and the thing weighs a tonne.  

The shades are a 85% sunshade.

It has proven very popular with family and friends.  As of yet there has not been space on it for me to try out.  

Bed measures 1.0M x 1.9M

Project all total took about 120 hours.  

Built from Plan(s)
Estimated Cost
$1250
Estimated Time Investment
Week Long Project (20 Hours or More)
Finish Used
varnish with solar filter. About 5 coats
Recommended Skill Level
Intermediate

Comments

Bathroom corner vanity

Submitted by Anonymous (not verified) on Mon, 06/12/2017 - 12:49

This project started because a corner bathroom vanity that fit my space requirements and budget did not exist. A plan specific to what I exactly needed also did not exist. After combing through what plans I found online, the Wall Kitchen Corner Cabinet best matched what I wanted. I modified it with the Momplex Sink Base Kitchen Cabinet in order to turn it into a sink base.


But, there was a problem. I hadn't actually built anything before. In order to get at least one project under my belt, I built the Vintage Step Stool. It turned out great, so I figured I was ready to go! Strangely enough, after spending about $100 and several weekends picking away at this project, it was done! It looked great, even. Then, I moved the vanity into the bathroom and realized that, while it may have looked great, it wasn't very square. Lesson learned was that this is a two person project. It is too difficult to keep things square and screw at the same time when there is only one person.


At this point, everyone was tired of having to use the kitchen sink to brush their teeth and wash their hands, so we needed to get this project done. $100 later, we had more material. Since I had figured out what needed to be done with the first vanity, let's call it our prototype, the second vanity went together REALLY quickly. 


Within a few hours, it was pieced together. Since it was going to be painted, we used Bondo to cover up our imperfections. Yes, of course there were imperfections. While much better than the prototype, it still was only my third woodworking project. Sanding, caulking, and priming took another hour or so. A few coats of the finish paint went on, followed by a couple more coats of a clear sealer, and it was done.


We moved it into place, screwed it to the wall, put the soapstone countertop on along with the sink and faucet, and it truly was complete. Sink is Kohler, faucet came from our local Habitat for Humanity store and I'm not sure what brand it is, and the soapstone came from soapstones.com. If we had oiled the soapstone with mineral oil, it would be a very dark gray.

Estimated Cost
$100-$150 for the wood, screws, caulk, primer, paint, and clearcoat.
Estimated Time Investment
Weekend Project (10-20 Hours)
Finish Used
Pratt & Lambert Azalea 5-12 and Designer White 33-1 for the colors. After each application dried, I sanded it with a very fine grit sandpaper to make the finish silky smooth. I also used our air compressor to blow the dust off, and then used a damp cloth to wipe it down before applying more coats. That worked better for me than using a tack cloth. Then, I added a few coats of a water based, heavy duty floor finish, meant for wet areas. I don't recall what brand it was.
Recommended Skill Level
Intermediate

Modern Farmhouse Coffee Table

Submitted by alabama360 on Wed, 08/11/2021 - 17:57

Made the coffee table for my new daughter-in-law. Looks great in their new apartment. Love the design and the plans were easy to follow. Thanks Ana!

Estimated Cost
$60
Estimated Time Investment
Afternoon Project (3-6 Hours)
Finish Used
Varthane Briarsmoke
Recommended Skill Level
Intermediate

Comments

Platform Toddler Bed

Submitted by sraper2 on Fri, 04/26/2013 - 08:18

I got my inspiration for this bed from the Fillman Platform Bed. I left the platform off, used 2x6s, and added bun feet. I love how low it is to the ground because I don't have to worry about my kiddos rolling off at night or jumping and getting hurt.

Estimated Time Investment
An Hour or Two (0-2 Hours)
Recommended Skill Level
Starter Project

Comments

Rustic X entryway table

Submitted by Erinawtrey on Mon, 10/03/2022 - 16:24

I made this to match Ana's rustic x console, end and coffee table!

Built from Plan(s)
Estimated Cost
$35
Estimated Time Investment
Afternoon Project (3-6 Hours)
Finish Used
Dark walnut
Recommended Skill Level
Starter Project

Comments

4x4 Truss Beam Table

This is my 2nd table built from plans on the site. I built the pocket hole farm table originally and our family used it for 2 years and then I sold it to another family to enjoy! I built this one a full foot longer and used a 2×10 in the center to widen it. We host large gatherings so I wanted the additional space. The dark walnut came out beautiful if darker than the plan table. We love it!

Built from Plan(s)

Comments

Headboard based on PB Oxford Storage Bed

Although I didn't build this from a plan I wanted to be sure and share it as it is because of my experience building from Ana's plans that I felt comfortable giving this a shot.

My in-laws were just updated their lake cabin and wanted a storage headboard as space is a premium and it will be the only furniture in the guest rooms. It is unique as it has shelves on either side which can pull out to function as a small night stand, perfect for cell phones, books etc. The back of the piece is tongue and groove knotty pine which for the more rustic look they wanted.

I will probably do things a little different when I build the next headboard but overall I am satisfied with the end result. I chose not to do a lower storage area, mainly to keep the cost down. It could be done very easily but this piece is already very heavy and that there is plenty of storage.

Estimated Time Investment
Weekend Project (10-20 Hours)
Finish Used
Special Walnut stain with semi-gloss Polycrylic. All of the wood was sanded and then I applied wood conditioner. One coat of the stain and three coats of the semi-gloss. I live in Minnesota and build it in my garage so I had to wait until this week when temperatures finally were warm enough to apply the finish.
Recommended Skill Level
Beginner

Comments

Easter Bunny Wood Decor Piece

Submitted by Nor7 on Thu, 03/19/2015 - 07:25

This was a simple build. You can probably tell from the pictures how it was cut, painted and decorated. The whiskers are just picture hanging wire. The wood was scrap from around my shop and all the other materials we had on hand.

Estimated Cost
$0. Made from scrap and hobby materials from around the house/garage.
Estimated Time Investment
An Hour or Two (0-2 Hours)
Finish Used
Acryllic Paint
Recommended Skill Level
Starter Project
Seasonal And Holiday

DIY Mobile Lathe Stand

Submitted by Anonymous (not verified) on Sun, 06/18/2017 - 14:35

I needed mobile stand for my lathe so I built one using scrap 2x4 and 2x6 boards.  

Estimated Time Investment
Afternoon Project (3-6 Hours)
Recommended Skill Level
Beginner

Farmhouse twin bed

Submitted by Anonymous (not verified) on Thu, 09/09/2021 - 12:04

Used your plans and modified with carriage bolts on the legs to attach the box to the frame. Thank you Ana, my son LOVES IT.

Comments

Woven back bench

Submitted by JoshMonroe on Tue, 04/30/2013 - 15:30

I started building a different bench, but I decided halfway through that I didn't like my design. I found this, and loved it, so I modified my partially built bench to incorporate the woven back design. I substituted in a few mortise and tenon joints for strength, and used either kreg or waterproof glue for the non-structural joints. The seat bottom is made from 2x4's I resawed in half. I also rounded over the edges of the 'Y' pieces, which I think makes it look a bit more like they're woven together. Thanks for the plans, this is a great addition to my front porch!

Built from Plan(s)
Estimated Time Investment
Day Project (6-9 Hours)
Finish Used
None yet, will be painted.
Recommended Skill Level
Advanced

Comments

spiceylg

Wed, 05/01/2013 - 05:35

Beautiful build! I love the details such as the edges of the Y pieces as you said. It definite adds more dimension and the curves on the arms as well!

JoshMonroe

Wed, 05/01/2013 - 11:01

Thanks! I saw a cabinet in a book on wood finishing that had adjoining edges routed like that. It looked so good there, I decided to try it here, and I'm glad I did!

Entry wall cubby and bench

This is a modifed version.  I made it with old pine boards that I had laying around.  I used wine corks for the hangers.  No stain or anything on it.  

Built from Plan(s)
Estimated Cost
This was free, because I had the old boards and wine corks.
Estimated Time Investment
Afternoon Project (3-6 Hours)
Finish Used
None
Recommended Skill Level
Intermediate

Blanket - Scarf Ladder

Submitted by naomi on Fri, 06/23/2017 - 06:41

I love blanket ladders and decided to make one.

I have to admit this was trickier than I thought.

Getting the slightly tapered angle right was a pain in the butt. I do love the final result though.

I used screws and a hammer and random things to give the new wood an old look.

I used the vaseline technique for the paint distressing.

Built from Plan(s)
Estimated Cost
$22
Estimated Time Investment
Afternoon Project (3-6 Hours)
Finish Used
Stain and enamel paint.
Recommended Skill Level
Intermediate

Workbench Console

Submitted by jccoleman1 on Mon, 03/23/2015 - 15:10

I followed the plans except I decided to do a chevron top instead of the 3 long boards. I used two coats of gunstock stain on the major partrs and 2 coats of semi-gloss clear on everything. Also I did not put caster wheels on (client did not need this thing rolling). 

Built from Plan(s)
Estimated Time Investment
Weekend Project (10-20 Hours)
Finish Used
Gunstock stain and semi-gloss clear coat
Recommended Skill Level
Beginner

Awesome Firepit Bench

Submitted by Anonymous (not verified) on Sat, 06/24/2017 - 22:51

I followed Ana's awesome Firepit Bench plans and was able to build this beauty!  We added a lantern hook, a hook for marshmallow forks and a bottle opener on the back.  My husband already said that we two more to go by the firepit. :)  Thank you, Ana, for sharing your plans and making them so easy to follow. 

Estimated Cost
$85
Estimated Time Investment
Afternoon Project (3-6 Hours)
Finish Used
No stain needed. Used cedar toned lumber from local big box store.
Recommended Skill Level
Beginner

Painter's Ladder Shelf for Back Yard

Submitted by Anonymous (not verified) on Mon, 10/04/2021 - 11:49

I came up with the idea of having something on my back porch to hold all my outdoor stuff.... things I wanted handy, like Pool Towels, Gardening tools and gloves, Sunscreen and Bug Spray. I started looking around for something to buy and finally decided to look for something to build. I was looking on the HGTV website when I found this and thought it was perfect. I'm not sure what exactly made me take it one-step further, but I found a small link embedded in the article and I clicked on it, and a love affair was born. I found the Ana-White website with tons and tons and tons of plans to make all the things I've dreamed about making. So, I signed up, printed the plans and got to work. First time I have built from plans and had to work slowly and not rush to complete it the same day. Snuck away in the evening, after dinner and cleanup, and spent about an hour a night in the garage with the heat and the mosquitos. BTW, tucking dryer sheets in your clothing does really keep the critters at bay. And here is the finished product .... doing exactly what I had planned and fitting perfectly in the location I wanted. On to the next project..... I have several printed out and haven't decided which to start on..... Is it the toy box for my son's toys that scatter around the living room.... or the queen-sized Farmhouse bed for my daughter who has been begging for more sleep room. Or the bookshelves for my room..... So may choices.... and I love that about this webiste.

Built from Plan(s)

Comments

Picnic Table

Submitted by Medickep on Mon, 05/06/2013 - 07:39

My wife started looking at expensive patio sets, which I thought were not worth the price, so I decided to build a picnic table. This is not the cheapest table out there, but it's built to last for years!! I used a high quality cedar as I got a price cut from a friend. I also used deck screws, so there would be no rusty screws!! The table top measures 7' long and looks like one you would see at a state park, notHome Depot!

Estimated Time Investment
Weekend Project (10-20 Hours)
Finish Used
Cabot Australian Timber oil: For this project I went with an oil project so I wouldn't have to sand it every year, like so many in my area with their decks. With this product, you simply clean the table and reapply!!
Recommended Skill Level
Beginner

Comments

Medickep

Thu, 09/05/2013 - 13:04

Thank your hanks for the kind words! This was my first real project and I was pleased with the results!

Gerry Czerniawski

Thu, 08/25/2016 - 09:48

Really like the picnic table - do you have plans for this? (I'm new to this site so apologies if they are here but I just could not see where?).

best wishes

Gerry