Ten Dollar Ledges
This is perfect for all of the trophies and pictures around the house! Now I need three more.
This console table was actually pretty easy to make. The top was constructed with 1 x 6 pine boards, and assembled using a Kreg jig and pocket hole screws.
For the base, I used 29" long, 2 x 3 legs attached together with 1 x 4 aprons. To make the platform, I cut 2 pieces of 2 x 6 the width of table top, and 2 pieces of 2 x 4 , two inches shorter. I stacked the 2 x 4 on top of the 2 x 6 and attached them with glue and screws. I then ran 3/4" cove moulding in the corner between the two pieces.
Using my Kreg jig, I drilled 2 pocket holes on the inside of each table leg, and attached the platforms. I then cut and mitered 4 pieces of 2 x 2 for each end, notching them in the middle to create X's. I attached the X's with glue and finish nails.
The last step before finishing was to distress the wood. In addition to hammer, chains and nails, I skipped a hand planer along the edges to create a "hand hewn" look.
Wed, 04/16/2014 - 05:30
Nice job on the table!! Are there plans for this anywhere?? I'd like to make one.
Debbie.
Thu, 08/20/2015 - 13:20
I think I can put this together, but I am trying confirm the length and angle of the X's. Drawing this up with exact measurements the X's wouldn't line up using 45 degree angles. There is a 5/8" overlap. Would that be accounted for using the "true" measurement of a 2"x4" 2"x6" etc? (I have a SketchUp file if someone wants to double check me!)
Cabin bed made into a barn for a 3 year old birthday boy! He. Was. Pumped!
So I had some leftover fencing material sitting around and I decided to try to make something out of it. I really don't have anything to compare this to on the site but I think it works for the primitive minds.
Made using the plane old shelf plan.
We were going to rent 5 farmhouse tables but the cost of renting was more than double the cost of building them myself plus by building them myself I could finish them the color that I wanted. We were then able to sell 4 of the 5. I kept one for my self. I also was able to build a smaller size one to custom fit my son and daughter in-law new house. Nothing like the satisfaction of building something for something so special.
Sat, 04/02/2016 - 16:31
...did it take to complete all of those tables?!? That was such a special thing to do for your son's wedding...and then for them to have a smaller version for themselves, I'm certain it will become a family heirloom passed down through the years! Those tables "made the look" for that entire setting! Just gorgeous! :)
Love large family gatherings in the summer and this table was just perfect for that purpose.
Added another set of steps and planter box. Thank you so much for the plans. It was a quick easy project that was doable in 2 nap times.
Brittney
Had to have this one. I made this almost to the exact plans, but shortened it 2" in order to accomodate for the couch height, as well as the height of our furry friend. It is constructed with the 1x3 and 1x2 pine furring strips called for in the original plan. I decided to leave the door off, as my daughter has a tendancy to play with them a little too much. I finished it in a gloss black to match the rest of our furniture. This will be my first of many posts. Love this website!
Though I've built a lot of kids' furniture now, I think this is my son's favorite item. He requests it constantly. I built two more for friends and even a tiny play one for his toy house.
This was my first attempt with a jig saw, and my biggest advice is to be sure the trigger is pressed all the way in and to go very very slowly. Also, when you are cutting the straight edges on the side, you can clamp a guide on just like with a circular saw. That helped a lot. By the time I made my second and third it was easy.
Rekourt dining room table with bench
DIY Potting Bench by At Home with Xin on Instagram
After searching for a bed for our tween we found that we couldn't find the bed we wanted for the price we wanted to pay. I'd been eyeing this site for months and finally decided to take the plunge. The Shanty-2-Chic blog really motivated me to get this going.
This was our first (and arguably most expensive) project ever- husband ended up acquiring new tools to make the job easier, haha.
We followed the tutorial from the site with modifications for a full size mattress. (Just substituted 53x75 for the queen measurements and adjusted cuts accordingly.)
Used furring strips (1x3) for mattress support to save money.
Finished with zinsser primer (bought a quart for all our future projects)- this stuff is awesome!
Picked a flat white paint in a color that matched her dresser.
Cost of Daughters New Bed:
Lumber $120,
Kreg jig clamp $29
Air compresser with nail gun $150
Learning how to construct furniture ourselves: Priceless
Used the Ana White plans for the console table but omitted the 1x12 and used 1x4 45' for the perimeter and ran anothe 1x4 up the middle. We added cross supports under the top to attach the top to, eliminating the second layer on the top.
Made a mini TV set for my son and as soon as my older daughter saw that she had to have one too.
After building the small dresser from the cabin (or camp) collection, we wanted a side table to match. Pottery barn makes one, and there were some similar plans on Ana's site, so we kind of made it up as we went, following the same basic design as the dresser, only with modified dimensions, and less drawers, etc. This was a super quick build after the dresser, and we made it all from scraps we had lying around - only things were purchased were the hardward for the drawer, and 1 square dowel for the drawer slides - less than 5 bucks! Used left over paint from the dresser as well.
Fri, 03/16/2012 - 15:19
Your room is so sweet. It makes me want to have more babies so I can build a room just like it... though I think it's supposed to go the other way around. :)
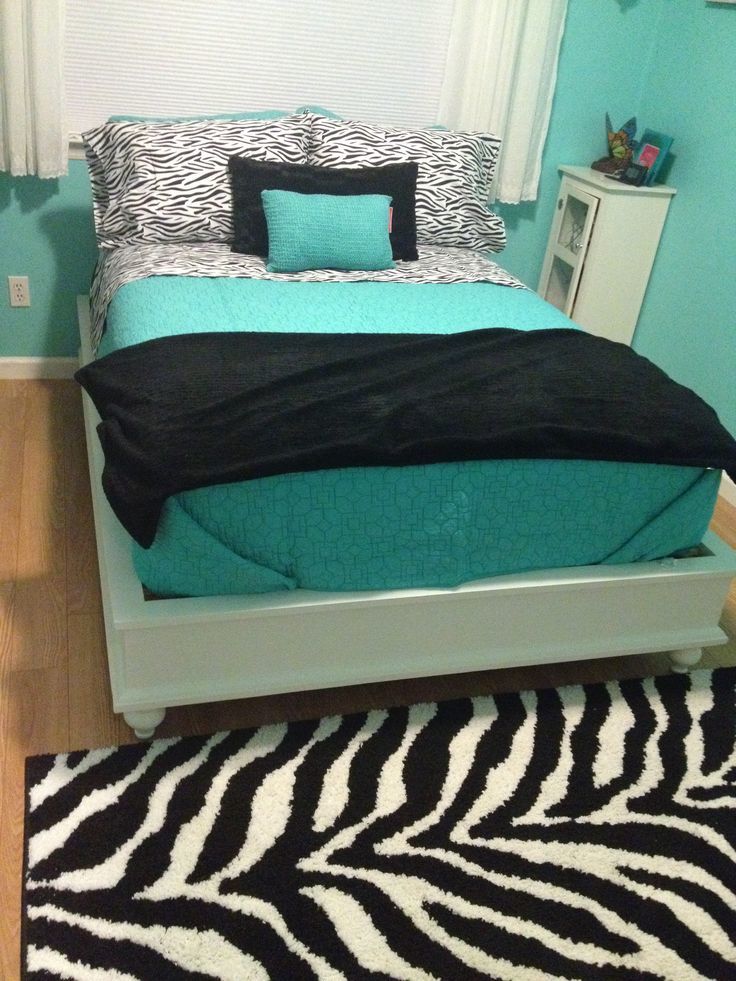
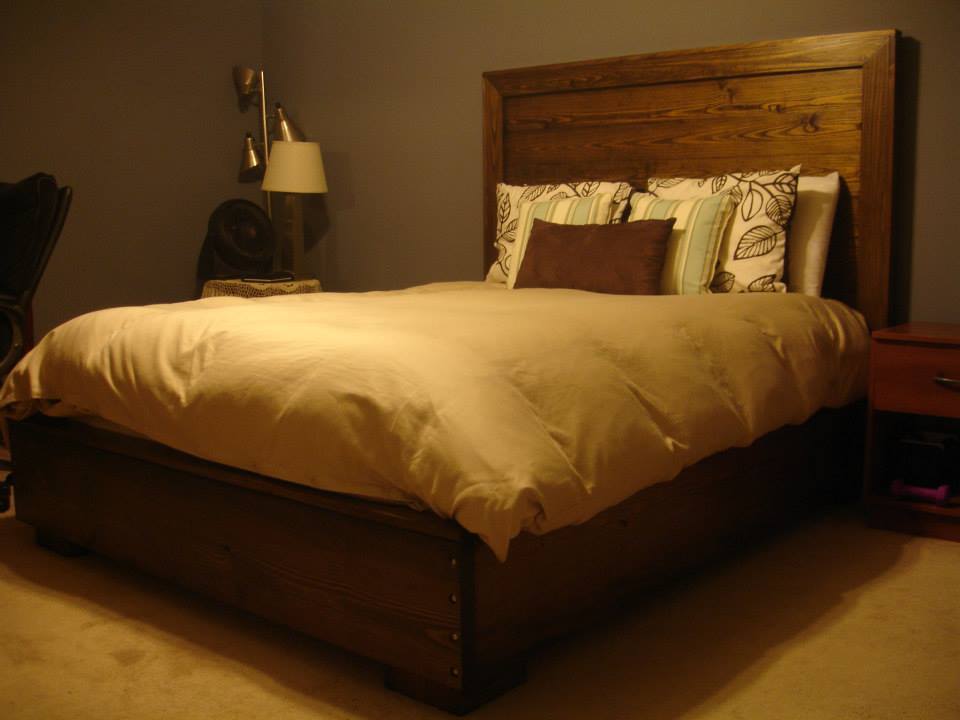
After finally getting fed up with having our mattress on one of those cheap metal "frames", and no headboard, I decided to try my hand at a platform bed and plank headboard.
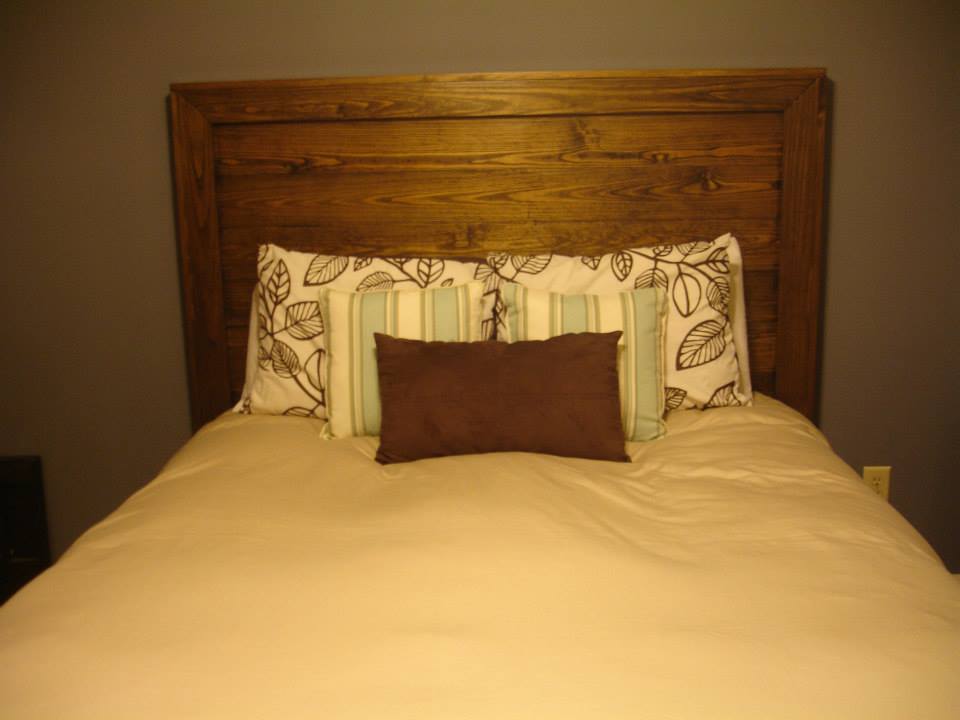
I followed the headboard plans to a T, with the exception of using 1x4's for the front trim instead of molding (at HD/Lowe's, the cheapest option would have set me back $40), and making it higher and wider to fit my bed plans. Everything came together very easily.
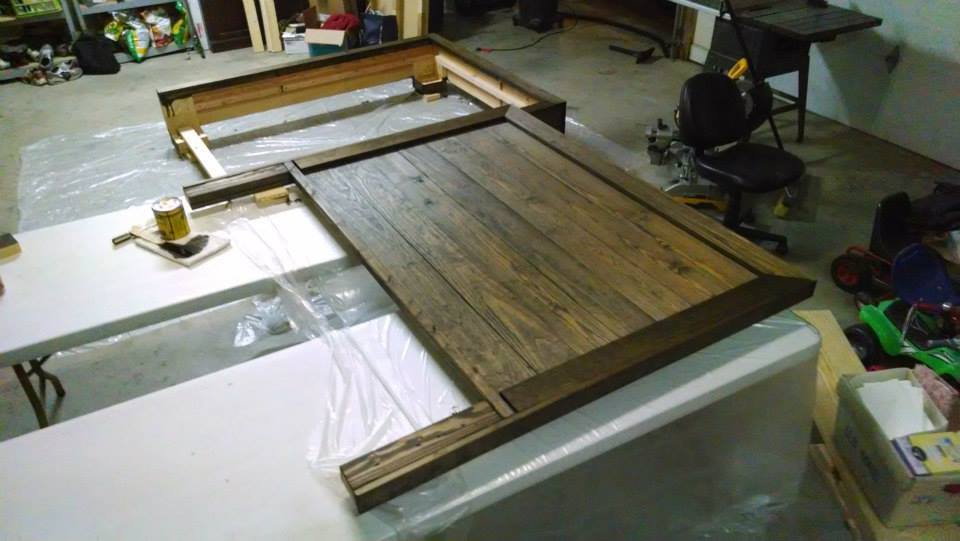
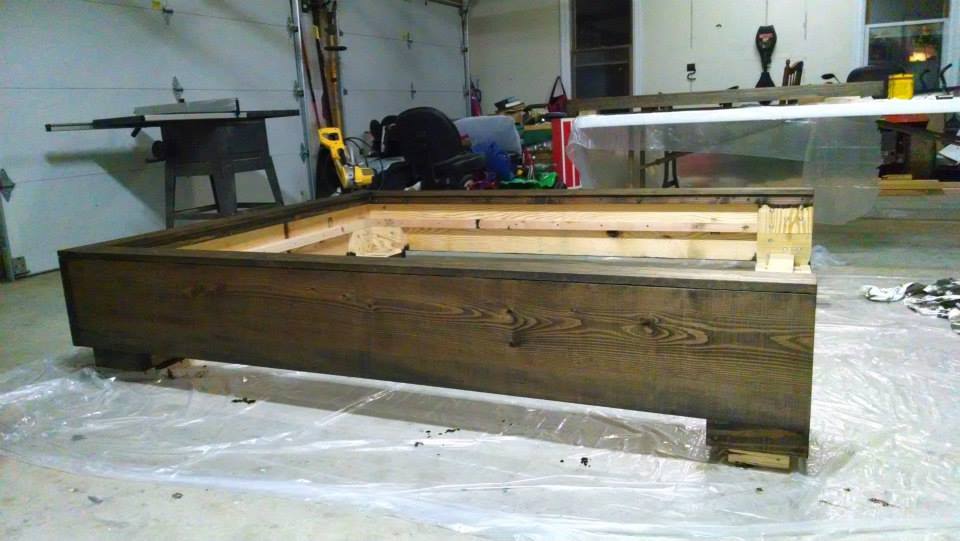
For the bed, I drew up the plans myself. I wanted clean lines and a modern look, with short wide legs. Instead of having the mattress rest on slats, I elected to hide the box spring within the wood frame, with the mattress sunk down 4" below the lip of the frame.
Total cost for headboard: $100
Total cost for bed: $80
Do NOT waste your time going to Lowe's or HD to buy any of the 1x's. The only frustrating part of this project was finding un-warped wood, and the big box stores had me pulling my hair out. Find a local wood place in your area, give them a call, and ask if they sell to non-contractors. My local yard was actually cheaper than the big box stores, and their wood was straight as a board, as it should be.
Mon, 03/10/2014 - 04:29
This looks great! Can I ask, is it a solid board at the bottom, or two boards? What did you use for the nail heads that you can see connecting the bottom boards? I'm fairly new at this. Is that just decorative or are they the screws holding it together? How do you get that look?
Thanks! I am going to try to do something like this.
Made these for my both my daughters and they love them. I think I may make some to sell as so many people seem to like them. I used a routered edge on my tops which deviates from plans a bit. I also used a biscuit jointer and glued in some biscuits to create my top made from 1x6 and 1x4 boards. Great plans and thanks for doing what you on this amazing website.
Fri, 10/21/2022 - 05:44
These are really beautiful. I love the white wainscot (?) in contrast with the natural wood top. I wonder if this design can be stretched upward and elongated into a cat little box cabinet enclosure? My mom could use one that's easy to open up to clean tall enough for a bit of enclosed storage, and a table top height for a place the cat can relax away from the dogs.
This is a kids work bench that I saw on pinterest. I couldn't find plans anywhere so I just winged it. If anyone knows who I should give credit to, I would be happy to do that.
This is made from pine studs. The dimensions are 24" wide x 42.5" back height, 19.75 bench height, 19" deep. The peg board is 24" x 18".
I used Early American stain with dark wax finish. I painted the peg board with Rustoleum Navy spray paint.
I used a plan from Jen WoodHouse for the red tool box.
I eliminated the bottom floor and created a shorter storage area instead. To make the project more manageable for one person, I chose 1/2" birch plywood, however, I think 5/8" would have been a bit more sturdy for this project. I love the plans and found them very easy to customize to fit my project.