Community Brag Posts
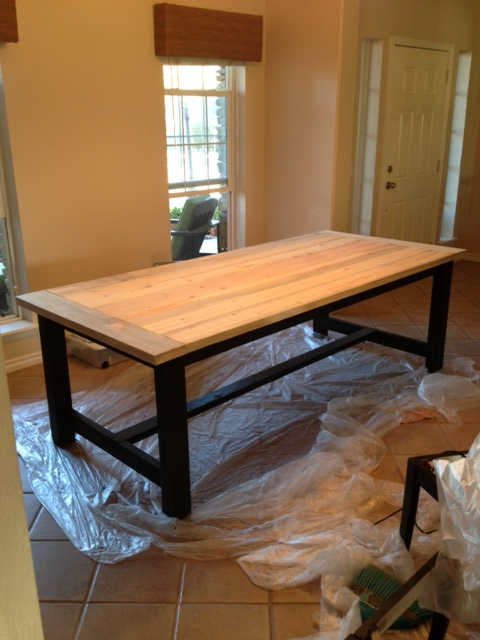
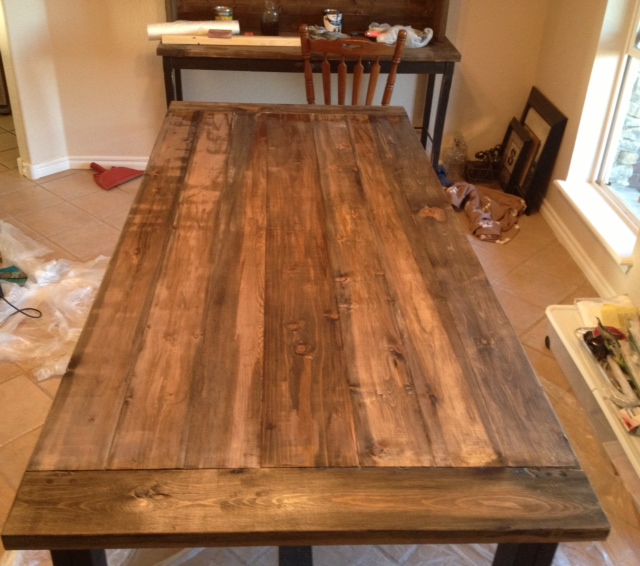
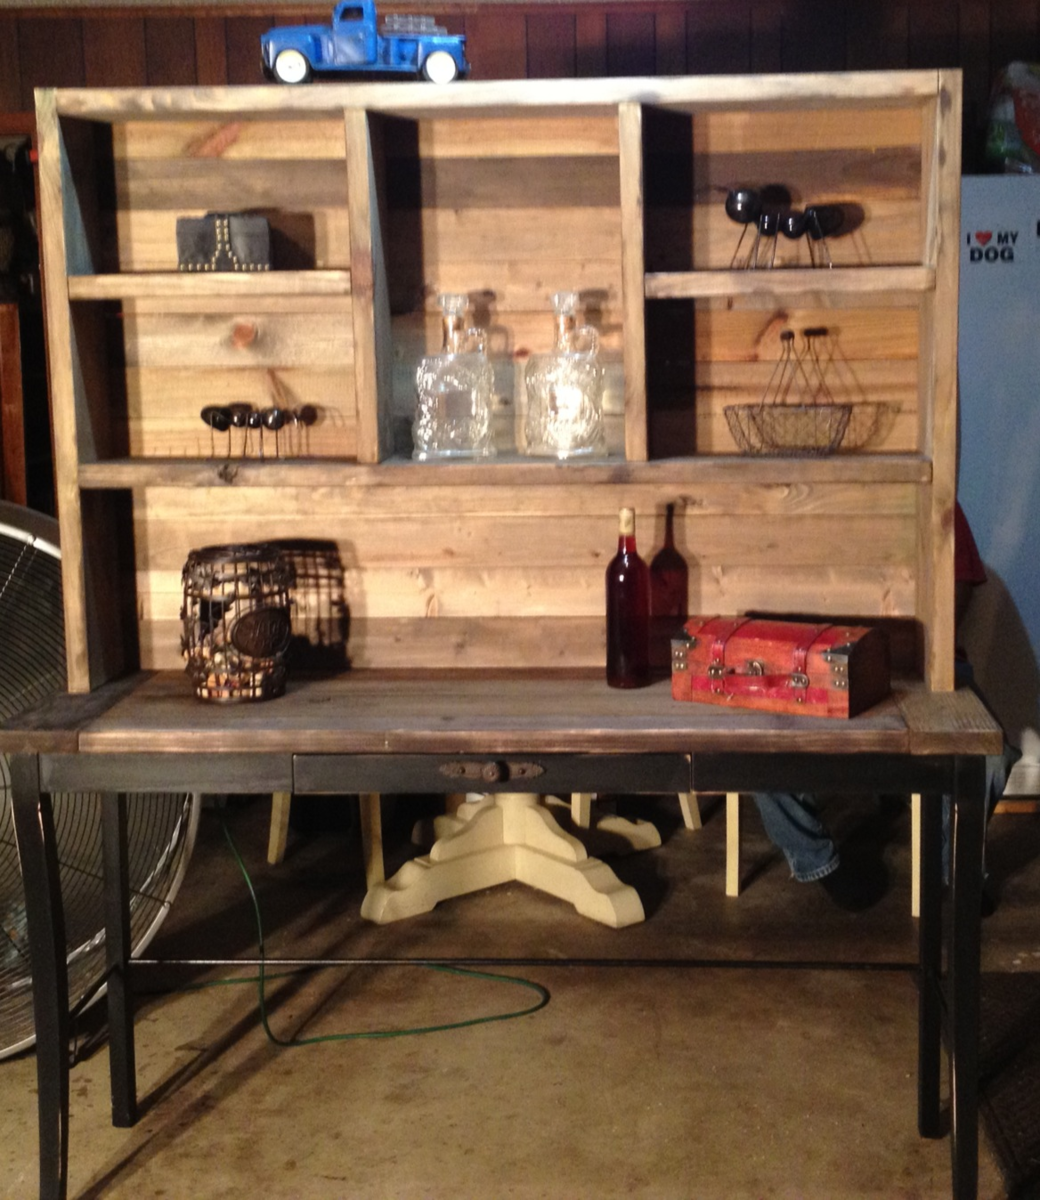
Farmhouse Table with Hutch
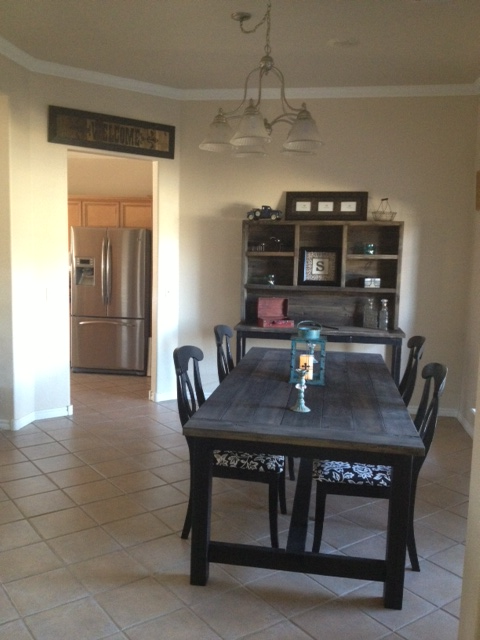
I really enjoyed making this table for my sister from Ana's Farmhouse table plans. I secured everything with Kreg screws from the underside. I added a couple screws from the top in the breadboard ends for added stregth. Im thinking of building another one but making it wider!
Built from Plan(s)
Estimated Time Investment
Day Project (6-9 Hours)
Finish Used
The base is painted with Behr satin black in 3 coats. I used vinegar and steelwool mix the the whole table was given several clear coats in satin.
Recommended Skill Level
Beginner
Comments
Tryde Coffee Table
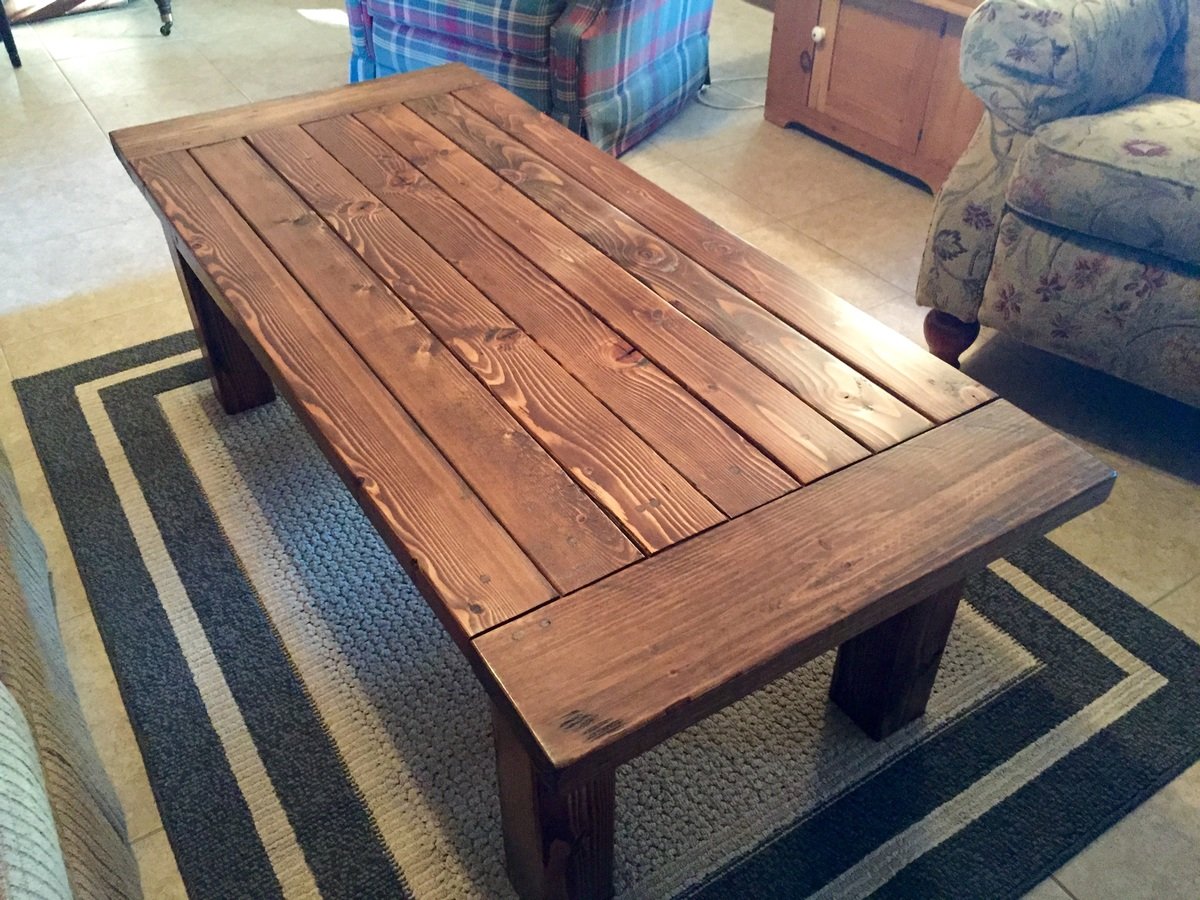
Ana's instructions were very easy to follow. The main problem I had was the 4X4 lumber was S4S, therefore the edges were rounded, which made for awkward joints with the aprons. Other than that, I used wood conditioner before staining and sealing.
Built from Plan(s)
Estimated Cost
<$75
Estimated Time Investment
Weekend Project (10-20 Hours)
Finish Used
Minwax special walnut stain and poly sealant
Recommended Skill Level
Beginner
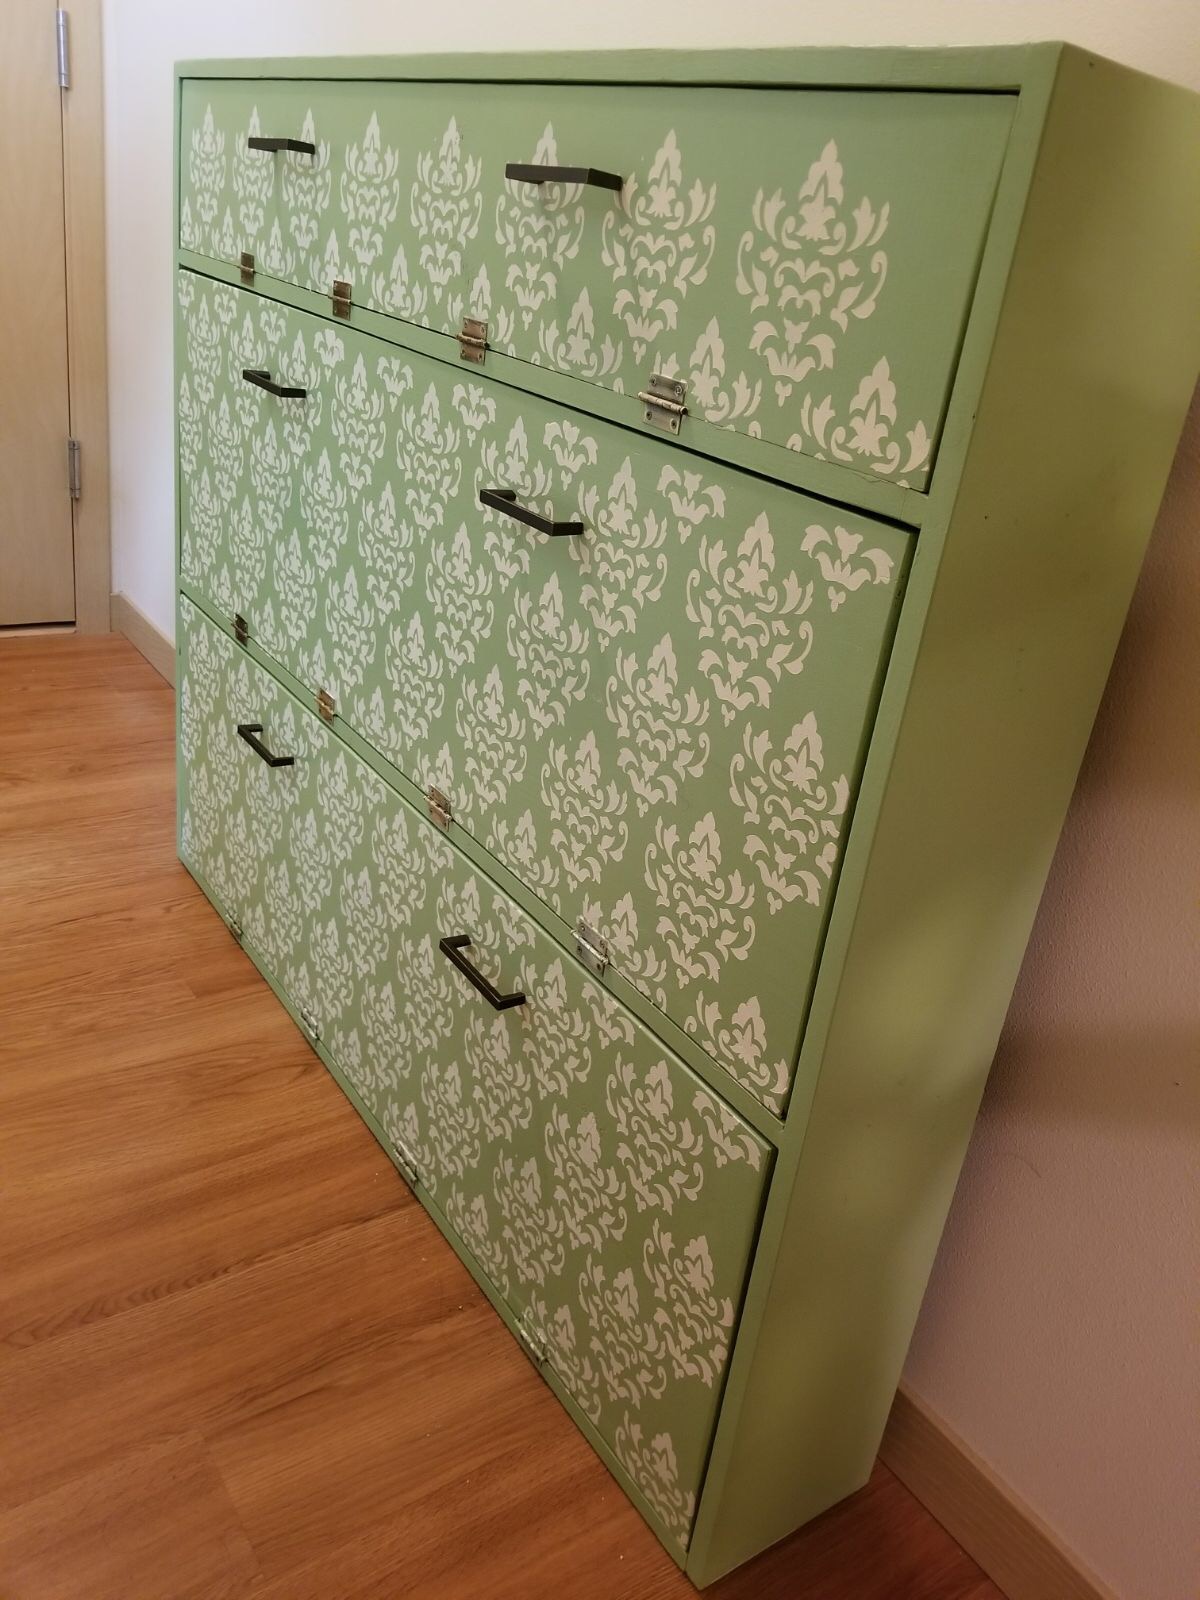
Shoe dresser
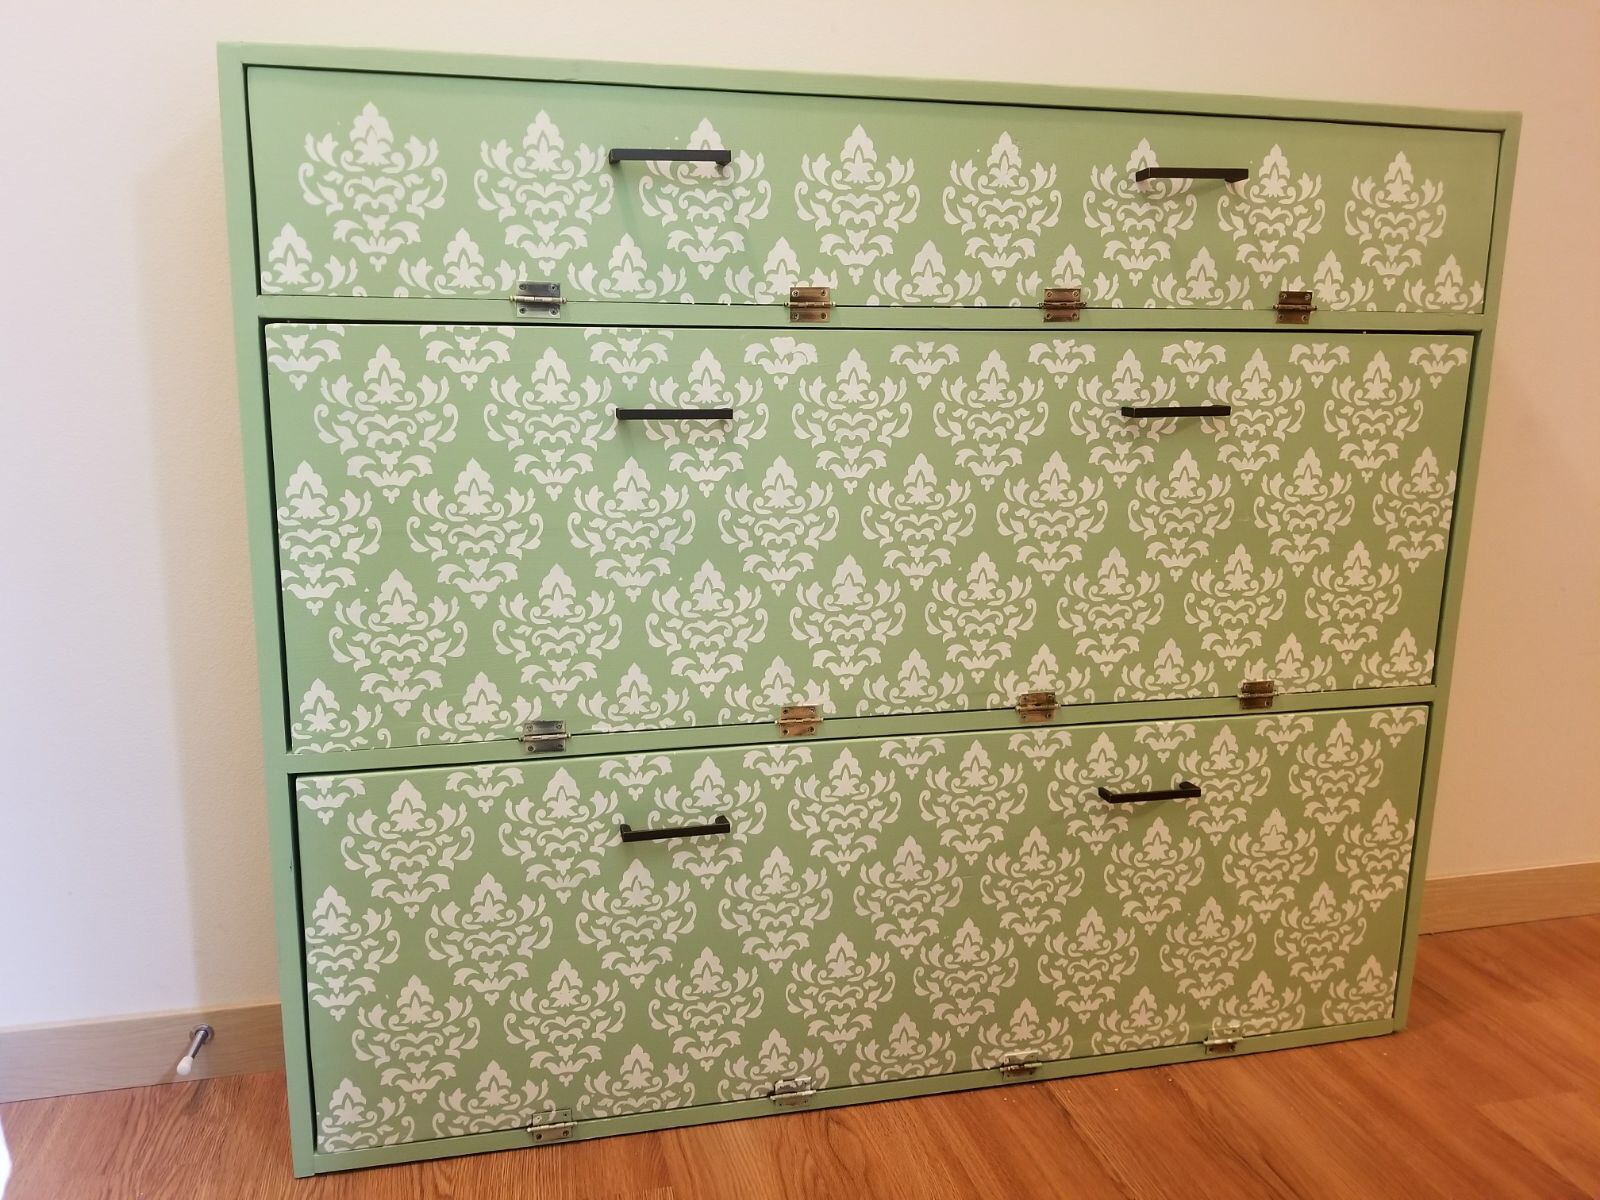
Shoe dresser with an additional row.

Built from Plan(s)
Estimated Cost
100
Estimated Time Investment
Weekend Project (10-20 Hours)
Finish Used
Paint
Recommended Skill Level
Intermediate
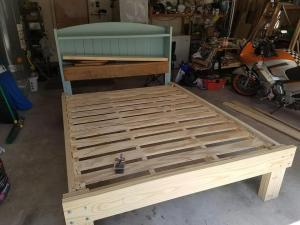
DIY Modern Farmhouse Bed
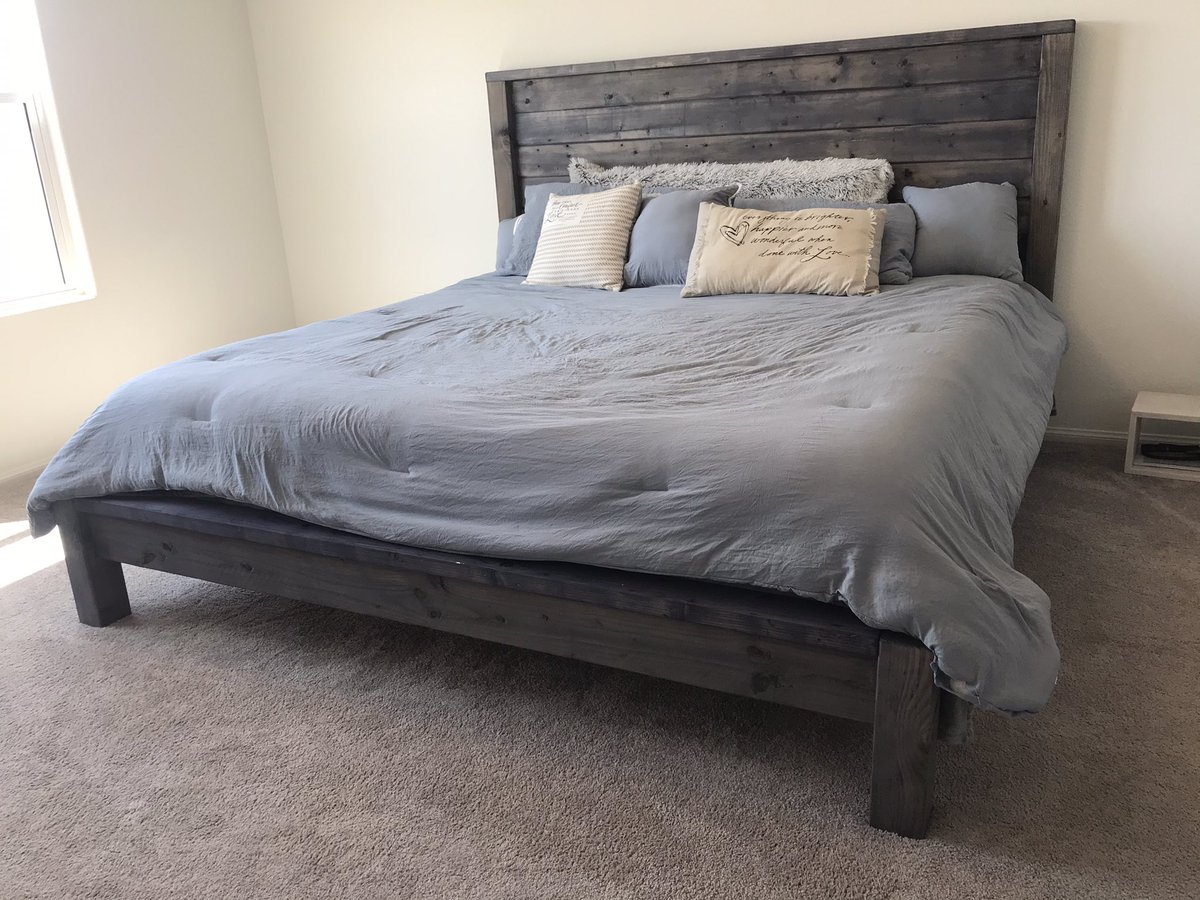
I built the modern farmhouse bed :)
Built from Plan(s)
Estimated Cost
200
Estimated Time Investment
Day Project (6-9 Hours)
Recommended Skill Level
Intermediate
Comments
Playhouse
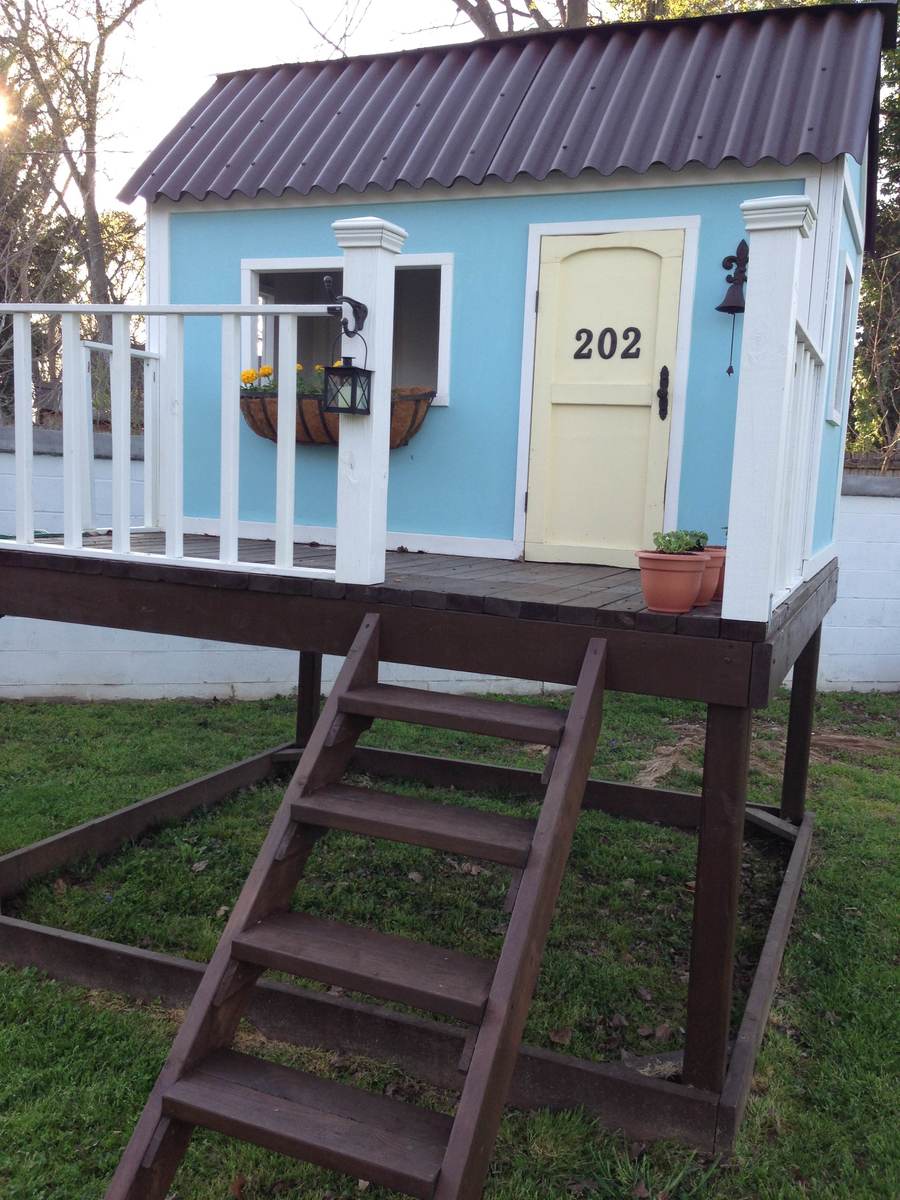
Wow! Did we ever pick a "small" project for our first build:) We had never built so much as a birdhouse and here we were building a playhouse. It was so much fun though and I'm glad that we did it. My daughter LOVES it and we are so pleased with how it turned out. We ran across a few problems due to our inexperience but nothing we couldn't overcome.
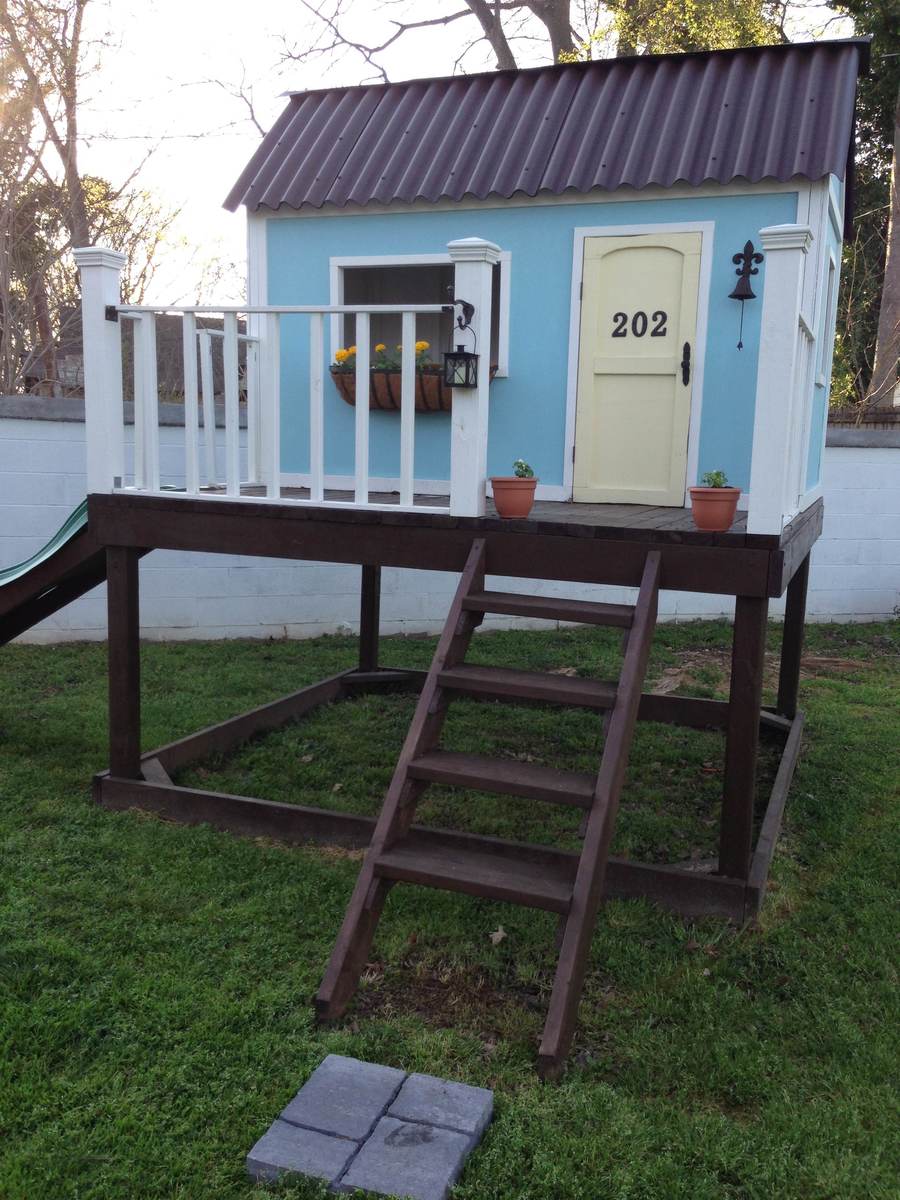
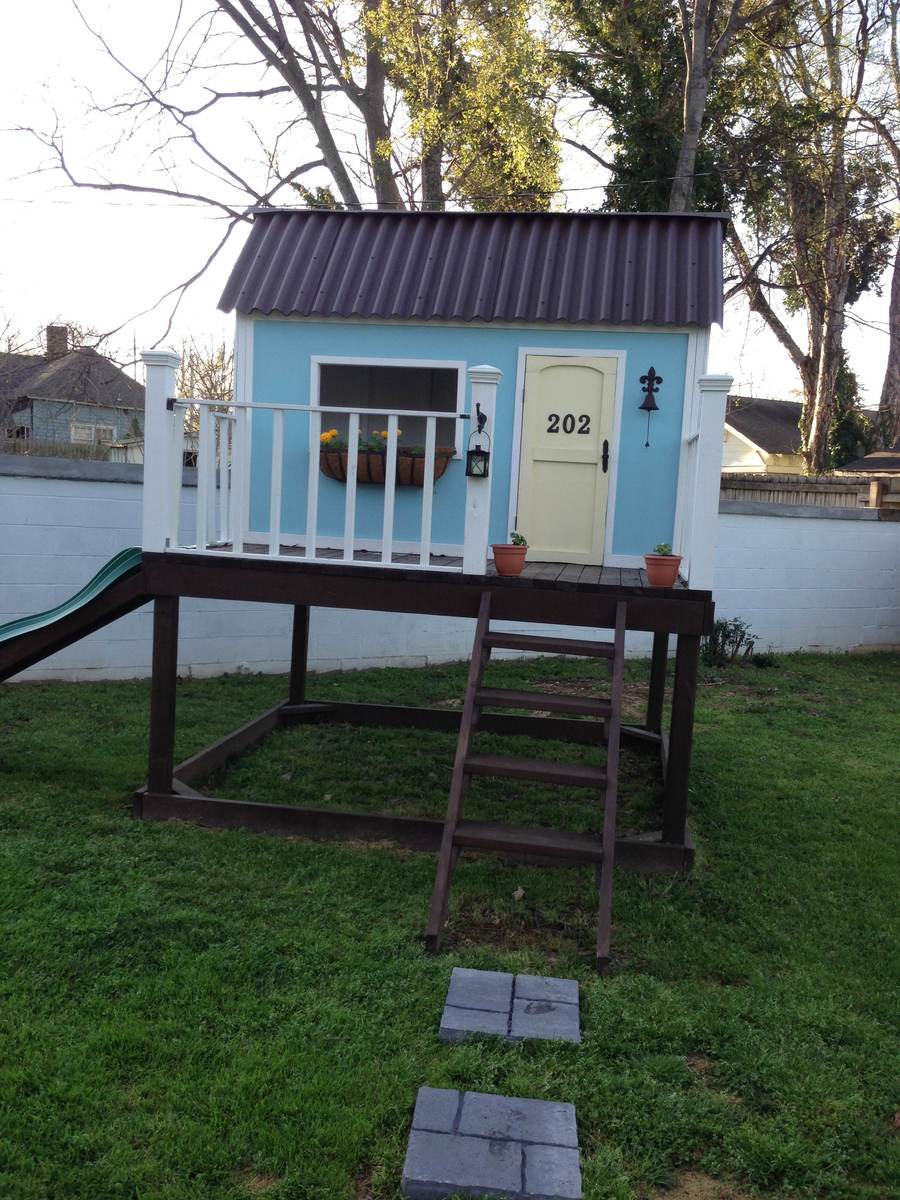

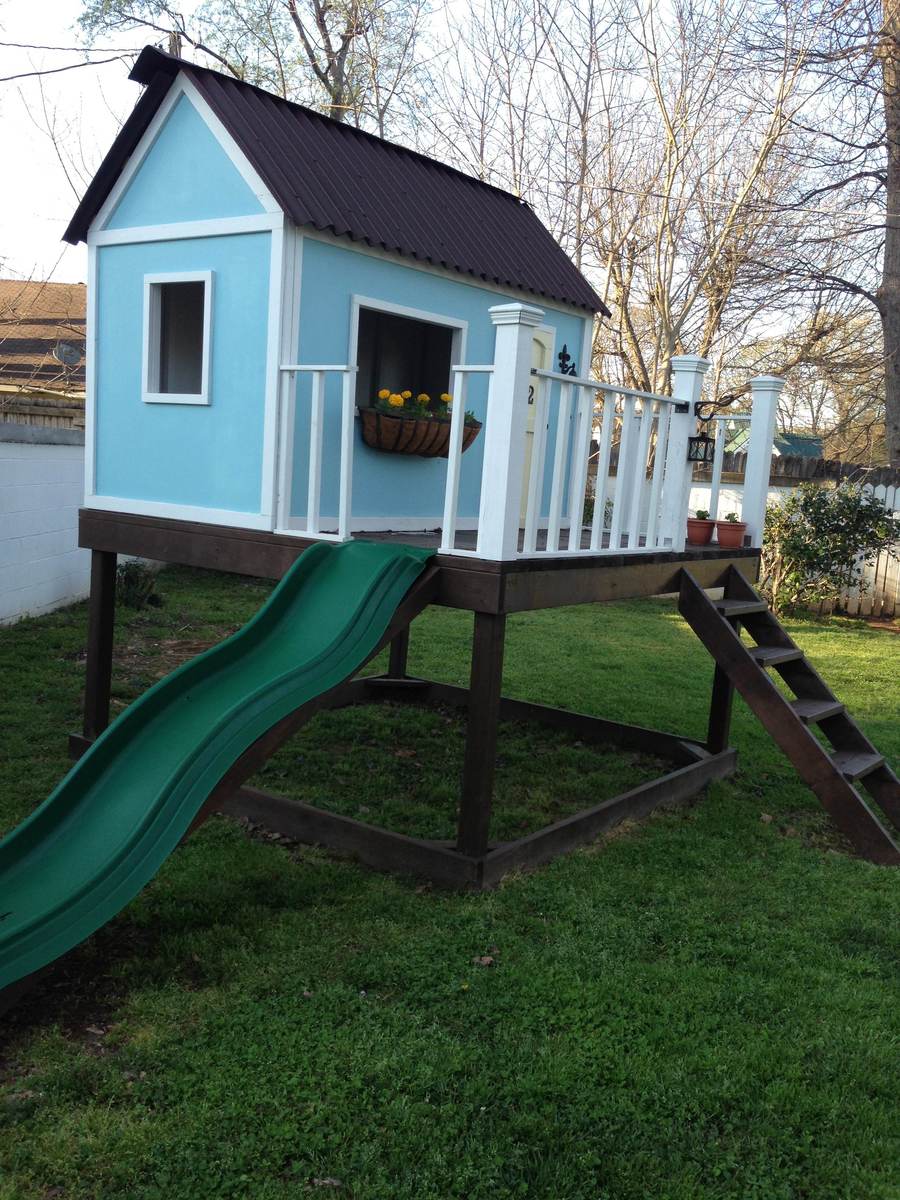
Built from Plan(s)
Estimated Cost
$600
Estimated Time Investment
Week Long Project (20 Hours or More)
Recommended Skill Level
Intermediate
Comments

Tue, 04/02/2013 - 05:29
Aww. Thank you so much! I
Aww. Thank you so much! I promise you, you can do it!!!!

Mini Farmhouse bedside Table
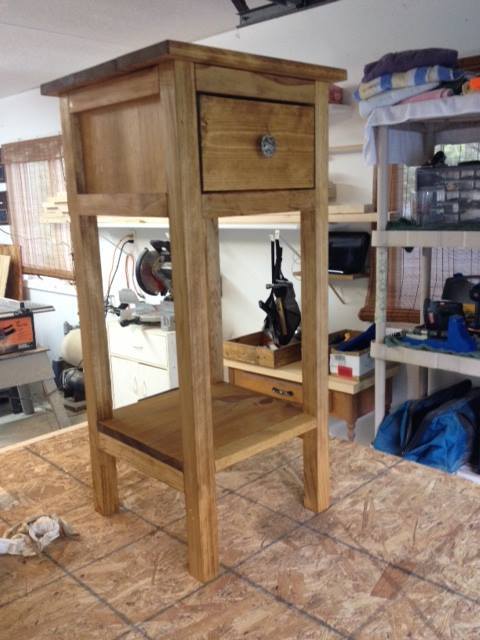
I made this taller to fit my bed.
Built from Plan(s)
Estimated Time Investment
Weekend Project (10-20 Hours)
Finish Used
Golden Oak and poly.
Recommended Skill Level
Intermediate
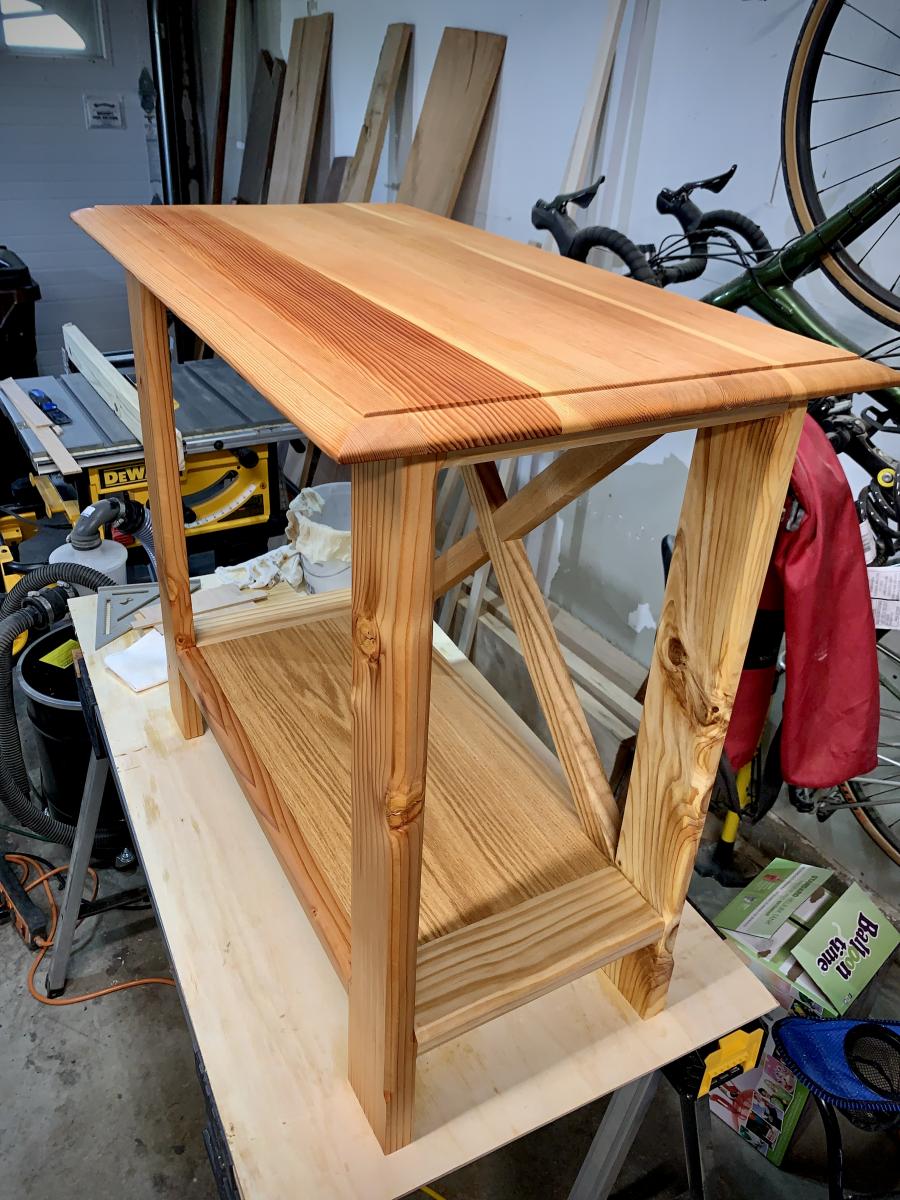
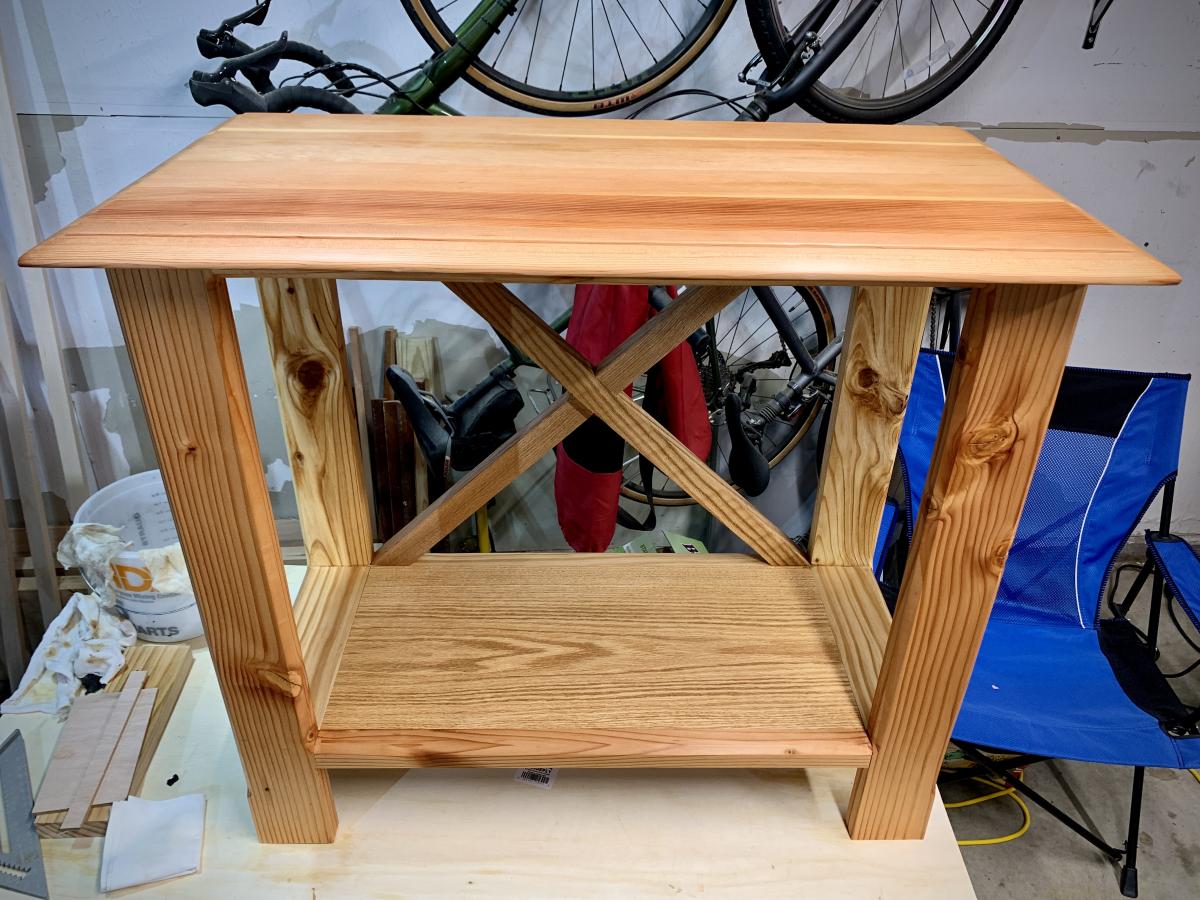
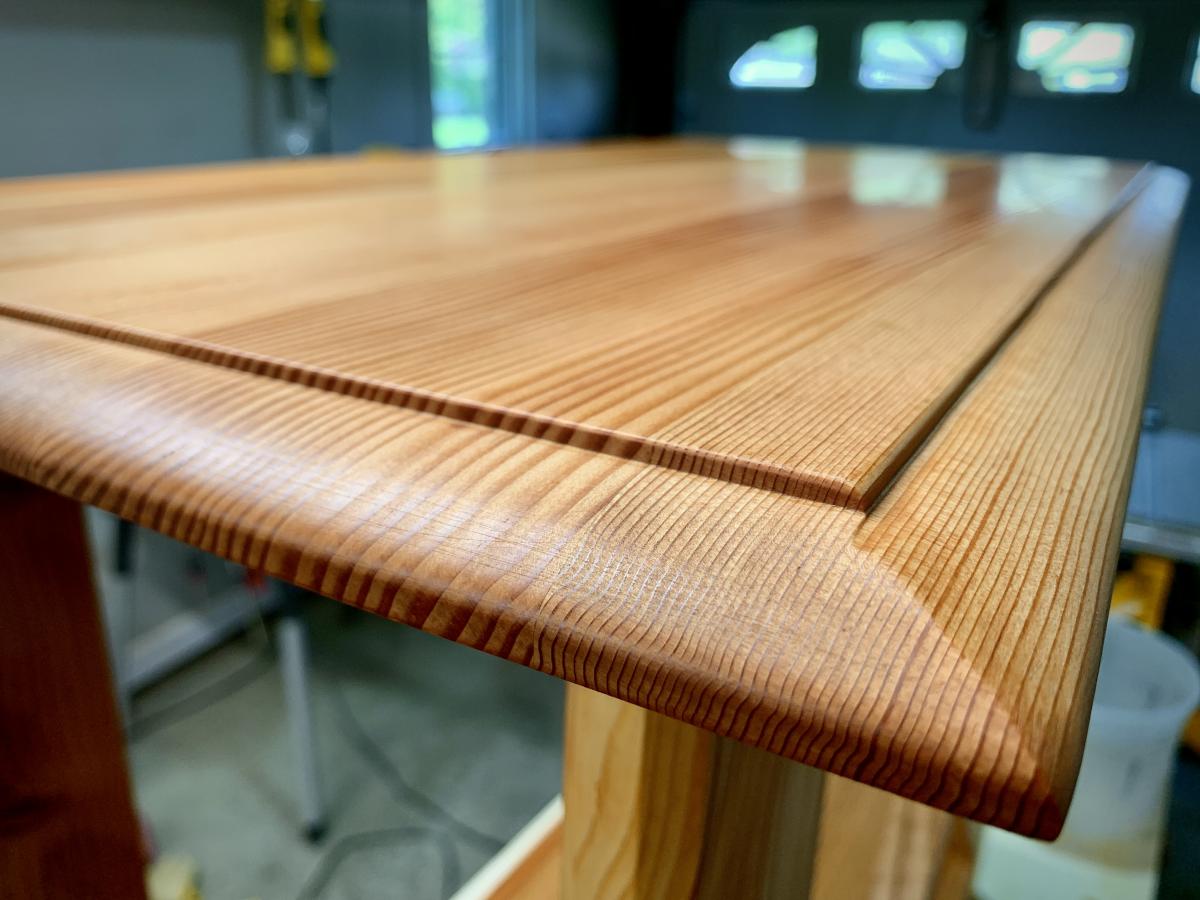
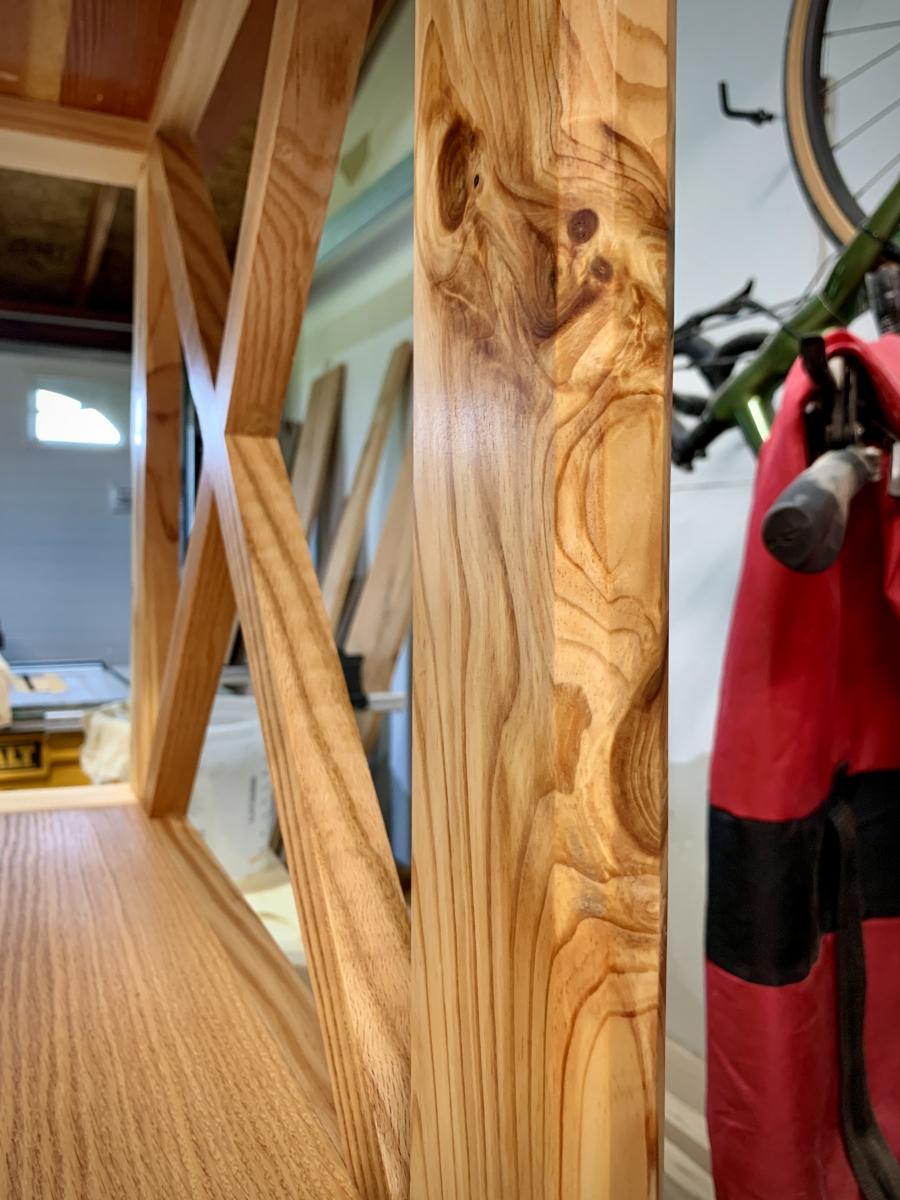
Rustic X TV Stand
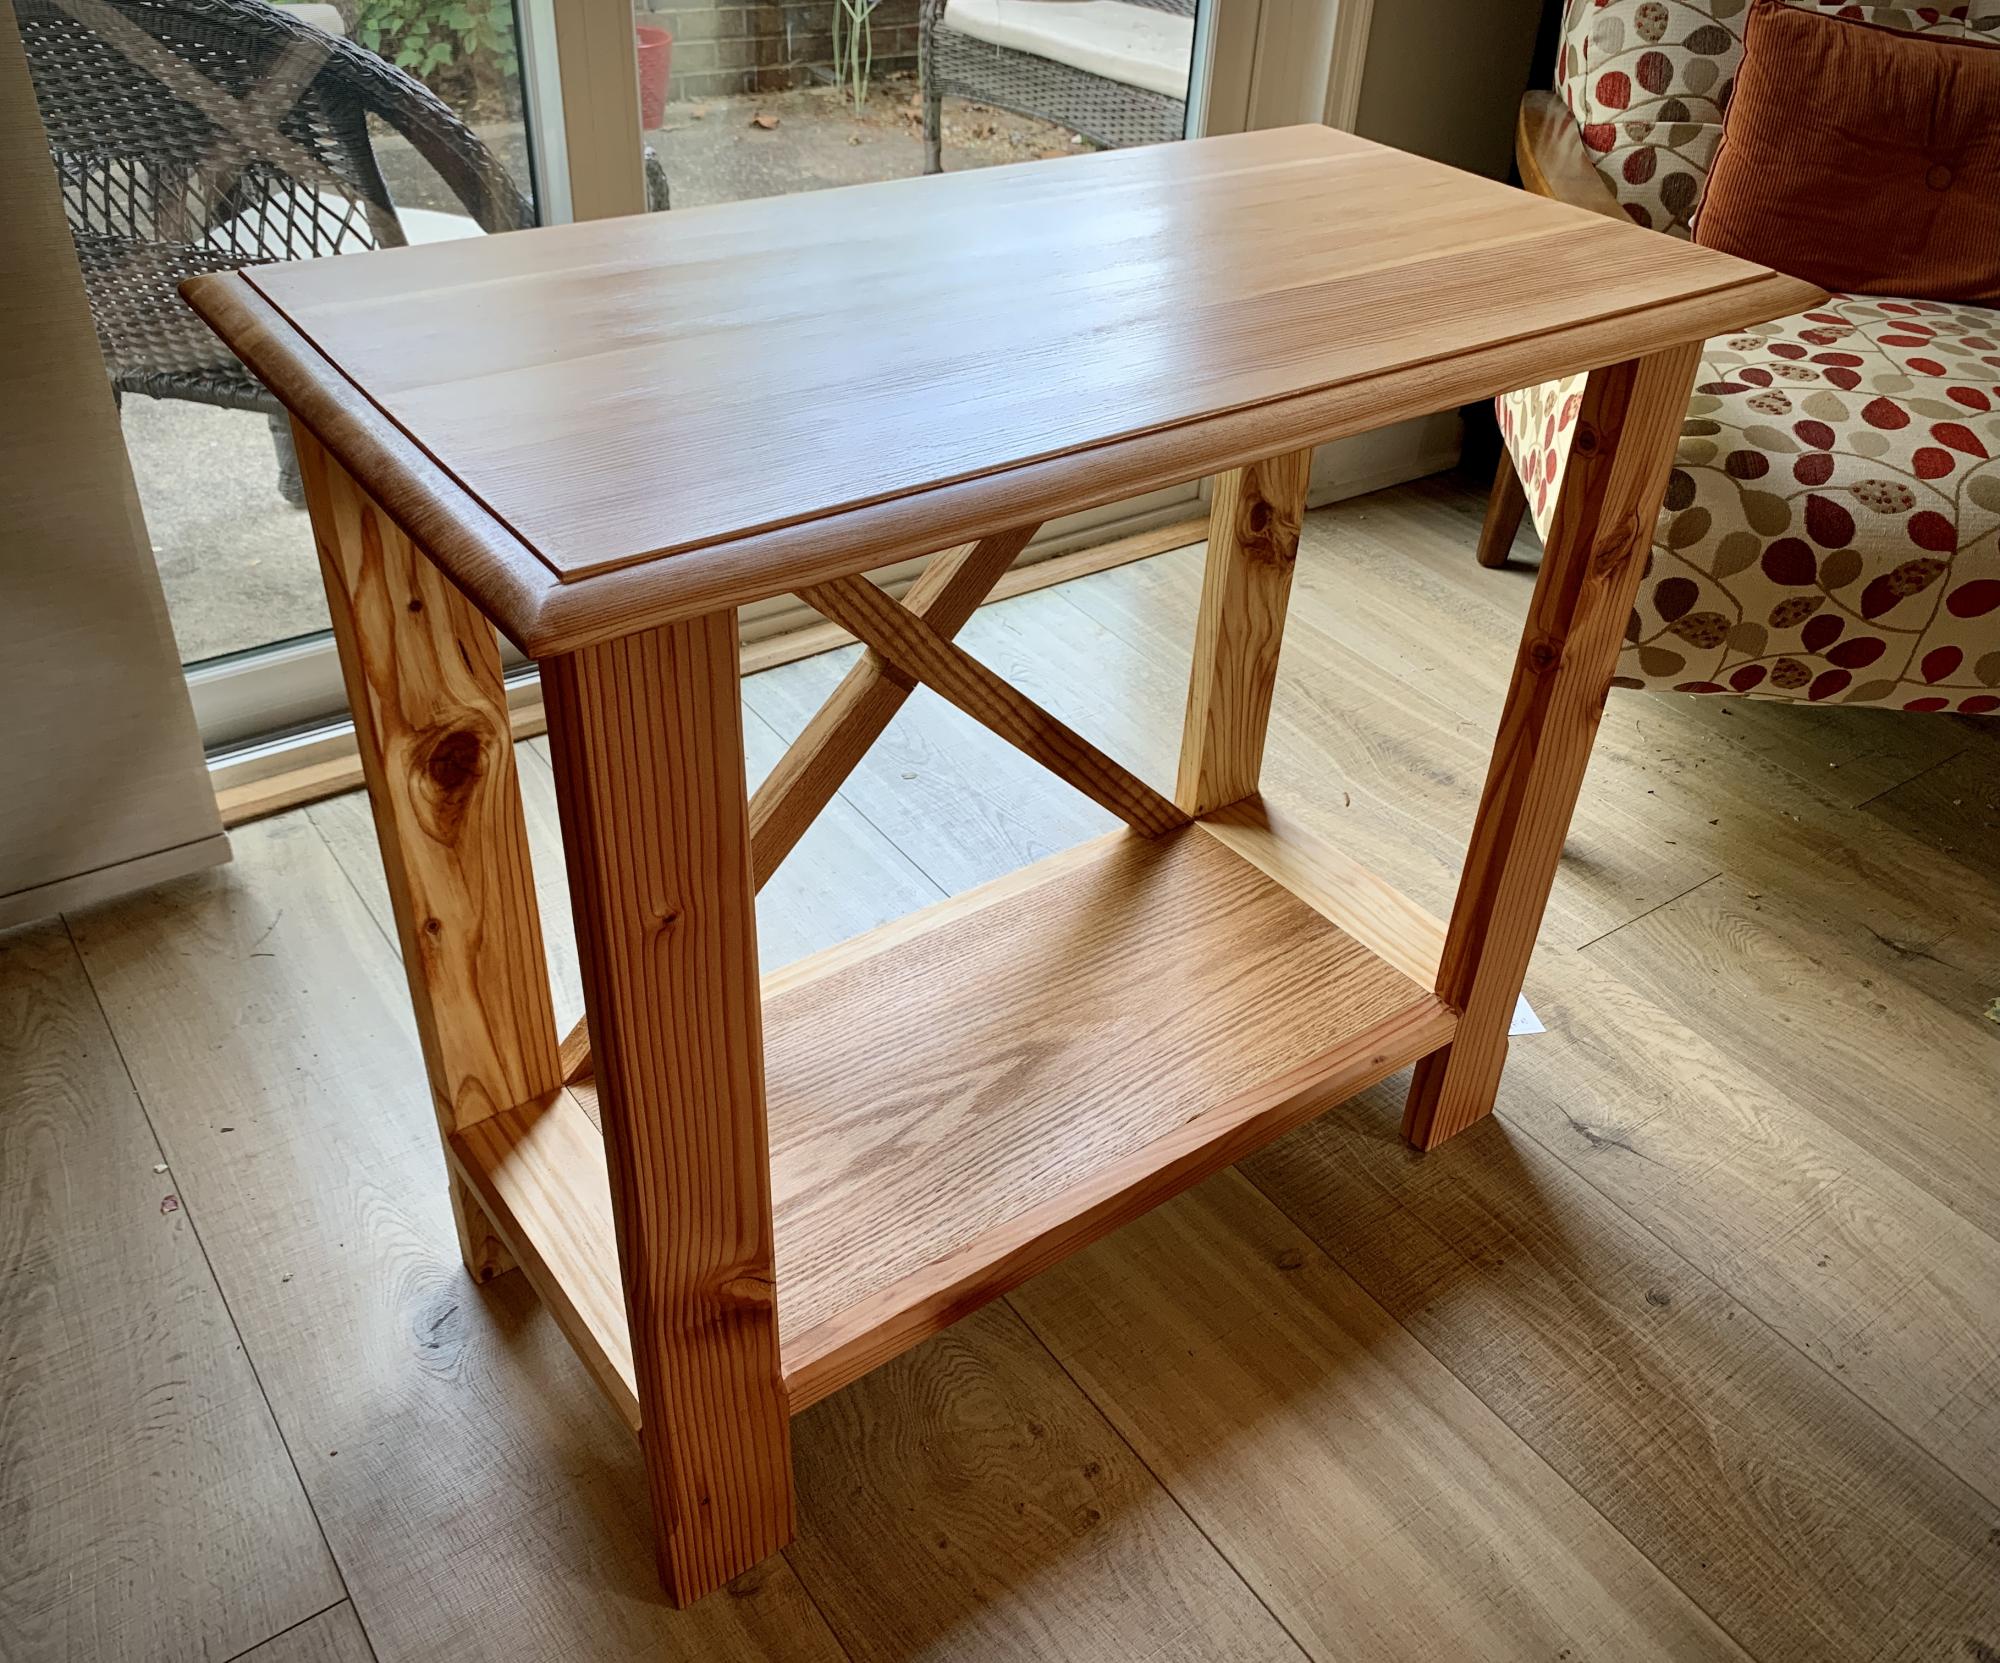
A couple more passes of finish and this will have a new lease on life. Beginning as a mixture of reclaimed wood and some shelving that Brian Carla Baker Smith had in their garage, it will soon be sporting a television as life begins anew for our friends. The most gnarly pieces turned out to provide the most character. I think that is a wonderful observation of life. Great plan from Ana White!
Built from Plan(s)
Estimated Cost
60.00
Estimated Time Investment
Weekend Project (10-20 Hours)
Finish Used
Tried and True Danish Oil Finish With 3 coats of Polyurethane on the top
Recommended Skill Level
Intermediate
Comments

In reply to Wonderful details! by Ana White Admin
Fri, 07/16/2021 - 17:02
Thank you for the great plan…
Thank you for the great plan Ana. Your plans, the details, and equipment required for the project have gotten me into woodworking. I appreciate all the work you put into your project posts.
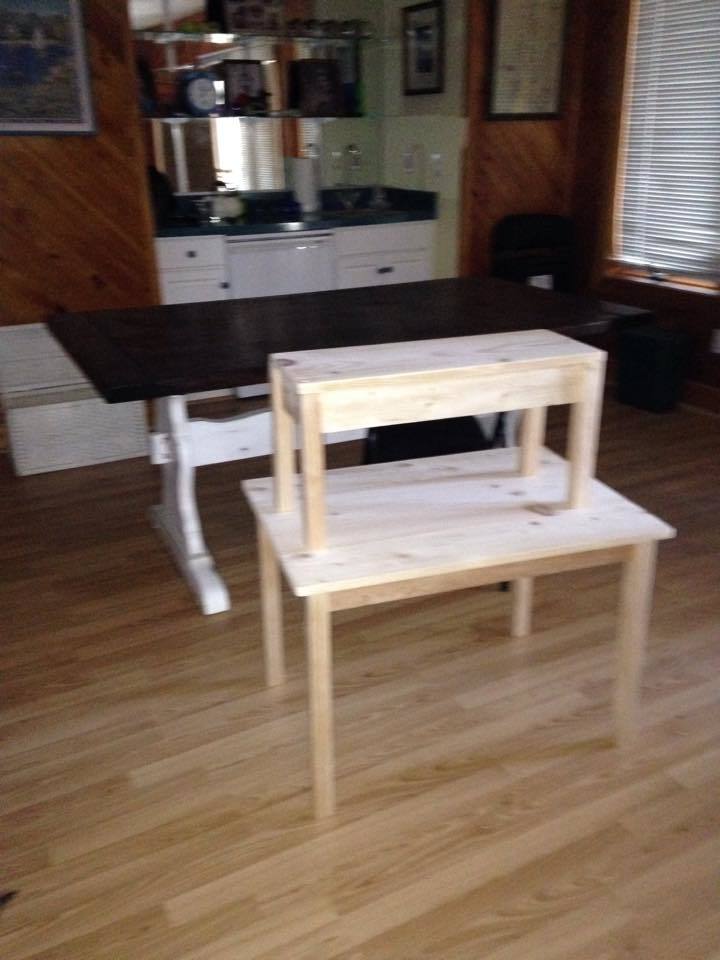
Clara Table
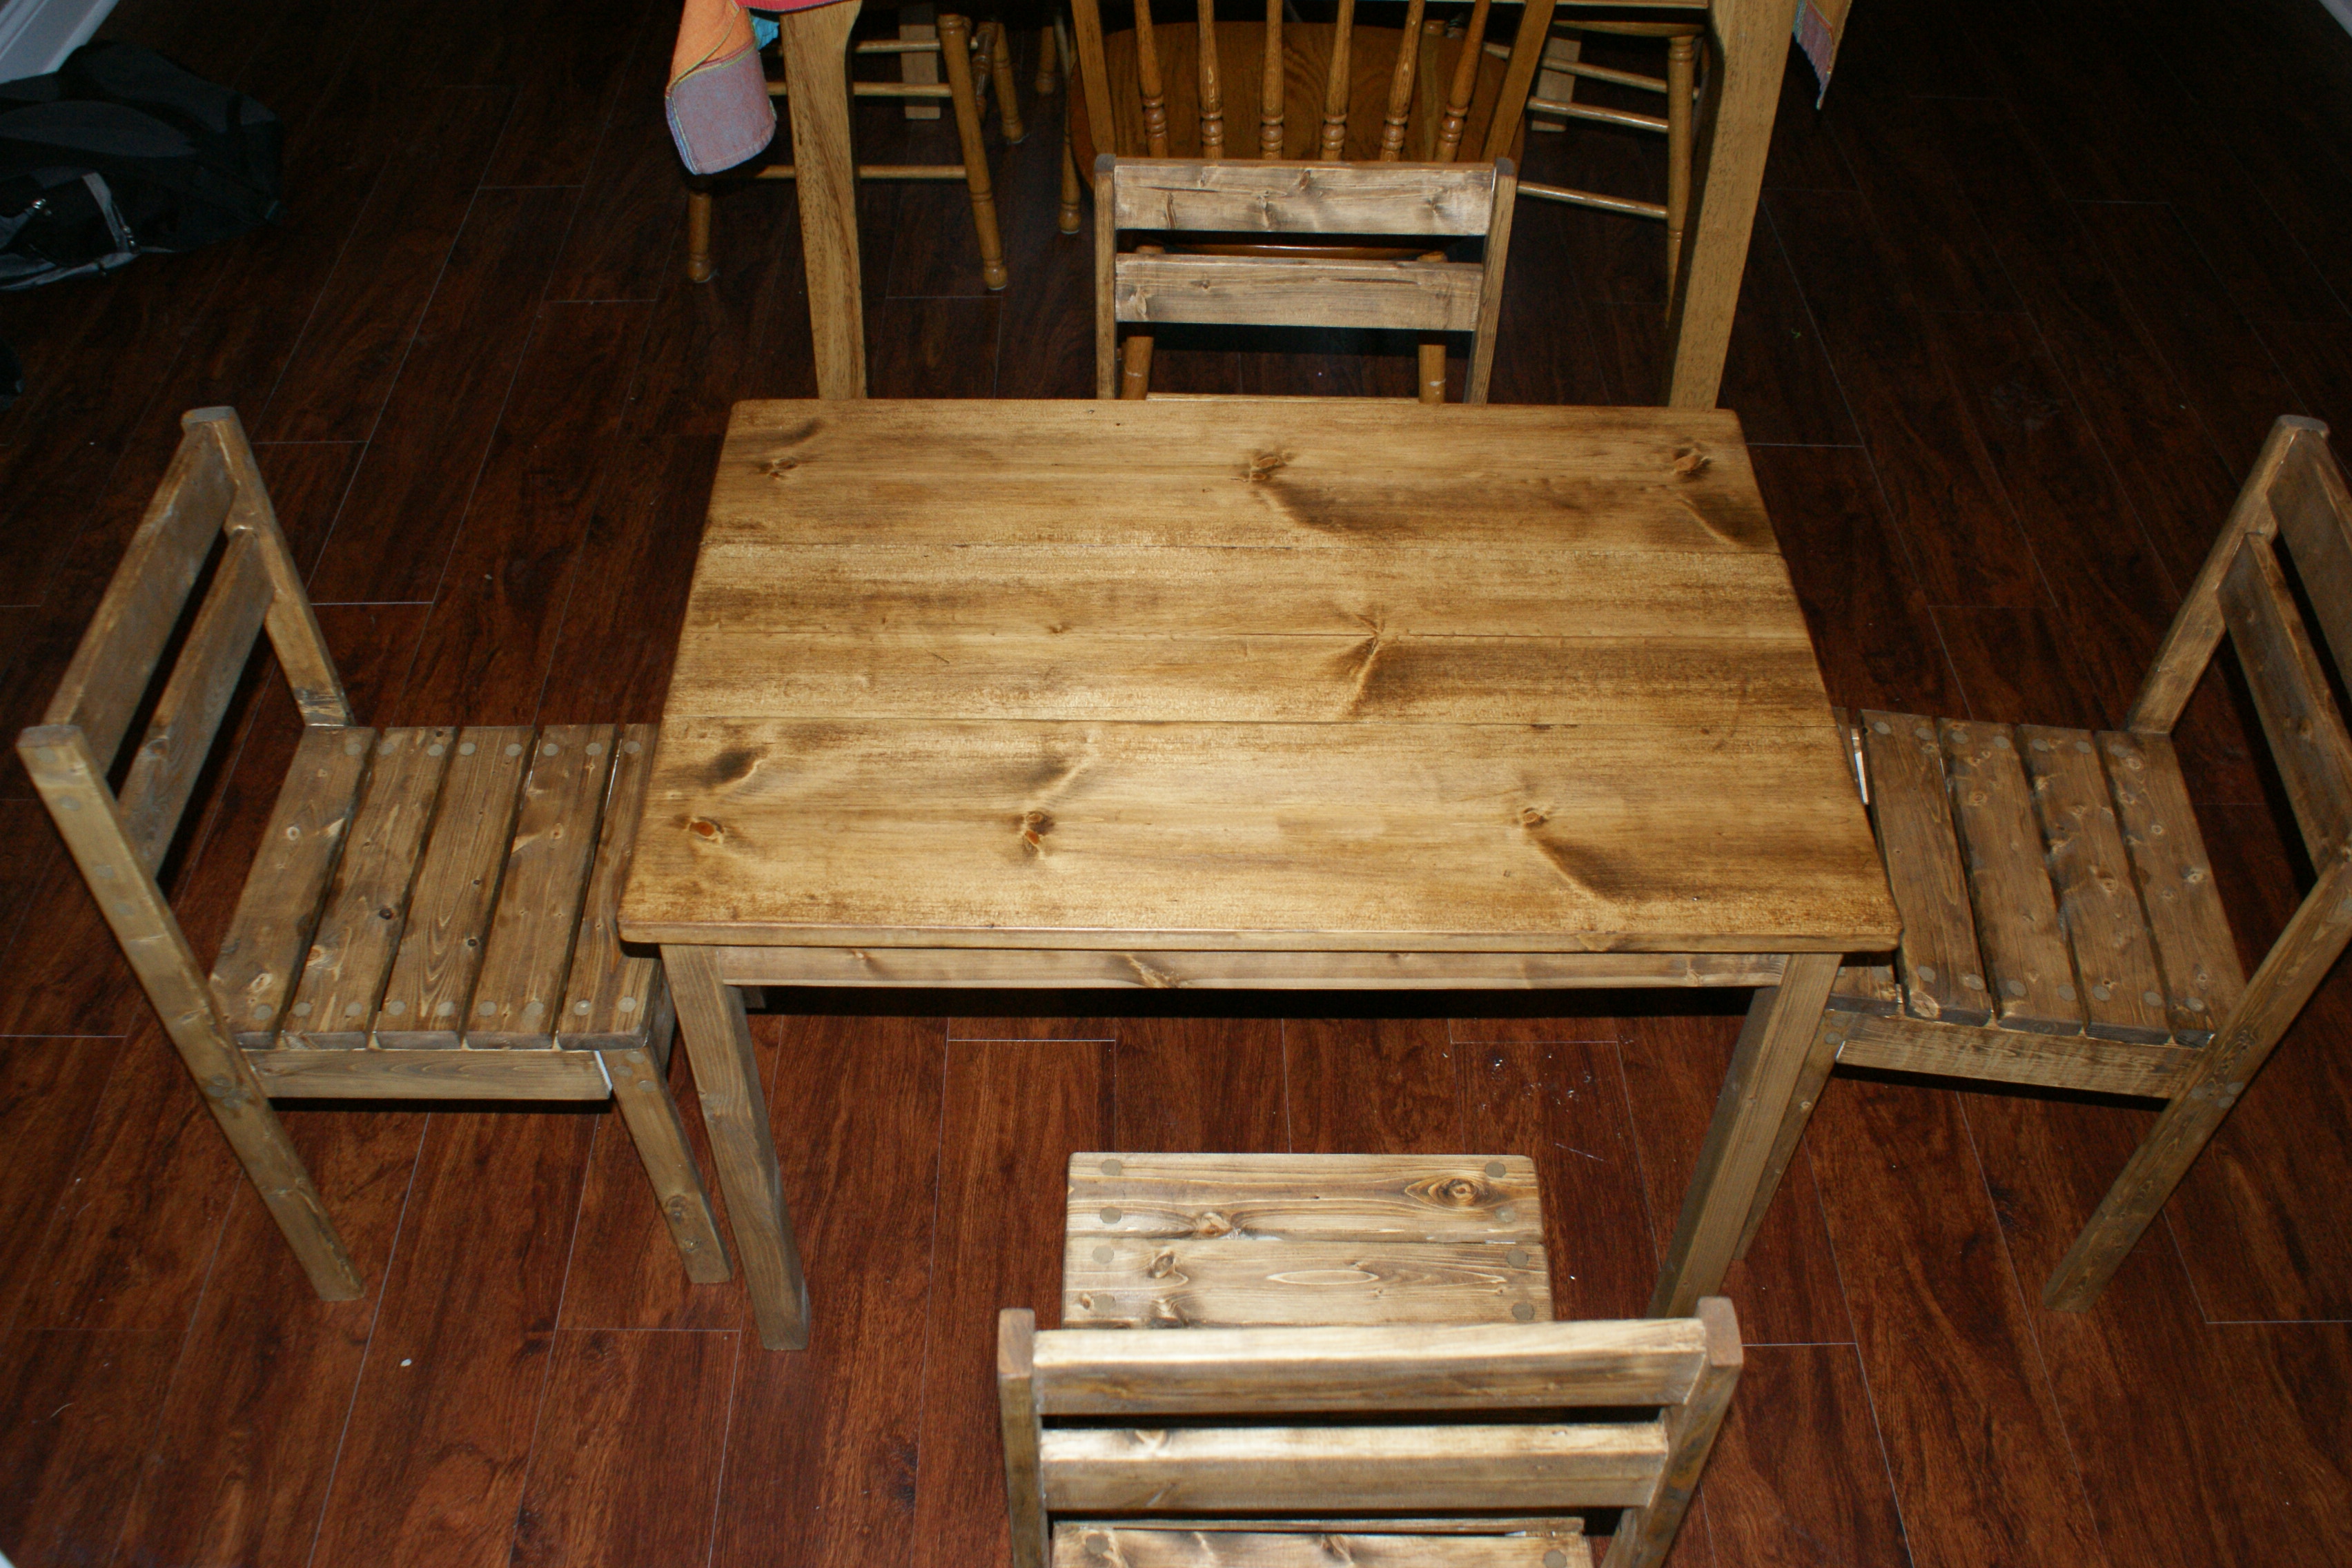
Made this for a friend. Followed the plans from the Clara table, chairs were made from the 4 dollar stackable chair plan.
Finish was Watco Danish Dark Walnut oil, which i just discovered and love. Goes on even and isn't blotchy on pine. For the table top i added a couple coats of polyurethane.
The table was easy to make, but the chairs took quite a bit of time with the amount of slats. Also there are about 30 screw holes per chair to drill, countersink and fill with putty. I am making another set for someone else, and will probably go with a single, wide slat for the back and seat. Also I would suggest adding braces to the legs, they seem a little flimsy
Built from Plan(s)
Estimated Cost
$50
Estimated Time Investment
Weekend Project (10-20 Hours)
Finish Used
Watco Danish Oil Dark Walnut
Minwax Poly
Minwax Poly
Recommended Skill Level
Intermediate
Comments
Lounge chairs
New chairs for our lake house. They turned out realy comfortable. Thank you Ana!
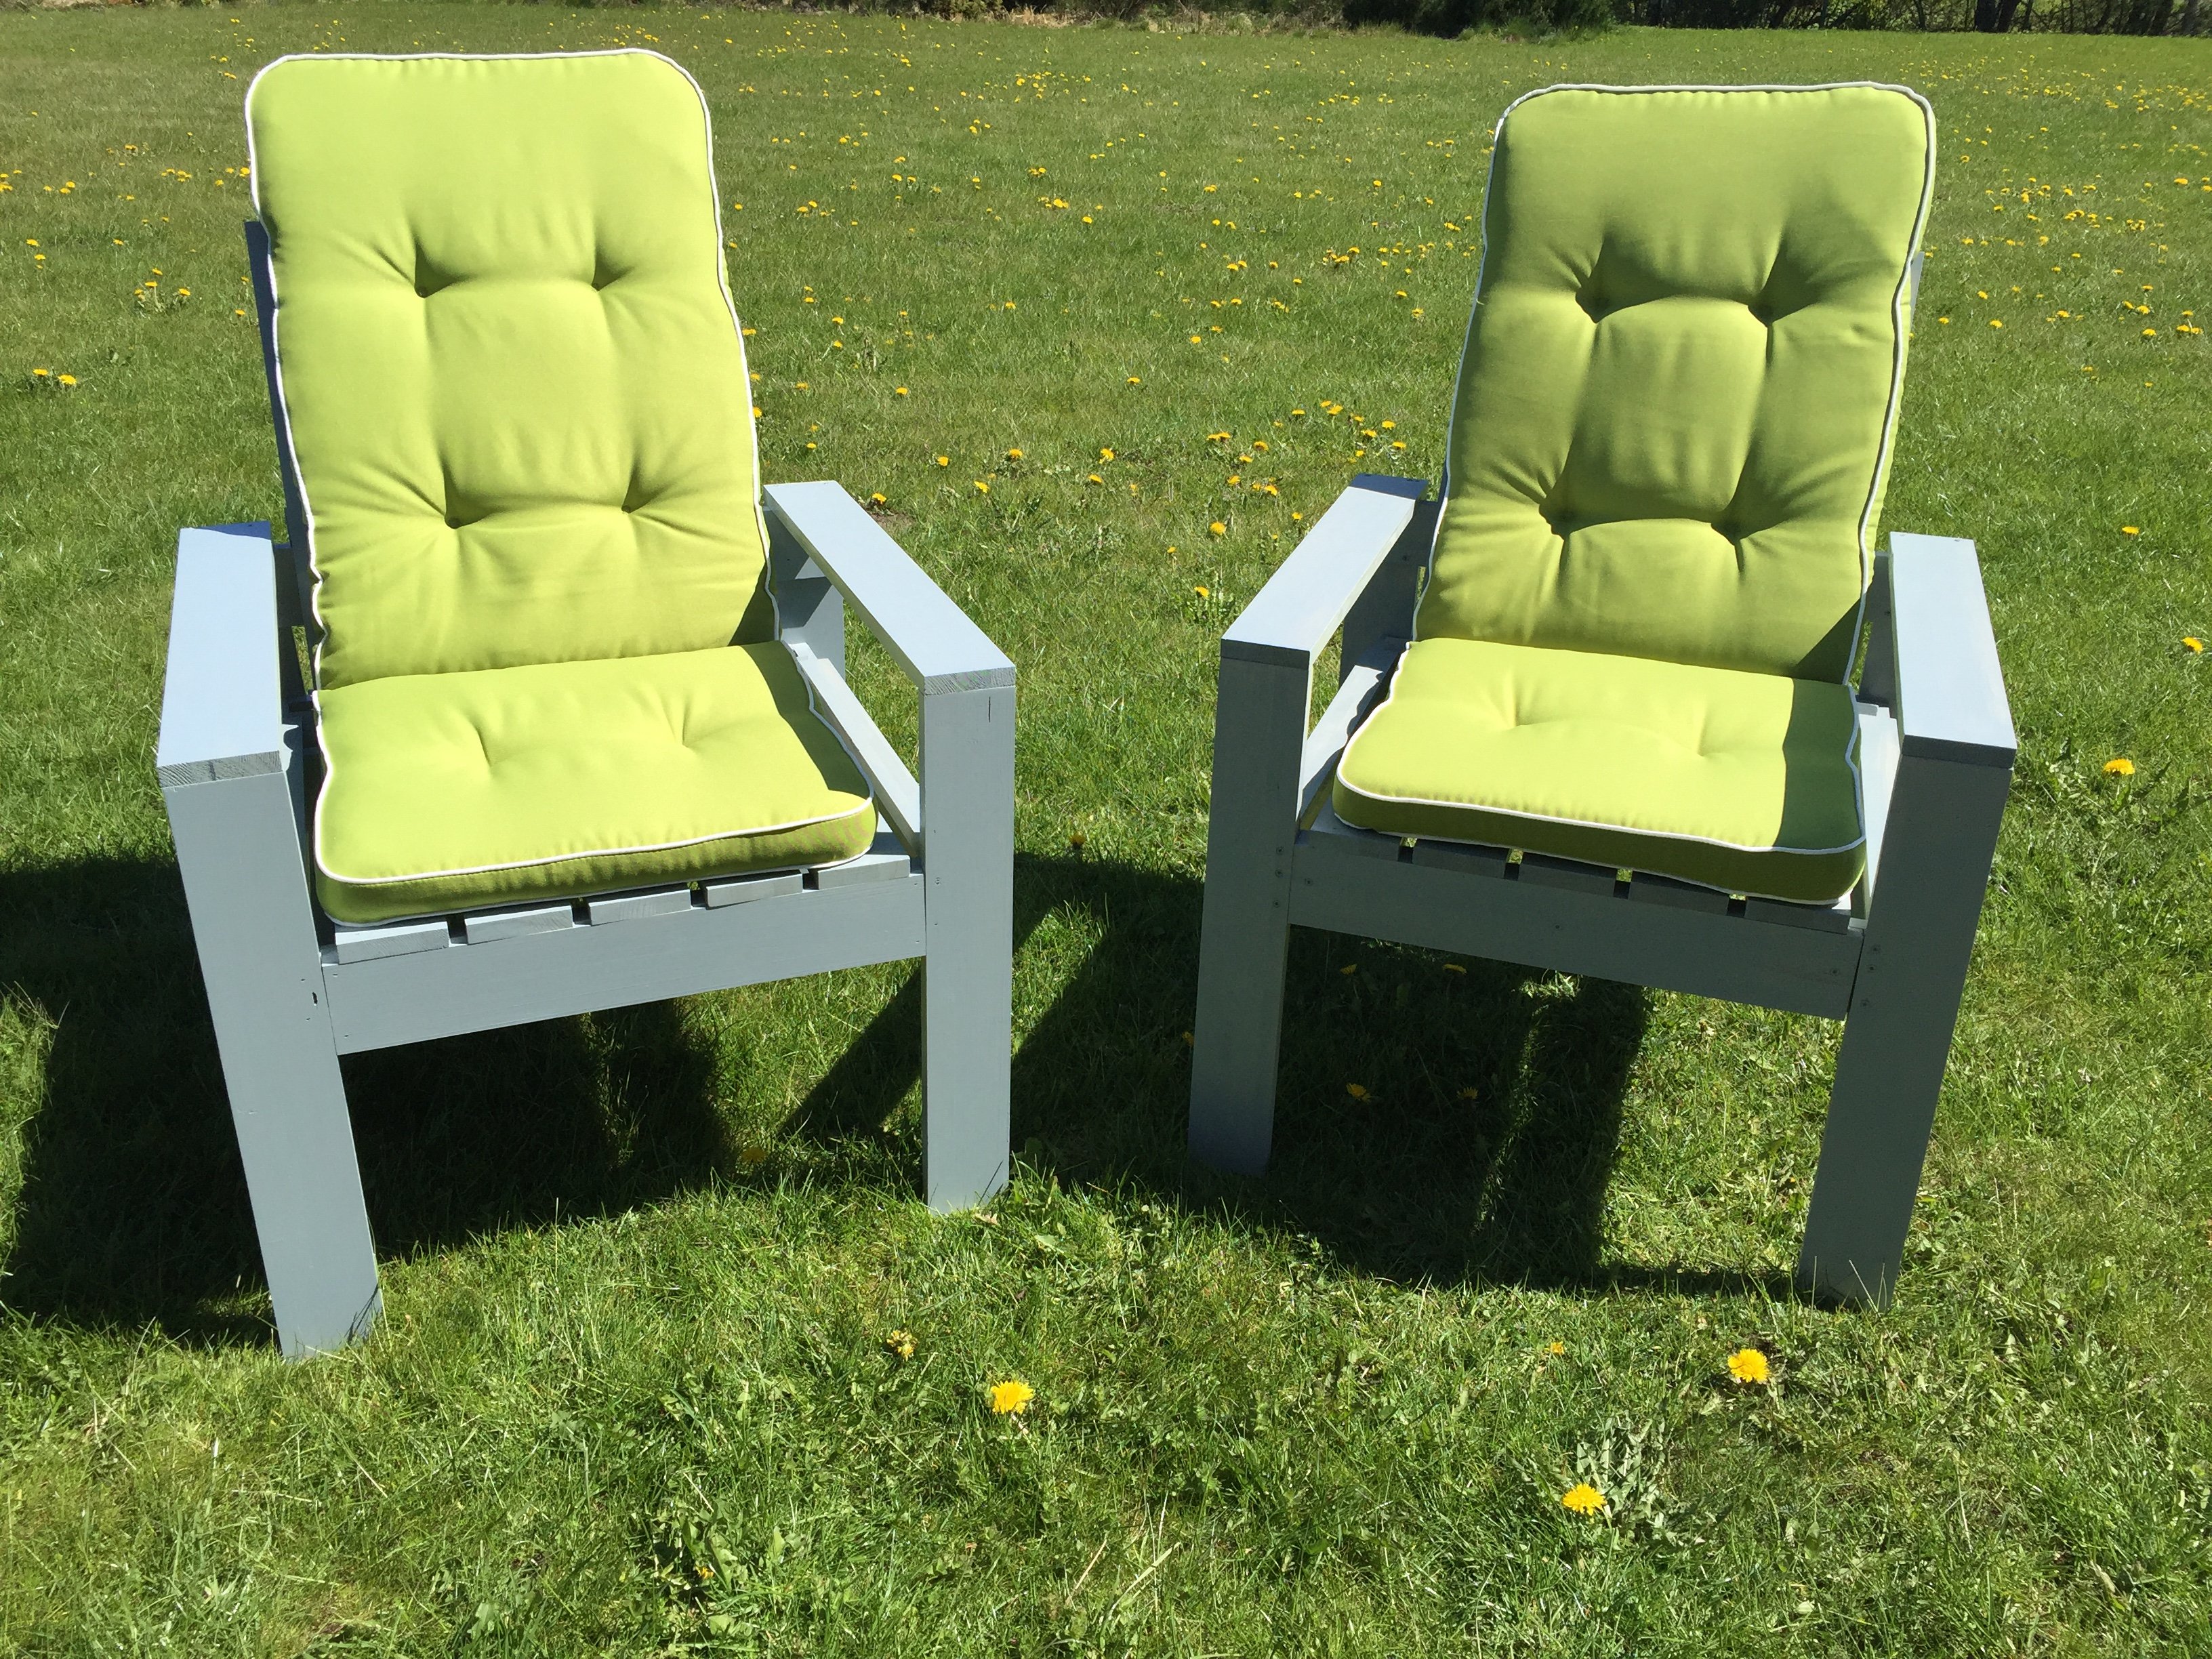
Built from Plan(s)
Estimated Time Investment
Weekend Project (10-20 Hours)
Recommended Skill Level
Beginner
Rustic X Bookshelf
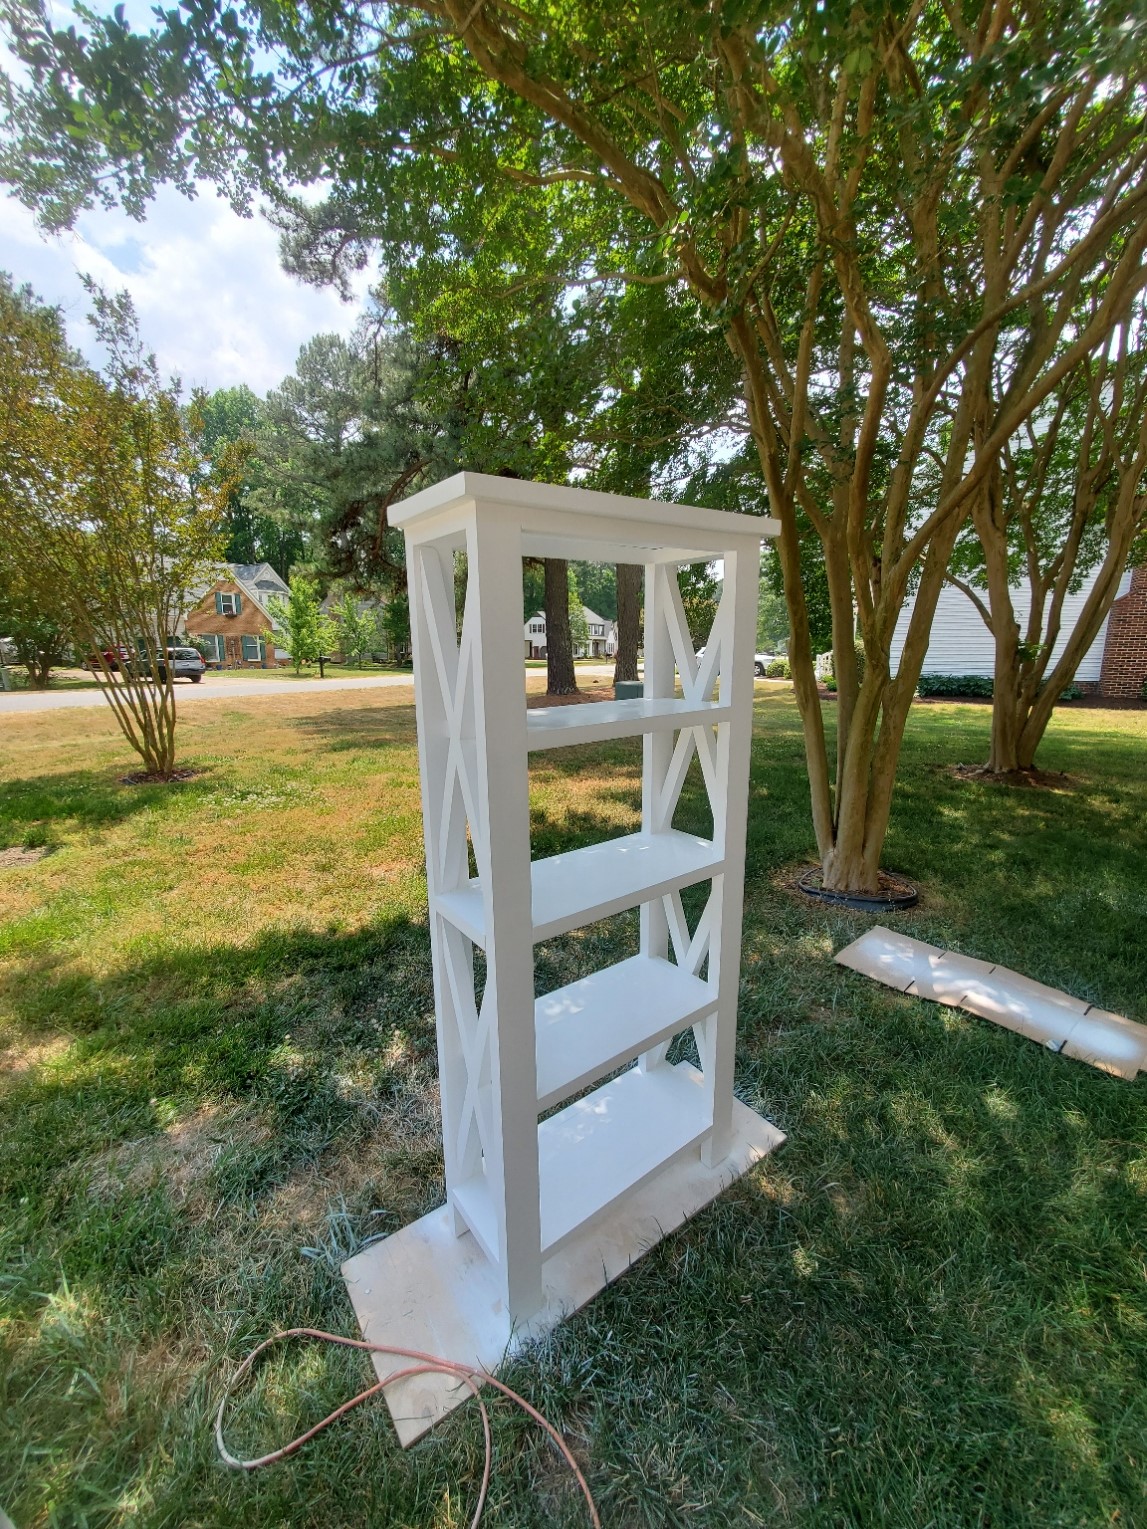
used Ana's plans, just modified the width and depth.
Built from Plan(s)
Estimated Time Investment
Week Long Project (20 Hours or More)
Finish Used
white primer and paint
Recommended Skill Level
Intermediate
Comments
Fri, 05/28/2021 - 12:35
This is officially DONE!,…
This is officially DONE!, just waiting for the paint to dry. Turned out heavier than I thought it would. Next time would try to use thinner materials. The X's weren't too bad, but were still a PIA. ... thats why most of them live in Texas
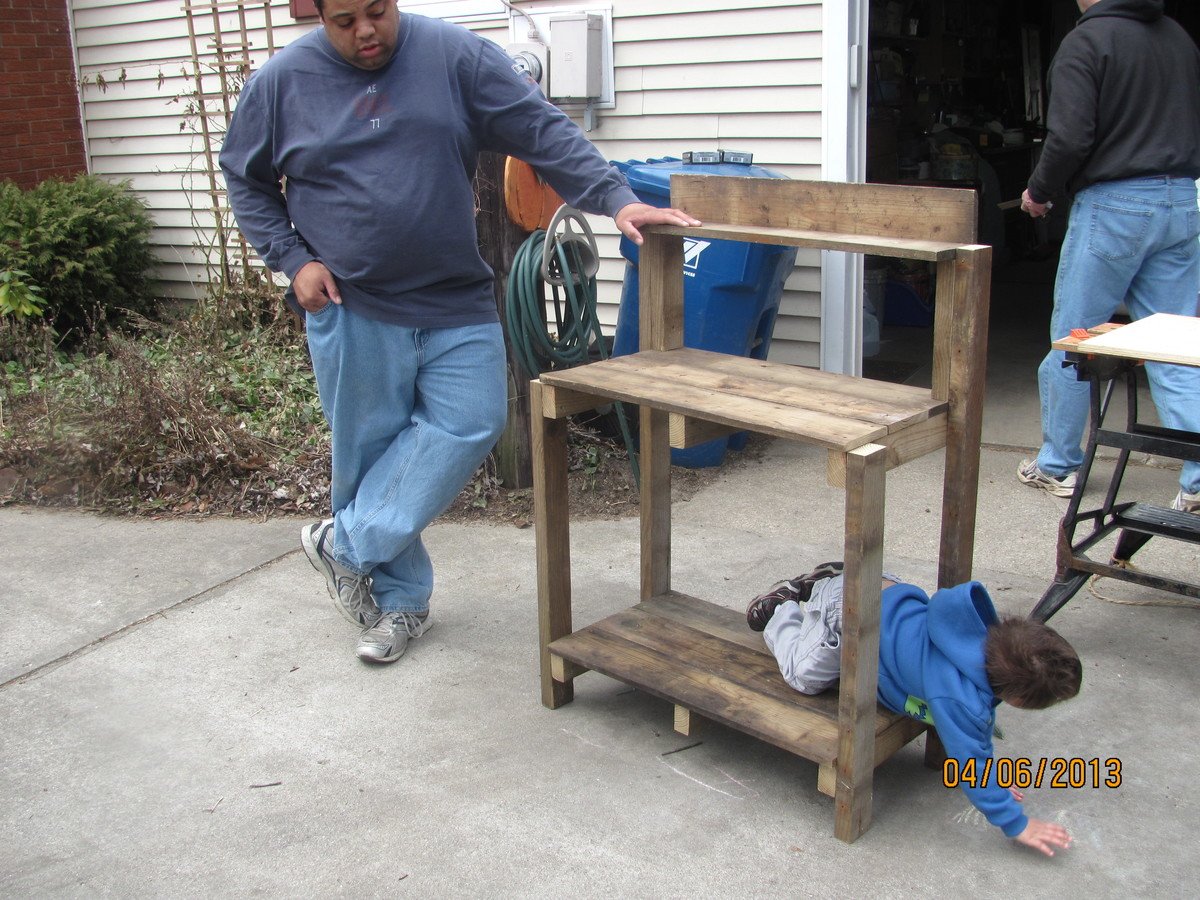
Simple Potting Bench turned sand table/ outdoor toy storage
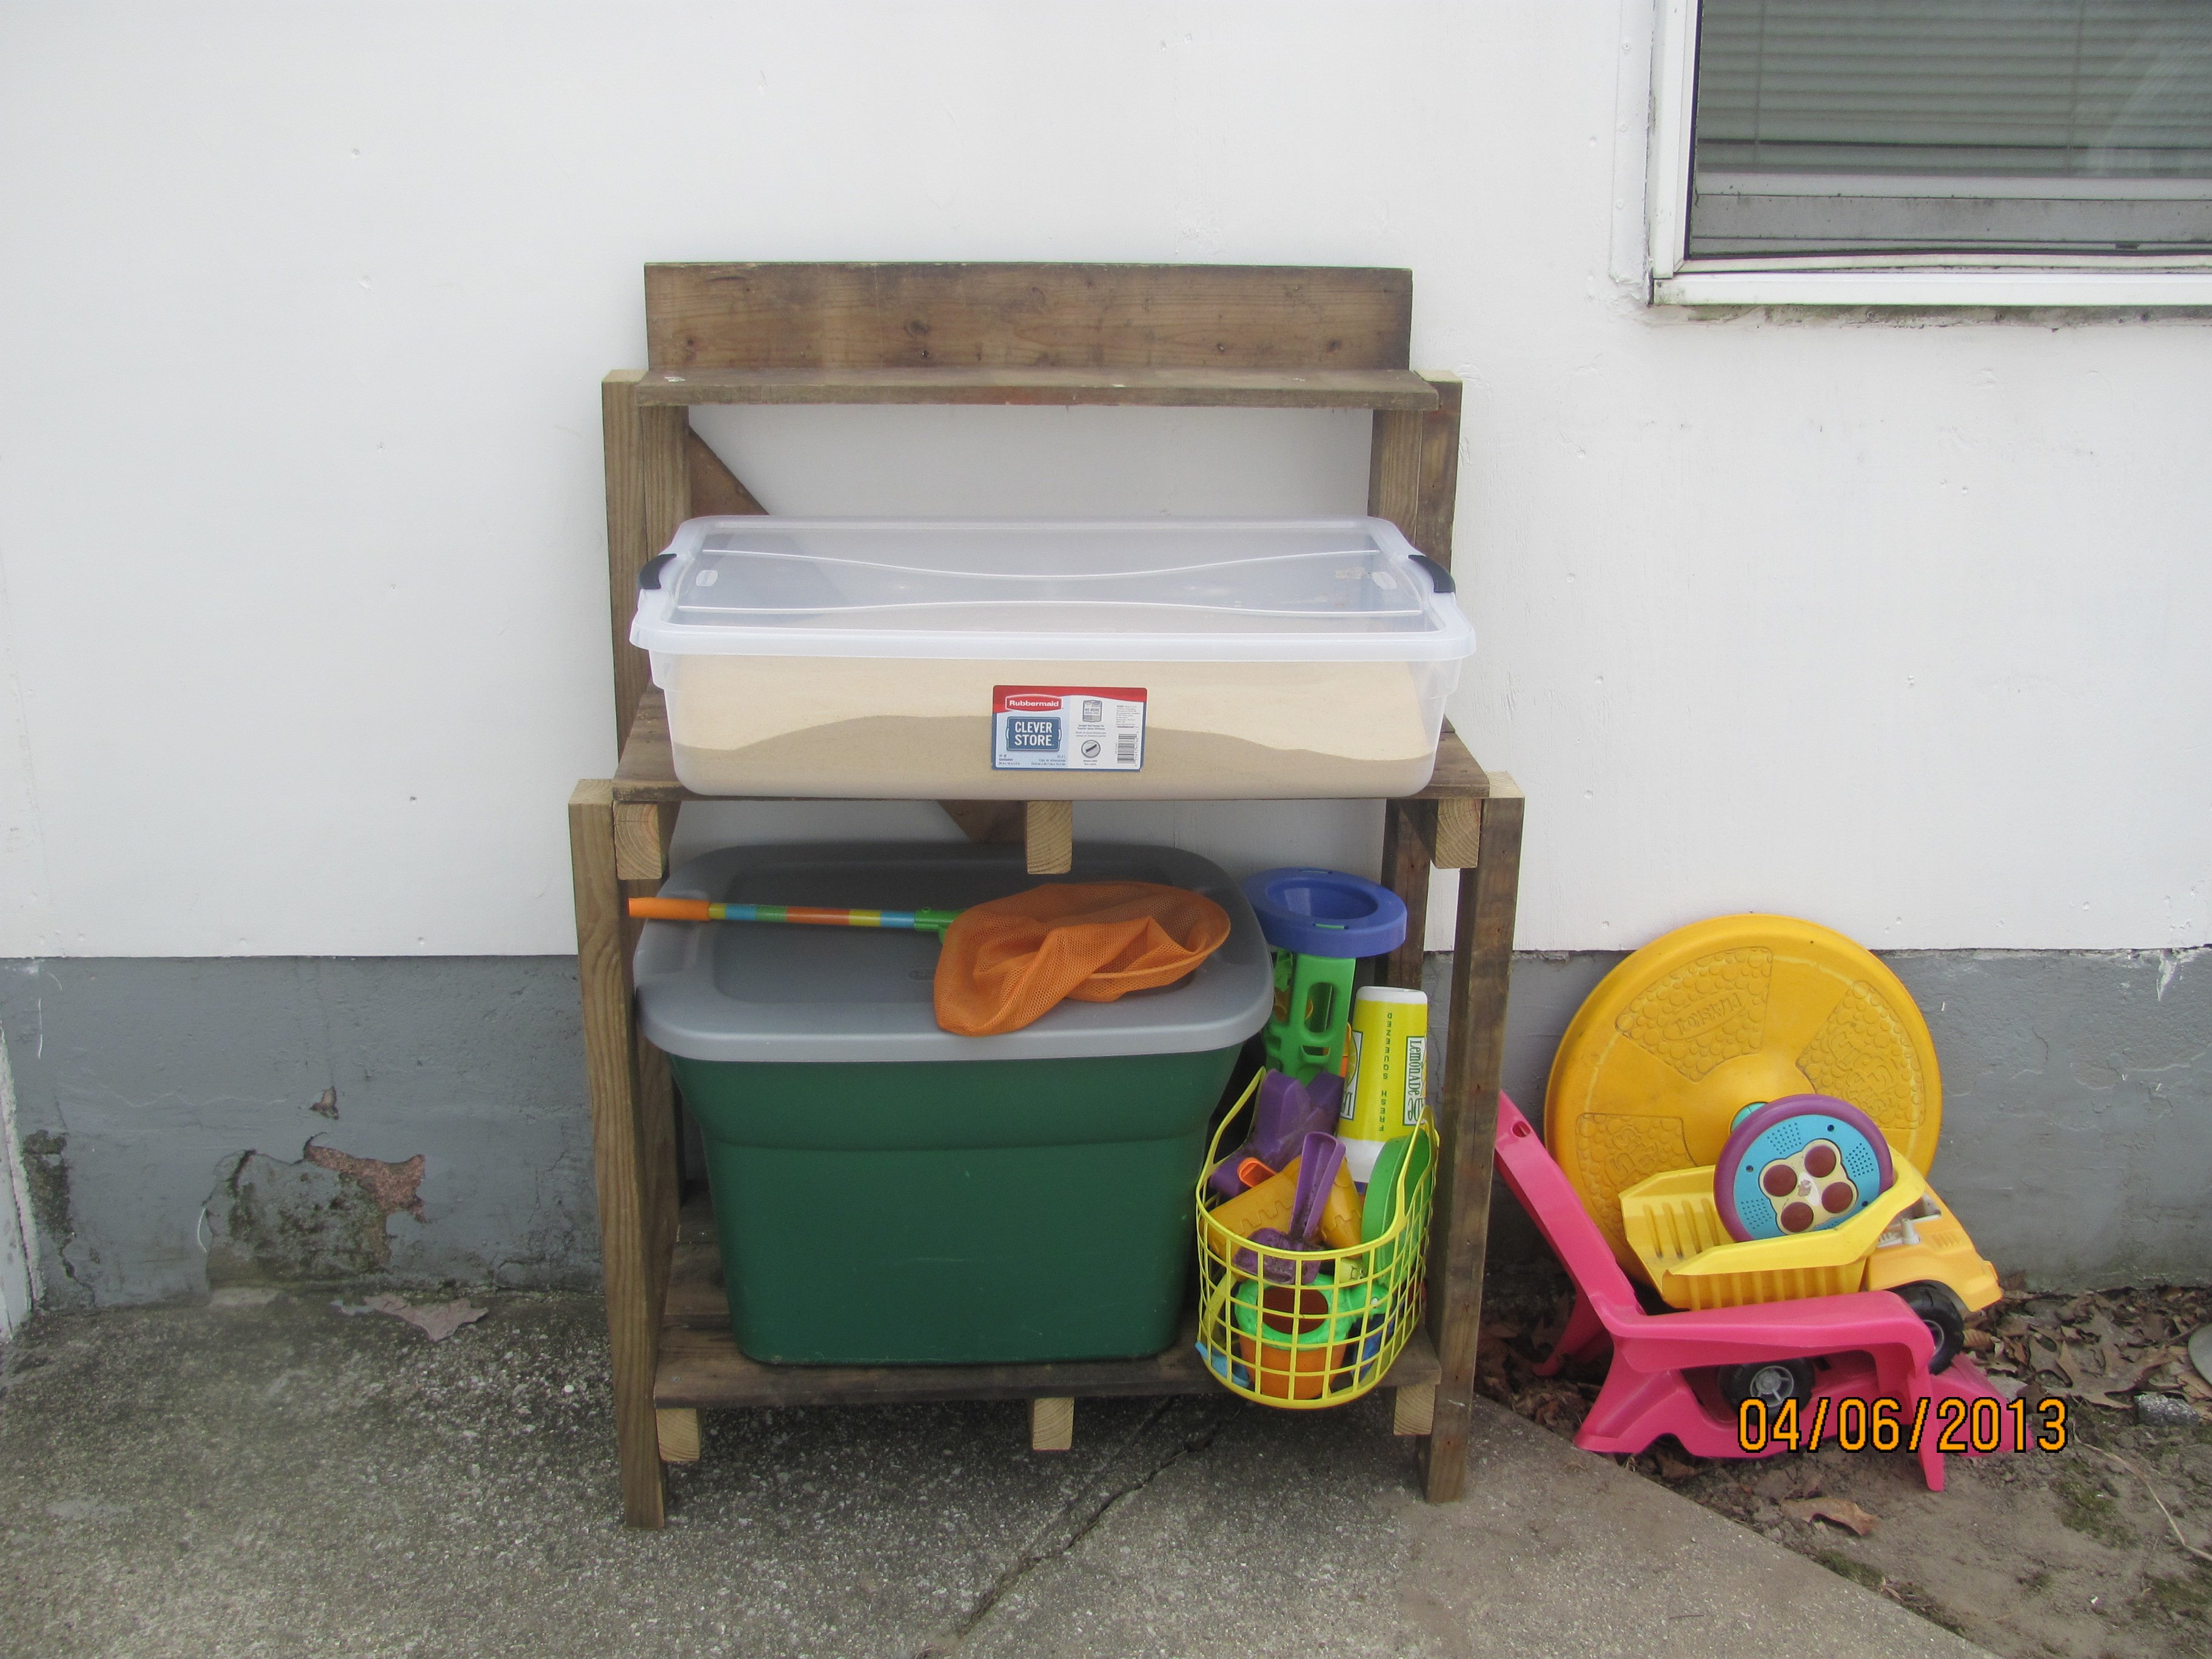
I wanted to build my kids a sand/ water table, but wanted something that would could also serve as other purposes. My father helped me since I used his tools. We shortened the whole project by 16% so my kids would be able to reach it better. We also changed up what wood was used. My father came through and had a pile of wood that he had no use for. So we used 1x6's that we cut down for the shelves and 2x4's for everything else. We also added a brace on the back to add a little more stability to the bench since my kids were going to use it. To finish it up I bought a plastic storage tub with a lid and some sand. The bottom shelf is used for toy storage.
Built from Plan(s)
Estimated Cost
$25 (cost of 2 boxes of screws, plastic tub and bag of sand... wood was free)
Estimated Time Investment
Afternoon Project (3-6 Hours)
Finish Used
None
Recommended Skill Level
Beginner
Clara Table and Chair and a bench
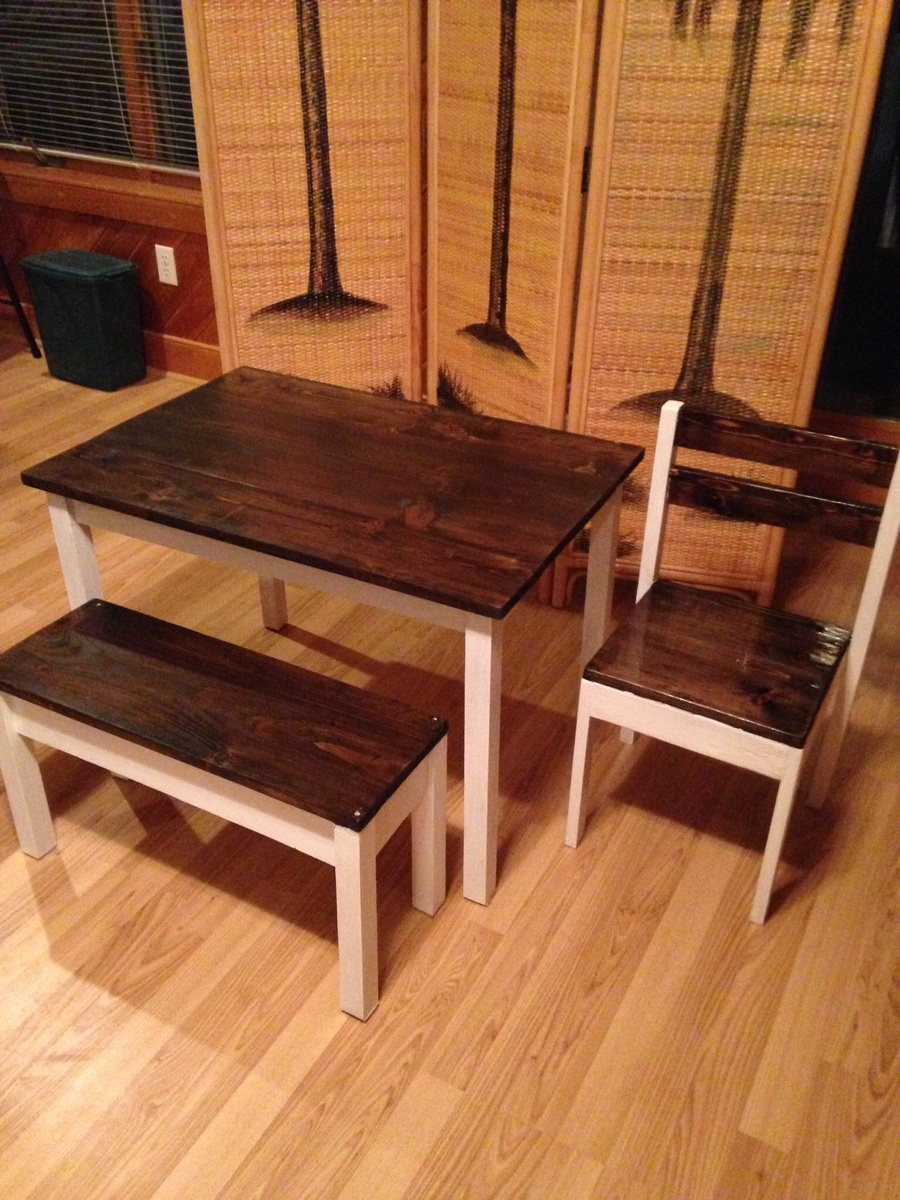
I used a 1 x 12 and 2 1 x 6 for the table top because thats what had on hand. I used Jacobean stain on the top and poly. I used white paint and glaze on the aprons and legs. 2 coats.
Built from Plan(s)
Estimated Time Investment
An Hour or Two (0-2 Hours)
Finish Used
Jacobean stain on top. white paint and glaze on the aprons and legs.
Recommended Skill Level
Starter Project
Adult and child adirondack
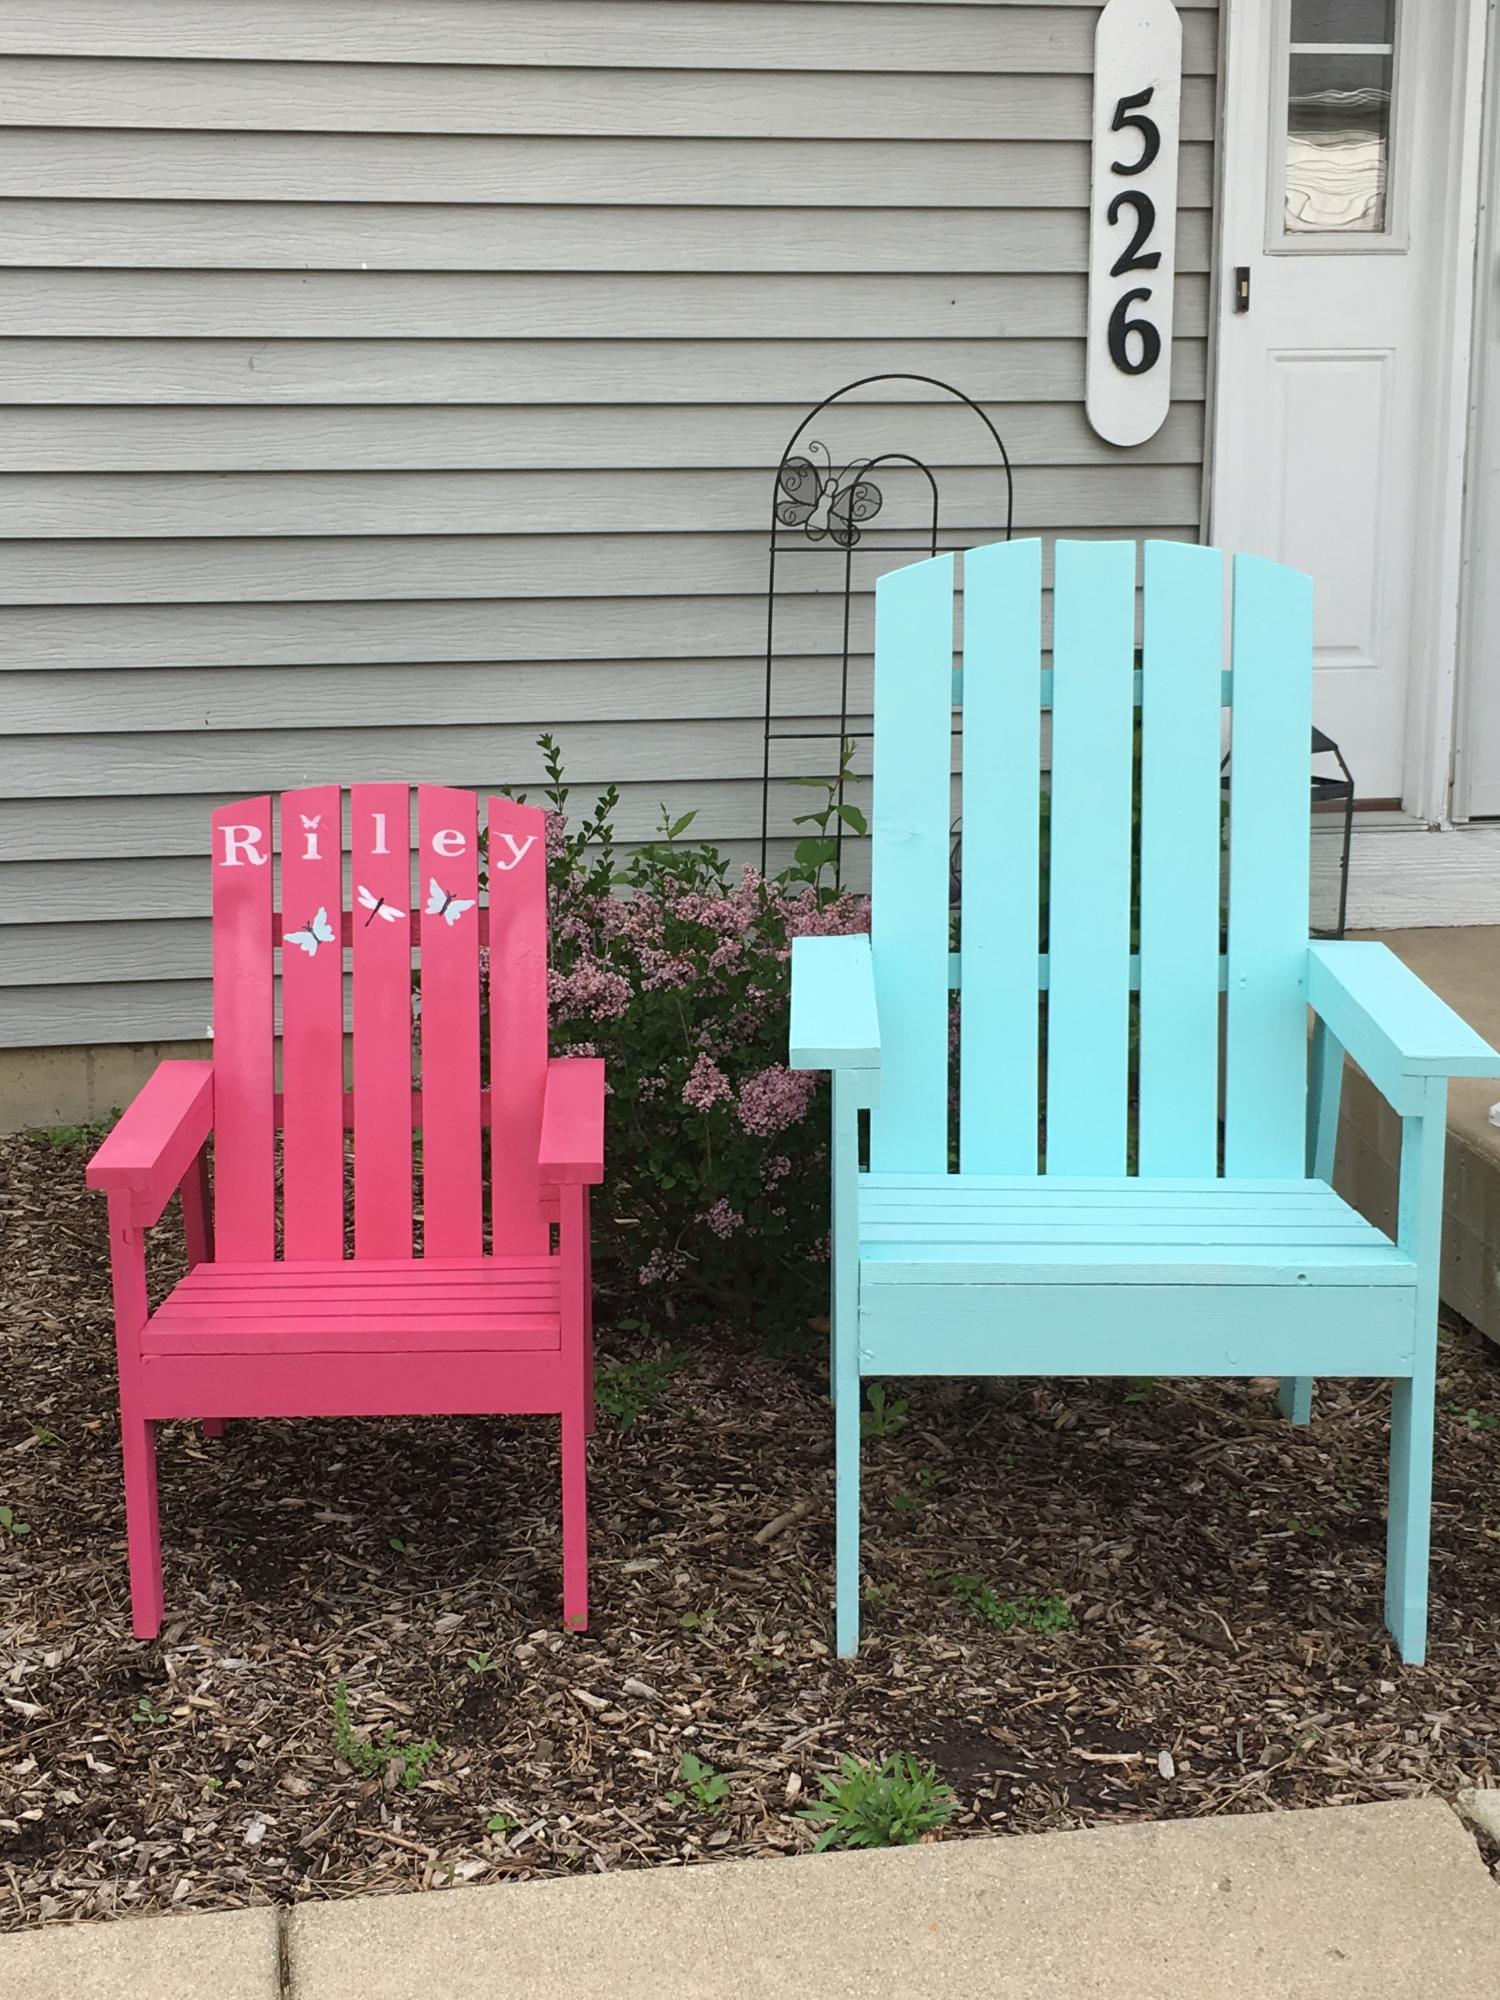
Love Ana's projects. Made a few mistakes, but all and all a fun and easy build
Built from Plan(s)
Estimated Cost
$40-$50 per chair
Estimated Time Investment
Afternoon Project (3-6 Hours)
Finish Used
Outdoor paint for the adult chair and spray paint for the child's. Used my cricut to make the stencil for the name and bugs.
Recommended Skill Level
Beginner
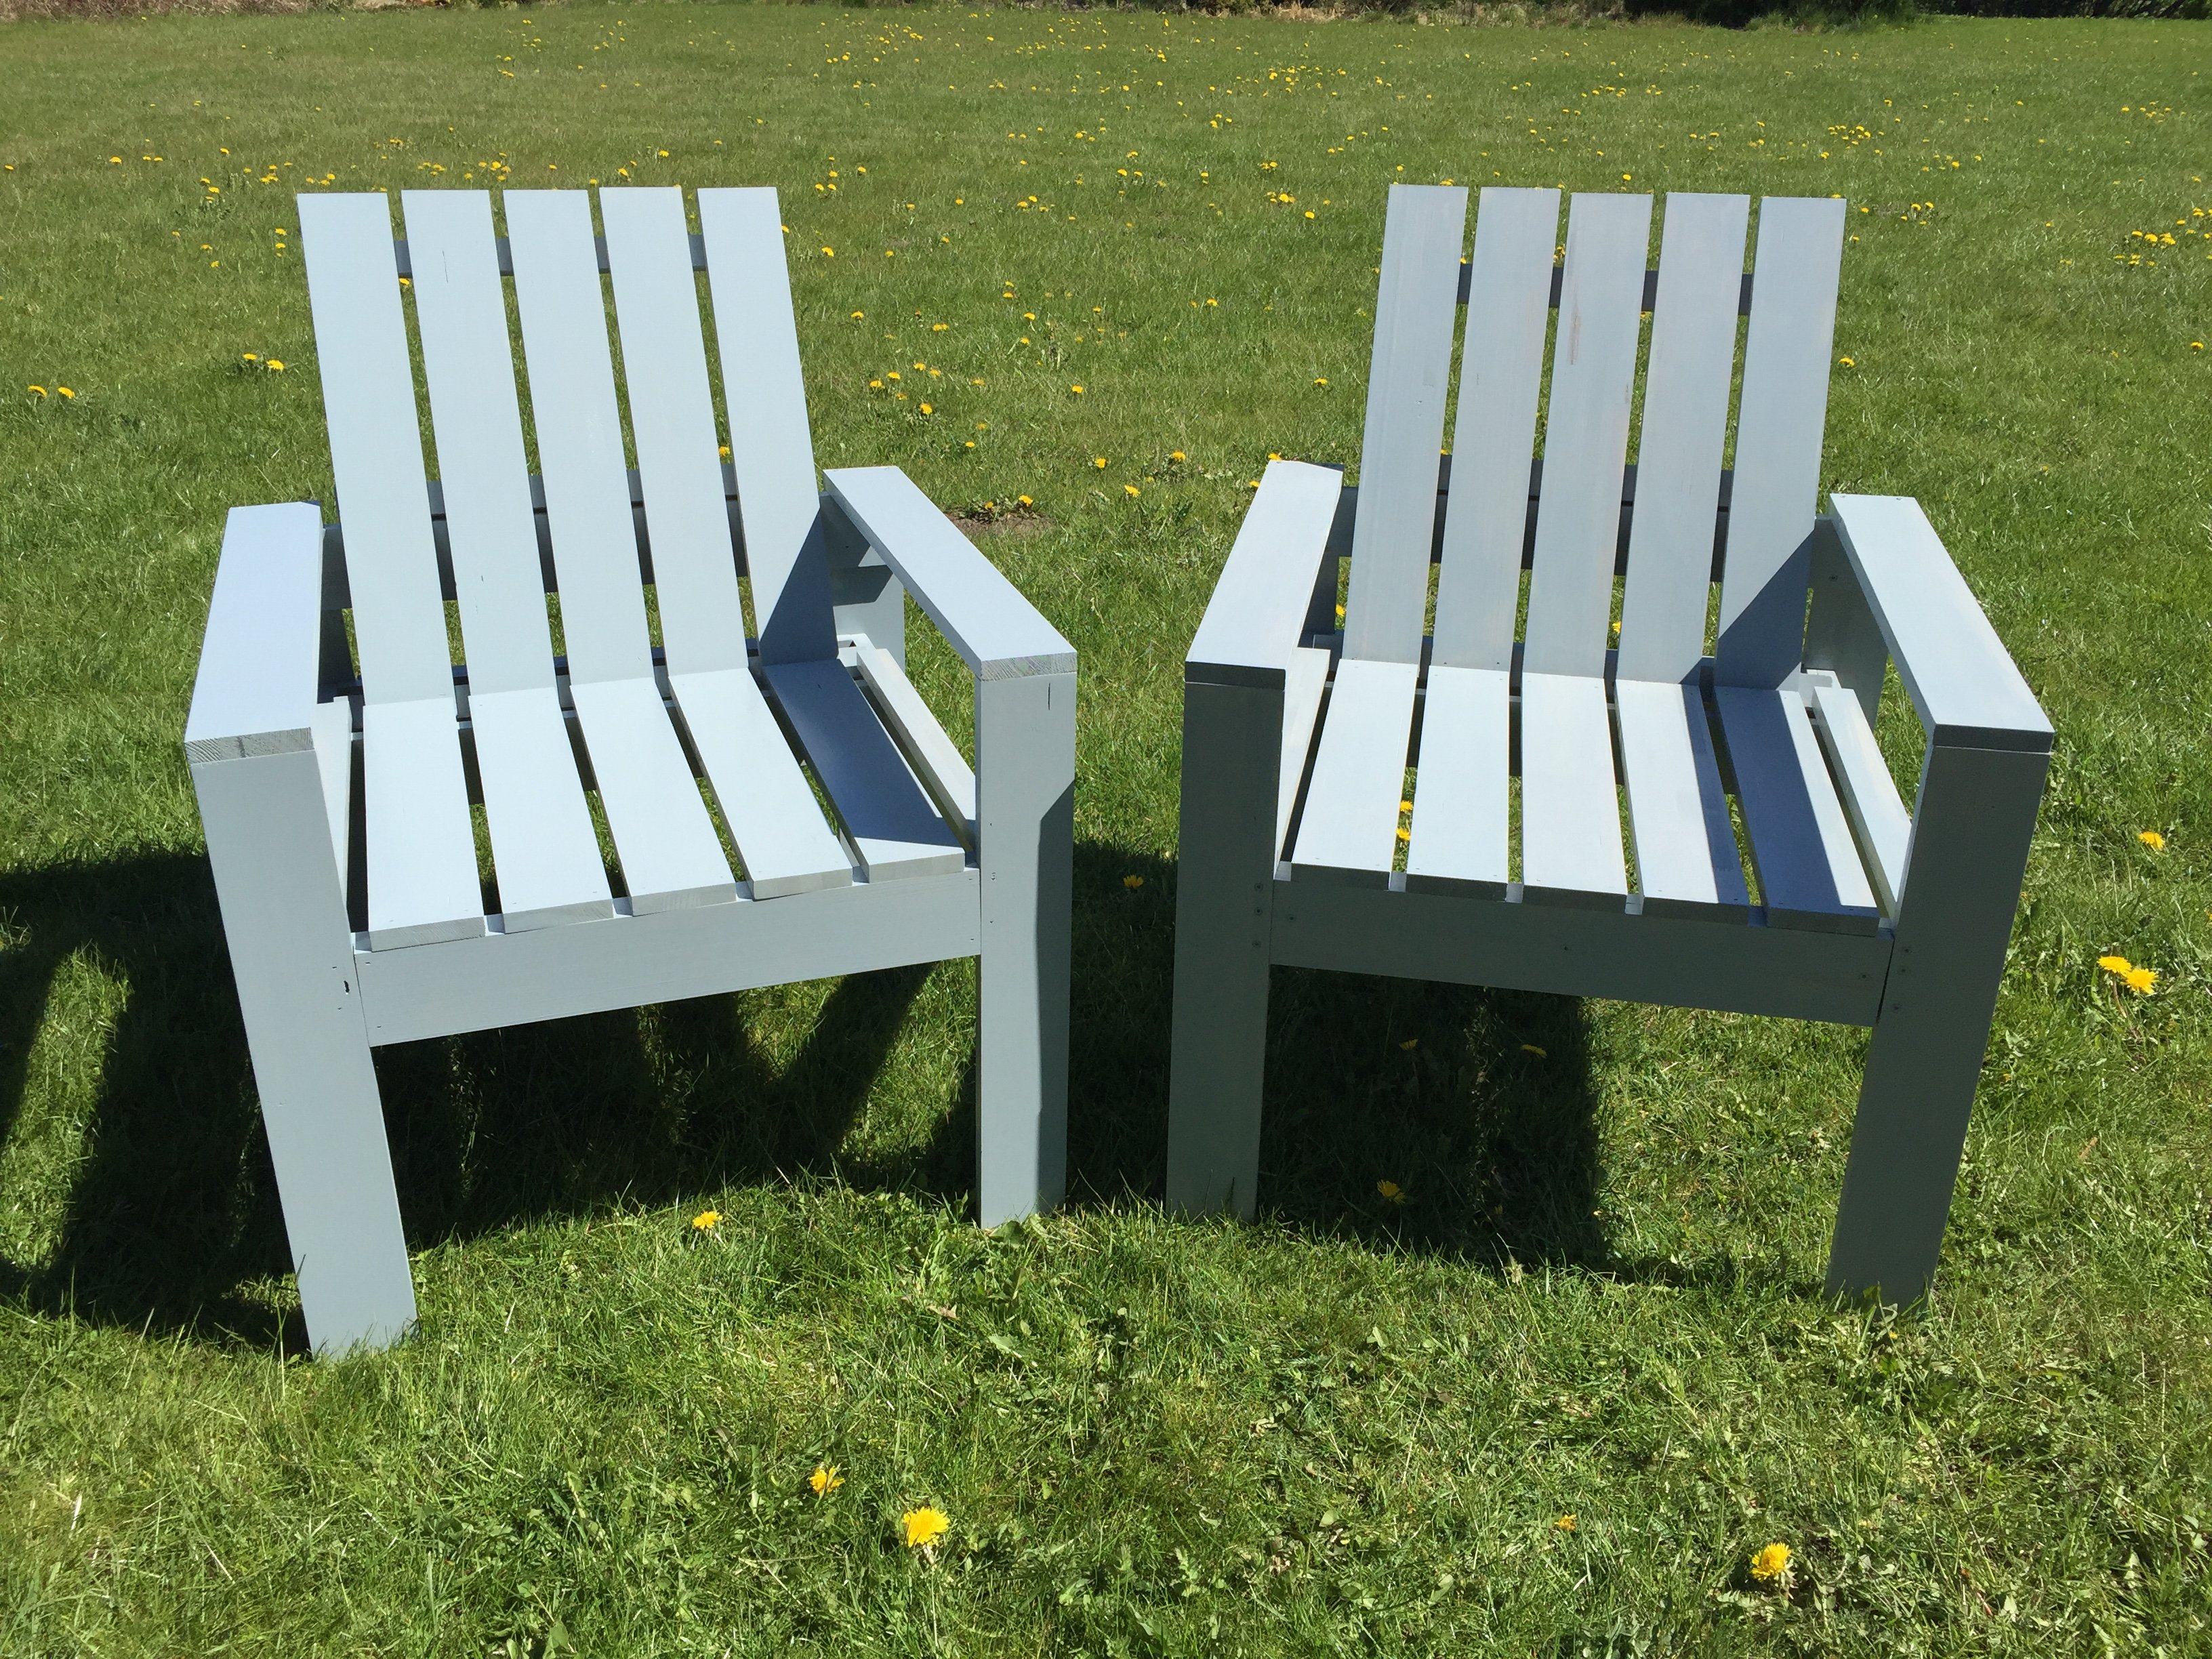
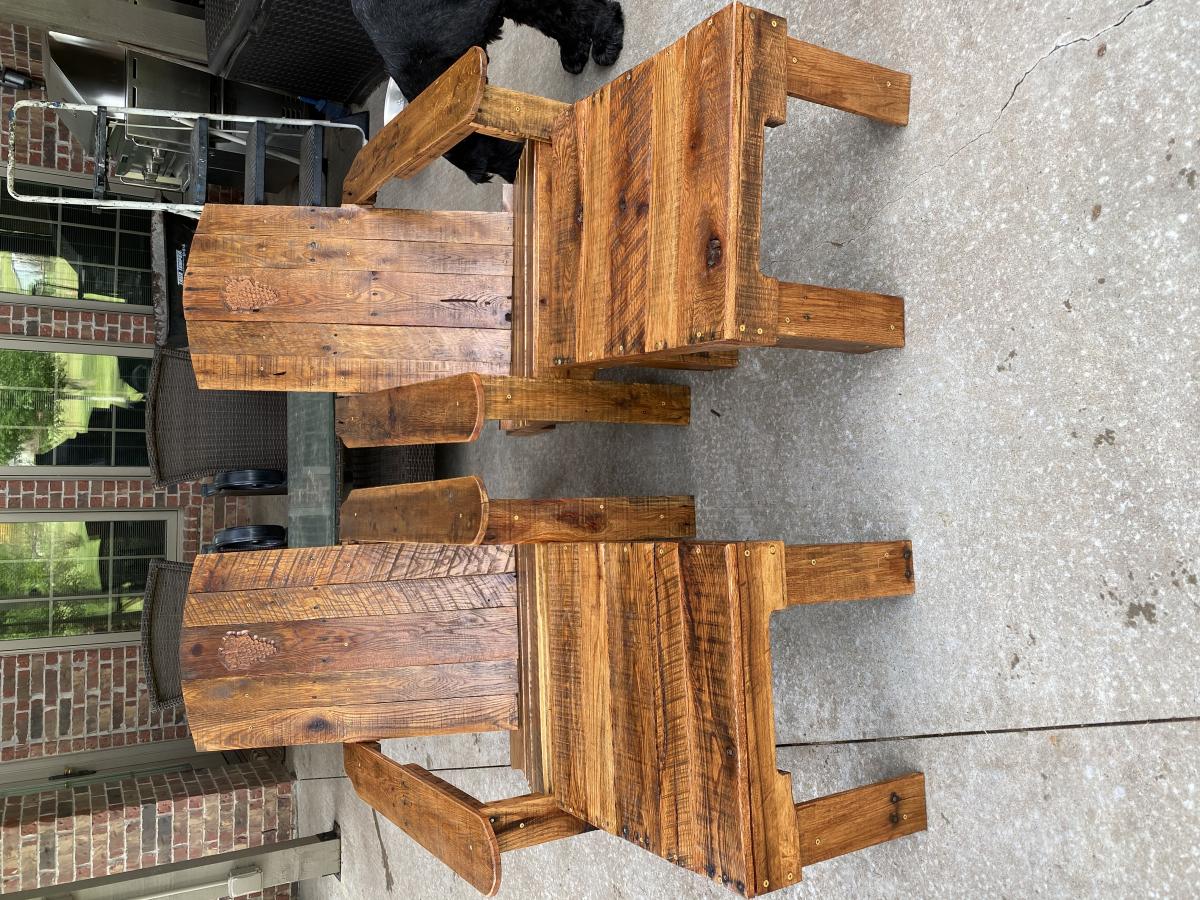
Modern Adirondack chairs
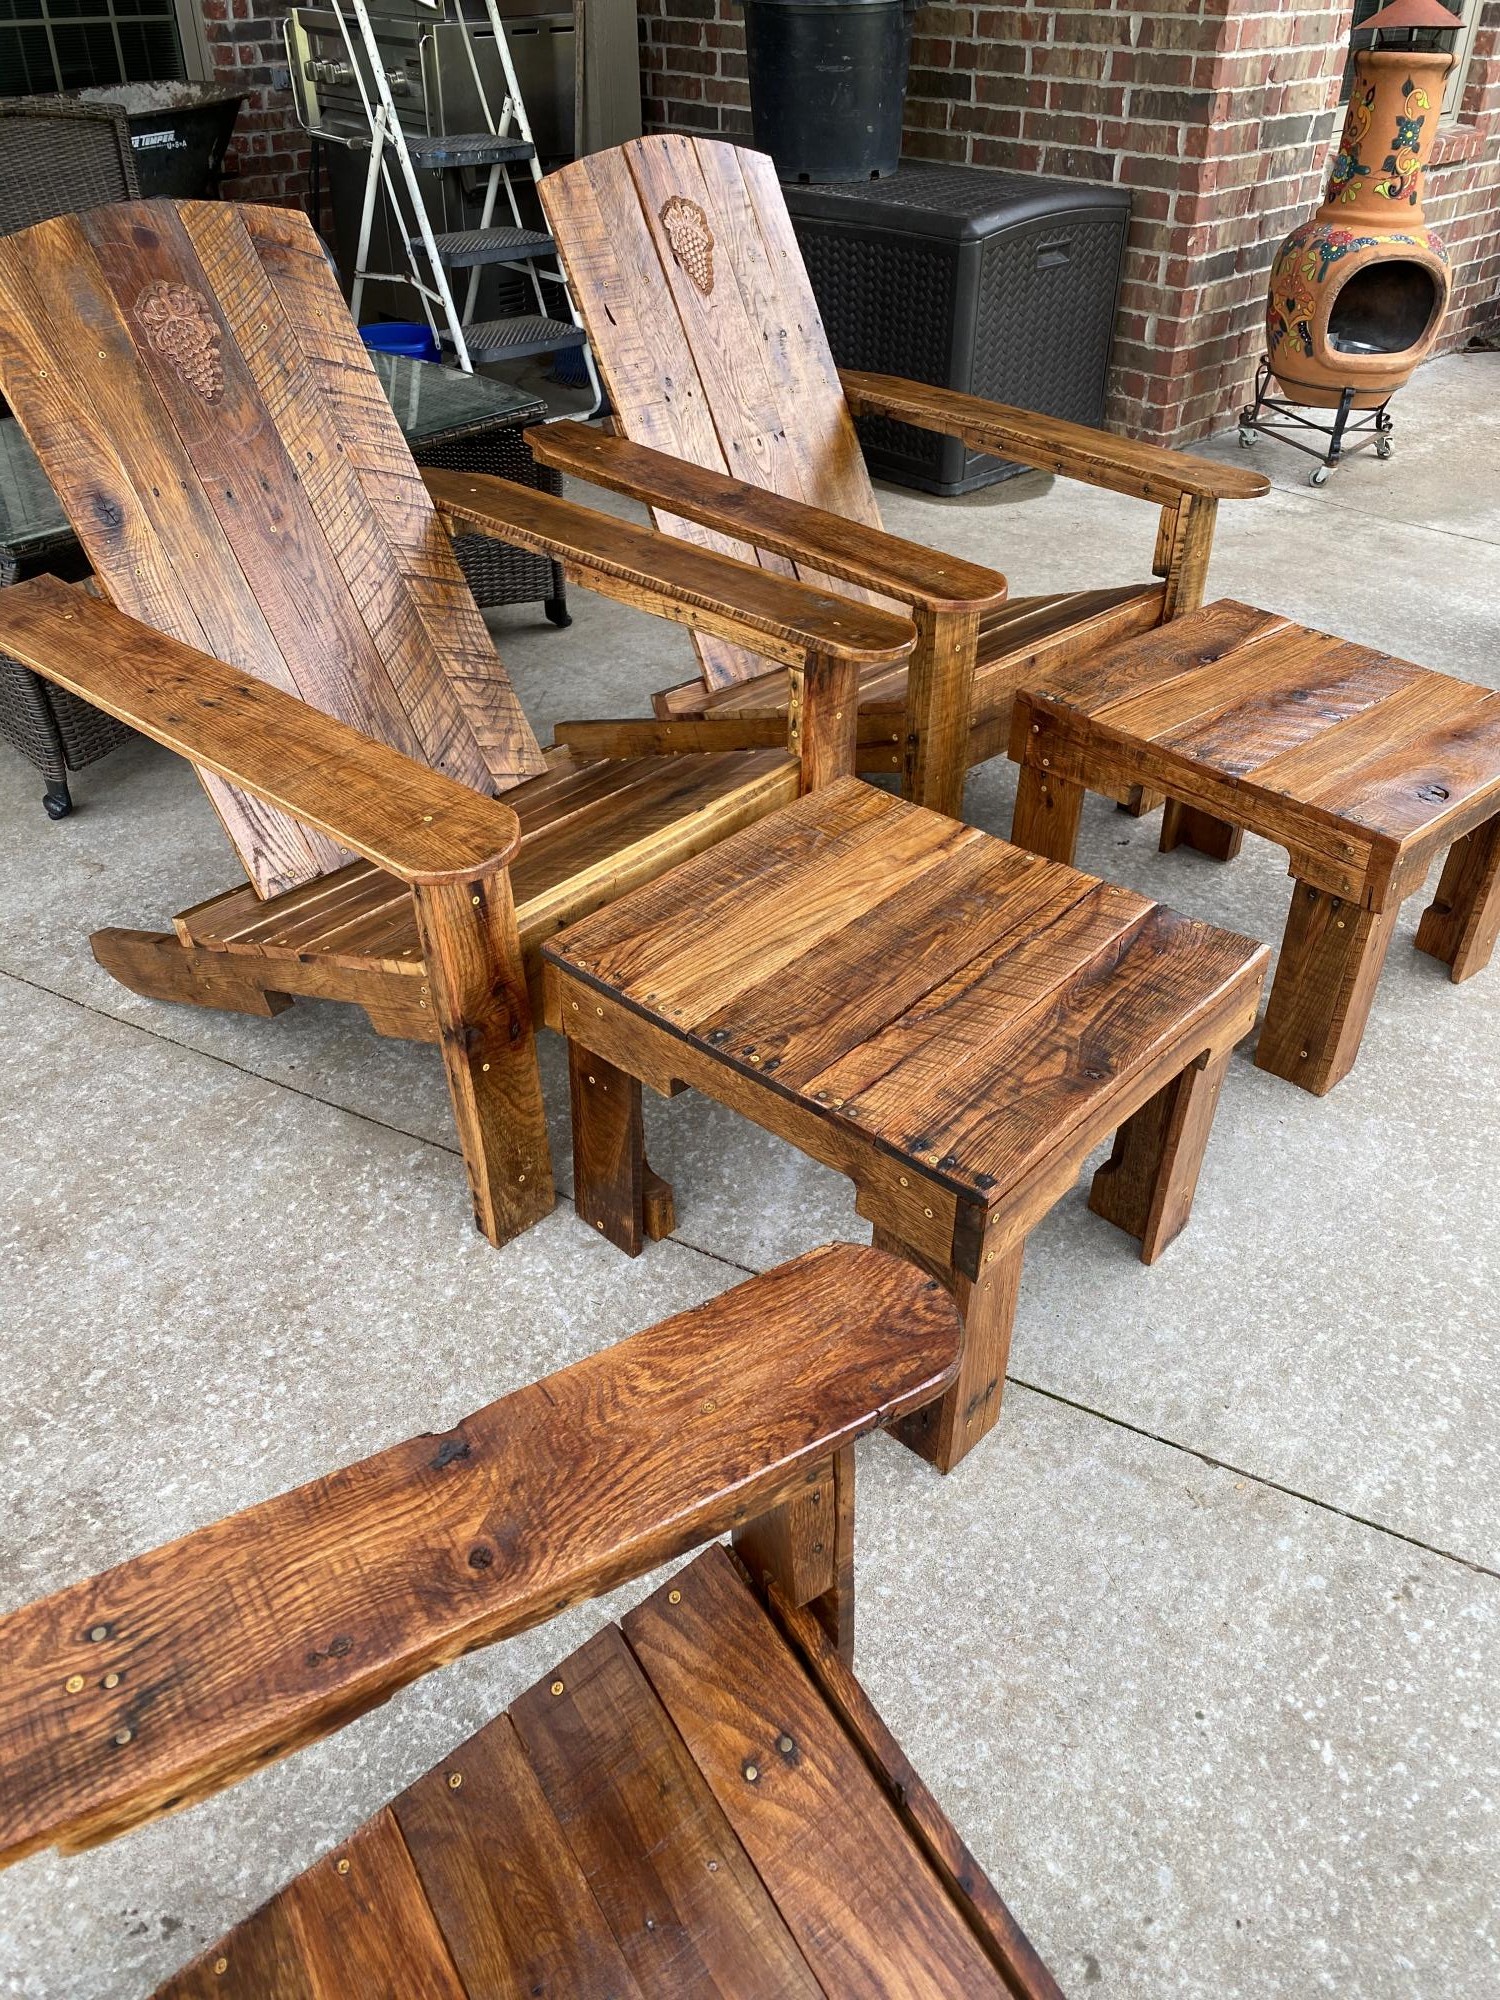
We used Ana’s plan for modern Adirondack chairs and modified them to build out heat treated pallet wood. The chairs are very comfortable. We appreciate her plans!
Built from Plan(s)
Estimated Time Investment
Week Long Project (20 Hours or More)
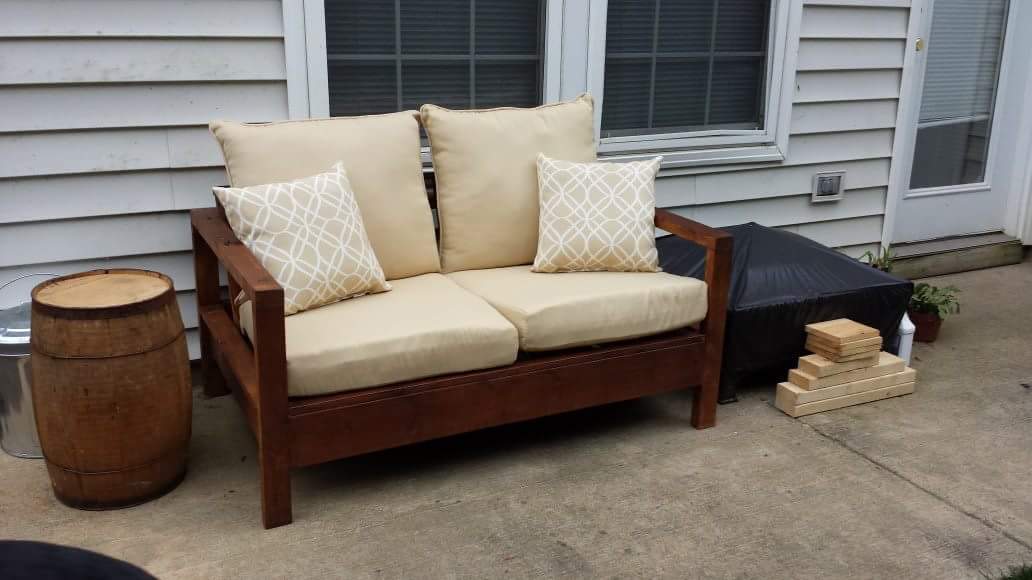
Bristol Outdoor Lounge Chair and Table
I made these chairs and table for my father as a Christmas gift to sit next to his pool. The chairs were fairly easy to make. To stay within budget I did use inexpensive white wood so the quality of the grain was not quite what I had hoped but I believe they still came out very nice. I used BEHR weather proofing wood stain in RedWood which turned out very nicely. The only thing that is currently lacking are the cushions. Due to the price of the foam that will have to wait.
For the table I started with the original plans on the site but when I realized just how long it would be I cut it down and added the two thin strips to break up the pattern.
If I were to do anything differently I would shrink the overall size of the chair to the size of standard cushions that can be purchased at local department stores or outdoor furniture stores to minimize the cost.
Estimated Time Investment
Weekend Project (10-20 Hours)
Finish Used
BEHR1-Gal. Redwood Semi-Transparent Waterproofing Wood Stain
http://www.homedepot.com/p/t/202301646?catalogId=10053&langId=-1&keyword=wood+weather+stain&storeId=10051&N=5yc1v&R=202301646#.UWLh8pOcfuM
http://www.homedepot.com/p/t/202301646?catalogId=10053&langId=-1&keyword=wood+weather+stain&storeId=10051&N=5yc1v&R=202301646#.UWLh8pOcfuM
Recommended Skill Level
Intermediate
Comments
Kitchen Island
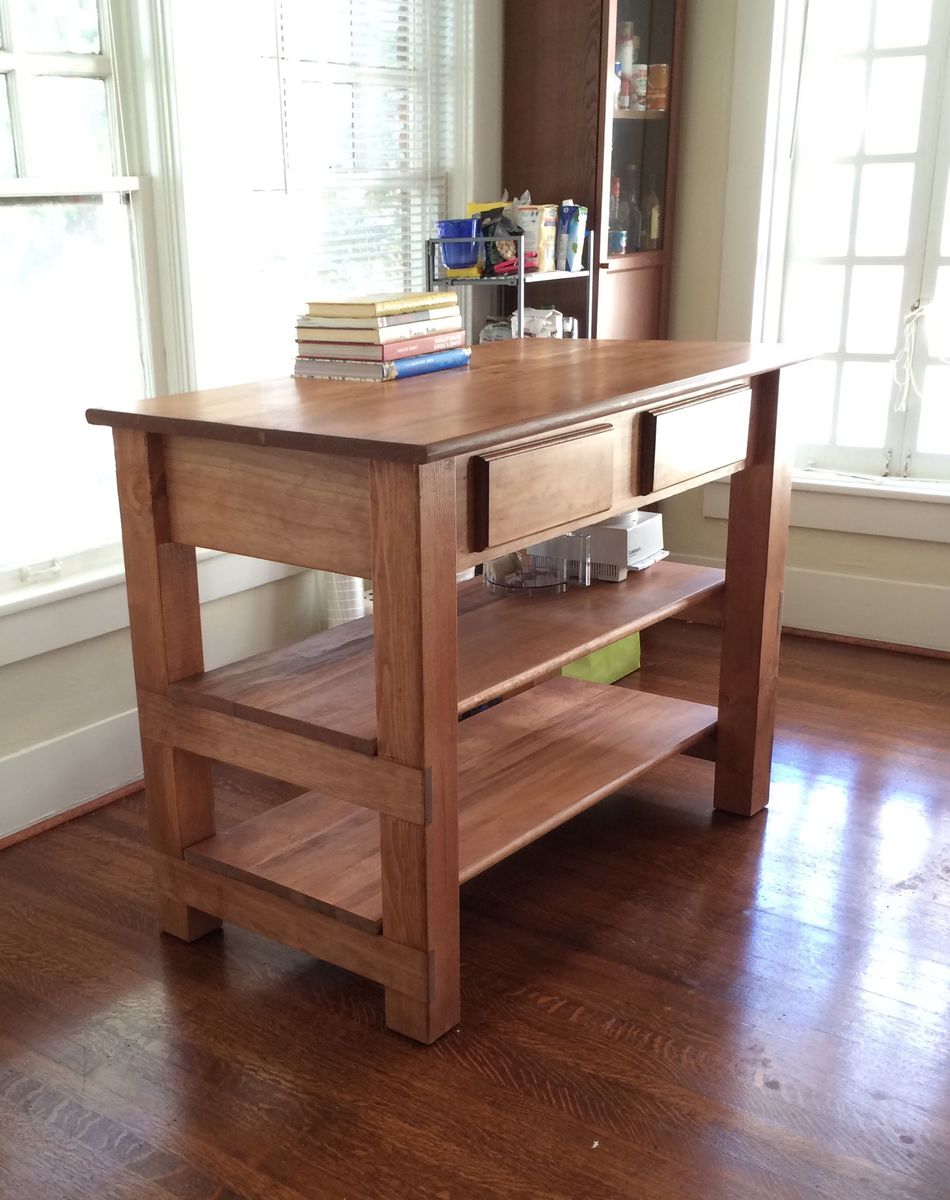
My first attempt at serious home project. My daughter needed a Kitchen Island and purchasing one was out of the question.
Not too tough.
Built from Plan(s)
Estimated Cost
220.00
Estimated Time Investment
Week Long Project (20 Hours or More)
Finish Used
MinWax Cherry stain
Recommended Skill Level
Intermediate
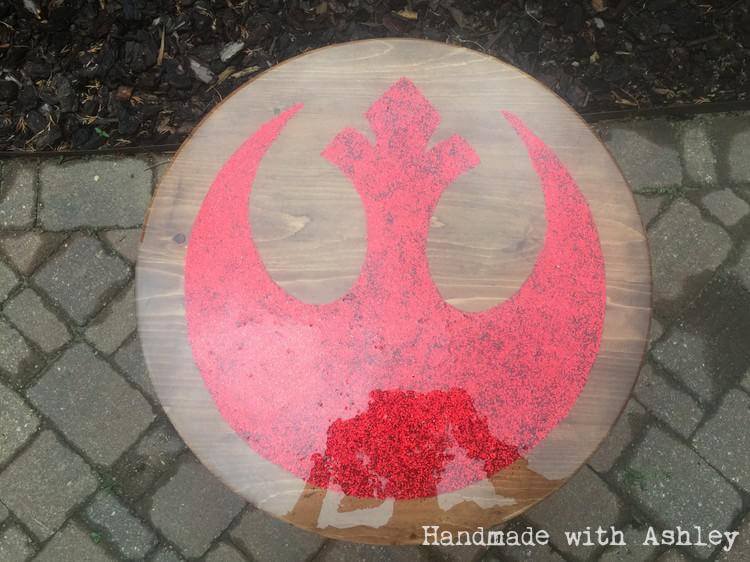
DIY Star Wars Themed End Table
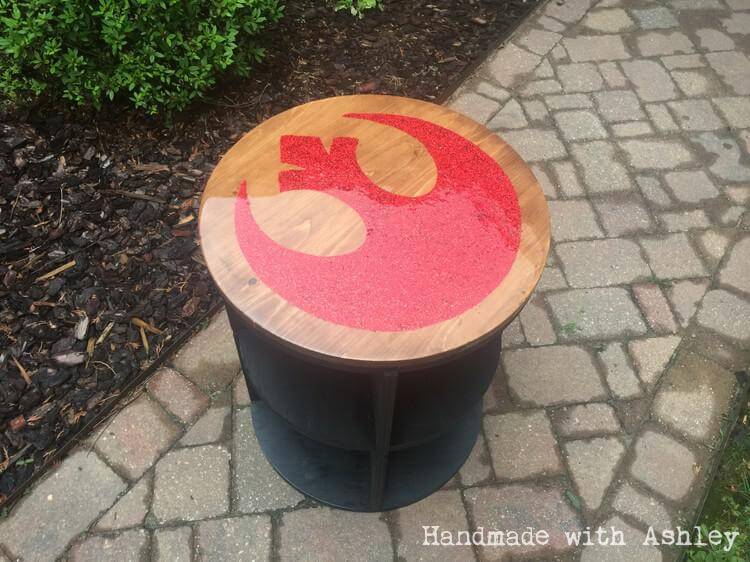
I build a Star Wars themed end table from a sheet of plywood and some scrap pine. Eventually, I'll add lazy susan hardware to make it spin. The top is glitter covered with a layer of resin. Click on the blog post link for a full tutorial on how to build it. :o)
Estimated Cost
$100
Estimated Time Investment
Weekend Project (10-20 Hours)
Finish Used
Black paint, ECOS Paints Woodshield in Pine Needles, Epoxy resin
Recommended Skill Level
Intermediate
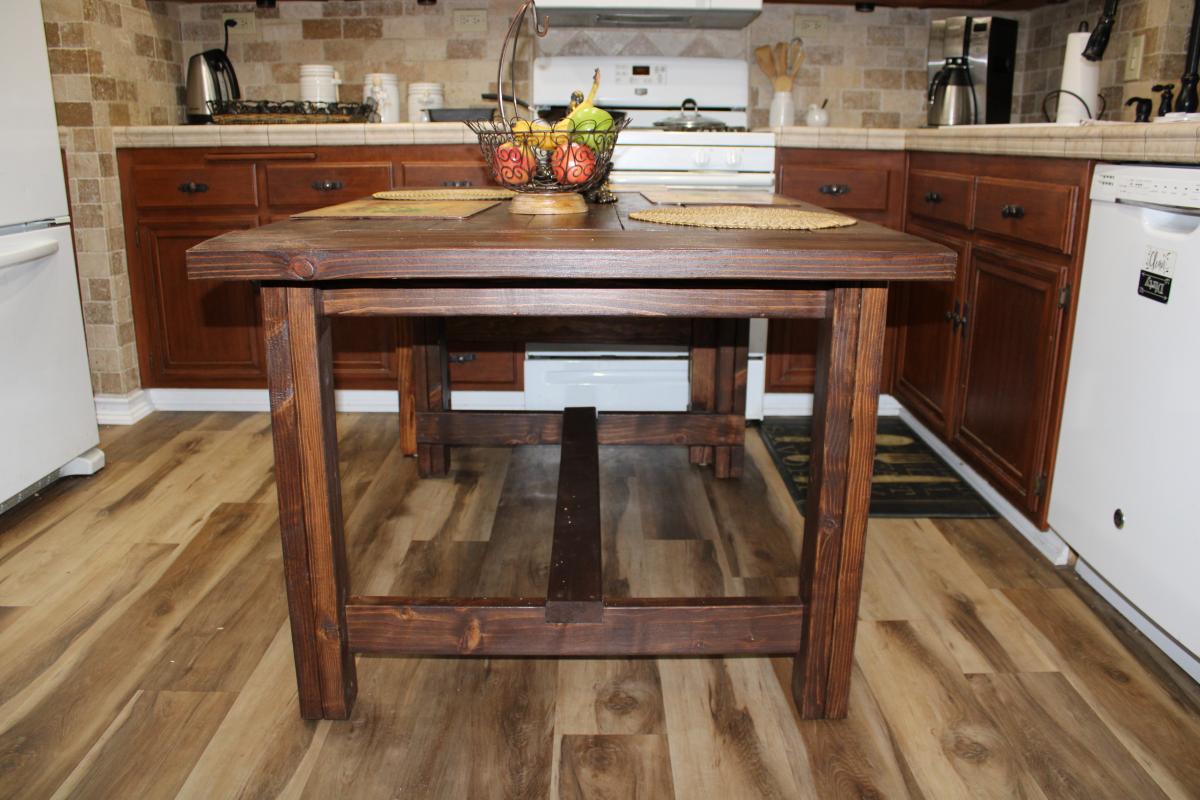
Farm table, with bench
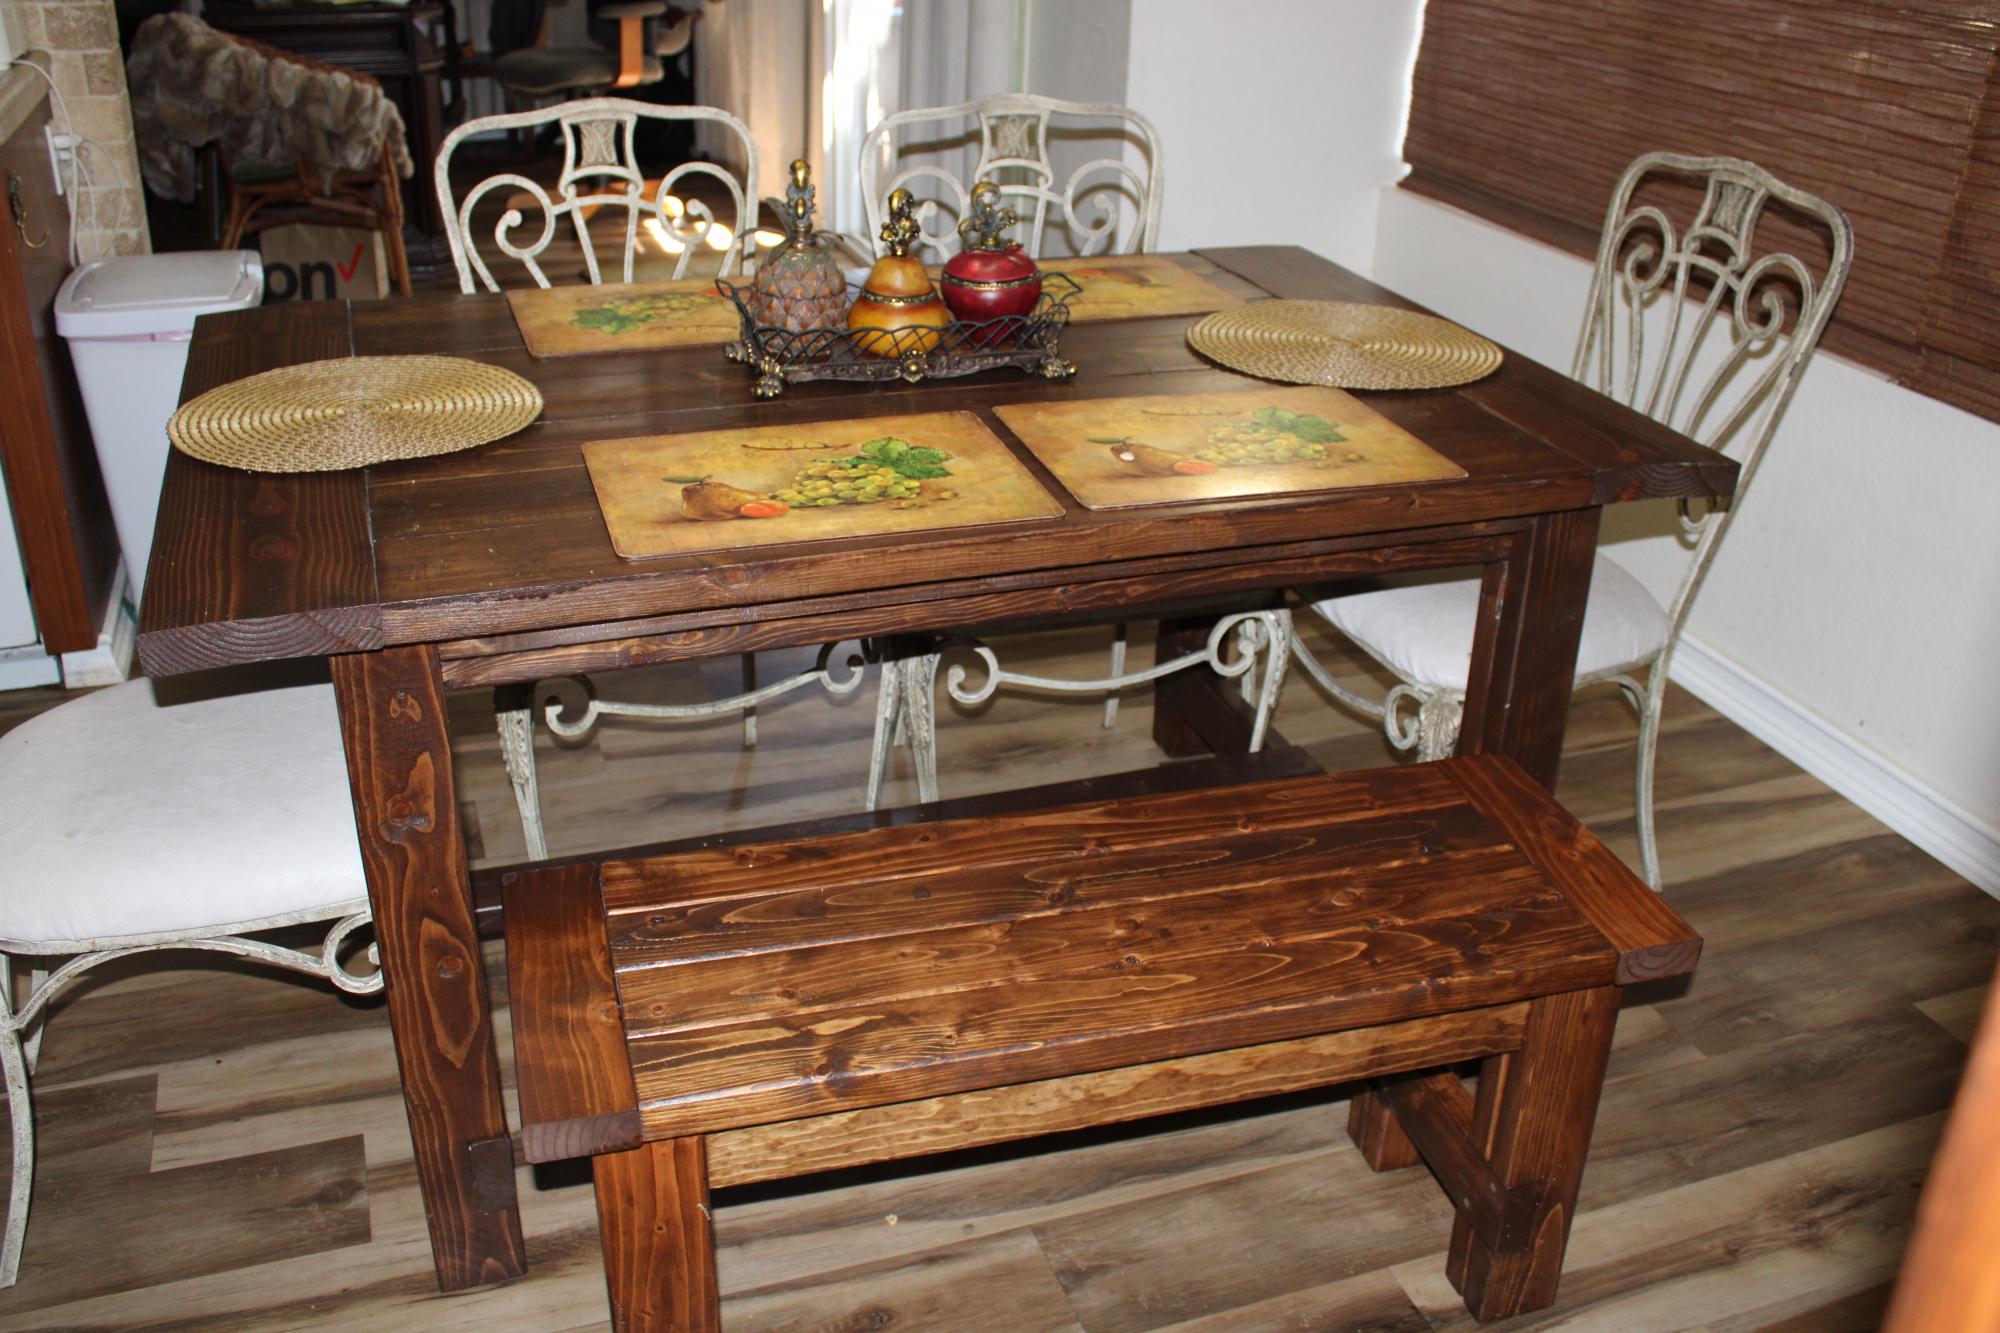
I started with the no pocket hole plans. I then shortened them to fit my kitchen, and modified them to use the pocket holes.
Estimated Cost
Around $200.00
Estimated Time Investment
Weekend Project (10-20 Hours)
Finish Used
Minwax stain, Varathane polyurethane.
Recommended Skill Level
Beginner
First Project and pretty proud of it!
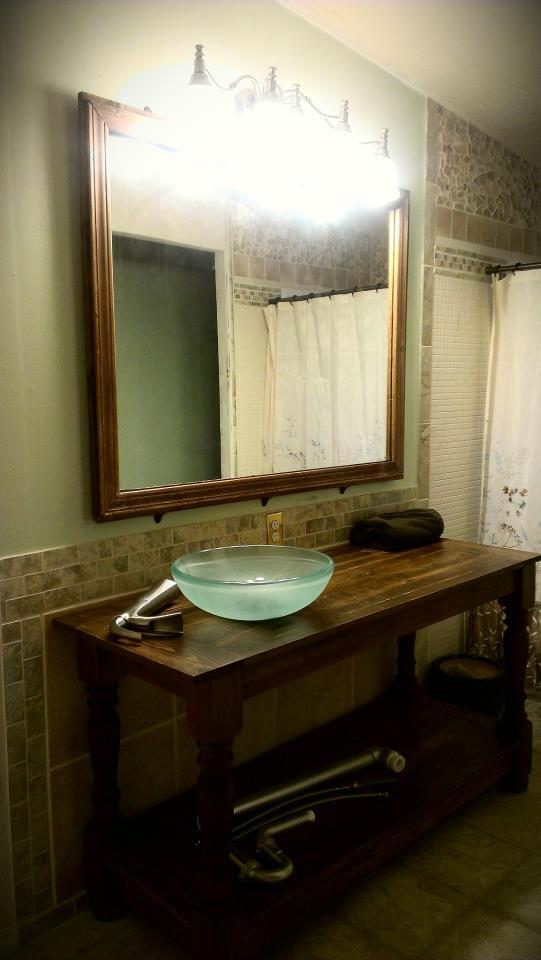
We have quite a fixer upper and while re-doing the bathroom, I came across Ana's Island plan in her book, The Handbuilt Home. This isn't the finished picture as we have installed the sink fixture and pipes, where I wrapped the exposed pipes with twine to give it a more rustic look. The table was modified in size and the mirror was a salvaged piece where I made a backer and framed it. Though still in need of some finishing touches, the look so far is spectacular... I wish I had a before and after photo. Much of what you can see, such as the tile in the shower and mirror has been made from found materials around the house or were items that were going to be sent to the dump. I love recycling!
New to building,
Stephanie Broker
Estimated Time Investment
Week Long Project (20 Hours or More)
Finish Used
Daly's Stain (Walnut) and water resistant seal
Recommended Skill Level
Intermediate