Community Brag Posts
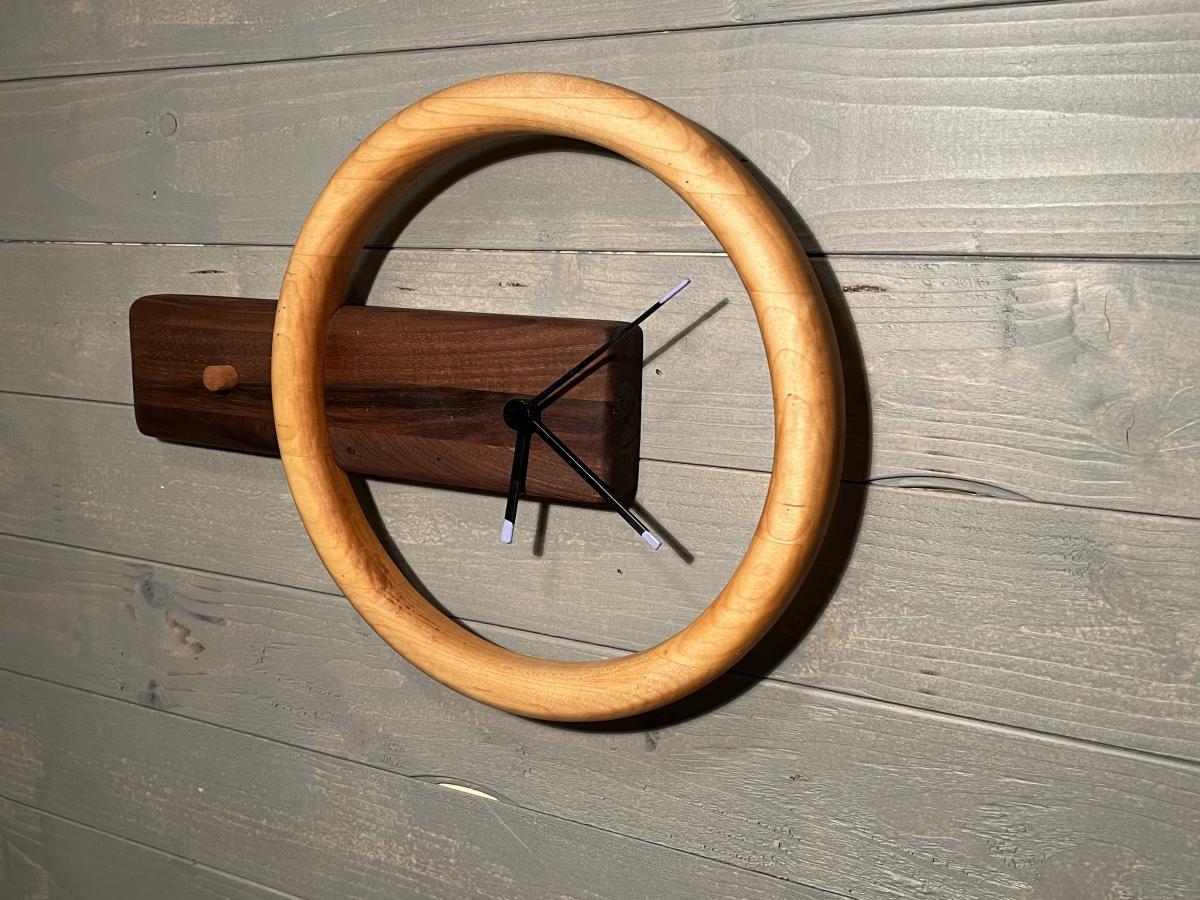
Modern clock
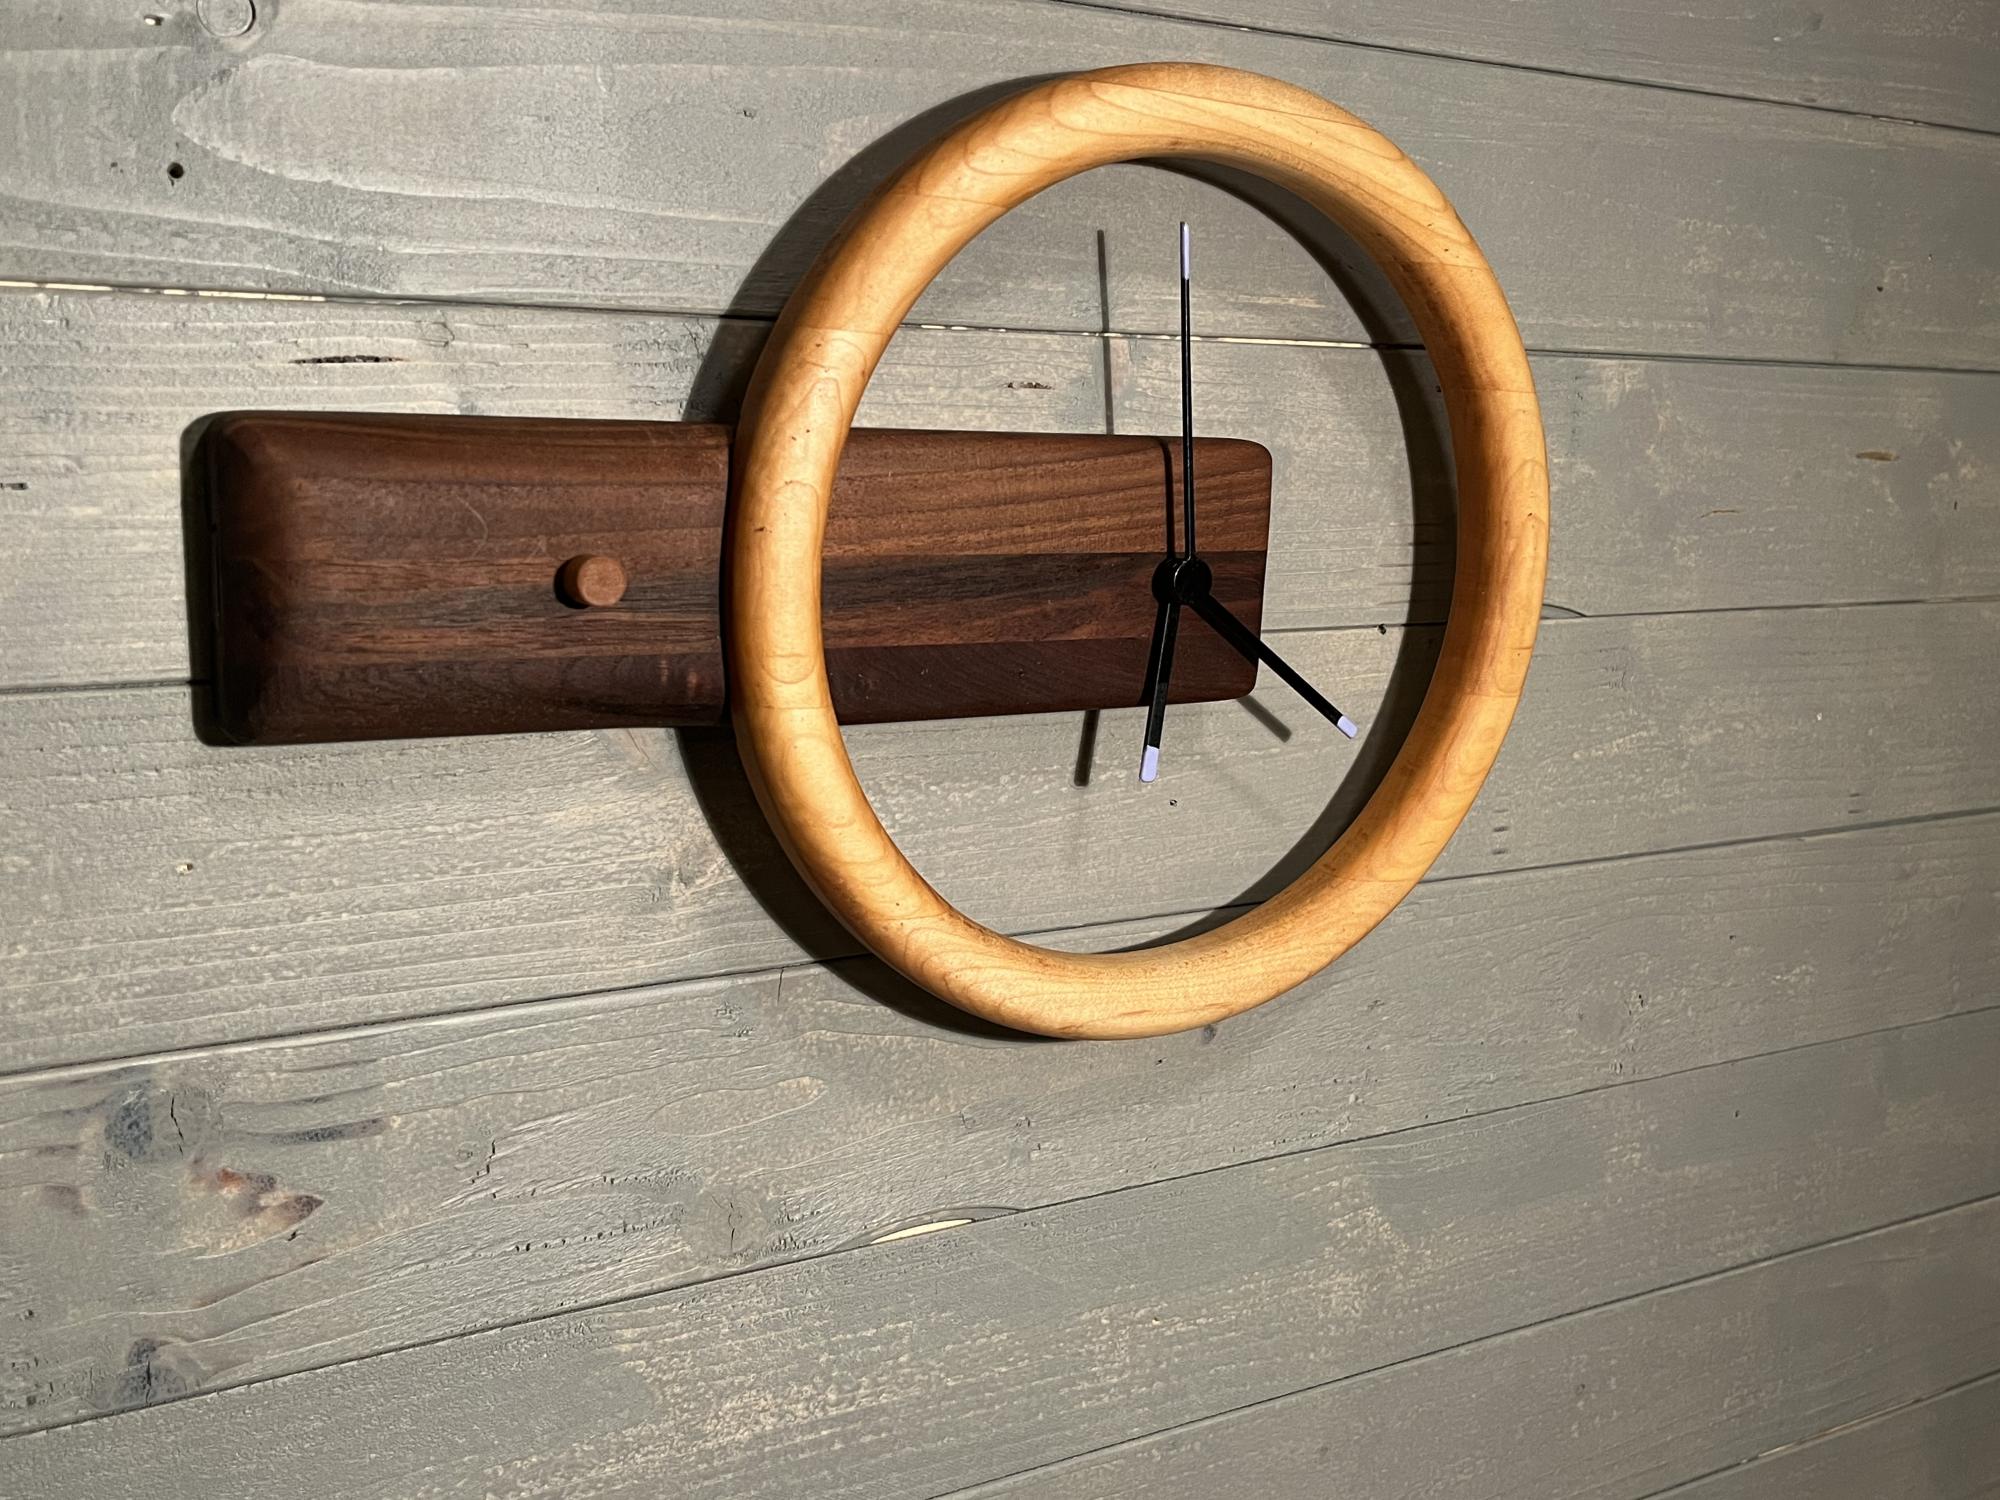
From a picture I found on Pinterest
Comments
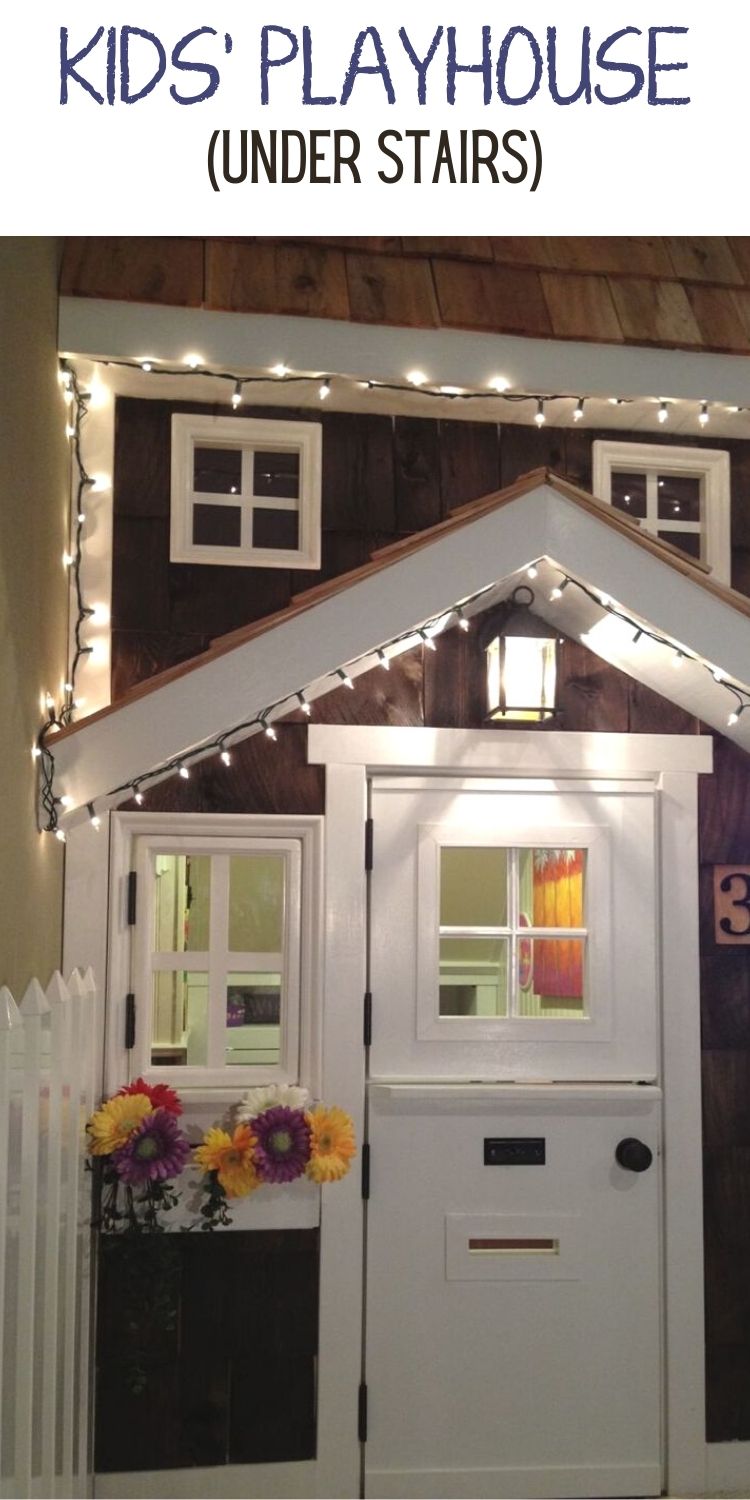
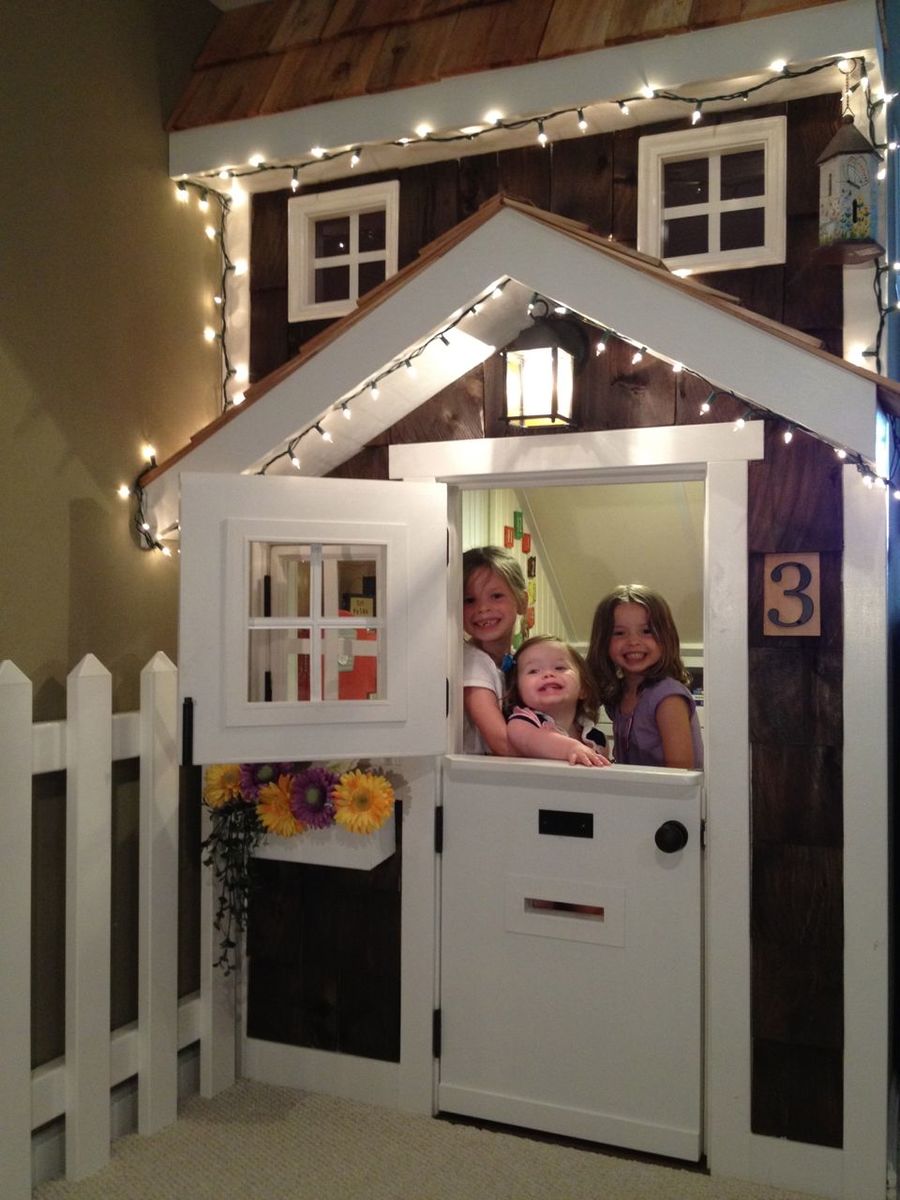
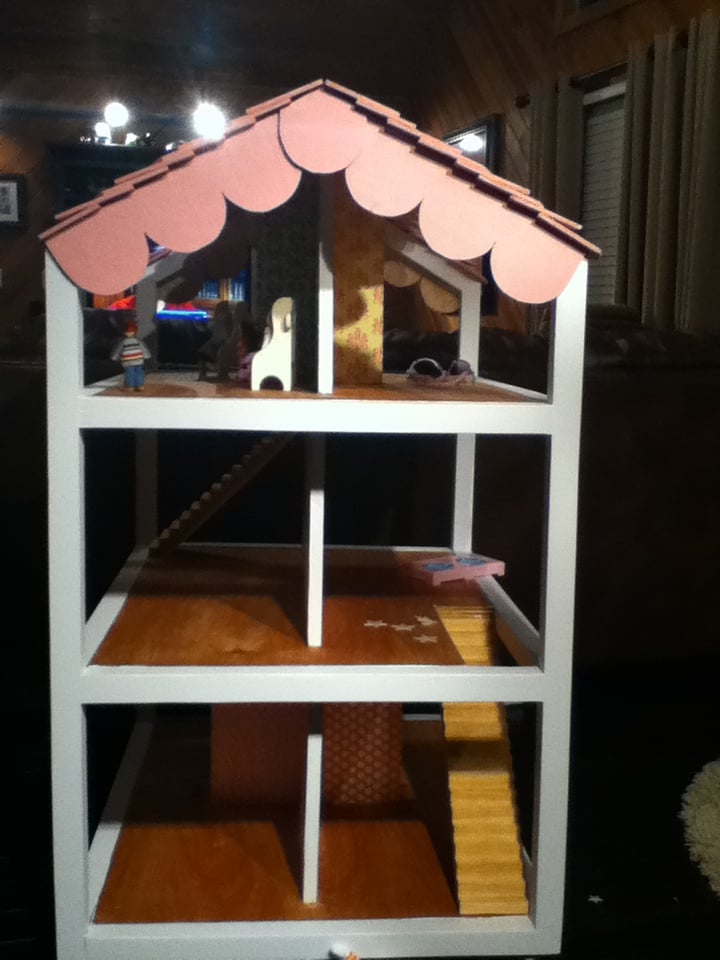
Kids' Playhouse (under stairs)

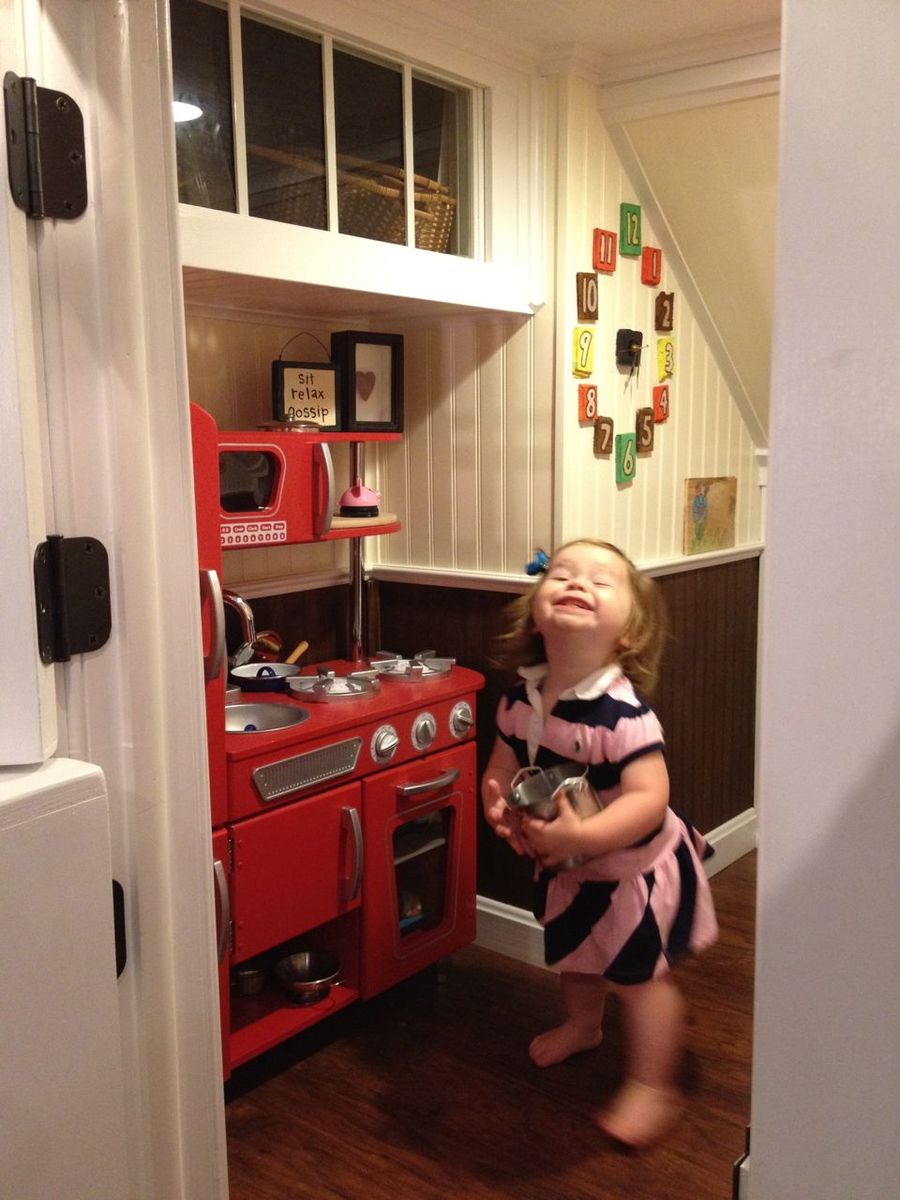
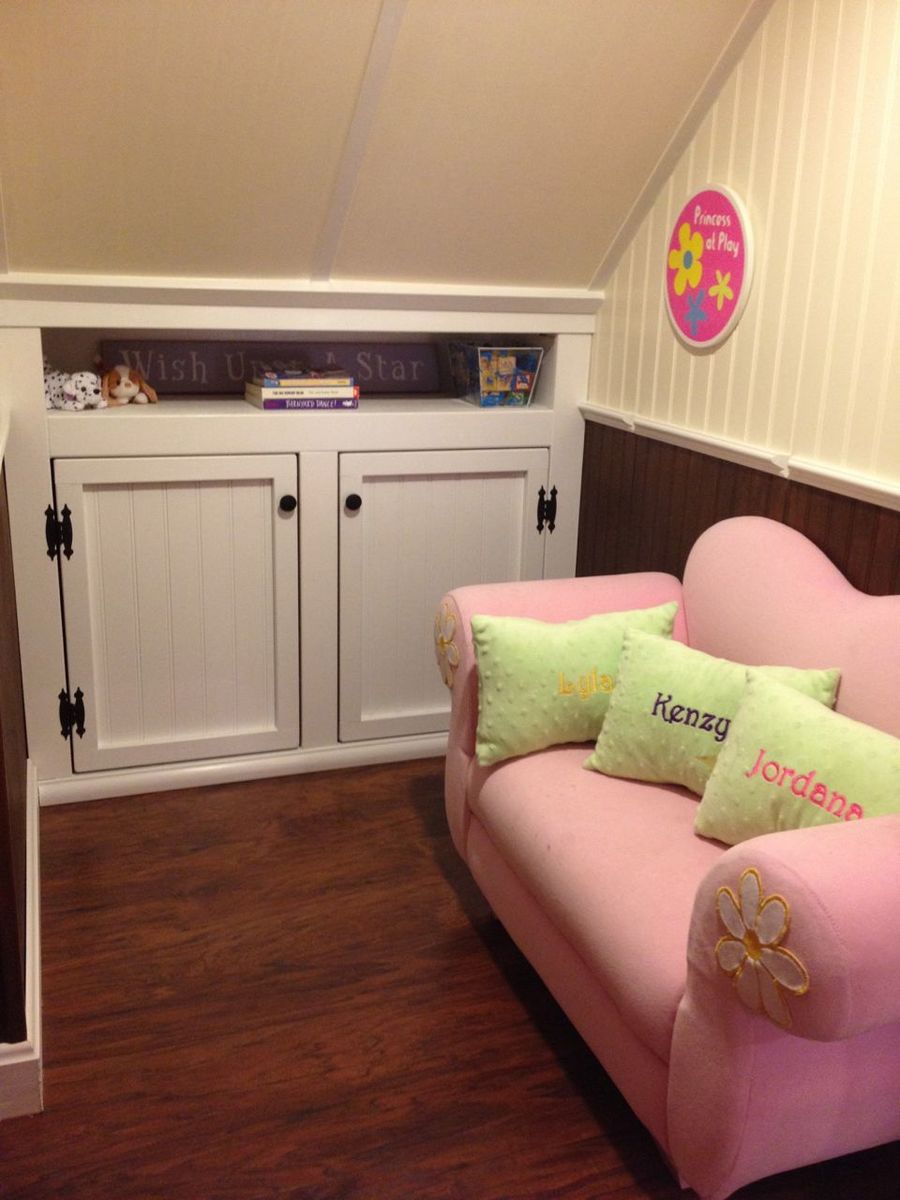
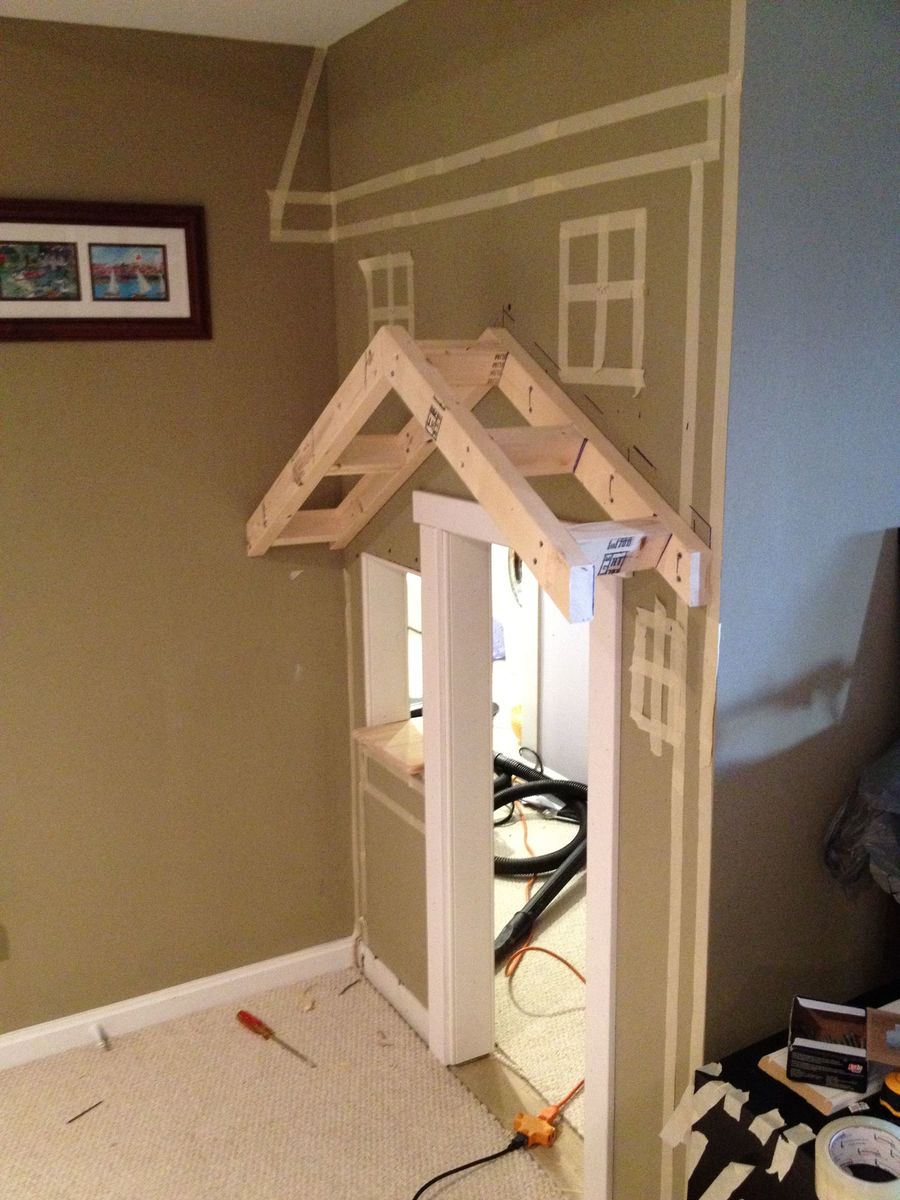
Had the perfect space for a little playhouse under the stairs in the basement and it's been our plan for 4 years to do something. Finally, we did something. Wanted depth so I added the roof and portico. Also added cedar shingles that I picked up for $7 at HD. Inside I had extra laminate flooring so I put that down and added beadboard, chair rail and crown molding. There's also a small transom window above the small kitchen area. The kids love the barnhouse doors with old fashioned doorbell, mailslot and window. The bookshelf under the stairs was the final touch. I didn't use any plans from this awesome site but did, as always, get a bunch of tips and inspiration!
Pin for Later!

Estimated Time Investment
Week Long Project (20 Hours or More)
Finish Used
Dark walnut stain on cedar shingles.
Recommended Skill Level
Intermediate
Comments
Sun, 12/18/2011 - 19:00
Wow! That is awesome!
Wow! That is awesome!
You really did a great job on that! So imaginative, too. WTG!
Sun, 12/18/2011 - 19:58
That is so stinkin' adorable!
That is so stinkin' adorable! Fantastic job. I love everything about it. Your kids (and grandkids) will remember the playhouse under that stairs forever!


Mon, 12/19/2011 - 06:54
Great idea!
Wow, this is too cool! They are going to love love love this! Can't wait to see the kitchen reveal!


Sat, 12/31/2011 - 18:26
too cool for words!
You did an amazing job on this. I'm planning a bunkbed with a similar facade. I love how cozy it looks without having to make an actual pitched roof. The shingles are such a nice touch that I may have to copy you! And it's wired for lights; you've really outdone yourself.
Mon, 03/19/2012 - 14:26
Door
Thanks to all of you for the nice comments! Re: the door, I just cut a plain 18x80 door slab ($21 from orange) and trimmed it out. I still need to put the window grille over the open space, and was hoping to find a cool 'speak easy' grille that fits the space.
Thanks again!
Thu, 05/03/2012 - 23:38
Soooo Cute!!
This has to be one of the most adorable things I've ever seen! What an awesome idea......how cool is that for the kids??! Love the lighting and the laminate (or is it hardwood) flooring inside. Even the stove is gorgeous! Such fond memories will be made there and remembered forever. Kudos!!
Fri, 07/13/2012 - 22:10
kid's playhouse under the stairs
I love this. I was just wondering about the little red kitchen. It looks like something I remember as a little girl back in the 60s. Did you make it or buy it somewhere?
Wed, 12/05/2012 - 15:34
Oh my goodness this is such
Oh my goodness this is such an inspiration! However, as a beginning tool user, I don't think I could get my finishes so nice. How much experience had you had at this kind of stuff before? Was the area closed in before this project or did you do that too? I've got an open stairway into our basement and would be starting from scratch with ceiling, walls, etc. and have no experience hanging drywall or anything. I think it would take me a year. Great job, and thanks for sharing!
Sat, 06/21/2014 - 12:51
How to - play house door
Hi there!
I was just wondering how you made the door for your play house? We're basically stuck at this level in ours right now... ;) Thanks for any tips!!!
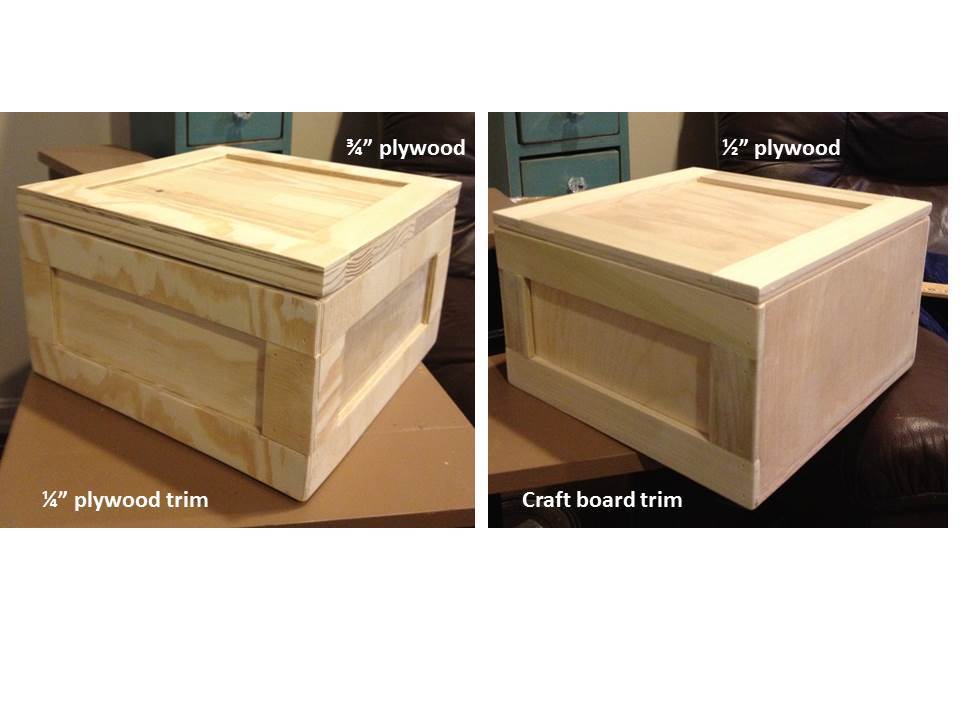
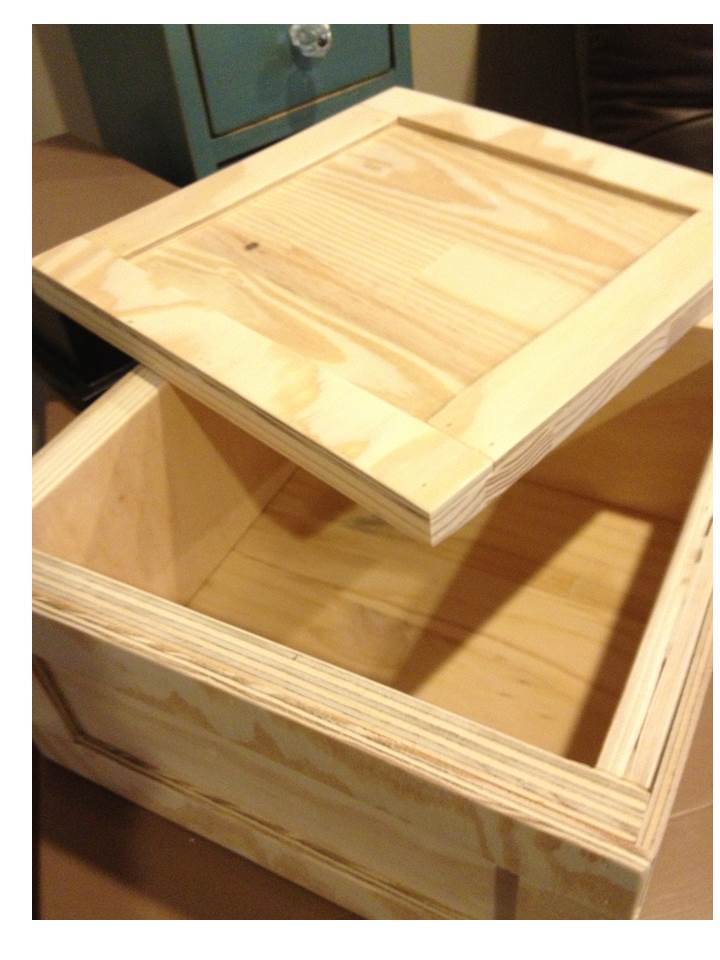
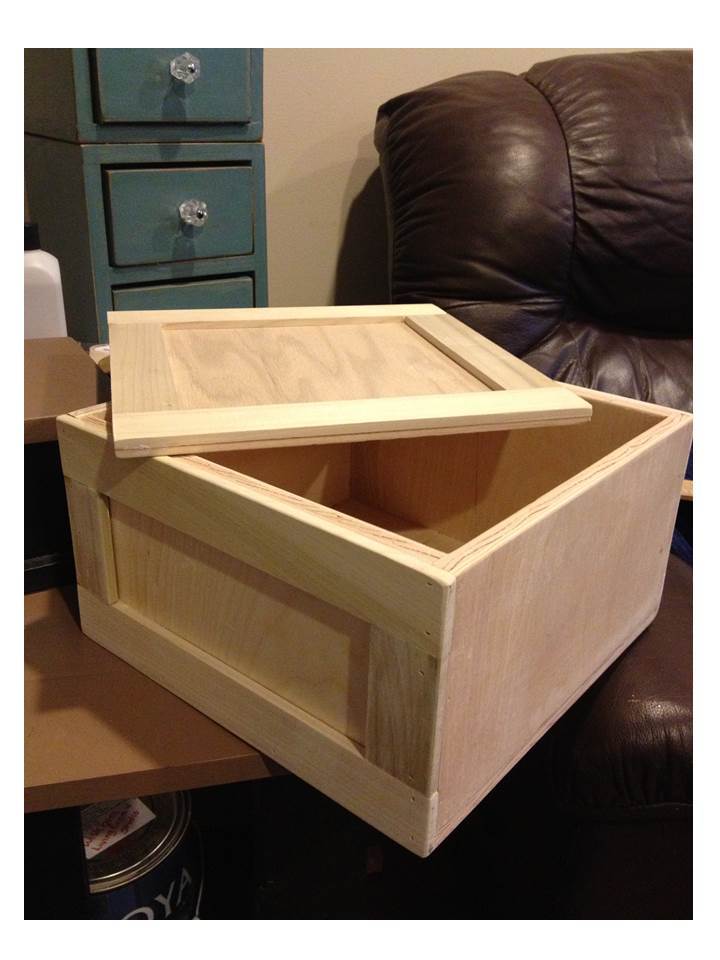
Gift crate (aka man crate)
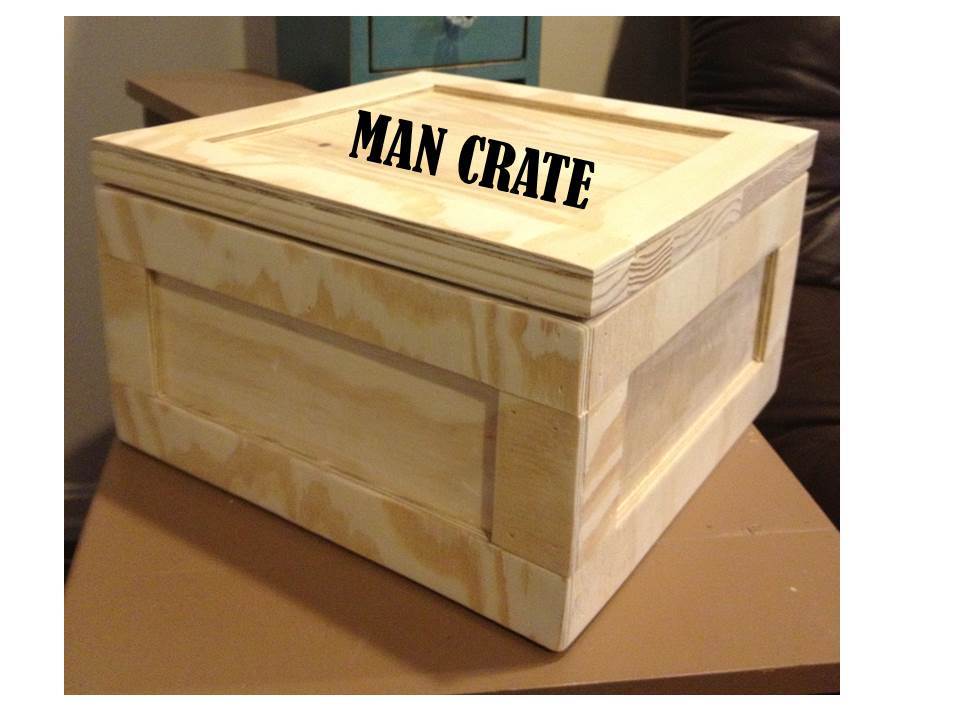
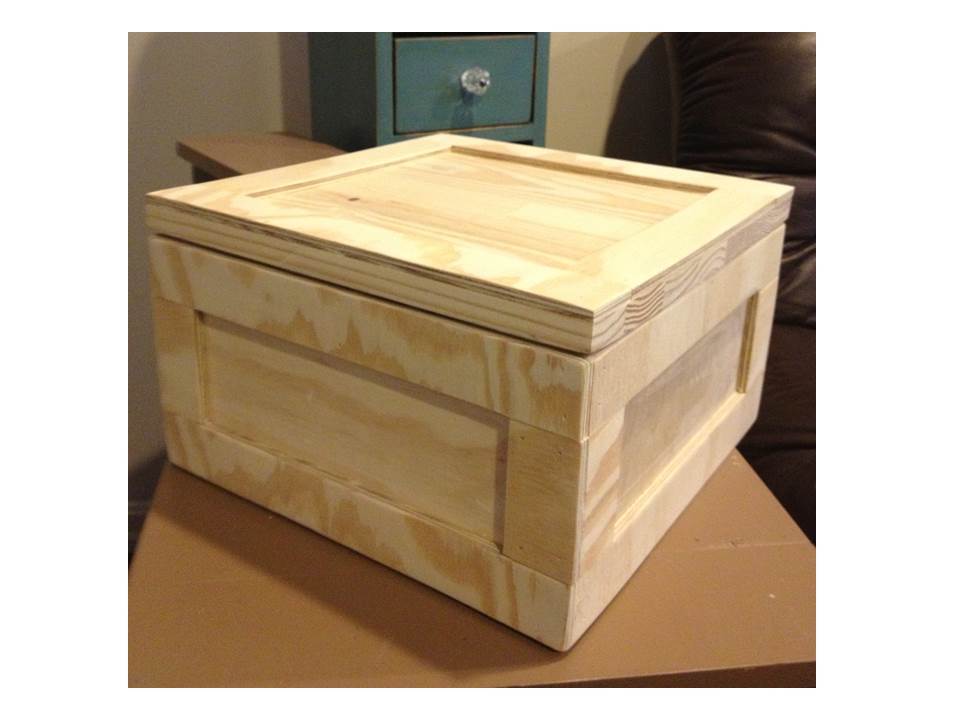
This is the prototype builds for the Plywood Gift Crate (man crate) plan. I had a great time developing and building this plan! I read a forum post about these and was inspired to do up a plan and build. When you give these as a gift, present it with the top nailed shut, and a crowbar for getting it open!
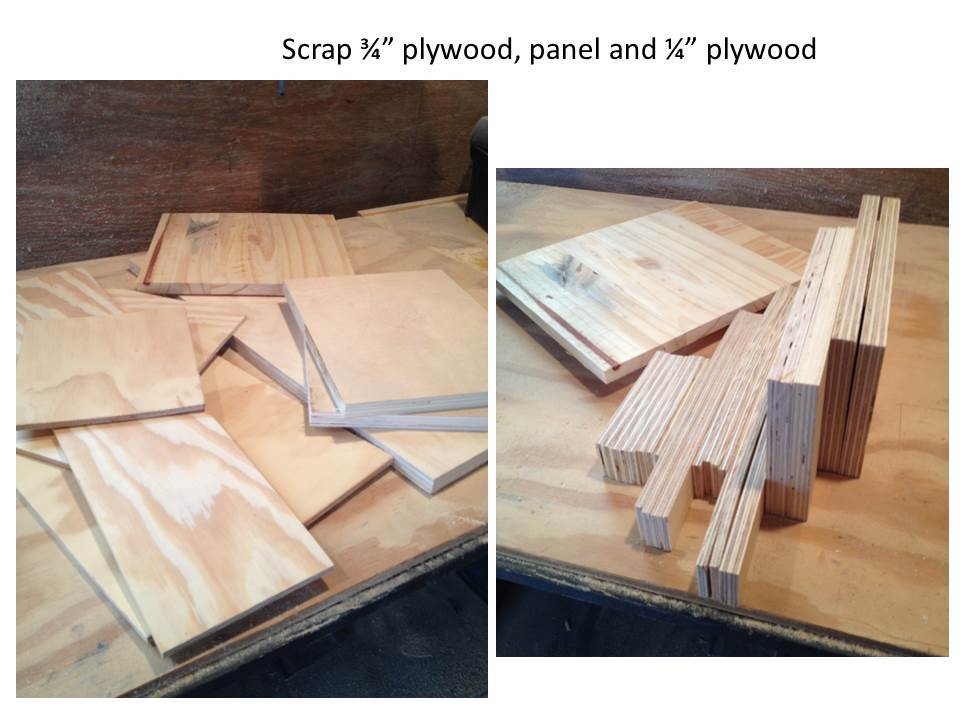
Two crates are shown. These each took a little over an hour to build. The 3/4" plywood one was entirely from scraps, and I purchased the poplar craft boards ($2 each) for the 1/2" plywood one. New wood would cost about $15. I left them unfinished like the inspiration. The picture just has the text added to it as a graphic. I do plan to stencil "man crate" on them though. The first prototype with 1/2" plywood scraps was made with a 1/4" scrap plywood top and poplar trim boards. My scrap top wasn't wide enough to cover trims on the sides, which is why the sides on that one are plain. The 2nd prototype was with 3/4" plywood scraps and uses strips of 1/4" thick scrap plywood for the trim boards.
If anyone is interested in different size crates, I've created a project calculator in Excel, that you can key in the desired dimensions and sizes of wood you plan to use, and the spreadsheet will give you the sizes for the pieces and a cut list. I couldn't figure out a way to attach that to the plan, but if you would like one, just send me a note through the contact form, and I'll email it to you.
I hope you build these, it was a fun and easy build!
Built from Plan(s)
Estimated Cost
$8
Estimated Time Investment
An Hour or Two (0-2 Hours)
Finish Used
These are both unfinished, just sanded smooth. I'm planning to stencil "man crate" on them in black.
Recommended Skill Level
Starter Project
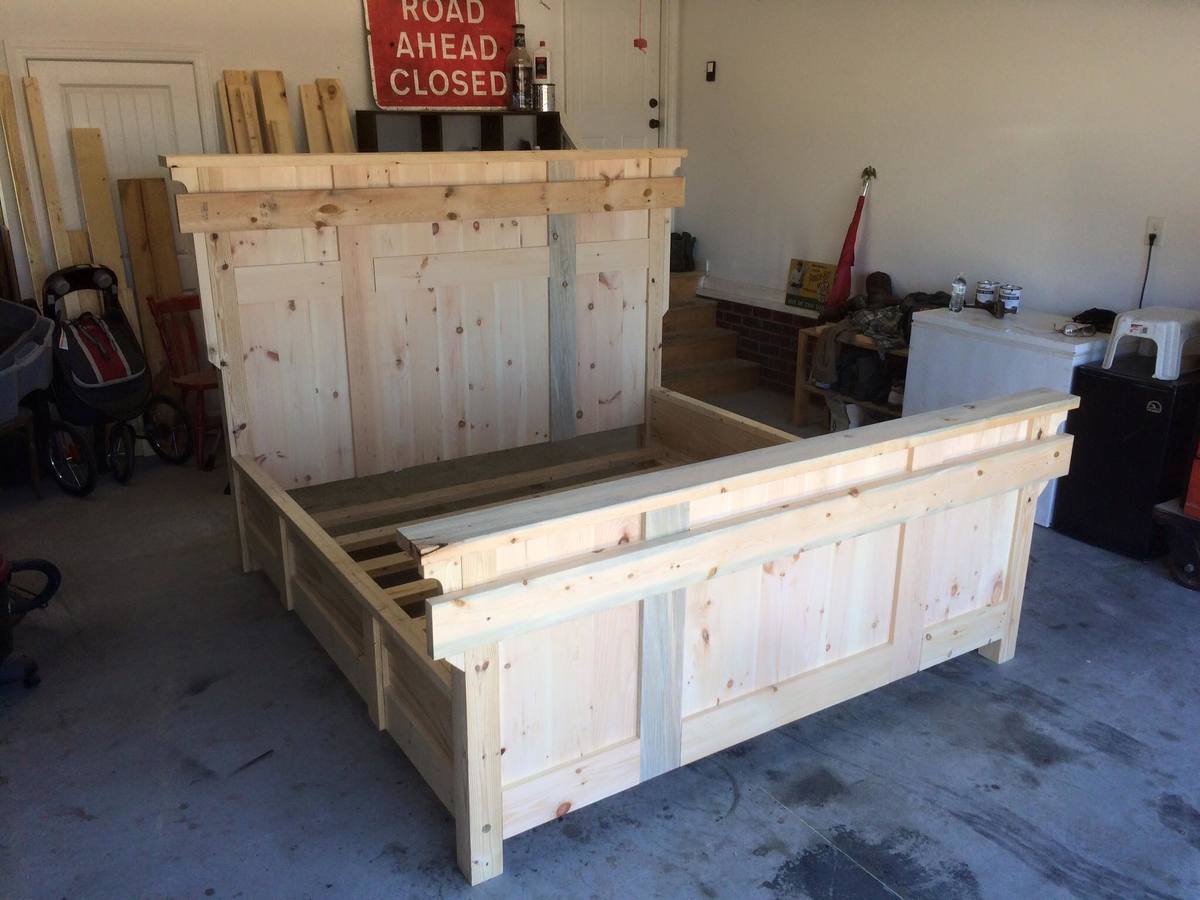
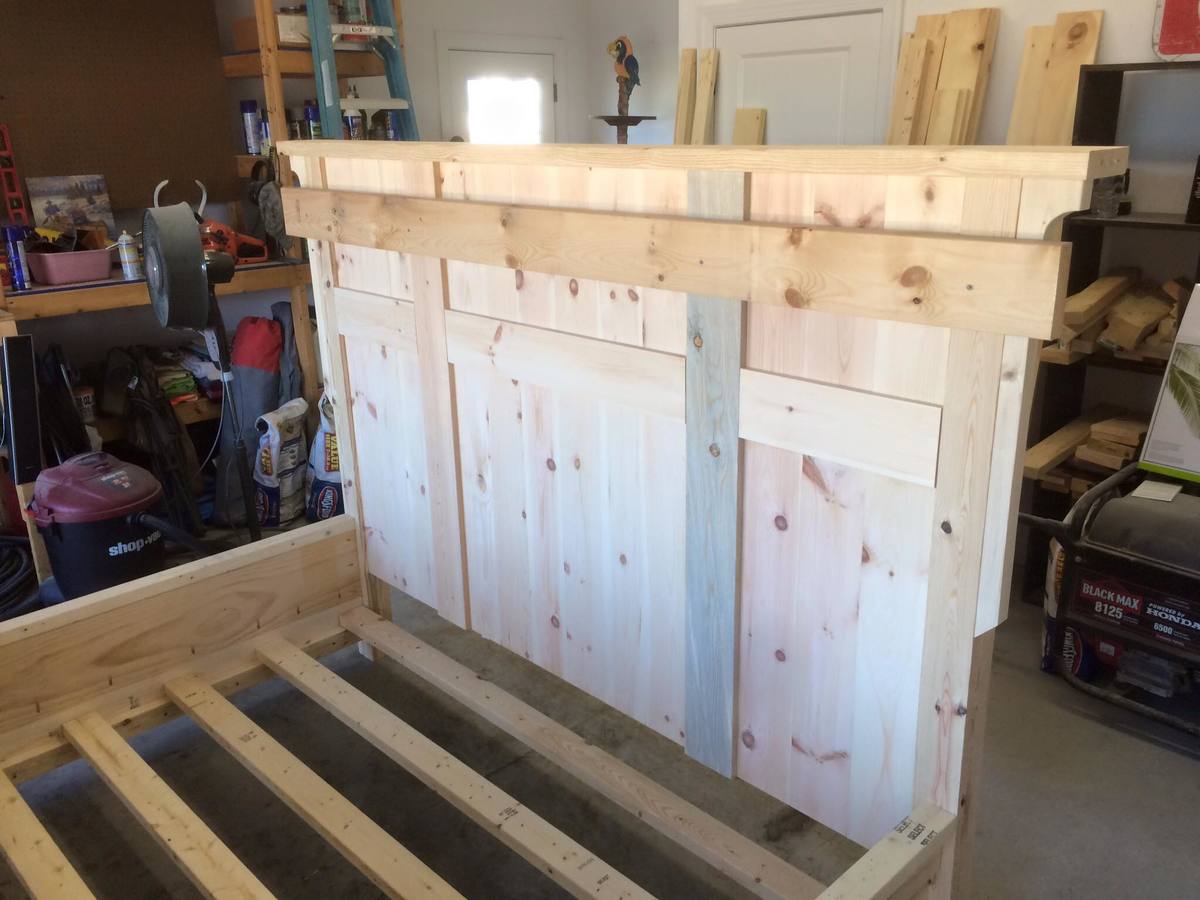
King Farmhouse Bed Frame

I spent 3 weekends building this for a friend. It was alot of work but it came out great!! He got the plans from Shanty-2-chic. We modified the plans alot to make it a truly unique piece.

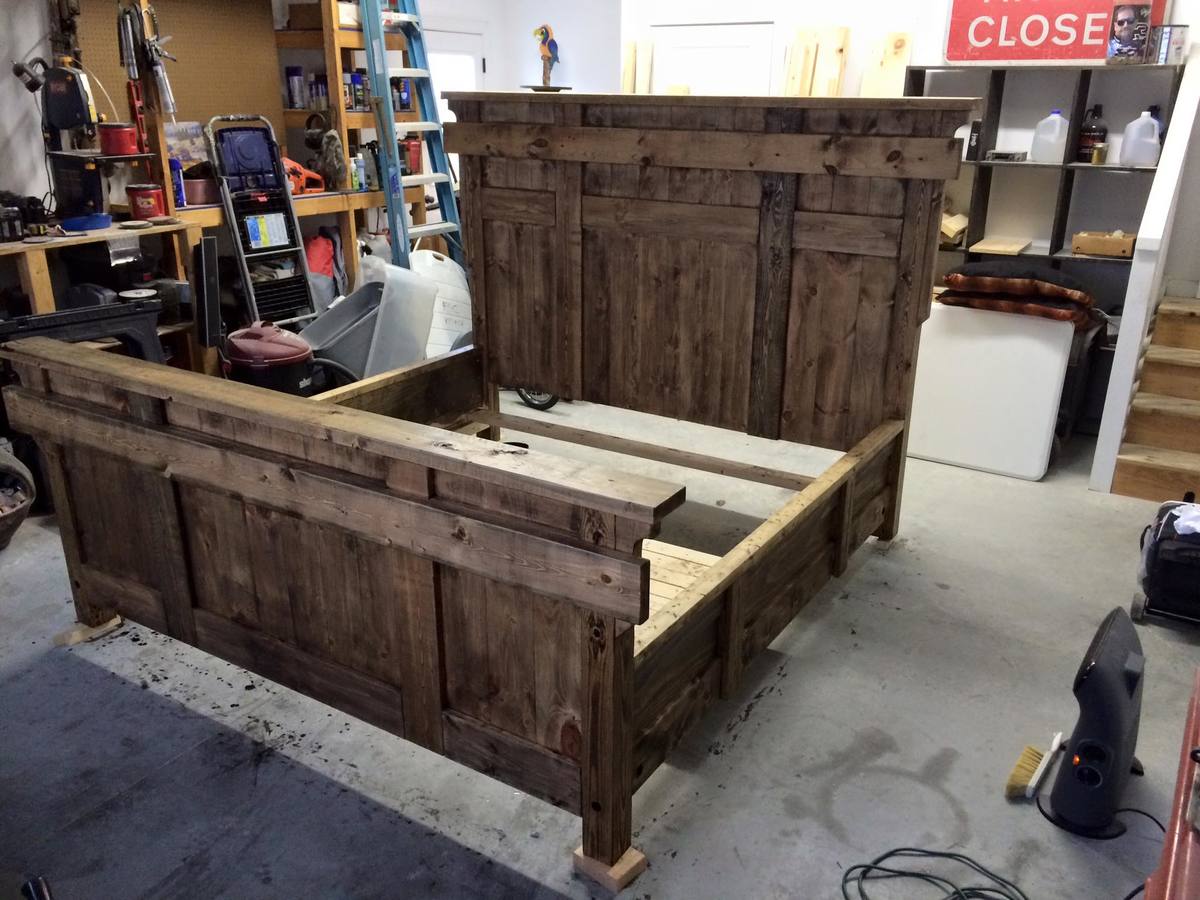
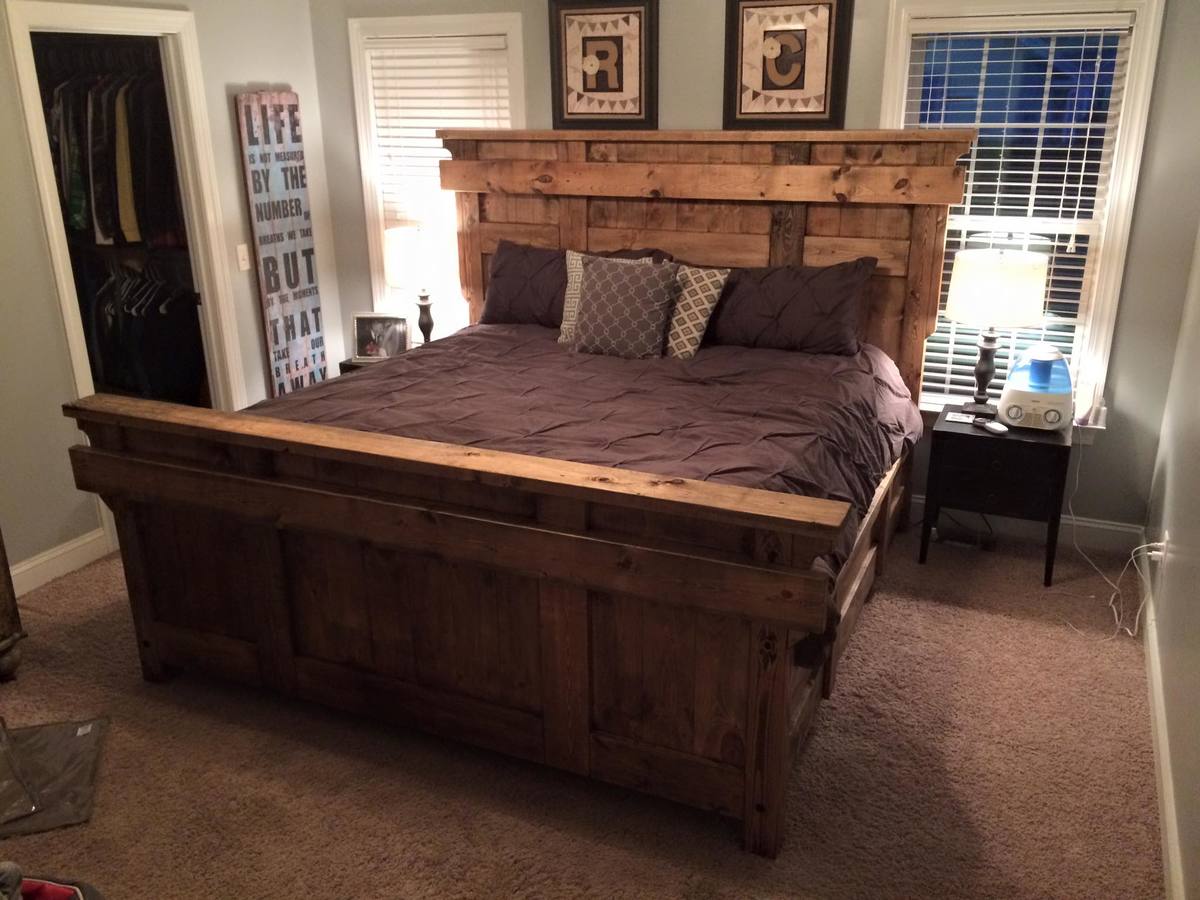
Built from Plan(s)
Estimated Cost
$400
Estimated Time Investment
Week Long Project (20 Hours or More)
Finish Used
varathane ash
Recommended Skill Level
Advanced
Kids desk
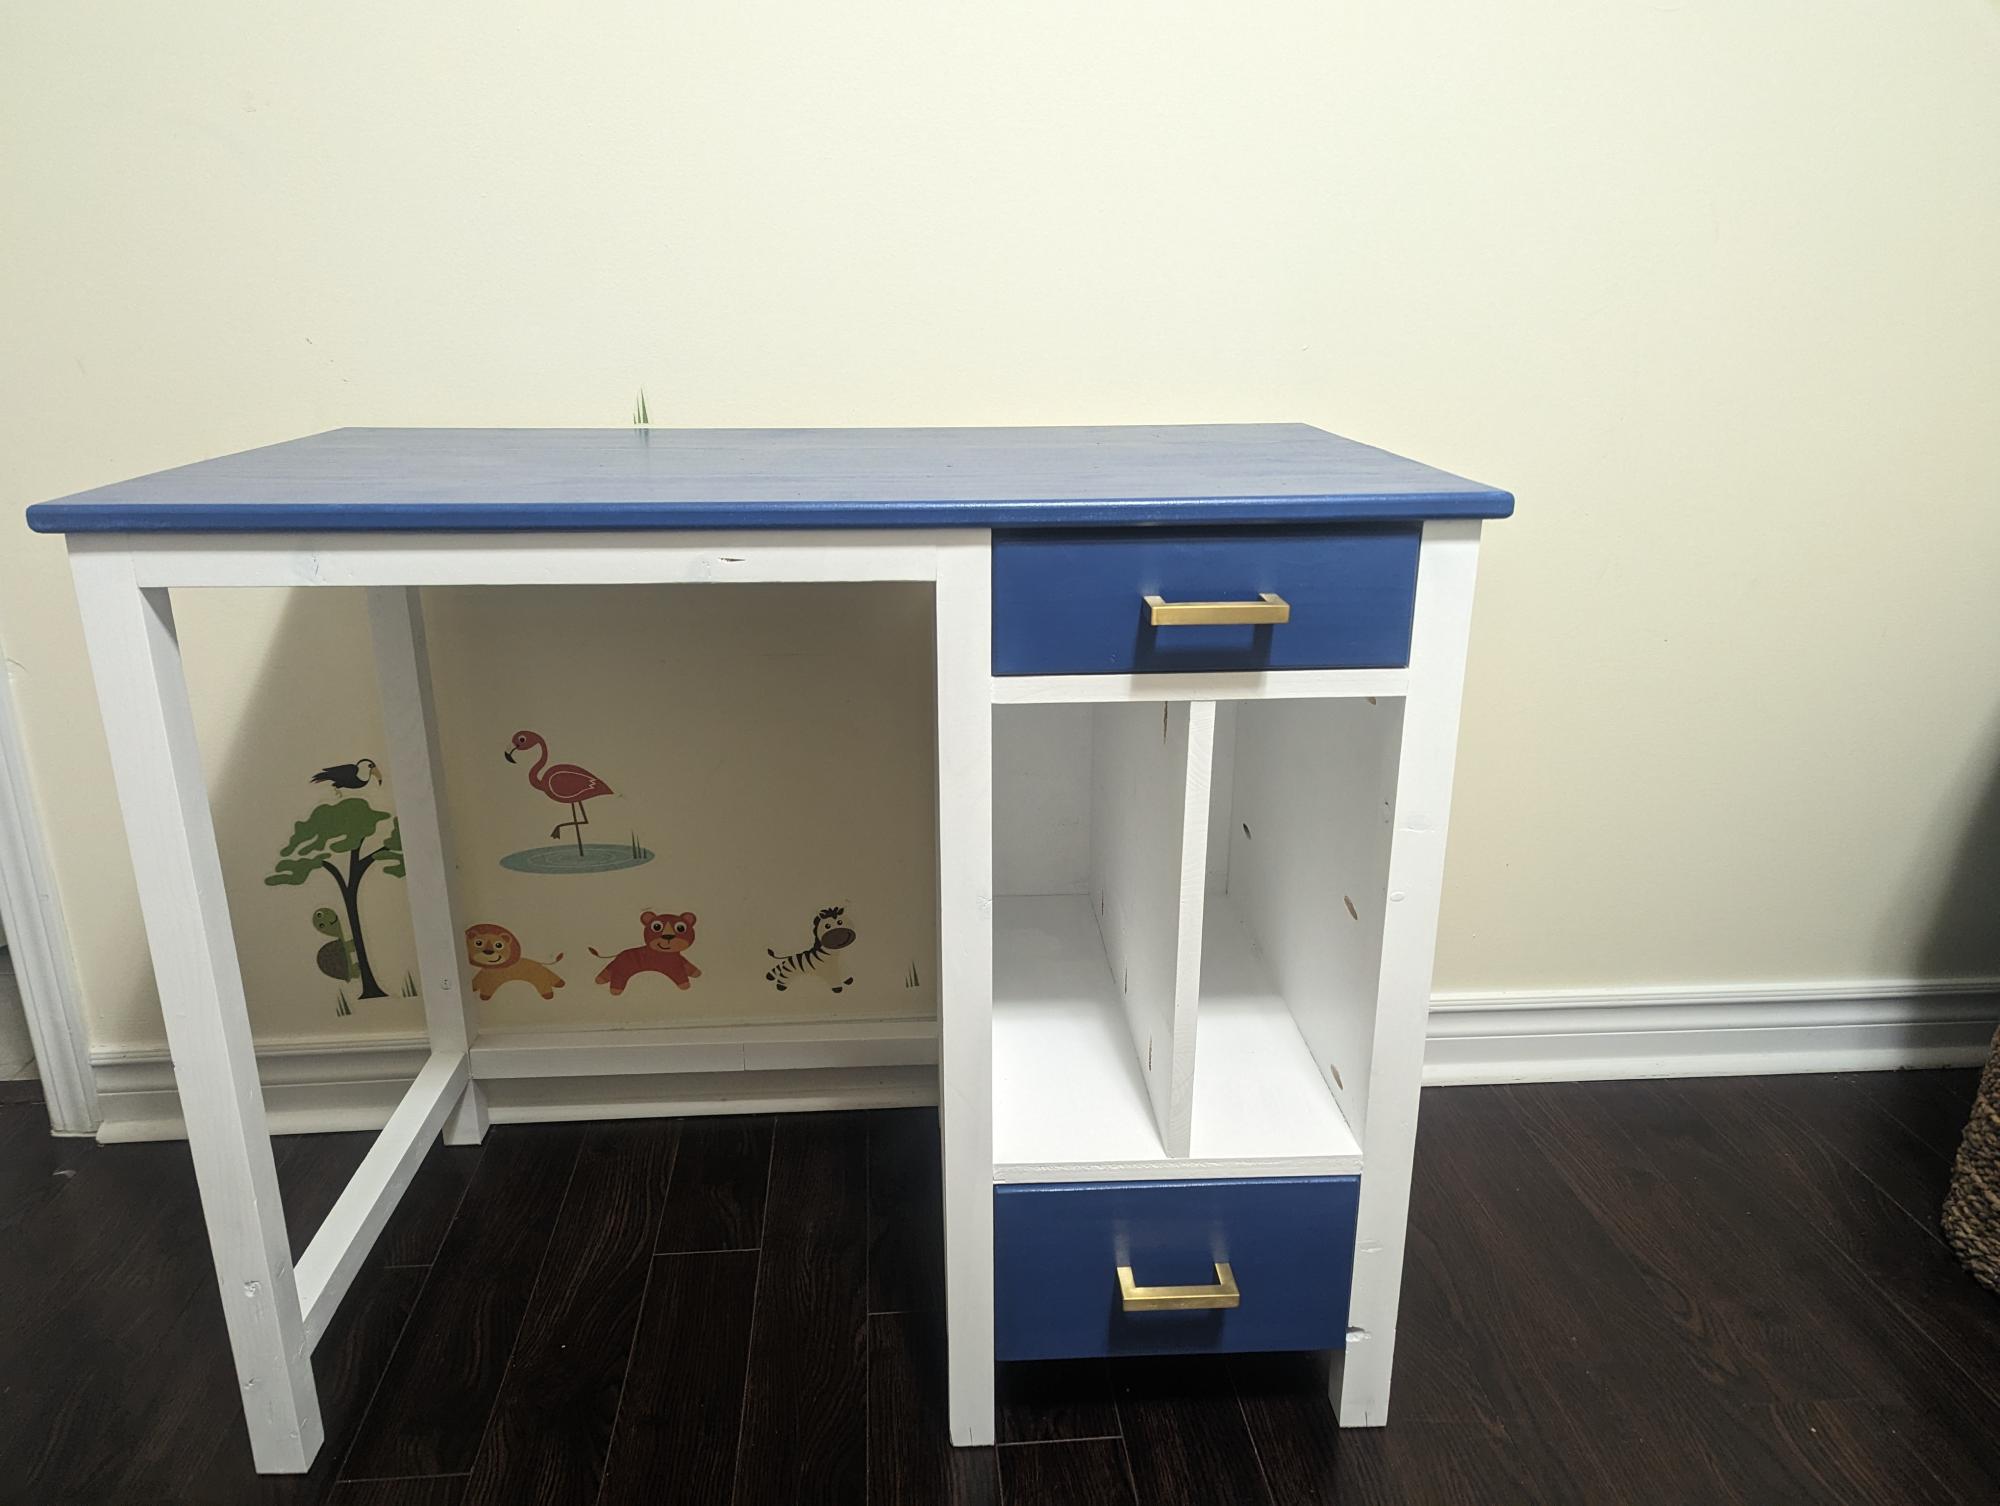
My daughter wanted a desk from a long time and this was a perfect plan!! I tweaked it a little as per our requirement and it came out be awwsome!! My daughter loves it :) Thanks Ana for the plan..
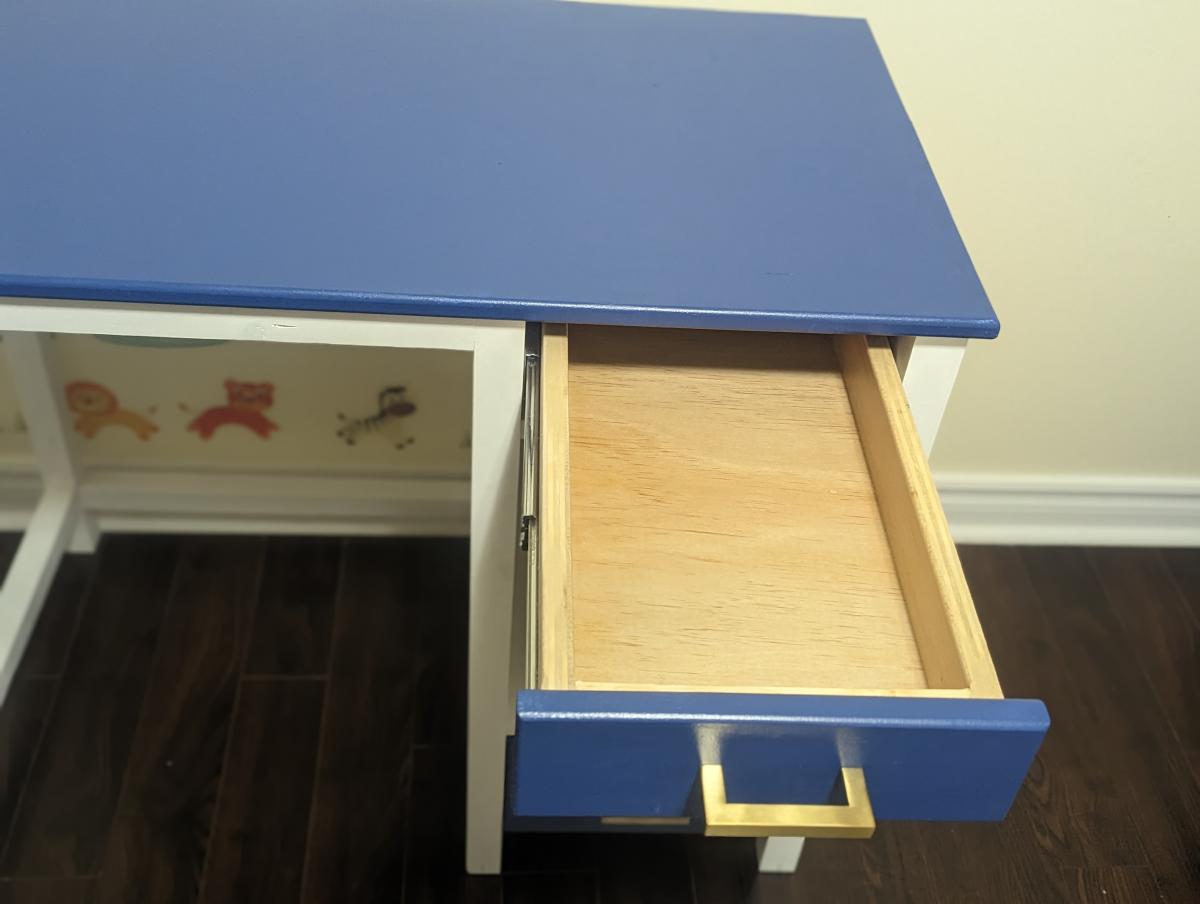
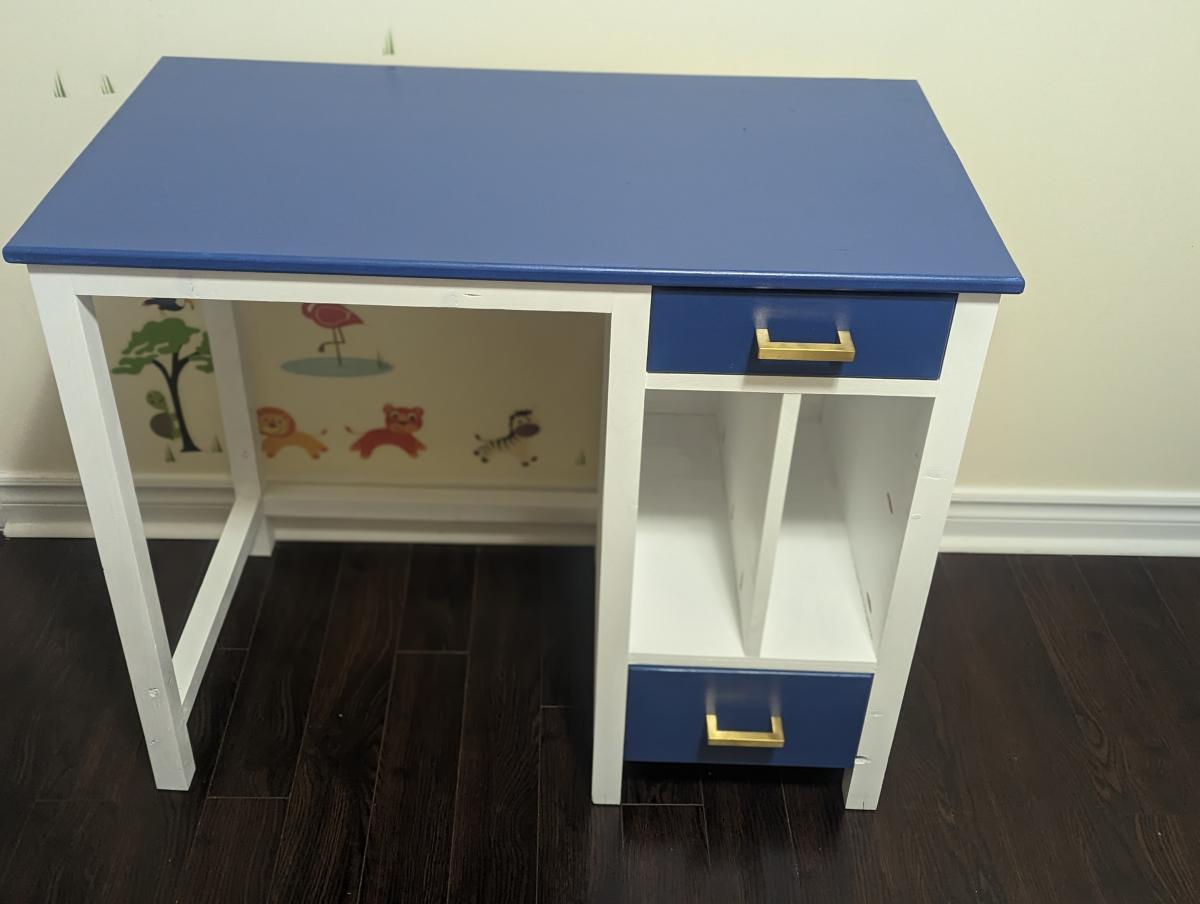
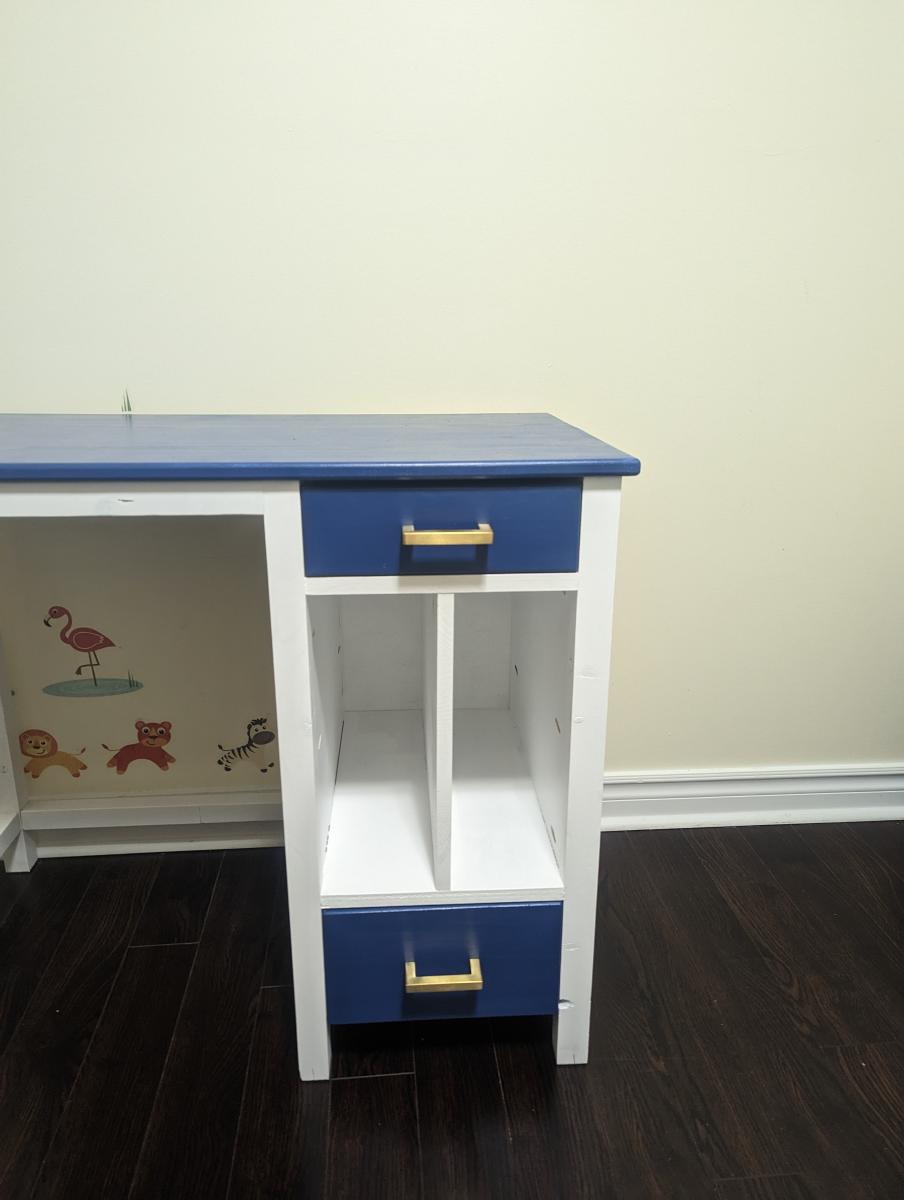
Built from Plan(s)
Comments
Bench
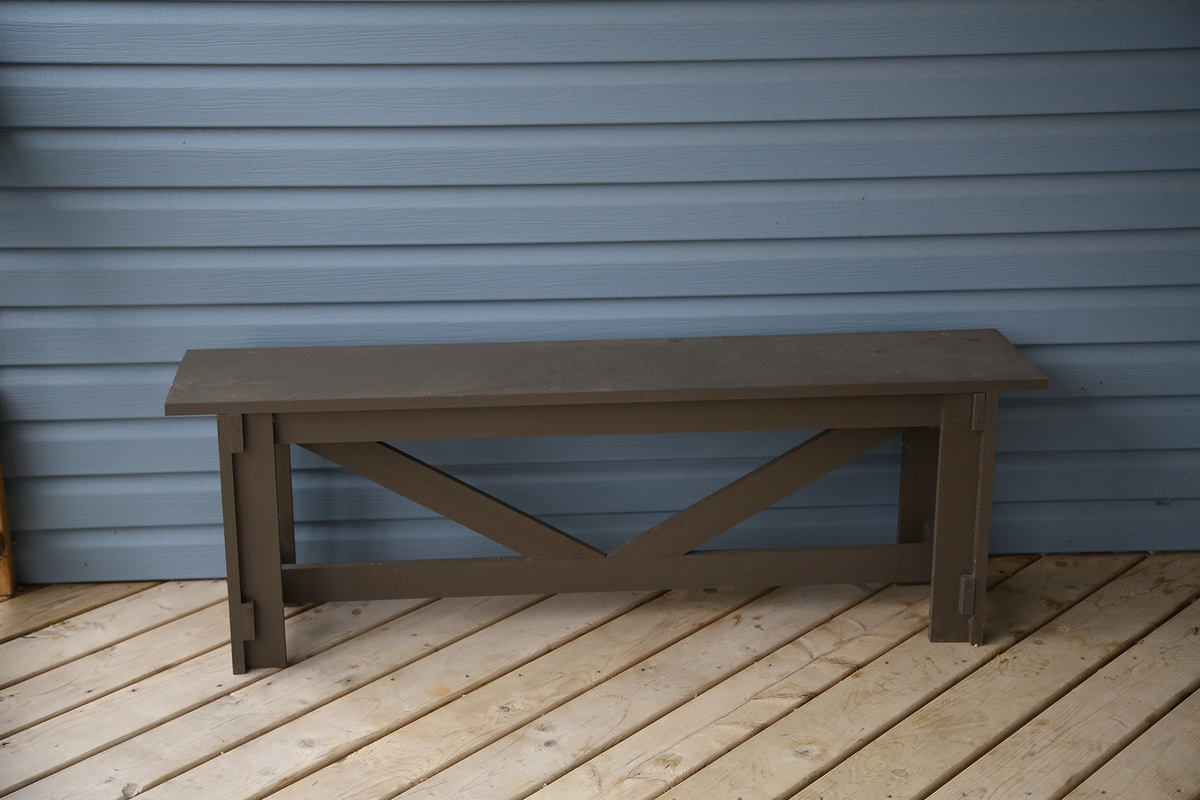
This bench is a perfect addition to our front porch.
This is one of the first projects that I tackled, and its holding up beautifully!
Built from Plan(s)
Estimated Cost
30
Estimated Time Investment
Day Project (6-9 Hours)
Finish Used
Outdoor Paint and Primer in one.
Recommended Skill Level
Beginner
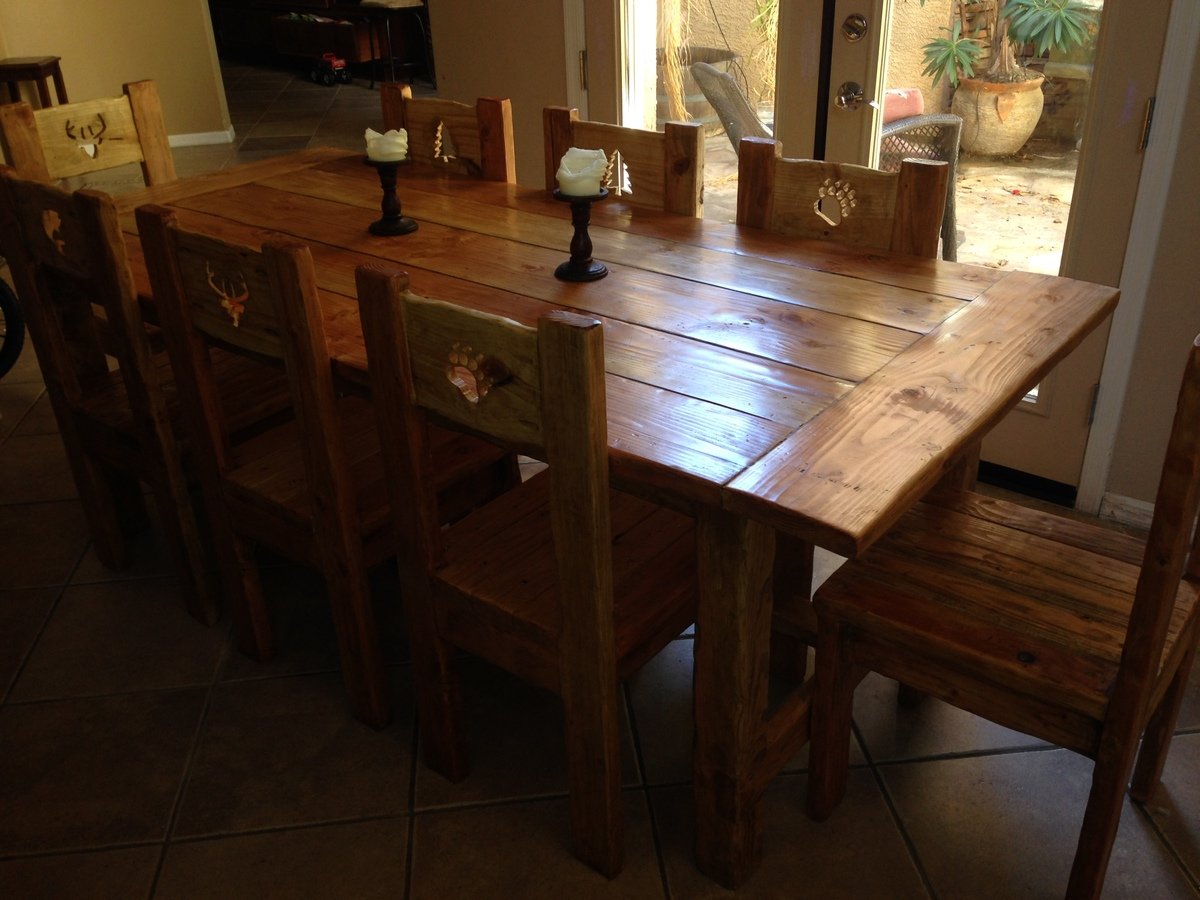
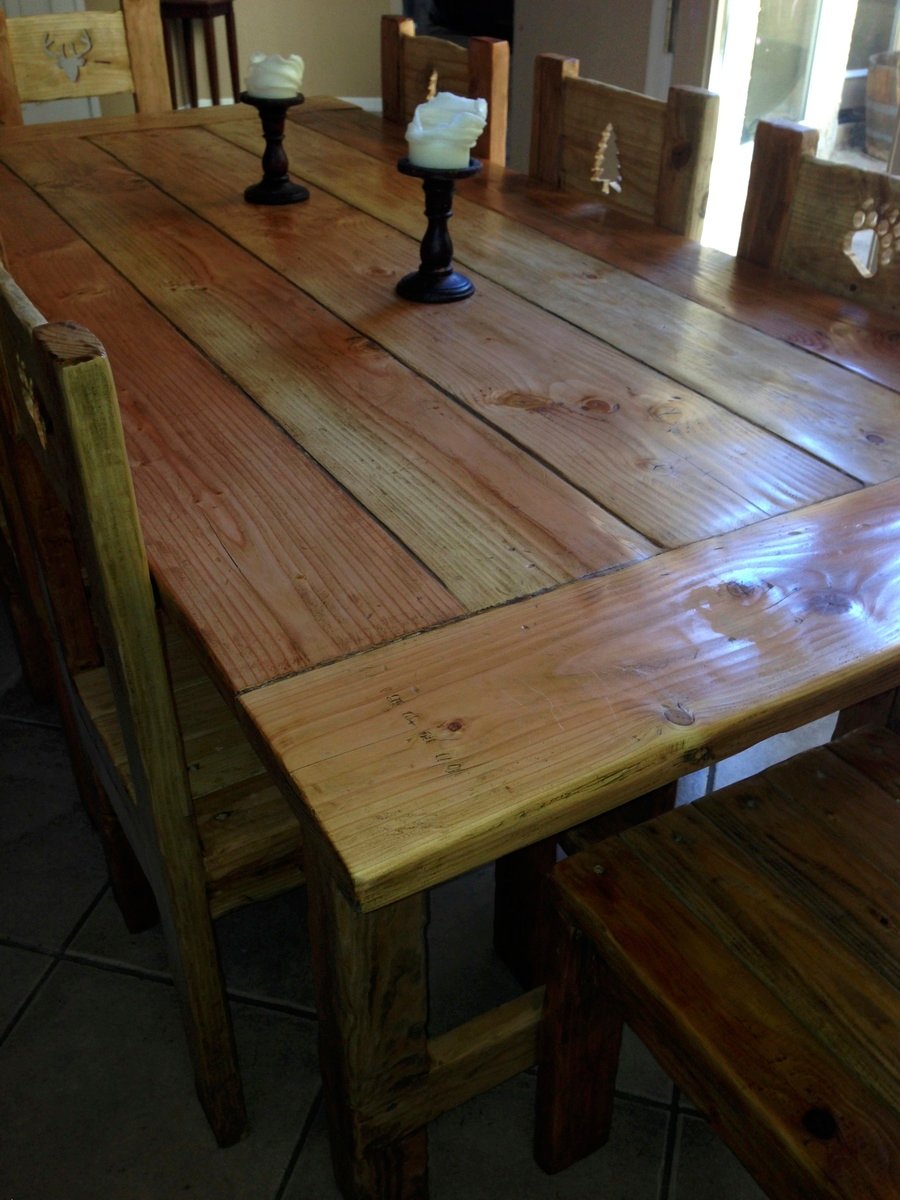
Our farm house table
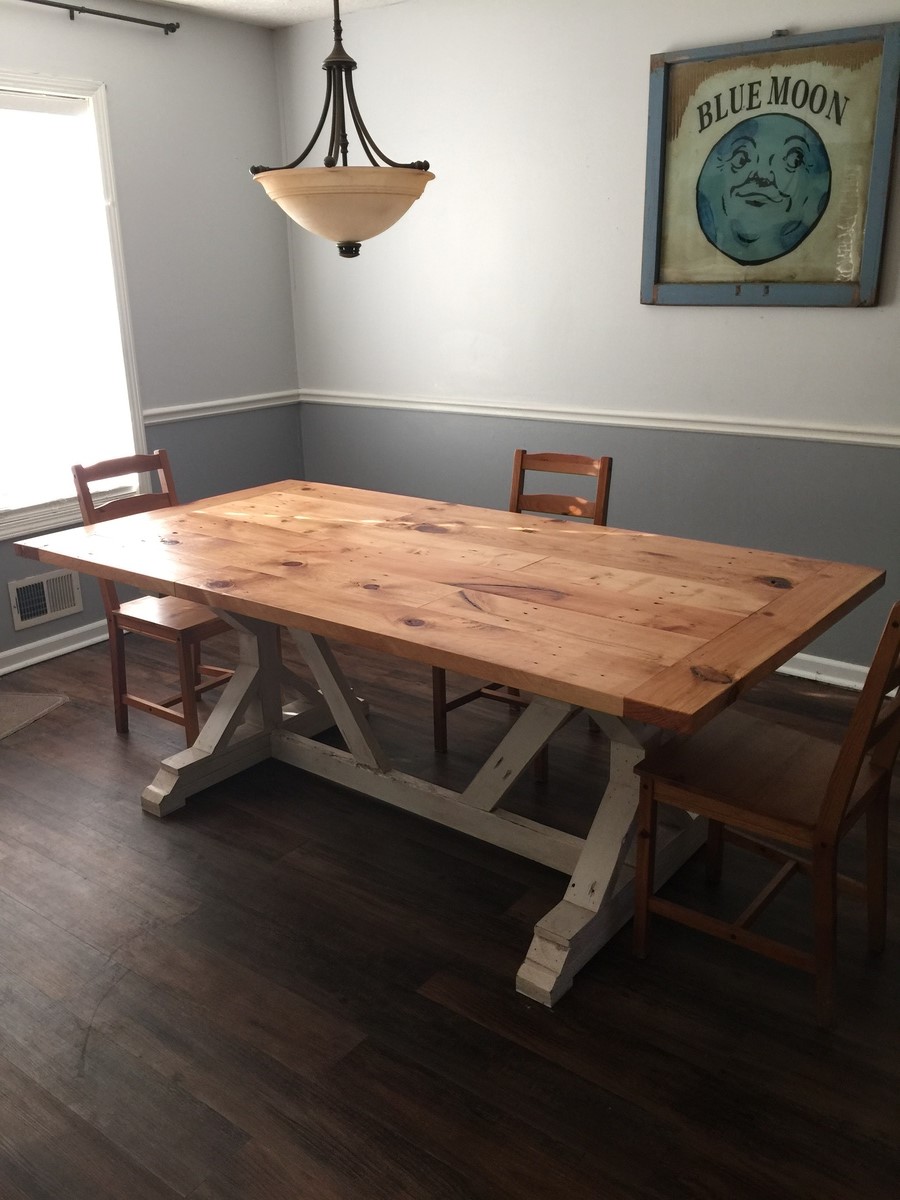
This table took me a few days to build and finish over my Christmas vacation. It's made completely of reclaimed wood. I left as many defects as I could to give it character. I'm finishing a bench for it now. Building this has brought the family together again. We are now eating at the table each night instead of in front of the tv. This table Is going to be in our family for many years to come. Thanks for your great plans Ana.
Built from Plan(s)
Estimated Cost
$20 for pocket screws and stain.
Estimated Time Investment
Weekend Project (10-20 Hours)
Finish Used
Minwax Golden Pecan stain on top. Three coats of Minwax Satin Laquer.
The base is painted with some old off white semi gloss latex I had in the garage, then rubbed with some dark walnut stain.
The base is painted with some old off white semi gloss latex I had in the garage, then rubbed with some dark walnut stain.
Recommended Skill Level
Intermediate
Outdoor 2x4 Sofa
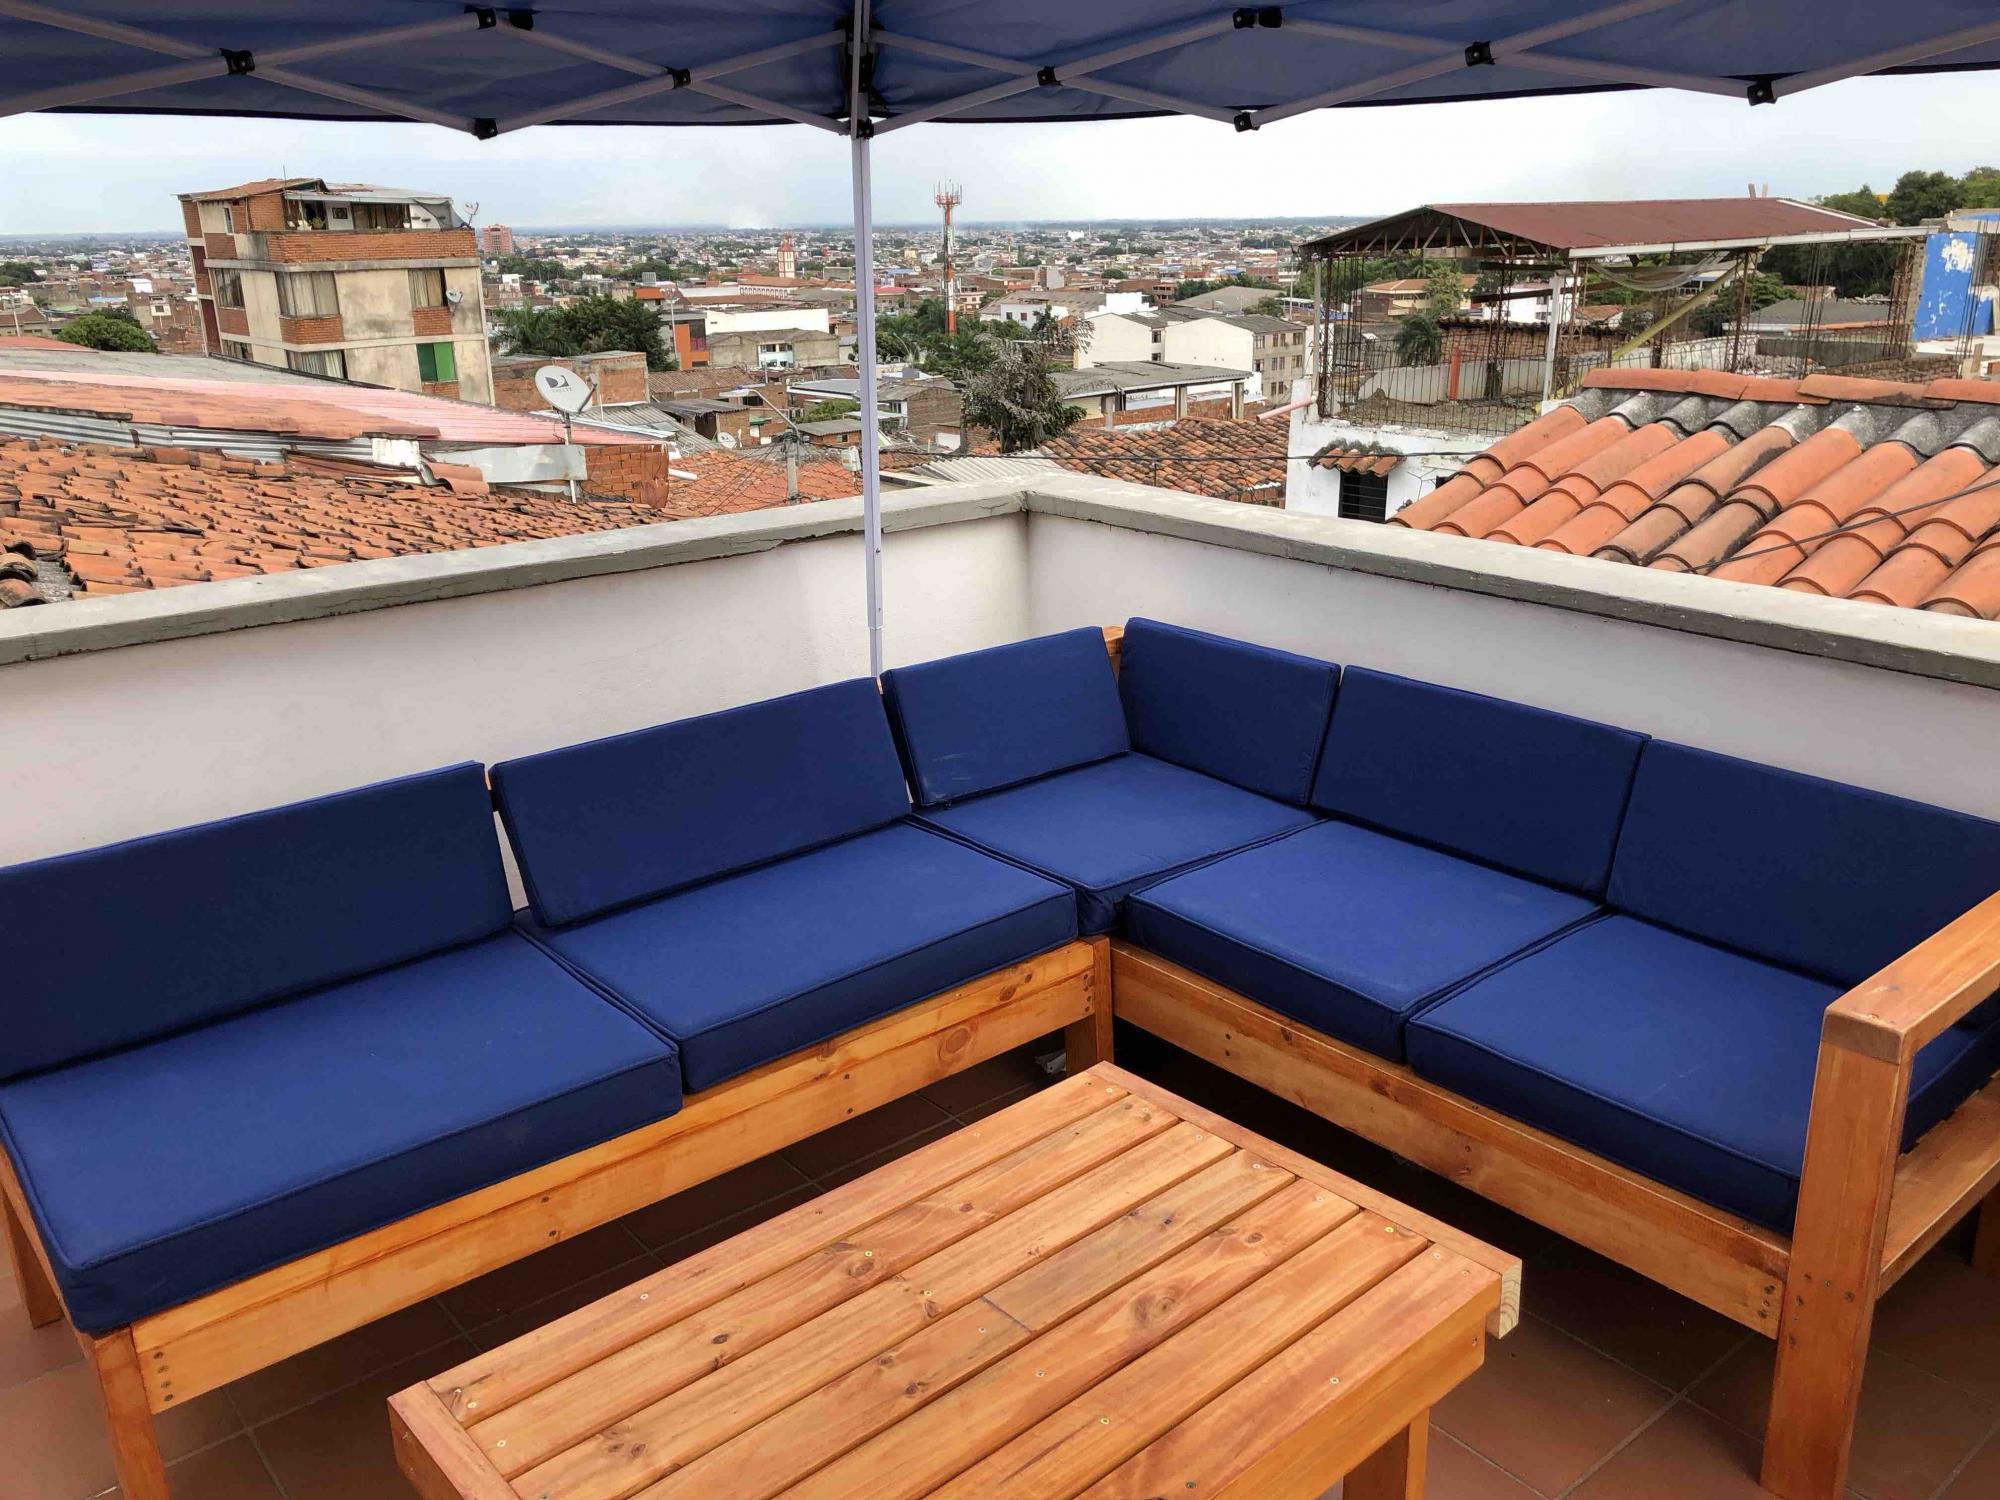
Last summer I rented a home in Cali Colombia that had a roof deck but no furniture. I had a lot of free time so I decided to use the 2x4 sofa plans to build this. It came out great, especially considering i had very few tools to work with.

Built from Plan(s)
Estimated Cost
Including buying the tools I needed for the job and the cushions, it cost about $500 in all. But I had all the cushions custom made. They were the most expensive part.
Estimated Time Investment
Week Long Project (20 Hours or More)
Recommended Skill Level
Intermediate
Dream Doll House

Dream Doll House
Built from Plan(s)
Estimated Cost
$150.00
Estimated Time Investment
Weekend Project (10-20 Hours)
Finish Used
Linseed oil and latex paint
Recommended Skill Level
Beginner
Comments
Fri, 01/13/2012 - 13:51
This is so pretty!
I love this! The floors look amazing, and the side scallops are too cute!
Easy Jewlery Box Current(unfinnished)
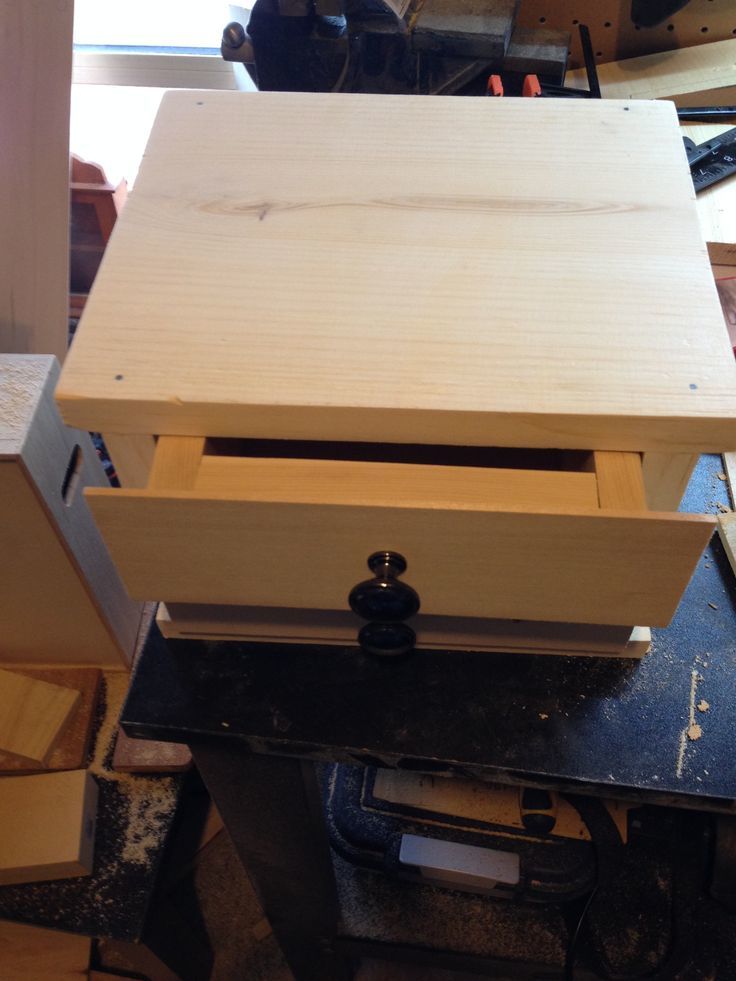
some minor changes in the box height and added fronts to the drawers,
currently working on this project will update when completed.
thanks for checking it out.
Estimated Time Investment
Afternoon Project (3-6 Hours)
Recommended Skill Level
Starter Project
Comments

Thu, 11/14/2013 - 16:33
Love this!
Love this! It looks awesome. What a fab idea to add the basswood drawer fronts! Definitely copying that! Thank you for posting, great job!! :)
Joanne
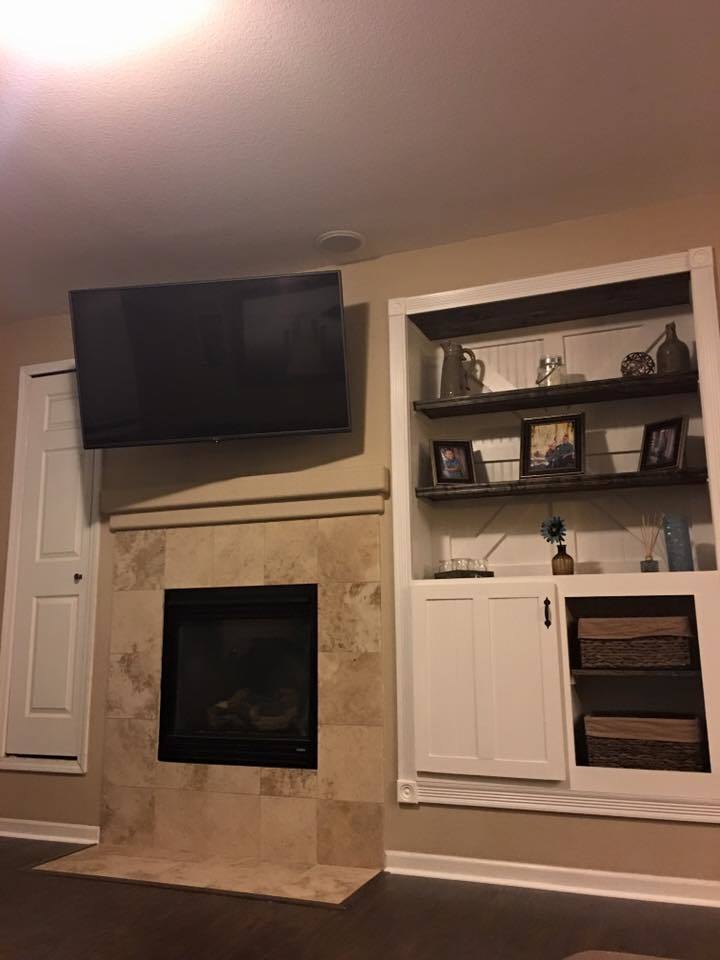
Media Center - Built-in
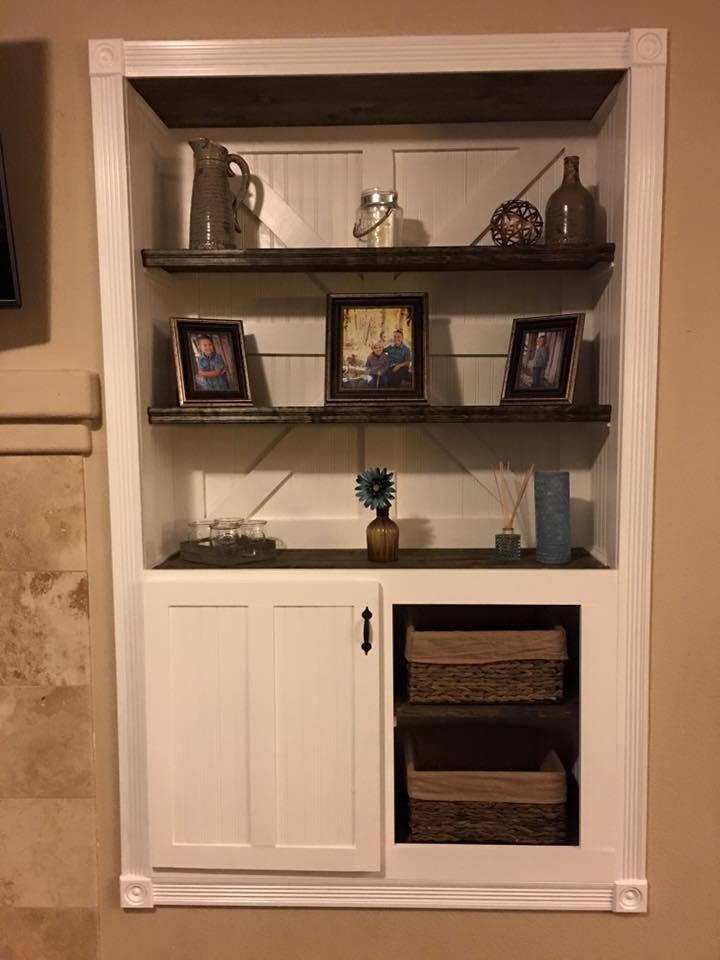
We built and designed this as we went. All the wires are concealed behind the back of the center and all the media equipment is in the cabinet. Everything was custom built for roughly $400 and it took about 2 days.
Estimated Cost
$400
Estimated Time Investment
Weekend Project (10-20 Hours)
Recommended Skill Level
Intermediate
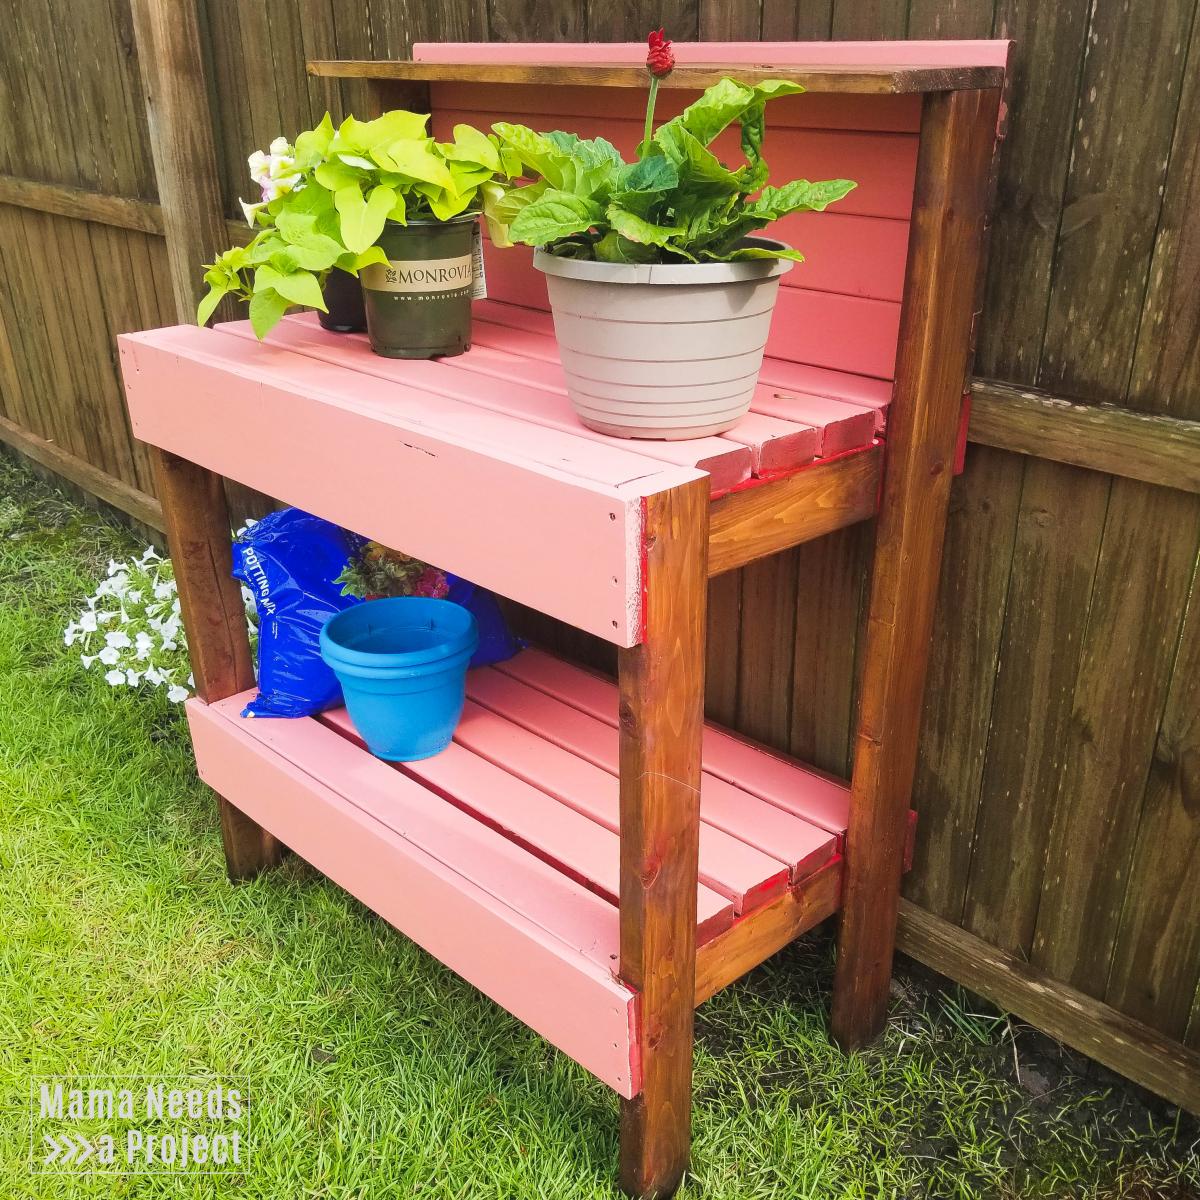
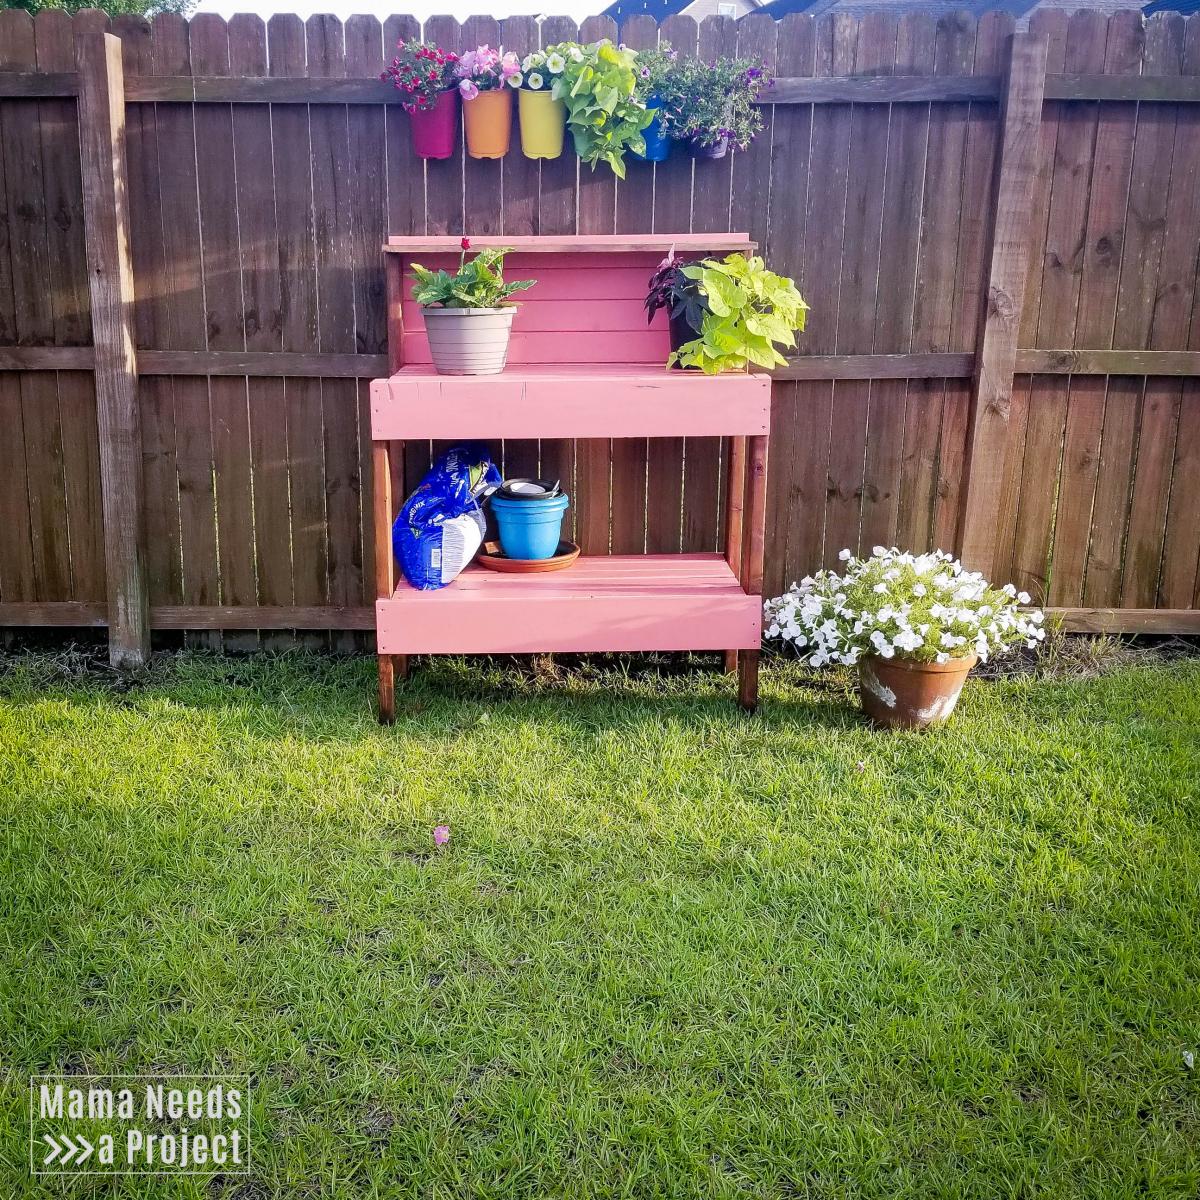
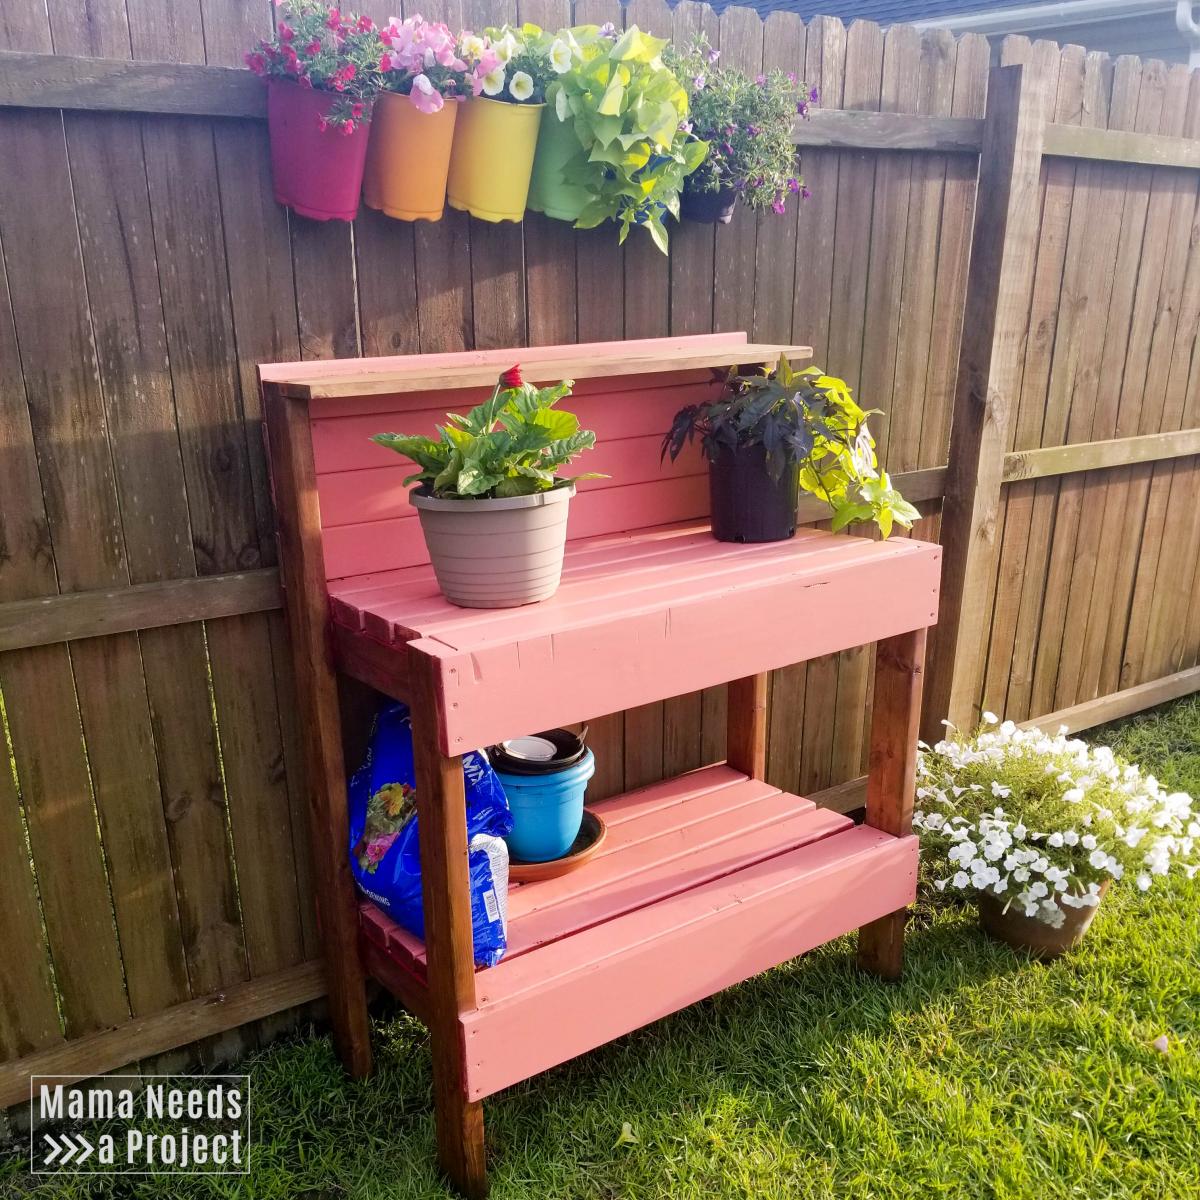
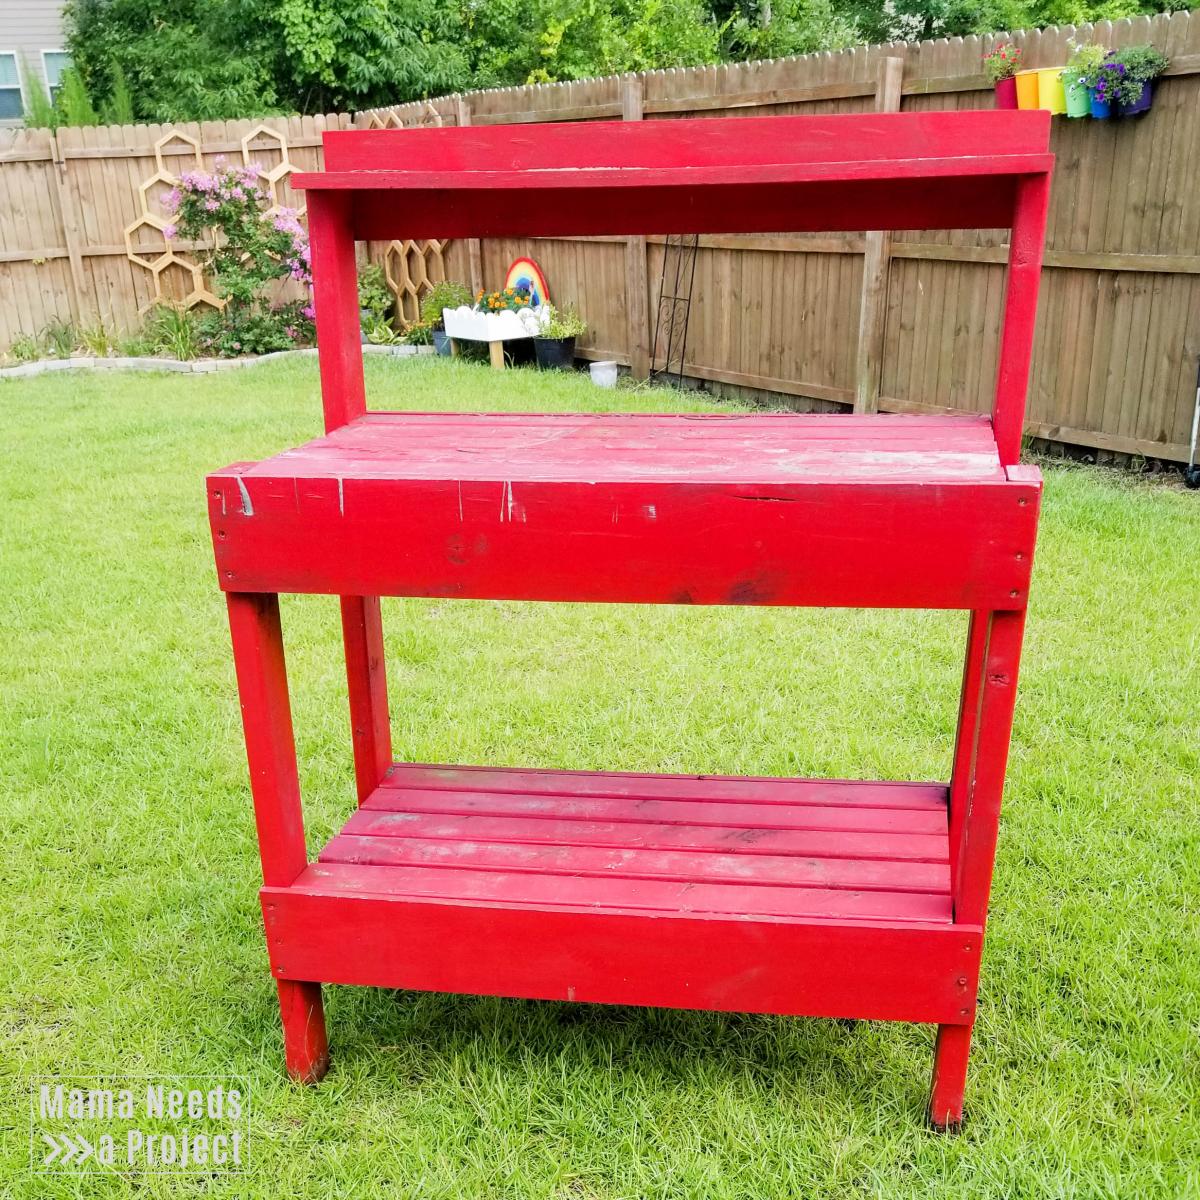
Simple Potting Bench
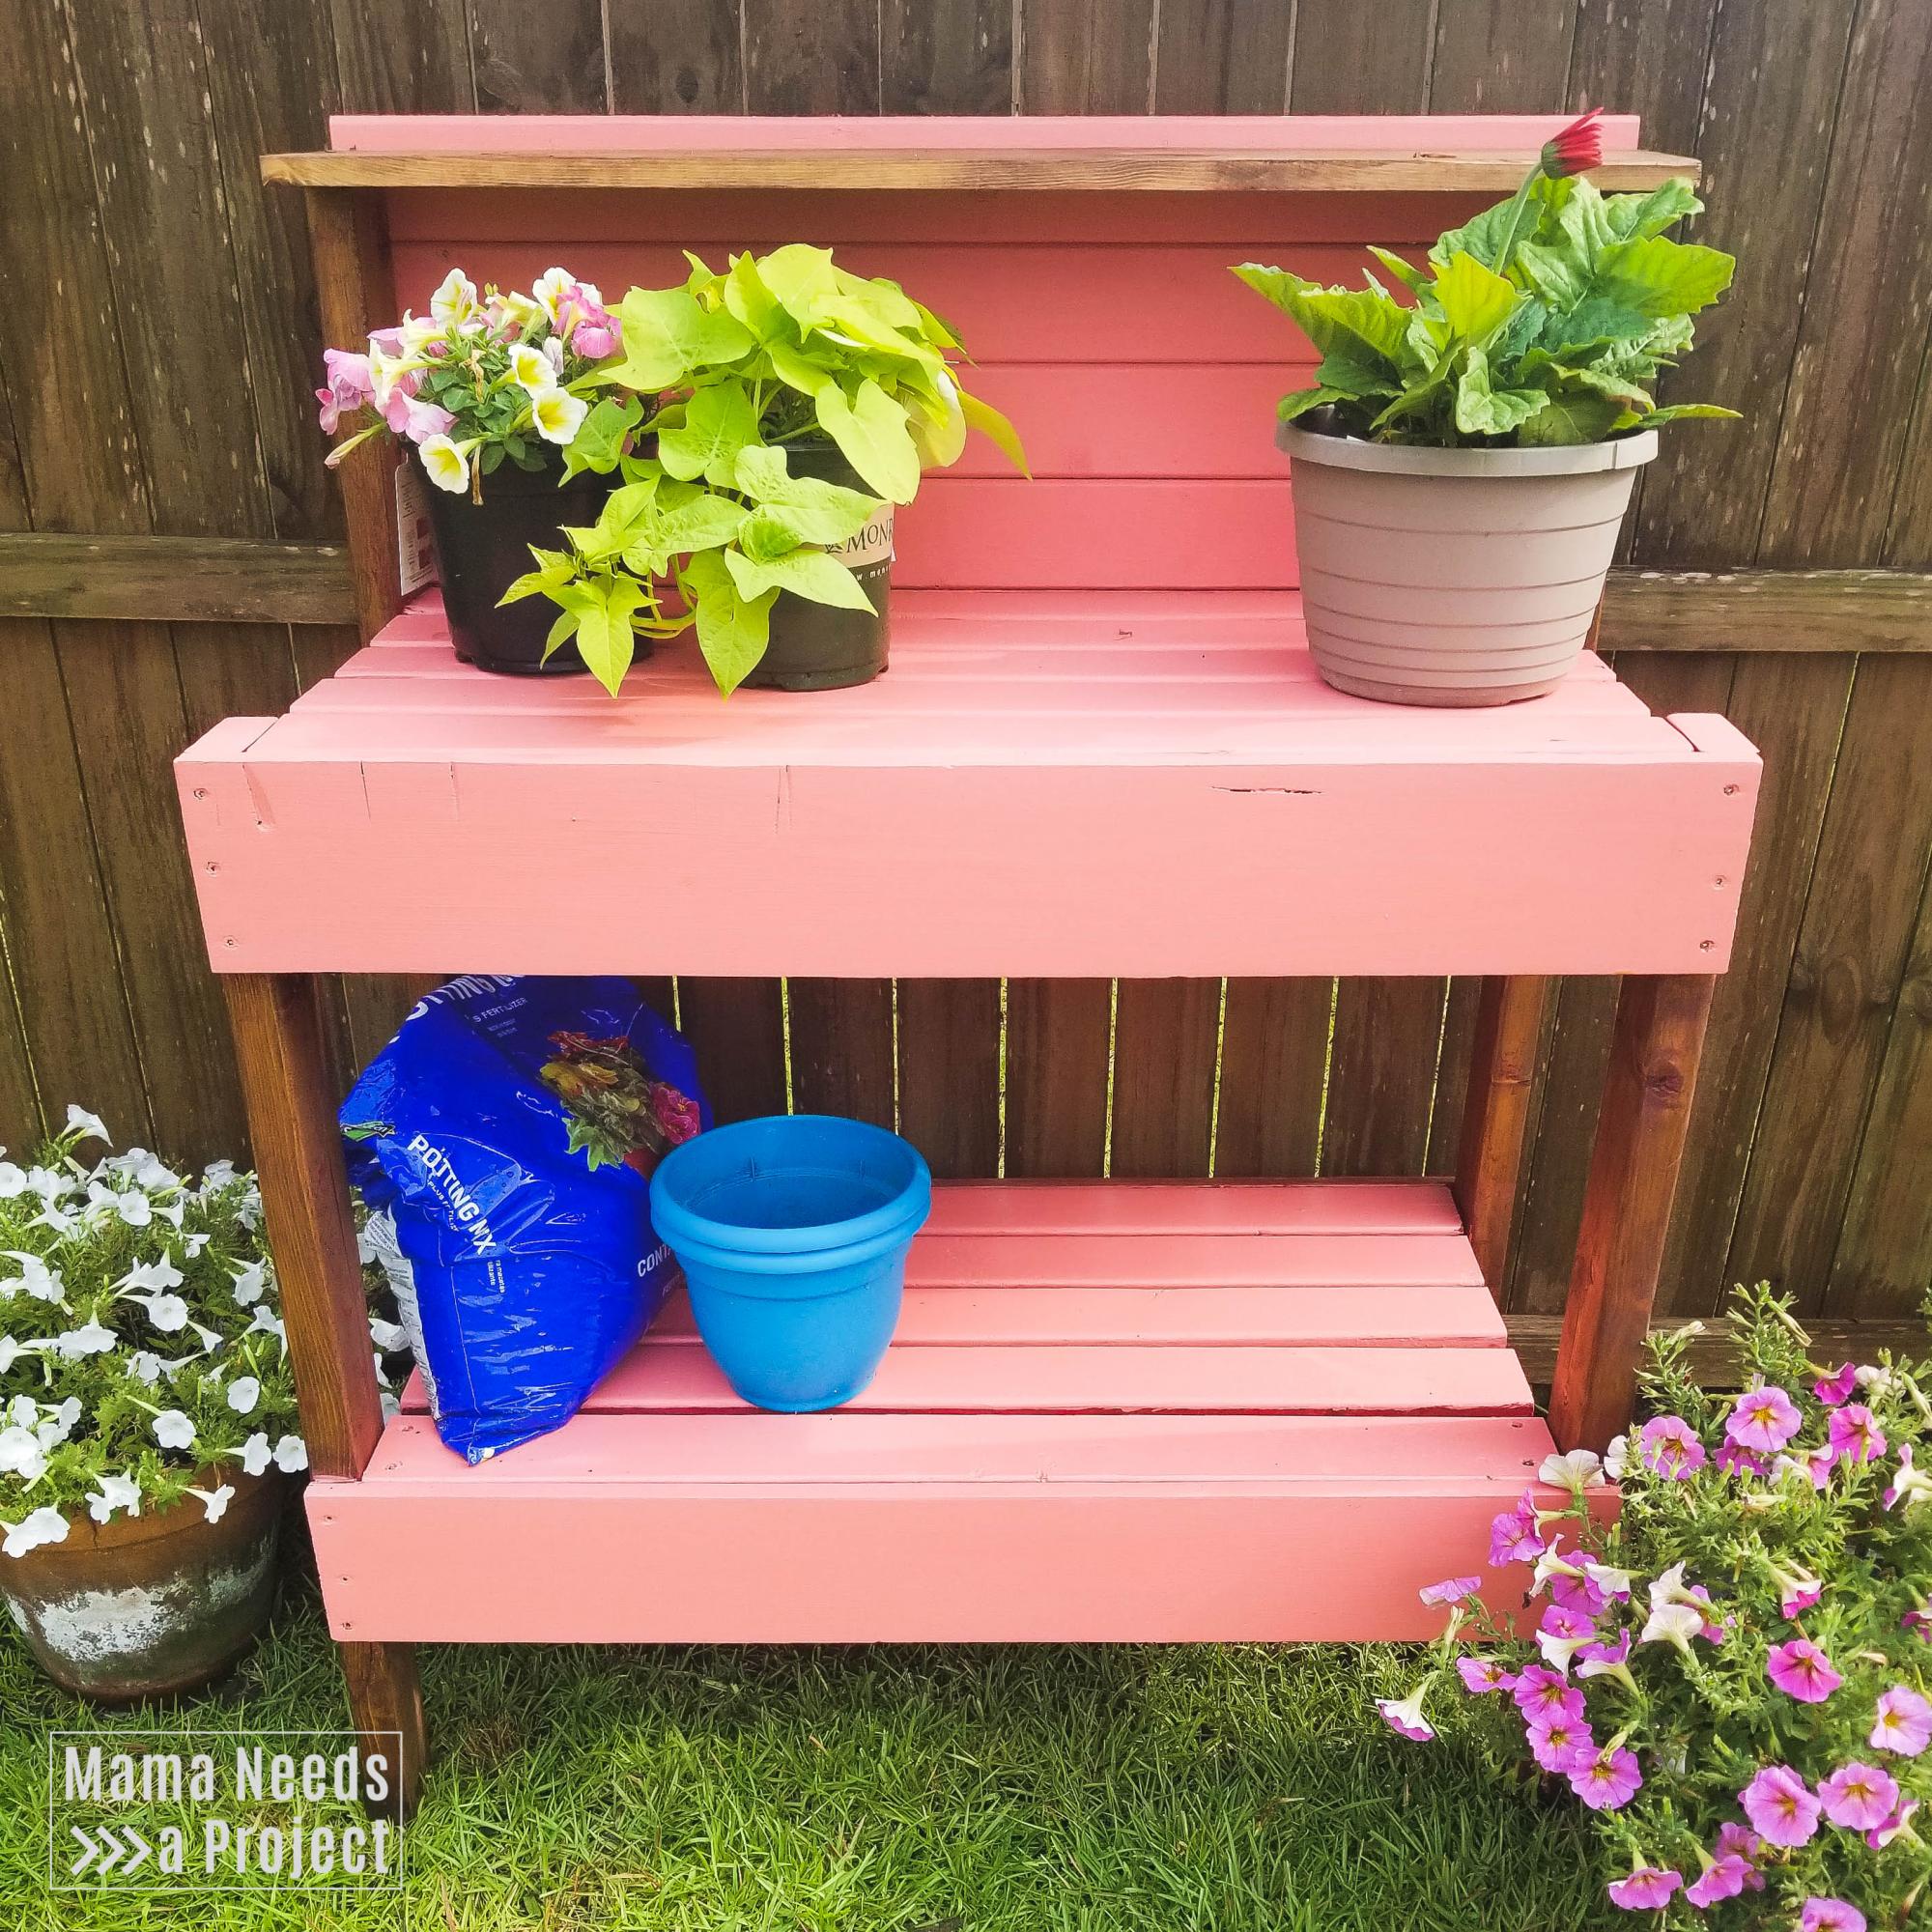
I originally built this potting bench in 2014. It was the very first project I built completely on my own! After 5 years of being outside it needed a little makeover. I sanded and refinished it, and made a couple modifications.
The last picture is the before :)
You can read about the whole building process here: https://mamaneedsaproject.com/2x4-potting-bench-makeover/
Built from Plan(s)
Estimated Time Investment
Afternoon Project (3-6 Hours)
Recommended Skill Level
Beginner
Comments
DIY Shelves
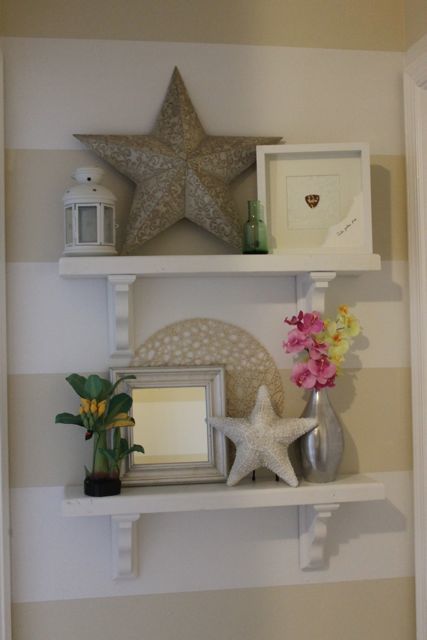
Love how these turned out and LOVE that I had almost everything in my garage already! Here's a tutorial for those of you who would like to make it!
Estimated Cost
Less than $30
Estimated Time Investment
An Hour or Two (0-2 Hours)
Finish Used
White Paint
Recommended Skill Level
Beginner
Comments
Thu, 12/29/2011 - 12:59
LOVE these shelves, and your
LOVE these shelves, and your wall colors are to die for! great job!

Sun, 03/11/2018 - 12:48
Website is gone
Was hoping to see these plans, but the website is parked. No luck finding the plans anywhere.
Rustic Table
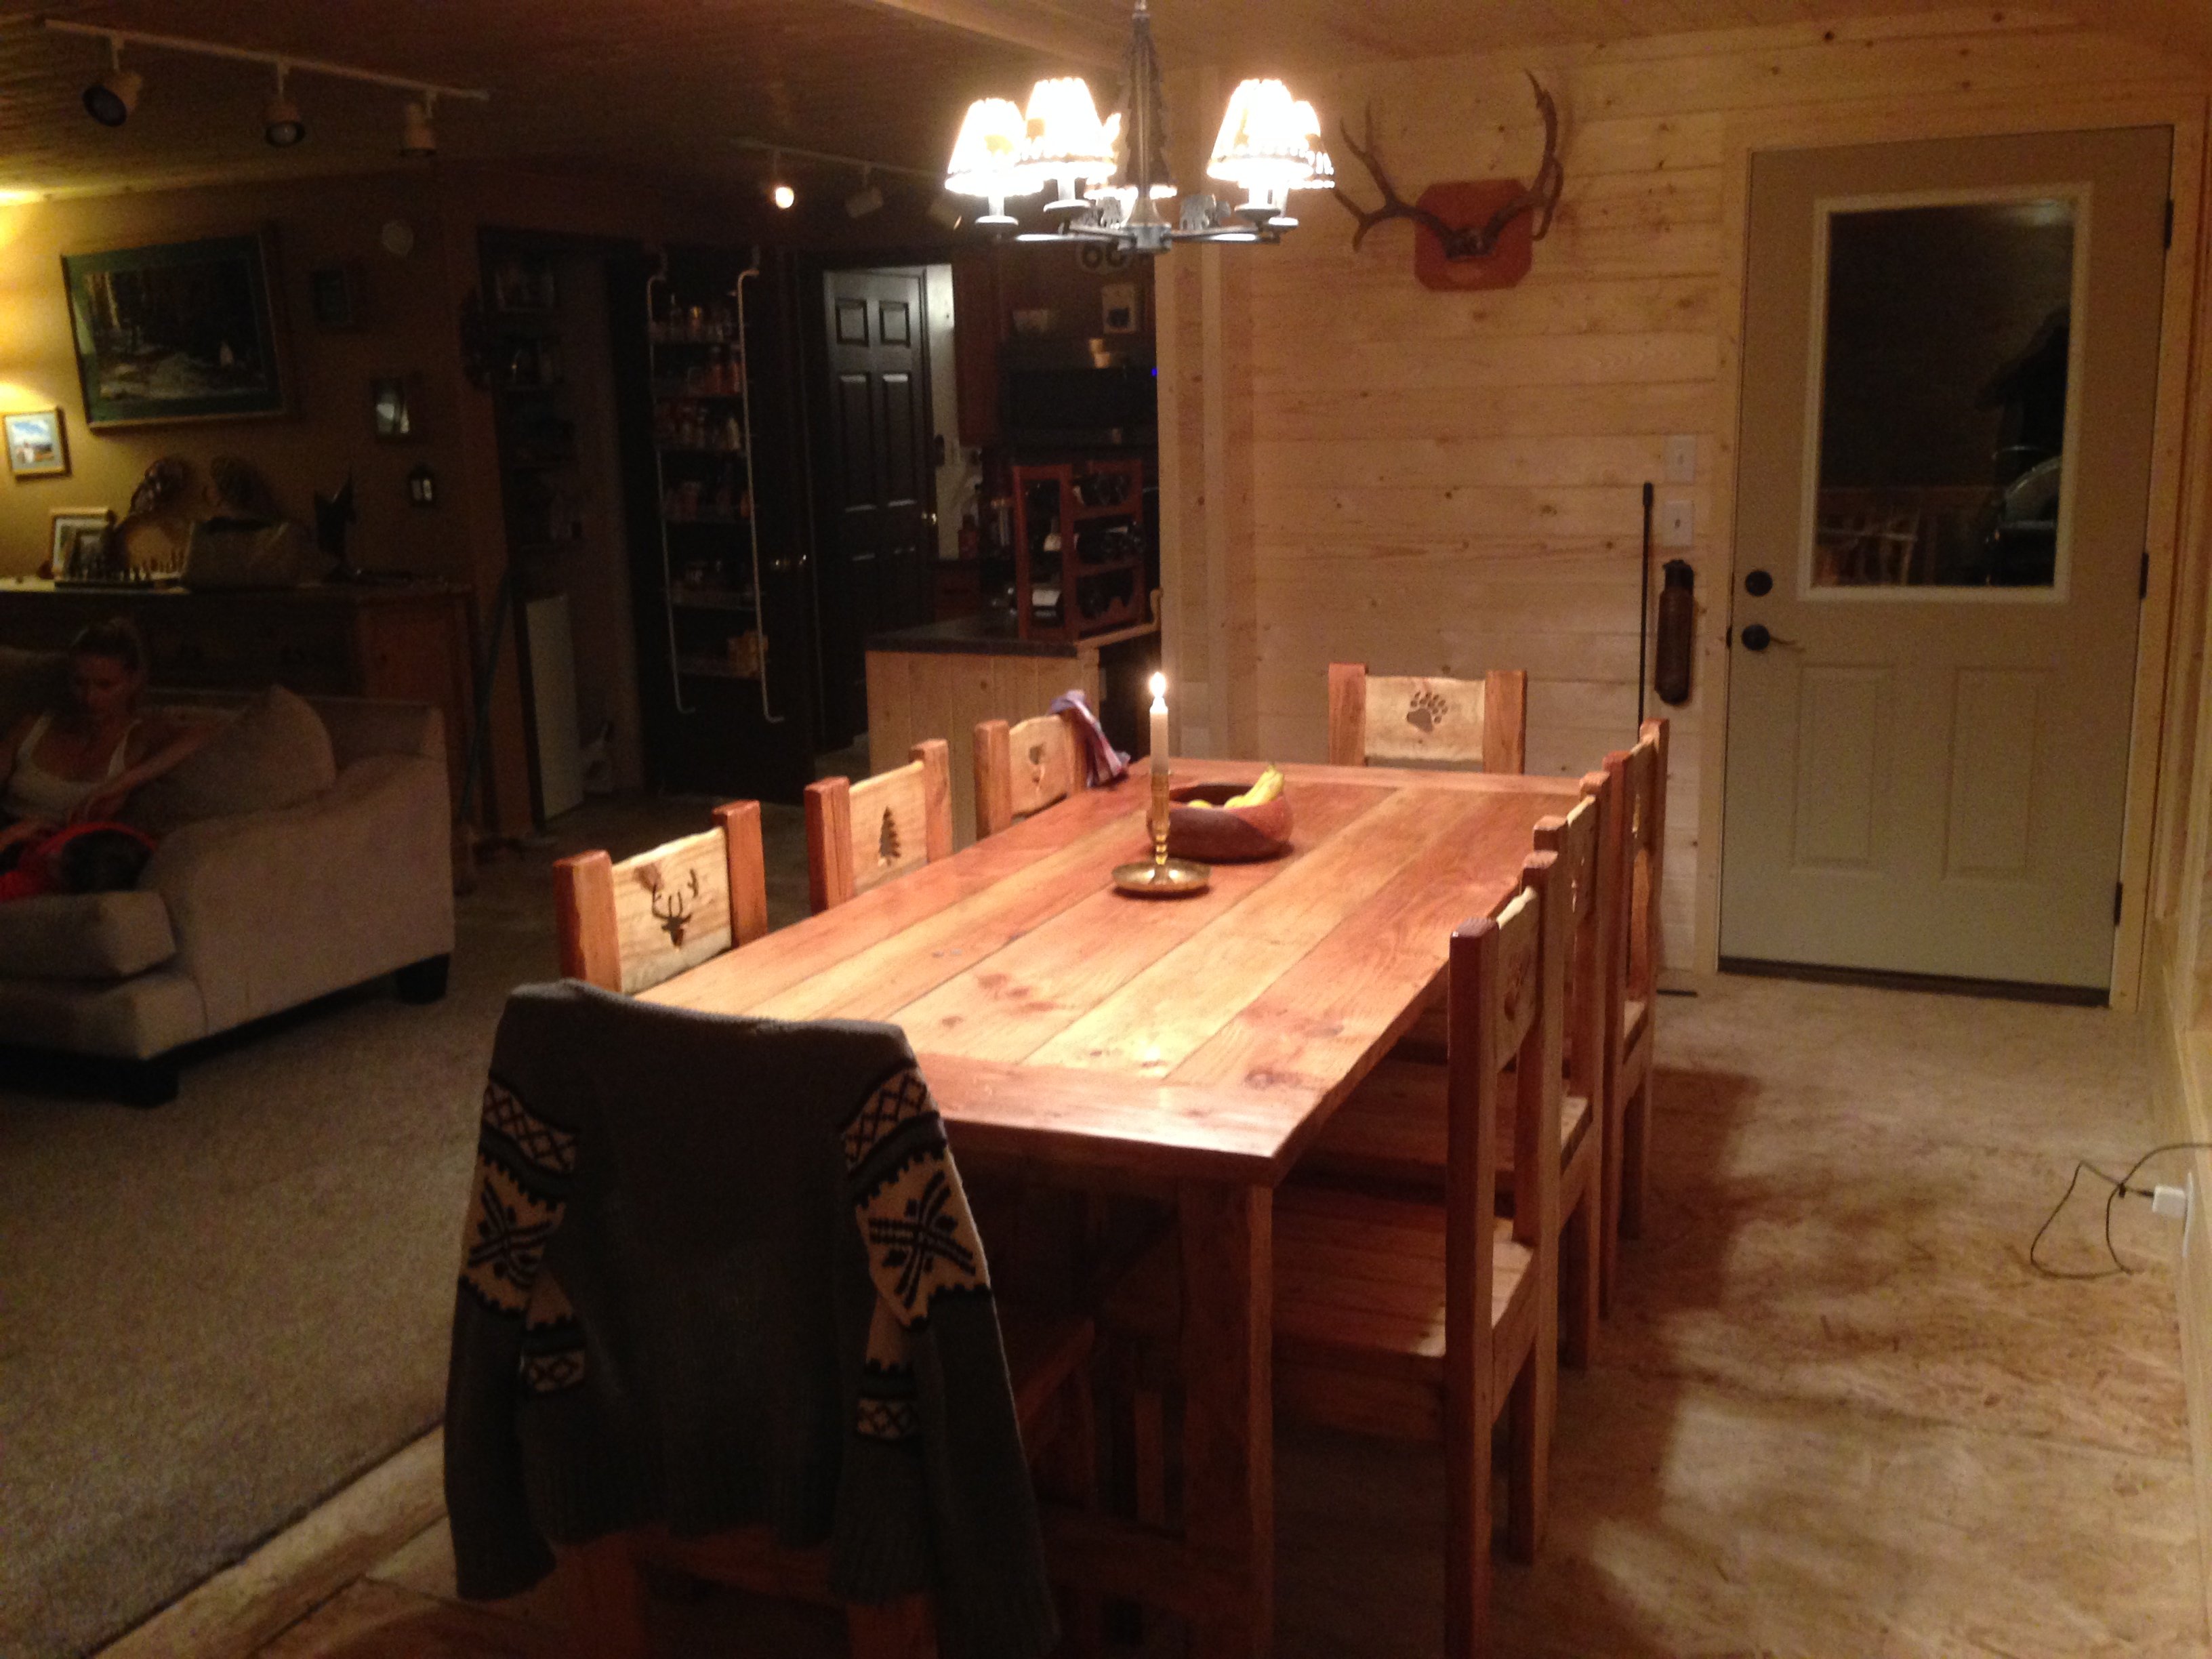
My wife and I wanted a rustic looking table for our cabin and didn't want to pay a fortune for it! This was my first project and I found it pretty easy to make. The finish is Briwax Rustic Pine and I was so happy with how it turned out I had to build some chairs to go with it! The chairs were made from a plan I found for making chairs using 2x4s
Built from Plan(s)
Estimated Time Investment
Weekend Project (10-20 Hours)
Finish Used
Briwax Rustic Pine.
Recommended Skill Level
Beginner
Comments
Sun, 11/17/2013 - 06:05
Great Job! I am braving my
Great Job! I am braving my first table myself ...
Sun, 11/17/2013 - 07:30
Great project!
These look awesome! Love the finish - how many coats of Briwax did you need to achieve that sheen? It's just the perfect amount of shine. And those chairs! Can you post some close-ups of those designs on the backs? Those look sooo cool, how did you do them?
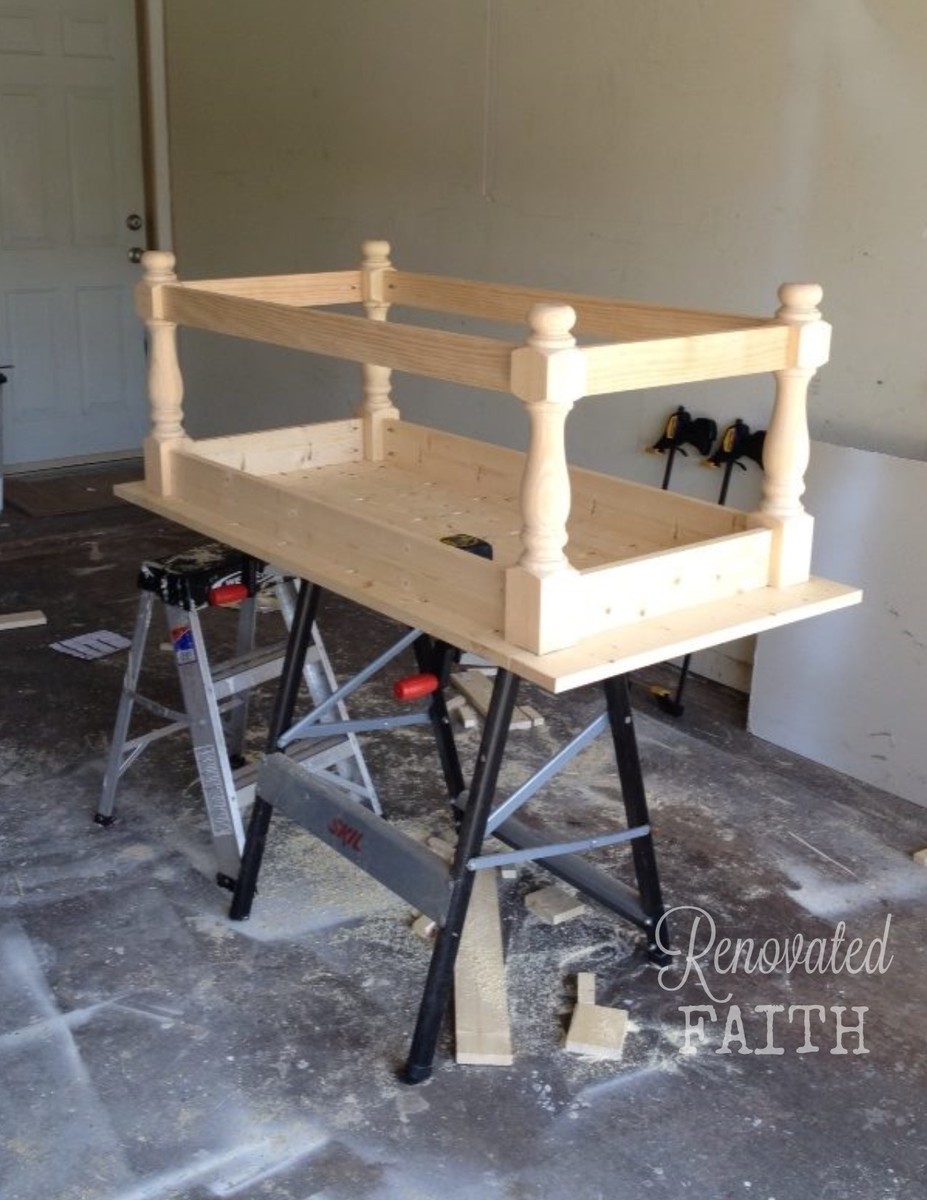
Turned Leg Coffee Table with Shelf
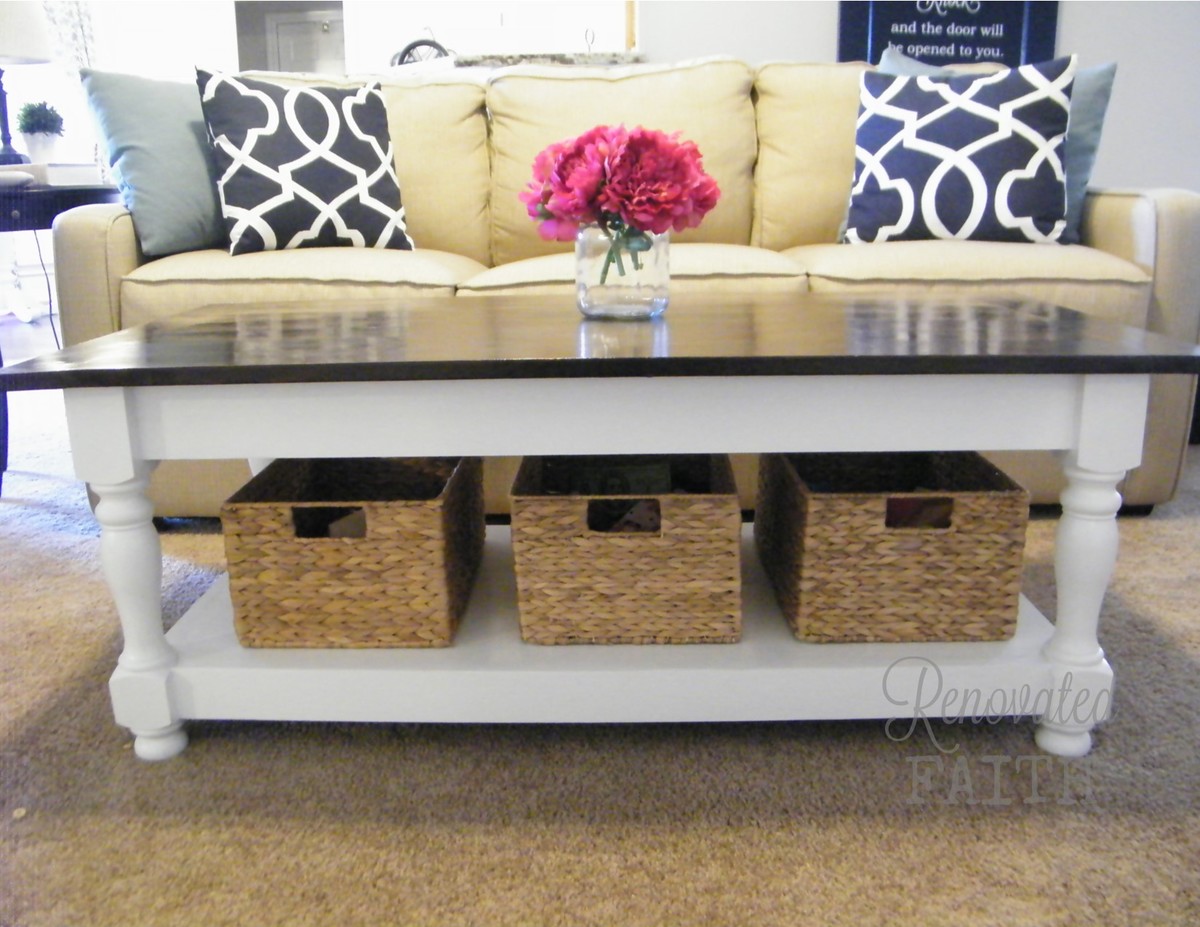
We combined the plans for the Turned Leg Coffee Table and the Corona Coffee Table to add the storage shelf for toys. Visit my blog for more details and pictures:
Built from Plan(s)
Estimated Cost
Using low-grade pine, we spent about $180.
Estimated Time Investment
Weekend Project (10-20 Hours)
Finish Used
Faux top stain using Minwax Gel Stain and Behr paint. Details are at www.renovatedfaith.com
Recommended Skill Level
Beginner
Desk with drawers and open cabinets
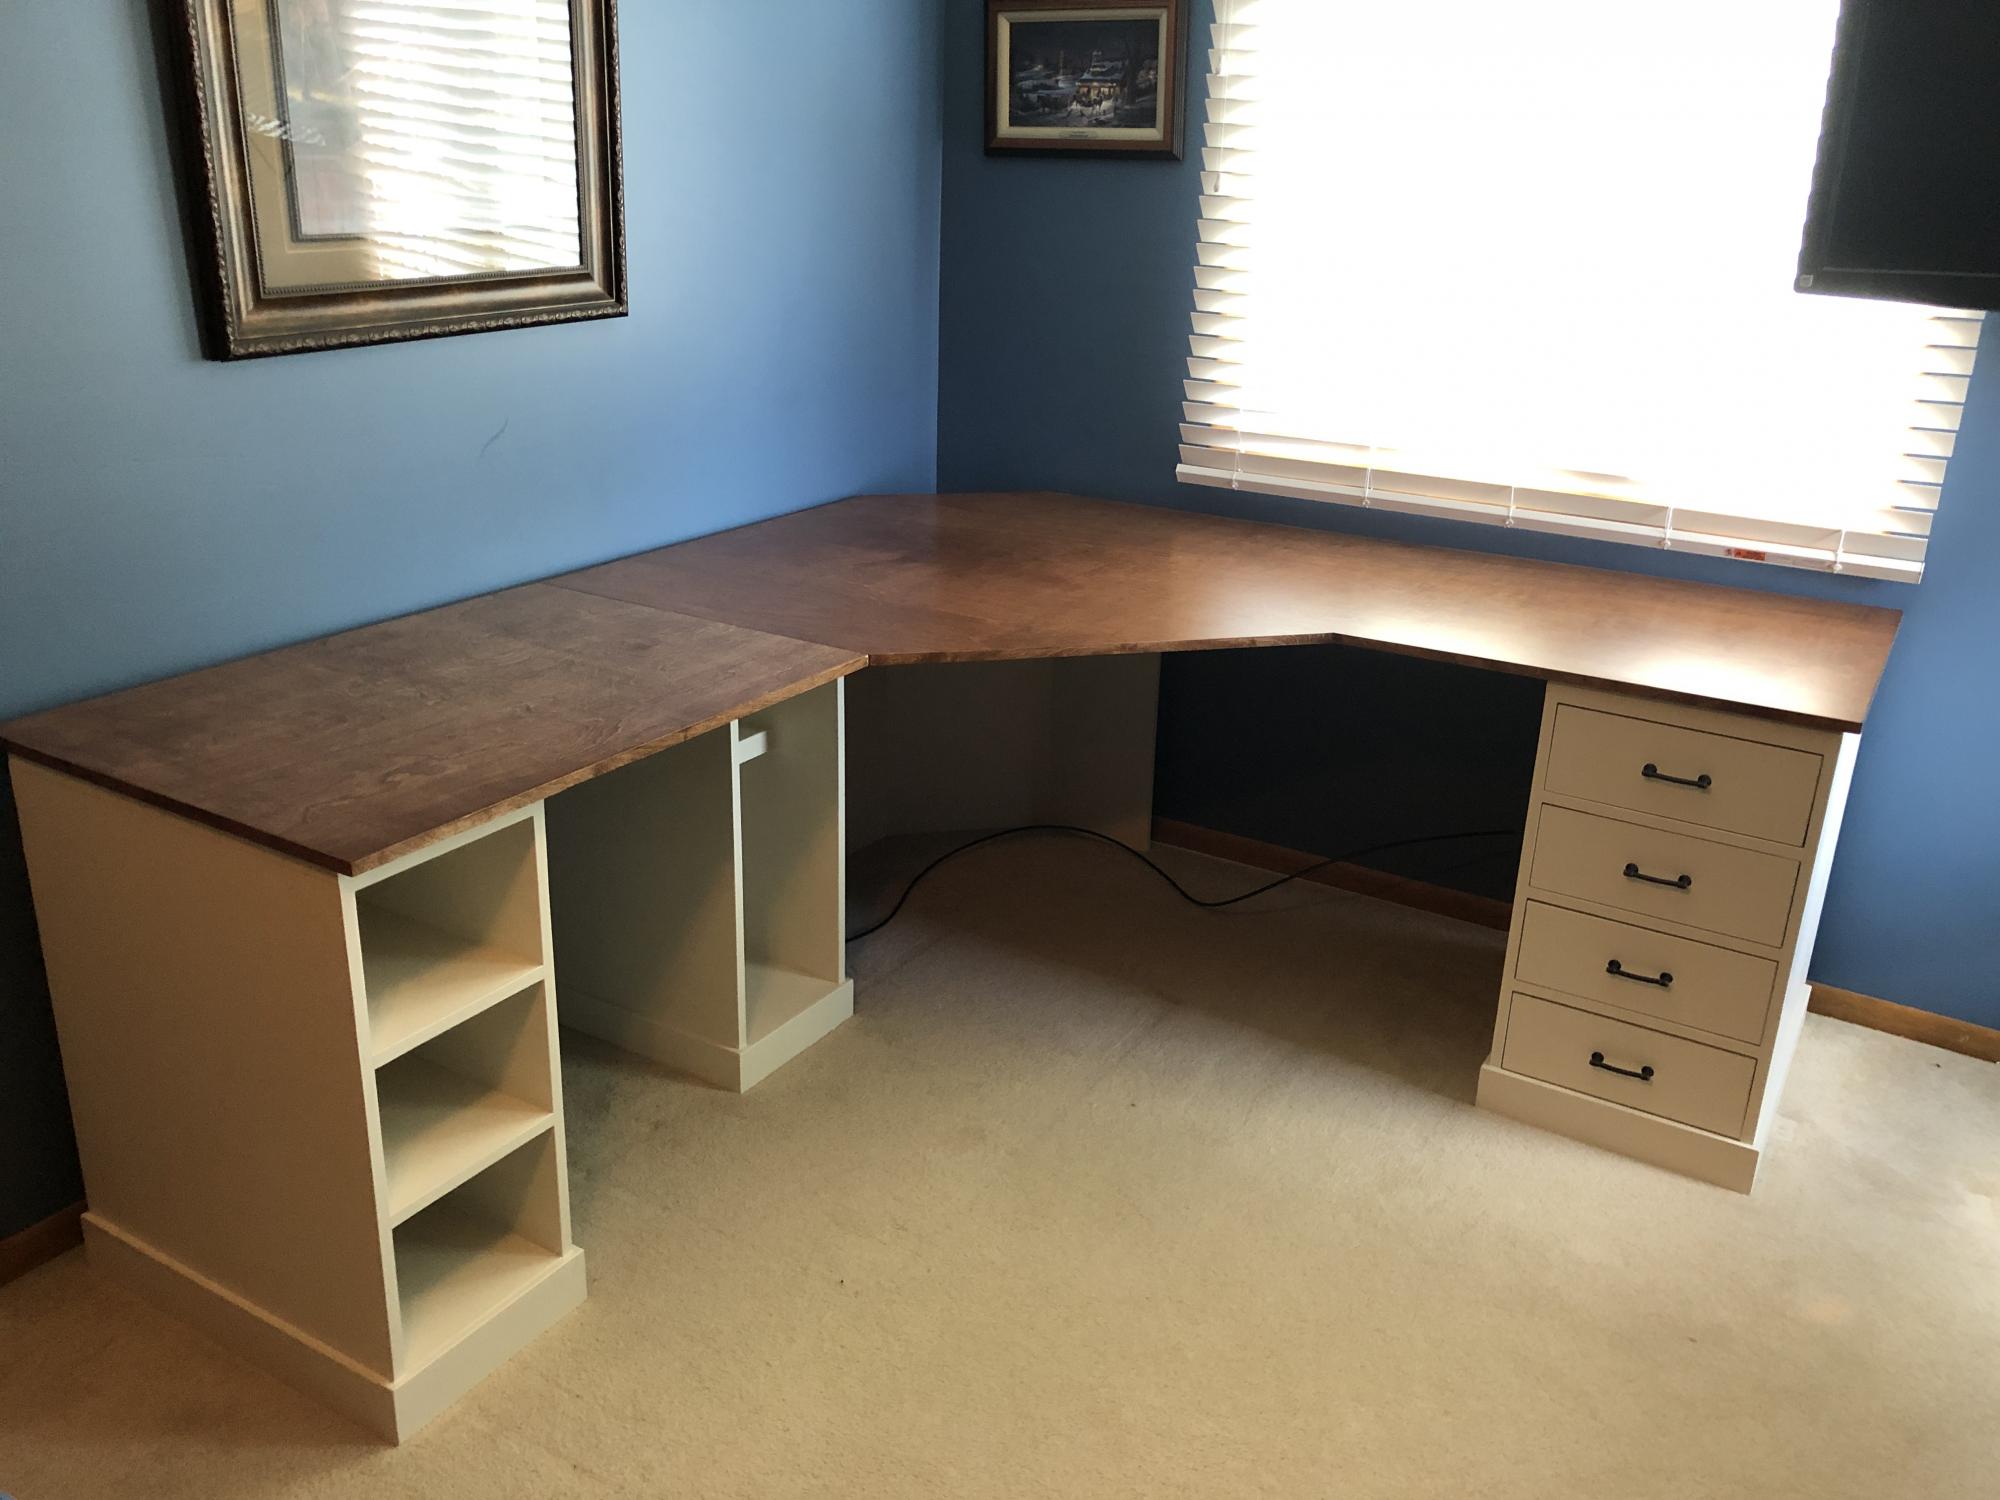
I used a modified version of the narrow drawer unit as the foundation for this desk build. I decided to make wooden drawer guides rather than using manufacturer metal guides. I liked the idea of it having a more traditional wood-on-wood feel and saving a few dollars. I love the simplicity of the base cabinet design and the contrast between the painted base and stained top. Thanks yo all who shared their projects for the inspiration!

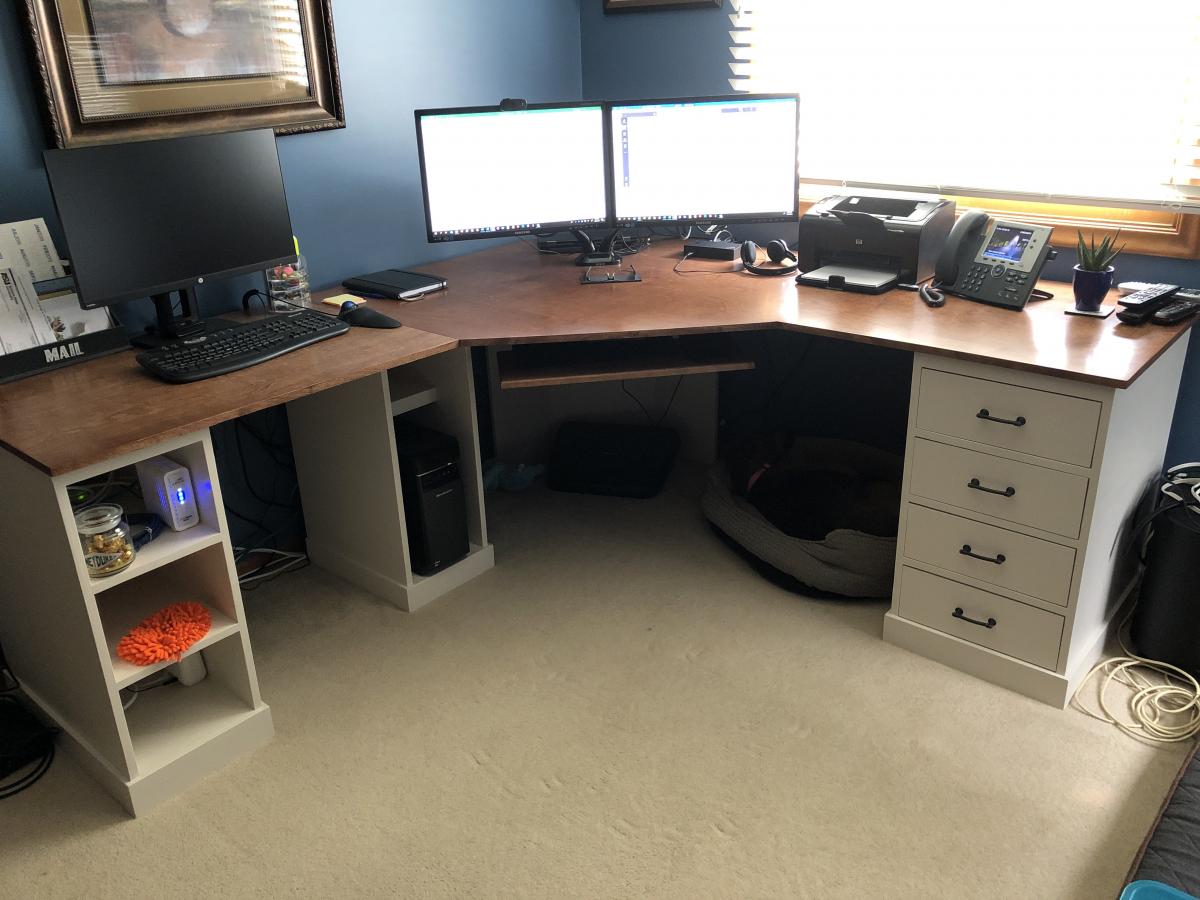
Built from Plan(s)
Estimated Cost
About $250
Estimated Time Investment
Week Long Project (20 Hours or More)
Finish Used
Paint, stain, and polycrylic
Recommended Skill Level
Intermediate
Triple Bunk
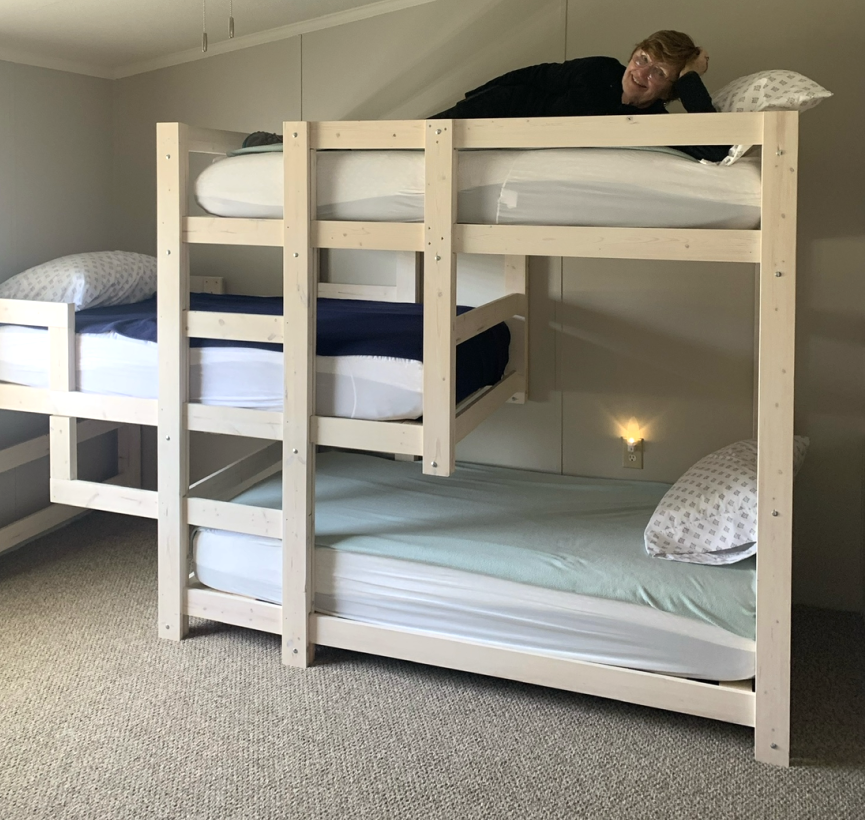
I needed to find a way to conserve space for 3 children to sleep in a very small home. I used an adapted pattern from Ana White. It turned out perfectly!
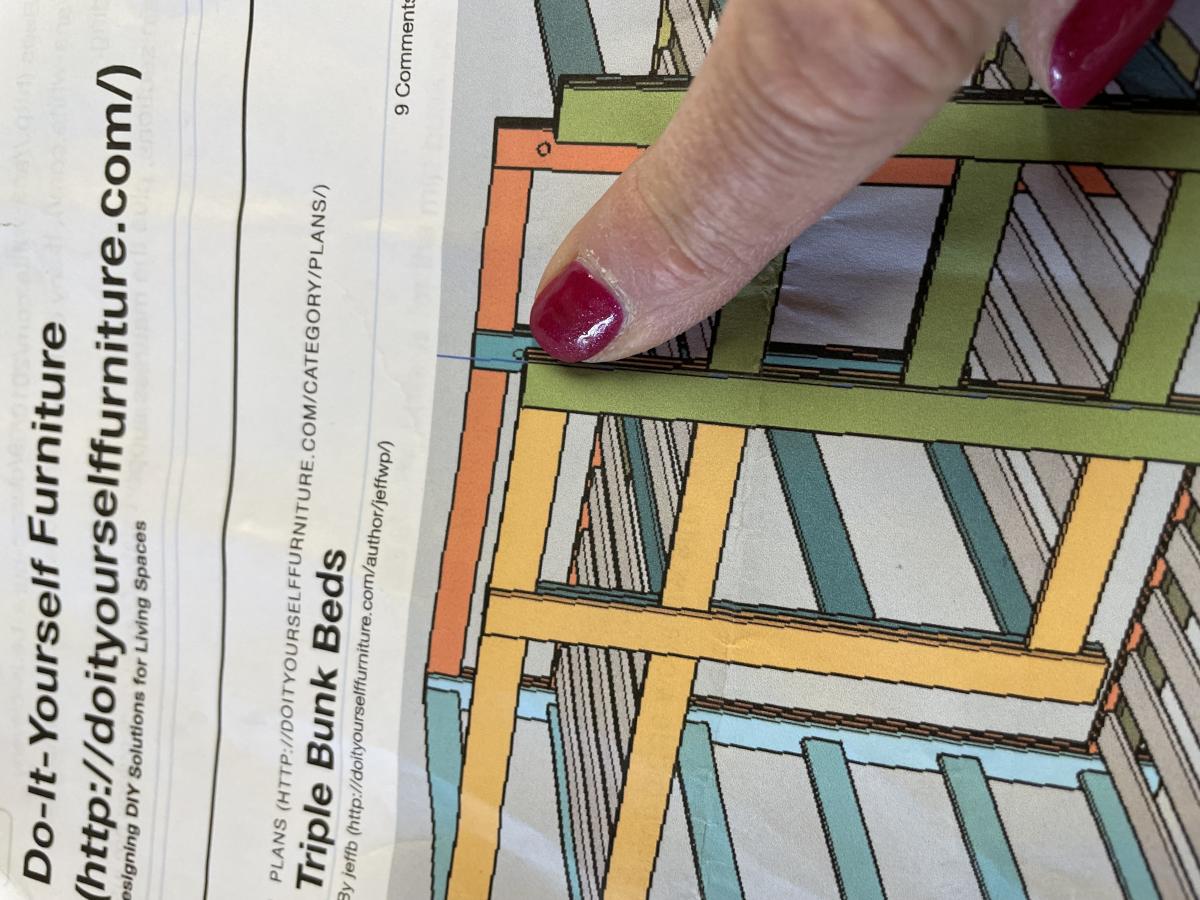
Built from Plan(s)
Comments
Sat, 04/29/2023 - 09:22
Triple Bunk Awesomeness!
WOW, this is great, you fit a lot of sleeping in a small space!
TV Stand, Media console

We needed a TV stand and I wasn't able to find anything from store... as usually. I found a plan here and decided to modify it a bit to fit our needs.
It was very simple and took me total maybe two hours plus painting
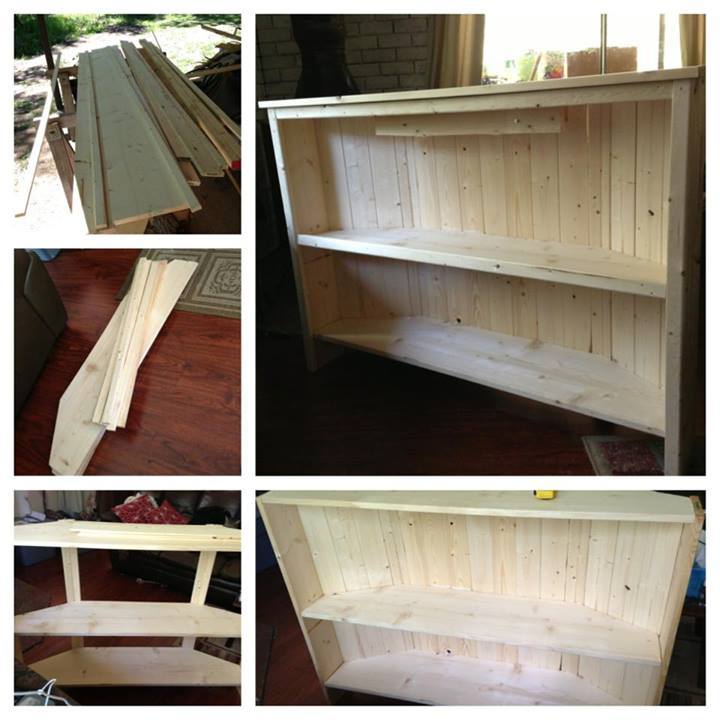
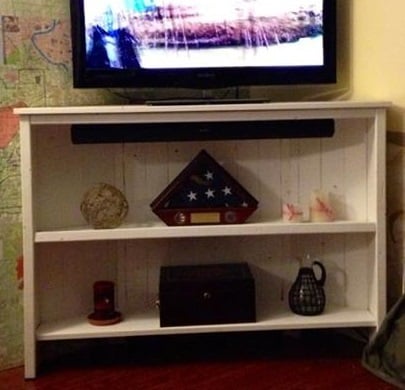
Built from Plan(s)
Estimated Cost
20$
Estimated Time Investment
An Hour or Two (0-2 Hours)
Finish Used
White paint
Recommended Skill Level
Beginner
Got my confidence in building back!!!!
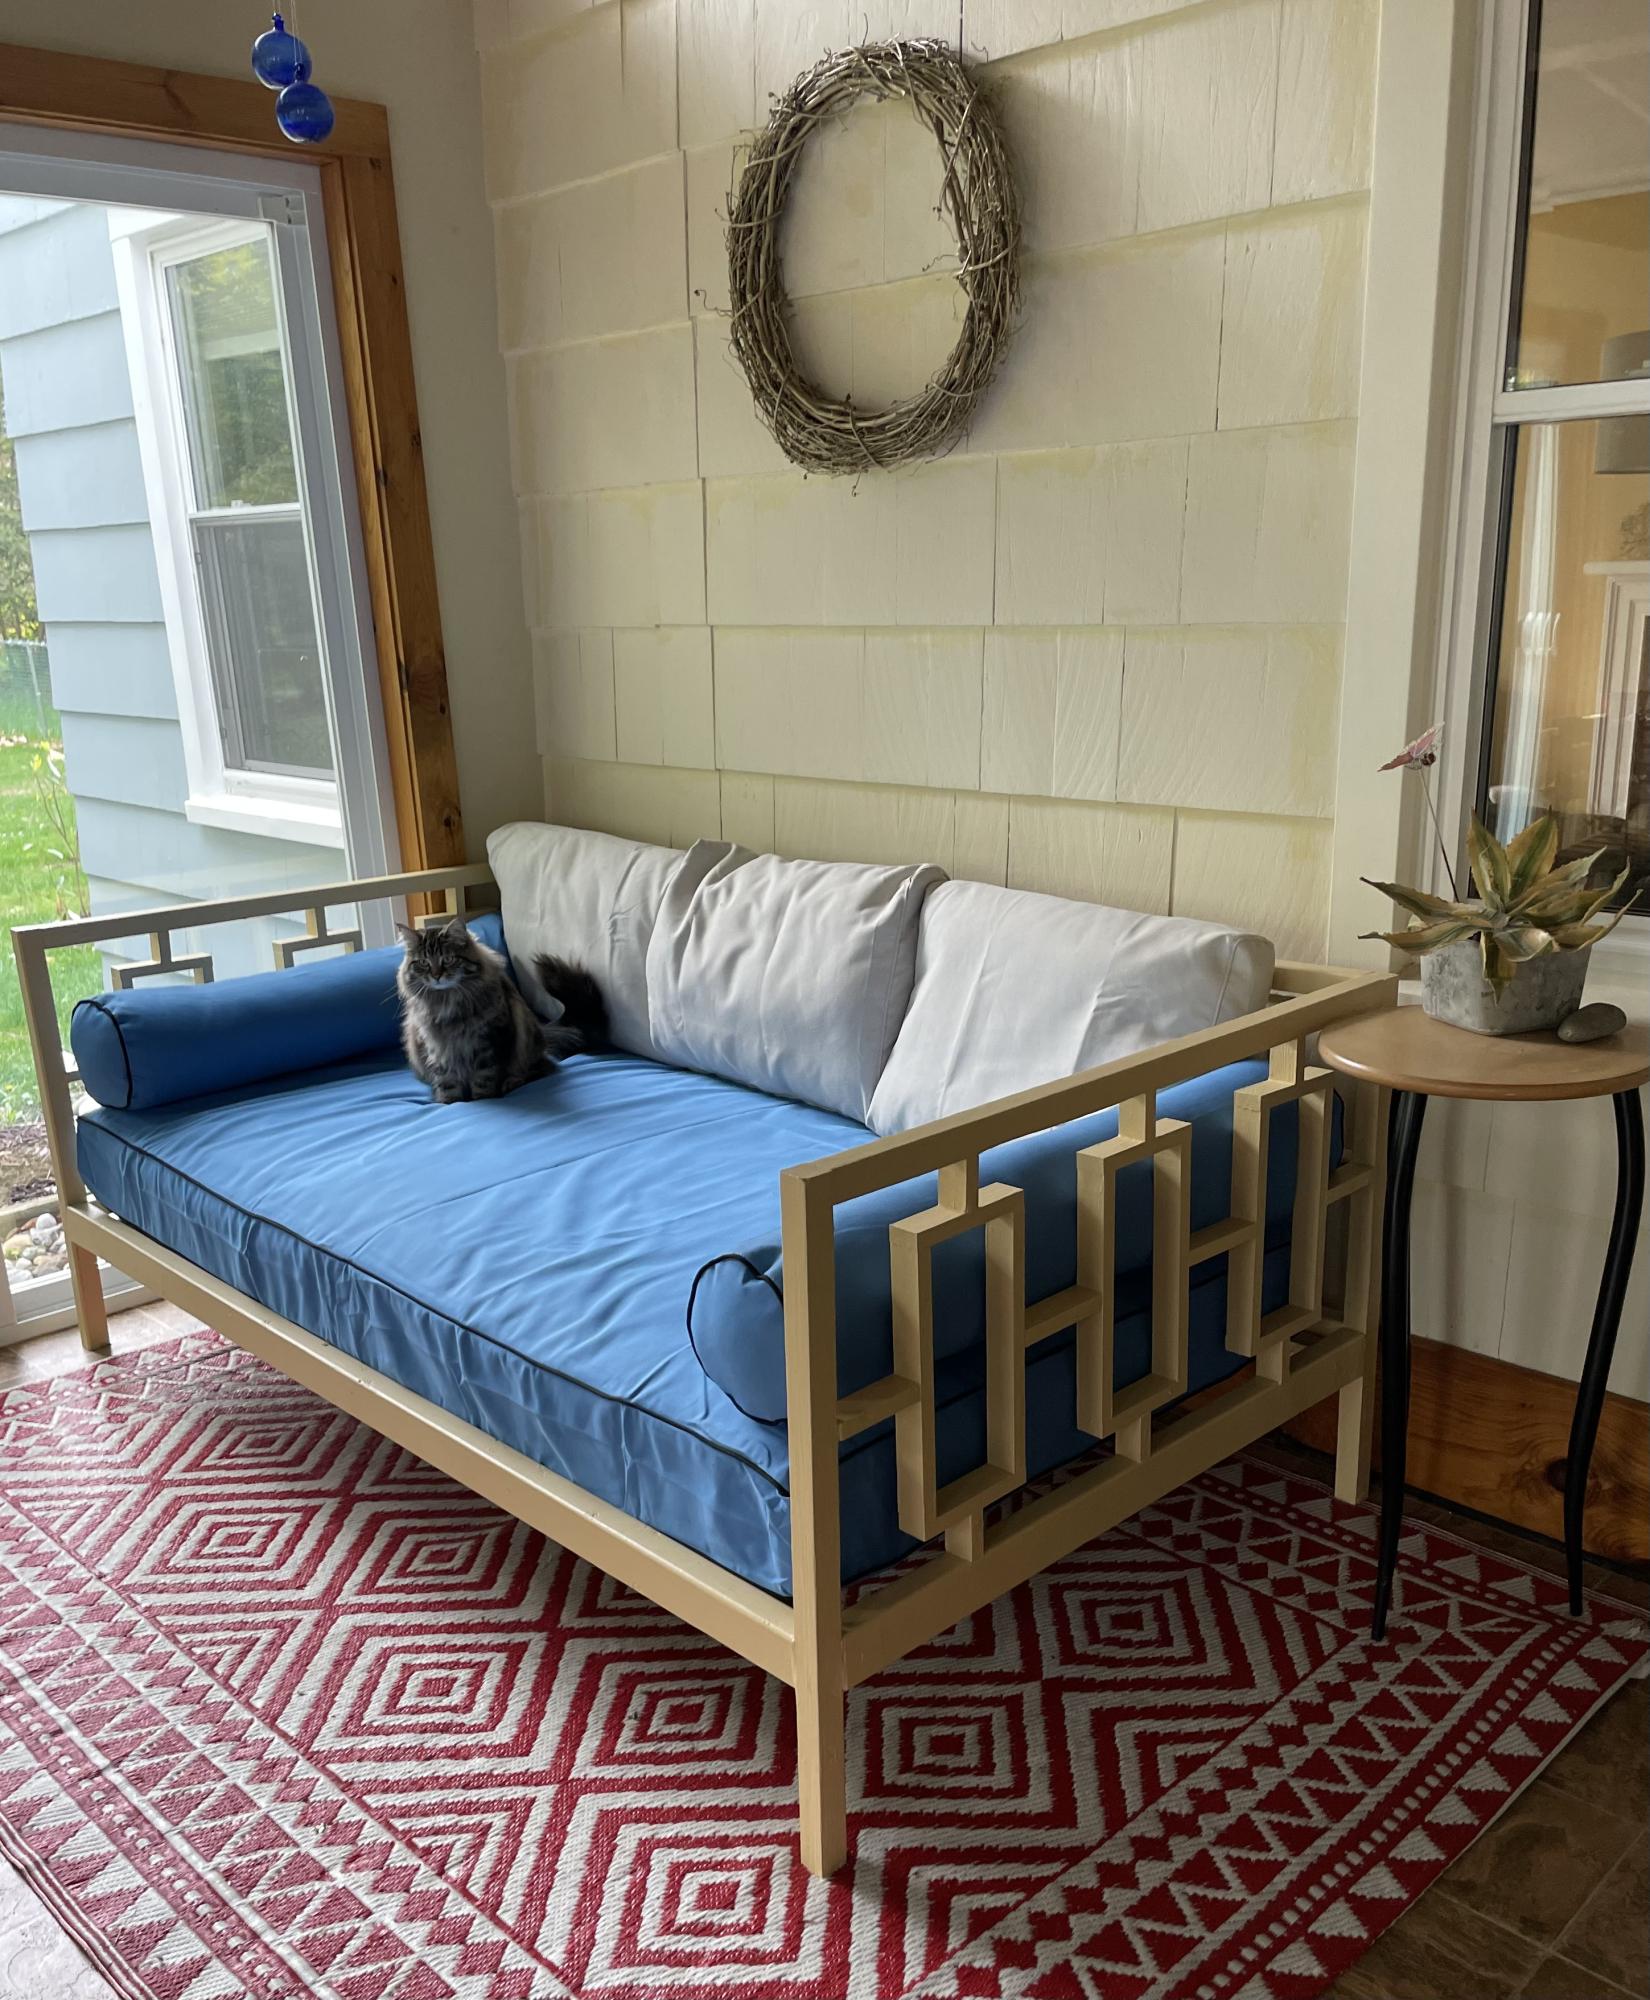
I woke up one morning and decided this space couldn’t go on without a day bed. One week later I am standing tall. This is my first intermediate build. Excited to jump into the next project!
Built from Plan(s)
Comments
Reclaimed-Wood Headboard, Queen
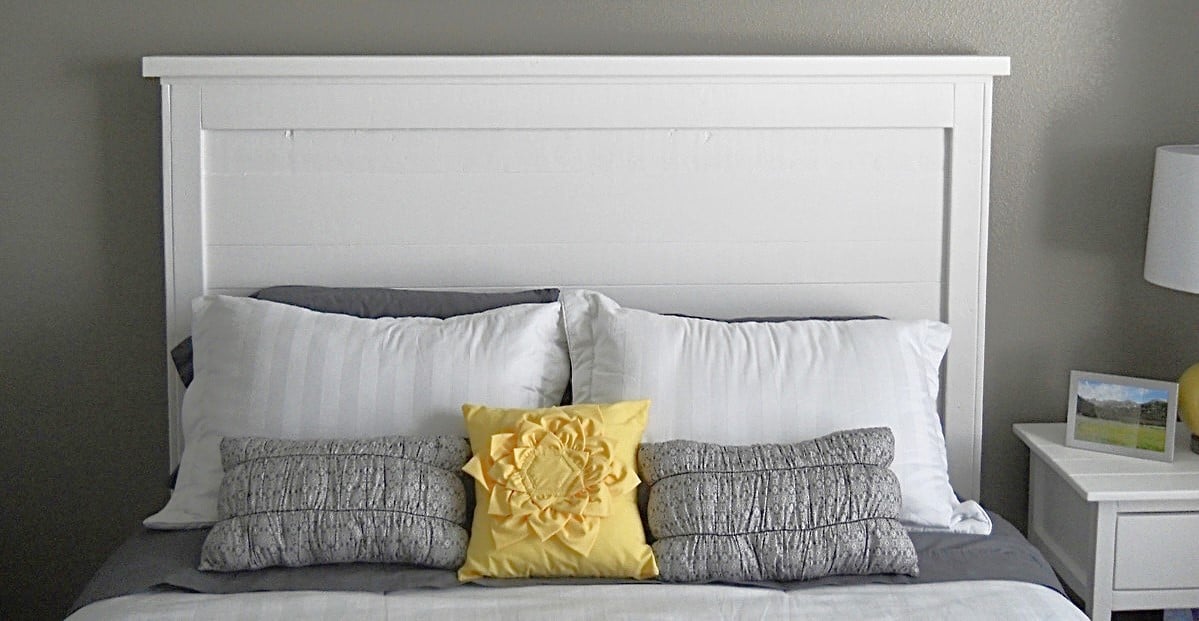
Wow, there are some really ugly headboards out there. I was intending to re-do one from craigslist but saw this plan and knew it had to be built! This was our first major woodworking project, and I think it turned out pretty good! And especially for only $45! It was a very easy build with accurate instructions/measurements! Great for beginners!
Built from Plan(s)
Estimated Cost
$45
Estimated Time Investment
Afternoon Project (3-6 Hours)
Finish Used
Paint: Lowe's Valspar "Du Jour" White
Recommended Skill Level
Beginner
Comments

Wed, 01/04/2012 - 23:49
Just love your bed and
Just love your bed and nightstand! Really inspiring and I love how you decorate too! Thank you for taking your time to share.

Sun, 01/08/2012 - 07:00
Elegantly executed
That's a wonderfully polished piece for something with the word "reclaimed" in the title, especially since it's your first. Looking forward to what you'll be doing a year from now if the first effort is this good.
Sun, 06/03/2012 - 15:53
headboard w/ reclaimed wood
I am new to Pinterest and Ana White, so is there any chance I could get plans for this emailed to me or sent to me at Pinterest?
Fri, 07/13/2012 - 16:29
To get the plans, all you
To get the plans, all you have to do is click on the link next to spot up above that says "from plans" and they will pop up.
Seasonal And Holiday