Community Brag Posts
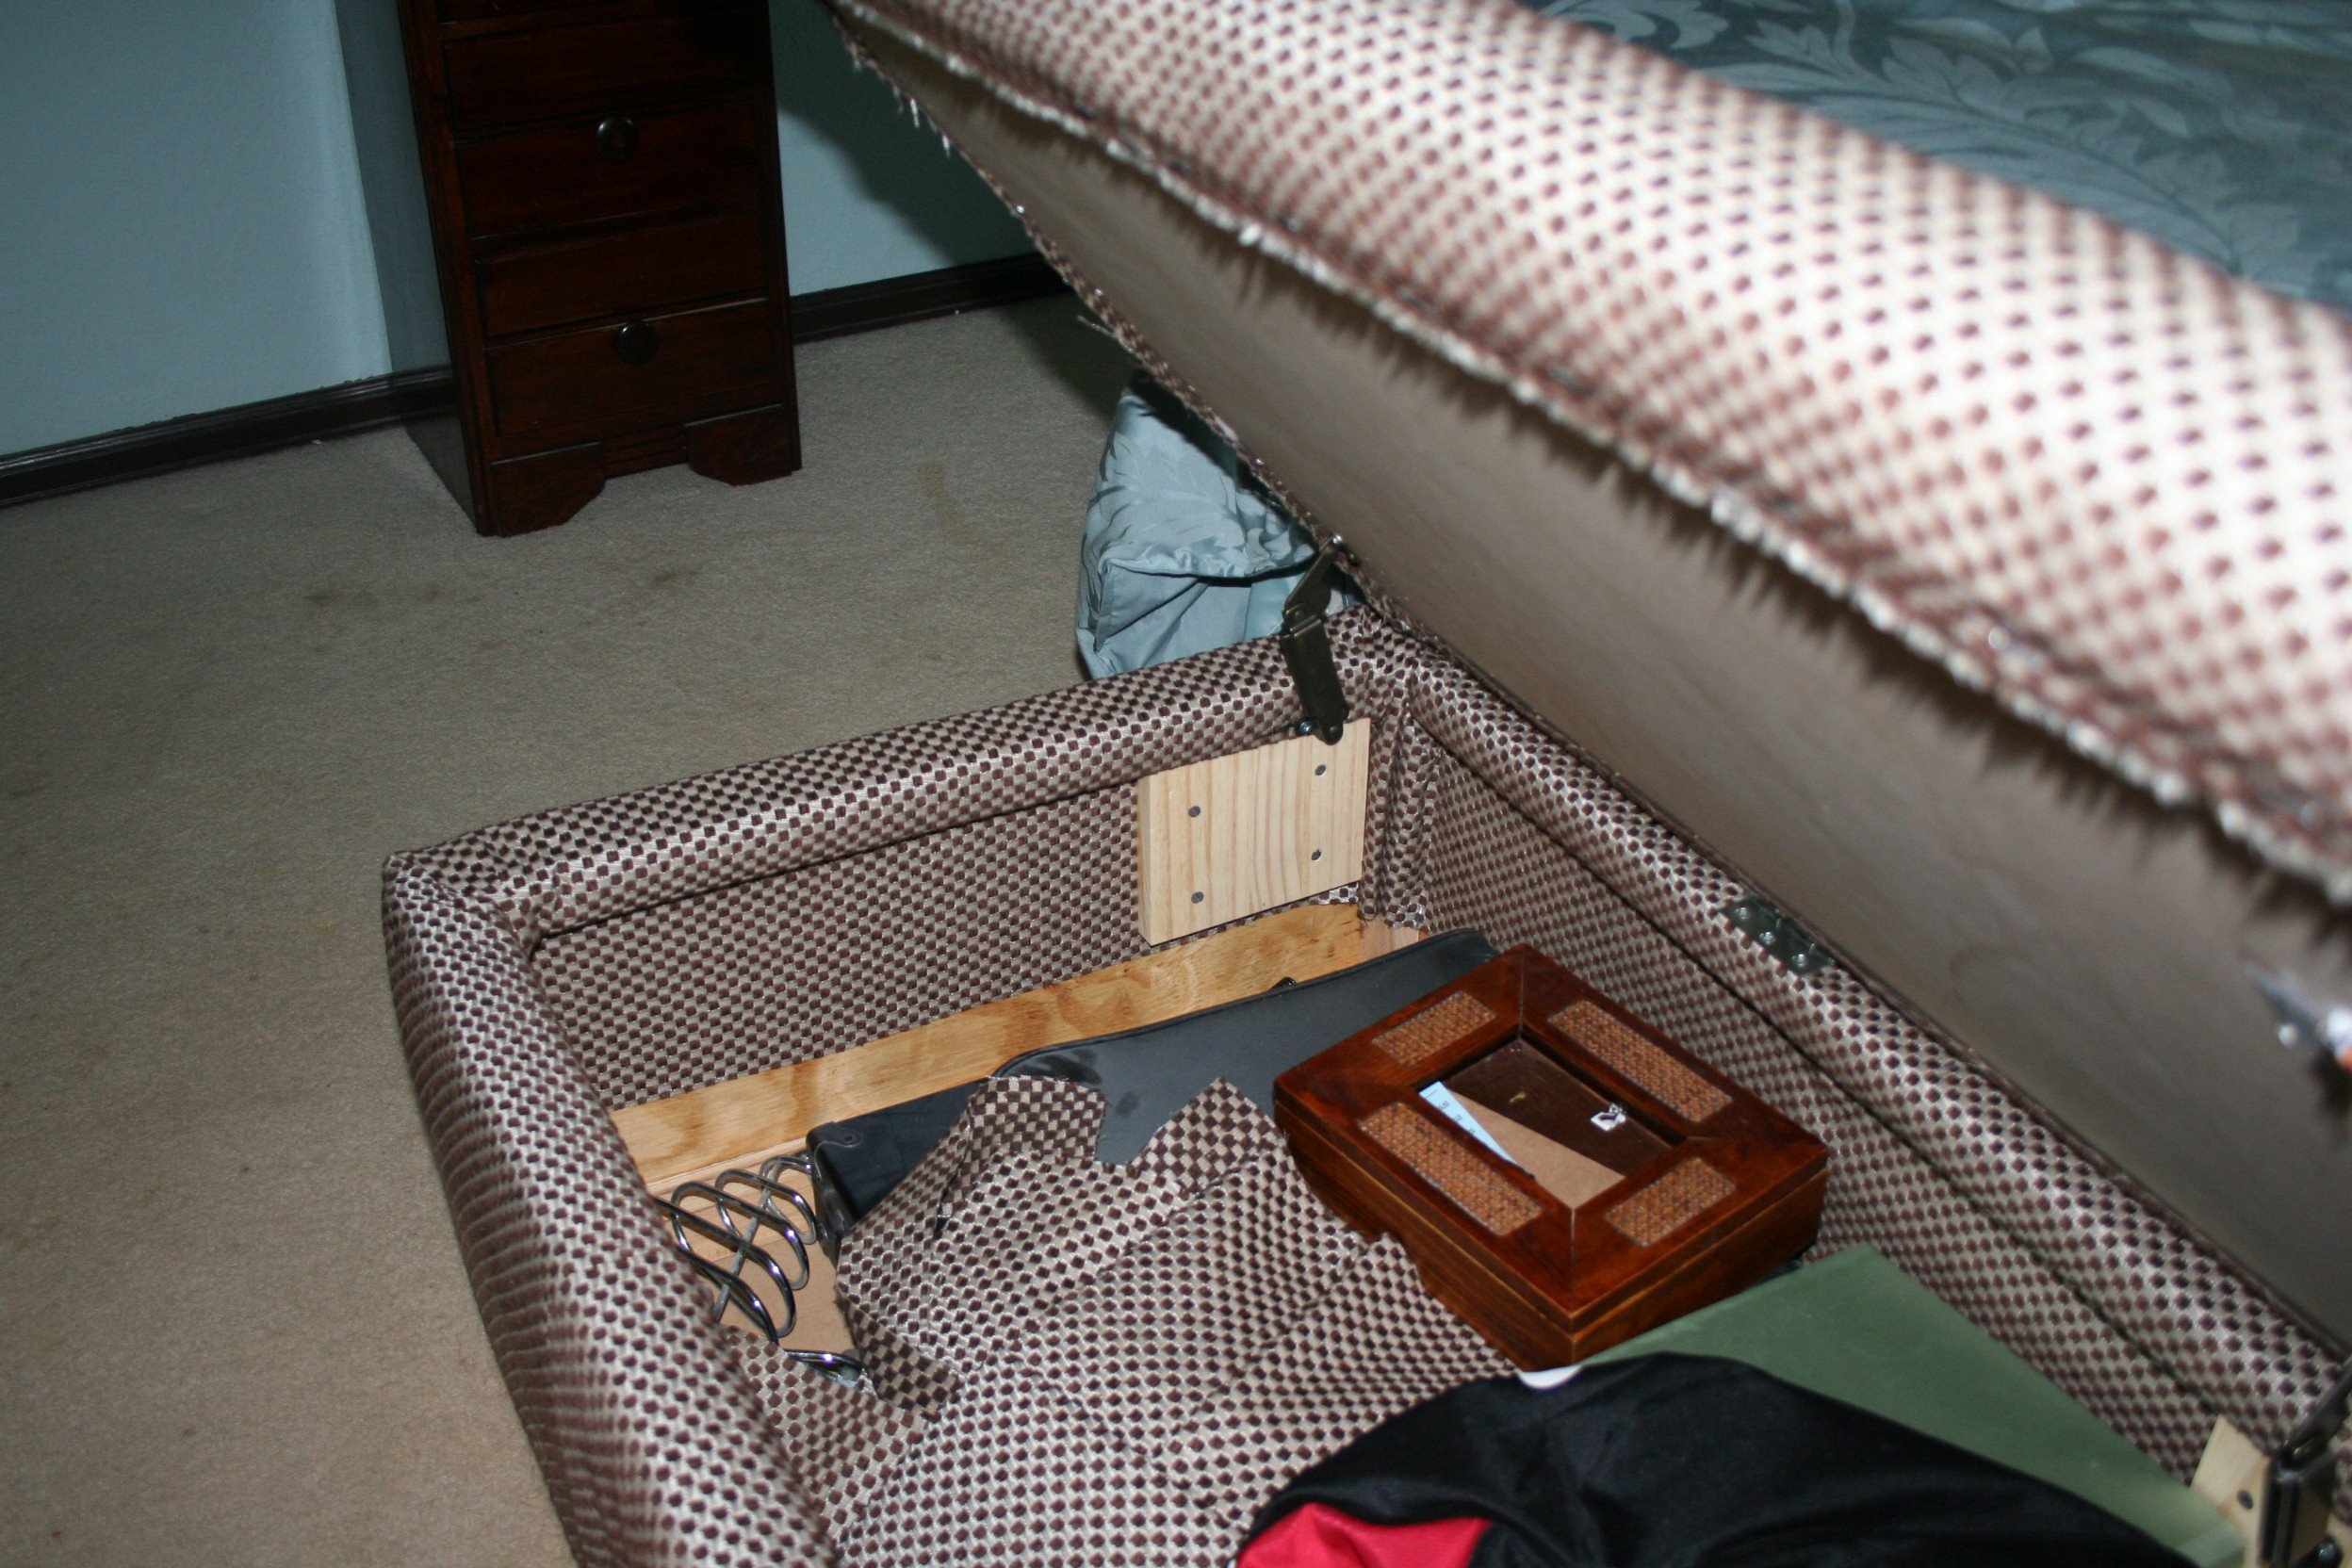
End of the Bed storage ottoman
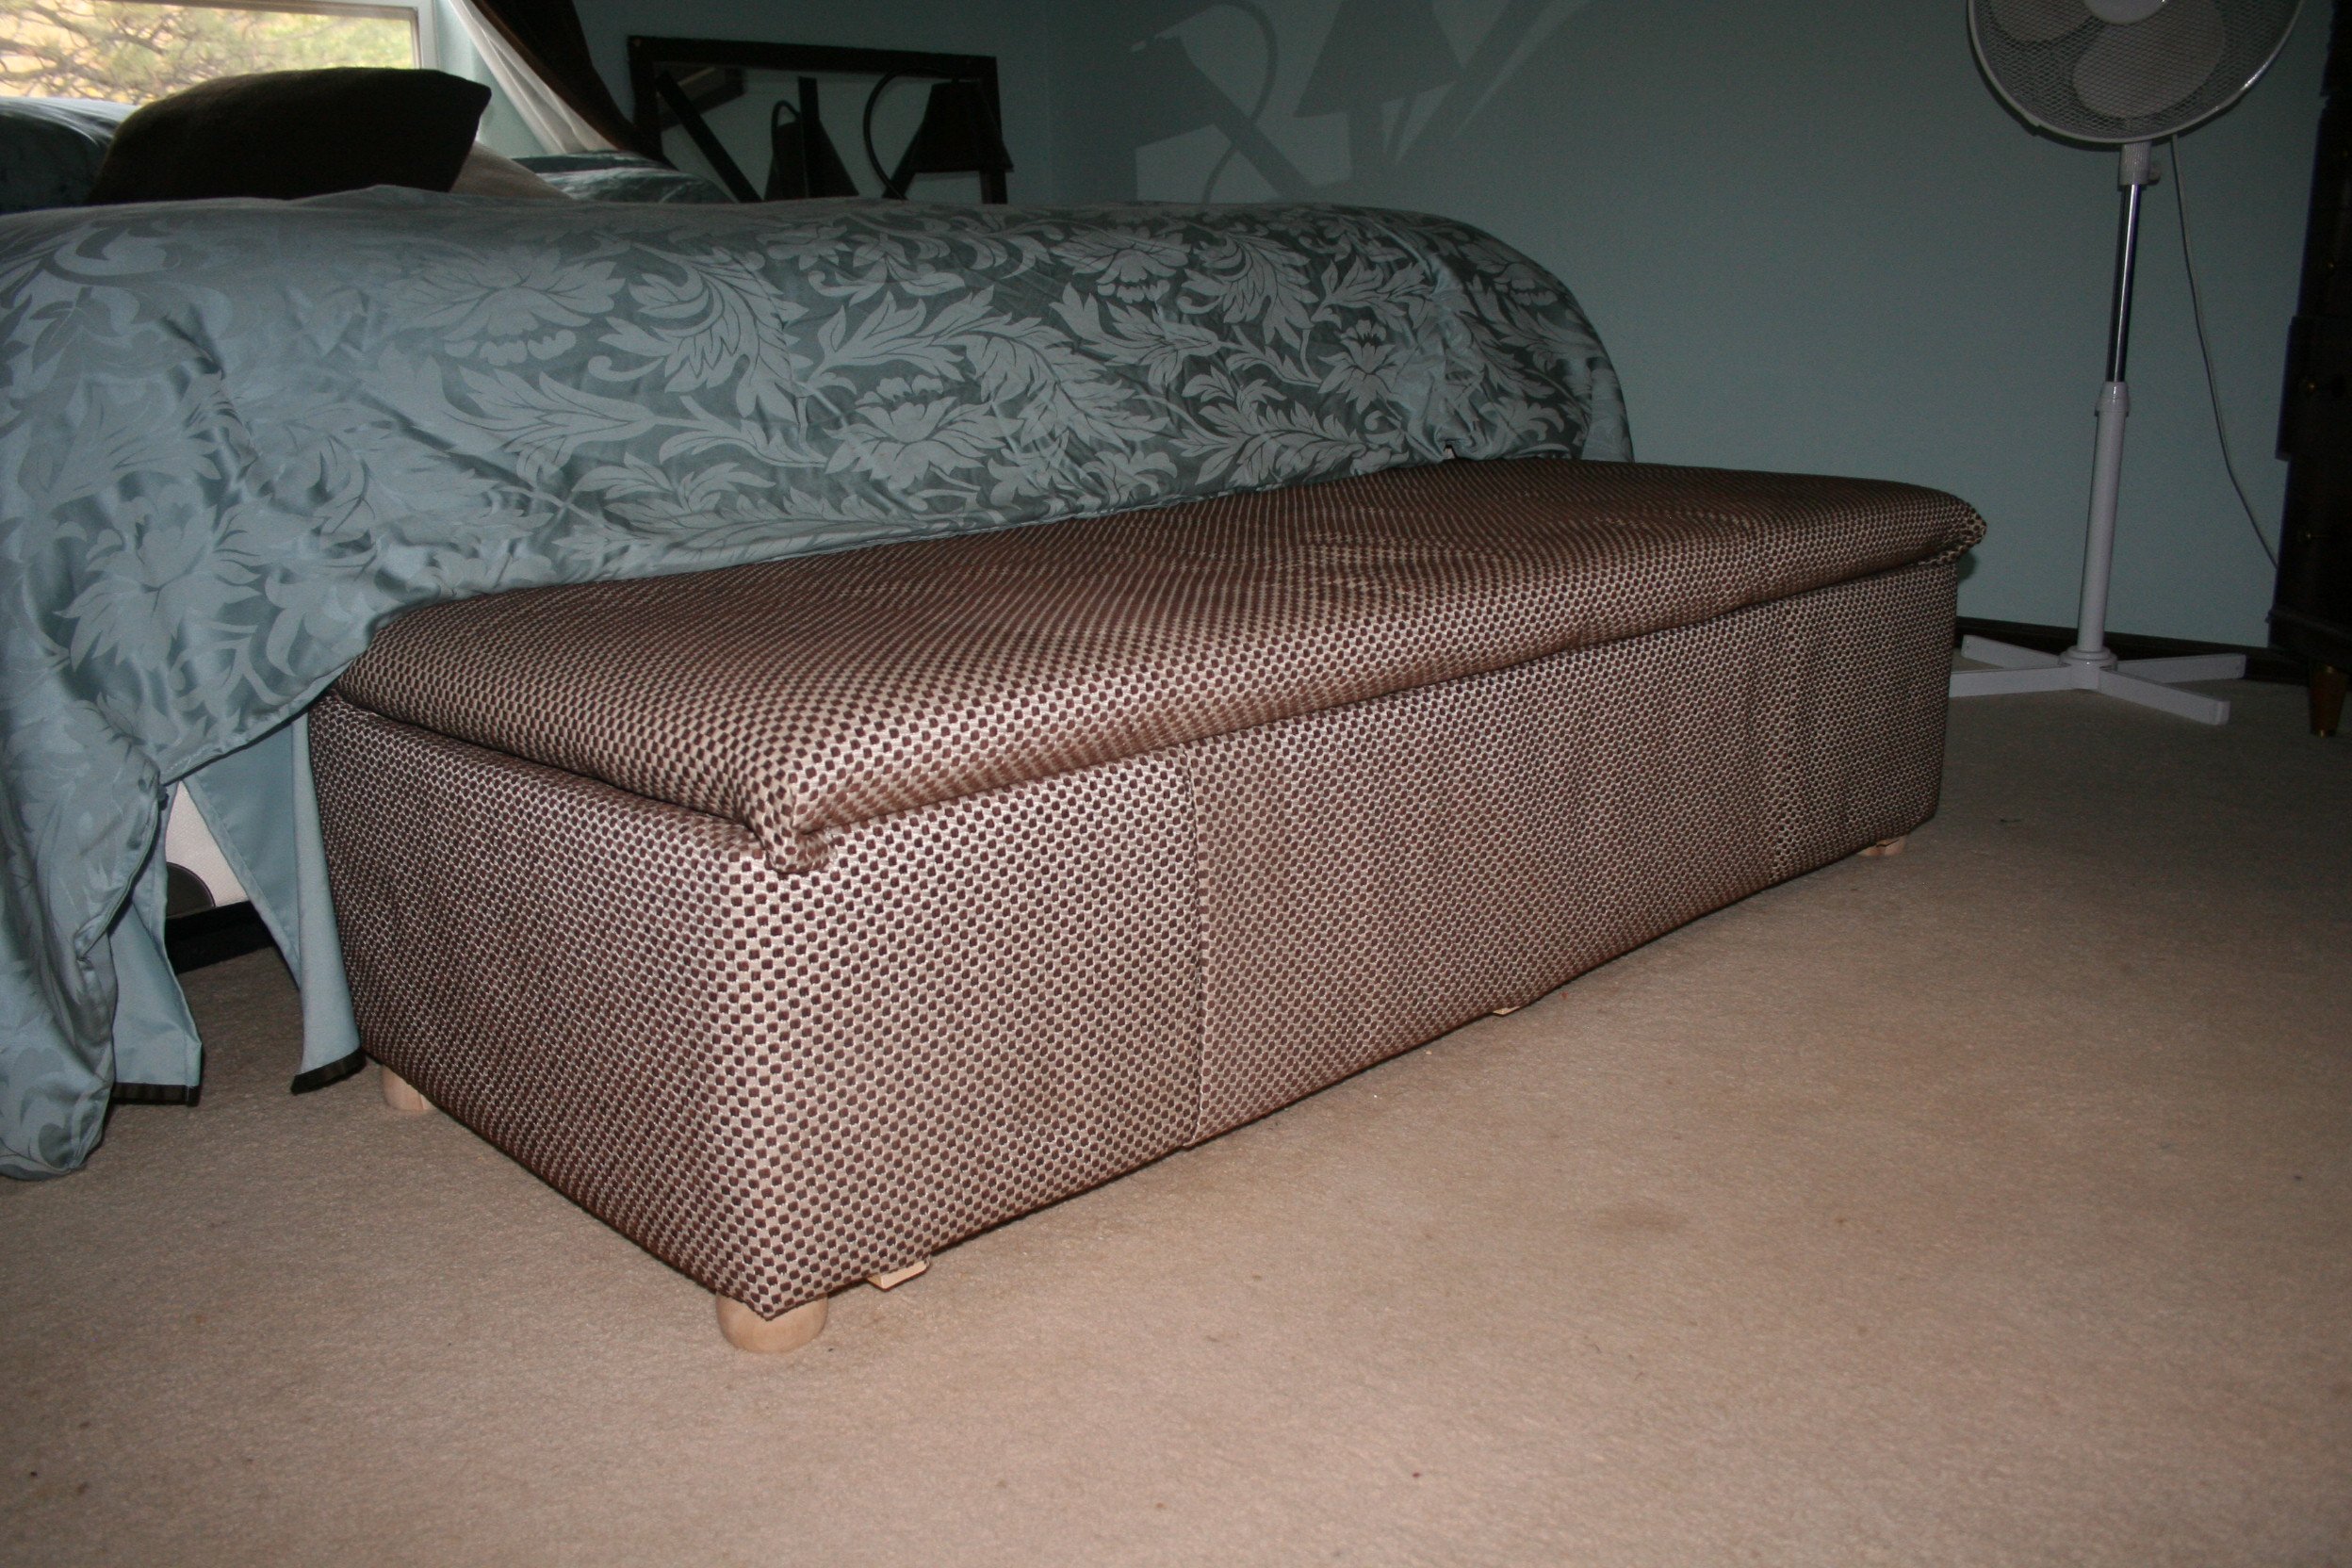
This was my first project. I already had a large ottoman, but it didn't hold anything. So I broke it apart for the box frame, added a bottom and hinged the lid. I was able to reuse the padding and upholster the pieces with sale fabric from Joann Fab ( love that store). Than I attached the fabric with a staple gun. Since it's in my bedroom, I like to keep wedding photos and such inside. Plus my 2 year old cannot open it!
Built from Plan(s)
Estimated Cost
$50, since I had the frame and padding already
Estimated Time Investment
Weekend Project (10-20 Hours)
Recommended Skill Level
Beginner
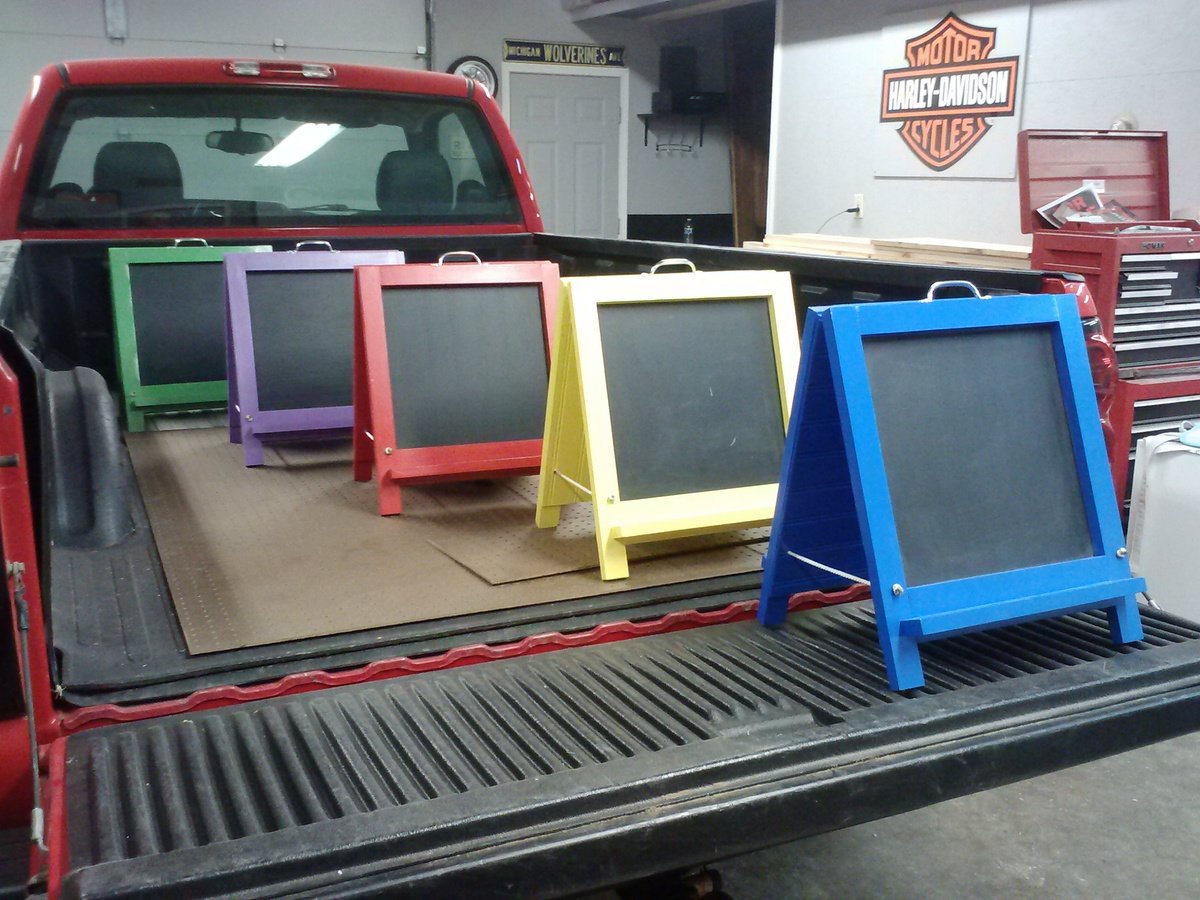
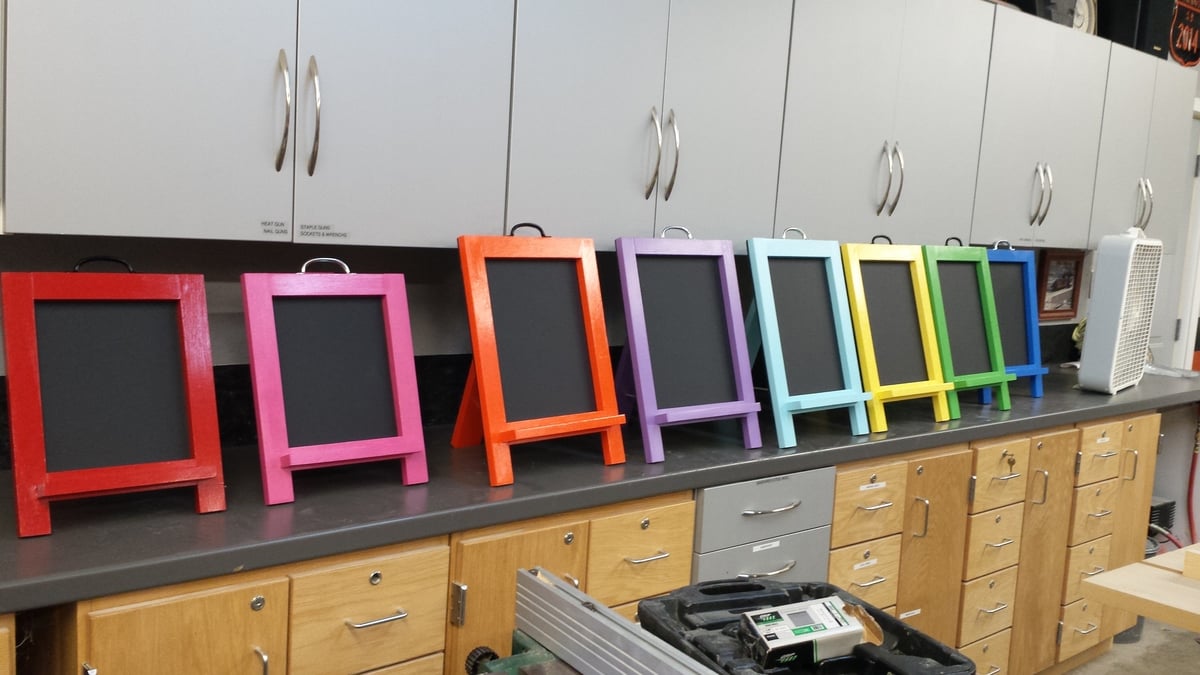
Tabletop Chalkboard Easel
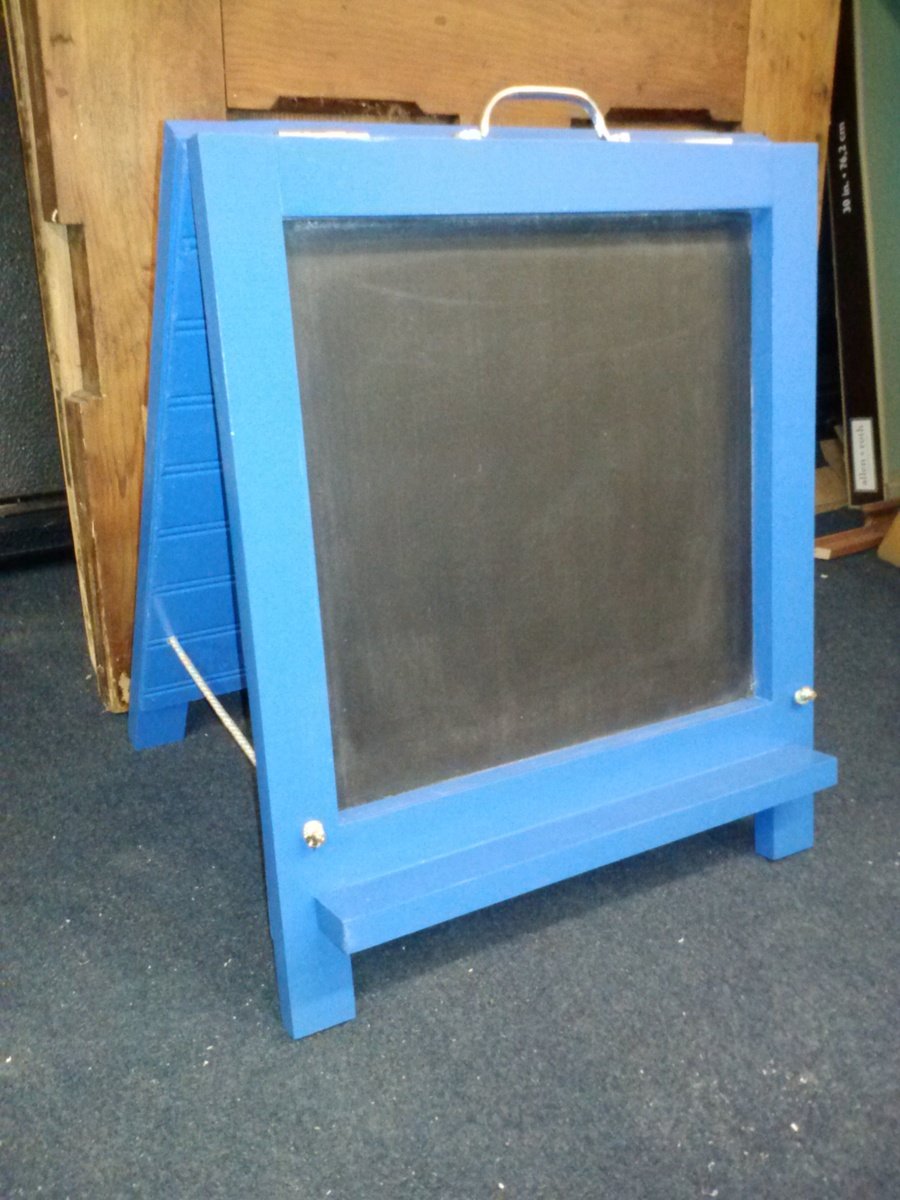
First project for upcoming annual craft show. Guessed on cost as we bought 2x6s and 2x12s on clearance and ripped them down ourselves for a cost savings. Used beadboard for the chalkboard because I got a slightly damaged 4'x8' sheet for just $3.95. Have to say that it's not the smoothest so I'd definitely go with something like luann next time. Still cute!
That last picture shows the second batch I made for the following year. I modified the plan to simplify it for me and use less materials by making it just one-sided.
Built from Plan(s)
Estimated Cost
$8-10
Finish Used
Olympic paint (not a huge fan). Sorry don't have color names. Purple color from oops paint at Lowes, Valspar, I believe.
Recommended Skill Level
Beginner
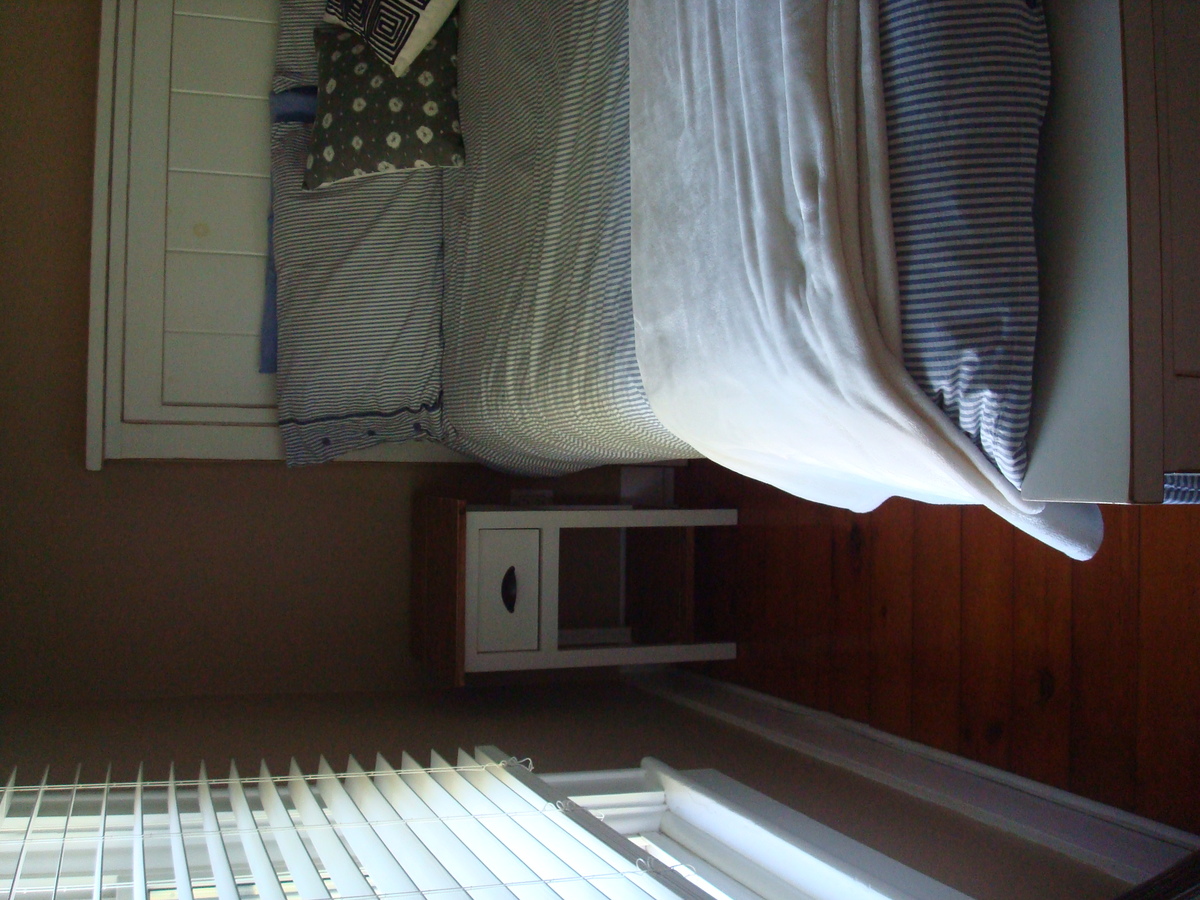
Kentwood Nightstand
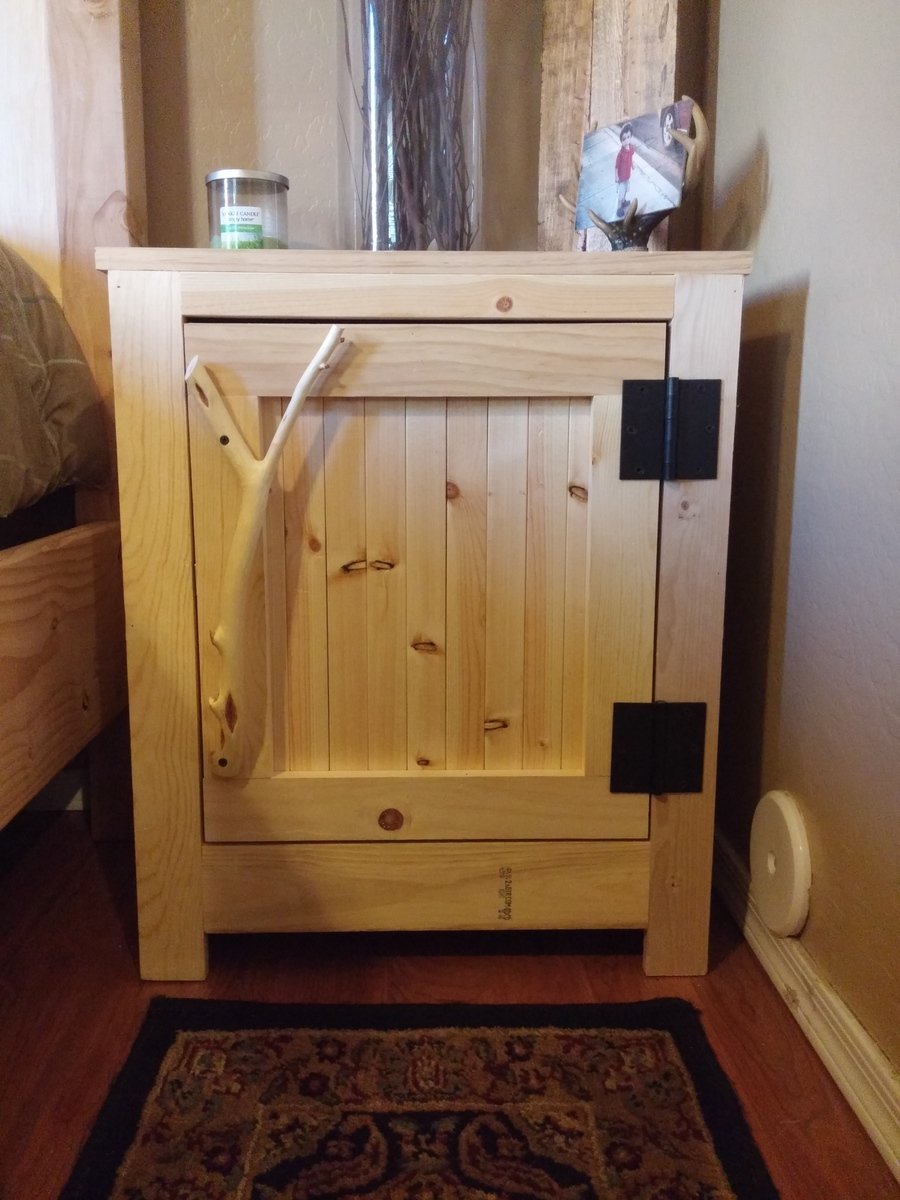
I made this nightstand and one other for my bedroom. I used 1x2's for the door and diamond willow for the handles. :)
Built from Plan(s)
Estimated Time Investment
Afternoon Project (3-6 Hours)
Finish Used
None yet :)
Recommended Skill Level
Beginner
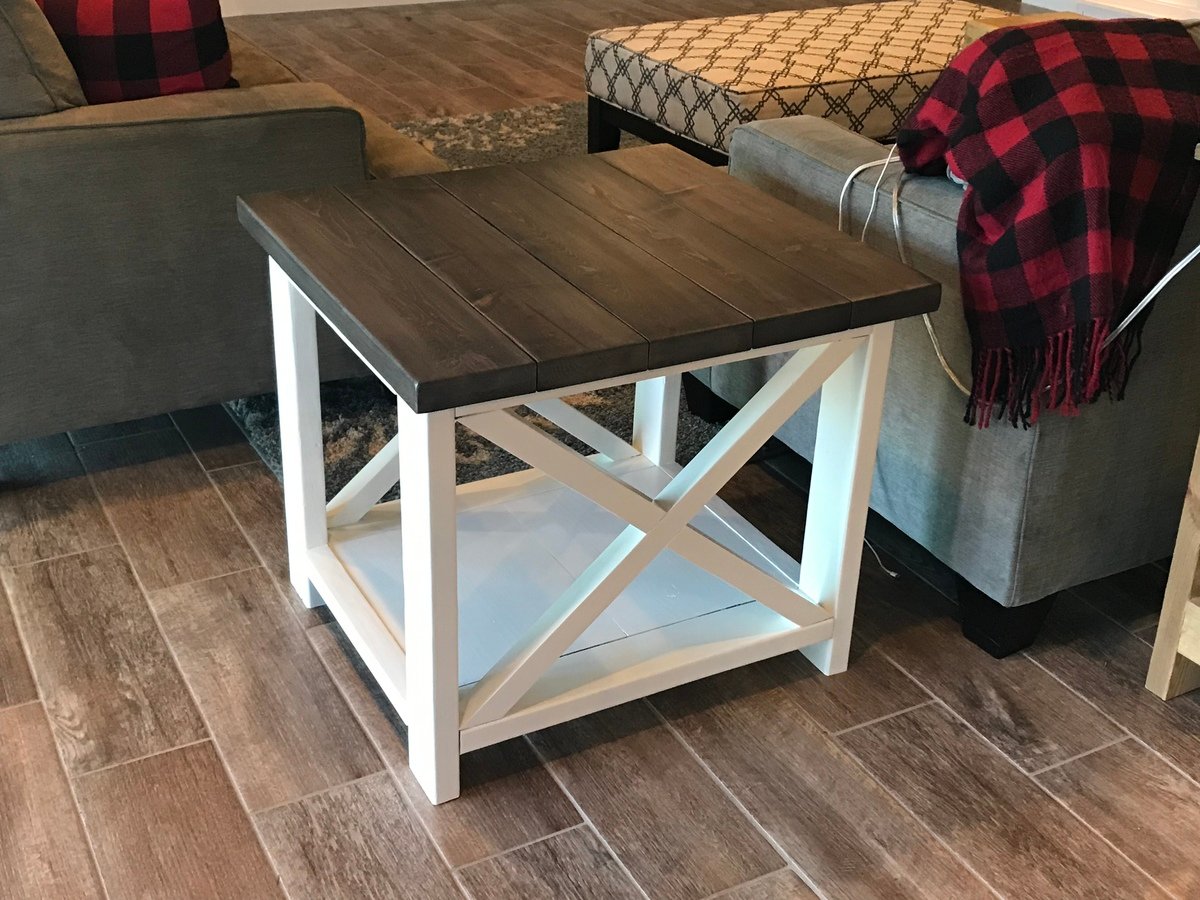
Rustic X Coffee Table and Side Table
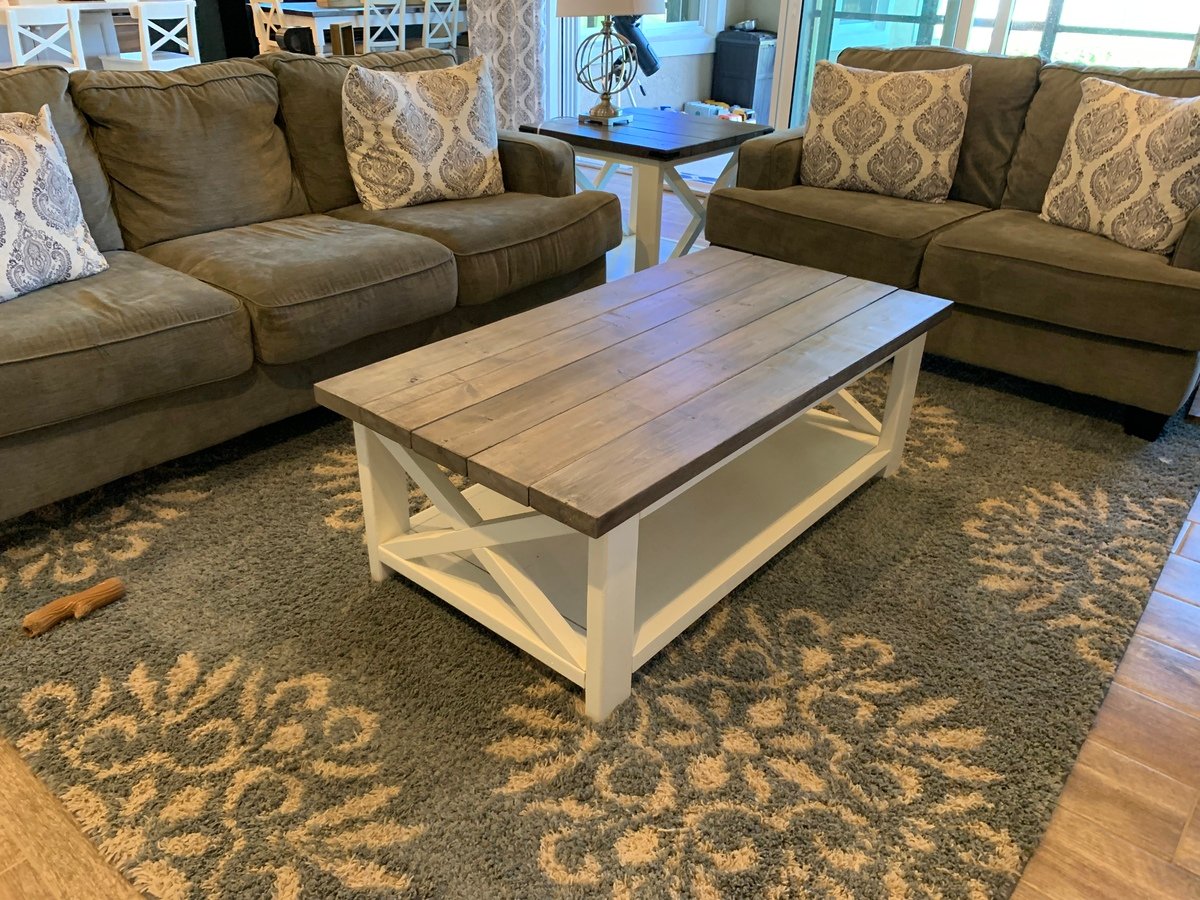
I absolutely love how this coffee and end table set have completed my living room. Each one took me about a day to complete and $80 or less!! Excellent, detailed plans resulting in a gorgeous piece. Thank you!
Built from Plan(s)
Estimated Cost
$80
Estimated Time Investment
Day Project (6-9 Hours)
Finish Used
The top is stained with Minwax Jacobean finish, then whitewashed with watered down Dover White From Sherwin Williams. Base is painted Sherwin Williams Dover White in semi-gloss finish.
Recommended Skill Level
Beginner
Comments
Thu, 02/20/2020 - 11:28
Adapted plans for square rustic x coffee table?
I love these! Plan to build coffee table, end table and console! Ana, any chance you have or could provide adapted plans for a square 44-inch rustic x coffee table? THANK YOU! :)
ladder shelf build
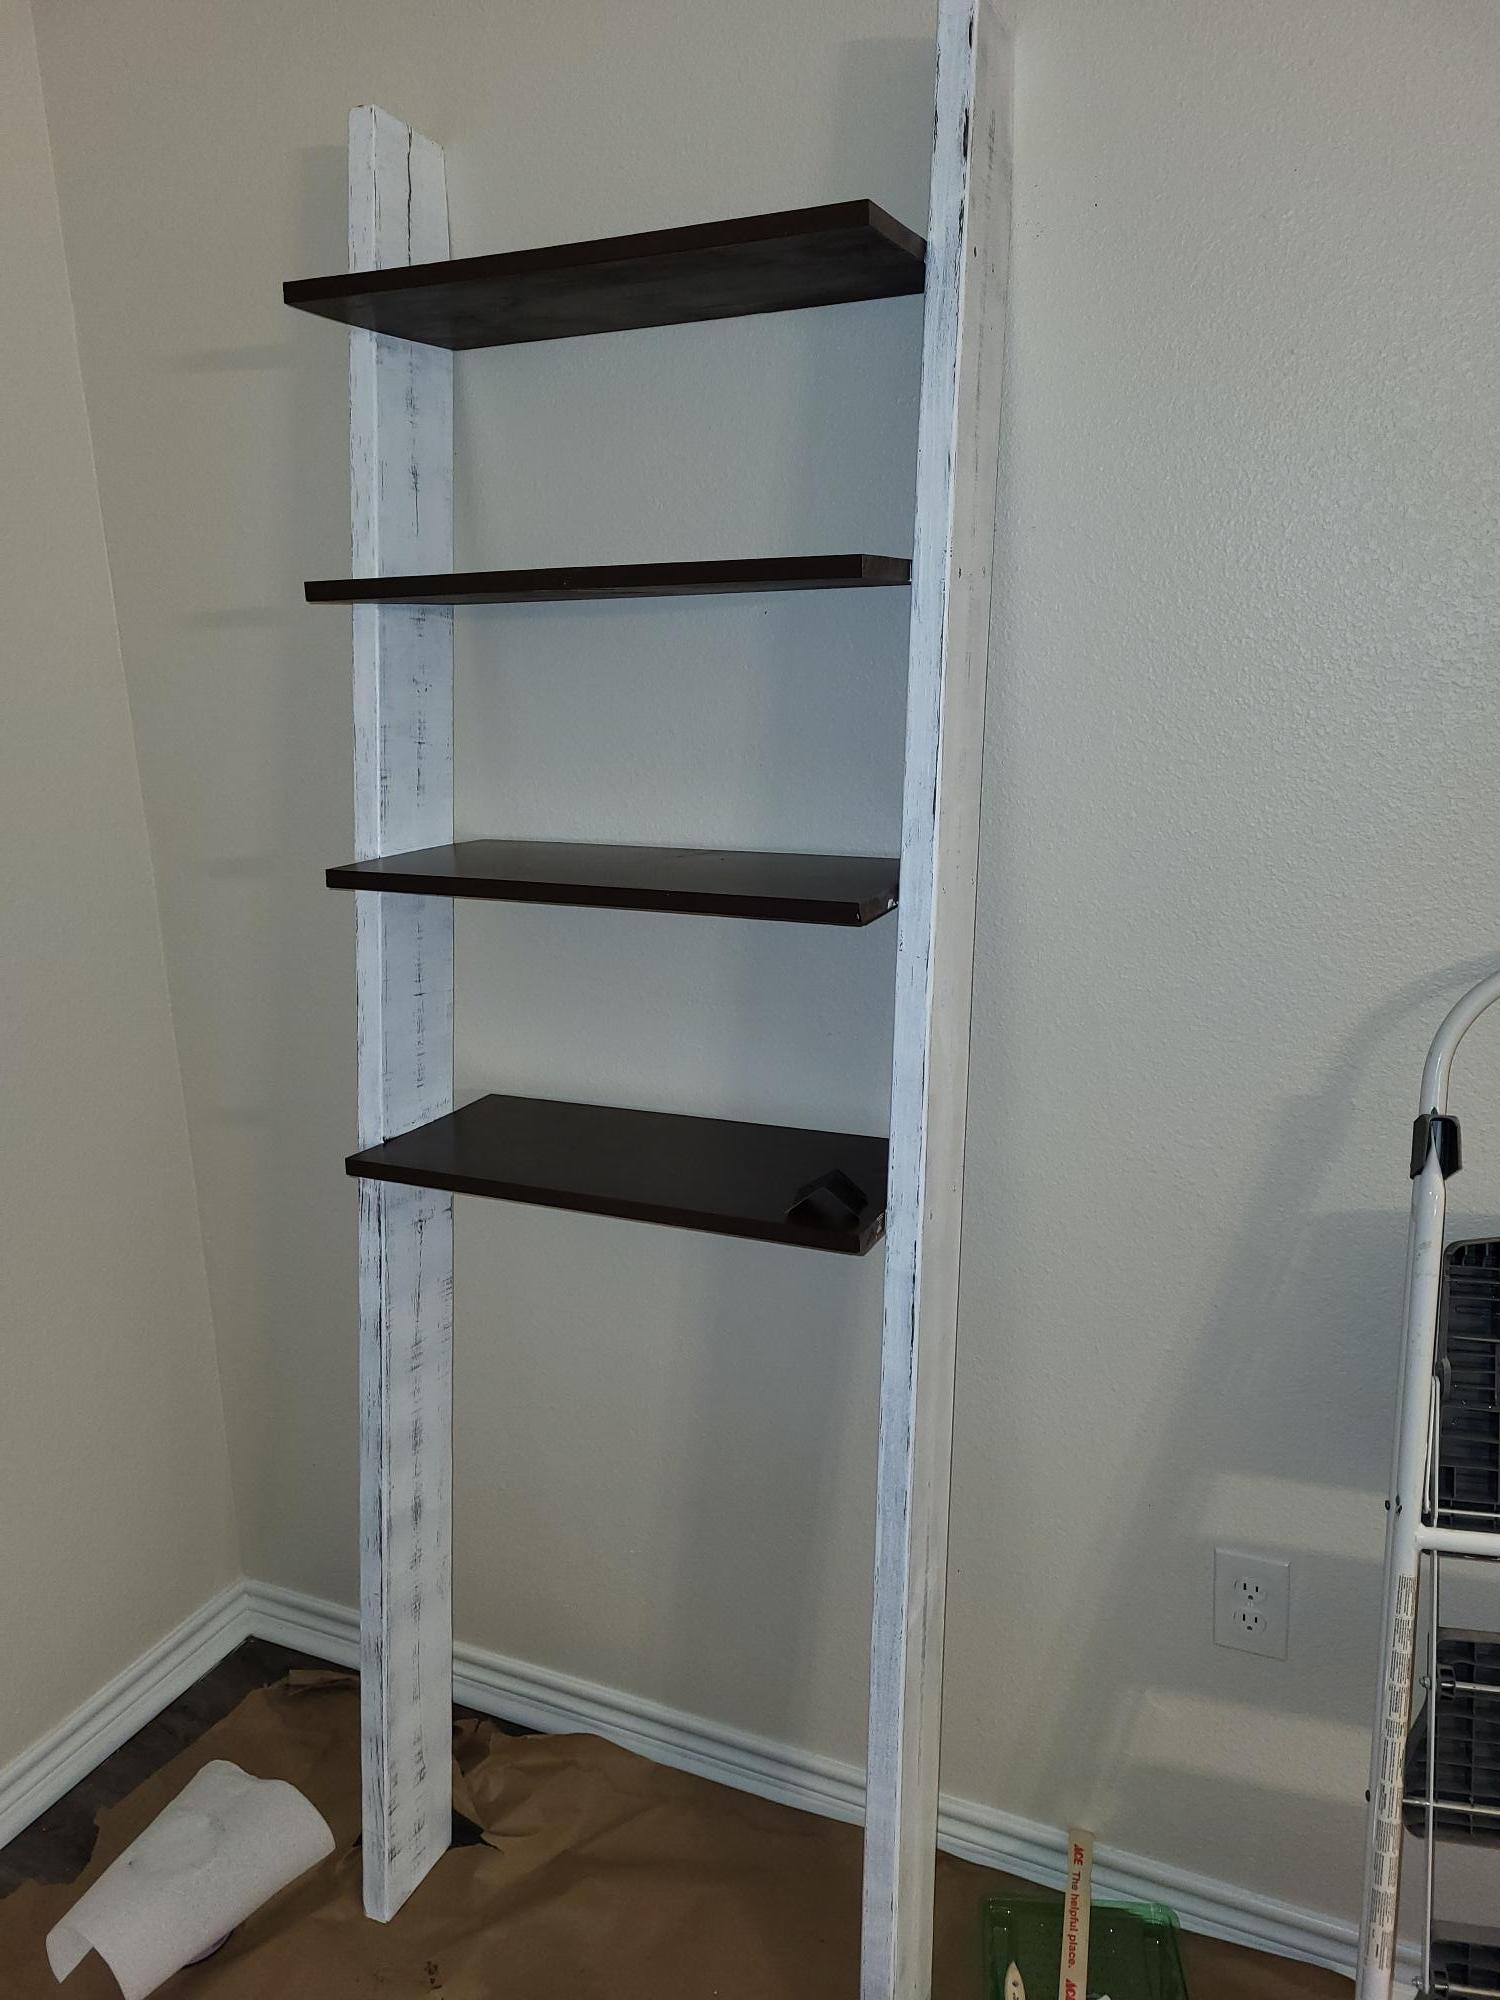
Thanks for the plans had to go with something like this to avoid putting cabinets in and risk hitting a water line in the wall.
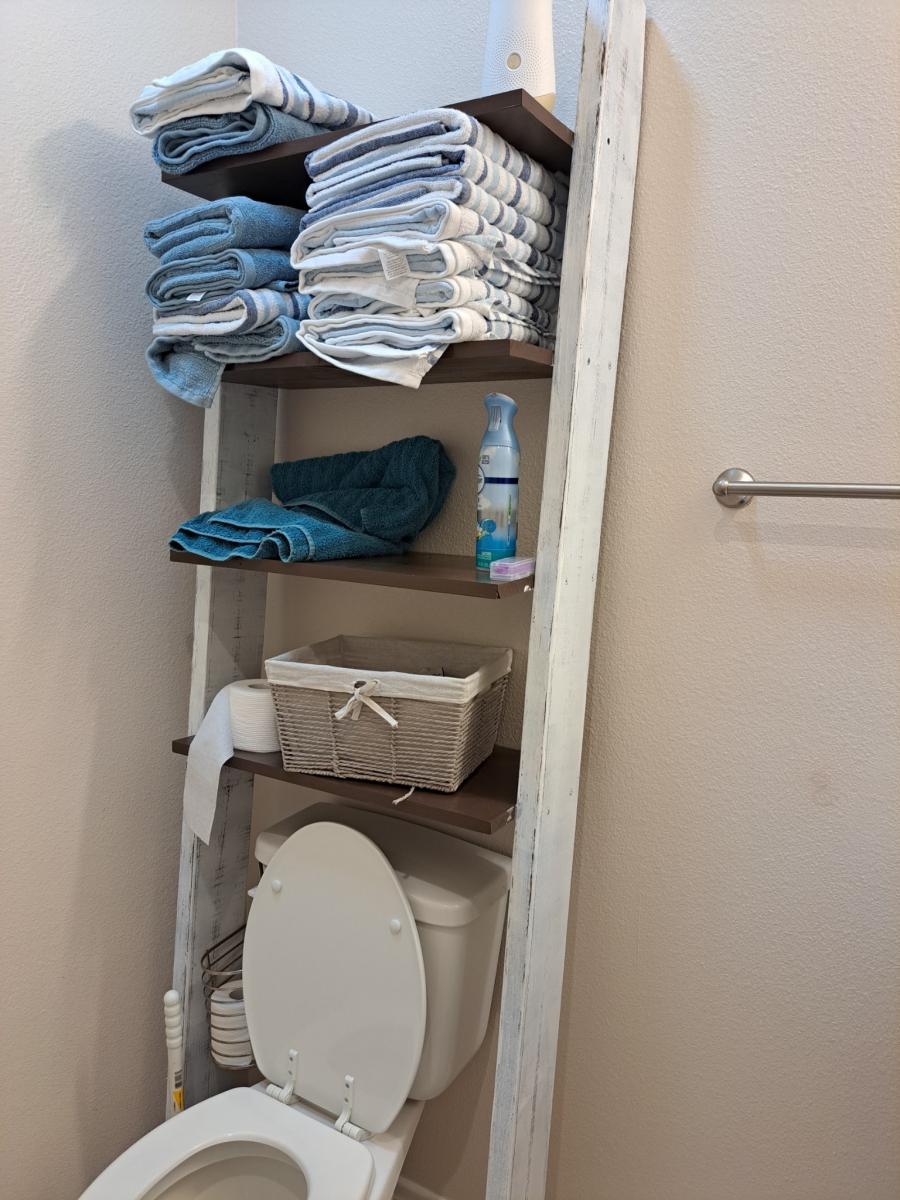
Built from Plan(s)
Comments
My first build - storage daybed!
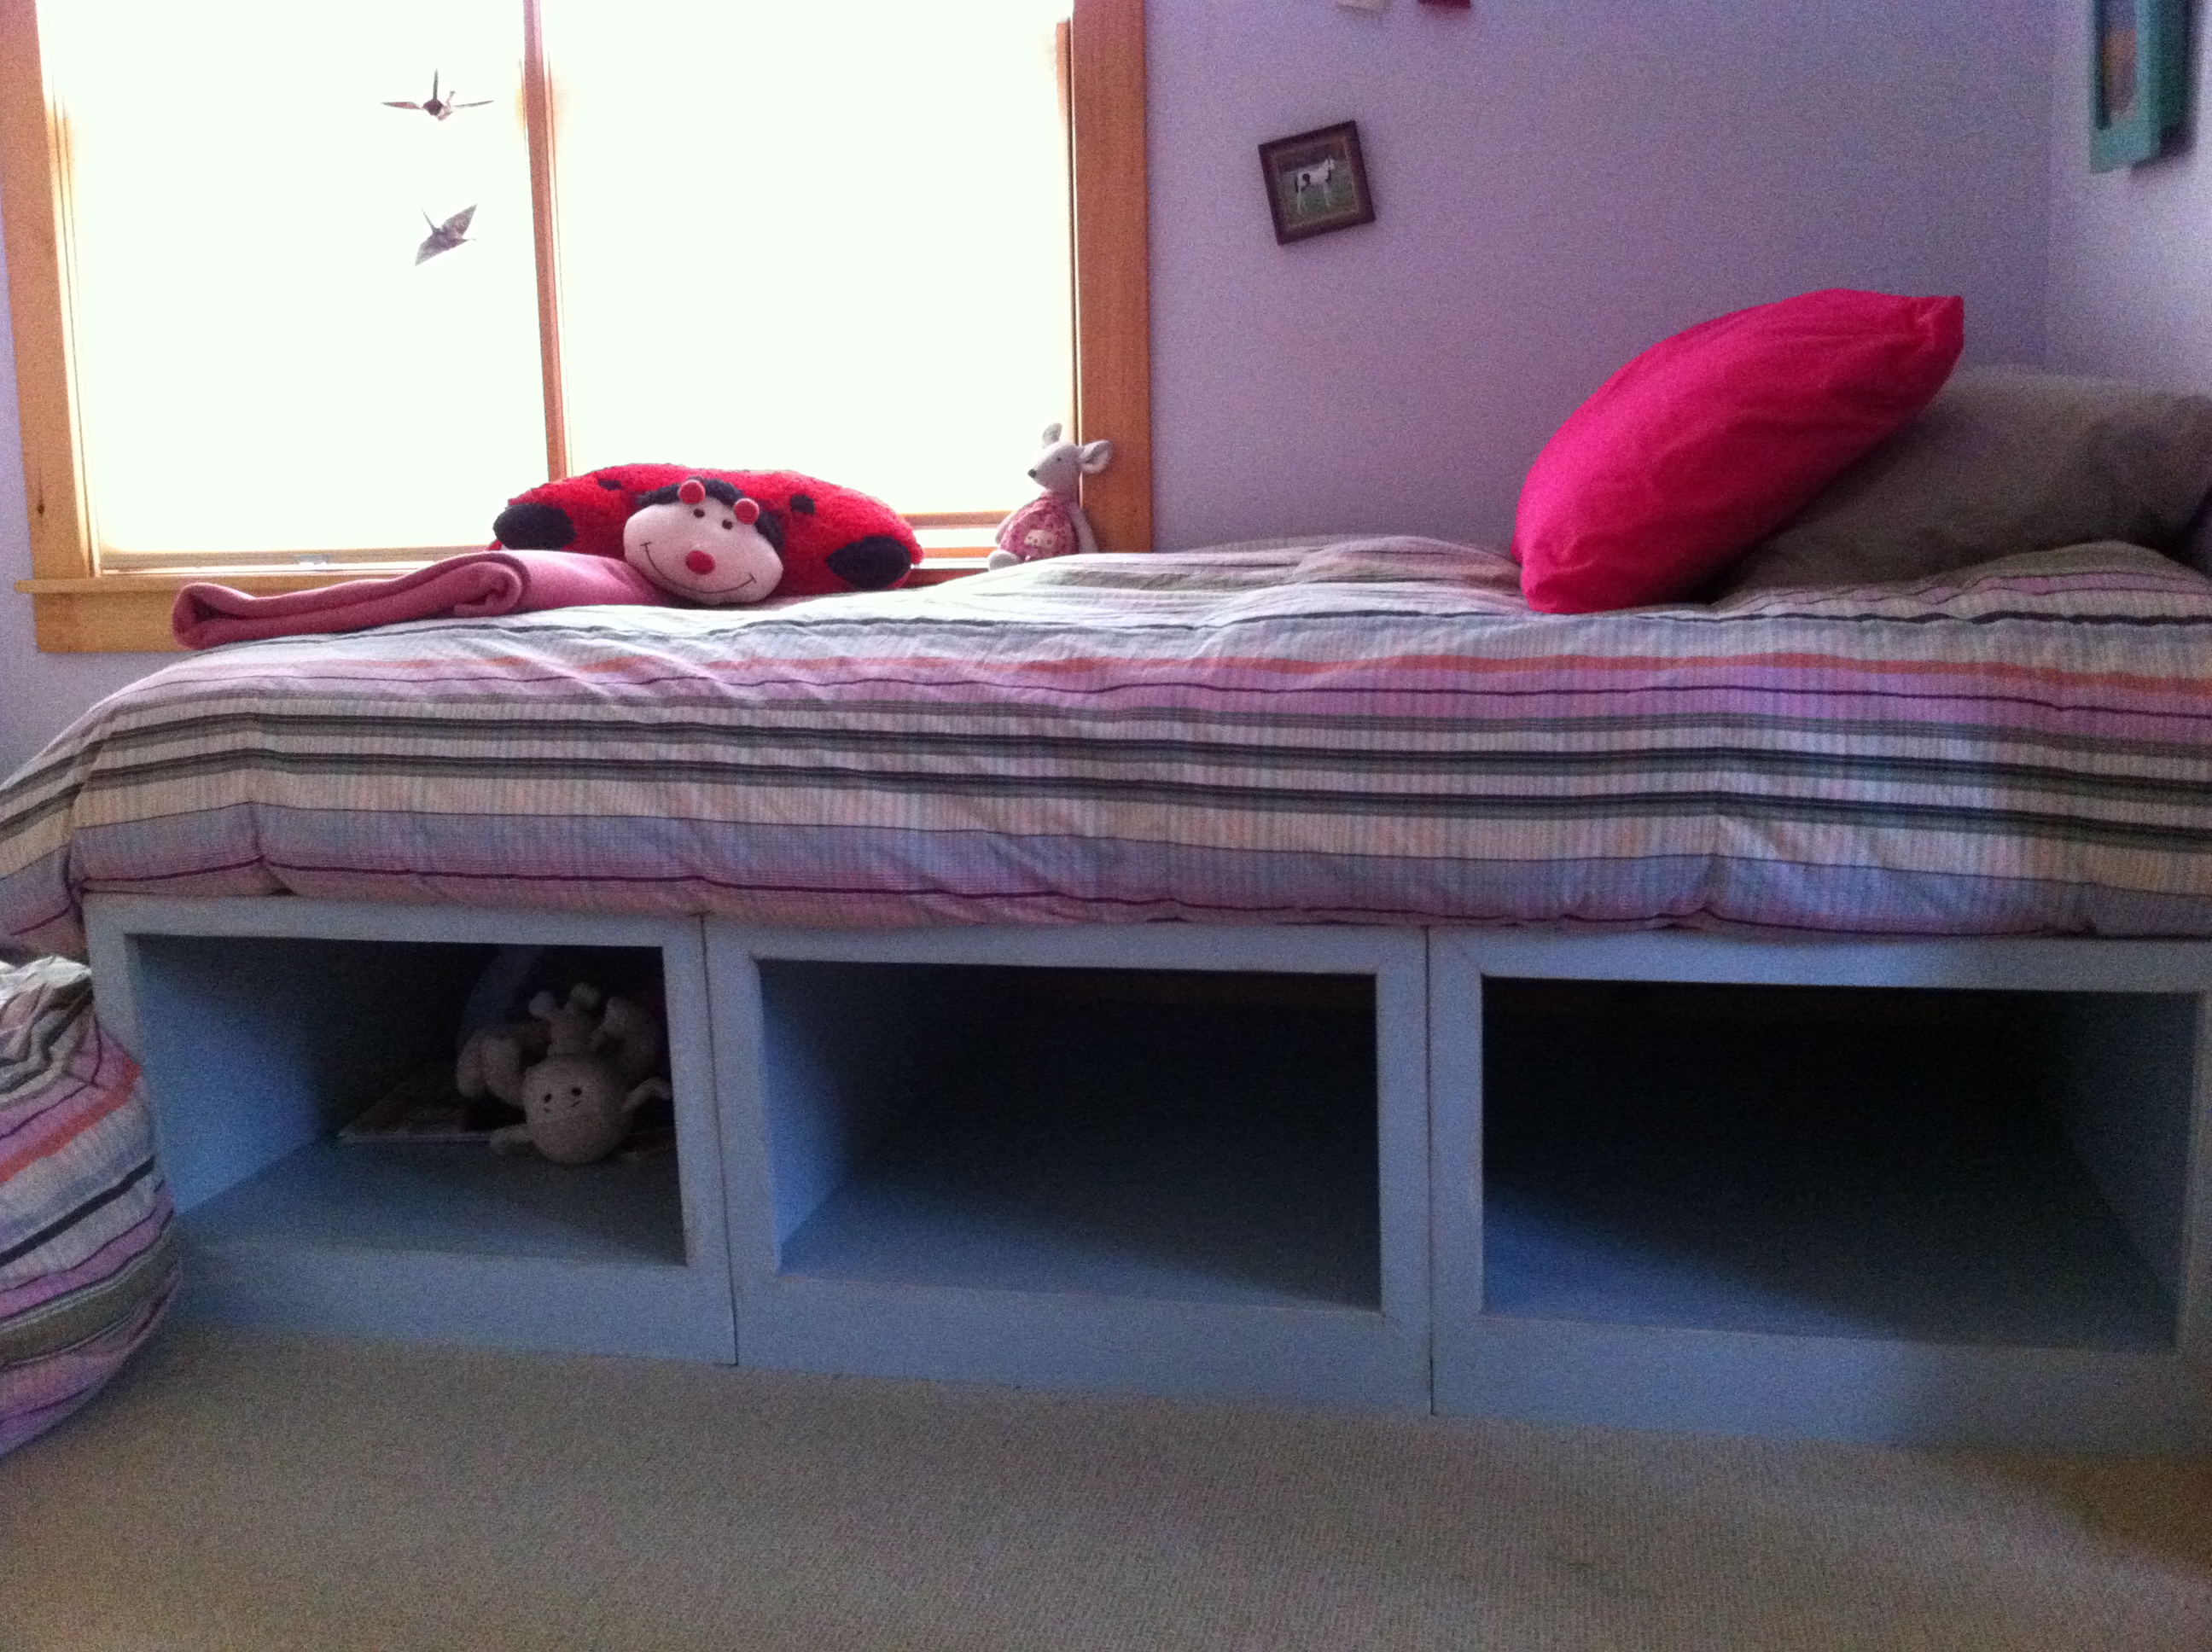
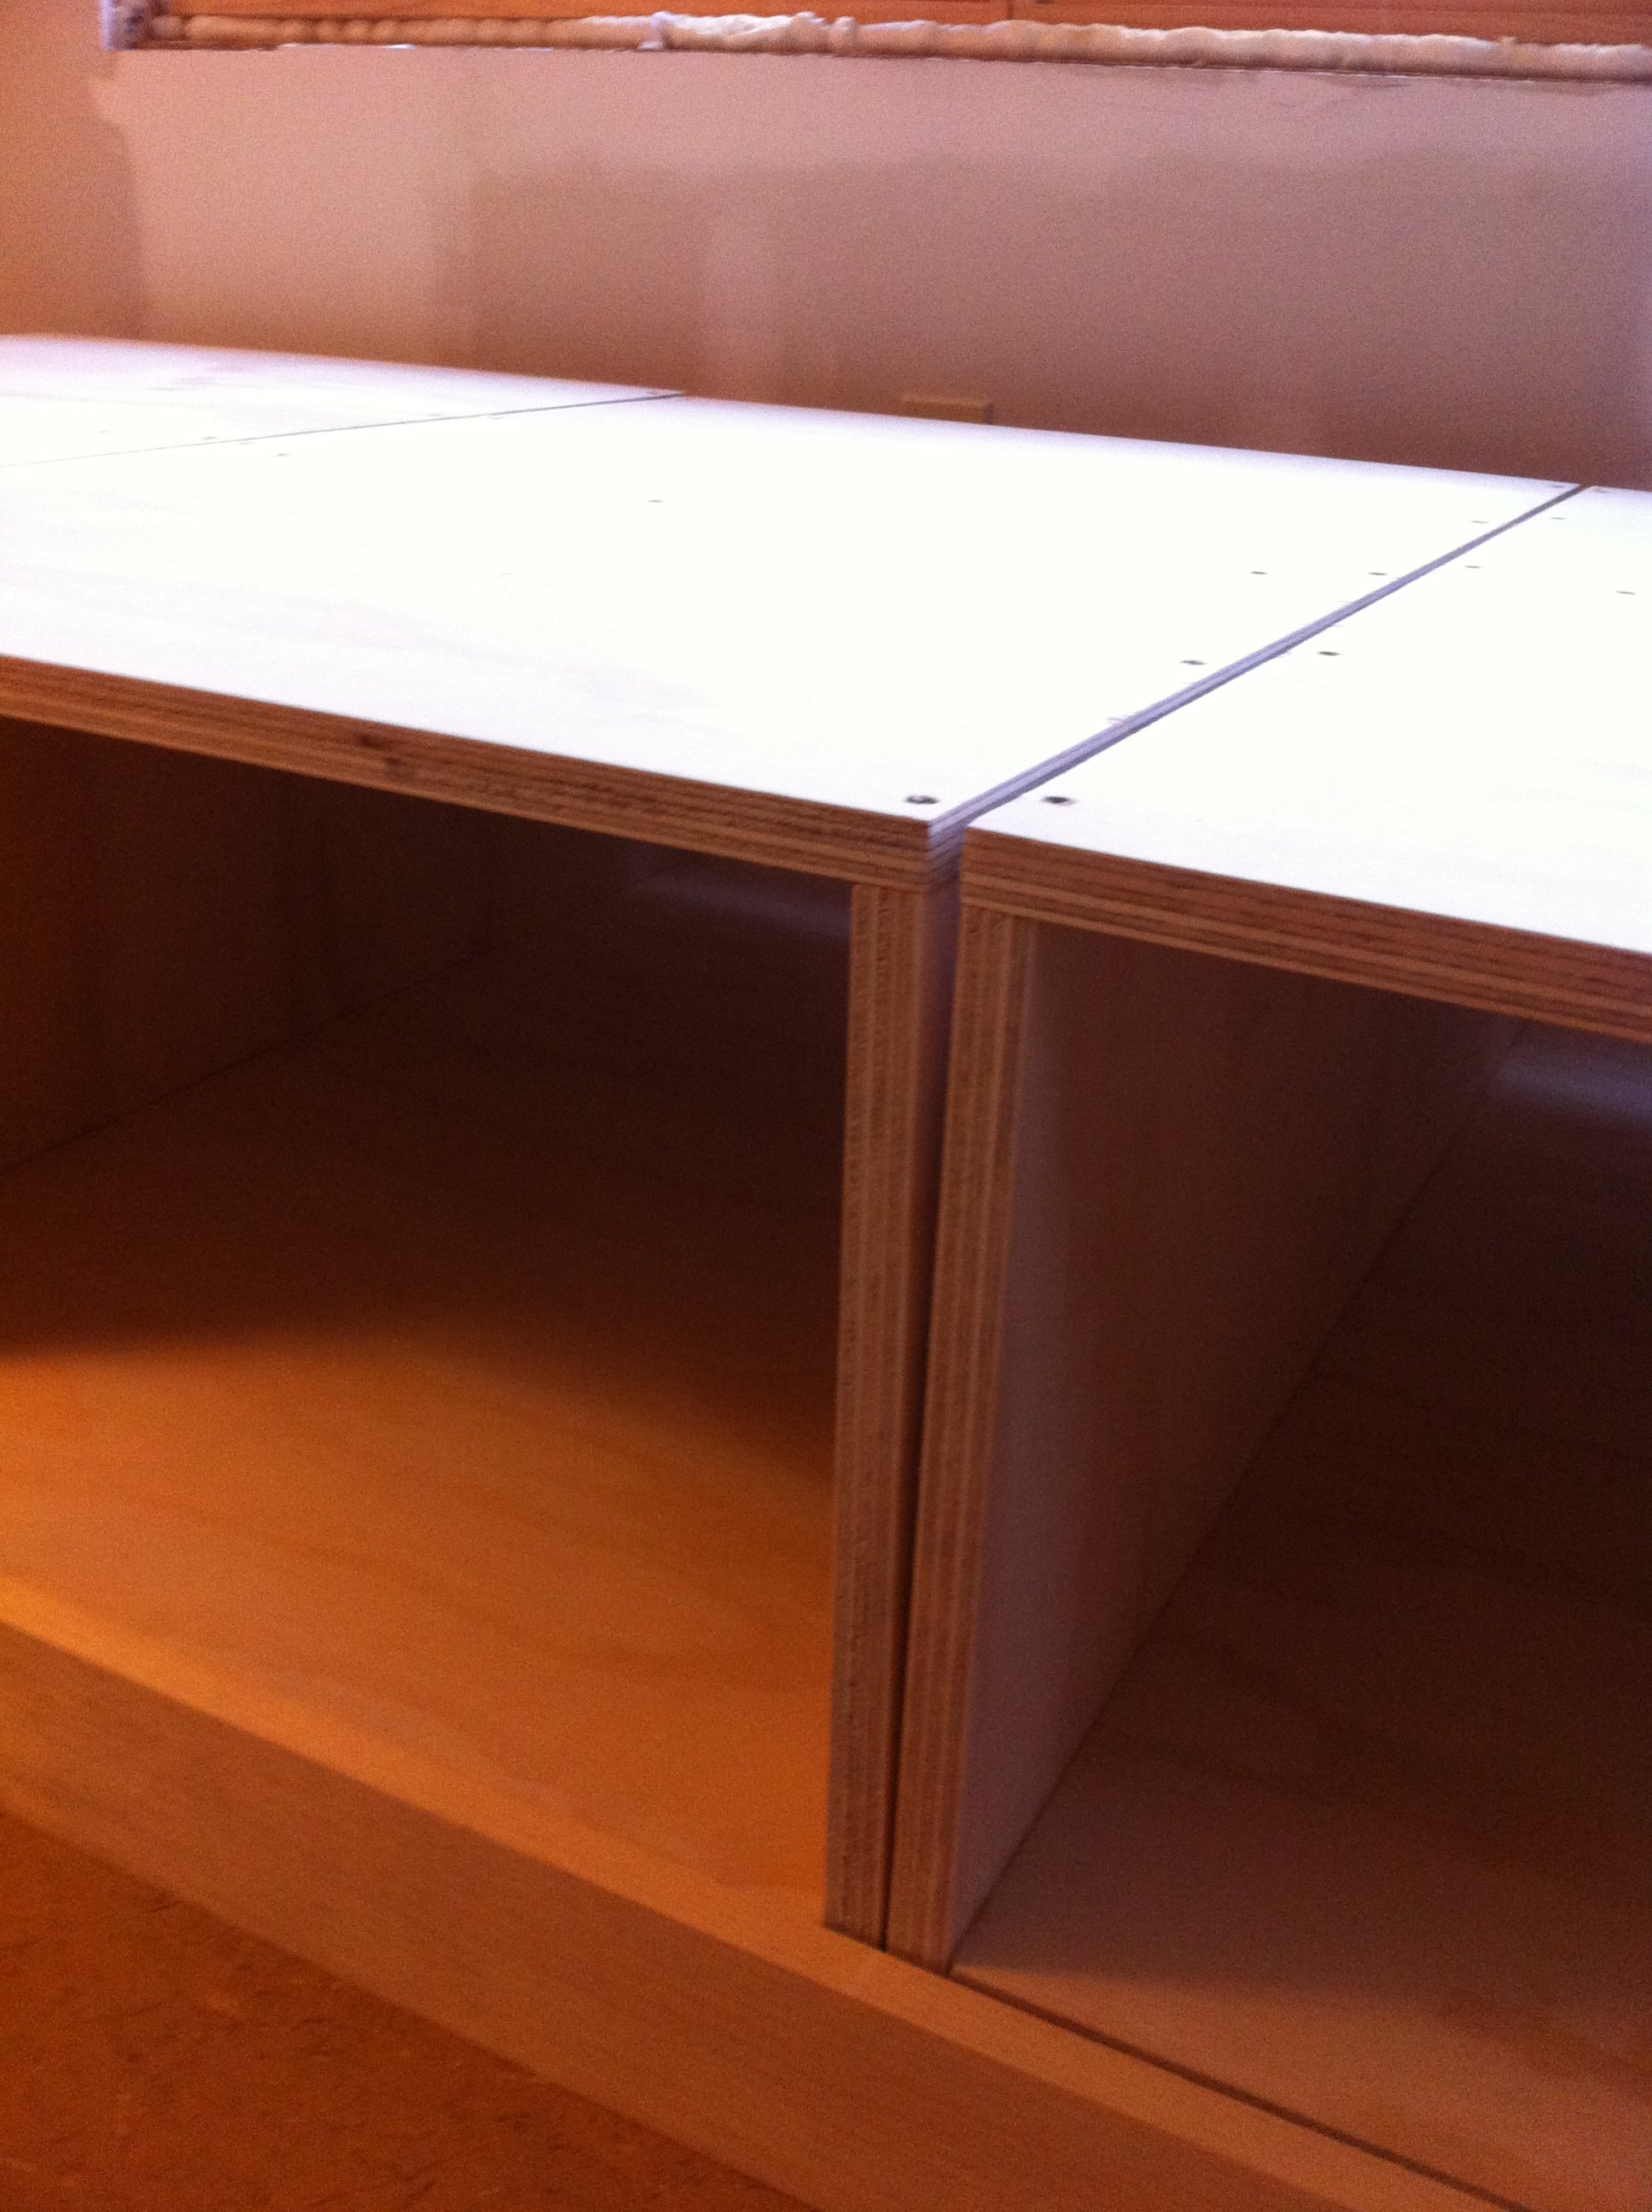
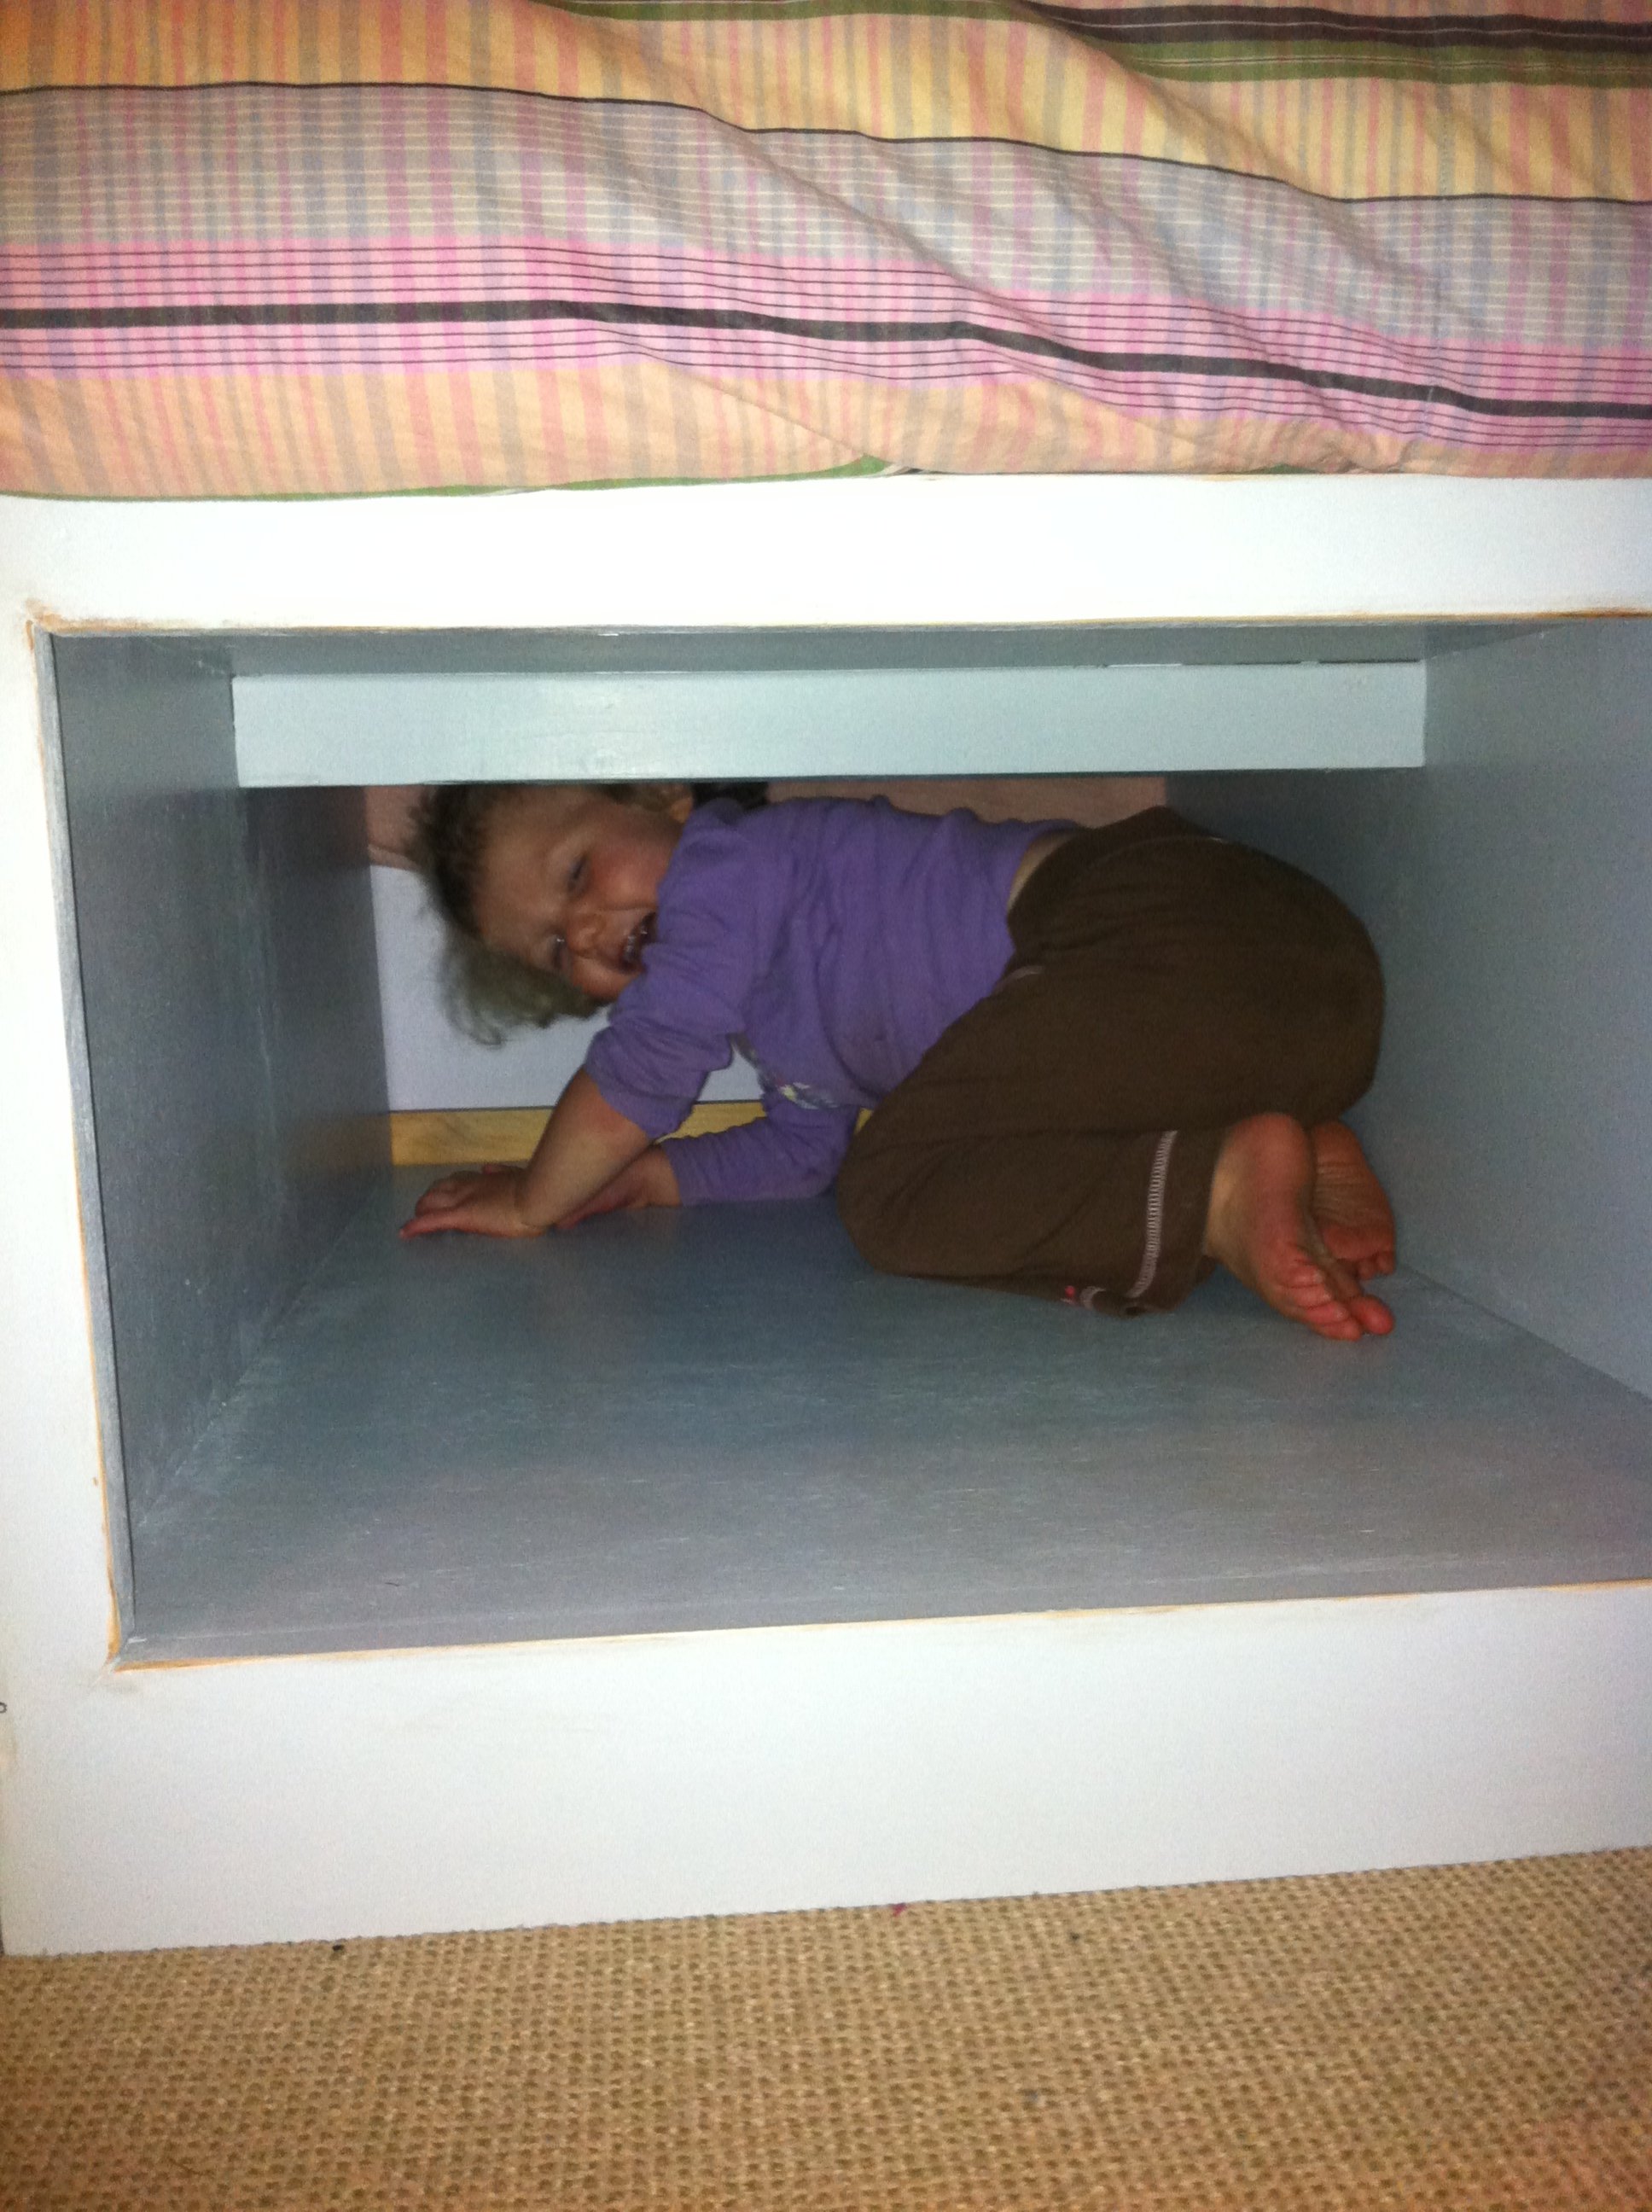
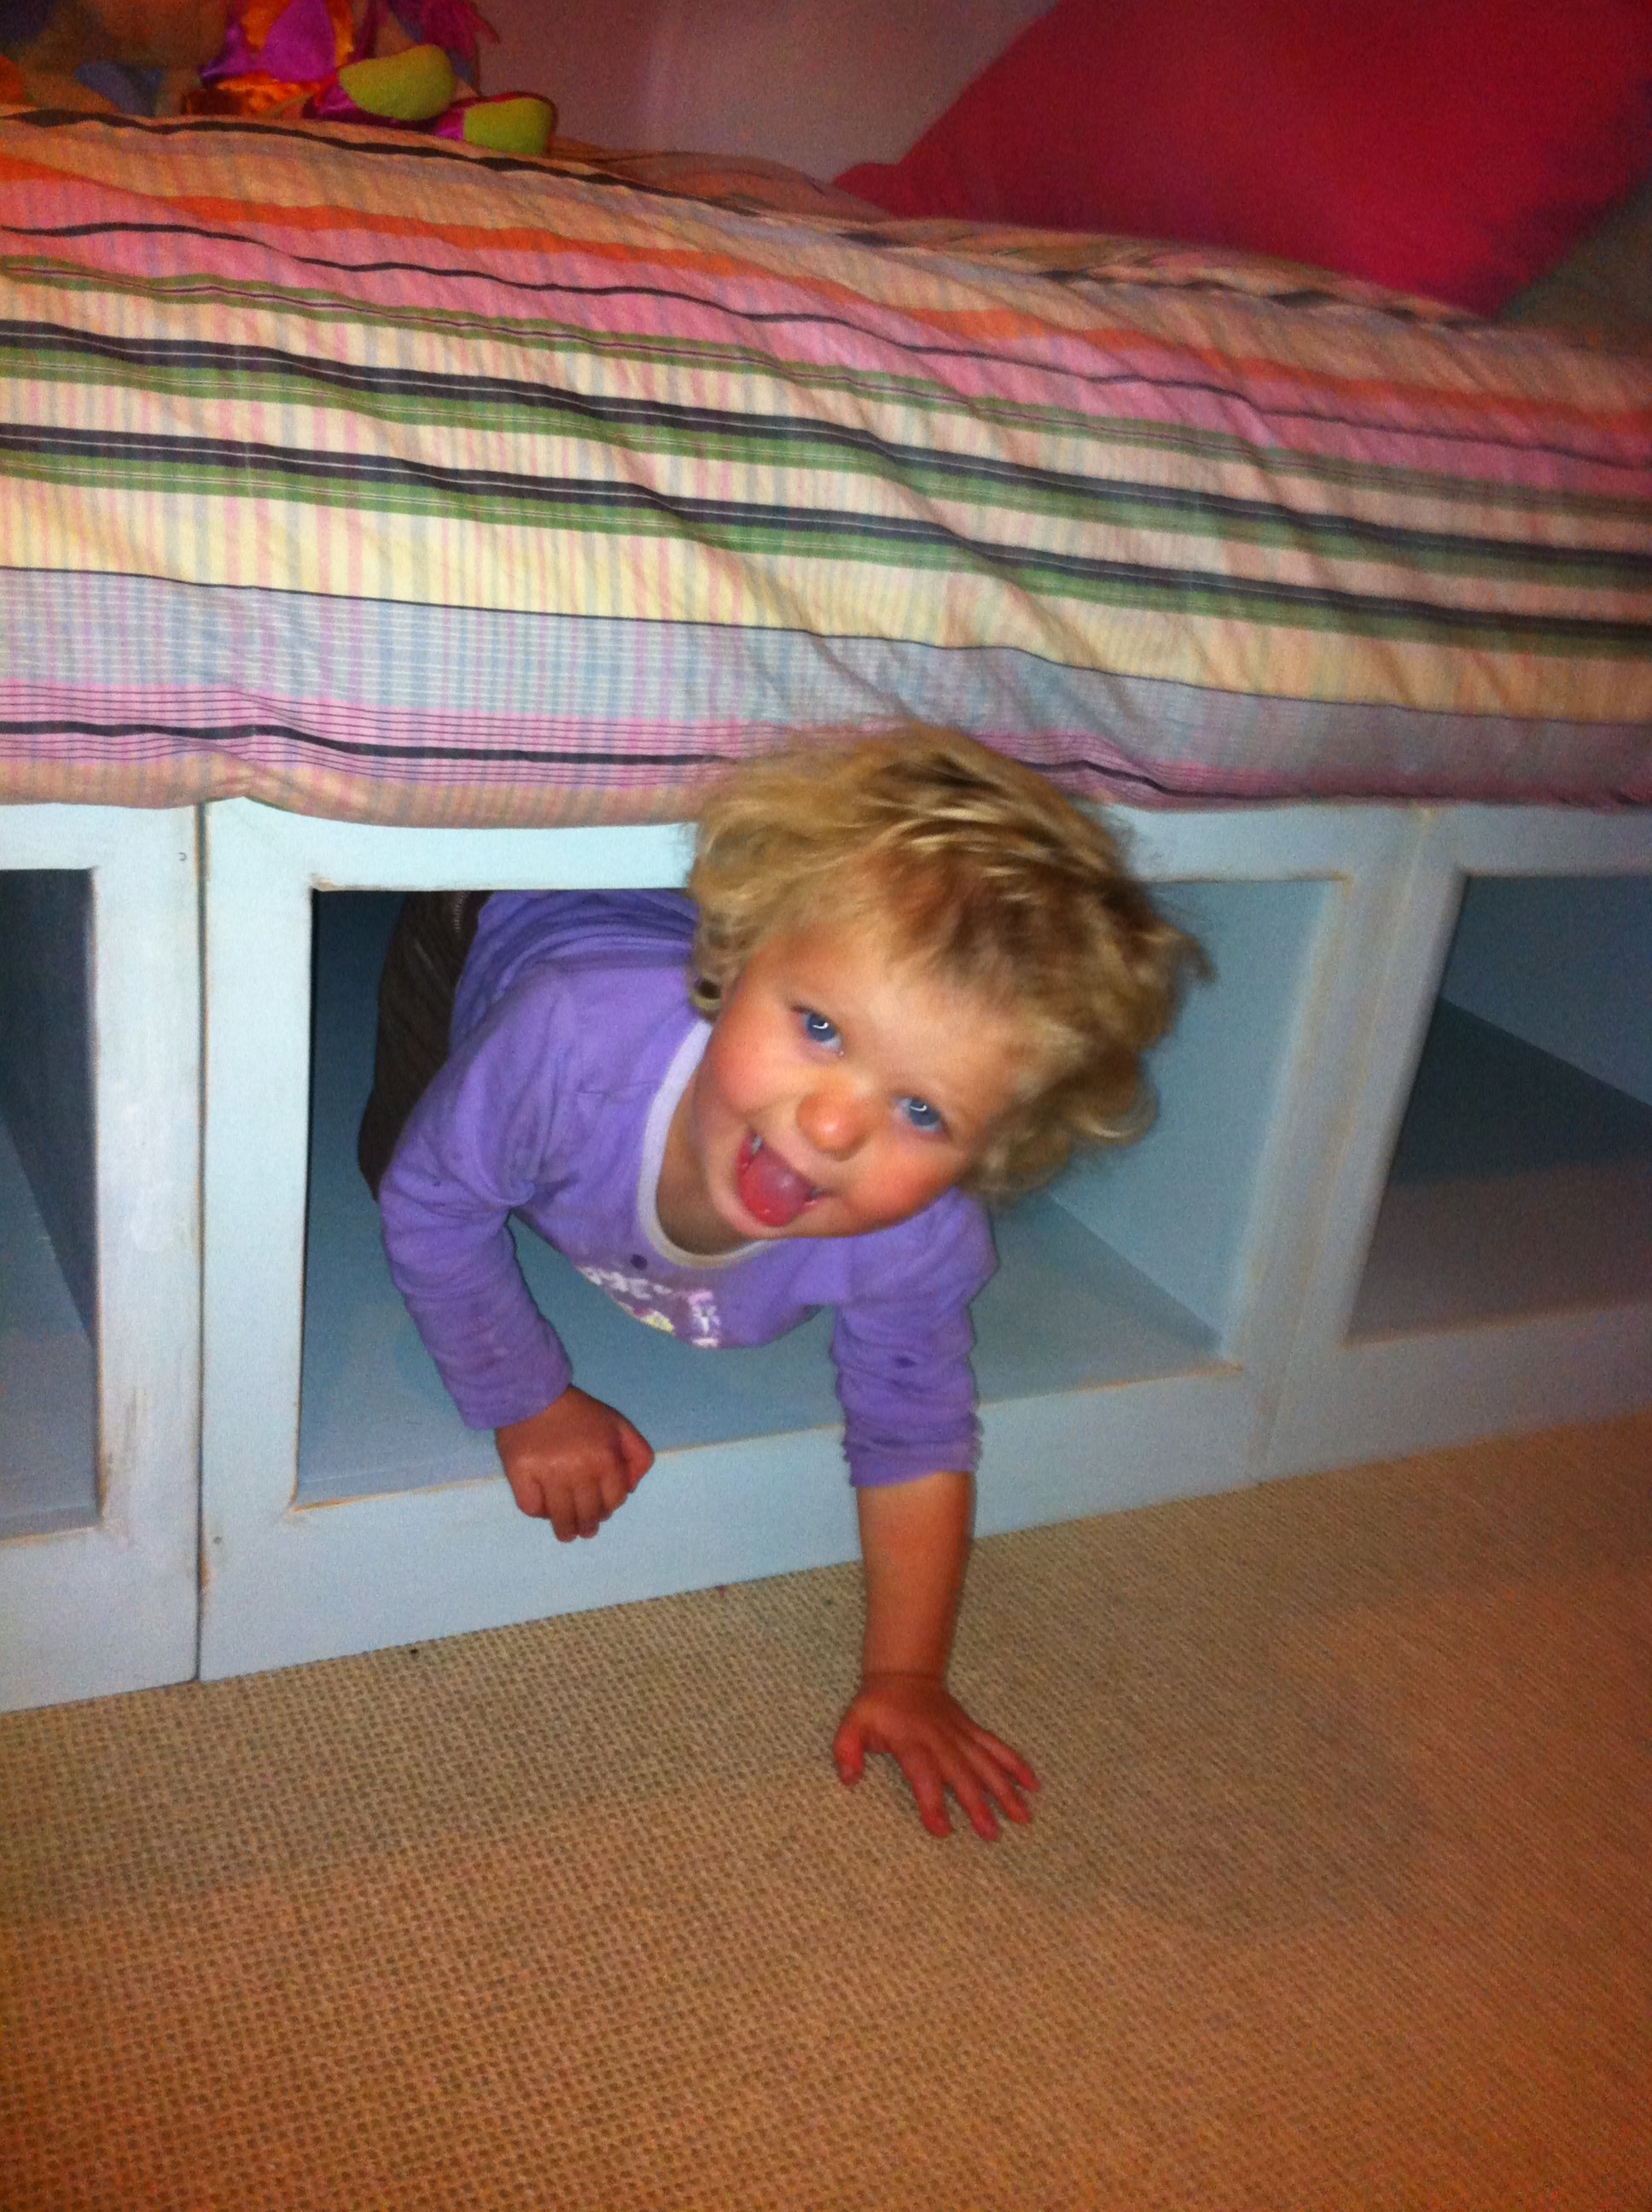
I finally did it! I purchased mattresses for our two girls (2 & 4) which have been just sitting on the floor for a while. Wanting to build some simple frames just to get them off the floor I ran across Ana's site. Oh boy! This site is amazing! We have a small house with very little storage so when I saw the storage daybeds I was smitten! The extent of my power tool comfort zone is dimensional lumber and a compound miter saw. Not plywood and definitely not the table saw, so I was a little leery about starting this project. In the end, I tackled it and am so glad I did! Even used the circular saw! Full disclosure, there's probably nothing square about the thing (see additional photos), but like mulch in your garden, trim covers a multitude of sins! I learned a lot and will take my time measuring and squaring for the next one. Also, as some readers commented, I would prime and do at least one coat of paint prior to assembly (that part was definitely time consuming). I also wanted the storage to go all the way back to the wall so I didn't include the center piece of plywood but instead trimmed down a 2x4 to a ~2.5" width and glue/screwed in into the plywood at the top center under the top piece. So far so good! On the finish, I wanted a distressed finish and started using a dark walnut stain but did not like how much it adhered to the paint as well as the sanded down edges. When I picked my daughter up from pre-school that day they had been doing flower rub pictures. I saw that the centers of the black-eyed susan’s and cone flowers came out a beautiful brown color. So when I got home my daughter and I went out and cut some old flower stems and we finished the other two cubby cubes that way. I think it turned out really well! I didn't end up top coating it with anything, I liked the scuffed up paint look. A big THANK YOU to Ana for doing all this work so we can too!
Built from Plan(s)
Estimated Cost
$135
Estimated Time Investment
Weekend Project (10-20 Hours)
Finish Used
Benjamin Moore Smoke and Dark Walnut stain for distressed finish on one cube which was replaced with the centers from our black-eyed susans and cone flowers.
Recommended Skill Level
Beginner
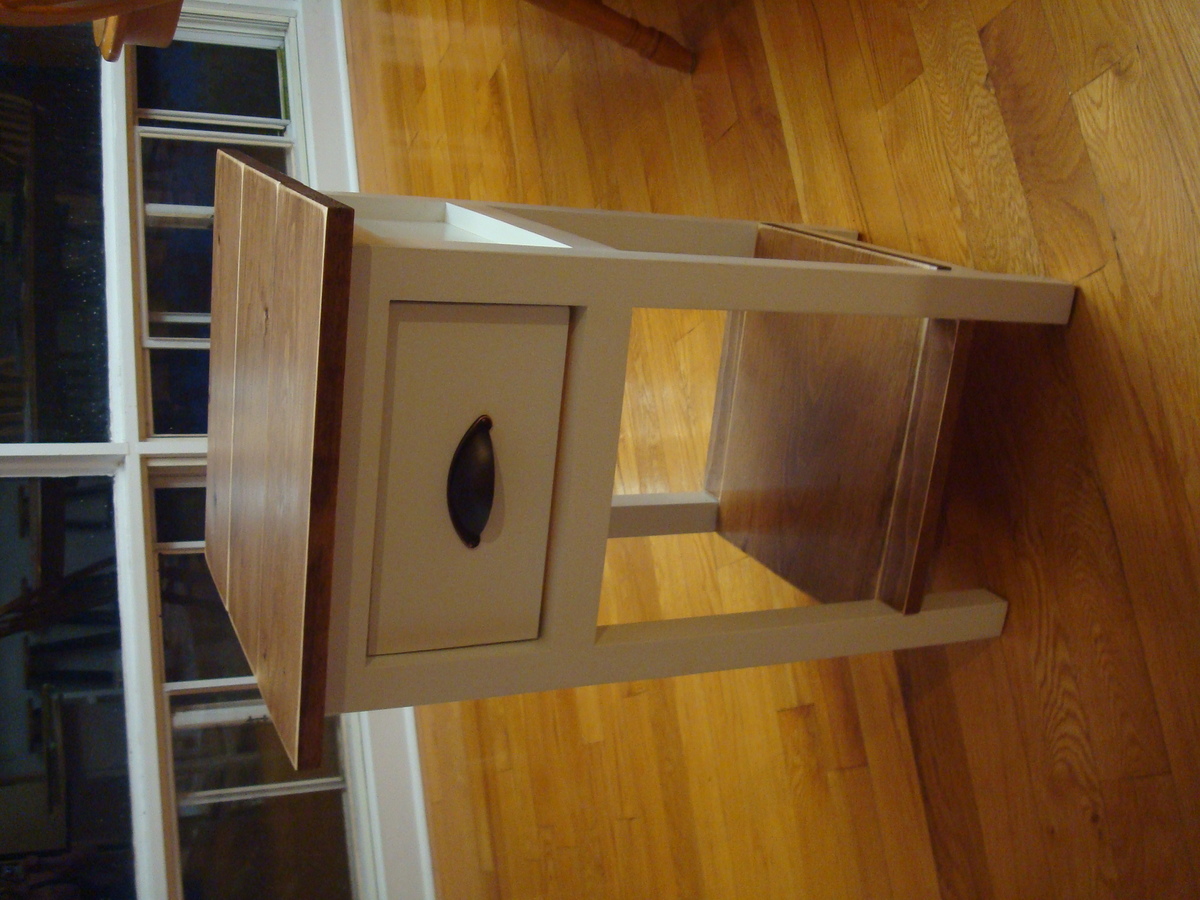
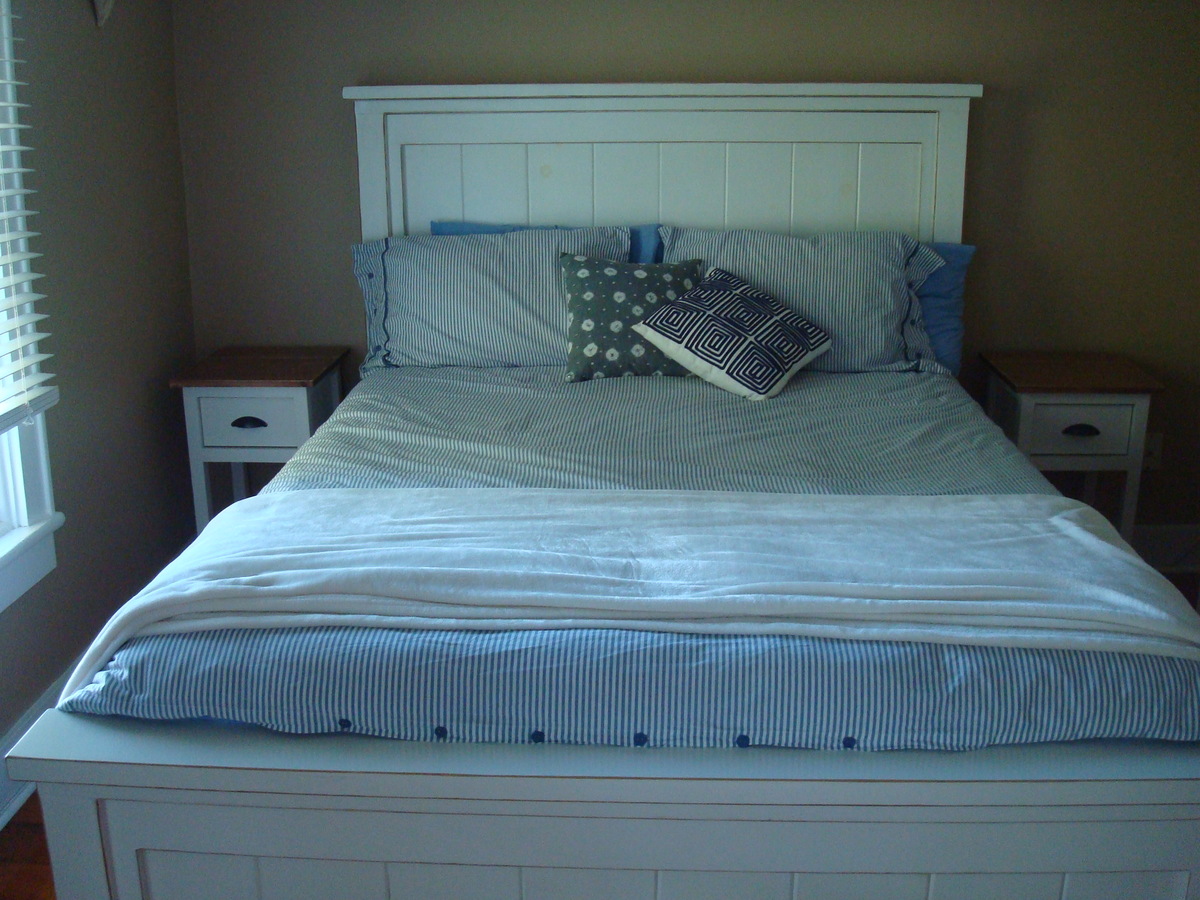
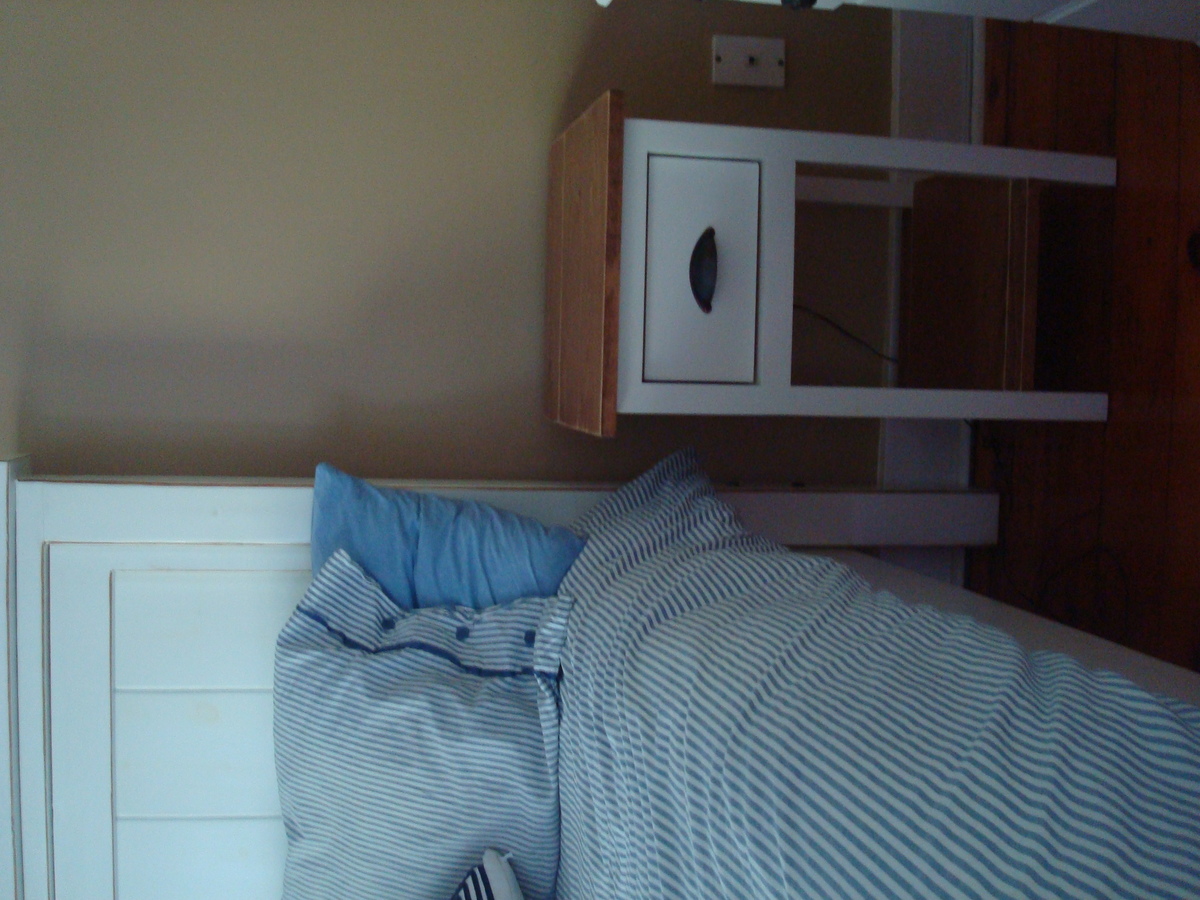
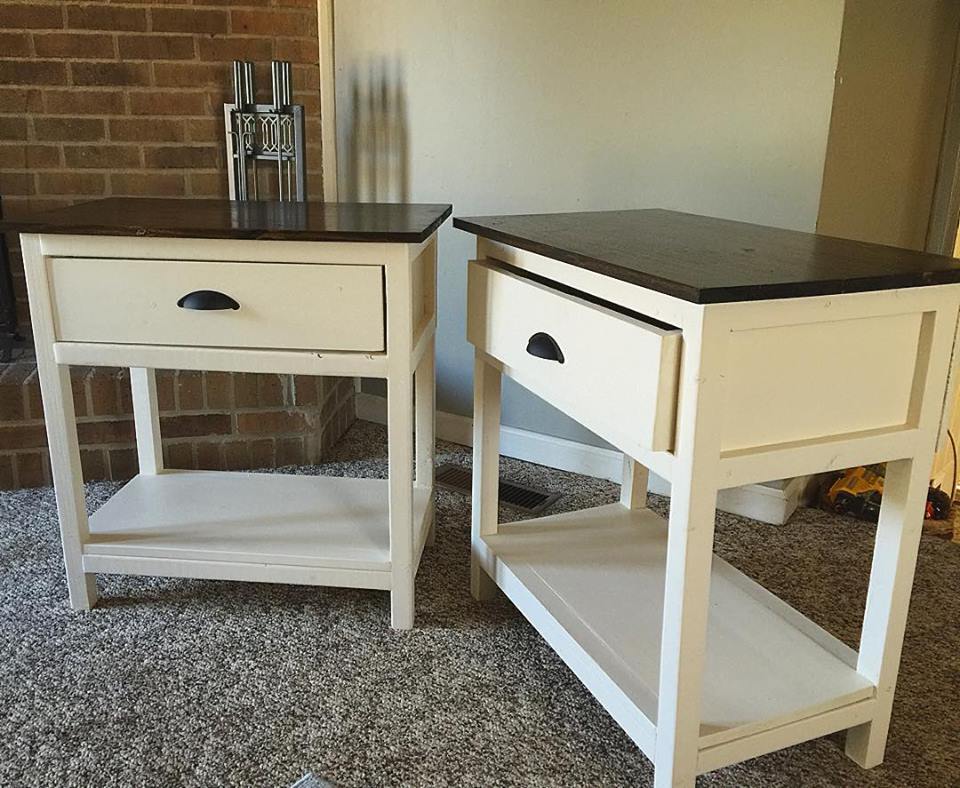
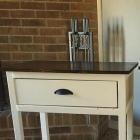
Farmhouse Bedside Table
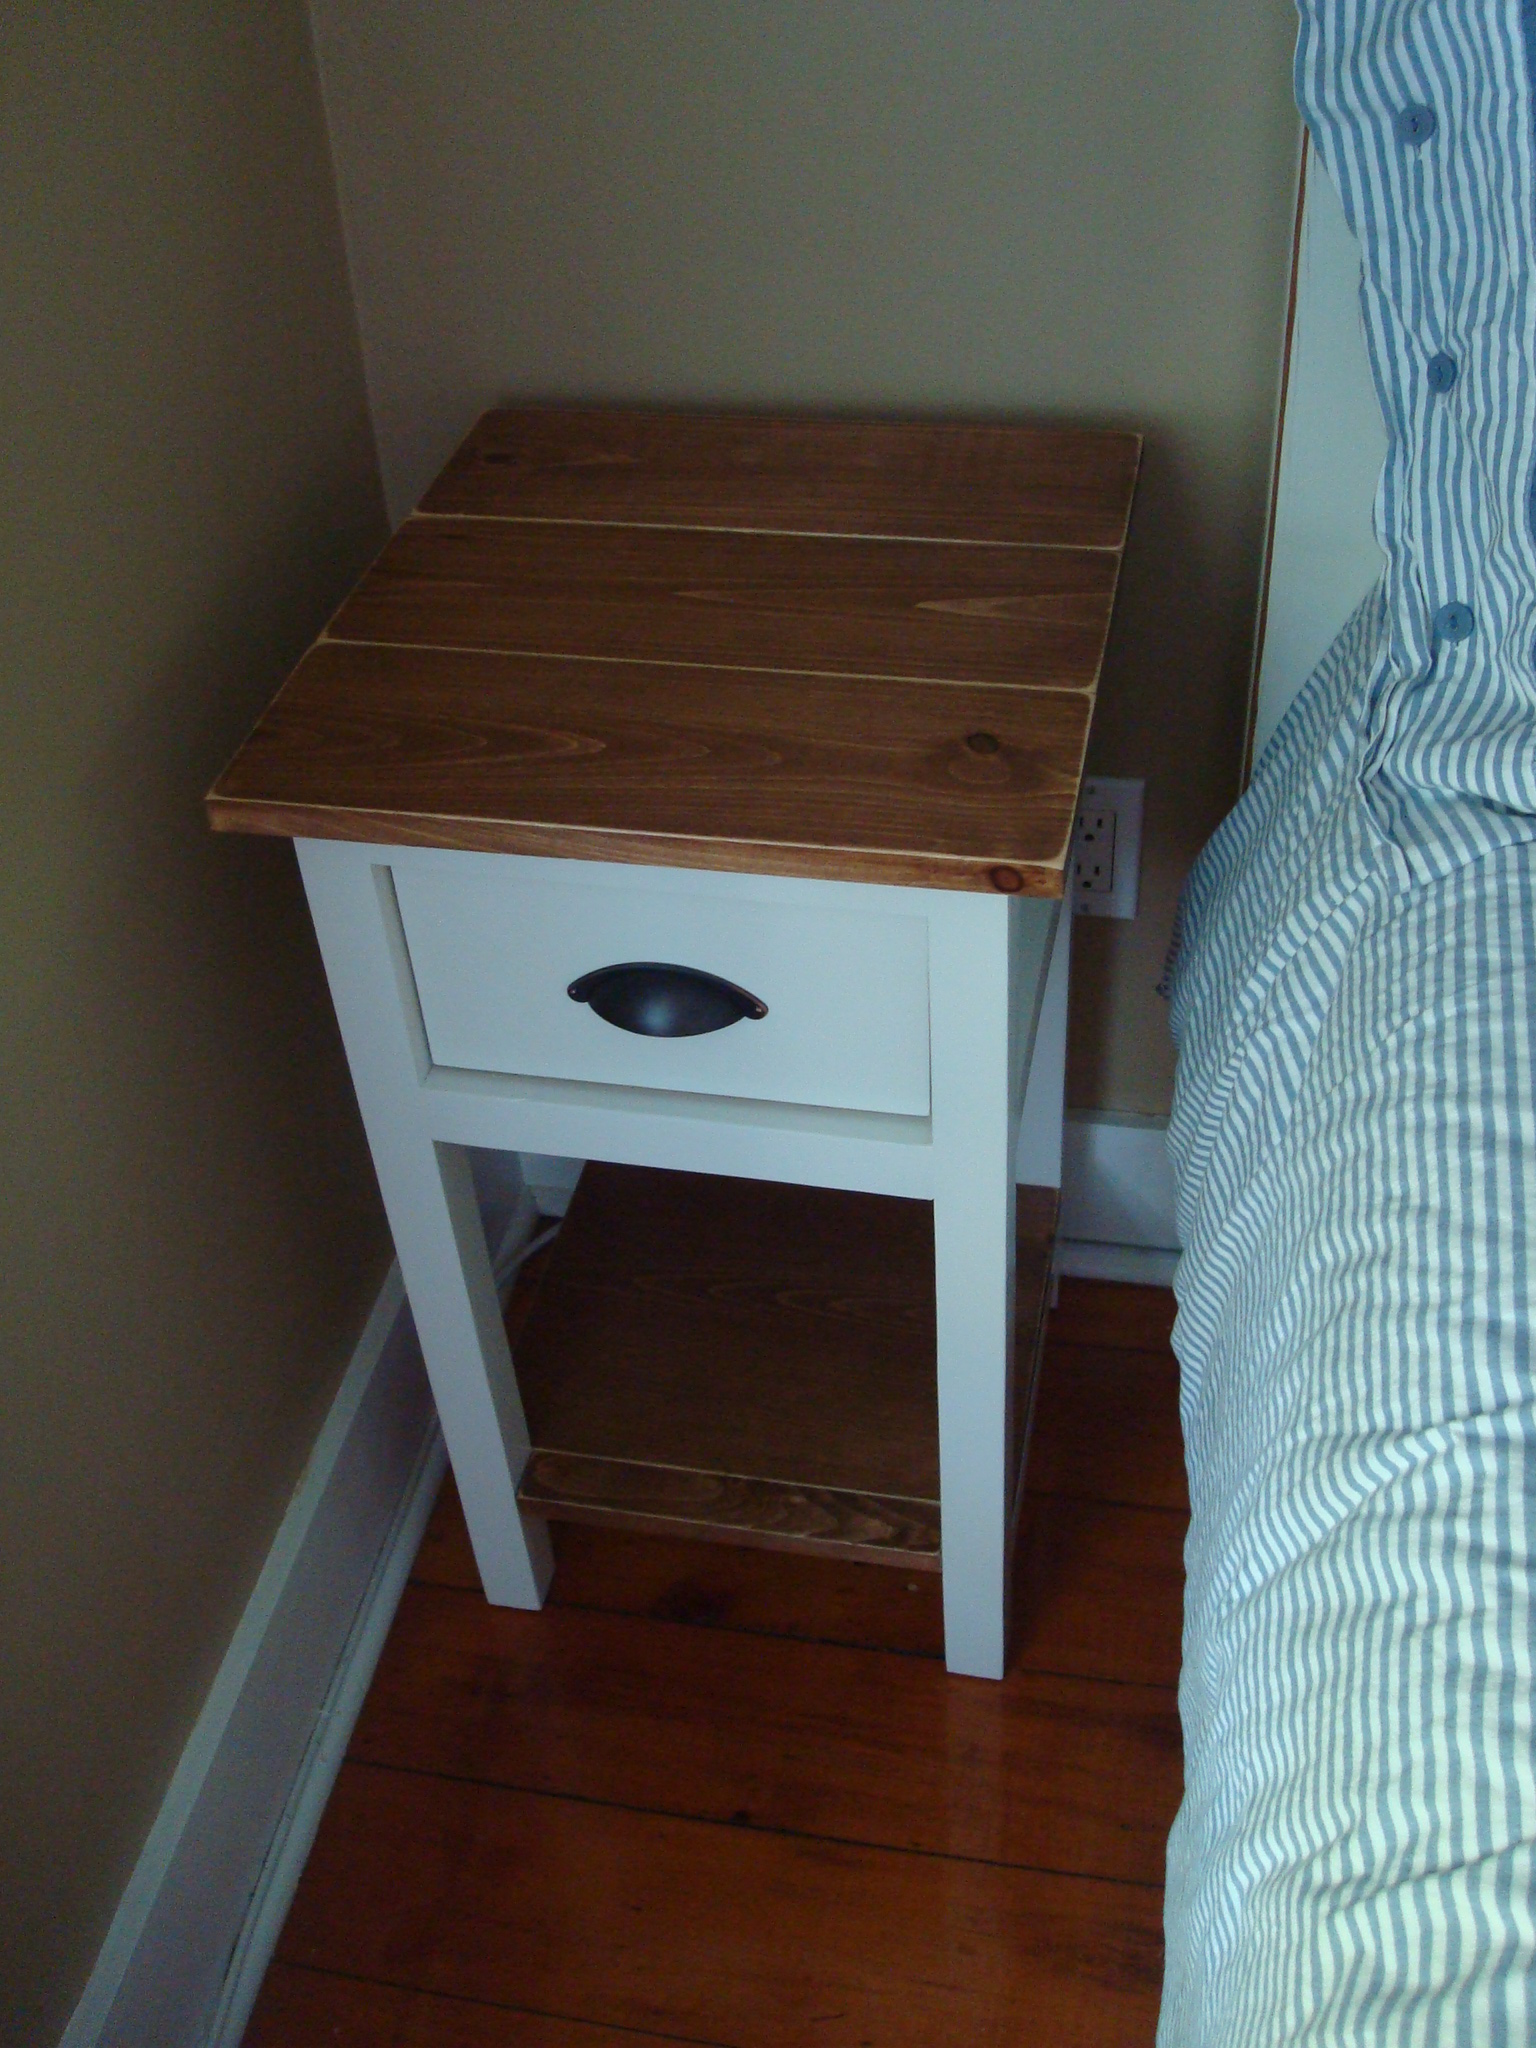
After finishing the farmhouse queen bed, I was eager to start another project. I needed bedside tables and I came across plans for the mini farmhouse bedside tables. After the building the first one, the second one went much quicker. Very happy with the results :)
Estimated Cost
$50.00
Estimated Time Investment
Day Project (6-9 Hours)
Finish Used
White paint, top and bottom shelf are stained with Minwax Special Walnut and sanded edges and corners to look a bit aged. Finished with 3 coats of Minwax polycrylic, sanding between coats.
Recommended Skill Level
Beginner
Comments

Tue, 10/22/2013 - 09:21
Beautiful!
Really nice work on the bed and the tables. I love the look with white legs and stained top/shelf.
In reply to Beautiful! by mom of 4
Wed, 10/23/2013 - 19:34
Thank You!
I was very happy with the way they turned out. I just finished a storage bench with the white bottom and stained top, I'll post pictures when I get a chance :)
Farmhouse Bedside Table
Super easy project. Both tables matched almost identical. Buying wood from Home Cheapo/Nowes makes it a little tougher because they aren't as straight as they should be, but a little sanding never hurt. Plan on making a few more for the other rooms.
Estimated Cost
$50-$55 per table
Estimated Time Investment
Day Project (6-9 Hours)
Finish Used
Jacobean and polyurethane on top with antique white spray paint on bottom.
Recommended Skill Level
Intermediate
Comments
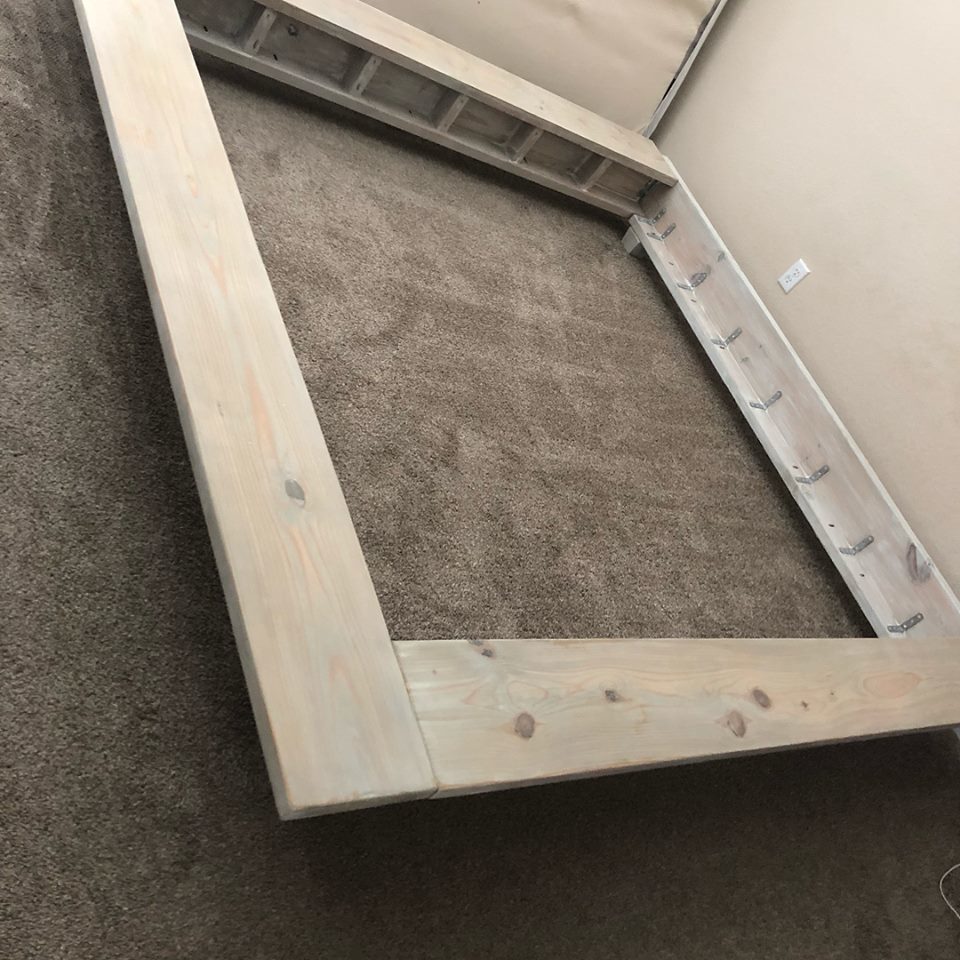
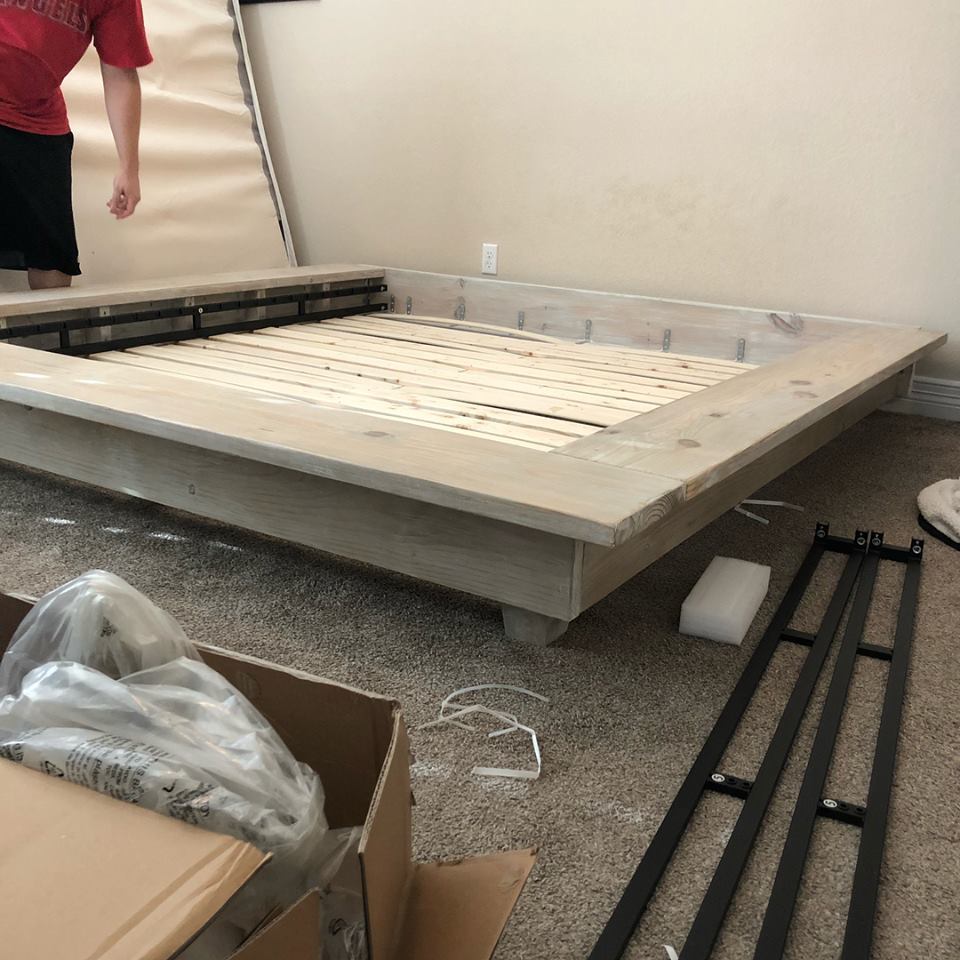
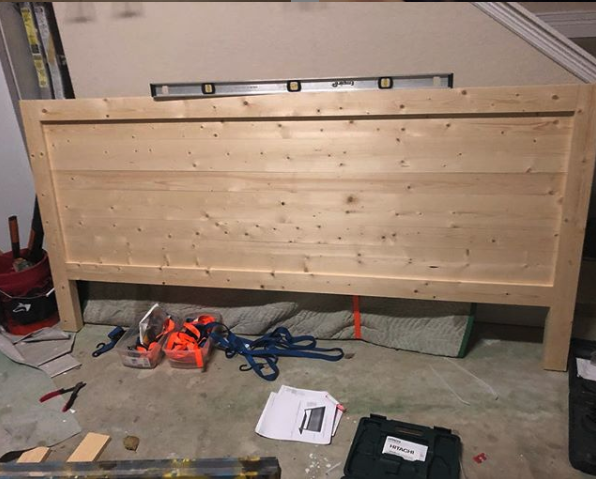
Reclaimed wood - look Headboard and . modified platform bed.
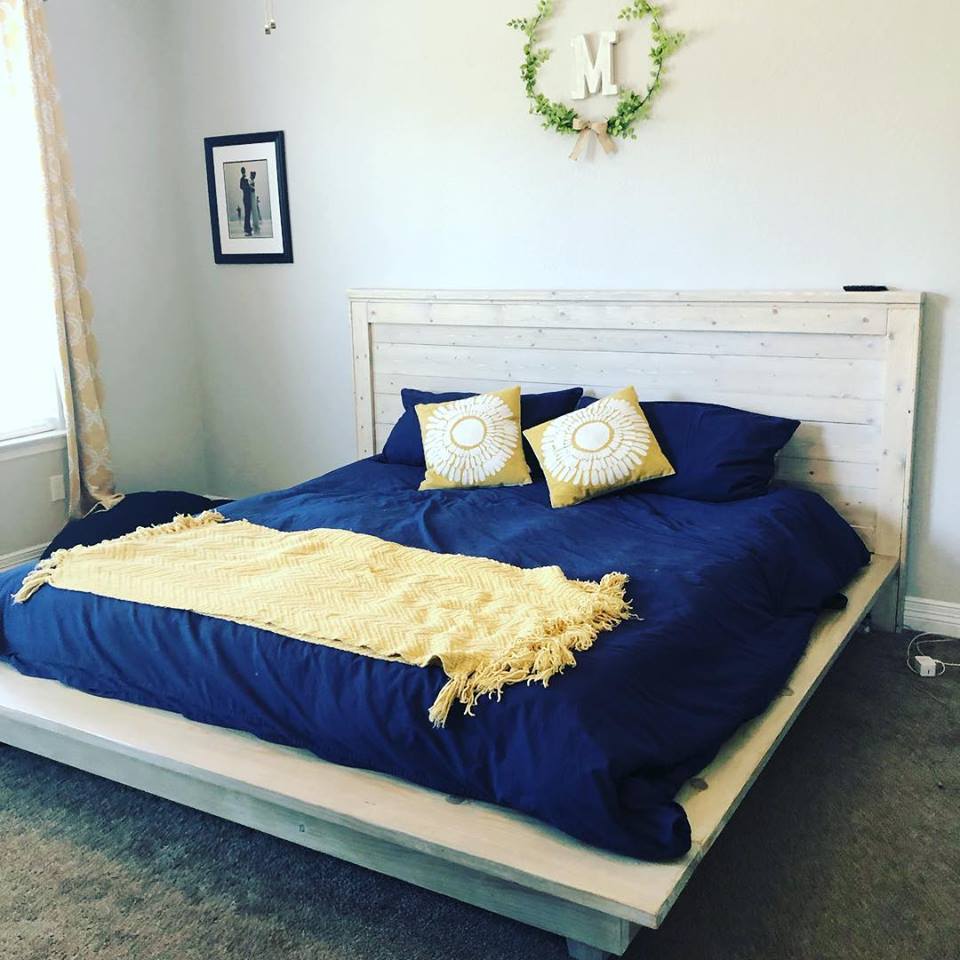
Made wider for a king and modified platform bed. Used a weathered oak stain followed by a 50/50 whitewash.

Built from Plan(s)
Estimated Cost
$300 ish
Estimated Time Investment
Week Long Project (20 Hours or More)
Finish Used
Used a weathered oak stain followed by a 50/50 whitewash. Varythaned.
Recommended Skill Level
Intermediate
A little take on Ana's sink
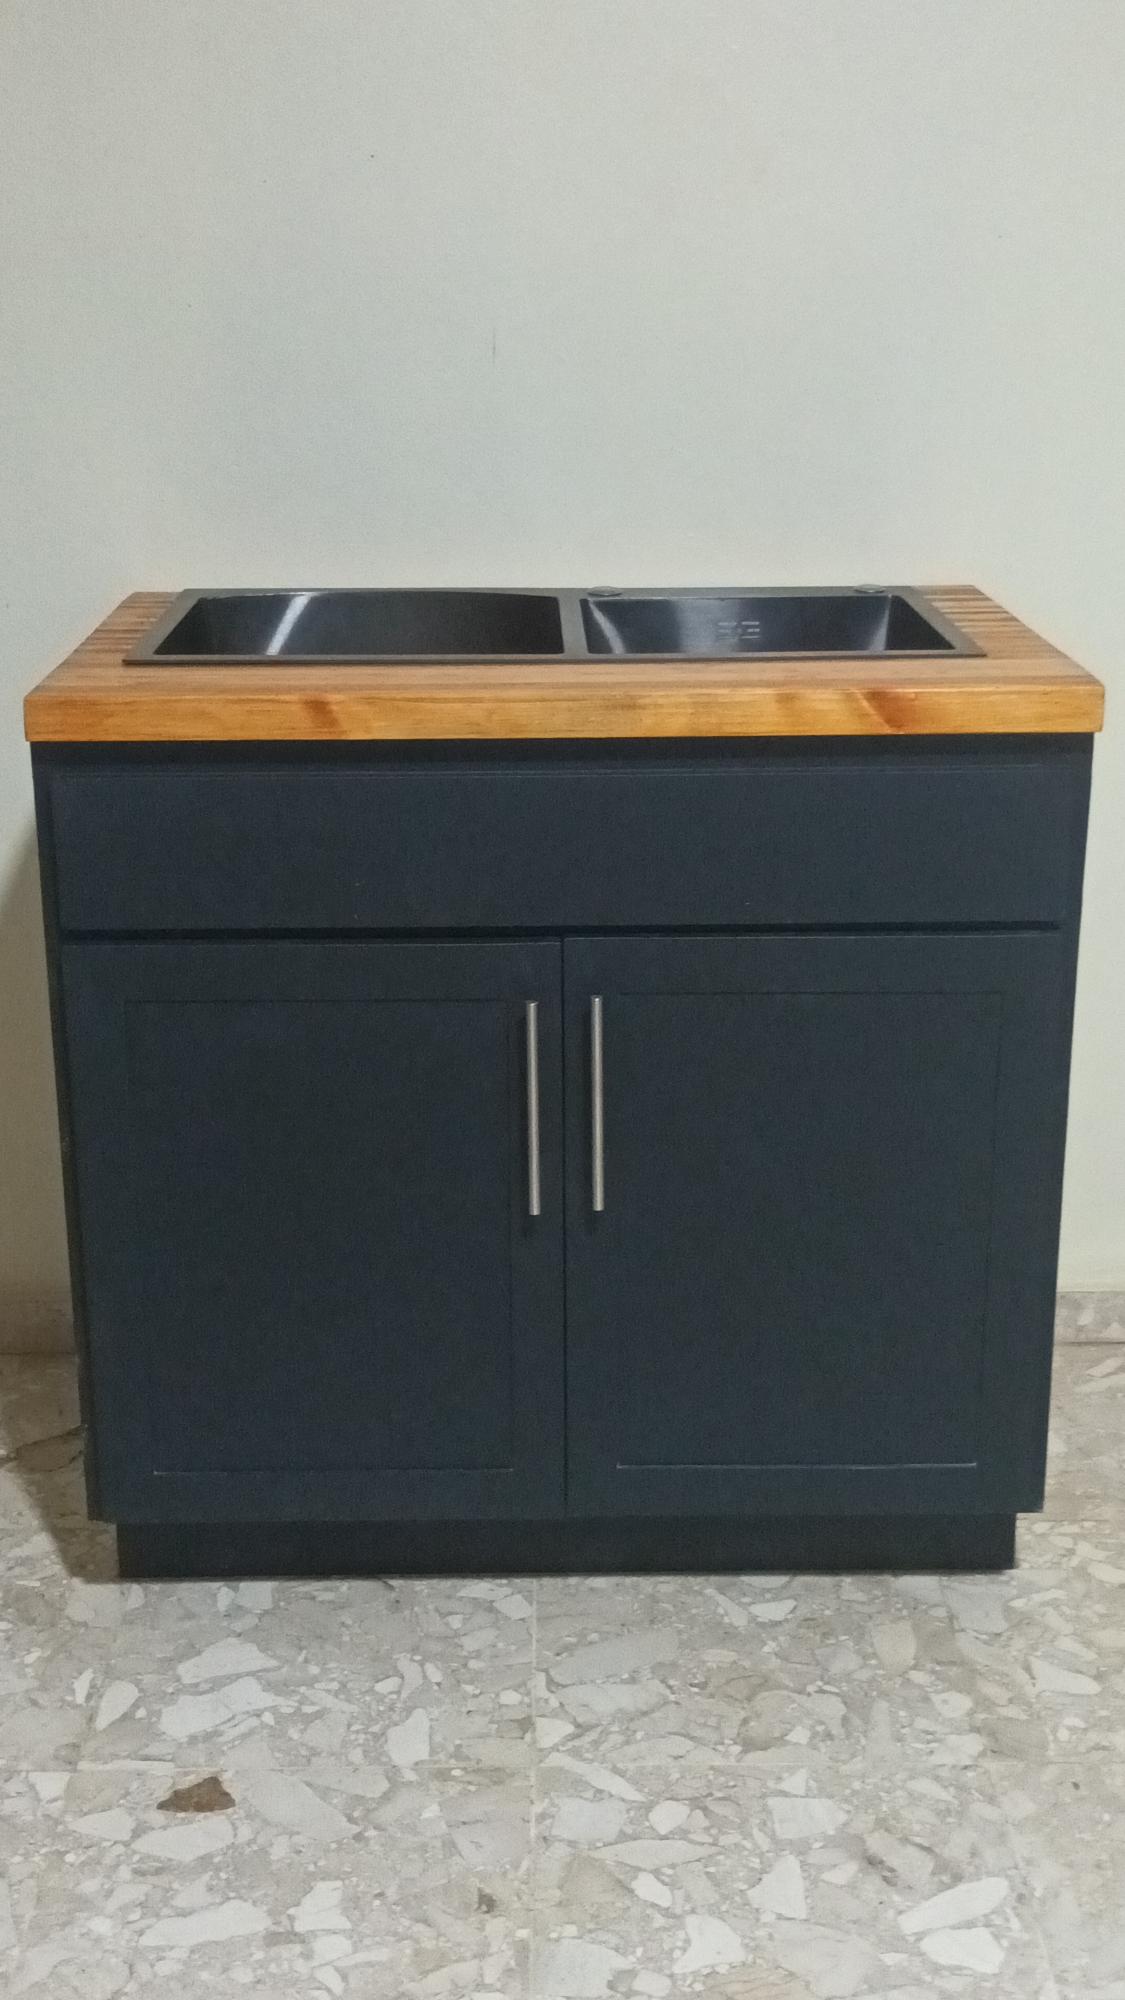
This was a build to convince my wife that I should do the cabinets in our new house...now I have to do them all. I should have just said, Sure, go to Ikea!"
Built from Plan(s)
Comments
Mon, 02/20/2023 - 10:36
LOL, you're hired!
Looks amazing, fantastic work! Thank you for sharing and happy building!
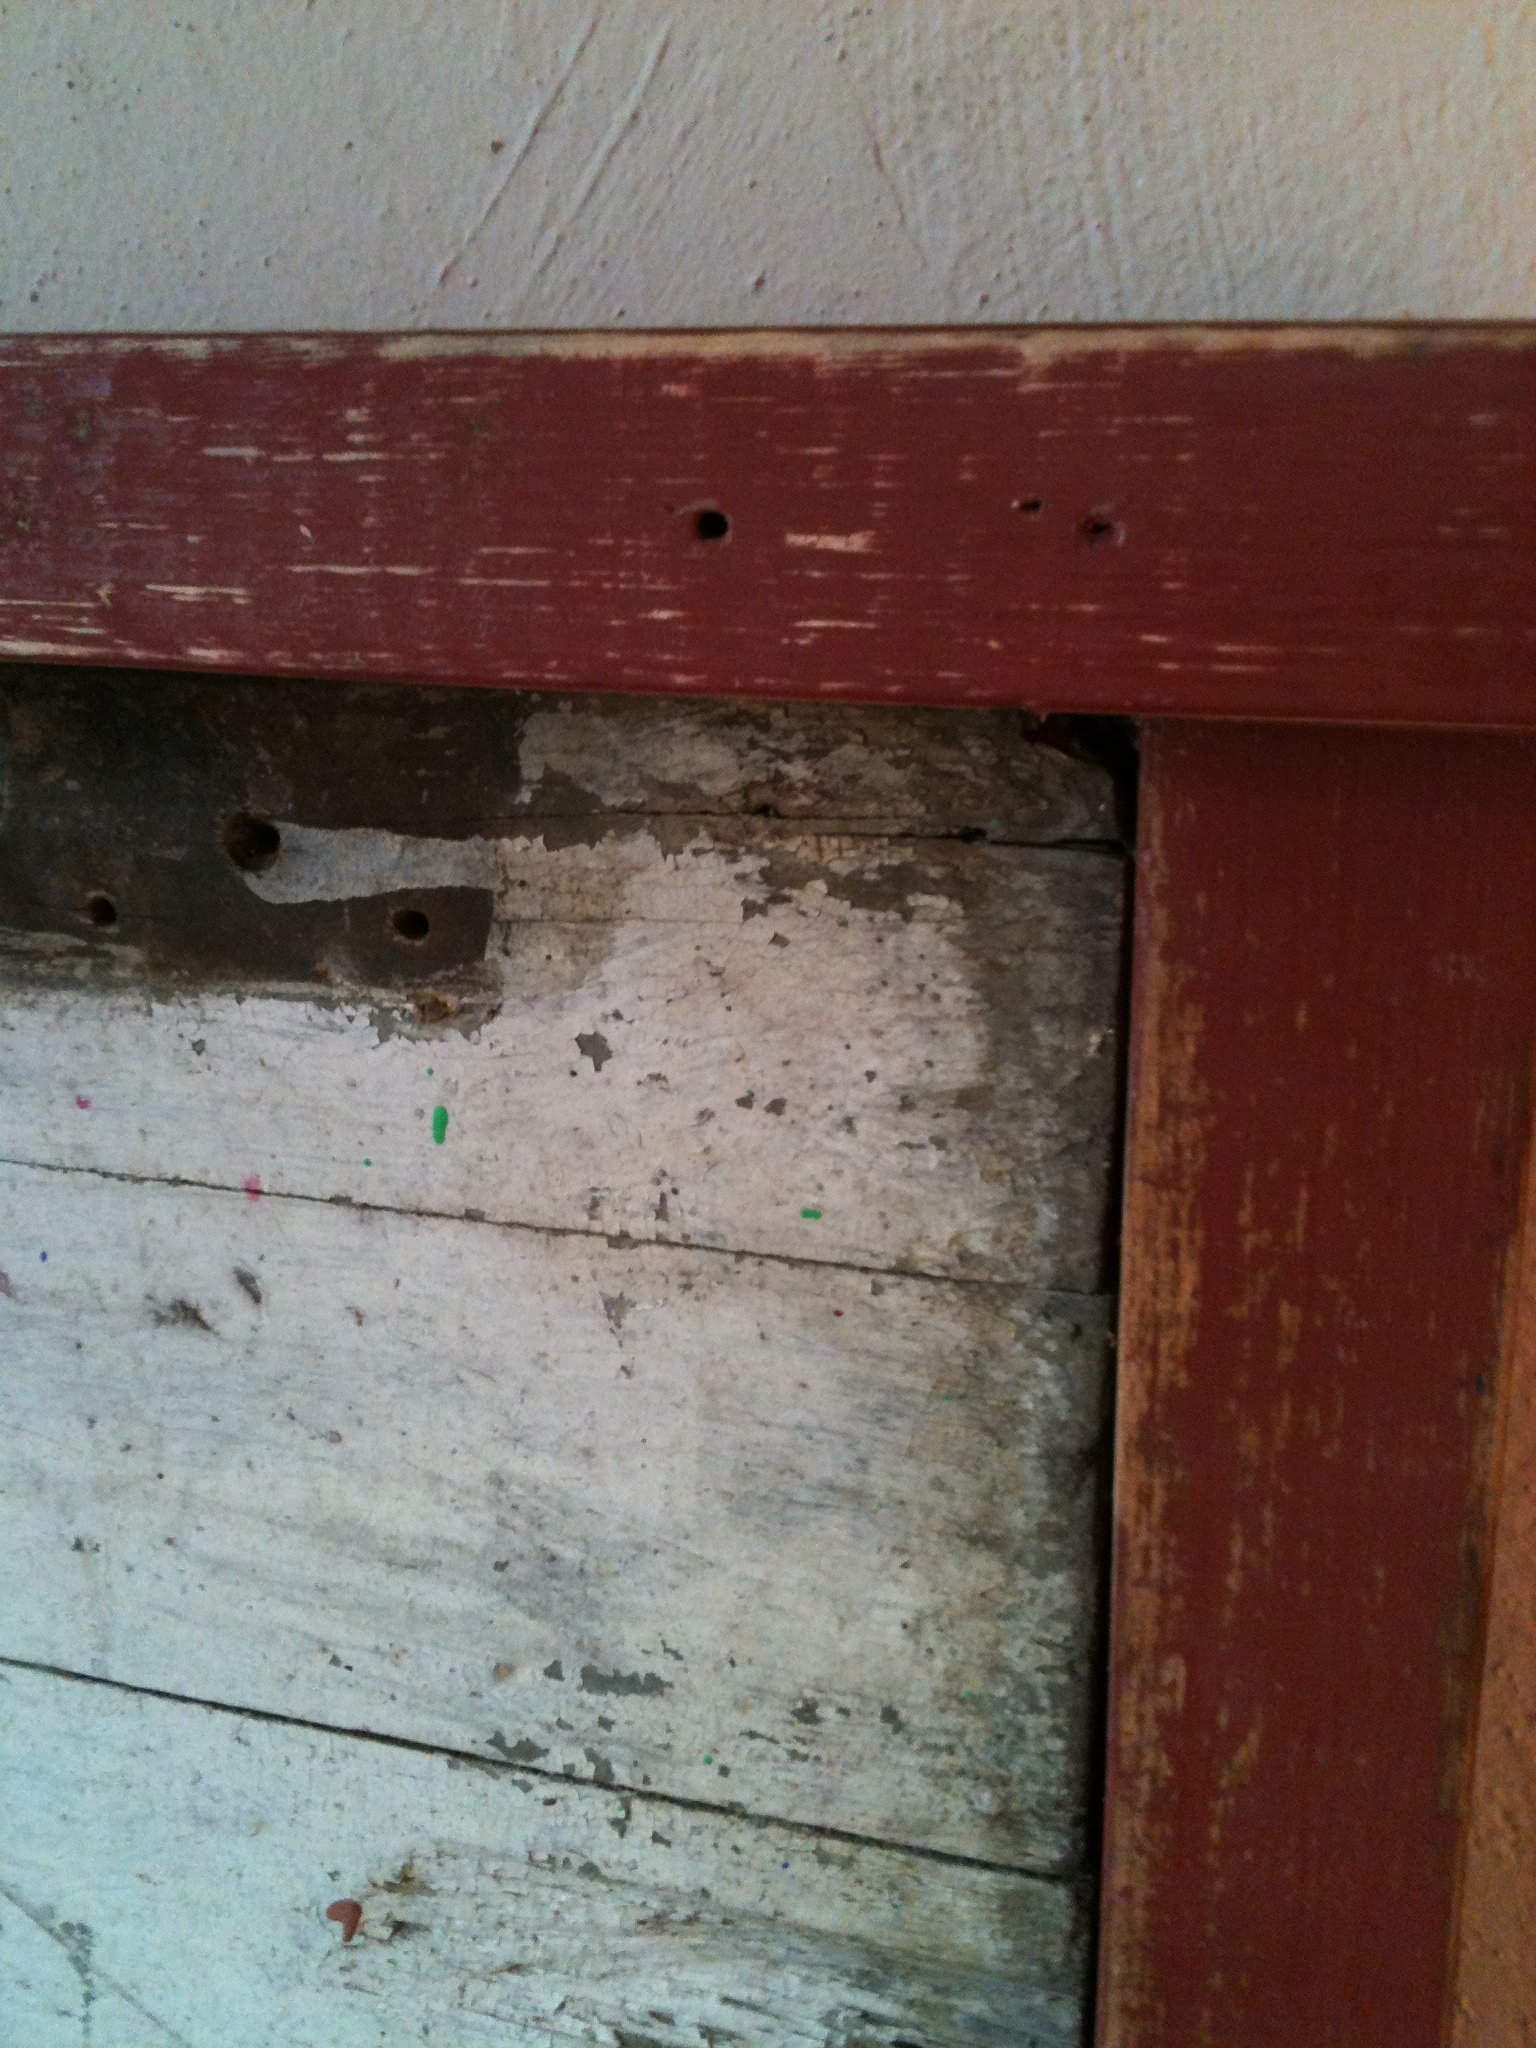
Reclaimed Wood Headboard (air quotes)
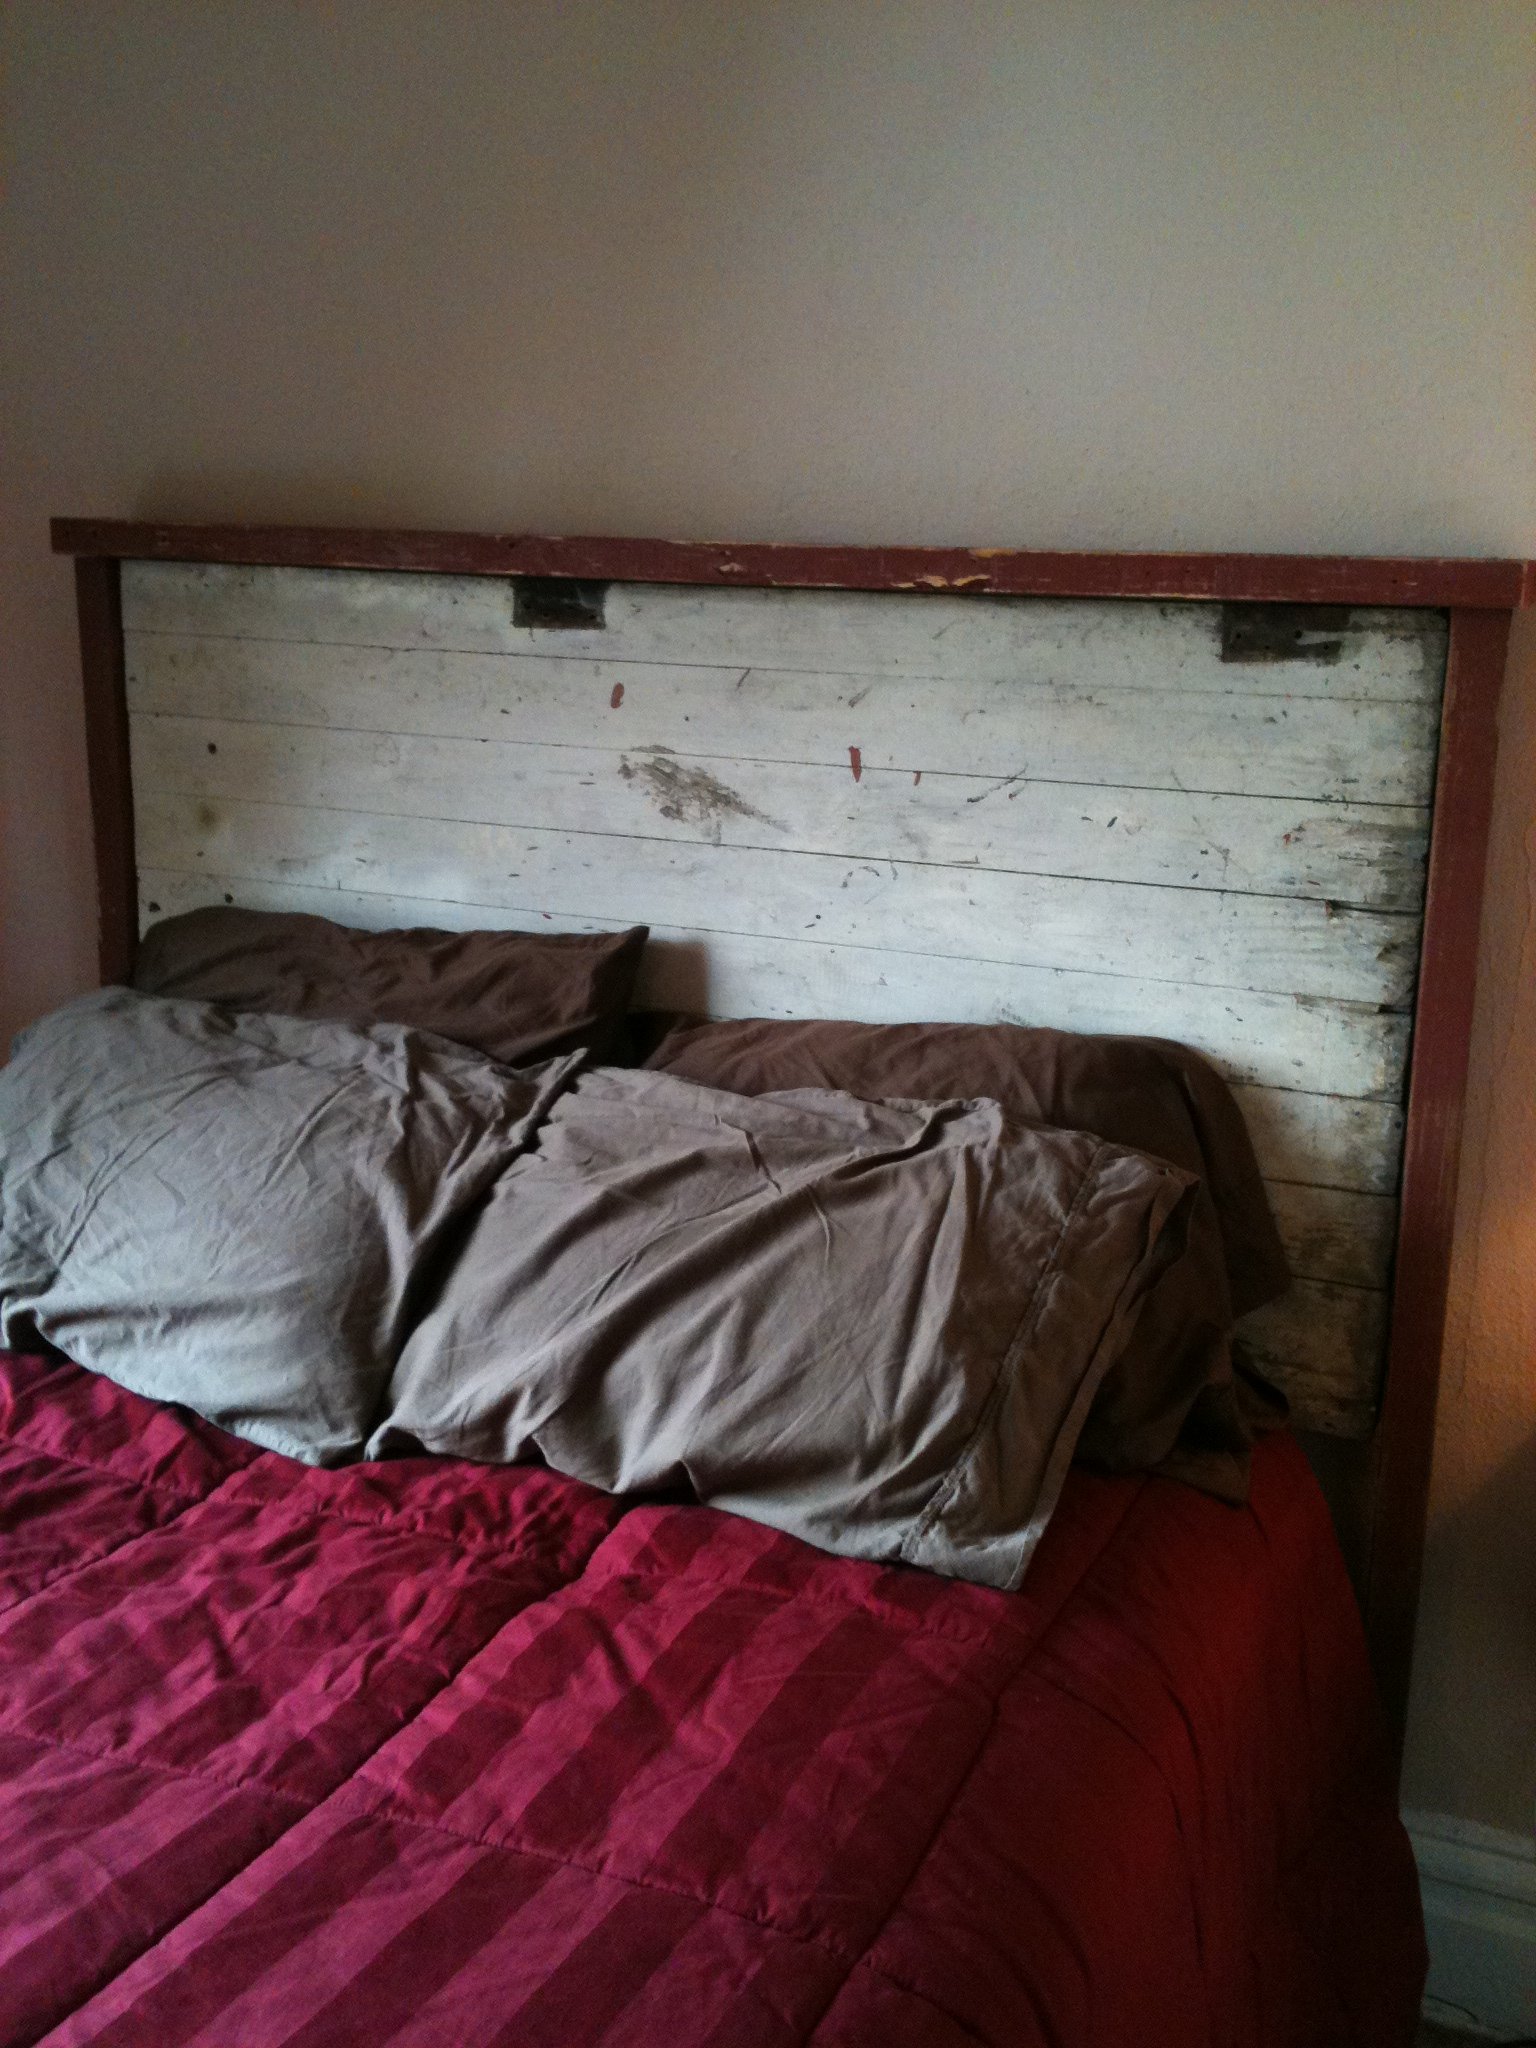
OK, first off this is not in any way, shape or form the Ana White plan for the Reclaimed Wood Headboard. However, I had to include a plan link and it IS a headboard made with reclaimed wood. So yea, air quotes. Second, I apologize for the poor quality photos of my recent brag posts. The digital camera is gone so these are iPhone specials. On with it now. This is my quick and dirty way of making a headboard, and kind of cheating. All you're looking at in these photos is some 2X3s and 2X4s around an old door to the root cellar in my basement. That's right, for once my main source of building material was not a pallet. As I took the door off the old rusty hinges and cleaned off the dust and cobwebs it occurred to me that this was probably original to the house from 1920. With that kind of history in mind the only thing I could do was take a saw to it and hack off 18 inches, oops. The 2X3 posts on the side were actually supports for a shelf that was made from a door(more on that to come). That shelf was actually found in the root cellar the door was for, this house has been pretty beneficial to me so far. The 2X4 top is from a pallet and aside from a 2X6 at the bottom to attach it to the bed, that's it. After that it was simply a matter of some oops paint on the trim(that would be the red) and a bit of sanding once it dried. The white is simply the condition the door was in.
Built from Plan(s)
Estimated Cost
Free
Estimated Time Investment
An Hour or Two (0-2 Hours)
Finish Used
Oops paint and a quick sanding for the trim, years of aging for the main portion.
Recommended Skill Level
Starter Project
Comments

Mon, 10/31/2011 - 11:21
You always manage to crack me up.
And I'm really diggin' how the headboard turned out. Nice!
Mon, 10/31/2011 - 12:29
Super cool
That is one cool headboard (air quotes!) and a very unique piece. Sweet!

Small Table
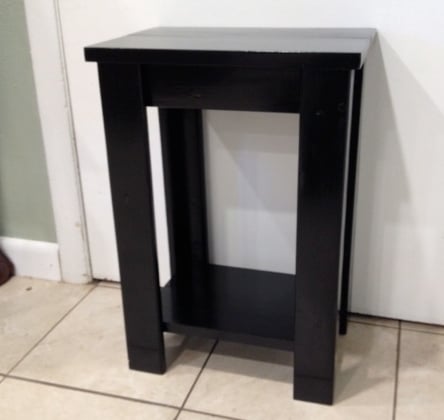
I made this little table for my sister-in-law. She needed a specific size to fit in between some bookshelves. She is going to put a lovely fish bowl on top. It cost me about $10 for the wood and paint. I modified Ana's plans for the "simple, cheap and easy console table" to fit the space.
Built from Plan(s)
Estimated Cost
$5 for lumber, about $10 total with other materials.
Estimated Time Investment
Afternoon Project (3-6 Hours)
Finish Used
I used Rustoleum Gloss Black paint/primer in one. Then I used minwax polycrylic.
Recommended Skill Level
Beginner
AG doll couch
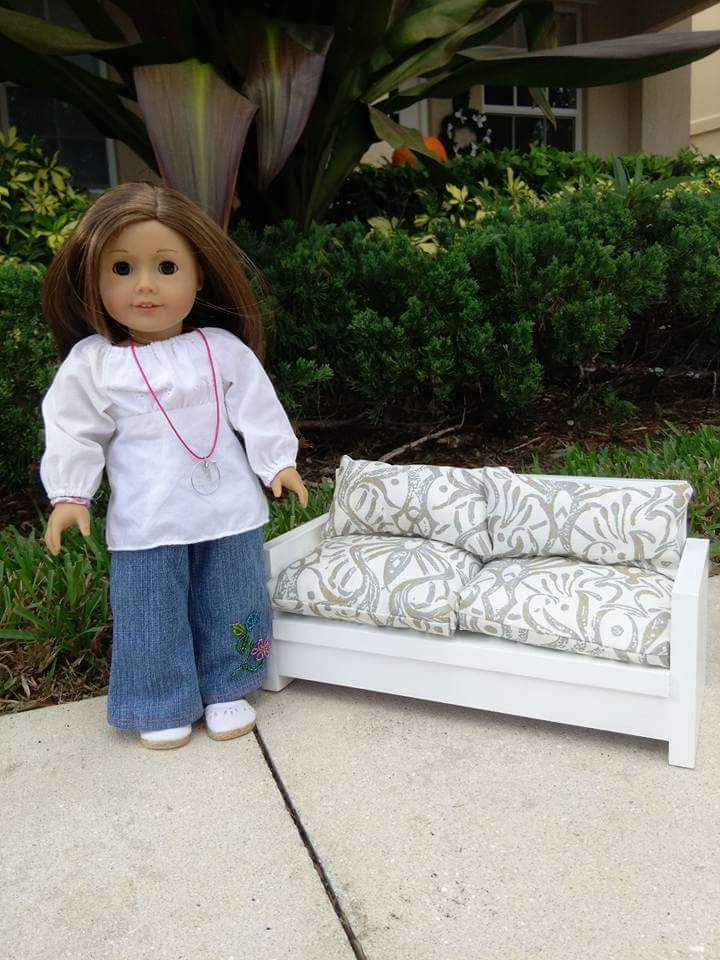
My very first Ana's project, I used the left over baseboards from our house remodel and the extra fabric from our tablecloth for the cushions. And first time using power tools and the kreg-jig I got for my birthday .
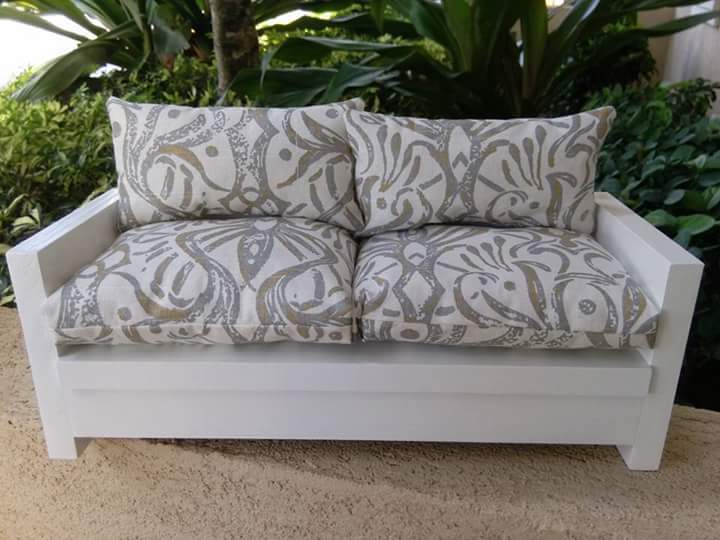

Built from Plan(s)
Estimated Cost
$0.00 all recycled materials
Finish Used
Semi-gloss white paint
Recommended Skill Level
Beginner
Comments
Rustic Desk
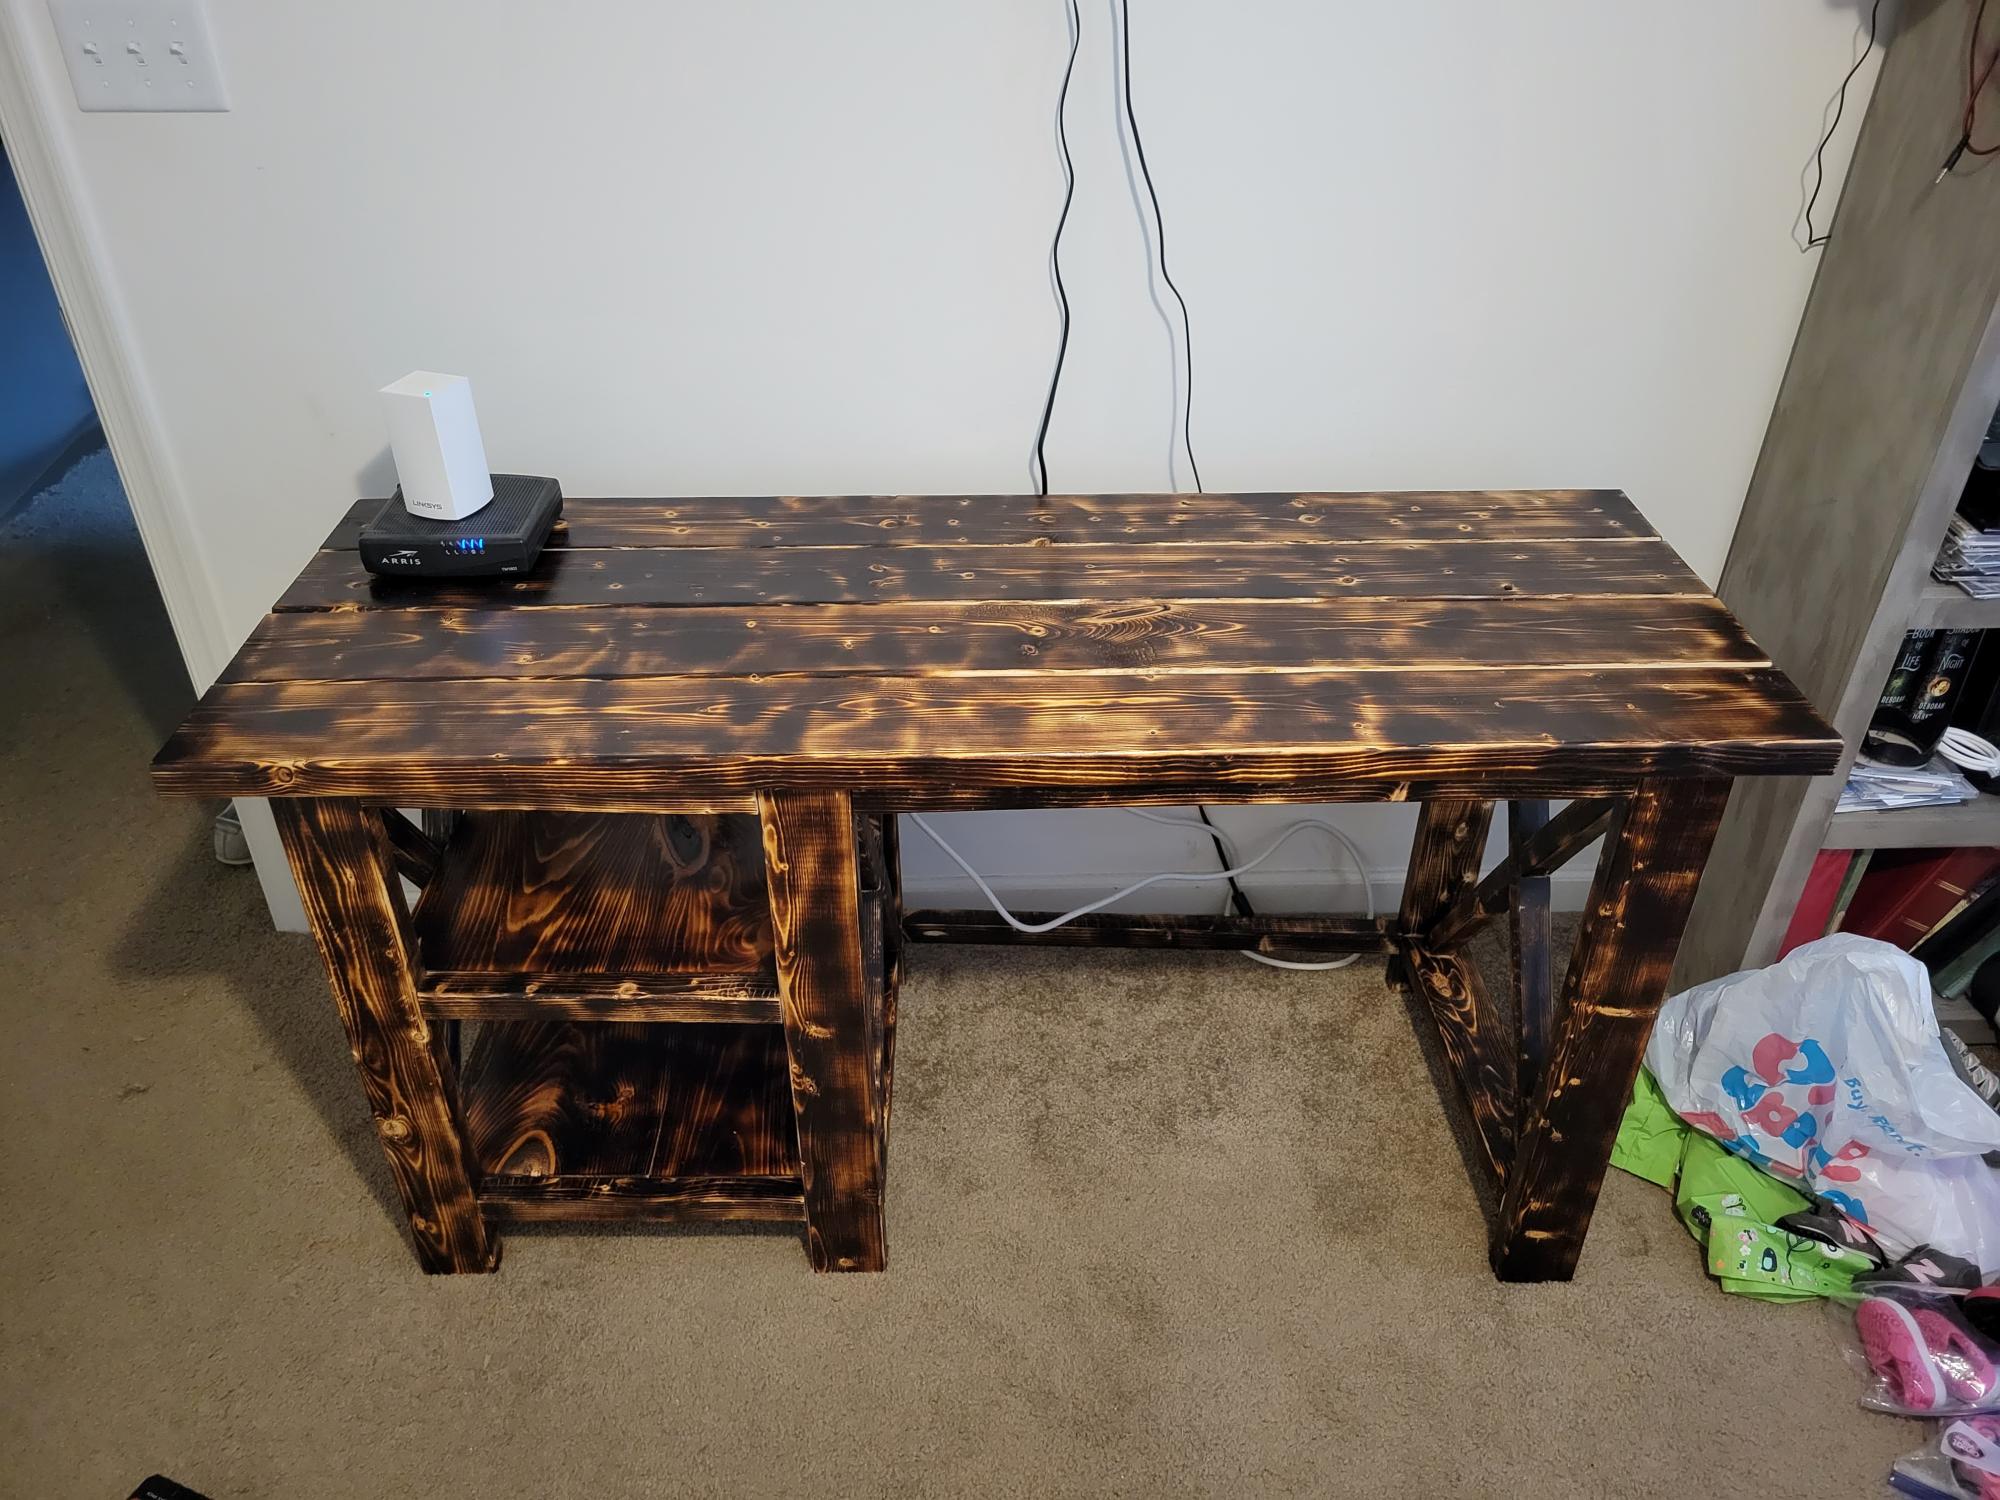
This was an easy project t to build. Decided to go out of my comfort zone and burn all of the wood before adding the finish. I loved the design of these plans and my aunt wants me to build one for her.
Built from Plan(s)
Comments
Fri, 02/24/2023 - 11:53
Great desk!
Looks fantastic, you're aunt will be happy with that! Thanks for sharing:)
Benjamin's Deck Chair
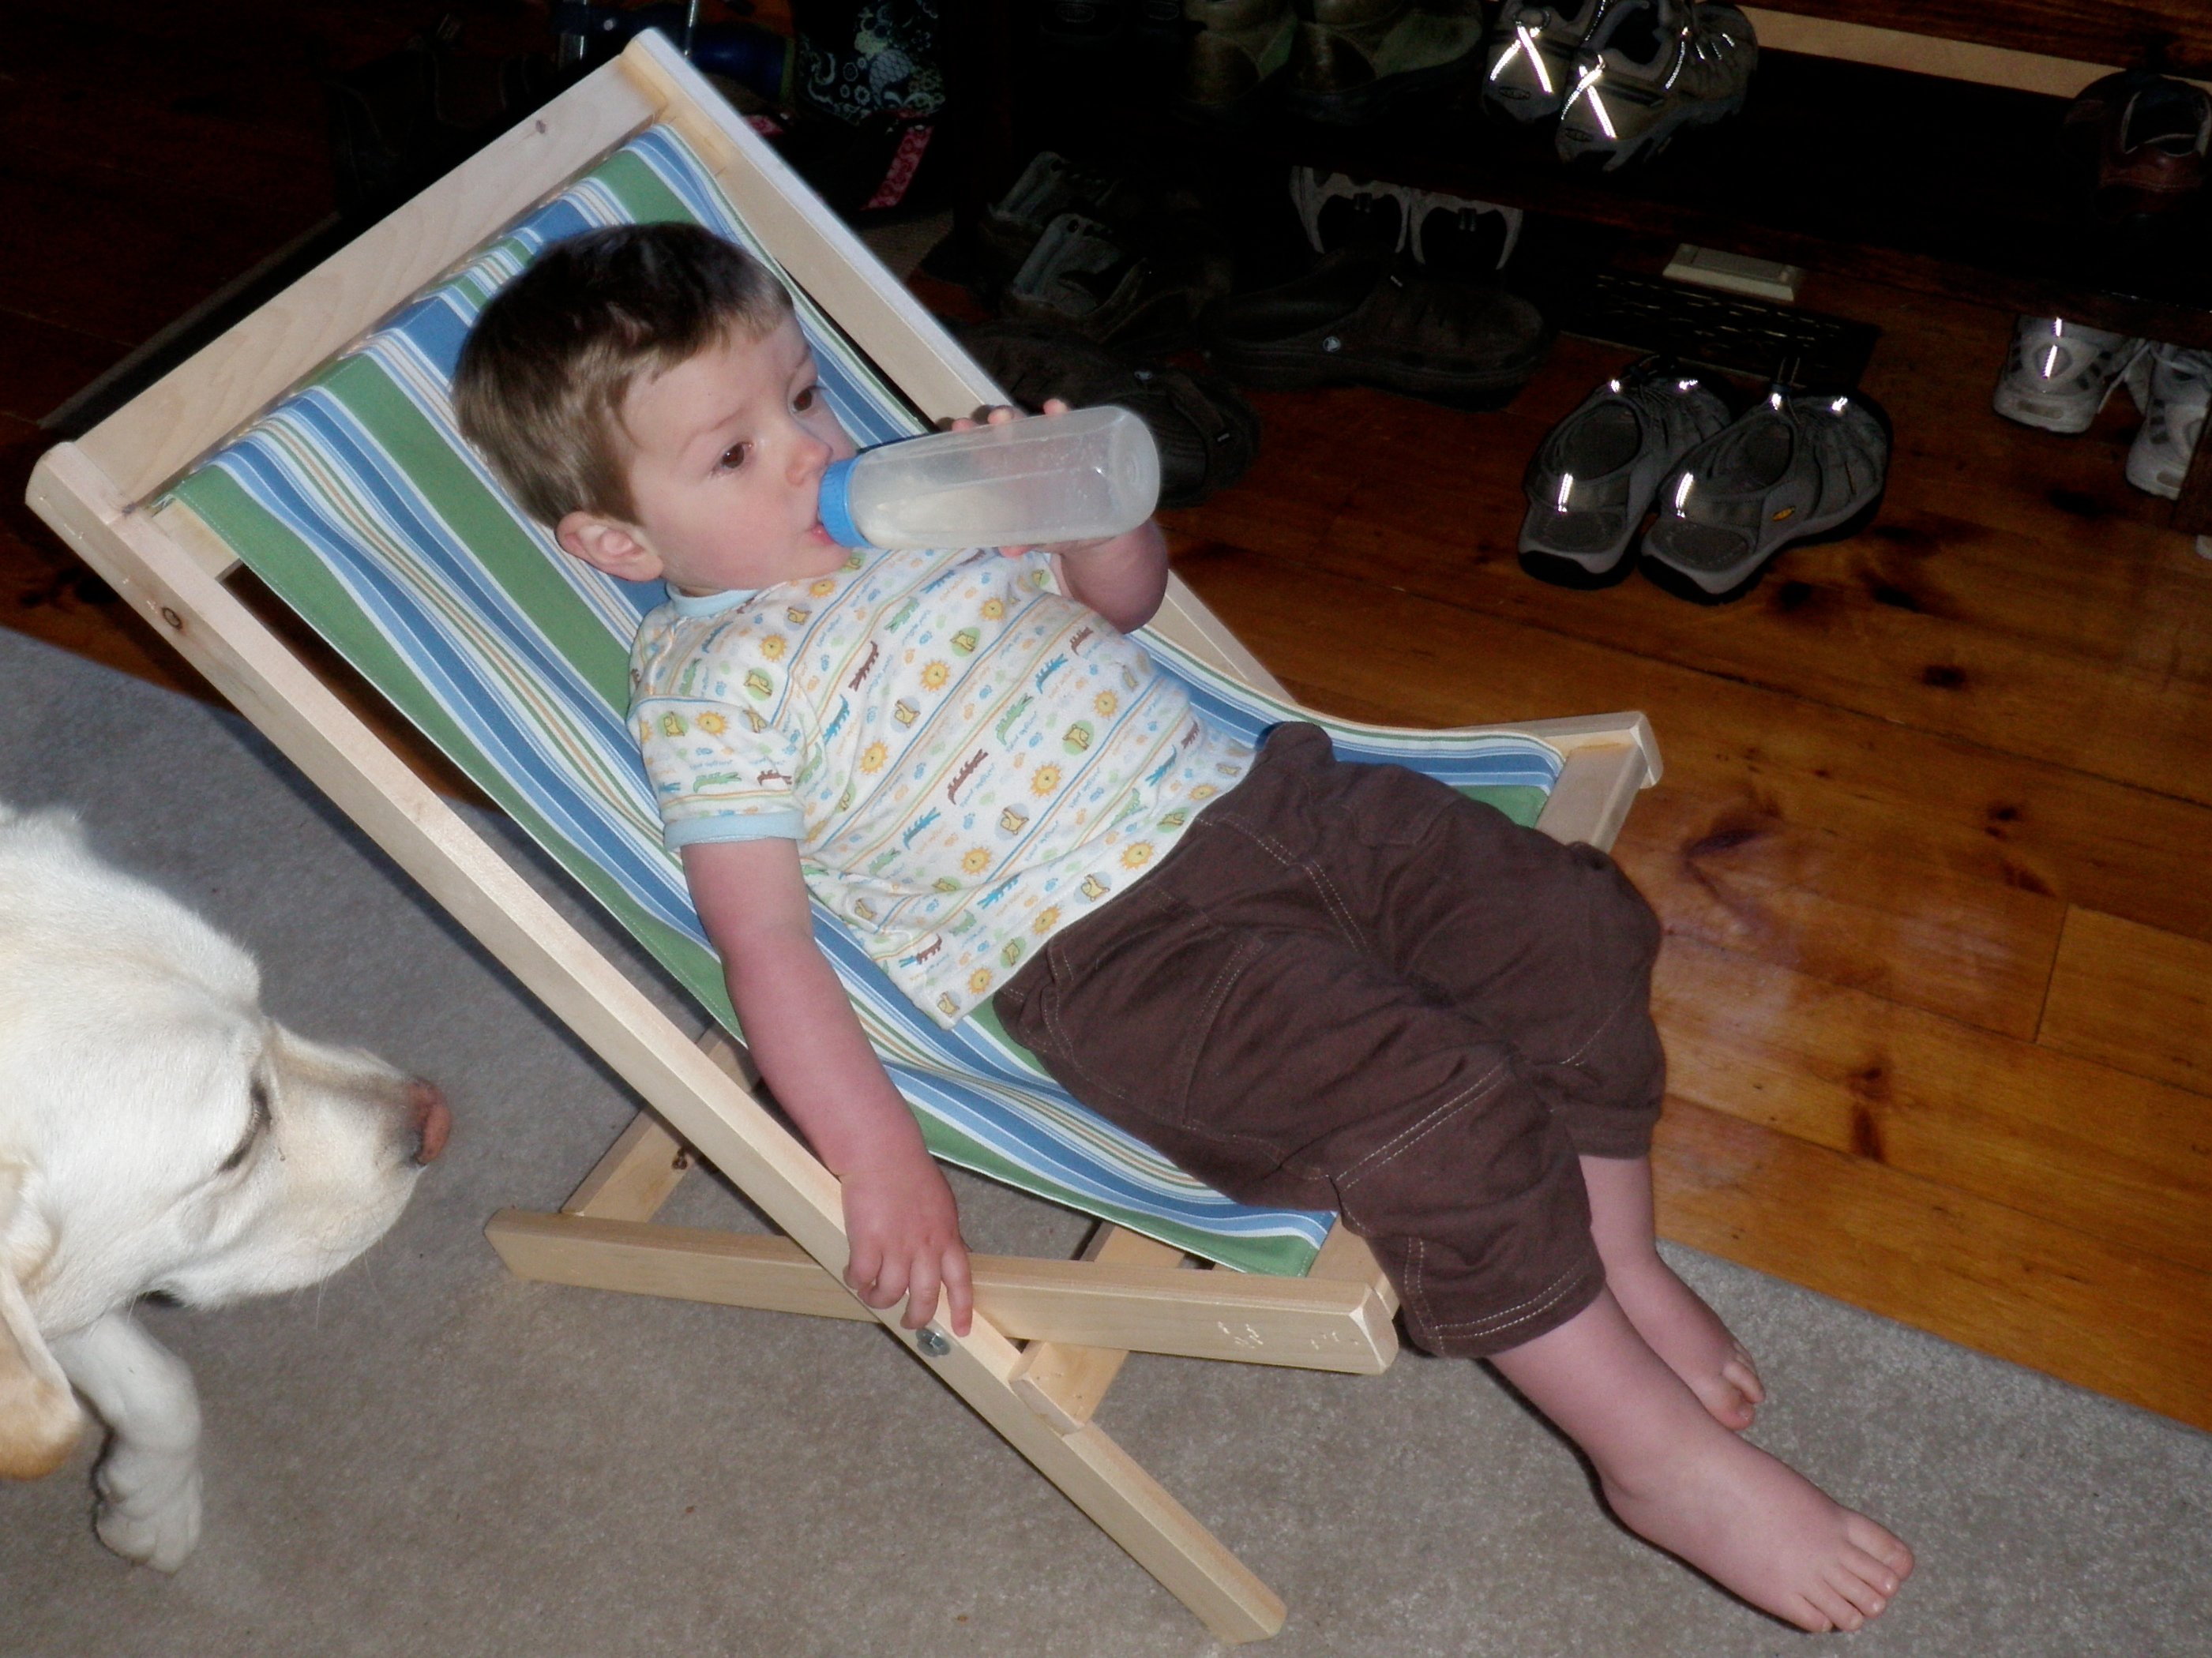
Built this for my 2 yr old son. It's adorable!
The only trouble we have is that when he climbs in it wants to tip forward, a weight or stake into the ground on the back cross brace would probably solve it.
Estimated Cost
Scraps!
Estimated Time Investment
An Hour or Two (0-2 Hours)
Recommended Skill Level
Starter Project
A Lovely Pair of Planters with Finials
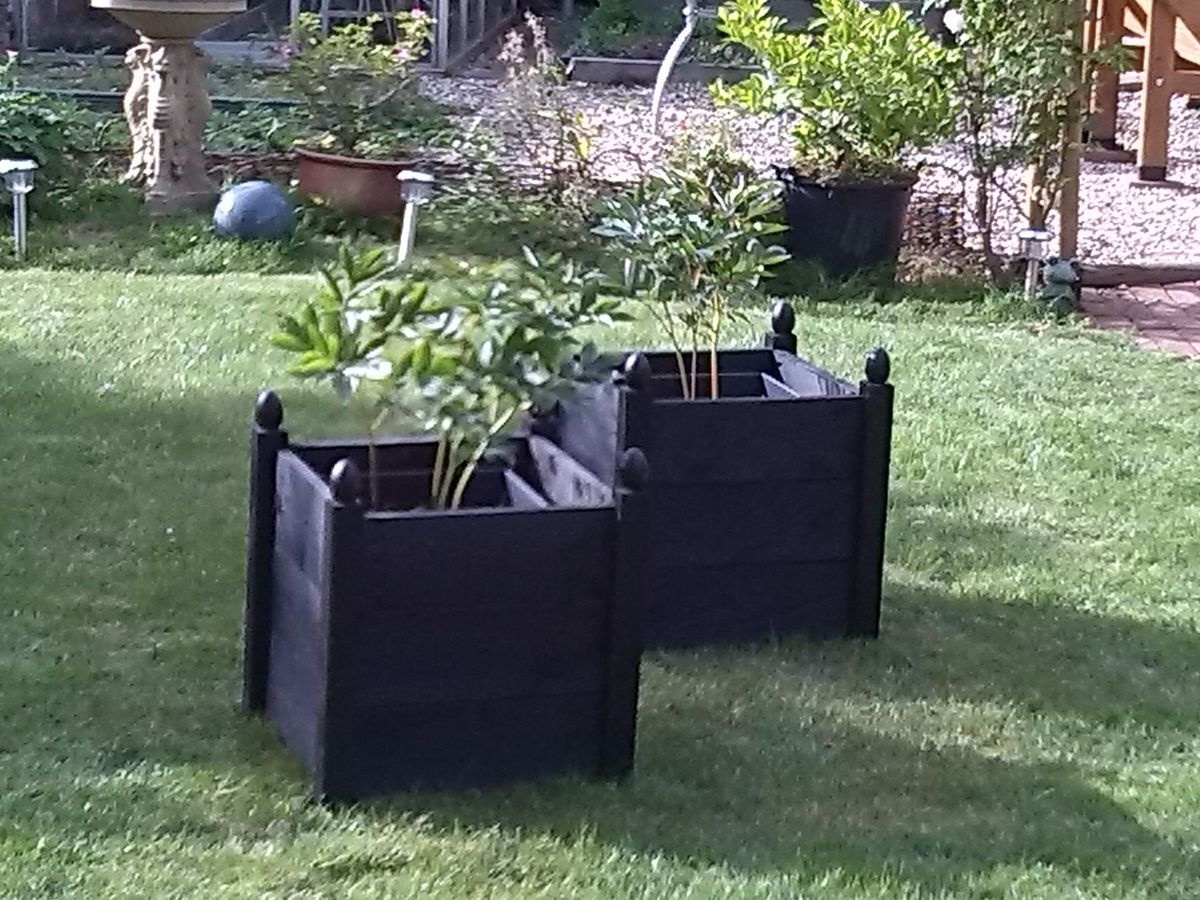
I wanted a fairly simple project to get started with, something I could make use of around my home and to help me get familiar with my new power tools - well, this project did the job nicely!
I'm extremely happy with the way the planters turned out and have already had other people asking me about them as they would like some too.
These planters worked out fairly expensive for me as the materials were extremely good quality and very heavy duty in size, I think I could get away with using slightly less robust materials to bring the costs down next time.
I had difficulty finding finials for the planters so I used some wooden turned eggs that I already had from my collection of pyrography blanks.
I can't wait for my next project now which will be a little more ambitious. I absolutely love Ana's website and can't wait to see what else I can make.
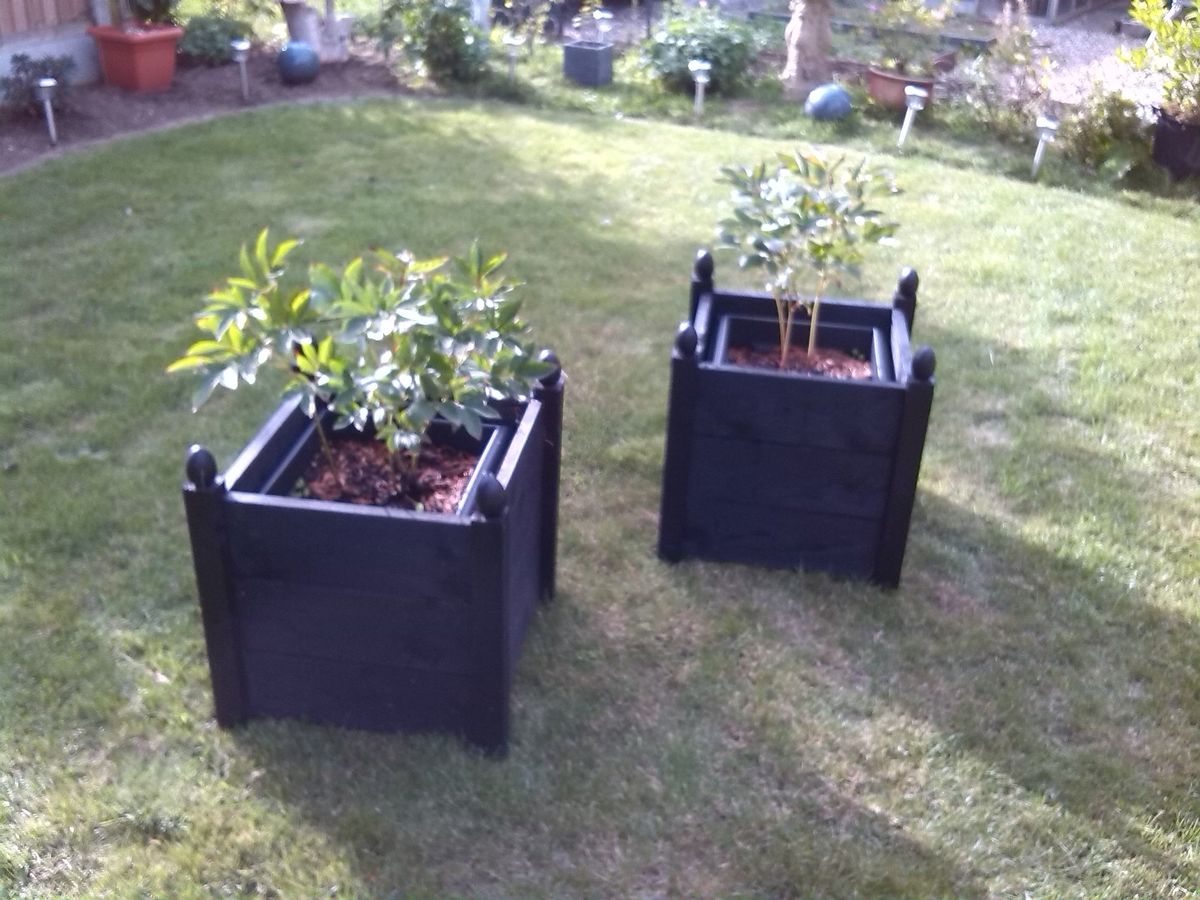
Built from Plan(s)
Estimated Cost
£80 a pair (UK)
Estimated Time Investment
Weekend Project (10-20 Hours)
Finish Used
Black Ash exterior wood paint from Culprinol.
Recommended Skill Level
Beginner
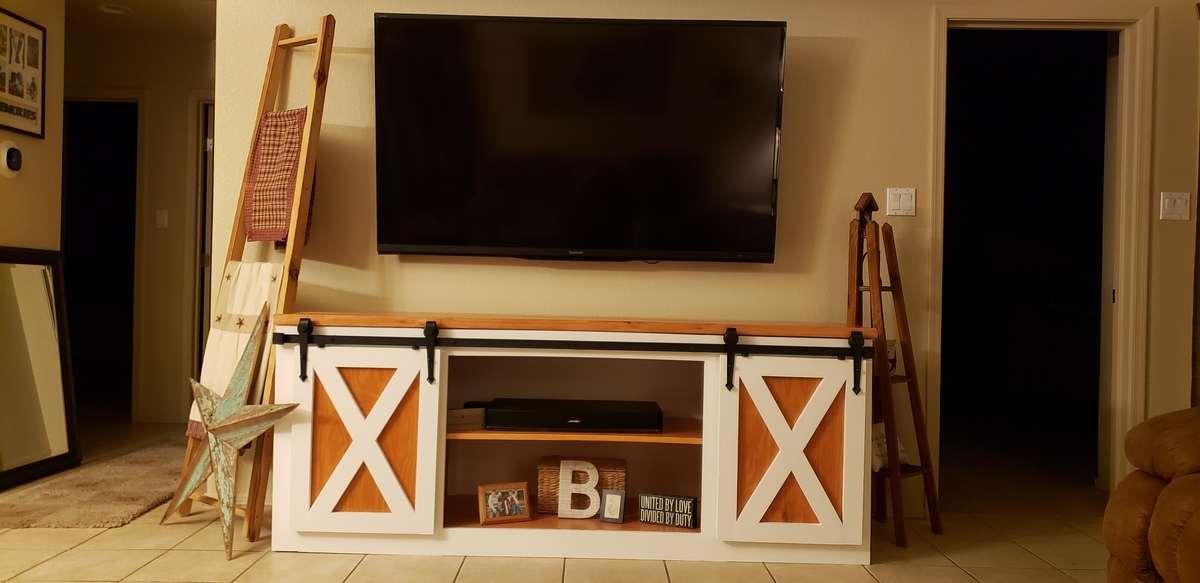
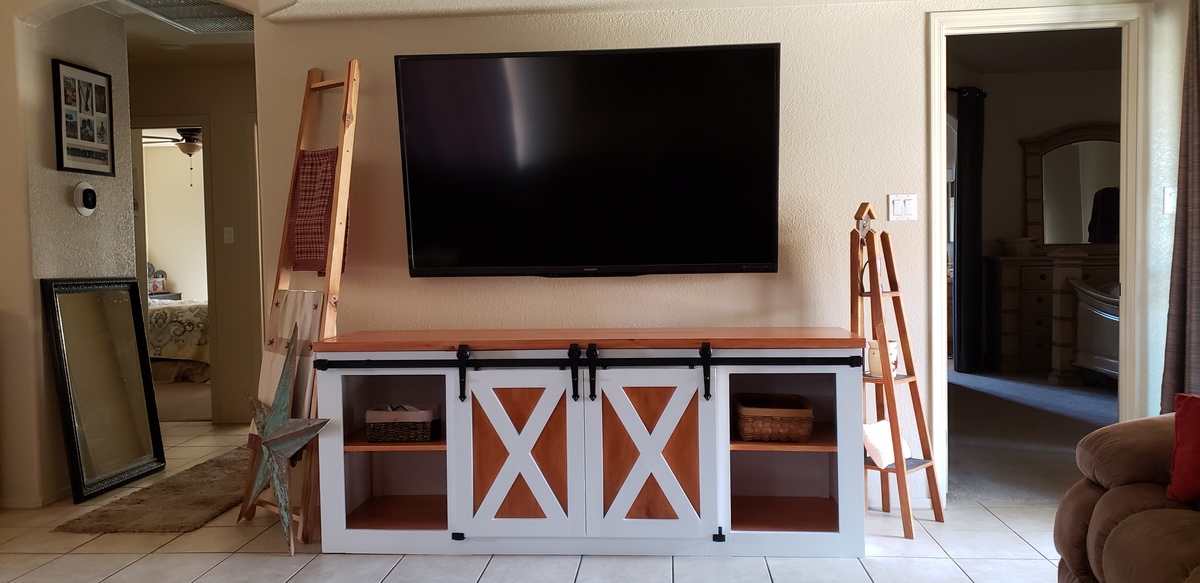
Entertainment Center
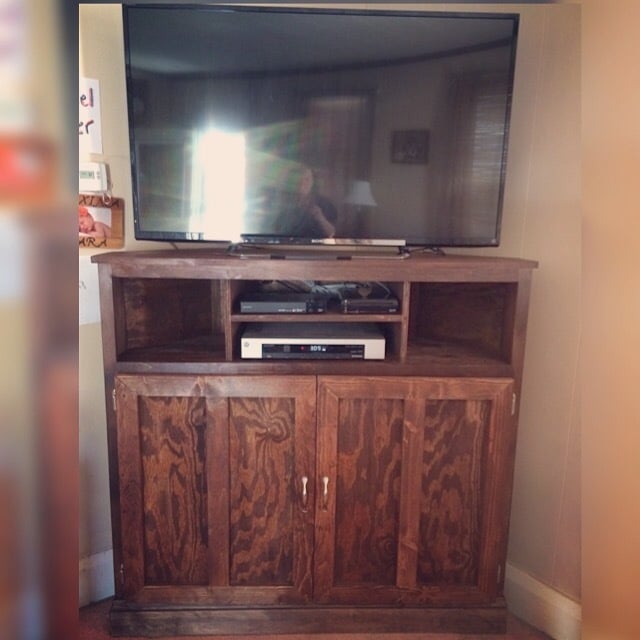
We had an oak armoire for our television and we needed to find something that fit our new 50" tv, an unexpected gift from my brother in law. This was perfect for the size we needed and the small space we had to put the tv.
Built from Plan(s)
Estimated Cost
$140
Estimated Time Investment
Weekend Project (10-20 Hours)
Finish Used
Stain and polyurethane
Recommended Skill Level
Intermediate
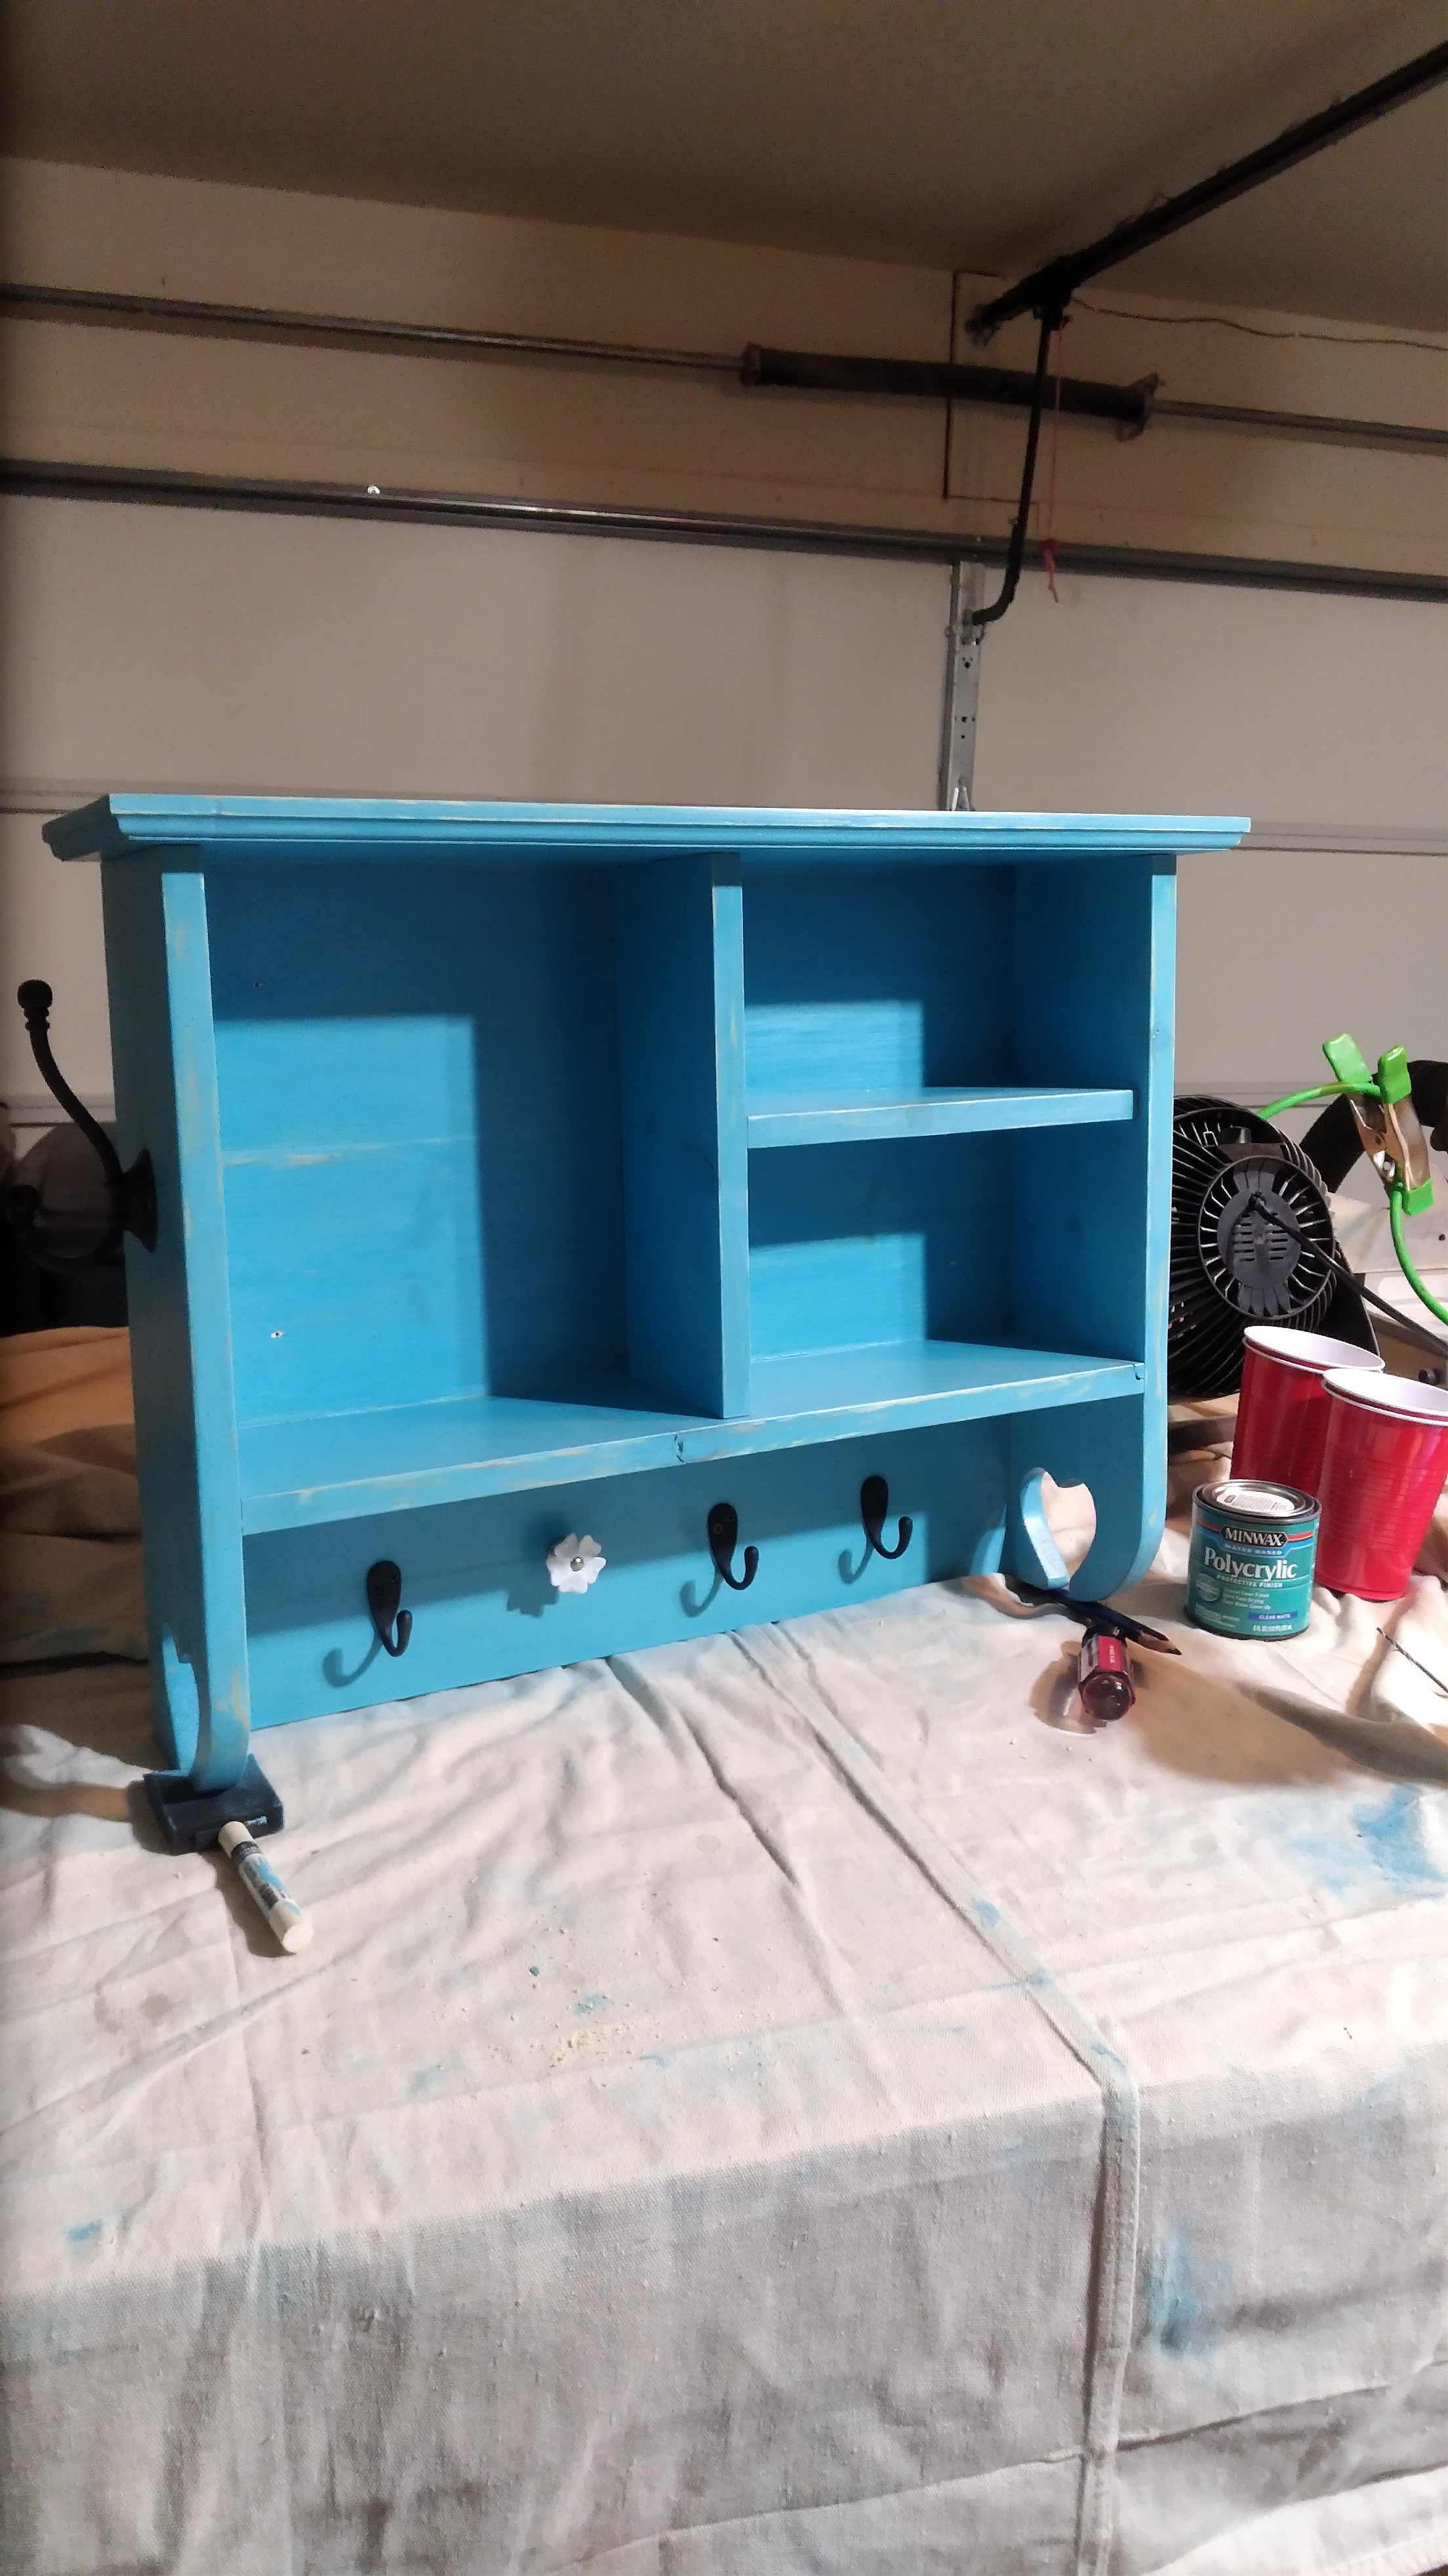
Bath wall storage shelf
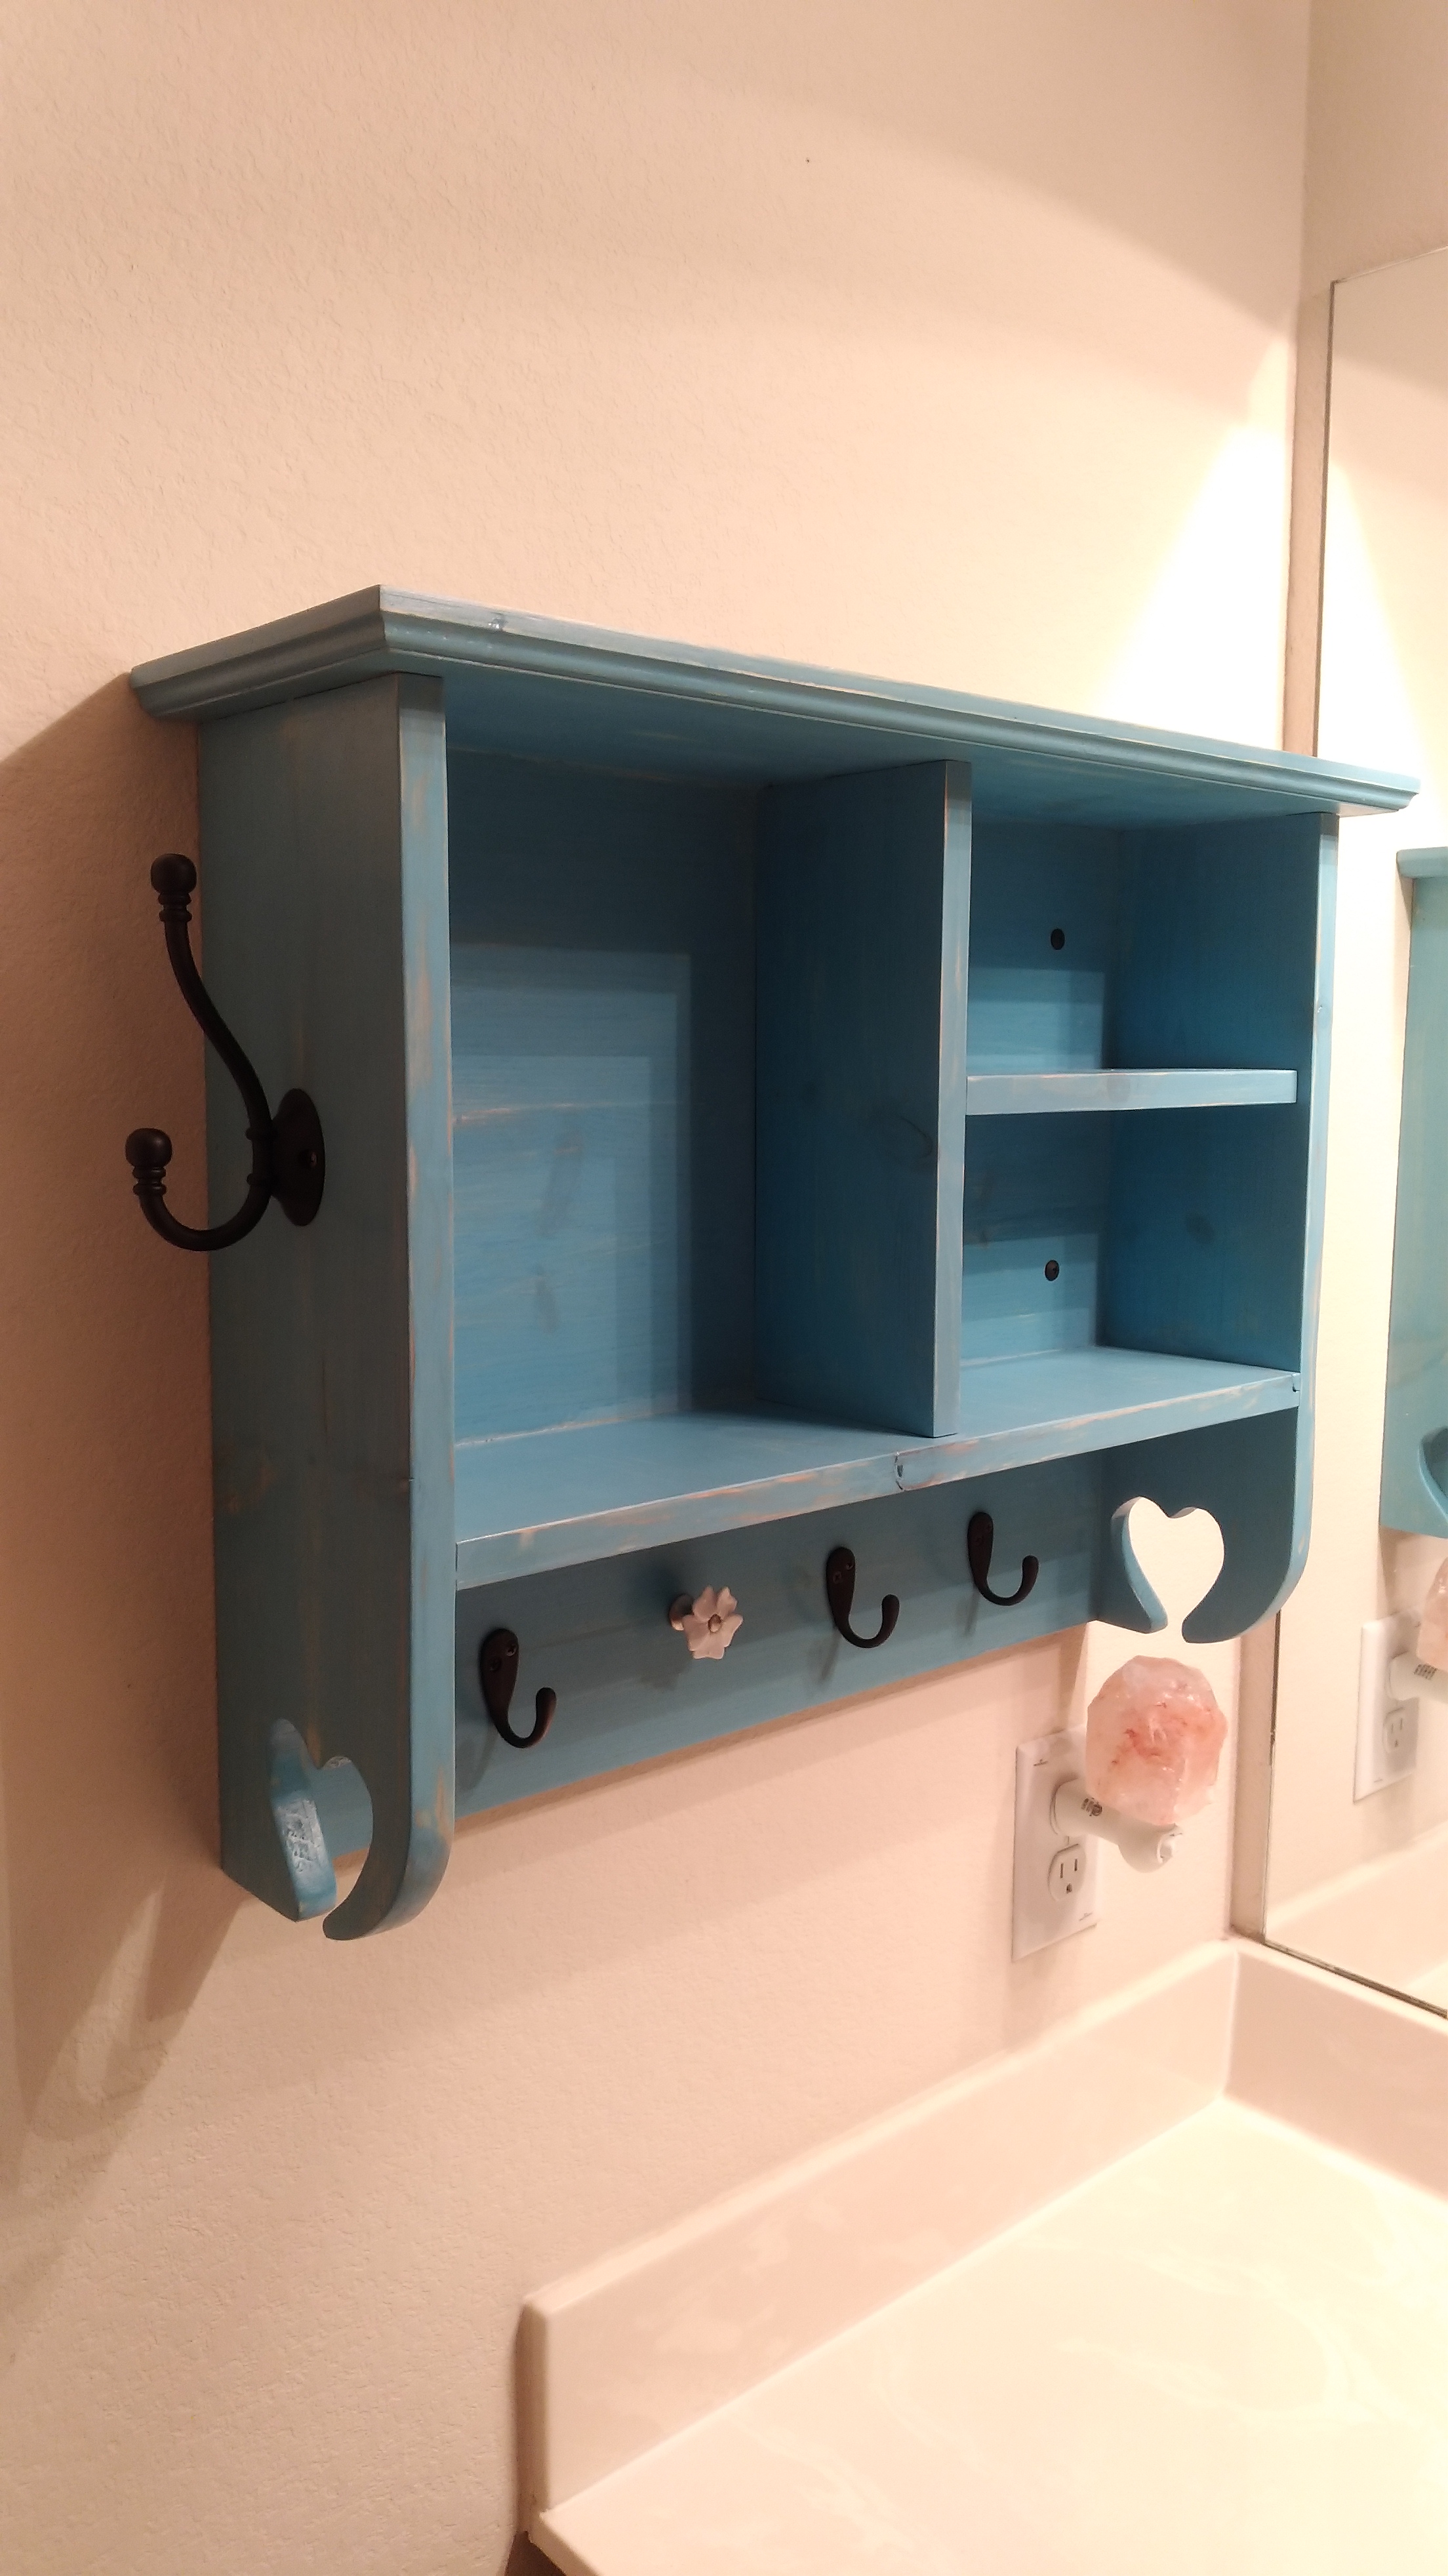
I liked the idea and my wife loved the outcome. Thanks Ana.

Built from Plan(s)
Estimated Cost
Didn't keep track. Sorry. Pretty cheap.
Estimated Time Investment
Weekend Project (10-20 Hours)
Finish Used
Antique blue I believe.
Recommended Skill Level
Beginner
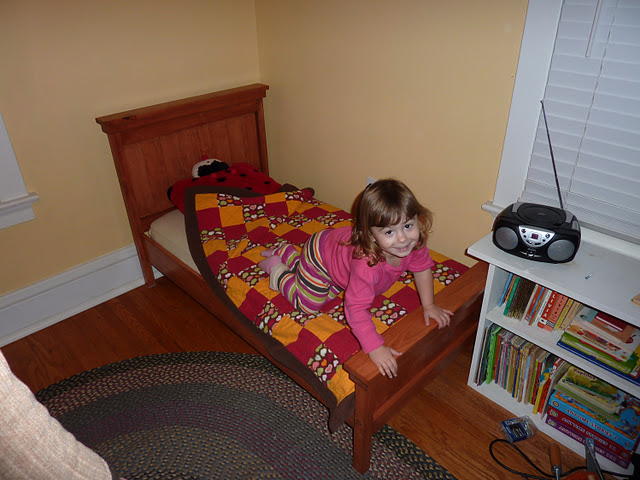
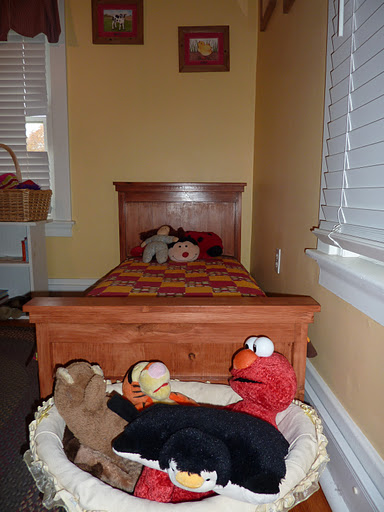
Bella's bed
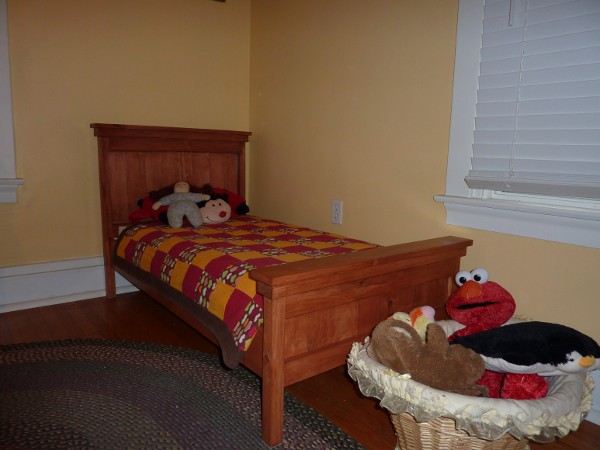
Since my daughter loves to climb and was starting to get a gleam in her eye when it was time to get up from her naps, the time had come to give her a big girl bed. I'm not ready for her to be in the twin bed that we have because it's so high off the ground, so the toddler farmhouse bed is perfect for her. We did have to edit the plans for our crib mattress
Built from Plan(s)
Estimated Cost
$70.00
Estimated Time Investment
Weekend Project (10-20 Hours)
Finish Used
Minwax water-based stain in Vermont Maple, 2 coats Minwax Polycrylic, final coat of paste wax
Recommended Skill Level
Beginner
Comments

Thu, 11/17/2011 - 01:02
So sorry for the tech
So sorry for the tech problems. I can't wait to see your toddler farmhouse bed! If you send me images I will upload to the post. Thank you so much for taking your time to submit a brag post. Ana
Knockoffwood(at)gmail.com

Sun, 04/14/2013 - 12:19
Dimensions
I've been looking to make a toddler bed for a friend and this is the perfect one. I like the headboard without the arch and I too need to be able to fit a crib mattress in it. Would you happen to have the dimensions that are needed for it to fit a crib mattress?
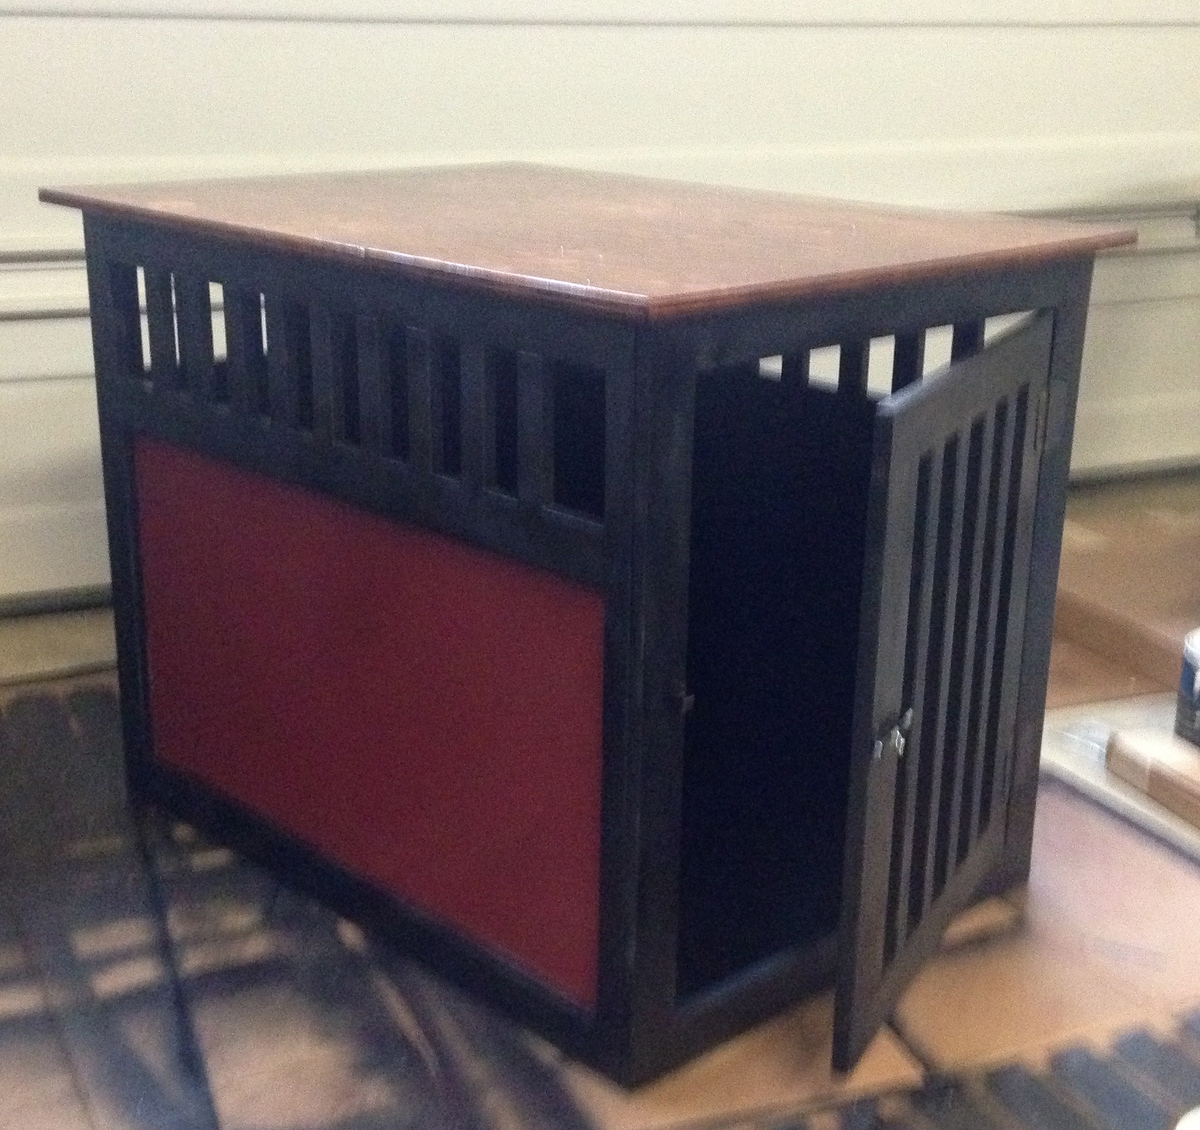
X-Large Dog Crate
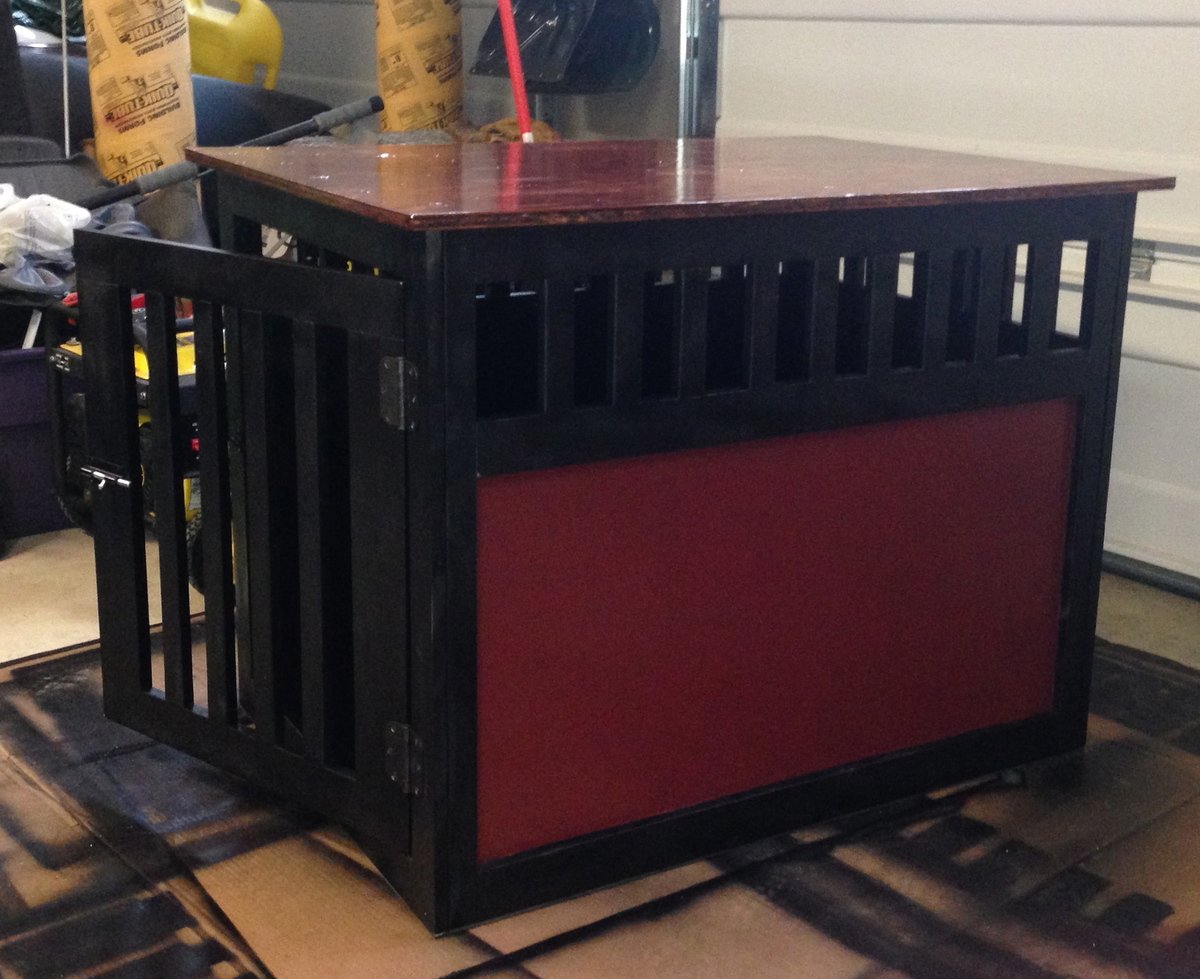
Found these plans for the dog crate and decided to build one for my large Rottweiler. It's large and tall enough for him to stand in (29"W x 41"L x 32.5"H). It didn't take long to cut and put all the pieces together, the longest part was staining the top and putting the urethane coating on it. The cost was really reasonable, I purchased the wood, used paint and stain I already had from previous projects. I plan on building more projects soon.
Built from Plan(s)
Estimated Cost
$50
Estimated Time Investment
Weekend Project (10-20 Hours)
Finish Used
Black spray paint on body and Maroon latex paint for accent panels. Stained the top.
Recommended Skill Level
Beginner
Comments
Mon, 12/09/2013 - 03:22
measurments
I would like to build the X large kennel for my dog.
is it possible to have the measurements for the X large version.
the large version is not big enough for my sweetie.
thank you so much
Mon, 12/09/2013 - 03:22
measurments
I would like to build the X large kennel for my dog.
is it possible to have the measurements for the X large version.
the large version is not big enough for my sweetie.
thank you so much
Wed, 04/02/2014 - 11:00
Wondering sizes of cuts as well
I want to build this for my Great Dane mix.. your dimensions would seem to fit the bill.. any chance you have a cut list handy?