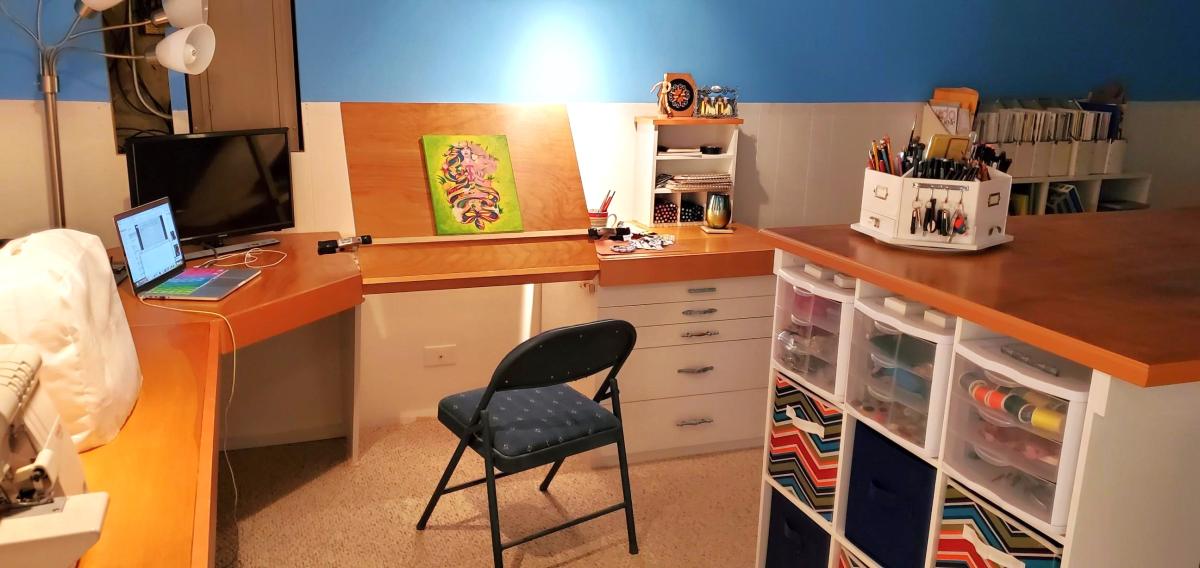
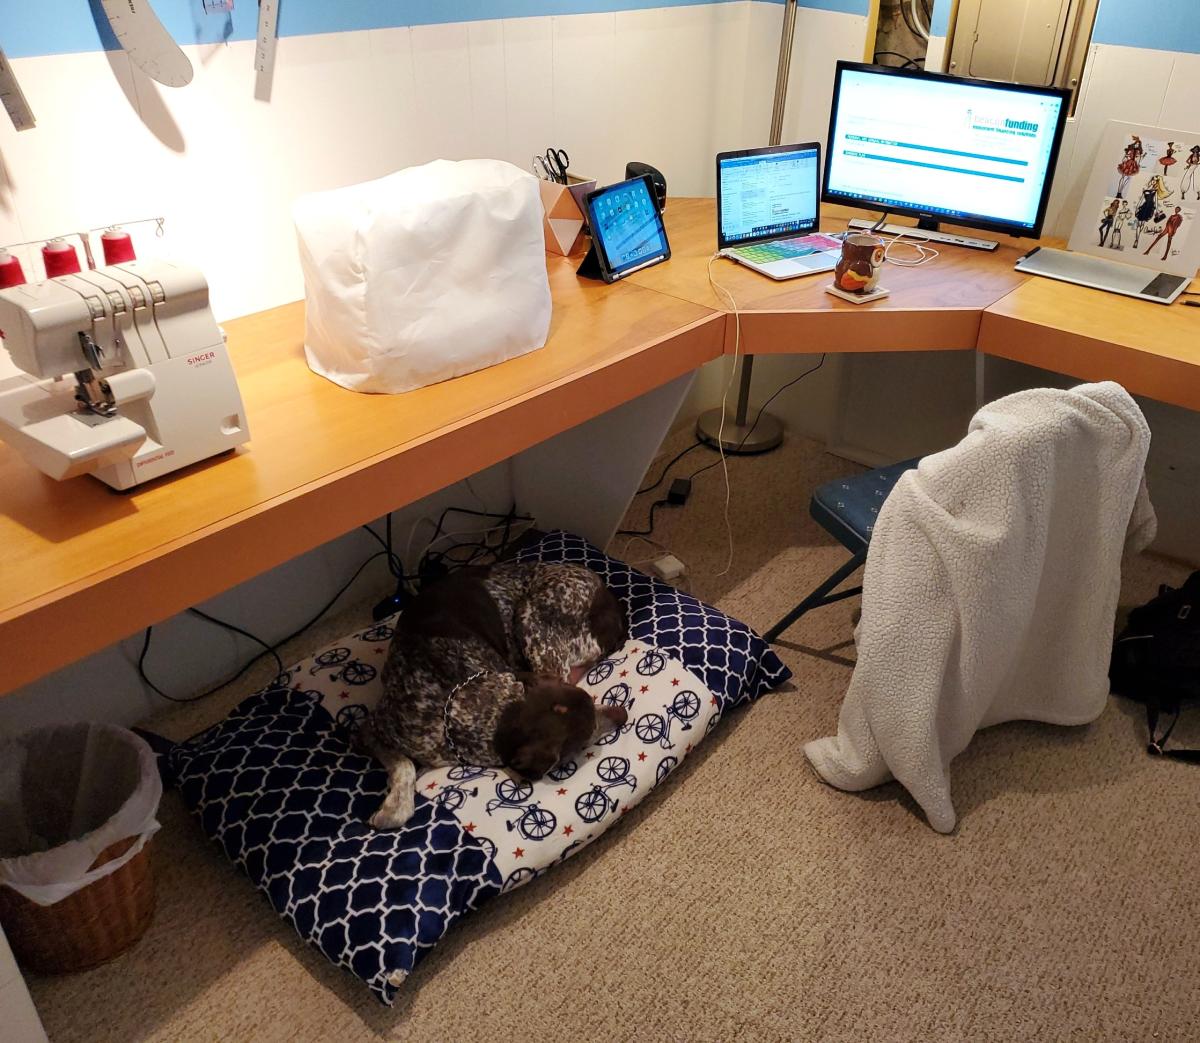
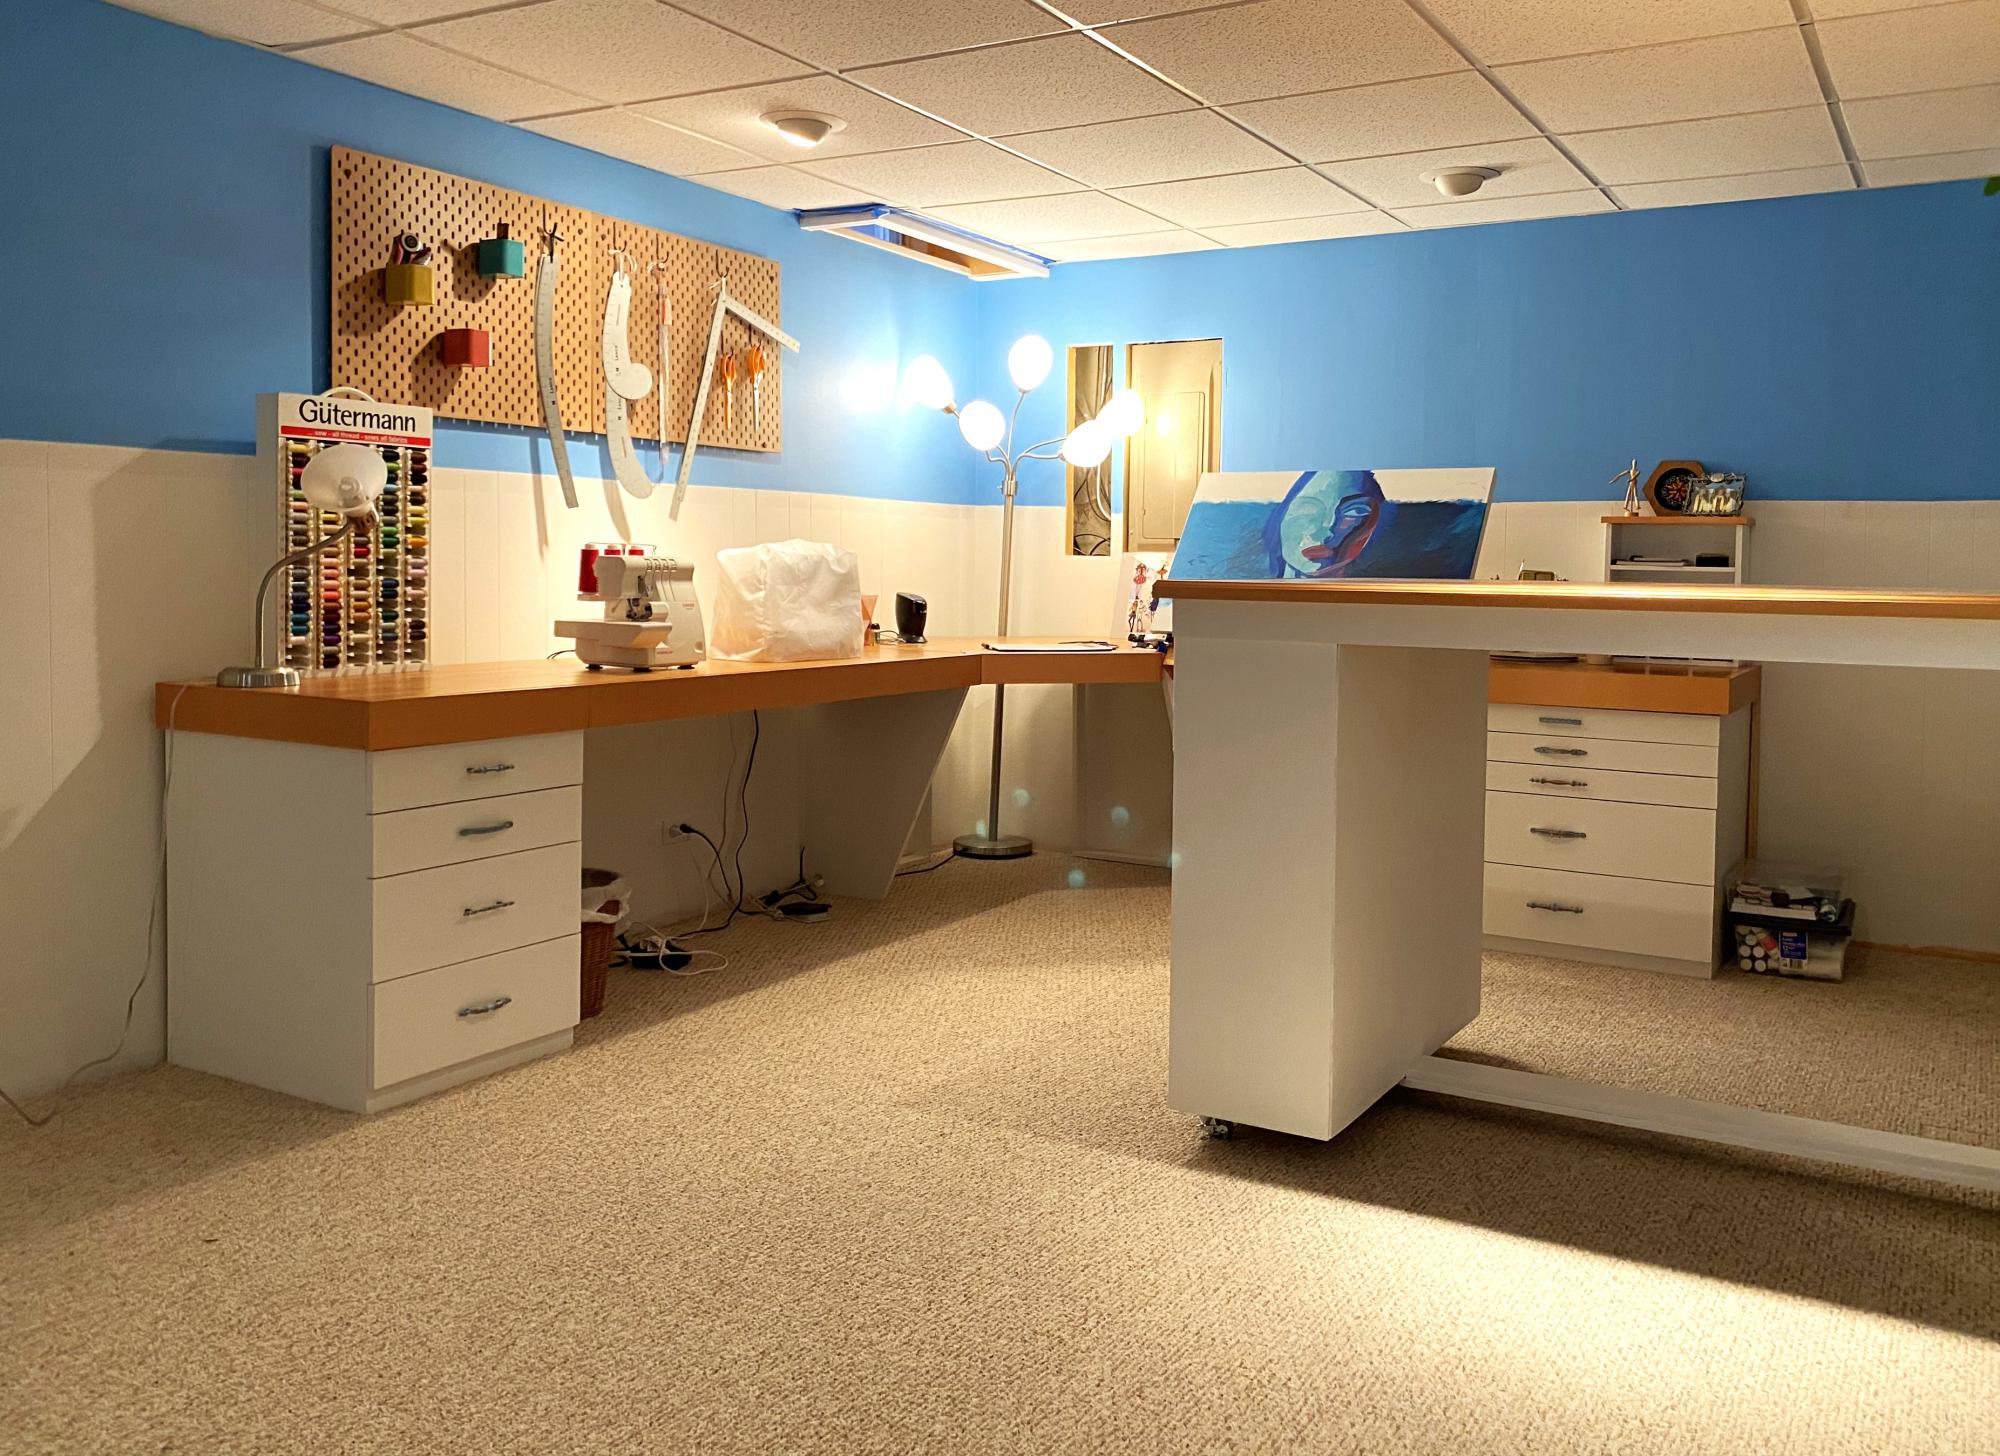
Community Brag Posts

Step-up Side Table

For my second-ever project, I built the step-up side table! It actually came together much faster than the "updated simplest console," which is listed as a starter project. However, I learned the importance of keeping square on this build!

I don't have a Kreg jig, so I followed the steps in a slightly different order since I couldn't do pocket holes. I also avoided ripping plywood to make 1x16s by using 1x12s instead. The dimensions fit my narrow space between two chairs better this way.

I LOVE this easy build and modern design. I'm pretty sure the cats are going to try to take it over, though. Thank you, Ana!

Built from Plan(s)
Estimated Cost
~$45 in lumber with lots of scrap
Estimated Time Investment
Day Project (6-9 Hours)
Finish Used
3 coats Valspar paint + primer already owned (custom mixed color), 2-3 coats Minwax gloss polycrylic (3rd coat only applied to horizontal surfaces and back)
Recommended Skill Level
Beginner

King Farmhouse Bed

I have loved this bed since I first saw it probably 8 years ago. Hubby finally got it built for me. It took him one weekend day. I was able to get the finishing done in a couple of days with plenty of dry time between coats of finish. Thank you Ana for this amazing plan!

Estimated Cost
$160
Estimated Time Investment
Weekend Project (10-20 Hours)
Finish Used
Primed wood with Kilz primer,
Painted with an oops off white color of Valspar High Gloss Enamel,
Glazed with a 1:1 mix of Valspar Clear mixing glaze and Minwax Gel Stain in Aged Oak,
Stained top boards in Minwax Gel Stain in Aged Oak
Recommended Skill Level
Beginner

Large Plant Caddy

Used cedar fence planks. These were pretty cheap at Home Depot. My husband wanted to use them for another project, but ended up not needing them. So instead of returning, I used them! I needed a caddy to hold a planter well over 150lbs. My husband and I had to load on a dolly to move around. It was made out of 2 planks and I added copper wheels (each wheel holds about 80lbs) from Lowe’s. I had a few extra planks, and made an herb window planter...I’ll post on that too!!

Estimated Cost
12
Estimated Time Investment
An Hour or Two (0-2 Hours)
Finish Used
Minwax- Sedona Red/ Totalboat Halcyon Clear Amber Gloss.
Recommended Skill Level
Beginner

Corner Garage Shelves - by Jared Starky

Submitted by Anonymous (not verified) on Thu, 08/15/2024 - 09:34

My son and I build these shelving units as a side hustle. We’ve built dozens over the past few years, this was a solo build this AM as he was working at his day job.

Tip: use clamps to hold the pieces of wood together before which put in the vertical supports.

Nice little corner unit.

Seasonal And Holiday

Double Camp Loft bed

I used the plans from the Camp Loft bed and adjusted to exactly what I needed. Two twin beds in a small bedroom without losing any floor space. I found the slide on craigslist while I was building this and it made the best addition. I also added a shelf along the base of one bed for the boys to have a play table and adds stability to the base of the bed to keep it from rocking.

Estimated Cost
200-250
Estimated Time Investment
Week Long Project (20 Hours or More)
Finish Used
I have not yet added the finish as I needed the beds up asap. I plan on spending a weekend when the kids are gone by simply adding a coat of poly.
Recommended Skill Level
Beginner

Comments

Lois (not verified)

Mon, 11/05/2012 - 17:38

Great Bed! Can I get the plans the way that they were modified? I am a beginner and definately need the step by step plans. This would be great for my nephew's!

Raye Lin (not verified)

Wed, 11/07/2012 - 14:09

I just made the first bed as the plans had. Instead of doing the stairs I just did an extra 2x4 across the legs so they can get up onto the platform. For the 2nd bed I followed the same instructions as the first but only doing one end and the rails (made a giant L) then flipped and screwed right into the side of the other bed. I used pocket holes all around so it went together very quickly.

Natali (not verified)

Wed, 11/07/2012 - 20:57

I really like this bed!my boys will love it! I am a beginner can I please get the plans and tell me how to make the bed with 5 feet high for more space
It will be my first time I can't wait. Thank you !

theprovocative…

Mon, 06/24/2013 - 10:36

I have scoured the web for this loft for my two youngest girls! As I am terribly untalented at drawing up plans PRETTY PRETTY PLEASE WITH SUGAR ON TOP make your adjusted plans available? I have until the end of next month to build this for my princesses birthday and I'm more than a touch frazzled that I cannot find these plans anywhere. Take pity on the less talented and please post your plans? Or email them? [email protected]

Thank a ton in advance!

SuperDaddy4

Mon, 12/08/2014 - 13:48

Great work with the modifications! Can you please share the new plans for the changes you made or let me know what exactly that you did to achieve the finished results. Thanks in advanced!

SuperDaddy4

Mon, 12/08/2014 - 13:48

Great work with the modifications! Can you please share the new plans for the changes you made or let me know what exactly that you did to achieve the finished results. Thanks in advanced!

mideastmom

Thu, 06/30/2016 - 20:16

I know it's been a while, but if you would share your finished plans, that would be great. We have the original camp loft, bought from someone else who built it, and we'd like to modify it to be an L-shape loft.

Simplest Armoire as a pantry cabinet

Submitted by aklab on Sat, 08/23/2014 - 19:45

Used the simplest armoire plans -- great plans and relatively simple for a first-timer like me. Chalkboard paint on the doors made it fun for the kids!

Built from Plan(s)
Estimated Cost
$100 including lumber, paint and hardware.
Estimated Time Investment
Weekend Project (10-20 Hours)
Finish Used
glossy white latex paint and chalkboard paint
Recommended Skill Level
Beginner

Grandson toy box

Submitted by joker16417 on Sun, 12/11/2016 - 15:25

I used the plans from this site with just a couple changes but the idea came from this plan here 

Built from Plan(s)
Estimated Cost
$110
Estimated Time Investment
Weekend Project (10-20 Hours)
Finish Used
Gliddon paints and wall decals
Recommended Skill Level
Intermediate

Outdoor loveseat

Submitted by Anonymous (not verified) on Mon, 08/24/2020 - 17:43

Just wanted a nice looking bench to seat at the porch! This turned out great!

Built from Plan(s)
Finish Used
Special Walnut and oil based polyurethane

Laundry Dresser

Submitted by Tina Barta on Fri, 11/09/2012 - 01:20

My very first build inspired by the Ana-White.com website. I would declare this as a success. Decided to make two laundry drawers and keep the bottom open for extra supplies. Perfect for our household.

Estimated Time Investment
Weekend Project (10-20 Hours)
Finish Used
Primer Zinsser 1-2-3, leftover paint sitting around in garage.
Recommended Skill Level
Starter Project

Saddle Seat Stools

Submitted by naomi on Fri, 08/29/2014 - 06:57

After a lot of cutting, screwing, chiseling and sanding... oh and a lick of paint! My new little Saddle Seat Stools are complete. Time will only tell whether they will hold up to the abuse the boys give them especially Brodie! These new stools only cost me $48 to make the pair and I got all the timber from Bunnings

Built from Plan(s)
Estimated Cost
$48
Estimated Time Investment
Weekend Project (10-20 Hours)
Finish Used
Teak and White Enamel Paint
Recommended Skill Level
Beginner

Dollhouse

Submitted by Anonymous (not verified) on Thu, 12/15/2016 - 11:31

When my daughter was born I promised that I would make her a dollhouse. A few weeks ago I found these plans, and absolutely loved the visual layout of the rooms. I stuck with this layout and tweeked the dimensions according to what worked best for the space it would proudly sit in. It is 46 inches high and 31 inches wide at the walls, and is made from 12 inch wide MDF which I primed with a latex primer and then finished off with a semi-gloss white on the majority of the walls. I also mixed the colors for the roof and also the 3 accent walls to give it an extra wee shot of color. 
I was very, very happy with the end result, and haviong caught what I now know as the "dollhouse bug" I though "what about if I added a chimney ?". So I added it. I then thought what about adding a roof ridge and something to cover my dodgy gable on the roof front . The house looked even better. Progressing onto full-blown "dollhouse-flu",  I then decided to make a chair for what would later be the living room. That was it, fully addicted now I couldn't stop and found myself obsessively planning, designing, messing up, re-designing, cutting, building and painting until I reached the point where last night I attended my first "DA" meeting. 
I found Dollhouse Annonymous very helpful and although not cured, I realise that it is perfectly acceptable for a 44 year old Scotsman to build a dollhouse for the daughter (naughty 2 1/2 year old daughter) that is the love of his life. If she is happy when she unwraps it on Christmas morning, then all of the work shall be worth it. 
This site is top of my bookmark list and I love it. !

Built from Plan(s)
Estimated Cost
$90
Estimated Time Investment
Week Long Project (20 Hours or More)
Recommended Skill Level
Beginner

Loft Bed w/desk

Submitted by Anonymous (not verified) on Sat, 08/29/2020 - 09:05

Our daughter has been asking us to build her a bed for months now. When eLearning became a reality for our household, we knew it was time to get to work. We usually do two to three big DIY projects a year, and have built from many of Ana White's plans. We often refer our the time together DIYing as "couples therapy".

We used Ana's plans for the Loft Bed and included the tall bookcase and desk system, with a few of our own modifiations and personal touches, such as:
- elimated the plywood backing on the bottom shelves of the tall bookcase
- only used one (1) bookshelf for desk system
- used toungue and groove paneling for back of small bookshelf, adding it to the sides as well
- made the desktop 19" wide
- added a framed magnet board
- added a sliding keyboard tray

Estimated Cost
$600
Estimated Time Investment
Week Long Project (20 Hours or More)
Finish Used
Desktop: Minwax Ebony stain
Everything Else: Zinsser 123 primer & Valspar Cabinet & Furniture Enamel (Snowbound Semigloss)
Recommended Skill Level
Beginner

Comments

Ana White Admin

Mon, 09/07/2020 - 20:33

This is so cool, I'm sure it's a dream come true for your lucky girl!

Building is our couples therapy, sounds like a t-shirt in the making:)

2 Bunk Shared Bedroom

Submitted by Anonymous (not verified) on Fri, 08/23/2024 - 11:08

Old bunk beds were only ¾ width and dark brown. So the room was dingy. Really like how these turned out. I painted the underside of the top bunk white to keep it lighter. Thanks for the plans!

Karen

Built from Plan(s)

Narrow end table

I adjusted the dimensions to fit my space and added a shelf on the bottom. I built it using my Kreg Jig.

Built from Plan(s)
Estimated Time Investment
An Hour or Two (0-2 Hours)
Finish Used
I stained the end table and then polyurethaned over the stain.
Recommended Skill Level
Beginner

Benchright Round End Tables

Submitted by DWL on Sat, 08/30/2014 - 21:06

This project was a challenge because of the instructions regarding the "recommended" pocket holes for the aprons. I soon realized you can't put a 3/4 pocket hole on a 45 degree mitred edge, and when I adjusted the depth of the pocket hole, I could not for the life of me screw it into the legs without the apron getting sucked past the edge of the legs. I ended up putting the pocket screws on the outside which I know is a major faux pas for wood workers, but because I used Kreg wood plugs and painted it, you can't see the little ovals where the screws are.

The photos are just for scale. The little girl is a big 2 1/2 year old, and the dog is not a St. Bernard.

We love the table and it works great for baby brother's room.

Thank you Ana for another great project!

Built from Plan(s)
Estimated Cost
$50
Estimated Time Investment
Day Project (6-9 Hours)
Finish Used
Gripper primer and Semi-gloss paint
Recommended Skill Level
Beginner

Truss Beam Table 35x60 size

Submitted by mlatanzi on Sun, 12/18/2016 - 22:12

Truss Beam Table size 35x60

Built from Plan(s)
Estimated Cost
$100-$150
Estimated Time Investment
Weekend Project (10-20 Hours)
Finish Used
Minwax Dark Walnut, Spar Urethane Ultimate
Recommended Skill Level
Intermediate

Cedar Planters

Submitted by ajmorfeld on Mon, 08/31/2020 - 15:03

Very easy fun build. I laid out the fence boards and marked the 5 degree angle but cut them with a miter saw as I was not confident to use the hand saw. Also numbered each section to easily put the sections back together. Miter saw was set to 5 degree angle also. I initially built with 7 boards and then took off two of them as it was really tall.

Estimated Cost
40.00
Estimated Time Investment
Afternoon Project (3-6 Hours)
Finish Used
Behr solid stain in Cordova Brown
Recommended Skill Level
Beginner

Farmhouse Bedside Table

For the 7 years I have been married to my lovely wife we have used an old 70's bedside table and some Rubbermaid boxes as our nightstands. It was time to give my wife a nightstand that she would love. With the help of the Kreg Jig, a new table saw and some trials and tribulations in staining, I have given her a special treat. Best part: She loves them!

Built from Plan(s)
Estimated Time Investment
Week Long Project (20 Hours or More)
Recommended Skill Level
Beginner

Comments

Jake

Tue, 11/20/2012 - 02:11

You did a great job on the night stands. What did you use for the legs? They look like 2x2s but where did you get them?

Scott Kershaw

Wed, 01/02/2013 - 01:47

Funny enough the legs are ripped down to 2x2's but they started as 2x3's. The 2x3's were cheaper at my local big box joint. What was nice about ripping them down on the table saw was that I could get a nice square edge on everything unlike just throwing a off-the-shelf 2x2 on there with their inconsistent rounded edges.

Home Depot DIH Workshop Rolling Storage Cart

So I went to the DIH Workshop held at my local Home Depot and finished my cart over the weekend. I had the guy at HD cut my plywood down, won't make that mistake again. He made each one about a inch shorter than I asked for so I had to make my adjustments for everything else based on that. Next time I will take a tape measure with me to make sure instead of lugging everything to my car, taking it home and then measuring.

All-in-all I like the way it came out even with the minor adjustments still a fantastic cart.

Estimated Cost
$52
Estimated Time Investment
Weekend Project (10-20 Hours)
Finish Used
Olympic Paint Gold
Recommended Skill Level
Beginner
Back