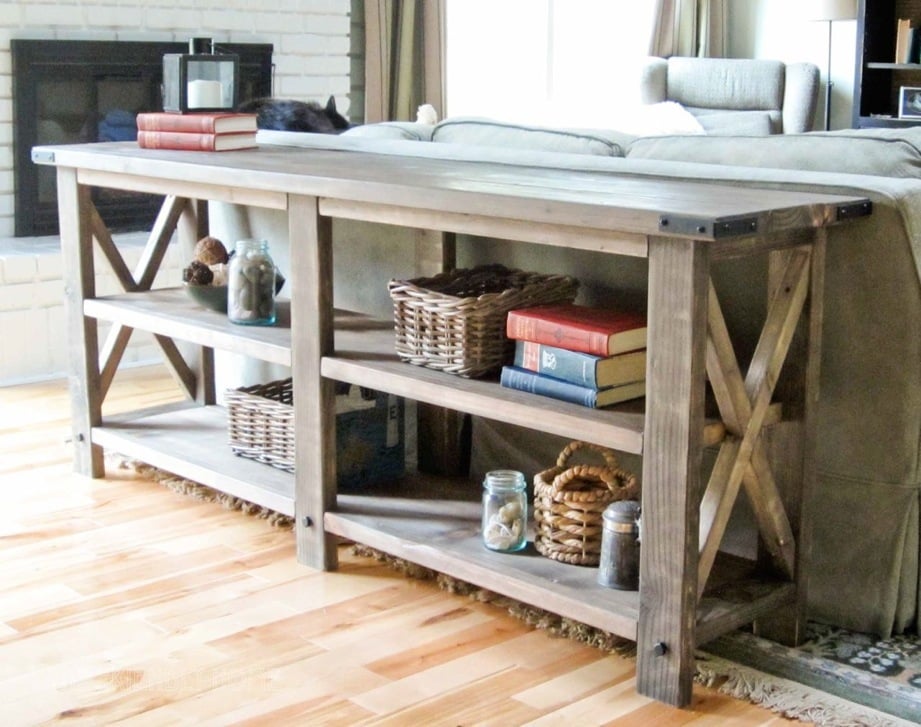


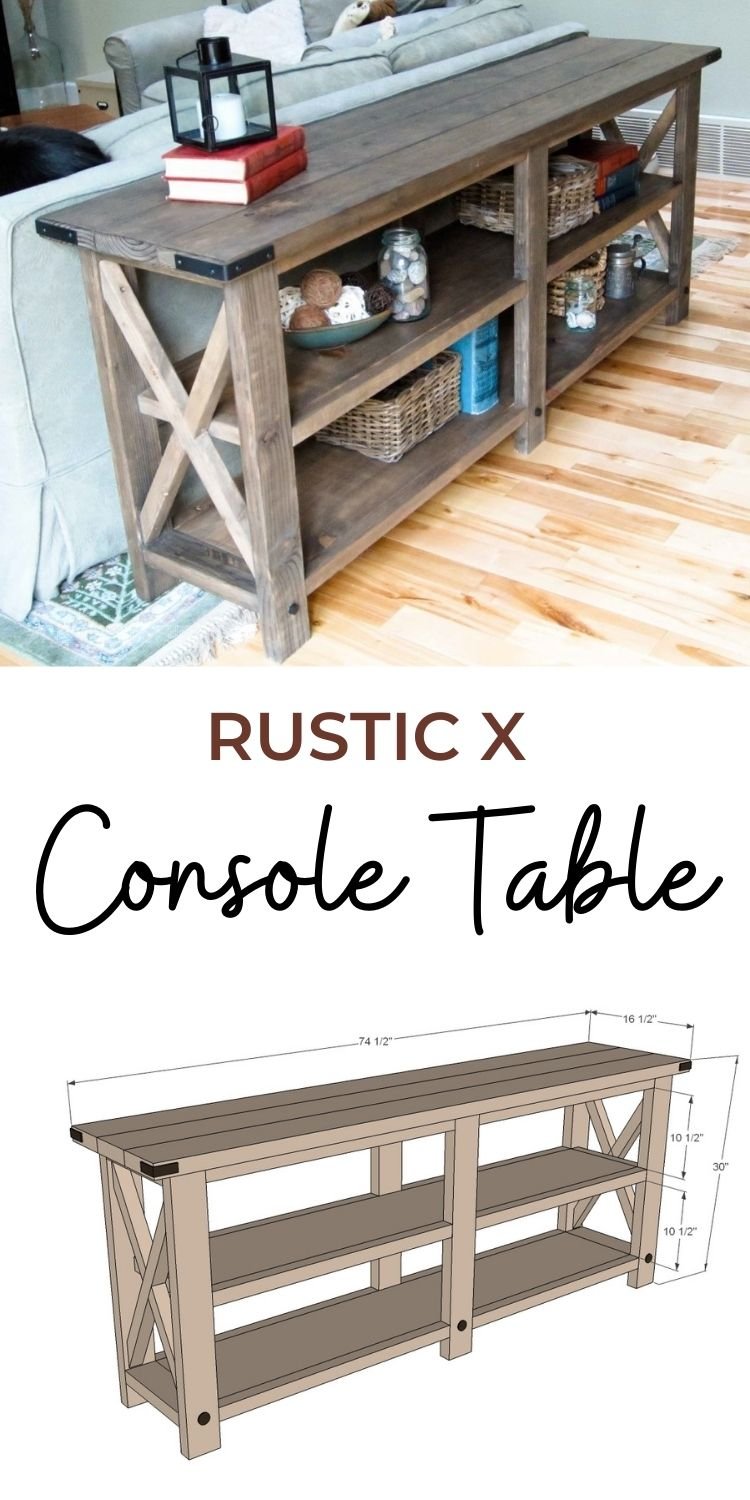
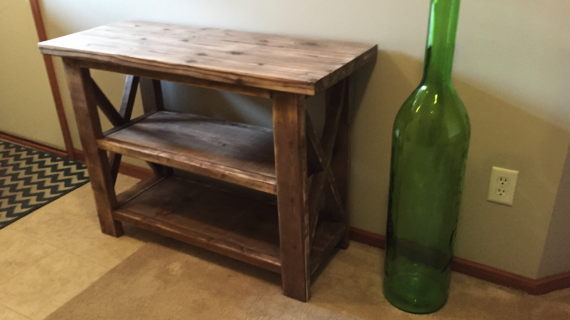
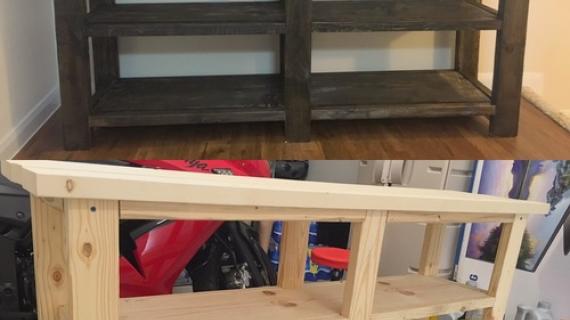
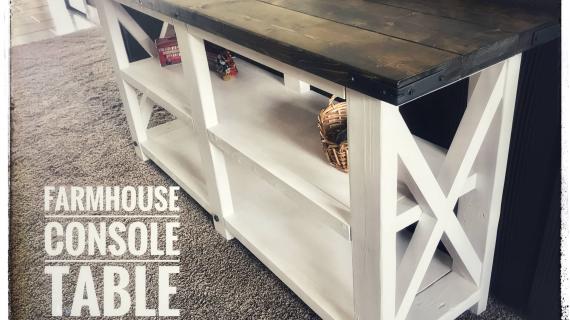
Build the super popular Rustic X Console Table with Ana White plans. This woodworking project has been built thousands of times and loved the world over. Its made of construction lumber (yes, 2x4s!) and the plans are easy to follow.
Also in this Collection: Rustic X Coffee Table Plans, Rustic X End Table Plans and Rustic X Bench Plans


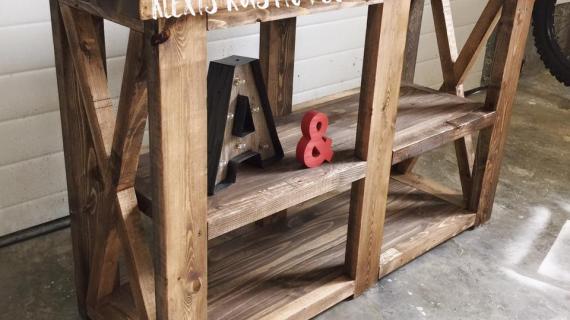
Rustic X Console Features
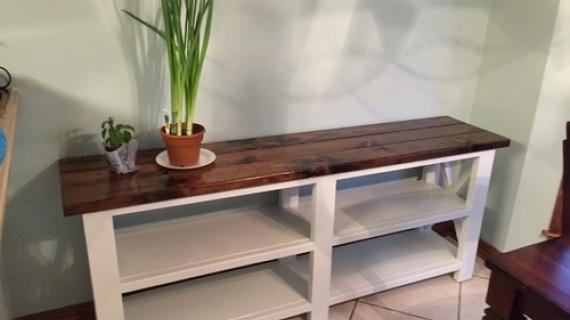
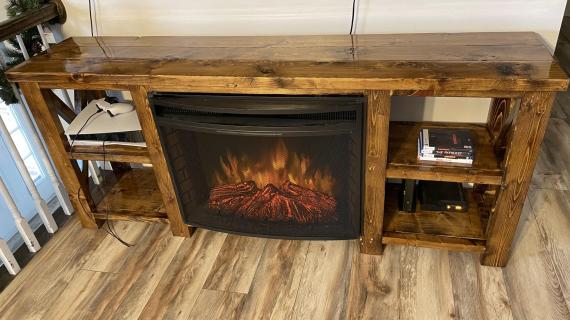
- Solid wood design accepts stain beautifully and paints up nicely
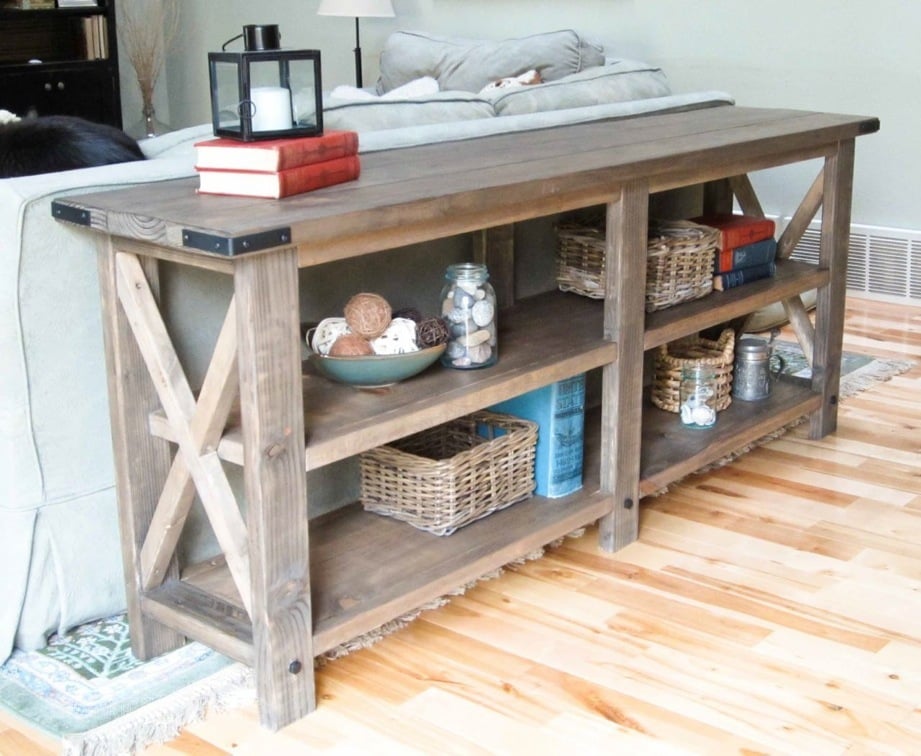
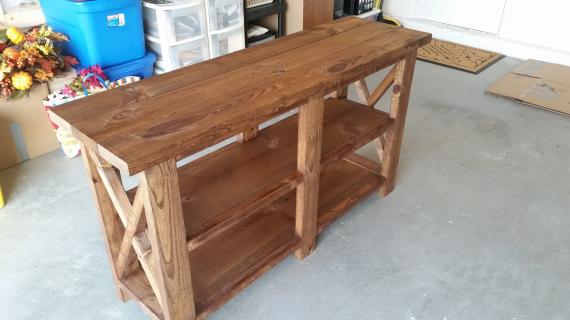
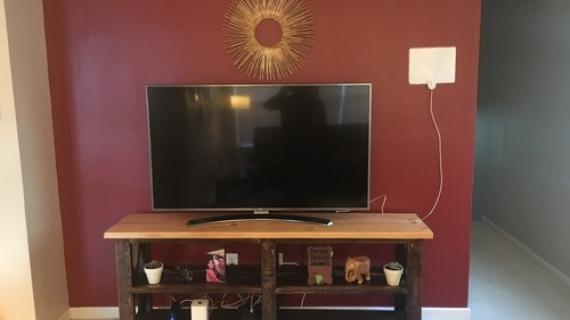
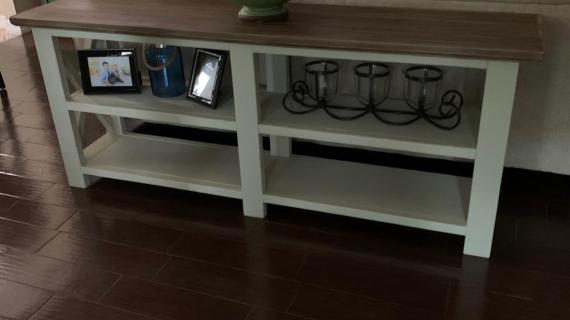
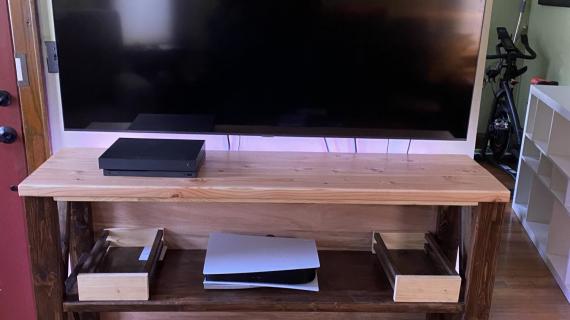
- Extra long length perfect behind sofas, sectionals, as a dining room buffet, or under the TV
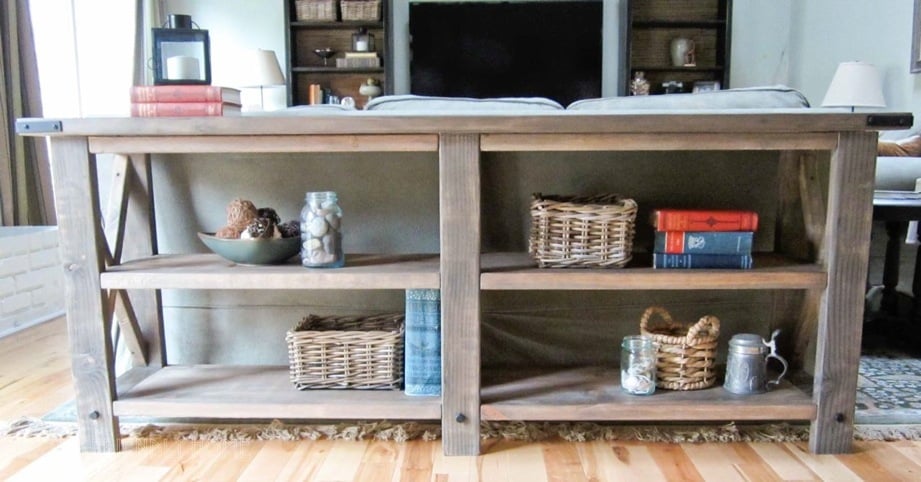
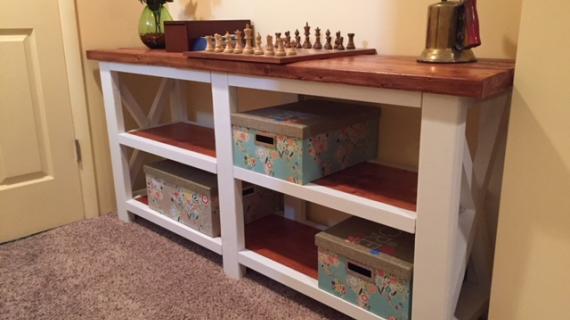
- Storage shelves perfect for displaying and storing
- Storage shelves fit most standard baskets
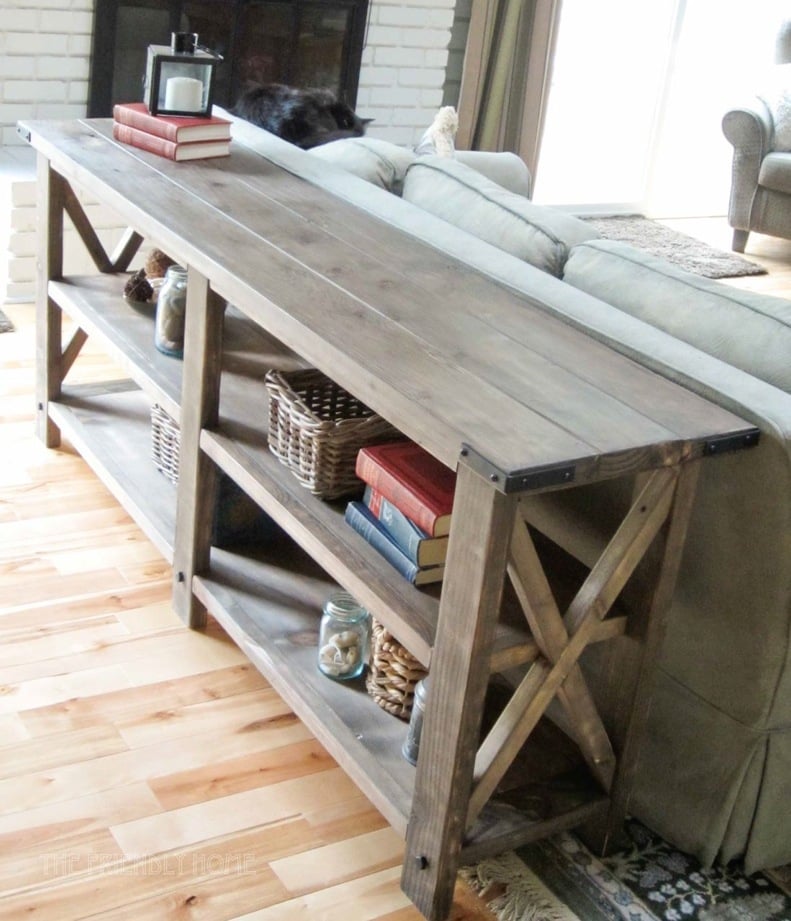
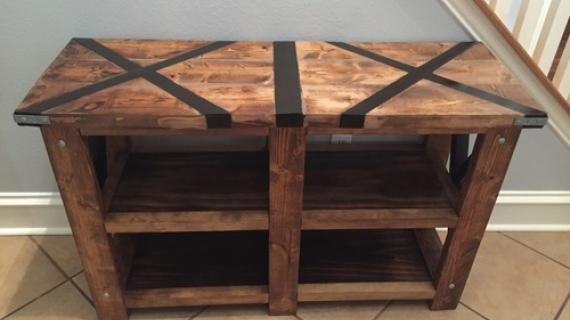
- Beautiful planked top is full of texture
- Step by step plans have no exposed screw holes

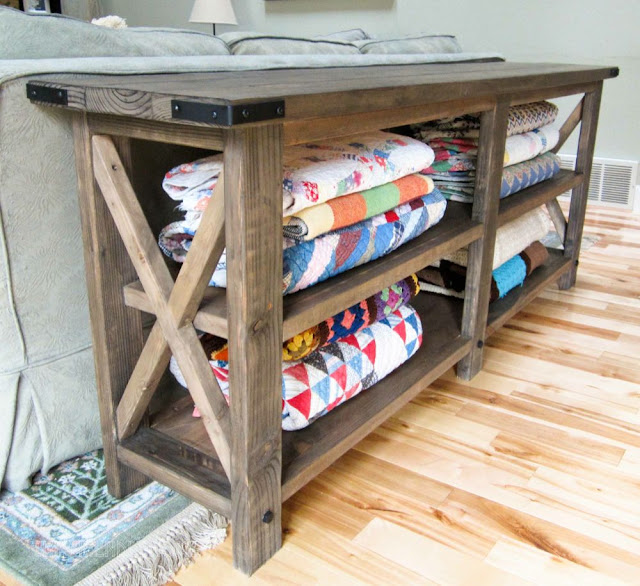
This beautiful Rustic X Console was built by Hillary from The Friendly Home. I encourage you to take a second to stop over to The Friendly Home and read more about Hillary building this console, the finish she used, and the story behind those beautiful quilts!
Easier to Build Option: Farmhouse Console Table Plans
For beginner or novice builders, we have added a easy to build option for this plan, the Farmhouse Console Table plans. It does NOT require pocket hole screws and is less expensive to build (but there is exposed screw holes). There is also a video tutorial to help with the build.
Pin For Later!
Preparation
- 6 – 2x2 @ 8 feet long
- 3 – 2x4 @ 8 feet long
- 1 – 1x12 @ 12 feet long
- 3 – 2x6 @ stud length or 8 feet
- Corner hardware/decorative bolts
- 1 1/4" and 2 1/2" pocket hole screws
- 2 1/2" screws
- 12 – 2x2 @ 30”
- 6 – 2x4 @ 28 1/2"
- 2 – 1x12 @ 63 1/2"
- 5 – 2x4 @ 11 1/4"
- 2 – 2x2 @ 11 1/4"
- 2 – 2x2 @ 22 1/2" (long point to short point, ends parallel, cut at 60 degrees off square)
- 4 – 2x2 @ 11 1/4" (longest point to shortest point, long end cut at 60 degrees off square, short point cut at 30 degrees off square, angles are in same direction)
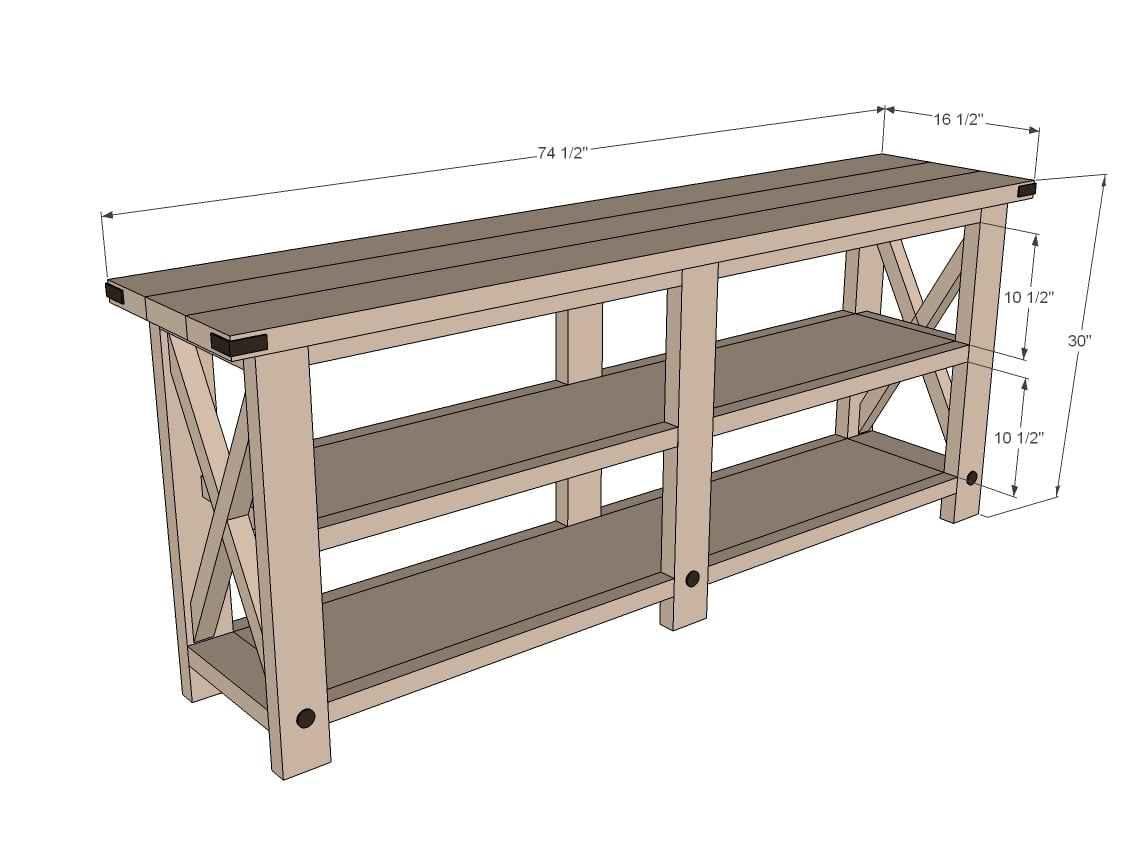
- 3 – 2x6 @ 74 1/2"
NOTE: If your saw does not cut 60 degrees off square, you will need to mark cuts with an angle square or compass/protractor and cut angles with circular saw or jigsaw. Practice this cut first on scraps!


Please read through the entire plan and all comments before beginning this project. It is also advisable to review the Getting Started Section. Take all necessary precautions to build safely and smartly. Work on a clean level surface, free of imperfections or debris. Always use straight boards. Check for square after each step. Always predrill holes before attaching with screws. Use glue with finish nails for a stronger hold. Wipe excess glue off bare wood for stained projects, as dried glue will not take stain. Be safe, have fun, and ask for help if you need it. Good luck!
Instructions
Step 1
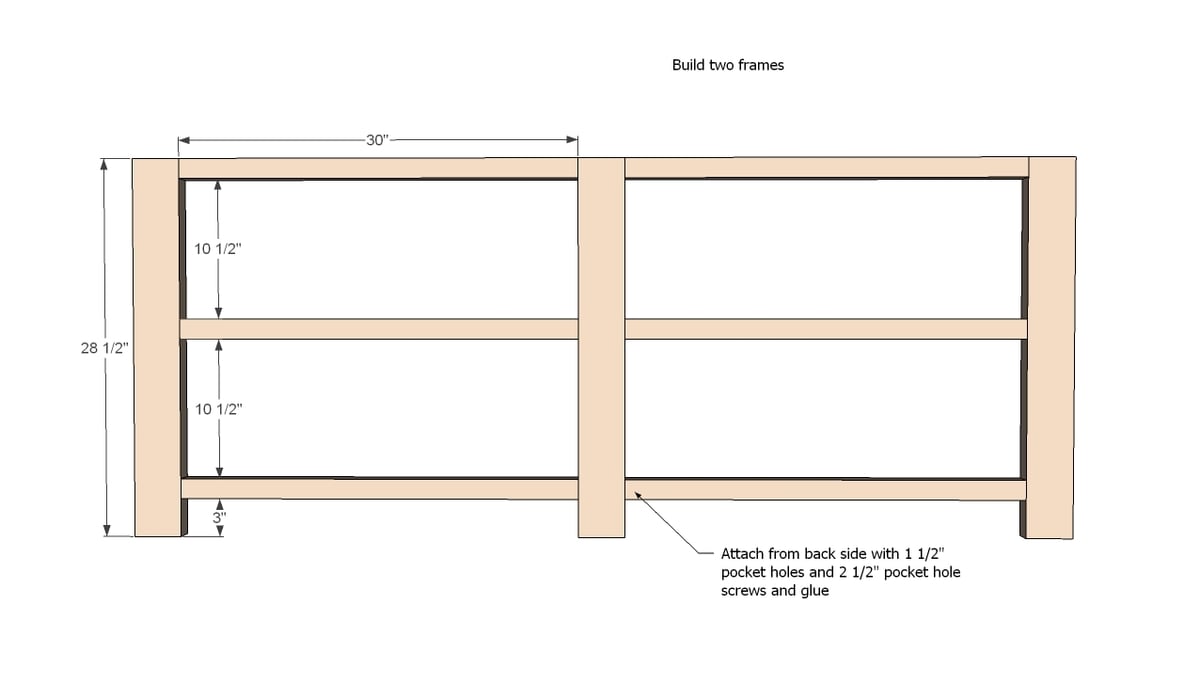
First build two frames as shown in diagram.
Step 2
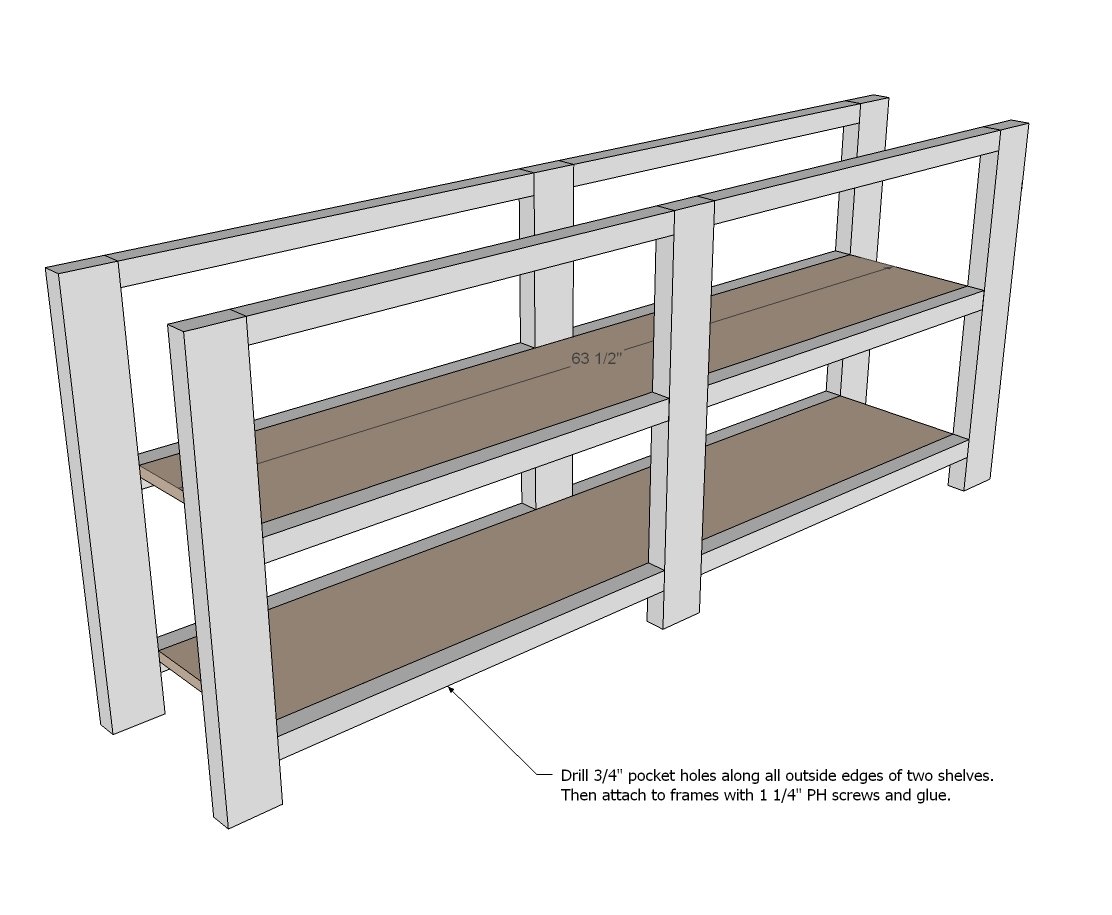
Then attach frames to shelves. NOTE: I recommend drilling 3/4" pocket holess with Kreg Jig around all sides of each shelf for attaching all shelf trim with 1 1/4" Pocket Hole screws later on.
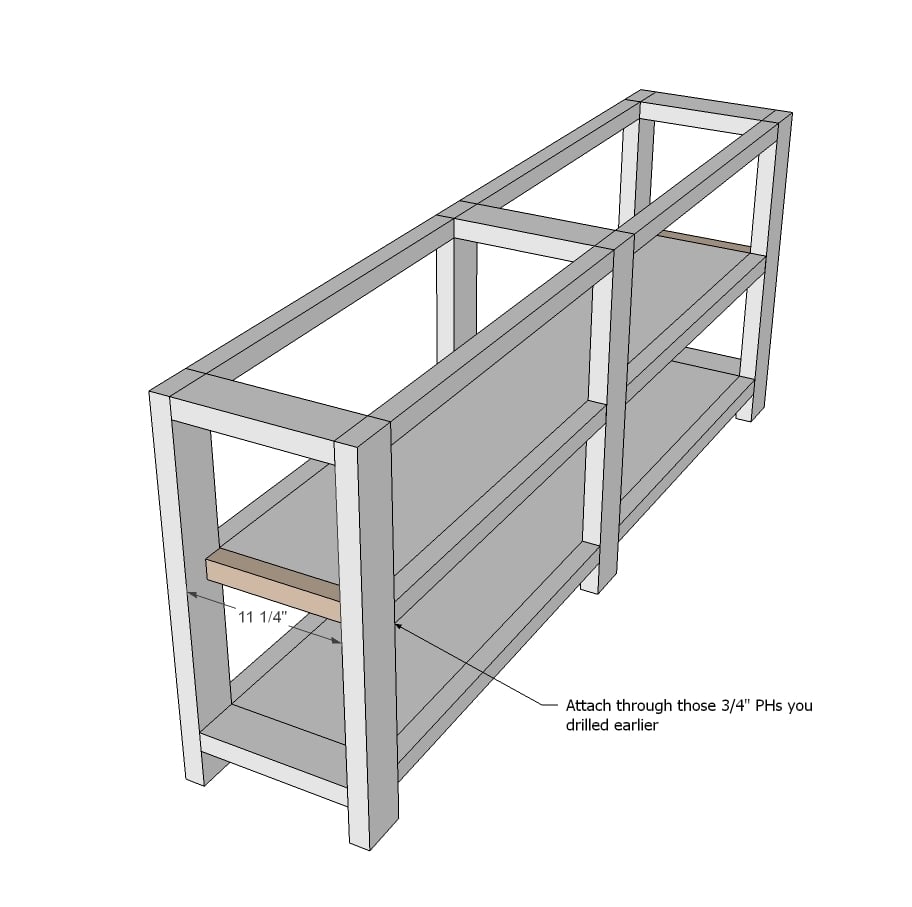
Step 3

2x4 end supports need to be the same width as your 1x12 boards - expected to be 11 1/4" wide. Measure the width of your 1x12s and cut the 2x4 supports to match this width.
Attach to frames and shelves. For attaching to frames, use 1-1/2" pocket holes with 2-1/2" pocket hole screws.
Step 4
Add trim to the shelf.
Step 5
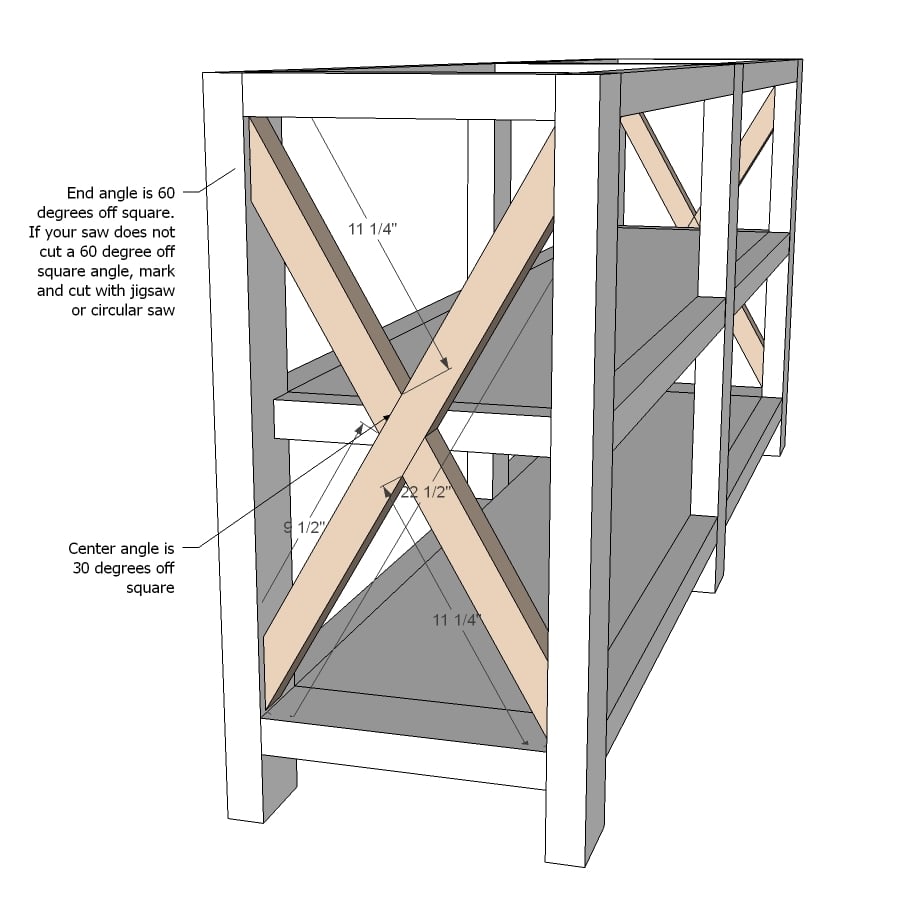
The X can be cut by just placing the uncut board alongside it's permanent position, and marking the overlap with a pencil, and then cutting the pencil lines with a circular saw or jigsaw.
First do the longer piece, then place inside the project, but don't attach yet.
The figure the smaller piece cuts and make those cuts.
Fit the smaller pieces in the project, and trace where they need to be joined to the larger piece.
Remove all pieces and attach the smaller pieces to the longer piece.
Then place the entire X inside the opening and attach.
Step 6
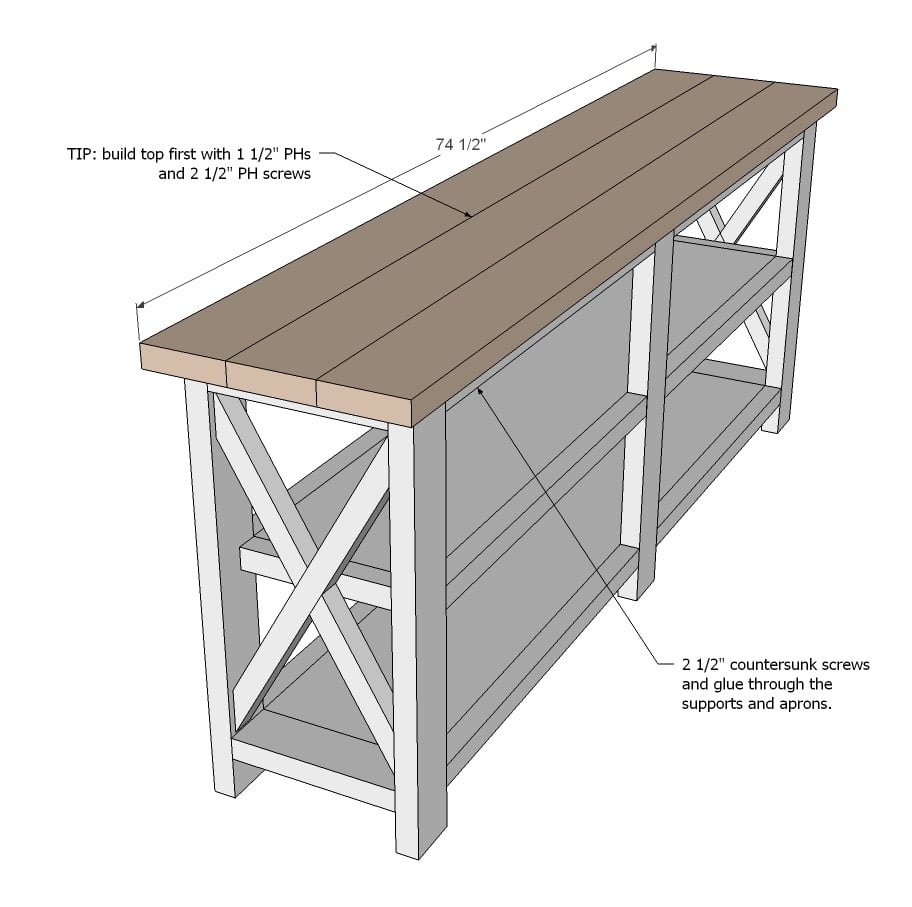
And then add the top. You can build top first with 1 1/2" pocket holes and 2 1/2" pocket hole screws and then attach to top through 2x4/2x2 aprons or just plank the top for a rustic look - it's up to you.
TIP: Just use your 2 1/2" pocket hole screws to attach the top so you don't have to go out and buy more 2 1/2" screws.
It is always recommended to apply a test coat on a hidden area or scrap piece to ensure color evenness and adhesion. Use primer or wood conditioner as needed.
Comments
allisonschuetz…
Tue, 06/30/2015 - 19:34
rustic console table
We are new to furniture building and am wondering the best way to attach the 2x2 to the 2x4 in the very first step of the build. At an angle? All the way thru the 2x4? So confused right now lol
In reply to rustic console table by allisonschuetz…
Ana White
Wed, 07/01/2015 - 08:30
Do you have a Kreg Jig? No
Do you have a Kreg Jig? No angle in step one, all straight cuts.
mlambert527
Tue, 07/07/2015 - 07:36
Decorative Hardware for Rustic Console
Can't wait to make this to store my record collection and stereo (will need to change dimensions a little to allow 12" albums). I am having the hardest time finding the decorative corners. Any suggestions of where to find these?
In reply to Decorative Hardware for Rustic Console by mlambert527
Ana White
Tue, 07/07/2015 - 10:30
Those are just regular L
Those are just regular L Brackets and Hex Bolts spray painted black.
mlambert527
Wed, 07/08/2015 - 06:45
wow - thanks so much!
wow - thanks so much!
zachbrun
Tue, 07/14/2015 - 08:17
Make sure you get your cuts right!
Hey Guys,
Everything went well with the table, and it looks great, but make sure everything lines up well before you make cuts for all of the wood. I would suggest cutting your 1x12s to size and then make sure you are cutting to exact lengths for the 2x2s on the sides. Remember that many 2x4s are not precisely 4 inches in width so that may alter the actual length you need for your 2x2s on the sides. Also, MAKE SURE YOUR 2x4s FOR THE SUPPORTS ARE THE EXACT LENGTH OF YOUR 1x12 WIDTHS. Some vary in width from 11 1/4 inch to actually 12 inches. Heed the discalimer at the top of the page that encourages you to read the entire page before starting.
Otherwise. Enjoy. I had a great time once I realized I couldn't rely on the cuts of wood to be the exact width. Beginners mistake.
DonnaH
Thu, 09/03/2015 - 17:11
Changing Dimensions for Rustic X Console
Hello Ana!
Your designs are FAB!! I'm interested in making the Rustic X Console but don't want the length to be 8'. I have space for 5' max. What would be the measured cuts for the materials list? Apologize that I'm not good at math-changes. I've made your farm bench and am in love with it!!
Donna H.
itzdonna
Thu, 09/03/2015 - 17:53
Number of pocket holes to drill?
Ana. Thanks for sharing your talents. We're going to assemble the table but are unsure of drilling the pocket holes. When connecting 2x2 to 2x4's I'm assuming we drill the pocket hole into the 2x2 but everything I'm reading states to put a minimum of 2 pocket holes to prevent it from rotating? Question being, will a 2x2 allow for 2 pocket holes given it's small size?
A Carew
Tue, 10/20/2015 - 15:38
number of pocket holes to drill?
I was wondering the same thing! Is one hole okay here because there will be vertical holes attaching the 2x2 to the shelf?
mlambert527
Sun, 09/20/2015 - 09:28
clamping when adding the lower shelves
I'm in the process of making this table, and can't figure out how to clamp the shelves to the rails to keep them flush when driving in the screws. The screws are coming out the top of the rail because the shelf lifts up above the rails. Can you give instructions on how to clamp for Step 2?
A Carew
Sun, 10/18/2015 - 07:18
Shelves question
Hi everyone, thanks for the great post here. After reading through the comments and plans, I don't see what the shelves are made of, or where they exist in the "shopping list". I see the top planks, but are the middle and bottom shelves just 1/2 or 3/4 in ply? I'd love to get going on this, but want to have everything lined up before I get in a groove. Thanks for your help here!
Ana White Admin
Sun, 10/18/2015 - 10:32
Cut List
All of the information is in the cut list, scroll down from the shopping list to see it. Hope this helps!
A Carew
Tue, 10/20/2015 - 15:40
thanks
I saw the cut list, but wasn't clear where the shelves came in to play. My math skills stayed in bed, but now I see. I appreciate you replying and for this awesome post. Just finished my home depot trip!
A Carew
Tue, 10/20/2015 - 17:47
thanks
I saw the cut list, but wasn't clear where the shelves came in to play. My math skills stayed in bed, but now I see. I appreciate you replying and for this awesome post. Just finished my home depot trip!
ozziegolf05
Fri, 01/22/2016 - 16:09
Stain
When staining, do I brush a layer on, wait a few minutes then wipe it off? Seems all of my pieces come out dark or reddish/rustic.
Mike_Pattenson
Sat, 01/30/2016 - 07:37
This is a great piece!
This is a great piece!
MrSpkr
Sun, 01/31/2016 - 13:13
Length of X bars
Because of limitations on equipment, I'll be having to back into the angles for the "X" bars on the console. I know the length from long to short points are 22.5" and 11.25" respectively; however, I need to know what the shortest length of wood for eac piece will need to be. For example, I know the longest pieces will be more than 22.5" because the 22.5" does not measure from longest point to longest point. Anyone have an easy answer for me? Trying to wrap up this severely late Christmas gift for my daughter.
Danijohnson48
Mon, 02/01/2016 - 12:41
Dimension modification
So I am beyond a beginner but I have been eyeing this console table for over a year and I just need to have it. I'm planning on using it more for storage for my little boys toys so I am wanting it to be a little taller like buffet height of 36 inches. Knowing nothing about carpentry, how hard would that be to modify these plans to add an extra 6 inches in height? Only the legs and X's would really be affected right? Any help you could give me would be greatly appreciated!
mattd745
Tue, 02/09/2016 - 05:20
Decorative Bolts/Corners
I was wondering where you got both and what you suggest for it. I am making a half version of this due to space tomorrow.
In reply to Decorative Bolts/Corners by mattd745
Ana White
Tue, 02/09/2016 - 12:30
They're just regular L
They're just regular L brackets and hex bolts spray painted black.
mattd745
Wed, 02/10/2016 - 07:54
Thank you so much! Loved
Thank you so much! Loved watching Alaska Range!
Palle
Fri, 03/18/2016 - 00:12
bracket and nails
Hi! Love this build. I will build this one soon. But where to get the nails and bracket
regards
In reply to bracket and nails by Palle
Ana White
Sat, 03/19/2016 - 12:30
Just L brackets and hex bolts
Just L brackets and hex bolts spray painted black.
EricEdward
Sat, 03/26/2016 - 05:33
Stain
I tried to make the stain with vinegar and 000 steel wool for this project. It has been sitting for 5 days in a sealed container and I still just have shredded steel wool in vinegar. It has not broken down or changed color at all. Not much to mess up here so apparently this does not work.
asmith6613
Sun, 04/03/2016 - 15:15
Polyurethane Over The Iron Acetate Coat a Good Idea?
Thank you very much for sharing this awesome furniture plan, my Fiance fell in love with the look of the console, especially the rustic coat! My question was about possibly finishing with a polyurethane coat to seal in the color for years to come. I wasn't sure if this would be a good idea to prevent the iron acetate coat from rubbing off with time or if it would alter the rustic color in any way?
smileyelf
Sun, 04/10/2016 - 10:48
rustic x console table
I cannot tell how to build frame from diagrams, I am a beginner at this . Instructions say to build two frames, how do you attach the upright pieces to the cross ones ? It says to use pocket hole screws and glue. Horizontal pieces appear to be 30" long , do you drill pocket hole under piece into upright 2x4 ? Sorry if this the wrong place to get help, could not find another way. Thanks in advance
sanders924
Tue, 05/03/2016 - 12:53
I
I
RobA
Tue, 05/24/2016 - 13:28
Thanks for the plans
here's what I came up with
http://www.ana-white.com/2016/05/DIY_furniture/custom-x-console
jpwesley
Tue, 06/07/2016 - 13:36
Rustic X console
Can you please tell me what kind of wood you used for this table?
love it,
Julie
JulieJabs
Sat, 06/18/2016 - 09:15
I too am terrible at math but
I too am terrible at math but need to build this like yesterday! I love it! Can someone tell me about the shelf and top measurements if my space to work with is 5' long (can go a little more if needed), 38" tall including top, and 13" deep. I feel like I'm going to have to change too many numbers for me to be confident doing it myself ;-) that would be awesome if there was a calculator to input your info! Any help is appreciated, can't wait to get started!!! Thanks
LWags
Sat, 09/03/2016 - 11:30
Hardware!
Where did you find that corner hardware? I've been looking everywhere! =)
In reply to Hardware! by LWags
Ana White
Mon, 09/05/2016 - 16:00
Just L brackets and hex bolts
Just L brackets and hex bolts. Thanks!
pcodonnell
Thu, 09/08/2016 - 14:54
Missing PDF Plans
The link to the PDF version of the plans for the rustic-x-console doesn't seem to be working.
Can you email me the plans to the address in my profile?
My daughter is eager to have me help her build this unique unit.
Peter
In reply to Missing PDF Plans by pcodonnell
Ana White
Fri, 09/09/2016 - 12:00
Here's the printer friendly
Here's the printer friendly version for now, thanks for your patience with
the site!
http://www.ana-white.com/print/5645
Cobbmv
Thu, 09/08/2016 - 20:45
Stain?
I'm trying to re-create this table exactly, and I've finished with the build but don't know what stain to use? I love this color and would love to have it in my living room!
In reply to Stain? by Cobbmv
Ana White
Fri, 09/09/2016 - 12:00
http://www.friendly-home.net
http://www.friendly-home.net/2012/05/oxidized-x-console.html
Robbandkri
Fri, 09/23/2016 - 12:31
Poly?
Wondering if you would use polyurethane on the top and shelves?
hrsmith0616
Fri, 10/07/2016 - 20:06
Type of Wood
What kind of wood did you use for this project? Is it pine?
Js8478
Fri, 10/21/2016 - 19:05
Wood used?
Hello, I'm planning on starting this build and the rest of the Rustic X collections, but I'm only curious to what wood was used in the console, coffee table and end tables? I've looked through comments but haven't found an answer. I appreciate the free plans, I'll post the results as soon as I'm finished :)
In reply to Wood used? by Js8478
Ana White
Mon, 10/24/2016 - 09:00
Pine
Pine
NYstyle
Sun, 10/23/2016 - 16:37
Are the X measurements correct???
I've doubled checked all my measurments and they're all good. The only issue that I'm having is the "X". By my measurement it should be 24 1/2, not 22 1/2 like the plan calls for. Am I doing something wrong here?? thanks.
NYstyle
Sat, 11/05/2016 - 03:39
good talk.
good talk.
robp
Mon, 01/02/2017 - 22:05
Corner hardware/decorative bolts
Does anyone have suggestions for where to get the corner hardware/decorative bolts? I really like the character it gives the table, but don't know where to find it. Thanks for posting the steps to build this!
hart1860
Fri, 01/20/2017 - 07:10
Accent pieces?
I can't find what the corners of the table top have on them (brackets?) and the bottom legs have bolts in them...I don't see those in the plans, anyone have an idea what exactly was used and if they are bolts are they deep into the wood or just enough to go into the 2x4?
Thanks in advance, can't wait to build this!
hart1860
Fri, 01/20/2017 - 07:11
Nevermid...the comment above
Nevermid...the comment above mine explains this. Disregard!
Ajmolfetta16
Thu, 01/26/2017 - 16:22
New dimensions
ann,
i want to make this for my girlfriend, however I want the height to be 35" with a length of 48". What's the easiest way for me to convert a the measurements to match this?
Wilskek
Wed, 02/08/2017 - 12:44
Corner Brackets
Has anyone been able to find those corer brackets? If so, where please....
tidefever
Mon, 02/13/2017 - 20:48
Decorative Hardware
Are there stores that carry the decorative braces and bolts or do these have to be ordered online?
Jantheman
Mon, 08/21/2017 - 20:30
Where can we find the corner braces?
Where can we find the corner braces that I see in the picture are on every corner? Is there a good company that we should know about for items like this?
In reply to Where can we find the corner braces? by Jantheman
Jantheman
Mon, 08/21/2017 - 20:31
Never mind, I see that it has
Never mind, I see that it has been answered already. Thank You.