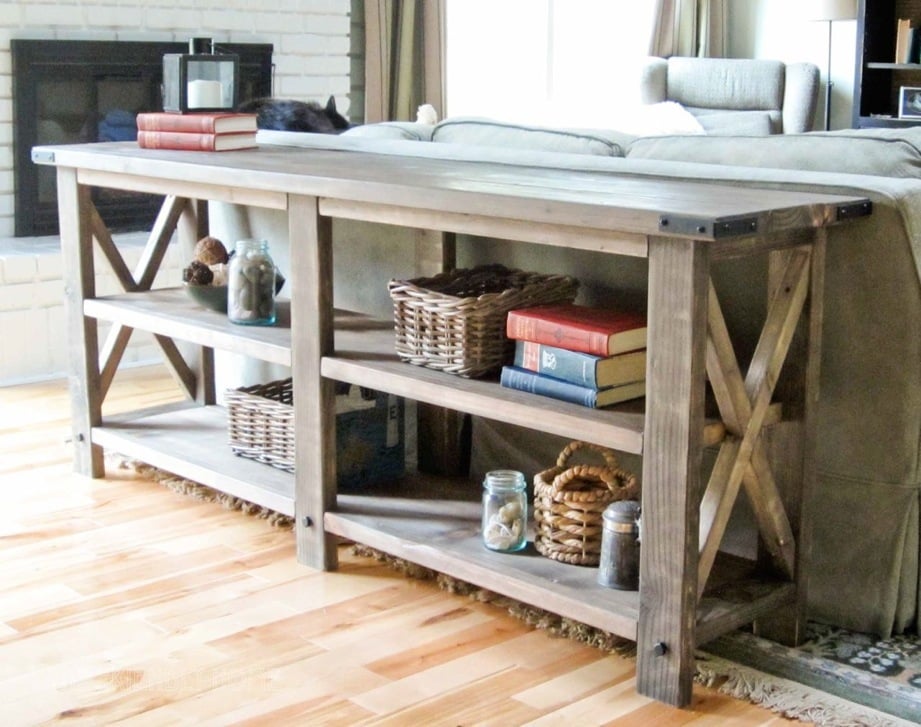


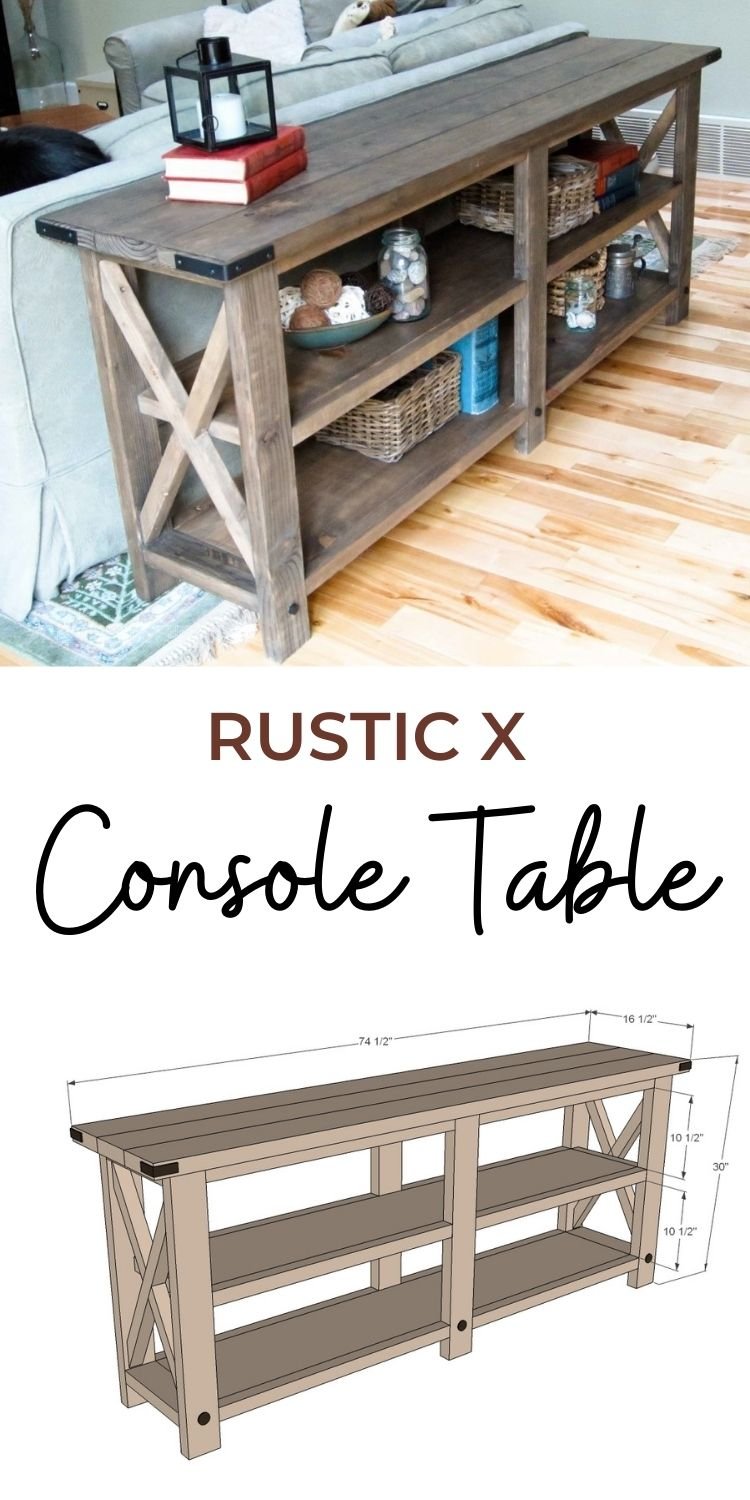
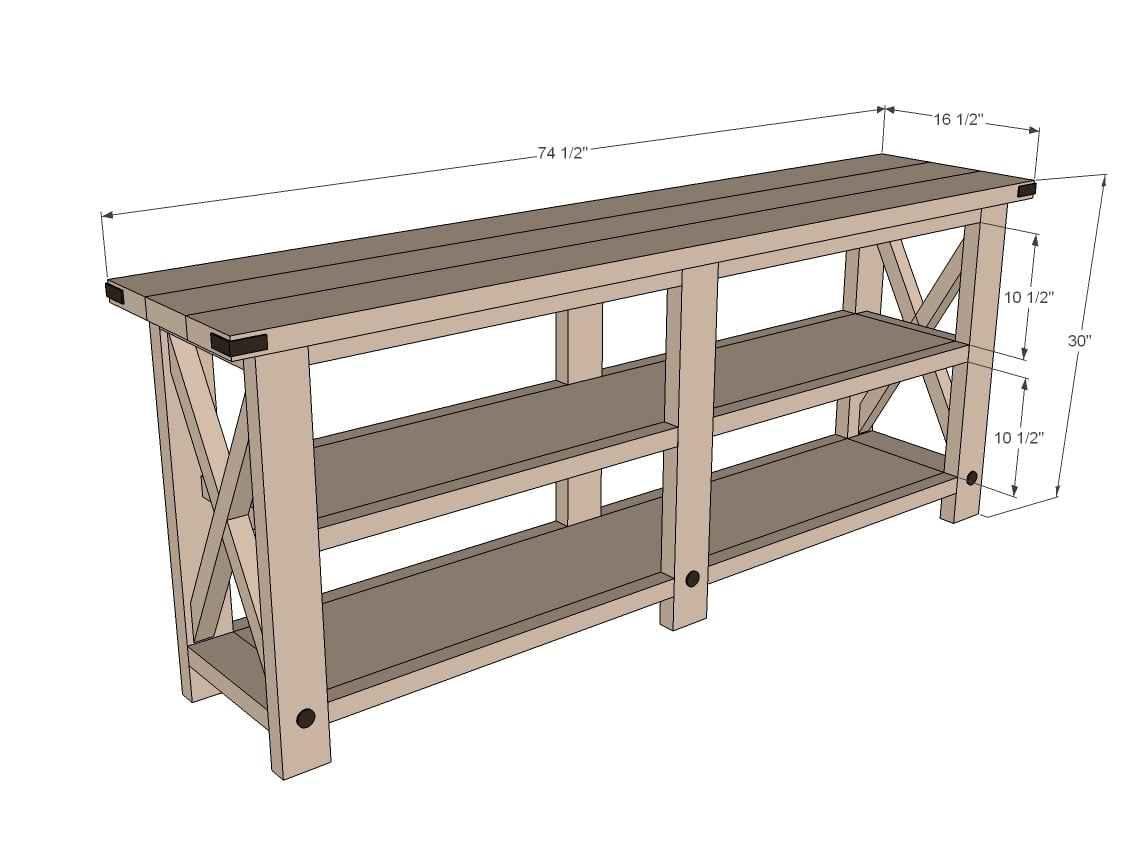
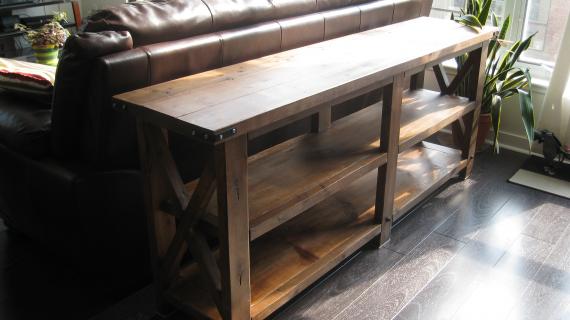
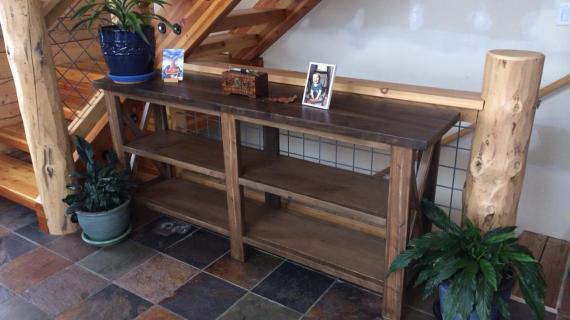
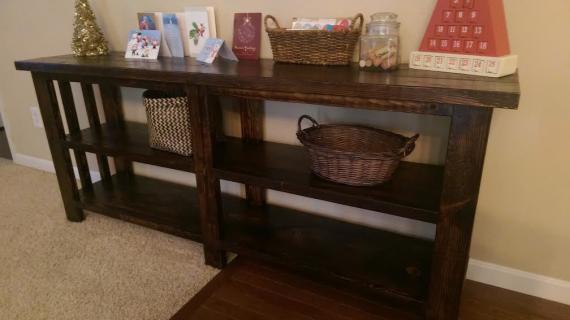
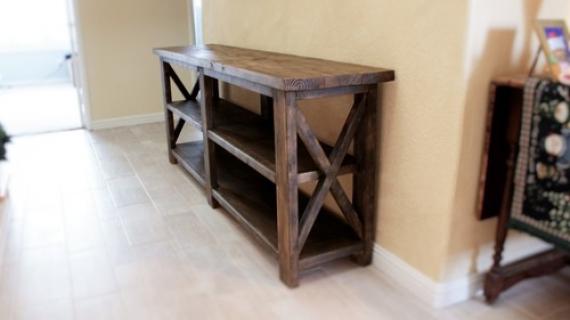
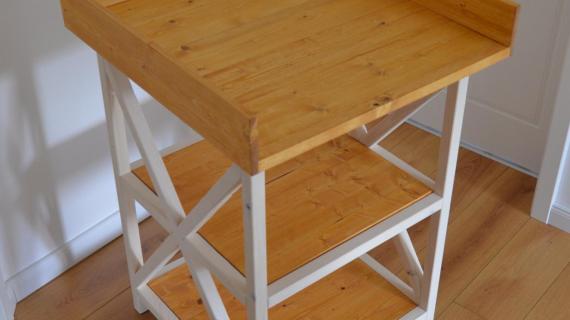
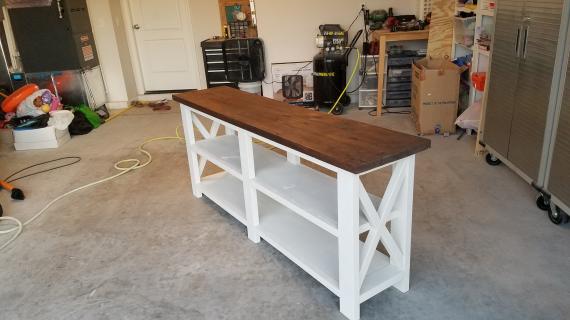
Build the super popular Rustic X Console Table with Ana White plans. This woodworking project has been built thousands of times and loved the world over. Its made of construction lumber (yes, 2x4s!) and the plans are easy to follow.
Also in this Collection: Rustic X Coffee Table Plans, Rustic X End Table Plans and Rustic X Bench Plans

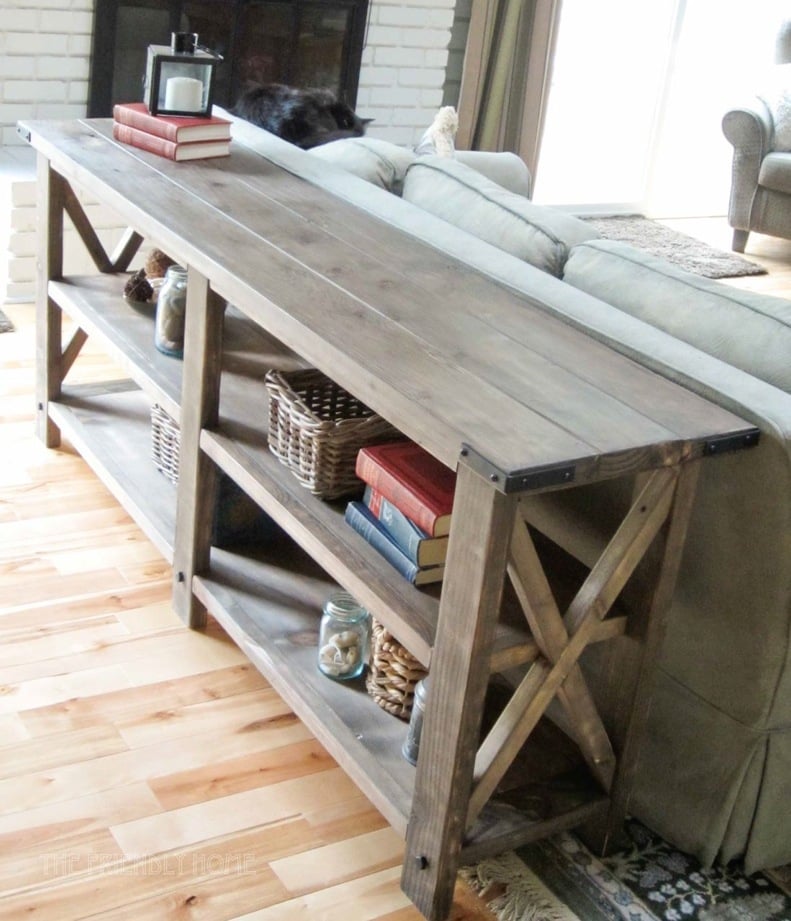
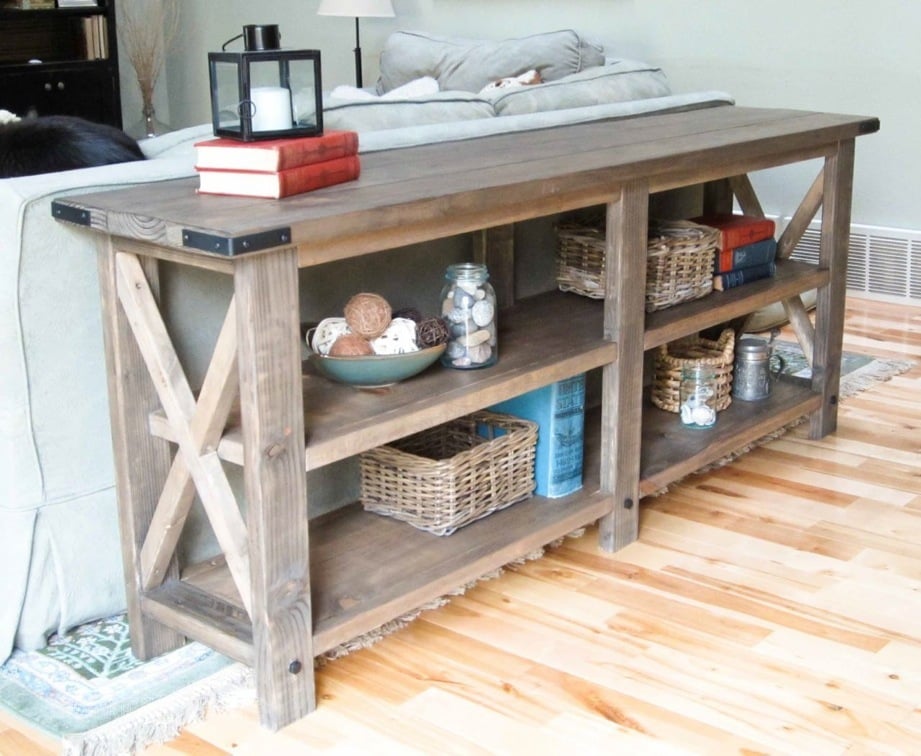
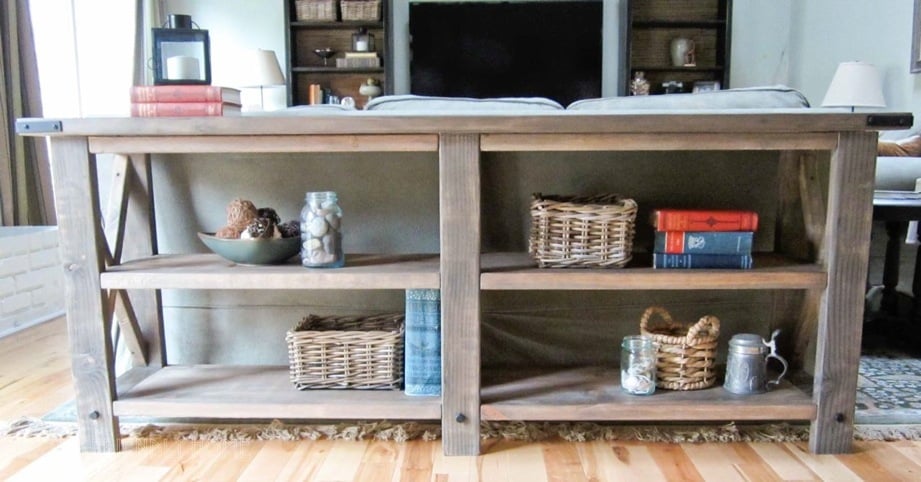

Rustic X Console Features
- Solid wood design accepts stain beautifully and paints up nicely
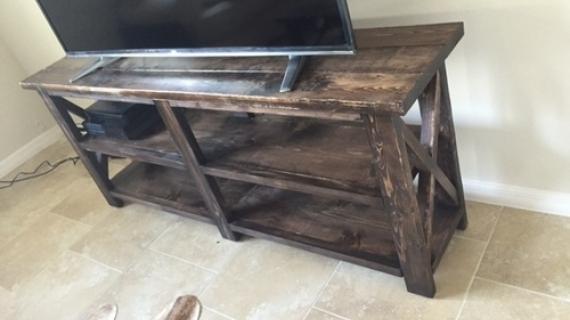
- Extra long length perfect behind sofas, sectionals, as a dining room buffet, or under the TV
- Storage shelves perfect for displaying and storing
- Storage shelves fit most standard baskets
- Beautiful planked top is full of texture
- Step by step plans have no exposed screw holes

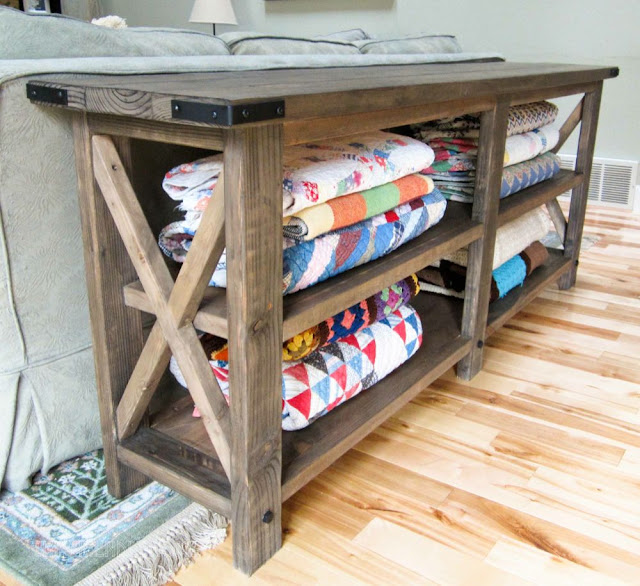
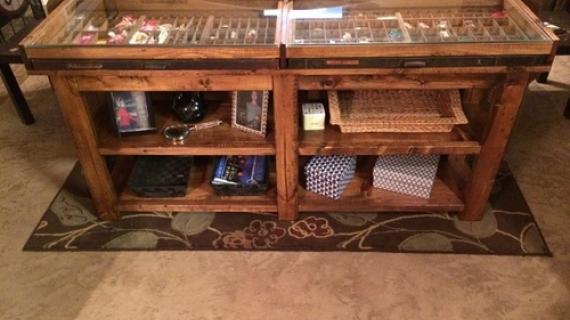
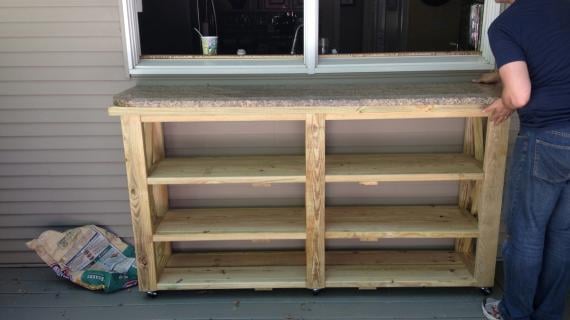
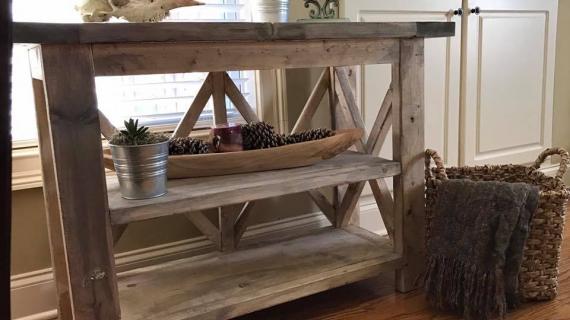
This beautiful Rustic X Console was built by Hillary from The Friendly Home. I encourage you to take a second to stop over to The Friendly Home and read more about Hillary building this console, the finish she used, and the story behind those beautiful quilts!
Easier to Build Option: Farmhouse Console Table Plans
For beginner or novice builders, we have added a easy to build option for this plan, the Farmhouse Console Table plans. It does NOT require pocket hole screws and is less expensive to build (but there is exposed screw holes). There is also a video tutorial to help with the build.
Pin For Later!
Preparation
- 6 – 2x2 @ 8 feet long
- 3 – 2x4 @ 8 feet long
- 1 – 1x12 @ 12 feet long
- 3 – 2x6 @ stud length or 8 feet
- Corner hardware/decorative bolts
- 1 1/4" and 2 1/2" pocket hole screws
- 2 1/2" screws
- 12 – 2x2 @ 30”
- 6 – 2x4 @ 28 1/2"
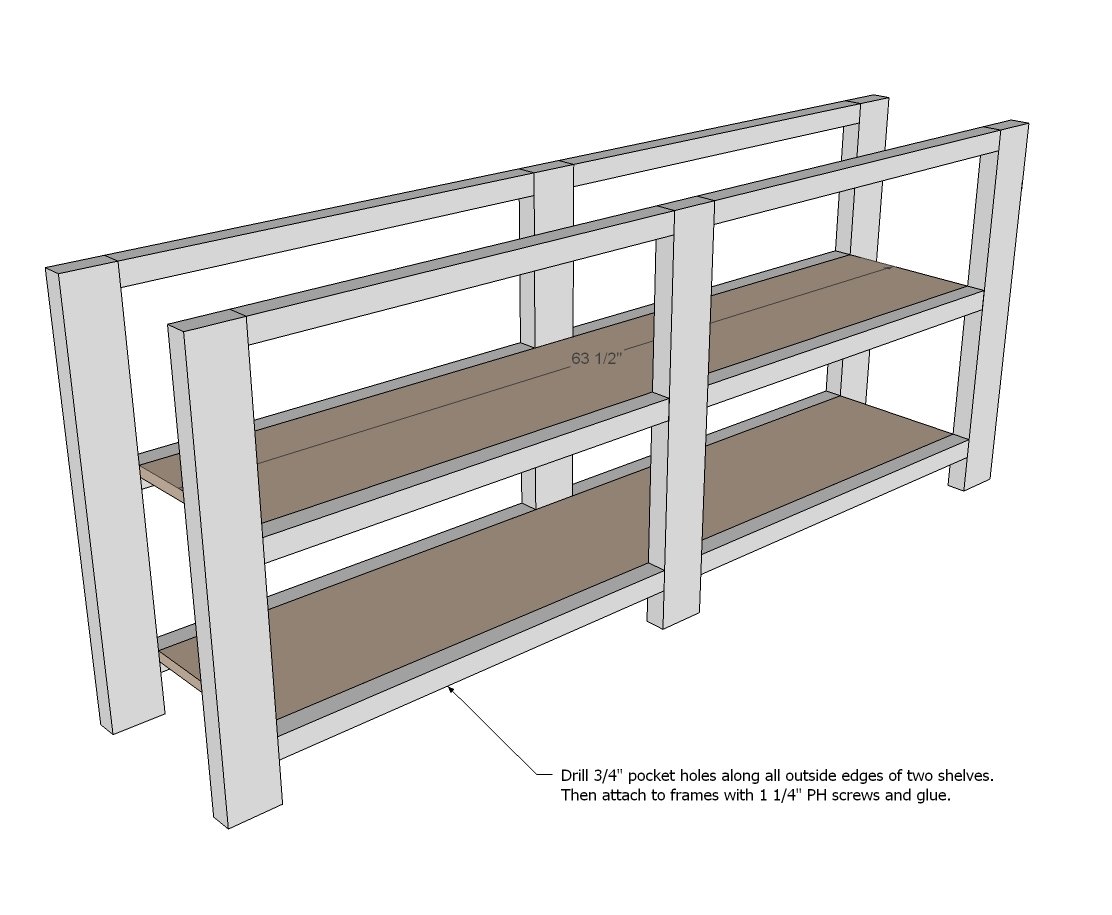
- 2 – 1x12 @ 63 1/2"
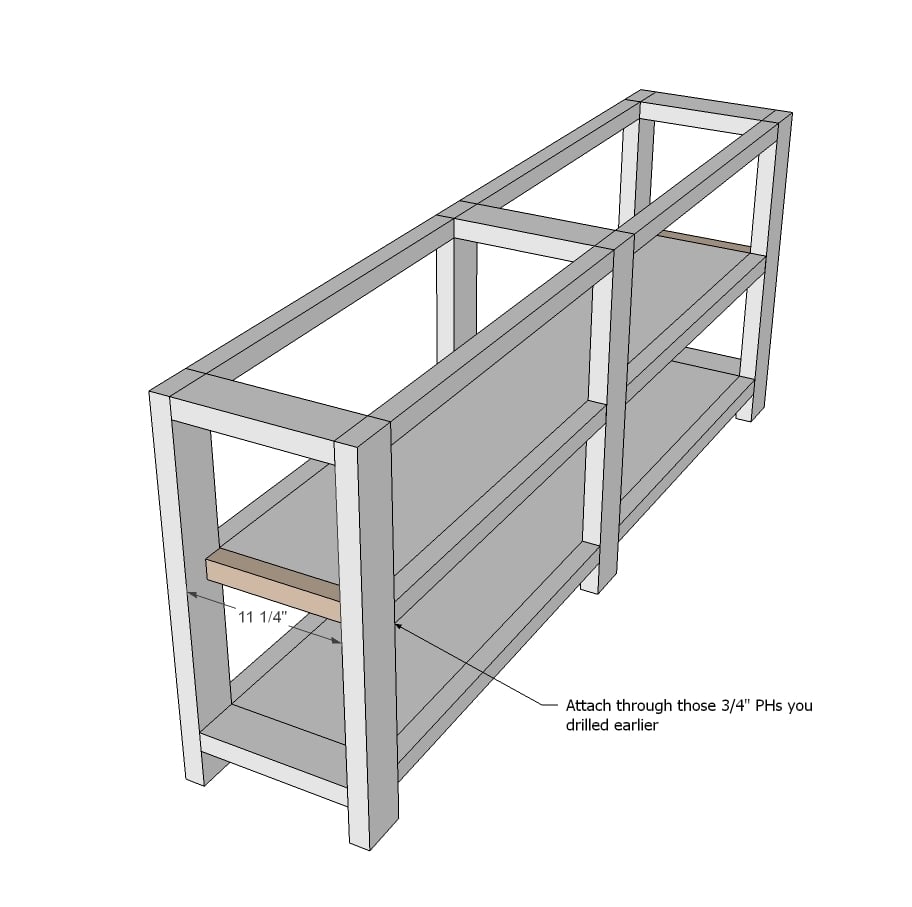
- 5 – 2x4 @ 11 1/4"
- 2 – 2x2 @ 11 1/4"
- 2 – 2x2 @ 22 1/2" (long point to short point, ends parallel, cut at 60 degrees off square)
- 4 – 2x2 @ 11 1/4" (longest point to shortest point, long end cut at 60 degrees off square, short point cut at 30 degrees off square, angles are in same direction)
- 3 – 2x6 @ 74 1/2"
NOTE: If your saw does not cut 60 degrees off square, you will need to mark cuts with an angle square or compass/protractor and cut angles with circular saw or jigsaw. Practice this cut first on scraps!


Please read through the entire plan and all comments before beginning this project. It is also advisable to review the Getting Started Section. Take all necessary precautions to build safely and smartly. Work on a clean level surface, free of imperfections or debris. Always use straight boards. Check for square after each step. Always predrill holes before attaching with screws. Use glue with finish nails for a stronger hold. Wipe excess glue off bare wood for stained projects, as dried glue will not take stain. Be safe, have fun, and ask for help if you need it. Good luck!
Instructions
Step 1
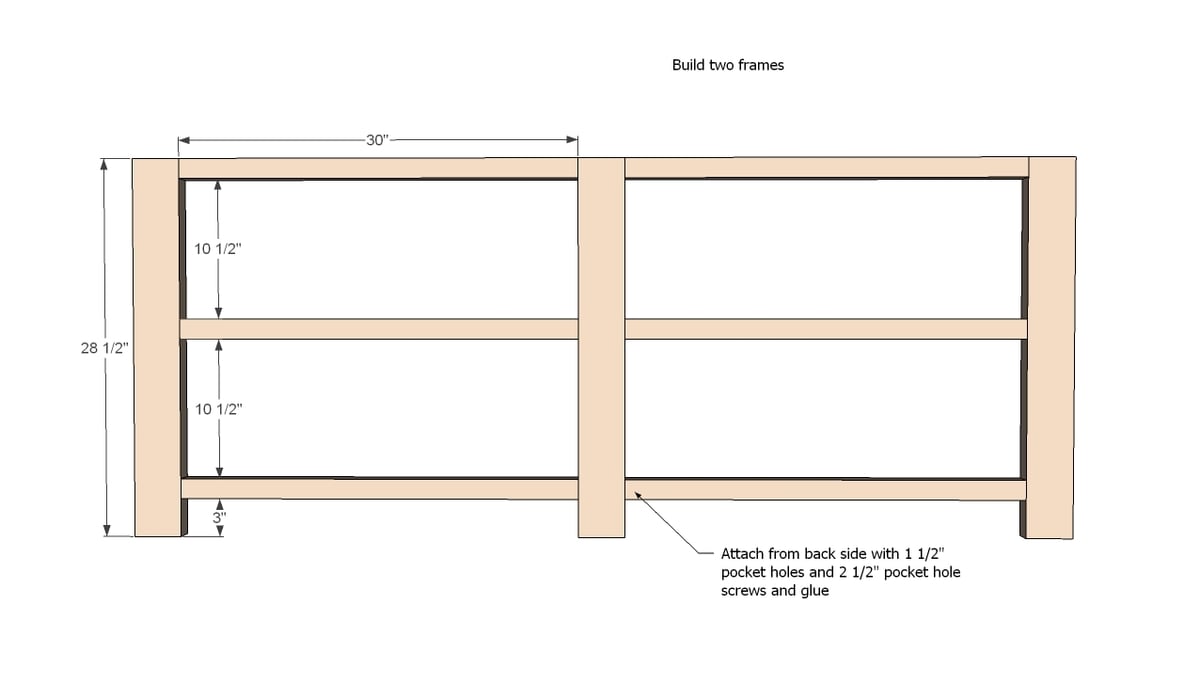
First build two frames as shown in diagram.
Step 2
Then attach frames to shelves. NOTE: I recommend drilling 3/4" pocket holess with Kreg Jig around all sides of each shelf for attaching all shelf trim with 1 1/4" Pocket Hole screws later on.
Step 3

2x4 end supports need to be the same width as your 1x12 boards - expected to be 11 1/4" wide. Measure the width of your 1x12s and cut the 2x4 supports to match this width.
Attach to frames and shelves. For attaching to frames, use 1-1/2" pocket holes with 2-1/2" pocket hole screws.
Step 4
Add trim to the shelf.
Step 5
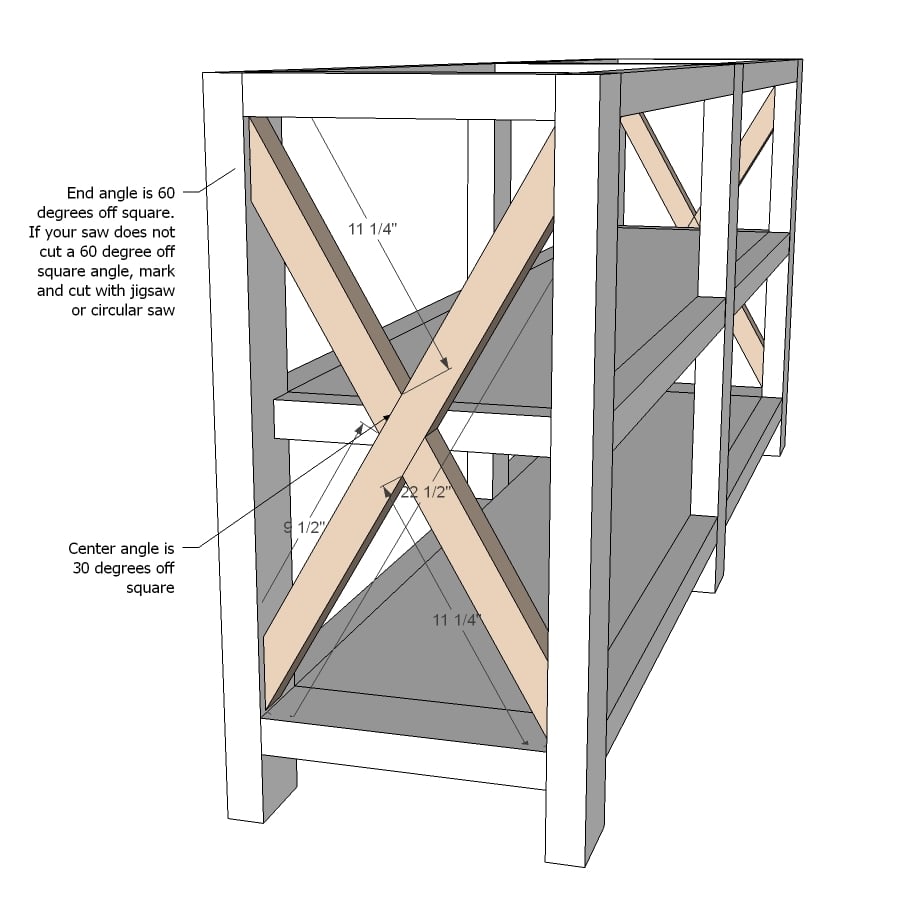
The X can be cut by just placing the uncut board alongside it's permanent position, and marking the overlap with a pencil, and then cutting the pencil lines with a circular saw or jigsaw.
First do the longer piece, then place inside the project, but don't attach yet.
The figure the smaller piece cuts and make those cuts.
Fit the smaller pieces in the project, and trace where they need to be joined to the larger piece.
Remove all pieces and attach the smaller pieces to the longer piece.
Then place the entire X inside the opening and attach.
Step 6
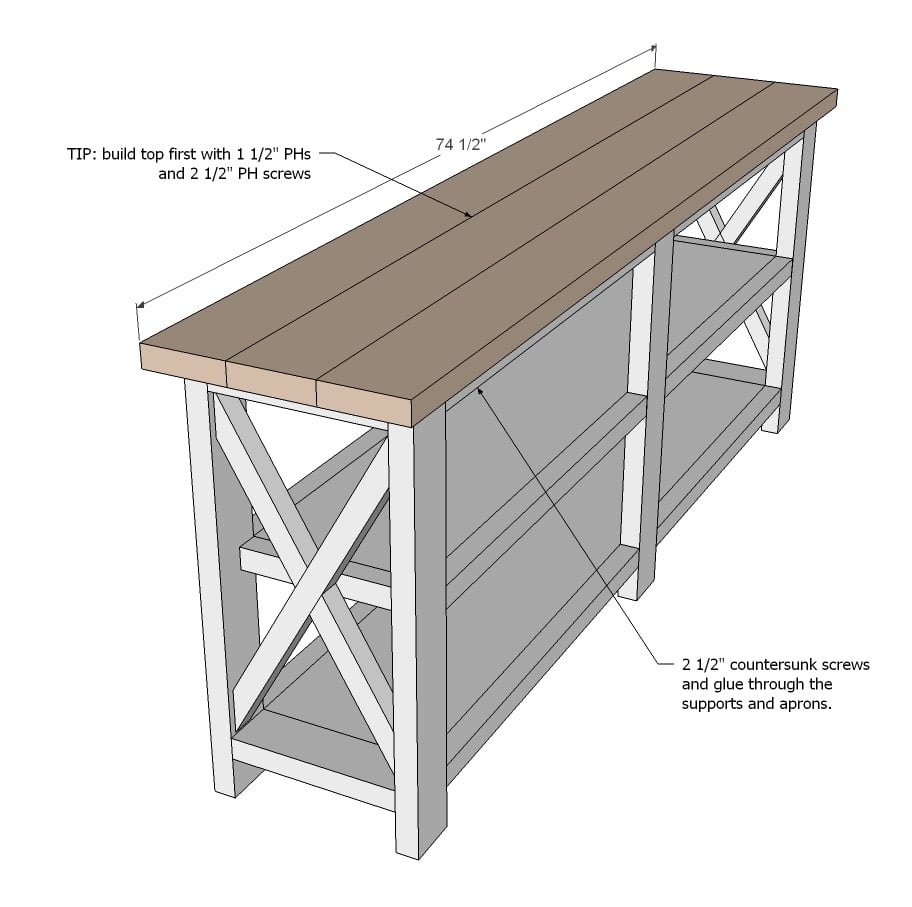
And then add the top. You can build top first with 1 1/2" pocket holes and 2 1/2" pocket hole screws and then attach to top through 2x4/2x2 aprons or just plank the top for a rustic look - it's up to you.
TIP: Just use your 2 1/2" pocket hole screws to attach the top so you don't have to go out and buy more 2 1/2" screws.
It is always recommended to apply a test coat on a hidden area or scrap piece to ensure color evenness and adhesion. Use primer or wood conditioner as needed.


Comments
brittmc
Wed, 09/20/2017 - 07:36
Need opinions/help on a modification!
Hello all!
I am going to make this but I want it to be 42 inches tall, 34 inches wide(with no middle support) and 16 inches deep. There would still be two shelves but one shelf would be higher than the other because on the bottom shelf i am putting dog bowls. In your opinion would it still be okay if the middle shelf didnt line up exactly with the center of the X on the sides, instead it would be higher? Let me know. I just dont want the doggos to bumb their heads.
Skodimer
Mon, 01/08/2018 - 17:23
Adding height
I'd like to build this and add six inches to the height for a retail display. What is a formula I can use to determine the cut angles for the X's once I've determined my measurements? Or is there another way to figure that out?
tdk5005
Wed, 01/10/2018 - 12:51
Pocket hole size
Can you help me understand pocket hole size? For example, when the plans say 1 1/2" PH what exactly is that that? 1 1/2" diameter? 1 1/2" length?
Bigjimwiebe
Thu, 01/11/2018 - 15:20
Decorative Hardware
Where is everyone buying the corner brackets and the decorative bolts? Thanks!
Krpeters0@
Sun, 01/28/2018 - 11:00
Decorative Bolts
Where did you purchase the corner hardware and decorative bolts from?
kconner24
Thu, 02/01/2018 - 12:35
Decorative Hardware
Love this table! We are currently working on building it. Did you purchase the decorative corner hardware like this, or did you buy galvanized and paint it? Either way, where did you purchase it?
Thanks in advance!
Lindsey97
Sun, 02/18/2018 - 06:52
Love this table!
I would love to build this table! But I am wondering how the two shelves are held in place?
Mhaney
Wed, 02/21/2018 - 18:28
Question
What is a good time frame to expect to make this table?
ortho1121
Sat, 02/24/2018 - 11:57
Miter cuts
To make the 60 degree cuts on your miter saw simply place a speed sqaure along the fence. This puts the wood at a 45 degree angle to start and then you just set your saw for 15 degrees. I use this when putting up picture framing on a wall going up a staircase where high angle cuts are needed.
Botsandme
Sun, 02/25/2018 - 13:57
Matching entry bench
By any chance are there plans for a matching entry bench ??
newtodiy24
Mon, 02/26/2018 - 07:04
Love
Does anyone know what the cost of this project comes out to be around?
jhoffbuhr
Sun, 03/04/2018 - 21:07
Slightly confused....
I have cut all the wood that was on the list, but my 2x2's (30 in ones) are not flush on the 2x4. Was I supposed to rip them down to a smaller size? I would appreciate all the help you can give.
RSQMonkeyII
Wed, 03/07/2018 - 12:59
Sketchup Plans
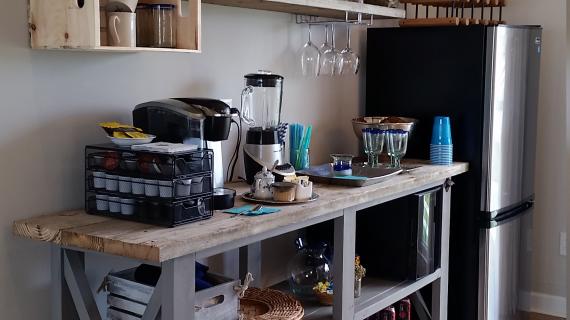
Does anyone ever share their SKetchup Plans on here> I want to convert this project to a coffee bar with a large blackboard and a shelf above. Just checking before I build it from scratch.
Robb
ewoodall
Thu, 03/28/2019 - 07:58
Corner hardware/decorative bolts
Where can I find the corner hardware and decorative bolts in black? I’ve tried Home Depot and Lowe’s with no success. Thanks
tinajay
Wed, 04/03/2019 - 10:42
I believe in the linked post
I believe in the linked post she said she just spray painted them black, but I have seen the black corner hardware on Amazon, don't know about the bolts
XOpTiMoX
Mon, 10/21/2019 - 11:12
The plan was awesome and I…
The plan was awesome and I changed a few things (length and no center shelf) as Th looks we wanted didn’t require the length or center shelf, but The corner hardware and decorative bolts, where did you pick these up from? I can find any anywhere local. Thanks shins for the great plans!
alansari
Sun, 11/24/2019 - 16:16
Thank you
Hello ana I apologize to you because I use Google Translate and my words may be incomprehensible I thank you from the bottom of my heart for your efforts and support to your followers I am very happy to follow your work and spend long hours on your page greeting love to you and your followers and the nice American people
We are a group of Saudi Arabia
daf4tee
Sun, 12/22/2019 - 17:32
On Step 5, what did y'all do…
On Step 5, what did y'all do for connecting all of these pieces besides glue? I was thinking of brad nails as it's not for support and more decorative. Any suggestions?
Brian209
Sun, 12/29/2019 - 21:26
Thanks Ana White
I love Ana White her plans are awesome and easy to use. I also love the YouTube channel very helpful.
mooreheadp
Sun, 01/05/2020 - 17:48
Help!
I finished building the two frames and am getting ready to attach the shelving but I realized that some of the 2x2s did not get glues down well and are loose. Is there anyways that I can make the bond stronger between the 2x2 and 2x4? I have already filled in the pocket hole screws and sanded them down.....
Richard6959
Tue, 01/28/2020 - 17:22
What is that ?????
Help! Can someone please let me know what the round decorative thing on the bottom of each leg is?
cjurado
Fri, 04/10/2020 - 12:12
Slat conversion
Is there an easy conversion to slats from the simpler console? the math isn't working in my head
chaig44
Tue, 04/14/2020 - 15:38
This project looks great,…
This project looks great, looking forward to building! Can you just clarify a few details on some things, specifically on Step 2?
On Step 2: Where are the PH being drilled and how many? How is the 1x12 being attached (is screw going into end grain?) Thanks in advance for any help!
bmw_923
Mon, 05/18/2020 - 20:26
Rustic X no pocket holes
Hi Ana!! I love this table and had my eye on it for some time. I'm new to building and ready to build, however there use to be a design link for the Rustic X without pocket holes. Now, I only see the farmhouse console table. I was wondering if you could share the plans for this build without pocket holes? Thanks so much in advance🙏🏽
JasonRev
Thu, 06/18/2020 - 14:13
What bolts did you use? I…
What bolts did you use? I love how they add to the farmhouse look!
andycoker
Tue, 10/20/2020 - 14:58
Rustic console table
Thank you the plans. I combined these with the other easier plans to create my own table. Using pocket holes the entire way. I painted the bottom half white and the top is stained minwax slate with a polyacrylic gloss finish.
jcmoore09
Thu, 11/12/2020 - 08:01
Can this table be scaled…
Can this table be scaled down?
onyxblack
Fri, 11/13/2020 - 21:43
I love this tv console but I…
I love this tv console but I want it 64 1/2”
So what would be my new measurement’s?
zee104
Wed, 12/09/2020 - 21:24
Attaching the X’s
For the X pieces on the sides how did you connect the small ones to the large one and then attach it onto the frame?
rhilder1052
Mon, 12/21/2020 - 08:36
Rustic X Console Table
What color stain in on the "Rustic X Console Table" in the picture?
jaa
Sat, 01/16/2021 - 07:47
Question on pocket holes
I am new to Kreg jig and am making the Rustic X console table. How close can you put the pocket holes together in the 2x2? It doesn’t seem wide enough to fit 2 holes since they would be so close to the edge. Couldn’t this break the edge of the 2x2?
jennlemley12@y…
Mon, 03/01/2021 - 12:23
Need help making the Xs
Help! I can't get the Xs to work out. I think its because my 1"x12" was a full 12" wide and not 11 1/4". I've tried three different combinations, but I can't figure out the angles of the ends and the length of the X pieces.
egalvan-alv
Sun, 03/28/2021 - 19:57
Has anyone added doors to…
Has anyone added doors to this build? I like the simplicity of the piece but was wondering how adding some doors would affect the look.
shazzy103
Sun, 11/14/2021 - 11:10
Your rustic X console table plans are being sold on Etsy for £29
I thought that I would let you know that your plans are being sold on Etsy along with your photos 🙈https://www.etsy.com/uk/listing/1090875770/rustic-x-console-table?gpla=…
pebbles
Sat, 03/12/2022 - 14:55
Shelves specs
Hi!’
I feel a bit dumb because I have read through the plans several times but cannot find the shelves specified in the material or the cut list. Are they sold a standard size? Are they plywood? Sorry about this but I’m not from the US so maybe everybody knows something I don’t haha.
Thank you!!