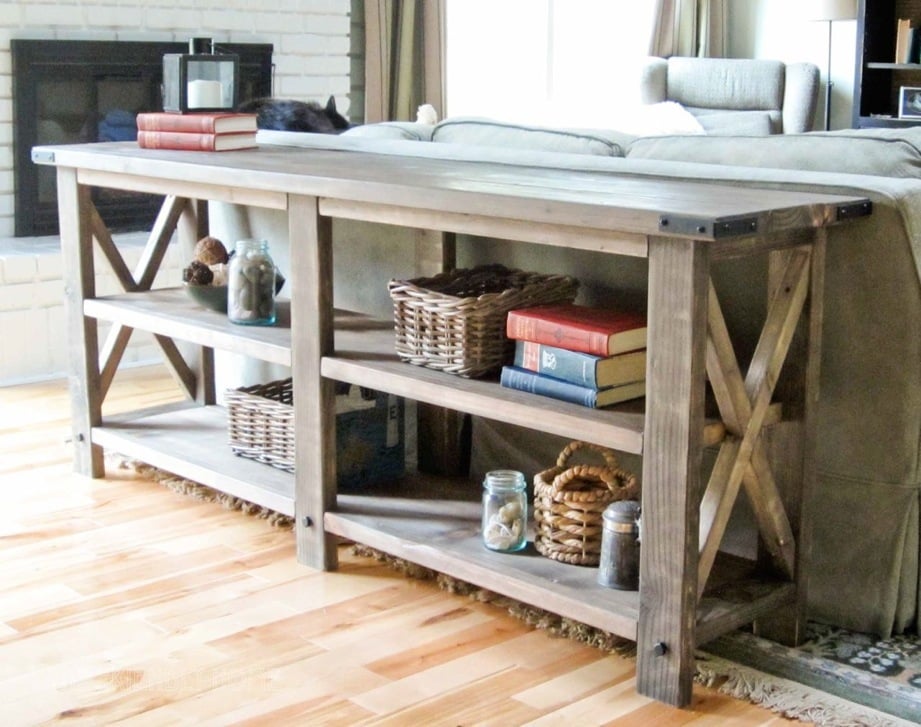


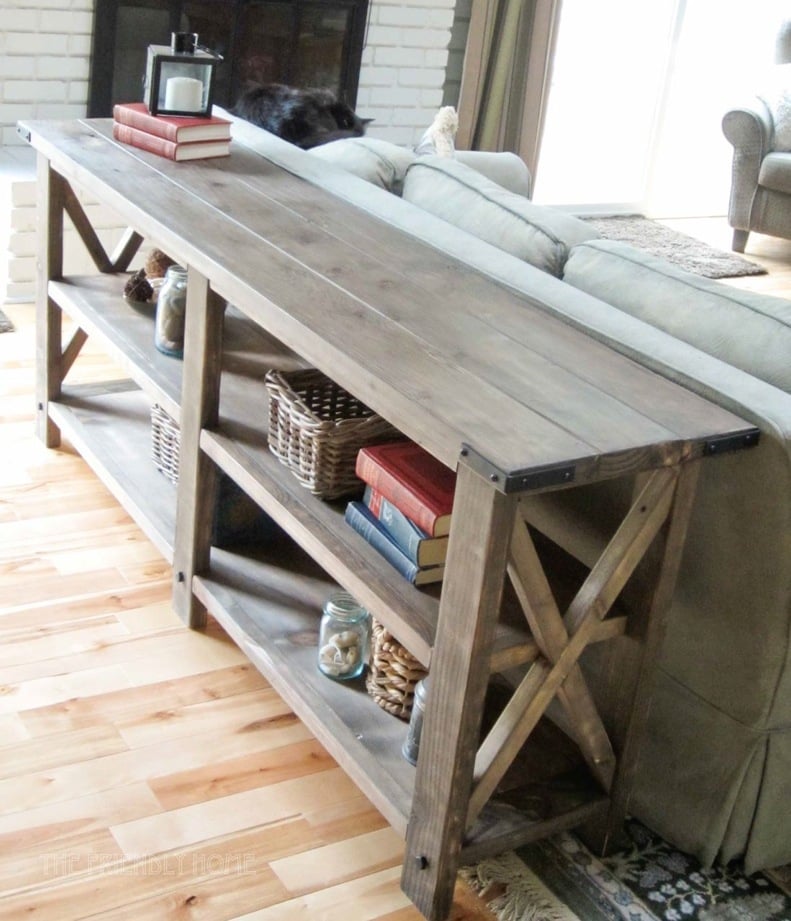
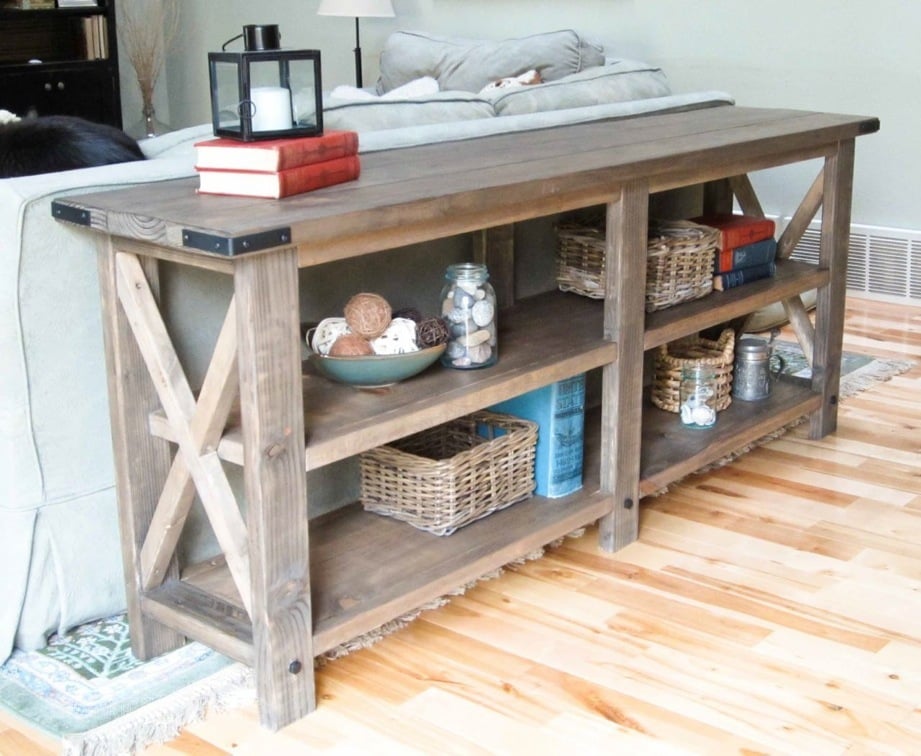
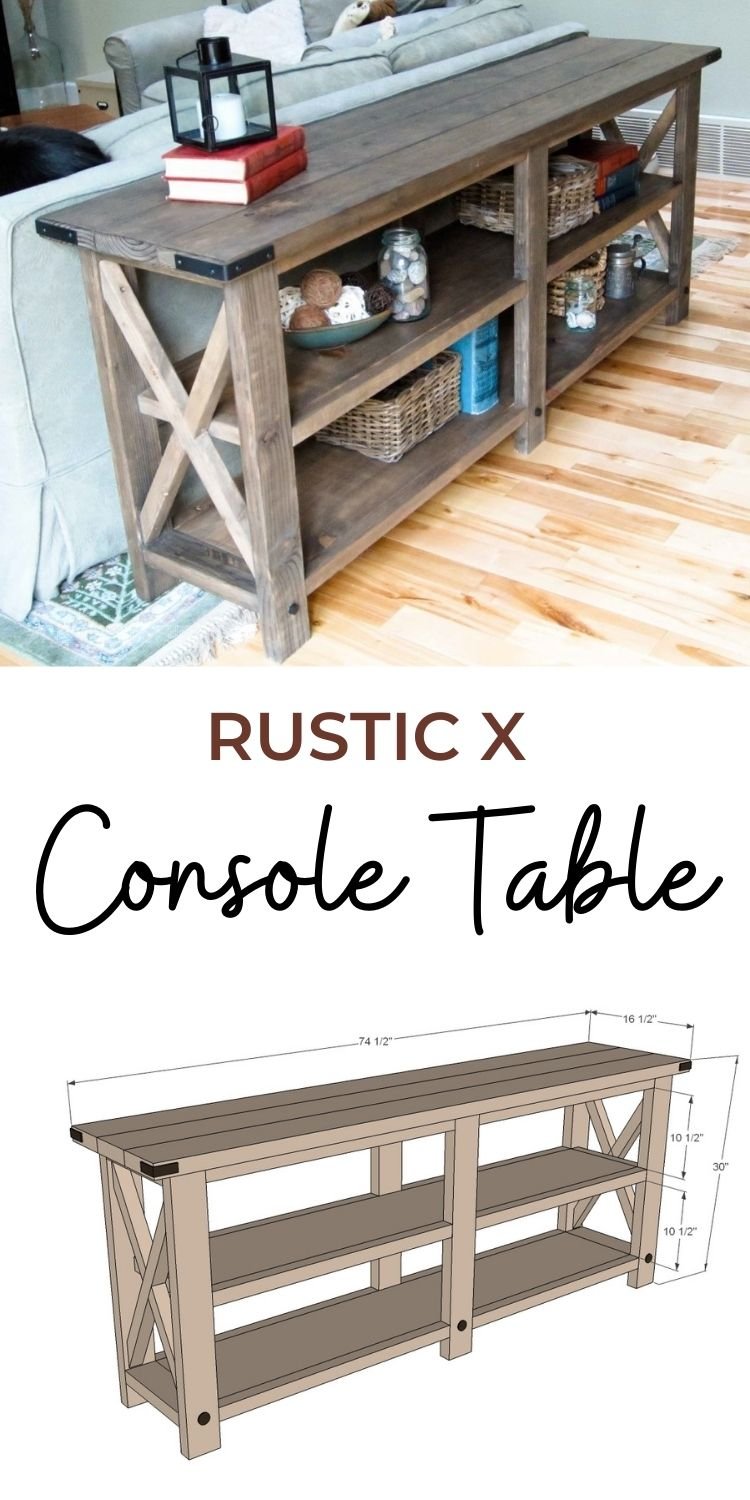
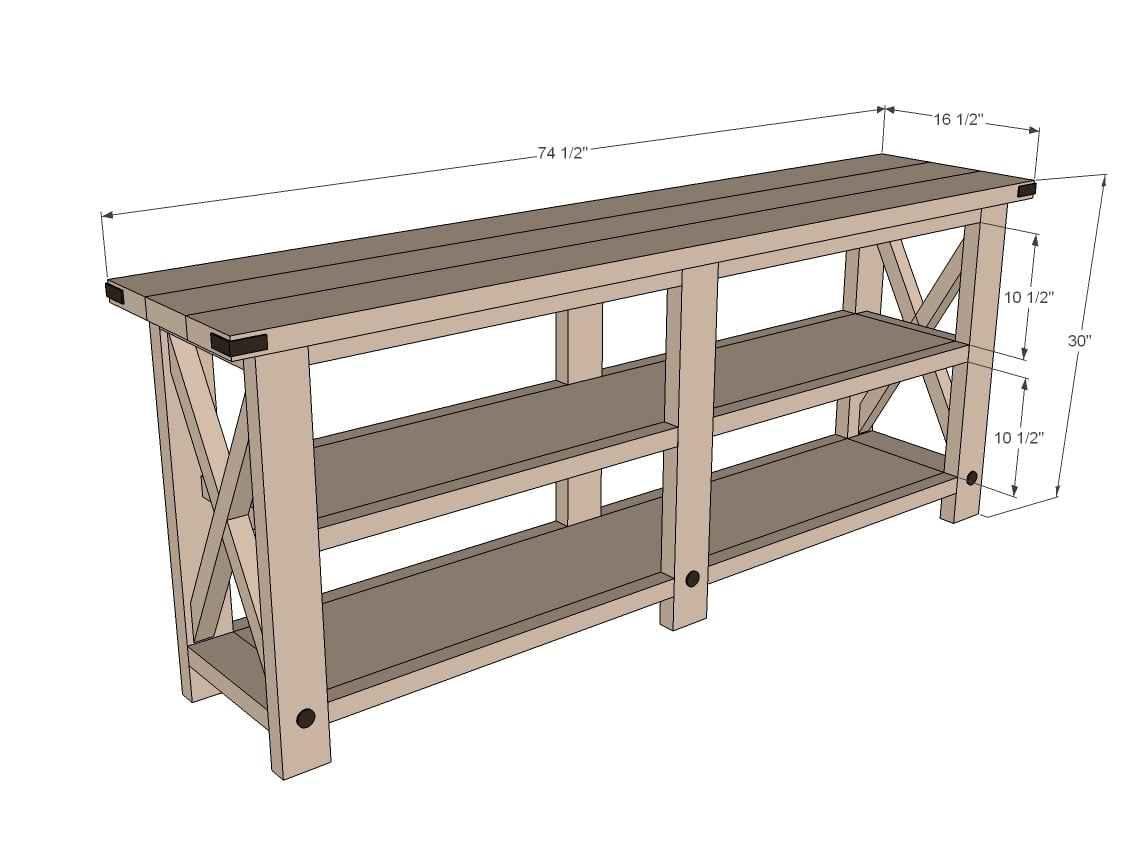
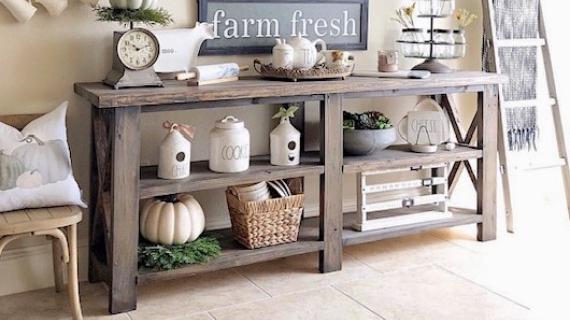
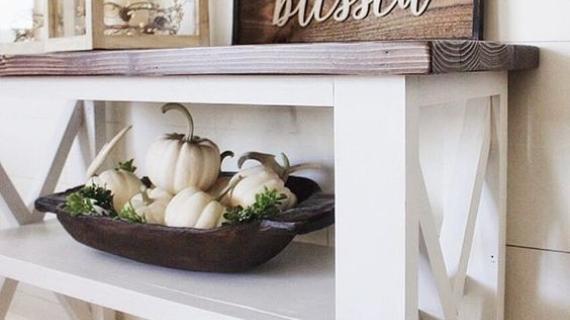
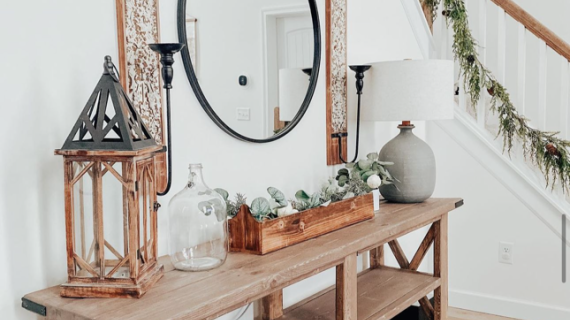
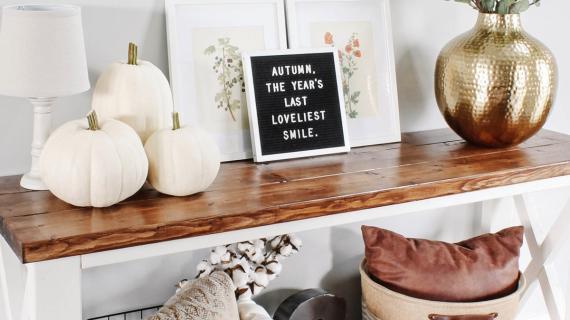
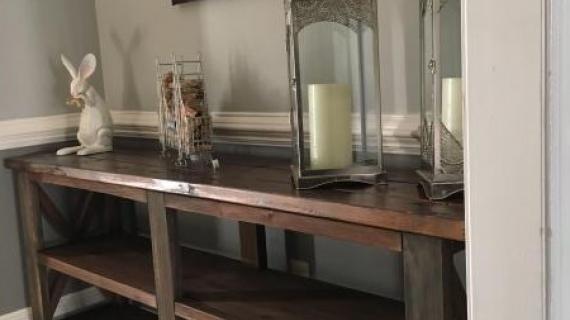
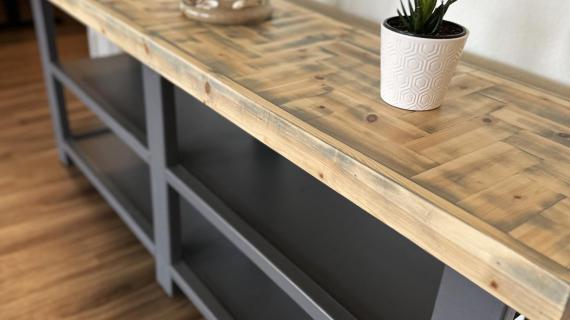
Build the super popular Rustic X Console Table with Ana White plans. This woodworking project has been built thousands of times and loved the world over. Its made of construction lumber (yes, 2x4s!) and the plans are easy to follow.
Also in this Collection: Rustic X Coffee Table Plans, Rustic X End Table Plans and Rustic X Bench Plans


Rustic X Console Features
- Solid wood design accepts stain beautifully and paints up nicely
- Extra long length perfect behind sofas, sectionals, as a dining room buffet, or under the TV
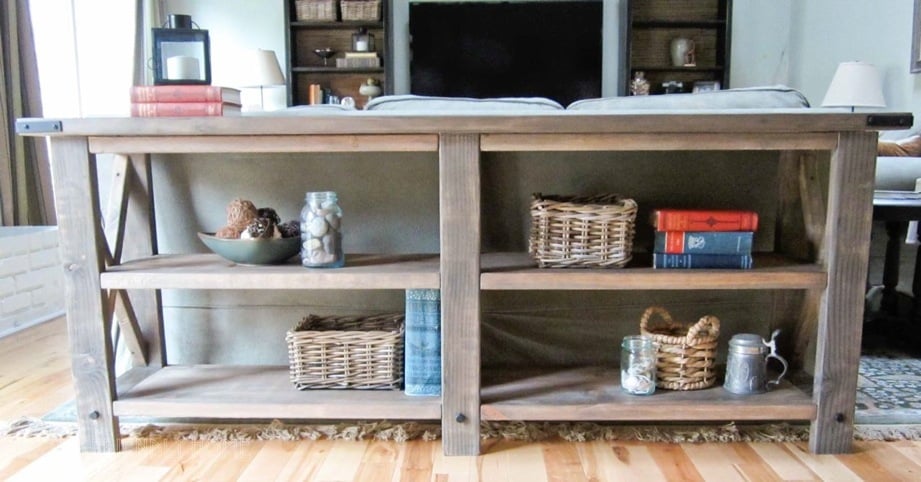
- Storage shelves perfect for displaying and storing
- Storage shelves fit most standard baskets
- Beautiful planked top is full of texture
- Step by step plans have no exposed screw holes

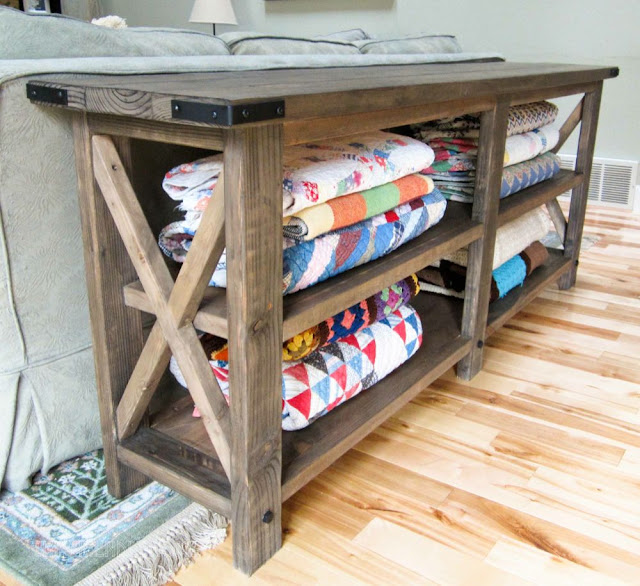
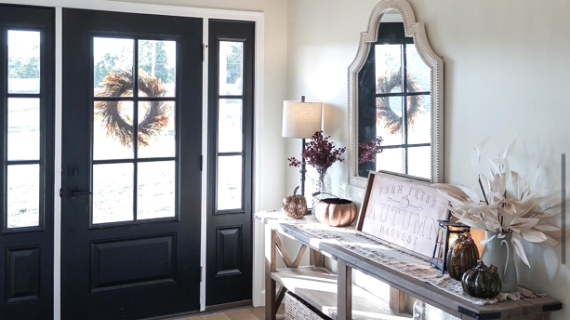
This beautiful Rustic X Console was built by Hillary from The Friendly Home. I encourage you to take a second to stop over to The Friendly Home and read more about Hillary building this console, the finish she used, and the story behind those beautiful quilts!
Easier to Build Option: Farmhouse Console Table Plans
For beginner or novice builders, we have added a easy to build option for this plan, the Farmhouse Console Table plans. It does NOT require pocket hole screws and is less expensive to build (but there is exposed screw holes). There is also a video tutorial to help with the build.
Pin For Later!
Preparation
- 6 – 2x2 @ 8 feet long
- 3 – 2x4 @ 8 feet long
- 1 – 1x12 @ 12 feet long
- 3 – 2x6 @ stud length or 8 feet
- Corner hardware/decorative bolts
- 1 1/4" and 2 1/2" pocket hole screws
- 2 1/2" screws
- 12 – 2x2 @ 30”
- 6 – 2x4 @ 28 1/2"
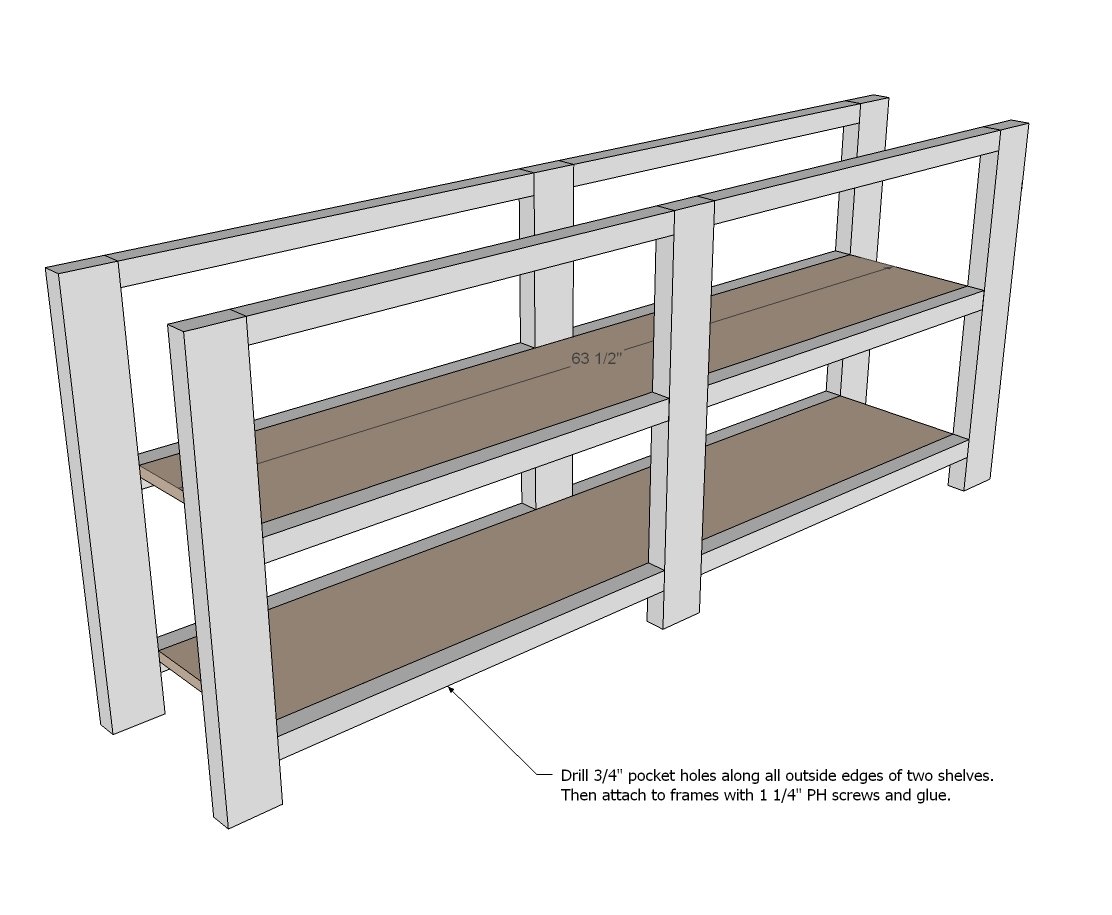
- 2 – 1x12 @ 63 1/2"
- 5 – 2x4 @ 11 1/4"
- 2 – 2x2 @ 11 1/4"
- 2 – 2x2 @ 22 1/2" (long point to short point, ends parallel, cut at 60 degrees off square)
- 4 – 2x2 @ 11 1/4" (longest point to shortest point, long end cut at 60 degrees off square, short point cut at 30 degrees off square, angles are in same direction)
- 3 – 2x6 @ 74 1/2"
NOTE: If your saw does not cut 60 degrees off square, you will need to mark cuts with an angle square or compass/protractor and cut angles with circular saw or jigsaw. Practice this cut first on scraps!


Please read through the entire plan and all comments before beginning this project. It is also advisable to review the Getting Started Section. Take all necessary precautions to build safely and smartly. Work on a clean level surface, free of imperfections or debris. Always use straight boards. Check for square after each step. Always predrill holes before attaching with screws. Use glue with finish nails for a stronger hold. Wipe excess glue off bare wood for stained projects, as dried glue will not take stain. Be safe, have fun, and ask for help if you need it. Good luck!
Instructions
Step 1
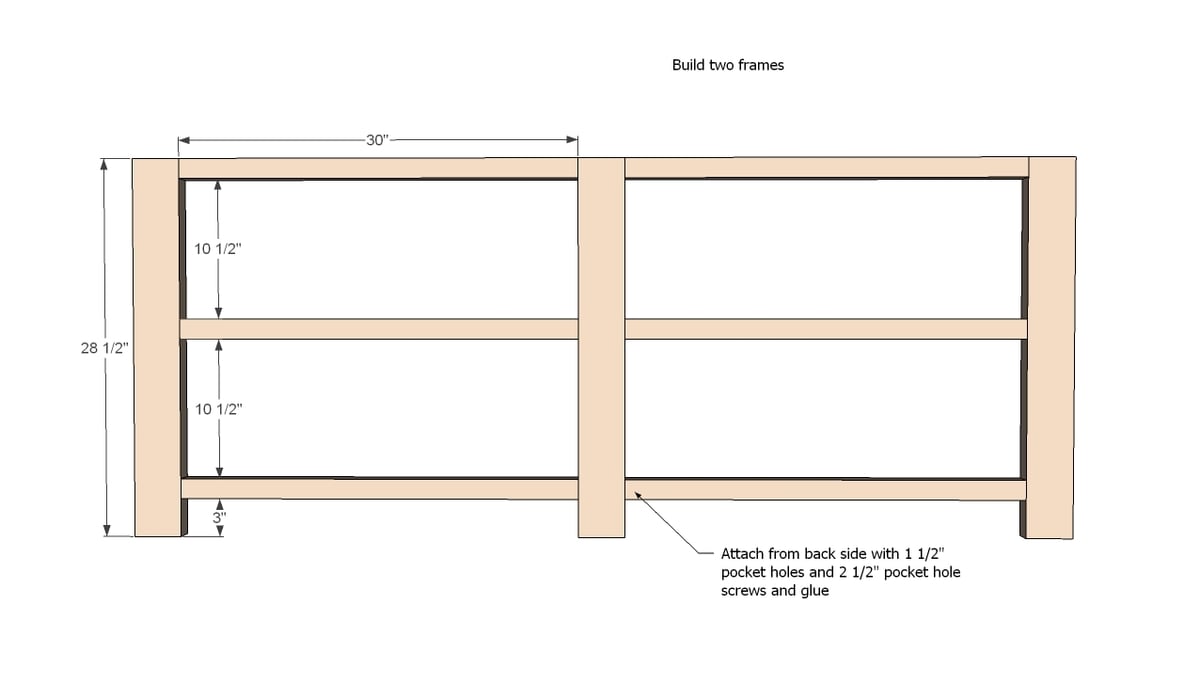
First build two frames as shown in diagram.
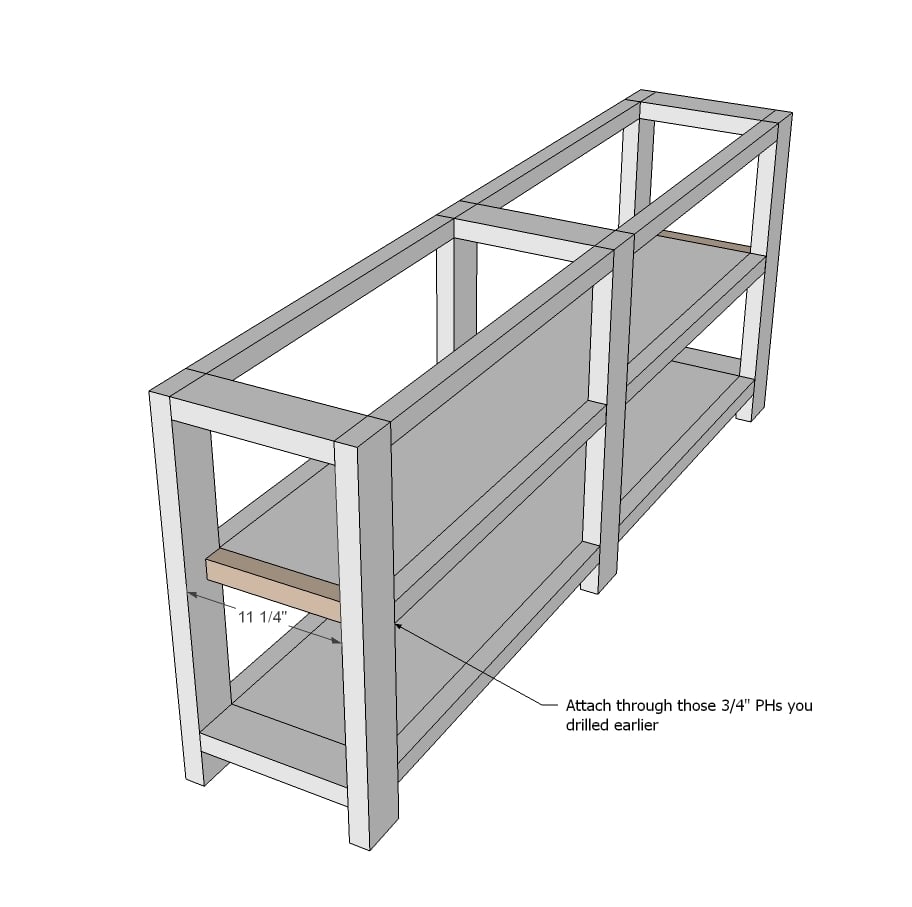
Step 2
Then attach frames to shelves. NOTE: I recommend drilling 3/4" pocket holess with Kreg Jig around all sides of each shelf for attaching all shelf trim with 1 1/4" Pocket Hole screws later on.
Step 3

2x4 end supports need to be the same width as your 1x12 boards - expected to be 11 1/4" wide. Measure the width of your 1x12s and cut the 2x4 supports to match this width.
Attach to frames and shelves. For attaching to frames, use 1-1/2" pocket holes with 2-1/2" pocket hole screws.
Step 4
Add trim to the shelf.
Step 5
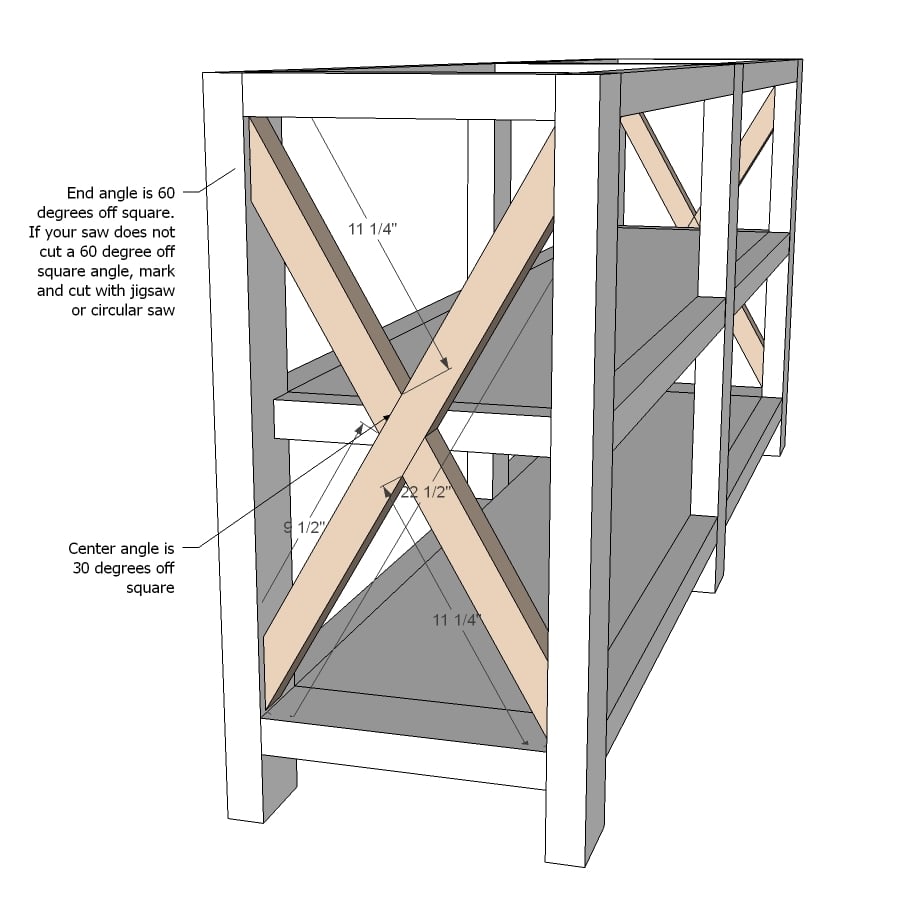
The X can be cut by just placing the uncut board alongside it's permanent position, and marking the overlap with a pencil, and then cutting the pencil lines with a circular saw or jigsaw.
First do the longer piece, then place inside the project, but don't attach yet.
The figure the smaller piece cuts and make those cuts.
Fit the smaller pieces in the project, and trace where they need to be joined to the larger piece.
Remove all pieces and attach the smaller pieces to the longer piece.
Then place the entire X inside the opening and attach.
Step 6
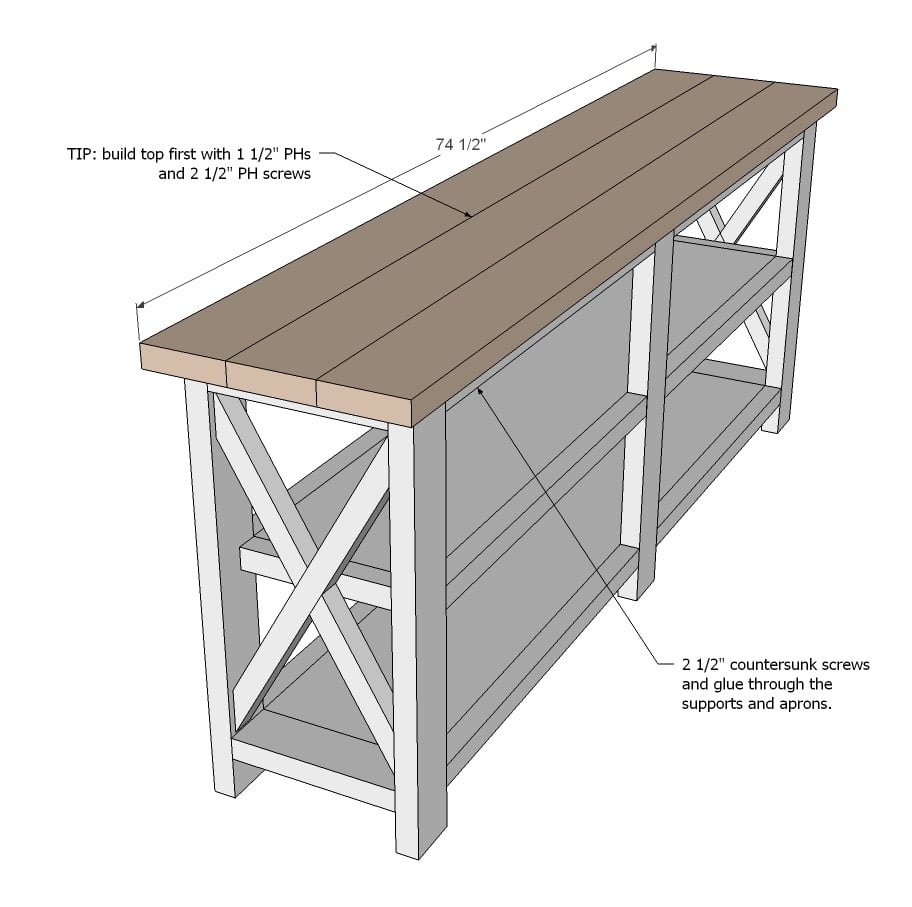
And then add the top. You can build top first with 1 1/2" pocket holes and 2 1/2" pocket hole screws and then attach to top through 2x4/2x2 aprons or just plank the top for a rustic look - it's up to you.
TIP: Just use your 2 1/2" pocket hole screws to attach the top so you don't have to go out and buy more 2 1/2" screws.
It is always recommended to apply a test coat on a hidden area or scrap piece to ensure color evenness and adhesion. Use primer or wood conditioner as needed.

Comments
skrew37
Thu, 02/06/2014 - 07:33
It's important to get the
It's important to get the Stanley brand brackets because the other brands have a little indent in the inside corner preventing it from sitting flush against the outside corner of the table top.
AngieDee83 (not verified)
Thu, 09/06/2012 - 17:27
Do I need to use a Kreg Jig & PH screws?
I don't have a Kreg Jig so I'm wonering if I can build this without one. If so, what do you suggest I do & if not, which Kreg Jig would you recommend that I purchase? Thank you for this tutorial so much! This piece, with the exact dimensions, is going to be more than perfect in our home!
Hillary (not verified)
Sun, 09/23/2012 - 12:05
You could do it without a
You could do it without a Kreg Jig. Just get a good countersink drill bit and use big deck screws. You'd have to join the top boards using mending plates, I think. A big set of clamps and wood glue would help, too.
RobKelly3
Tue, 09/11/2012 - 08:26
PH
Hi All! I'm sorry, I have another very newbie question...when you have to cut a piece of wood at an angle but also need to attach with pocket hole screws, using the Kreg Jig, do you drill the pocket holes before you cut? Or do you drill after you've cut? Like for the X-Console, for X pieces, do you drill the pocket holes before you cut the angles on the ends, or do you cut them first? If you cut them first, how do you orient the wood in the jig to drill the holes? I'm sorry if this is a redundant question. Thanks so much!
Hillary (not verified)
Sun, 09/23/2012 - 12:00
Drill after cutting and just
Drill after cutting and just hold it straight up in the jig. On this piece, I drilled the holes on the insides of the Xs. On the next two X pieces I built, I didn't use the Kreg Jig to attach the Xs; I just screwed them in at an angle.
ErinElizabeth (not verified)
Mon, 09/17/2012 - 18:53
No Kreg Jig?
I guess my question is the same as the one above mine; how difficult is this without the Kreg Jig? Or, what is your opinion on the Kreg Jig mini? At $22, it's a lot easier to convince my husband than the $100 a normal one costs... :)
Hillary (not verified)
Sun, 09/23/2012 - 11:57
I used the Mini for a lot of
I used the Mini for a lot of projects before I was ready to buy the full Kreg Jig. But, with the Mini you'll need to buy at least one Kreg face clamp to hold the Mini onto the piece of wood you're drilling, and you should probably also have a Kreg corner clamp, which has one end that clamps into the Kreg hole you've drilled. So it will still end up costing you around $75 total, probably. I think the full Kreg jig comes with a face clamp.
JBurke (not verified)
Fri, 09/21/2012 - 16:14
In LOVE!
I am so in love with this piece. It is exactly what I want. How much would it cost if you made me one? : ) I just don't all of the tools to do this and I have never built a pieces of furniture before.
Hillary (not verified)
Sun, 09/23/2012 - 11:55
Hi, JBurke. If you're really
Hi, JBurke. If you're really interested in having one built, email me at hillary (dot) dickman (at) gmail (dot) com and we'll chat. The shipping may not be worth it, but we'll see!
Brooke smith (not verified)
Mon, 09/24/2012 - 17:20
Im to the "x" stage and I'm
Im to the "x" stage and I'm about to pull my hair out!!!! Hahaha
My miter saw does not do 60's and I'm not great yet with the circular saw. Obviously. I don't want to give up but I'm stuck!!!!!! Lol
Brooke smith (not verified)
Mon, 09/24/2012 - 17:20
Im to the "x" stage and I'm
Im to the "x" stage and I'm about to pull my hair out!!!! Hahaha
My miter saw does not do 60's and I'm not great yet with the circular saw. Obviously. I don't want to give up but I'm stuck!!!!!! Lol
Hillary (not verified)
Mon, 09/24/2012 - 18:28
For the Xs I had to pull the
For the Xs I had to pull the 2x2 out away from the fence. I first held the 2x2 up to the console and marked where I needed to cut. Then I lined up my miter saw blade with the mark and then cut. It was (I'm sure) not the safest way to do it but I kept a lot of pressure on the 2x2 and kept my hands far, far away from the blade. Good luck. :)
claydowling
Mon, 09/24/2012 - 20:27
Tenon saw
You can get an inexpensive back saw at most home centers or hardware stores. They're great for these kinds of inconvenient cuts. If you haven't used a saw like this before you should look up some of the videos out there on cutting with hand saws (especially First Class Cuts).
It's a versatile tool. I use one of these saws, a cheap chisel, a speed square and a sharp pocket knife to build a desk on Saturday.
mblee (not verified)
Tue, 10/02/2012 - 08:33
What type of wood did you use?
Do you use just regular "white wood" like you get at lowes, home depot, or any other fine home store? Pressure treated or just plain stud lumber.
Brooke Smith (not verified)
Tue, 10/02/2012 - 08:48
Wood
I just used the cheapest of each kind. My 2x4 were studs.
Also make sure you get the straightest boards possible. I found this out the hard way. The 2x2's are the hardest ones to find good ones but it makes this project A LOT easier if they are straight! Lol
Good luck!
Hillary (not verified)
Tue, 10/02/2012 - 10:57
The 1x12s for the shelves
The 1x12s for the shelves were whitewood, which I think is the same as (or similar to) #2 Pine. The 2x2s were furring strips, which are whitewood too, I think. Brooke is right -- they are really hard to find straight and some days you have to leave and come back after they've gotten a fresh shipment. The 2x4s and 2x6s were fir. Do not use pressure treated lumber for this project unless you're planning to put it outside. Even then, you could get away without it, I think.
All the lumber for this project came from Lowe's. In my town, Lowe's has okay lumber for rustic projects, but HD is much better if you want higher quality (straight) boards. That probably isn't true everywhere. It definitely pays to look at both places or other lumber yards in your town.
Cliff (not verified)
Thu, 10/25/2012 - 11:39
Rustic X console?
I was wondering if any of you all have had to put a support piece of wood in the middle for the two shelves?
Hillary (not verified)
Thu, 10/25/2012 - 14:41
rustic x console
Nope, no support. But it does have pocket screws joining it to the middle legs.
Odu2010 (not verified)
Fri, 11/02/2012 - 06:34
Middle shelves
Love it. But do you attach the middle shelves. I have never used ph and I am not sure by the instructions on how to do the middle shelves. Also, if I was not going to use ph how would I attach the middle shelves? Thank you!
Hillary (not verified)
Fri, 11/02/2012 - 10:14
rustic x console
Drill pocket holes into the underside of the shelf where it lines up with the legs and the 2x2 face frame. If you decide not to use pocket holes, then countersink screws from the legs and the face frame into the middle shelf. I would definitely recommend pocket holes. Once you watch the video that comes with the kreg jig (or on the Kreg website) you'll see how easy it is.
Brooke smith (not verified)
Fri, 11/02/2012 - 07:37
Update: I ended up making my
Update: I ended up making my x's crosses! It was a gift for my preachers wife and it came to me after I went to bed that why don't I just make them straight edged crosses? They looked awesome :)
I will try to post a picture if I can figure that out hahaa
Hillary (not verified)
Fri, 11/02/2012 - 10:16
rustic cross console
What a great idea! I hope I'll get to see photos!
Bebe Gaddy (not verified)
Sun, 11/04/2012 - 05:57
RUSTIC X BOOKCASE
I would like to use this same idea but as a 46" wide by 6 ft tall bookcase, How do I convert this and know how much wood I need? The room I'll put it in is old knotty pine so I want to try to match that finish. Any ideas will help. I have been after my husband to build bookcase for many years but I thought I would try to build it myself if I could get easy clear instructions. All help would be appreciated!! Thanks, Bebe
Kyla (not verified)
Sun, 11/11/2012 - 18:34
What is the exact stain that
What is the exact stain that you used for the original piece?
Hillary (not verified)
Sun, 11/11/2012 - 19:47
how to oxidize wood
Here is the tutorial: http://thefriendlyhome.blogspot.com/2012/07/how-to-oxidize-wood.html
Good luck!
Kyla (not verified)
Sun, 11/11/2012 - 18:35
What is the exact stain that
What is the exact stain that you used for the original piece?
Ryan D (not verified)
Thu, 11/29/2012 - 07:03
Hex Bolts?
This is a great table! I can't thank you enough for sharing your knowledge with the public. What a sense of accomplishment when someone who doesn't have any woodworking experience can build such a nice table. Quick question: I know you said you got the hex bolts from Lowe's and painted them... but how did you attach them? Did you just pre-drill a hole and screw them in? Did you use nuts on the reverse side and a washer in front? I'm worried I will strip the wood. They are just 1/2" x 1" right? Thanks again for all the help!!
Amy Lou (not verified)
Sun, 12/30/2012 - 15:37
DIY Rustic X Console Table
I finally posted about my console table! Thank you so so so so so very much for this amazing tutorial! Your website and you are SO INSPIRING!
Merry Christmas and Happy New Years!
http://southernbellesoulmountainbrideheart.blogspot.com/2012/12/a-littl…
campo3030
Tue, 06/11/2013 - 12:38
Great!!
Thank you so much for posting your tutorial!! i just posted a concern about where to put the PH's for the shelves and your instructions were awesome!! Table looks great, thank you again.
Christa Hobart (not verified)
Fri, 01/18/2013 - 18:47
When should I stain?
Today I went out and bought all my wood to create this beautiful piece. My question is this. When should I stain it? Should I stain after I cut and before putting it together or should I build first and then stain? Sorry if you have already answered this but I didn't see it anywhere...thank you!
ashleysoko (not verified)
Sun, 01/20/2013 - 14:13
cut list
i love this project but it is a little big for my house. i would like to make a scared down version of this. what would be the material list and cut sizes and list if i only wanted the project to be 4 foot long instead of 74 inches?
thank you ashley
Christa Hobart (not verified)
Mon, 01/21/2013 - 17:18
Stain not changing color
My husband and I have made this piece and LOVE it. However we are at the staining part and my vinegar doesn't seem to be changing with the wool pad in it. How long does this take? I'm not noticing any difference at all in my pad disintegrating. Are there any tips tricks to this? Is there another way to go about getting this color? Thank you tons.
Jami (not verified)
Tue, 01/22/2013 - 13:26
Cost
Do you remember about how much the console ended up costing?! thanks so much!!
malaer613
Sun, 03/03/2013 - 11:06
hardware
Hey all,
Where do I find the corner metal brackets and decorative hardware? I've tried Lowe's and Home Depot. Thanks!
mainman38
Mon, 04/29/2013 - 22:06
Hardware
Can someone point me in the right direction where to get the decorative bolts and the corner brackets in black or any decorative type of color.
karejensen
Fri, 07/26/2013 - 08:50
L brackets
I saw someone else posted their project and they said this: "For the hardware, I used 4" L-brackets and bolts sprayed with Rustoleum hammered spray paint." I hear you can find these at most hardware stores but many times they are not black. Good luck finding the black ones. Maybe they can be ordered in by your local big box store.
Jruffe
Thu, 05/30/2013 - 07:54
Where does everyone buy the wood
Hello ive been looking for a few days now, curious if i should just go to a homedepot or lowes not sure none of the saw mills around me have 2x2's or 2x6's, please help thanks
jon
campo3030
Tue, 06/11/2013 - 12:33
PH for shelves
Hey everyone! i'm a novice at wood work and i plan to get started on this table once i get home from work. I just had a few question. one, i'm stumped on how many PH's to put on the shelves and the placement of the PH's. Also, has a video come out on how to assemble this table? I'd appreciate any additional info on the construction of this table to help me in any way possible. Thank you very much for your time, take care!
Derek
Pabs
Wed, 06/19/2013 - 09:46
I know what I'm doing this weekend!
Beautiful, I love this table, will need yo modify slightly to fit into my available space but I will definitely get it done.
Thank you…
lscrandall
Thu, 06/27/2013 - 18:40
Thank you!
I just sold a piece in my hall way tonight that was to big for the area. I am going to replace that piece with this lovely find! Thank you so much for allowing me to use the plans! :-)
IansMama
Thu, 07/25/2013 - 13:01
Pocket screws
I am going to attempt to build this with my Dad, after we purchase a kreg jig. He believes that we need three pocket screws on each section of trim that attaches to the shelves ending in approx 44 pocket screws without even starting the top. I feel this is over kill when I'm only using it to hold pictures and light things. Since this set of plans does not seem to have a pic of exactly where she placed her screws, can anyone tell me what their opinion is?
karejensen
Fri, 07/26/2013 - 08:27
Where do I find the corner guards??
I'm dying to know where you can find these corner guards. I can't find them anywhere online. Maybe I'm searching the wrong description. Any help anyone can give me would be great!
Thank you!
In reply to Where do I find the corner guards?? by karejensen
dcostillo
Fri, 07/26/2013 - 12:39
L Brackets
Karejensen, these look like an L Bracket painted black. See http://www.homedepot.com/p/Everbilt-3-in-Zinc-Plated-Corner-Braces-4-Pa… for an example. I've noticed when you paint items like this, you have to sand it down a bit so the paint sticks, and do it lightly and multiple times so it doesn't get clumpy.
inferno831
Fri, 07/26/2013 - 13:09
Oxidized Stain
Can someone that has already made this "oxidized stain" using steel wool and vinegar help me out?!
So I followed the instructions provided on the comments above and took a pillow of 0000 steel wool, ripped it up and pushed it into a gallon jug of white vinegar. So my question is this... How long should it take for the steel wool to disolve? I've had this jug of vinegar and steel wool for 4 days now and cant tell a bit of difference. Should the cap be closed or open. I have it open currently; although I had it closed for the first day until I read where the cap should be loose. I just finished building the Big Ur table from this site and am dying to stain it to look weathered, so Im hoping somone can help.
JBWilliams
Tue, 07/15/2014 - 10:19
Oxidized Stain Help!!!
Did you receive any feedback about creating the stain? How long did the process take to complete? Were you happy with your results? I am going to start this and am curious how it will go. Thank you!!!
inferno831
Tue, 07/15/2014 - 11:16
Oxidized Solution
No one ever responded, but I can tell you that I figured out the problem and it all had to do with me being patient.
I took an entire pillow of steel wool and pushed it down into a gallon jug of vinegar and for several days I didnt even notice a change in the steel wool or the vinegar. Around the 5th day, I thought I had noticed a change, but it was so subtle that I coundn't tell for sure (which is about when I posted my question to this site). Then honestly... I forgot about the jug and went onto another project and came back about a week later and that's when I noticed that the steel wool had completely dissolved. I've since tested it on several species of wood, all with different wait times before wiping off the excess and each time results are vastly different. So make sure that you test on similar wood to the project you'll be building.
Long story short... it does work... looks great when applied... but takes a little more than a week to be ready for use.
Good Luck.
JBWilliams
Tue, 07/15/2014 - 11:44
Thank you!
Thank you VERY much for responding! I really appreciate it! I am excited to try it.
ladams1221
Mon, 08/05/2013 - 08:27
Tip for easier attachment when using PH screws
I sometimes wrestle with awkward or heavy pieces when trying to attach them using PH screws. It makes the job easier if you first glue, then tack in place using a pneumatic finish nailer, then drive the PH screws for a permanent & very strong joint. Just be careful not to drive the nails where the PH screws will be going.
Jaime_lyn77
Mon, 08/19/2013 - 05:35
Decorative Hardware
Could you tell me where you got your hardware ie. the decorative bolts and corner hardware?