Community Brag Posts
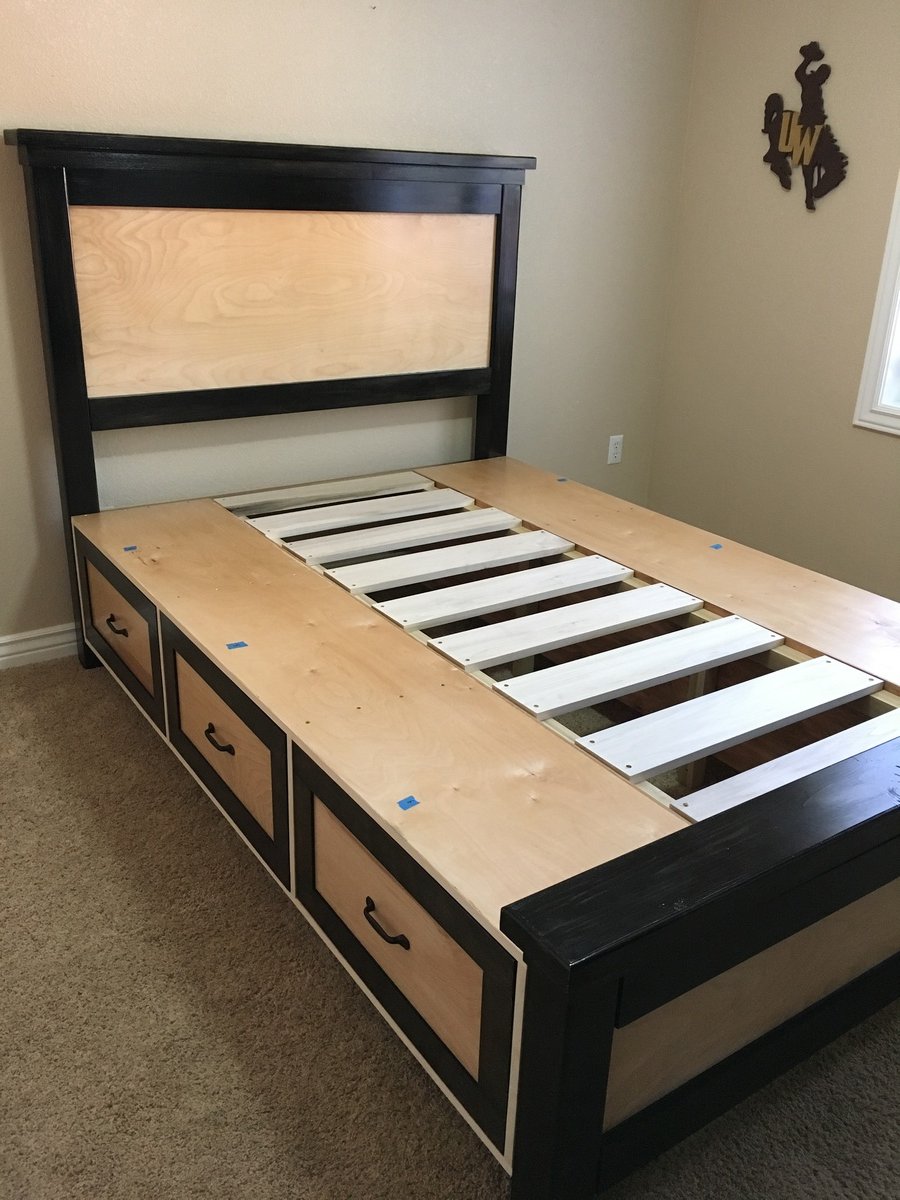
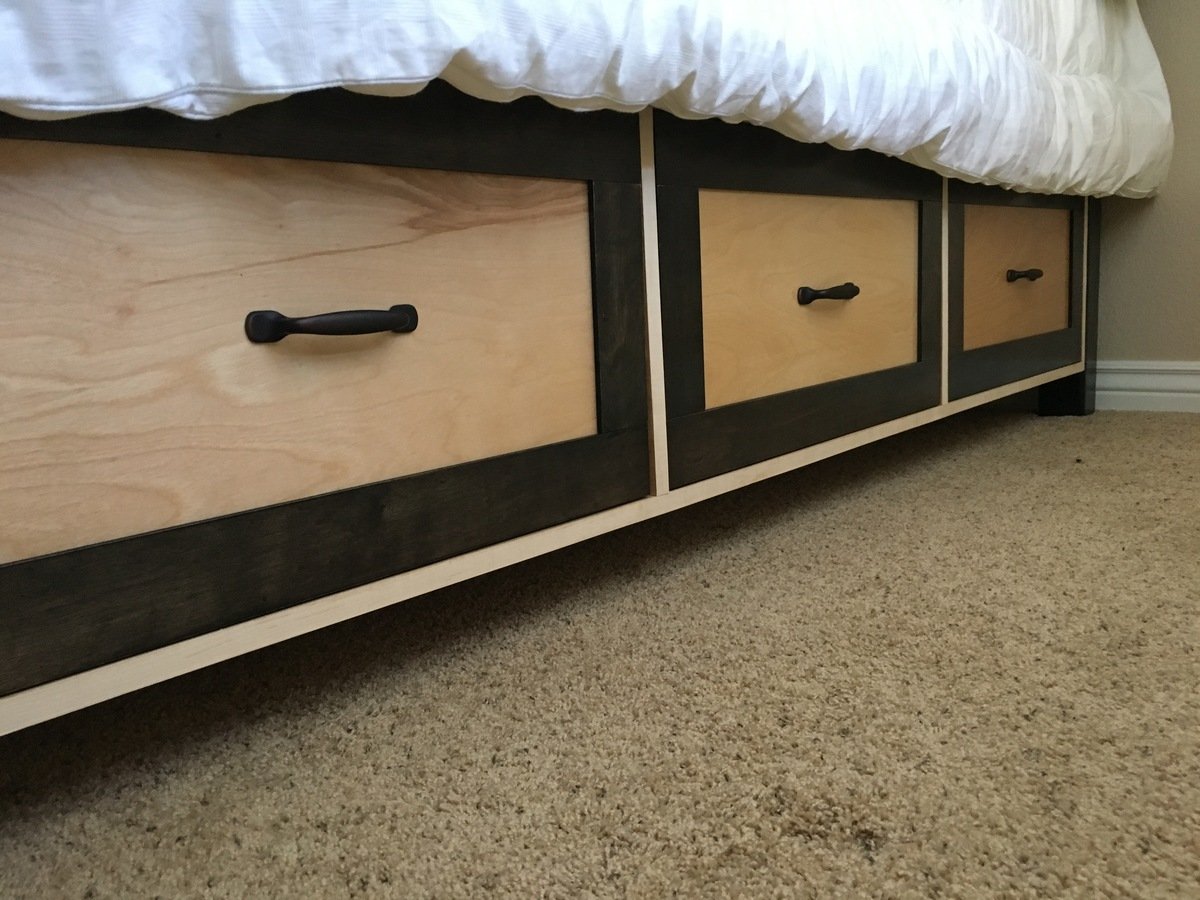
Farmhouse Storage Bed in Cheyenne
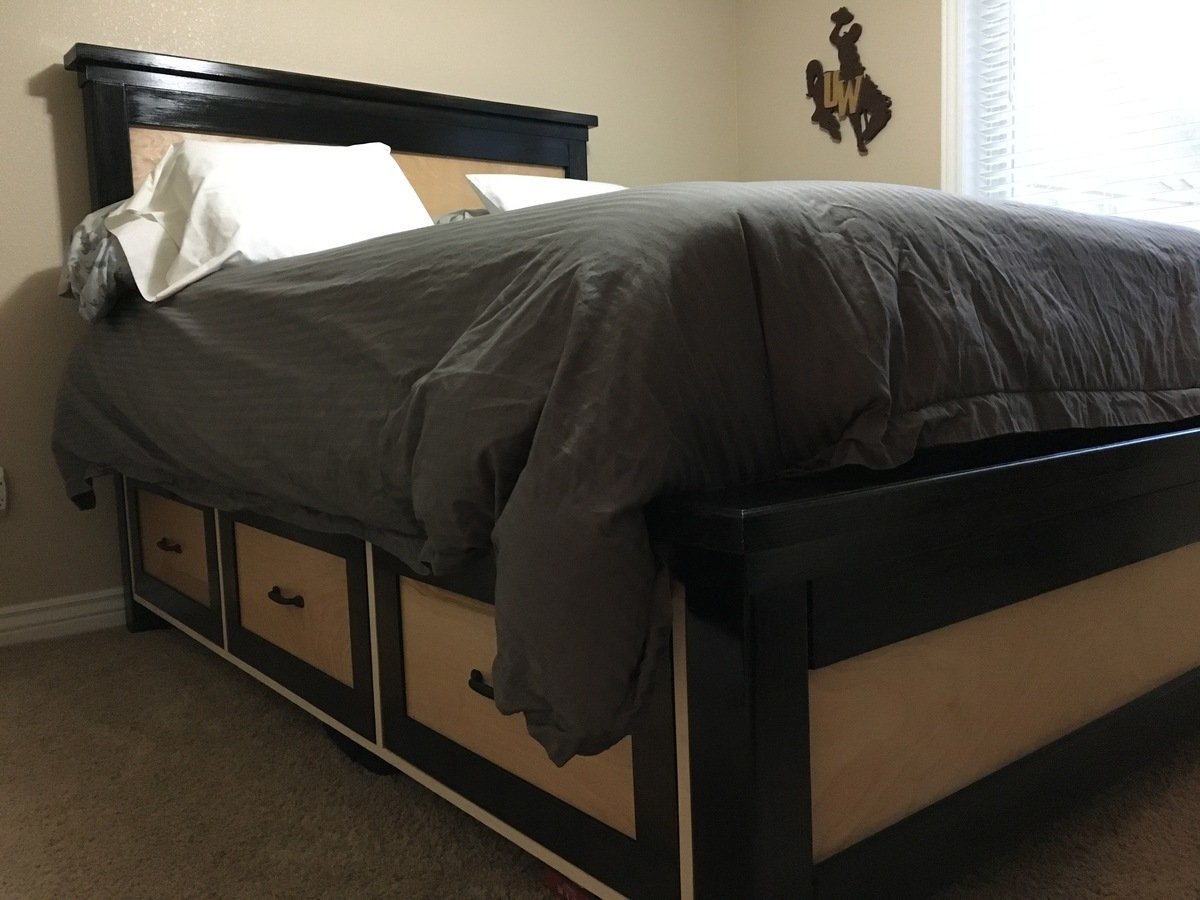
First time building furniture and enjoyed the project. I used better lumber as I wanted to avoid paint but it turned out well for my first try. Thank you Ana White for a good set of plans.
Built from Plan(s)
Estimated Cost
$700 but I used premium lumber, hardware and finished all the surfaces which took more time and money.
Estimated Time Investment
Week Long Project (20 Hours or More)
Finish Used
Minwax black gel stain and 5 coats of minwax polycrylic.
Recommended Skill Level
Advanced
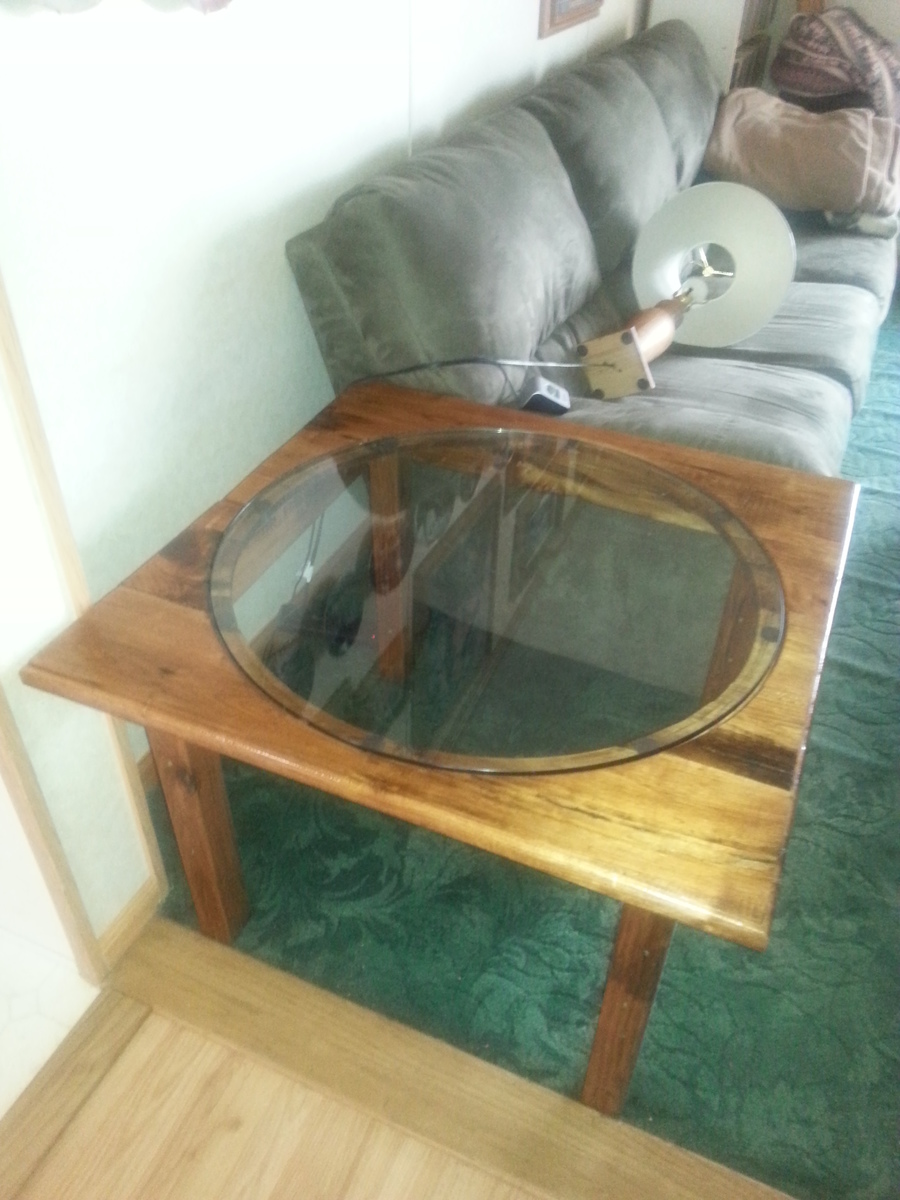
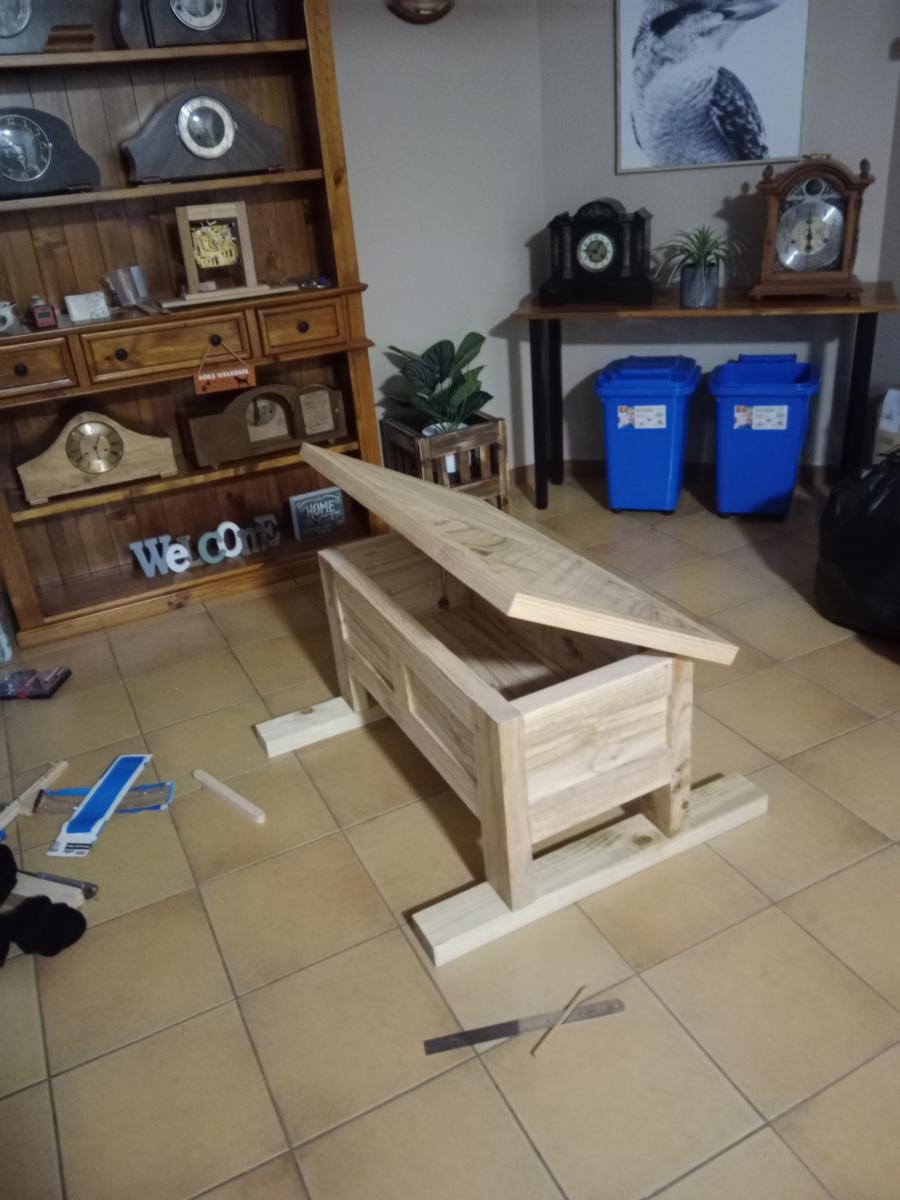
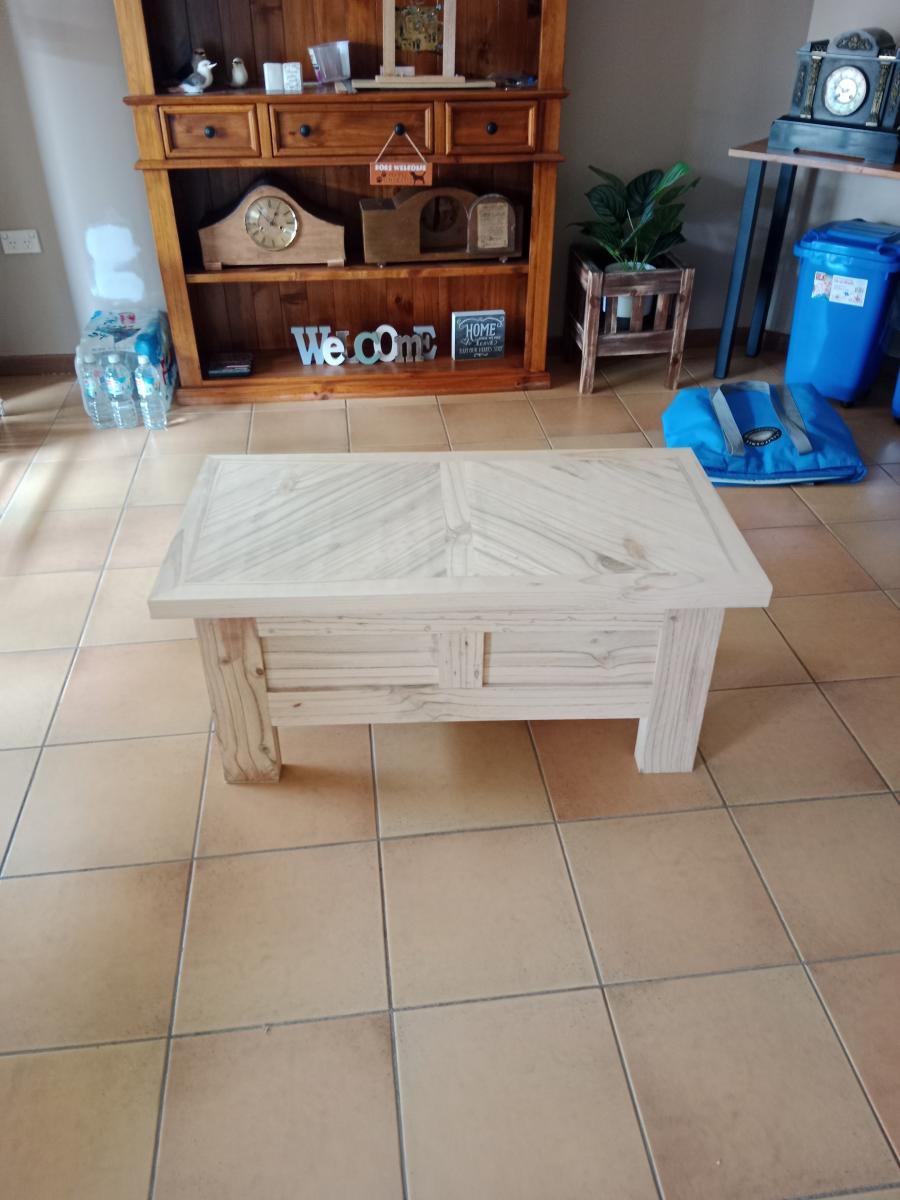
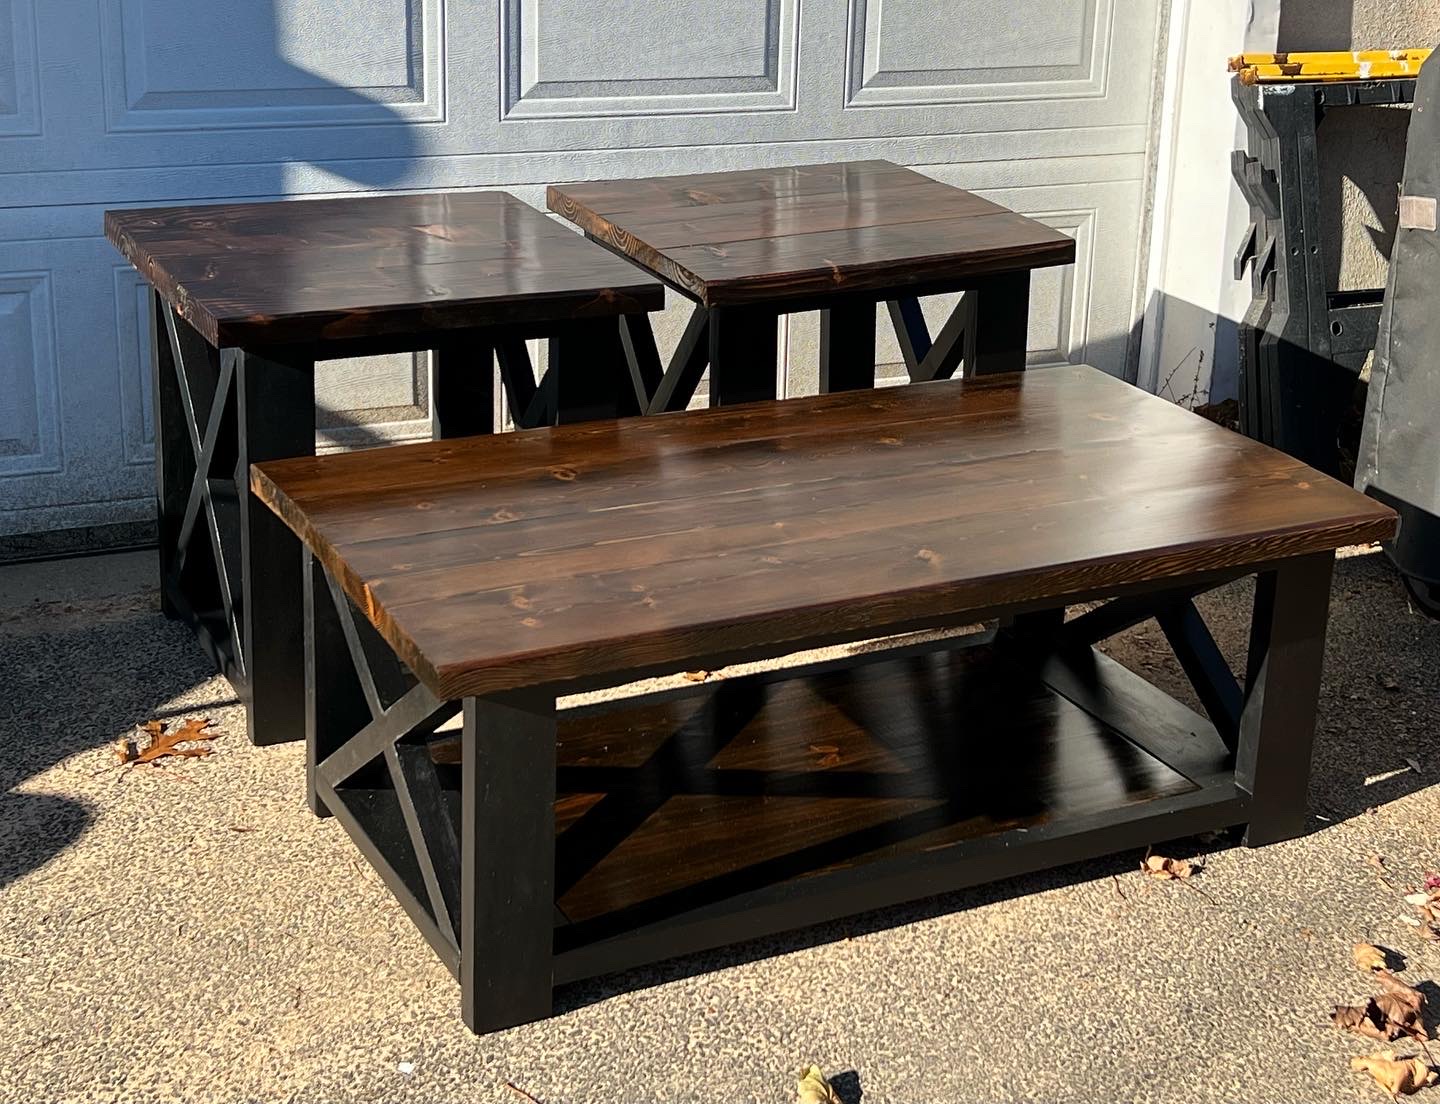
Coffee Table
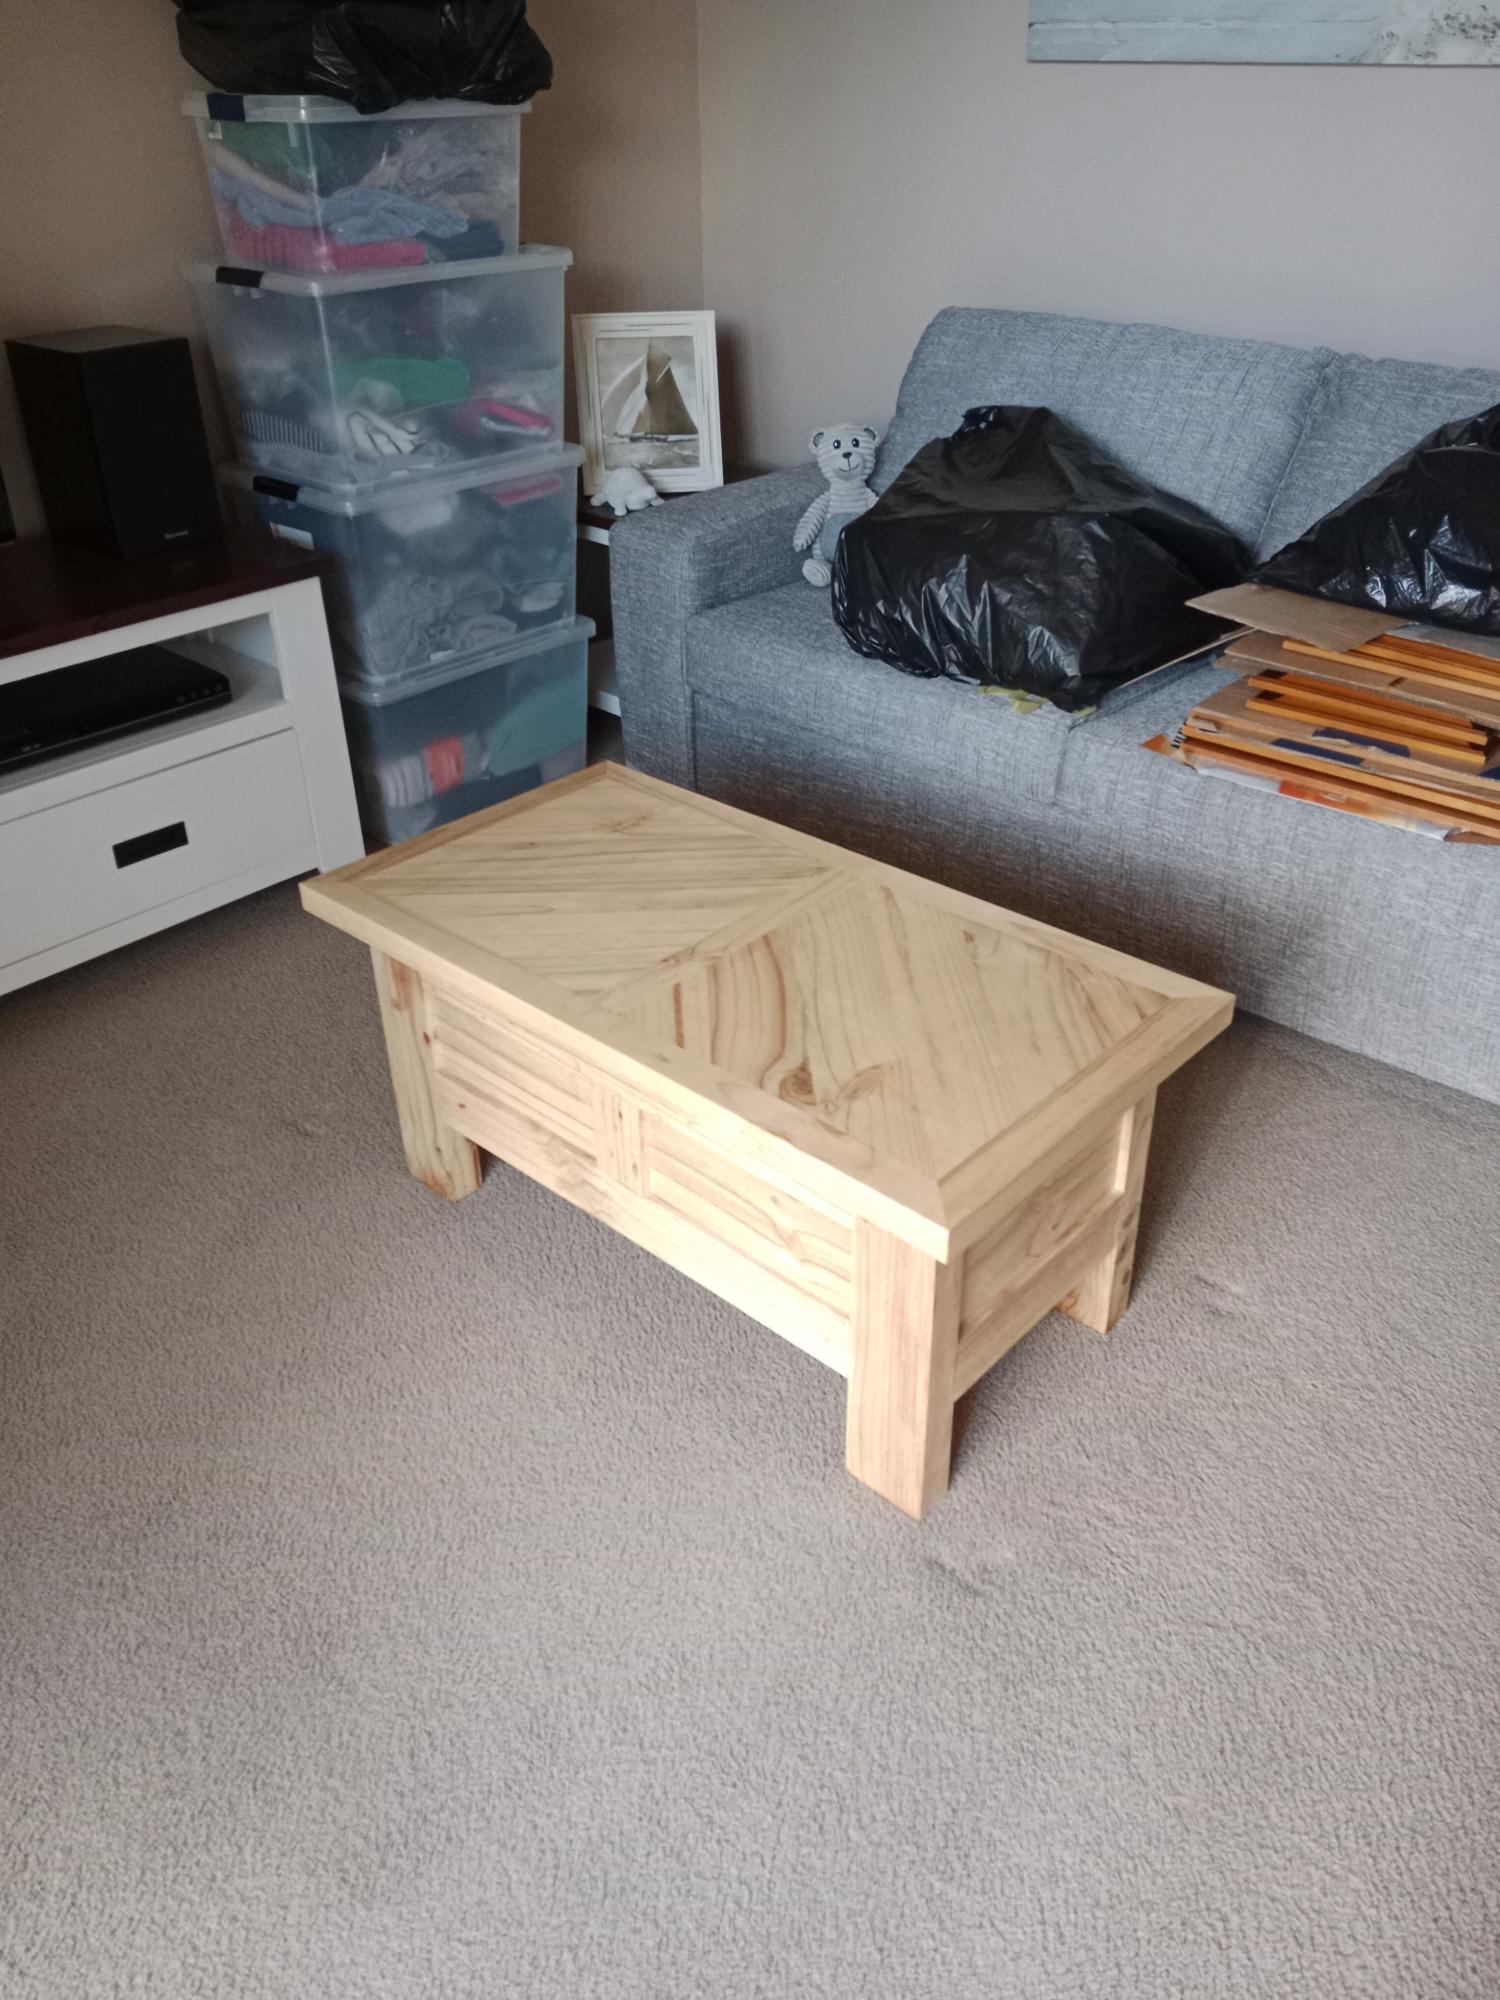
We wanted a new coffee table, I didn't really have a plan but the top was done to match the 4 x 4 x base pedestal dining table. As with all my projects it is made out of 200mm x 50mm pine landscaping sleepers
Built from Plan(s)
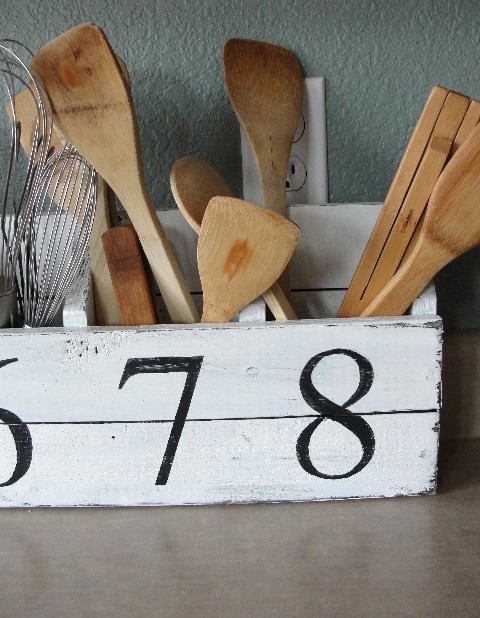
Numbered Cubbies
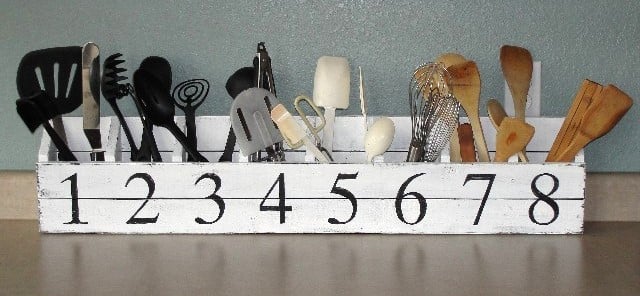
Like so many others, I saw this and had to have one of my own. It was cute and quick - perfect! I had the same height issues that others had. The center supports are too tall for the 1x2 and 1x3 on the front. I wound up using all 1x3's, 2 on the front and 3 on the back. Because the cubbies came out a bit deeper, I thought I would try it as a utensil holder in the kitchen. Cute, huh.
Built from Plan(s)
Estimated Cost
less than $10
Estimated Time Investment
Afternoon Project (3-6 Hours)
Finish Used
I tried Ana's antique finish. The first layer I spray painted black. I didn't know if Ana sprayed or brushed on the white, but I brushed on mine. Painted the numbers on, then distressed it a bit.
Recommended Skill Level
Beginner
Comments

Mon, 08/29/2011 - 11:01
What a great use for the
What a great use for the cubbies! I never would have thought of that!
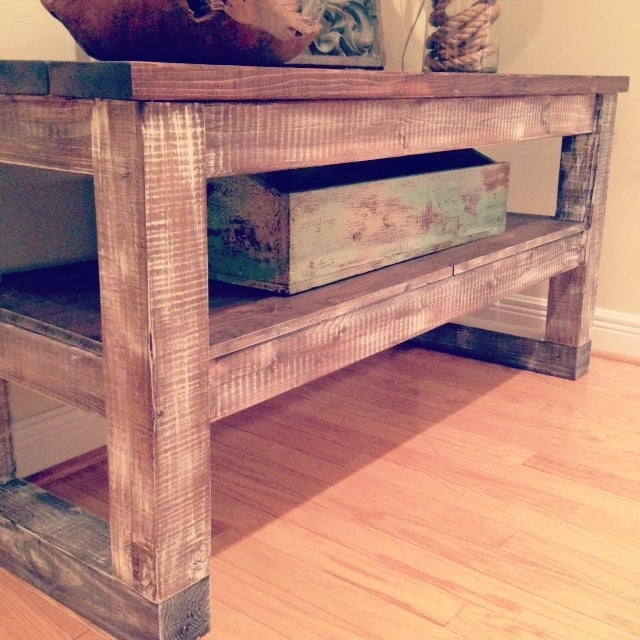
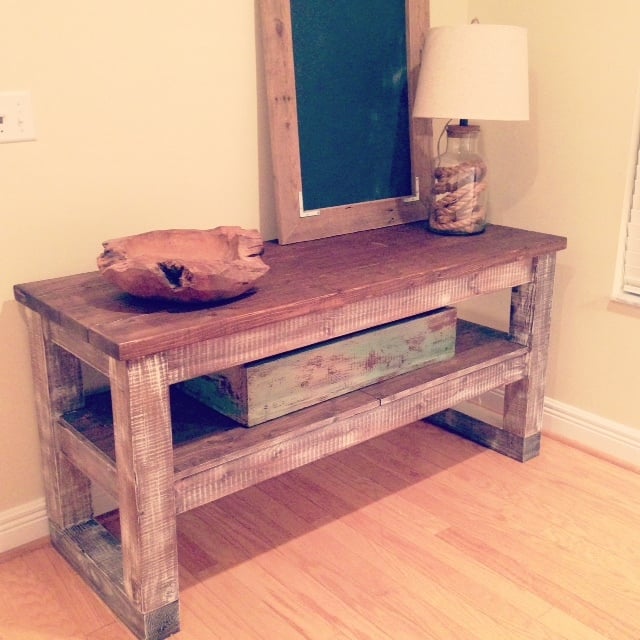
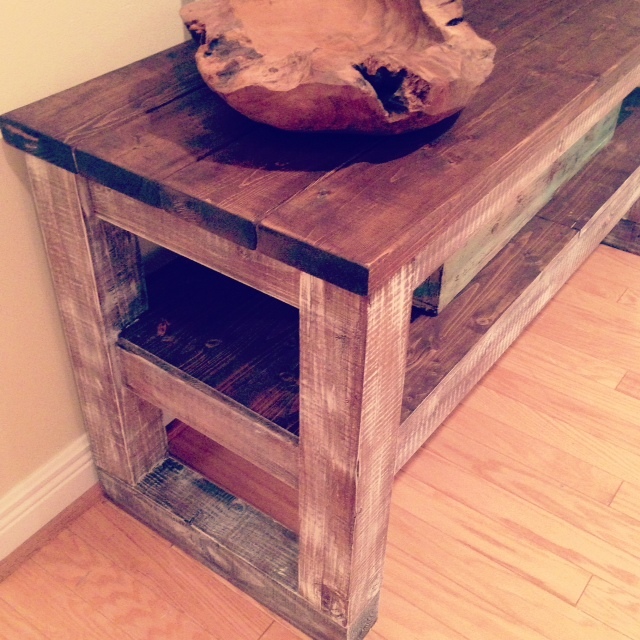
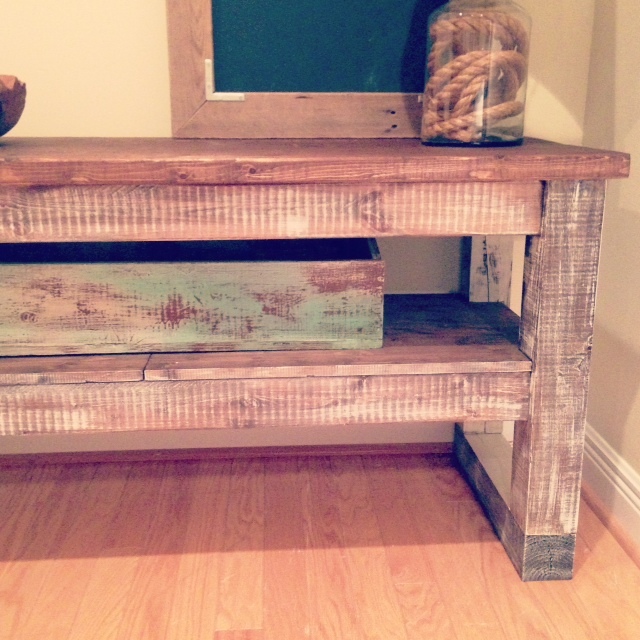
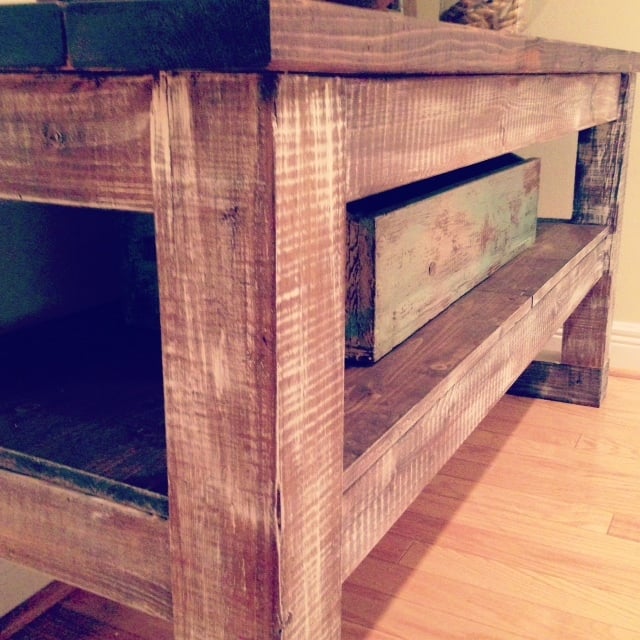
Taylors console
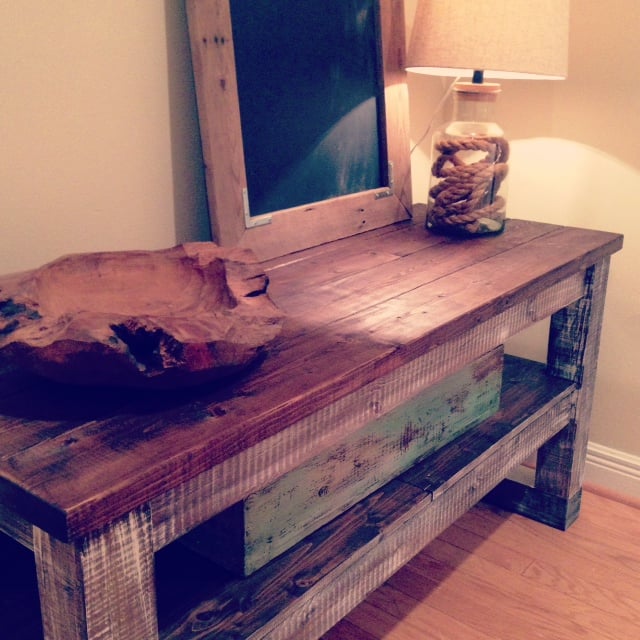
Loved working on this table. An easy build for sure. Couldn't find wheel casters that I liked so had to use another 4x4 to give it height. Will be building another one soon :)
Thank you so much for sharing the plans.
Built from Plan(s)
Estimated Time Investment
Weekend Project (10-20 Hours)
Finish Used
Stain and wry brushing
Recommended Skill Level
Starter Project
Comments

Sat, 09/21/2013 - 08:15
Unique Finish!
I love how you finished your project!
And the 2x4's across the bottom really make it look solid.
Val
artsybuildinglady
Mon, 09/23/2013 - 05:40
Love the finish, could you elaborate
Love the finish, would it be possible to elaborate on how you got it to look so AWESOME!!! Did you just brush on the stain and the use a wire brush????
Mon, 12/30/2013 - 19:28
Hi! What color stain did you
Hi! What color stain did you use and technique? It looks beautiful! Would love to make something similar!
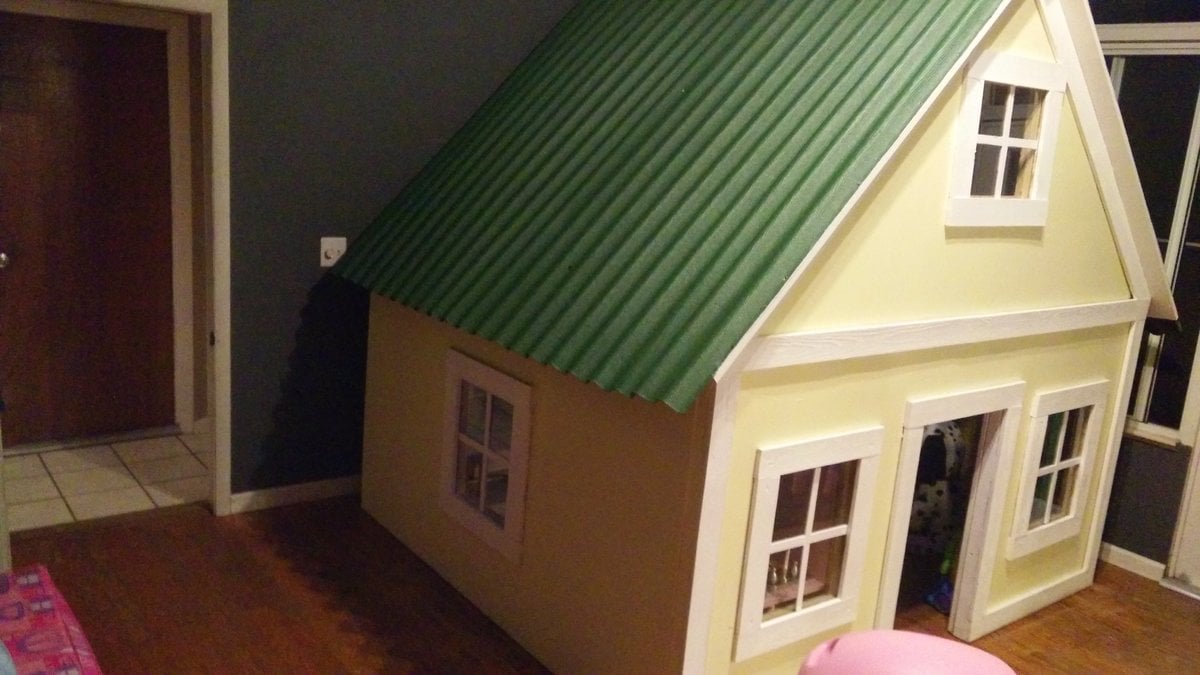
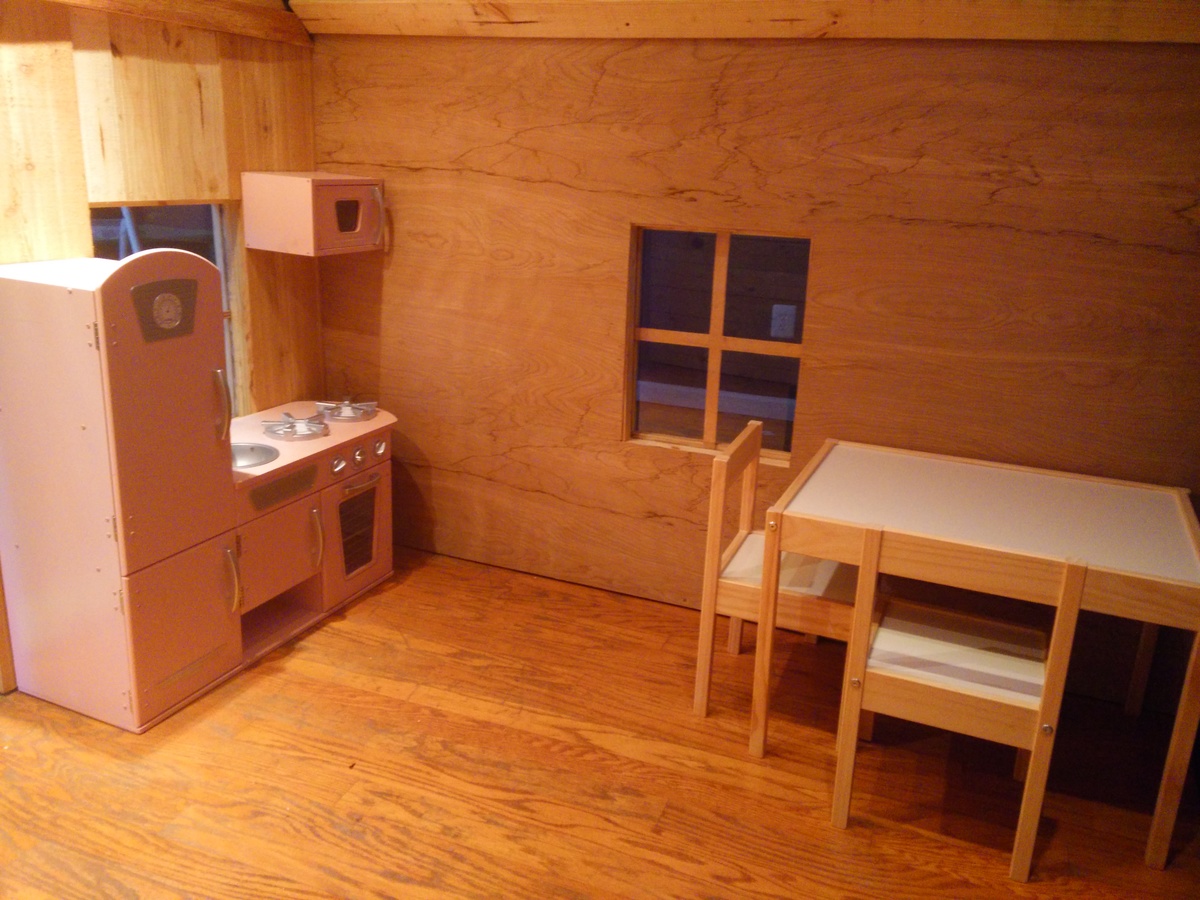
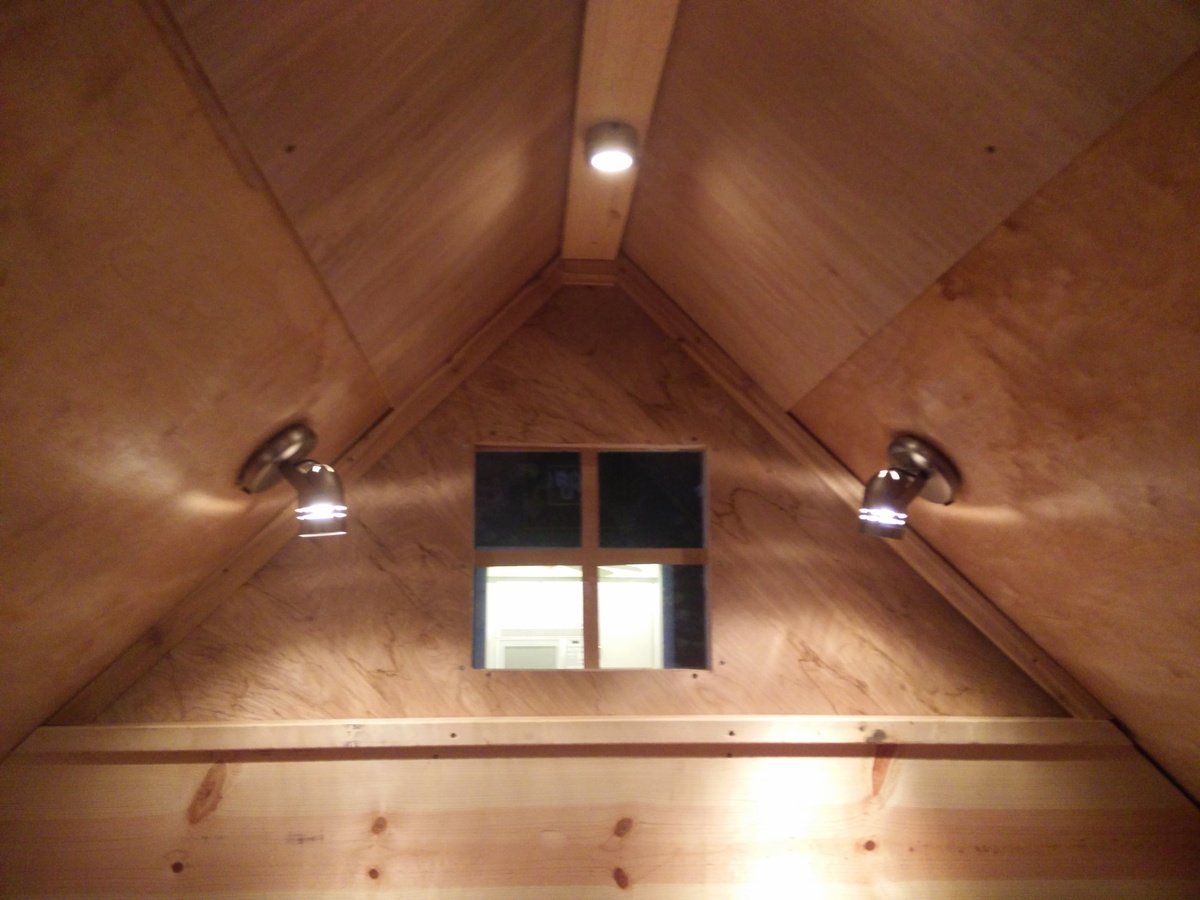
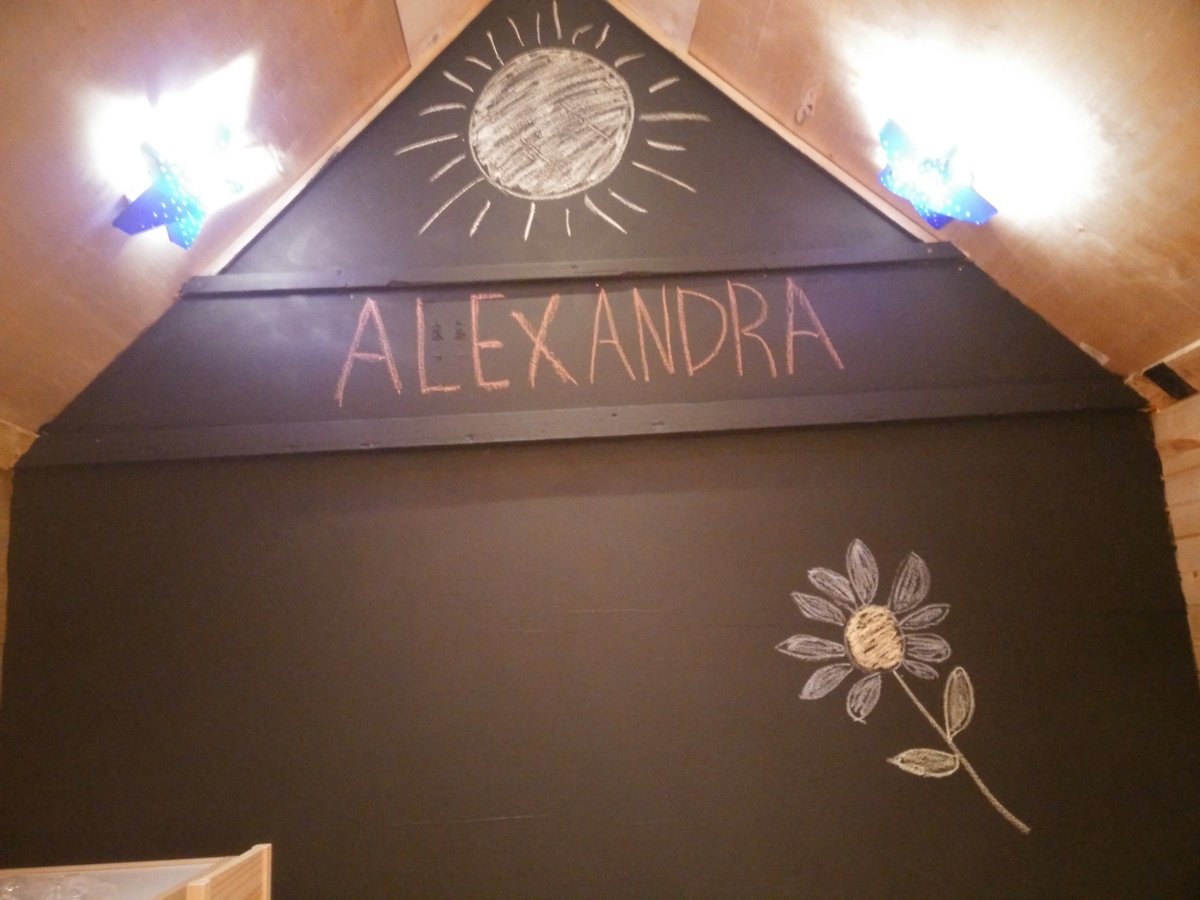
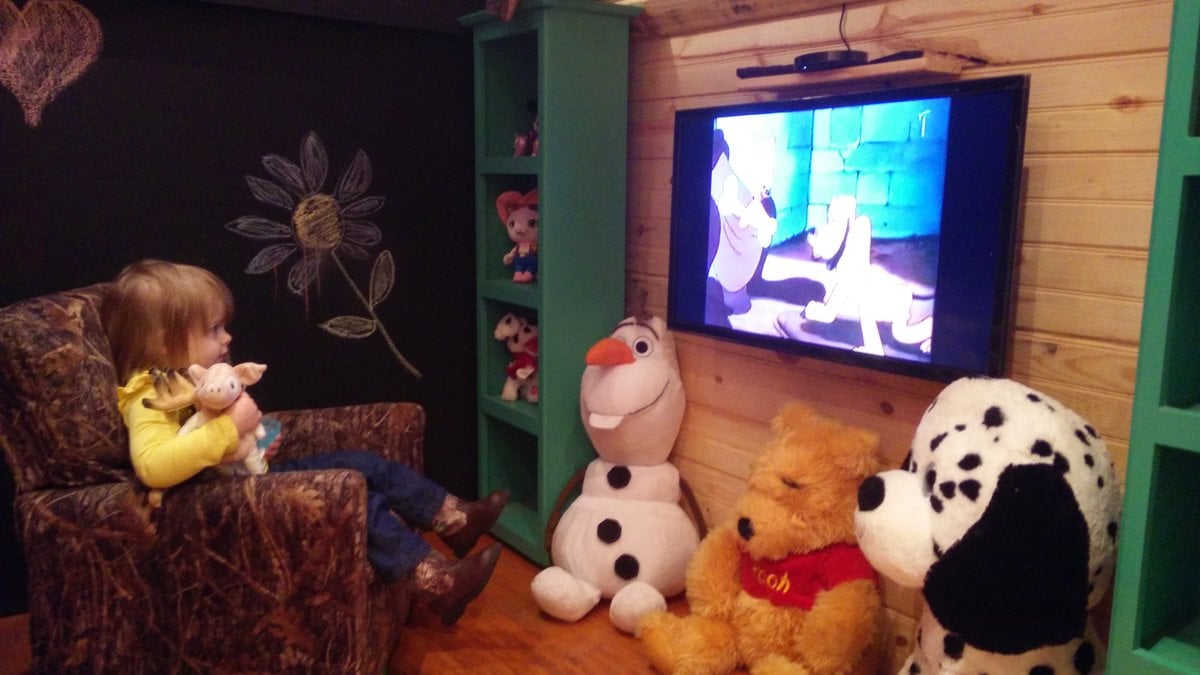
Alexandra's Indoor Playhouse
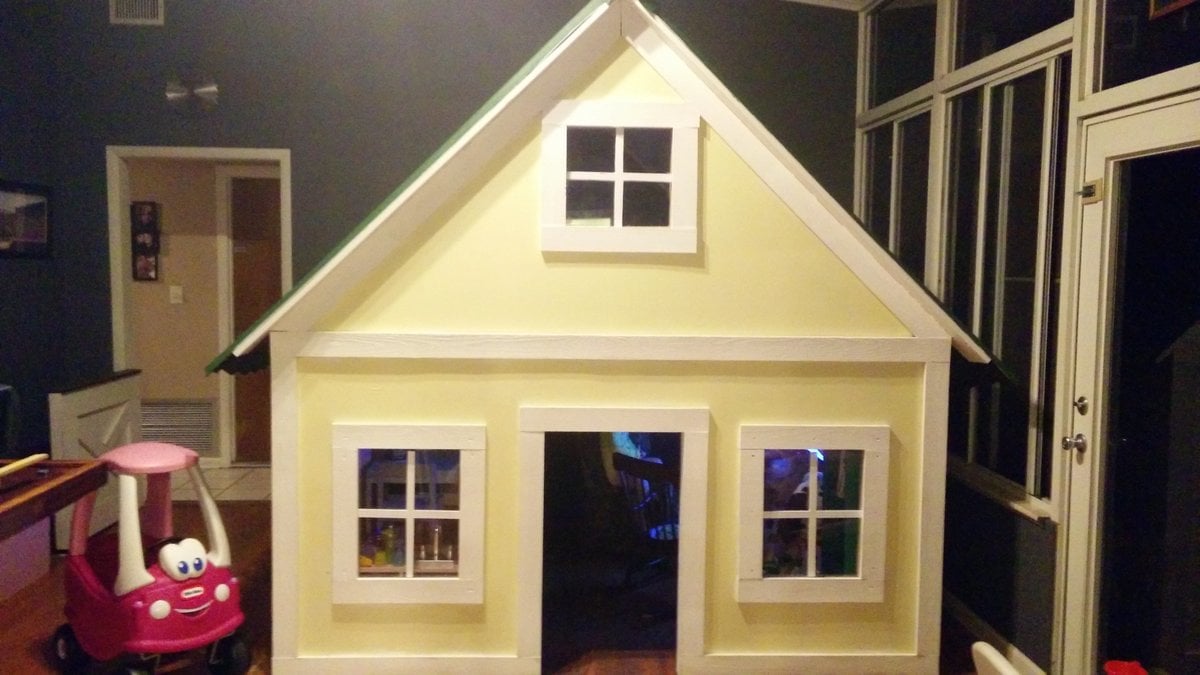
I built this indoor playhouse for my daughter who turned 2 in september. She loves to help mommy cook, loves to have little tea party's for her dolls and love to watch Chip n' Dale terriorize Donald Duck. So I thought I would give Alexandra her very own little house to do all those things. I hope you all like it and have just as much fun building one of these as I did.
Estimated Cost
$500
Estimated Time Investment
Week Long Project (20 Hours or More)
Finish Used
Paint
Recommended Skill Level
Beginner
Comments

Sun, 11/29/2015 - 19:02
Very impressive! I love this
Very impressive! I love this tiny house and all the nice attention to details.
Tue, 12/31/2019 - 10:08
Where can I get the plans ?
Hi Ana -
Where can I find the plans for this house . Just too cute !
Sadhana .
Simple And small reclaimed barn wood bench
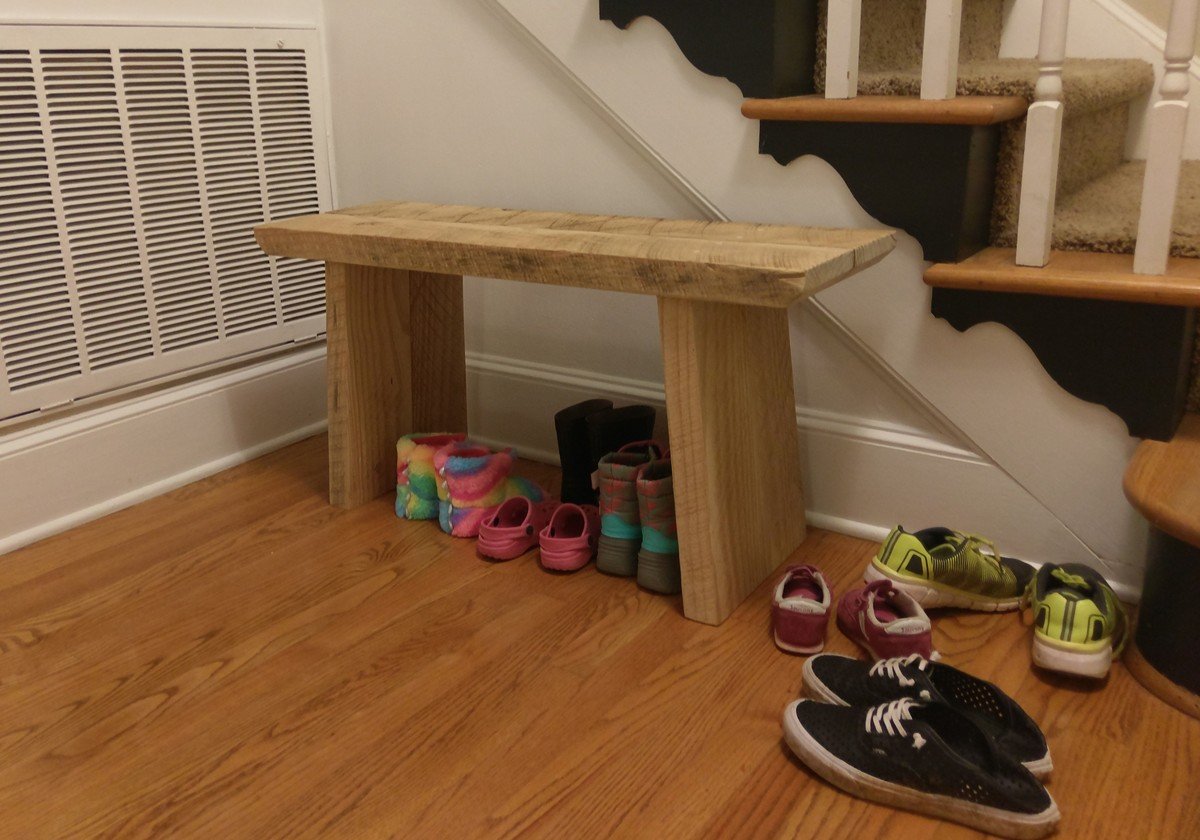
My wife wanted a small bench for our entryway/foyer. I happened to have some reclaimed pine barn wood laying in my shop, so I whipped this up.
The original plan was to use a colored wax or thinned paint on it to give it a weathered appearance (which is why I did screws and plugs from the top - I thought they were going to be painted over), but the wood turned out too beautiful with all of the character. We couldn't bring ourselves to paint it.
There are a few more pics and details in my blog post about this small reclaimed barn wood bench.
Estimated Time Investment
Afternoon Project (3-6 Hours)
Finish Used
Clear wax
Recommended Skill Level
Beginner
Greenhouse
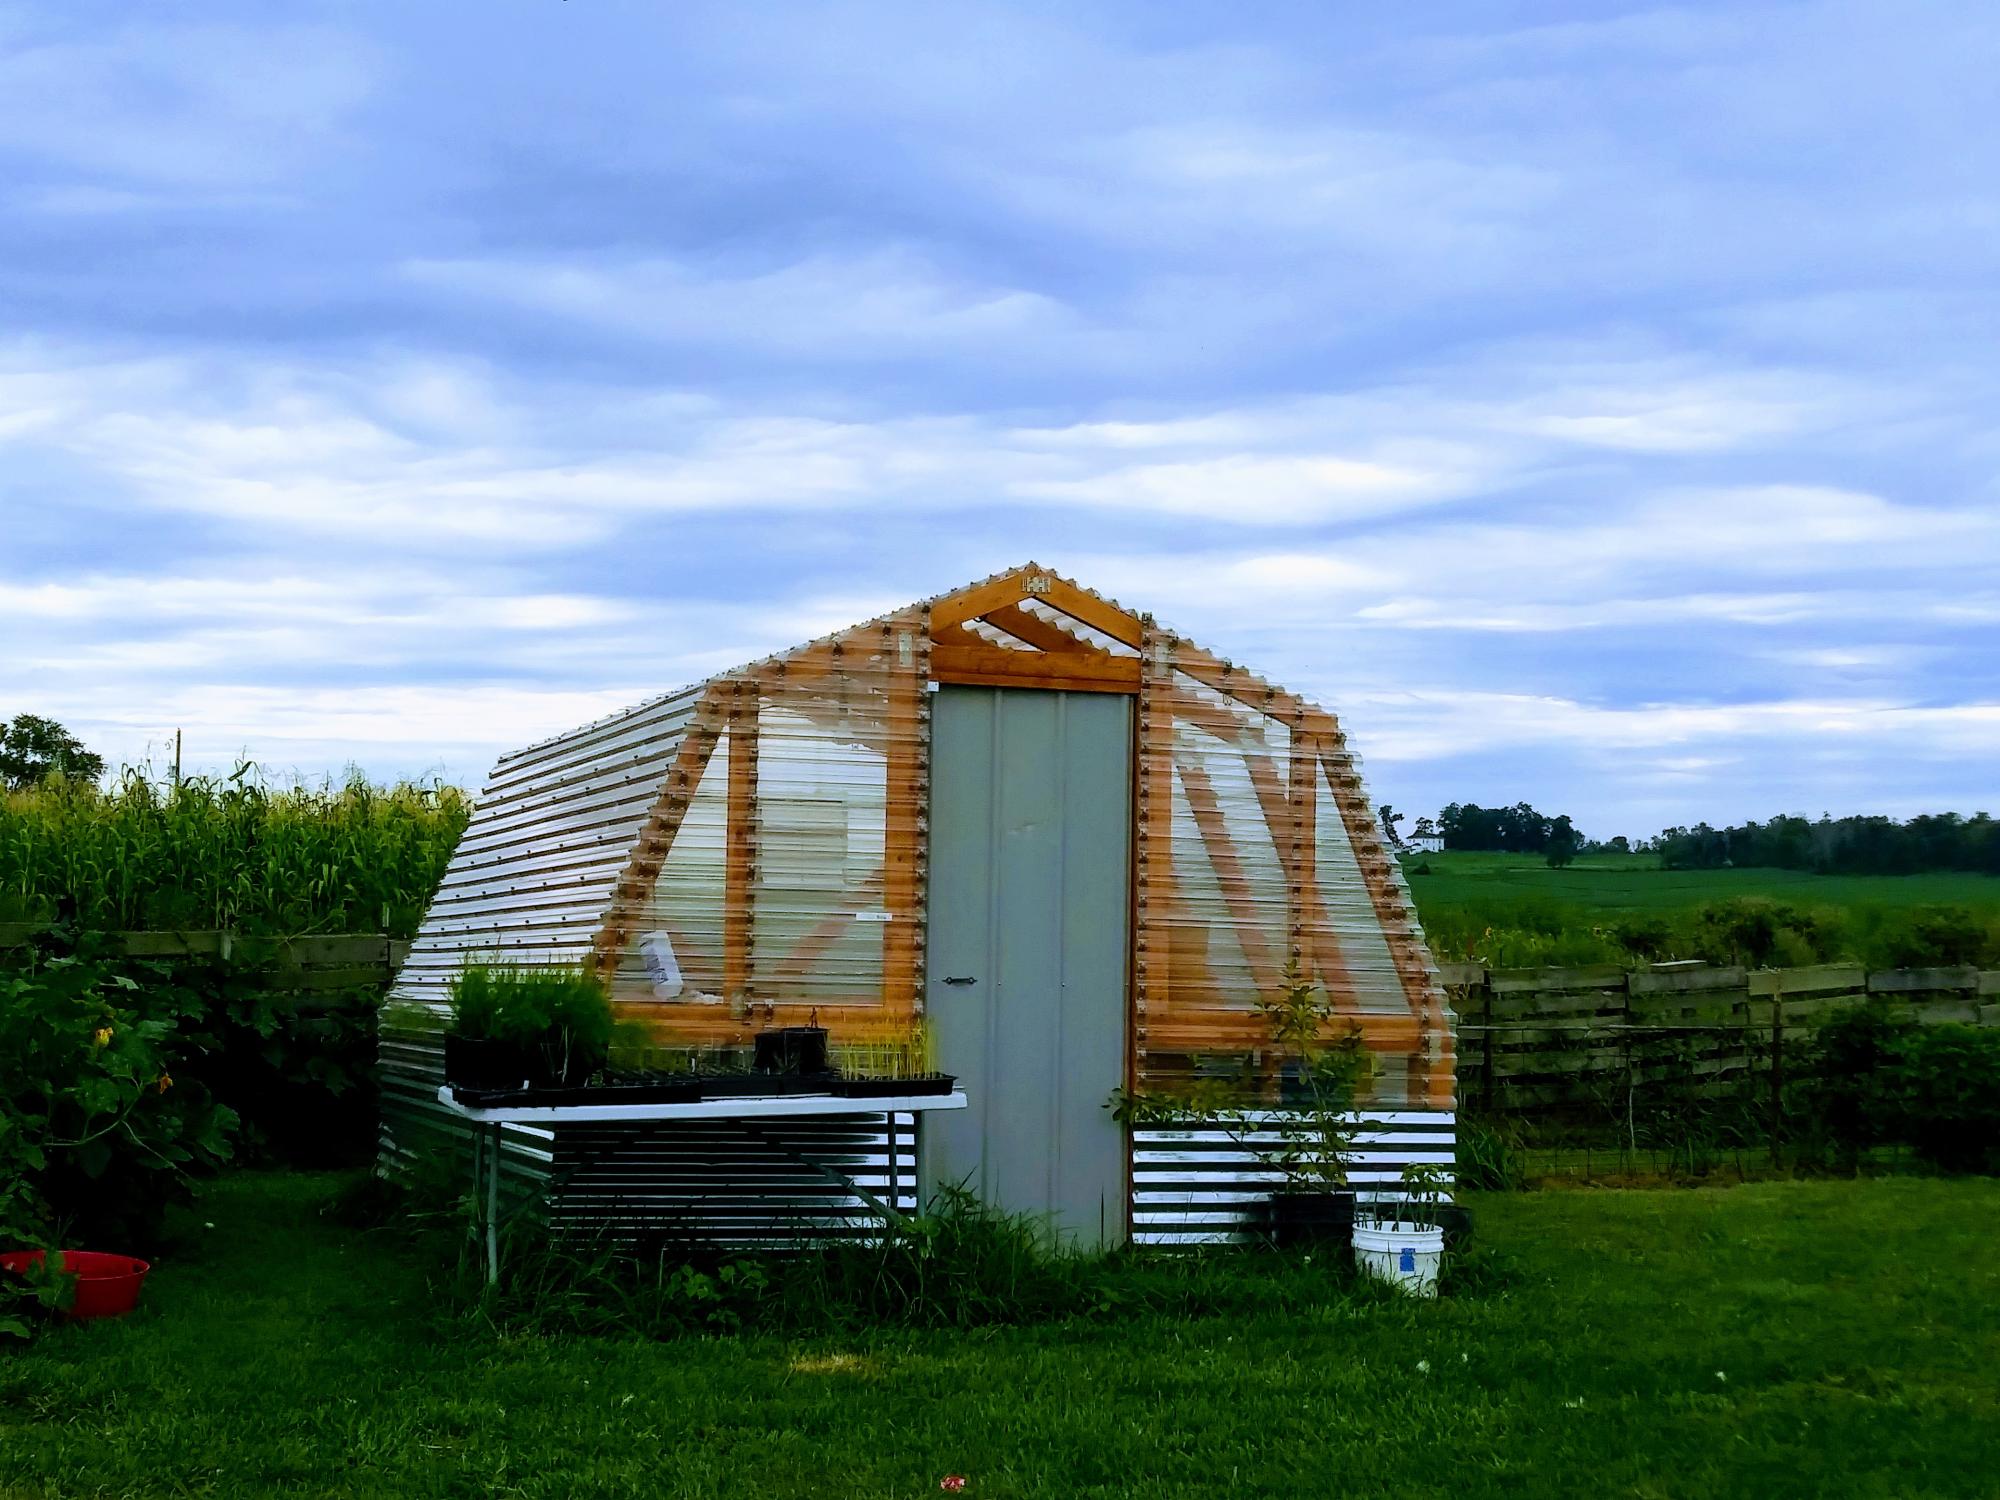
The plans from Ana White were excellent! I worked on this greenhouse through last winter and finished this past March. It worked perfectly for my needs through the entire growing season. I highly recommend this plan for a cost effective greenhouse, even if you have no prior building construction experience (I didn't before I built this). It only cost me $1,100 or so when all was said and done. The cheapest I could find a comparable greenhouse of this size to purchase was $2,500.
Built from Plan(s)
Comments
Classic Storage System Desk
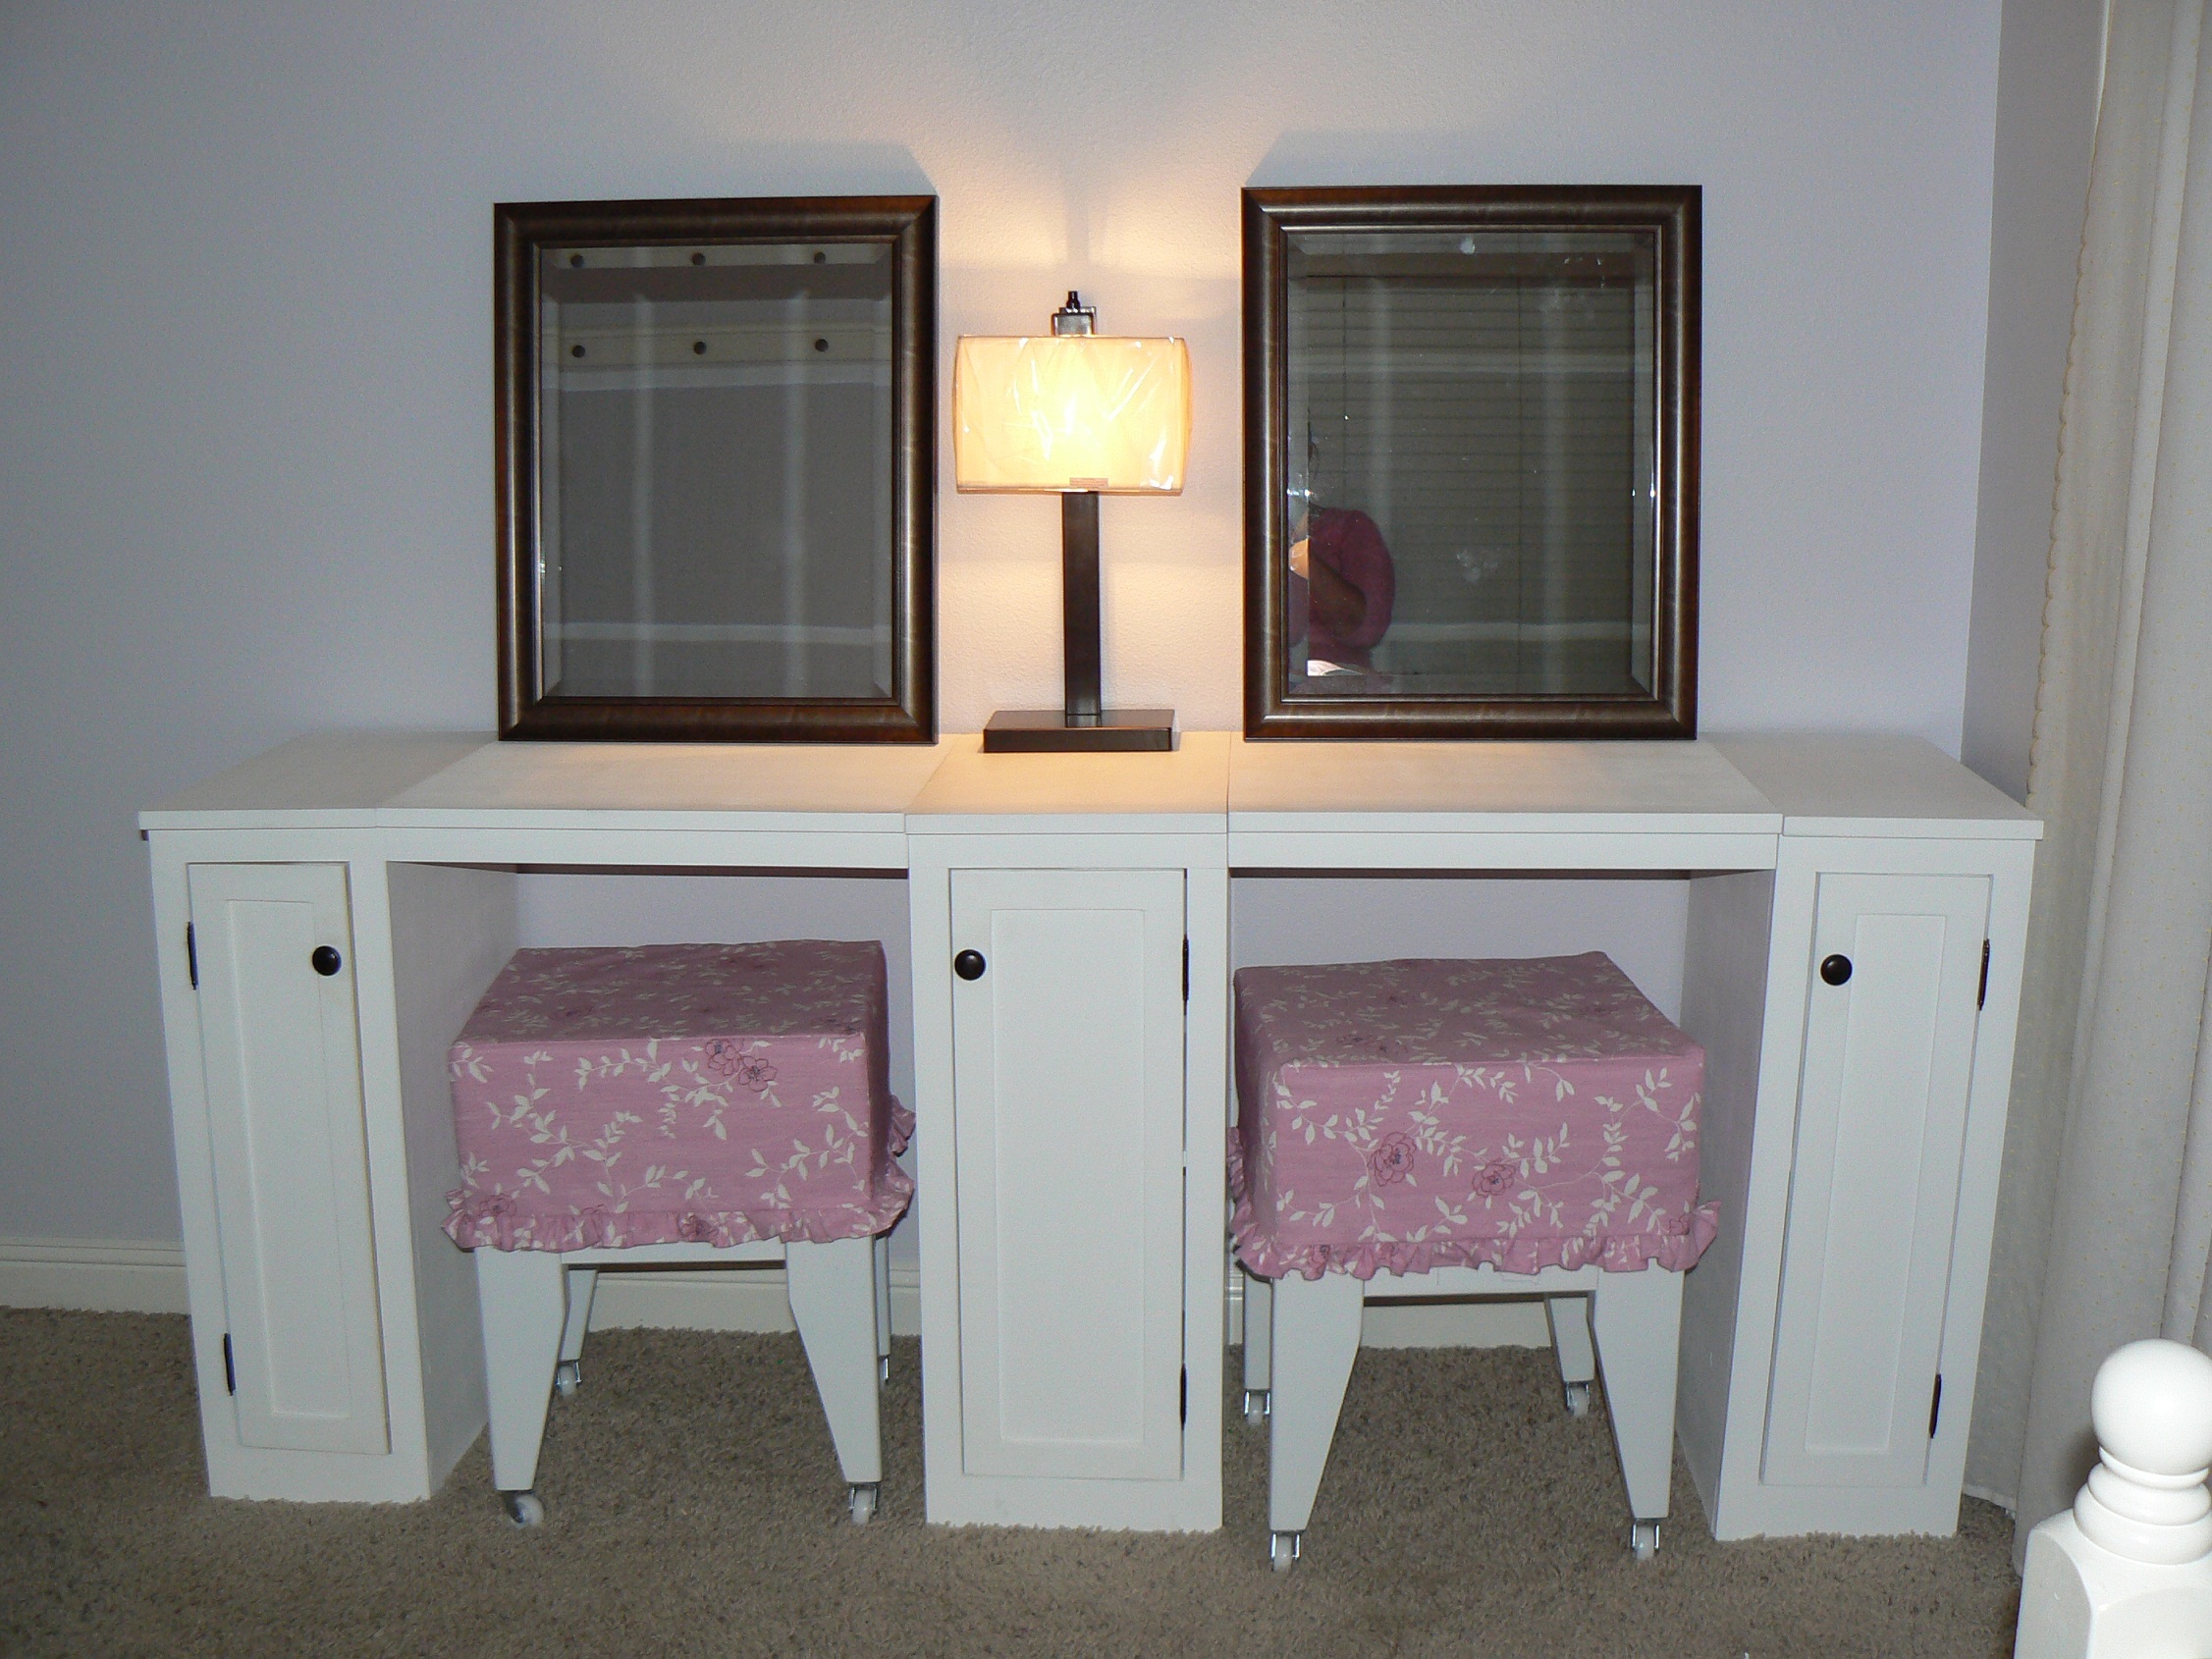
This was my first furniture project. I made this desk/vanity for my twin daughters' 9th birthday. I sized them to fit the space and added doors rather than drawers. I also made the stools using the plans for the upholstered bench - just resized. It was a fun project and I can't wait to start another! You can read more on my blog: http://karlakroese.blogspot.com/2011/08/new-hobby.html
Built from Plan(s)
Estimated Cost
$150
Estimated Time Investment
Week Long Project (20 Hours or More)
Finish Used
Paint. This phase of the building process is what took the longest. Aaargh! Building is fun, but sanding, priming, sanding, painting, sanding...stinks!! All that hard work, though, paid off. Sanding is key to a good paint finish.
Recommended Skill Level
Intermediate
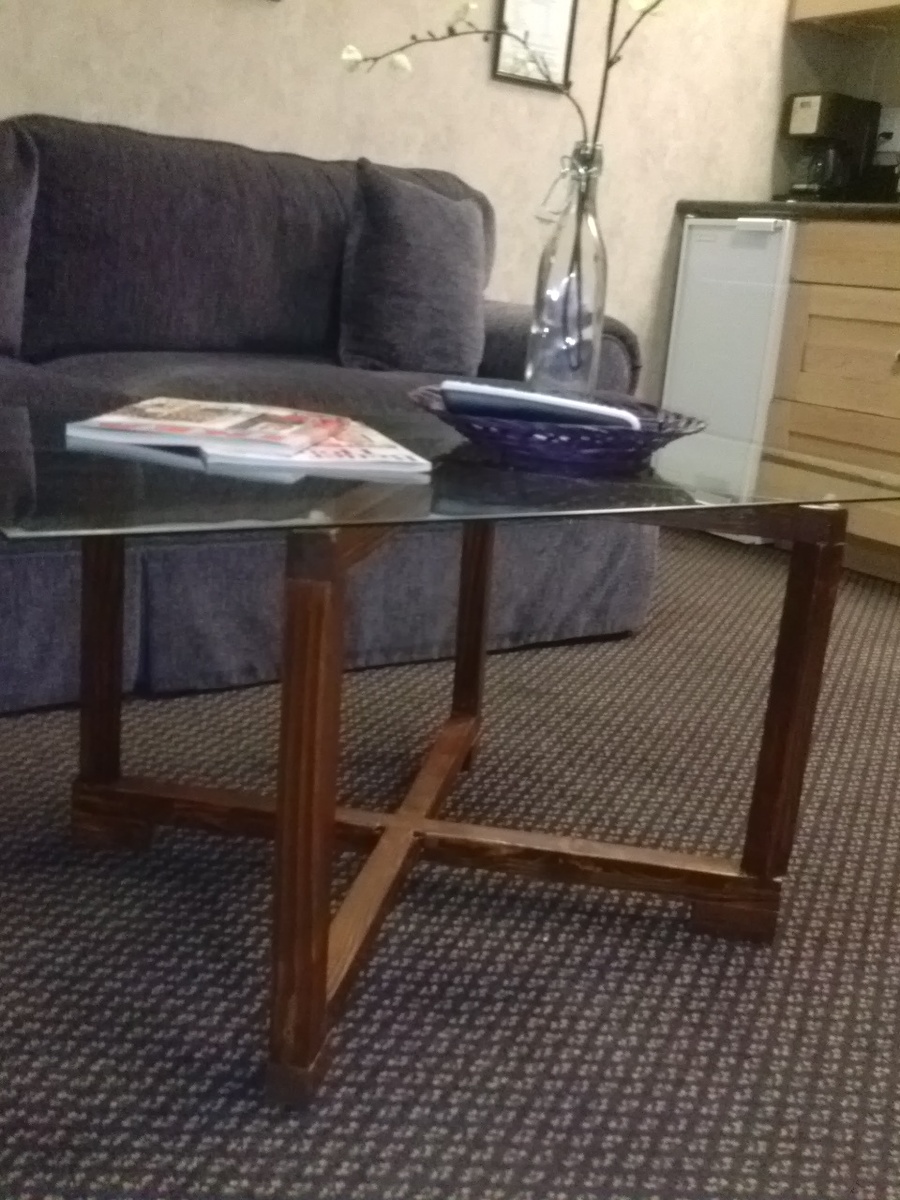
Lisette Coffee Table
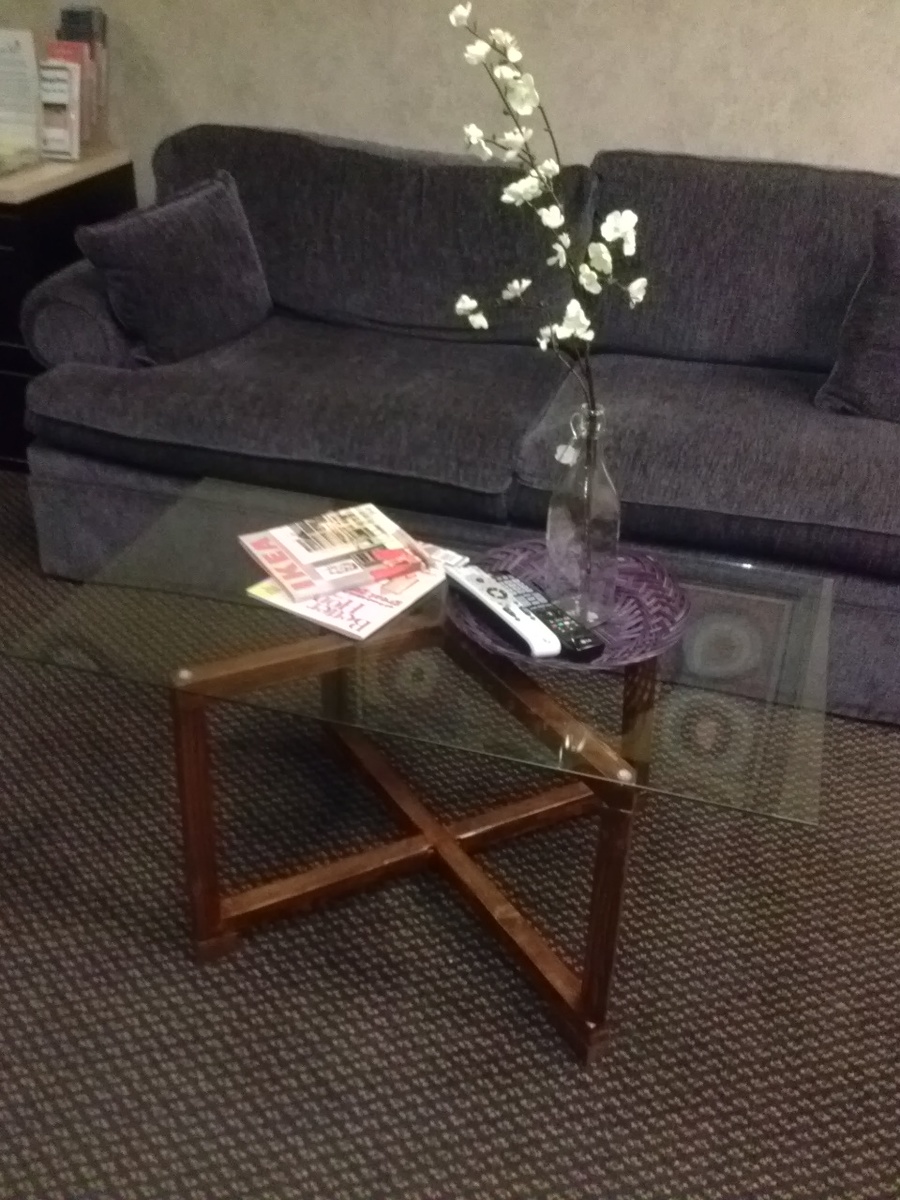
My friend "Lisette" asked for a small modern coffee table. For her small studio apartment. So I came up with this modern-ish table. Made of 2x2's and a 20"x40" glass top.I found it on the side of the road with a FREE sign on it in Pacific Beach. Oh how I love beach people and all the free stuff they leave around :)
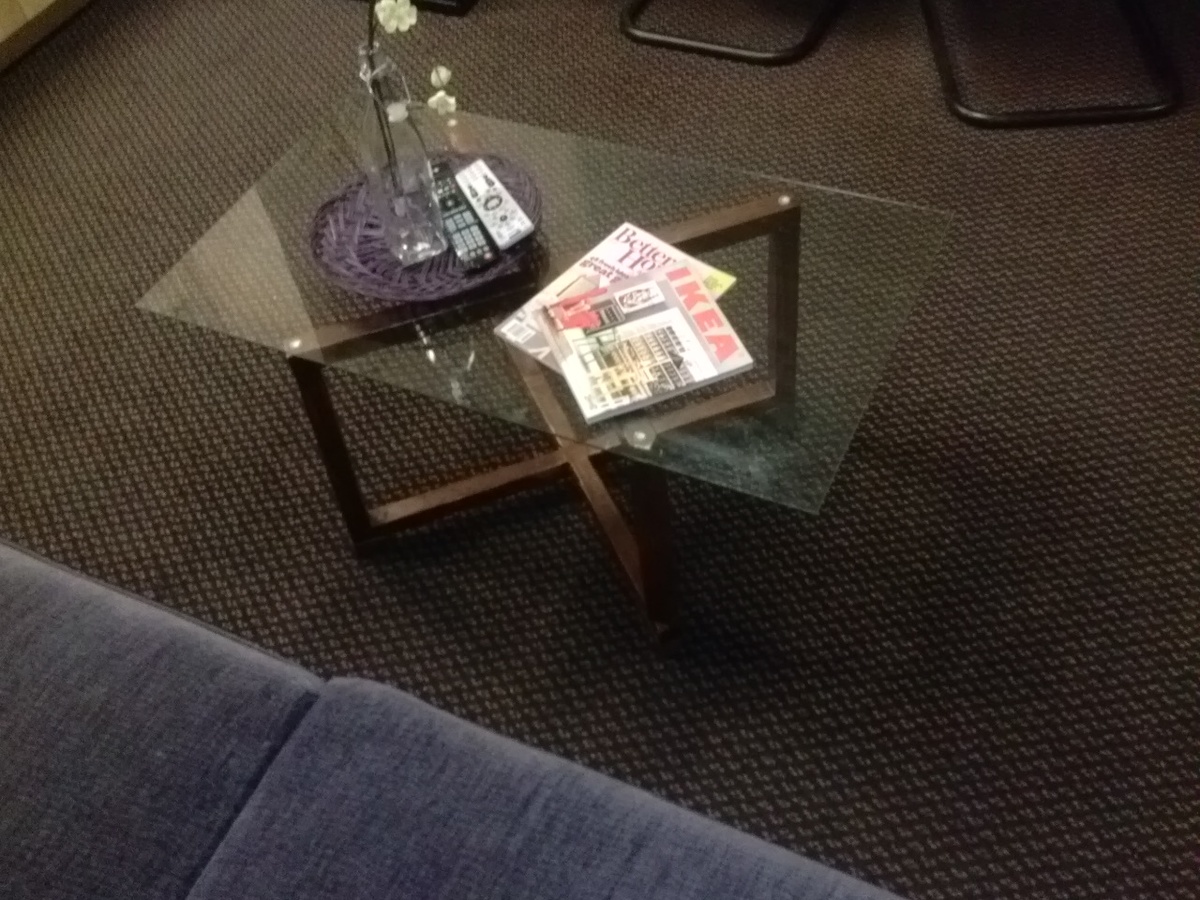
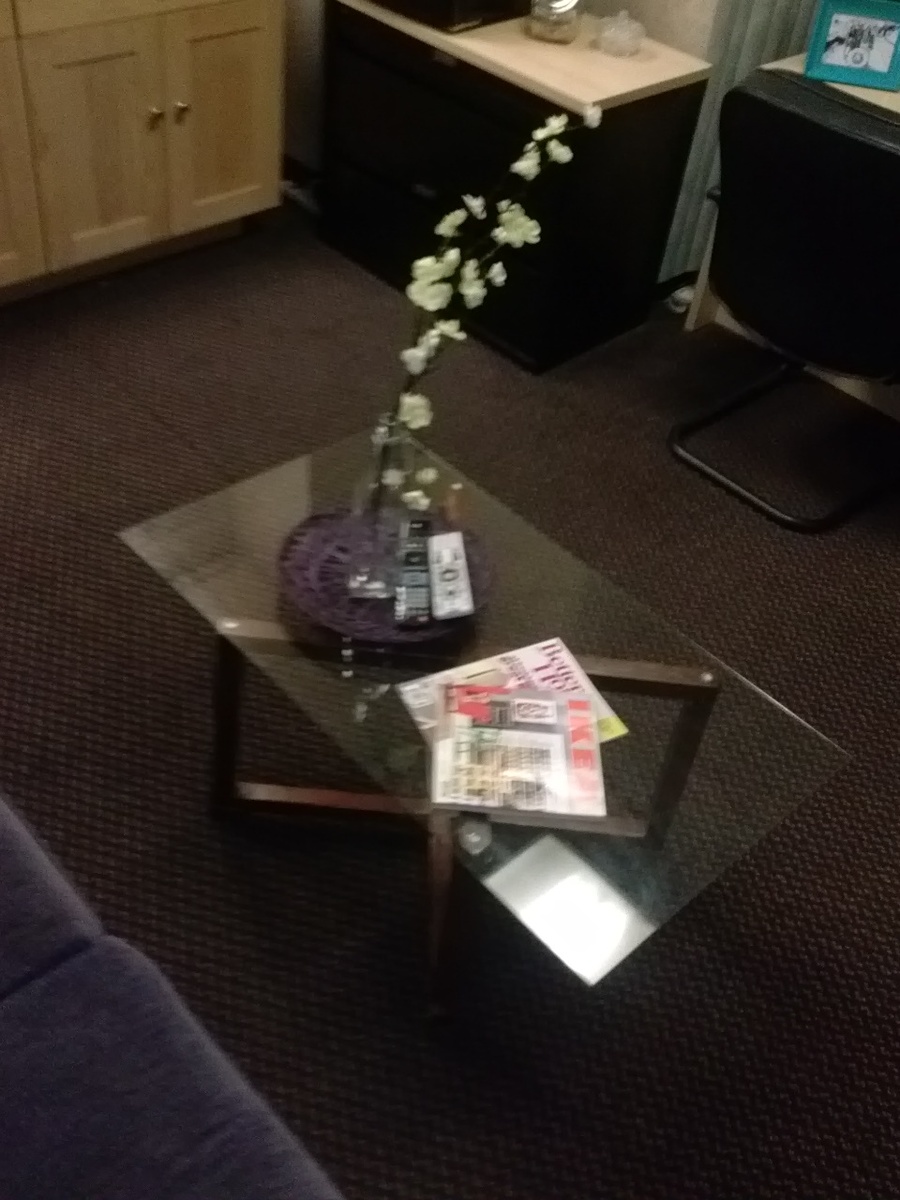
Estimated Time Investment
Afternoon Project (3-6 Hours)
Finish Used
Minwax Chestnut Stain (3 coats) and semigloss poly spray (5 light coats)
Recommended Skill Level
Starter Project
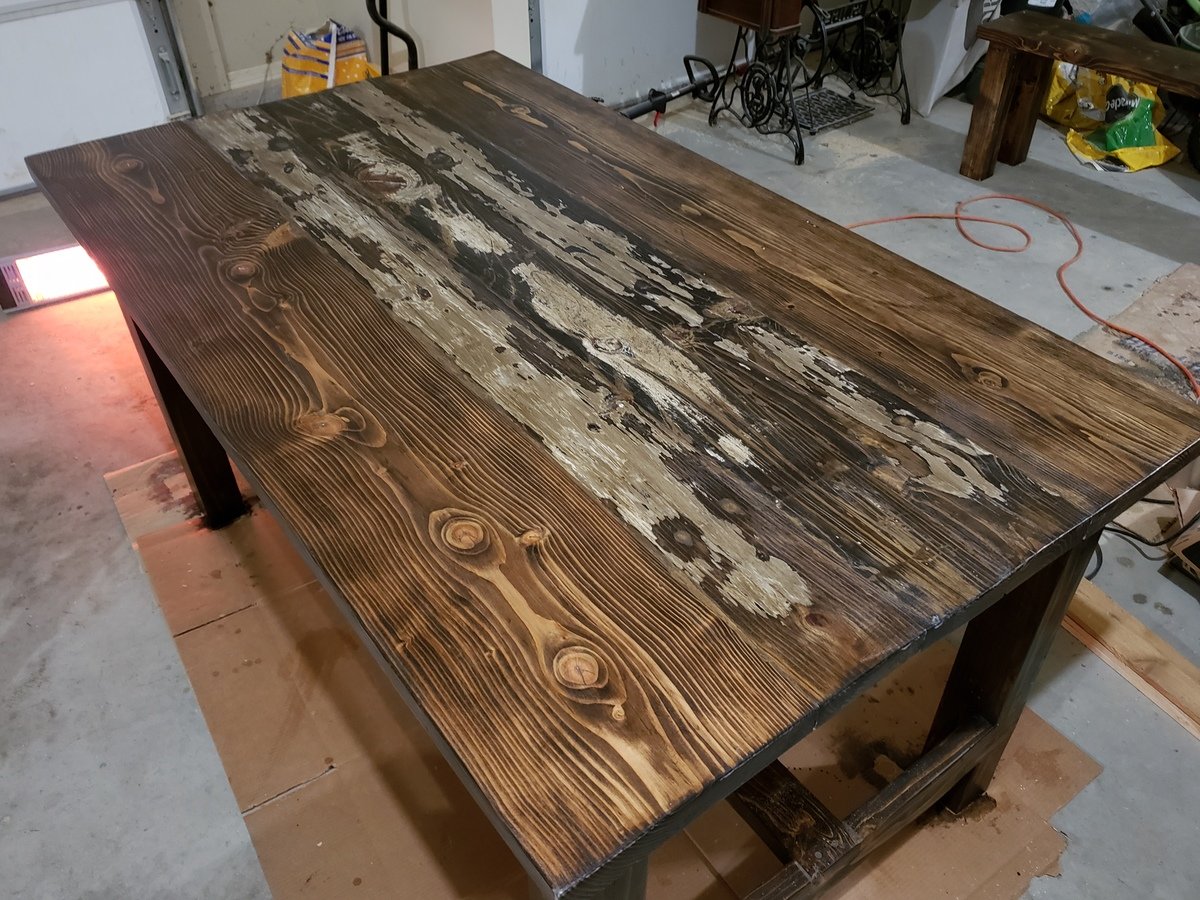
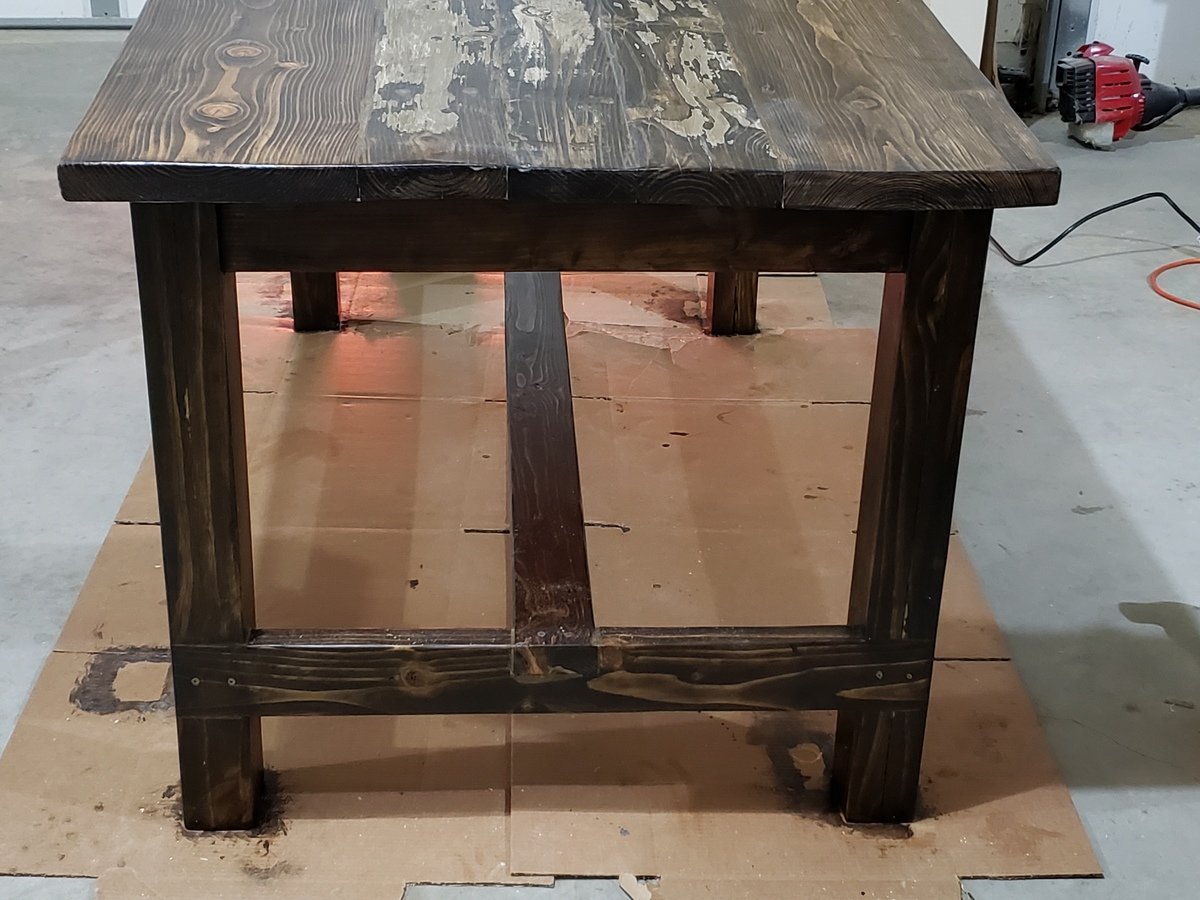
My first dining table
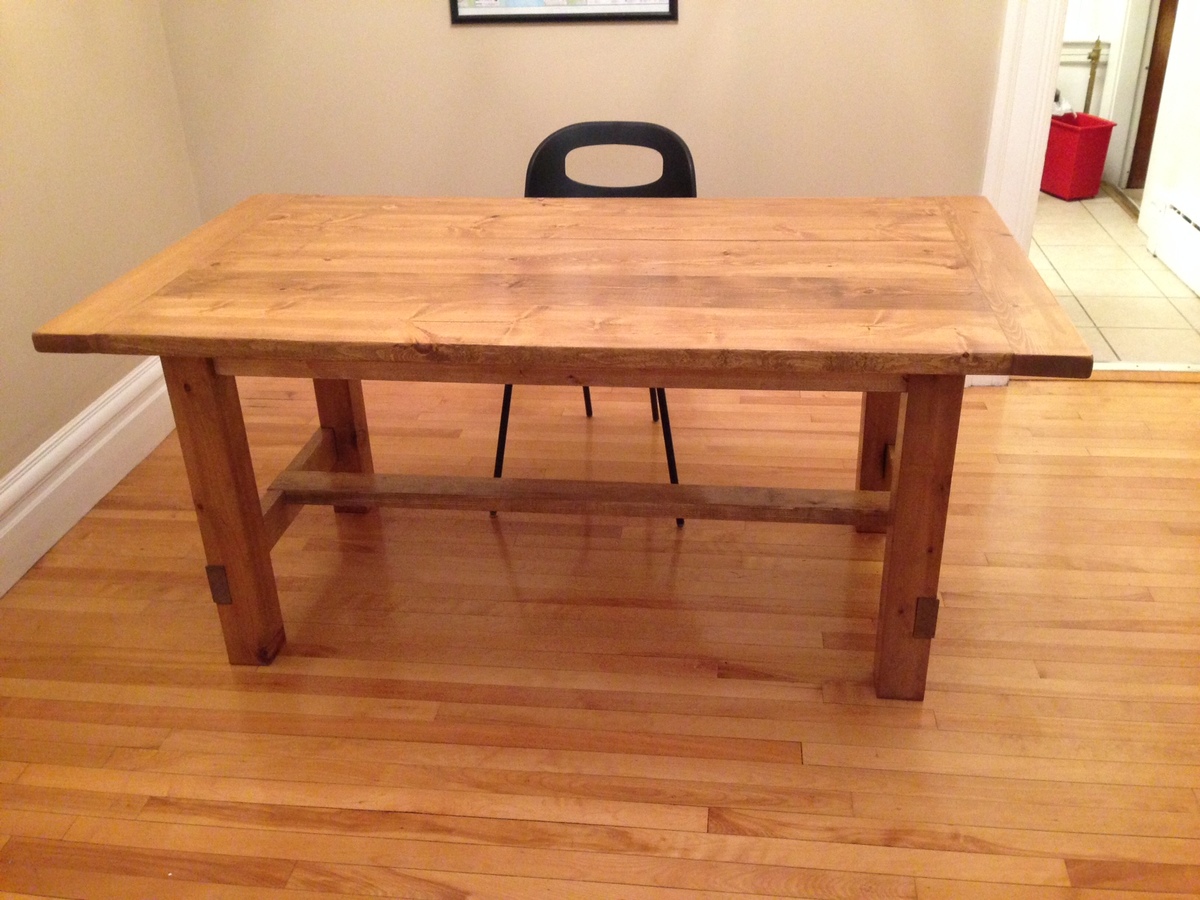
I built this table using modified pocket hole plans and a mix of pine, spruce and cedar lumber.
When I laminated the boards together to the table top I also applied four culls to try to keep it flat as possible. When I removed the culls the boards weren't as even as I had wanted so I used a belt sander with a 120 grit to take out the high spots. I filled the knot holes with some 5 minute epoxy and I really liked the look. I would use decent epoxy if I do another large lamination of knottty wood as the $5 microtube I bought was thick and hand to work into the small voids around the knots. After the epoxy cured for 12 hours I gently used the belt sander gentle to remove the excess and then gave the entire table top a little 220 grit action.
Built from Plan(s)
Estimated Cost
This project cost around $300 in materials and took about 24 hours spread over a couple weekends to complete. The cost of the Kreg K4 jig isn't included in that price, but it will come in handy for the next few years.
Estimated Time Investment
Week Long Project (20 Hours or More)
Finish Used
I applied two coats of Minwax Fruitwood stain before topcoating with 4 coats of a 4:1 mixture of Helmsman Spar Urethane/Paint Thinnner. I gently sanded with 220 grit and then polished with a clean cloth between coats of the Helmsman. The Wood Whisperer from YouTube has some really helpful tips to get a smooth finish like diluting your finish and applying it with a clean cloth which has been moistened with paint thinner. I recommend checking out his channel.
Recommended Skill Level
Beginner
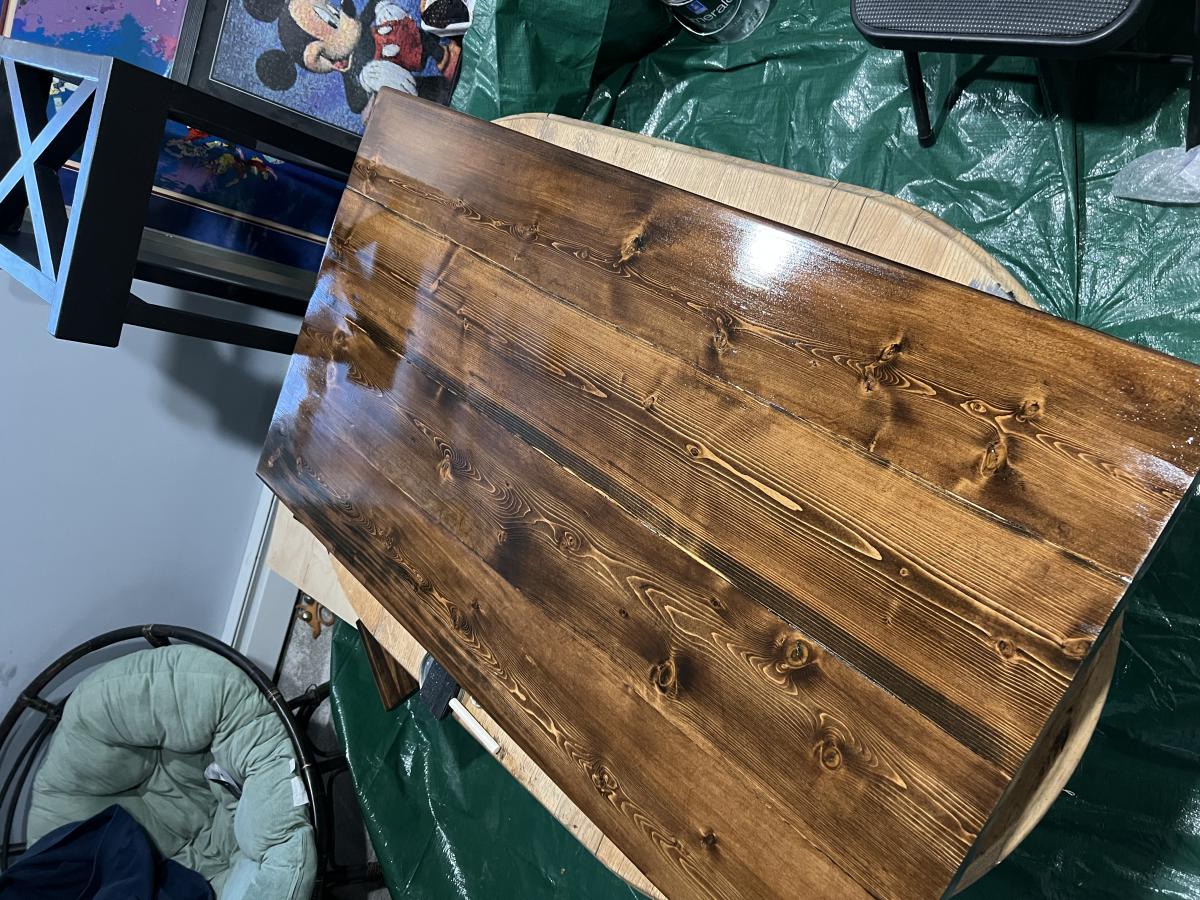
Farmhouse Coffee & Side Tables
Milled all prices of wood from 2x8 Douglas Fir, Esresso Minwax stain, and Sherwin Williams Emerald Tricorn Black paint. Used mostly Kreg pocket hole screws and GRK #9 - 2 1/2” screws to secure the top to the base.
Built from Plan(s)
Comments
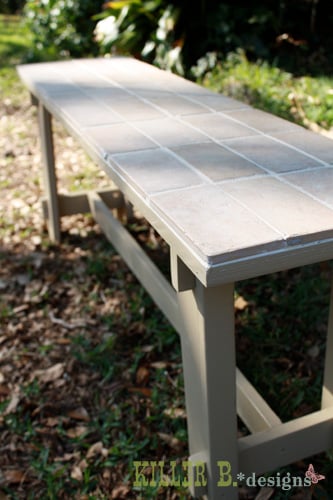
Tiled Rustic Bench
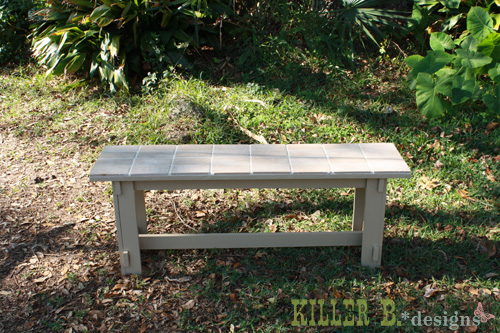
I used the Rustic Bench plans, but adjusted the length to make it smaller, since my plywood top was a bit wider and shorter than the top on the plan. It was the last remnant from our incredibly versatile plywood sheet. I also had to cut out the two cross supports, because 1) they’re too difficult for me to figure out (they’re not right in either of my benches) and 2) I didn’t feel like buying a board just for those. I had just the right amount of spare lumber lying around, and I was going to maximize it!
At first, I wanted to just build a bench for my sister for Christmas, and paint it like our island. But after visiting my parents over Thanksgiving and taking home some reclaimed tile from their old outdoor bar, I knew this bench had a better destiny than mere paint. When I laid down the tile scraps and they fit perfectly, I knew serendipity had spoken.
This was the first time I’d ever worked with tile. I did a little research (aka grilling my husband’s best friend, who is a tile guru), and discovered I didn’t really need any fancy materials to lay the tile down on. As it’s just a bench, and in no need for mold-prevention or cement board like bathroom walls, all I needed to do was rough up the plywood top with my grinder and a steel-wool like disk. With the bench already sanded and painted, I started the tiling process. I bought a bucket of tile adhesive and grout all-in-one, and went to town. I didn’t have a trowel, so I made do with my putty spatula. I just had to make the grooves in the adhesive one-by-one as opposed to one quick stroke. I spread the adhesive, laid the tiles, carefully washed off any overspread on the sides, and let it sit for 24 hours. Then I spread in the grout (it’s all the same stuff, just different application), washed the overspread off again, and let it sit for another 24 hours. Then I had a gorgeous top!
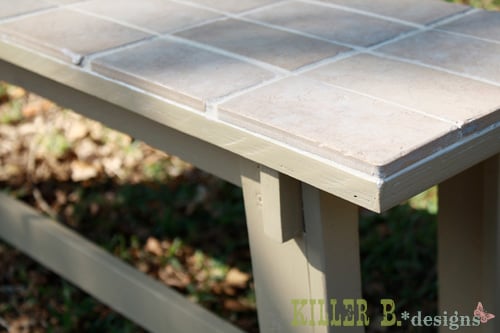
Built from Plan(s)
Estimated Cost
$20
Estimated Time Investment
Weekend Project (10-20 Hours)
Finish Used
Marble Tile, Valspar Harvest Brown satin latex paint
Recommended Skill Level
Beginner
Comments
Queen Murphy Bed
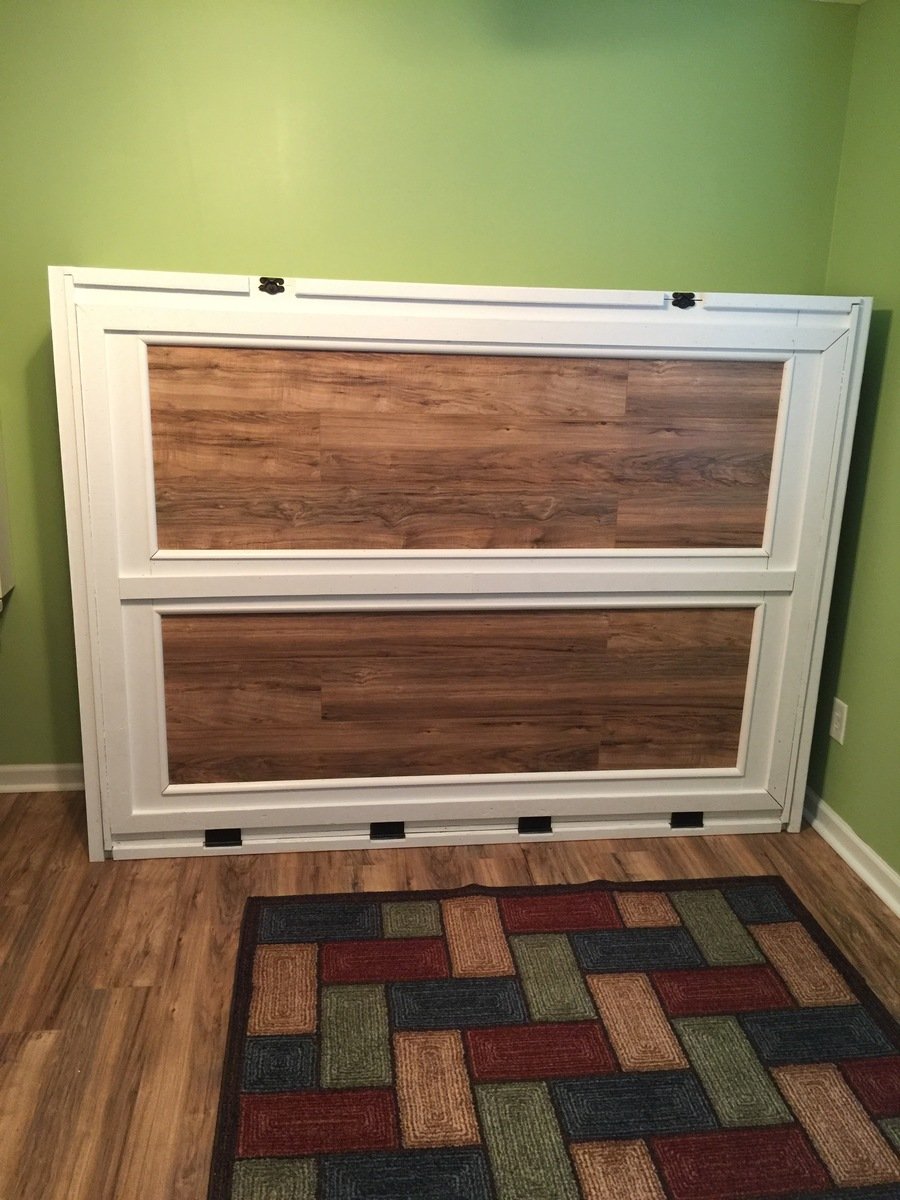
Not too bad of a project but had to a good bit of guess work so I could changed the plans for a queen size bed and flip in on its side.
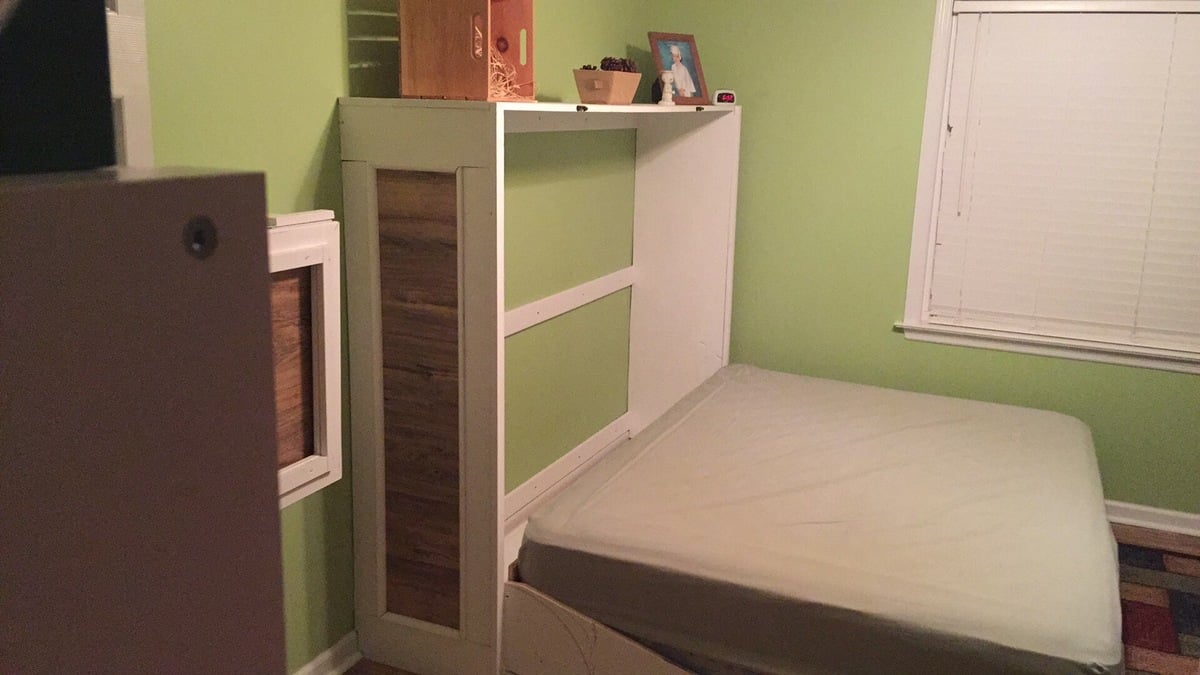
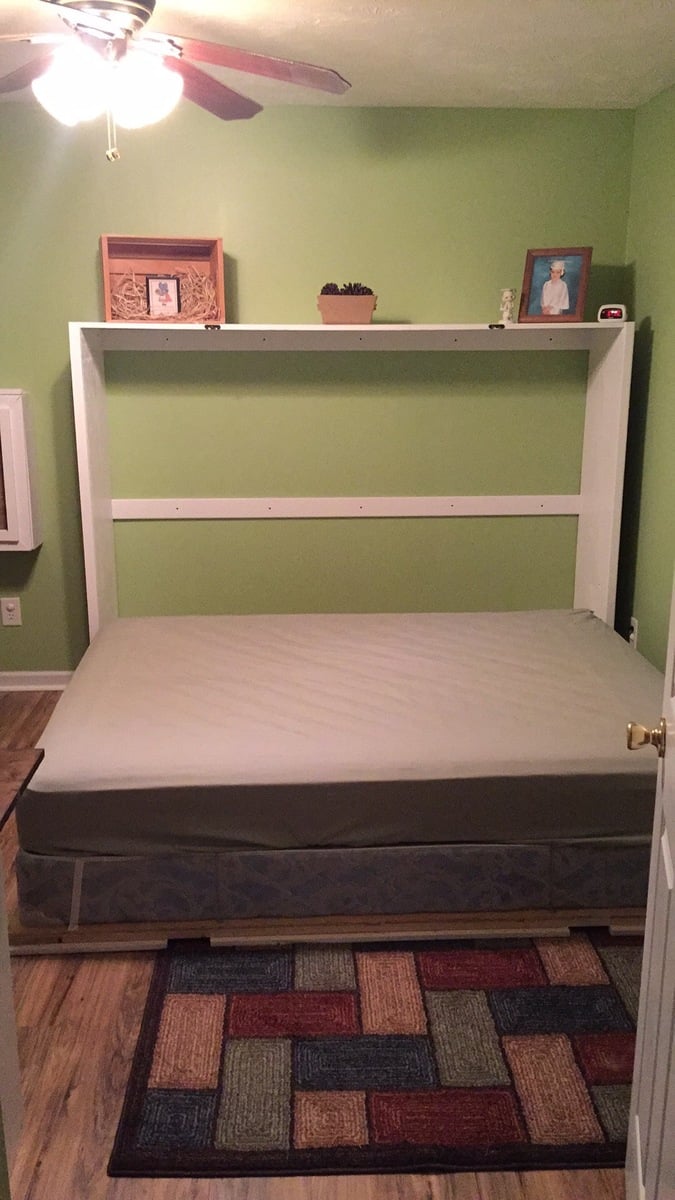
Built from Plan(s)
Estimated Cost
$200 if you already have the bed
Estimated Time Investment
Week Long Project (20 Hours or More)
Finish Used
White Paint and laminate flooring left over from the floor.
Recommended Skill Level
Beginner
Comments
Sun, 05/29/2016 - 18:50
Measurements
Good evening!
I am new at wood working, and would be very interrested in knowing the different measurements you changed to get from a twin to queen murphy bed. If it is posted on this page, I tried but couldn't find it. Thank you for your help. Have a good day.
Marie-Julie
Historic Palouse Halltree
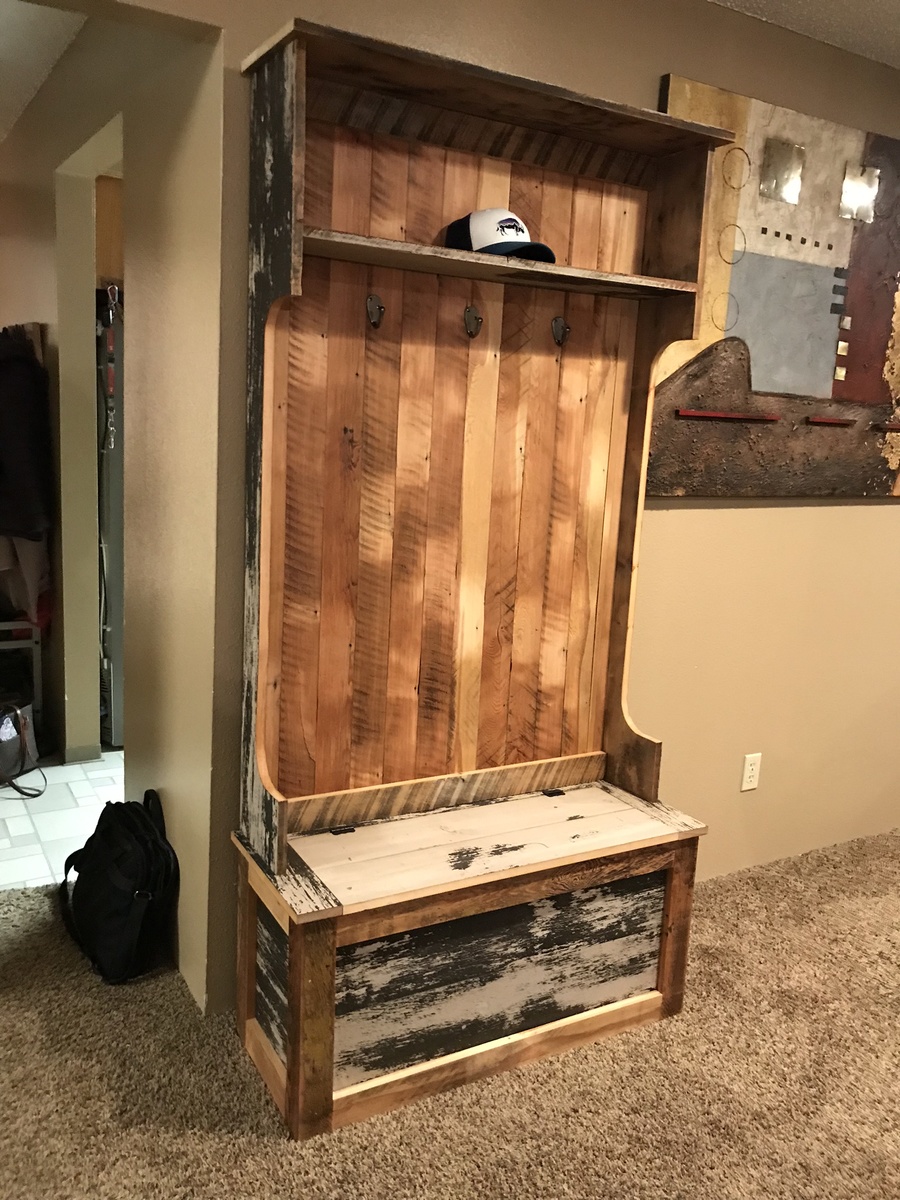
This piece was inspired by Ana’s plans and built as a collaborative project with my son. The stock was all salvaged from a century+ old railroad depot on the University of Idaho campus that was marked for demolition. The green and cream boards were the ceiling of the depot, and the unfinished stock came from the flooring, which was 1” tongue and groove red fir. The first agricultural crops, forest products, and settlers of the region (North Idaho, Eastern Washington) flowed through that terminal. This piece, therefore, is iconic of the regikn’s rough-hewn beginnings and stands as a reminder of its important past.
Estimated Cost
$60 for glue, hinges, screws, polyurethane. The wood was salvaged for free.
Estimated Time Investment
Weekend Project (10-20 Hours)
Finish Used
After sanding the bare wood and scrubbing the painted surfaces, I sprayed a satin polyurethane (good ol’ rattle can!)
Recommended Skill Level
Intermediate
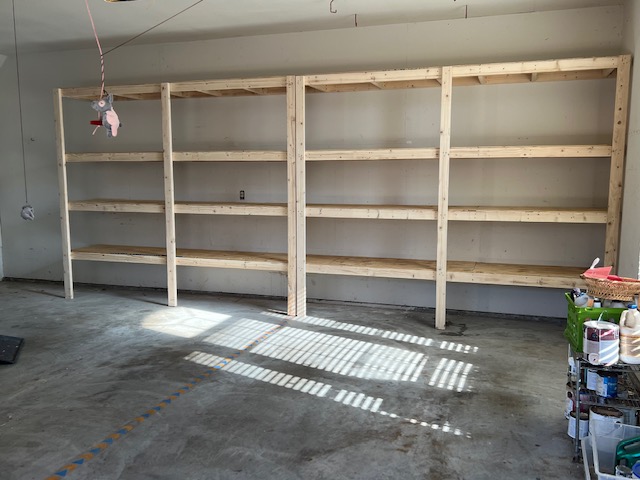
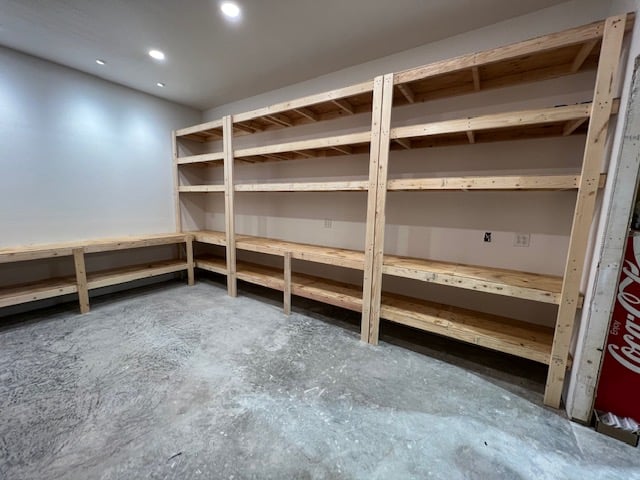
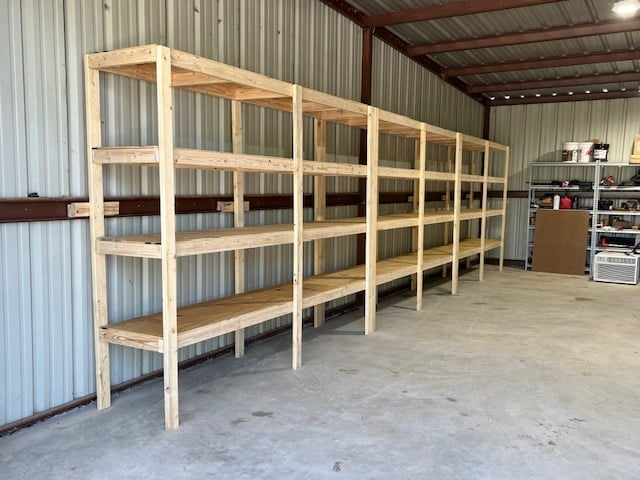
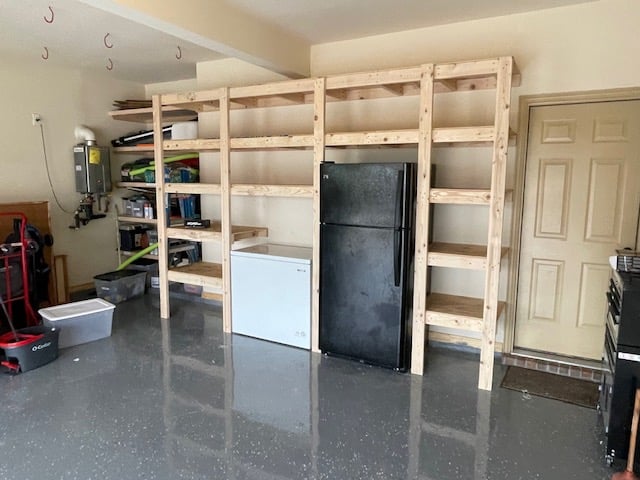
Garage Shelves Galore - by Jared Starky
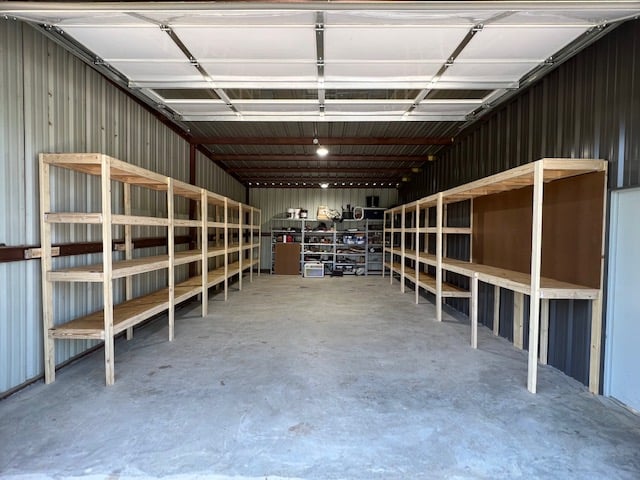
This one plan can facilitate many outcomes.
Built and shared by Jared Starkey
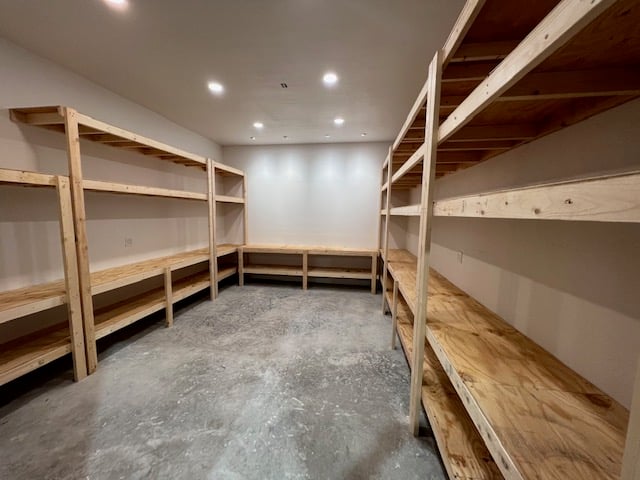
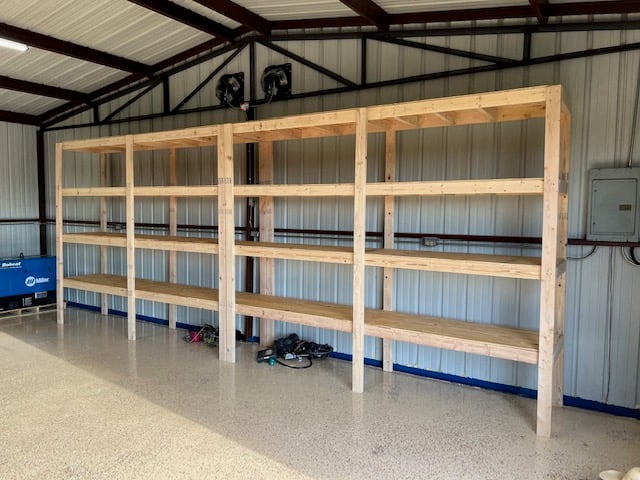
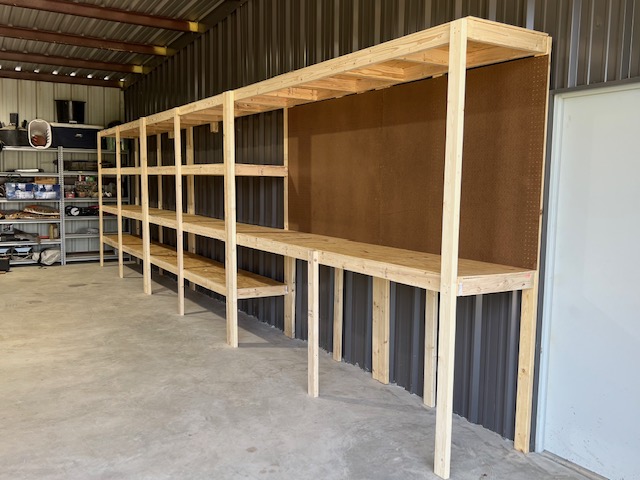
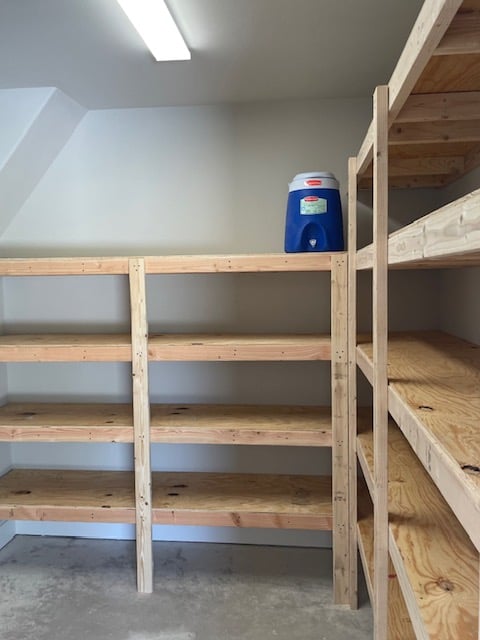
Built from Plan(s)
Stool
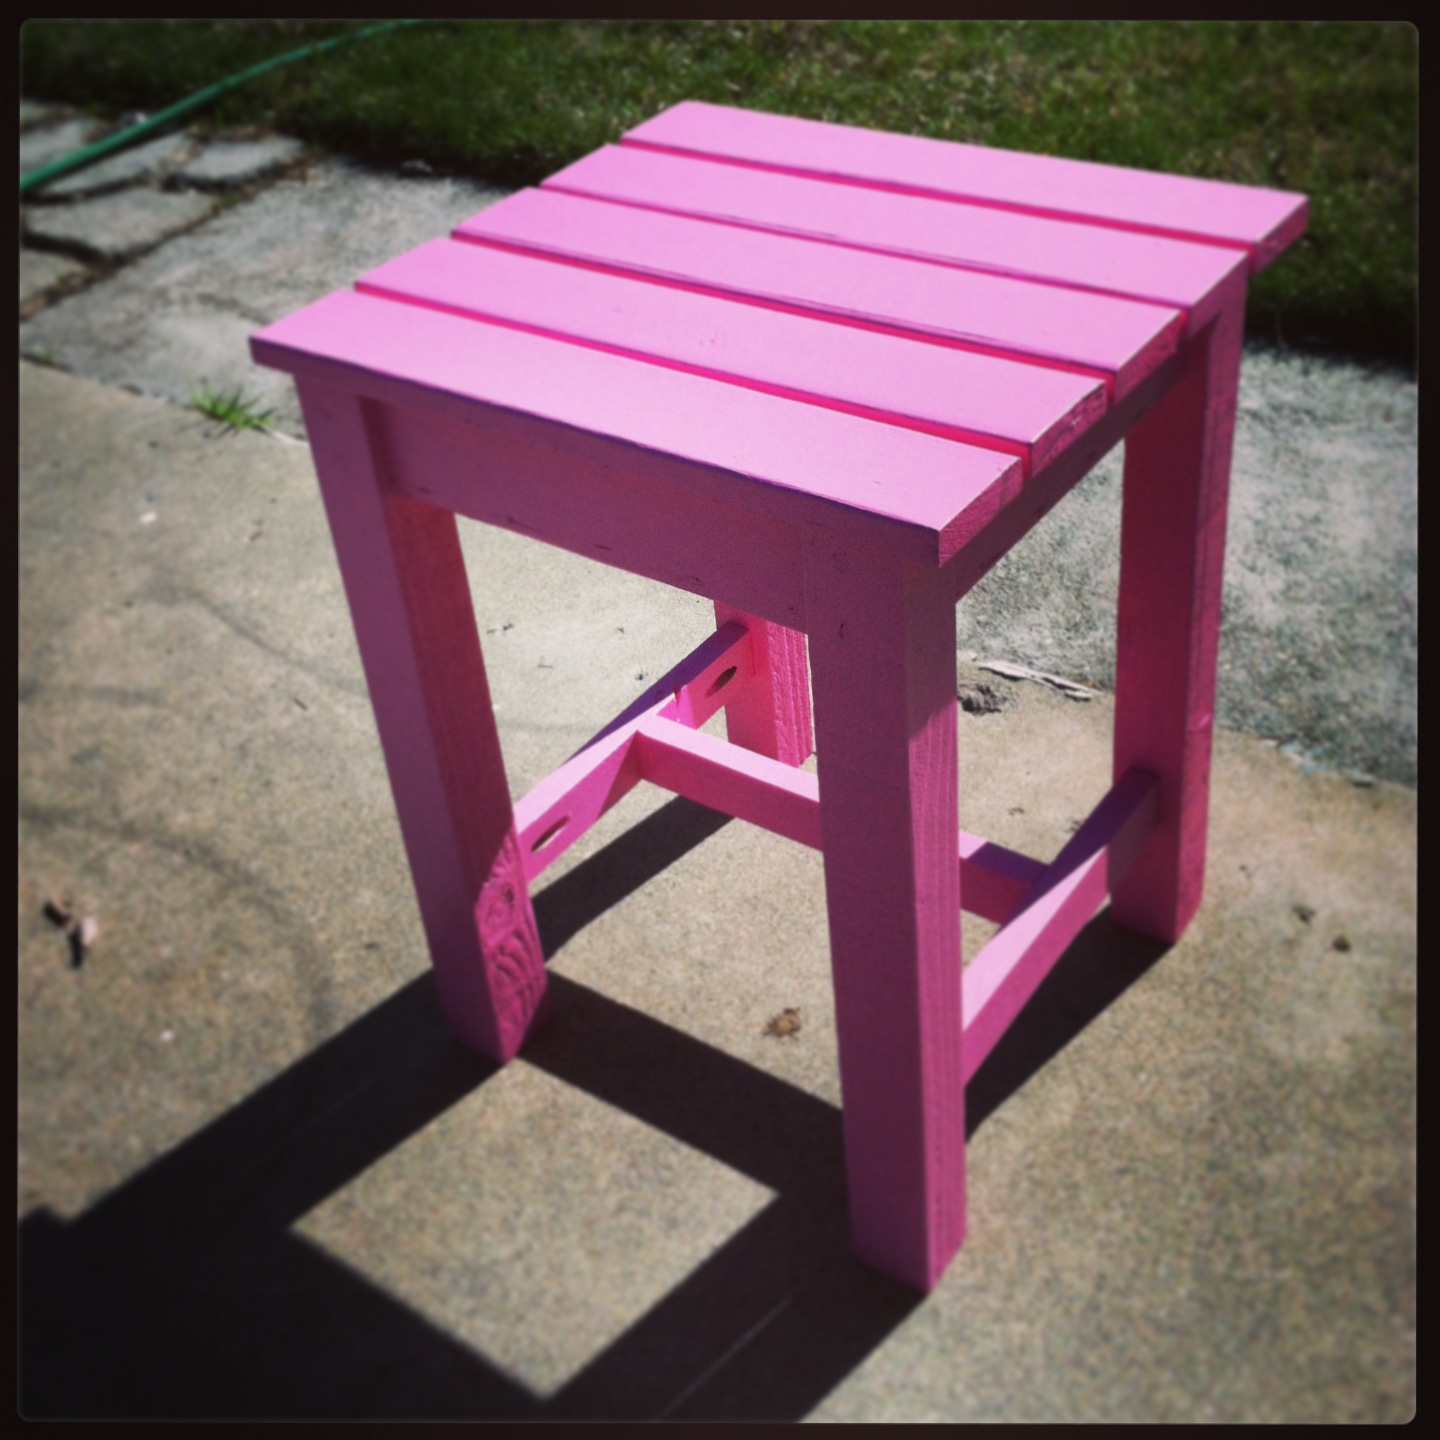
First woodworking project!
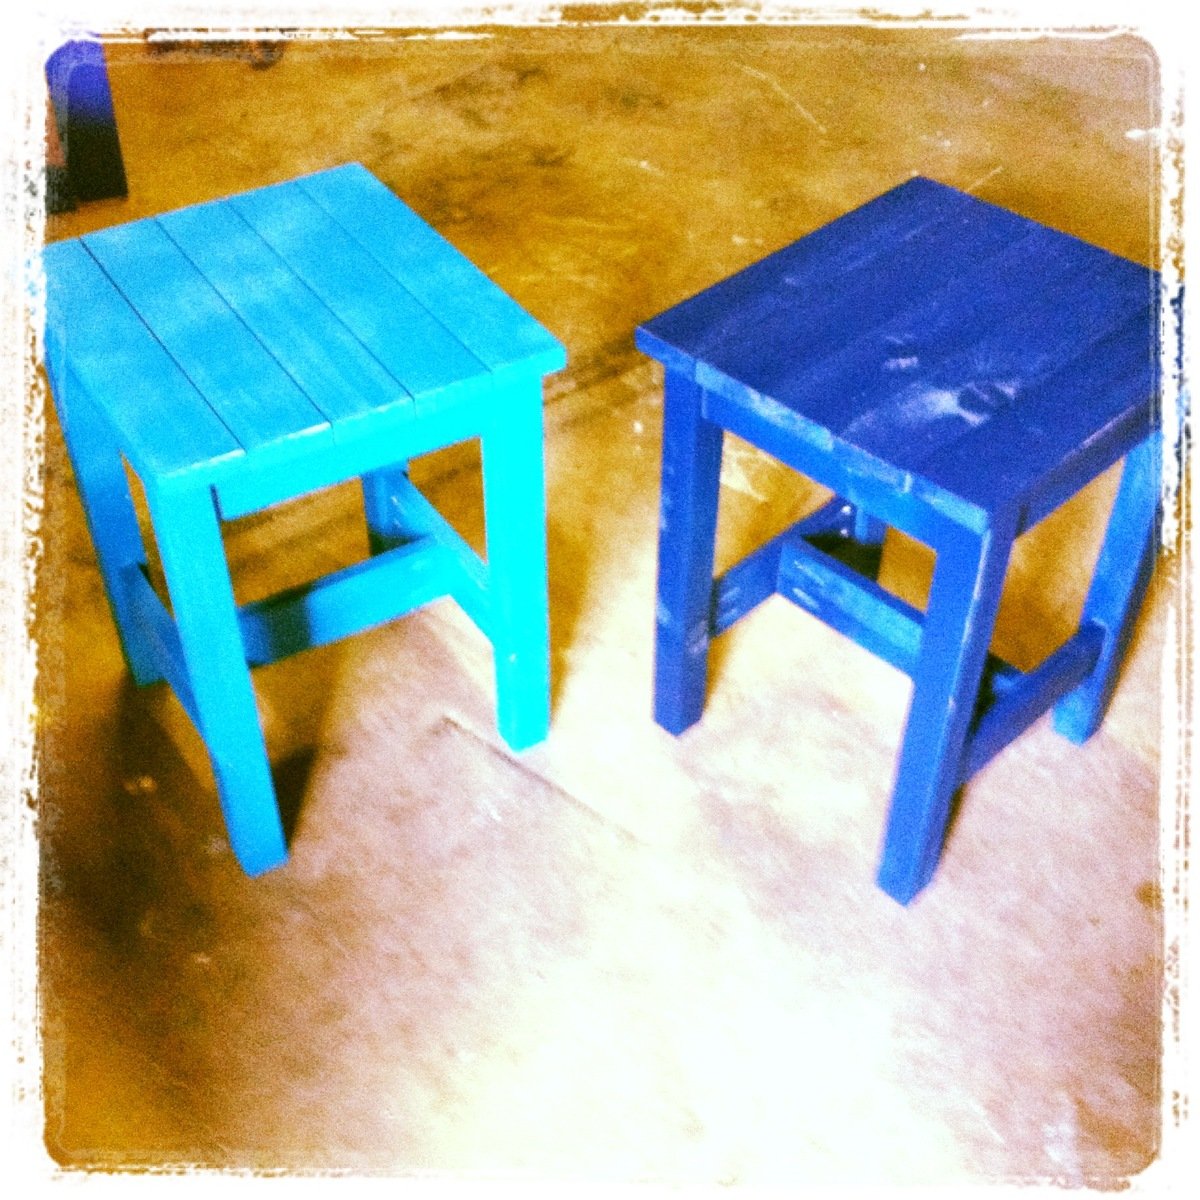
Built from Plan(s)
Estimated Time Investment
Afternoon Project (3-6 Hours)
Finish Used
paint
Recommended Skill Level
Starter Project
Bed by Burke does DIY
I also created a build video here: https://youtu.be/h_oEu908-iI
Built from Plan(s)
Estimated Time Investment
Afternoon Project (3-6 Hours)
Finish Used
White Spray Paint
Recommended Skill Level
Beginner
Farmhouse table
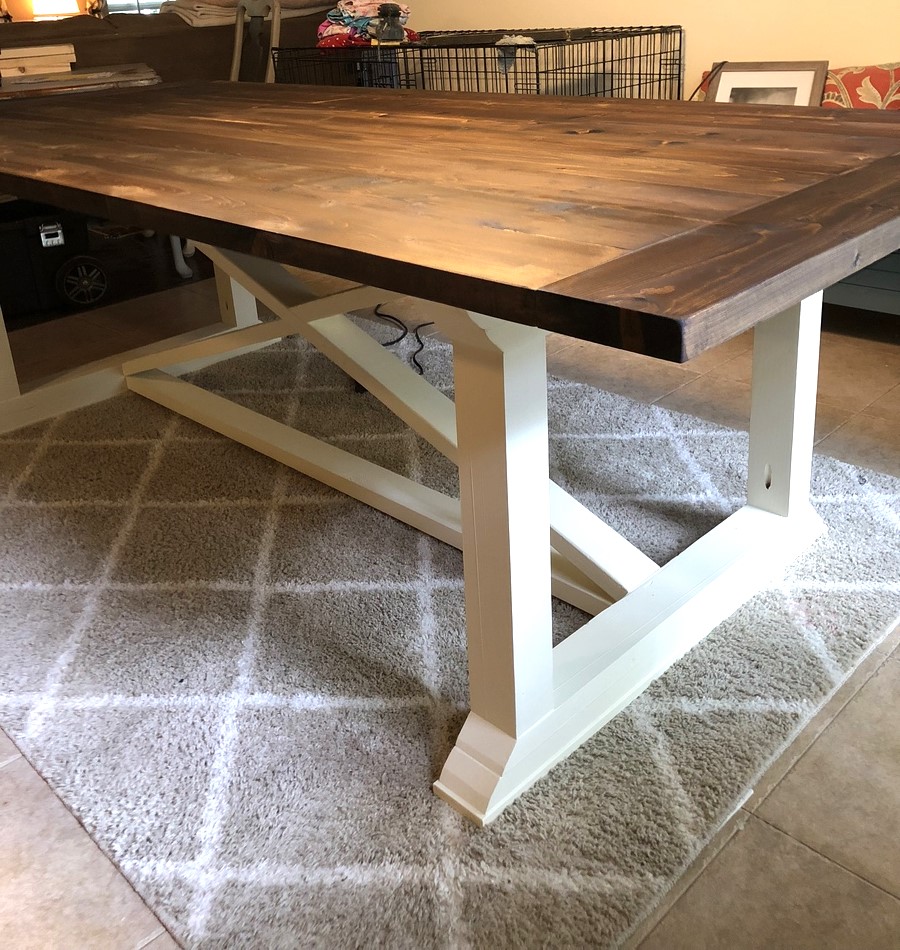
built from Ana White plans for my son and daughter in law
Built from Plan(s)
Estimated Time Investment
Weekend Project (10-20 Hours)
Finish Used
White matte paint and old English stain
Recommended Skill Level
Beginner
Comments
terry fisher
Mon, 11/23/2015 - 13:01
Making this was a little bit
Making this was a little bit of a headache maker,but got thru it.No plan from anywhere was used.
terry fisher
Mon, 11/23/2015 - 13:03
Some thing I tried to be
Some thing I tried to be different .