Wardrobe
I built this wardrobe for my daughter. I wanted cubbies to keep her folded clothes neat and easily accessible, yet giving her two drawers for undergarments and accessories.
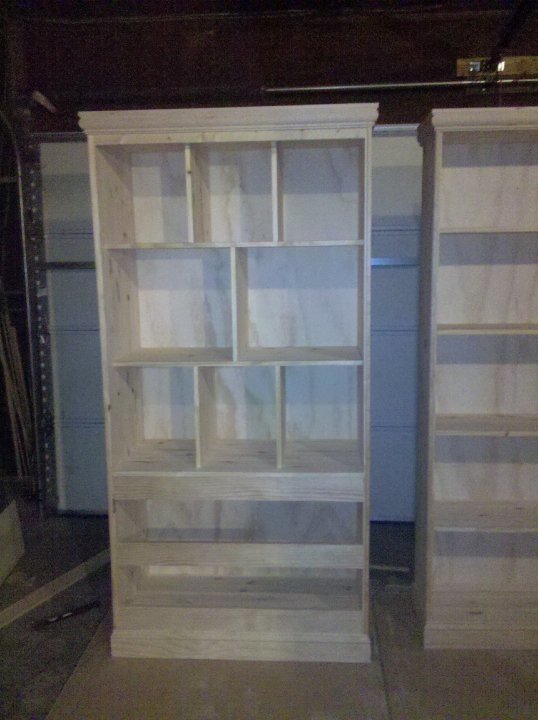
Custom Kitchen Island with a butcher block top and reclaimed pallet wood on the sides and back. Sliding barndoors cover the lower cabinets and hammered black gate knobs finish out the upper drawer.
My husband and I worked on this in the evenings. It took us about a month, just because we didn't have the time to devote all at once. We modified Ana's plans for the Apothecary Media Console to accomodate a surround sound bar in the center and to custom fit our baskets. We went with 4 cupboards to keep a uniform look. The faceplates were painted before we permanantly attached them with gorilla glue. . . one of the last steps. The finished cabinet is approximately 86 inches wide by 33 1/2 inches tall by 18 1/2 inches deep.
I added a small attached desk to the Camp Loft bed plans and framed a 1/2 inch sheet of scrap plywood painted with chalkboard paint. i then Reused an old "hanging herbs" fixture bought from IKEA for art supplies. My daughter calls it her "Art Studio"!!
Fri, 06/28/2013 - 13:35
I love that your daughter calls it her art studio. Adorable! and the color is perfect!
I fell in love with the Ballard Designs Turin bookshelf. But it was way too expensive and not the right size for my space. So I made up my own version!
Made from plywood with a poplar face frame. For the side panels I just nailed on poplar rails & stiles, then routed a simple cove molding with my router. The base molding and crown molding I bought by the foot from HD. I routed the fluting on the face frame with a hand held palm router and a small U-groove bit.
I saw a picture of marble machine years ago and I finally got around to trying to make my own. I seriously had doubts about getting it working; so I didn’t want to invest money in nice wood. Therefore, besides the dowels, everything you see was made from a scrap 2×4.
As expected, it was a challenge to get mechanism worked out. I had to remake the cup and adjust the pivot point but I eventually got it working as shown in video.
Build Instructions: https://www.instructables.com/id/Wooden-Marble-Roller-Machine/
In Action: https://youtu.be/sel0w0gXGQk
My husband just finished the Elementary Trestle Table from Ana's plans. I painted the base white and he polyurethane'd the pine project panel for the top. He also used "Super Glaze" on the surface for a thick shiny protective coating. I made the Storage chairs from Ana's plans last year, they were my first real project. I also made Grace's Bookshelves a while back, you can see them a little in the background, one is pink and one is blue. We love Ana's plans and are always printing and planning what we're going to build next.
Wed, 02/07/2024 - 06:16
Love the shine on the table.
Do you have the plans for the table? I made this table and the chairs in 2020, but now can't find the designs for the table. Thank you for any assistance.
This was my very first project. People ask me how much it cost me to make it, and I don't know that you can quantify the satisfaction of making our own furniture. The whole family helped in making this table. We elected for the Rust-o-leum Kona stain and then a semi-gloss poly. i think my next project will be a kitchen table, some built-ins as well as taking my son's favorite college team logo to embed onto a chair. Thank you for making the available and easy to follow.
I worked on this in the evenings after work so it took more than a day or two to complete. Plus sanding, staining and finishing if done right took over the course of a couple of nights.
3 boys playing in the sand.
I used 2x8's for box base. I ran into spacing trouble, 1x4's must have been really new, they were about 1/16" over 3 1/2". I had to reduce spacing on each gap a hair to be able to close.
Project is still in progress but so far this has consisted of a firepit, 20x20 slab, 4 cypress columns, bistro lighting, 2 modern outdoor chairs, 1 modern outdoor bench, 4 matching tables, and a project screen. To come: flower bed, projector storage stand with casters and hinged top, outdoor speakers, and possibly a green egg stand, and extending power to the back of the slab.
This is a knockoff of the Pottery Barn "Caden Leather Ottoman". Made from Ash and American Walnut.
This was a fun, easy project...and perfect solution for the book clutter. I got some good practice rounding off corners (invested in a belt sander) and cutting out the handles. I beleive the baskets my wife bought for the bottom shelf cost double the entire project.
This is by far the best site I have ever found for wood projects.
Slightly more elegant version of an outdoor cedar patio table. This is made from 100% cedar and joined using Kreg pocket hole screws. The finish is 2 coats of Sikkens Cetol MRD that has been hand rubbed on using a cloth, with 24 hours of dry time between coats.
Wed, 06/19/2013 - 23:22
I really like the way you modified this design and I would like to duplicate it. I am curious about how you changed to framework to accommodate table top with the boards running lengthwise. The original design has the framework running lengthwise, so I am assuming you added framing that runs perpendicular. Is there any way you could include pictures and measurements of the framework under the tabletop? Thanks. Great work!
Thu, 06/20/2013 - 07:13
Hi odpdxo, you should check out my website:
http://www.bryanpryor.com/2013/05/22/diy-cedar-patio-table/
I have a lot more details, including a full sketchup model for the build of this table posted. I think it will answer all of your questions.
Fri, 06/21/2013 - 14:58
Wow that's beautiful! Are you going to make benches to go with it?
wanted a storage chest but didn't want just a chest so saw this in a picture then did my own measurements for what i wanted
My daughter-in-law requested a pub table for my son’s birthday. Having never done this before I searched the web and found Ana White’s site (great by the way). Table was built using the image of old_man’s table on Ana White’s site as inspiration (size 42” x 44” x 42” high). I used 2x8s for the top, jointed and trimmed down to 6” wide and then glued together. Since I could only clamp up to 25” wide, I made the top into two sections gluing one board at a time to minimize wet boards. I then had two halves that I glued together using a wedge setup so as to avoid purchasing additional expensive clamps. Once the top was complete, I sized out my base and opted to place the apron boards between the 4x4 leg instead of placing them outside the legs. They were attached by drilling pocket holes in the apron and then attached with glue and screws. The top was then attached to the legs and apron from using 1 1/2” right angle brackets. As old_man stated and I concur, this table is HEAVY.... Thanks to both Ana White and old_man for the inspiration.
This was my first project! I did get better the more I made. Even mitred corners on the top! Thank you for the easy to follow plans.
This is a picnic table my husband made for my niece's doll from scrap wood we had left over from the drawer pull project. he said "enough room so that she can have a doll party" I'm waiting to see her at Easter to piant it with her!
These garden beds are fantastic! They were so easy to build and look great in our backyard. We have always found ourselves with a garden covered in weeds or plants out of control. Our garden this year looks wonderful and we have hardly any weeds in the beds. Thanks for the great plans!
Fri, 05/24/2019 - 10:05
I'm so glad the plans worked for you! Your garden looks fantastic!
I build the x-desk with drawer with slight change in length and height to fit it for Kids. I also took pictures as I was building the project and converted them into a time lapse video of 2 minutes. Hope you enjoy it. https://youtu.be/KcrF2zqKudQ
Both my princesses absolutely LOVE their dollhouse. It was my first diy project and it's wasn't nearly as difficult as I thought it would be.