Chaise Lounge

Ana White inspired chaise lounge......
Built from Plan(s)
Finish Used
Clear Thompson waterseal
Ana White inspired chaise lounge......
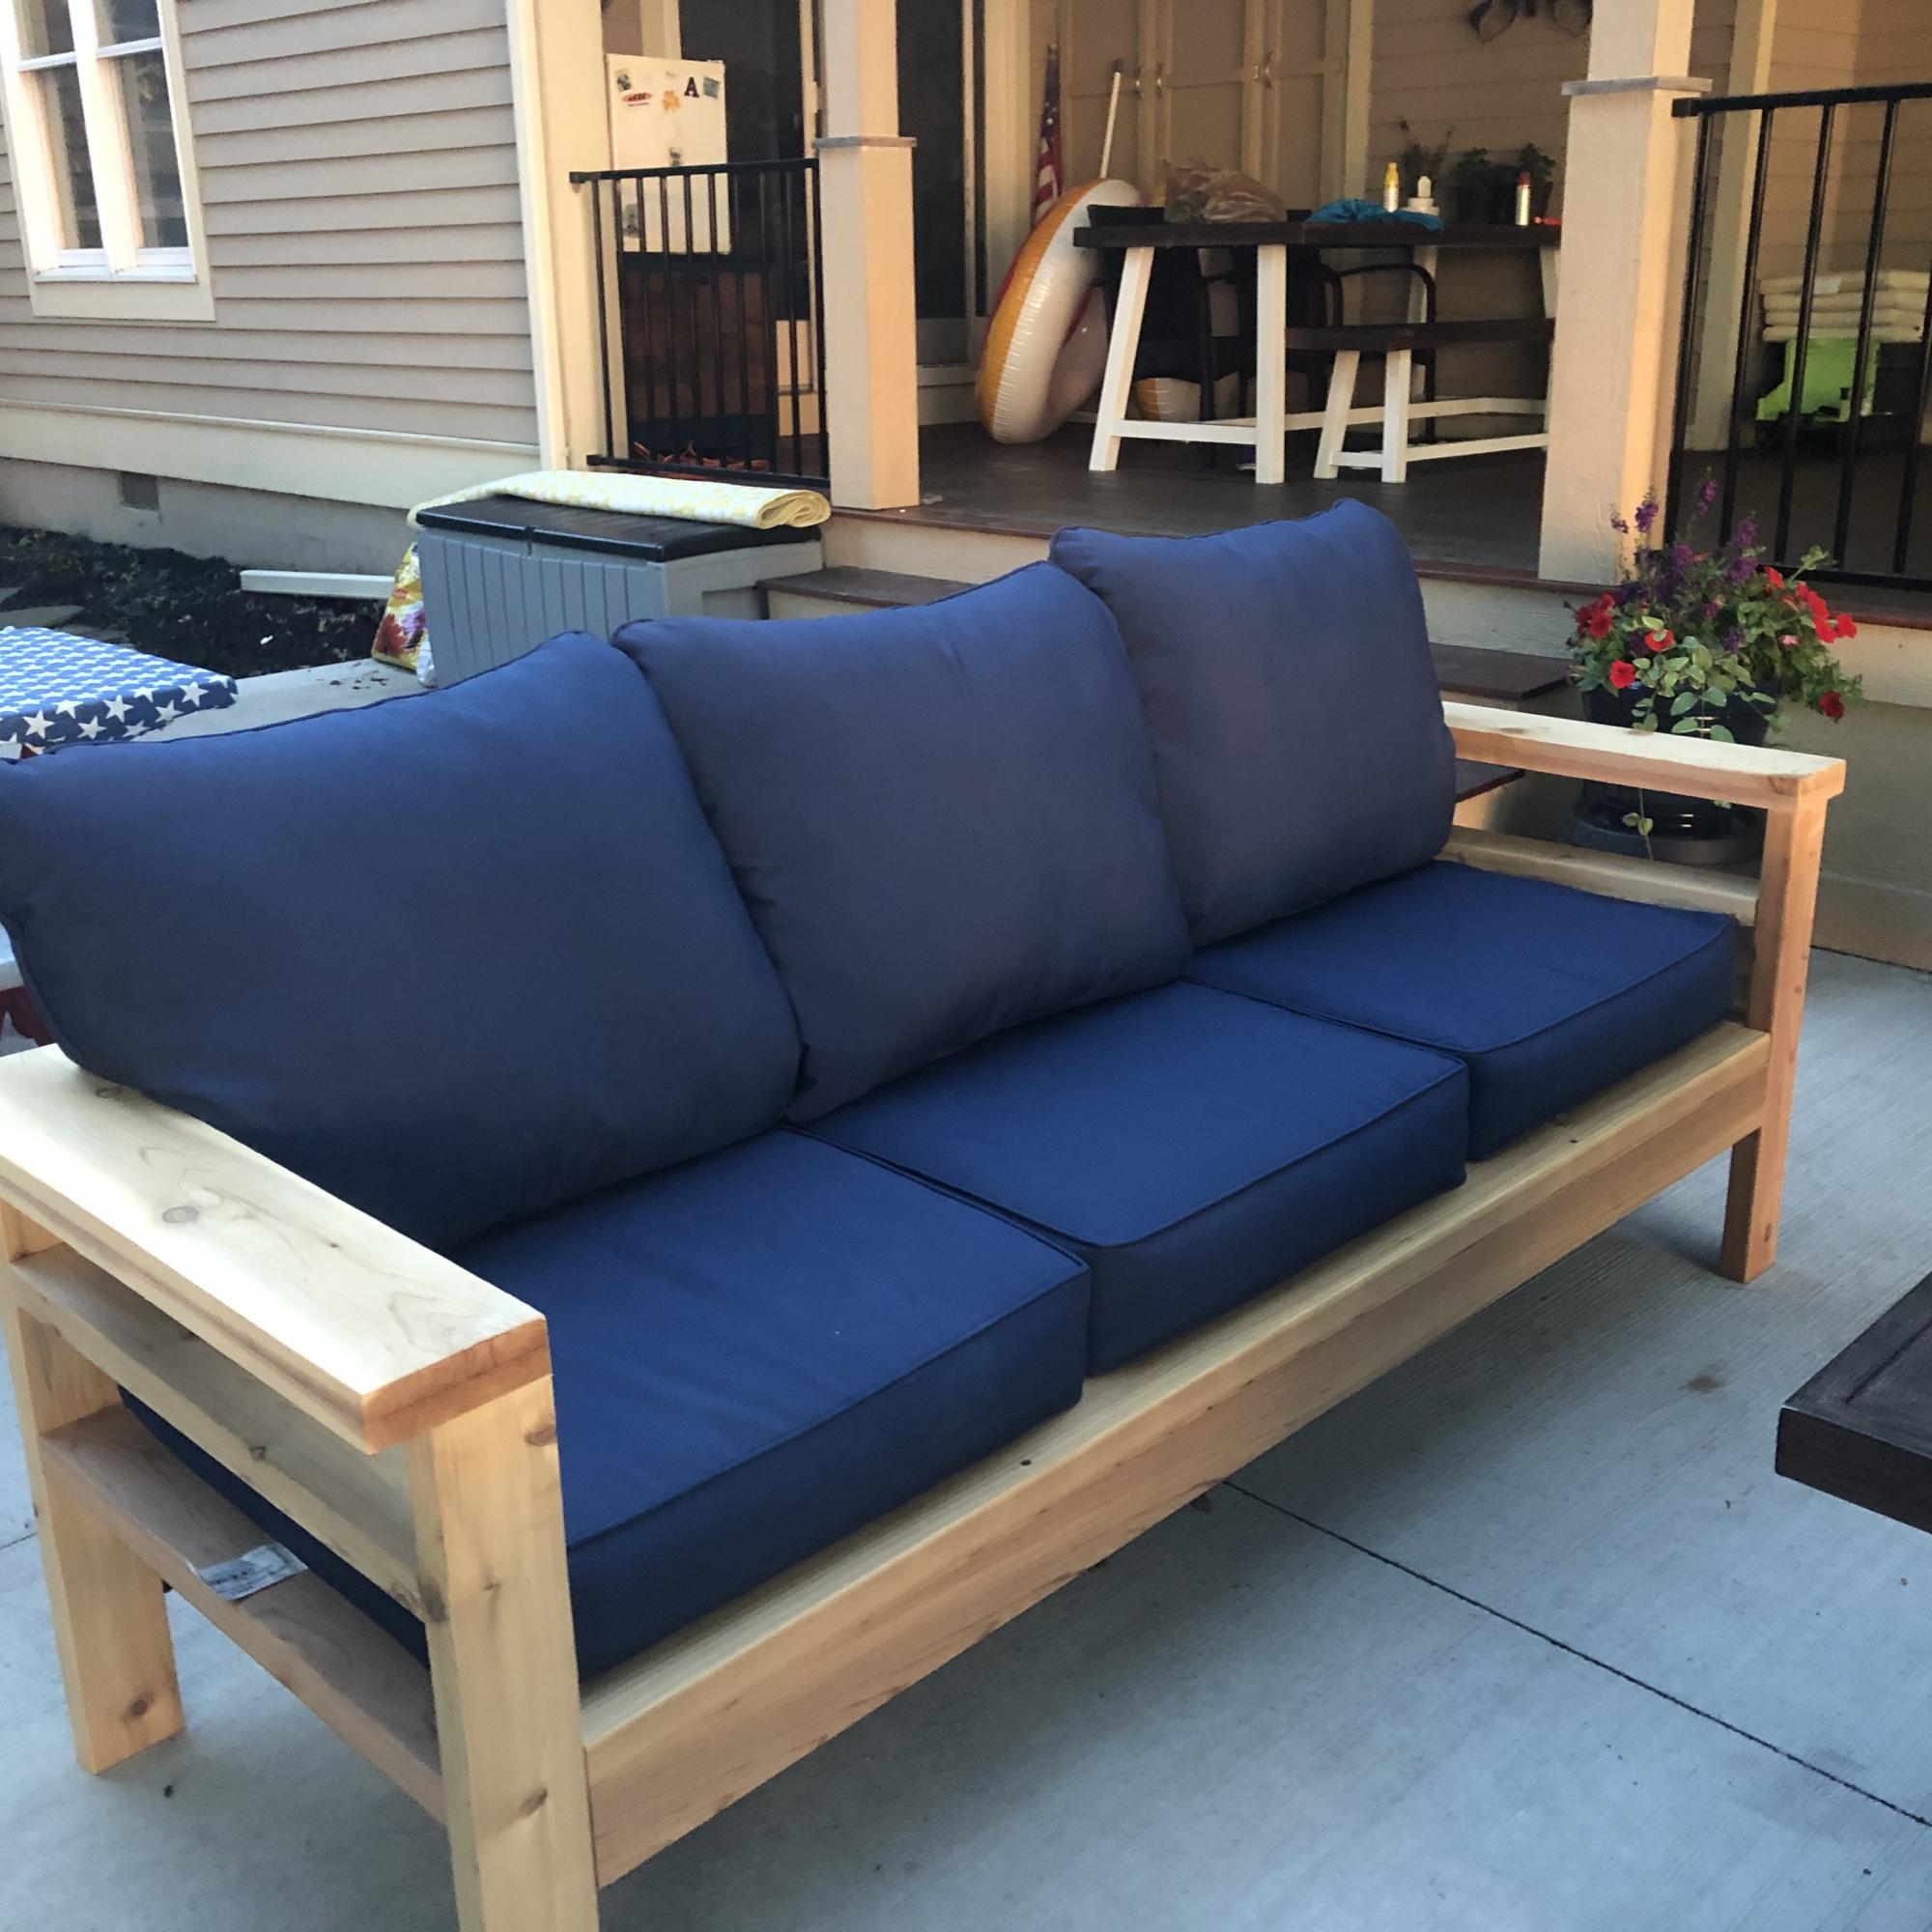
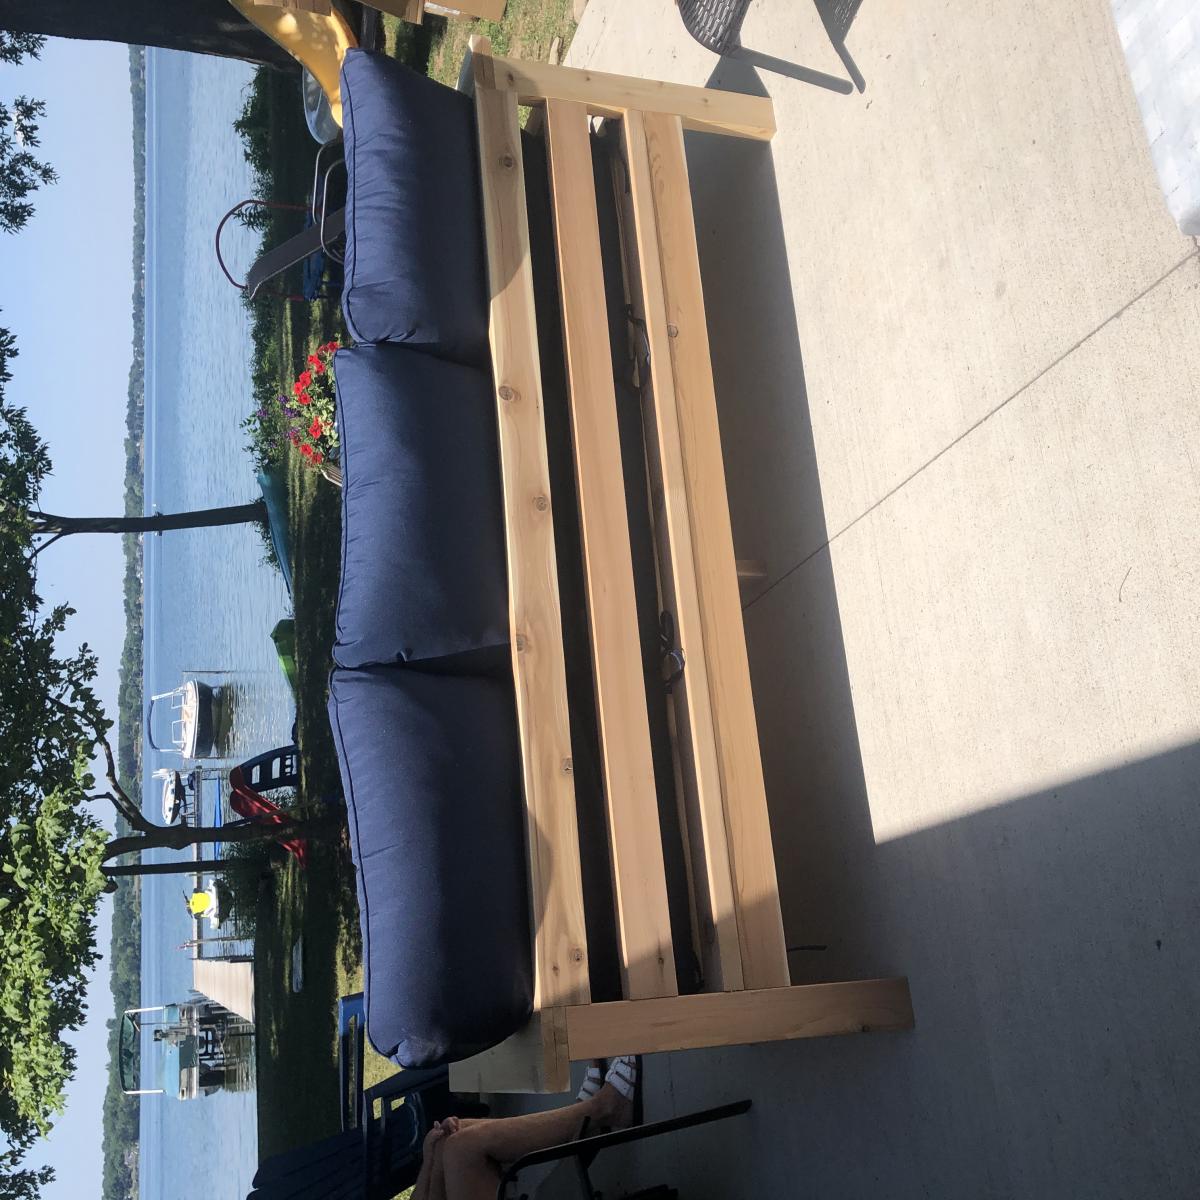
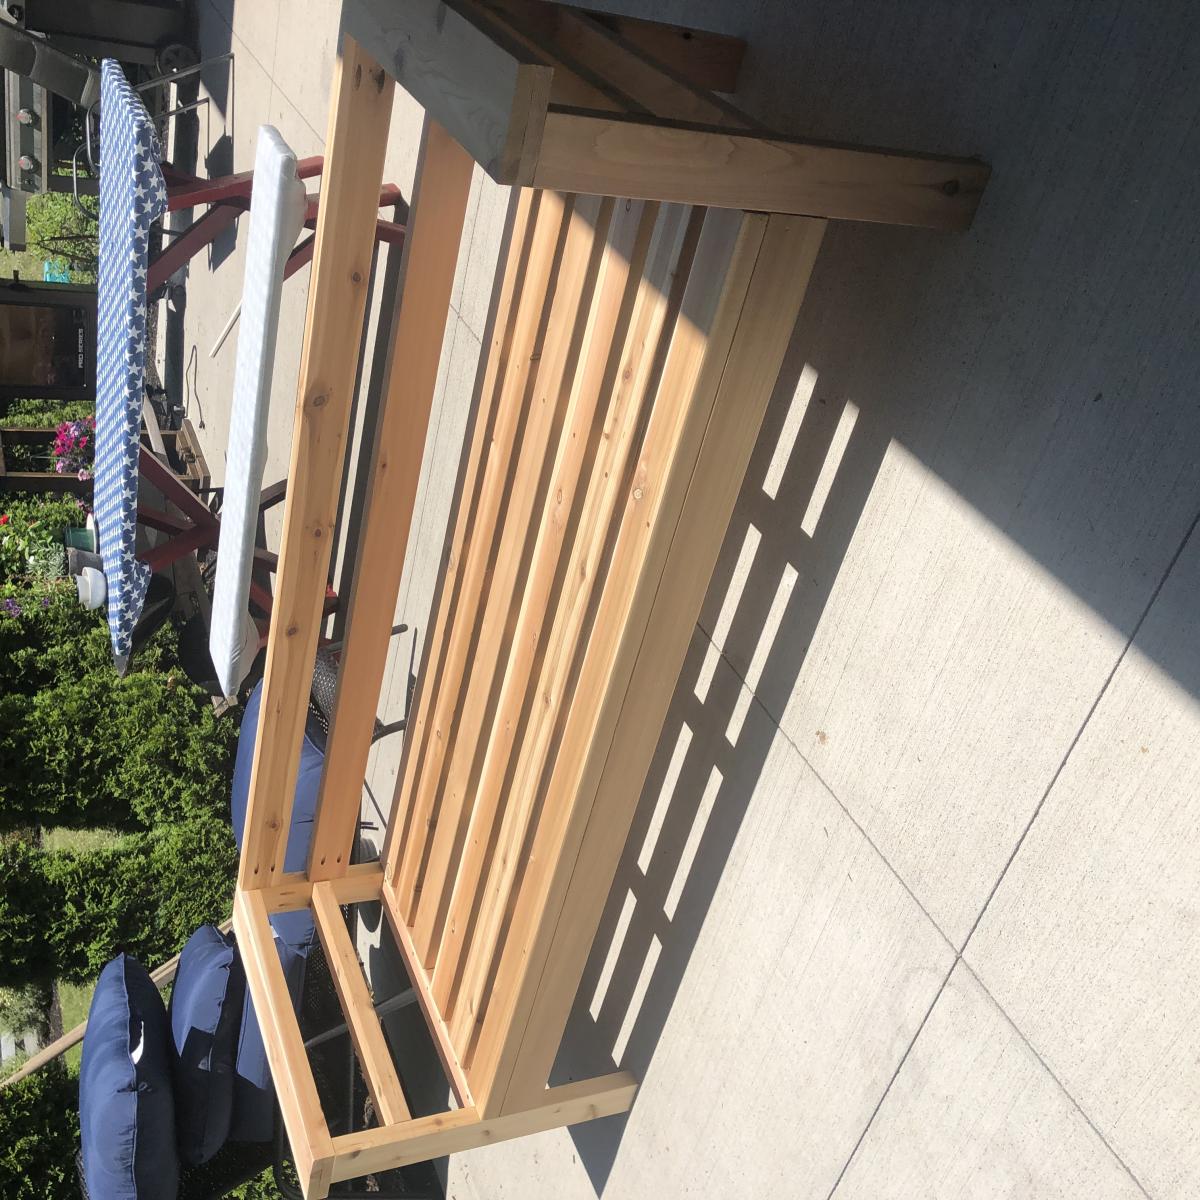
I used cedar and added the extra boards so the cushions would stay put. We also made the arms 2x6 boards so we wouldn’t need end tables for the couch. The plans were super easy to follow. I mostly used pocket holes so the screws wouldn’t be visible. Love how it came out! Thank you for the plans, Ana!!


You can see the final project here: http://crabandfish.blogspot.com/2012/10/lil-archers-bed-its-done-its-do…
It was time for our son to move to a big-boy bed! We looked at tons of plans, but none were quite what I wanted. In the end, fish modified plans for Ana White's Camp Loft Bed with Stair. We wanted to make it a bit shorter because we only have 8' ceilings and there is a ceiling fan in the room. We spent about $80 for the lumber and invested in a kreg jig as well. The bed is stained with Minwax Golden Oak. We bought a 10" deep twin-sized foam mattress for the bed - if you are adding a coil mattress and boxspring, the bedside rails would definitely need to be higher.
Our son LOVES it! He is almost three and is easily able to navigate the stairs, which I don't believe will become too "baby-ish" as he grows older. If they do, the steps can easily be removed from the frame without losing structural integrity.
The underbed area has a great "cool" factor - we hang blankets to create forts, and it has become a place our son gravitates to for reading, playing, anything!


Sat, 01/03/2015 - 11:41

They were simple to make and the plan was easy to follow. The only modification I made was adding the 1x3 topper in place of the longer legs sticking out of the top.


Fri, 07/19/2013 - 06:36
Adding these to my to-do list for spring (yes, I plan ahead). I'm thinking of elevating and elongating them to fit around a bay window.

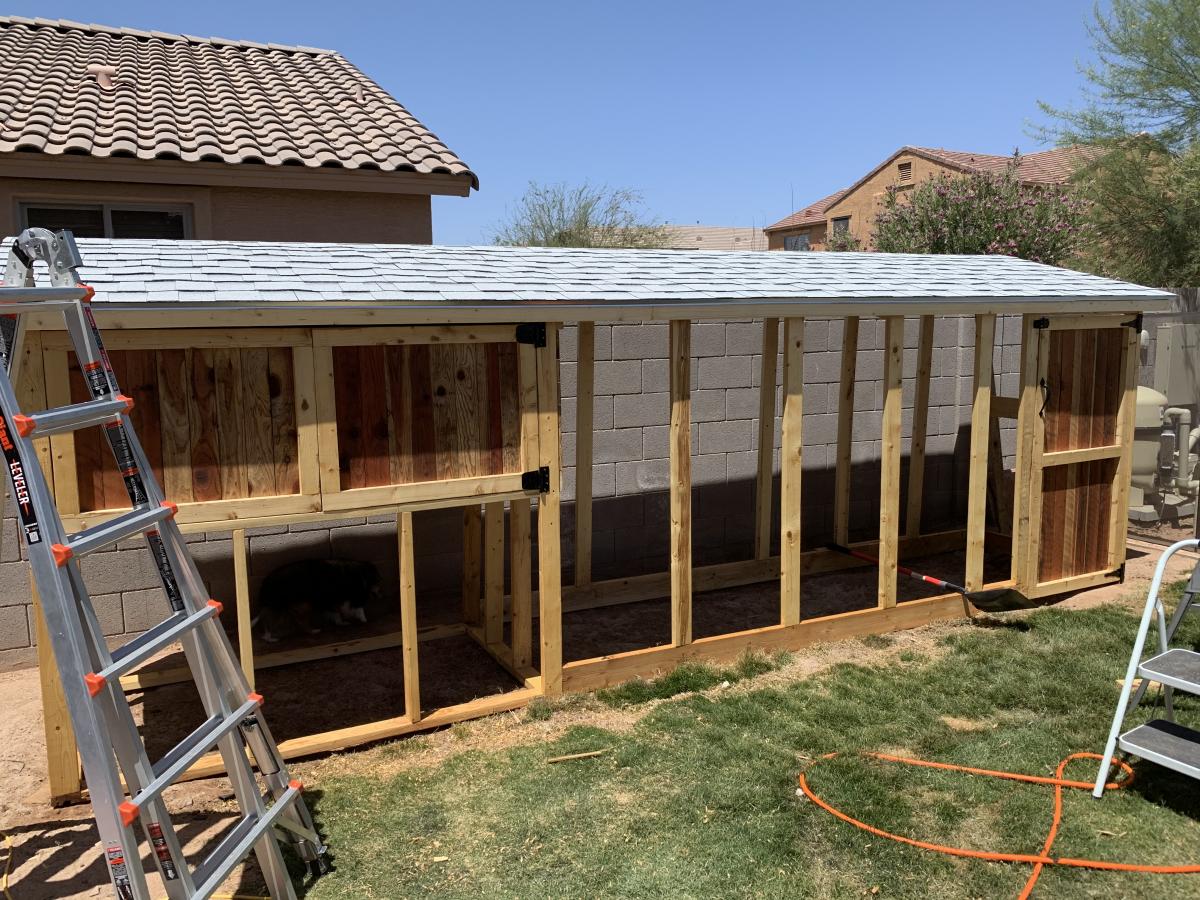
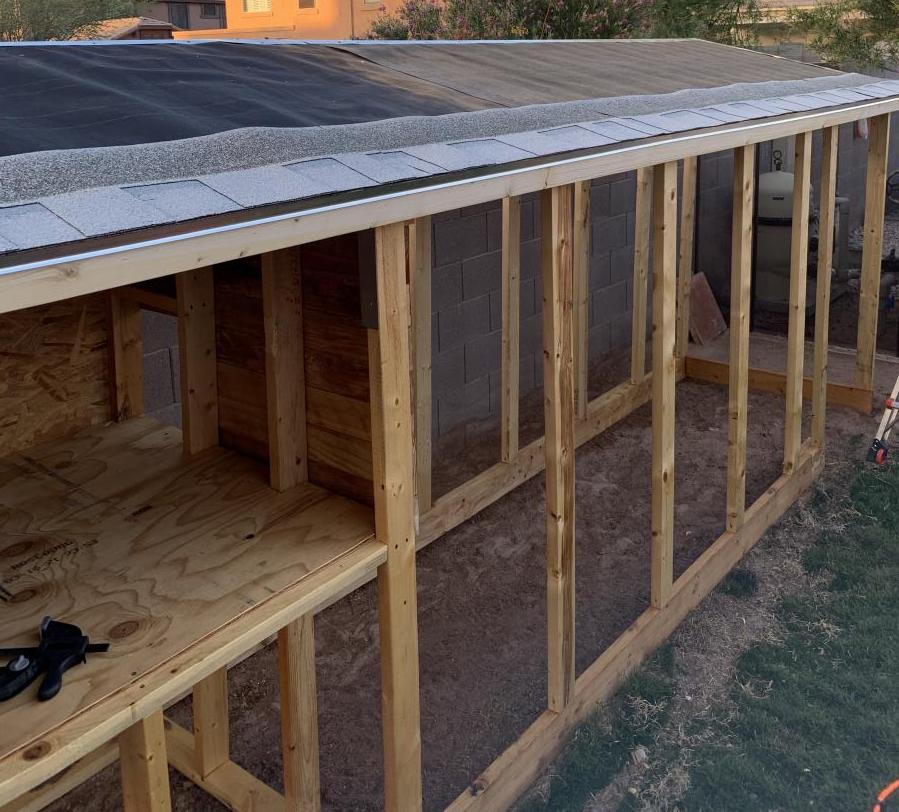
I took the idea of the "small cedar shed" and decided to upsize it for a new chicken coop. Our old one was small enough that we had to let our six hens out to roam the yard. Chickens. Poop. Everywhere. I wanted one big enough to have them live in it. The nesting box is about 24 sf. The whole coop is 18' long, about 6-1/2' at the back with a 15° slope to the roof, and about 4' deep. I built the ladder up to their nesting box and made a mitre-cut panel under the nesting box for cleaning out, feeding, and watering. Total materials cost was about $1000, but a couple of local homebuilders helped by letting me scavenge the lumber for the nesting box from around houses that they were finished framing.


This is the perfect workbench for my needs.
I upgraded the casters to bigger ones as my shop's floor is in rough shape.
I also added storage under the two work surface next to the miter saw. This was just a matter of closing under the 2X4 frame and making the two sections on casters a little shorter. The only downside for that mod is that the plywood can bend a bit since it is not screwed to the frame. I don't mind since it falls flat as soon as there is weight on it. Also, this mod makes it hard to include fence system (it would need to be removable, like fixed with dowels only, no glue) and almost impossible to include a precise fence system since it would need to be removable. In my case, I do rough, non-repetitive cuts, so there is no need.
TIP : Pay a little extra for smooth plywood. I lost a lot of time sanding mine :(


Tue, 02/04/2020 - 08:21
Awesome! Do you have pictures/info for the cart that has the Dewalt table saw? I have the same one and would love to build the cart for it.

I used Ana’s fireplace plan and added lightweight brick. The vaulted ceilings was a challenge but I figured it out!
Marcia T.

 My home office remodel was inspired by a post from Ana White a few years ago. For this project I ended up using IKEA bookshelves and cutting the tops off and flipping them upside down. I used some crown mounding to cover the base of the cabinets on the tops. The desk top bases are file cabinets I found at the office supply store and the desk tops are edge glue pine. Overall I think I only had to make 8 cuts for the entire project. Saving me a ton of time and money. Thank you Ana for all of the wonderful post!
Mark Danreiter on Facebook


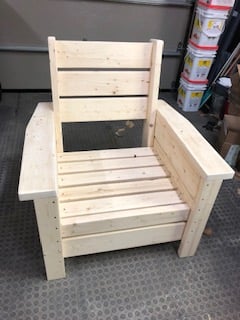
Modified with a high back and modern adirondack arms.
The base of the chair is built exactly to the plan except that the arms are done in a modern adirondack style.
The back was made independently to fit inside the base and then attached to the plan base.
Very comfortable but very heavy chair even without the modified back.
Not stained yet obviously.
Cushions are hard to find I think I would make it slightly smaller next time and maybe even find the cushions first and alter the plan to fit.


Tue, 06/09/2020 - 09:11
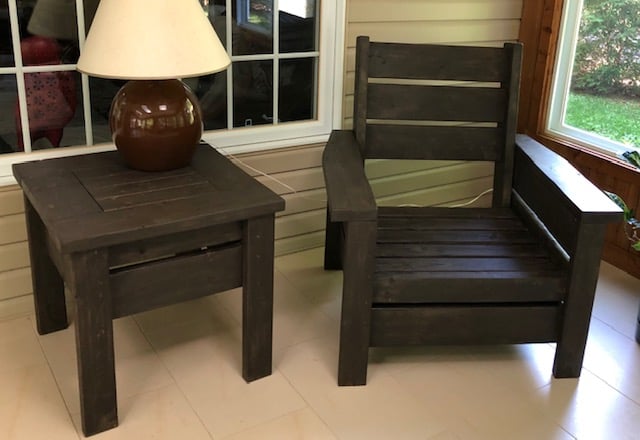
Stained with Saman: Urban Grey mixed with some left over brown 4:1 and now has a companion side table
Wed, 06/24/2020 - 07:33
Do you have the plans for the table you built? Im a brand ne beginner. I am trying the modern outdoor chairs and live this table with them.

I built the original cabin bed for my son when the plans first came out and it has been such a huge hit. After seeing the loft version on RH, I decided to modify the original plans in an effort to give my son more floor play space in his room. The loft bed was his Christmas gift and I've never seen him more excited (he's four). Both he and his brother spend hours a day playing in the bed and underneath. It's hands down the most satisfying project I've built.


Mon, 06/24/2019 - 10:00
Hi!
I am so sorry I didn't see this sooner! I added the modified plans to the "blog link" section above. The modifications I made are in red. Feel free to email me if you have questions. I don't seem to get notified of comments on here.
Fri, 06/22/2018 - 17:50
This is absolutely stunning!!! I want to build the same one for my kids' rooms! Did I mention I love the colors as well? You did such a great job! Did you have to add anything for additional support since it's lifted higher than the original plan? Anything else I should be aware of or anything you can share if I were to build this bed? Thank you so much!
Mon, 06/24/2019 - 10:07
Thank you! I'm so sorry for the delayed response. I don't seem to receive notifications of comments on here. No, I did not have to add any additional supports. It is really sturdy. The build itself is very similar to the original, I just adjusted the height of the bed, and changed the dimensions of the upper cabin to leave more space on the bottom for play or another mattress. Hope that helps some. The plans are linked above in the "blog link" section if you're still interested.
Fri, 06/22/2018 - 17:56
Is your room 8' or 9' ceiling. Would you mind sharing your dimensions?
Mon, 06/24/2019 - 10:11
We have 8' ceilings. If you're still interested in the plans, I linked them above in the "blog link" section. Sorry for the seriously delayed response. I apparently need to check my notification settings. Feel free to email me if you have any questions. [email protected]

Chicken coop with run!
by Vicki


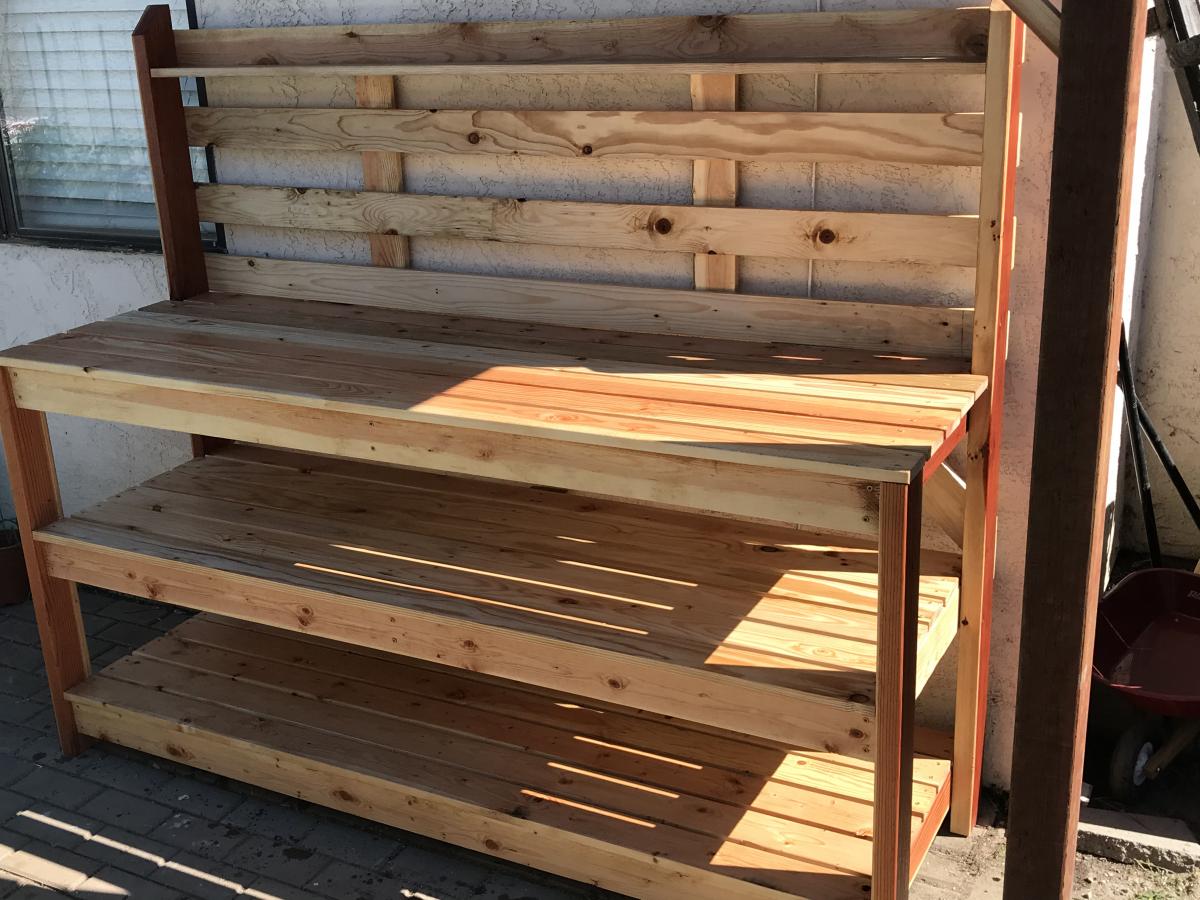
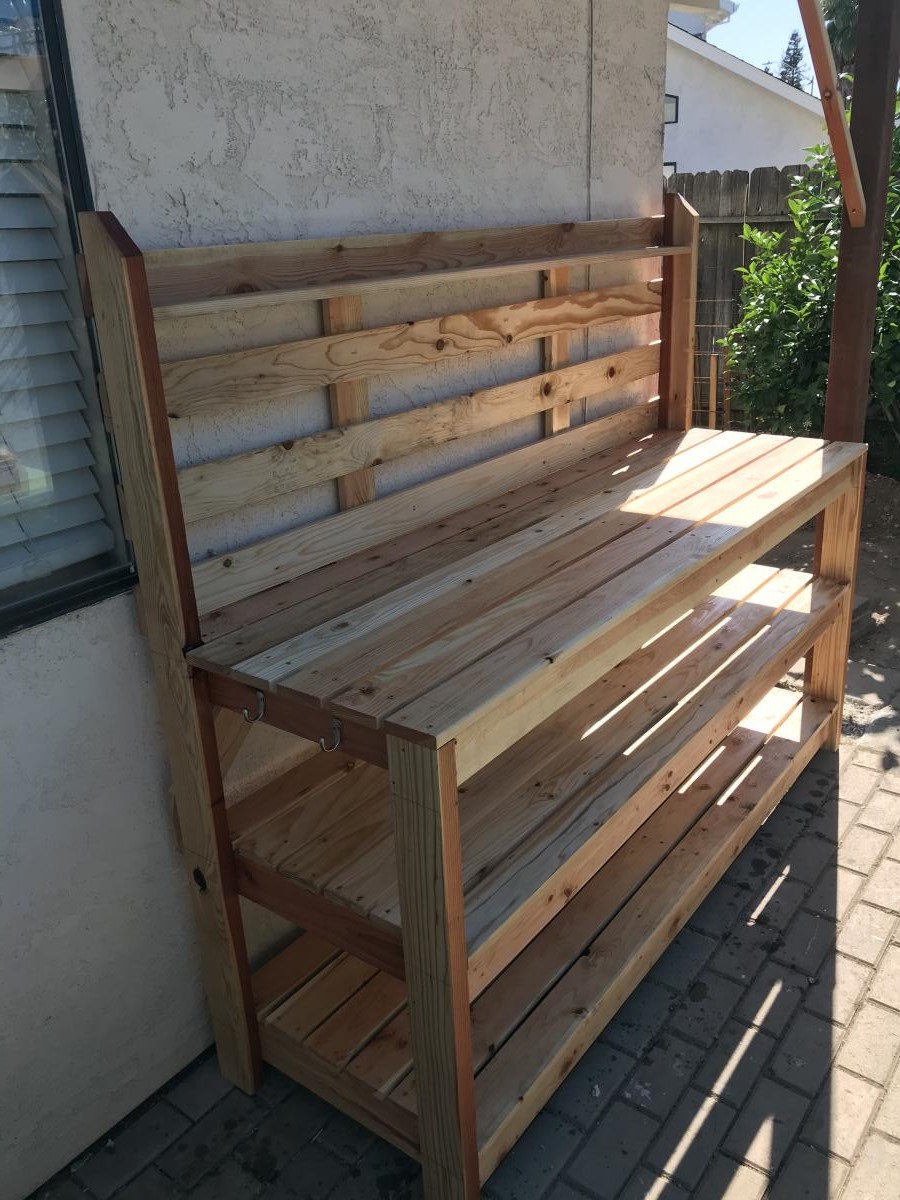
I built the simple 2x4 potting table out redwood in 6’ length.


This was our first build and it was quite a big project to take on to start with. We had so much fun and learned so much along the way.
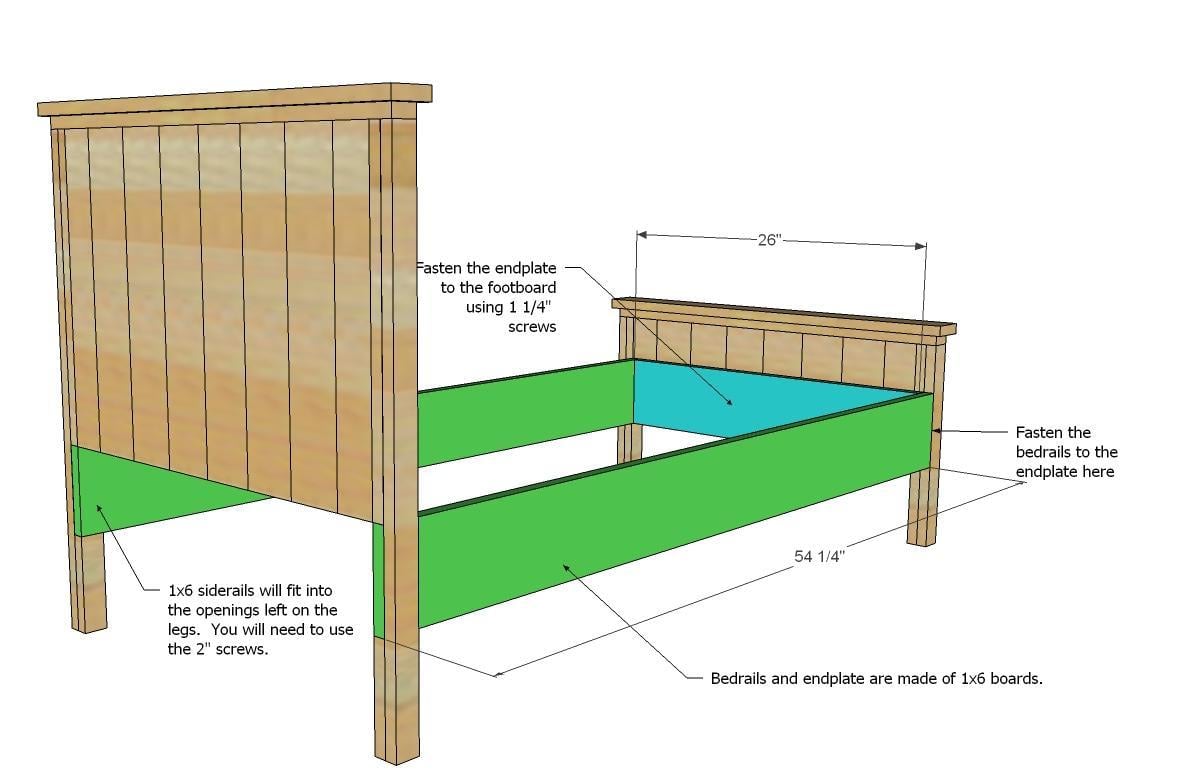
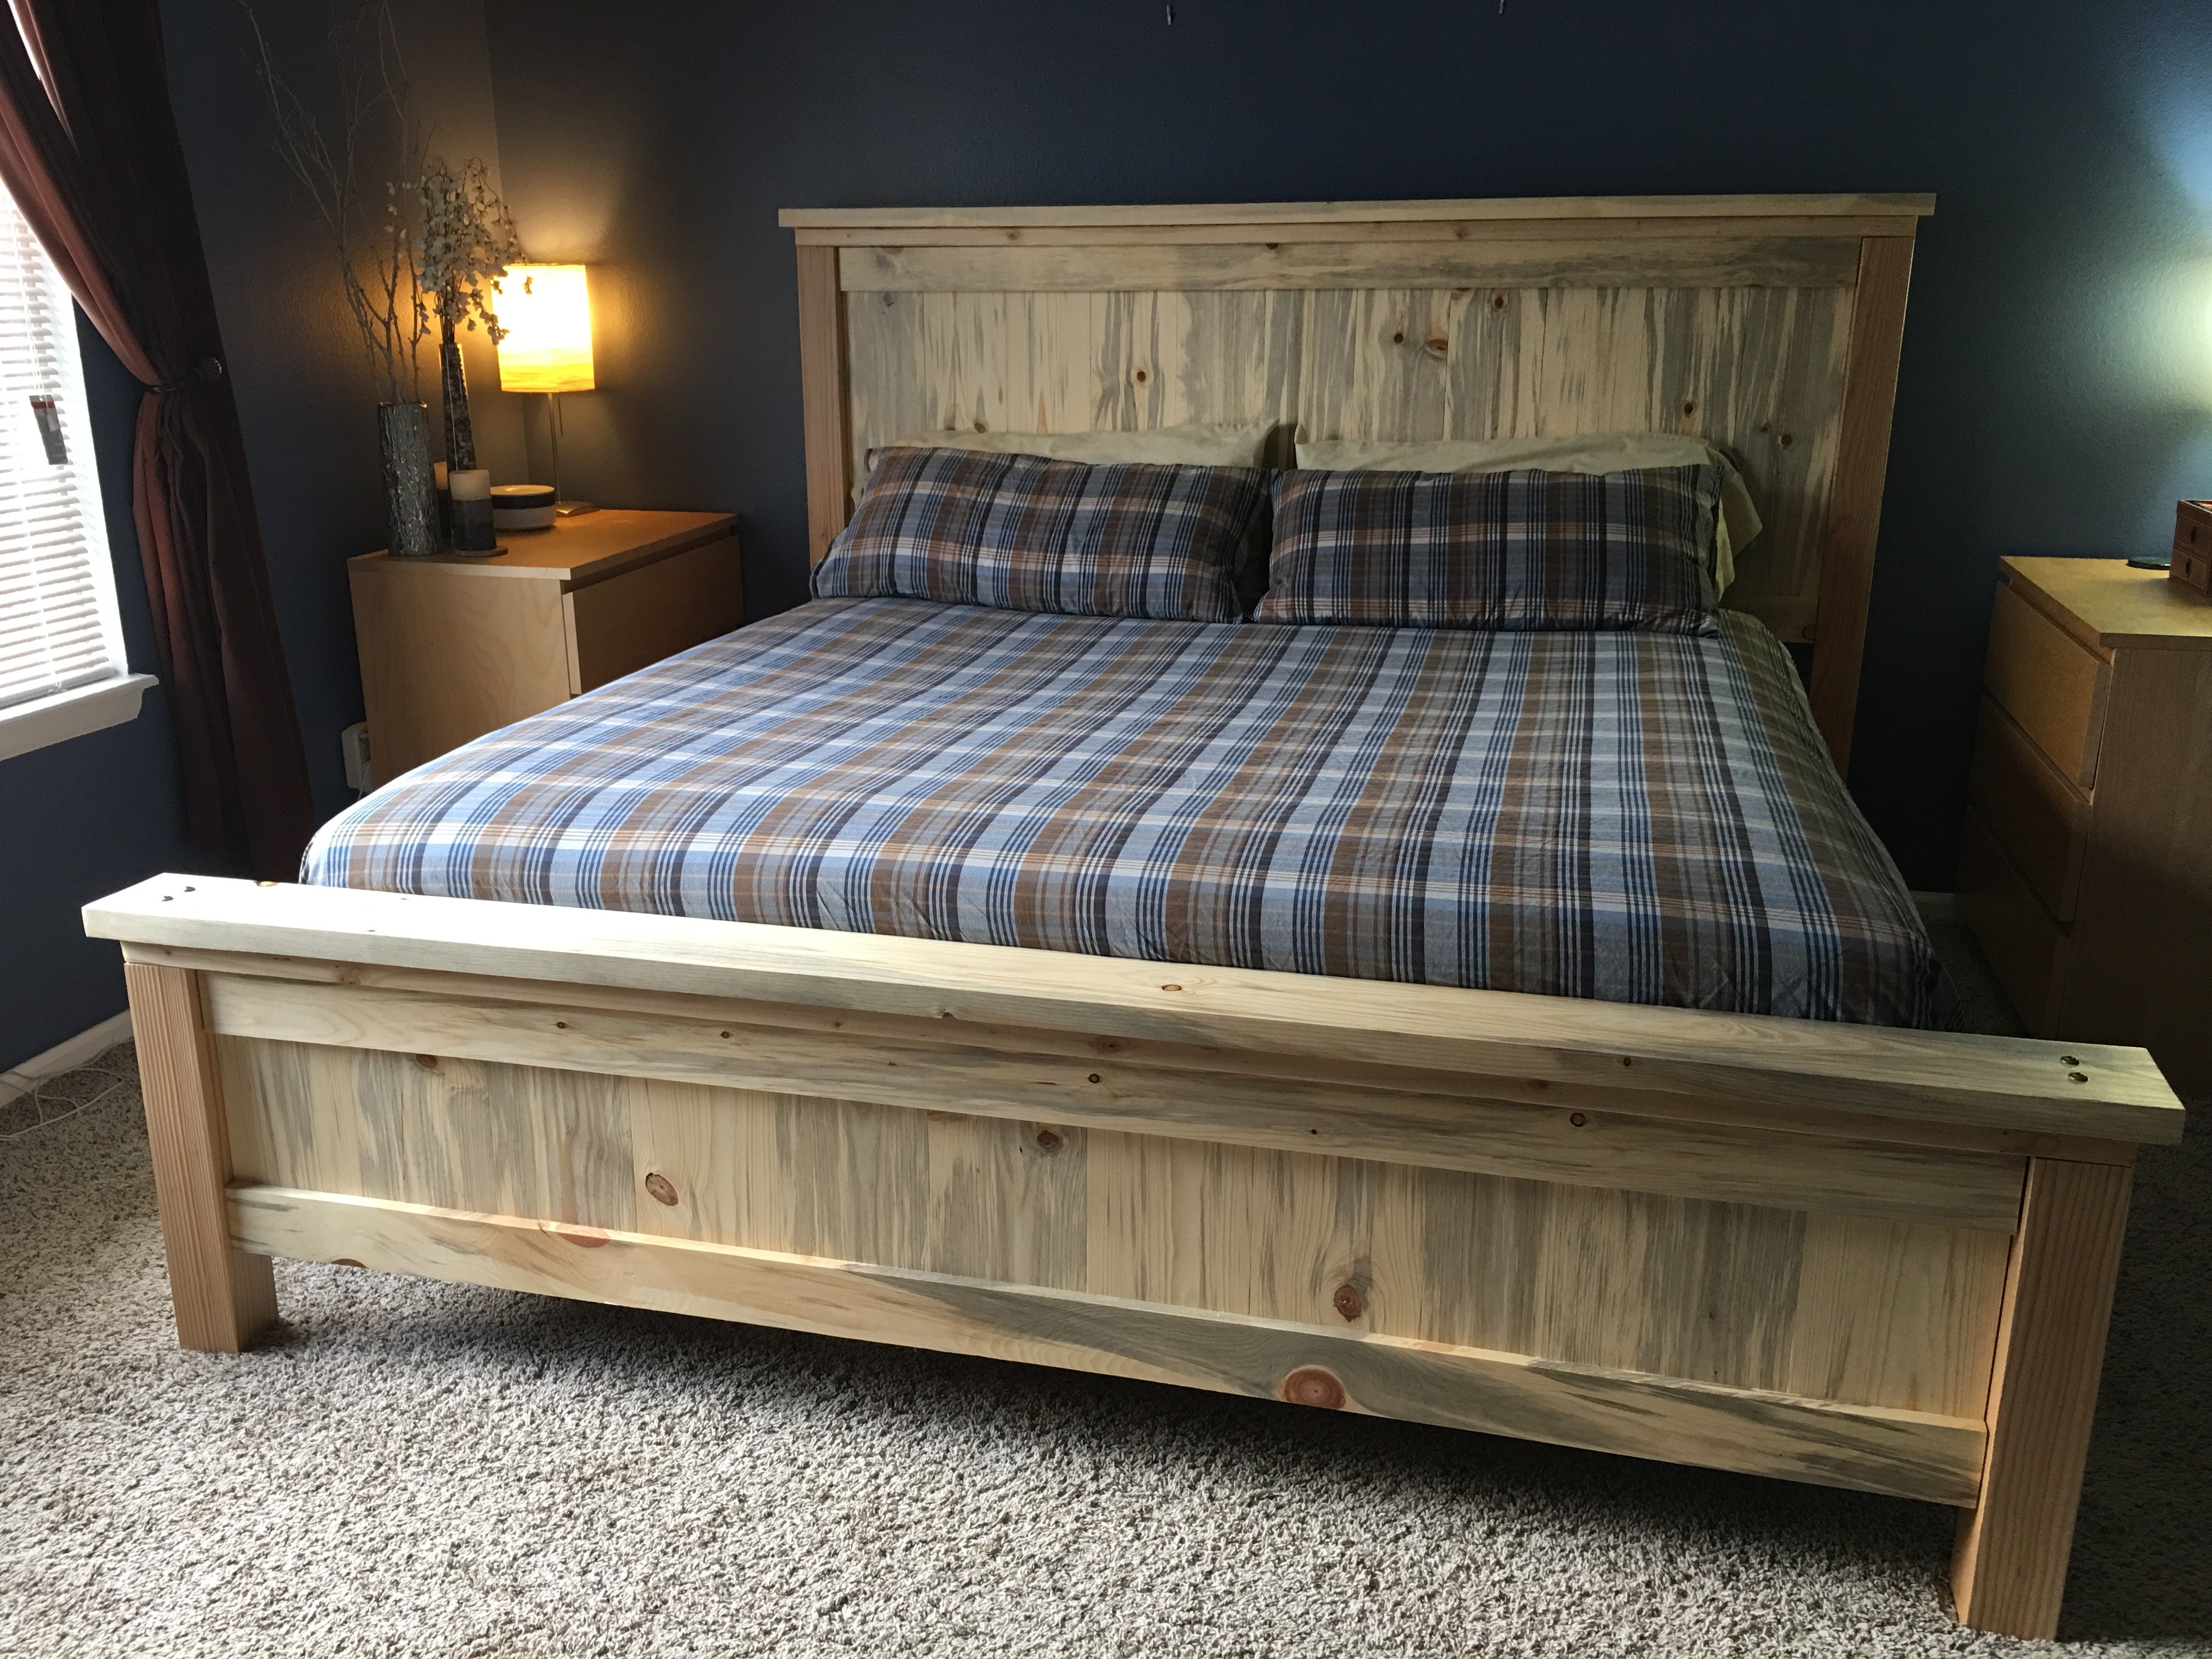
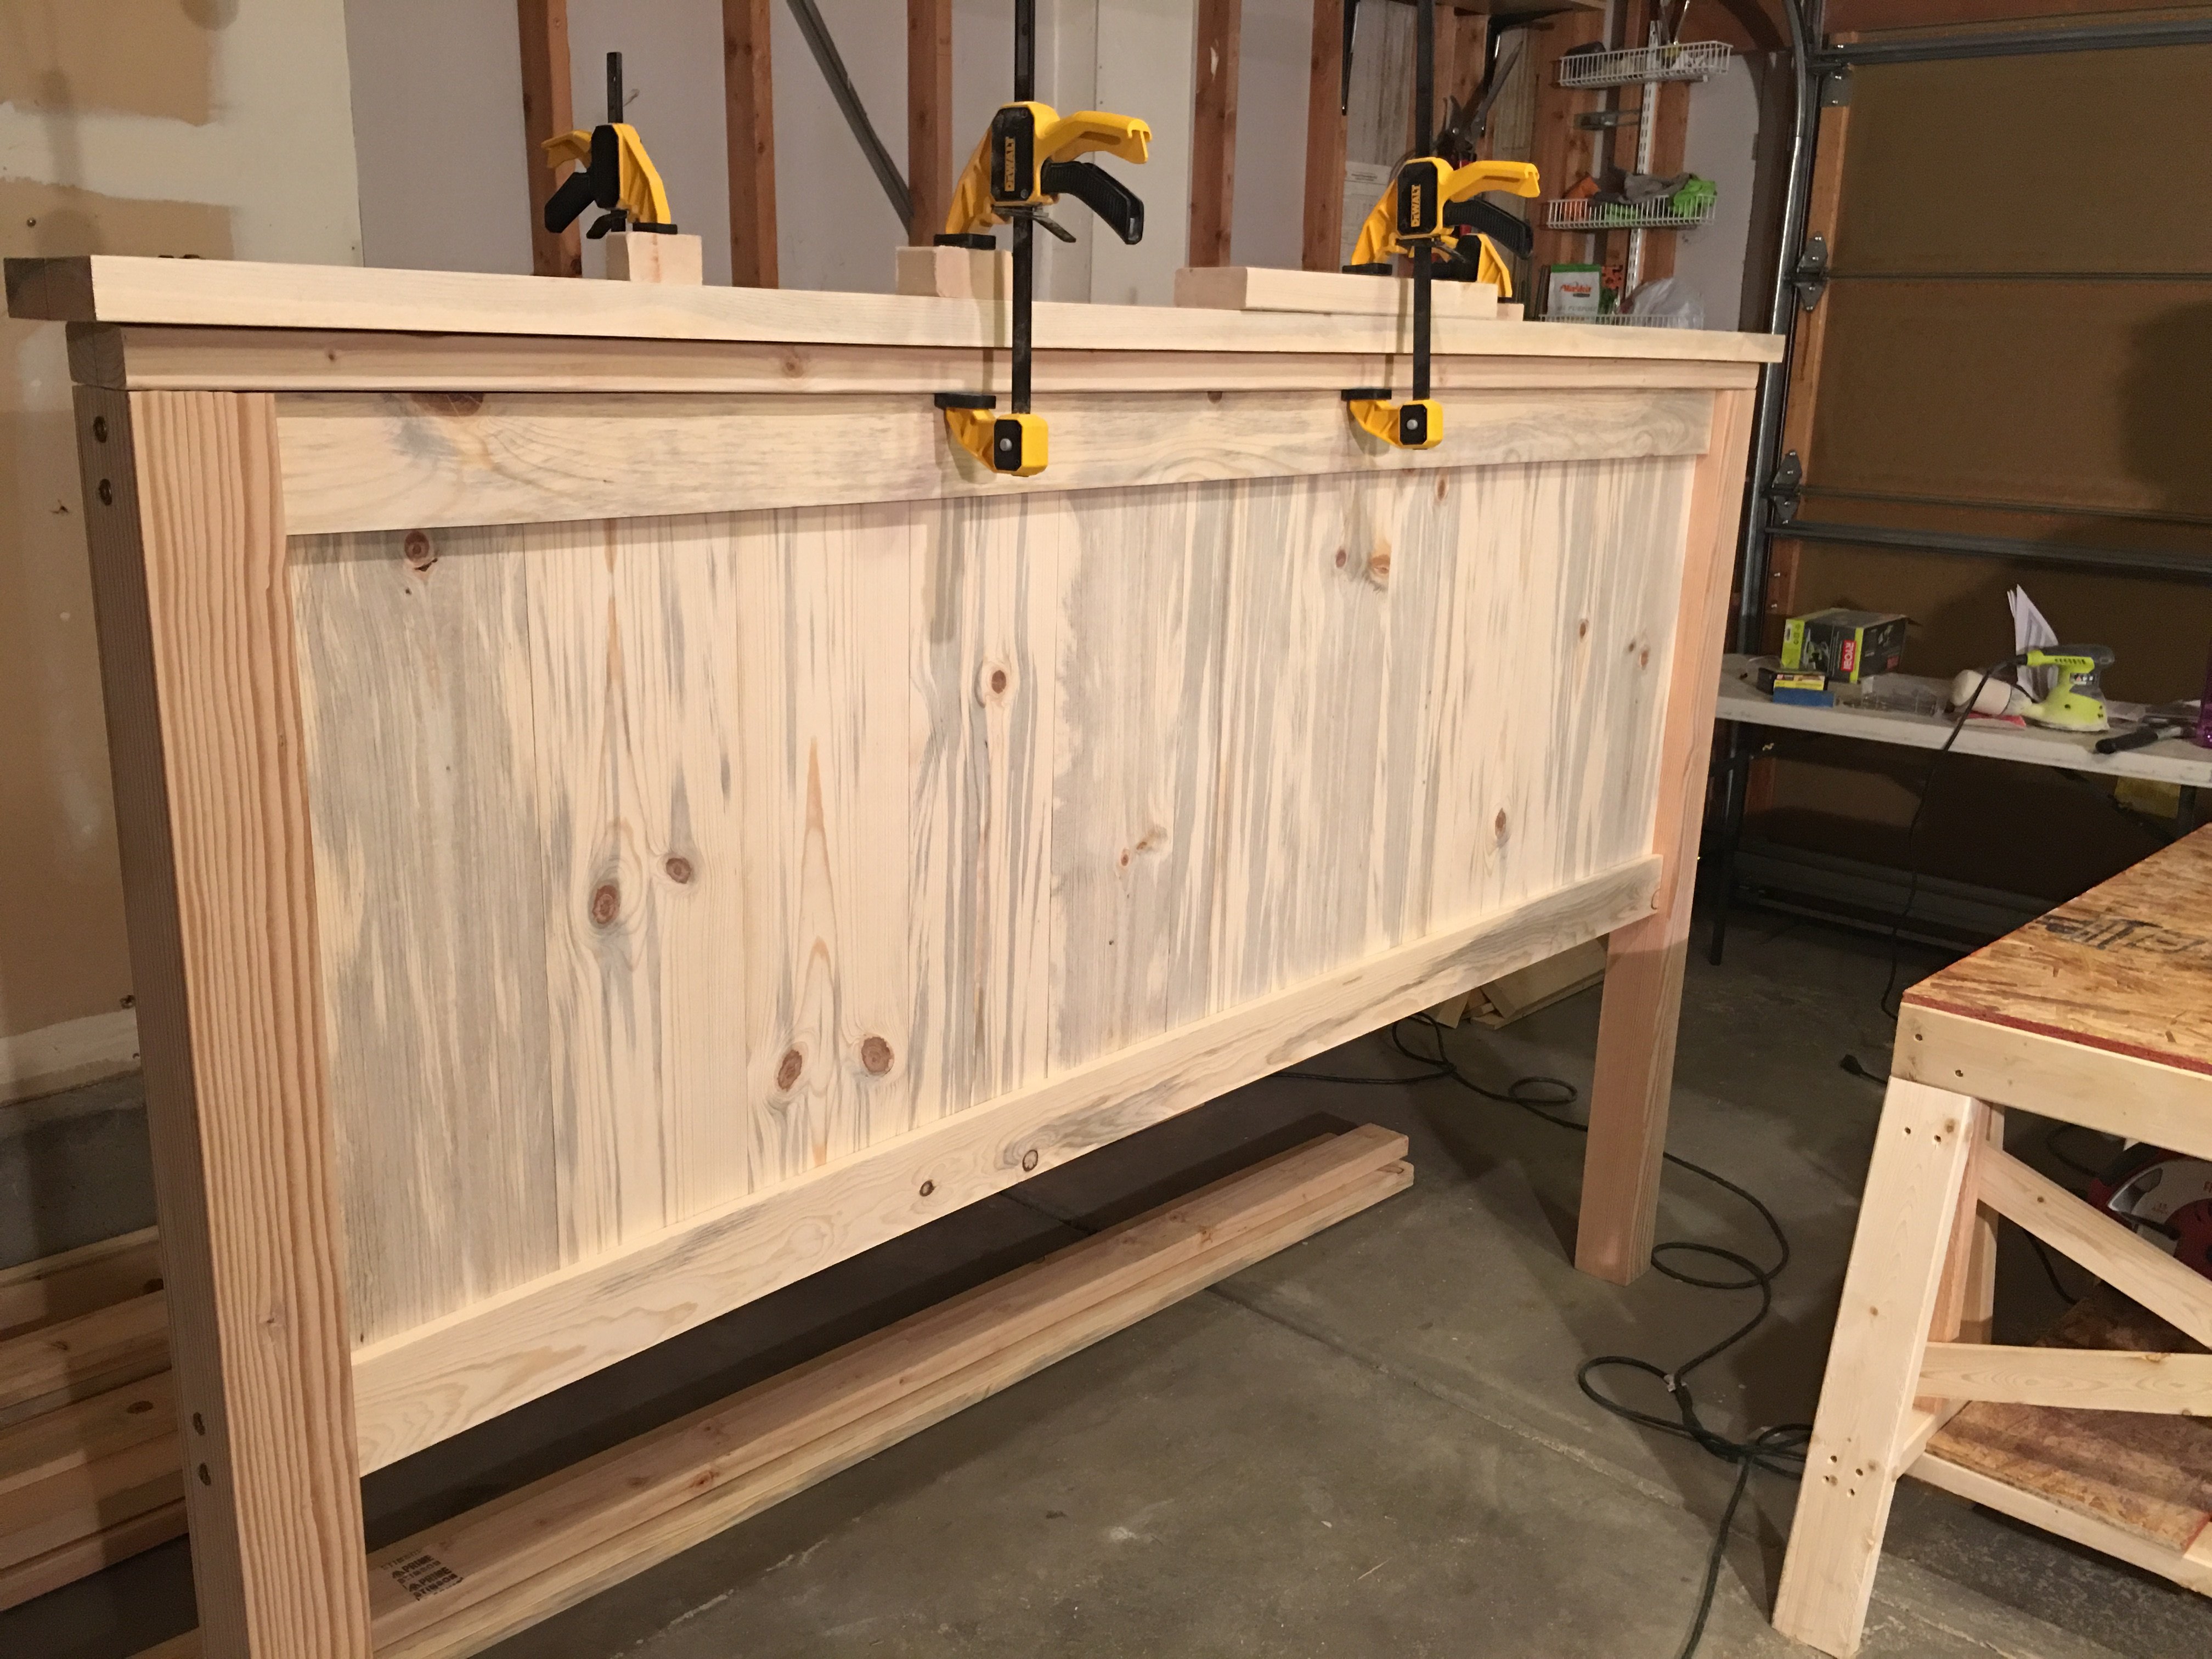
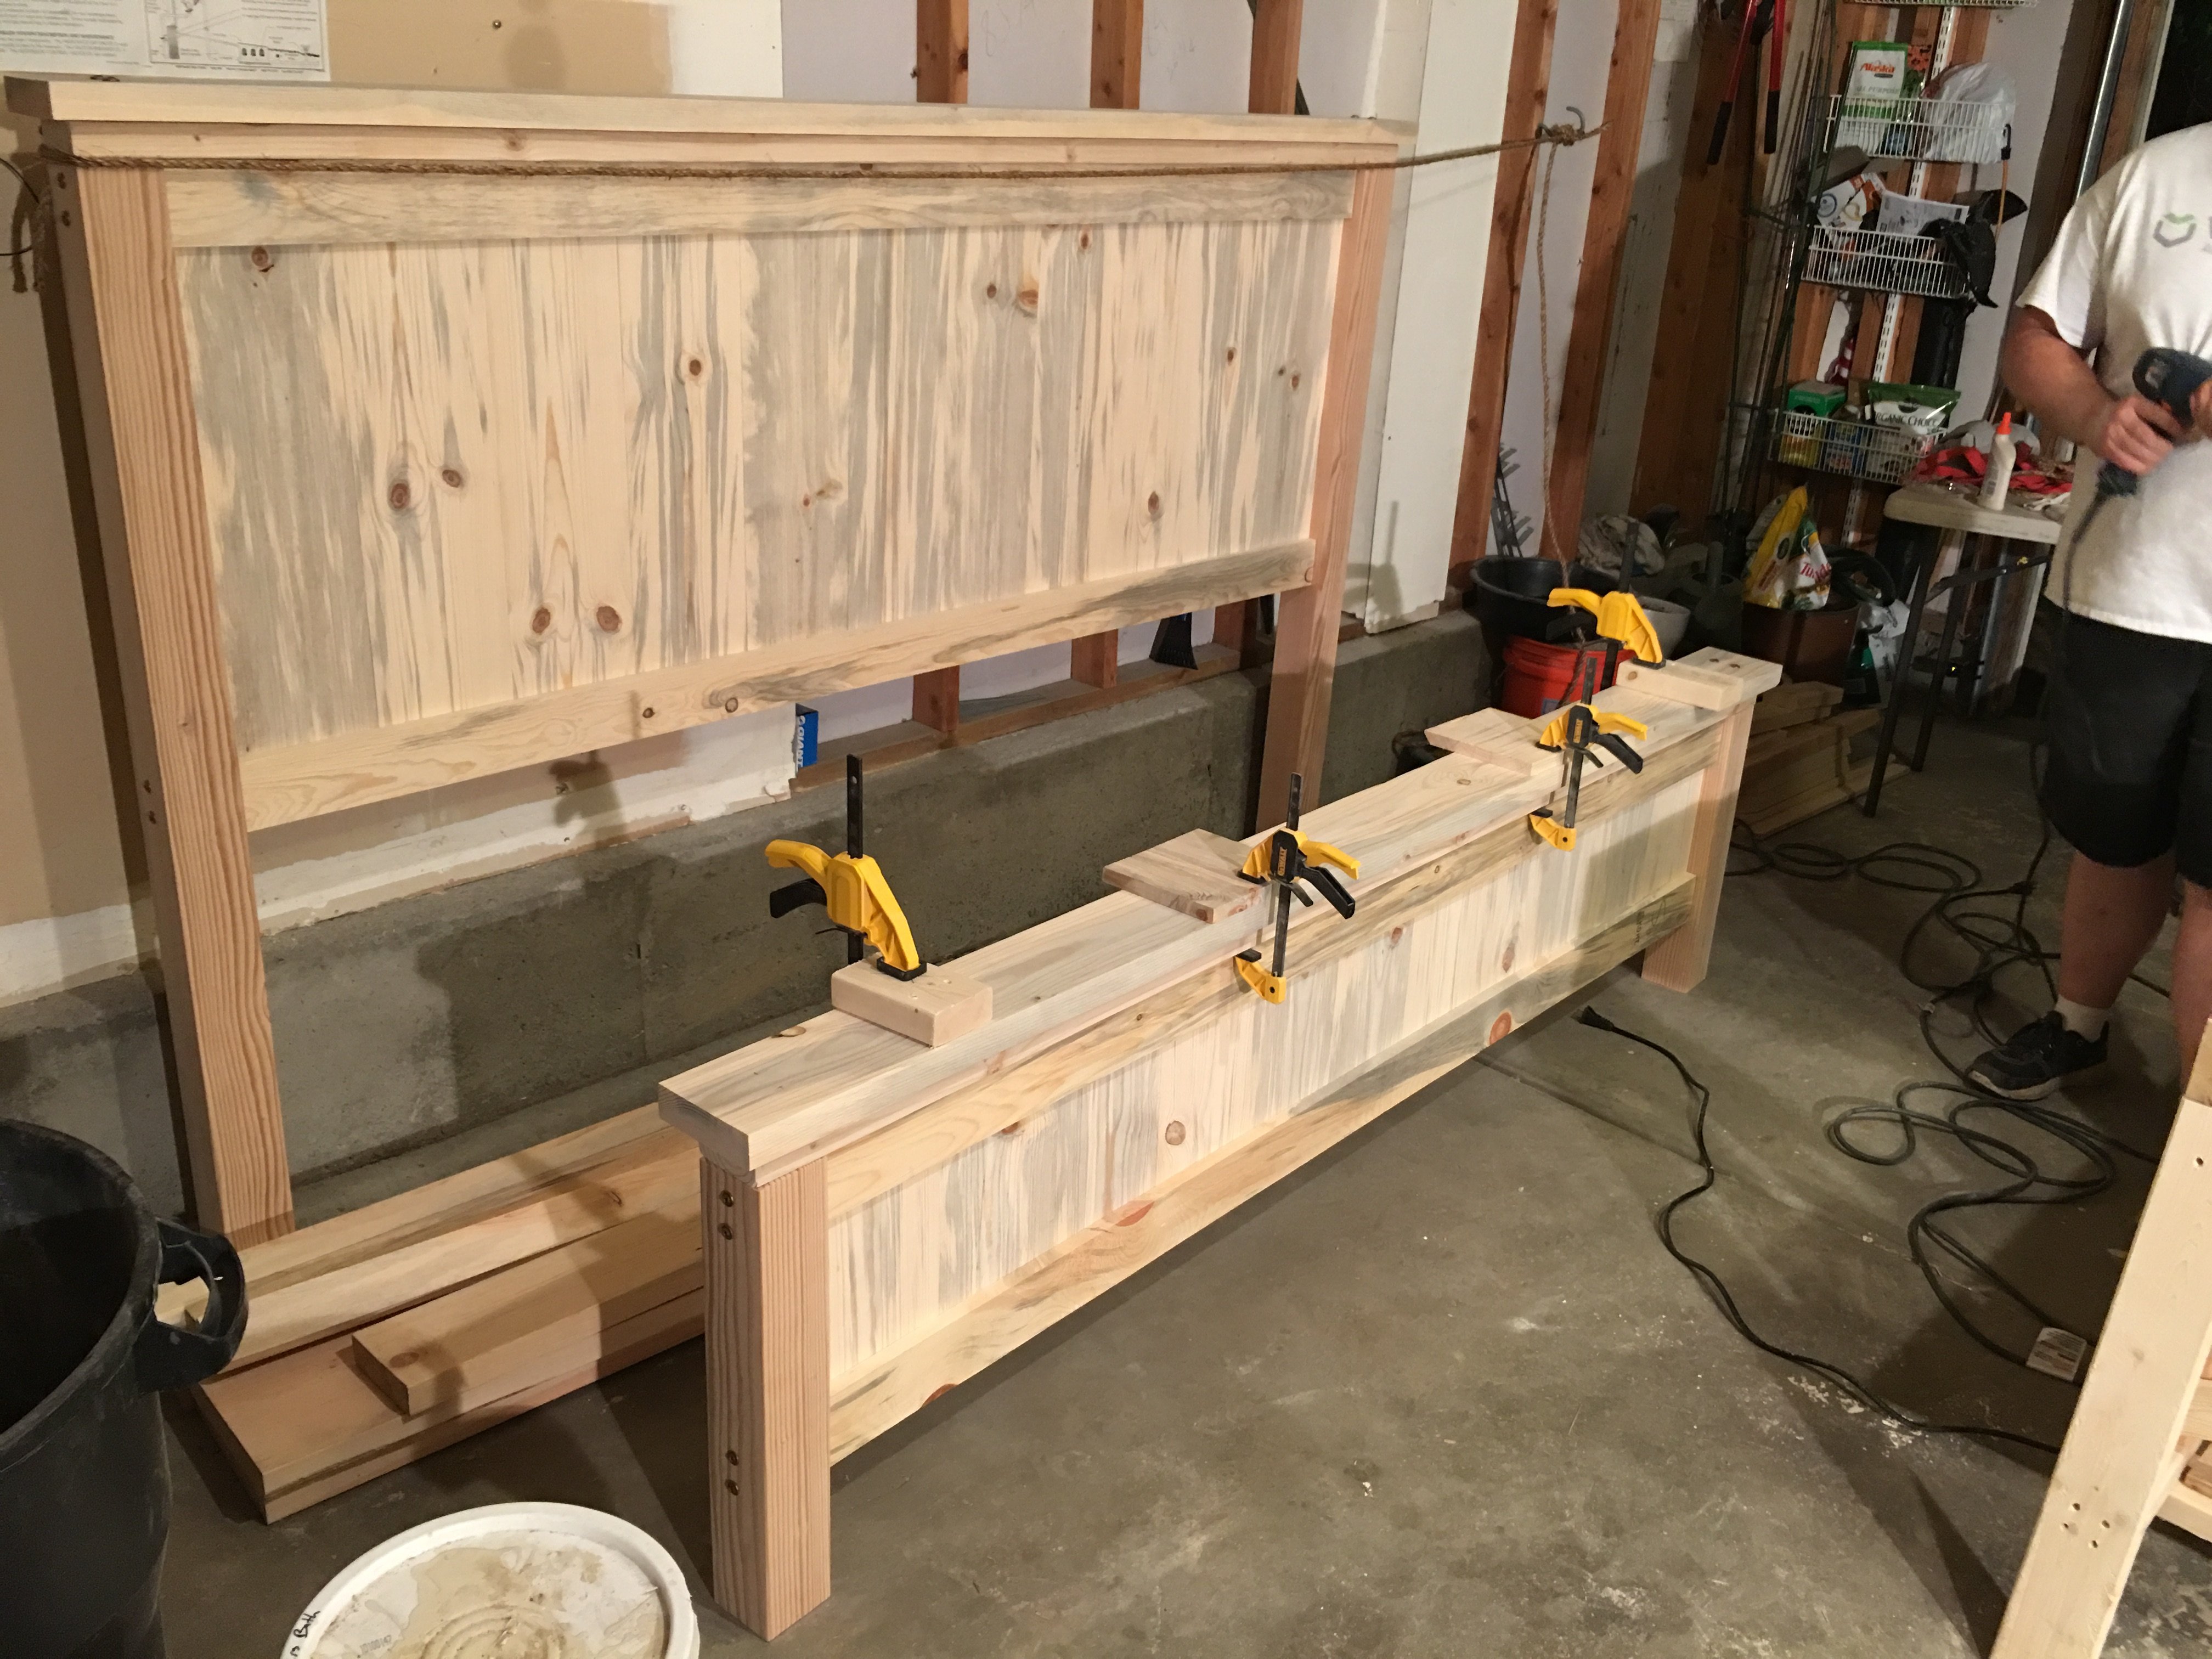
Our biggest lessons were to hand pick our wood and make sure we get the straightest pieces possible. We had to wrestle some wood to make this bed work! Clamp everything especially when using large bolts as the pieces would pull apart from each other. We even used a ratchet strap at one point becuase our small clamps weren't cutting it. I'm sure there's a better way and we'd love to hear about it but we made what we had work. We also had to figure out how to attach the side rails and at what height. We ended up using 3 4-inch screws on each end to screw them into the posts.
We love this bed not only because it was a labor of love but because its such a solid beautiful piece.


Sun, 03/01/2020 - 11:29
Very nice! I love the lighter wood too, but my wife likes the darker stain, so we compromised in the middle for the finish. Why arethe post always so red? I can appreciate the natural tendency of nature to add color, but the 4*4's are always red-er in color. Do they always use a different pine or certain part of the tree for those?
Mon, 01/18/2021 - 11:27
I believe the posts are actually Douglas fir and not pine judging by the look and color of the grains.

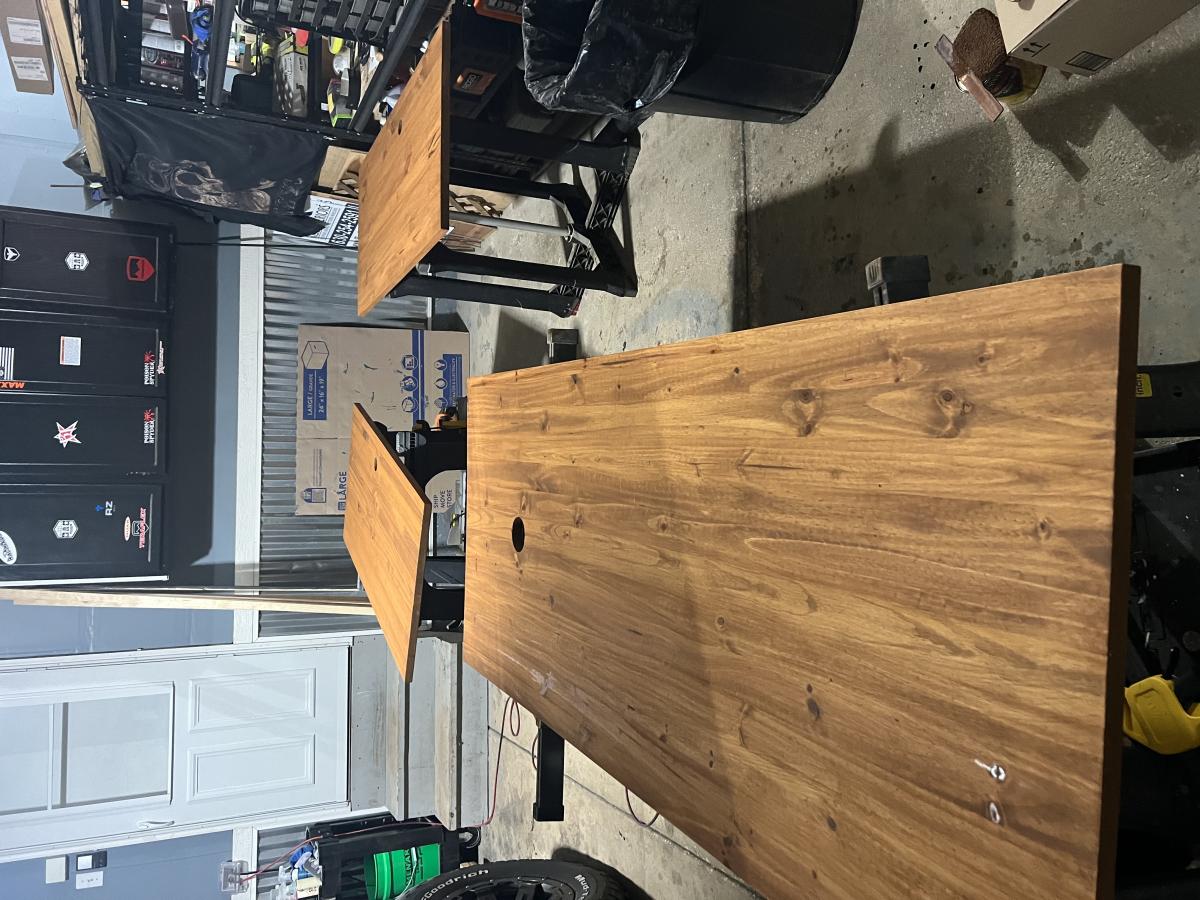
I reduced the size of the 2x4 coffee table to make 2 end tables. They can be used as additional seating when needed.

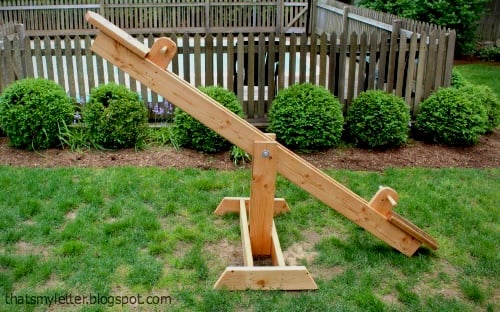
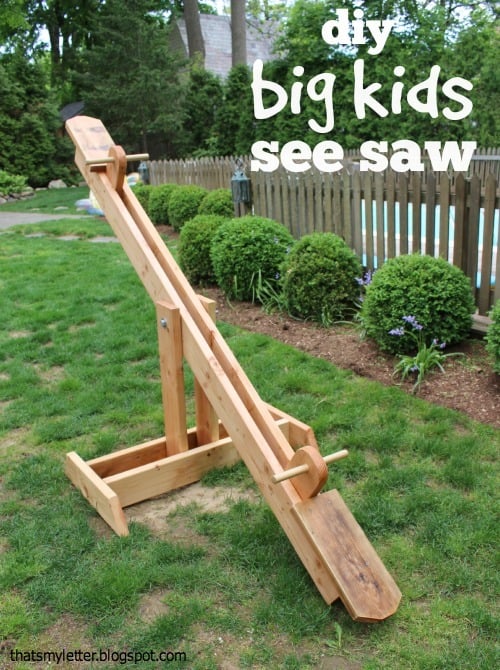
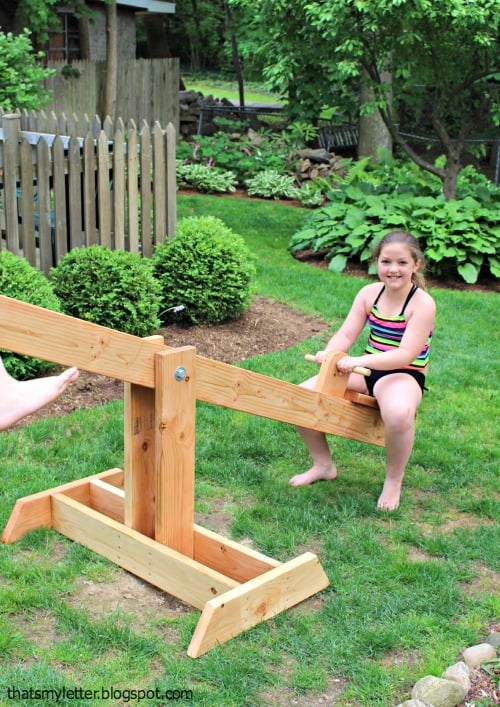
I built a big kids see saw using 2x6's all around with a 2x8 seat. The center post is 30"h.


Created the stand for the raised planter using 2X2 assembled using dowels. Painted the stand mixing black with a bit of white to simulate metal. The actually plastic window box fits within a wood open box with mitered corners fir clean log. Bottom of the stand provides a shelf using (9) 2X2s with a dado placed on either end to fit on the runners of the stand.


Mon, 05/01/2023 - 08:24
It looks super high quality, love your take! Thanks for sharing.
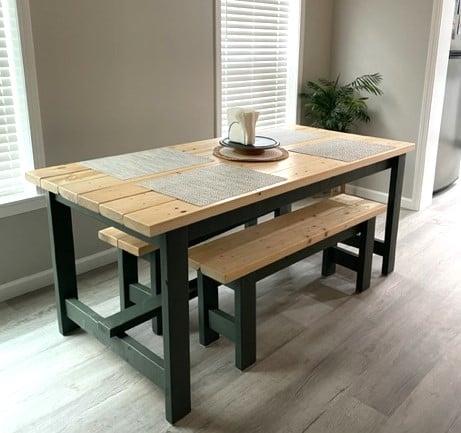
I used the farmhouse table plans, with a few modifications. I made two benches to go along with it. This was my first big wood project and I'm pretty proud of it. My daughter bought her first home and needed a table custom sized to her space so this was perfect. I love all of Ana's plans, so easy to follow.

My husband and I had been looking at many different stores to try and find a bar table for behind our new couch in our basement. We wanted something that people could eat and drink at when we entertained and/or be able to sit at and play video games. I should have known we were better off to build our own rather than look in a store. It was only $30 in lumber and took 3 hours to build. And another project in the books!


Saw the other project and based everything off of that. I made some adjustments on the shelf side to ensure I could lay down 3 layers of 2x6's without it hanging off too far. At first I wasn't going to go with the rail shelf system, but I couldn't find anything that I liked at the store to make actually shelves. I did cut a 2* angle on the bottom and top of the shelf framing. I figured if I put enough weight on those shelves, I woudln't want it messing with the frame of the cart too much. On the bin side, I decided to just do different heights instead of angled because I know I'll have plenty of 3' plus. I chose to put a scrap bin on the end for anything smaller than a foot. Many of those joints were done with my Kreg setup, but not all of them. The last fix I did was add a 2x4 to the insde of the shelf frame. This was to move the shelf hangers in so that an 8' board wasn't just edge to edge (I found that to be a problem when I put some of the 1x4's on there...they would be on 2, but not always all 3). So moving each side in around 1.5" gives you about 3" to play with as far as 8' lumber goes. This enabled me to turn my old storage into bench and shelves and I'm ready to get moving on projects!


Our last project was building a tiny garden tools storage shed. We used only 1 x 4 boards. We don't have any plans, but you can watch the entire building process on our YouTube channel. We are very proud of the way the project turned out.


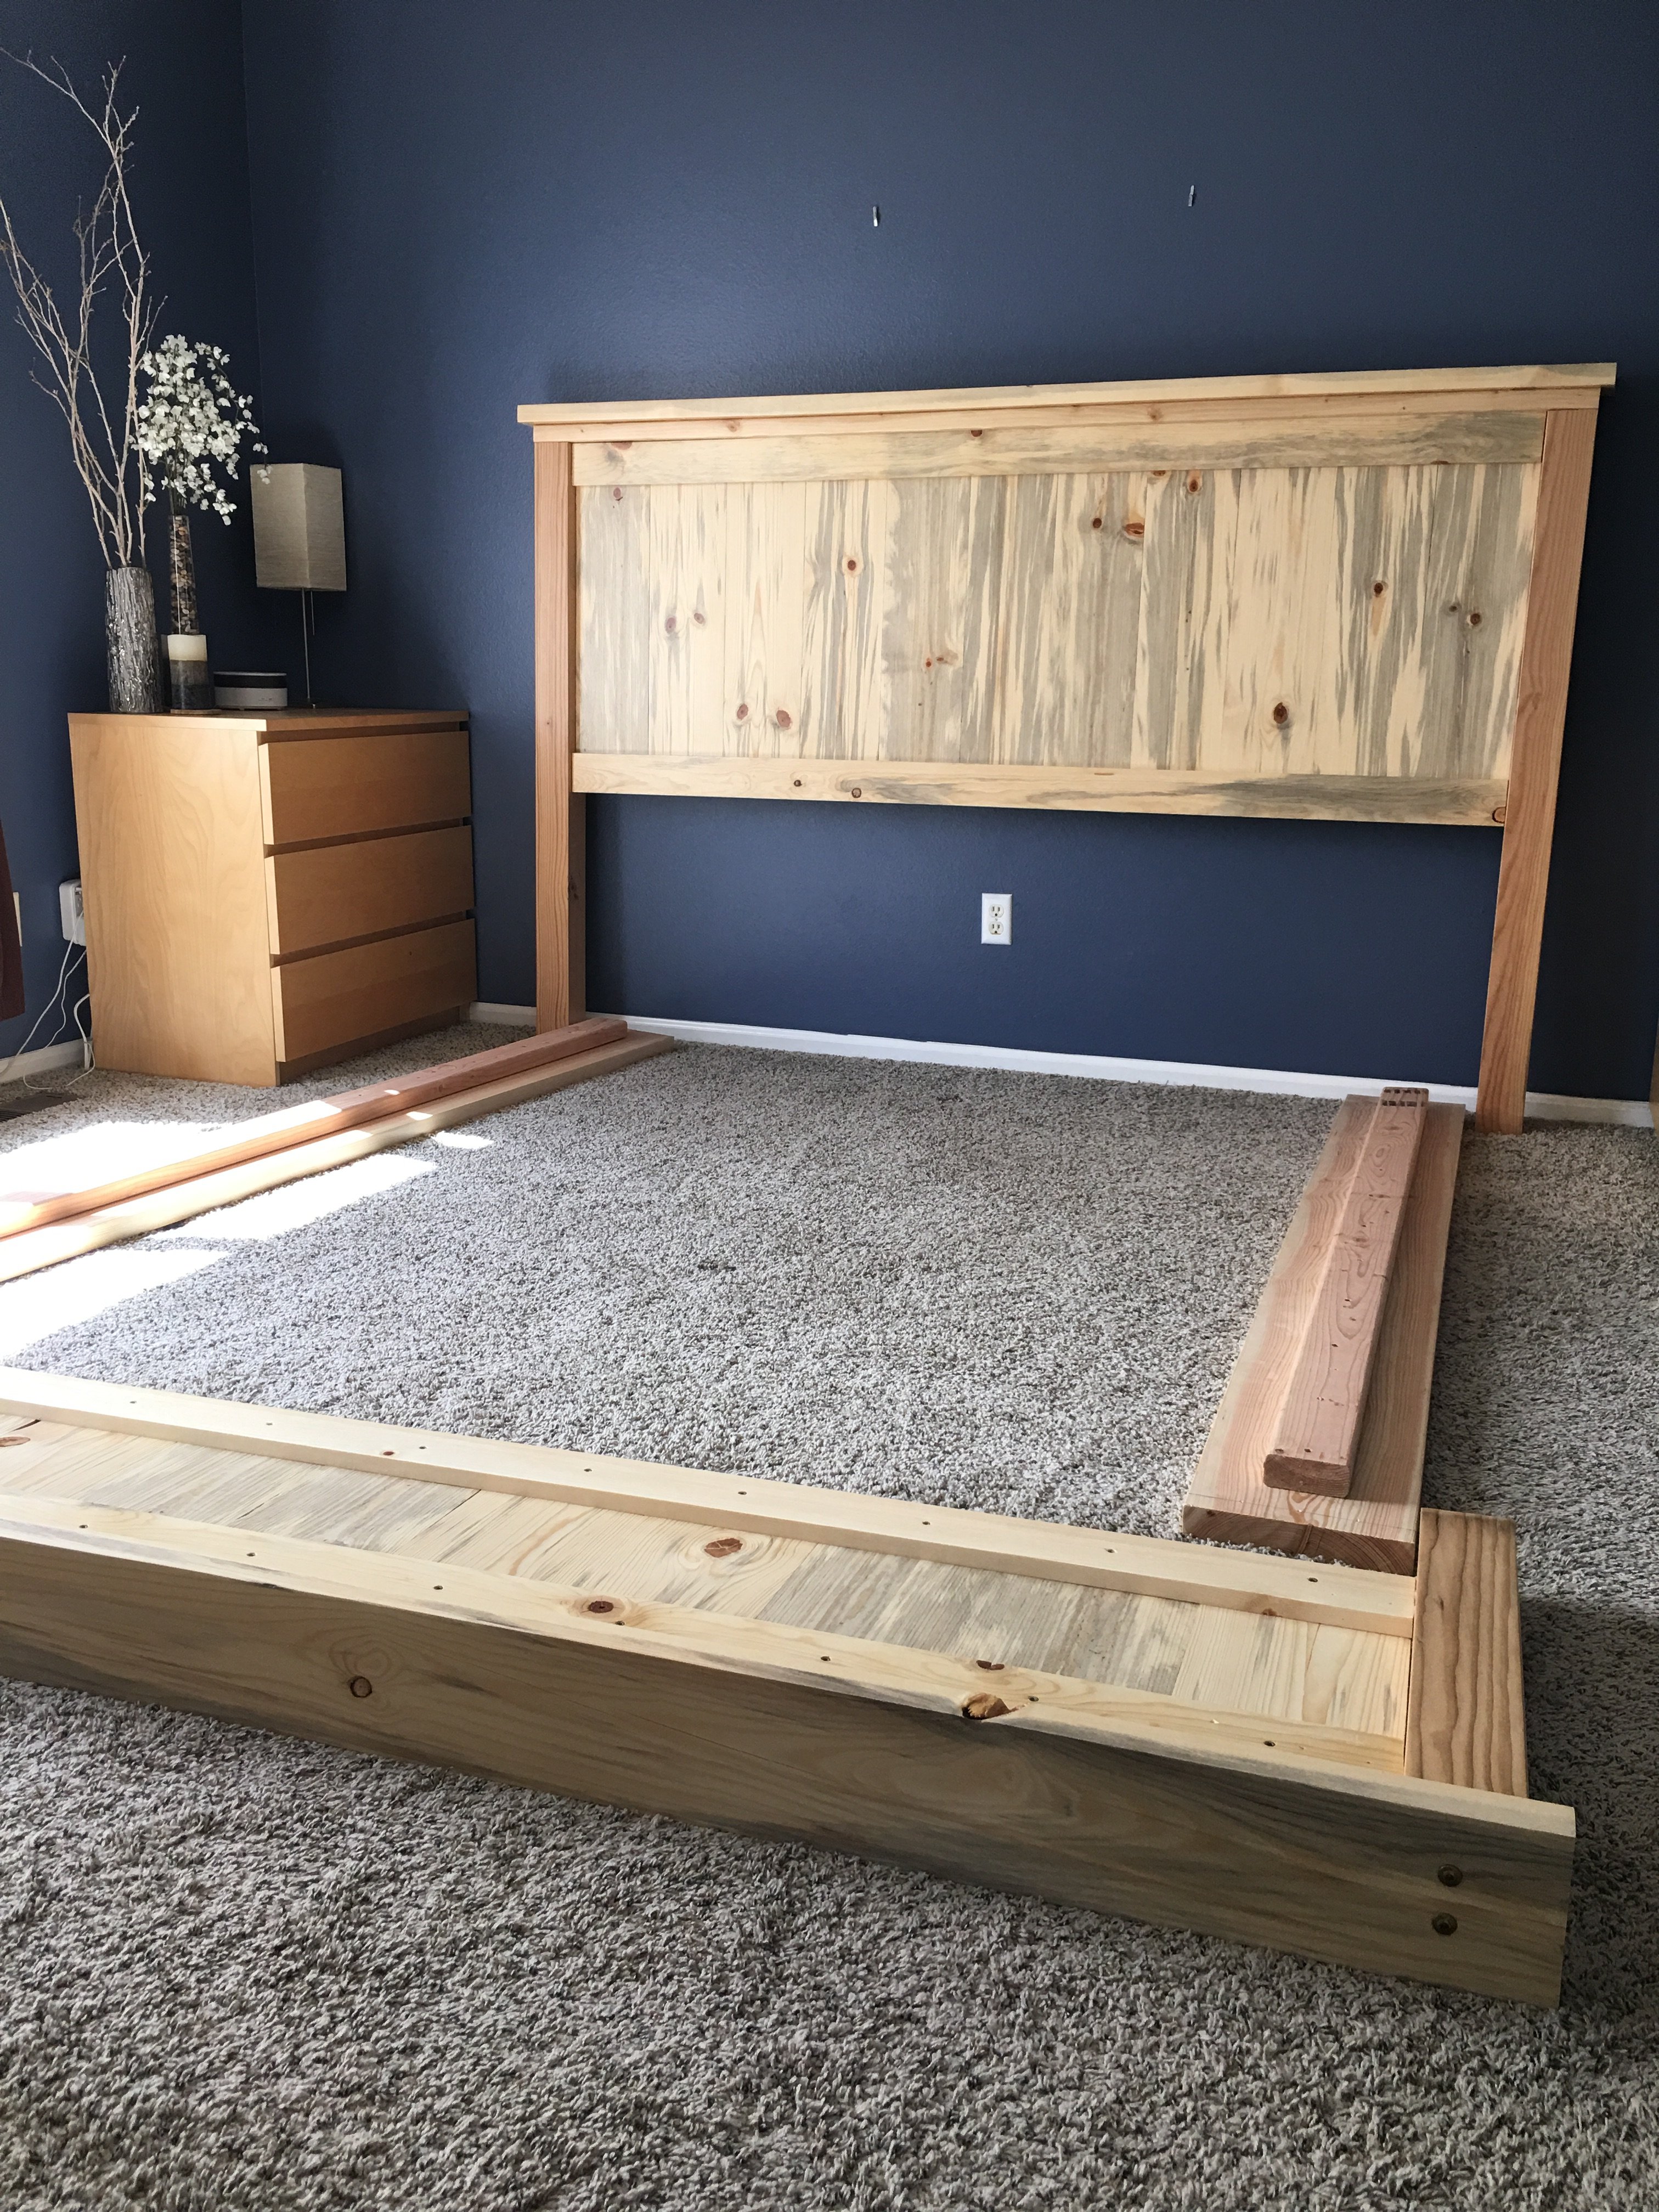
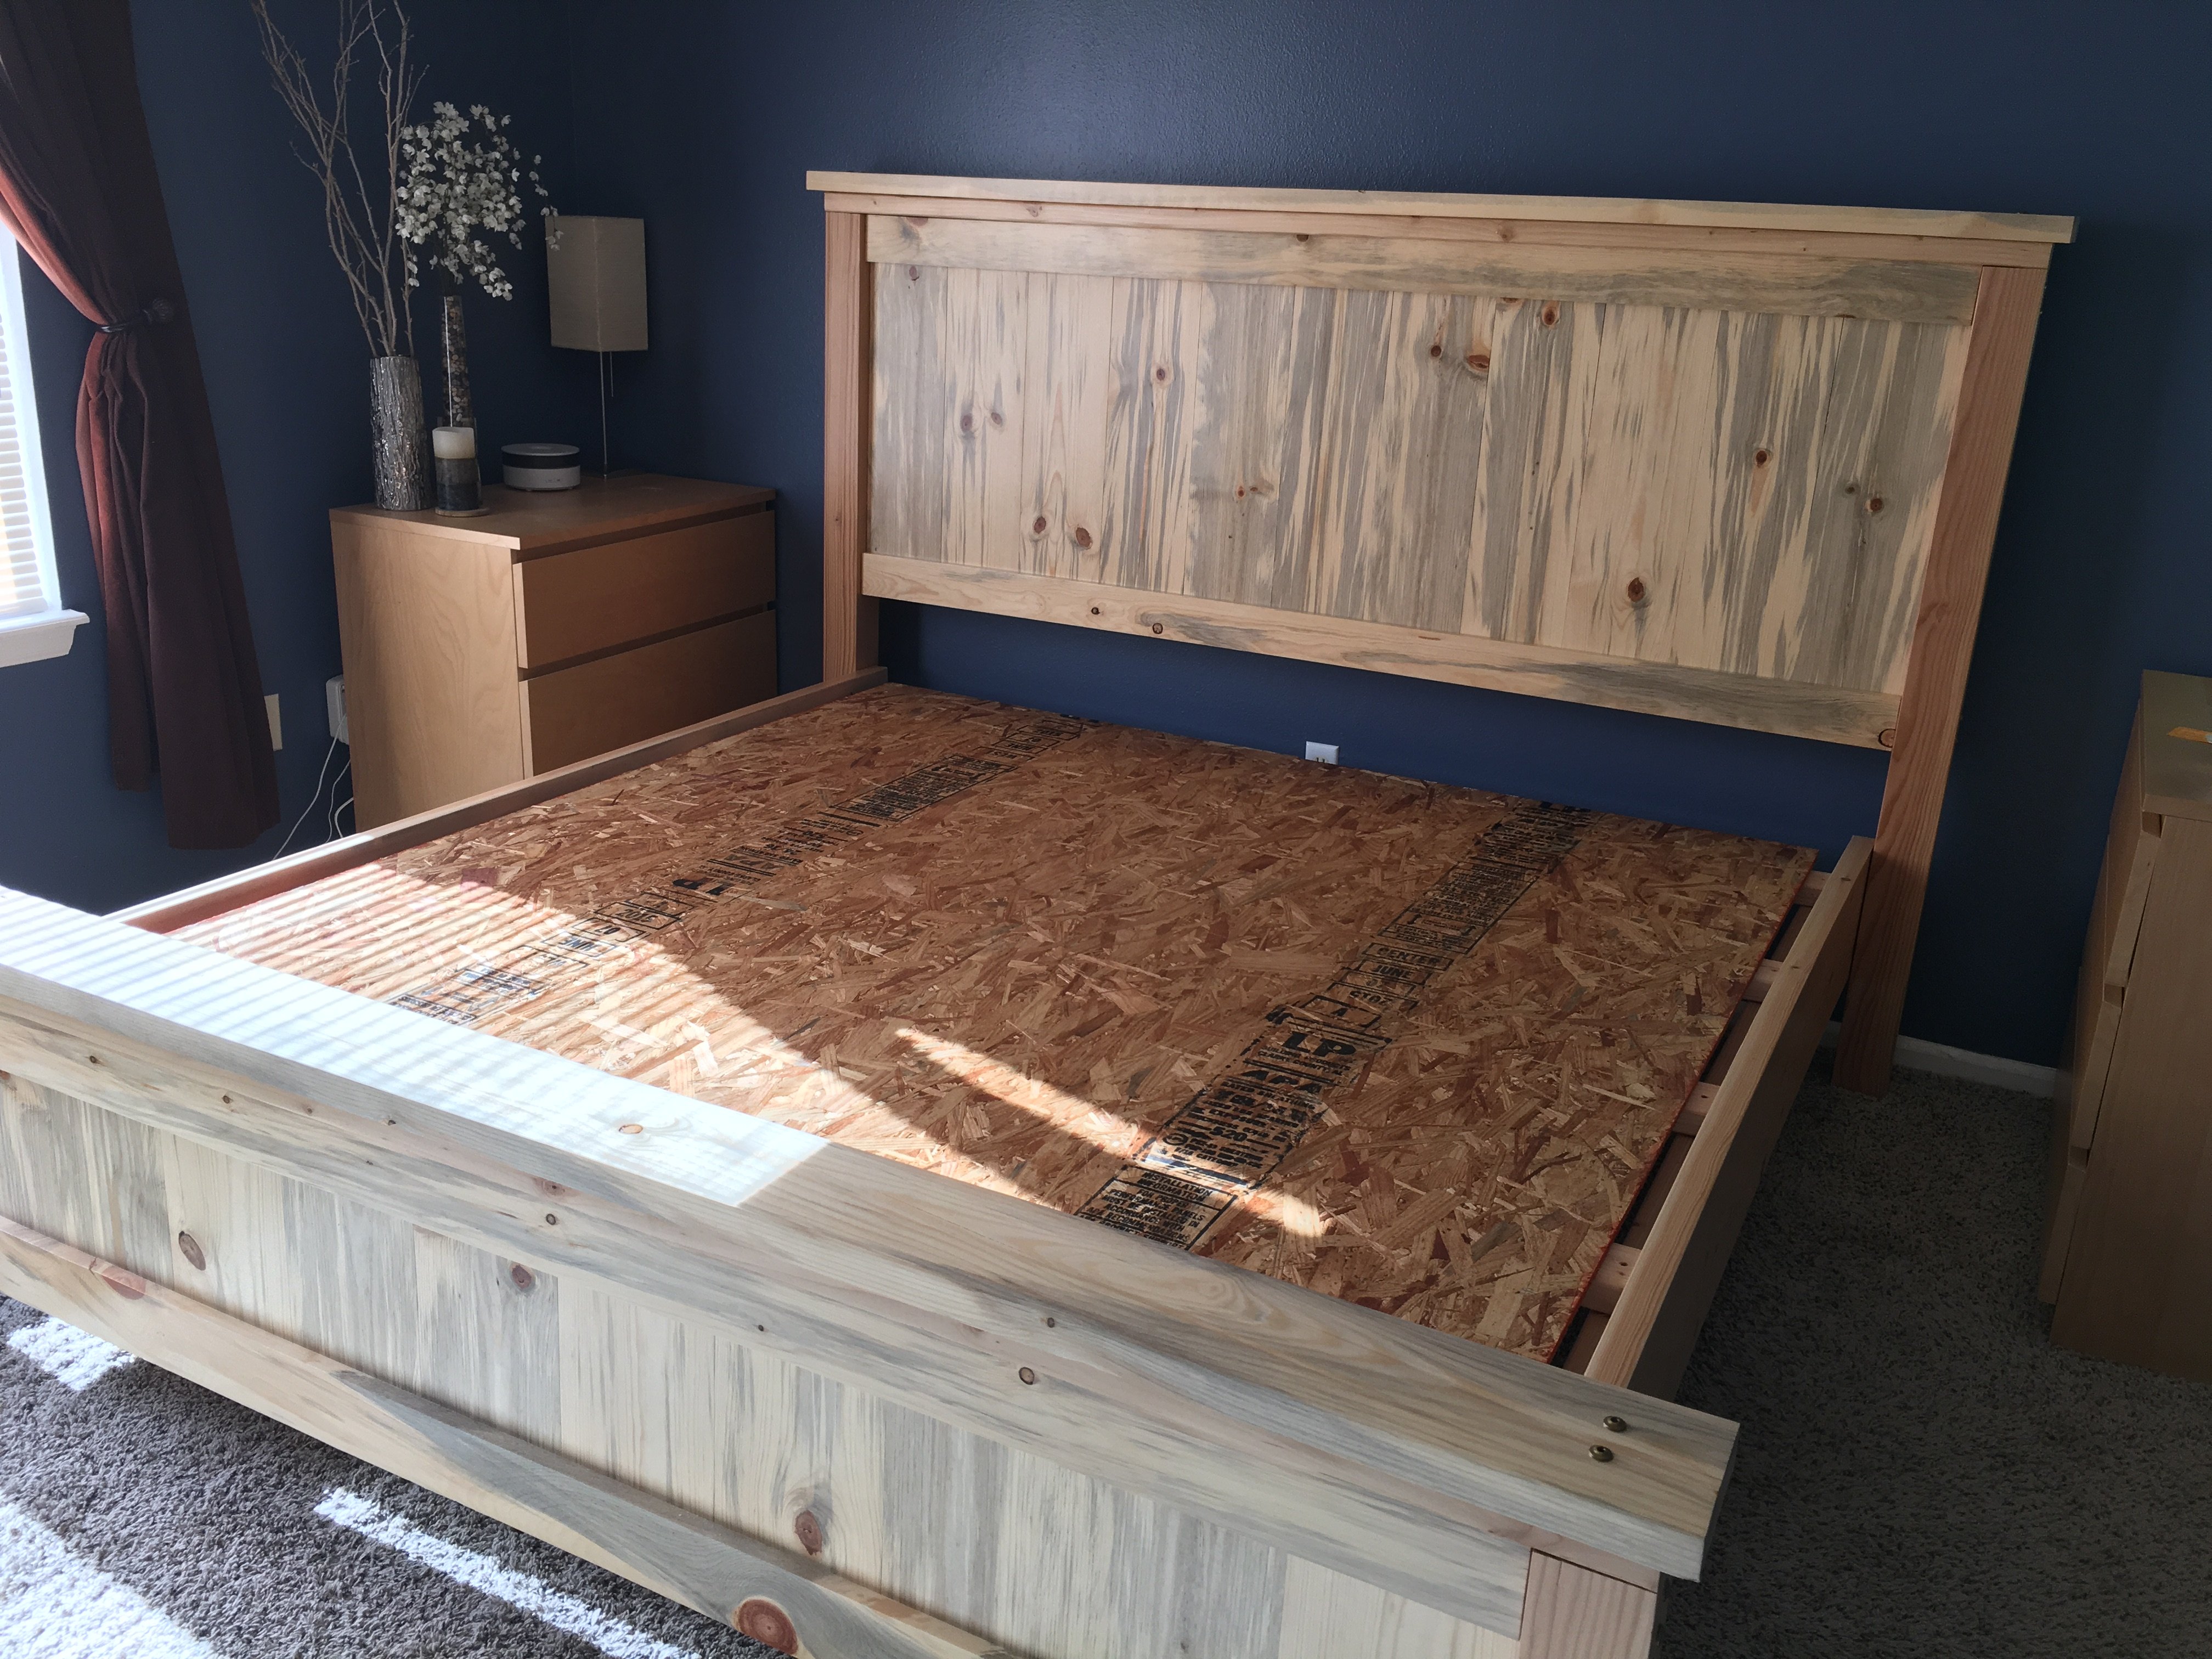
I could not find a frame which would accommodate my new adjustable king base. Modified Anna's plans by increasing the height of the headboard and footboard. Finished with chalk paint and antique finish for a rustic look. Side rails attached with mortises to allow for moving bed in 4 pieces if needed. Love my new bed


Sat, 11/30/2019 - 03:31
Hi! We are making this headboard this weekend. We want to increase the headboard height and footboard as well. Do you happen to know the cut measurements or how you adjusted the height of the 1x6 (or 1x8 as others used) to make it work? Yours looks perfect! Thank you in advance for any feedback!

