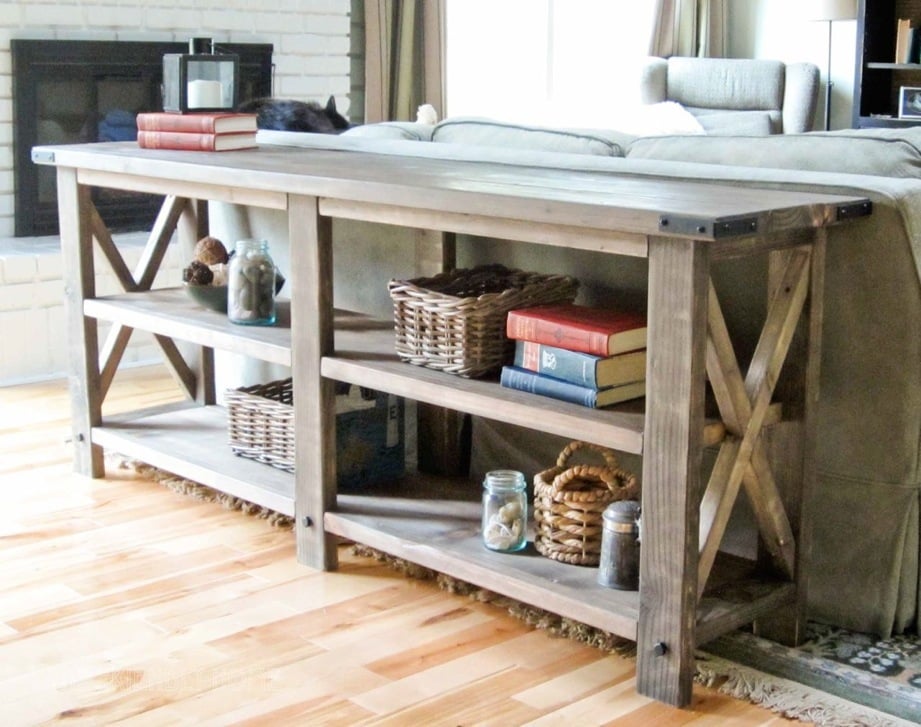


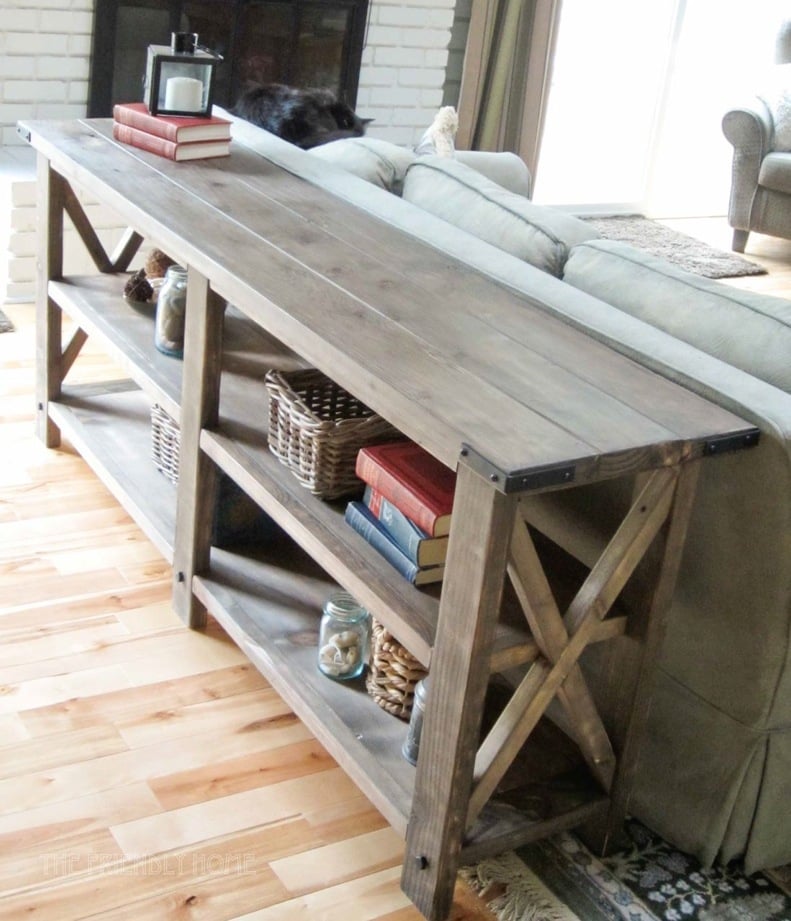
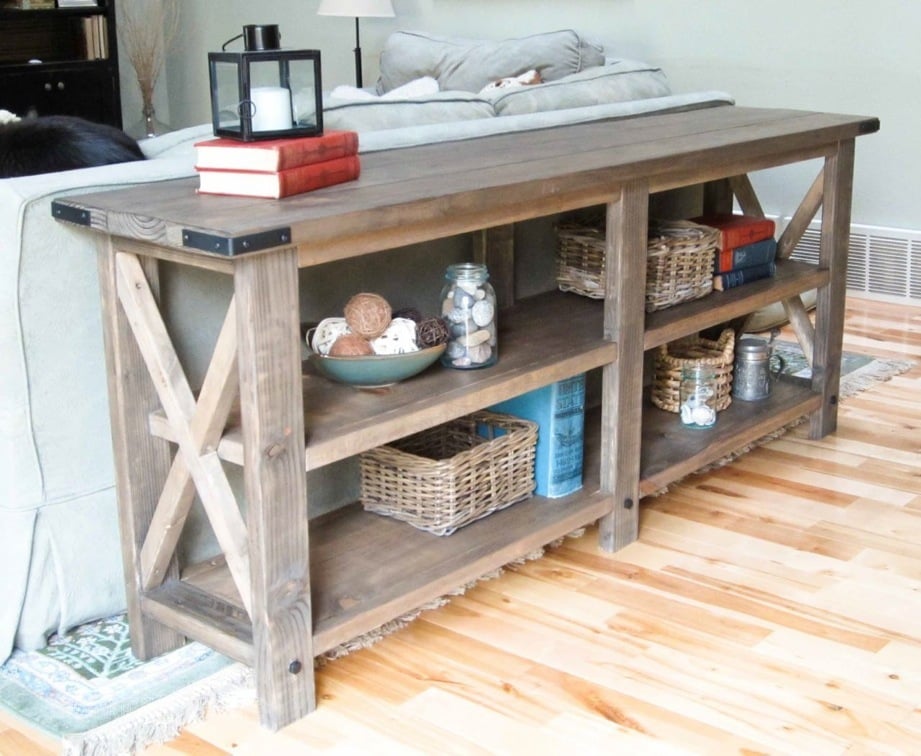
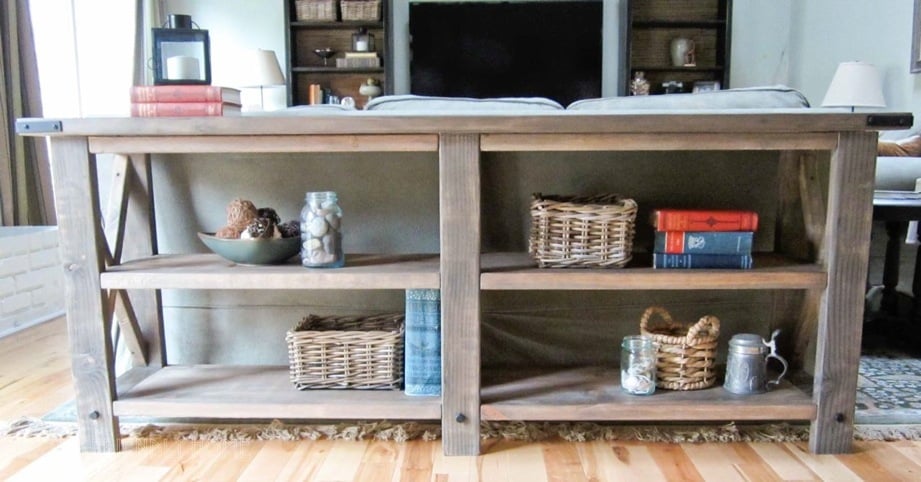
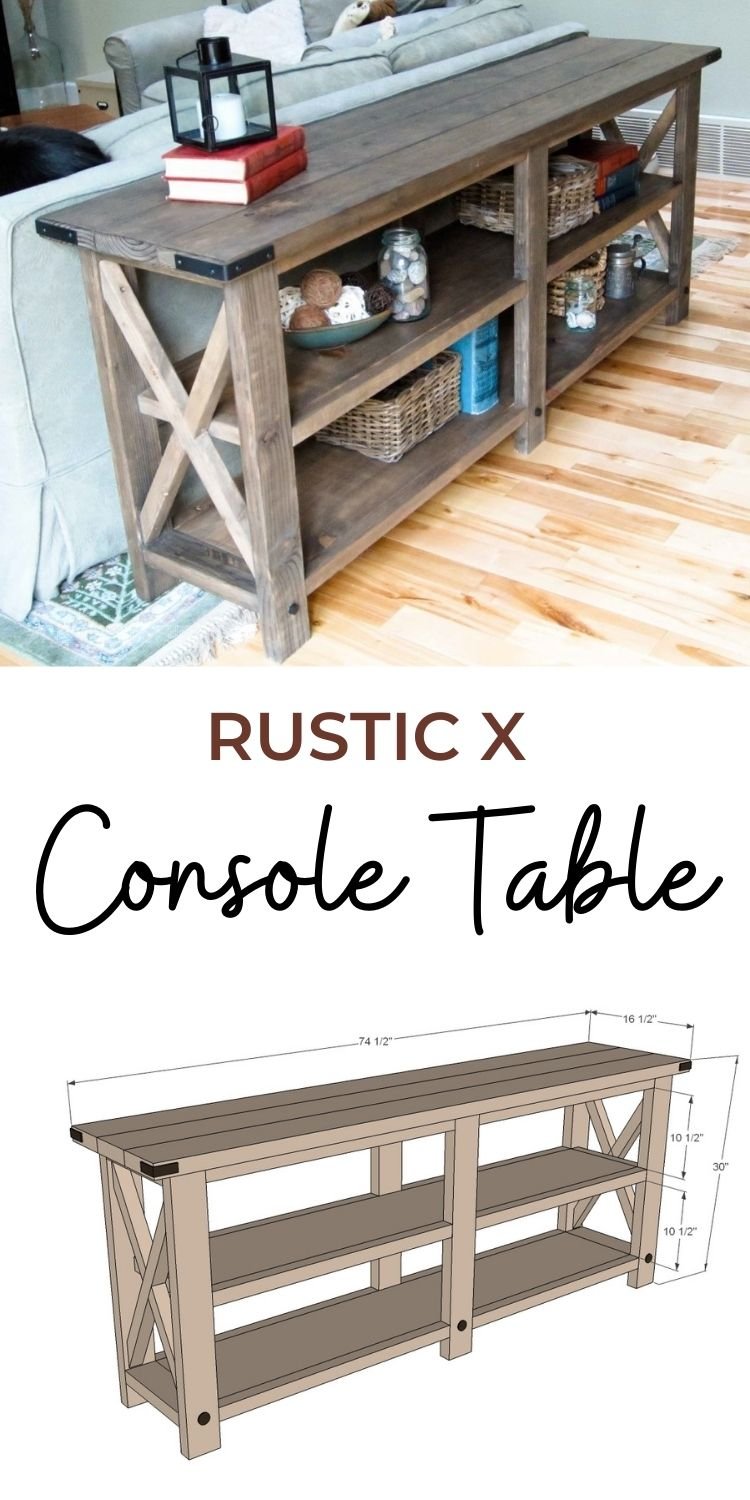
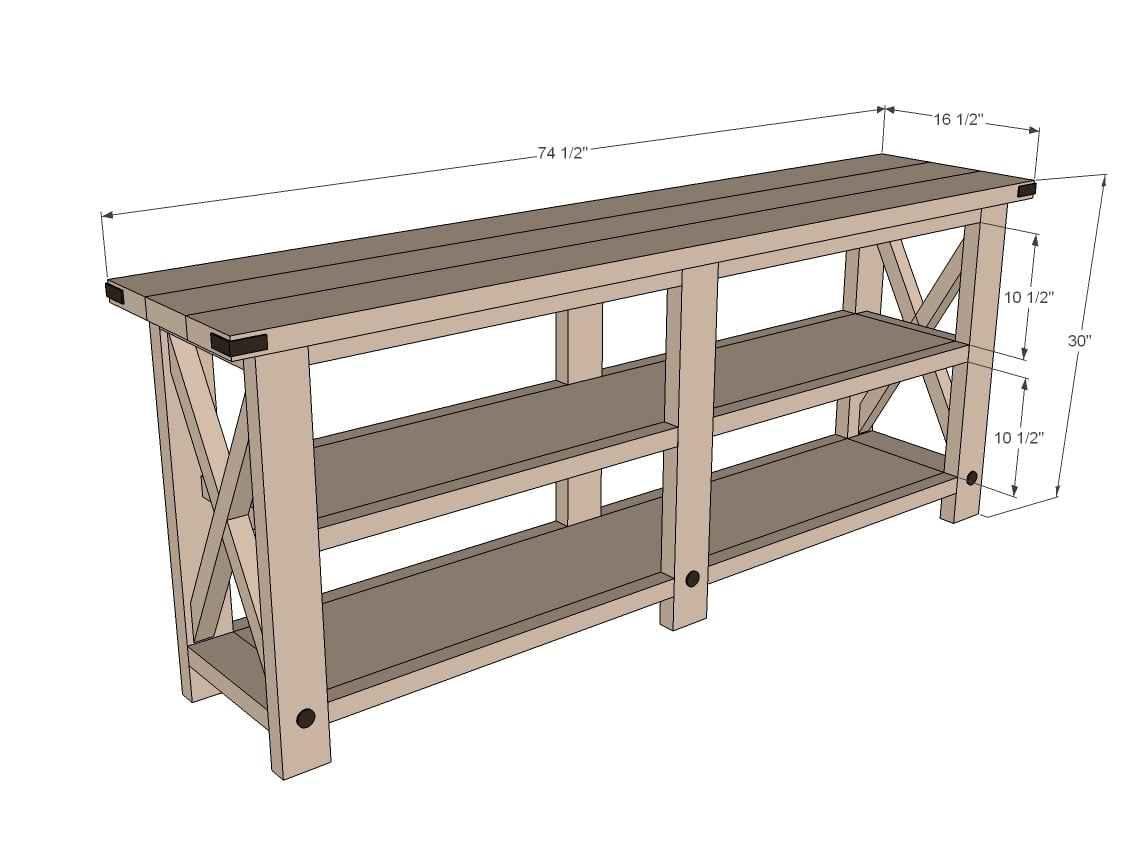
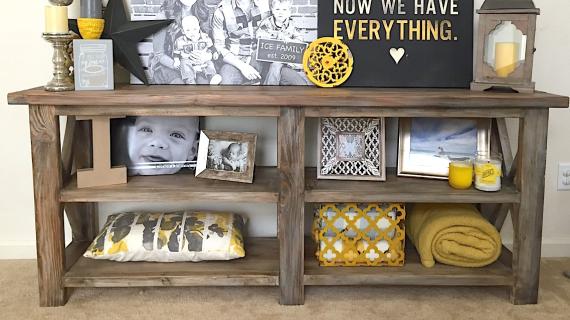
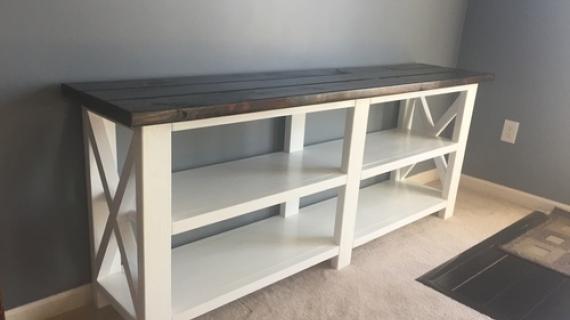
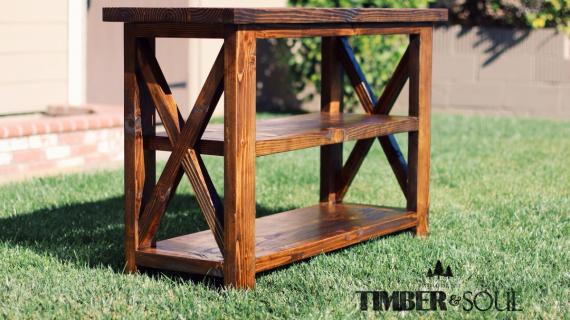
Build the super popular Rustic X Console Table with Ana White plans. This woodworking project has been built thousands of times and loved the world over. Its made of construction lumber (yes, 2x4s!) and the plans are easy to follow.
Also in this Collection: Rustic X Coffee Table Plans, Rustic X End Table Plans and Rustic X Bench Plans


Rustic X Console Features
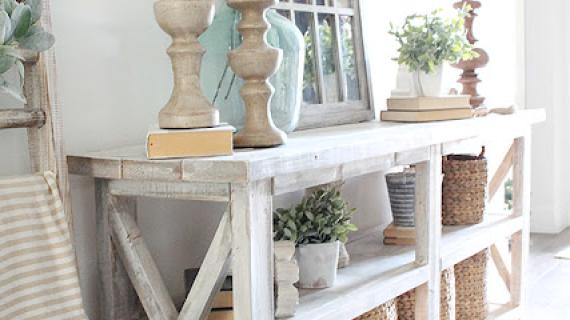
- Solid wood design accepts stain beautifully and paints up nicely
- Extra long length perfect behind sofas, sectionals, as a dining room buffet, or under the TV
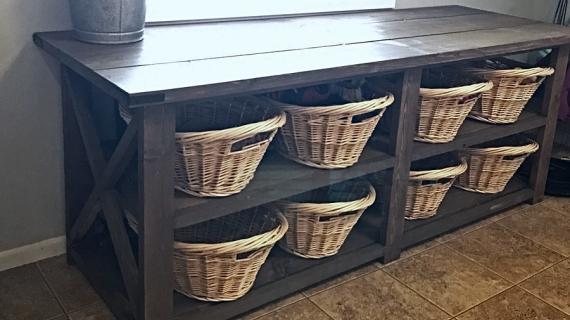
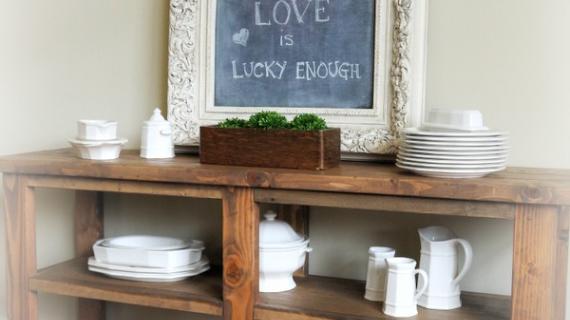
- Storage shelves perfect for displaying and storing
- Storage shelves fit most standard baskets
- Beautiful planked top is full of texture
- Step by step plans have no exposed screw holes

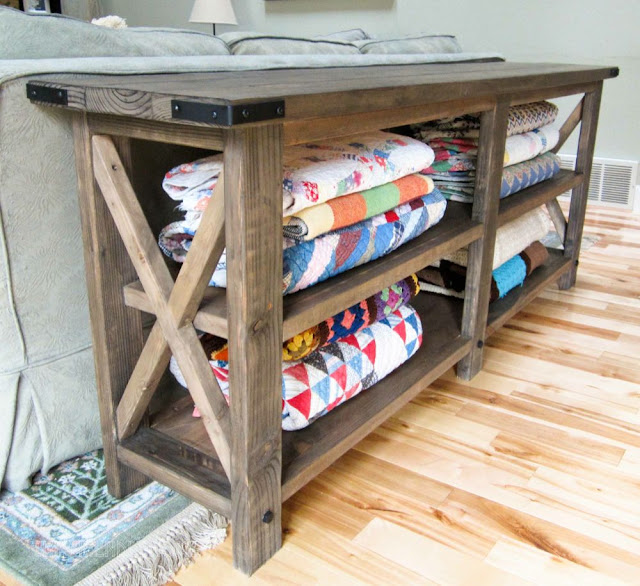
This beautiful Rustic X Console was built by Hillary from The Friendly Home. I encourage you to take a second to stop over to The Friendly Home and read more about Hillary building this console, the finish she used, and the story behind those beautiful quilts!
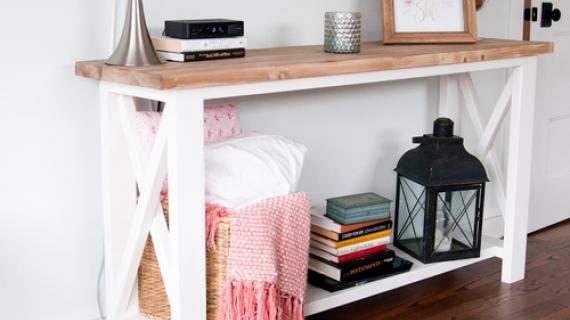
Easier to Build Option: Farmhouse Console Table Plans
For beginner or novice builders, we have added a easy to build option for this plan, the Farmhouse Console Table plans. It does NOT require pocket hole screws and is less expensive to build (but there is exposed screw holes). There is also a video tutorial to help with the build.
Pin For Later!
Preparation
- 6 – 2x2 @ 8 feet long
- 3 – 2x4 @ 8 feet long
- 1 – 1x12 @ 12 feet long
- 3 – 2x6 @ stud length or 8 feet
- Corner hardware/decorative bolts
- 1 1/4" and 2 1/2" pocket hole screws
- 2 1/2" screws
- 12 – 2x2 @ 30”
- 6 – 2x4 @ 28 1/2"
- 2 – 1x12 @ 63 1/2"
- 5 – 2x4 @ 11 1/4"
- 2 – 2x2 @ 11 1/4"
- 2 – 2x2 @ 22 1/2" (long point to short point, ends parallel, cut at 60 degrees off square)
- 4 – 2x2 @ 11 1/4" (longest point to shortest point, long end cut at 60 degrees off square, short point cut at 30 degrees off square, angles are in same direction)
- 3 – 2x6 @ 74 1/2"
NOTE: If your saw does not cut 60 degrees off square, you will need to mark cuts with an angle square or compass/protractor and cut angles with circular saw or jigsaw. Practice this cut first on scraps!


Please read through the entire plan and all comments before beginning this project. It is also advisable to review the Getting Started Section. Take all necessary precautions to build safely and smartly. Work on a clean level surface, free of imperfections or debris. Always use straight boards. Check for square after each step. Always predrill holes before attaching with screws. Use glue with finish nails for a stronger hold. Wipe excess glue off bare wood for stained projects, as dried glue will not take stain. Be safe, have fun, and ask for help if you need it. Good luck!
Instructions
Step 1
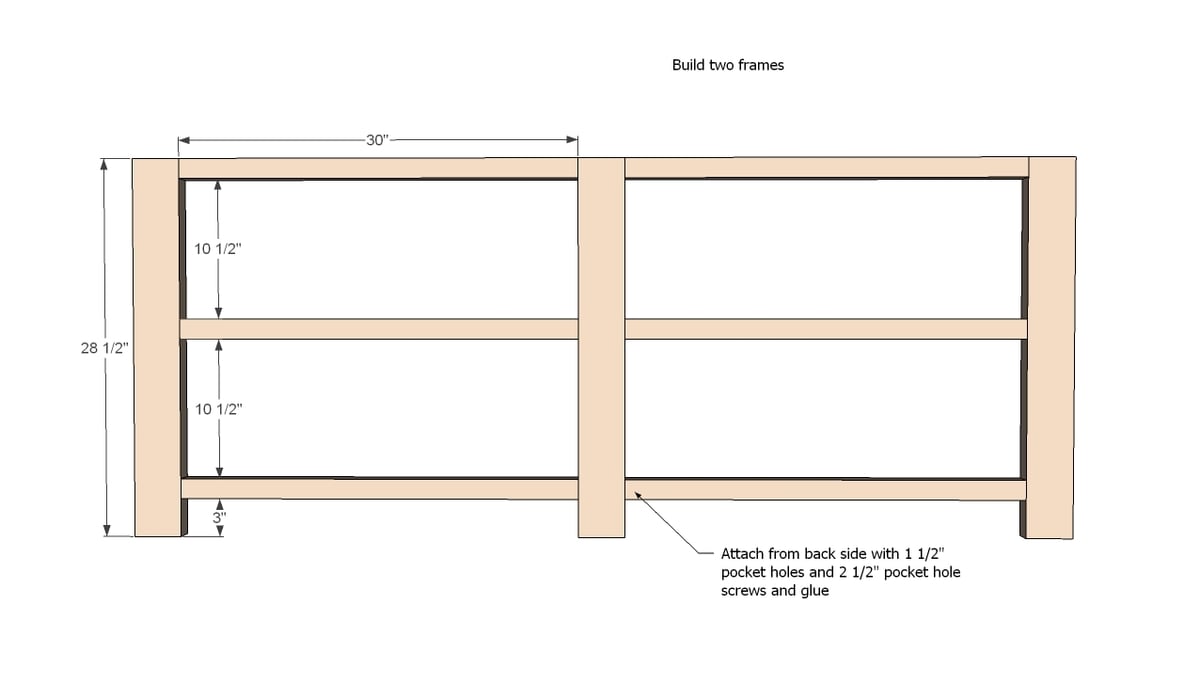
First build two frames as shown in diagram.
Step 2
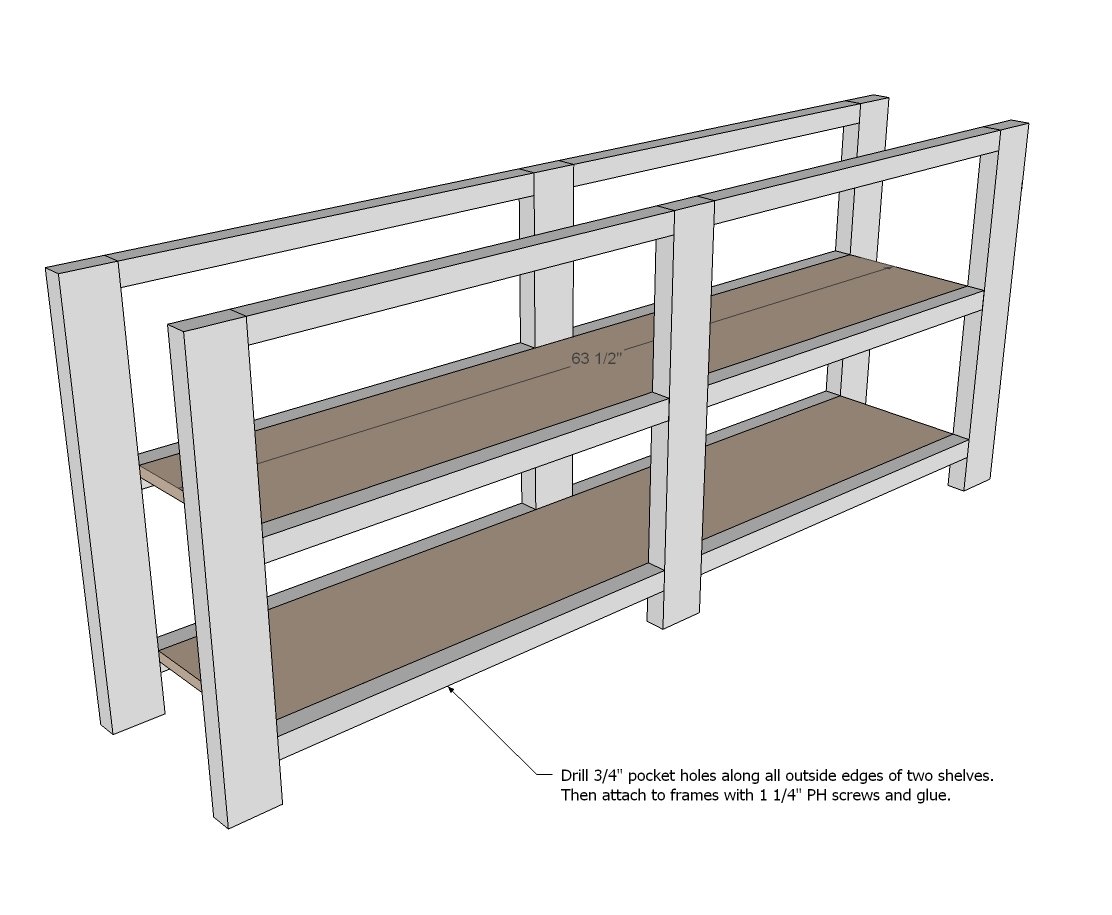
Then attach frames to shelves. NOTE: I recommend drilling 3/4" pocket holess with Kreg Jig around all sides of each shelf for attaching all shelf trim with 1 1/4" Pocket Hole screws later on.
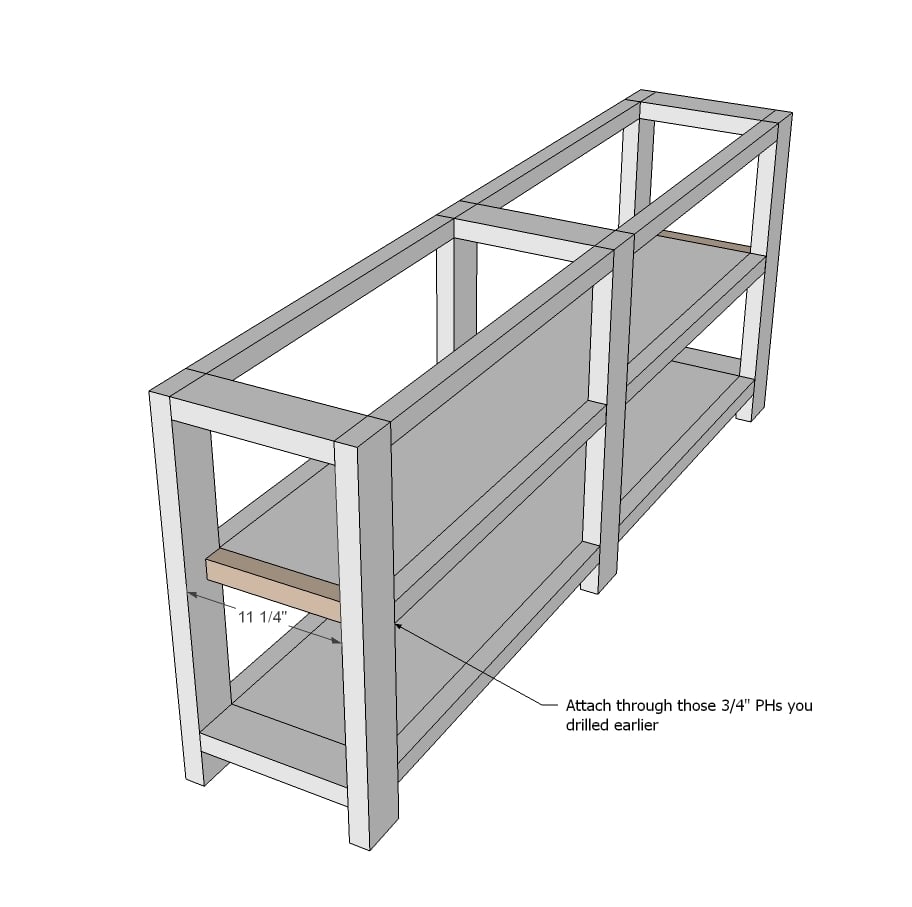
Step 3

2x4 end supports need to be the same width as your 1x12 boards - expected to be 11 1/4" wide. Measure the width of your 1x12s and cut the 2x4 supports to match this width.
Attach to frames and shelves. For attaching to frames, use 1-1/2" pocket holes with 2-1/2" pocket hole screws.
Step 4
Add trim to the shelf.
Step 5
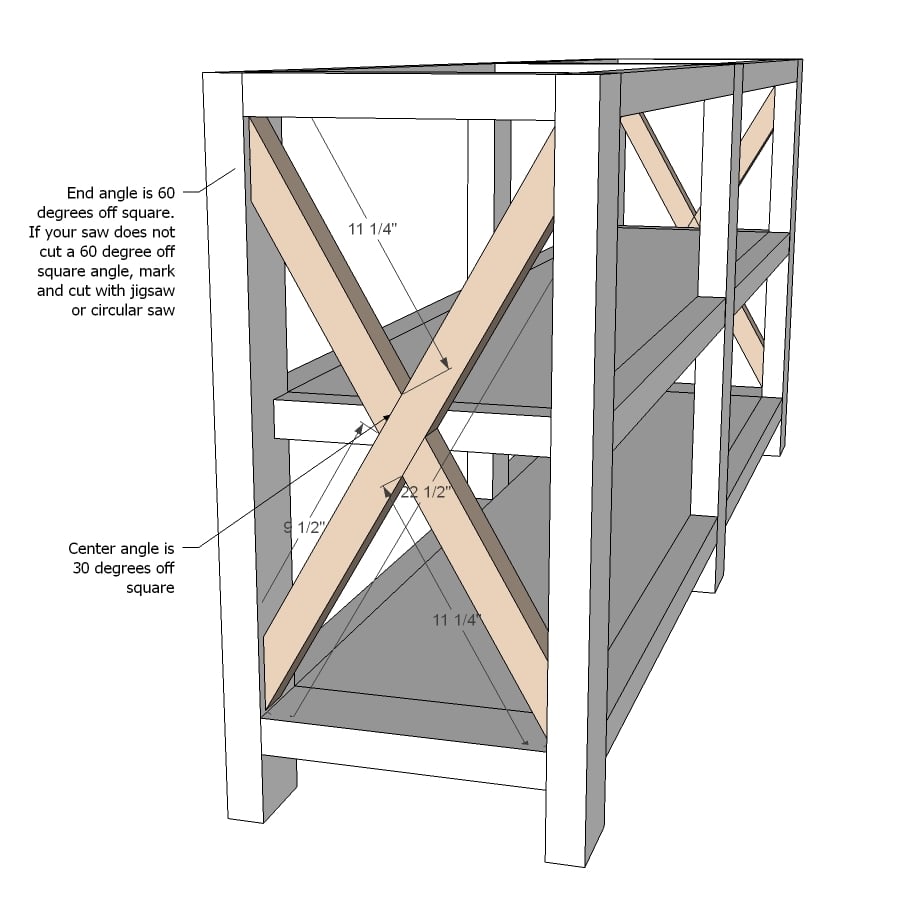
The X can be cut by just placing the uncut board alongside it's permanent position, and marking the overlap with a pencil, and then cutting the pencil lines with a circular saw or jigsaw.
First do the longer piece, then place inside the project, but don't attach yet.
The figure the smaller piece cuts and make those cuts.
Fit the smaller pieces in the project, and trace where they need to be joined to the larger piece.
Remove all pieces and attach the smaller pieces to the longer piece.
Then place the entire X inside the opening and attach.
Step 6
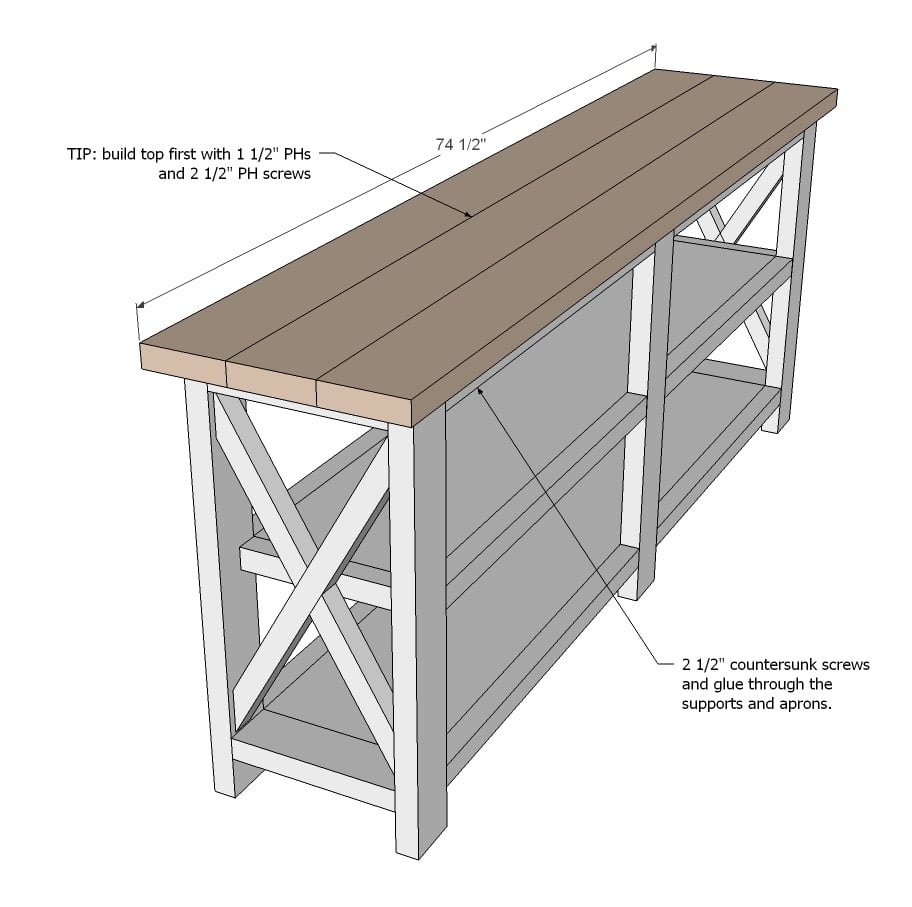
And then add the top. You can build top first with 1 1/2" pocket holes and 2 1/2" pocket hole screws and then attach to top through 2x4/2x2 aprons or just plank the top for a rustic look - it's up to you.
TIP: Just use your 2 1/2" pocket hole screws to attach the top so you don't have to go out and buy more 2 1/2" screws.
It is always recommended to apply a test coat on a hidden area or scrap piece to ensure color evenness and adhesion. Use primer or wood conditioner as needed.


Comments
spiceylg
Mon, 05/21/2012 - 09:58
Love
Love this table, I had pinned Centsational Girl's table as well! Hillary you did a fab job! I think it has now been placed on my must build list! My hubby is going to think I'm crazy, because his concept of must have is too practical for me, ha!
linseylouwho
Mon, 05/21/2012 - 10:26
Wanna meet half way?
I LOVE this table! I have a wall in my home that I've been looking for a console table for! One that is HALF this size would be perfect! I mean PERFECT!! Only one little problem...I STINK at math. How about plans for one that is half as wide. That would be awesome. Thanks
Winter300
Tue, 04/05/2016 - 11:50
Math
So, the overall width would end up being 8 1/4 inches, with the inside pieces being 5 5/8s. Everything else would pretty much be the same, though I am not sure what the angle on the X pieces would be. To do that, you can just hold the piece up and scribe it. With all that being said, be advised that lopping it in half might throw the proportions off enough to make it look odd.
whitney_smith
Mon, 05/21/2012 - 10:39
Nice!
This piece looks amazing! Truly a show room look. Amazing!
Samantha Conway (not verified)
Mon, 05/21/2012 - 11:19
I love this table! I am
I love this table! I am looking to replace our entryway table, and this fits in perfect with the country feel of our home.
Anonymous Coward (not verified)
Mon, 05/21/2012 - 11:22
That stain :)
It's Iron Acetate ... otherwise known as "Steel wool dissolved in vinegar" and brushed on. And strong black tea. Followed by waxing, but you could use a wipe-on polyurethane if you wanted.
INGREDIENTS:
One "pillow" of extra-fine steel wool
1 Gallon of cheap white vinegar
A box of harsh, cheap black tea (maybe)
Shred the steel wool and stuff it into the vinegar jug. Leave the cap loose! Set it aside for several days, swirling it occasionally to check the progress. The bubbles are hydrogen gas. When the steel wool is gone, your stain is ready.
Check it on a scrap piece ... brush it on and it should turn greyish as it dries. If it's too dark, dilute the iron acetate with water 50:50 and test another scrap.
For a more intense grey, you need tannin. Brew up some really strong black tea (use a lot of bags and boil it till it's really undrinkably dark)
Brush the tea on and let it dry, then apply the iron acetate solution. If it's too dark, dilute the iron acetate with water 50:50 and test another scrap.
This is a great stain for blending repaired spots into a fence - load a garden sprayer with 50:50 iron acetate and water and spray the new wood.
Hillary (not verified)
Mon, 05/21/2012 - 12:00
tea
I used organic tea because it was what I had on hand and let it steep for a few hours. Worked like a charm!
Anonymous Coward (not verified)
Mon, 05/21/2012 - 11:23
That stain :)
It's Iron Acetate ... otherwise known as "Steel wool dissolved in vinegar" and brushed on. And strong black tea. Followed by waxing, but you could use a wipe-on polyurethane if you wanted.
INGREDIENTS:
One "pillow" of extra-fine steel wool
1 Gallon of cheap white vinegar
A box of harsh, cheap black tea (maybe)
Shred the steel wool and stuff it into the vinegar jug. Leave the cap loose! Set it aside for several days, swirling it occasionally to check the progress. The bubbles are hydrogen gas. When the steel wool is gone, your stain is ready.
Check it on a scrap piece ... brush it on and it should turn greyish as it dries. If it's too dark, dilute the iron acetate with water 50:50 and test another scrap.
For a more intense grey, you need tannin. Brew up some really strong black tea (use a lot of bags and boil it till it's really undrinkably dark)
Brush the tea on and let it dry, then apply the iron acetate solution. If it's too dark, dilute the iron acetate with water 50:50 and test another scrap.
This is a great stain for blending repaired spots into a fence - load a garden sprayer with 50:50 iron acetate and water and spray the new wood.
Cindy from Indiana (not verified)
Mon, 05/21/2012 - 11:25
Be still my heart!
I would type how much I love this table, but I'm feeling faint because my heart is pitter-pattering! ;-) /jk
Love it, love it, love it!
LisaT
Mon, 05/21/2012 - 11:47
Total love!
Ok, I am getting addicted to building things and these plans aren't helping!lol Thanks so much for all your awesomeness! This is great!
brookifer86
Mon, 05/21/2012 - 12:24
Oh my stars
This is on the build list. It's just THAT fantastic! Cannot wait to have this in my house!
birdsandsoap
Mon, 05/21/2012 - 14:20
Wow! What a neat design, it's
Wow! What a neat design, it's the perfect display table for all of those heirloom quilts. Well done!
RBear
Mon, 05/21/2012 - 16:12
I LOVE this table!! But I want the drawers.
I LOVE this table!! But I want to upsize it like the from Pottery Barn and add the drawers.
Any ideas how to add the drawers? The unit has open sides. Would a drawer slide underneath the drawer work here? I have only used the side mounted drawer slides.
Hillary (not verified)
Tue, 05/22/2012 - 22:26
drawers
Hi, RBear. Yes, I looked at the inspiration piece assuming someone would want to make it with the drawers and so I've thought about it a bit. To build it like the inspiration piece you'd need to use undermount slides and attach them to the middle shelf so they wouldn't be visible from the sides. I did it on a big storage bench I made last year and it took a bit to figure out the drawers, but it wasn't rocket science. I actually used two center-mount slides per drawer and just lined them up so they were perfectly parallel, because the drawers were heavy. These drawers might be light enough for just one center-mount slide each. (http://thefriendlyhome.blogspot.com/2011/01/game-storagecheck.html) If I were doing drawers, I'd use 1x10s for the drawer body and face and place the middle shelf so that the clearance for the 1x10 drawer would be right. I think right now the space is 10 1/2" and the 1x10s would be 9 1/2" or 9 1/4" depending on what kind you use, so you'd need to move the bottom shelf up a hair to accommodate the drawers exactly.
Good luck!
RBear
Fri, 05/25/2012 - 15:17
Thanks, Hillary!
I remember your game storage post. I love it!!!
Ante
Wed, 07/10/2013 - 13:00
hi hillary
Quick question.. did you use spruce on all the X projects? thanks ahead of time and everything you did looks great.
tracysmith
Mon, 05/21/2012 - 16:41
Crazy
So, my mom comes over today and says she needs a new tv console and I pull up Ana's site to give her some ideas and voila, the answer is the very first thing she sees - this table! We're going to modify it a bit to fit her needs but as soon as I have this baby built, I'll post some pictures in a brag post! Thanks for posting the plans, she's gonna love this!!!!
jenn923
Mon, 05/21/2012 - 18:10
Love this!! Any way to make a coffee table?
I love this console table and I'm thinking it would be a great media console...I'll have to make some modifications to fit my living room though. But I also need a coffee table...any way you could do a coffe table plan? Pretty please! :)
In reply to Love this!! Any way to make a coffee table? by jenn923
tracysmith
Tue, 05/22/2012 - 01:04
What size of coffee table are
What size of coffee table are you looking for? Overall size idea would be great in order to draw up some sketch up plans. That is as long as Ana isn't already planning on doing them ;-)
Hillary (not verified)
Tue, 05/22/2012 - 22:14
coffee table
Ana and I are working on a coffee table. It's coming! :)
Jake
Mon, 05/21/2012 - 20:00
What is a PH
What is a PH screw. I am sure I will feel stupid when you tell me but I have to ask.
In reply to What is a PH by Jake
tracysmith
Tue, 05/22/2012 - 01:00
PH is short for Pocket Hole
PH is short for Pocket Hole screw. They are specific screws made for a pocket hole system. No question is a stupid question on this site. We're all here to to help and encourage each other. Keep 'em coming!!!
IansMama
Thu, 07/25/2013 - 13:04
pocket hole screw
I posted a questions to this thread, however, I'm not sure you see it unless I reply directly to your post. I'm just wondering exactly how many pocket hole screws are used on each trim section attaching to shelves, and their approx. placement on the piece. Thanks so much!
Keri
Mon, 05/21/2012 - 21:37
Thanks for the finish idea...and another thing on the to-do list
I really do play on making this, but first I'm going to try out the finish on the (modified) loft bed that's sitting in my "workshop" (read:kitchen, at least until we get the garage set up right) waiting for me to finish sanding it. I was wanting something more "rustic" like this to match the idea I have for my boys room - almost like they could have been stranded in some jungle somewhere and this is their tree fort. Or at least fort....the tree part is a lot more work, or takes wall painting by someone more artistic than I. Thanks, "Anonymous Coward" for posting the directions!
Jake
Tue, 05/22/2012 - 04:04
PH = Pocket Hole
Thanks TracySmith. I use my Kreg Jig all the time. In fact I just finished the frame for a new gate and it was built with PH joints. I learn something new every day.
In reply to PH = Pocket Hole by Jake
tracysmith
Tue, 05/22/2012 - 14:43
Don't ya just love that
Don't ya just love that thing?!! I can't imagine building without it. It has literally been the tool that got us started! That and Ana White! Keep up the good work!
jaime6891
Tue, 05/22/2012 - 09:28
Amazing!
I love it! I can't wait to get started on it during the long weekend. Great job!
Kathyy (not verified)
Tue, 05/22/2012 - 15:25
Our First Project
Showed this to my husband last night and he was as excited as I was . We have been looking for a console table and all I find are just not a good fit, but yours is perfect! Love your blog - the directions are great and we can't wait to get started!
annalea
Thu, 05/24/2012 - 15:33
Thinking in Complements . . .
Lots of compliments, too, but complements, first. Isn't there a way to cut the complement of the 60-degree angle? Maybe by cutting the board to the length it needs to be at the very point of the angled cut (the longest dimension), then turning the board 90-degrees and cutting a 30-degree angle? (90 - 60 = 30) That would create a 60-degree angle at the other end of the mitered cut. The sum of the angles of a triangle are always 180, and a mitered cut on the end of a board can be figured like a right triangle. 90 degrees is already taken for the right angle (which is a place you're not cutting), so the two angles left have to add up to 90.
I haven't run into the 50-degree limitation, so this is just a guess on a new way to use a saw . . .
But . . .
I do know, from sewing and paper piecing, that it's possible to turn and flip and do all kinds of crazy things with things you cut in order to get what you need at the end. ;o)
Hope this helps! (HTH!)
annalea
Thu, 05/24/2012 - 16:15
Here's what I mean . . .
Here's a ROUGH sketch of what I'm talking about. Hth!
http://farm9.staticflickr.com/8026/7264530580_ea387155cb_b.jpg
franky (not verified)
Fri, 06/01/2012 - 09:06
thank you for sharing
wow...this is such a great tutorial..thank you so much for sharing! need to try this at home asap!
sosloe (not verified)
Fri, 06/01/2012 - 09:50
Rustic / Aged hardware
This is a great piece, I dig the rustic style. I really like the decorative corner hardware and bolts. Any guide or suggestions on how to 'age' new hardware you can buy at home depot to get that weathered/old look? :)
Hillary (not verified)
Mon, 06/04/2012 - 13:39
rustic hardware
The hardware I used was shiny new stuff from Lowe's. I just painted it with flat black spray paint. It would be fun to work with multiple coats of spray paint. Maybe some turquoise, some rust colored, with a little sanding to let the undercoat show. So many possibilities!
Maitai396 (not verified)
Thu, 06/14/2012 - 10:51
Cost??
Love this piece. I too would need it to be a bit more shallow. I was wondering if you recall how much it cost to make this?
Hillary (not verified)
Sun, 07/08/2012 - 16:52
x console cost
I think it was around $110.
adam (not verified)
Fri, 07/20/2012 - 13:12
stain
This is great! I'm definitely going to give this one a try. Would you recommend staining the wood pieces before assembling?
adam (not verified)
Fri, 07/20/2012 - 13:14
stain
This is great! I'm definitely going to give this one a try. Would you recommend staining the wood pieces before assembling?
Hillary (not verified)
Tue, 08/07/2012 - 23:20
For this I think you're
For this I think you're better off putting it together and then staining. You'll want to get the ends of the planked top sanded uniformly before staining, which is easier to do if you assemble first. Good luck!
jvofamily (not verified)
Thu, 08/23/2012 - 17:21
I would love a plan for an end table
Love this!!! I need the console too - but while you are thinking about a coffee table - would you consider an end table next?
Hillary (not verified)
Mon, 08/27/2012 - 22:44
Rustic X End Table plan
There's one up already actually. Here's a link: http://ana-white.com/2012/08/plans/rustic-x-end-table
RobKelly3
Thu, 08/30/2012 - 07:54
Quick question about the top
Hi there! I'm so happy to have found your site. And I LOVE this table. It's going to go perfectly in my apartment. I just have a few very quick questions that i hope you can help me with. Please forgive my lack of proper terminology..I'm still learning.
1. Did you put PH in the aprons and 2x4's to attach the top? Or, did you just screw straight down through the legs and aprons? Any preference there?
2. Do you think that using a piece of plywood for the top with nosing around the edges could work for the top?
3. When you drill a pocket hole, do you have predrill the other piece as well?
Thank you so much for this site and for your time. :)
In reply to Quick question about the top by RobKelly3
hillarylouise
Wed, 09/05/2012 - 18:30
x console construction
We're all still learning. There's nothing pretentious about Ana's site so you never have to be afraid to ask questions! That's what makes it so great.
Answers for you:
1. No. I turned the table upside down and drilled and screwed straight down through the aprons into the underside of the top. It's definitely the easiest way to do it. I can't remember whether I pre-drilled, but if you have a countersink bit (I do not) that might be the way to go. I think I just put a lot of weight into it and since the wood is relatively soft, the head of the screw buried itself. You could do pocket holes on the insides of the aprons instead
2. I suppose ply would work, but you'd lose the rustic-ness and character of the piece. If you are going for a more refined looking table, ply will be perfect.
3. No, don't pre-drill the other piece. The pocket hole screws (definitely use actual pocket hole screws) are made to be self-tapping so they don't split the wood on the other side. That's what makes pocket hole construction super easy for newbies like us. :)
RobKelly3
Fri, 09/07/2012 - 07:08
Thank you so much!
Thank you so much!
steelmagnolia
Sun, 04/27/2014 - 06:39
Self-tapping?
After attempting to build this with my husband, we've run into a few problems. The 2x2's often split when we try to connect them to the 2x4's.. I'm not sure what we're missing here or what we're doing incorrectly.. My husband is an experienced builder, and even he can't figure out what's going on. We are using another brand of a pocket hole system.. Could that be it? Hope you can help..??
After this happened I did some research on the screws and I read an article that explained the difference between self-tapping and self-drilling screws.. Self-tapping screws are not meant for wood projects as they do not provide proper reinforcement. Were you perhaps just using that term interchangeably?
Link to Article: http://www.ehow.com/list_7574951_differences-between-selftapping-selfdr…
Phestr
Fri, 08/31/2012 - 18:01
My Honey-Do list is filled with Ana White
My wife has discovered your site, and I am so happy. Don't get me wrong, I like trying to figure out what she wants me to build from a quick description and a "Kinda like this" browse of the internet, but life is so much asier when she hands me a plan and says, "Build this".
Now, I do have a question. Is there a way to get Sketchup Models from you? I need to build this table with different dimensions, and it'd be easier to modify if I had the orginal model. Love the site, I'll be here often.
In reply to My Honey-Do list is filled with Ana White by Phestr
hillarylouise
Wed, 09/05/2012 - 18:35
models
Hey, Phestr. I'm going to answer this for Ana because I don't know whether she'll see your question. If you contact her directly (try messaging her on FB to get in touch with her -- she's at Knock-Off Wood) you might be able to get the model. But, it might be faster to re-do the dimensions on your own. Good luck!
Phestr
Wed, 09/05/2012 - 19:25
Thanx
I'll try that route. I'm not in a terrible hurry, this table is about #3 on my build list.
emilybemly (not verified)
Sun, 09/02/2012 - 20:40
rustic x console
I am going to build this table, if you wouldnt mind, could you please post some pictures of the places where the wood joins to I can just see what its spose to look like? Beautiful table, I cant wait to get started!
george and jacks mom (not verified)
Wed, 09/05/2012 - 13:17
Decorative corner pieces
Where did you find the cute corner pieces and bolts?
In reply to Decorative corner pieces by george and jacks mom (not verified)
hillarylouise
Wed, 09/05/2012 - 18:38
decorative hardware
The hex bolts and corner brackets are from Lowe's. They're silver ones found in the hardware aisle -- the corner brackets come in 2-packs, I think. They're "Stanley" brand. The hex bolts are from the bulk bins. They're 1/2" size, if I remember right. I sprayed them all with flat black spray paint.