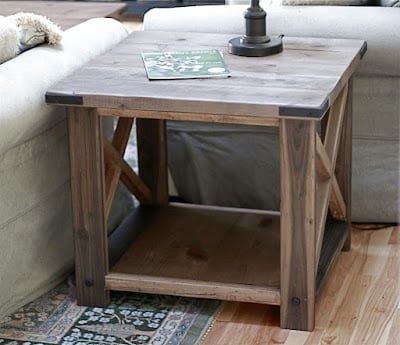


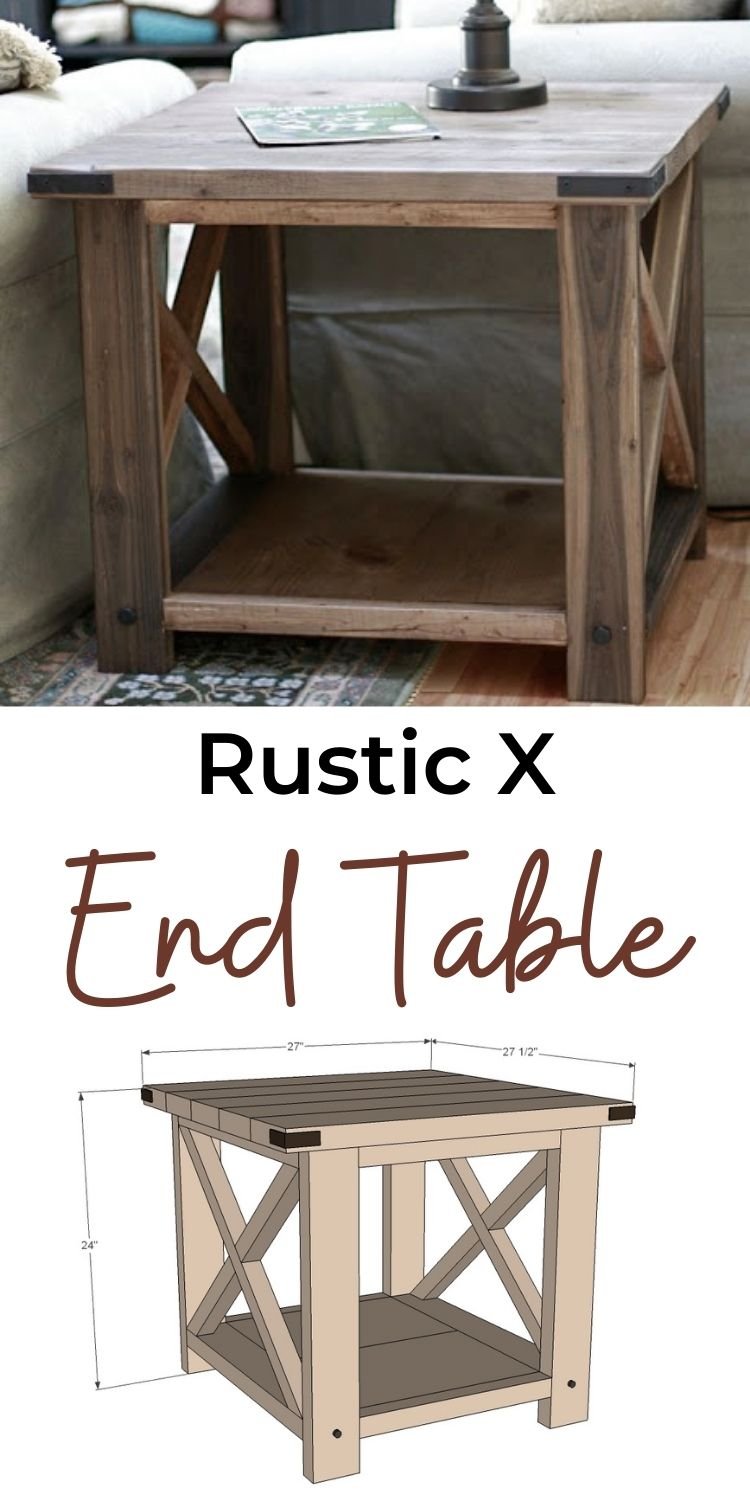
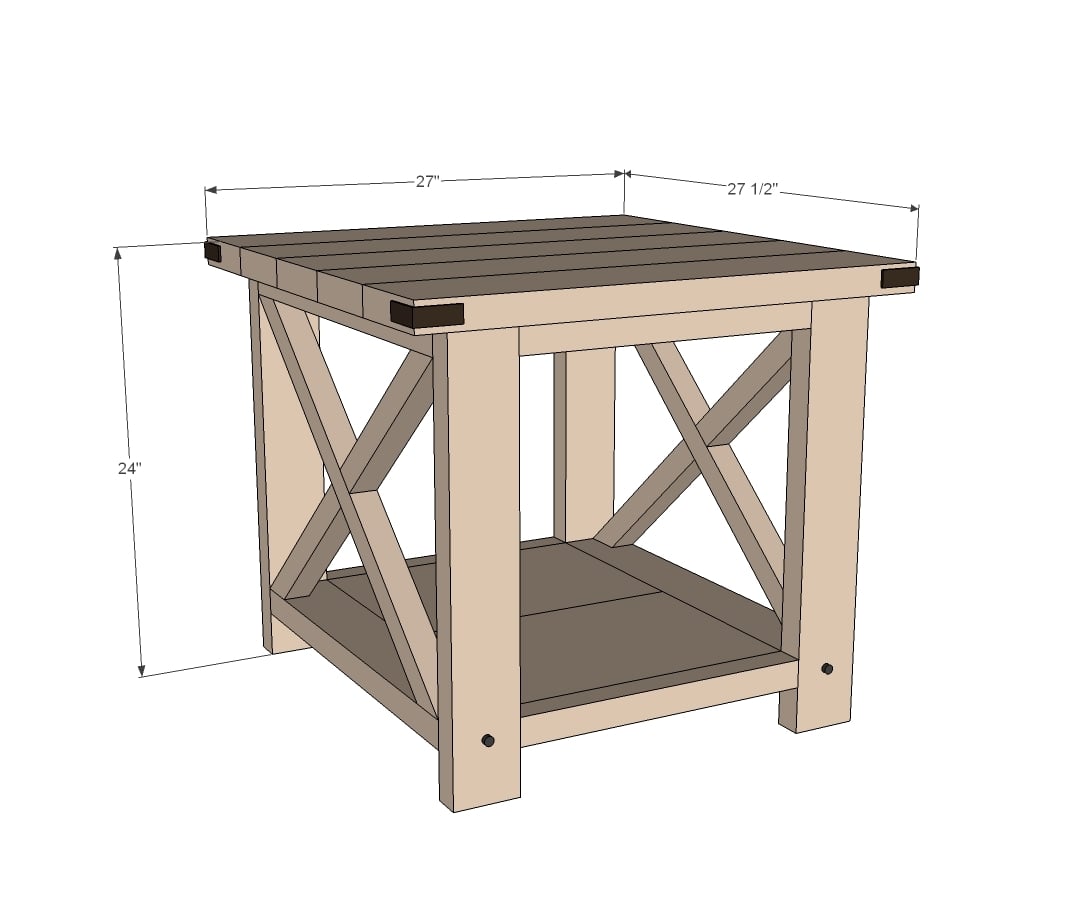
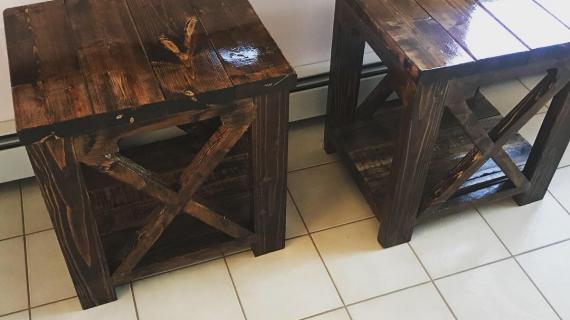
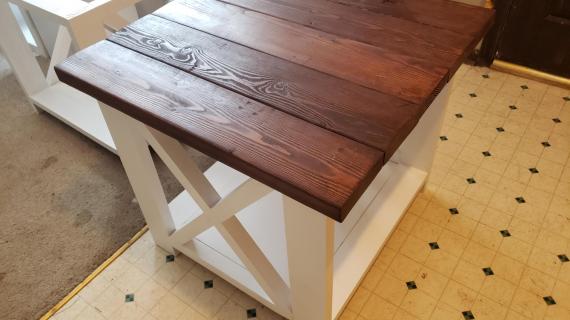
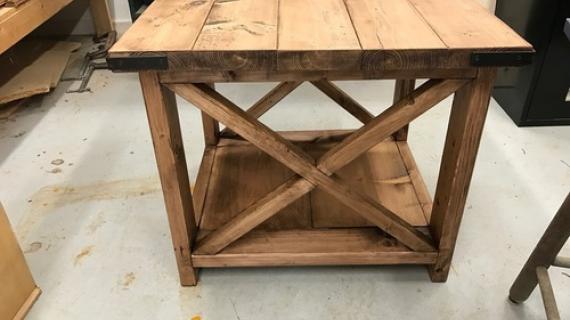
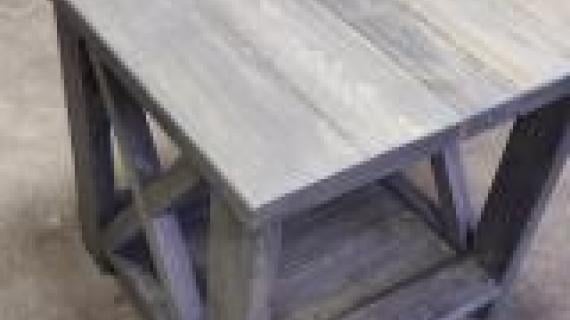
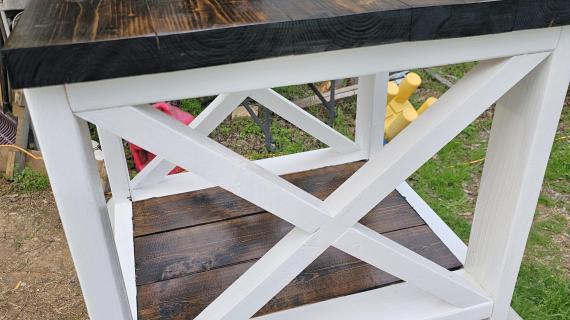
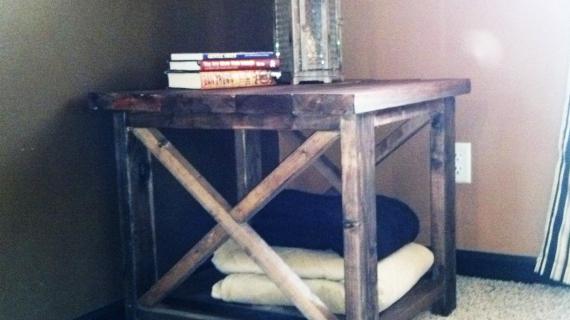
Build your own end tables! These gorgeous rustic style end tables are built from 2x4s and lumber. We love the large size and the open bottom shelf. Stain or paint any color. Our beginner friendly plans make it easy with step by step diagrams, shopping list and cut list.
Also in this Collection: Rustic X Console Table, Rustic X Coffee Table and Rustic X Bench Plans
Rustic X Living Room Table Collection
This end table is part of a collection of living room furniture that you can build. All the plans are available for free for your use.
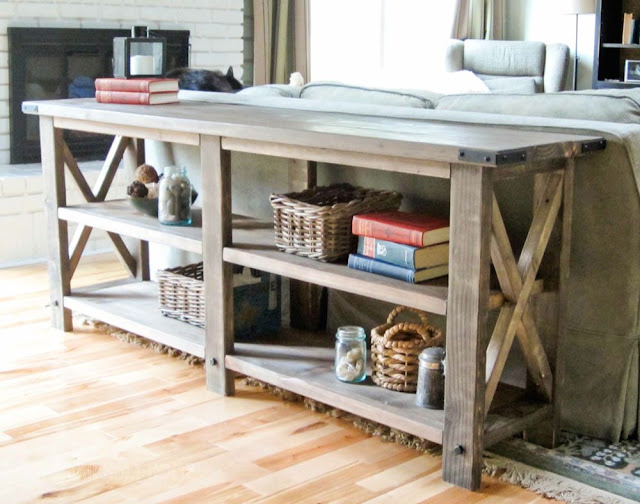
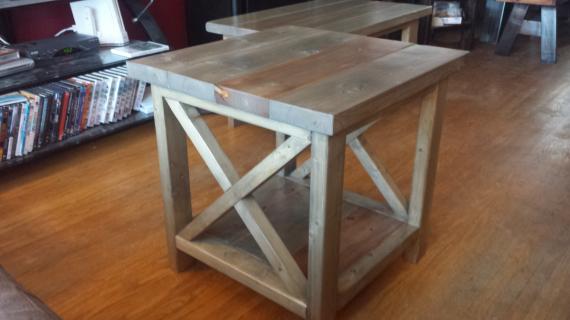
It all started with this beautiful X Console Table, built by Hillary from The Friendly Home.
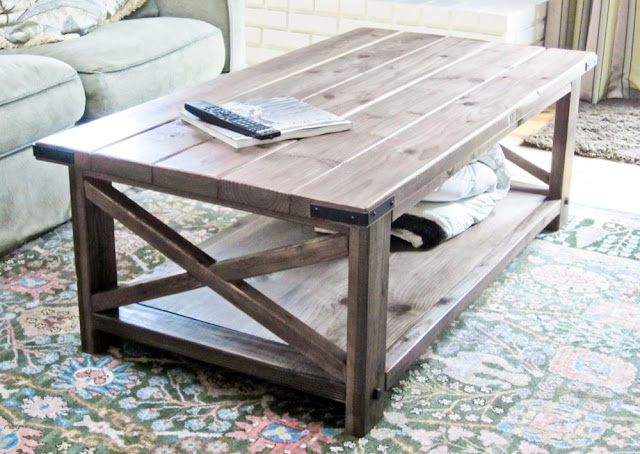
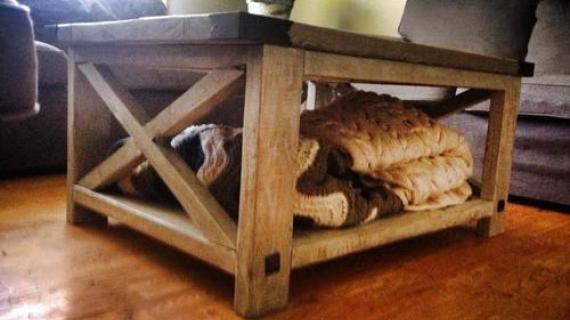
And then we added this beautiful Rustic X Coffee Table, also built by Hillary.
Now, Hillary used up her scraps and built X End Tables!

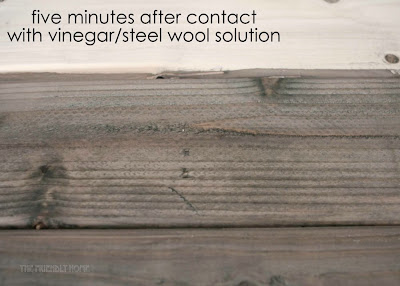
DIY Wood Finish
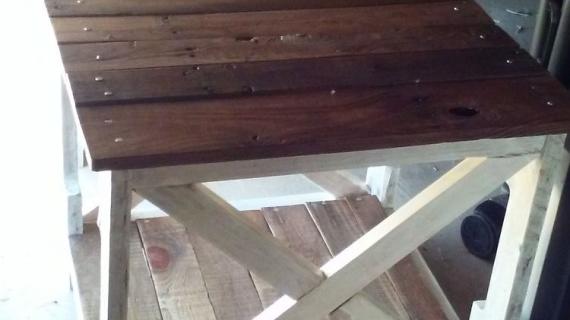
Hillary used a steel wool and vinegar solution to age her end table. Want the same finish? Get the step by step tutorial here.
Pin For Later!
Preparation
- 2 - 2x4 @ 8 feet long
- 1 - 1x12 @ 3 feet long
- 2 - 2x2 @ 8 feet long
- 2 - 2x6 @ 8 feet long corner bracket hardware decorative bolts
- 2 1/2" and 1 1/4" Pocket Hole screws
- wood glue
- 8 - 2X4 @ 22 1/2" - Legs
- 4 - 2X2 @ 16" - Trim
- 2 - 1X12 @ 16" - Bottom shelf
- 2 - 2X2 @ 26 1/2" (LONG POINT TO SHORT POINT, ENDS ARE PARALLEL, 50 DEGREES OFF SQUARE) *
- 4 - 2x2 @ 13 1/4" (Longest edge, one end cut at 50 degrees off square, other end cut at 10 degrees off square, see diagram) *
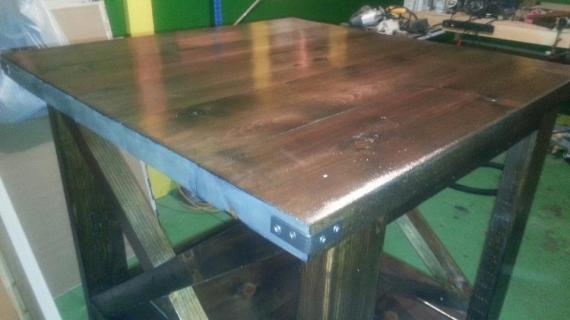
- 5 - 2x6 @ 27" - Top
*You may wish to trace and cut these in place


Please read through the entire plan and all comments before beginning this project. It is also advisable to review the Getting Started Section. Take all necessary precautions to build safely and smartly. Work on a clean level surface, free of imperfections or debris. Always use straight boards. Check for square after each step. Always predrill holes before attaching with screws. Use glue with finish nails for a stronger hold. Wipe excess glue off bare wood for stained projects, as dried glue will not take stain. Be safe, have fun, and ask for help if you need it. Good luck!
Instructions
Step 1

Start by building two ends as depicted in diagrams. You can also attach with countersunk 2 1/2" screws and glue.
NOTE: Yellow board width should be 22 1/2"
Step 2
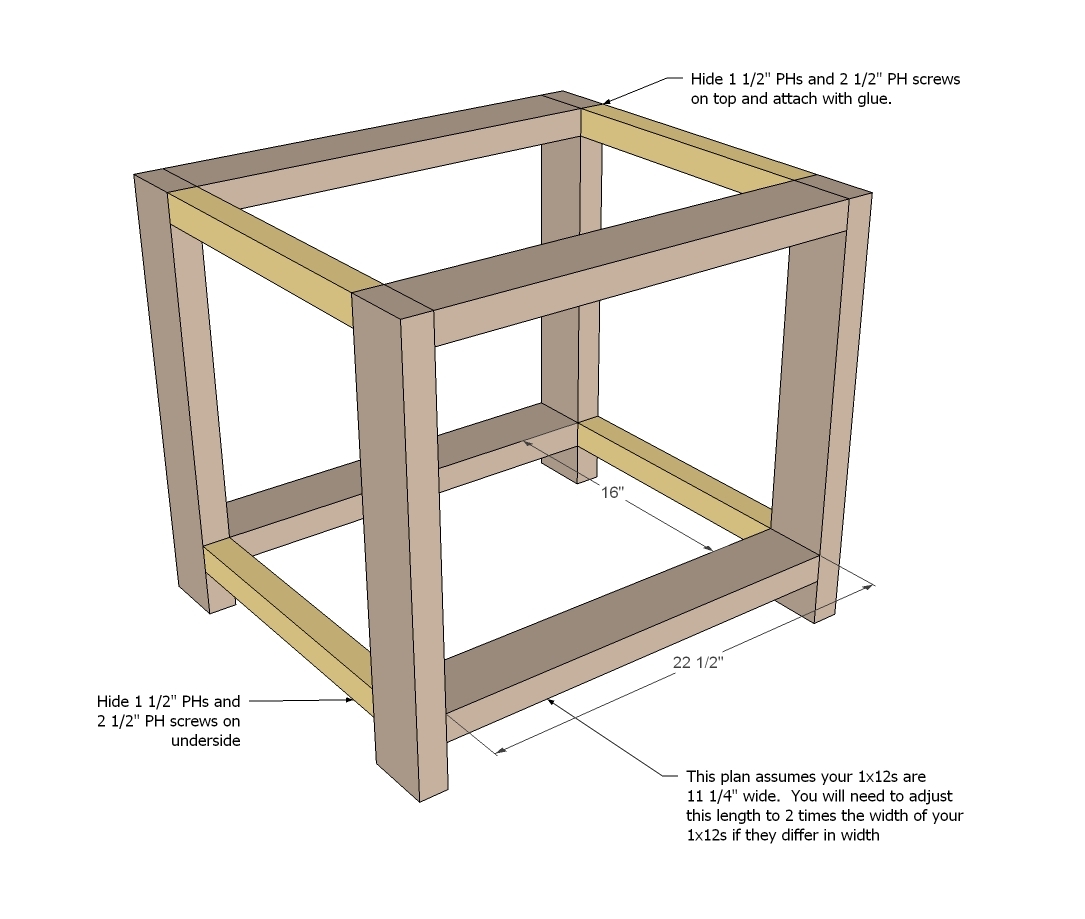
Next attach the 2x2 sides.
Step 3
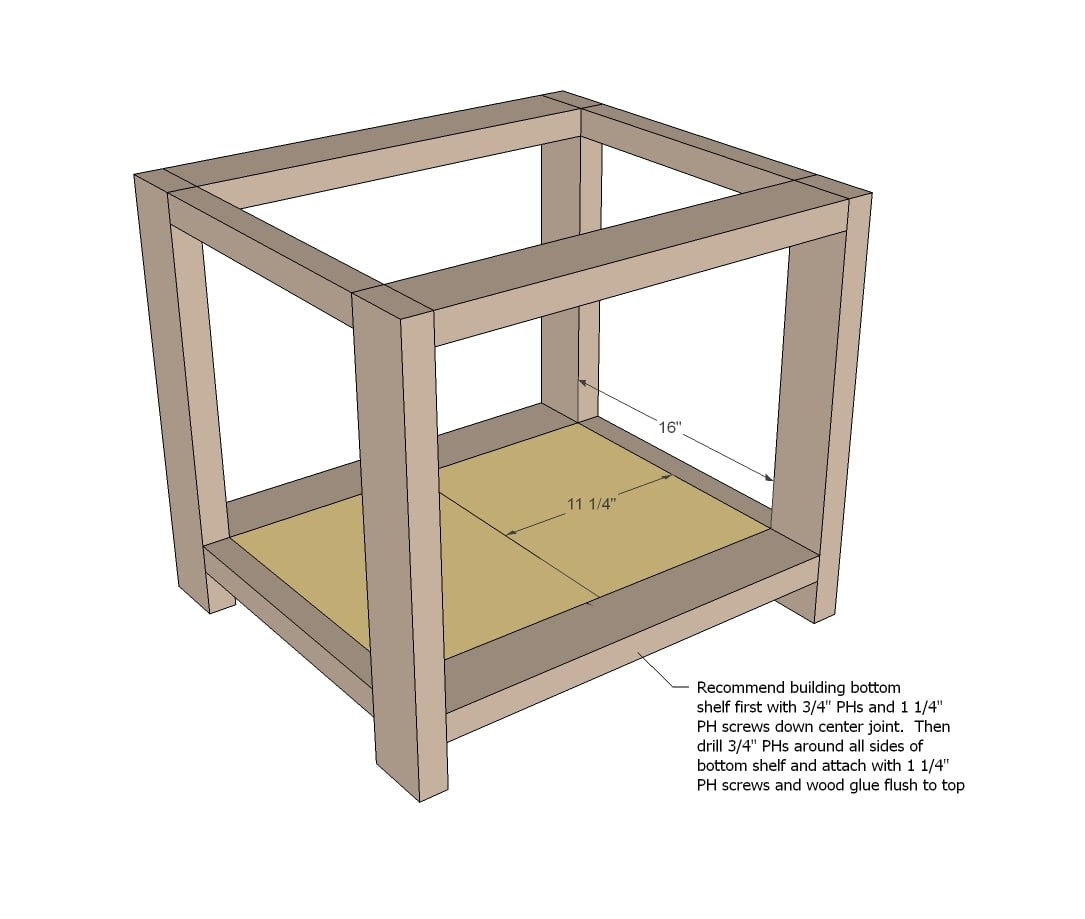
And then build your bottom shelf and attach to bottom of console.
Step 4

Now it's time to fit your cross braces. A standard miter saw should cut a 50 degree angle off square. If not, you will need to mark it with a square (remember 50 degrees is off square, so that means the angle off the board edge would be 40 degrees.
Another trick is to just hold the board in place, mark the angles, and cut. These aren't support boards or anything like that, so some glue and a few nails or countersunk screws from top/bottom will do the trick.
TIP: We recommend building the entire X first, the attaching the complete X inside the end table.
Step 5
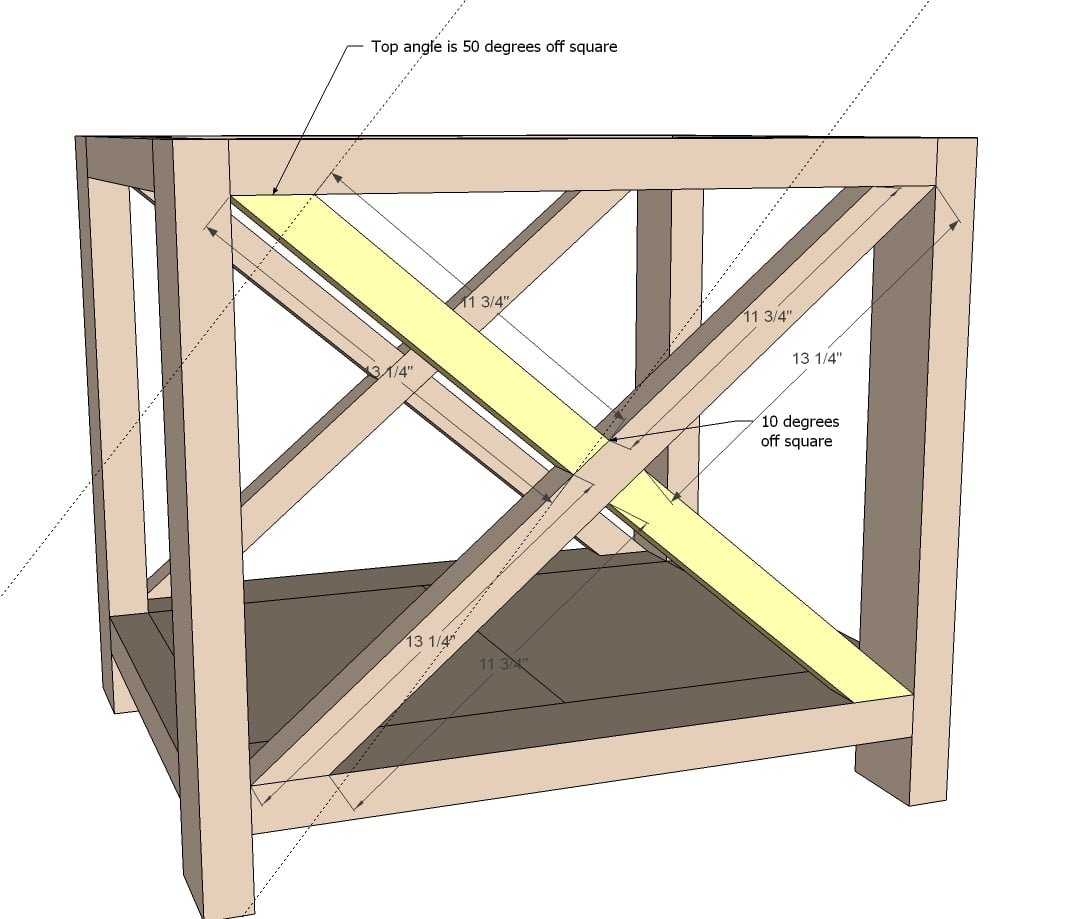
The smaller X pieces can be cut to fit. Attach with a 1-1/2" pocket hole and 2-1/2" pocket hole screw, one screw per joint.
Step 6
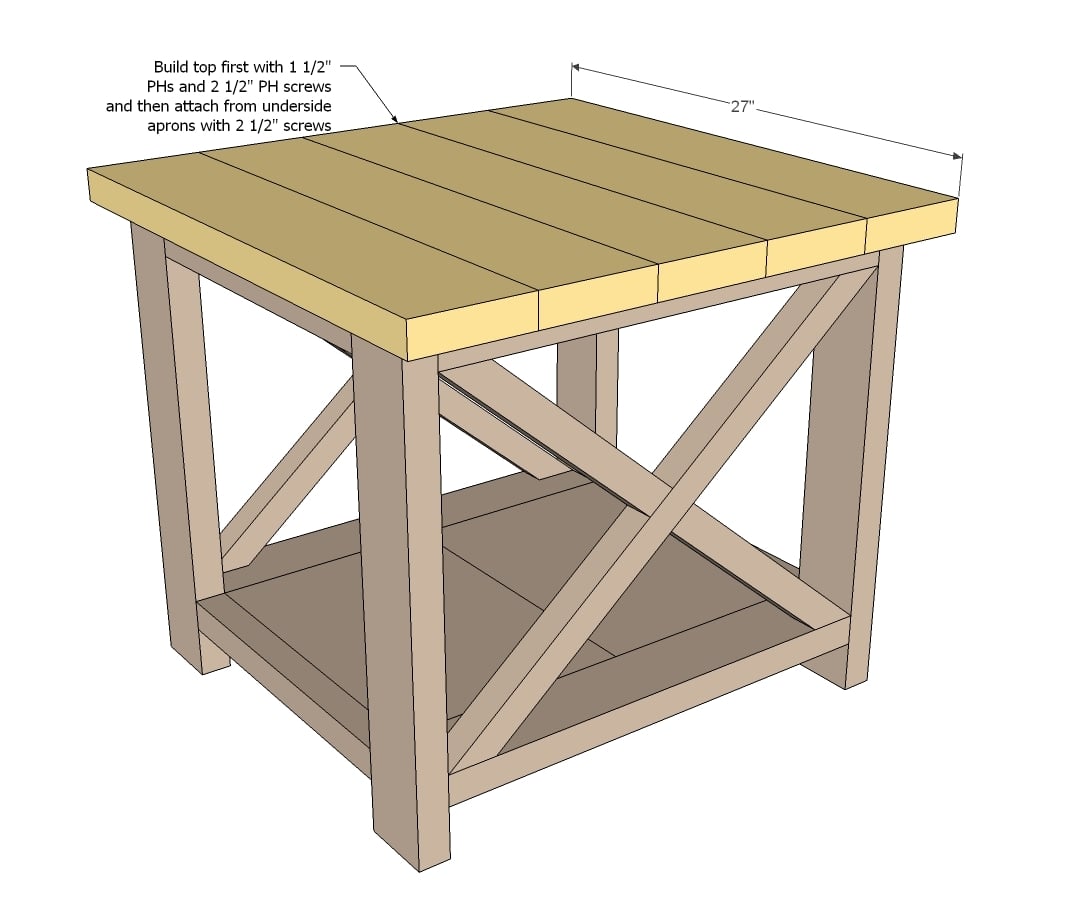
Next build your top ... and attach in place with countersunk 2 1/2" screws. If you have the PH screws on hand, I just use a few of those!
Step 7
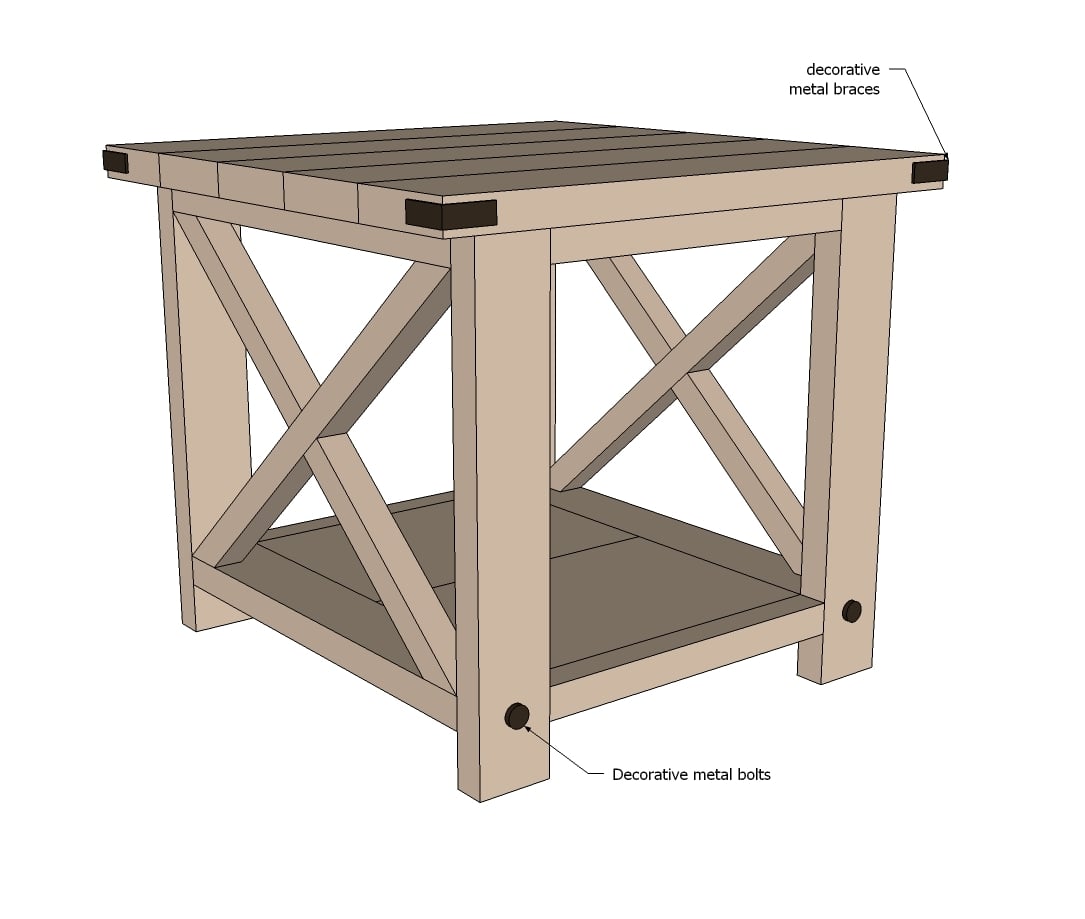
And then add the decorative hardware!
It is always recommended to apply a test coat on a hidden area or scrap piece to ensure color evenness and adhesion. Use primer or wood conditioner as needed.

Comments
bergercb07
Mon, 08/19/2013 - 10:35
brackets and decorative bolts
i have looked all over and online for these two items , do you know of a website that i can get these?
rmccully11
Sat, 09/07/2013 - 13:50
Bottom Shelf
I created pocket holes in my bottom shelf as directed, but when I attempt to attach to the 2x4, my screws are entering at an angle that forces them up and through the 2x4, being very visible on the finished piece. Has anyone else had this issue and if so, how'd you fix it? Or am I doing something incorrectly?
Aberleda
Mon, 09/16/2013 - 22:05
Rustic x end table
Just wondering where the use of counter sink drill bits come into play when making this design? And also what size drill bits are needed. Thanks, love your furniture!
JoNell Lynch
Sun, 01/26/2014 - 19:21
Rustic X End Table
Is there a trick to use with the xs. My table must not have been square and I had a hard time cutting the xs to fit in there snuggly. I still have an end table and a coffee table to build.
Crunchy In The…
Tue, 03/11/2014 - 05:41
Rustic X
I fell in love with these tables! So much so, that we built the console table too, and redrew the plans to make a TV stand! Hubby Dear was particularly proud of the TV stand. Check out the pics!
http://crunchyinthesuburbs.com/2014/03/10/projects/
Thank you for the inspiration! We are smitten with DIY furniture now!
terrigarli
Sat, 08/23/2014 - 07:55
Pocket Holes
I'm very excited to start making this, but I'm a bit confused why all the images say 1 1/2" PHs and 2 1/2" PH screws. What does this mean? I'll be buying a kreg jig when I buy the lumber.
terrigarli
Sat, 08/23/2014 - 07:55
Pocket Holes
I'm very excited to start making this, but I'm a bit confused why all the images say 1 1/2" PHs and 2 1/2" PH screws. What does this mean? I'll be buying a kreg jig when I buy the lumber.
In reply to Pocket Holes by terrigarli
Jake
Sat, 08/23/2014 - 15:10
Translation
PH means Pocket Hole screw. The thickness of the lumber being joined with a pocket hole screw determines the length of screw you should employ. Kreg has a chart you can print out that tells you which length screw to use depending upon the lumber being joined.
Since you are new to using pocket hole joinery let me add that you need several clamps to hold the boards in place when you drive the screws. Otherwise they will take over. This is especially the case if you are connecting a mitered joint. When you near the end of driving the screws do it in little spurts with your drill to firmly seat the screw but also to prevent driving the screw through the board. It happens. Last always complement PH screws with a good wood glue like Titebond II or III.
emily.polt@gmail.com
Tue, 10/07/2014 - 18:33
Stain
I love this table! What stain was used on the table in the original picture? Thanks in advance!
KandA Country Decor
Mon, 10/20/2014 - 07:01
My table Wobbles
I built this table and now it wobbles :( I tried sanding down the leg I thought was too long but now it's even worse. Any advice on how to fix this? Thanks!!
In reply to My table Wobbles by KandA Country Decor
Nathan1342
Mon, 10/20/2014 - 07:11
If it wobbles becuase you don
If it wobbles becuase you don't have the legs exactly the same height this can be easily fixed by using a furniture pad or by buying adjustable furninture sliders like these: http://www.homedepot.com/p/Shepherd-1-1-2-in-Feltgard-Plus-Round-Felt-T…
I've installed sliders like these on all my tables since its very likely the customers floor will not be level. Just inset them so they are completely flush with the bottom of the leg then you can turn them in and out to level the legs.
Hope this helps!
Nathan
booksnotbombs
Mon, 10/20/2014 - 14:28
I built a wobbly table once,
I built a wobbly table once, too, and fixed it by using a little furniture pad as suggested above. No one notices.
MB34
Wed, 03/11/2015 - 18:01
Use a Biscuit Joiner for the tops
I am a former cabinet builder so I know a LOT about woodworking ;-)
For those that don't have a Kreg or other Pocket Hole jig, you can use a biscuit joiner to join the tops together. You can also use 2 1/2 finish nails in a 28° finish nailer to attach all the pieces together. That is how I plan on doing it. I have done some redesign, too, to make it easier to build.
One thing I've noticed is people having trouble determining the angle to cut the 'X' pieces. What I would do is create a cardboard mock up the same size as the space between the legs and layout my 2X2's on that and mark my angles.
b.magee
Wed, 05/13/2015 - 19:05
Modified Plans
I modified the plans to be a little smaller but I'm having a hard time with the degree cut of the X's. Is it still the same degree of cut? Or since I changed the plan it would be different? Also, if it's different, how do I determine what it is? THANKS!
q0987
Tue, 09/29/2015 - 18:52
How to make a flat counter top?
Hello all,
The major problem I have seen so far is to make a flat counter top. After using pocket hole screws to join the five 2x6 boards, they are not even any more and I can see boards are not in the same surface. When I check the images posted by ana, the End Table looks so smooth.
Question> what is the tricks to make a flat End table counter top?
Thank yoiu
Tsu Dho Nimh
Wed, 09/30/2015 - 09:45
Flat joined boards - CLAMPS!
The secret is to use clamps - LOTS of clamps - and glue. One set of clamps will hold the board you are connecting tight to the board with the holes, and the rest will hold the boards flat to your work surface. Then you use a planer or sander and make it smooth.
Look up "edge joining boards" on youtube and Google - there are lots of tricks.
Ana White Admin
Wed, 09/30/2015 - 10:43
Table top
Have a look here too http://ana-white.com/2014/05/plans/10-tips-building-tabletops
kasheppa
Wed, 10/14/2015 - 16:00
Finish for Table
Hi Ana,
We decided to use a Rust-Oleum stain for the end tables, but we were wondering if we need to use anything else to finish it (i.e. poly, wax, etc.)... We want the table to have kind of a rustic look, so we don't want anything too shiny. Any recommendations?
Thanks!
Drew
Emilynhok
Fri, 10/16/2015 - 16:01
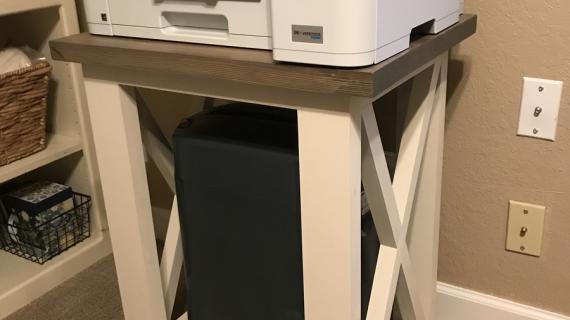
Perfect little table to cover my random electrical outlet!
Love this! This is my 3rd project and still learning a little from my mistakes. But practice makes perfect right?! I made the large porch bench with the rustic x's and had some left over wood to make this table. Thanks Ana for all the wonderful plans you provide. You're awesome!
Welderman
Sat, 12/19/2015 - 21:14
hi new to woodworking here.
hi new to woodworking here. why does the drawing say to use 1 1/2 and 2 1/12 ph?
In reply to hi new to woodworking here. by Welderman
Wrighthandyman
Sun, 12/20/2015 - 11:21
pocket hole requirements
Welderman
Sun, 12/20/2015 - 05:54
PH screws
So am I supposed to use 1 1/2 ph and 2 1/2 ph screws or is it one or the other?
In reply to PH screws by Welderman
AmyMiLo
Mon, 12/21/2015 - 13:00
The pocket holes will be 1 1
The pocket holes will be 1 1/2 , the pocket hole screws will be 2 1/2.
Took me awhile to figure that out too, I had to search threw all the comments.
In reply to The pocket holes will be 1 1 by AmyMiLo
AmyMiLo
Mon, 12/21/2015 - 13:01
through" lordy.
through" lordy.
denitabergen
Tue, 05/31/2016 - 07:44
Rustic X square coffee table?
Love the X tables, heading out to buy my lumber today for 2 end tables. But I really LOVE the look of the square coffee table. Do plans exist for a Rustic X Square coffee table? Not the rectangle design.
jgoellner
Mon, 06/06/2016 - 16:51
Decorative Bolts and Bracket
I was wondering what size the bolts and brackets you used are. I saw that you just used bolts and brackets you bought at lowes.
HarleyL7
Tue, 06/14/2016 - 13:45
PH screws won't hold
I am using 2 and 1/2 PH screws and it's always loose or it goes thrush to the other side of the board.
Rfillmore
Thu, 06/23/2016 - 11:39
Quick question
I am going to use Wenge 2X6s for the table top and a dark finish on pine for the rest of the table. Once everything is cut to size and prepped, would you stain the pine before final assembly or assemble and then stain? Thanks
In reply to Quick question by Rfillmore
Ana White
Mon, 06/27/2016 - 10:00
I would recommend pre
I would recommend pre-staining all boards.:)
laurahamer07
Sun, 07/24/2016 - 20:47
x bars
Hi there,
I was hoping someone could help me out. What would the length of wood be for the 2x2 crossbar prior to cutting it to the appropriate angle? We are doing everything by hand with no mitre saw So it's easiest to make one 90 degree cut prior to the off square cut.
TIA for the help! (26.5" from long to short point is what I'm referring to)
Merc7112002
Wed, 07/27/2016 - 12:24
Awesome idea!
pruittmac
Tue, 10/18/2016 - 07:24
Rustic end table
I am planning on making one of these tables today. Wondering about how long it takes just to build it? TIA!!!
Jaelane
Fri, 11/18/2016 - 15:15
kreg jr
you said you have a kreg jr. It when I go to look for one there are so many different kinds. Kreg R3 jr , R4 ect. I'm not sure which one to buy. What exact one do you have?
Bethany Simmons
Tue, 02/28/2017 - 13:11
Decorative brackets and bolts
Anyone have any suggestions on where to find reasonably priced decorative brackets and bolts?
In reply to Decorative brackets and bolts by Bethany Simmons
Brian Famous
Thu, 01/25/2018 - 12:57
Make them yourself!
You can actually make them yourself fairly easily. All it takes is a piece of flat bar steel, a way to cut the steel (I use a grinder with a cut off wheel, but a hacksaw would work too), a drill with a good drill bit (for drilling the bolt holes), a vise, a hammer, and some spray paint.
If you get a longer piece of steel than you need, it's easier to bend because you get more leverage on it. To make it even easier, you can use a torch to heat the steel at the point you want to bend it.
MacGyver
Mon, 01/22/2018 - 16:01
Measurement help
I'm new to the world of woodworking and trying to figure out the easiest way to adjust the measurements but still make it look the same.
In reply to Measurement help by MacGyver
Brian Famous
Tue, 01/23/2018 - 07:41
New dimensions?
If you are trying to change the measurements, can you provide the new final dimensions (height, width, and depth) you are trying to achieve? Knowing those dimensions would be the first step in determining how the measurements need to be changed.
MacGyver
Tue, 01/23/2018 - 15:20
Terminology help
New to woodworking and new to terminology. In terms of the lower shelf, what does 3/4 PHs mean.
In reply to Terminology help by MacGyver
Brian Famous
Thu, 01/25/2018 - 13:04
PH = Pocket Hole
I believe Ana is using PH to signify pocket hole screws, which you would use a Kreg jig to predrill the holes for.
In reply to Terminology help by MacGyver
Brian Famous
Thu, 01/25/2018 - 13:04
PH = Pocket Hole
I believe Ana is using PH to signify pocket hole screws, which you would use a Kreg jig to predrill the holes for.
Darcy C
Wed, 07/17/2019 - 18:55
I am new here, and just…
I am new here, and just starting woodworking. This looks fantastic; I will post when I'm done.
Darcy
thenigan
Sun, 02/02/2020 - 07:51
Print plans
How do you print the plans?
xeno
Wed, 04/29/2020 - 11:32
Hardware??
Ann,
Where can I find the corner bracket and decorative bolts? I've looked, but can't find the exact ones you use.