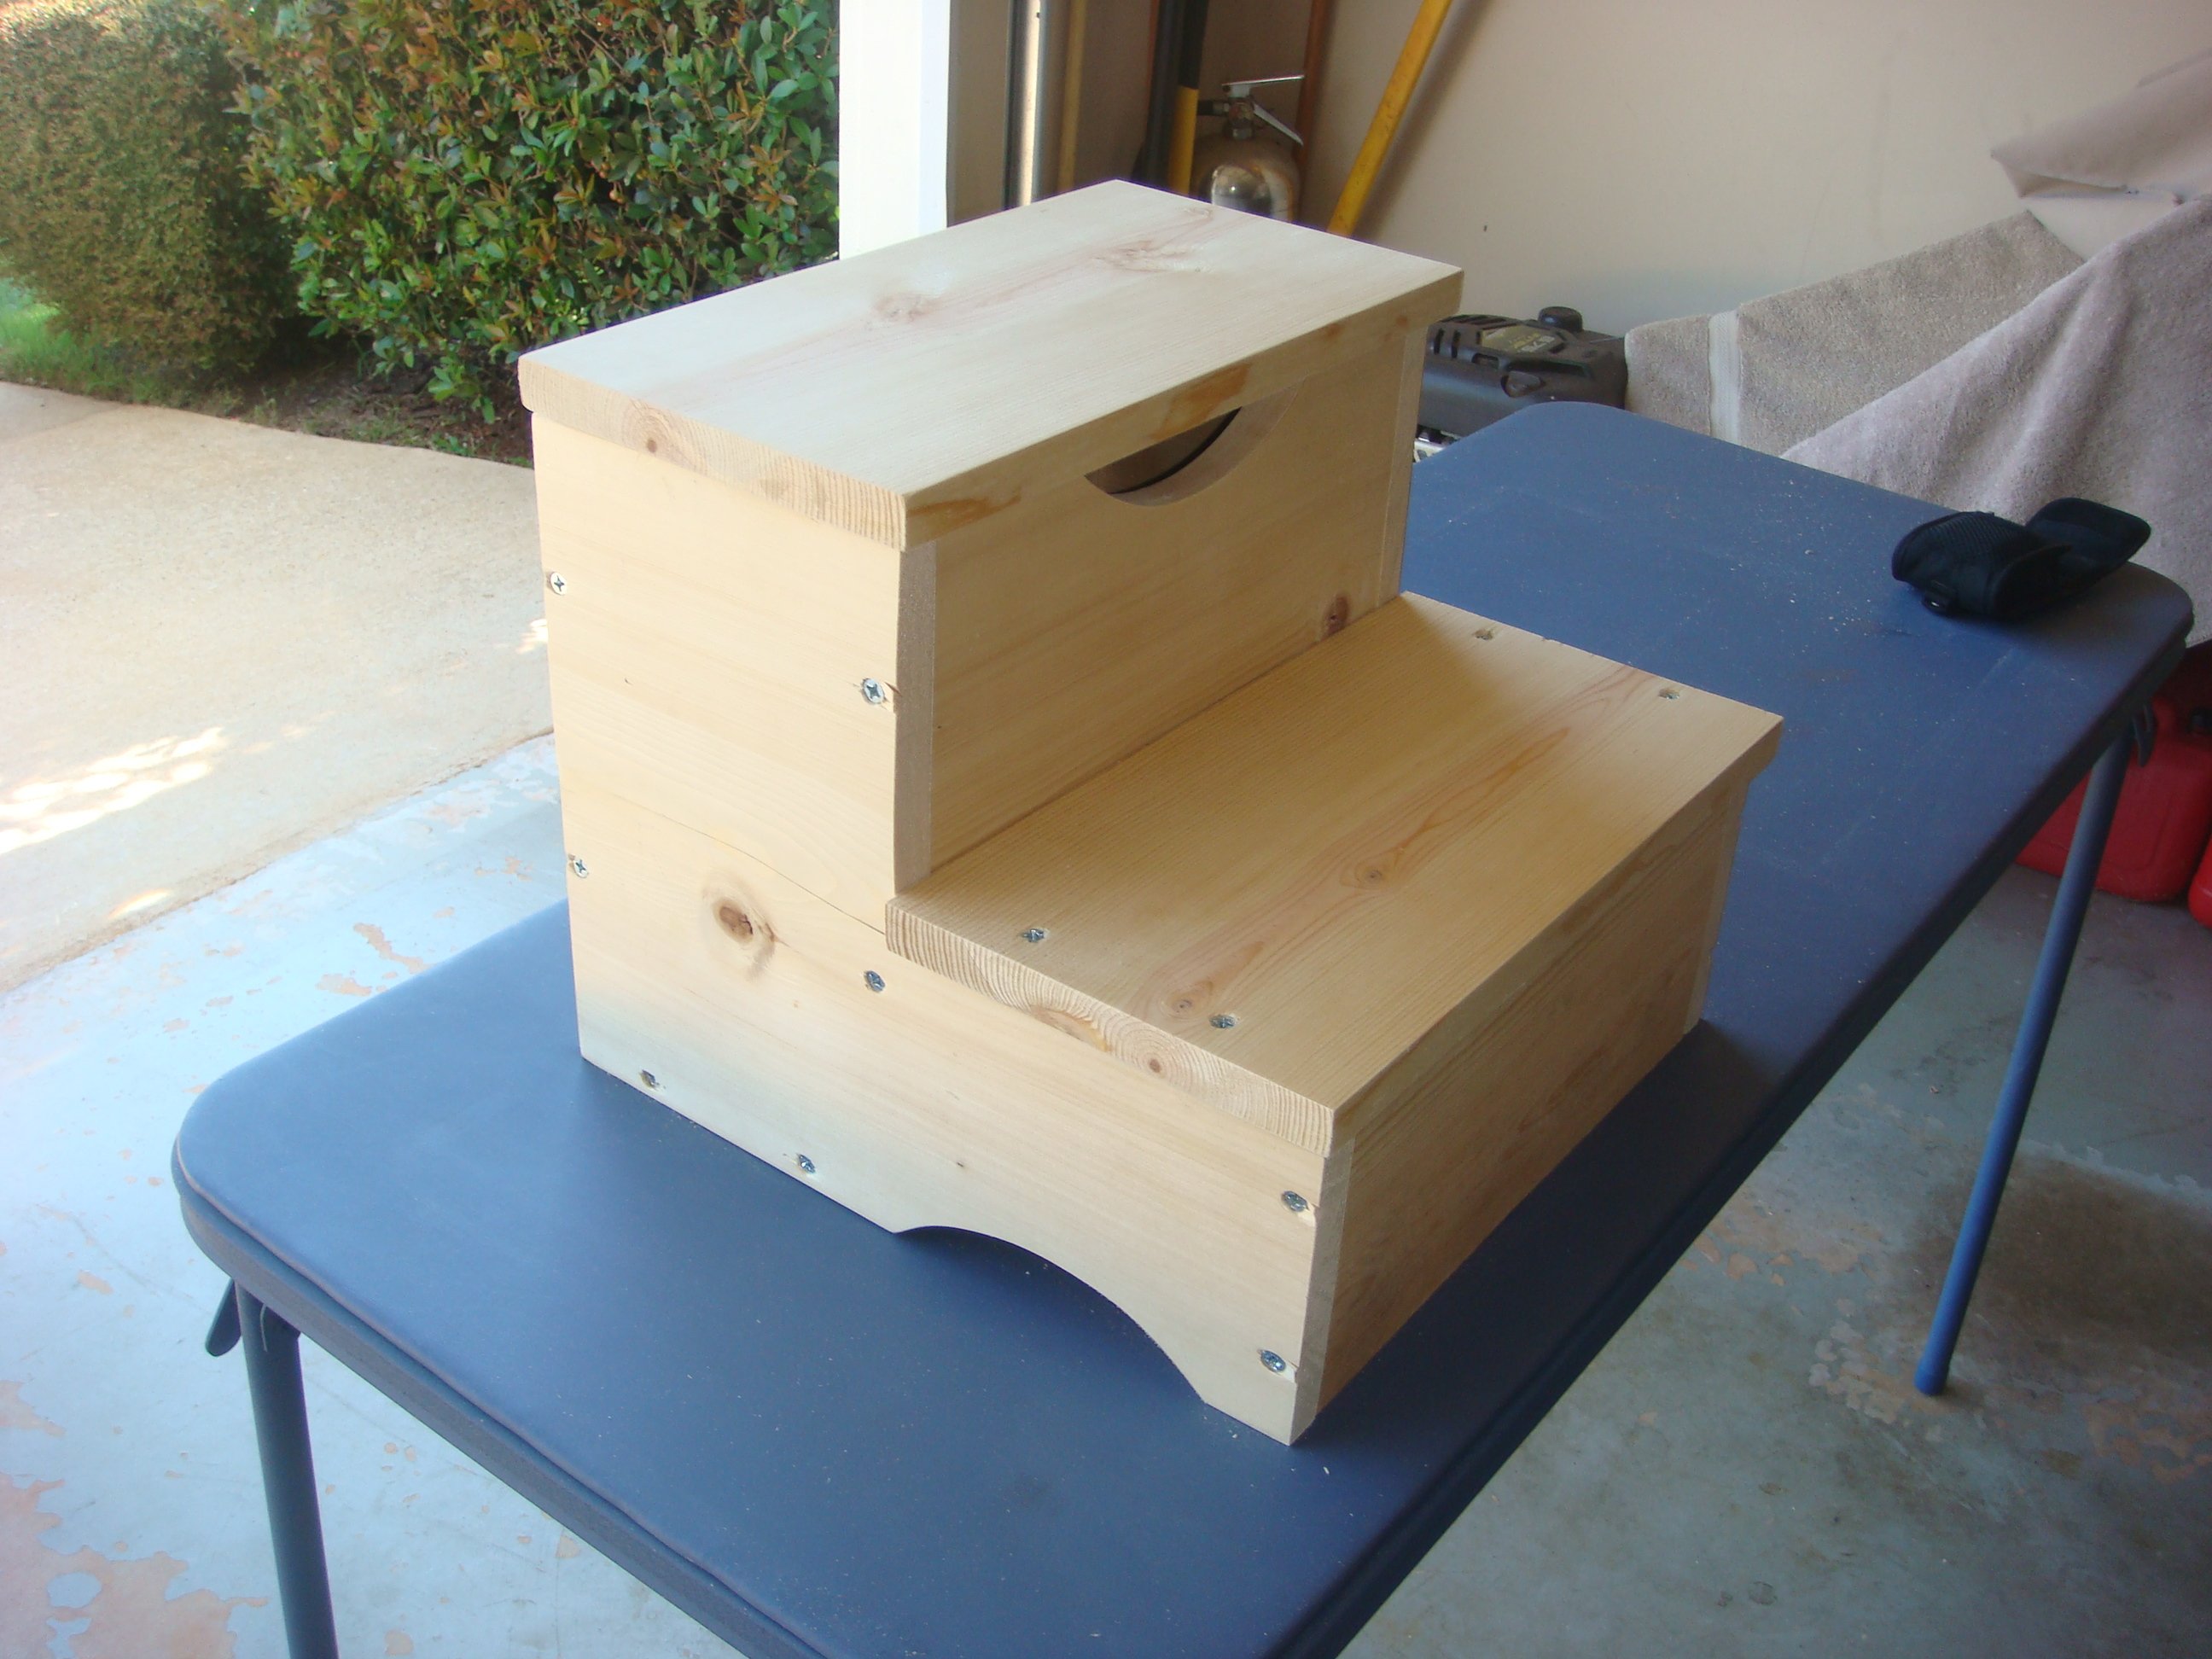
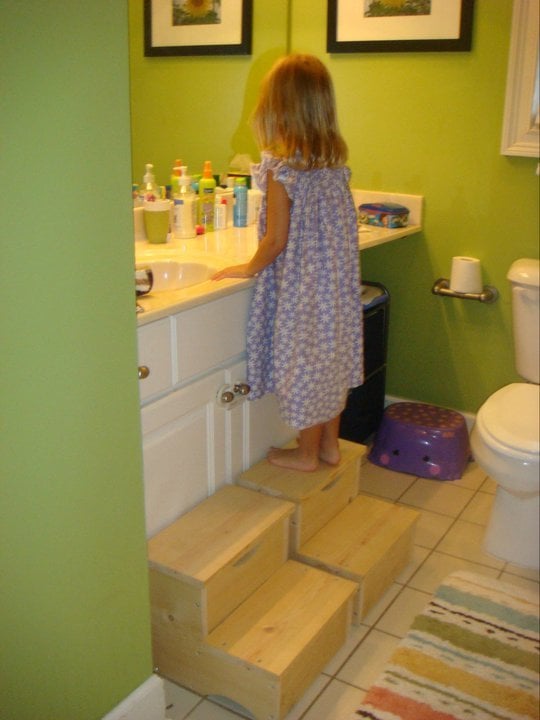
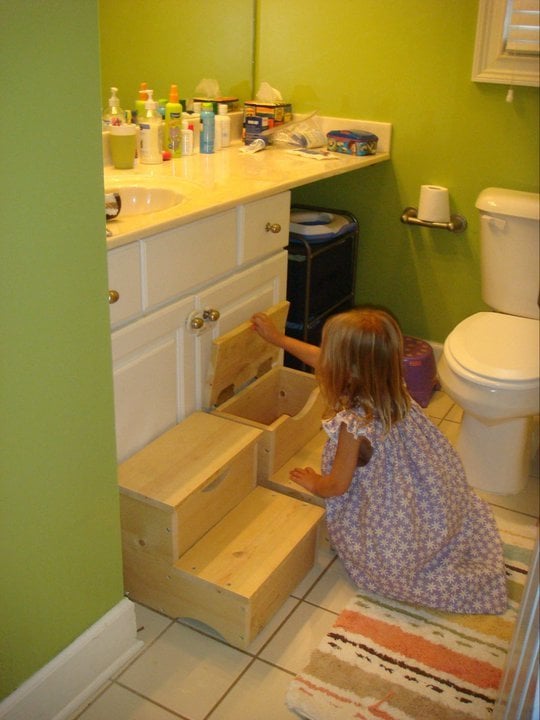
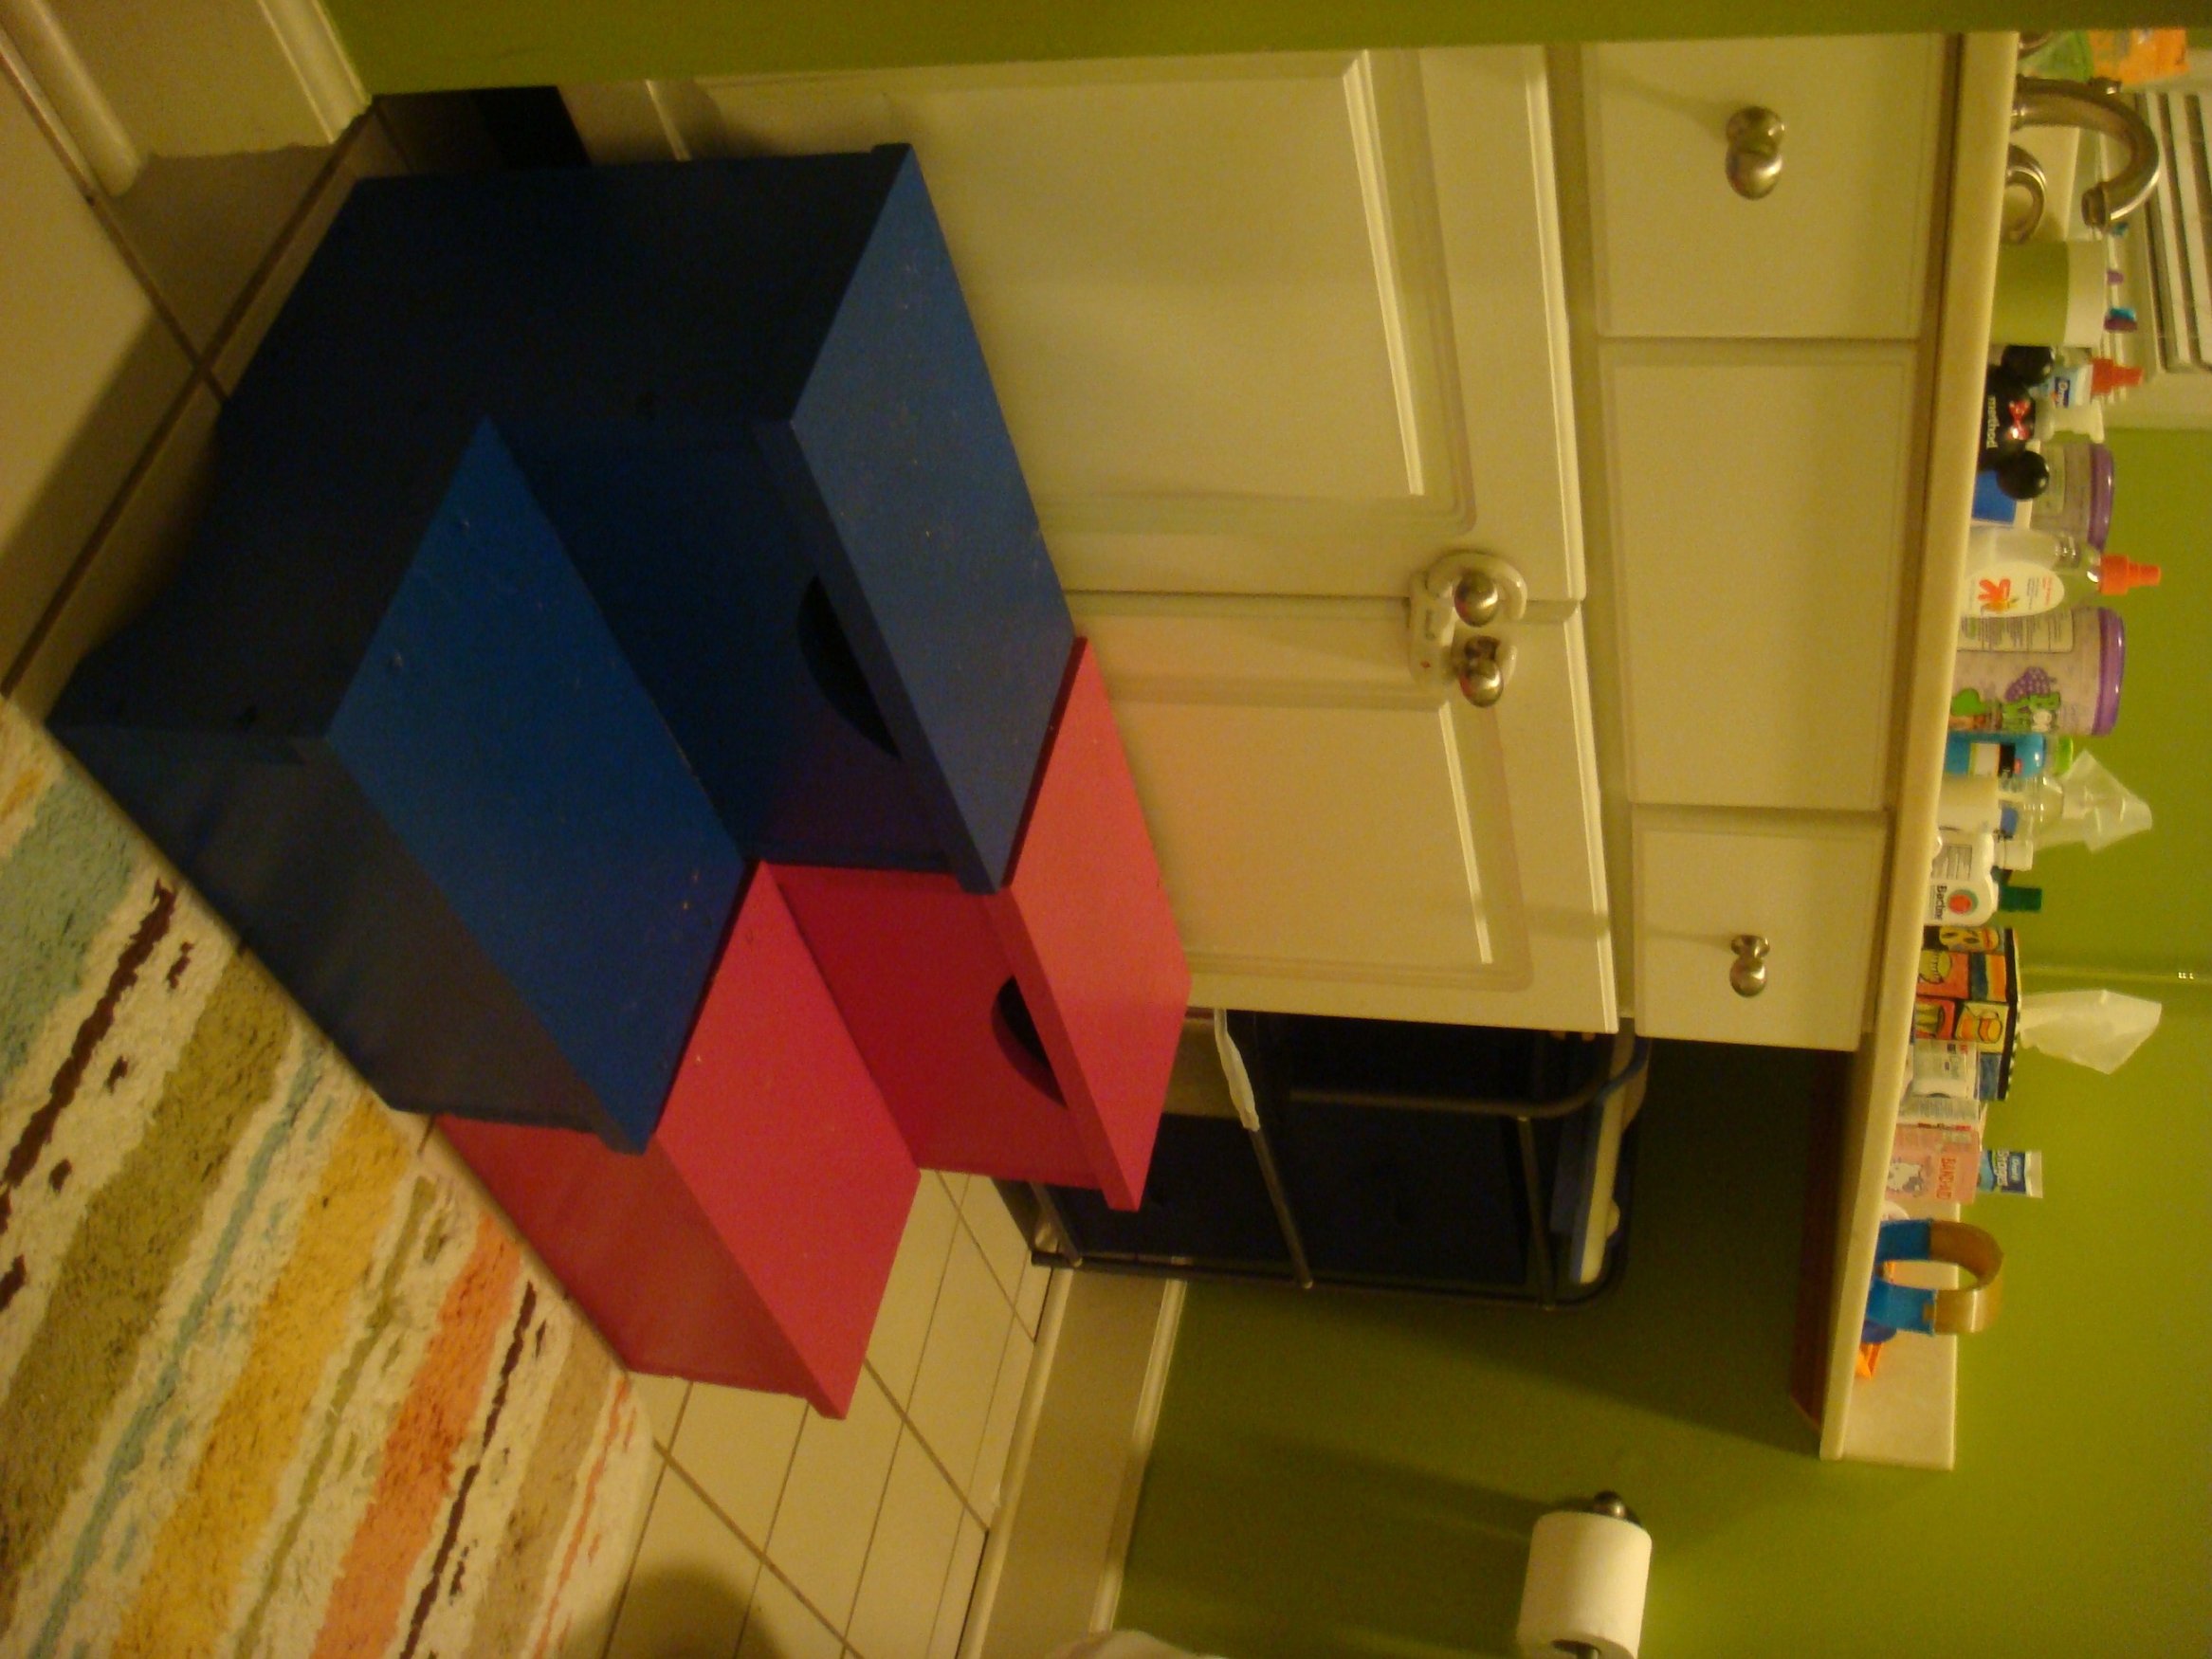
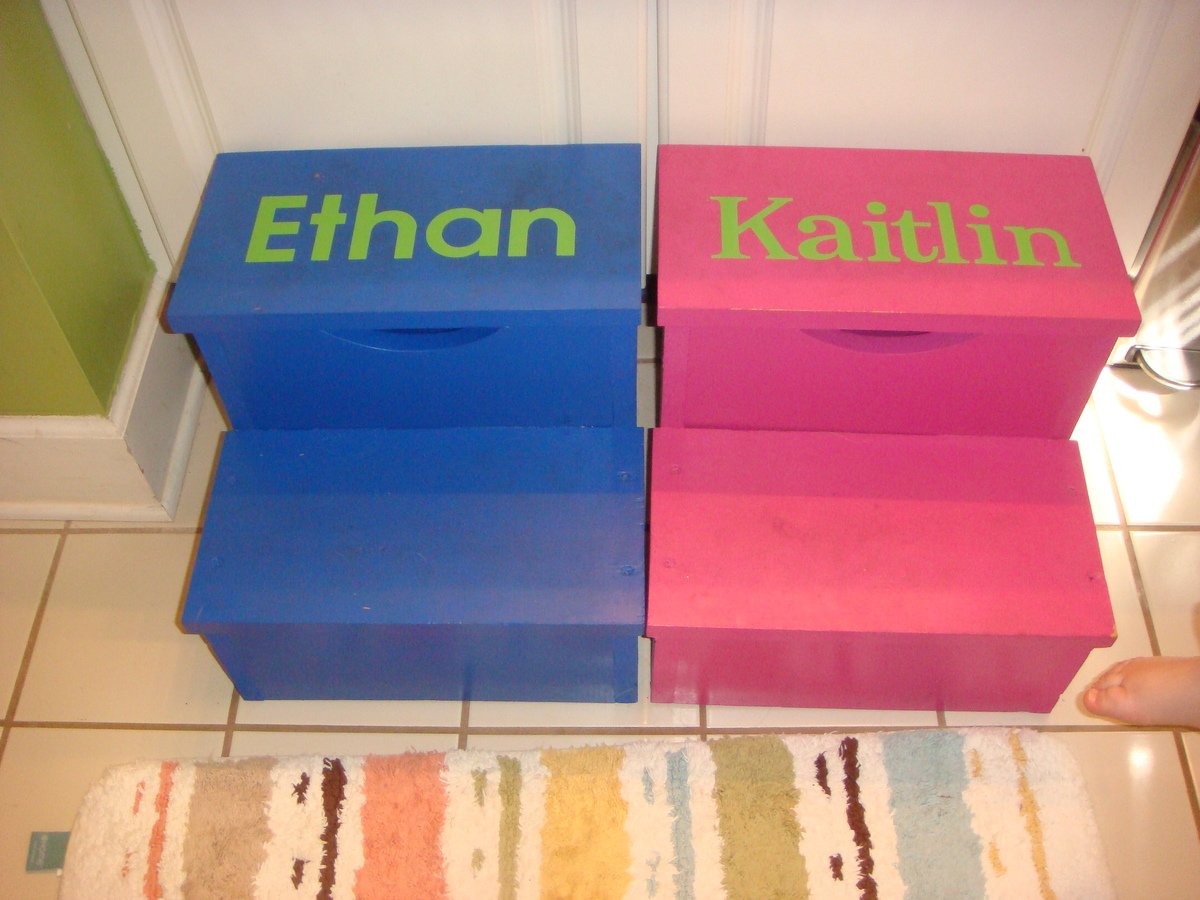
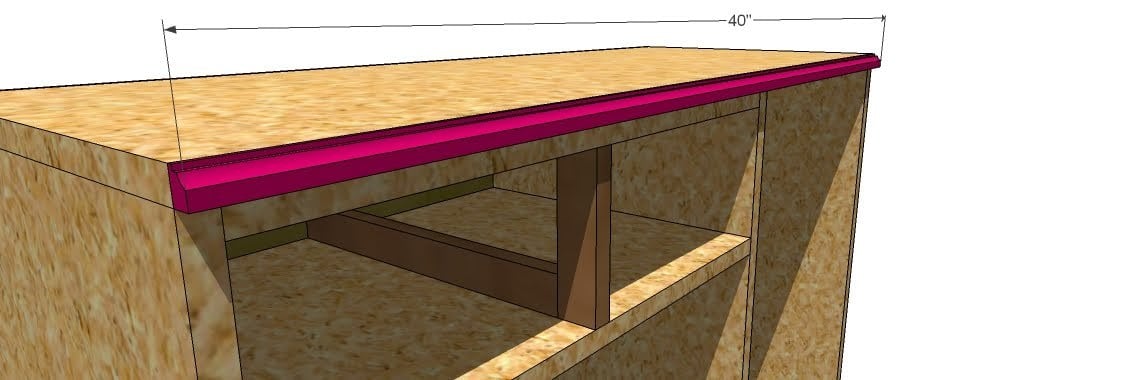
Community Brag Posts

Step Stools

Submitted by SoCalMom on Tue, 12/25/2018 - 01:04

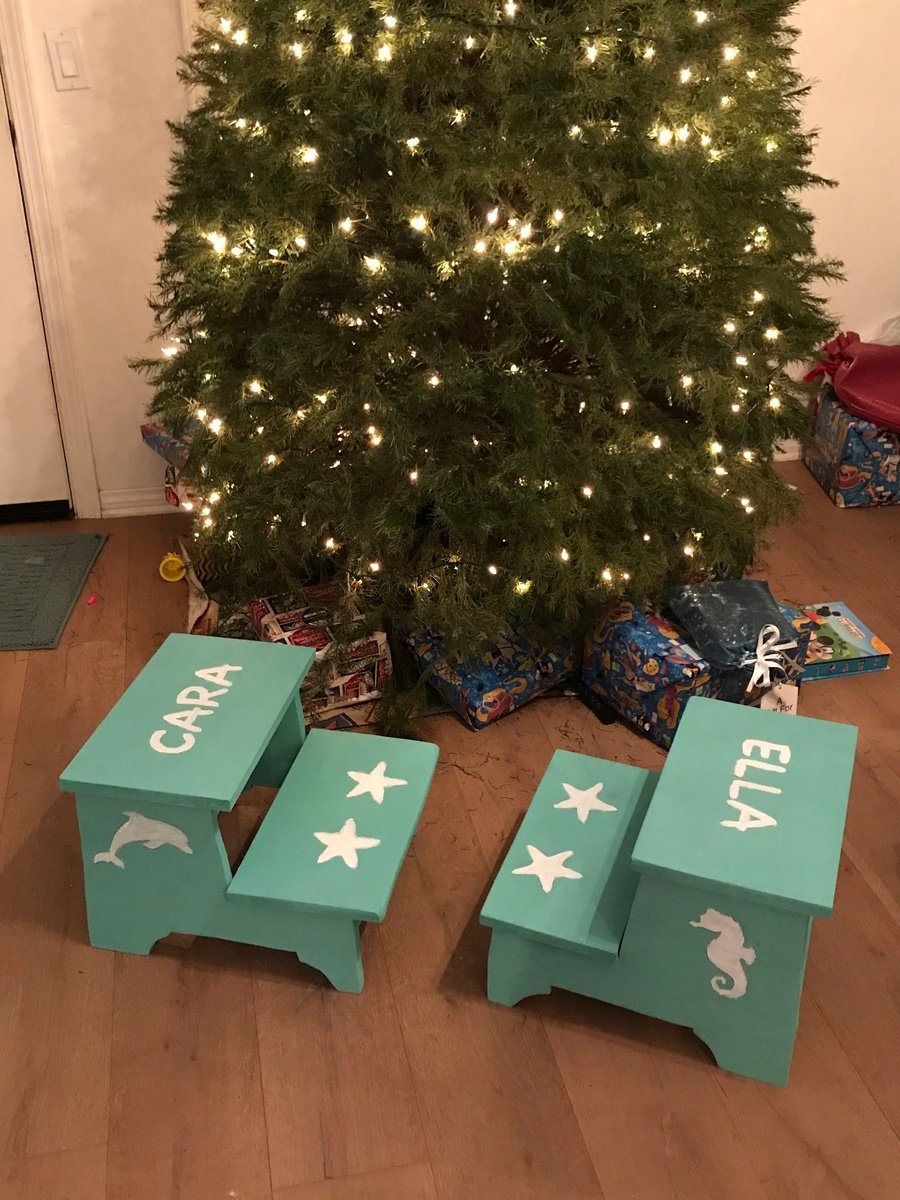
One for each daughter for thier bathroom. I did use a wider board on top for larger standing surface and stability. 

Built from Plan(s)
Estimated Cost
$20 each
Estimated Time Investment
Afternoon Project (3-6 Hours)
Finish Used
Paint
Recommended Skill Level
Beginner

Final product with few modifications

Submitted by Anonymous (not verified) on Wed, 08/31/2022 - 08:22

Made few modifications. Added a 9th board to the tabletop to make it larger, horizontal aprons connecting the legs, and seat support. For stain and sealer, I used Olympic semi-transparent redwood. Overall a great project. Thank you, Anna.

Built from Plan(s)

Comments

Ribbon Holder

Submitted by lizseburn on Thu, 08/11/2011 - 21:19

My husband wasn't home this week, so I had to create something.. He's just lucky that I didn't give the kitchen a makeover! ;]

I modified and improvised with what I had lying around... I used a 1x4 for the bottom because I didn't have enough 1x2 scraps left, but then I decided to put the lettering on it because I thought it looked too plain. I like how it turned out!! :]

Built from Plan(s)
Estimated Cost
$2!! - I just had to buy the dowel. I had everything else lying around. :]
Estimated Time Investment
An Hour or Two (0-2 Hours)
Recommended Skill Level
Starter Project

Comments

spiceylg

Fri, 08/12/2011 - 08:01

That came out really nice and I love the lettering! How did you do the lettering if I may ask?

Farmhouse Queen Bed and Fancy X desk

Submitted by musickbox on Thu, 09/05/2013 - 13:00

We built the Farmhouse queen bed and fancy X desk for our bedroom. It was relatively easy and looks so great! The bed is made of pine and cedar. (It is really really hard to find pine 4x4 posts that aren't pressure treated around here.) We used pine for the desk. Paint color on the bed and base of the desk is Behr "Polar bear" with a coffee stain distress. The desk top is Benjamin Moore "Dash of pepper." The bed cost about $175 to build and the desk cost $30. (We used a lot of scraps for the desk.)

Estimated Time Investment
Weekend Project (10-20 Hours)
Finish Used
Behr Polar Bear paint, Benjamin Moore Dash of Pepper paint, coffee stain distress.
Recommended Skill Level
Beginner

Comments

JoanneS

Thu, 09/05/2013 - 17:03

Your bed and desk are beautiful! Great job on this build, and I love the colors!

Planked Wood Sideboard

Submitted by mquimby12 on Fri, 10/30/2015 - 08:42

I used Ana's plans and Hillary's suggestions to build this extra large buffet.  It took probably 25-30 hours if you consider the extra trips to Home Depot and Lowe's because I didn't yet have the proper tools.  I used Annie Sloan's French Linen as my base coat, Old White as my dry brush coat, Annie Sloan Clear Wax throughout and Dark Wax in the crevices.  This was my first big league build, so I had to recruit a skilled neighbor for assistance with the drawers and doors.  My two recommendations would be to ensure the piece is square at every step, and to cut the wood as you go.  Don't make all the cuts at once because there will be adjustments.

Built from Plan(s)
Estimated Cost
450-500
Estimated Time Investment
Week Long Project (20 Hours or More)
Finish Used
Annie Sloan French Linen dry brushed with Old White
Recommended Skill Level
Intermediate

Comments

mquimby12

Thu, 11/05/2015 - 12:12

Thanks for your comment! I used Minwax Early American and a matte poly finish. My intention was to paint the top, but someone convinced me to stain it to see how it would look. I liked the stained version better.

DWinMadison

Wed, 11/04/2015 - 09:06

I'm building this a we speak....got the sides finished this weekend.  Question:  Did you router the exposed front, top and side edges?

mquimby12

Thu, 11/05/2015 - 12:10

I think you mean along the bottom? If so, I basically purchased some baseboard moulding at Lowe's. I didn't care that it was primed because my plan was to paint it.

Barn beam mantle with hidden space

Submitted by Anonymous (not verified) on Thu, 12/27/2018 - 19:05

I made this longer using two 8’ 1x4 pine boards and added a center brace inside. I added a pack of simple hinges to the top so that the face could flip up and we could access the inside. I also routed the face and back.

Built from Plan(s)
Estimated Cost
$30
Estimated Time Investment
Afternoon Project (3-6 Hours)
Finish Used
Early American with Polyurethane Semi-Gloss clear
Recommended Skill Level
Beginner

Compago Table

Submitted by Coiss on Sat, 09/07/2013 - 11:54

This was the first table i built a couple of years ago at the age of 19, it is just a simple trestle leg table made from white oak. The dimensions are 10 feet long by 3 feet wide.

Estimated Time Investment
Week Long Project (20 Hours or More)
Finish Used
The finished i used is a product called Gripseal Clear that is available in South Africa, unlike oils or varnishes it doesn't give the wood a yellow collour , it keep sthe natural clollour
Recommended Skill Level
Beginner

Camp Loft Bed with Stair Junior Height

Submitted by CKarnas on Mon, 11/09/2015 - 04:22

My husband built this bed for our 4 year old son and let me say its just perfect! His room is on the smaller side and this made a huge difference for him to have more play room. When my son seen it his eyes filled up with tears he was so excited! My husband built this bed on a Sunday afternoon. He torched the wood along the grain, and then over a period of a week added clear (he used 3 coats as the wood just soaked it up pretty good ). Highly reccomend this project!

Estimated Cost
around $150
Estimated Time Investment
Day Project (6-9 Hours)
Finish Used
My husband torched the wood along the grain and then 3 coats of clear
Recommended Skill Level
Beginner

Industrial Style Wood Slat Closet System with Type M Copper Pipes

Submitted by Anonymous (not verified) on Mon, 12/31/2018 - 09:31

Substituted the galvanized pipes for heavy grade (Type M) copper pipes for a prettier, warmer look (I'm obessed with copper accents!) 

So happy to have found these plans, and proud of how it turned out! It was even better than what I was hoping/looking to build. (I can't stop staring at it! :) It looks like I paid over $1000 at some high end furniture store like West Elm, but managed to make it for under $200!!!

Thanks Ana White for these plans and all of the others on your site. You have shown both me and my 65 year old mother the confidence and joy of woodworking! (And saved us a lot of money, too!)

Estimated Cost
$150-$200
Estimated Time Investment
Day Project (6-9 Hours)
Finish Used
Varathane 1 qt. Briarsmoke Premium Fast Dry Interior Wood Stain, used wool applicator and quickly wiped down with a rag and paper towels. Leaves the wood grain visible, gives it a reclaimed wood look.

Stay small in length on the copper pipes and use heavier grade (Type M) to prevent sagging
Recommended Skill Level
Starter Project

Adirondak Chair and Stools

Submitted by Anonymous (not verified) on Wed, 09/14/2022 - 21:00

Plans were super easy to follow. I finished the chairs by using the Shou Sugi Ban technique. I burned the chairs and stools completely, than wire brushed them. I repeated the process a second time. I finished by adding a coat of poly which I believe gave the chairs a little more depth. They are so comfortable and plans were perfect. Thank you Ana!

Tilt-Out Trash Can (Slightly Modified)

We built this tilt-out cabinet for our trash and plan to build a matching one for our recycling. We modified it a little and used bead board on the face of the cabinet to match some other elements in our kitchen. We painted it bright red using some leftover paint and absolutely love it!

We ended up not using any mechanism to prevent the drawer from falling to the ground - the trash can we purchased is JUST big enough that it stops the drawer from opening all the way, which is great!

There are more pictures below and on our blog, http://strawbridgestuff.com

Estimated Cost
$25
Estimated Time Investment
Afternoon Project (3-6 Hours)
Finish Used
We painted the cabinet using Valspar's "Fabulous Red" in semi-gloss.
Recommended Skill Level
Beginner

Comments

rosie4bw

Tue, 05/15/2012 - 14:00

Hi, I really like the way you did the brash bin with the beadboard door. Could you
tell me what size the door frame is. I just started doing different projects and are still new at it. THanks Linda.

Jodieth

Fri, 09/07/2012 - 12:35

Your trash bin looks great. I too love the beadboard. I am putting a lot of beadboard in a small house I am planning on renting until my kids are out of college, then I want to make it into a place I can teach sewing and make furniture covers.

scothershman

Thu, 10/29/2015 - 08:51

Is there a sketchup file for this plan? I would like to modify it alittle but it would take me awhile to reproduce due to my bad sketchup skills.


Thanks!

Wooden Heart

Sun, 03/27/2016 - 01:31

I love this! I live in a one bedroom apartment and I just have a space between the fridge and a cabinet for pots and pans where the bin sits. I've always found this ugly to be honest but haven't known how to change it but this is perfect, thank you!

Country style dresser

This is a country style dresser I built from one of ana's plans. I slightly modified the top and the dimensions to fit my needs. Painting this dresser was the biggest challenge. First I stained the entire dresser, then I applied 3 coats of ce ce caldwells chalk paint. I then used a wet rag to wipe away the yellow in areas I wanted distressed. Last I applied a paste wax to seal it.

Estimated Time Investment
Week Long Project (20 Hours or More)
Finish Used
top: red oak stain and 2 coats of poly
bottom: ce ce caldwell's carolina sunshine chalk paint
Recommended Skill Level
Intermediate

Comments

dananryan

Tue, 09/10/2013 - 08:59

The paint job is superb. It makes the dresser look like an antique. Love the hardware too. A real gem. Wow!

Slat Coffee Table with Incorporated Book Shelves

Submitted by P76 on Sat, 11/14/2015 - 16:02

First time I designed a piece of furniture.  Made out of pine.  Slat top and bottom with book shelves on both ends.  Joints held with glue and pocket screws.  Minwax pre-stain conditioner.  Two coats of Minwax Provincial stain.  Three coats of polyurethane.  

Estimated Cost
$175
Estimated Time Investment
Weekend Project (10-20 Hours)
Recommended Skill Level
Intermediate

Comments

elizadim

Sat, 01/14/2017 - 08:58

I really want to make this table! It's simple, yet very functuional and exactly what I need! Please help me with some plans or some instructions. It is the first piece of furniture I will try to make on my own :)))

6ft Farm House Table

Submitted by Anonymous (not verified) on Wed, 01/02/2019 - 08:54

This was my first shot a farmhouse table. It was pretty easy to make overall. Frame and tabletop were put together mostly with dowels and wood glue but I put a few pocket screws and corner braces in for extra support. I also added a decorative trim board to the sides, which I put on the face of 2x3s. The tabletop is four 2x10s and two 2x6s for the ends. The stain is a dark Expresso color and I coated with polyurethane. The legs were bought from Lowes at a reasonable price since I lack the tooling and know-how for a lathe. 


The benches were exactly the same except I used two 2x6s for the tops. 

Built from Plan(s)
Estimated Cost
250
Estimated Time Investment
Weekend Project (10-20 Hours)
Finish Used
Minwax Wood Finish - Expresso
Minwax Polycrylic - Simi Gloss
Recommended Skill Level
Beginner

Comments

Doll Farmhouse Bed

Submitted by spiceylg on Sun, 08/21/2011 - 12:42

One of my first projects and first attempt at sewing since 7th grade!

Estimated Time Investment
Day Project (6-9 Hours)
Finish Used
It's been a while since I completed this but I first primed and then spray painted the finish. I believe it was called Heirloom White. I use lengthier guestimated times to include sanding, painting and drying times.
Recommended Skill Level
Beginner

Simple, Cheap and Easy Console Table

Submitted by REASMOM on Thu, 09/12/2013 - 17:37

I used Ana's plans for the Simple, Cheap and Easy Console Table and modified it. I used 1x4 boards for the top of my table and added a bottom shelf using 1x3s. The top is stained with Minwax Early American and the bottom of the table has 2 coats of red paint and a chocolate glaze. I lightly sanded some areas of the table (it was my first time distressing a piece of furniture so I didn't want to overdo it) and then I used a chocolate glaze to get a distressed look. I finished it with 3 coats of Polyurethane.

Estimated Time Investment
Afternoon Project (3-6 Hours)
Recommended Skill Level
Beginner

Tryde media console and modified plans for matching stand

Submitted by StevenRLaw on Wed, 11/18/2015 - 13:27

Built the console (without the hutch) and my wife wanted another one a little diffrent for the other wall so I modified the plans a bit and made the second one. this was our first "distressed" paint job. I think it turned out great!

Built from Plan(s)
Estimated Cost
$100 for both including paint.
Estimated Time Investment
Day Project (6-9 Hours)
Recommended Skill Level
Beginner

4 ft table from plans

Submitted by Anonymous (not verified) on Sat, 01/05/2019 - 22:09

Great project and fun to do. I've actually made 6 tables off this same plan, all different sizes,from 4ft. To 8ft.. 

Built from Plan(s)
Estimated Cost
80.00
Estimated Time Investment
Weekend Project (10-20 Hours)
Finish Used
Walnut stain, 3 coats of poly, and distressed paint on bottom.
Recommended Skill Level
Beginner

Comments