Community Brag Posts

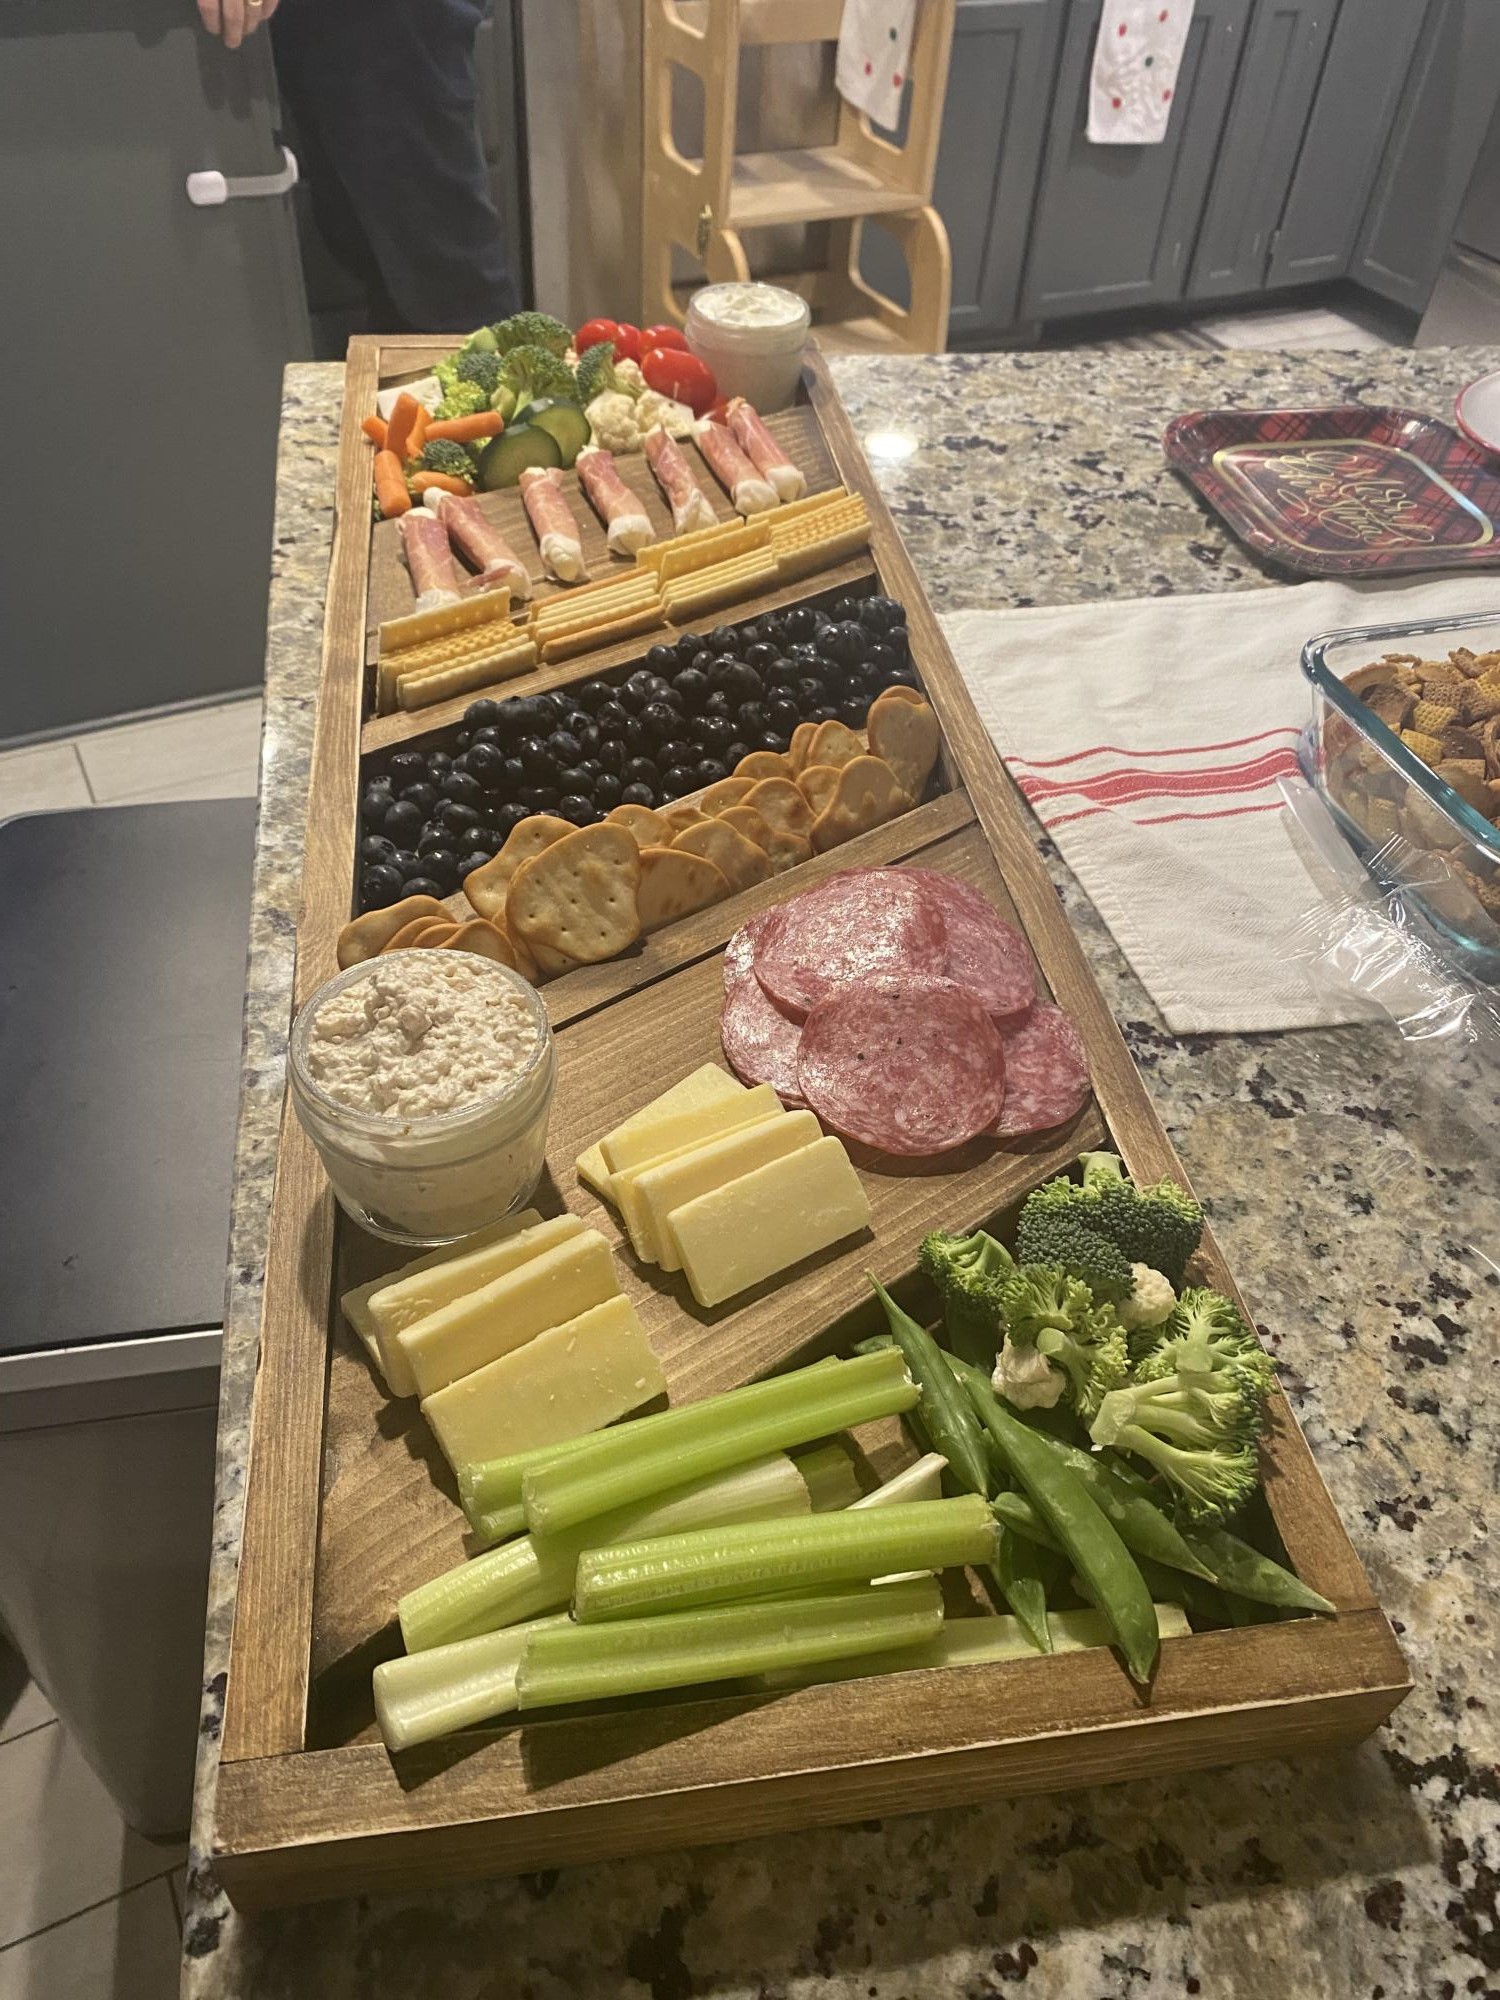
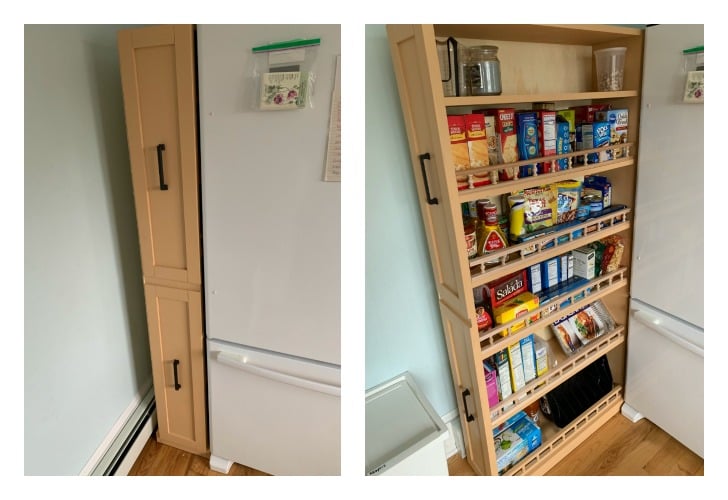
Small kitchen island with slide out double trash cans

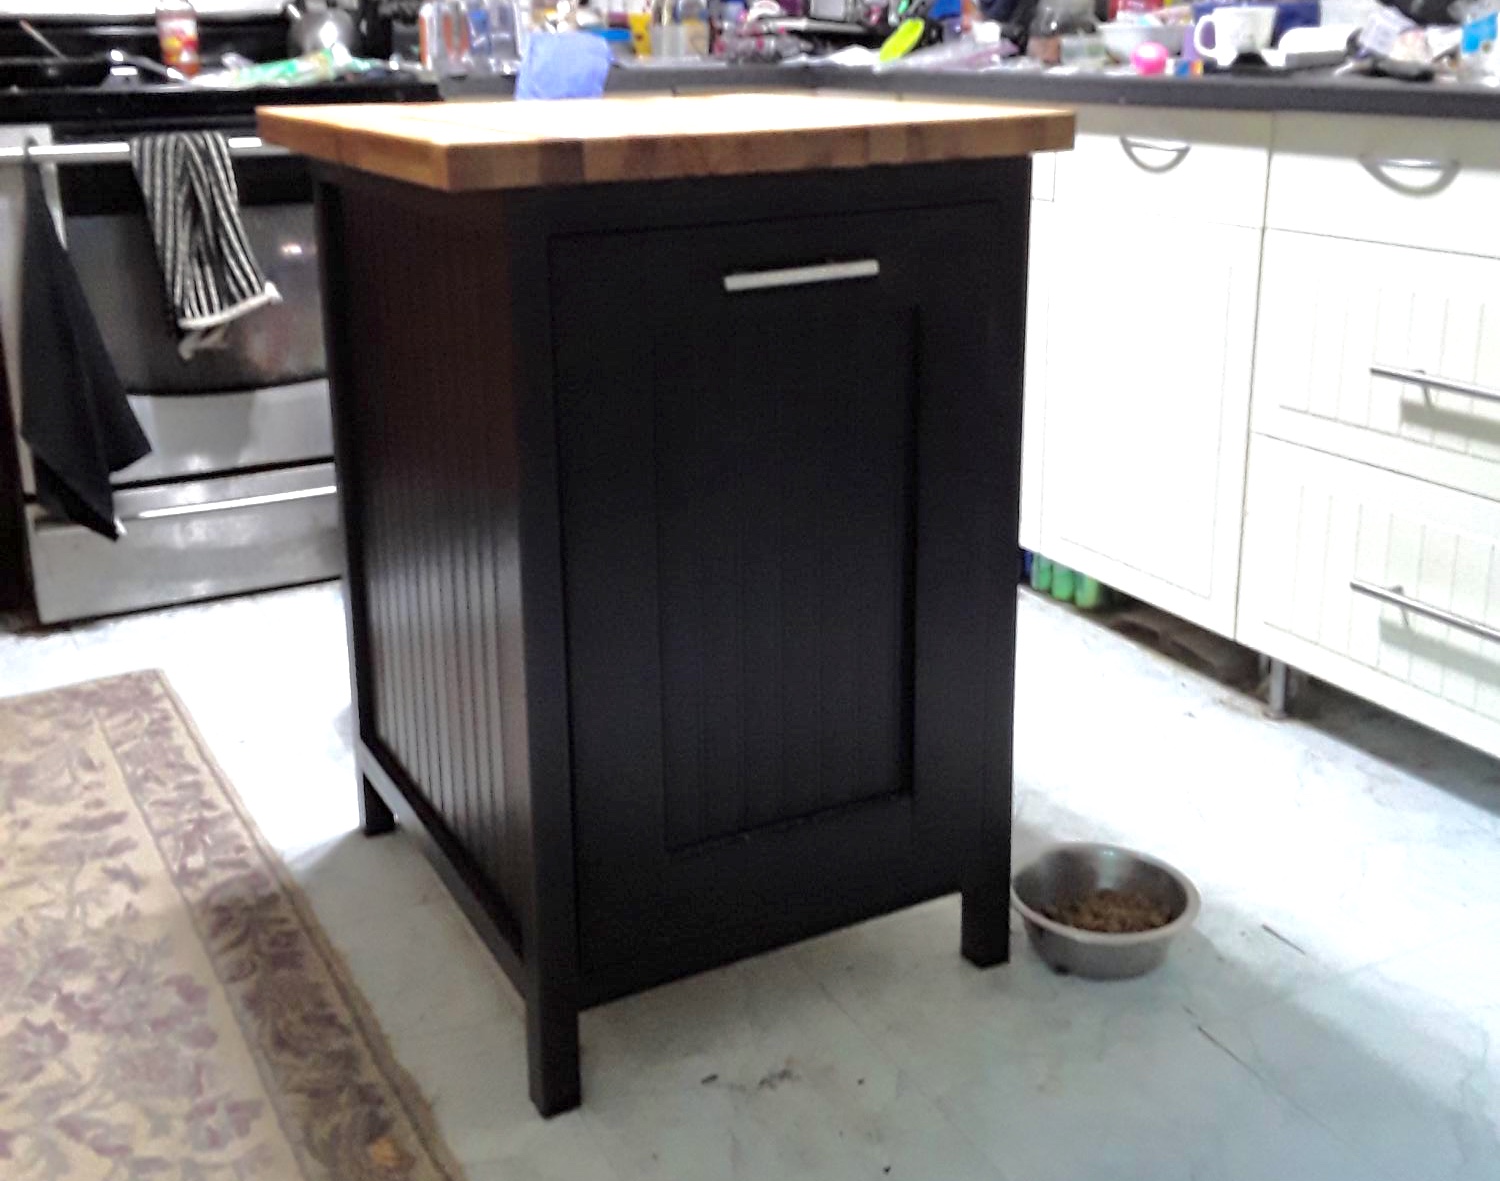
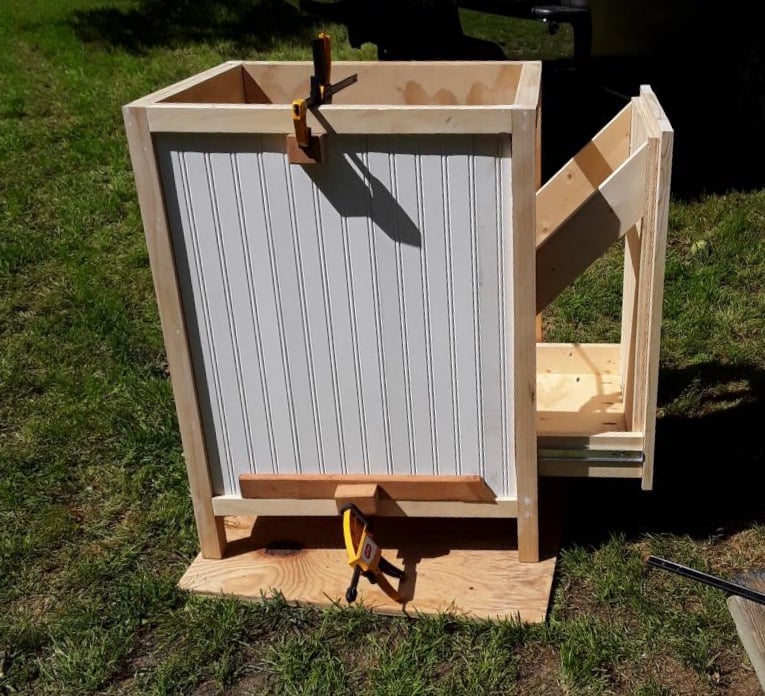
This was a mommy do during work furlough. Wasn't too hard. I have minimal experience with saws, but with hubby help, we got it done. Some of the instructions didn't make sense, but but we were able to figure them out or change them to work. I used bead board on the front and sides that we added over the existing sides. I used a manufactured butcher block that had to be cut down. Looks great and now my trashcans don't walk around the kitchen when the dogs play. The downside, the dog bowls slide under the island. If you have to cut down butcher block, make sure you have the proper blade.

Estimated Cost
$200.00 because of the manufactured butcher block.
Estimated Time Investment
Weekend Project (10-20 Hours)
Finish Used
Black cabinet paint
Recommended Skill Level
Beginner

Indoor Playground Set

Submitted by Anonymous (not verified) on Fri, 02/10/2017 - 11:56

This playroom set was inspired by the plans you posted.  I was forced to make some significant modifications due to the fact that our bonus/playroom has angled ceilings.  We have a rock climbing wall, ladder, crawl tunnel with windows, trapeze bar, monkey bars, miniature baskeball goal and a slide.  My boys are 6, 3 and 19 months and they love it!  Thanks for the inspiration.


Jim and Caroline Sparrow

Estimated Cost
$1250
Estimated Time Investment
Week Long Project (20 Hours or More)
Finish Used
Behr Paint on bottom and Minwax Stain on top
Recommended Skill Level
Advanced

Comments

Bunk Beds for a Small Room

Our bedrooms are 9' x 9' so when our girls needed to move in together, we needed a bunk bed that would be short enough to fit under the fan, have a place for drinks, books, an alarm, and tissues, and also have a place where our youngest could have a dark sleeping space while older sister stays up later.

We're not going to be in this setup for long, so I used common board to keep the cost down as much as possible. The whole bed cost about $200, but I would suggest staying away from common board. It was really warped and couldn't be sanded smooth. We ended up going with a dark, thick paint to cover the wood imperfections. To deal with the warped wood, I made an outline of each end of the bed with painter's tape on the garage floor and used weights to hold the wood where it was suppose to be. I also modified the plans to make the bottom bunk a bit shorter and made the whole thing only 3 inches off the ground. All put together the bed is very sturdy and everything lined up well.

I used some scrap wood to make the holders for drinks and tissues and a holder for the iPod and speakers. These just rest over the railing, so we can move them around if need be. The book racks are Ikea hacks....they're just spice racks painted to match the bed. The curtains are just hung on a 1" dowel set into the same cups that closet rods are put up with. I also added some flower knobs from Target so that the girls can hang a robe when it's cooler outside.

Thanks for the plans Ana! My girls LOVE this bed!

Built from Plan(s)
Estimated Cost
$200
Estimated Time Investment
Week Long Project (20 Hours or More)
Finish Used
Paint and polyurethane coat.
Recommended Skill Level
Intermediate

Comments

DIY Learning Tower / Kitchen Helper

Our little one may be happily playing independently but the second I go to make dinner she demands to be held and refuses to be put down, making cooking impossible. To help keep her occupied but still involved I've been eyeing a learning tower / kitchen helper on Amazon for months now, but at $200 it just wasn't in our budget. My sister-in-law had made a learning tower from a plan by Ana White and suggested I try to make one too. I was unsure at first, I've never made anything more complicated than a birdhouse, but I decided to give it a go!

Please see my blog post for additional photos and lessons learned during this project.

Built from Plan(s)

Bunk Beds for 4 to 6

Submitted by Judianne on Thu, 07/02/2015 - 10:32

We used the Build a Simple Bed plan and the Bunk Bed from Simple Bed. I modified the plans to build a double bunk bed. We needed a way to fit up to 6 small children in a long, narrow room. Although we haven't built the trundle beds yet, each bunk will also have a trundle bed. The kids especially love their "privacy" curtains!

Built from Plan(s)
Estimated Cost
Under $300
Estimated Time Investment
Weekend Project (10-20 Hours)
Finish Used
paint
Recommended Skill Level
Beginner

Channing Bookcase

Submitted by plumbguy on Mon, 12/07/2015 - 14:40

I'm a better plumber than a carpenter.

Built from Plan(s)
Estimated Time Investment
Weekend Project (10-20 Hours)
Finish Used
Paint & Poly
Recommended Skill Level
Beginner

Charcuterie Board

Submitted by Anonymous (not verified) on Wed, 12/28/2022 - 15:27

Made a this for my step-daughter and her husband for Christmas. Love your projects, and am learning to do everything on my own which is so empowering thank you for sharing and encouraging all us girls we can do it!

Comments

Farmhouse Storage bed

Submitted by 1bwalls on Sun, 12/27/2015 - 12:37

I built this in a full size.  Took some time to adjust all the measurements.  I used cheap lumber since I was painting it and it cost a little over $350.  Then I spent another $75 because I screwed up measurements.  :). This was only the 3rd thing I ever built, so I think I did alright.  The plans were great!  Watched several videos on YouTube about squaring drawers and that helped.

Estimated Cost
$425
Estimated Time Investment
Weekend Project (10-20 Hours)
Recommended Skill Level
Intermediate

Modern Farmhouse Bed

Submitted by Anonymous (not verified) on Tue, 02/26/2019 - 08:33

I made this as part of a room makeover for my teenager. It was my second furniture project, the first being Ana’s original farmhouse bed. This was my first project with the Kreg jig and I watched a great YouTube video by shanty2chic to learn the basics of pocket holes. This was also my first staining project and I love the results. My daughter loved it so much she had me stain her closet doors to match! The lumber for the bed was only $120, I spent an additional $80 on wood and screws for the slats to support the mattress, my new kreg jig came with enough screws to make the bed frame. I spent another $80 on wood conditioner, stain and poly since she didn’t like the first stain (Briarsmoke, which I will definitely use on another project).

Built from Plan(s)
Estimated Cost
$200
Estimated Time Investment
Day Project (6-9 Hours)
Finish Used
I started with a wood conditioner and then used Varathane Early American stain applied with a rag and dry brushed on top of that with varathane Kona, again watching a shanty2chic video for technique. Poly is water based satin finish. I used the triple thick but still had to do 2 coats, partly for coverage but also because the water based poly raised the grain so I needed to do a light sand and a second coat of poly for a smooth finish.
Recommended Skill Level
Intermediate

Comments

okstout4

Mon, 10/19/2020 - 19:49

This is very nice. Love the color too. I used Special Walnut in Behr brand and it came out too dark. Wished I had looked at some of these builds before I did the Behr brand stain.

Pretty AND Functional Wall Shelf

To finish off my bathroom remodel I built the Martina wall shelf. I reused the metal hook that was previously on my wall before the board and batten treatment. It fit perfectly in the space under the shelf meant for hooks. I wish I had measured out my towels and storage needs. I could have actually stored more if I had adjusted the plans to make the shelf a little deeper and a couple inches wider. Overall, I'm very pleased! The Kreg Jig is a fun little tool, too!

Estimated Time Investment
Day Project (6-9 Hours)
Finish Used
primer/sealer (1 coat)
Valspar High Noon in Flat Enamel finish (2 coats)
Recommended Skill Level
Beginner

Comments

Roller Vertical Pantry

Submitted by MikeW on Mon, 05/06/2019 - 08:49

Made my wife happy!

Estimated Time Investment
Day Project (6-9 Hours)
Finish Used
Paint
Recommended Skill Level
Intermediate

Comments

Modern Craft Table *tweaked*

Completed Modern Craft Table! We tweaked the plans a bit because I was looking for a larger table top. The top now measures 48" x 76". We simply did this by adding an extra set of cubbies to the other side of the shelves. Absolutely LOVE how this turned out! All I need now is 4 counter height stools built and lots of shelves to complete my craft room! Will be sure to post those once they are completed!

Built from Plan(s)
Estimated Time Investment
Weekend Project (10-20 Hours)
Finish Used
Ultra White Latex Paint
Recommended Skill Level
Beginner

Comments

Ana White

Thu, 11/17/2011 - 01:10

Darn I was so excited to see you craft table! I apologize that your brag post did not show images. If you can send me images at knockoffwood(at)gmail.com I'd be happy to post. Thanks so much for submitting a brag post. Ana

Guest (not verified)

Sun, 03/04/2012 - 07:31

I LOVE LOVE LOVE your craft table. I want one! Looks like my husband wil have to get busy! Thanks for sharing!
Kristina
Houston, TX

Kimmy (not verified)

Tue, 03/20/2012 - 17:51

Is this the pic of the one you did ?? I am wanting a bigger table top too. I have waited years for just the right table and this is it.

Kimmy (not verified)

Tue, 03/20/2012 - 17:51

Is this the pic of the one you did ?? I am wanting a bigger table top too. I have waited years for just the right table and this is it.

Kimmy (not verified)

Tue, 03/20/2012 - 17:54

Is this the one you made ? I want a bigger table top as well. But I don't see the extra cubbies.

Kimmy (not verified)

Tue, 03/20/2012 - 17:54

Is this the one you made ? I want a bigger table top as well. But I don't see the extra cubbies.

naildoctors

Tue, 05/29/2012 - 00:05

This is great!! I am planning something similar, but what is your idea or the plan you used for the middle support to keep it from sagging over time? My idea is to run another cubby in the middle from side to side. What do you think?

Laura Mulholland (not verified)

Mon, 01/21/2013 - 09:54

I love the modern craft table, just what I have been looking for, do you share instructions, dimensions, etc.? thanks, Laura

HapETexanGal

Thu, 05/12/2016 - 15:14

I'm loving this and would love to have FIL build it for me but the plans look like its for the regular modern craft table but not the tweaked?  Also is there support for the middle?  Can you send me a link for the tweaked supply list please, can't seem to find it.  Love what you do!

Ariel's Coffee Table

I built that table for a friend using primarily hand tools. The only power tools were a table saw to rip the legs from a scrap 2x12 from another project, and a drill for draw-bore holes.

The table is made from pine, so that it is light enough for a woman of small stature to carry it up to a third-floor apartment. The frame is made with mortise and tenon joinery for strength, and the joints are draw-bored to make sure it doesn't fall apart in our lifetime.

The top is a glued-up panel from five other boards. This was my first panel glue up, so it was a little bit exciting in the same way that a kitchen fire is exciting. The surface has a rustic texture, made by planing it smooth with a cambered jack plane. The texture isn't visible under normal lighting, but with a raking light you can see it. It's very interesting to run your fingers over this table because of the texture from the plane, and the strong grain of the white pine.

Estimated Time Investment
Week Long Project (20 Hours or More)
Finish Used
The finish is amber shellac, with four coats of gloss polyurethane, thinned 1:1 with mineral spirits to improve the flow and help the finish self-level.
Recommended Skill Level
Intermediate

Outdoor Loveseat

Still need to stain but this was my very first project and it turned out well!  The directions are very easy to follow and I am very happy with it!

Estimated Cost
$25
Estimated Time Investment
Afternoon Project (3-6 Hours)
Finish Used
Will be using Minwax oil-based stain over a wood conitioner, and a clear flat oil-based top-coat.
Recommended Skill Level
Beginner

King Farmhouse Storage Bed

Submitted by Anonymous (not verified) on Sun, 08/18/2019 - 15:41

After a successful attempt at Ana’s farmhouse desk I decided to make a bed for my wife... needless to say I think she likes it! Thanks to Ana and Pretty Handy Girl’s plans! (This is my 3rd woodworking project)

Estimated Cost
700
Estimated Time Investment
Week Long Project (20 Hours or More)
Finish Used
Valspar Cabinet Enamel
Minwax Dark Walnut stain
minwax Polycrylic satin polyurethane

I used acetone to transfer the graphic I designed for my inlay. I carved out the inlay with a router. I stained the wood and then painted the surface black.
Recommended Skill Level
Beginner

Comments

Rustic X Tall Bookshelves

Submitted by frmoody on Wed, 10/02/2019 - 09:23

A friend wanted these bookshelves to match the Farmhouse X Desk but she wanted them narrow so they would fit in a small office. This was a very challenging and at times frustrating build getting everything to fit and getting the X's correct but in the end they turned out very well.

Built from Plan(s)
Estimated Cost
$75
Estimated Time Investment
Week Long Project (20 Hours or More)
Finish Used
The wood was painted with a white cabinet paint and the shelves were stained with Varathane Kona.
Recommended Skill Level
Intermediate

Comments

American Girl upholstered arm chair

Submitted by Anonymous (not verified) on Sun, 02/21/2016 - 13:47

I used the pattern and instructions on how to re-size from http://1inchminisbykris.blogspot.com.es/2013/01/chair-upholstering-tutt…. I then built the base using 1x1 and part of a wood closet rod I had left over and drawer bottom material from Home Depot.  I know those descriptions are not super informative but it's just materials I had around the house.  Once the base was built I used Ana's instructions from the doll mattress tutorial to sew the bottom and back cushions.  Unfortunately, I don't have pictures from the build but I intend to make her a couch when I have time so hopefully I can add some pictures of that to give an idea of what the frame looks like.

Estimated Cost
~$20
Estimated Time Investment
Afternoon Project (3-6 Hours)
Recommended Skill Level
Beginner

DIY Outdoor Sofa, Chairs and Coffee Table

Submitted by Anonymous (not verified) on Thu, 07/27/2023 - 13:22

I decided to build my patio furniture and built a couch, with cushions, coffee table, 2 Adirondack adult chairs and one child’s Adirondack chair. It was so much fun to plan and build all of the furniture and so enjoy going out there on cool days! Thanks to Ana White for all of the plans! This is my 20th Ana White project! On to my next project! Plans were outdoor modern sofa, modern Adirondack chair, kids Adirondack chair, 2x4 outdoor coffee table.

JoAnne

Seasonal And Holiday
Back