Community Brag Posts

1x12 Wood Bulk Bins

I added legs to mine so it would lean up against the wall above the molding. I liked the look of it without plywood backing. I'm really happy with it and it was pretty simple to make.

Estimated Time Investment
Weekend Project (10-20 Hours)
Finish Used
Toy shelf
Recommended Skill Level
Beginner

Farmhouse bed king with drawers

Submitted by 1AIRCRAFt1 on Sat, 03/27/2021 - 18:36

Hi Ana! I'm new to these internet sites, my wife was showing me your Farmhouse Bed so I gave it a shot. this is the first furniture piece I have ever built. I did make a few changes to your plans, I hope you don't mind. I added drawers on both sides of the bed. I also king sized it. let me know what you think of it. I think it turned out well. (of course) It sleeps better that any bed we have ever had. Because of the built in storage we were able to remove a large dresser giving us more room in the bedroom. I really enjoy your site, thank you! P.S. I still don't understand what the "PIN" thing is or how to work it.

Estimated Cost
$550
Estimated Time Investment
Weekend Project (10-20 Hours)
Finish Used
White Wash
Recommended Skill Level
Beginner

Comments

1AIRCRAFt1

Mon, 03/29/2021 - 16:16

Thank you. I would have never tried it without your drawings. I gotta tell ya, your really good at what you do. your the only one I follow. Thanks once again. Love your work!!!

Reclaimed Wood Counter Shelves

Made from reclaimed pine moulding.

Estimated Cost
$10
Estimated Time Investment
An Hour or Two (0-2 Hours)
Finish Used
Varathane Kona
Recommended Skill Level
Starter Project

Comments

My first build, total success!

Submitted by thempaula on Wed, 01/21/2015 - 16:46

This was my first time using a plan from this site, it was my first time using a kreg jig, and pretty much my first time using a circular saw on anything that mattered.  Also my first time staining.  I'm real happy with how it turned out except for the staining! I used a stain + polyurethane in one and found it very difficult to get the color even without streaks.  Next time I think I am going to stain all my cut wood BEFORE I assemble.  I think that will let me have a nice even stain.  Any thoughts on that?

I enlarged the plan by adding 12 inches to the top and 6 inches to the width. So I added a shelf 12 inches above the top one.  It feels big and I love that.  

Another thing that worked out nicely for me,  I noticed when I was buying lumber from HD, the 2x2's were all a little bit warped or crooked, So for the four legs I opted for the premium perfectly strait and smooth pine.  It was 8 bucks a piece instead of two but worked out I think.  For the back I used mahogany pickets - not smooth, hard to sand down, but looks nice.  

Took me about 20-25 hours over two weekends.  Sanding and staining were the only laborious parts.


Estimated Cost
120 for lumber and screws
30 for stain,conditioner and brush

other essentials I needed to buy: kreg jig (40) with the right clamps (40) and some saw horses (40)
Estimated Time Investment
Week Long Project (20 Hours or More)
Finish Used
american oak (water based stain and poly in one)
Recommended Skill Level
Beginner

Comments

windjamer812

Wed, 01/21/2015 - 23:01

You did a great job. Keep up the good work and learn how fun and addicting these projects become.

ncderemer

Fri, 01/23/2015 - 14:36

First I think your shelves look beautiful! I generally do find it easier to stain before I assemble. The corners can be really hard to do properly otherwise. The other thing I would say is that a stain primer can help make your application more even.

smuilenburg

Thu, 11/10/2016 - 11:34

I like the size that your book shelf is better than the original.  What are the dimensions of your altered plan?


Garage work bench

Submitted by Anonymous (not verified) on Sat, 04/22/2017 - 17:15

Nice and easy work bench to complete my garage setup.

Built from Plan(s)
Estimated Cost
$75
Estimated Time Investment
Afternoon Project (3-6 Hours)
Finish Used
Base for my next projects!
Recommended Skill Level
Beginner

Mudroom bench

Submitted by Dan Kielty on Thu, 04/01/2021 - 18:16

Mud room bench with recycling cabinet

Estimated Cost
$300
Estimated Time Investment
Weekend Project (10-20 Hours)
Finish Used
Behr chalk paint, Minwax ebony
Recommended Skill Level
Intermediate

Comments

Blue Subway Bookshelf for my school room

Submitted by kadfamily on Sun, 03/17/2013 - 14:01

I can take no credit, except for choosing this amazing project! My man took off a couple days from work to make this as a late Christmas gift. It's beautiful and gives just the organization I needed in my homeschool room. I could not love it more!

We added a few more inches height to each shelf to make it taller than the original design. It's perfect.

Built from Plan(s)
Estimated Time Investment
Day Project (6-9 Hours)
Finish Used
Semi-gloss paint
Recommended Skill Level
Beginner

Hybrid Farmhouse / Trestle Table, bench, chairs

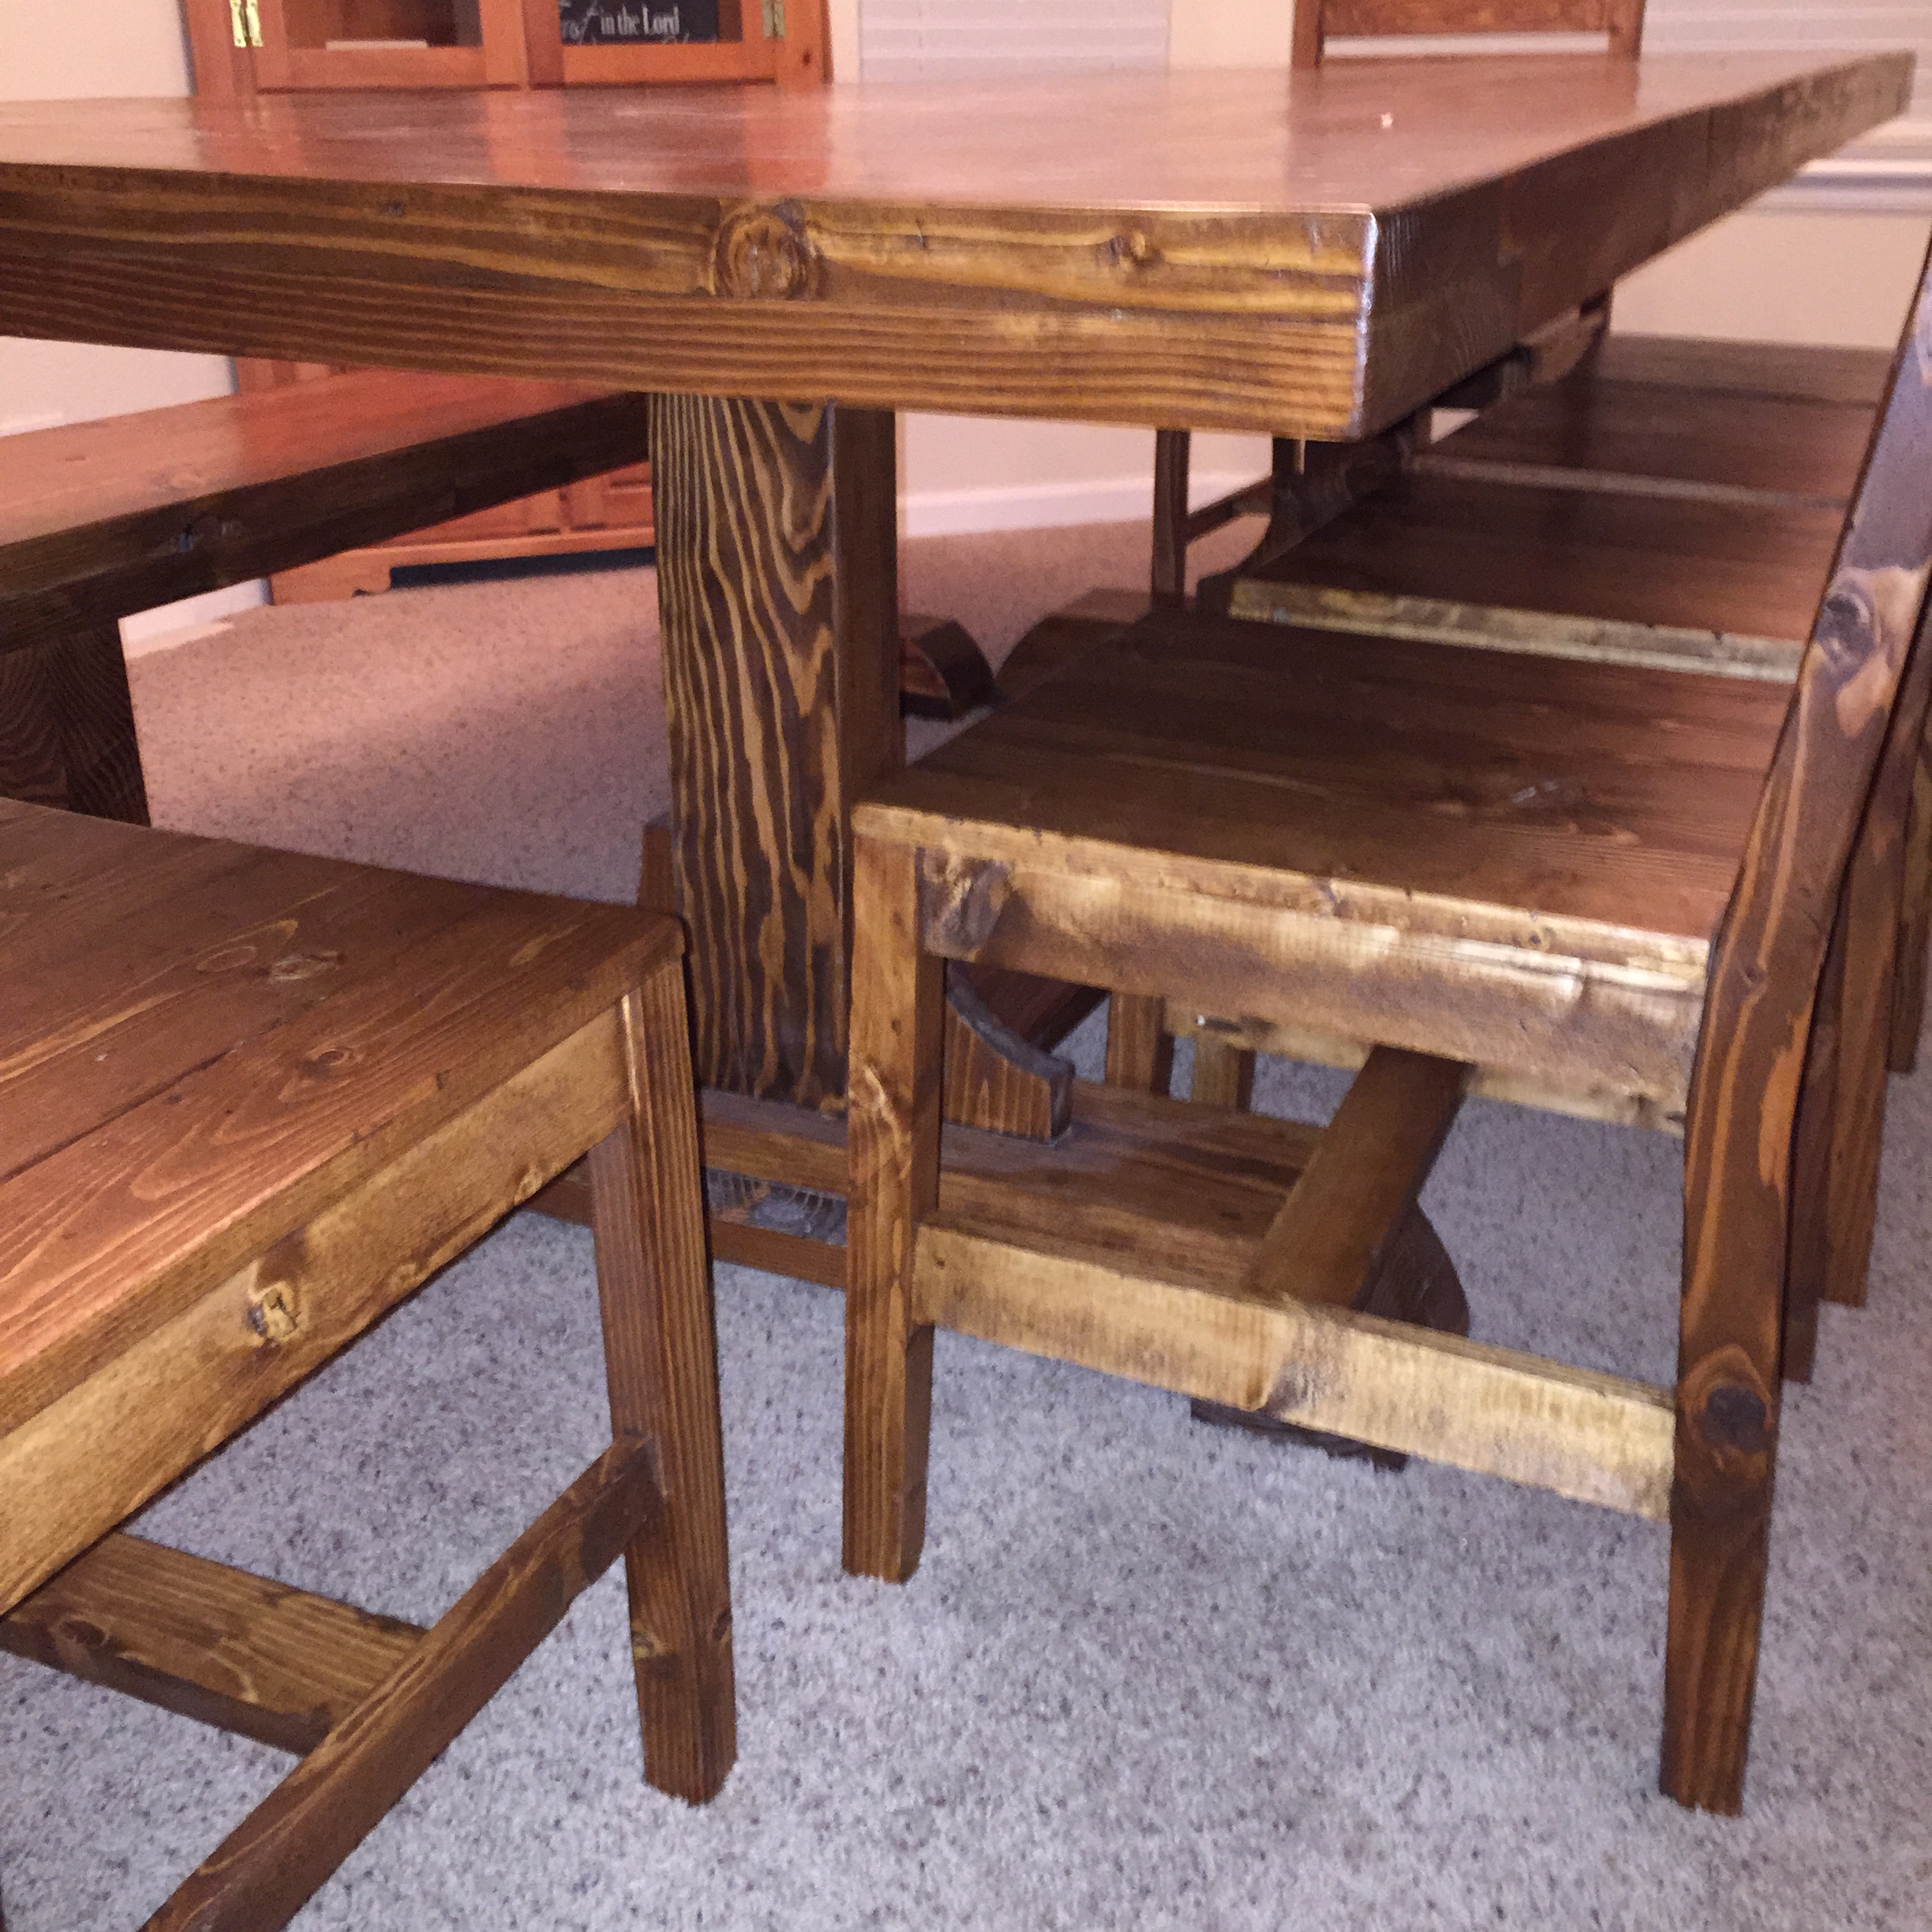
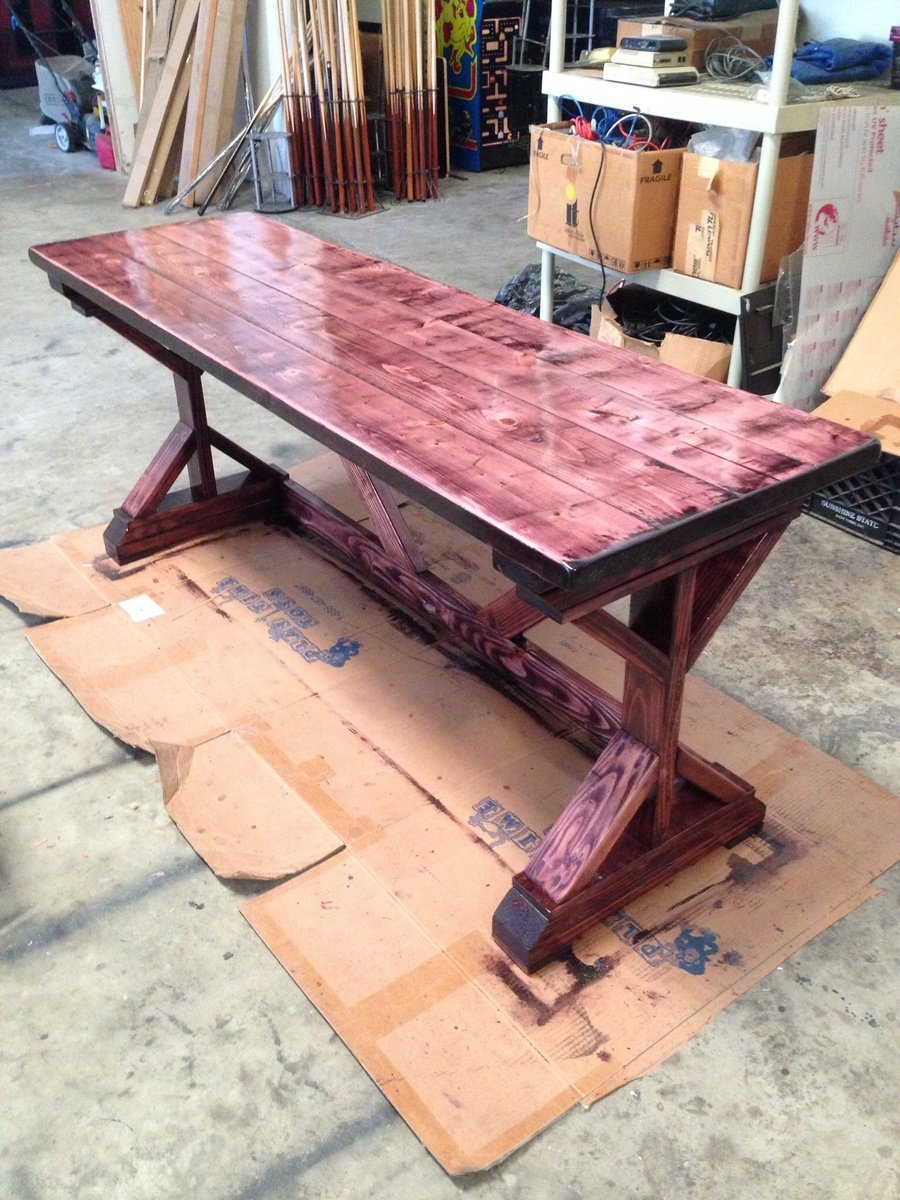
I spent a lot of time looking at photos that my wife tagged on pinterest, most from builders who frequent Ana's site.  I learned a lot just from looking.

I stole particular ideas from Ana, Tommie and Ellie, and another site that I can't find right now, but they really did the trestle / farmhouse hybrid idea first and I just modified their idea a bit.  If anyone has seen their site, please remind me so I can give credit where it is due!

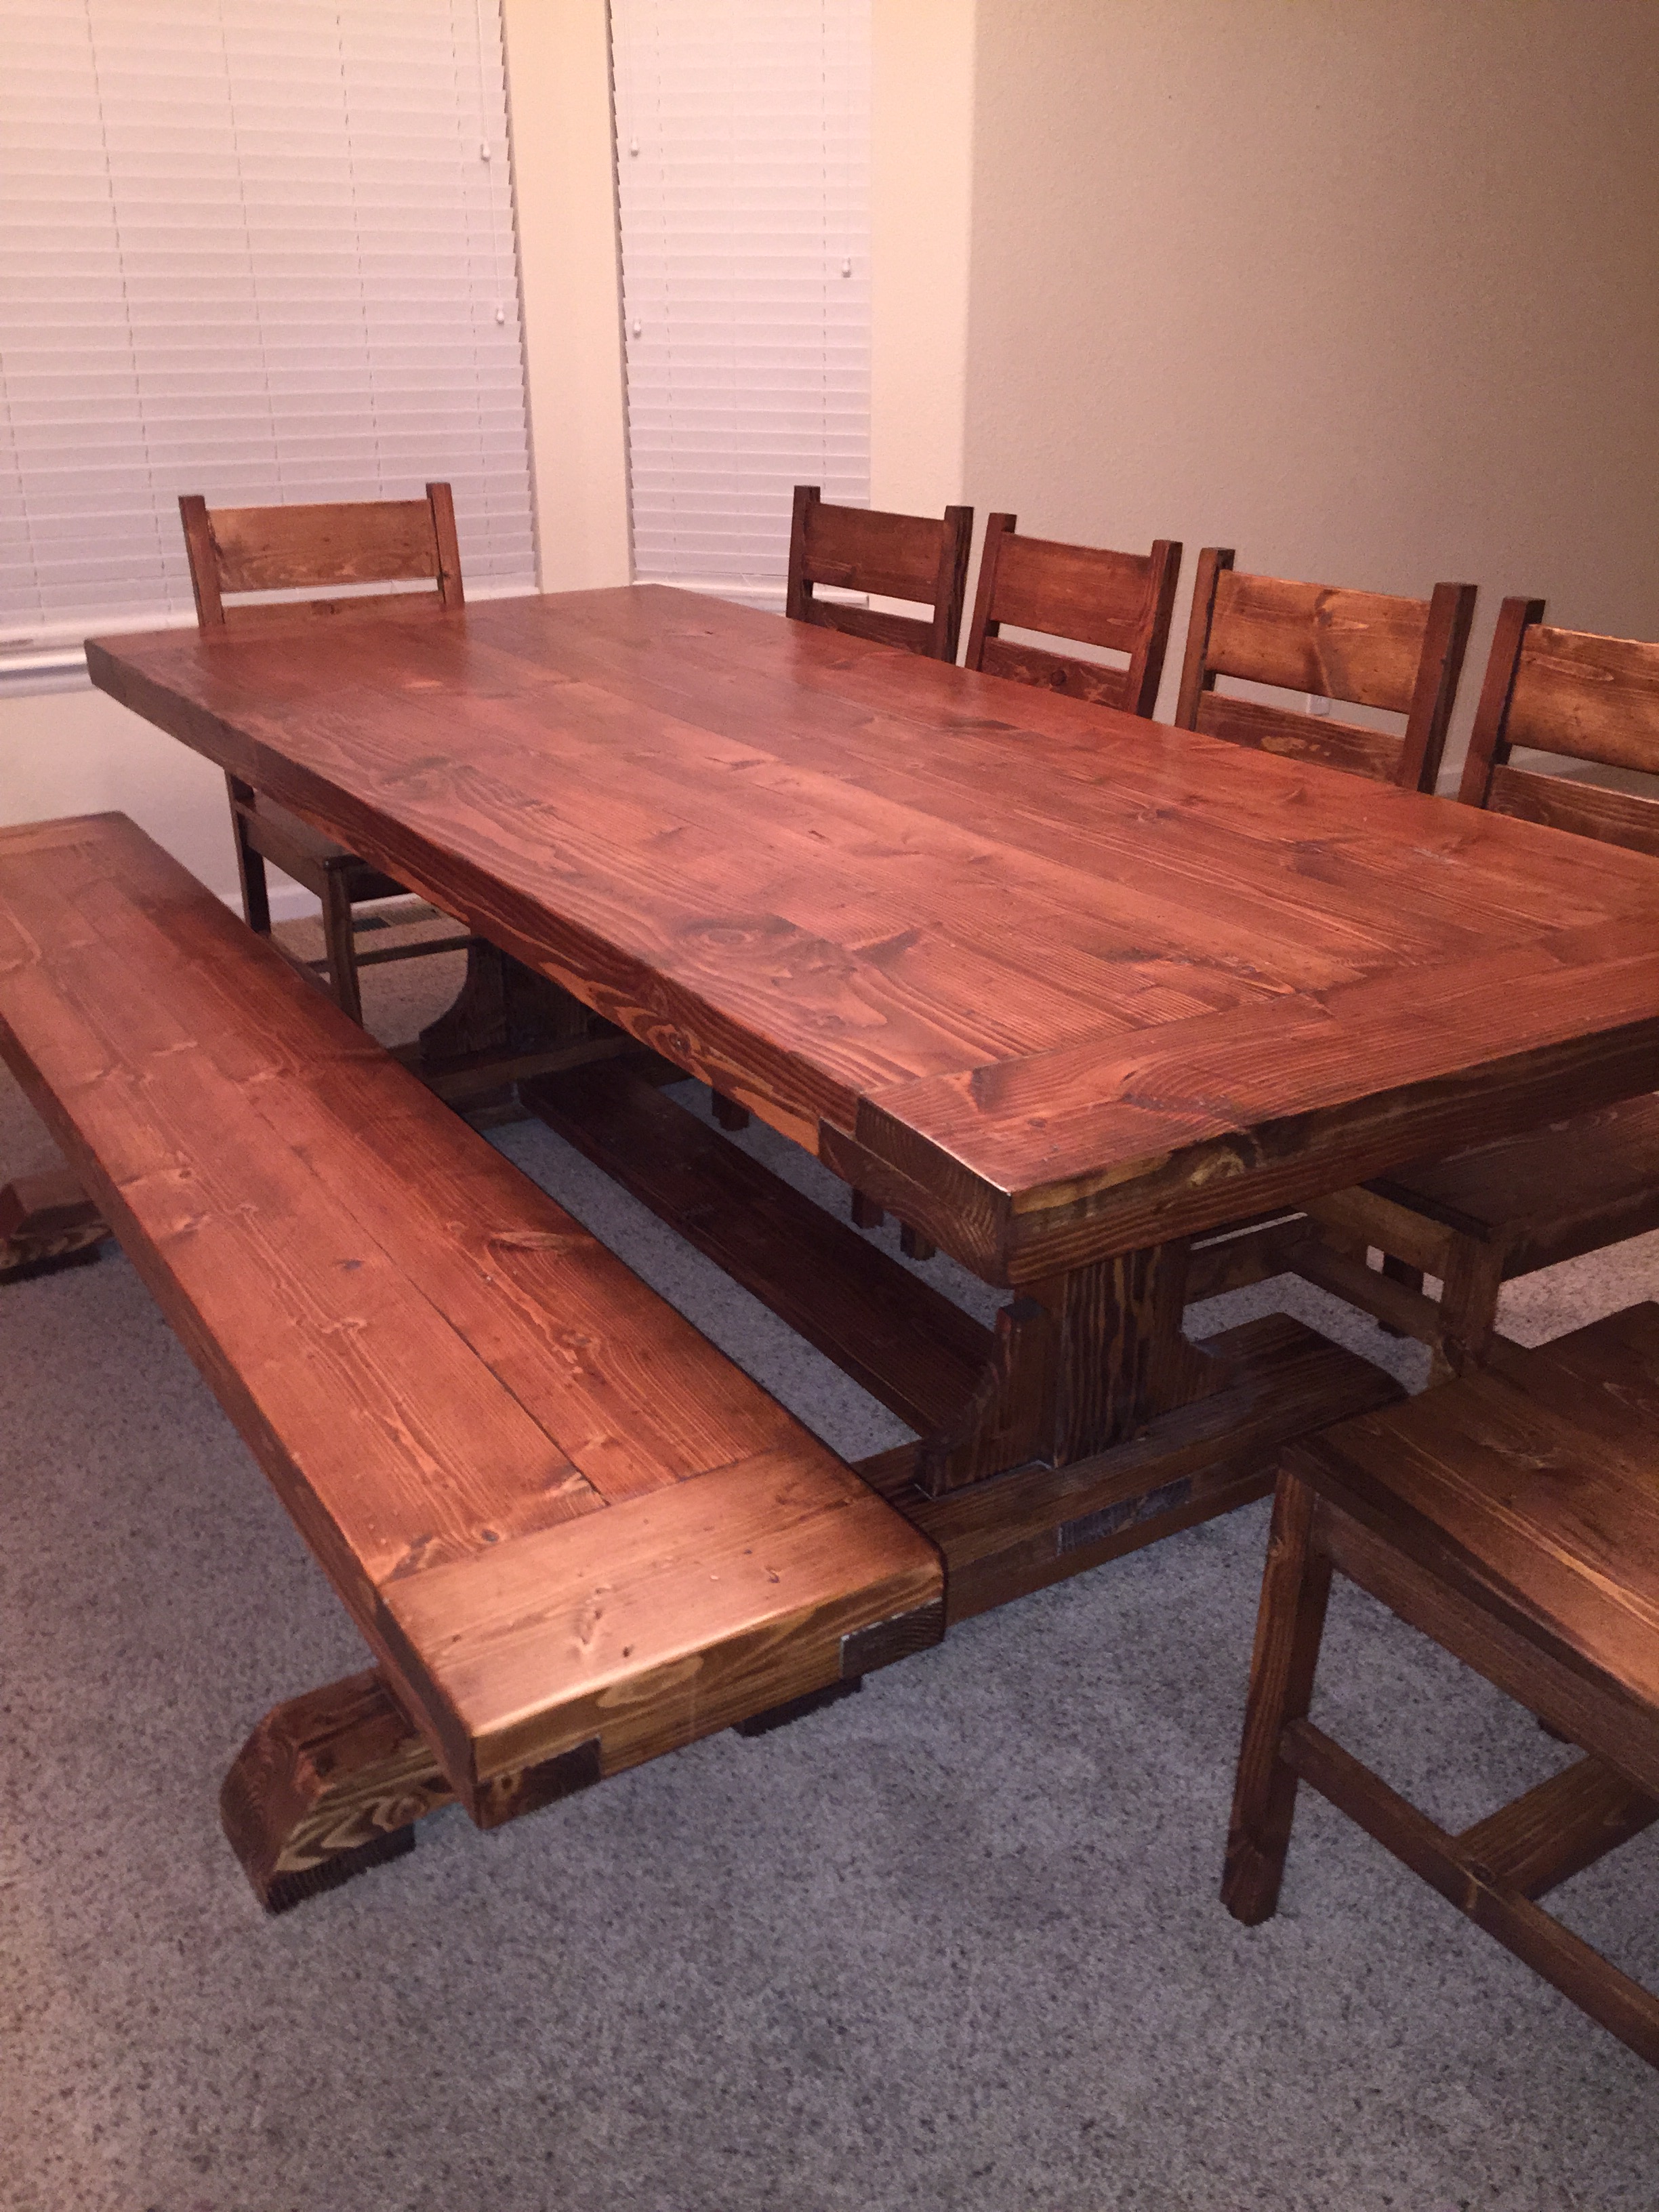
I didn't really use a plan other than having a general idea of what I wanted the size of the table to be.  I believe it came out to about 102" x 44"

I built 6 chairs and the bench.

All is built out of construction grade lumber, and gets lots of compliments.


The table came together in a solid weekend, the bench took a couple of evenings, and the chairs...those chairs took forever to cut out, shape, assemble, and finish.

Estimated Cost
About $400, including purchasing a couple of jigs, but I had a lot of stuff "laying around"
Estimated Time Investment
Week Long Project (20 Hours or More)
Finish Used
Minwax English Chestnut and about 8 coats of satin lacquer. Steel wool between coats and finished with carnuba wax and buffed out.
Recommended Skill Level
Intermediate

Comments

JoanneS

Mon, 02/02/2015 - 18:15

Wow these are so great! Beautifully built, and your finish looks flawless! You have a dining room that will last for generations! Love it!

kkmerrett

Tue, 03/07/2023 - 12:47

Truly an inspiration for when we are to the point of building our table. Thank you for sharing.

Mini Night Stand

Submitted by Anonymous (not verified) on Mon, 04/24/2017 - 21:07

Took us 4 months cause we have kids so we have to work during naps and after bedtime and then we were hesitant to work on it for a while after a little stressful episode building the drawer. We had to lower our expectations for perfection when working with pine and no clamps. We're happy with how it turned out though! Reminds me of Van Gogh's "The Bedroom" for some reason. 

Estimated Cost
$25 wood
$8 paint
$22 Prestain, stain, poly
Estimated Time Investment
Weekend Project (10-20 Hours)
Finish Used
Minwax special walnut/ 3x water based poly
Americana indoor outdoor "patio" grey
Recommended Skill Level
Starter Project

Clubhouse - low edition

Submitted by Anonymous (not verified) on Wed, 04/07/2021 - 22:44

Come across these plans when looking for a new room/bed for my 2,5yo. Unfortunately the room is under the roof so I had to lower the entire house. I am currently building a drawer from leftover wood that fits under the bed (for bed linnen or maybe even a mini bed for our dog to sleep in 🥰)

Built from Plan(s)
Estimated Time Investment
Weekend Project (10-20 Hours)
Recommended Skill Level
Beginner

Comments

Mudroom Lockers

Submitted by suzanx on Tue, 03/19/2013 - 17:45

I saw a brag posted by jaimecostiglio (mudroom locker and bench unit) and really wanted to build one for my mudroom! I didn't extend the bench out as far out as her original plan but there is still plenty of room to sit and put shoes on. We are a family of 4 but I built 5 lockers. Kind of wish I had built 6 because my husband is occupying 2 (one for his regular coat/jacket and the other for his motorcycle gear - so not fair).

Anyway, we love it and everyone who visits are amazed that we built it from scratch! This was our very first building project and it took a while because we wanted to make sure it was perfect. It's actually screwed into the wall so it will most likely stay with the house if we ever move.

Estimated Time Investment
Week Long Project (20 Hours or More)
Recommended Skill Level
Intermediate

Comments

LisaMarie

Sat, 03/30/2013 - 14:29

I am looking forward to building one of these, too. Yours looks great! I would definitely unscrew it and bring it with me with a move!:)

arausch

Sun, 06/23/2013 - 17:50

can you help direct me to the plans for this locker unit? I see the username of an original poster but can't seem to find the post. A URL would be much appreciated. Thanks in advance and nice work!

Lisa0820

Thu, 12/03/2015 - 09:55

Can someone please send or direct me to the plans for this unit?

Thanks

Lisa

Princess Lazy Susan Dress Up Tower

Submitted by zechdavid on Fri, 01/30/2015 - 06:02

This project started by using the Ana-White Dress Up Tower Plans.  Modifications were made to increase storage area and to include a lazy susan base.

Estimated Time Investment
Week Long Project (20 Hours or More)
Finish Used
50/50 General Finishes Coral Crush and Snow White Milk Paint (2 coats) and one coat of Aqua ZAR Clear Satin.
Recommended Skill Level
Intermediate

rustic vanity and mirror

Submitted by abbpim on Sat, 04/29/2017 - 11:00

I built this vanity and mirror out of pine and finished it in a variety of stains to get a reclaimed look.

Recommended Skill Level
Intermediate

Outdoor furniture for my daughter

Submitted by Anonymous (not verified) on Mon, 04/12/2021 - 16:22

Made two chairs, side table, coffee table/ bench from Ana’s pattern

Built from Plan(s)

Comments

Fancy X Desk

My first big project. It turned out great! There are a couple of issues with the plans but nothing a little common sense couldn't resolve. Also, for any beginners out there, make sure when you're going through your cut list, start with the larger pieces first then work your way down to the smaller cuts. You'll end up having to take another trip to the hardware store if you cut the smaller pieces first. Great plans Ana White! I built this as a Christmas gift for my girlfriend. She was blown away! She absolutely loves it!

~Justin~

Built from Plan(s)
Estimated Cost
Wood cost: $45.95
I did end up spending a lot more on stain, polyurethane, hardware, sandpaper.. The list goes on. But most of these items are things I can reuse for future projects.
Estimated Time Investment
Weekend Project (10-20 Hours)
Finish Used
Black Cherry Stain and then a clear polyurethane.
Recommended Skill Level
Beginner

Comments

I'm pretty proud of myself

Submitted by Anonymous (not verified) on Mon, 05/01/2017 - 10:17

Pretty straight forward plans.

Built from Plan(s)
Estimated Cost
$350
Estimated Time Investment
Weekend Project (10-20 Hours)
Finish Used
Shou Sugi Ban/ Tung oil
Recommended Skill Level
Beginner

Modified King Farmhouse Bed

Submitted by Anonymous (not verified) on Tue, 04/20/2021 - 15:31

We ended up deviating more than we were originally intending from the Farmhouse Bed plans. We started off planning to modify so that it was able to be disassembled (used metal brackets and to fit storage drawers at the foot of the bed. The my finance got a router, so we ended up with a lot of mortise and tenon and tongue and groove joints, and a fancier headboard. I LOVE the end result but we were definitely in over our heads at times!

Estimated Cost
400
Estimated Time Investment
Week Long Project (20 Hours or More)
Finish Used
Traditional Cherry and Black Cherry Oil Stain, Black Tea as Wood Conditioner and Poly Finish
Recommended Skill Level
Intermediate

Comments

Little e's Train Table

Submitted by jaime19861 on Mon, 03/25/2013 - 14:38

I made this train/activity table for my niece's 2nd birthday. I did omit the bottom shelf to allow more leg room when sitting/kneeling on the floor. The one BIG issue I encountered was that I cut the top inset to fit perfectly. Then I painted it.... the pieces no longer fit due to the extra paint thickness. UGGGGG! So, I had to go back to sanding to get that nice fit again.

I put in a scrap of indoor/outdoor carpeting for "grass" for the train set to sit on. This is not glued in, so it can be removed if they decide to use it for something other than the train. I painted it using cabinet paint to give it a little extra protection against scratches and scuffs since it will be used by a two year old. I painted the inset white on one side, but I put chalkboard paint on the other side. This way, it's like three tables in one! An activity table, chalkboard table, and a train table! She loves it!

I need to get a picture of it with the top on so you can see the white and chalkboard sides. It was a really fun build!

I may build the smaller Lego version for my own house - not to play with Legos, but to keep the dog's tail from knocking over any beverages I set down! It also would be a nice place to store the laptop when not in use.

Built from Plan(s)
Estimated Time Investment
Weekend Project (10-20 Hours)
Finish Used
I primed it using Kilz and then used Dutch Boy Cabinet and Trim paint and Rustoleum Chalk Board paint for the inset.
Recommended Skill Level
Beginner

A Letter Shelf

Submitted by pde00311 on Fri, 02/06/2015 - 09:19

With another baby on the way in a few months, we decided to move our 2+ year old daughter across the hall into her first big girl room. I built big sister the Kendal Extra Wide Dresser, Traditional Wood Toddler Bed, Letter A Shelf and a Dollhouse Bookcase and matched the colors with her new comforter, lamps and princess canopy tent from the Land of Nod outlet.

This is a pretty easy project to build with the right tools. For the backing, I used beadboard plywood that I had leftover from the headboard of the toddler bed. The one tricky thing was how to actually hang the bookshelf. The weight of wood for the shelf is somewhat heavy and that's before anything even goes in/on top of it. After a few trips to the big boxes, I decided on using a heavy duty mirror hanger, which so far, has worked great. 

Built from Plan(s)
Estimated Cost
$25
Estimated Time Investment
Afternoon Project (3-6 Hours)
Finish Used
Behr White Fur and Pink Ballerina paint with a few coats of Minwax Polycrylic
Recommended Skill Level
Starter Project

Comments

TwoCuteKids

Fri, 02/06/2015 - 11:28

What a lucky little girl! You inspired me to make-over our little girls room now that she is 4. What a gift to create all these beautiful items for your home. PS - Love your outdoor sectional too!

pde00311

Tue, 02/24/2015 - 13:05

It took a lot of work, but it was well worth it. The best part about completing a room make-over is her reaction to having all new stuff. Our daughter has not once wanted to go back to her old nursery room. p.s. I cannot wait for the cold/ice/snow to end so we can start enjoying the sectional again.

pde00311

Tue, 02/24/2015 - 13:01

She loves all of new big girl room furniture, which mostly came from your plans!

2x4 Outdoor Couches!

Submitted by Anonymous (not verified) on Thu, 05/04/2017 - 07:39

Outdoor Couches made from the plans on the website.  Added 2 2x4's on back top to add support when leaning back.  Also added vertical supports on the back to help with added weight.


Stained and Sealed with Natural Cedar Stain and Sealer

Estimated Cost
$110 for the wood for both couches
$400 for both sets of cushions and accent pillows
Estimated Time Investment
Day Project (6-9 Hours)
Finish Used
Natural Cedar Stain and Sealant by Timeless
Recommended Skill Level
Beginner

Birdhouse Plans from Scrap Wood

Submitted by thediyplan on Mon, 04/26/2021 - 14:45

Having a home for your feathered friends will encourage the birds to keep visiting your backyard. If you have a garden, you want to attract birds to establish a healthy balance. Birds consume thousands of insects, especially in the spring when they’re feeding their young. To help support this environment, I’m made DIY Birdhouse Plans from scrap wood. If you have scrap wood laying around, you could easily build this birdhouse for your backyard.

A simple bird nest box with correct dimensions will help a mother bird with a reliable place to live in and raise her young. This helps mother nature to keep the cycle of life in order.

See my website for additional pictures and how I've built it, THeDIYPlan.com

Estimated Cost
$25
Estimated Time Investment
Afternoon Project (3-6 Hours)
Recommended Skill Level
Intermediate