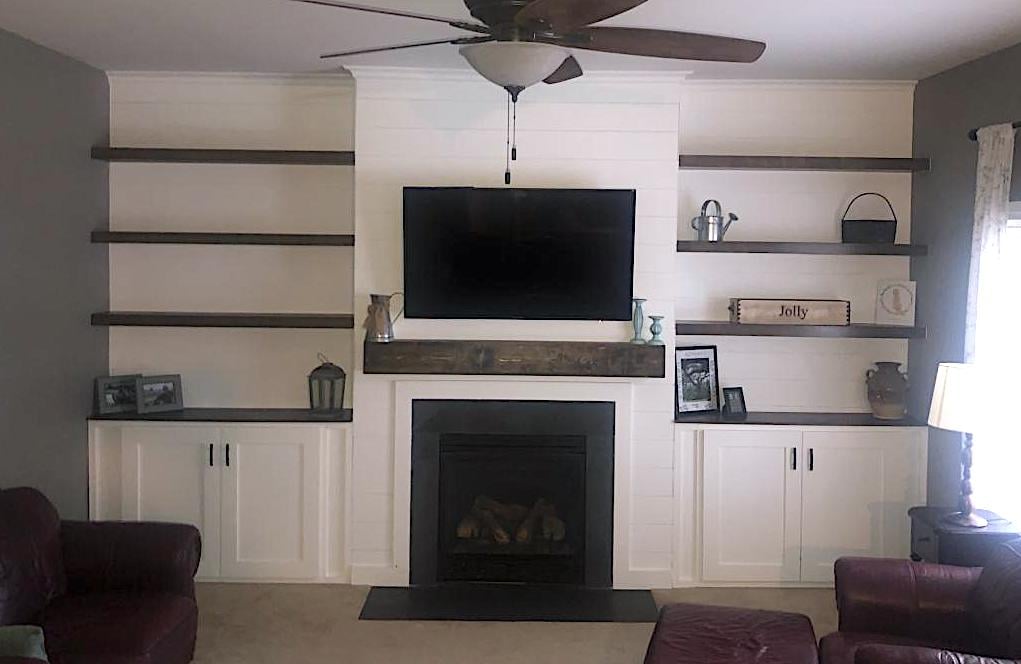
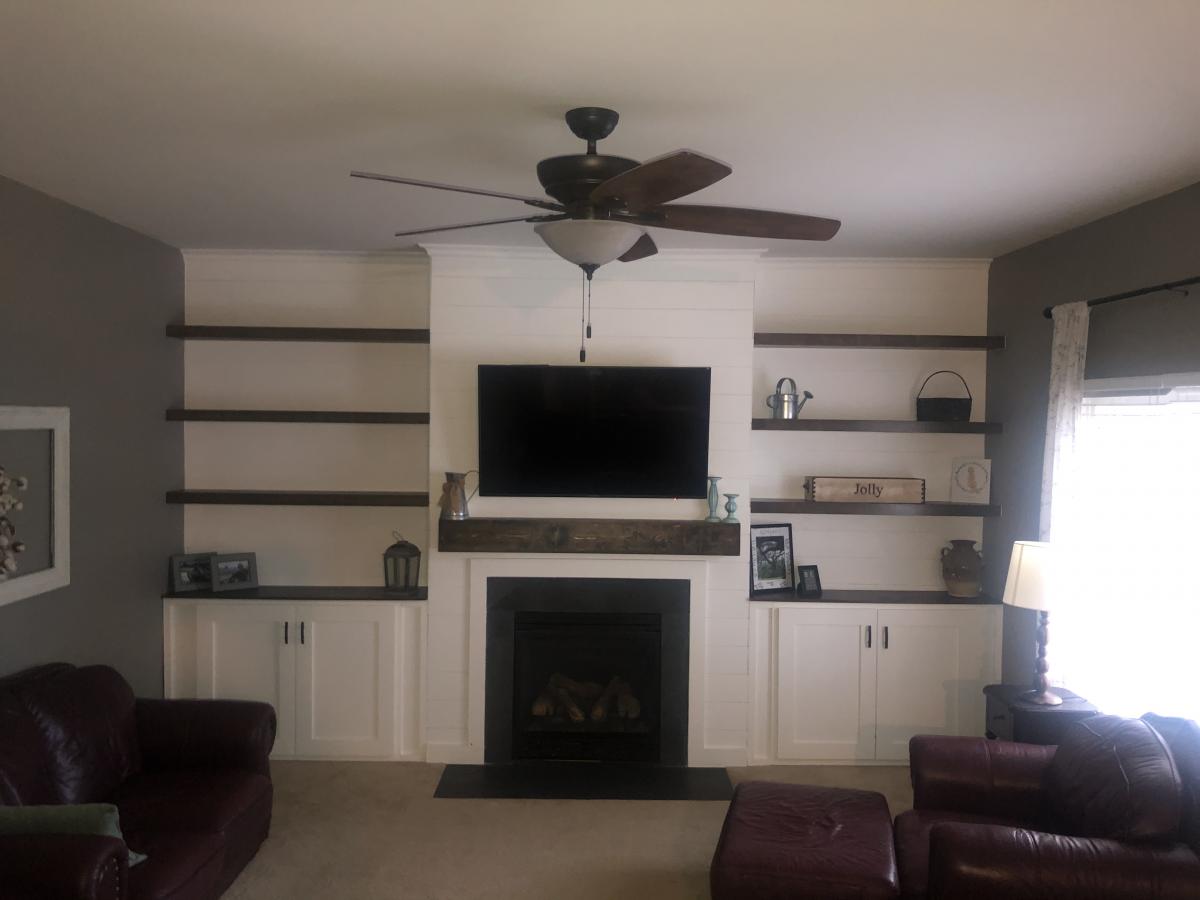
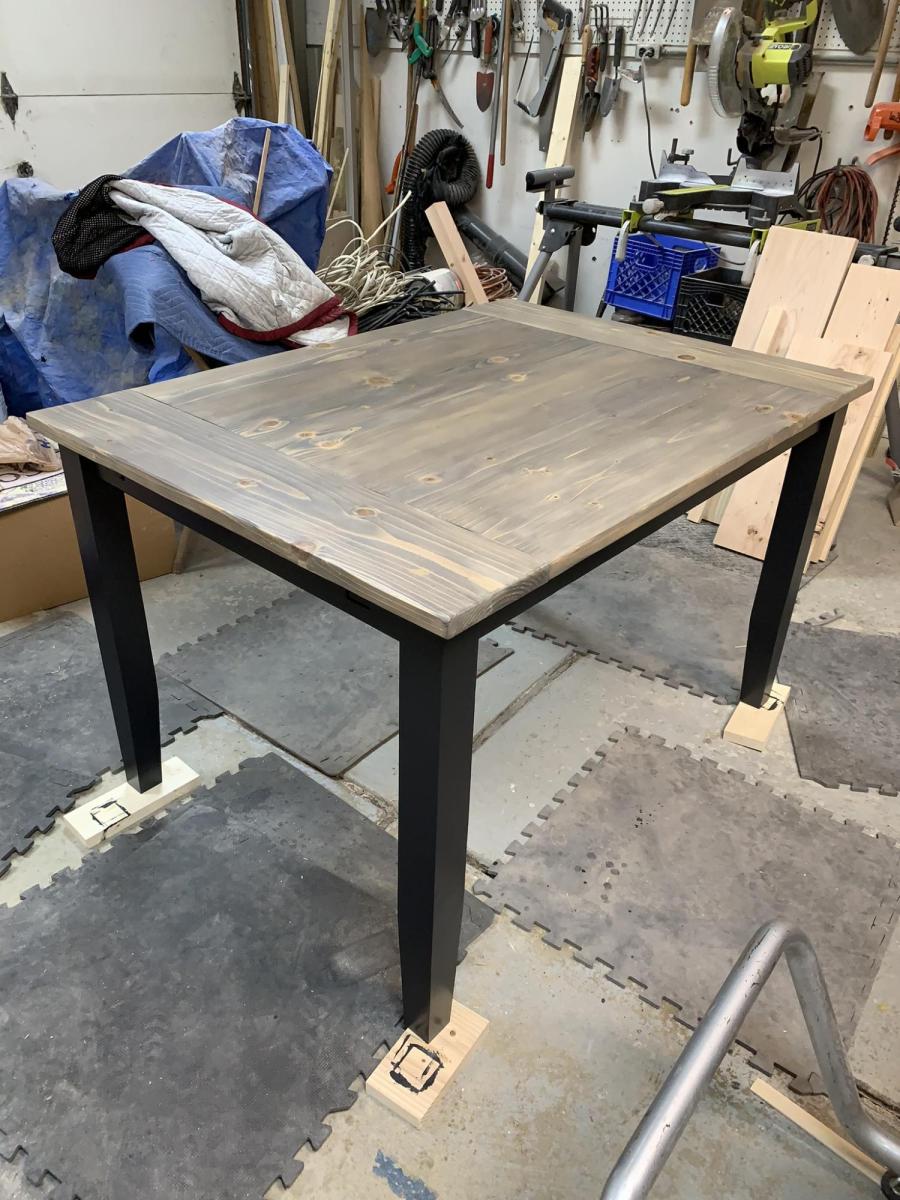
Medicine Cabinet
![](/sites/default/files/3154811921_1341277930.jpg)
I found this project on I different site (sorry) but really wanted to make it for our quest bathroom. It was not to difficult and it really helps to finish off our quest bathroom since it was missing a medicine cabinet.
![](/sites/default/files/3154811922_1341277930.jpg)
![](/sites/default/files/3154811923_1341277930.jpg)
![](/sites/default/files/3154811924_1341277930.jpg)
![](/sites/default/files/3154811925_1341277930.jpg)
I found this project on I different site (sorry) but really wanted to make it for our quest bathroom. It was not to difficult and it really helps to finish off our quest bathroom since it was missing a medicine cabinet.
This was my first time building a piece of furniture on my own, so it was a lot of learning and trial and error on my part. The plans were fantastic for the most part (I thought the bench plans could have used a little more specification and couldn't seem to find a pocket hole version). We completed the project over the course of a couple months, simply because we revisited it when time allowed. It could easily be done in a much shorter period. One thing I will say is this -- add a step to the plans and utilize a planer and jointer on all of the boards. I had the table put together at one point and whew, I wasn't sure what I did wrong, and I went back and had followed all the steps. While this might sound obvious now, remember it was my first time doing something like this, so I followed each step to a T. I also used a belt sander on the table and bench tops to level things out even more, and went across the grain to make a smooth surface with an 80 grit belt, then hand sanded with a sanding block with 120, 220, and 320 grit. I also modified the bench plans to cut about 5 inches off so that they would fit under the table.
We used Minwax pre-stain conditioner, then one 10 minute application of Mixwax Honey stain, followed by Mixwax Satin Poly. It turned out great and we are already moving on to other projects!
So my husband and I have this thing...I find the projects, he builds the projects and I get to finish it. I'm more of the artsy one and he is more hands on. So this is the first table we did from Ana!
this is my intro to woodworking by myself and i think the table turned out ok. ana's website sure helped allot.
I had been wanting to build a mantle for quite a while but couldn't decide what I wanted it to look like, then I saw the wood mantle with hidden storage plans on Ana's website. I used a steel wool\vinegar mixture as a stain, 3 coats making sure it dried completely before applying the next coat. I finished it off with a beeswax & orange oil wood polish & conditioner. So far I'm storing the remote for the fireplace, the key to the gas for the fireplace and the tool that helps remove the front of the fireplace in there. I'm not sure what else will find it's way in there. I'm very happy with how it turned out.
Julie V.
I made this without the fancy headboard, but I'm very happy with how it turned out! See my blog for complete details.
Yes, my husband and I share our bedroom with 6 dogs and an occasional cat (or 4). Our older dog (Petra) has slept on our bed for over 10 years, and she's getting too old to jump anymore. We didn't want her to feel like she was getting kicked off the bed, so I made Petra her very own bed at the end of ours so that she wouldn't feel left out. I was inspired by MurdaRae's dog bed (http://ana-white.com/2012/06/doggie-daybed), and thought it was genius to use a toddler/crib bed. So I went looking for plans on Ana-White, and came up with a mixture between a couple of twin bed plans. I love that the plans are easy enough to modify my sizes, and come up with exactly the custom solution that I need. This was my first big project using Bri-Wax. The last one was kind of a disaster when the wax changed the stain color to something not-so-great. With this project, I learned to wait at least 2 weeks before attempting to wax it. I was blown away with the results. It is a beautiful subtle satin finish that feels great to the touch. Plus, I can easily touch up all the dog fingernail scratches that will inevitably occur. When I re-assembled the bed in my bedroom, I actually nicked it in a few places. No problem -- slap on some more Bri-Wax! My Bri-Wax was 11 years old, and pure liquid. I tossed it in the fridge (per Bri-Wax's recommendation), and it was as good as new. The only real problem I had with this project was leaking sap from one of the 4x4s. I'm still fighting this today. In talking with Rustoleum/Zinsser reps, they said that no sap could penetrate their "Seal Coat" shellac product. After 5 coats, the sap is still penetrating, but only if I turn it on it's side or upside down. I'm still baffled. I made the mattress cover out of a dog blanket, and made the cushions from some remnant fabric (suitable for dogs and weekly washing), so this was a fairly inexpensive project. It was a success because Petra slept in her bed from the fist night and loved that she had all the room to herself, and no boston terrorists (I mean terriers) attempted to bother her.
Sun, 08/26/2012 - 10:24
It matches the woods in your bedroom so well and looks great! Also, I love the bolster pillows around the edges. That is something I need to make for our dog bed. Thanks for sharing.
Made the swing then just kinda came up with my own frame.
Tue, 09/11/2012 - 05:04
I have been considering making this bench for a friend but I wonder how comfortable it is...is it comfortable? Does it require a cushion? Is the back high enough to be comfortable leaning back in it for long periods? Also - how long did you wait to paint your pressure treated wood? I just recently learned you have to allow pressure treated wood dry out before painting...no one seems to tell you how long you have to wait though. Thanks for any help/opinions you share.
In reply to Comfortable? by mikejillnelson
Wed, 09/12/2012 - 19:38
Honestly, it's not very comfortable. I think the seat part is a little too long, and the back is a little too short. We're going to put a beefy cushion on the back, and I think that's going to help because it will push us forward a little bit. It's not bad to sit in, but I definitely think it could be tweaked.
I let the wood dry out for 4 days (but I cut and assembled it the day I bought the wood). I'm not sure if that was long enough of not, but I was getting impatient, and, like you, couldn't find any real answers on drying time. It wasn't really that wet to begin, though. Hope that helps!
Thu, 09/13/2012 - 00:04
I thought my kids and I were the only ones who used "ghetto" as a way to describe things... but I have to say that your frame looks great, it serves its purpose so I have to respectfully disagree with you, it doesn't look anything like "ghetto" :-)
In reply to I have to laugh by tracysmith
Thu, 09/13/2012 - 15:31
Well thank you! I put the first coat of white paint on the frame today and it looks much nicer now!
Tue, 01/22/2013 - 10:02
Hey, can you post the dimensions of your frame? its exactly what I'm looking for. Do you have it screwed down to the deck? will it tip over?
Tue, 01/22/2013 - 11:27
Hey, can you post the dimensions of your frame? its exactly what I'm looking for. Do you have it screwed down to the deck? will it tip over?
My very first big project! My 6 year old daughter was in need of a new bed and a room makeover so I decided to build her a headboard which then turned into a whole new room!!!
I really wanted it to it to have some dimension to it so I added some moldings and a mini shelf to the top of it. I basically just designed it myself, based on what some of the $1000+ pottery barn ones look like and spent hours at the hardware store finding the perfect moldings.
For the main backboard I used plywood, however to keep it light I used a sheet of molding and added a round edge to make it seamless.
My my daughter was so excited Mommy built her whole room.
In reply to Beautiful! by Ana White Admin
Sun, 10/16/2016 - 23:50
I am so excited!!! And fully addicted to your site. Thank you so much! You're an inspiration!!!
Still needs stain and cushions. Will post finished product once complete.
My wife wanted a collapsible table for her craft fair sales. I put a wooden dowel in the opening for her to drape packing paper over and hooks on the sides for gift bags. Easy plans to follow and it turned out great!
Todd Martens
Made two of these this spring. One for strawberry plants, and one for herbs and flowers. Made according to plans.
First build.
The plans and cut list were a tad off but I made a saw guide a cut it down from 36 to 24 after assembled.
I had HD do all my cuts but have since done my own!
Happy Fall Y’all. Love the Gray / White Farmhouse Colors. I can share the plans I modified for this build if anyone wants to build their own .
Sat, 08/22/2020 - 08:33
Hello could you please share the plans for me. Want to duplicate your awesome work.
Sat, 08/29/2020 - 12:33
I believe this is JUST what I came here looking for! Please share the plans and dimensions. :)
Sun, 10/25/2020 - 14:31
Hello! I’d like the plans & dimensions for this as well! Thank you so much! Turned out AMAZING!
Thu, 06/17/2021 - 17:40
This is exactly what im looking for. Can you please share your plans 😍
Sun, 08/08/2021 - 15:36
Hi Ana can you please share your plans for this with me? Thank you
Wed, 10/13/2021 - 19:36
Can you please share the plans with me? Thank you!!
Mon, 01/31/2022 - 03:50
Lovely build. I would love to receive the plans for this particular project please? Thank you!!
I had been wanting to build something to hide the litterbox for a long time. When I saw the Printer's Console plan, I knew this was the perfect plan for a cat litter box furniture. I loved that Jen Woodhouse's version was completely modified to her bar plan, so I thought I could modify for my litterbox idea. I modified the plans on size, as I was trying to use a bunch of mis-matched plywood. I also modified it to include a cat door, a cat passageway on interior panel, a vent on the back behind one of the drawers, and the stone top. I built a frame on the back to house the backing as an inset piece, as I didn't want it to be seen at all. I learned a very important lesson during this build. Not all 1x3s are created equal. Once I got my doors assembled, they were too big for the opening. I couldn't shave off the tiny amount needed, and couldn't make anything work short of starting over with 1x4s, sawing off a small amount, and cutting down the # of "drawers" (and handles). I wanted the inside to be fully finished (because cat pee on raw wood would not be good!). I had to finish certain "planes" prior to putting the thing together. I used kitchen and bath paint on the inside floor and sides for easy cleanup. The stone was carryover from construction on our house 12 years ago. The handles were an amazing deal @ $1.81/each .
Sun, 11/25/2012 - 09:51
That is a fantastic idea and the table top is beautiful.
Mon, 11/26/2012 - 09:38
That is the most beautiful litter box I have ever seen!
Mon, 06/17/2013 - 12:23
Love your use of the buffet. Our family has discussed making a piece of furniture like this for our smaller dog. Nice to see someone has done it! Our big dog has scheduled feedings but our little dog would prefer to be a free feeder. Poor thing chokes down his food in our pantry listening to our big dog breathing under the door waiting for him to finish. When he is done we open the door and the Big, greedy dog bolts in looking for left overs. A family member has to wait patiently for the little dog to finish so he can escape the pantry. I really don't want a doggy door in my pretty swinging bi-fold doors to my pantry which is also access to our kitchen.That would be a pain to have to keep closed all day. But this buffet idea is super cute! Thanks for the inspiration.
Fri, 01/09/2015 - 22:01
I know this is an old post, but I'll ask anyway
I love this piece and am in the planning stages for ours. Thank you for sharing!
I am Wondering how you went about the table top. Did you install a 3/4 ply on top but not flush, allowing room for mortar and tile? If so how much room did you allow for the tile/mortar? 1/2 inch? How did you keep the surface of the tile level and uniform? Lastly, did you seal the tile with anything when you finished?
Aesthetically, the tile top really sets this piece off and I really want to make my own.
Thanks
We needed a way to store our 6 month old's toys in our main living area. We were previously keeping them in a pack and play and that wasn't going to cut it. We decided this plan would do the trick. It works even better than we anticipated. Built exactly the same as the plans with the same finish as well.
I built this for my daughter Keila. She loves it and her friends do too! Took me one day. I painted the entire bed in deck paint. It completely eliminated all
Splinters!!! I added the slide, a USB plug, cup holder, and fan.
My daughter is into everything Minnie Mouse right now so I figured, why not!
Tue, 04/28/2015 - 12:04
Is there any way to get the plans for the minnie mouse chair? Would love to make this. I can open the plans for the basic adirondack chair, but not the minnie mouse one.
Thanks!
Sun, 07/24/2016 - 18:30
I am not able to download the minnie mouse chair
plans, can someone please assist?
So fun! Directions were easy! Can also be used as Backpack hanger if you put a little bit longer feet on them. I bought the metal hooks from Walmart.
I loved the look of the Craft room Storage tower but modified to suit my wife's bathroom theme/decor. The inside back (MDF beadboard) is painted a milk coffee color to lighten it up. The door inserts are plexiglass, which was more expensive than glass but with 2 boys 6 and 2 it is well spent, and the MDF beadboard. Covered the plexiglass with self-adhesive film for glass on both sides to hide the towels inside. This project took me about 12 hours to complete but over a 3 month period, mostly spent on finishing the project with my boys underfoot or at 12-2am. YIKES!!! If i keep this up she will want to buy instead of letting me build.
Price List:
wood: $100
Stain/Paint: left over from house reno. would have been $15 stain $20 Varnish 30$ quart of paint
Handle: $7
Hinges: $4 basic style
I wanted to use Eurostyle hinges but opted to buy the Kreg system instead of Forstner drill bits.
Will be building another just different dimensions for laundry room makeover.
Sat, 01/26/2013 - 12:18
Thanks! It was my first furniture building project! I did a huge reno that i did on my house but that is construction and 1/8th in isnt as big of an issue as in furniture.
Mon, 01/28/2013 - 20:45
I've been wanting to build something similar for my bathroom! Yours turned out great. It inspires me to get to work!
Comments
Lady Goats
Tue, 07/03/2012 - 10:13
Oh, YAY!
LOVE IT!!! Looks better than mine!
Lady Goats
Tue, 07/03/2012 - 09:40
I know that Ry would love it
I know that Ry would love it if you would post a brag post on her site, too!
beansurfin
Wed, 07/04/2012 - 11:20
Thanks
Thanks. Just did. Thanks for reminding me.