Community Brag Posts
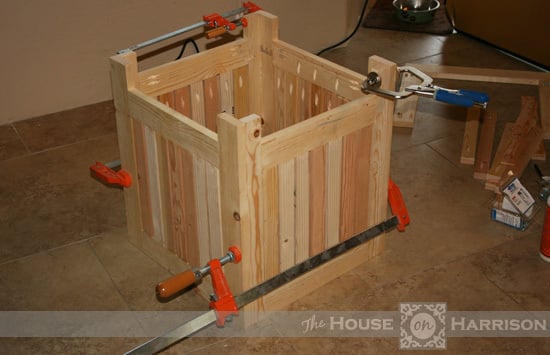
My Big Green Modern Porch Swing
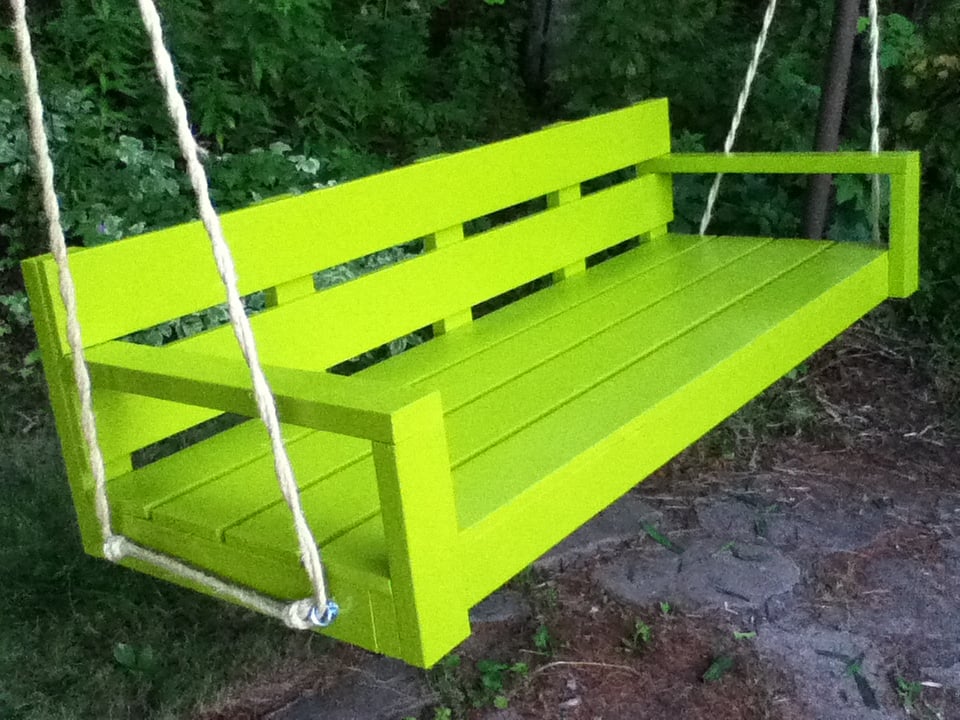
This is my version of the Large Modern Porch Swing. I did a couple of things different. I wanted a nice finish so I cut everything to length then did 3 coats of high gloss exterior paint. It feels pretty indestructible and I know it's covering all the surfaces well.
Since I painted everything ahead of time and I liked the finish I thought about the screws and nails and was able to assemble it using only screws and having none of them visible. I pocket drilled most of them, although without a jig so they're actually toenailed. The seat slats are screwed down with angle brackets underneath and the back slats screwed from the back side. That way there is no need for finishing nails or wood filler.
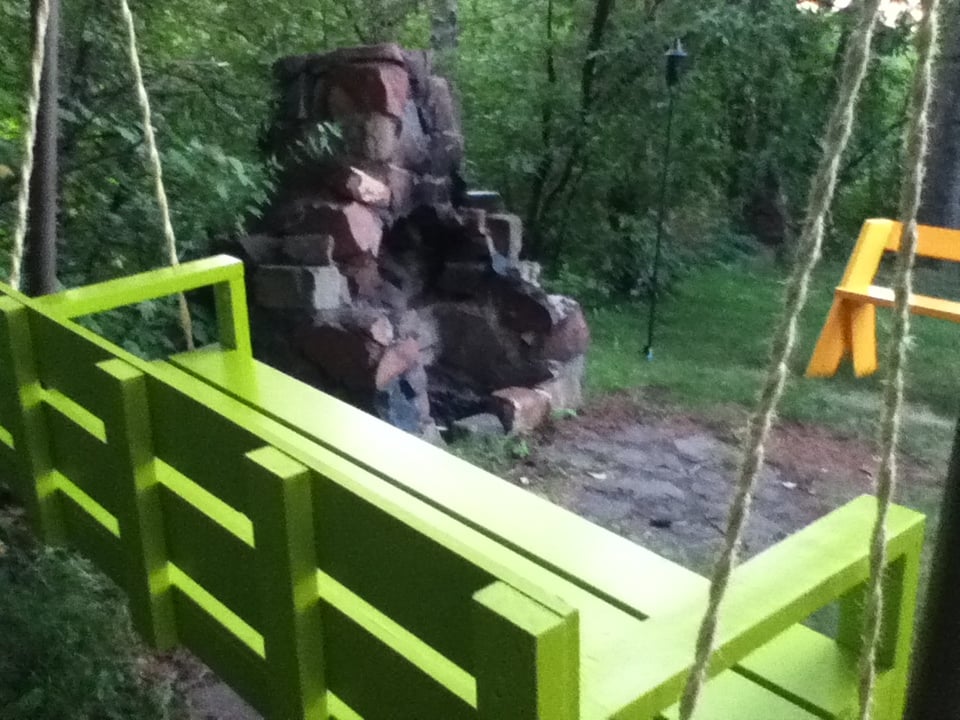
Other than that's it's pretty much to plan. The structure we have may have been for a swing at some point so I had a pipe to attach to. To be extra safe I doubled up the rope and used a pedigree cow hitch. It's very sturdy and if and one line breaks there is another piece as a backup.
I'm really happy with how it turned out. Out of all the porch swings I've seen this one best suits our style and taste.

Built from Plan(s)
Estimated Cost
$150 for materials, hardware and paint
Estimated Time Investment
Weekend Project (10-20 Hours)
Finish Used
High Gloss Exterior Paint
Recommended Skill Level
Beginner
Comments
Wed, 08/15/2012 - 21:44
What is it hanging from? I
What is it hanging from? I like the idea of using something other than a wood frame, for increased strength.
Sat, 08/18/2012 - 23:46
We're not exactly sure what
We're not exactly sure what it is it's hanging from, it was here when we got the place. I don't have a picture but it's just 2 6.5' pipes cemented into the ground and one 7' pipe joined to them at the top with elbows. It's probably overkill, I think you'd be OK with a well built wooden structure but it's what I had available.
Mon, 04/27/2020 - 08:58
I am not a fan of those…
I am not a fan of those attachment point. I made the same swing and used those attachment points. When my son was sitting on the back and the dog jumped up it flipped over backwards. I moved the back attachment hook a few inches from the bottom of the back piece and it's much more stable.
Wood and Leather Sling Chair
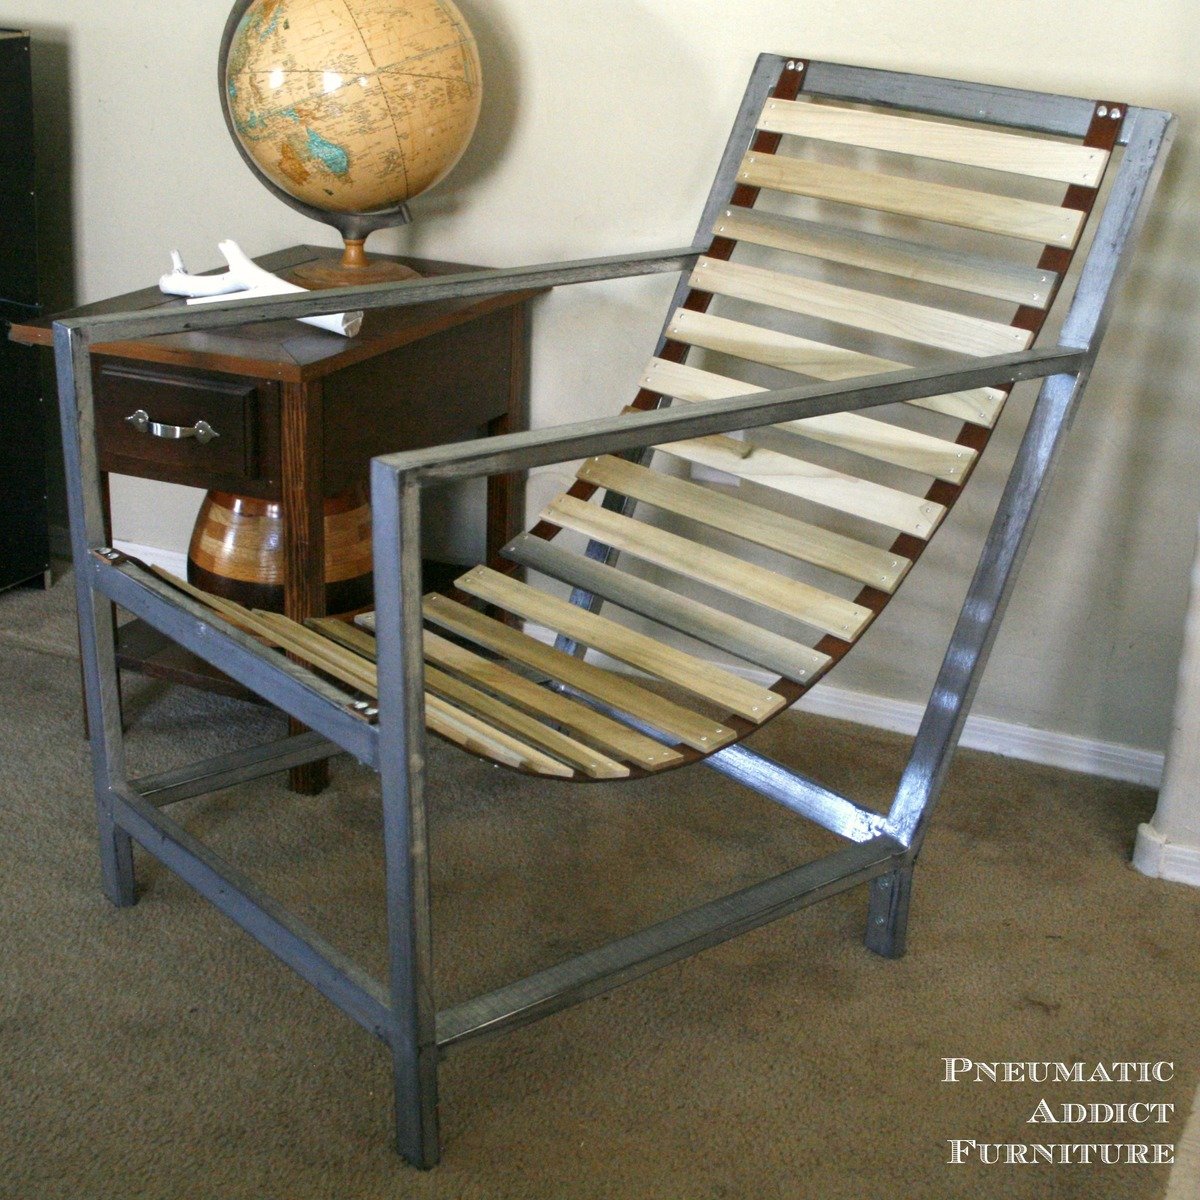
Despite how it looks, this chair was actually pretty cheap and easy to build. The one caveat is that it really needs to be built from hardwood. The minimalist design of this chair requires the strength of solid hardwood. I don't think pine would cut it.
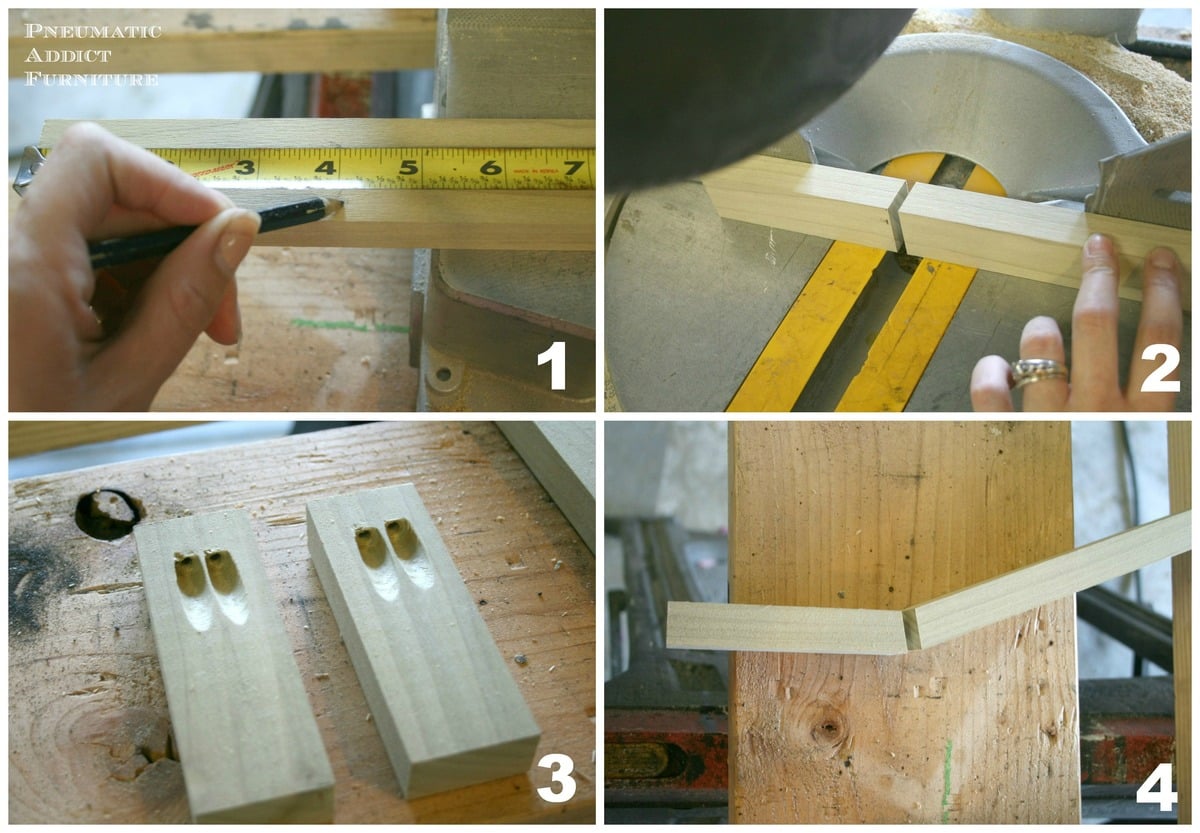
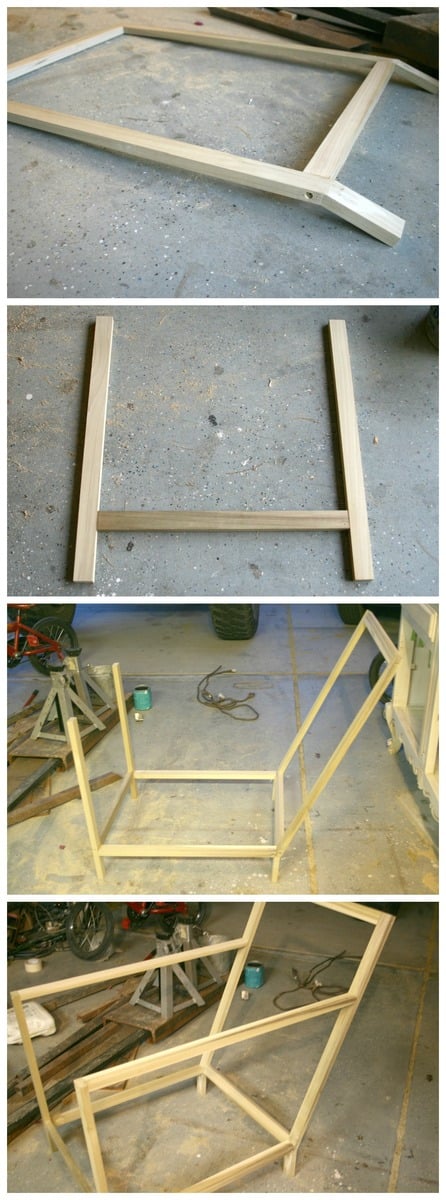
I started by building my angled legs. My chair is nice and lounge-y. If you don't like the relaxed, lounger style, you may want a slightly more shallow angle to your back. The total length of the back is 33". I wanted the leg portion to be 4" tall, so I first cut 2, 33" lengths. Then, measured 4", and cut at a 10-degree angle. I inverted the 2 pieces, and attached them together with glue, pocket holes, and screws.
Once I had my angled legs, I put together my back frame, front frame, and finally joined them together with the armrests and side supports. I used wood glue and countersunk, 3" screws at each joint.
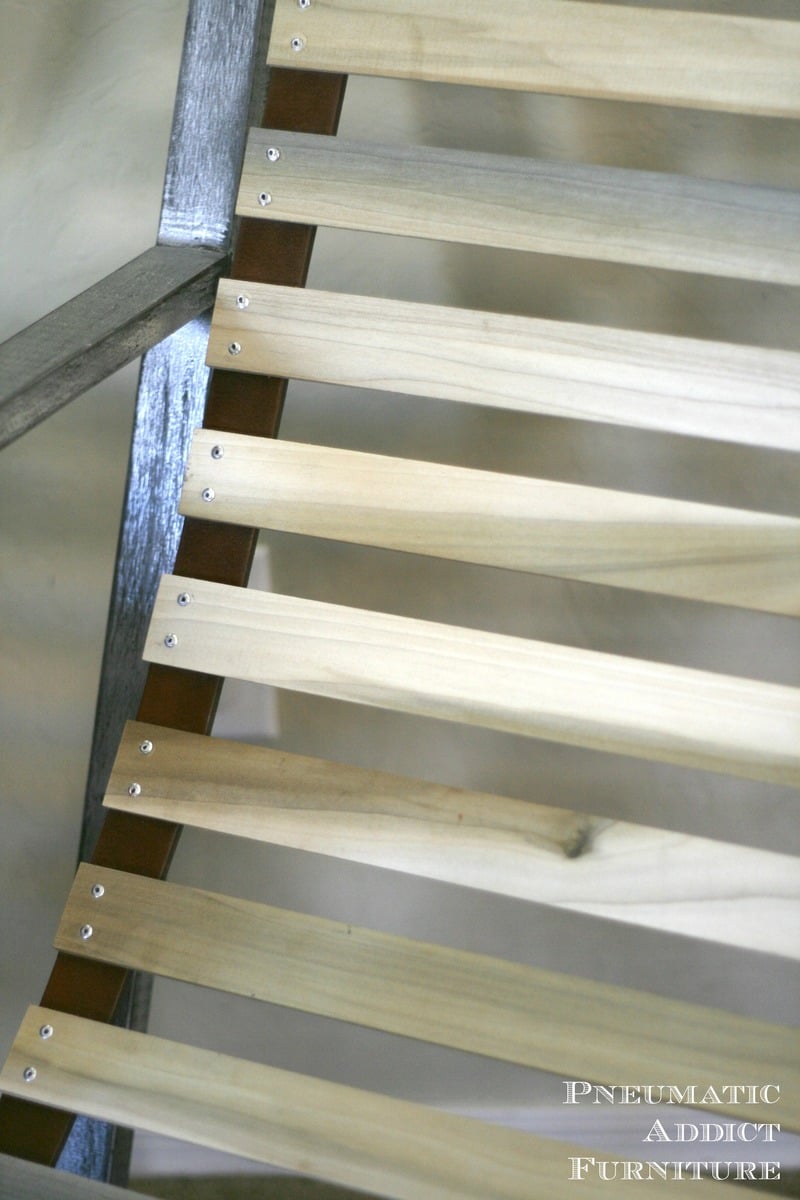
To create the sling, I took two, 52" leather belts, and strung 19" wide slats, 1" apart. I attached the slats to the leather using a pop rivet gun. For this size chair, I used 17, 1.5" wide slats to create the sling. I then attached the sling to the frame using carriage bolts and nuts.

Estimated Cost
$75
Estimated Time Investment
Day Project (6-9 Hours)
Finish Used
I primed the frame with black primer. Then sprayed a coat of Oil Rubbed Bronze by Rustoleum, Next, I layered a coat of metallic silver and distressed to allow some of the darker paint to show through. I sealed the whole thing with 3 coats of satin polyacrylic.
Recommended Skill Level
Intermediate
Comments

My Greenhouse
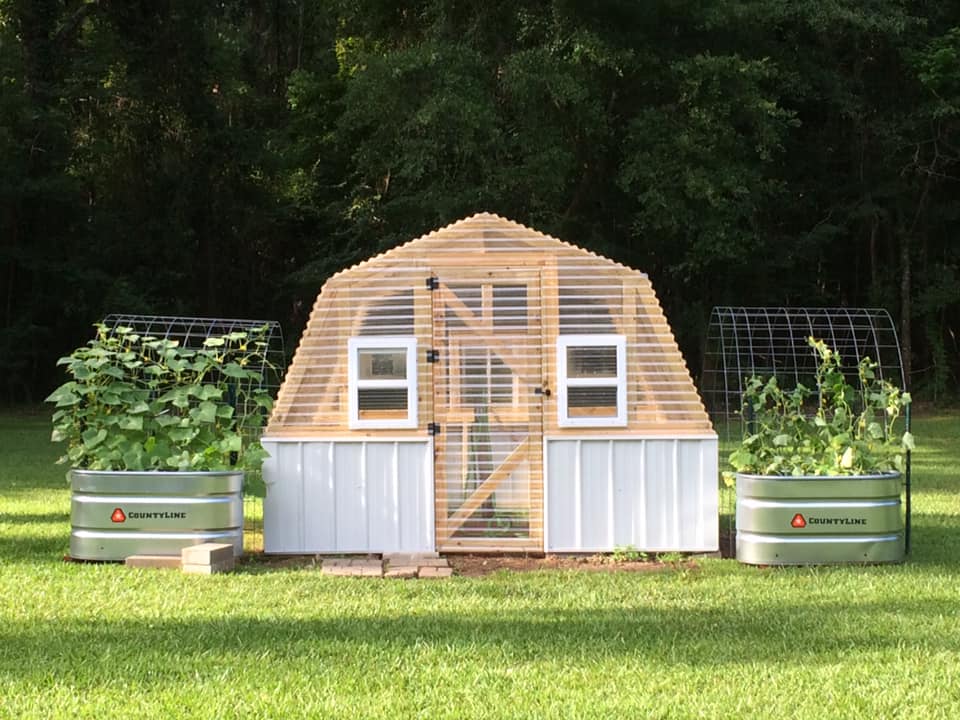
I went from a 6 x 8 Harbor Freight Greenhouse to this one 10 x 12. I added a few windows...
Built from Plan(s)
Comments
Seasonal And Holiday
Mudroom Bench and Hooks
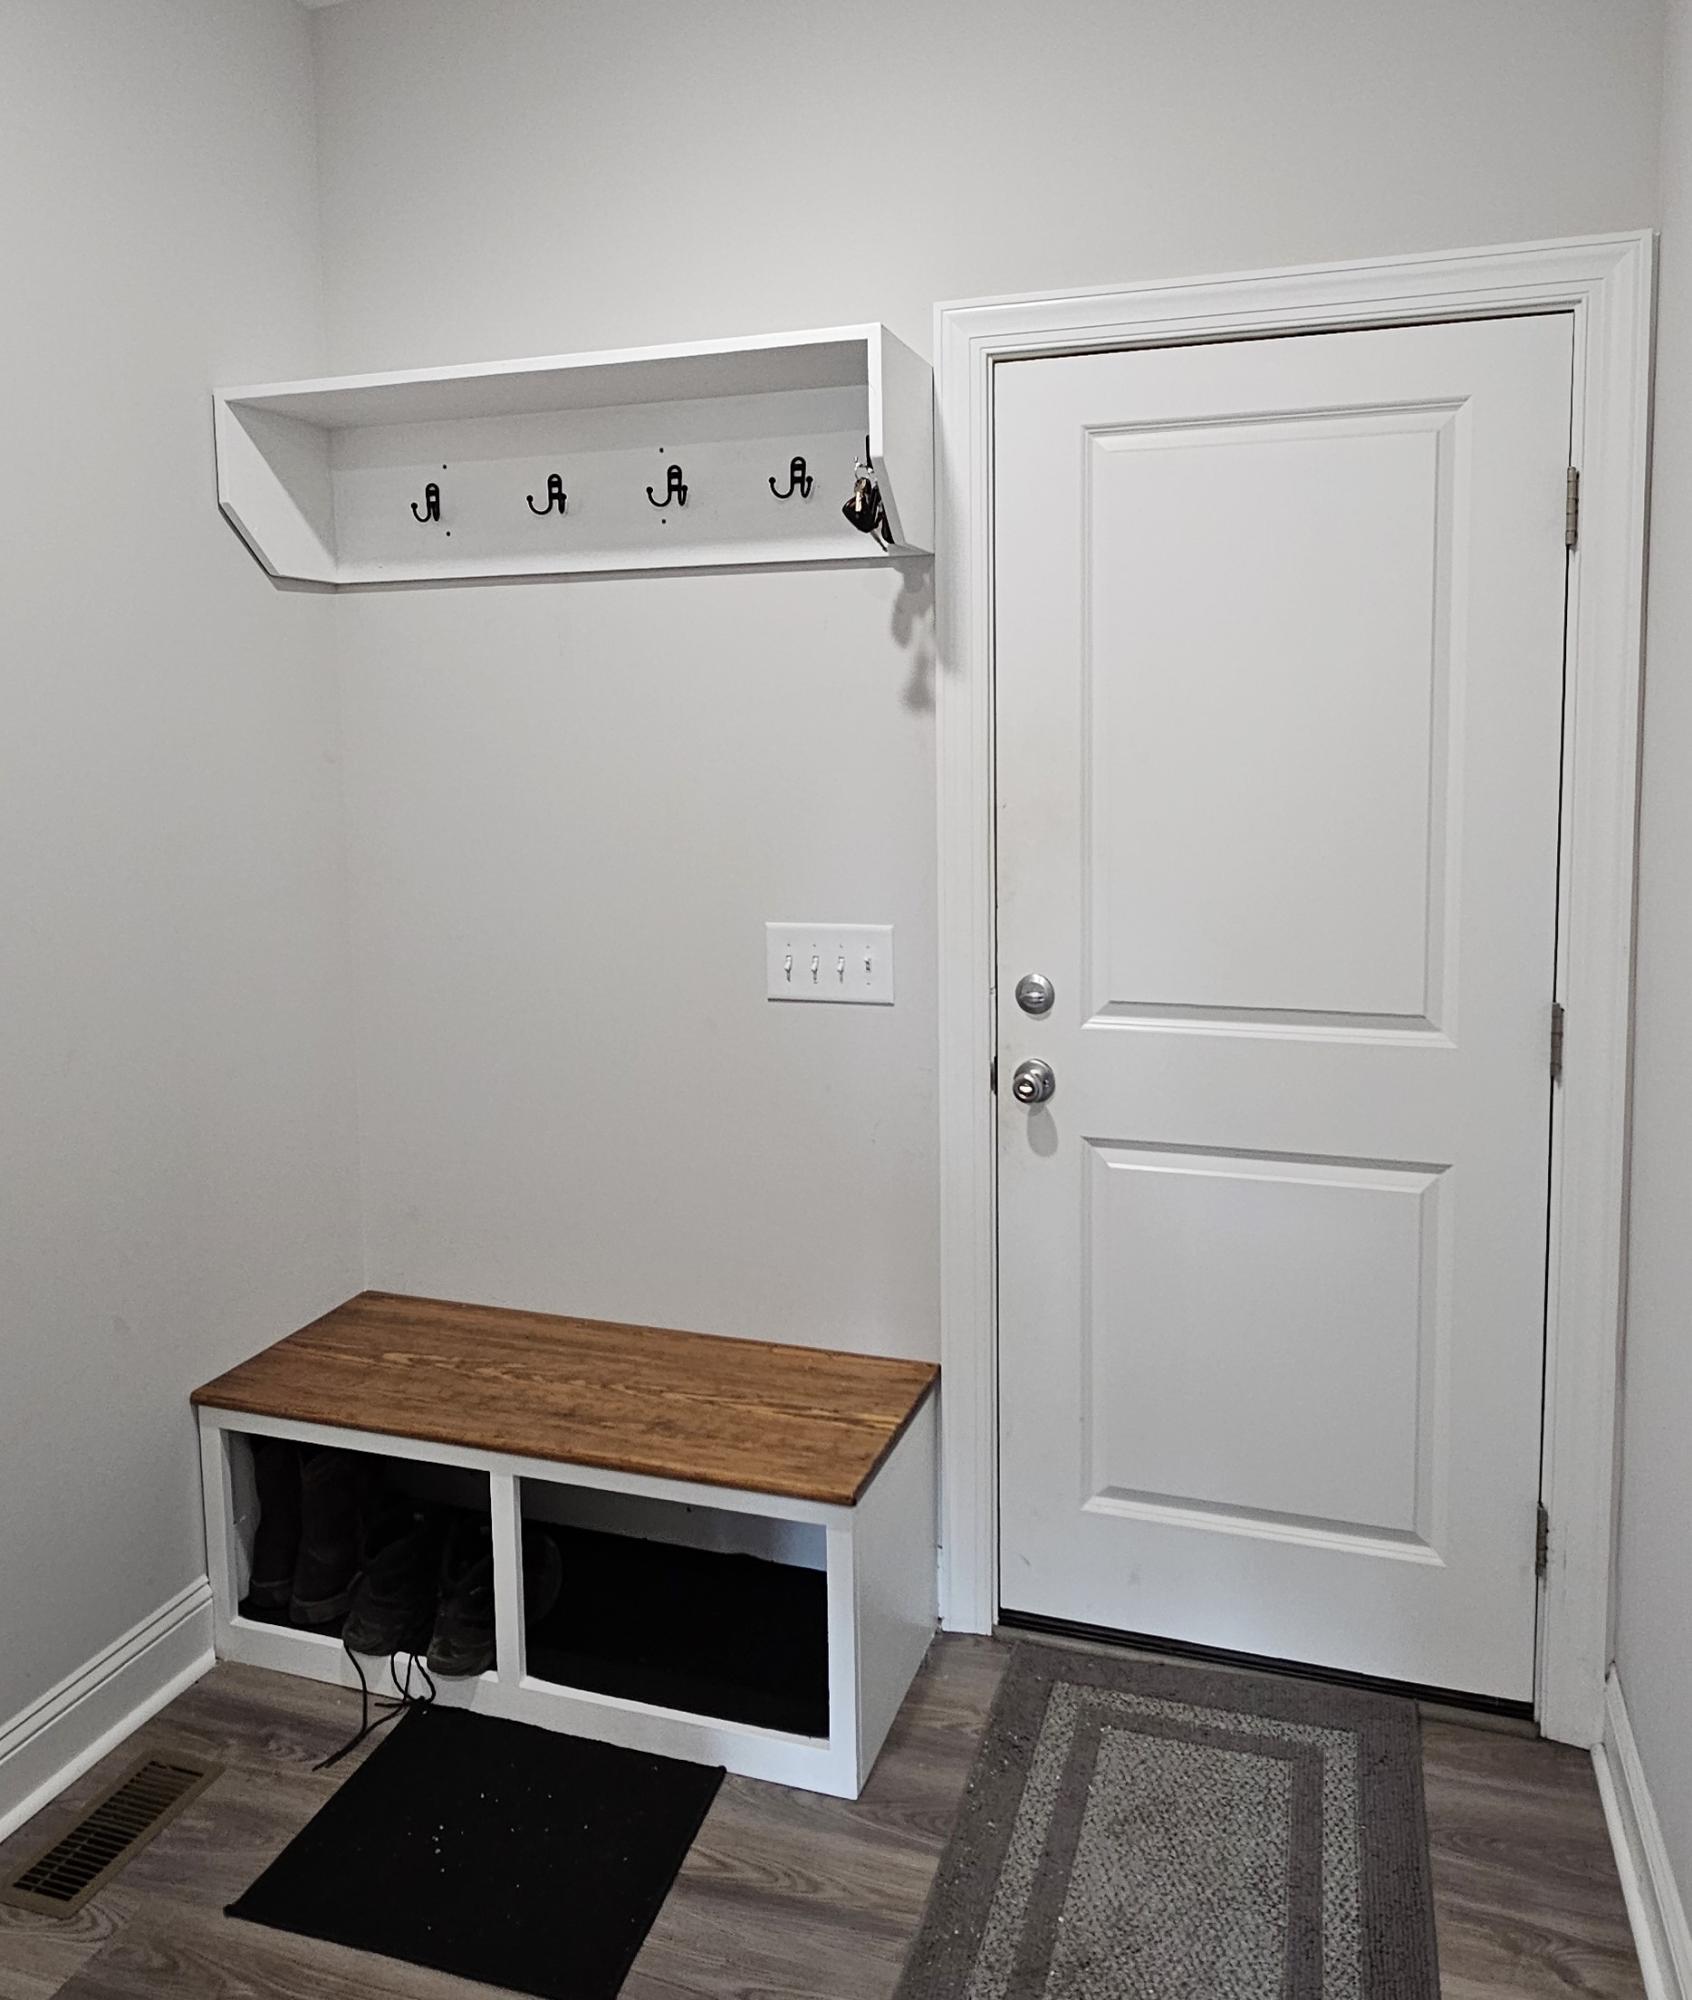
Built my wife a bench and coat rack for our mudroom also a bench for garage.
Thanks to Ana watched her on youtube.

Built from Plan(s)
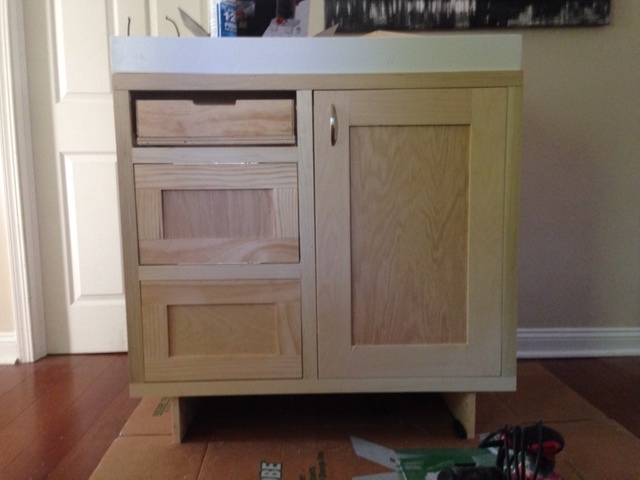
Changing Table
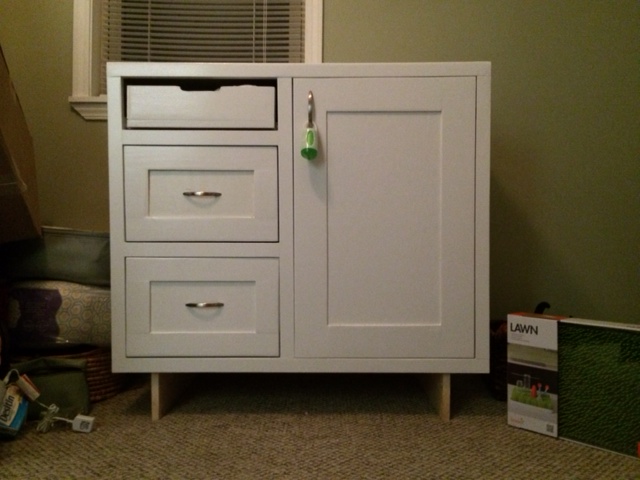
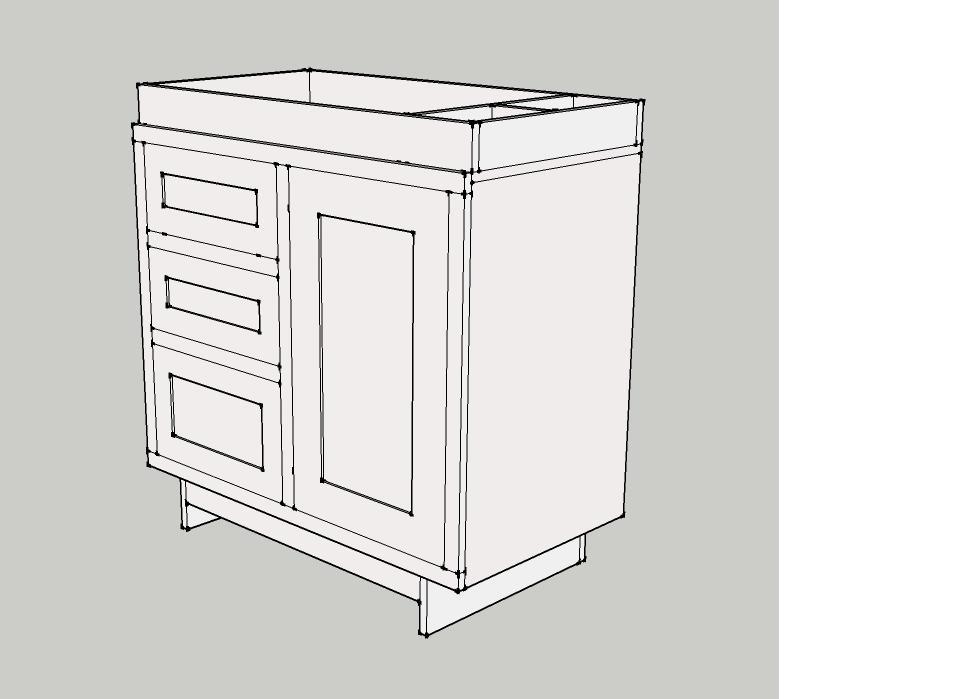
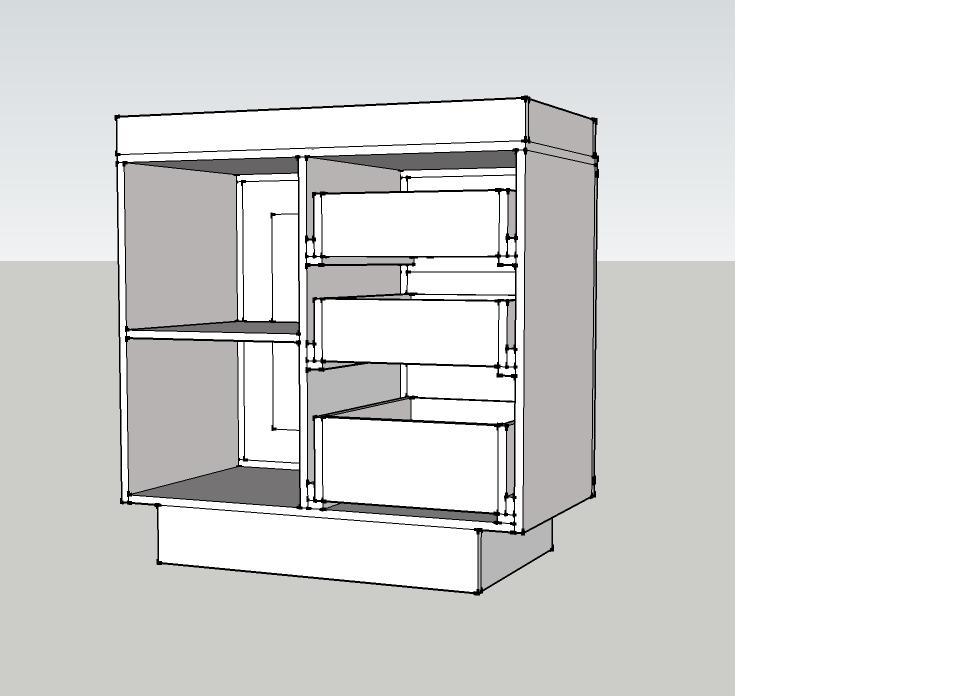
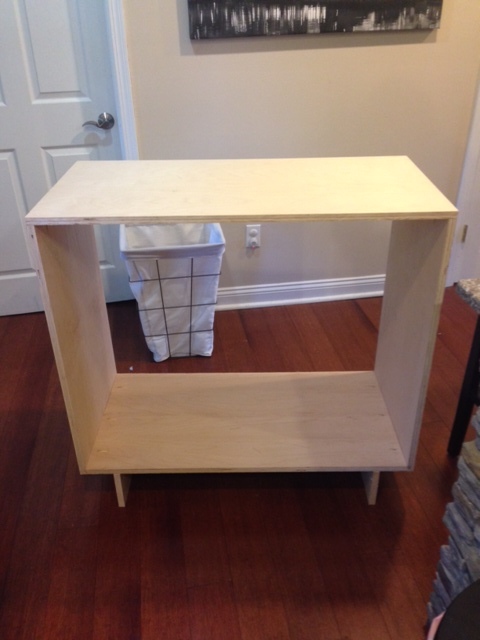
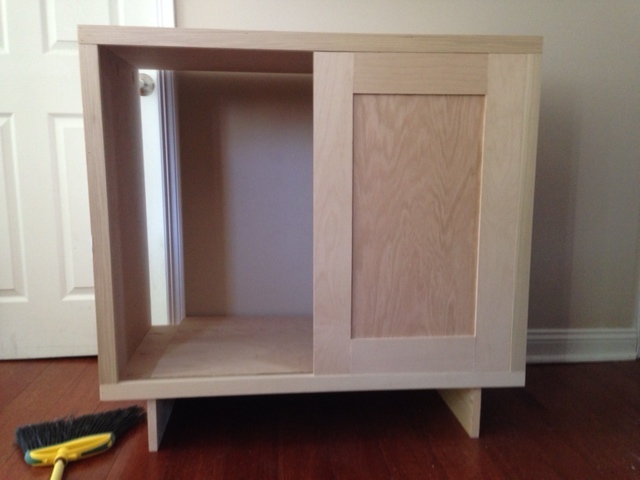
After building the Emerson console for our living room, and seeing how Ana modified the plans for a changing table, I decided to do the same. Although I eliminated one of the doors to make it fit our room a little better and also cut down on plywood costs, I'm VERY happy with how this turned out.
I also decided to use shaker style drawers and a shaker style cabinet door to give it a slightly more polished or modern look. Our baby is due in July and these drawers are already full of diapers and clothes!
Built from Plan(s)
Estimated Cost
$175
Estimated Time Investment
Weekend Project (10-20 Hours)
Finish Used
Kilz primer on the bare wood, followed by Valspar Ultimate paint in Ultra White, and finally protected with Minwax water based polyurethane to prevent the white from yellowing. Lots of sanding to smooth out the painted surfaces and get rid of any runs/brush strokes/lap marks.
Recommended Skill Level
Intermediate
Comments

Mon, 06/09/2014 - 07:19
This turned out BEAUTIFUL!
I love the modifications you made to this! Definitely looks modern and polished. Great job!
Wed, 06/11/2014 - 12:28
Thank you!
Thank you for the kind words! I visit all of your sites daily so I appreciate the feedback
Leaning bathroom shelf
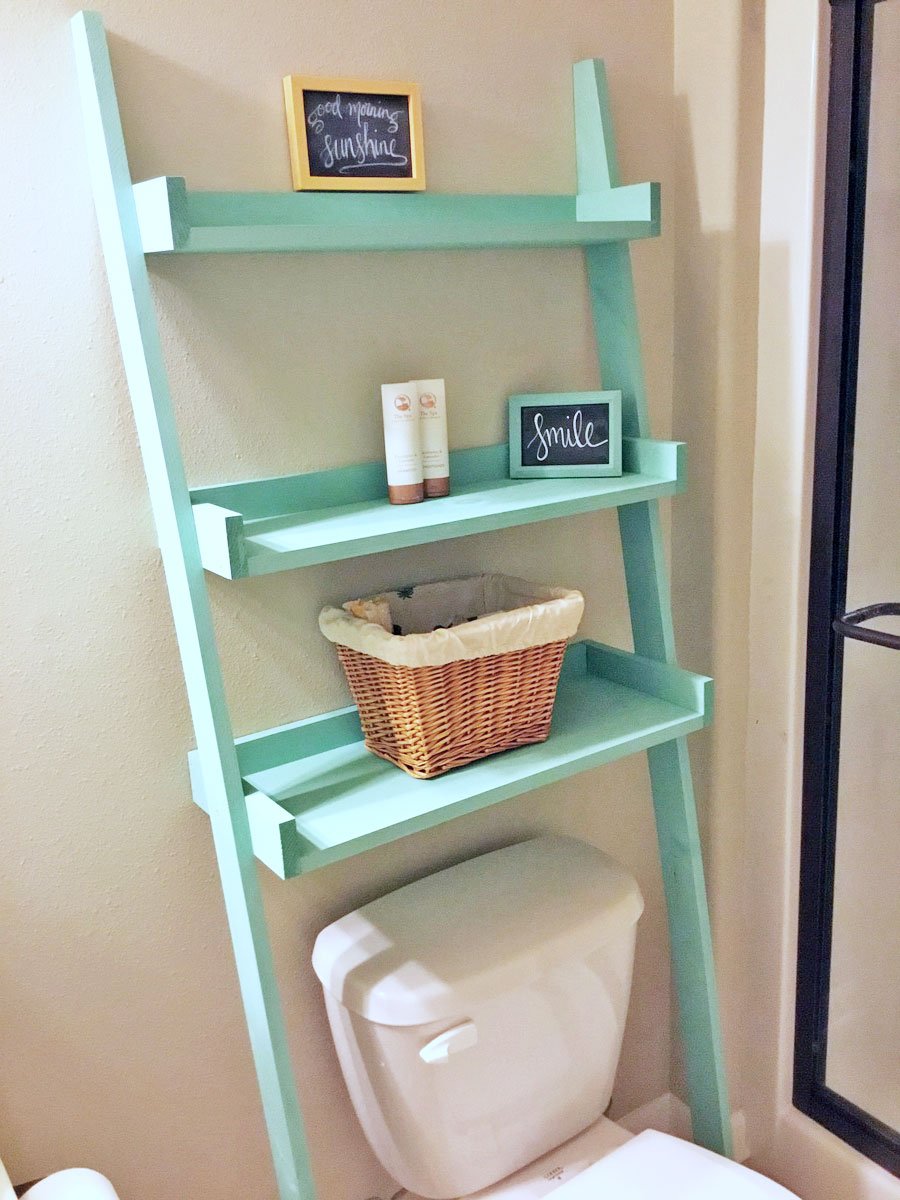
I saw this plan and immediately decided to make it! My mom had been telling me for a while I needed a shelf in the bathroom she uses while visiting. She was coming the next day so decided I needed to hustle to surprise her. I left the lumber store at 8pm and finished painting the assembled shelves by 11pm. The next morning I moved shelves to the bathroom and when she arrived later that day she was so surprised! She loved it! Thank you so much for the idea!
Built from Plan(s)
Estimated Cost
$11 for lumber (I purchased 2 pieces 1-1x6 @ 8ft and 1-1x10 @ 8ft and cut to size). I already had nails, wood glue, and paint (you could purchase a sample size for $3 @Lowes and have enough for this project ).
Estimated Time Investment
Afternoon Project (3-6 Hours)
Finish Used
Scenic view colored paint
Recommended Skill Level
Beginner
Comments

Wed, 06/19/2019 - 17:01
This is amazing! Three…
This is amazing! Three hours! I'd be surprised too!
Thank you so much for sharing a brag post, much appreciated!
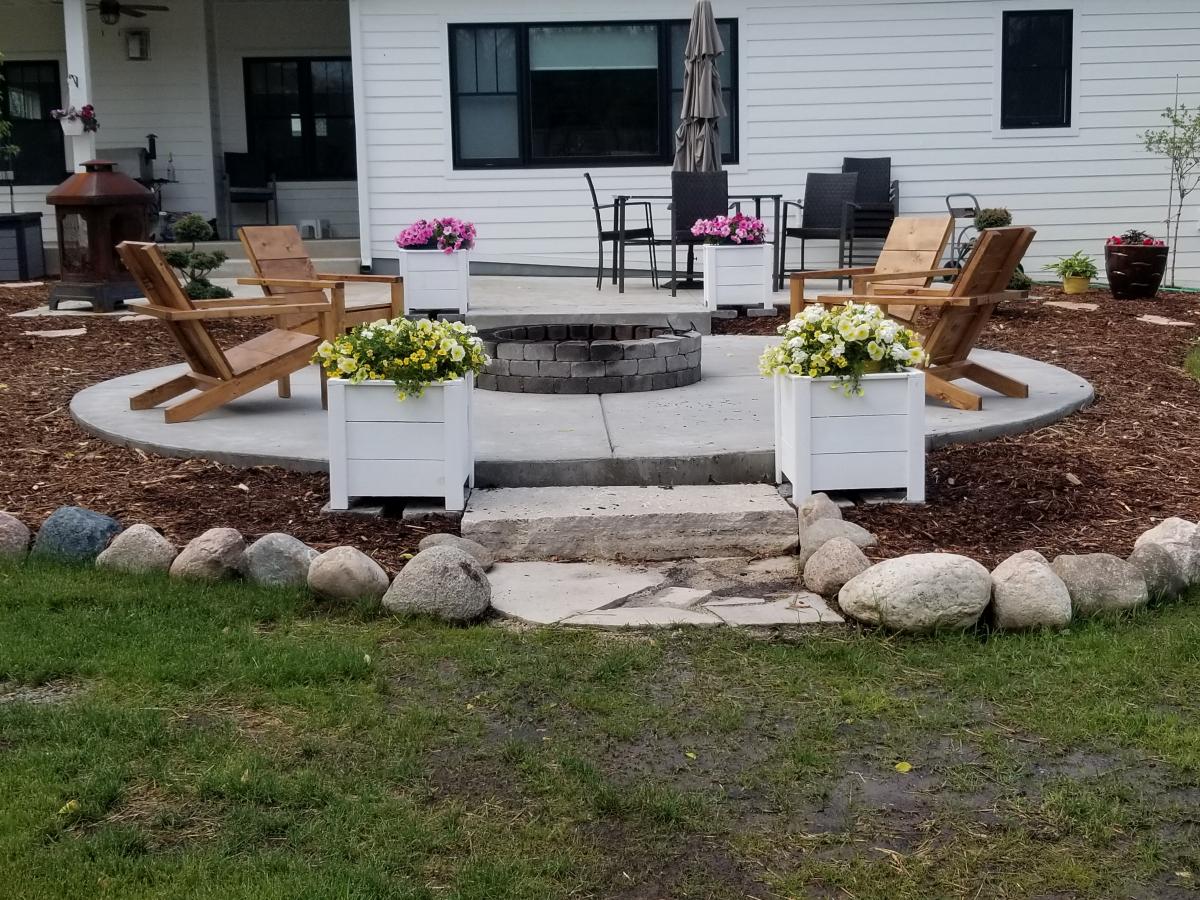
Planter Boxes
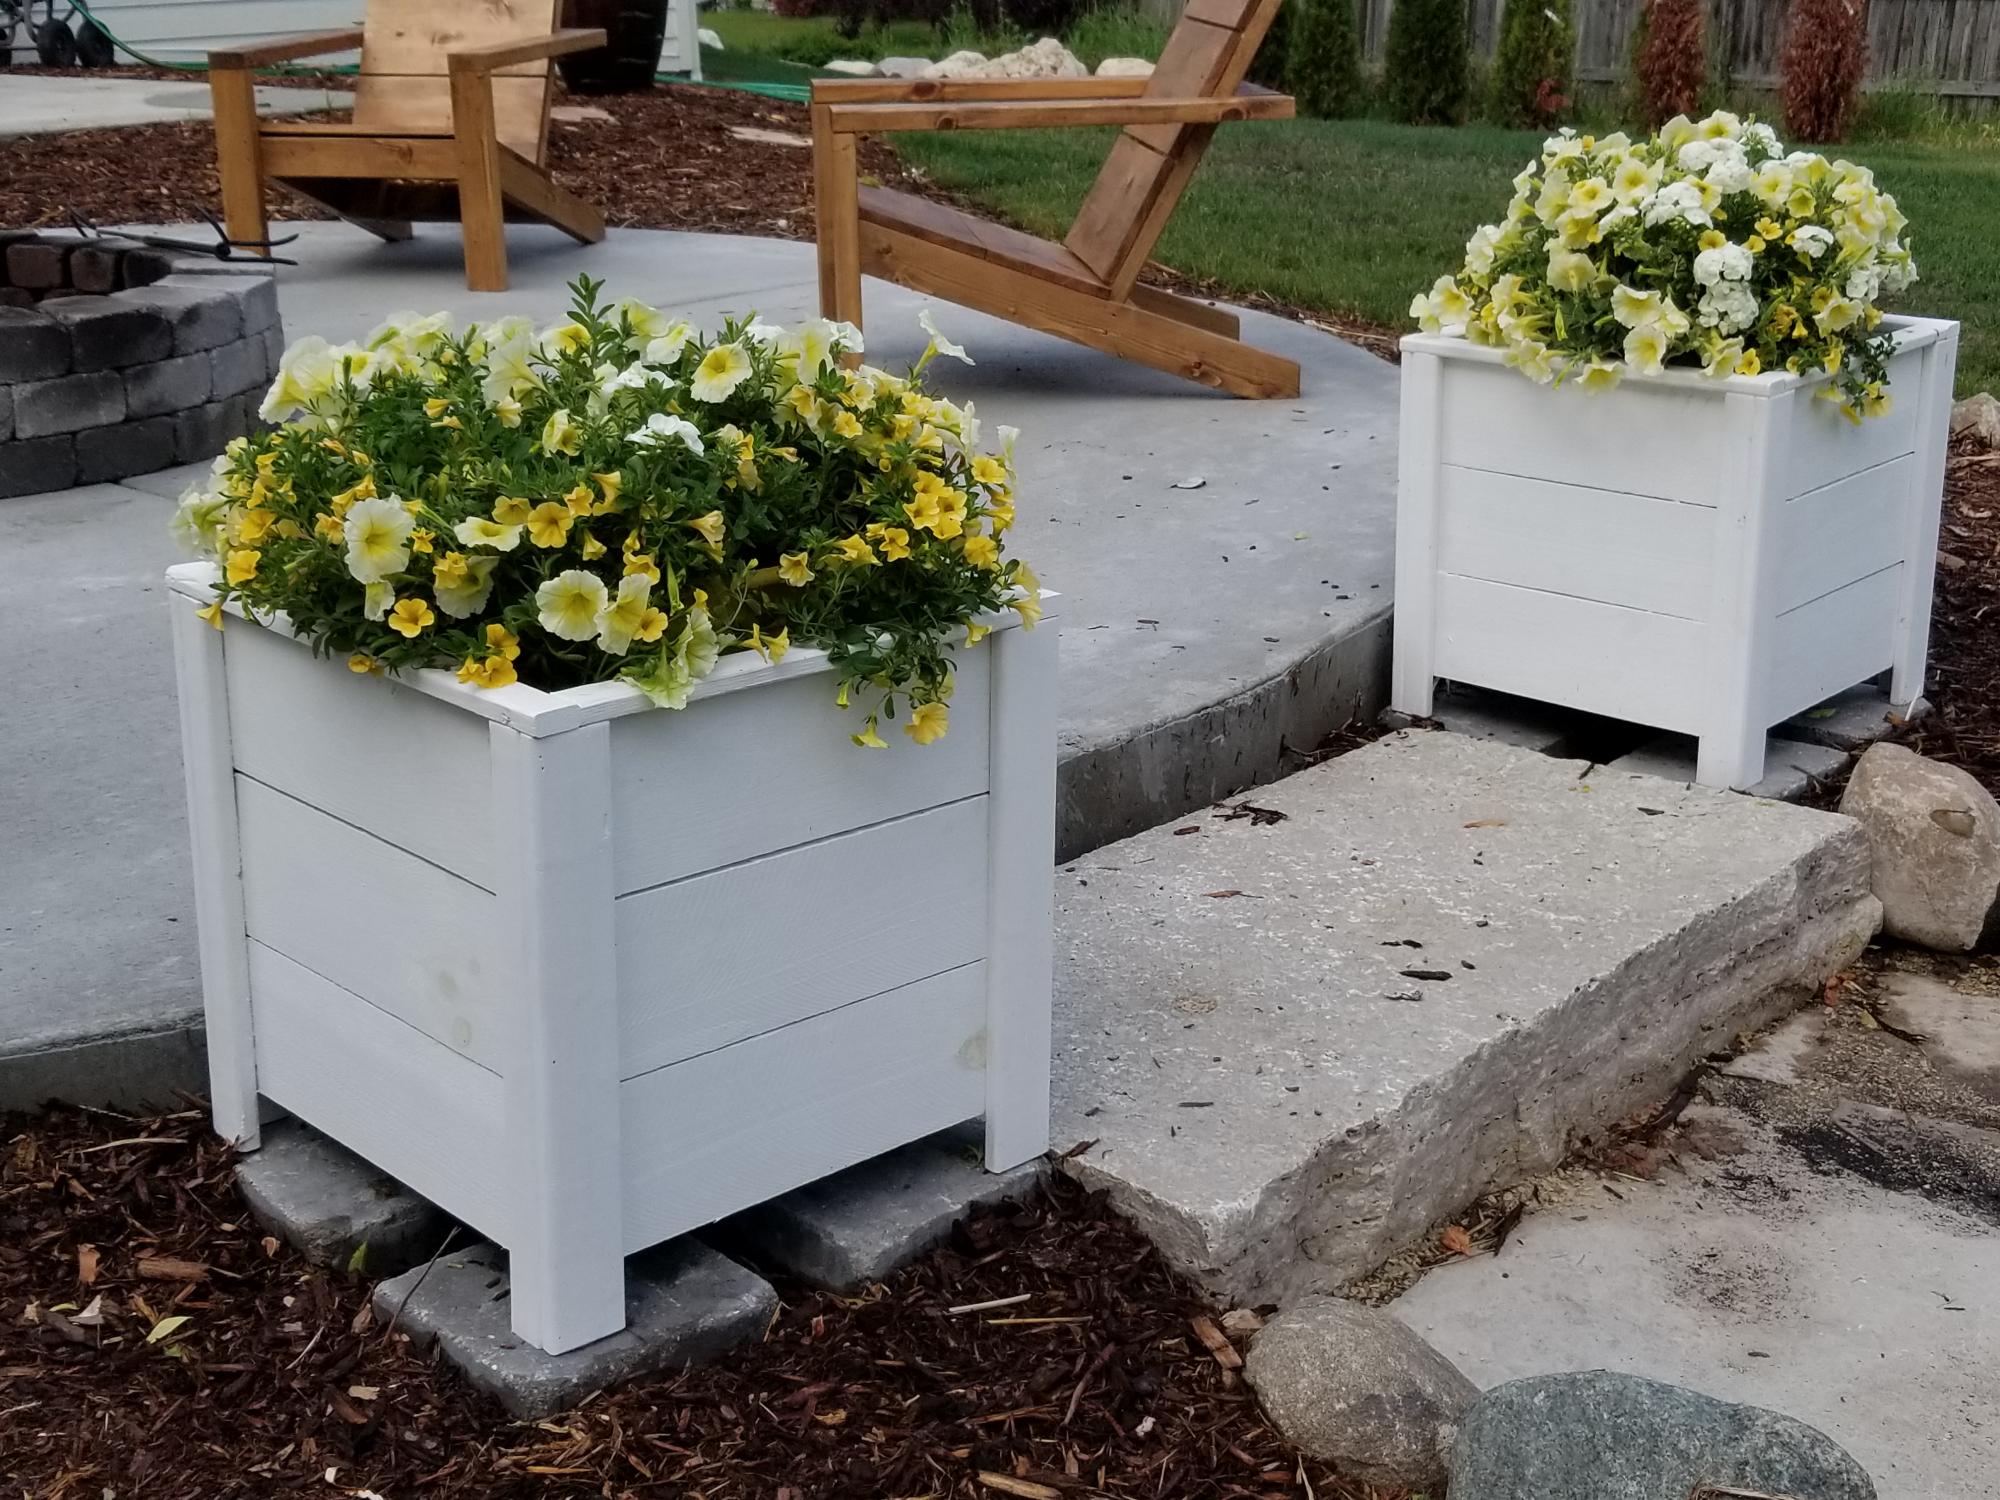
I followed the plan exactly including the suggestion of the fence paint (2 coats). This was a very easy build. It took much longer to paint than it did to build. These boxes are the perfect accent on our new patio/firepit.
Built from Plan(s)
Estimated Cost
$10/box for the wood
Estimated Time Investment
Afternoon Project (3-6 Hours)
Finish Used
Behr Fence Stain (white) 2 coats
Recommended Skill Level
Beginner
Comments
Modern Outdoor Chairs
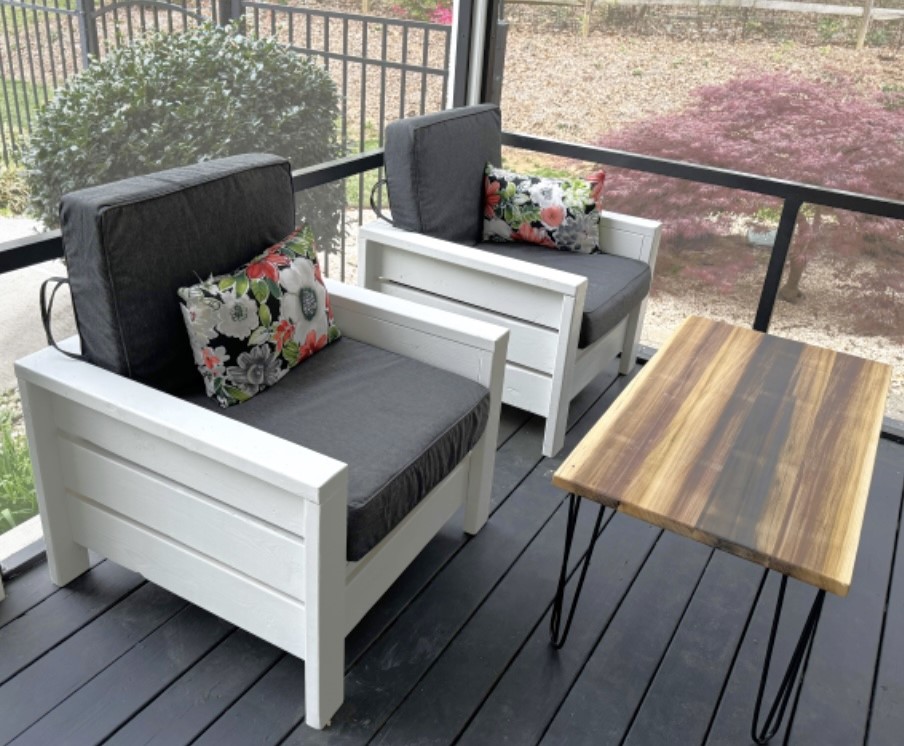
Modern Outdoor chairs. Great plan that I’ve wanted to do for a while. Very easy to execute the cut list and plans as written.
Mike Sebazco
Built from Plan(s)
Laundry Sorter
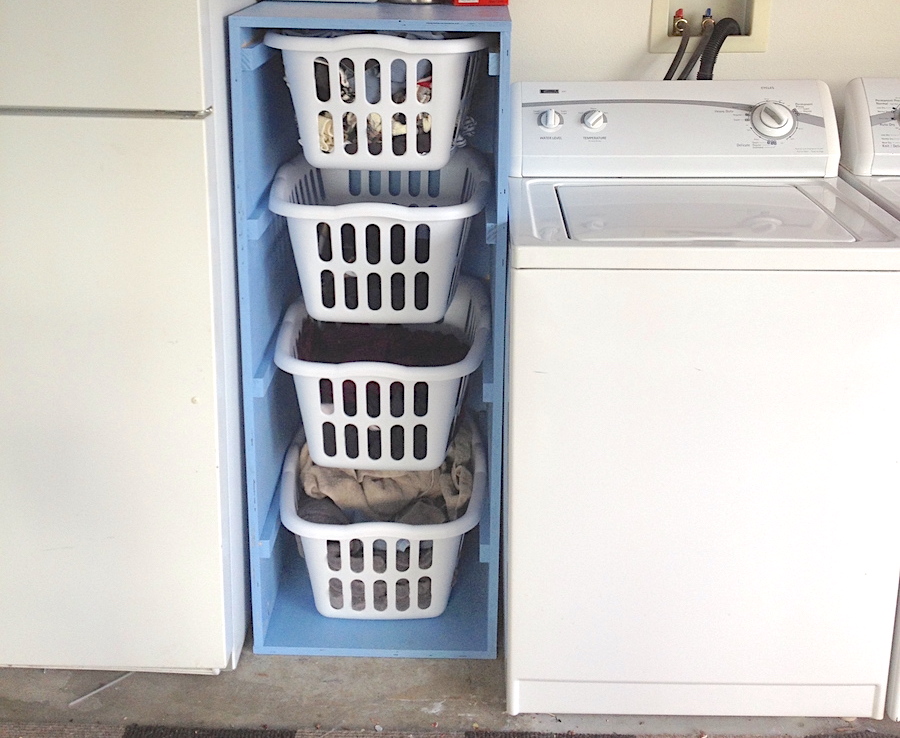
I was tired of having my laundry piled on my garage floor. These plans were the perfect solution. It fits great in the small space I had next to my washer. And it was so easy. I was able to do it all by myself. My husband just had to catch the plywood for me when I ripped it. I was able to find the baskets on the plans at Target and used left over paint from my sons' playroom. My laundry is now always sorted, making it much easier and faster to clean.
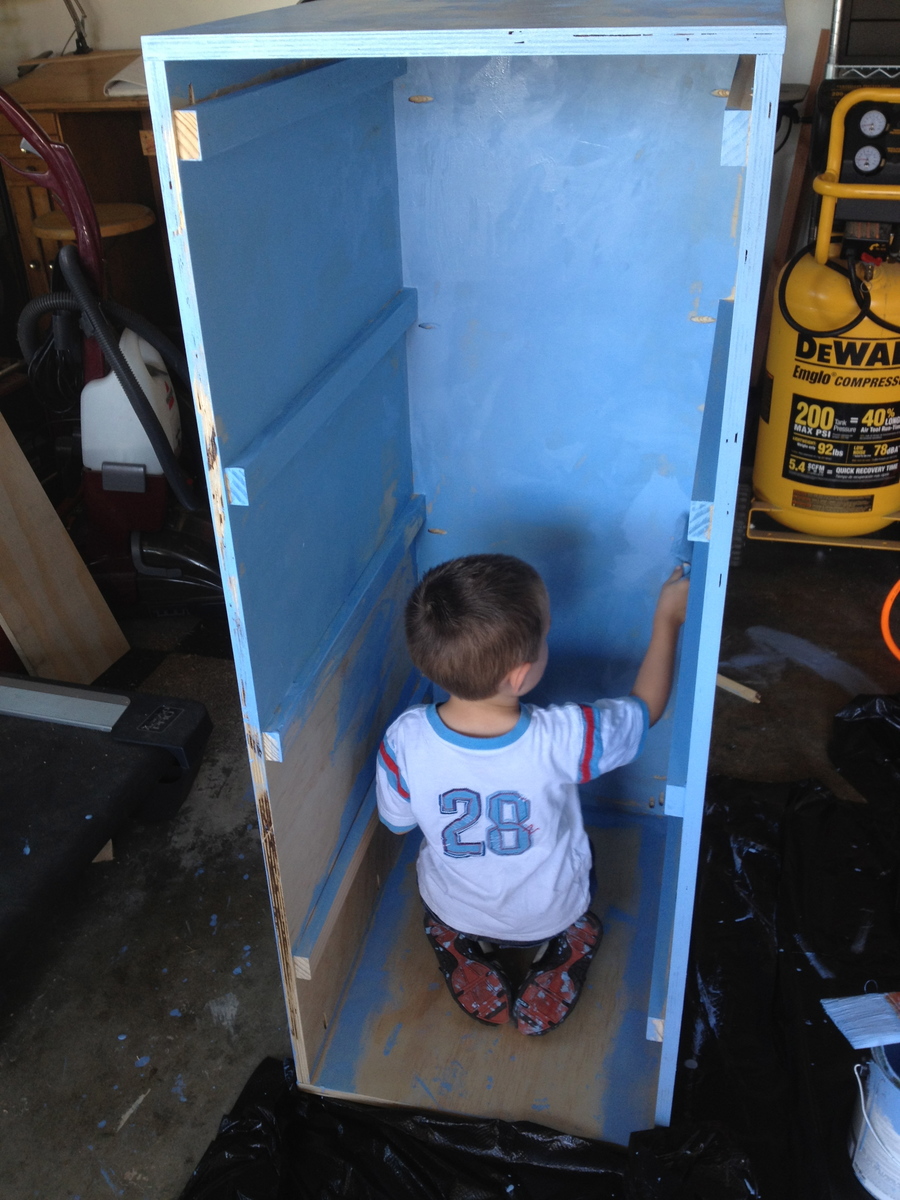
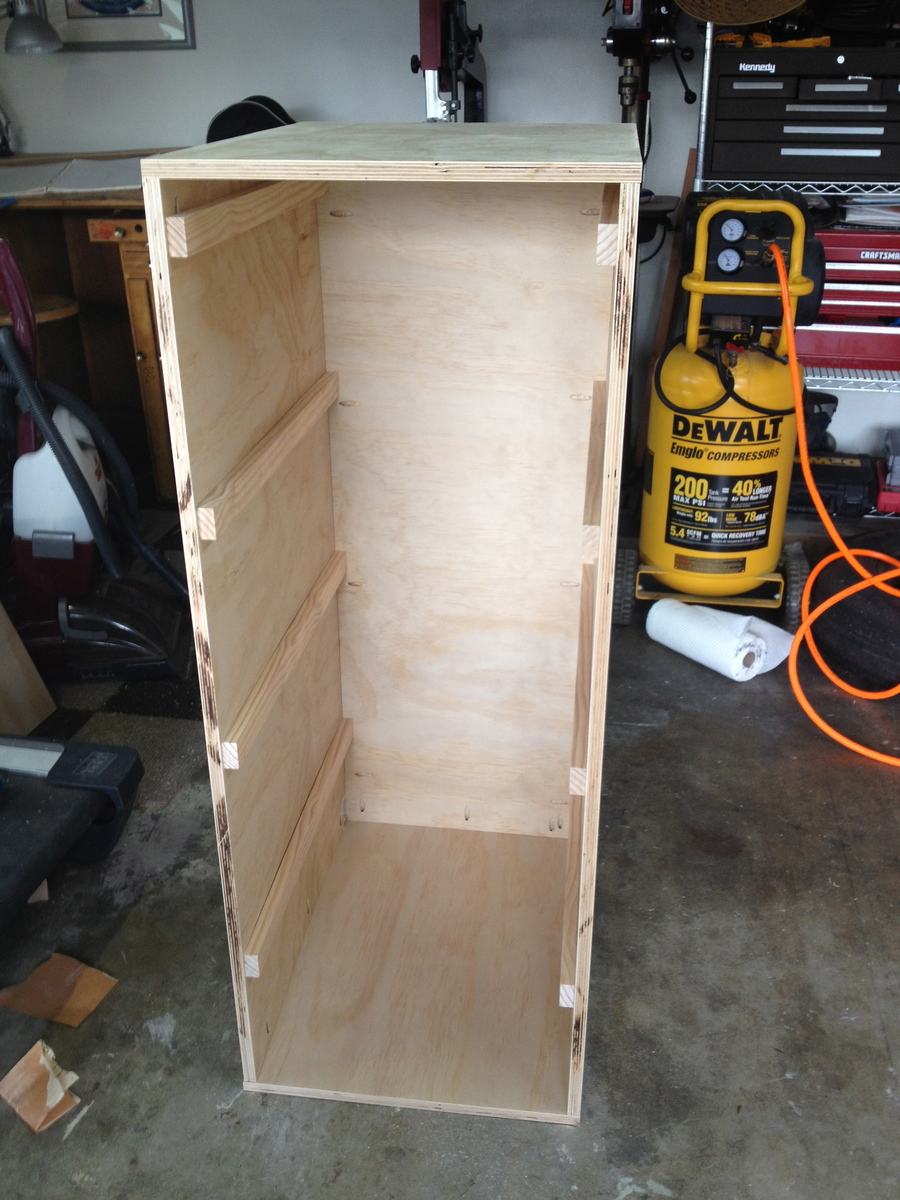
Built from Plan(s)
Estimated Cost
$60
Estimated Time Investment
Day Project (6-9 Hours)
Finish Used
Water based paint in eggshell finish. Since this was going to be in the garage I just used leftover paint. If it would have been used anywhere else, I would have used a semi-gloss.
Recommended Skill Level
Beginner
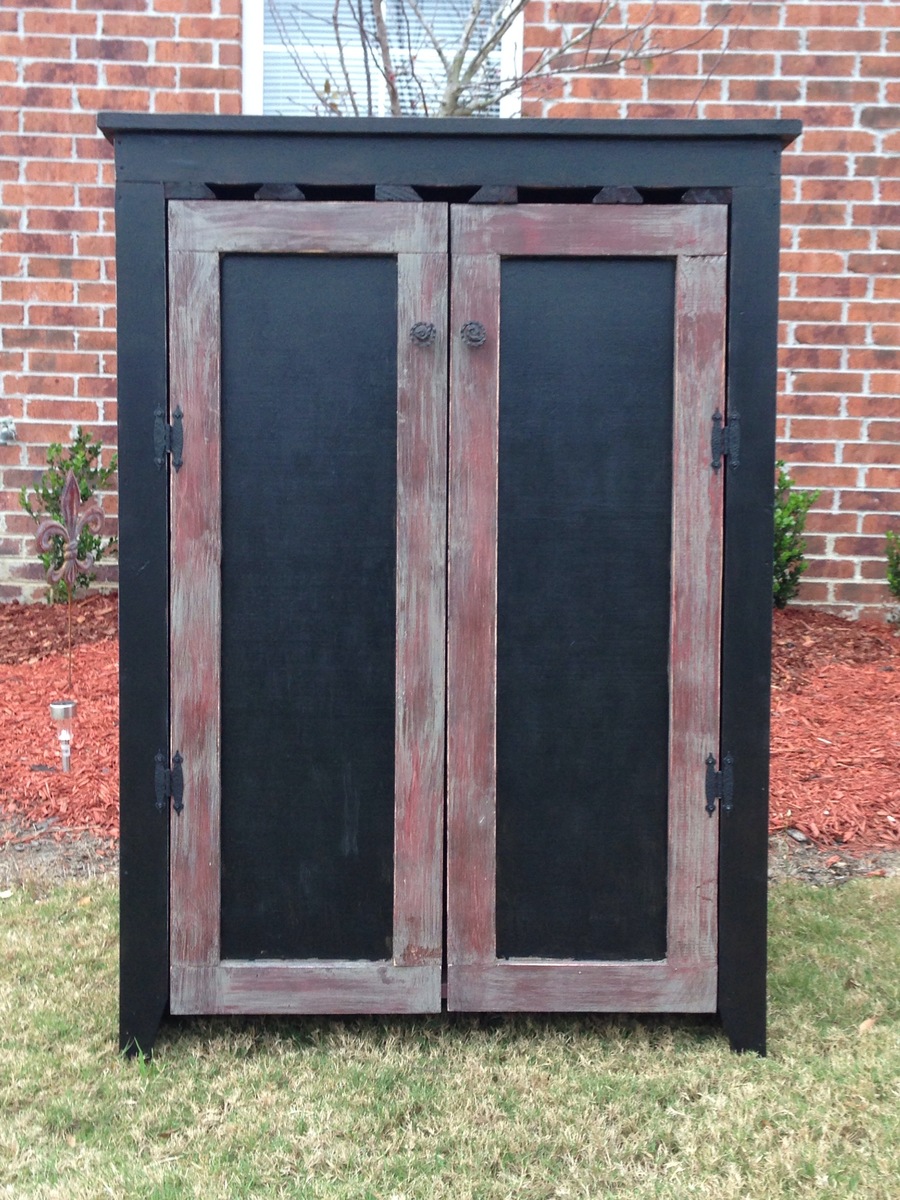
Wine Cabinet - Made from jelly cupboard\pie safe plan

We used the plans from the jelly cabinet \pie safe and added a wine rack at the bottom and wine glass rack that the top! I love it! I get so many compliments on it.


Estimated Cost
$150.00
Estimated Time Investment
Weekend Project (10-20 Hours)
Finish Used
I wanted it to look rustic\antique so I used spray paint and regular paint. It was my first time doing something like this. I was pretty much just experimenting and it turned out perfect.. We are building one for my Mom next, I wait to see how it turns out!!
Recommended Skill Level
Beginner
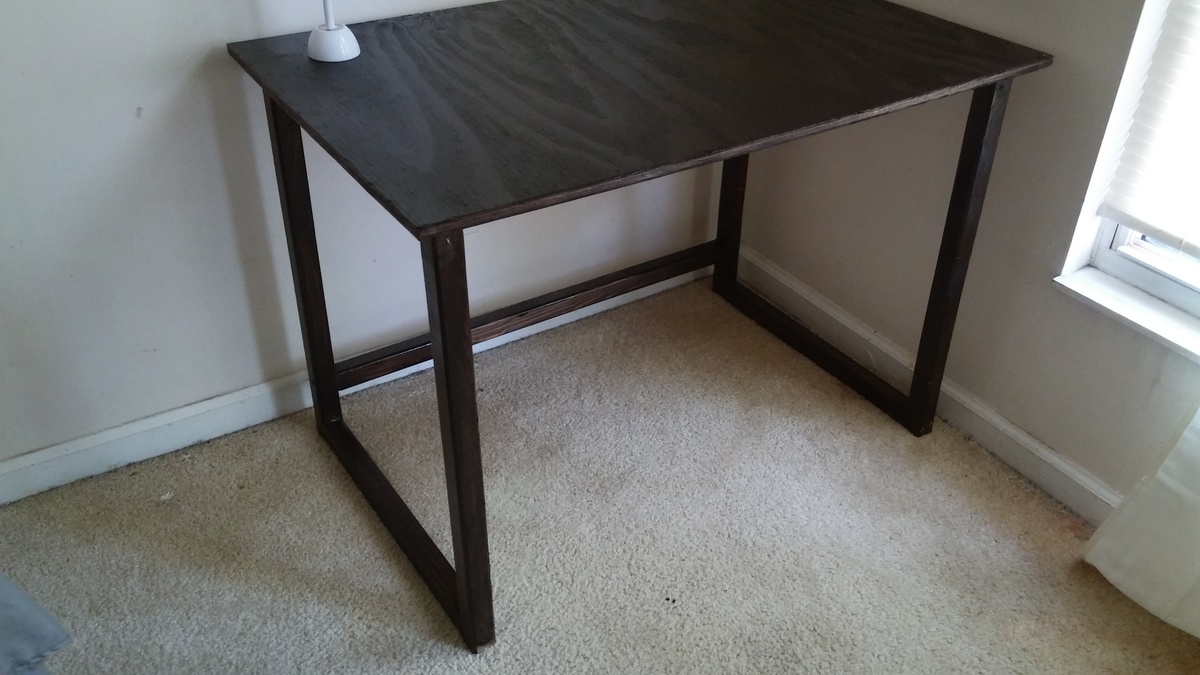
Cute corner desk
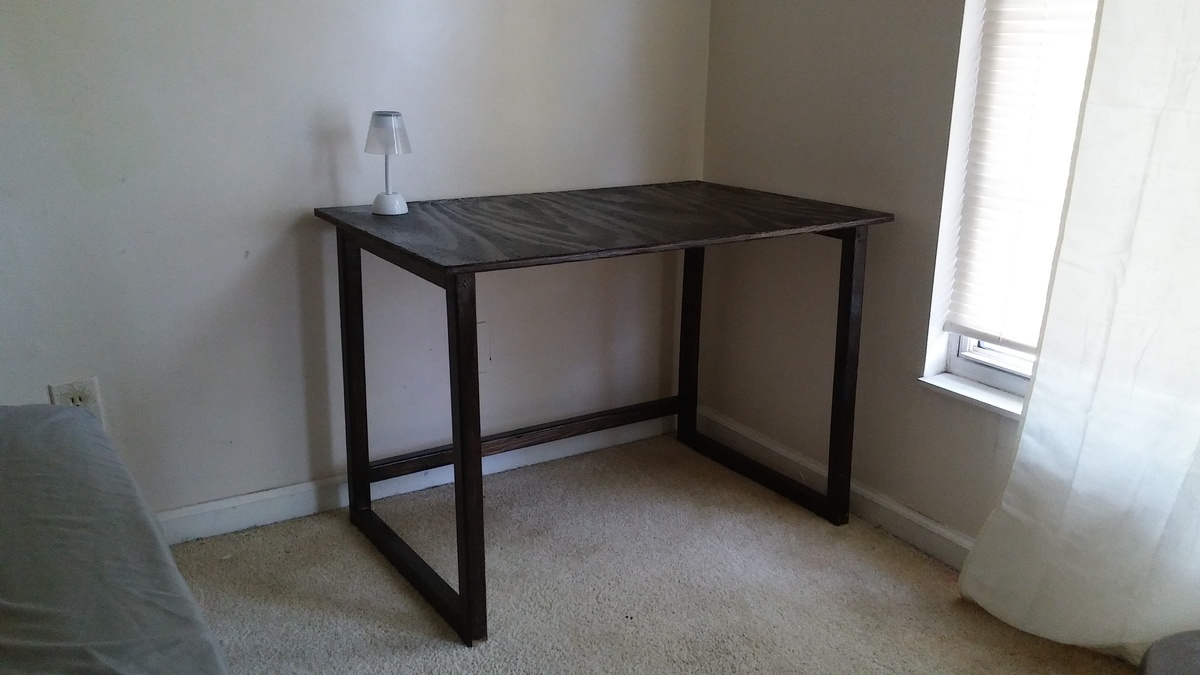
This 2x2 desk base was the perfect size for our 6' exchange student. He needed plenty of room width and length wise. We went with stain in Kona. More time was spent staining then building.
Built from Plan(s)
Estimated Cost
$20
Estimated Time Investment
An Hour or Two (0-2 Hours)
Finish Used
It is the base for a corner desk
Recommended Skill Level
Starter Project
Papa’s Treehouse
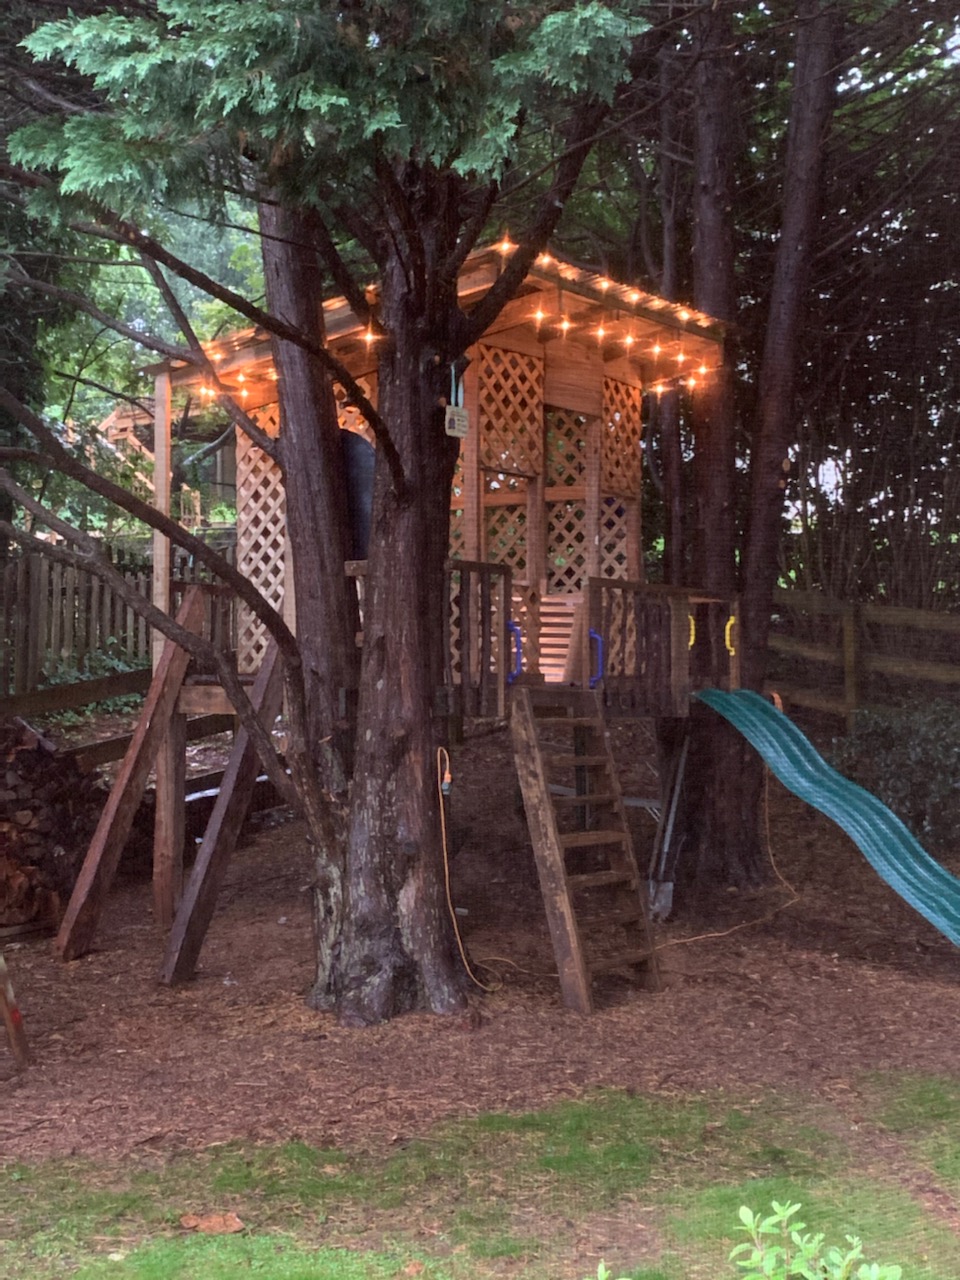
Have 3 granddaughters; 3, 2 and 6 months, so far 😉 Saw your treehouse video and made a modified version of your triangle platform using the trees I had available. Kinda went over the top a bit, but give you all the credit. Repurposed mostly old deck PT wood and rough hewn beams from neighbors.
Thanks!
Bill Magyar
Duluth GA
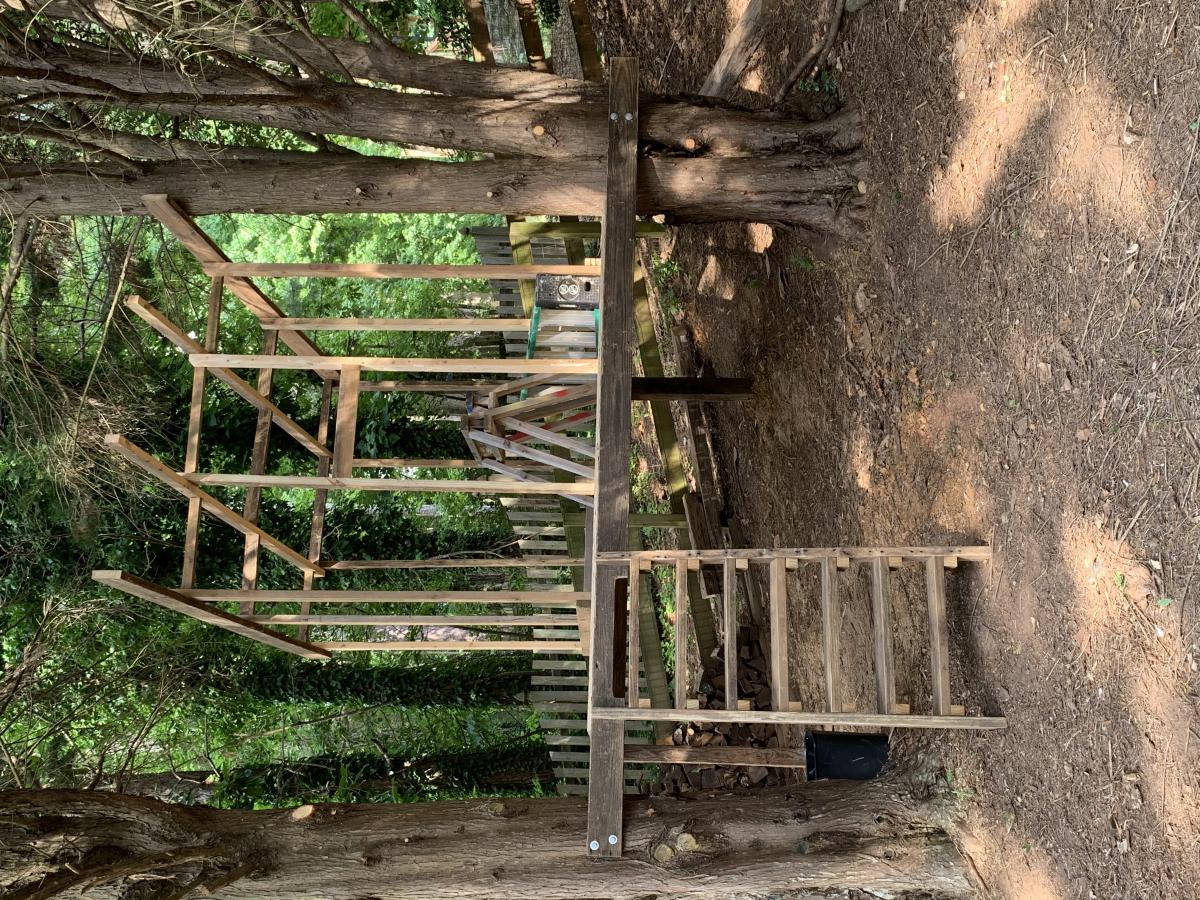
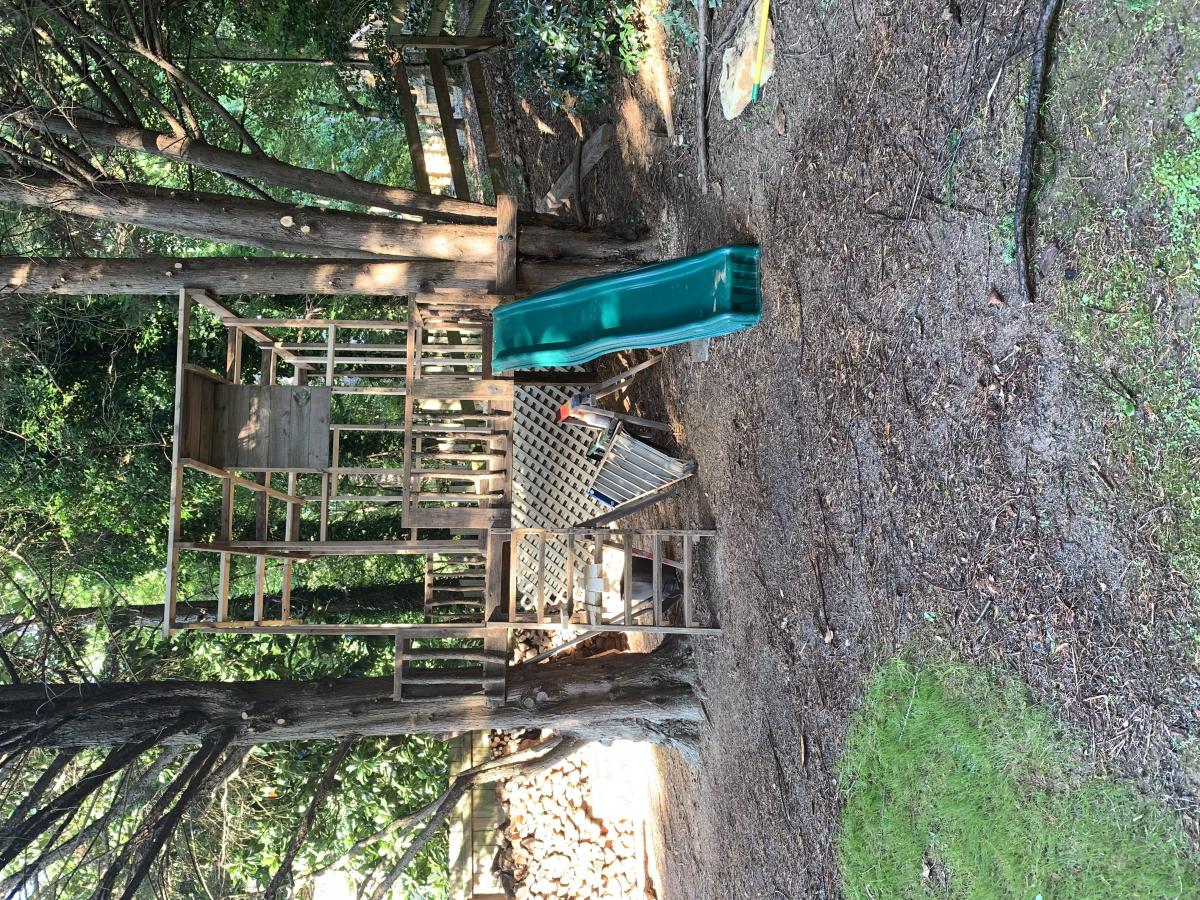
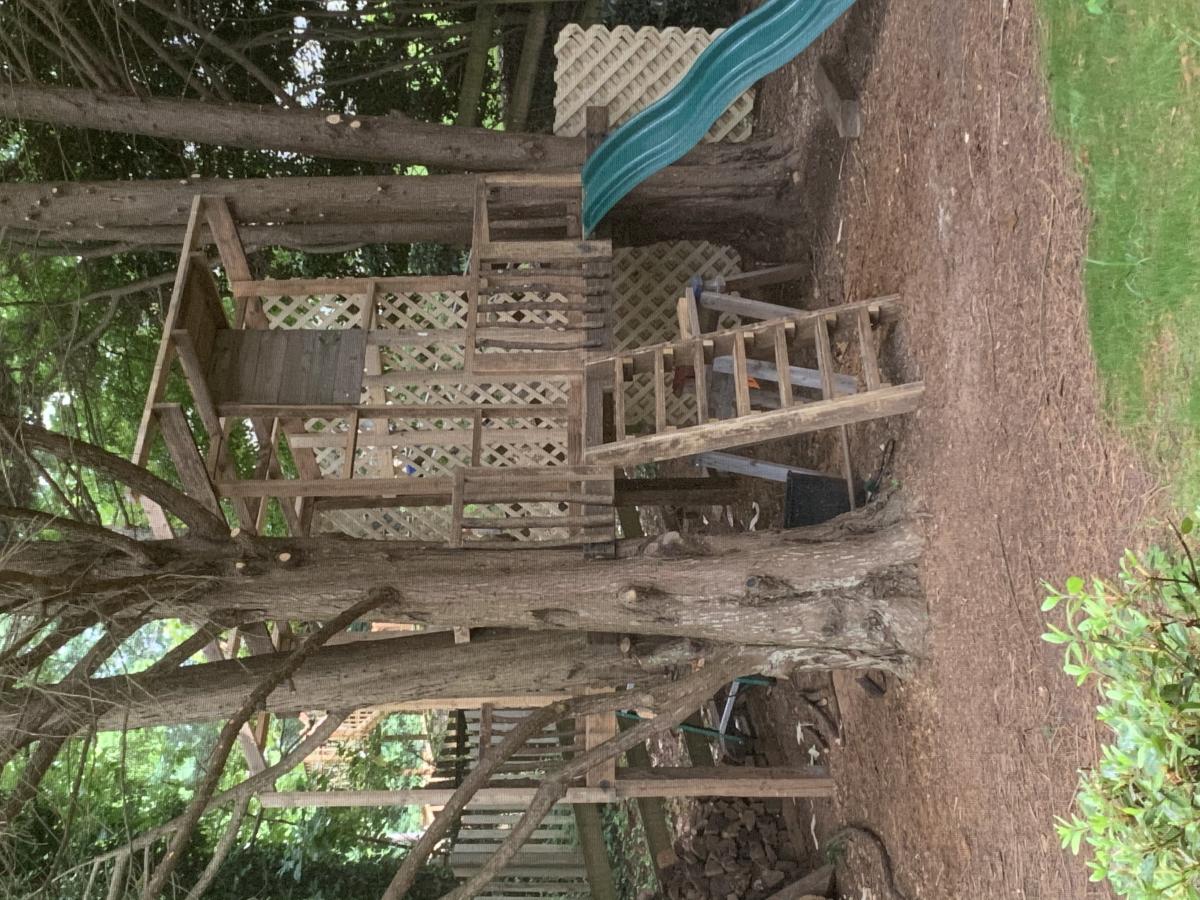
Estimated Time Investment
Week Long Project (20 Hours or More)
Finish Used
PT Wood patina and tea/vinegar aging solution on new.
Recommended Skill Level
Advanced
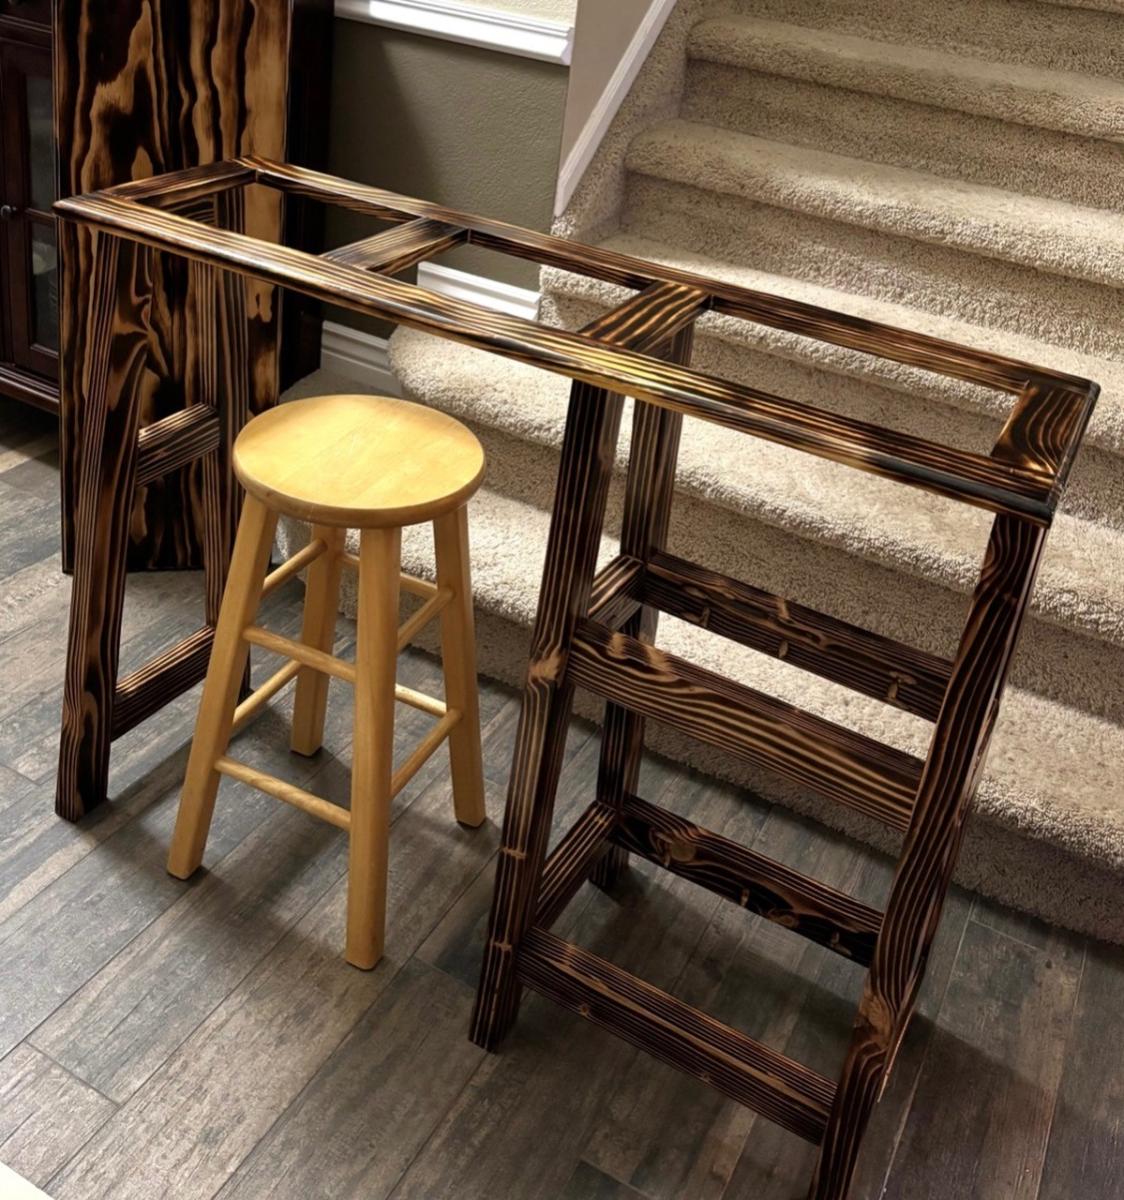
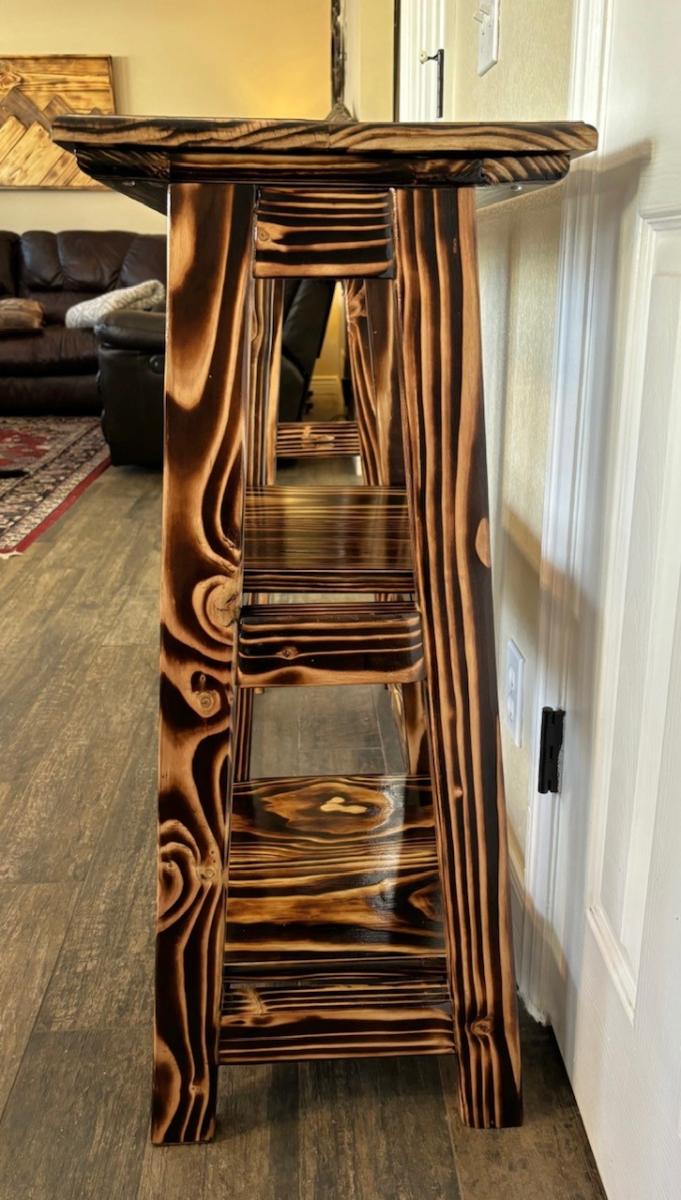
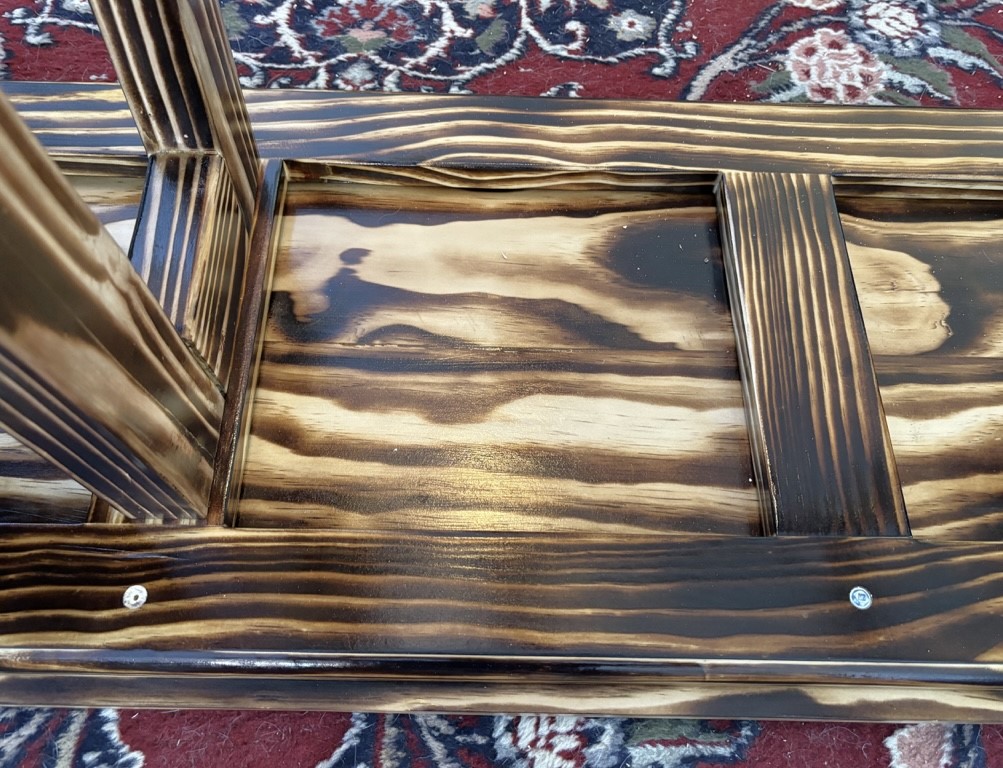
Standing Console for Teaching
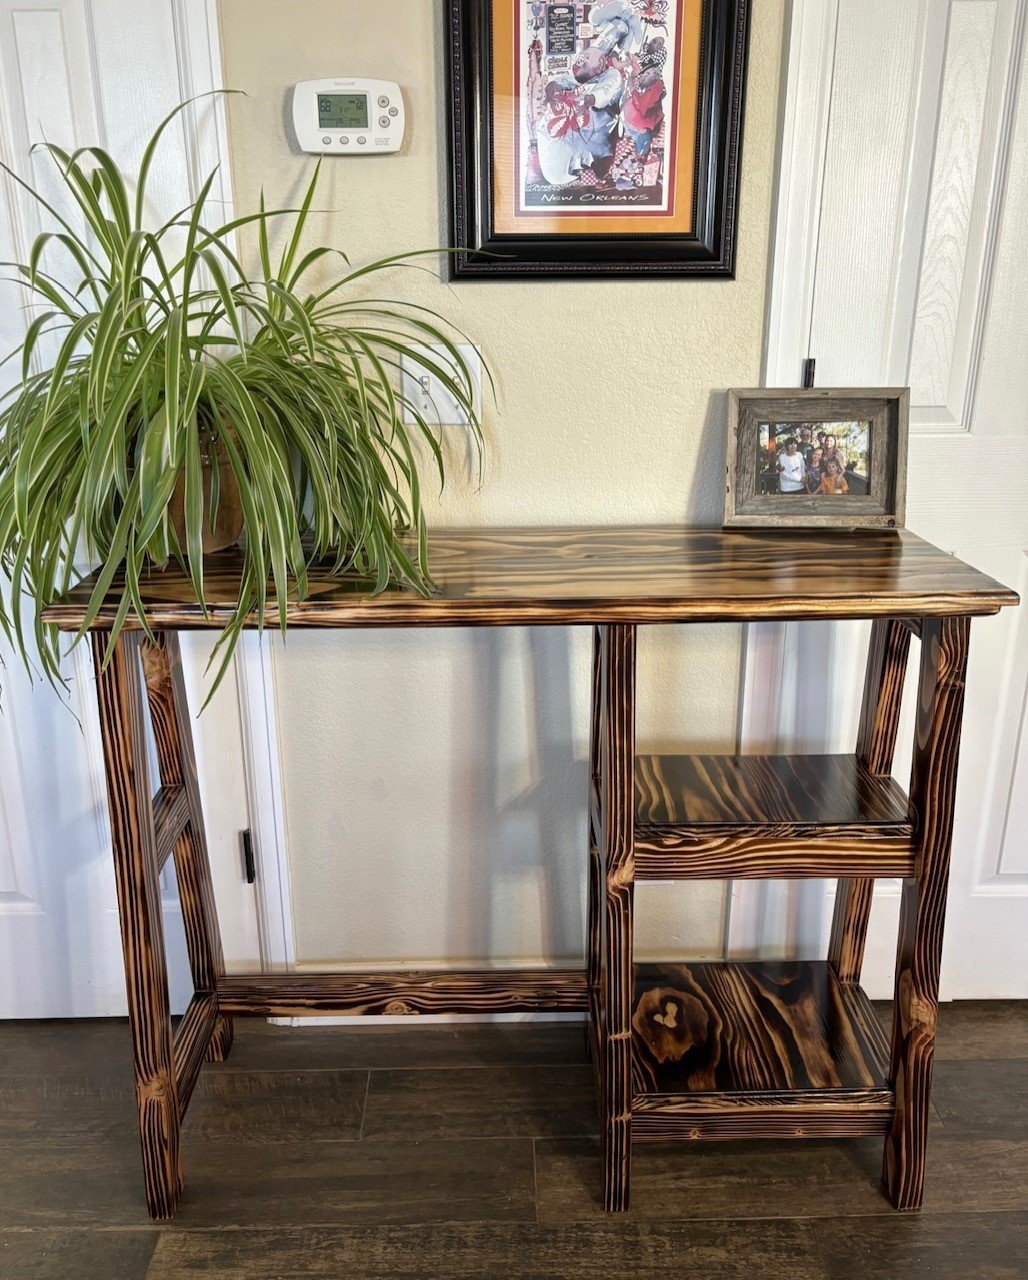
I am a teacher and constantly bending over lower desks and I did not have a table to teach off of in the front of the room. So, I built one with Ana’s ideas of a console table with two shelves. I found a link to Kreg from her site and here was this table. I changed the height and width to give proper support of my back (counter hight) and a width that would hold a teacher book. I liked the A-Frame loom and had not built anything like this before, so I learned. I burned the wood for a fun mix of light and dark wood tones. My dad gave me some router bits and I used one to curve the edges of the top, ropy under frame, and shelves. That way all edges are curved for myself and students. I finished it with a coat of poly and a light sanding in between. Thank you Ana for the skills, confidence, and now a love for creating something useful and fun! My students and parents were shocked !! Plus it adds so much warmth to the classroom. Blessings, Jennifer
Outdoor Umbrella Stand
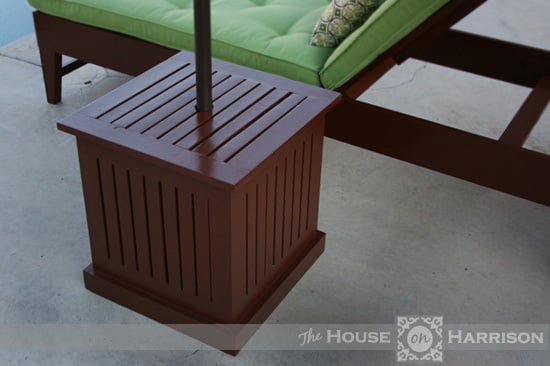
This was such and easy project. It went together in a few hours. The hardest (and most time consuming) part was finishing it. I detailed the build process on my blog if you'd like more info.
Built from Plan(s)
Estimated Cost
$30
Estimated Time Investment
Day Project (6-9 Hours)
Recommended Skill Level
Beginner
Craft Room Cupboards
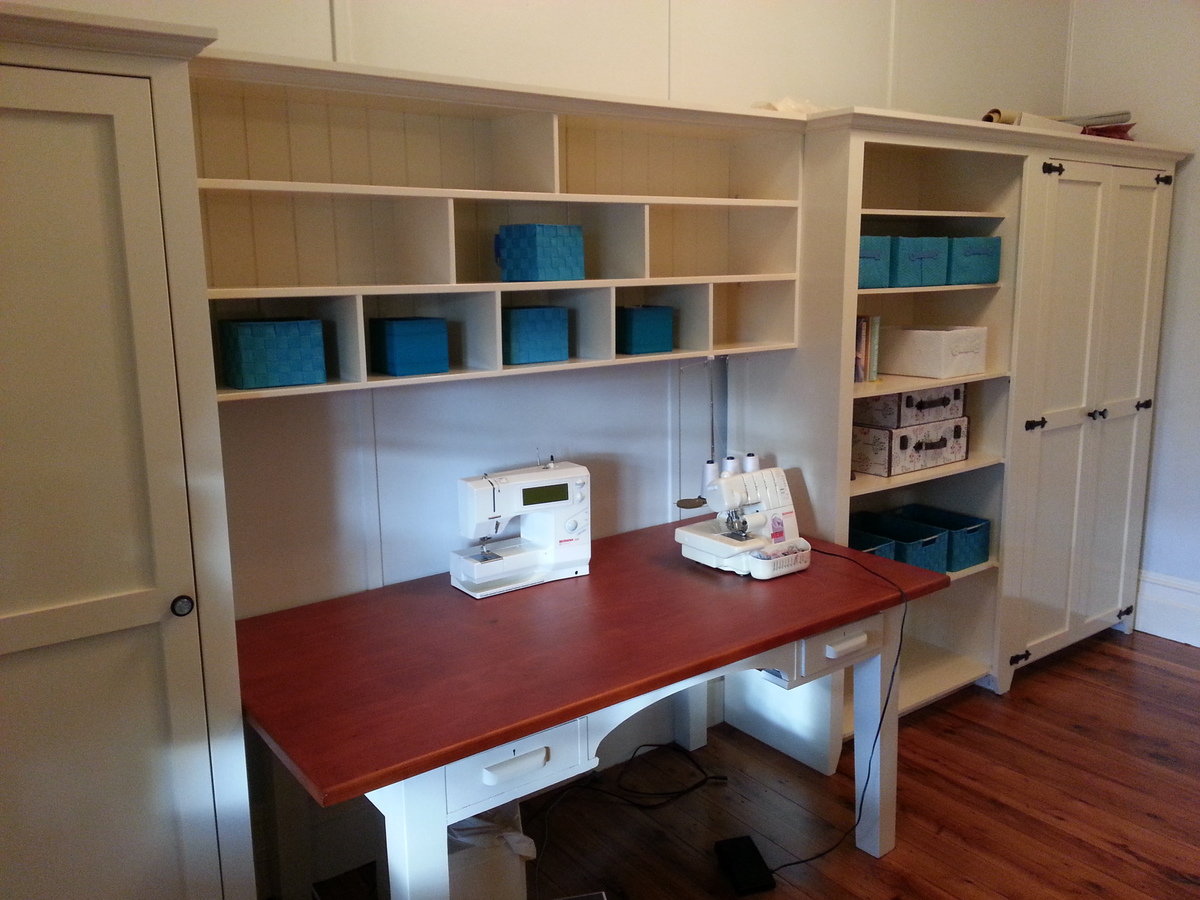
My wife was wanting to get some cupboards and a hutch for her craft room that we were setting up. I looked to buy something but it was very hard to find anything the right size and combination. I was looking at different plans and I came across your site and was inspired to have a go myself. I used the plans for Patrick's Jelly Cupboard and also the Schoolhouse hutch.
I had to change some of it to get the right fit. It took a fair while to complete but I now have a very happy wife
Built from Plan(s)
Estimated Cost
$800 au
Estimated Time Investment
Week Long Project (20 Hours or More)
Finish Used
Enamel Paint
Recommended Skill Level
Intermediate
Our Leaning Wall Desk
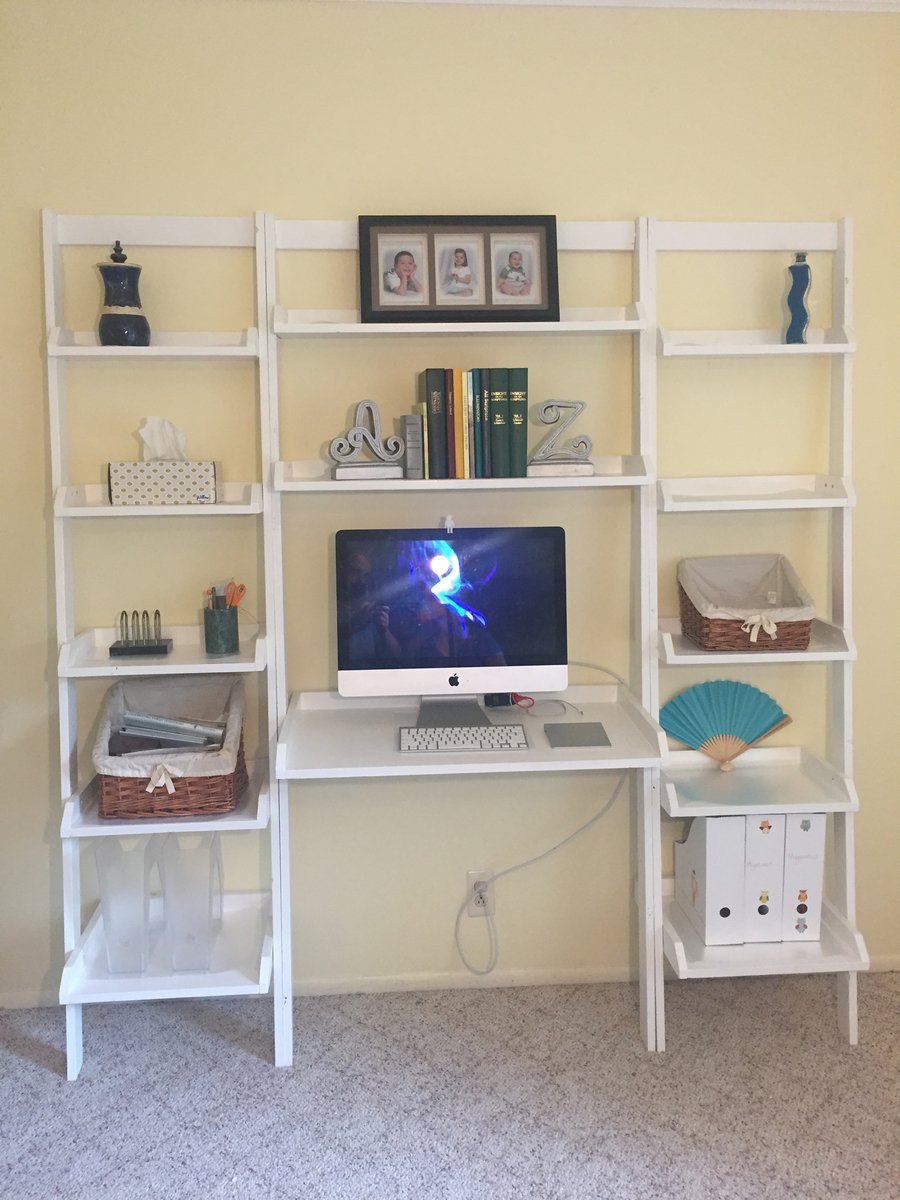
I followed your plans, with the exception of the computer desk. I mede it just a bit deeper, 1.5" or so. If I were to do this again, I think I'd go a little deeper still, maybe. Anyway, great design.
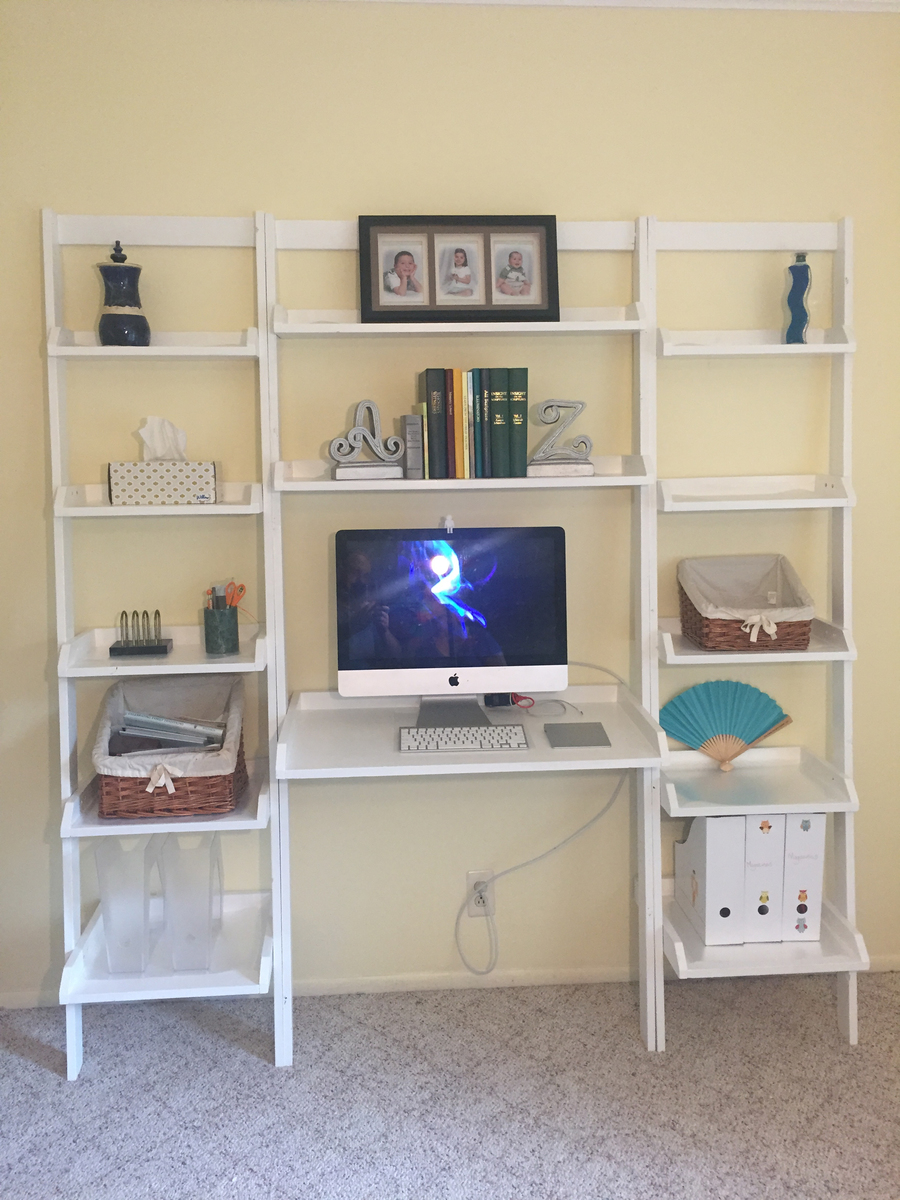
Built from Plan(s)
Estimated Time Investment
Day Project (6-9 Hours)
Finish Used
White latex paint
Recommended Skill Level
Starter Project
4 Drawer Entry Way Bench
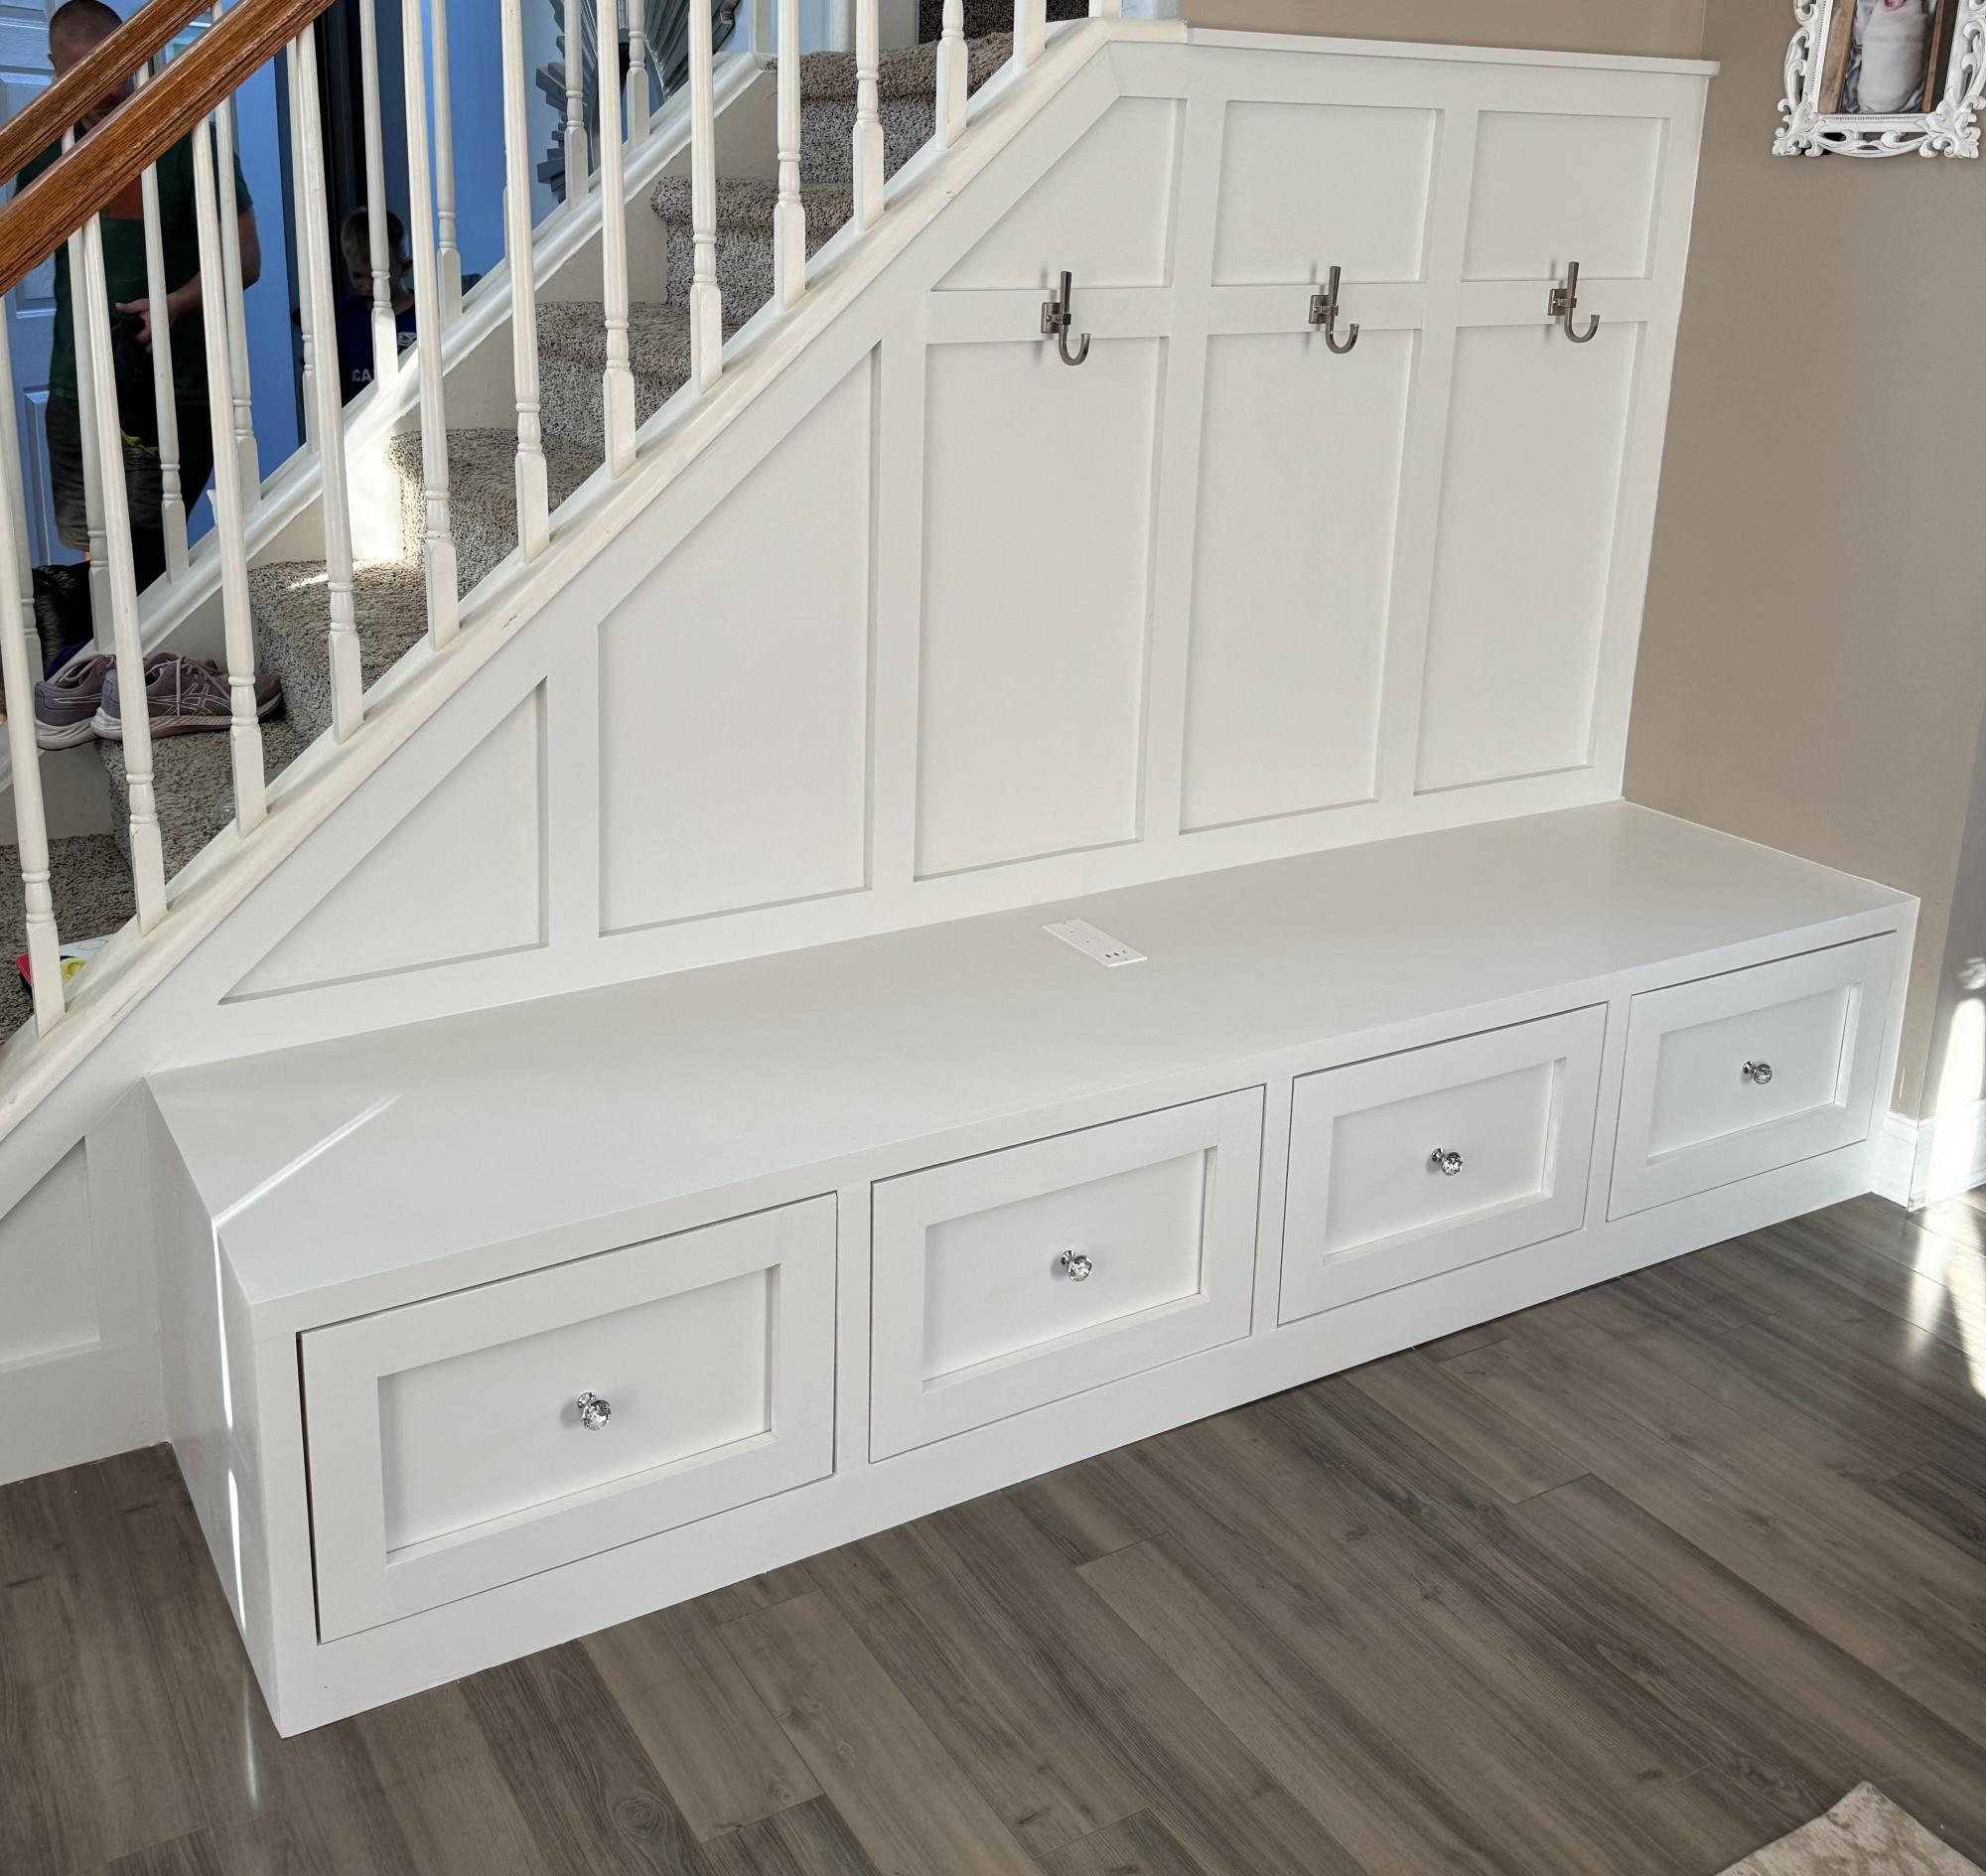
I had an empty space next to my stair case and desparately needed a place for my kids to hand their back packs and put their shoes that wasn't all over the place! I adjusted Ana's plans for 4 drawers since there are 4 of us and added board and batten. I also was placing the bench over an outlet which I didn't want to lose so I got an extension piece and cut a space out for it on top with a jig saw. Love the way it came out!
Built from Plan(s)
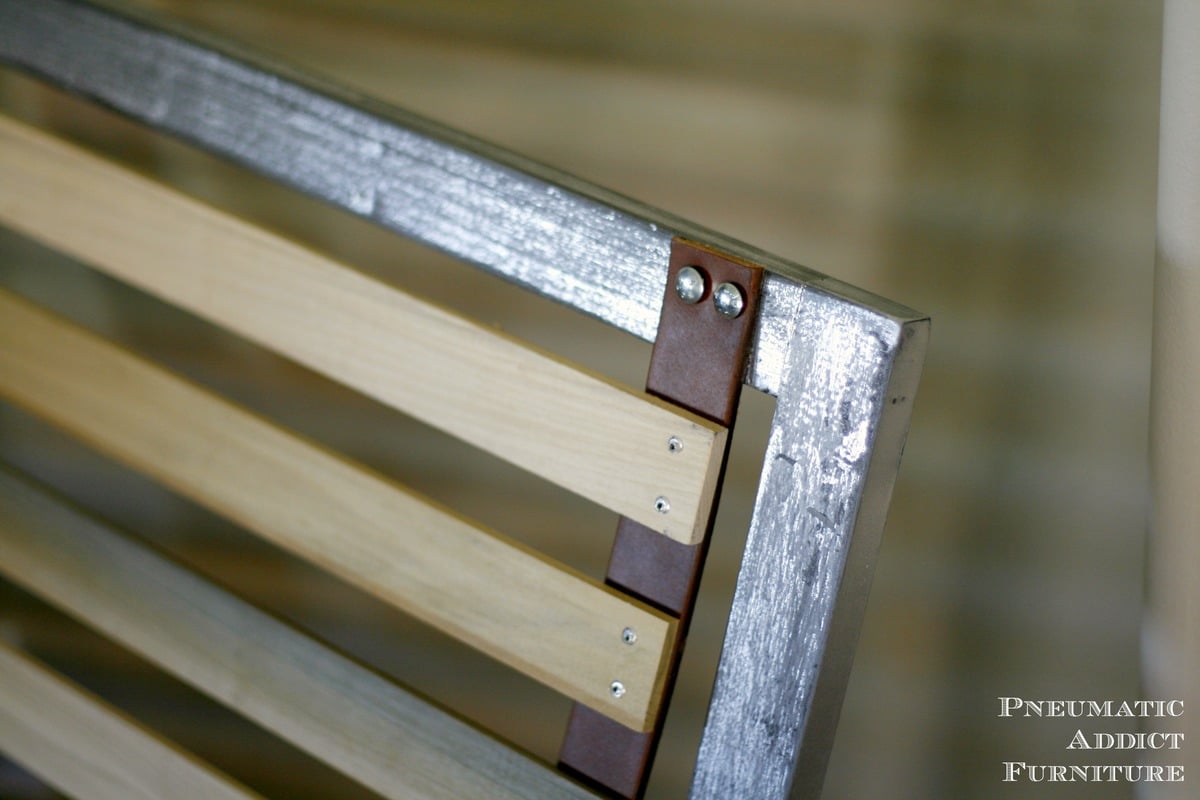
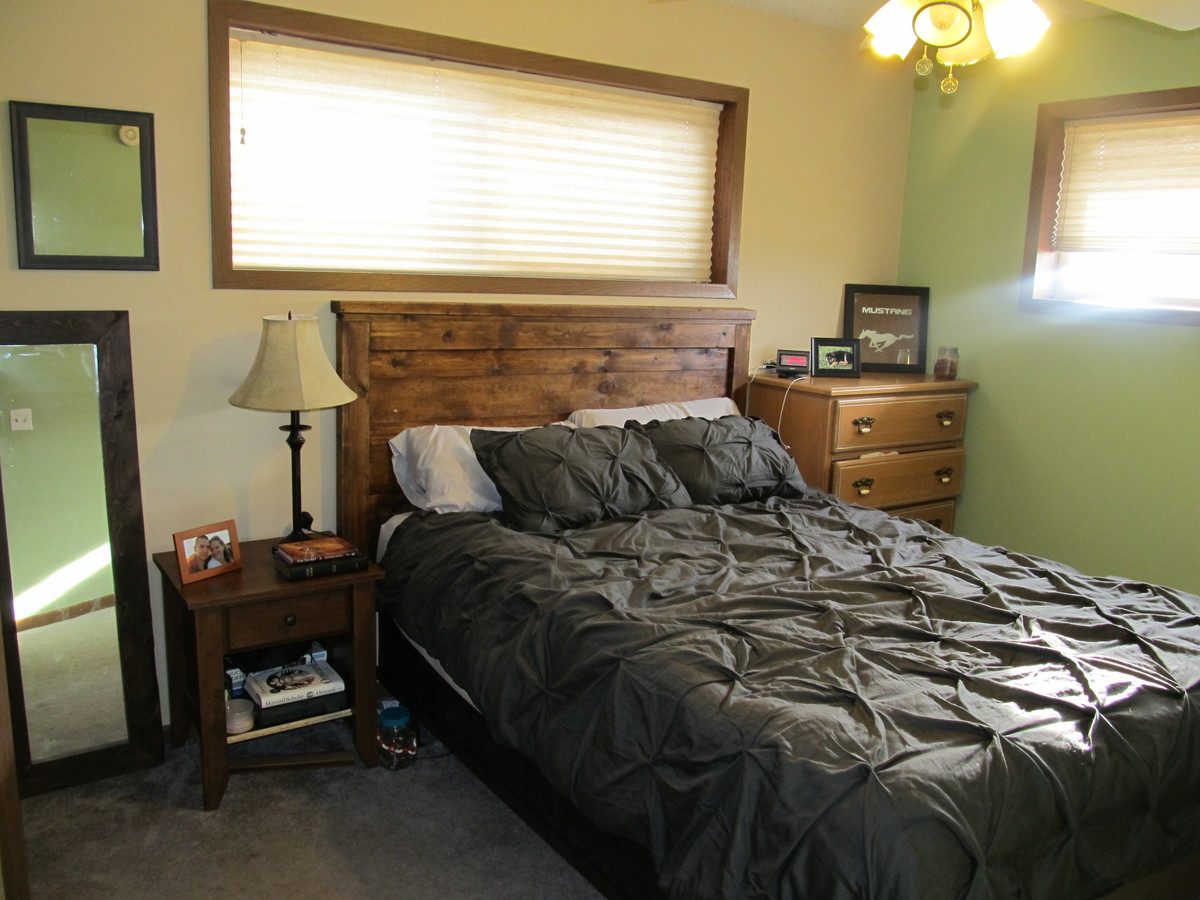
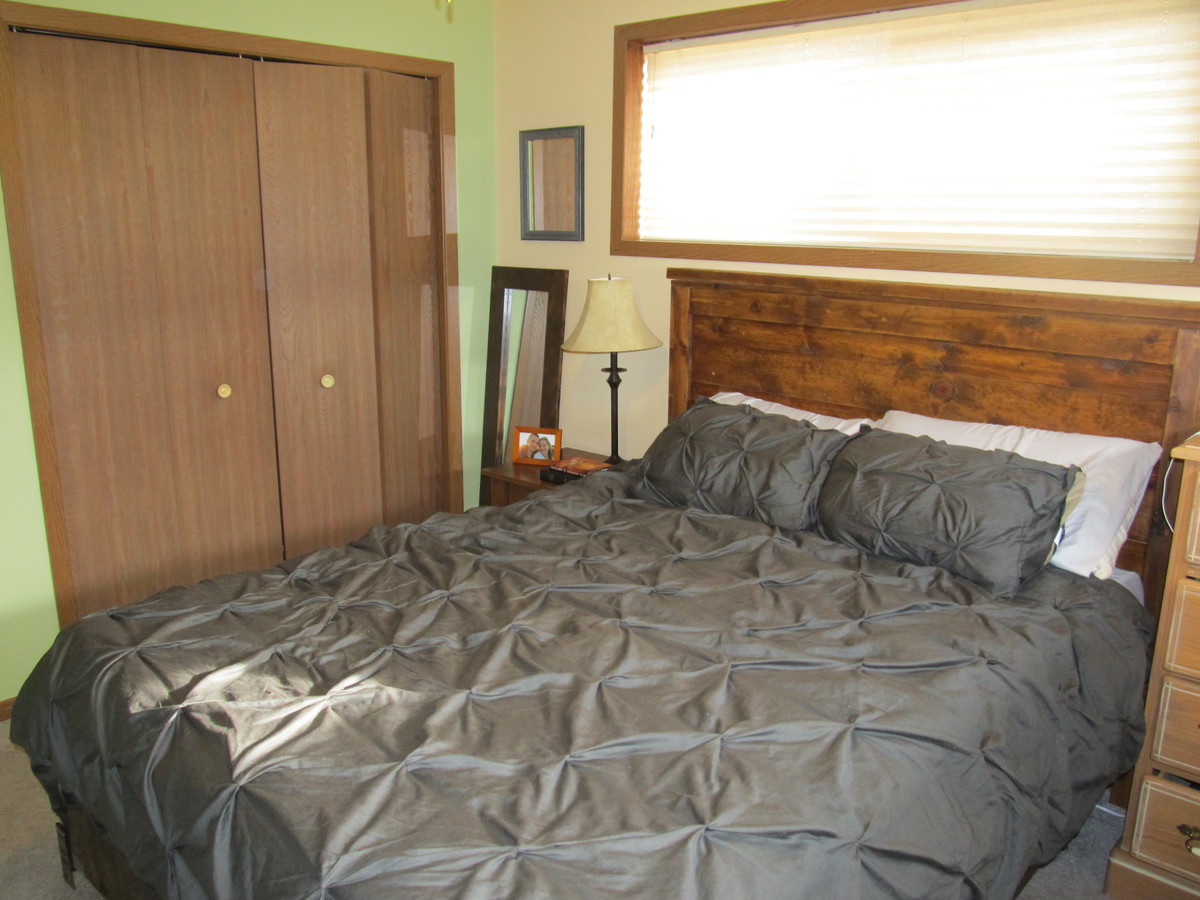
Reclaimed-Wood Headboard, Queen Size
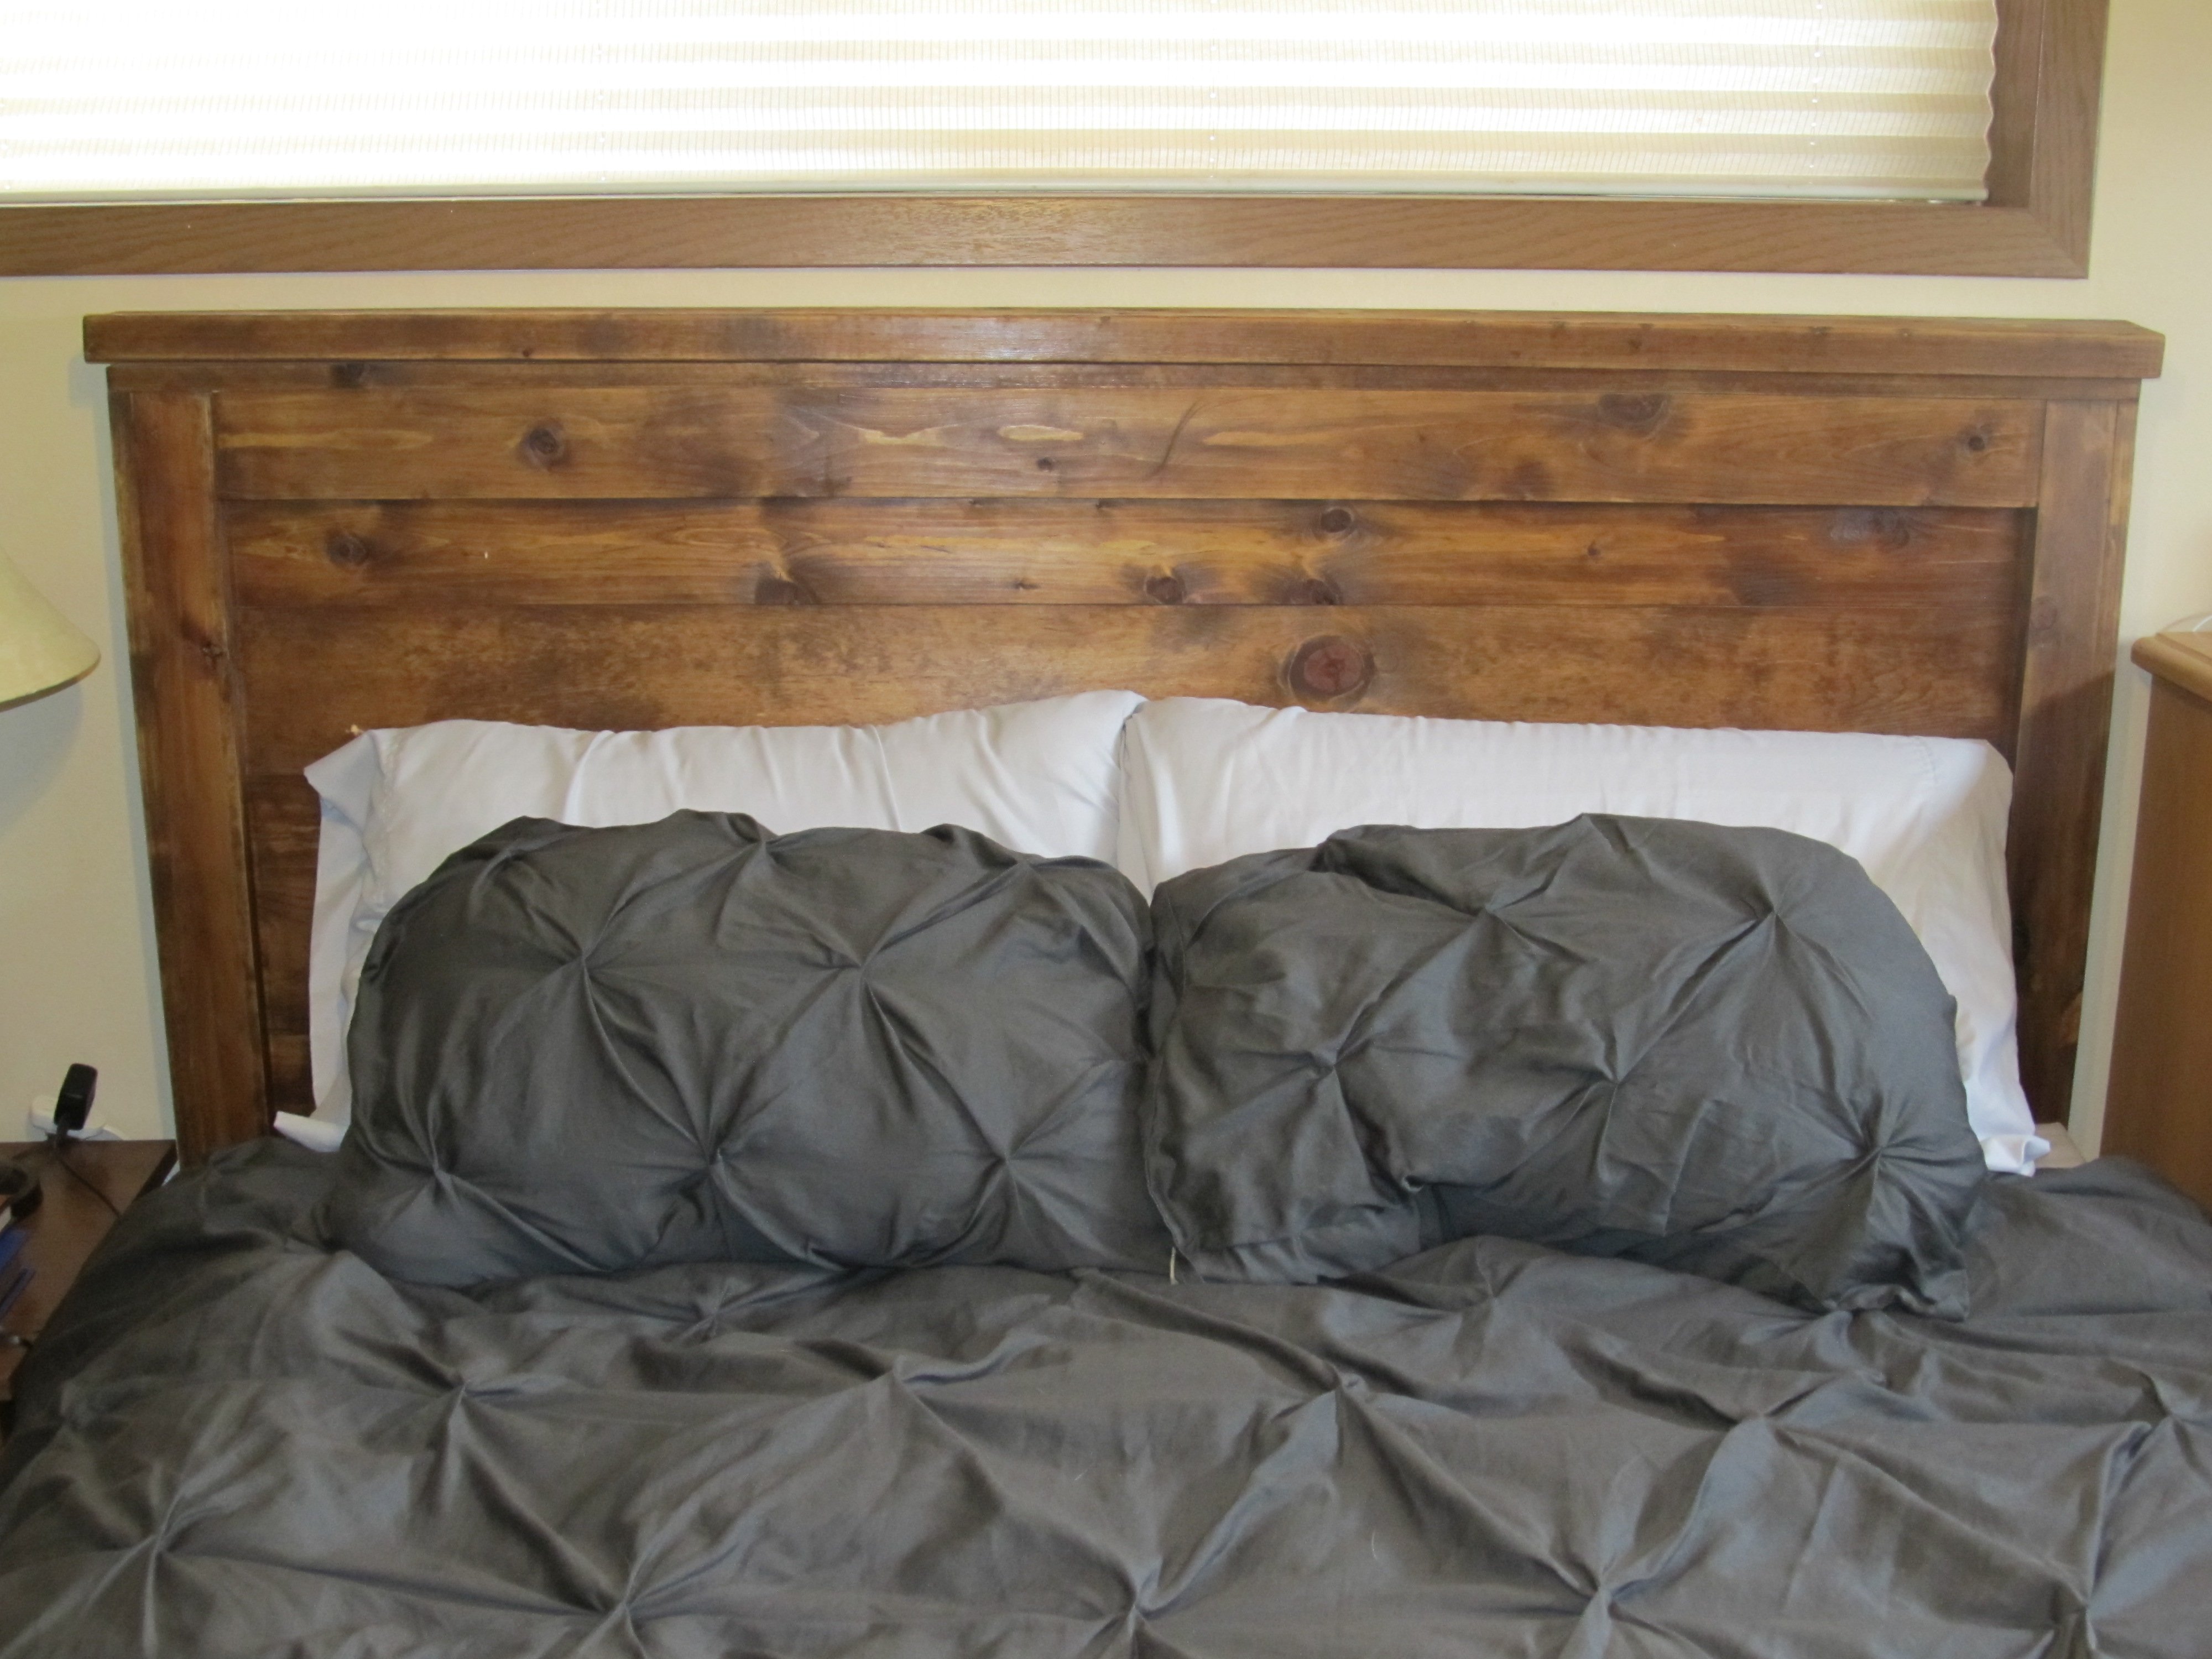
You can't tell in the pictures but the frame where the bolts are supposed to be barely touch the legs on the headboard. I have a standard queen bed on a standard queen frame, but it's just a bit too wide to bolt the frame to the headboard. I also had to take about 8 inches off the original plans because of the window the bed is under. Measure, measure, measure.
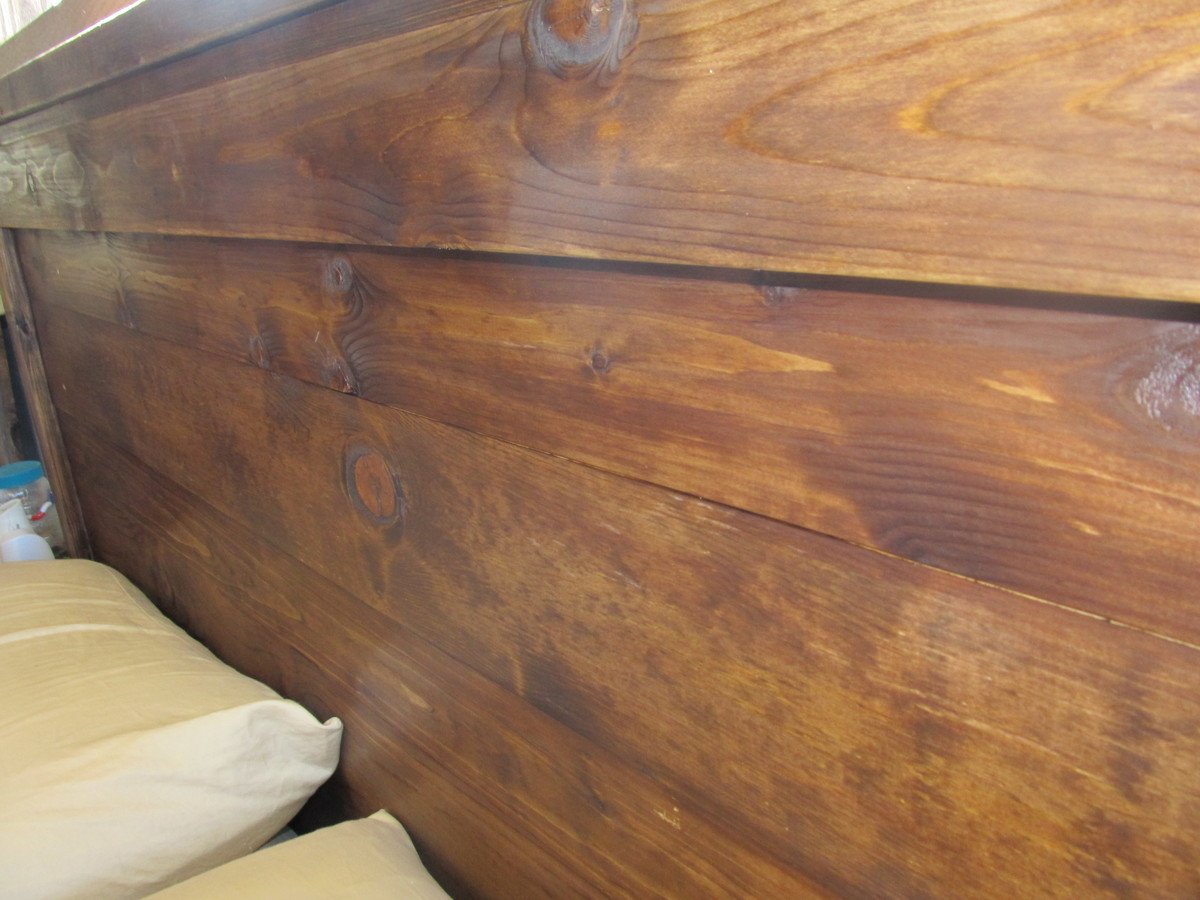
Get straight wood. The straighter, the better.
I used standard finishing nails and liquid nails glue to hold it. I didn't need to break out the Kreg Jig as the original plan stated.
Built from Plan(s)
Estimated Cost
$40
Estimated Time Investment
Afternoon Project (3-6 Hours)
Finish Used
I made my own finish using steel wool in vinegar. This is what took the most time.
Recommended Skill Level
Beginner
Sewing/cutting table
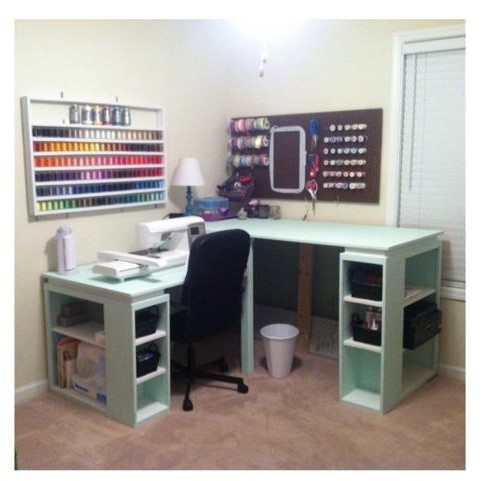
This has become my dream sewing/craft desk!! This project took about a week from start to finish (with work days in between). The shorter portion of the desk is used for my machine and sewing. The taller portion is used as a cutting table. The plans (dimensions) were tweaked some to get the perfect heights for me :).
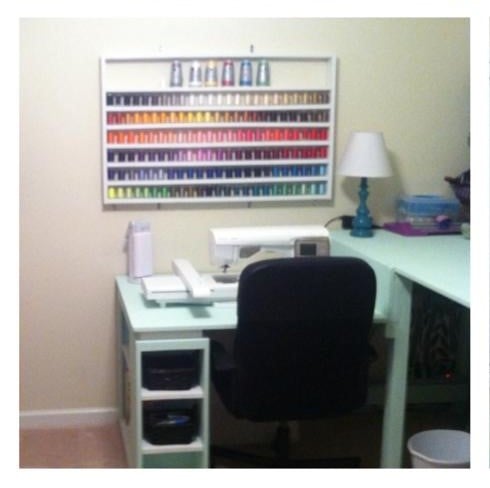
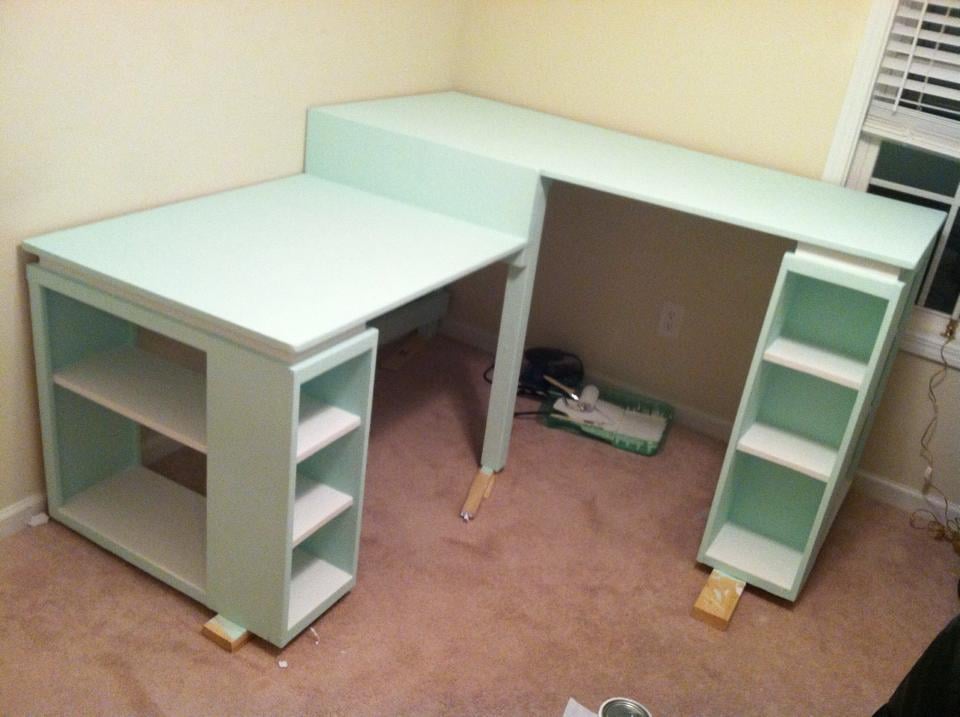
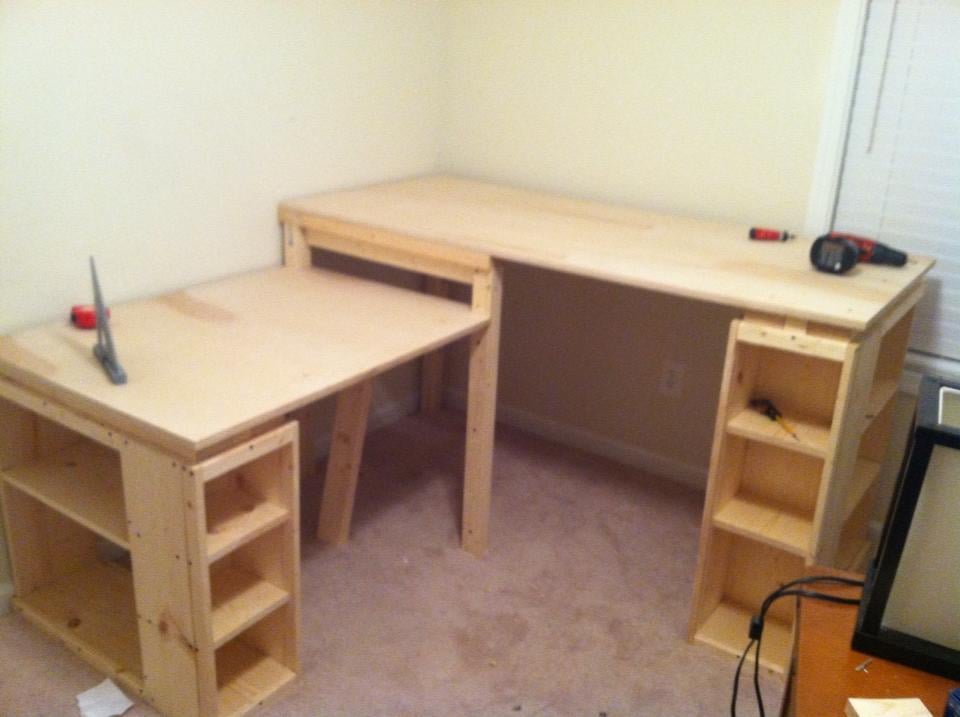
Built from Plan(s)
Estimated Cost
$200
Estimated Time Investment
Weekend Project (10-20 Hours)
Finish Used
After sanding I painted 1 coat of interior primer the about 2-3 coats of mint flat interior paint. I decided not to add a clear coat just because I wanted to use my amazing desk ASAP!!!
Recommended Skill Level
Intermediate
Comments
Wed, 03/25/2015 - 06:31
Measurements
Your desk is GORGEOUS!!!! It's exactly what I've been looking to build for my space. I would love to know how you modified the plan to make it.

Wed, 03/25/2015 - 07:21
I really like this
I need to modify my home office/craft space and building a couple of these just may do the trick.
Wed, 03/25/2015 - 07:23
Thread Shelf
I also wanted to comment on the thread shelf you build, that is really awesome, you can see all your colors right in front of you. Mine are in a drawer and I have to pull the whole thing out to see what I need. This is really giving me ideas.
Fri, 09/04/2015 - 08:45
Plan Instructions
Would you please send the plan instructions (with measurments). It is perfect for me as I sew and embrodery both and have two machines.