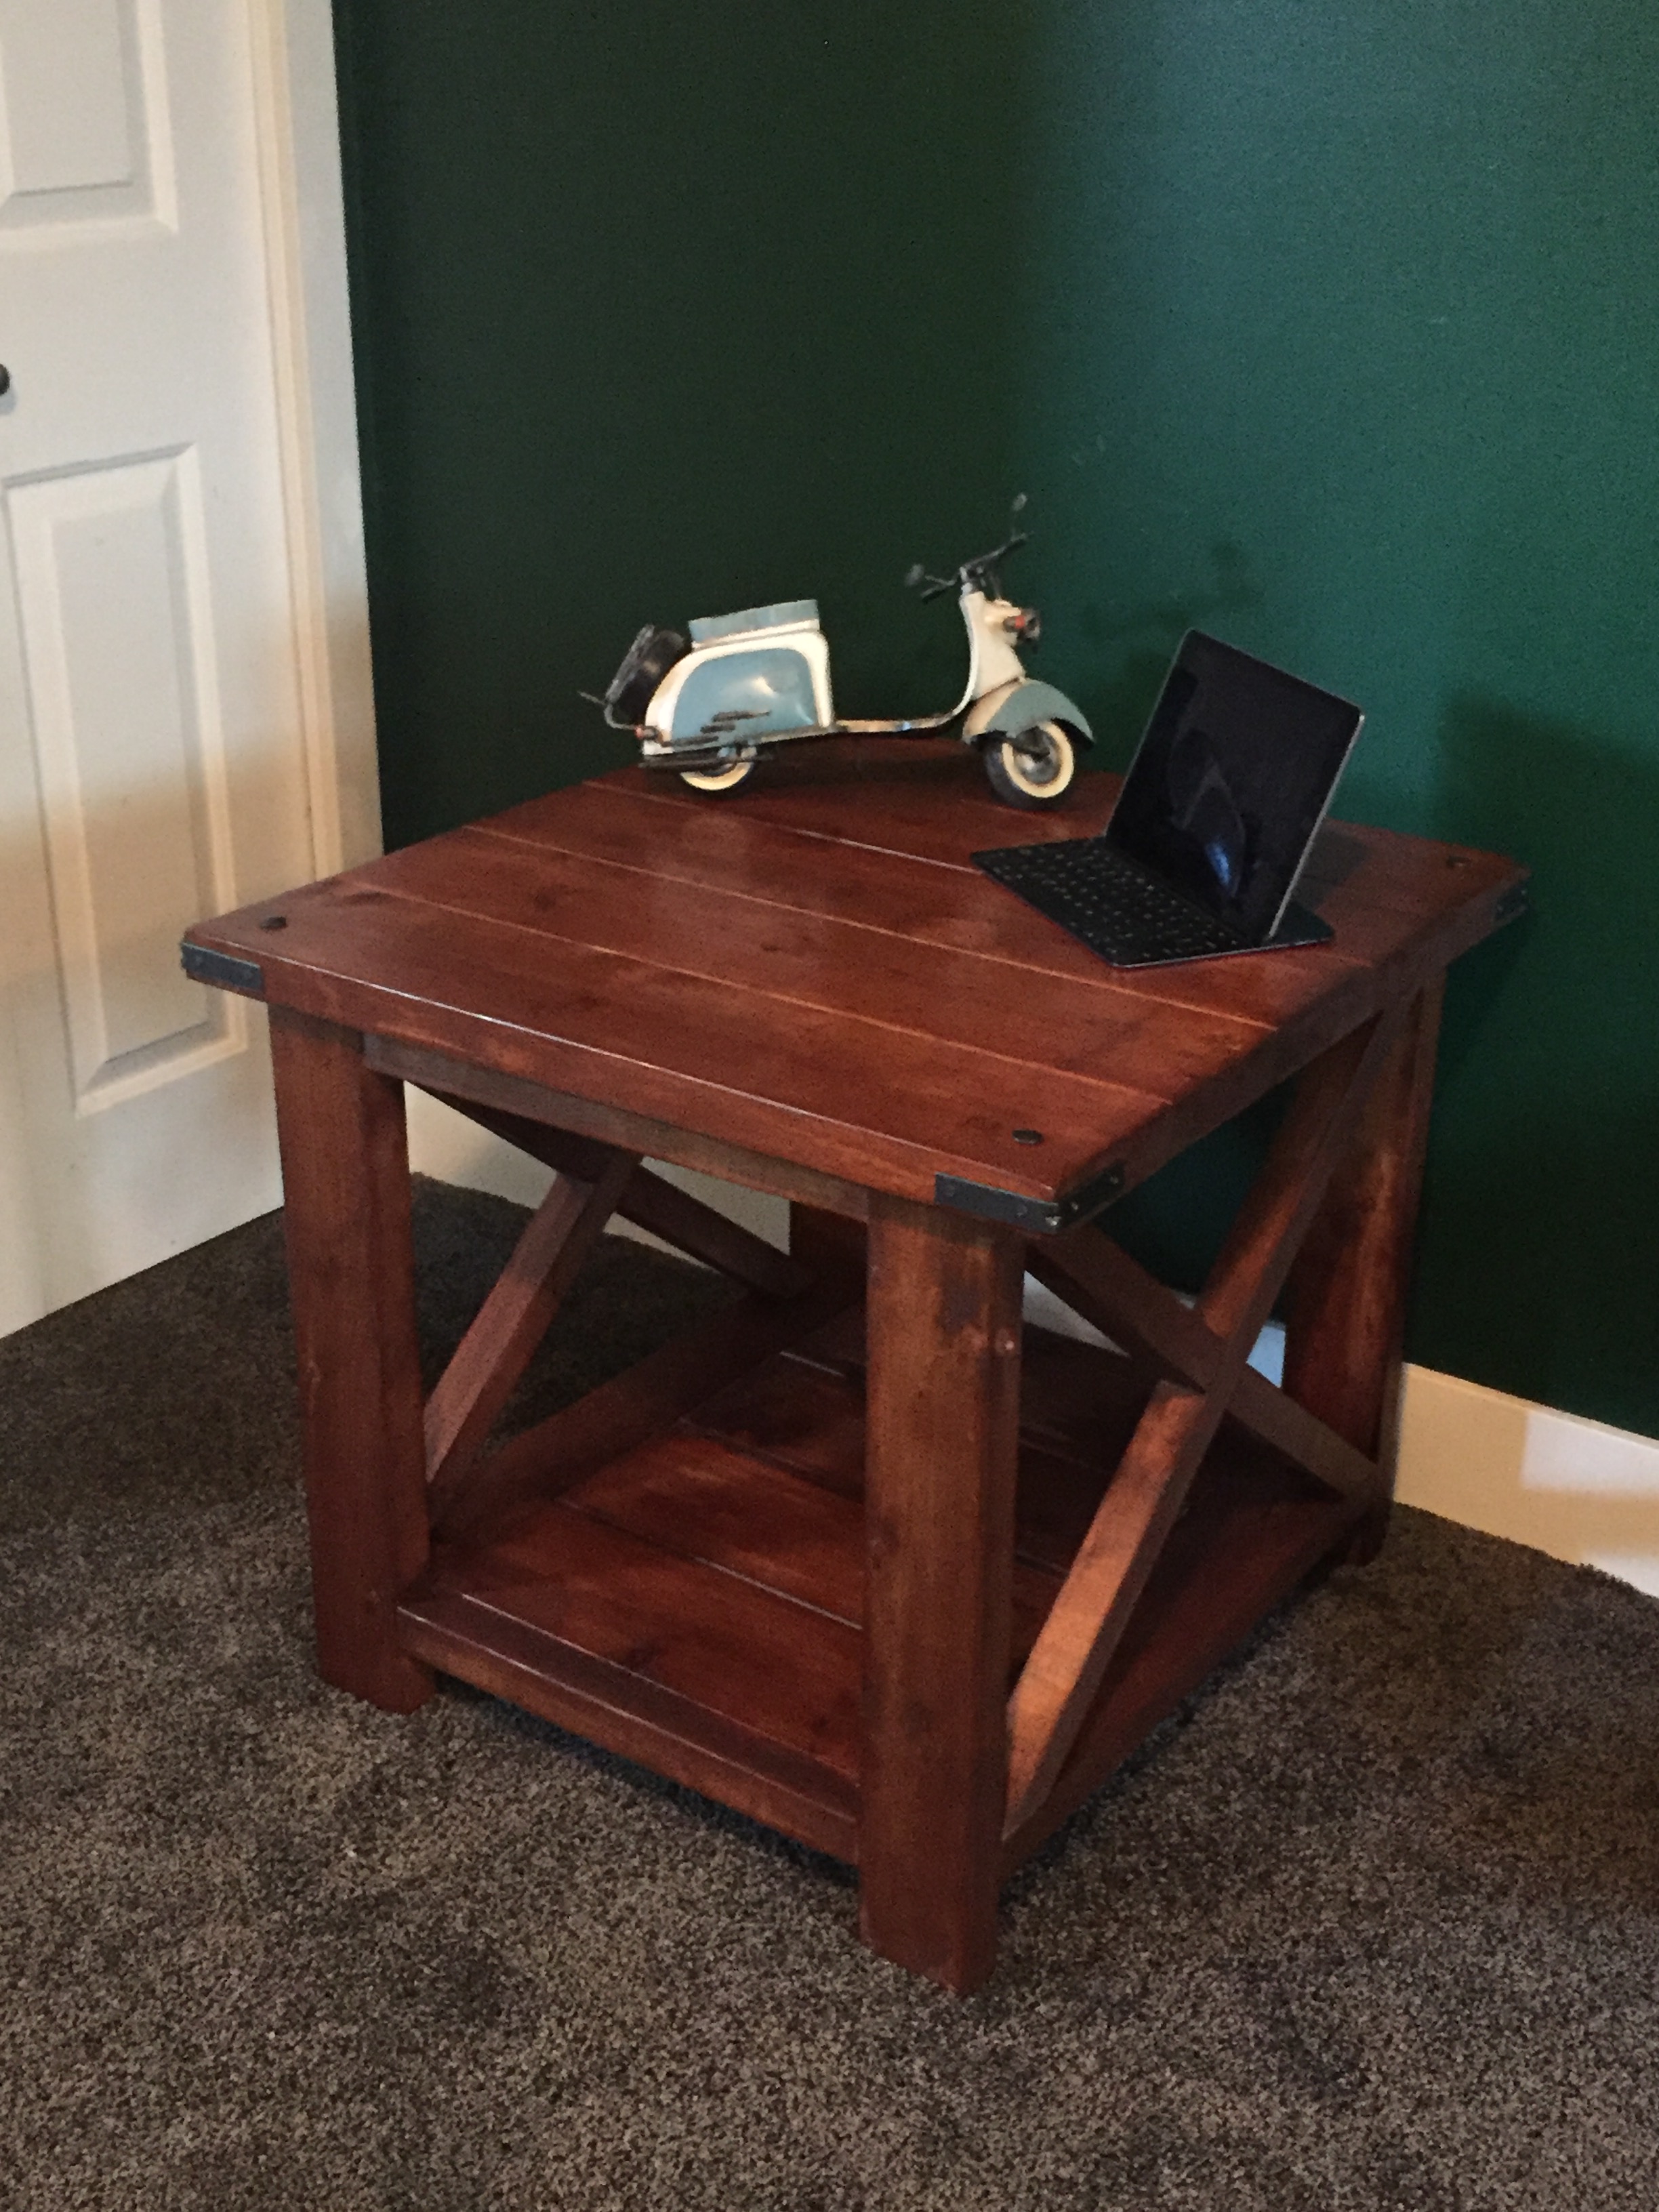
Patio tables

Fun and easy project. If I did it again I would definitely follow the directions to stain the wood first. My first Ana-White project. I’m hooked!
Built from Plan(s)
Fun and easy project. If I did it again I would definitely follow the directions to stain the wood first. My first Ana-White project. I’m hooked!
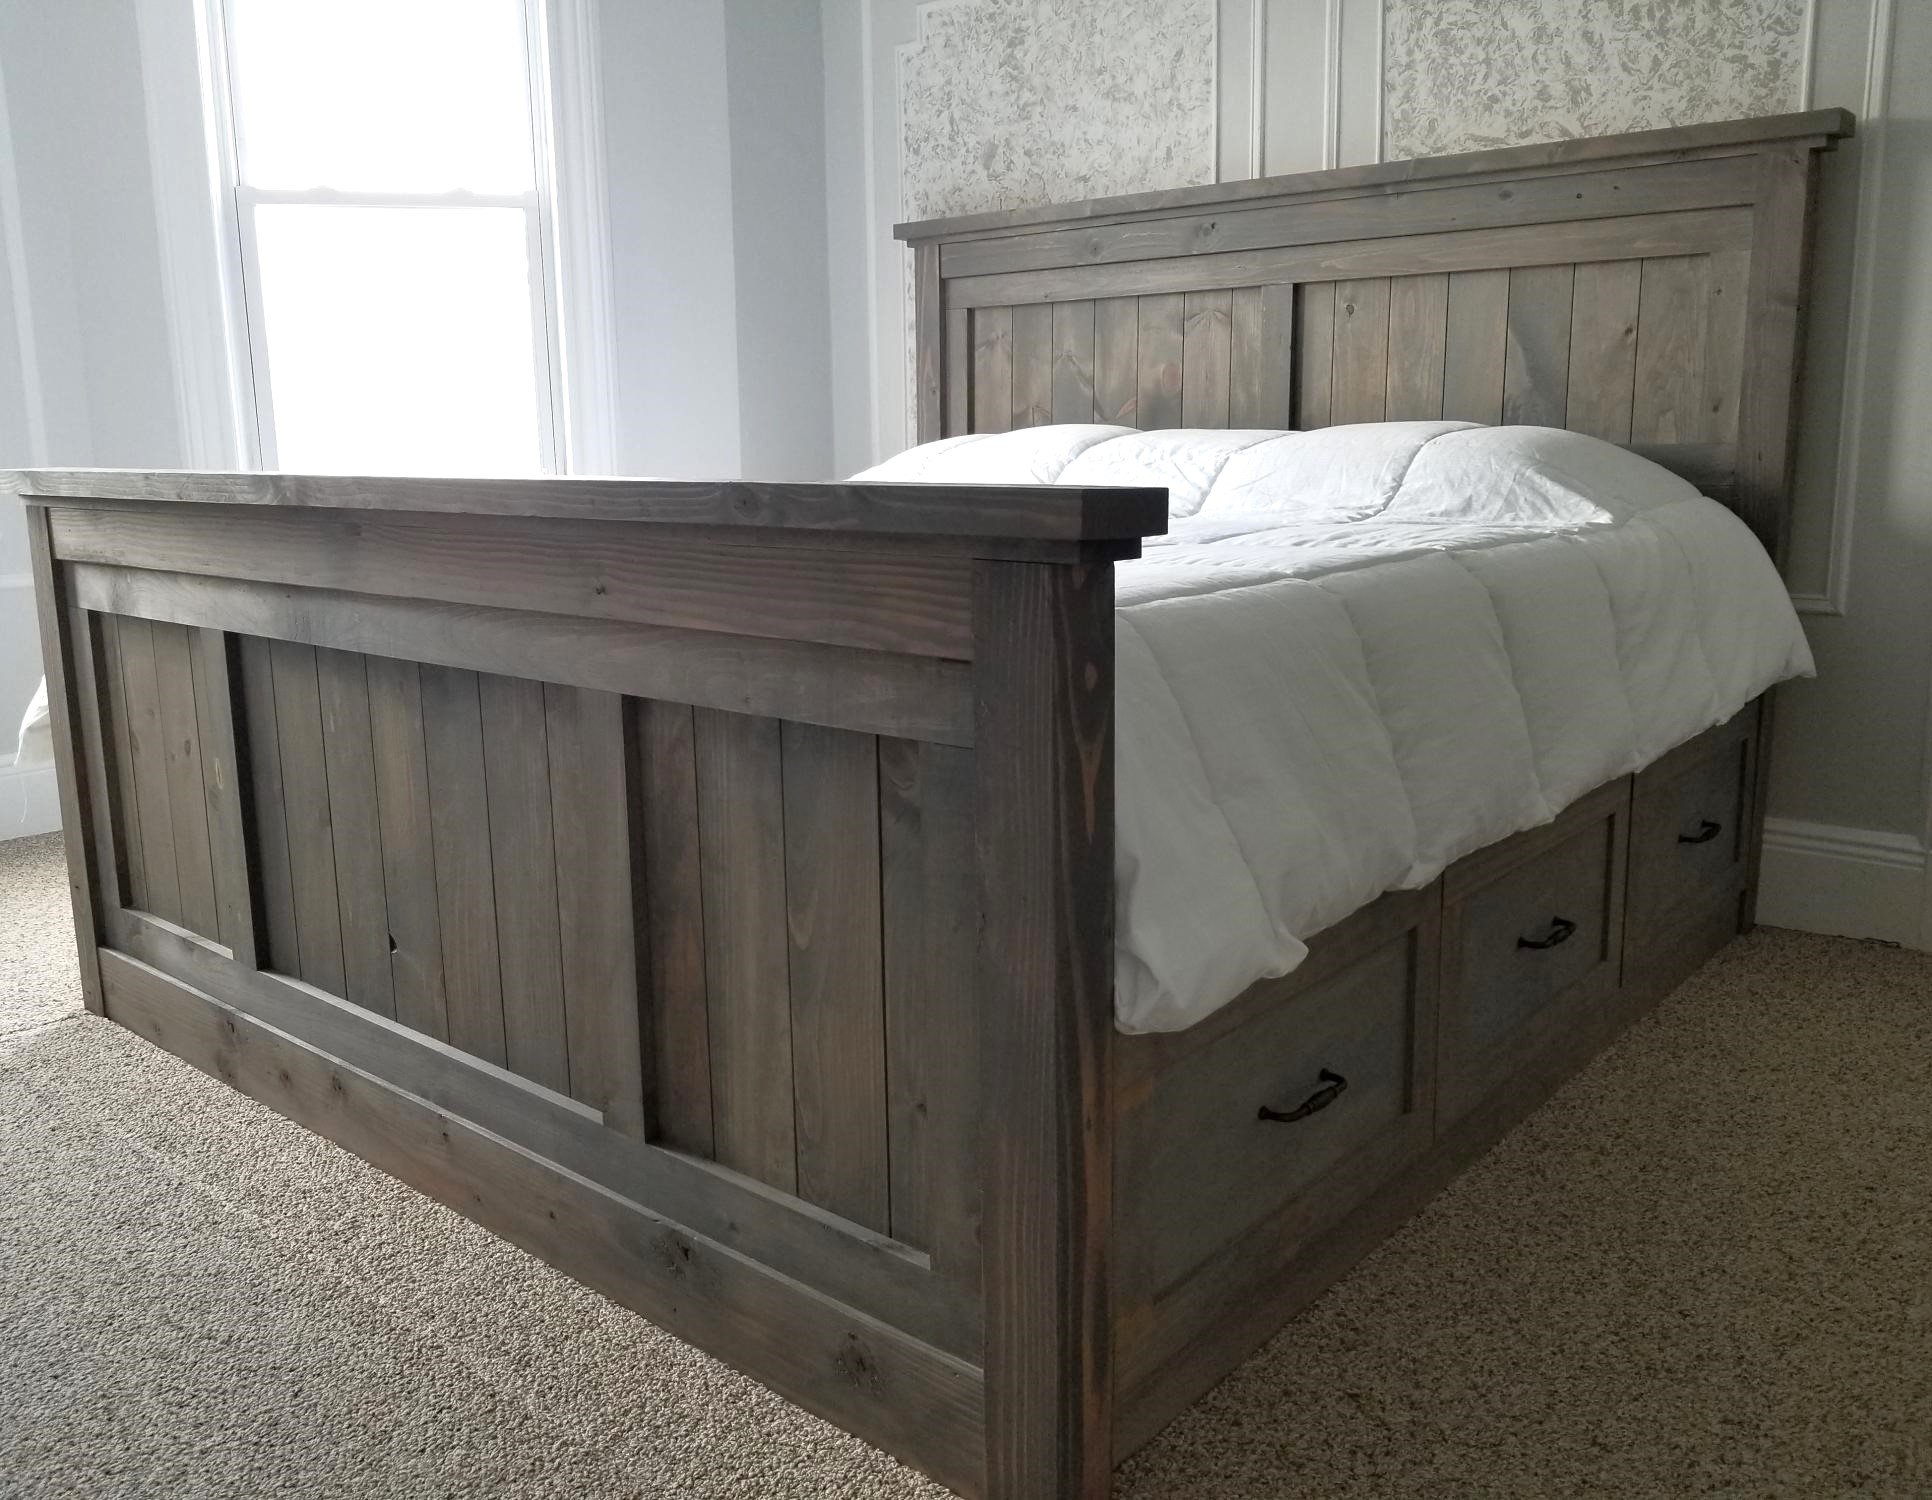
Seen this awesome plan on Anas site and had to build it in KING SIZE. The drawers are enormous, the bed is rock solid. I love it
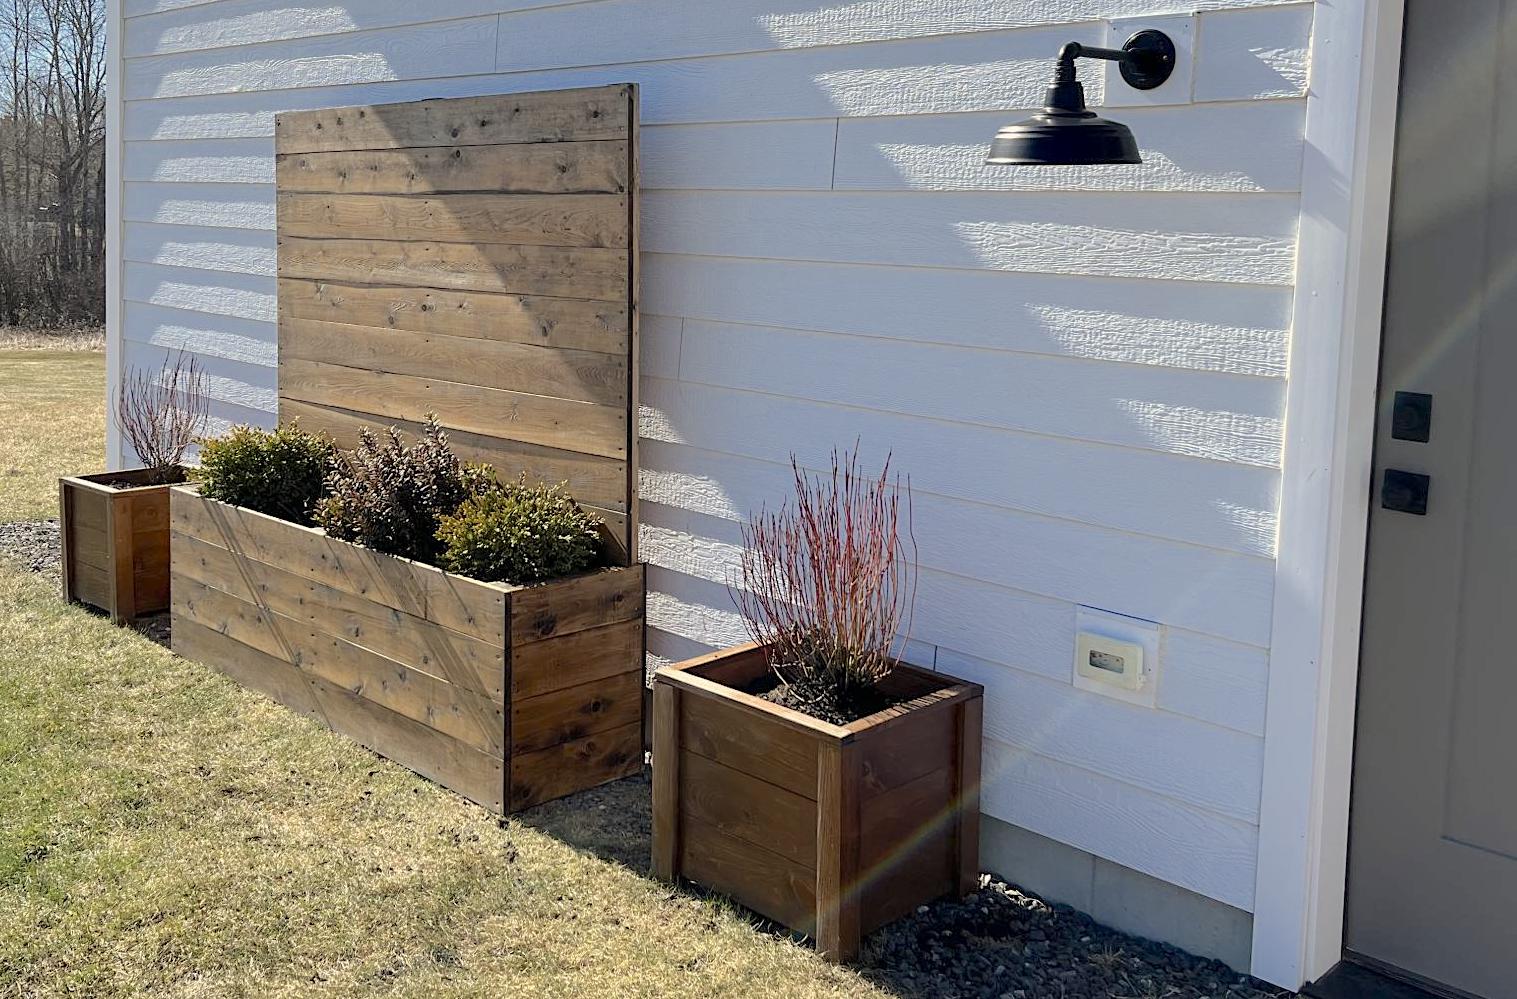
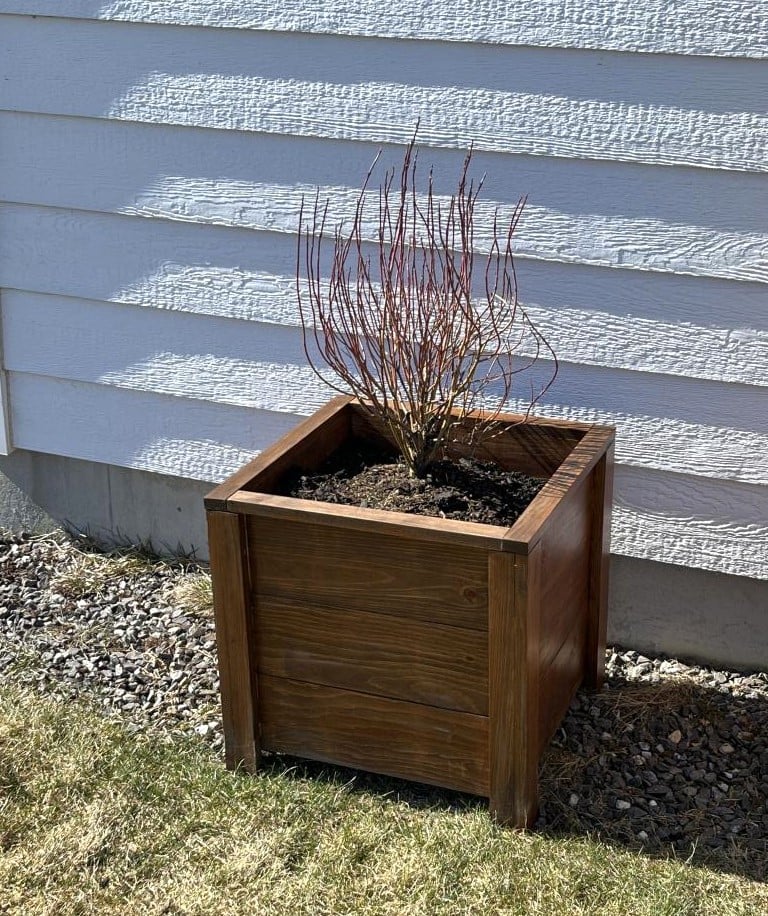
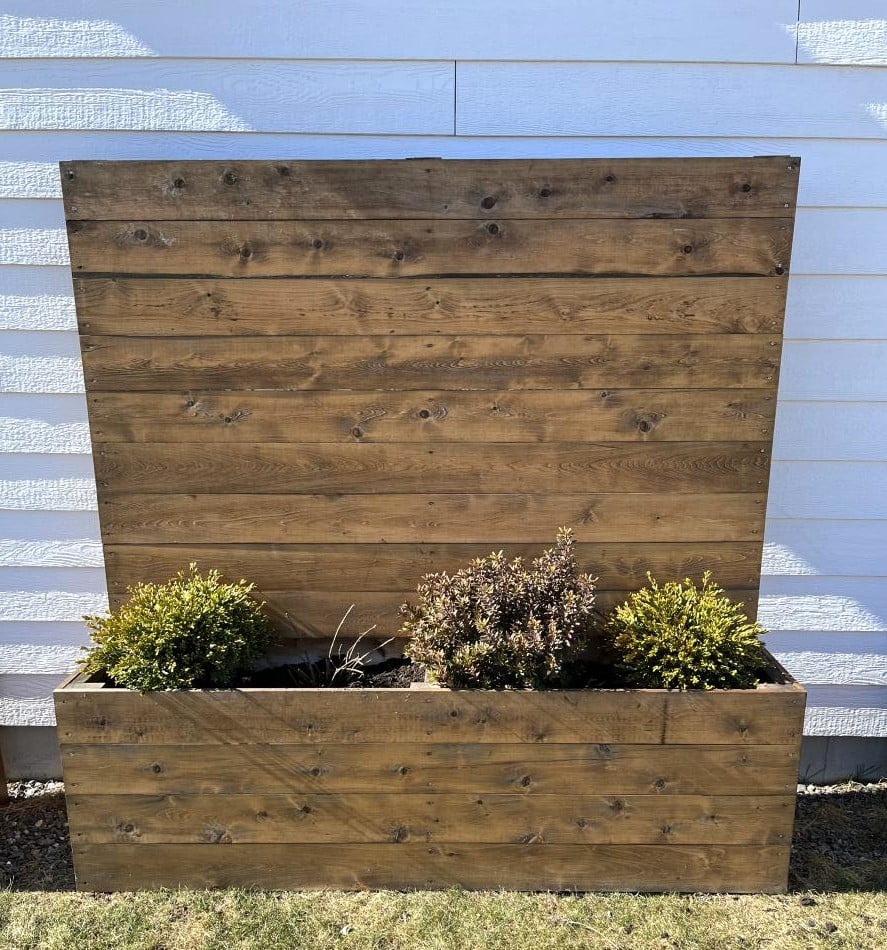
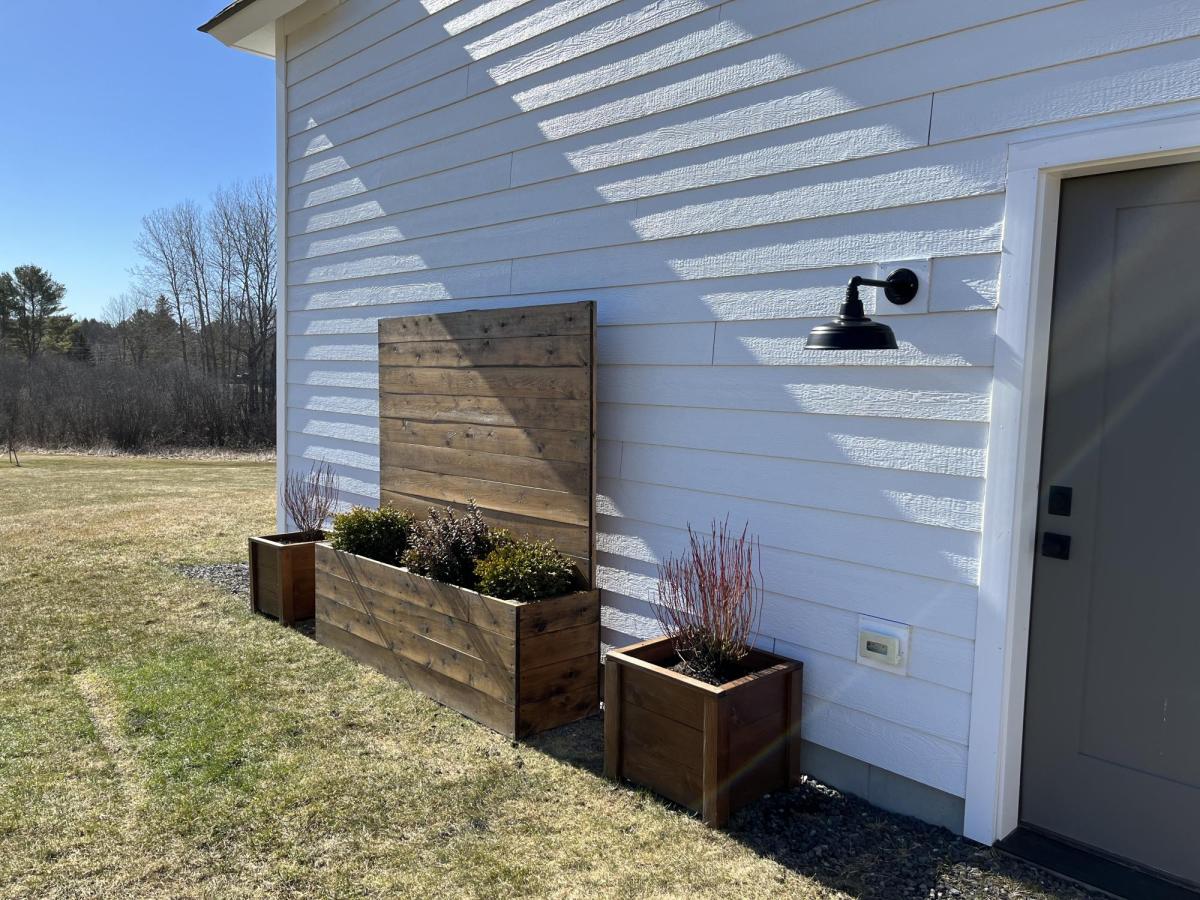
These planters are exactly what we needed to warm up this blank siding! The smaller planters are made from pine, the larger from cedar.
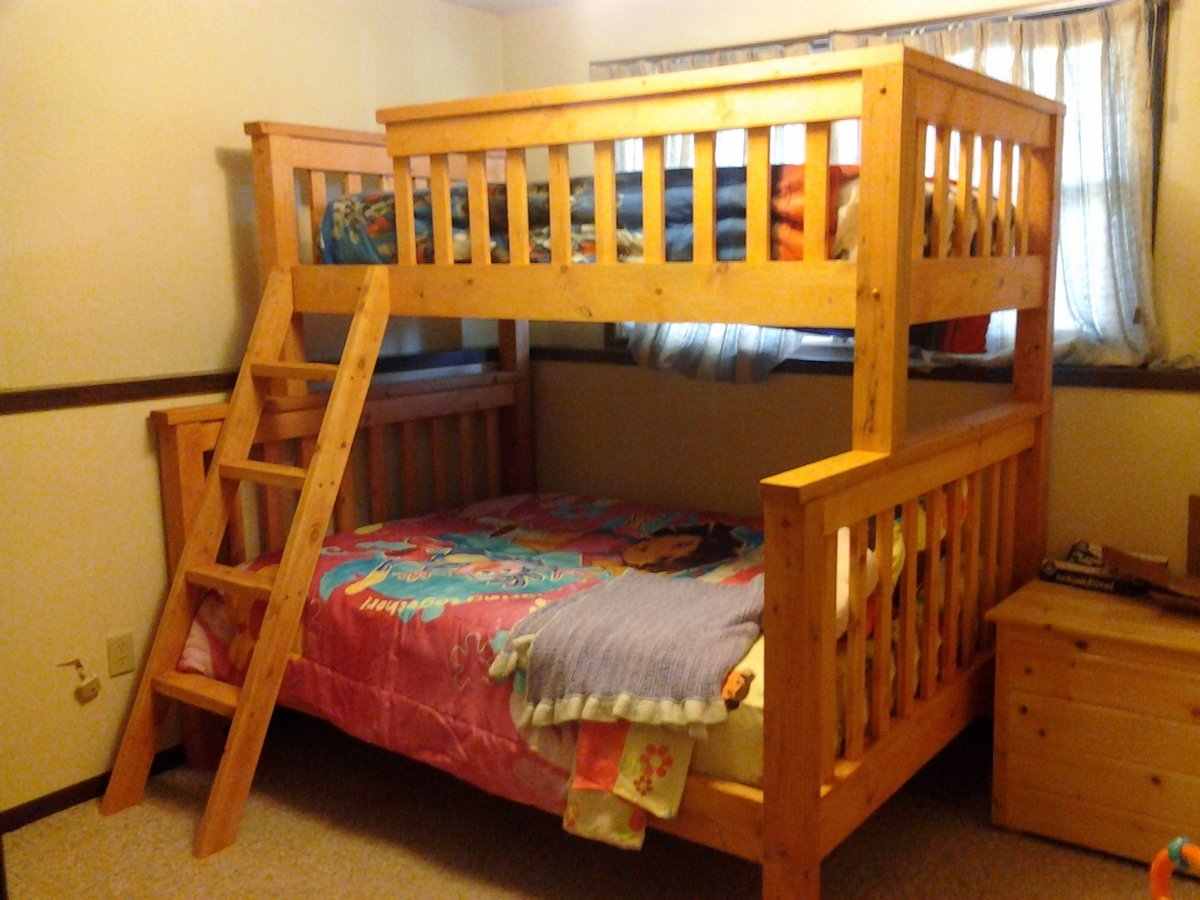
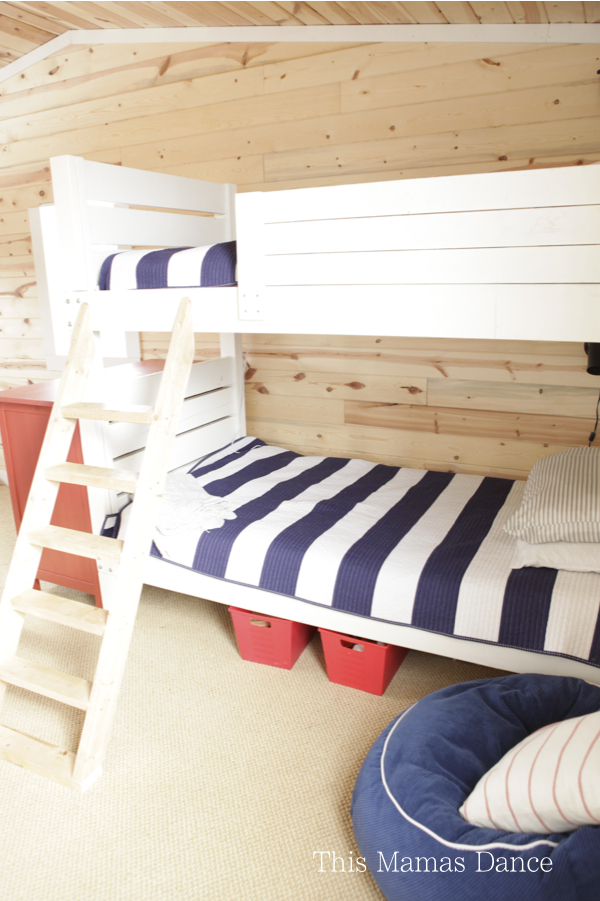
I wanted my kids to have more space in their shared room, but I did not want to pay a ton of money for a new bunk bed. My husband and I found a plan for this bunk on Ana-White and fell in love with the design. It turned out so great that we will still be using it in our next home whether it's needed or not. We did change a couple of things on the plan that we didn't care for. The first is that we added a side rail for safety. Secondly we also traded the 1x6 boards on the head and foot boards for 1x4s on the top but kept the 1x6s on the bottom.
Mon, 01/09/2012 - 17:39
With pocket screws on the bottom and then one screw through the 1x4s into the post before the 2x4 on the top goes on. And then the 2x4 is screwed onto the 1x4 and post with trim screws.
Wed, 03/28/2012 - 13:02
Cost us about $300 and over an entire weekend of time spent on this project.
It's not for beginners. My husband has had many many years of experience in carpentry and woodmaking.
Good luck to you.
Also, he changed a few things in the plans we found in order to make it look better.
Thank you
Jillian
Wed, 03/28/2012 - 12:59
Cost us $300.00 to make and almost non-stop making it for the whole weekend. And then stained for hours.
This is with many years of experience in construction and woodmaking.
This is not a beginners project and then expect it to look amazing.
My husband changed these plans a bit to make it look better than the other ppls that we've seen on here.
But, good luck to you and make sure to have plenty of room and time.
Also, we had to make this bed in 10-15 different pieces and put together in the bedroom we wanted it in. There is absolutely no way it will fit otherwise.
Jillian
Sat, 10/25/2014 - 22:25
I don't see how you could put the fill/twin over a queen since the queen is longer. Obviously you could spin the queen around and make it an L-shape but then you are looking at a different build.
Sat, 10/25/2014 - 22:28
I really like the look of this ... I'm going to try to replicate!
What does the bottom of the guard-rail look like? Did you space out your slats a little more than the original design? I like the 2x4 topper instead of the 1x6.
Sat, 02/28/2015 - 16:46
We made this bed over the course of a week, both of us have extensive experience in woodworking and building. Ours is very wobbly on the long axis. We had a friend who is a structural engineer come in and take a look. He offered suggestions to shore it up and nothing really worked. The 3/4" overlap is not enough to secure the side rails, imo, and we used a variety of brackets to make it not wobble, to no avail.
This bed is coming apart in a few weeks and will be stored. If it is ever used again, it will be as two separate beds. I spent about $400 on this. My son never felt safe sleeping on the top bunk and has slept on the bottom exclusively.
Just my $0.02.
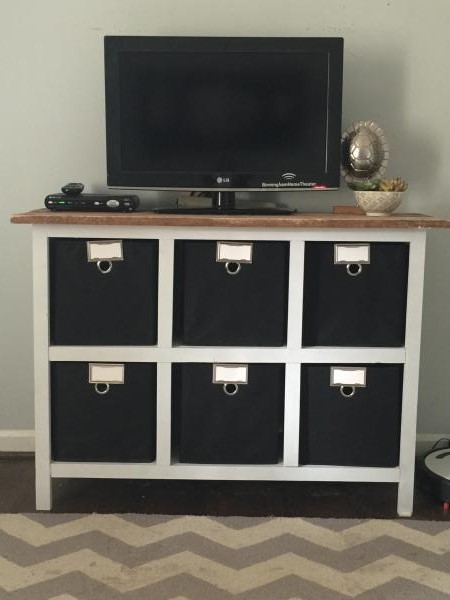
Really fun project. My dividers were a little off, but for kiddo storage- it's not too shabby. Bins were on sale at target. Because I trimmed the whole case out in 1x2s- 11x11 was the size I needed. The labels were extra, but totally worth the cost in my opinion. Loved this project and love the organization it brings!
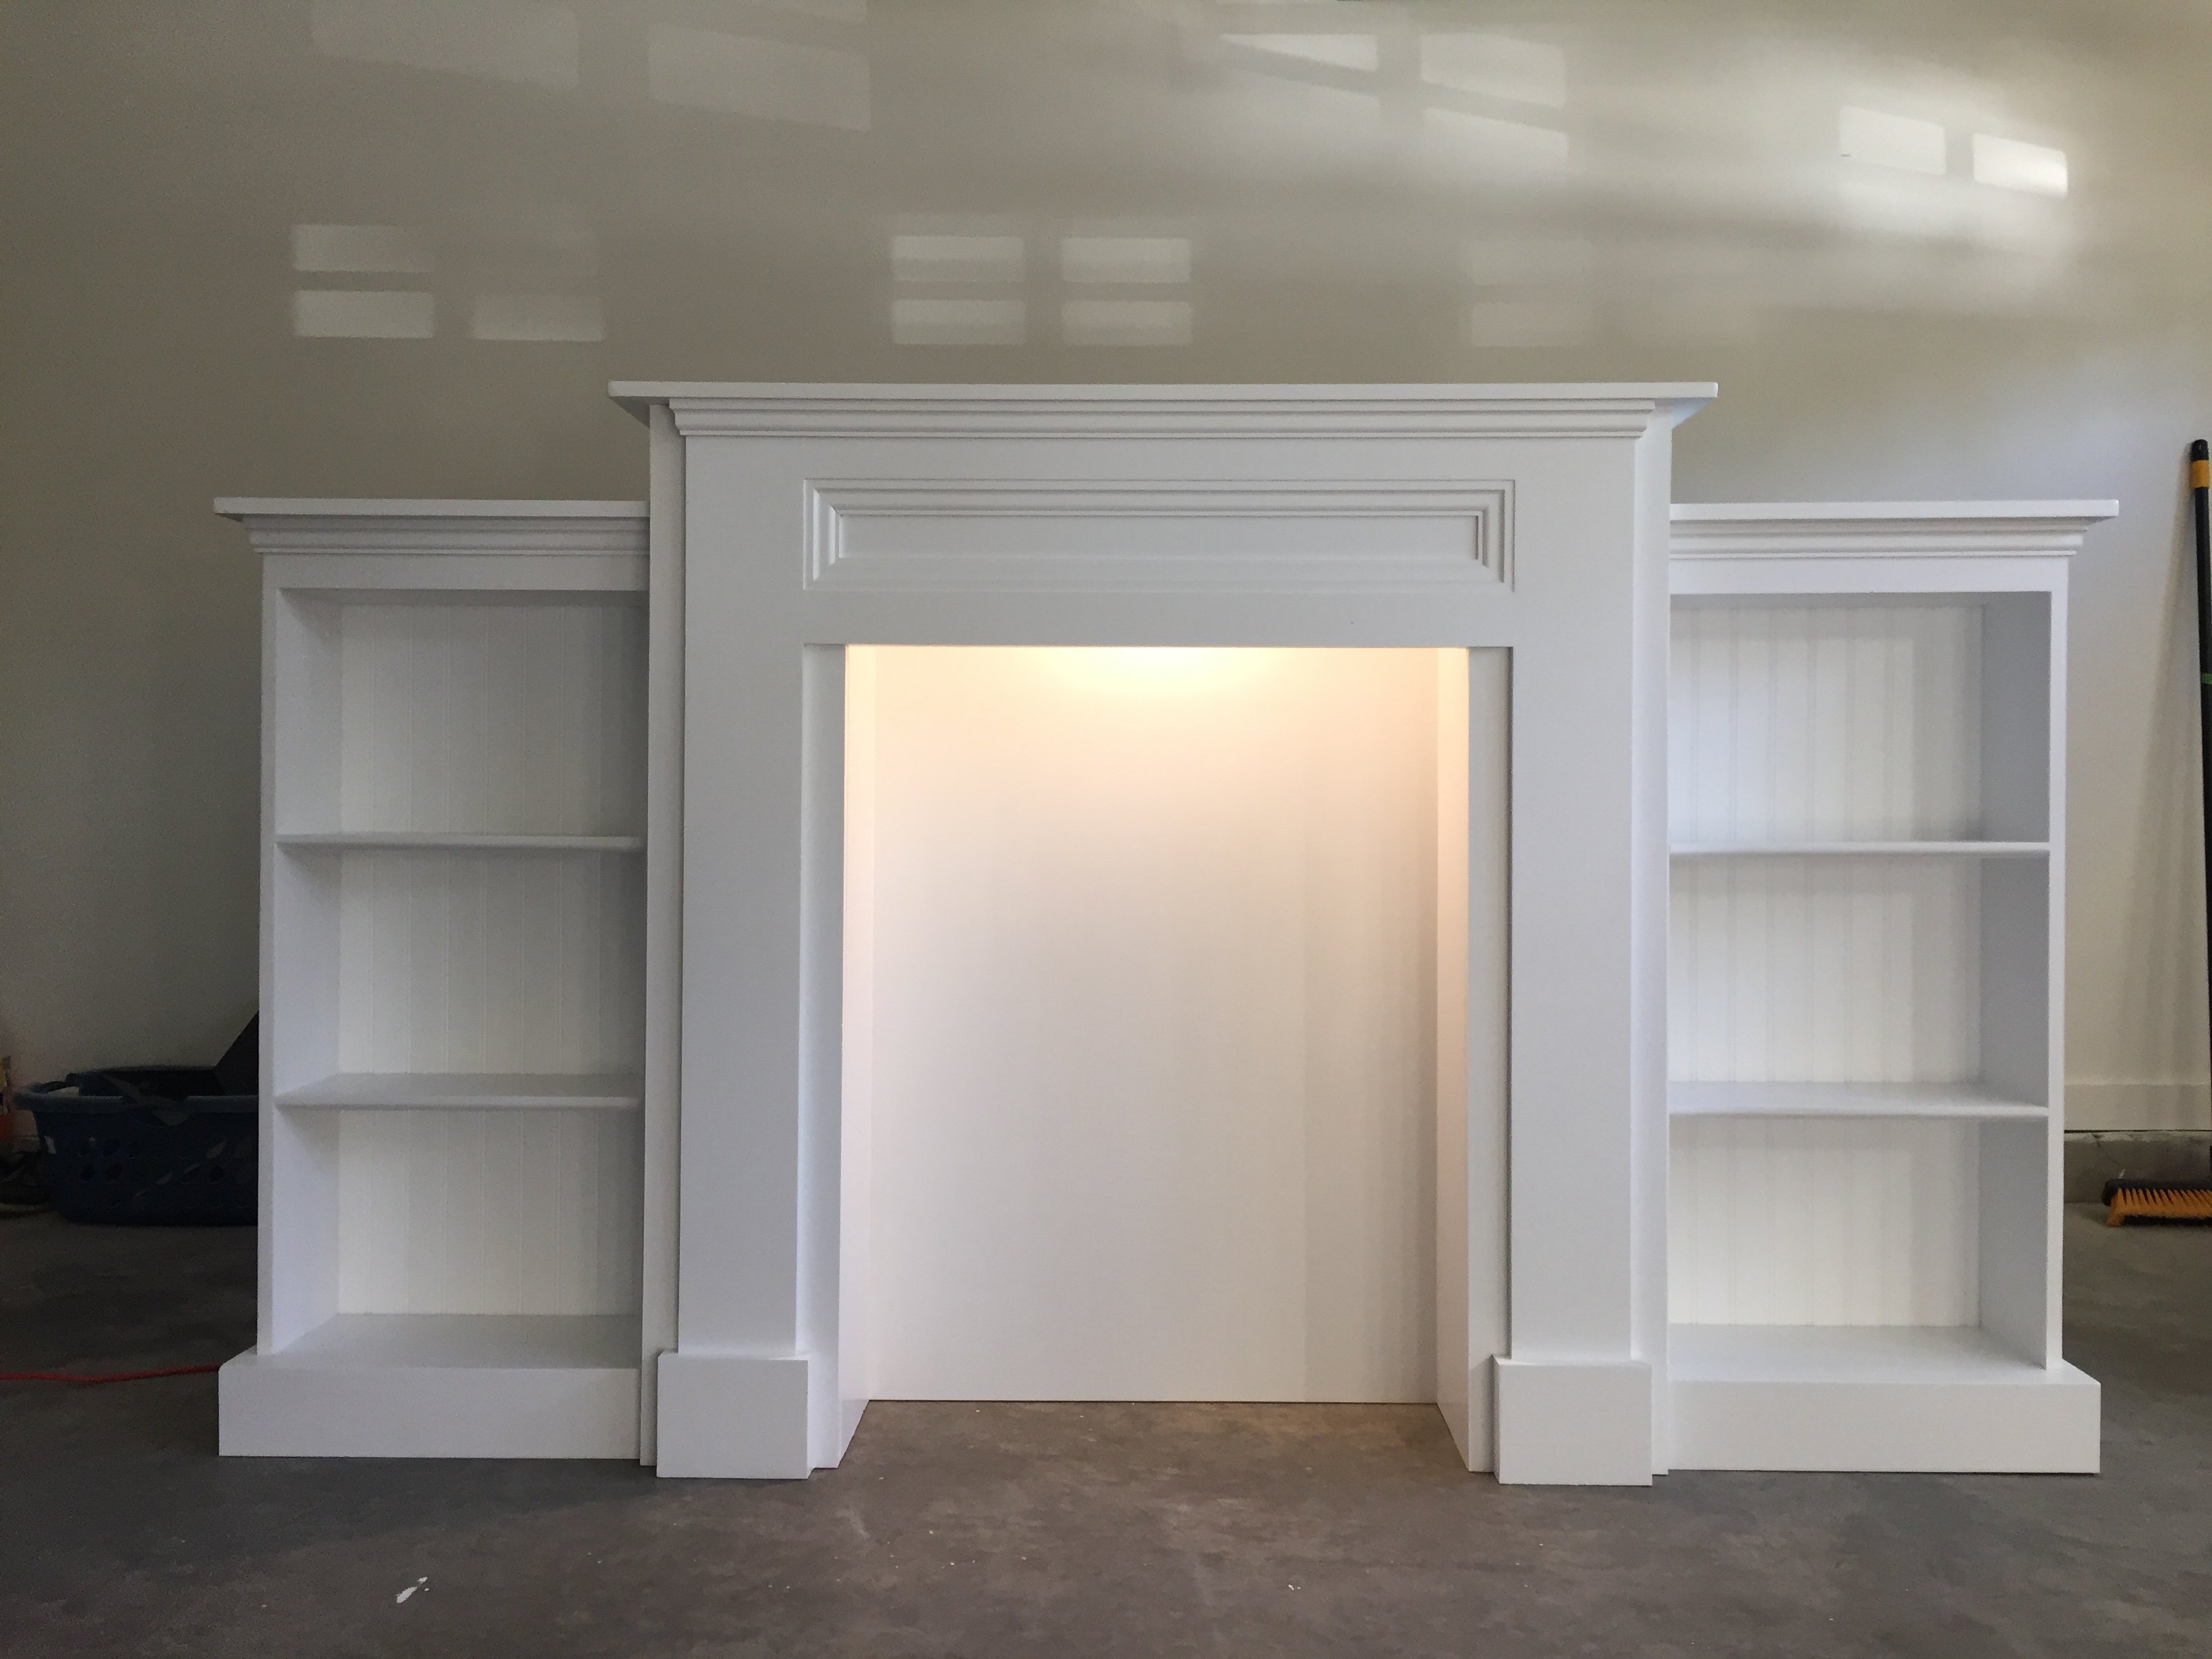
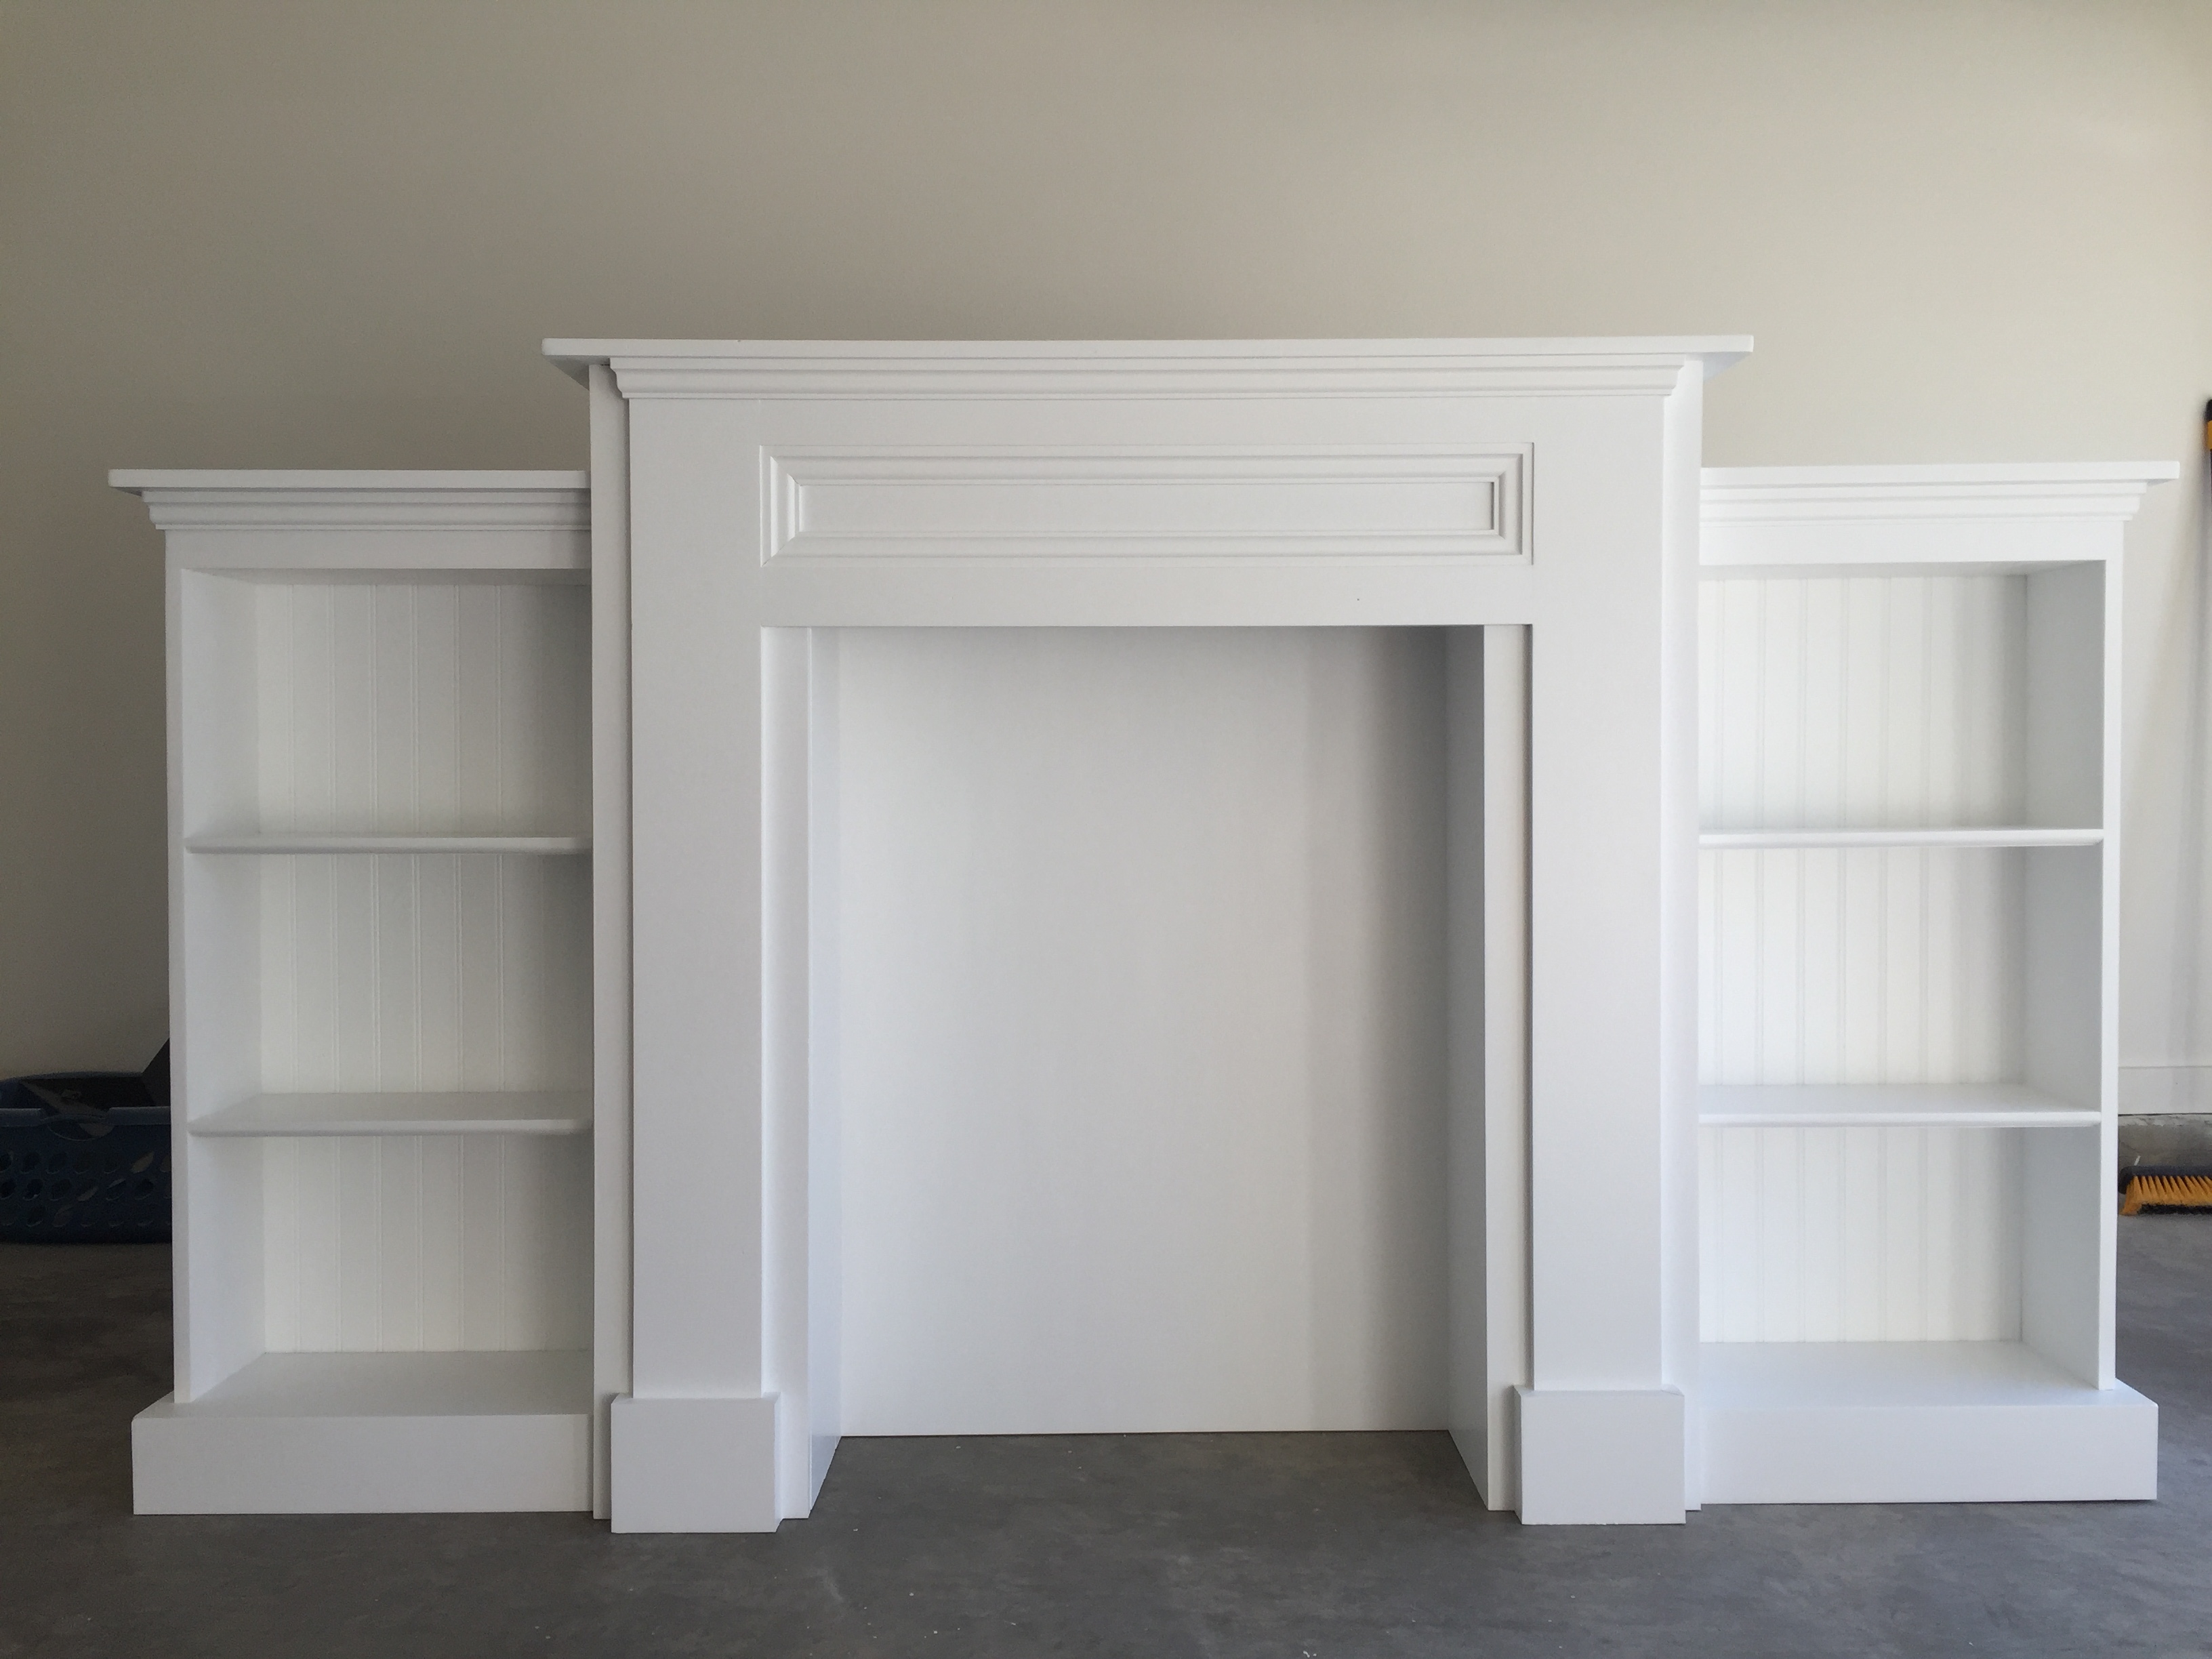
Made from the modified Mimi's Faux Mantle design from another brag post.
Tue, 12/19/2017 - 22:01
Are you able to tell me how wide this is from the end of one bookcase to the other? I'm trying to find out if it will fit in my living room. Thanks!
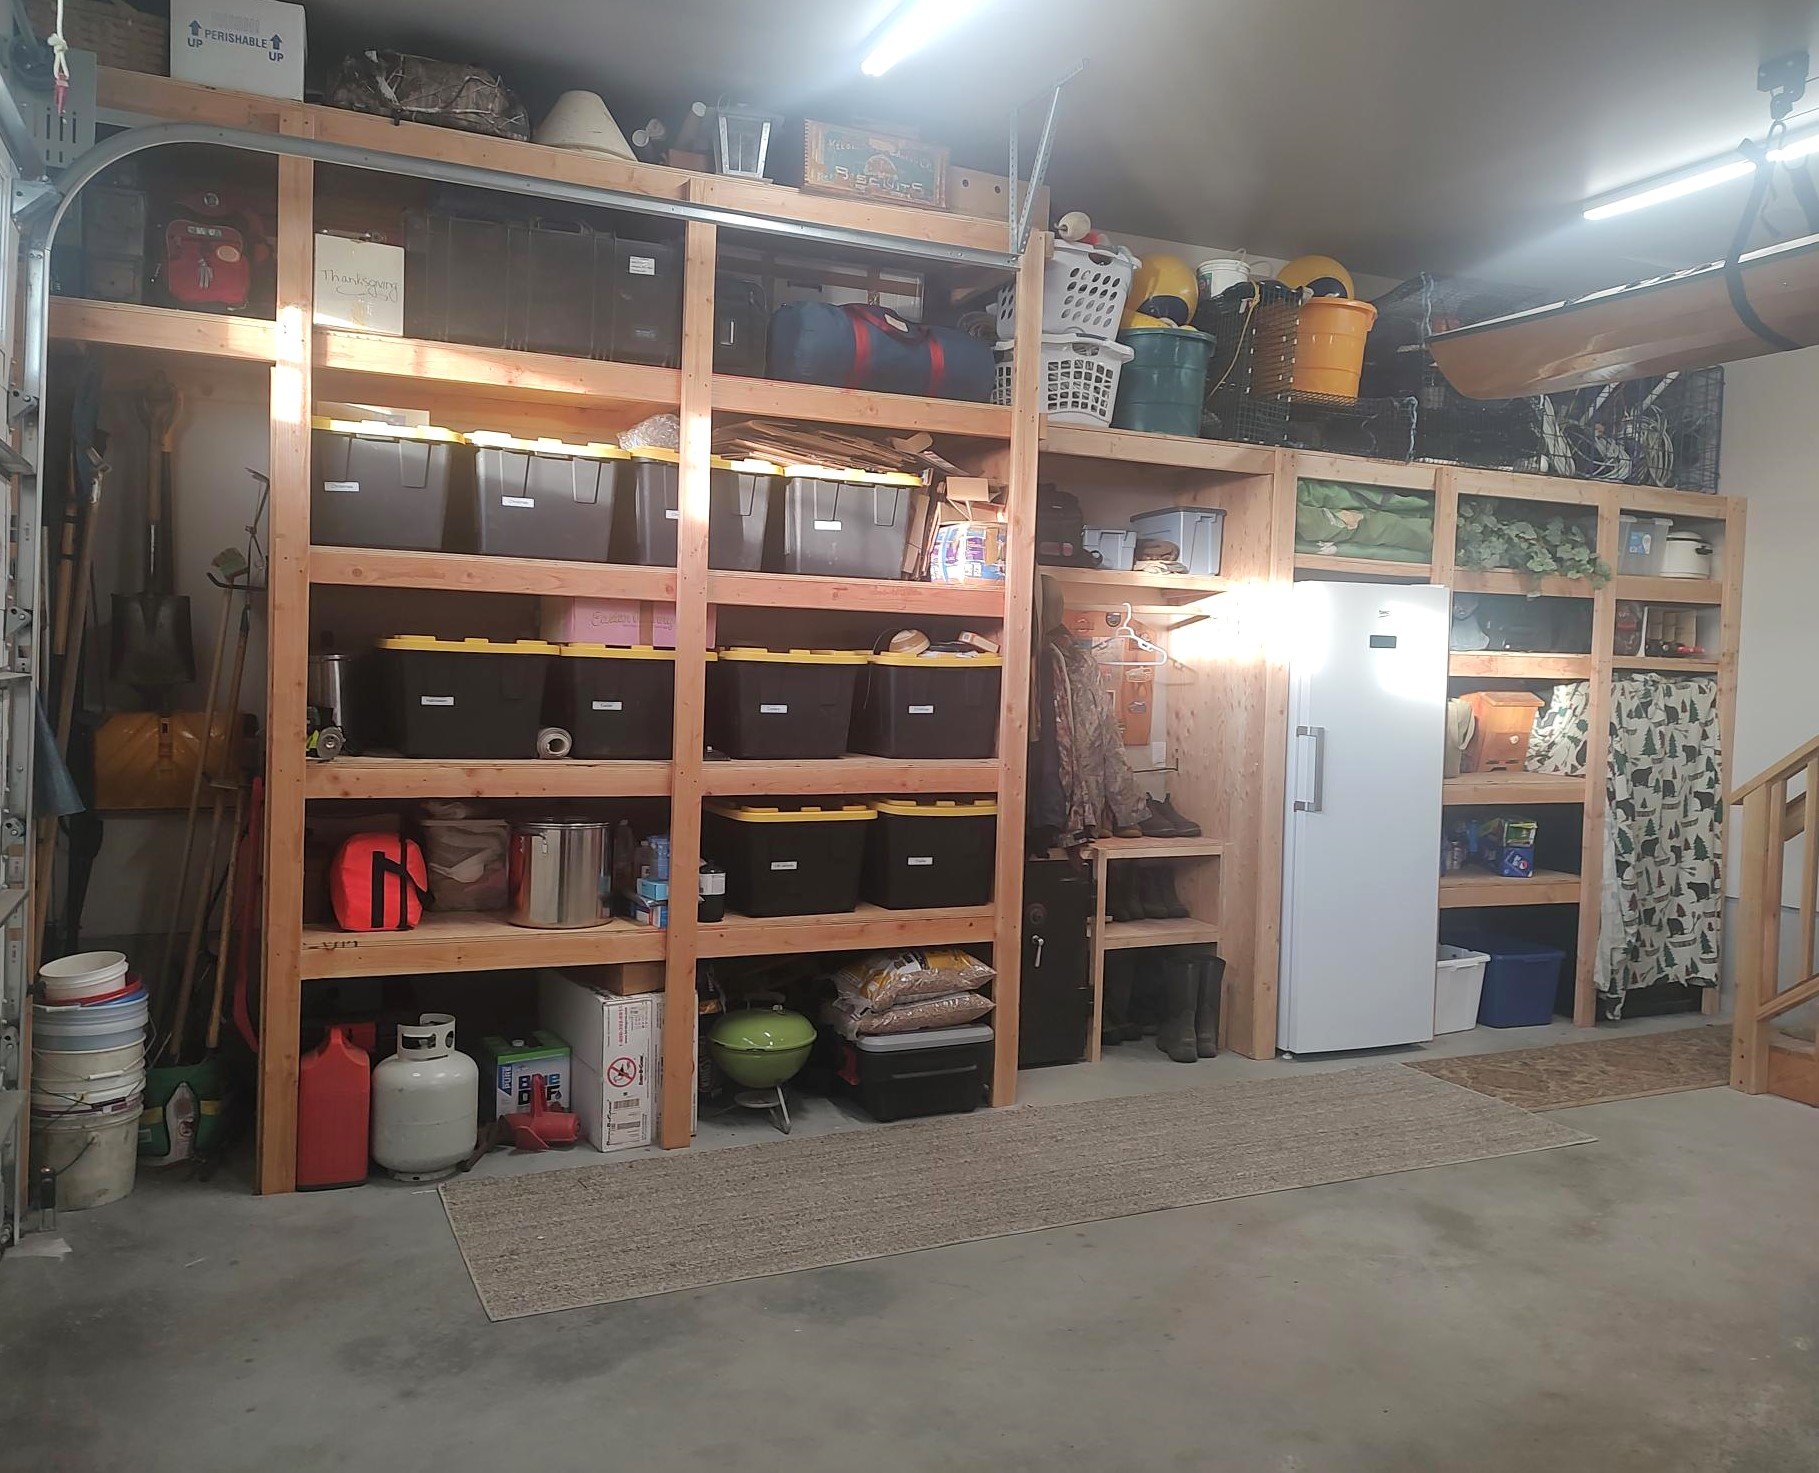
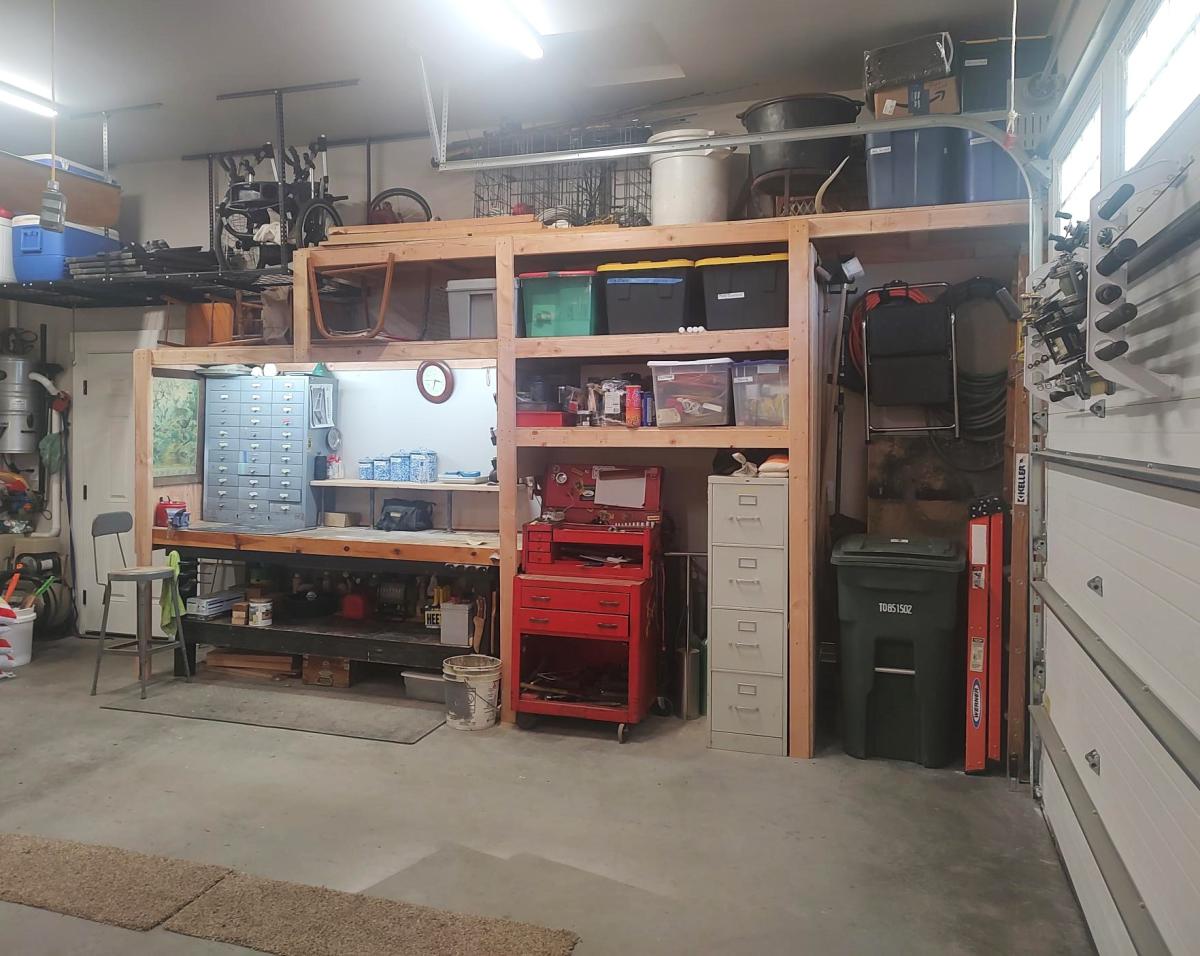
I just finished shelves on both sides of my garage using your video. I built a coat rack and boot rack. I also made space for tall items like tools and ladders near the garage door. I had to also build in a gun safe, freezer and my work bench. Everything came together and now I have everything in bins on shelves.
Gary Hoffman

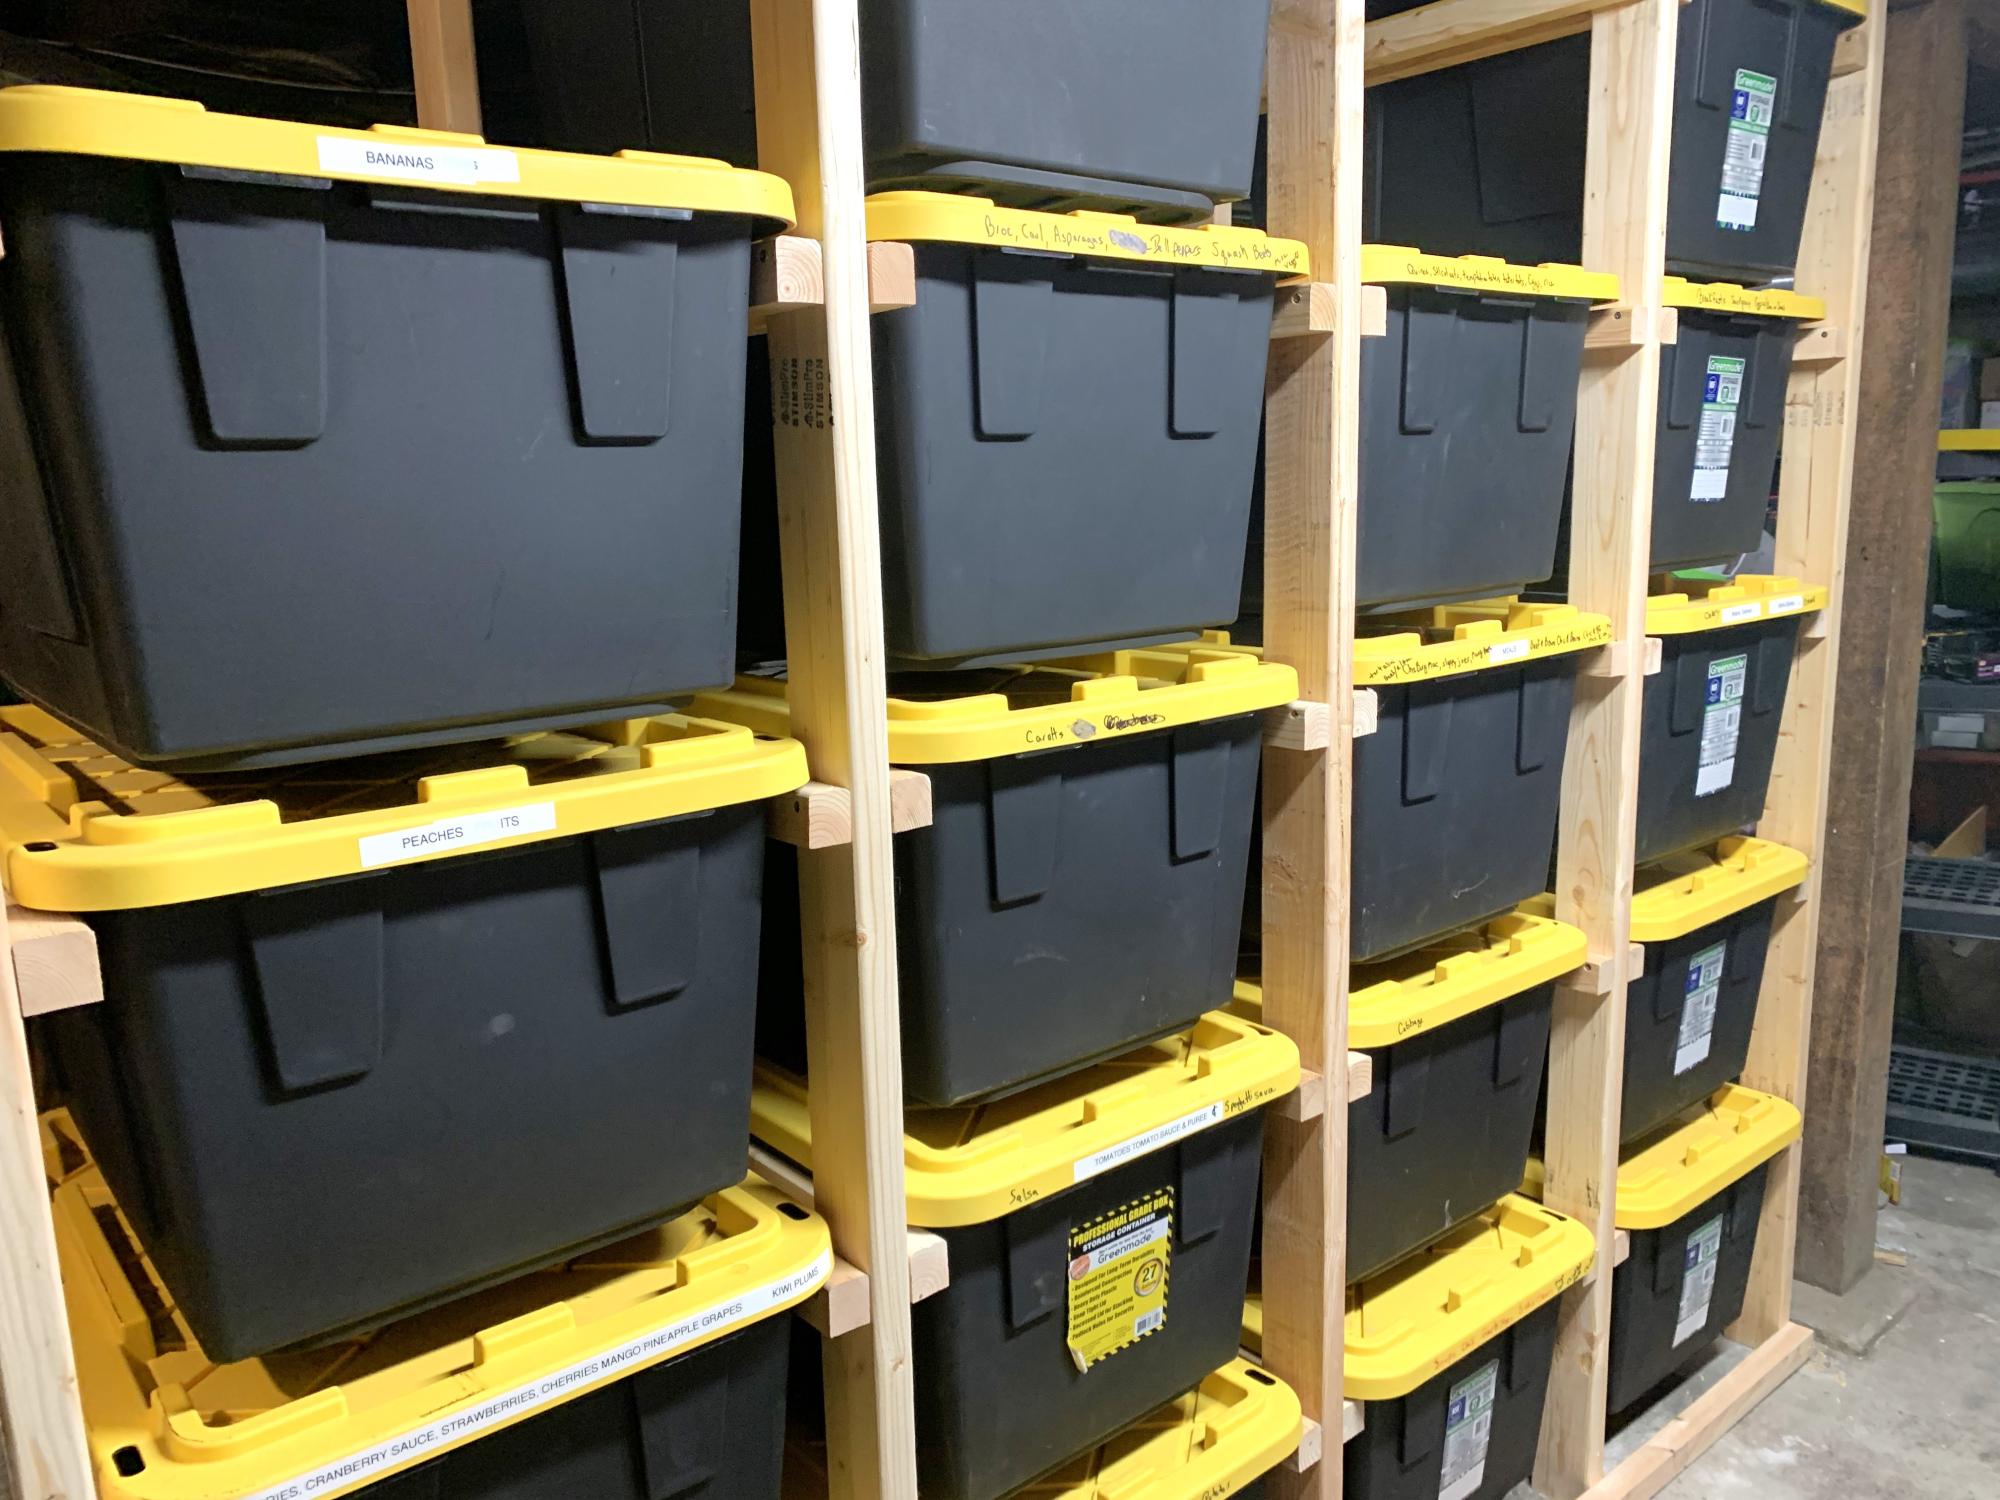
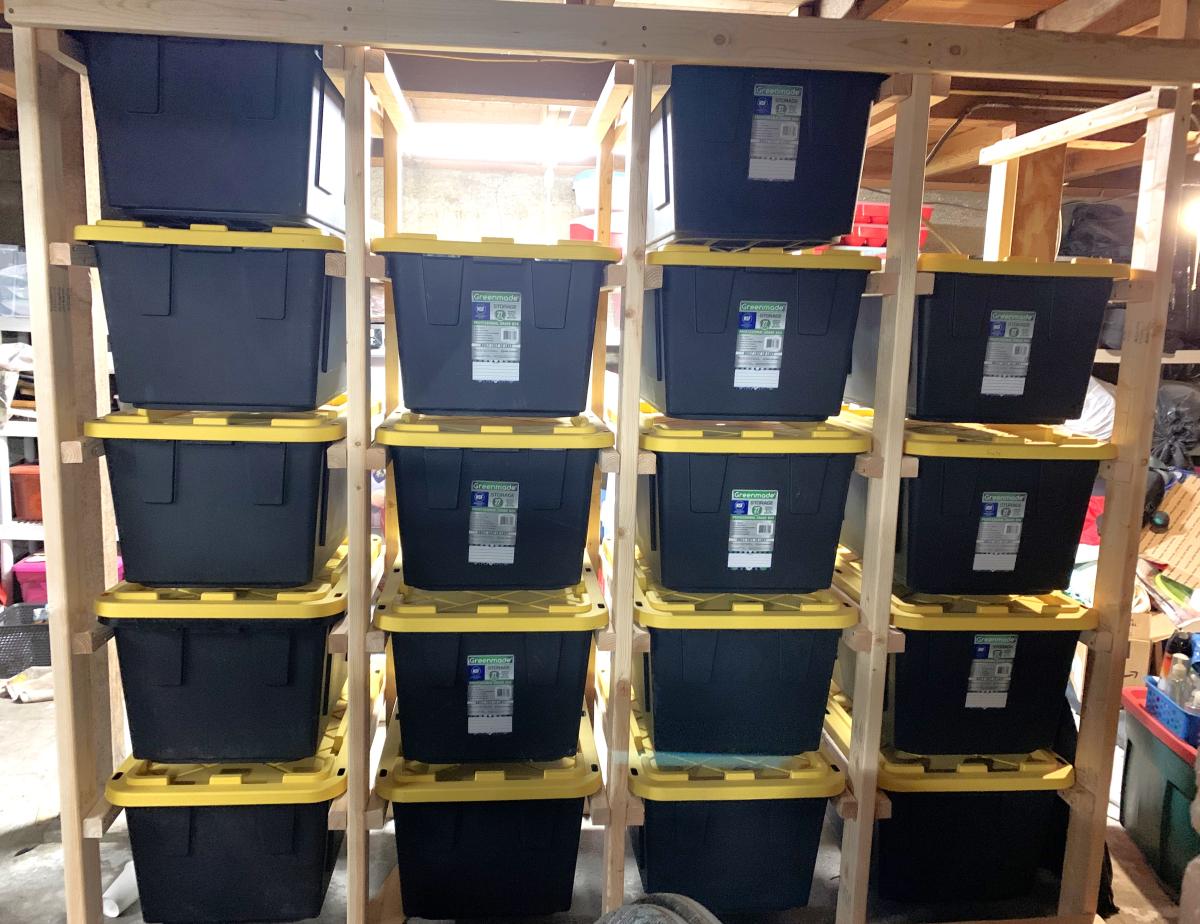
storage for totes - can be made to accommodate any size totes - just adjust the measurements basically it is "ladders " 2x4s for legs 2x2s for "runs" 2x4s across the bottom & top this is in a basement with short ceilings so if you have a taller space you can go taller or you can go shorter.

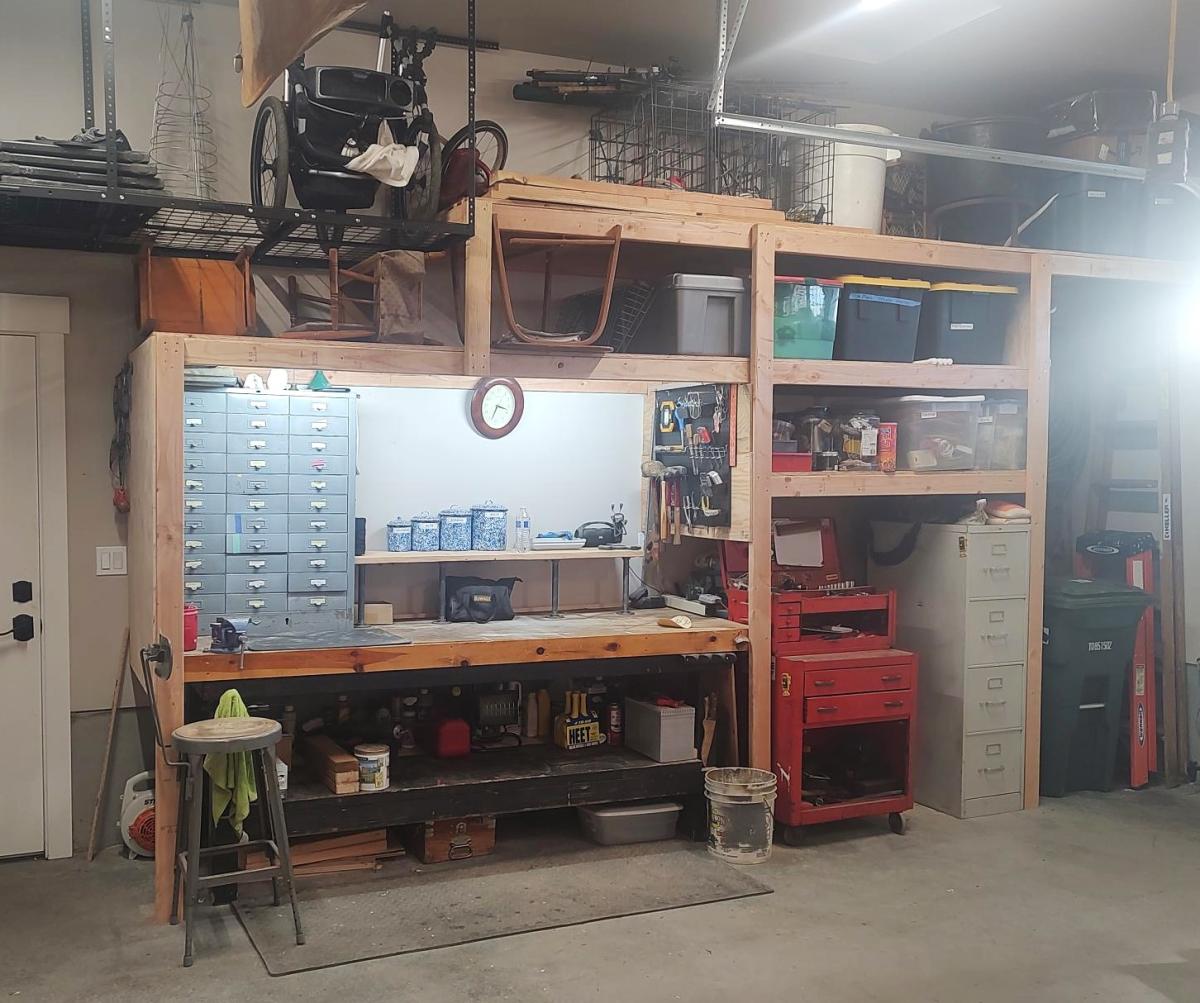
I recently had a workshop built and I have been trying to now work on the furniture for it. My first project was this workbench inspired by the plans "garage workshop workbench". I added drawers on each side and will probably end up adding a shelf in the open area as well after letting my kids finish decorating the top. It's already a nice addition and I may build a smaller version for my garage. I added casters and have the option to roll the table around or have it stationary.
Tonie

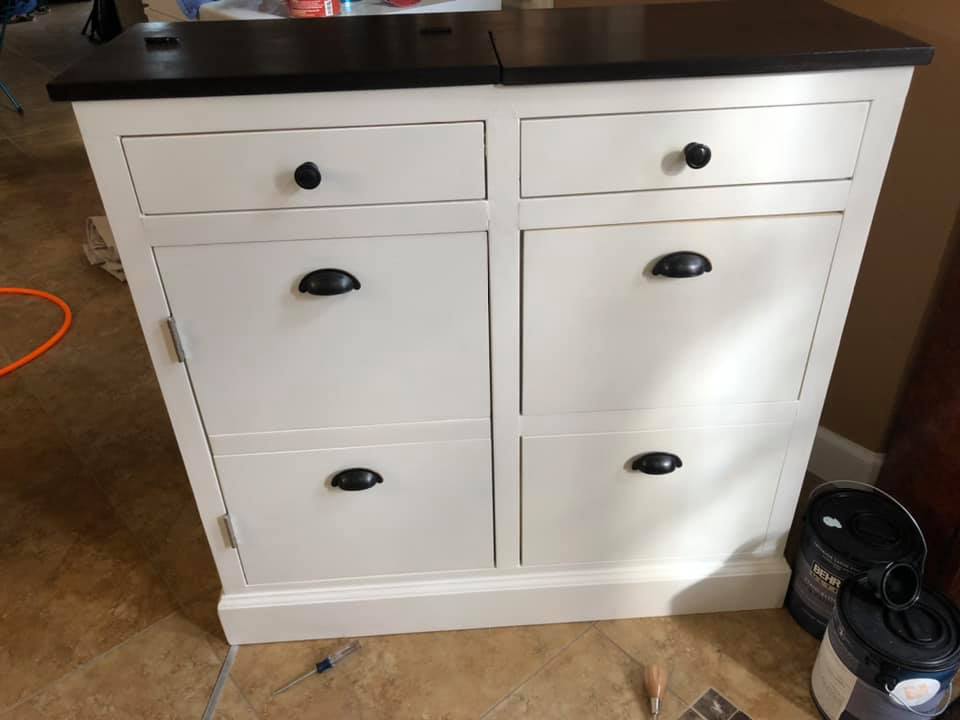
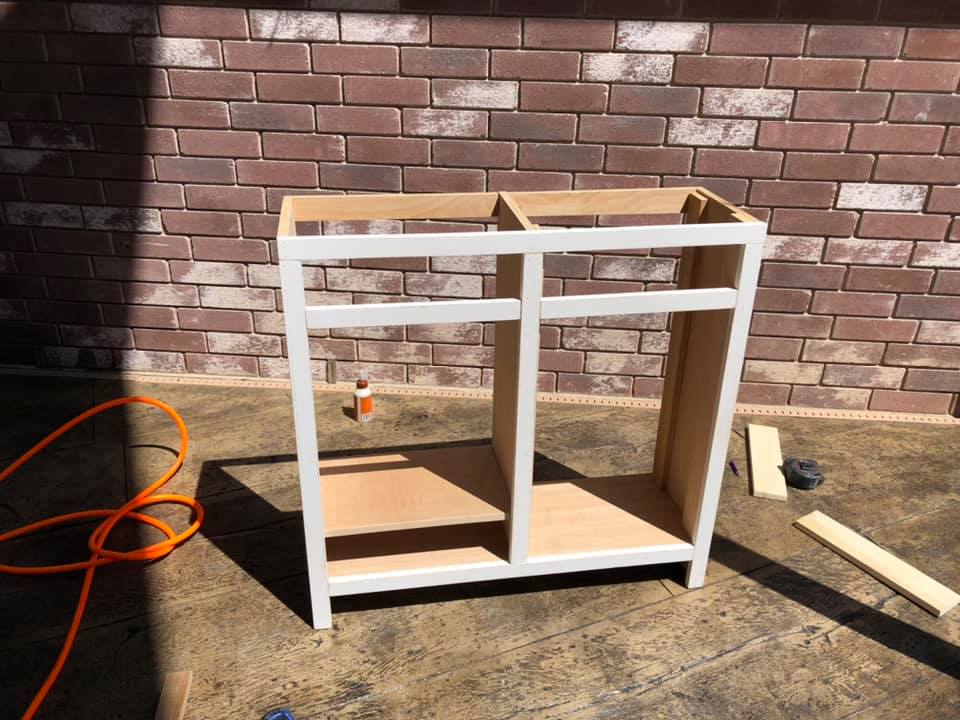
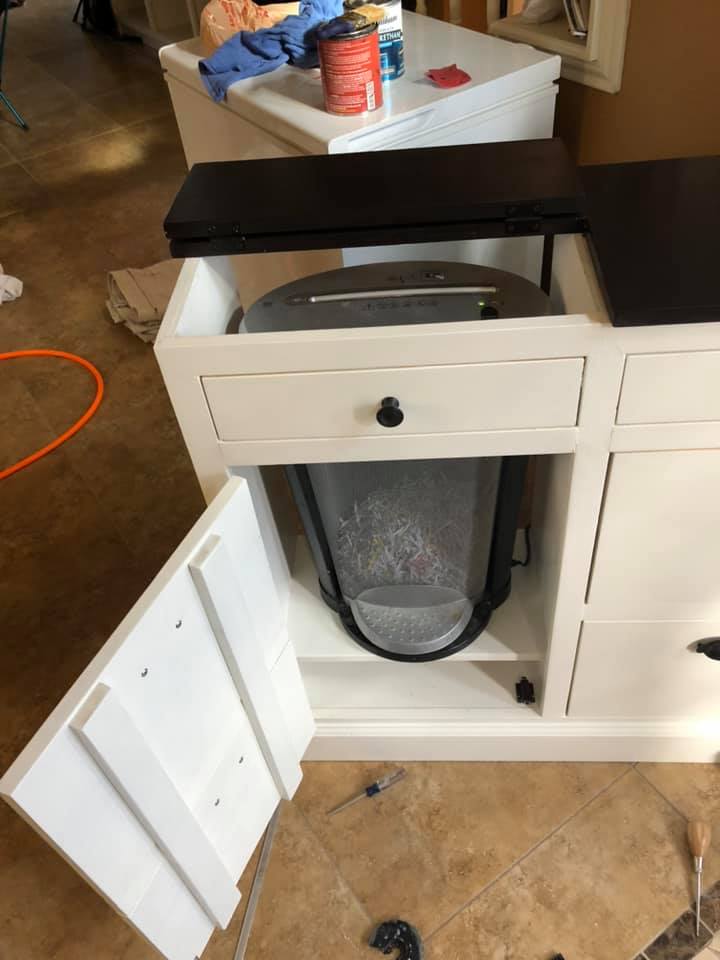
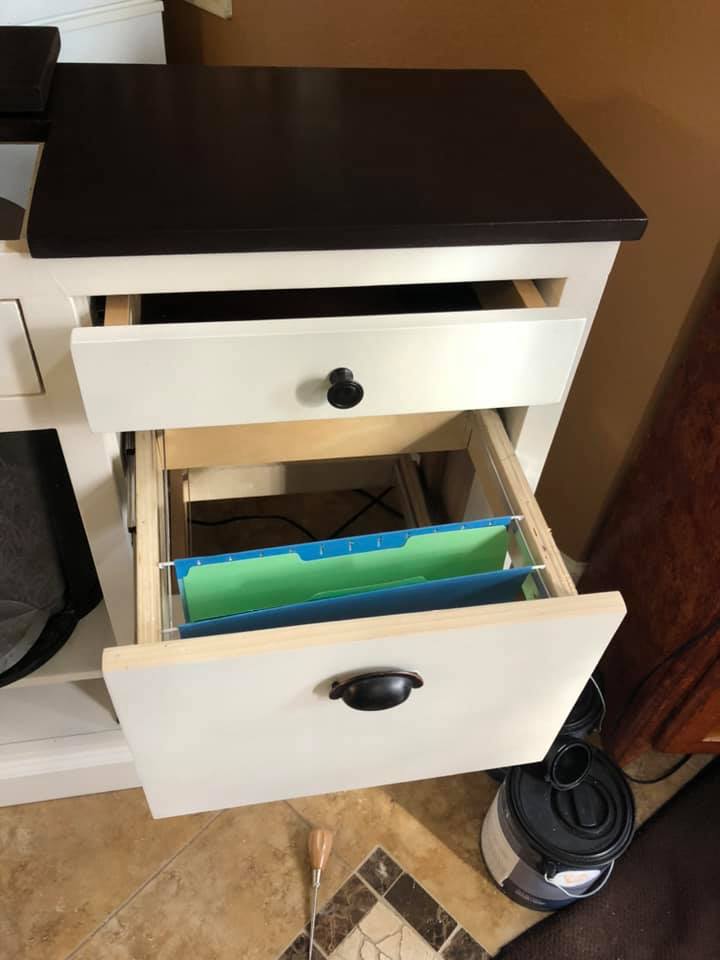
After scouring the internet for a piece of furniture that could hide my shredder and act as a filing cabinet, I decided to look here, and lo and behold, Ana had posted this project the week before. It was literally an answer to prayers!
I had a lot of leftover plywood that I cut to size to build this project. The drawer slides were the most expensive part of this project. It was pretty tough and I made a lot of mistakes, but I am very happy with it. It was just what I was looking for. Installing the drawers was the hardest part of this project. I made the shredder compartment to fit my specific shredder, and it barely fits. I already had drawer pulls and paint.
Fri, 12/04/2020 - 21:27
It's a hard working piece and you did a great job! Thanks for sharing:)

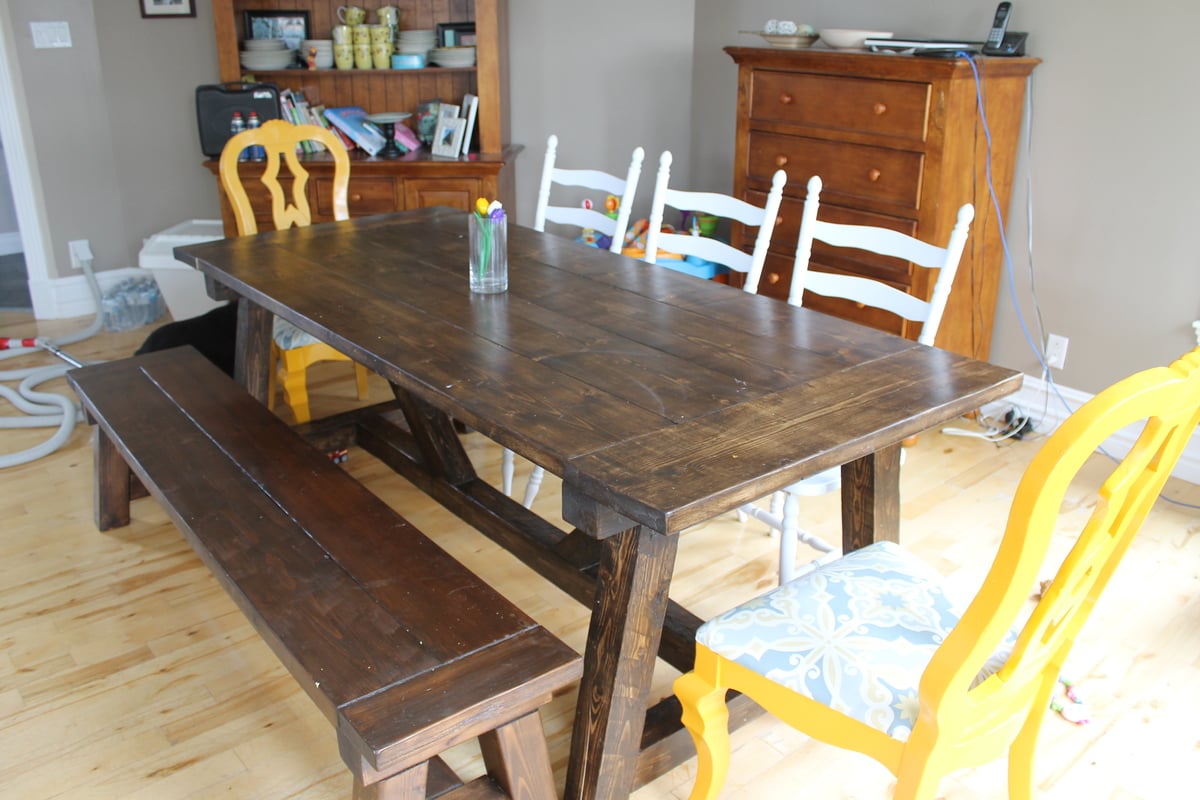
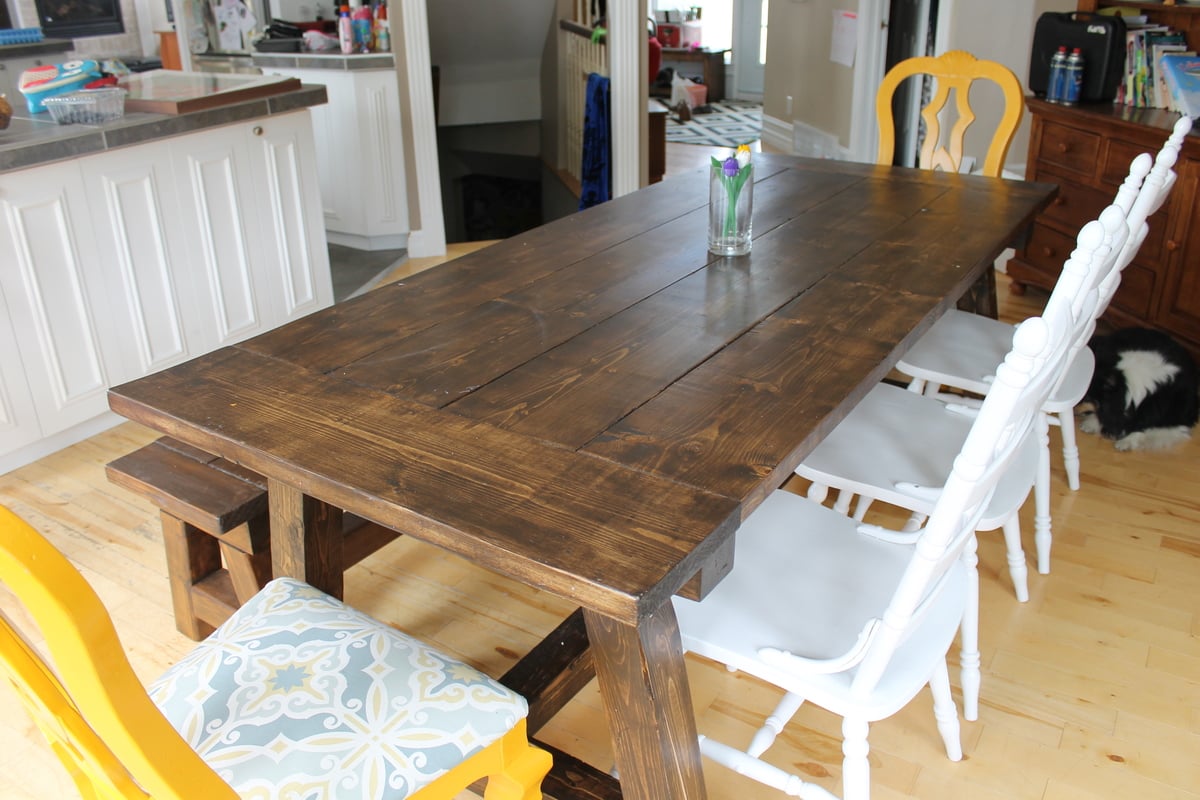
We needed a big sturdy table for 8-12 persons for our big dinning room but didn't want to pay 3000$ for it. Then i found Ana-white's site and thought "why not!". It's my first project, i started whit the bench and then made the table. All buy myself, my husby doesn't even know how to use a saw. He help me carry it inside thought ;) The plans were realy easy to follow. Somebody stop me, i'm refurnishing my hole house, i can't stop! In 2 months i'v made 2 dinning tables, 2 patio tables, 1 coffe table, 5 benches. So if i can do it, you can too!
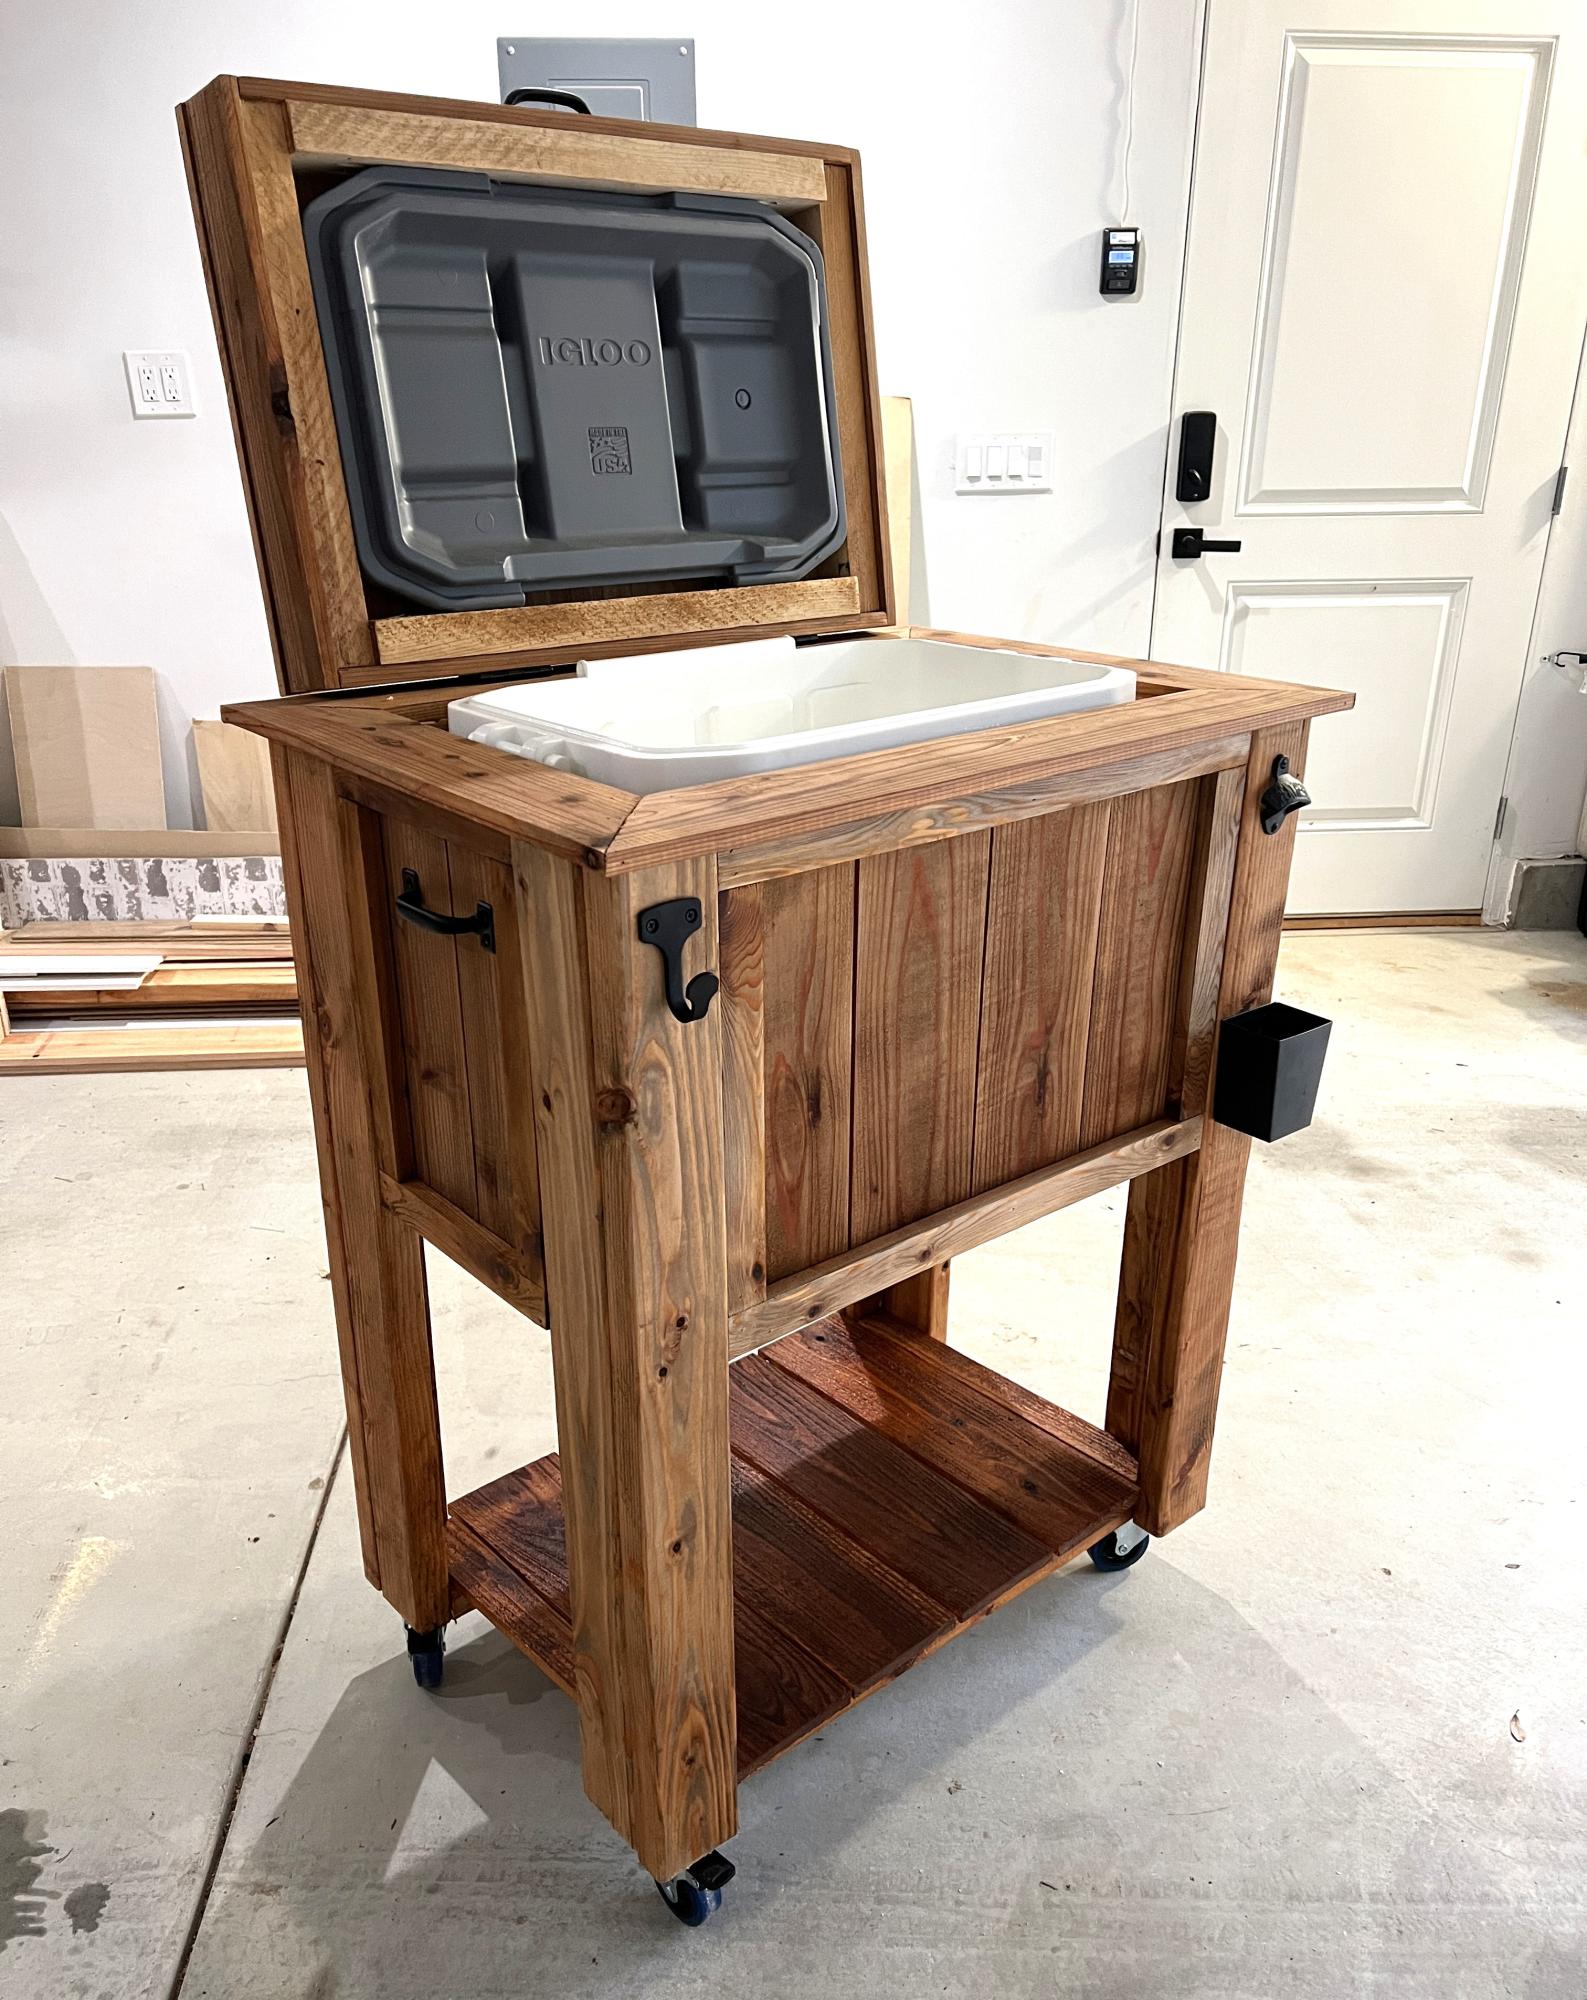
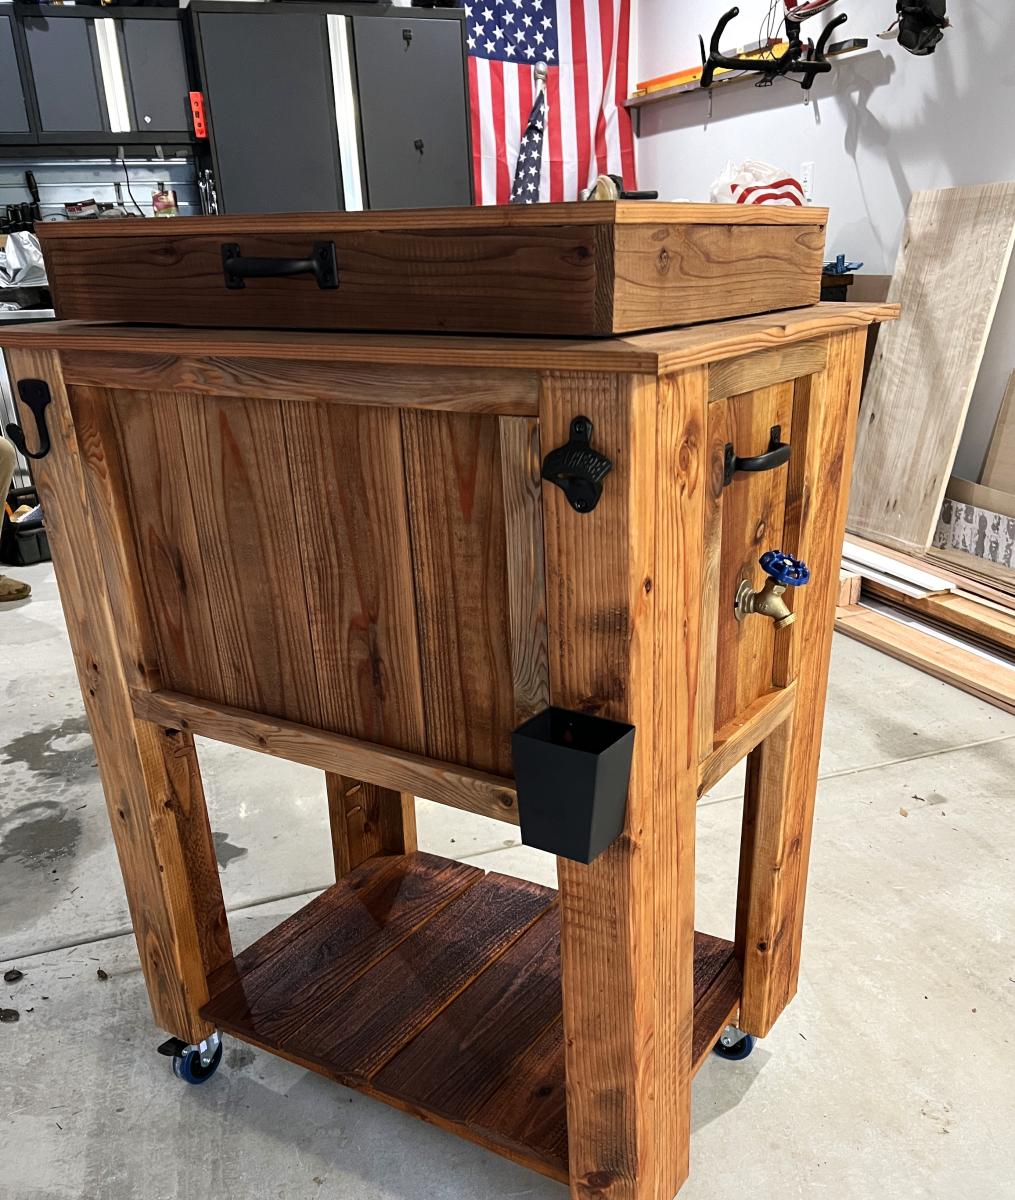
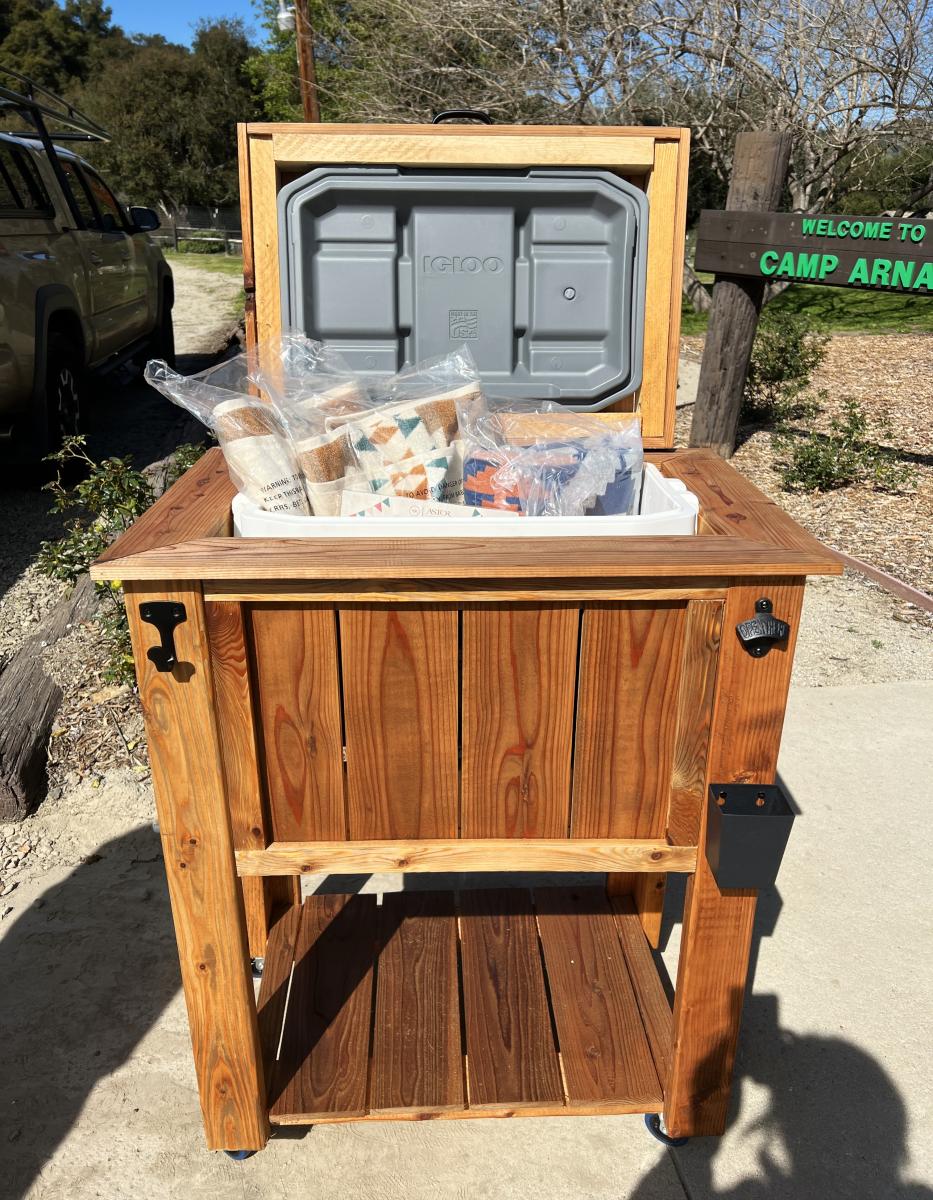
I made this Ice Chest Cart for my son’s schools silent auction. It features a spigot for drainage, bottle opener, hook for a bar towel and I also set it on castors so it can be easily moved.
This was my first attempt after finding the site. I was so happy with the ease of the plans and the way it turned out i made the dining table
5 1/2W x 5 1/2L x 8H.
Ana made this project very easy for me. I did the main building while hubby cut the wood & helped drill in hard to reach areas. Thank you Ana for boosting my confidence. I’ve never done anything trike this.

This was an easy project to complete in an afternoon that does not require any advance woodworking skills


Wed, 11/26/2014 - 12:19
This project looks even better than mine! I love look with paint! Well done!
Wed, 12/10/2014 - 09:41
This is my second completed project with plans and ideas from your website. Thanks for your good work!
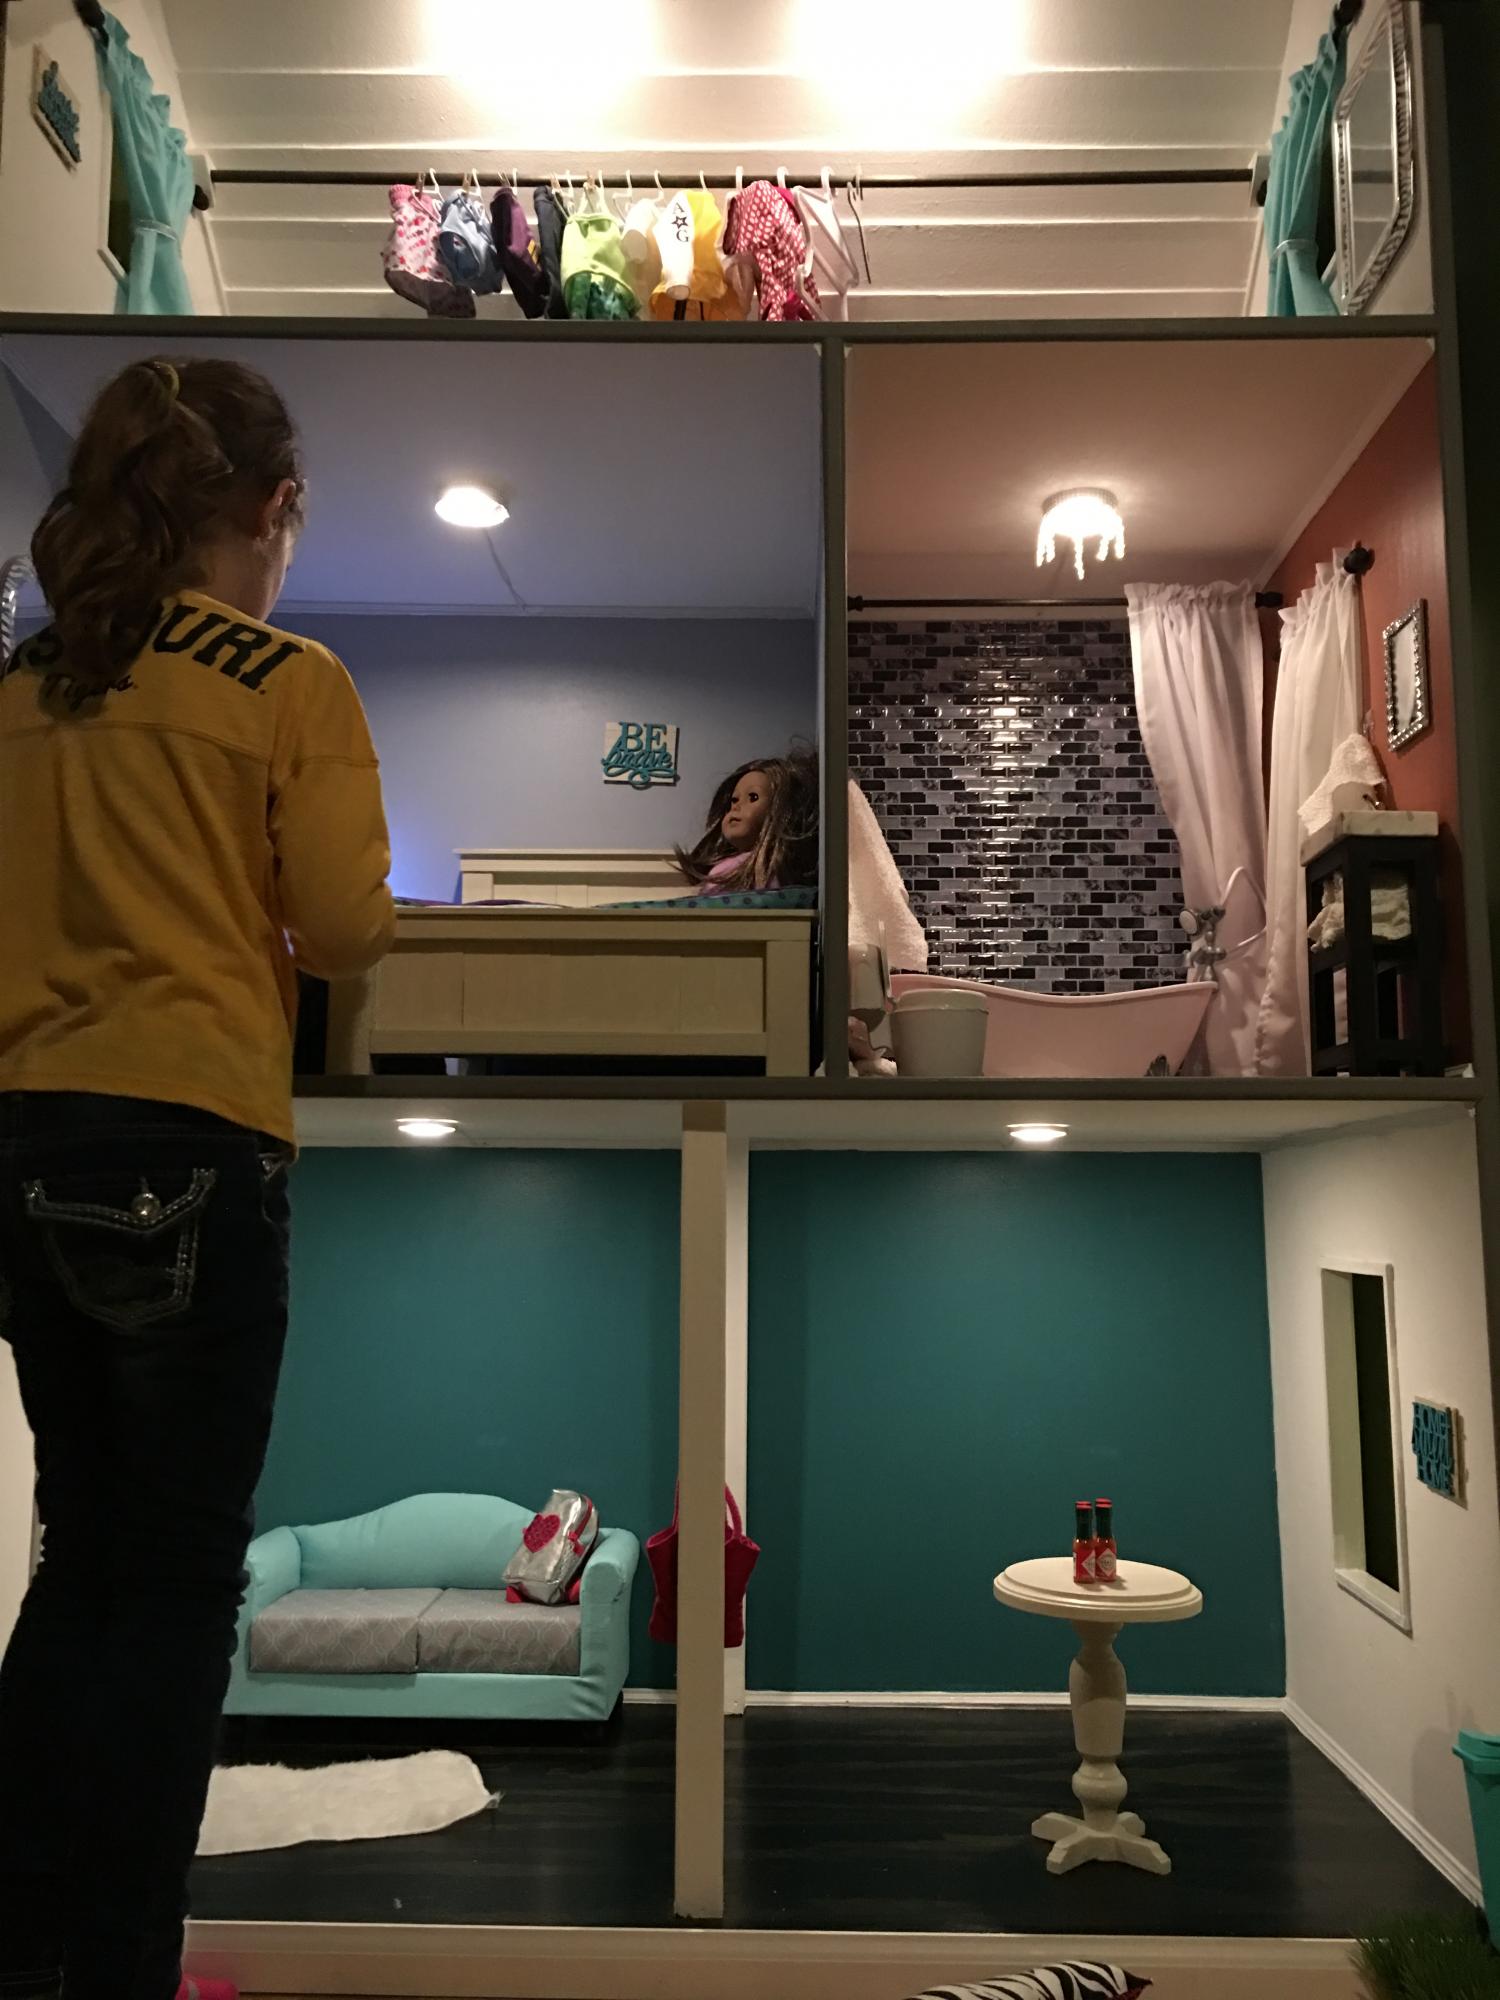
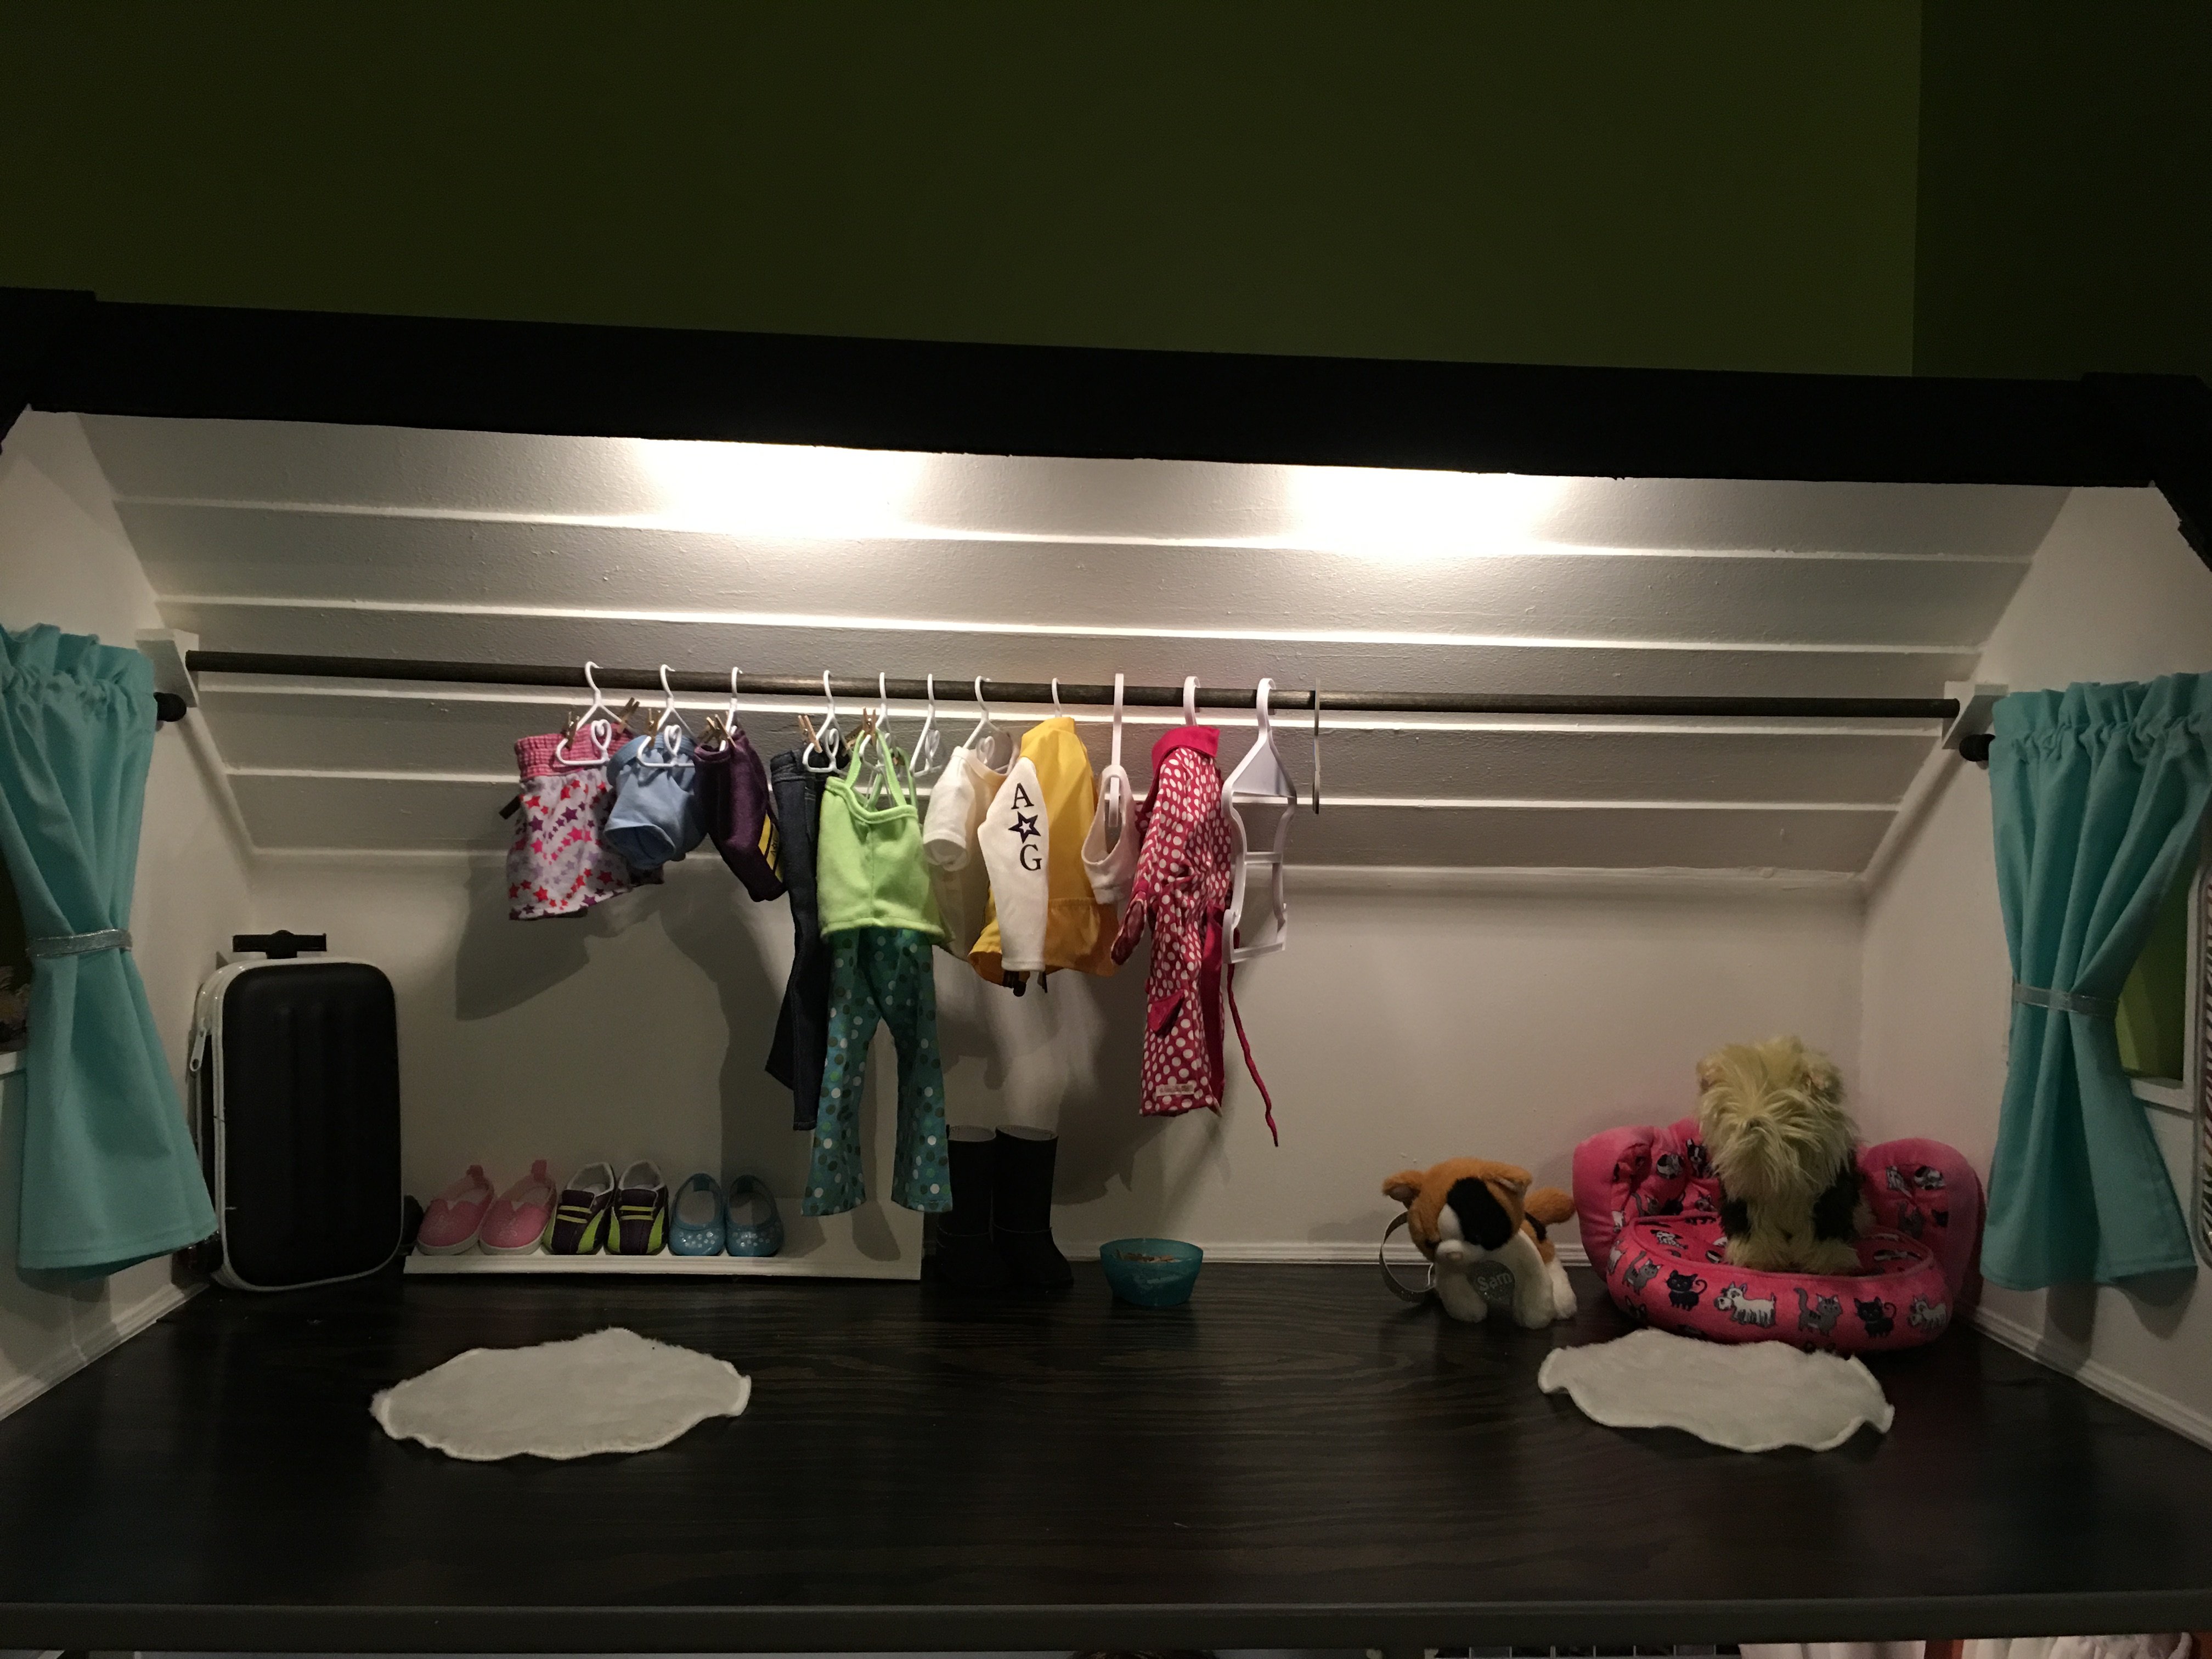
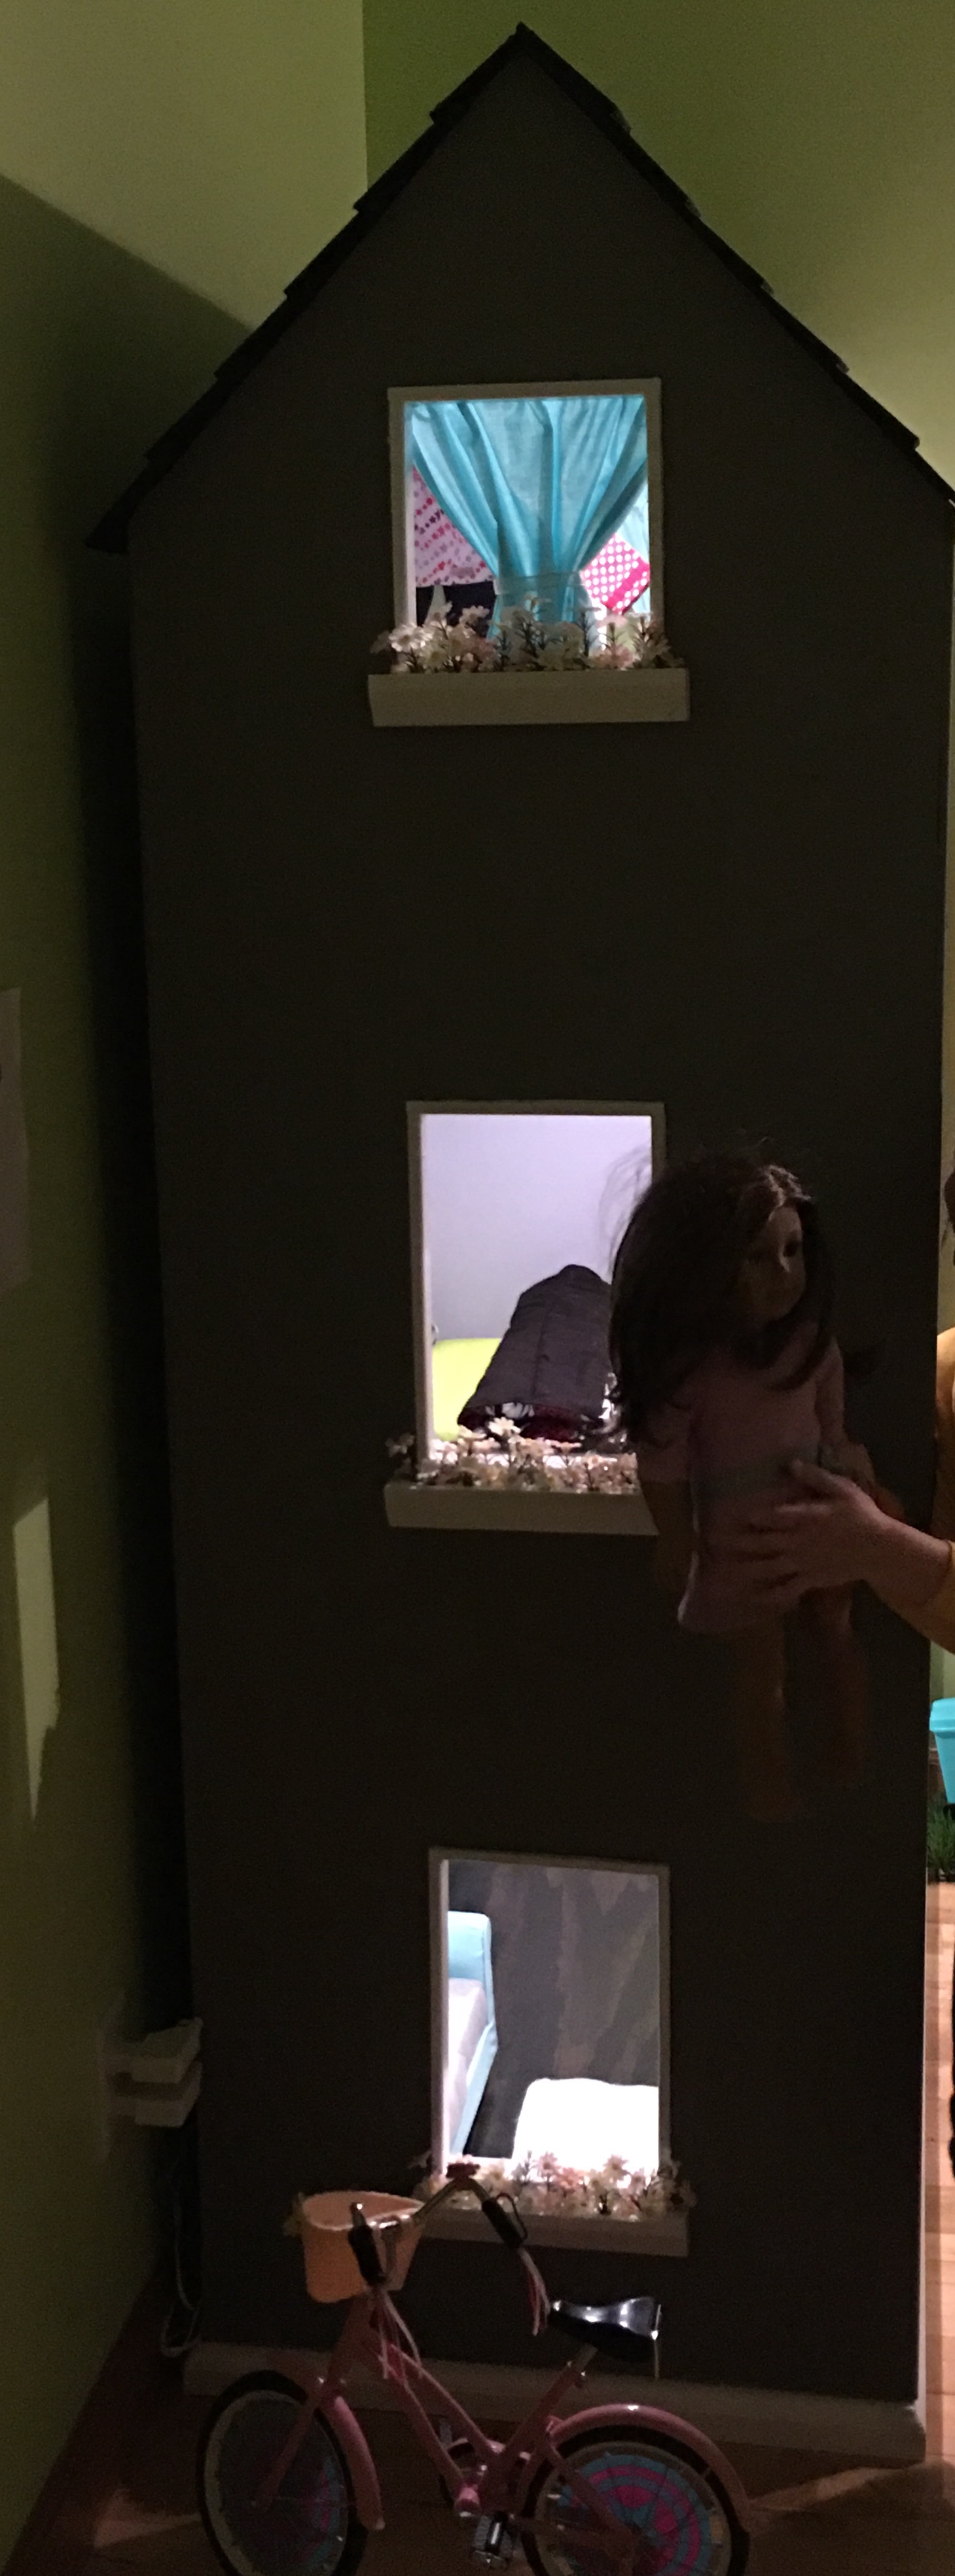
This dollhouse was super easy to make! Harper (the doll) wanted an open concept living/kitchen, and that is the first floor. Second floor are the bedroom and bathroom. Top floor is the closet. The roof is made from 3.5" slats of luan glued together and painted with black sanded paint. Notice the baseboards and crown molding? The window boxes are really cute, too! I still owe my granddaughter a garage and patio with pergola, and kitchen appliances and chairs, but that will wait until summer when she can help craft/build them.
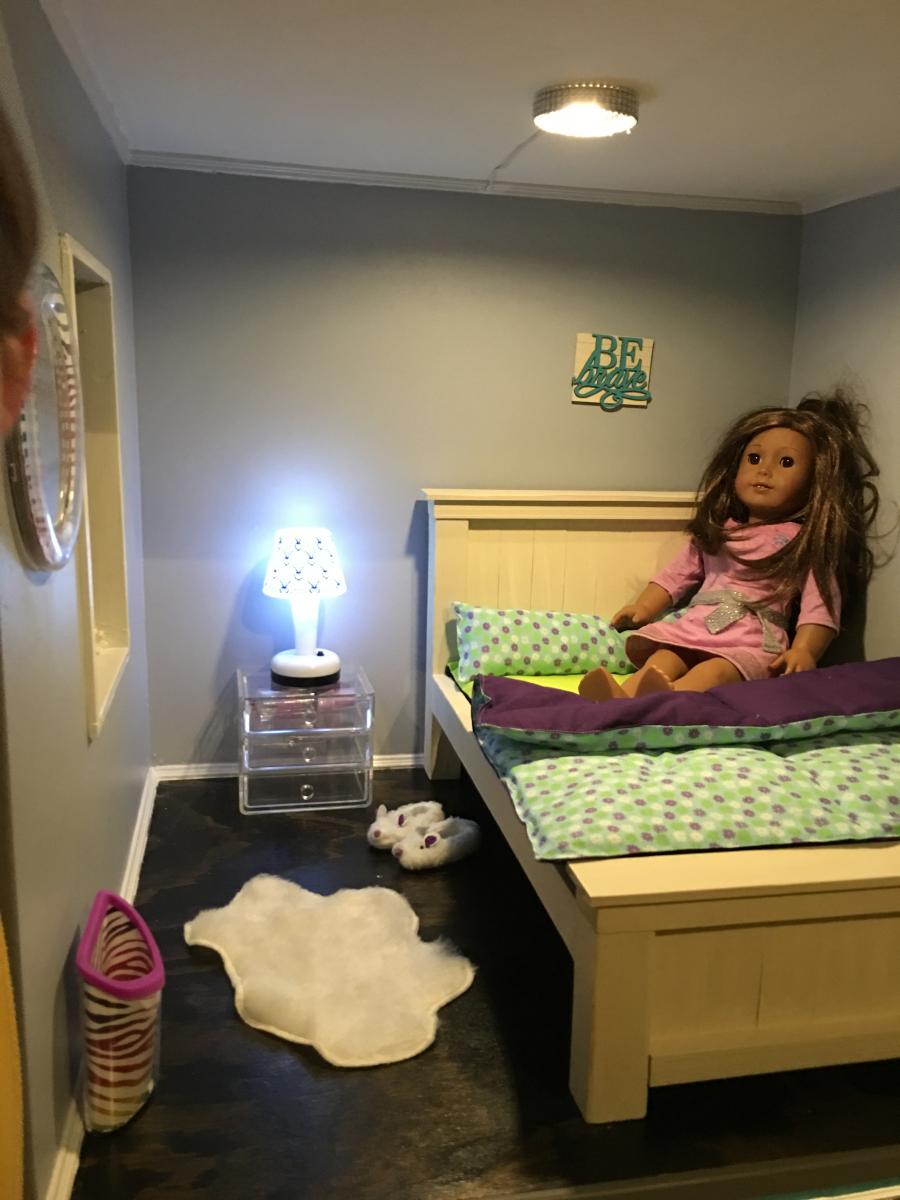
Harper's bed is modeled after the farmhouse bed plans available on this site, but I used smaller scrap lumber. I wanted milk paint but was unwilling to pay the high price, so I bought a sample jar of antique ivory paint and watered it down. It turned out great!

We built these bunks for our boys, ages 4+6. The plans were super simple to follow. The frame was built out of scrap 2x6's and 2x4's. We did have to make a modificatioon on the ladder- it came up just short for some reason, so we added a 2x4 to the bottom.

Sat, 03/14/2015 - 20:26
Great job on the beds! That room looks awesome. I love the color selection.

In reply to Great job on the beds! That by handmadewithash
Sat, 06/20/2015 - 08:56
Thank you!

My wife wanted a portable farmhouse style rustic dining table that she could take to photoshoots and other events. I started with a top made with 2x6s and make the legs with 4x4s and the rest with 2x4s. Stain is dark walnut with a clear coat on top.
The legs are attached with door hinges and can fold into the top for more portable use. There is also a board that can be inserted in the bottom slots so that when in use the legs can not fold in.
So far the rustic dining table is working out great, although this table is VERY HEAVY and needs 2-3 strong people to carry it around. I have also made a lighter version using 1x6 tops and all 2x4 frame and legs.
Photos courtesy of Jennifer Blair Photography Designed by Amber Veatch Designs


Wed, 06/12/2013 - 04:15
Oh I really hope that you are able to put these modified plans up!!! A foldable farmhouse table.... what will they think of next!
Sat, 10/22/2016 - 12:25
Stunningly beautiful! Thank you for sharing and inspiring!
Sat, 10/22/2016 - 17:21
I cannot find the plans for the tiny house drawers any where. Can someone please point me in the right direction. Thank you!
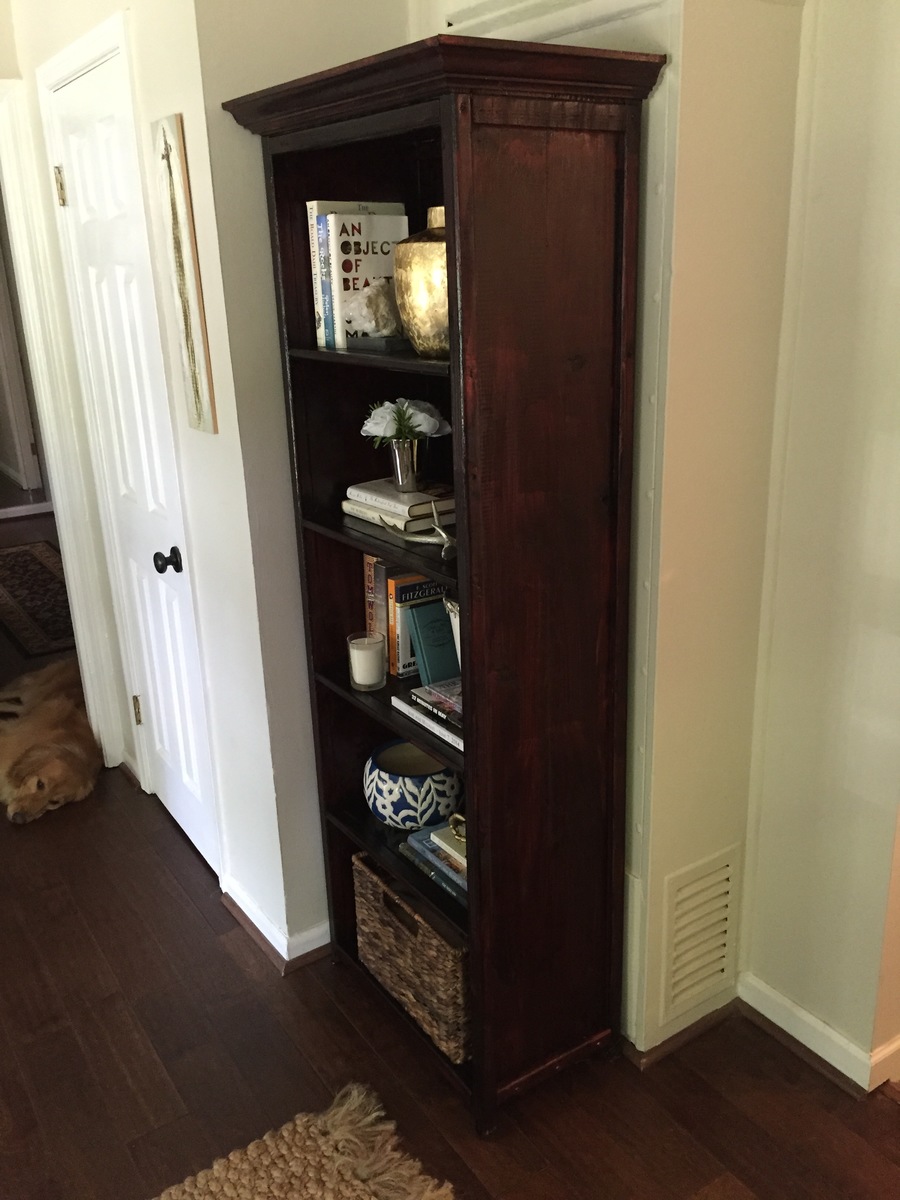
We needed a bookcase to fill a void in our living room and this was it. I altered the dimensions to increase the height to 72.5". I also added crown molding to the top which turned out nice. I used the same Bombay mahogany stain suggested by a previous post.
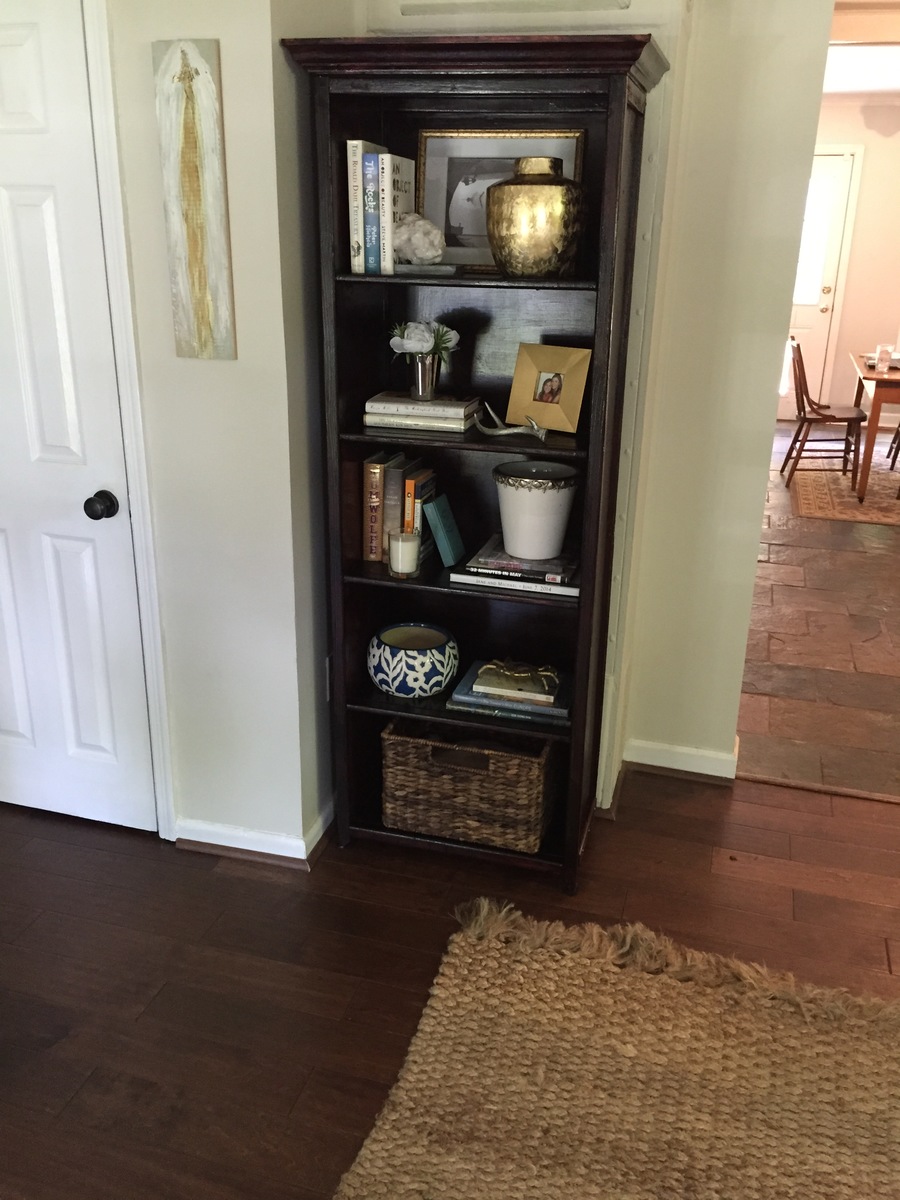
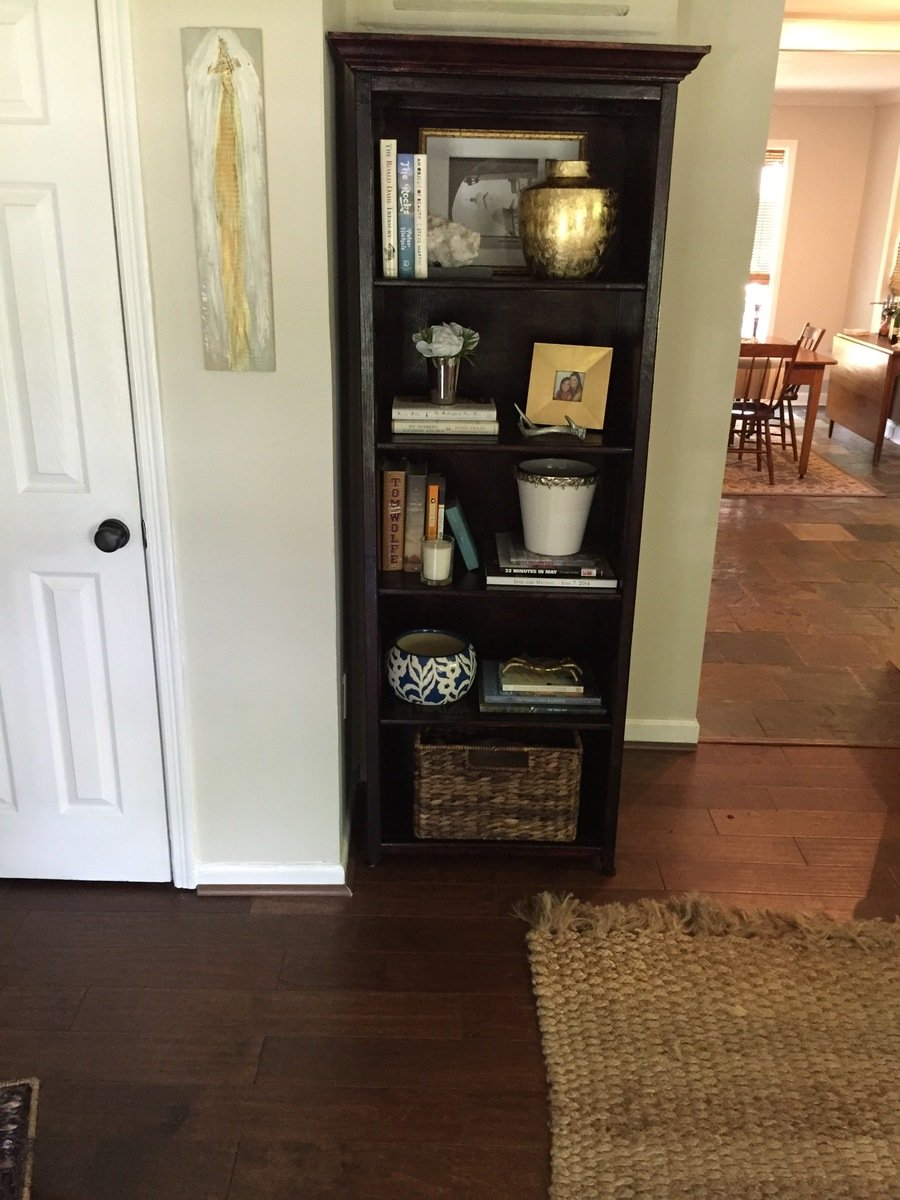
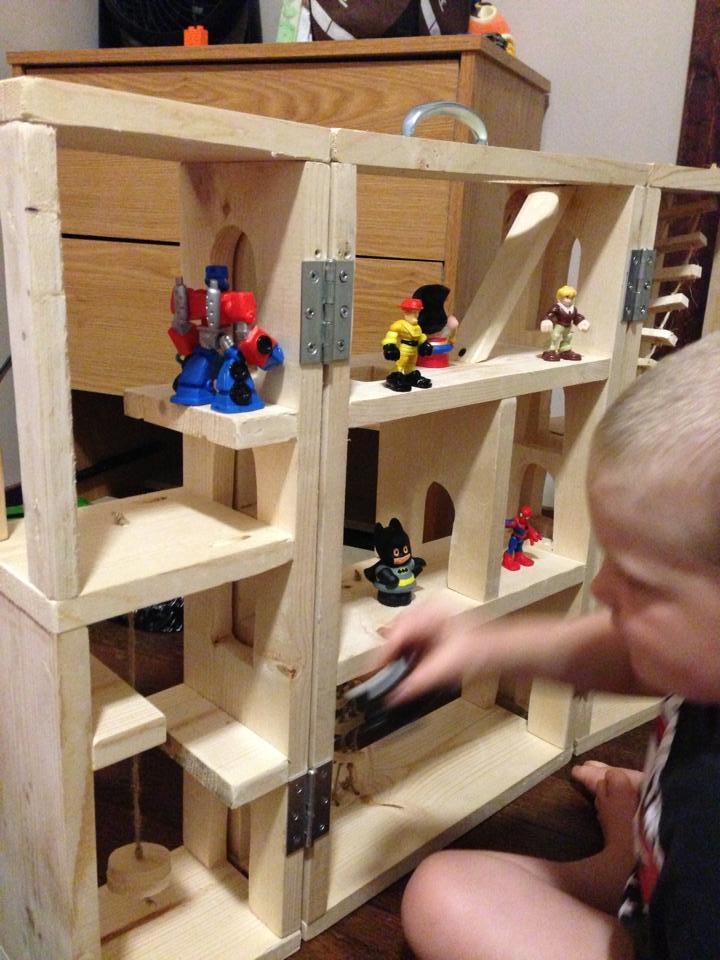
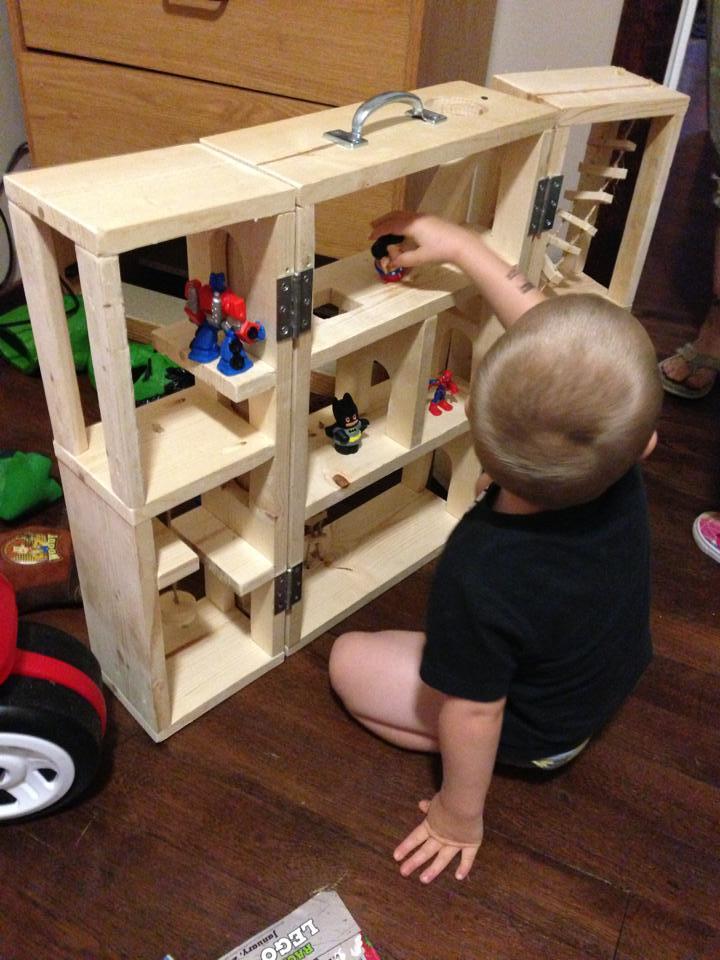
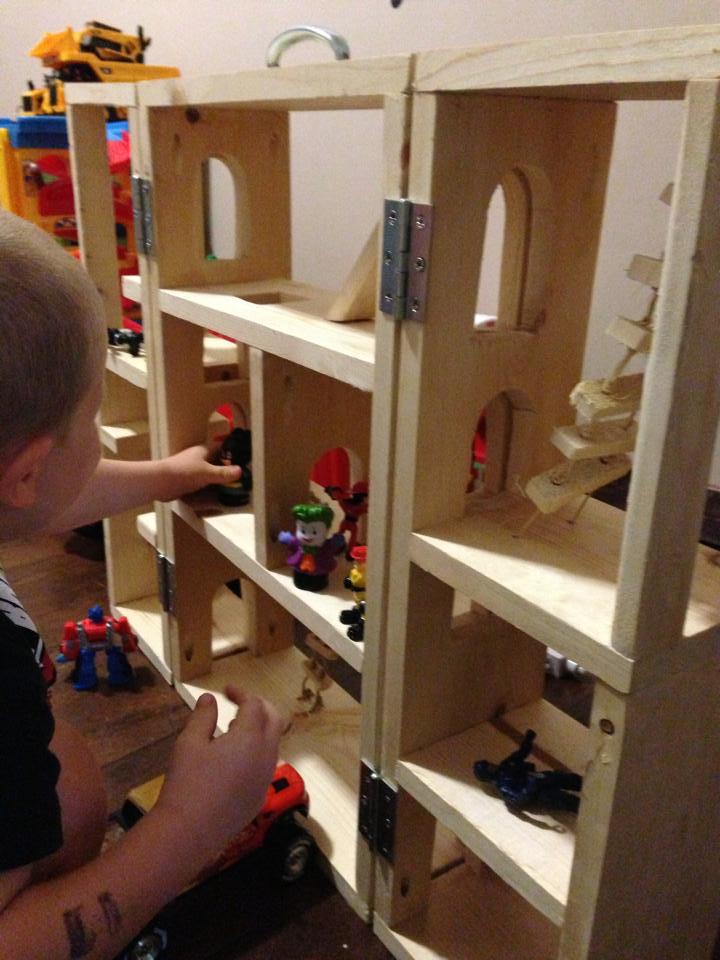
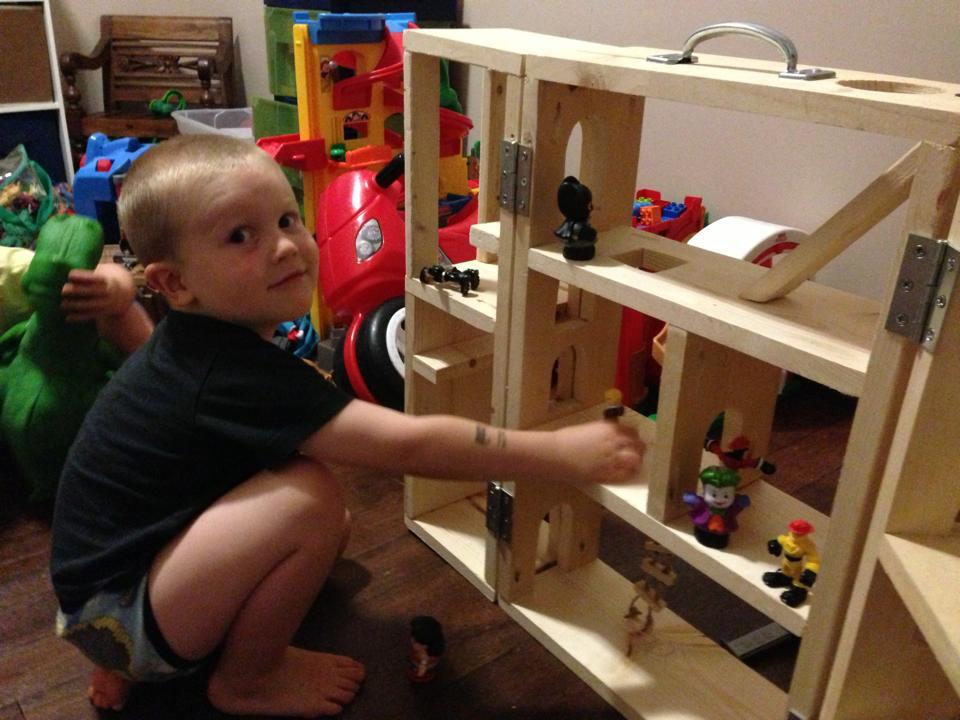
This was hard for me because I am horrible at using the jigsaw. If I do another one I'll probably not do as many door openings.
It took longer than expected due to filling in all the pocket holes an waiting for the wood filler to dry.
My grandson loves it, he didn't care about my mistakes on it.
Comments
Ana White Admin
Fri, 03/03/2023 - 11:54
Great first project!
Way to go, can't wait to see what you build next! Thanks for sharing.