Community Brag Posts

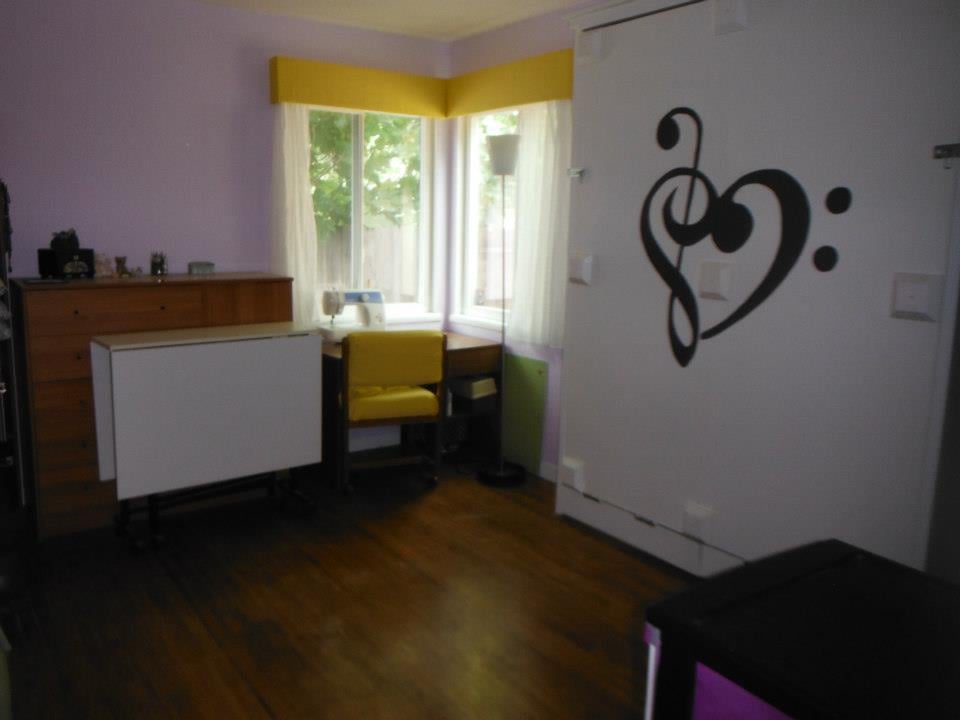
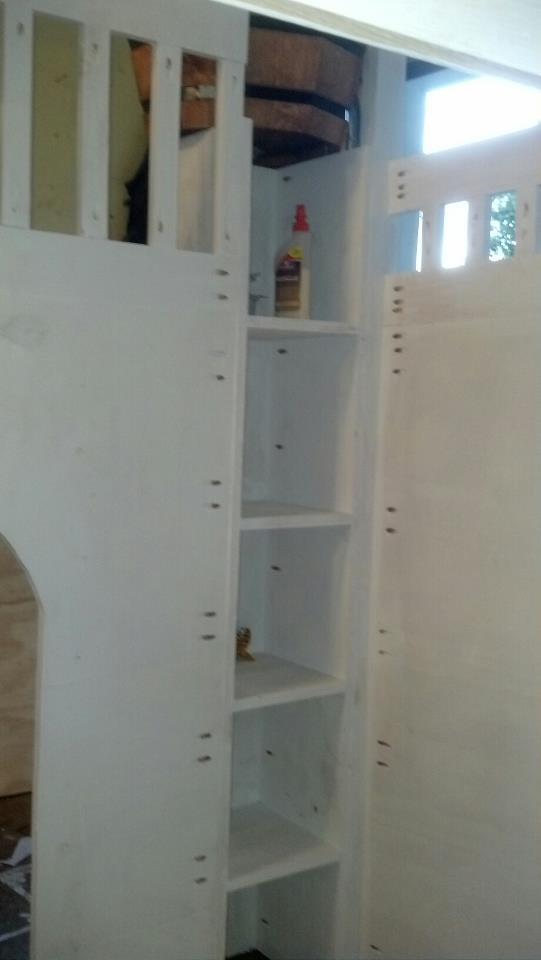
Murphy Bed - queen
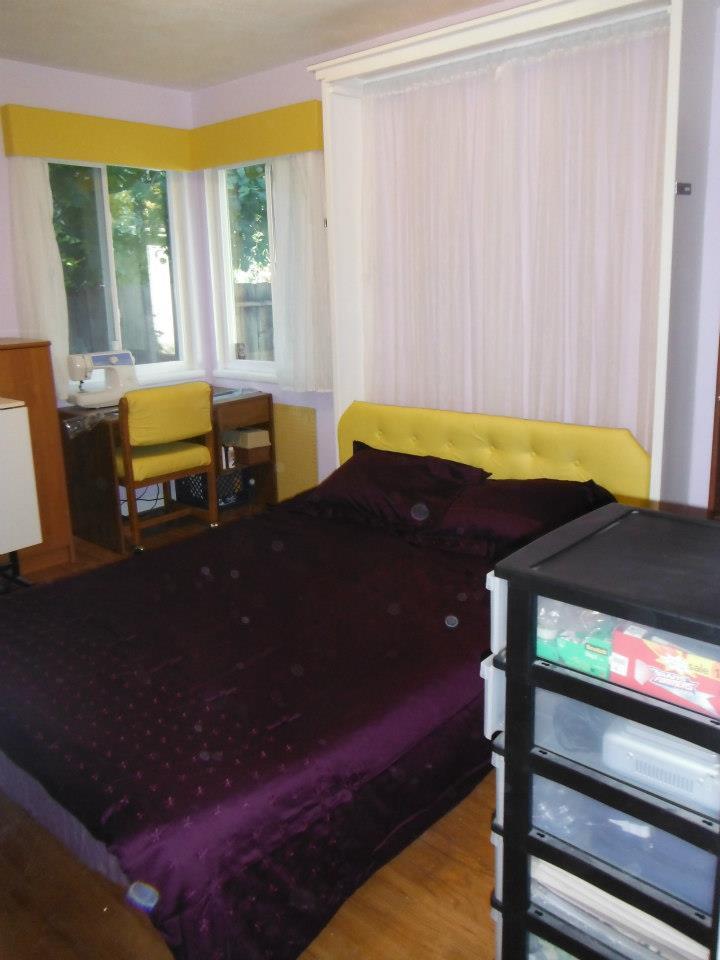
Taking the plans for the full sized Murphy bed (http://ana-white.com/2010/03/plans-a-murphy-bed-you-can-build-and-affor…) I added a few inches to convert to a queen and raised it off the floor 5 1/2 inches with removable fence post toppers.
The yellow head board lifts up and stores inside the frame when up. If I had it to do over again, I would sand and paint as I built. Thanks to Ana, I now have a guest room!
Built from Plan(s)
Estimated Cost
$150
Estimated Time Investment
Week Long Project (20 Hours or More)
Finish Used
wood was sanded, primed and painted
Recommended Skill Level
Intermediate
Comments
Mon, 10/08/2012 - 11:13
Great job!
Holy smokes! Great job! I just got my early birthday present - a Kreg Jig Master System!!! One of the first things I will be building is a murphy bed, so thank you for the inspiration.
It looks great!
Fri, 11/30/2012 - 20:18
This is fabulous! What did
This is fabulous! What did you use at the backing of the box? Is that fabric? The whole thing looks so nice!
Wed, 02/13/2013 - 11:45
Love the bed
I just wanted to know if you used the jig required or if you used something else? Camille
Thu, 04/25/2013 - 11:44
Not required but....
The jig is not required but it sure makes everything fast and easy
Wed, 04/24/2013 - 19:55
Queen Murphy
I love your adaptation of Ana's plans. Would you be willing to share the dimension for the queen murphy? Thank you!
Mon, 04/29/2013 - 14:32
Queen Murphy
I am wondering what king of hinges you used for the bed. Did you use continuous (piano) hinges or regular door hinges? How wide are they? I am not sure what the acceptable width for the hinges is to be safe. Thanks.
Wed, 06/12/2013 - 16:35
Measurements
What were the altered measurements and exactly how did you raise it? I really like Anas plan except that the mattress was so close to the ground. I want to make this for my apartment and I'm painting the outside like a tardis. (:
Fri, 07/26/2013 - 18:50
measurements
I raised it 5 1/4 " using fence post toppers from home depot. The fence post toppers unscrew for upright storage. You could leave them in for a more dramatic look but I liked the cleaner lines with them out until needed
Sat, 11/02/2013 - 15:33
queen dimensions
Would you be willing to share the dimensions you used when building your queen murphy? Even if they aren't exact, it would be such a big help to me!
Sat, 12/28/2013 - 22:56
In that same picture, if you
In that same picture, if you look at the bottom 6 inches of the closed bed (under the hinge) there is a storage section where I hide the legs when the bed is raised. It is otherwise dead space and made for an easy storage conversion at the last minute.
Homework Table and Chairs
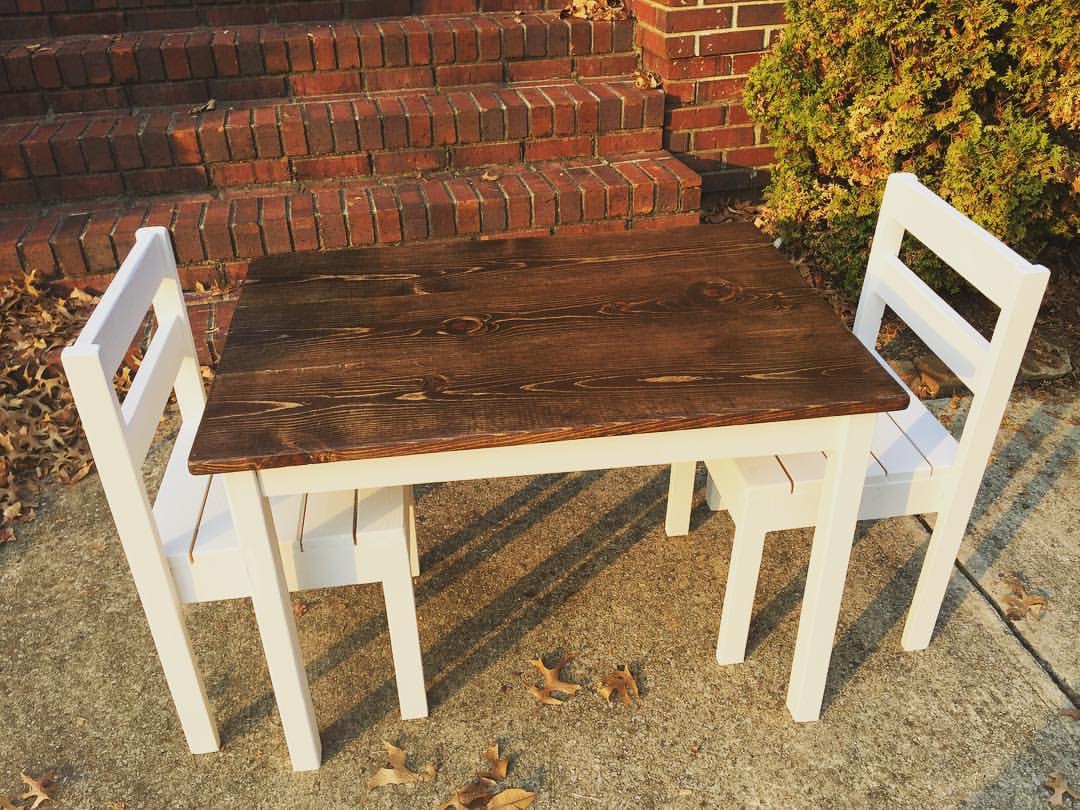
Needed a small "homework" table for my 6 year old. Looks more appealing in the living room than the Disney Princess table she's has since she was 2. Super simple build and very affordable!! This is my 3rd project from Ana White and definitely not my last.
Estimated Time Investment
An Hour or Two (0-2 Hours)
Recommended Skill Level
Beginner
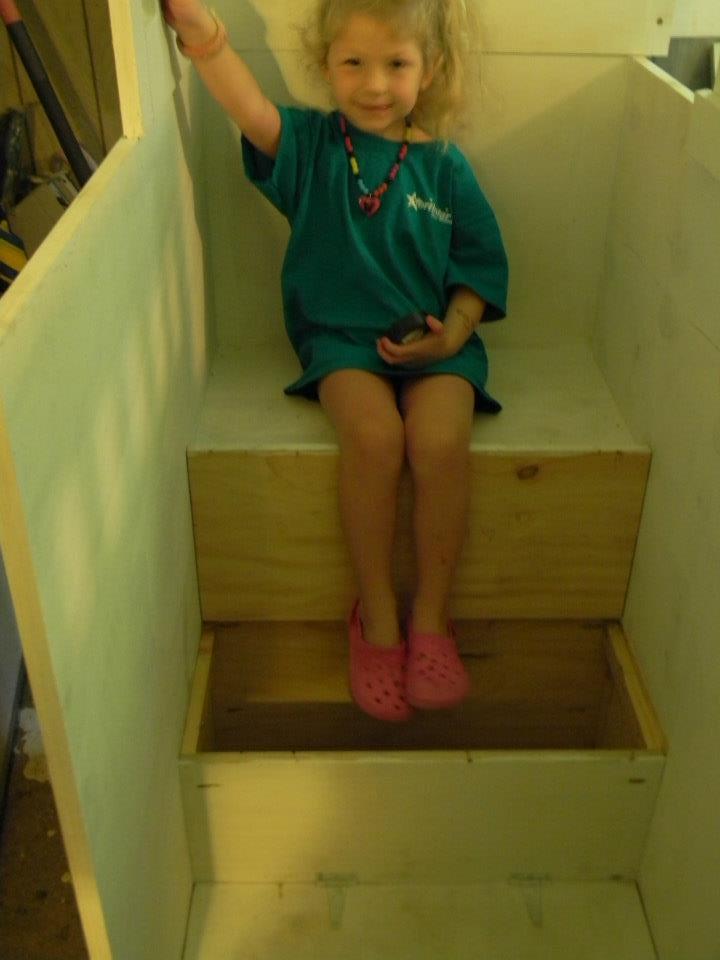
Chris's Custom Beds

After seeing my daughter's bed. A guy I work with asked me to build his son one. He told me it could be just like Lillians, but if I could make it pirate themed that would be great. So here we are and the first bed from "Chris' Custom Beds" is done.
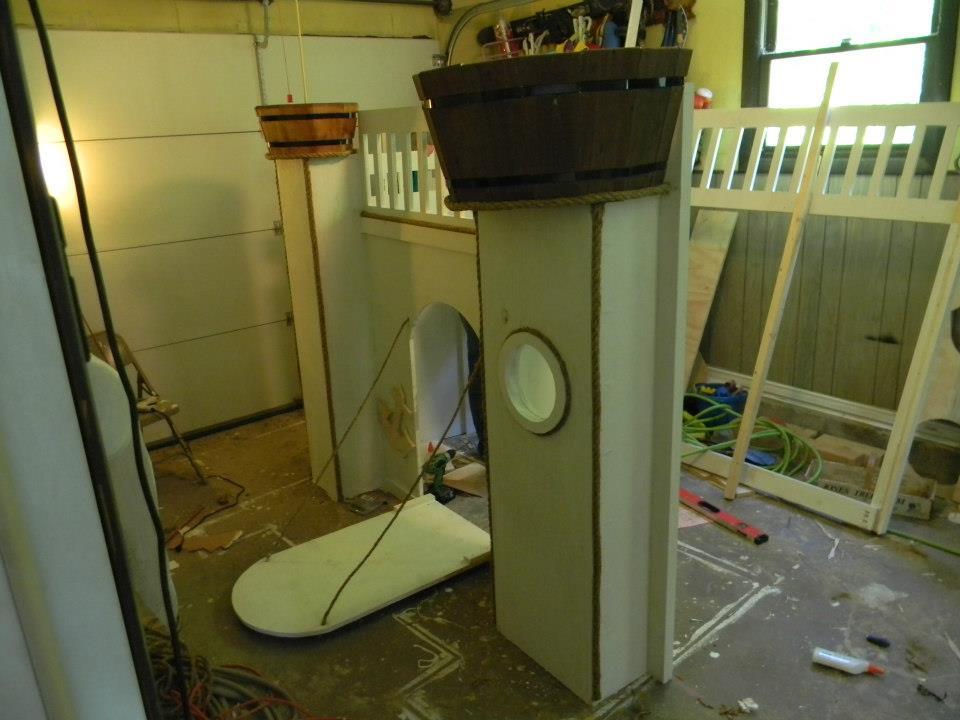

Estimated Cost
$1200.00
Estimated Time Investment
Week Long Project (20 Hours or More)
Finish Used
The agreement was it was to be deliever and primied only.
Recommended Skill Level
Intermediate
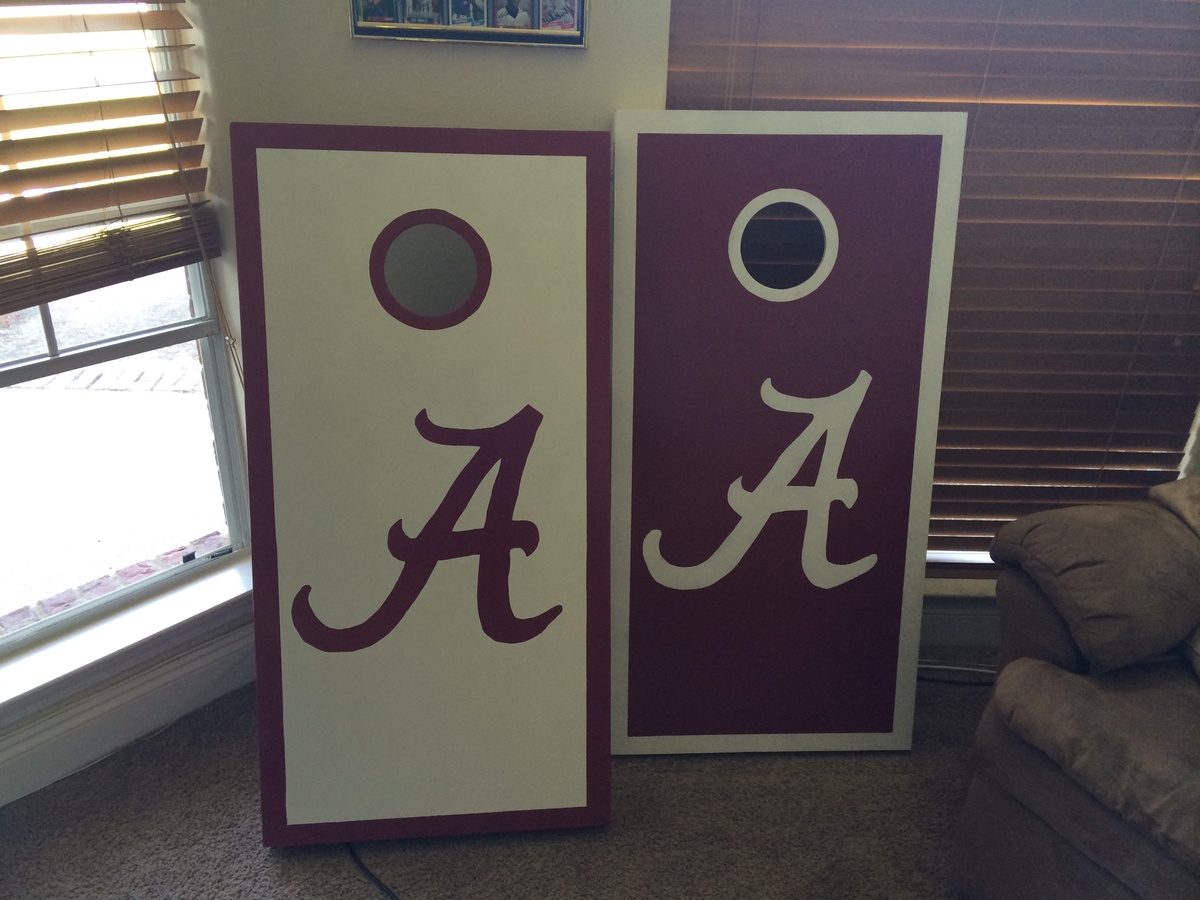
Cornhole Boards
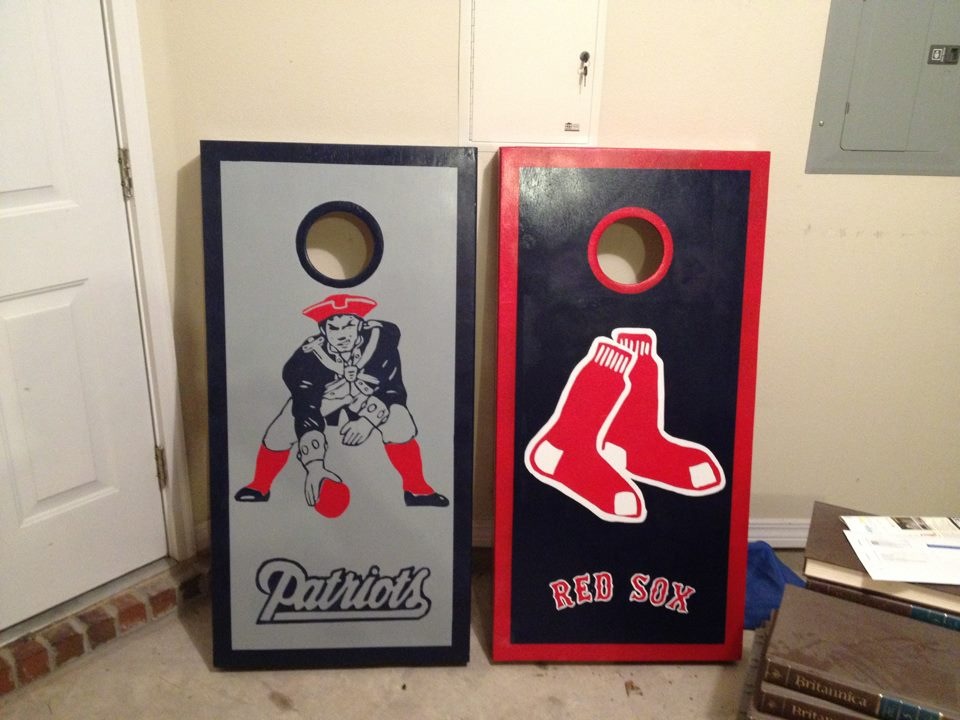
Custom cornhole boards, made with pocket joinery
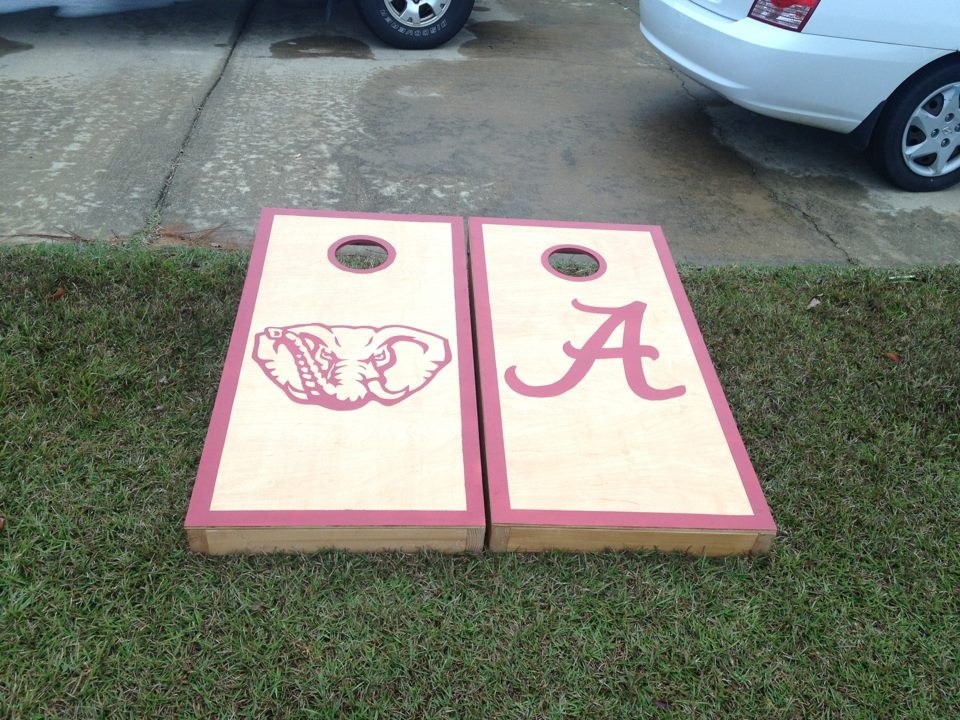
Estimated Time Investment
Weekend Project (10-20 Hours)
Finish Used
Spray paint, stain, decals, always covered with polycrilic
Recommended Skill Level
Beginner
Comments
Kids chair
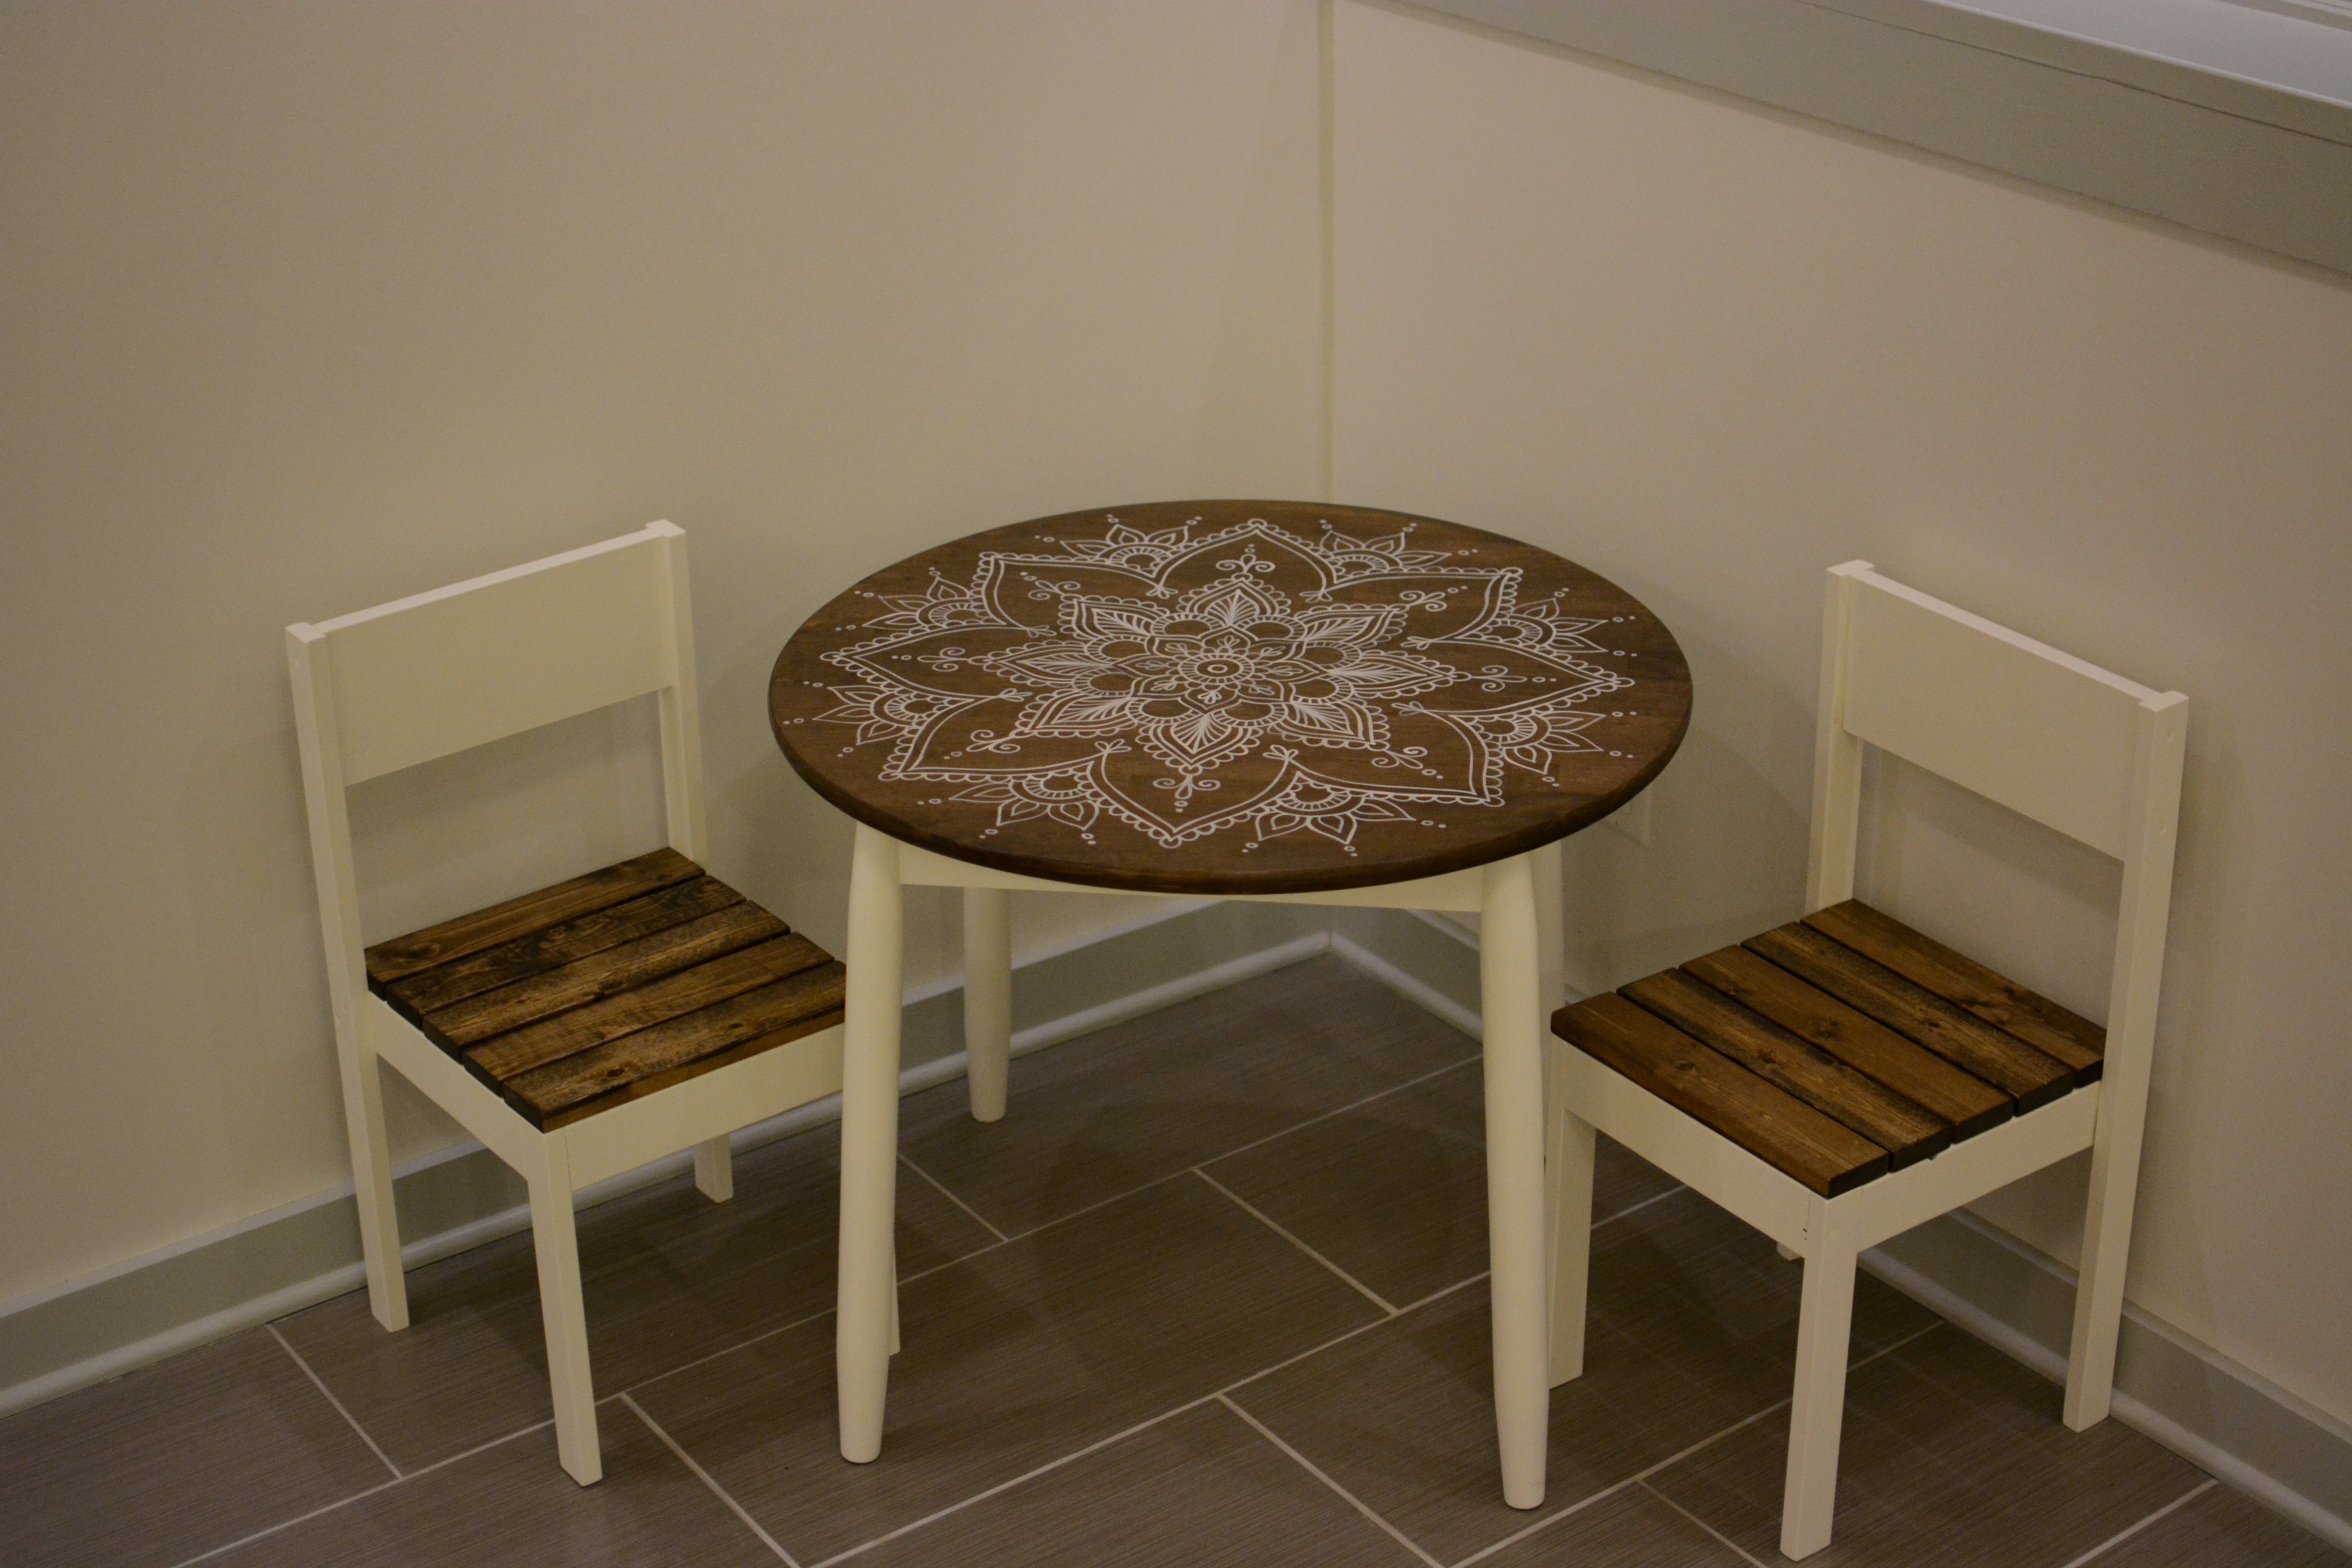
Childrens chair
Built from Plan(s)
Estimated Time Investment
Afternoon Project (3-6 Hours)
Finish Used
Dark walnut stain. Lemons edge Valspar paint. Sprayed the whole thing with clear gloss spray paint.
Recommended Skill Level
Beginner
Pardon Tower Desk
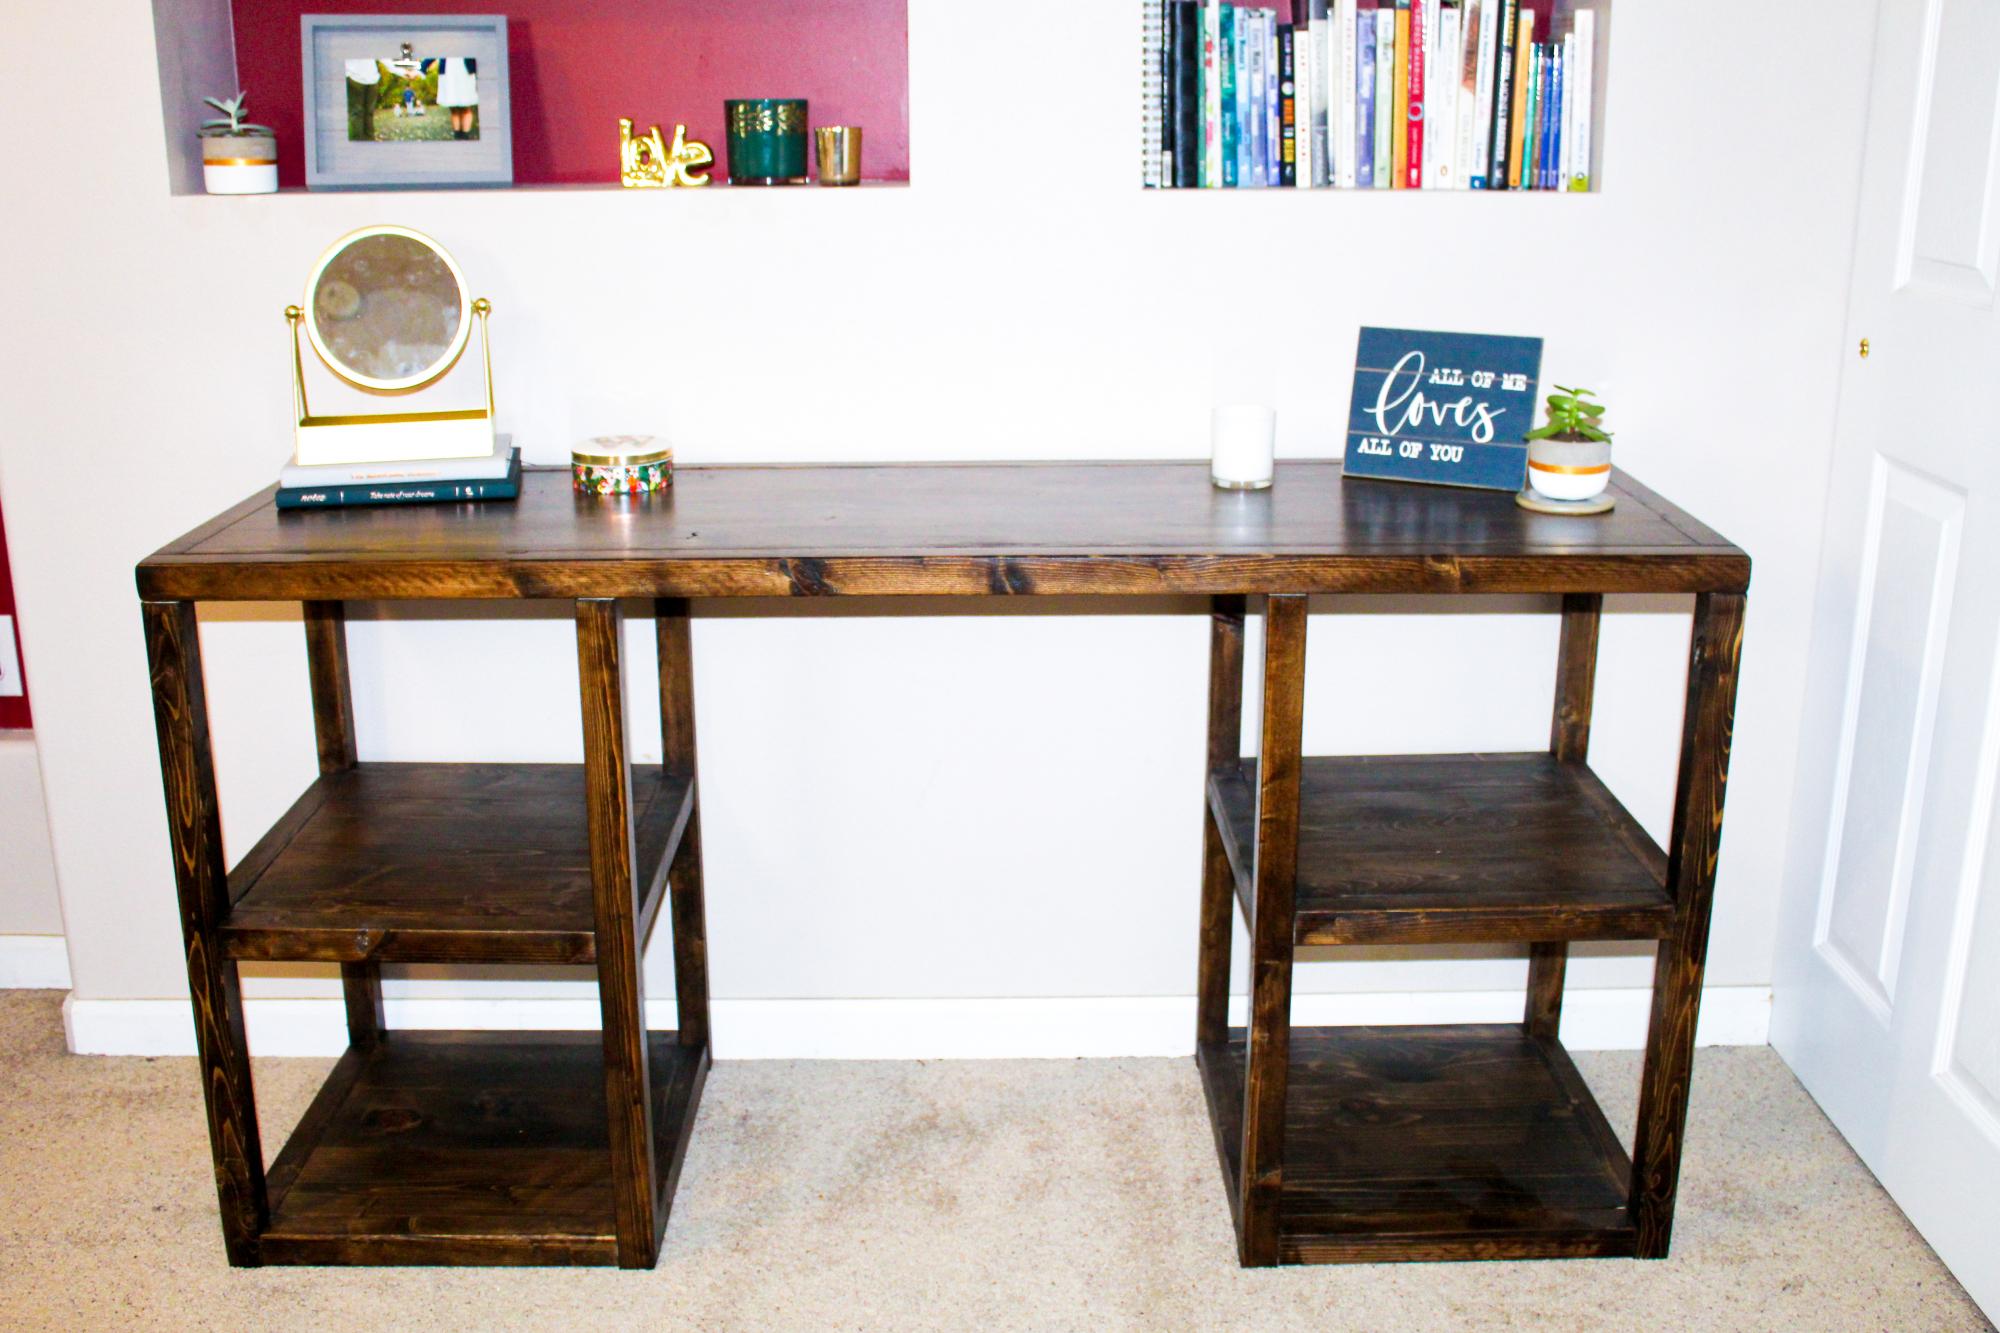
Built this desk for my wife a couple months back. Love how it turned out, plans were a huge help as I am new to woodworking.
Built from Plan(s)
Estimated Time Investment
Day Project (6-9 Hours)
Finish Used
Minwax Dark Walnut, Minwax One Coat Polyurethane
Recommended Skill Level
Beginner
Backyard DIY Sectional
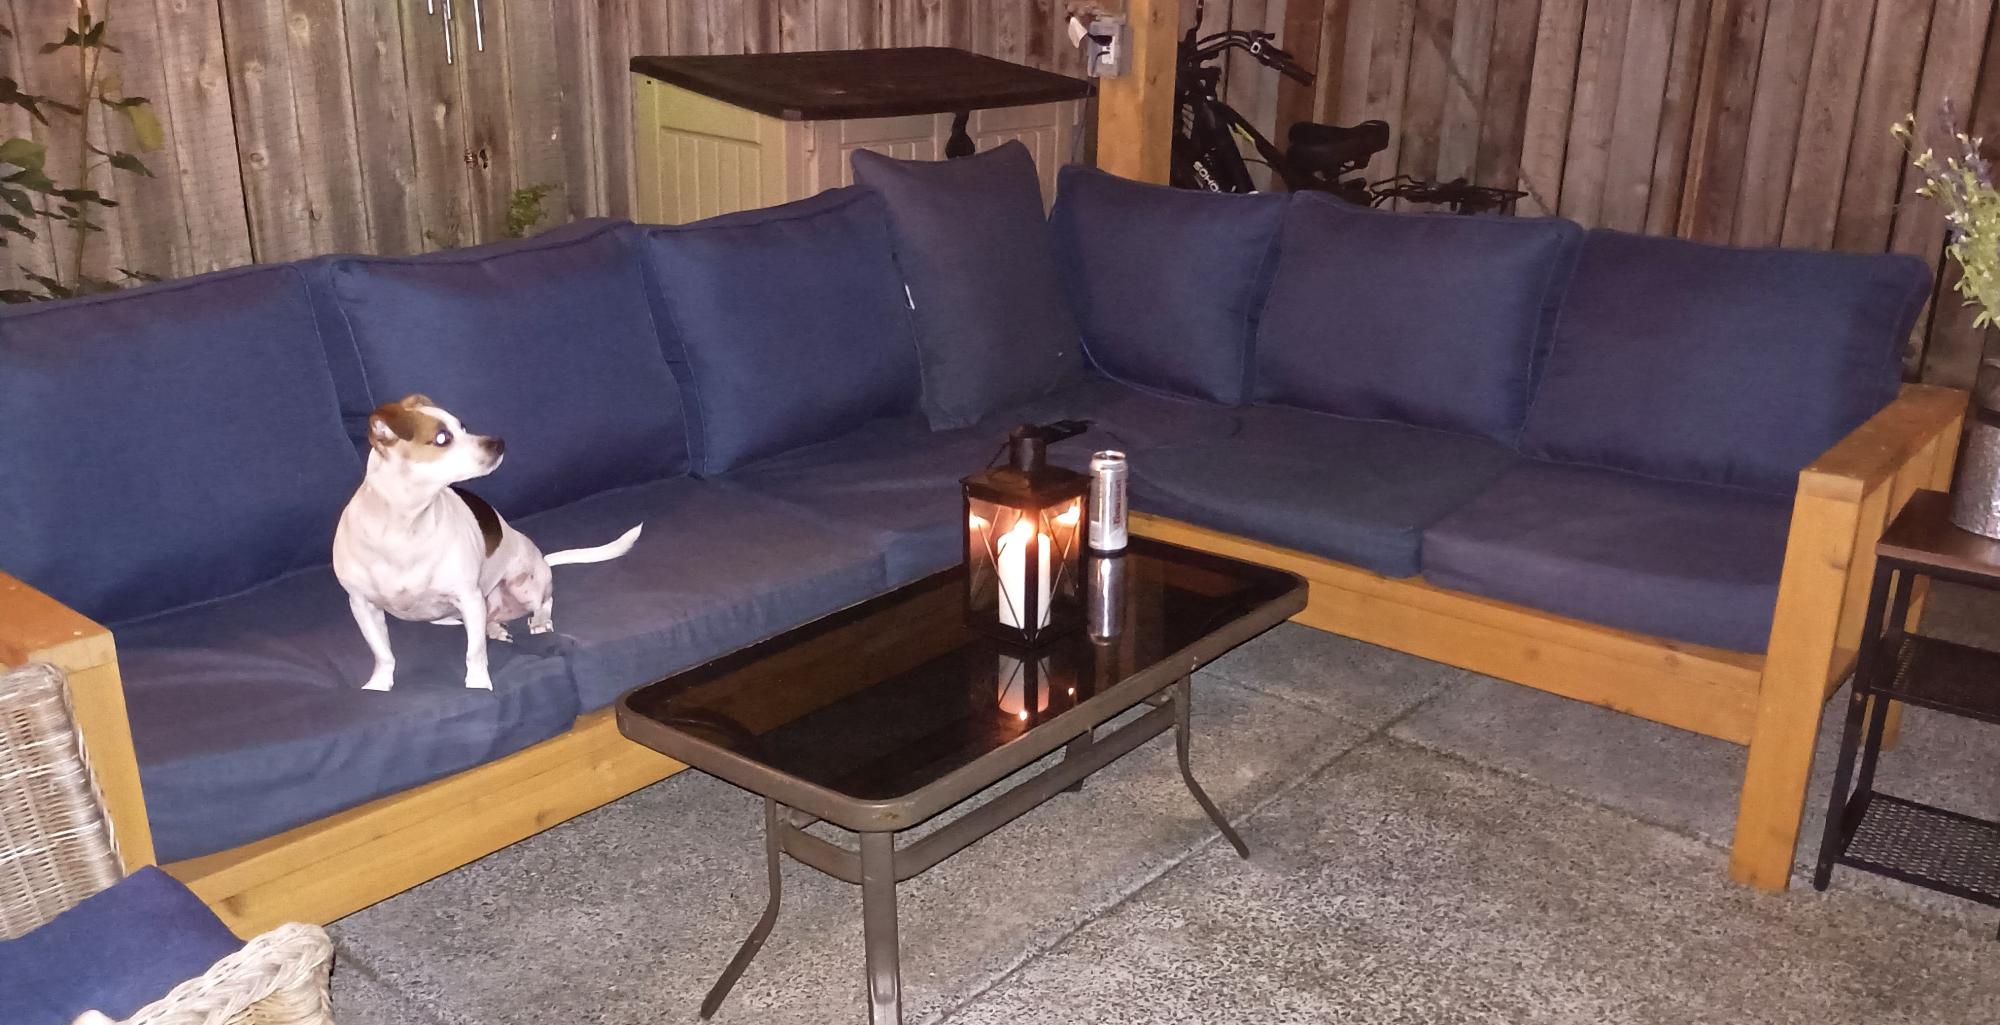
We love our sectional...
The Harts
Built from Plan(s)
Drop leaf storage table
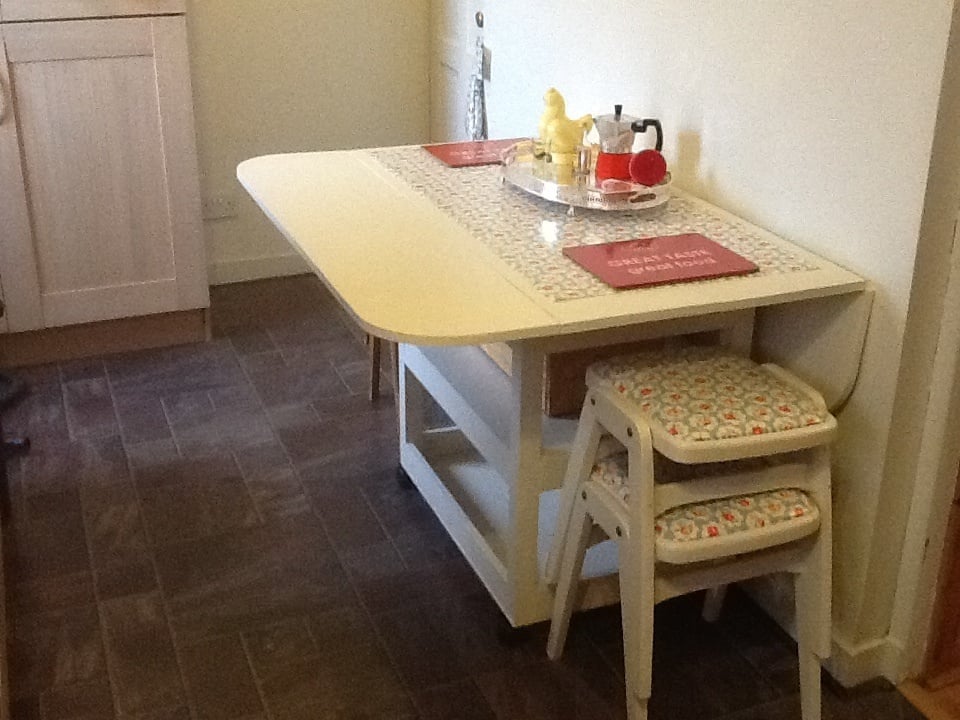
My husband made me this table after me seeing and falling in love with your drop leaf storage table.
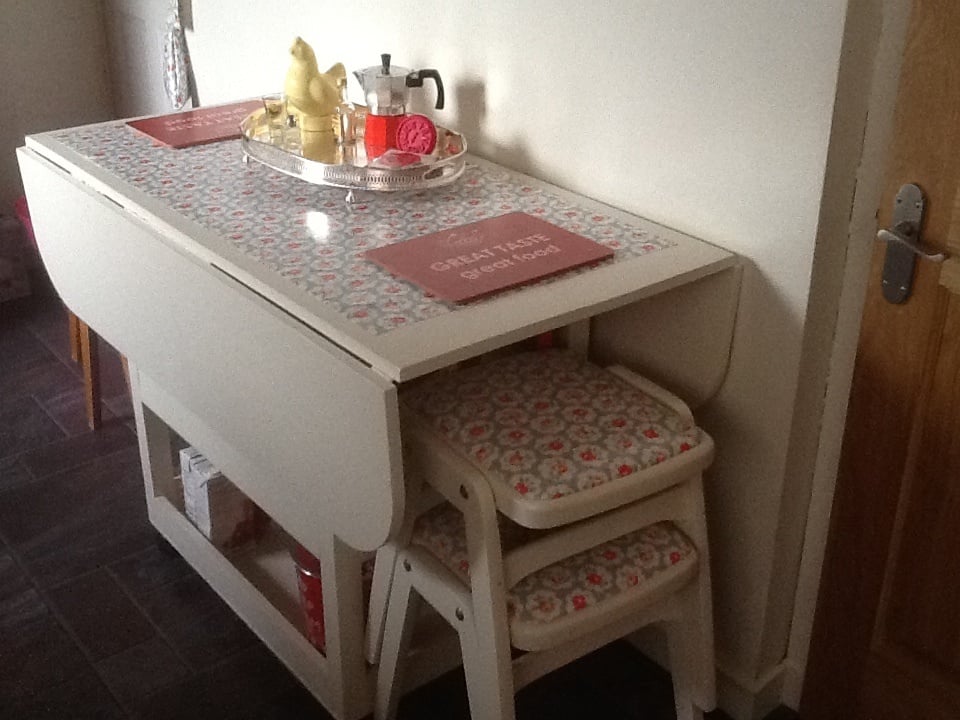
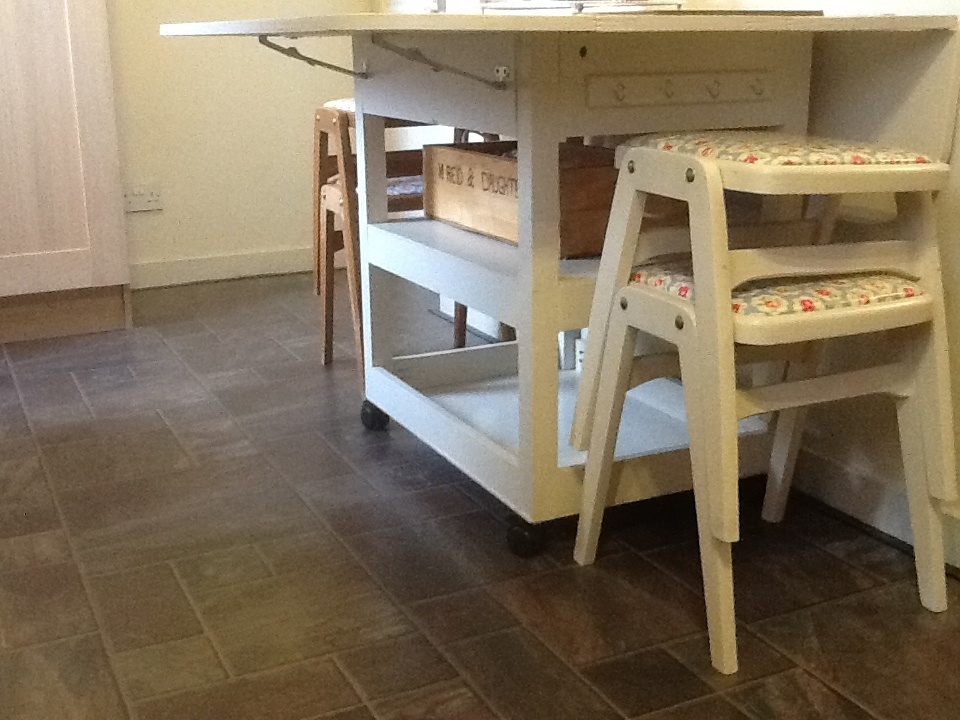
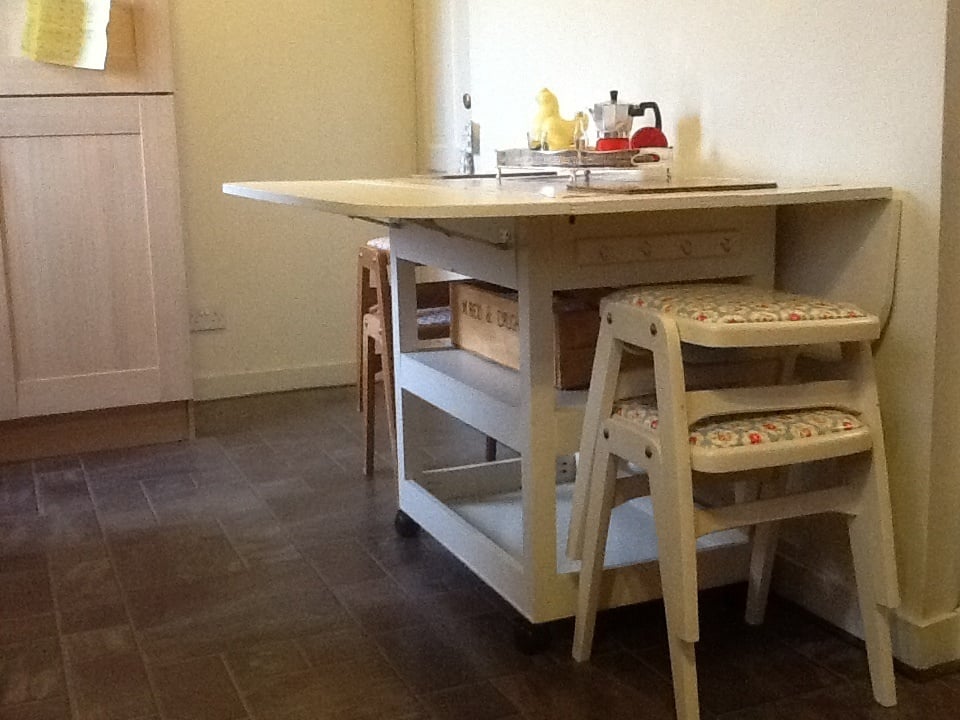
Built from Plan(s)
Recommended Skill Level
Beginner
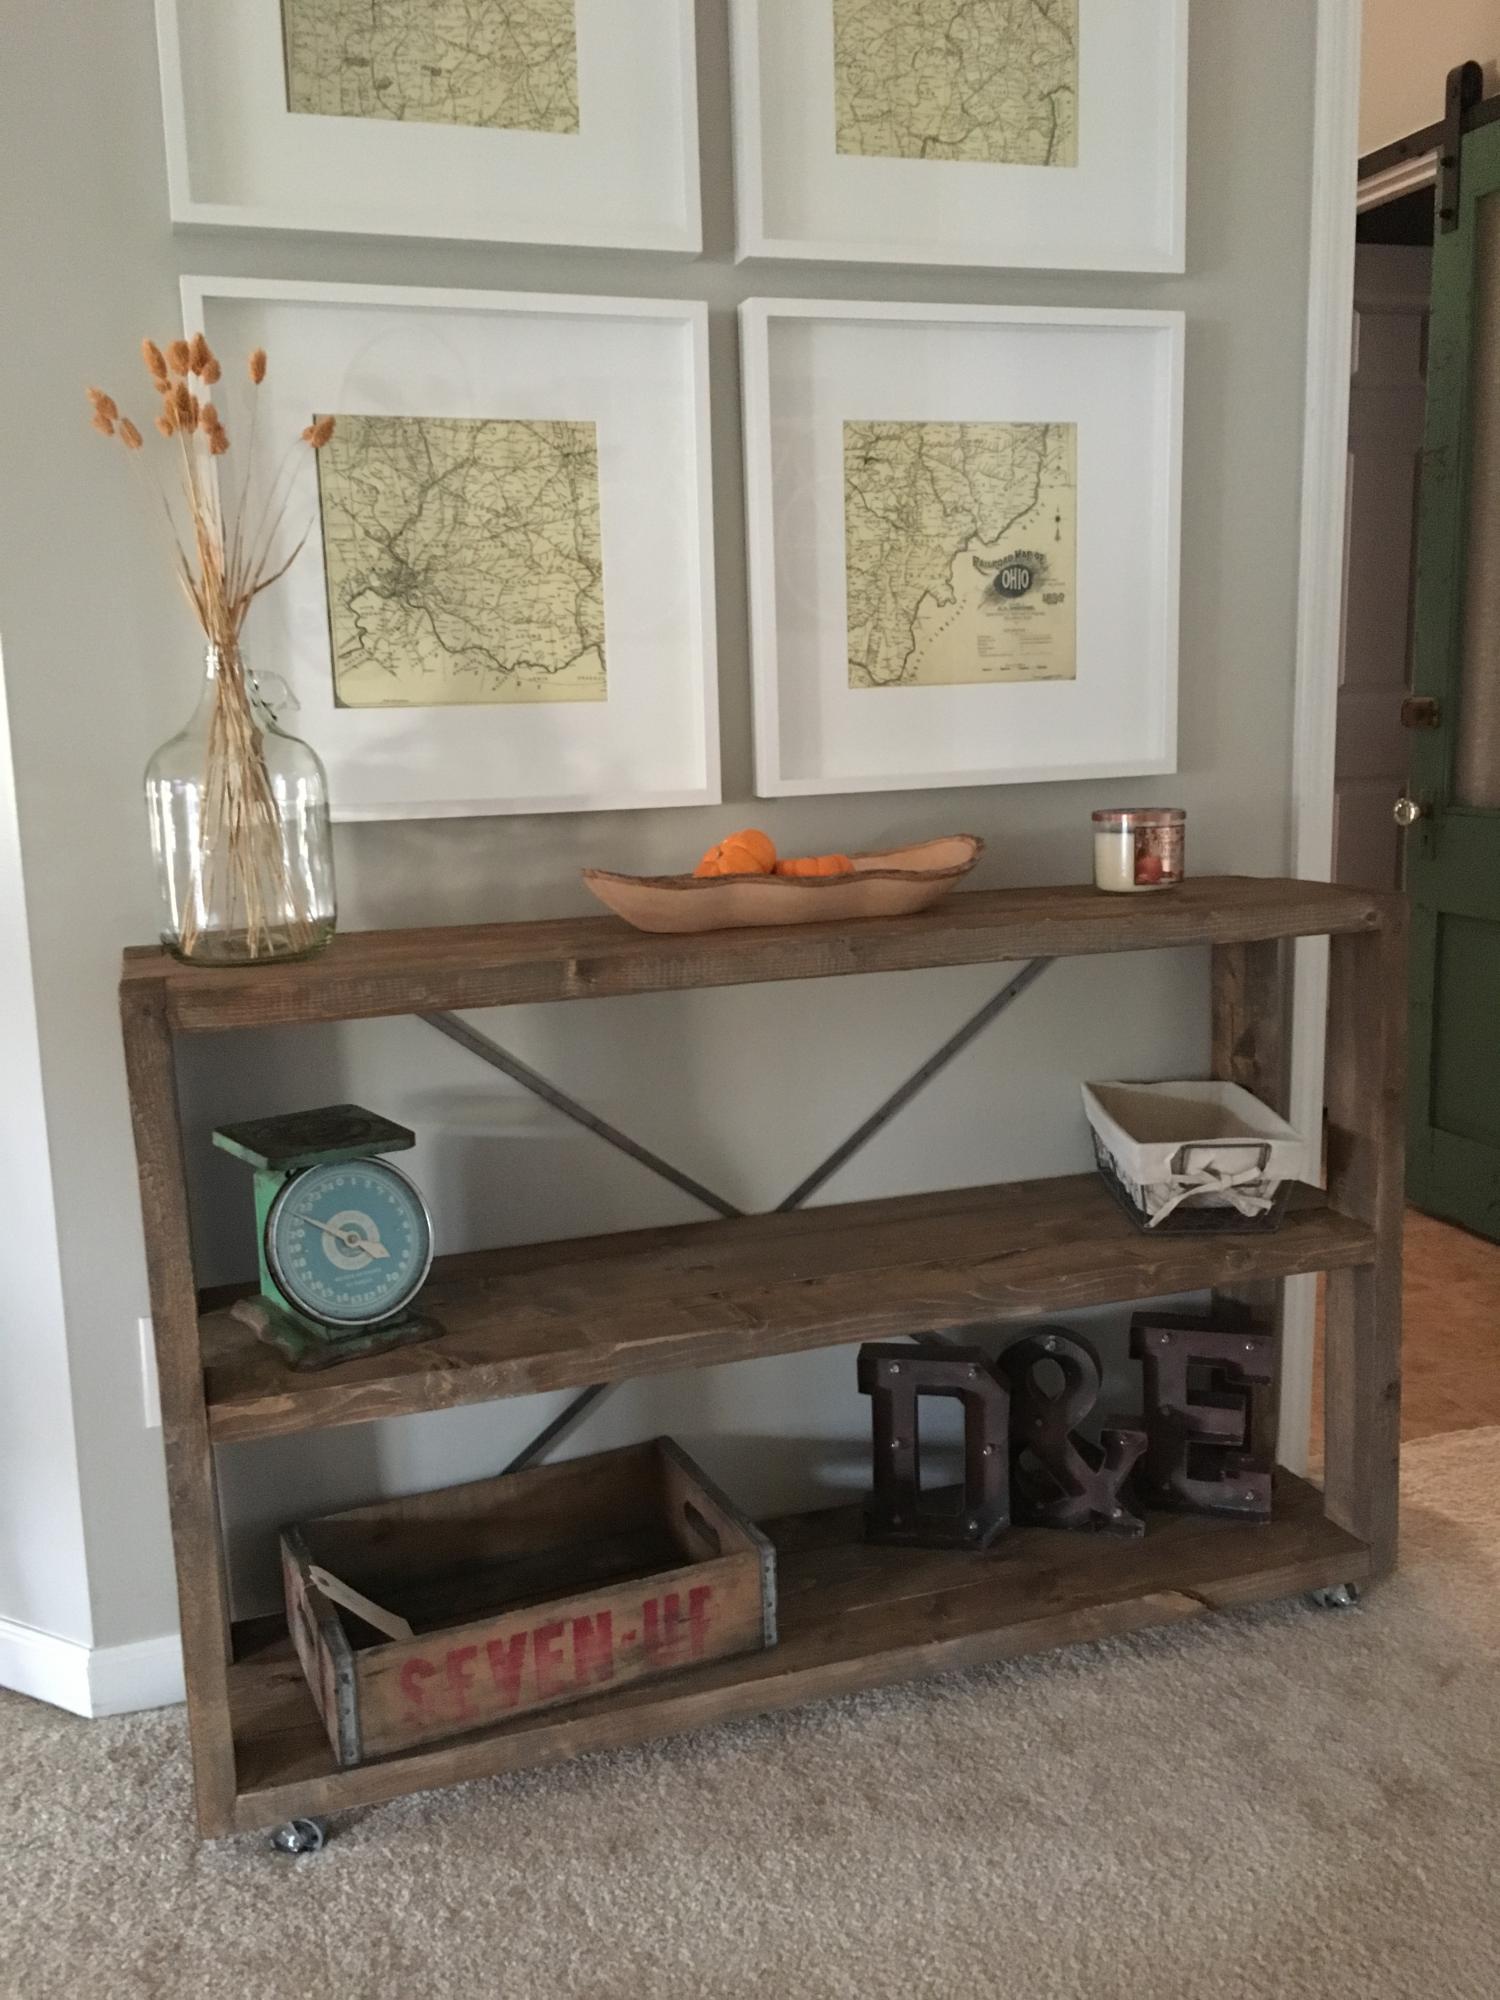
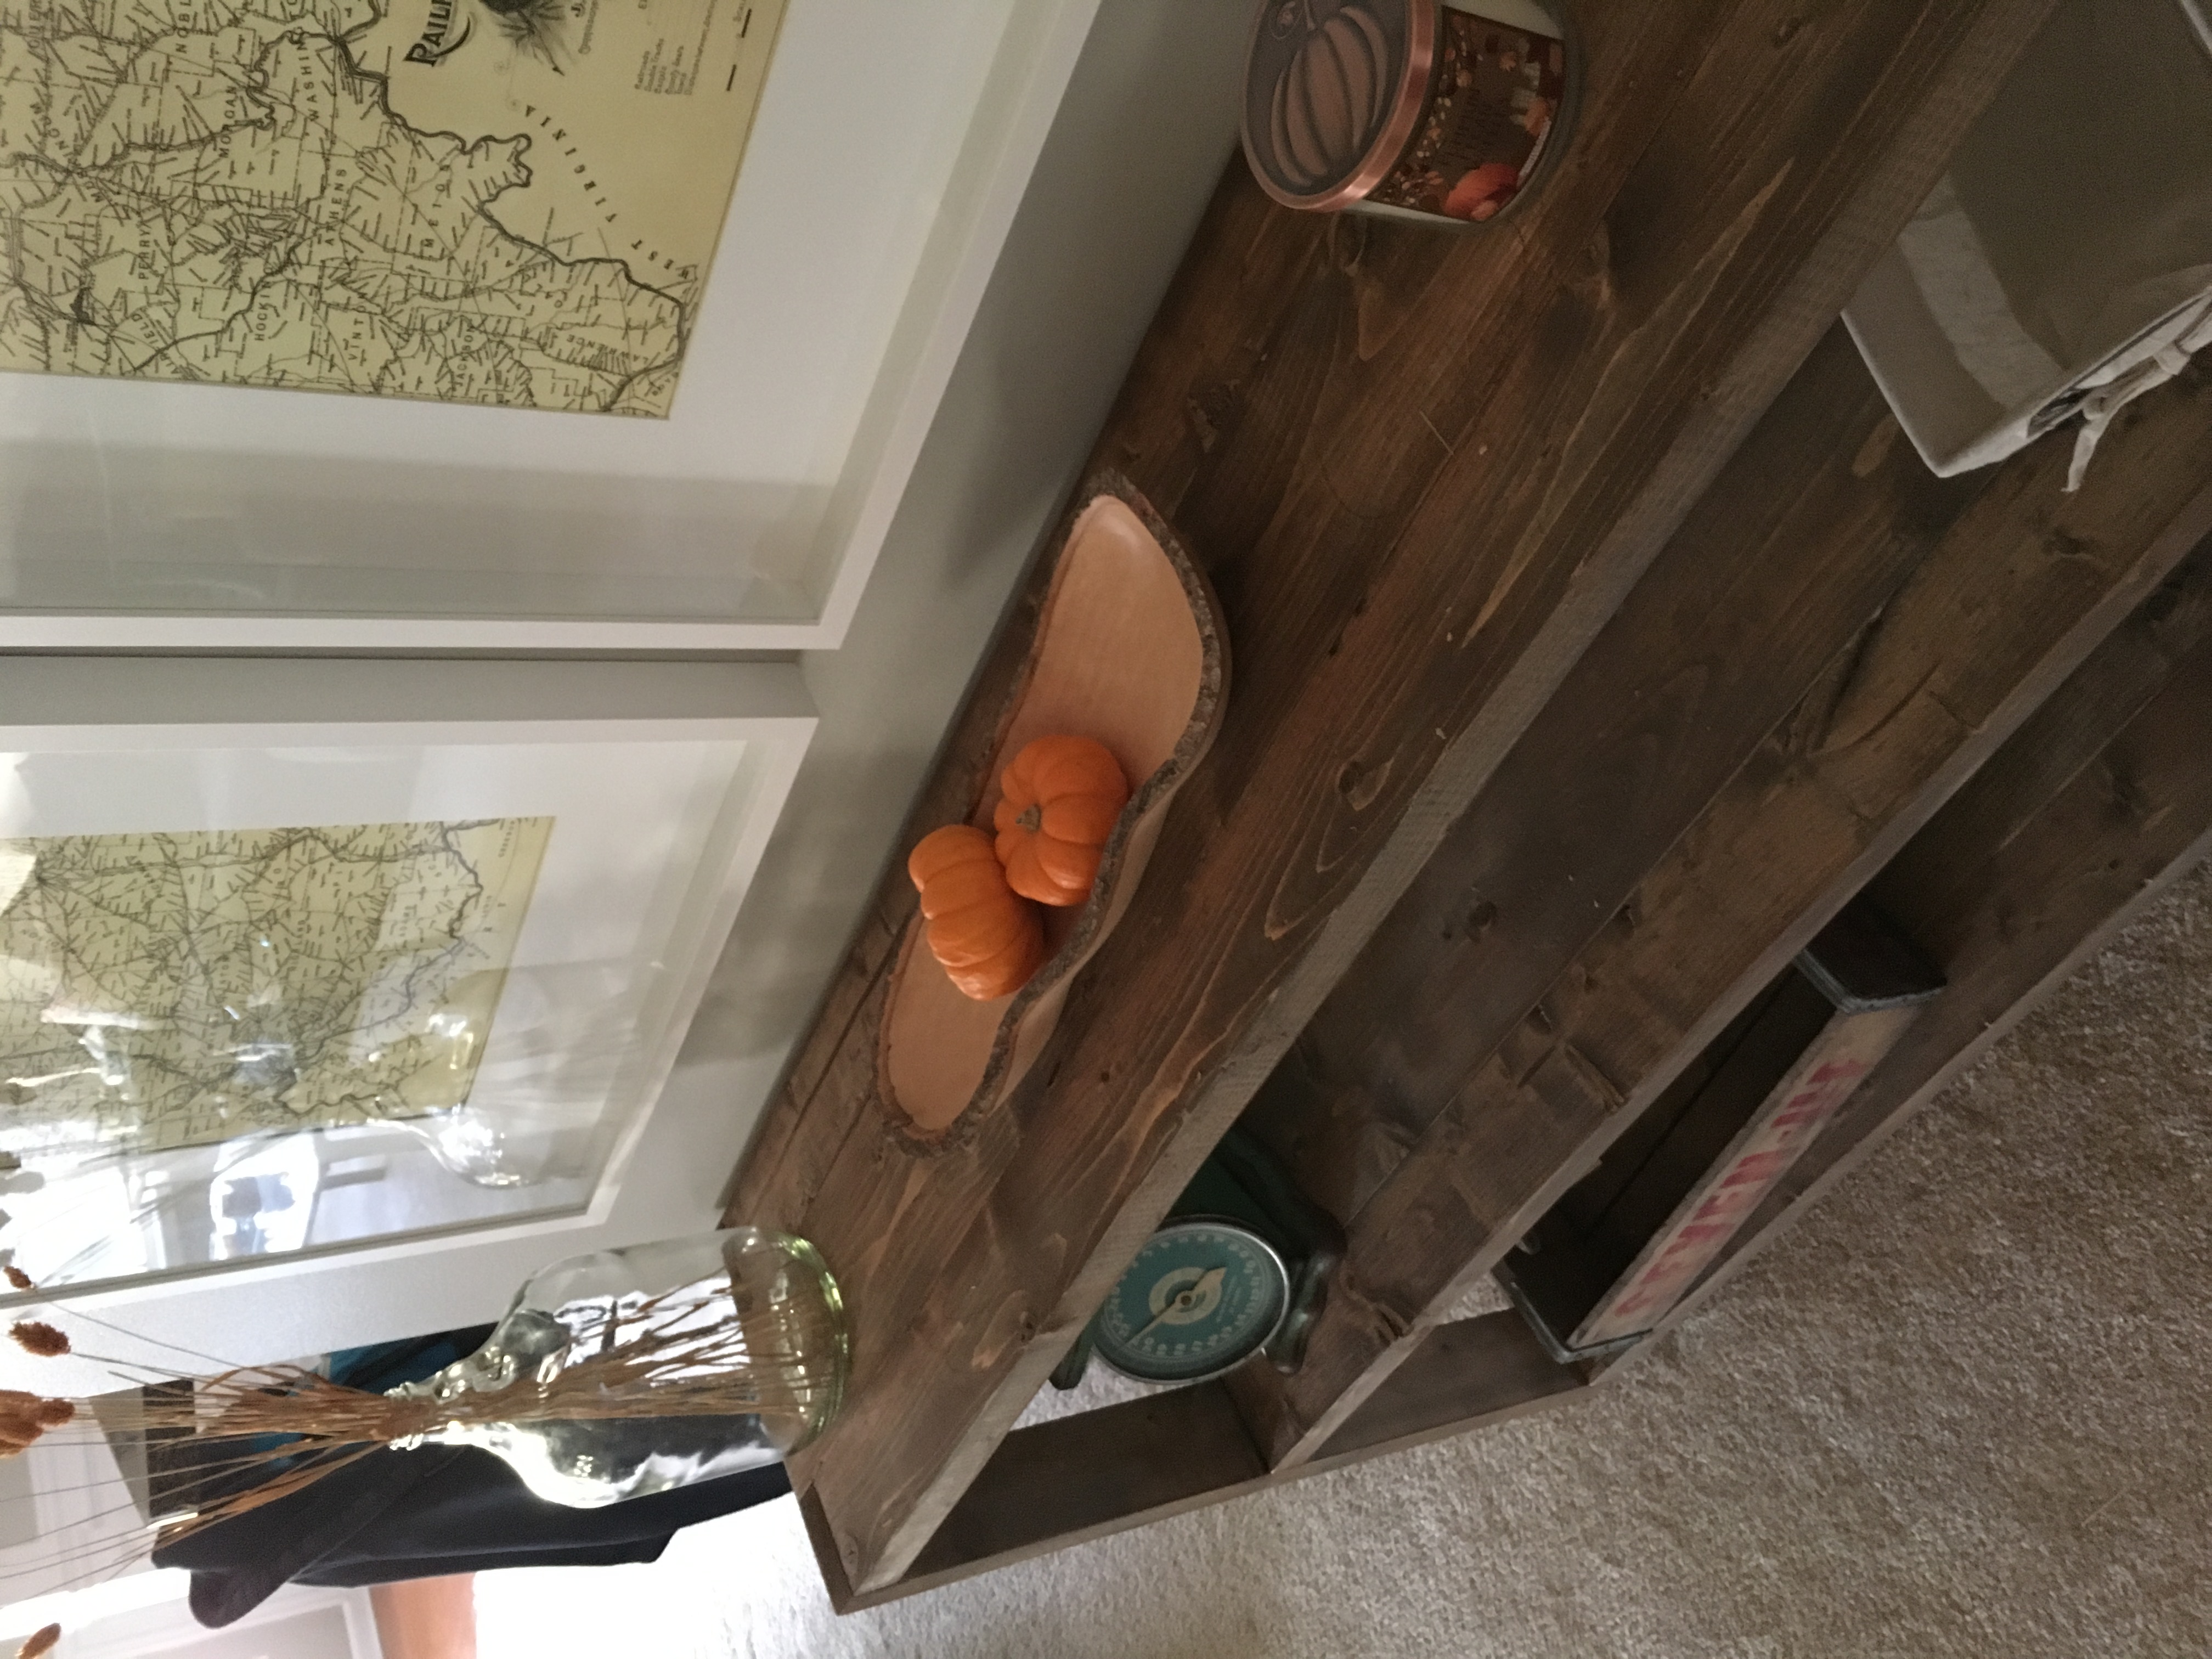
Rebecca Media Center (kind of)
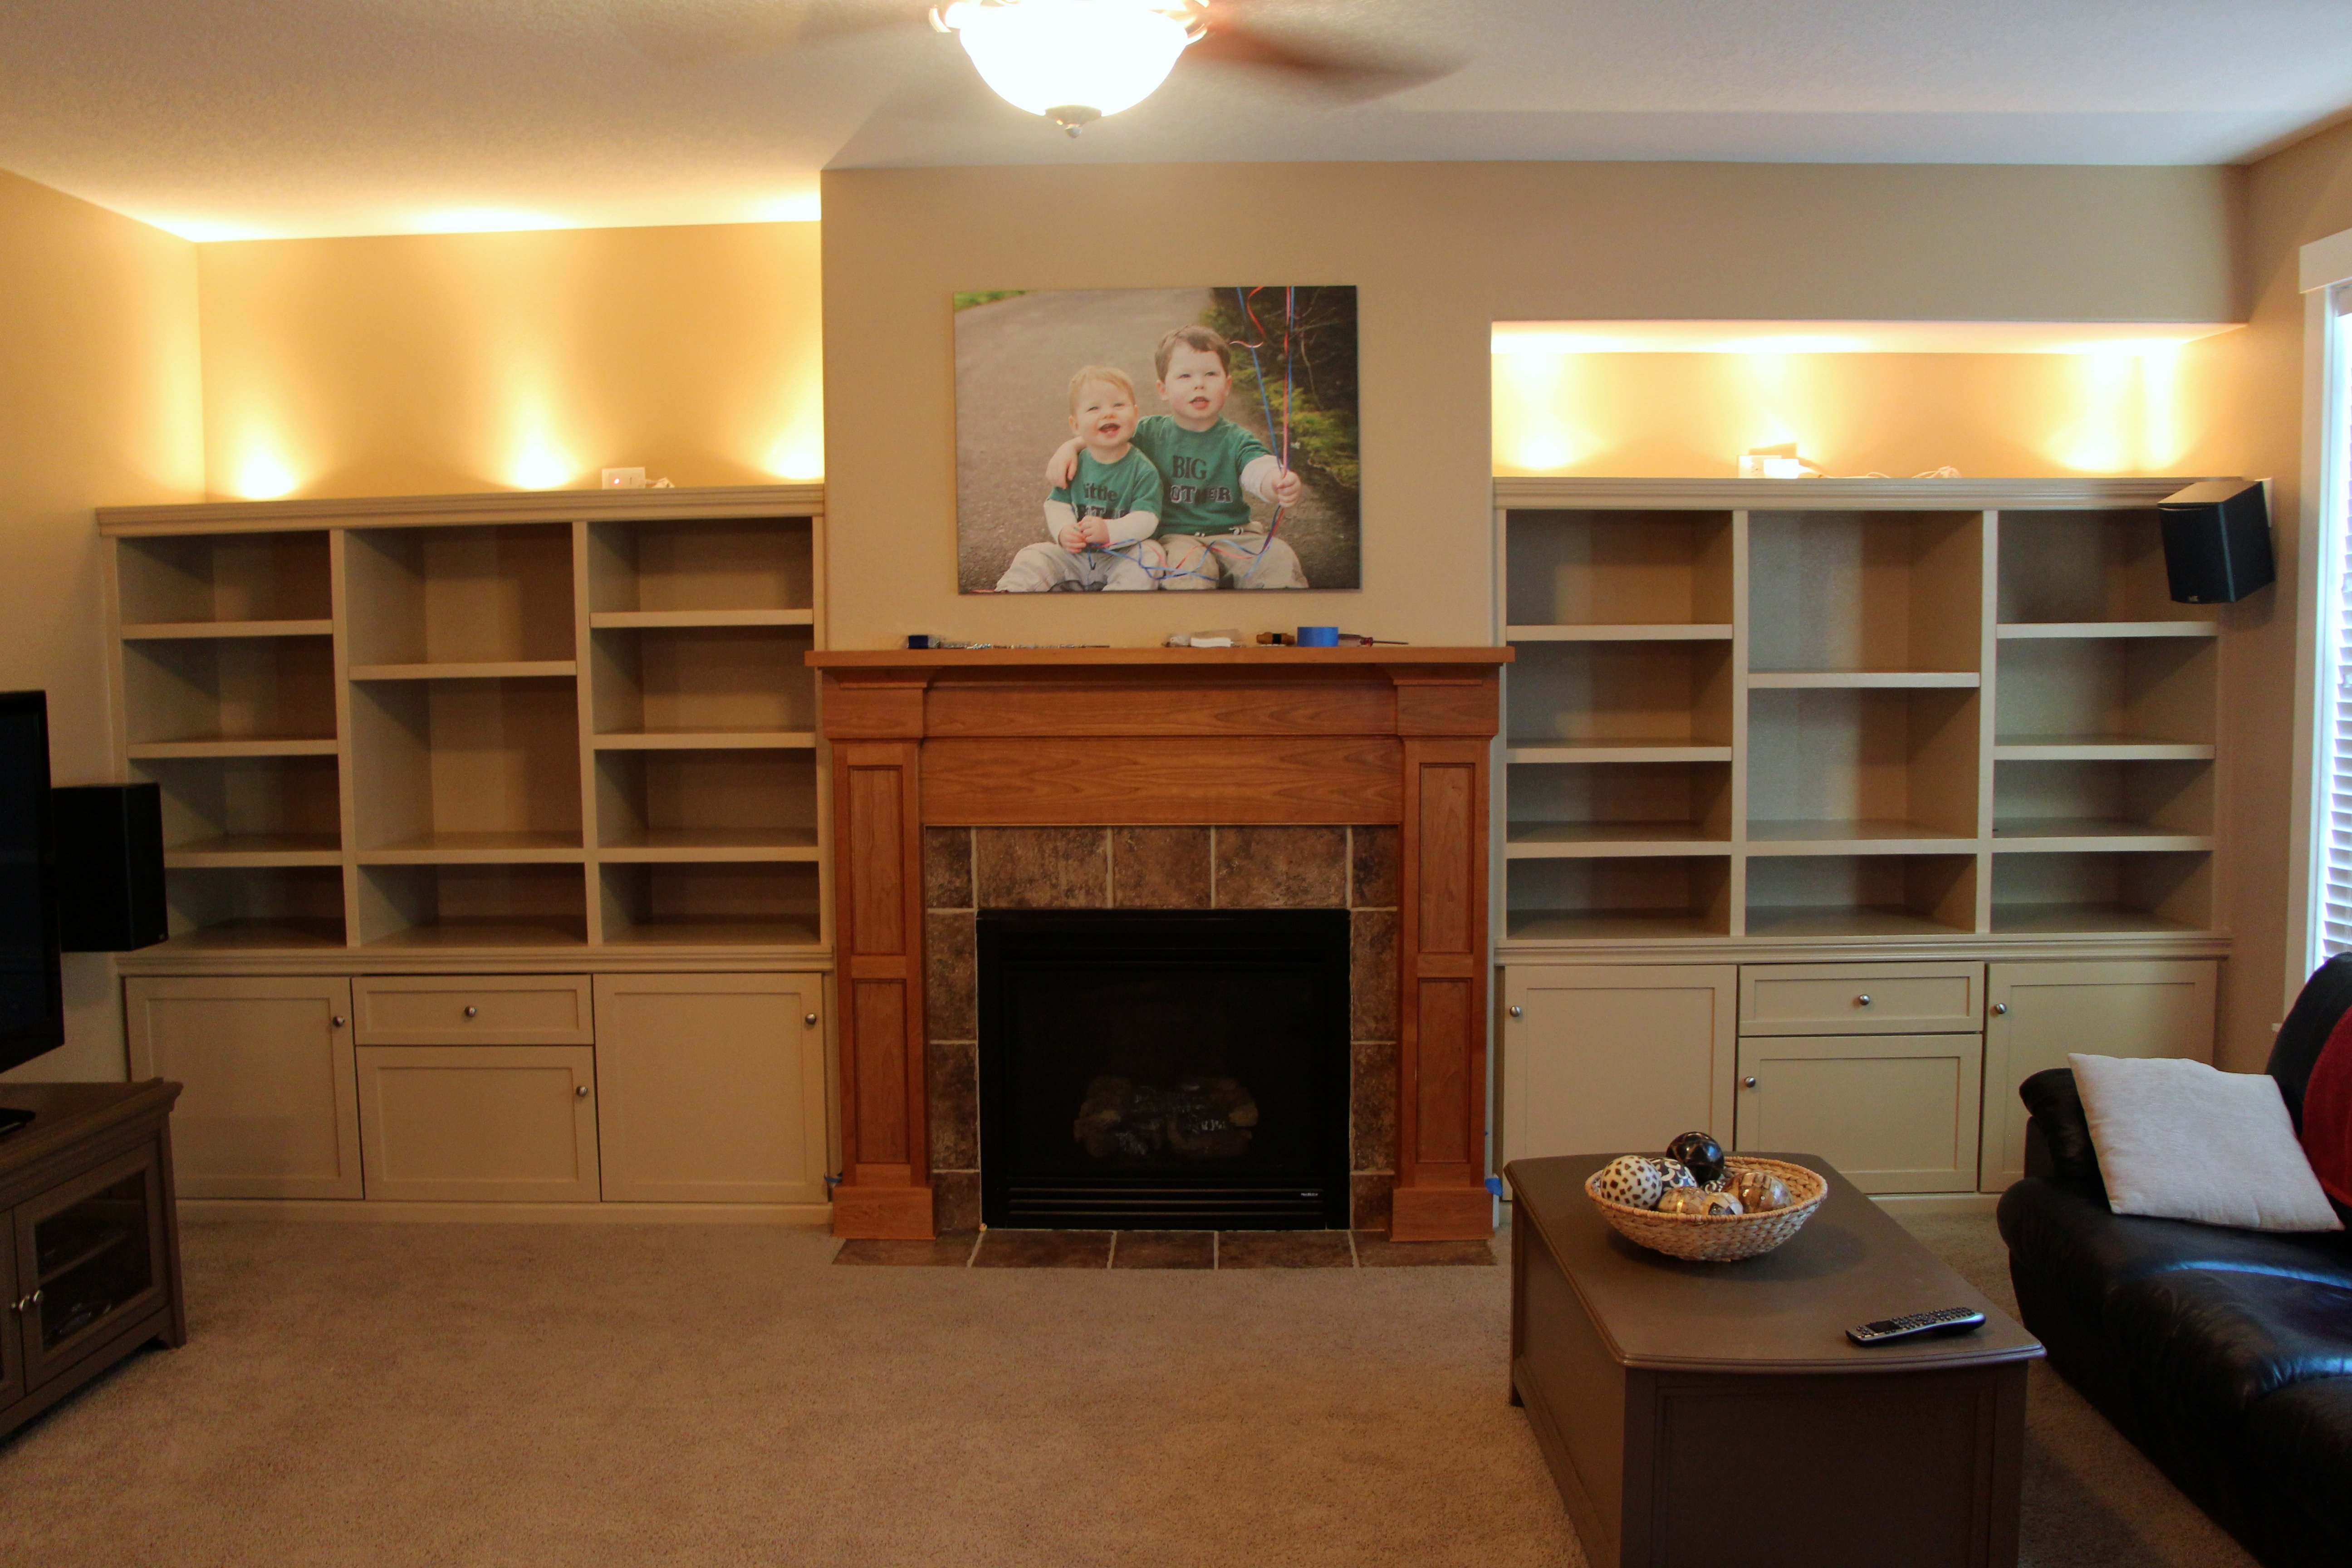
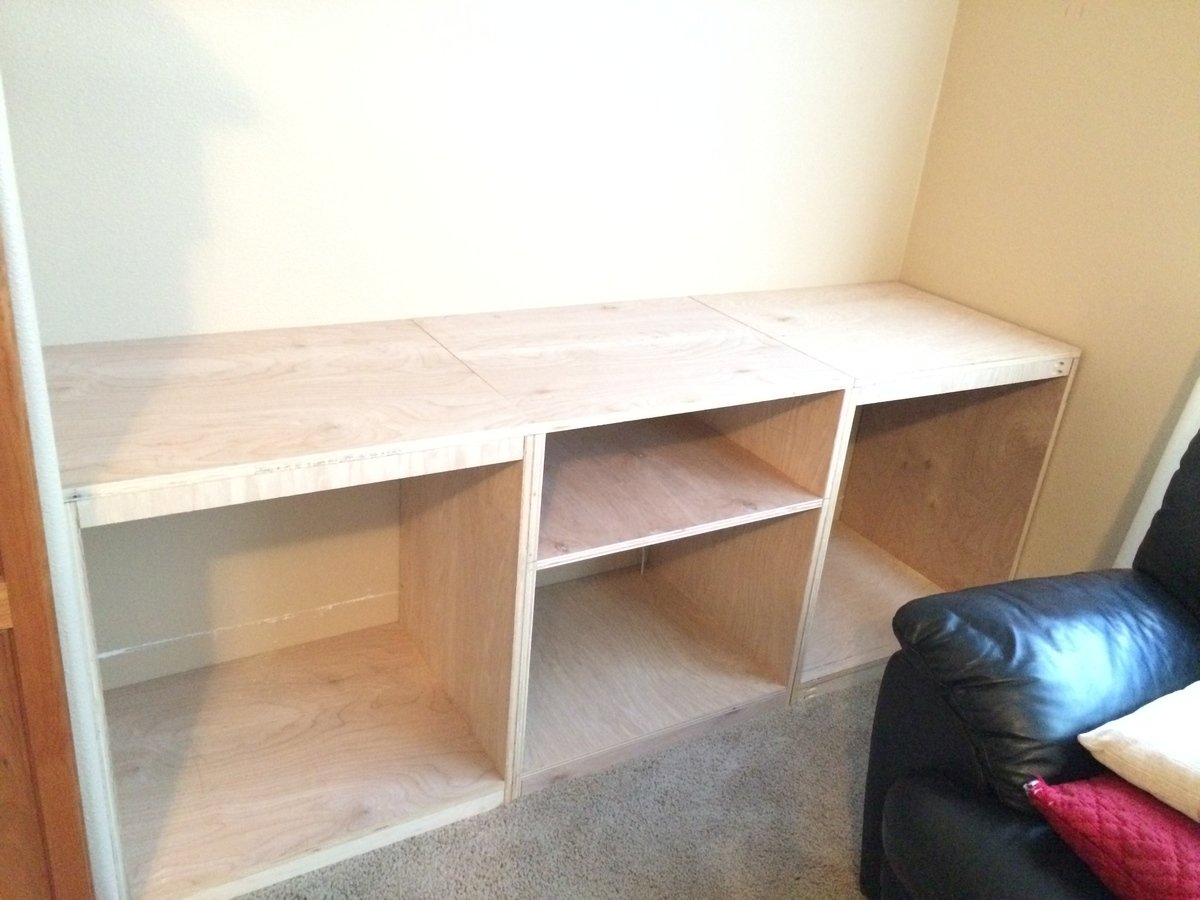
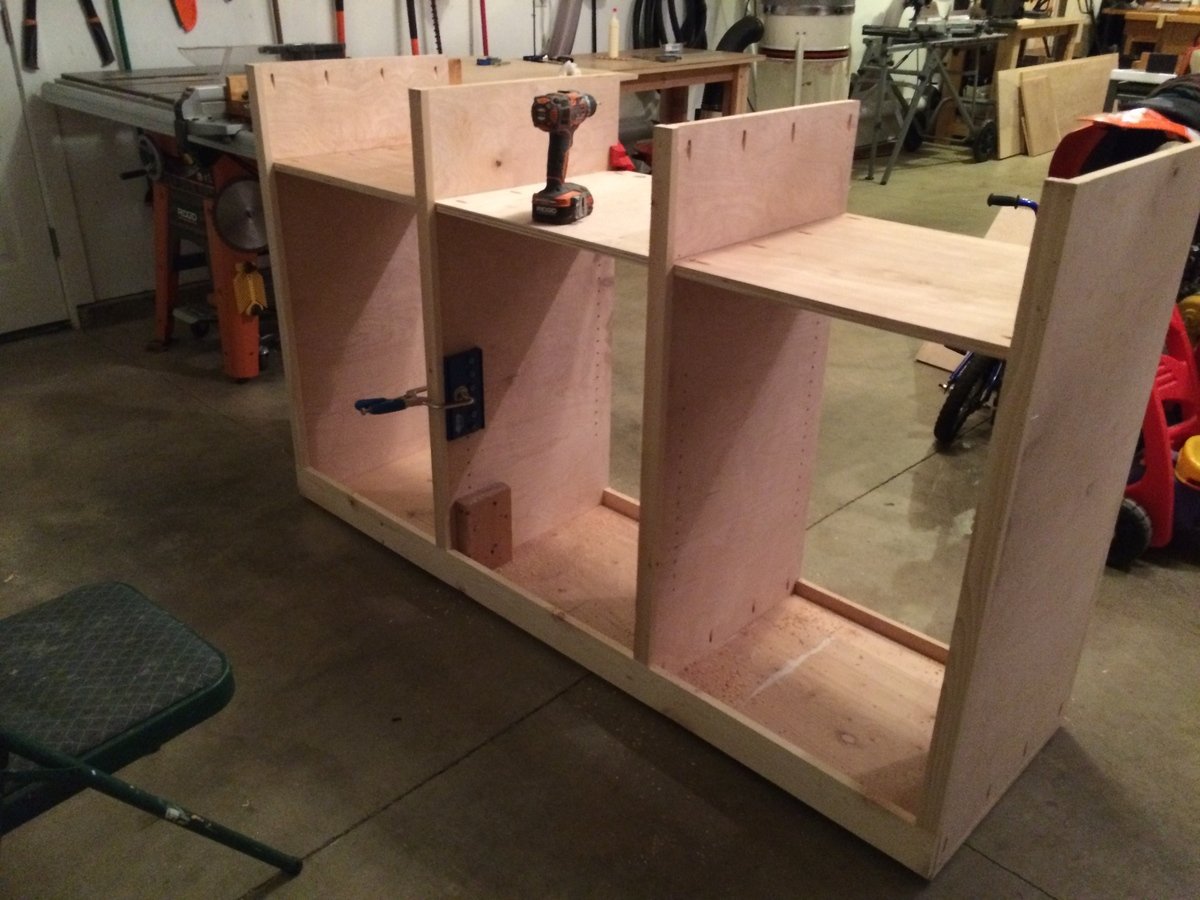
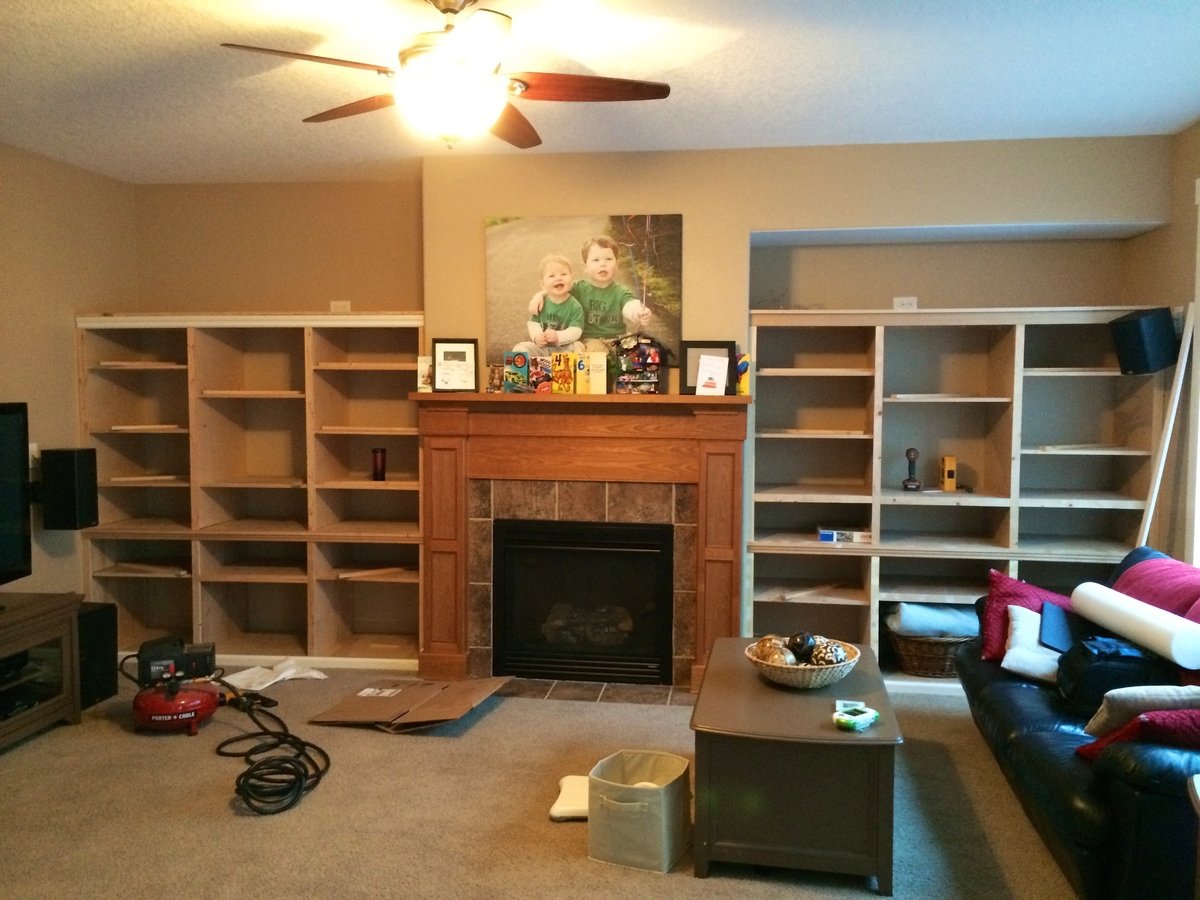
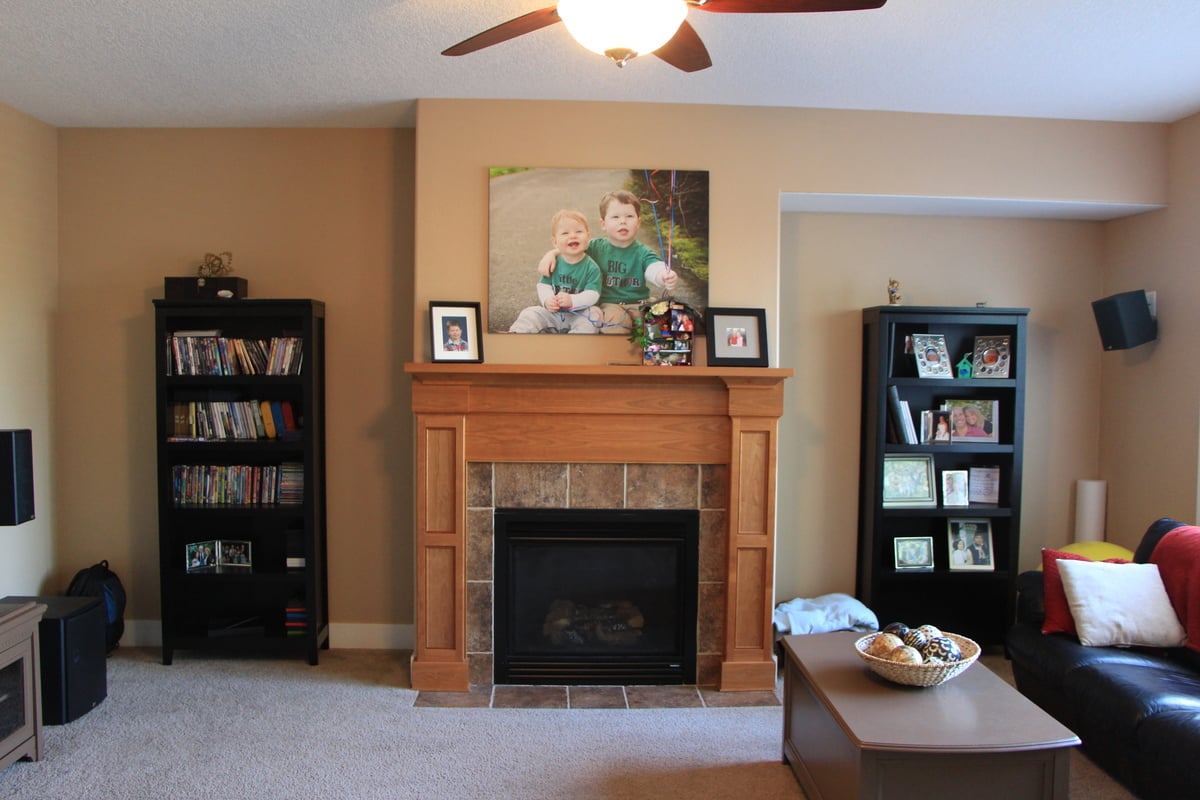
I've been wanting to build some built ins in the recessed area surrounding our fireplace for awhile now. I wasn't really sure how I wanted to tackle this and at first it was just going to be shelves from the floor up. After browsing around, I stumbled onto Rebecca's media center and could see how I could turn this into my built ins!
The whole thing is mostly boxes placed next to one another with trim that covers all of the seems. The bottom left and right cabinets were inspired by her media center side base and the middle of the bottom row is a modified version of the center console piece. For the top I combined the console side and hutch piece to get something that would work for me.
I learned a lot on this project and tried to take my time. Using trim across the entire project help make it look like one big piece of furniture. One thing I would do differently if I was to do this again is to use higher quality trim, such as hemlock as the pine required lots of wood filler, sanding and time, all which exceeded the cost difference between the two types of lumber. I used the Kreg drawer jig for the first time, which was nice and also used the Kreg shelving jig after I decided to make all of the shelves adjustable. It to was a nice and easy to use tool. A must for anyone who makes adjustable shelves.
I sanded, sanded and sanded some more and than put two coats of high quality primer (57$/gallon) from Rhodda, which was a God send. It hid all of the imperfections and created a nice smooth area to paint, which I used foam rollers and the Renaissance paint also from Rhodda. They said it went on and dried like a oil paint, which I love, but cleaned up with water. It was awesome paint to work with, but we'll see if it gets that hard eggshell layer that oil paint gets. It's already pretty hard the night I painted it!
The hardest part for me was going to the local Woodcraft store and deciding what hinges I need and how to adjust them perfectly! This was so hard as the tolerances were minimal and I wanted everything to be uniform. I could probably adjust them a little more!!
I included a picture of what the area looked like before!
The idea I had, which was the best, was when it came time to decide on a color, I had my friend who is handing in Photoshop, show me several colors on a picture I took. This changed the planned several times and save a lot of money in paint. In the end, we decided to paint them the color of the walls to make them look like they were always there. It also worked with the stained mantle next to them!
Built from Plan(s)
Estimated Cost
More than I want to calculate!
Estimated Time Investment
Week Long Project (20 Hours or More)
Finish Used
Rodda primer 2x coats. Rhodda Renaissance paint 2x coats.
Recommended Skill Level
Intermediate
Comments
Wed, 08/06/2014 - 07:23
This is so impressive. I have
This is so impressive. I have an area in my office I want to built some similar built-ins, but I fear it won't come out nearly as nice as this. :)
Wed, 08/06/2014 - 10:15
Thanks for the kind words
The build was much easier than the finish work, which surprised me a lot! I learned a lot on this project including having good corner clamps!
Booksnotbomb-
You can totally do this, which is why I included some of the earlier photos showing it was just a bunch of boxes! PM if you need help getting started!
corner cupboard

Finished it with two coats of shallac and used black iron hardware.
I built it for a cabin I am building. Thank you for the palns, they were great!
Built from Plan(s)
Estimated Cost
Around $100
Estimated Time Investment
Day Project (6-9 Hours)
Finish Used
Two coats of Shallac
Recommended Skill Level
Intermediate
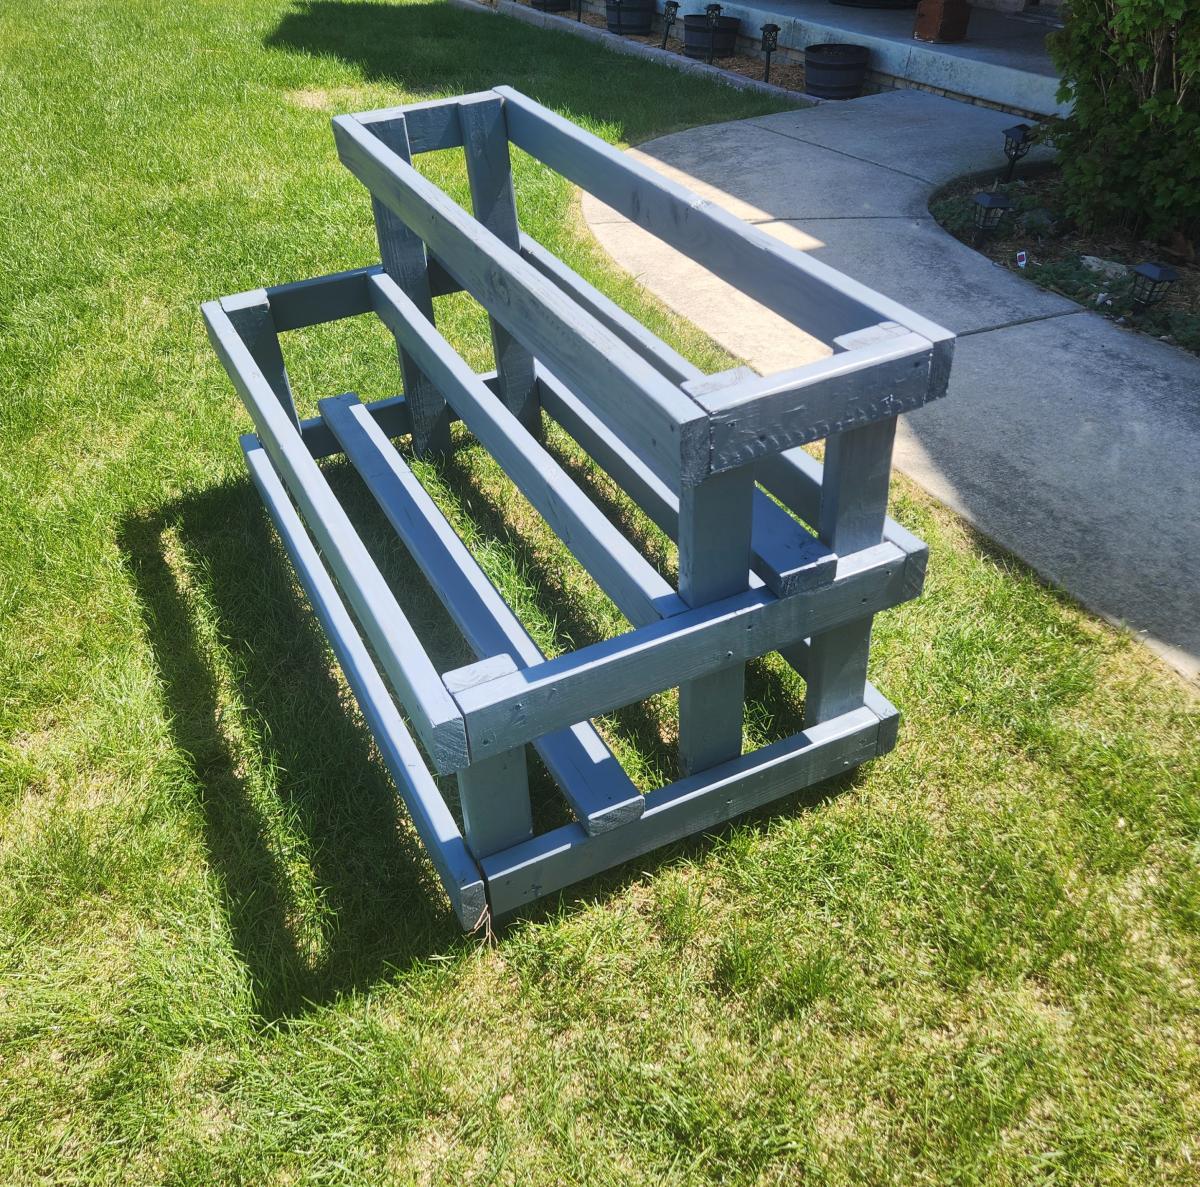
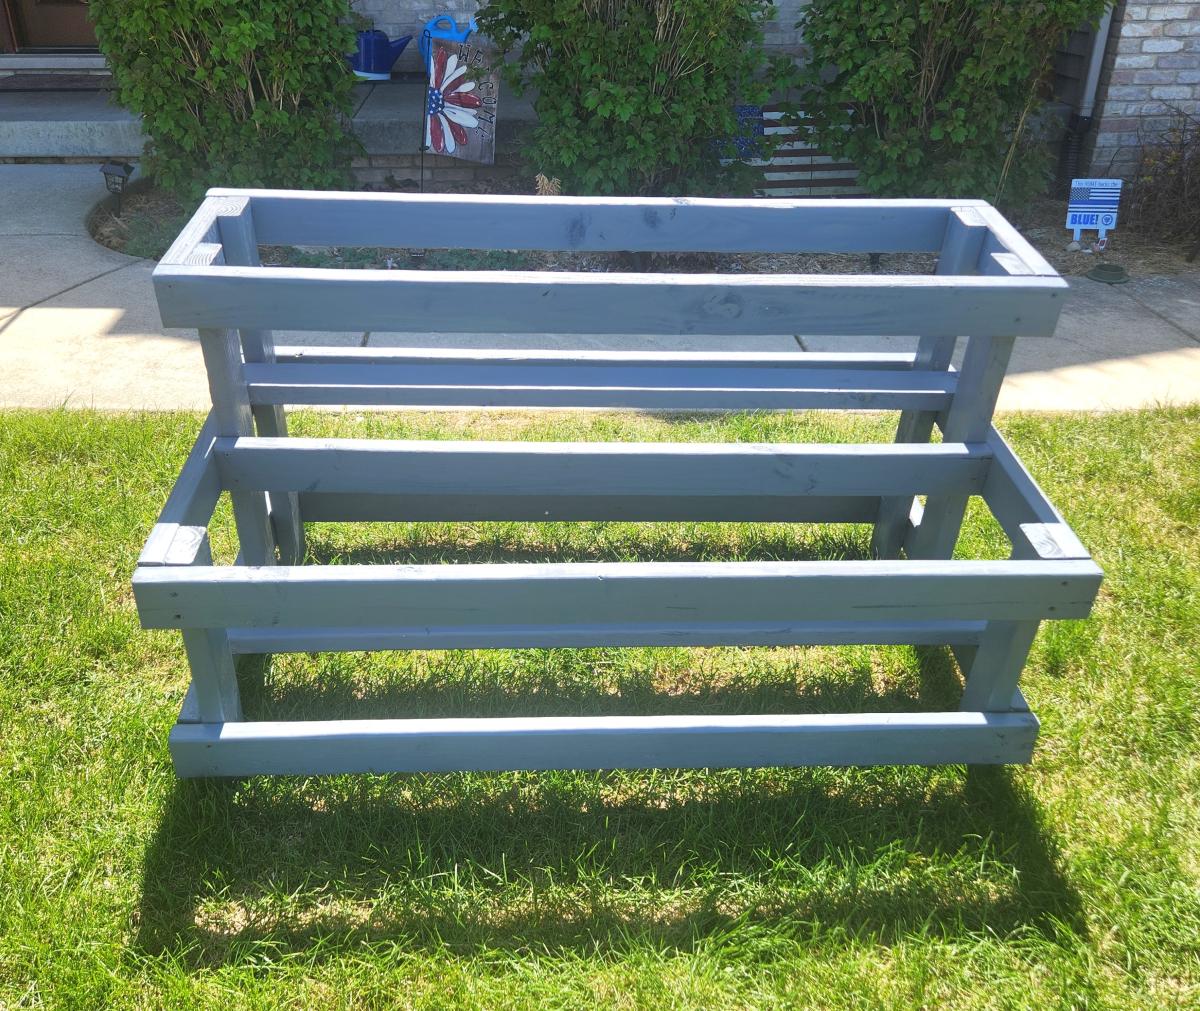
Truss farm bench/Honey pine stain
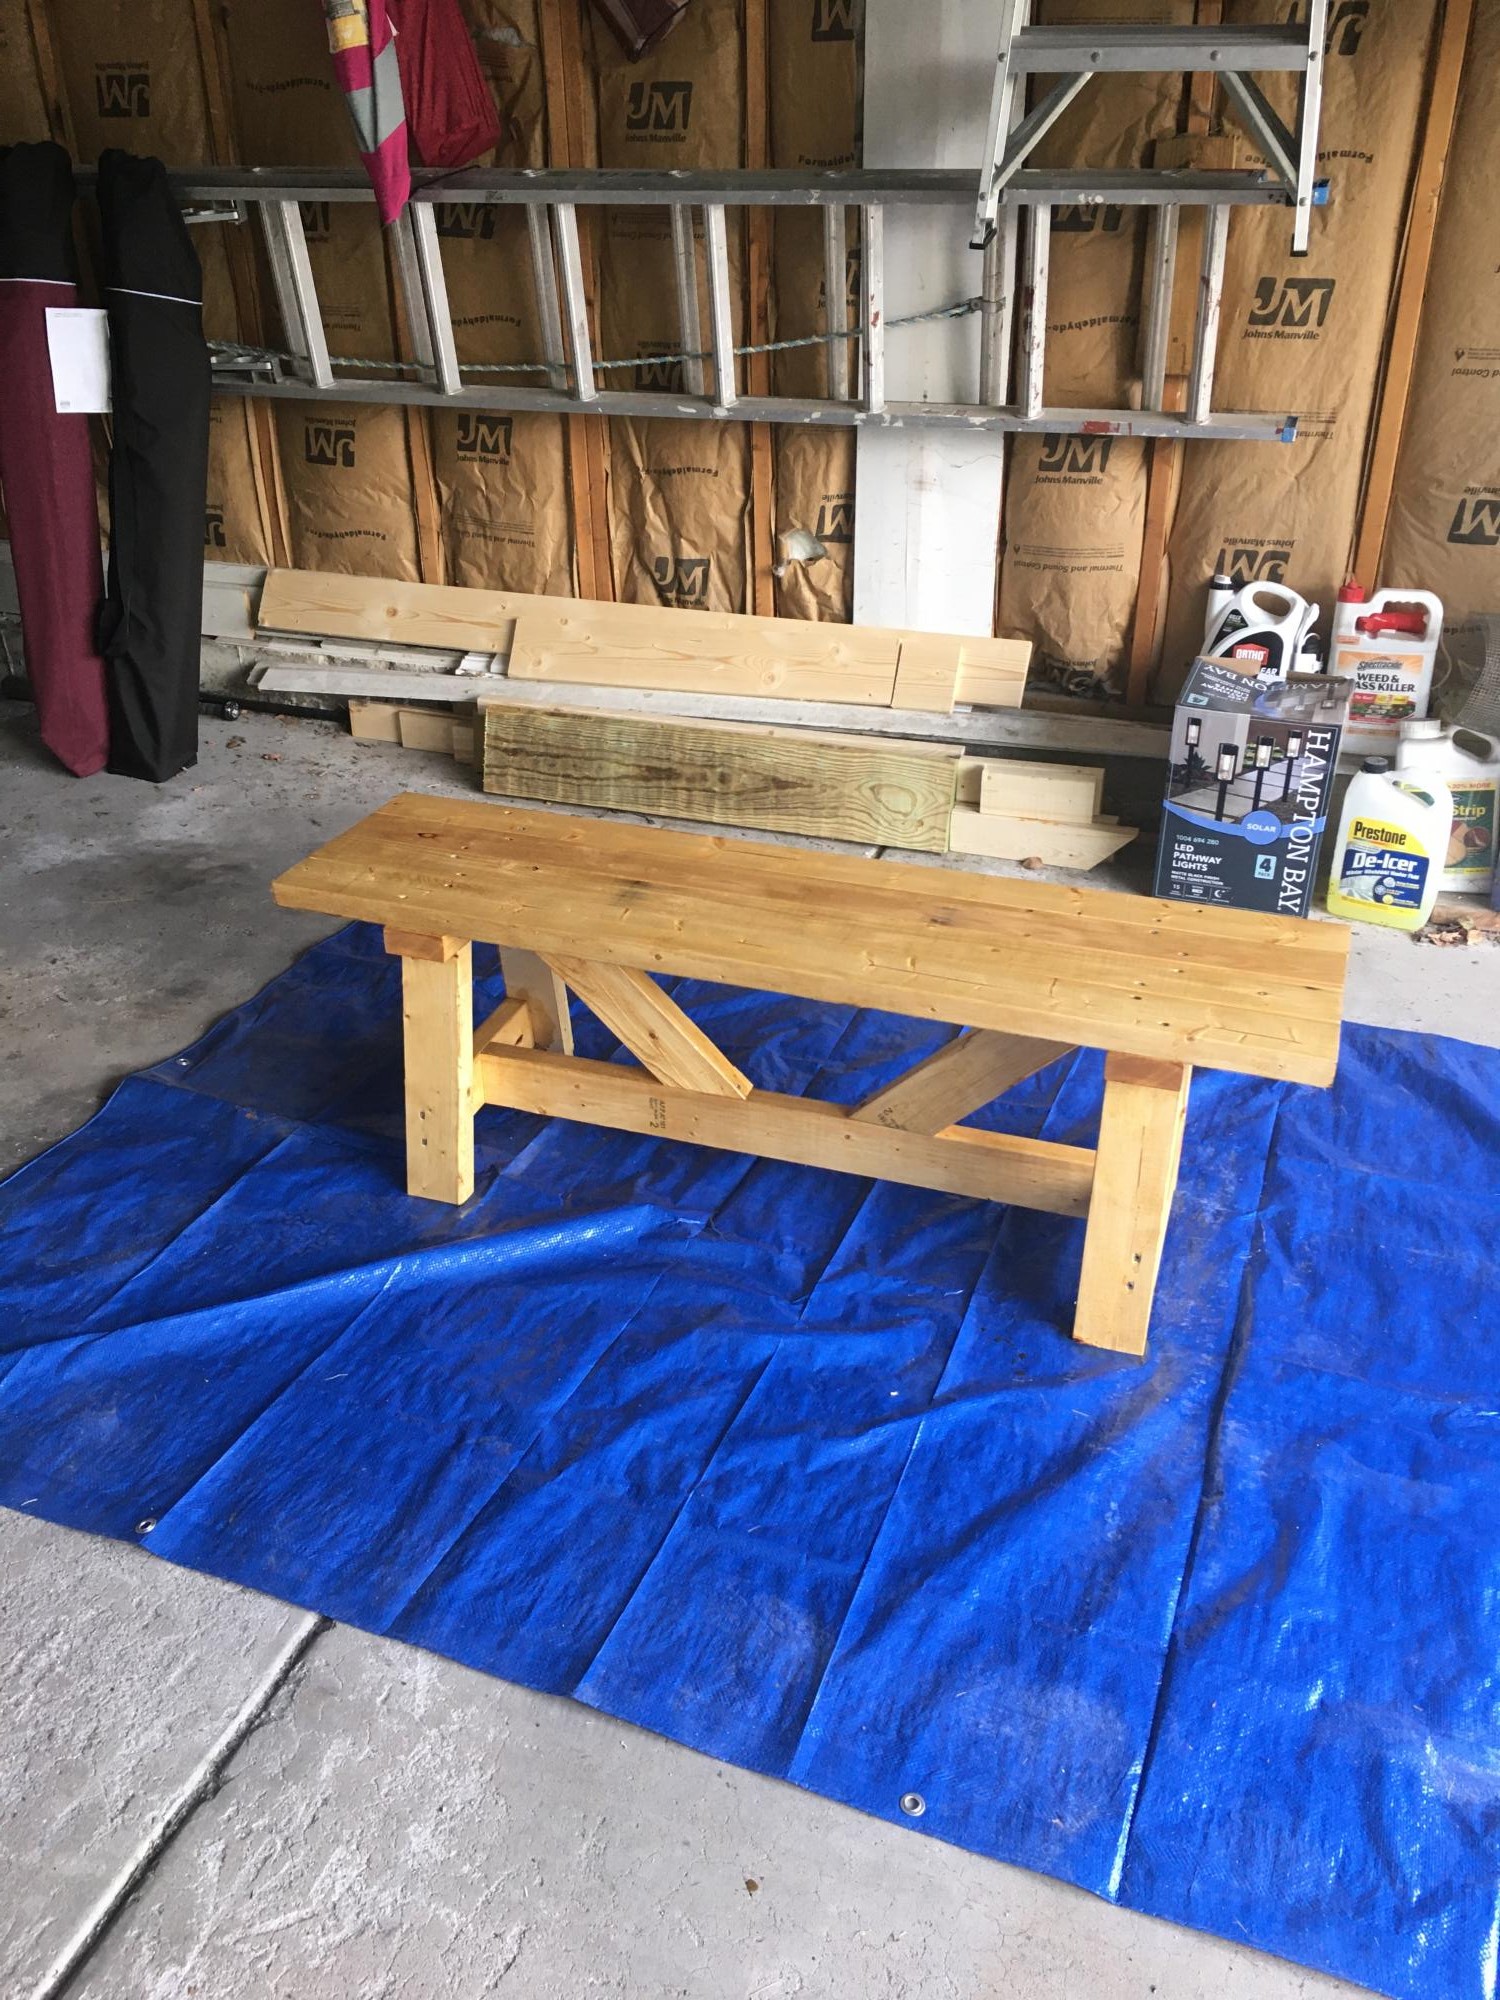
Second project after newly discovering Ana’s site
Built from Plan(s)
Estimated Cost
$35
Estimated Time Investment
Afternoon Project (3-6 Hours)
Finish Used
Minwax honey pine
Recommended Skill Level
Beginner
Simple Modern Outdoor Sectional
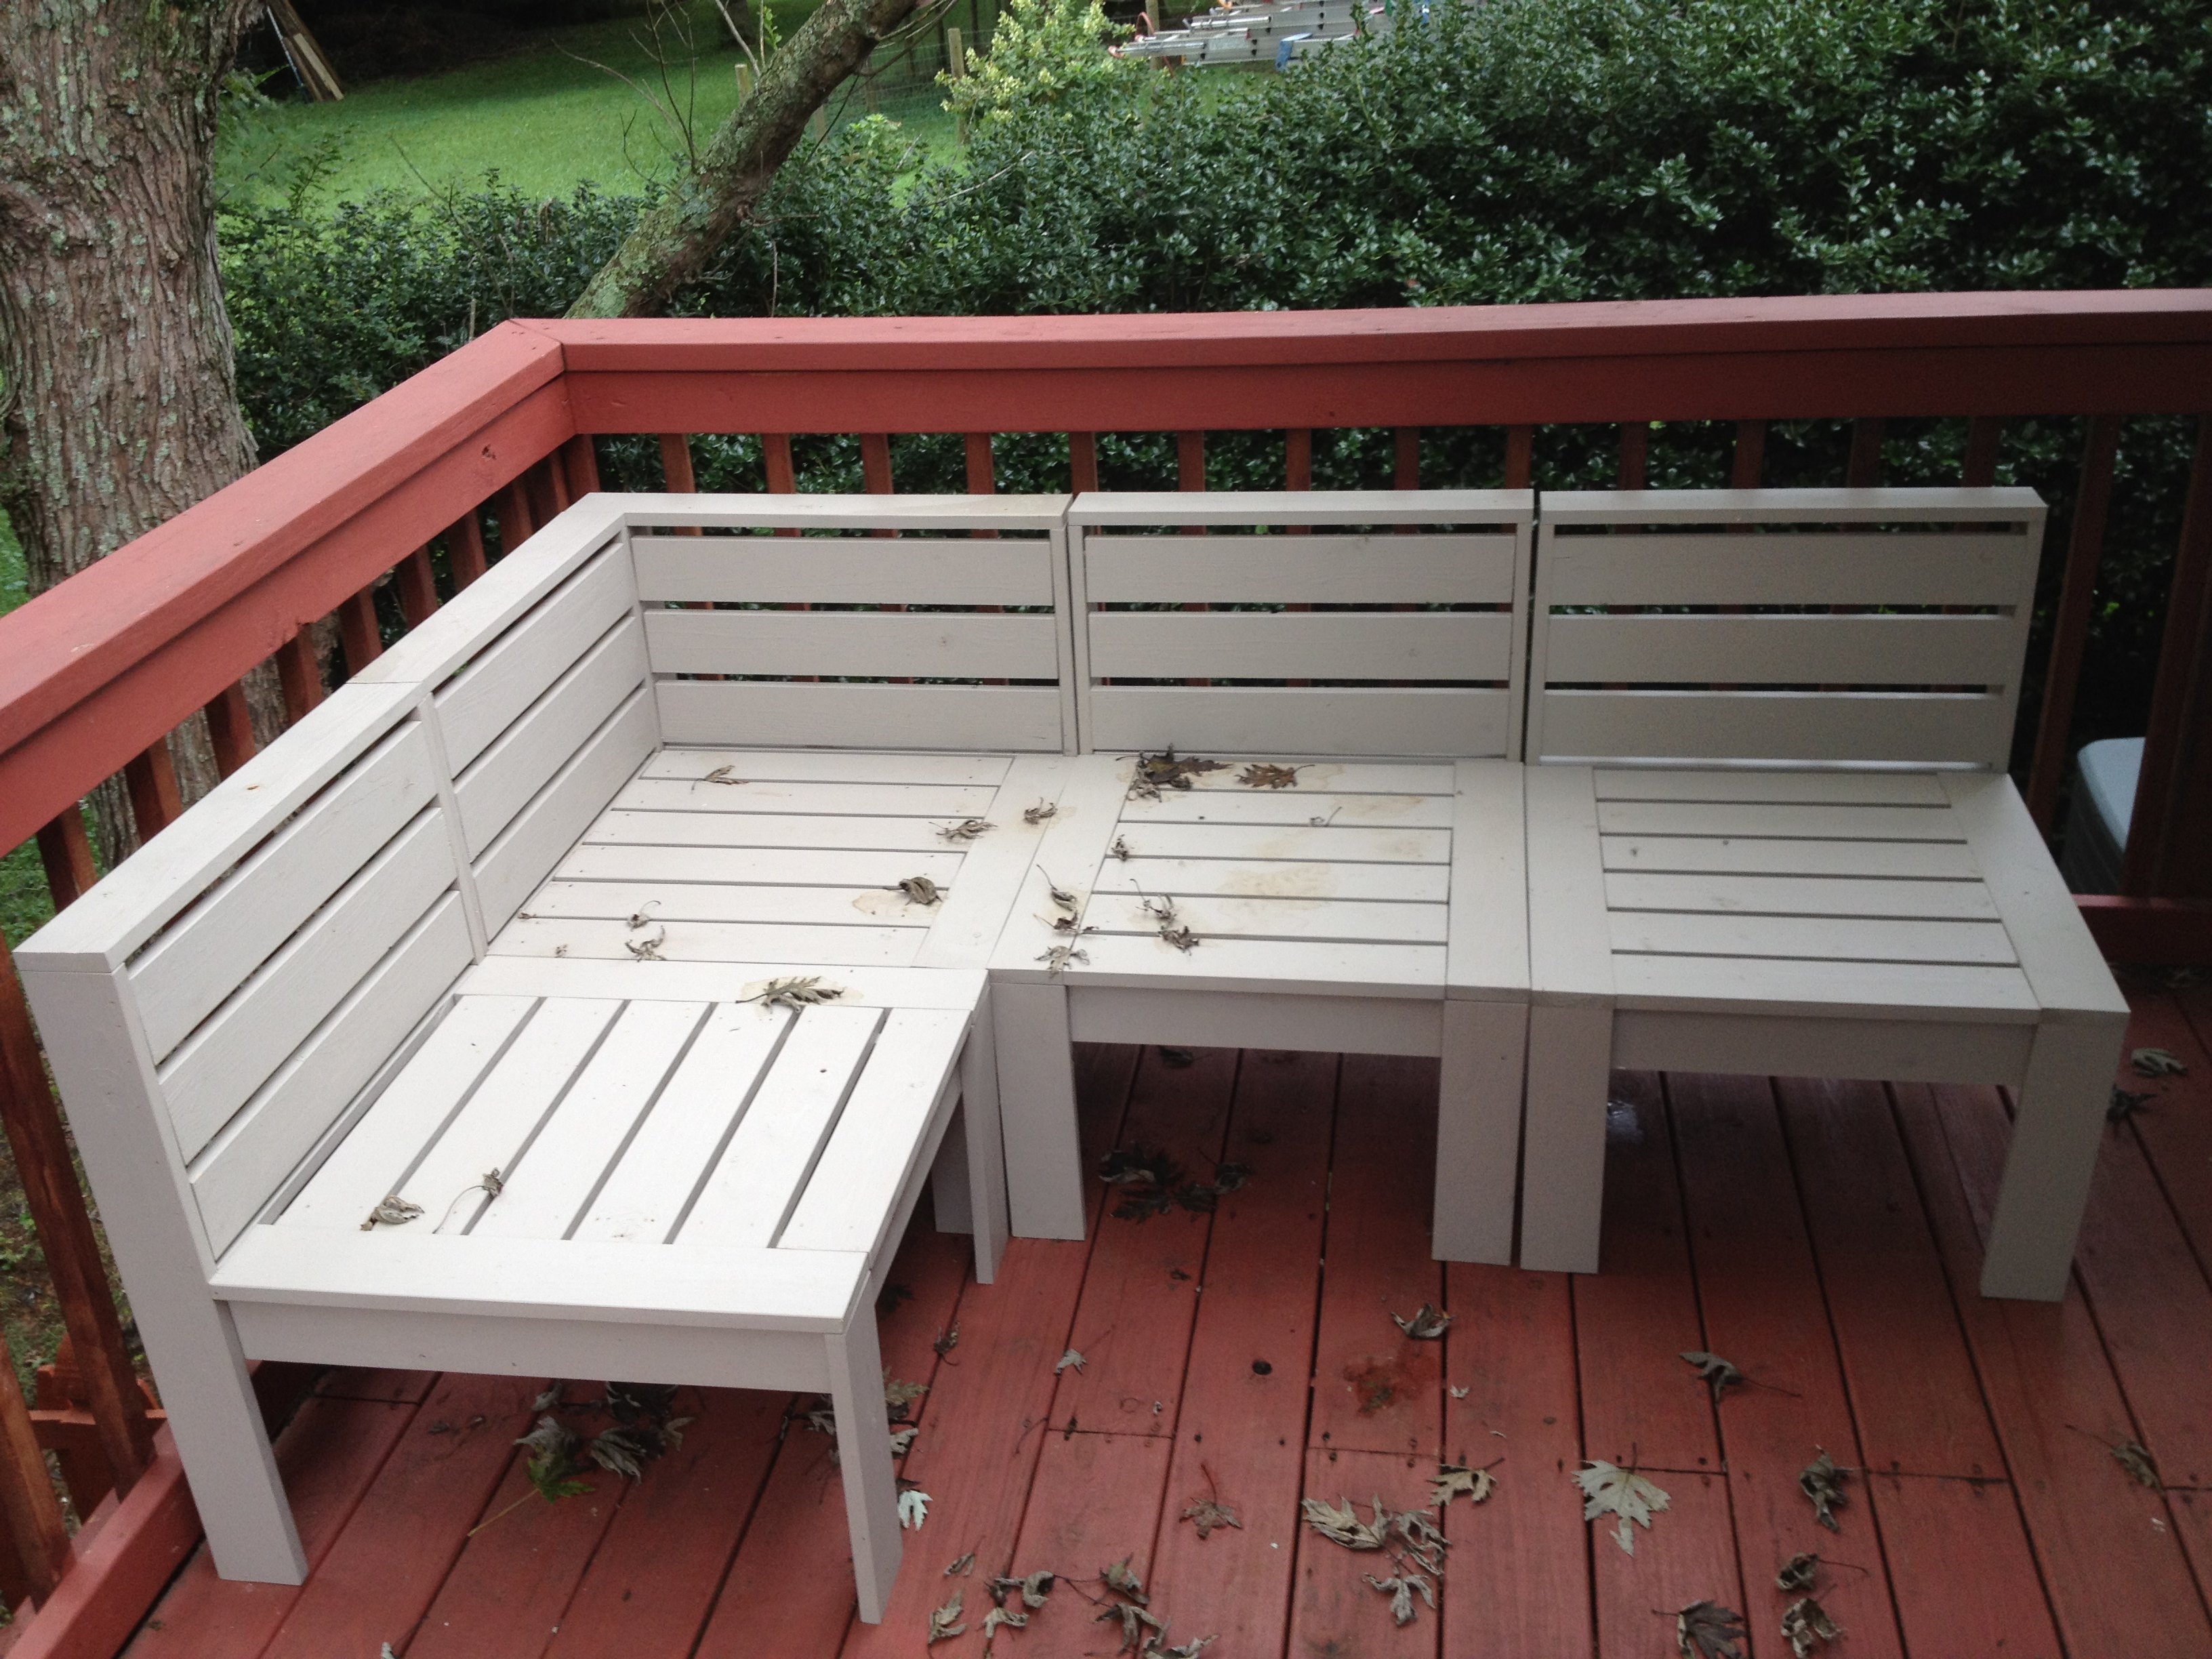
This project my husband and I started together. We live in a very damp and rainy area where cushions would just be more of a pain than a comfort outside.
We decided to add slats on the back so the sectional would stand alone without cushions.
Well, after the first corner piece, I got busy and every day my husband would add another piece to it.
I did do much of the sanding and painting. We sanded and painted these before assembly, made life tons easier.
It was white pine with out exterior house paint color. We really love them!
Thank you Ana!!!
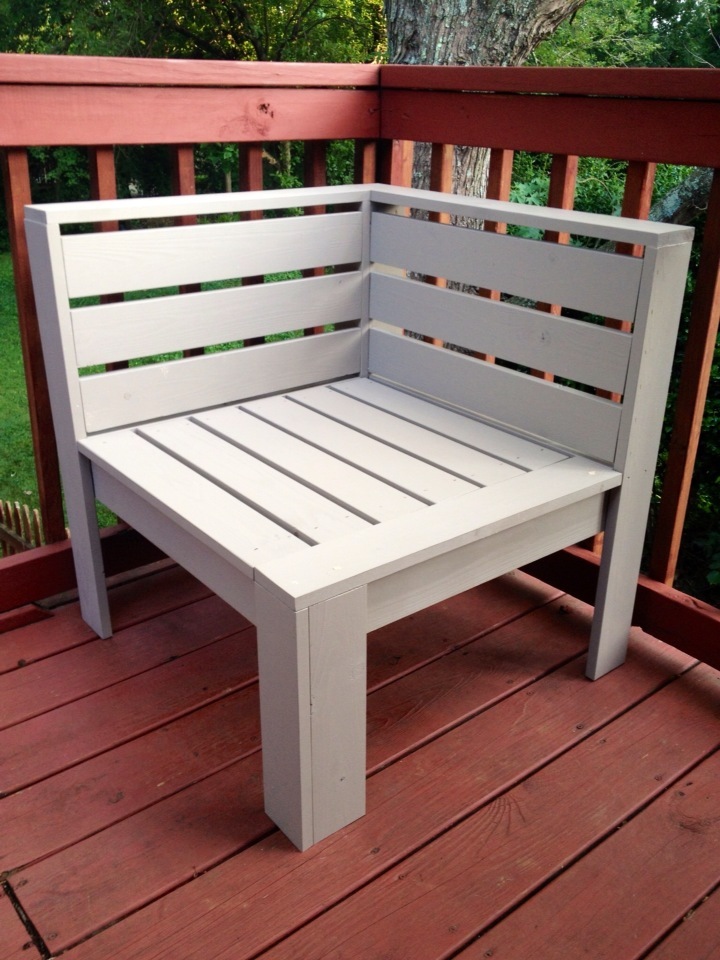
Built from Plan(s)
Estimated Cost
$170
Estimated Time Investment
Weekend Project (10-20 Hours)
Finish Used
Behr Exterior Paint and primer in one.
Recommended Skill Level
Beginner
Restoration knock off shelf
I modified the plans to fit my space. I needed a shorter wide shelf. This project was easy and fun. Turned out great
Built from Plan(s)
Estimated Cost
$60
Estimated Time Investment
Afternoon Project (3-6 Hours)
Recommended Skill Level
Intermediate
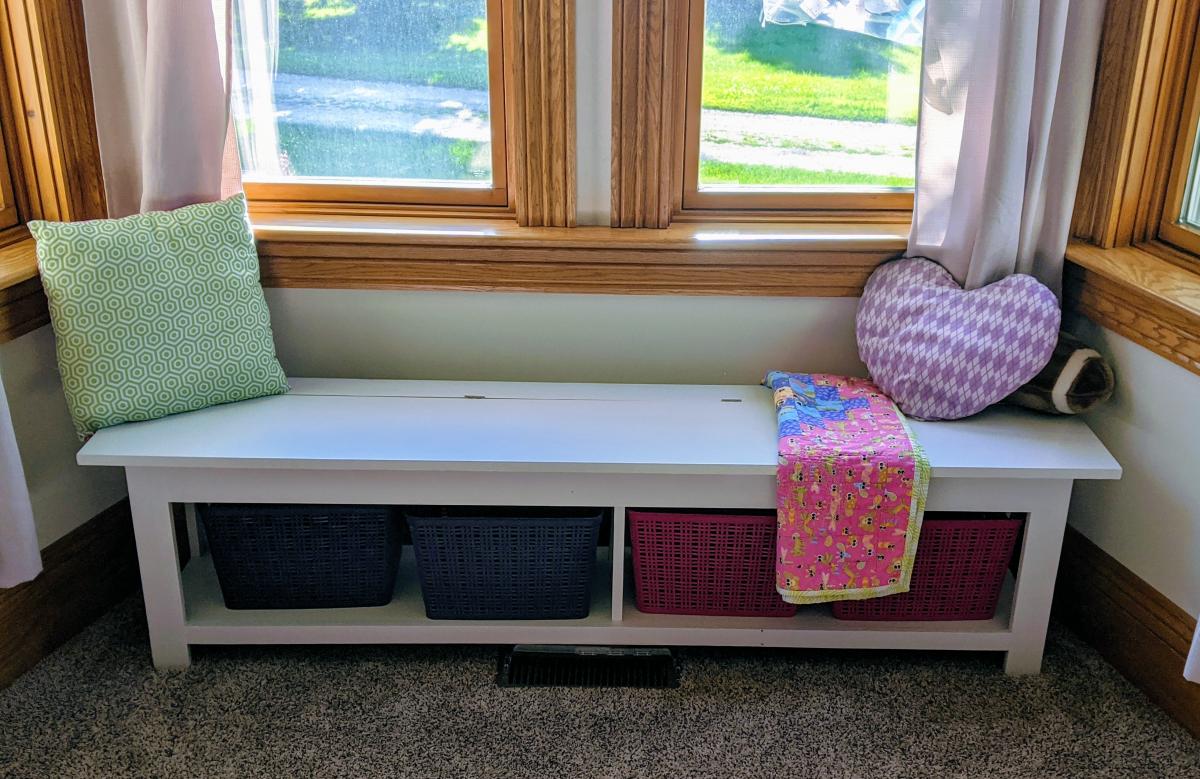
Window Seat
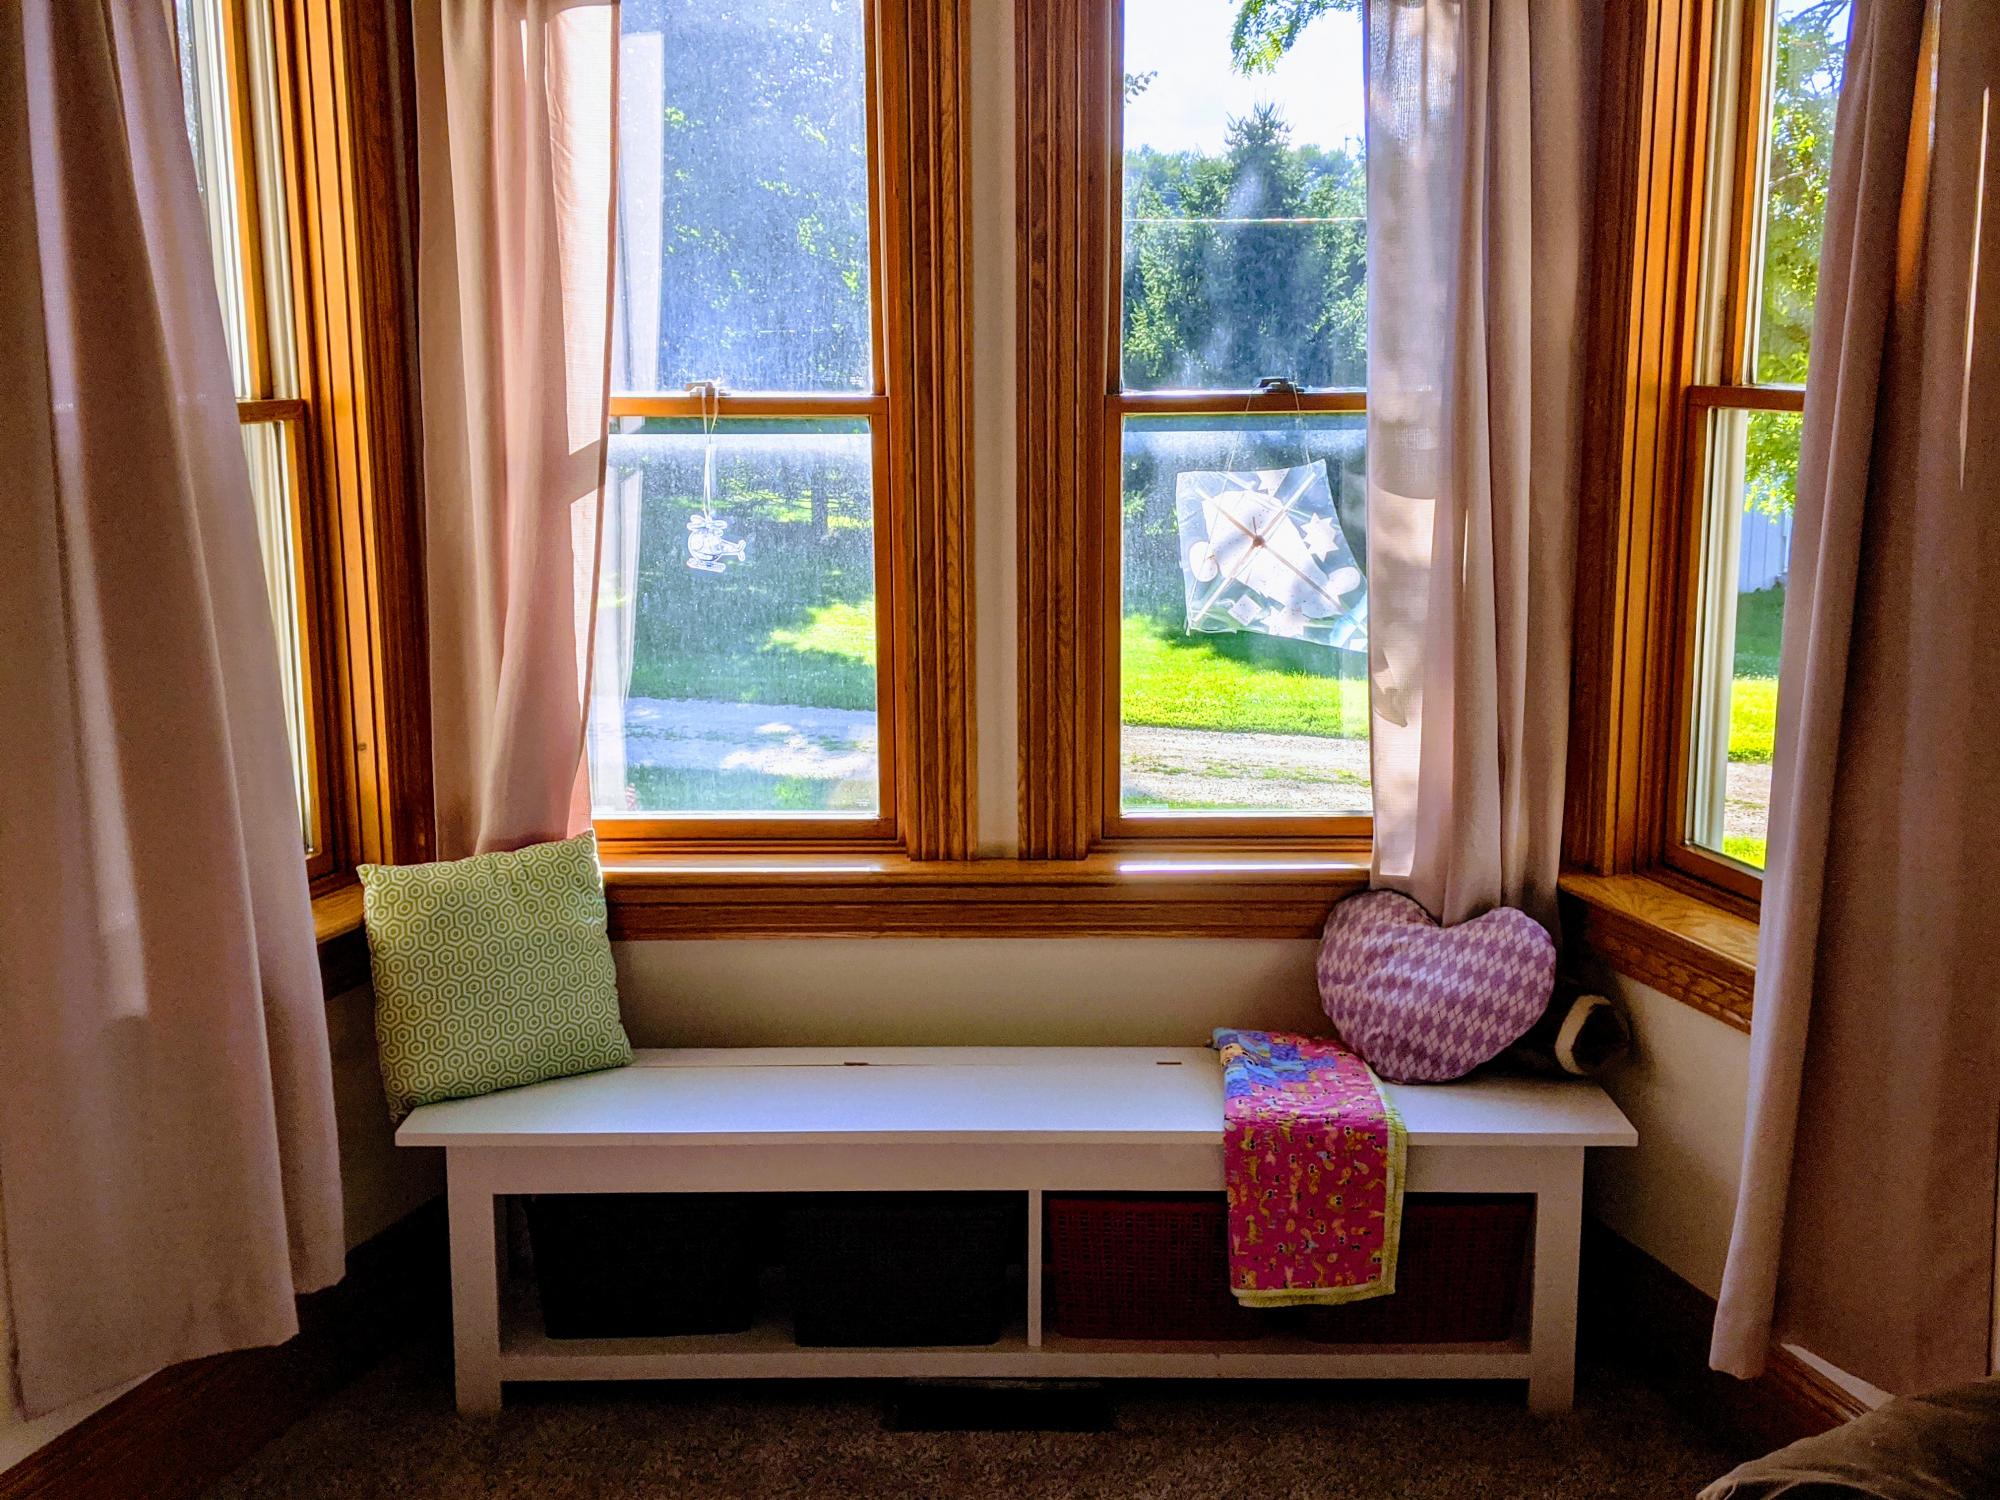
My daughter turned 5 in July. She loves twirly dresses, unicorns, and building. Her current project is a full size airplane made from wood. She is certainly ambitious. For her birthday, she received all kinds of building toys (Legos, knex, etc.) and quickly got to work, creating masterpiece after masterpiece. Like every 5 year old, dismantling a masterpiece is unthinkable. So, she has taken it upon herself to display her projects on every available surface, despite its intended function (i.e., my desk). We needed something that she could use to build, store, and display her projects that wasn't in the way and didn't disrupt our everyday routines (Mama's gotta work!).
Enter, this window seat. I've been wanting to build one for years but never really found a plan I liked. This is exactly what I was looking for, as it has enough building space and storage space to meet our needs. Maybe one day i'll get to use it as a window seat!
I used the flip top storage bench plan and modified the length to fit our windows. The lid is 69" wide and the base is 64.5". I added some supports in the middle, as well. I painted the inside storage space purple to give it a kid friendly touch. I also added lid supports on both sides to prevent pinched fingers.
Estimated Cost
$100?
Estimated Time Investment
Day Project (6-9 Hours)
Finish Used
White paint with purple paint in the storage area. Sealed with mod podge hard coat. 😁
Recommended Skill Level
Intermediate
Porch Bench with storage
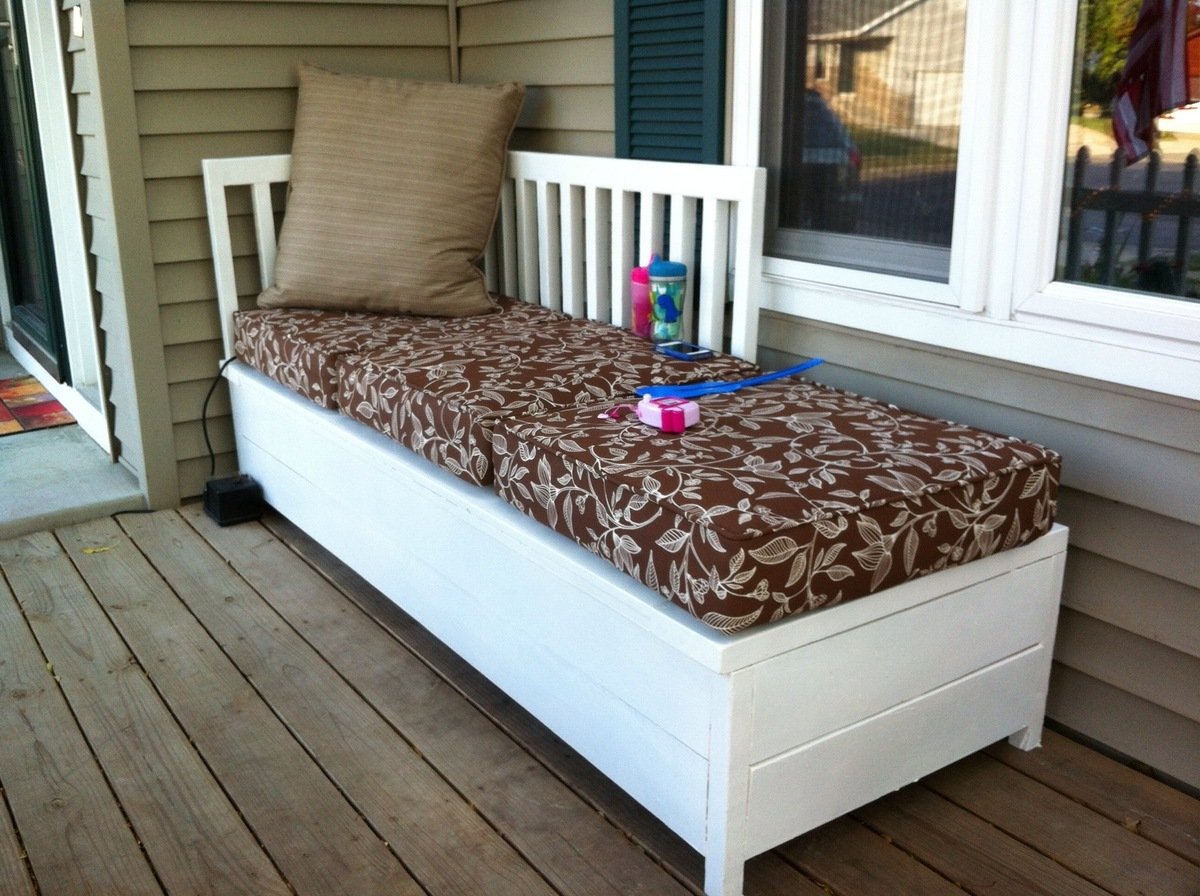
We added a small porch on the front of our house last summer, but the only seating we had out there were our porch rockers. So- I had been checking Ana's plan catalog for something we could use. I came across the Weatherly Sofa- but with the back on it would cover some of our picture window... plus we wanted someplace to put the cushions while we were not on the porch.
I designed this using those plans- but enclosed the bottom as well as stopped the backrest at the point where our picture window starts...
The W-Mart here in town had their summer end clearance on pads at $10 a piece and voila- completed project.
ou cannot see the bench top- but it is pieced together from 1x4s. The remaining bench was made from 2x6 and 1x2s.

Built from Plan(s)
Estimated Cost
$75
Estimated Time Investment
Week Long Project (20 Hours or More)
Finish Used
Exterior latex and sealer
Recommended Skill Level
Intermediate
Rustic X End Table
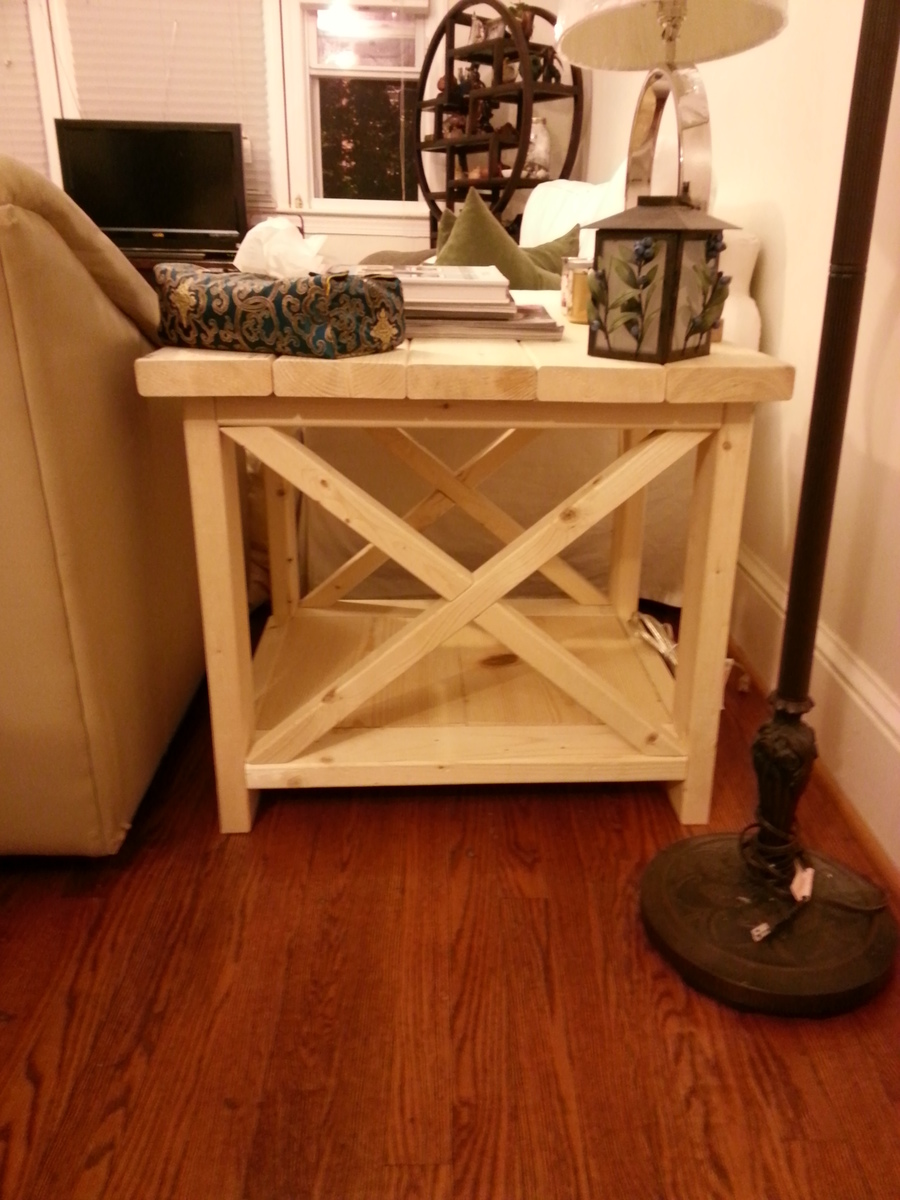
Built two of these over the weekend. The first one took 7 hrs to build and the second one only took 3 hrs. Things I learned:
1) Do step 3 before you do step 2. It was a nightmare trying to fit the 1x12s into the rectangular opening. Once you get the 1x12s in there, you can sandwich the 2x2s neatly onto the sides without having to shave down the 1x12s trying to get them to fit.
2) Check for square as you go. This will be important when you get to step 4 and 5.
3) I don't know about other folks but the 2-1/2 PH screws were always screwing all the way through to the other side so I used 1-1/4 PH screws for most places.
And that's it folks! A gorgeous and easy side table. =)
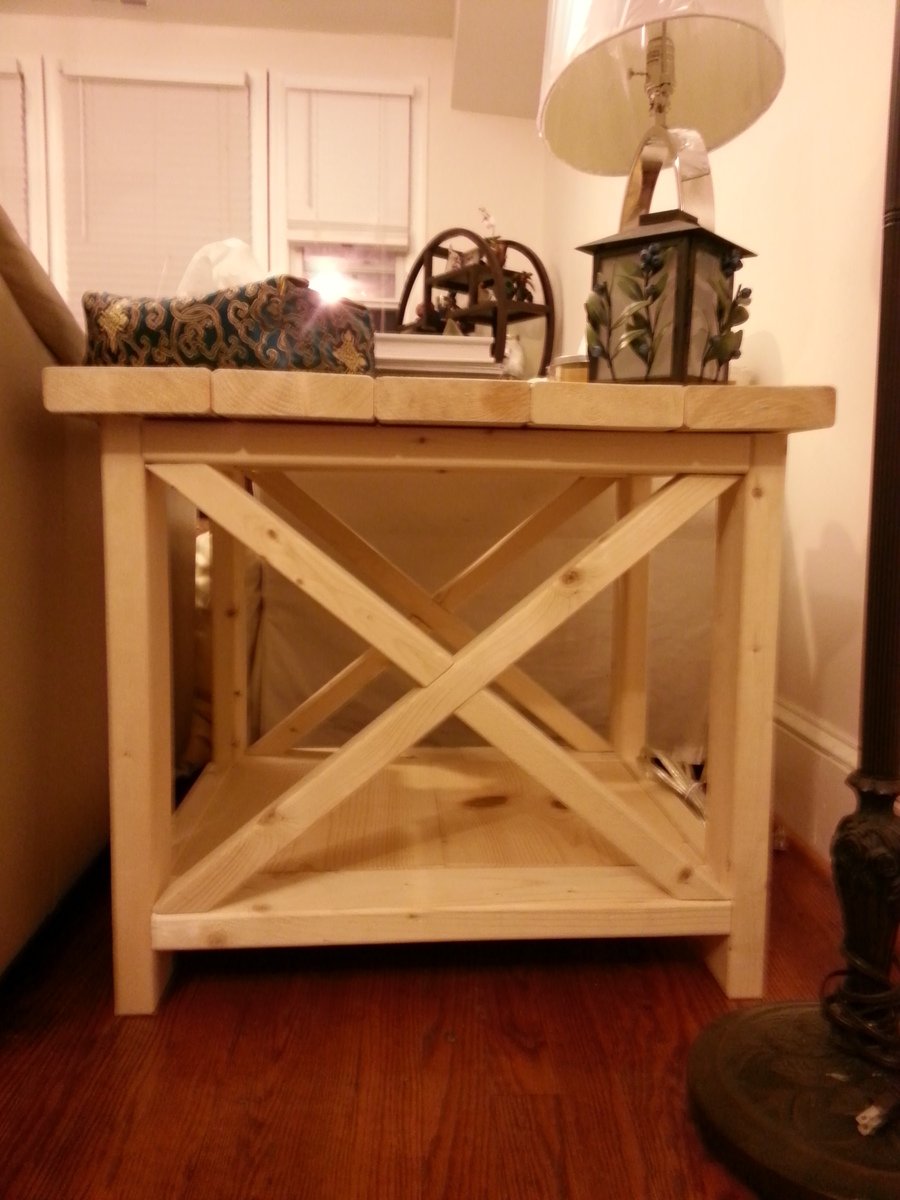
Built from Plan(s)
Estimated Cost
$30
Estimated Time Investment
Afternoon Project (3-6 Hours)
Finish Used
haven't decided what kind of finish but I am kind of digging the natural pine color!
Recommended Skill Level
Beginner
Old English Style Farmhouse Dining Table
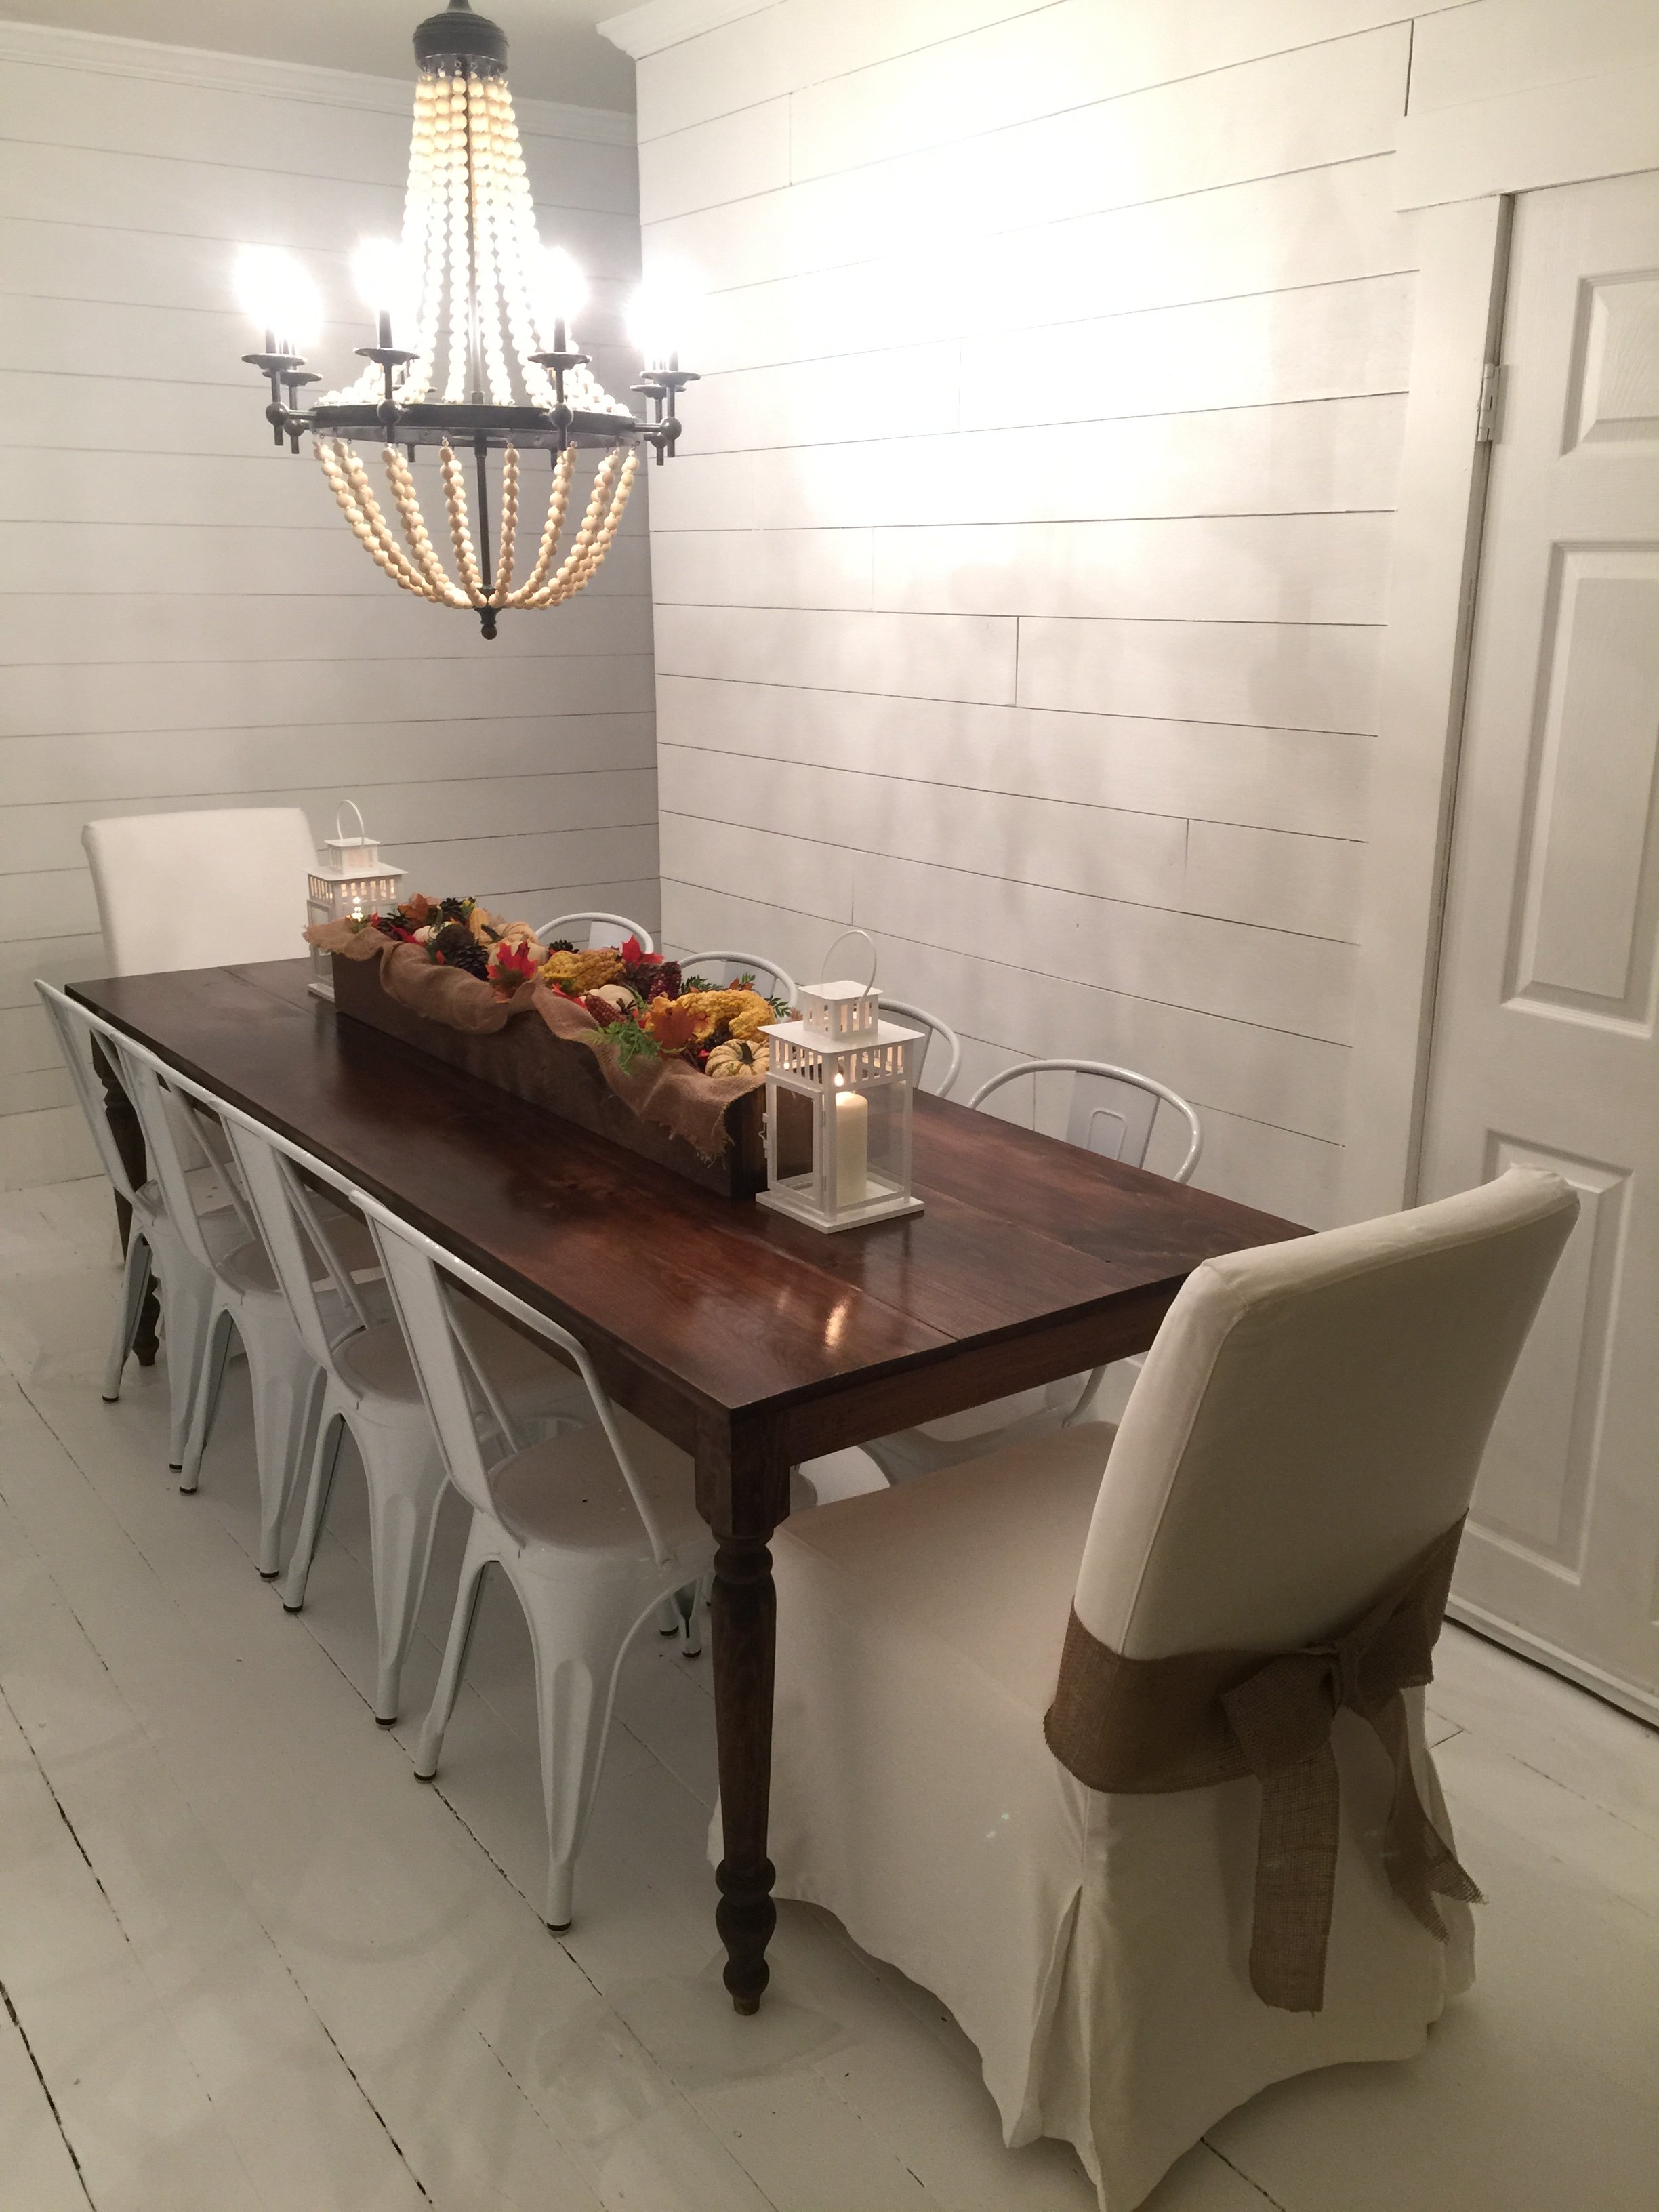
First table my husband and I have ever made, and it turned out beautifully!
Built from Plan(s)
Estimated Cost
$150
Estimated Time Investment
Afternoon Project (3-6 Hours)
Finish Used
Minwax Provincial Stain, 2 Coats
Recommended Skill Level
Beginner
dumpster dresser
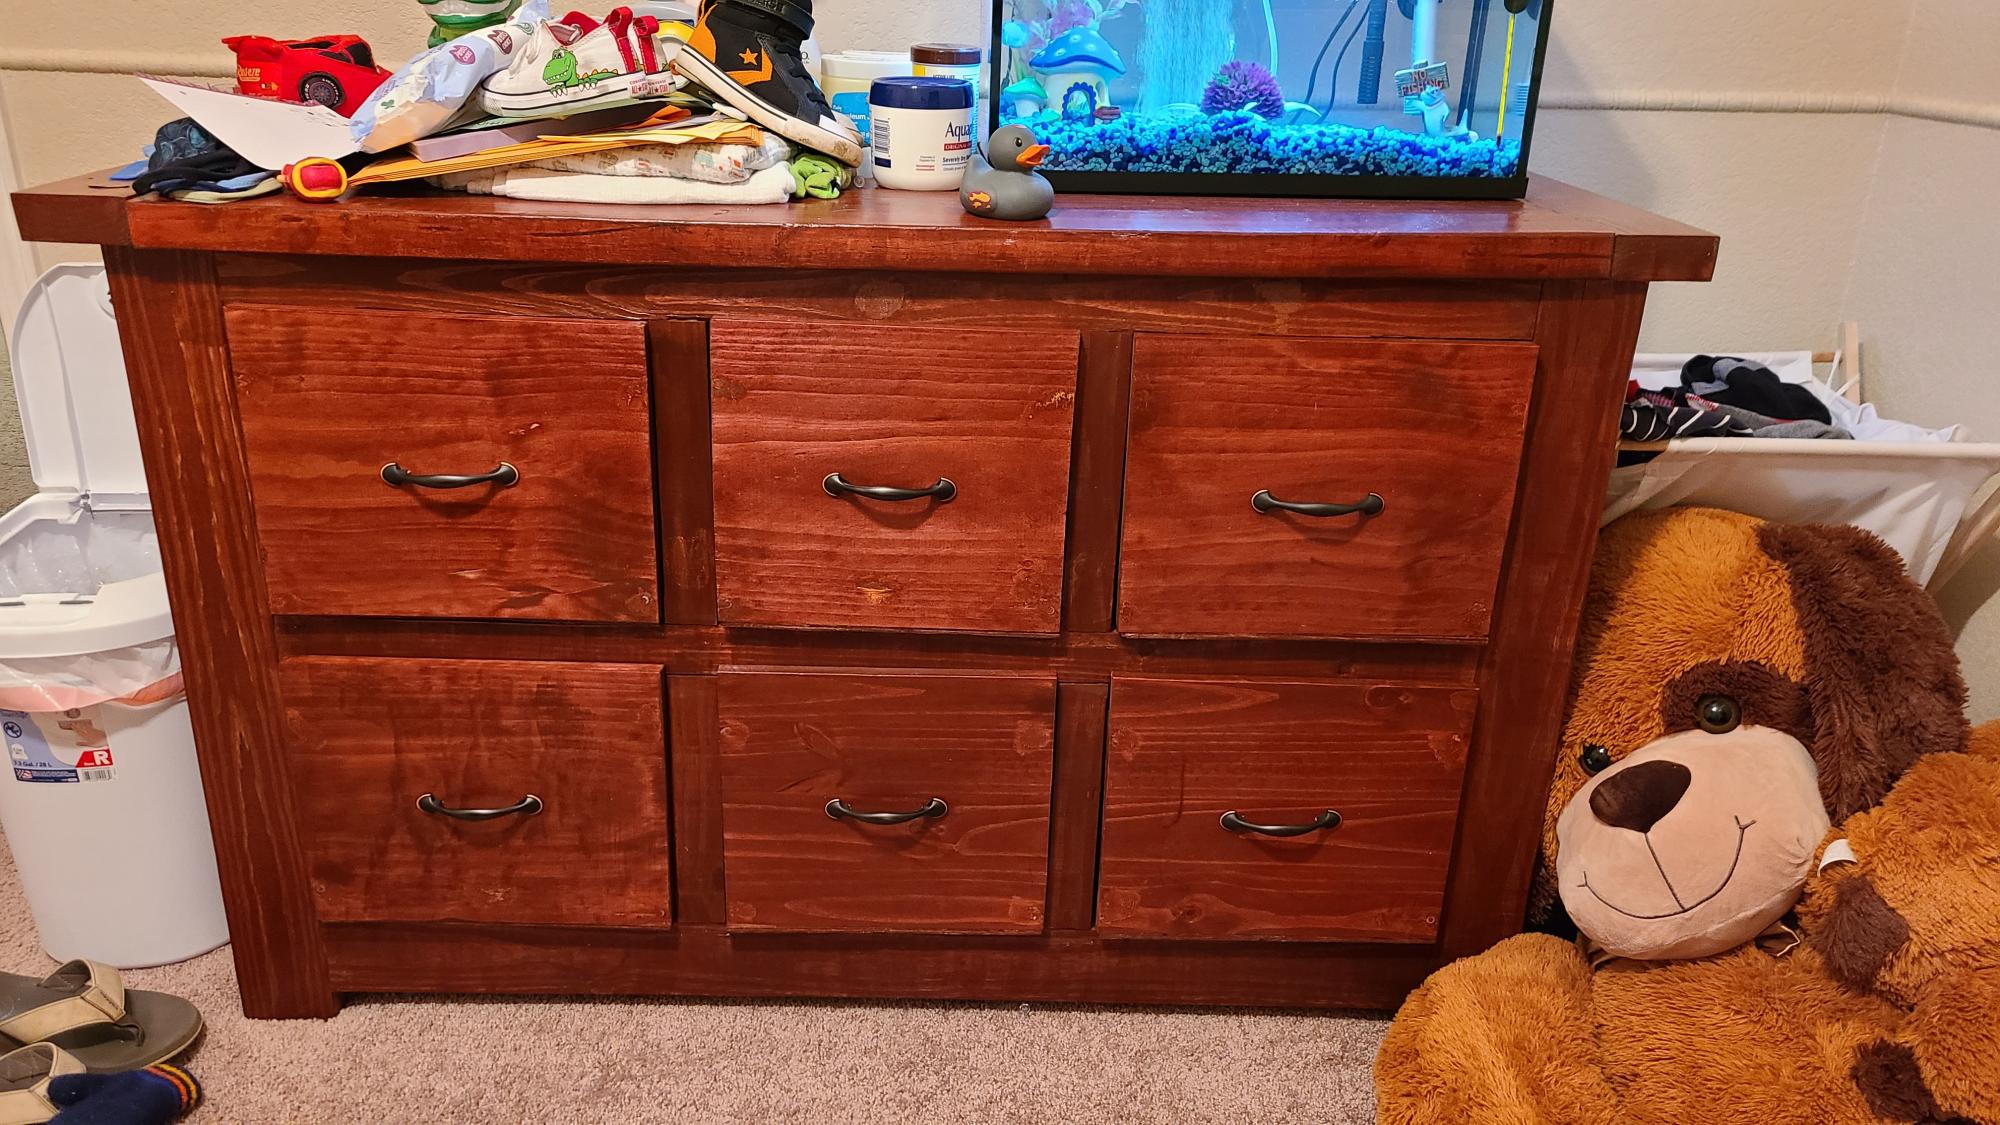
I had left over lumber from a fence that I put up. The kiddo needed to have a big boy dresser. Made this with all treated 2x4s. I cut all of the inside supports to dimension from the 2x4s. Only wood that I needed to buy was for the drawers.
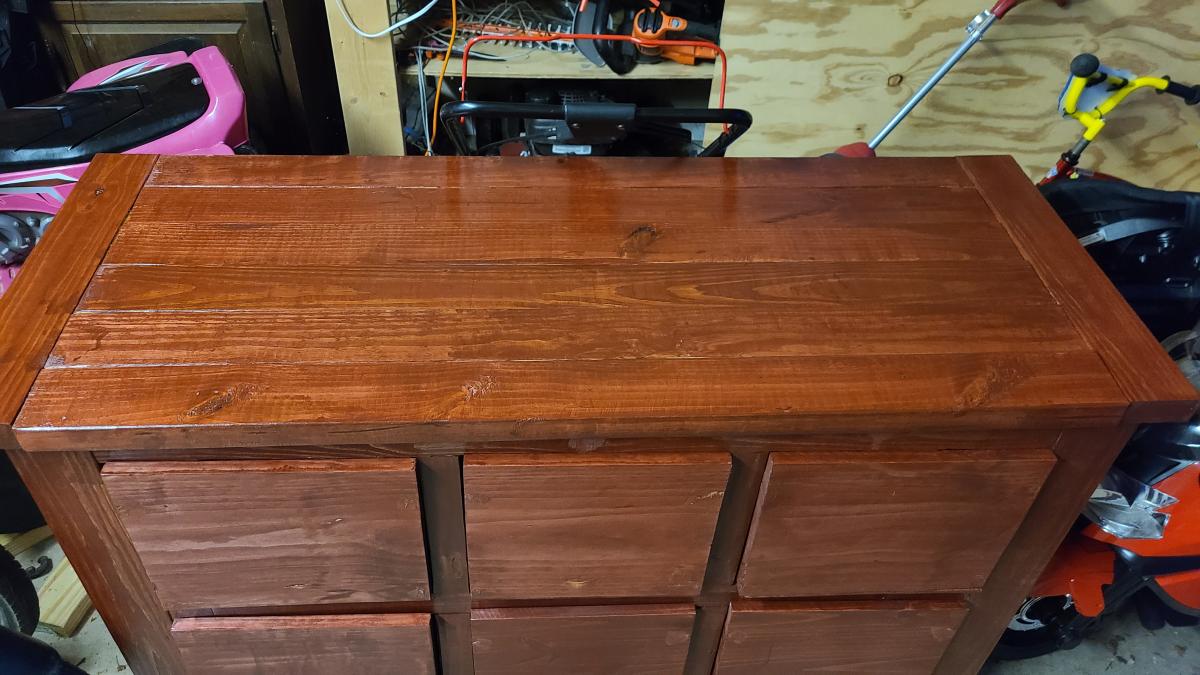
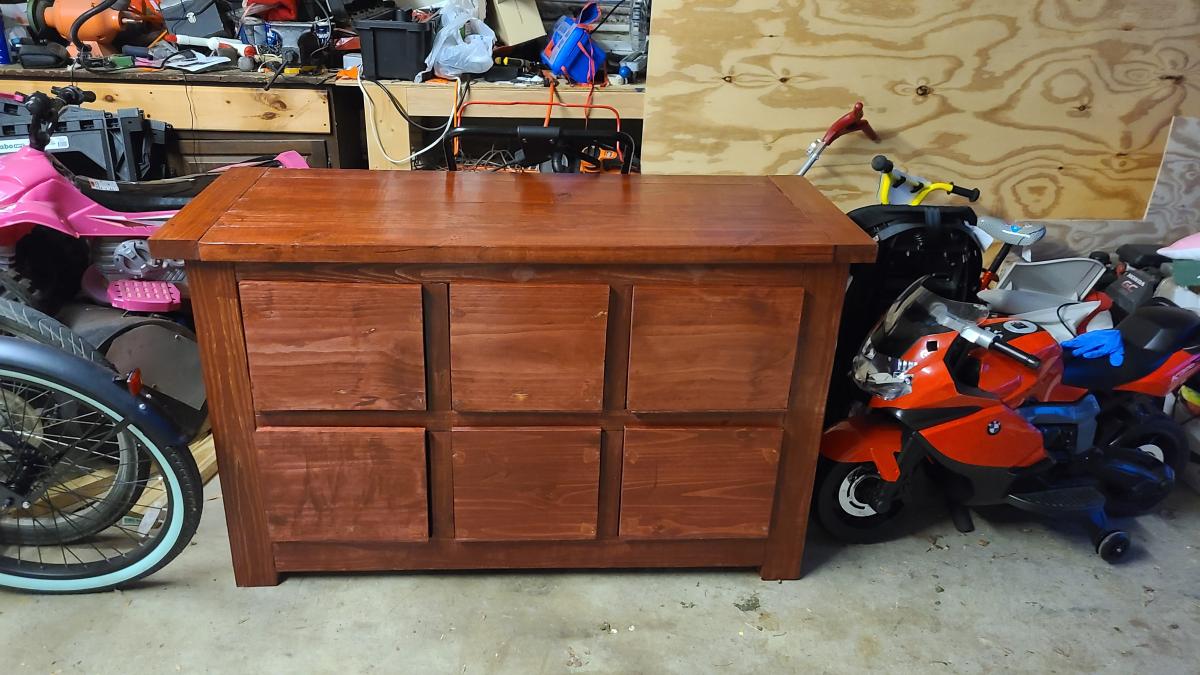
Estimated Cost
150
Estimated Time Investment
Weekend Project (10-20 Hours)
Recommended Skill Level
Intermediate
King Farm House Bed
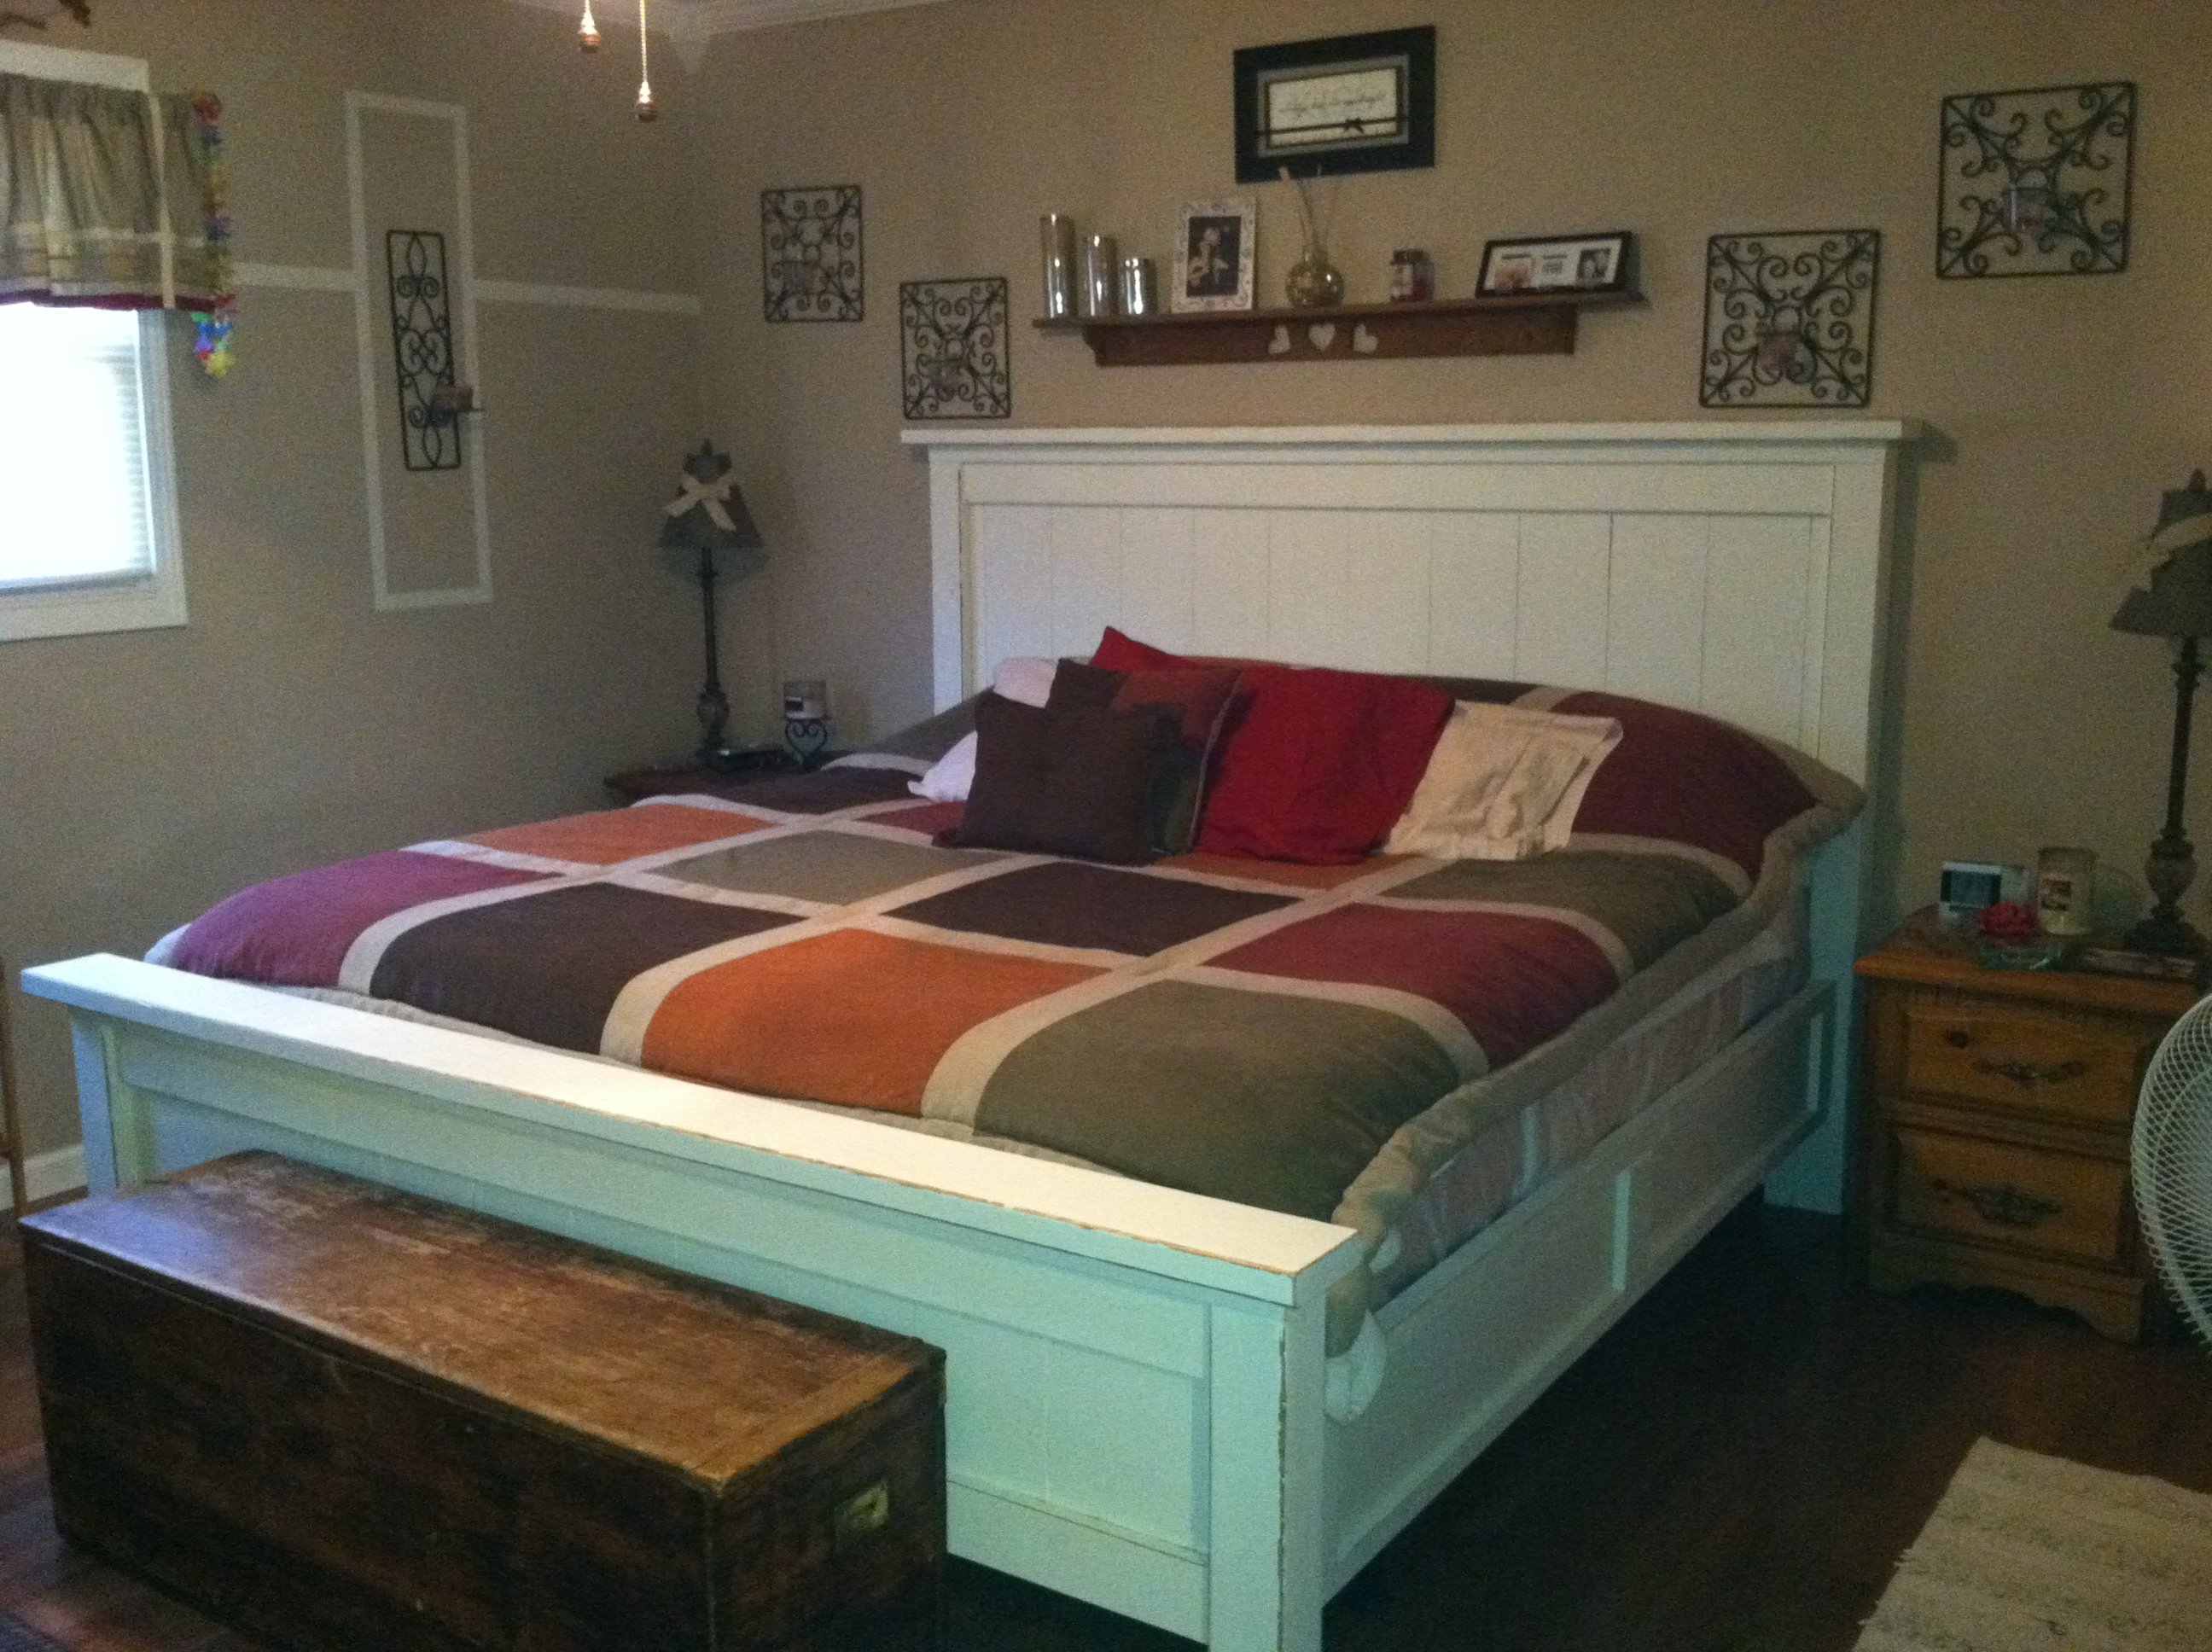
I made this bed for my wife using the plans found on this side.
I worked out great and she loves it!!!! Very east project. It took one week end to complete. I altered it slightly and added decorative side panels.
Built from Plan(s)
Estimated Cost
150.00
Estimated Time Investment
Weekend Project (10-20 Hours)
Finish Used
Distressed, antique look
Recommended Skill Level
Beginner
Comments
Tue, 05/21/2013 - 03:59
The project looks good and
The project looks good and perfect for the home and we always look for decking up our home in the most beautiful way possible and for that you can check out http://blog.decorplanet.com/2012/06/exploding-toilets-prompt-recall-of.html.
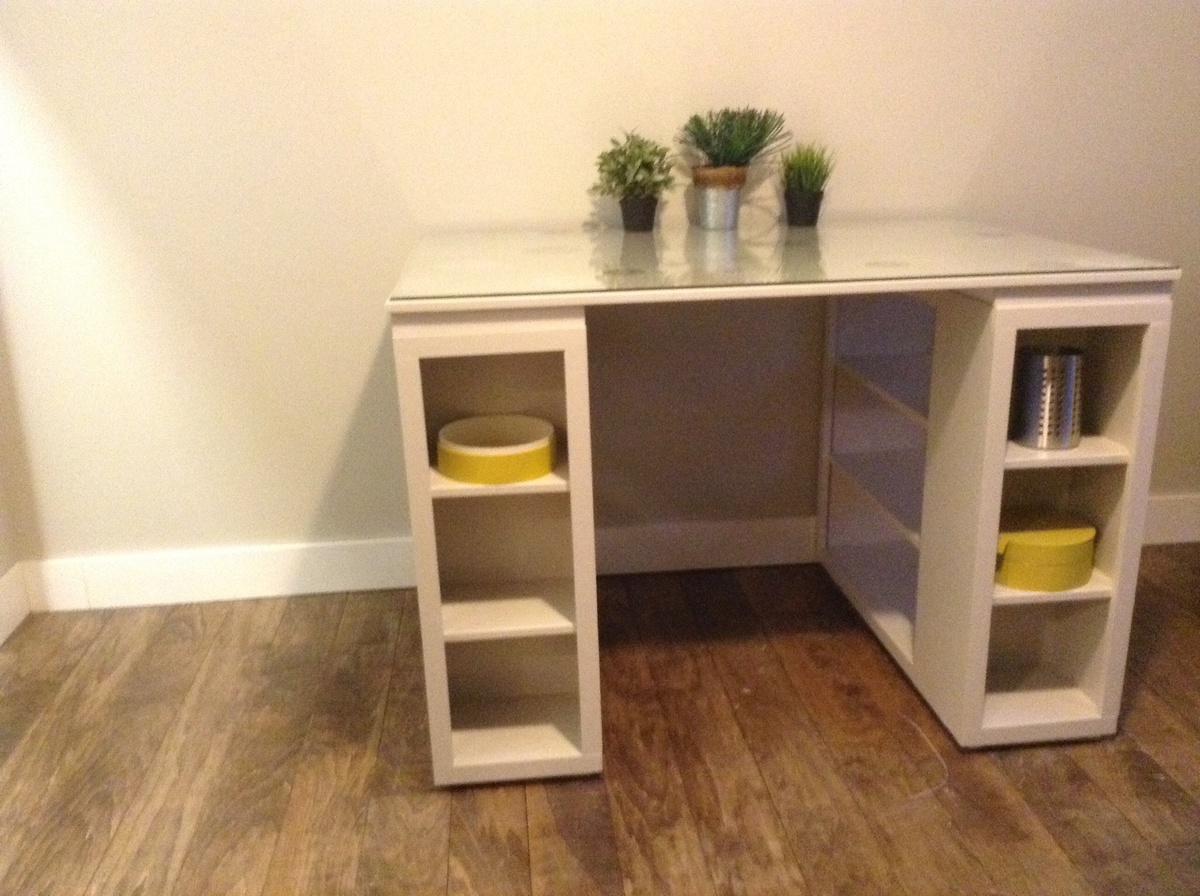
Craft Table
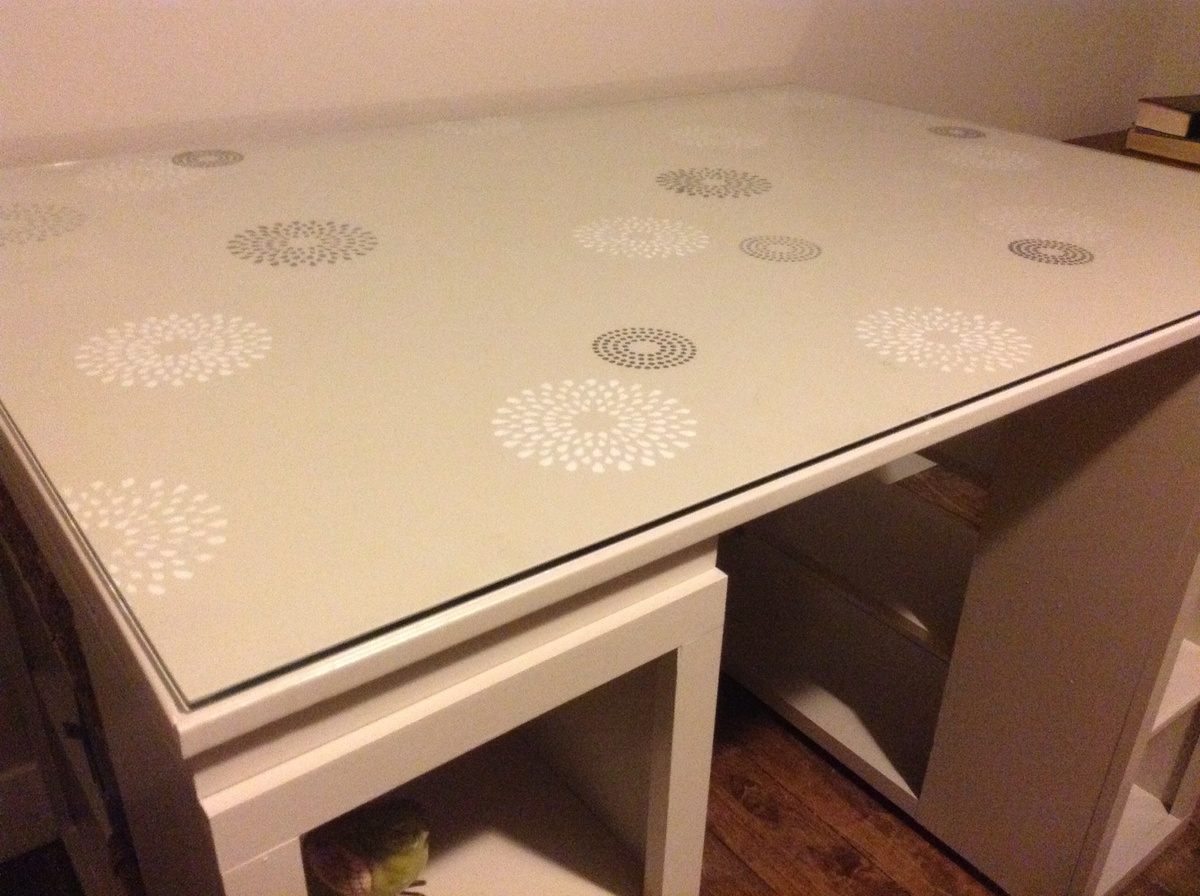
This was my second big DIY project ( I should say DIO for Do it OURSelves) since my husband had to help me with a few things. Anyway, I chose to paint the whole thing the same color as my office/craft room; BM Revere Pewter. Then, I stenciled some flowers in different colors of gray and white on the top. I had a piece of thick glass cut for the top. When I need to do anything heavy duty (like the open shelf console I did next) I simply put a bath rug on the glass. Even so, it's pretty tough as I've dropped lots of stuff on it without a crack!
I made this from the plan in Ana's book. Before we tackled this, I pulled all the carpet out of my office and put in a plywood floor (ripped into 6" widths).
I just finished the console which was made with plans from Ana and Shanty. Looking to move onto the next big project; a bar cart with doors or a dresser. Yikes! This is fun!
P.S. Love my Ryobi One Plus tools!
Thanks Ana, for the inspiration!
Estimated Cost
$150 ($80 for glass)
Estimated Time Investment
Week Long Project (20 Hours or More)
Finish Used
Paint, glass top
Recommended Skill Level
Beginner