Community Brag Posts

Play vanity

Submitted by Theresa W on Thu, 01/02/2014 - 12:11

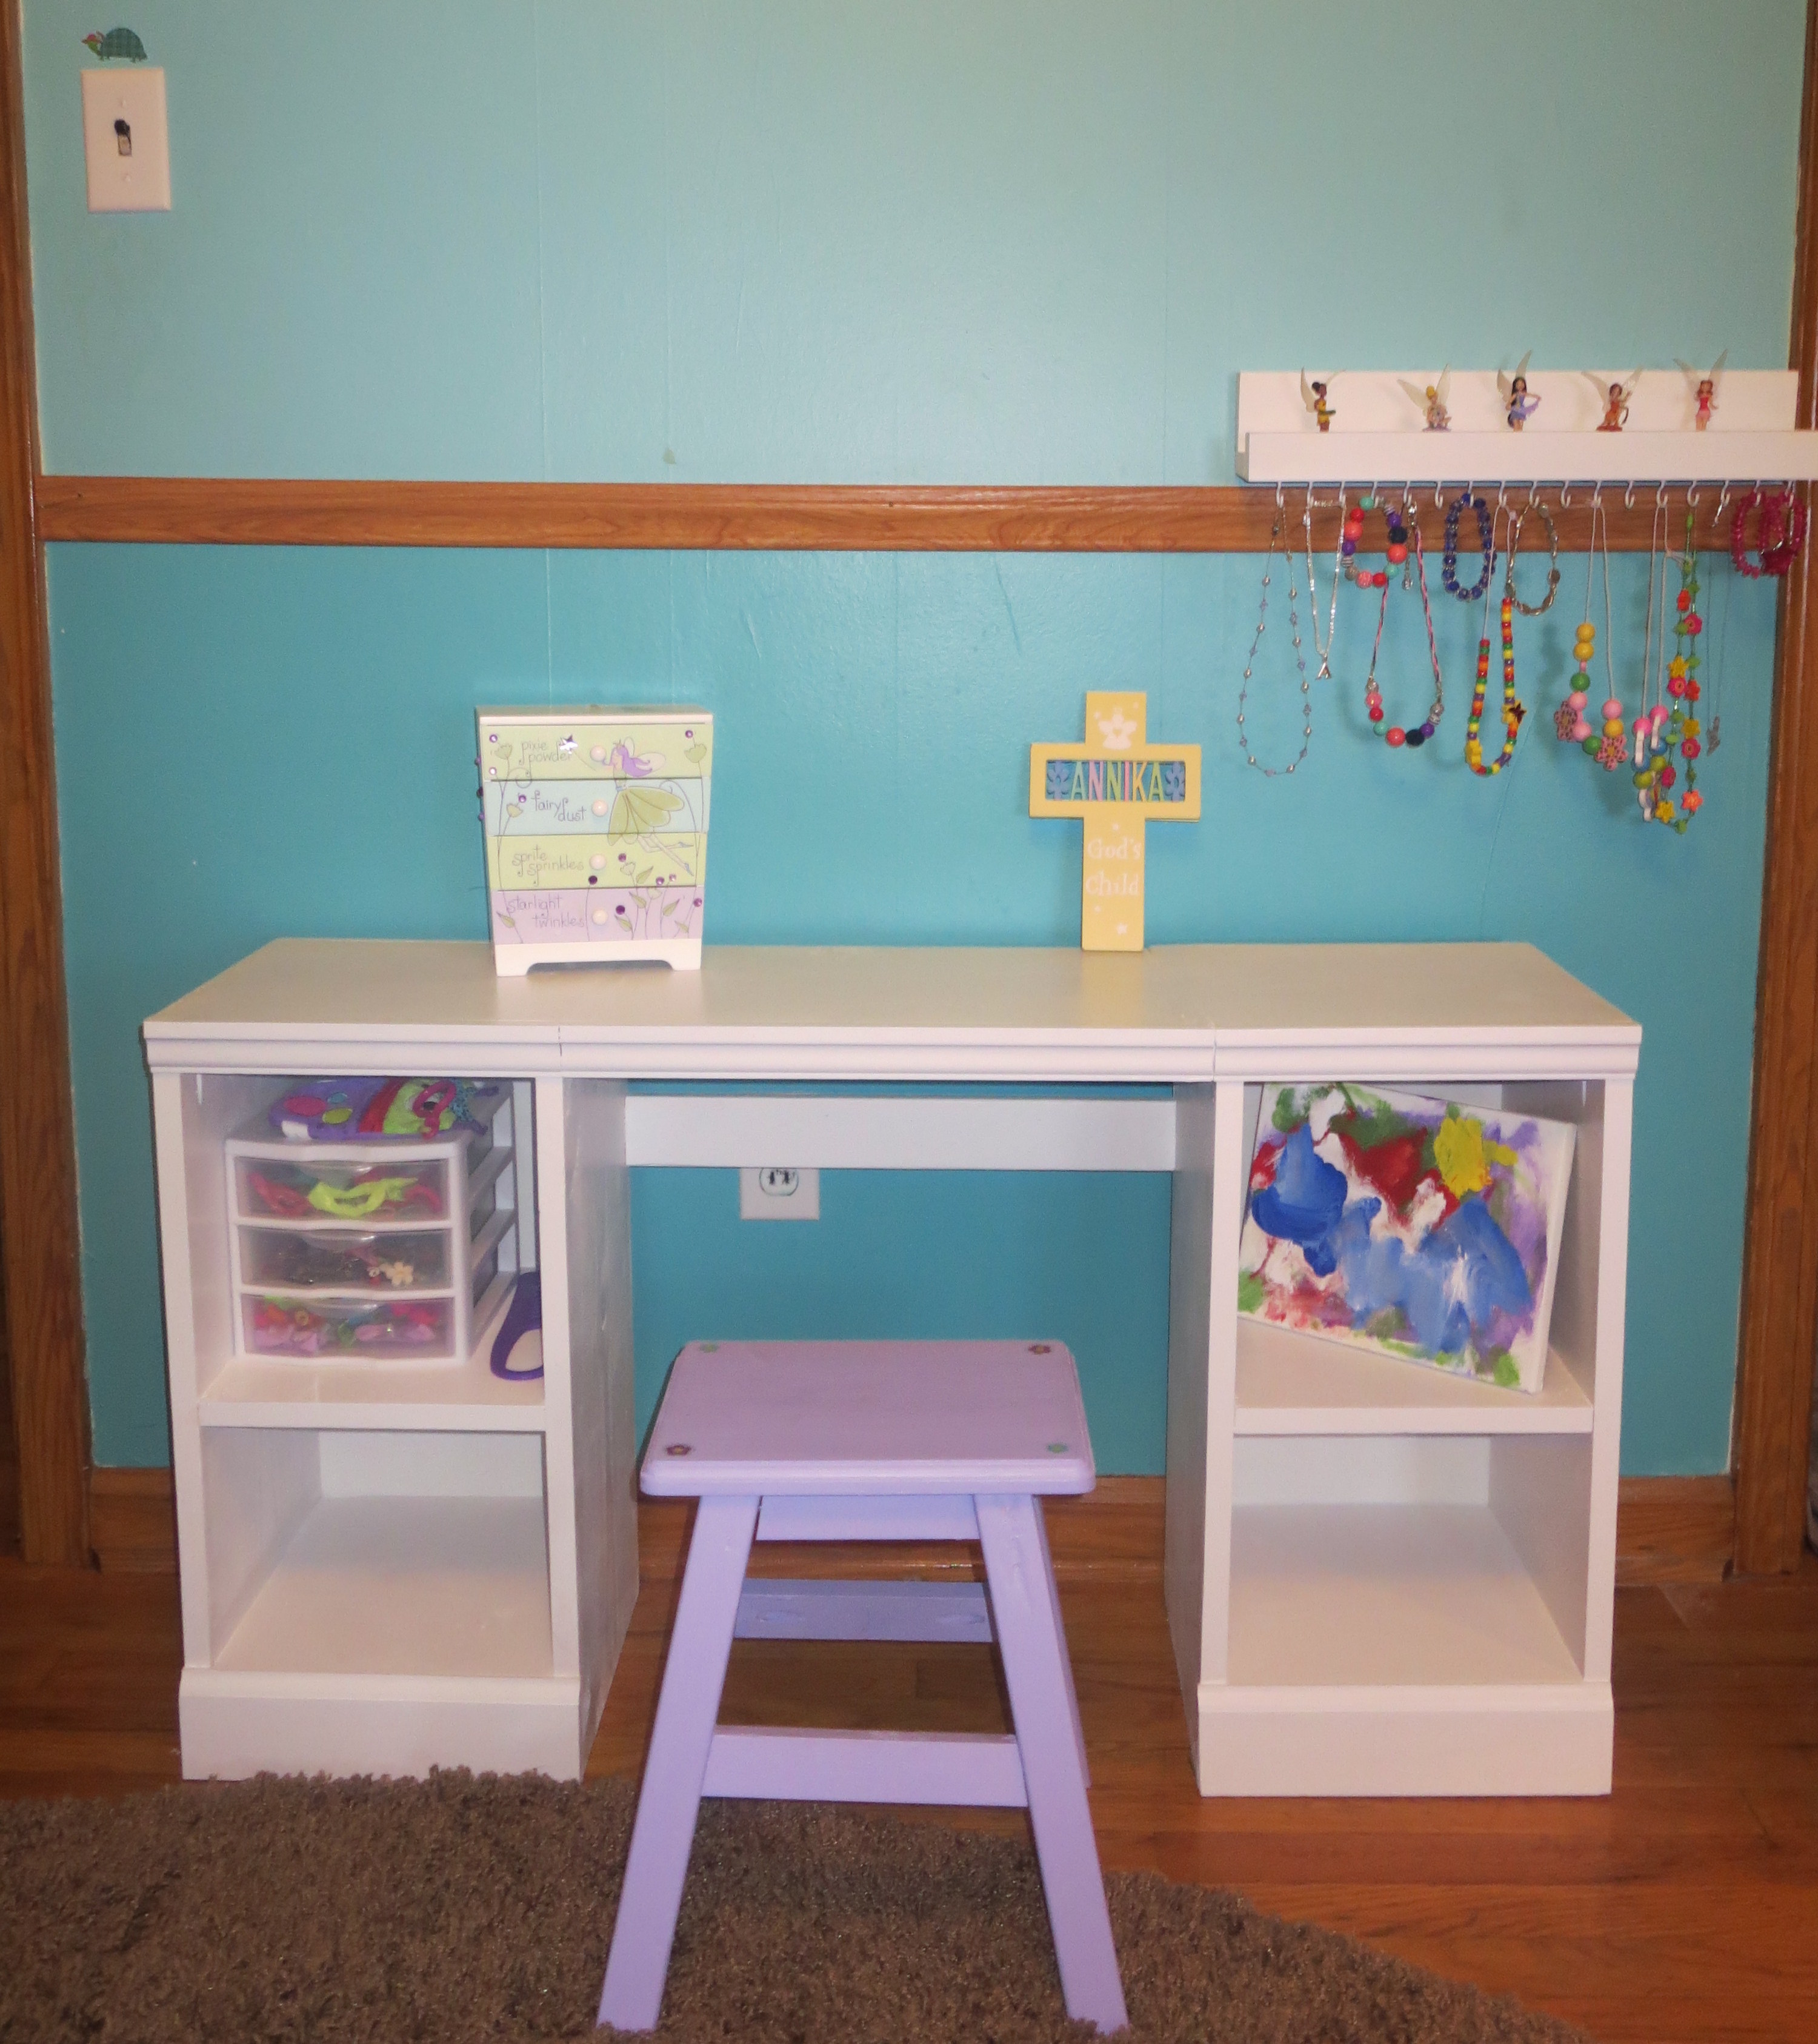
I wanted a little desk/vanity for my nearly 4 year old daughter so she could have easy access to her jewelry and hair ties. The dimensions of this were perfect. She has so many necklaces that I put together a $10 ledge with some hooks to hang many of them. The vanity was an easy build, the stool was much more difficult.

Built from Plan(s)
Estimated Time Investment
Day Project (6-9 Hours)
Finish Used
White latex semi-gloss enamel
Sassy Violet semi-gloss latex
Recommended Skill Level
Beginner

Comments

Closet Storage

Submitted by tracysmith on Mon, 03/12/2012 - 07:42

I didn't even know that I had made a closet storage system like Ana's but while perusing the projects, I came back across this plan and figured I could submit a brag post for it! Thanks Ana!!

We used melamine shelving and MDF trim. No paint needed if you get the MDF boards primed (although you really should!)

Estimated Cost
Have no idea, didn't pay attention.
Estimated Time Investment
Day Project (6-9 Hours)
Finish Used
Nothing!
Recommended Skill Level
Beginner

Apothecary Console

Submitted by Caligator on Sat, 01/04/2014 - 05:45

Added 2x6 as the top. Fun project. Took about 35 hours and $350.

Estimated Time Investment
Week Long Project (20 Hours or More)
Recommended Skill Level
Intermediate

Console table

Submitted by tjhead on Thu, 03/24/2016 - 10:19

Built from the Balin Console Table plan.  I needed more storage for my entryway table, so I added the extra drawers.  First, I had it stained but found this chalk paint in the mistints at Lowe's.  Perfect color!

Built from Plan(s)
Estimated Time Investment
Weekend Project (10-20 Hours)
Finish Used
Dark walnut stain underneath a custom dark green chalky finish paint by Valspar.
Recommended Skill Level
Beginner

DIY Farmhouse TV Console

This was the second piece of furniture that my husband and I ever made. We had built a coffee table that had a lift up top so that we could eat dinner on the couch and store all of our board games. Once we tackled that, I thought we could conquer the world (even though the table was pretty basic). So when my now-husband was about to move into his first apartment without a roommate and I saw it as an opportunity to decorate my own place (even though I wasn’t living there). Luckily,he agreed it was time to get rid of his tiny Ikea TV stand that was probably 2ft off the ground and not a great height for a TV, and agreed to build this awesome TV console with me. To this day, it’s still my favorite piece of furniture in our house.

Built from Plan(s)
Estimated Cost
500
Finish Used
dark walnut

Comments

My First Project

Submitted by PS on Thu, 03/15/2012 - 12:31

My husband and I got sick of buying particle board furniture and having it fall apart. I was so excited to see these desk plans and decided to build each child one of their own.

I tweaked the plans a lot. I learned a little SketchUp in the process. Each of these desk tops sits on 4 16x16" bases. Each desk has one drawer base, one fixed-shelf base, and two adjustable shelf bases. The bases can be rearranged as desired and can later be used as shelves when we don't need the desktops anymore.

All 3 desks took me just over 4 months to complete. Of course, Christmas happened during that time.

I used Fir based on some misguidance at the lumber yard. I'm still a little upset by that. I used pine edgebanding and am pleased with the finished look though. I just hope the wood is hard enough to not suffer too much damage.

I really enjoyed this project and my kids are loving the results. Their desks don't wobble and they have a lot of space.

Thanks for the jumping off point and all the instructions here. My next project is a built-in entertainment center. Should be fun!

Estimated Cost
$325 each
Estimated Time Investment
Week Long Project (20 Hours or More)
Finish Used
MinWax Water Based Stain in Golden Harvest (or Harvest Gold, I forget the right term)
MinWax Water Based Poly - Clear Semi-gloss

Recommended Skill Level
Beginner

One Piece Play Kitchen

Submitted by erlenzen on Mon, 01/06/2014 - 17:18

This was my first project and I learned a lot about drilling and sawing. I love the cute kitchens people have built with this plan, but we went for realistic with neutral colors since it is going to be in our own kitchen and not in a playroom. The biggest challenge was was that I was continually finding components I wanted to add, but then I would have to redo things I'd already done to fit them in.

For someone doing this plan, my only suggestion is to put the pocket holes inside the oven area instead of inside the sink area, as the countertop is easier to screw in that way.

For the fridge, I used 11x14 clear acrylic for the shelf and glued in a motion sensing light. For the farm sink, I used glidden super glossy white paint, which is supposed to not show brush strokes but it did for me. I also made the shelf under the sink a half shelf. For the oven, I used cookie racks from the dollar store and a push-on light inside. The counter top is a realistic looking laminate I found in the shelving dept of Menards for $2. I found the wire disks for the stove top at a surplus supply shop for 75c each. My husband tiled the backsplash and we added that board after the grout had dried so the rest of the kitchen wouldn't get grout on it.

Estimated Time Investment
Week Long Project (20 Hours or More)
Finish Used
paint
Recommended Skill Level
Starter Project

Comments

JoanneS

Mon, 01/06/2014 - 17:59

Great job on this play kitchen! It looks awesome, love all the details you used. That counter top looks very real, and I love how you put the white inside the fridge with the light! Clever and super creative! Fantastic job on your first project!

Linda7

Tue, 01/07/2014 - 10:05

This is one of the most realistic-looking play kitchens I've seen. I love the look of the farmhouse sink, the white interior of the fridge, and the tile backsplash. This will be wonderful to pass down to a future generation!

4x6 Version

Submitted by Anonymous (not verified) on Mon, 03/28/2016 - 08:00

I made a few modifications that I think people starting this project may want to know. 1. 4x4 box gets a little tight for more than one kid. I chose 4x6 so that the bench dimensions would scale up to 3 slats per section correctly, but the length of 1x4 boards would not have to be lengthened, which would required additional support. 2. As a rule of thumb, any outdoor lumber that may have prolonged exposure to water (IE. Touching the ground) should be pressure treated. I couldn't find 1" thick treated boards, so the box uses 2x10 boards. 3. Used a redwood semi-transparent stain.

Estimated Cost
$150
Estimated Time Investment
Day Project (6-9 Hours)
Finish Used
Redwood semi-transparent stain
Recommended Skill Level
Intermediate

Kitchen island

Submitted by Chriss45 on Sat, 11/16/2019 - 20:32

I designed and built this kitchen island for my daughter and her husband along with the cabinets. the island top is made of walnut.

Estimated Cost
800 dollars
Estimated Time Investment
Week Long Project (20 Hours or More)
Finish Used
Benjamin Moore paint
Recommended Skill Level
Advanced

Comments

ladybug'13

Sun, 11/17/2019 - 06:23

Wow! This is so beautiful! What a special gift you've given them. You did a great job and I especially love the color and top of the island. 

Rolling Workbench with "Drill Holders"

Submitted by Joni on Sun, 03/18/2012 - 11:03

Given that I work out of my garage, I desperately needed a rolling workbench in order to roll out, make the sawdust mess, and roll back in. I had already made Michaela's island for another purpose inside my house, and I loved the sturdiness of the 4x4 posts as legs. I had industrial-type locking castors, but they only screwed in with a threaded post. Thanks to my engineer dad, he determined the best way to attach a screw-in castor to the bottom of the 4x4 (and did all that work for me!).

The size is modified from Michaela's original plan to include a 3 1/2" overhang all the way around for easy clamping (and top is 6' x 2.5'). I also cut a 2' piece of PVC pipe into 3 sections and attached for my drill storage. I put full-extension glides on the drawers and made some dividers from scrap wood.

Built from Plan(s)
Estimated Time Investment
Week Long Project (20 Hours or More)
Finish Used
4 coats of Spar Urethane
Recommended Skill Level
Intermediate

Comments

birdsandsoap

Sun, 03/18/2012 - 13:29

This is beautiful. If anything you create ON this table looks nearly as beautiful as the table itself, you have found a new profession. Good job!

Kitchen breakfast bar with built in trash receptacle

Submitted by tommybo76 on Wed, 01/08/2014 - 17:49

I wanted to add a breakfast bar to our kitchen but had nowhere to place the garbage can. An Internet search eventually led me to Ana's site and the perfect solution. I used the trash receptacle idea and integrated it into my breakfast bar. I added a cookbook shelf and incorporated shelves on the other side to use wasted space where leg room was not impeded. I also built a hidden shelf for cell phones, keys and wallets. The top is from Ikea and I cut to fit. The structure and base was all cut from a sheet of MDF and I added bead board for a bit of design. This site is fantastic! I've built modified versions of plans from this site including the shed, tv stand with side DVD shelves, mud room lockers, and have plans for more projects. I will post these projects soon. Thanks Ana!

Estimated Cost
$200
Estimated Time Investment
Week Long Project (20 Hours or More)
Finish Used
White paint
Recommended Skill Level
Intermediate

Comments

tommybo76

Wed, 01/08/2014 - 20:27

The trash can space was originally going to be an area to store wine...thanks to my wife's suggestion I had to think of a way to store the trash can. That led me to this site and I've now been inspired to do several other projects based on plans found here. This site is terrific and inspirational!!

Bench with A Frame Ends

Submitted by AndyH on Tue, 03/29/2016 - 17:54

Bench made with A frame ends. 5 feet long, 17 inches high and 14.5 inches wide.

Estimated Cost
$30
Estimated Time Investment
Afternoon Project (3-6 Hours)
Finish Used
Varathane Kona and three coats of satin protector.
Recommended Skill Level
Beginner

Christmas tree

Submitted by Anonymous (not verified) on Sun, 11/24/2019 - 21:01

Thank you very much for the Christmas tree plans, was a nice and fun project, I added a star, can be removed if people wants to use the tree year long.

Thank you again
Sergio

Built from Plan(s)
Estimated Cost
$15
Estimated Time Investment
Afternoon Project (3-6 Hours)
Finish Used
I burnt the wood with a torch to begin with, then I mix water base paint with water , (more water then paint) brush it and wipe it off, then I use a clear finish. I did stained everything before I put them together. Took me 20 minutes to cut the wood for 2 trees, the time consuming was waiting for the stain to dry. Awesome project and fun.
Recommended Skill Level
Beginner

Square Outdoor Picnic Table

Submitted by Anonymous (not verified) on Sun, 07/30/2023 - 14:49

6 seater Recycled Fijian Kauri with extra leg supports, one side higher & closer for kids.

Marty

Built from Plan(s)

Comments

Florida Gator Themed Playhouse

My husband Jon recently built this playhouse with/for a friend of his from work. It took them two months to complete and it's awesome! Jon's friend is also a die hard Gators fan so they made sure to add blue and orange as much as they could. Thanks Ana for giving them the courage to take on such a feat!

Estimated Cost
$2000
Estimated Time Investment
Week Long Project (20 Hours or More)
Finish Used
None
Recommended Skill Level
Advanced

Comments

birdsandsoap

Wed, 03/21/2012 - 01:51

Great Job! All this says is "GO BRONCOS!" I'm an Idaho girl and I love the BOise State colors, lol! "Playhouse" is an understatement. This is a jungle. This is a huge play structure! and it is awesome.