Turquoise Farmhouse Bench
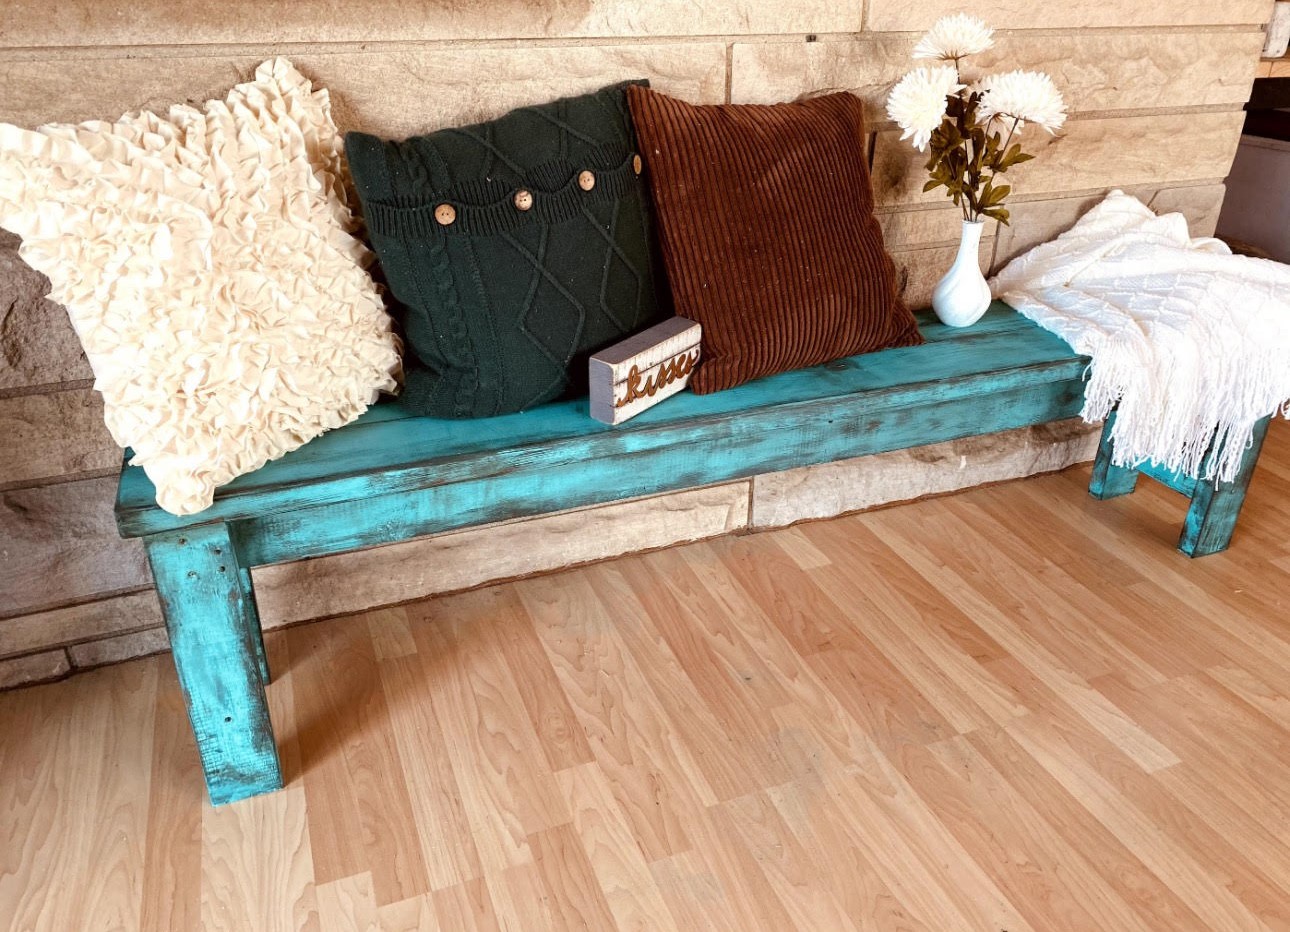
Beautiful farmhouse bench by Leila Adams
Built from Plan(s)
Beautiful farmhouse bench by Leila Adams
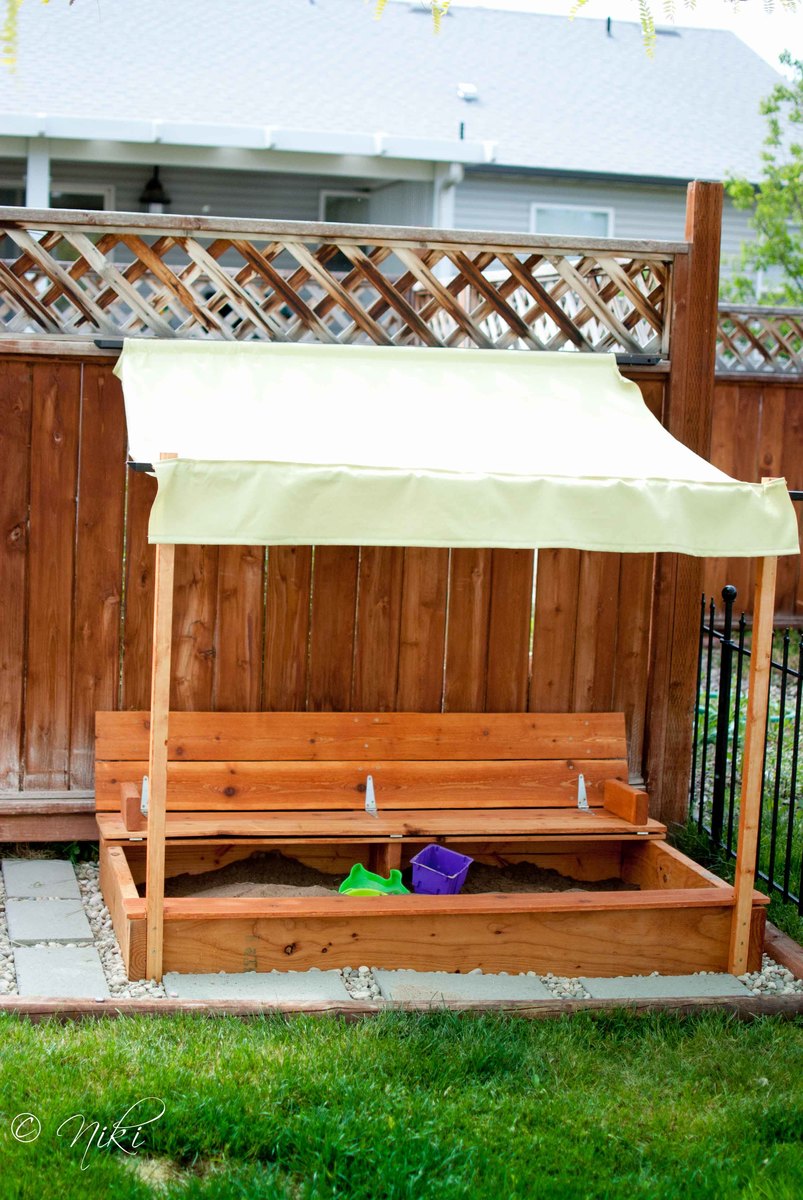
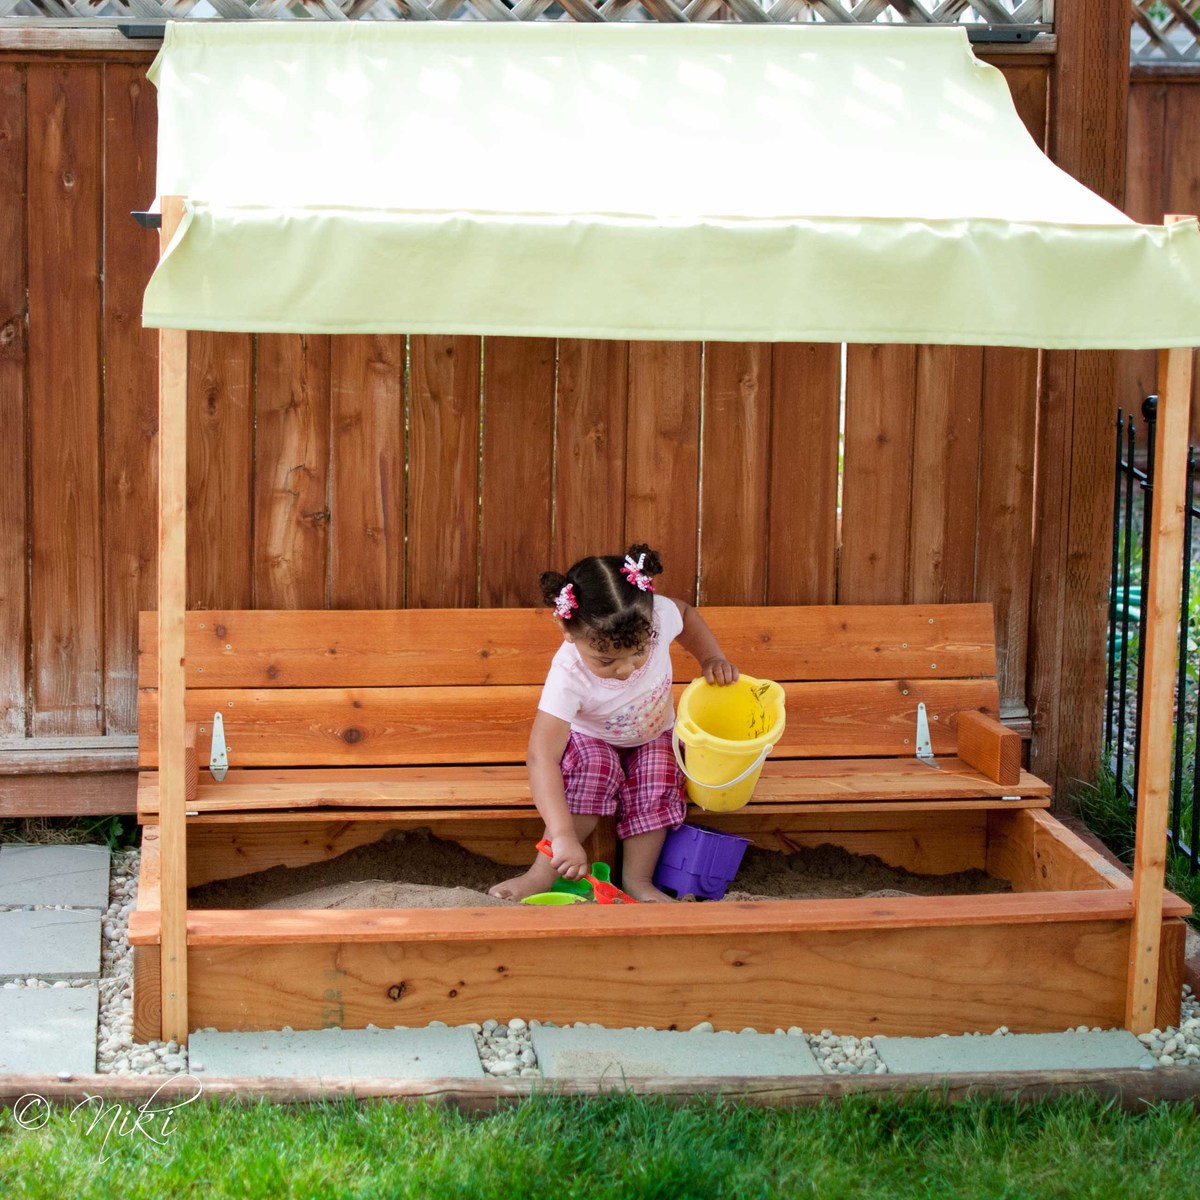
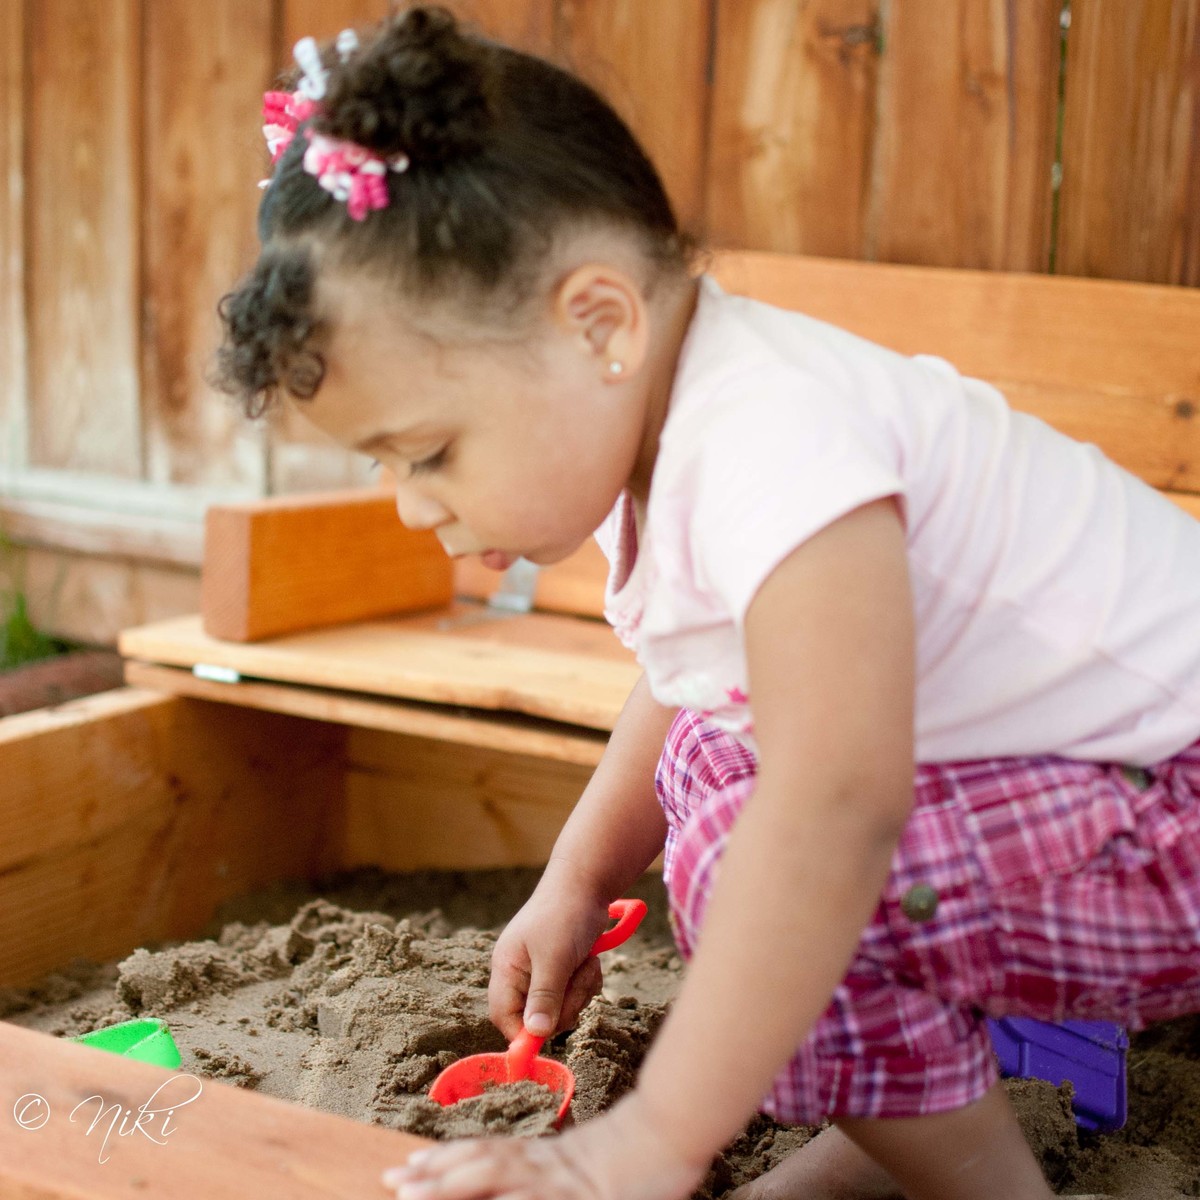
"Cellar? What cellar? We don't have a cellar... Oh, you mean the new sand box! Here, let me get some shade too."
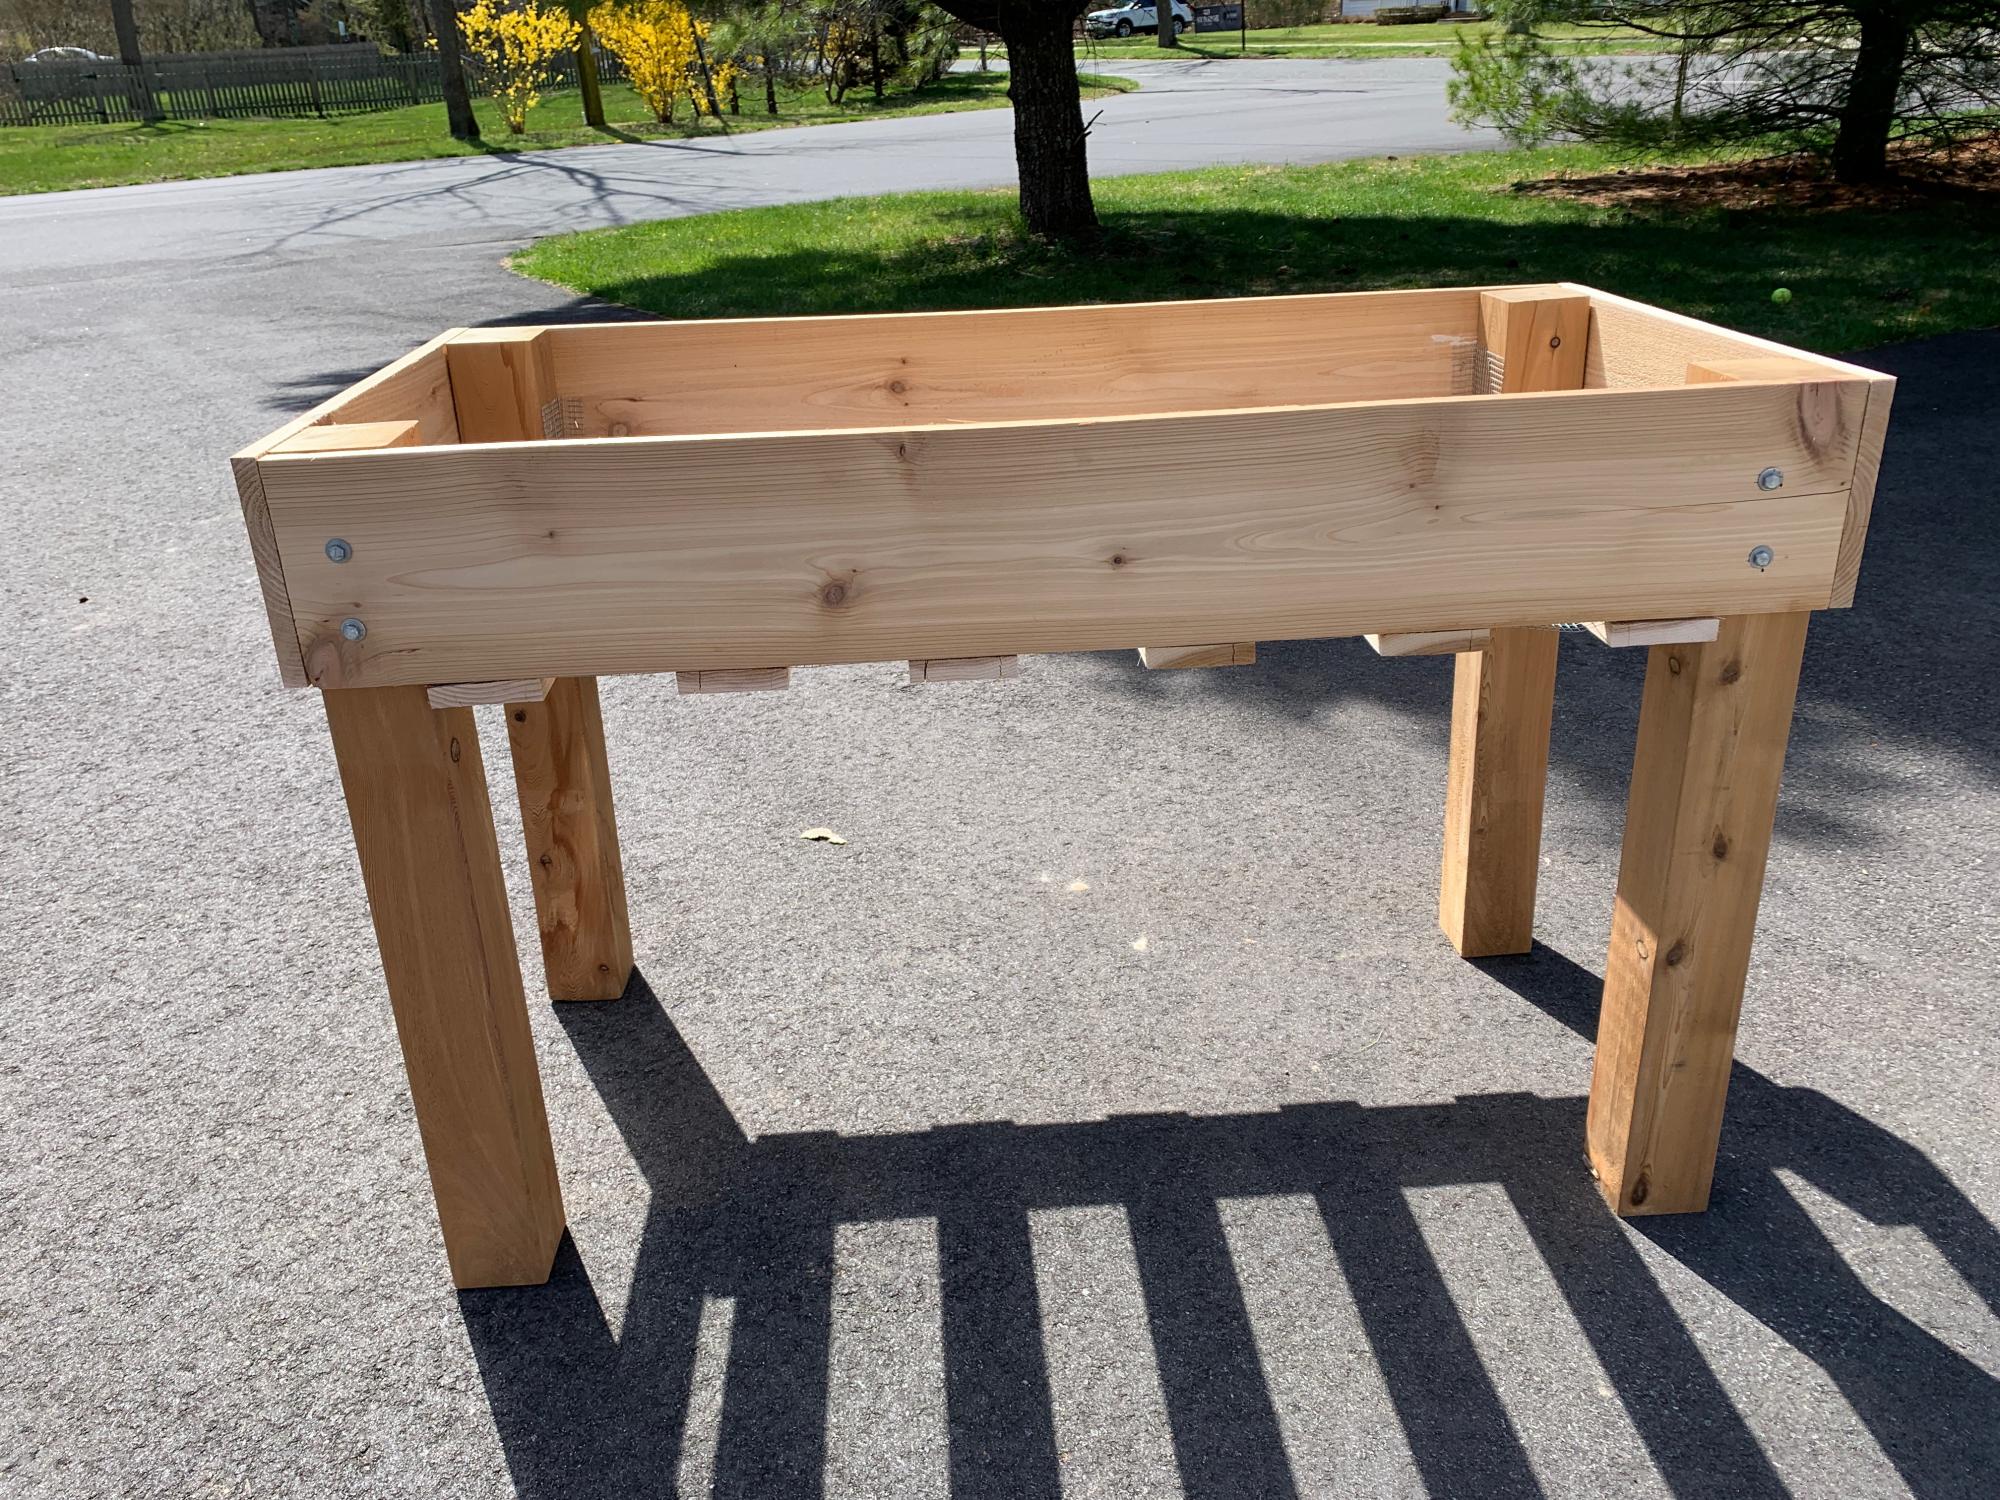
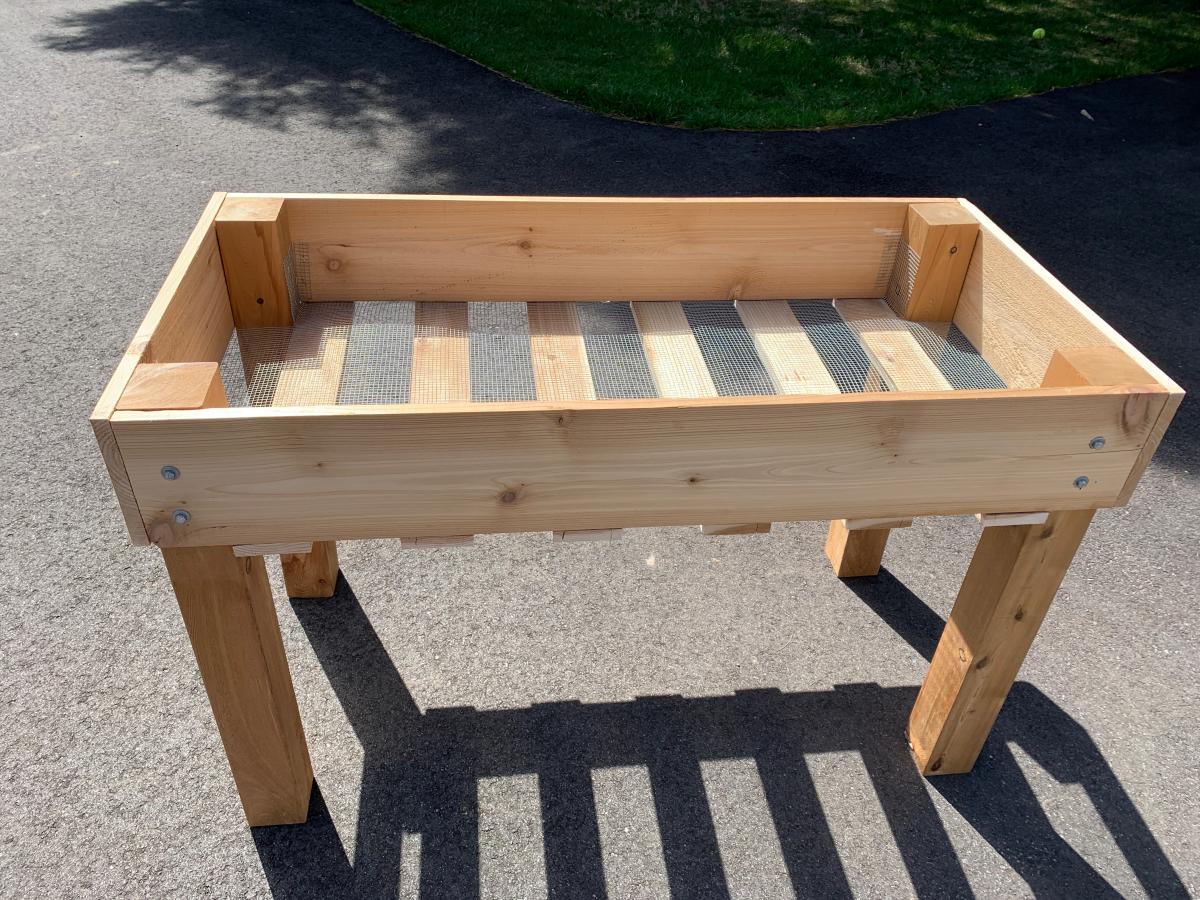
I'm not sure why, but I can never seem to follow plans exactly. I guess that's not entirely true. I CAN follow plans exactly, but I almost never do. Maybe it's some sort of passive rebellion or something, but I usually have to put my own spin on the things that I build. Sometimes it works out in my favor. Sometimes not. This build was a little of both.
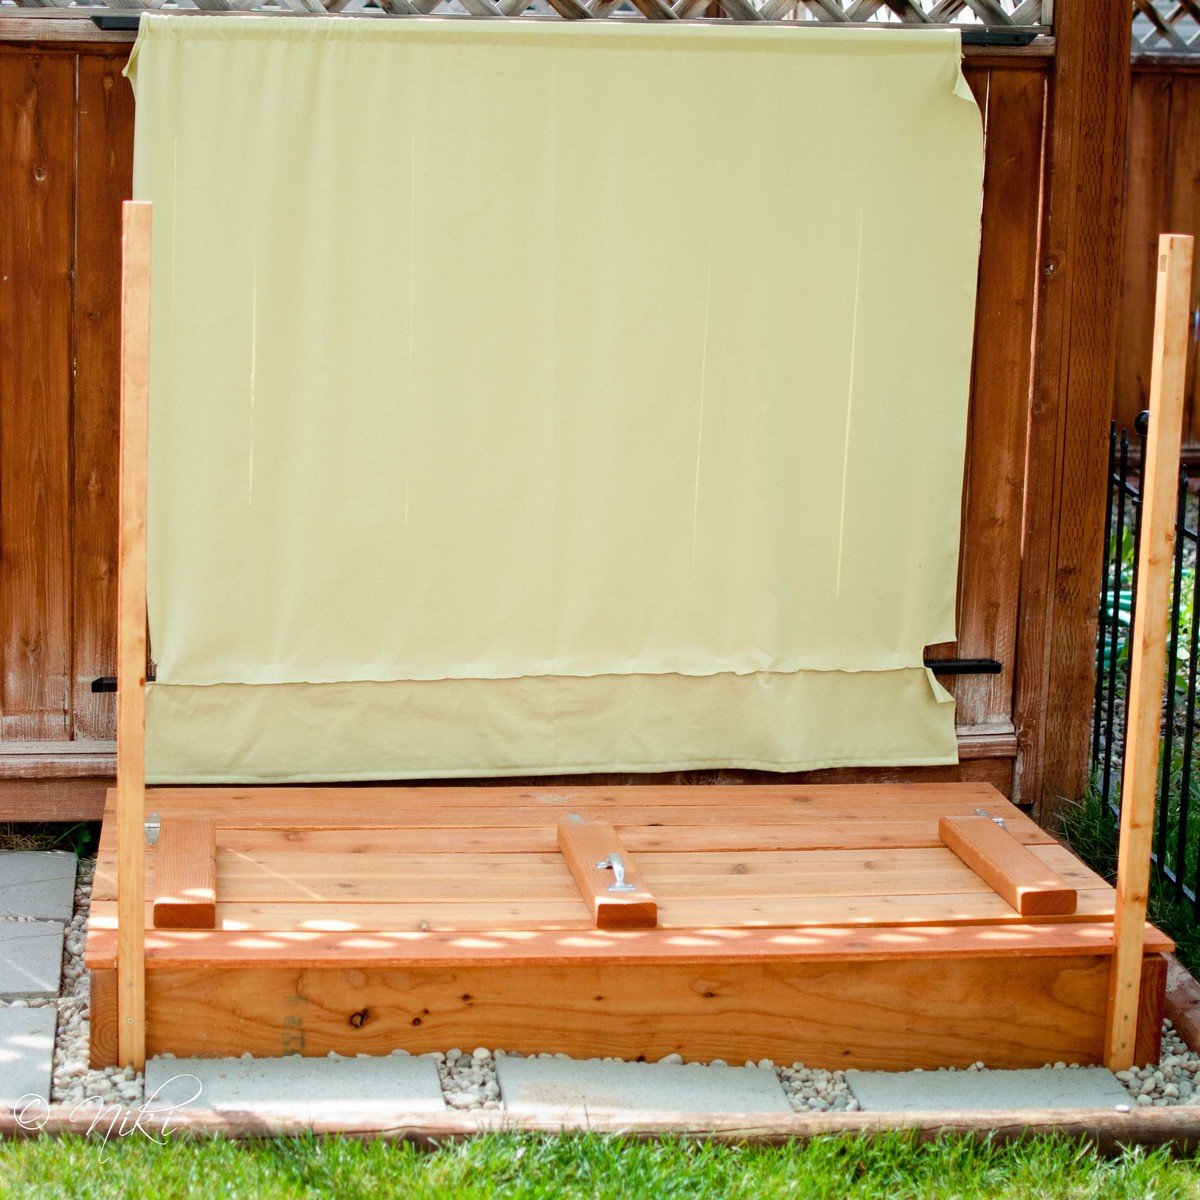
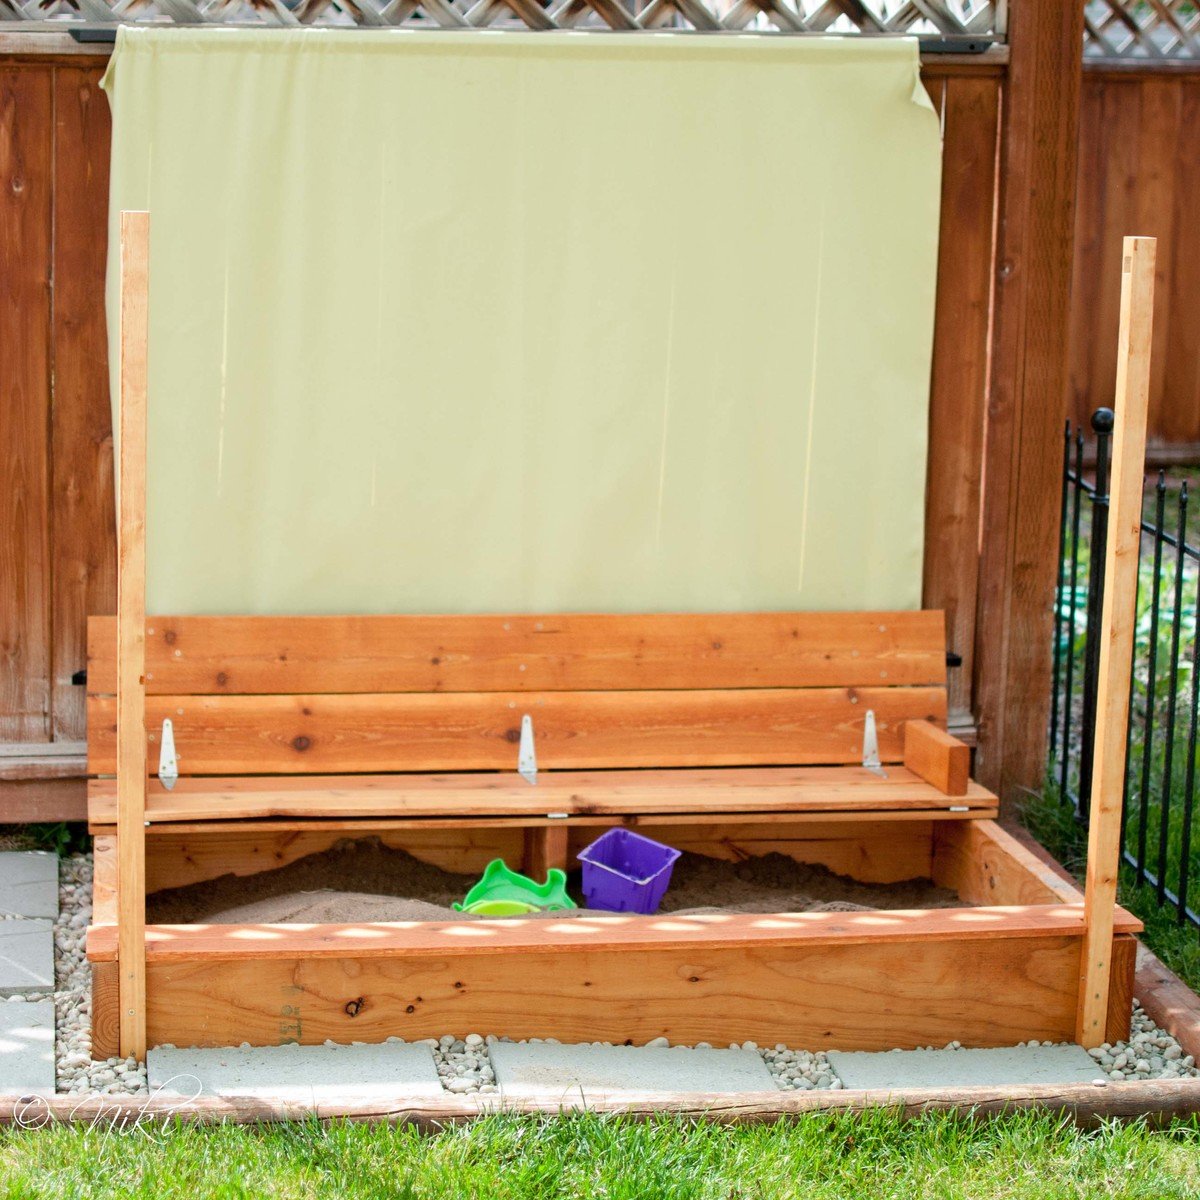
I decided to only build one bench in our sand box. This cut down on a lot of supplies. By making it longer a single bench and making it longer, it covers about the same amount of square feet, just in a rectangle instead of a square. When pricing lumber, I noticed that 2x8's were cheaper than 1x8's. So I went with those instead. It can't hurt to beef up the sides a little, right? This required some easy calculations on the cut list. I also decided to use 1x6 fence planks instead of 1x4 whitewood or pine. The fence planks were cheap, and I figured they would look nice in the back yard. They are also naturally pest and rot resistant. They required extra sanding to take the rough off. However, this is one place that I'm thinking the modification didn't work in my favor. The fence planks are not as thick as the whitewood. This combined with the increased length makes the the top pieces feel pretty weak. I put a little support piece under the bench. I'm quite sure the bench would not have held up well without the support.
Because this is an outdoor piece, I dry fit everything, and then stained everything before assembling it, to make sure all of the edges were well protected.
Cost breakdown (not including canopy)
Fence planks $14
2x8x8 $11
hinges $9
handle $2
stain $10

Thu, 03/07/2013 - 08:49
I just love the changes you made to this sandbox! Can you tell me what you used for the construction of the canopy? Thanks!
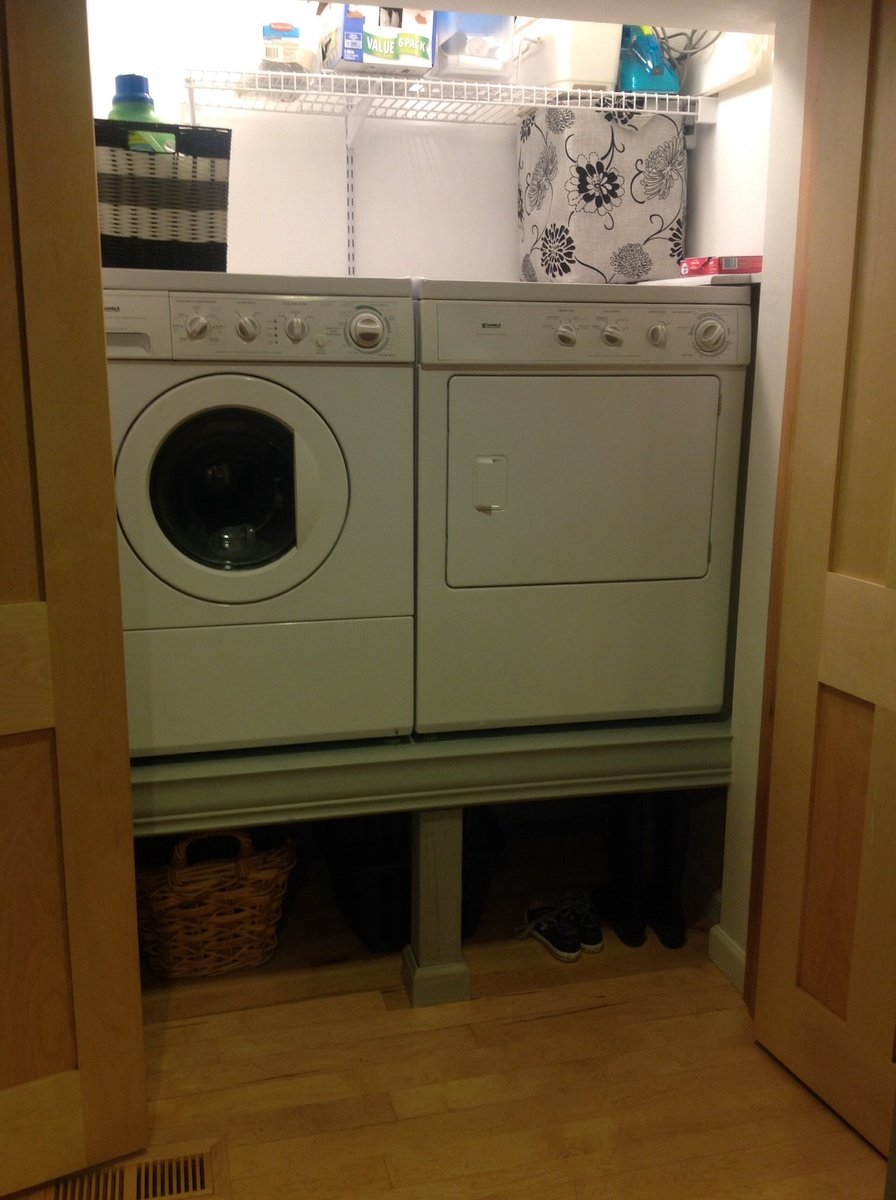
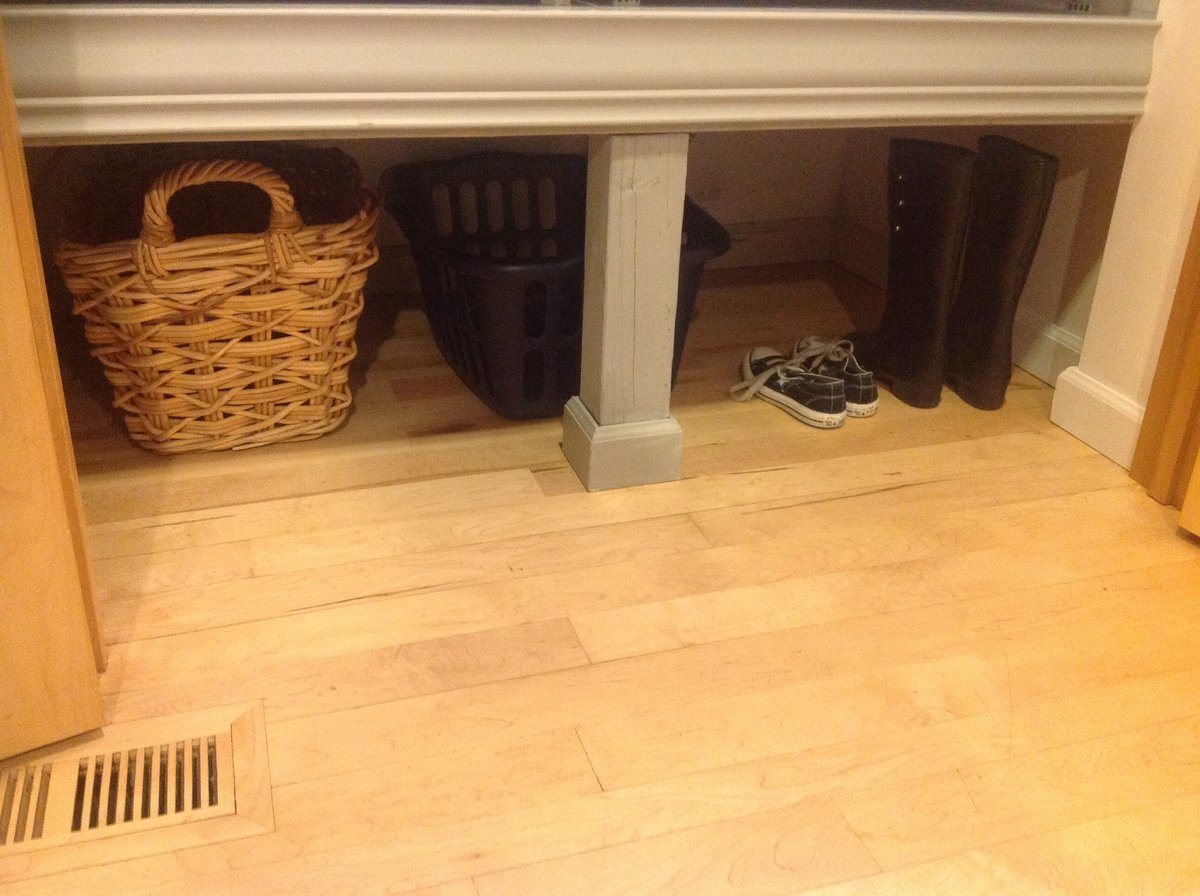
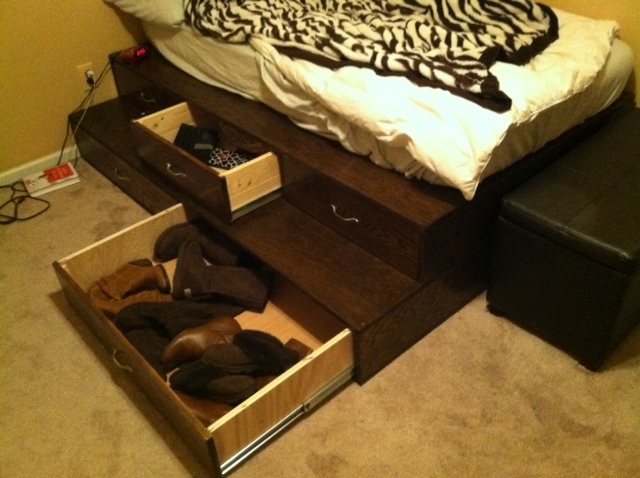
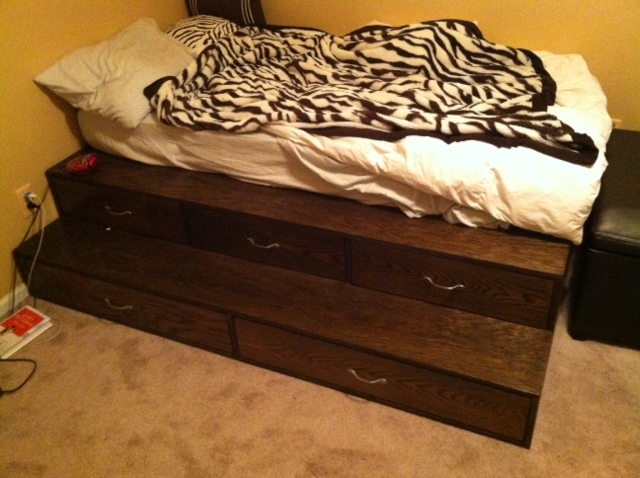
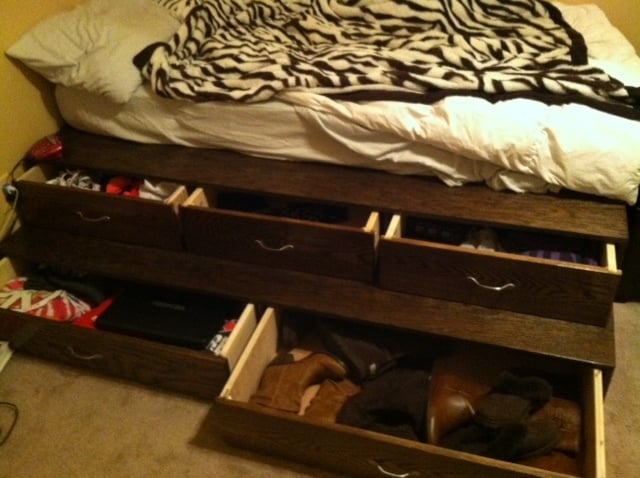
My hubby built this from saushas washer/dryer pedestal plans. He modified it a bit because we needed the storage taller underneath for shoes and baskets. Our closet is right by the front door and it was always a mass of shoes in front of the washer and dryer that you couldn't shut the door! It works great. We have beautiful hardwood floors (that was my hubby's trade for 12 years) and didn't want to cover them up either:)

Saw the basic 'c' looking shape end table on Pinterest, but it didn't have any plans. So I drew up my own plans, used different types and dimensions of lumber, and added the black iron pipe to our design to truly make it our own. These took my quite a while, and were a lot more expensive then I wanted them to be. So these will probably be staying in my home. Lol
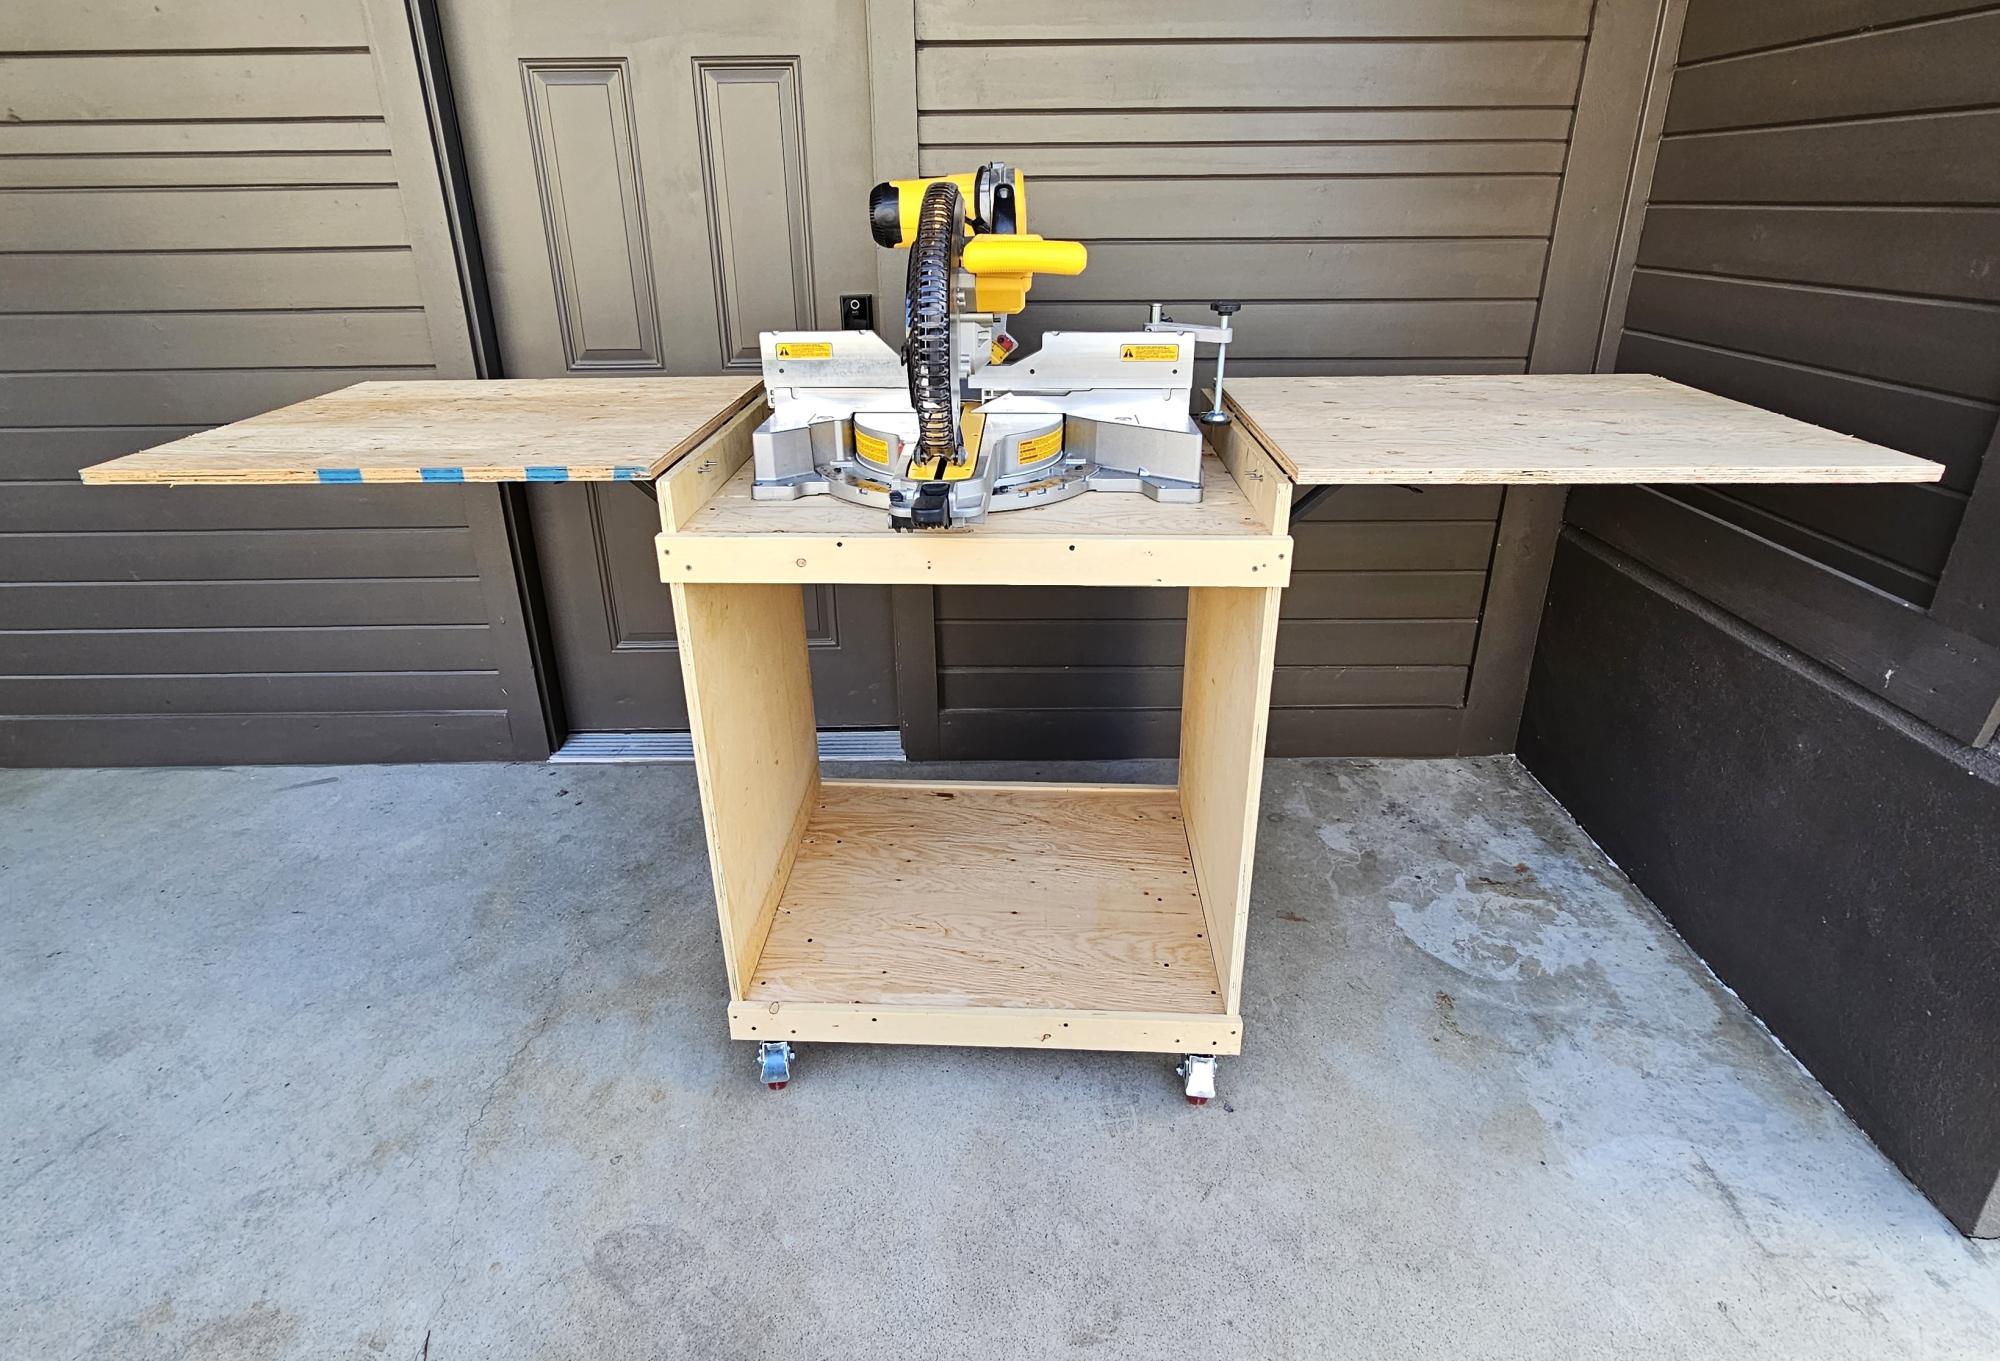
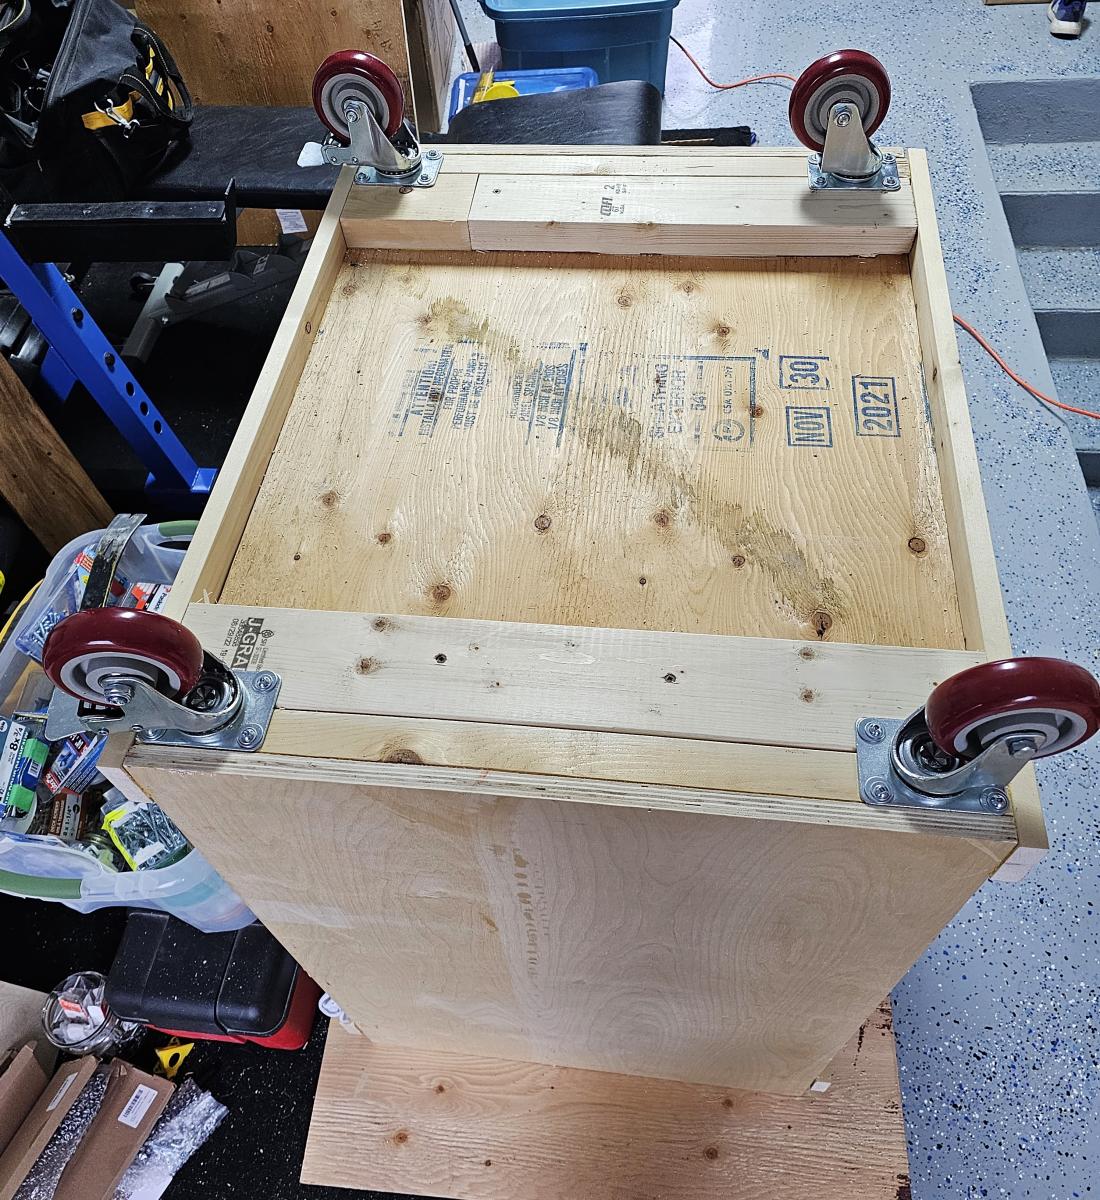
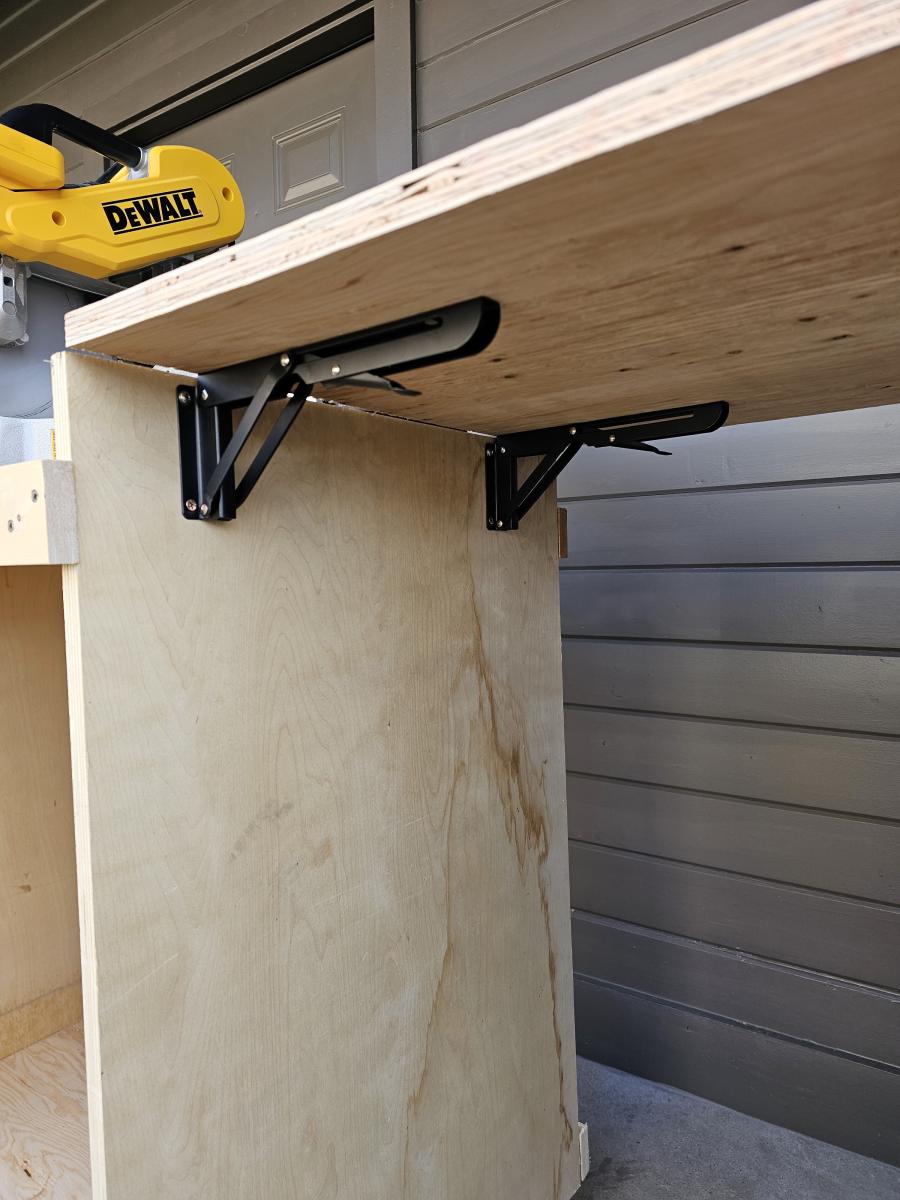
I pretty much followed the plans exactly as provided. The folding brackets I used are supposed to be heavy duty and able to handle up to 100 lbs. per pair of brackets. We'll see how they do. If needed, I might add the 2x2 or 2x4 braces I've seen many others do on here. It's nice to finally have my mitre saw off of my workbench.
These are the brackets and wheels I used.
https://www.amazon.ca/gp/product/B08PVFJ87Y/ref=ppx_yo_dt_b_asin_title_…
https://www.amazon.ca/gp/product/B093FQVV8P/ref=ppx_yo_dt_b_asin_title_…
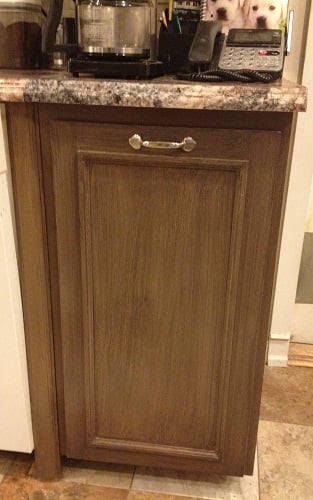
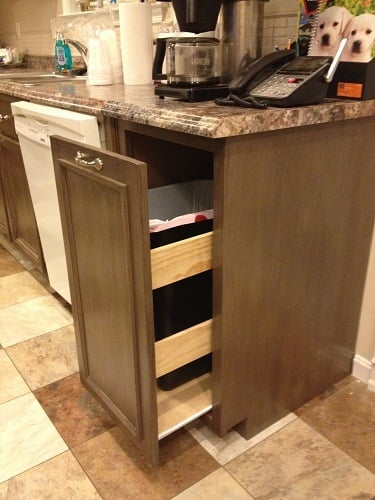
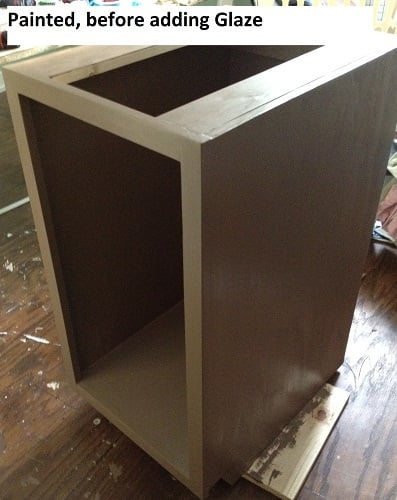
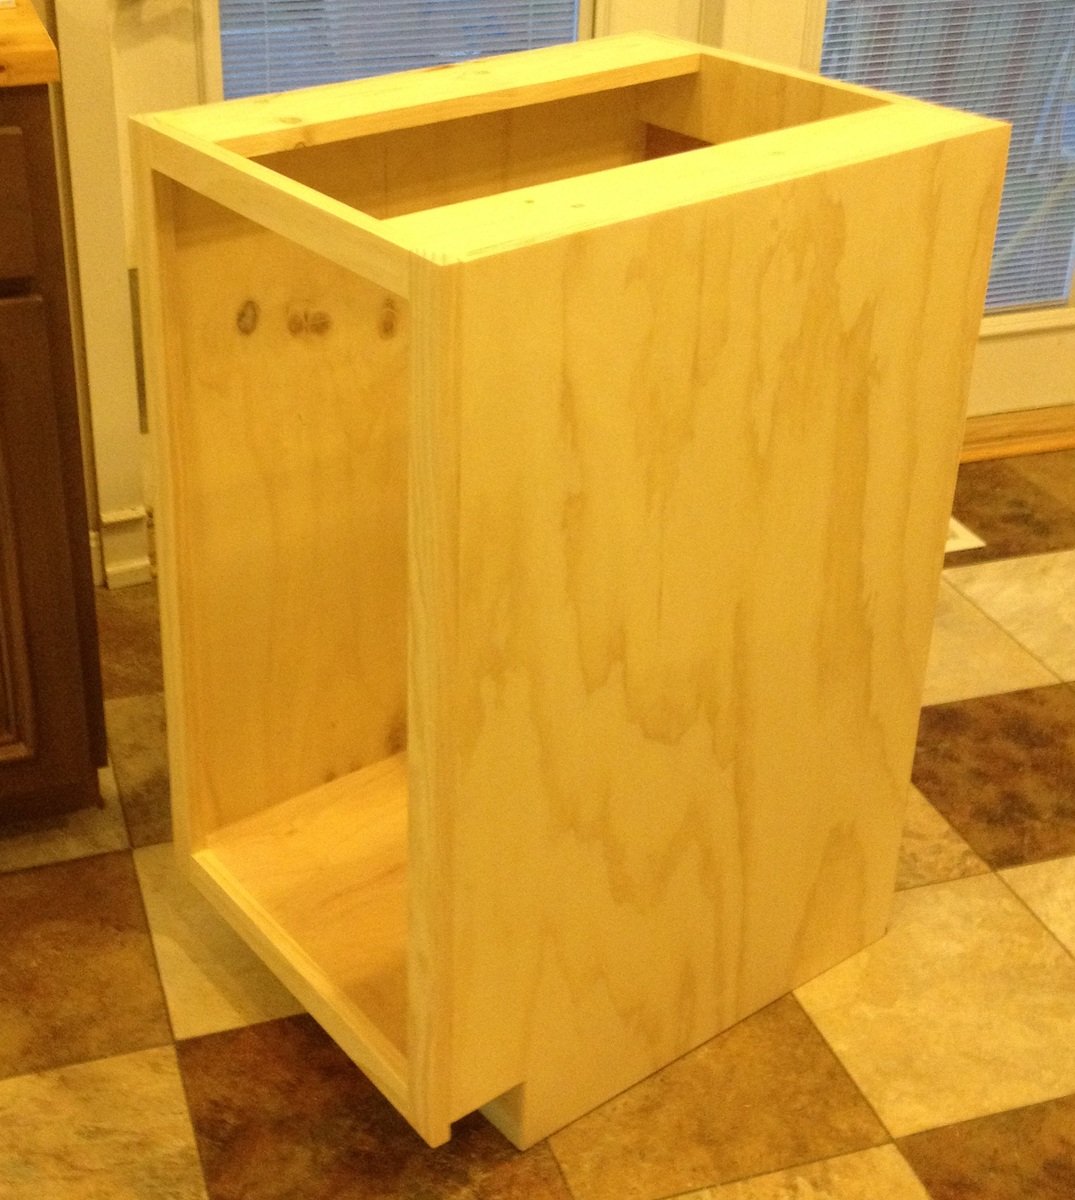
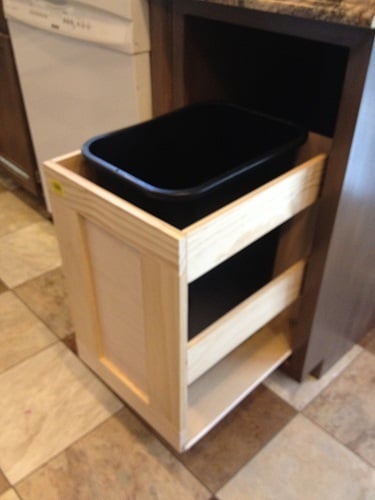
Plan was super easy to follow. Built a drawer type pull out so I could fit in odd sized trash cans. Made the pull-out part like an open sided drawer box, out of lightweight wood, and attached the door to it - used 75-lb euro drawer slides. Construction took a couple of afternoons, and finishing took a couple of afternoons. The finishing materials were all left over from other projects, and the plywood for the cabinet sides was left over from our kitchen island build. Topped with a leftover piece of countertop. The contractor who installed our new countertops said I did a good job on the cabinet build. I was very flattered! Ana, thank you for your wonderful plans!

Thu, 07/26/2012 - 15:16
Thank you Gina! Yep, I built the door too! :) This one is made from an edge glued Aspen wood panel (available from Lowes, ripped to size with the table saw), and then I added the wood mini-stop moulding 2" in from the edges (did these measurements and attached the trim before sanding). I did the glaze pattern over the paint so it looked like a frame and panel door when it was all done. This door is the same style we did for our pantry and island. I'm planning to do all the rest of my cabinet doors over (one at a time - ;0) to match this one. PS - I used the edge glued panel instead of plywood for the door so the edges wouldn't need any extra covering up, and also they are nice and flat and super smooth so they don't need much sanding. Aspen wood took the paint beautifully, and the grain doesn't even show through once it's painted. I had used stain grade pine panels for the pantry and island, but I think I'll stick with the Aspen for the rest of them, to save myself some sanding. ;)
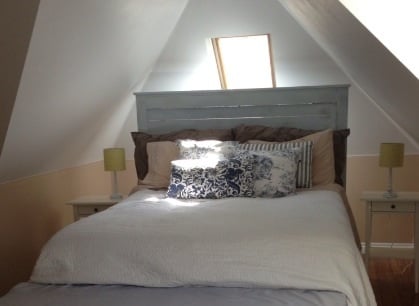
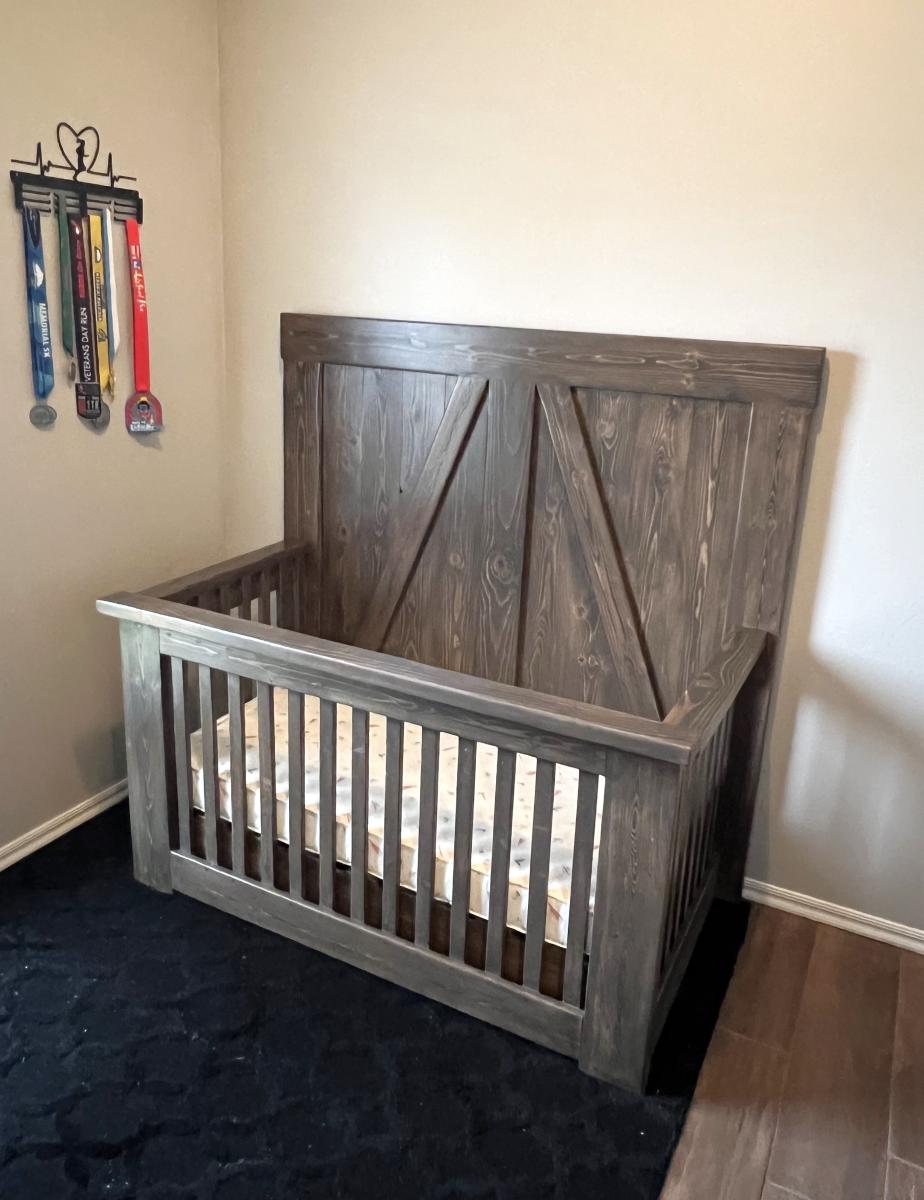
We made this for our master bedroom. We had wood that was already primed so it made the project go faster. Also, the wood for the back panelling isn't entirely straight which I like because it allows slits of lights to flow through and looks a little more rustic. I used a soft blue paint for the color called abracadabra. I hand sanded in some areas to give it a worn look and then I placed a stain over the top in which I almost immediately wiped off because I wanted it to be very minimal.
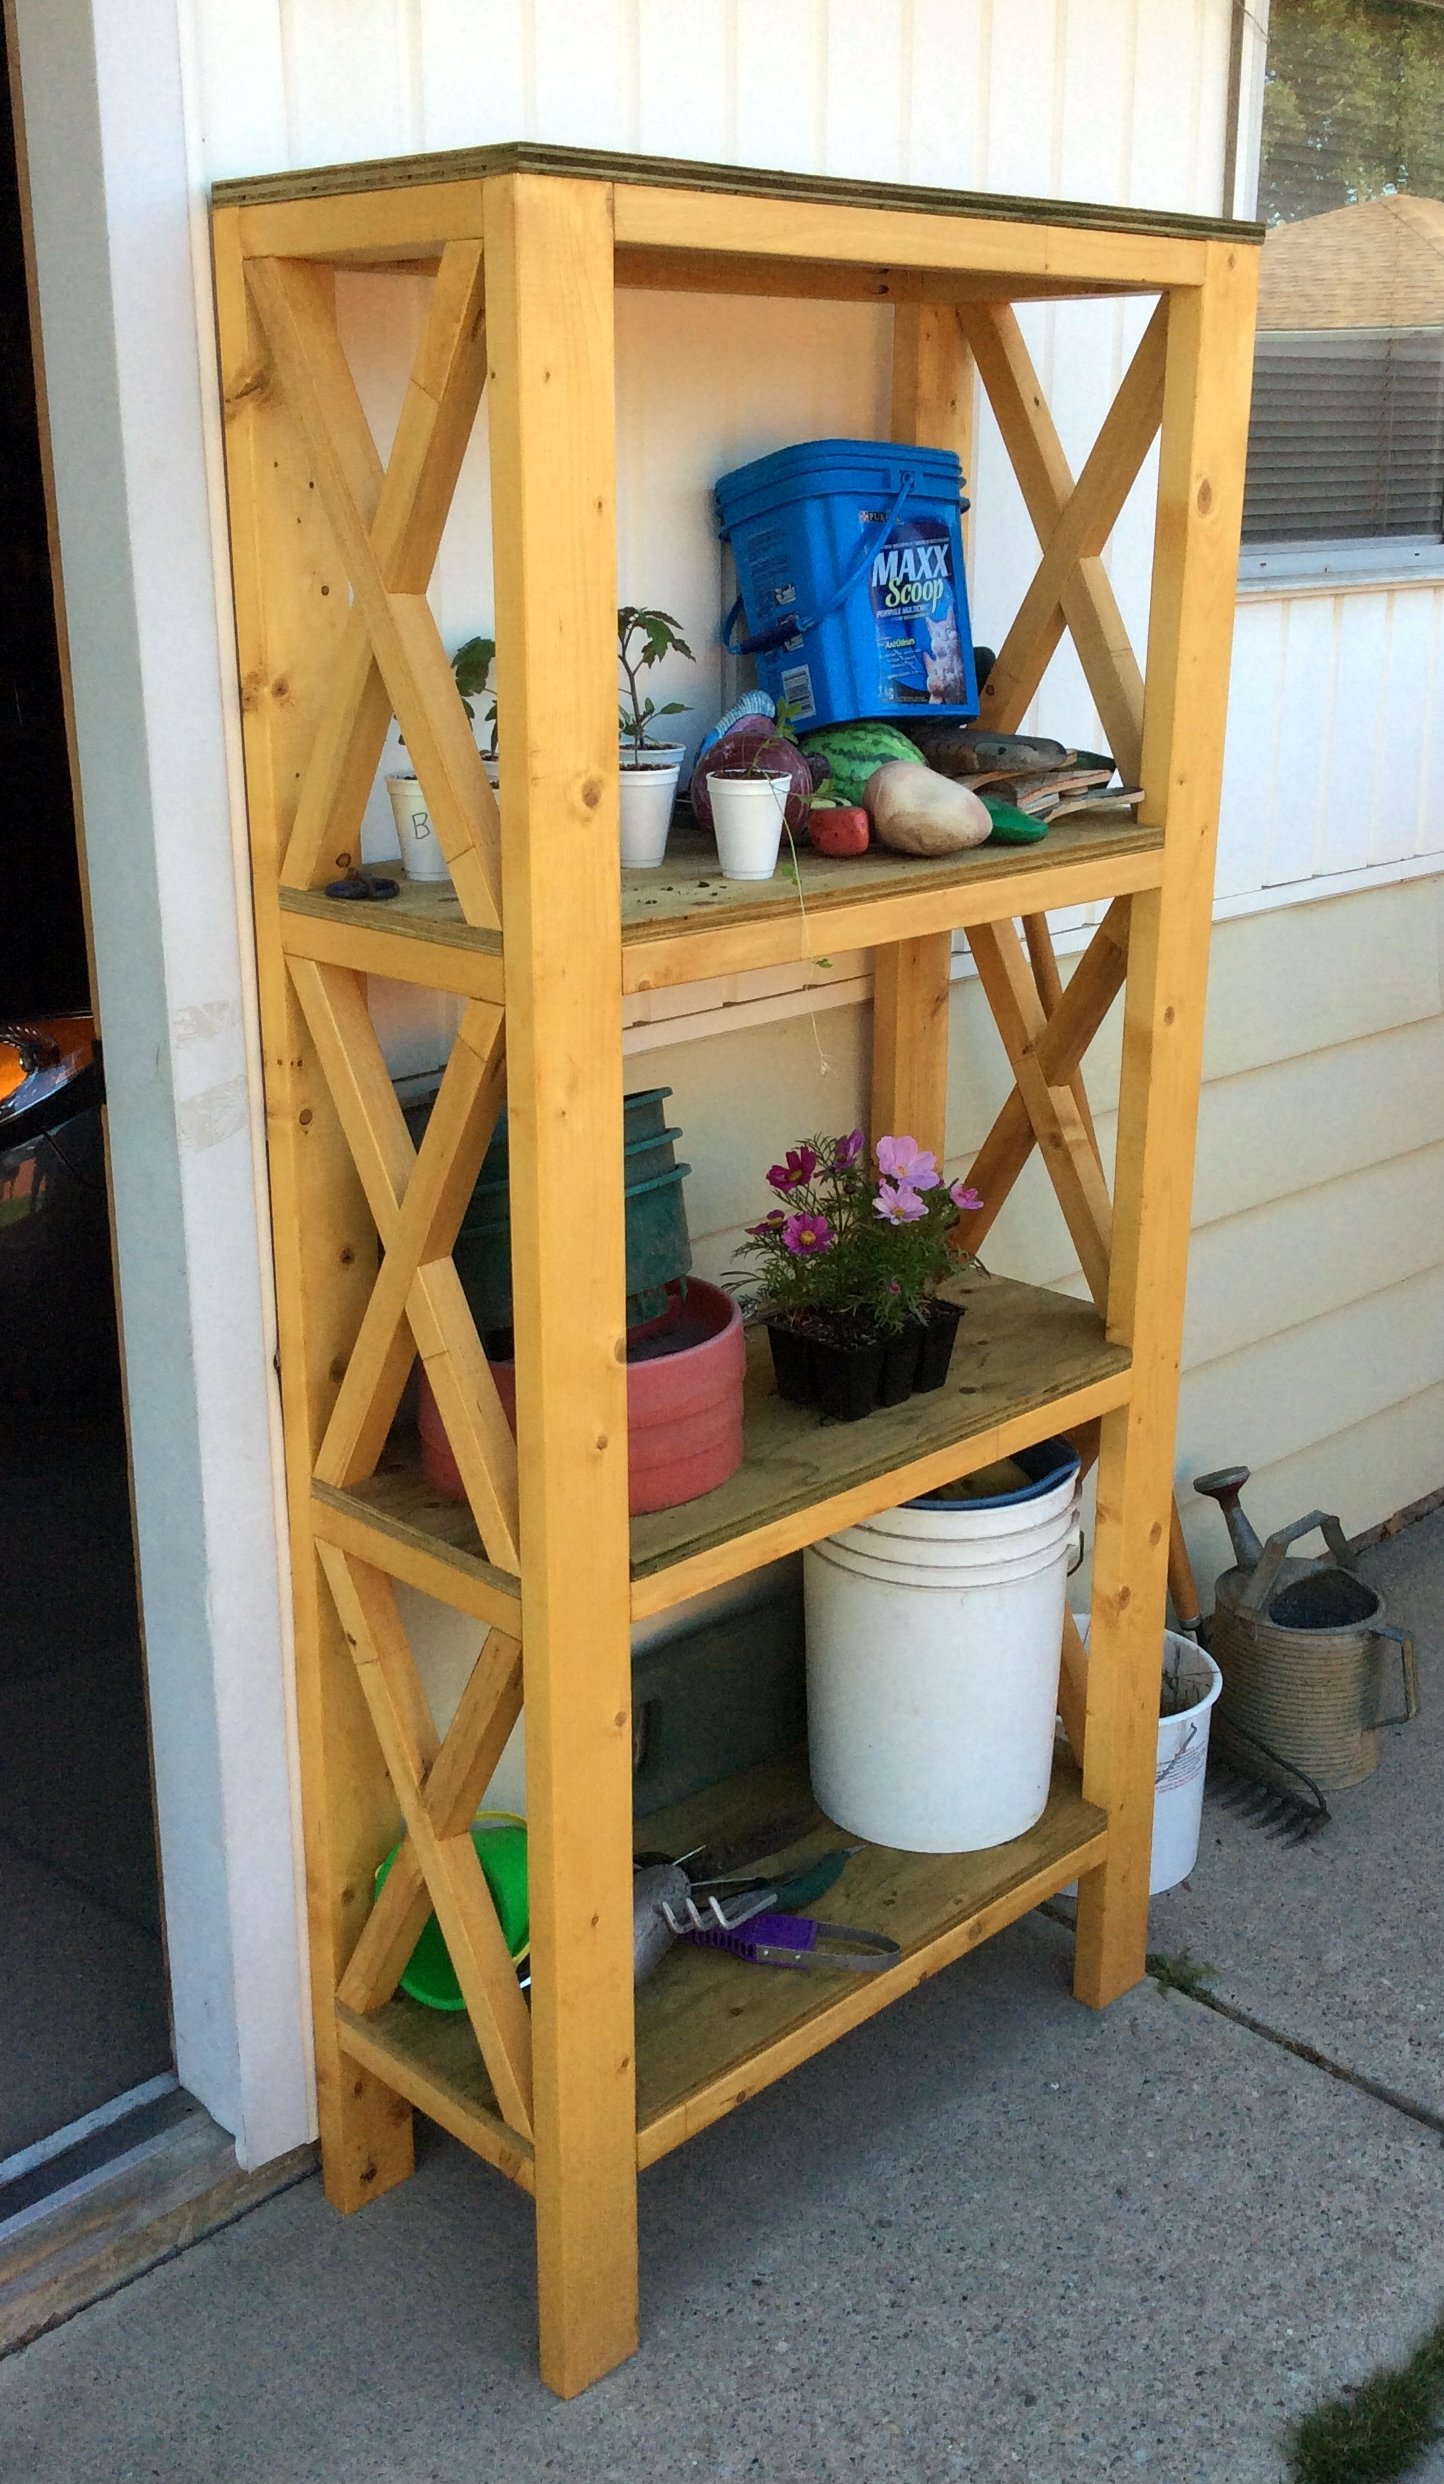
My wife wanted a Garden Shelf to replace the one that just gave up the ghost, so I browsed my favorite site for plans similar to what I was thinking. Thats when I found the Rustic X Book Case. Perfect.
I need to stuff larger objects then books in there, so I changed it to 3 shelves and I put those on top of the cross members. That was easier and it gives it that work bench look.
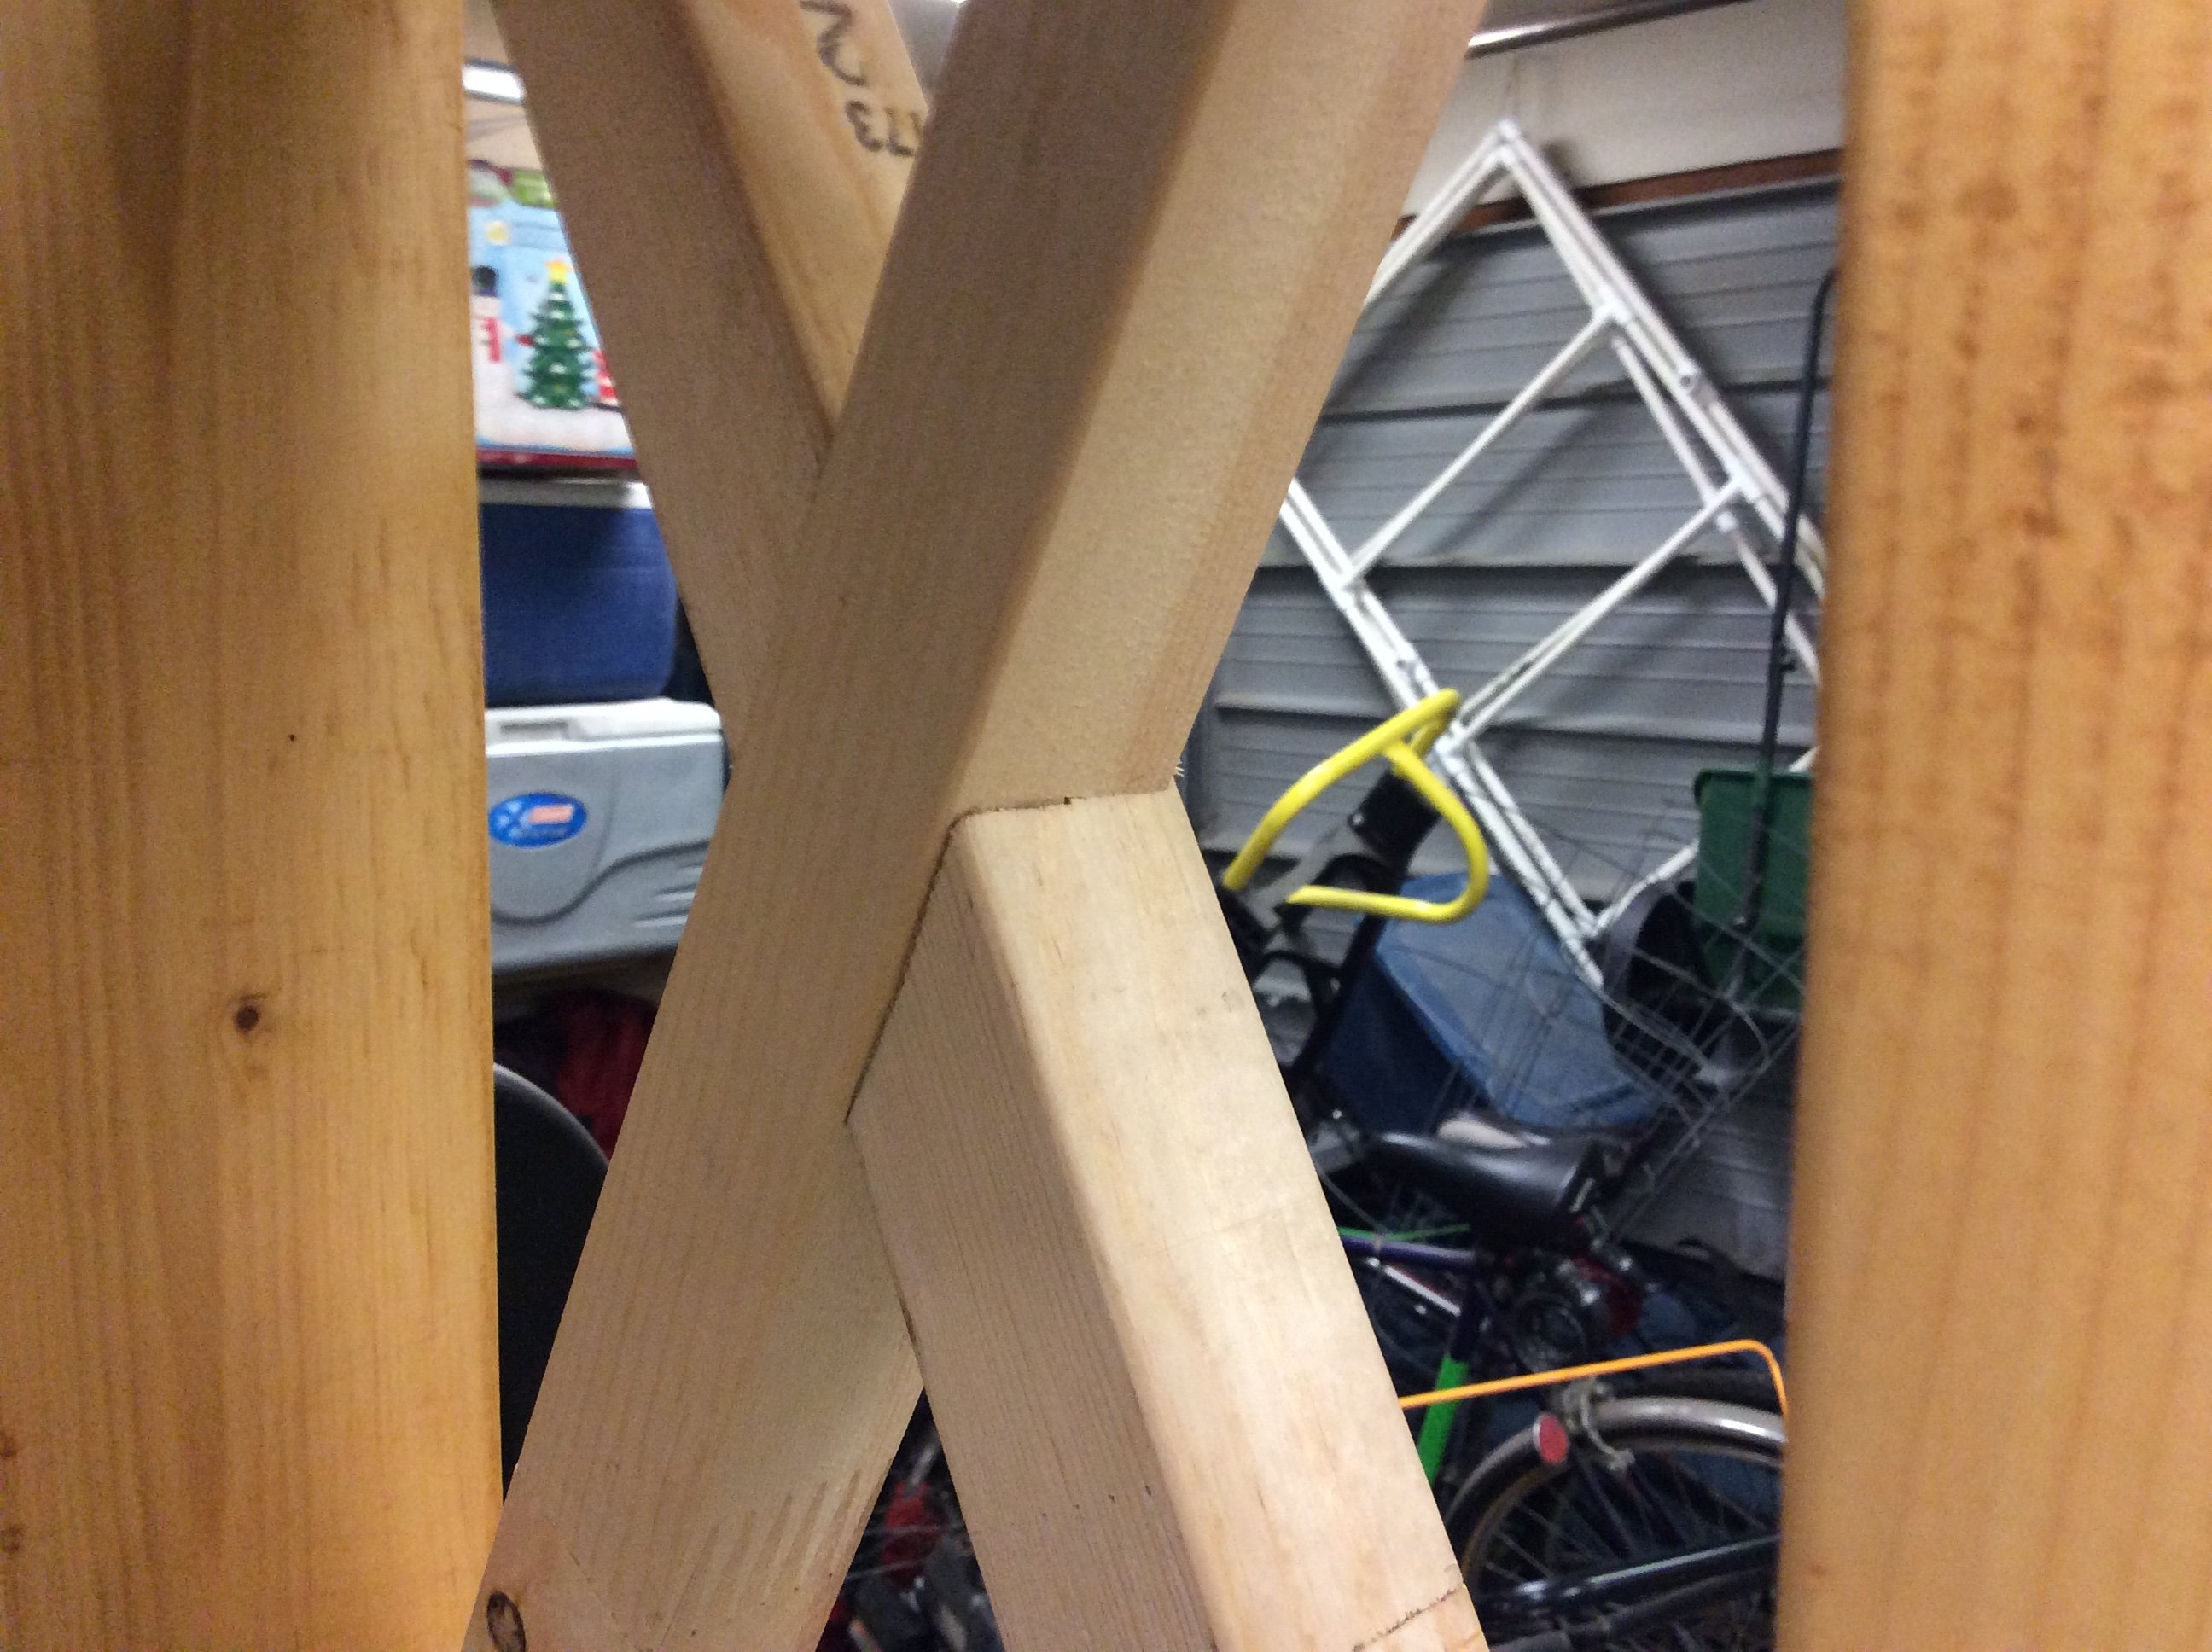
For the X's, I had the wood to risk so I tried recessing them. I dry fitted (chop saw highly recommended) and marked them and when I flipped them over, they aligned perfectly. With a circular saw set to just slightly less then 1/2 depth, and some very careful cutting, they fit together quite well.
Sturdy with a bit of class. I'm pleased. Thanks.
My 15 and 12-year-old sons made two of these for me. Super easy, they followed the step by step instructions which were perfect, easy to read. They made two in only a few hours!
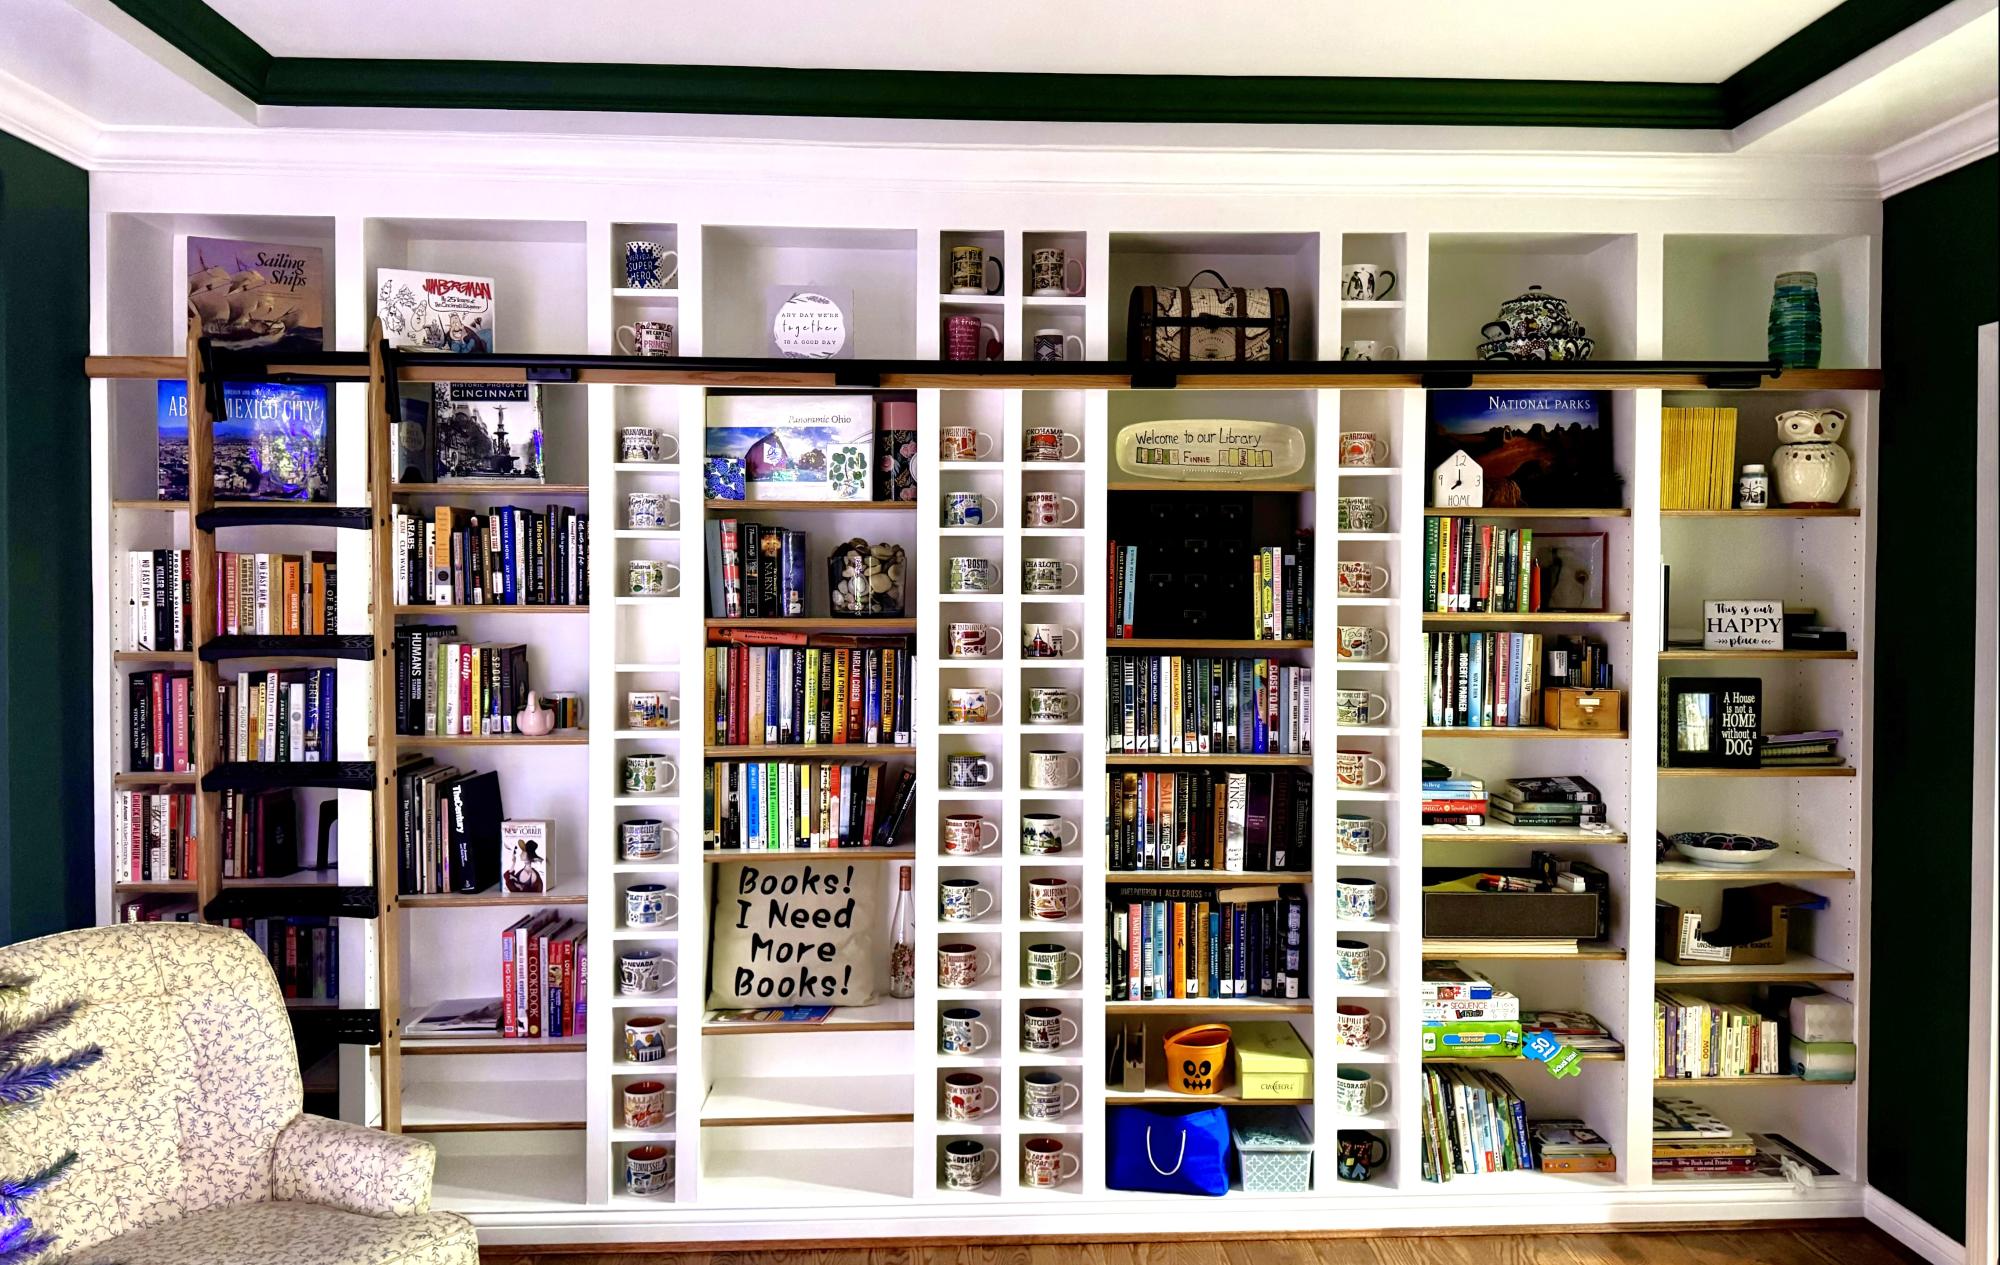
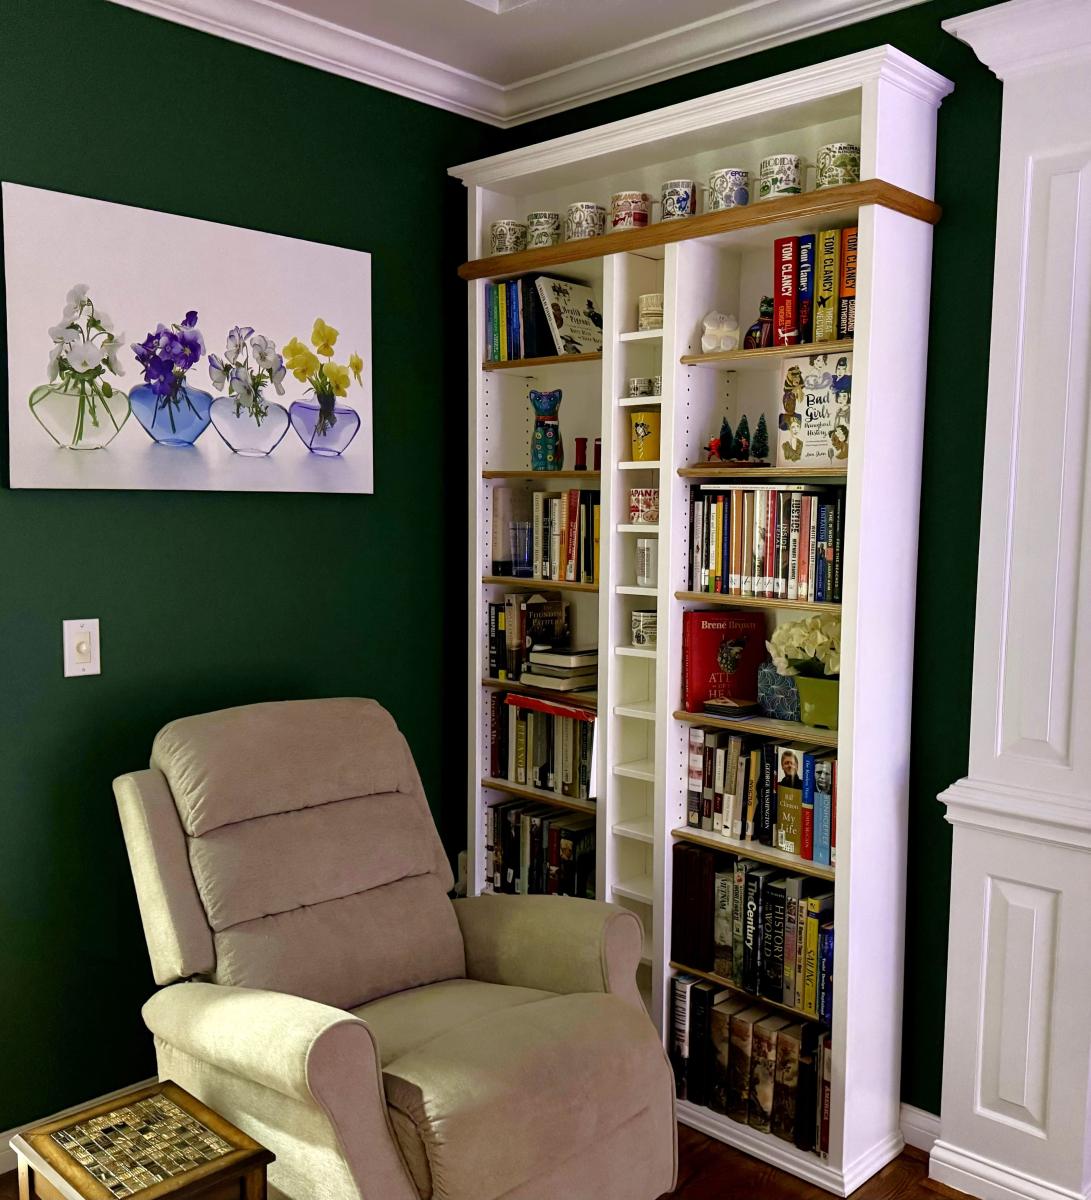
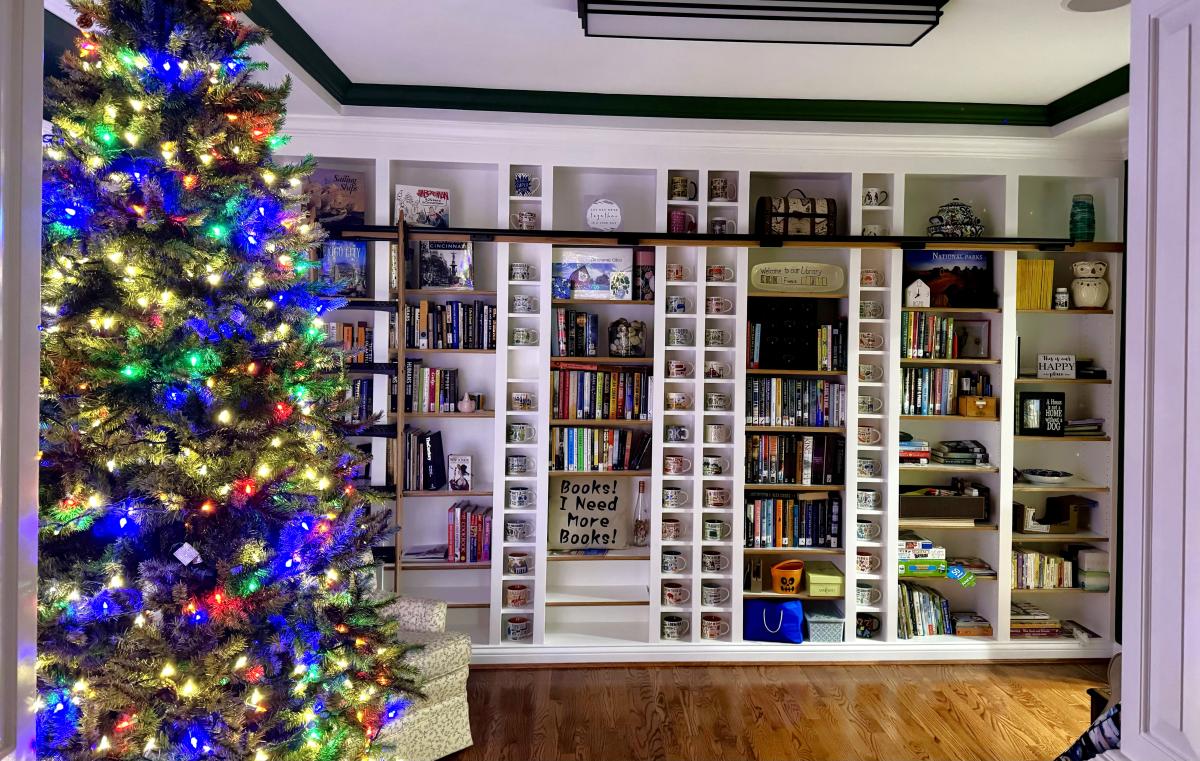
These bookshelves are modified from the Extra Wide Console Bookcase Plans from your website. They were constructed using 3/4 inch plywood for the bookcases, 6” MDF boards for the cup cubbies, and 1/2 inch plywood for the shelves. Purchased a jig from Rockler to drill the 1,000+ shelf holes and built the rolling ladder from oak using the plans and parts from Rockler. What began as a plan for a simple bookcase morphed into selling the dining room furniture and converting the room (which we had only used once in over 2years) into a library that we enjoy every day!
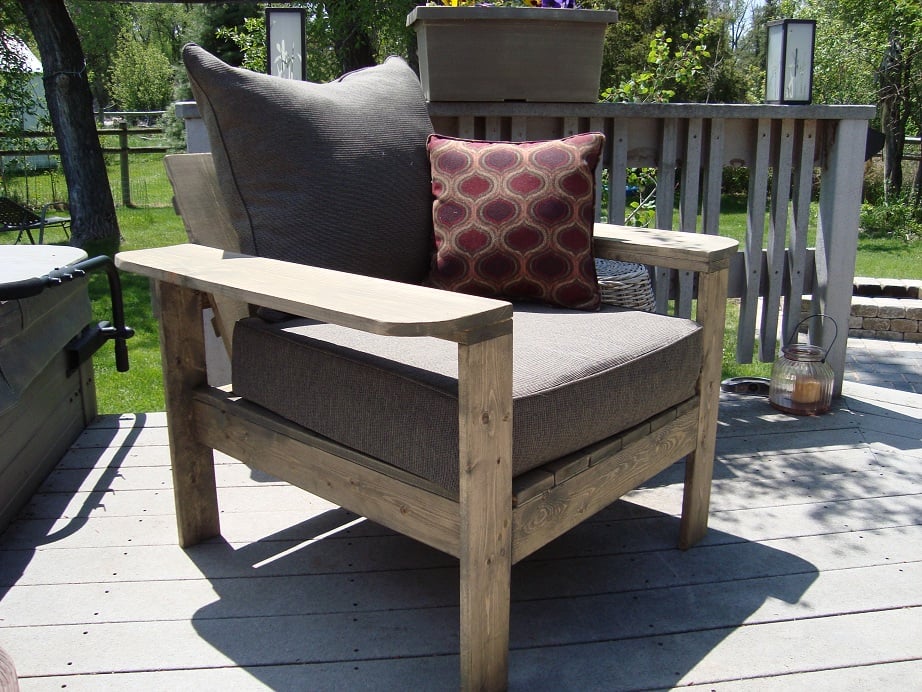
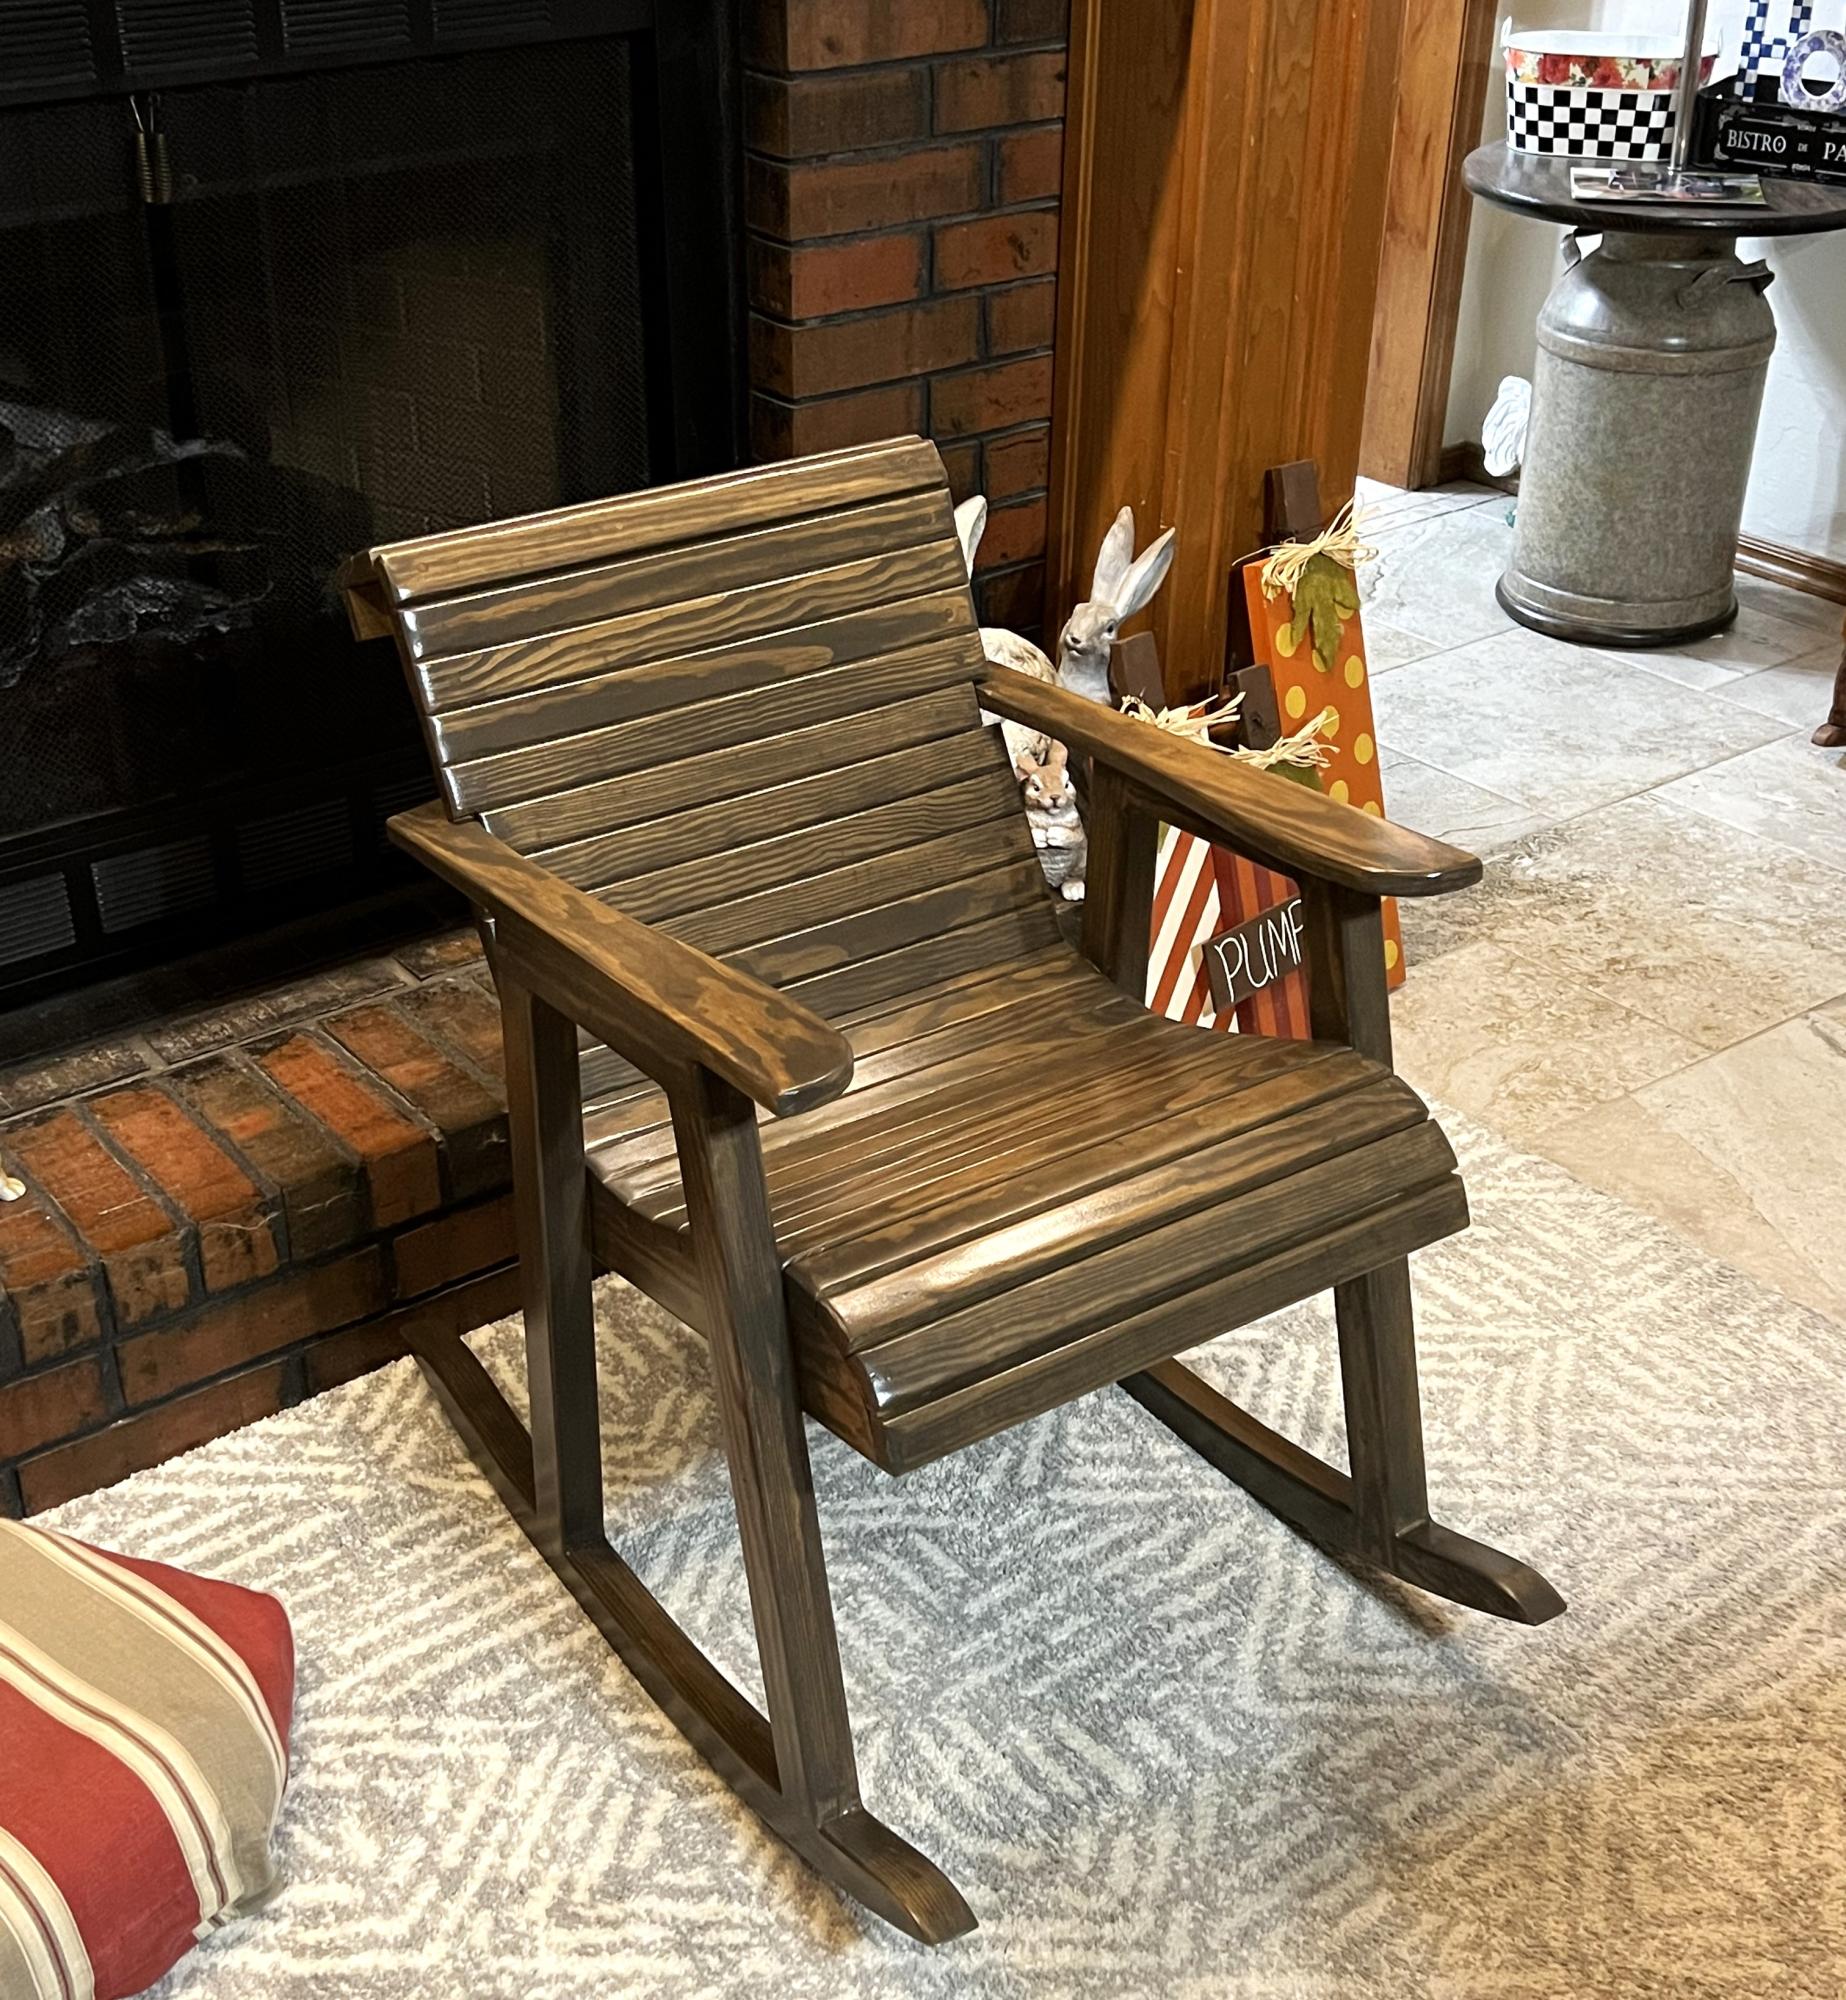
I used the plans for the simple outdoor lounge chair and just made the arms wider, the cushions came from Target.............the dog loves it !

Thu, 05/31/2012 - 07:14
This is BEAUTIFUL!!! Nicely done woodwork and cushions too!
Thu, 05/31/2012 - 07:15
This is BEAUTIFUL!!! Nicely done woodwork and cushions too!
Thu, 05/31/2012 - 09:28
I love how you made the arms wider and rounded. Adirondack chair meets school desk! Bravo!
Sat, 07/28/2012 - 18:06
My husband and I love to sit outdoors and read with a hot cup of tea. The wide are will be perfect for us. Would you mind sharing the cost of your project?
Sun, 09/14/2014 - 22:04
Hi! I would love to make this patio set but I am having some trouble with cushions. I noticed that Ana stated this chair will use a standard size 20x20 cushion. On your notes it says you got your cushions at Target, are they 20x20, I love the deep cushions but cant seem to find any that sized. Are yours 20x20, or did you modify you project? If so, what dimensions did you use? Thanks so much!!!
Sun, 09/14/2014 - 22:05
Hi! I would love to make this patio set but I am having some trouble with finding cushions. I noticed that Ana stated this chair will use a standard size 20x20 cushion. On your notes it says you got your cushions at Target, are they 20x20, I love the deep cushions but cant seem to find any that sized for the bottom ones. Are yours 20x20, or did you modify your project? If so, what dimensions did you use? Thanks so much!!!

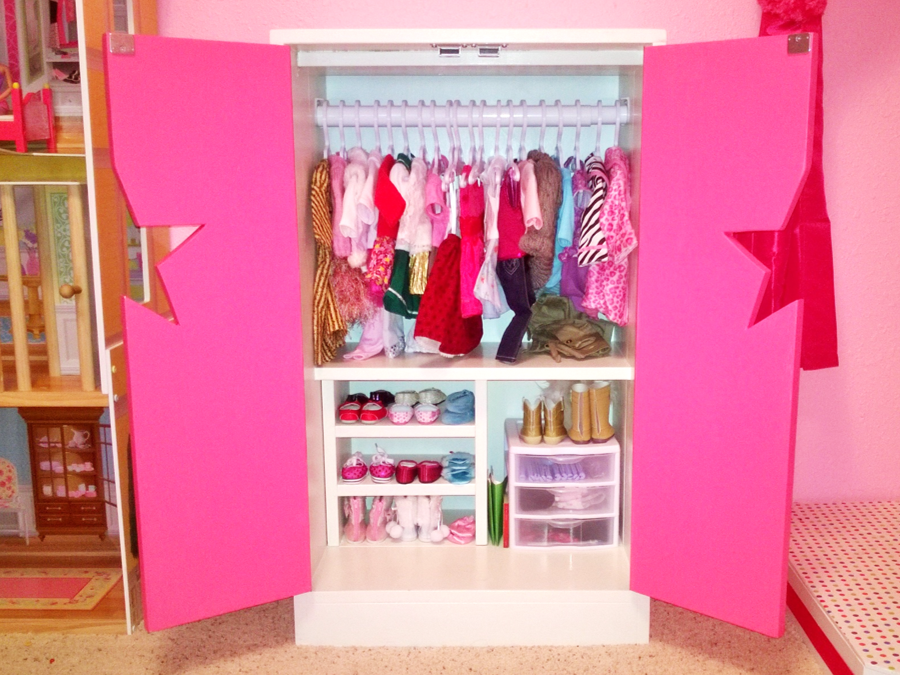
My daughter has been accumulating American Girl doll clothing and accessories since her birthday last summer (2013), and we were rapidly running out of room for all of it. Luckily, her Grandpa ("Pop") is a skilled carpenter and whipped up this awesome closet for her in a weekend (including the amount of time it took to pick out all the materials, paints, and paint everything/let it dry). She absolutely loves it and it is the perfect way to keep everything organized, while still looking great!

I made this for my 4-year old granddaughter and added it to the play area I built for her last summer.
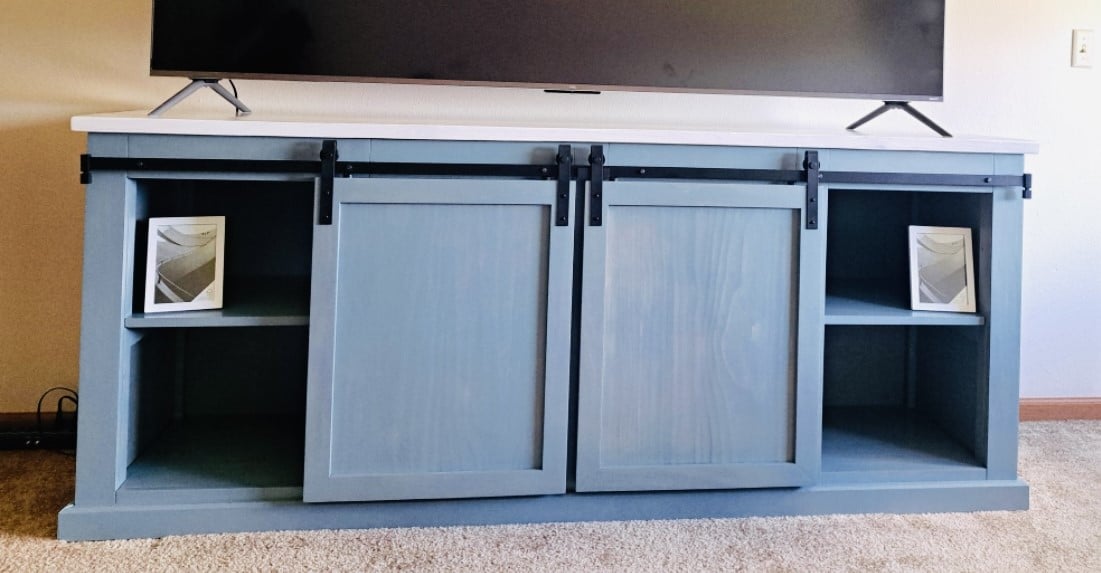
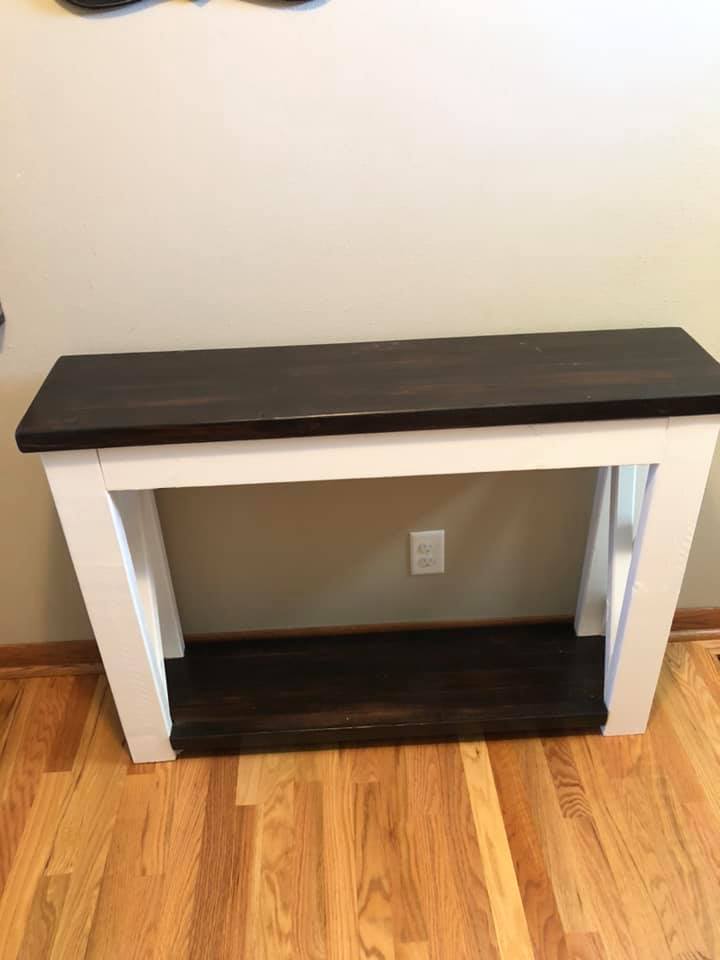
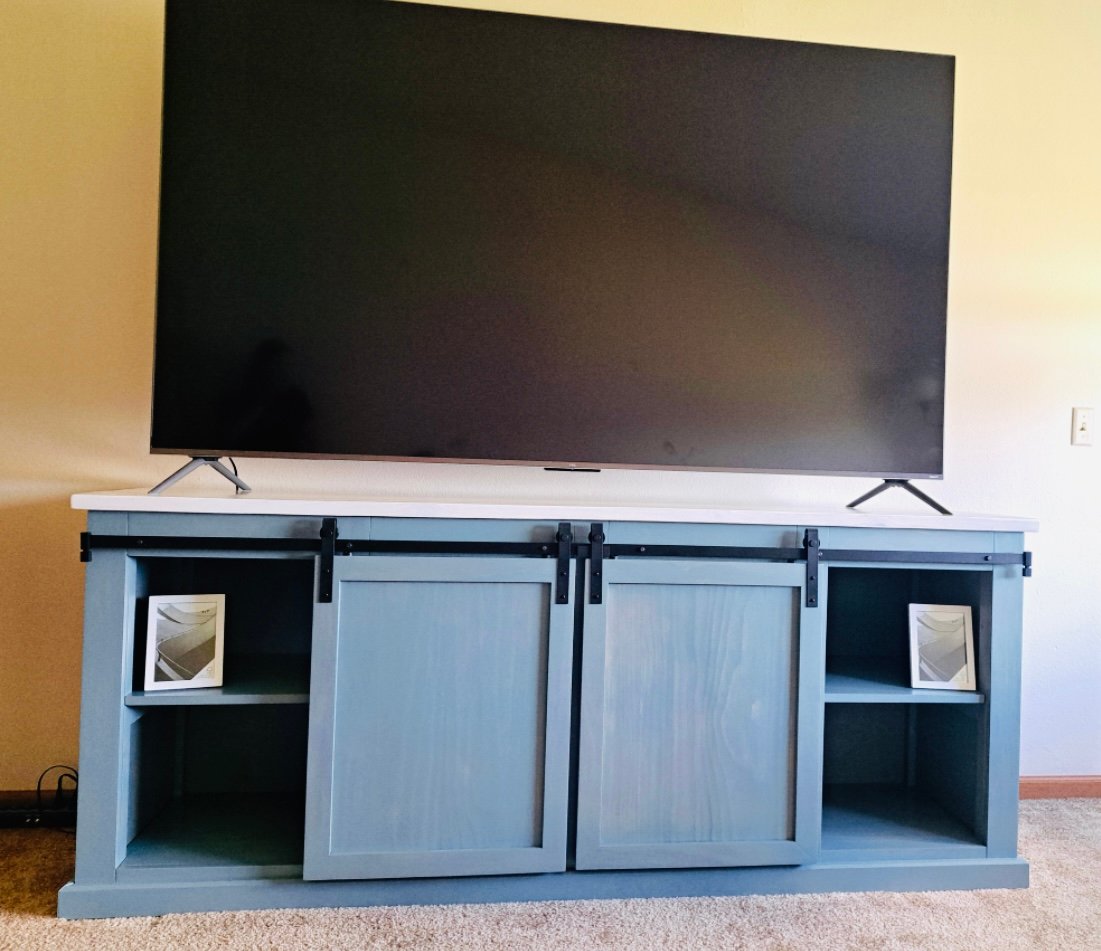
Our grandson needed a tv stand for his new apartment. They liked the plan from your website and this is our version.
Steve Mawhorter
Sat, 11/18/2023 - 13:31
Love your finish choice, it looks amazing! Thanks for sharing.

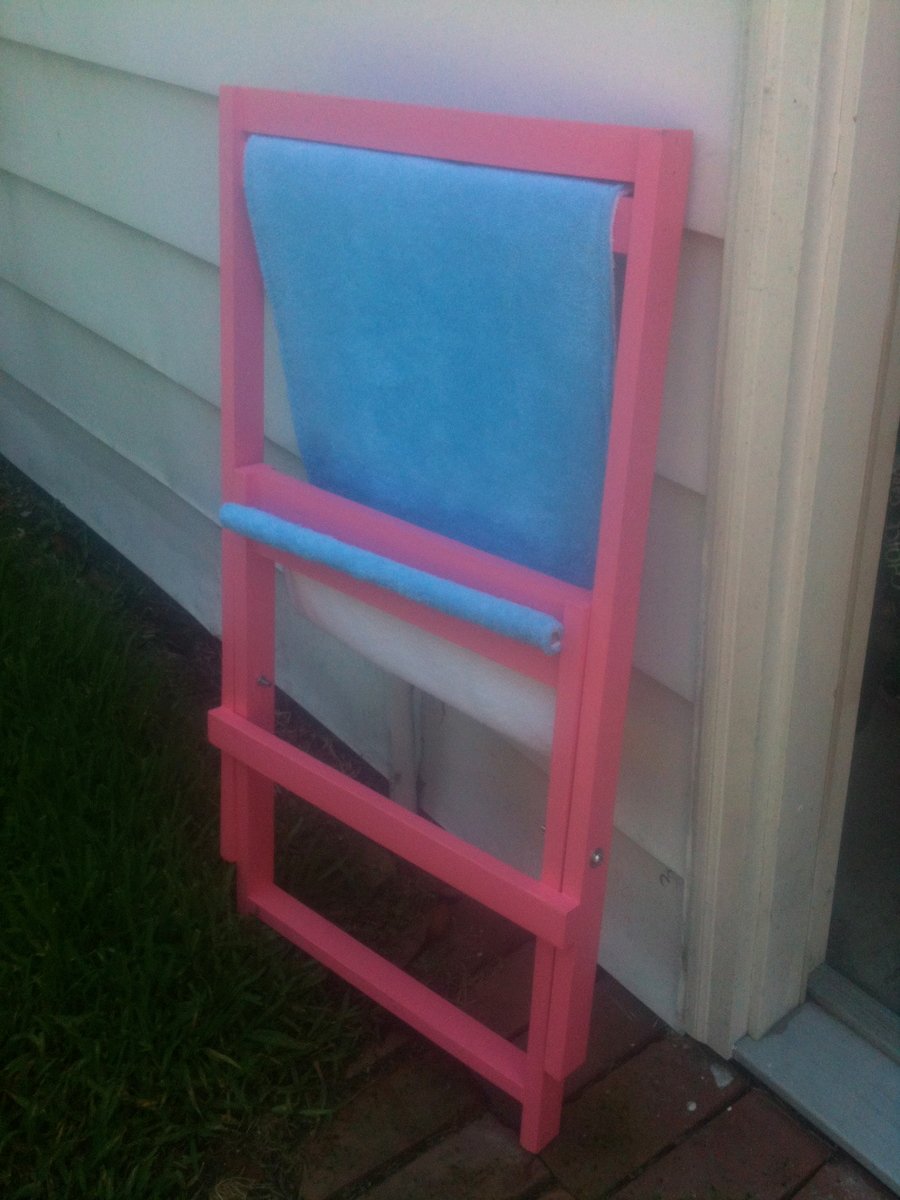
I used two towels to make the sling portion of the chair, instead of outdoor/decor weight fabric. Even though the towels were thick, I did not need to change the dimensions of the dowels or slits in the wood that hold the dowels.
Thu, 05/31/2012 - 16:59
What a great idea to use towels. I have a few extra beach towels that would be great for this.
Thanks!
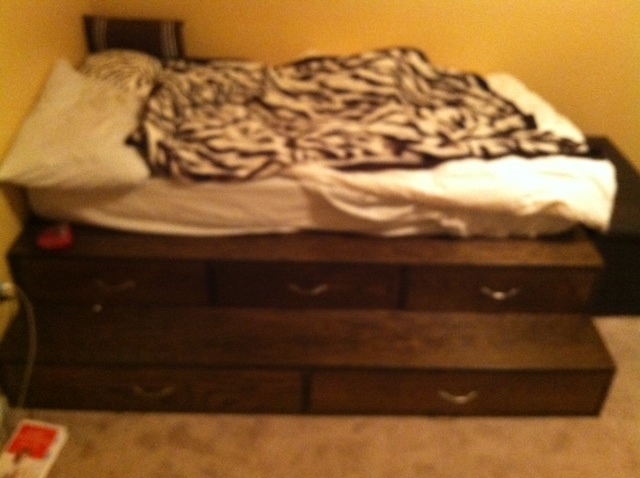
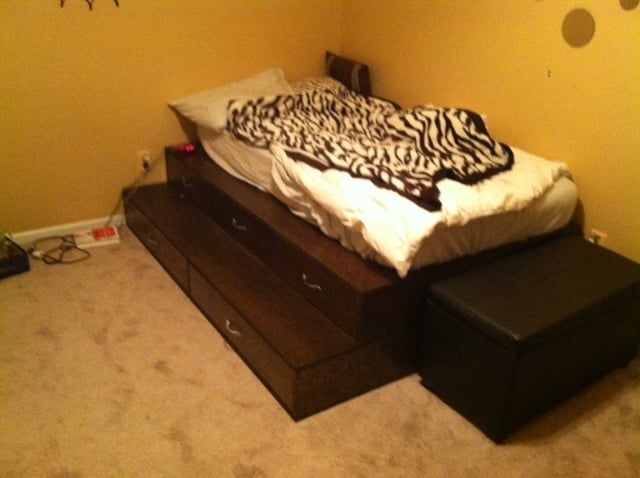
Base was easy to do, drawers were another story! very big drawers, plan a lot of time for these.

Fri, 10/10/2014 - 18:33
My daughter said that's AWESOME! :) I think it looks fantastic!!!
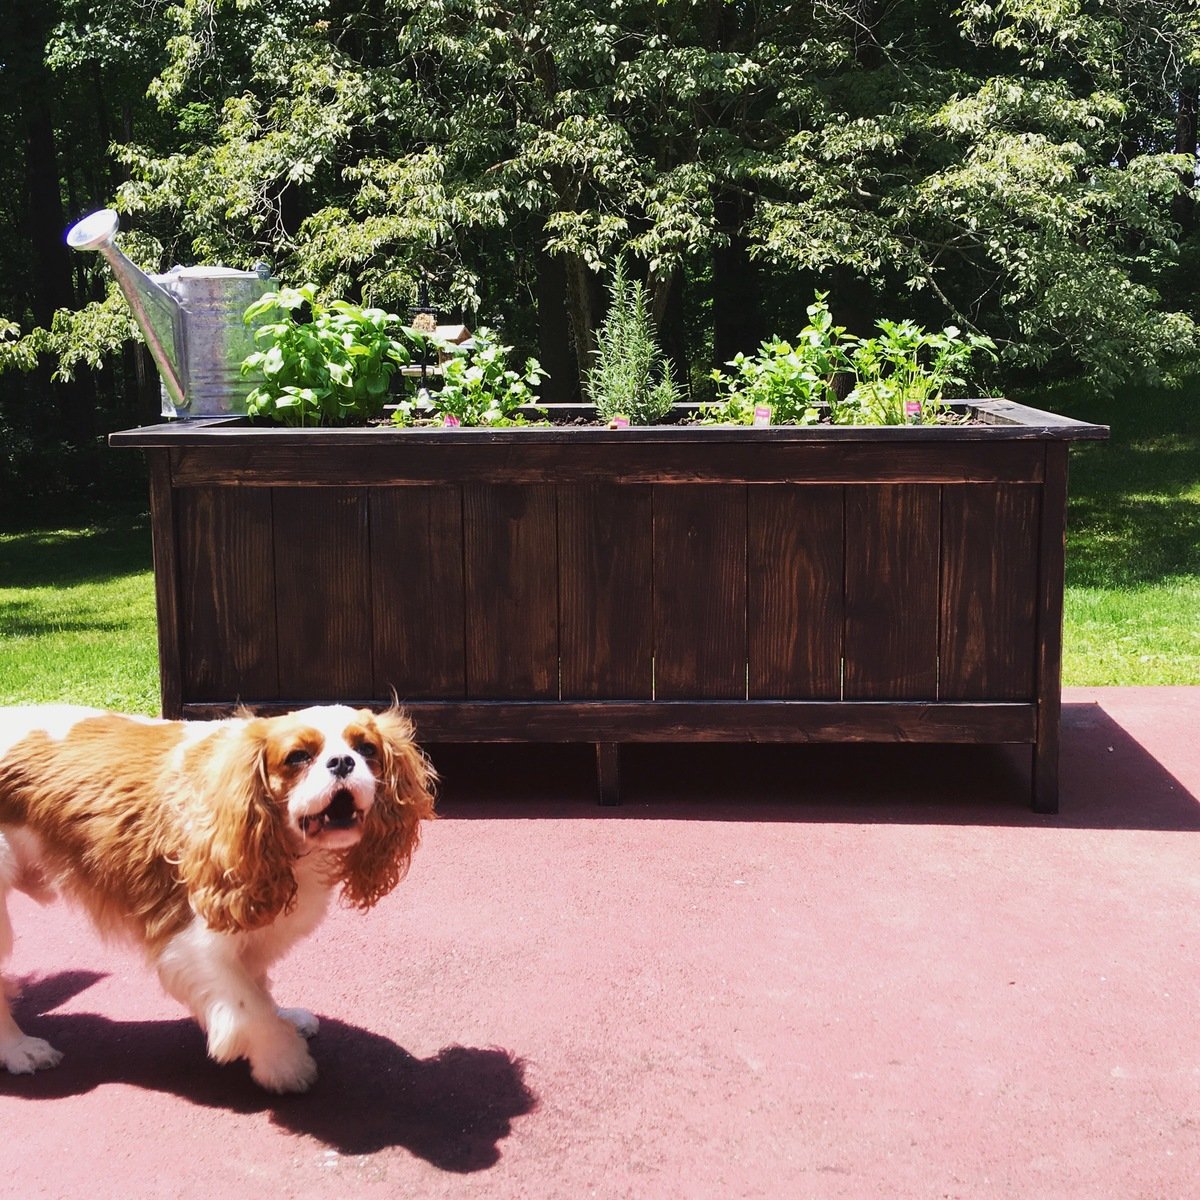
Modified the dimensions to make a good sized planter for patio herb garden :)
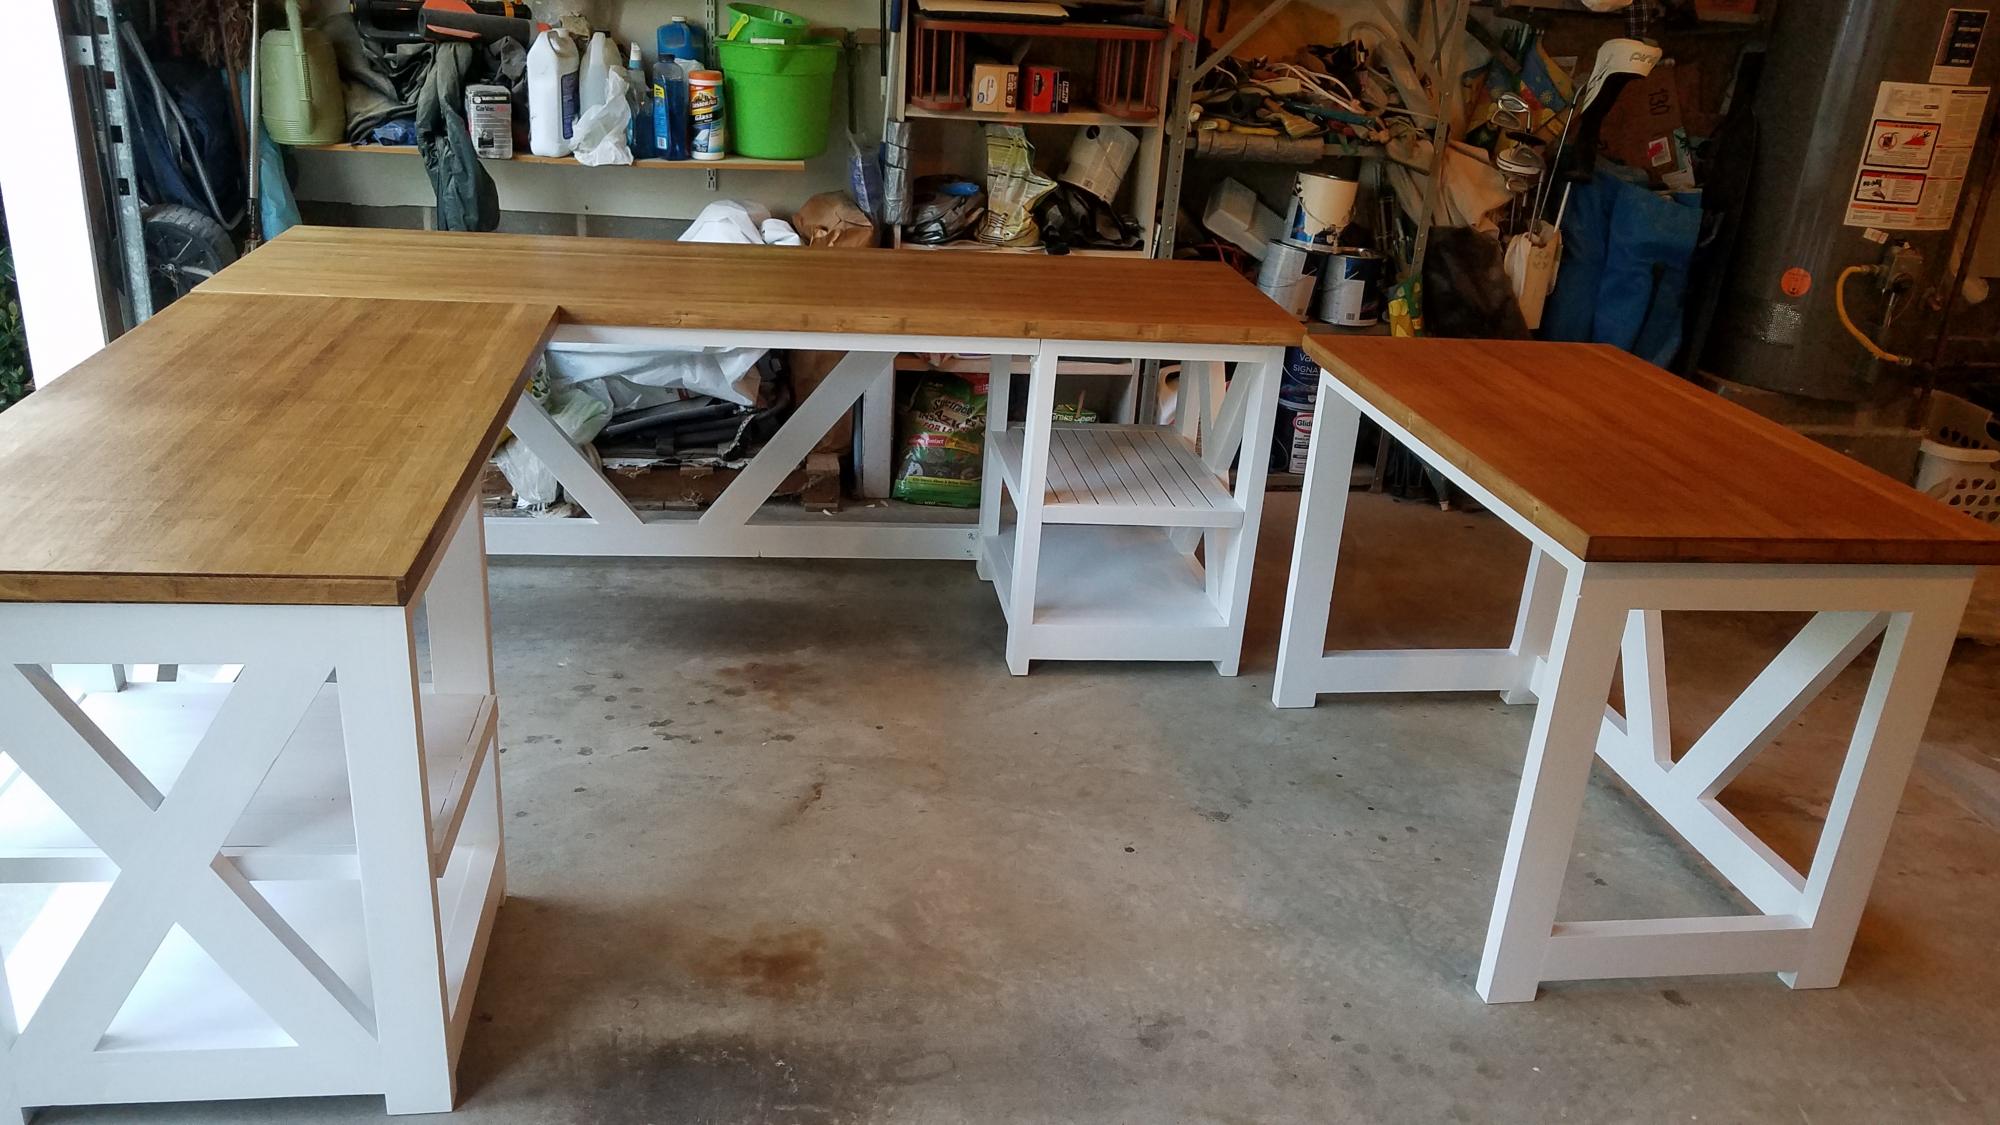
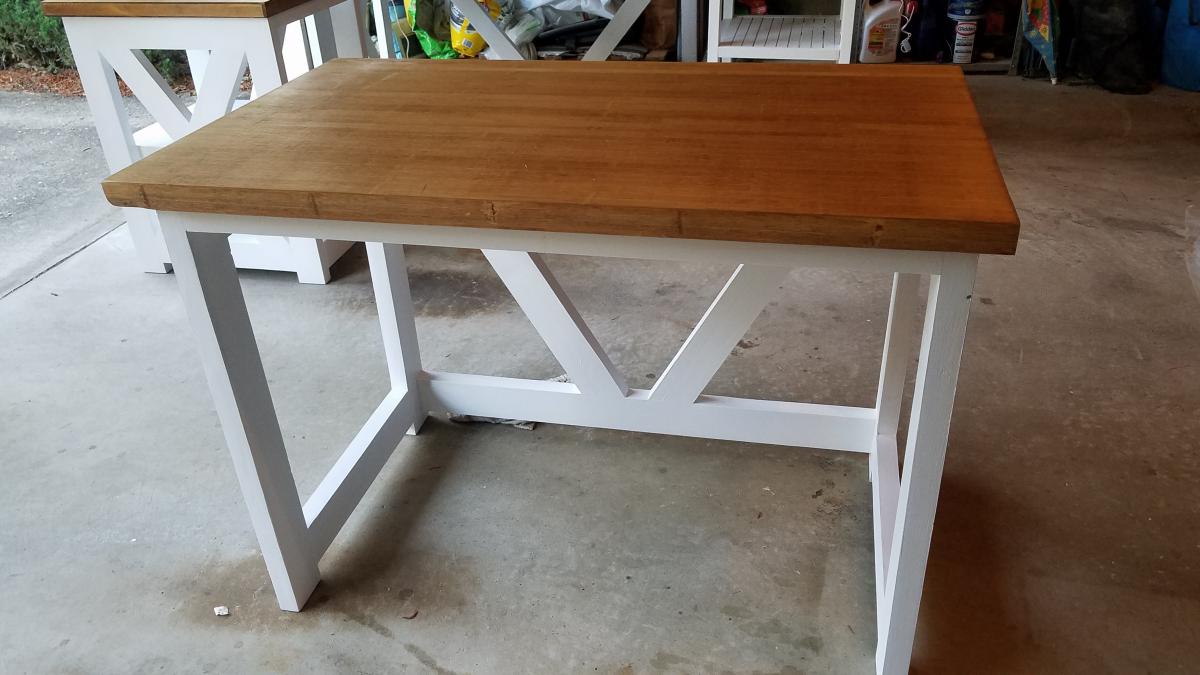
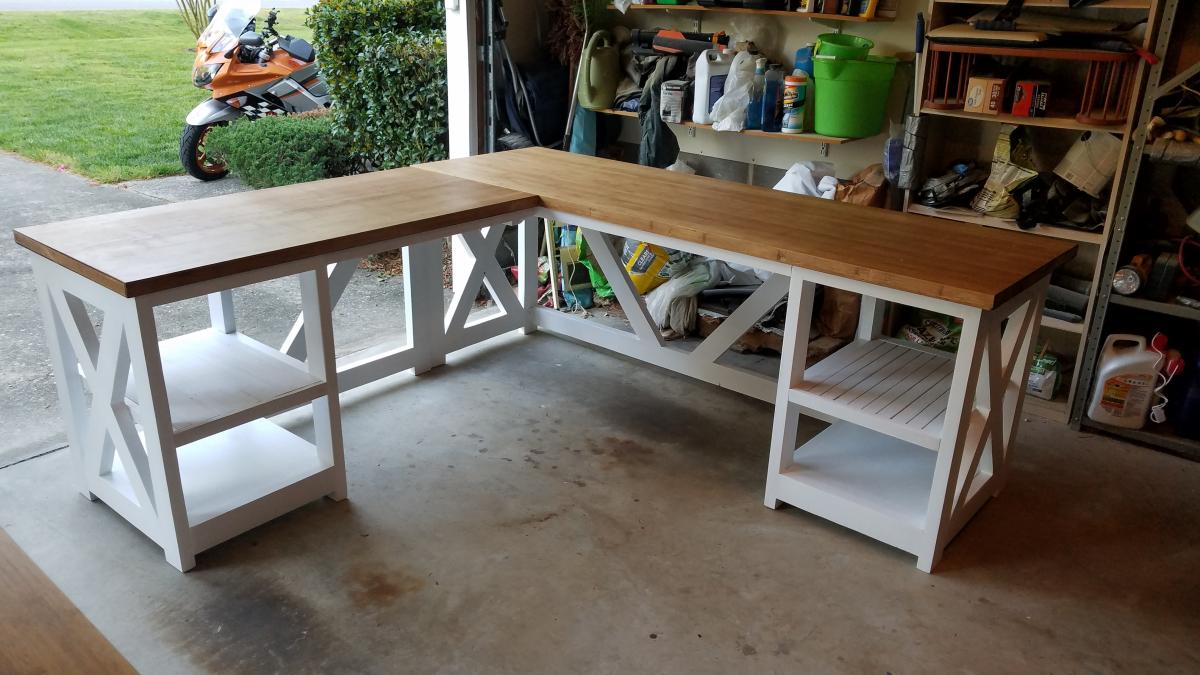
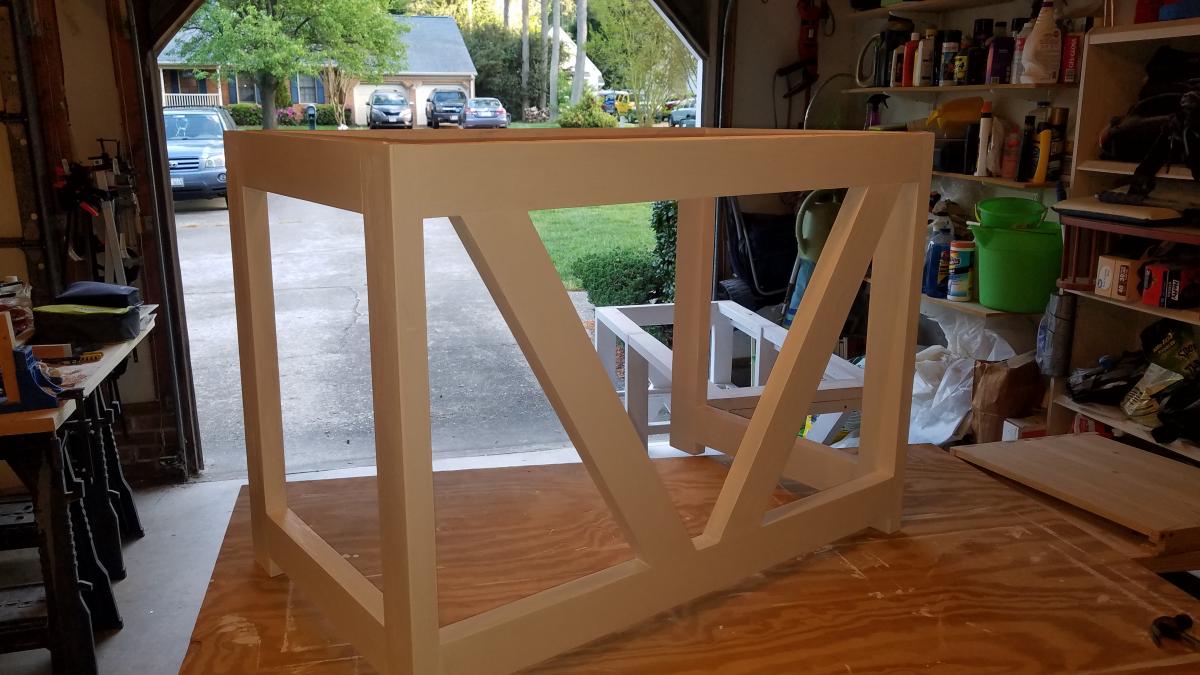
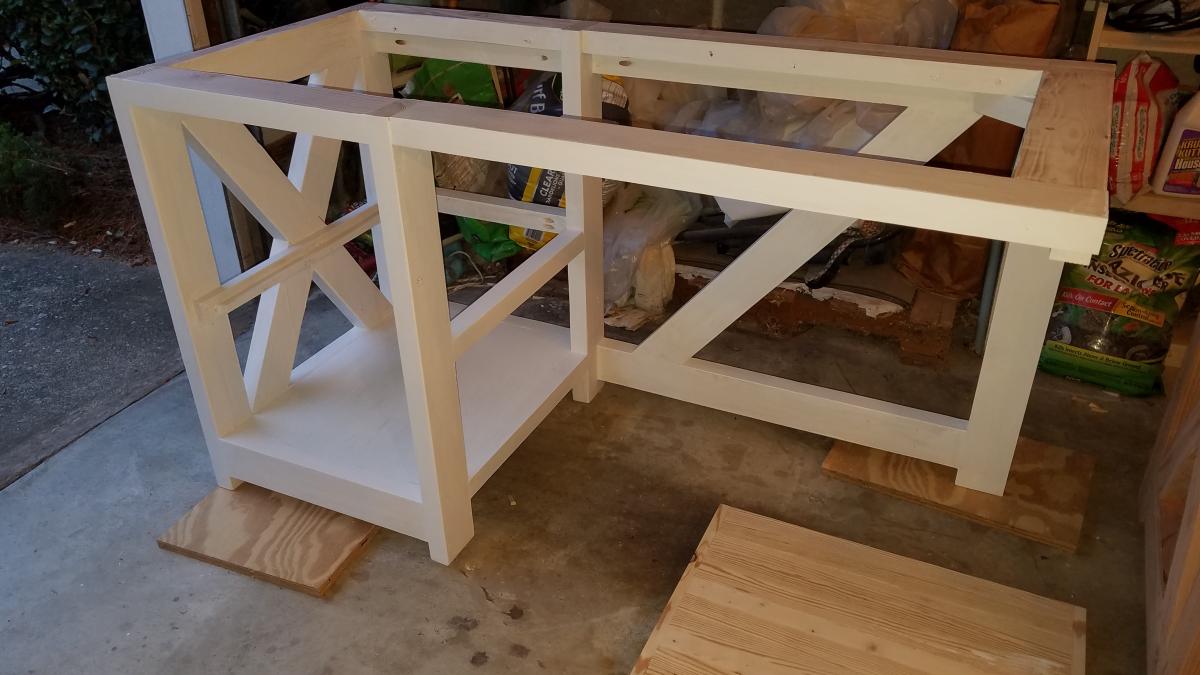
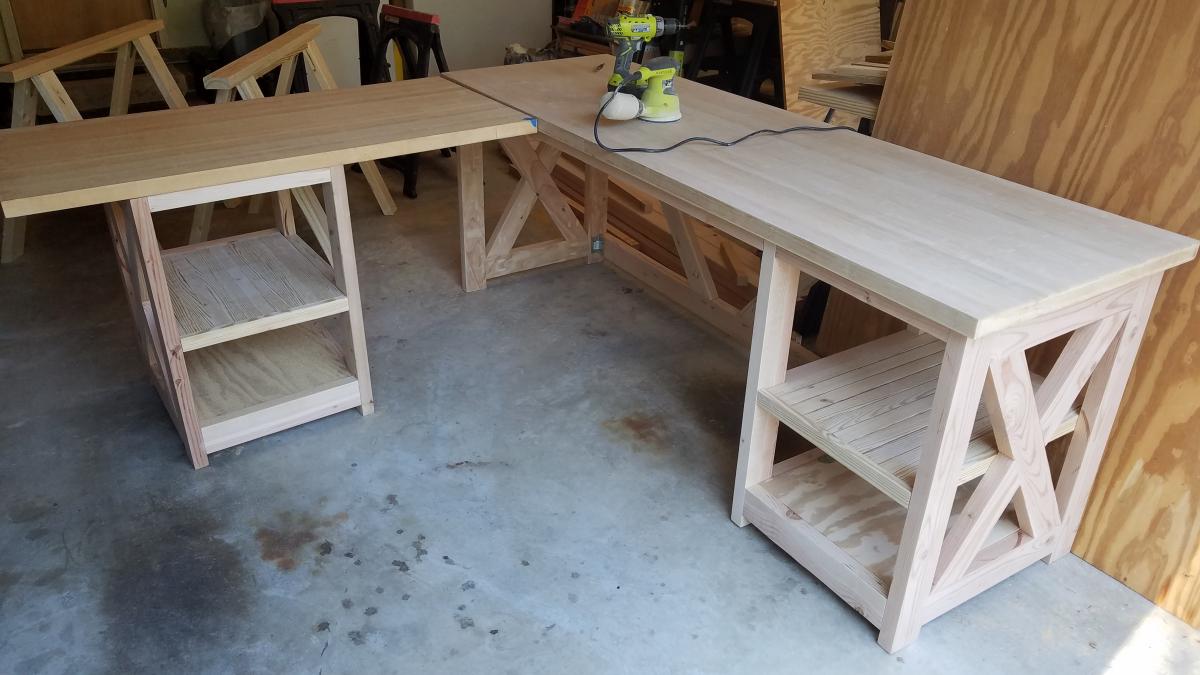
I built this L shape desk based on Ana White's rustic X desk plan. I would not have attempted this without her guidance. Love how this turned out, probably the nicest project I've ever done. Thanks Ana!
Tue, 05/26/2020 - 09:34
This is awesome! My son and I are looking to build an L shaped desk for him and this looks to be the one. Any thoughts on how I would mount a computer tray beneath? Think there is enough clearance below the 2x4 without hitting knees?
Thanks!
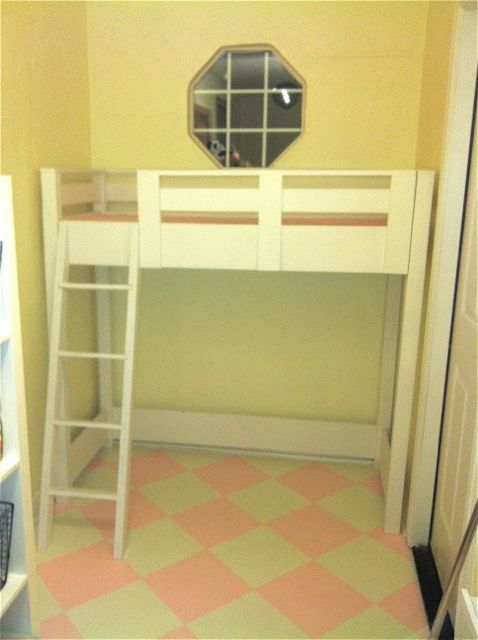
We converted our mud (junk) room into our daughter's playroom. The room is awkward (5' X 12'), but I knew I wanted a reading loft by the window. The area we were working with was 63" wide and 23" deep. I wanted the loft to come right up to the window which is exactly 5'. This is obviously not a standard bed size so we couldn't just buy something. I came across your site (love it!) and found the loft bed plan. I reconfigured the loft using our measurements and my husband is the one who actually built it. It turned out so well! I still have some pillows to make, but my daughter and her friends have already been spending a ton of time up there!