Rustic x coffee table
![](/sites/default/files/whitpin.jpg)
Dark walnut table top. Weathered 1x4s on the bottom shelf in place of 1x12
![](/sites/default/files/20170131_230135.jpg)
Dark walnut table top. Weathered 1x4s on the bottom shelf in place of 1x12
My dad and I built this bed together as our first wood working project. We worked on it off and on for about three weeks before it was finished and in my room. We used brackets instead of pocket holes/screws to attach the side rails. Next up will be matching nightstands and a dresser!
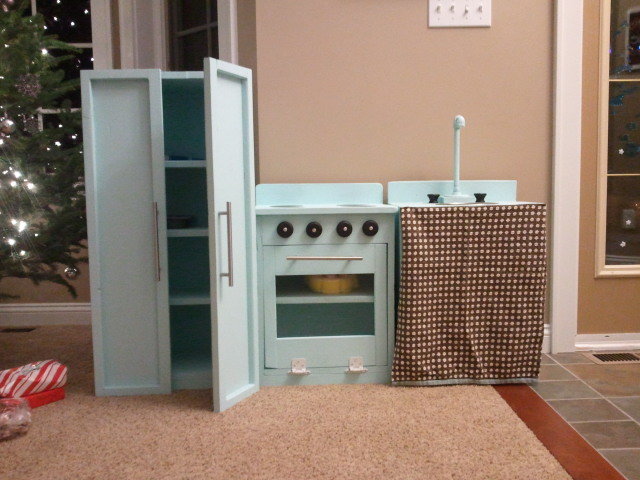
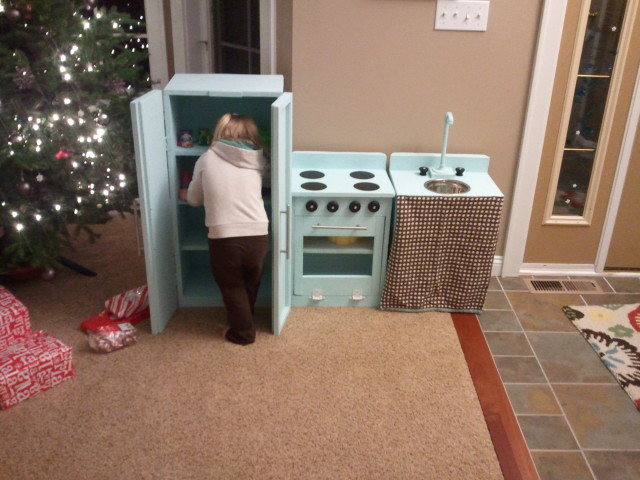
After looking at the price of kitchen sets I decided to make this one for my daughter last Christmas.
The Sink:
I made the sink and the stove identical. I then stole one of my wife's dish towels and stapled it in front of the shelves. I took an aluminum bowl for the sink and cut it out with a jigsaw, I then put clear caulk around the bowl. The faucet was from a hardware store, i found some pipes and put them together until they looked like a faucet. The knobs were from Michael's, I painted them black and put a nut/bolt so they could be turned.
The Stove:
In order to make the burners, i put painters tape on the top of it after it was painted. Then I used a bowl to trace and cut circles in the tape, i then peeled that tape and used black spraypaint on the circles. The burner knobs were also from Michael's.
This project took a while, maybe 2 weeks of working a couple hours every few days, but i was surprised and impressed with my work after I was done.
First of many outdoor projects. This collection from Ana is awesome.
Full Tutorial with a LOT more photos on the Blog HERE
We had measured the garden space so we could build this frame to fit the space. The deck frame was made to be the correct height for the slide that we would attach later.
Once all the boards were put onto the frame I added some rails for safety of course. Then stained everything....
PS This IS a beginner project! I promise!!!! I am a beginner and I built it, it's still standing so you can do it too! I promise!
First "real" wood-working project in the books. I combined two of your plans so that we would have space in our kitchen for recycling and trash, as well as shelving for pots/pans and all the mail that piles up. We had a narrow section, so made this out of 10" boards, instead of 12". I will possibly add the secretary door at some point, if for no other reason than to hide all the snacks! Thanks for having so many amazing plans available, they keep me dreaming of endless possibilities.
Wed, 10/28/2020 - 14:28
Love the added tilt out garbage can! Thanks for sharing your version:)
My daughter wanted McKenna and her loft bed for Christmas. I didn't want to spend $225 for the bed. I loved the bunk bed plan but revised a bit to make it like a loft bed. I added the shelves and desk and used the height from the Loft Bed plan so it was tall enough. I also made the mattress using the tutorial link with the bunk bed plans. I loved making it and the plans are soo easy to follow. My next project is the Horse Stable.
Inspired by the RH Balustrade Salvaged Wood Coffee Table.
Harriet chair with modified back. Back made with 1x2 and 1x3's. Plenty sturdy but if I was making them for someone else, would probably use a wider stock for the backs but I love the simple but unique design. Chairs were easy to build, but I liked them better before I badly upholstered them :)
When designing the layout for my husband's home brewery/man cave I needed seating that would fit in the narrow space. I looked at several plans and used pieces from a few. The final support design was suggested by my brother-in-law. I am in the process of making cushions to fit as it is definitely not something to sit on for long with any comfort!
I wanted the dresser to look a little more like a piece of furniture since it was going to be in our walk-in closet, so my husband made cubicles to hold the baskets rather than rails. He used .75" sandpaper-grade plywood, painted it to match our bedroom walls, and added matching baseboard to dress it up. The towel bars on each side were added so that towels and washcloths could hang to dry prior to putting them into a basket. An awesome side benefit is that the top of the dresser is a convenient place to rest the stacks of folded laundry as I'm hanging them up.
I followed Ana's plans for the King Farmhouse bed to begin with. I then added some small crown and cove molding to make it look a little fancier. To make the bed match existing furniture, I used a hole hog drill bit to cut out semi-circular holes from the feet of the footboard. I feature a few other projects like this on my blog http://pneumaticaddict.blogspot.com .
What an awsome introduction to using a Kregg Drill. The plans were so easy to follow, making this a really fun build. I did increase the dimensions of the kennel to accomadate Ezzy's full grown size, but the plans were otherwize followed. The tin signs arranged for the top of the kennel makes it a great conversation piece.
Tue, 11/04/2014 - 18:15
This is super cool! It looks great and I love the color that you chose!
This is a very easy project to make for the beginning woodworker. It is low cost since it is made from scrap pallets and should only take a couple of hours to make. The same plans can be used to make a nicer version from 1x4 cedar boards. The planter holds succulent plants which are almost care free and extremely easy to grow.
More Info: https://www.instructables.com/id/Succulent-Planter-From-Pallets/
Large dog kennel/ end table. Love it!!
Tue, 11/10/2020 - 09:47
Great project! It looks like a success, thanks for sharing:)
Had a blast building this. I am still learning as I am just starting out building and woodworking. Took a afternoon to build it and a few days with coats of primer and paint.
This is my first project and I am thrilled with how it turned out. Thank you Ana, you have empowered this stay at home mom!
Sat, 11/08/2014 - 12:03
I love the color of stain on this one! It really works well in this room!
I am not a carpenter, I do not even have a tape measure. I got tasked by my leadership dothan class to build a farmhouse table for the academic dream room which is part of the Bright Key Program. Which is being renovated at Honeysuckle Middle School. Found your plans and got inspired. One glitch they wanted this table to be able to sit fourteen chairs. So I had to make a few adjustments like increasing the main boards to twelve foot. Because of your plans, many urban middle schoolers will have a place to get tutored considering cafeteria tables are so expensive. I am a believer of your plans. The positive feedback I received was well worth my time and would not of been a sucess without your plans. I did mine with pocket holes as well.
I made the "Outdoor Loveseat" from the "Modern Comfort Collection". The plans were very helpful! As a true novice, one issue I ran into was that the seat back bottom slats was about 3/8" longer than would fit. In any case, I was able to trim the boards down and the seat looks great. I ordered the cushions from Amazon.
The seat is now at my father's house where he can sit in the sun - when it's warm enough (in the spring/fall/winter) or cool enough in the summer. The build time was longer because I cut the wood and pre-assembled major pieces at home and then drove the pieces to my father who lives out of state.
Thank you for sharing the plans!
Just needed some better storage for coats and shoes. Used Hilary' locker plan and just modified it for my space/needs.