Community Brag Posts

DIY Chevron Growth Chart

I wanted to make a portable growth chart for my little guy and any future children. I really liked the over-sized ruler growth charts, so I set out to make one just like that. While searching for some inspiration, I came across Taryn’s Rustic Growth Chart at Design, Dinning and Diapers. I loved the finished look of her project!   I followed her steps to create one of my own!  Check out the blog link for more project details.

Estimated Time Investment
Afternoon Project (3-6 Hours)
Finish Used
Miss Mustard Seed's Milk Paint in Ironstone, ECOS Paint WoodShield Dark Walnut and WoodShield Satin Varnish
Recommended Skill Level
Starter Project

Comments

Coffee table

Submitted by Anonymous (not verified) on Fri, 06/02/2017 - 17:33

 I am so proud to show you what I made! I made a super comfortable coffee table/ ottoman for my livingroom. When not in use it's the same size as my couch to it works as an ottoman too :)  

Estimated Time Investment
Afternoon Project (3-6 Hours)
Recommended Skill Level
Beginner

Modern Adirondack Chair

Submitted by Anonymous (not verified) on Wed, 07/14/2021 - 11:08

Lots of fun to Build from Anna White's plan.

Estimated Time Investment
Afternoon Project (3-6 Hours)
Finish Used
Bear Exterior Latex
Recommended Skill Level
Beginner

Comments

Toy Storage Unit

This project on ana white is called "more than a nightstand" but we built this to be a toy storage and we LOVE how it turned out!

Estimated Cost
$50-60
Estimated Time Investment
Weekend Project (10-20 Hours)
Finish Used
American
Recommended Skill Level
Intermediate

Comments

Lady Goats

Wed, 04/17/2013 - 20:26

Are you the first to build this? Haha, I've loved the plan, but never wanted to try it because I hadn't ever seen it built. It's confirmed, I love it! Great job!

Large Rustic X Bench

Submitted by kcragun on Sun, 03/08/2015 - 15:23

I made this bench a little wider than the plan and made the legs more solid. I was shooting for a restoration hardware-type finish. It was fun to experiment. Used Dark Walnut stain, a white chalk paint "wash" (diluted chalk paint with water - about 50/50), sanded it back a little and added clear and dark wax. I still need to add wax to the legs, but had to share!

Estimated Time Investment
Day Project (6-9 Hours)
Finish Used
Dark walnut stain, Annie Sloan chalk paint (diluted about 50/50 with water), Annie Sloan clear wax and dark wax.
Recommended Skill Level
Intermediate

Comments

Greenhouse build

Submitted by Anonymous (not verified) on Tue, 06/06/2017 - 07:50

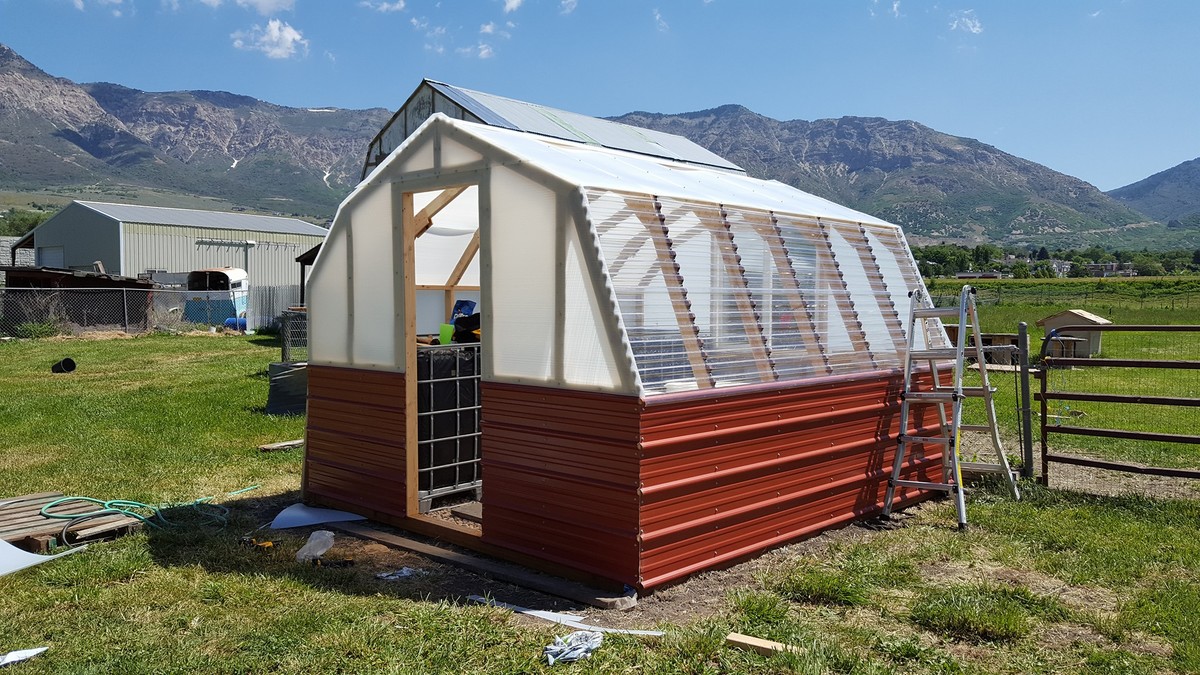
Looked everywhere for plans to build a G-House and kept coming back to this one...

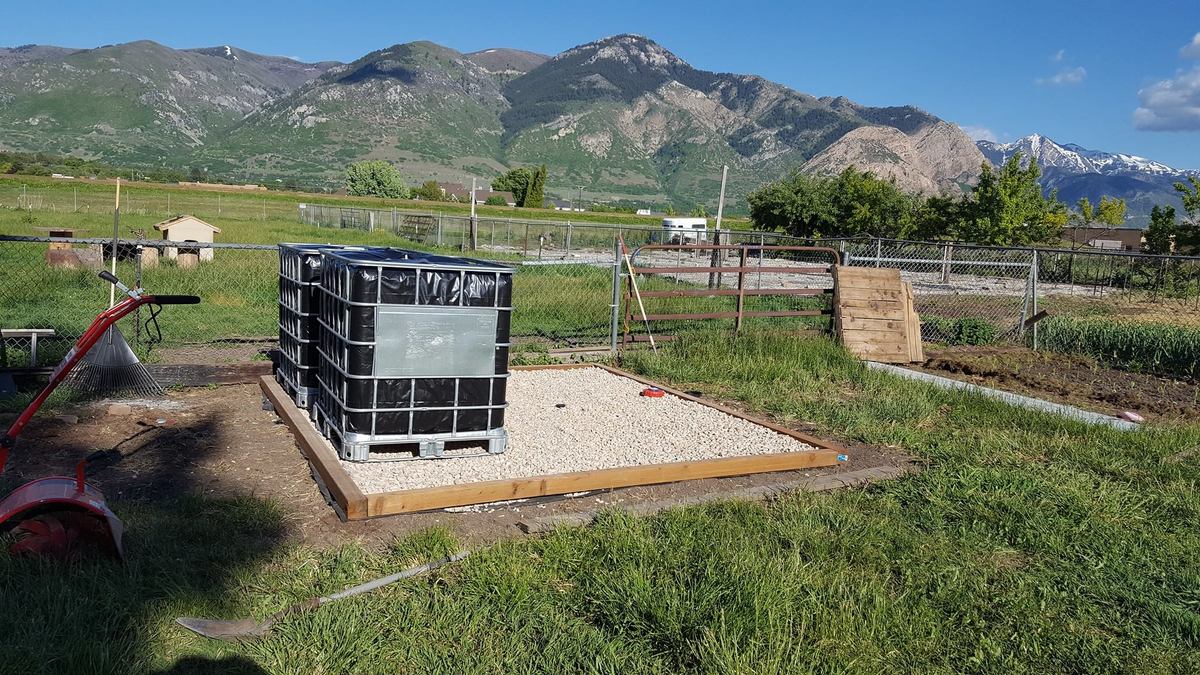
Wanted to integrate 2 275 gallon IBC containers for thermal mass so I had to adjust the plans a little.

Stared off with clearing the land and putting down some 4x4 pressure treated timber as the base.. Found a good price on some 1" minus gravel so I went and got 2 truckloads for the interior.. adds to the themal mass as well... Bonus...

Once the gravel and timber were down, it was time to build structure.  The south wall is according to plan but the north side had to be extended to 60" tall to facilitate the containers.... Looks a little wonky but function was my primary concern.  Built all the base in my garage and moved them out.

Once I got all the peices outside, I 4" screwed them to the pressure treated lumber and ran 3' rebar thru the corners from some stability and wind protection.

Up went the front and back framing then onto the rafters..  The south side was a breeze as the plans were pretty exact... the north side on the other hand had to be measured and cut individually due to the plan modification.  Was a bit of a pain but went pretty well..

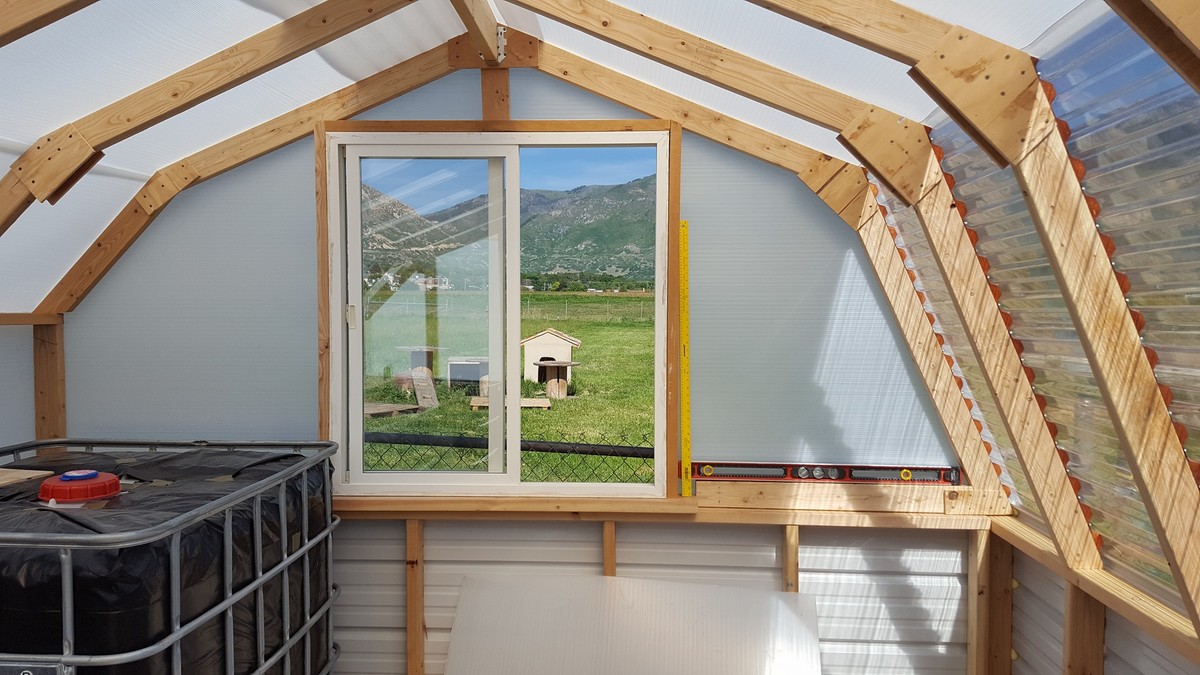
Rafters up and its time for some covering..  Decided to go with a combo of Solexx and SunTuf panels...price was comparable.

SunTuf panels went on really easily.. the solexx was a different story since it expands a tad when it gets hot..  Leaves sags and natural vents when overlapping but it all tightens back up when the temp comes back down.

Weve been hitting 90s this last week and its consistently 120+ inside so I decided to frame in a window.  Fans will be added on either side of hte window shortly and the door is being built.


Estimated Cost
$1000
Estimated Time Investment
Week Long Project (20 Hours or More)
Finish Used
Solexx and SunTuf
Recommended Skill Level
Intermediate

4x4 truss beam table

Submitted by mpkerling on Mon, 07/26/2021 - 12:20

A quality table big enough for the whole family without costing a fortune! I was able to tailor this to be the perfect size for our family’s house in the country.

Built from Plan(s)
Finish Used
50% special walnut, 50% classic grey

Comments

Bench Side Table

Submitted by keribeth on Sun, 04/21/2013 - 06:38

I altered the plans for the Providence Bench to make this shorter bench, which I'm using as a side table. I love the chunky look of the 2x4s and the angled legs! I built it in an afternoon, but finishing took a bit longer, and I'm listing it as intermediate because of making angled cuts and beveling some ends, but it really wasn't that hard. Cost is for lumber only--I used leftover stain and polyurethane.

Built from Plan(s)
Estimated Cost
$12
Estimated Time Investment
Afternoon Project (3-6 Hours)
Finish Used
Minwax gel stain in Hickory
Recommended Skill Level
Intermediate

Aburey's "Purple"

Submitted by Anonymous (not verified) on Sat, 06/10/2017 - 09:00

My friend got his project done, two weeks before x-mas.

Estimated Time Investment
Week Long Project (20 Hours or More)
Finish Used
Our 3 year old daughter asked for a purple kitchen for Christmas. I couldn't find one that I actually liked, and then I came across these plans. Two weeks before x-mas I took them to my buddy and he made her kitchen for me. His wife and I painted it. My daughter loves this kitchen and we've gotten so many people asking where we got it.
Recommended Skill Level
Beginner

Comments

Little Girl Make Up Vanity

Submitted by akwebb3 on Tue, 08/03/2021 - 13:43

I made this little vanity as a gift for my grand-daughter for Christmas. I pretty much followed the plan for most of it. I didn't use stair balusters and just used 2x2's and created my own light up mirror. I bought a round piece of wood from Lowes then drilled holes spaced evenly around the edge so it looked the way I wanted. Then used a string of Christmas Village house lights that I found at Walmart. I used my Dremel to carve out a pathway in the back for the excess cord to lay in then inserted the lights into the drilled holes. I wanted to use plastic bulbs for safety reasons so I went with an LED bulb that I found on Amazon. But those didn't have that nice globe look so I used some ping pong balls and an exacto knife to cut out a small circle just large enough to fit the base of the bulb and attached those. So the lights are completely safe as they are all plastic and won't heat up since they are LED. I just used some scrap wood that I had on hand to make a little seat and bought a small piece of faux fur fabric to lay over the top for a more fancy look.

Built from Plan(s)
Estimated Time Investment
Weekend Project (10-20 Hours)
Recommended Skill Level
Beginner

Comments

My Outdoor Table!!

This is my wonderful Outdoor Dining Table!!

My husband's first project and I couldn't be more pleased with the end result.

Thanks Anna White for your EASY to follow instructions!

Built from Plan(s)
Estimated Time Investment
Weekend Project (10-20 Hours)
Recommended Skill Level
Beginner

hanging daybed

Submitted by cableslack on Sun, 03/15/2015 - 08:58

I really liked and wanted to build the hanging daybed.  Then I needed somewhere to hang it.  Then I wanted to use it during the day (Northeast Brasil - Sun is brutal)

Built using massaranduba wood (Father in law has a woodshop) and the thing weighs a tonne.  

The shades are a 85% sunshade.

It has proven very popular with family and friends.  As of yet there has not been space on it for me to try out.  

Bed measures 1.0M x 1.9M

Project all total took about 120 hours.  

Built from Plan(s)
Estimated Cost
$1250
Estimated Time Investment
Week Long Project (20 Hours or More)
Finish Used
varnish with solar filter. About 5 coats
Recommended Skill Level
Intermediate

Comments

Modern Farmhouse Coffee Table

Submitted by alabama360 on Wed, 08/11/2021 - 17:57

Made the coffee table for my new daughter-in-law. Looks great in their new apartment. Love the design and the plans were easy to follow. Thanks Ana!

Estimated Cost
$60
Estimated Time Investment
Afternoon Project (3-6 Hours)
Finish Used
Varthane Briarsmoke
Recommended Skill Level
Intermediate

Comments

Rustic X entryway table

Submitted by Erinawtrey on Mon, 10/03/2022 - 16:24

I made this to match Ana's rustic x console, end and coffee table!

Built from Plan(s)
Estimated Cost
$35
Estimated Time Investment
Afternoon Project (3-6 Hours)
Finish Used
Dark walnut
Recommended Skill Level
Starter Project

Comments

4x4 Truss Beam Table

This is my 2nd table built from plans on the site. I built the pocket hole farm table originally and our family used it for 2 years and then I sold it to another family to enjoy! I built this one a full foot longer and used a 2×10 in the center to widen it. We host large gatherings so I wanted the additional space. The dark walnut came out beautiful if darker than the plan table. We love it!

Built from Plan(s)

Comments

Easter Bunny Wood Decor Piece

Submitted by Nor7 on Thu, 03/19/2015 - 07:25

This was a simple build. You can probably tell from the pictures how it was cut, painted and decorated. The whiskers are just picture hanging wire. The wood was scrap from around my shop and all the other materials we had on hand.

Estimated Cost
$0. Made from scrap and hobby materials from around the house/garage.
Estimated Time Investment
An Hour or Two (0-2 Hours)
Finish Used
Acryllic Paint
Recommended Skill Level
Starter Project
Seasonal And Holiday

DIY Mobile Lathe Stand

Submitted by Anonymous (not verified) on Sun, 06/18/2017 - 14:35

I needed mobile stand for my lathe so I built one using scrap 2x4 and 2x6 boards.  

Estimated Time Investment
Afternoon Project (3-6 Hours)
Recommended Skill Level
Beginner

Farmhouse twin bed

Submitted by Anonymous (not verified) on Thu, 09/09/2021 - 12:04

Used your plans and modified with carriage bolts on the legs to attach the box to the frame. Thank you Ana, my son LOVES IT.

Comments

Woven back bench

Submitted by JoshMonroe on Tue, 04/30/2013 - 15:30

I started building a different bench, but I decided halfway through that I didn't like my design. I found this, and loved it, so I modified my partially built bench to incorporate the woven back design. I substituted in a few mortise and tenon joints for strength, and used either kreg or waterproof glue for the non-structural joints. The seat bottom is made from 2x4's I resawed in half. I also rounded over the edges of the 'Y' pieces, which I think makes it look a bit more like they're woven together. Thanks for the plans, this is a great addition to my front porch!

Built from Plan(s)
Estimated Time Investment
Day Project (6-9 Hours)
Finish Used
None yet, will be painted.
Recommended Skill Level
Advanced

Comments

spiceylg

Wed, 05/01/2013 - 05:35

Beautiful build! I love the details such as the edges of the Y pieces as you said. It definite adds more dimension and the curves on the arms as well!

JoshMonroe

Wed, 05/01/2013 - 11:01

Thanks! I saw a cabinet in a book on wood finishing that had adjoining edges routed like that. It looked so good there, I decided to try it here, and I'm glad I did!