Children's Bench with Arbor
Child's Bench with Arbor
Inspired by Ana’s island plans with a few of my own tweaks.
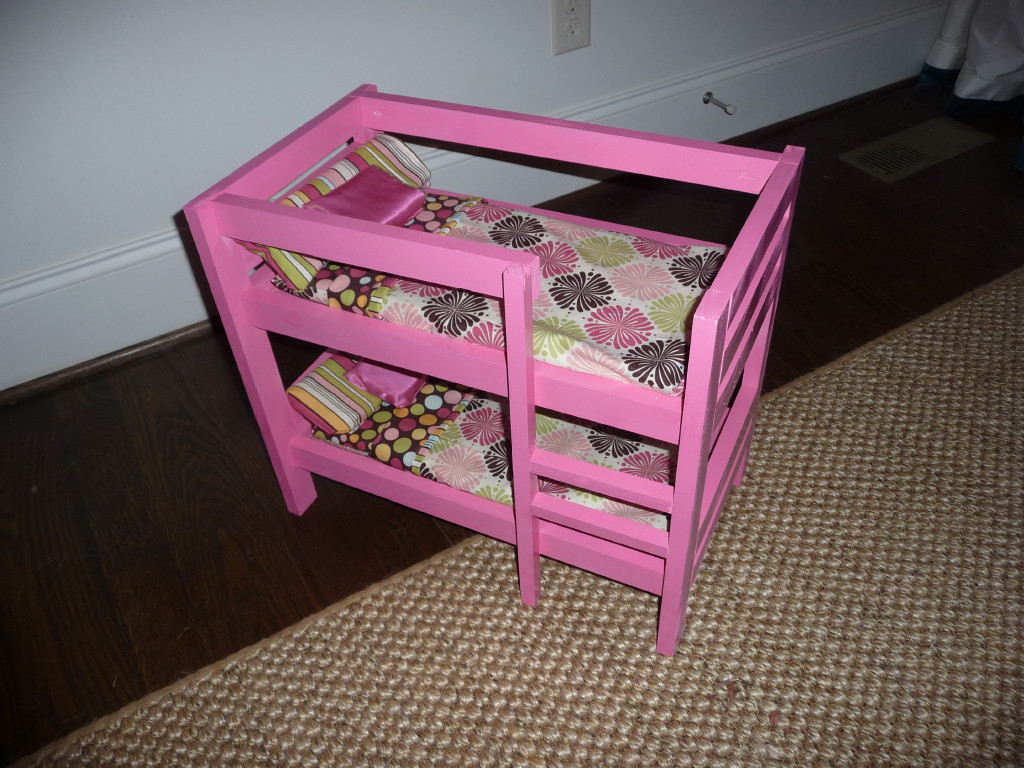
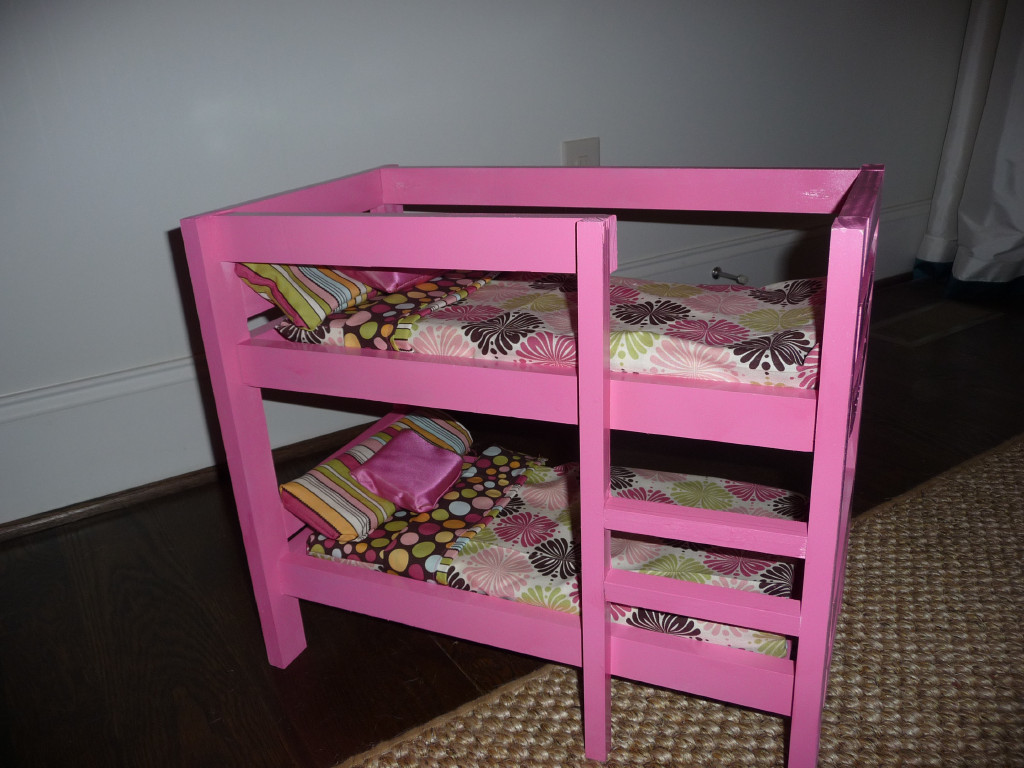
After my niece Ella was so excited about the farmhouse doll bed I made for her birthday, (http://ana-white.com/2011/09/ellas-doll-bed) I decided to make a doll bed for her little sister's 5th birthday. I went with the bunk bed and it was so easy to make. It probably took only 3 hours of time total (including finishing/painting). Thanks, Ana, for making me so popular with my nieces!
The bed is super sturdy. The kreg jig was invaluable. I used "select" pine boards just so the finishing would be easier. I had to use a 3/4"x3/4" trim board for the 1x1, so it was a little more expensive. Total wood cost was about $21.
I used a gloss spray paint. I don't have girls, so I never realized how happy spraying something glossy bubblegum pink can make you!
There are a couple of errors in the cut list. There should be 4 1"x1"x19" cuts for the cleats. To fit all of the cuts in one 1"x1"x8', I made the 4 cleats about 16 inches each. Also, you can't get all of the cuts out of 3 1x2s. I didn't want to run back to the store, so I left out the middle side rails on the top bunk. I kind of like the more "mod" look! (and it's not like you need the rail for safety!)
My youngest was outgrowing her crib-turned-toddler bed, so I let her pick a bed for me to build, and this was her choice. Fortunately, it's a bed I've already built, so it sure made life easier. The plans for this bed are inaccurate, which I learned the last time I built it, so I was prepared for the modifications I would have to make. While I was at it, I made the headboard 4" shorter and the footboard an inch and a half taller (to hide the end of the mattress). I also trimmed out the dividers. All personal preference.
Wed, 10/16/2013 - 19:12
What is that wall color and where did you get the rug???? Your build is, as always, beautiful, but I absolutely LOVE that paint color on the walls. Would love to use that somewhere in my home.
In reply to What is that wall color and by Pam the Goatherd
Thu, 10/17/2013 - 11:47
Hi Pam! Thanks!
Not sure why the photo is upsidedown. This project was very easy with the proper tools.
I needed a double vanity that was just under 8' long, so I modified the plans to fit my space. I replaced the open shelving with a third row of drawers and added drop down doors just below the sinks. The plans were very easy to follow and I love how it turned out!
Built this while 8 months preggo with help from my husband and best friend (sewing). I wanted to make it big enough to be an extra bed and I wanted it to be comfortable so I invested in an 8"memory foam mattress. Here is the pic before the leg base went on.
We made the back 3" higher since the mattress is so thick. I have kids so I made the cushion cover around the whole mattress so we could take it off and wash it. I staple gunned plain grey fabric to hide the plywood of the lid (since I was limited to fabric I had found).
It is a little too deep to sit on for two people but it is great in a corner where you can lounge on it with a book or snuggle for a movie with your partner or kids! :)
Wood /glue/adhesive spray - about $120
Fabric - bargain bin upholstory fabric/thread - $67
Cushion covers (filled with old pillows,leftover uphostry foam and two KING pillows) - cream, from IKEA bargain bin 4@ $5 each= $20+tx
Mattress- Twin memory foam (Classic 8")- $199+tx @ Jysk on sale (they go on sale every two months).
So the whole thing was about $450 and we love it. The only thing I saw that came close was $3000 in a store downtown.
Thank you so much for the plans Ana!!
Samantha A.
Halifax, NS
I had recently put a bathroom, tiled/carpeted my basement to make it more into a family room. The basement of my house is connected to the garage and has an entry door from the garage. As you can see the walls are brick and my wife wanted something to organize our coats and shoes. I found the plans on this sight for the entry way bench and shelf/coat rack and thought that would be perfect. I don't think it could have worked out better for the new basement/family room.
I took the plans from DIY and followed them to the "T"...more or less. I'm making 4 more of these for family and friends and will try the Kreg Jig to install the seat bottom and back rests.
My son and his girlfriend are expecting baby Nova in May. He asked that I build her a changing table or a toy box. I picked the the table.
The drawer setup in the plans is not clear, however I used 14" drawer slides. I mounted a small 1x2 on each side and in the middle to mount the drawer slides to. To accomodate the drawer slides, I had to reduce the width of the drawers by approximately 1/4 inch. I waited until the I was ready to install the drawers so could fit check them prior to final cut and drawer slide installation.
As for the Baskets underneath - they are Elfa baskets from the Container Store. They are mounted in with slide out trays.
Coffee Bar Built-in! Shared by Katie Cain
We have a family that we are very close with. We both have young boys with Down syndrome, so getting to know them has been a lifesaver. Well, I wanted to help "save their life" too by making another organizer bin for the kid's schoolwork. I used scraps from my garage and an old Ikea frame that a friend gave me. As you can see, I modified from the original plan to add a letter holder and hooks for the keys. Now they don't have to "ohhh and ahhhh" when they come to my house, because now they'll one all of their own.
Wed, 03/07/2012 - 06:07
I just made it from pine. You can use screws/nails or L brackets to keep it together and to attach. I can't remember now how I did it.
We wanted a bench to go with our new table, but couldn't find one we liked, so we decided to make this our first project. Finished it with paint and an over glaze to match the finish on the chairs. Couldn't be happier with the results!
This is a table and bench set I made for a couple of friends who moved into a new home and needed a place to eat and study. I incorporated some scrap iron, piping with purchased lumber. In addition to beating the lumbar with chains, old tools, chisels, etc. I used a vinegar and steel wool mixture to create the distressed appearnce and sealed it with natural color danish oil. The vinegar also helps create a nice rest patina to the metal which I sealed with a clear spray enamel.
I extended the slats past the legs by 2 inches on each side. Stained the legs Cherry and Torched the seat. All the wood was reclaimed.
Here is the video: https://youtu.be/lI5d3r2-41o
First time using jigsaw, think it turned out pretty good! What a fun project to build!
Really wanted one of these but everything I found was way too expensive so I found these plans, tweaked em a bit to fit the space I had and voila, double tilt-out trash bin. Thanks for the wonderful plans!
Sat, 05/02/2020 - 14:36
This is the exact Style I've been looking for!! I see that you made this ages ago - any chance you still have the dimension modifications you made somewhere?
We are loving the way this turned out. I made it 5.5 feet long, split the top and added a divider support bar in the middle inside the top storage area. It feels super sturdy (has had our twin toddlers climbing and banging all over it without a problem!) and is getting a ton of use. Winter gear in the top, and shoes/boots in the bottom. As my first big wood-working project, it was relatively easy thanks to the instructions. Having the wood pre-cut at Lowes saved me needing the tools, but the pieces were not exact. I also found that this cost us more in materials than was listed, maybe because I bought the higher-grade pine, and we made a longer bench. I
I used Ana's website and found the plans for this awesome and adorable bench! I placed it on my front porch at my house and it really brings a feeling of "home" to the outside! The best part about it is that I only used six 2x4s and the cost was under $18! (If I would have read the first direction about cutting the long pieces first then I could have avoided going back to Home Depot for an additional 2x4 lol) Also- if you have never done a miter cut before that has to be a precise length, make sure to cut the board longer than what the plan says and then cut the angles. I made the mistake of making a cross cut at 13" and then making the 45° angle, causing it to be too short.
We used Ana's Laundry Basket Dresser plan and modified it slightly to fit our needs and our space. We made spaces for two laundry baskets, plus a shelf for laundry supplies and a bigger top for ironing/folding. We also attached casters to the bottom so we can wheel it around wherever we want!
See more pictures on our website strawbridgestuff.com
Fri, 11/11/2011 - 09:31
I have been eying this plan and you have given me a great idea on how to modify the dresser plan to fit my area. Looks great!