Community Brag Posts
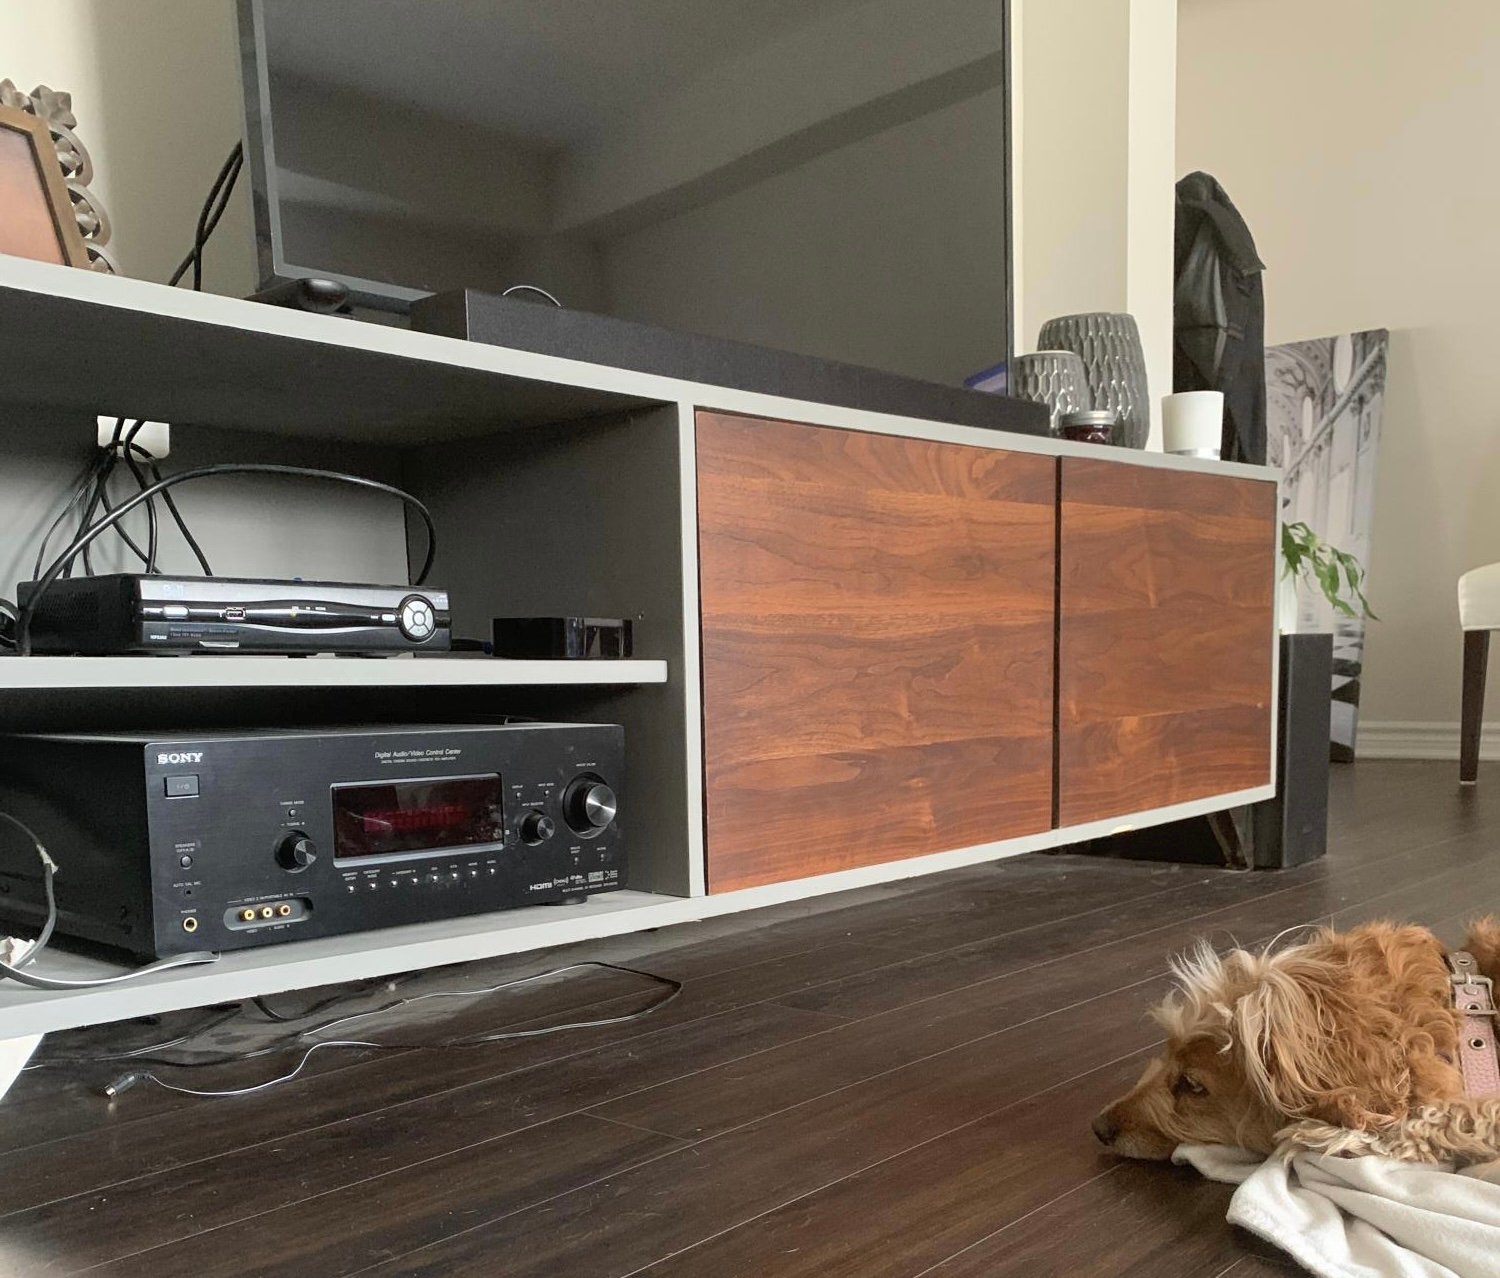
Media console
This great plan!! Thx Ana!
Built from Plan(s)
Comments
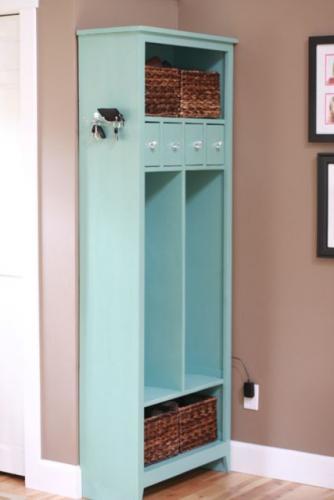
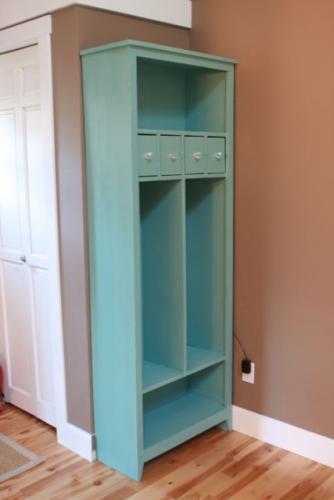
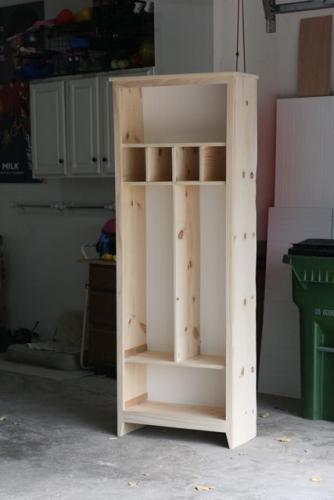
My first build!
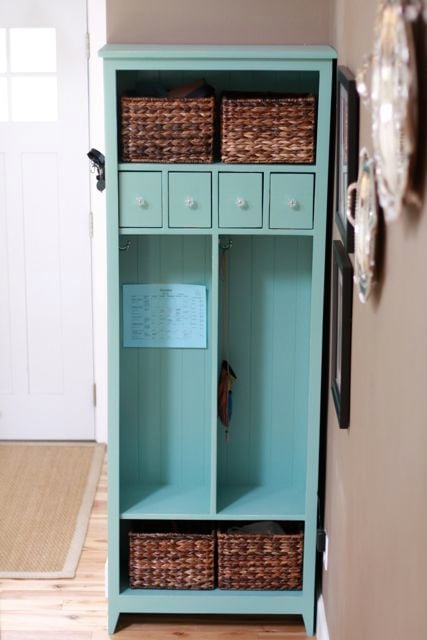
This locker cabinet was my first build and I learned a ton. For example:
1. Use the Kreg face clamps while drilling into the Kreg Jr.
2. Buy straight wood.
3. Buy wood that is not warped.
4. Do not try to buy wood with grouchy kids in tow.
Are you seeing a theme? Yep, your project will only be as square and perfect as the wood you buy.
I modified the locker plan to include apothecary-style drawers for our cell phones, sunglasses and chapstick. I also drilled through the back of one of the drawers to turn it into a charging station for our cell phones.
The locker has been super useful so far and is such a great way to keep my kids' backpacks and lunchboxes organized. The baskets are designated for my purse, stuff I need to return to stores, the dog's leashes, and library books. It's so nice to have all this stuff near the front door and never wonder where any of it is!
Built from Plan(s)
Estimated Cost
$100
Estimated Time Investment
Weekend Project (10-20 Hours)
Finish Used
Ralph Lauren "Aged Mint" in flat. Distressed and coated with Minwax Polycrylic in satin.
Recommended Skill Level
Beginner
built by Grandpa
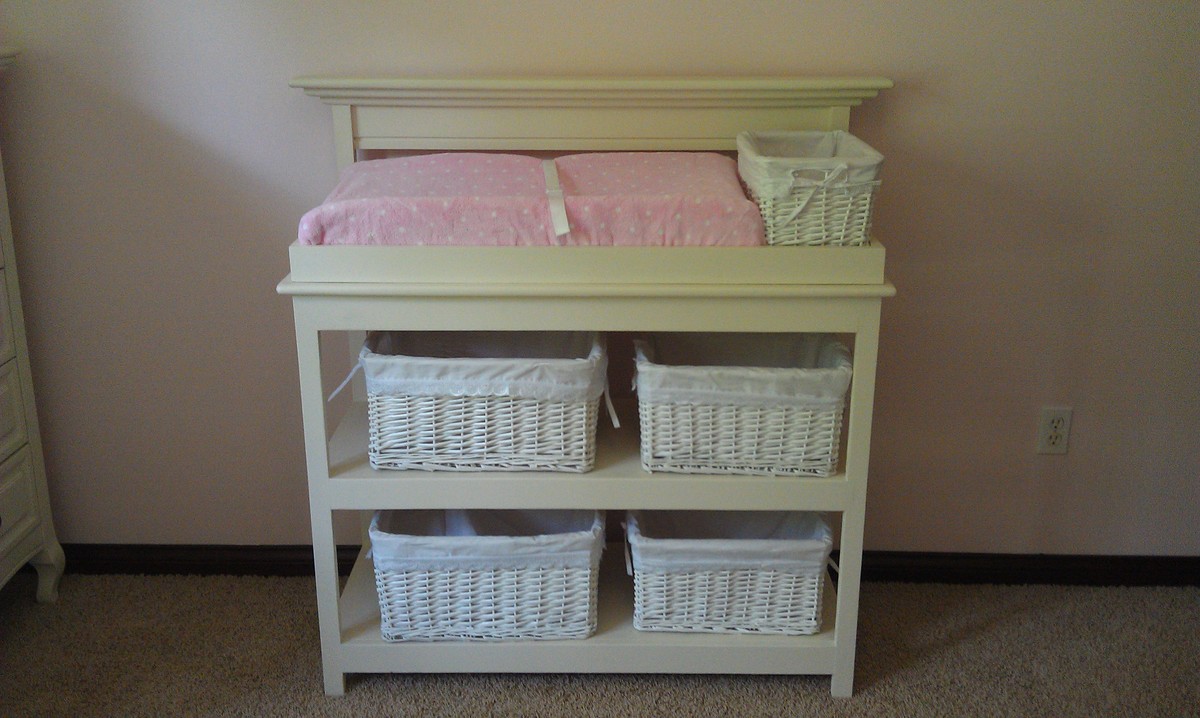
Grandpa modified the simple changing table to match the rest of our nursery furniture.
Built from Plan(s)
Estimated Cost
$100
Estimated Time Investment
Weekend Project (10-20 Hours)
Finish Used
Paint
Recommended Skill Level
Intermediate
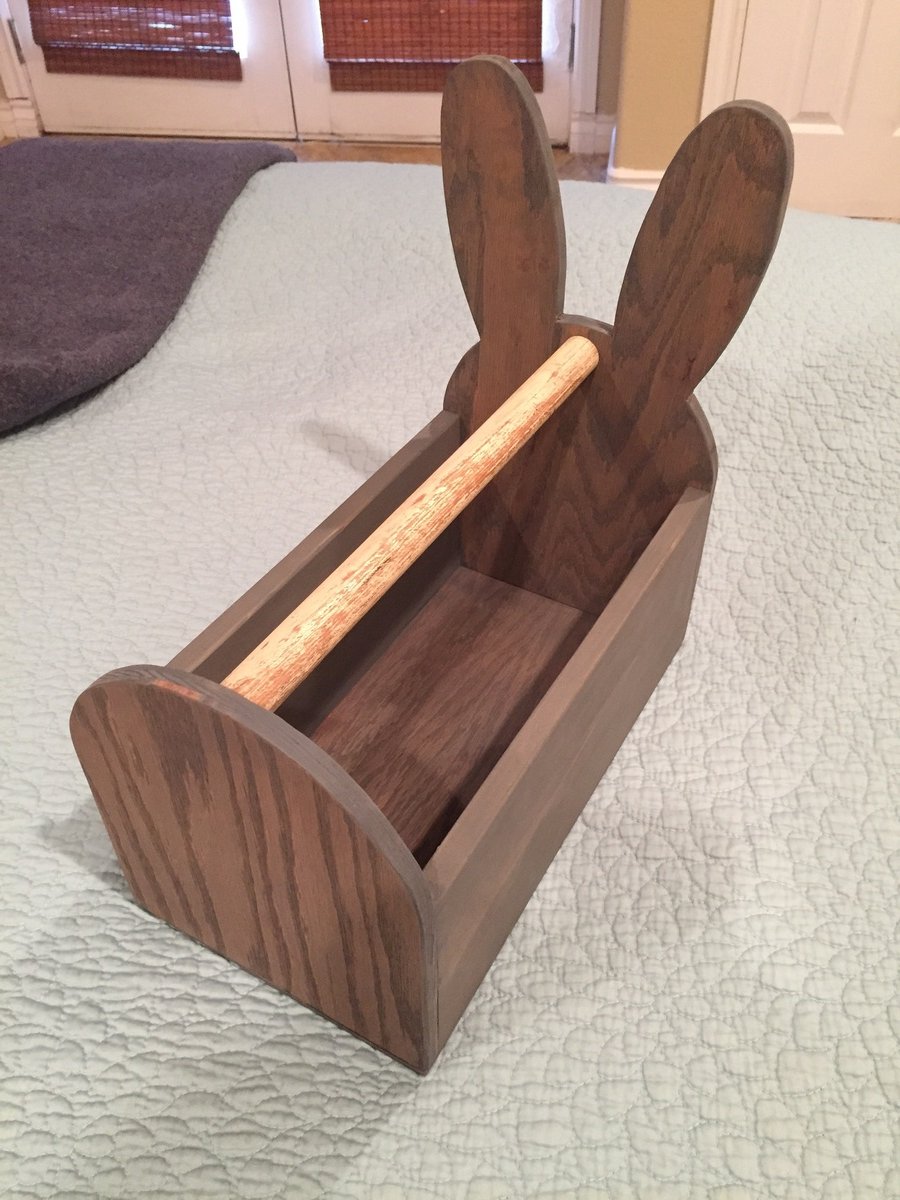
Bunny box
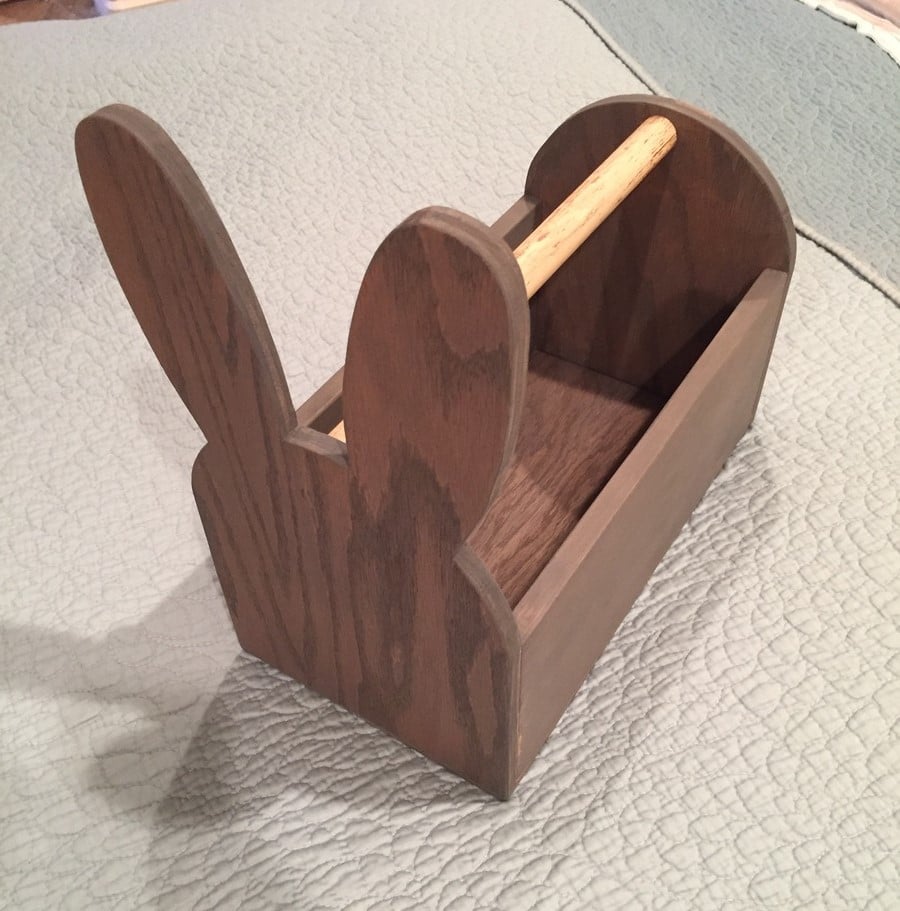
1/2" oak ply, cedar fence post, 1/4 inch oak ply
First brag! I had a little time to play in the garage and decided to join the scrap wood bandwagon. The wife loves the bunny box and now the mother-in-law NEEDS one. Back to the garage I go...
Built from Plan(s)
Estimated Cost
$0
Estimated Time Investment
An Hour or Two (0-2 Hours)
Finish Used
Minwax Classic gray
Recommended Skill Level
Beginner
Comments

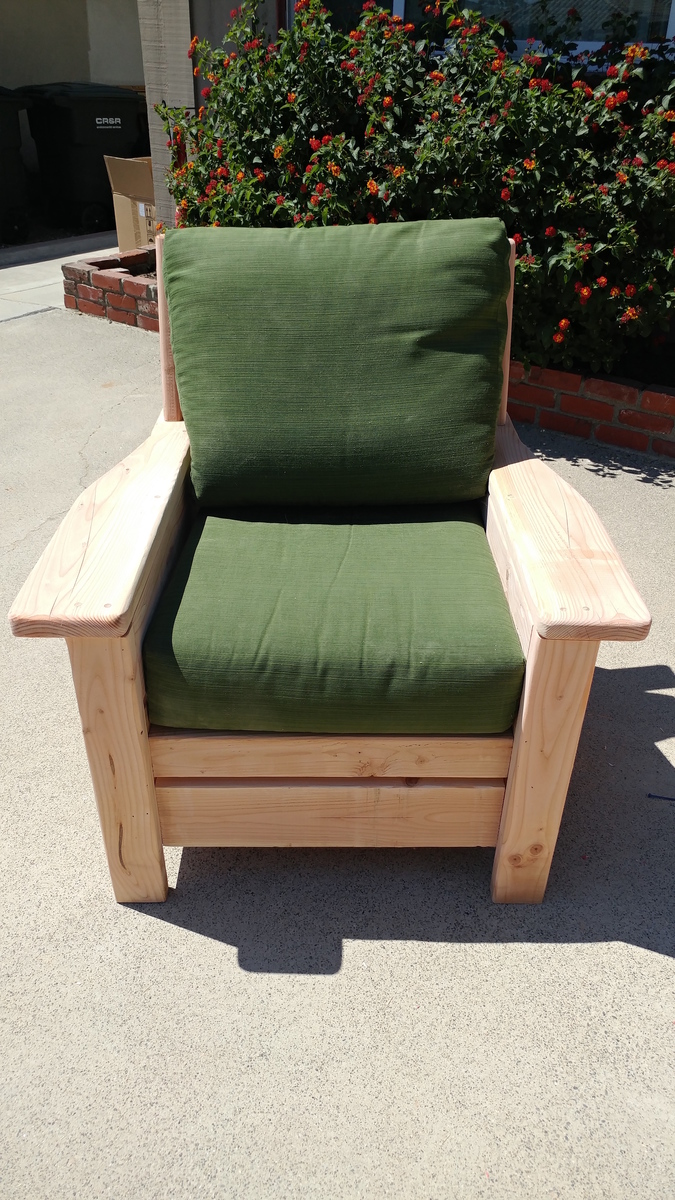
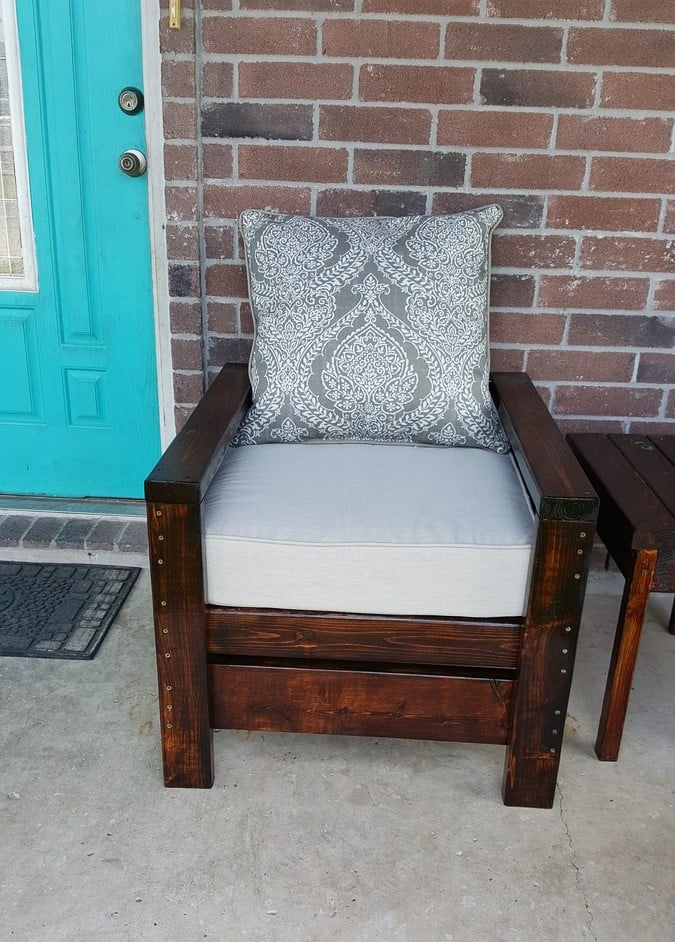
Modern Outdoor Chair with a twist
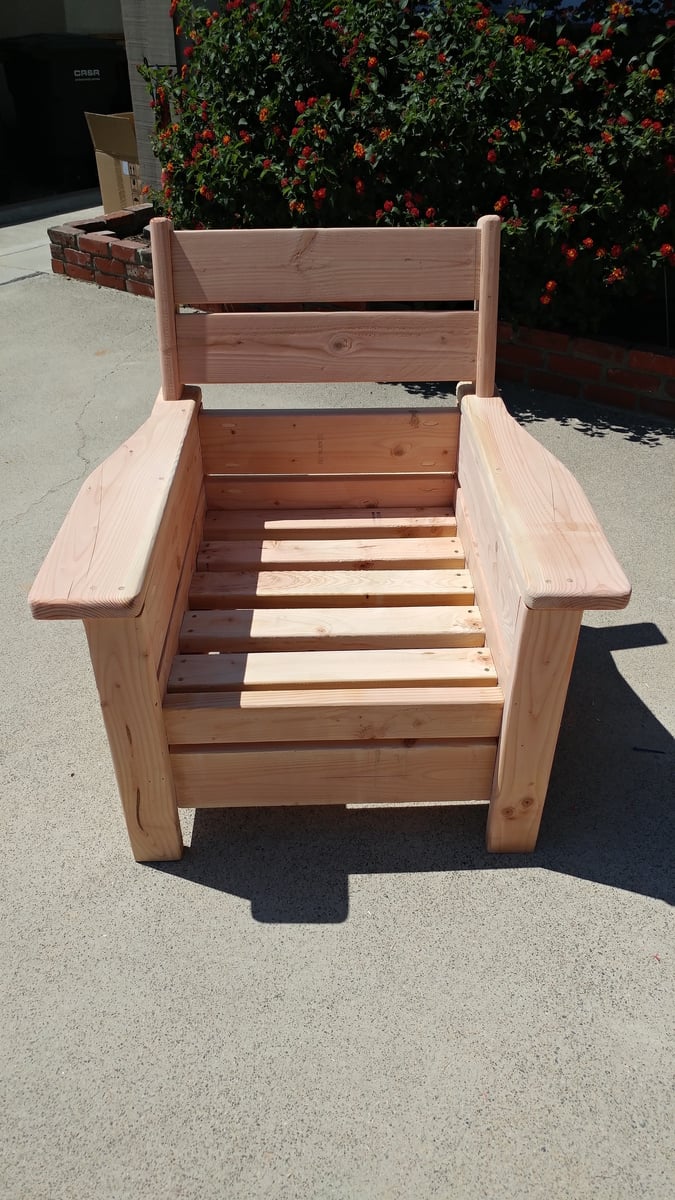
Taken from the Modern Outdoor chair project and added a back. Then decided that I love the andorak style chair arms and thus the Andrmodern chair was born..
Built from Plan(s)
Estimated Cost
$35.00
Estimated Time Investment
Afternoon Project (3-6 Hours)
Finish Used
Will use the Behr two in one
Recommended Skill Level
Beginner
Comments
Mon, 08/03/2020 - 09:02
I’d love to know how you…
I’d love to know how you made the changes, love it!

Thu, 03/18/2021 - 09:20
Modern outdoor chair with a twist
Could you please share how you added the back and arms to the modern chair plans.
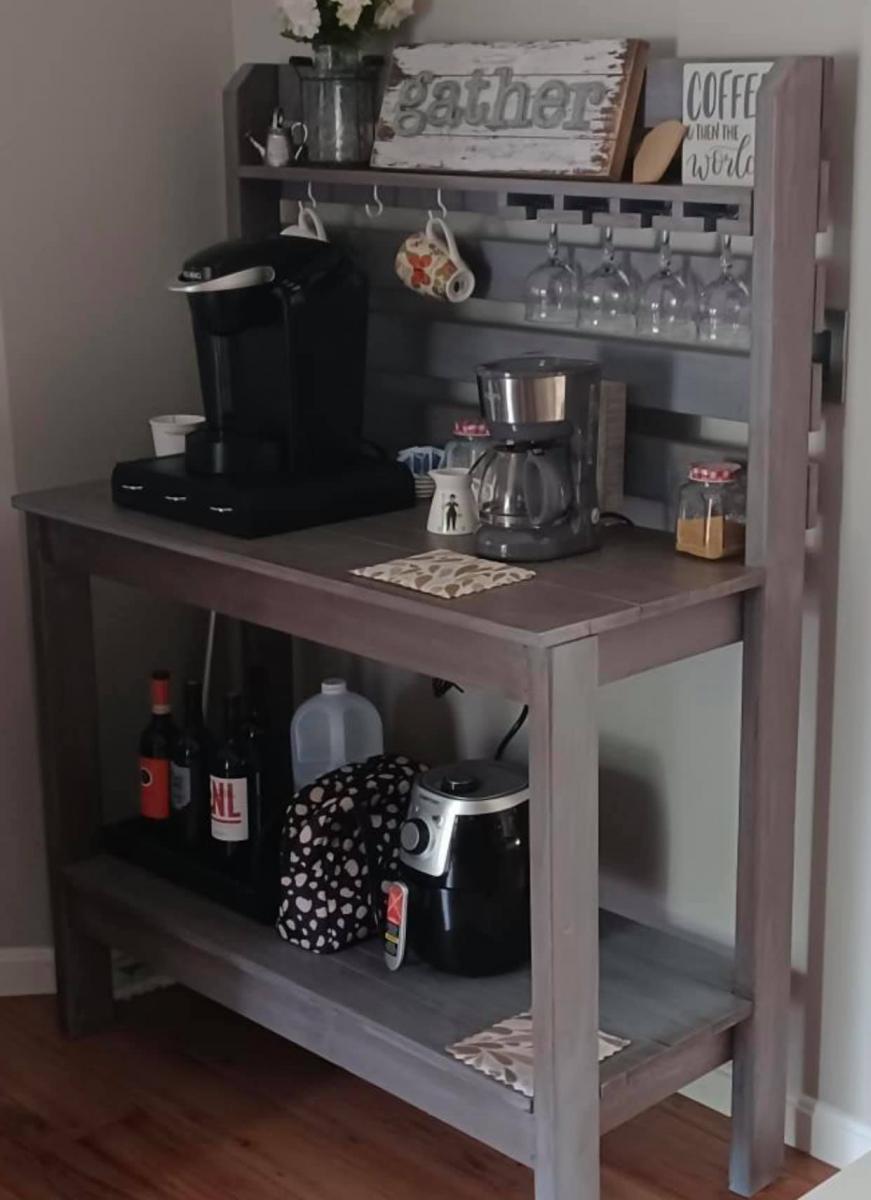
Coffee - Wine Bar (Adapted from Planter's Bench
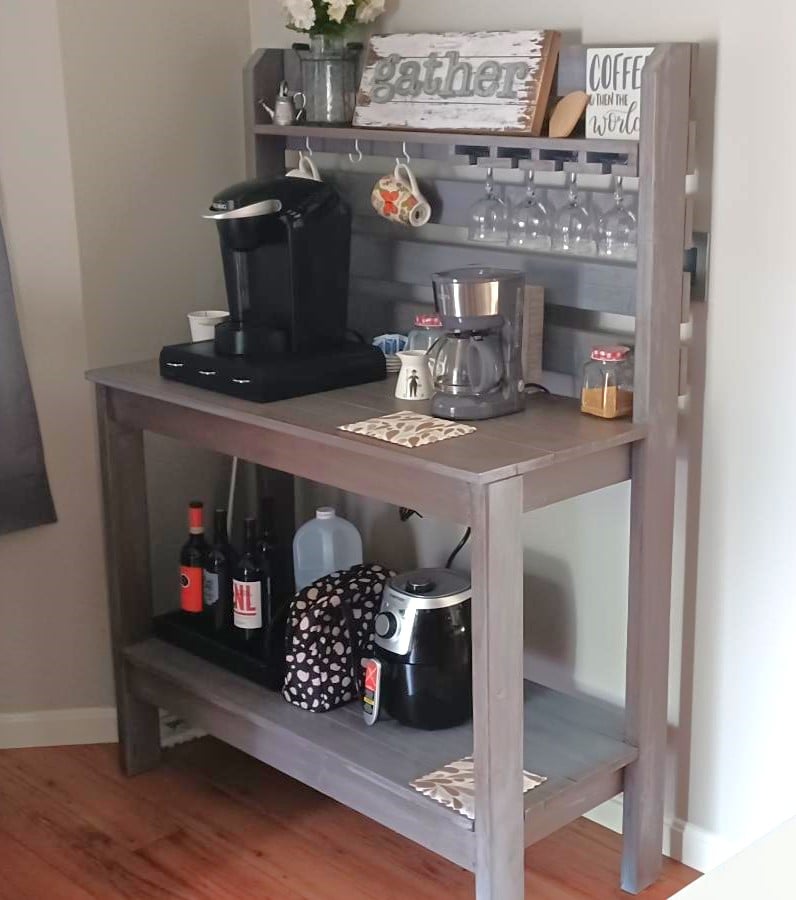
Built for my daughter but it came out so well, kept it.
Built from Plan(s)
Comments
Murphy Bed
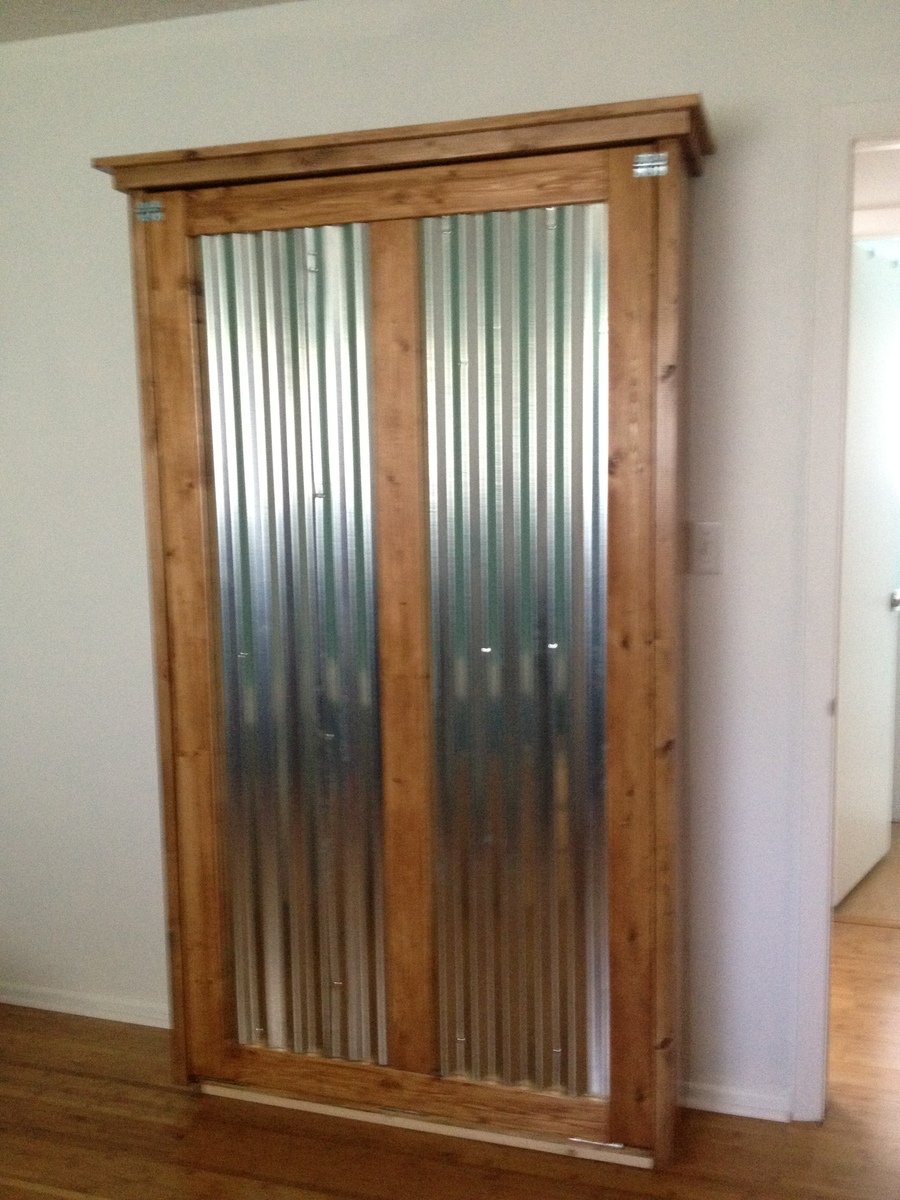
I'm turning my messy sewing room into an organized craft/guest room, so I made a murphy bed to conserve space. I used corrugated tin on the the face of the bed so that I can use it as a magnet board while not in use as a bed.
Built from Plan(s)
Estimated Cost
$100
Estimated Time Investment
Weekend Project (10-20 Hours)
Finish Used
Polyshades Antique Walnut--two coats with light sanding in between
Recommended Skill Level
Intermediate
Comments

Fri, 05/17/2013 - 09:54
Hardware Cost?
The estimated cost is $100, but the hardware linked from the original plan was over $300. Do you have an alternate method of mounting this?
Fri, 05/17/2013 - 11:23
Hardware cost
I think that link was a suggestion if you want an assisted lift/lowering system, and that hardware is part of what makes regular Murphy beds so expensive. I just used door hinges--3 for $8. It's not that heavy to lift and lower the bed, in my opinion.
Fri, 05/17/2013 - 11:40
Hardware Cost :)
Thank you for your reply! If I make this project, I think I'll try the door hinges. It won't be frequently used (a few times a year) and I'm pretty sure we can handle the minimal weight for those few occasions.
P.S. I really like the styling with the wood and corrugated metal, it looks sharp!
Fri, 06/28/2013 - 20:02
great muphy bed
thanks for sharing the murphy bed. have been looking for a space solution for my daughter's bedroom. the corrugated tin look sharp in this project--my daughter would like the corrugatged tin as well--except for hot pink stain on the cabinet.
anyone know where to get hot pink stain?
Sun, 09/08/2013 - 20:58
Does anyone have any
Does anyone have any suggestions on how to bring it up off the floor some?
Wed, 02/10/2016 - 04:24
Modify possibility?
Paint tin with dry erase or chalkboard on one side for daily notes?
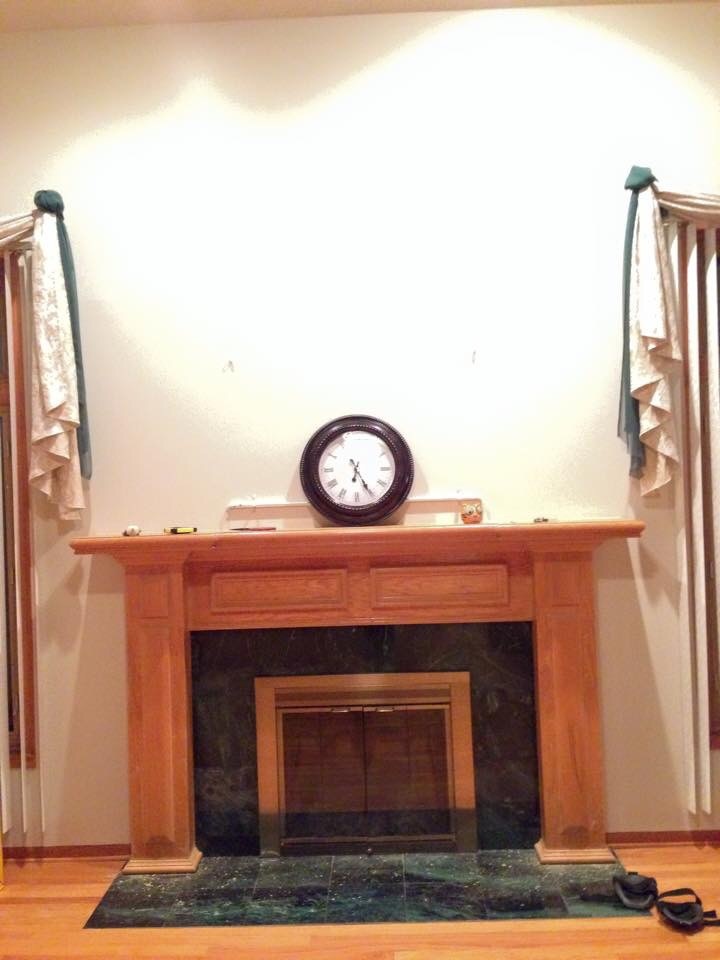
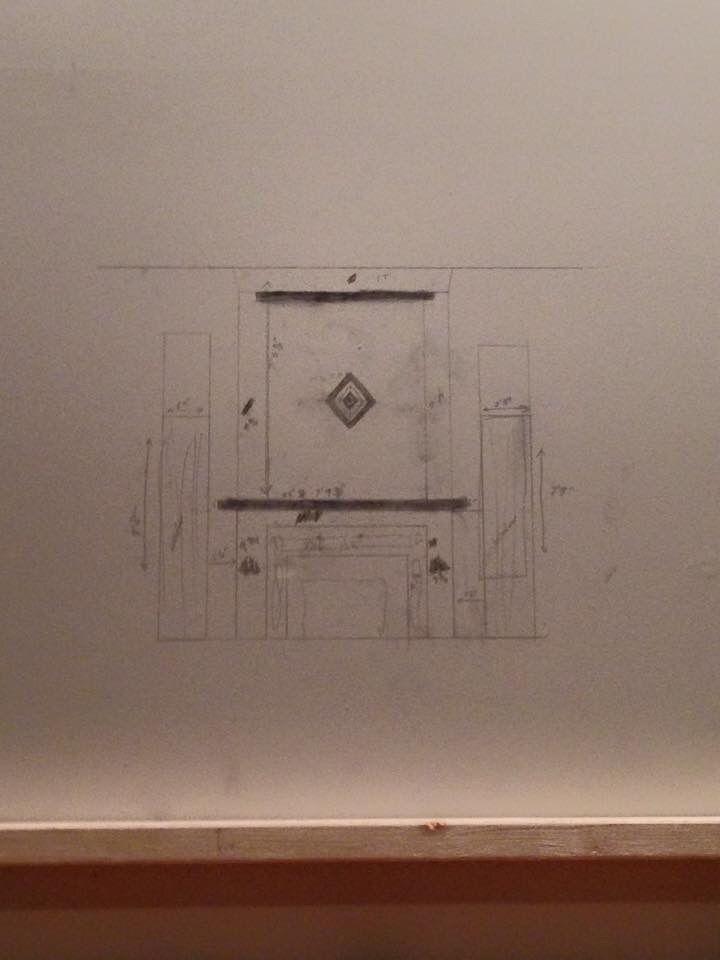
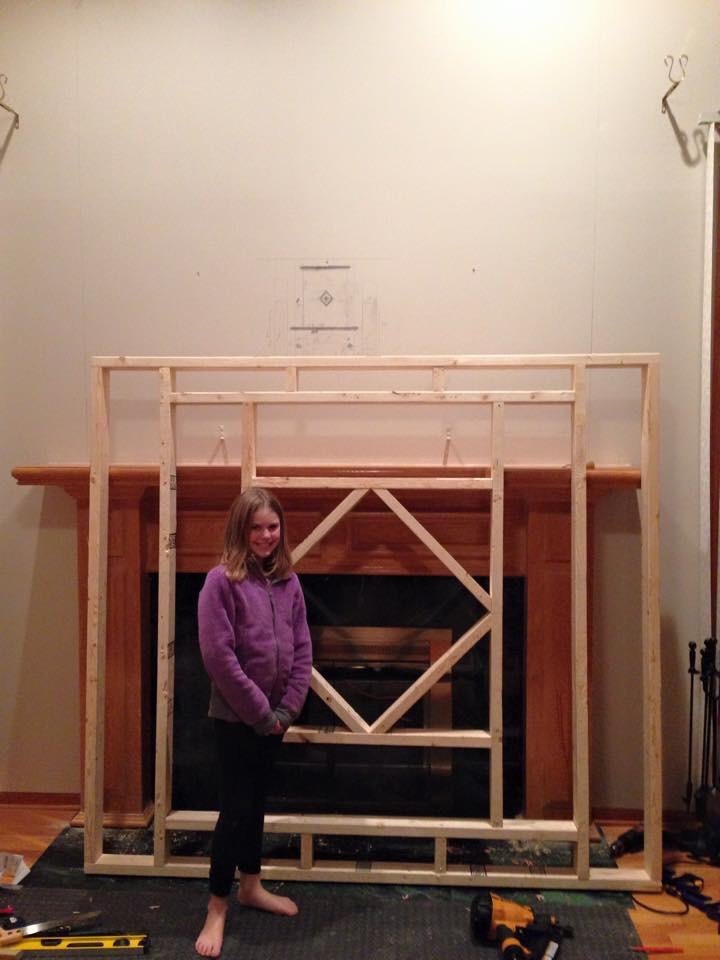
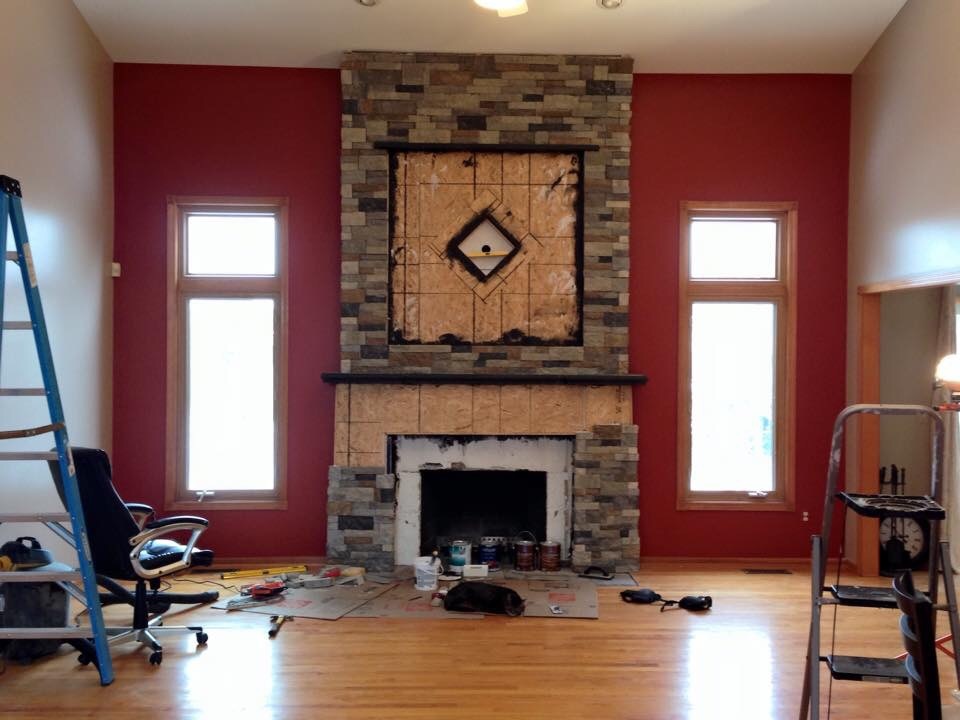
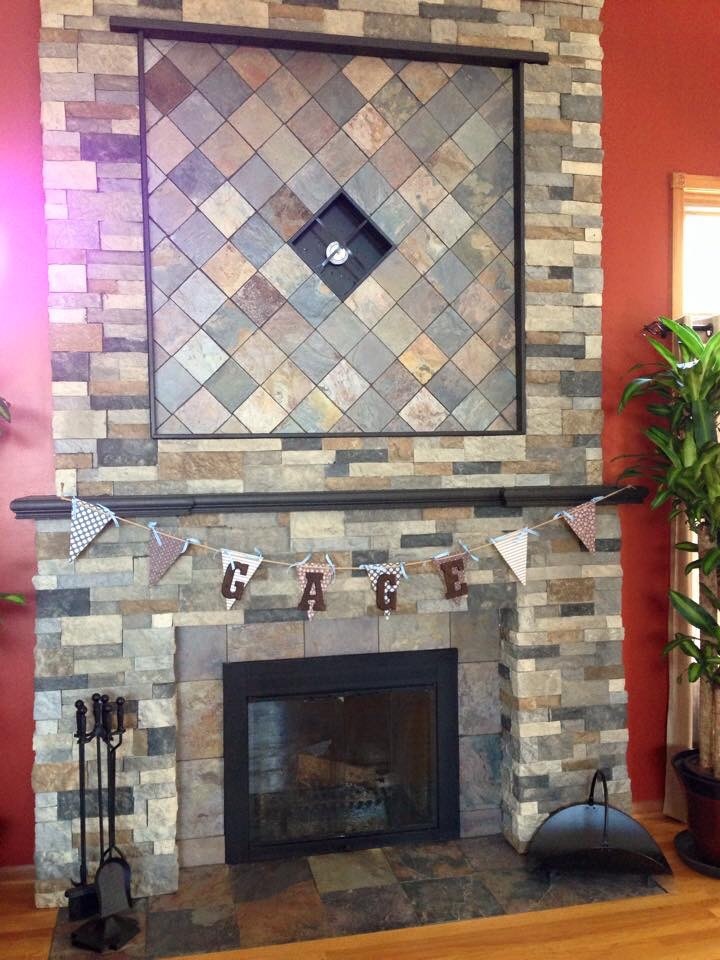
Fireplace makeover
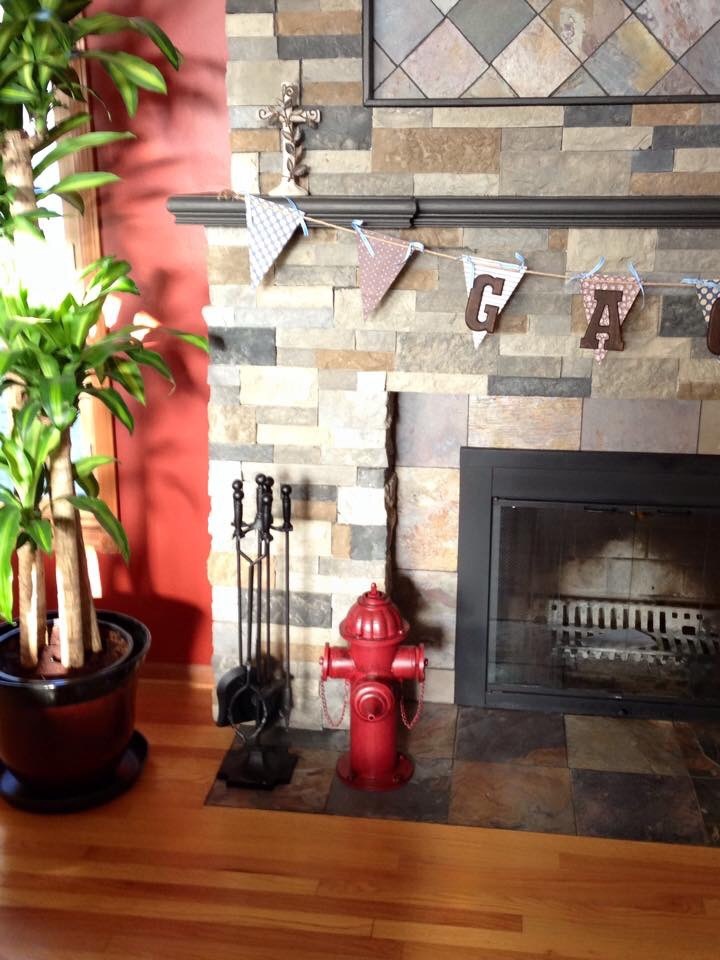
This is my first DIY project ever. No plans.
Estimated Time Investment
Week Long Project (20 Hours or More)
Finish Used
Airstone
Recommended Skill Level
Beginner
Comments
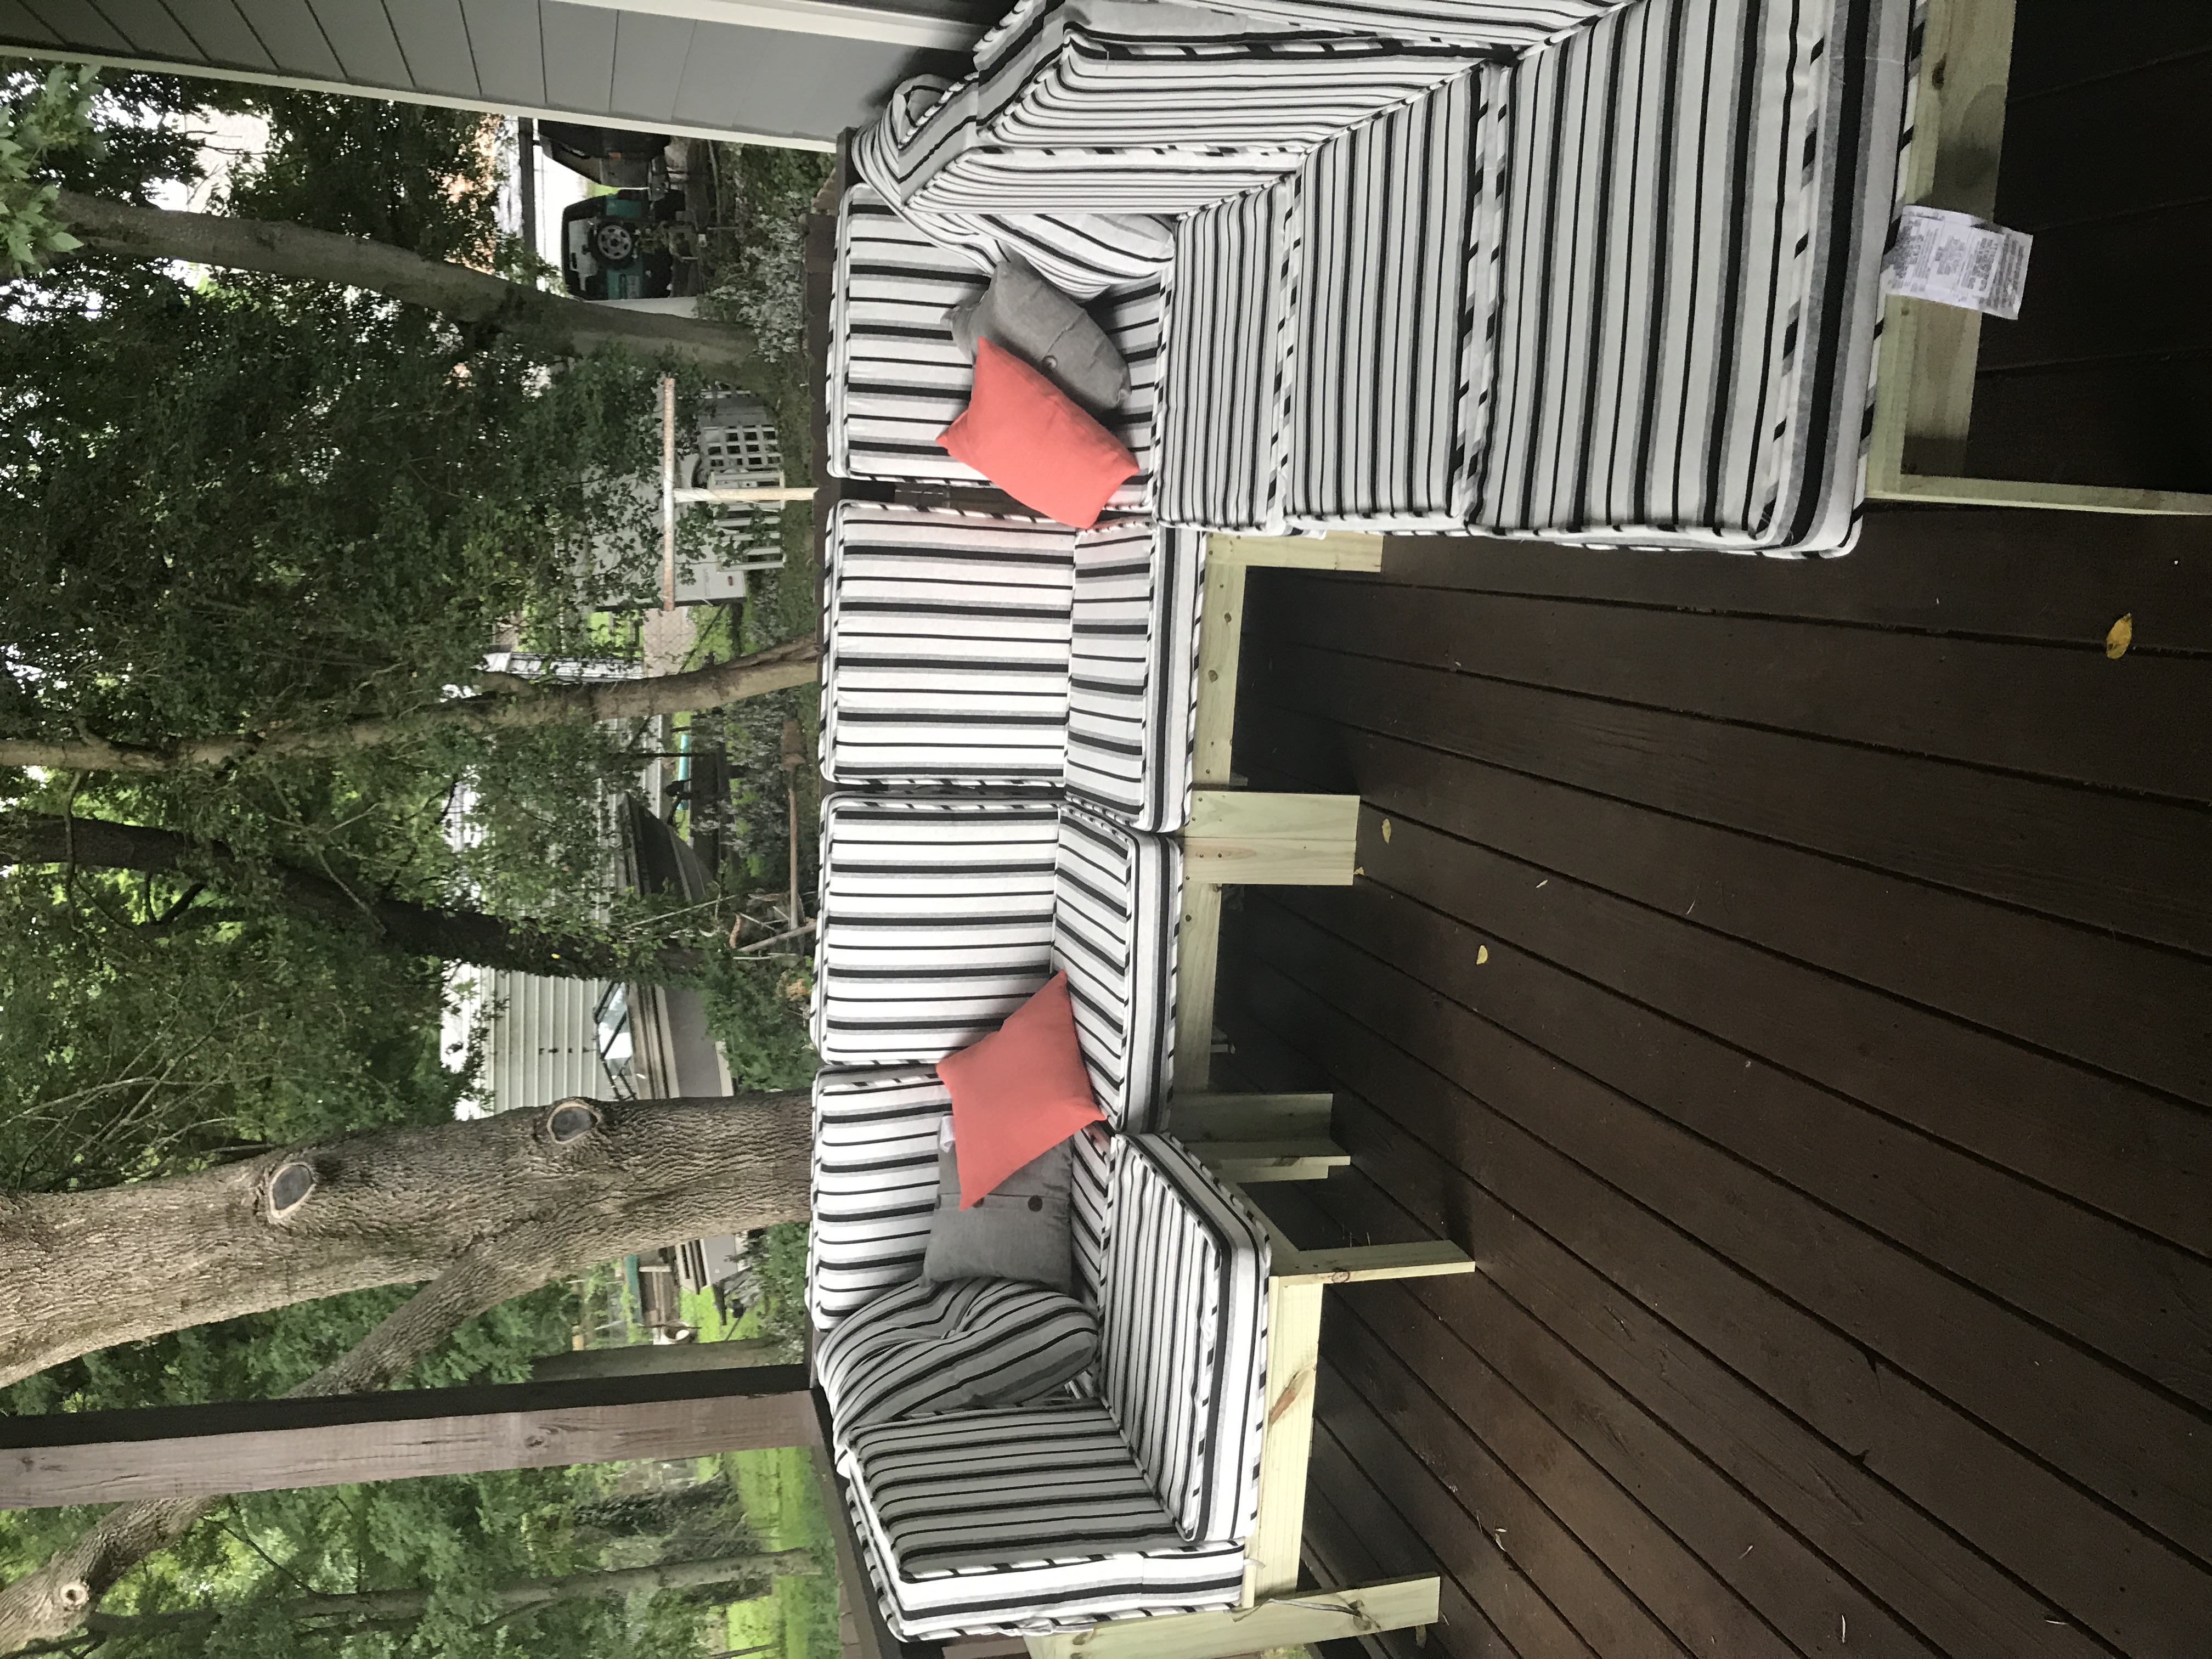
Outdoor Sofa and Sectional
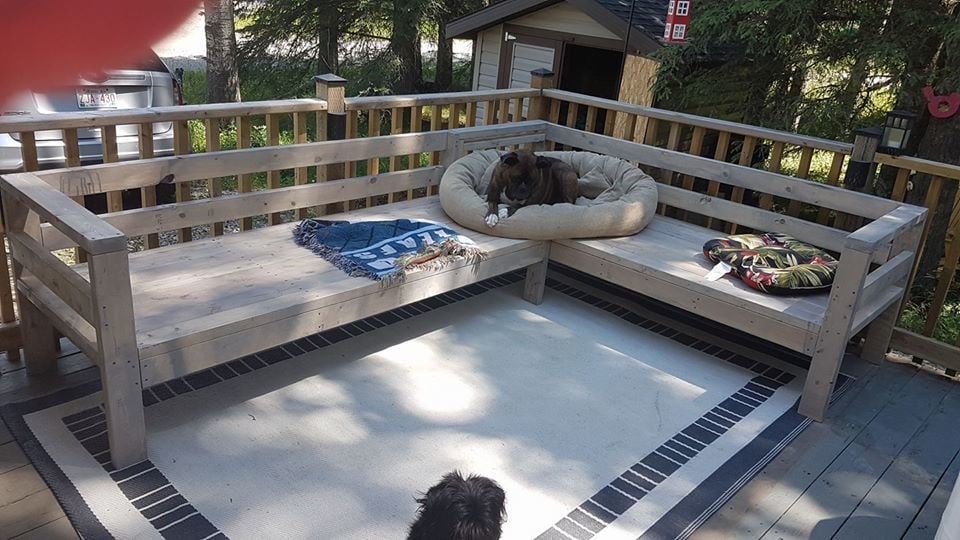
I haven't really done anything like this, came out quite well. I modified the back for what I think is better comfort, added side supports to hold throw pillows in place and added 2 extra 2x4's to seating surfaces. The sofa I built in an afternoon with an extra pair of hands to line things up and hold them in place. The sectional took a little longer to complete as my helper was off building his own couch (after he saw how simple it was to do). I also didn't use a pocket jig (couldn't find one in rural hardware store) but a countersink drill bit for all screw holes.
Built from Plan(s)
Estimated Cost
in Canadian, for the sofa and sectional about 220 with stain.
Estimated Time Investment
Weekend Project (10-20 Hours)
Finish Used
latex semi transparent stain
Recommended Skill Level
Beginner
Comments
Fri, 06/28/2019 - 09:39
I love the changes! I wish I…
I love the changes! I wish I thought of them myself.
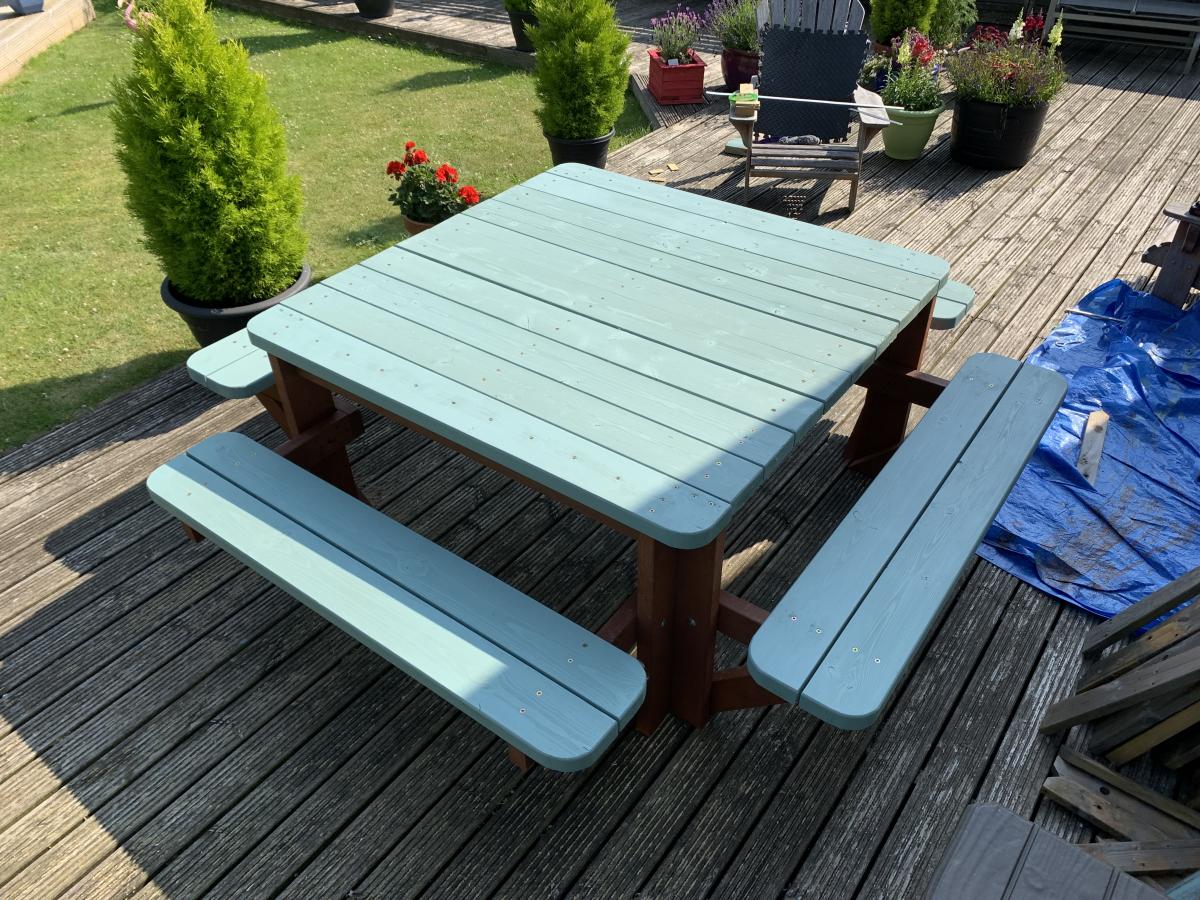
Square Picnic Table
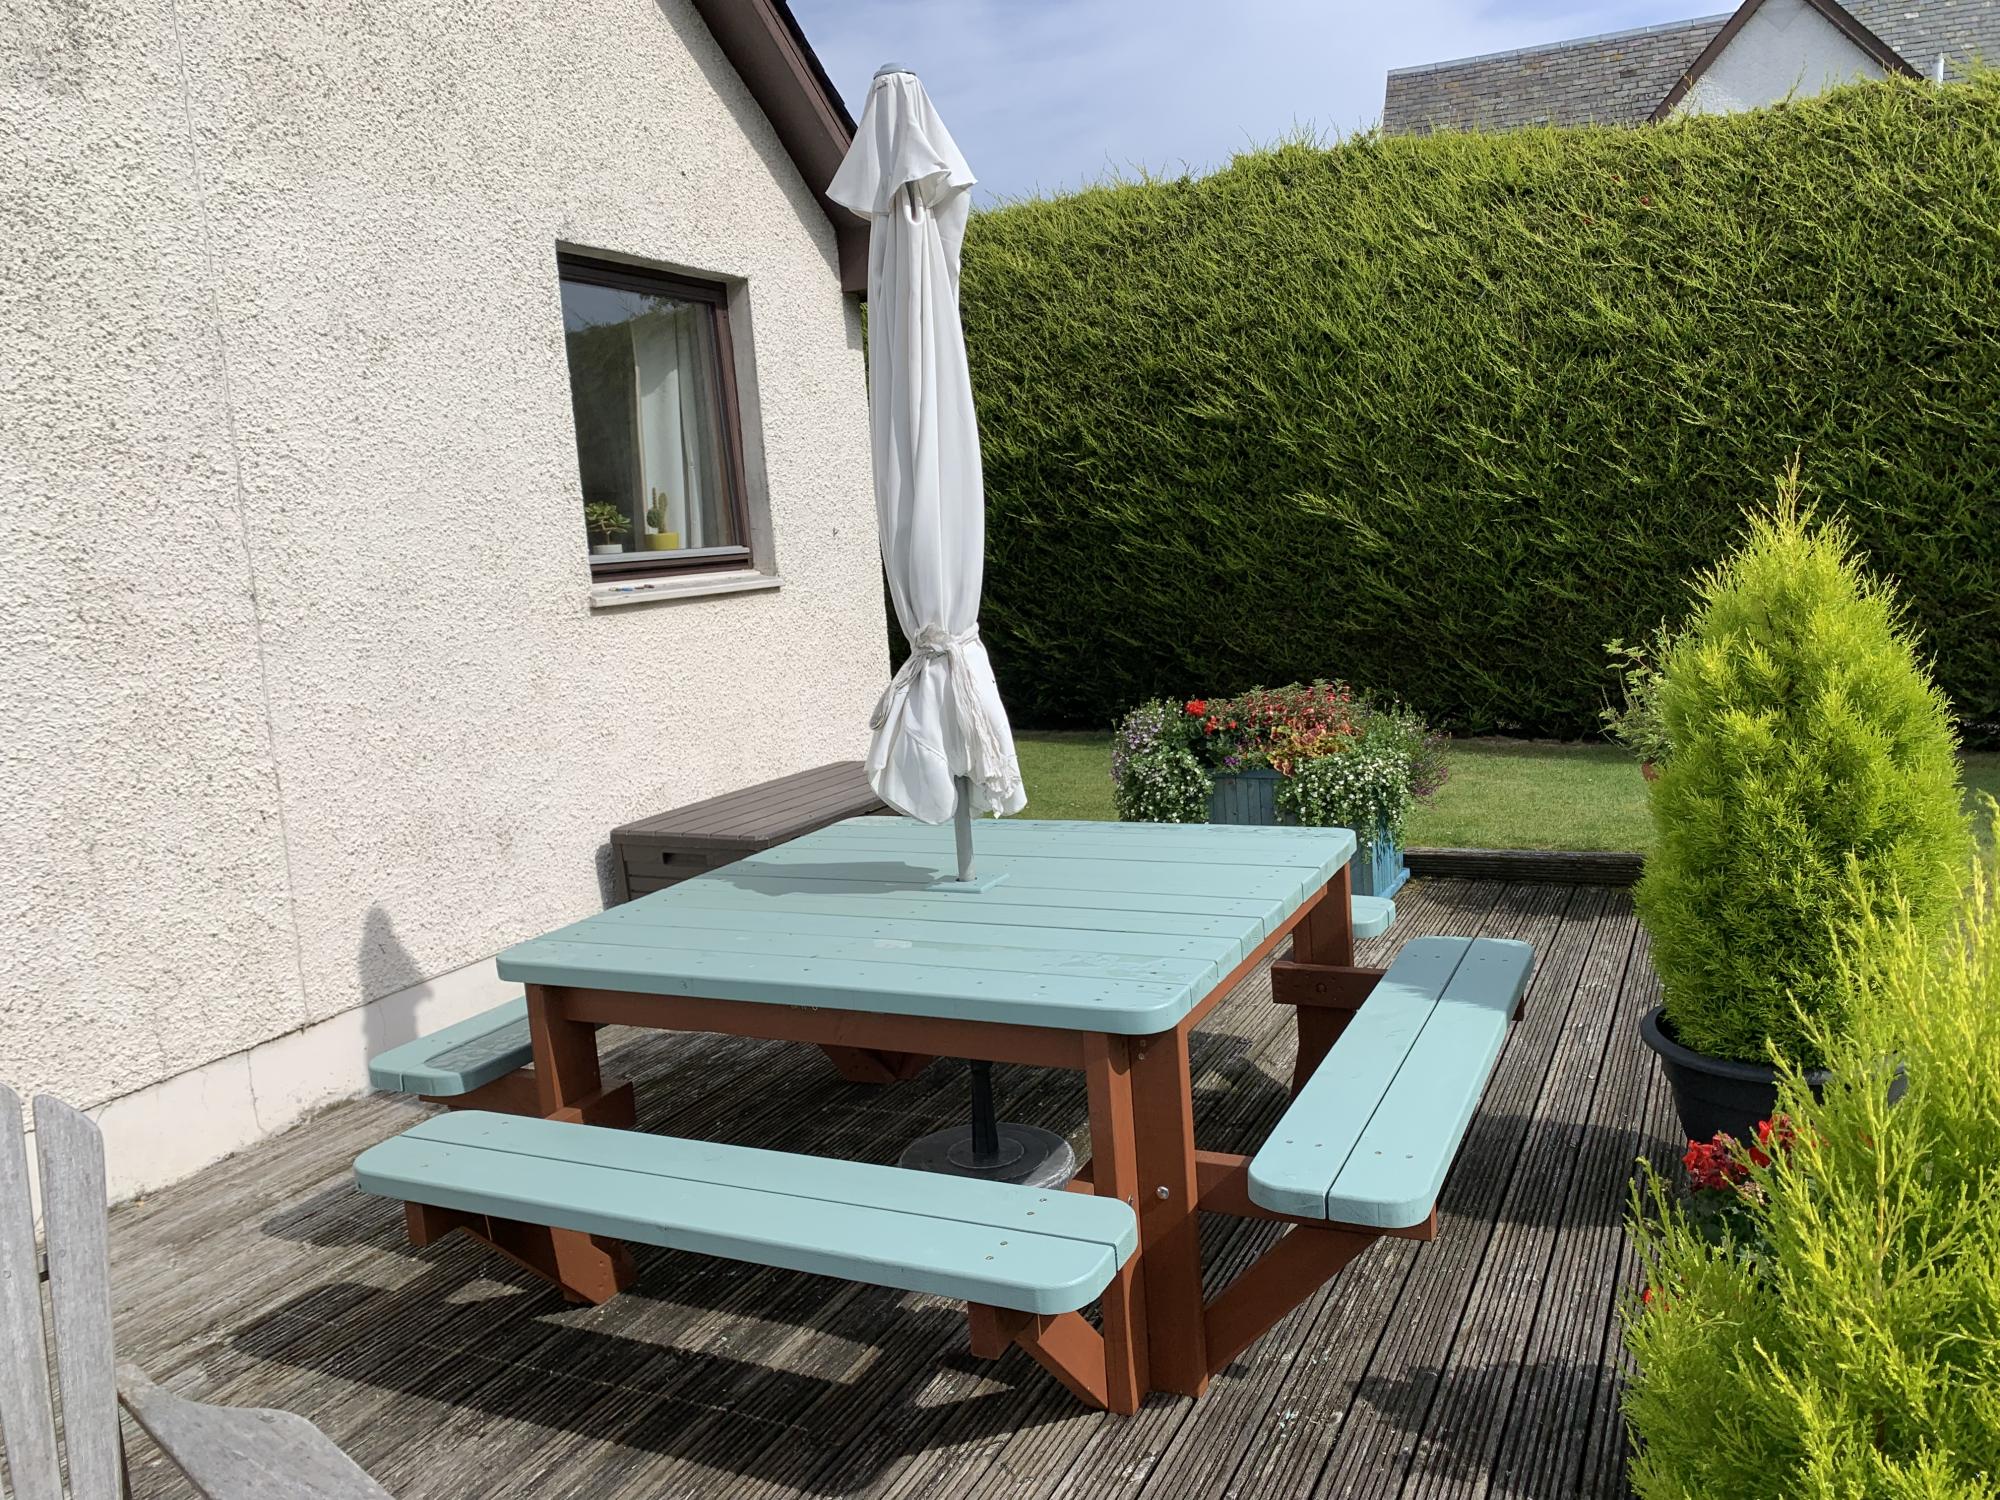
This is a bit larger than Ana’s plan. I added additional support to the table top and added a braced opening for the umbrella. I also went for a more rounded finish by rounding all the corners of the table and benches with my jigsaw and then sanding to create smooth curves.
Built from Plan(s)
Comments
Leaning Wall Media Center
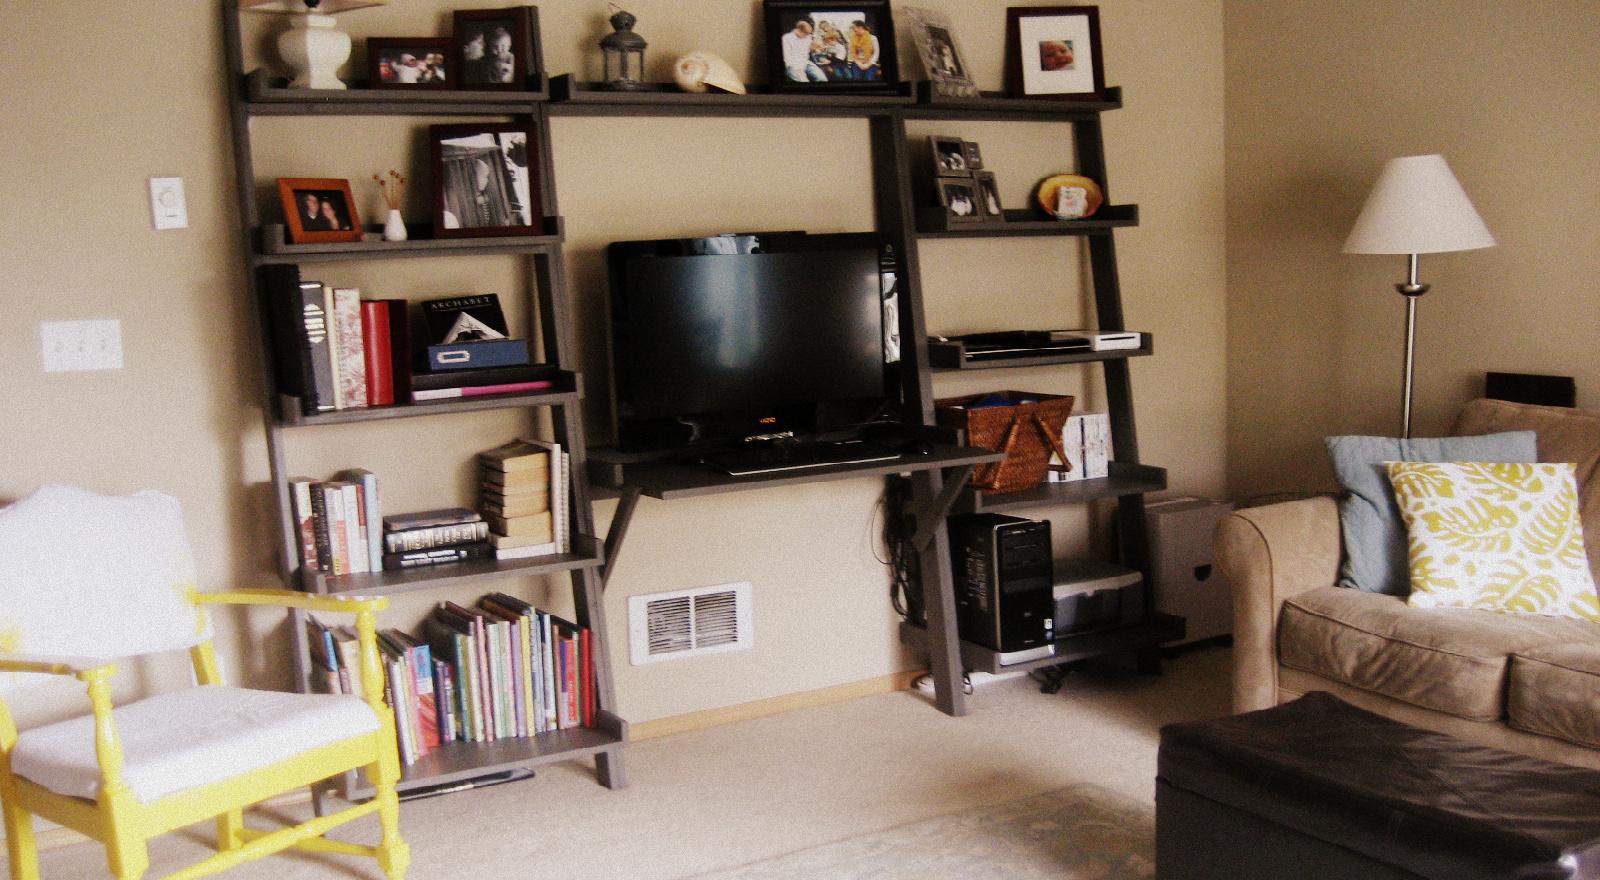
Recently I was a Crate and Barrel and I found the Sloane Leaning Desk and thought that it would be perfect for my media center. (See that wall heater under the desk, I needed that to be open and I was tired of my big wood box of a media center on the, now, couch wall.) So knowing that I had seen the Leaning Wall Shelf on this site I knew I could reconfigure it a bit to work out for my own needs.
First, I cut the dimensions down a bit. Instead of the 31 1/2" length on all of the shelves I cut them at 24". Then then all the back trim at 25 1/2". Then for the middle section, I cut the shelf and desk at 36" and the back trim to 37 1/2". The side trim for the desk is 14 1/4". The desk itself was 22x36" and the top shelf was cut from a 1x8x6. I did this because I could cut all the other shelves and the desk from one piece of 4x8' plywood. For added support I used a 2x4 as the brace under the desk and added 1x2 braces (cut at a 45 degree angle) for extra support on the front/ sides of the desk (see photo). I also left all the edges squared off for a more modern look, like the Sloane.
I hope this helps you and good luck with your project! FYI, this was my first build EVER, and with a little help from my dad cutting the wood and getting it level, I got it done pretty easily. Oh, and get yourself some large clamps or an extra set of hands to help hold things together while you're drilling.
Estimated Cost
$140
Estimated Time Investment
Week Long Project (20 Hours or More)
Finish Used
I built the main supports and shelves separately then sanded, primed and painted them before assembling them in my home. For the primer I used 1qt. Zinsser 1-2-3 (1 coat), then used 1qt. of Martha Stewart, Seal (2 coats with a smooth finish roller) in a satin finish.
Recommended Skill Level
Beginner
Comments
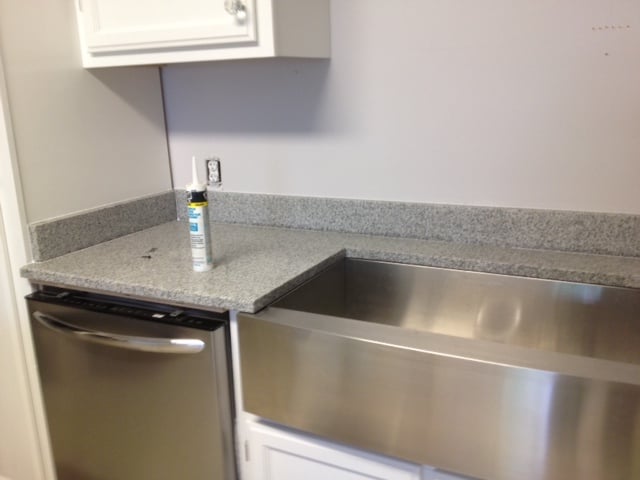
Kitchen Cabinets
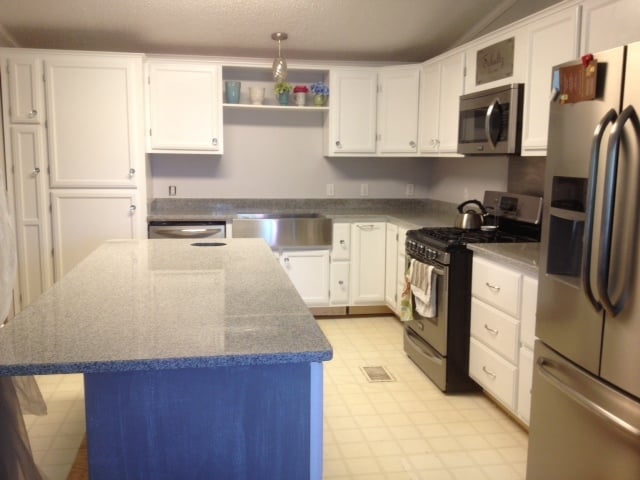
Here is a pic of kitchen cabinets I built using Ana's plans.

Recommended Skill Level
Intermediate
Comments
Tue, 04/07/2015 - 11:40
Beautiful!
If you lived near me, I would hire you. If you can do this, your funk tire buying days are over ! Awesome job!
Mon, 05/04/2015 - 12:00
Kitchen Cabinets
Thank you, this was my first Kitchen remodel. I am not sure if I want to do this for hire. I may just build the cabinets but not sure if I want to install anymore.
Mon, 05/04/2015 - 12:03
Kitchen Cabinets
I still have to install the back splash and flooring. Going with a knotty pine flooring. I will distress it and I am going to install vintage Common Rose Head nails at the butt joints of the flooring.
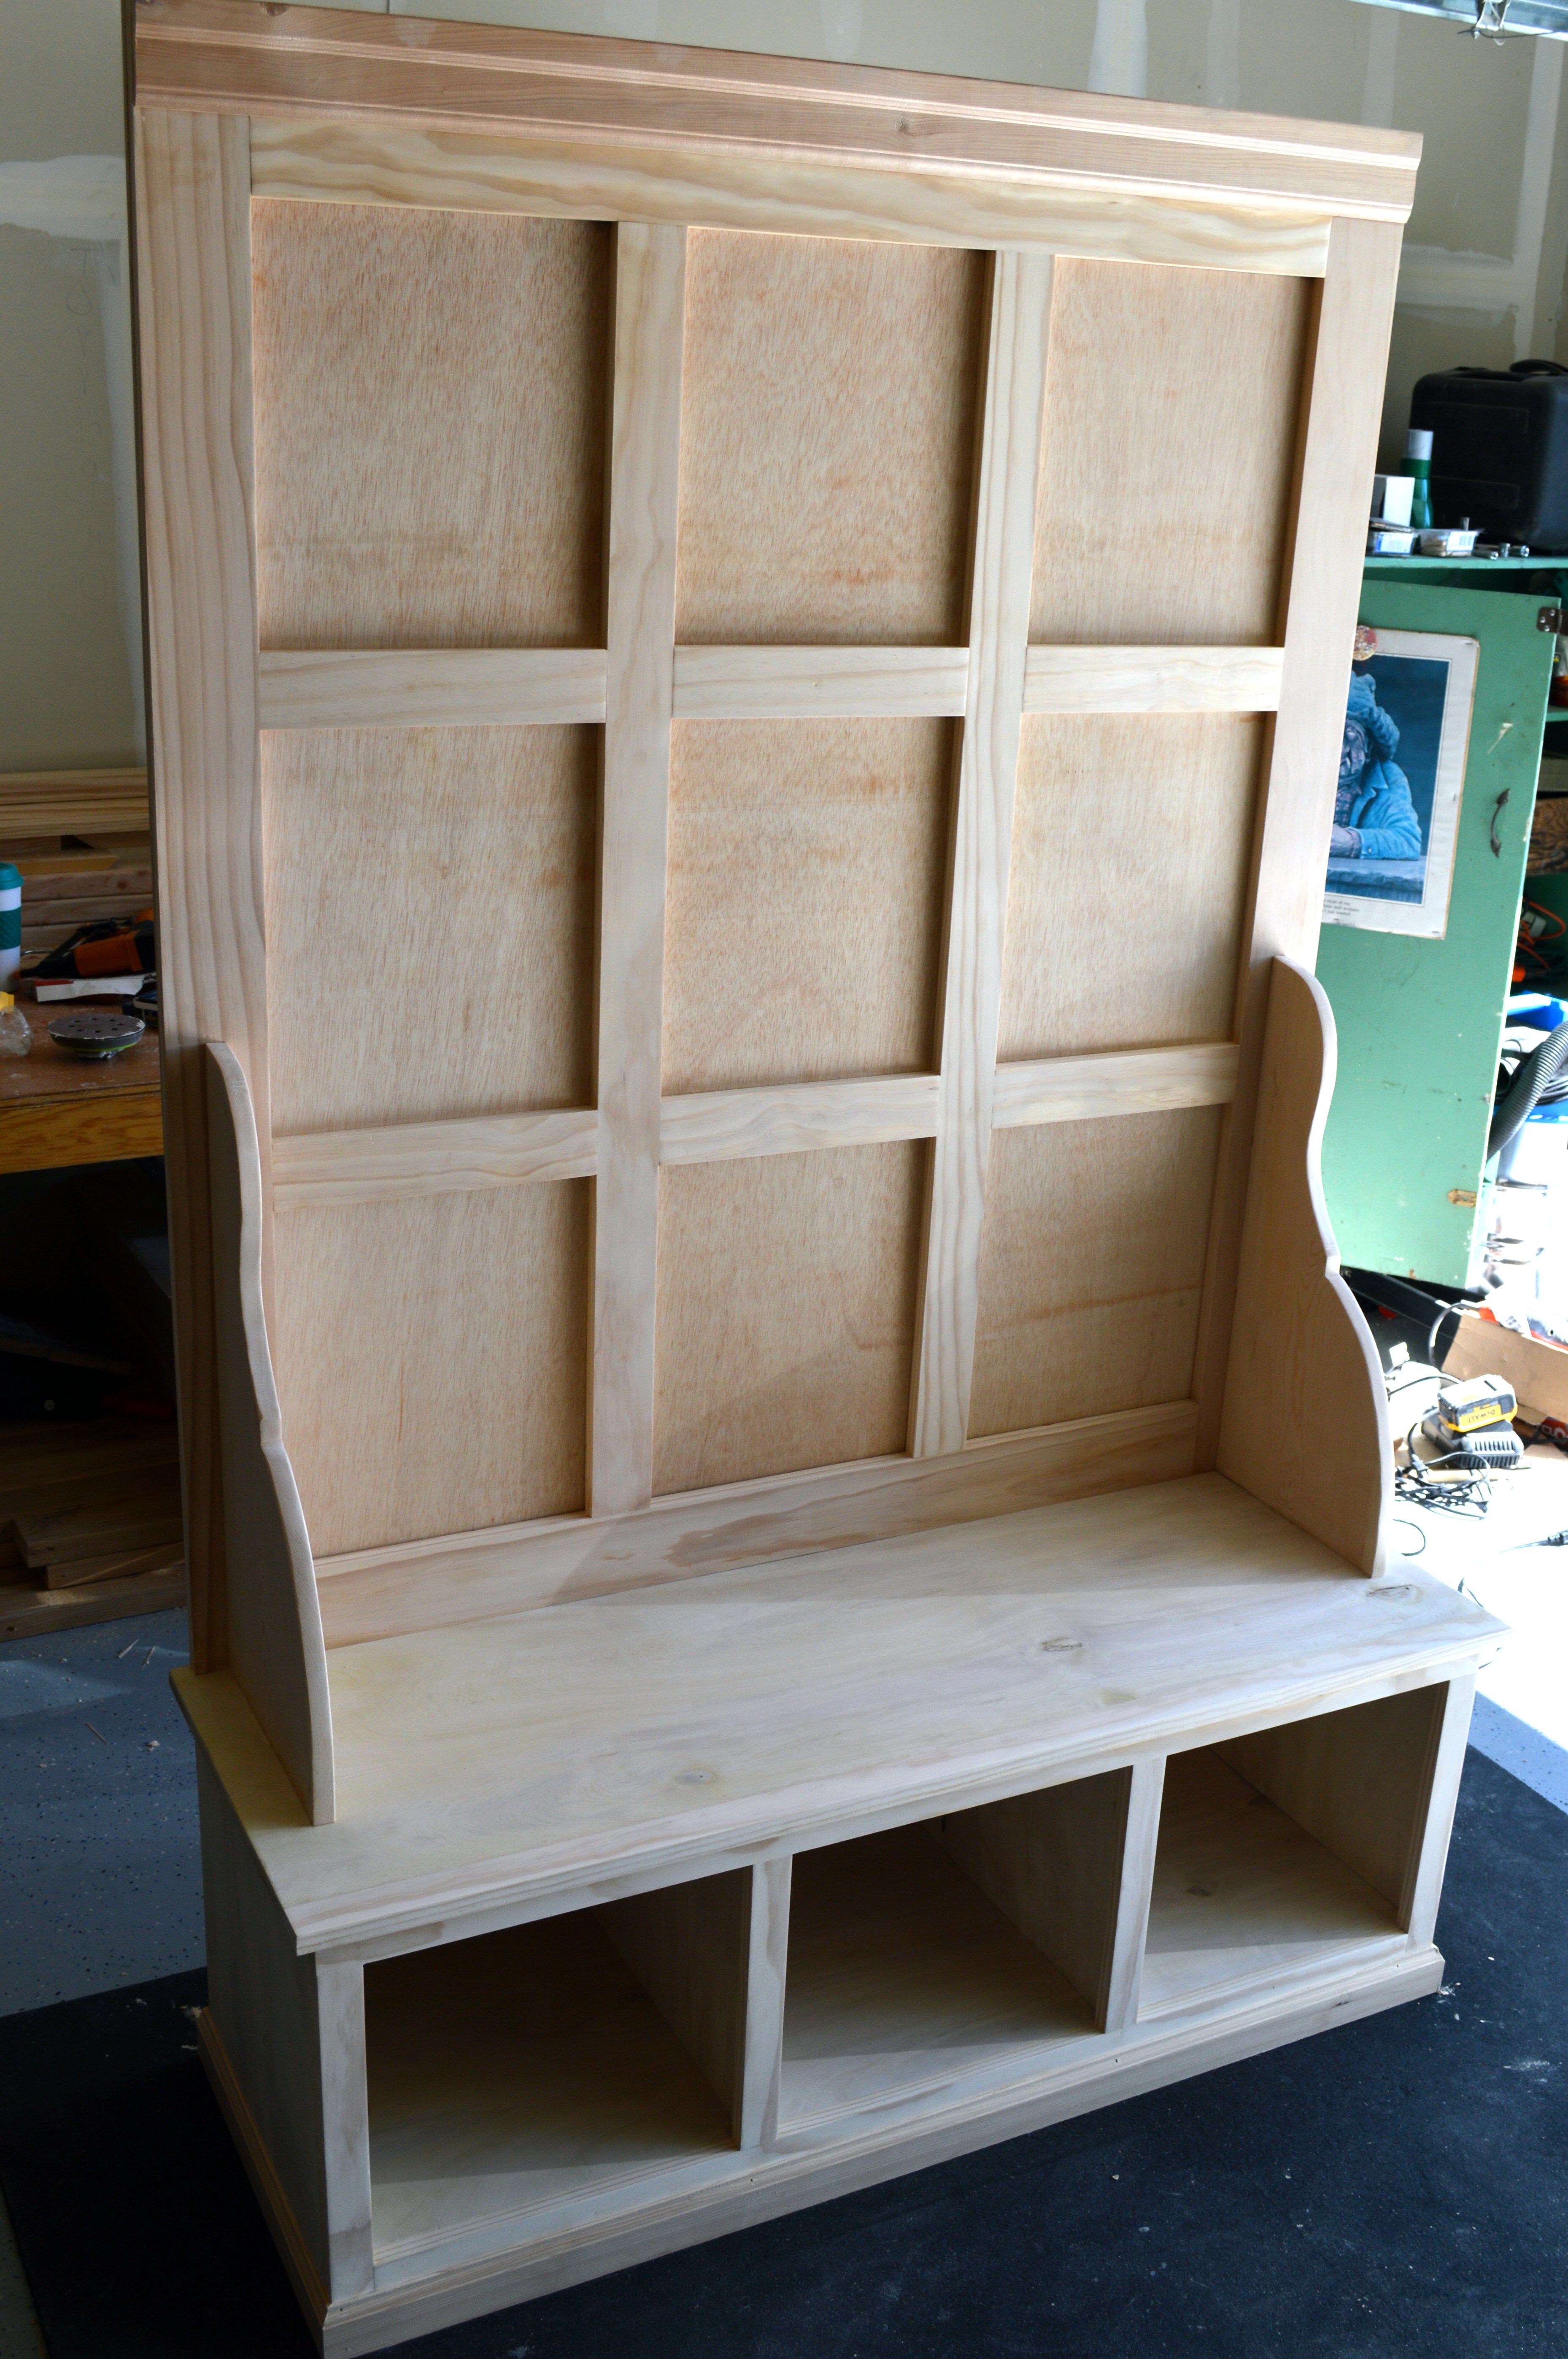
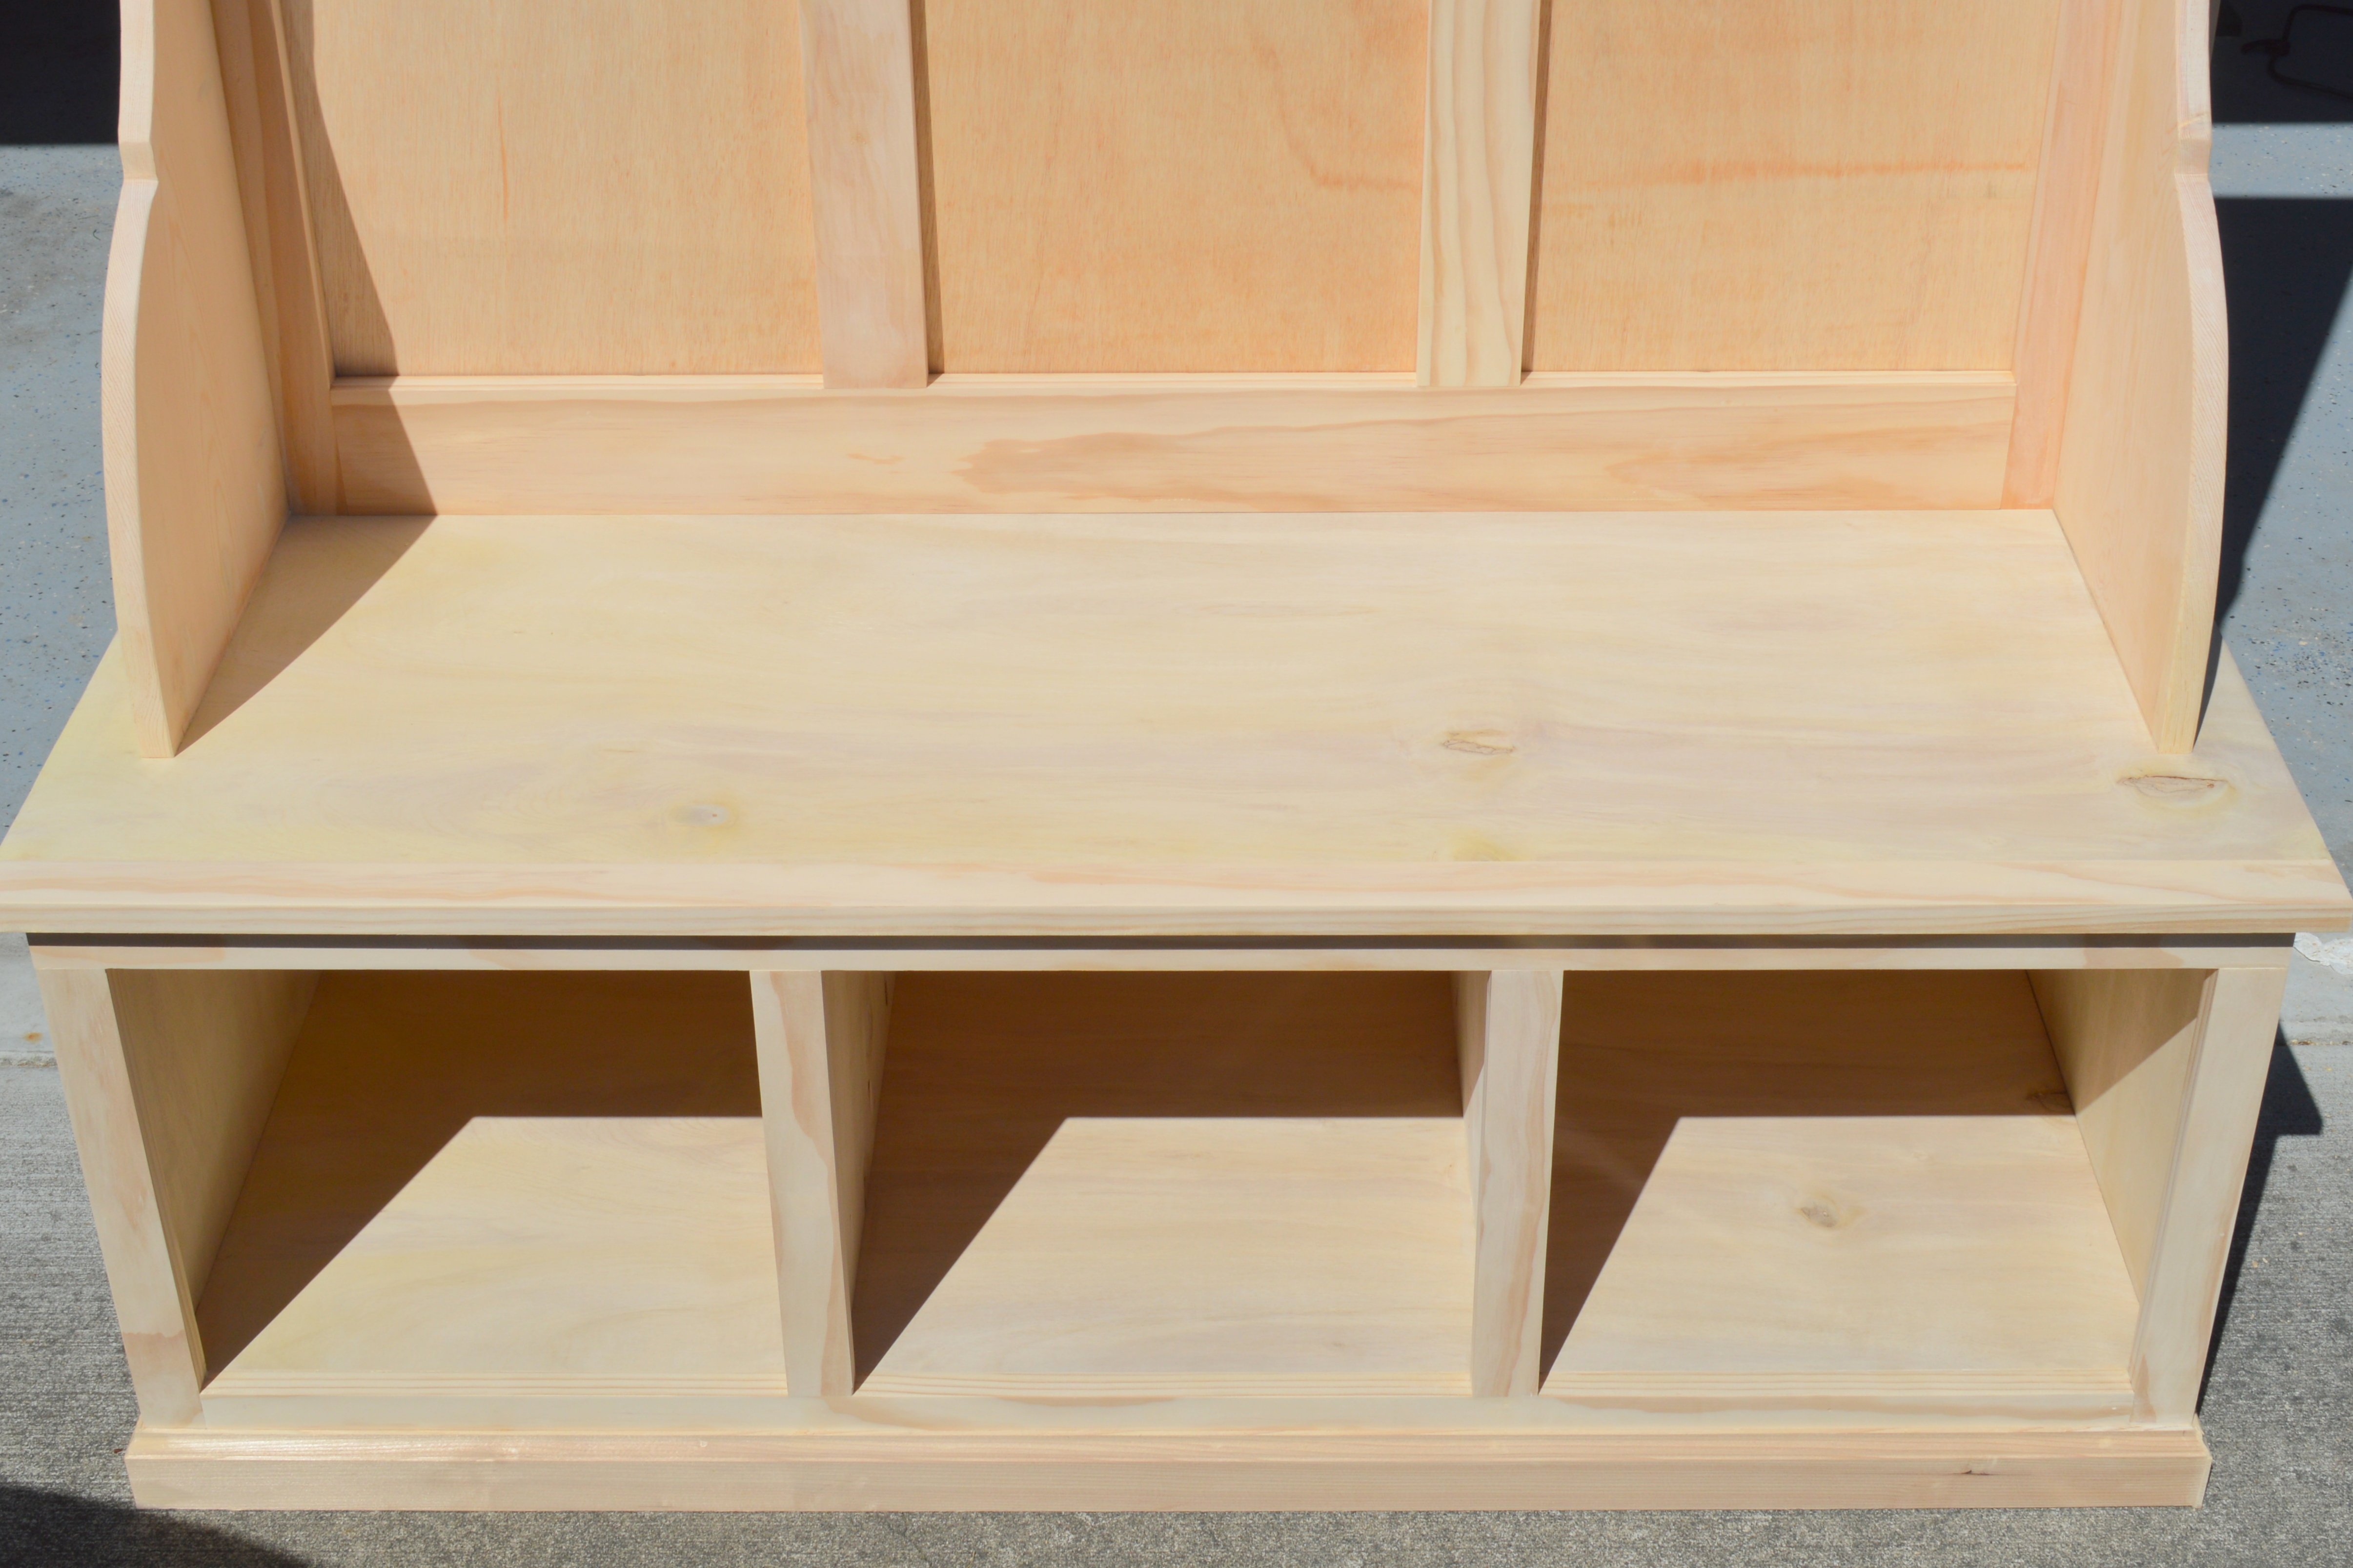
Hall Tree
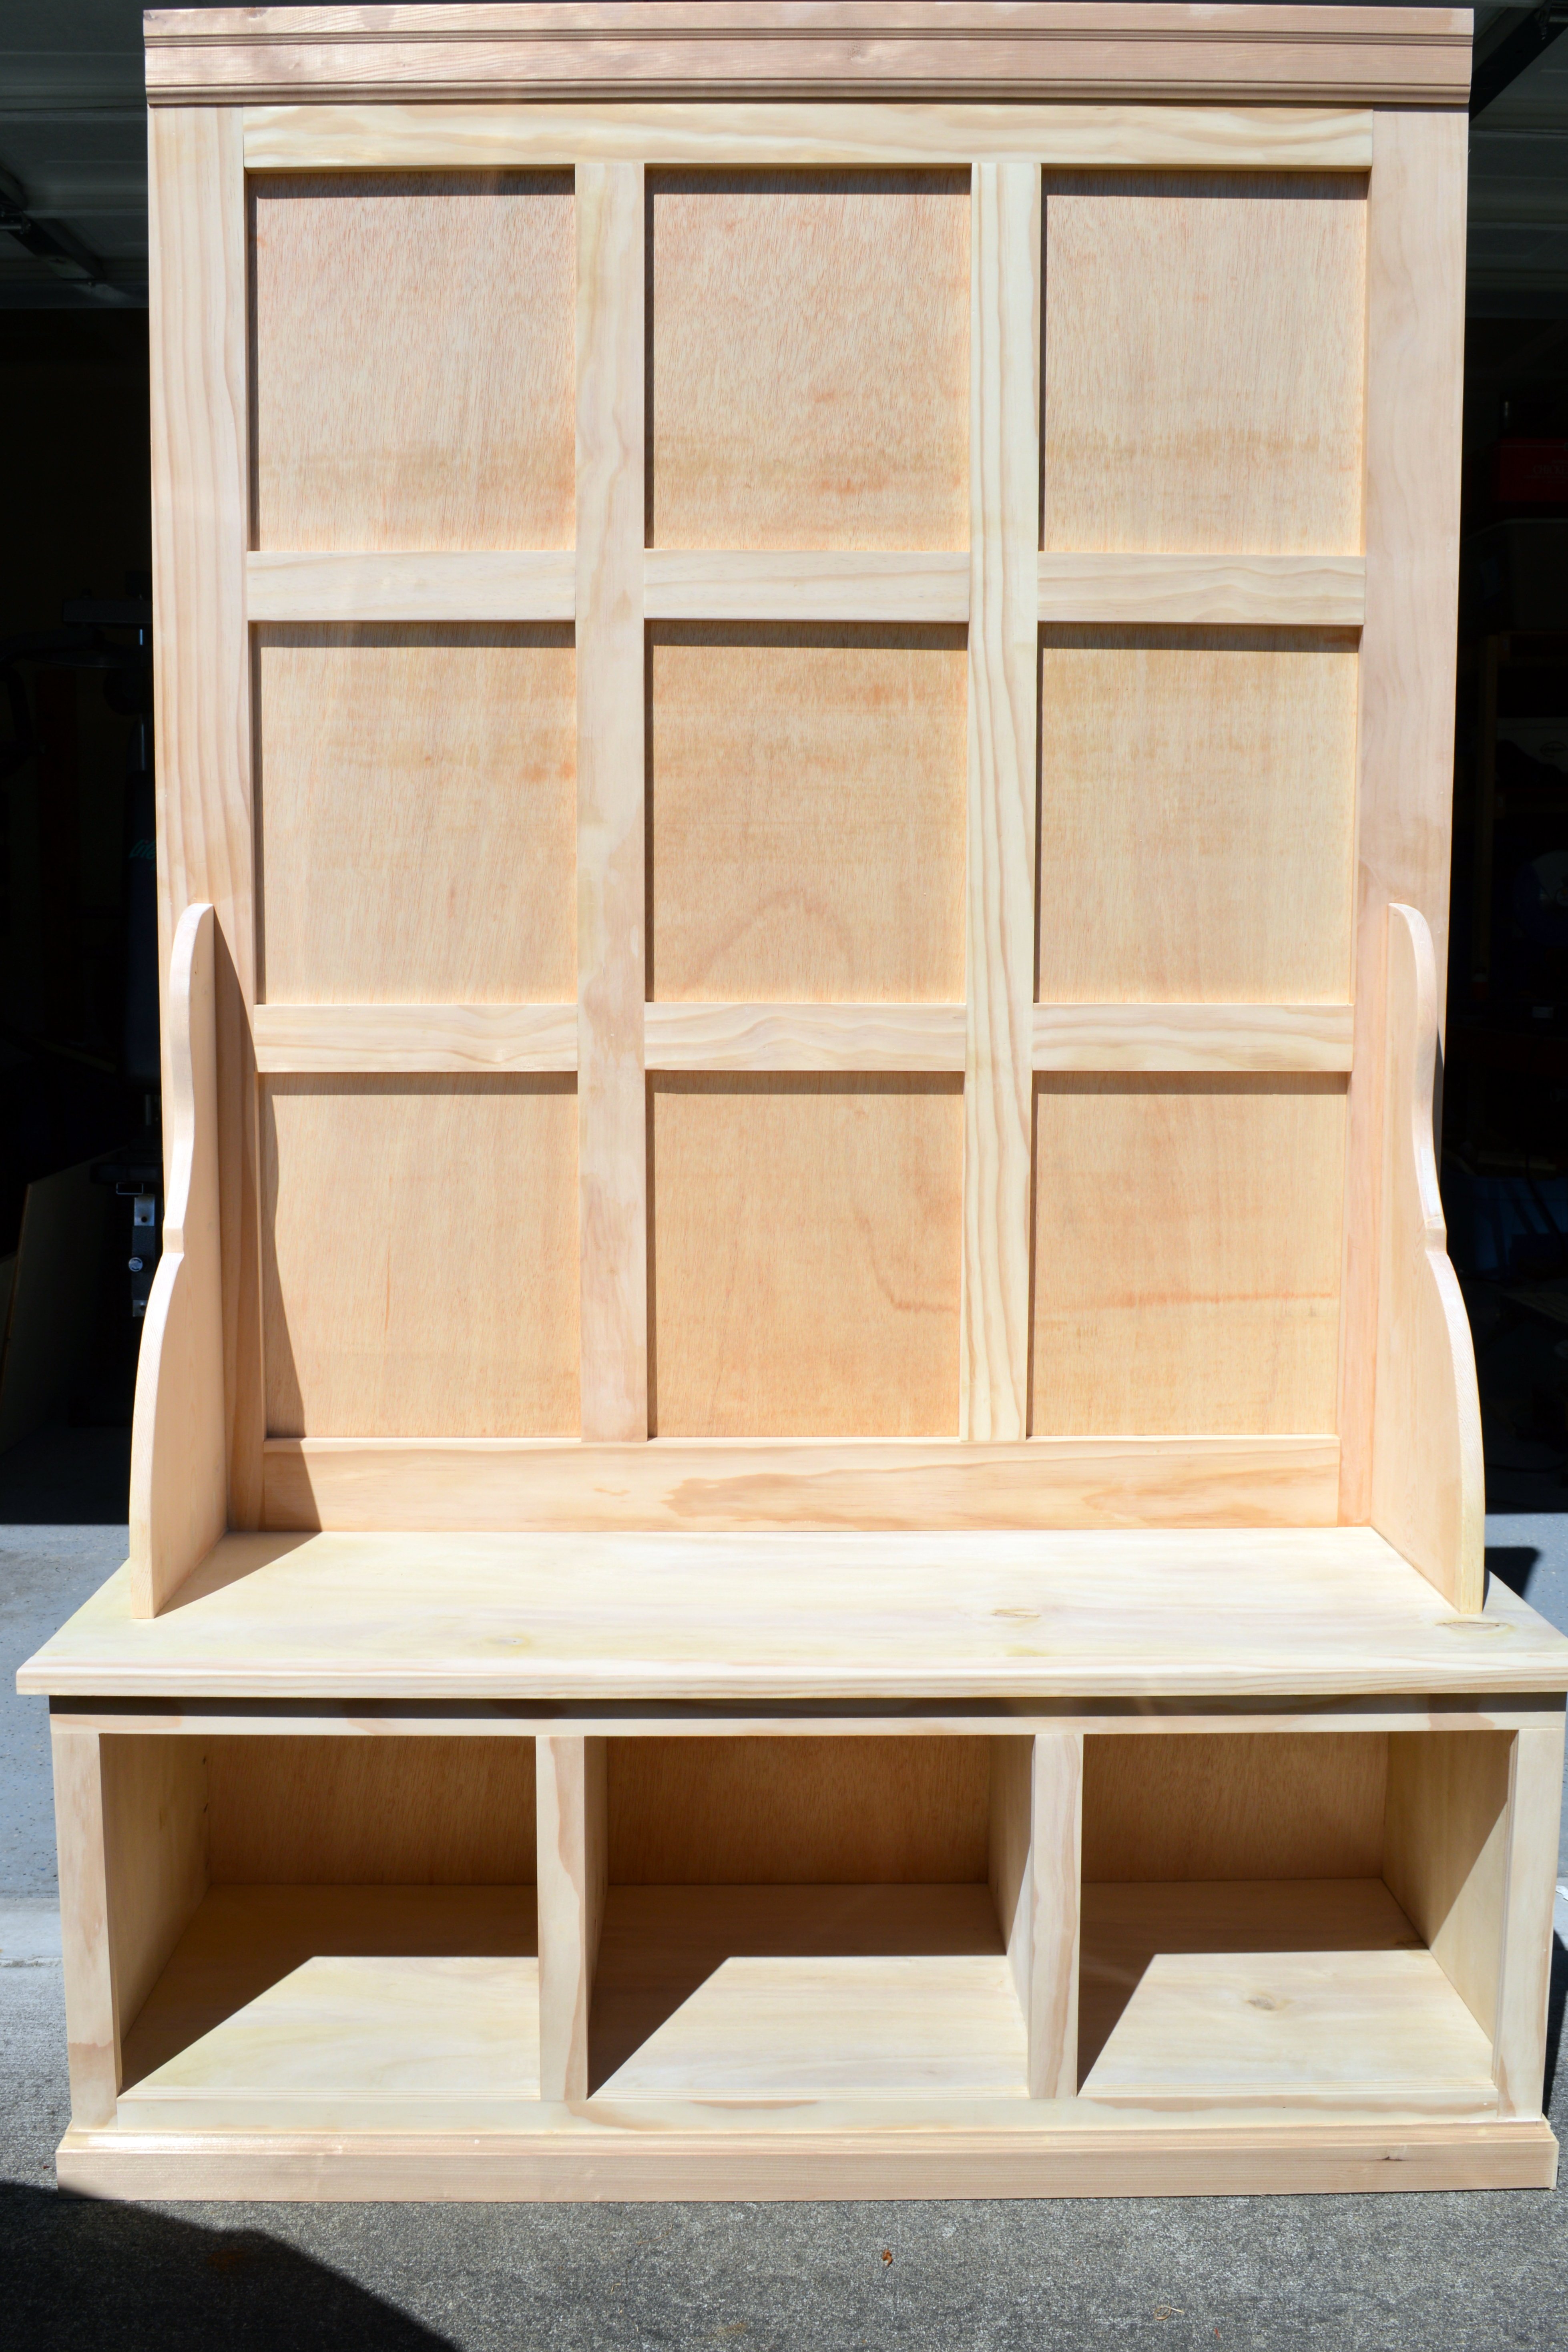
I made this project for a friend. It was very important to get straight boards for the back in order to make everything square. Let me know if you have any questions!

Built from Plan(s)
Estimated Cost
$180
Estimated Time Investment
Day Project (6-9 Hours)
Finish Used
None yet! I did fill and sand the project and condition the wood for paint. Any exposed pocket holes were filled with angled dowels, some wood filler, and then sanded flat. I used a little extra 1x3 in order to face the middle two dividers. One more note...depending on your board length, you might need to get an extra 1x4. An 8 footer will leave you 1" short for the 41" board. But hey! Leftover wood turns into a new project!
Recommended Skill Level
Intermediate
Farmhouse table
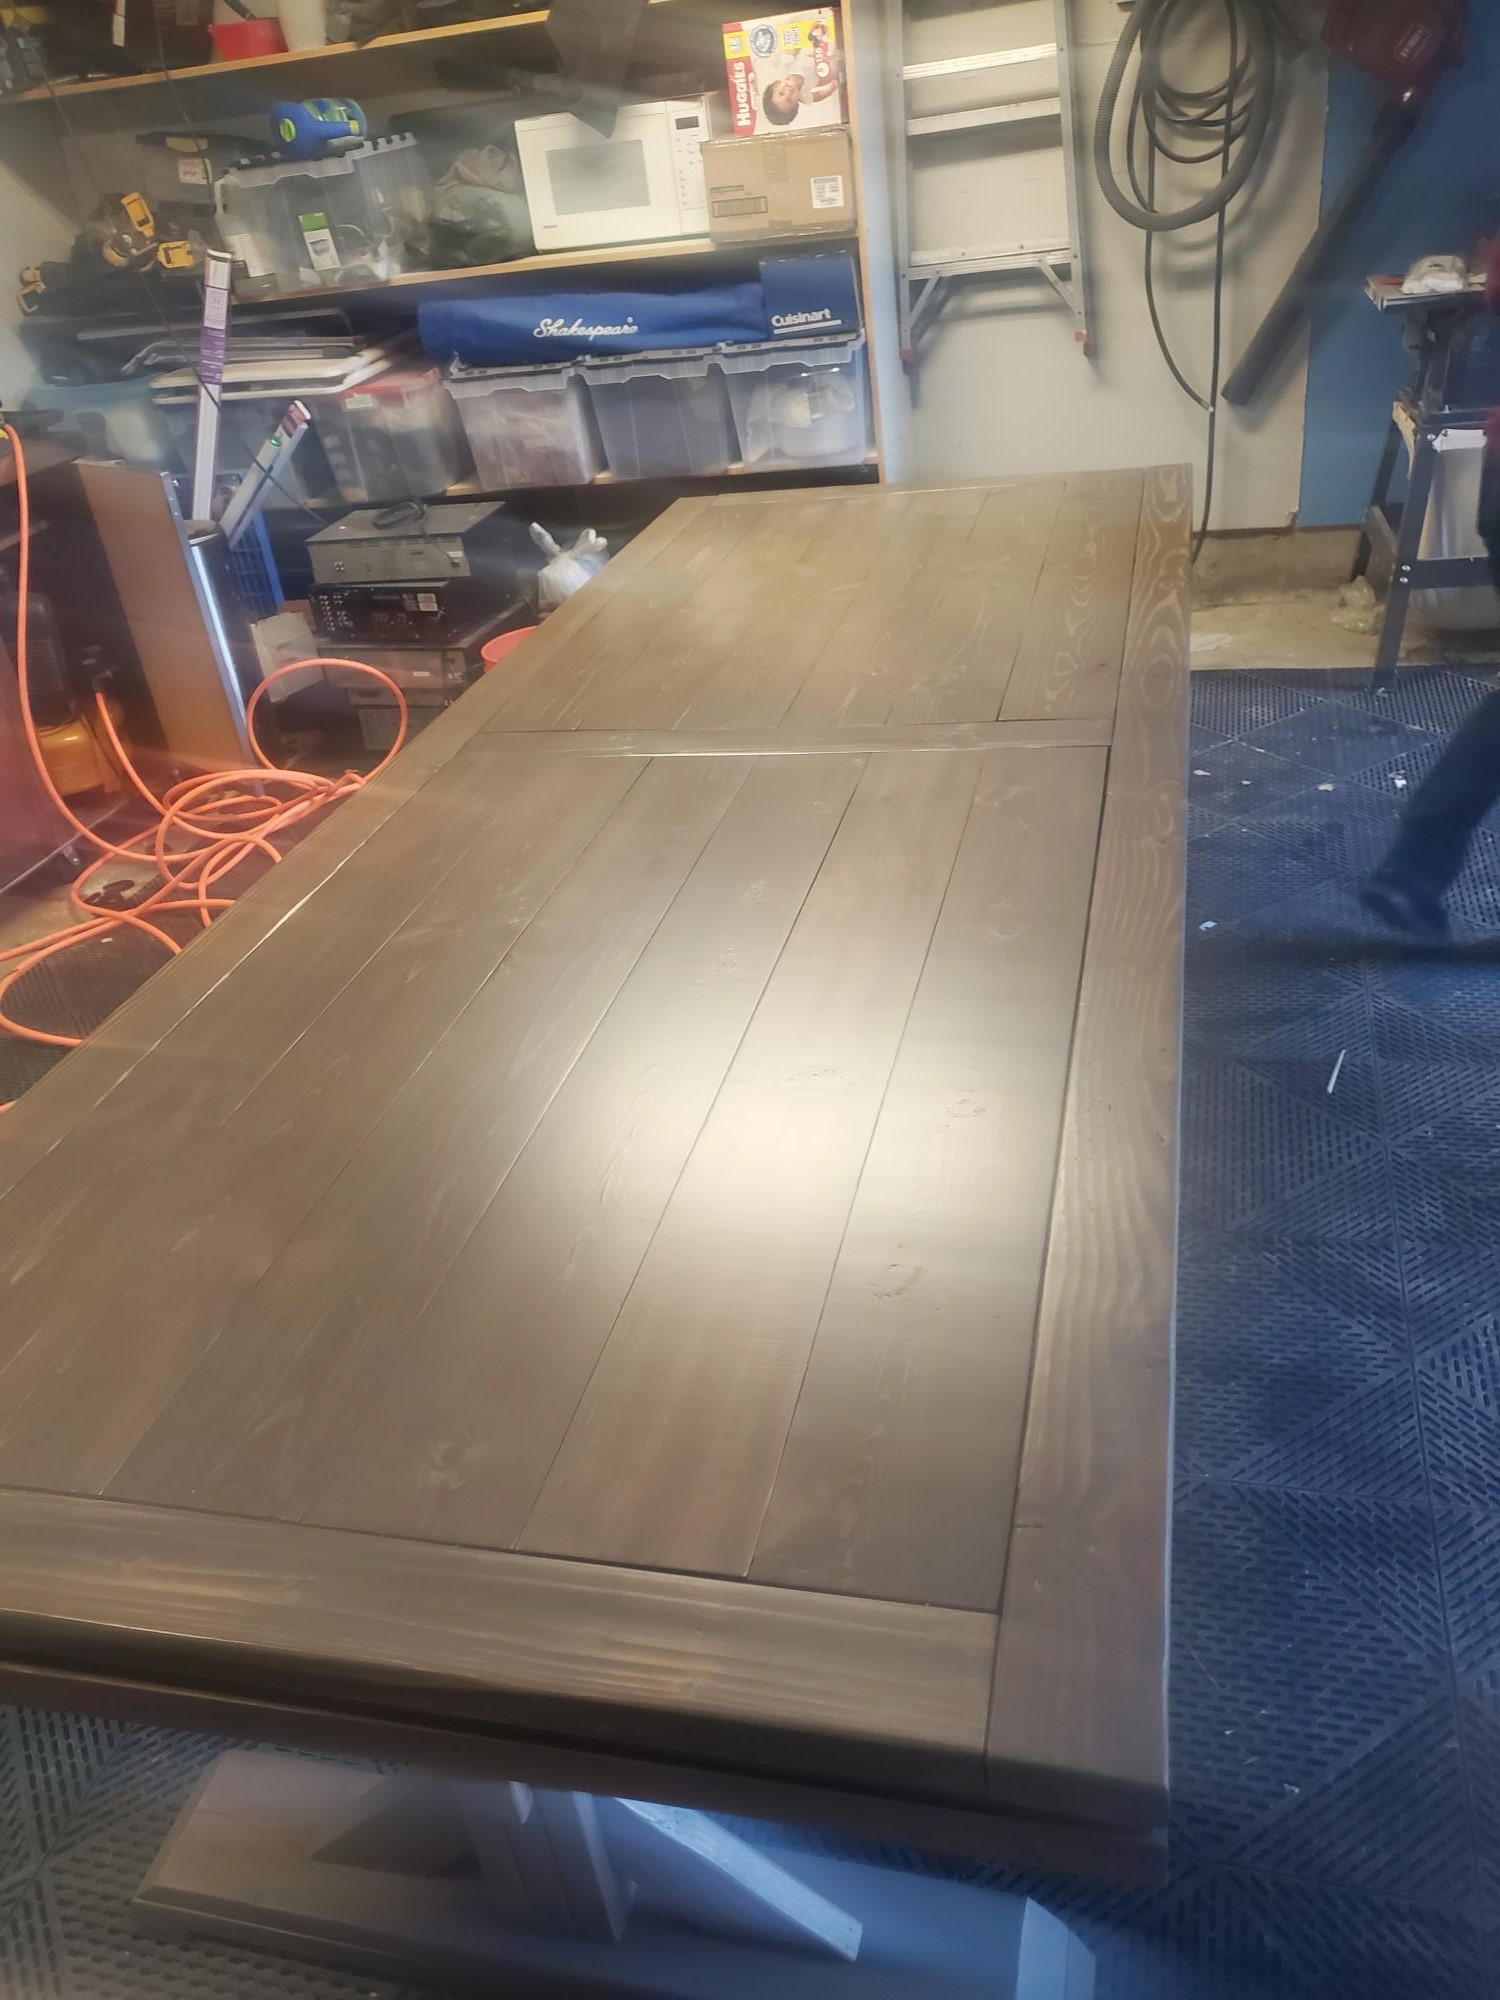
Farmhouse table
Built from Plan(s)
Comments
Pallet Shelf!
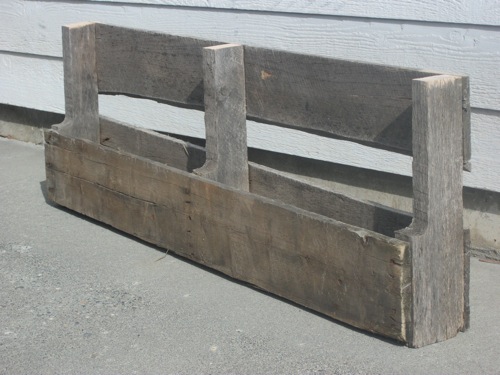
Ok, so no one is going to get really jazzed about this but me, but hey.. I actually had to cut this, which I did on my own with no help from the hubs and nail in the bottom boards. That was a bit tricky cause I used other pallet wood so I didn't have to rob any of the nice stuff from my scrap pile. :-)
Built from Plan(s)
Estimated Cost
FREE
Estimated Time Investment
An Hour or Two (0-2 Hours)
Finish Used
We ended up painting these for my Dad and step-Mom, but for my own that I have, we put nothing on them at all.
Recommended Skill Level
Starter Project
Portable countertop
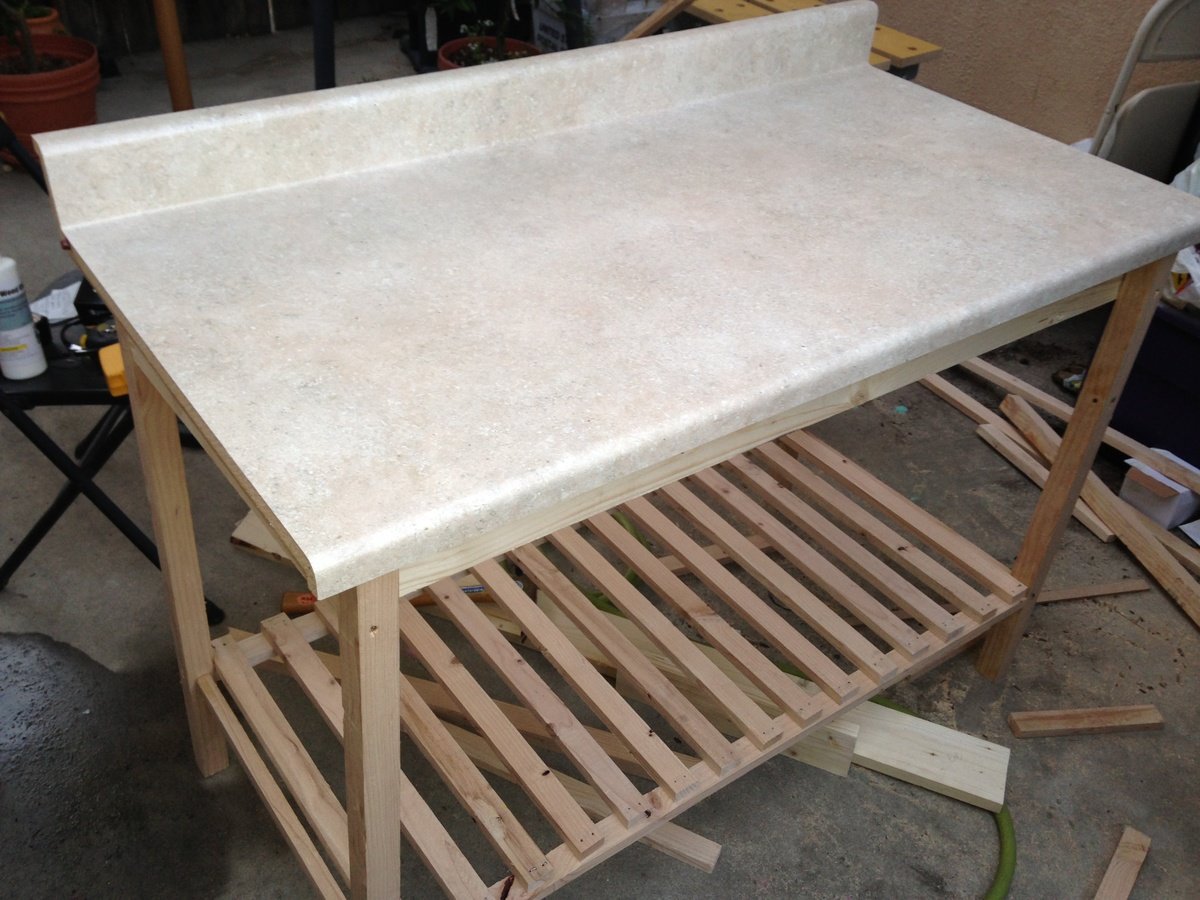
I made this from the kitchen island plans, but added a countertop. It's really sturdy and cost about $65 in materials. I love it.
Built from Plan(s)
Estimated Cost
$65
Estimated Time Investment
Afternoon Project (3-6 Hours)
Finish Used
Unfinished
Recommended Skill Level
Starter Project
doll crib
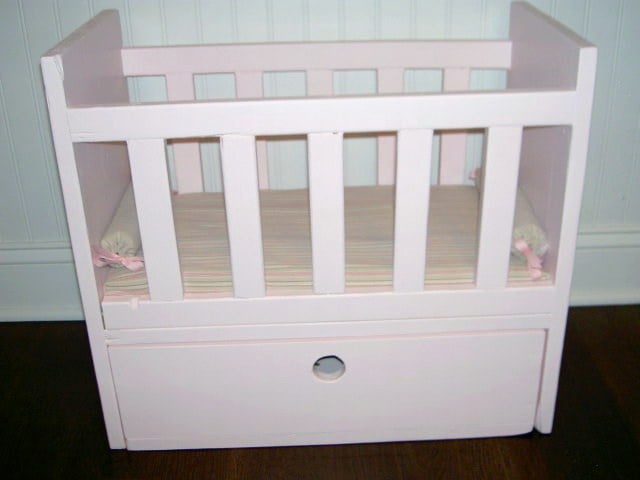
Doll crib with storage bin.

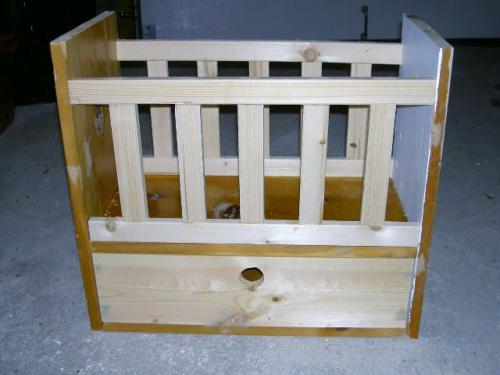
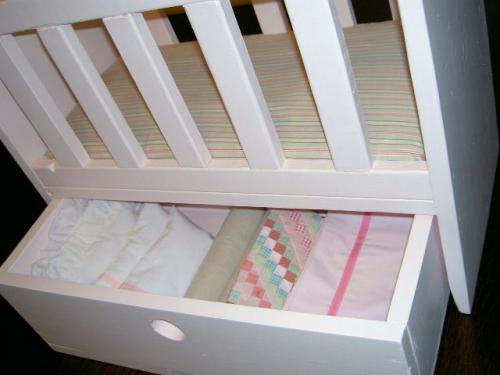
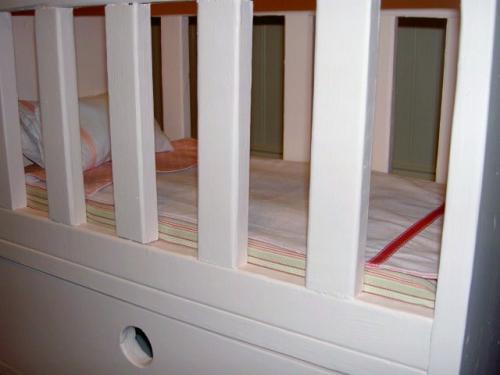
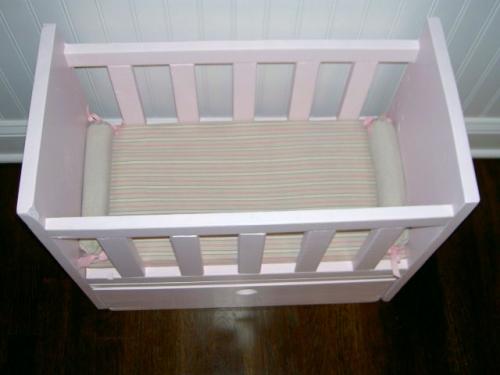
Built from Plan(s)
Estimated Cost
$5.00
Estimated Time Investment
Afternoon Project (3-6 Hours)
Finish Used
1. one coat primer
2. two coats pink eggshell finish
2. two coats pink eggshell finish
Recommended Skill Level
Beginner
Sliding laundry room door
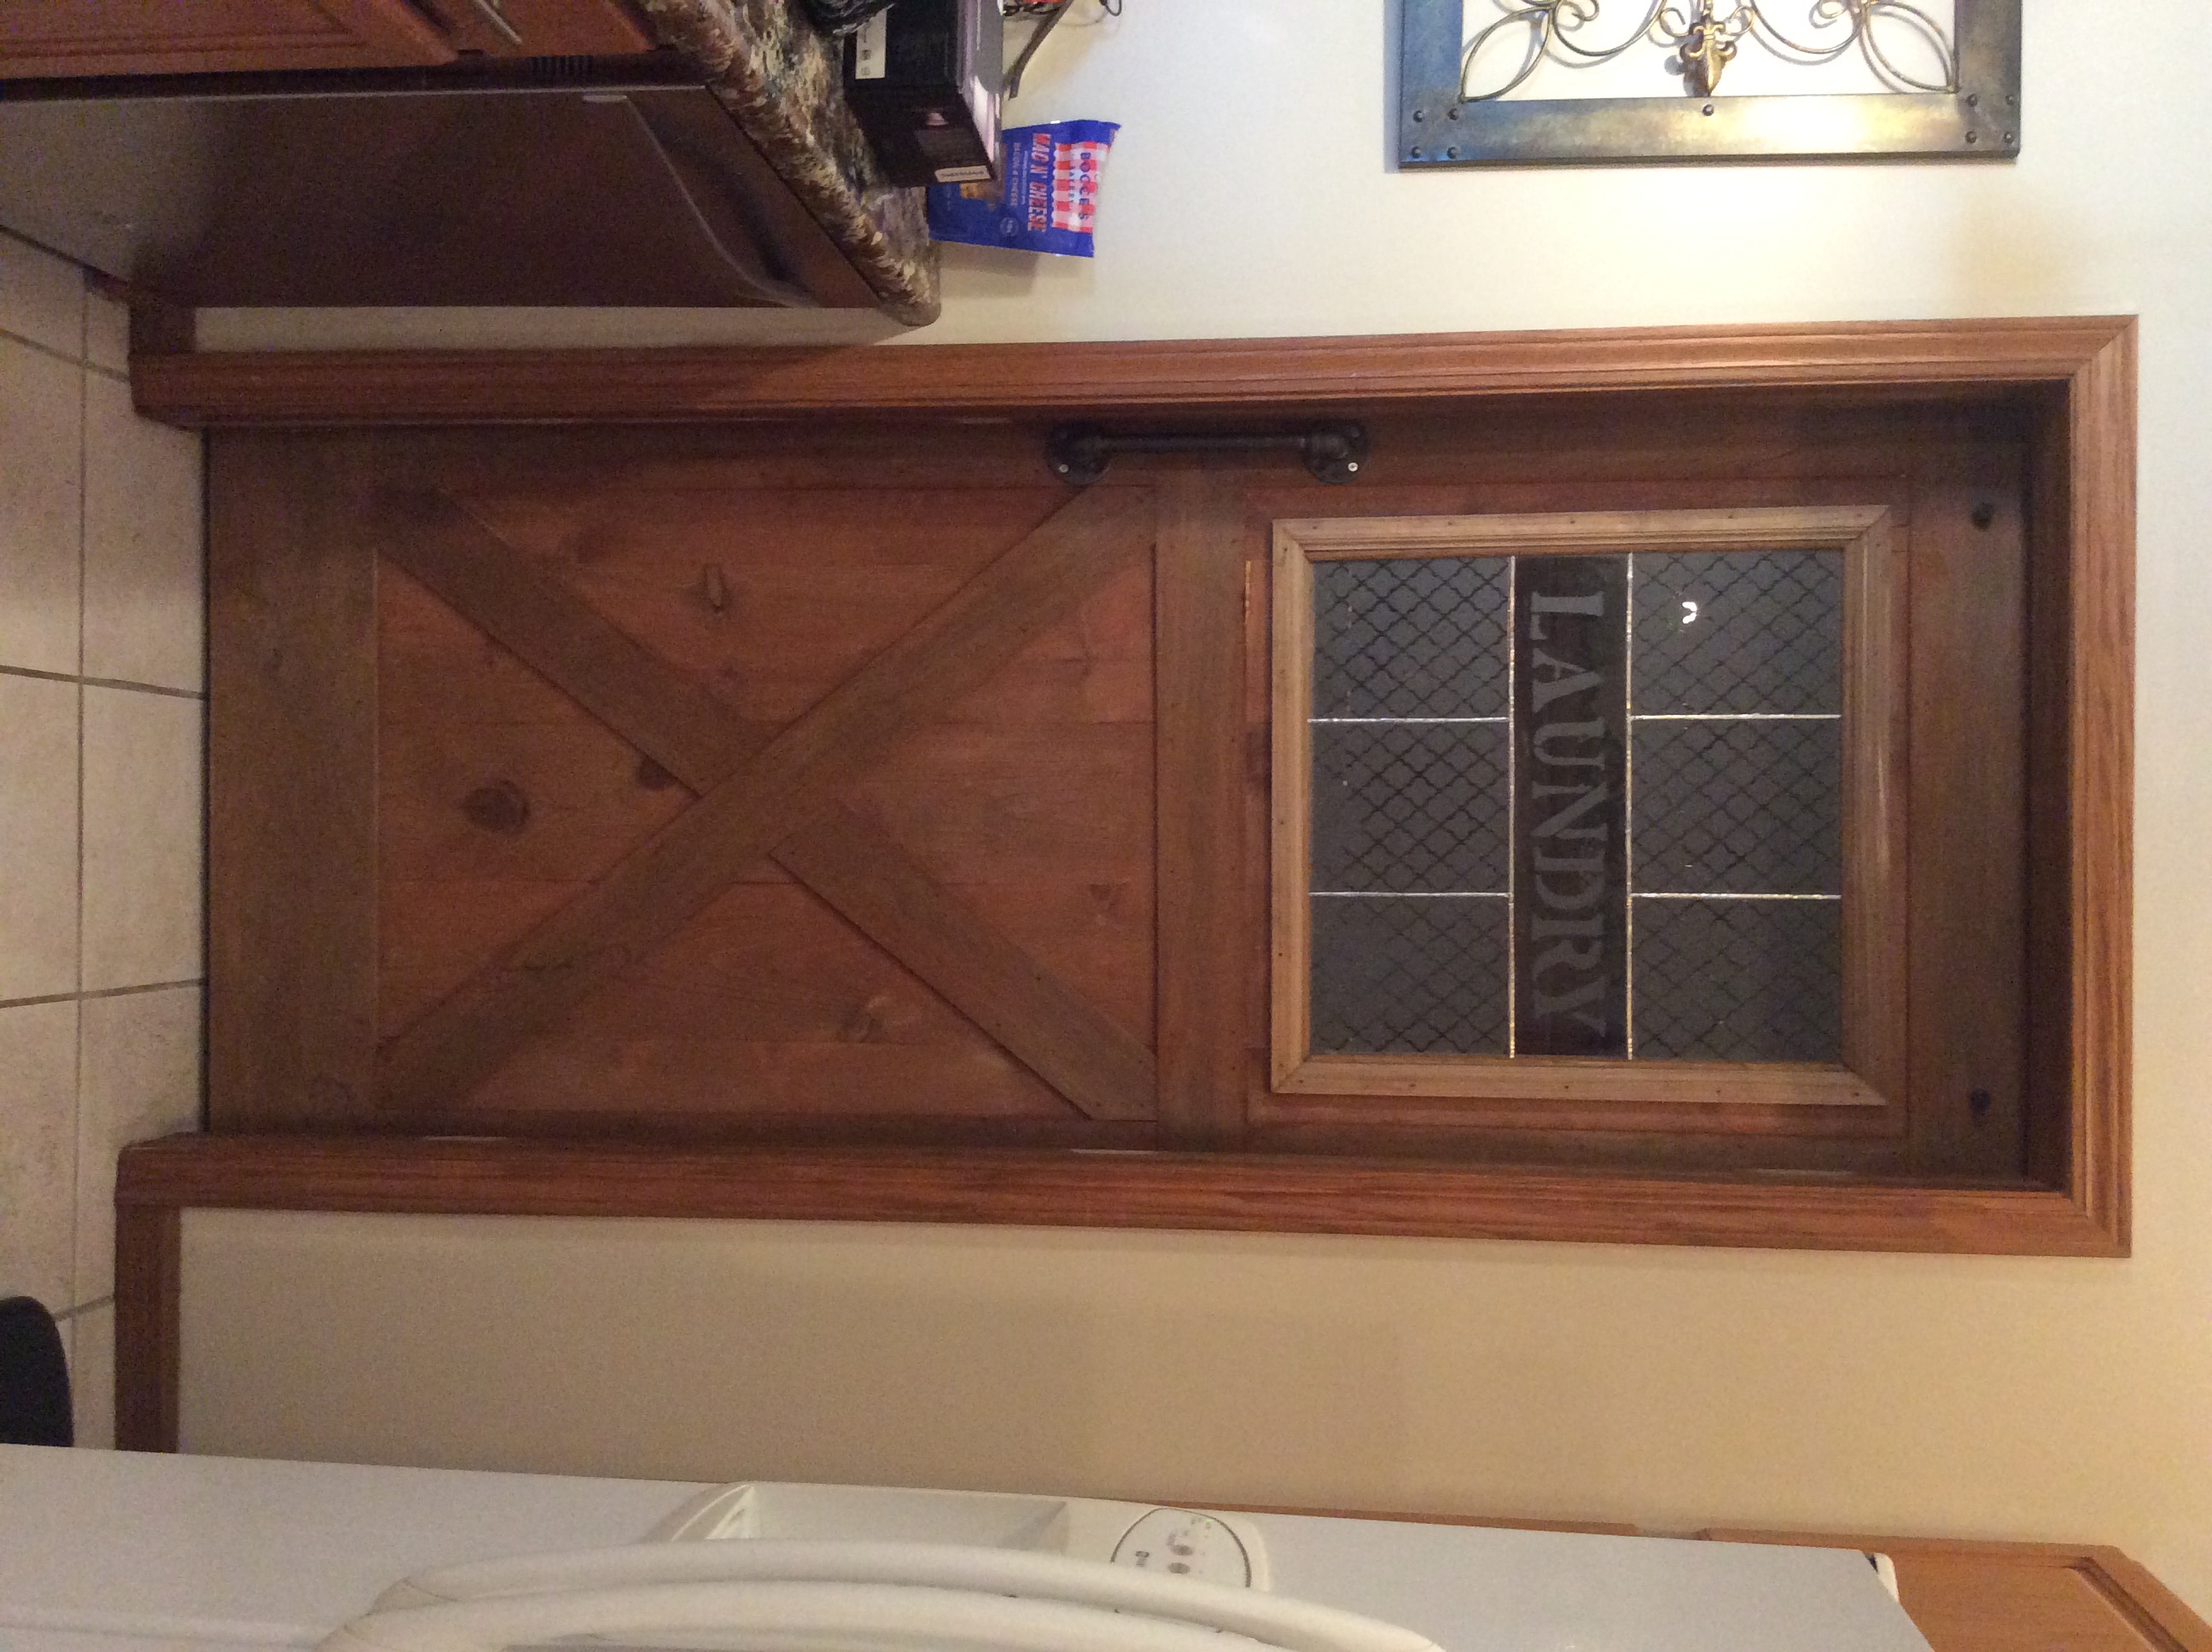
Sliding door to my laundry room with etched, stained glass window
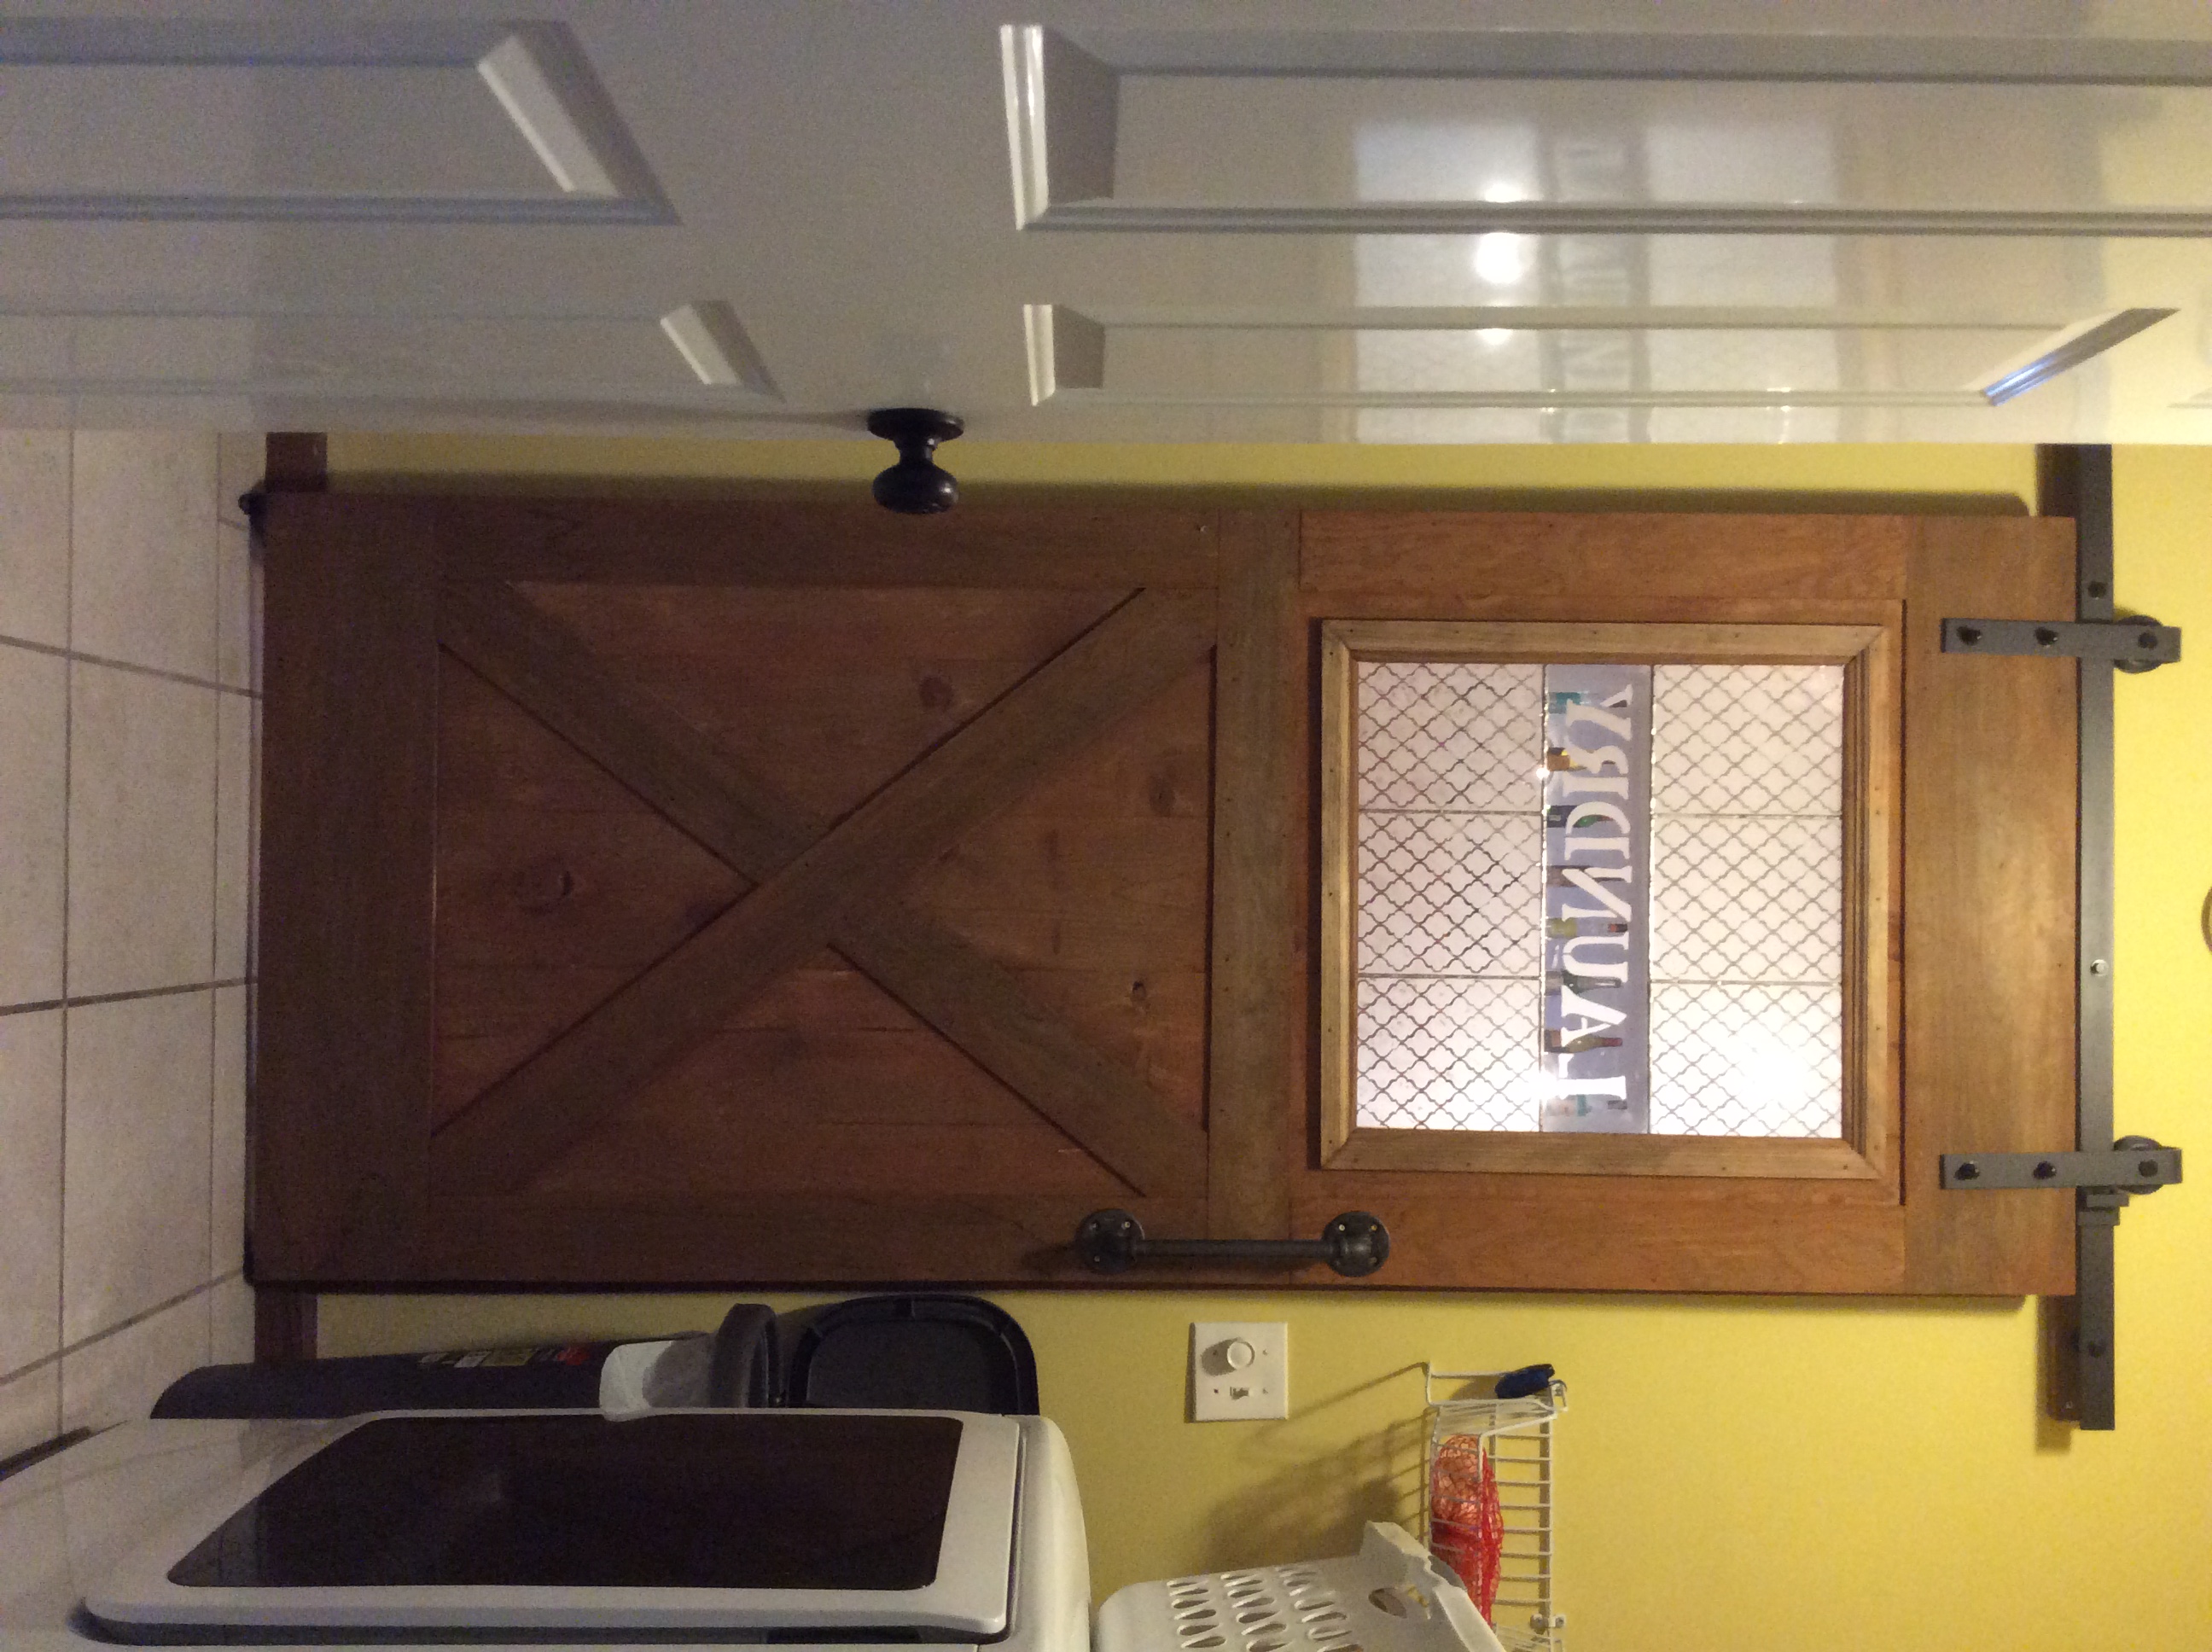
Estimated Cost
$50 plus glass and etching gel, sliding door hardware
Estimated Time Investment
Day Project (6-9 Hours)
Finish Used
Steel wool soaked for a week in vinegar and painted on
Recommended Skill Level
Intermediate
King Size Farmhouse Bed and Nightstands
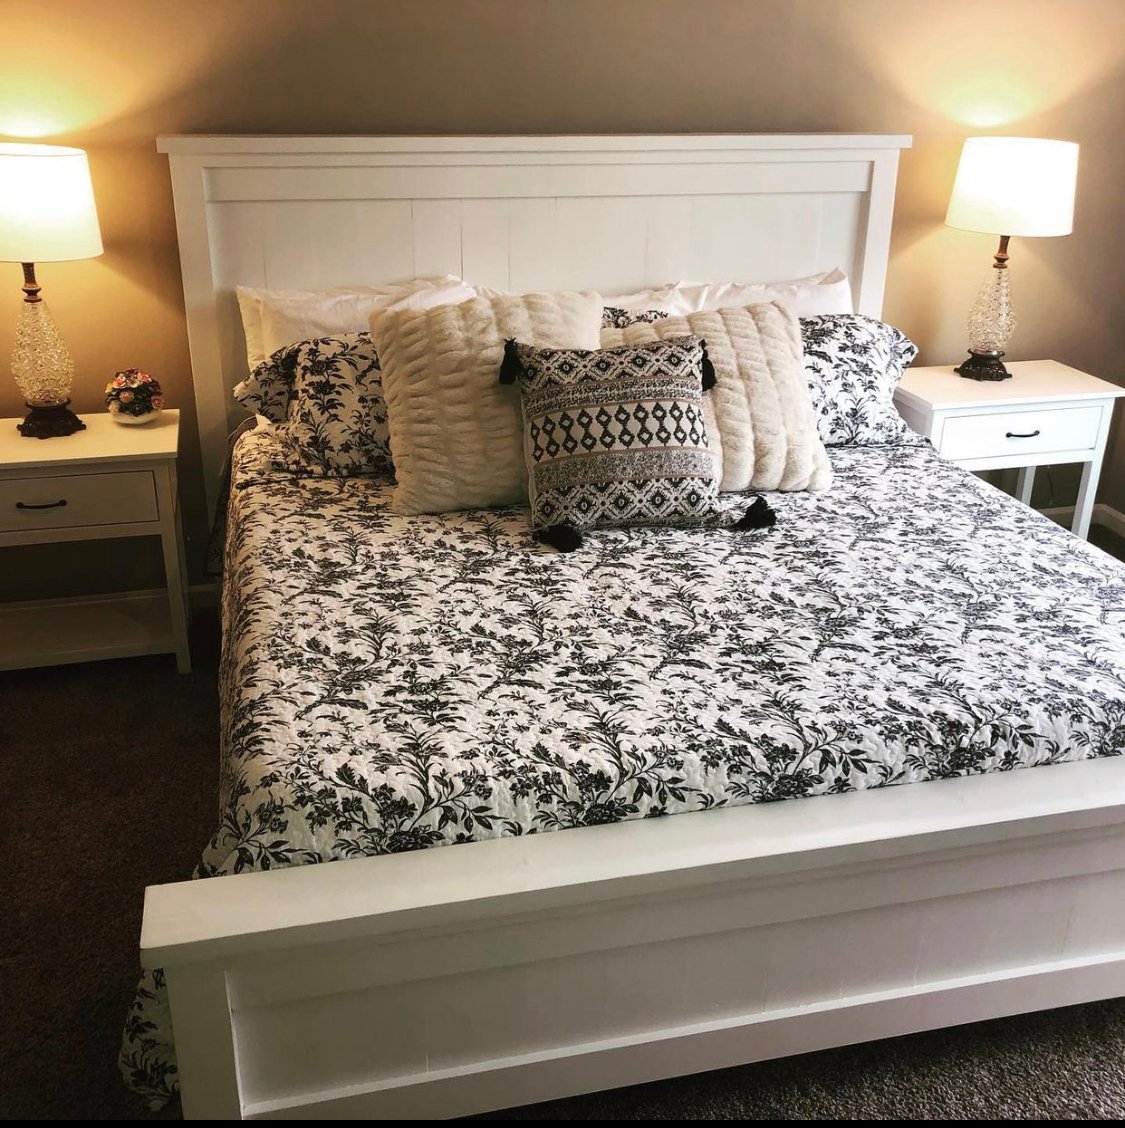
We were thrilled with how this turned out. The plans were spot on!
Built from Plan(s)