Community Brag Posts

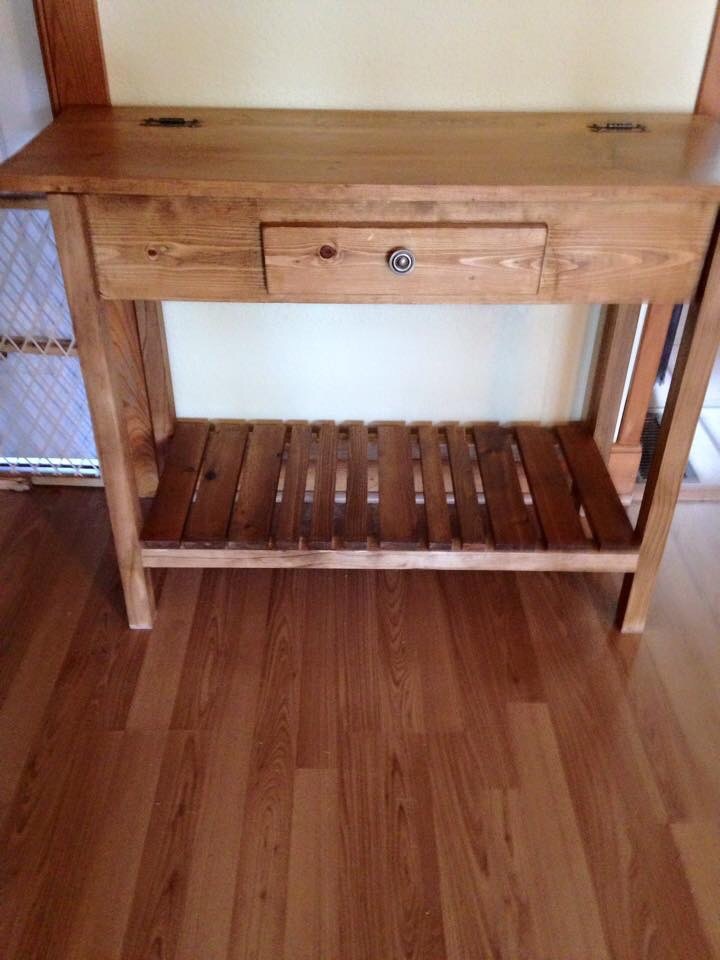
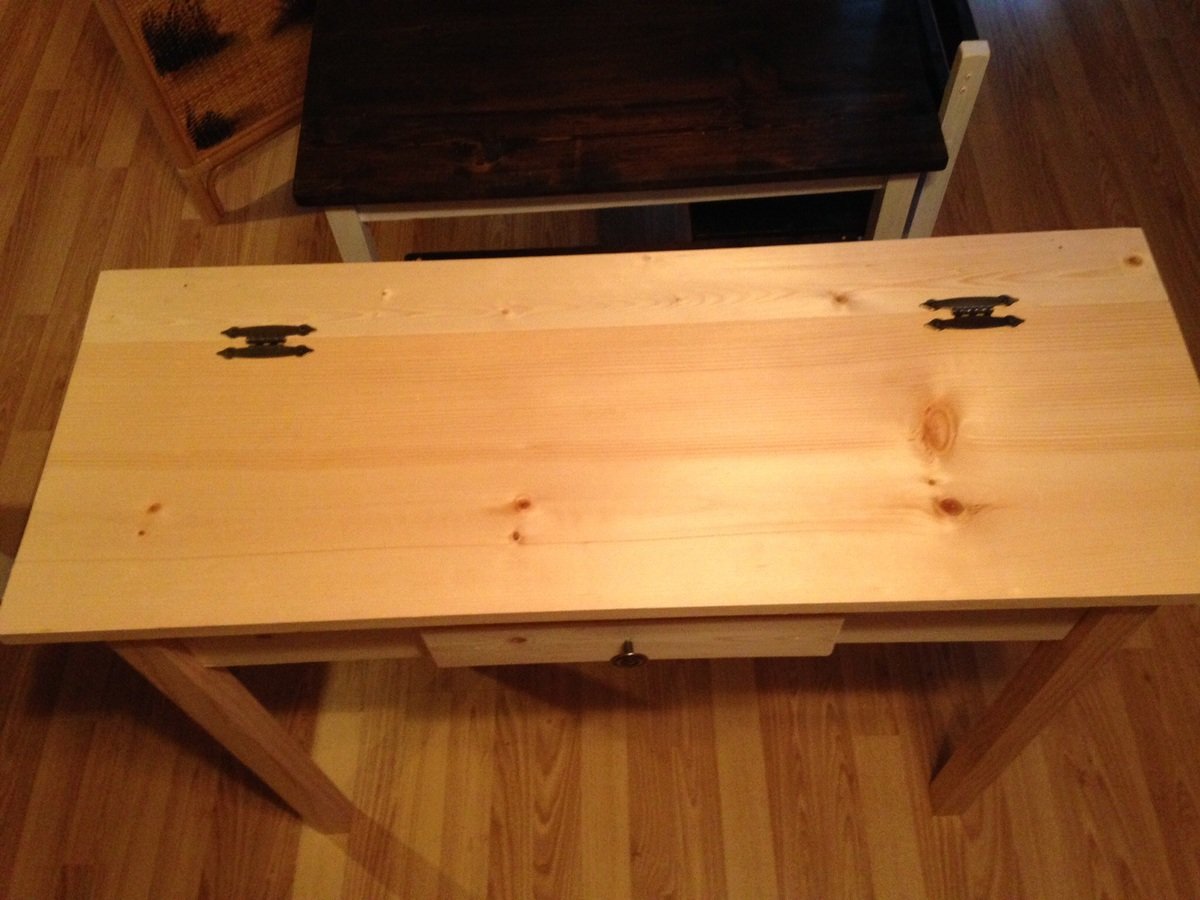
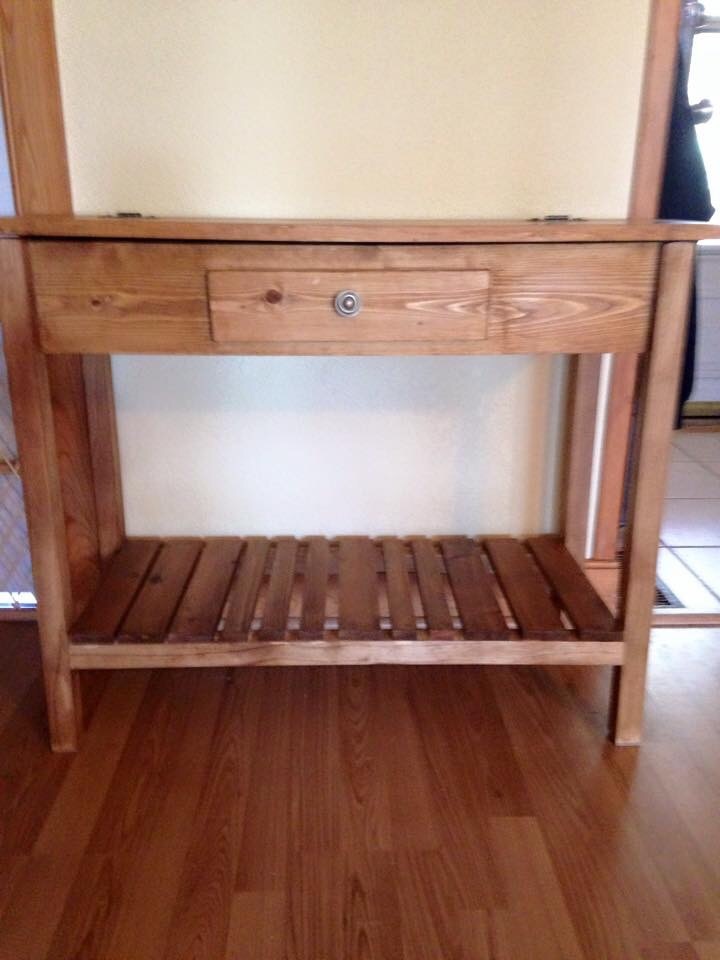
Salsa Console
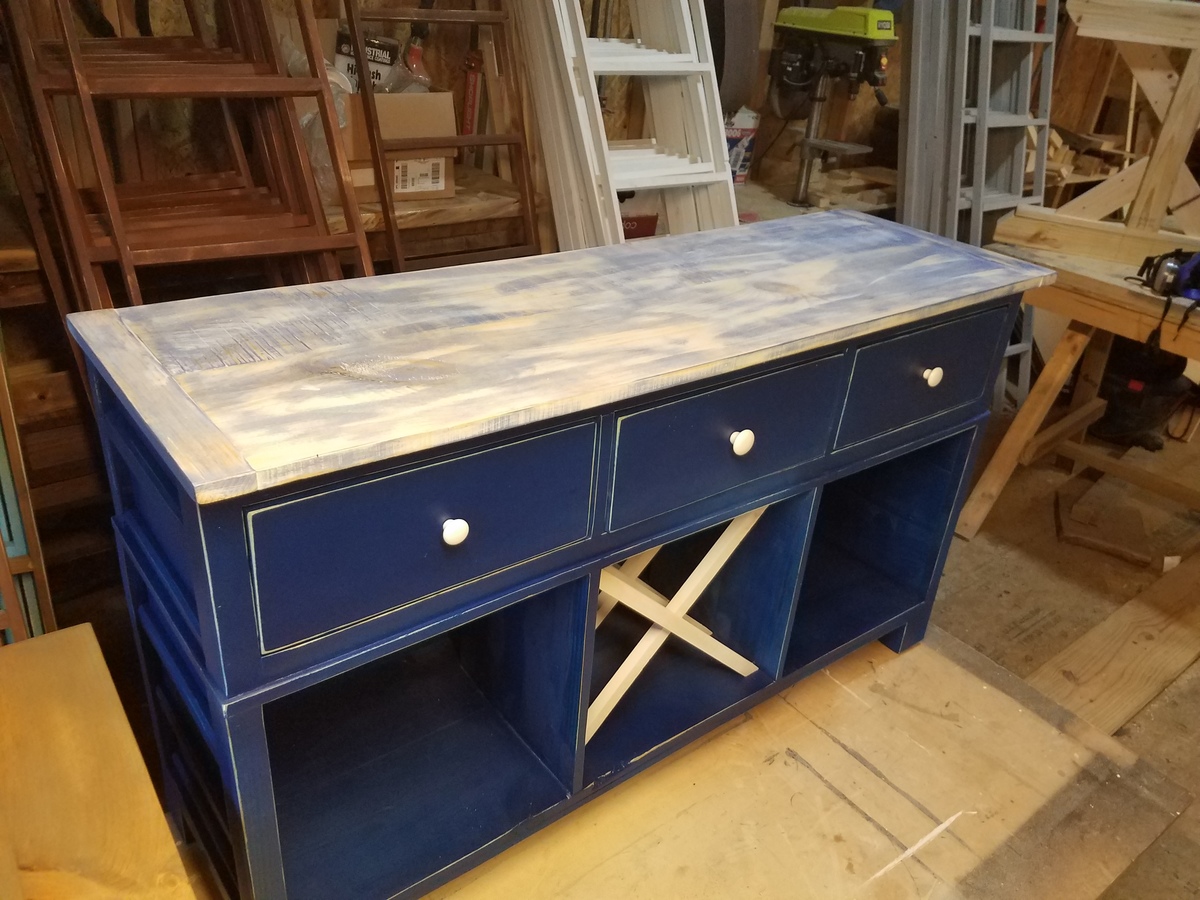
Did this build in about 8 hours. Very nice plan getting alot of compliments. Will surely be building some more. Made from white pine. Left the front doors off this one. The color is American Dream from Amy Howard. The top is a base white with a blue tincture stain then distressed to get my desired effect. And finally a matte clear catalyst laquer to finish it off

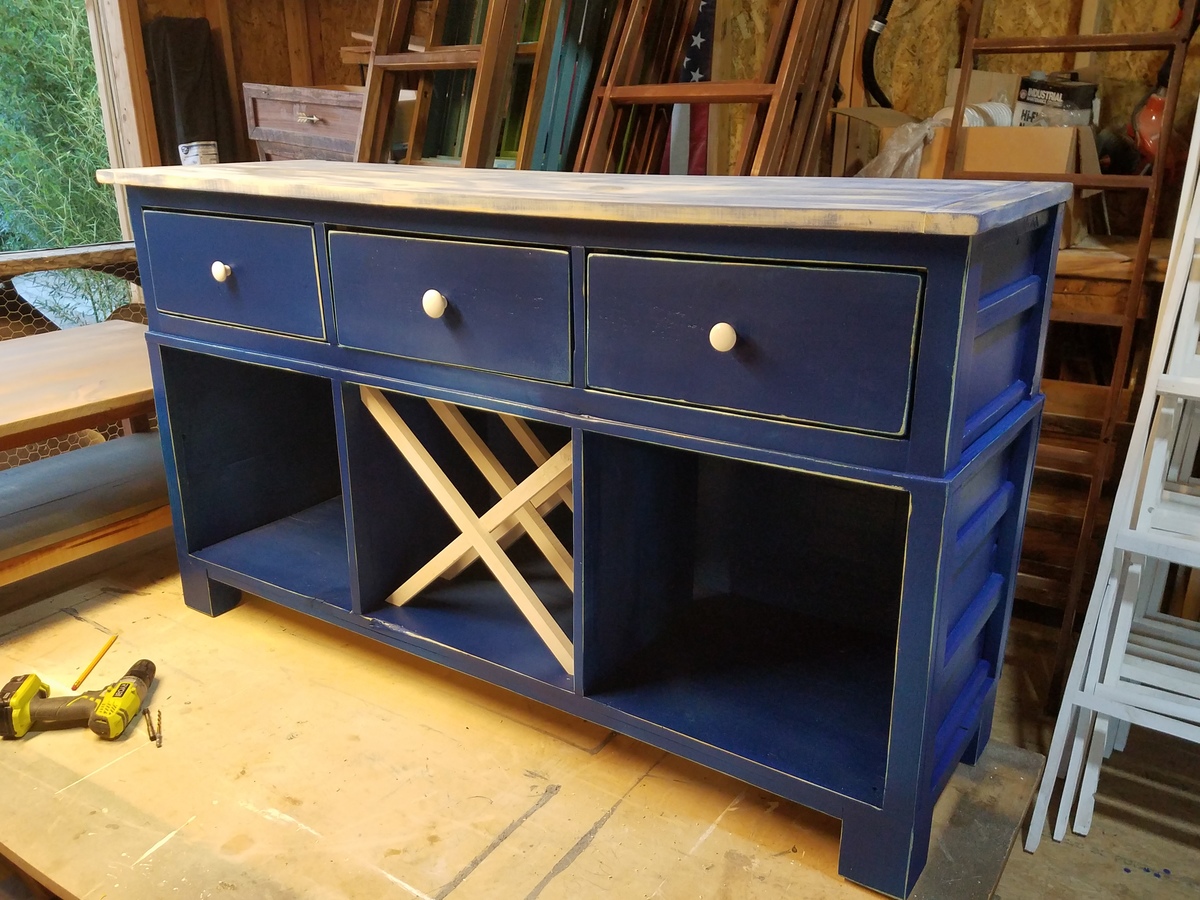
Built from Plan(s)
Estimated Cost
I actually only spent about $30 on this project as I resawed all the material from reclaimed shipping crates made from Spanish pine.
Estimated Time Investment
Day Project (6-9 Hours)
Finish Used
Matte Laquer
Recommended Skill Level
Intermediate
The Orange Library Book Cart
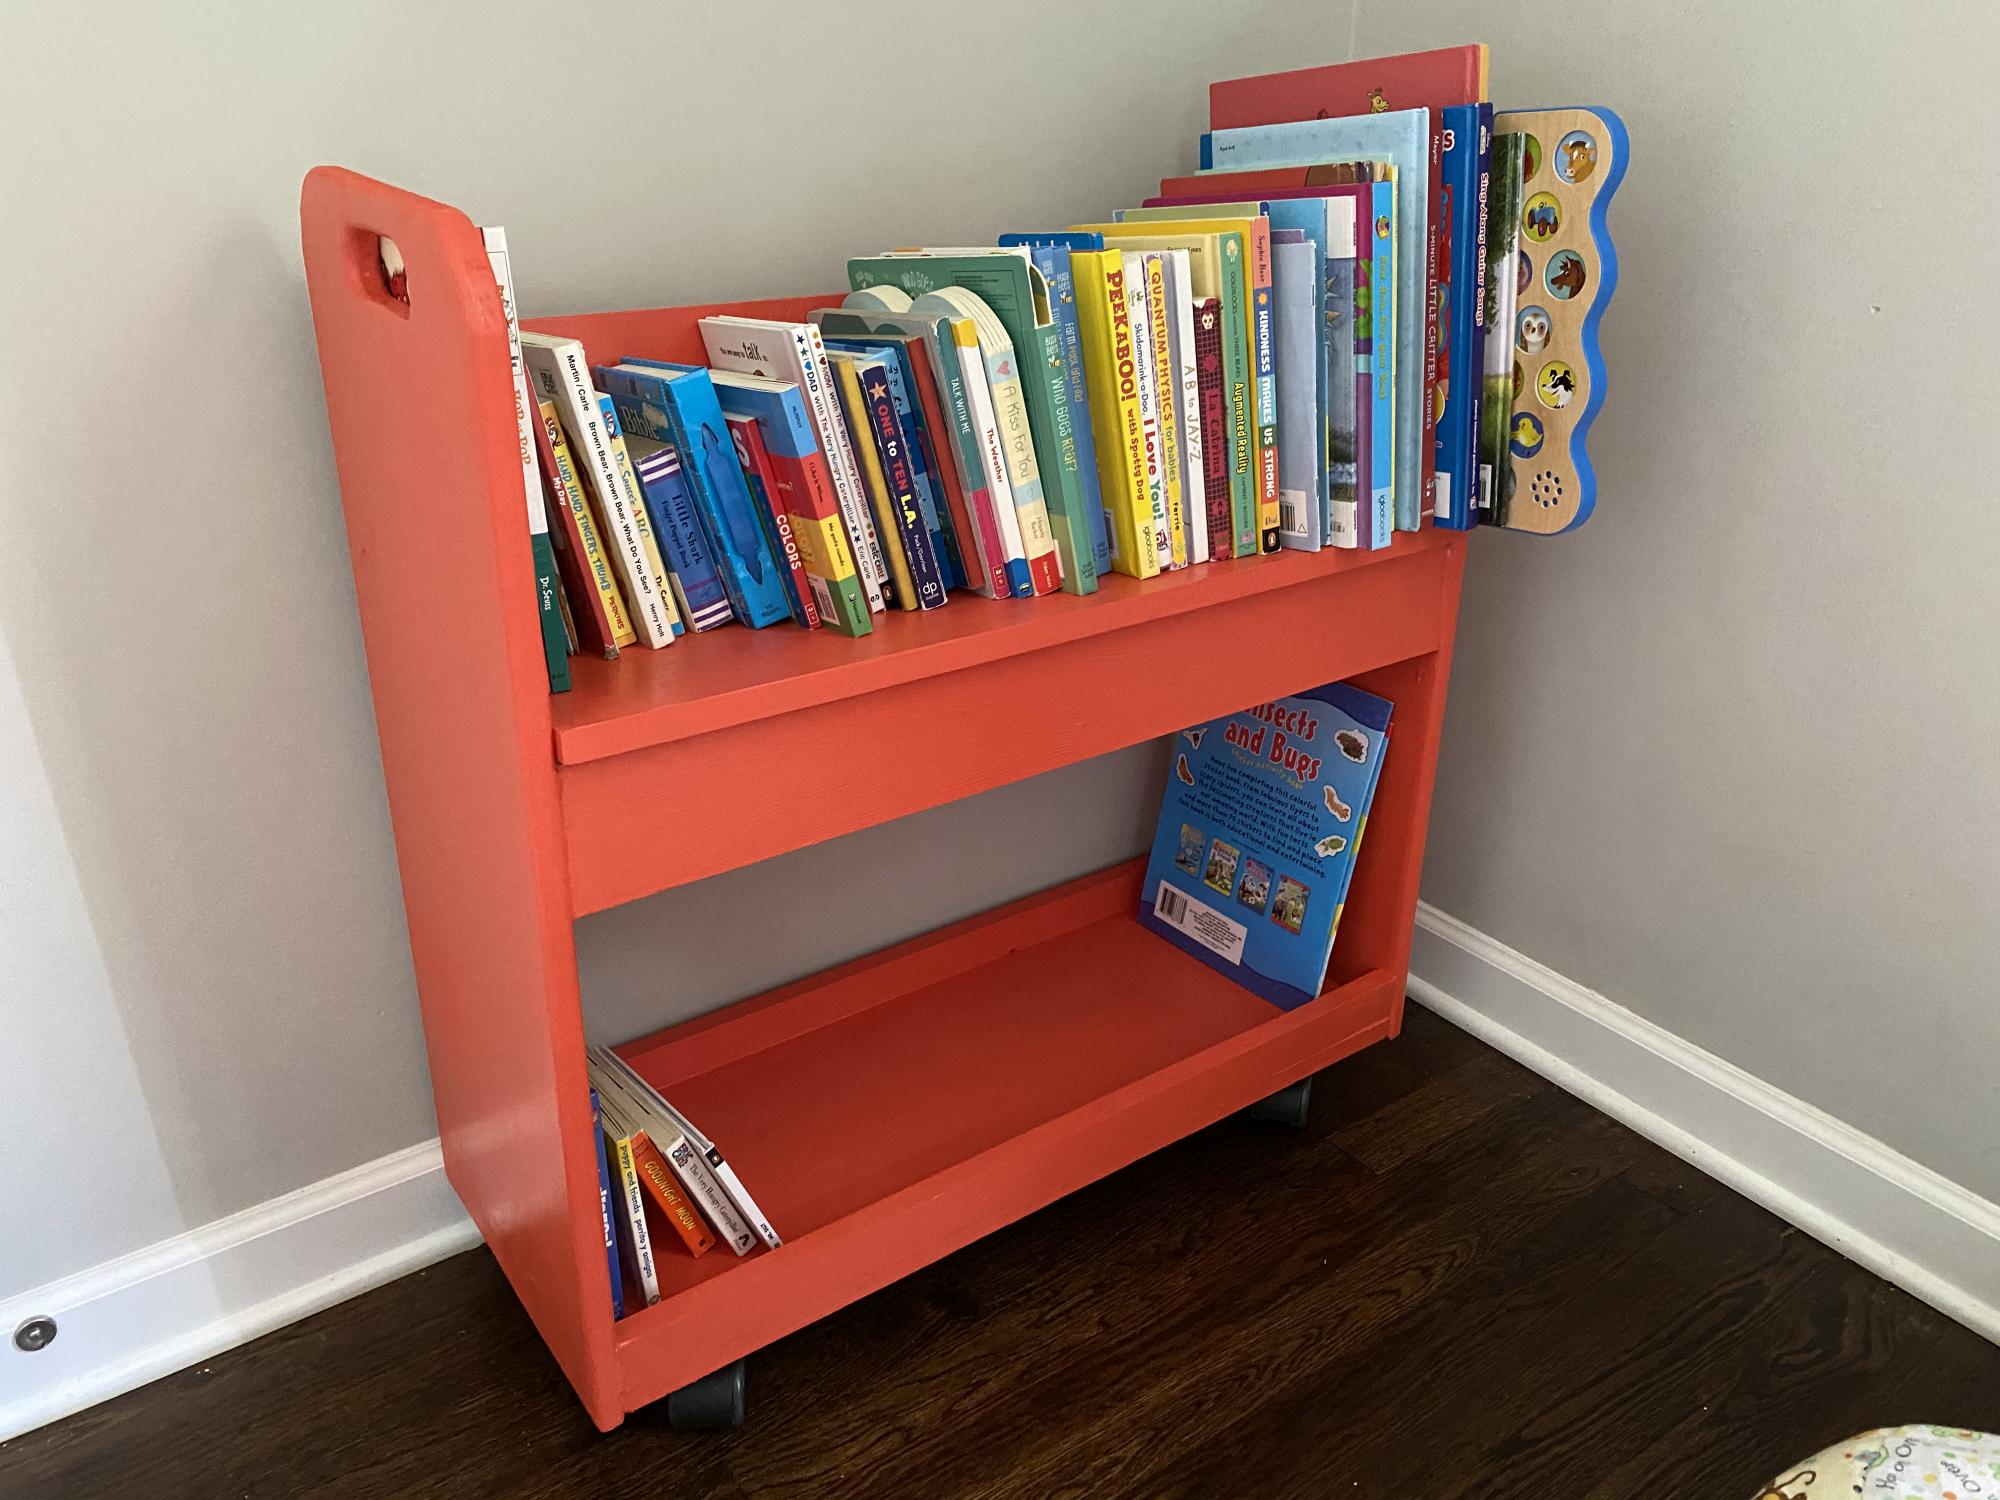
This was really easy once I finally got the top and handles on the side pieces complete. I still haven’t master my jigsaw yet :( Any tips would be helpful. The tearout I get when I use my jigsaw makes it impossible to follow any lines I draw. But I think the curves came out pretty okay.
Built from Plan(s)
Comments
Mon, 06/28/2021 - 20:09
Great Job!
It looks awesome, love the color choice! The jig saw just takes practice, but it looks like you did a wonderful job on that aspect as well!
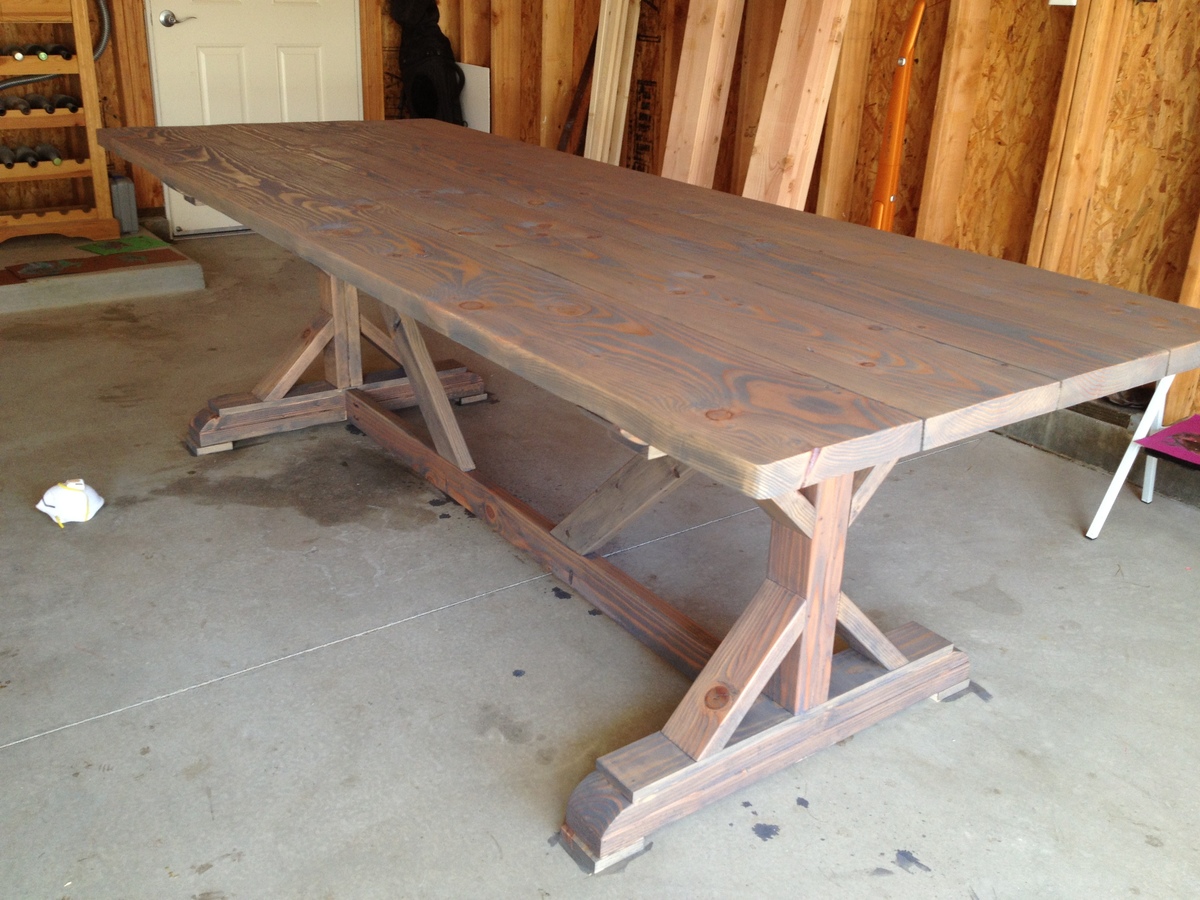
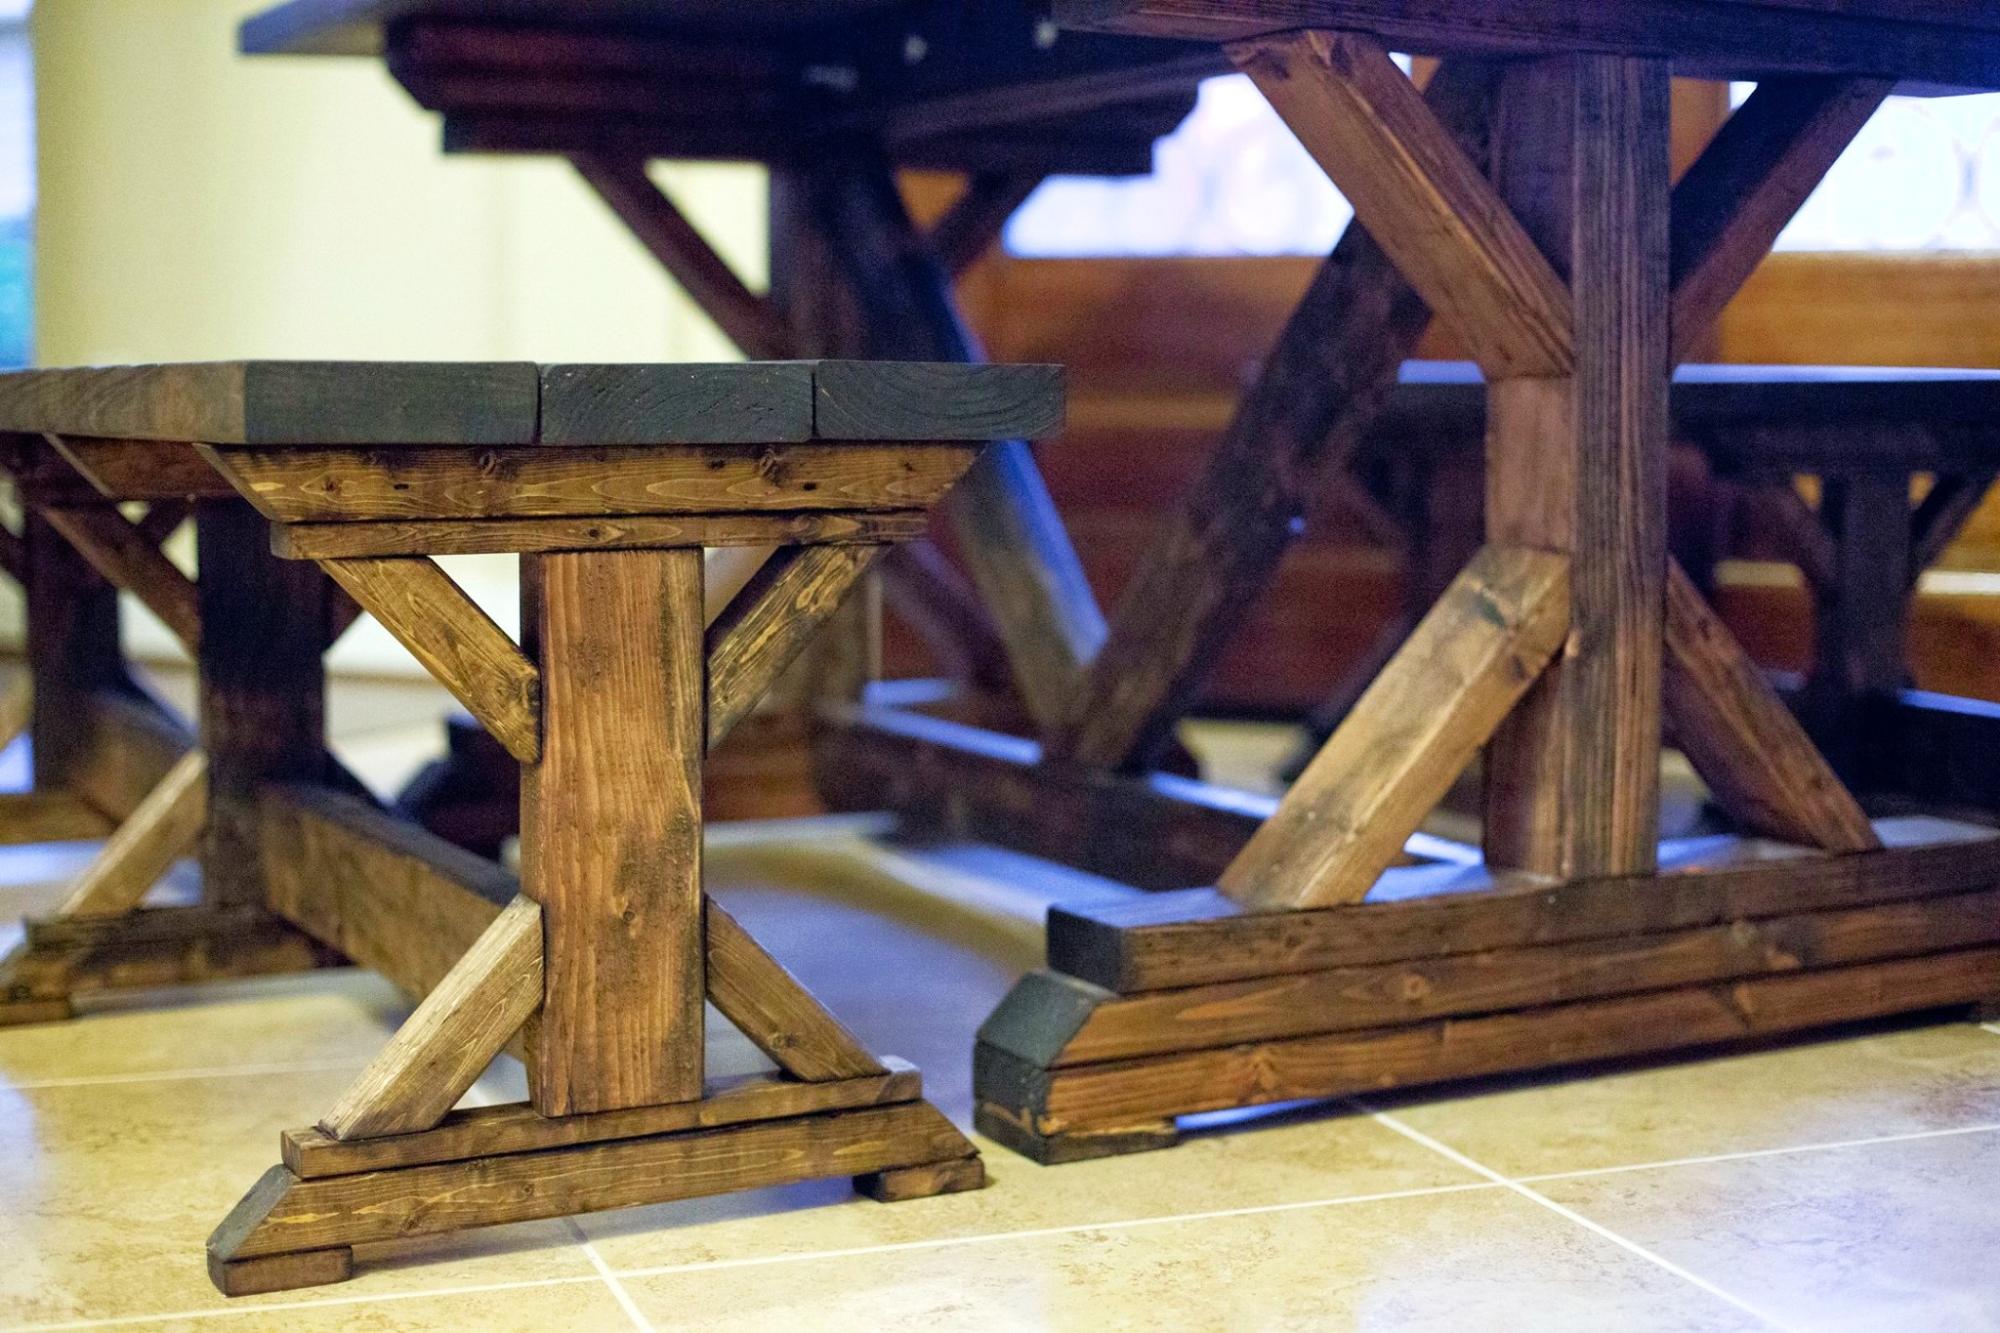
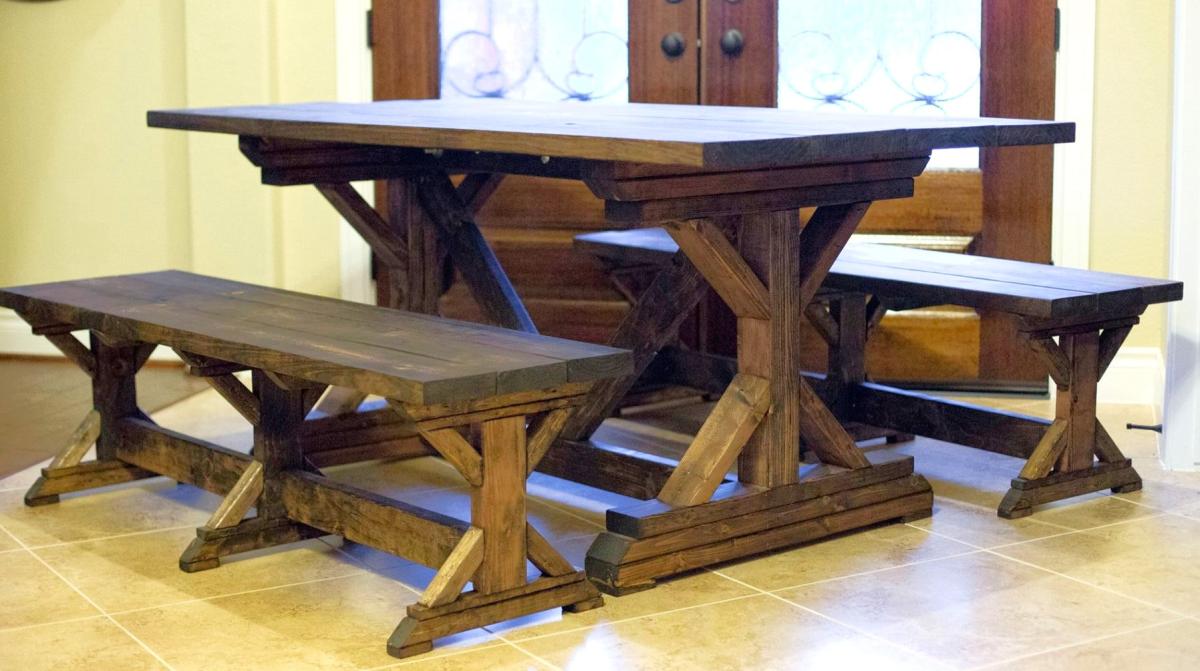
Anthropologie inspired Fancy X Farmhouse Table & Benches Part 1
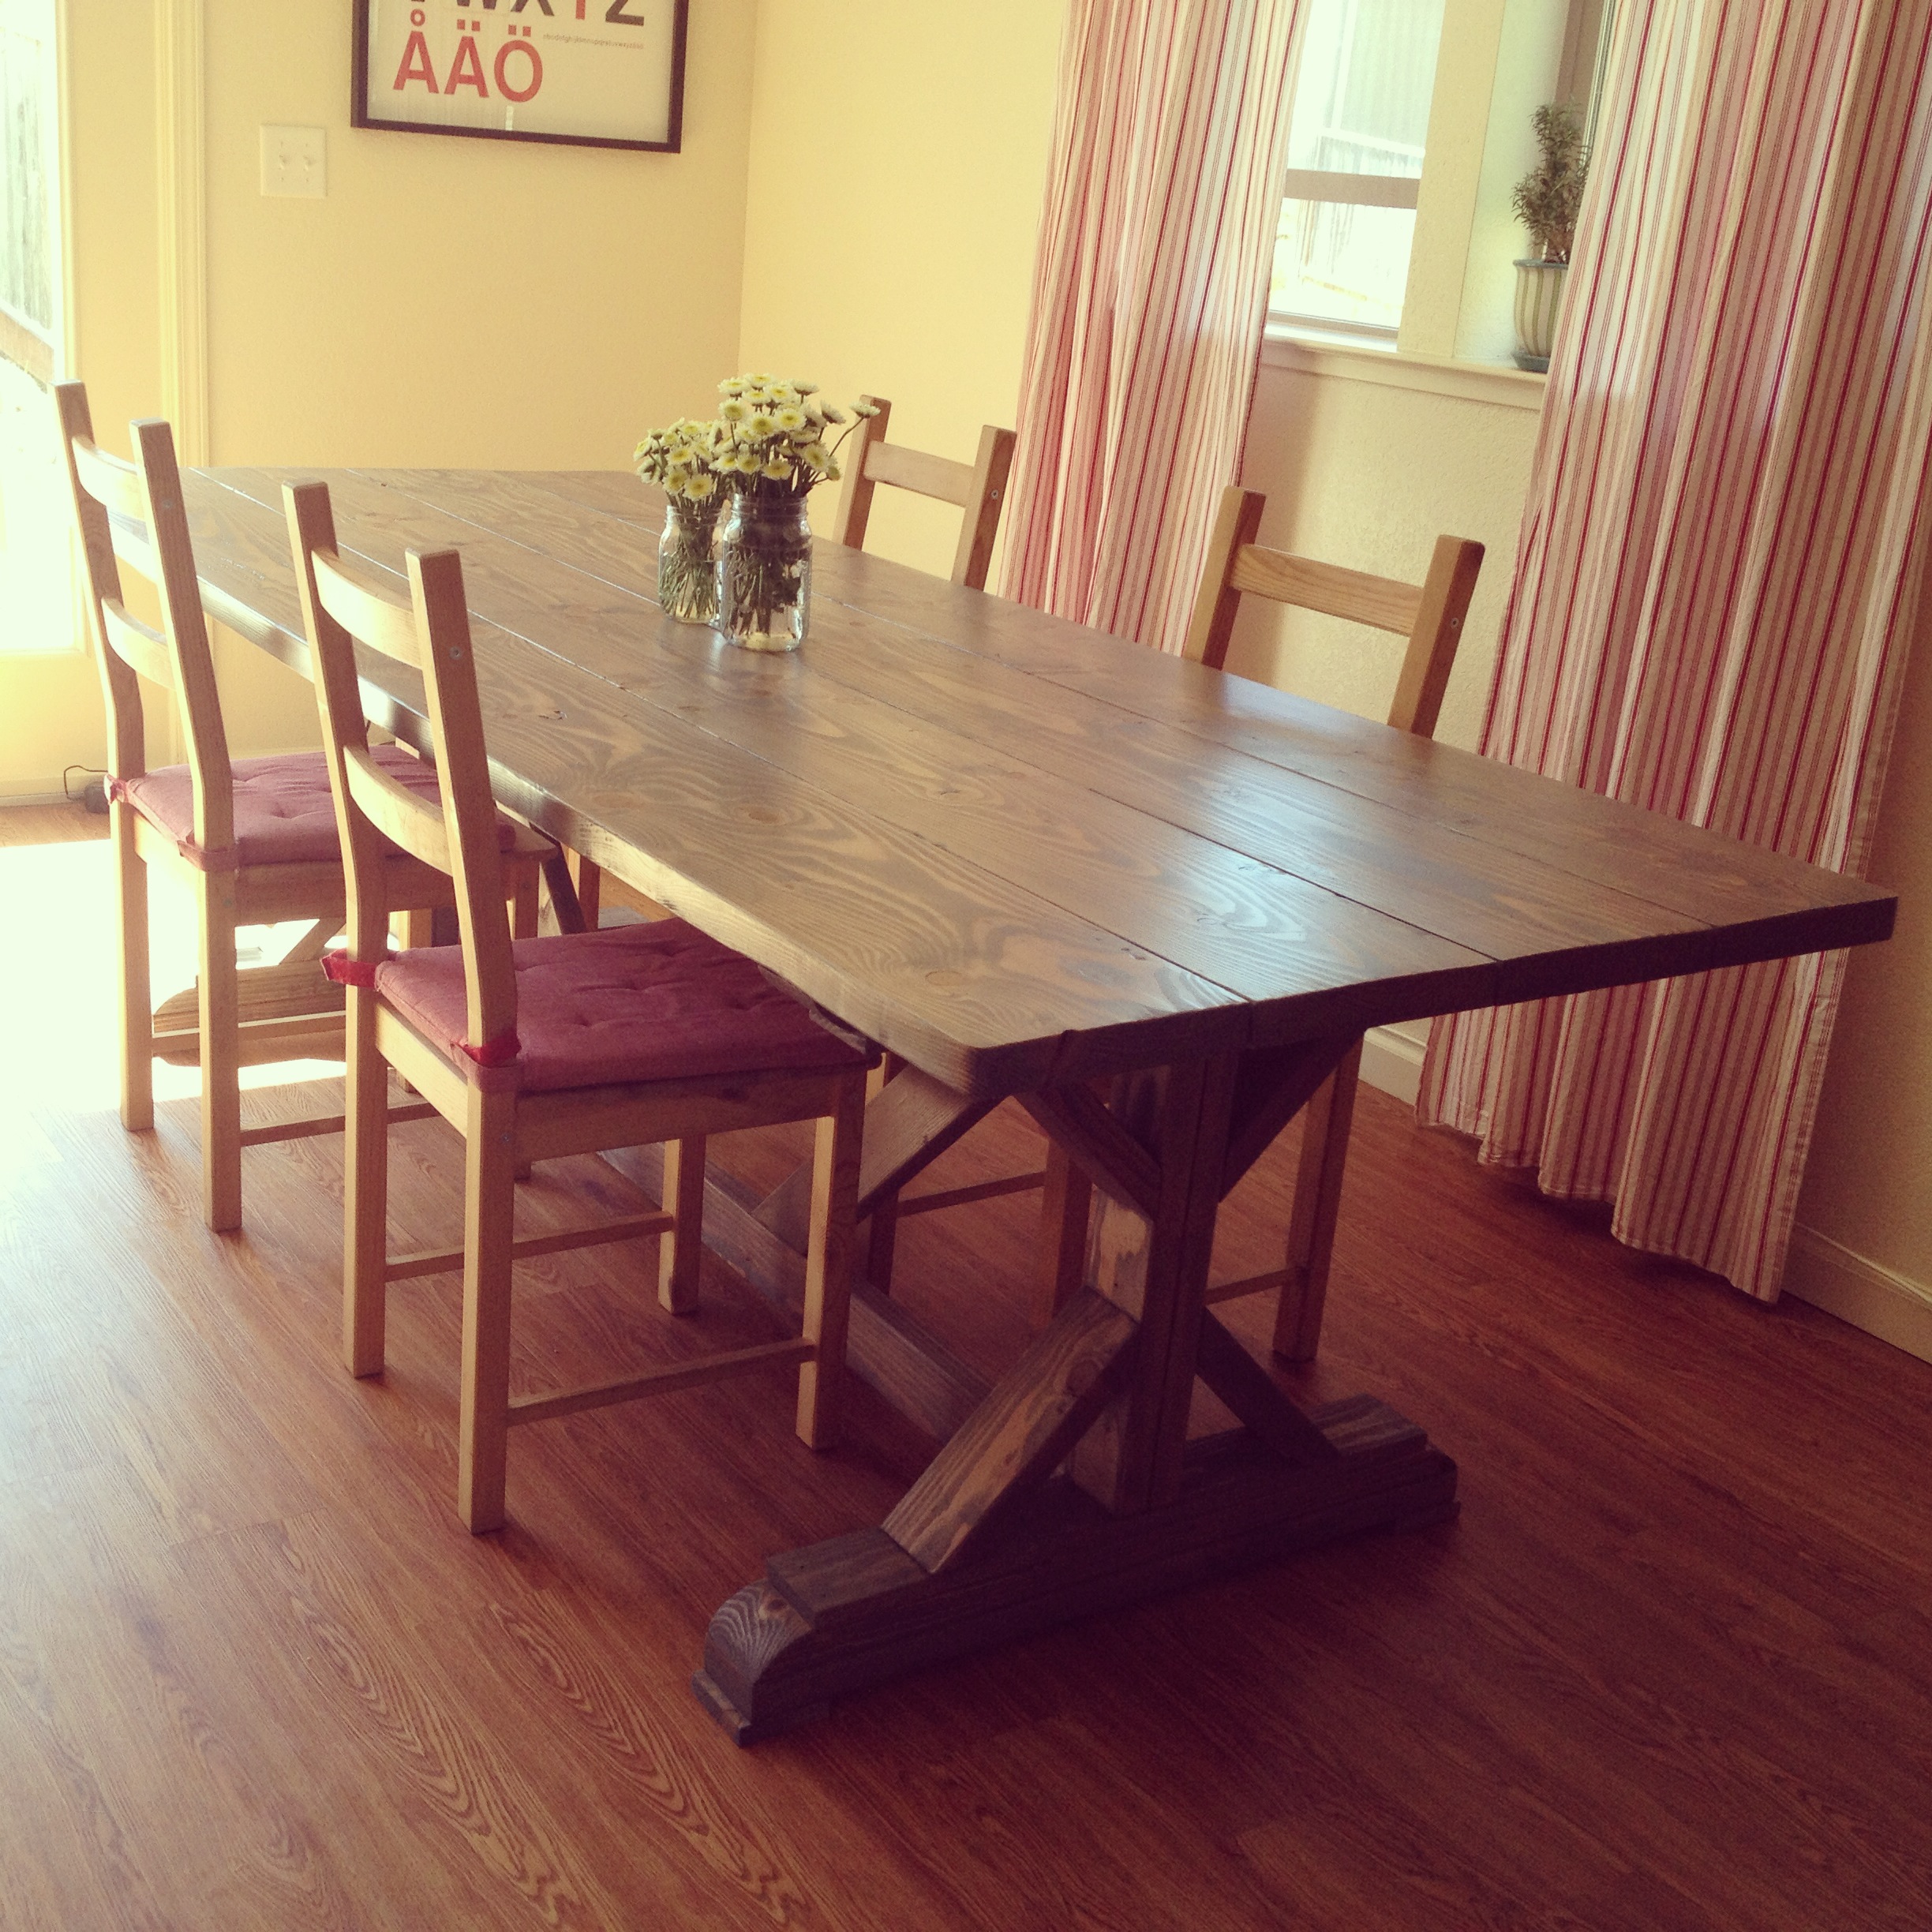
This project was super easy, my husband and I did this together while I was 9 months pregnant with our other 2 kids and dog running around the whole time! We made the table and 2 benches for $250 including lumber and finishing supplies. Check out my blog for details.

Built from Plan(s)
Estimated Cost
$250
Estimated Time Investment
Weekend Project (10-20 Hours)
Finish Used
Grey Stain
Recommended Skill Level
Beginner
Stair leg flip top table
I made this smaller to fit in the space where it's going. I used 2x2 legs, and the table is 39" wide. I added the bottom shelf also. I will finish it in golden oak.
Built from Plan(s)
Estimated Cost
50.00
Estimated Time Investment
Afternoon Project (3-6 Hours)
Finish Used
Will be golden oak.
Recommended Skill Level
Beginner
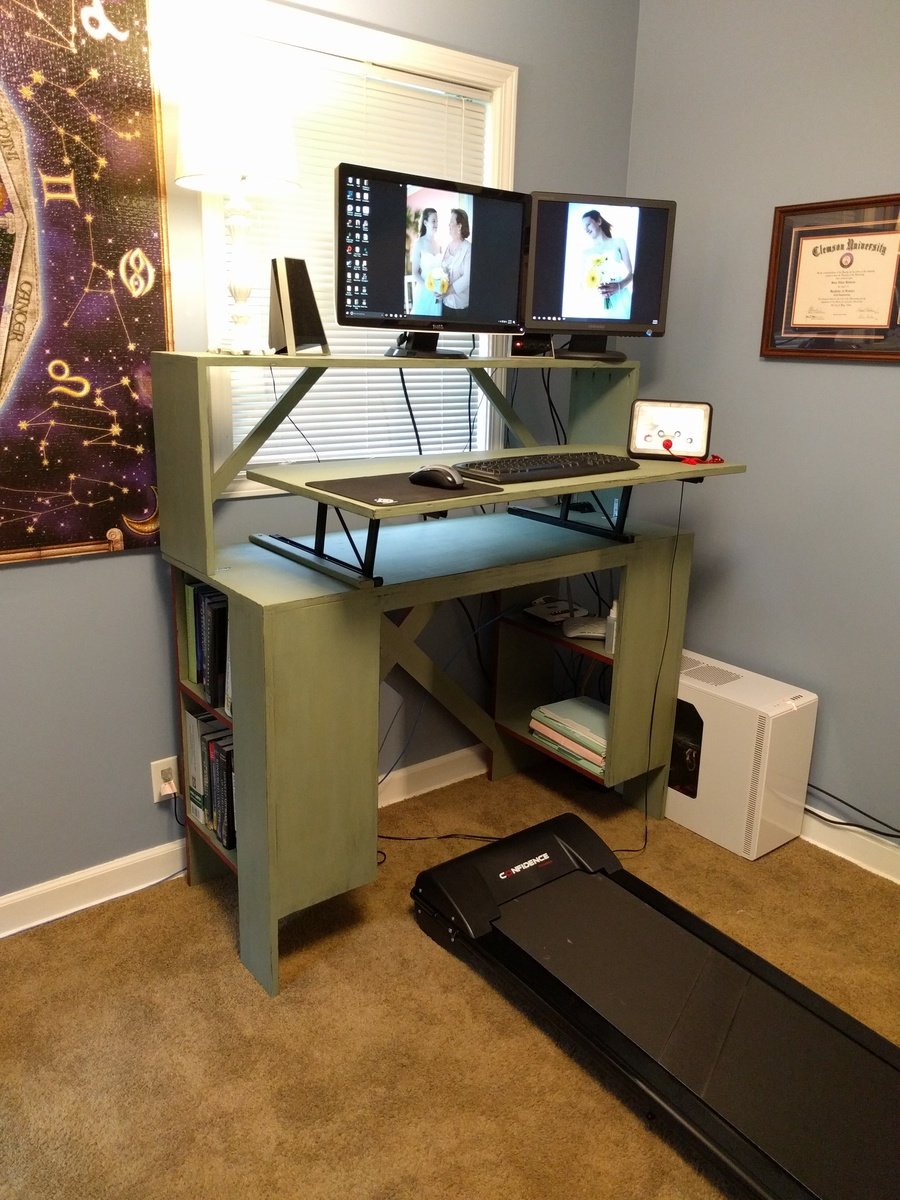
Standing/Walking Desk w/ Bookshelves
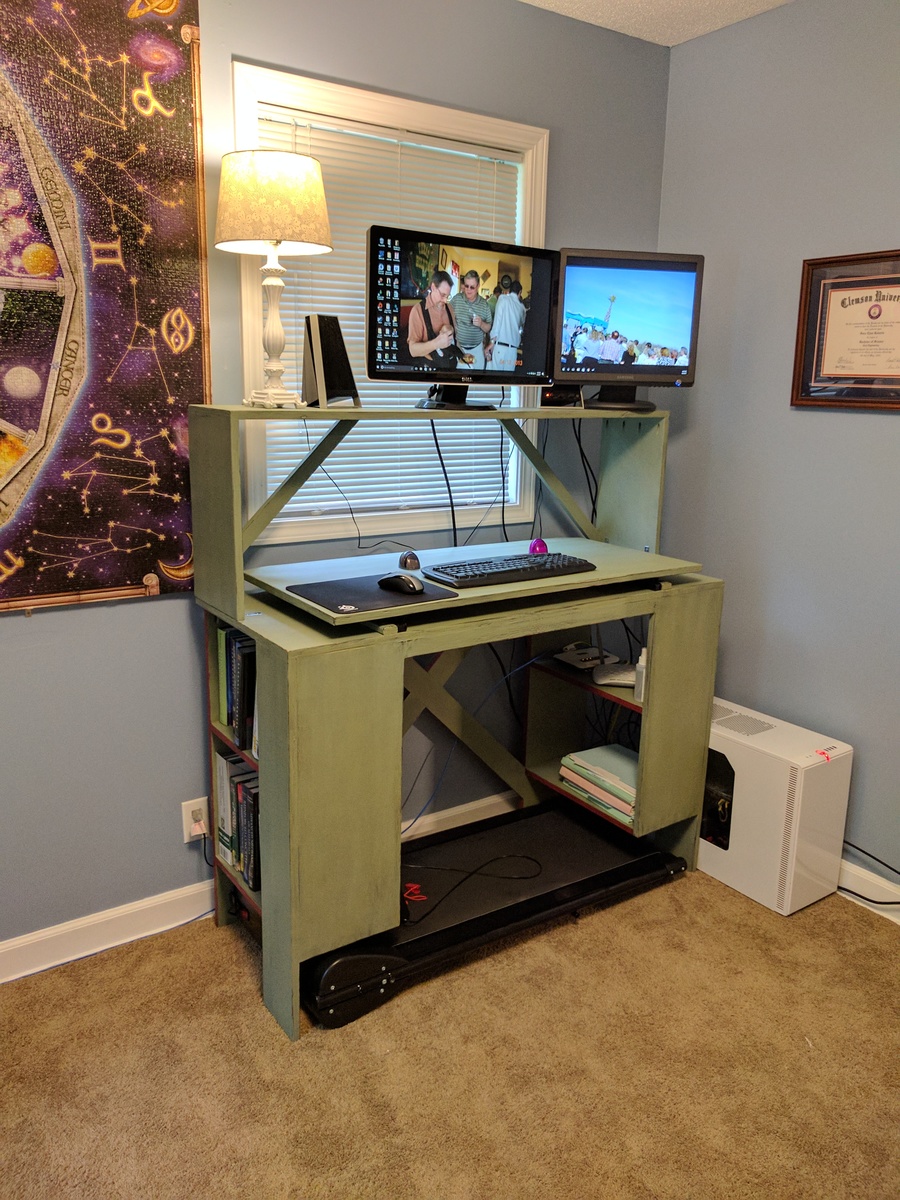
Standing/Walking desk with side bookshelves built in. Desktop folds up and out so keyboard is at correct level for my height while walking on treadmill. When folded down, keyboard is at acceptible level for standing on ground. Desk designed so that the small walking treadmill can slide under and be out of the way when not in use.
Lifting Hinges used are Woodtek Coffee Table Lift Mechanism: https://woodworker.com/coffee-table-top-lift-mechanism-lr-mssu-164-228…
Estimated Cost
Lumber: (1) 23/32 Plywood 4x8, (1) 23/32 Plywood 4x4 = $45...Lifting Hinges: $57...Finishing: 2 pints of General Finishes Milk Paint + Acrylic Topcoat = $56...TOTAL = $160
Estimated Time Investment
Weekend Project (10-20 Hours)
Finish Used
1 coat of General Finishes 'Lamp Black' Milk Paint...
2 coats of General Finishes 'Basil' Milk Paint...
Sanded w/ 120 grit to achieve a distressed look...
1 coat of General Finishes 'Yellow Ocher' Glaze Effect for patina...
1 coat of General Finishes 'Flat on Flat' Acrylic Topcoat on high traffic areas
2 coats of General Finishes 'Basil' Milk Paint...
Sanded w/ 120 grit to achieve a distressed look...
1 coat of General Finishes 'Yellow Ocher' Glaze Effect for patina...
1 coat of General Finishes 'Flat on Flat' Acrylic Topcoat on high traffic areas
Recommended Skill Level
Intermediate
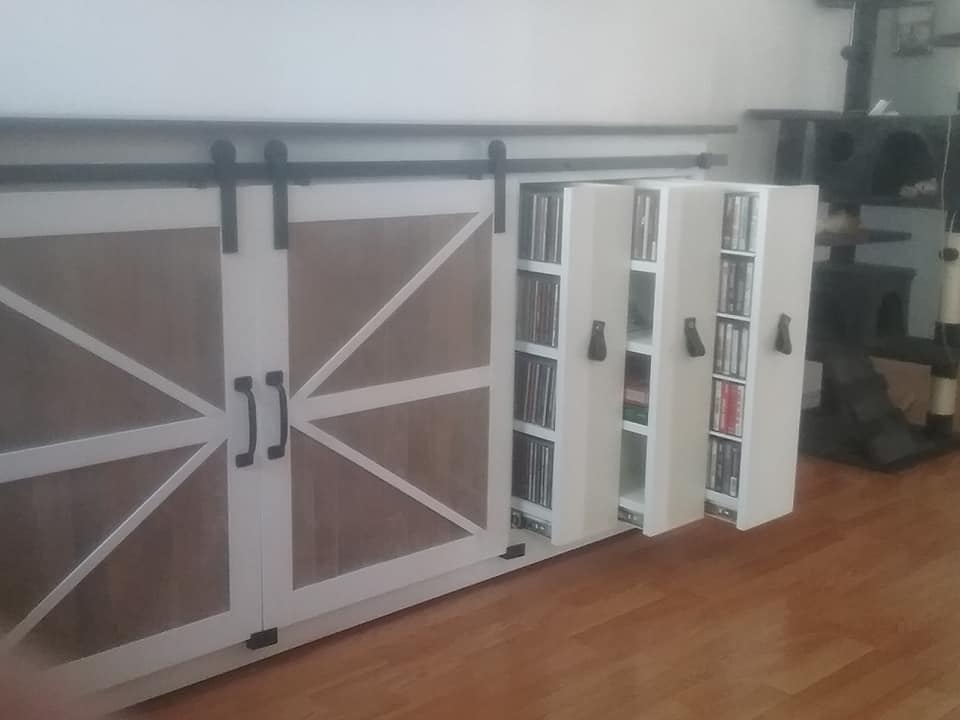
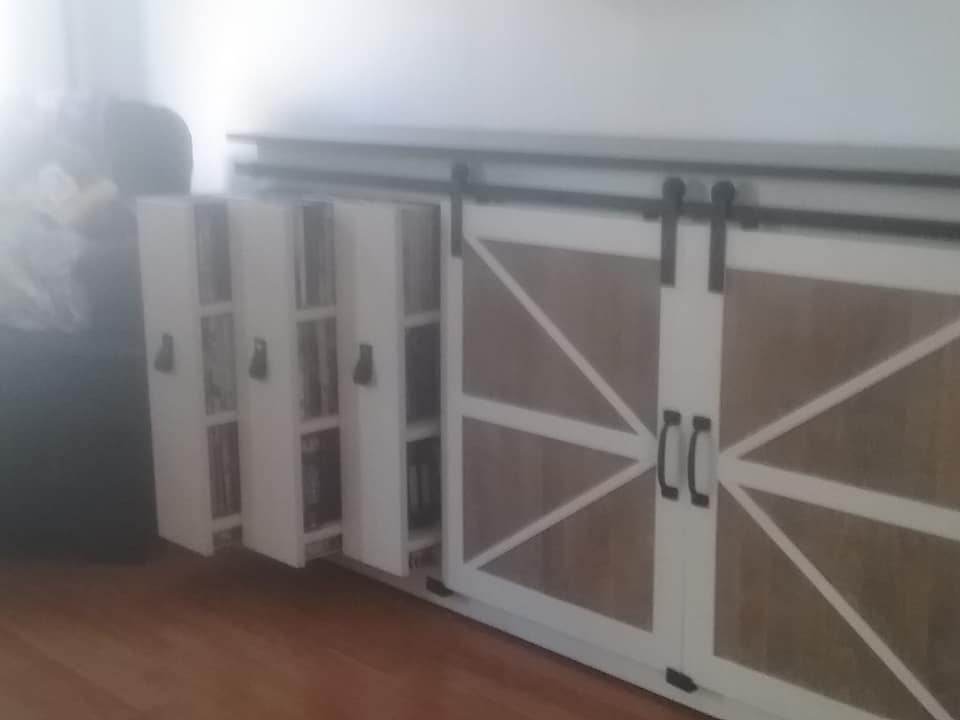
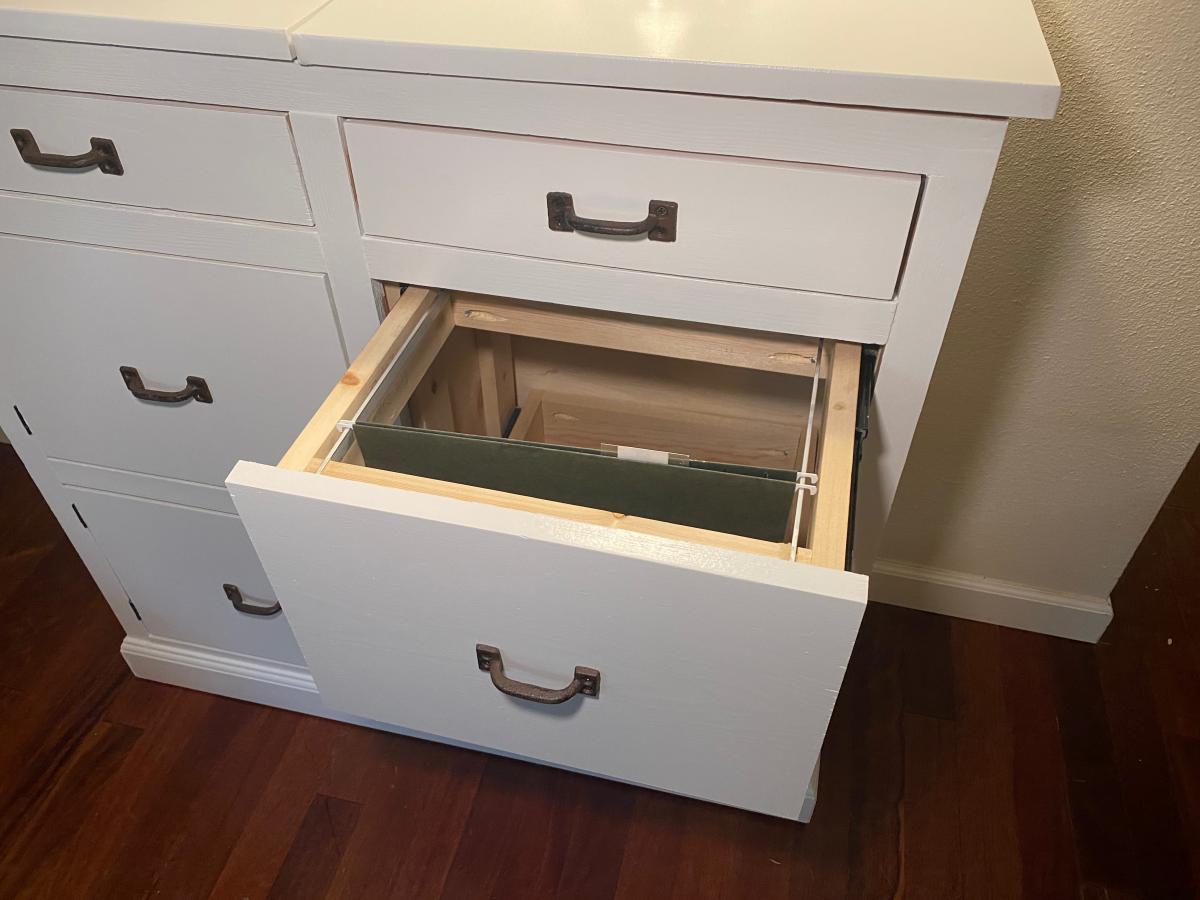
Farmhouse Media Cabinet (modified)
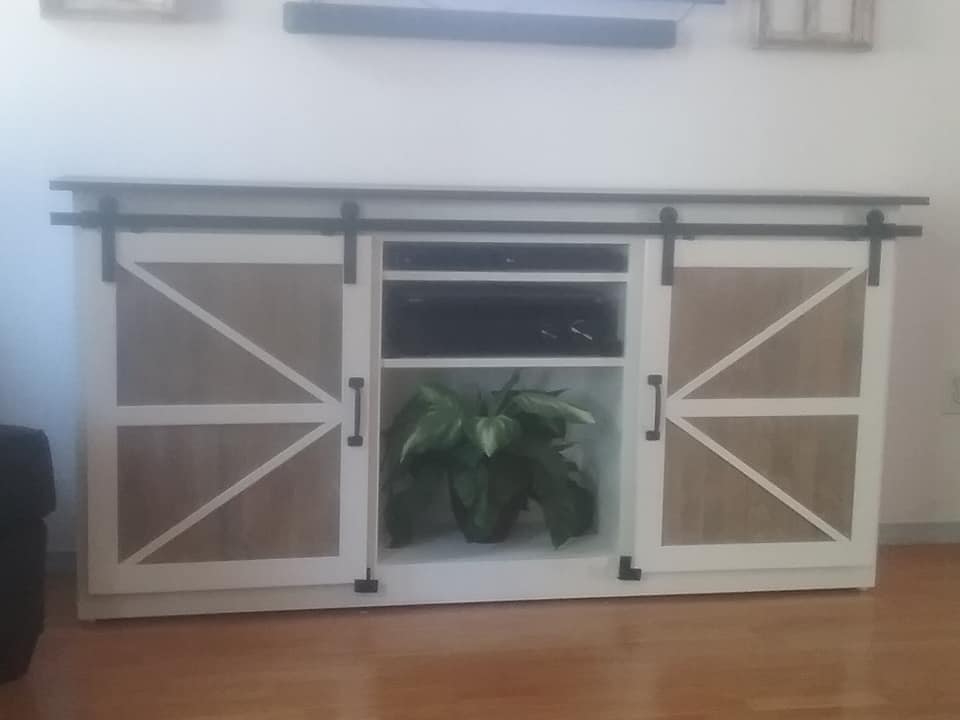
This is a modification to the Patrick Hosey Plan. Being my first ever furniture build it took considerable time to plan out the dimensions for the project before I even began. The Mrs and I both felt strongly the media cabinet needed the ability to store large amounts of media thus the design you see was born.
Each of the 6 pull outs are on a pair of 10 inch full extend drawer glides for complete access. The body was painted with an Oxford White furniture paint, and the top is painted with a Mocha Paint. The sliding doors are inset with a pre-finished Barnwood found at a local box store ripped to width and fitted into the 3-rail door. The angled trim is ripped from the edge of 1 x material and planed to thickness.
Built from Plan(s)
Estimated Cost
$625.00
Estimated Time Investment
Week Long Project (20 Hours or More)
Finish Used
Paints: White and Mocha
Recommended Skill Level
Intermediate
Comments
Wed, 07/21/2021 - 14:06
Love the media storage…
Love the media storage shelves that pull out. Fantastic idea!
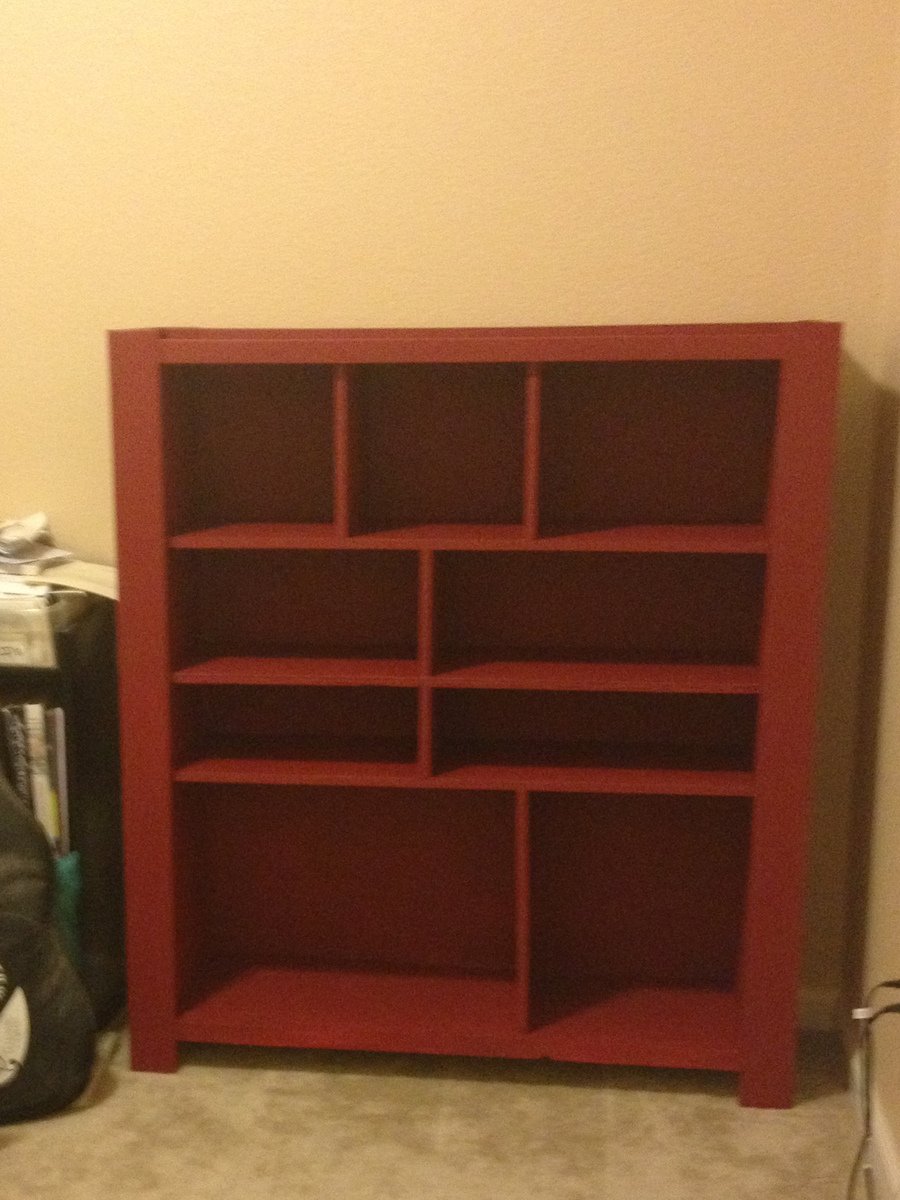
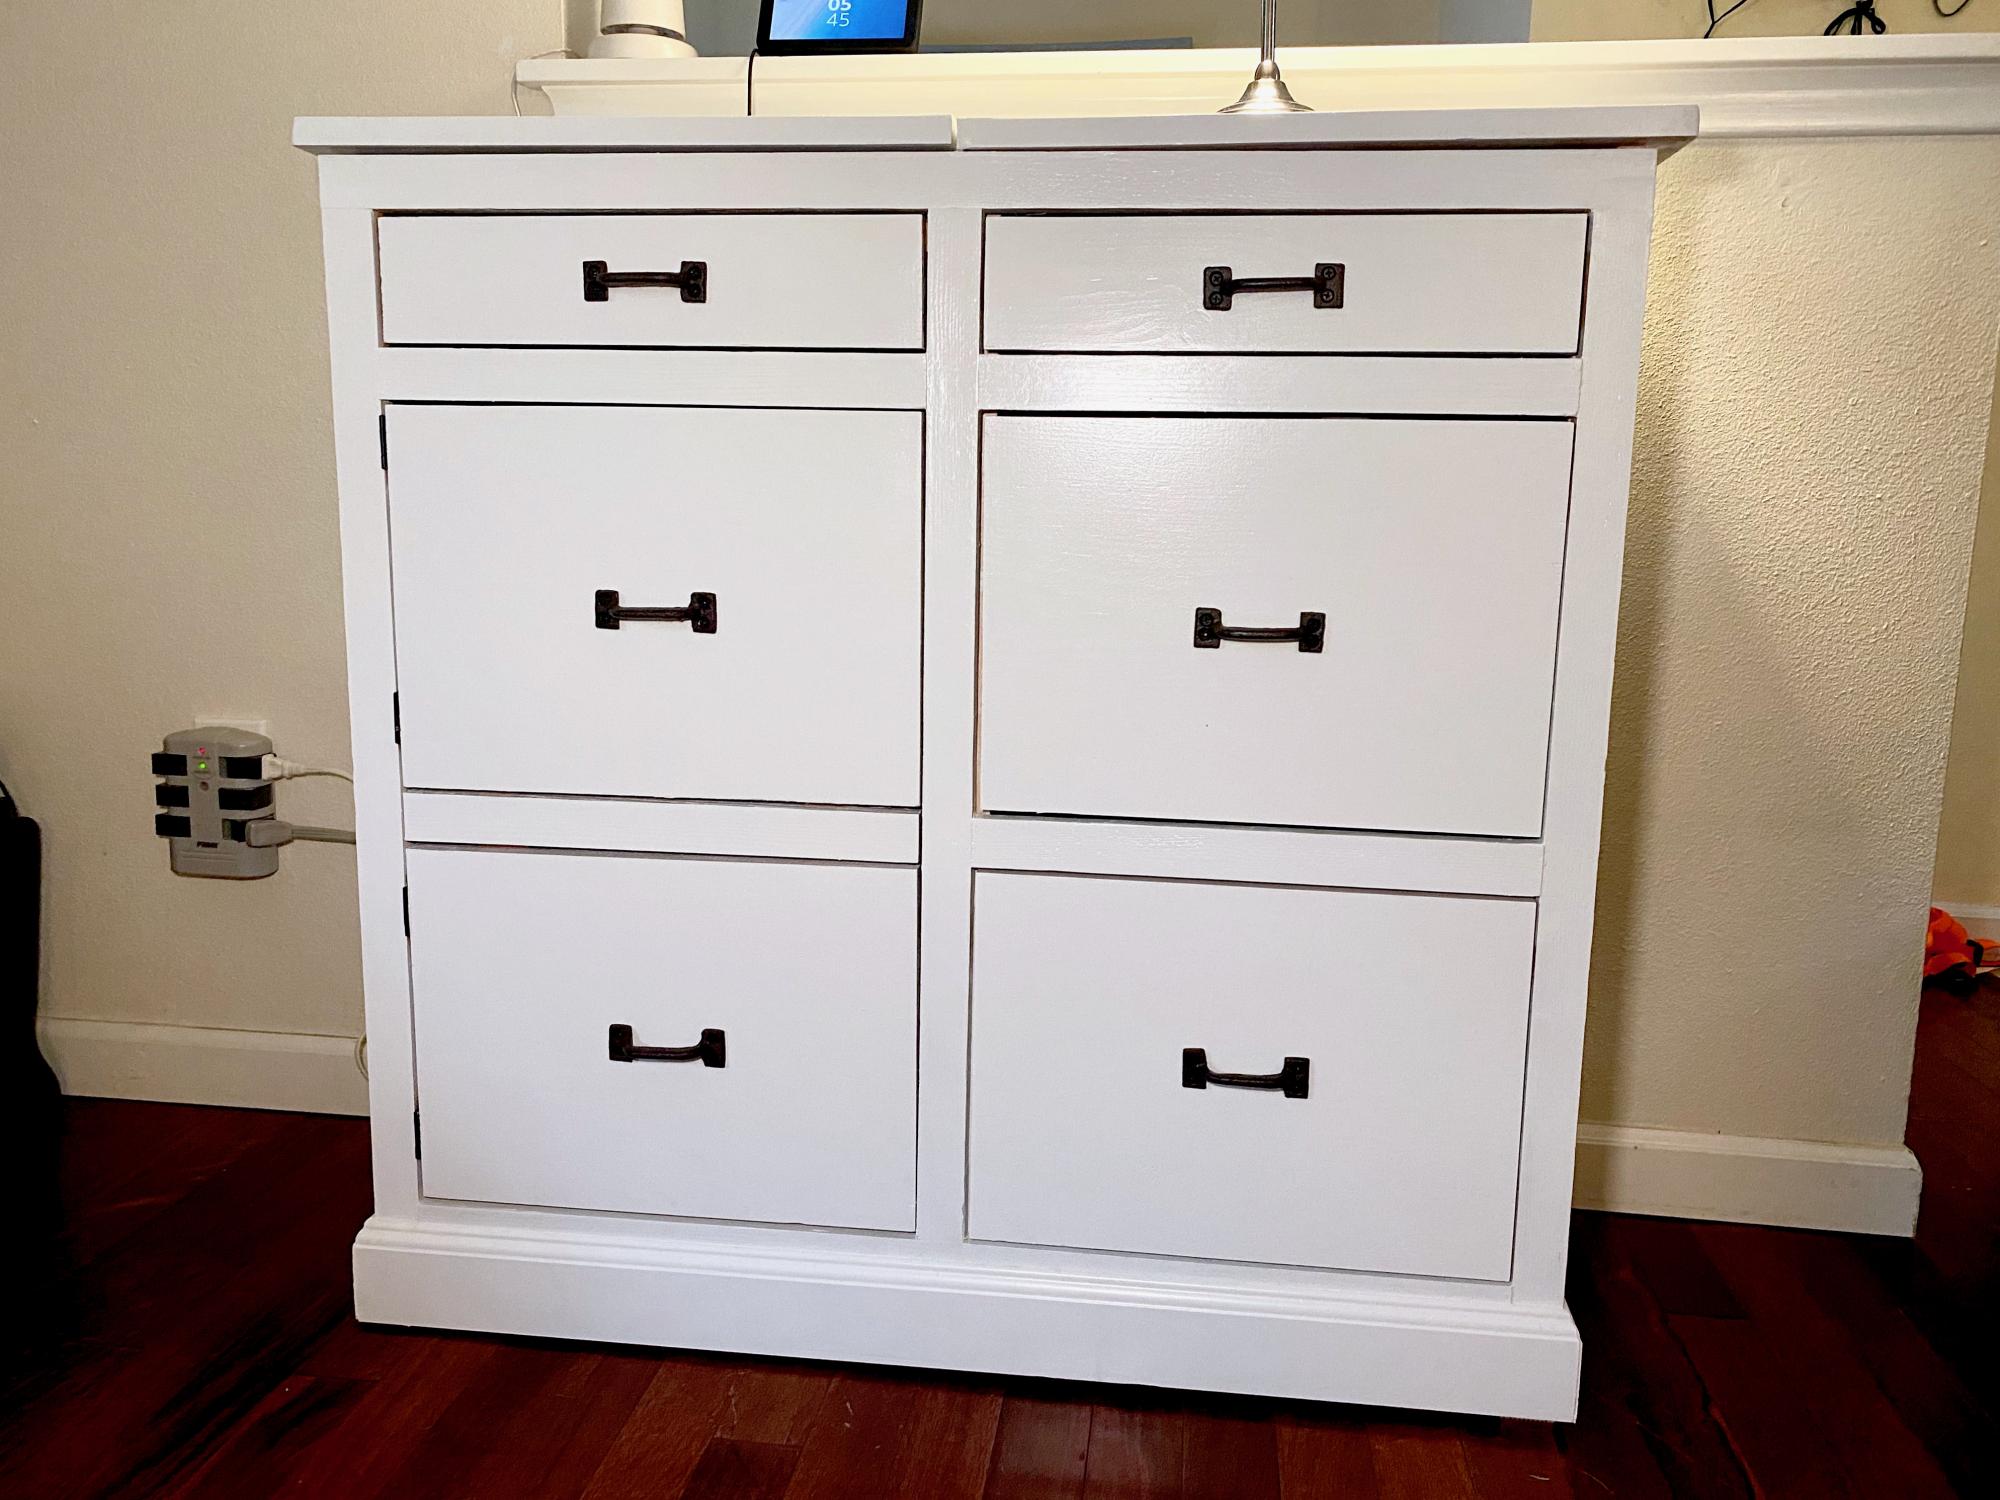
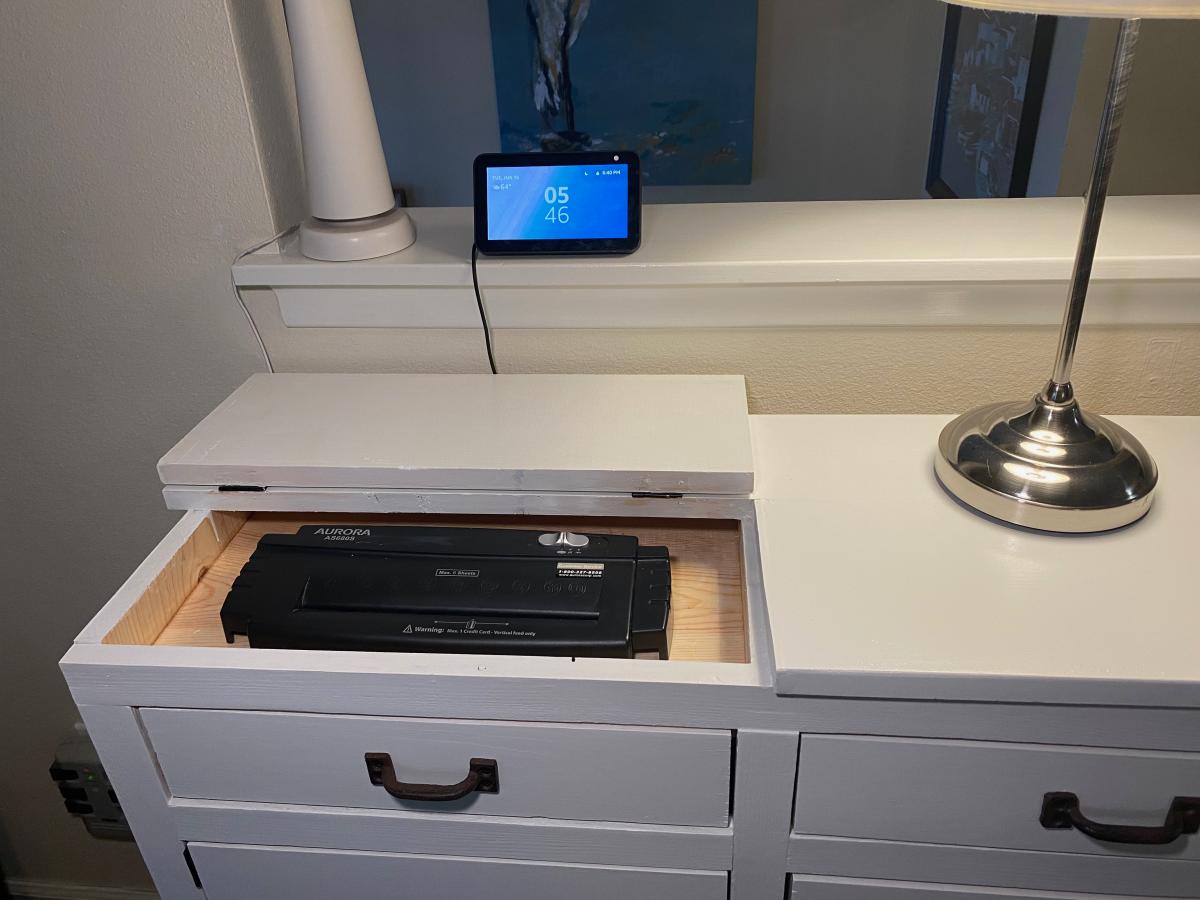
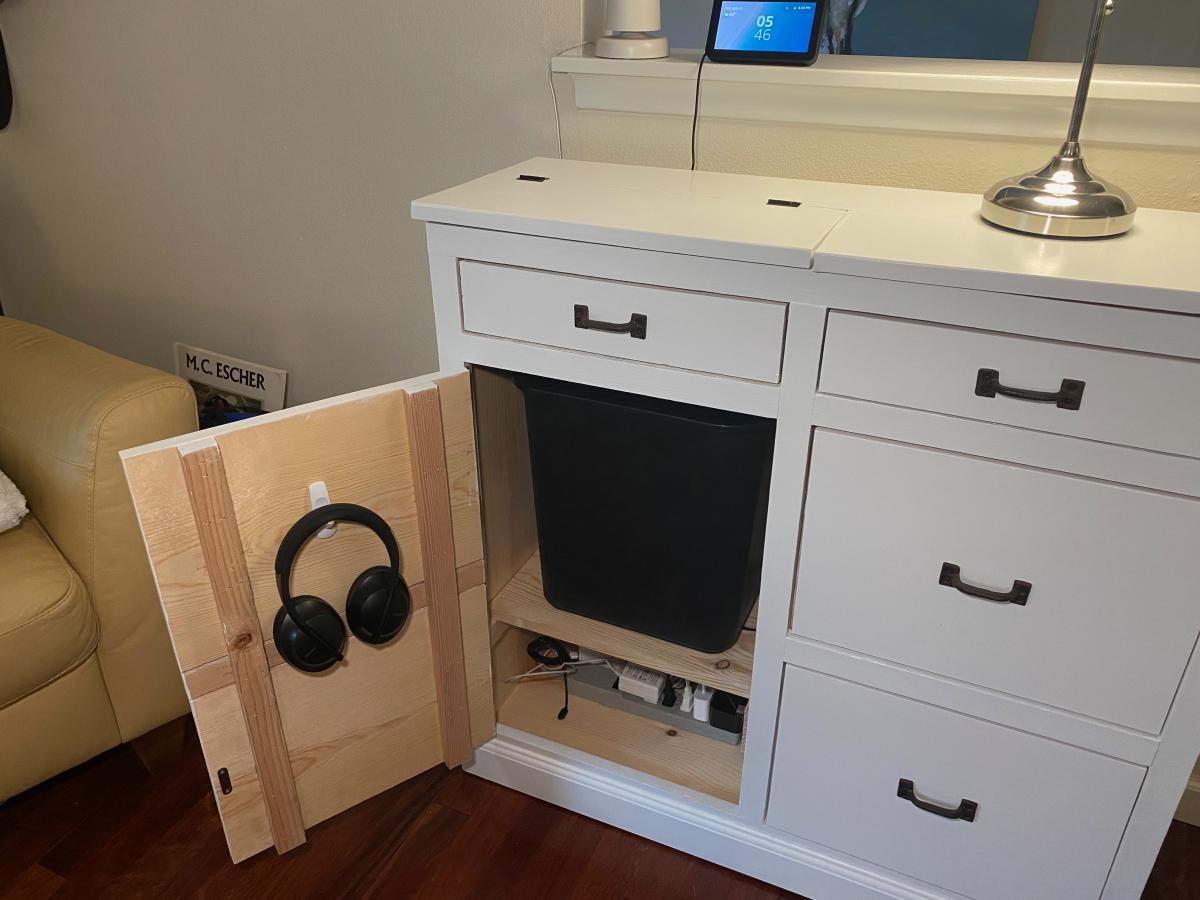
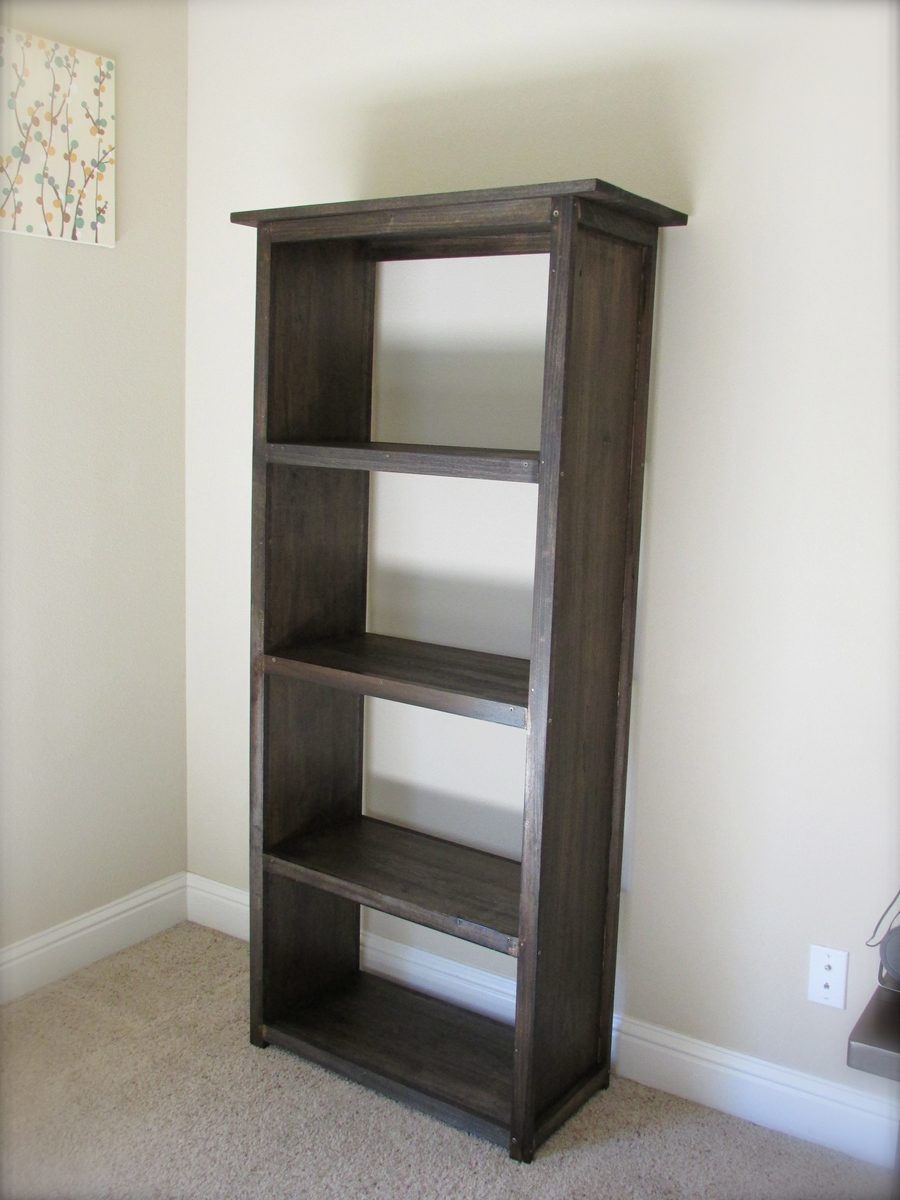
COMPARTMENT DEPOT BOOKSHELF
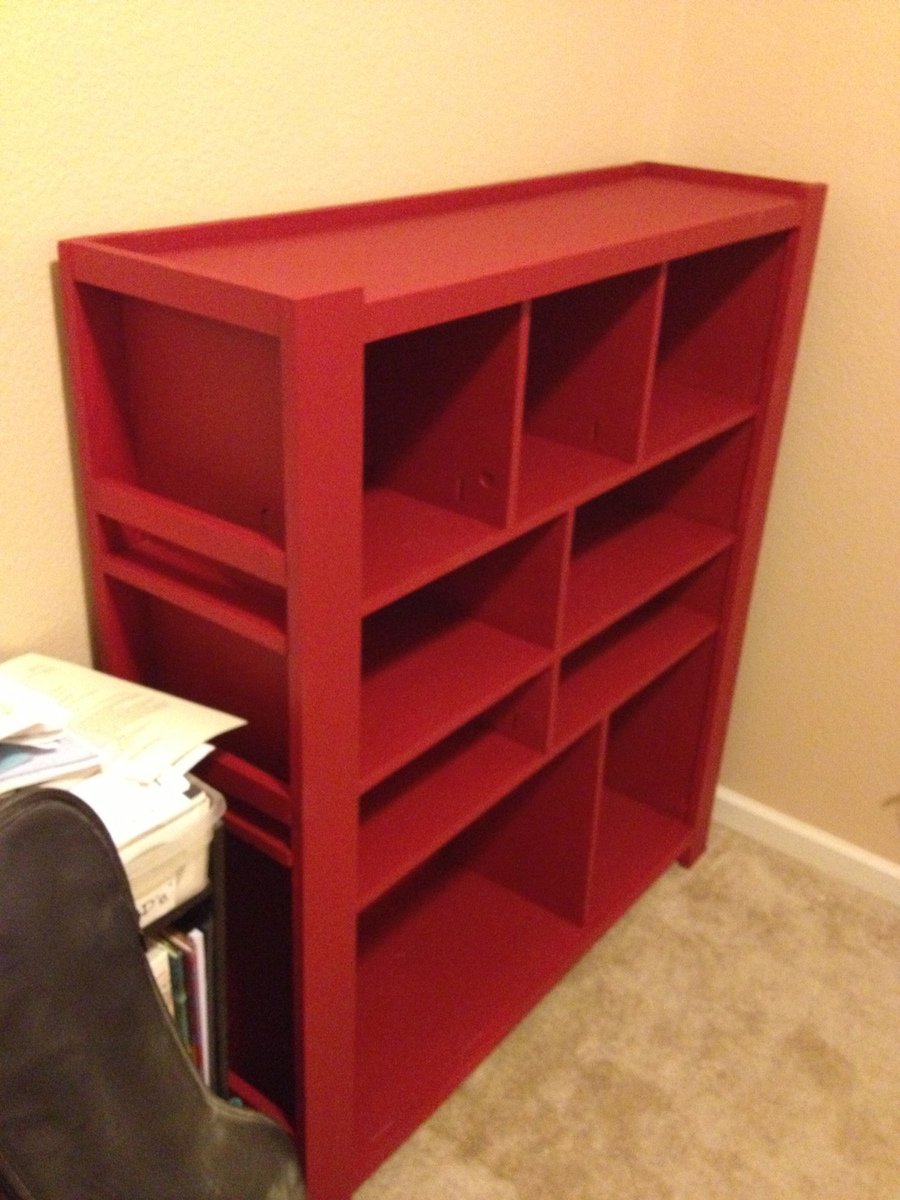
I love how this bookshelf turned out! I made the bottom part 6" taller so I can fit my shredder in there. I'm using this in my office/guest room so I can have office type stuff, but have it all contained in one place, so it doesn't take over the whole room. Ana's instructions were great! There are slight issues but they are so minor it still turned out great! Overall I am very happy with how this turned out. :)
Built from Plan(s)
Estimated Cost
$80
Estimated Time Investment
Weekend Project (10-20 Hours)
Finish Used
Red Oops Paint! :) I just sanded it all down really well, and painted 2-3 coats on the whole thing.
Recommended Skill Level
Intermediate
Comments

Sand box
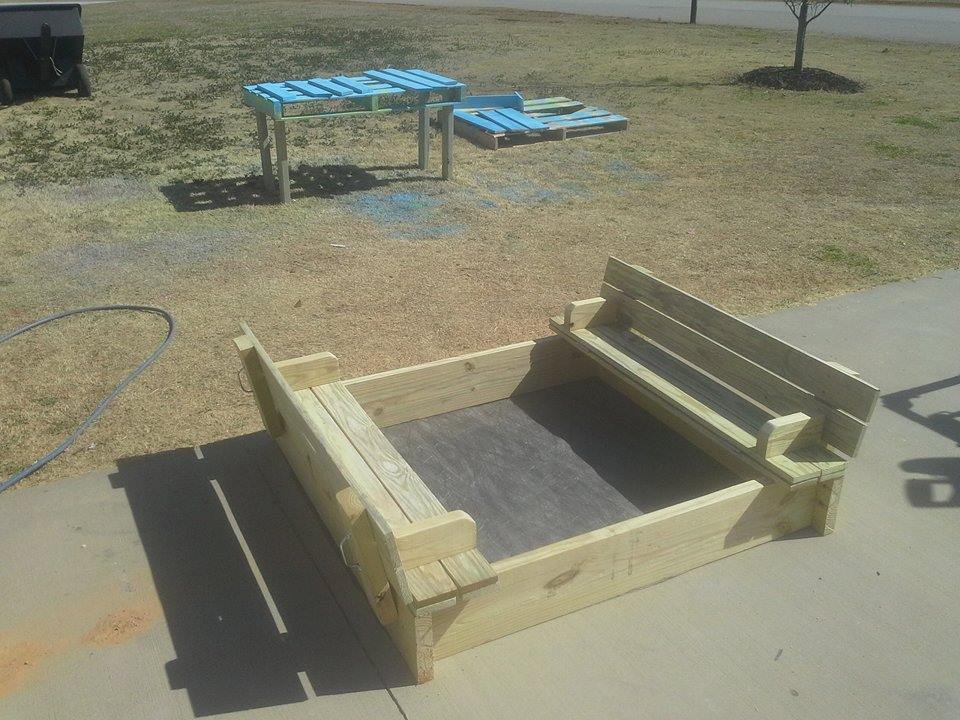
I followed this easy plan. Only thing I changed is rounding the arm rest as a safety feature. Added weed barrier on the bottom
Built from Plan(s)
Estimated Cost
$67.00
Estimated Time Investment
An Hour or Two (0-2 Hours)
Finish Used
Sanded only
Recommended Skill Level
Beginner
Comments

Tue, 03/10/2015 - 18:46
There's going to be some
There's going to be some happy campers in there! Nice work!
Small Chicken coop
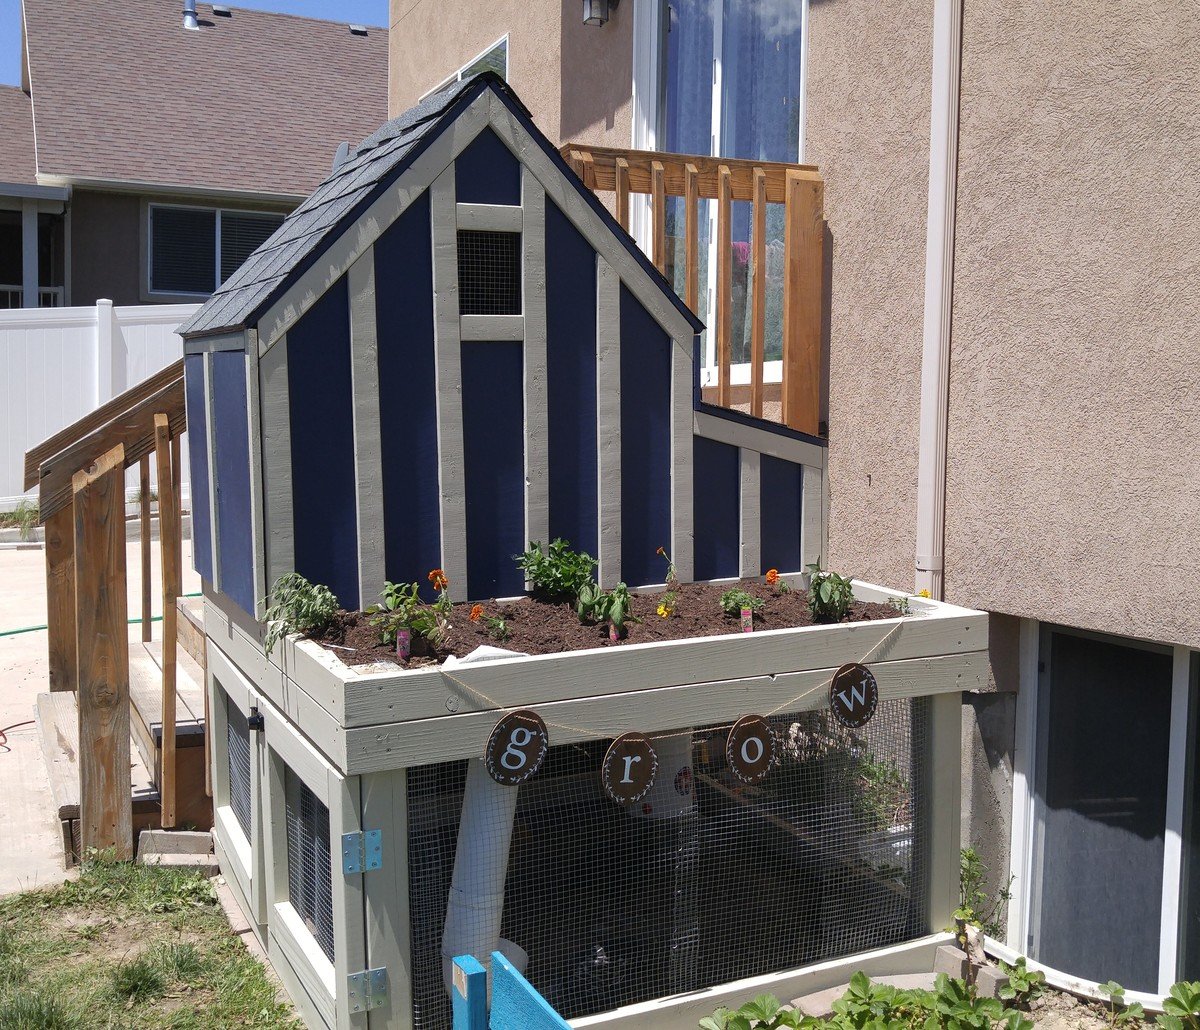
We built this to go right next to our stairs. The run has hardware cloth on 3 sides and then the side touching the stairs opens up to under the stairs so they have a bigger run.
We extended the floor so that it went all the way to the nesting box. We will be adding a nesting box to the wall by the cleanout doors rather than where the plans put the nesting box. We like that this gave us more square foot per chicken on floor space. Due to this change though we had to use interier hinges so the floor could slide in and out easily. We also added a door to the bottom so the coop could be locked seperately from the run.
I wanted to turn the space where the planter box is into a storage space and may still do that later to store food, clean out supplies, and first aid supplies. We'll see!
Built from Plan(s)
Estimated Cost
$500 This includes Cedar wood for all exterior wood, hardware cloth to cover everything and have a 12 inch apron under the coop, two colors of stain, shingles, big boxes of screws (we had a million leftover), hinges and locks with keys. We definitely went the expensive route but I think it will last us a long time and hopefully we've created a Fort Knox!
Estimated Time Investment
Weekend Project (10-20 Hours)
Finish Used
Cabot Stain Newberry Blue and Navajo White
Recommended Skill Level
Intermediate
The Mail Boss (my attempt)
This was my take on the mail boss. It took a lot longer than I thought but I learned a lot in the process.


Built from Plan(s)
Estimated Cost
$150
Estimated Time Investment
Week Long Project (20 Hours or More)
Finish Used
Benjamin Moore Advance in Pure White
Recommended Skill Level
Intermediate
Comments
Wed, 07/28/2021 - 09:20
Looks fantastic!
Thank you for sharing your build, great hardware choice and finish!
Kentwood bookshelf
very easy to put together!! Thanks Ana
Built from Plan(s)
Estimated Cost
$100
Estimated Time Investment
Day Project (6-9 Hours)
Recommended Skill Level
Beginner
Coffee Table for College
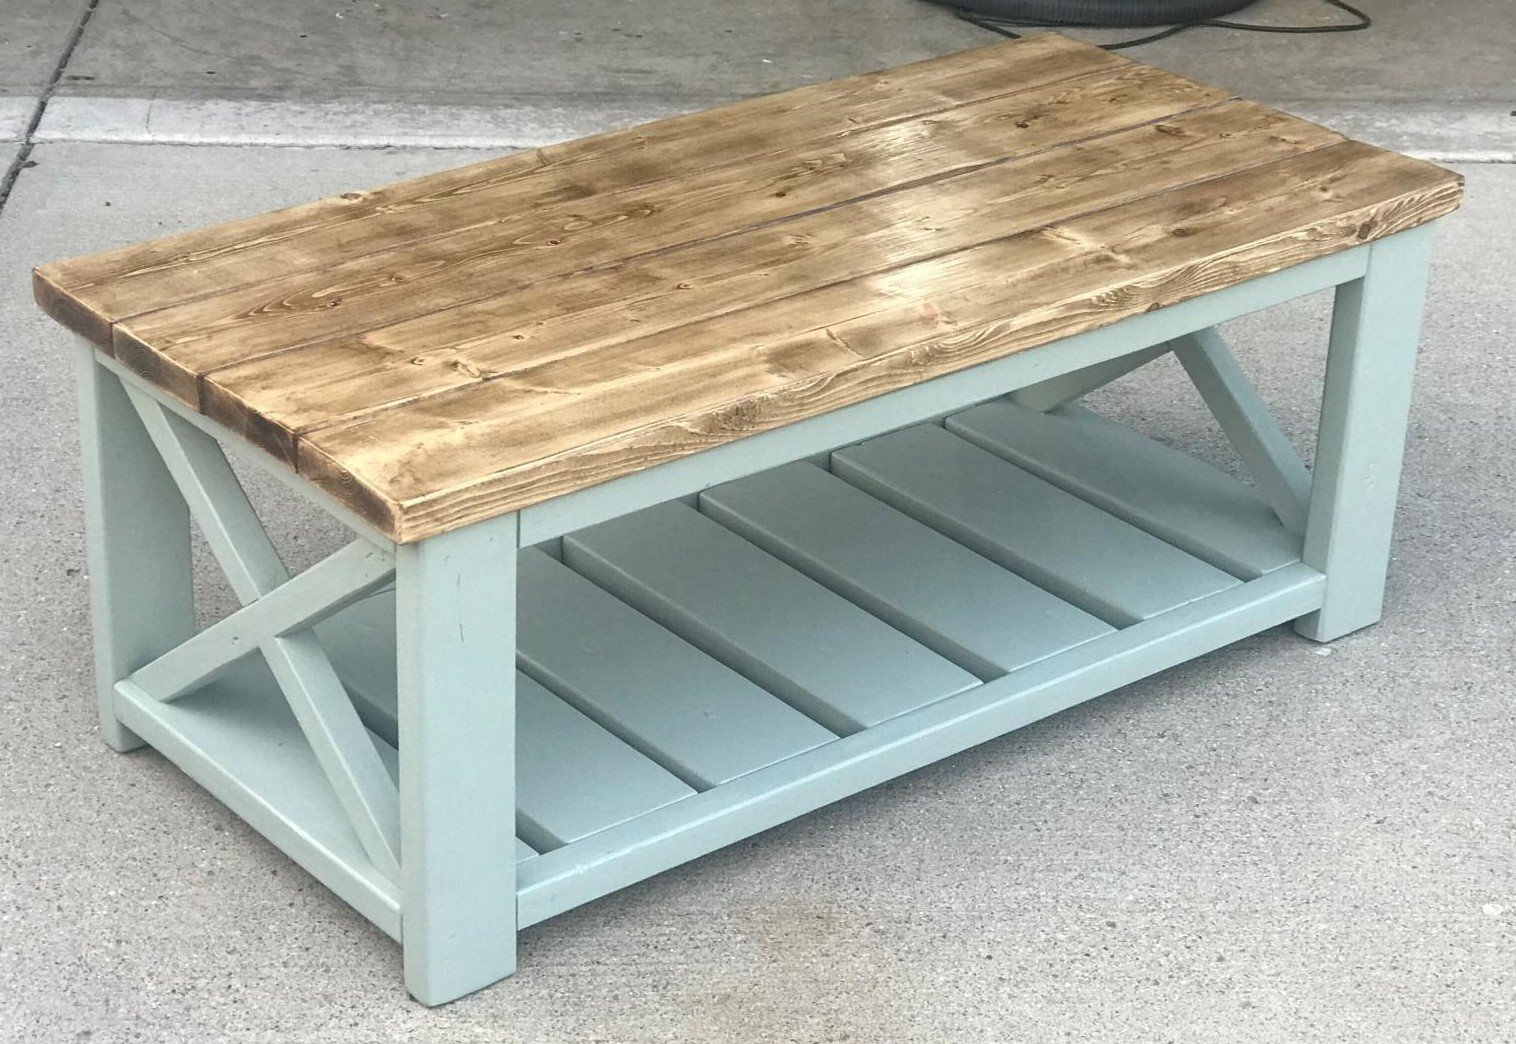
My daughter is going back to school and moving out of the dorms and into a house and needed a coffee table. Saw these plans, had almost all the wood so off we went. Happy with how it came out. We used some paint we had for the base (Pure Sage) and I used a Weathered Oak stain with 5 coats of satin polyurethane for the top. If she has room will make a matching end table!
Comments

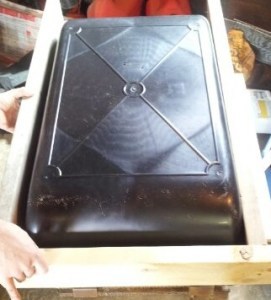
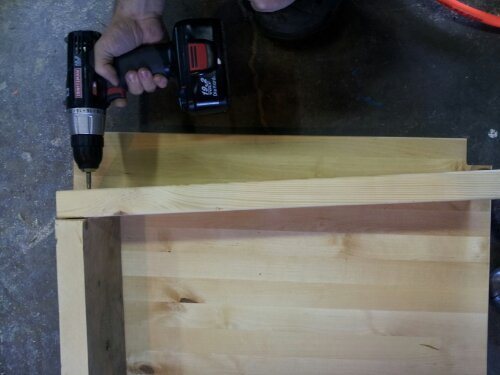
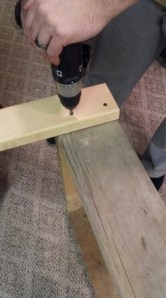
Sand or Water Table
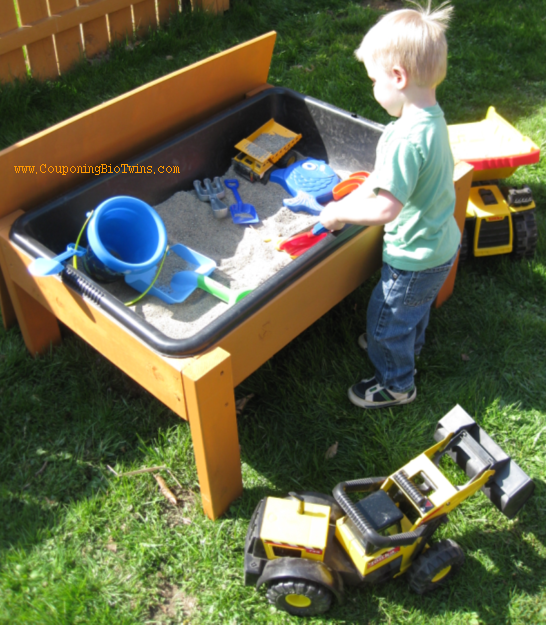
This is a very easy way to create a sand or water table for your kids and it only takes a few hours from start to finish. A few pieces of wood, some screws and tub to hold the sand or water and your set. Enjoy!
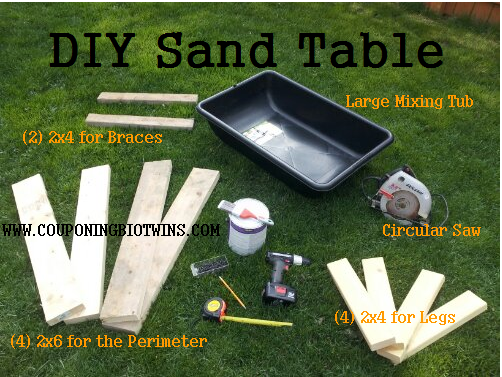
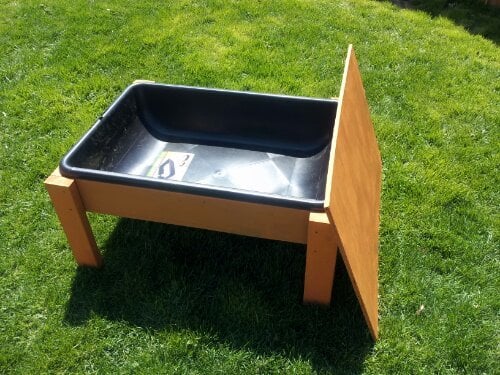
Estimated Cost
$25-$30
Estimated Time Investment
An Hour or Two (0-2 Hours)
Finish Used
Behr wood stain
Recommended Skill Level
Starter Project
Comments

Thu, 04/25/2013 - 04:58
I Love This!
I've been wanting to build something like this for the kids. Thanks for the inspiration.
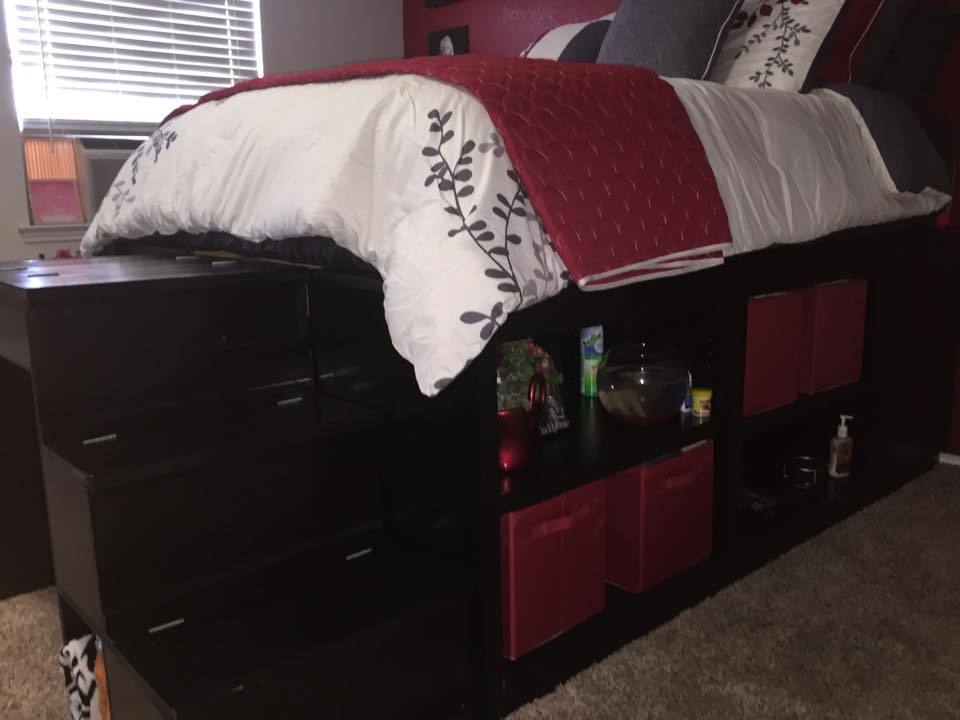
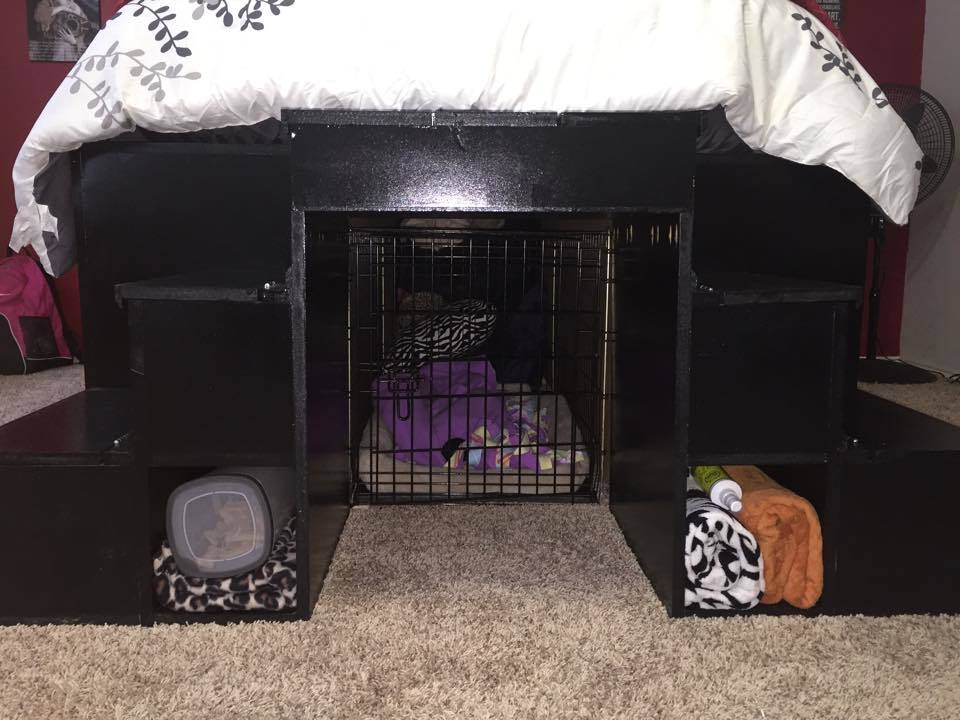
Extra Large Storage Bed with Stairs
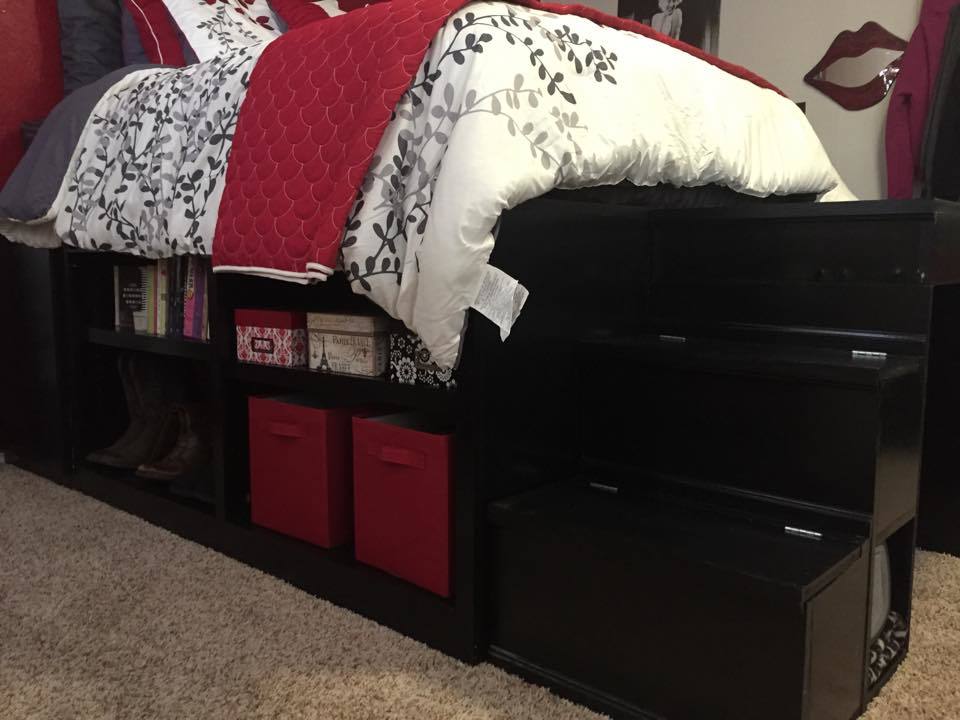
My daughter wanted a bed with lots of storage so searched on here and found the queen and king storage beds, but she wanted something taller. So, I modifed the plans for the bed and made it slightly larger than a queen storage bed, but not quite as big as the king, and almost twice the height. I then built a set of stairs (modified the plans for the stairs as well so she would have 2 sets that created a bridge for her dog's kennel to go under her bed hidden away slightly. This was by far my biggest and most challenging project to date, but we were thrilled with the way it turned out. She loves the bed and I loved the time I was able to spend with her while building (she is 20 so time like that is far and few between)
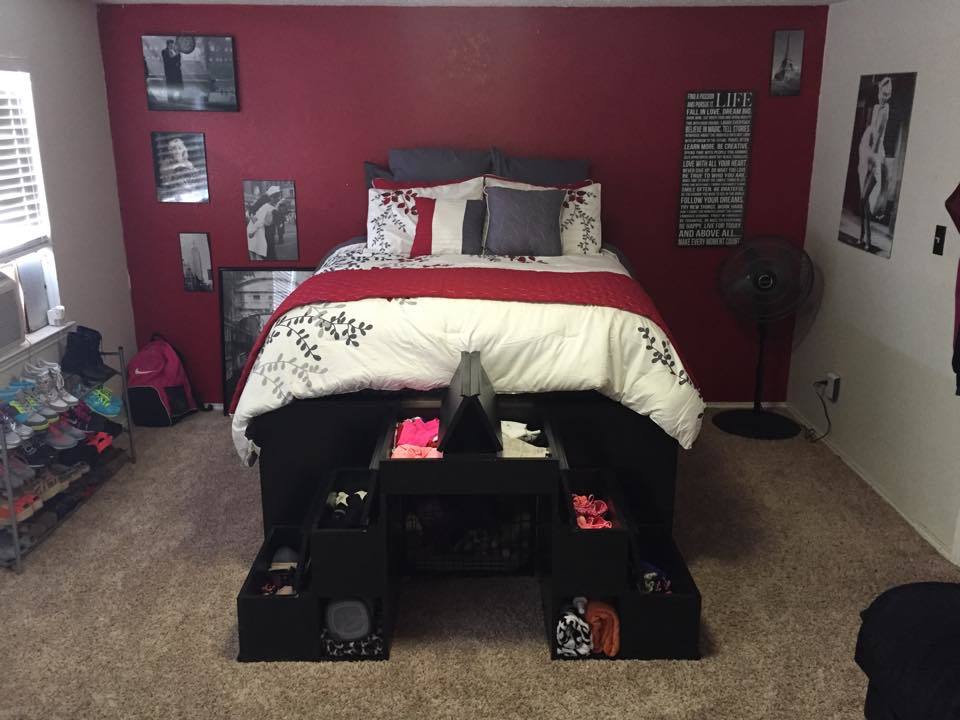

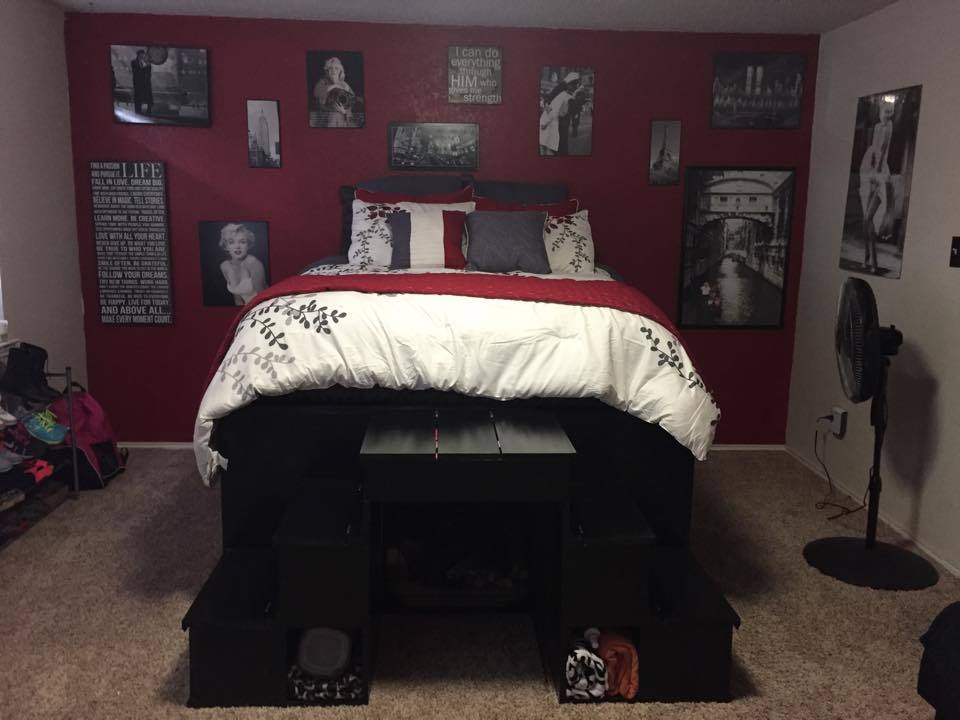
Built from Plan(s)
Estimated Cost
$500
Estimated Time Investment
Week Long Project (20 Hours or More)
Finish Used
high gloss black paint and polyacrylic
Recommended Skill Level
Intermediate
Comments
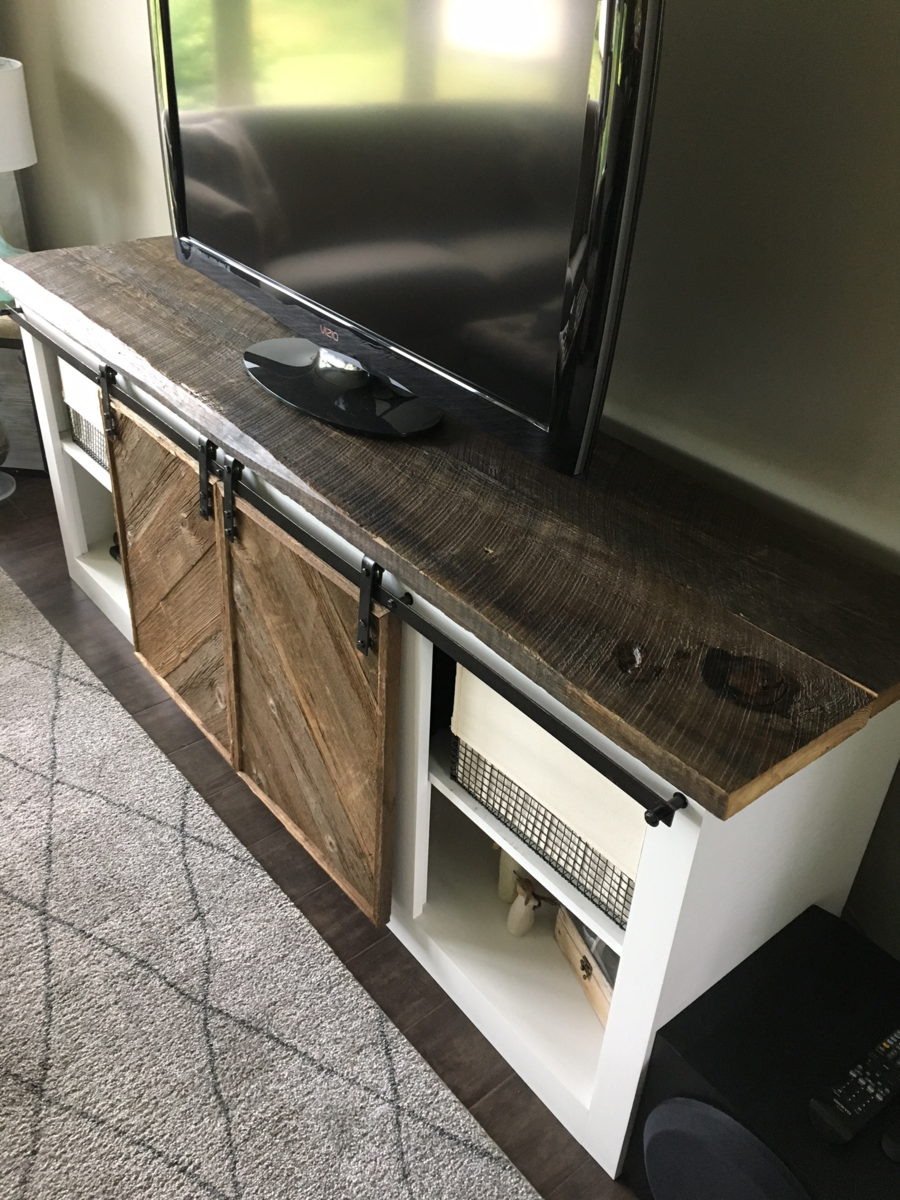
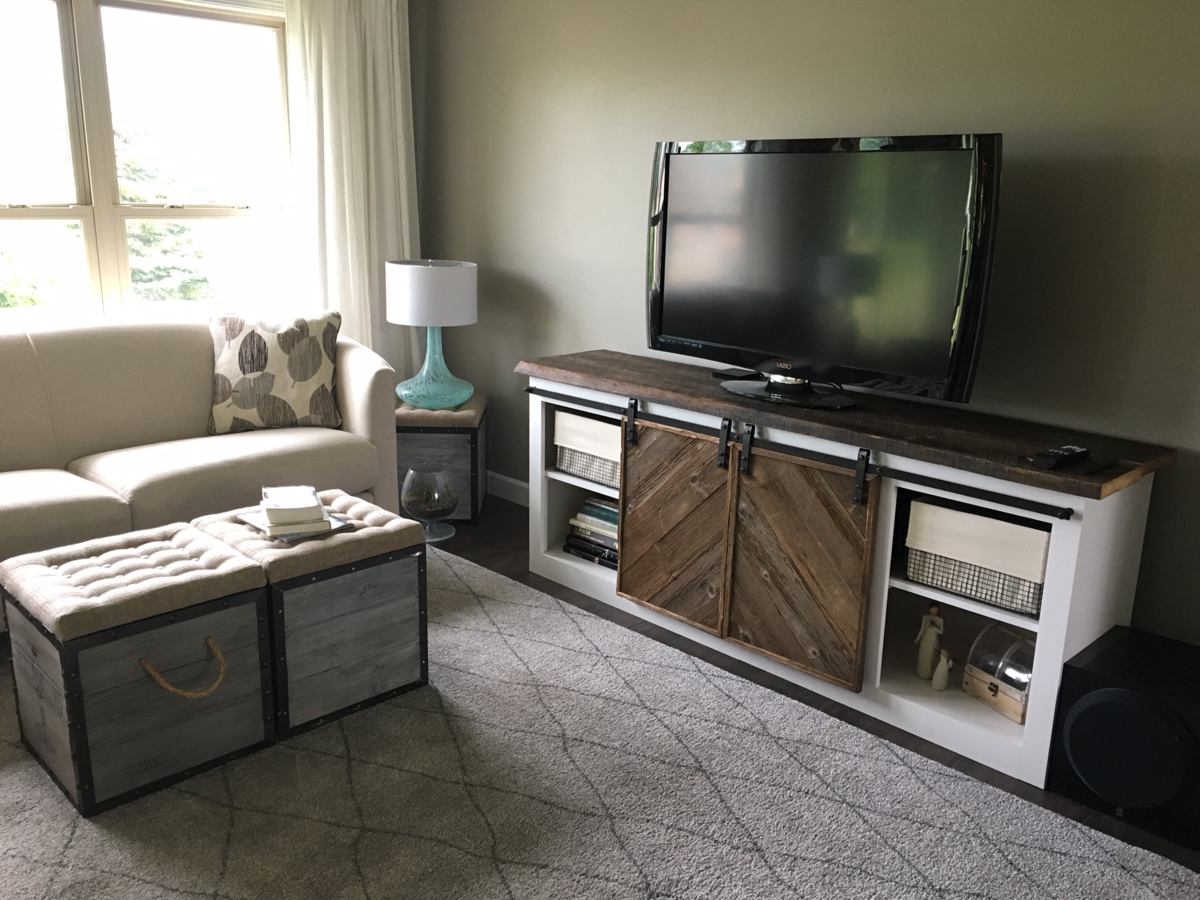
TV Console with reclaimed accents
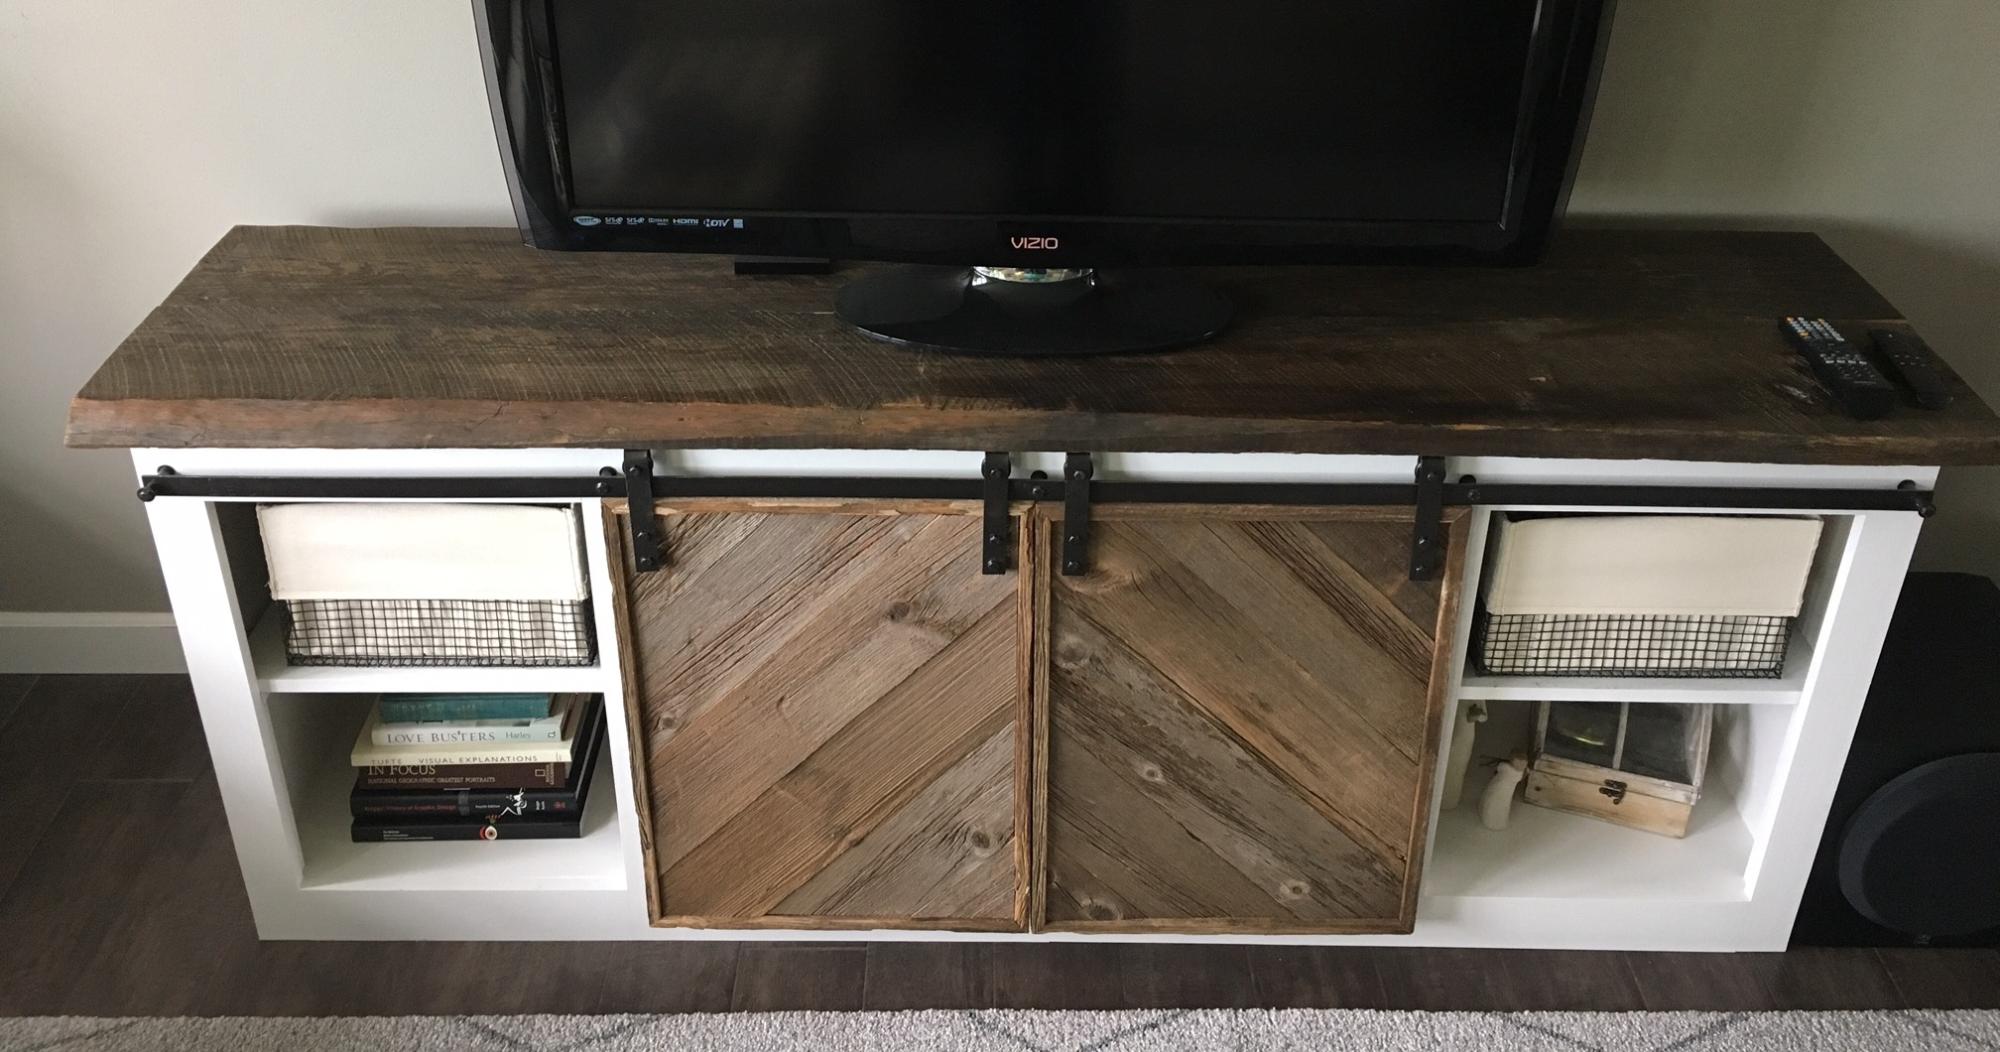
This isn't a difficult piece to build, but the hardware can be a bit tricky. My husband loved having an excuse to get a blowtorch! He used it to bend aluminum flat bar that we then spray painted an oil rubbed bronze. My favorite part has to be the saw marks on my reclaimed top. This piece really pulls together our living room!
Built from Plan(s)
Estimated Cost
Approximately $300. $70 of that was just for the reclaimed top.
Estimated Time Investment
Week Long Project (20 Hours or More)
Finish Used
Behr Marquee cameo white in satin and general finishes flat top coat to seal the top.
Recommended Skill Level
Beginner
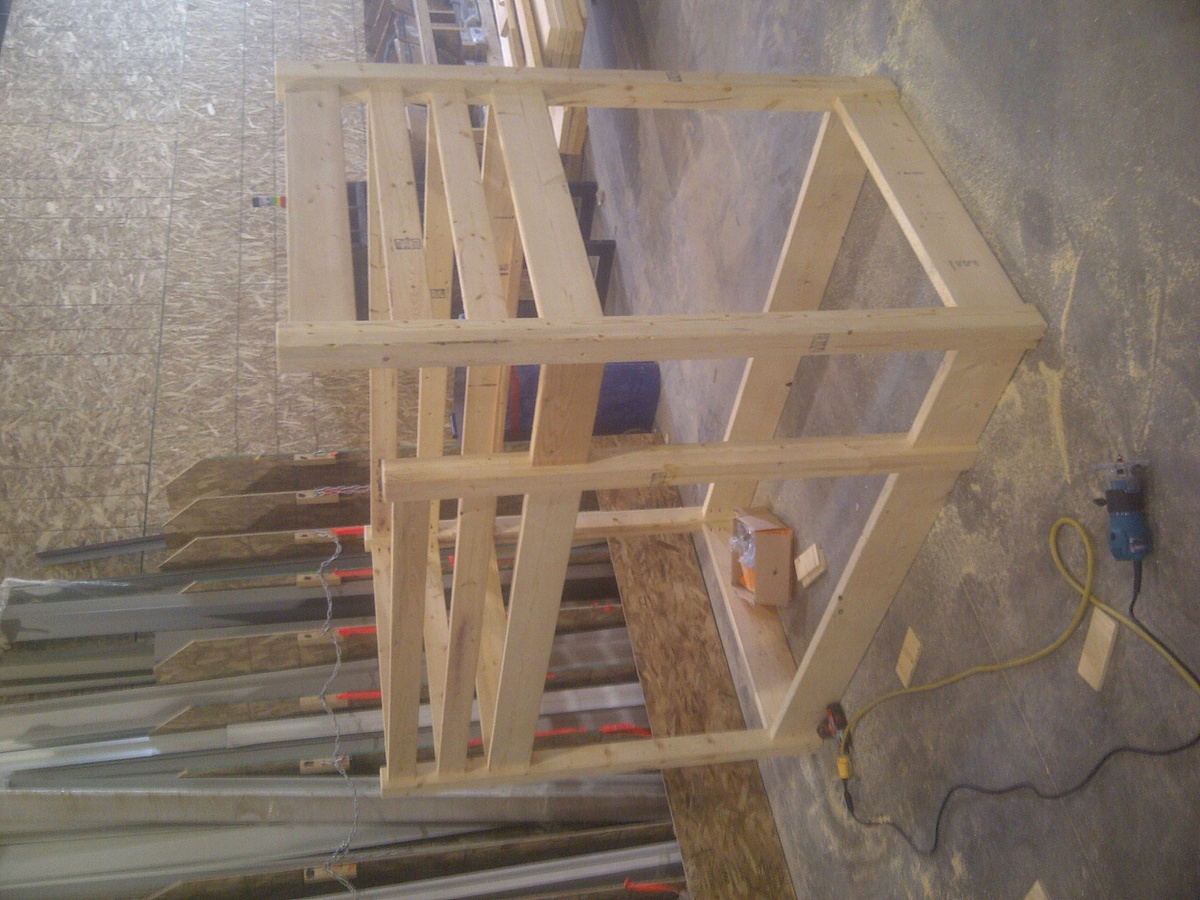
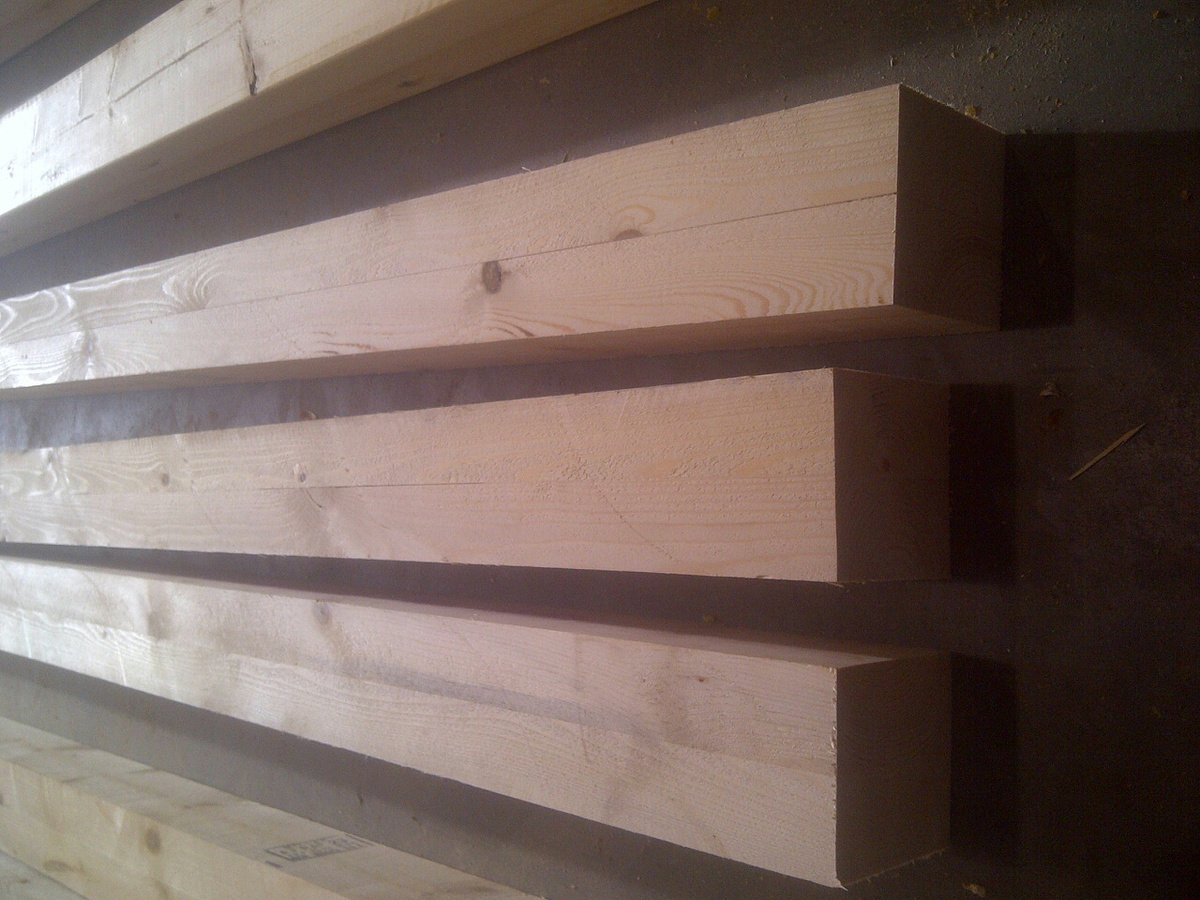
Bunkbed
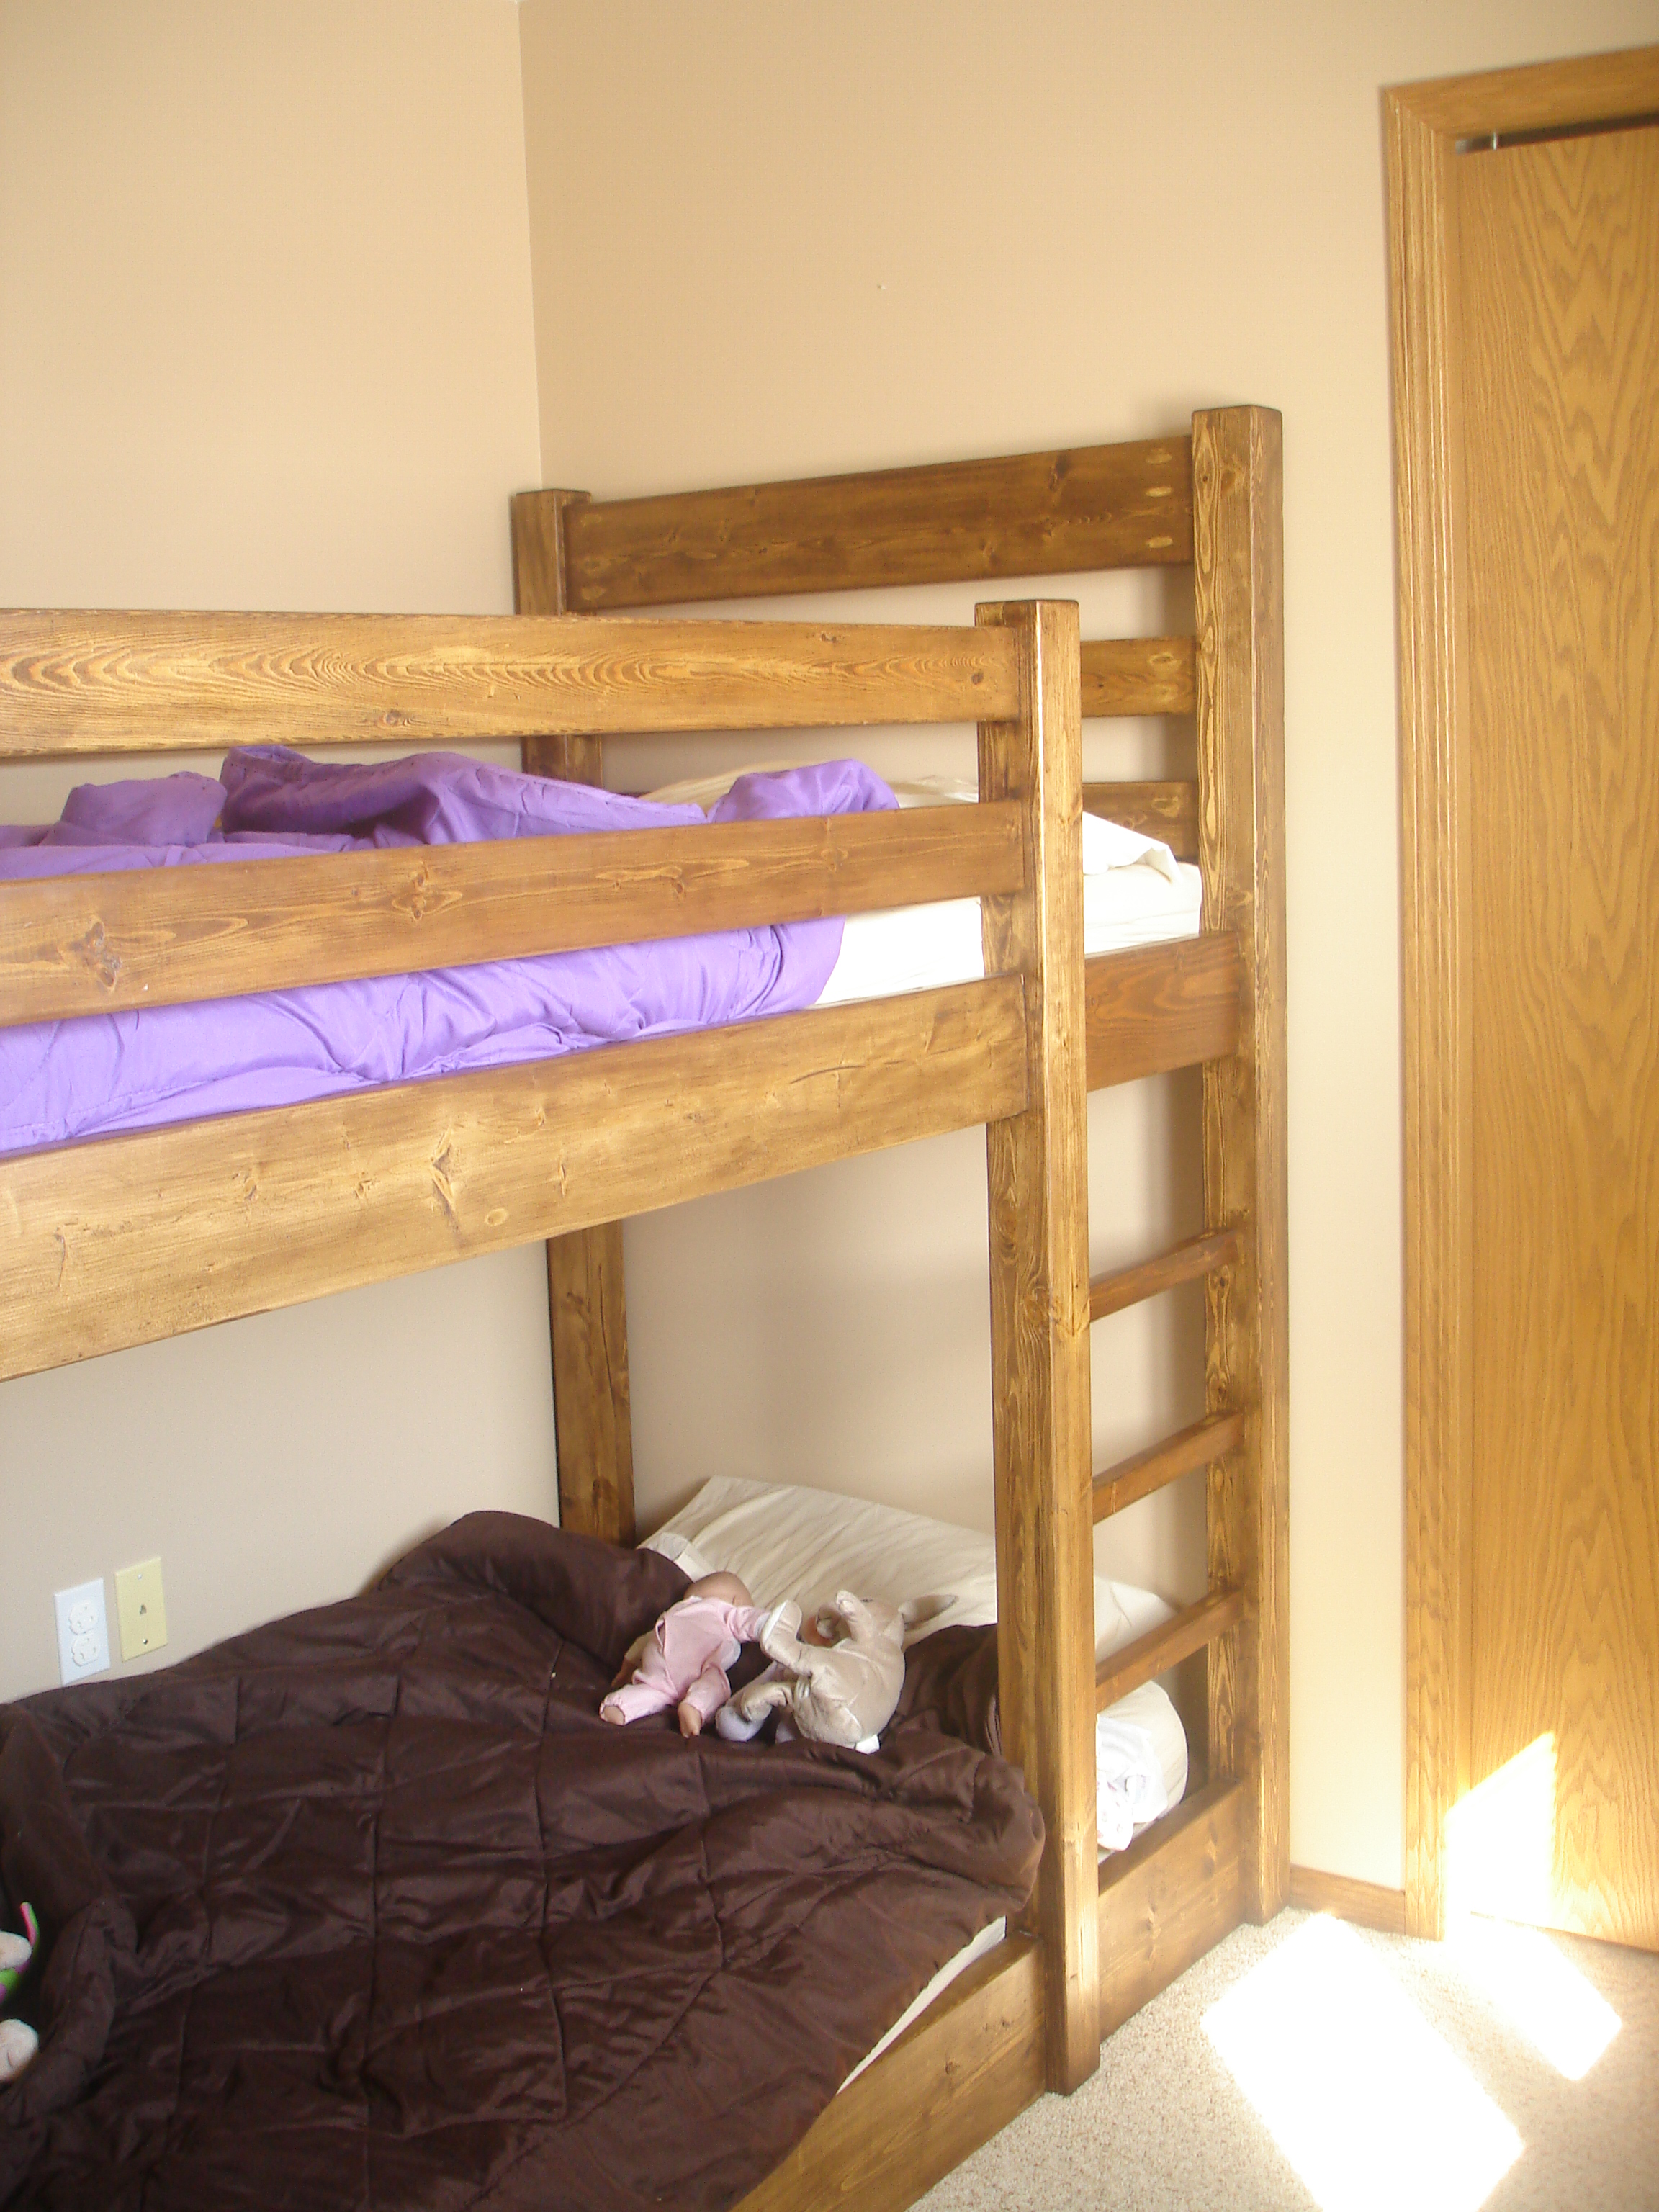
I designed this bed that we built with inspiration from Ana's camp loft bed plans, but without stairs and second bed underneath.
We couldn't find untreated 4x4's for the legs so my husband glued two 2X4's together. In the end you can hardly tell that they aren't one piece.
Estimated Cost
$100
Estimated Time Investment
Day Project (6-9 Hours)
Finish Used
Wood Conditioner
Varathane Dark Walnut Gel Stain
Spray-on Lacquer
Varathane Dark Walnut Gel Stain
Spray-on Lacquer
Recommended Skill Level
Beginner
Comments
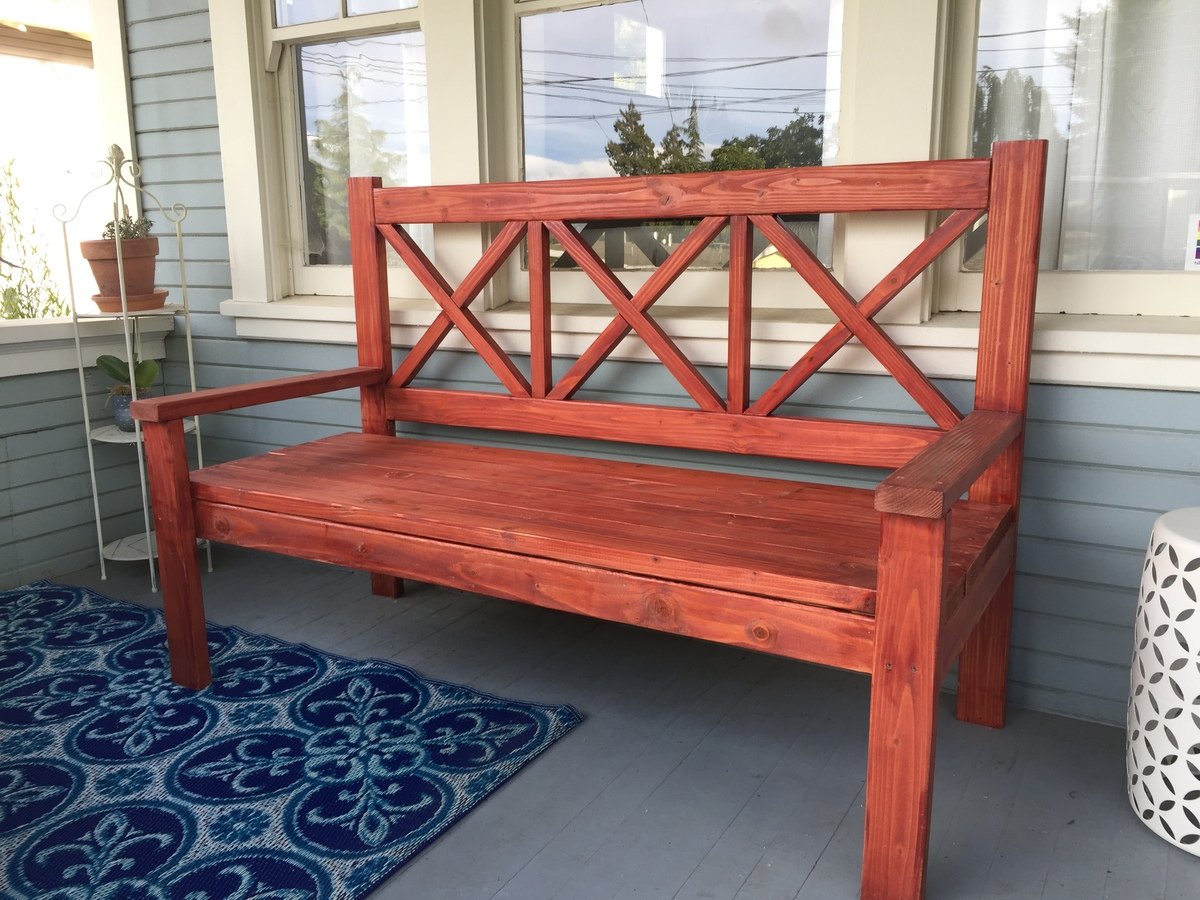
Farmhouse Dining Set
This was a bit more work than I anticipated but I think it turned out great. The quoted buy list was a little off so I had to make an additional trip to the hardware store.
I used the Fancy X Table plan and the Fancy X Bench plan to make this set. Since I wanted it only 6' long I had to do some modification to the plan but not much.
I also designed the table top into two pieces that fastened together through the center piece so I could take it apart easily and fit it though a standard door.
Built from Plan(s)
Estimated Cost
$120 (since there were two benches and the table). I found the wood in my area to be a little more expensive than quoted on the plan. Particularly the 2x10's.
Estimated Time Investment
Week Long Project (20 Hours or More)
Finish Used
MinWax - Dark Walnut. To get the finish even I had to invest ALOT of time into sanding. I had to use 60 grit in some spots to even out the factory cuts but most of it I was able to go over with just 220 grit. DON'T FORGET TO SAND THE ENDS!
Recommended Skill Level
Intermediate
Comments

We love the skylights in our version of your greenhouse!
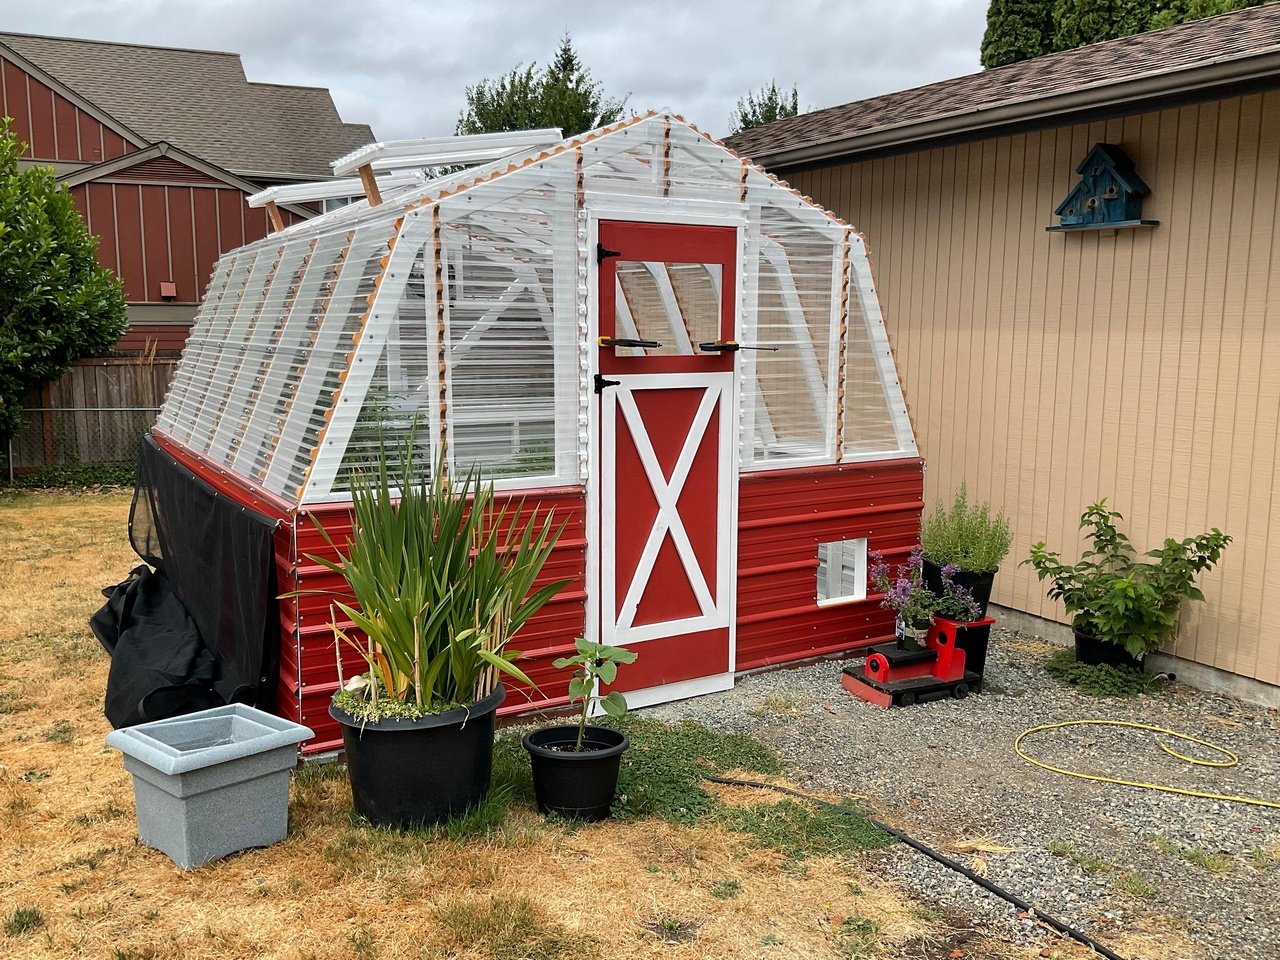
This was the perfect post-retirement project for me. It was a lot of work, but very rewarding.
I documented most of it on my blog.
We sure love this greenhouse!
Built from Plan(s)
Comments
Tue, 08/31/2021 - 12:23
WOW, WOW, WOW!
Gorgeous, those skylights are the ticket! Thank you for sharing!
Surf Shack Loft Bed

Taken from inspiration from the original Clubhouse Bed and from the "Treehouse Bed" in the Pottery Barn Kids catalog, my daughter's "Surf Shack" bed was created. Total cost for supplies (mainly lumber) ~$300. Pottery Barn's version: $1,500. Yikes!
Wicker turtles from Pottery Barn Kids (size: SMALL). Fishing Net from Oriental Trading Co.


Built from Plan(s)
Estimated Cost
$300
Estimated Time Investment
Weekend Project (10-20 Hours)
Recommended Skill Level
Intermediate

Comments
Ana White
Wed, 03/04/2015 - 14:11
Beautiful! Really awesome
Beautiful! Really awesome workmanship!