Community Brag Posts
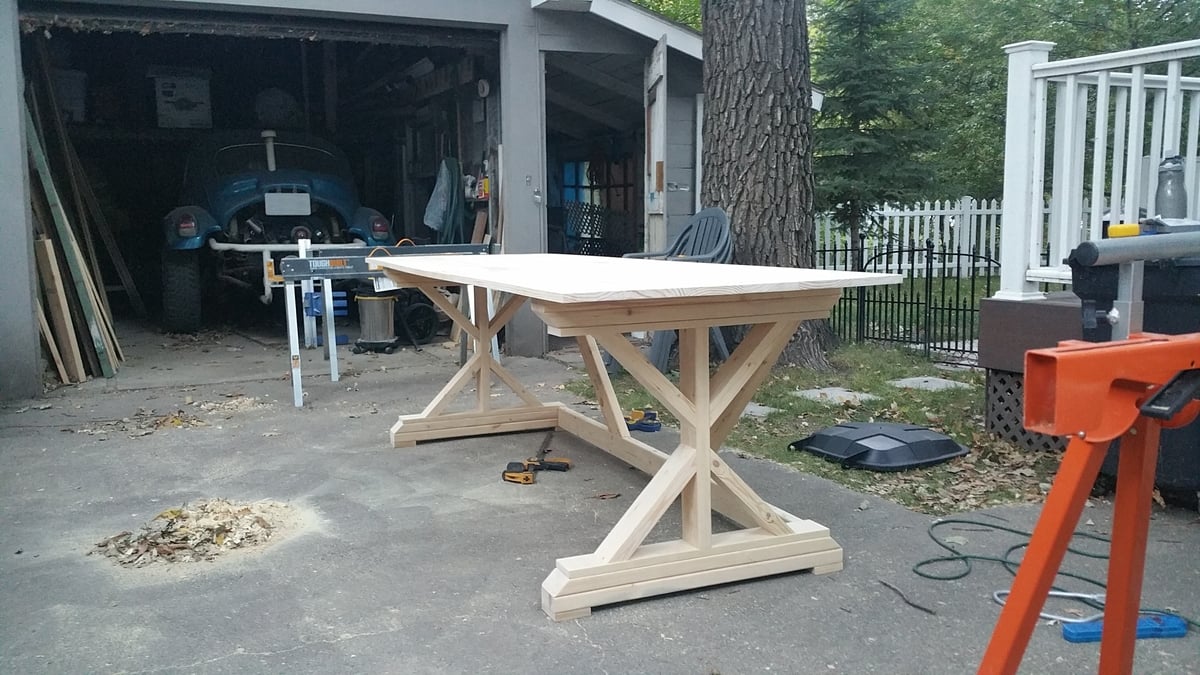
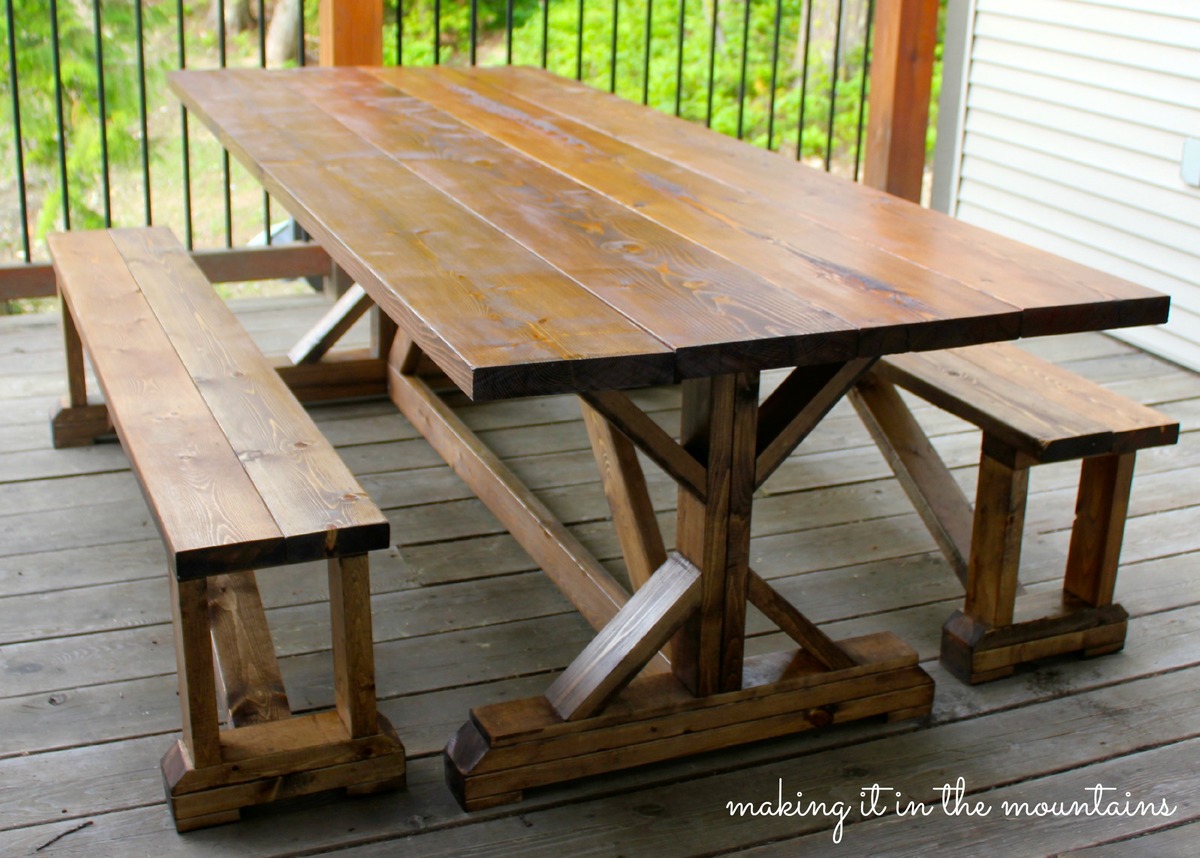
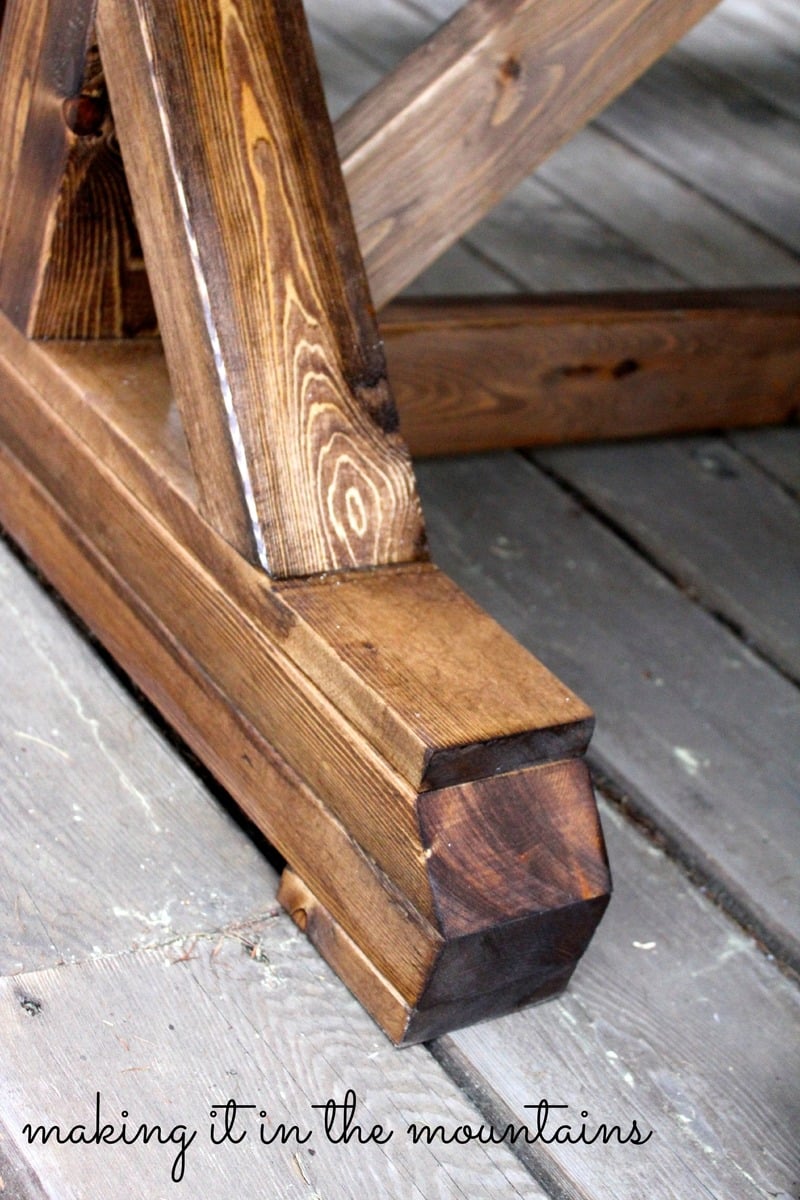
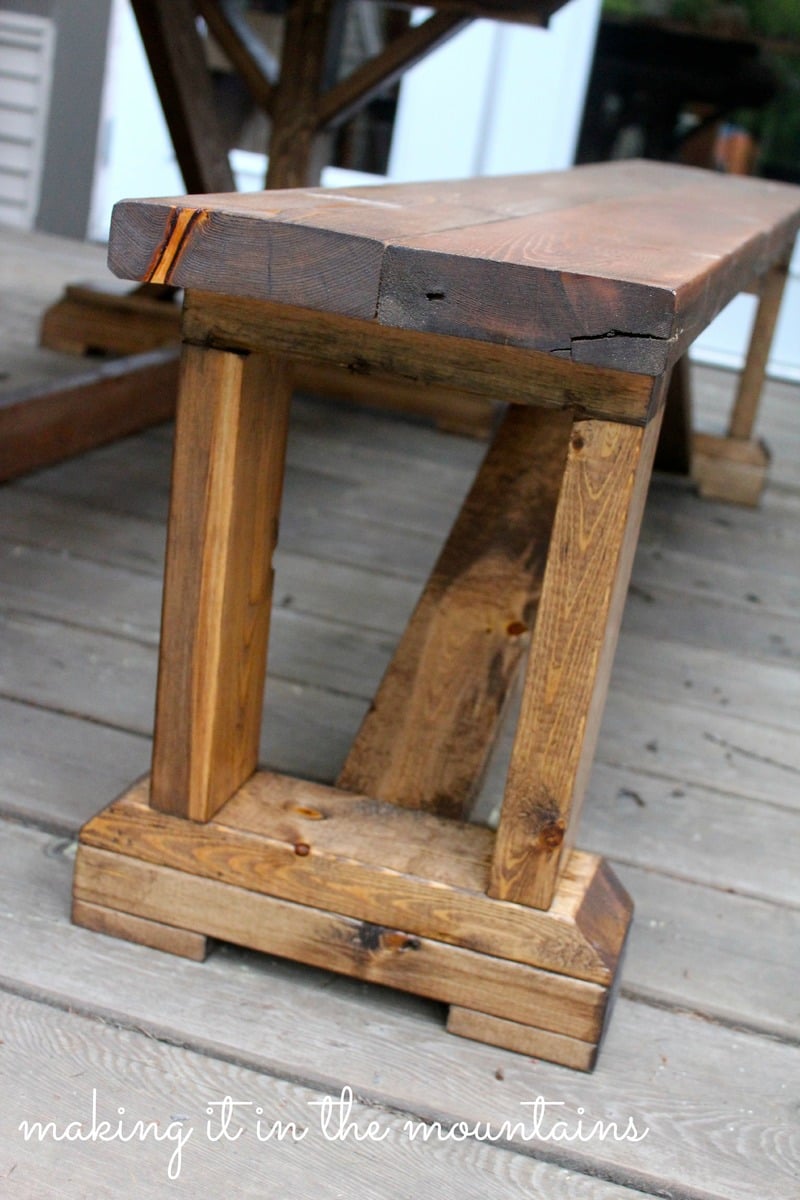
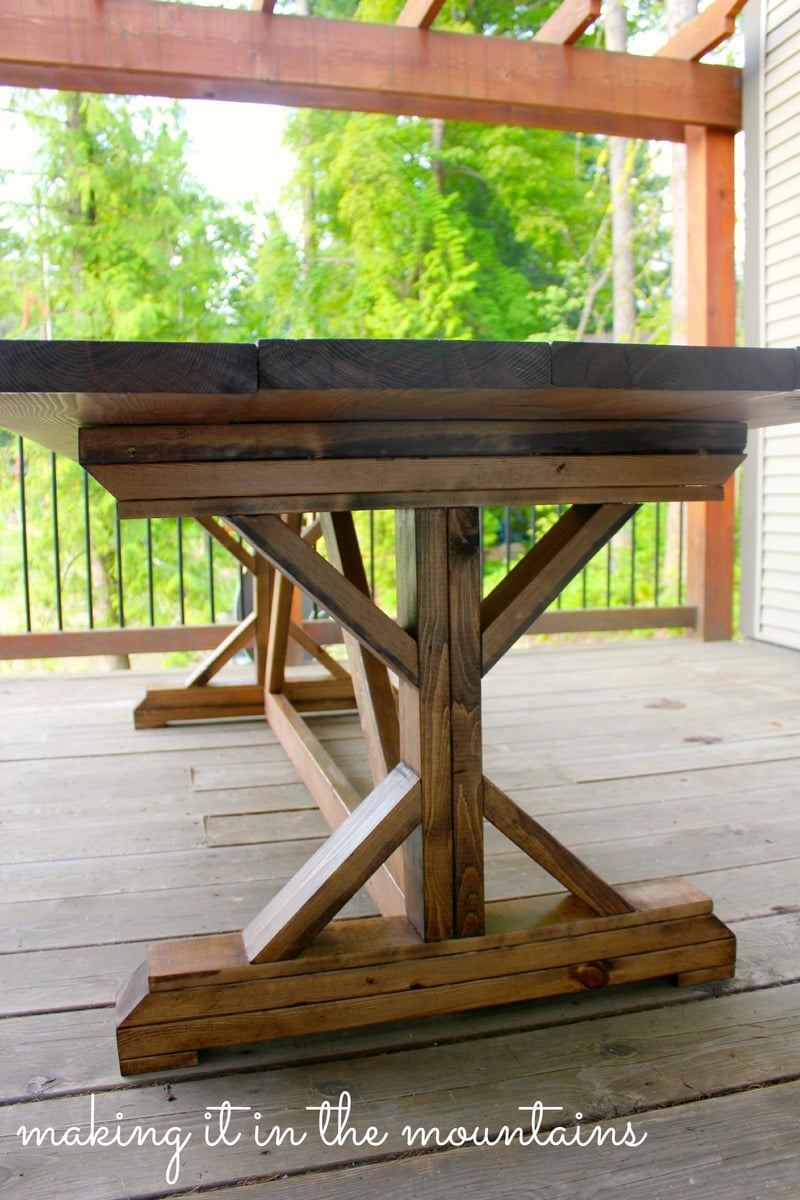
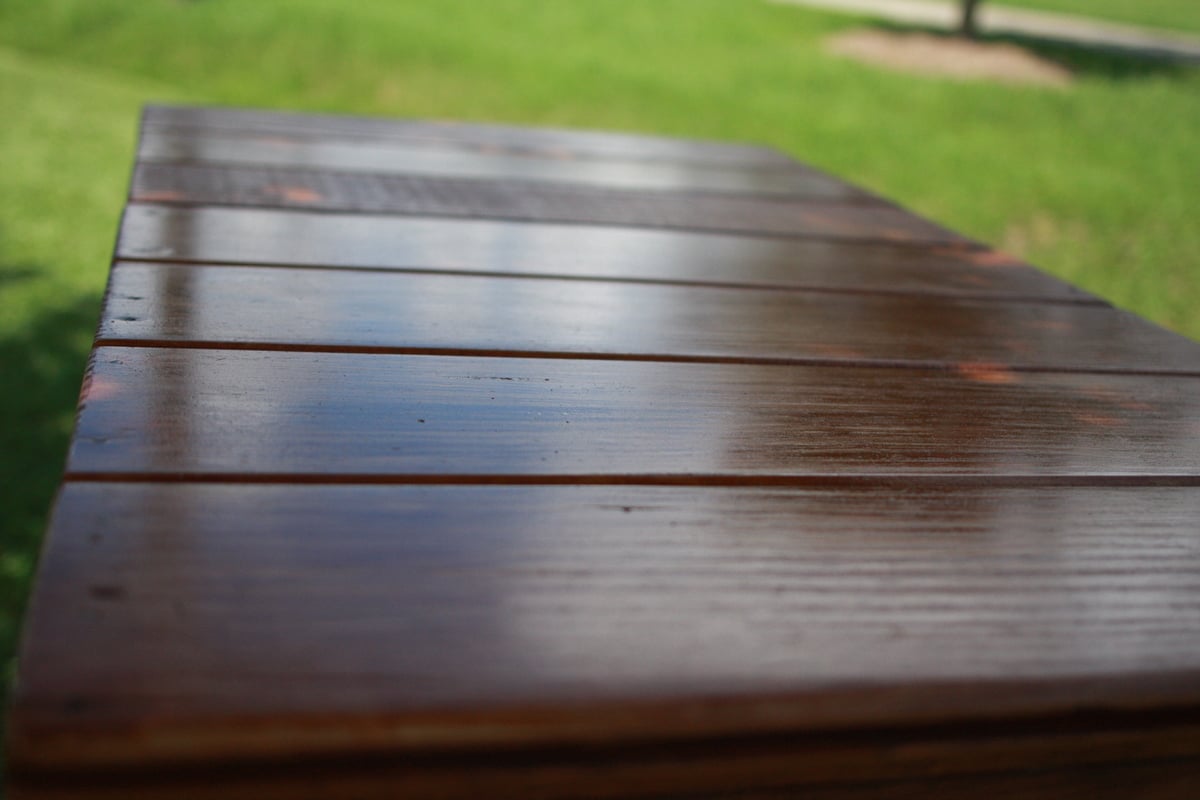
Farmhouse Table

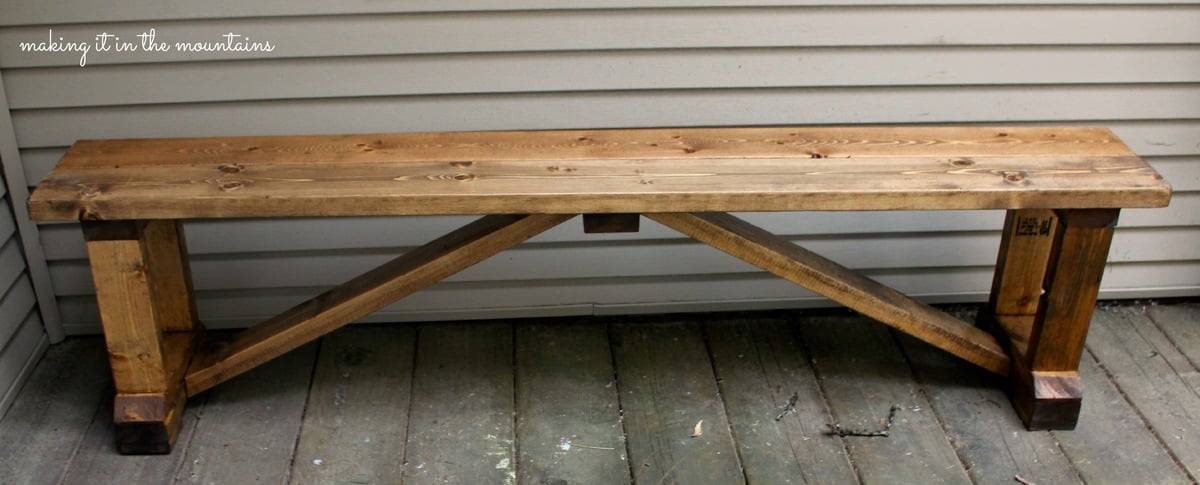
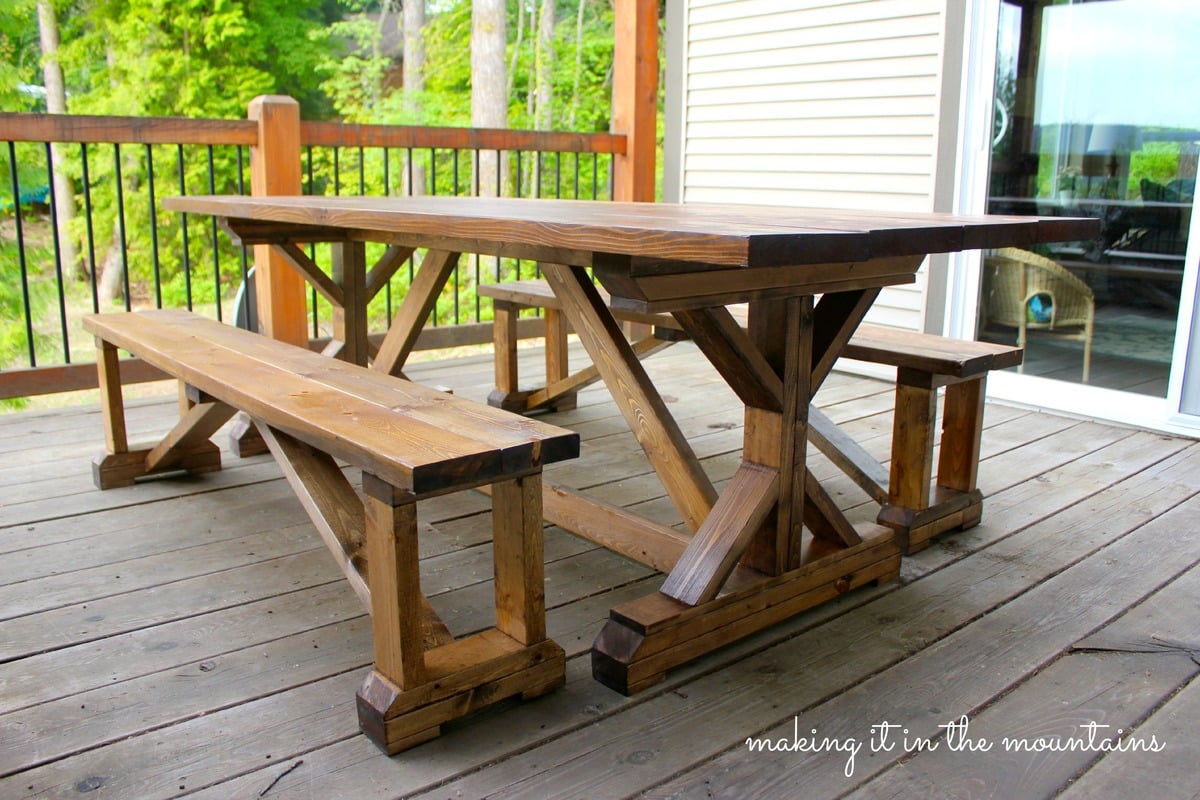
We decided to build the Farmhouse Table after our 30 year old dining table began to crack and just wasn't working so well for our family of 5. This was our first project, so we made a lot of mistakes but also learned a lot. One of the hardest things was finding decent lumber that wasn't warped or split. We also made two Farmhouse Benches but they aren't included in this photo.
Built from Plan(s)
Estimated Time Investment
Weekend Project (10-20 Hours)
Finish Used
Minwax Special Walnut
Recommended Skill Level
Beginner
Wood Working Apron

Thank you soo much for the apron plans. I've used a sewing machine about 5 times in my life, and I didn't know what "stitch in the ditch" or bias tape or trim was, but with the plans and some web searching, I was actually able to sew this apron. It took me considerably longer than others, especially because I don't have an iron, pins, or a seam ripper (ripping a seam took me over an hour). Again, thank you sooo much! I hope to never lose my pen and tape measure at the lumber yard again with this handy creation :)
Built from Plan(s)
Estimated Cost
Less than $6
Estimated Time Investment
Afternoon Project (3-6 Hours)
Recommended Skill Level
Beginner
Comments

Sun, 06/15/2014 - 05:27
Looks great!
Great job on the work apron, Yvonne! Congrats on conquering the sewing machine!

In reply to Looks great! by JoanneS
Tue, 06/17/2014 - 00:27
So much to learn
Thank you, Joanne. :) There is so much I want to learn, and for some reason, I feel like I need to learn it all now, when my life is busier than ever. Hah!
In reply to Amazing job by spiceylg
Fri, 06/27/2014 - 10:55
Like a jigsaw :)
Thank you so much. It reminded me of using a jigsaw, and vice versa. :)
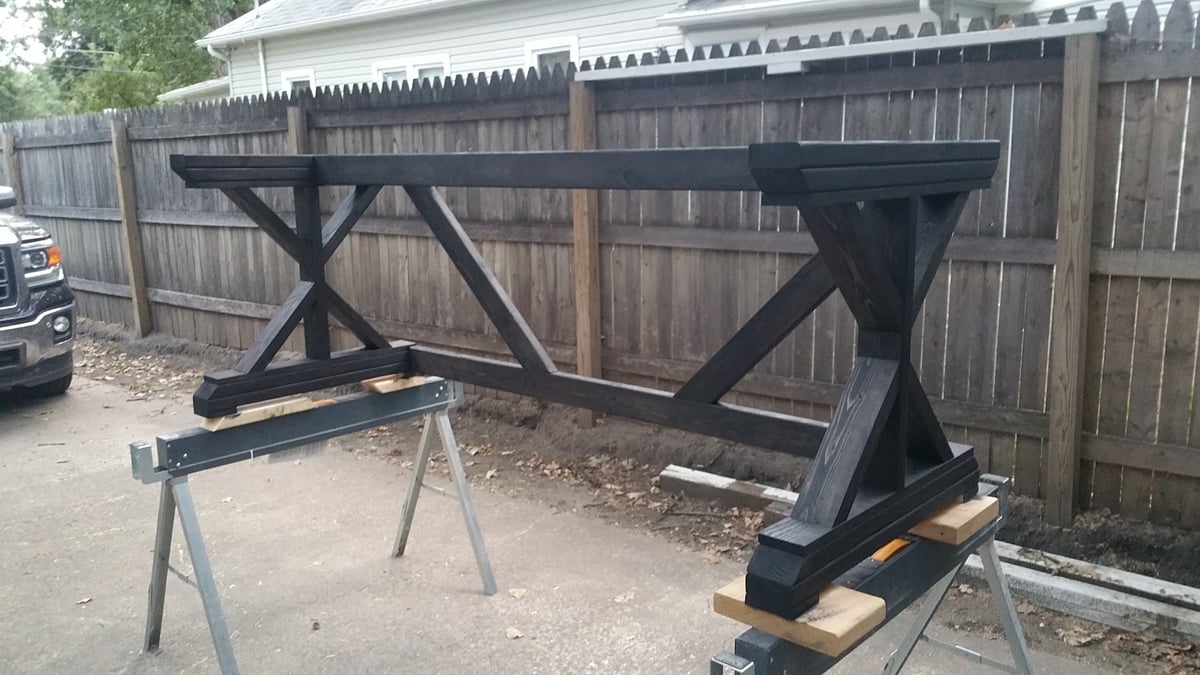
Big Fancy X Desk

Needed a big desk. Made mine at 8' long.
Built from Plan(s)
Estimated Time Investment
Weekend Project (10-20 Hours)
Finish Used
Minwax Ebony
Recommended Skill Level
Beginner
Comments
Tue, 10/04/2016 - 05:47
Looks great!
The desk came out great. I made the same desk, I went with the 2x12x6 dual board top. I like the look of the solid piece on top...will have to try it on the next one.
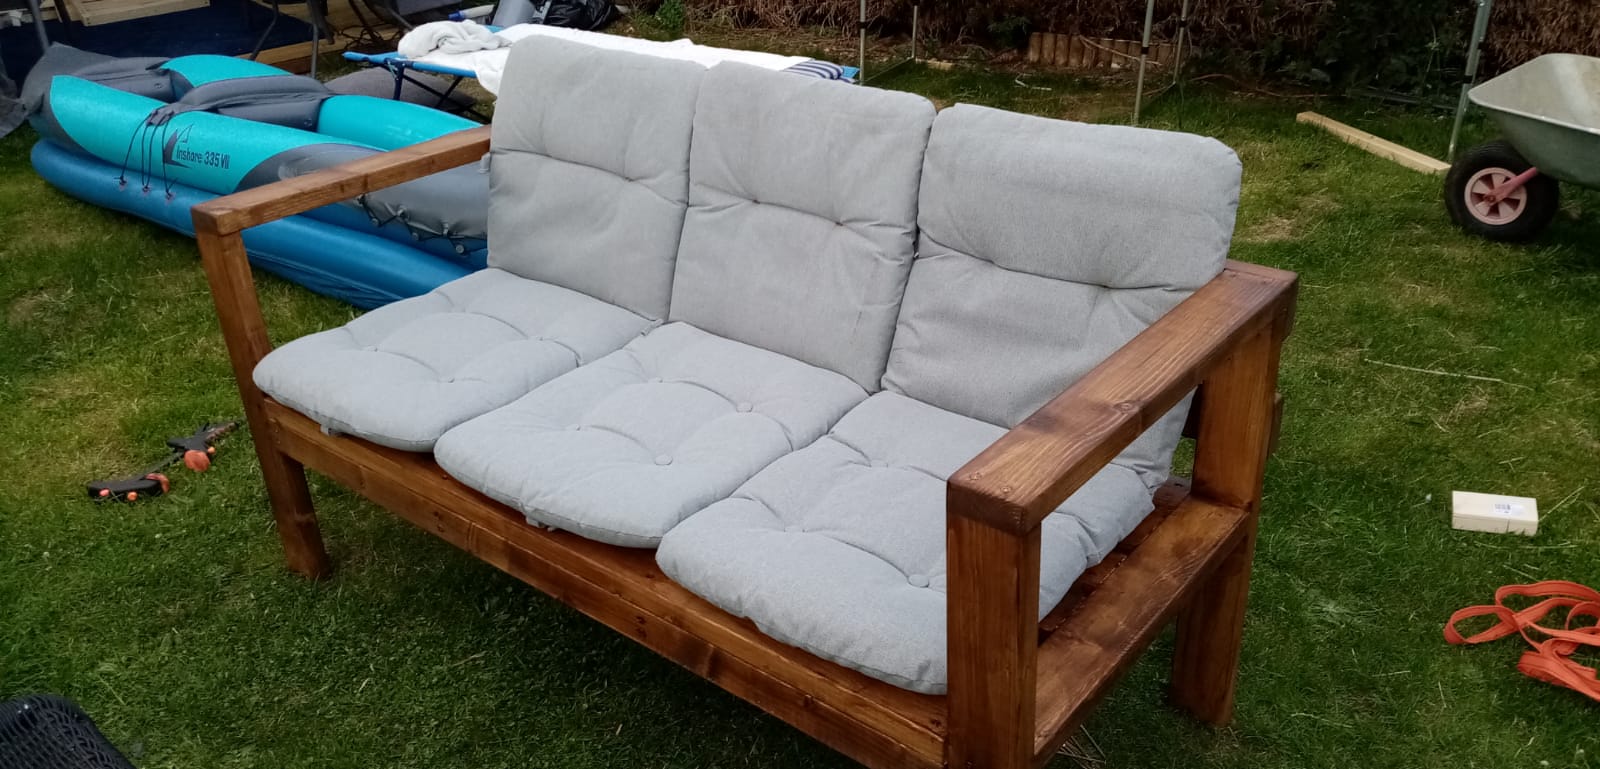
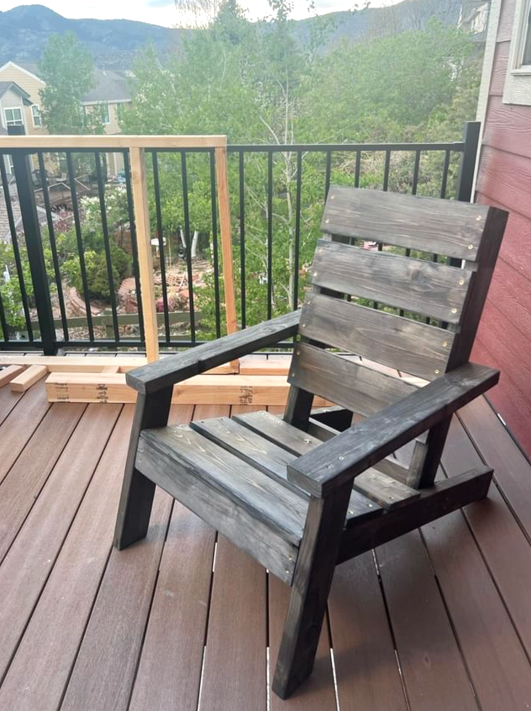
Modern Adirondack and 2x4 Sofas
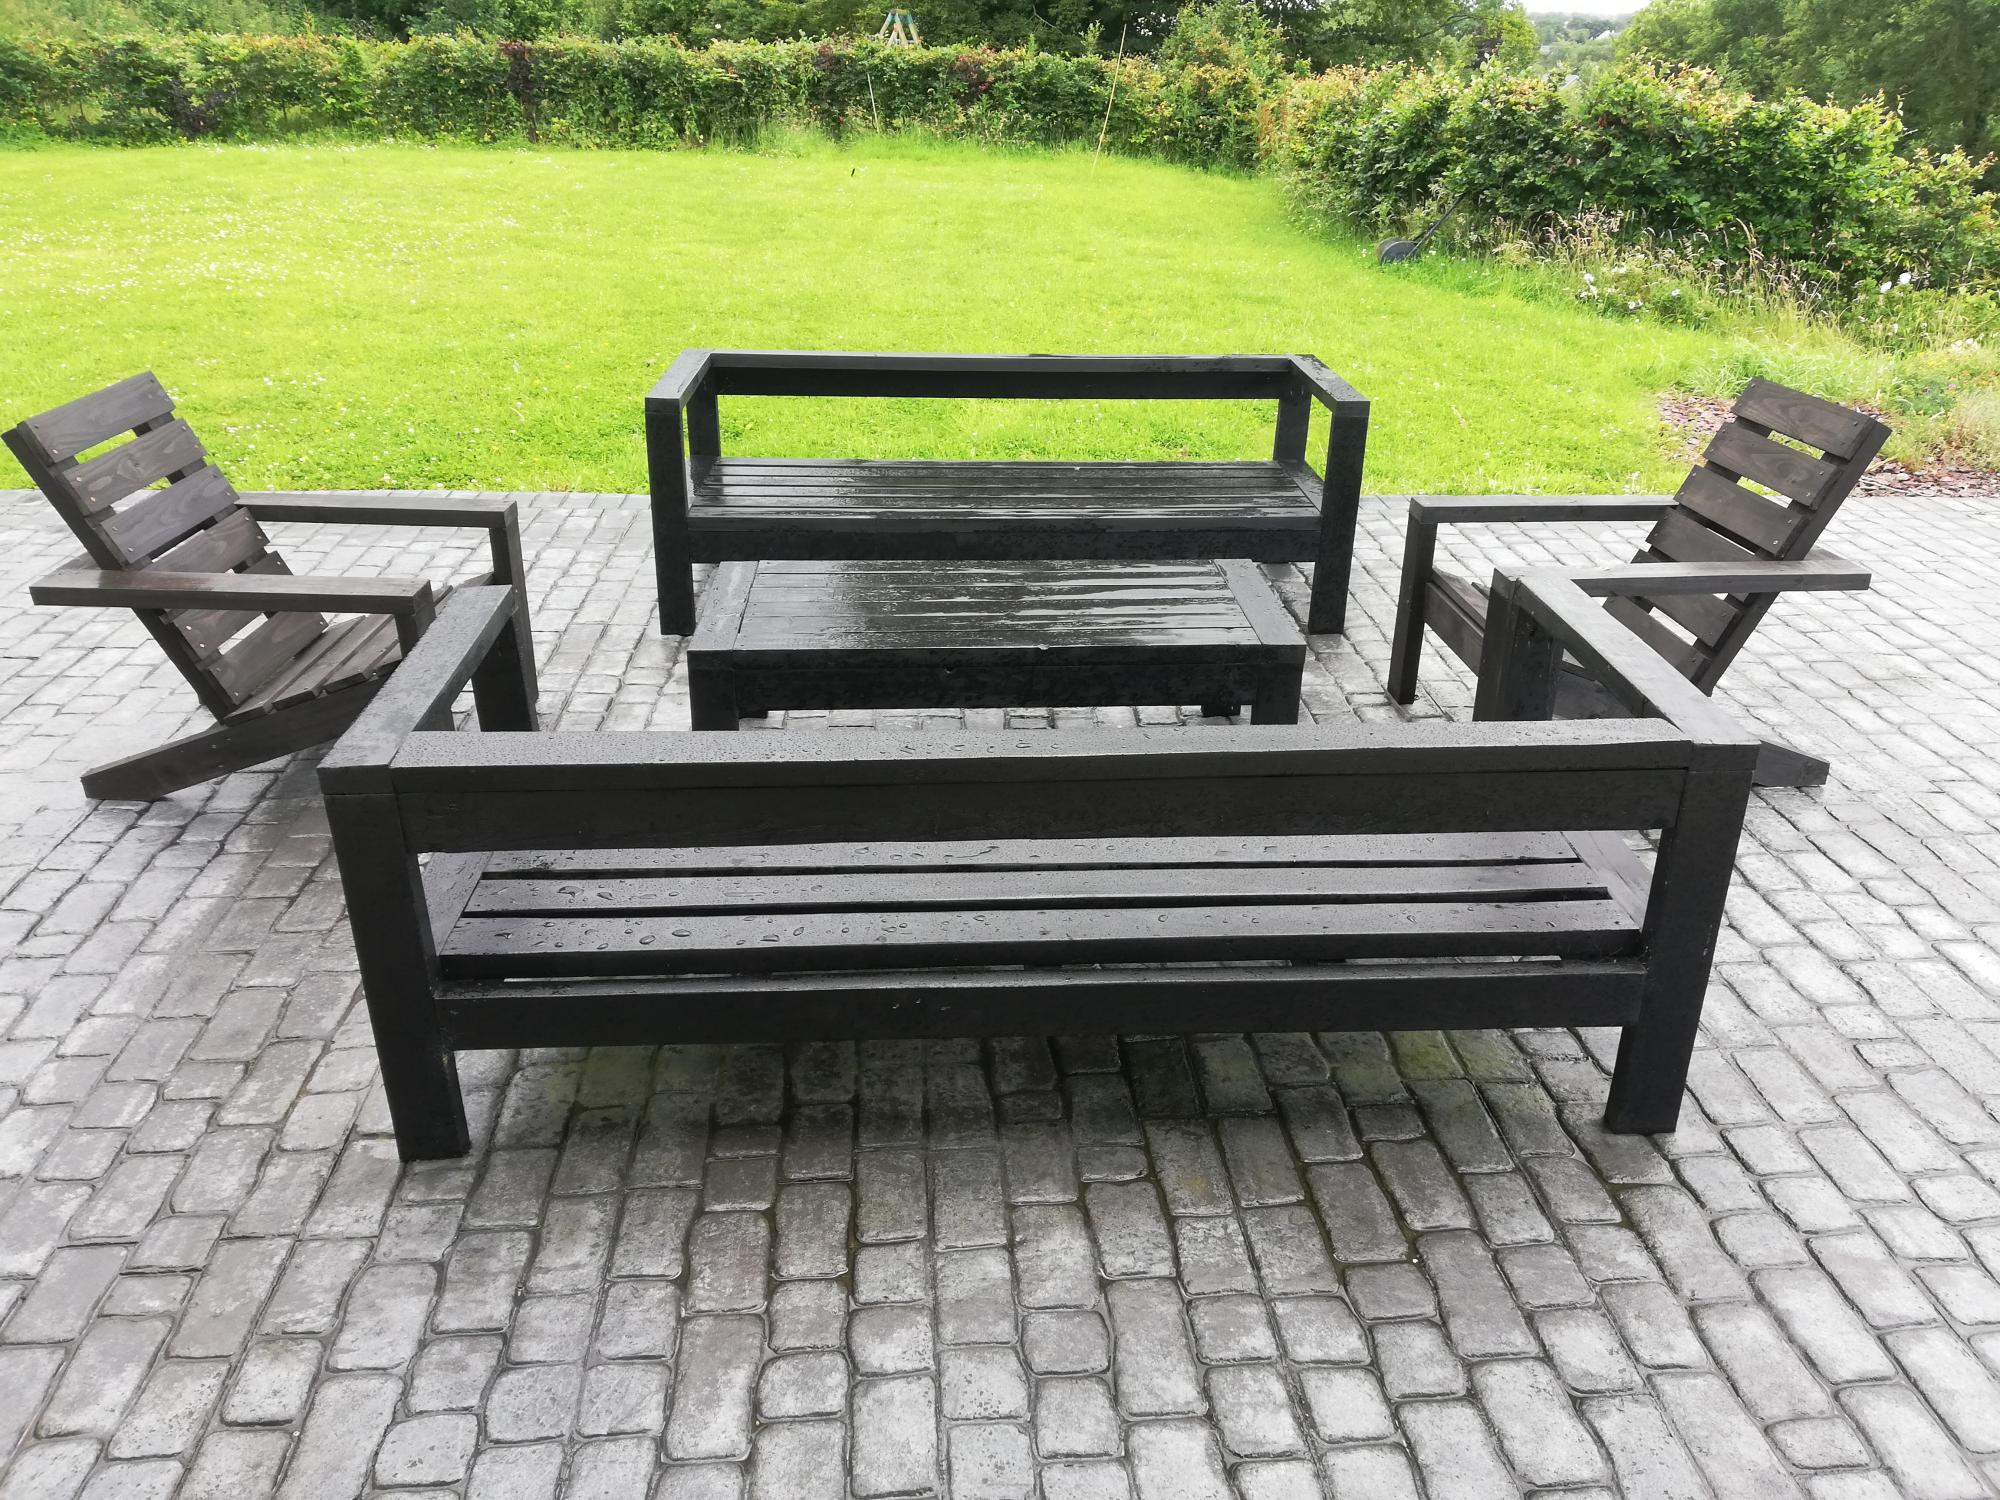
Thanks Ana for your great plans... Unfortunately it hasn't stopped raining since we finished the armchairs! All we need now is the sun :)
We used 4x1 for the seats to match the outdoor sofas.
Built from Plan(s)
Estimated Cost
€200
Estimated Time Investment
Weekend Project (10-20 Hours)
Finish Used
Garden Woodstain
Recommended Skill Level
Beginner
Outdoor Octagon Table
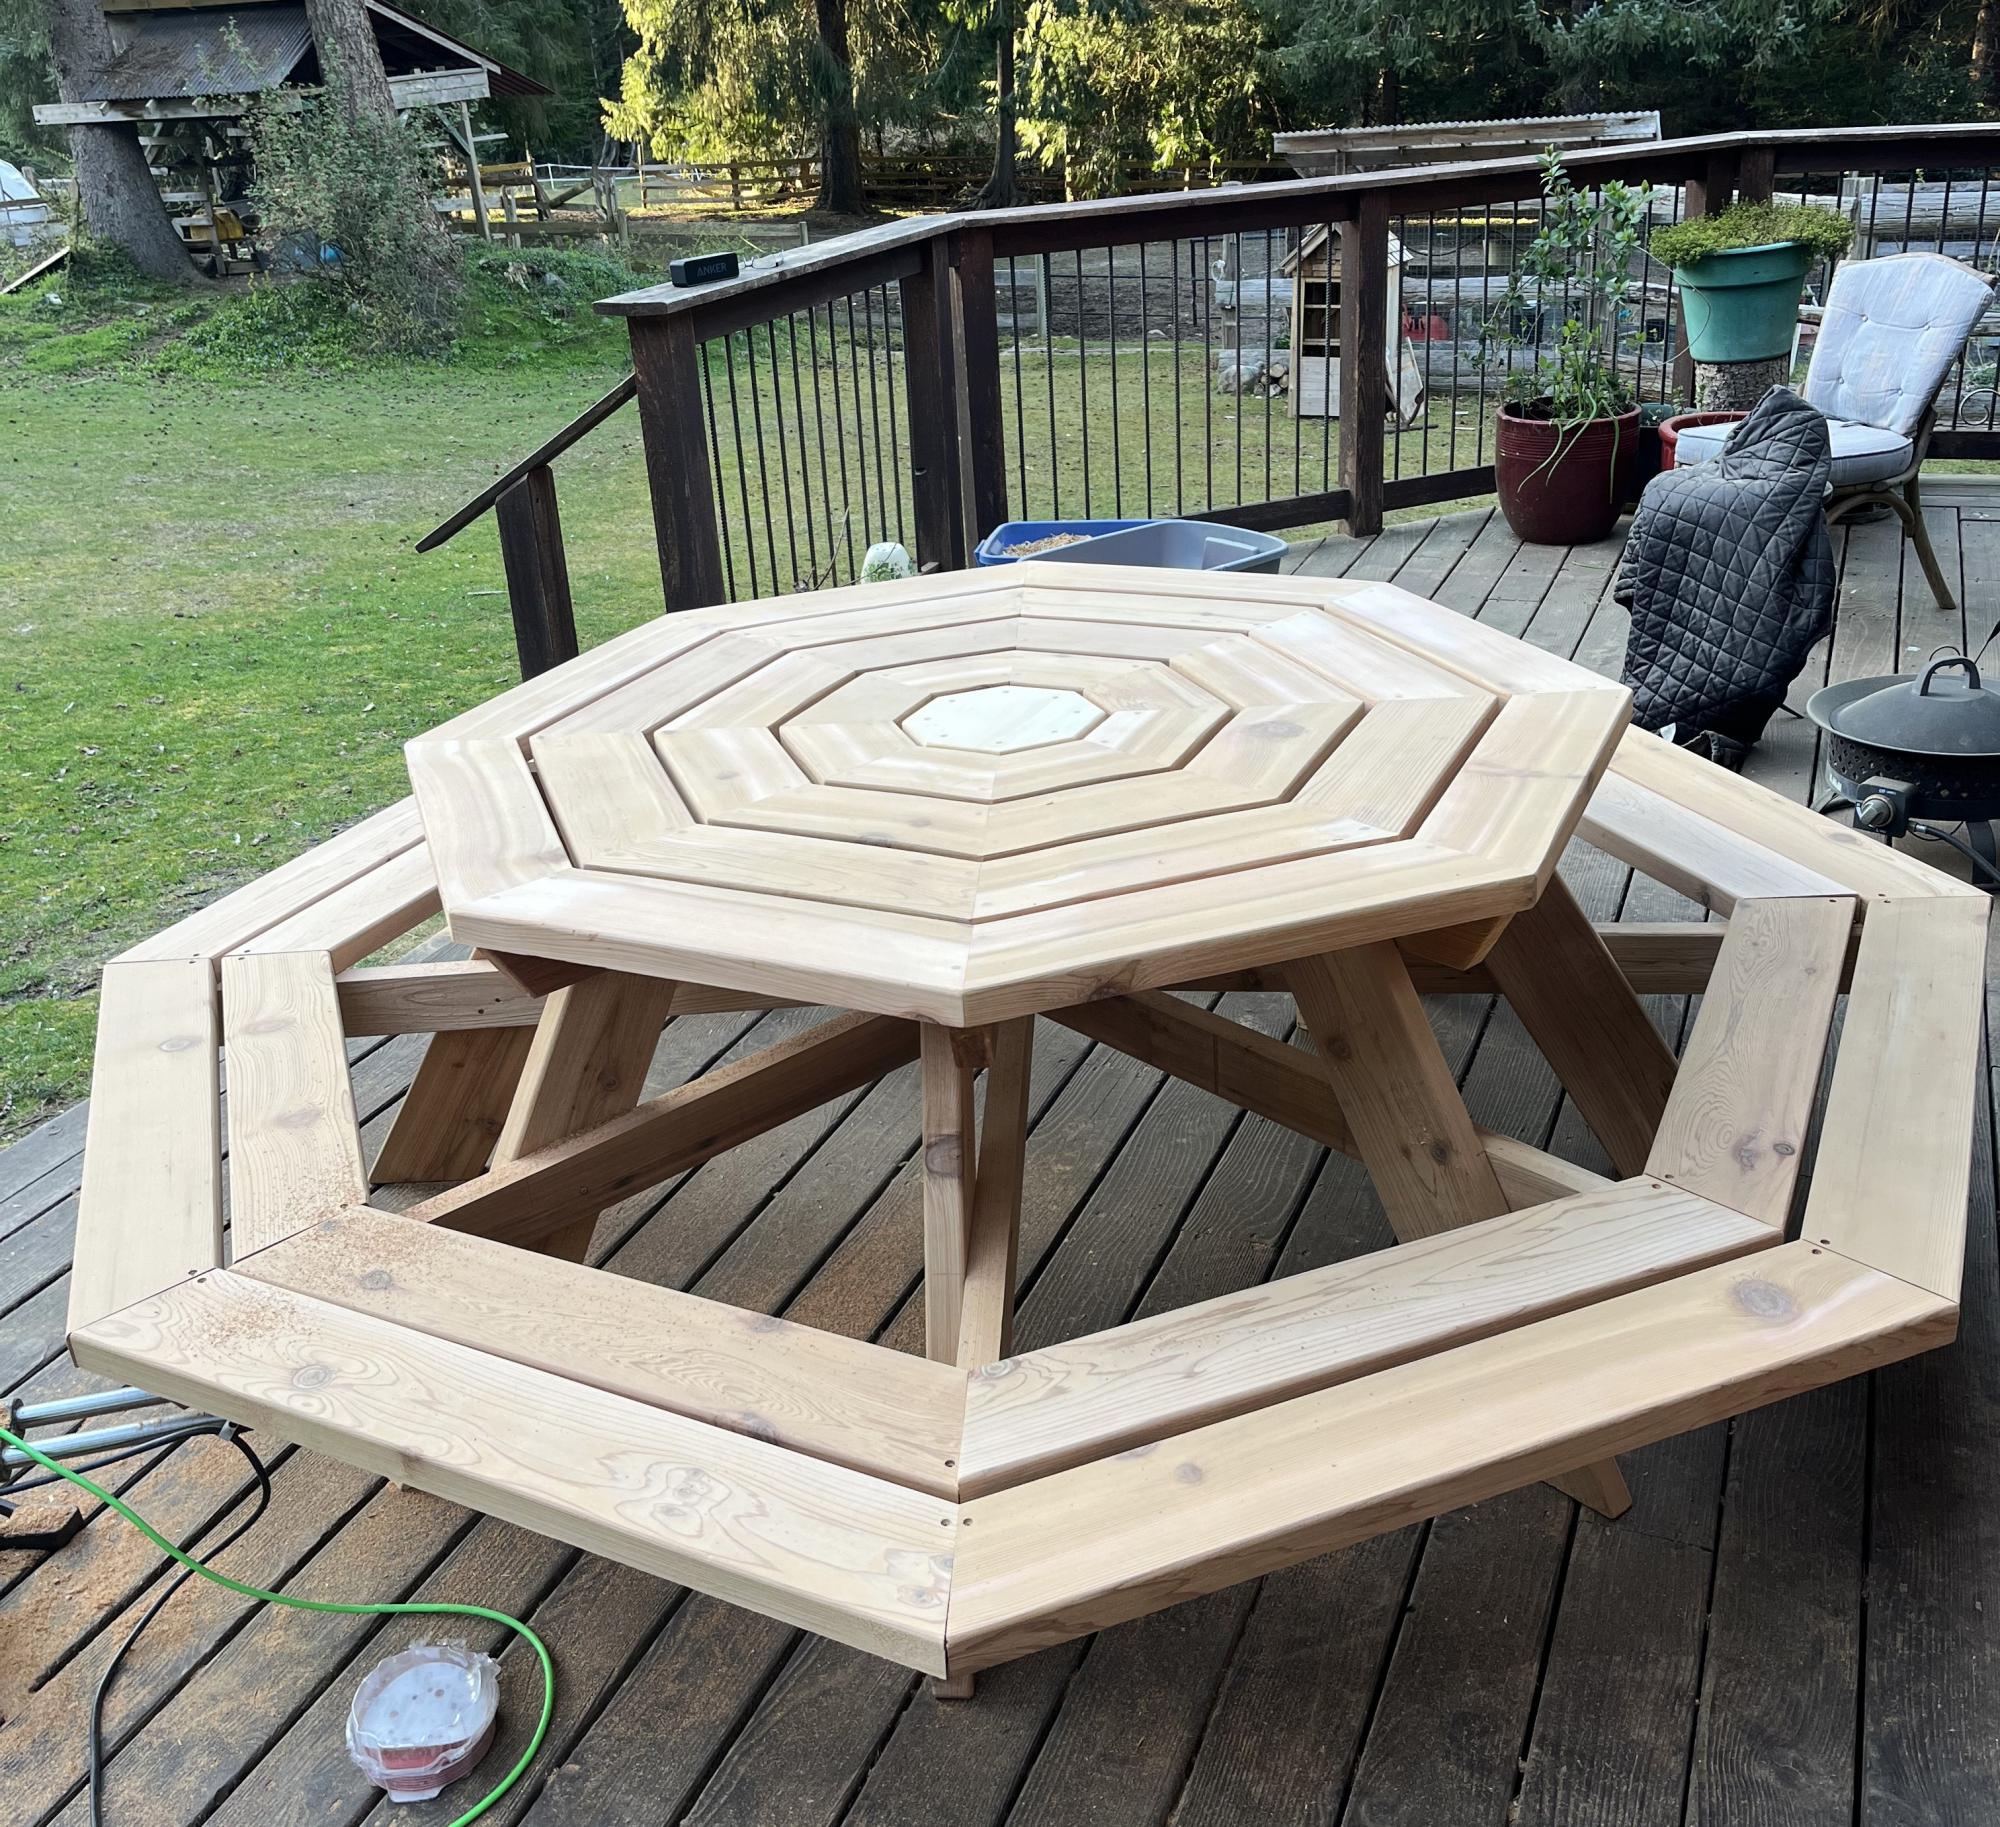
DIY Octagon Picnic Table
Built from Plan(s)
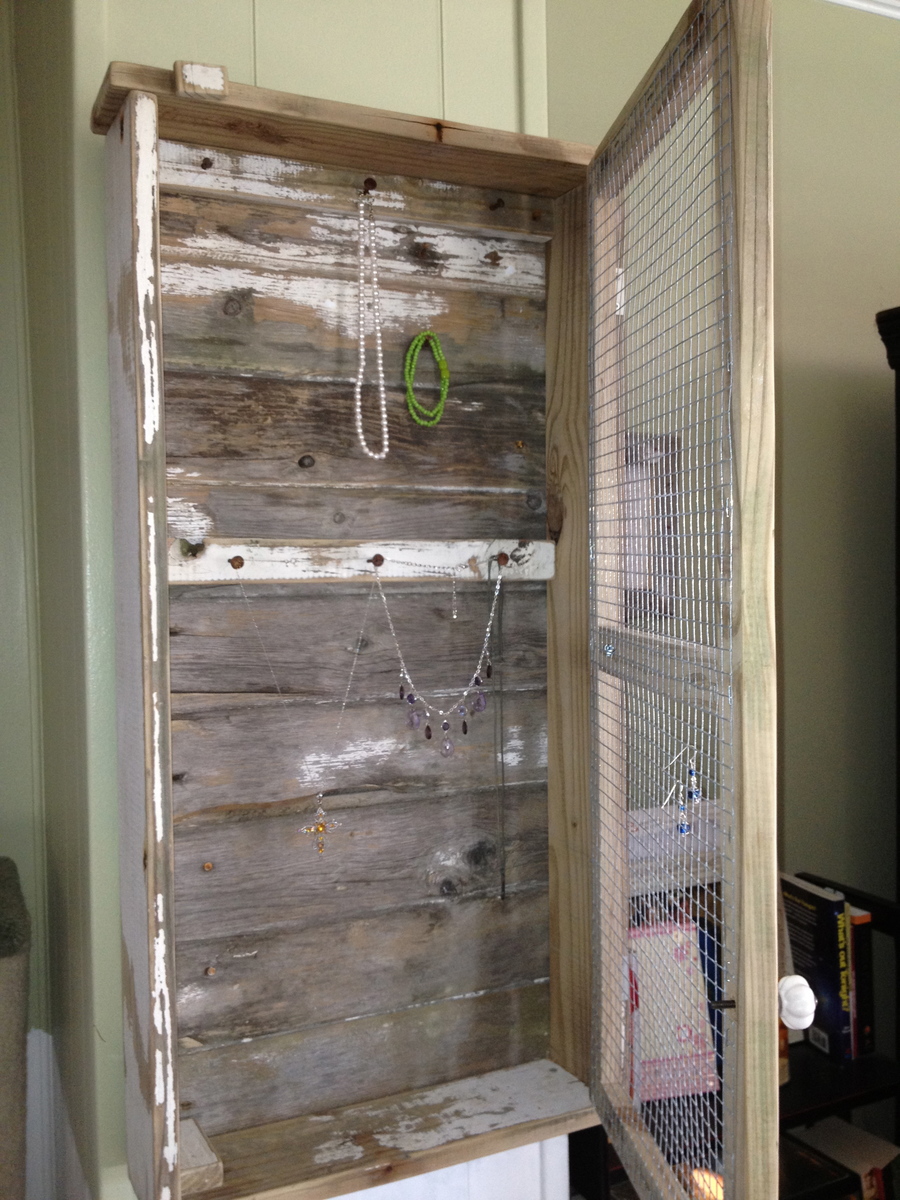
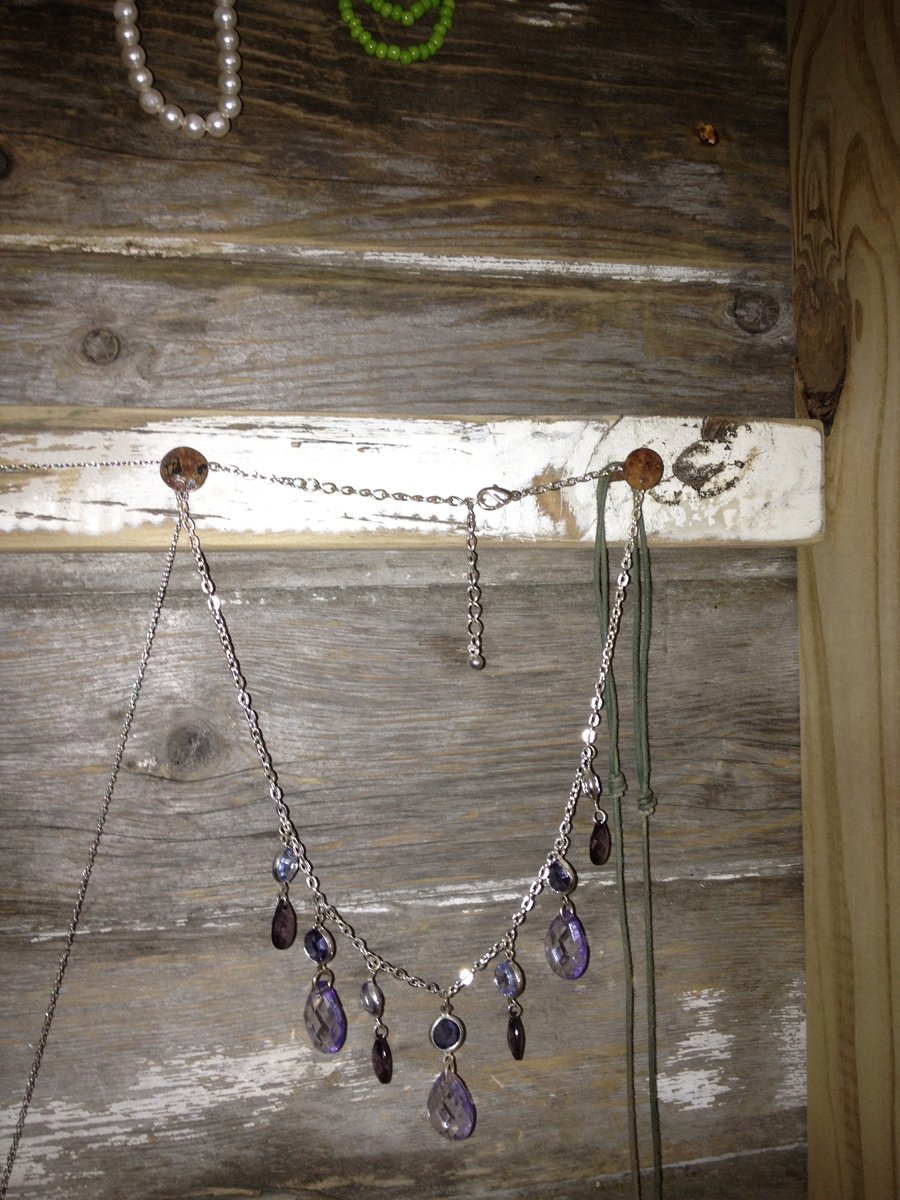
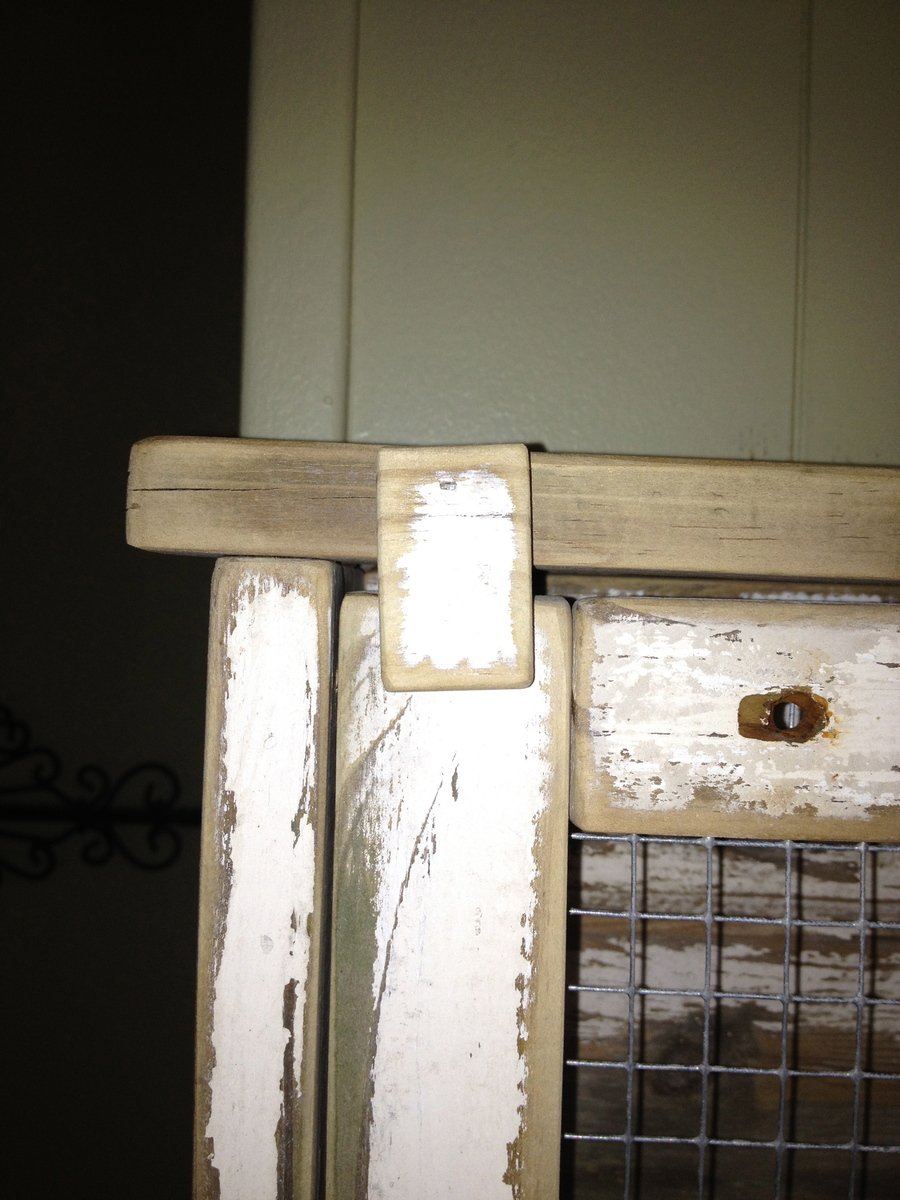
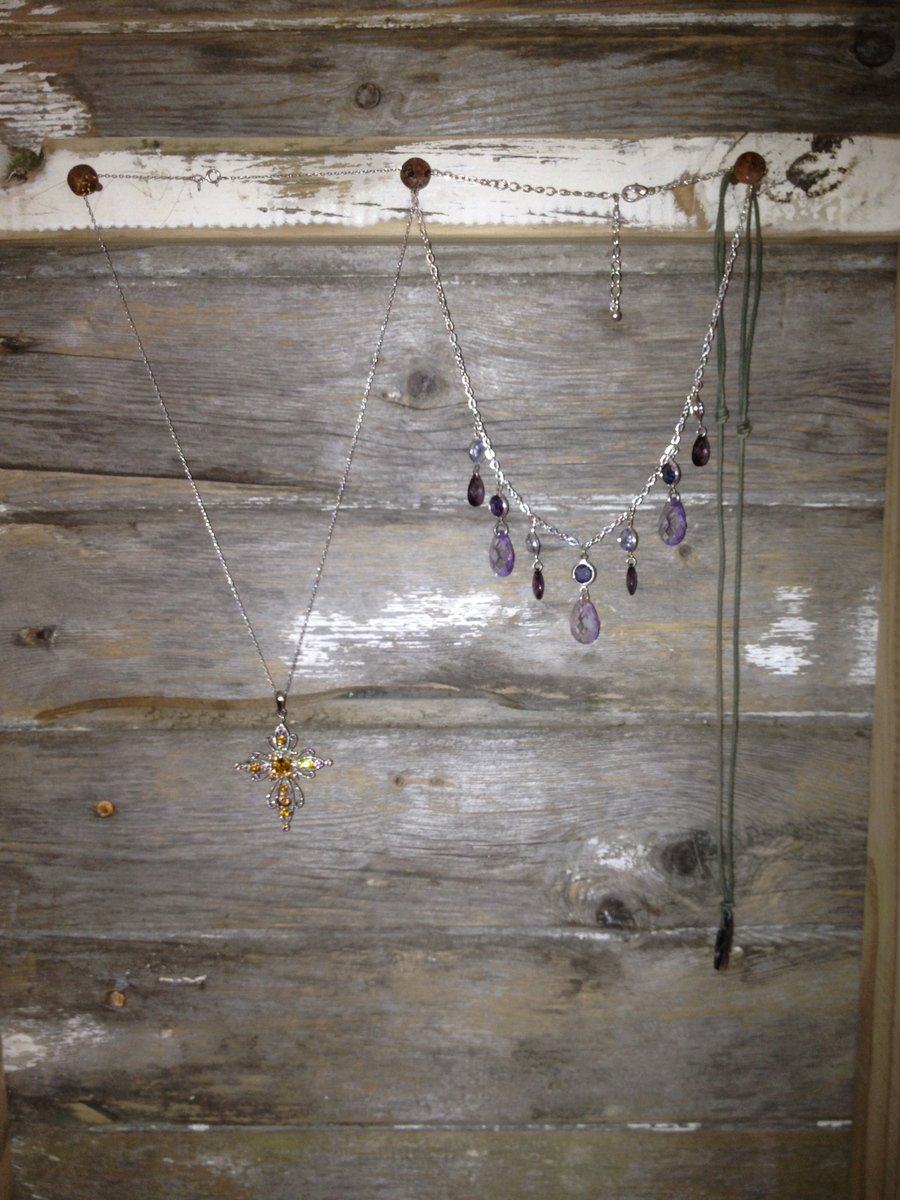
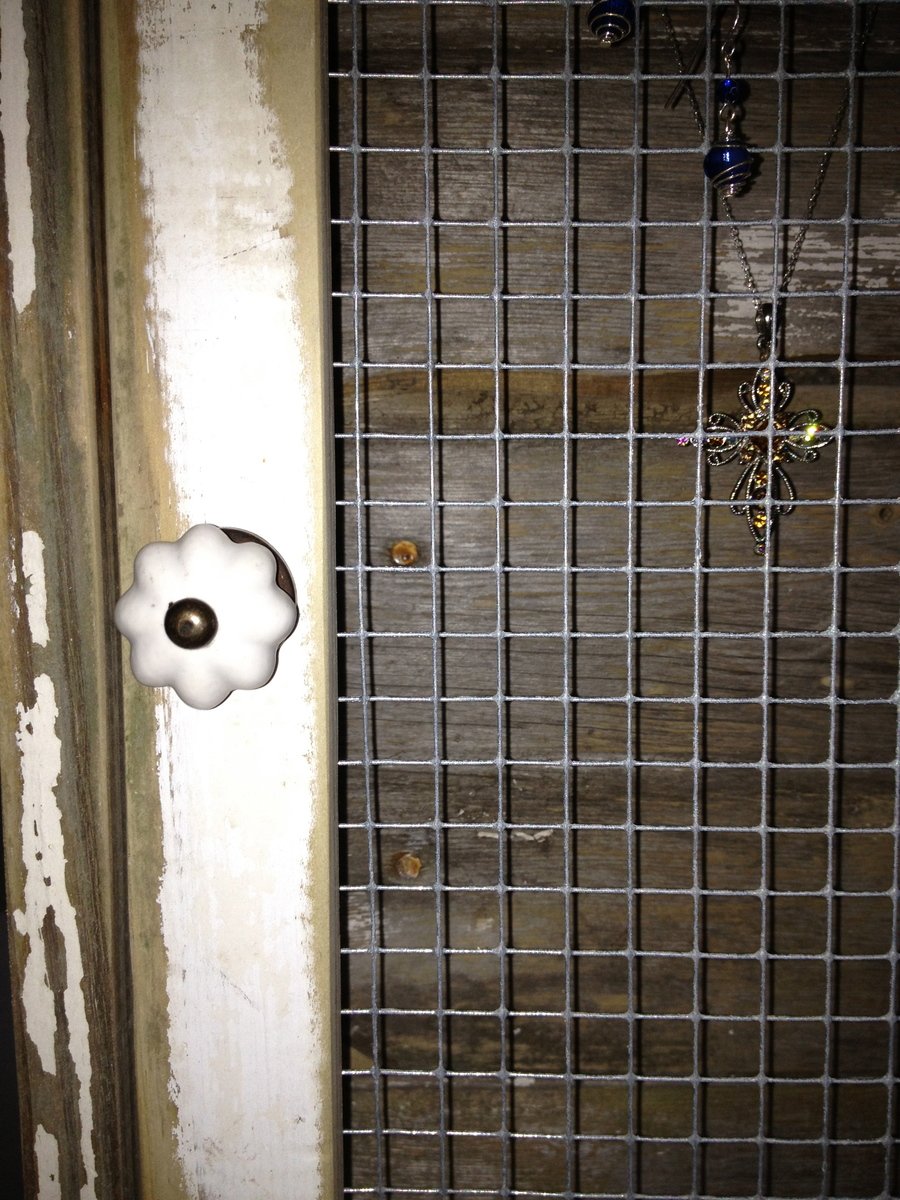
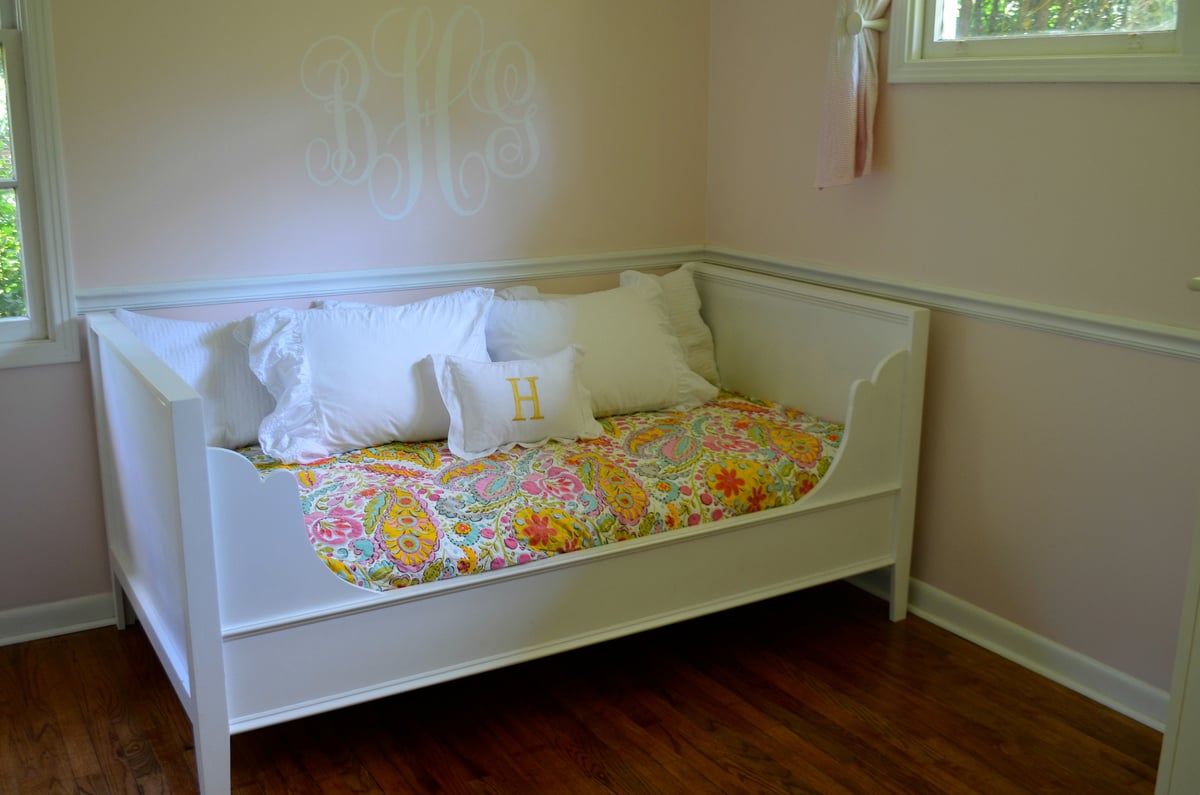
Wall Jewelry Cabinet
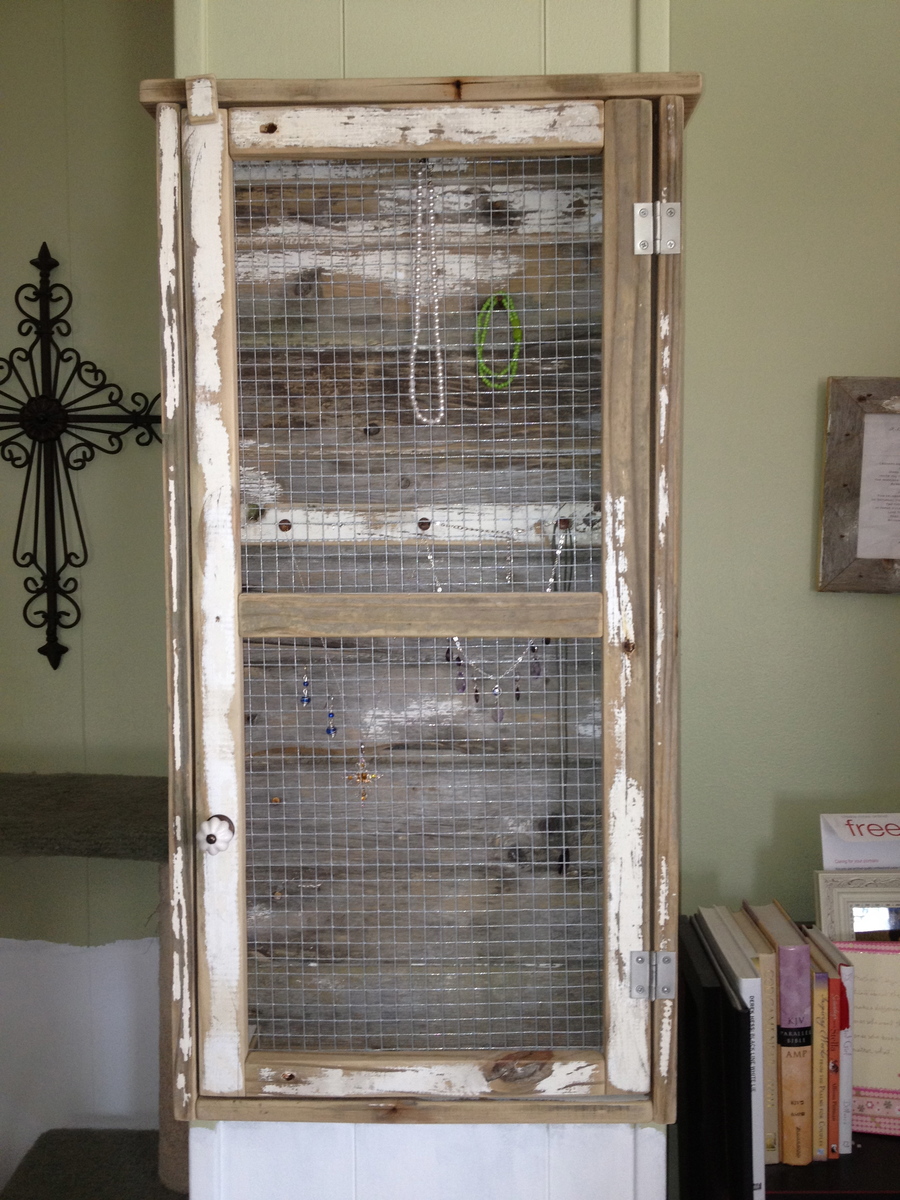
I used the wall jewelry cabinet plan and modified it a bit to fit the materials that I already had in the garage. The whole project was built using salvaged barn wood and siding that was built in the 1800's. It took a little longer to square up the boards and sand them to a friendly feel but I had little to no finishing time in the end. The plans were so spot on that used them almost exactly.! I just added another cross support to the door and used old barn wood tongue and groove for the back. I also fastened a little piece of wood at the top of the door with one brad nail. I did this to keep the door shut in a more attractive way then a clasp or hasp. The little piece swings out of the way with ease. I bought the knob at hobby lobby for 2 dollars and the hinges were less than 2 dollars. The hardware cloth came in a roll that was 24 inches by 25 feet long for 10 dollars. Basic wood working knowledge and tools are super helpful with this project and as is stated in the original plans... a kreg jig makes it so much faster and easier.! Thanks so much for sharing!!
Estimated Cost
about 14 dollars including the hardware cloth.
Estimated Time Investment
Afternoon Project (3-6 Hours)
Finish Used
Just cleaned the wood with compressed air and sanded to a friendly feel being carful not to kill the old look. Thats the only advantage to using old wood... the finish time is short but the prep time is a little more involved.
Recommended Skill Level
Intermediate
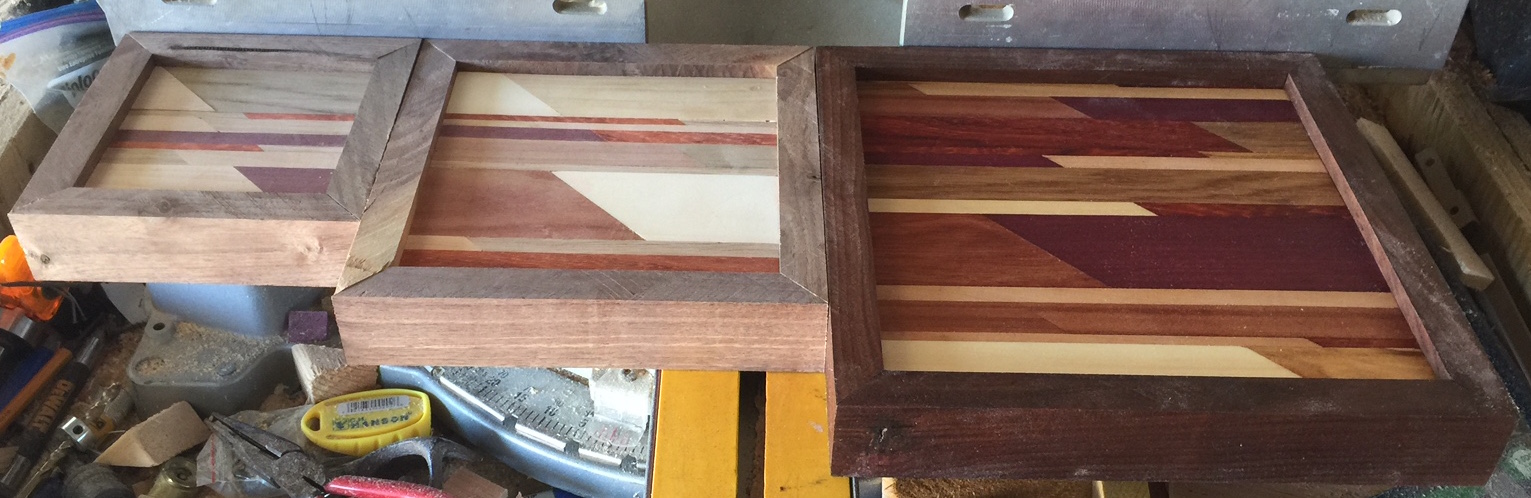
Wall Art
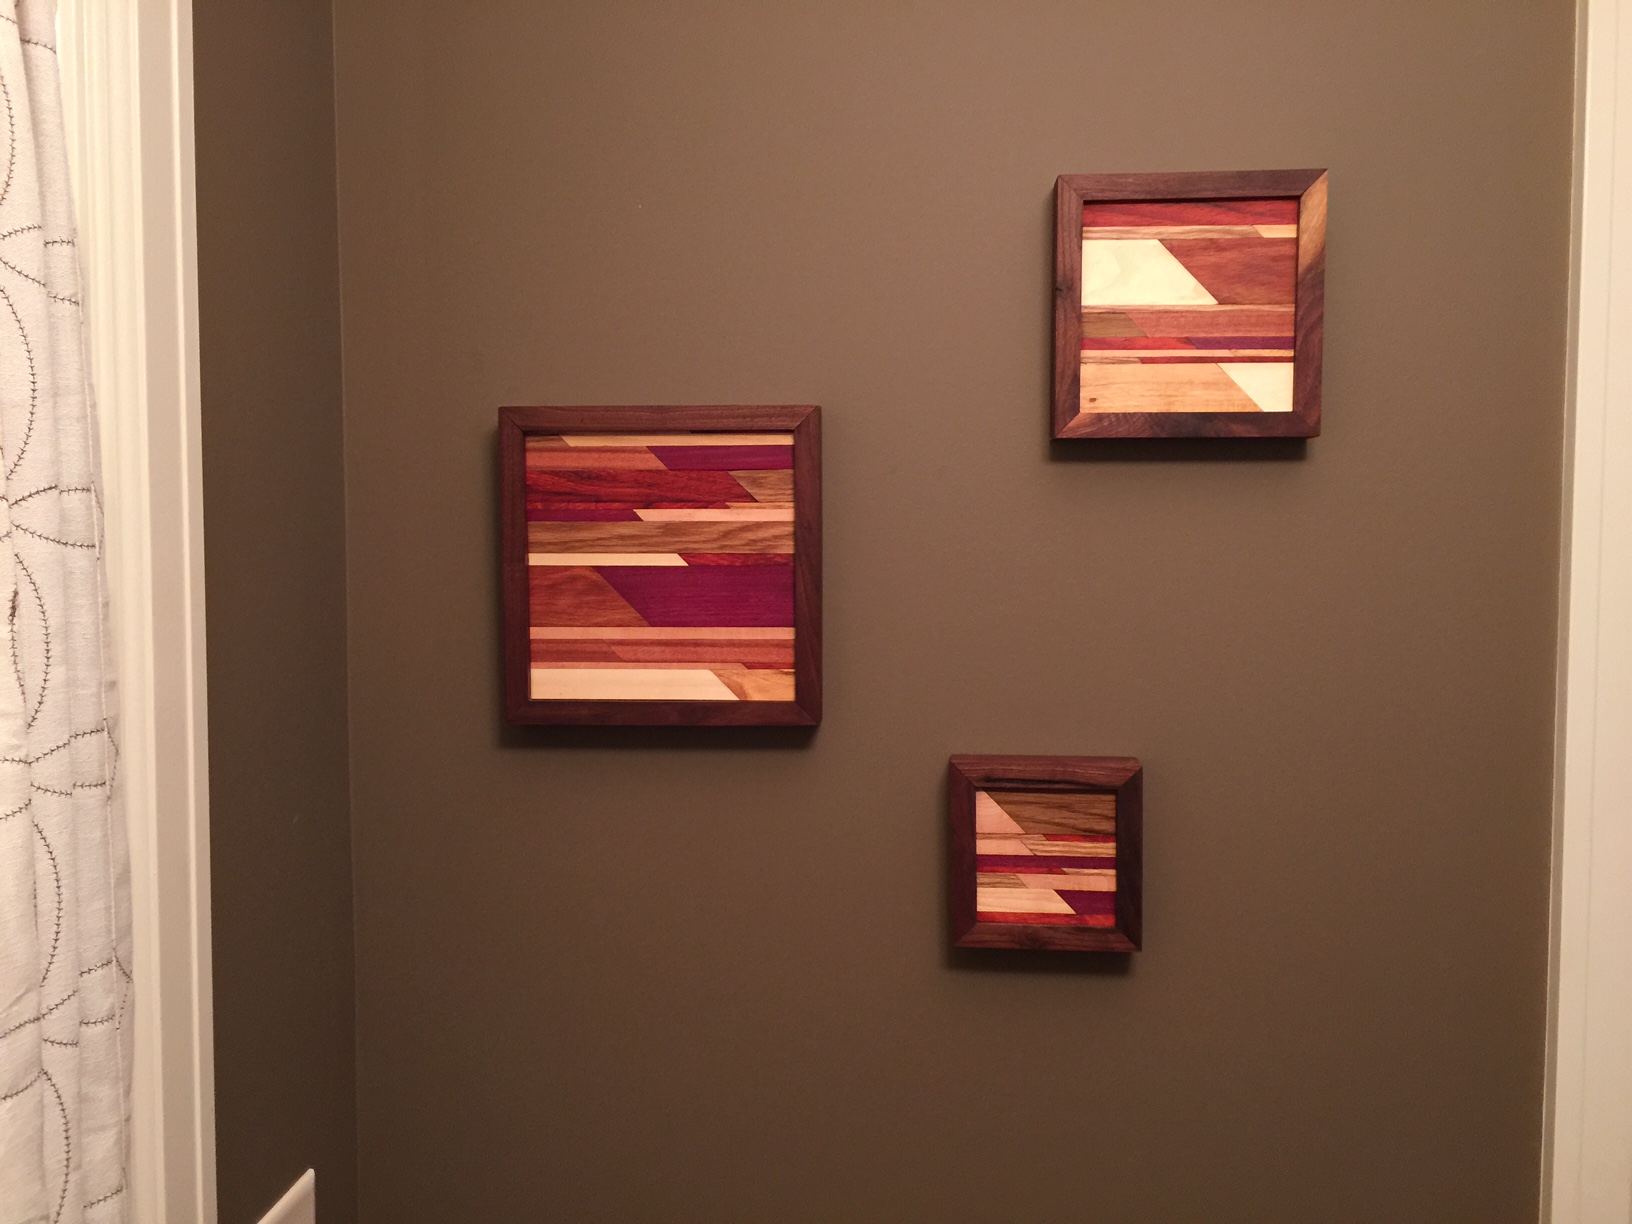
I saw a post on Fixthisbuildthat.com about making wall art. It looked super cool so I thought i would give it a shot. My wife loved the first one so I made two more per her request. These are pretty easy to do if you have a table saw and a miter saw.
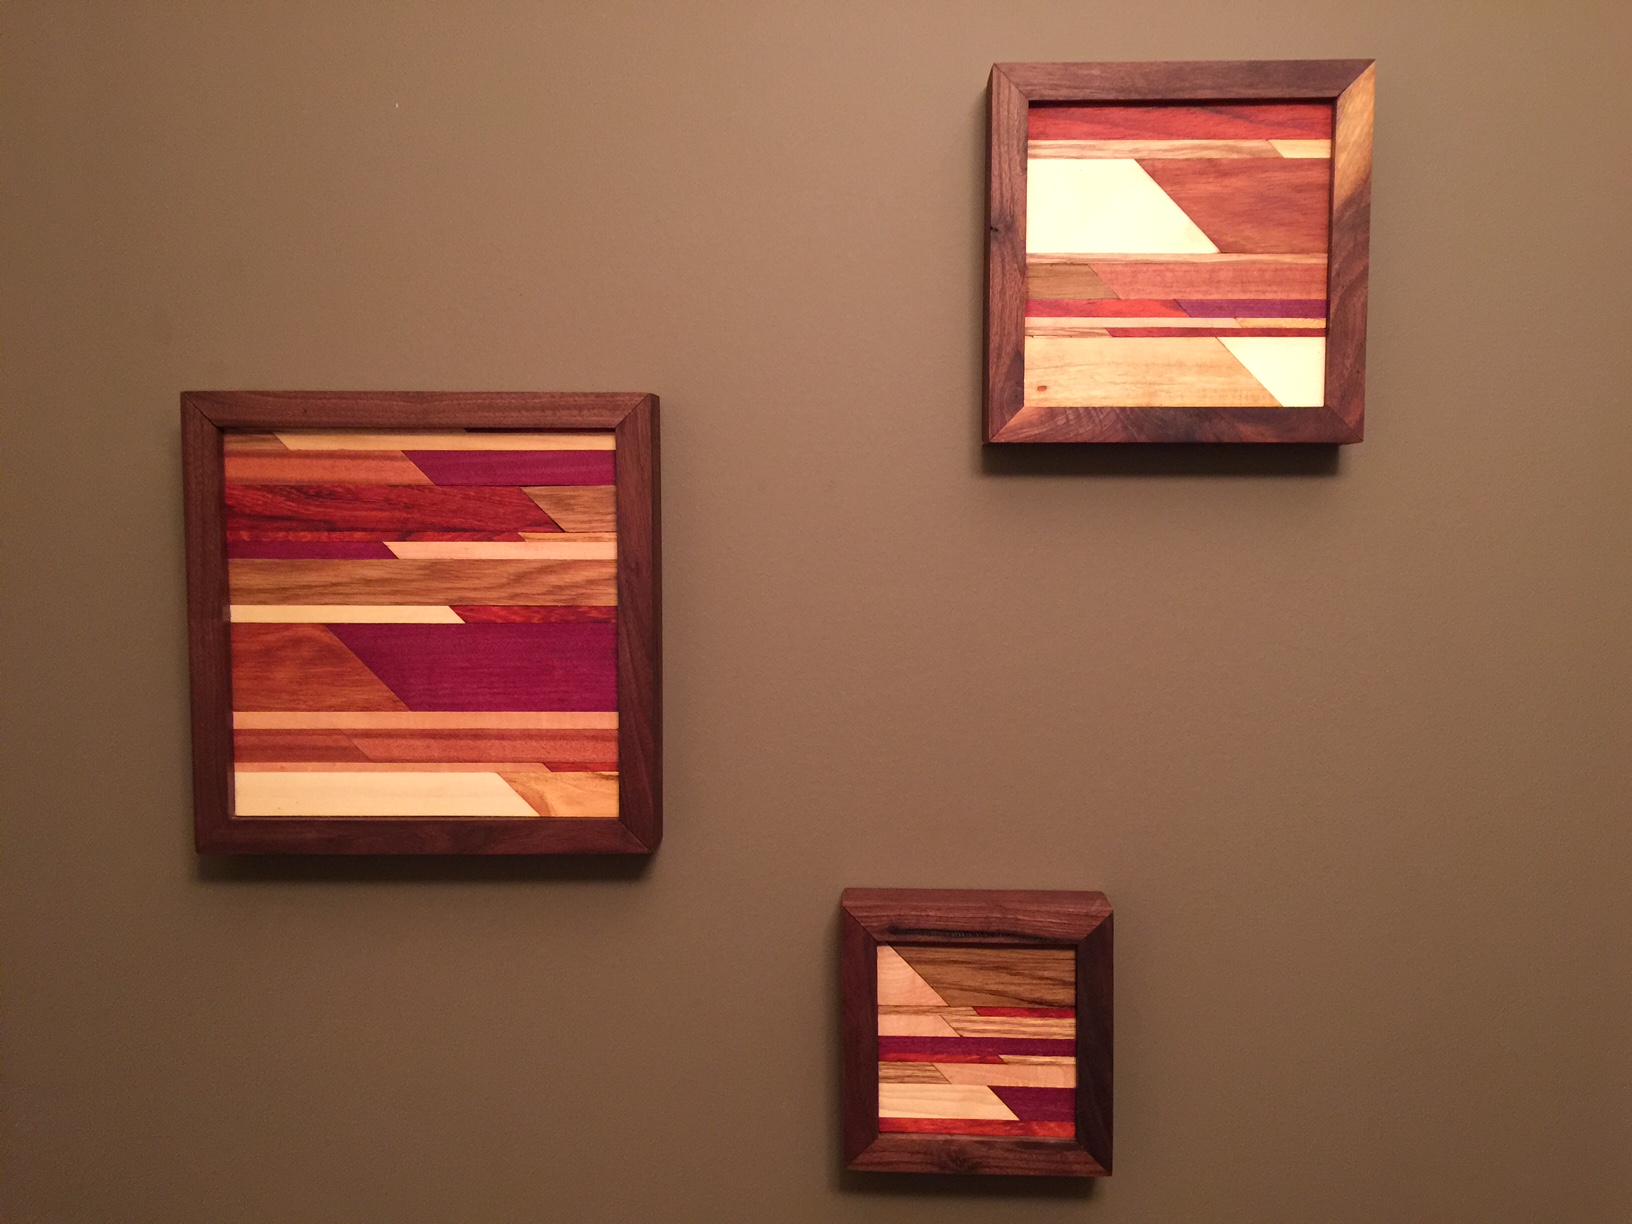
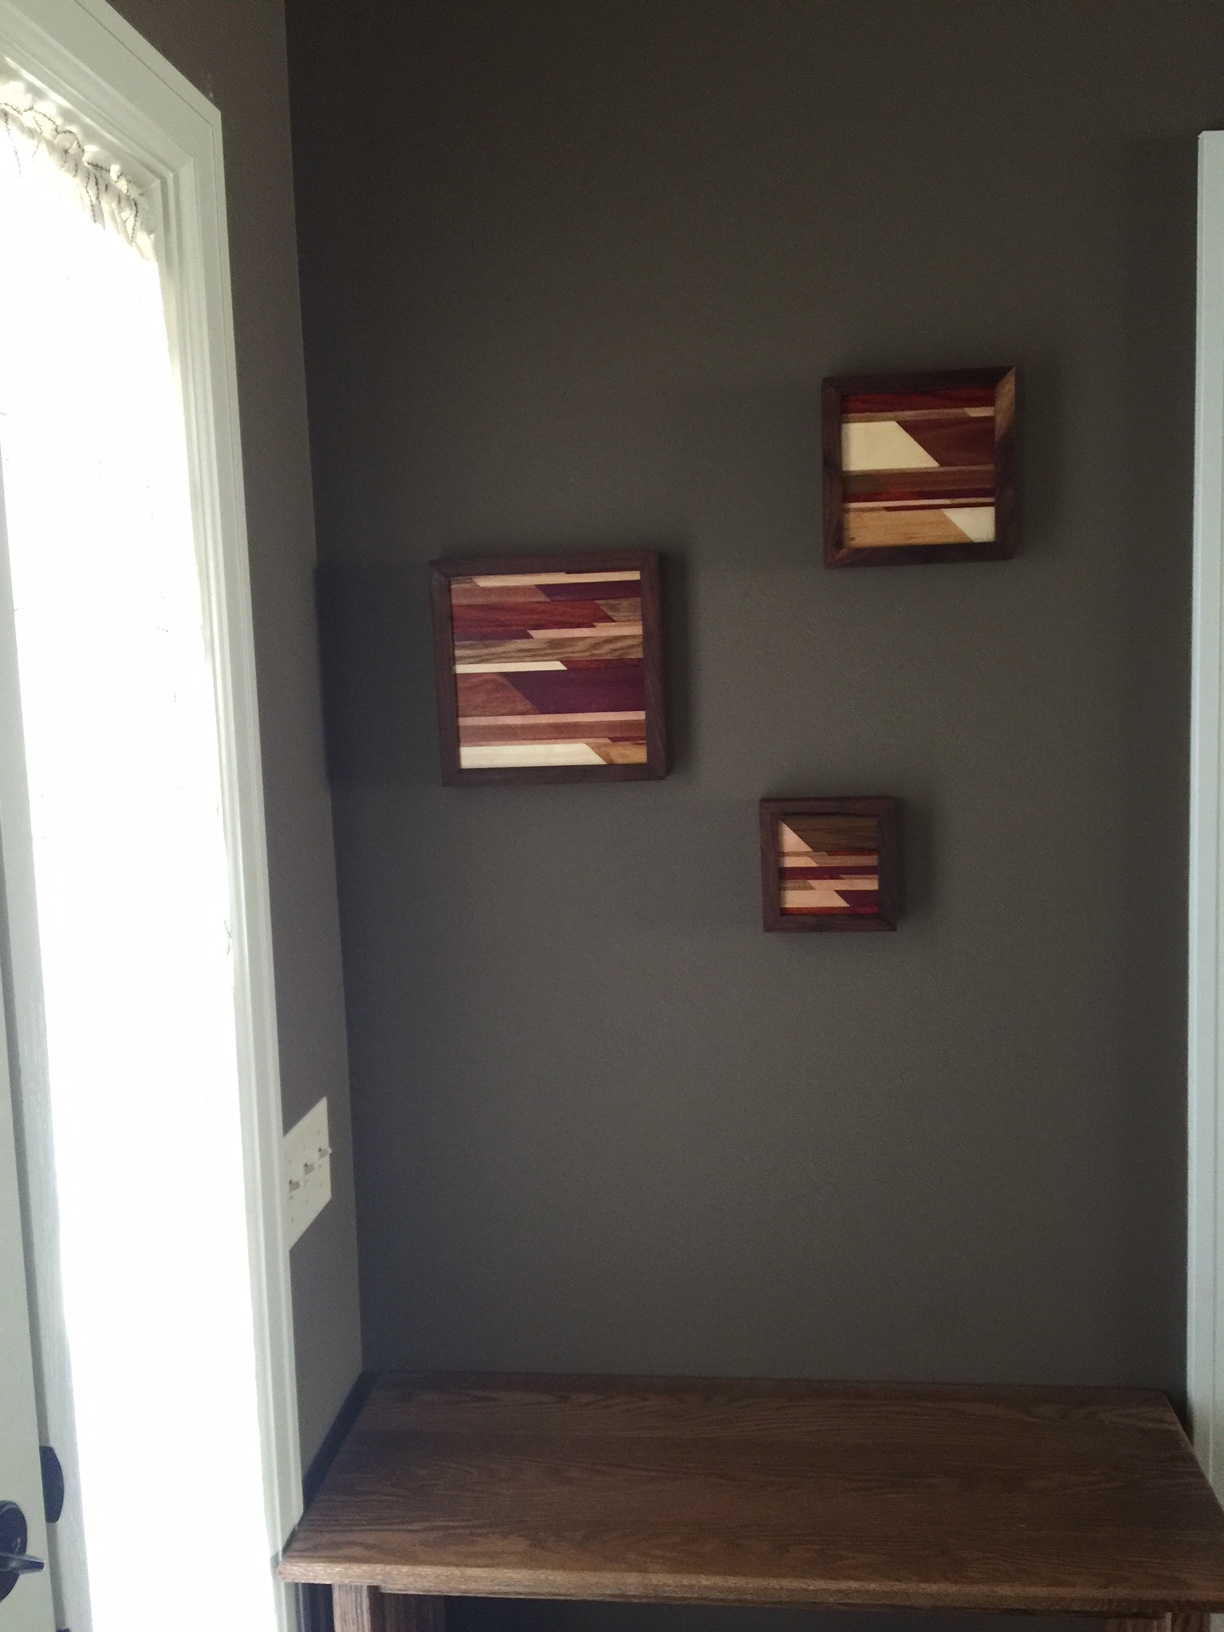
Estimated Cost
I spent 34 dollars on wood shorts at my local hardwood store. I have read that you can get hardwood scraps form cabinet builders and lumber yards if you have any close by. May be worth a shot maybe you could do these for free. I had walnut from a previous project so I did not buy the walnut or it may have been a little more.
Estimated Time Investment
Afternoon Project (3-6 Hours)
Finish Used
I used mineral oil to give the wood a nice pop.
Recommended Skill Level
Beginner
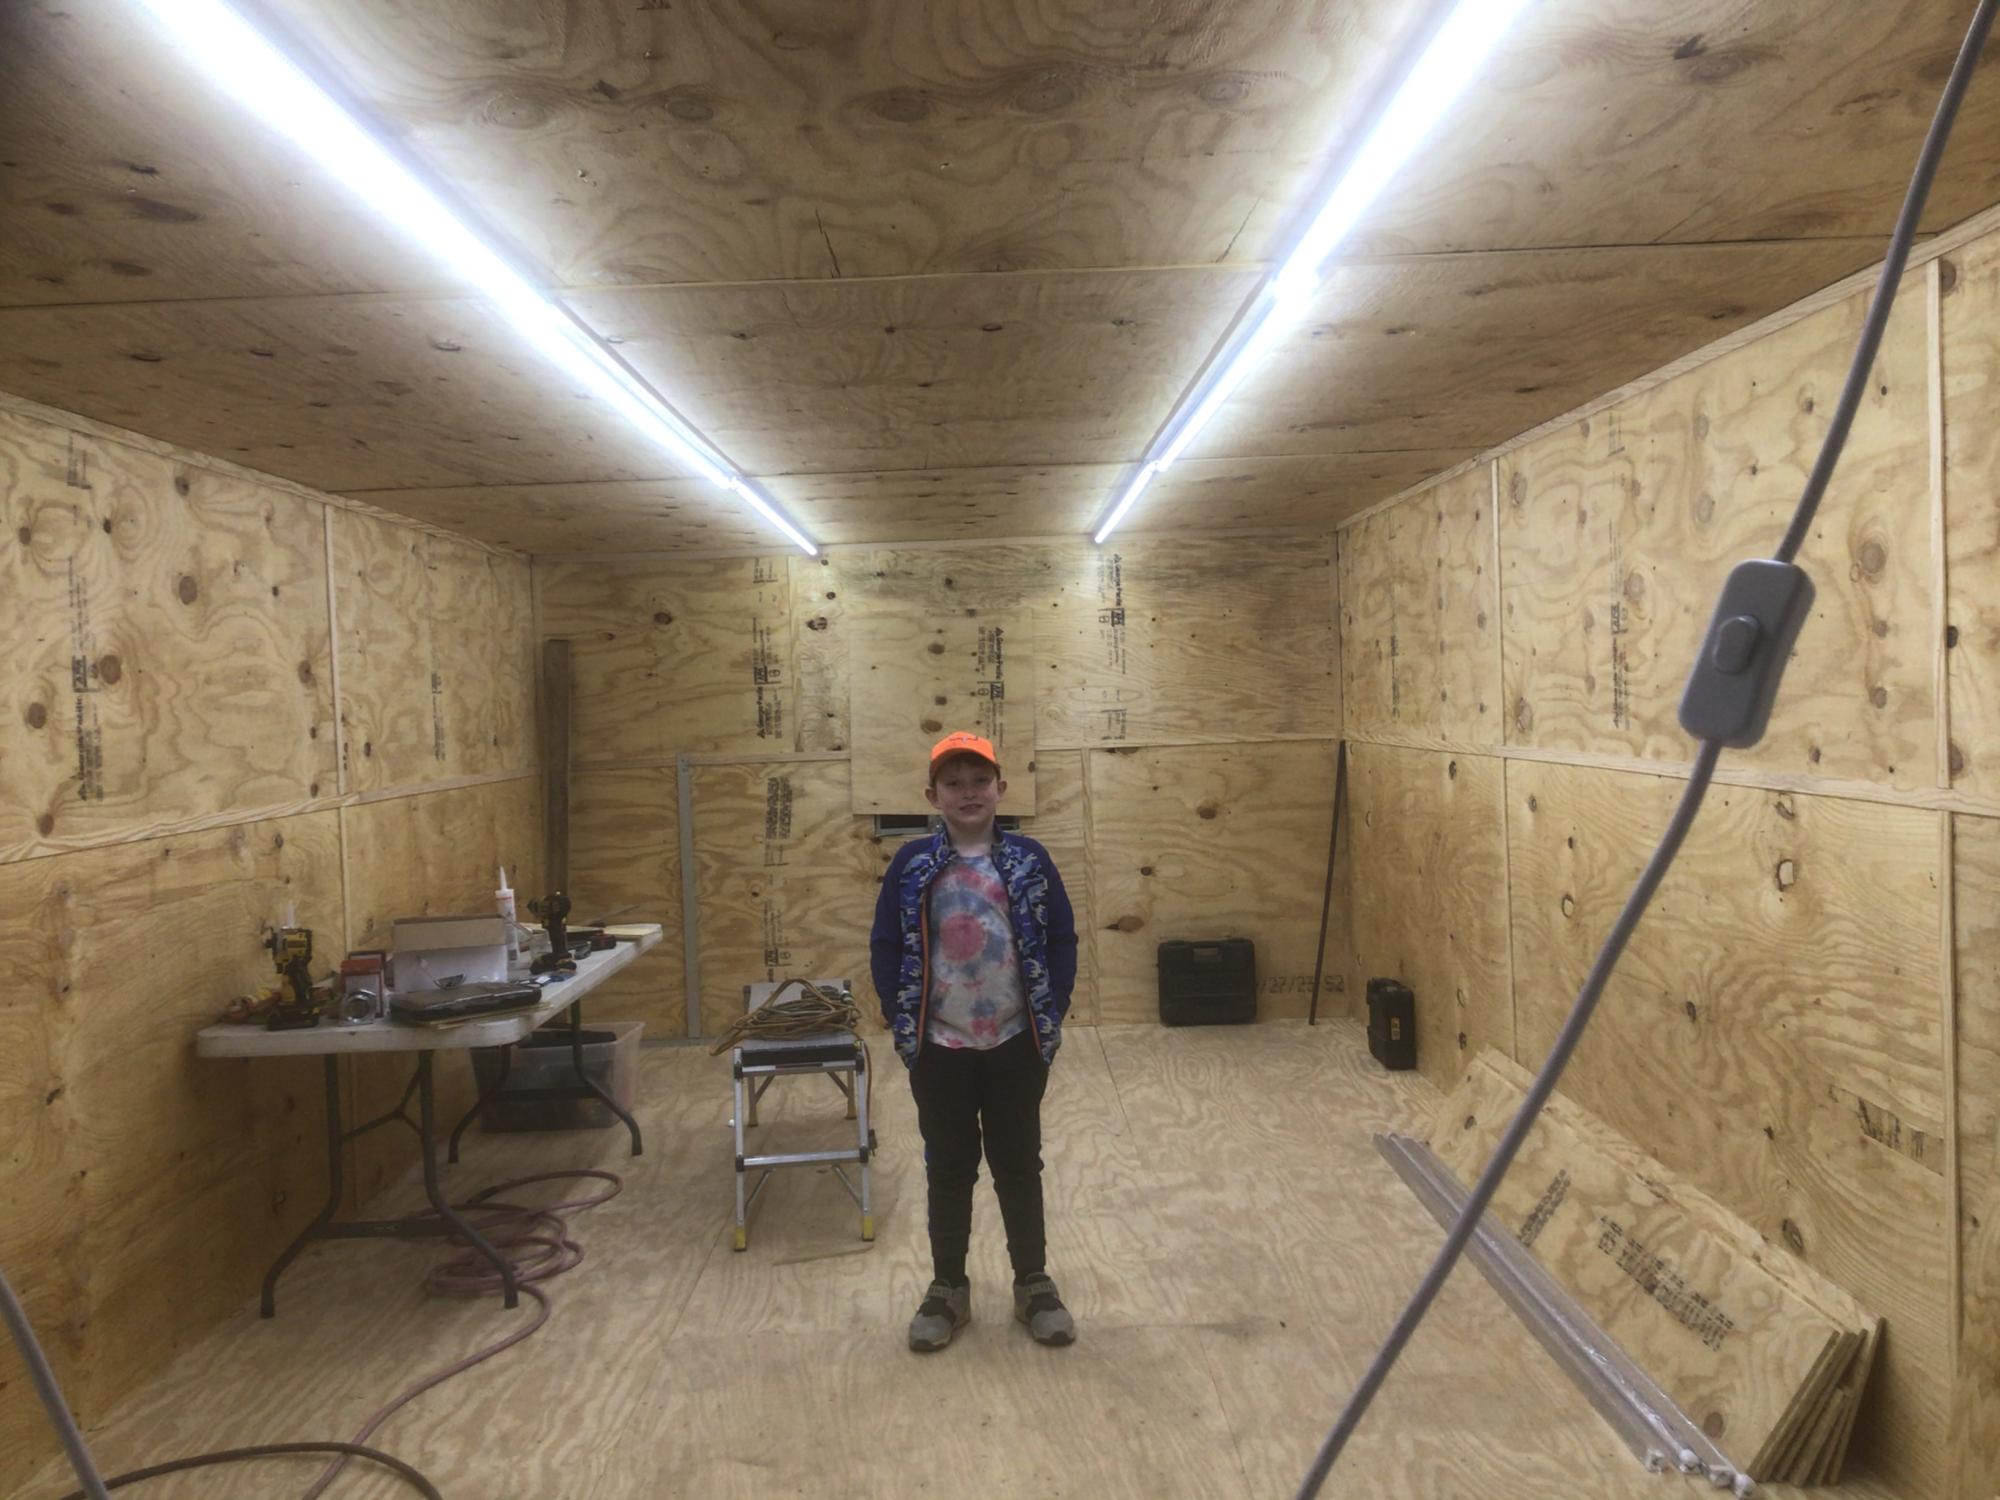
Ryobi Nation workshop and shelves
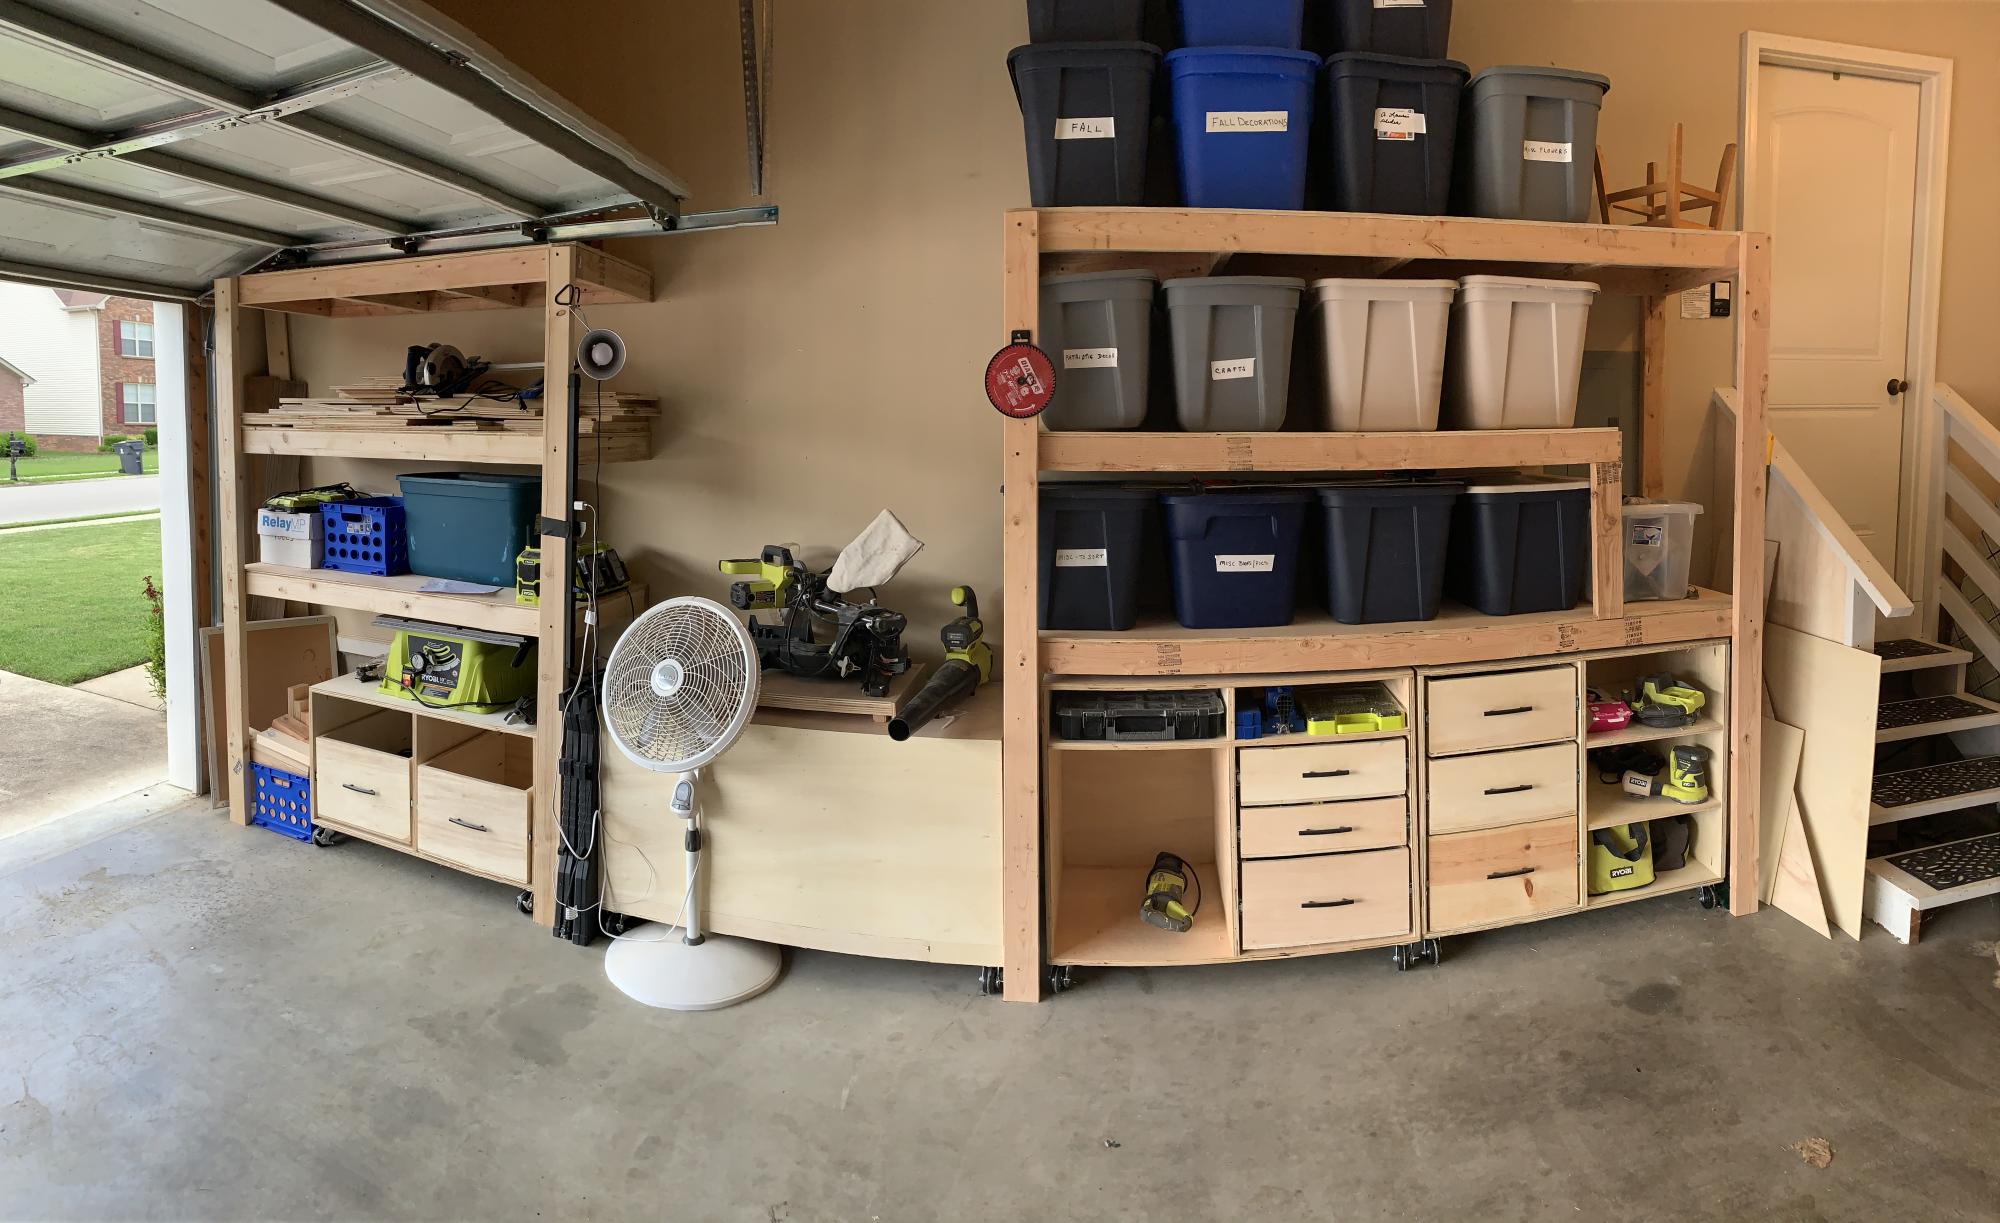
I bought a whole workshop full of Ryobi tools second hand from my brother over a year ago. I started researching workshop plans and came across Anna White’s Ryobi Nation Dream Workshop. I downloaded the plans and spent about 2-3 months working on it in my spare time. I made a lot of mistakes along the way but I’m pretty happy with it overall!
Built from Plan(s)
Estimated Time Investment
Weekend Project (10-20 Hours)
Finish Used
None
Recommended Skill Level
Intermediate
Comments
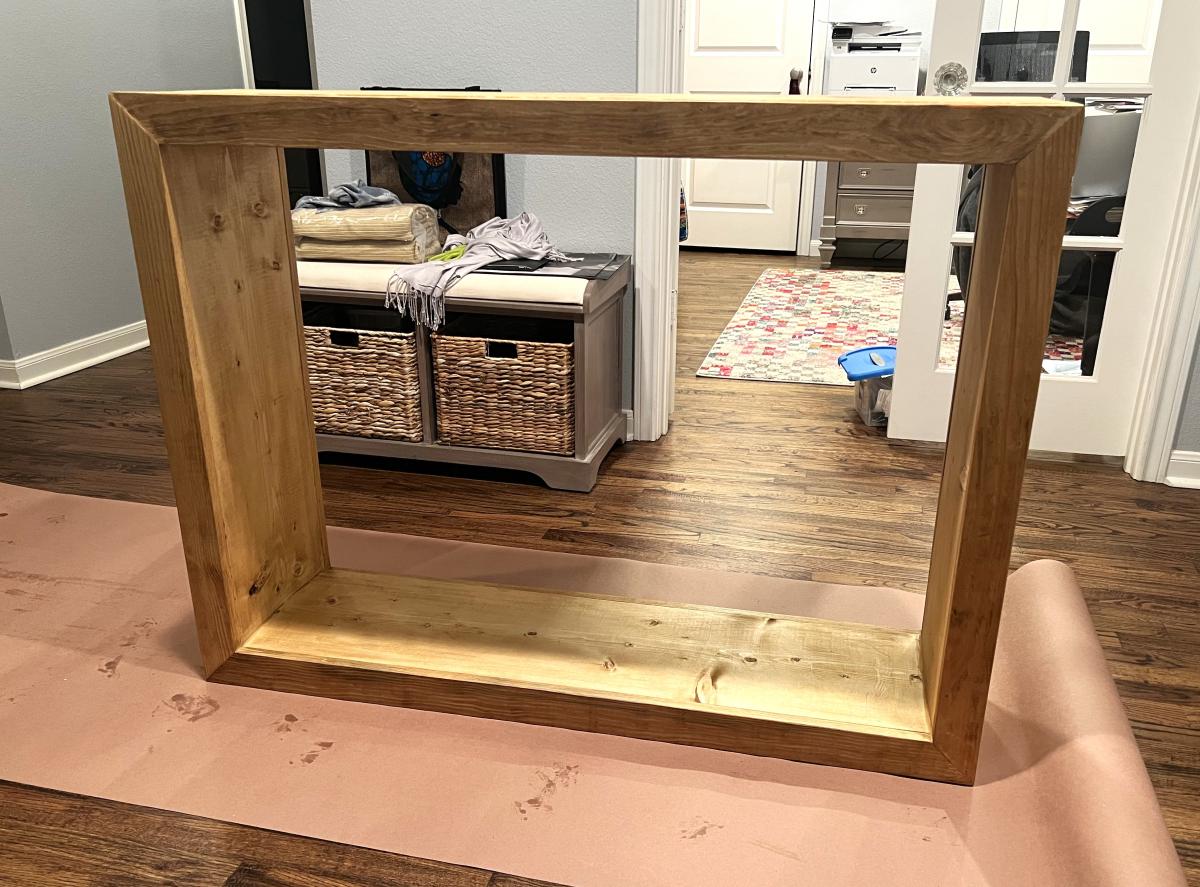
Waterfall Console
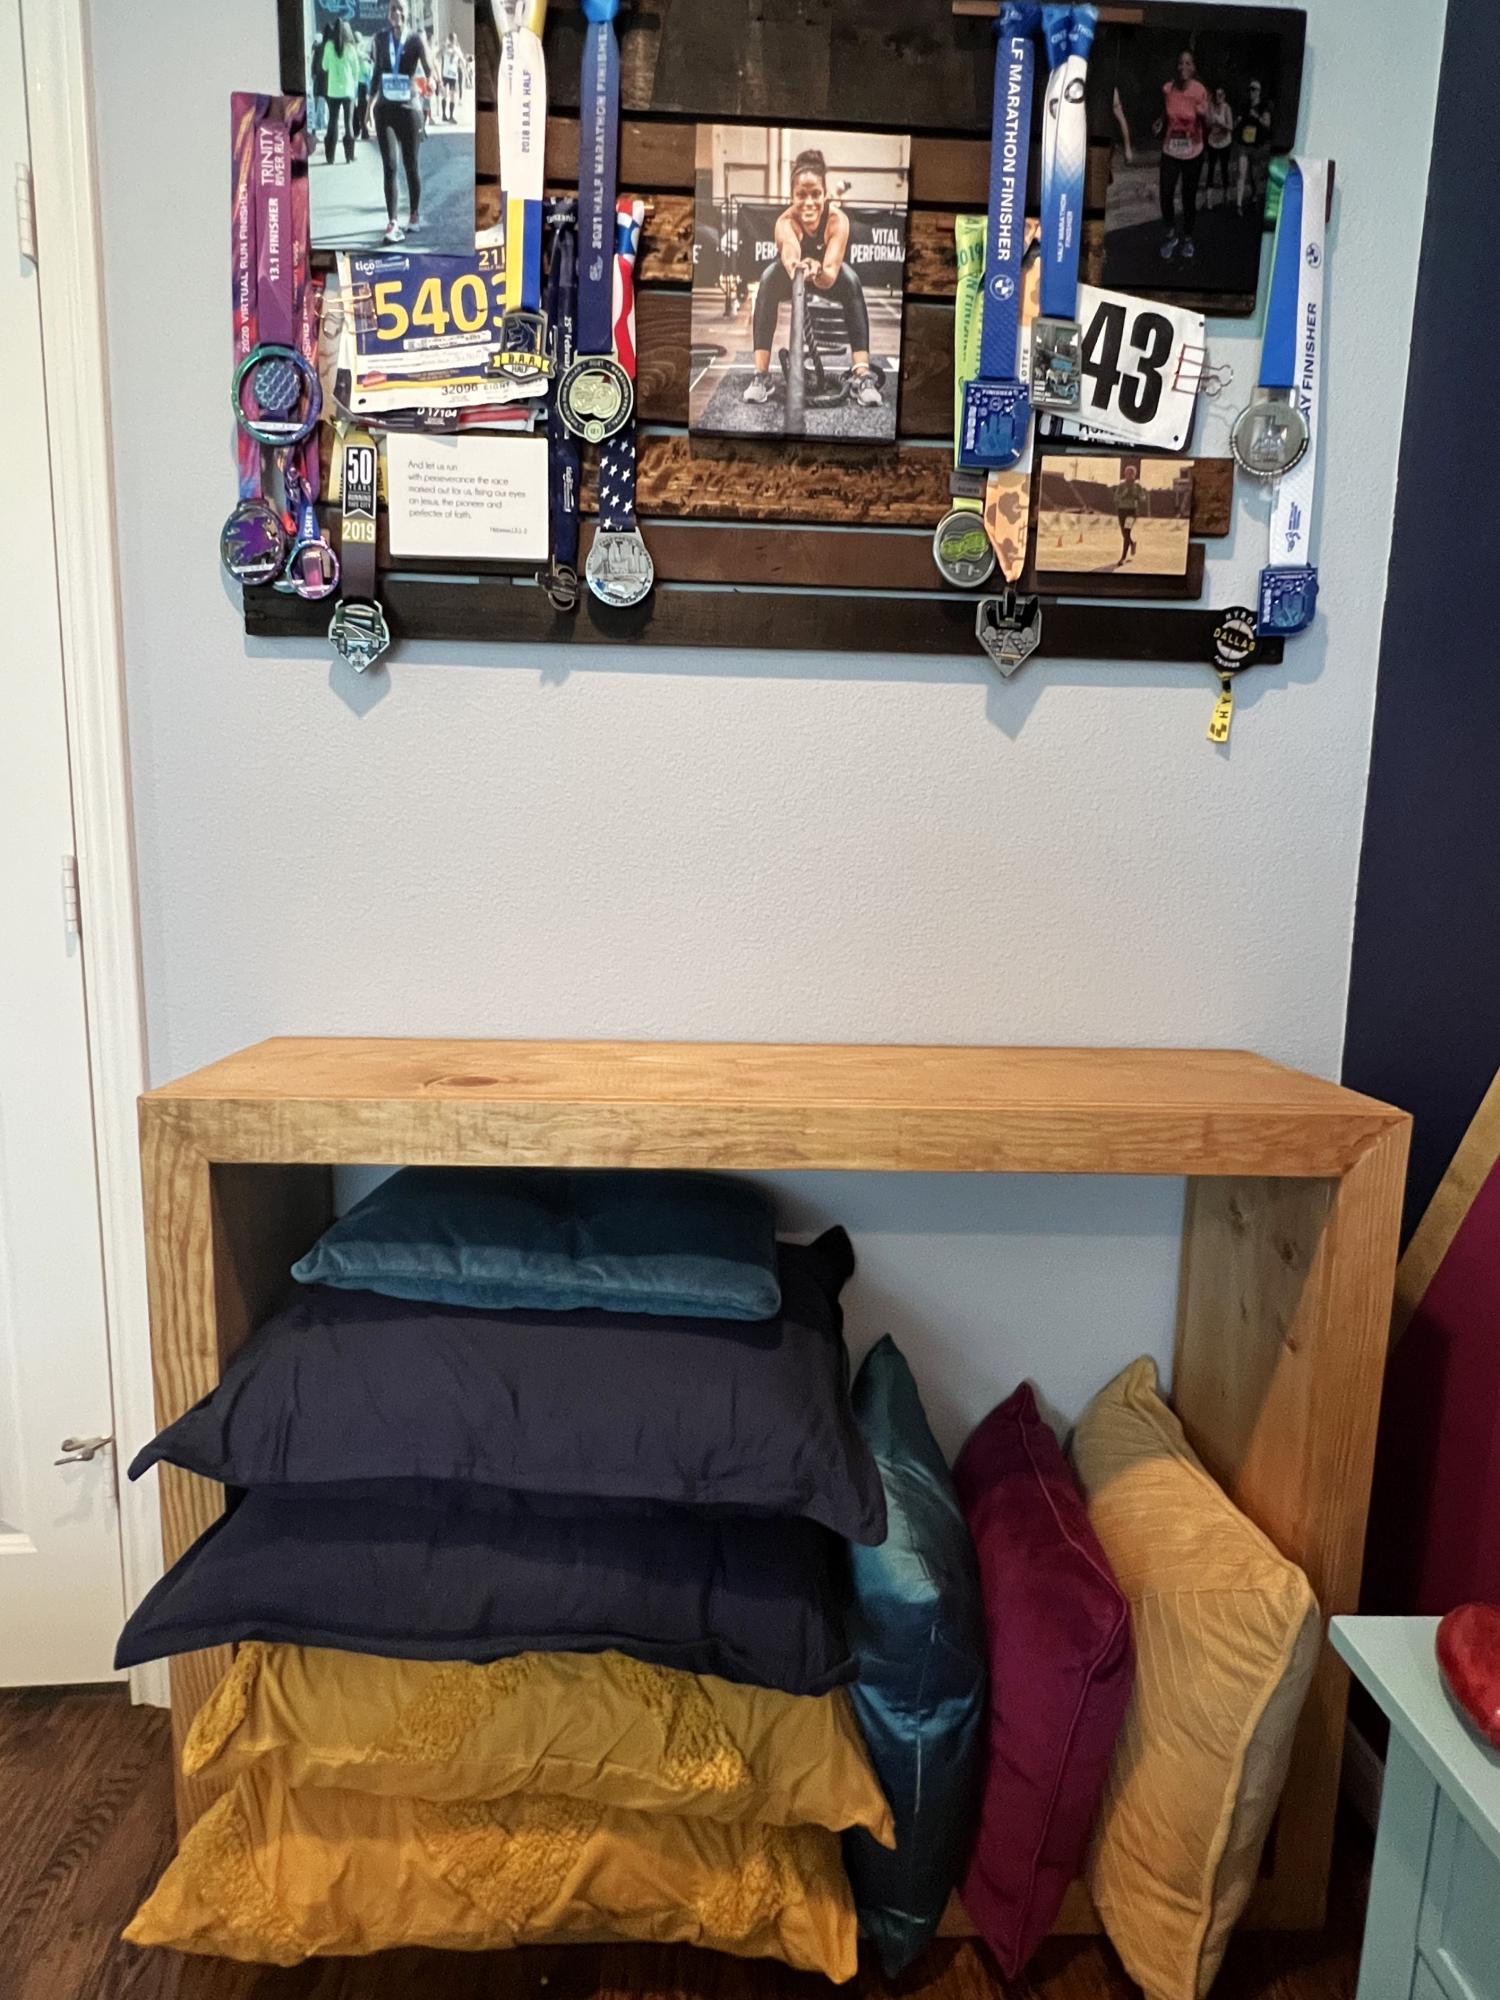
This is the 52 inch waterfall console. I fell in love the it and thought it might be a great way to store my bed pillows when they aren’t in use. I modified it to be shorter and taller, to fit my space and needs. This was my first time using a kreg jig and brad nailer… tutorials on those would be great, but I figured it out! And I’m so excited I did - this is a game changer for my building projects!
Ashlie Alaman
Built from Plan(s)
Our first build!
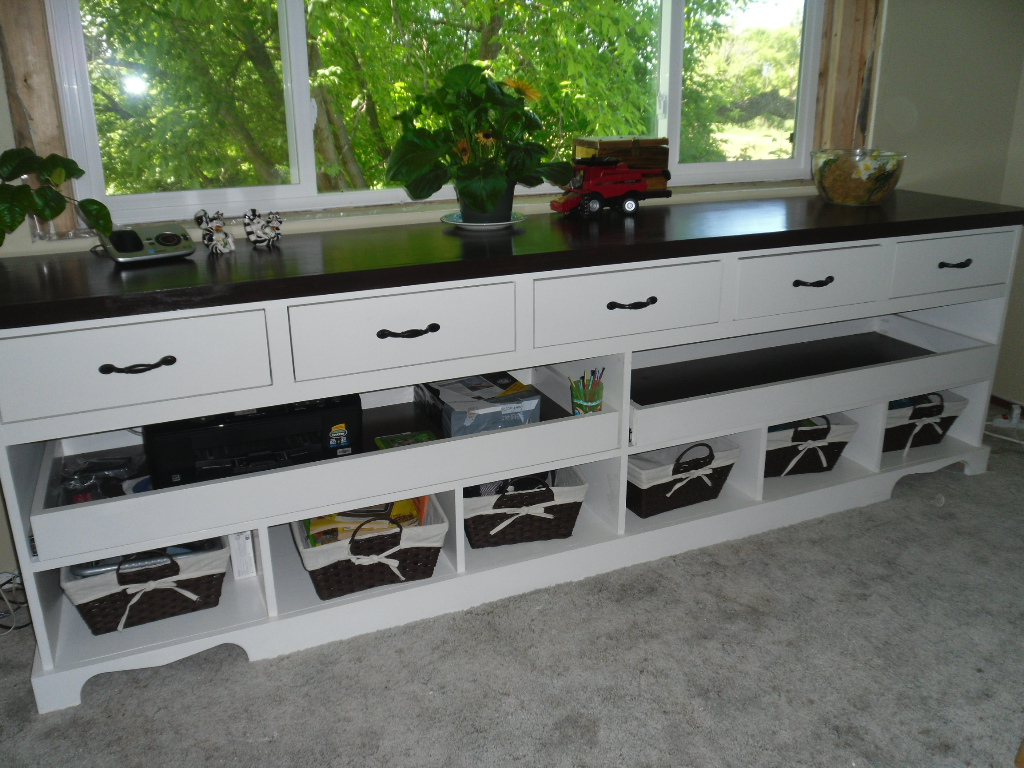
This is our first build. Instructions were easy to follow but we didn't go much on the bottom center drawer runners!
I love the second layer of slide out drawers we use for the printer , paper and electronic gadgets!
Built from Plan(s)
Estimated Cost
not sure
Finish Used
birch plywood painted white and top stained walnut and all coated with poly
Recommended Skill Level
Beginner
Comments

Wed, 06/25/2014 - 05:37
Great job!
Love this. What great mods and you even tackled drawers for a first build?! I'm too chicken and still haven't tried. Especially love how you used slide outs in the middle. Clever!
Farmhouse Table
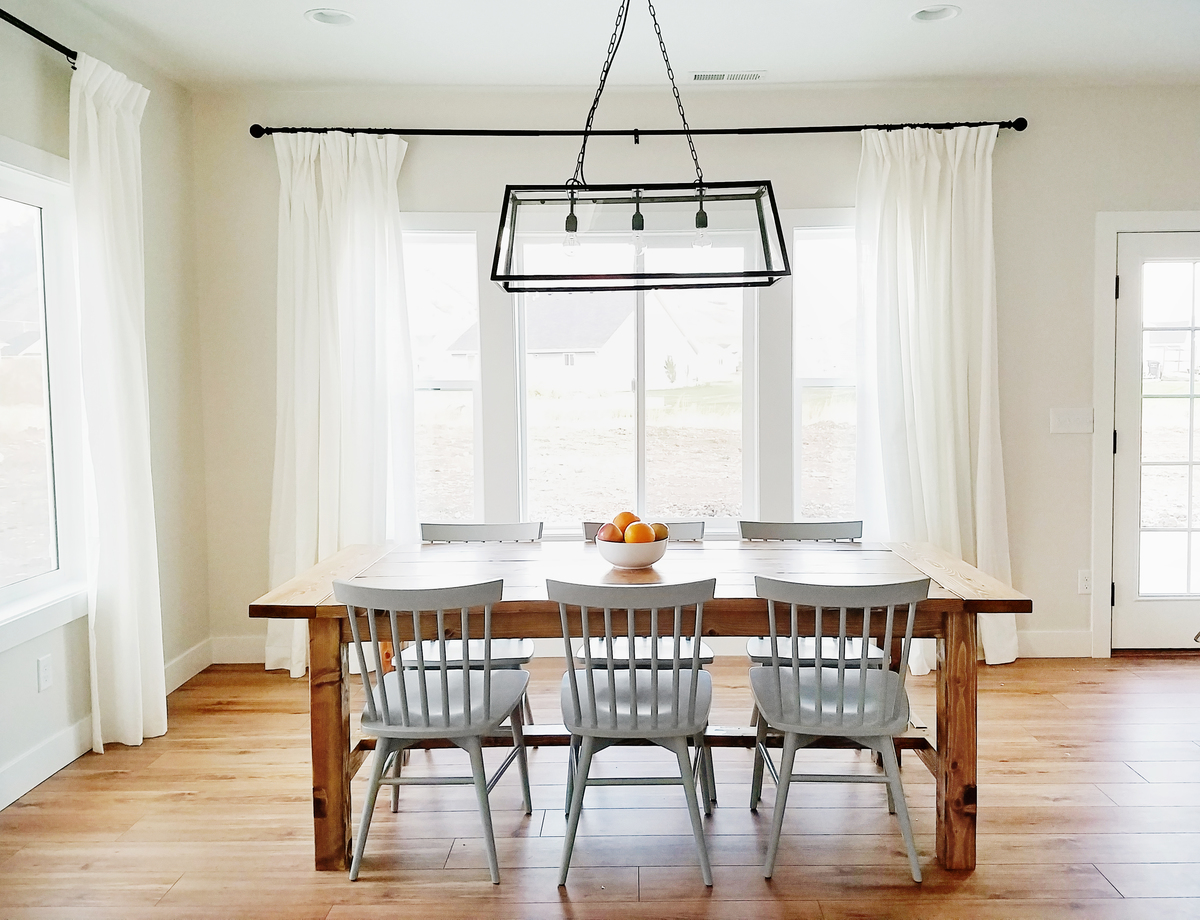
We love the look of farmhouse tables but we wanted to try building our own rather than spending over $1500 on one.
We saw this tutorial on pinterest and we decided to make it our first woodworking project, we love how it turned out!
Built from Plan(s)
Estimated Cost
$300-$400
Estimated Time Investment
Weekend Project (10-20 Hours)
Finish Used
We used 1 coat of Minwax wood conditioner, followed by 1 coat of Minwax Early American. We finished it with 2 coats of Minwax Polyurethane, sanding lightly between coat 1 and 2.
Recommended Skill Level
Beginner
Comments
Wed, 09/21/2016 - 20:22
So beautiful!
You did a great job, can't believe it's a first project! What's next?:)

Thu, 09/22/2016 - 09:15
Truly amazing first project!
Truly amazing first project! Can't wait to see what's next for you guys! Ana
Compact Park Bench
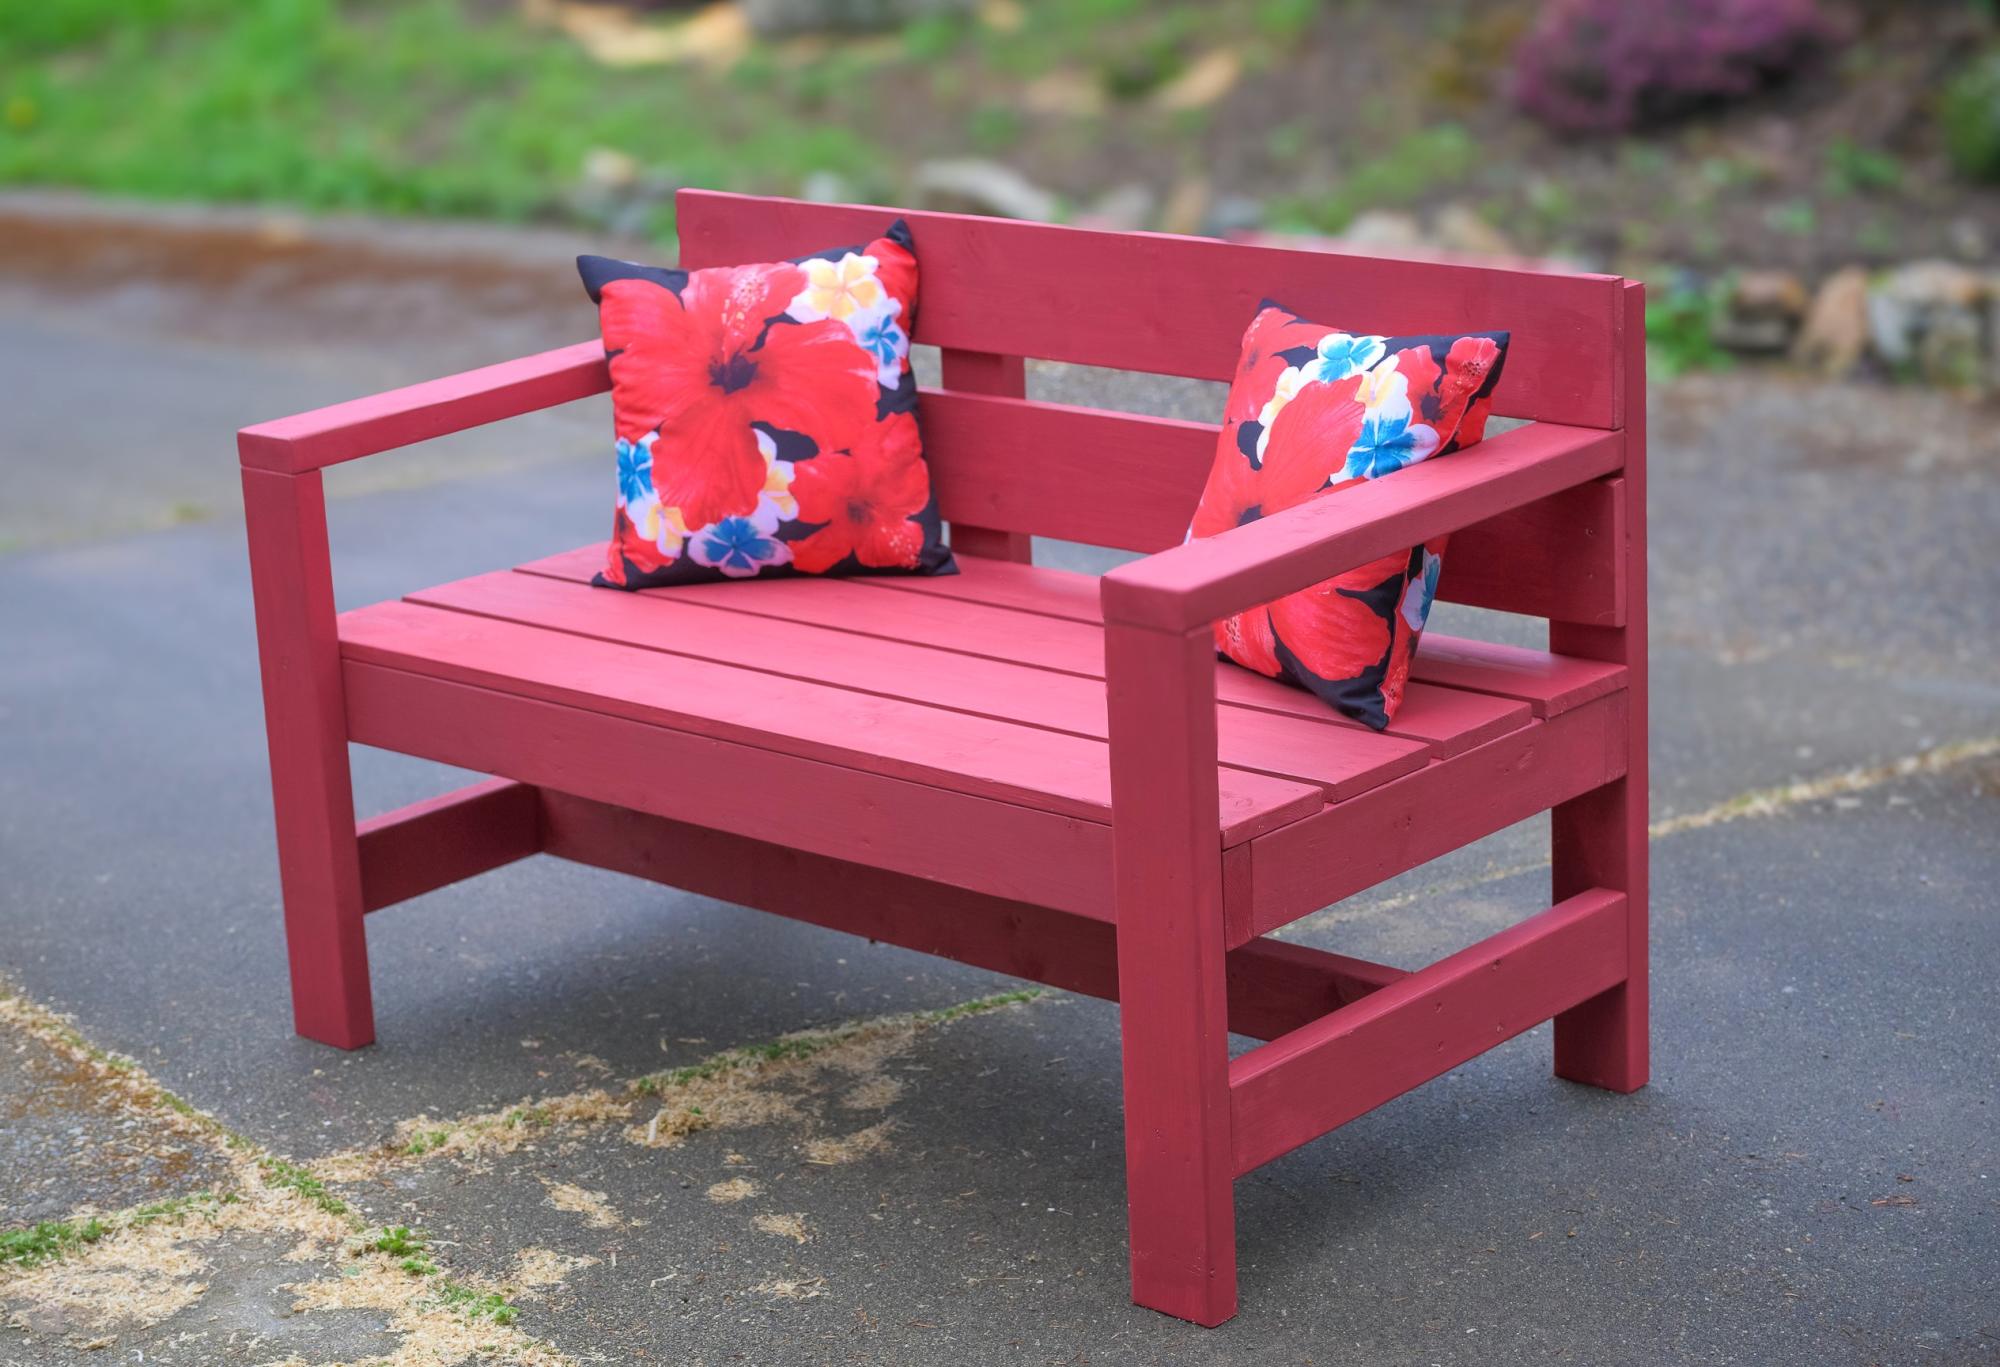
I am new to this. I used your plan but reduced the lenght by 24 to make a 2 seat Garden Bench. I used softwood and painted with this outdoor paint. Thanks for inspiration and plans. I am located in Victoria, British Columbia, Canada.
Built from Plan(s)
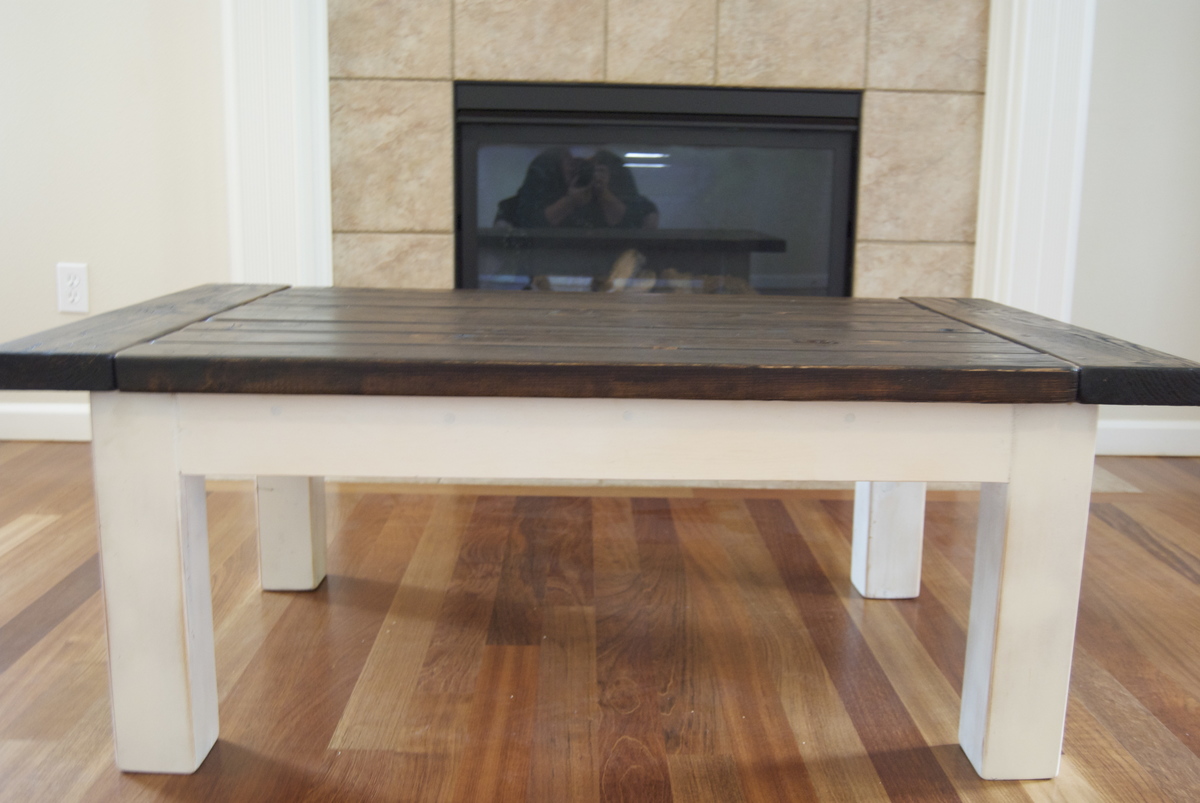
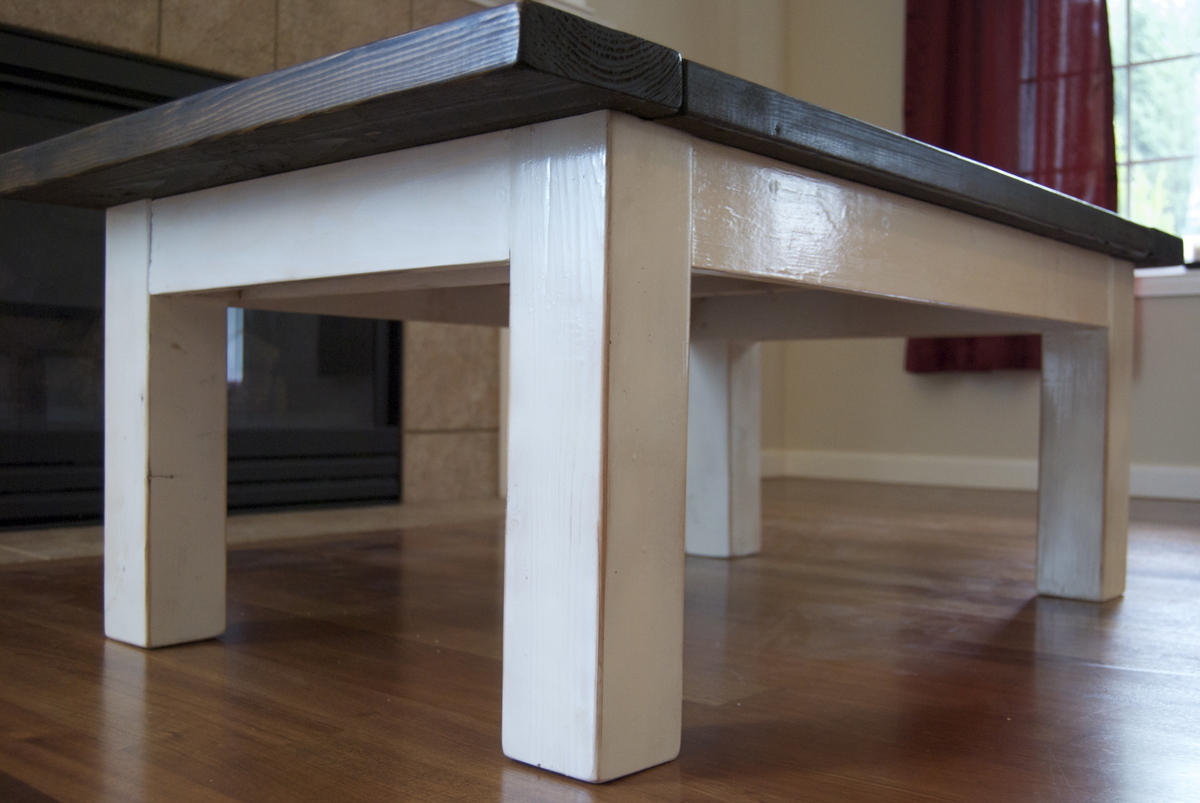
Coffe Table
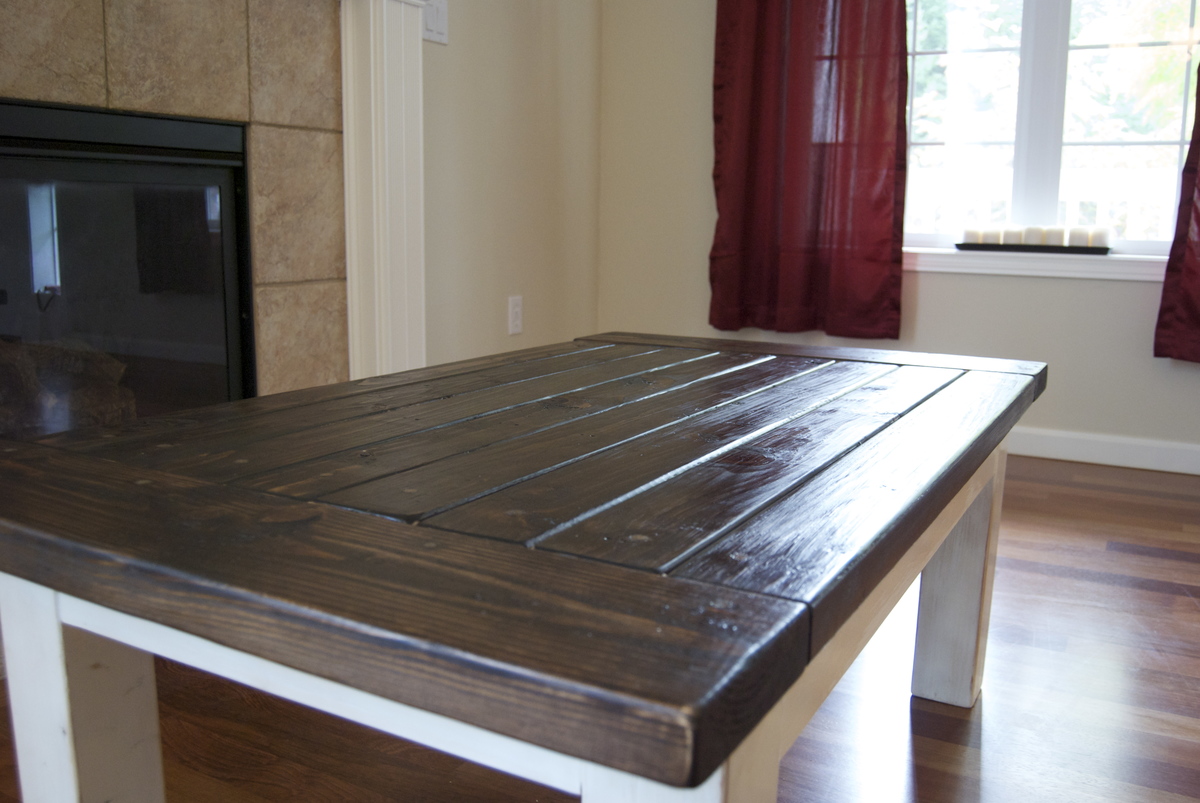
After the high of finishing my first build (http://ana-white.com/2012/08/farmhouse-table-rustic-table), I was quick to find my next fix. My mom was so impressed with the table, she trusted me to build her another piece of furniture for our very empty new home. She liked the look of this coffee table, so I adjusted the dimensions to meet her needs and away I went. It was pretty fun and not too difficult. It was a little more time consuming that I had anticipated, but that was mostly due to the two different finishes on the legs/apron and the top.
Built from Plan(s)
Estimated Cost
$50
Estimated Time Investment
Day Project (6-9 Hours)
Finish Used
For the legs and skirt/apron: Sanded 120 grit then 220, painted with Rust-Oleum heirloom white (spray paint, one coat), then sanded down on the edges to get the distressed look.
Table top: Minwax Dark Walnut (One Coat brushed on pretty heavy, then wiped off the excess after 15 minutes).
Finished with three coats of Minwax Water Based Clear Gloss Polyurethane (Brushed), sanding with 220 grip sandpaper between coats.
Table top: Minwax Dark Walnut (One Coat brushed on pretty heavy, then wiped off the excess after 15 minutes).
Finished with three coats of Minwax Water Based Clear Gloss Polyurethane (Brushed), sanding with 220 grip sandpaper between coats.
Recommended Skill Level
Beginner
DIY Pottery Barn Inspired Table
I cannot believe how easy and inexpensive it was to get the Pottery Barn look for SO MUCH less!
Built from Plan(s)
Estimated Cost
$150
Estimated Time Investment
Weekend Project (10-20 Hours)
Finish Used
Minwax stain in Special Walnut and Minwax exterior finish.
Recommended Skill Level
Intermediate
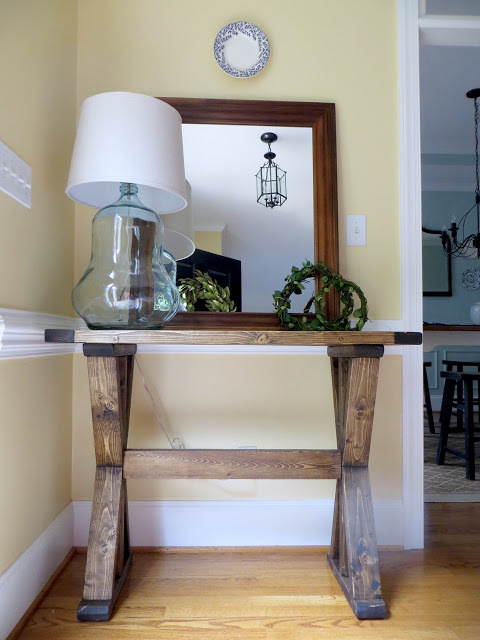
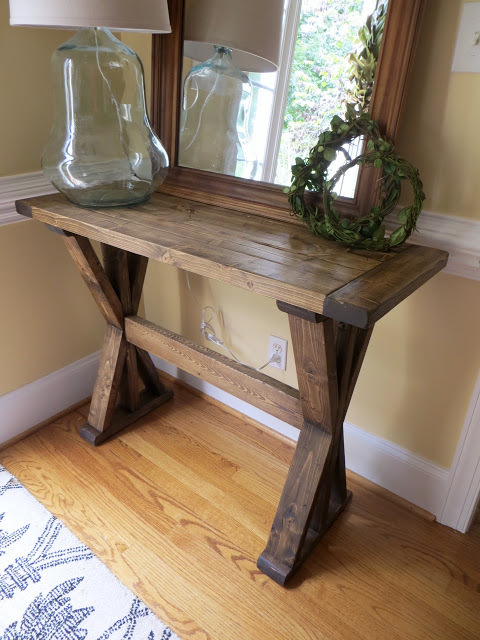
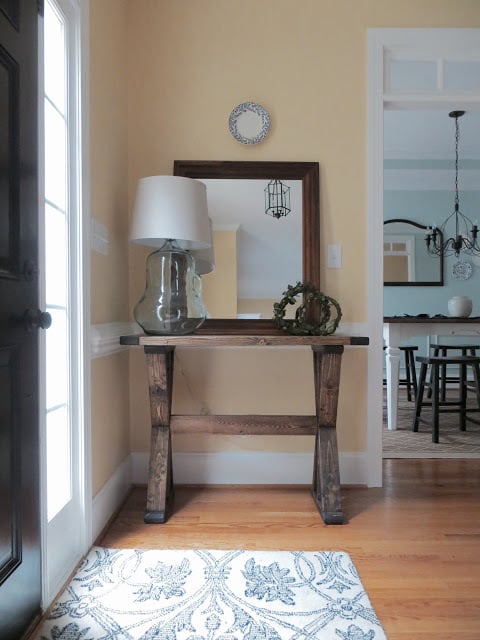
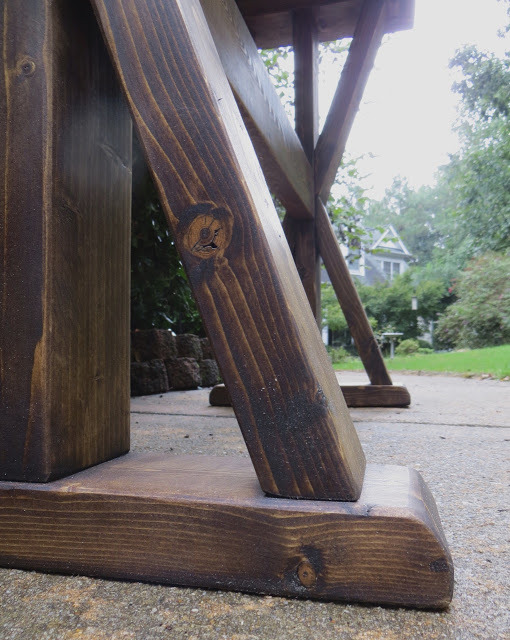
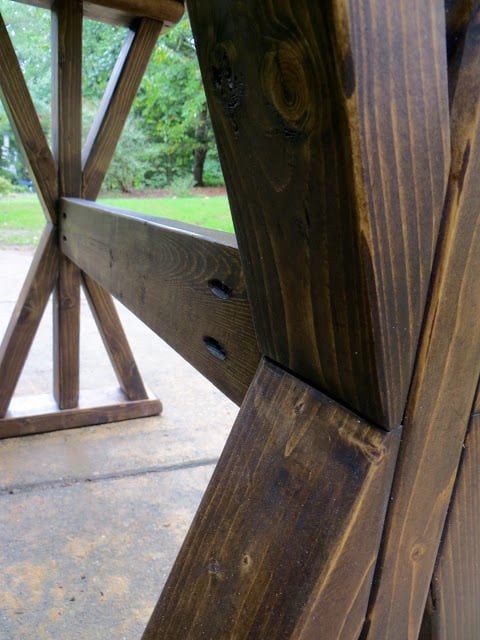
'X' Entryway Table
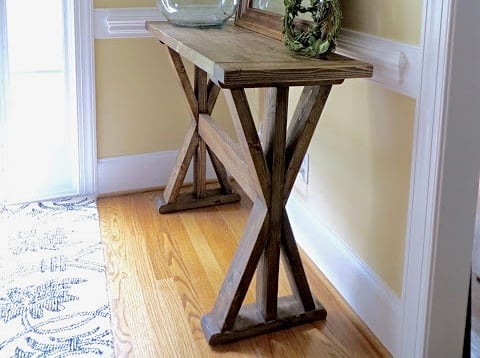
This table is built out of only 2x4's - that's 5 boards for about $15! It was pretty easy and took half a day. If the fancy angles are too hard to cut safely I recommend doing 45-degree angles! I'm happy to have a nice entryway - first time my whole life! :)
I've created a post on my project blog wth instructions & pictures for anyone to make their own.

Estimated Cost
$15 for Lumber
Additional for Screws and Wood Finish
Additional for Screws and Wood Finish
Estimated Time Investment
Afternoon Project (3-6 Hours)
Finish Used
Minwax Wood Conditioner, Minwax Dark Walnut Stain then lasly, Paste Wax (Dark Brown).
Recommended Skill Level
Beginner
Comments
Sun, 09/25/2016 - 09:42
Your entryway is beautiful!
Your entryway is beautiful! Love this console, it is gorgeous!

In reply to Your entryway is beautiful! by Ana White
Tue, 09/27/2016 - 12:16
Thank you!
Thank you Ana! You made my day! It was such a treat to see it posted on your Facebook page! I told my husband that NOW that "I am famous" (haha) that I should be able to get the jointer & planer I've been begging him to let me buy! I'm thinking maybe a direct message from you would be just the trick! :)
Wed, 01/29/2020 - 13:54
Cut angle?
What angle were the leg cuts? More than 50* because my saw wont go that far. Please let me know.
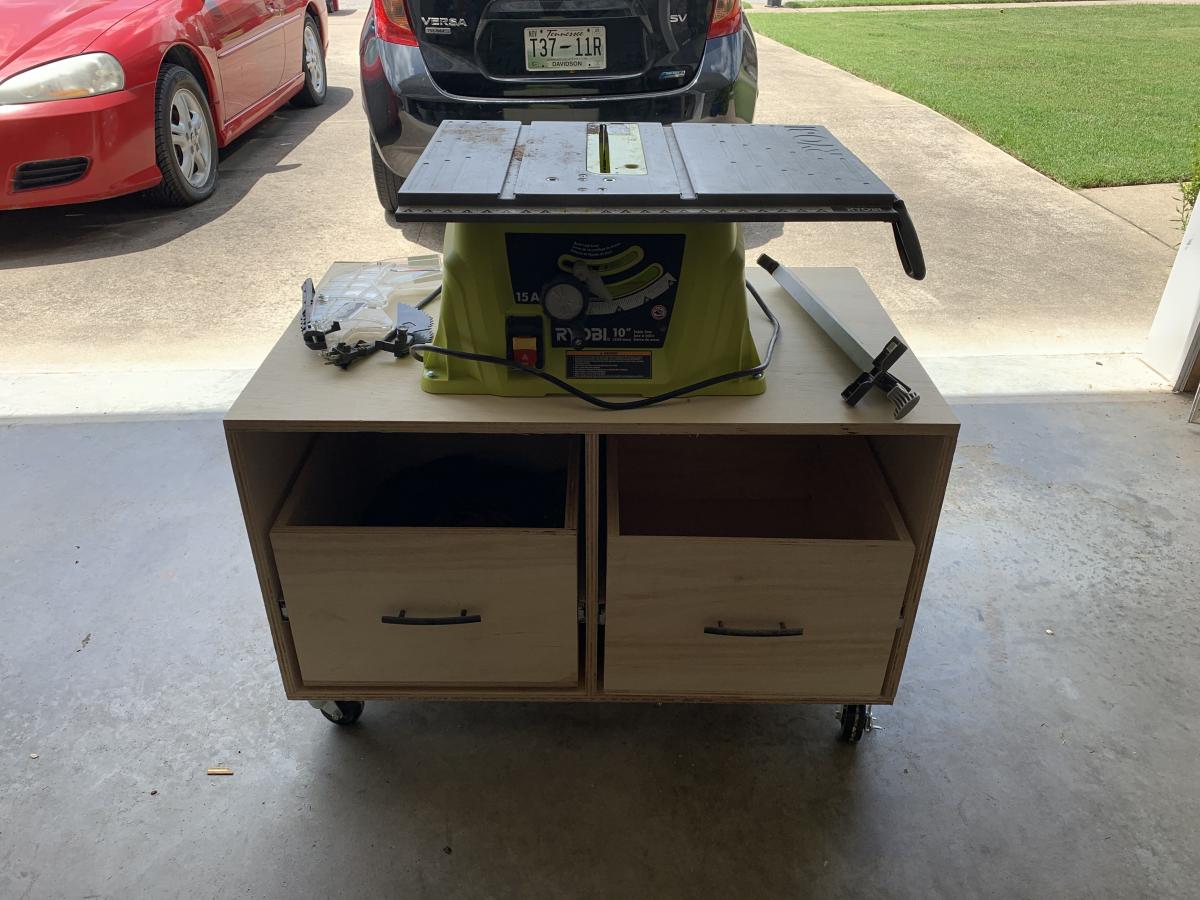
Garage Shelf
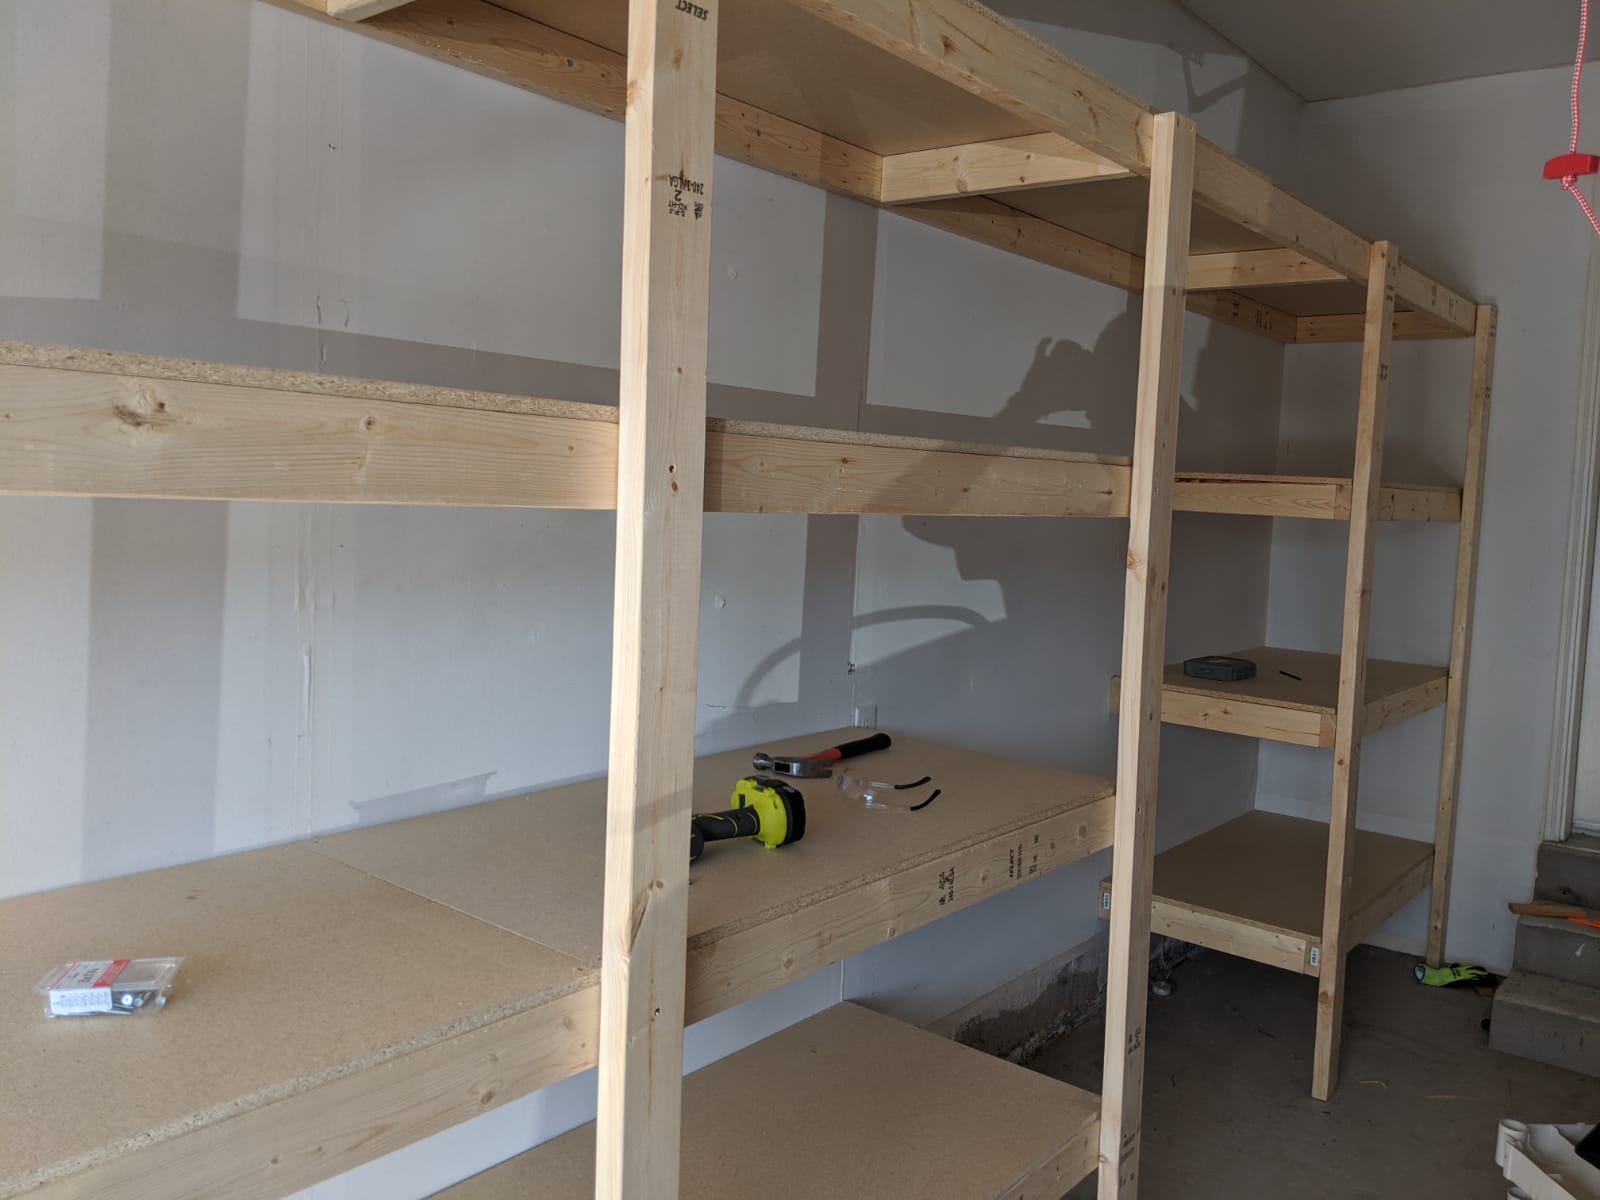
Garage Shelf inspired from Ana's Ryobi workshop design
Built from Plan(s)
Easy Build Adirondack Chair
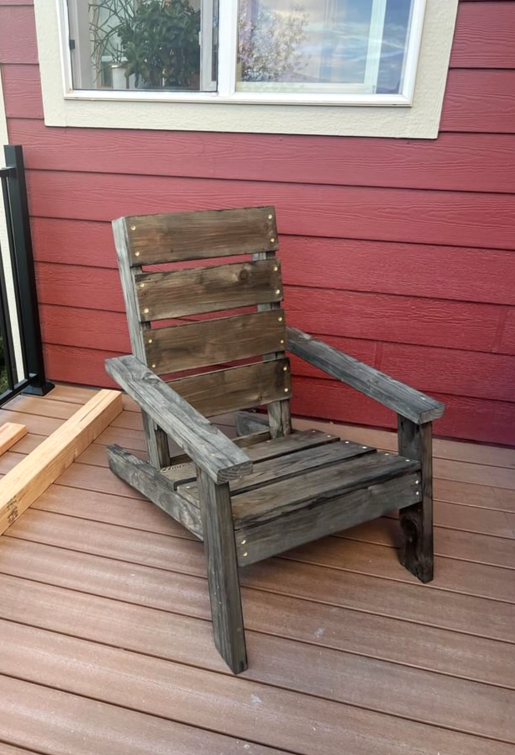
DIY Adirondack Chair
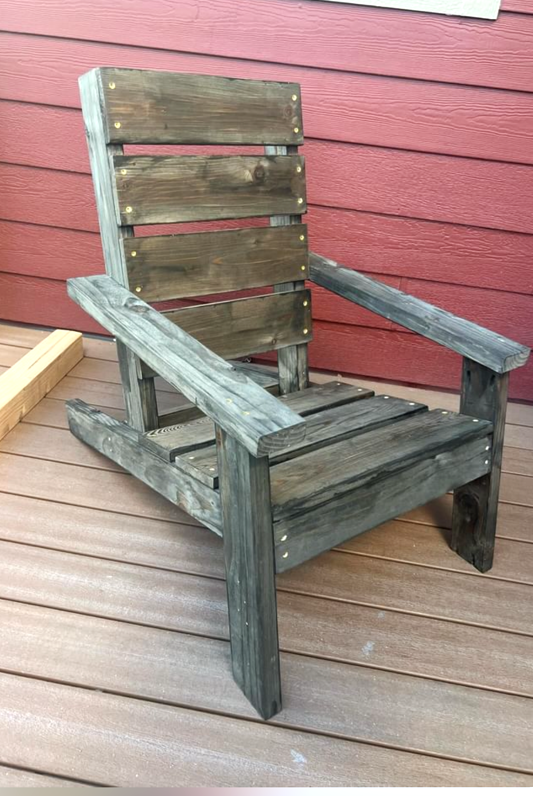
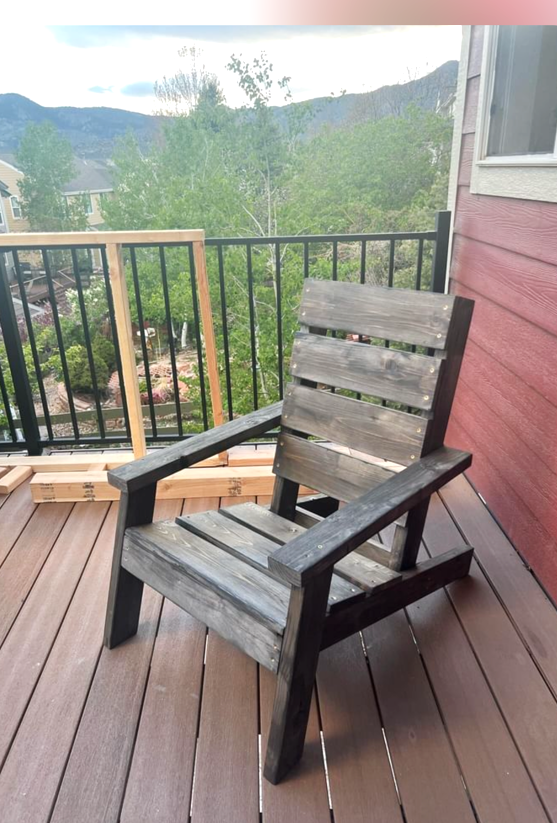
Built from Plan(s)
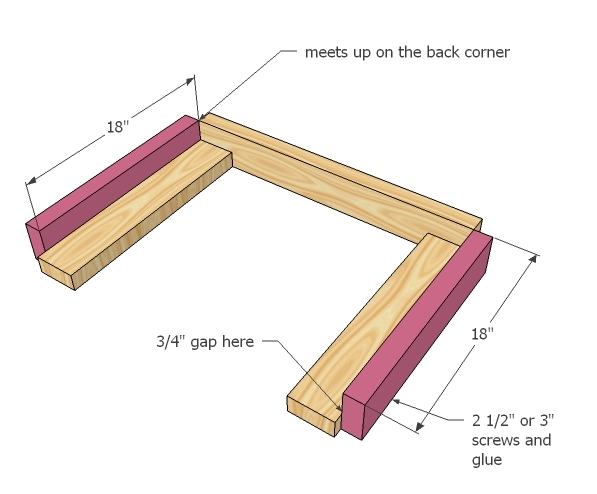
Outdoor Wooden Cooler

An Outdoor Wooden Cooler is the perfect way to accent any deck, patio, or garage. Can be made from Cedar, Pressure Treated, Cyprus, etc. Sizes can vary from small 28 qt coolers to Large 120 qt coolers capable of holding hundreds of drinks. These coolers can be themed for your favorite sports team, favorite hobby, or anything of your choice. Engraving or wood burning is available.
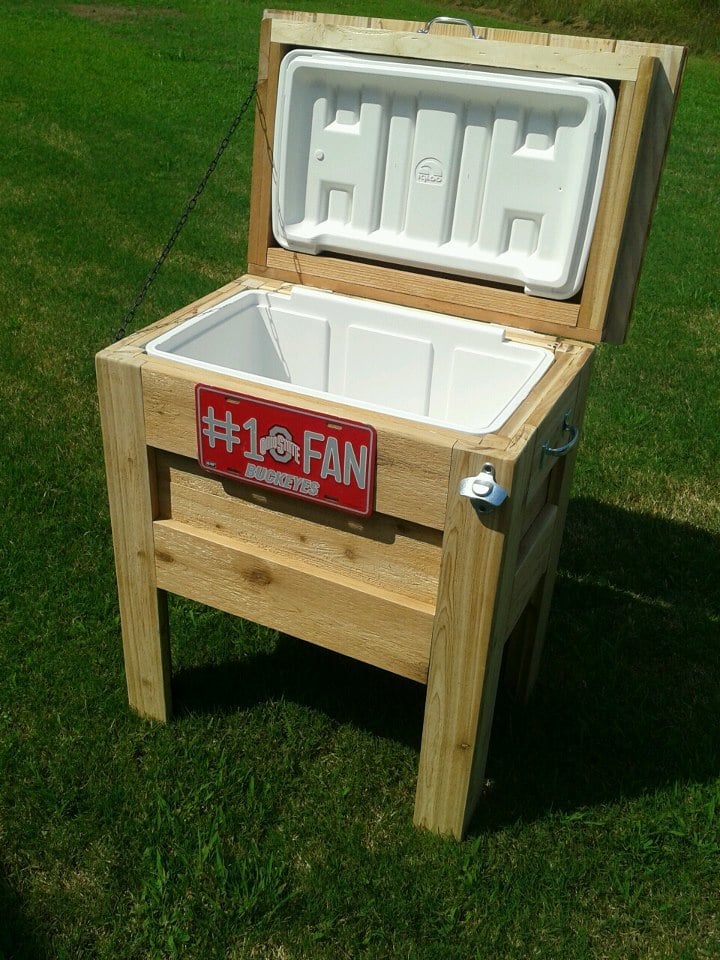
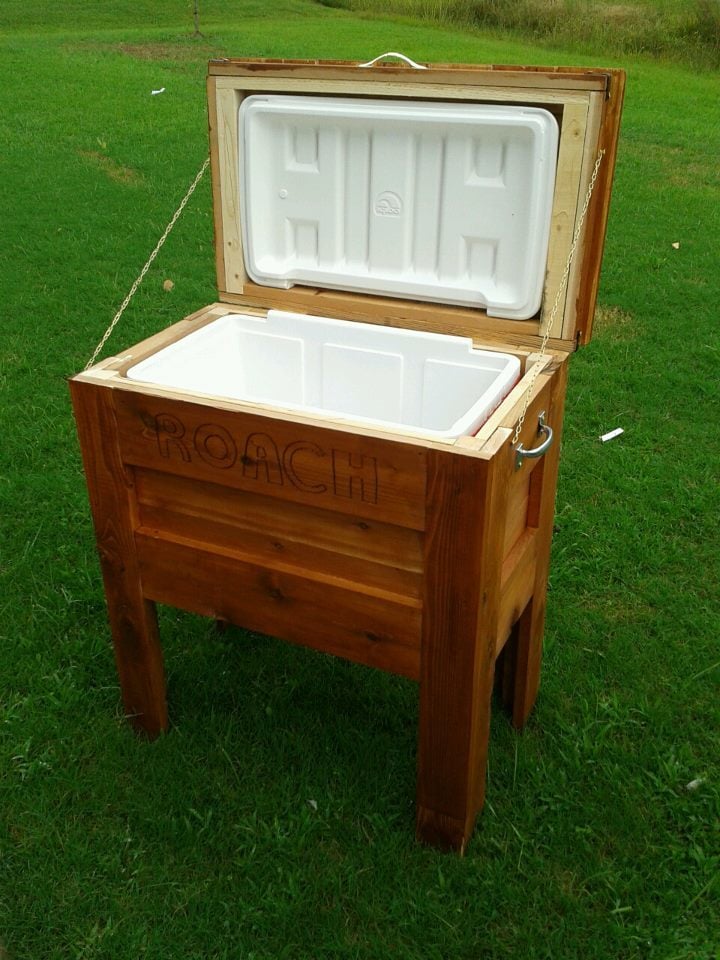
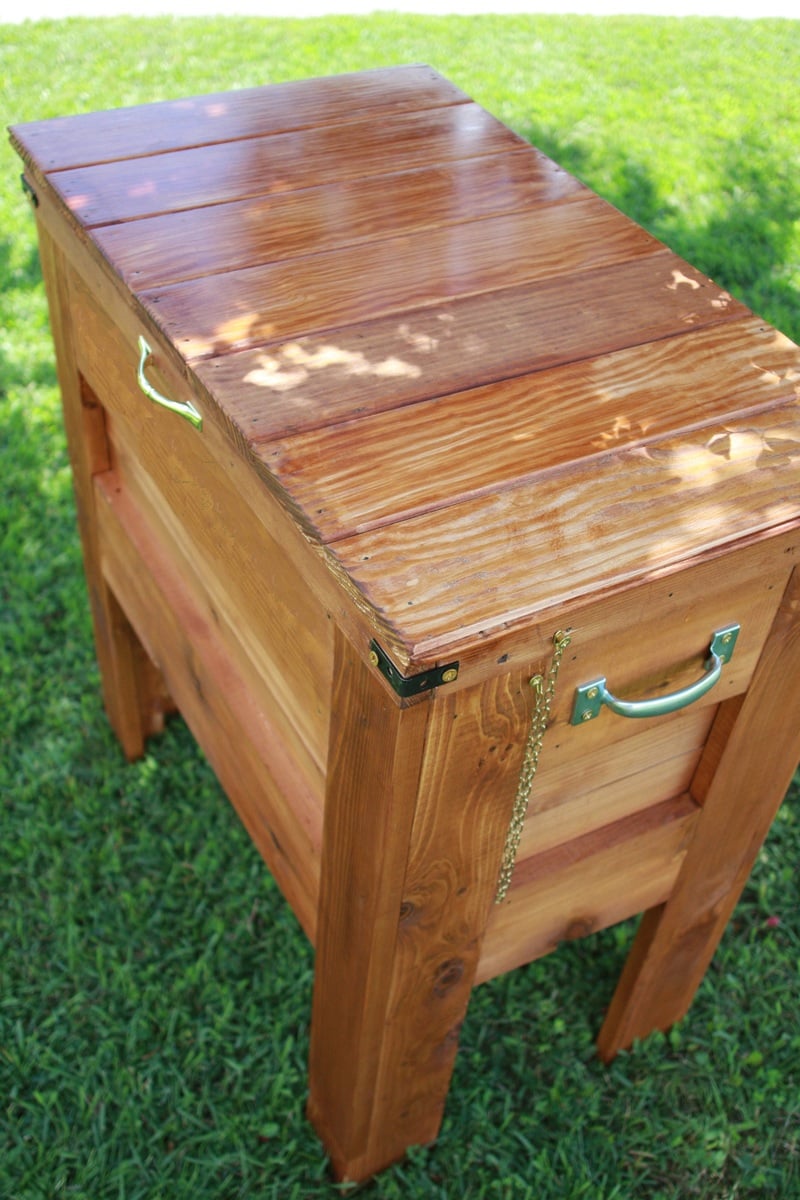
Built from Plan(s)
Estimated Time Investment
Weekend Project (10-20 Hours)
Finish Used
Stain, painted, distressed, etc.
Recommended Skill Level
Intermediate
Comments
Fri, 08/31/2012 - 09:52
I want to make one of these
Well, actually, two. My beer loving son-in-laws would love this, and Christmas is coming! Do you happen to have any "step-by-step" directions you'd be willing to share? I can figure out the dimensions but it would be really helpful to read - or see - the components and how you put it all together.
Thanks for sharing!
In reply to I want to make one of these by sgilly
Fri, 09/28/2012 - 11:43
Wooden Cooler response
I had to make a new page because of some password issues. Thanks for comments. I have no plans yet, I've built so many it's sort of muscle memory now. Shoot me an email at [email protected] and perhaps I can help.

Sat, 09/01/2012 - 10:59
I want to make one too. Is
I want to make one too. Is the lid tricky at all?
Fri, 09/28/2012 - 11:41
Outdoor wooden cooler response
I had to make a new page because of some password issues. Thanks for comments. I have no plans yet, I've built so many it's sort of muscle memory now. Shoot me an email at [email protected] and perhaps I can help.
And no, the lid style I like is nothing more than some tongue~n~groove boards cut to length, attached with pocket holes and nailed to the lid frame. Tongue~N~groove is optional of course, you could just use regular boards.

Thu, 03/14/2013 - 21:08
Cooler Plans
I don't mean to hijack Adam's great build, but I have some step-by-step plans available for a cooler I built with a similar style. It has a 2x2 frame with old fencing facing. For those of you looking for plans/tutorial http://www.killerbdesigns.com/rustic-cooler-a-how-to/

Thu, 05/07/2015 - 07:20
DIY Wood Double Cooler... used a similar design and worked great
My husband used a similar design to Adam's but made it a double. :) He also added wheels and a bottle opener/cap catcher. Great work Adam!
http://purposefulproductions.blogspot.com/2015/04/diy-wood-drink-cooler…