Community Brag Posts
Sofa Table with Granite Top
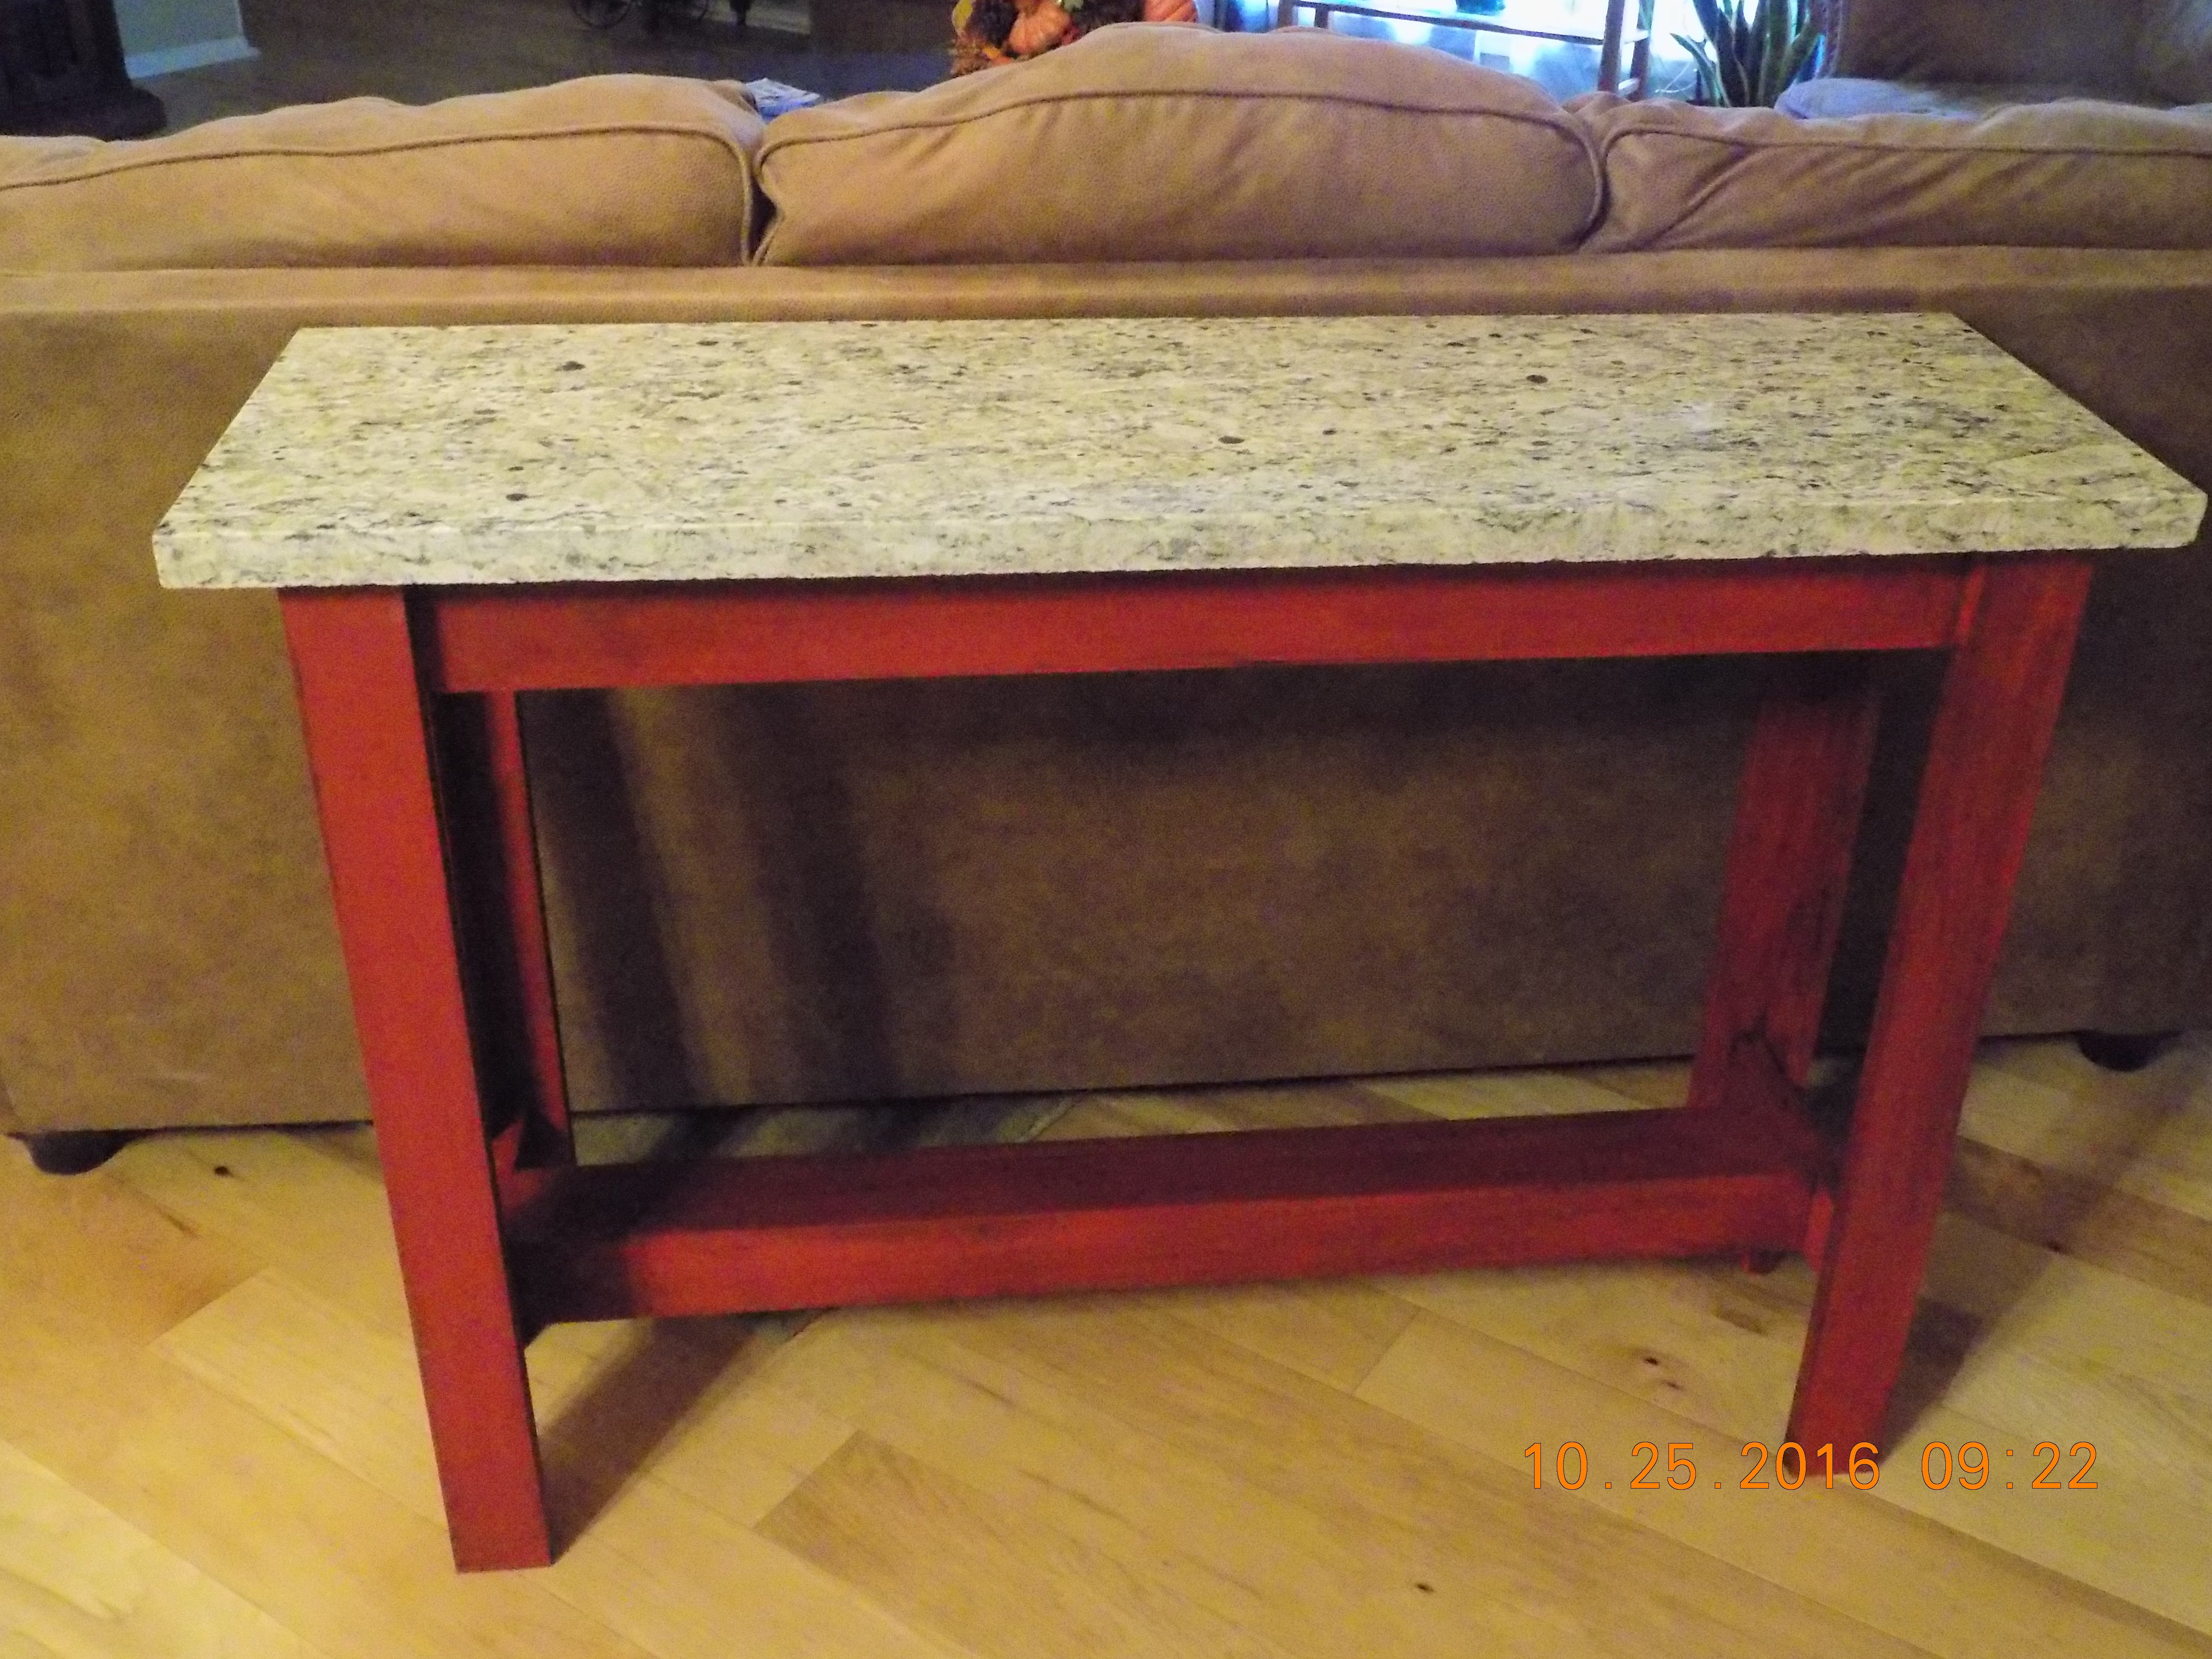
Built using the Simple, Cheap znd Easy Console Table Plan. I utilized a scrap piece of granite for the top that I cut to size and polished and poplar wood that I had laying around the shop.
Built from Plan(s)
Estimated Cost
$40.00
Estimated Time Investment
Weekend Project (10-20 Hours)
Finish Used
Valspar red antique paint and finishing wax
Recommended Skill Level
Intermediate
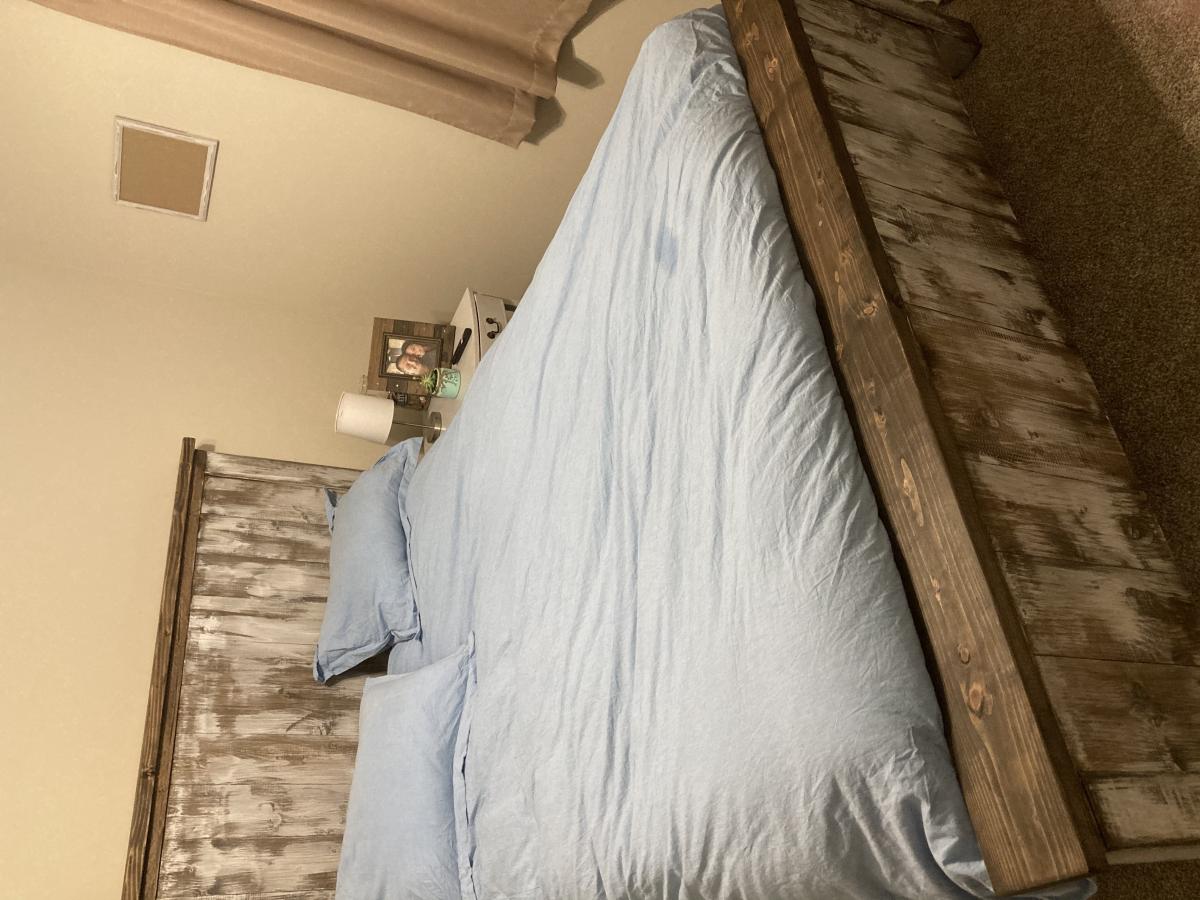
Queen Bed
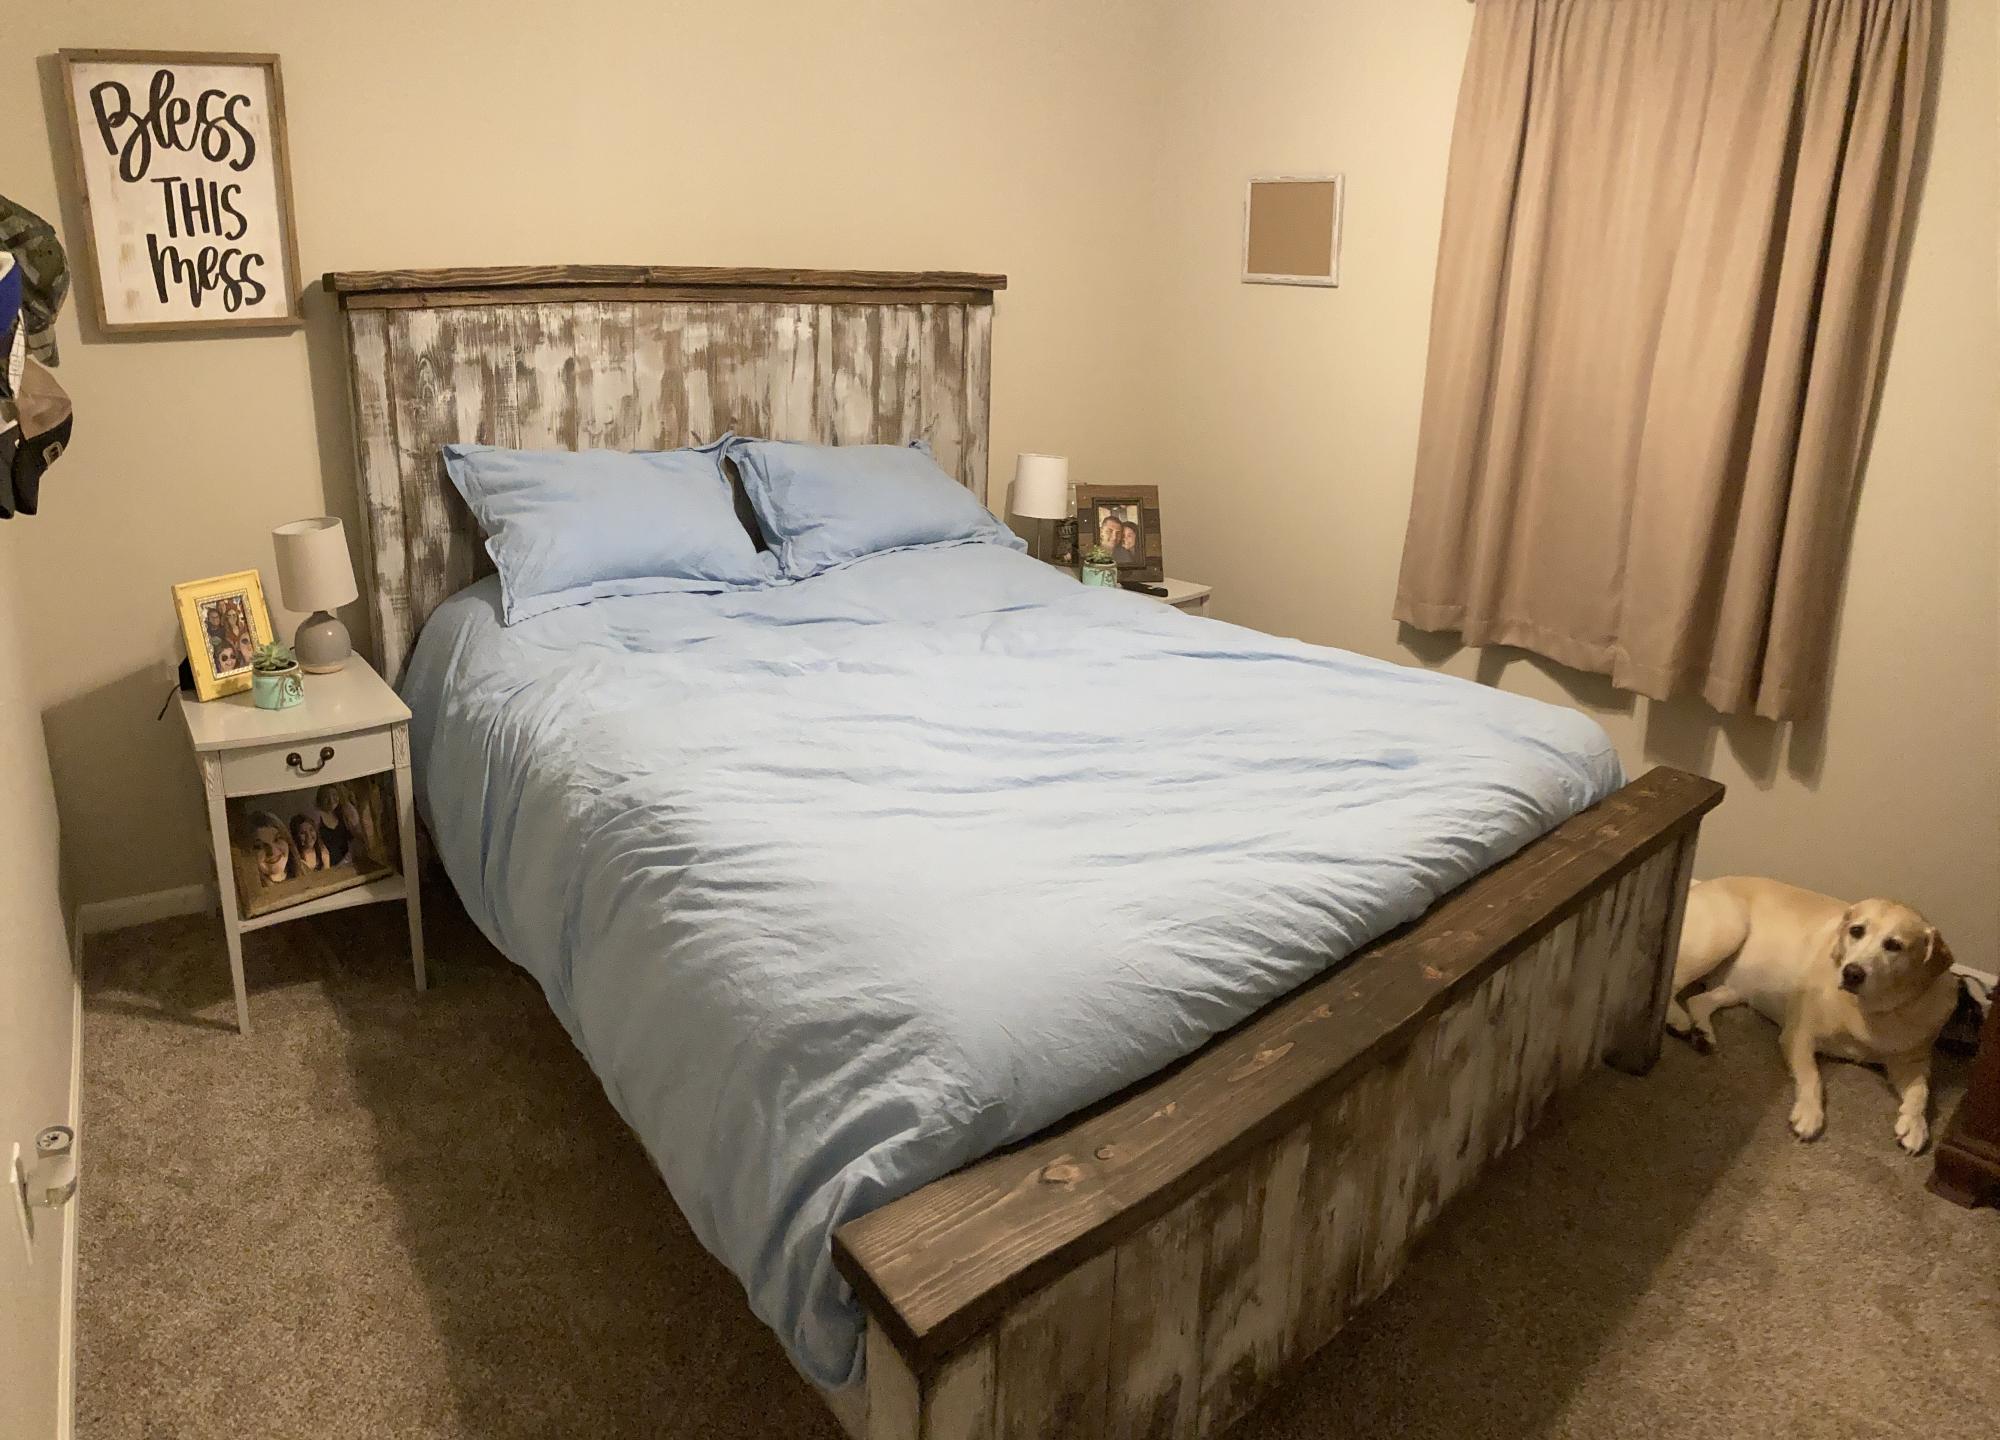
Queen bed with headboard and footboard.
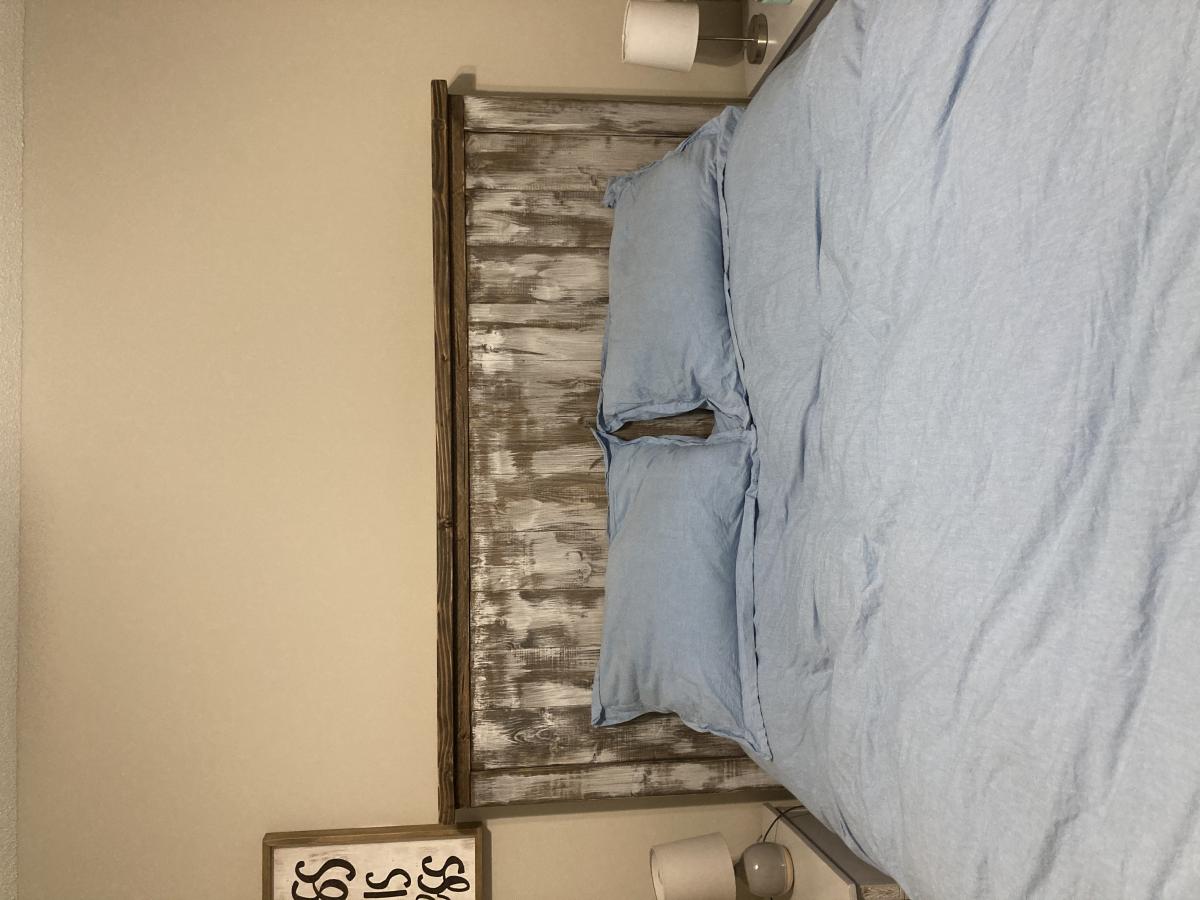
Built from Plan(s)
Estimated Time Investment
Weekend Project (10-20 Hours)
Recommended Skill Level
Intermediate
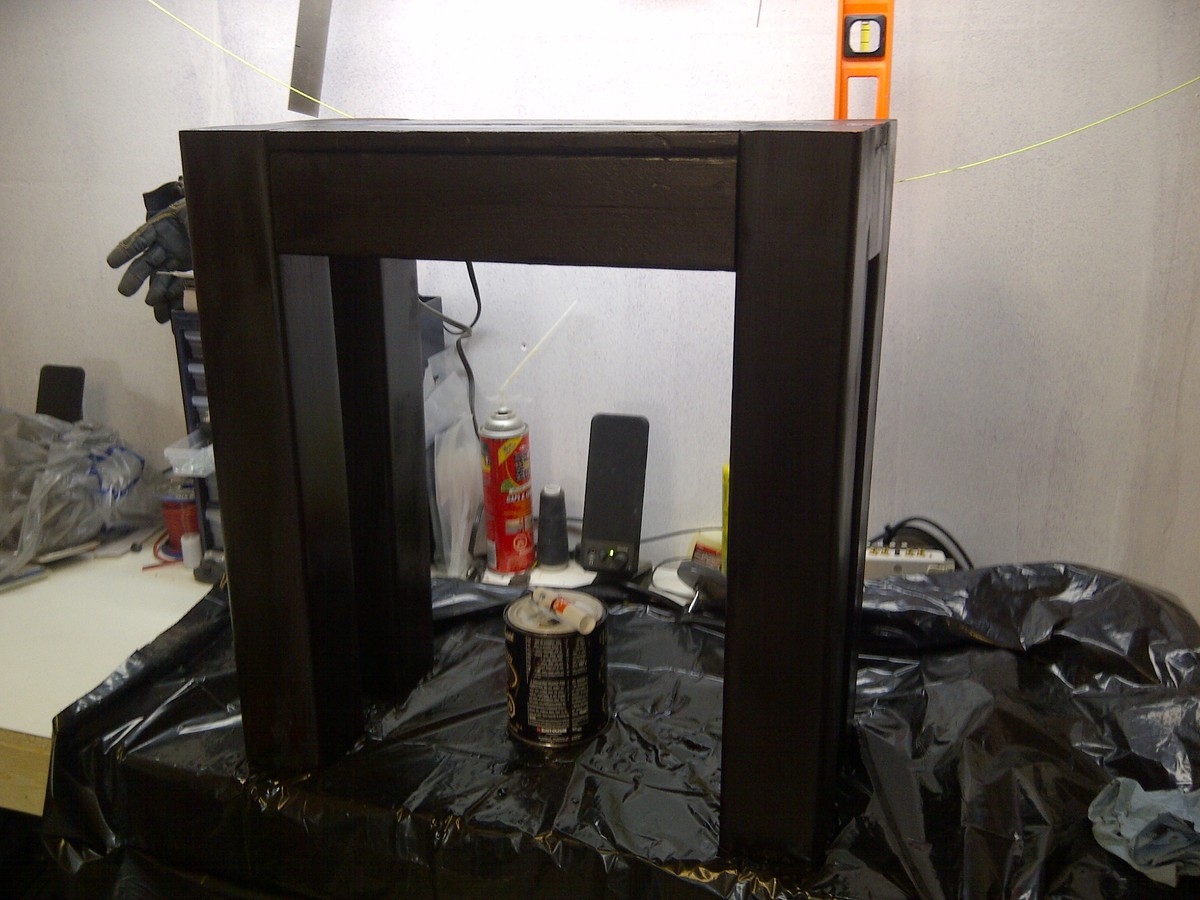
Smaller Rustic X end table
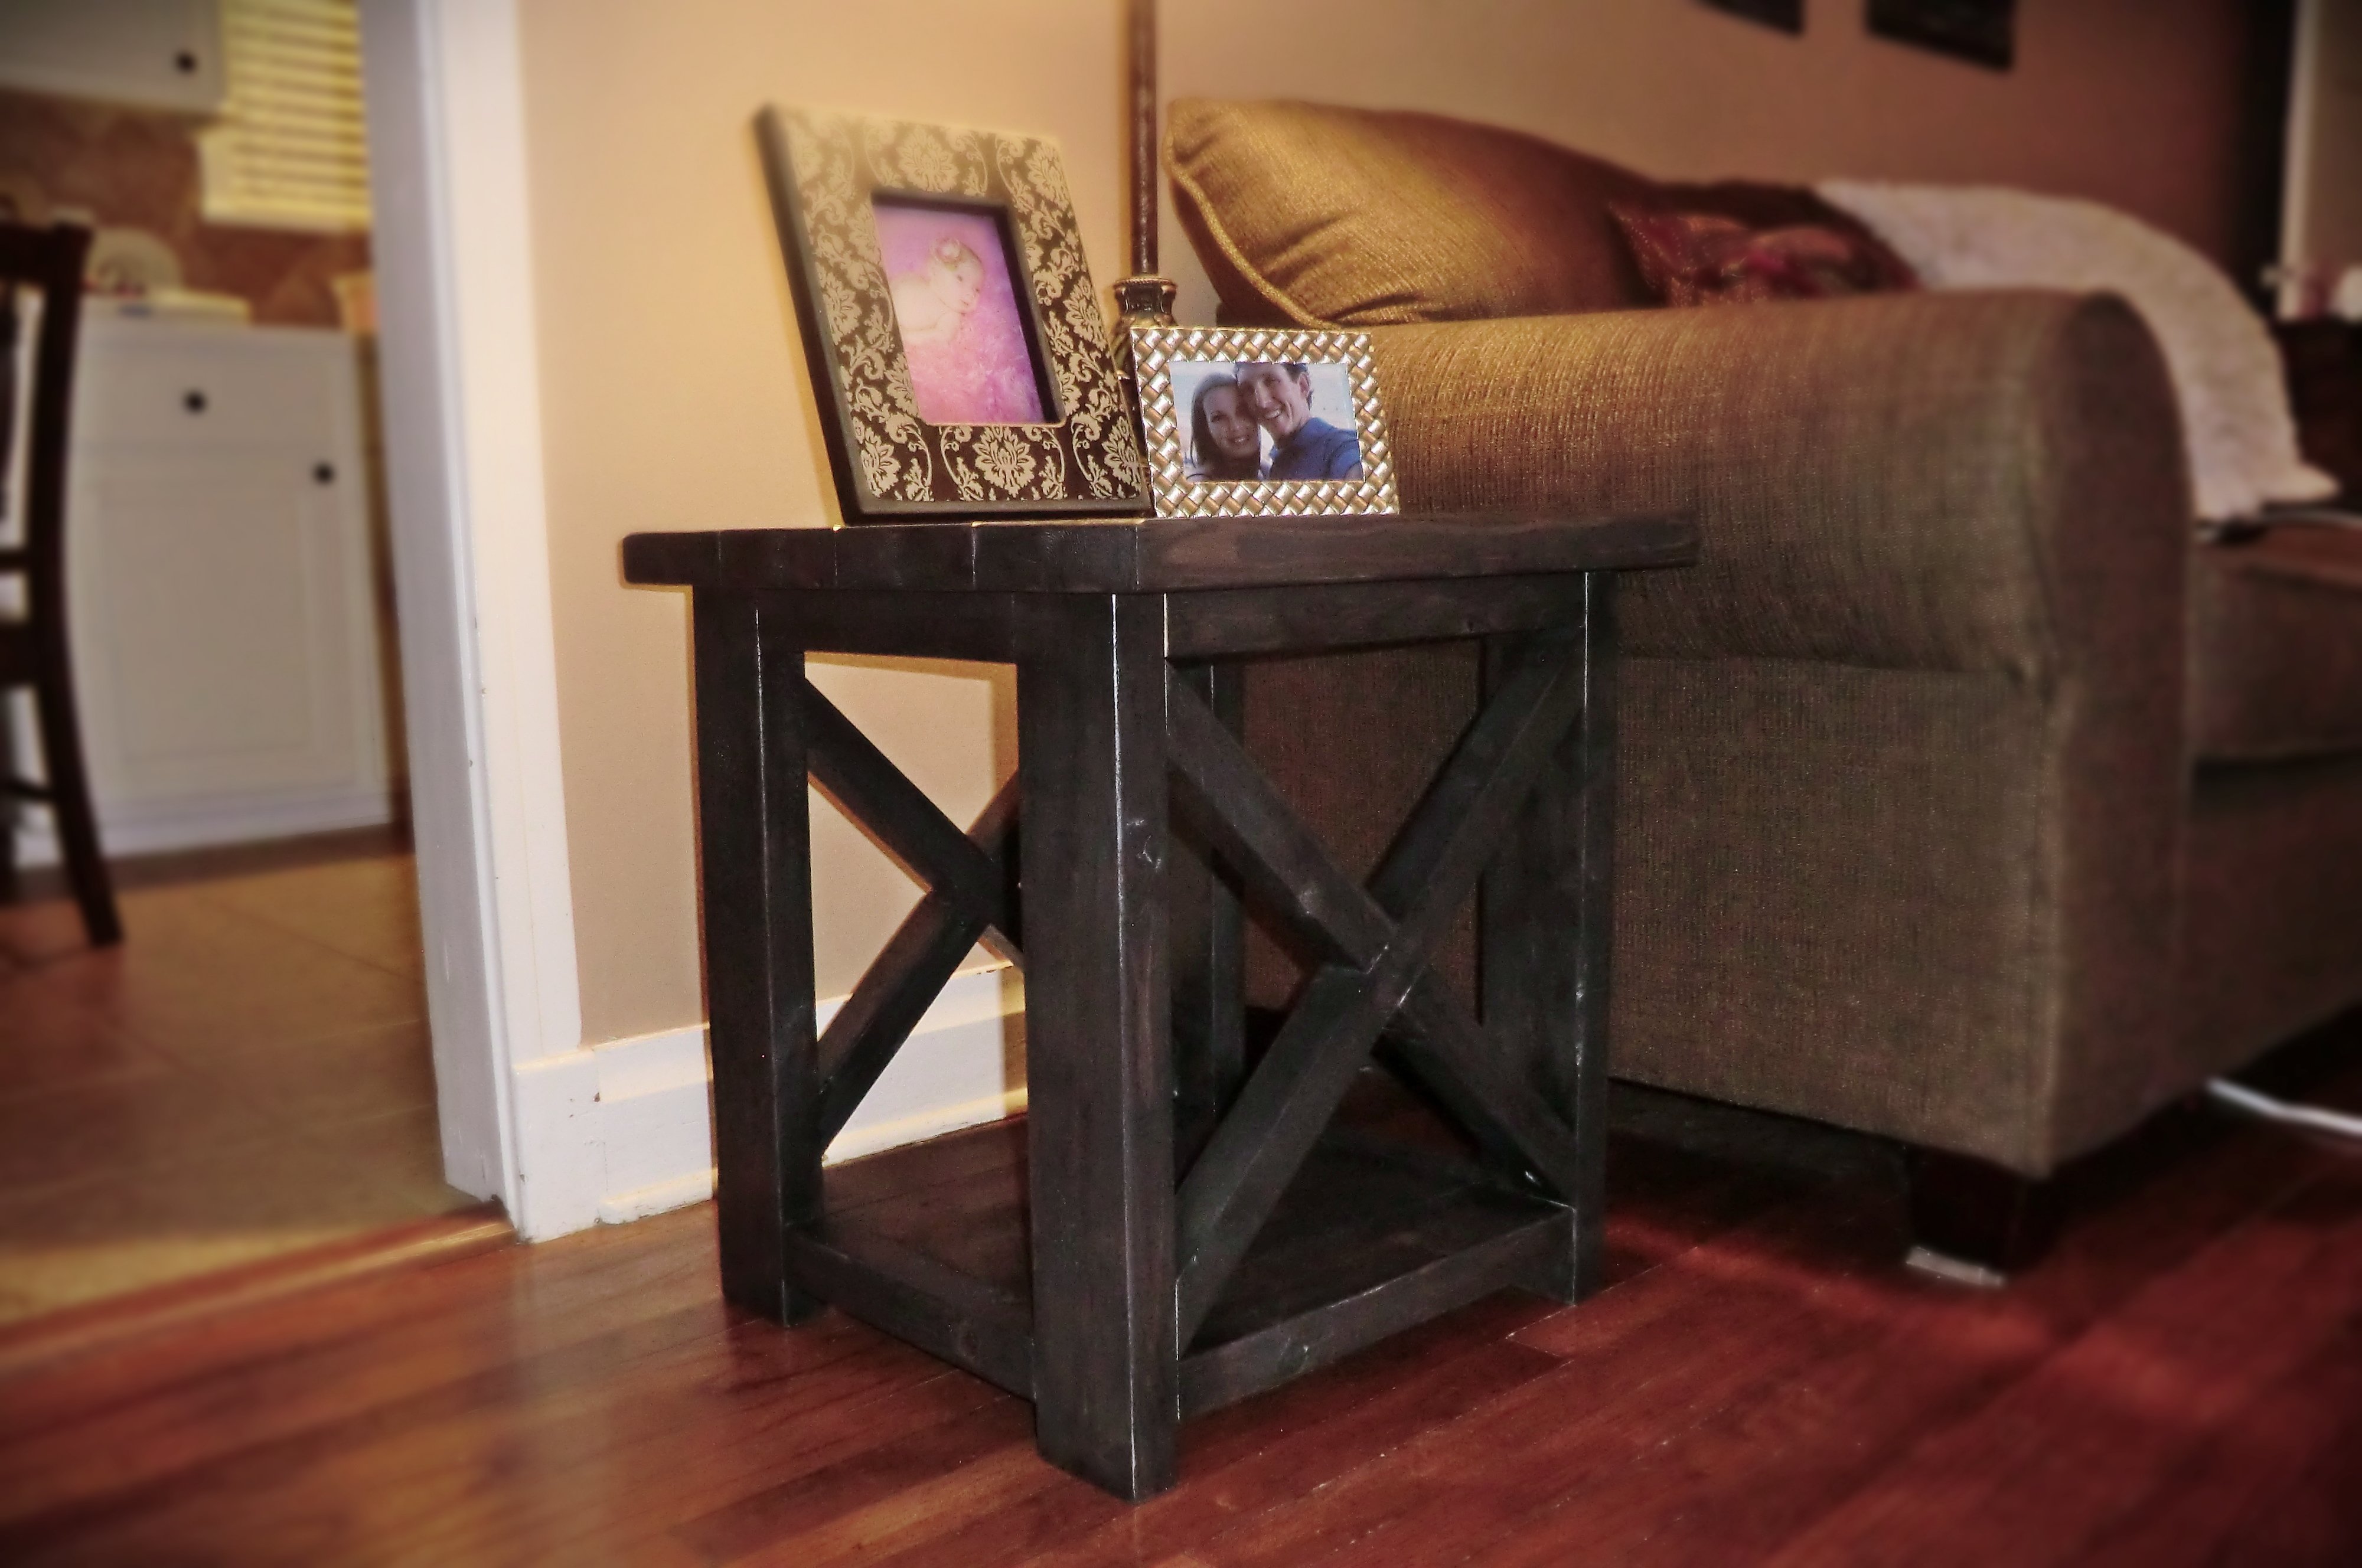
I built these two end tables from the rustic x end table plans. I tweaked the original plan to make them smaller. I only used 4 - 2x6's for the top instead of using 5, and I used 2 - 2x6's for the bottom shelf instead of using the 2 - 1x12's. My top is 20x22.5 and the base is 18x18.

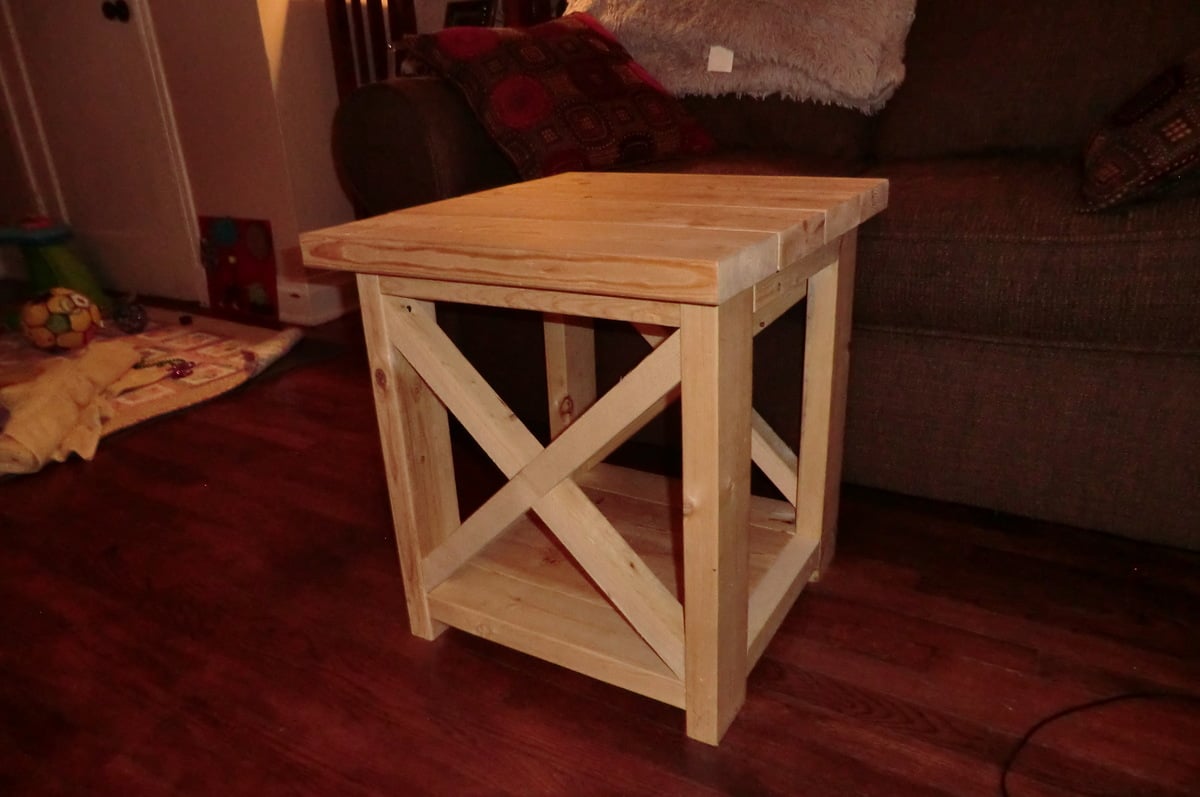
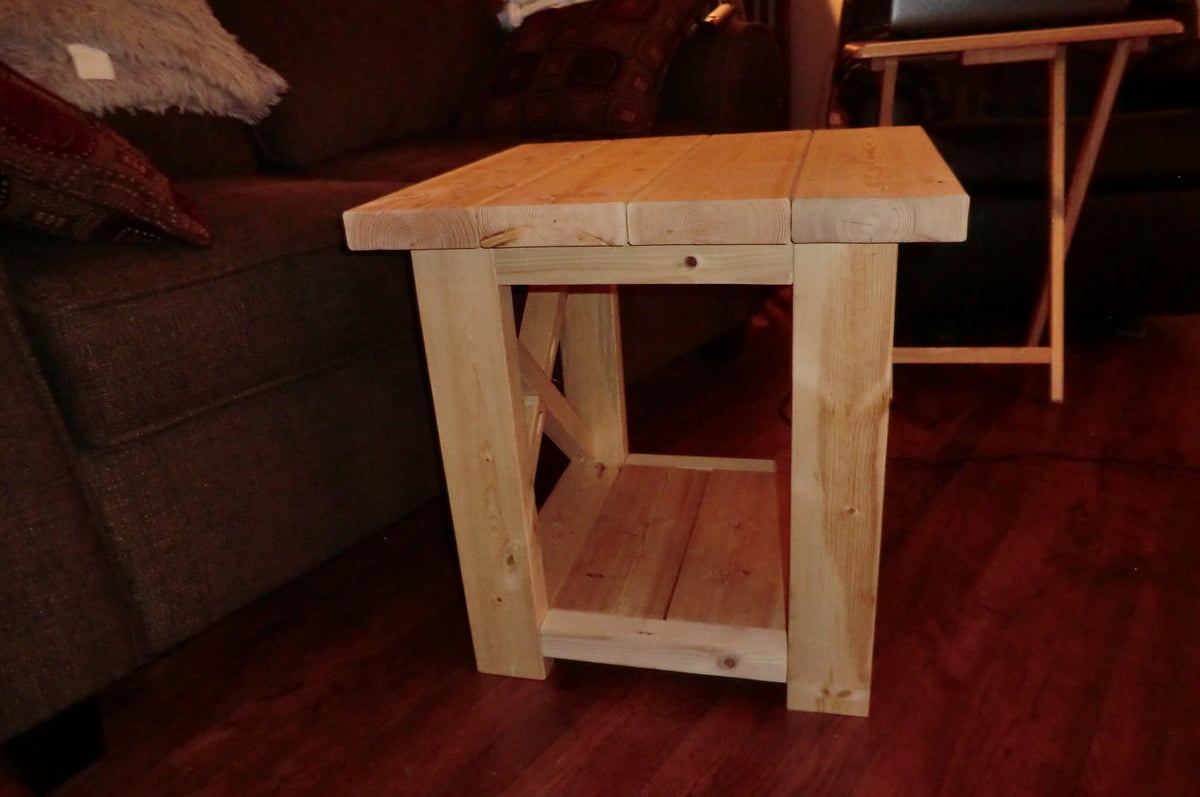
Built from Plan(s)
Estimated Cost
$12/table
Estimated Time Investment
Afternoon Project (3-6 Hours)
Finish Used
I started off with a blend of minwax classic grey, rustoleum sunbleach, and rustoleum kona (I was going for a weathered grey look). It looked good on the scrap piece i tried, but it turned a blueish grey on the tables. I then covered everything with minwax ebony to try an kill the blue tint and darken it. It ended up being a dark brown with some gray tones. Finished with minwax satin polyurethane. I spent alot more time playing around with stain colors than I did actually building the tables.
Recommended Skill Level
Beginner
Comments
Fri, 09/28/2012 - 10:36
Rustic Table
Great job ! these Rustic table are good for interior design and make a good look .I read this , have good price ,timing ,wood and also your hard work .

Wed, 04/20/2016 - 05:43
smaller tables
i love this! we just built the bigger one to find out it was a bit too big but we were still able to find a place for it. my husband and I are going to build your smaller version cant wait!

Mon, 06/13/2016 - 12:46
I made the original and found
I made the original and found it larger than I wanted. I was going to do a smaller version like you did. How tal is yours?
Baby's first step stool
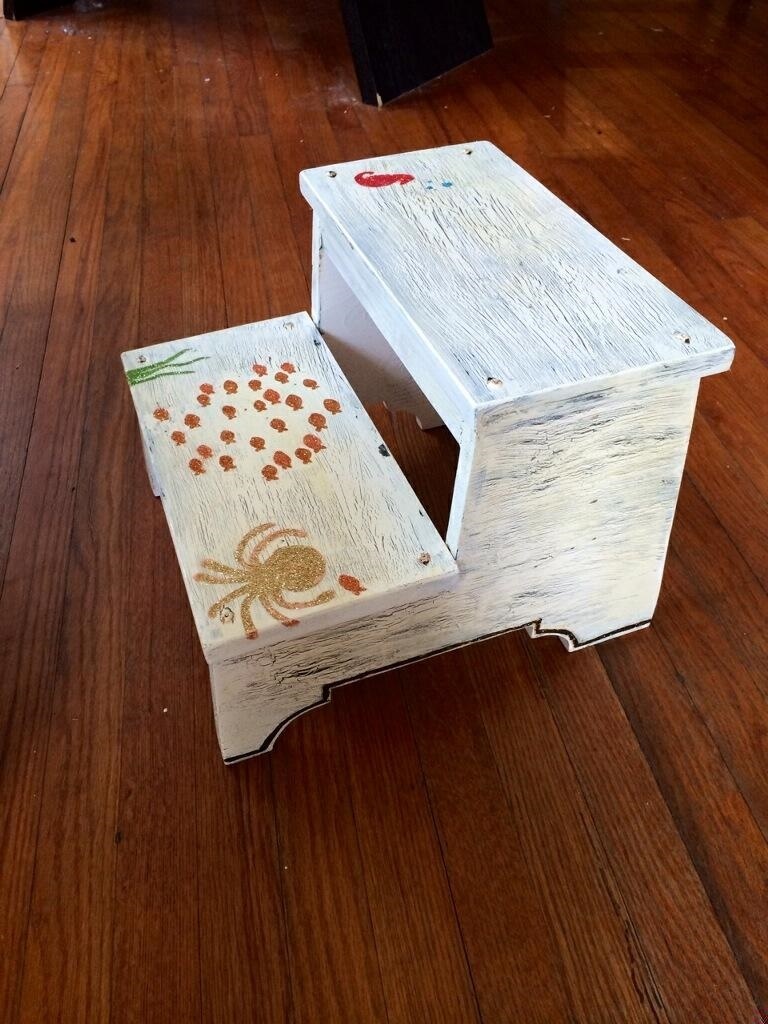
I made this for our first new family addition. My wife is 20 weeks pregnant and we find out if it's a boy or girl tomorrow at 0800! So excited, and thanks to Ana for the great plans.
Nate
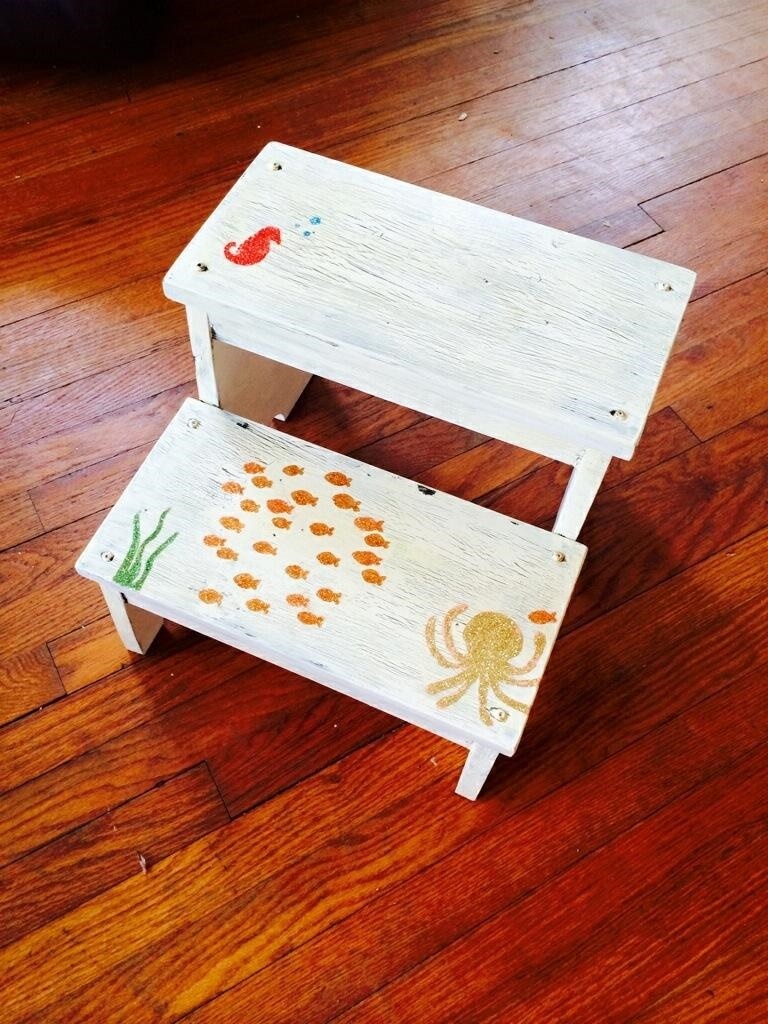
Built from Plan(s)
Estimated Time Investment
Afternoon Project (3-6 Hours)
Finish Used
I applied an ebony stain first. When dry added glue over stain and painted antique white before glue dried for the "crackle" effect. Polyurethane applied afterwards (yellows the paint a bit, but that's what I was going for). My wife then painted the sea life and we covered in a spray on enamel to finish.
Recommended Skill Level
Intermediate
Fancy hall tree
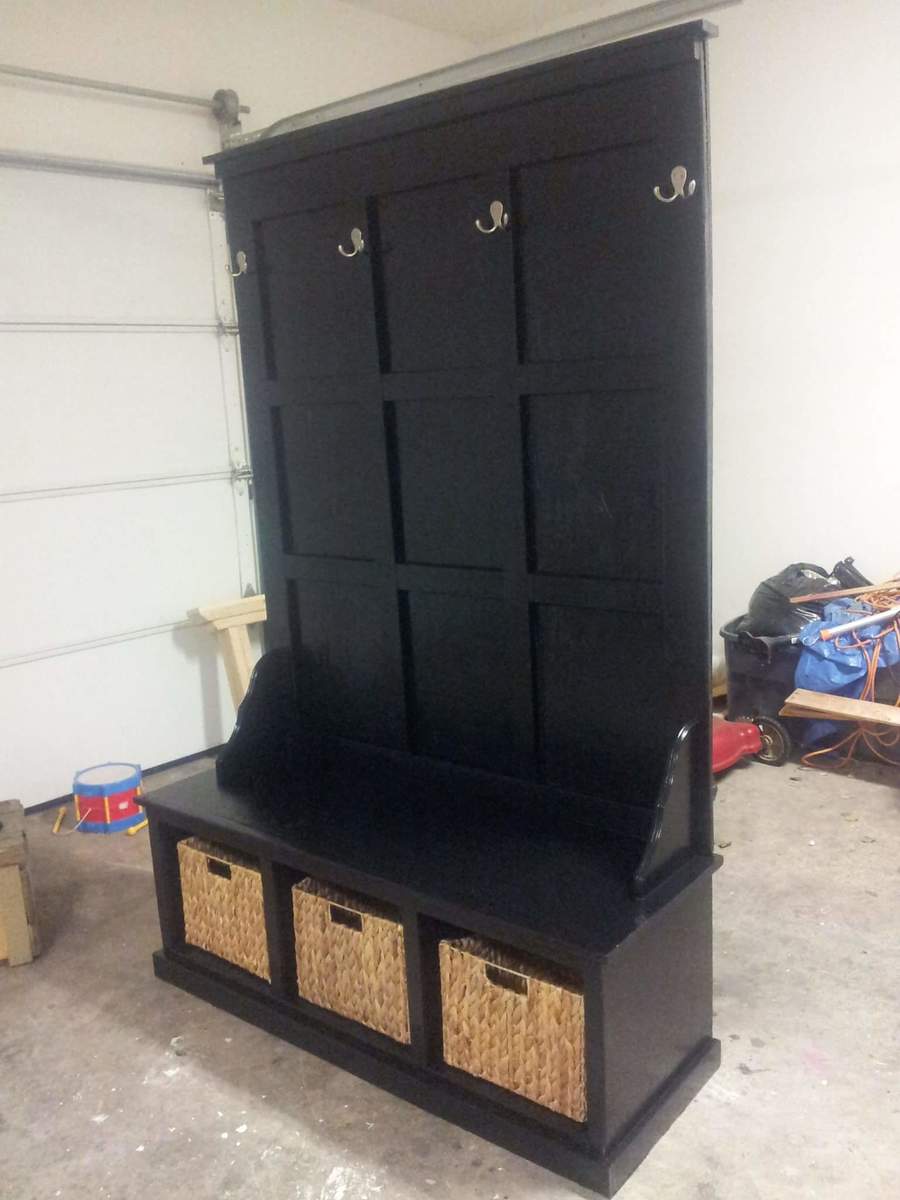
This was the biggest project I had ever built at the time. I was so happy with how it turned out!!
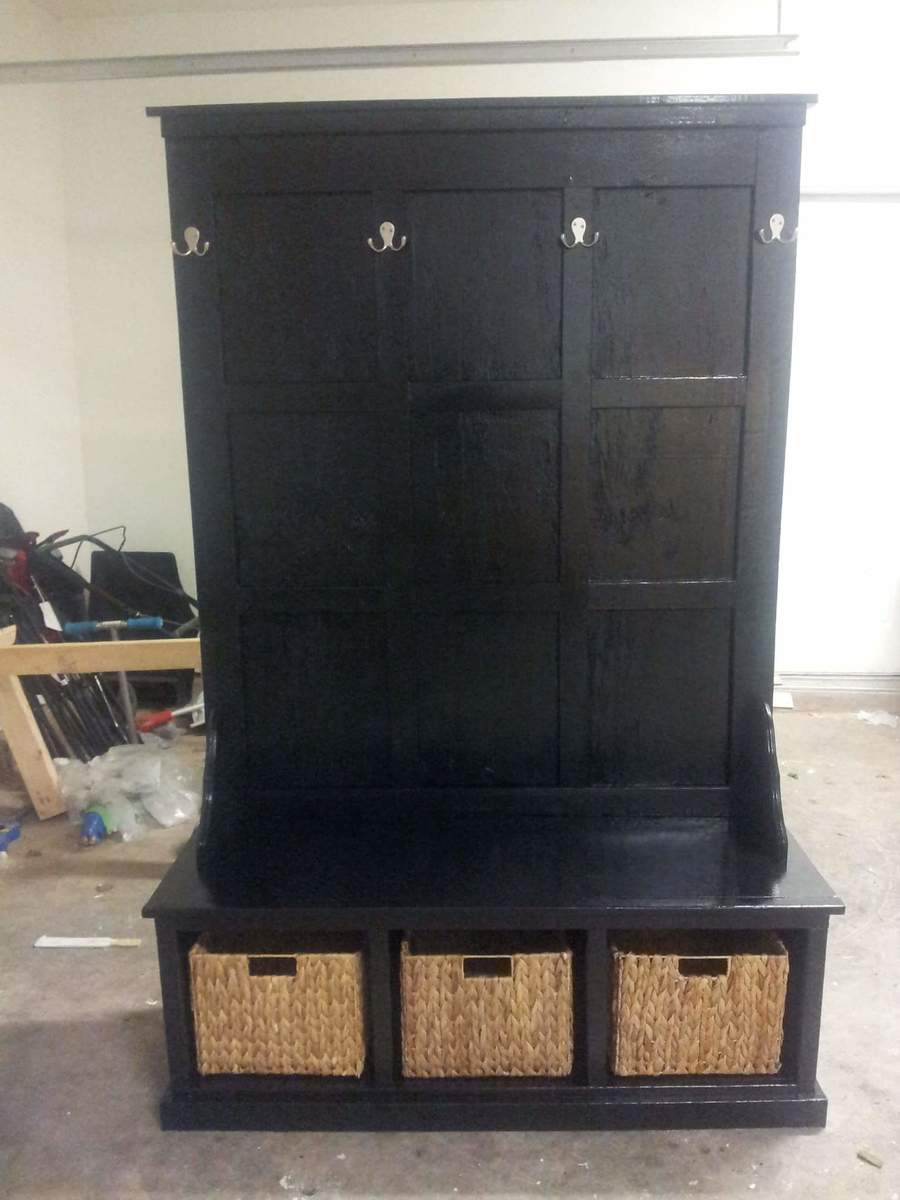
Built from Plan(s)
Estimated Cost
$100
Estimated Time Investment
Weekend Project (10-20 Hours)
Recommended Skill Level
Beginner
Outdoor Chair with Built-in Beverage Holder
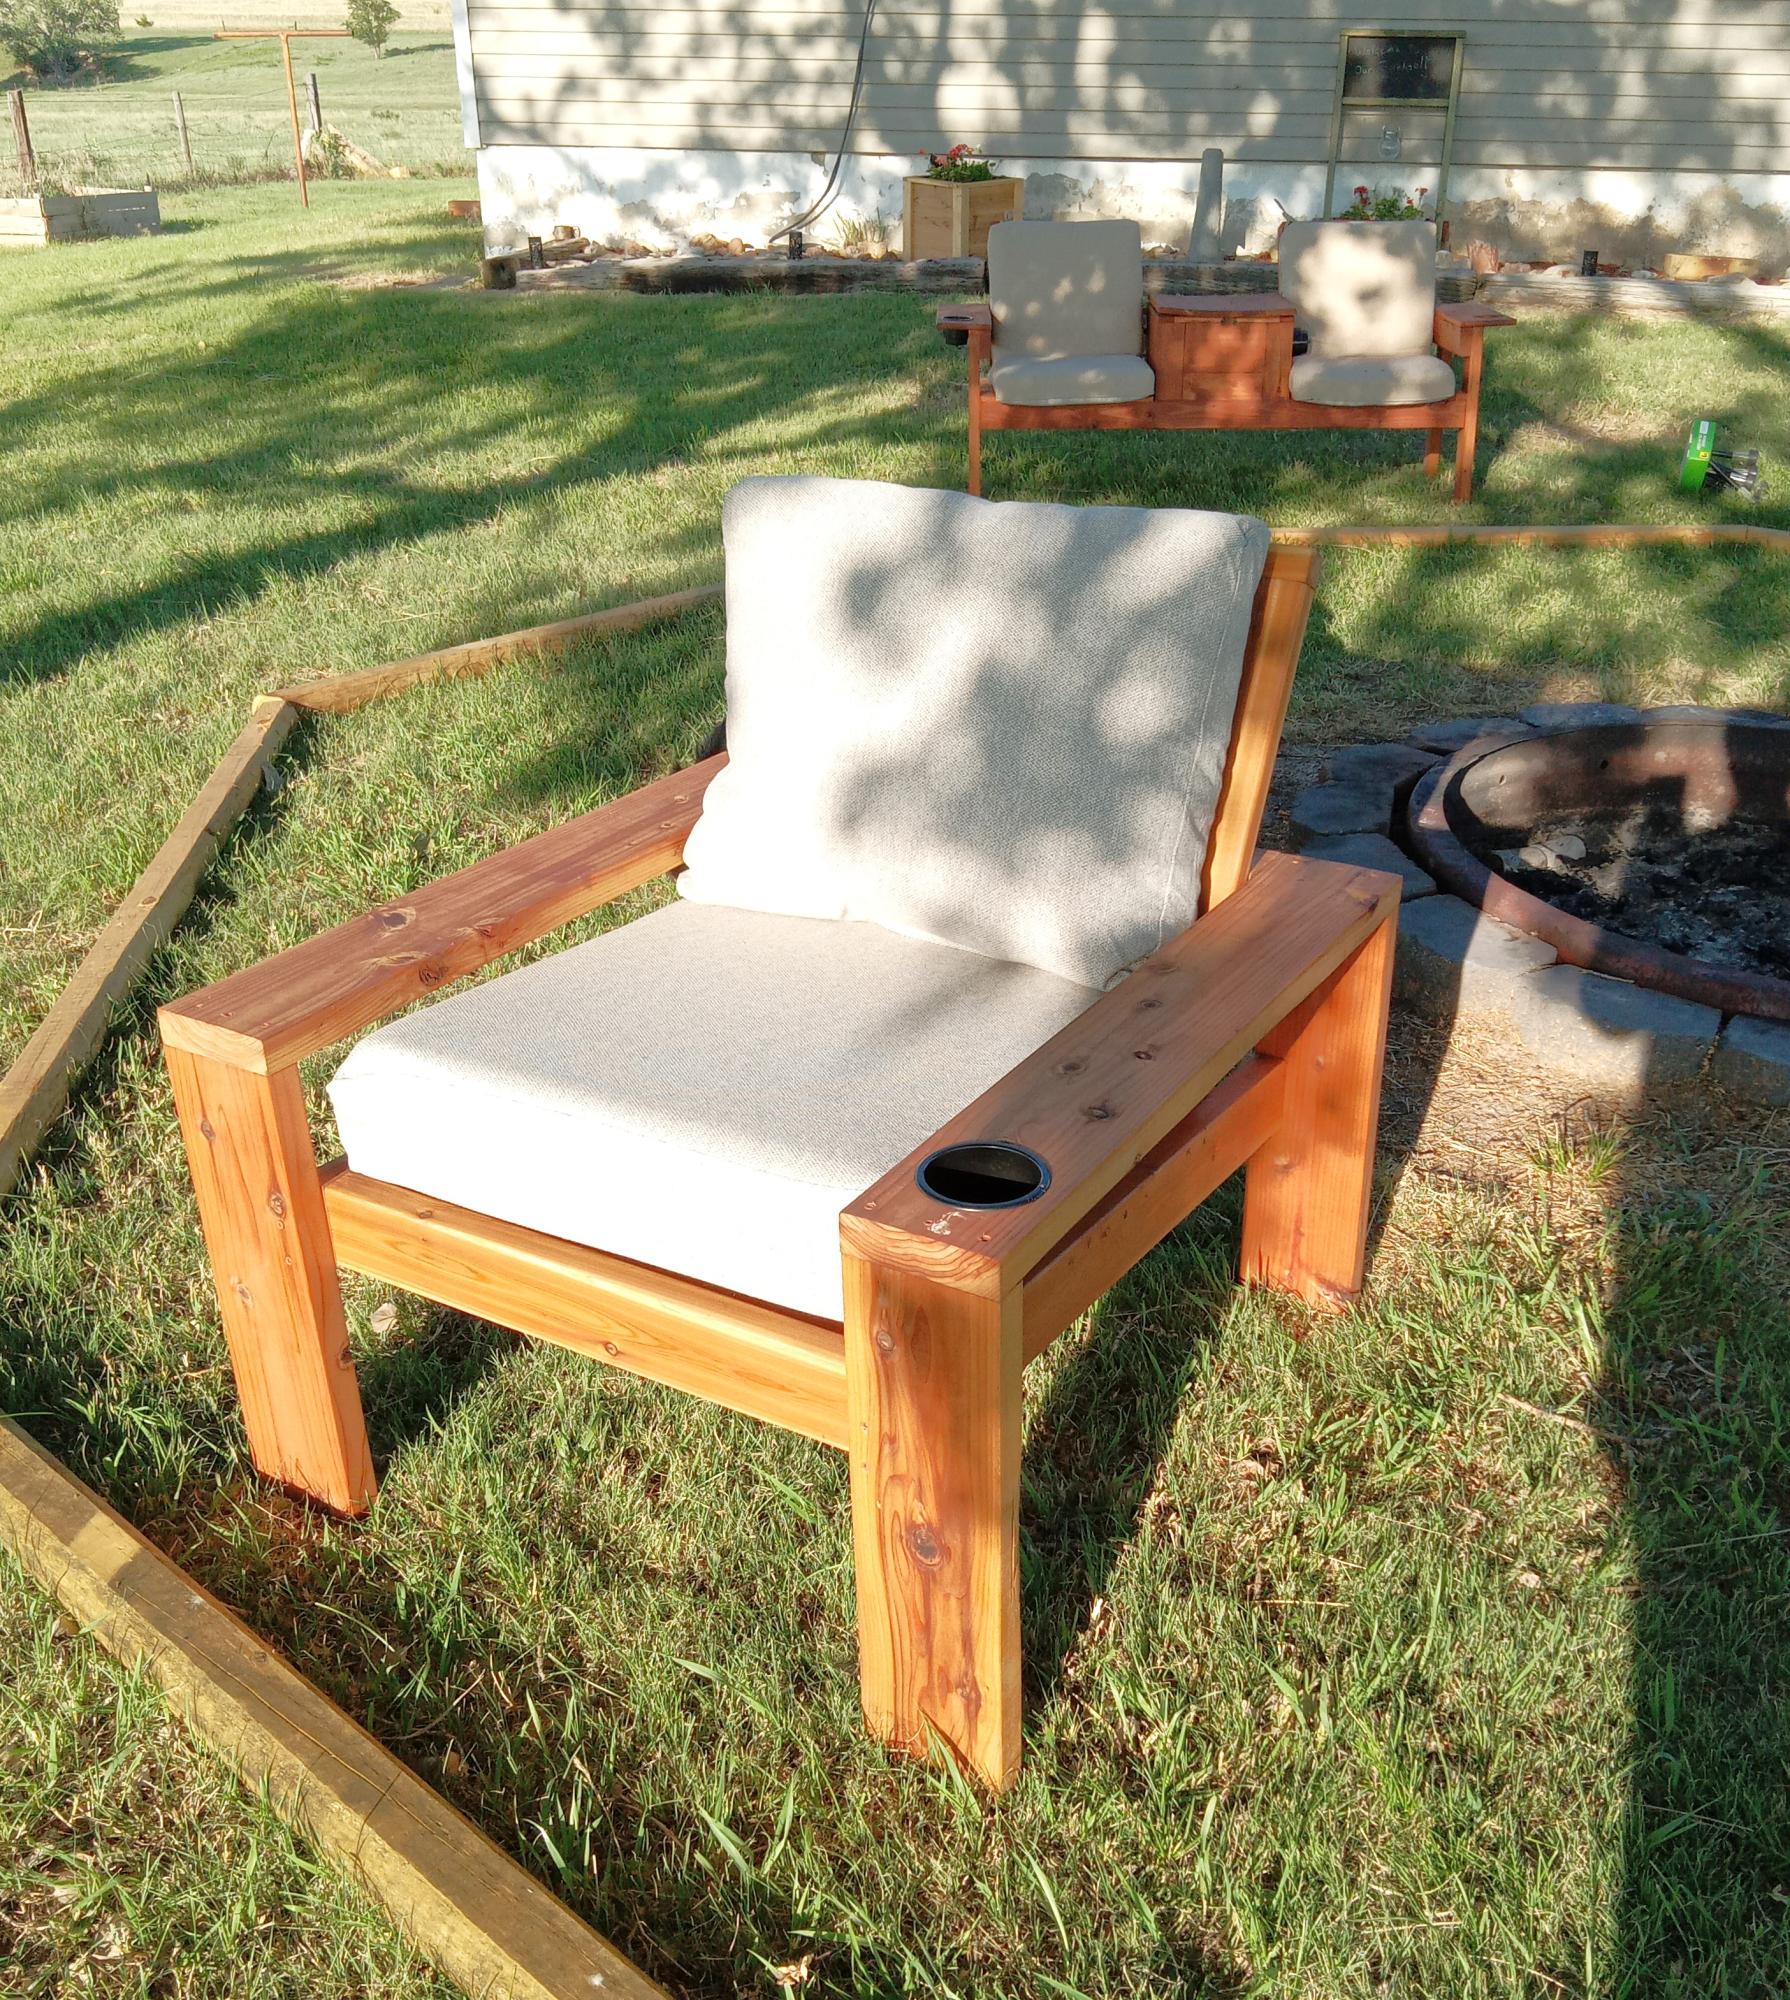
Made from the Ana White. Deep seat cushions lounge chair plans with a few modifications. I used 2x6's for the legs and arms so I add cup holders and I added three horizontal back slats using pocket holes. Love the way they look!
Cortney Hall
Built from Plan(s)
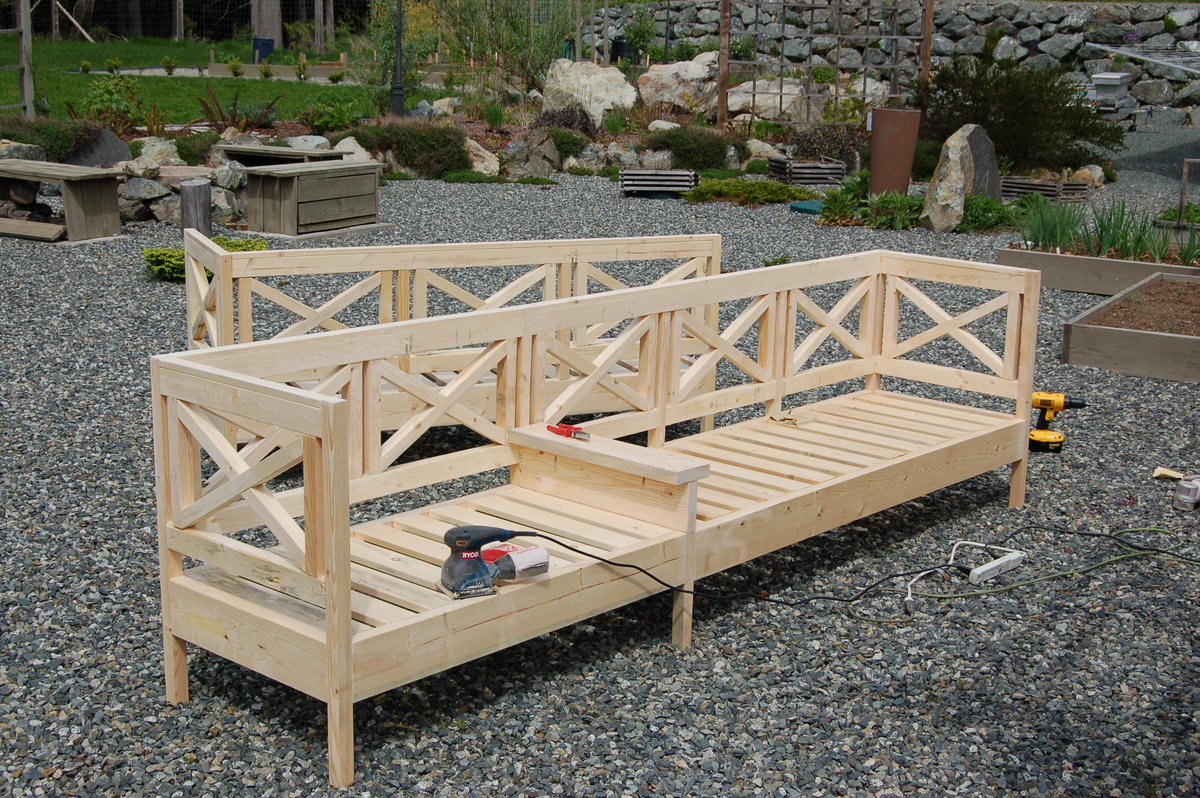
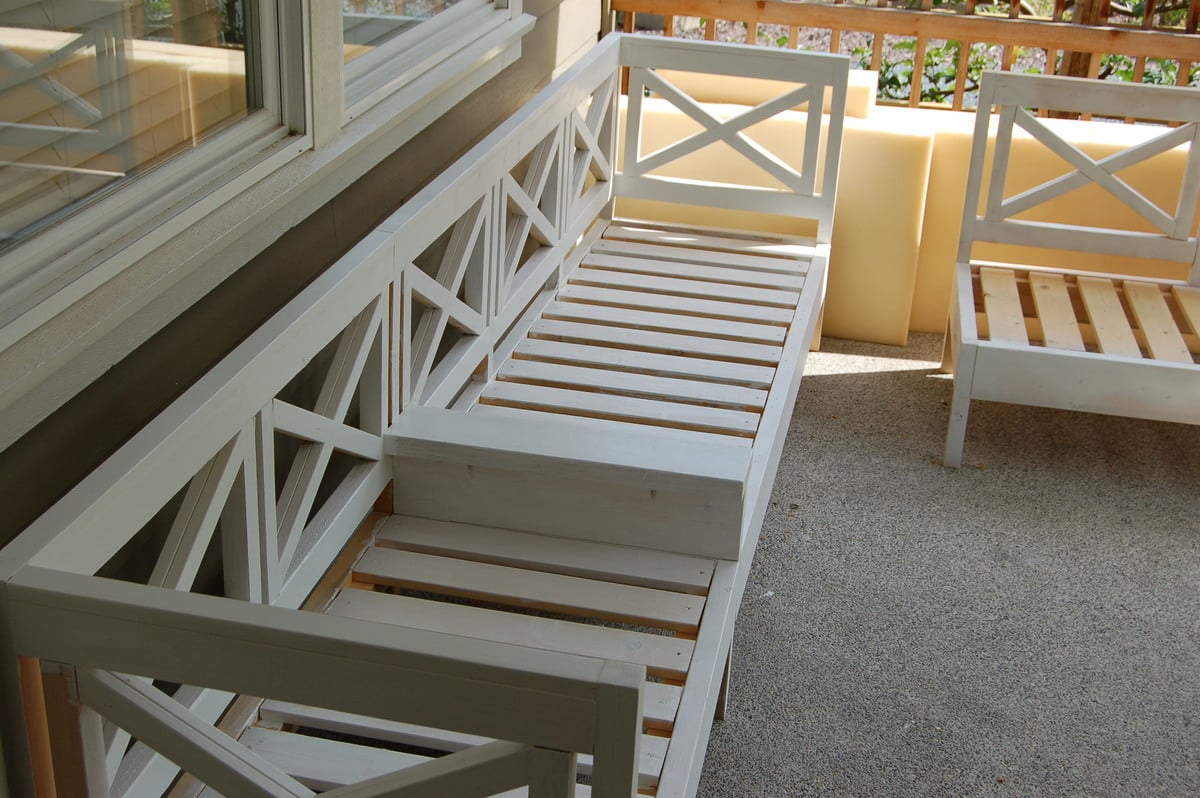
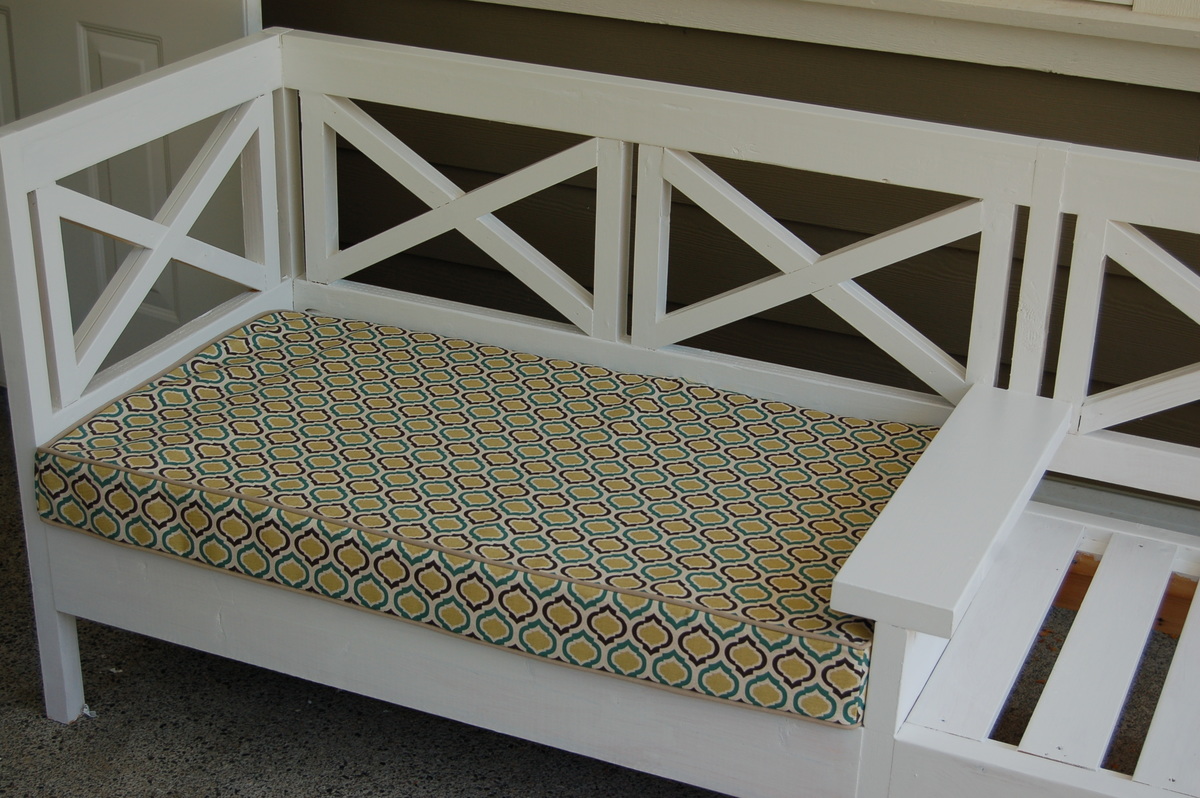
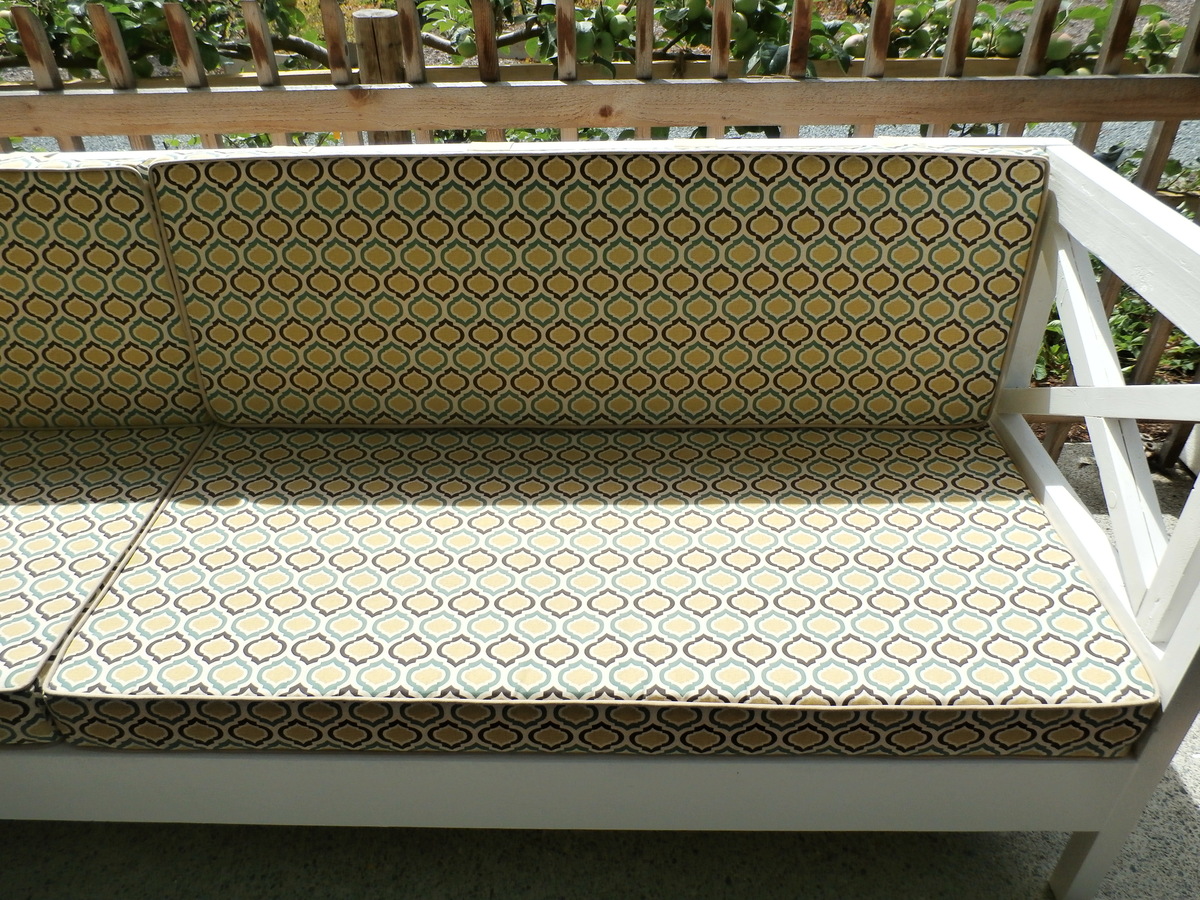
Weatherly Benches
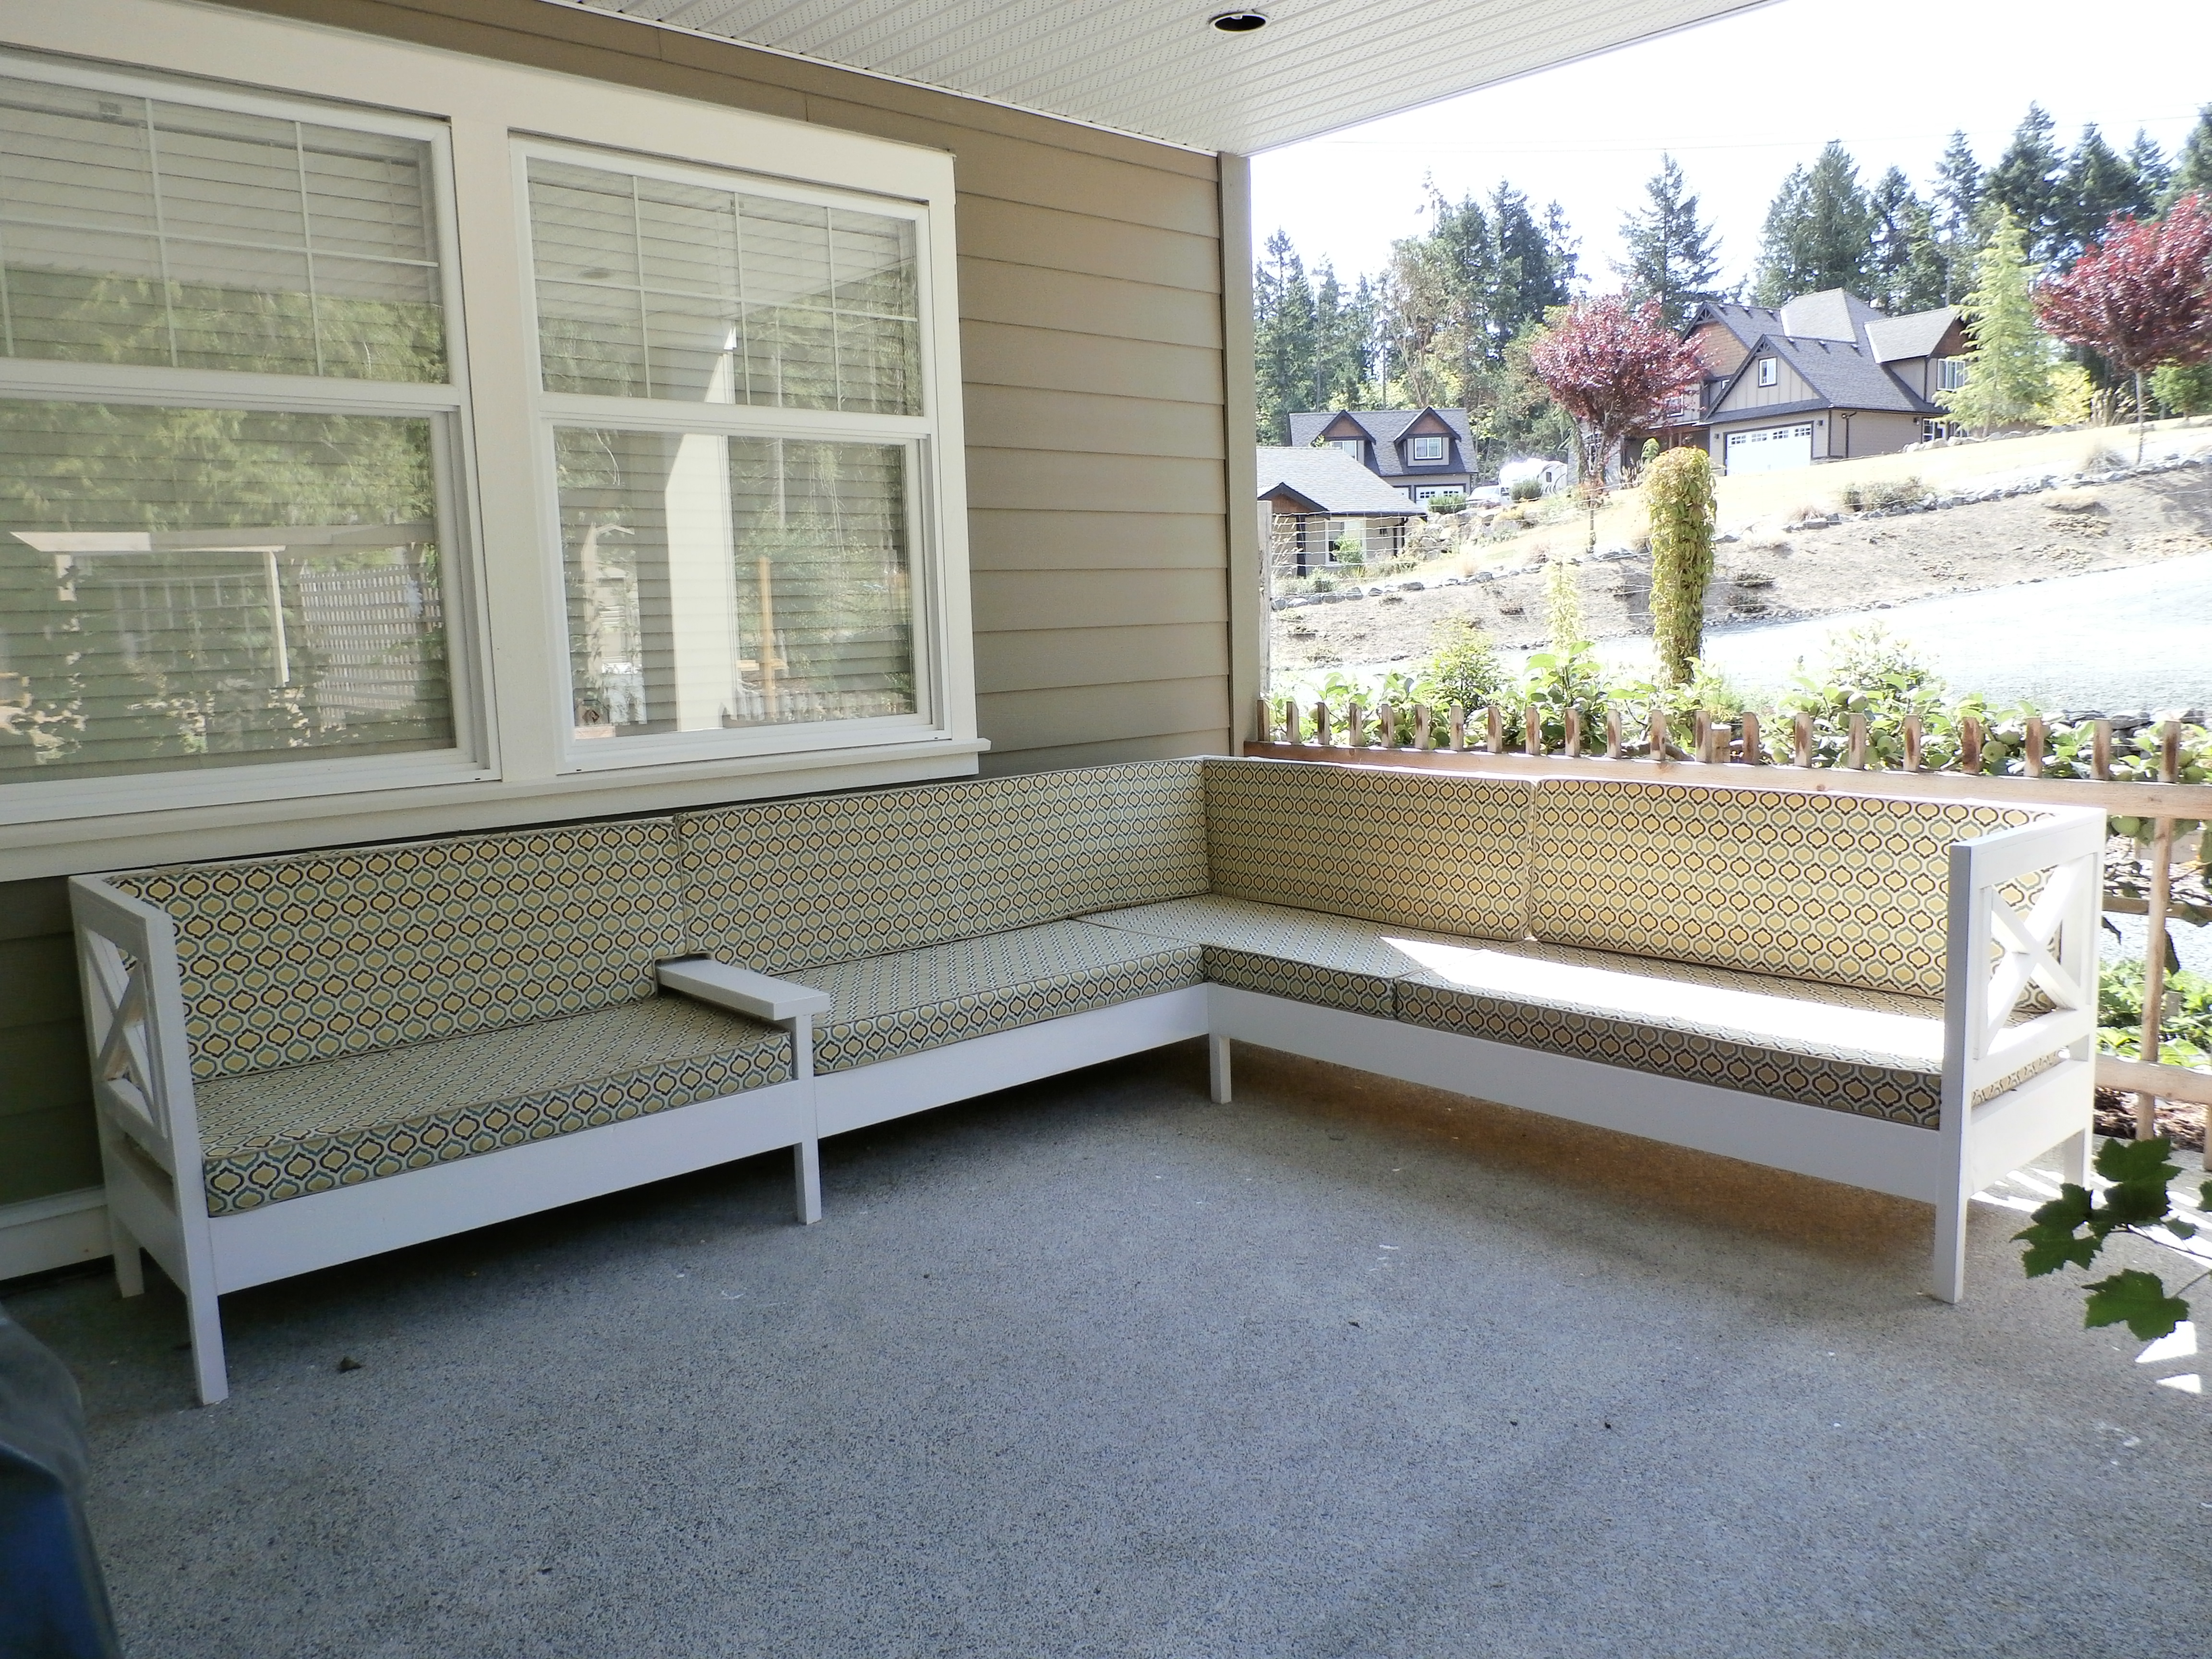
We used the Weatherly plans for this project amending in a couple of places. The two seat version was attached to the three with using just one set of legs and then we added a 2 x 6" upright at the join and put another 2 x 6" on top for a drinks tray! Rather than 8 individual 24" cushions we went with 48 x 24" seats and did the same for the backs.
The cost for materials was only about $70 and the outdoor fabric was twice that amount. As it is under a covered deck we just used 4" foam for the seats and 2" foam for the backrests, costing about $100. All Canadian Dollars.
Built from Plan(s)
Estimated Cost
$70
Estimated Time Investment
Day Project (6-9 Hours)
Finish Used
We coated everything twice with Benjamin Moore Cloud White external paint.
Recommended Skill Level
Intermediate
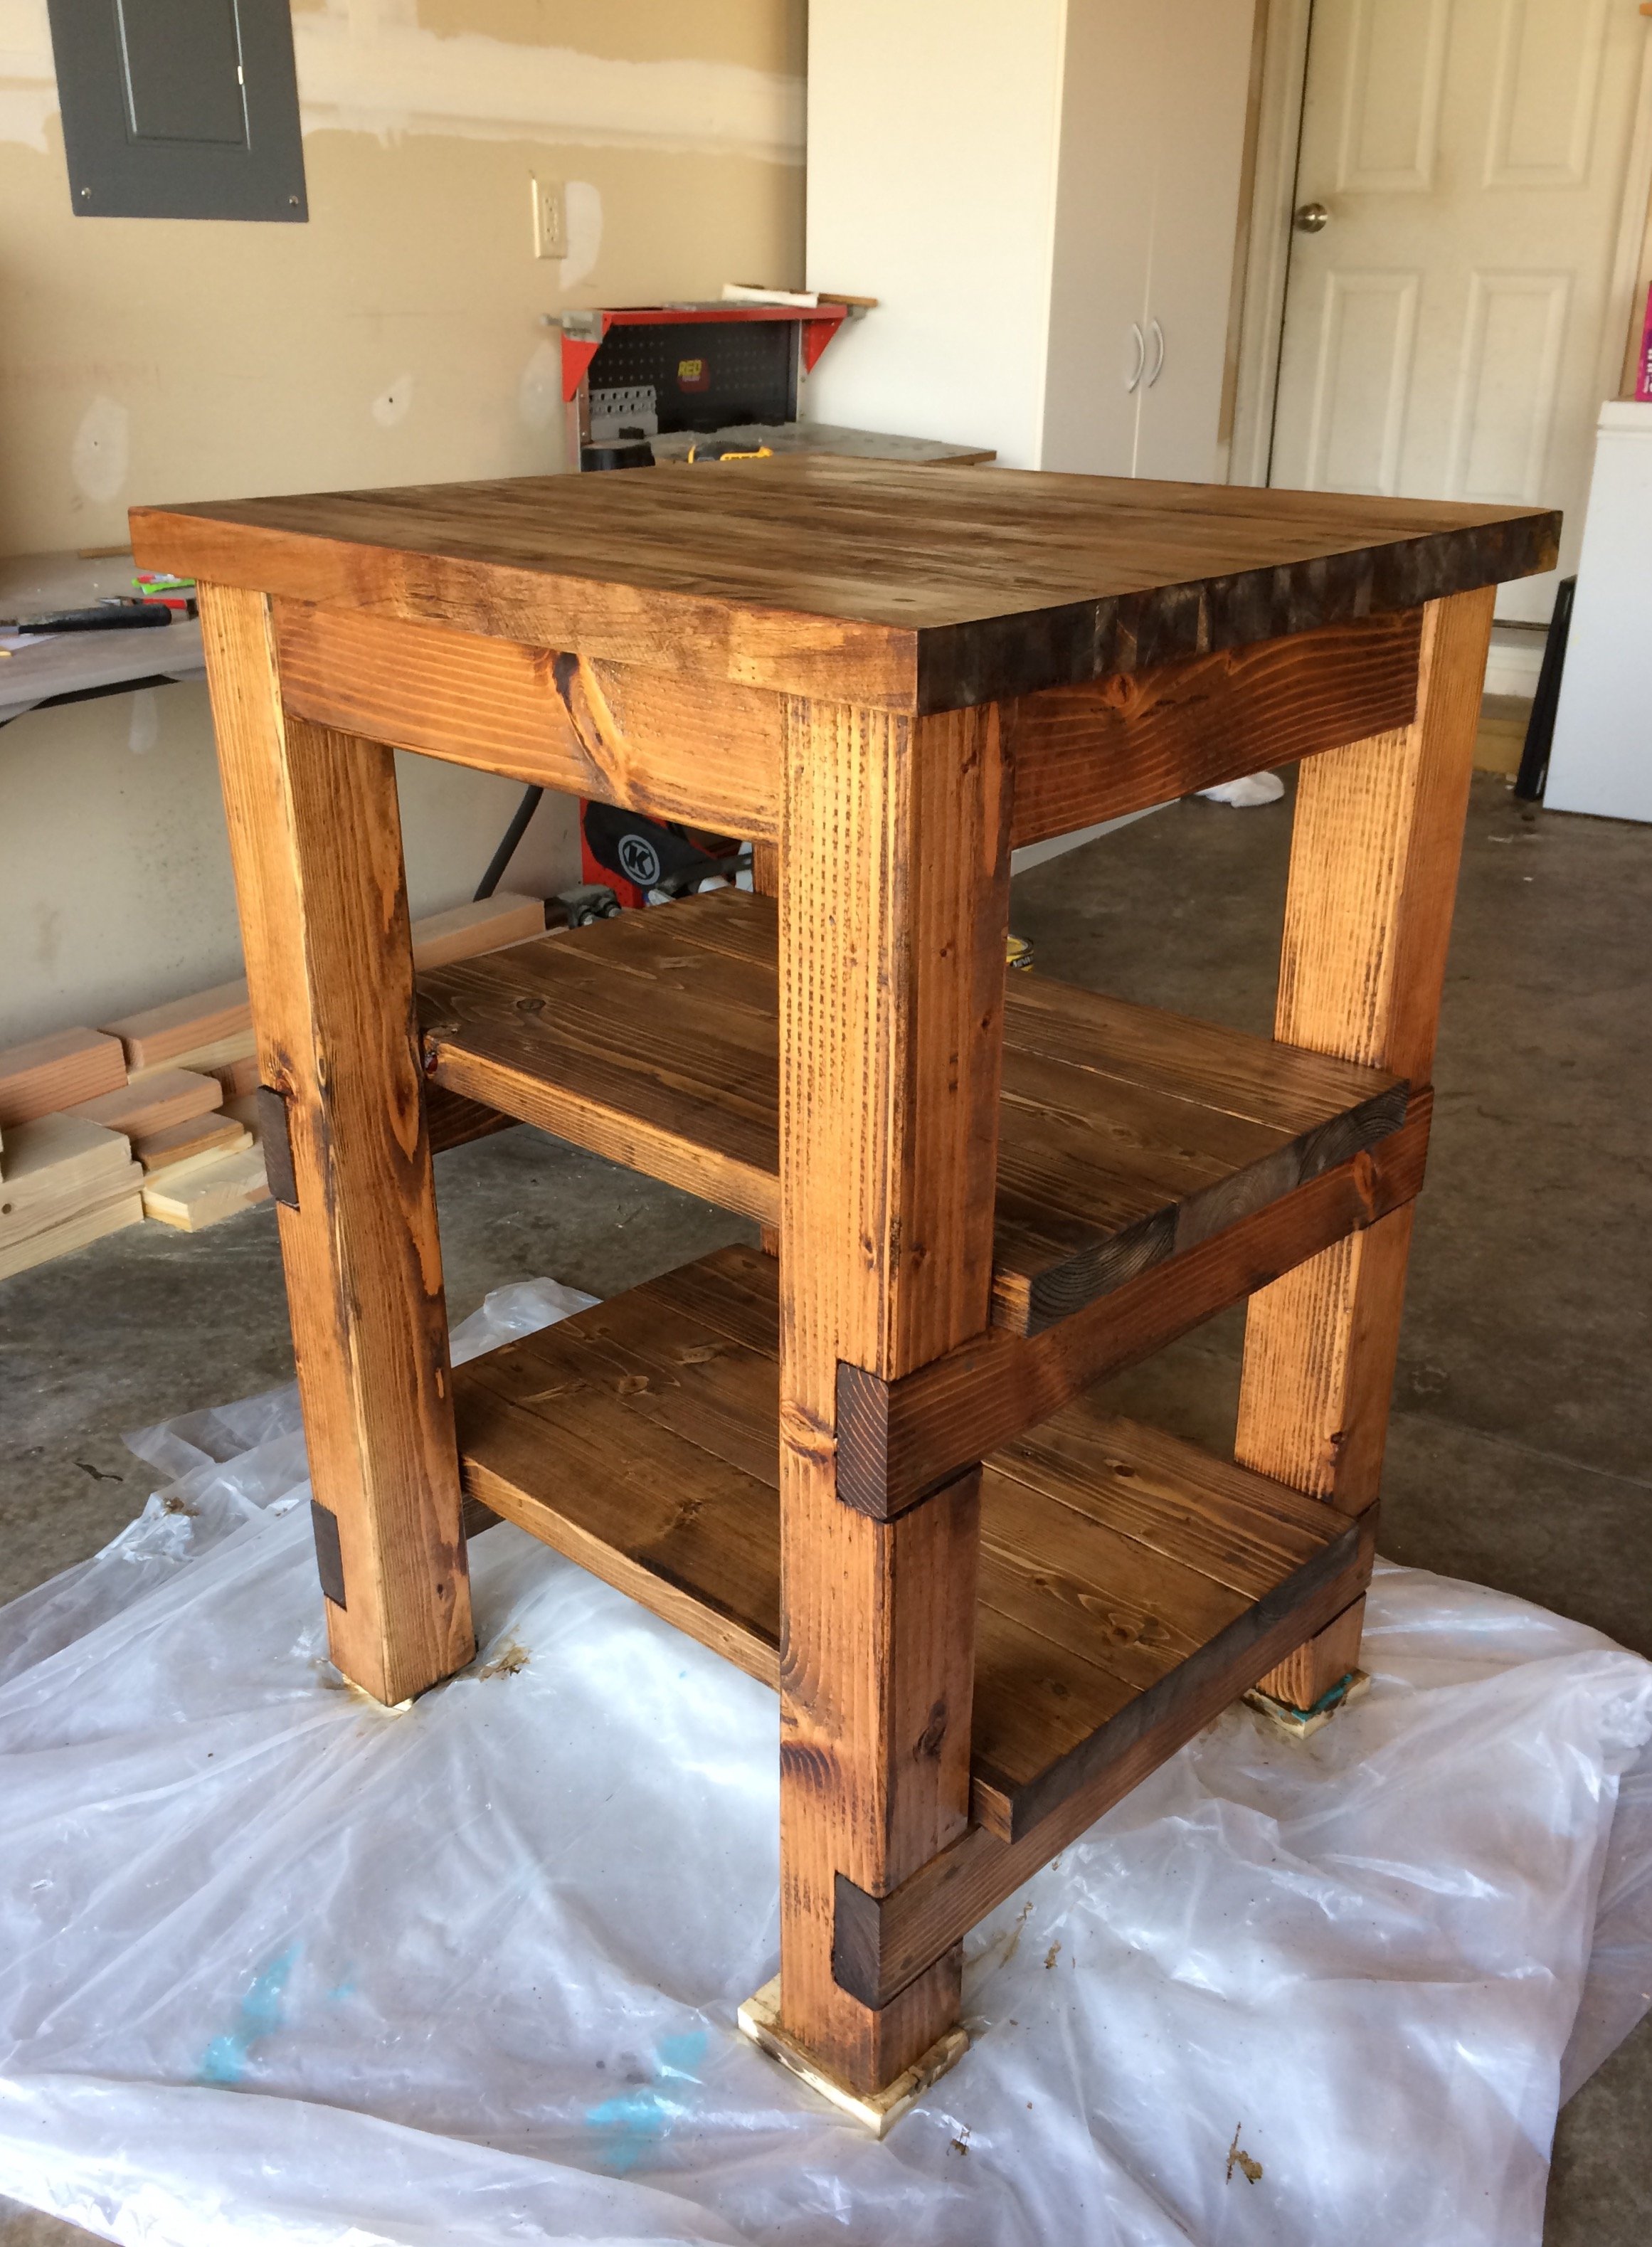
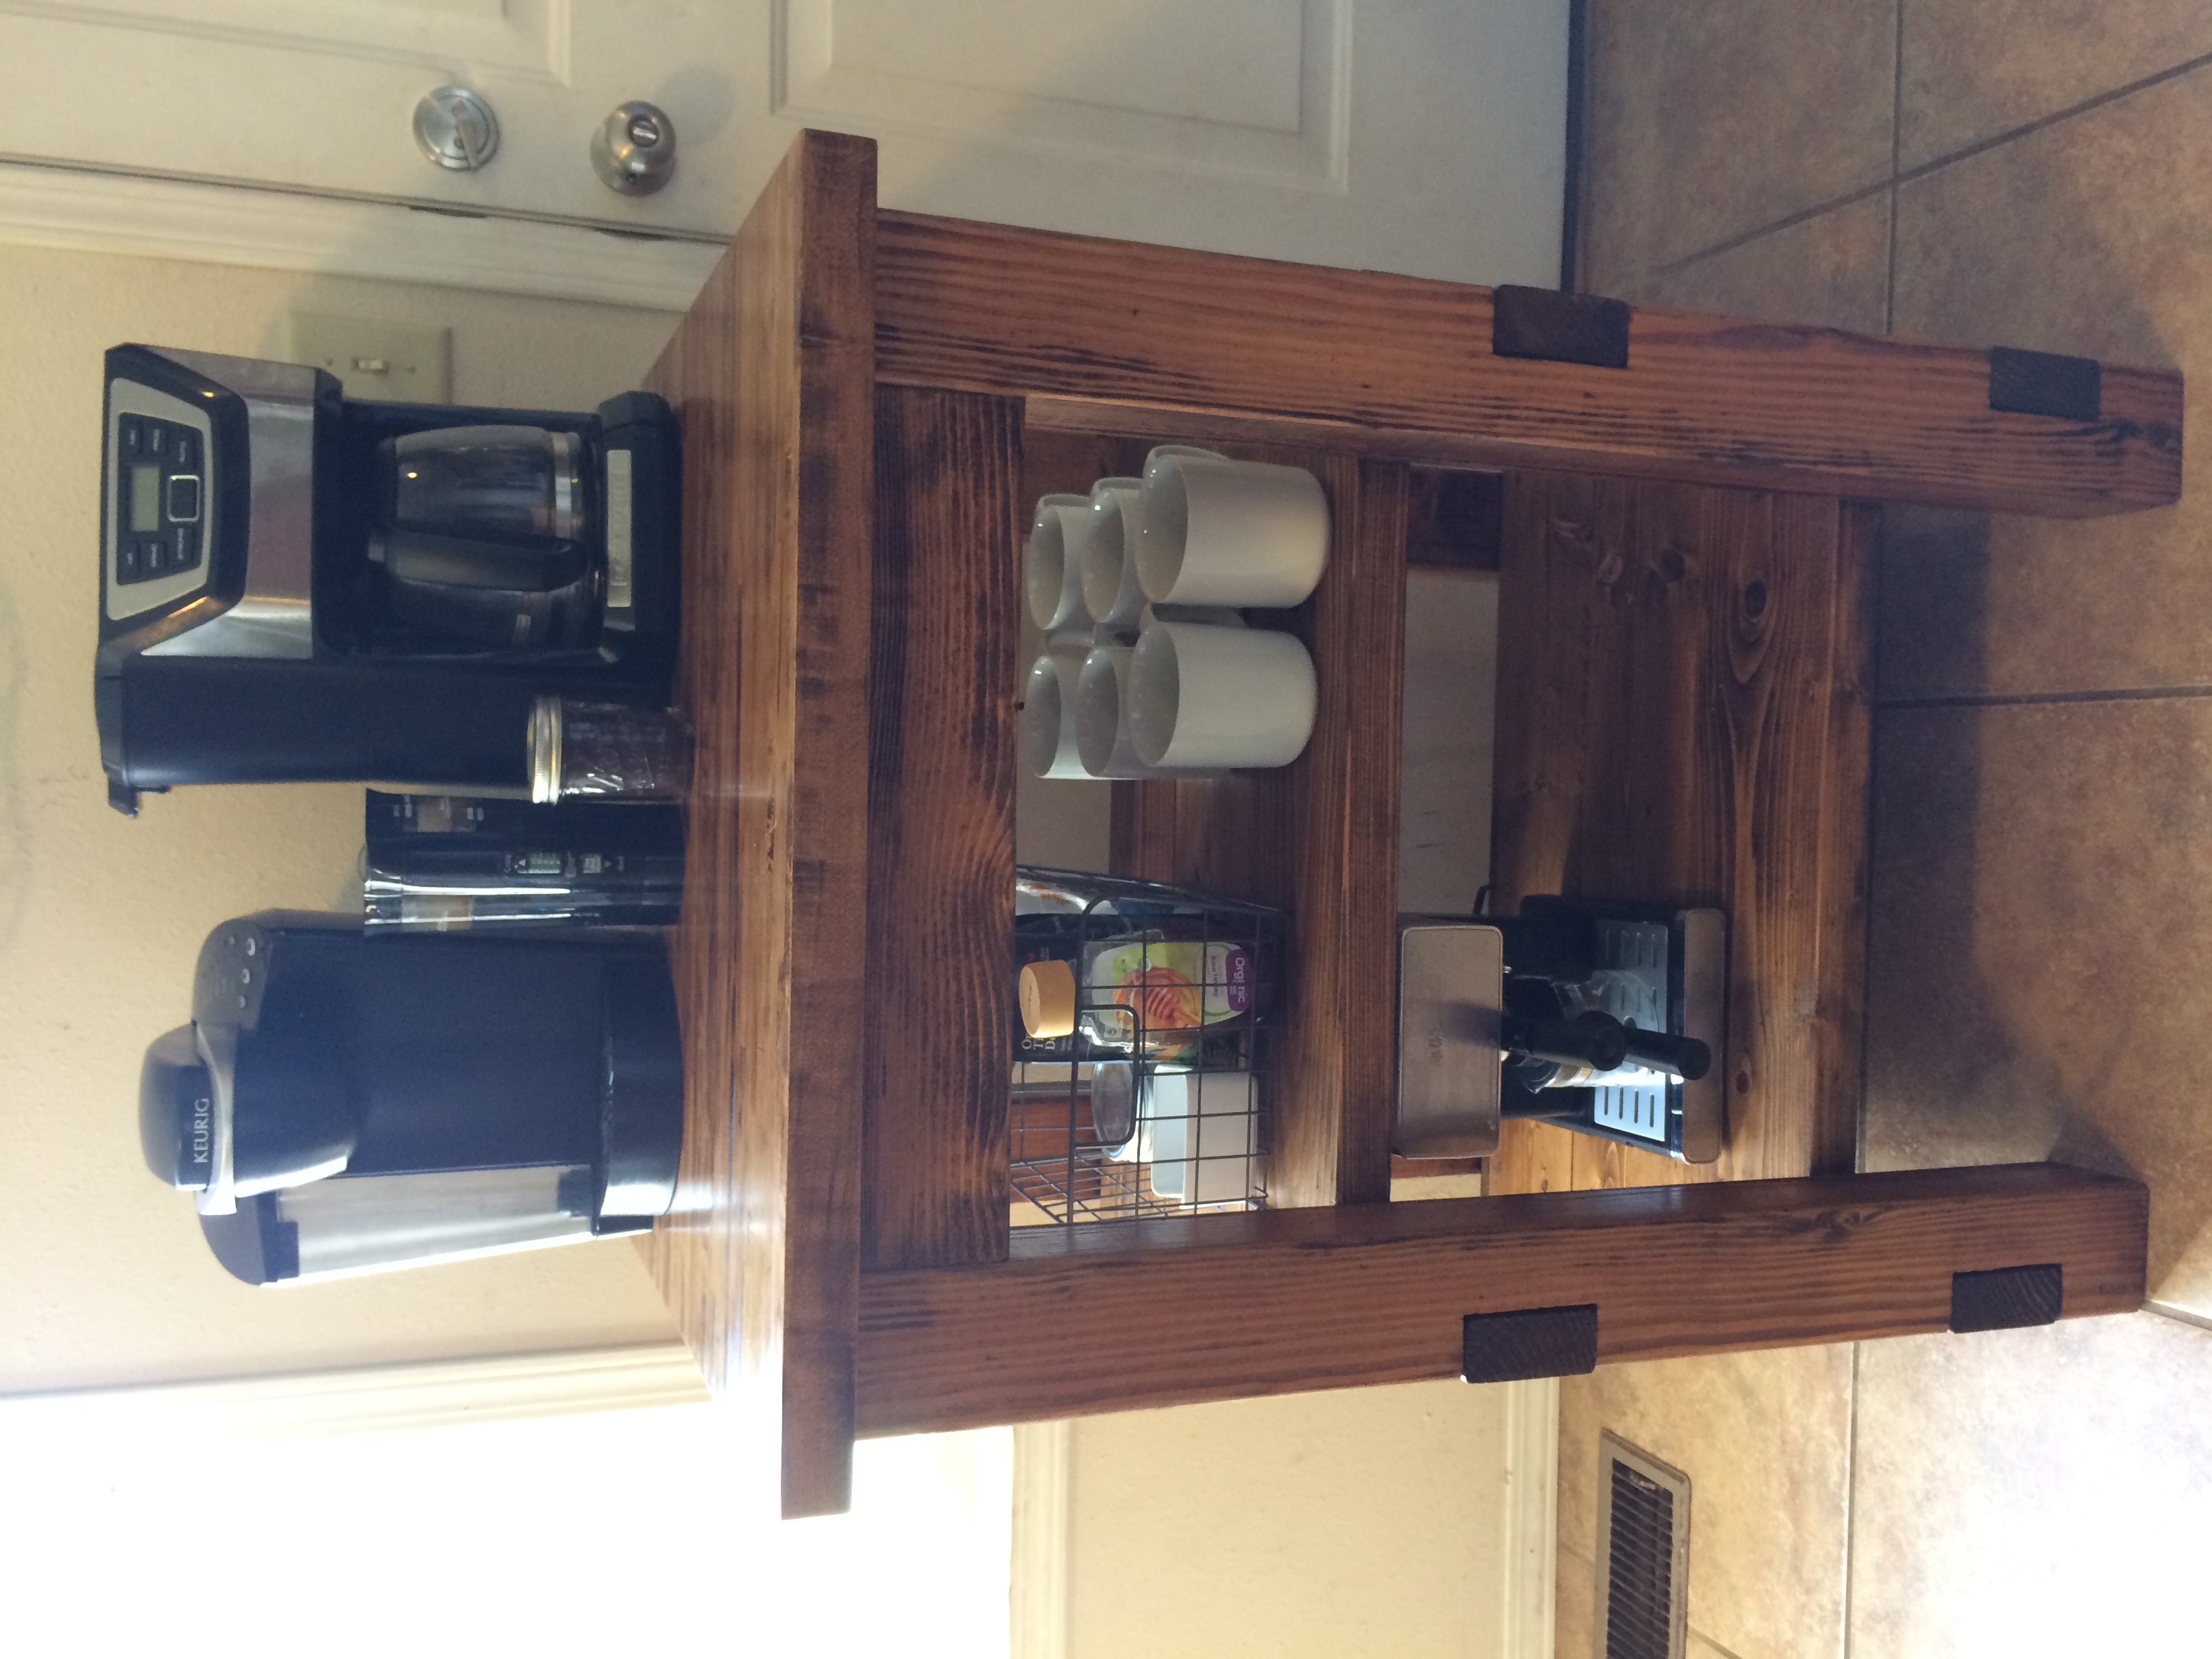
Coffee Bar
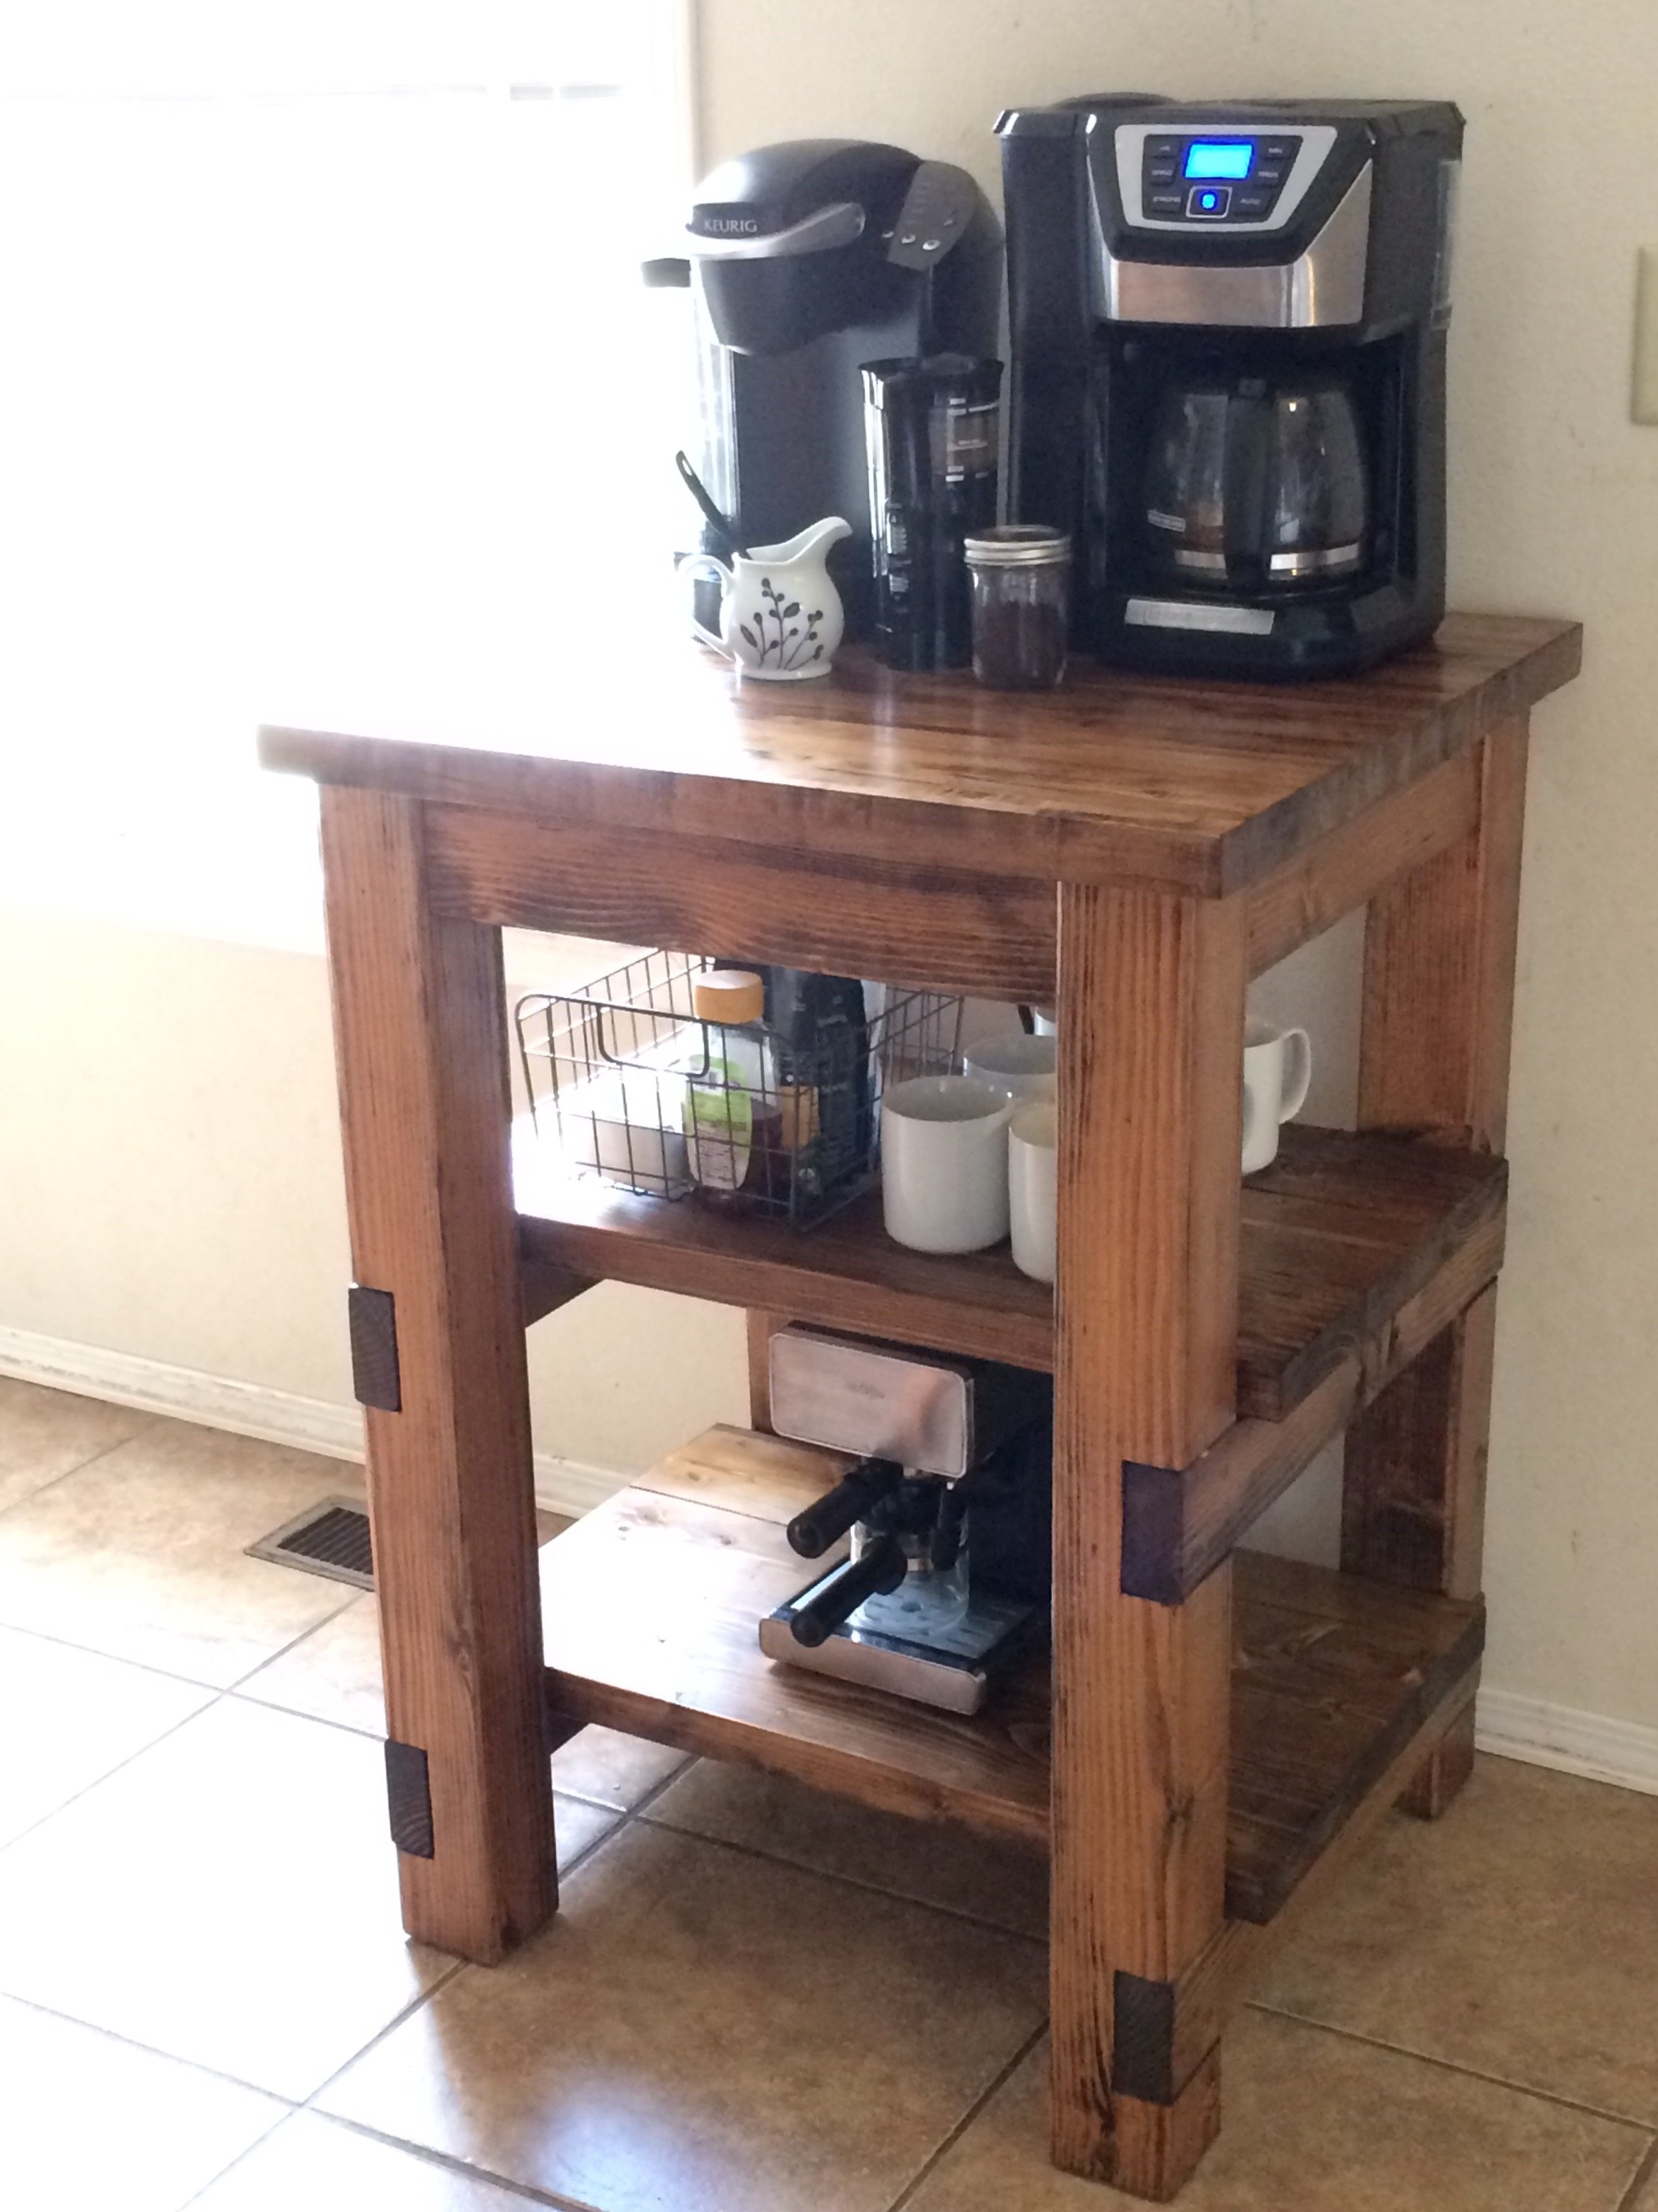
I modified this plan to fit a 27"x 25" chunk of butcher block that my mother-in-law gave me. The finished height is 36 & 1/2". I didn't have any special tools to make the notches for the shelves. I simply lowered the blade-stop on my 7&1/4" miter saw and fastened the screw with hair ties (or in other words, I jimmy-rigged it ;)). I practiced on scrap wood until I reached the depth I needed. There is a 9&1/4" clearance between both shelves, and the shelves have a 1" overhang off the sides. I mainly used pocket holes to connect the pieces. The shelves (3-2x6s each) were fastened together with wood glue and pocket holes, then I slid them into place and screwed them into the side aprons/supports from the top, then filled with wood filler. For the top, I added support from underneathe (2x2s that I had on-hand), then used 2&1/2" screws from underneathe through the 2x2s into the butcher block. At first I used zinc wood screws, but learned quickly that they strip extremely easily, so I switched to sheet rock screws. Fun project!!
Built from Plan(s)
Estimated Cost
$35 in lumber, not counting the butcher block top which I got for free from my mother-in-law.
Estimated Time Investment
Weekend Project (10-20 Hours)
Finish Used
For the butcher block, I decided to stain it since it would not be coming into contact with food. I sanded the butcher block with 220 grit sandpaper with my orbital sander. For the rest of my project I first used 80 grit, then 220 grit. Then I applied pre-stain wood conditioners overall, then Minwax provencial stain (I left it on for about 3 minutes then wiped it off). Then I used two coats of polyeurethene, sanding with 400 grit between the coats.
Recommended Skill Level
Intermediate
Comments

It took a little bit to finish, but it was worth the wait
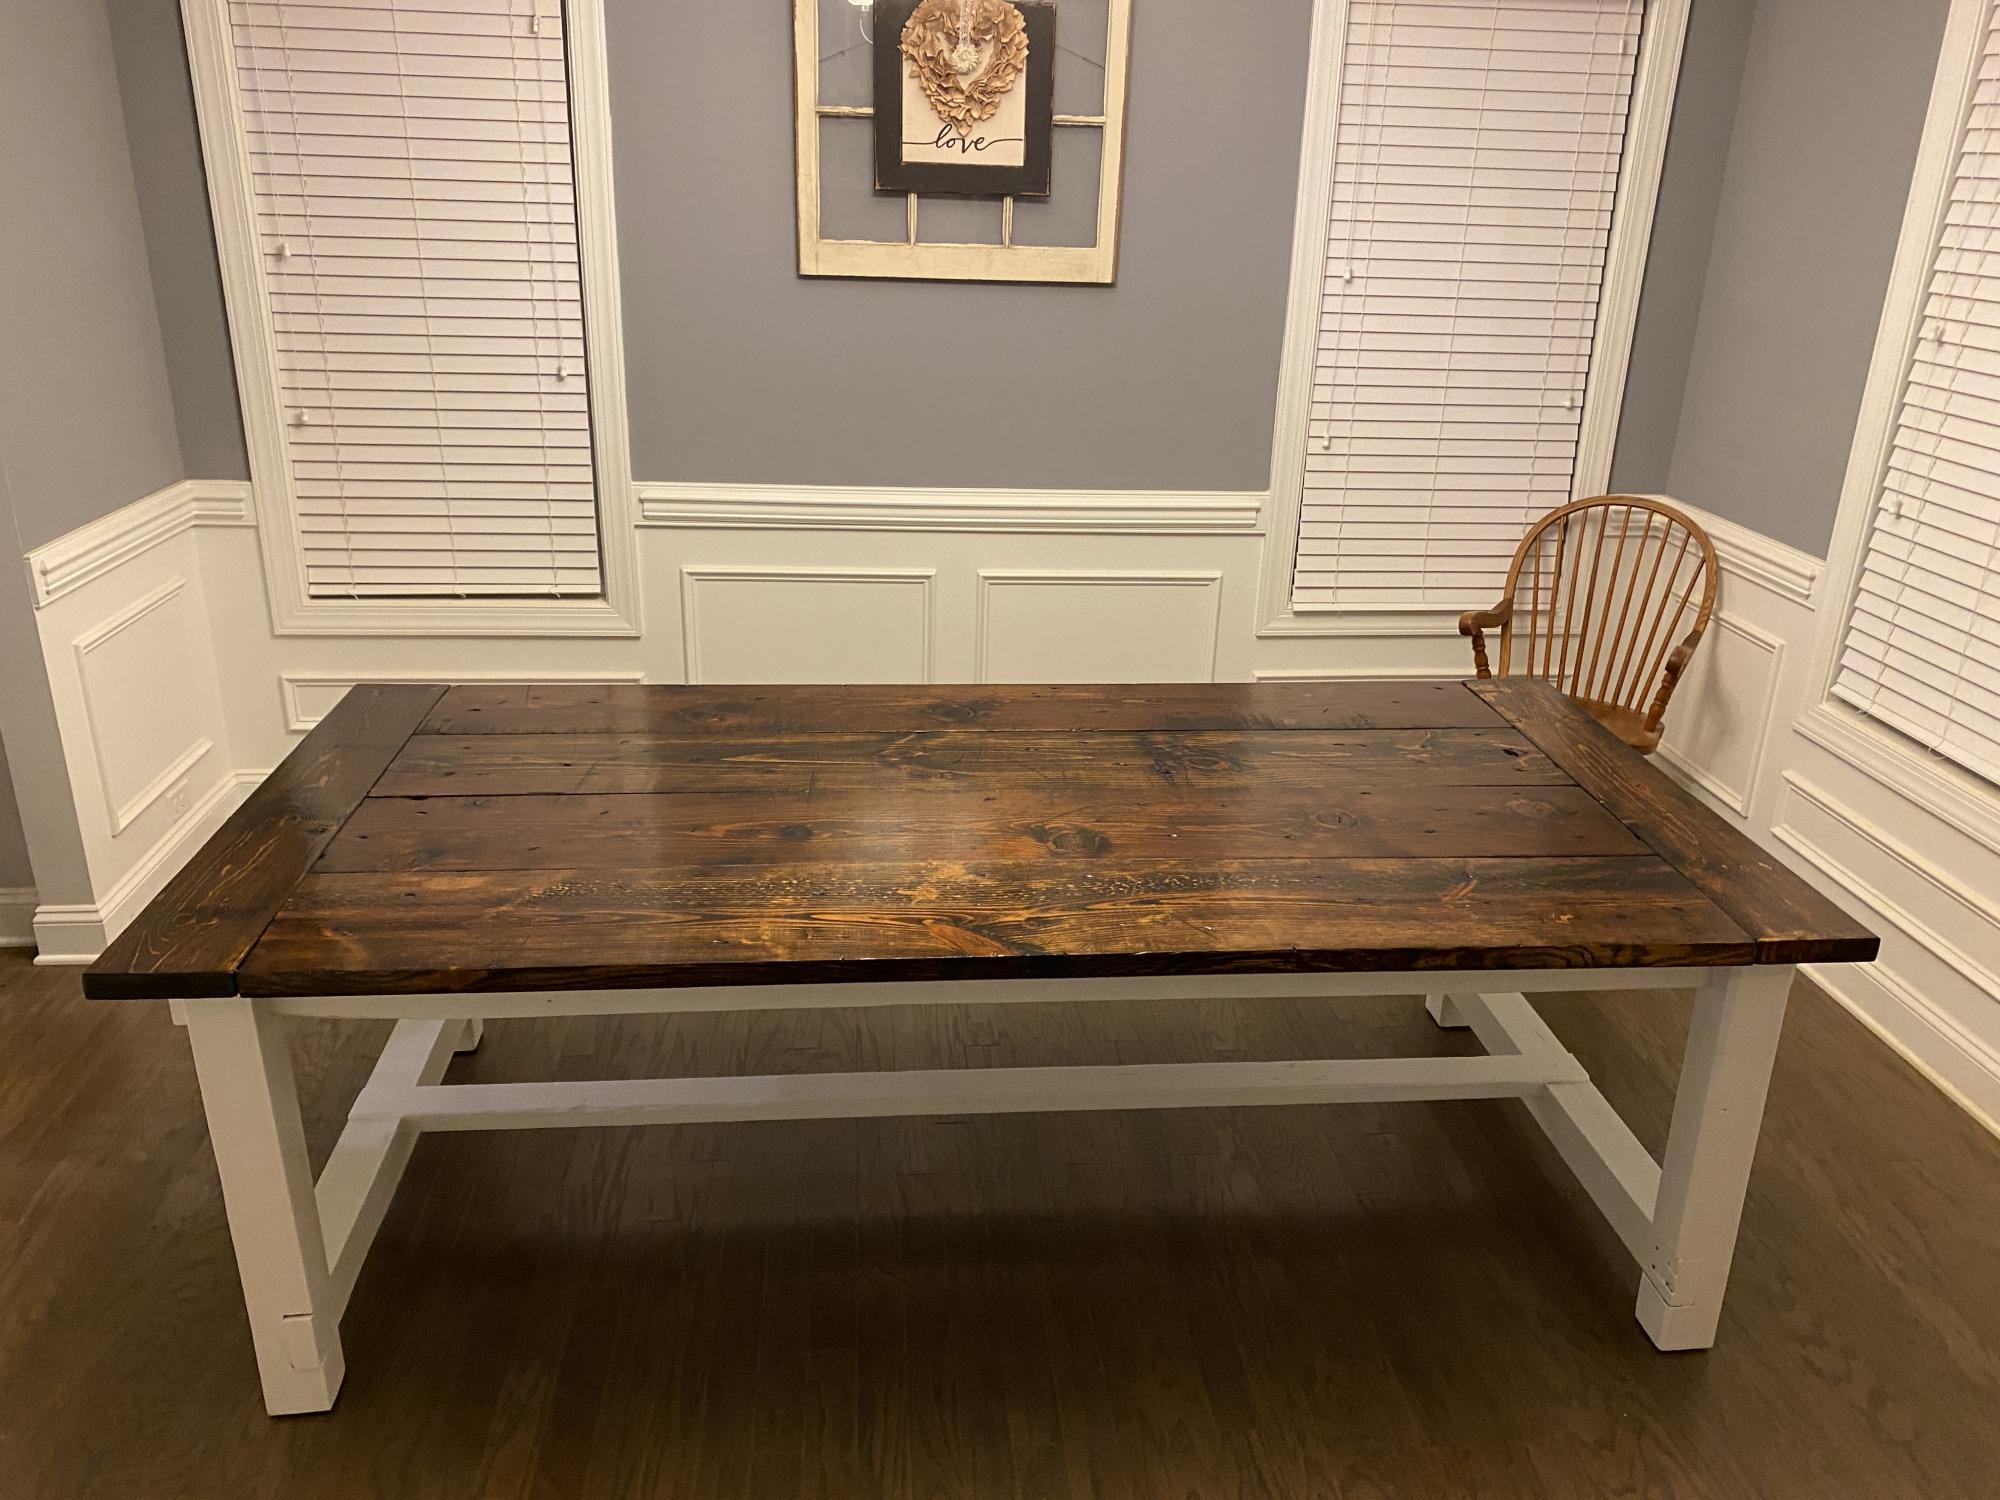
My wife wanted a Farmhouse table for as long as I can remember. When we bought our first house it was the first project I undertook. I finished building it in time for all 15 members of our extended family to come for Thanksgiving but didn't have time to stain it. After the holidays I went back to school and staining it went to the back burner. When I finished my degree three years later it was time to finish the table. The end result was worth the wait according to my wife.
Built from Plan(s)
Estimated Time Investment
Week Long Project (20 Hours or More)
Finish Used
Minwax Dark Walnut
Minwax Satin Poly
Valspar Cabinet and Furniture Paint
Minwax Satin Poly
Valspar Cabinet and Furniture Paint
Recommended Skill Level
Intermediate
Outdoor Wood Adirondack Chairs
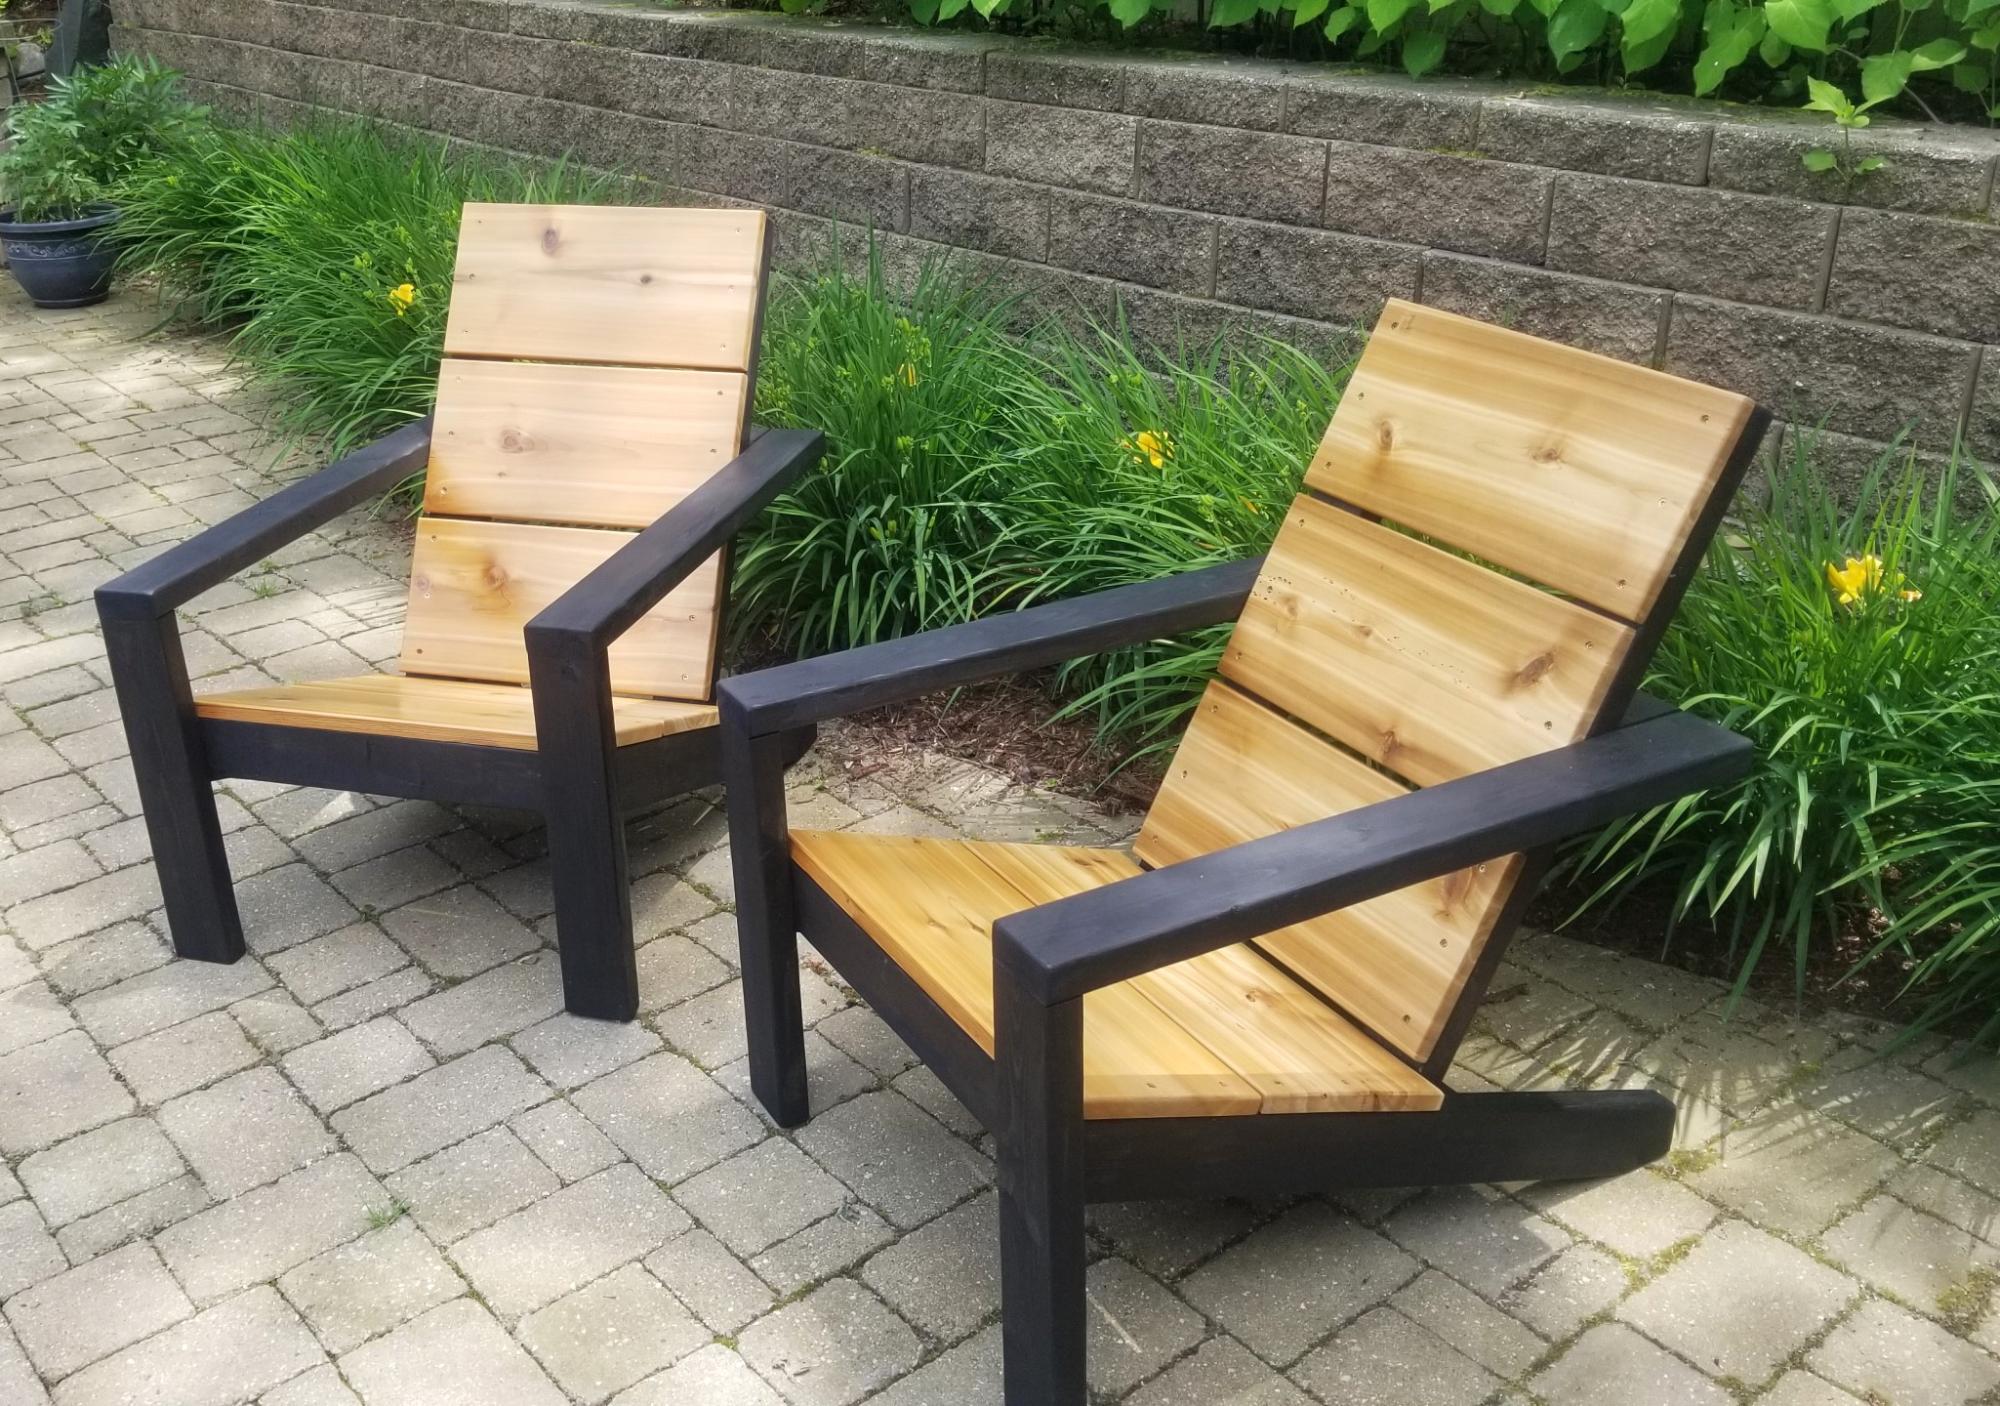
Great project plan, thanks Ana. Followed Ana's plans the only thing I did different was to coutersink and plug all visible screws.
Chair seats are cedar with a few coats of semigloss total boat varnish on the cedar. This enhanced the visibility of the cedars wood grain. I like the way the flat and gloss work together.
I bought covers on Amazon to help protect them from the sun a rain.
John Harrison - Michigan
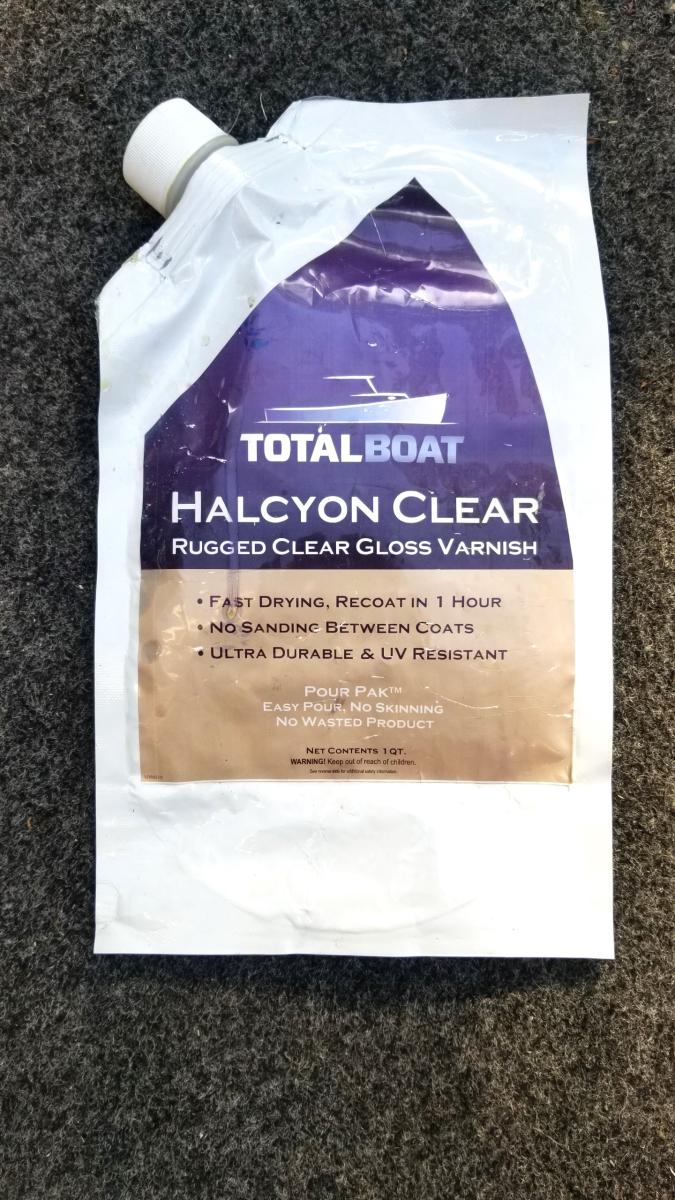
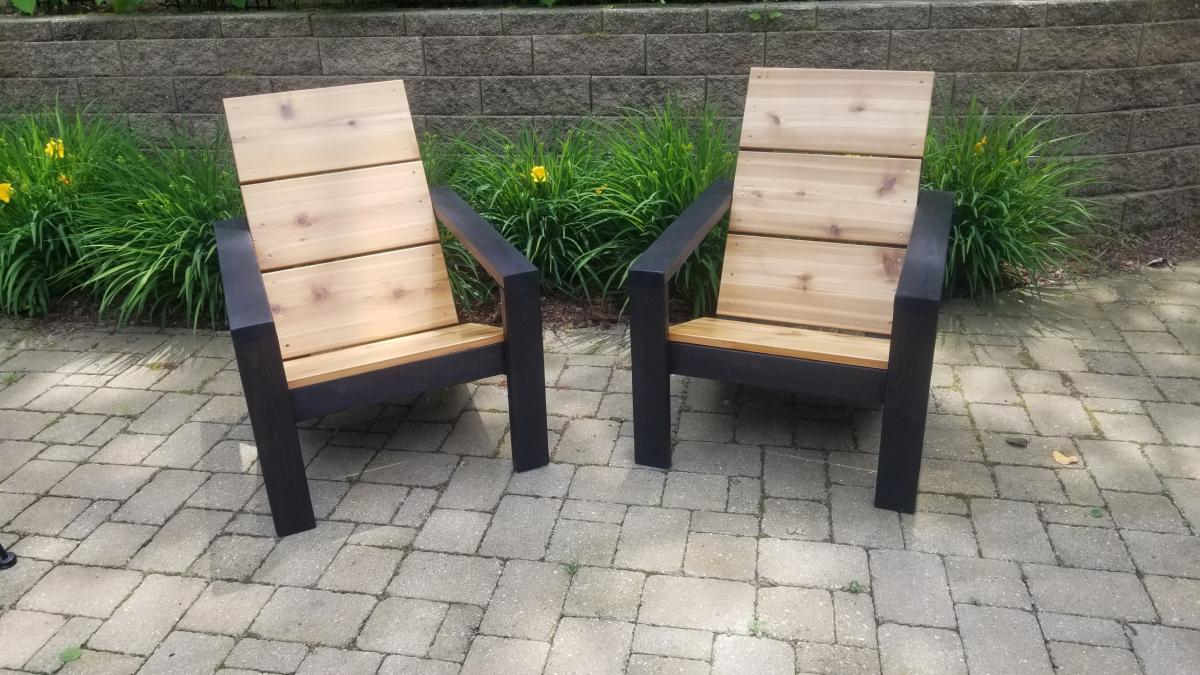
Built from Plan(s)
Ottoman
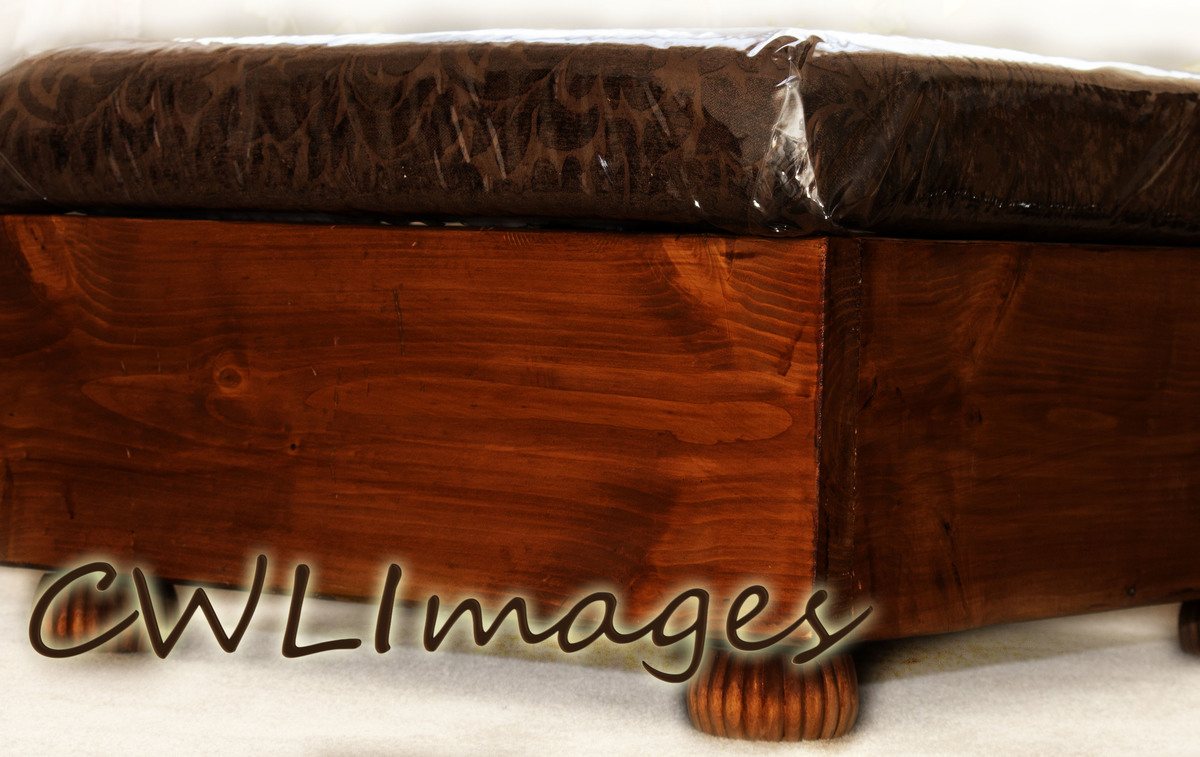
This is my 3rd completed project. This has storage, individual hinges was used.
I am still on the sofa after 9 months could not decide if I wanted to make storage.

Built from Plan(s)
Estimated Cost
estimate cast was $55 dollars, and that was due to the coast of the fabric covered top with plastic covering.
Estimated Time Investment
Day Project (6-9 Hours)
Finish Used
I sand the piece with 120, 220, 500 grit. Then stain/protection, it was suppose to be walnut, and it turn out this color. Can't complain, the cats are happy about it.
Recommended Skill Level
Intermediate
Custom Grandy sliding cabinet
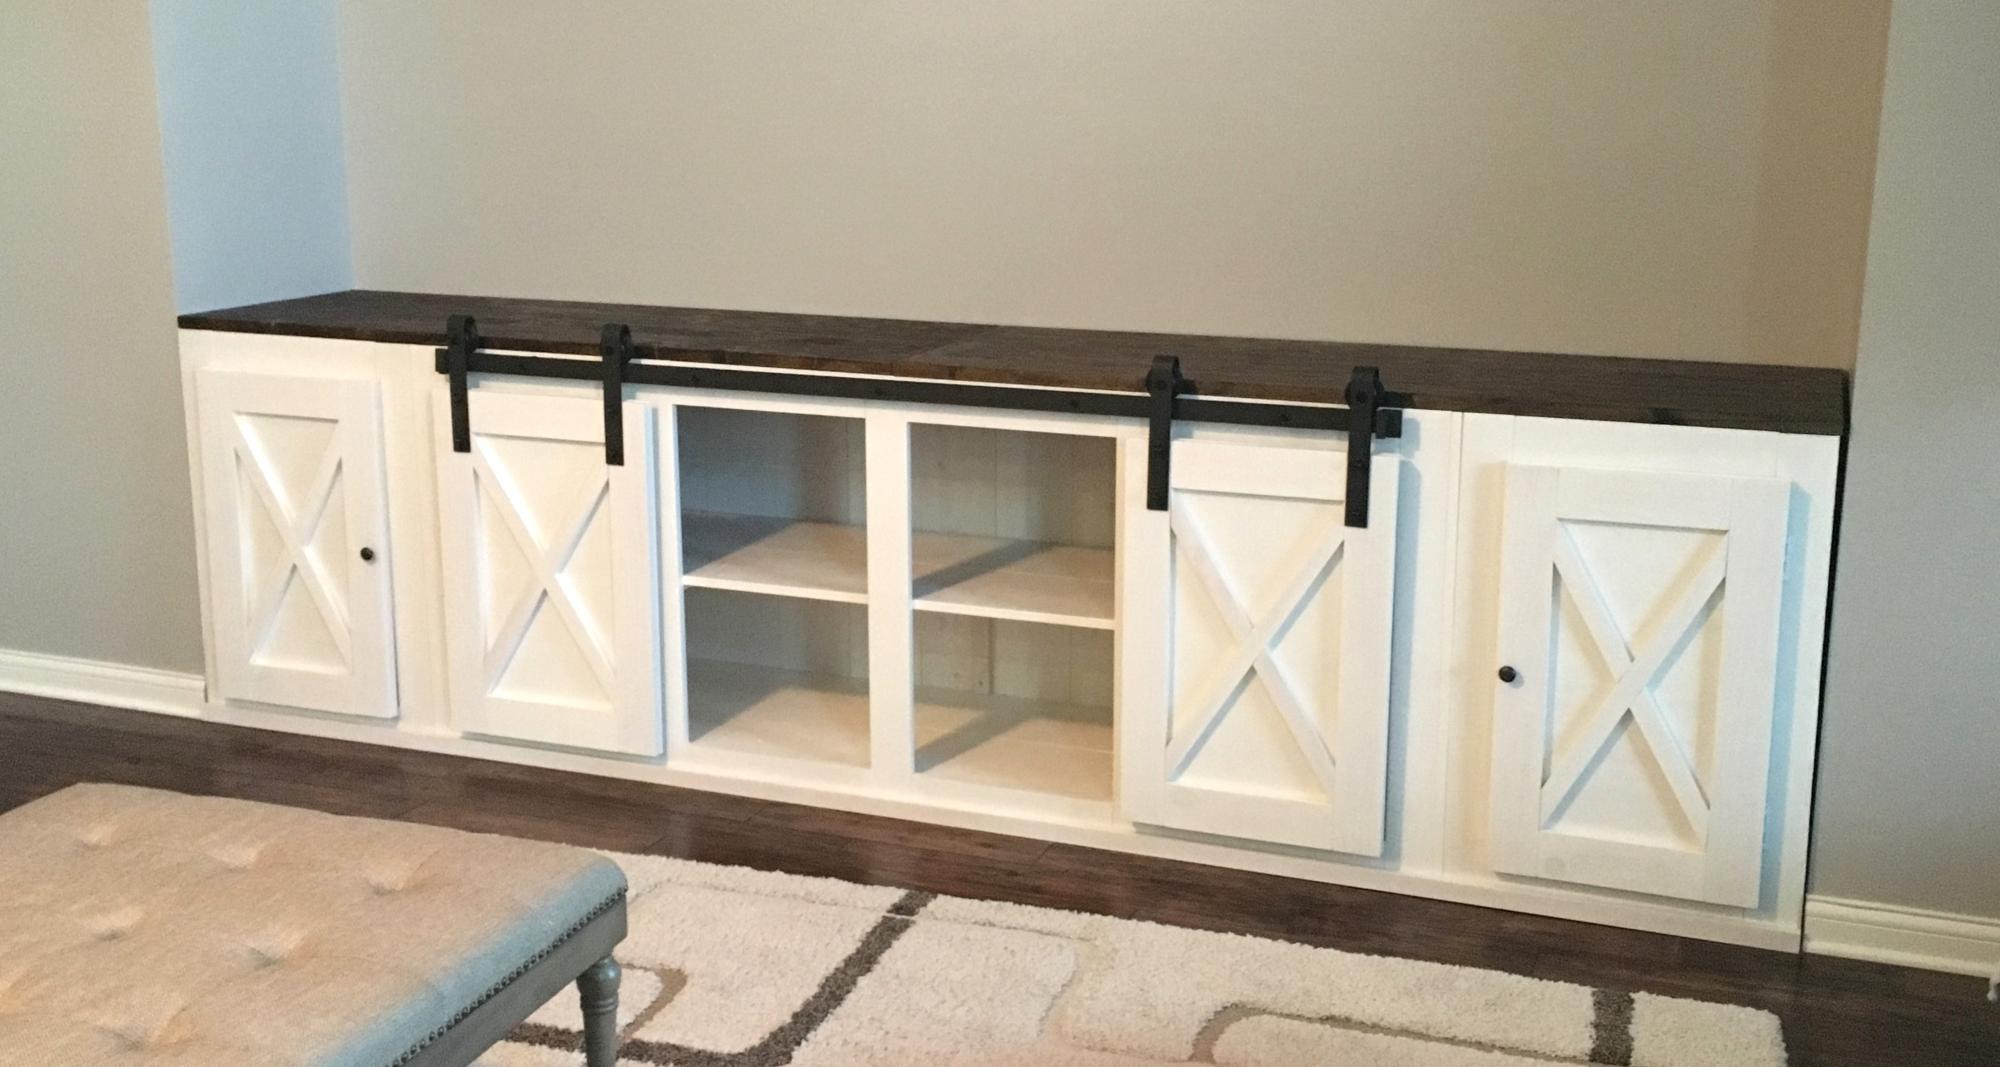
Built by Cunningham Custom
Built from Plan(s)
Estimated Cost
$1000-$1200 used all premium material
Estimated Time Investment
Week Long Project (20 Hours or More)
Finish Used
Sherman williams ovation paint for the body and minwax jacobean for the top
Recommended Skill Level
Intermediate
Small 2x4 Potting Bench
iSideTable
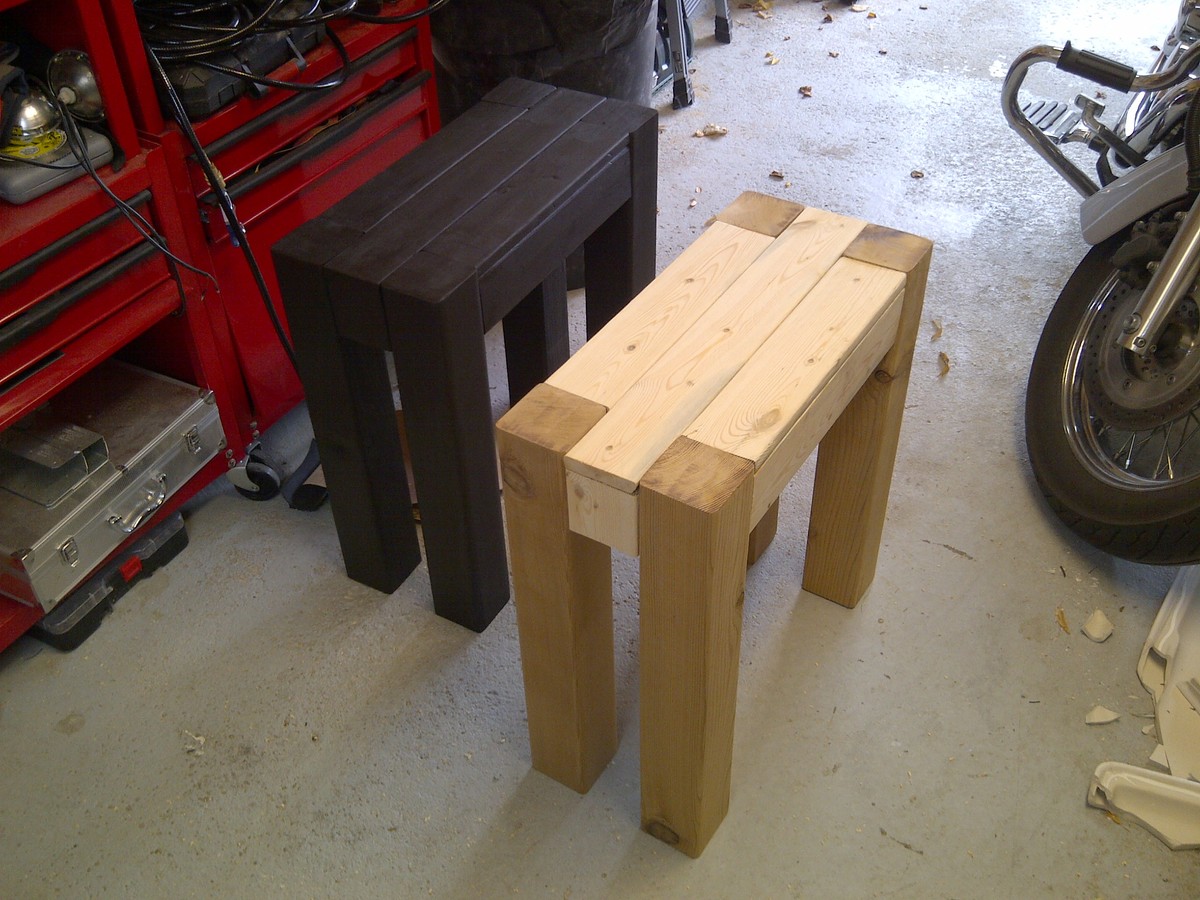
I bought my first home in July, and have been looking for furniture to fill it with. Then I found this site, and decided I would build what I want. I plan on making the iTable as well, but for my first project, I thought about starting a little smaller. I also needed side tables for my couches more. So was born the iSideTable ;)
23 3/4" high
10 1/2" wide
22 1/2" deep
Materials used:
1 4x4x8
1 1x4x8
All told materials alone for this project is a miserly $23!!
I have just finished my first coat of Varathane Kona (it's what we have in Canada). I want it nice and dark so I am leaving it on to dry, then applying a second coat.
Built from Plan(s)
Estimated Cost
$30
Estimated Time Investment
Afternoon Project (3-6 Hours)
Recommended Skill Level
Starter Project
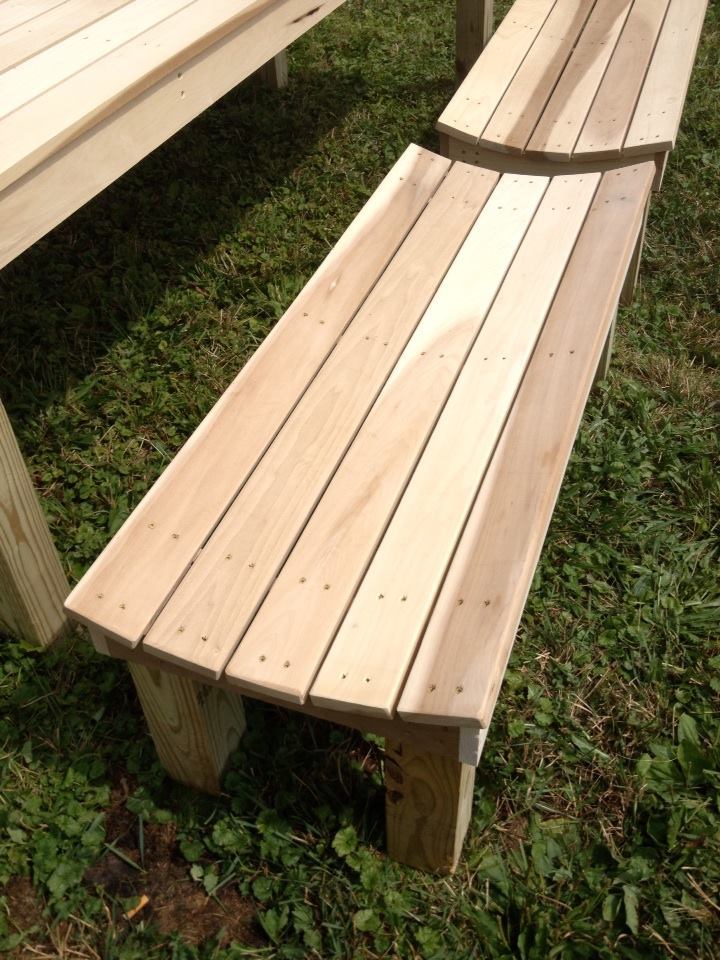
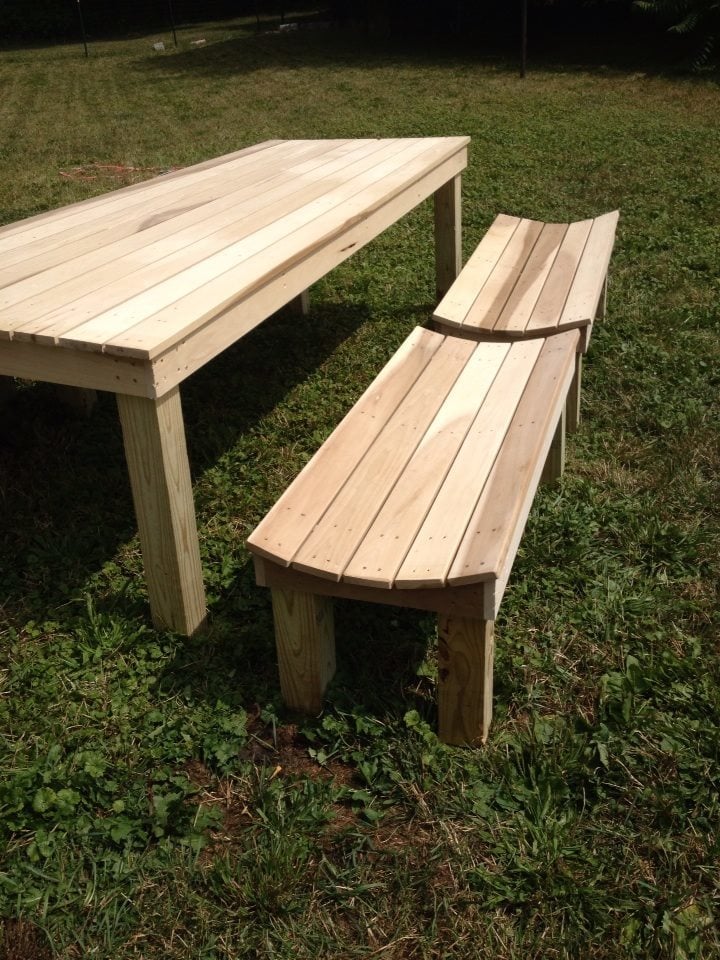
Modified Simple Outdoor Dining Table
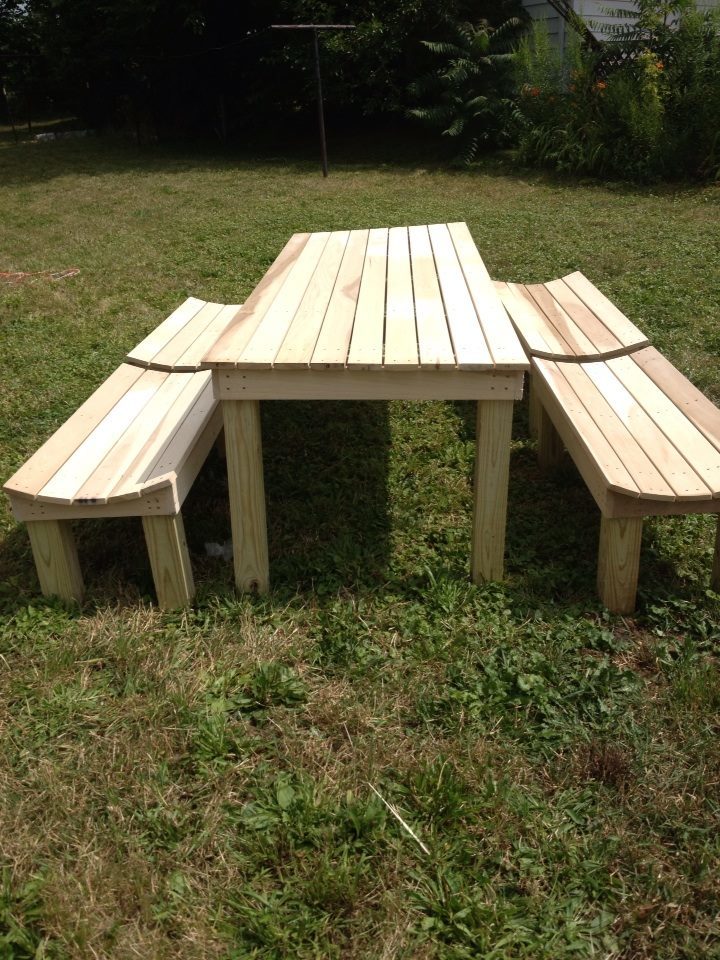
When I wanted to build a new outdoor dining set, I immediately turned to the Ana White website to browse the plans. I chose the simple outdoor dining table and this is my much modified version of that plan.
I liked the look of the table and the bench and the vertical slats but I needed to modify the plan to build a larger table that could seat as many as 10 if needed. I also wanted a curved bench top because of aesthetics and because it's so much more comfortable. I soon realized that I wouldn't be able to keep the vertical slats in the bench and get the curve I wanted. Once I went with horizontal lines in the bench I modified the table to match.
I finished building the tables and benches at 3 am on a Saturday morning, just in time for a family BBQ at 6 pm. There wasn't time to apply a finish, but I plan on using a golden pine stain and semi-gloss clear urethane sealer with UV protection.
Poplar was on sale when I went shopping for wood. It wasn't my first choice but the price made it hard to turn down. Because the legs sit directly on the ground I chose pressure treated 4X4 lumber for those.
Although the finished product is much different than the original plans for the simple outdoor table, I hope you enjoy seeing what I was able to build from that starting point.

Estimated Cost
$250
Estimated Time Investment
Weekend Project (10-20 Hours)
Finish Used
As stated, the photos show the unfinished table and benches but they will be stained golden pine and weather sealed with a semi-gloss urethane finish.
Recommended Skill Level
Intermediate
A little shorter, a little wider
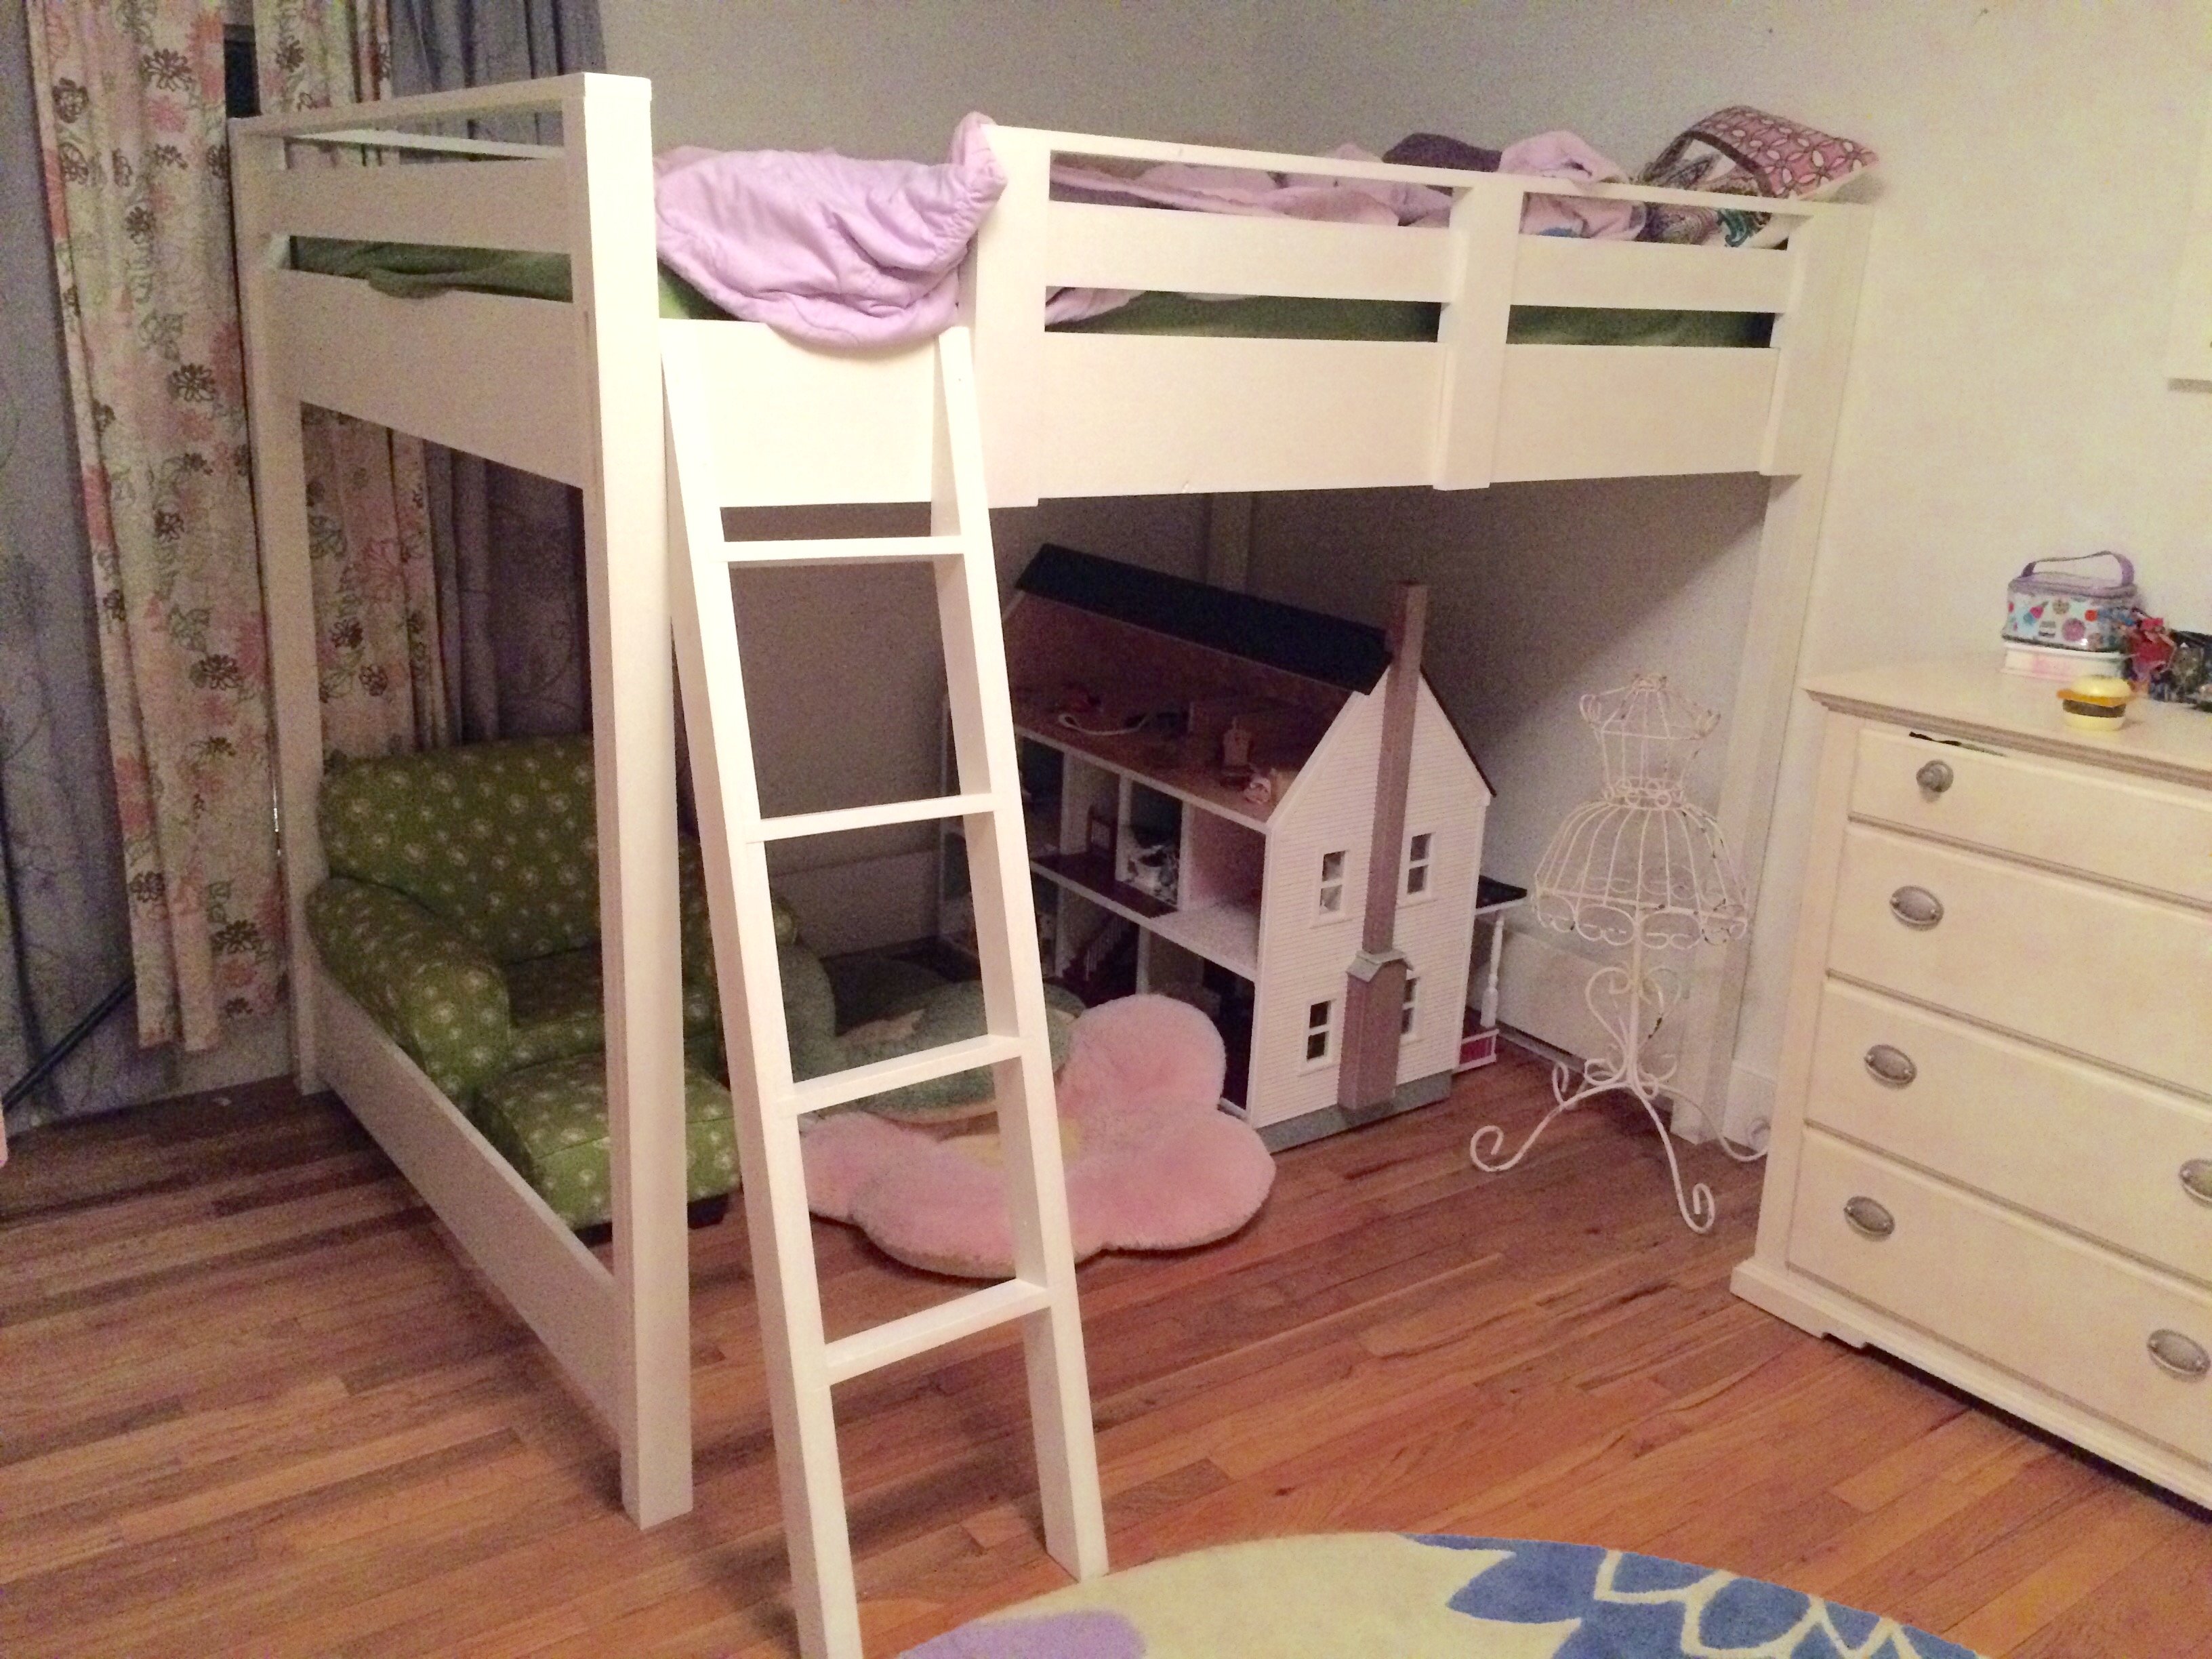
This is the first piece of furniture I've ever made. Great plans. I shortened mine 10 inches by reducing the height of the legs, filler pieces, and ladder. My daughter loves it!
Estimated Cost
230
Estimated Time Investment
Day Project (6-9 Hours)
Finish Used
Paint
Recommended Skill Level
Beginner
Kentwood Twin Bed

Here’s the final pics of my sons Twin sized “Kentwood bed” that me and him built together . The color is “Indigo Cloth”. Was really fun doing this build. Now he’s been in his room all day today and never left and dads laying in his bed lol. I used Maple Hardwood Plywood and whitewood 1x’s, 2x’s
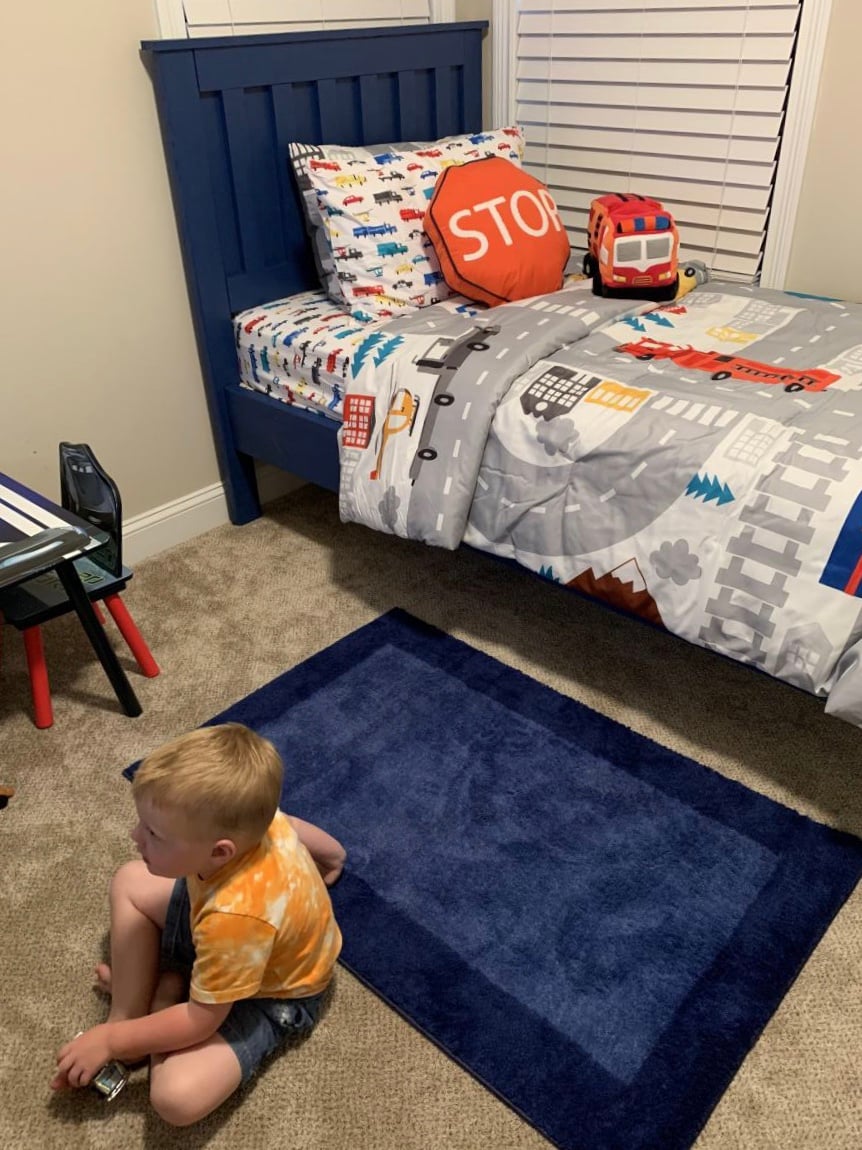
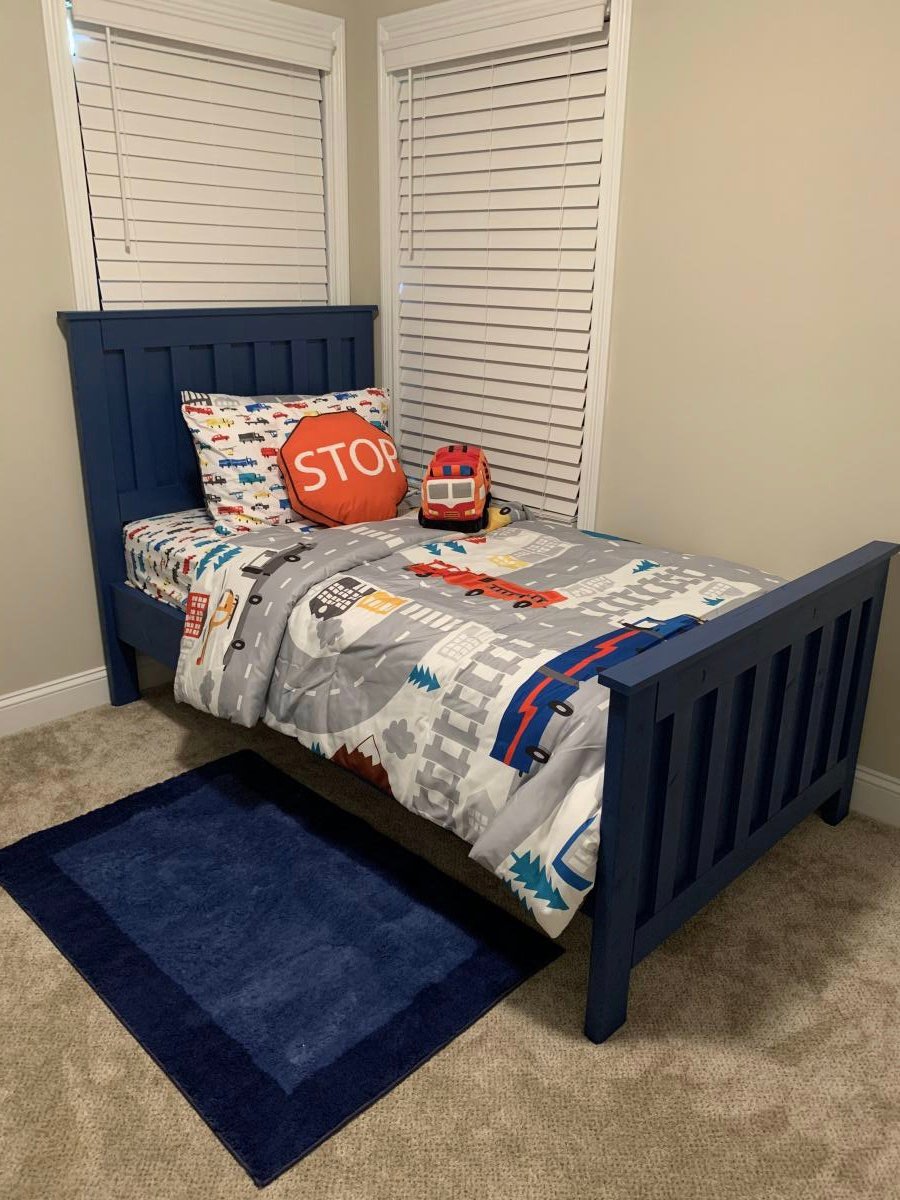
Built from Plan(s)
Estimated Cost
$180
Estimated Time Investment
Day Project (6-9 Hours)
Finish Used
Valspar Cabinet / Furniture Satin “ Indigo Cloth” blue.
Recommended Skill Level
Beginner
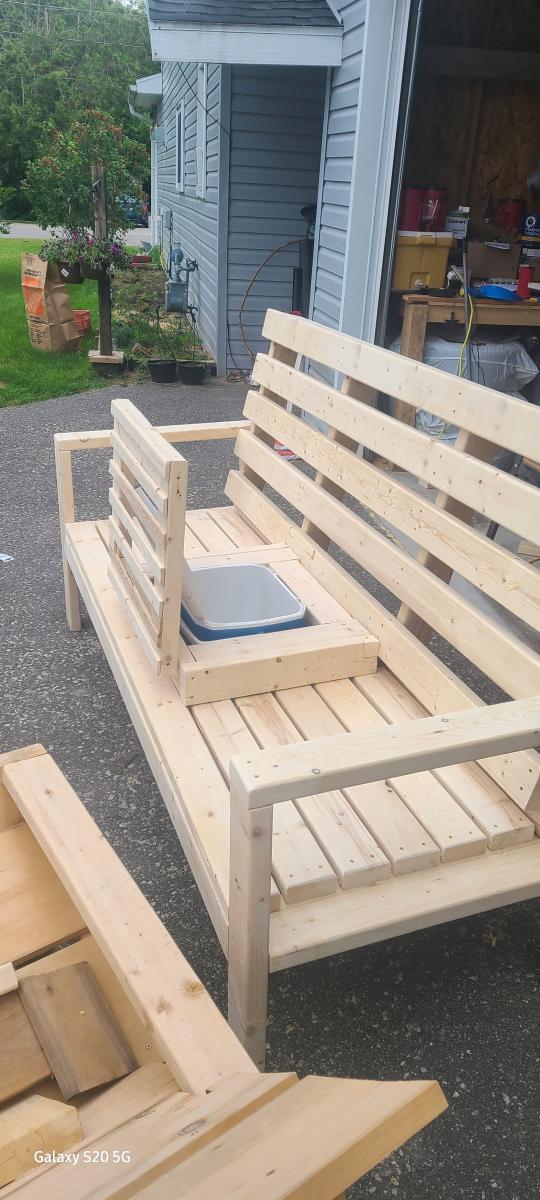
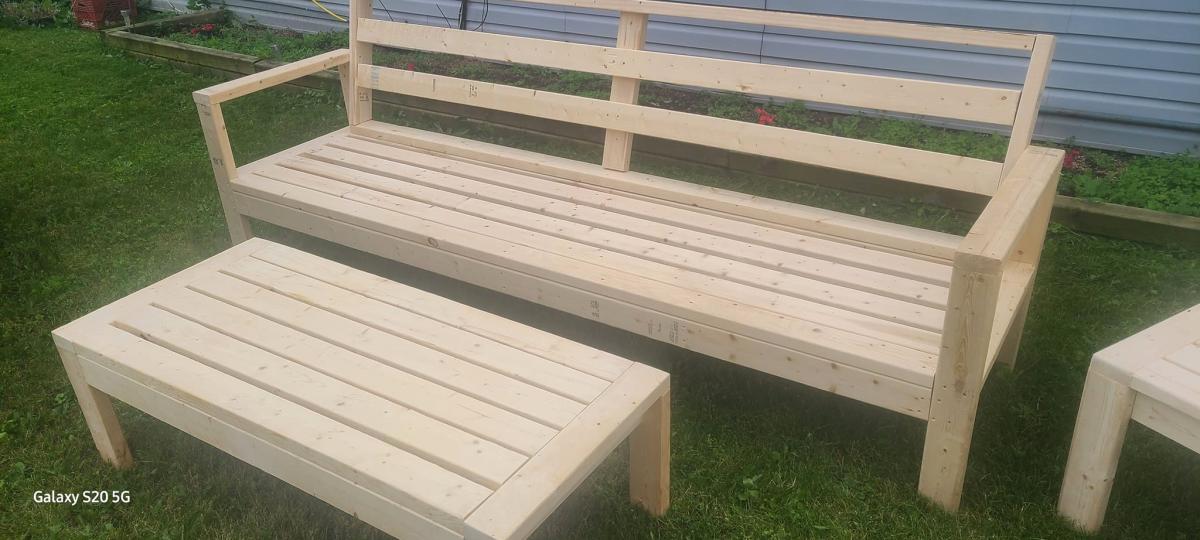
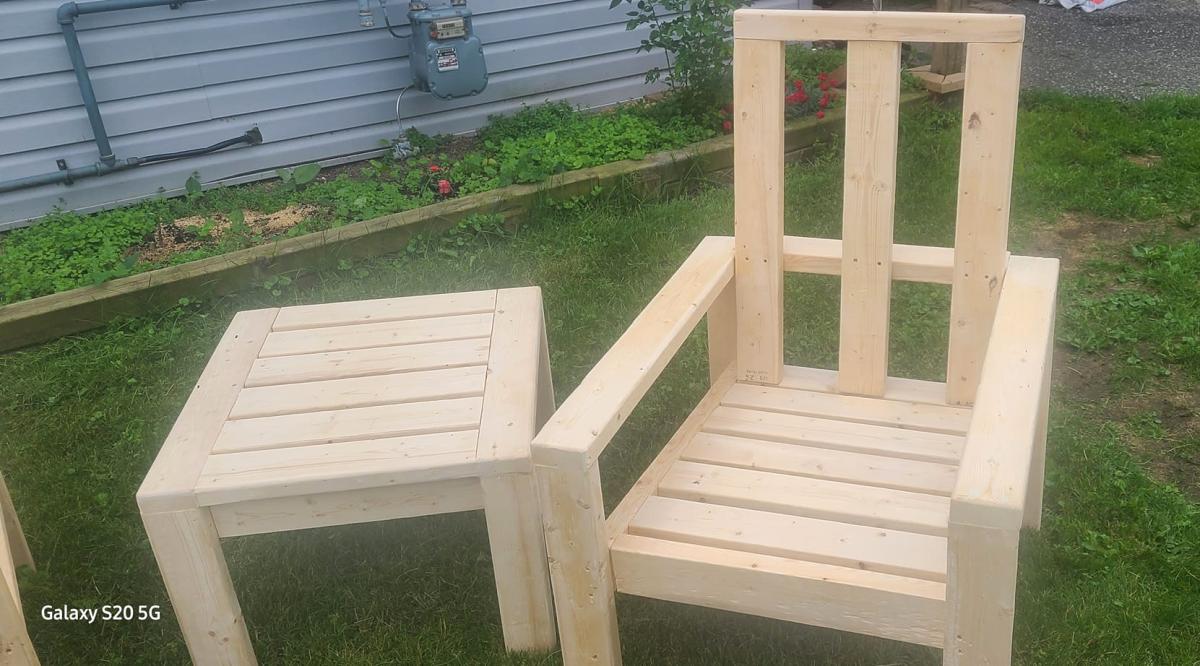
Outdoor DIY Wood Furniture
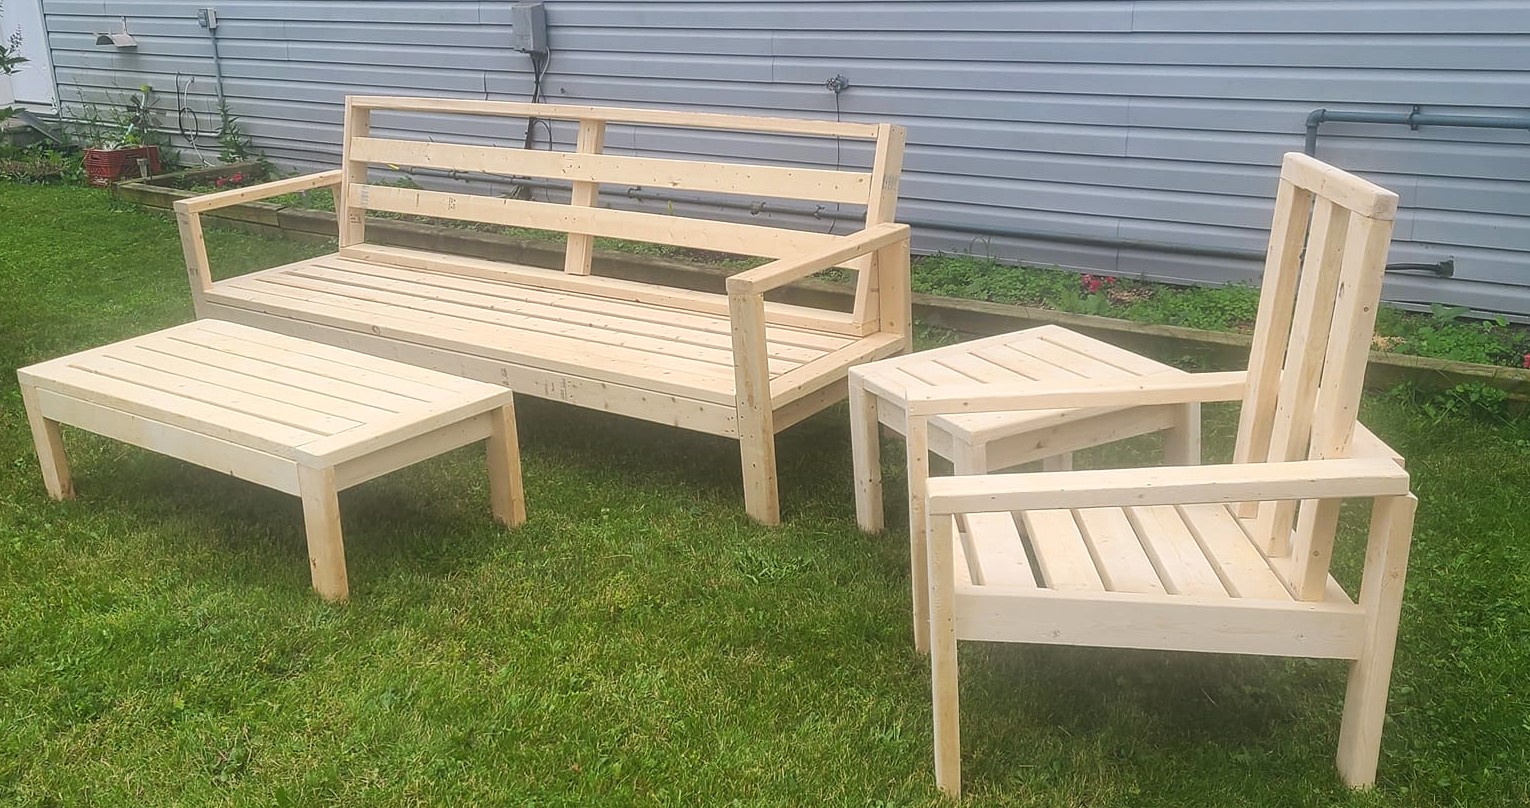
Second pic is a 6ft variation of your bench with a cooler installed in center. The other 3 pics are also from your plans, this is an 8ft bench with coffee table, end table and chair. not sure where I went wrong on the angle for chair but the length was correct however as you can see the back of the arm came up 1" short.
John Dunn
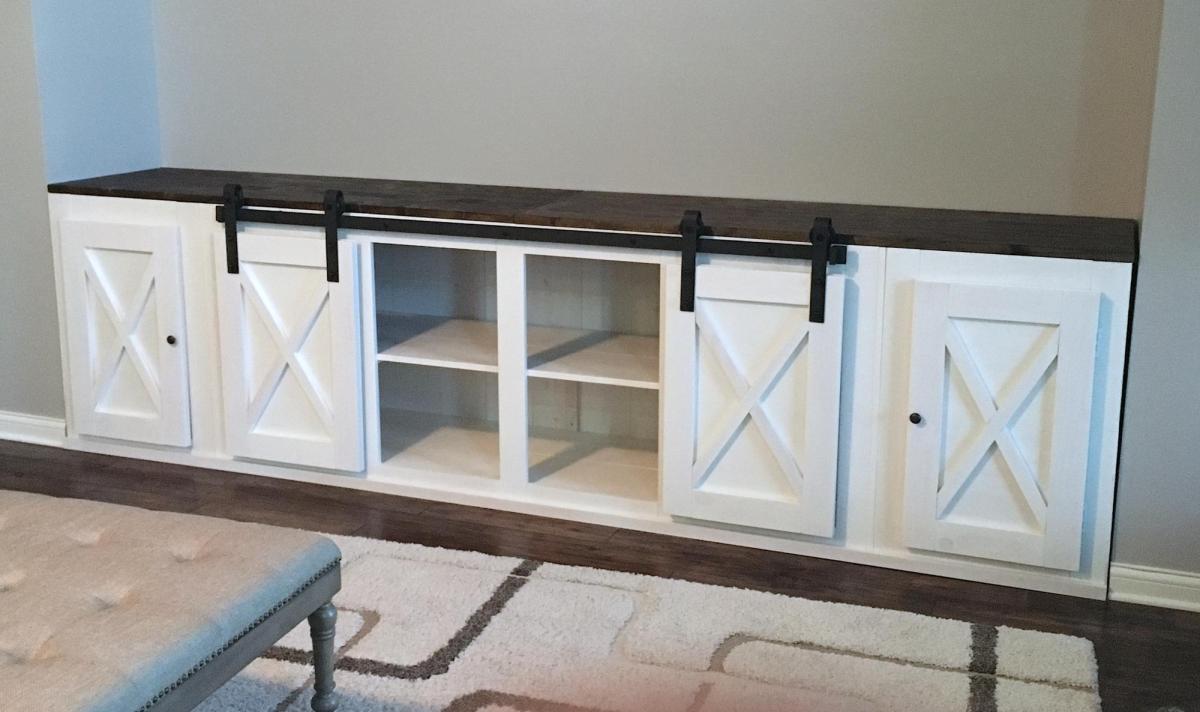
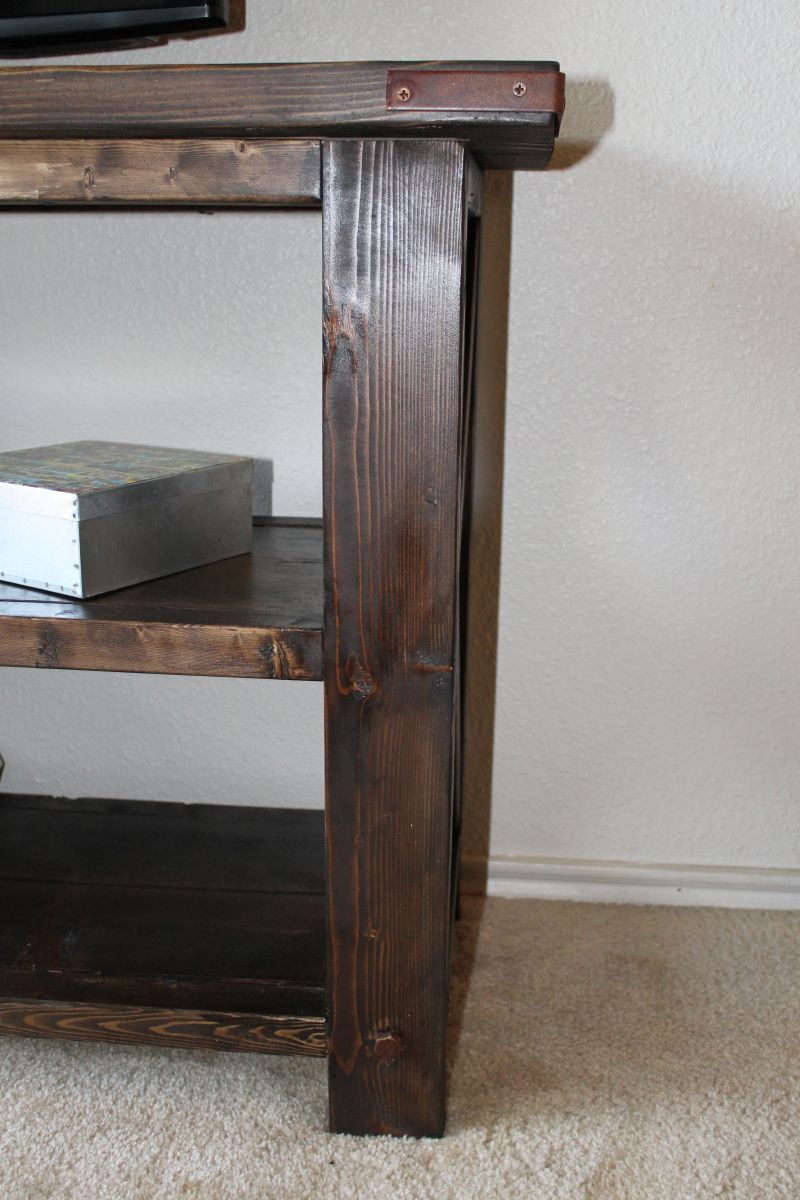
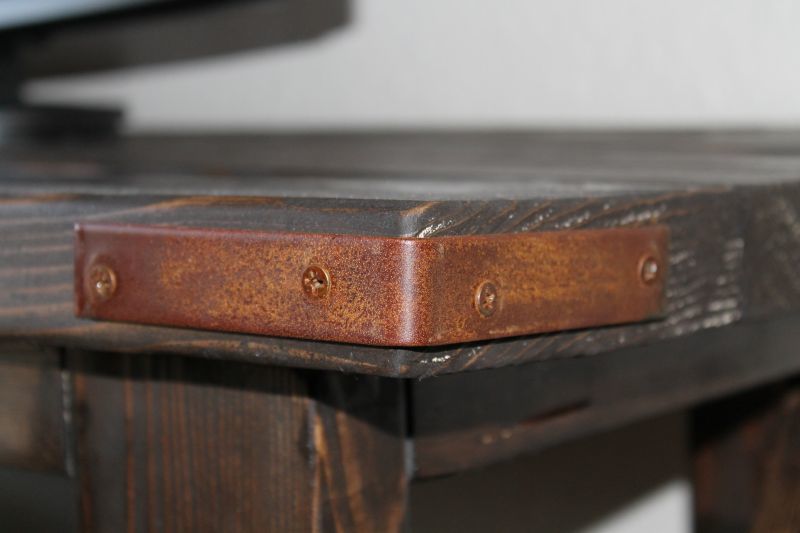
Our version of the Rustic X Console Table
We LOVE this Rustic X Console table! We used a Kona stain and we took the iron hardware and rusted it up with heat, vinegar, salt and hydrogen peroxide.
Built from Plan(s)
Estimated Cost
$130
Estimated Time Investment
Weekend Project (10-20 Hours)
Finish Used
Kona Stain
Recommended Skill Level
Intermediate