Community Brag Posts
First bed for granddoughter
I made this for my granddoughter.
Built from Plan(s)
Estimated Cost
$45.00
Estimated Time Investment
Weekend Project (10-20 Hours)
Finish Used
white paint
Recommended Skill Level
Beginner
Comments
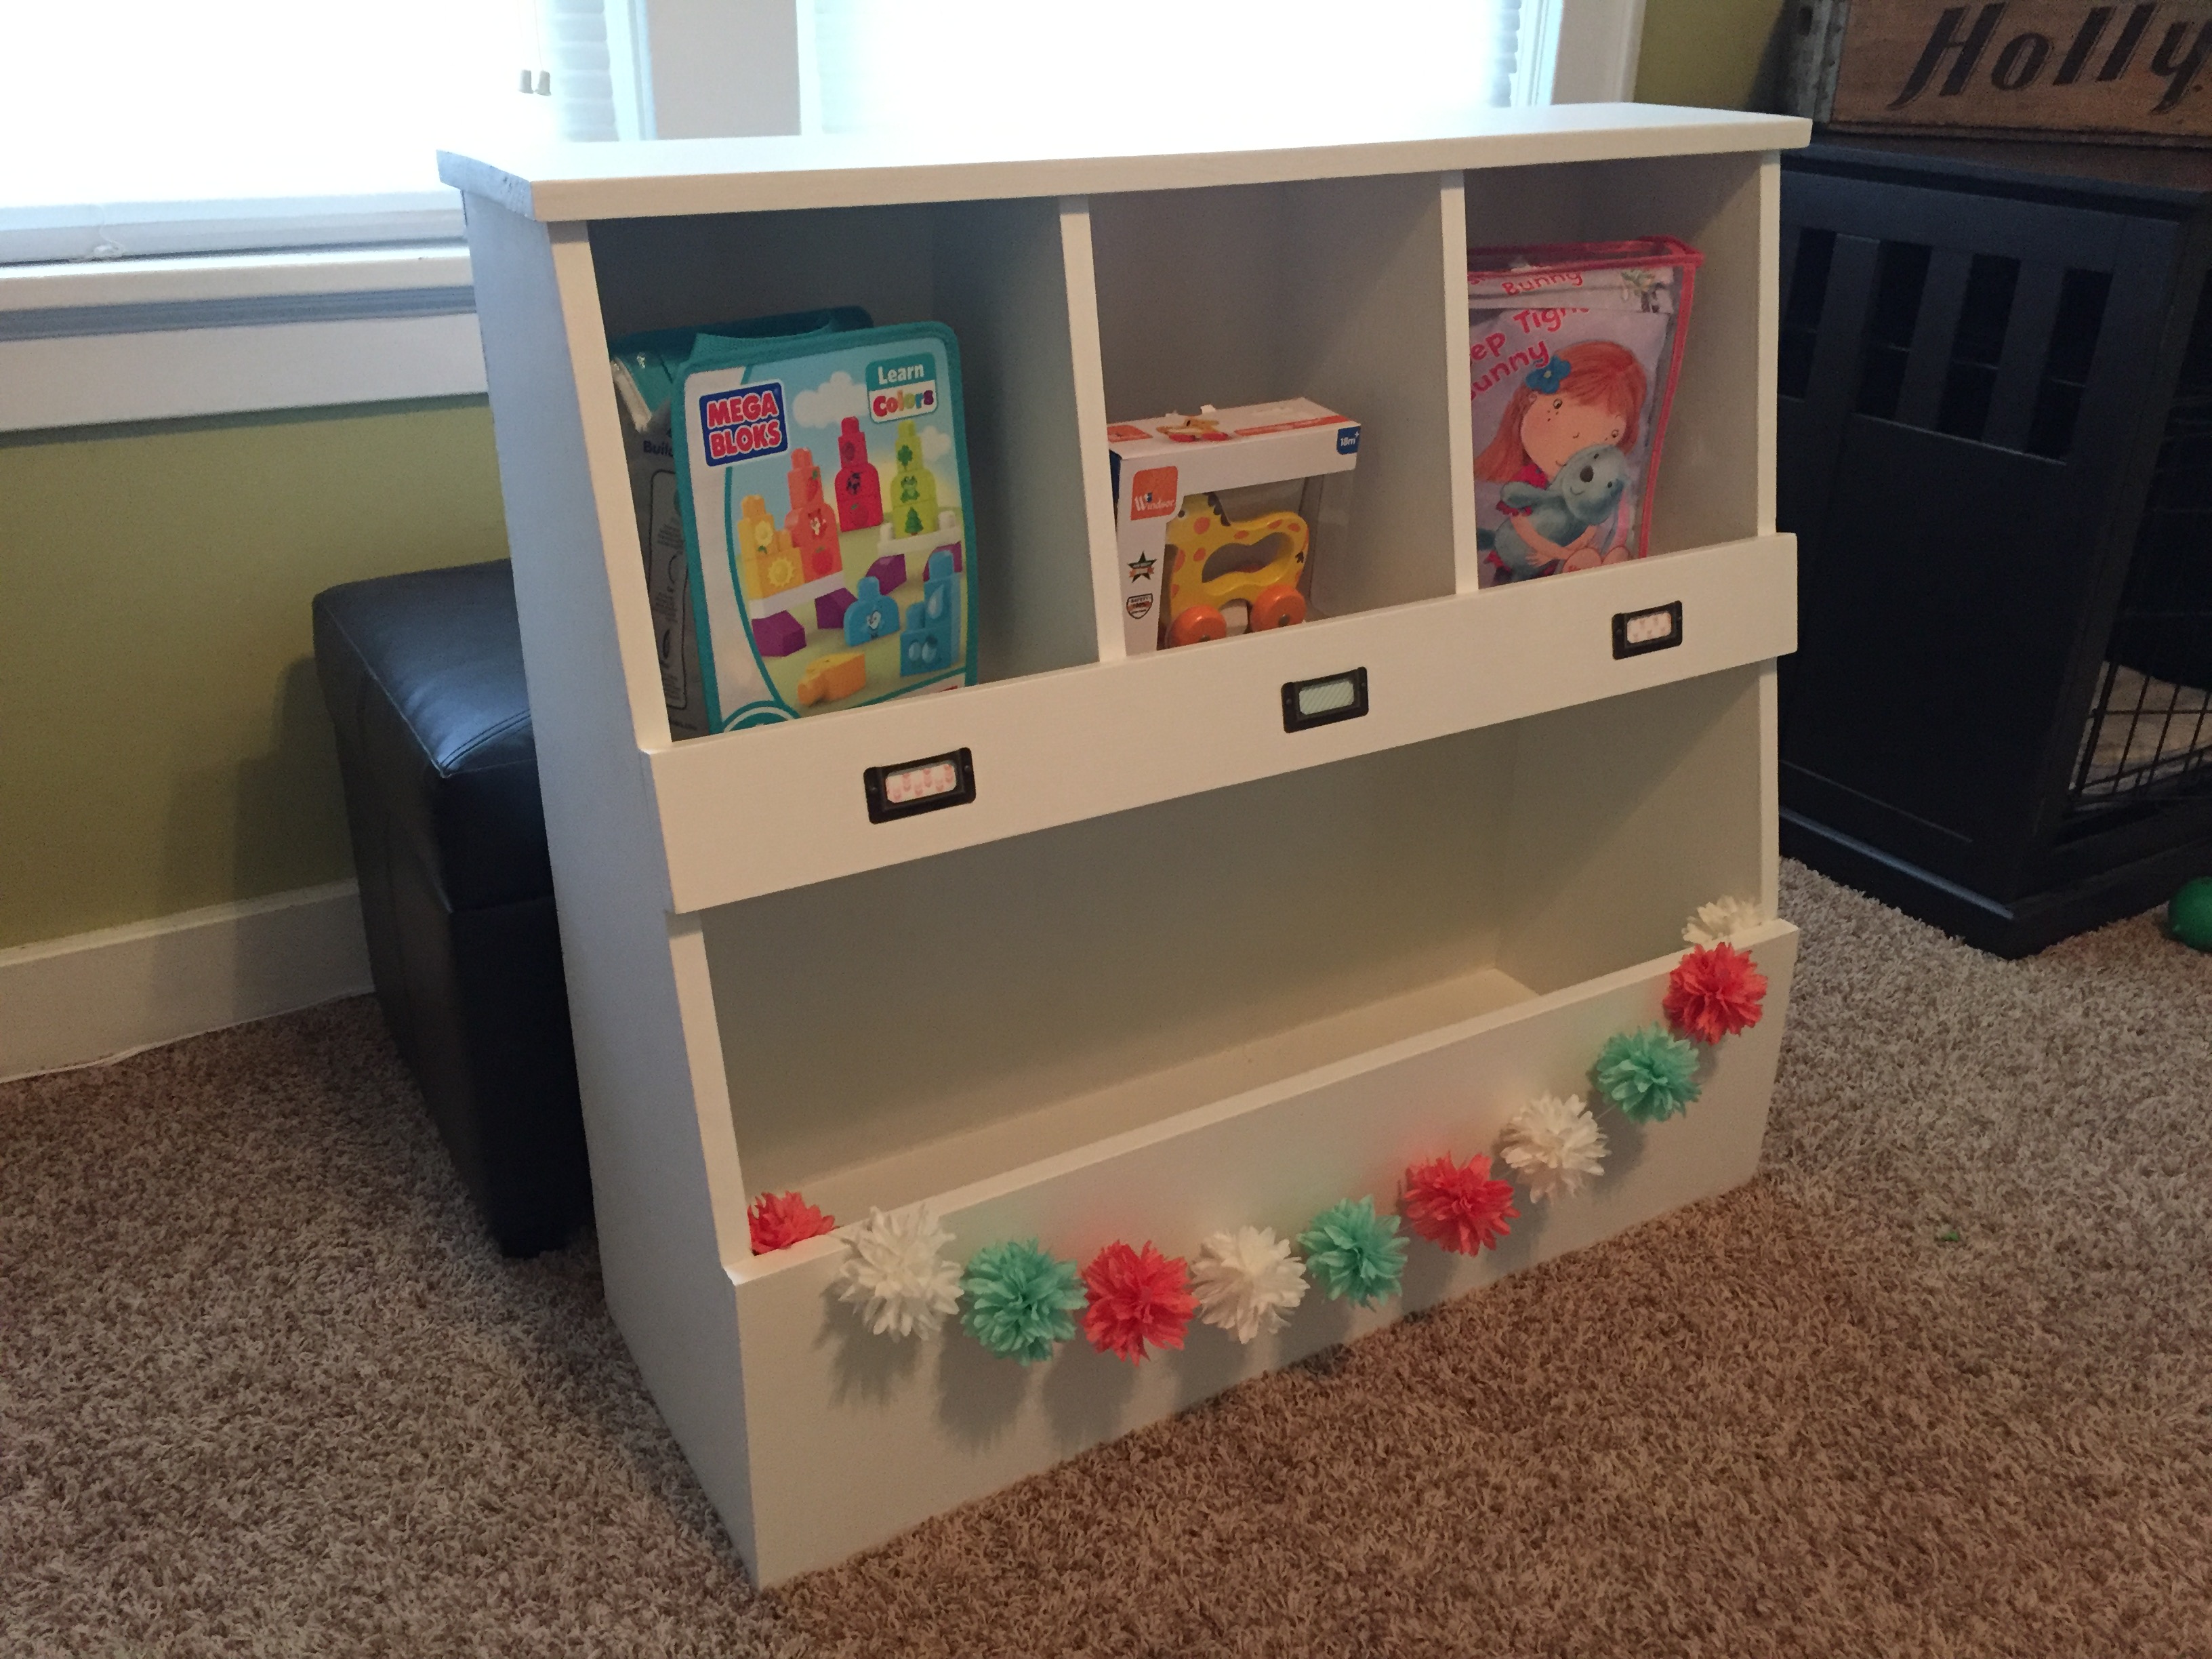
Toy Box with Cubbys
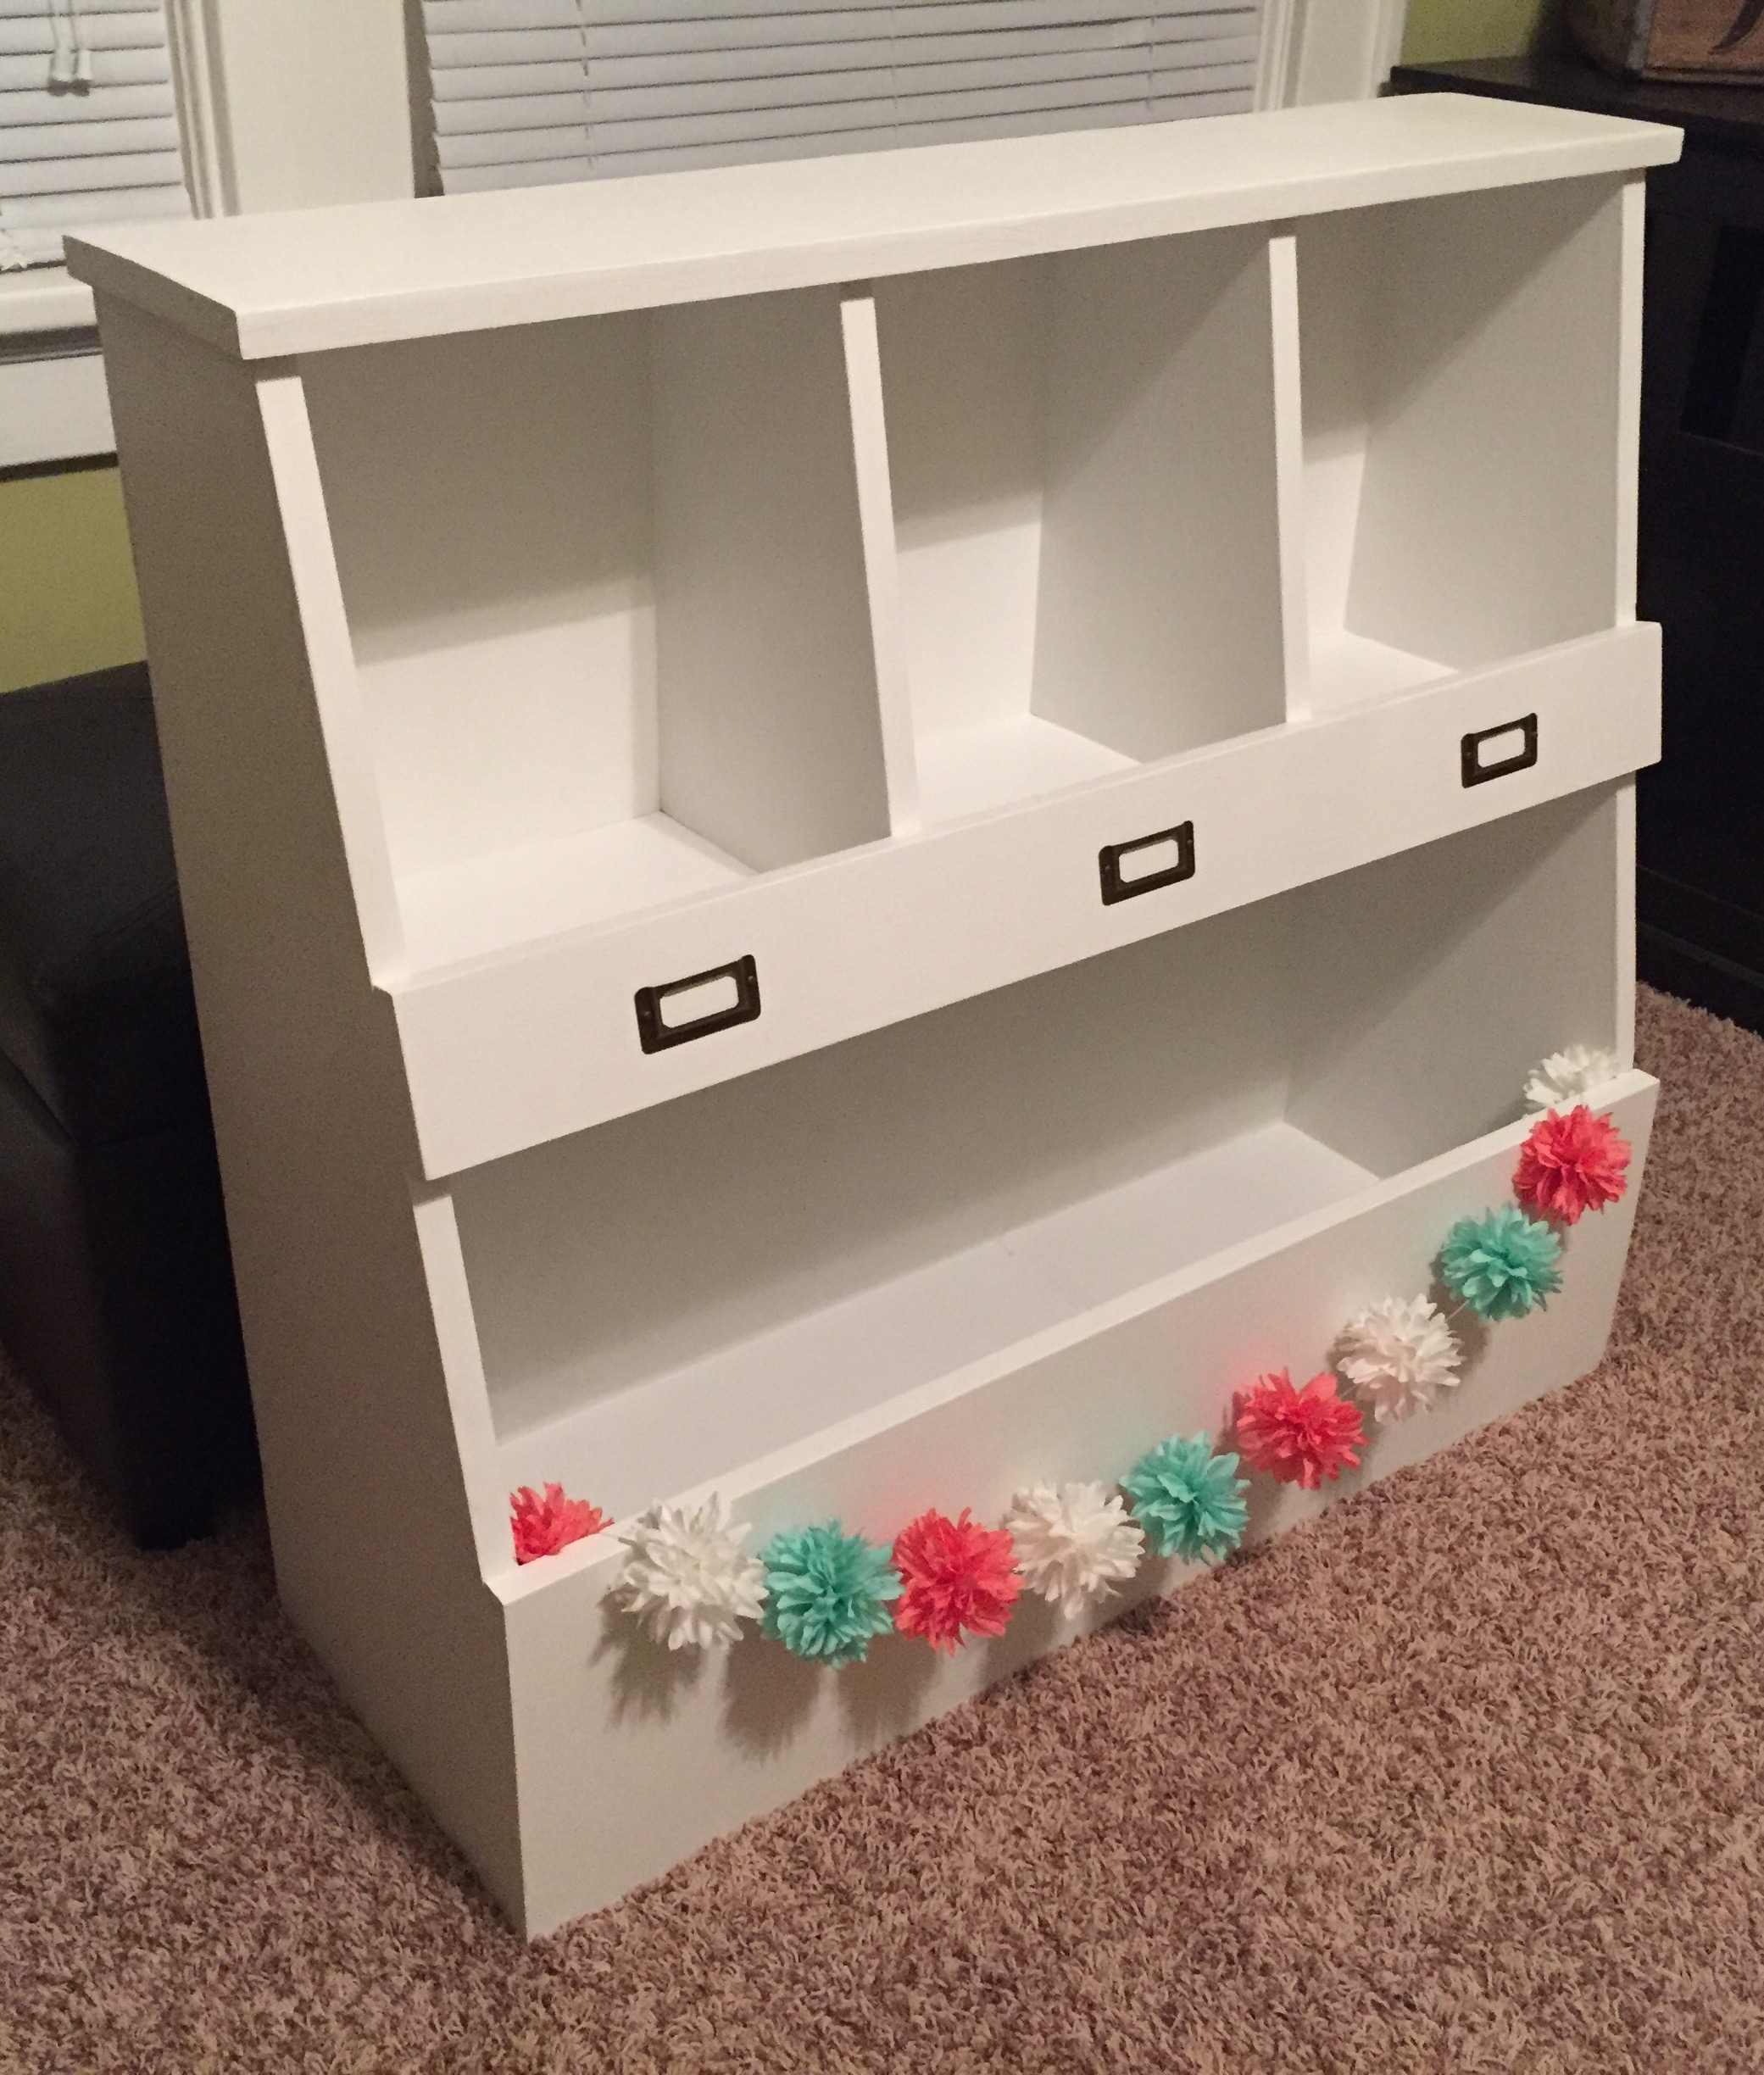
This was my first real woodworking project. This design was perfect for my one year old niece. Used Rustoleum Chalked Linen White and Clear Matte Topcoat. Made sure to use Zissers Bullseye on all the knots in the wood so they wouldn't bleed through, although I should have primed the entire piece. Pretty simple to make, with the angled cuts being the hardest. Found the label holders at Hobby Lobby in the scrapbook section.
Built from Plan(s)
Estimated Cost
$90 for wood, screws, glue and paint
Estimated Time Investment
Day Project (6-9 Hours)
Finish Used
Rustoleom Chalked Linen White and Clear Matte Topcoat
Recommended Skill Level
Beginner
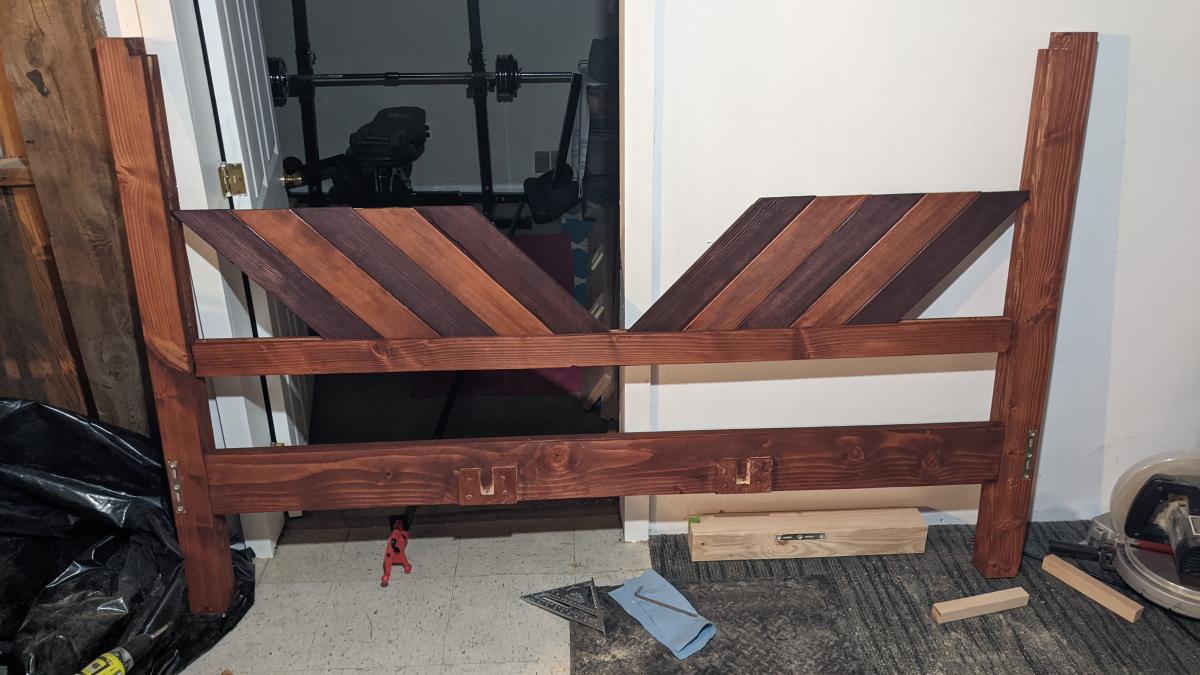
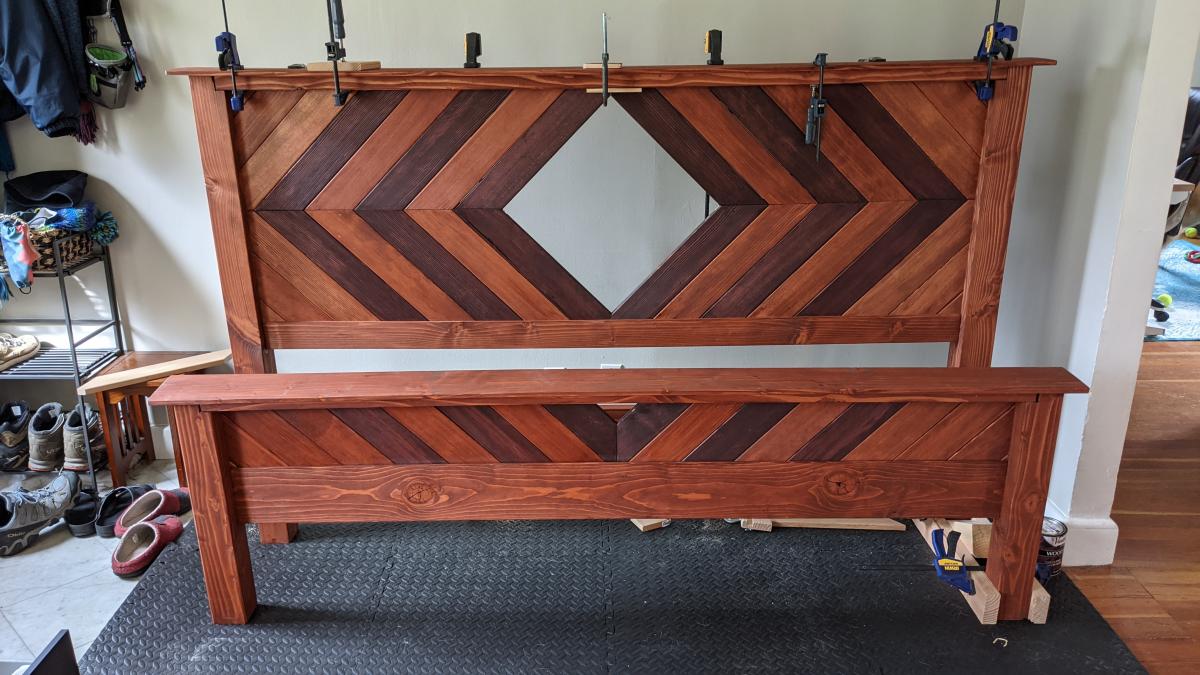
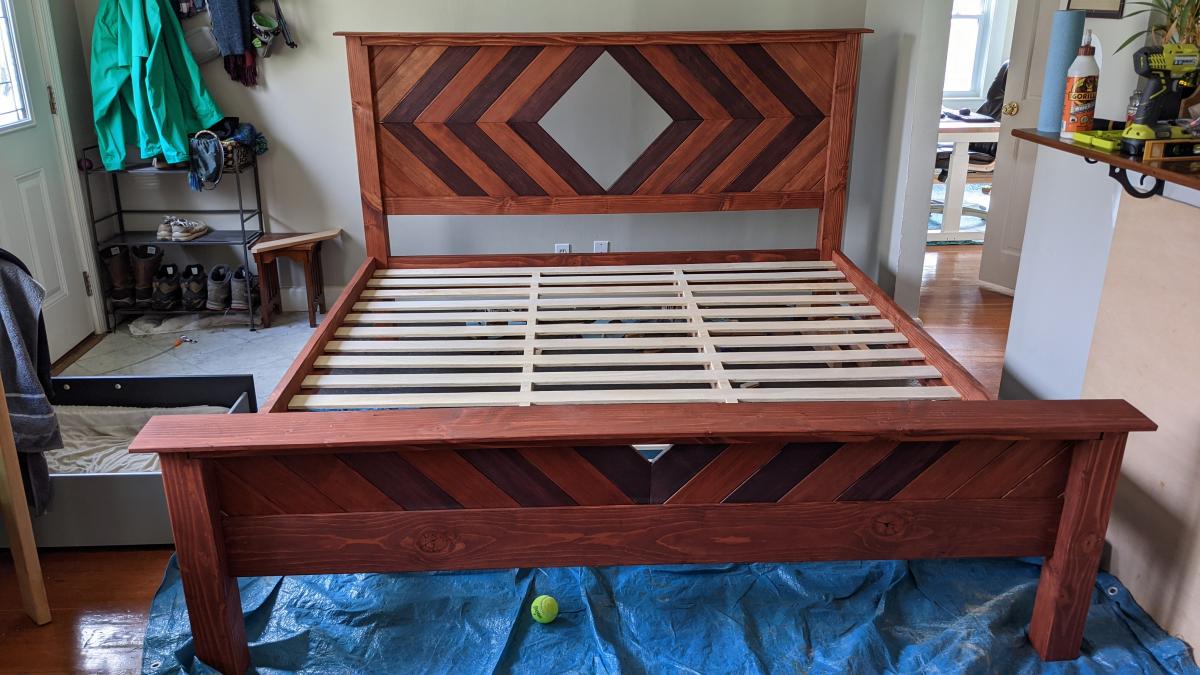
Modified King Farmhouse Bed
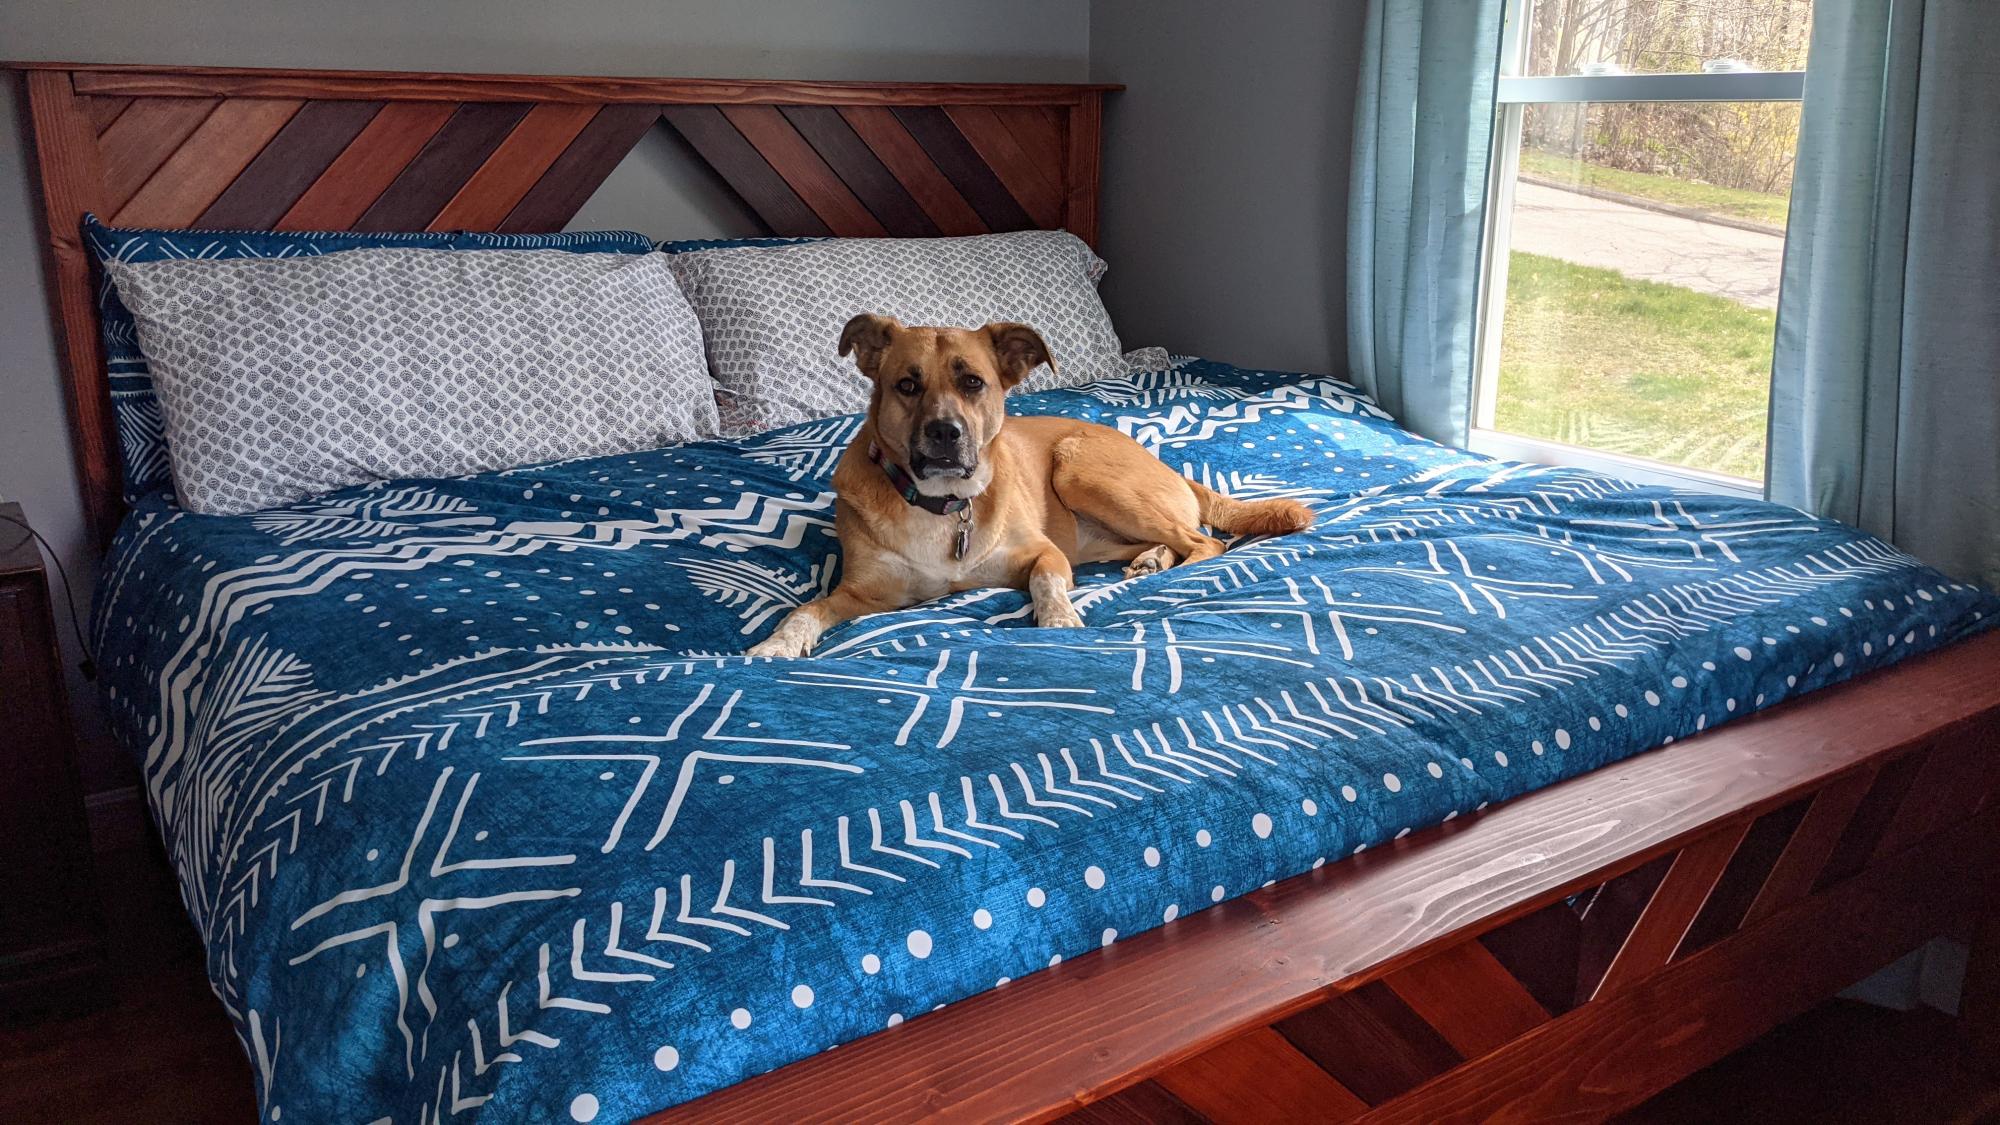
We ended up deviating more than we were originally intending from the Farmhouse Bed plans. We started off planning to modify so that it was able to be disassembled (used metal brackets and to fit storage drawers at the foot of the bed. The my finance got a router, so we ended up with a lot of mortise and tenon and tongue and groove joints, and a fancier headboard. I LOVE the end result but we were definitely in over our heads at times!


Built from Plan(s)
Estimated Cost
400
Estimated Time Investment
Week Long Project (20 Hours or More)
Finish Used
Traditional Cherry and Black Cherry Oil Stain, Black Tea as Wood Conditioner and Poly Finish
Recommended Skill Level
Intermediate
Comments

Sun, 07/30/2023 - 09:26
awesome modifications, looks…
awesome modifications, looks wonderful. Enjoy.
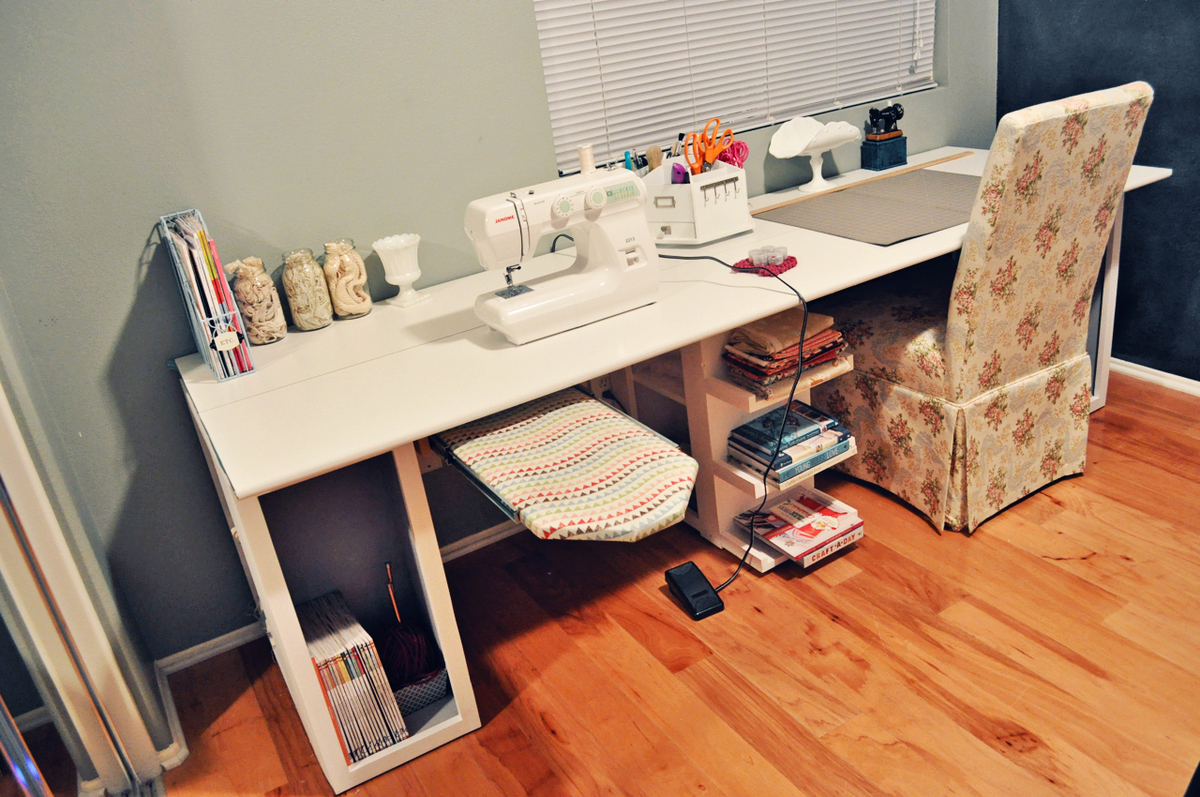
Modern Craft Table with Pull Out Ironing Table [Modified]

The craft table was based on the Modern Craft Table plans and heavily modified to be at regular seating height. We also added a pull-out iron table based on plans from Made by Marzipan. The pictures are kinda deceiving, but the ironing table does push all the way back in the table and it only juts out just to show it :) Check out our blog post for more:
http://tonyandkristine.blogspot.com/2013/03/diy-craft-table.html
Built from Plan(s)
Estimated Cost
Appx $150
Estimated Time Investment
Week Long Project (20 Hours or More)
Finish Used
behr latex paint in dove white and the interior base of shelves were painted in ASCP paris grey.
Recommended Skill Level
Beginner
floating shelves
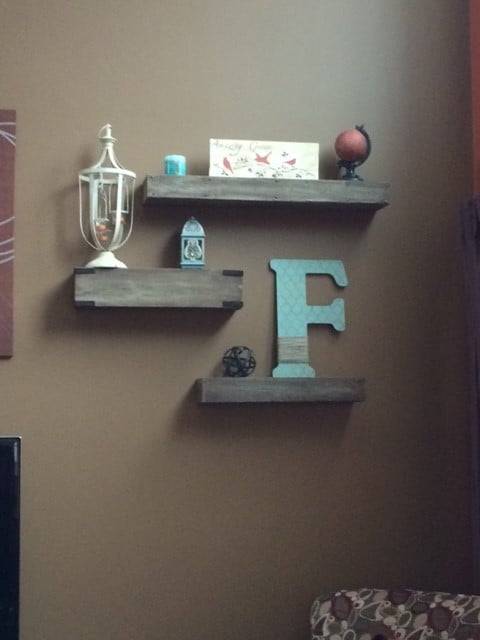
These shelves were easy and easy to customize the size according to your needs. They are fun to decorate and add a rustic flair to my living room.
Built from Plan(s)
Estimated Time Investment
An Hour or Two (0-2 Hours)
Finish Used
I distressed the wood then used grey chalk paint and dark wax
Recommended Skill Level
Starter Project
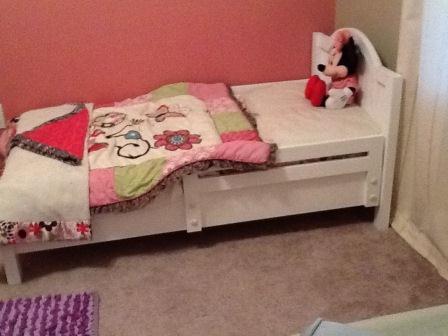
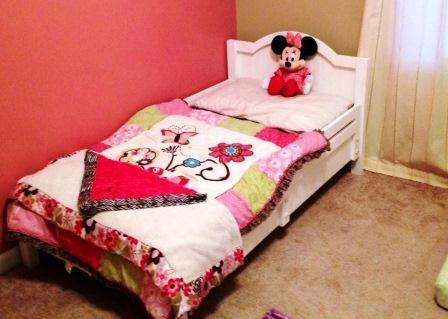
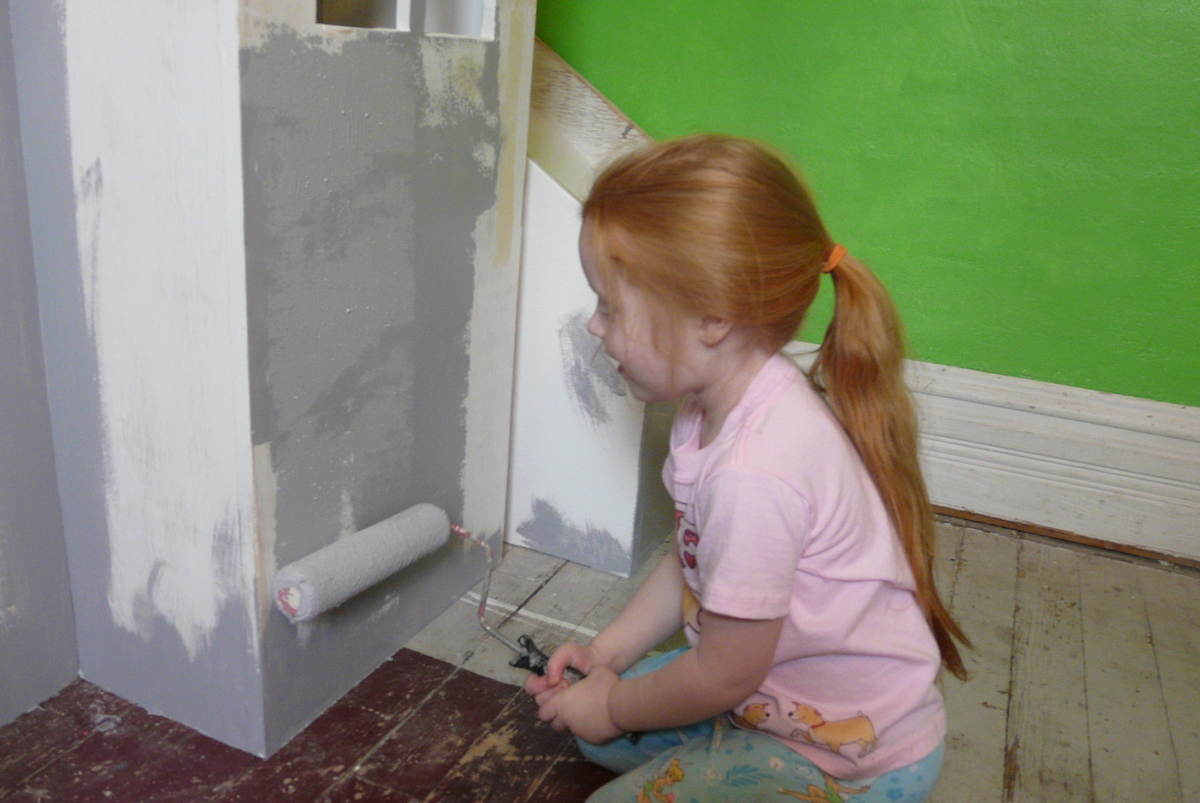
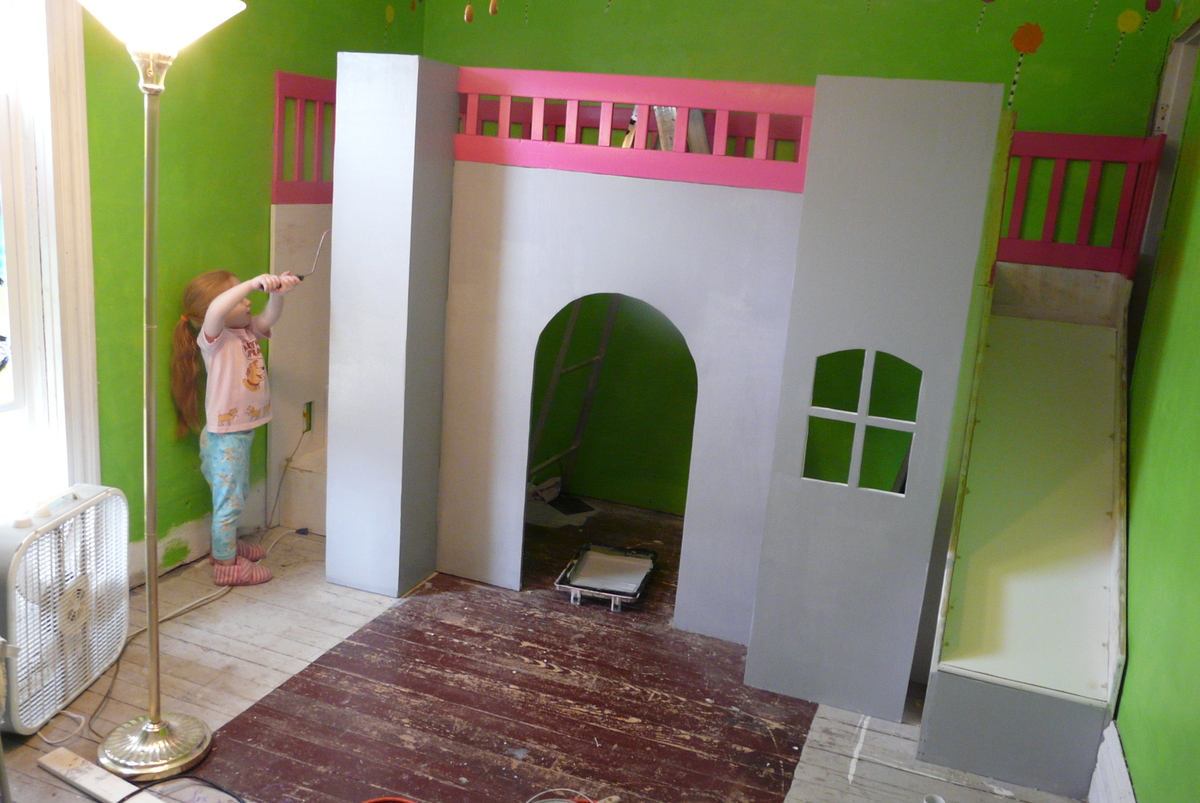
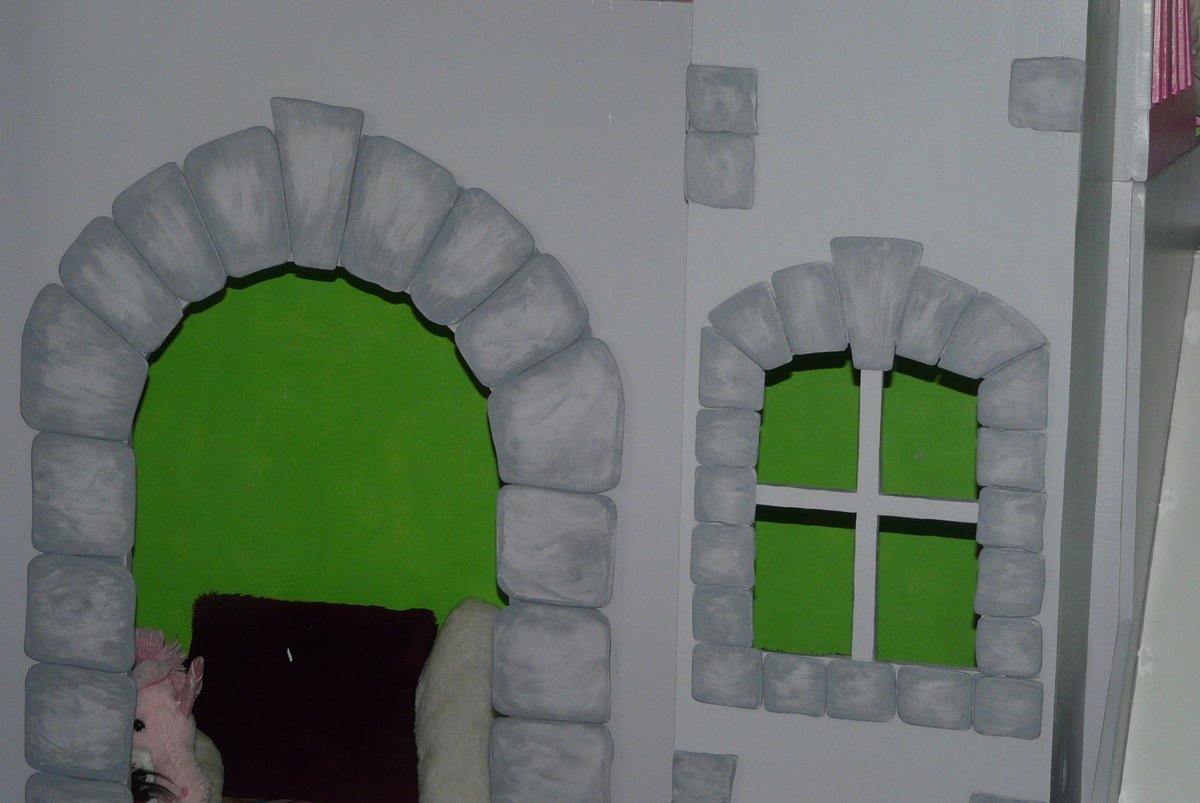
Millicent's castle!
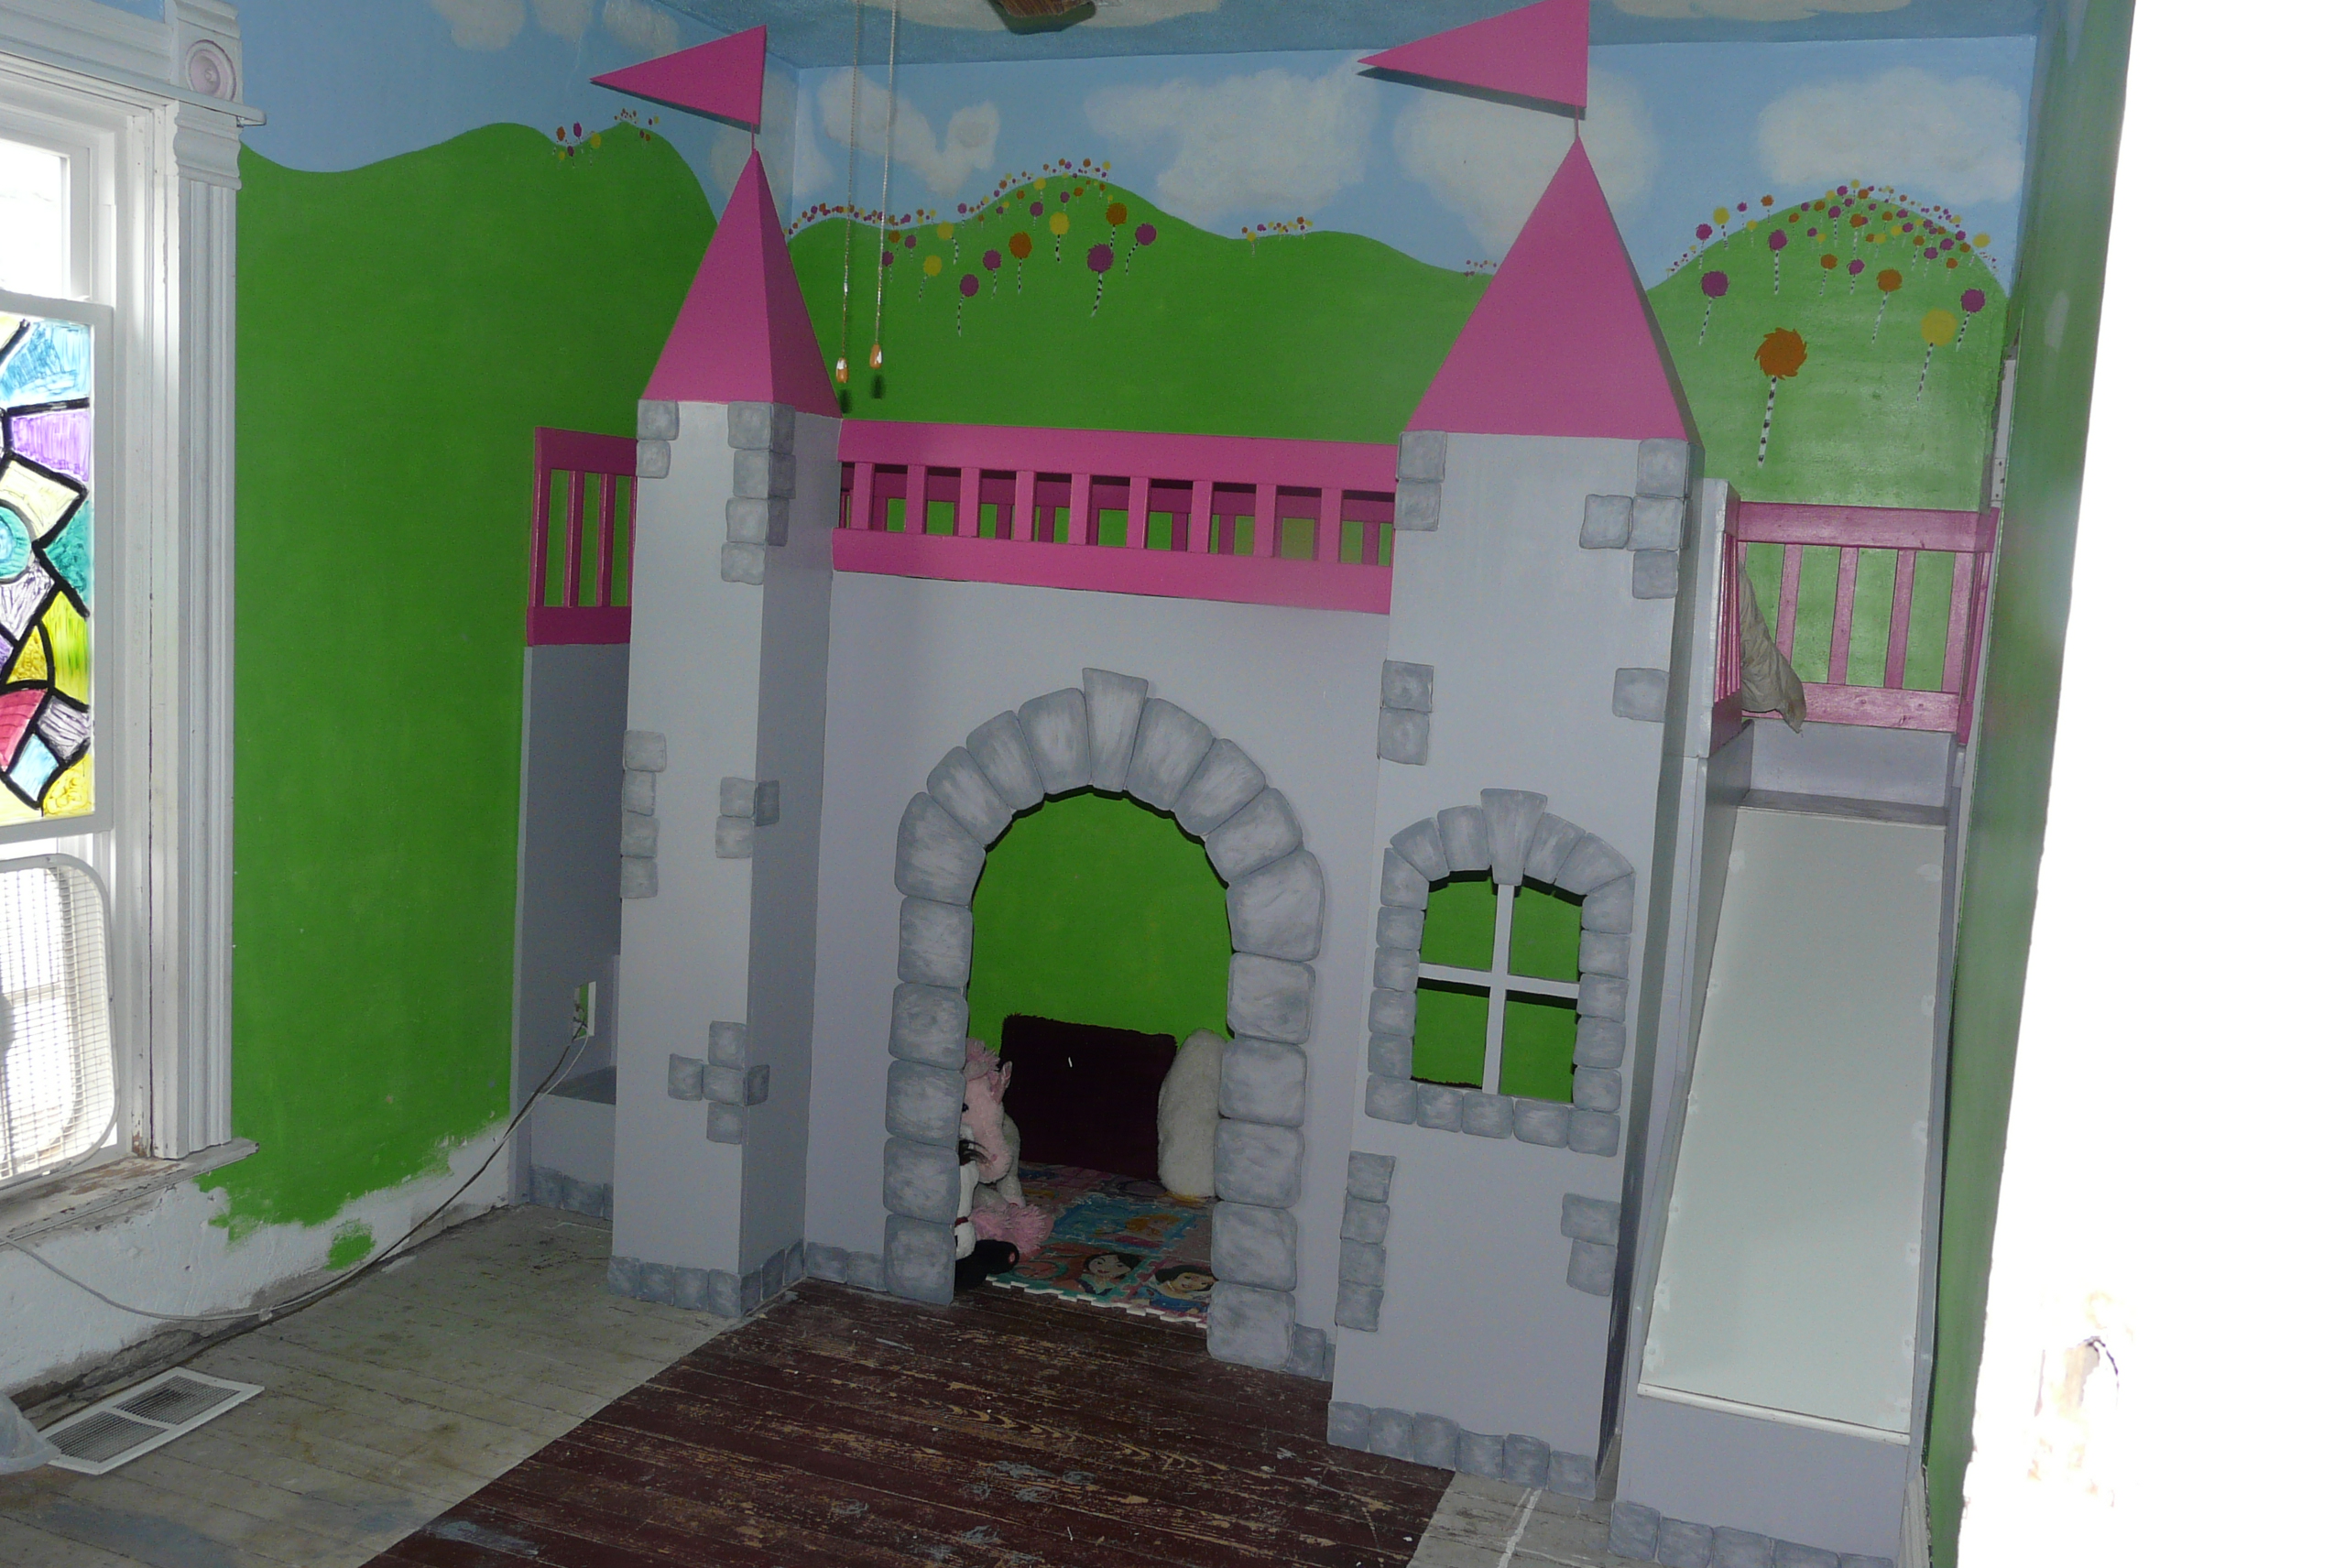
I found the plans for this bed on this site and was sooooo happy. i was looking for a unique bed for my daughter. I had searched beds for girls and cam across castle beds. I found some pretty extravagant beds costing $20,000 by personal designers and then I found beds from $1,000 to $5,000 buy it and put it together and THEN I found this plan. People asked me if I had experience in building anything. The answer was no BUT I CAN do it!. Plus the plans were very easy to read and understand! My daughter is beyond excited! She can hardly contain herself! THANK YOU!
Recommended Skill Level
Beginner
Comments

Wed, 03/27/2013 - 16:48
Amazing!
You did an amazing job on the castle! Truly outstanding. Absolutely love the painted details on the castle. And the mural! Wow! Its so great your daughter got to participate too. She'll remember this when she's all grown up. Congrats on a fabulous project! :)

Sat, 03/30/2013 - 15:36
Fantastic job!
You did a fantastic job! I love the detail you added! I'm so glad the plans were easy to understand :)
4x4 Truss Beam Table and bench
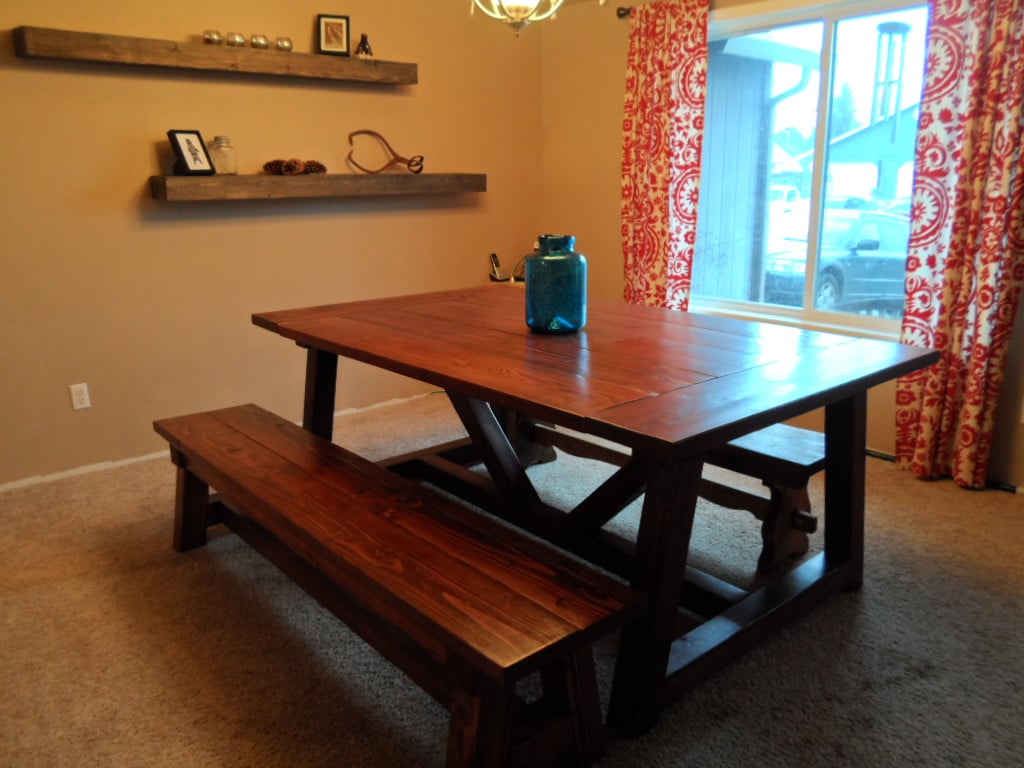
Love this plan and the table and bench turned out exactly as I hoped. I did it by myself except for a little heavy lifting from my sweetheart. I researched the finish online and I am so happy with the results.
Built from Plan(s)
Estimated Cost
With finishing products and screws this was approximately $200
Estimated Time Investment
Week Long Project (20 Hours or More)
Finish Used
Minwax Pre stain conditioner, Minwax English Chestnut *( 2 coats), Varethane Poly *( 3 coats) then #0000 steel wool to smooth the bumps then Minwax Paste wax hand rubbed until the finish was perfect.
Recommended Skill Level
Intermediate
Comments
Tue, 02/10/2015 - 08:19
Looks great!
We have been shopping for tables and cannot find anything we like for a good price. I keep going back to building one myself. Your table top looks great .. nice and flat. Did you follow the plans to a T, did you use a kreg jig?
Tue, 02/10/2015 - 22:13
I did change the dimensions
I did change the dimensions of the top a little. I wanted a wider surface. I did use a kreg jig, it made it a breeze to build. I spent a lot of time on the finish, sanding, using steel wool, and several coats of polyurethane. Thank you for the compliment !
First One!
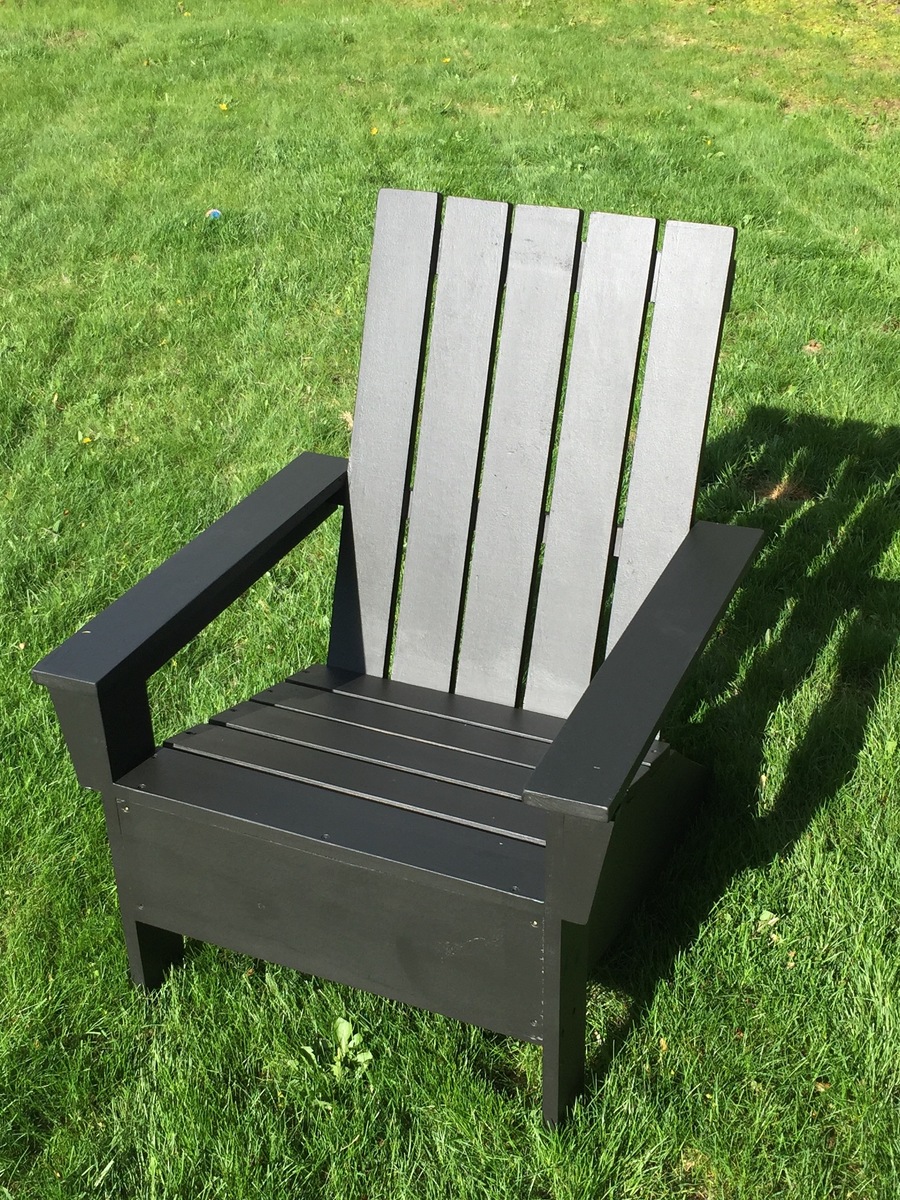
Very easy, completed with just a work bench, circular saw, clamp and screws - I painted mine after assembly, used small brush to get in between, then a roller to finish. Next one will be MUCH easier! I also sanded all the edges of wood, to give it a "worn" look. Three more to come, enjoy the process.....
Estimated Cost
$50
Estimated Time Investment
Afternoon Project (3-6 Hours)
Finish Used
Behr Wood Stain Waterproof, Slate. Cleans up with soap/water.
Recommended Skill Level
Beginner
Modern Adirondack Chairs
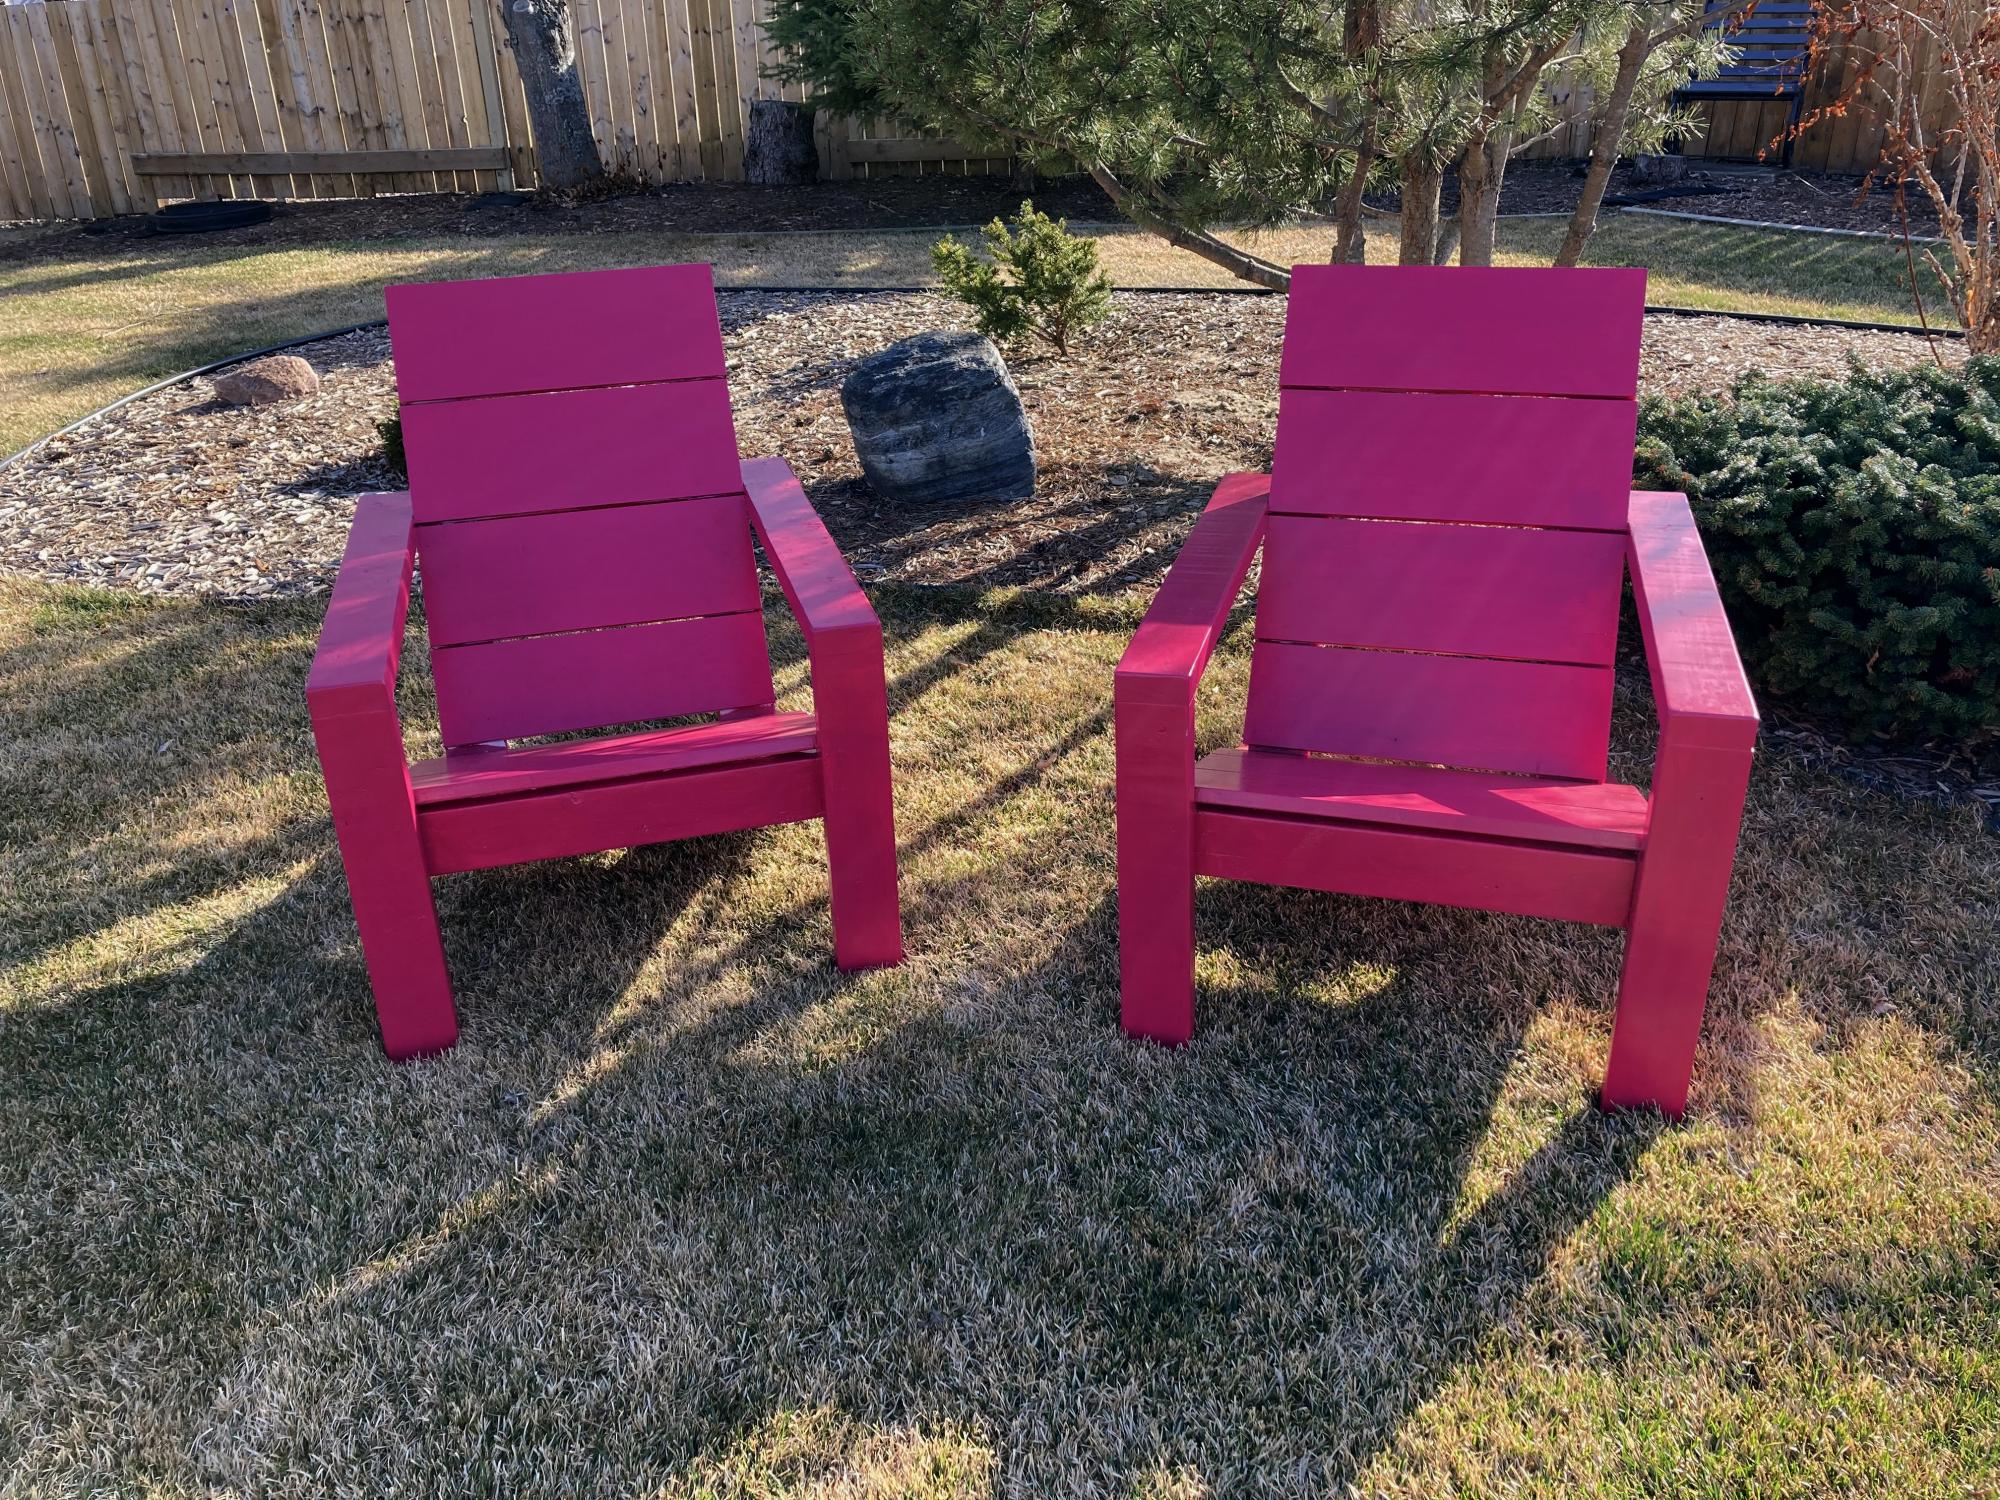
This was a nice simple build. The only problem where I live (near Edmonton, Alberta) is that the price of lumber has gone crazy. I think it is the same everywhere. 2 x 4's are running about $8.50 (CAD) each. I can see myself building a few more of these as the neighbours like them. Chose to go with a funky magenta colour to add some colour to the backyard. Very comfortable to sit in but I think I will add some cushions. I should have taken Ana's advice and painted the boards (especially back and seat) first. Once assembled I had to go in with a small brush to get the sides.
Built from Plan(s)
Estimated Cost
$40 each
Estimated Time Investment
Day Project (6-9 Hours)
Finish Used
Exterior semi gloss paint.
Recommended Skill Level
Beginner
Comments
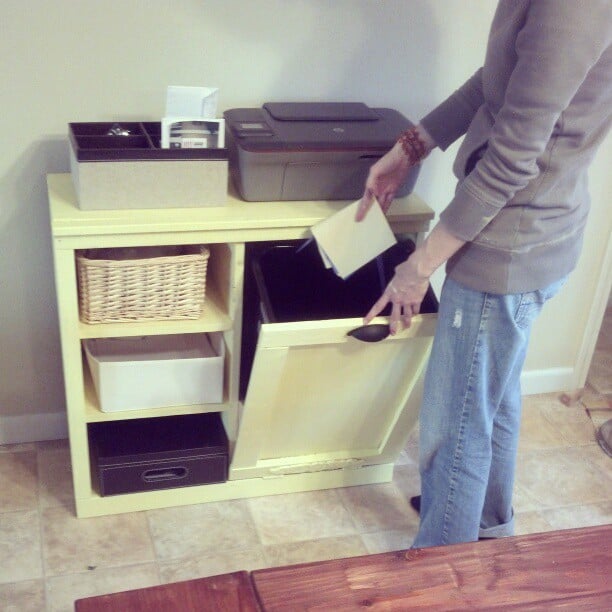
Recycling Center
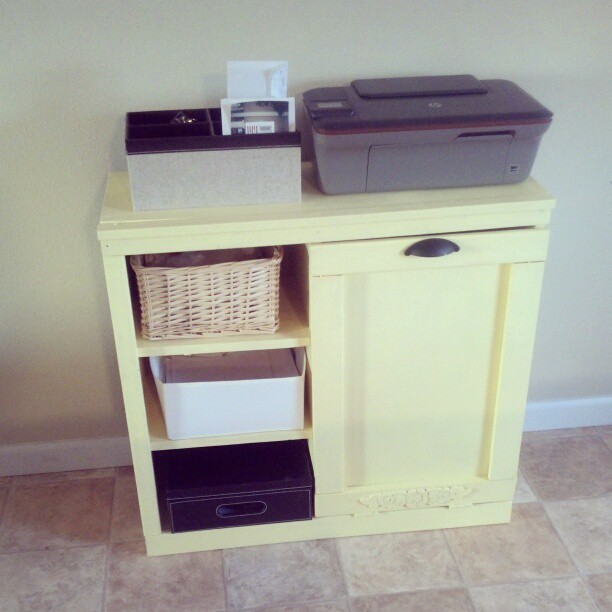
Well...this was pretty much all done by me.
I am really not liking how many bad boards there are at the store. It takes forever to find a decent board. I had some of my x12s measuring closer to 11 (yes I know they aren't 12 inches).
The door is a little wonky but if it bothers me too much I will just replace it with a curtain on a tension rod.
I love the yellow and I am very proud of myself :)
I didn't have a Kreg jig (too expensive for us right now) but it would definitely have been helpful...
Built from Plan(s)
Estimated Cost
100
Estimated Time Investment
Day Project (6-9 Hours)
Finish Used
I can't remember the exact color...yellow in Valspar satin.
Handpainted with brush
Handpainted with brush
Recommended Skill Level
Intermediate
Comments
Sun, 03/31/2013 - 07:44
Agreed!!!
I run into that problem as well!!! And with two kiddos at my hip it gets more annoying to sift thru 5 boards before a good one comes up. But it's all worth it. I made this as well and and the magnetic closure made all the difference. This is really nice by the way. The color is fab!
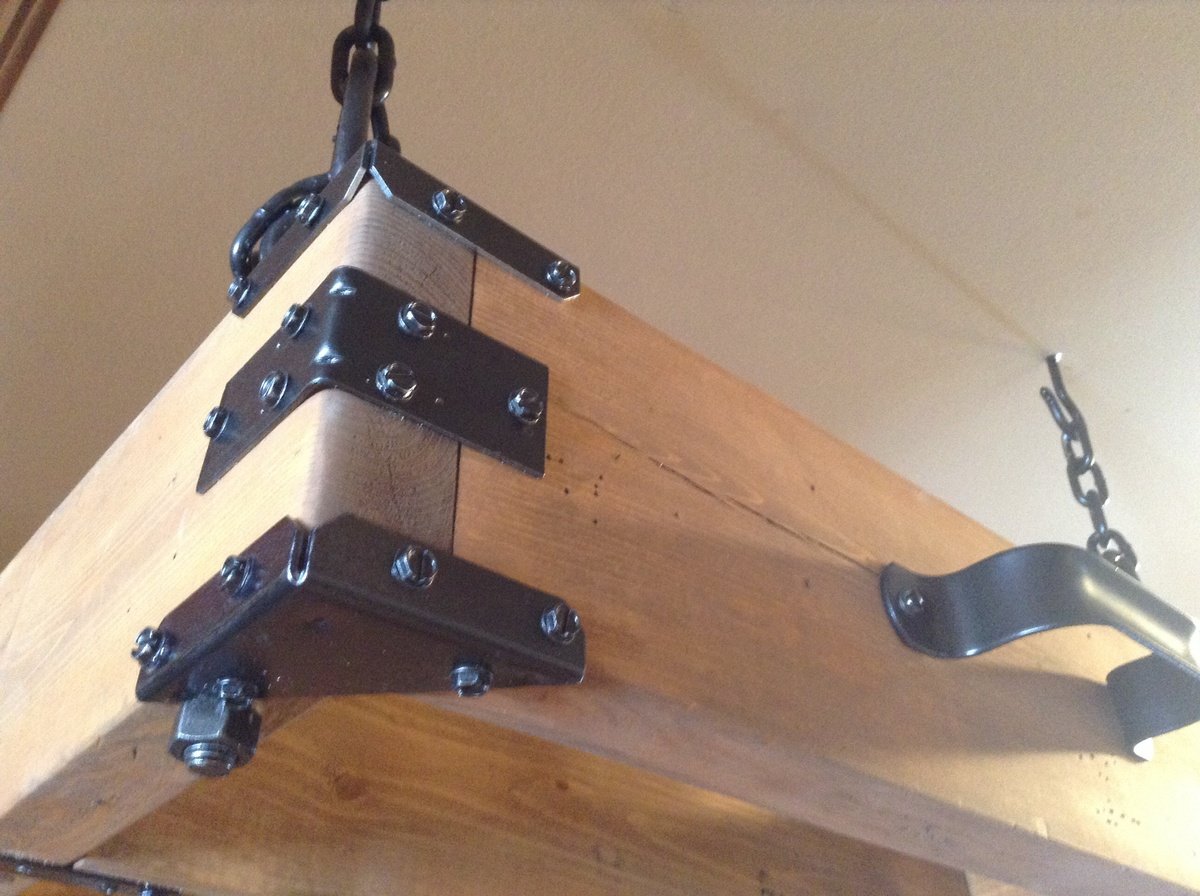
Rustic Pot Rack
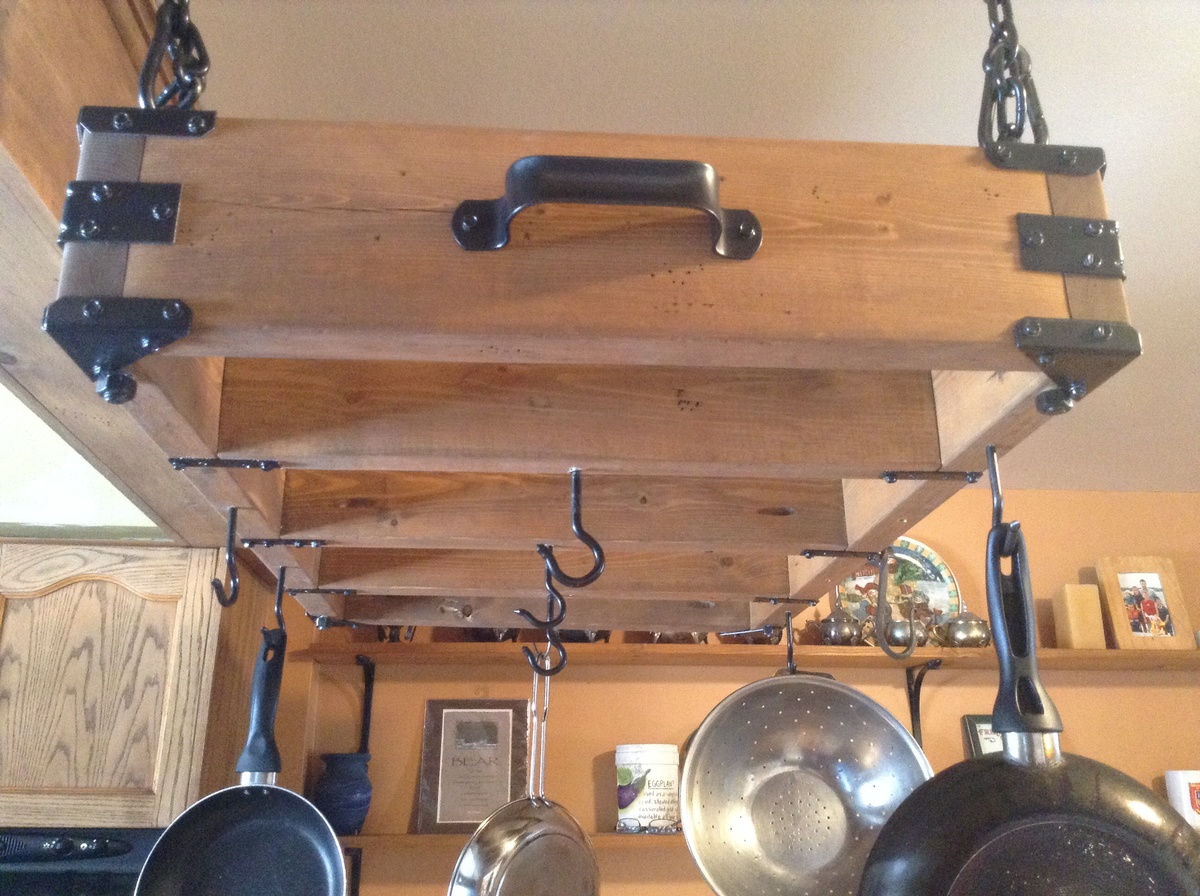
My kitchen needed a rustic pot rack to hang all my pots and pans. Instead of paying way too much money, I decided to get exactly what I wanted by making it myself. $20 worth of 2x6's and spray painted hardware purchased at The Home Depot in an oil bronzed was all that was needed to create this rack. I attached the hardware with metal screws to give it an even more rustic feel.
Built from Plan(s)
Estimated Cost
$20 for lumber
Approximately $60 for hardware
$10 oil rubbed rust oleum spray paint
Approximately $60 for hardware
$10 oil rubbed rust oleum spray paint
Estimated Time Investment
An Hour or Two (0-2 Hours)
Finish Used
Minwax Special Walnut
Minwax paste finishing wax
Minwax paste finishing wax
Recommended Skill Level
Starter Project
Comments
Husbands birthday gift
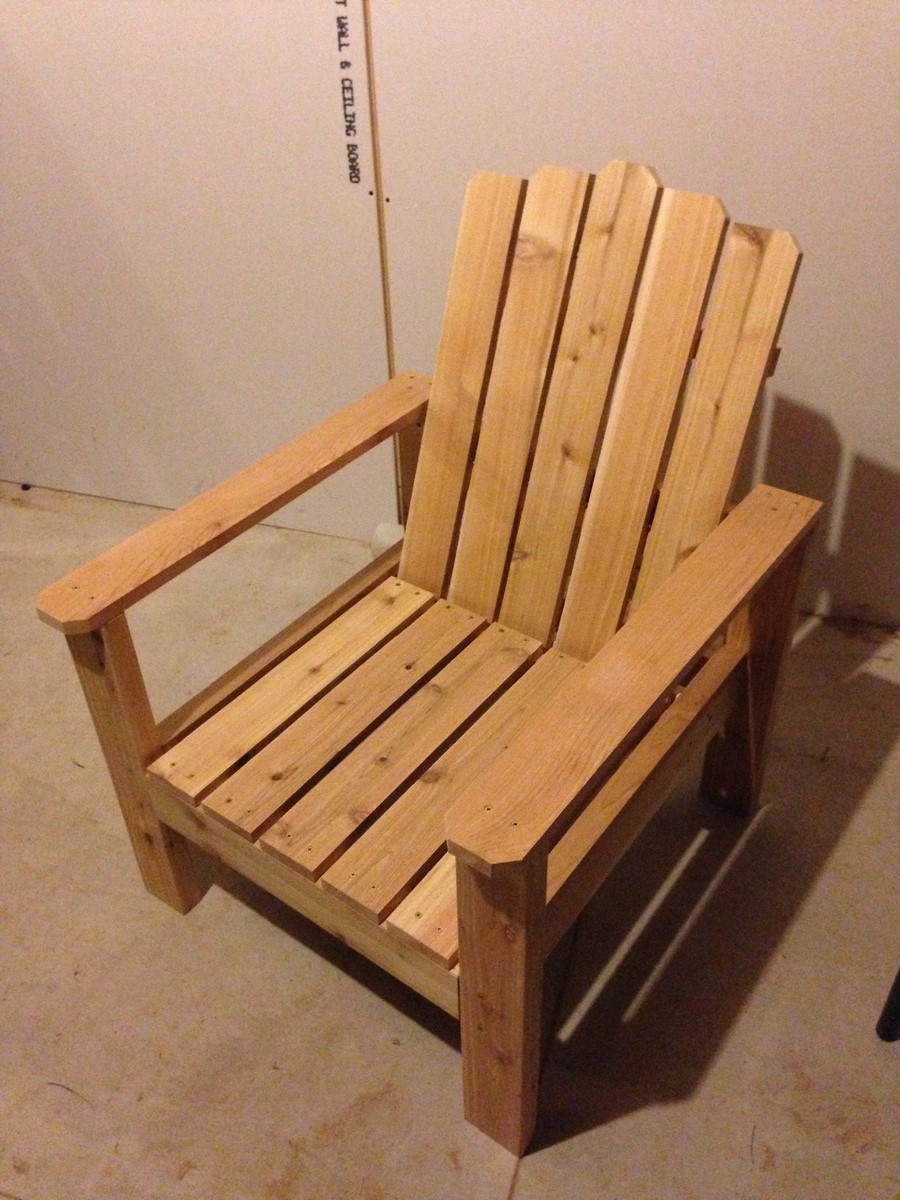
My husband loves to set outside and look out over our 10 acres with his coffee in the mornings. I thought this chair would be a great birthday gift to use for that purpose! It was fairly easy to put together. I just have to purchase some cushions and it'll be ready to give to him. I did modify a few things...used some 2x4s, changed up the back boards a bit and put some angle cuts on the arms. I'm very pleased with it! This is the third or fourth project we've made from Ana's plans. We just love them!
Built from Plan(s)
Estimated Cost
$60
Estimated Time Investment
Day Project (6-9 Hours)
Recommended Skill Level
Beginner
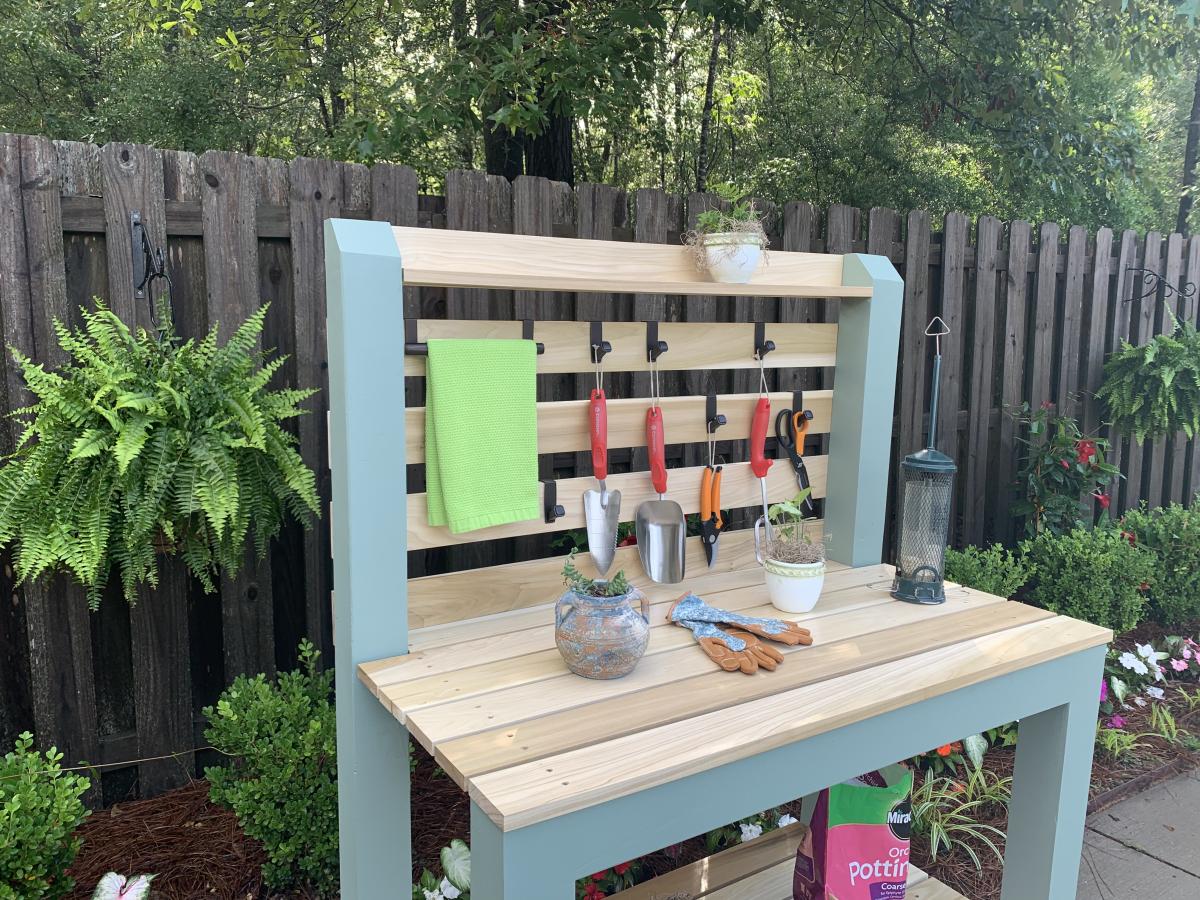
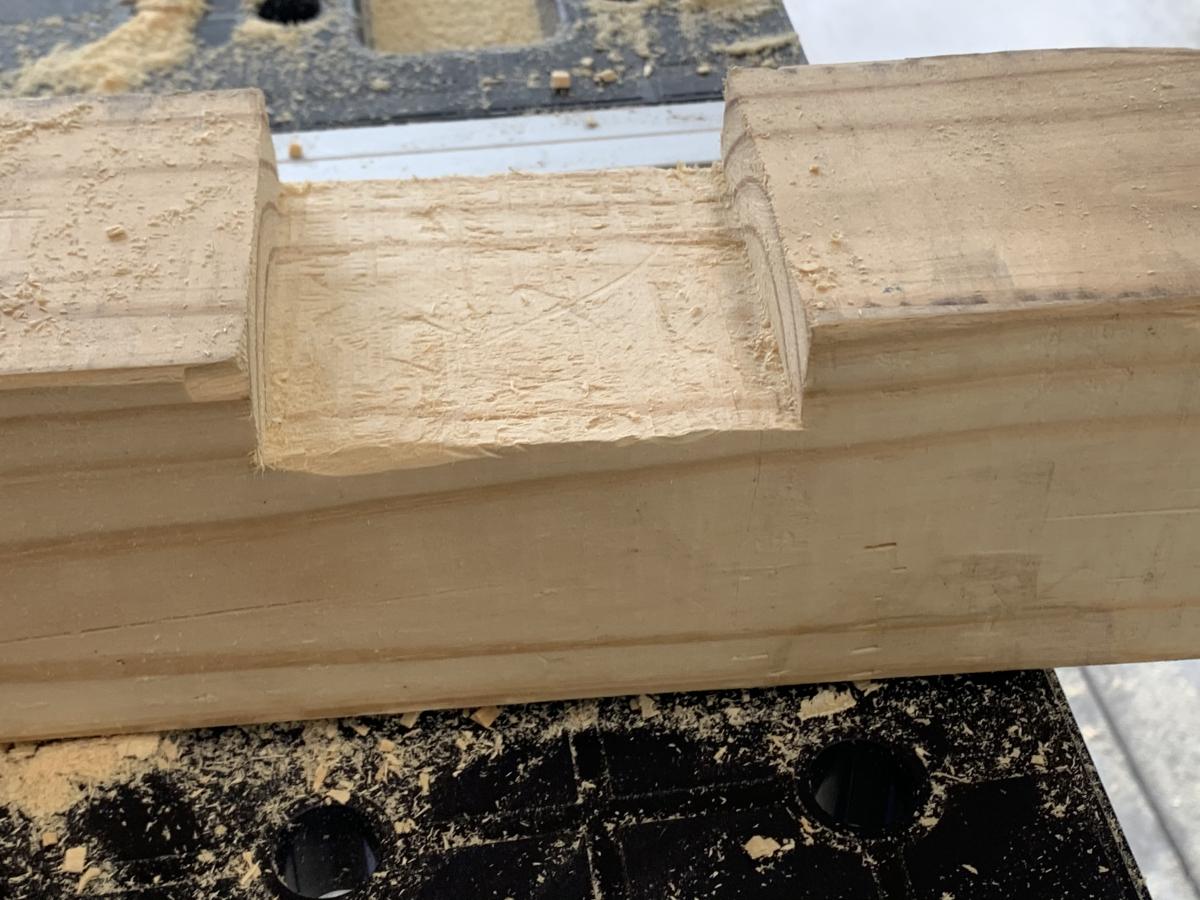
Simple 2x4 Potting Bench - Modified
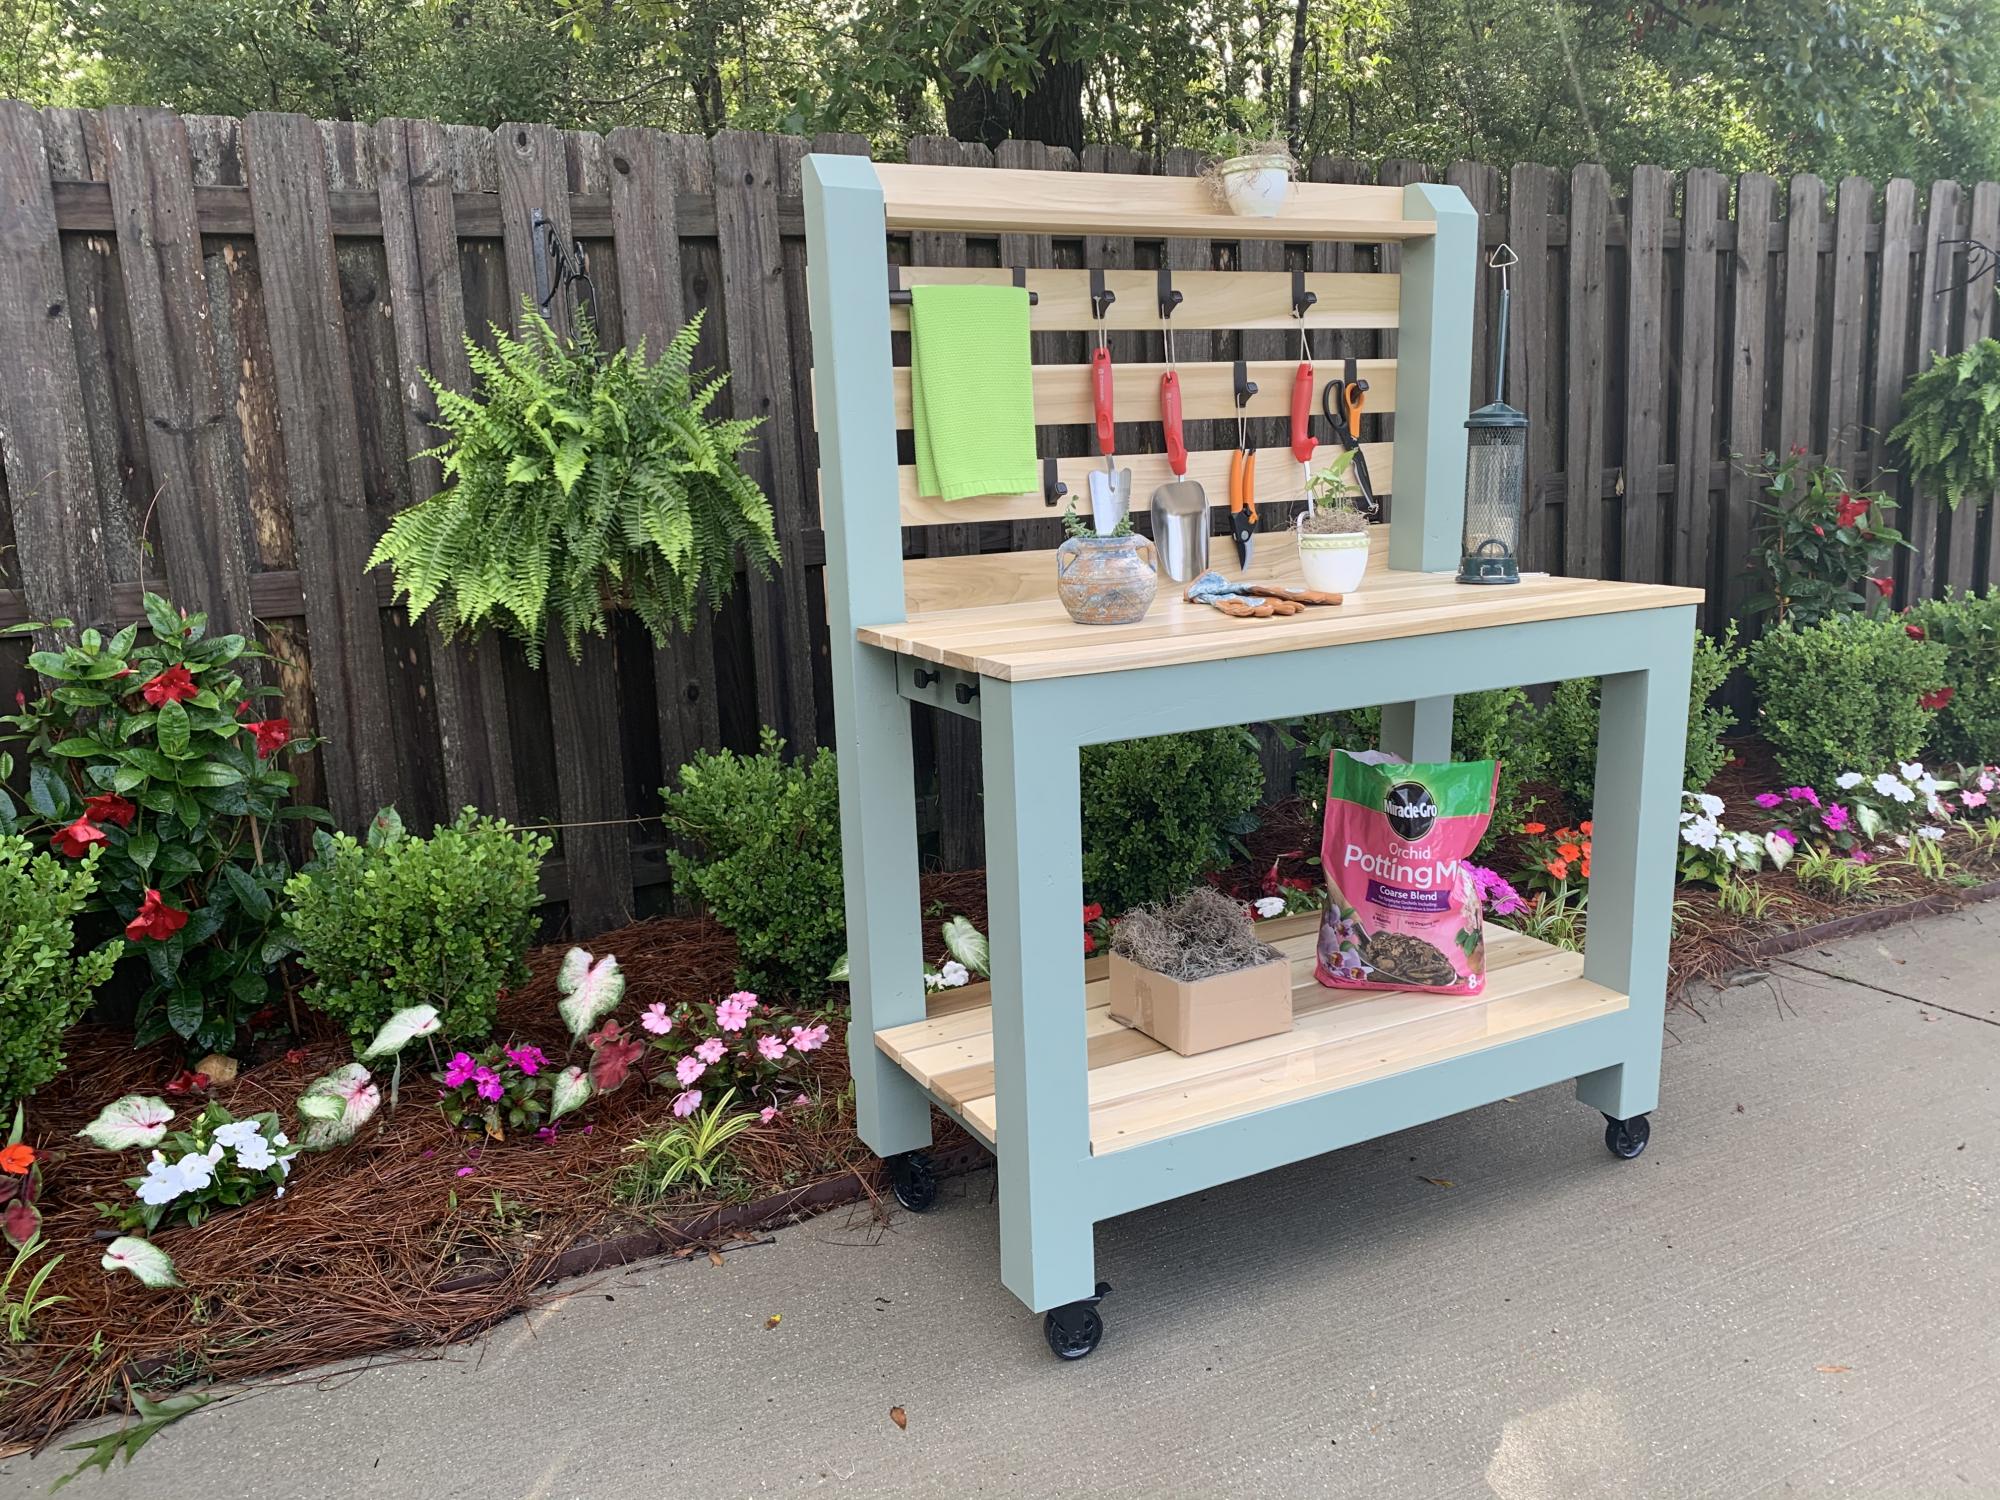
I was intrigued by Ana’s Simple 2x4 Potting Bench. The project seemed simple enough and it would be used as a means to clean up clutter in the garage. My main focus was to make it semi-portable and weather resistant. Instead of using 2x4’s for the corner posts, I used 4x4’s to accommodate casters. I also shorted the length of the posts by 4 inches to compensate for the height of the casters. To provide extra rigidity I did a dado for the 2x4’s that connect the front and rear legs. In retrospect, I wish that I did not dado the legs because it made it more difficult to attach some of the shelf planks. I painted the frame green and left the shelves and backboards clear for beautiful contrast. My wife is ecstatic with the result.
Built from Plan(s)
Estimated Time Investment
Weekend Project (10-20 Hours)
Finish Used
Benjamin Moore Environ Green paint for the frame and Minwax Polycrylic for the poplar shelves and backboards.
Recommended Skill Level
Intermediate
Comments
Pam the Goatherd
Fri, 03/22/2013 - 08:19
This is soooooo beautiful!
This is soooooo beautiful!
aharford
Sun, 03/24/2013 - 17:00
How to
How did you make this?