Community Brag Posts
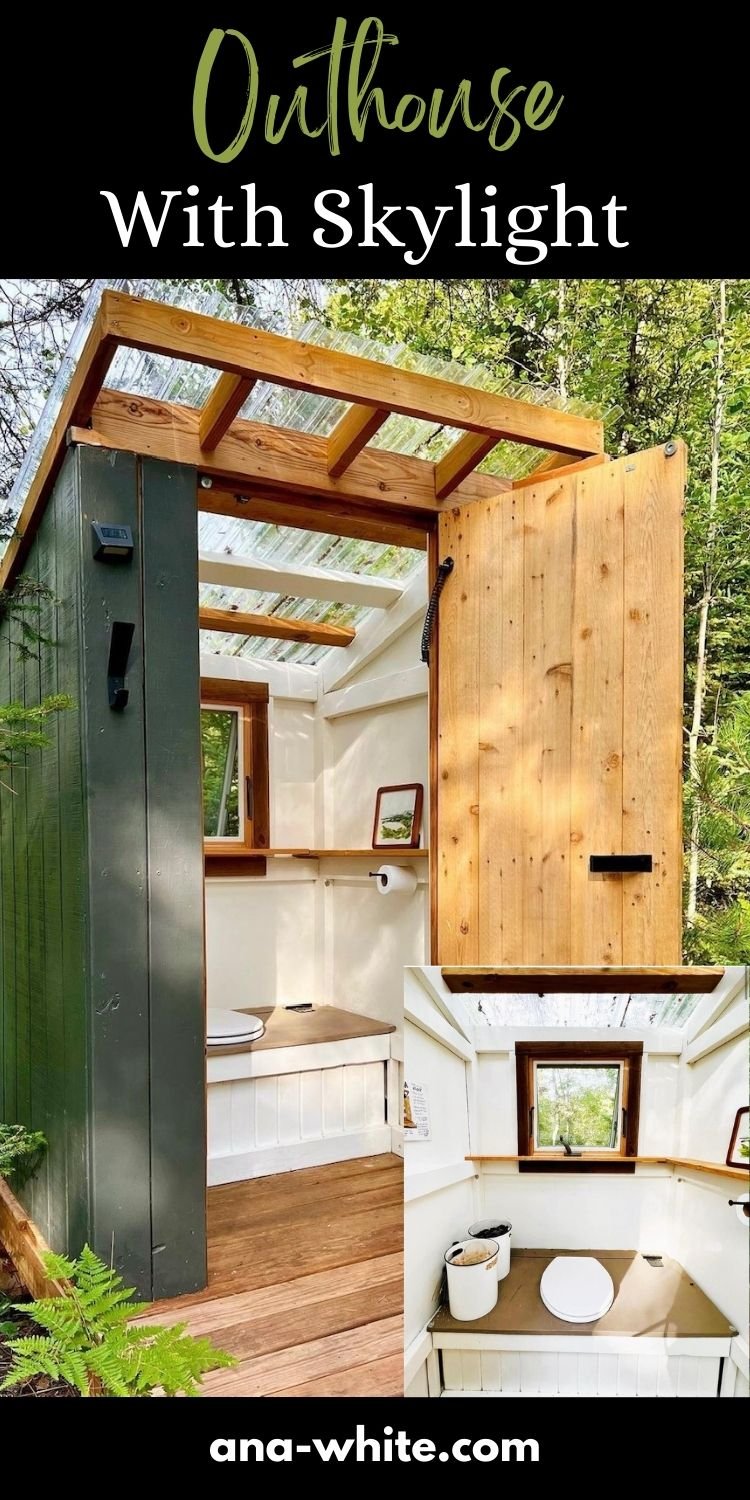
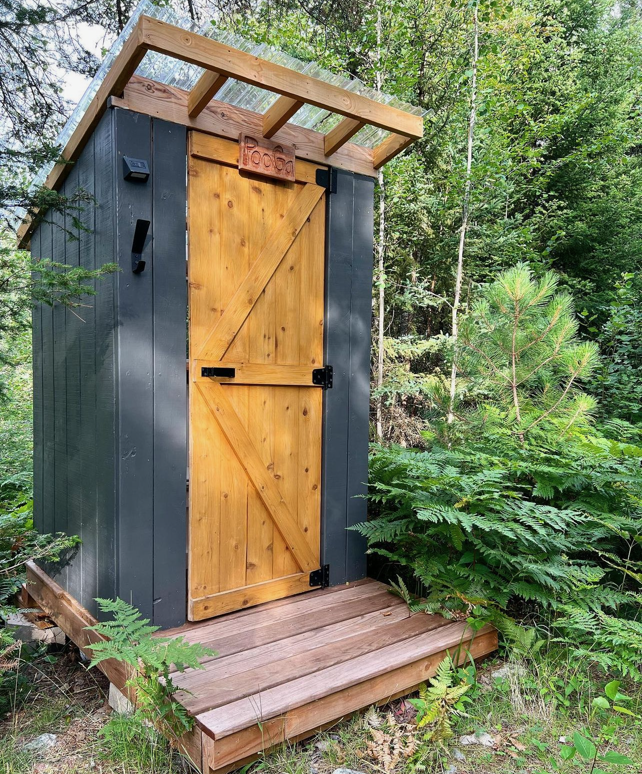
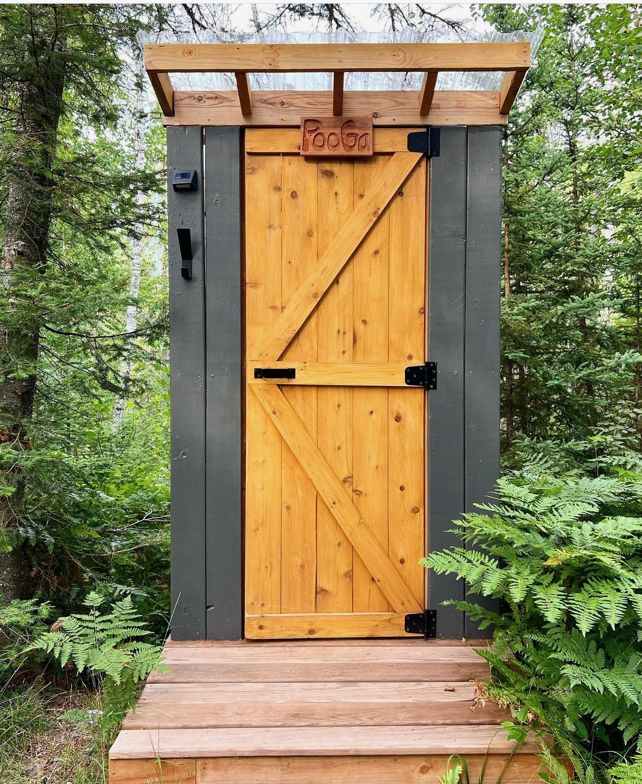
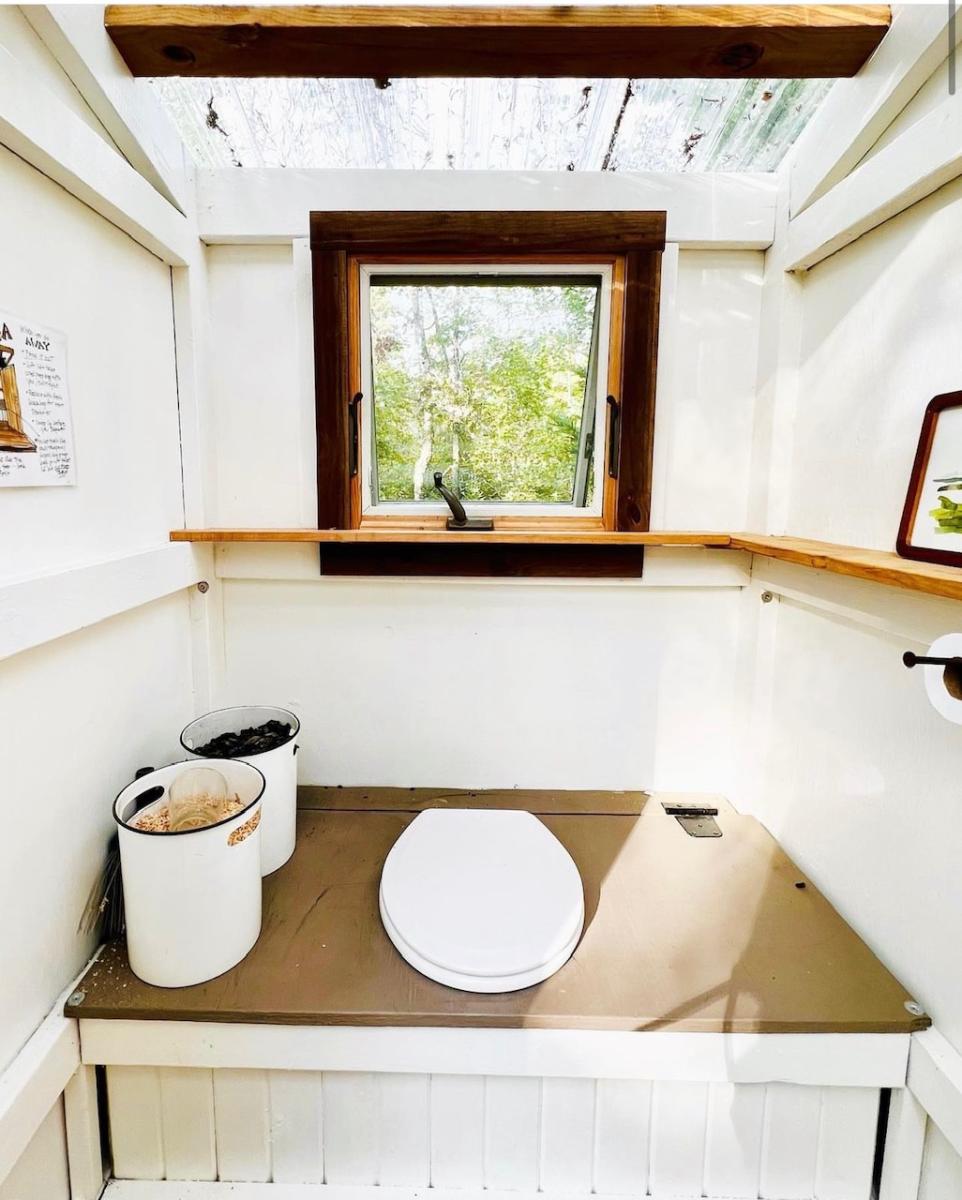
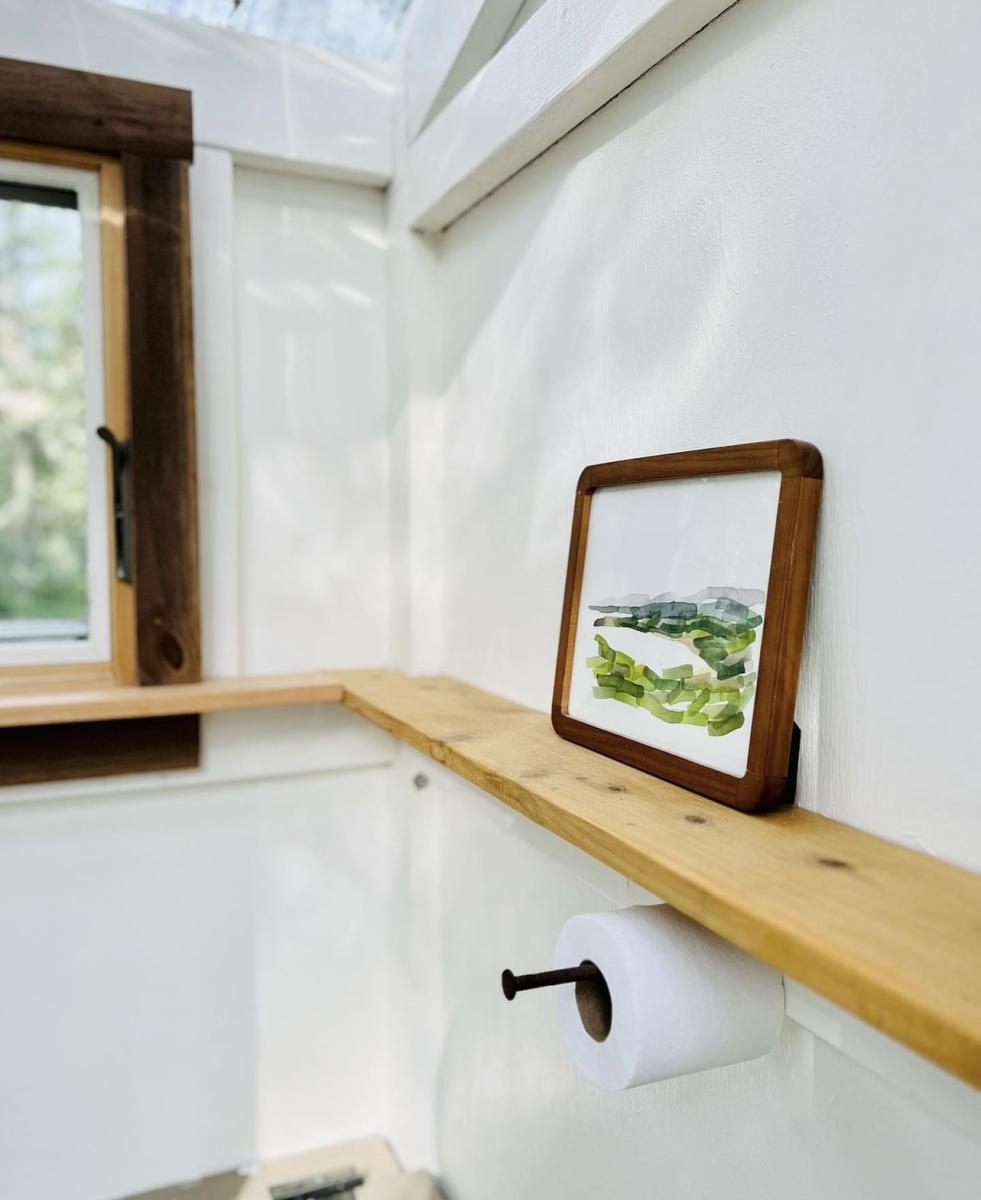
Outhouse with Skylight
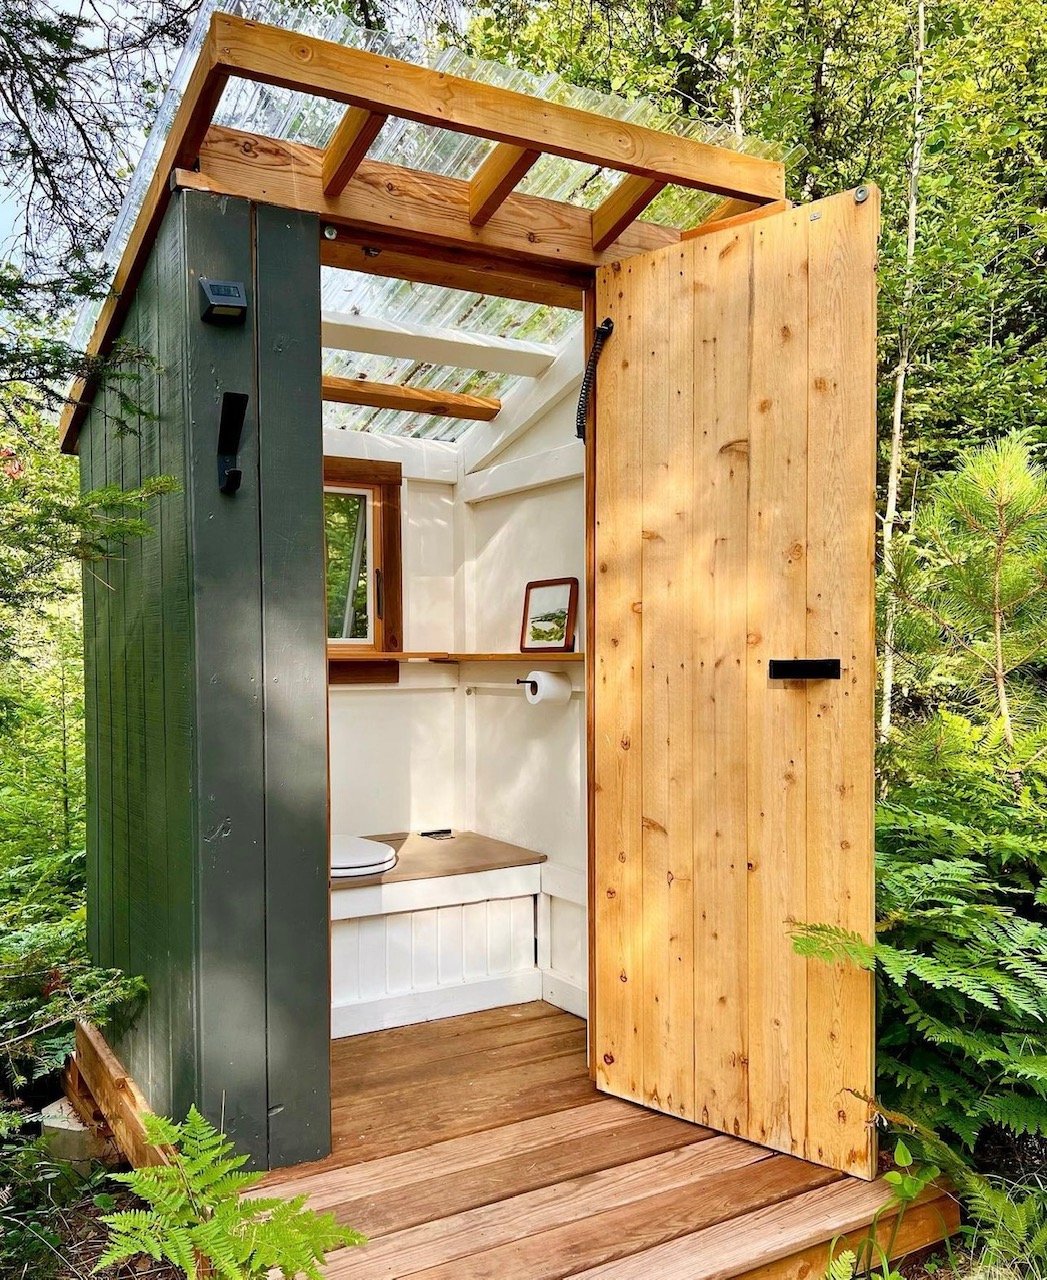
Our favorite throne in town.
My daughter and I built the outhouse in the snow a few years ago. Once the TwoGa was named after the Stuga, the outhouse quickly became “The PooGa” (aka “The Ash-Hole “🤣). We use ash in the winter and sawdust in the summer, to keep away the stink, which works like a charm.
This is an adaptation to an Ana White outhouse design.
Pin For Later!
Built from Plan(s)
Comments
Fri, 08/04/2023 - 11:06
Best Outhouse Around
Love what you did here, the natural light and bright cheery interior, well done!
6' Square Sandbox

I've been wanting to buy or make a sandbox for my son for a couple of years now. Since seeing this on Ana White I knew I had to make it. My son is 4 yo and I didn't think the 4' square sandbox would be big enough for him, so I made it bigger. Ours is 6' square. Materials: 4@1x8x6' 12@1x6x6' 2x4 - used leftovers from another project 8 hinges 4 handles decking screws Cut lengths: 2@1x8 cut to 71.5 (long sides of the box) 2@1x8 cut to 70.5 (short sides of the box) did not cut the 1x6 boards (top planks) - actually designed the other boards to fit their length to prevent cutting (saving time) (note that original plan uses 1x4 planks - I used 1x6s so I could use the same number of planks but cover a larger area) 4@2x4 cut to 11.5 (arm rests) 4@2x4 cut to 18.5 (back supports) followed instructions for assembly otherwise. At my husbands suggestion we put the handles on the sides and can easily open from either side - prevents having to lean over to the middle to open (back saver) I finished the project in 4 hours including clean up and a couple of small breaks. This is my first Ana White project. It was a lot of fun to build and I hope my son will enjoy it for years to come!

Built from Plan(s)
Estimated Cost
$190
Estimated Time Investment
Day Project (6-9 Hours)
Finish Used
Sand and stain with sealer included
Recommended Skill Level
Beginner
Comments
Sat, 09/01/2012 - 20:59
This is perfect!
Wow, this is just what I need! I've been wanting to make a sandbox for under the playhouse but the other plan was too small. This would be great for the little guys. Thanks!
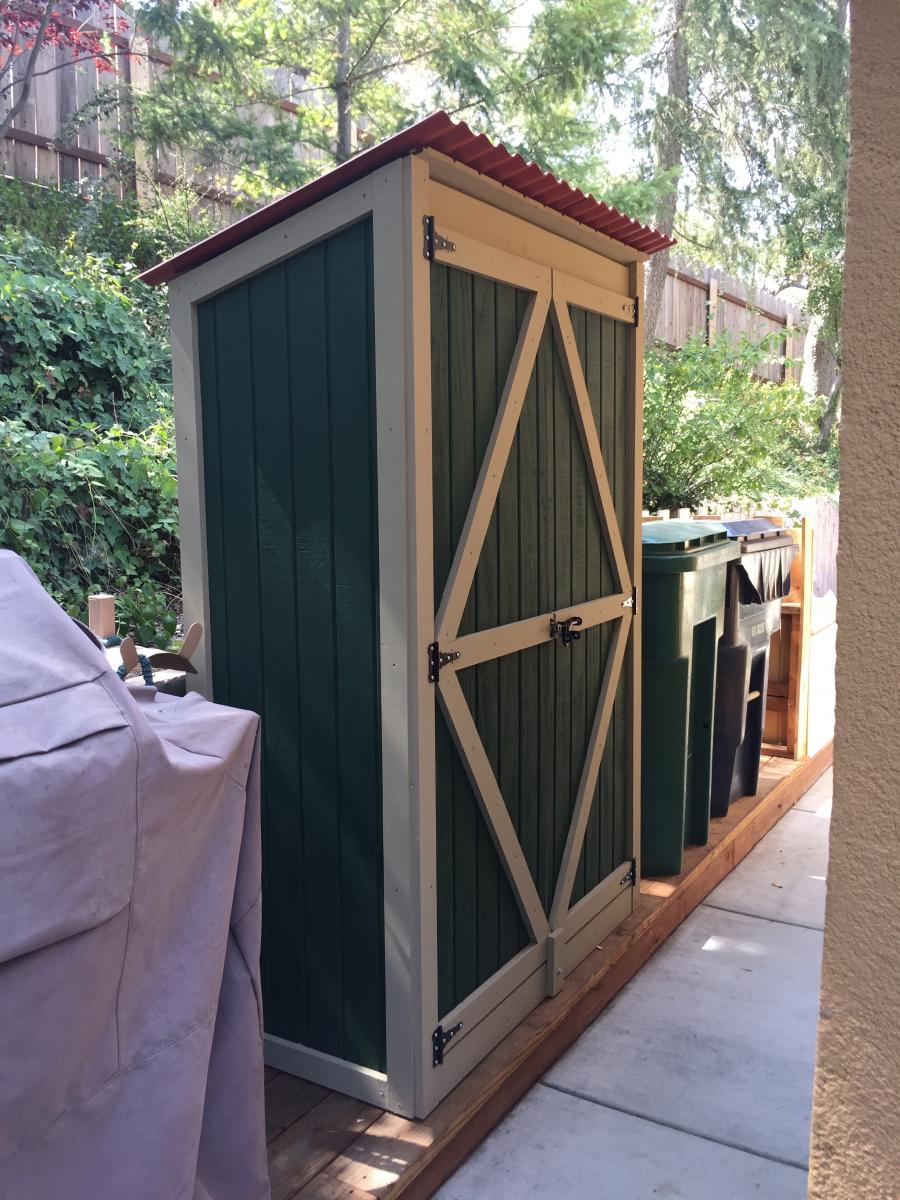
Garden Tool Shed (based on plans for Small Outdoor Shed)
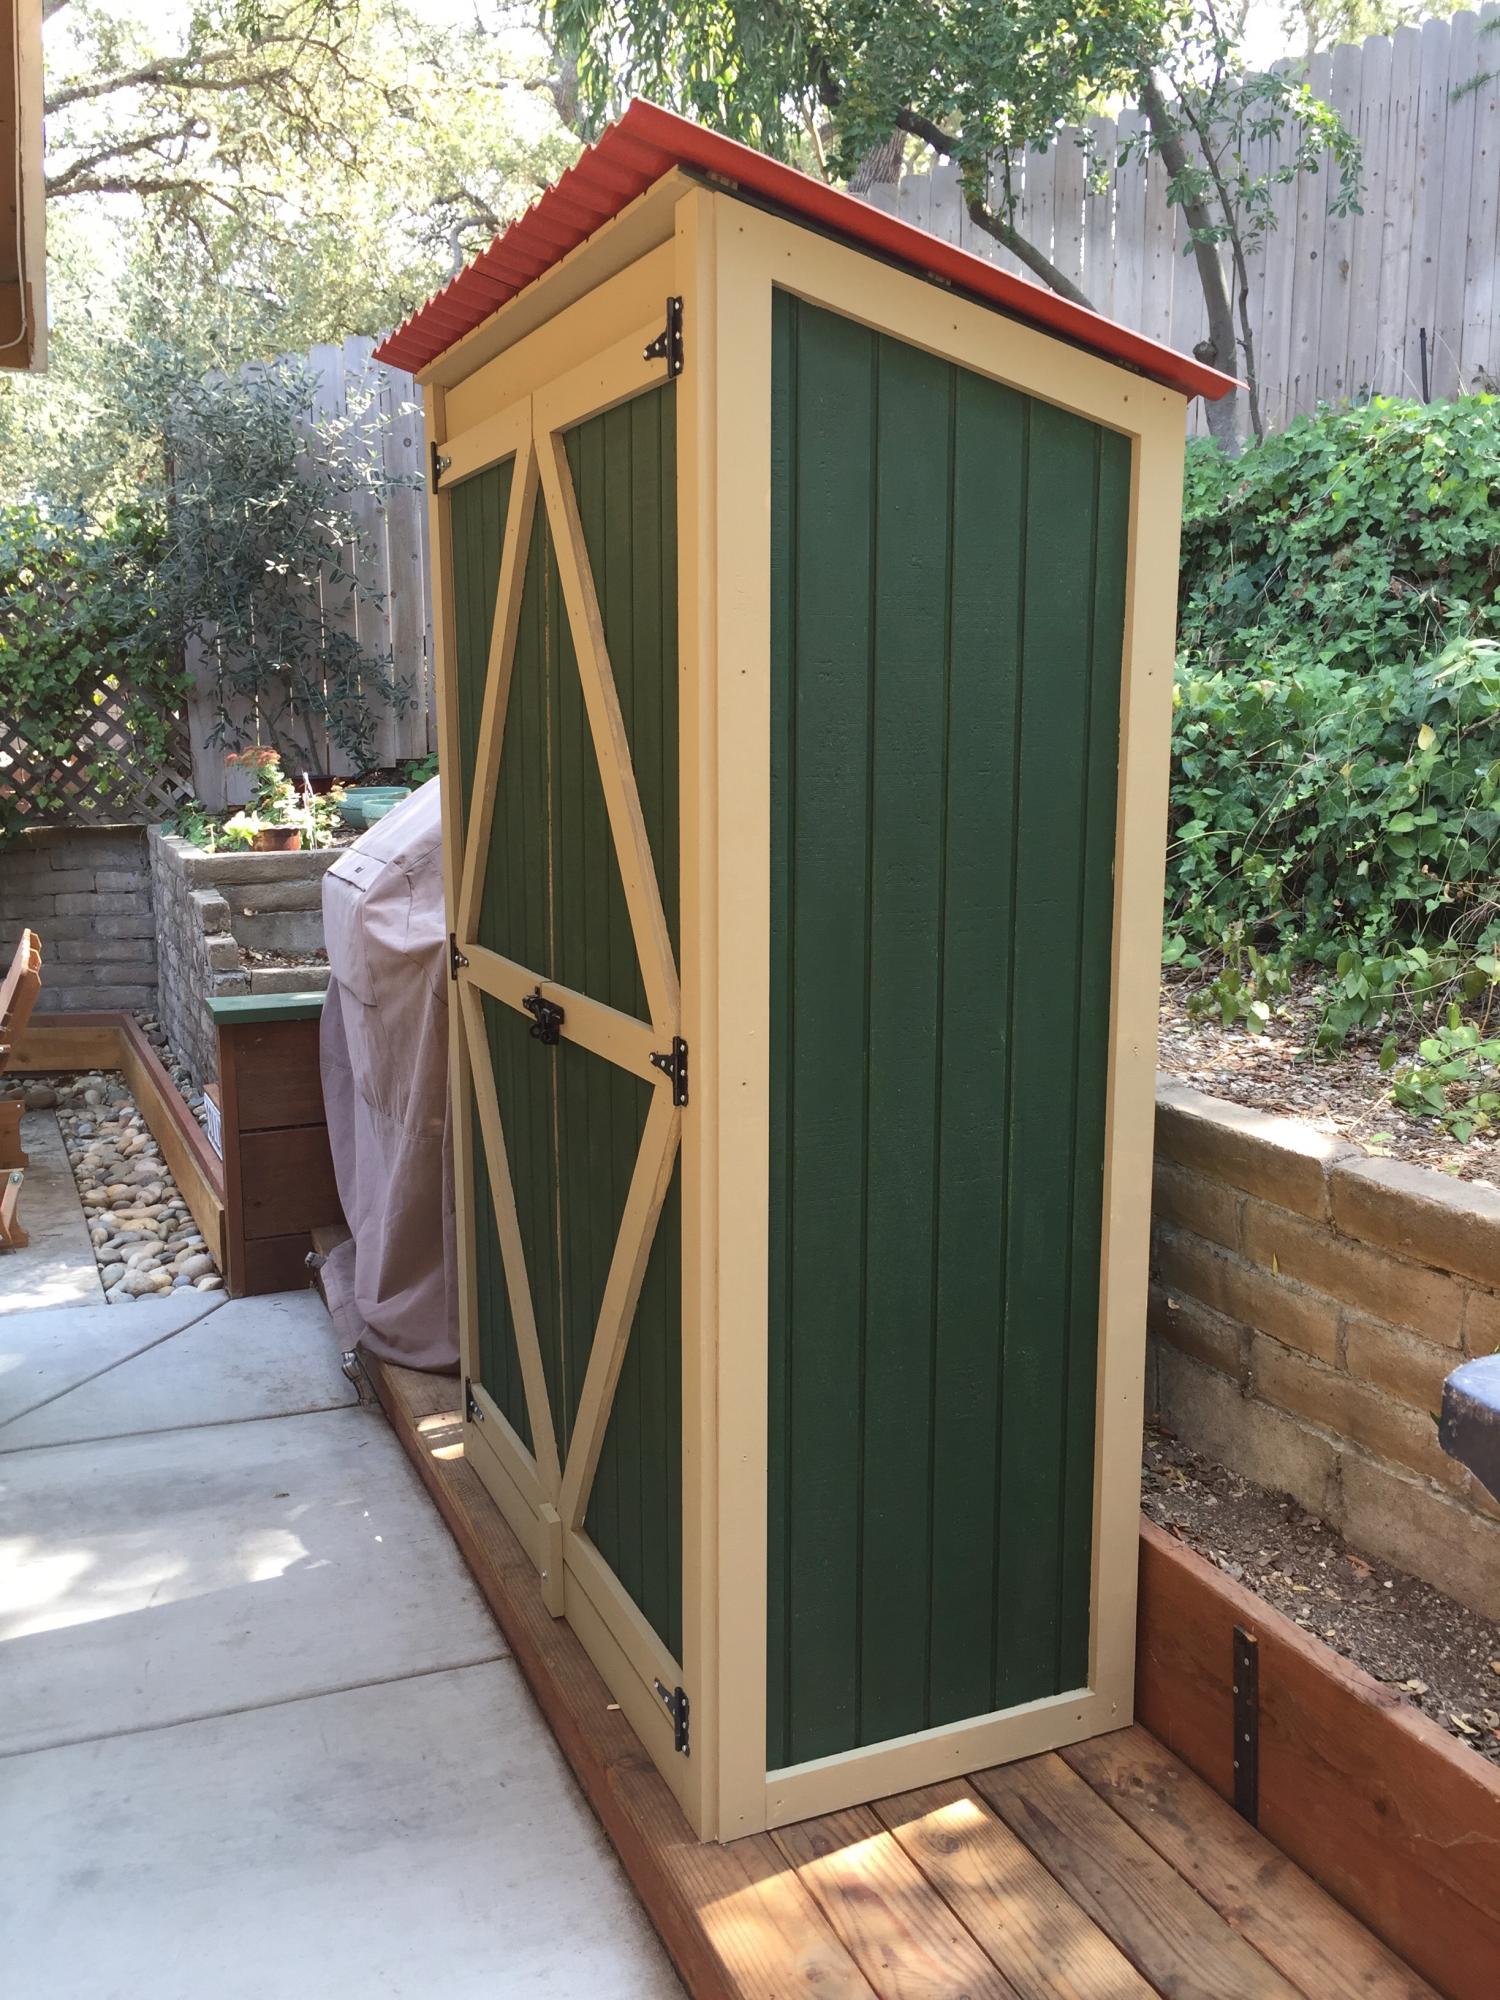
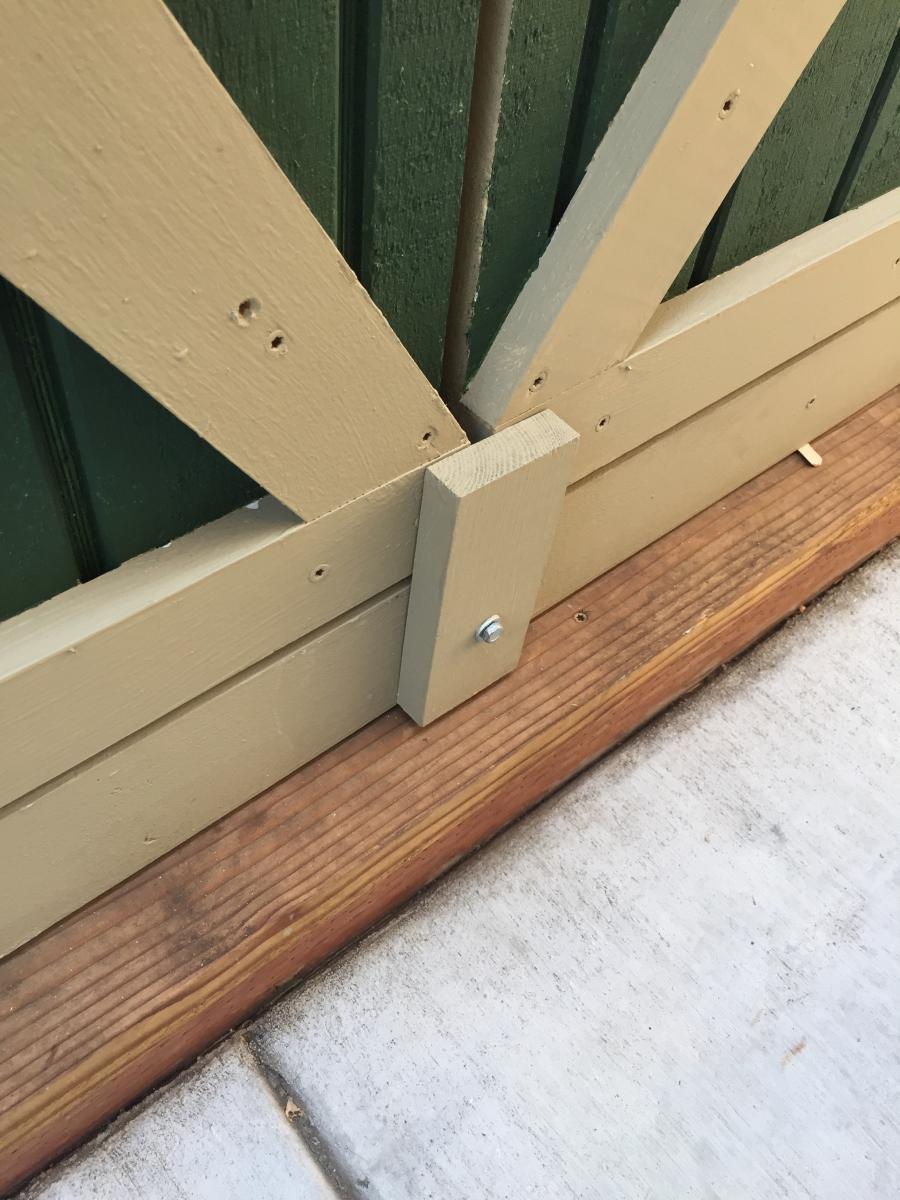
My husband and I built a garden tool shed using your plans for a "Small Outdoor Shed or Closet." We needed exactly this size for our available space. (THANK YOU! The video was really helpful and the plans were very detailed.) We are not handy at ALL, and are definitely beginners when it comes to woodworking. But, when the person who was supposed to build it for us was delayed, we thought we could try it, or at least START.
We bought a lower-end Kreg pocket jig and a secondhand mitre saw, and set to work, using T1-11 siding. We ended up building the entire shed ourselves, and were very surprised at the end result (and proud too!). The hardest part was building the doors, since we weren't really sure how to construct them to keep them from bowing. We ended up putting trim all around the edges of the T1-11 plywood doors, inside and out. (We were too far into building them when we realized we probably should have done it differently.) We also couldn't figure out how to get the double doors to stay tightly shut, but ended up using a rotating block (see picture) at the bottom and it works great, especially given that one of the doors had a slight bow at the bottom.
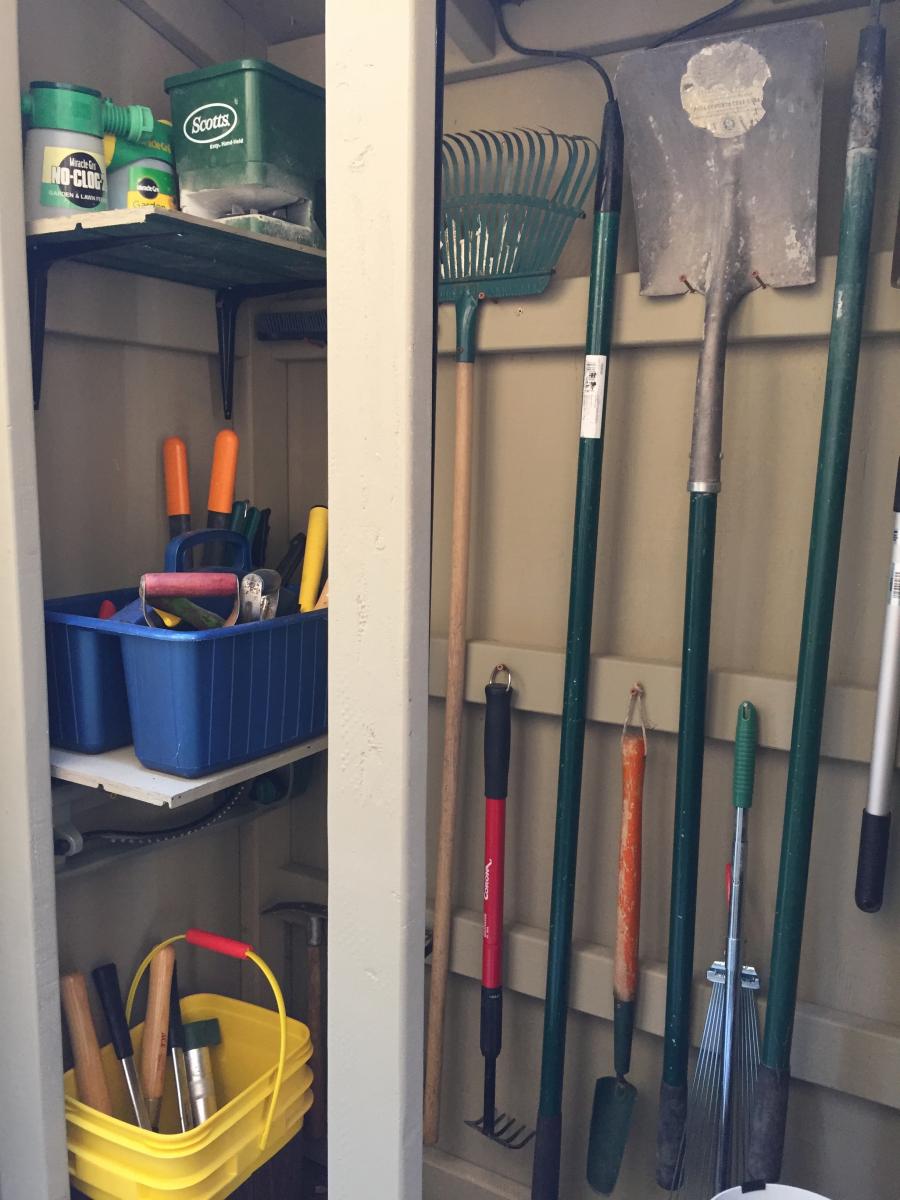
I think the only ways in which we deviated from the plan were that we added trim, an additional 2x4 up high across the back of the shed (for hanging long-handled tools), and two interior shelves on the left (from leftover siding). We used colored corrugated polycarbonate sheeting over the roof instead of asphalt shingles. (Unfortunately you have to use specific screws for the sheeting and one length was too short and the other too long and protrudes through the roofing slightly, into the interior. But we like the pop of color the sheeting adds, and REALLY didn't want to do shingles for such a small area, nor did we know how to do shingles.)
My final suggestions would be that a mitre saw and pocket jig are REALLY helpful and using star head screws is easier. I would also suggest that you paint everything (prime and color coat) before assembly and just touch up afterwards, especially if you use a lot of trim as we did. We primed and painted the siding but just primed the trim, and it was a real pain to put the color coat on all that 1x3 trim after construction.
This plan is listed as an "intermediate" project and I think that's probably a correct designation. As beginners, it just took BOTH of us to figure it all out (we work really well together) and to build it, and it took a much longer time than it would for someone with more experience.
Built from Plan(s)
Estimated Cost
I think we probably spent between $300 and $400 on lumber, hardware and paint, not counting buying the secondhand mitre saw and the Kreg jig.
Estimated Time Investment
Week Long Project (20 Hours or More)
Finish Used
Primed and painted, green and tan. (We bought the green and had the tan on hand.)
Recommended Skill Level
Intermediate
Comments
Tue, 10/06/2020 - 15:56
Well done! I love this! …
Well done! I love this! Can I ask what dimension your garden tool shed is? And how did you decide on the new roof size/angle? I have a similar space and am contemplating something similar. Thanks!!
Tue, 10/06/2020 - 15:56
Well done! I love this! …
Well done! I love this! Can I ask what dimension your garden tool shed is? And how did you decide on the new roof size/angle? I have a similar space and am contemplating something similar. Thanks!!
Wood and Corrugated Metal Raised Planter

My attempts at your wonderful planter boxes with plastic edge to make the sheet metal less dangerous.
I used leftover oak flooring for the sides. My wife loves your design. The garden awaits.


Built from Plan(s)
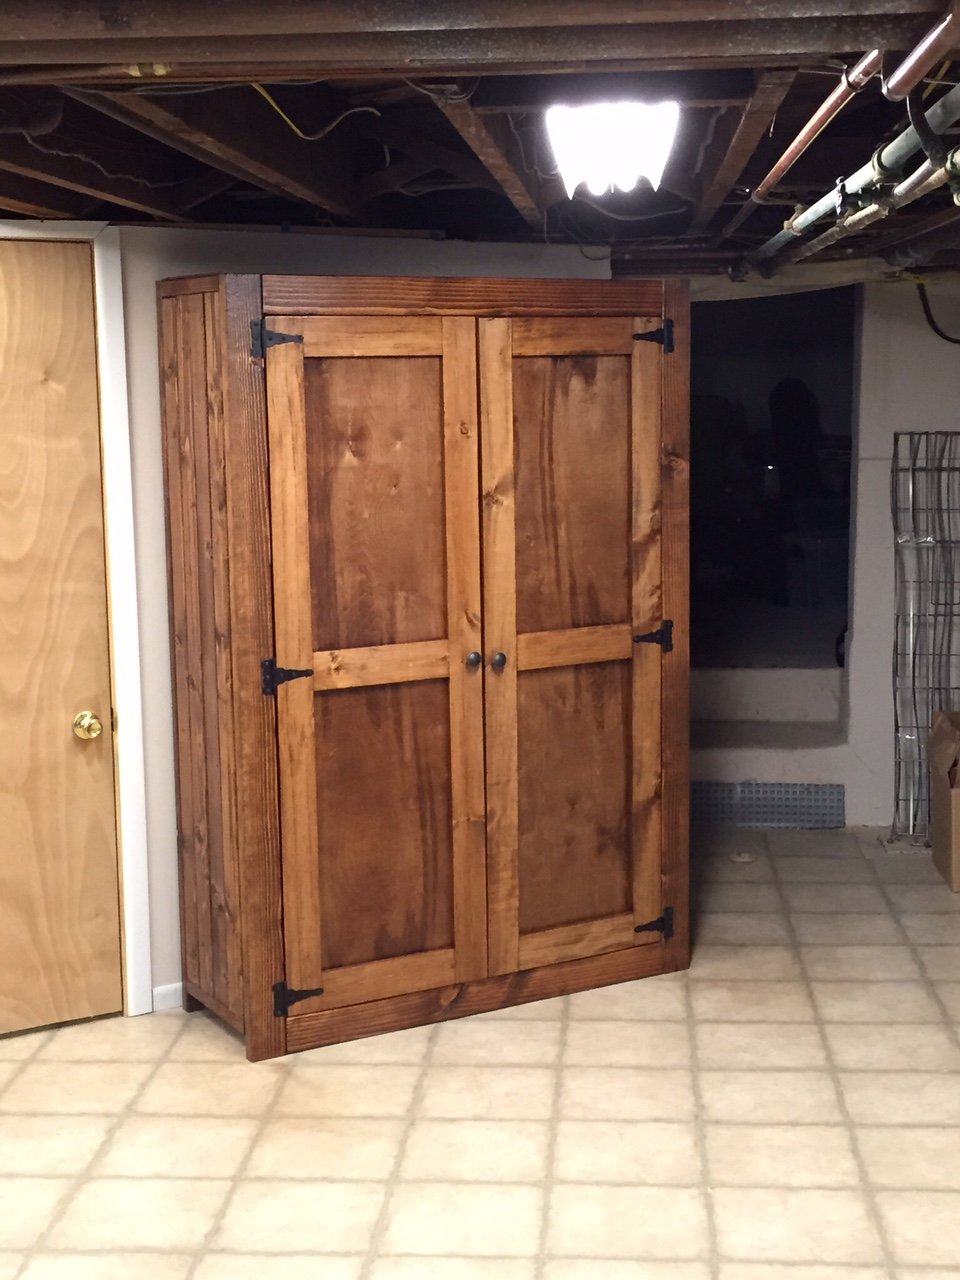
2x4 DIY Pantry
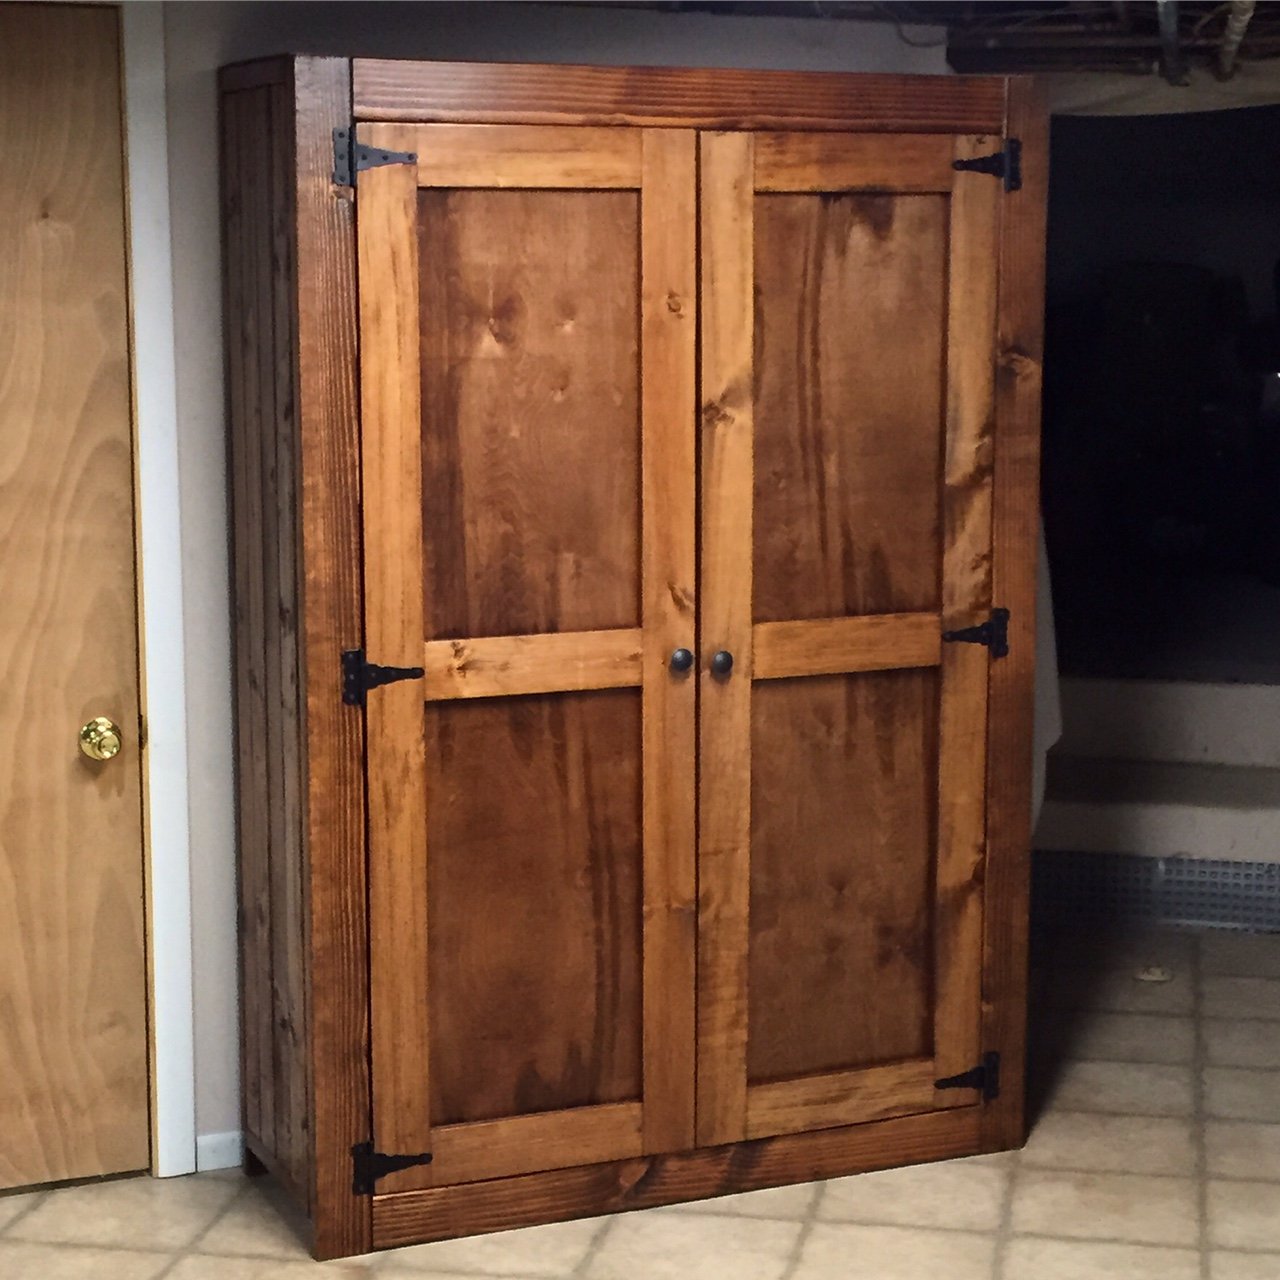
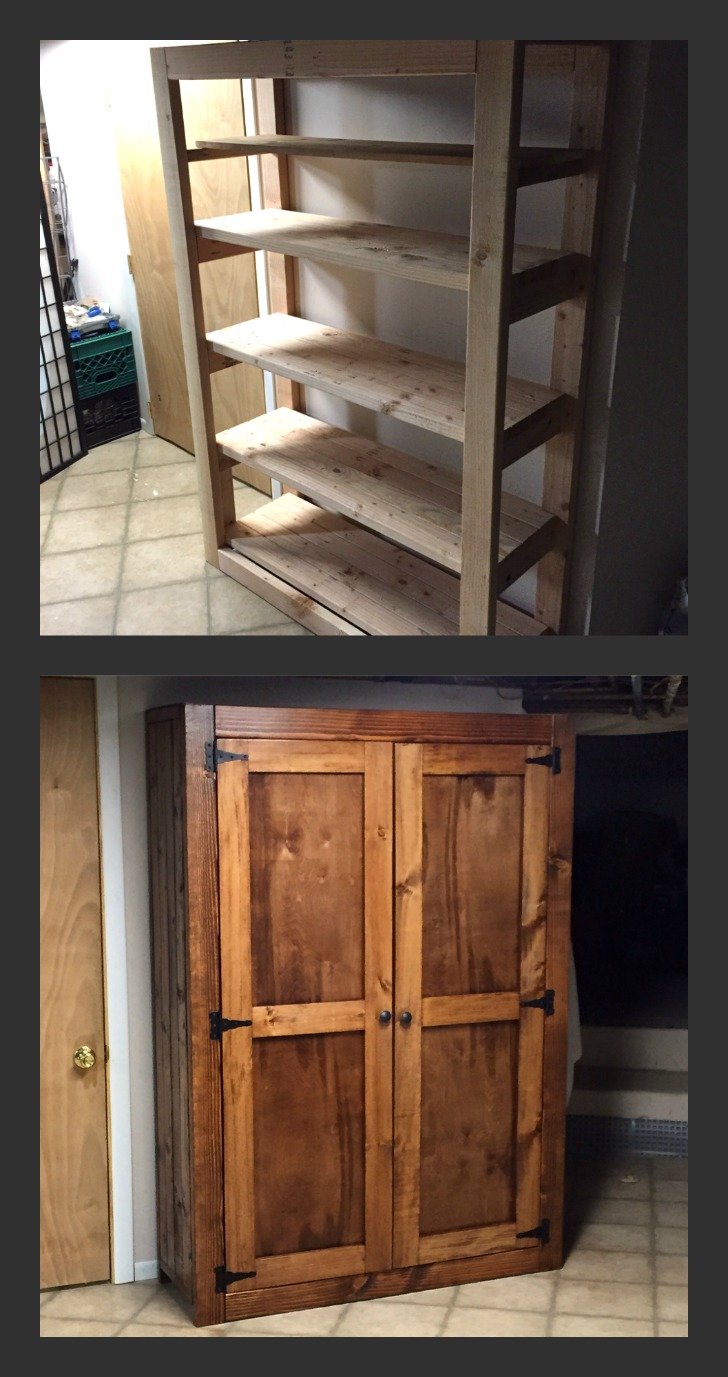
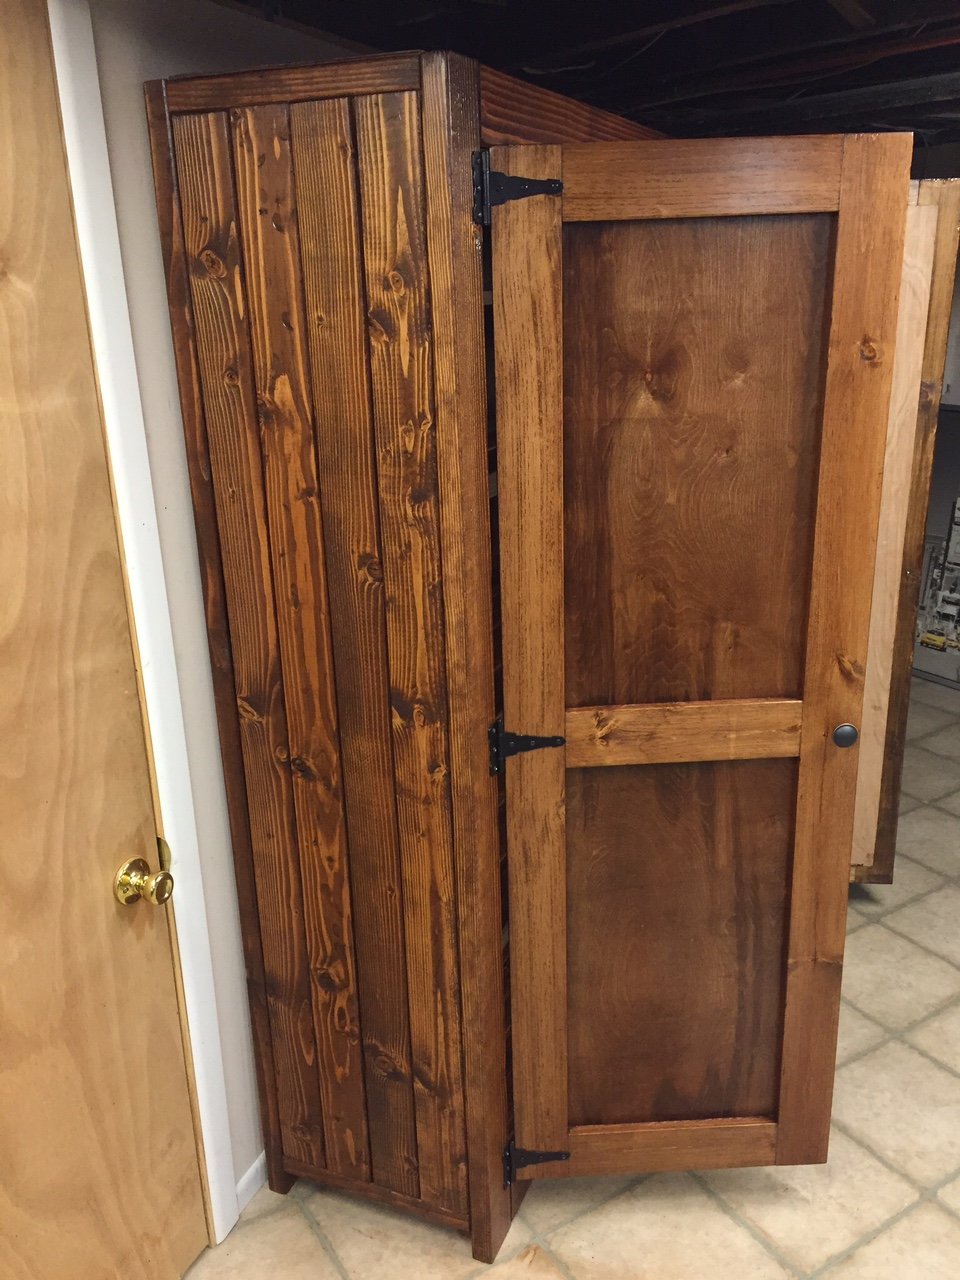
Anything is possible when you put your mind to it. This is my 4th DIY furniture project. First time working on cabinet/doors. Installing them straight was the biggest challenge. The side of the pantry is actually four 2x4's. I measured the frame so tightly that I had to use a hammer to bang in the fourth 2x4 on each wall, also adding a distressed look in the process. The pantry is very large, 48in wide and about 17 inches deep. Our kitchen lacks storage space and we could use a little more space for food and also pots, pans etc. The staircase to our basement is off our kitchen, so I placed the pantry right at the bottom of the staircase for easy access. I am thrilled with how this came out considering the time and effort it took. Very gratifying. Build on!
Built from Plan(s)
Estimated Cost
$180-$200
Estimated Time Investment
Week Long Project (20 Hours or More)
Finish Used
Miniwax English Chestnut
Miniwax Semi Gloss Poly
Miniwax Semi Gloss Poly
Recommended Skill Level
Intermediate
Comments

Thu, 03/05/2015 - 06:24
I really love how the
I really love how the finished turned out. I need to build something like this too! My current pantry just isn't big enough for bulk shopping :)
Thu, 04/16/2020 - 10:55
Building this from your…
Building this from your pictures as we speak! What type/thickness of wood did you use for the back panel and door panels??
Sat, 07/23/2016 - 18:21
That looks awesome!
I am thinking about building one but I am not sure if my skill level is up to this yet. I am going to attempt to build the Kentwood Bookshelf and see how that goes. I am remodeling my office and want real wood shelves instead of that pressed wood junk. Great job on your build. I love this website!
Sat, 01/13/2018 - 18:09
Hey Michael
Hey Michael I really love the pantry and would love to make this exact one but there is not enough info on the sizes and what all you used for all the wood. If you have time I would greatly appreciate it if you could give us some more info thank you
Thu, 01/09/2020 - 06:19
Is the top of this a single…
Is the top of this a single piece of plywood. Pictures are a bit vague. Trying my hand with this
Wed, 04/28/2021 - 16:38
Love it! I am in need of one…
Love it! I am in need of one too. Can we get the plans for this pantry?
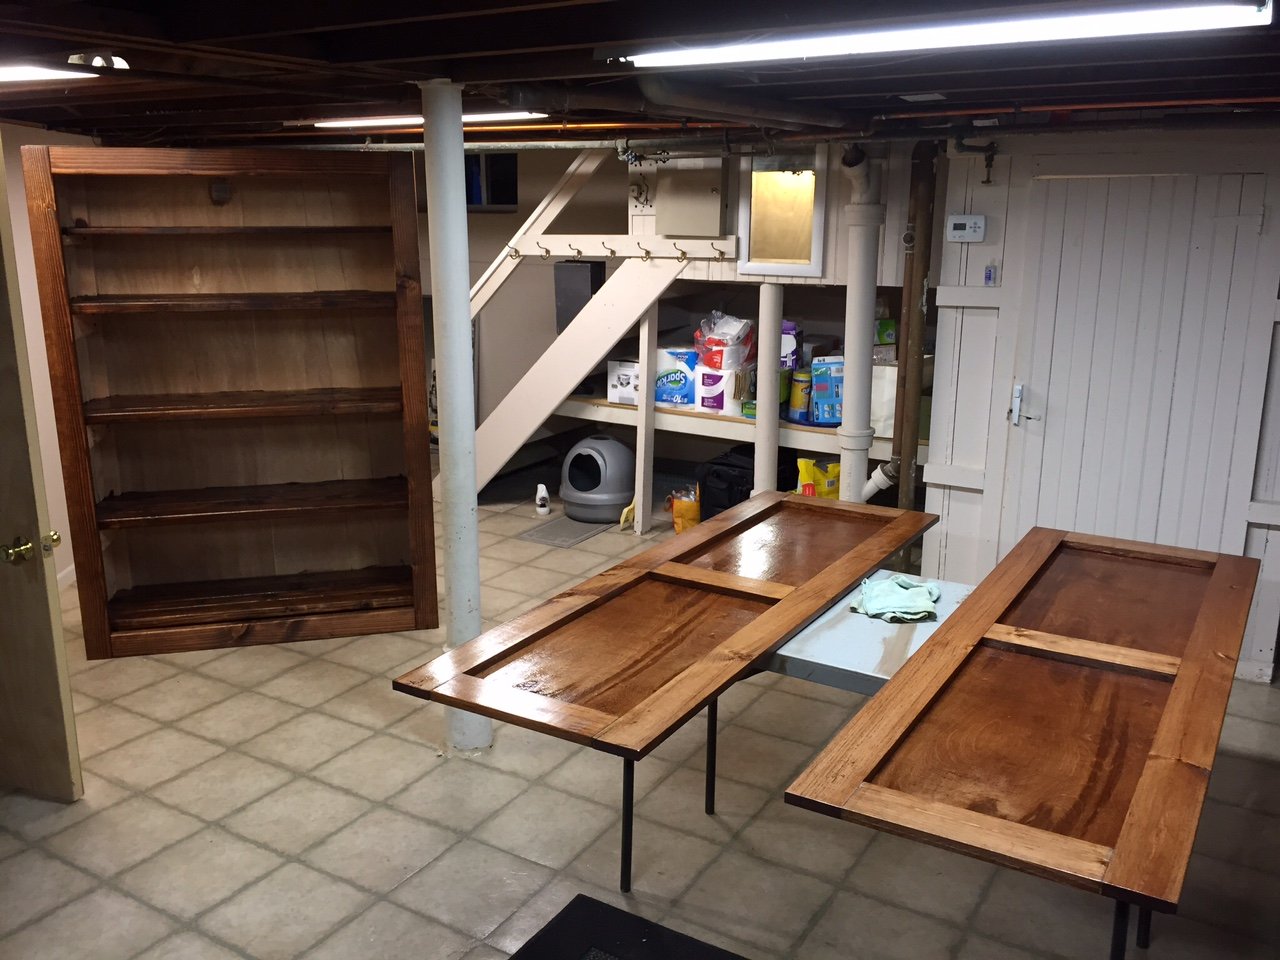
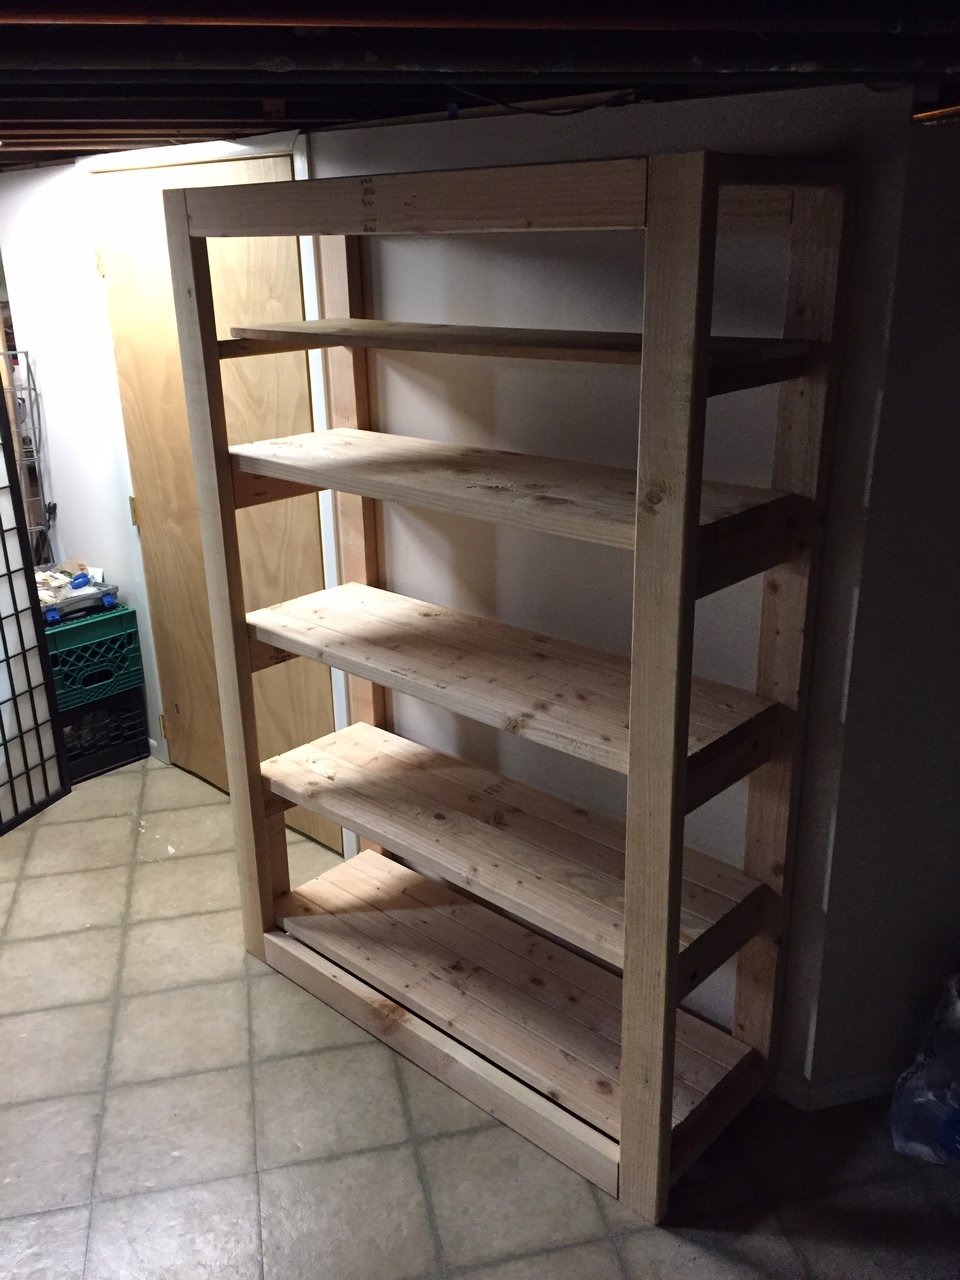
Garage Shelves Plan with Added Doors - Built and shared by Jeremy Doyle
Garage Shelves Plan with Added Doors - Built and shared by Jeremy Doyle
Built from Plan(s)
Octagon Picnic Table with Umbrella
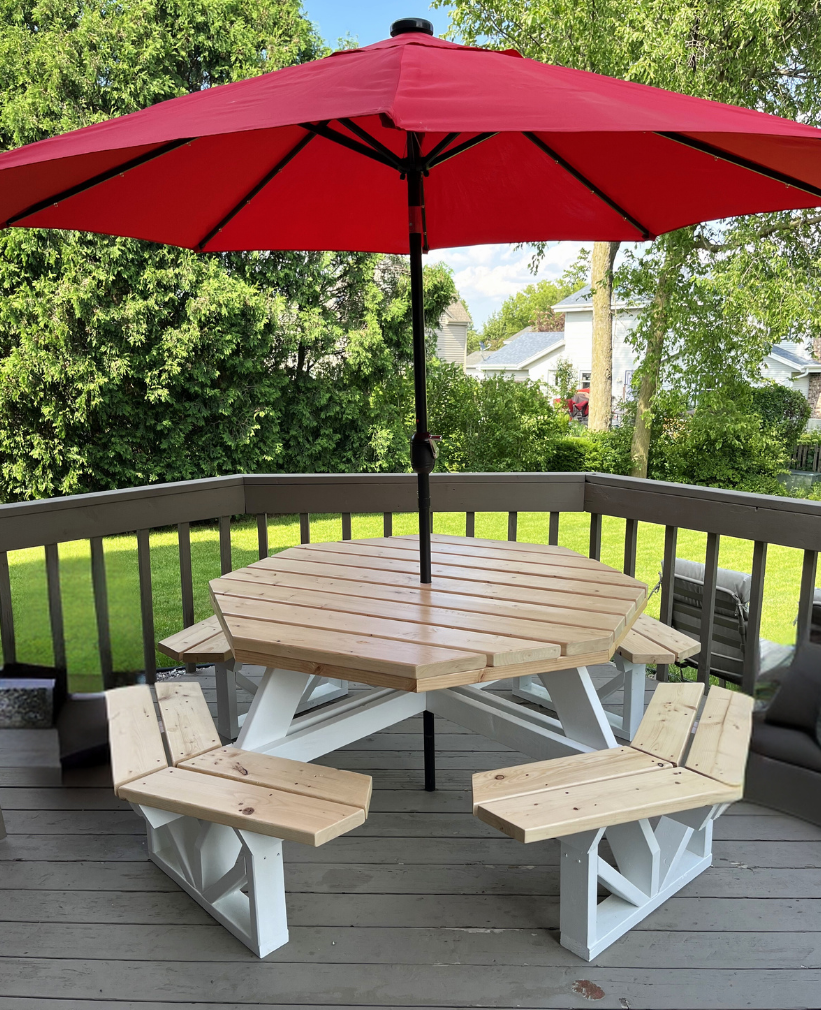
A new table for a new home for my son. Added hole and block for umbrella. Very satisfied with project and plans. Thanks Ana
Frank N.
Built from Plan(s)
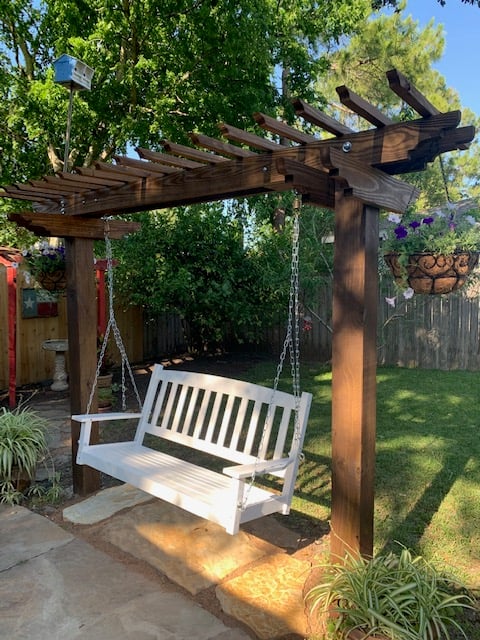
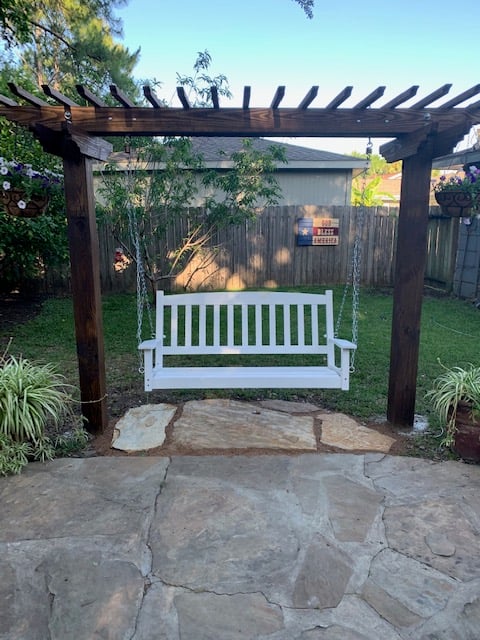
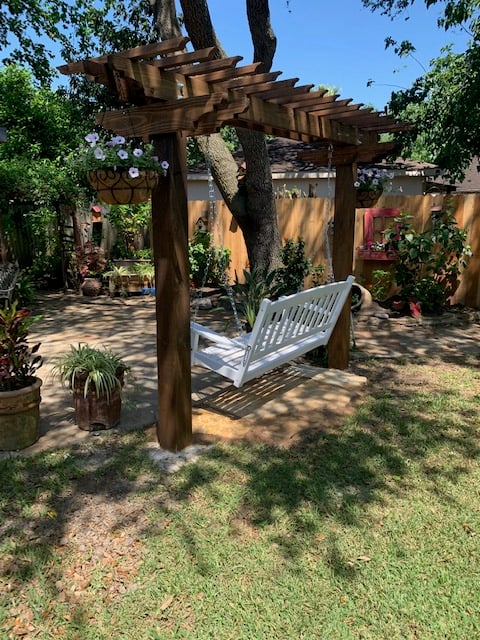
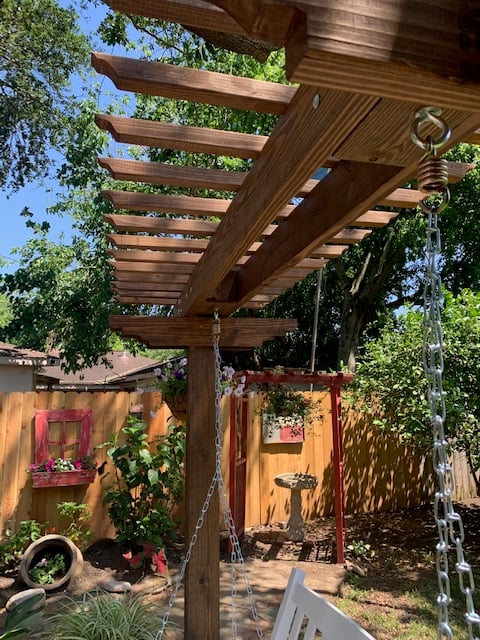
Pergola Swing
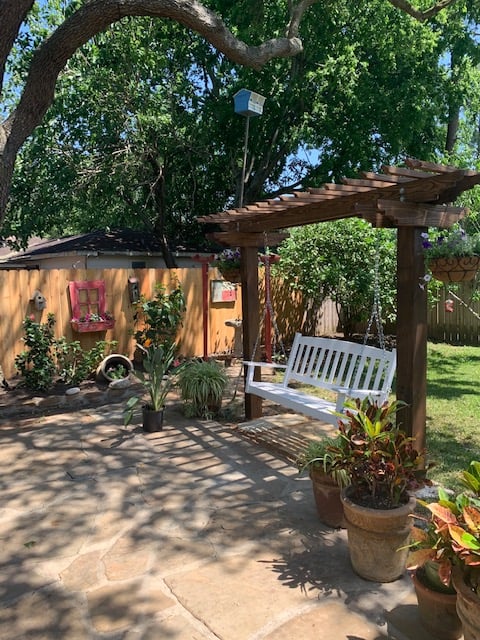
I saw this project on YouTube under Arbor Pergola Swing. It did not mention any specific detailed plans or cut list but it was enough to get me started. I began with (2) 10' 6" x 6" post. buried each 24" and cemented. I cut the post tops at 83" from ground line. The rafter consist of (2) 10' 2"x 6". I used the leftovers of the 6" x 6" post tops in the middle of my rafters to hang the swing from with 1/2 " eye bolt. Then I used (9) 2" x 2 " x 8' and cut each at 36" to finish off the top and (2) 2x6x8 for the 4 rafter supports. I drew out the designs of the rafters and top ends free hand and at made a template for the cuts with s jigsaw.
The entire cost including hardware minus the swing was $170. My wife had purchased the swing last Fall at a clearance for $40 brand new.
Built from Plan(s)
Estimated Cost
$170.00
Estimated Time Investment
Weekend Project (10-20 Hours)
Finish Used
Valspar Duramax Special Walnut
Recommended Skill Level
Intermediate
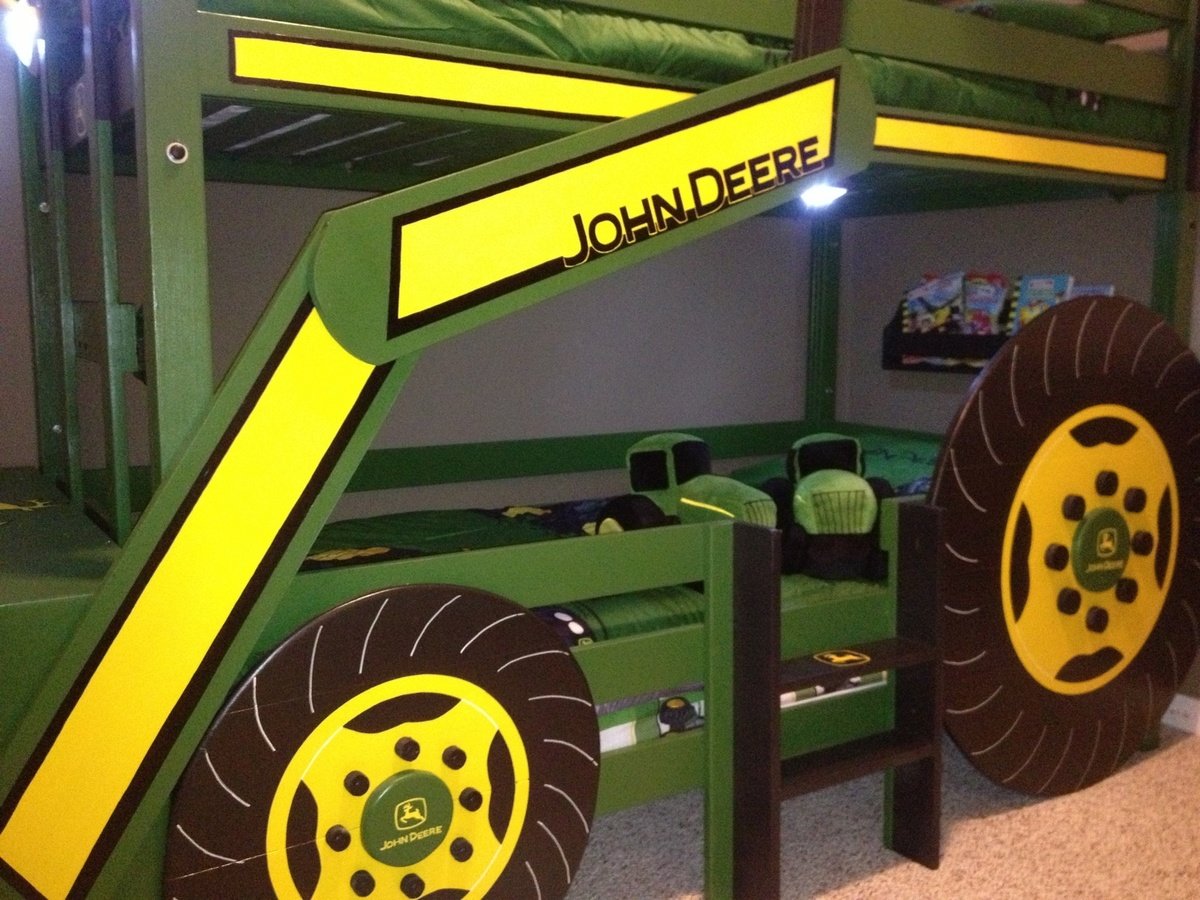
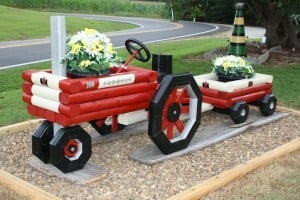
John Deere Tractor Bunk Bed
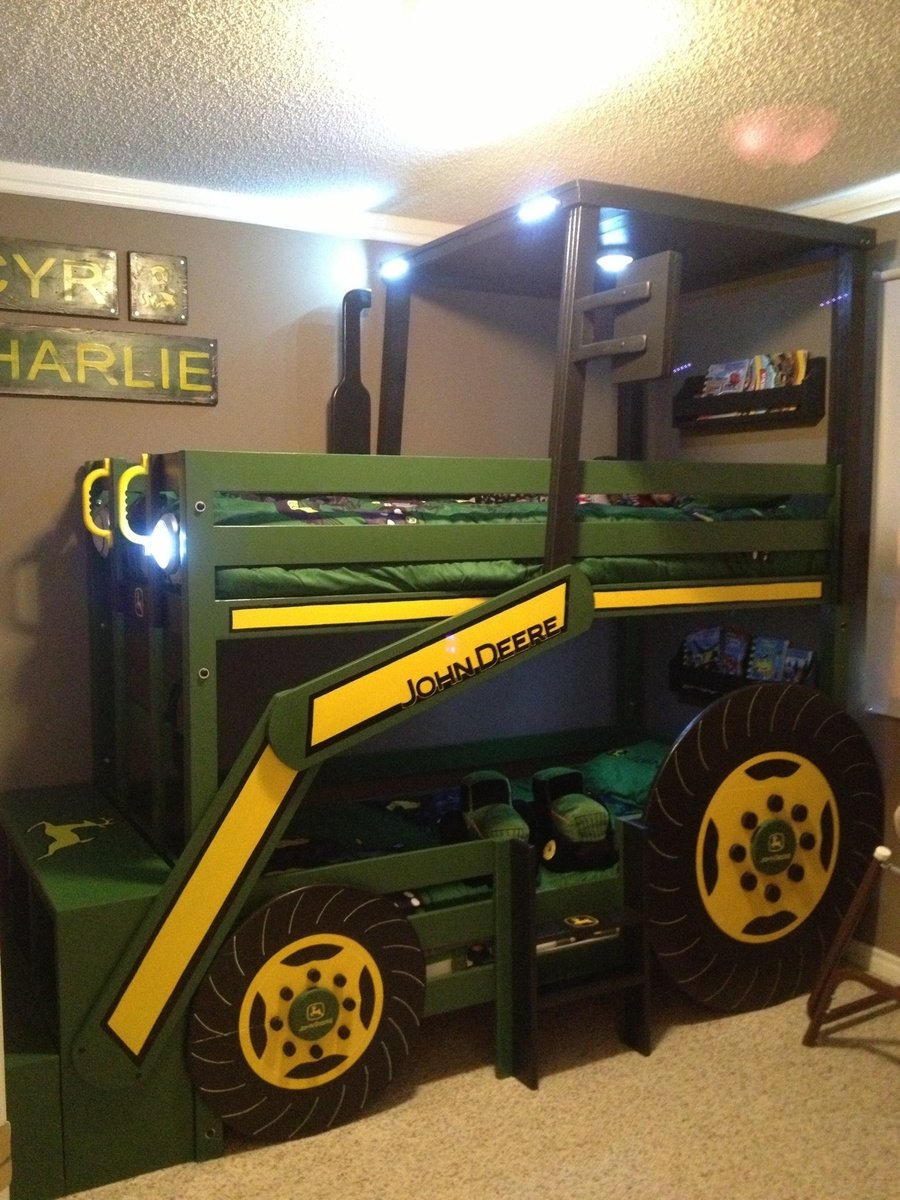
With another baby boy arriving in August, my one and three year olds are moving to a "big boy" room. My oldest decided he wanted a bunk bed and as they both are obsessed with tractors, when I saw the "John Deere Tractor Bunk Bed" plan, I was sold.
We would be needing a twin sized bunk bed though not a toddler. I used the classic bunk bed plans and simply modified them to suit our needs. I moved the ladder to the front, added a rail on the bottom bunk and added a small ladder to the side for my one year old to climb into the bottom bunk.
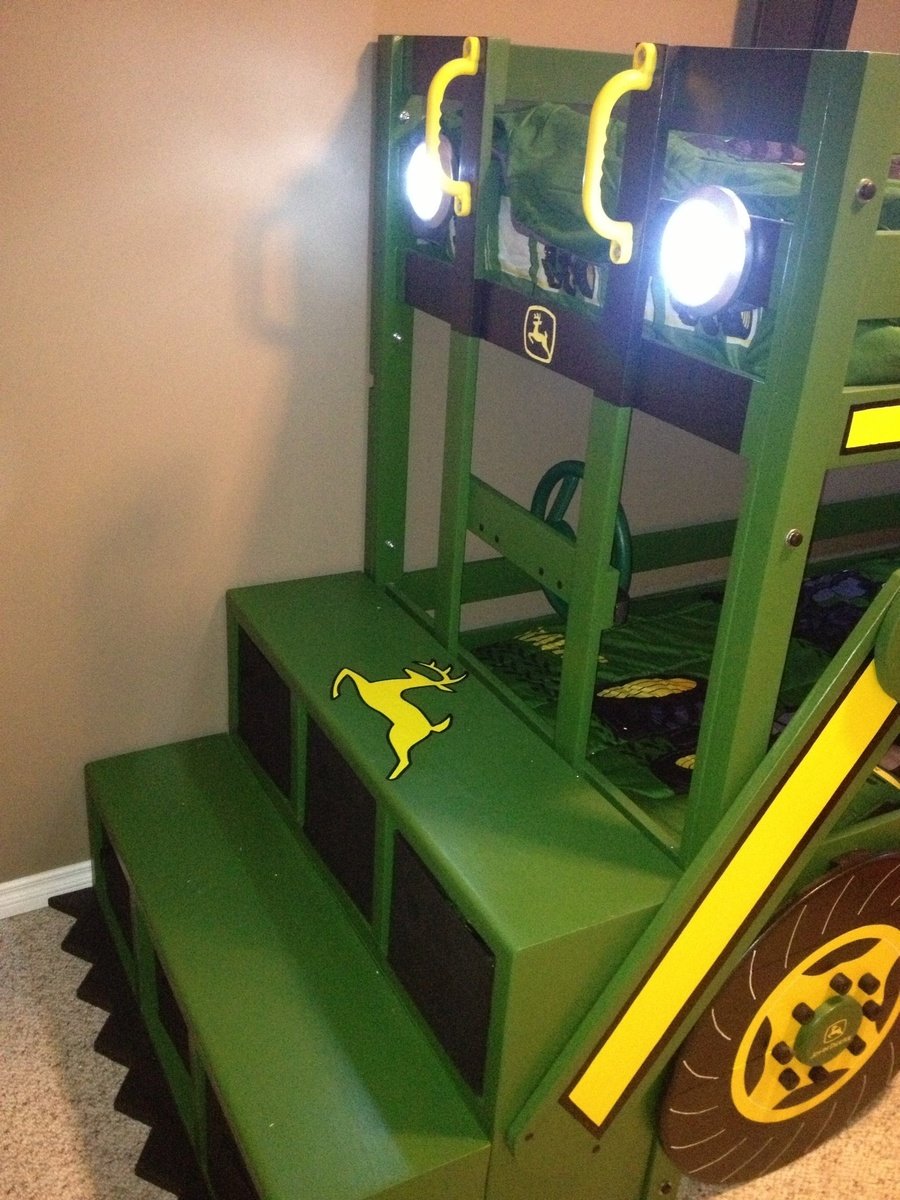
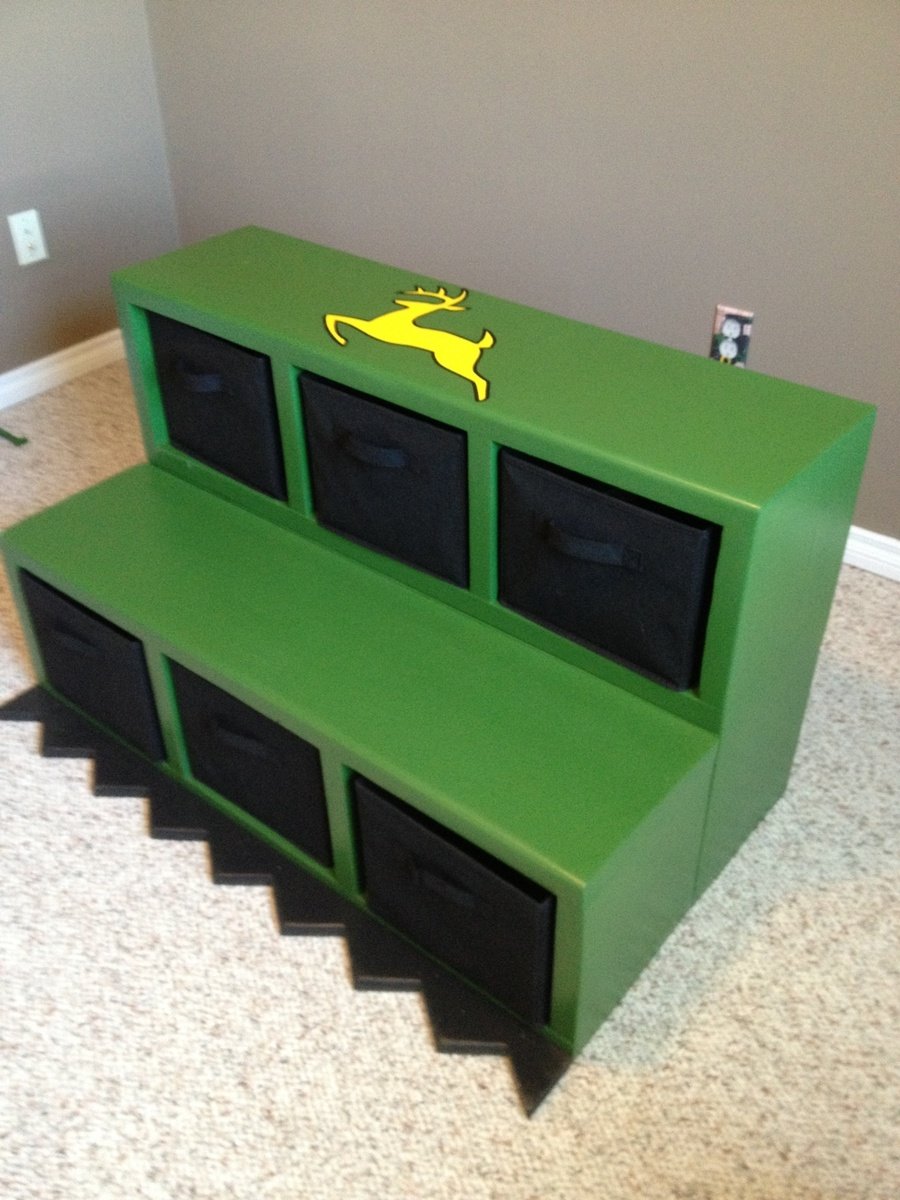
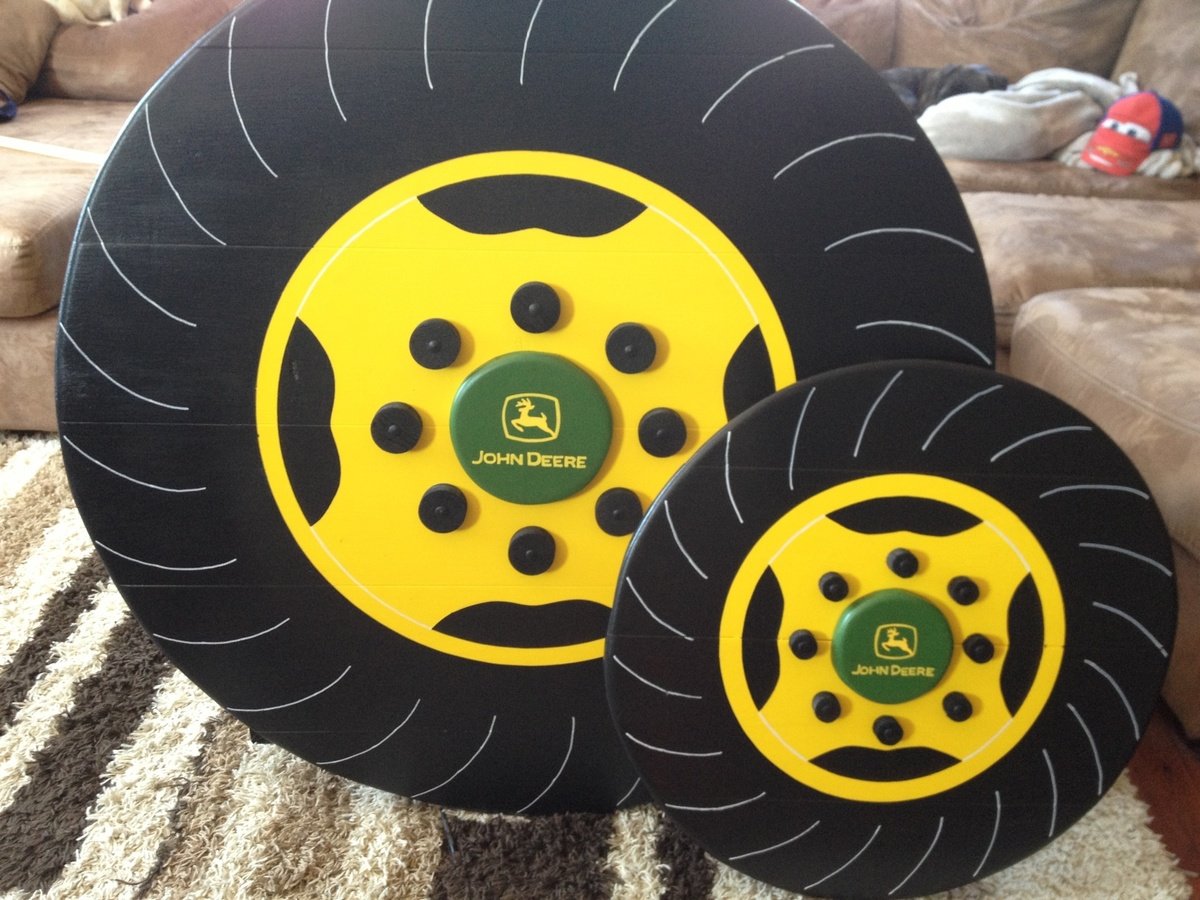
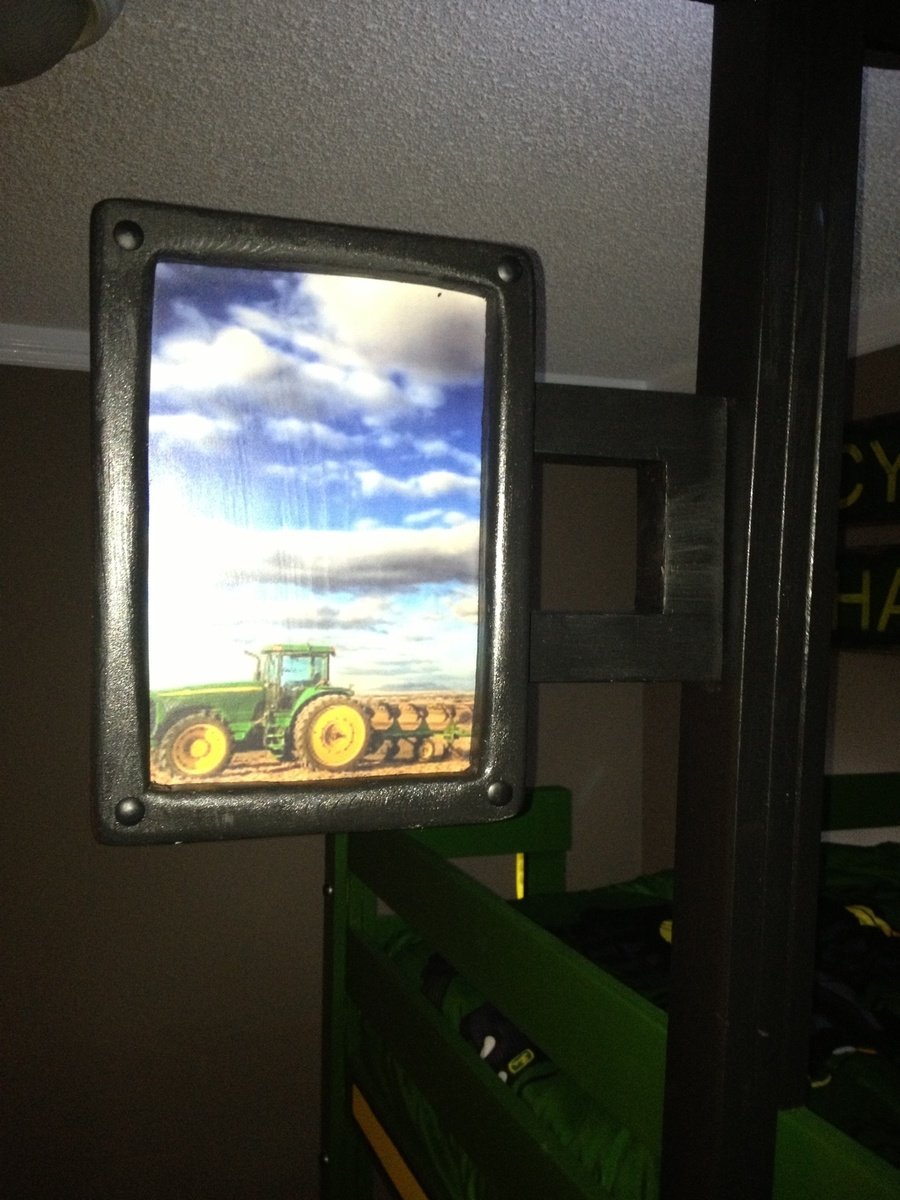
Once the the frame of the bed was complete, I added the tractor accessories. A couple of storage cubby shelves with fabric baskets for toy tractors which act as stairs up to the ladder and make the tractor bucket at the front. Also, the wheels which are made from joined 1x6s as I find plywood hard to sand and paint to the quality of finish I like. A cab & roof from 1x4s framed together. A side mirror that I decoupaged a picture of another tractor on. I used push lights for the headlights as well as a reading light above each bed (they're on timers so they'll turn themselves off). A steering wheel (play equipment access from toys r us). Also, I built and mounted by the head of both beds a "flat wall book holder" so they would have somewhere to store a few books.
My boys and I are fairly new to building so I spent a lot of time planning and measuring to ensure it would all come together in the end. It paid off because it all went smoothly (even with "help" from my boys). It's not perfect but they're very happy with the result. We also built a John Deere themed "Just my size closet" and even finished with over a month to spare before the new baby arrives! :)
Just want to say a quick thank you to Ana both for the amazing plans and also the inspiration to take on these projects. The time spent with my boys building as well as the resulting treasures are priceless and I would have never realized what we were capable of had I not stumbled upon your website and been so inspired by you and everything you've accomplished. Thank you!
Built from Plan(s)
Estimated Cost
$550.00
Estimated Time Investment
Week Long Project (20 Hours or More)
Finish Used
John Deere Green paint (home depot was able to color match a toy tractor), marigold yellow and black and polyurethane.
Recommended Skill Level
Beginner
Comments

Thu, 10/09/2014 - 14:12
This is amazing!!
I am new to this and I was wondering were to find the measurements for the twin size bed? I would love to make this for my boys!!
Mon, 10/20/2014 - 13:10
Plans Please
HI! You did an amazing job with this! Is there any way you can post the plans or send them to me? Thanks in advance.
Mon, 11/03/2014 - 07:48
Plan Request
Sorry for the slow response to those requesting plans. For main structure of the bunk bed, I used Ana's "Classic Bunk Bed" plans. For all of the add-ons, I made up my own plans. I'm pretty low tech so unfortunately they're just pencil & paper plans but I'd be happy to scan and email them to you if you're interested. Just message me and I'll send them your way. :)
Fri, 11/21/2014 - 13:26
Love your plan
Can you please email me your plans? AaronTKesler@gmail.com. Thanks!
Thu, 07/09/2015 - 19:48
Did you get tree bunk bed plan?
I was just wondering if you by chance got three bunk bed plans?? If so would you be willing too send them my way??? lilbgirl_11@hotmail.com thanks so much
Thu, 05/26/2016 - 14:54
Plans please!
I know that it has been a while, but did you ever get plans for this bed? If so, will you please forward them to me at kerrilux@gmail.com? Thank you!

In reply to Plans please! by kerrihicken
Sun, 02/12/2017 - 07:36
plans
if you recieved plans for this can you please forward them to me timburke40@gmail.com
Fri, 01/02/2015 - 12:36
If you wouldn't mind sharing
If you wouldn't mind sharing with me also I would love a copy. Email ... brenneman826@aol.com This is by far the BEST tractor bed I have seen online! You did an awesome job!!!!! Hopefully I can recreate!!!!
Mon, 01/05/2015 - 08:44
AWESOME!!!!
I love this! You did an amazing job! Could you please send the plans to ericaelijah08@yahoo.com
Thank you so much!!
Wed, 01/28/2015 - 14:08
Plans Please
Hi Veronica, Well done fantastic job! Two little men who want to move in together because of a new addition on the way. Their request though is a John Deere Bunk Bed! would be grateful if you could forward on your plans if you have time, Kindest regards.
In reply to Plan Request by Veronica P
Thu, 01/29/2015 - 07:18
Plans for making this John Deere Bunk Bed
Hi, I would love to get a copy of the plans used to make this bunk bed for my grand kids. Have two grandkids and a third one due the middle of February so got to get a bed made quickly for them to have a great bed to sleep in when staying with nana and pa. Plans can be emailed to me at dianaspetsnoopy@yahoo.com 731-415-9666. Thanks Diana
Mon, 02/02/2015 - 07:31
This looks so great. Could I
This looks so great. Could I get a copy of your plans? Thanks frank-scott@roadrunner.com
Mon, 02/09/2015 - 21:06
John Deere bunk bed plans
I would love to receive a copy of of the Plans for the John Deere bunk bed. My email is inspiration120708@yahoo.com
Tue, 03/03/2015 - 10:43
Tracktor Bunk Bed
Can you please email me the plans. I have a 4yr old that is obsessed with John Deere. We would like to make this for his birthday. efuglsang@auspecialists.com
Thu, 03/05/2015 - 22:31
Love the jd bed
Just love the whole thing very beautiful & I was wondering if you could send me the plans for the whole set up. My email is lilmiscena@yahoo.com thanks
Mon, 04/06/2015 - 21:04
Bunk Bed
Hi Veronica, like everyone else i love your plans, could you possibly email them to me? Thanks in advance.
Thu, 05/28/2015 - 10:35
John deere bunk
Please send me the plans for the John Deere Bunk Bed. I love it.
Fri, 05/29/2015 - 09:06
Plans
Please send me your plans for the John Deere Bunk Bed in the twin size. neeley-hobbs@cherokee.org
Sun, 05/31/2015 - 23:36
plan request
Will you please email me the plans for the John Deere tractor bunk bed? Thank you. You did awesome
Tue, 06/09/2015 - 08:06
Plans for tractor bed
Hi! Can you please forward me your plans for the john deere tractor bed to linzst3@gmail.com?
Thank you so much and awesome idea!

In reply to Plan Request by Veronica P
Fri, 06/12/2015 - 19:31
John Deere Bunk Bed Plans
Please, please email these plans to me! My son will love this!!!! Email is aprilnave@hotmail.com. Thank you!!!
Thu, 06/18/2015 - 14:04
Tractor Bunk Bed Plans
Thanks for being willing to share your plans. Your tractor bed is amazing. I have 2 boys who would LOVE a bed like this. Could you please send your plans to mdemary22@gmail.com?
Thank you so much
Thu, 07/09/2015 - 19:22
please asap
could i plans get your plan emailed to me lilbgirl_11@hotmail.com
Sun, 09/06/2015 - 10:06
John Deere bunk bed plans
Dear Veronica,
Our grandson, 6 years old, will absolutely adore this bed. He loved riding on Grandpa's real JD tractor. Please send me your plans for the attachments. They are just darling and I could not do any better. Thanks for your generosity!
Fri, 01/15/2016 - 10:52
Can you please send me your
Can you please send me your plans? i am stumped on the arms of the tractor
Wed, 07/13/2016 - 12:12
Plans
Veronica P this bunk bed is amazing! Could you email me your low tech paper and pencil plans please? :) kallierae@live.com
Fri, 09/13/2019 - 21:11
Tractor bunk beds
Hi Veronica. My 3 year old just loves the tractor bunk bed. I was wondering if you would mind sending me the plans you have. It would be greatly appreciated. My email is Blake.meche@yahoo.com
Thanks in advance
Wed, 10/16/2019 - 17:56
Plan Request
If you're still sharing, we would love a copy of your add-ons plans.
Thanks,
MyMaw and PawPaw
Sun, 08/23/2020 - 11:32
tractor bunk bed
What an awesome build! We would love a copy of your plans if you could please share. Thanks!
thosedarnluedemans@yahoo.com
Thu, 09/05/2024 - 04:37
Do you still have the plans…
Do you still have the plans for the pieces you added on?
Mon, 12/15/2014 - 20:19
would love to have this plan
Would you please email me these plans for your bunk bed? Thanks A lot!!! email to austinholscher@hotmail.com
Thu, 05/26/2016 - 15:00
Tractor Bunk Bed Plans
Hi! I know that it has been a while, but I see a message where Veronica says she emailed you the plans. If you still have them, will you please send them to kerrilux@gmail.com. Thank you!
Tue, 12/16/2014 - 19:22
Is there any way I could have
Is there any way I could have email plans? L.o.outdoors@live.com . Thank you.
Sun, 12/21/2014 - 00:35
Plans
Please email the plans for this to davevisentin@hotmail.com
Thank you in advance!
Tue, 12/23/2014 - 07:33
Bunk Bed Plans Request
Hi Veronica! I would love an email of the plans to make this bed. My sons thinks it is out of this world!!! Thanks for all you effort and wonderful job.
Sat, 12/27/2014 - 15:12
Would you please consider
Would you please consider emailing the plans to me? We have started this for my son today and would love your insight on some measurements. Such a wonderful idea, thank you for sharing! alwardt_farms@yahoo.com
Tue, 01/06/2015 - 08:21
Plans Emailed
Hello all. I've tried emailing plans to all those who've requested them. I had some trouble attaching the files as they were large so if you didn't receive them, please let me know and I can resend. Thanks
Tue, 01/06/2015 - 11:53
Hi Veronica. I did not
Hi Veronica. I did not receive an email. Woul you have time to try again? If you email me your address I can send you my fax number if that's easier too. Thank you so much! I can not tell you how much I appreciate your dedication to this! alwardt_farms@yahoo.com
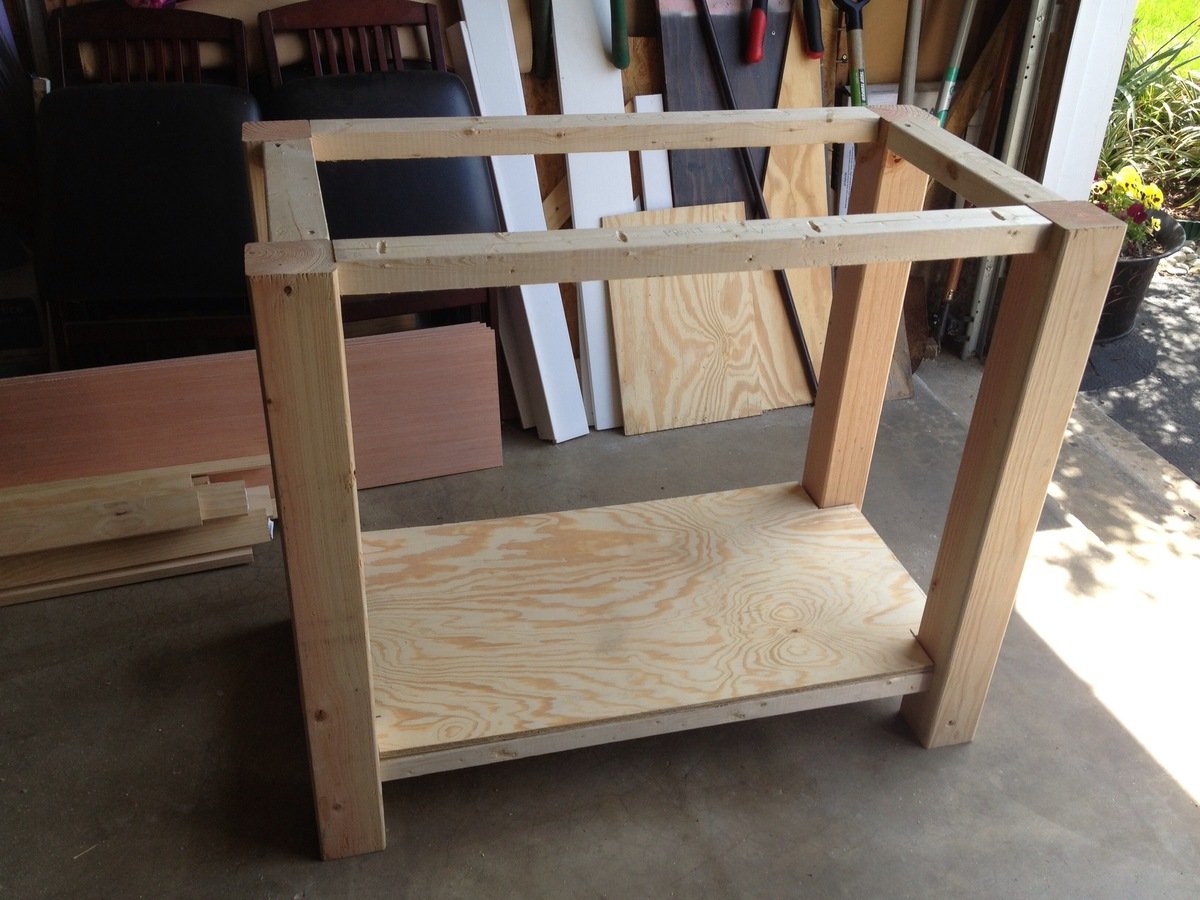
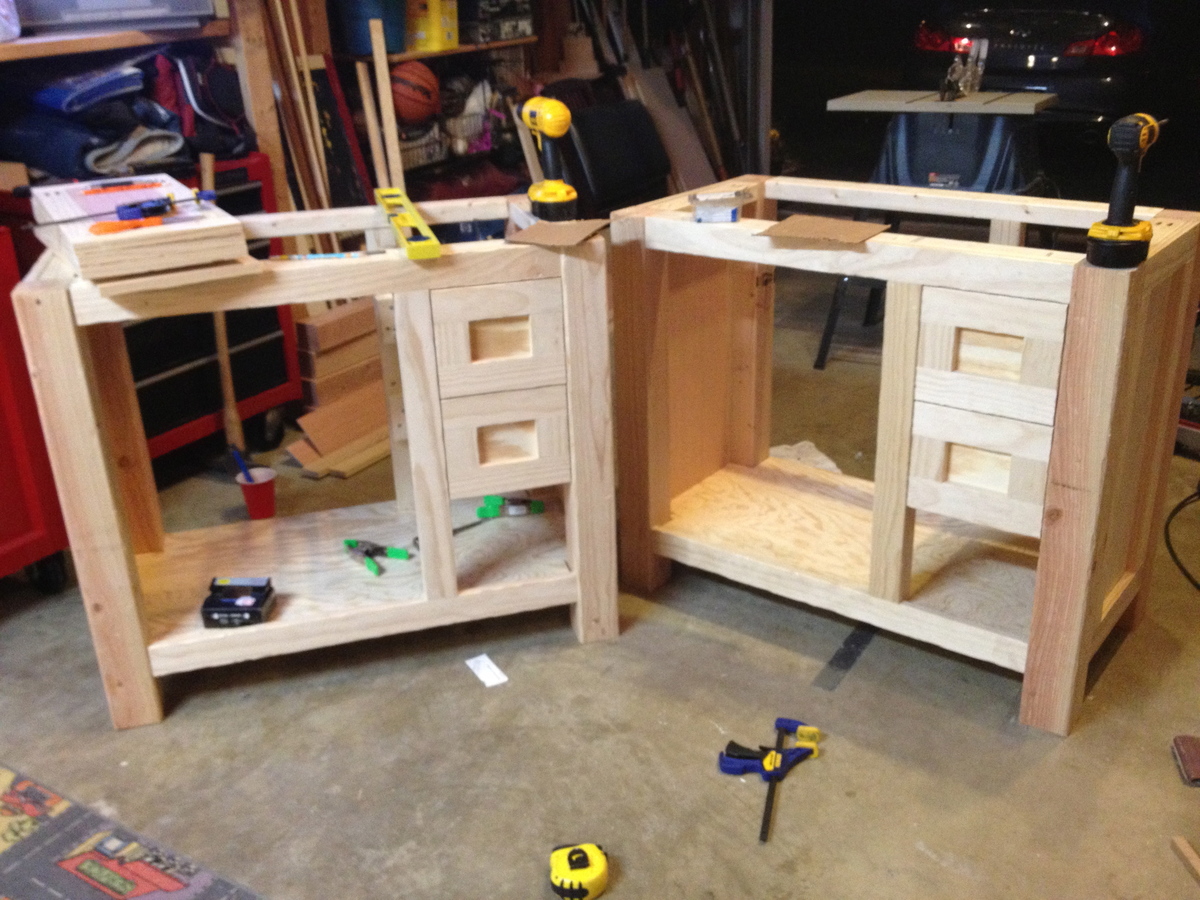
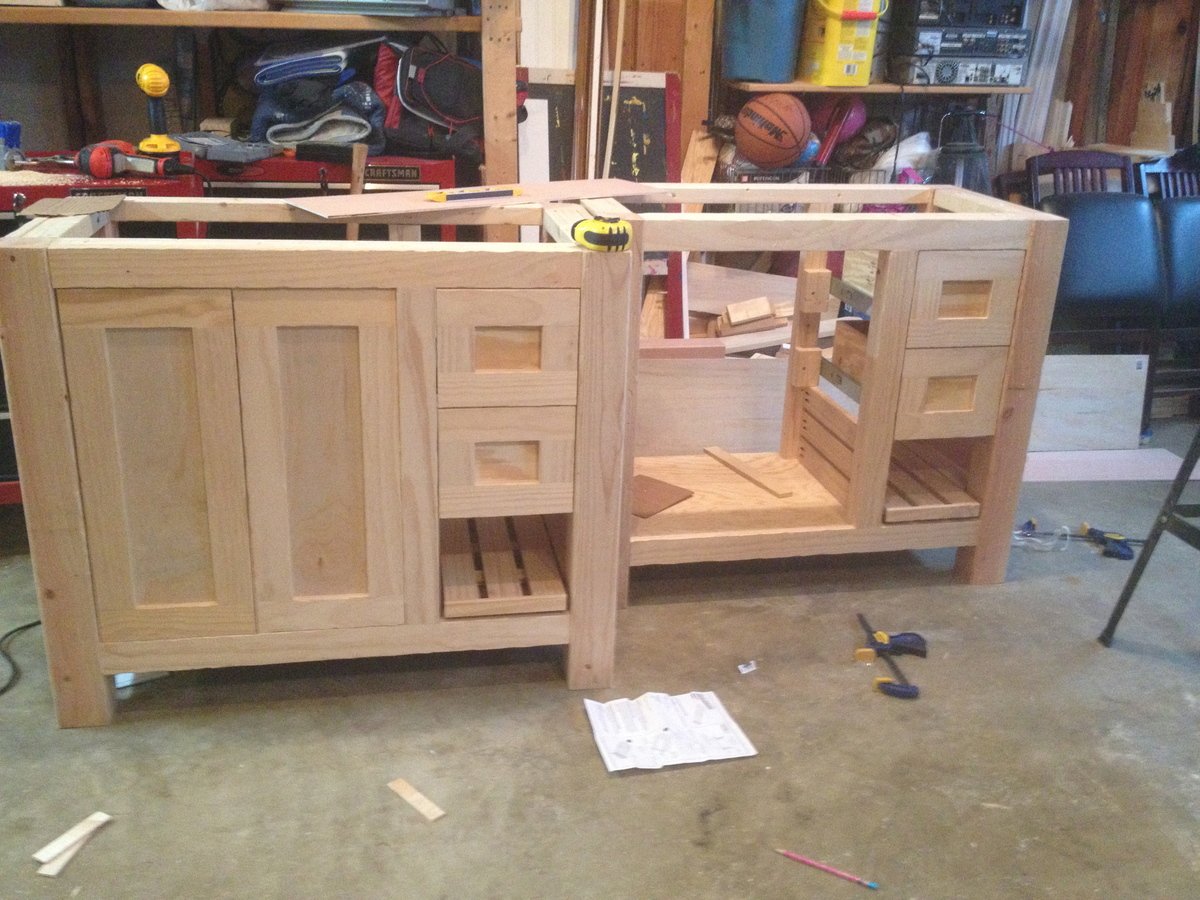
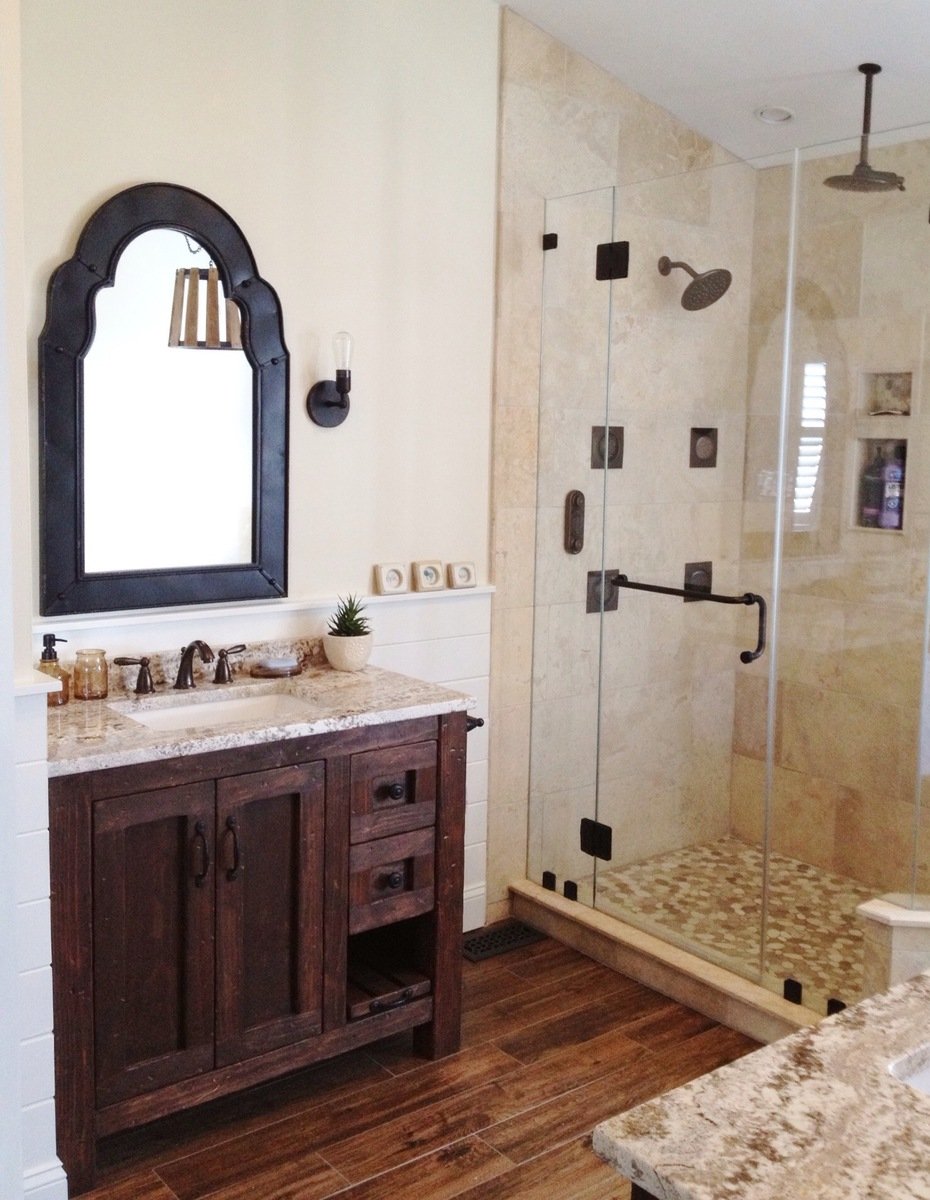
Bathroom Vanities
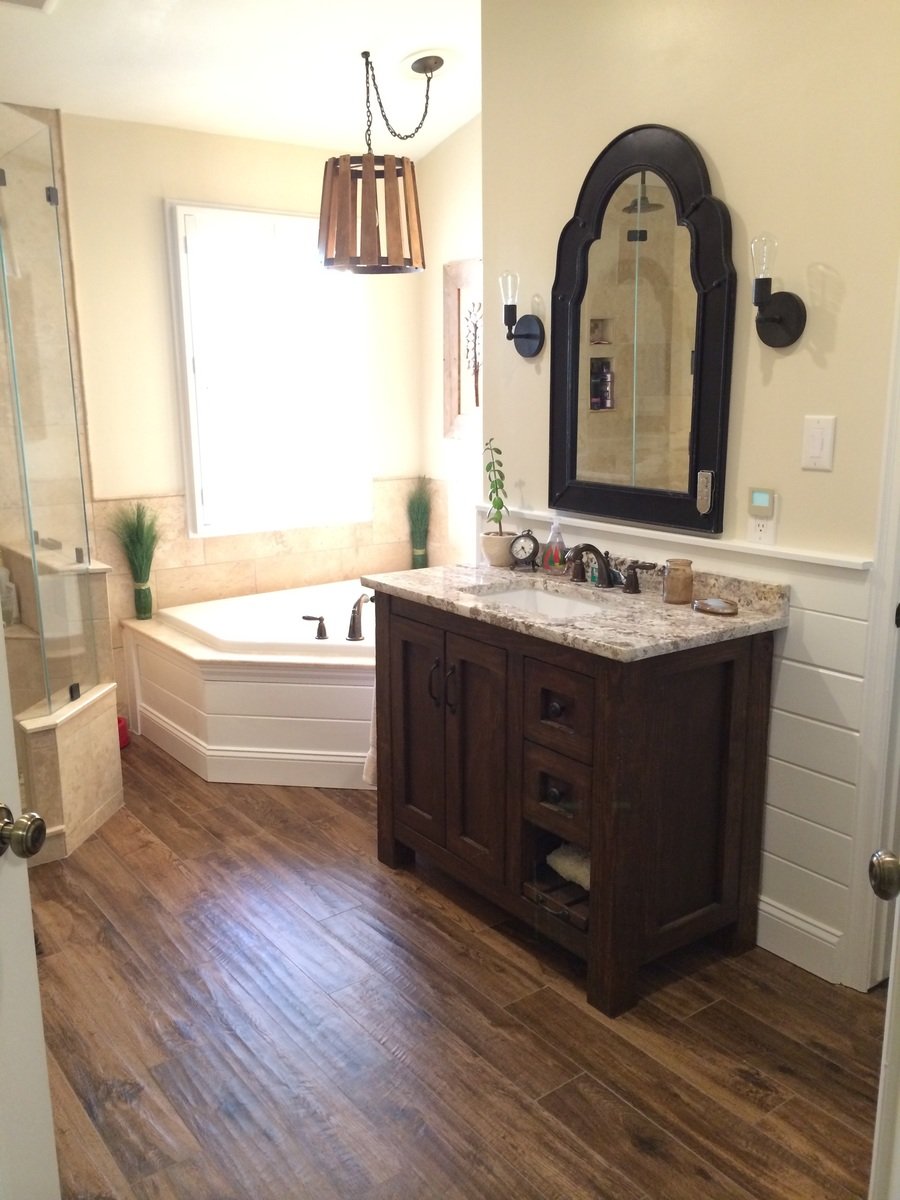
Rather than burning a few thousand on vanities for my bathroom remodel I decided to build them instead. The bottom shelf on the right slides out for a footstool so the kids can reach the sink.

Estimated Cost
Wood was cheap, the granite and sink were not, though I was able to save by getting remnant slab from granite shop.
Estimated Time Investment
Weekend Project (10-20 Hours)
Recommended Skill Level
Intermediate
Comments

Sun, 01/05/2014 - 20:55
Absolutely stunning!
These are so beautiful -- they really look like high-end rustic pieces. The slide-out footstool is genius. The distressing is fantastic. I really love your pebble art as well.
Would you mind sharing the stain color?
Wed, 02/03/2016 - 17:48
I drew this up in sketchup as
I drew this up in sketchup as I was planning to build one like this, but decided to do something different. Is there a way to upload a sketchup file?
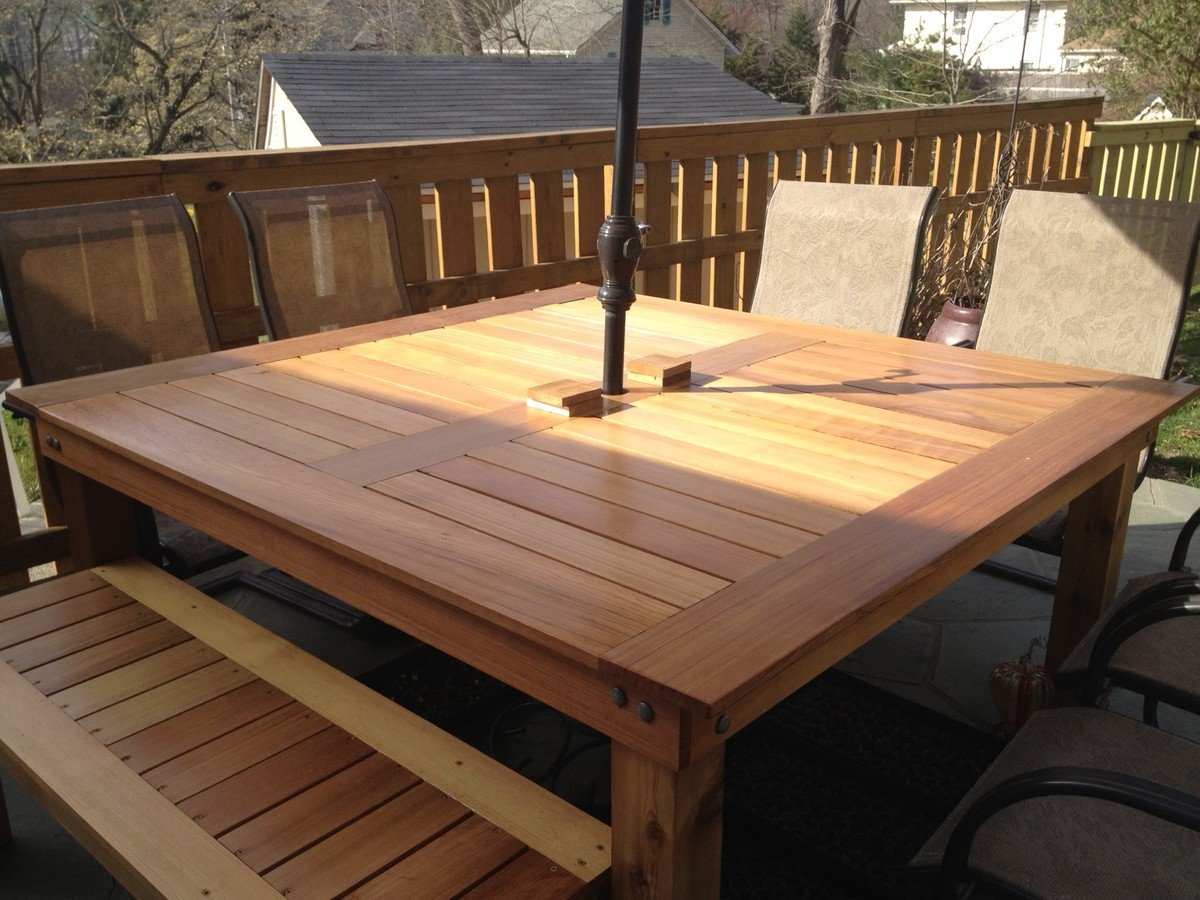
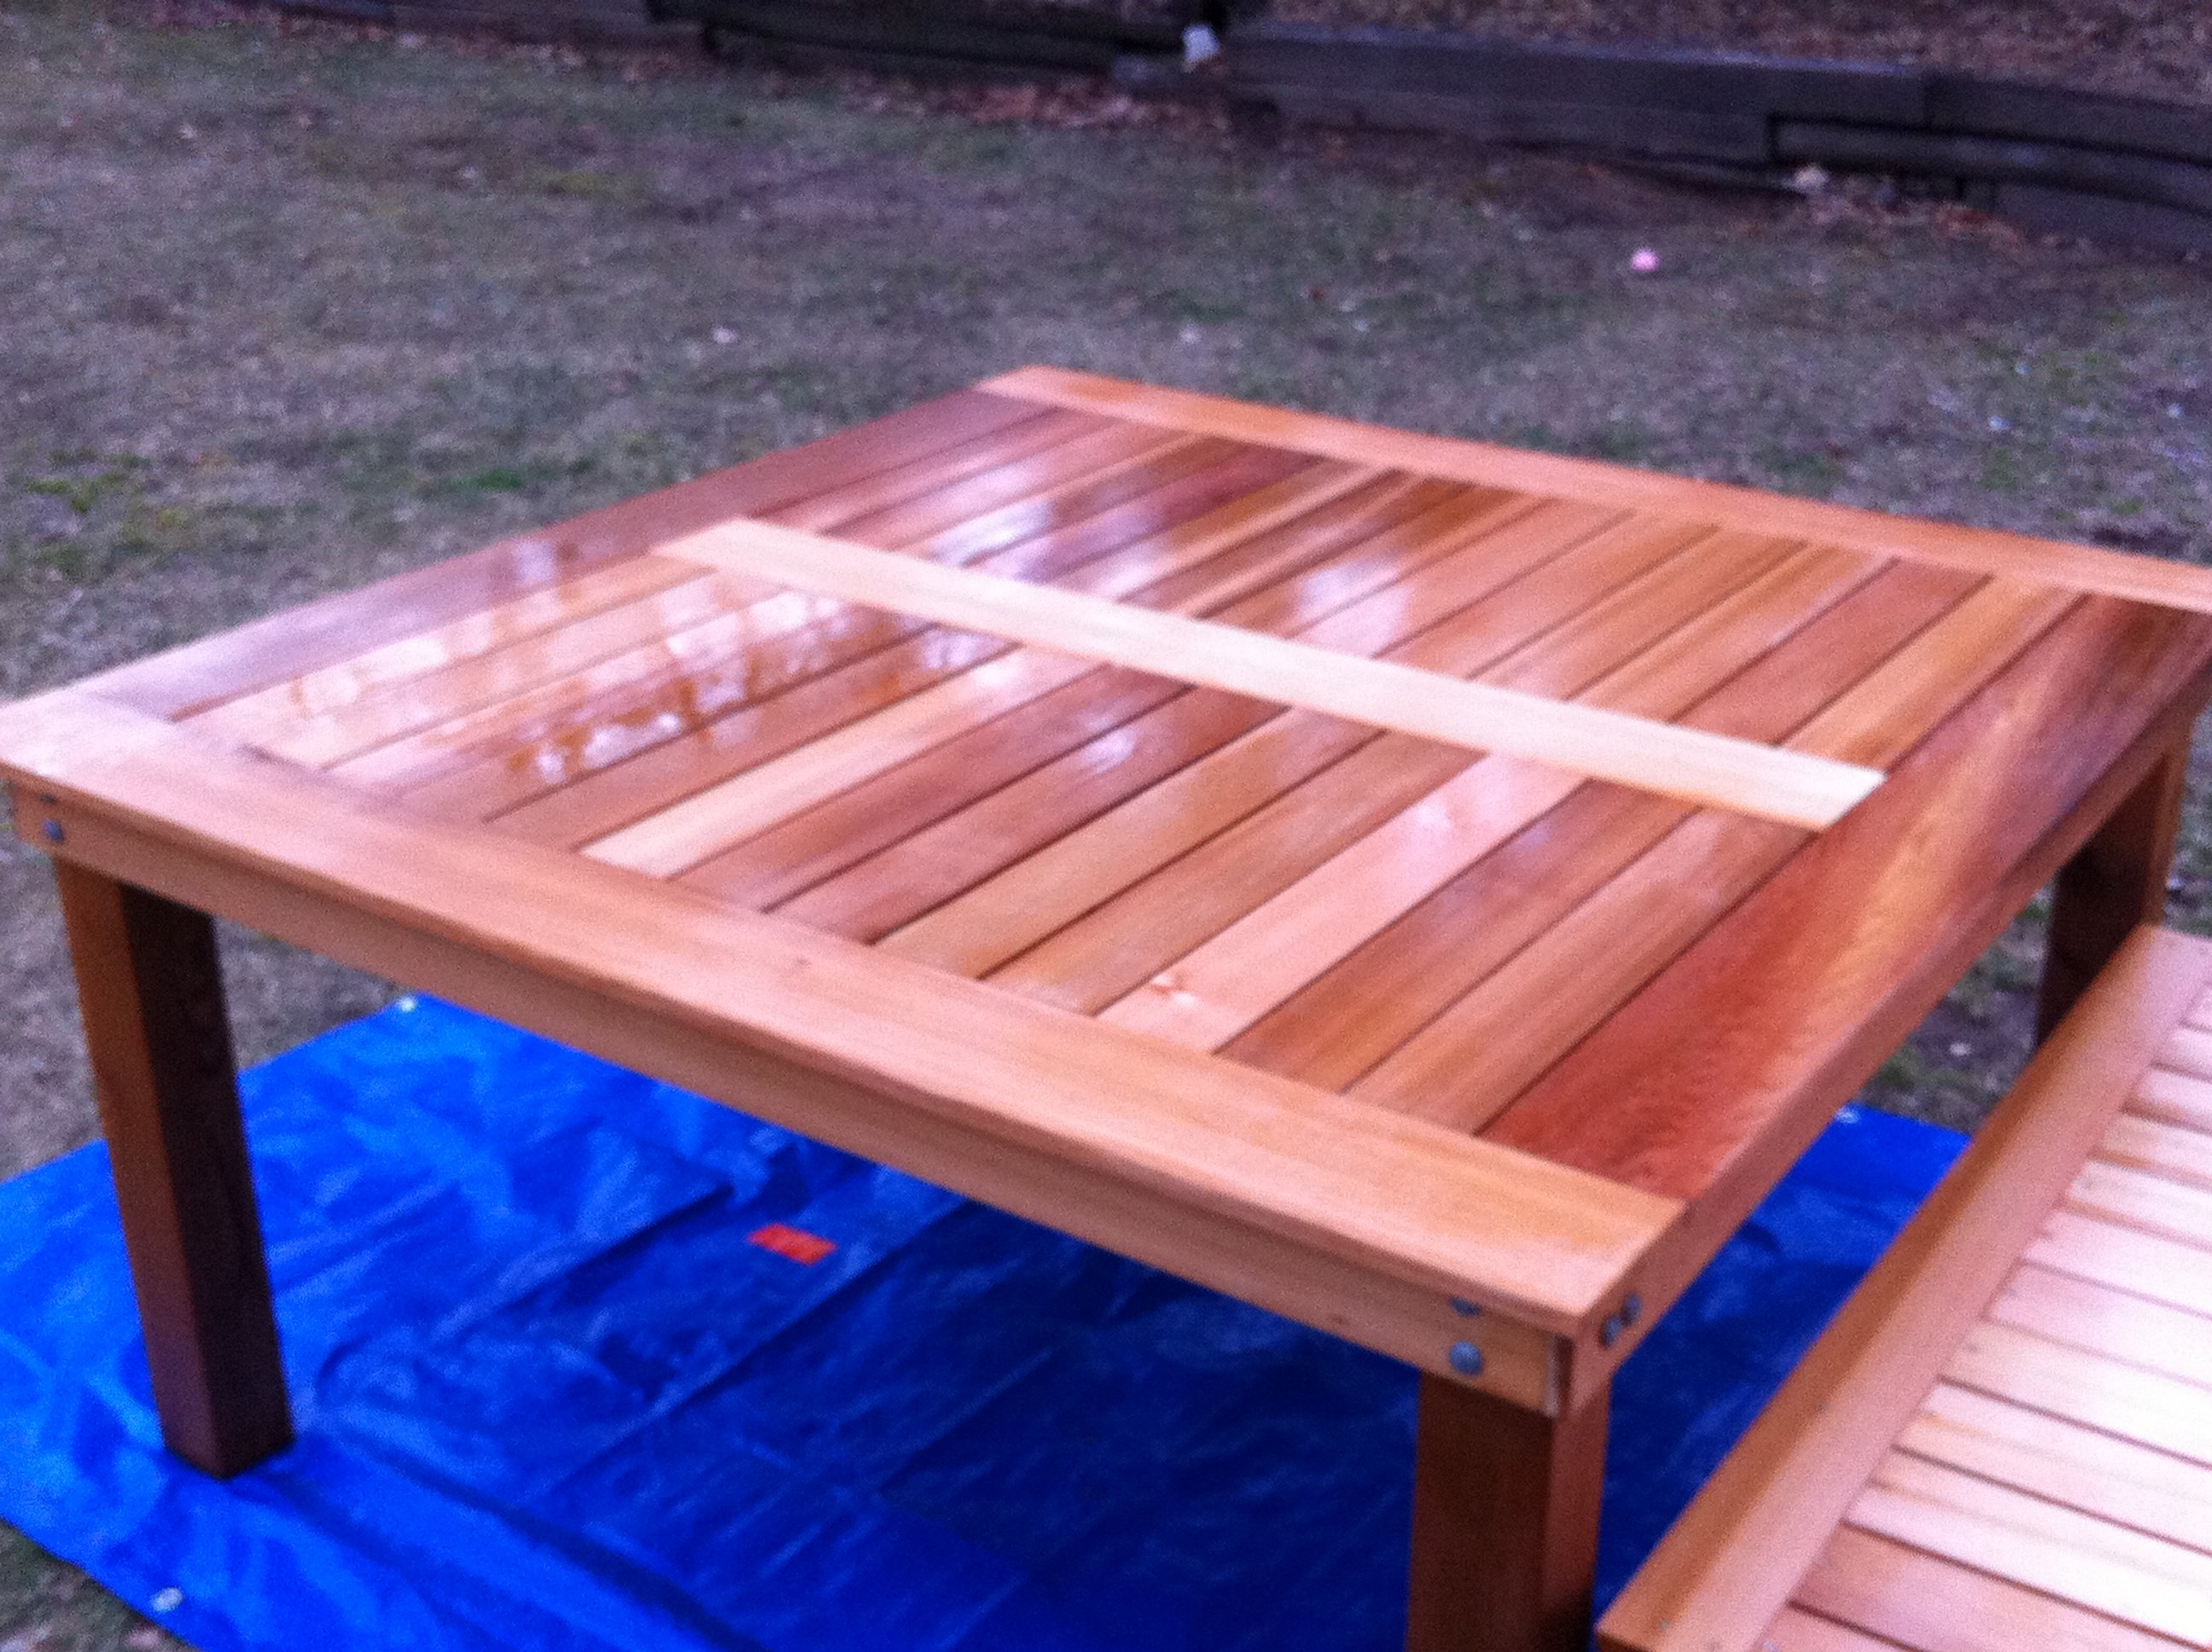
Simple Square Cedar Outdoor Dining Table
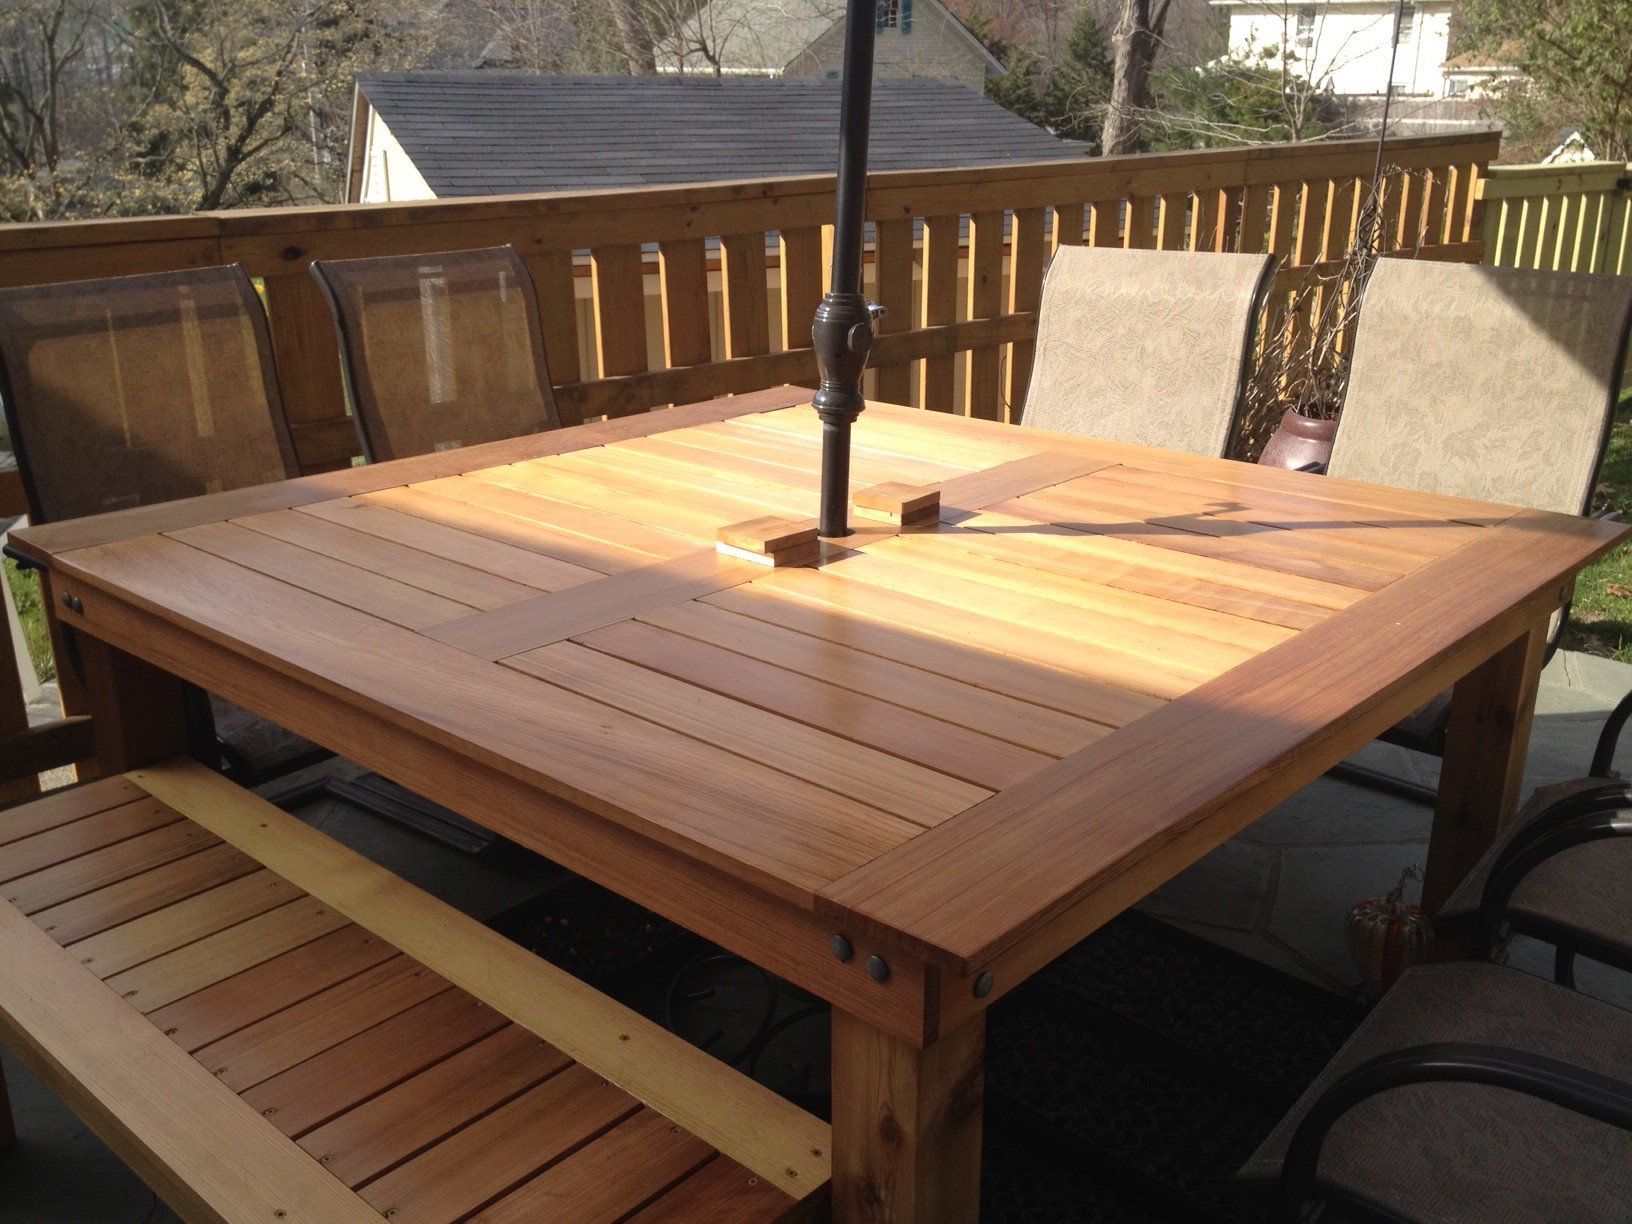
I've been planning on building a patio table for this coming spring and summer, but didn't know where to begin. I found Ana's wonderful site and now I don't know where to stop! So many great ideas.
After seeing ewood's great table I decided to make one similar. I made my square table based on Ana's and ewood's basic designs. Thank you both. I also made a bench based on Ana's design.
Built from Plan(s)
Estimated Cost
300--475
Estimated Time Investment
Weekend Project (10-20 Hours)
Finish Used
Semigloss Spar Urethane
Recommended Skill Level
Beginner
Comments

Sun, 03/18/2012 - 16:36
Beautiful and Solid!
That looks like it could handle a big and boisterous group. The cedar and the finish are beautiful.
Thu, 03/29/2012 - 07:37
Great for larger families!
I have a family of 7 (soon to be 8, I hope), and was trying to figure out how to fit us all on the rectangular table. This is the solution! I can simply make 4 benches to go with it! Thanks for the idea and the picture!
Mon, 04/09/2012 - 07:24
Questions :)
Love this table and your modifications to ewood's table. I was wondering what size are the legs on your table - I can't tell if they are 4x4s...which is sort of what I'd like to have on mine. And they are under mounted, which I love because I want to make ours with the ability to remove the legs for reduced storage space in the winter. If you could would you mind putting a few close up photos of how the outside corner came out and the underside of the corners. It would be much appreciated.
Mon, 04/09/2012 - 07:27
Questions :)
Love this table and your modifications to ewood's table. I was wondering what size are the legs on your table - I can't tell if they are 4x4s...which is sort of what I'd like to have on mine. And they are under mounted, which I love because I want to make ours with the ability to remove the legs for reduced storage space in the winter. If you could would you mind putting a few close up photos of how the outside corner came out and the underside of the corners. It would be much appreciated.

In reply to Questions :) by K_W (not verified)
Sat, 04/14/2012 - 13:35
Yes - I used 4x4 legs
Hi - sorry it took a little while to get back to you. Yes the legs are 4x4's. I used knotted cedar 4x4's for the legs and made them 29" tall. I wanted to be able to disassemble the table and put it away for winter, so I attached the legs using carriage bolts, 2 per side (4 total per leg). I drilled holes using a pilot bit, then used a spatter bit to make the larger holes for the carriage bolt.
I didn't bother to counter sink them, but if I made another I think I would try that to make a more polished look. The legs are sturdy, the table doesn't wobble at all, but I am sure that someone with more furniture building experience might have a different/better idea.
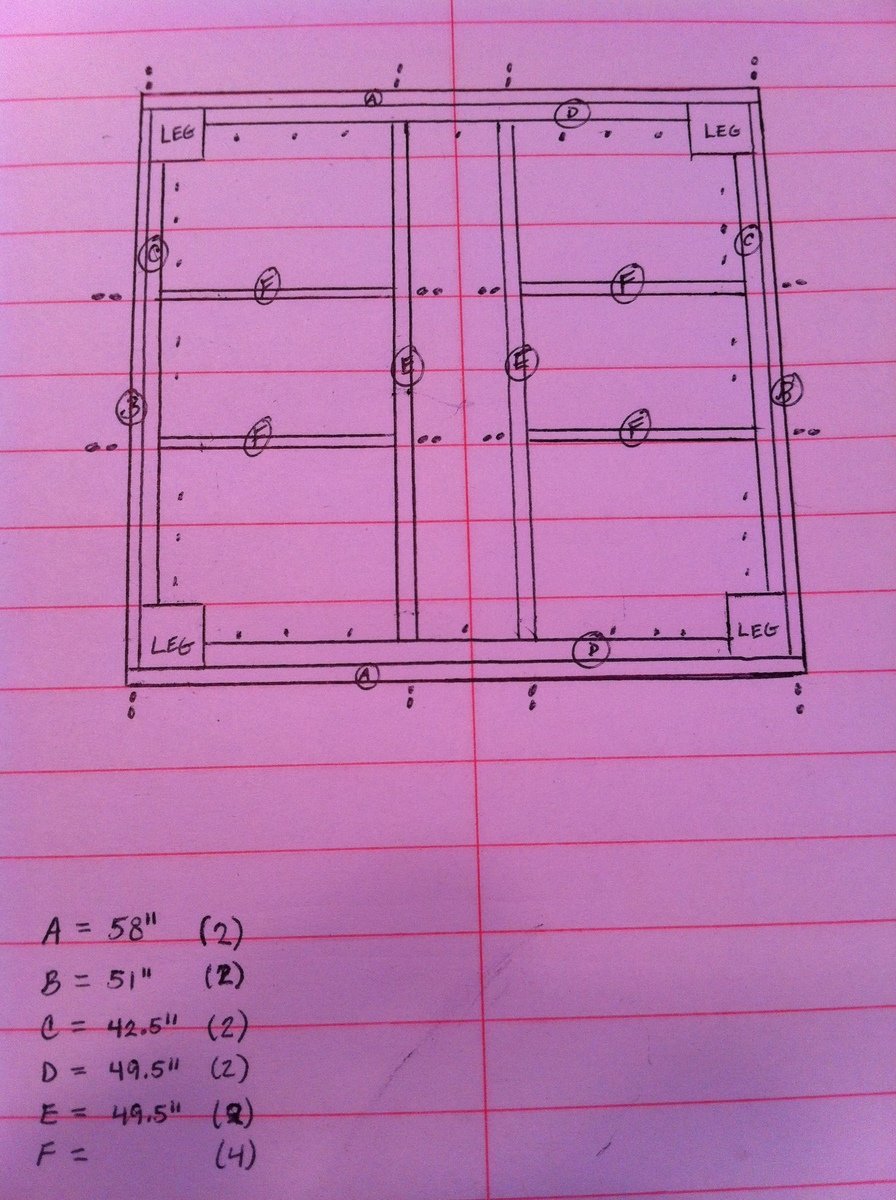
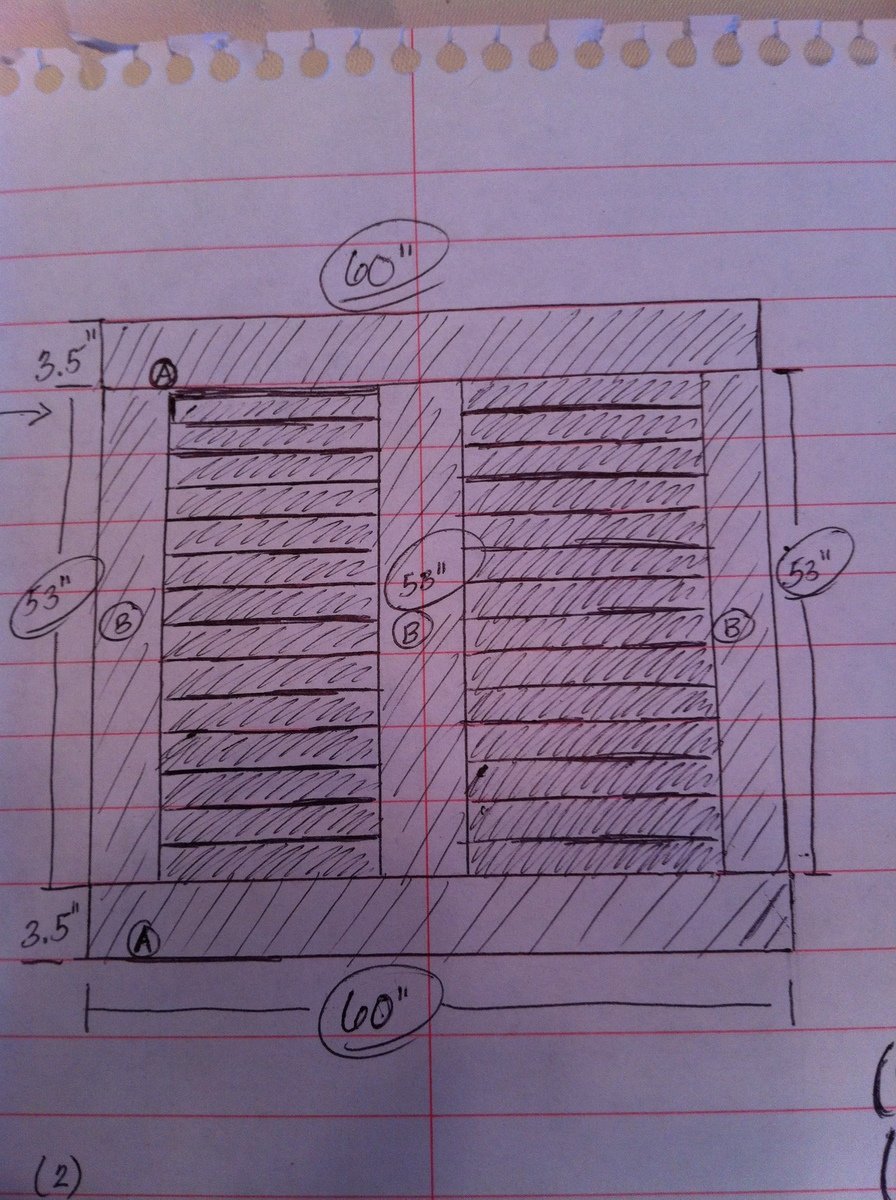
I've added a couple more photos showing the corners, outside and underneath. I've also added my very basic plans that I used to make the table, one of these days I will study Ana's post of how to use sketch-up, until then this is what I worked with.
Wed, 06/06/2012 - 09:26
Question
Can you tell me what size (width) boards you used on the frame pieces of the table, and what size on the inner boards? From your diagrams, it looks like the frame is made of 1x4s, but the inner pieces look smaller. Thank you !!!
Your table is absolutely beautiful. It looks like a very high-end piece of furniture. One of my favorite things is how the carriage bolts are installed -- I wouldn't change a thing on them!
Tue, 07/30/2013 - 16:36
Sorry it took so long to
Sorry it took so long to reply - I didn't see your post. So far the table is holding up well.
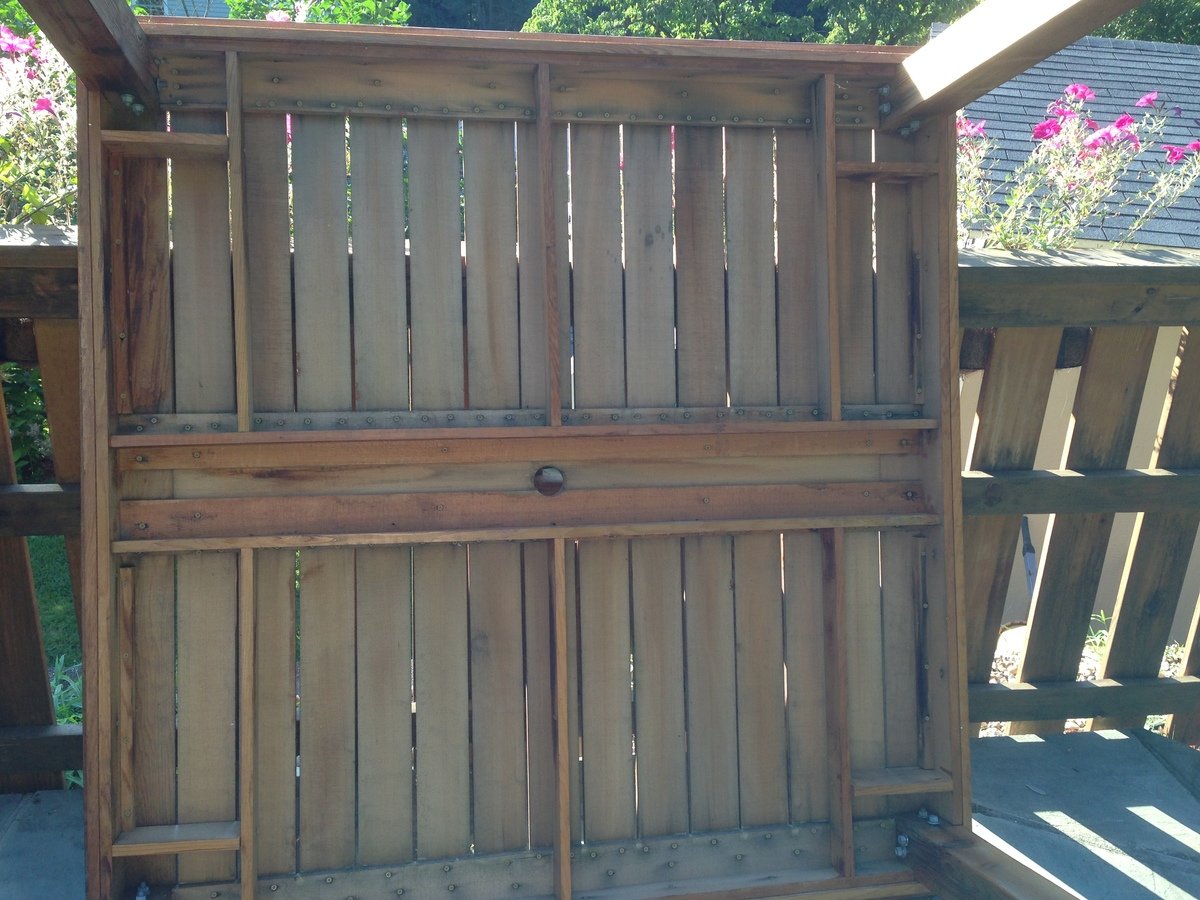
You're right, the top is made from 1x4's, including the inlaid slats. To support the top, I cut 1x4's down to 1x3's so they remain hidden by the side 1x4's of the frame.
Tue, 10/16/2012 - 18:02
Question
Love the table - looks absolutely fantastic! I have been looking for a decent square outdoor table for ages and this one certainly fits the bill.
Can you please add a photo of the underside of the table and advise how you fastened inner boards on table top. Thanks.
In reply to Question by Aussie Paul (not verified)
Tue, 07/30/2013 - 16:40
new photo of bottom
I added a new photo of the bottom. Hopefully this will help show how I attached the top. I have a number of additional photo's I can send to you if you like - this site limits the number of photos I can add.
Everything is attached from the bottom to hide the screws. I used a kreg jig and it helped so much - i really recommend it.
Wed, 08/14/2013 - 12:35
Table plans
I love the look of this table, man - I think I'm gonna steal some ideas from this.
I have a question about your top, though. The slats look to be 1x4s, which I can understand, but the edges seem to be a bigger size.
Did you use 1x6 boards for the edges? 1x8s? Something else?
Thanks for your help.
Mon, 09/02/2013 - 11:03
table top
Thank you - please take any ideas from it that you can. That is what I love that about Ana's site. You can take these great ideas and make them fit your own style...
You're right - the table top is made of 1x4's and 1x6's. When i put the top together I made the frame first. Then I added the exterior 1x6's. Next I added the center 1x6. Lastly I cut each 1x4 to size and added them.
Sat, 05/17/2014 - 07:15
Materials List
This is an amazing table, it is beautiful! I am somewhat new to wood working and was wondering if there was a material list? I plan on creating this in AutoCAD first, so I have a visual to work off of. Also what did you use for spacing in between the boards or what was the allowance of space.
Thanks again, your work is beautiful!
Wed, 06/17/2015 - 11:48
Material List
Great table…any chance you can share the plan and material list? Cheers

Wed, 04/22/2020 - 20:37
Question for Plans for Simple Outdoor Table
In looking at the plans and the underside of the table, there are some measurements missing that make it a little hard to decipher. It would be good to know the lumber sizes e.g. 1x4x8 etc. the underneath side seems to have some additional boards that don’t seem to be in the drawing. I was just wondering if it might be possible to get some additional details?
Sun, 05/24/2020 - 08:05
Question on underneath tabletop screws
This is a beautiful table and I'm going to try and replicate in a rectangular version. Primary question I have is what length screws you used to affix the framing pieces underneath to the top side so that the wood doesn't split and that the screws don't pop thru the top. Any help you can provide would be appreciated, if even you still look at this page. Thanks in advance!
Fri, 01/31/2025 - 06:49
I love it!!! Thanks for…
I love it!!! Thanks for sharing your plans! What stain/sealer did you use?
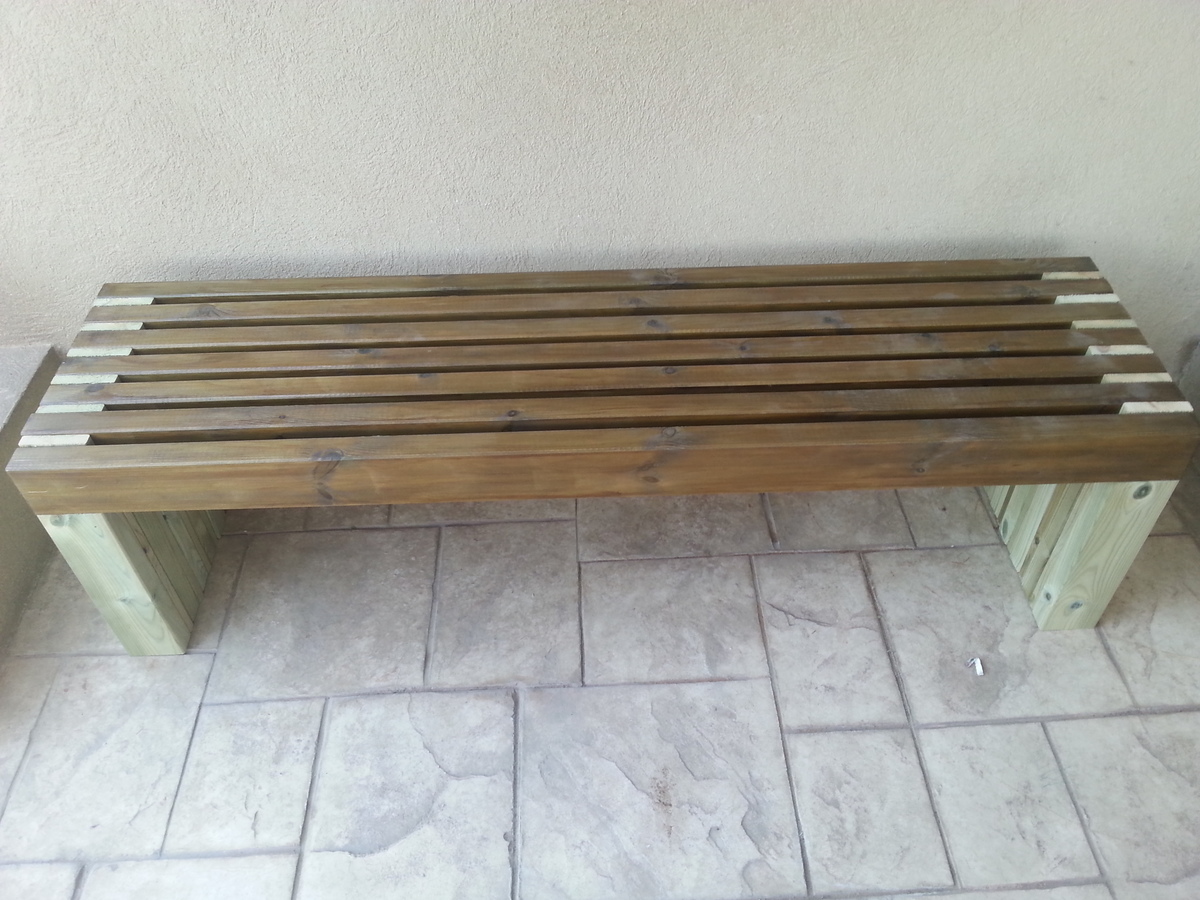
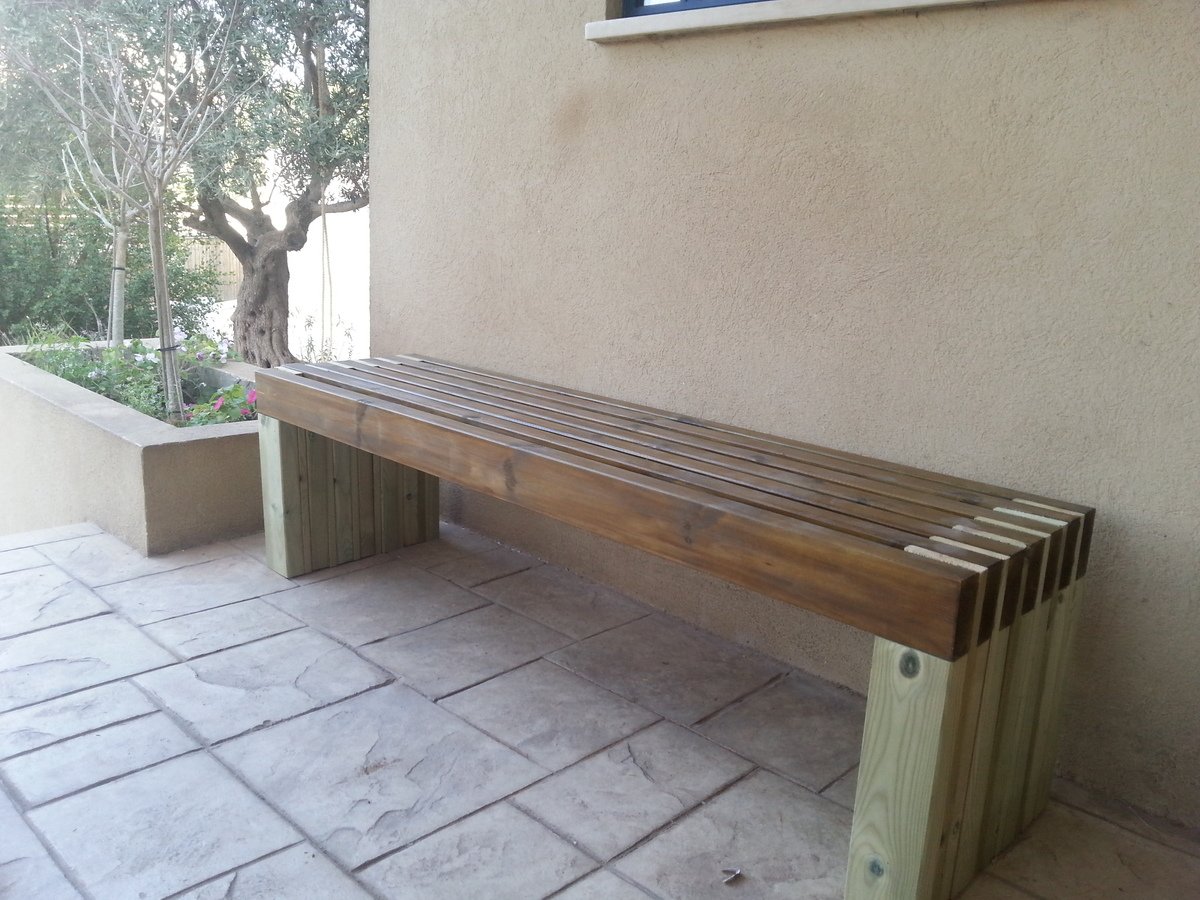
My new and amazing outdoor bench

Thank you for the easy and fun bench plan.
It was really easy to install.
Even my 2 little daughters had fun (-:

Built from Plan(s)
Estimated Time Investment
Afternoon Project (3-6 Hours)
Finish Used
Bondex walnut
Recommended Skill Level
Starter Project
Comments

Thu, 04/24/2014 - 08:06
Love the finish!
I love the finish you did on the bench. Thanks for sharing!
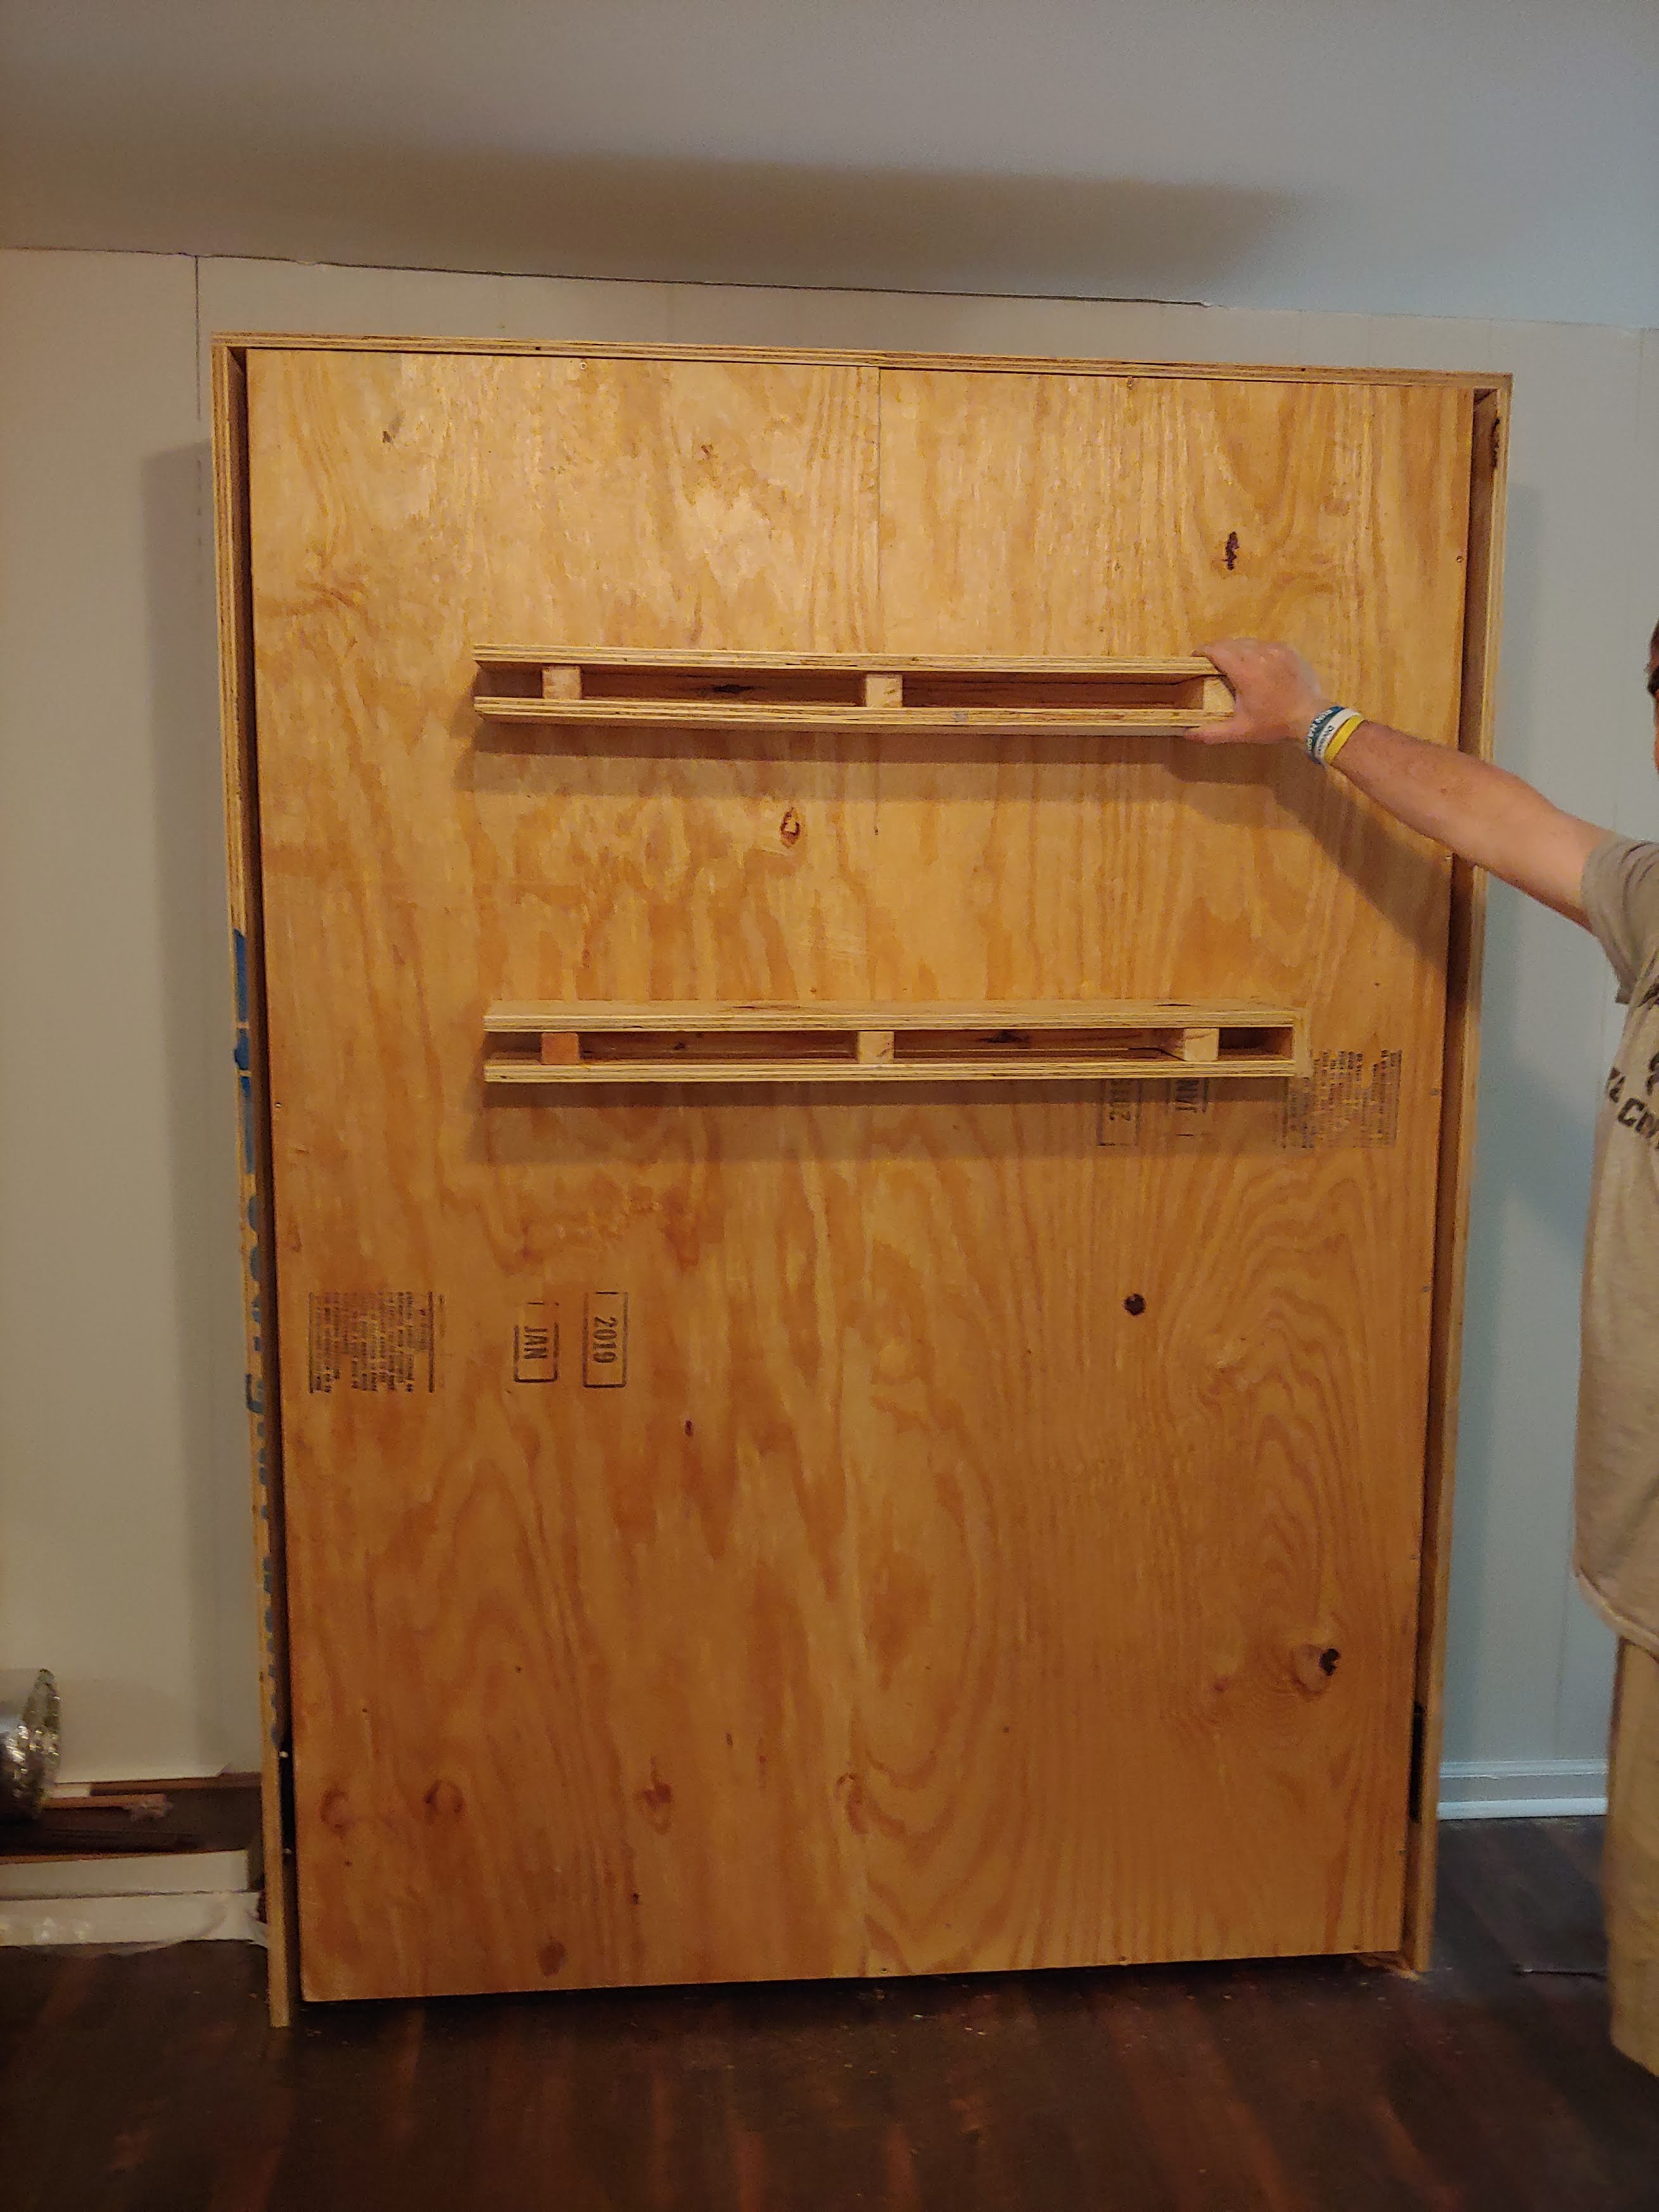
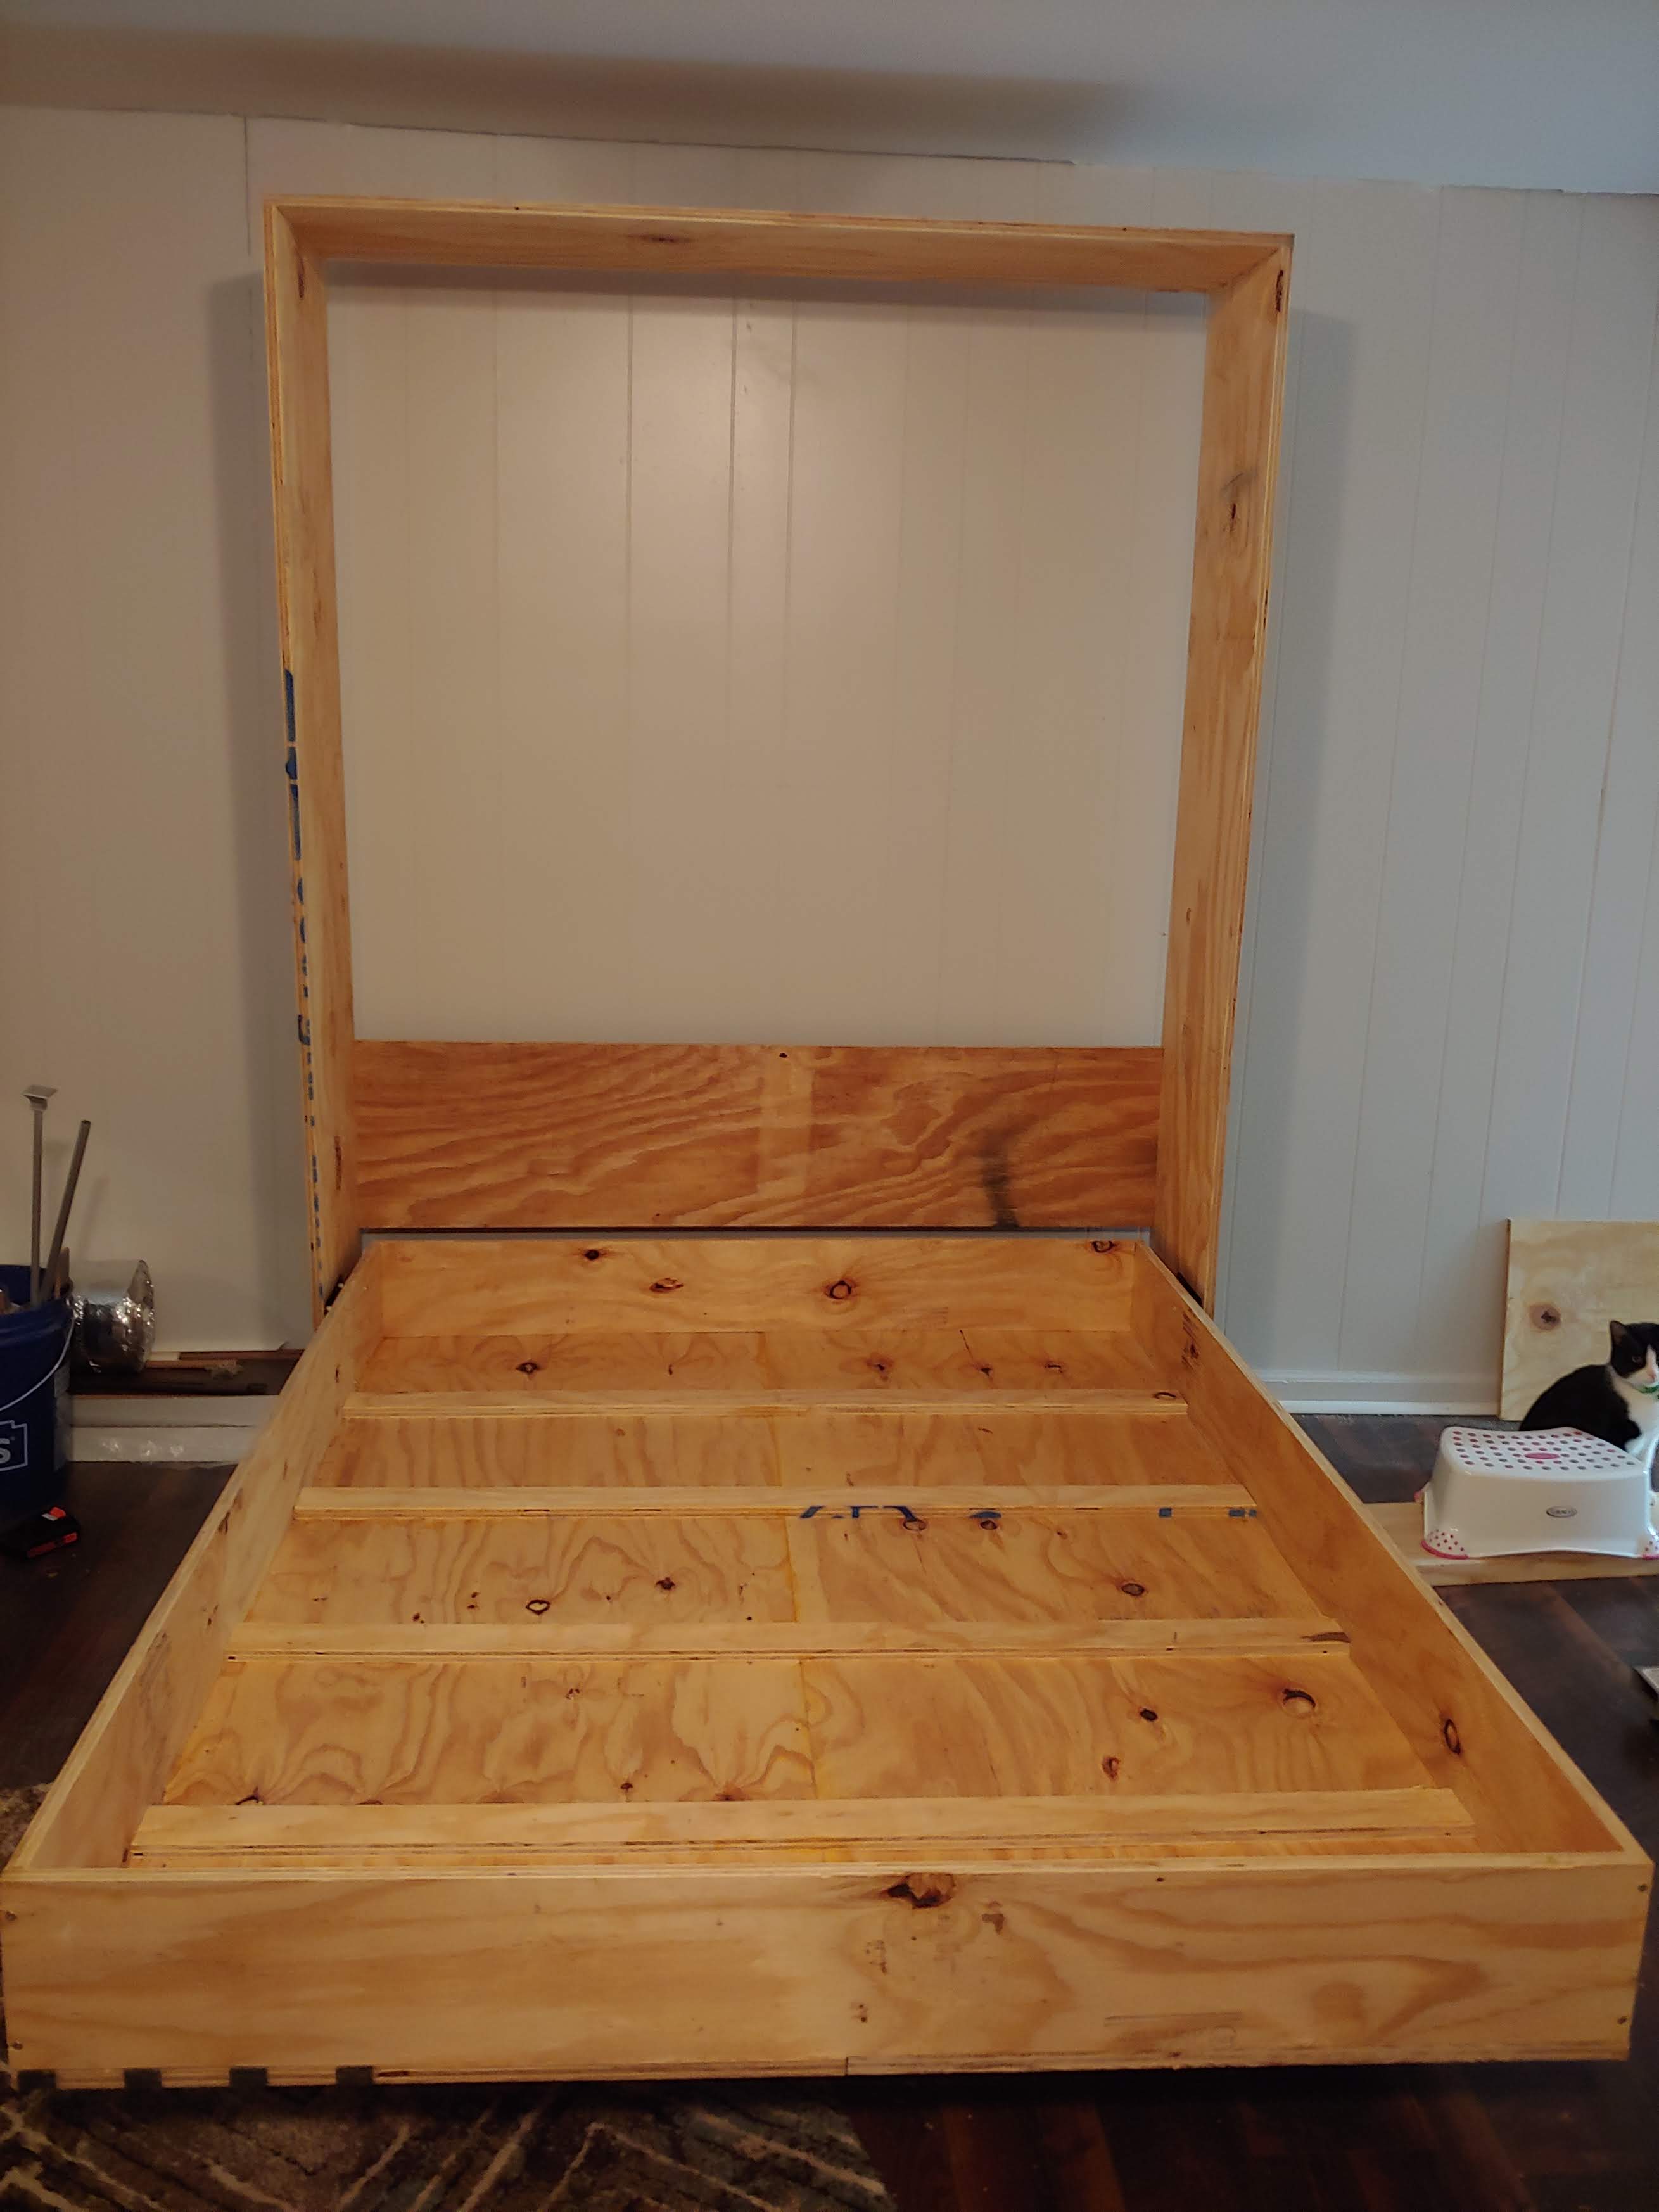
Murphy bed
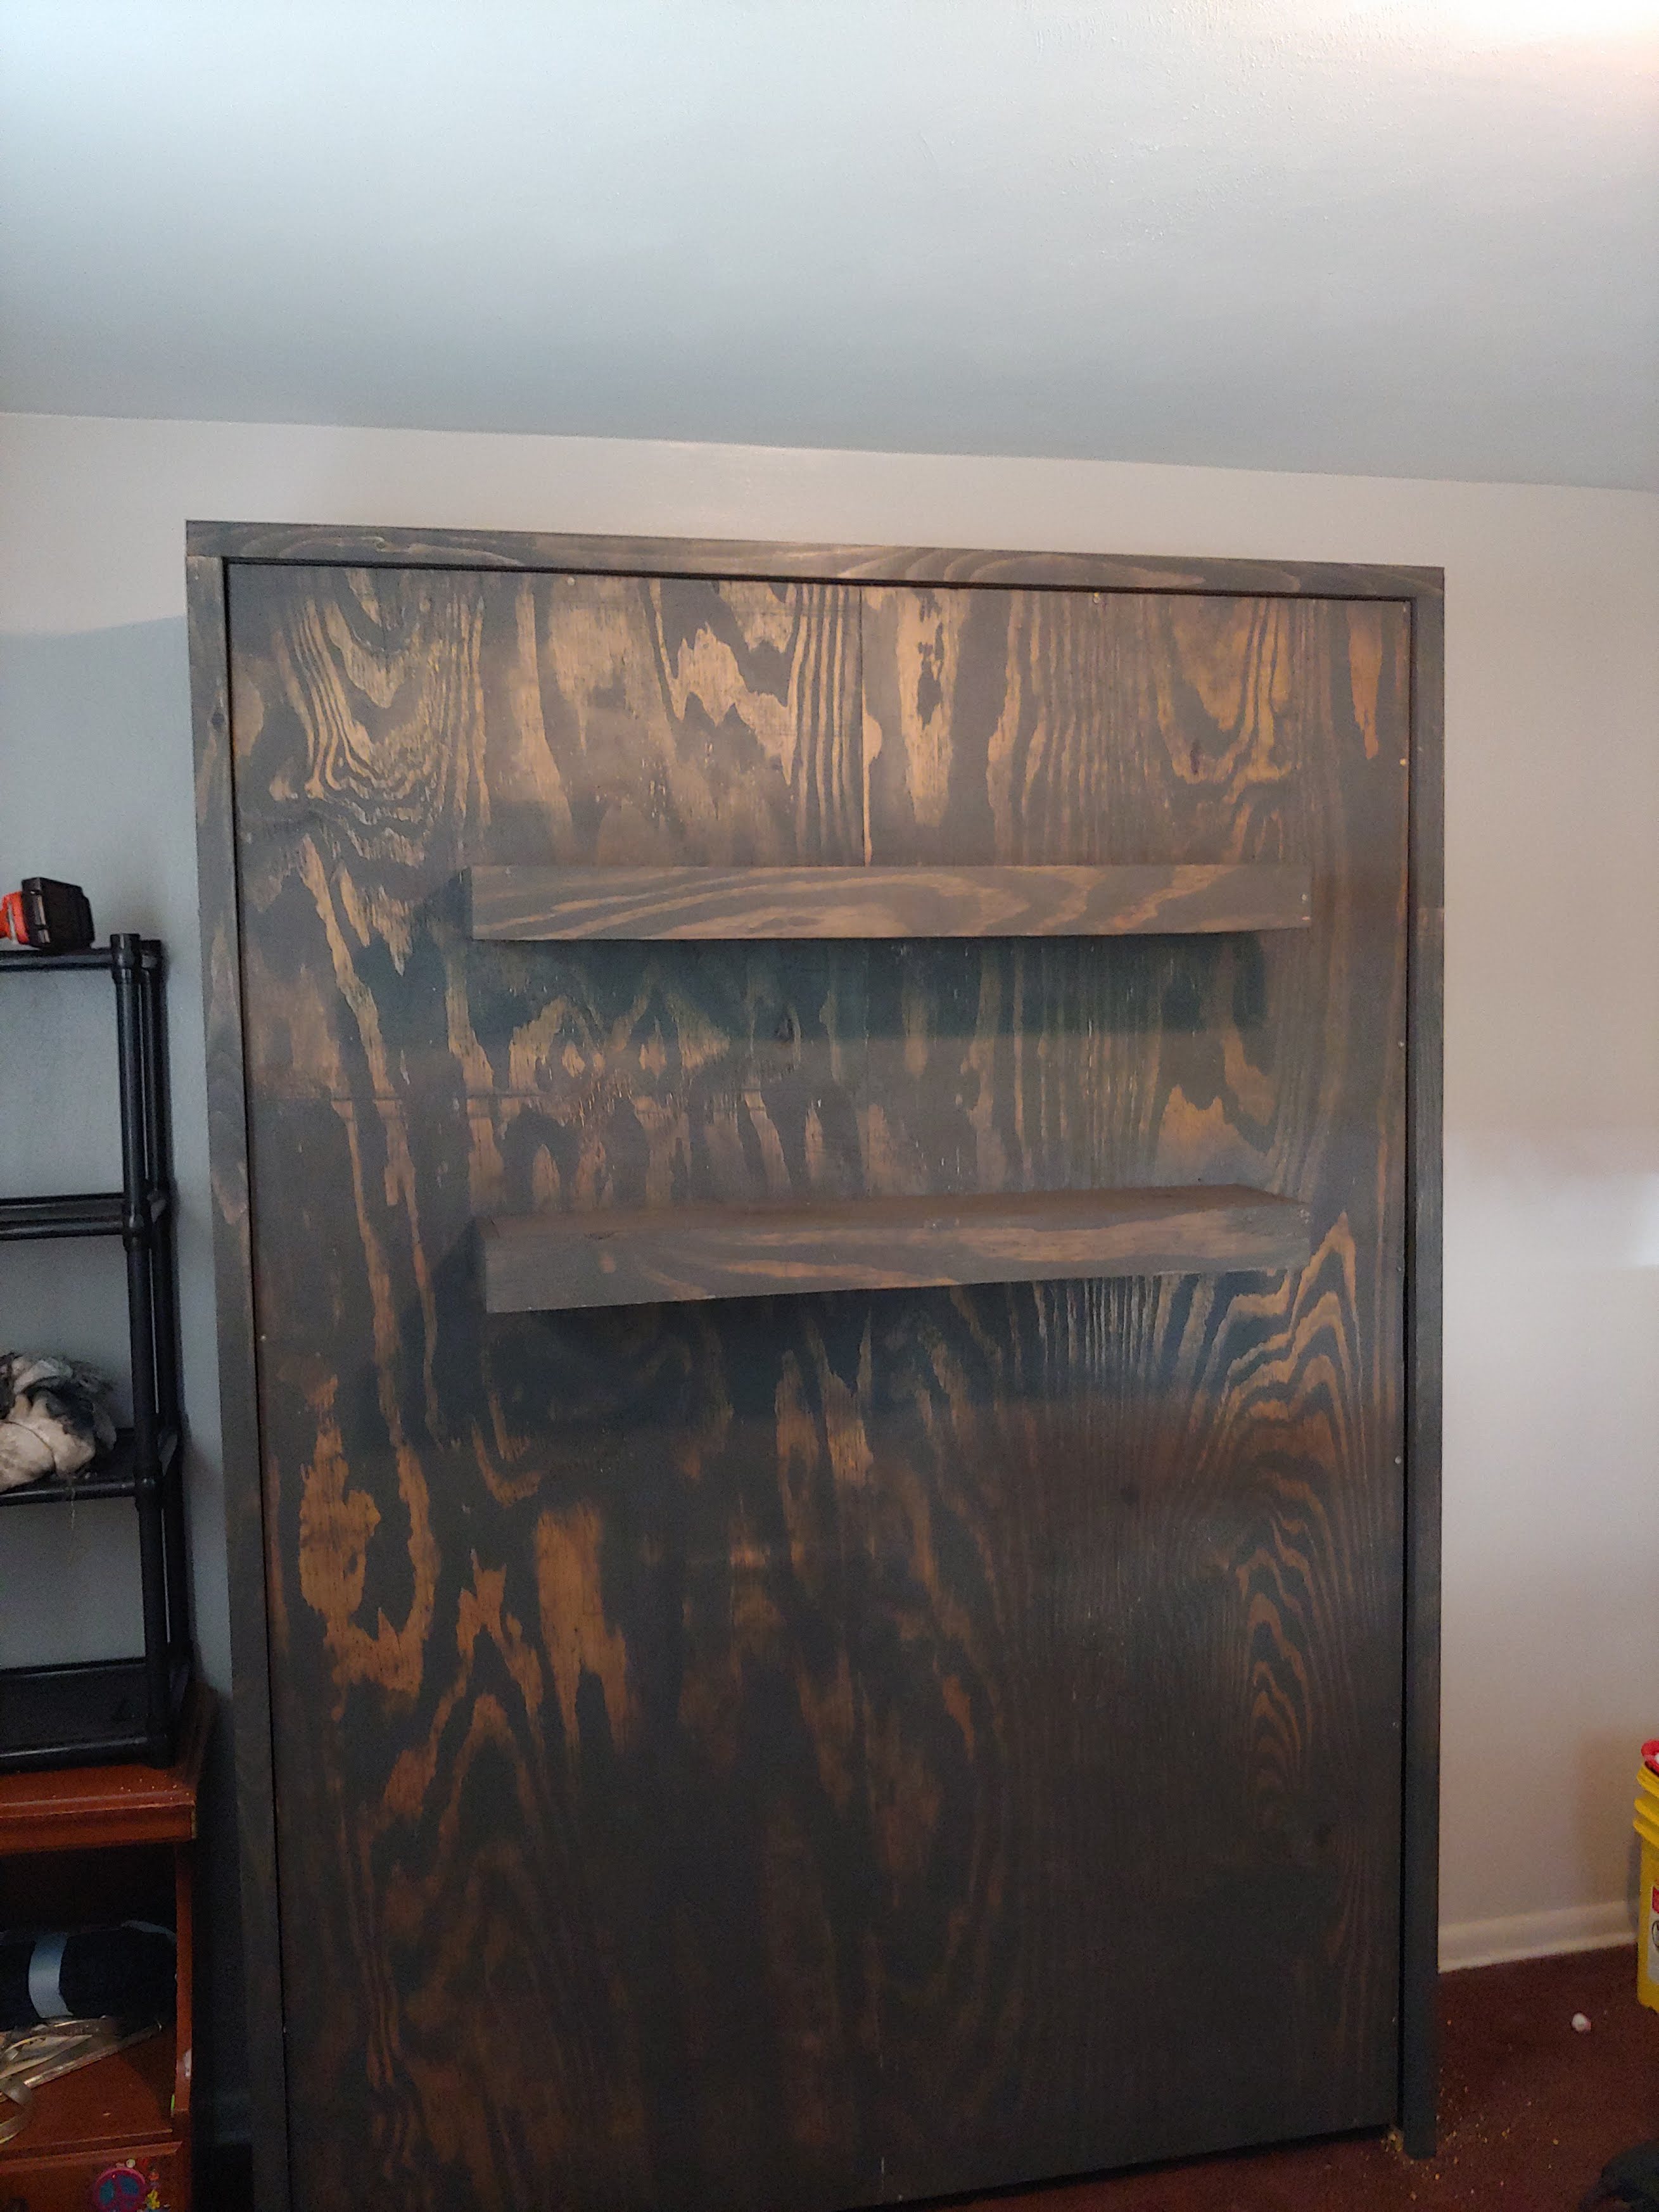
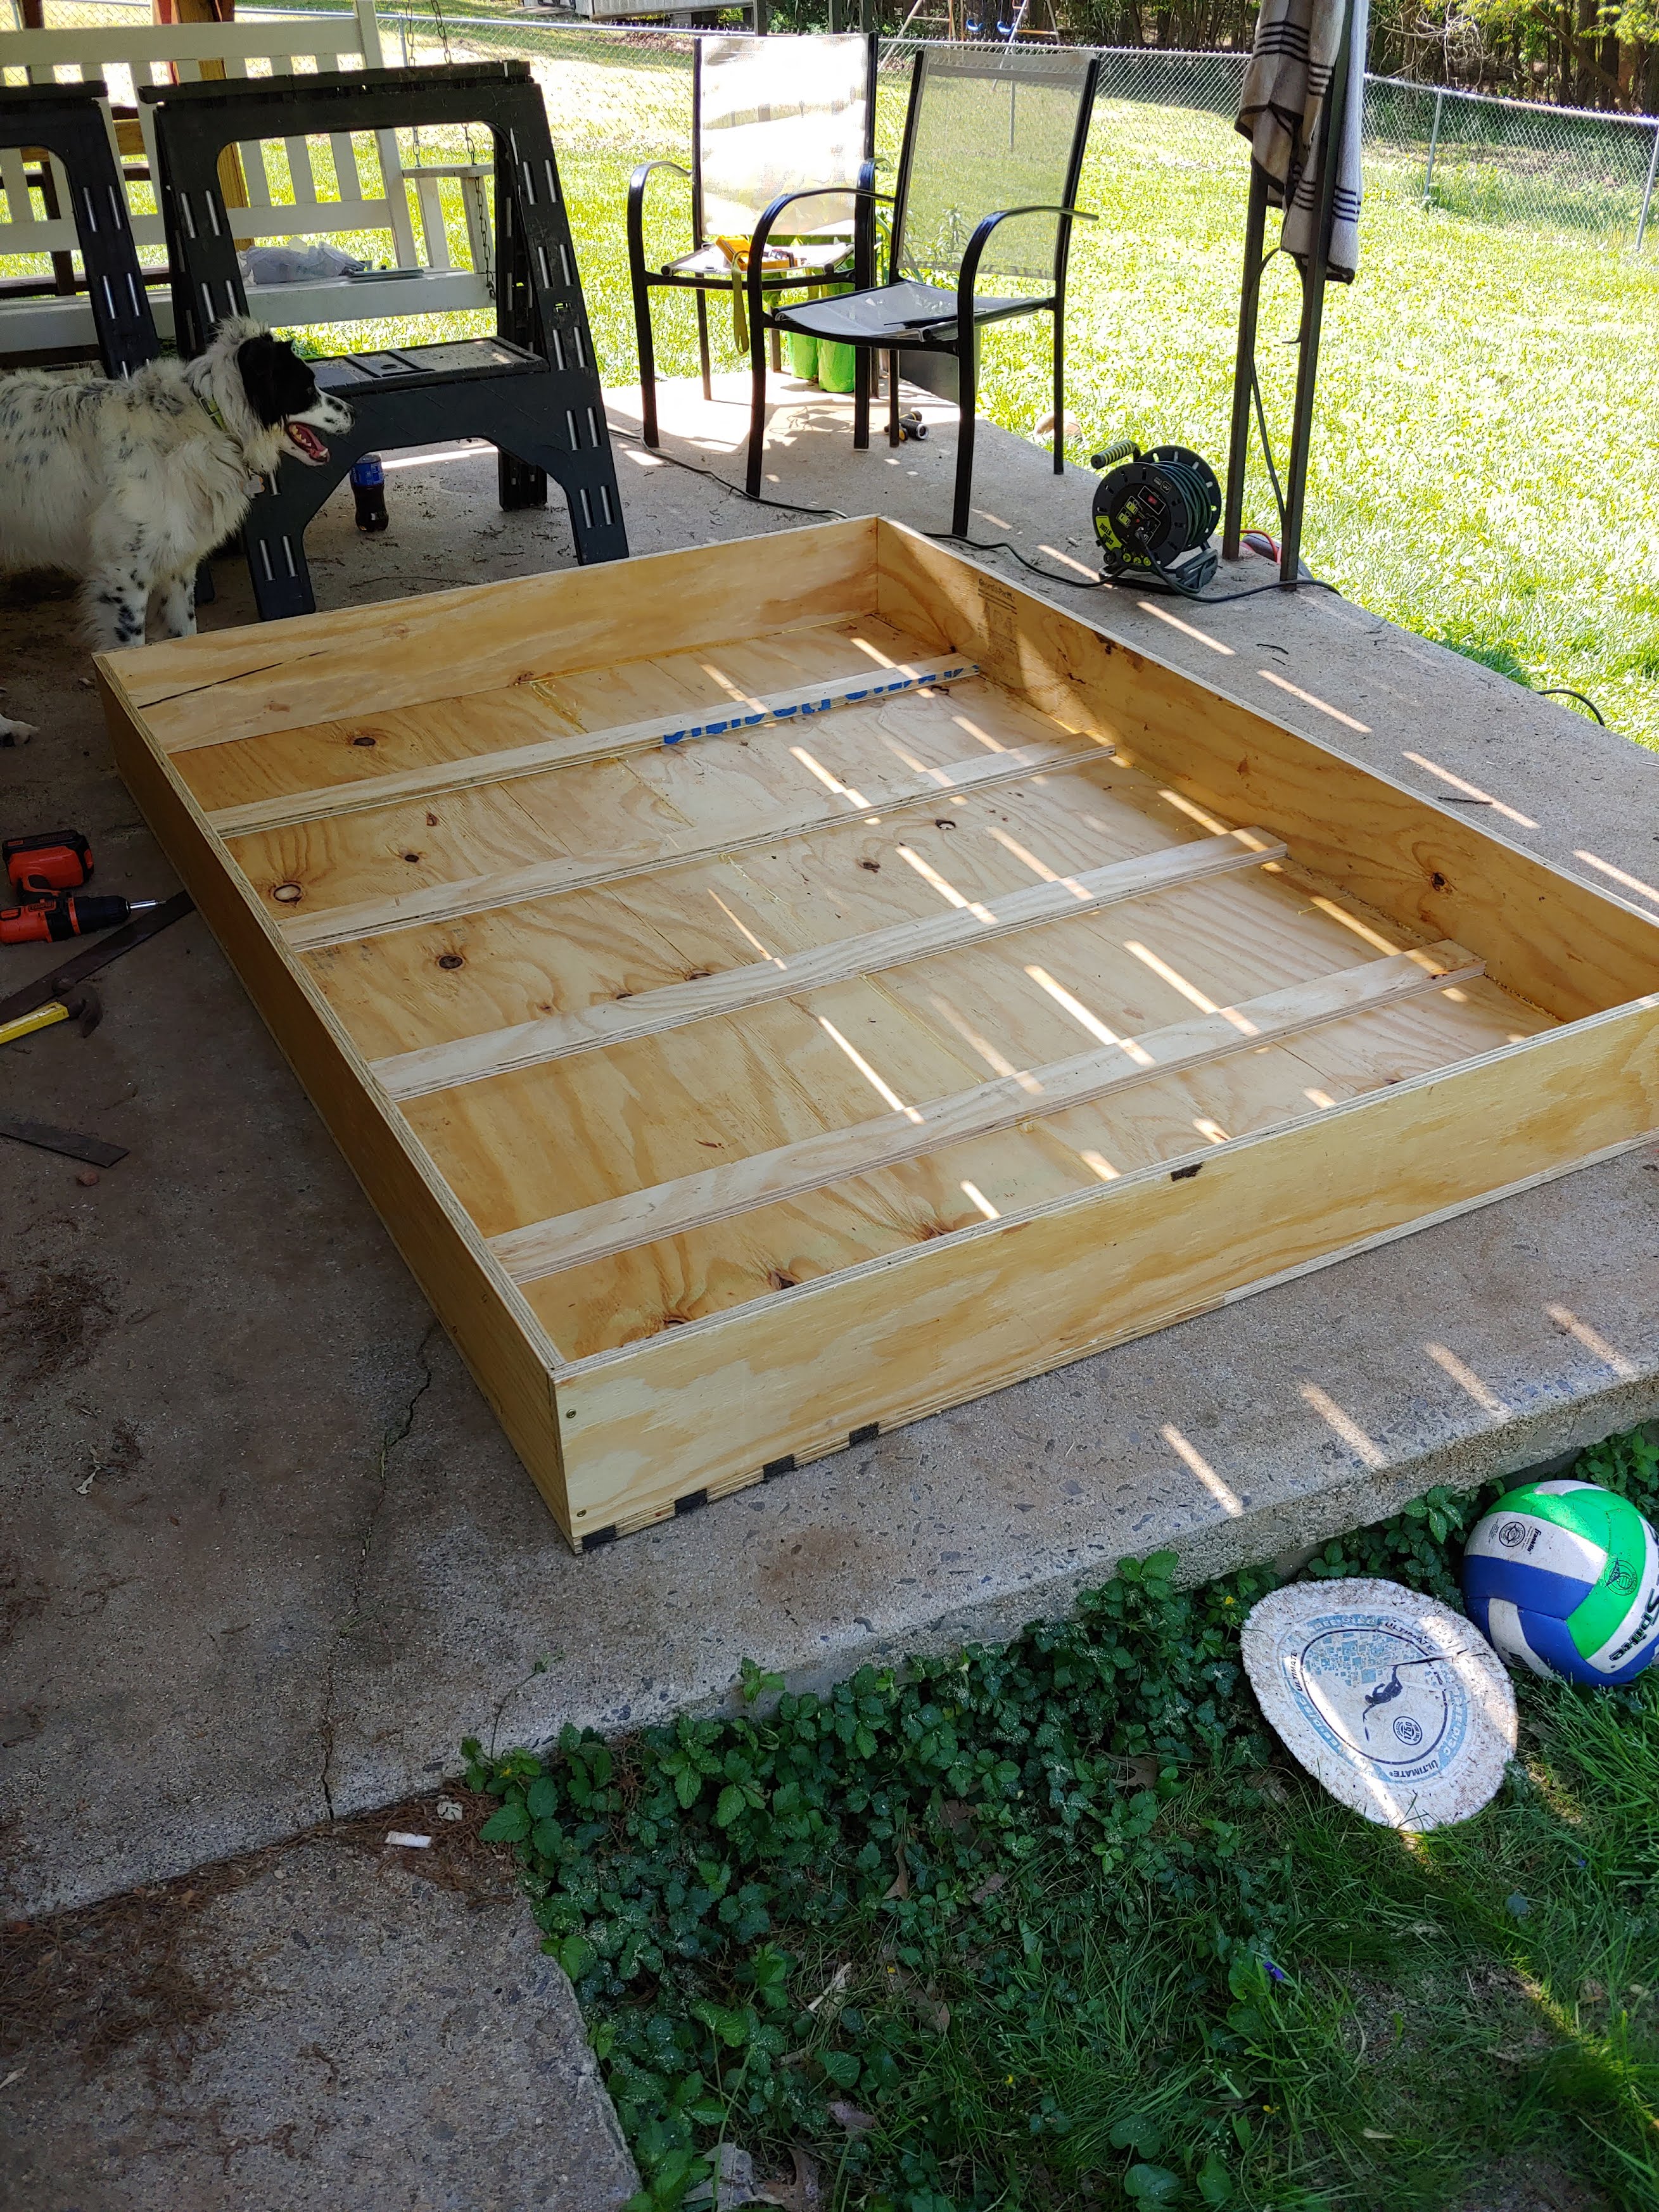
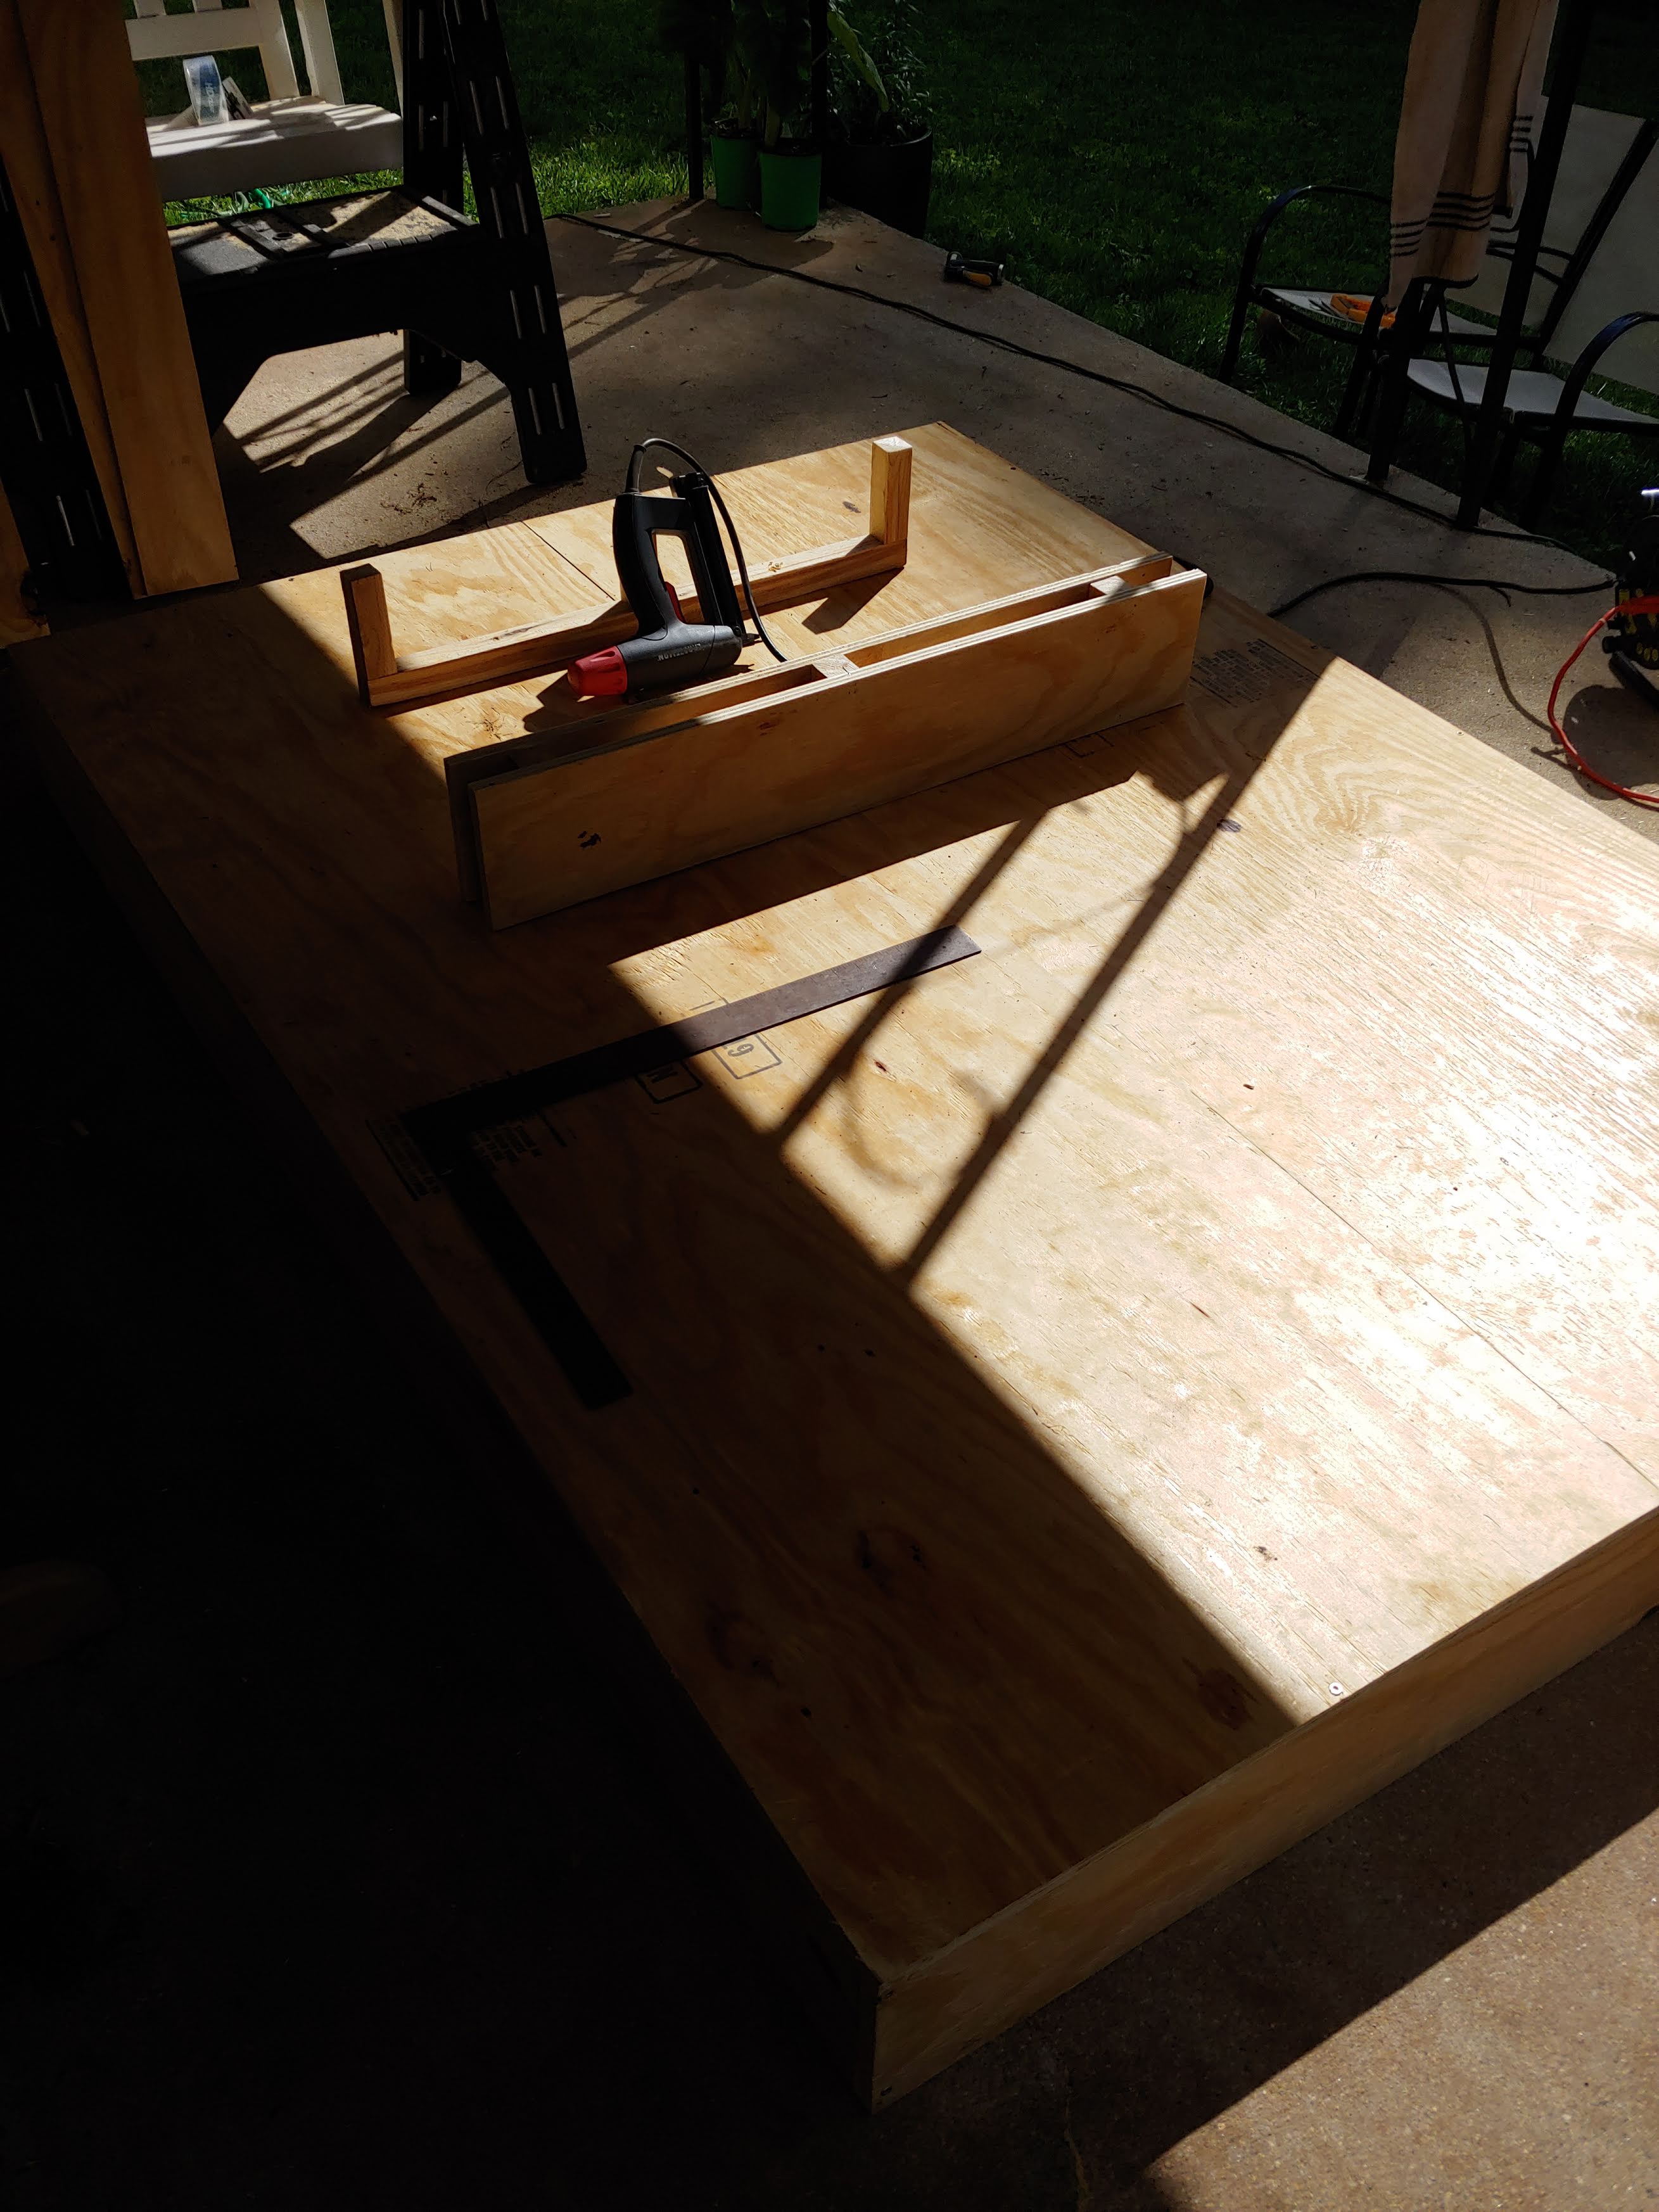
So I've always wanted to build a Murphy bed. And by always I mean since I first came across plans here that made it look so simple. It ended up taking me a while to do because my job has me working 6 days a week so I was only able to work on it for short chunks of time.
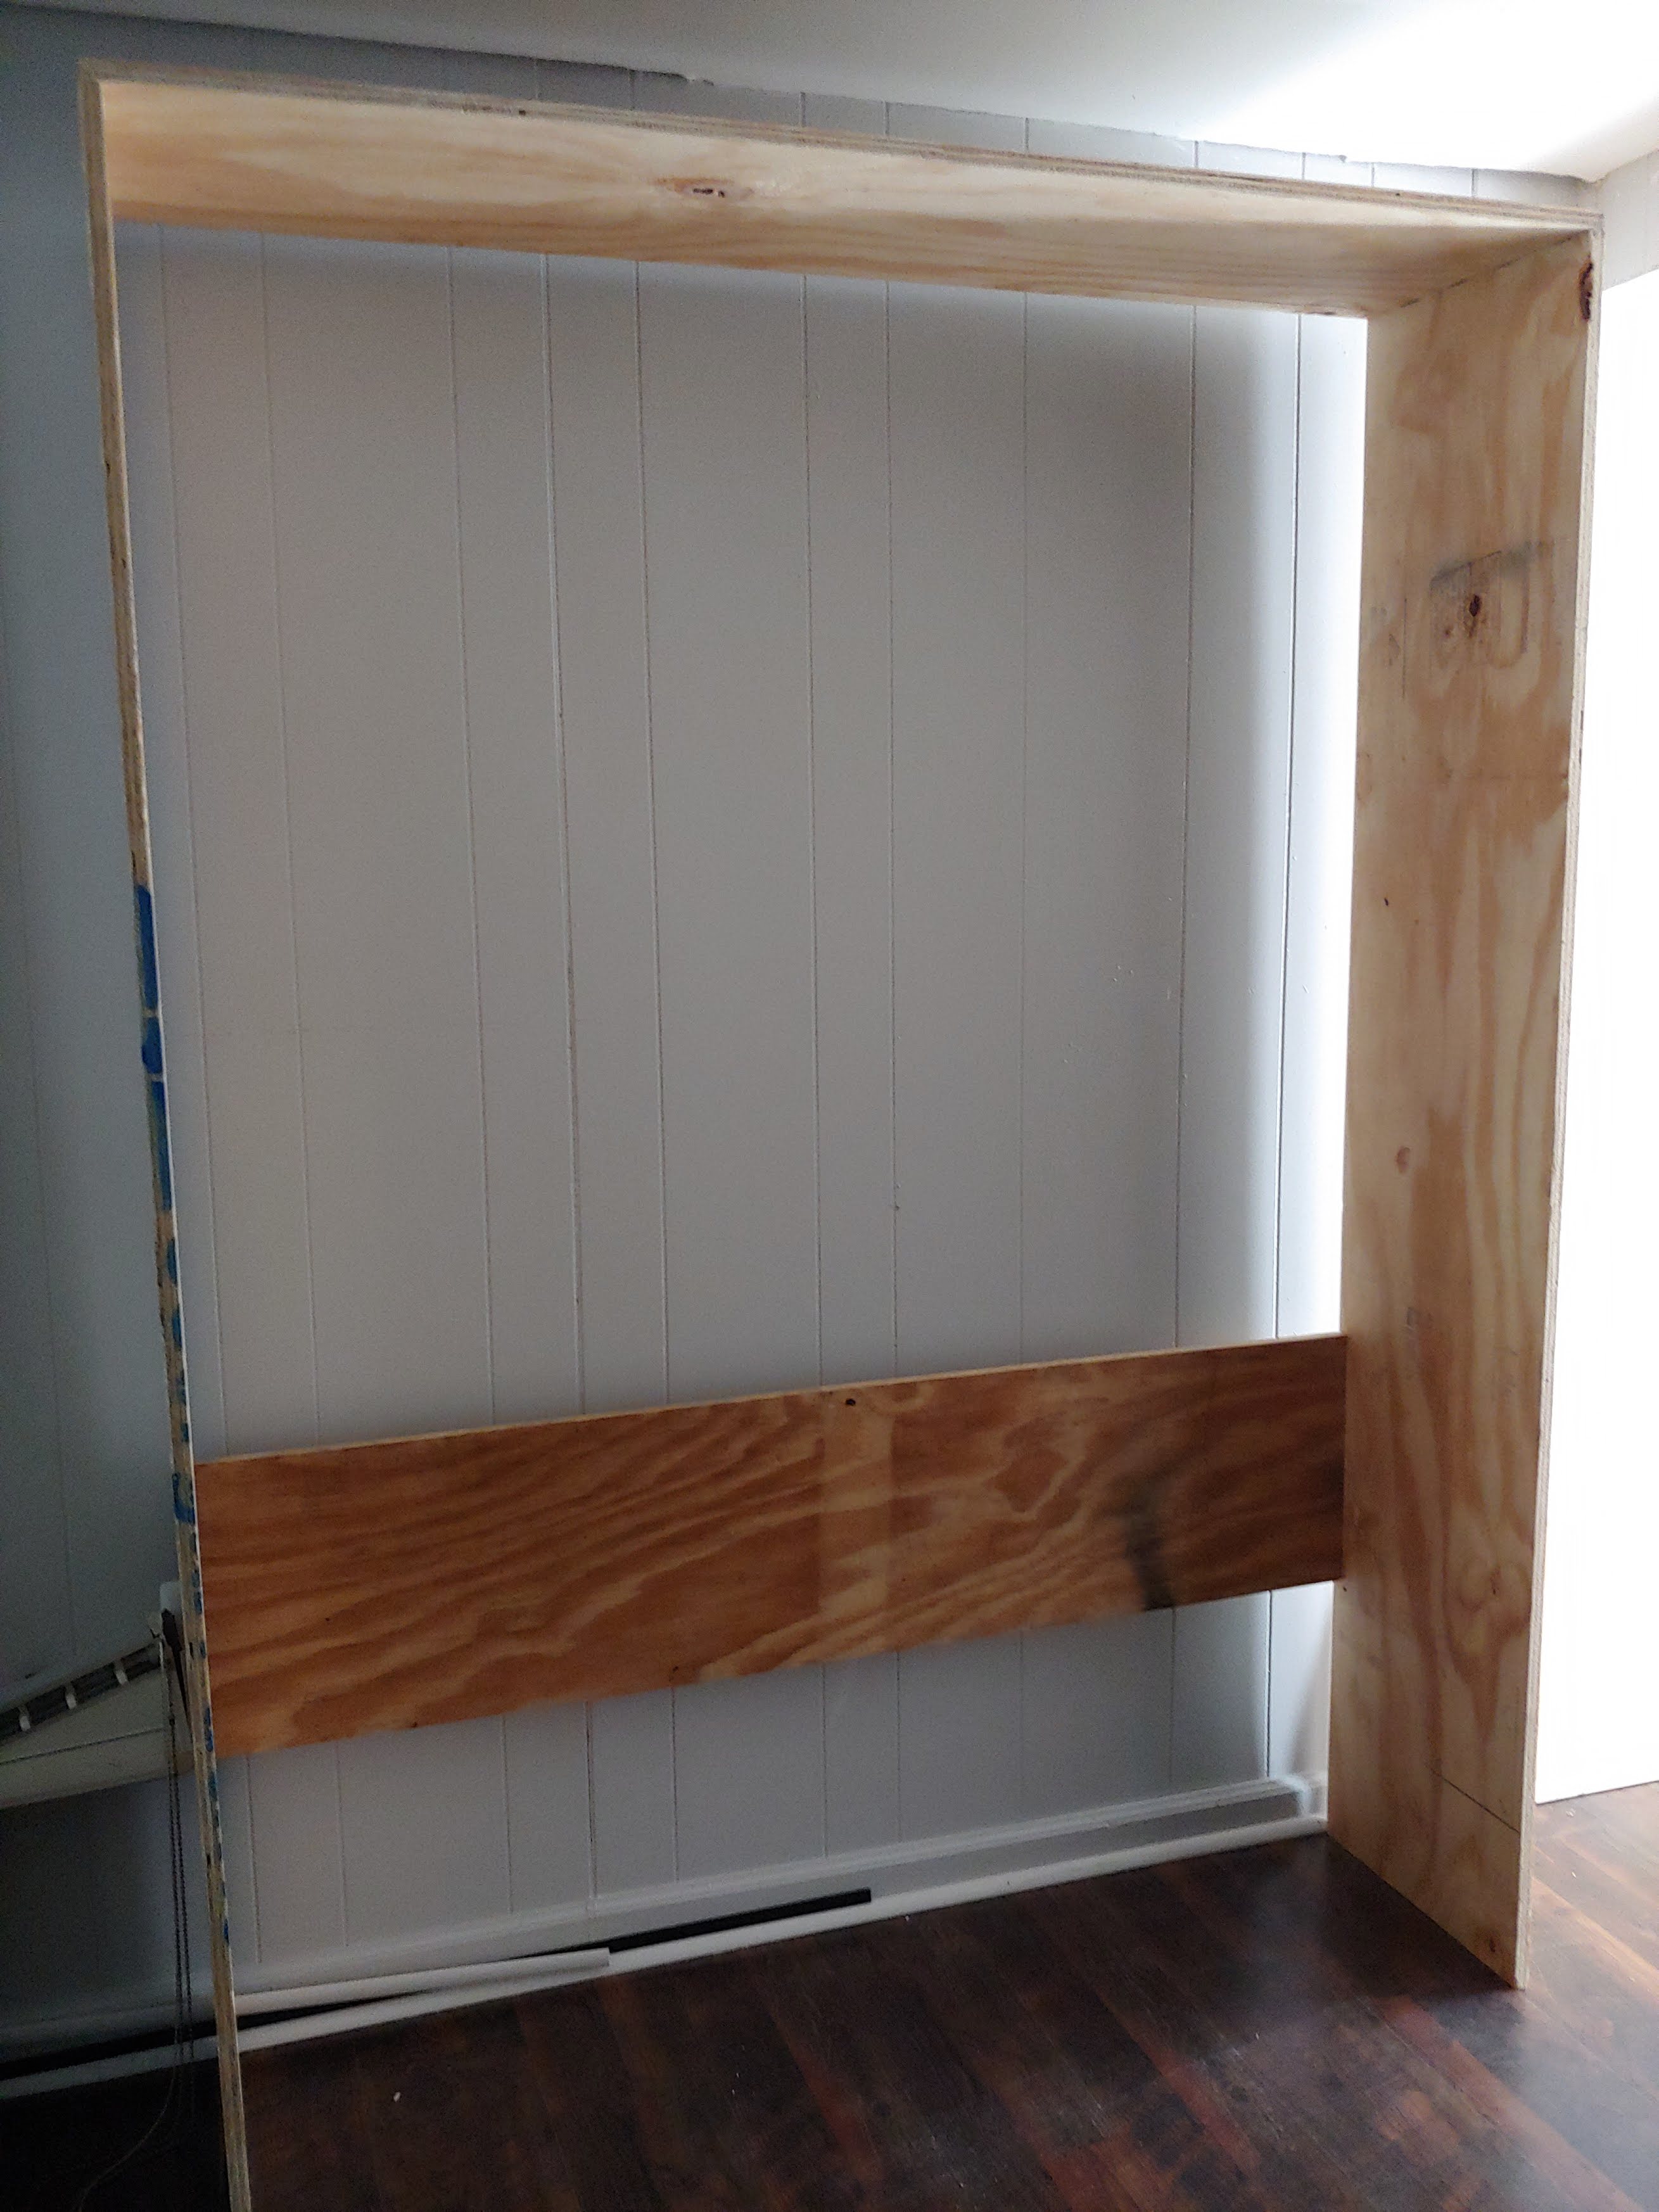
I ended up utilizing a few different plans and mashed them together to build a full size murphy bed. The shelves are the support legs when the bed is down. The "hinge" mechanism are heavy duty 360 degree seat swivels.
All-in-all it turned out WAY better than I expected with only some minor issues throughout the construction process.
Next up is a twin xl Murphy bed with a murphy desk attachment that will serve as a craft table when up.
Built from Plan(s)
Estimated Cost
3 - 4x8 sheets of 3/4" plywood ($25 each)
3 - 1x2x8 to wrap the frame ($2-3 each)
1 pack Door Hinge pins to serve as the pins to hold the bed upright ($3-5)
1 pint stain
1 pint shellac
2 - Heavy Duty 360 degree seat swivels ($20)
Screws/nails/etc.
All told, this project probably cost around $200
3 - 1x2x8 to wrap the frame ($2-3 each)
1 pack Door Hinge pins to serve as the pins to hold the bed upright ($3-5)
1 pint stain
1 pint shellac
2 - Heavy Duty 360 degree seat swivels ($20)
Screws/nails/etc.
All told, this project probably cost around $200
Estimated Time Investment
Week Long Project (20 Hours or More)
Recommended Skill Level
Intermediate
Comments
Sliding Barn Door Console

This is my first furniture build using one of your plans. I modified the width to fit into the space it was placed. Also made most of the console with repurposed wood. Bought standard sized hardware and cut to fit. The top was premade butcher block that I also cut to fit.
It is such a blessing that you share plans and encourage others to build. I have followed you for some time and I love seeing how you have grown such a large community of followers. - https://www.instagram.com/sadelsonchuck/
Built from Plan(s)
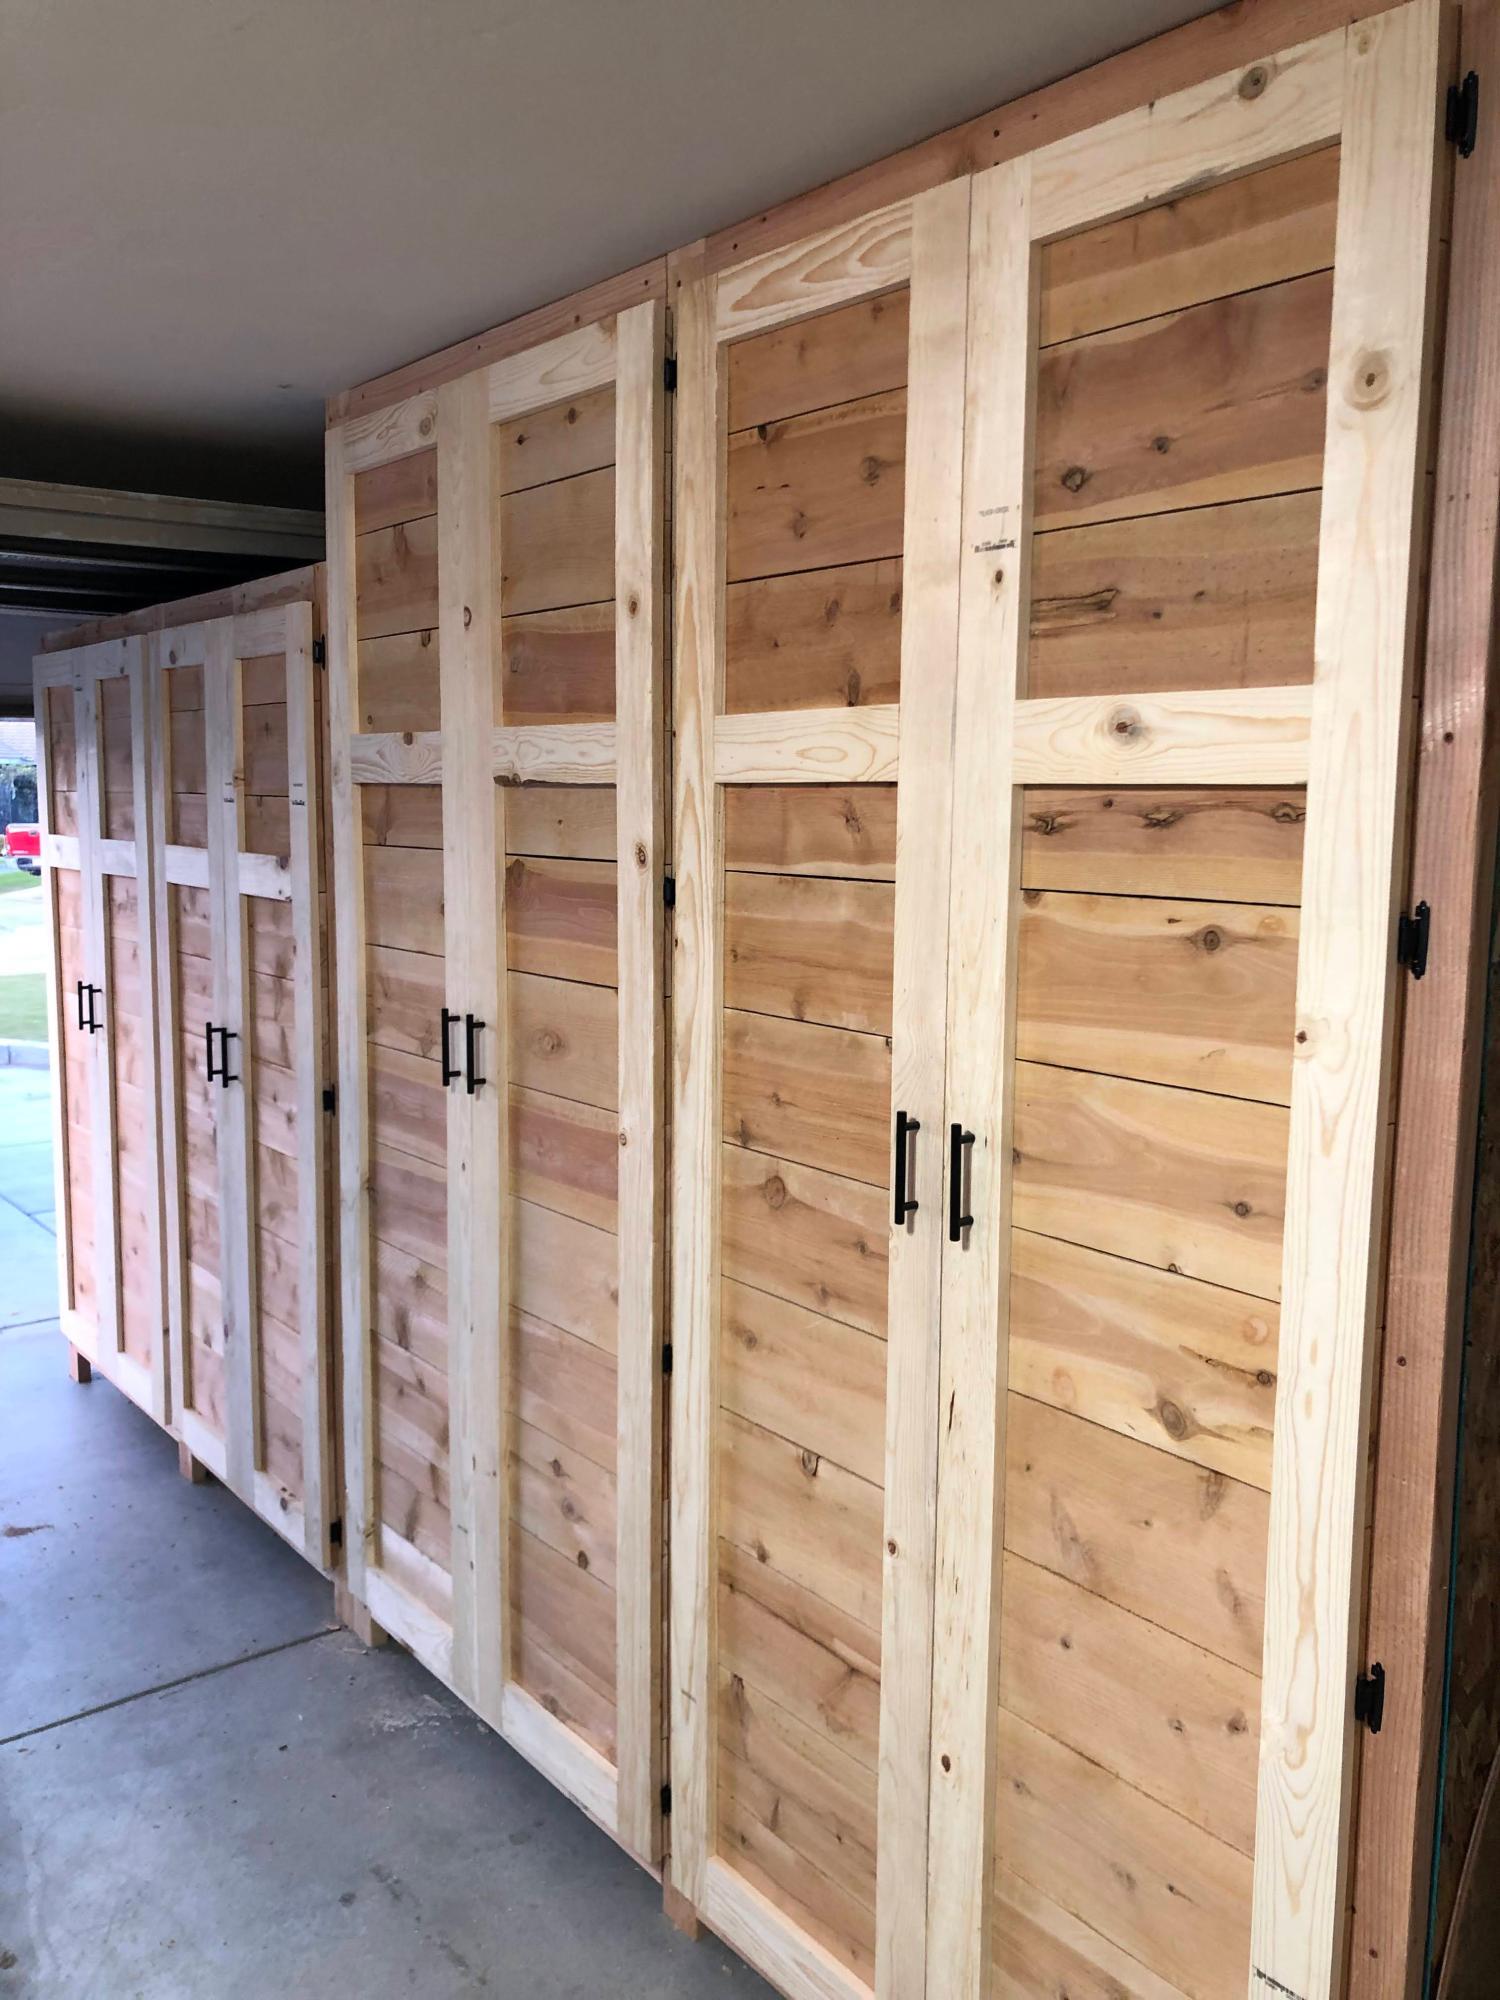
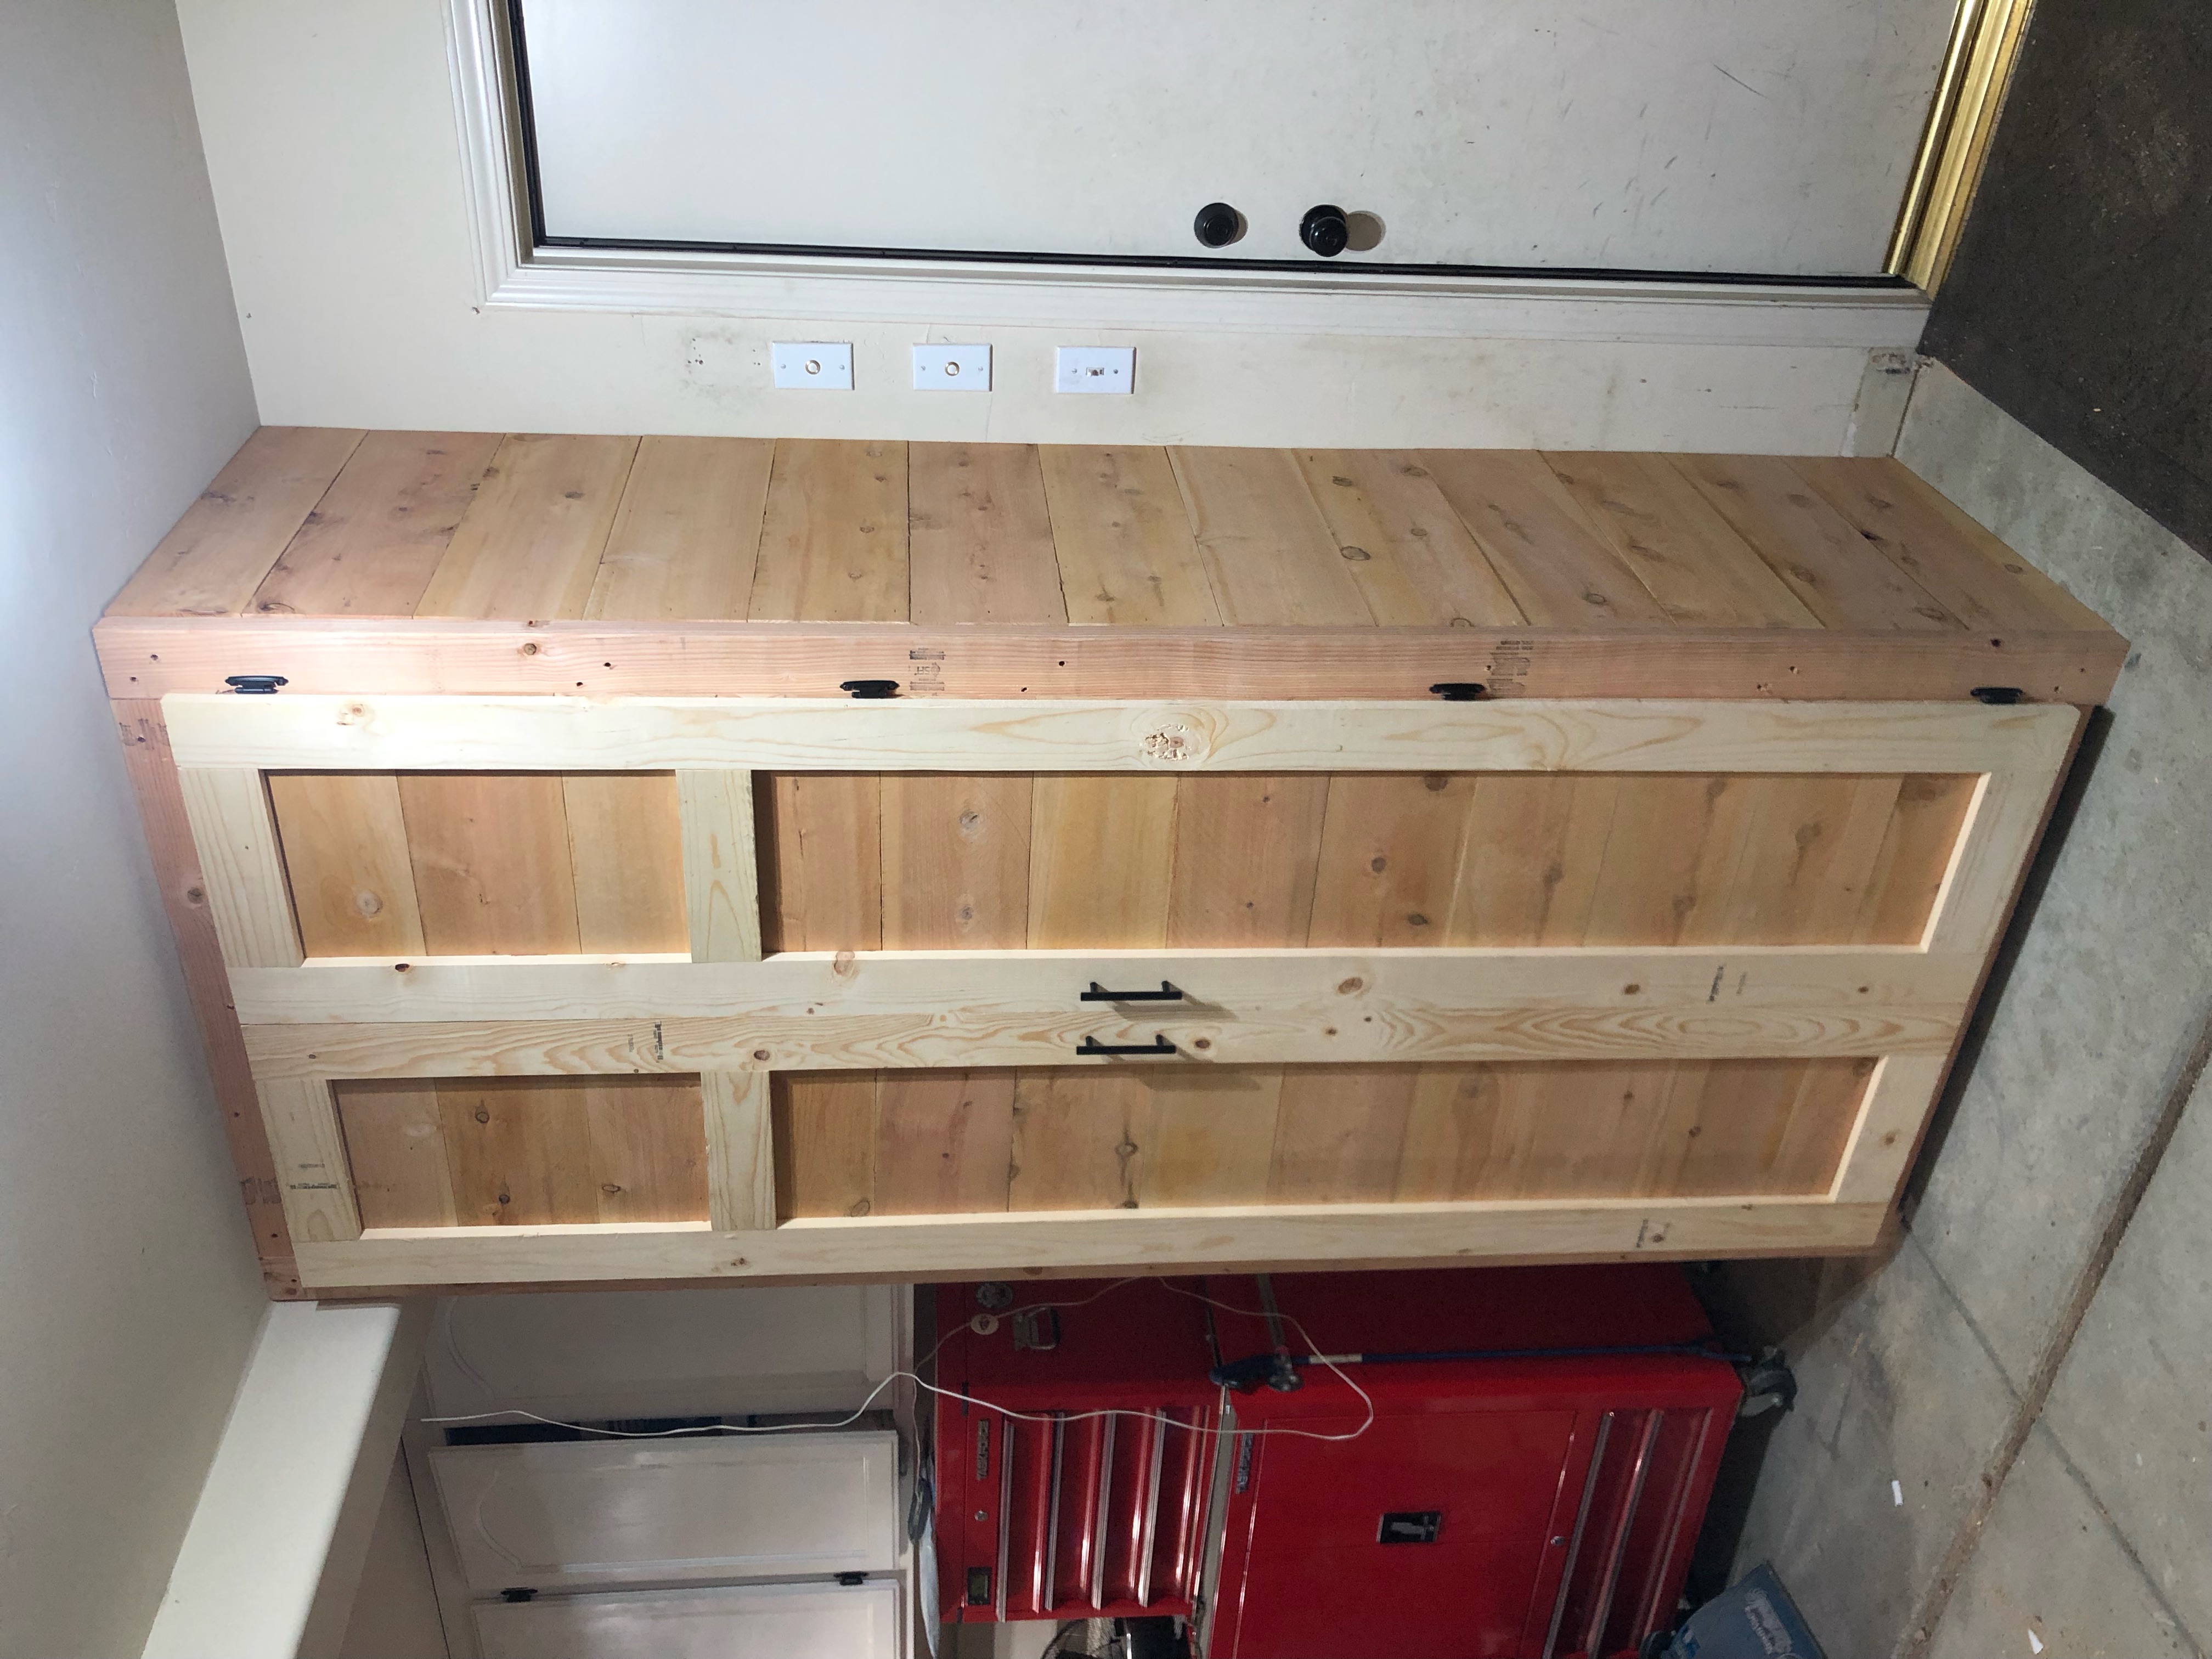
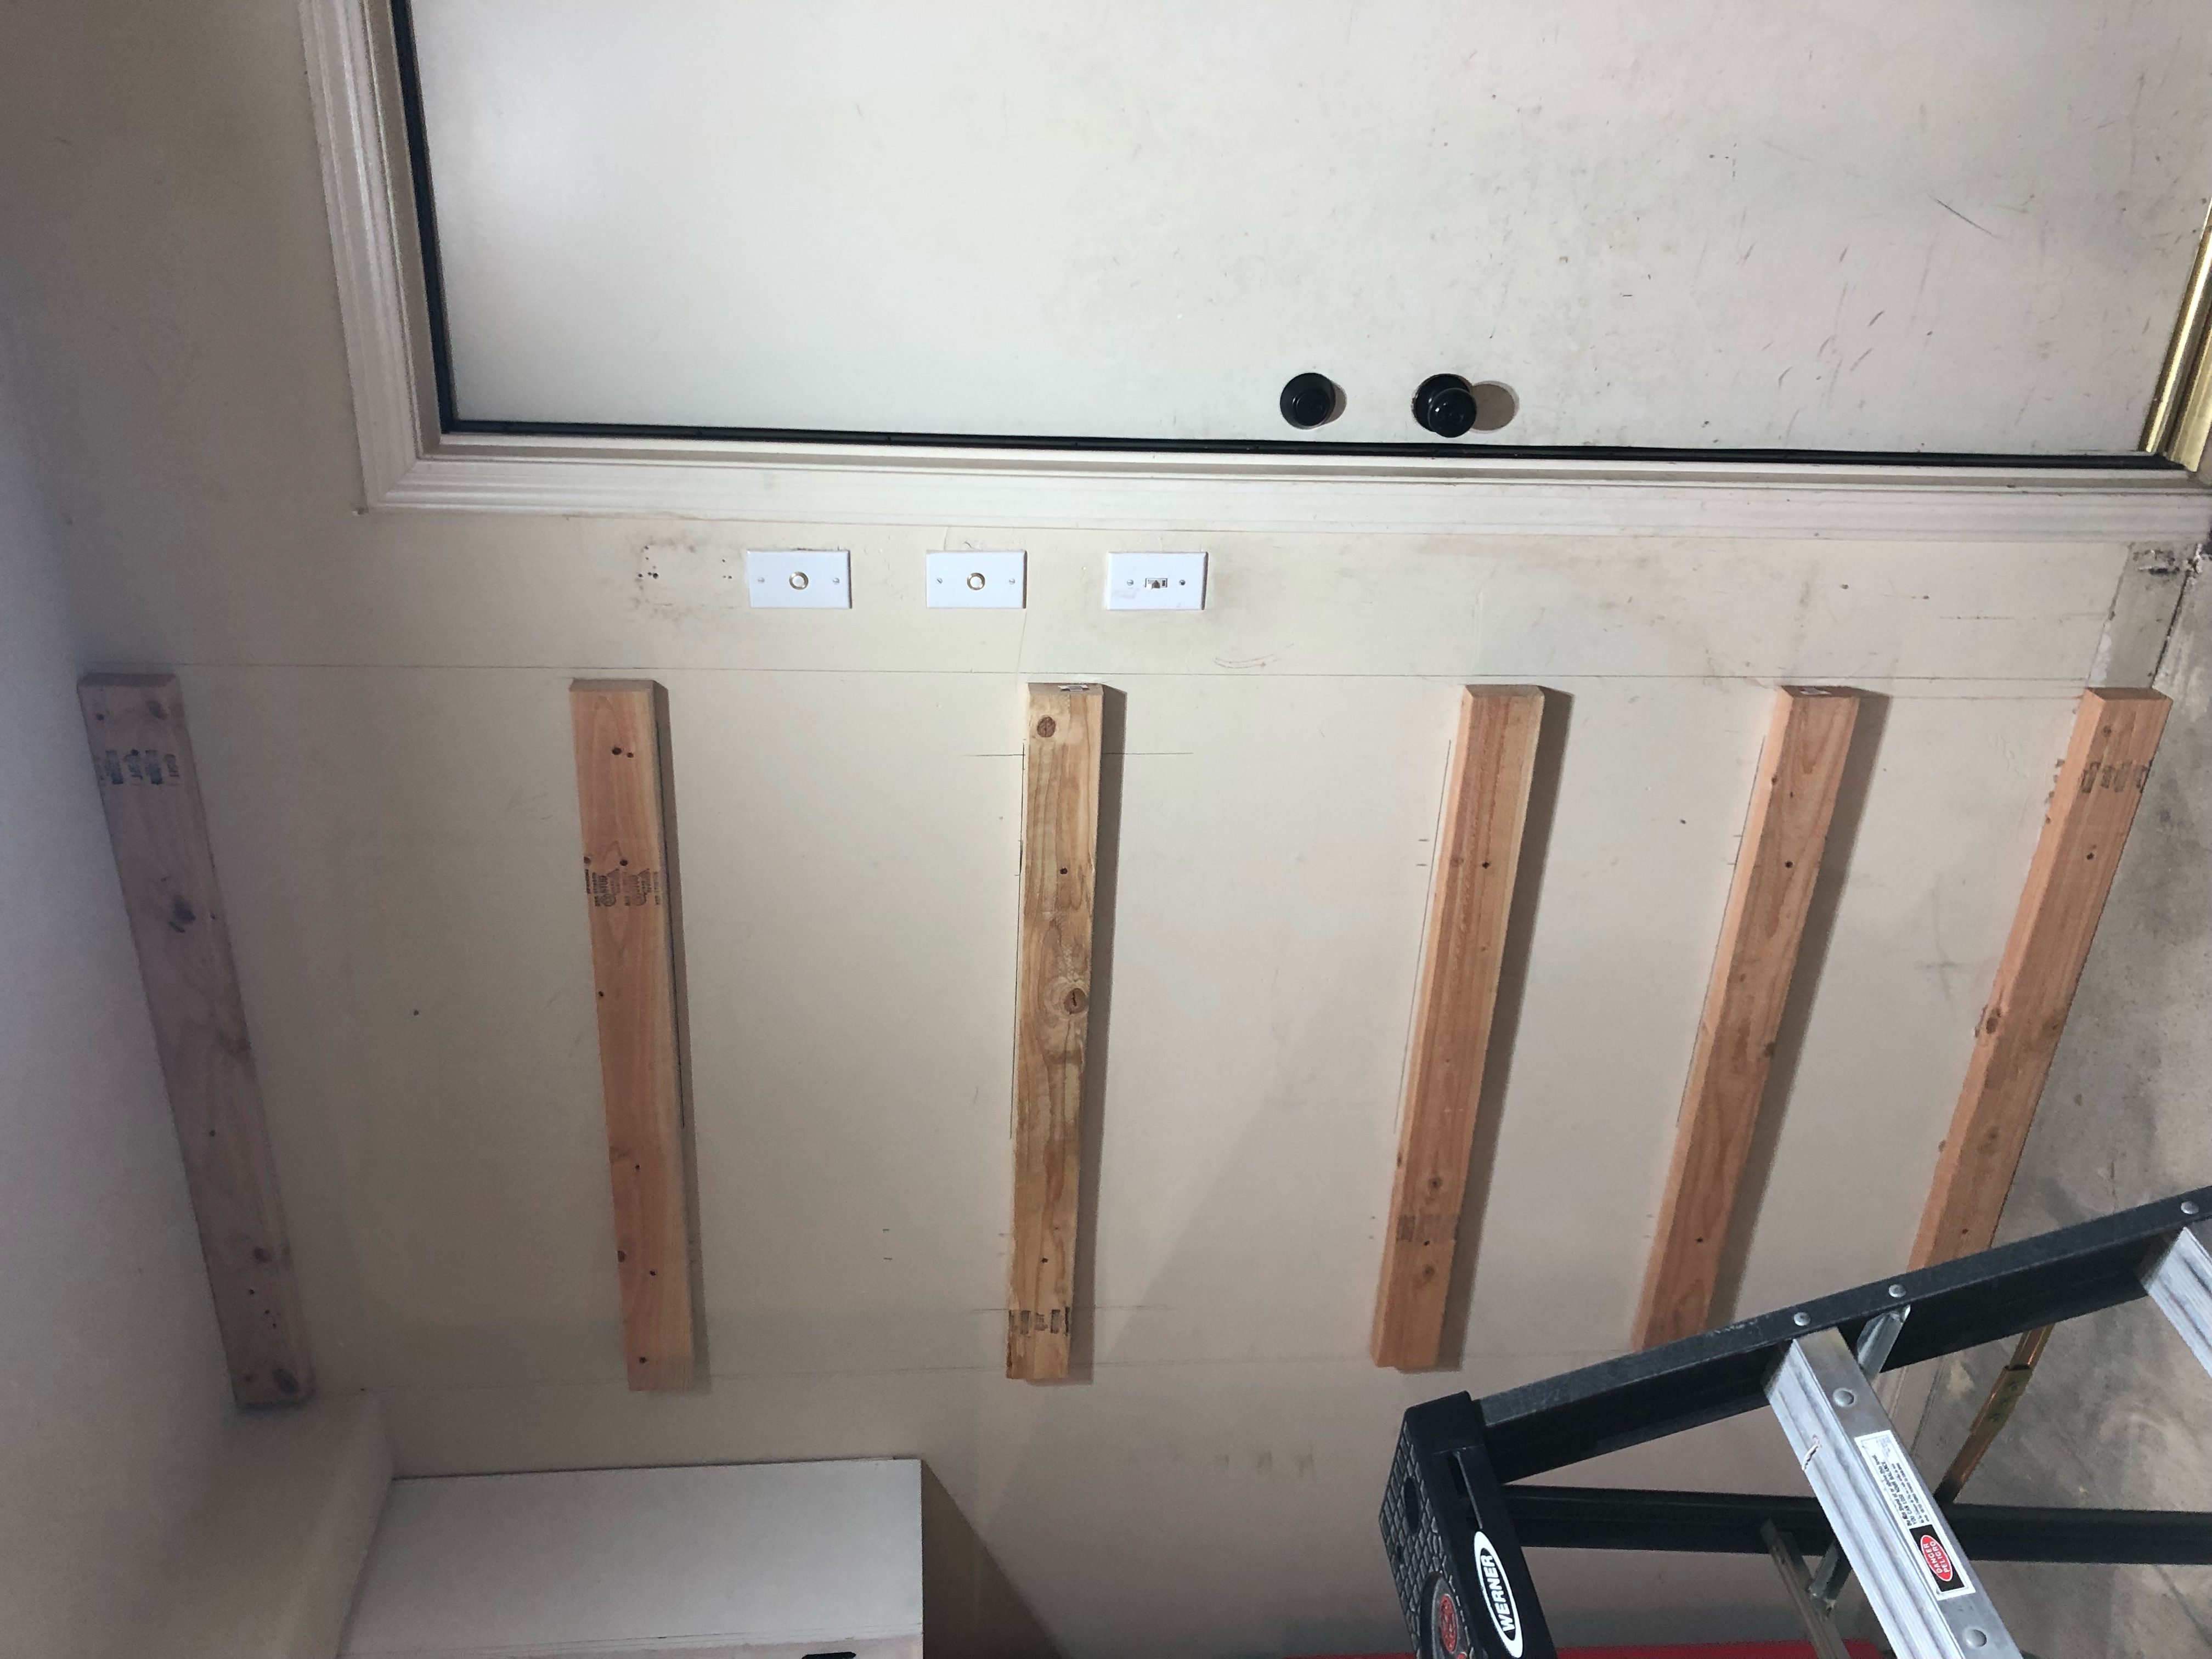
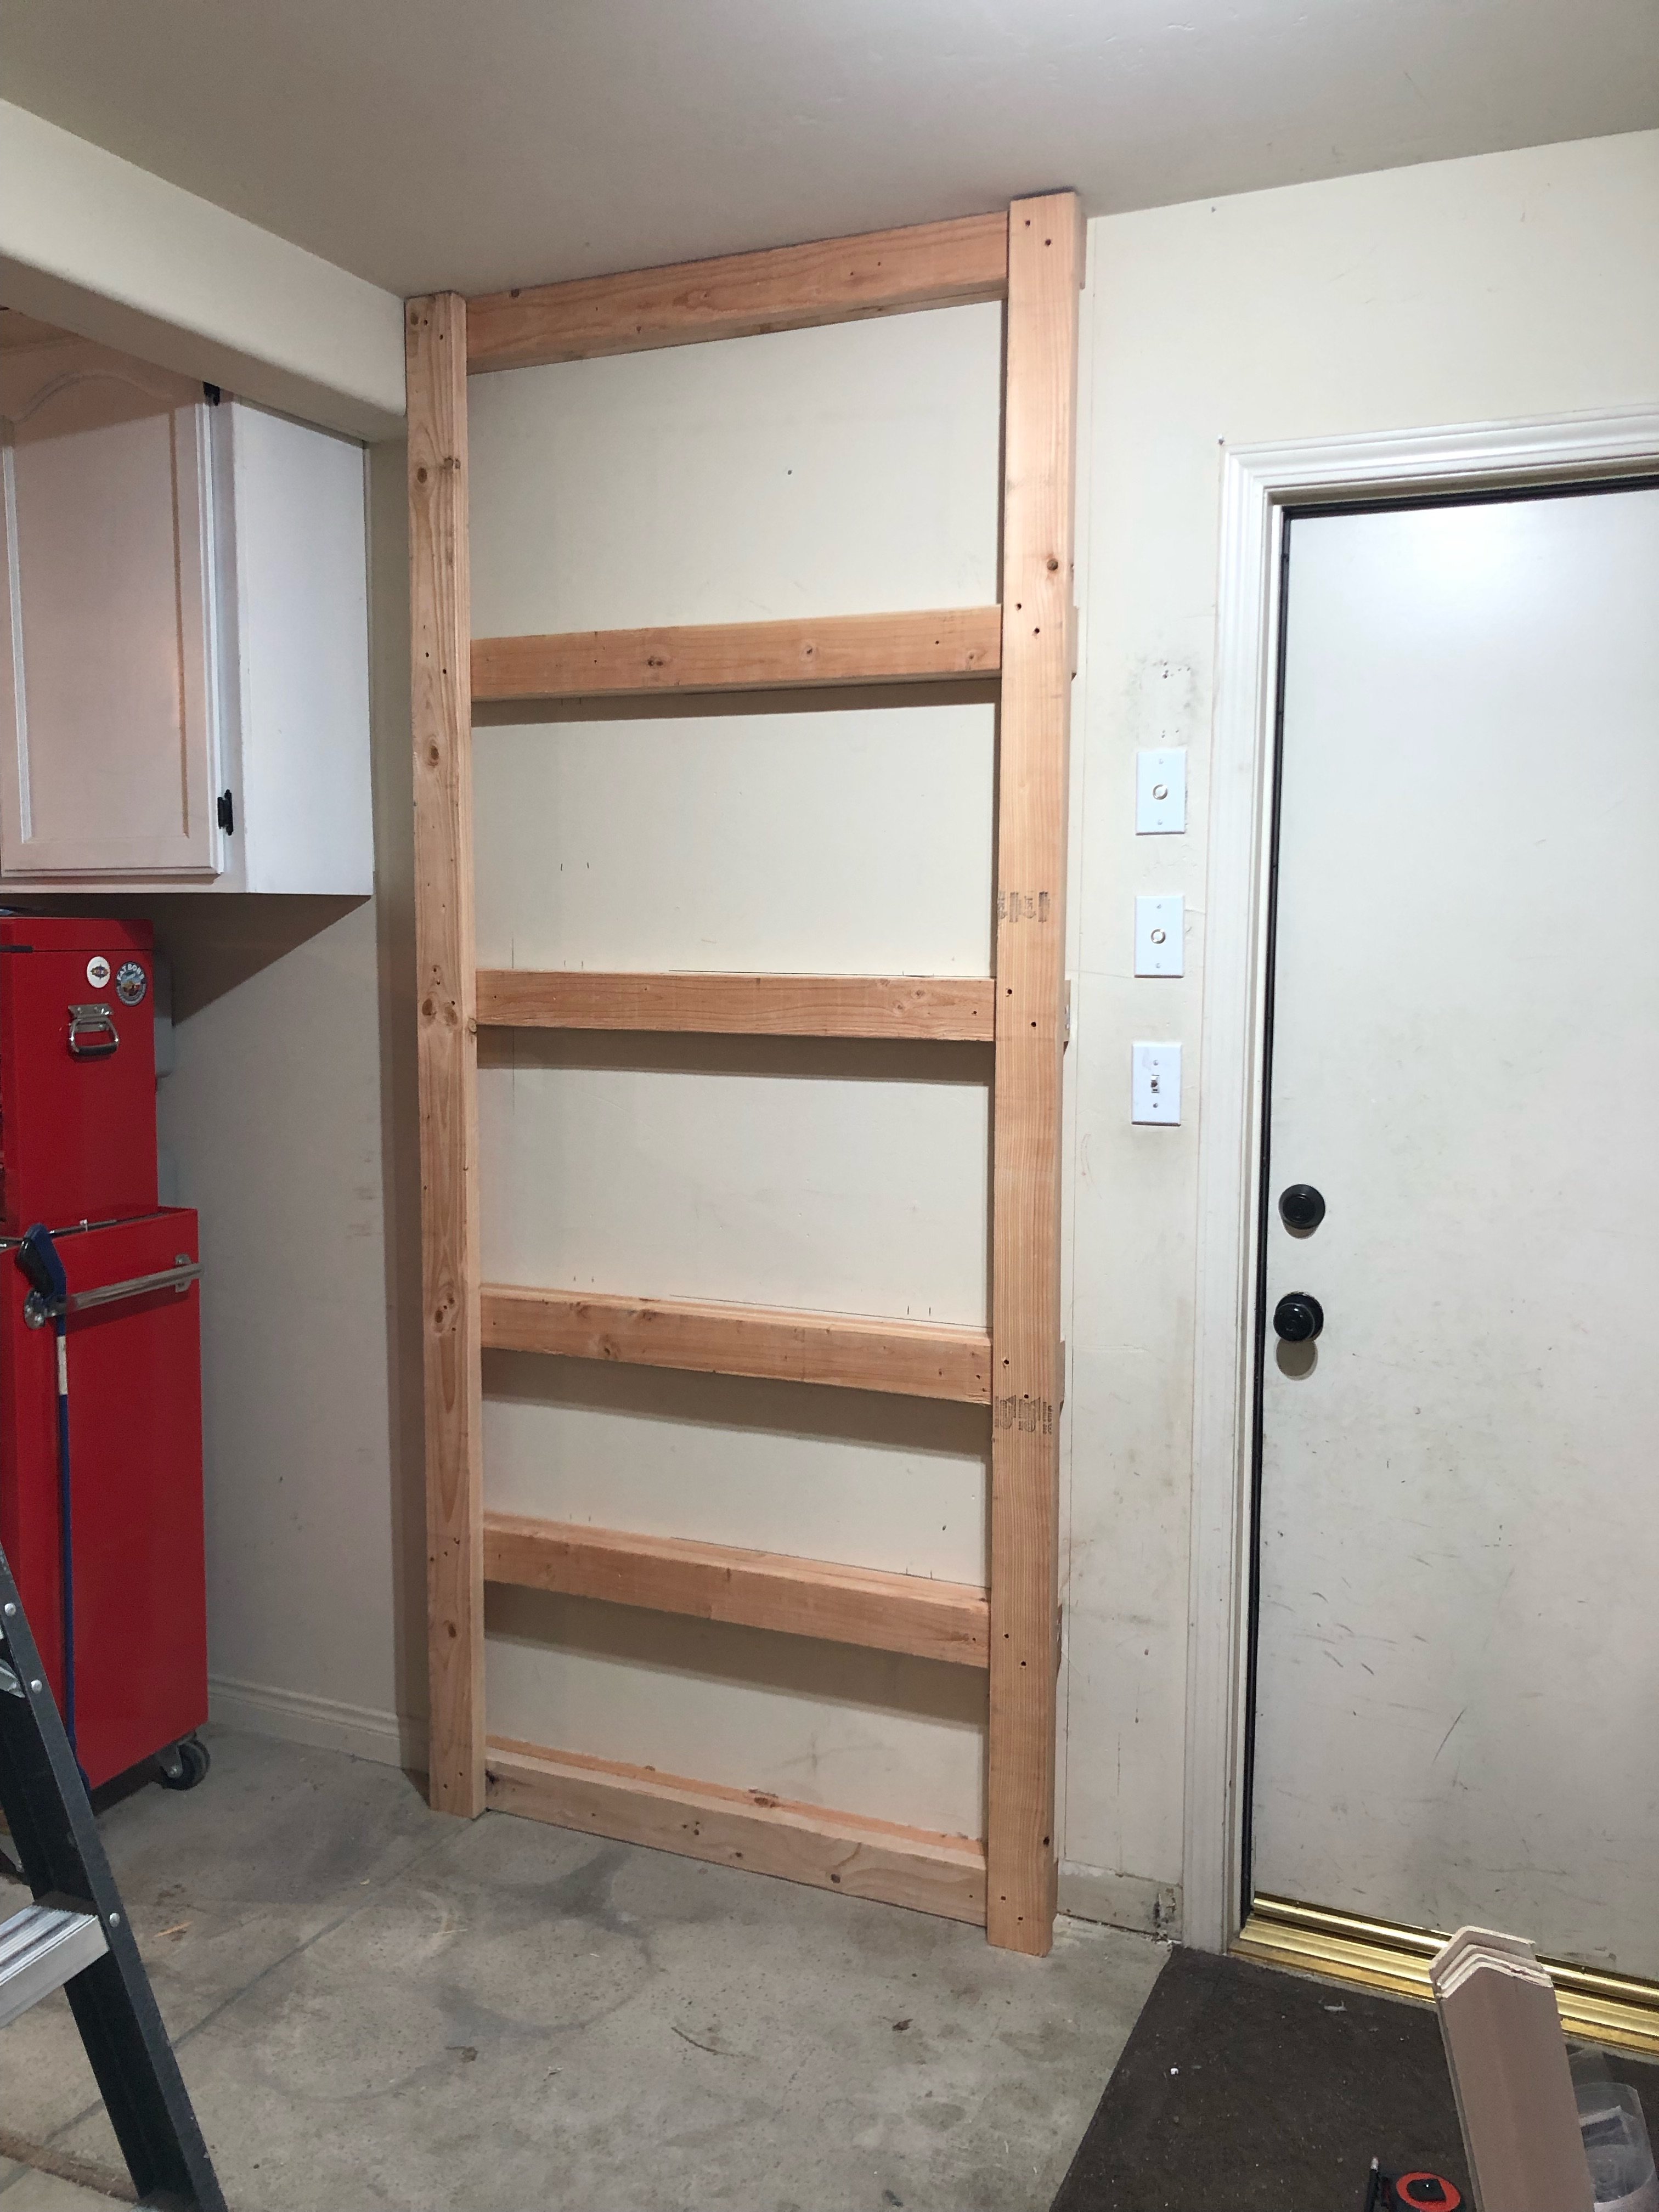
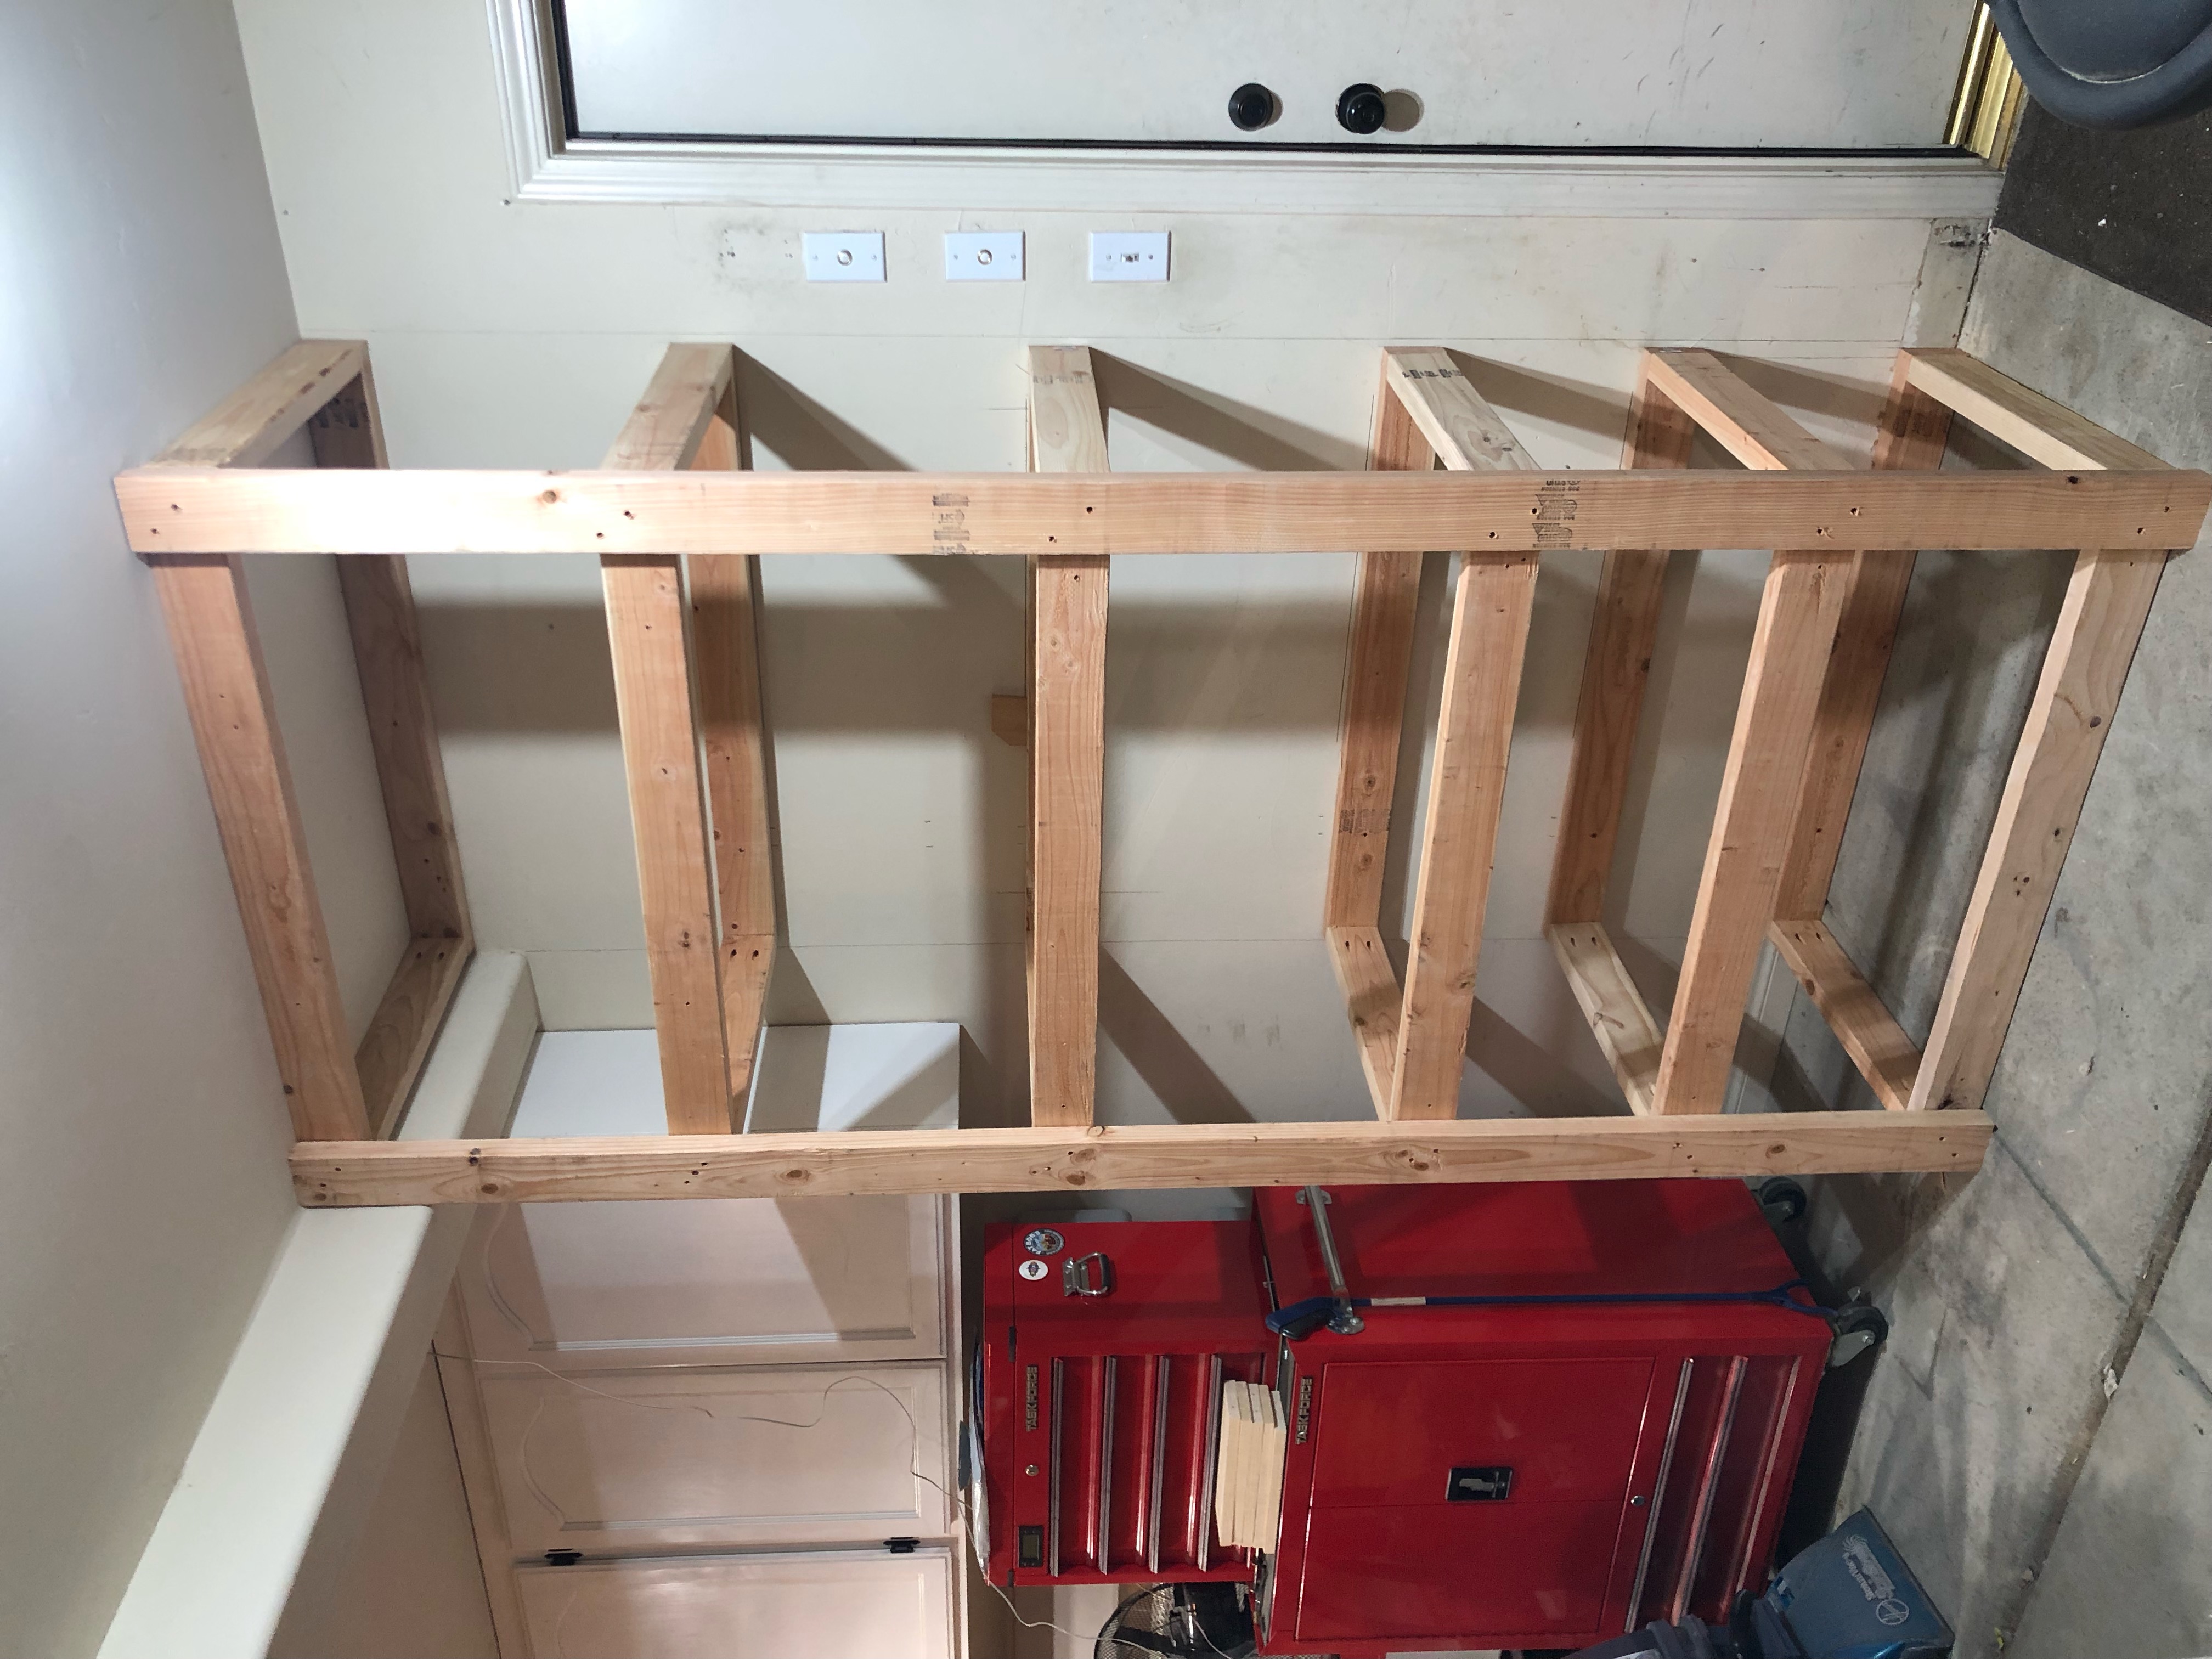
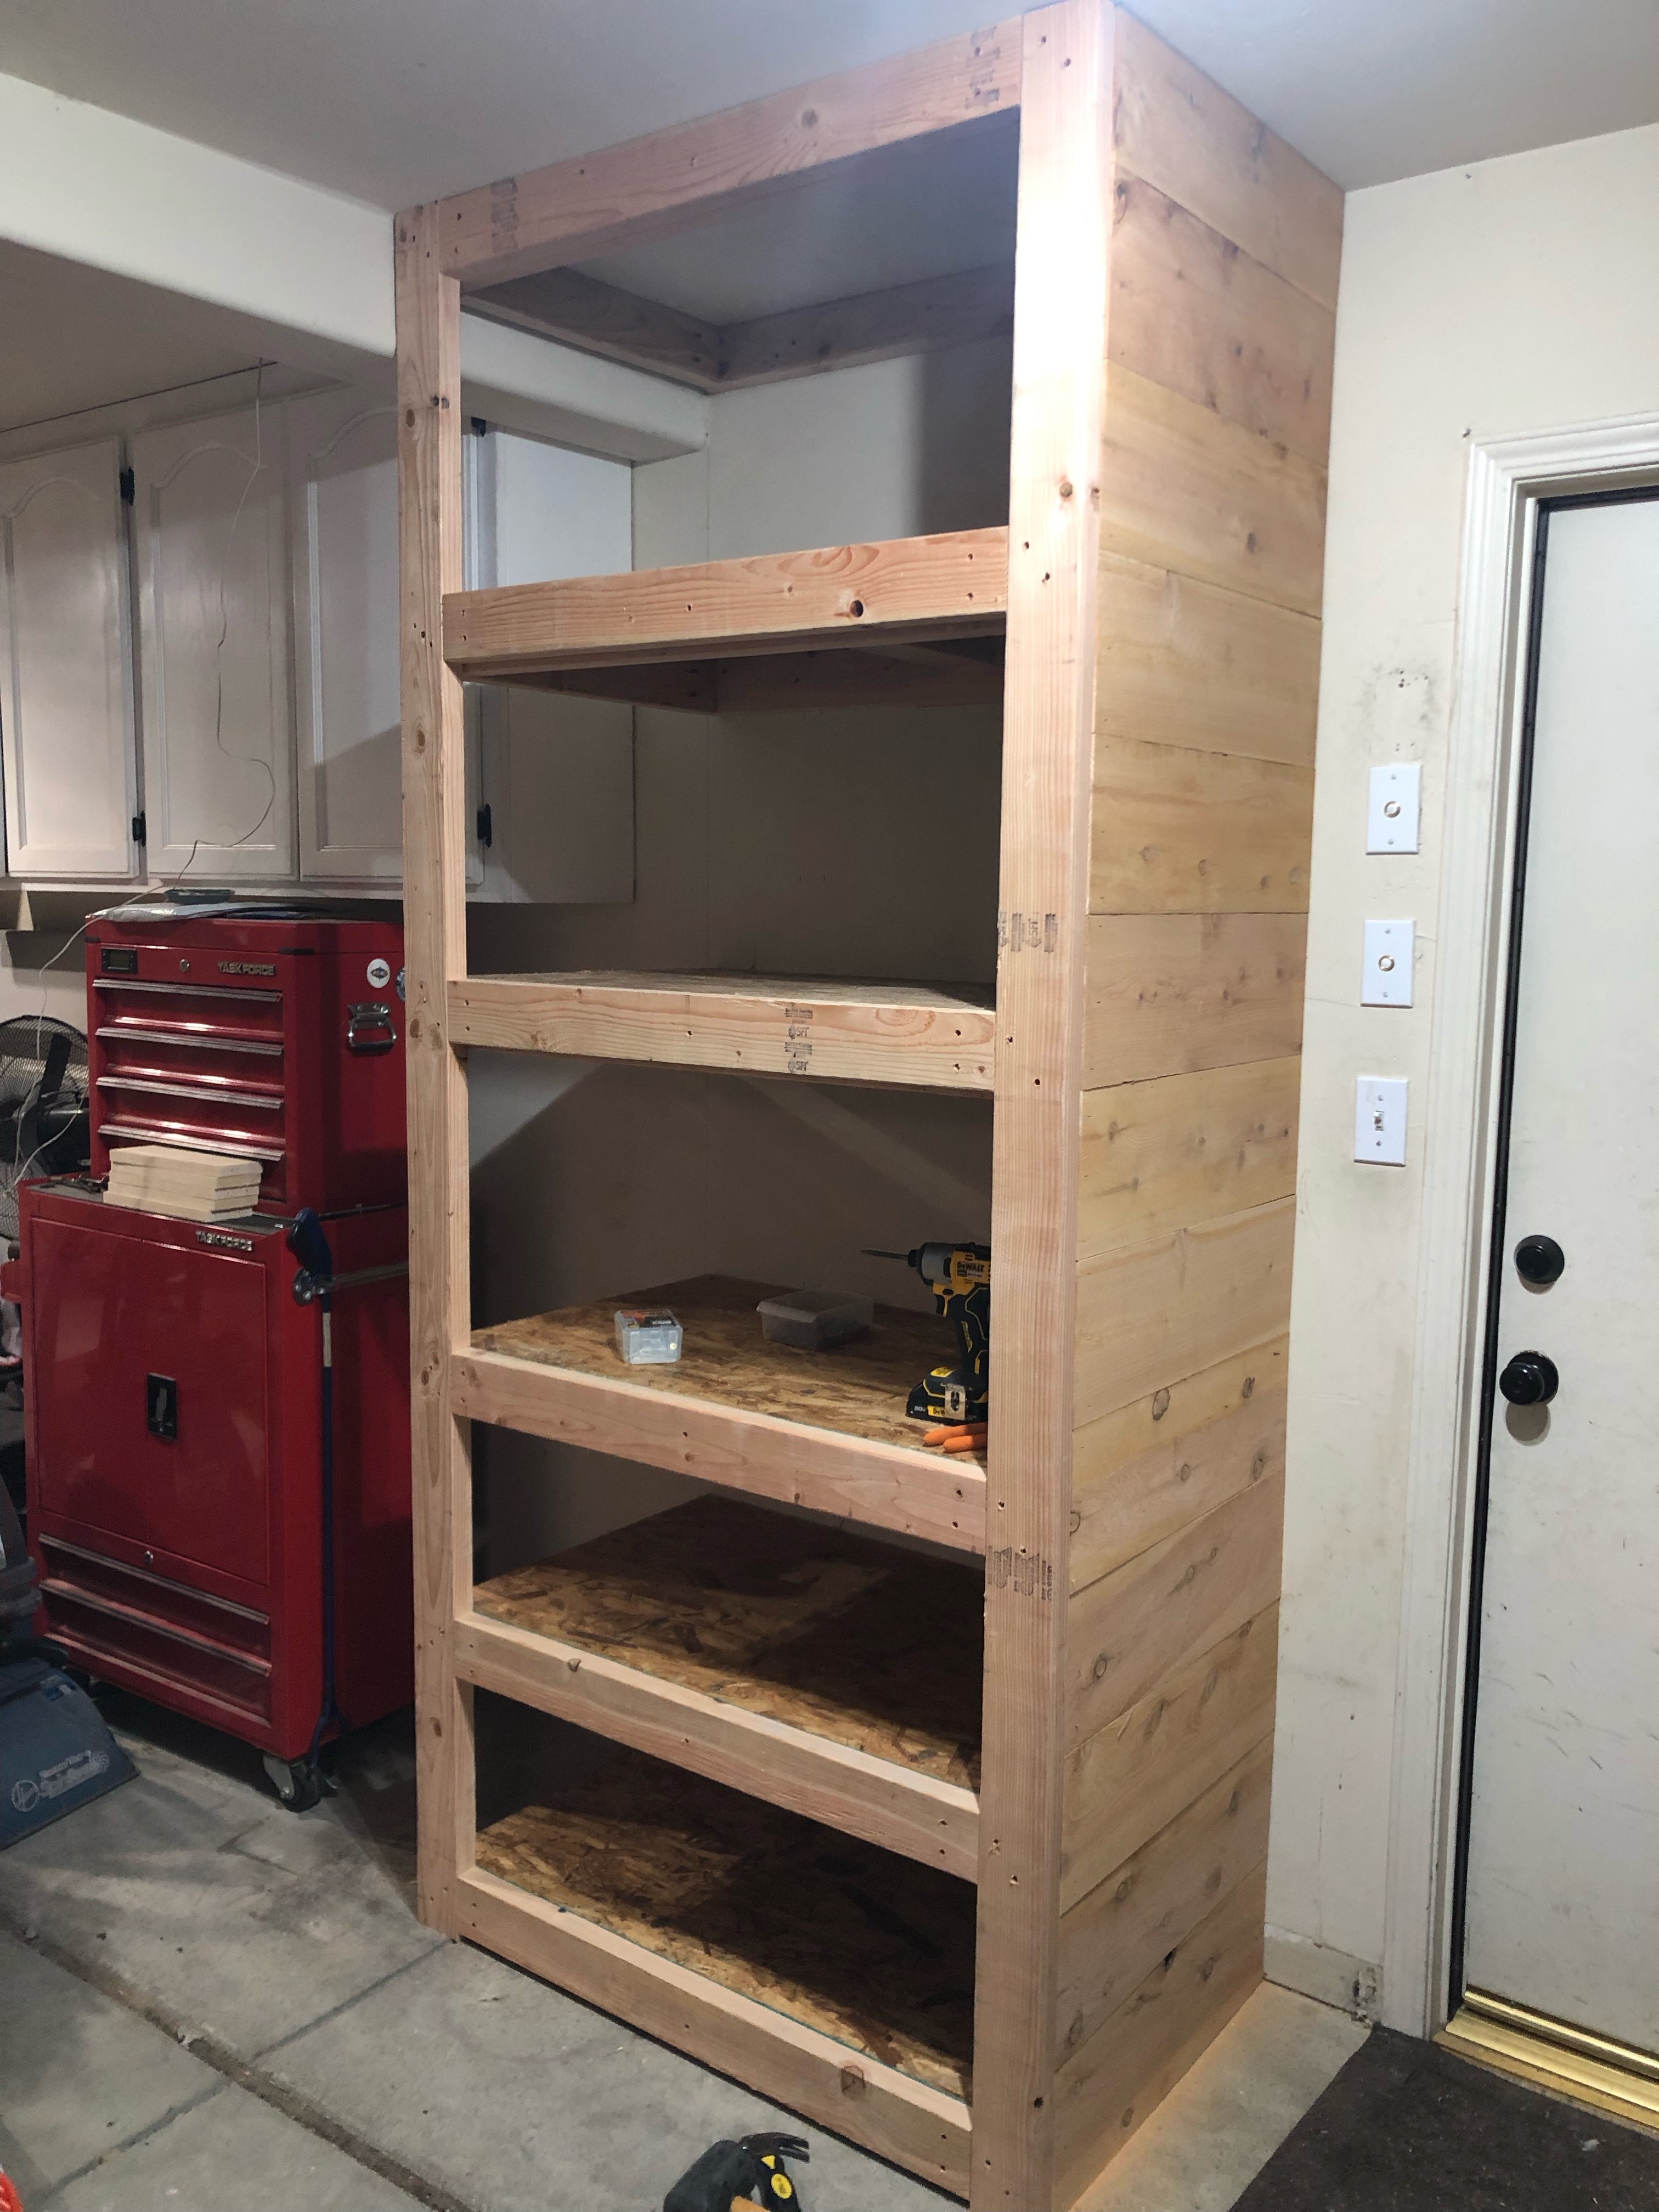
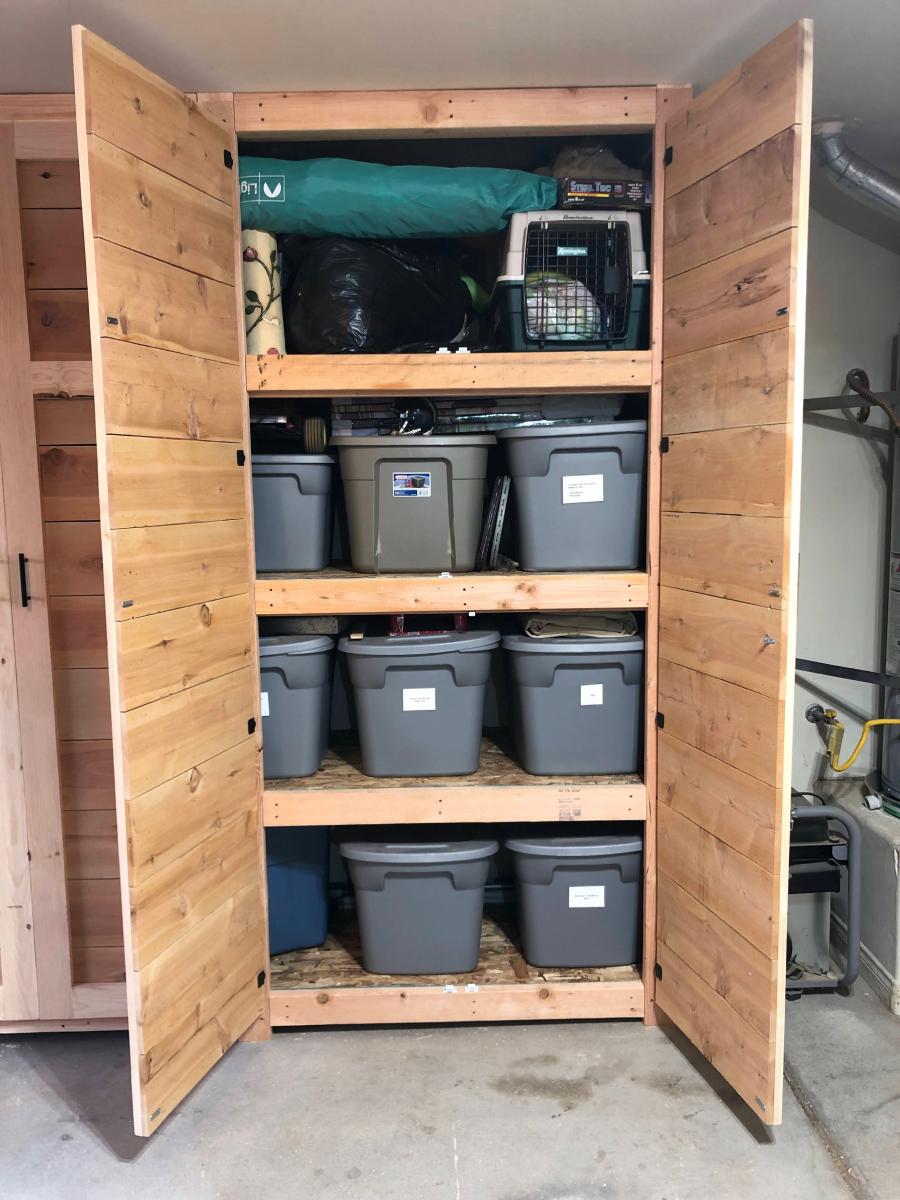
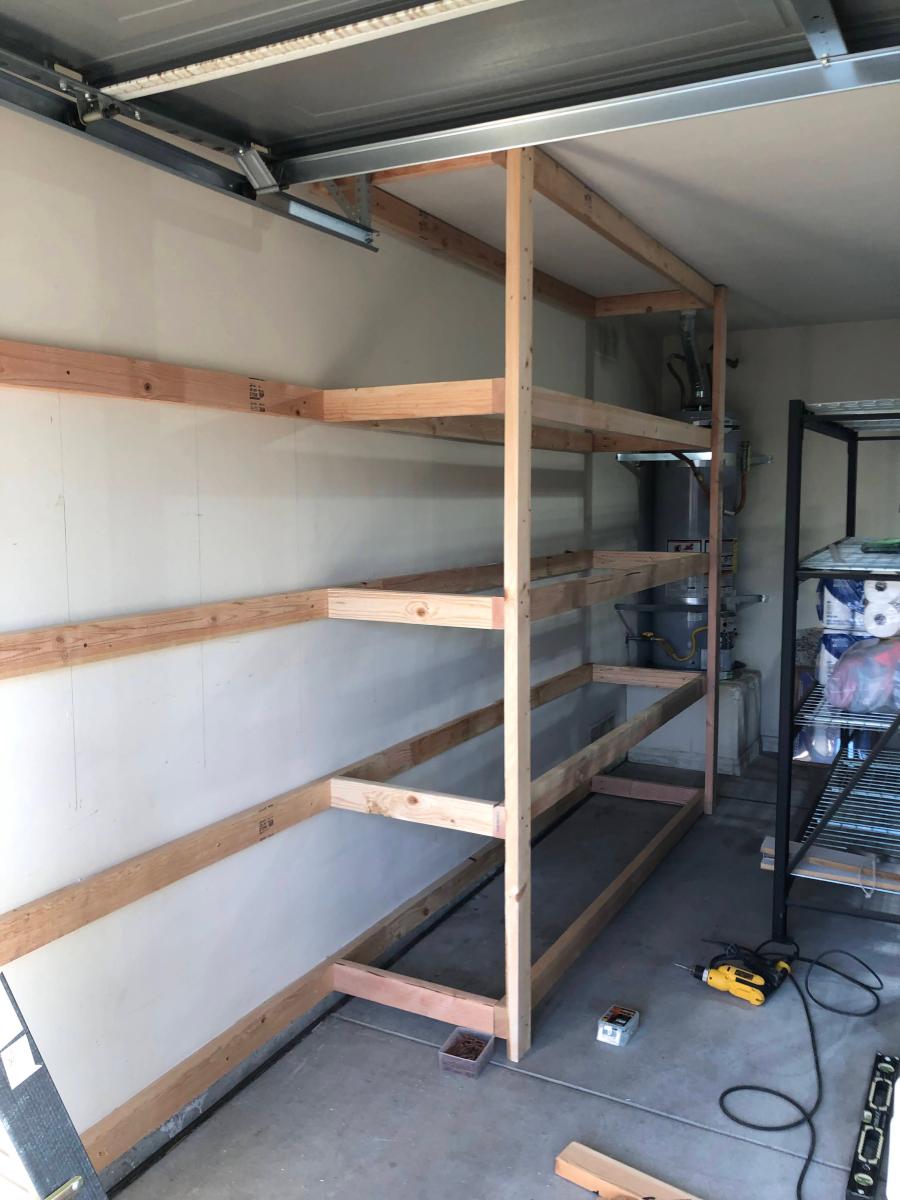
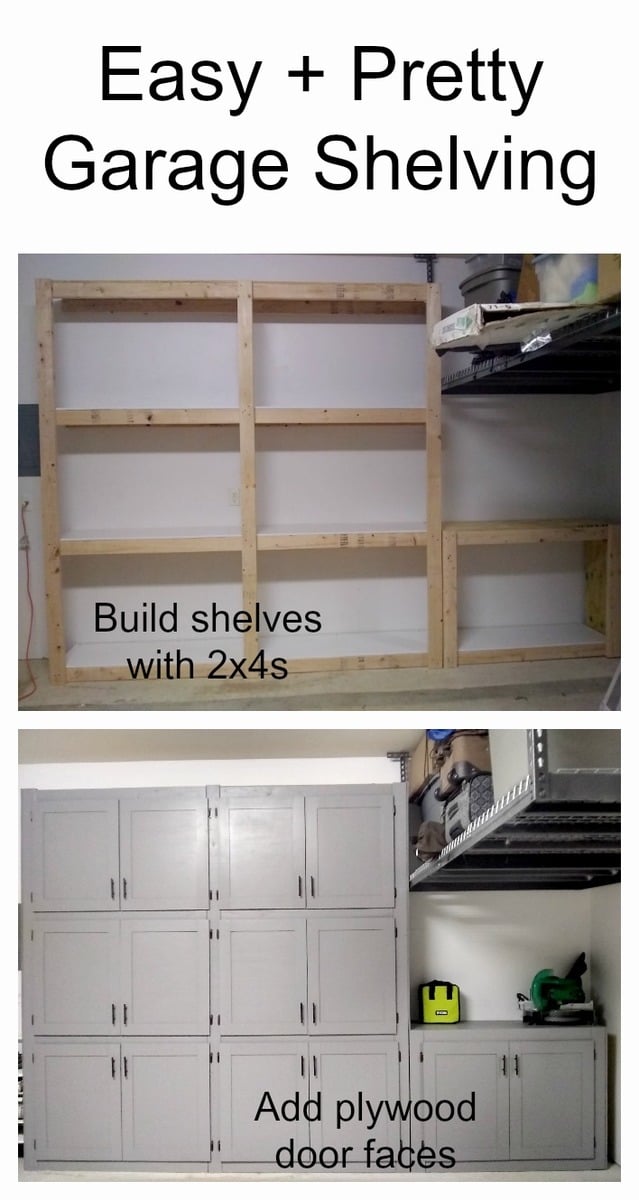
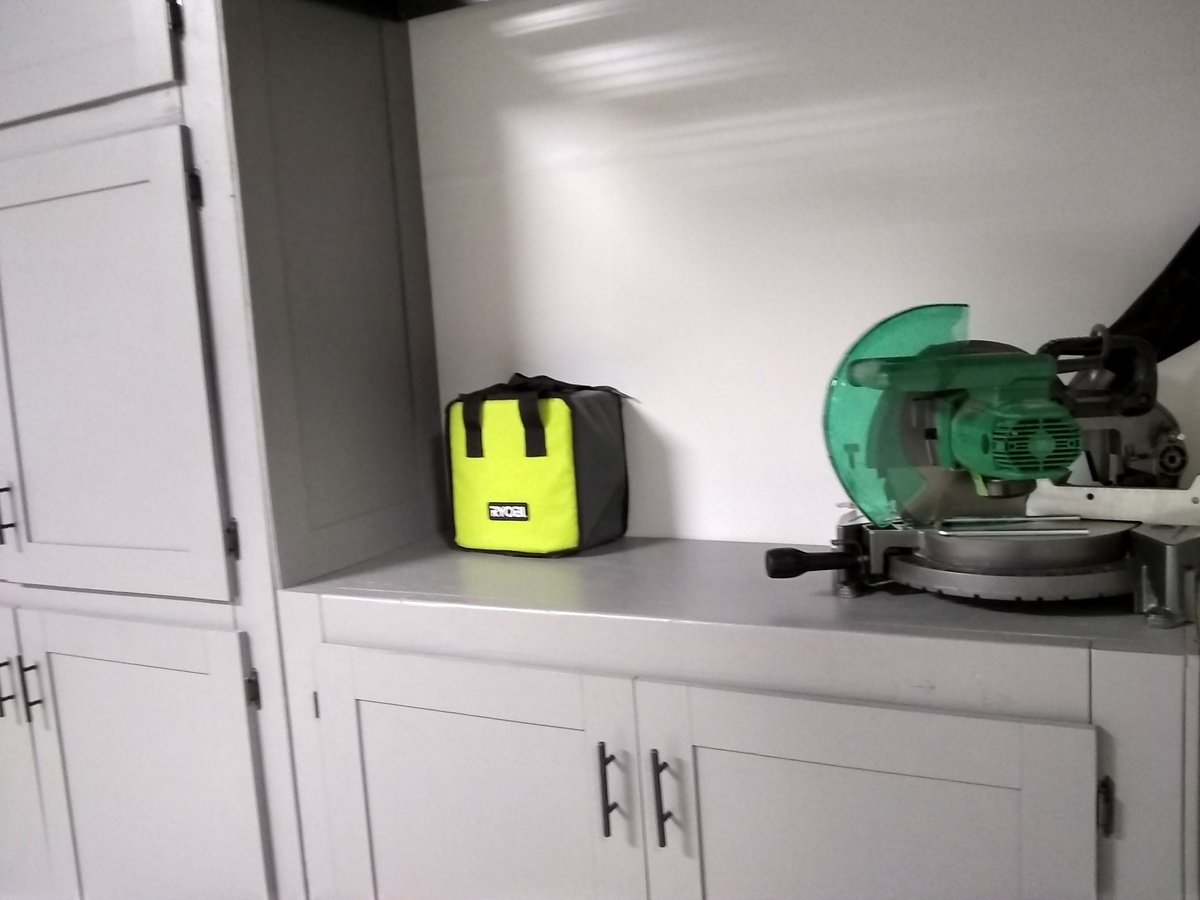
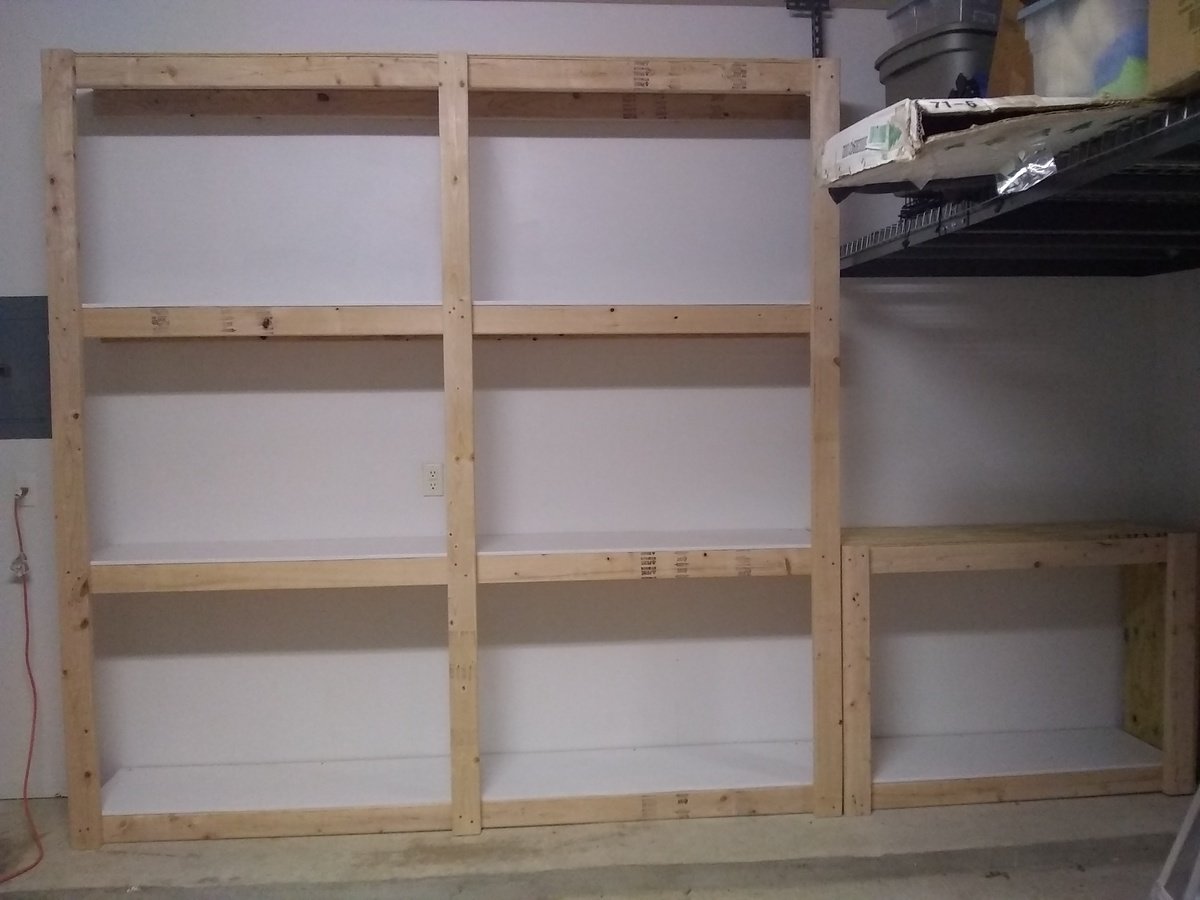
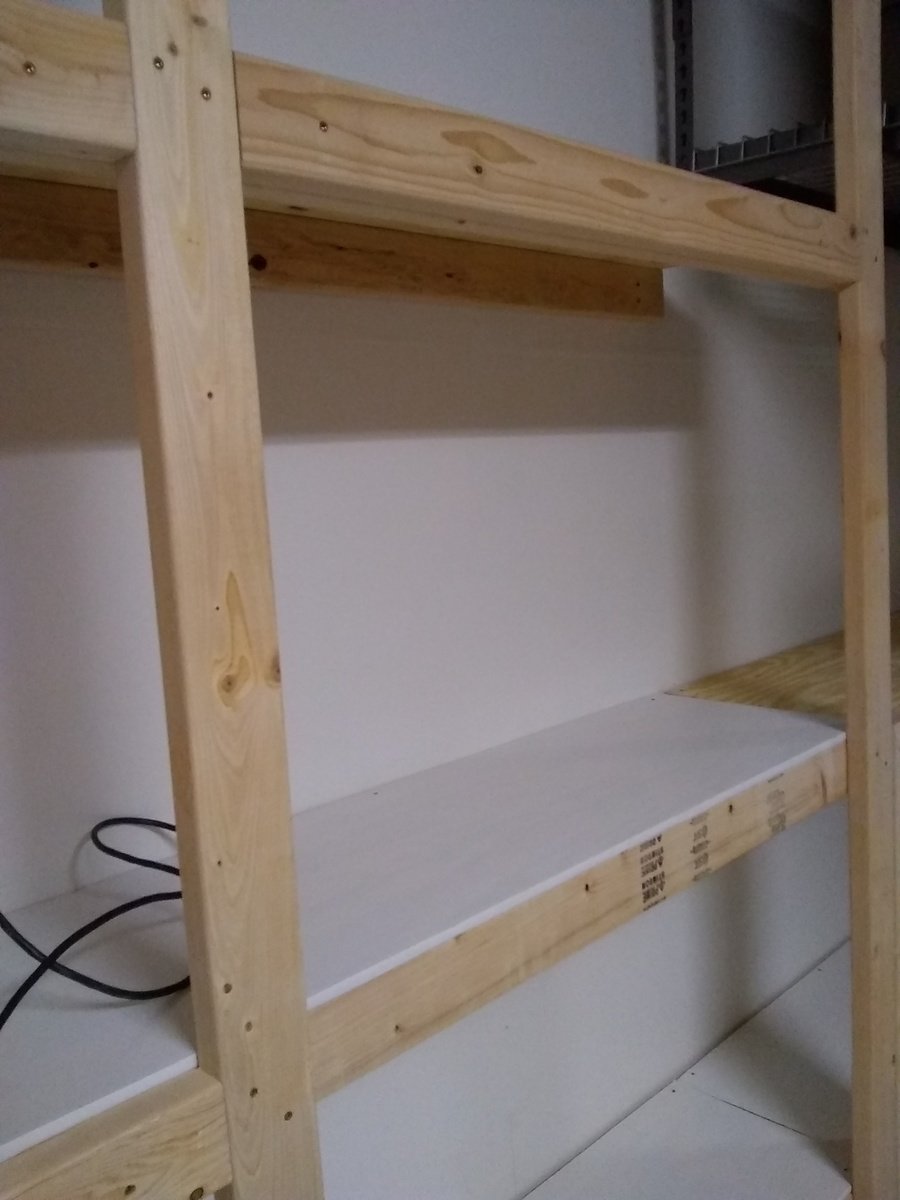
Garage shelves with doors
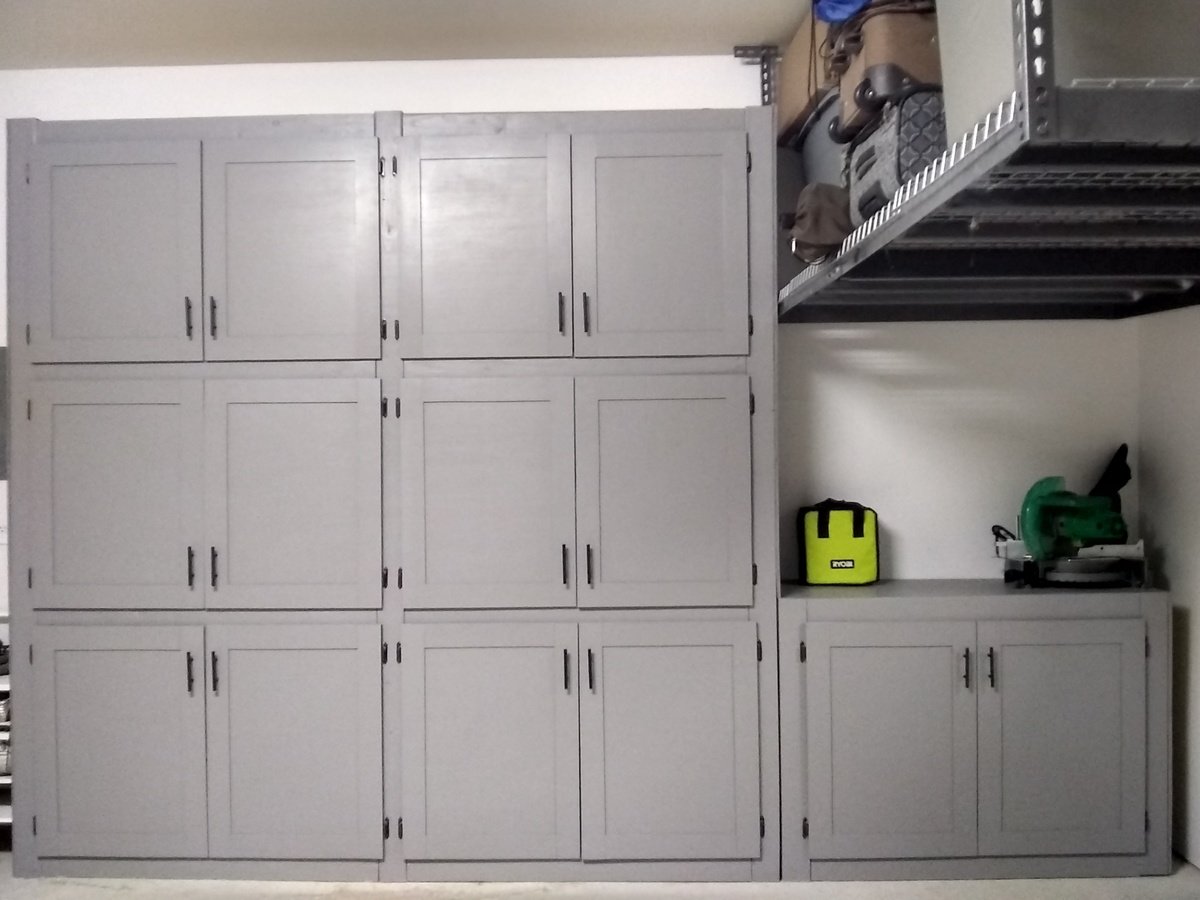
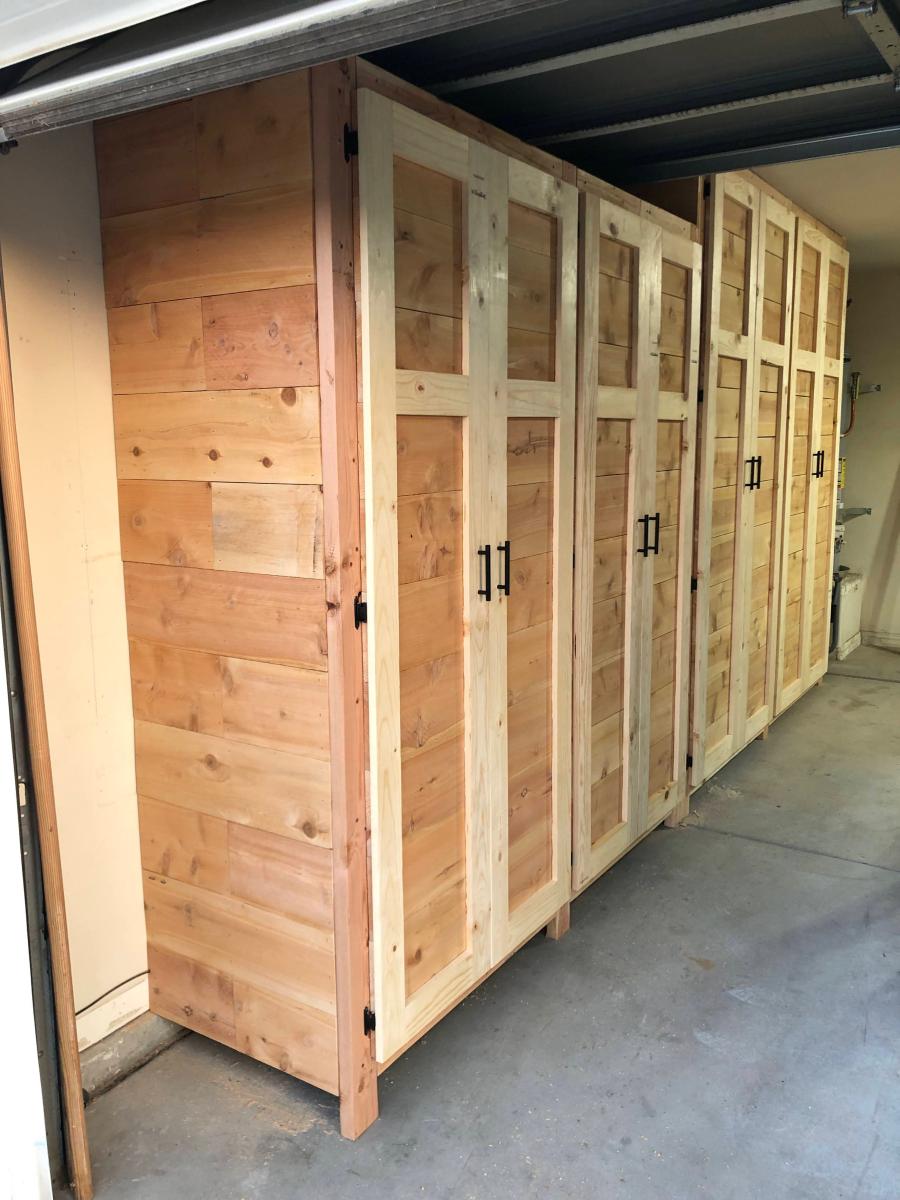
I have been wanting garage cabinets for a long time but couldn't afford them. When I saw these shelves I knew it would be easy to add side panels and create doors for the sections. The size is 8'x8' with the 4'x3' under the ceiling rack. I put a 2"x4" in the middle to divide each section, measured and cut doors from 5mm lauran plywood. I also cut the stiles and rails from the same material to give it interest but mainly to make it thicker to avoid warping as much as possible. I added 2"x4" to create a facing for the doors to rest on. Also used overlay hinges to simplify the hanging as much as possible. I was able to follow the design plan and the only thing I did was add a shelf at the bottom. The cleats were definitely not necessary, it's very sturdy.
Making the doors
The first thing is to learn how to measure for cabinet doors. There are plenty of sites and YouTube videos showing how to correctly measure. If you are doing the same type of doors like I have, with no middle divider, then be sure to pay attention how to correctly measure for those instead of a single door.
The easiest way to make the doors will be getting 1/2 in sanded plywood and use a table saw to cut each door to size. Skip the shaker style trim and put the hardware on and be done. Make sure the hinges will be able to hold the weight of the door.
Unfortunately, I didn't have a table saw but I did have a router and a jig saw, and found a great video on YouTube on how to use a router to cut straight edges without a table saw. I measured out one door and used that outline to cut two identical doors. It turned out that each section was slightly a different width so I had to do two at a time. However, if you have a circular saw you can rig it to make a table saw and make a guide to rip the doors. It all depends on what tools you have available to you.
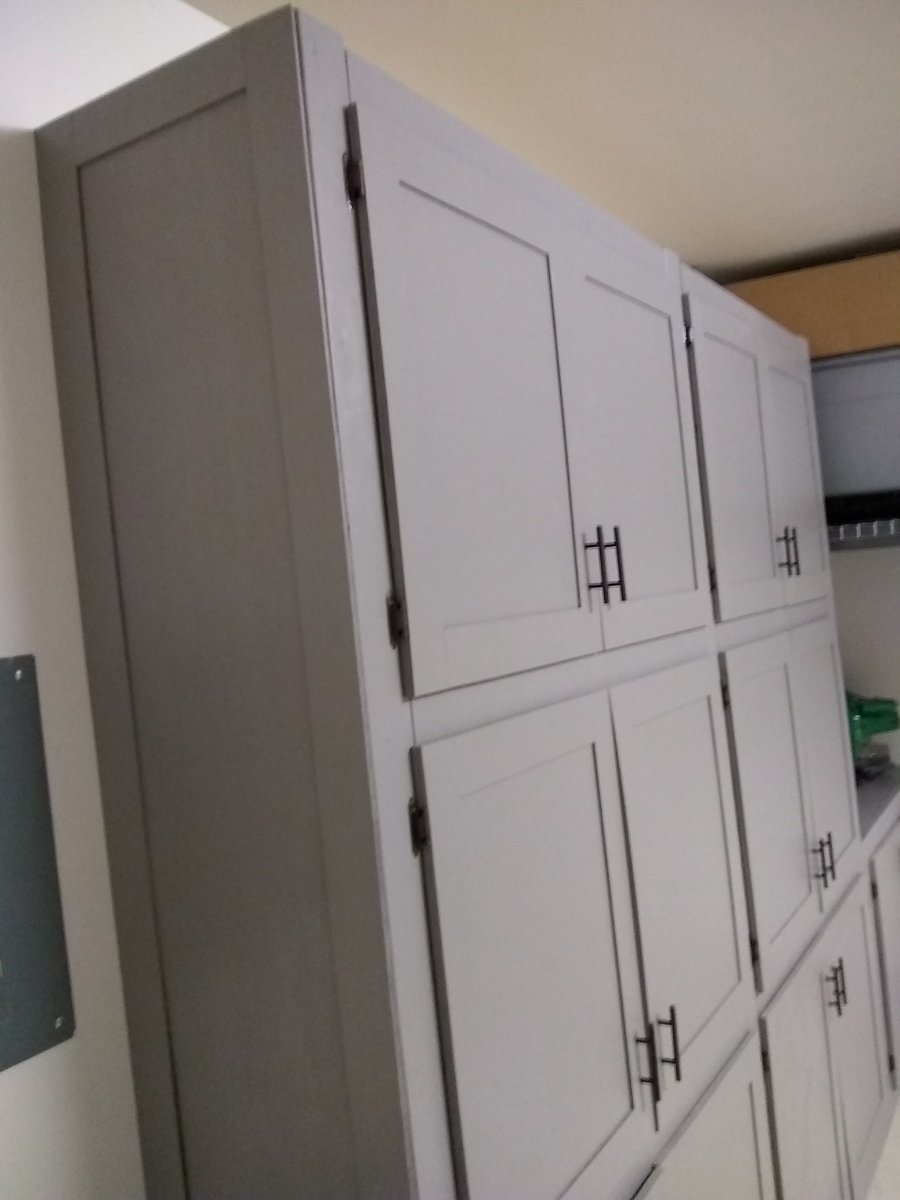
I have a compact plunge saw and was able to cut the 3 inch strips for the shaker style with it. Honestly, that was the most tedious part and most time consuming by far. That also had to do with the fact that because the plywood is only 5mm thick I cut strips for both the front and the back to make it over 1/2 inch thick to help minimize warping and give the hinges something to grab.
I used the miter saw to cut the stiles and rails to size and a 23 gauge nailer with 1/2 nails and glue to get them on the door. I glued and nailed the front and the back of each side at the same time because the nails are a bit longer than two pieces of plywood. I then turned it over and nailed the other side. The great thing about using a 23 gauge is that I didn't have to fill any holes because they are so small you can hardly see them at all.
The last thing is to use your sander to ensure all of the pieces are even. I used a 60 grit and then followed it with a 220 where needed.
If you want to avoid cutting the strips but still want to have the shaker style, Home Depot sells 1/4 thick Polystyrene flat moulding that will add vertially no weight to the door but the cost can easily add up if you have a lot of doors.
Lastly, if you are wondering why I got such thin plywood that ended up creating more work. The reason is because I wanted to save money on hardware and I didn't trust the inexpensive hinges I got off eBay would hold a heavy door for many years.
Built from Plan(s)
Estimated Cost
About $300 not including some tools I needed to buy anyway.
Estimated Time Investment
Week Long Project (20 Hours or More)
Finish Used
Interior satin
Recommended Skill Level
Beginner
Comments
Wed, 06/19/2019 - 13:20
What kind of paint did you…
What kind of paint did you use? Looks really nice, the whole thing!

Thu, 07/18/2019 - 10:28
This is amazing! Thank you…
This is amazing! Thank you for sharing so much detail on your project too.
Wed, 06/10/2020 - 13:14
measurements
Can we get detailed plan of how you made this from the start to end like a material list and cut list.
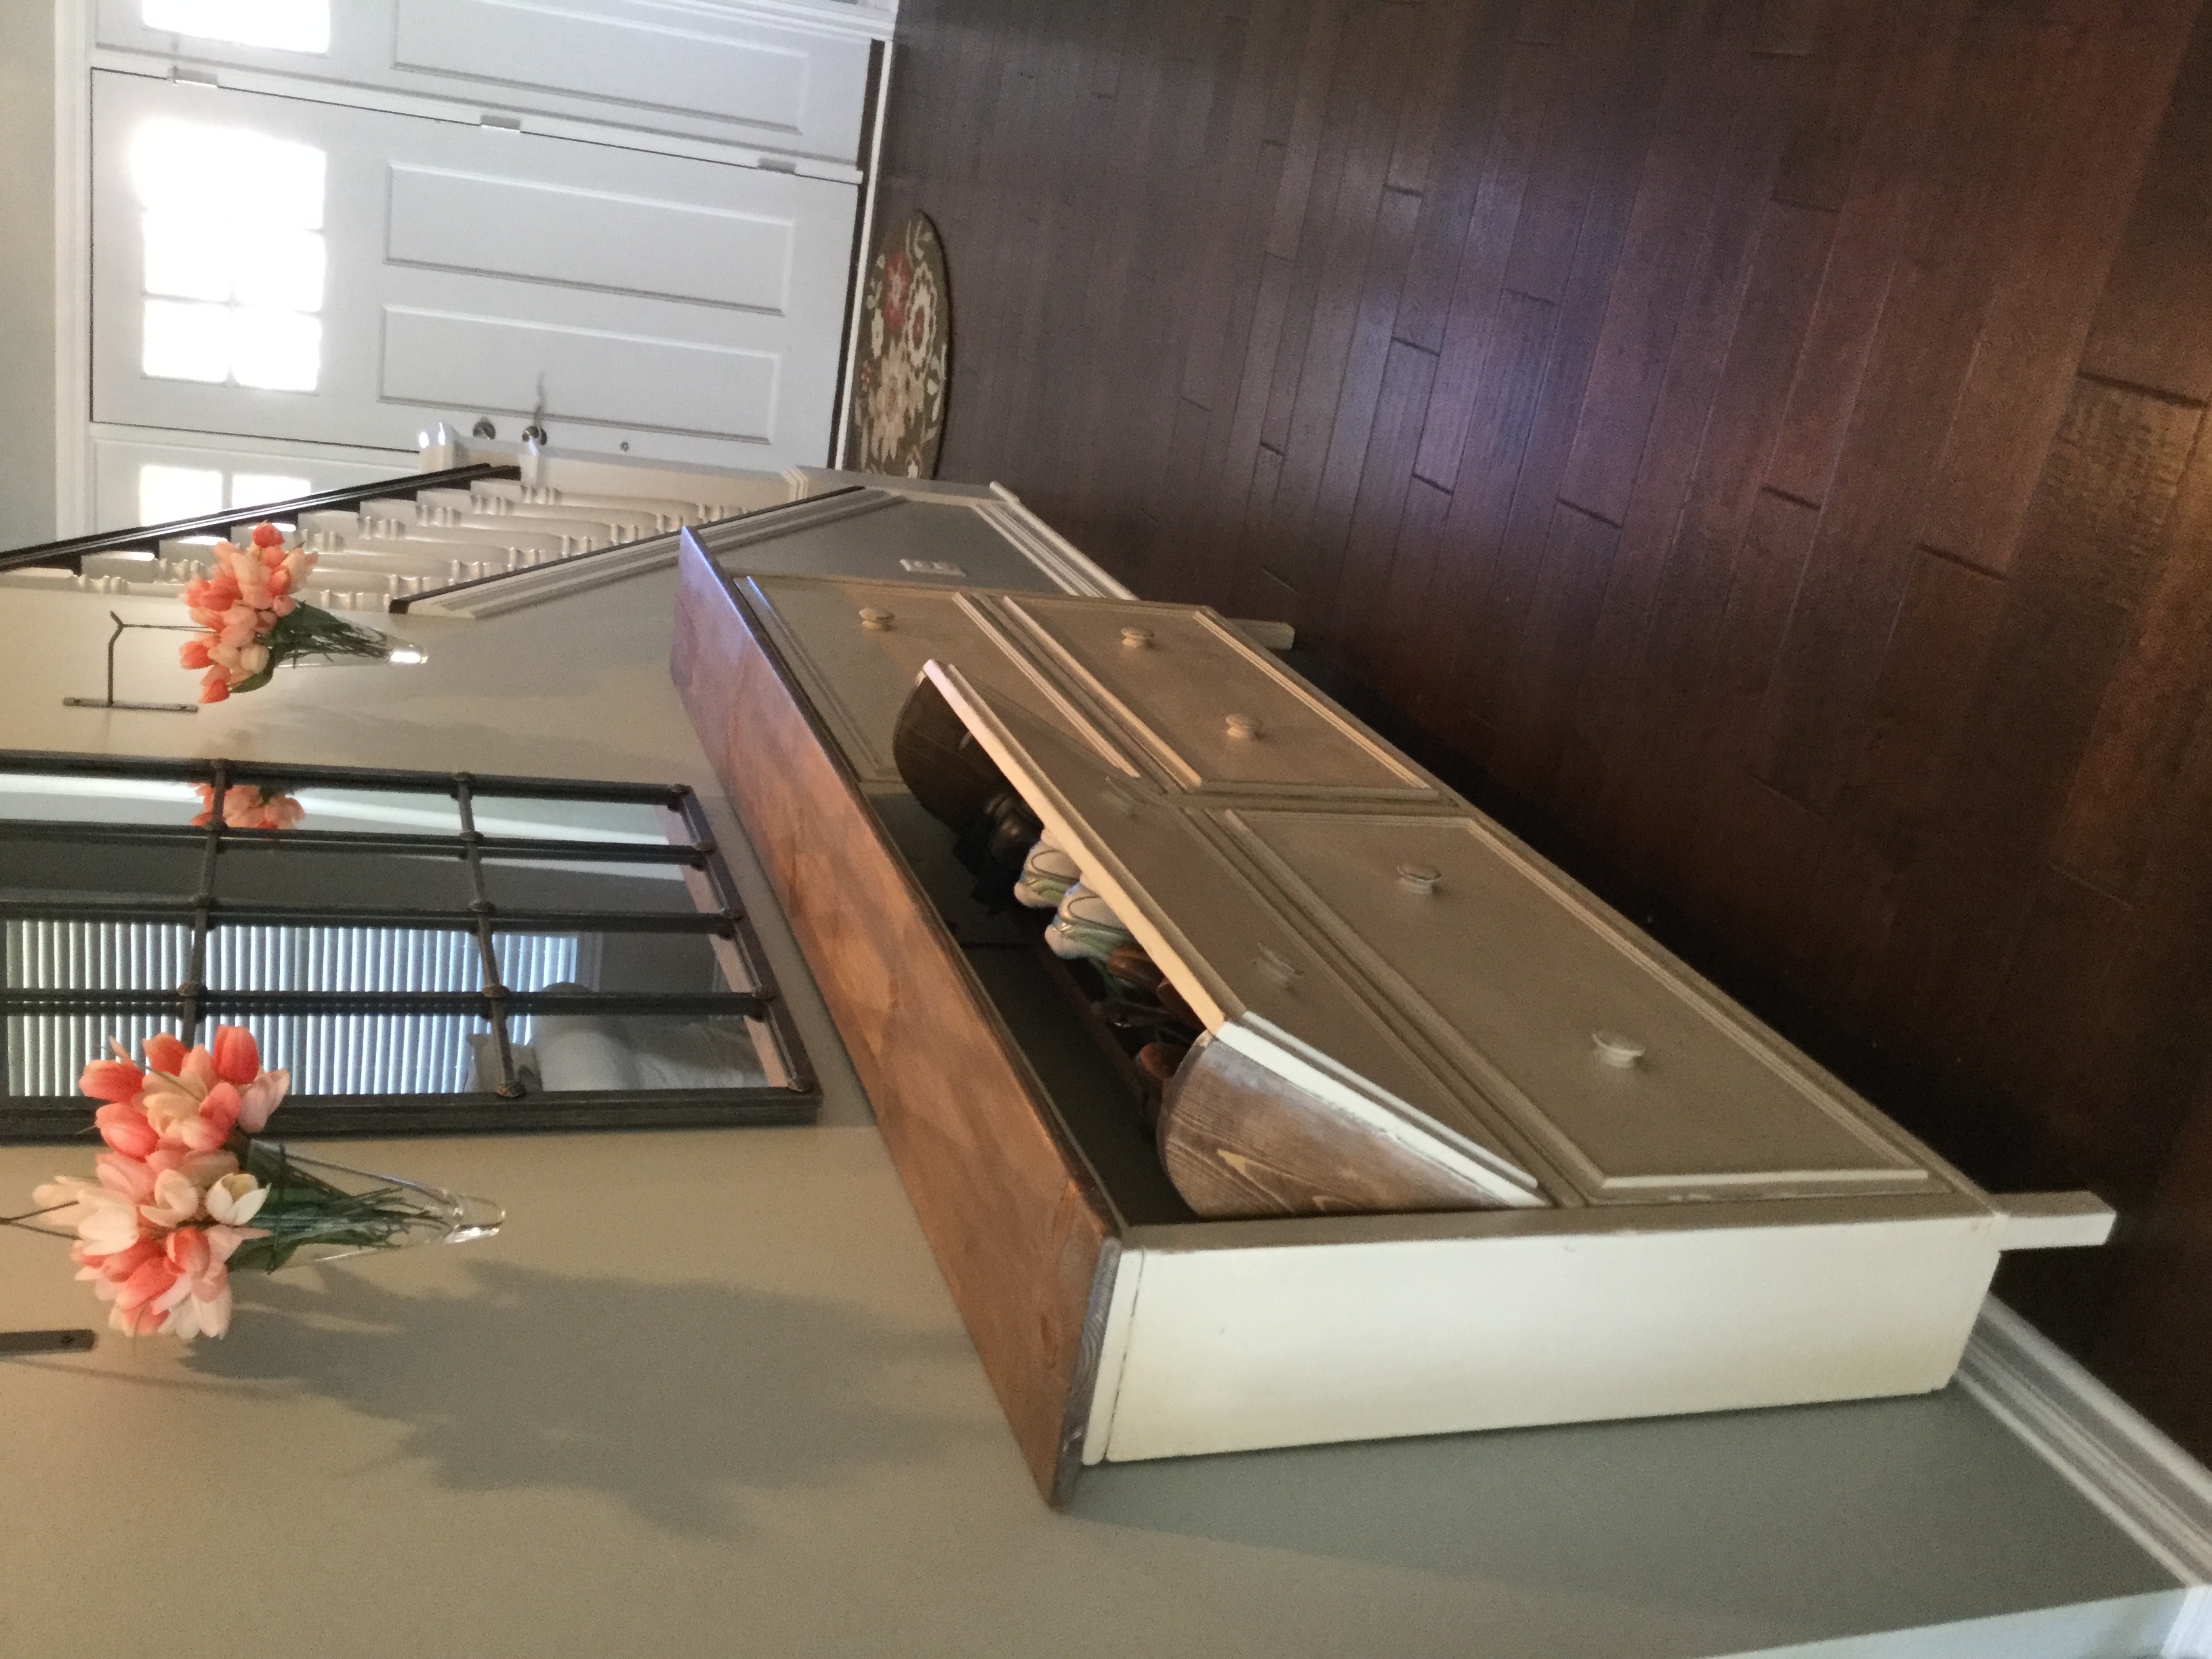
Shoe Dresser
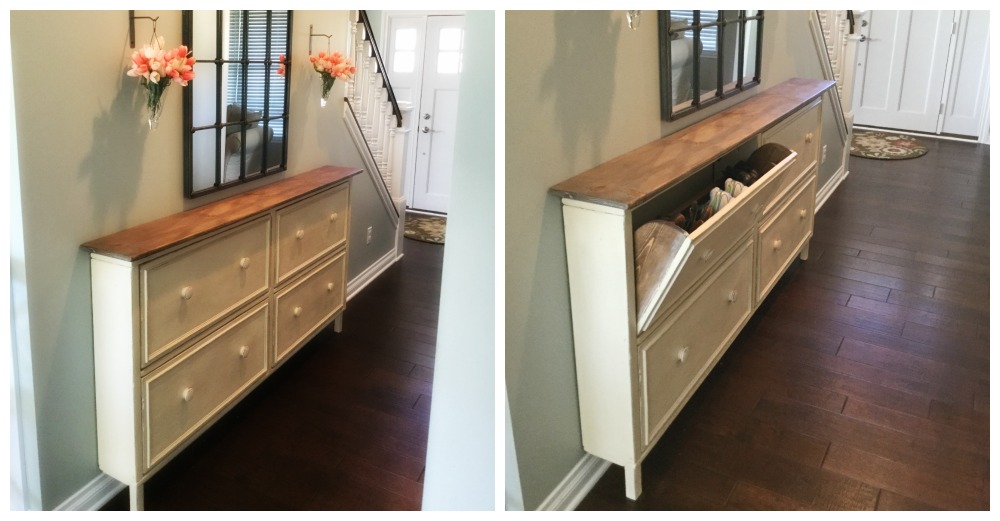
We used the shoe dresser instructions with some modifications to make it longer
Built from Plan(s)
Finish Used
Stain, polyerthane, chalk paint and wax
Recommended Skill Level
Advanced
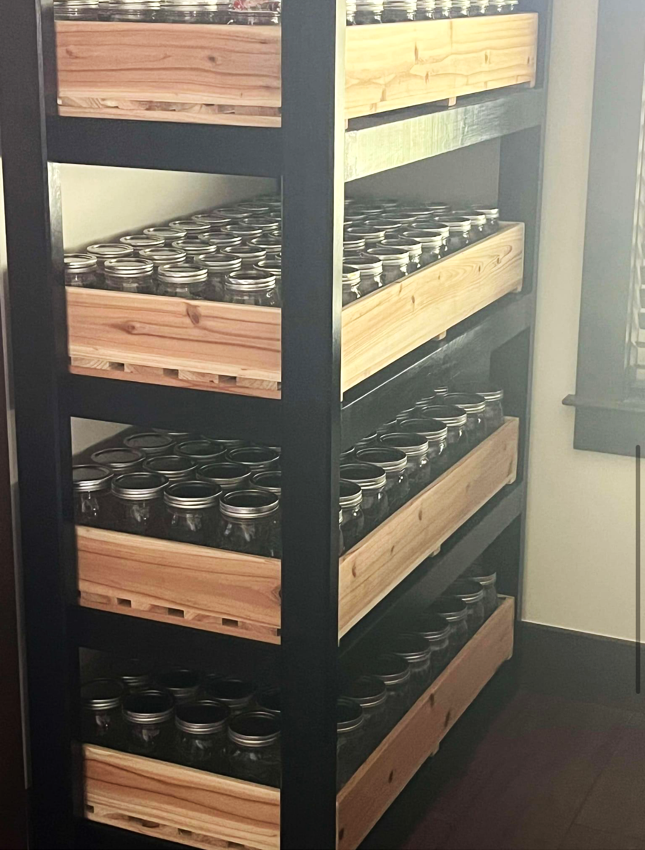
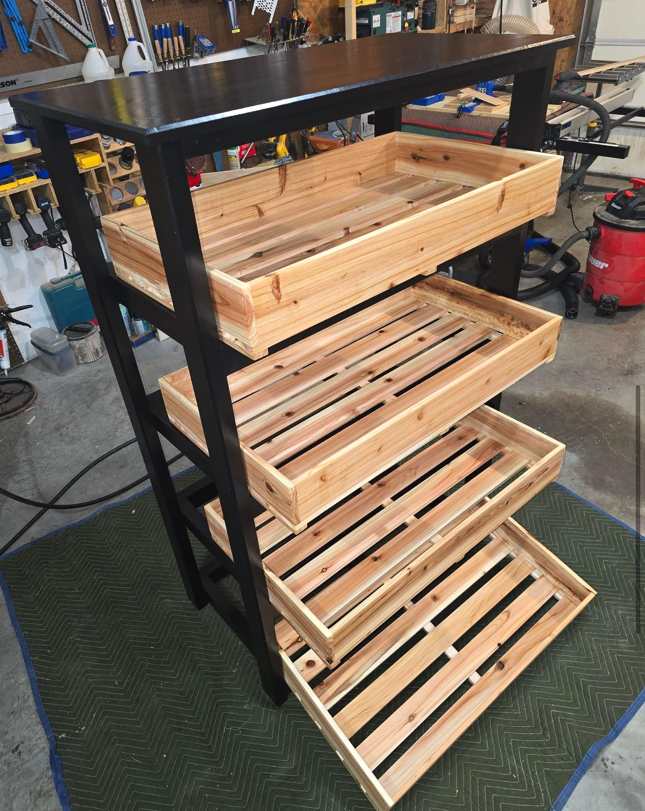
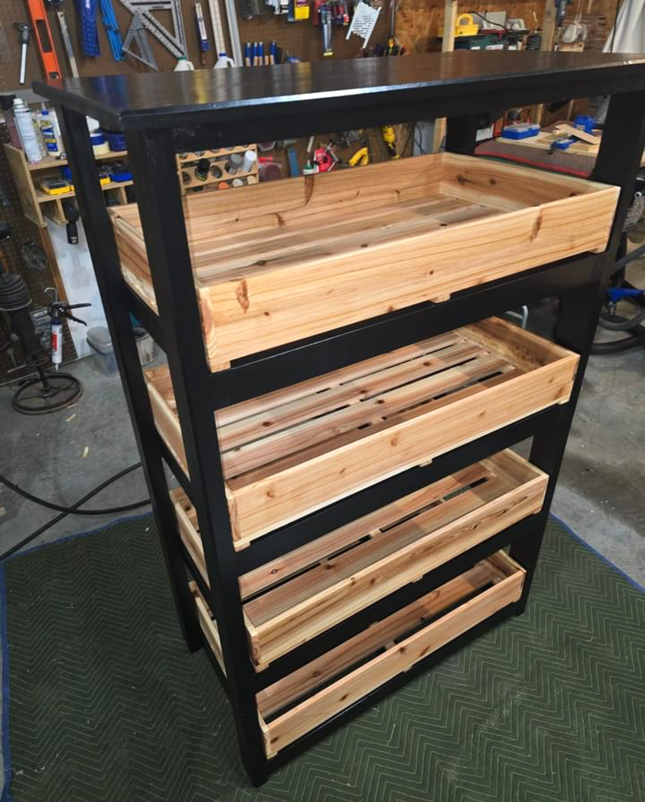
IKEA Hack 6" Tray Cabinet
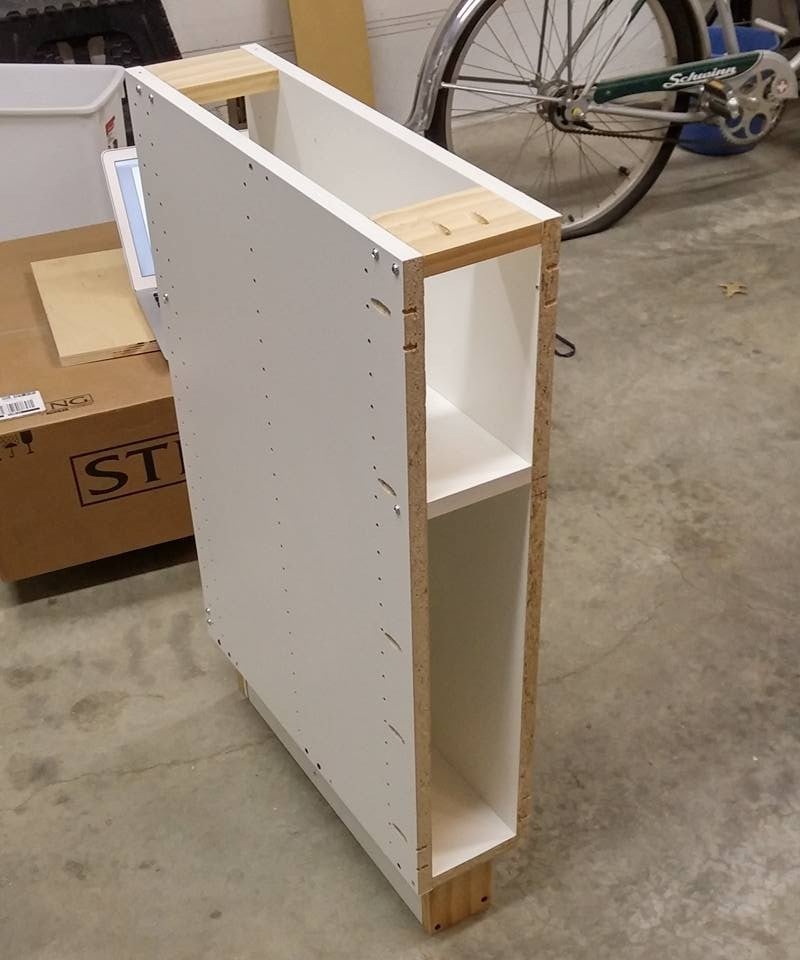
I'm happy to share with everyone my IKEA hack 6" tray cabinet.
I found a 24" cabinet box in IKEA's As-Is section and took it home for half price ($23)! I would have preferred plywood, but my table saw is a little small and cutting large sheets of plywood is a little scary. When I deconstructed the cabinet, it sustained some damage (as its particleboard), so if you try this at home, be careful! I ended up changing the depth to 22" in order to cut off the damaged piece, but that shouldnt be noticeable with average trays and cutting boards.
I used Ana's 6" tray cabinet plan and modified the dimensions a little for my planned space. It still needs the back, face frame and door (which will be a replacement drawer front from the cabinet manufacturer). I plan on building the face frame at the time the cabinets are installed, since this will go in between the 36" corner easy-reach and the 36" sink base. Once its done, I'll post updated pics!
Built from Plan(s)
Estimated Cost
$30 (cabinet and an aluminum straight edge tool to help me cut straight lines with my Dremel).
Estimated Time Investment
Afternoon Project (3-6 Hours)
Finish Used
Face frame will be painted to match factory cabinets
Recommended Skill Level
Intermediate
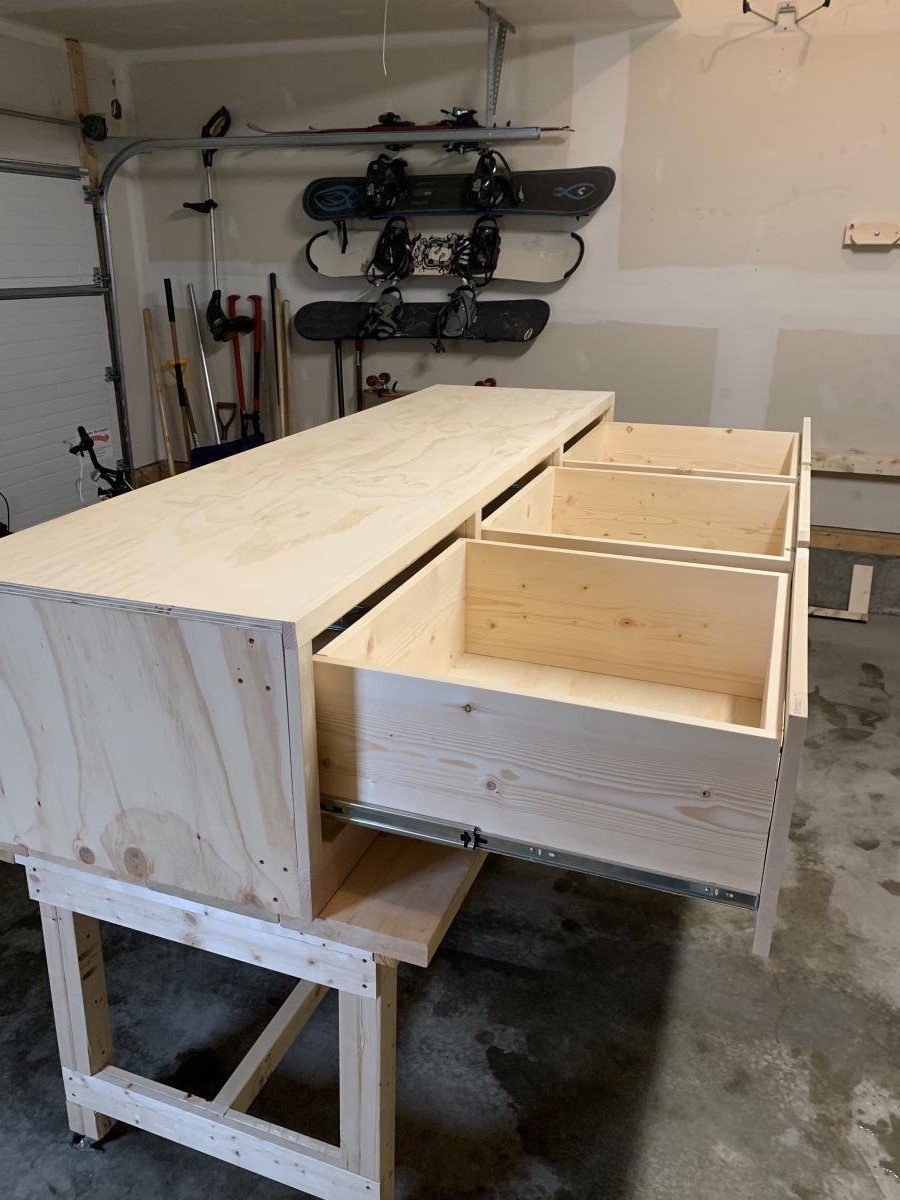
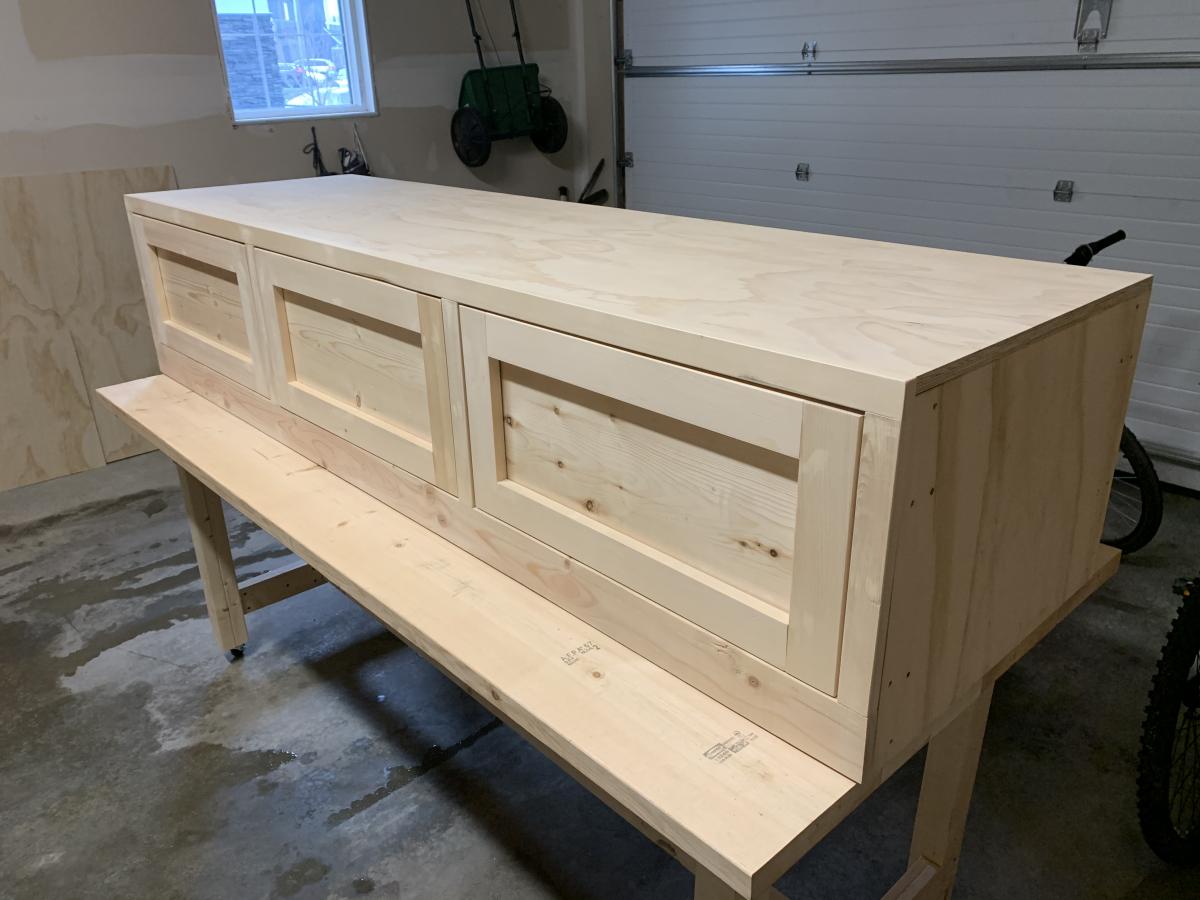
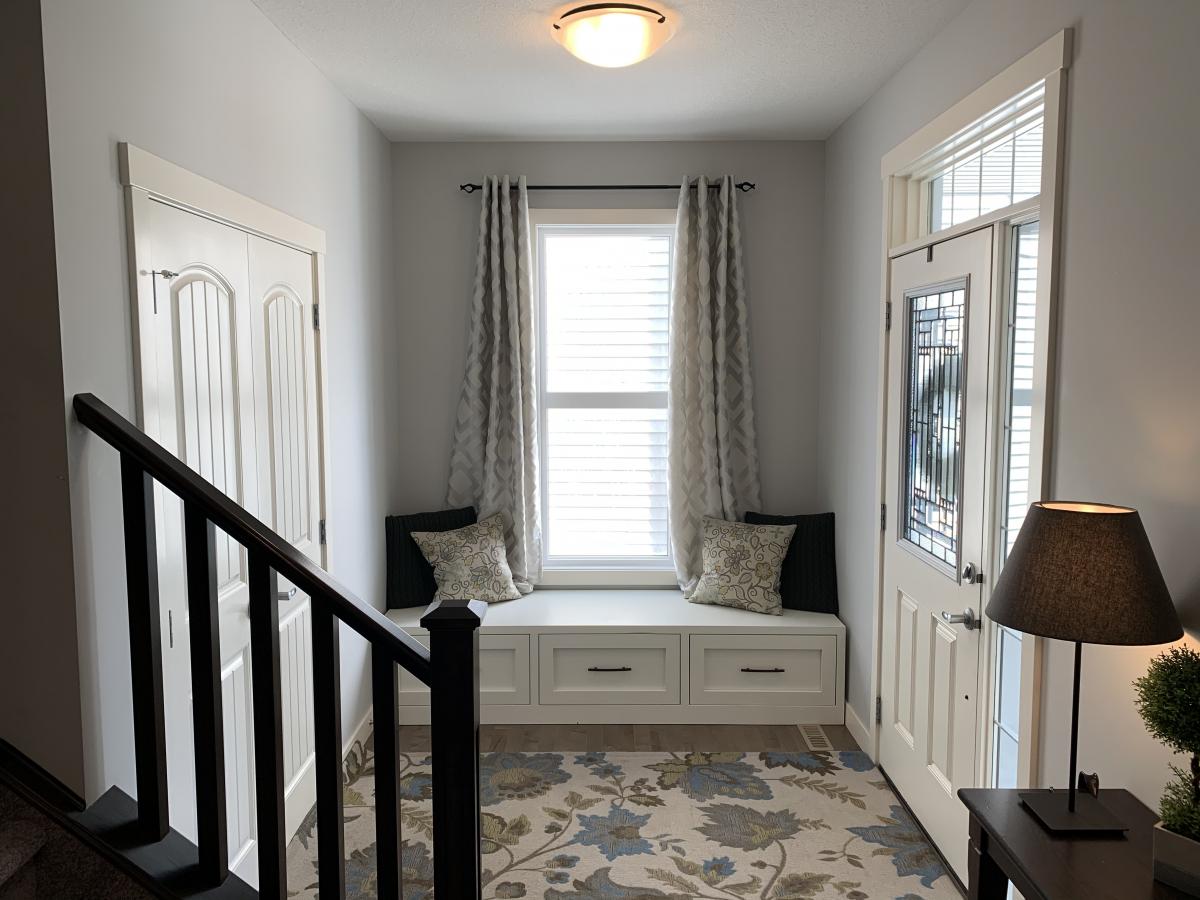
Bench with soft-close drawers for Front Entry
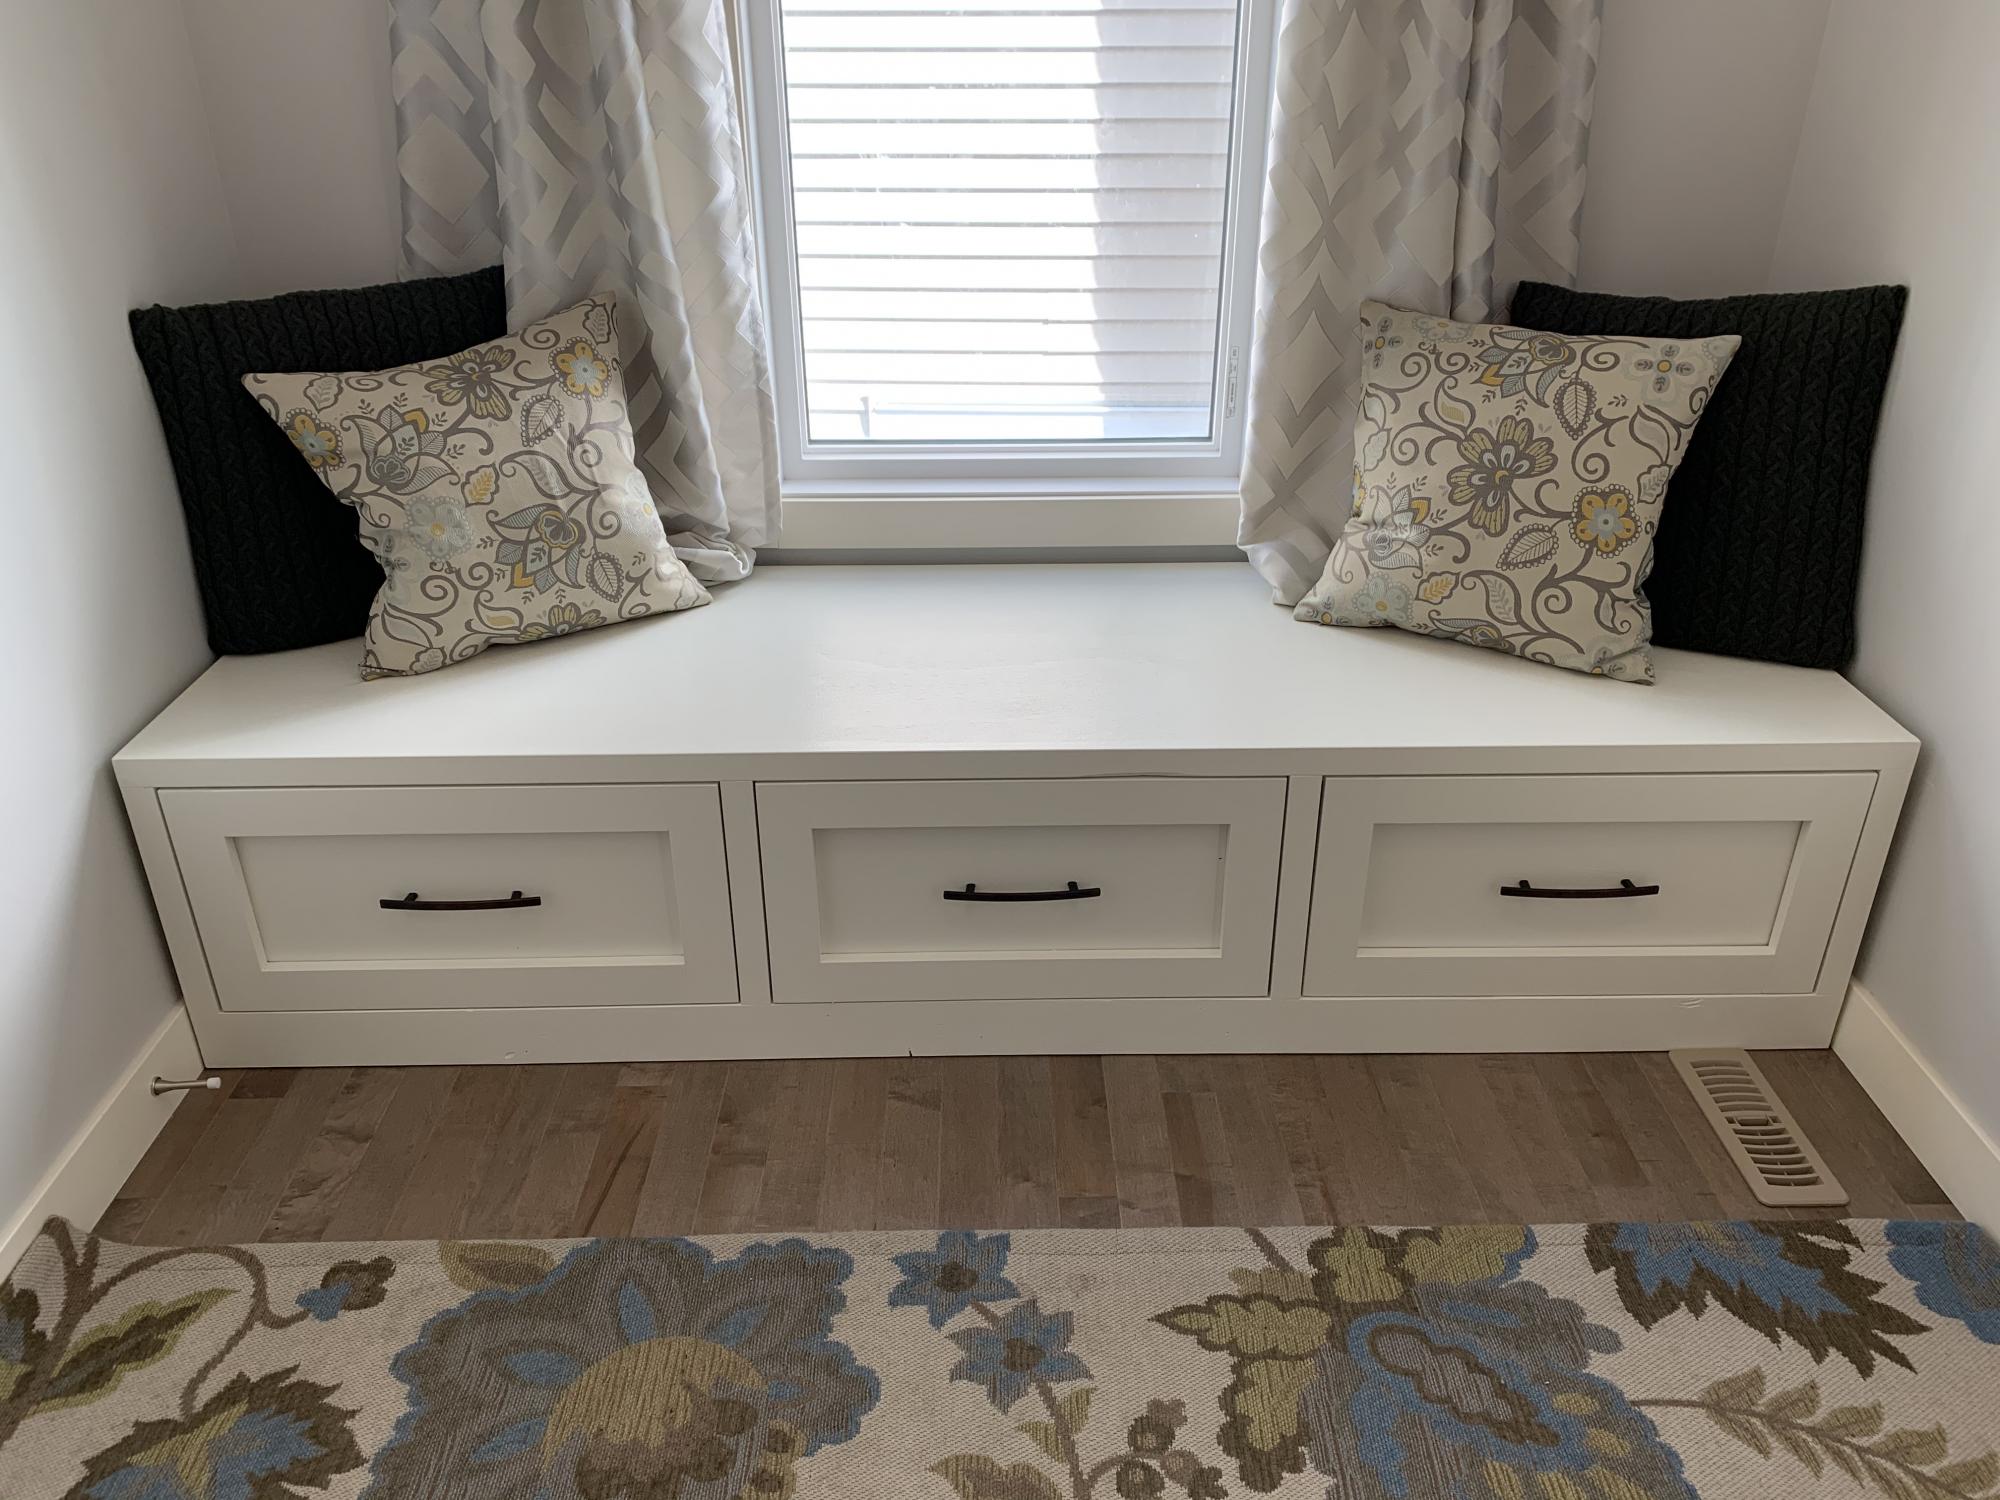
We needed a bench to fill the space in our front entry and provide some storage for seasonal gear. We couldn't find anything to buy that would work for us, so when my wife found these plans, I had to try it! Couldn't be happier with the results. We widened the bench by a foot to 84" to fill the space. Basically, it just made each drawer 4" wider. Everything else was built to plan. The most expensive thing was the soft-close 24" drawer slides (~$100). As soon as you go above that 24" depth, they get pricier! It was also tricky to get the drawers to catch properly on the soft-close mechanisms, but I made sure to take the time to get it right before closing it all in. Now I just open and close the drawers for the pure satisfaction of it! I used premium pine plywood for the top and I find it still doesn't give that smooth finish I like, even after sanding. I think I'll create a new top out of joined knotty pine planks later and just attach it to the top.

Built from Plan(s)
Estimated Cost
$300 CAD
Estimated Time Investment
Week Long Project (20 Hours or More)
Finish Used
Primer and pearl finish paint.
Recommended Skill Level
Intermediate
Smart DIY Garage Storage

I used Ana's plans for her simple freestanding garage shelves as well as the yard tool organizer. I love how neat and tidy everything is!
Built from Plan(s)
Seasonal And Holiday
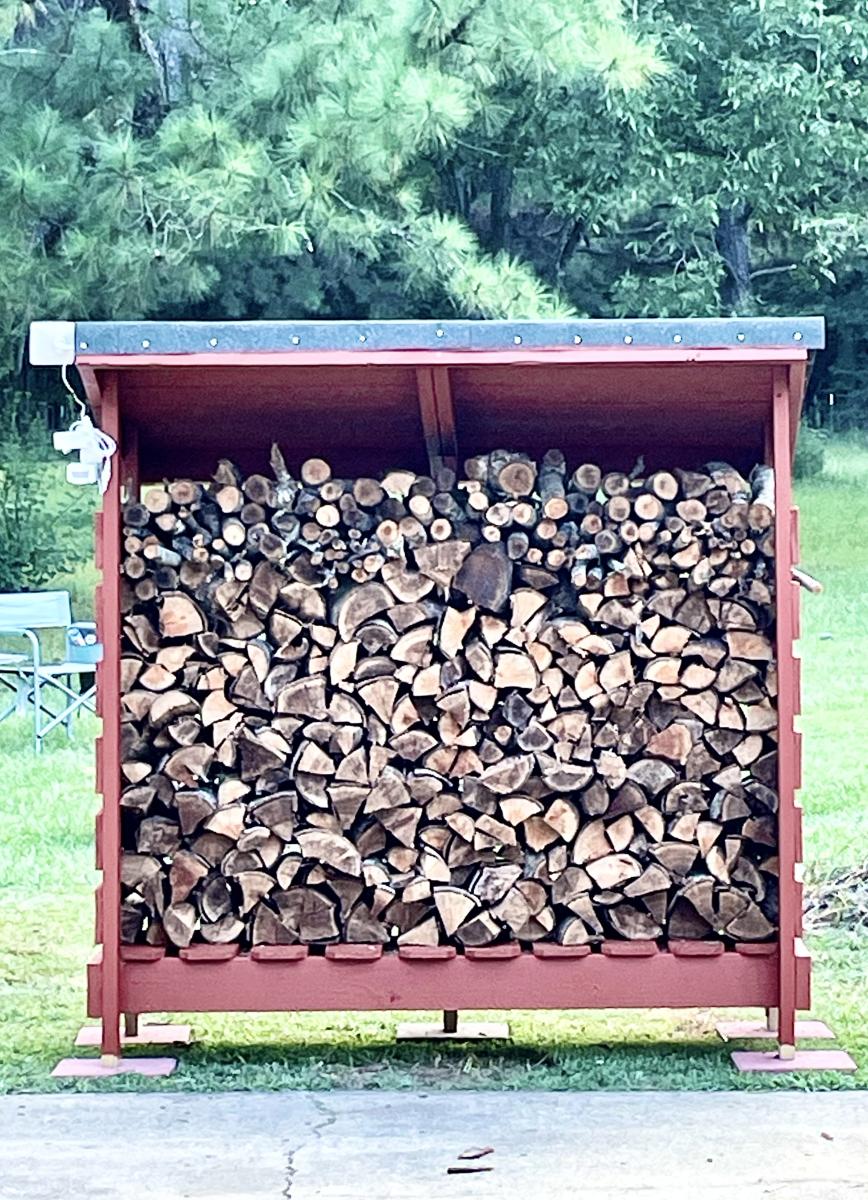
Open Design Wood Shed
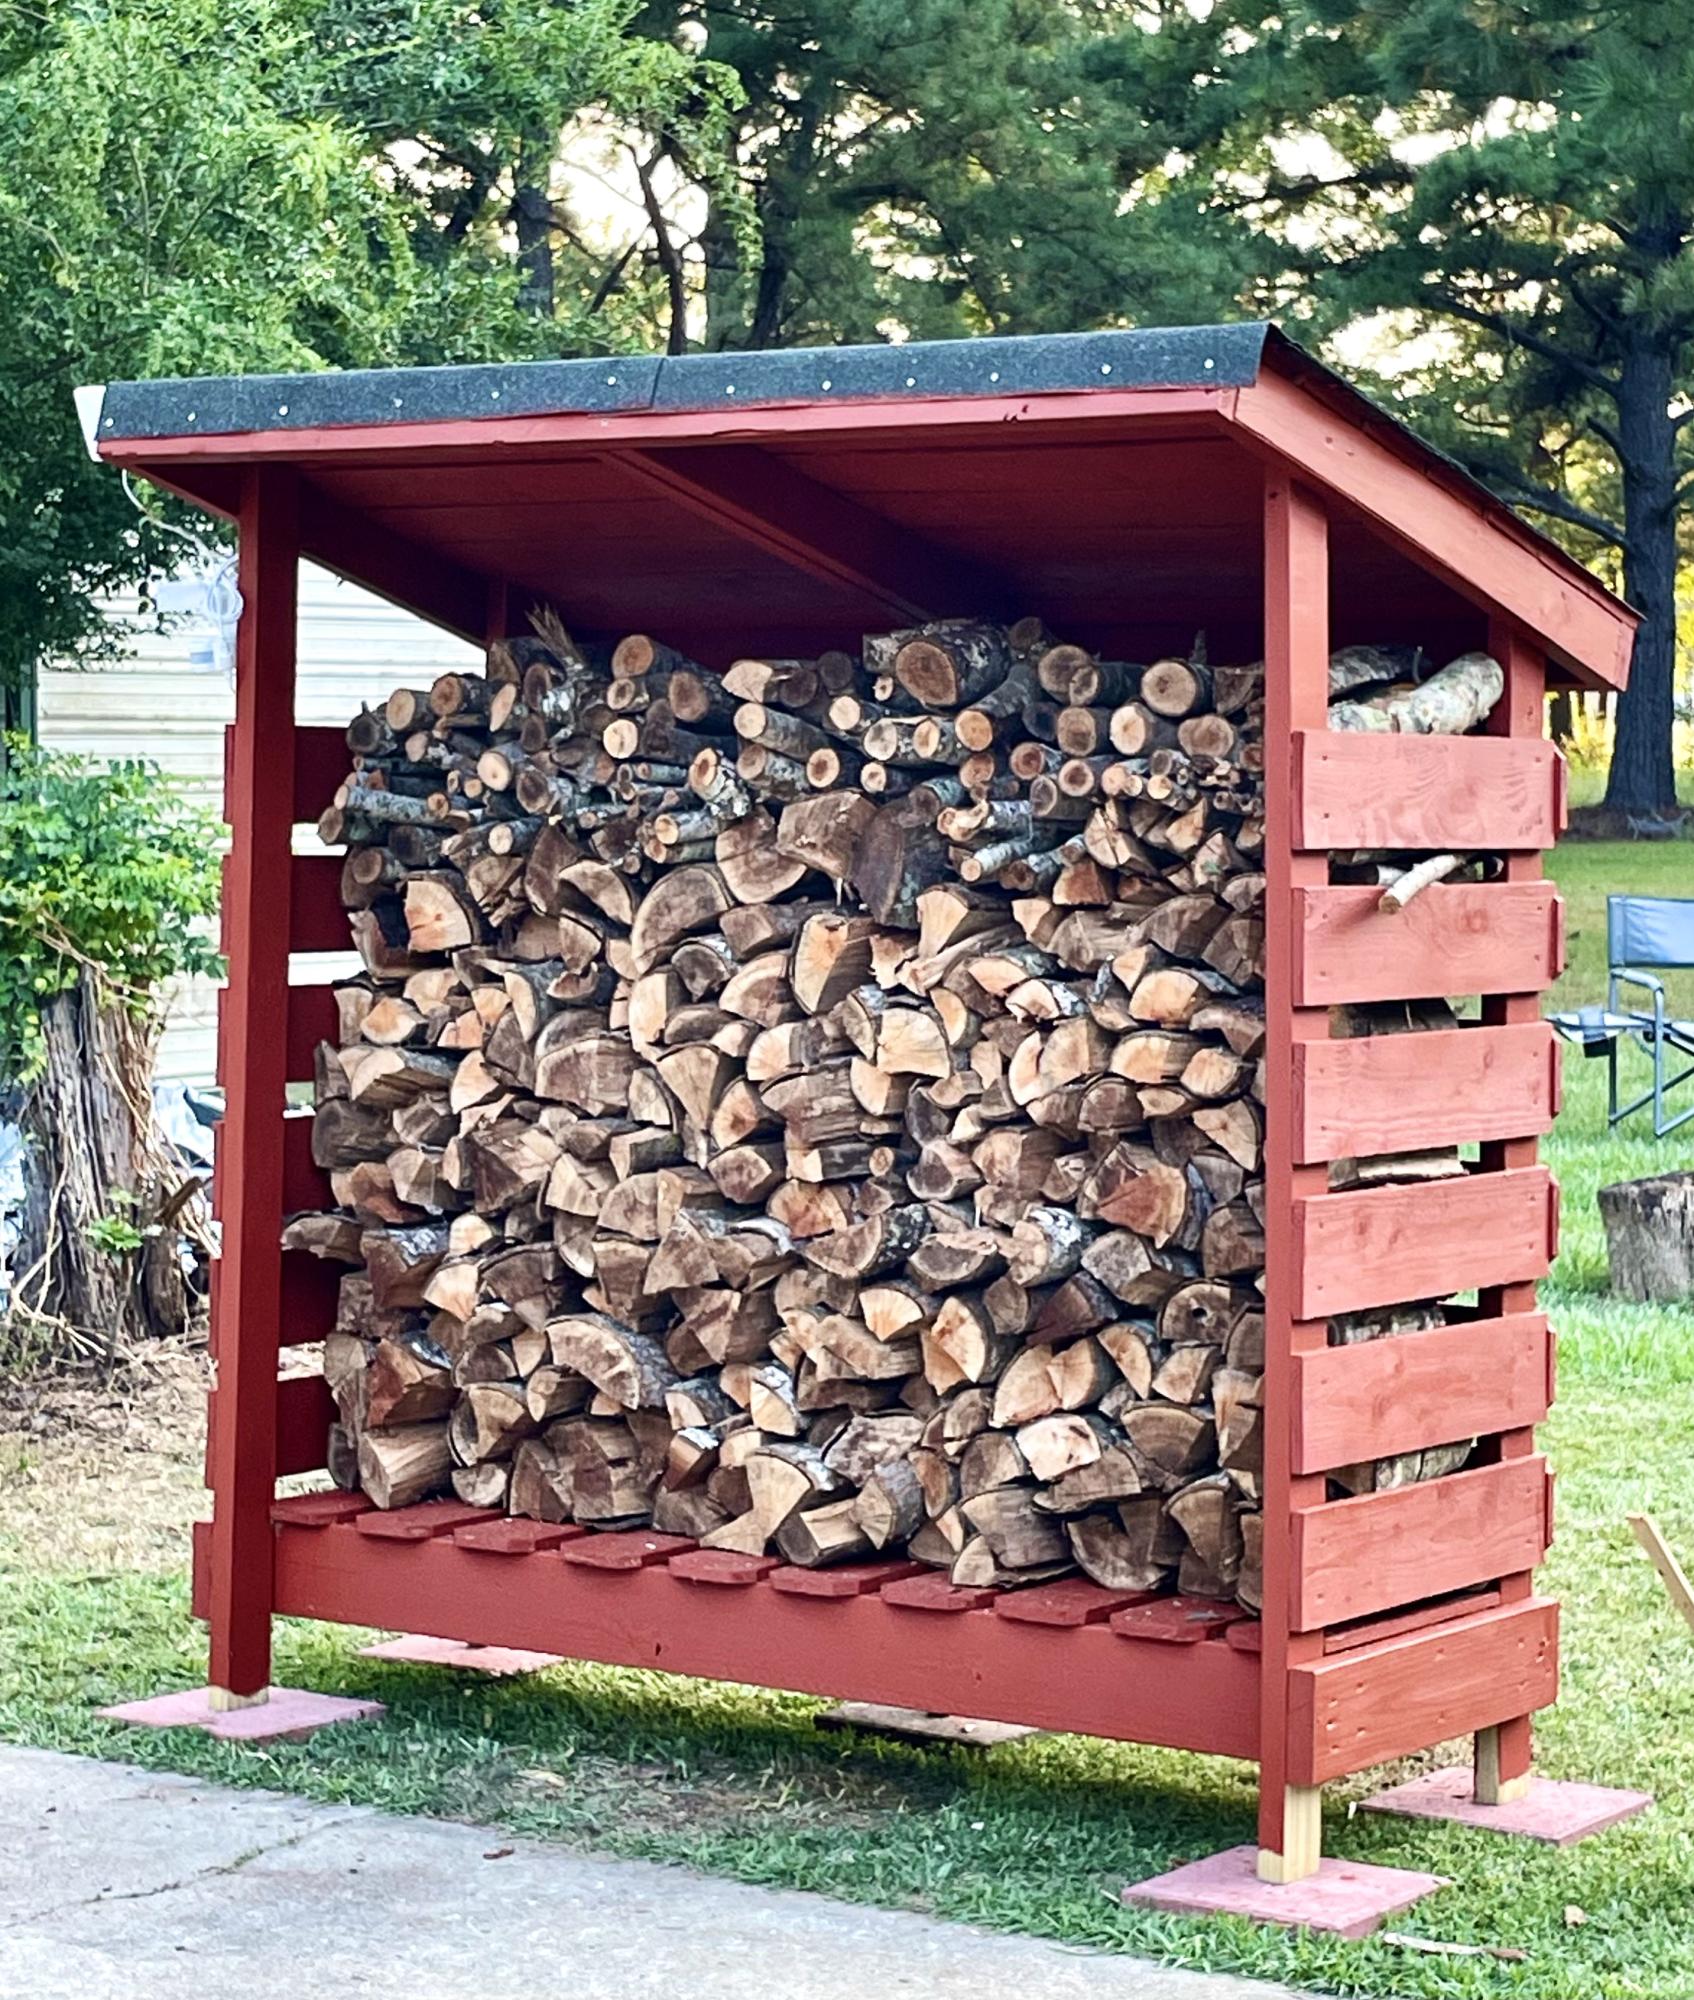
Great design. Weekend project. Thanks Ana for your detailed plans.
Wade

Built from Plan(s)