Community Brag Posts
Chalkboard

Child's chalkboard as a birthday present. "Frozen" inspired color theme. Received feedback that it would also work very well as a boutique store sidewalk sign.
Built from Plan(s)
Estimated Cost
$10-$15
Estimated Time Investment
An Hour or Two (0-2 Hours)
Finish Used
Behr Paint and Primer in turquoise. Acrylic Paint in Purple.
Recommended Skill Level
Starter Project
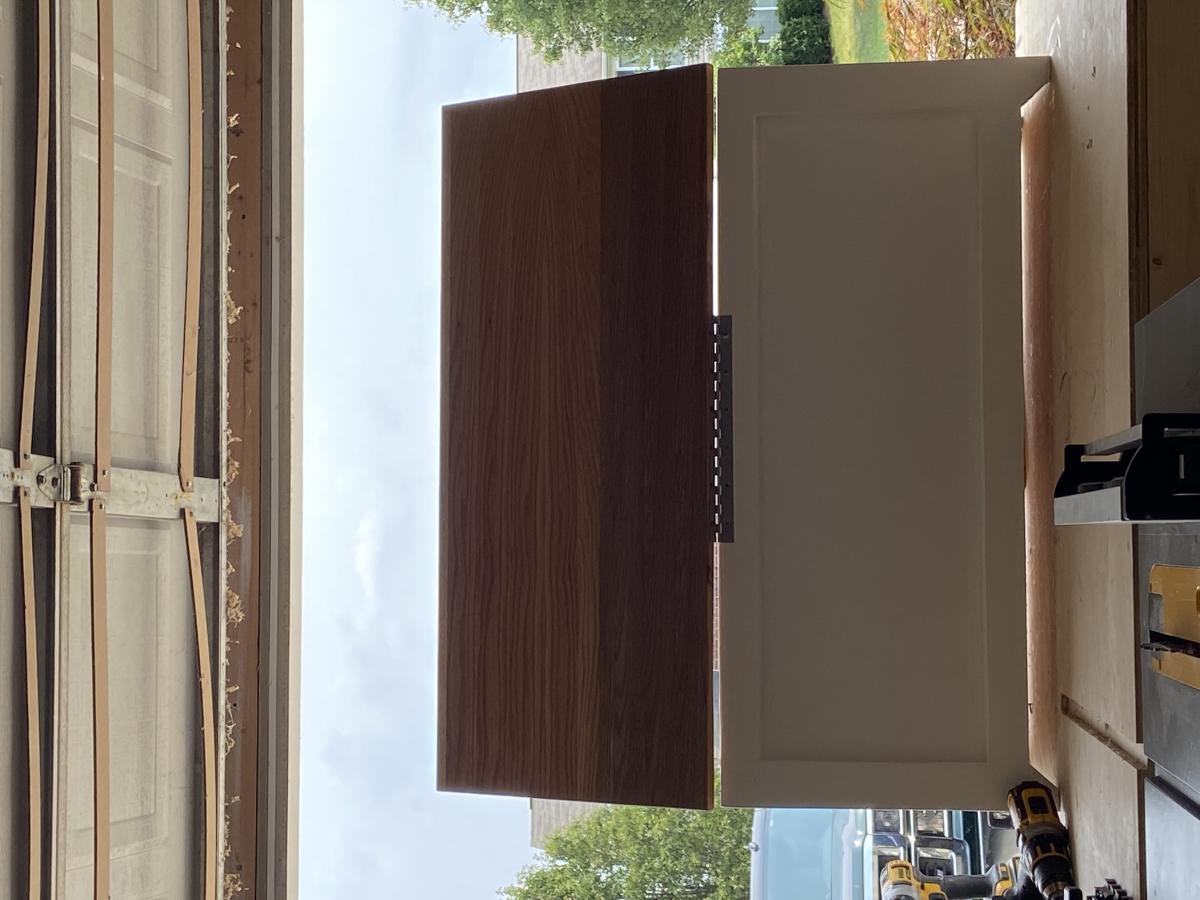
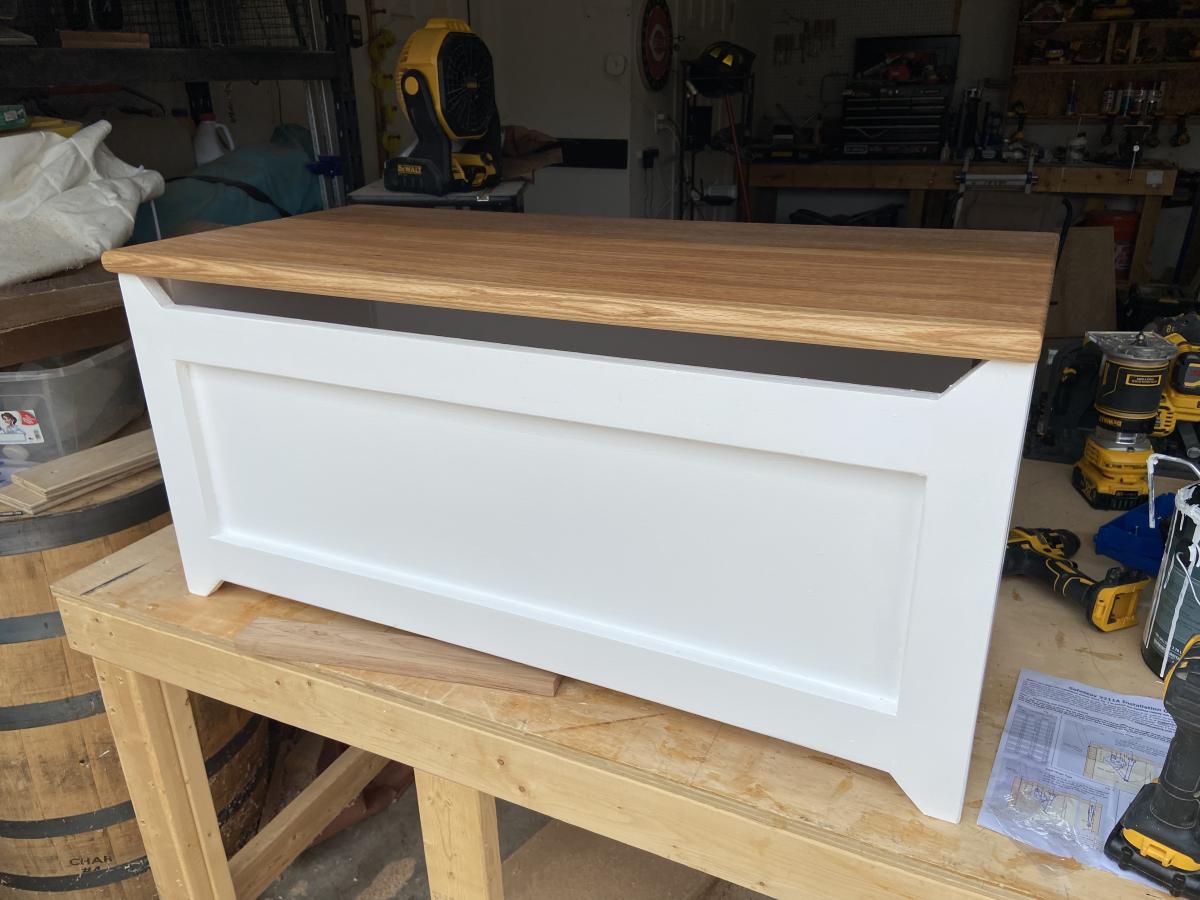
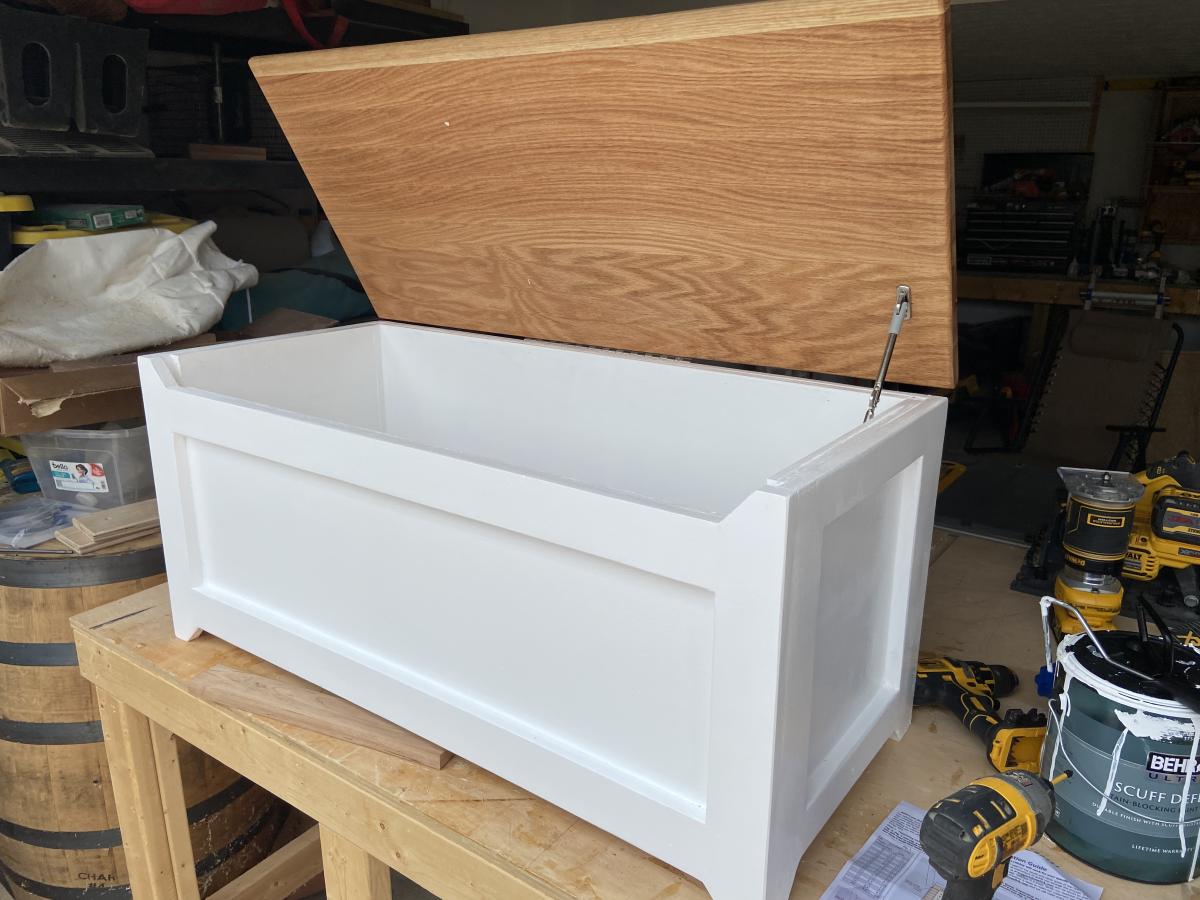
You chest
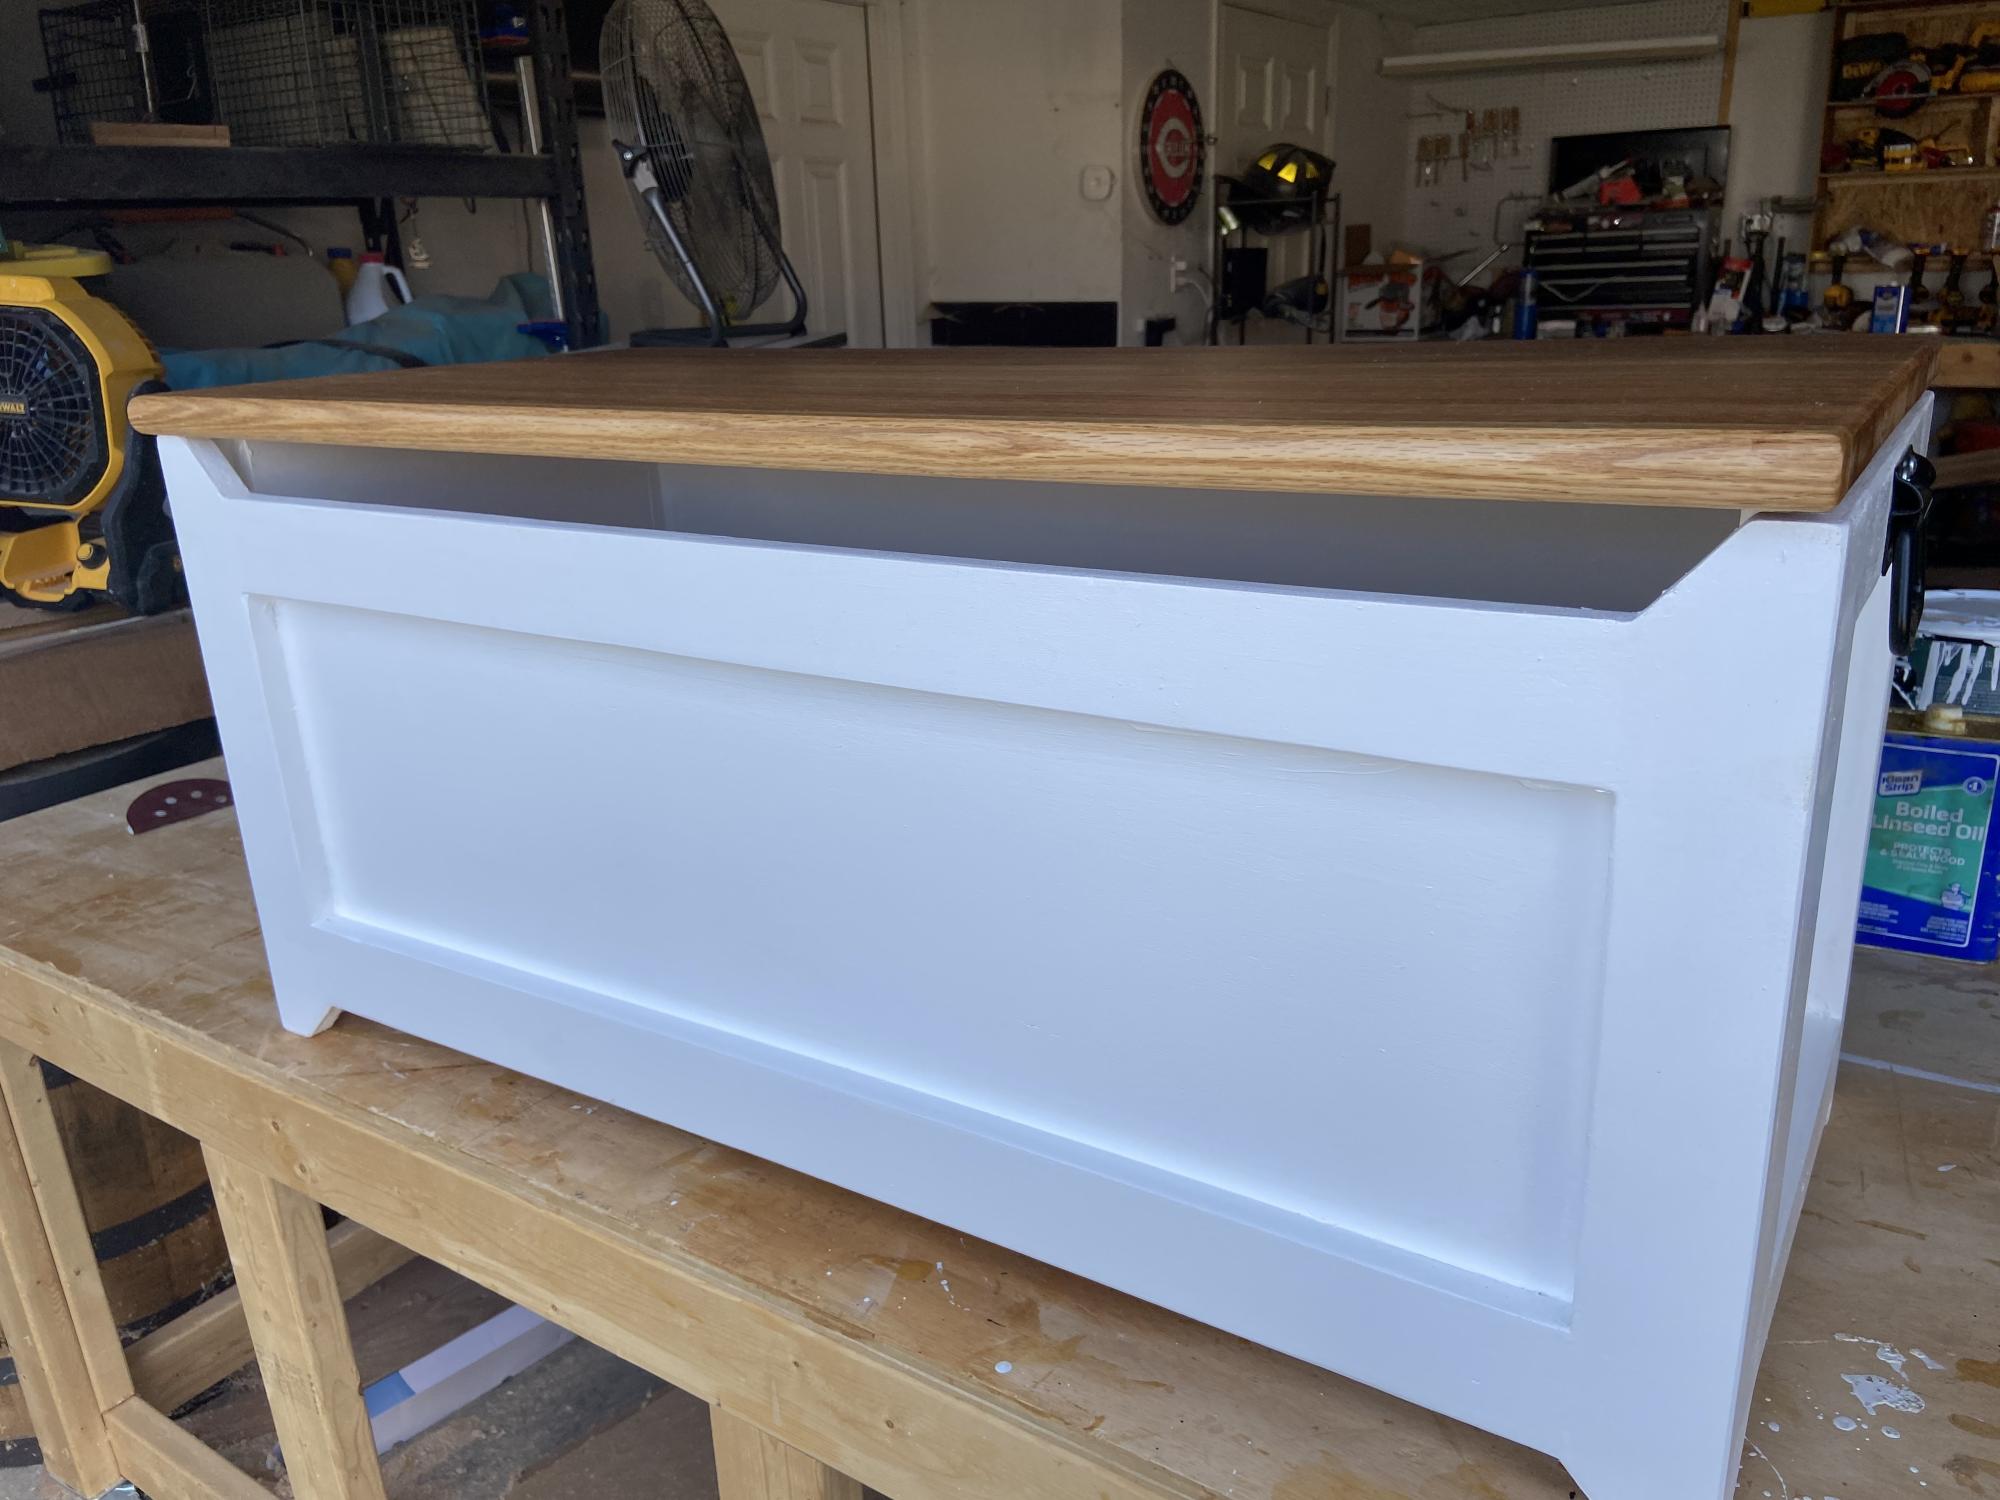
Ana White’s plans are the best I’ve seen. Some are easy and some are challenging builds. She’s so very encouraging in her videos. She makes me feel like I can keep on building. I’m very happy to say I started my business from her inspirations.
Built from Plan(s)
Comments
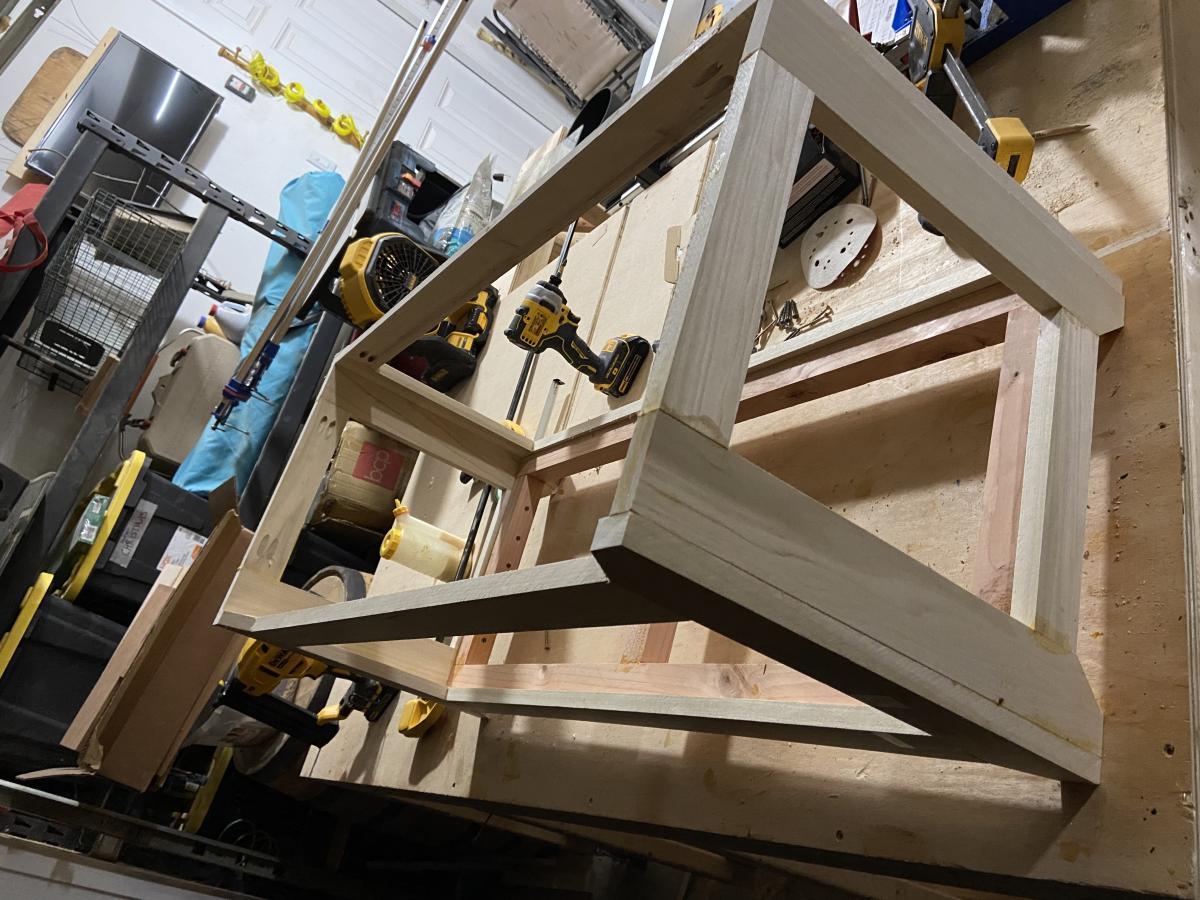
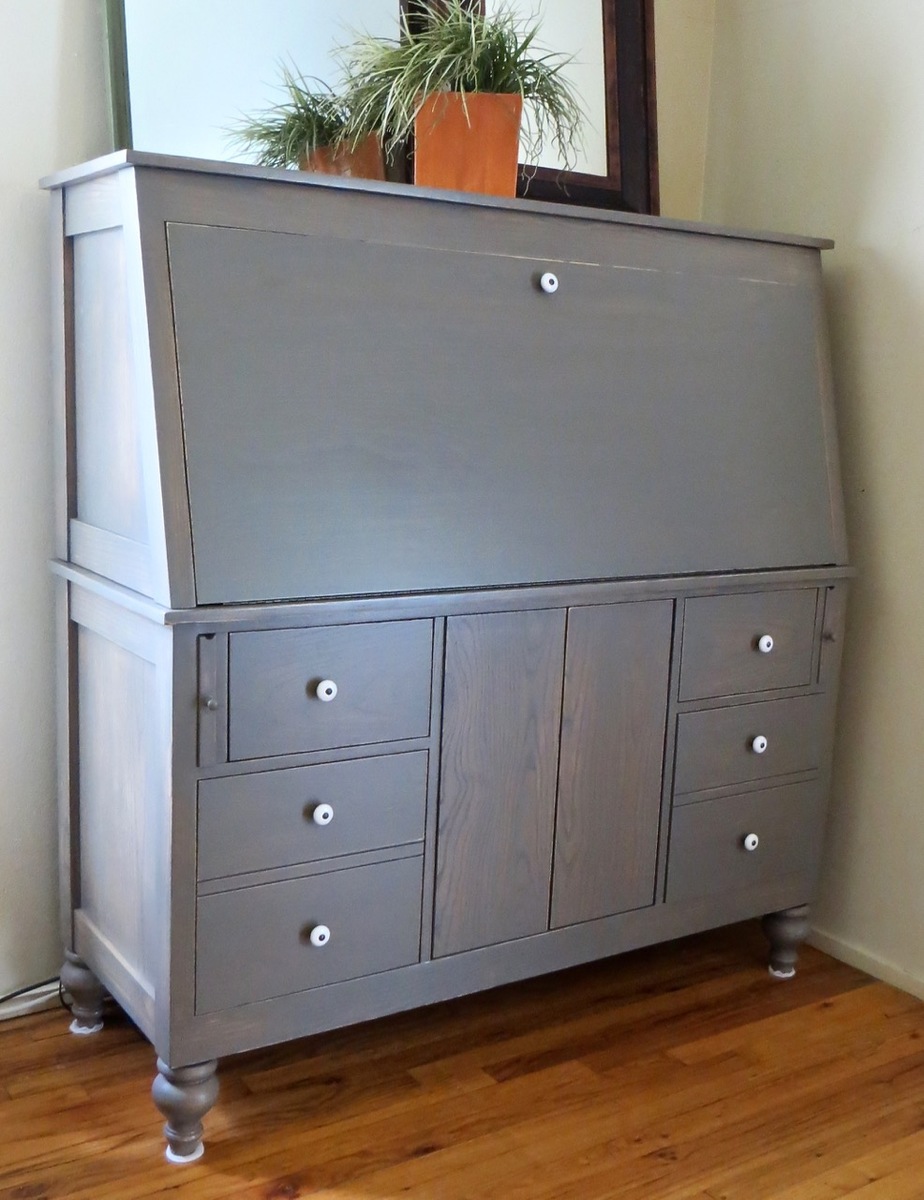
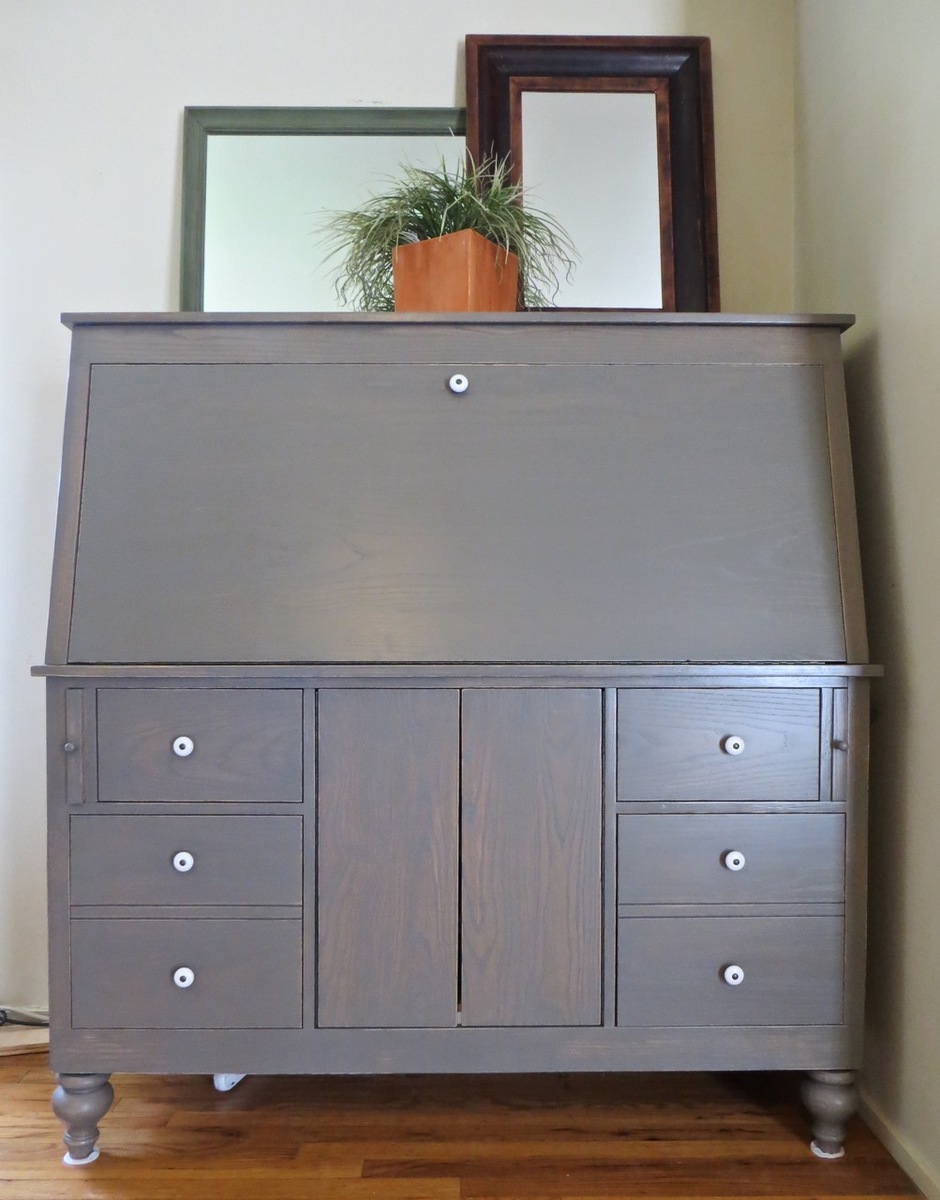
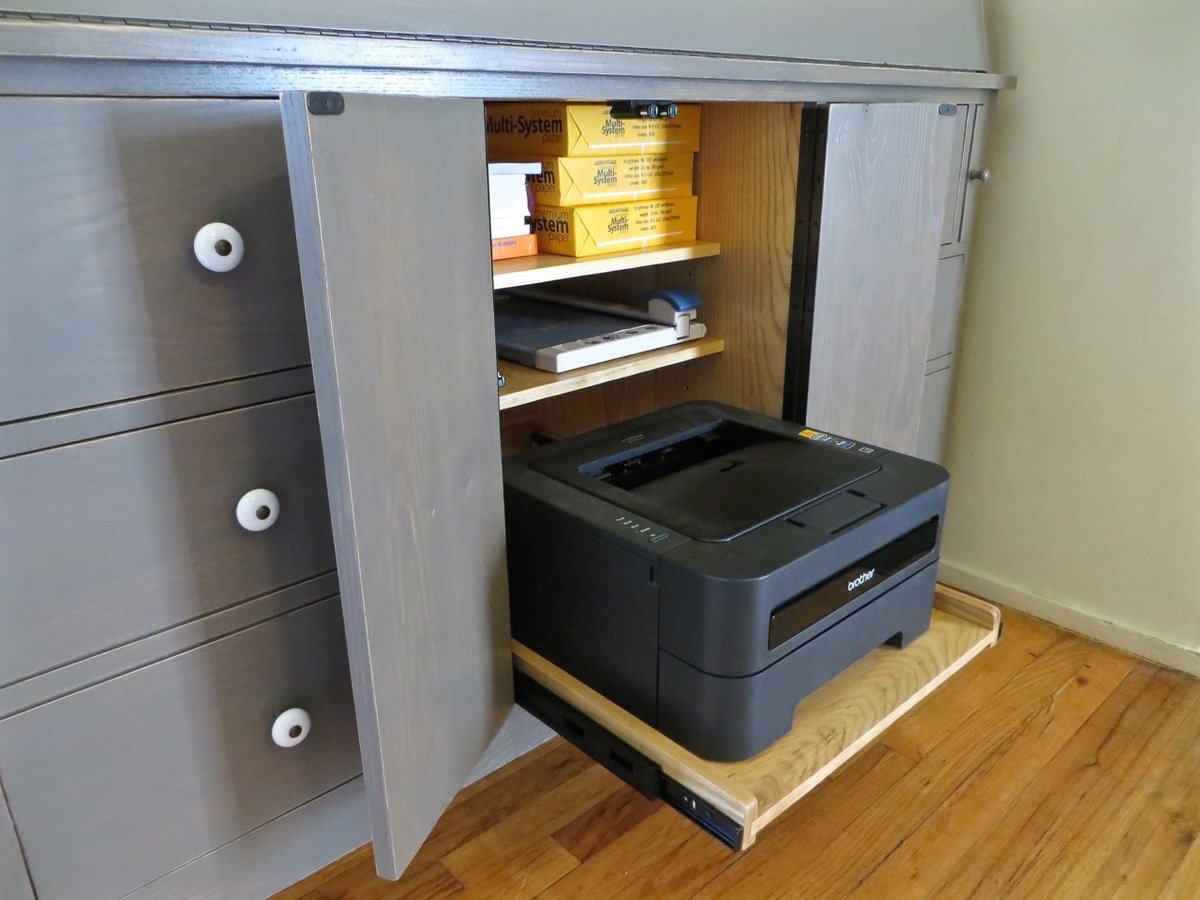
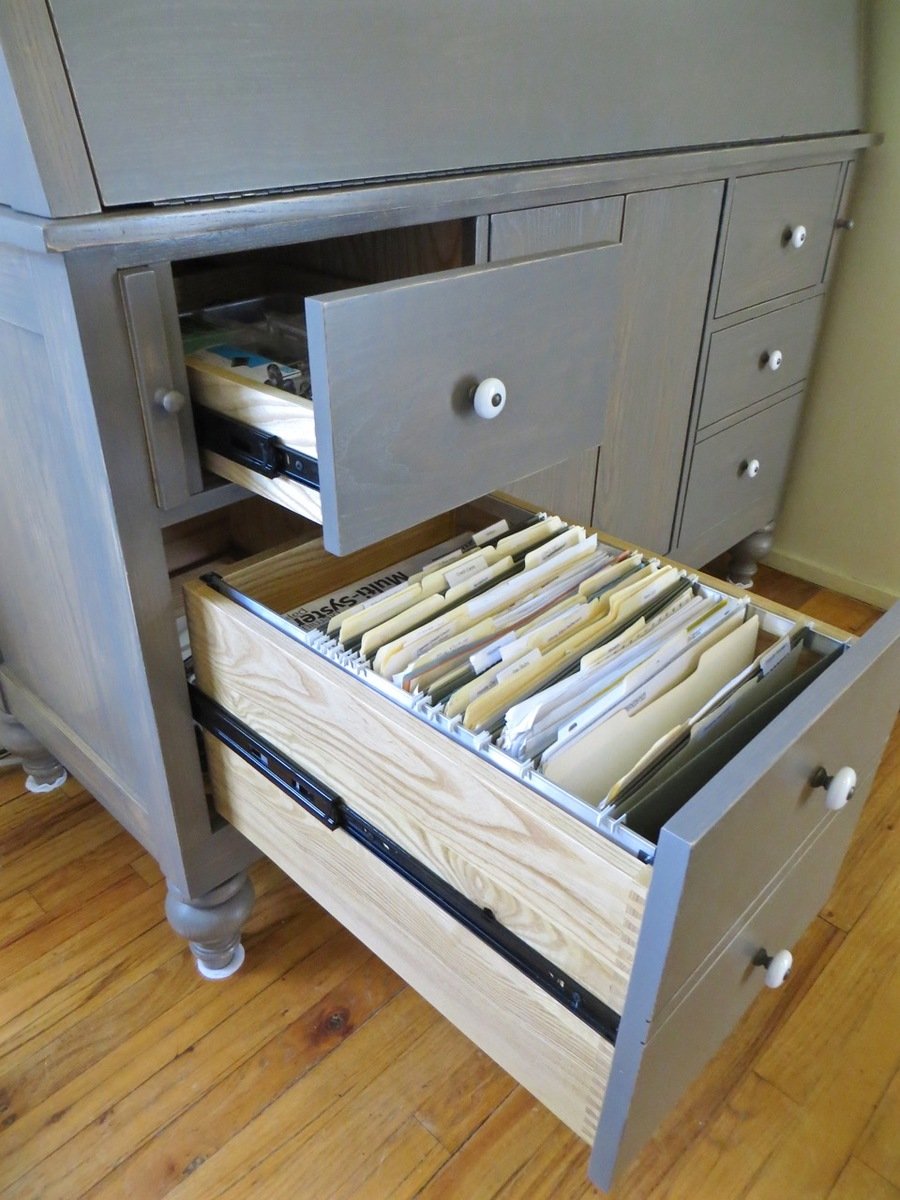
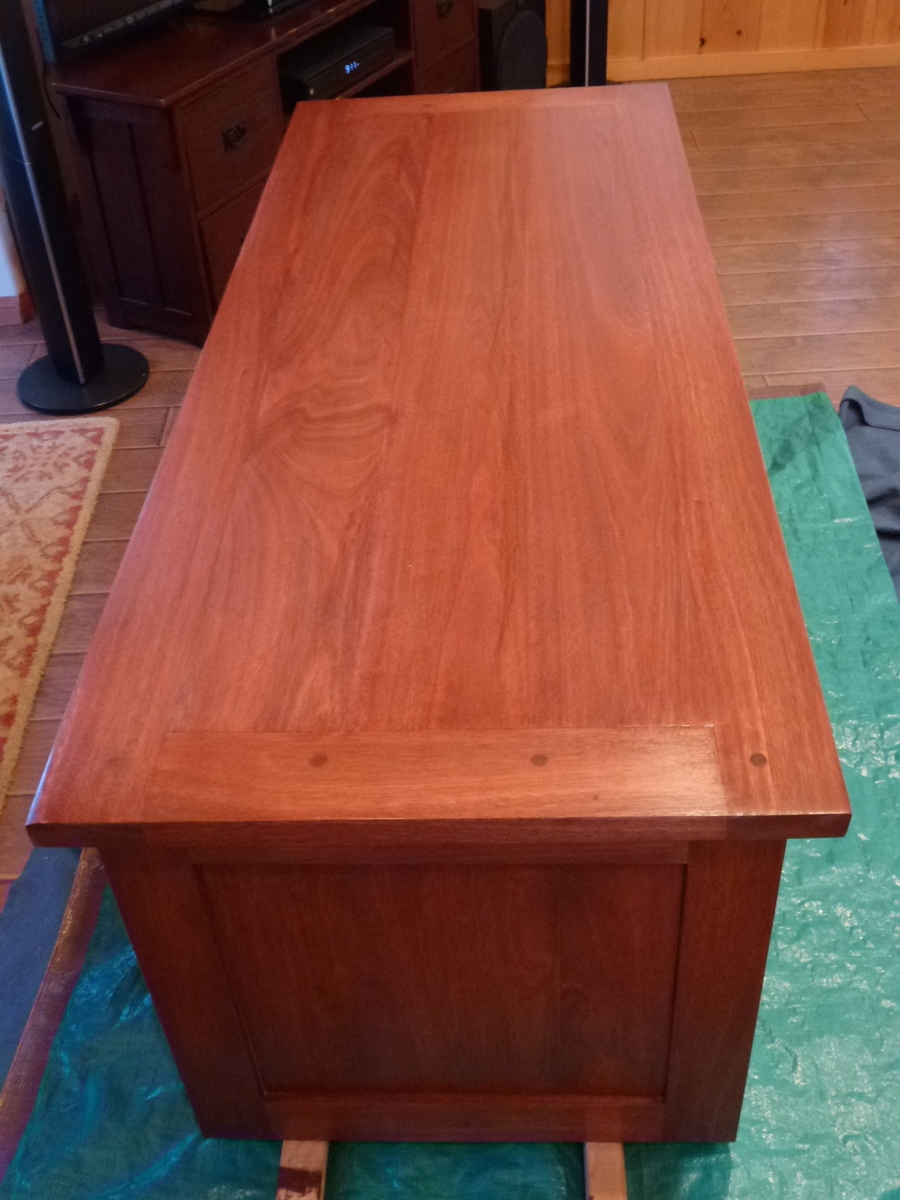
Drop-Down Door Hutch Desk
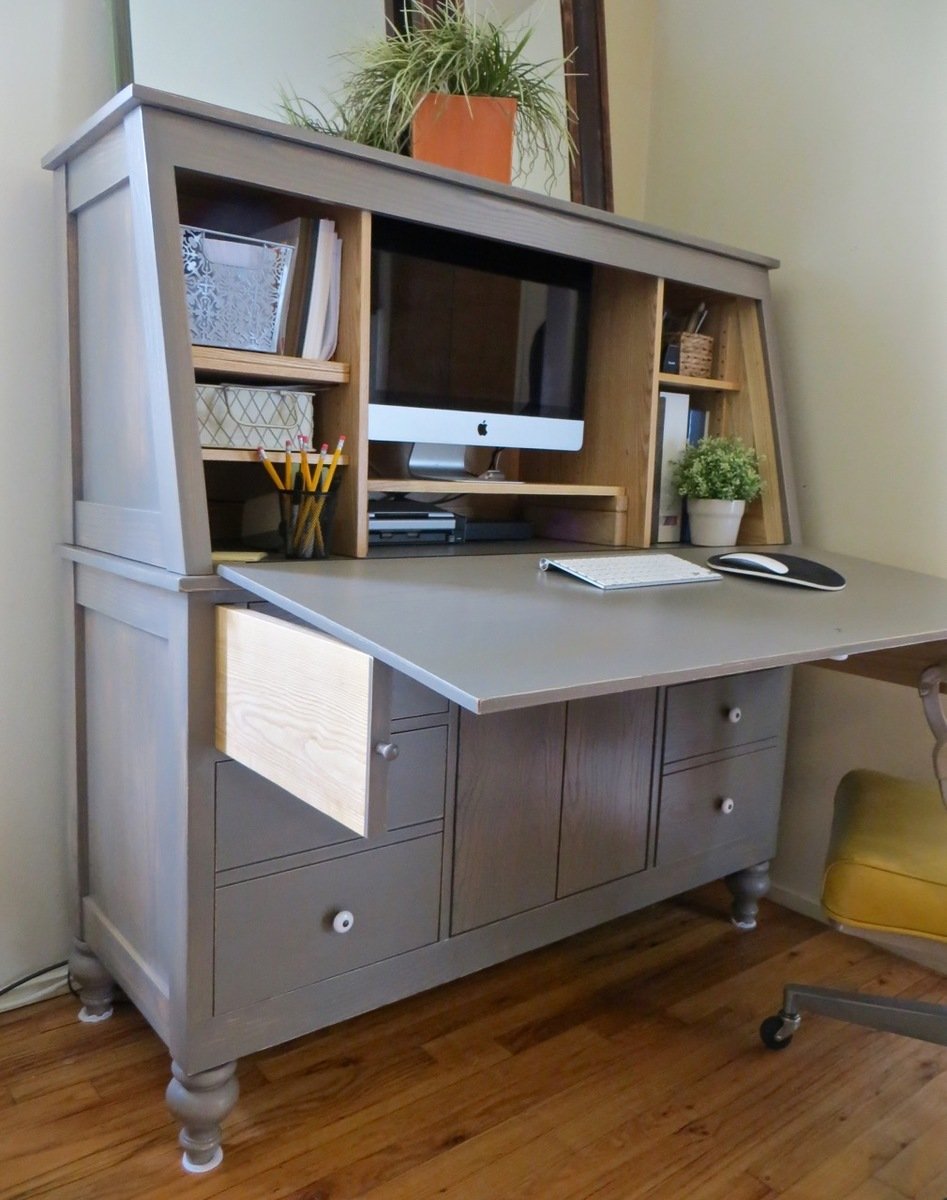
I designed this desk from another desk I built. With this one, I wanted the overall foot-print smaller but still something that was able to organize all our office stuff and be able to close everything to keep it clutter-free. We have a small apartment, and although this desk is about the size of an up-right piano, it works perfectly into our living space!
I made it out of raw hardwood (Ash) and because I knew just the wood alone would make this desk heavy/bulky to move I made the top hutch removable. It's held in place by wood pegs (dominos). All the shelves are adjustable and the drawers are full-extension (something I've never had - wahoo)! The drop-down door is help up by 2 pull-out boards on each side (my first desk had chains). I spend a lot of money on this desk because I knew it was a chance in a lifetime to make and wanted it to be perfect and something that would last generations.
I built the main carcass off of plans/measurements I designed, but then all the insides, drawers, shelves, doors, etc where made as I built (because just a millimeter difference in building changes everything)!
If you want more pictures/descriptions of the building process I wrote about it in a 4-part series on my blog.
Estimated Cost
$1,000 for all wood & supplies
Estimated Time Investment
Week Long Project (20 Hours or More)
Finish Used
To achieve the ash gray color I used "General Finishes" brand water-based stains (equal mixtures of Walnut, Antique Oak & Whitewash) with 1/2 ratio of Pre-Stain Conditioner (bought from Woodcraft). I did 2-3 coats stain, lightly sanded and sprayed 2 coats of Ceramithane clearcoat using HVLP sprayer (sanding with 550 grit paper in between).
Recommended Skill Level
Intermediate
Comments
Wed, 09/23/2015 - 11:22
is there plans available for this project?
is there plans available for this project?

In reply to is there plans available for this project? by Nsmjc
Tue, 09/27/2016 - 12:20
No plans :(
Hi there! I'm sorry but I don't have plans put together on it! I designed it in Google Sketchup and have some 'screen shots' I could send you for basic measurements if interested. You can e-mail me at twirlybirdbaby@gmail.com
Mon, 06/15/2020 - 09:08
drop-down door hutch desk plans or dimensions?
Hi. Do you happen to still have those 'screen shots' or any other info/dimensions from this build? LOVE LOVE LOVE it!!
Custom Pantry Spice Rack

After special ordering glass spice jars for my cupboard I came across your plans for this spice rack and decided to attempt the build. Plans were very well written and easy to execute with a few customizations. I opted for brass rods to hold the jars in place and lined each shelf with shelf liner to ensure the jars don’t move when the pantry door swings. I am very pleased with the outcome and will be making a matching rack for my aluminum foil, plastic wrap, etc.

Built from Plan(s)
Comments
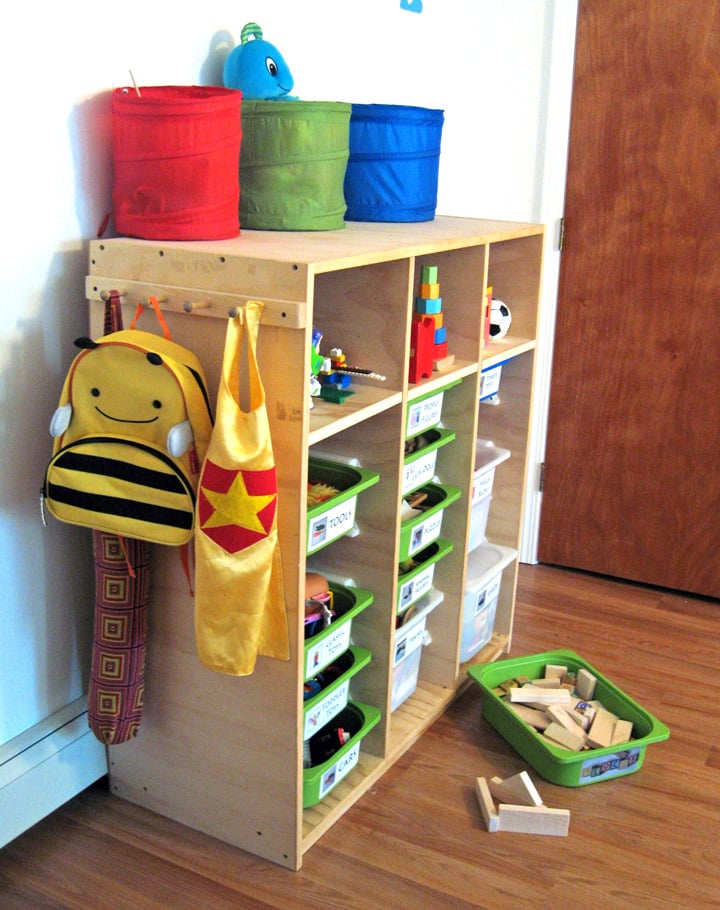
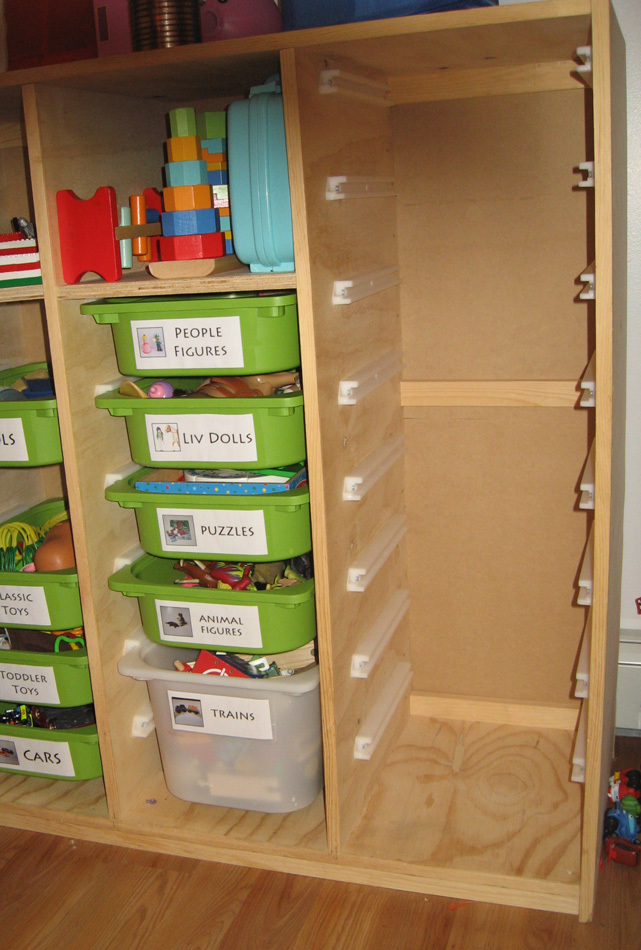
Trofast Toy Storage Solution
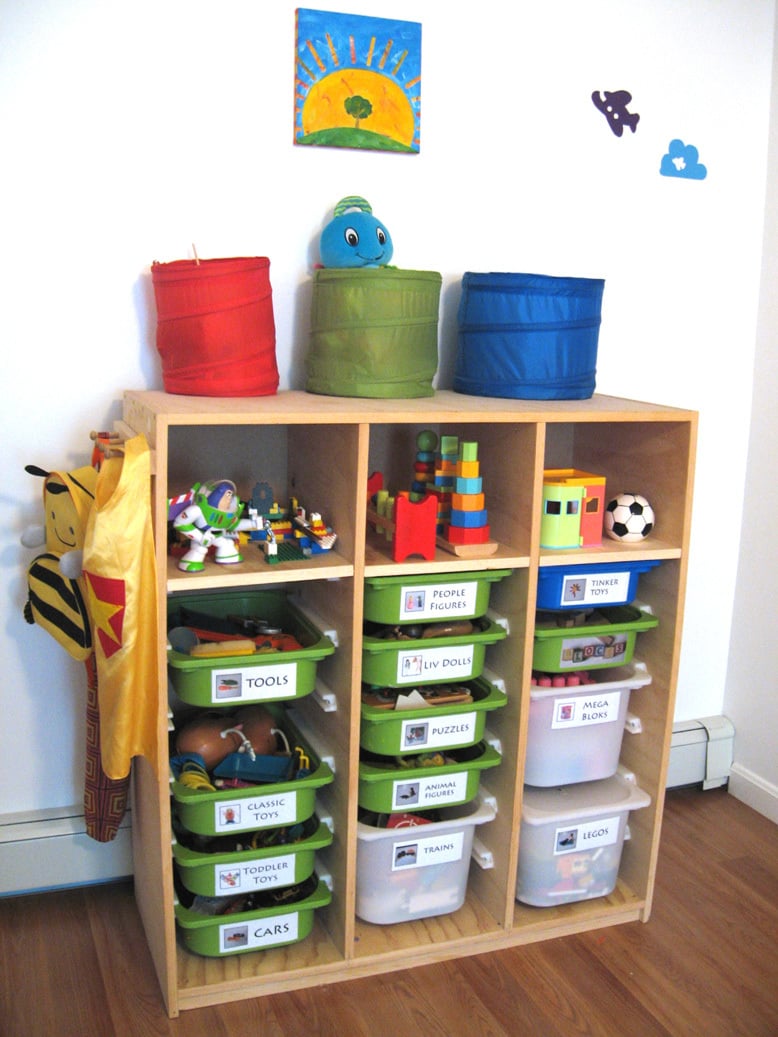
I had been asked a few times for these plans, but as someone else posted a similar one, I'll just stick to a blog post for now and describe my differences. I made this shelving unit January 2010, just after I found out of I was pregnant with my third child, and it's been a lifesaver since then. I desperately needed a toy storage solution (and purging), as shown in the 'eek' kids closet below. I didn't like the shape of triangular Ikea ones, as they spanned more floor space than I cared to give up. Plus, I wanted a place to put *almost* all of my kids toys, so I wanted it to be tall. I'm so glad we did, since we've moved twice (also, 'eek') since than, and it's made packing and unpacking the kids toys super (SUPER) easy. At first, I was afraid that the kids would go crazy and just tear down every bin at once, but it hasn't happened yet. Unlike the other plan that was posted, I used white sliders that ikea sold. I'm not sure if they still sell, as I don't see them online. It cost an additional $24 (they were $1/2), but seemed worth the extra money. I didn't have a router and wasn't particularly confident with our table saw skills. Plus the Ikea version had some really thin areas that made me nervous that it would break easily. I tried to keep it easy and just had to line up and screw the sliders in. Now that I'm a little more confident with a table saw, I'd give the router style a-go. I used two sheets of cabinet grade plywood, each costing about $30. I ripped down some pine boards to cover the front edges, which made the unit look loads nicer. However, I wish I would have used maple, instead of pine as they got dented almost immediately. Not a big deal though. The three shelves were sort of an afterthought, but turned out to be great for puzzles and other type toys. I didn't use backing or cross supports initially, but put some in after we moved. You can see them in the last picture below. The heater in our temporary house caused the slightly-bent sides to become very bent sides. That caused the drawers would spontaneously fall out, which was always quite the shock and disappointment. I put in some supports in the back, which I wish I did initially as it would have made manufacturing easier. Also, If I were to go back, I would put one cross support in the front-middle, as the boards are so tall, it needs something to help maintain the shape in the front. I've found that even in a perfect fitting slider, really heavy buckets would bend just enough to flex out of them to crash... so don't plan on filling one of the large buckets with matchbox cars and sticking it on the top. Regardless, we've learned our lessons, made it work better, and has been a huge success in our house for a while now.

Built from Plan(s)
Estimated Time Investment
Weekend Project (10-20 Hours)
Recommended Skill Level
Intermediate
Comments
In reply to Very nice by Supermom77 (not verified)
Tue, 10/04/2011 - 19:42
Haha, I guess a little.
Haha, I guess a little. Picking up when they aren't motivated is an ongoing battle. However, I did find having a specific place to put items with labels helped a lot, albeit with screaming. Actually the labels would probably be the best motivation of all of it.
The ideal is to have the kids only play with one bin at the time, but with more than one kid, that theory very quickly gets muddled... One child wants to play with one toy and one wants play with another, then "lego houses can't be broken down" and "polly pocket is using those blocks for the house" and so on. So it's more of a end-of-the-day(week/month/year haha) pick-up routine.
However, there seems to be a light at the end of the tunnel. My oldest (almost 6) seems to have caught on that the faster she picks up, the sooner she can move onto other activities besides playing (coloring, playdough, etc.), and is starting to pick up as soon as she's done without us even asking. I think getting an allowance has also helped with that.
That was way more than I thought I was going to comment, but I guess it goes to show you should never ask a Mom her opinion on something, unless your ready for a lecture :)

Thu, 10/13/2011 - 21:44
I love that your labels have
I love that your labels have pictures on them! I thought I should have done that way back when since my children are too young to read. Easy to find and easy to put away. Good job, Mom!
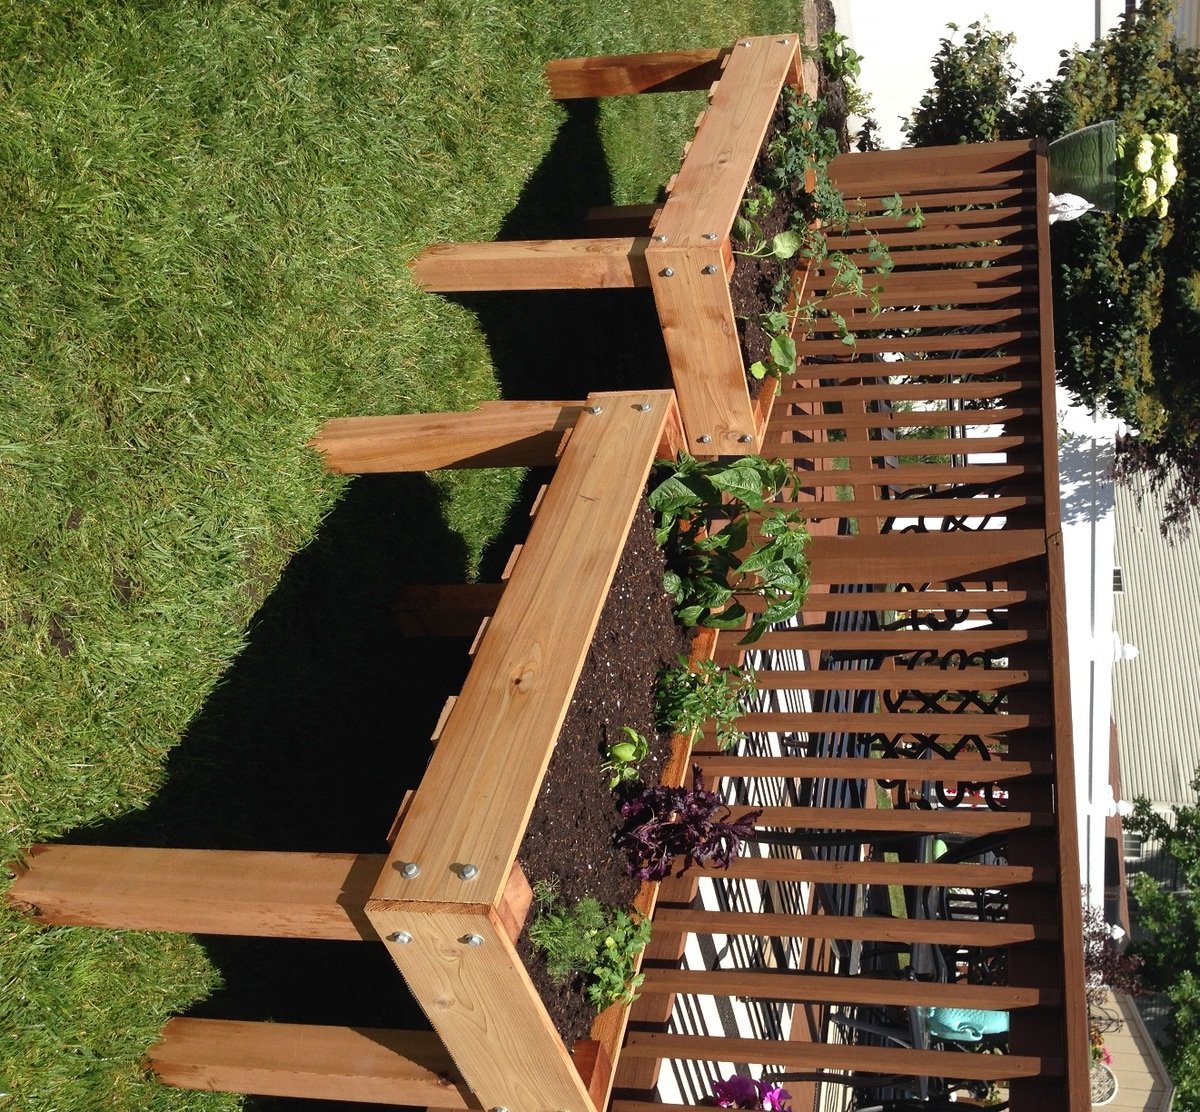
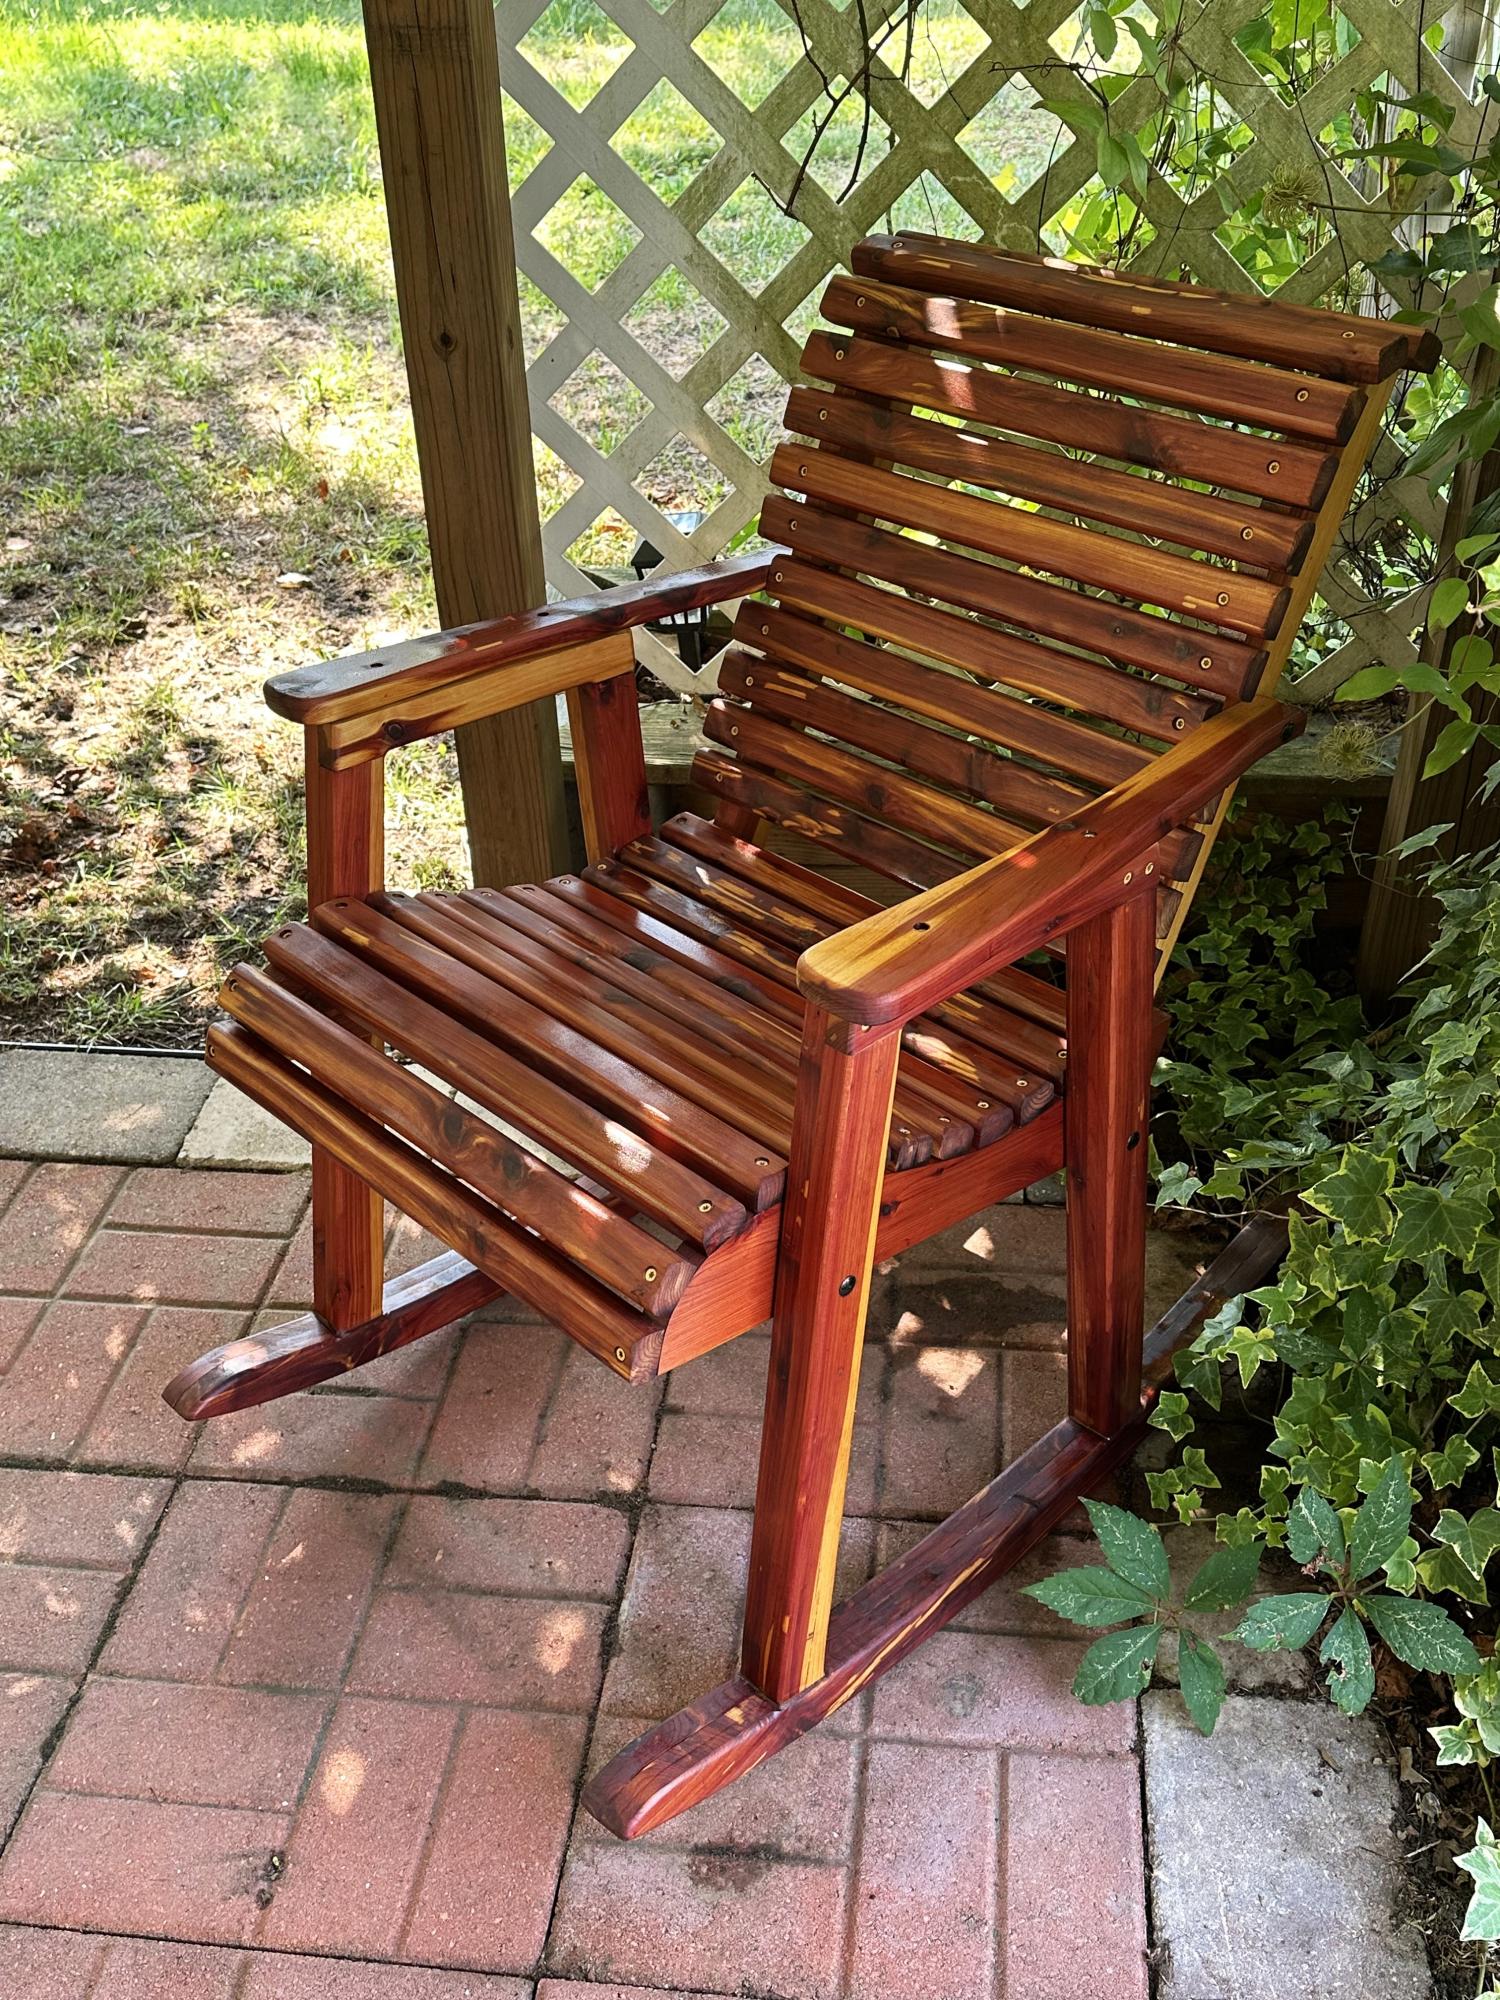
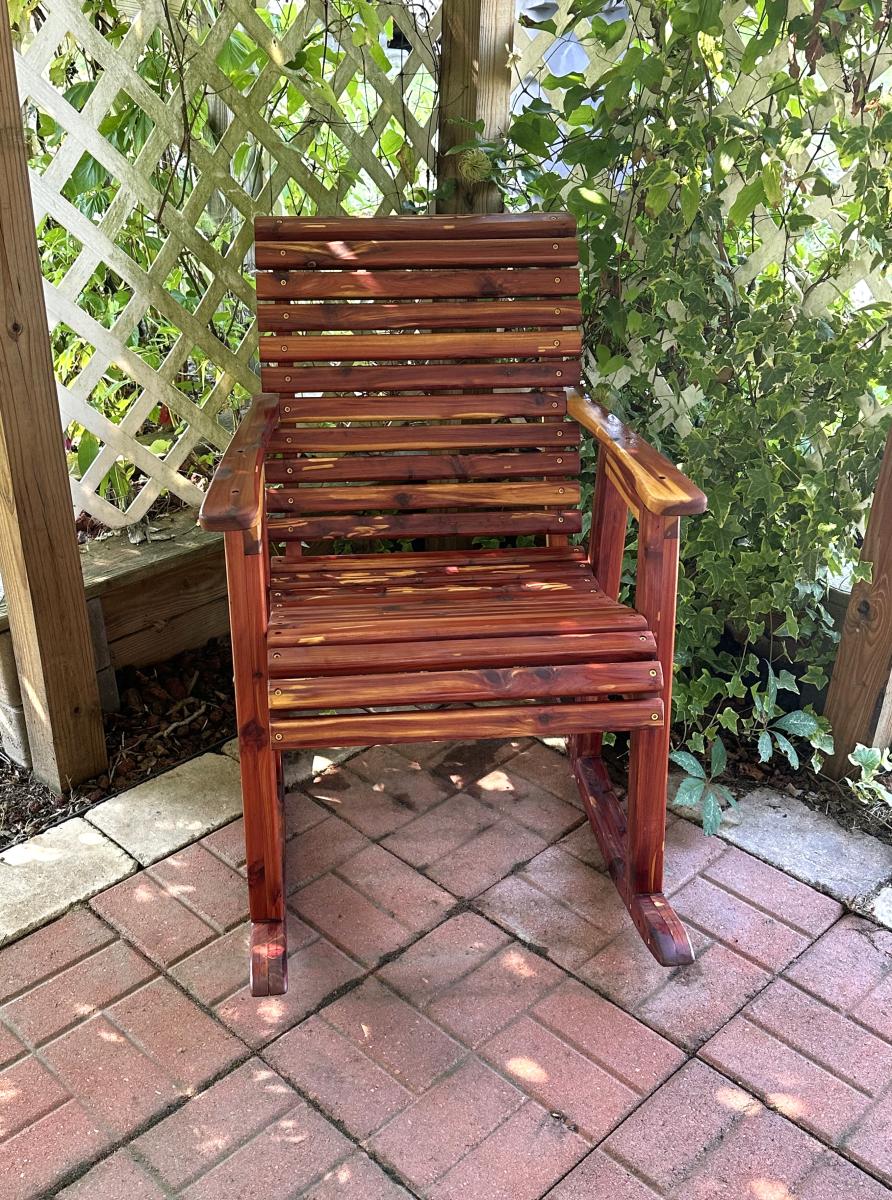
Adirondack Chair
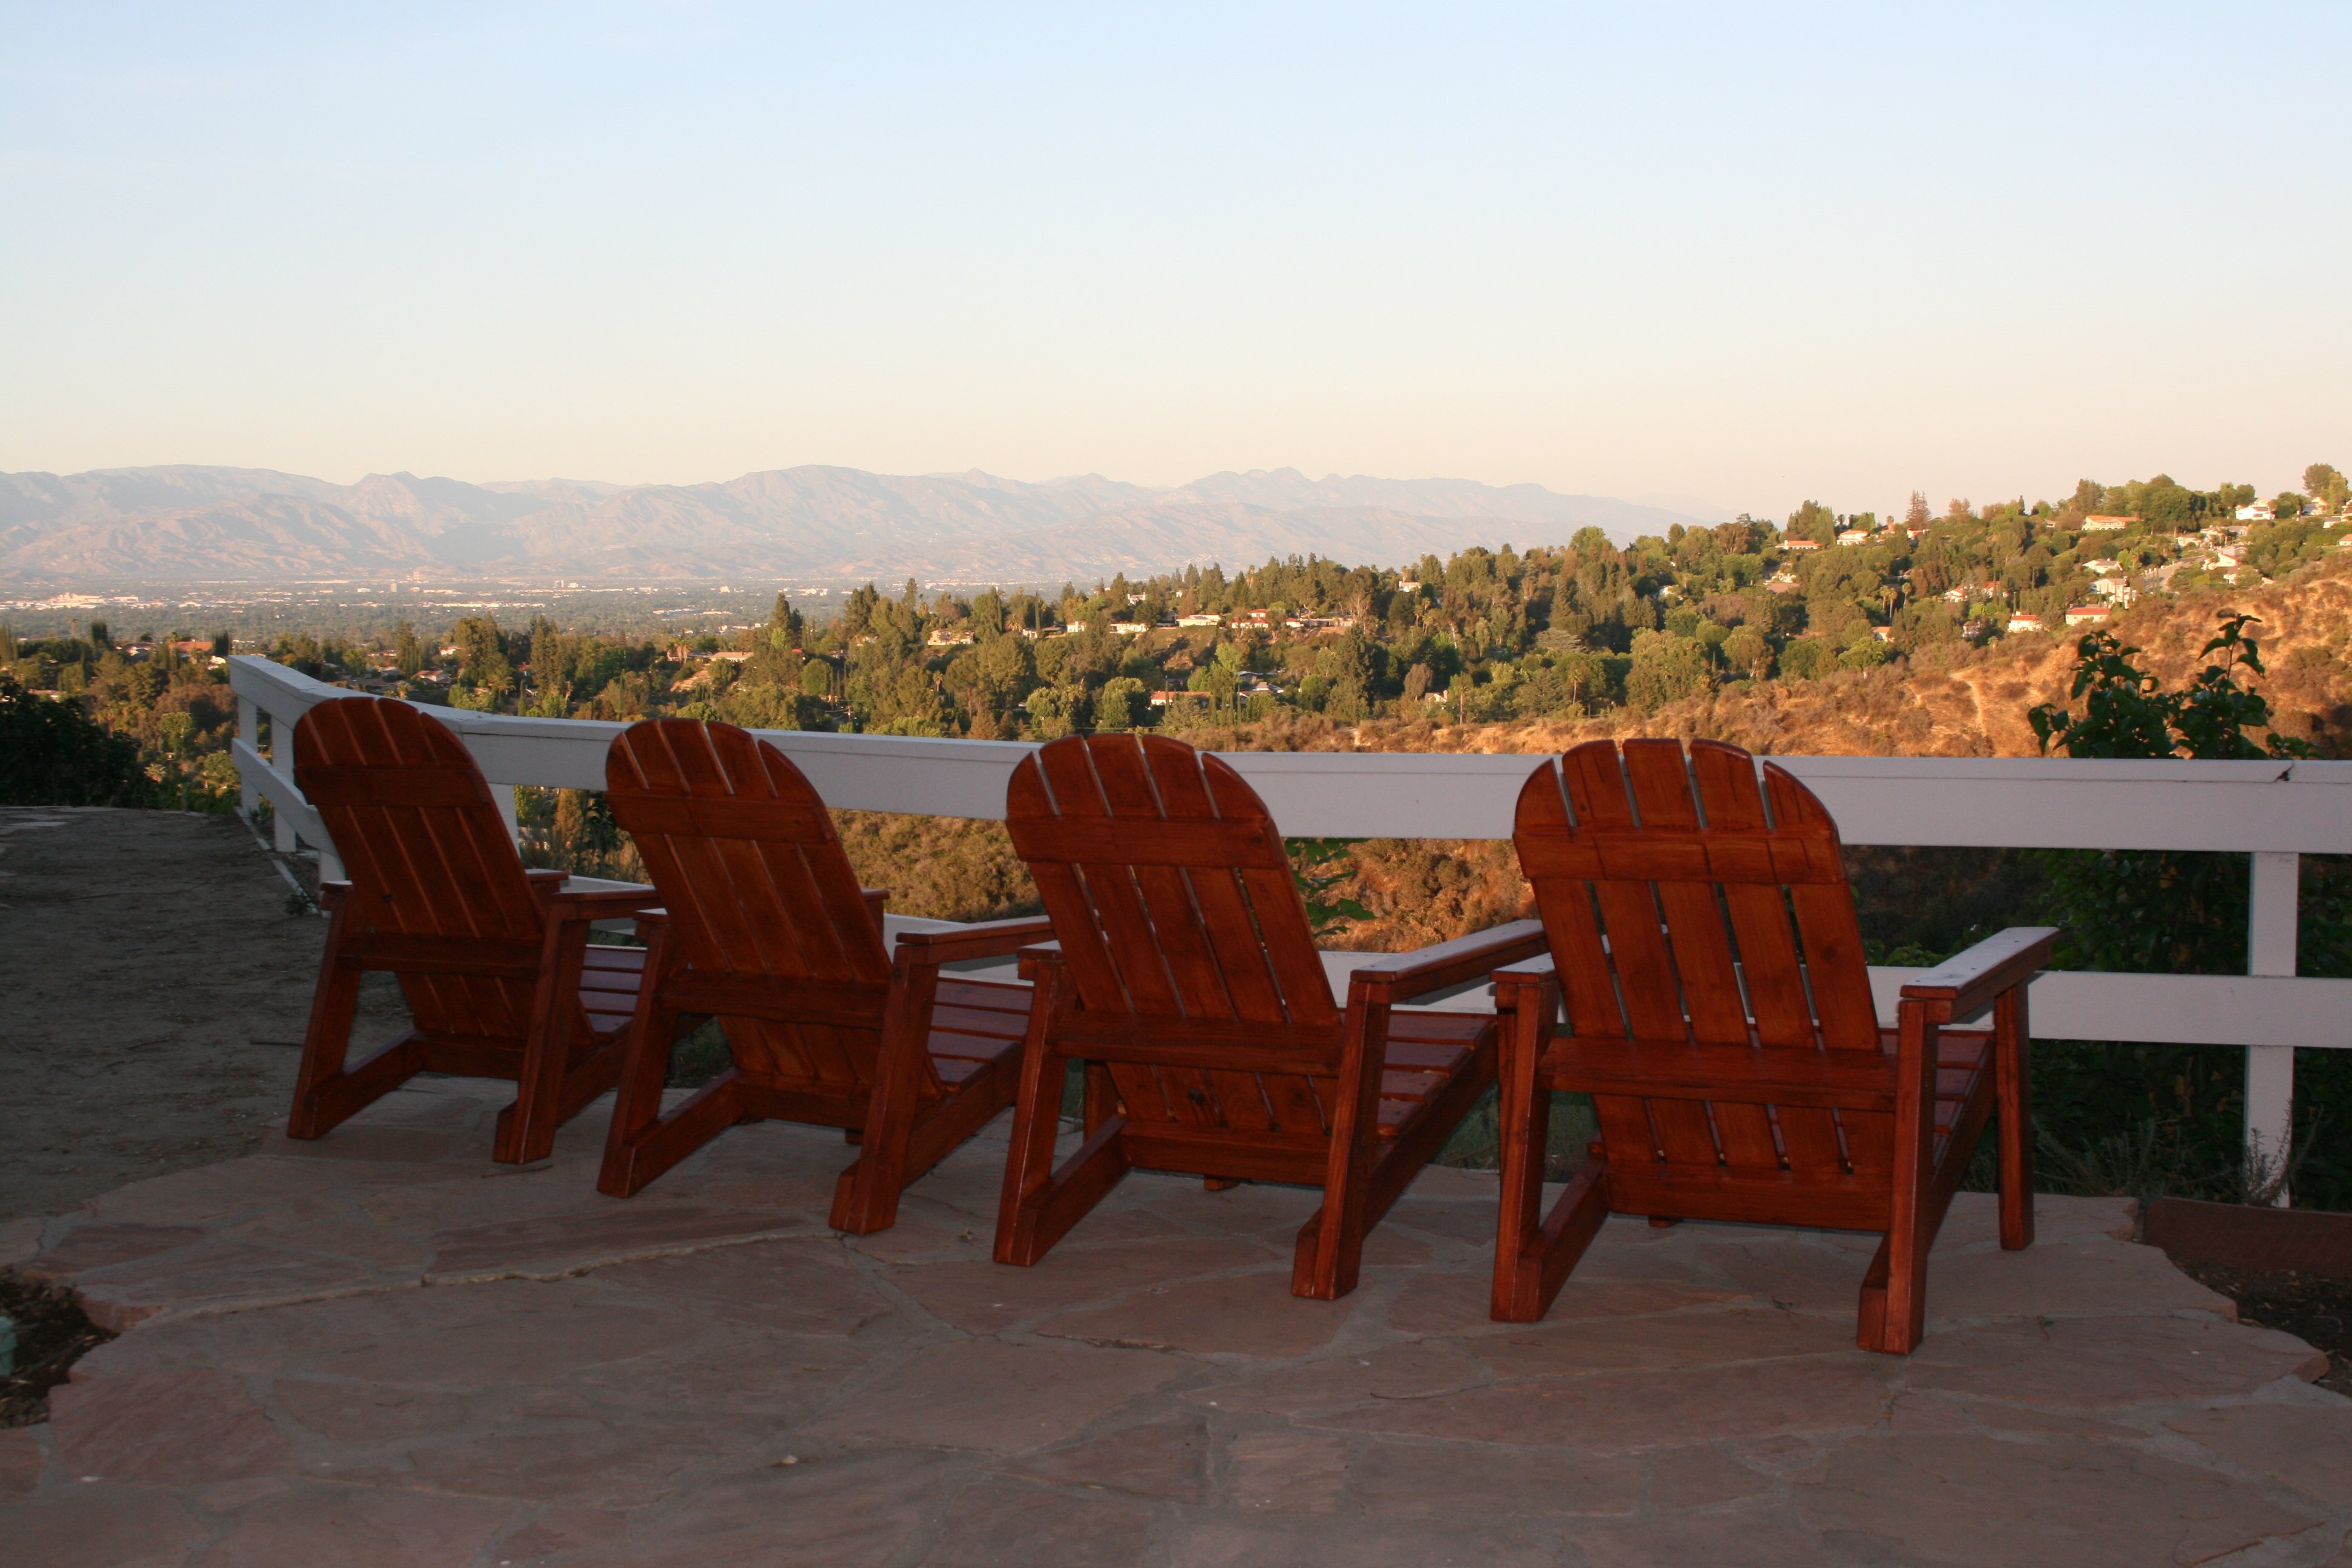
Watts Built on Wolfe Way
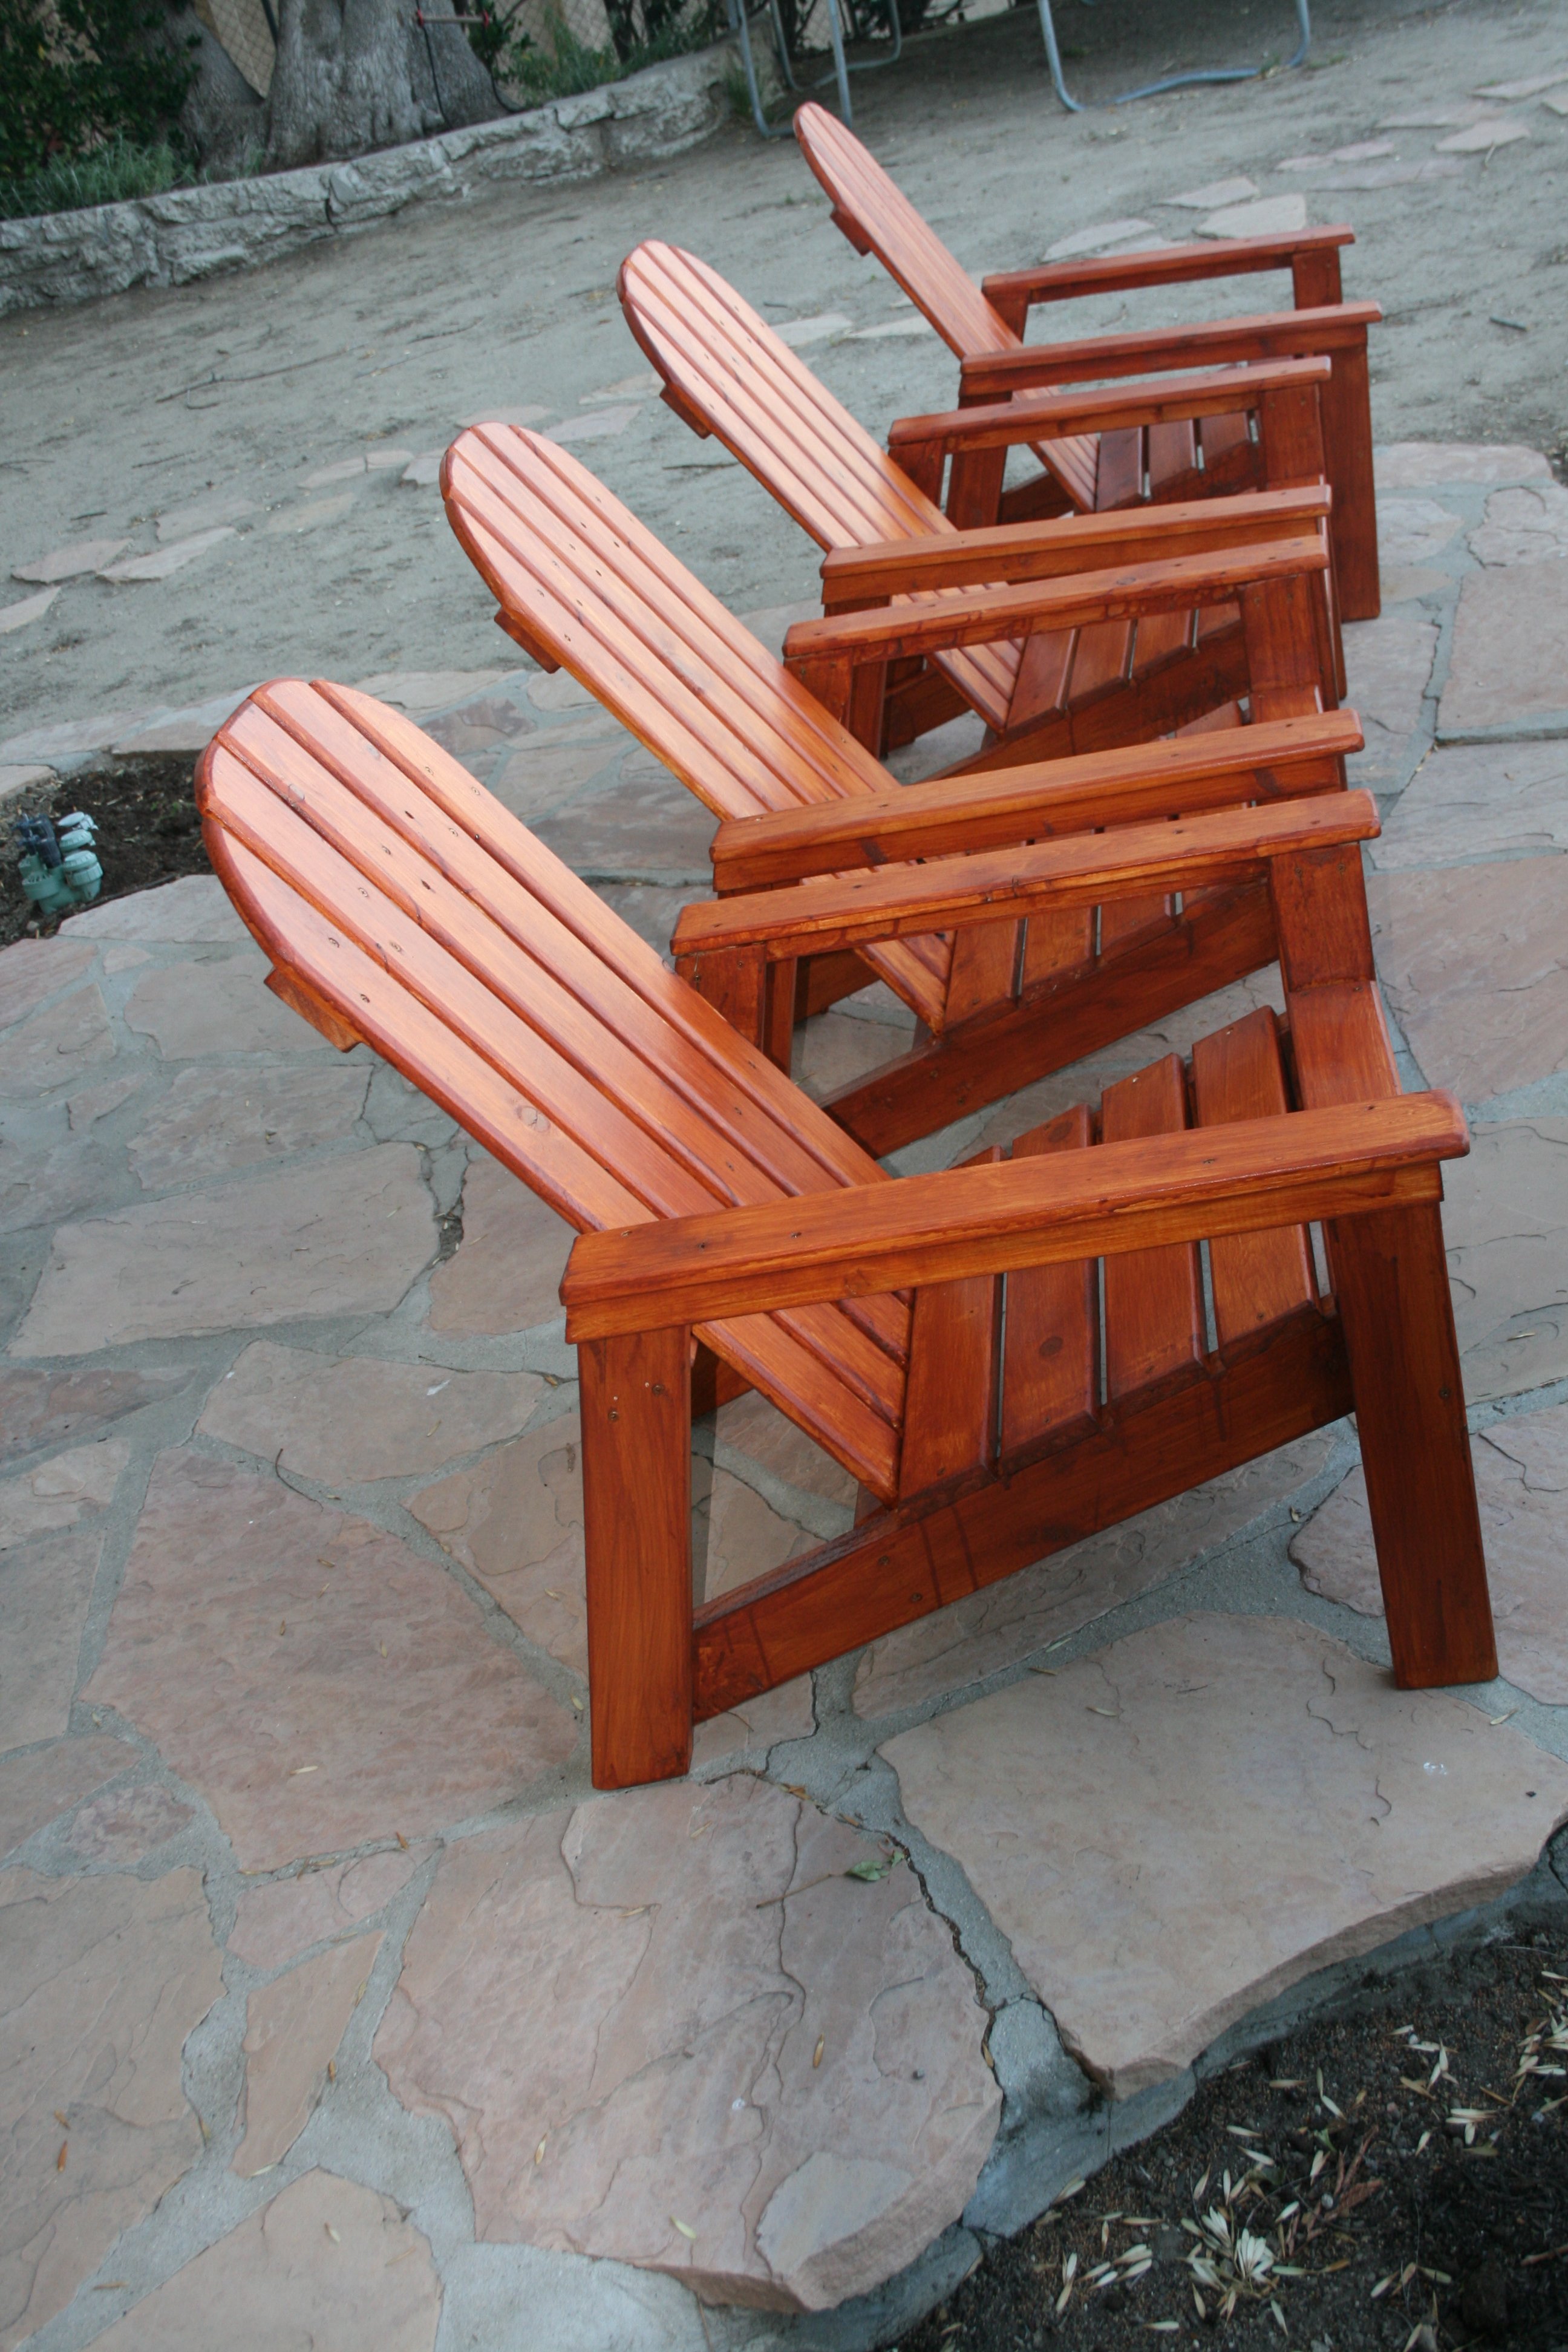
Built from Plan(s)
Estimated Cost
$150 for all 4
Finish Used
Behr Transparent Weather Proofing all-in-one Cedar Naturaltone No 501
Recommended Skill Level
Intermediate
Comments

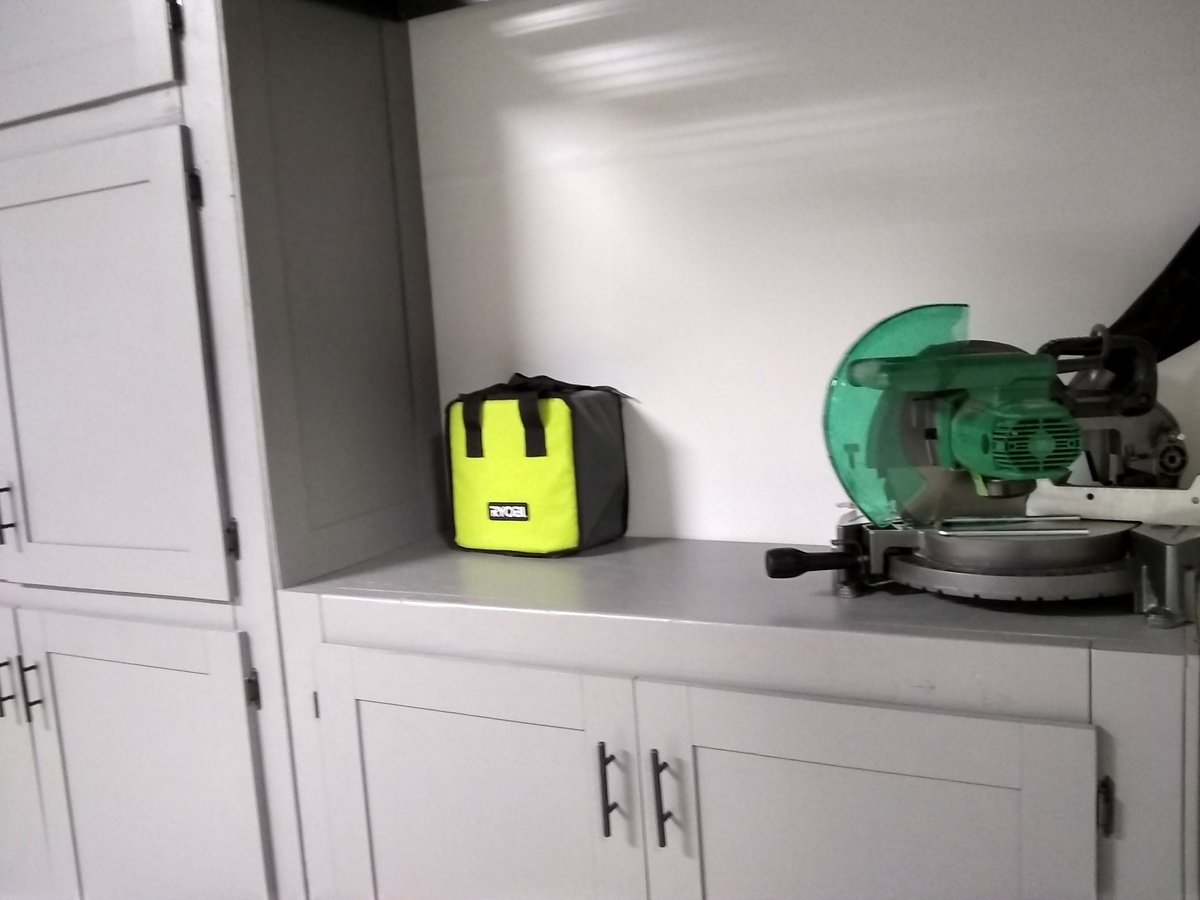
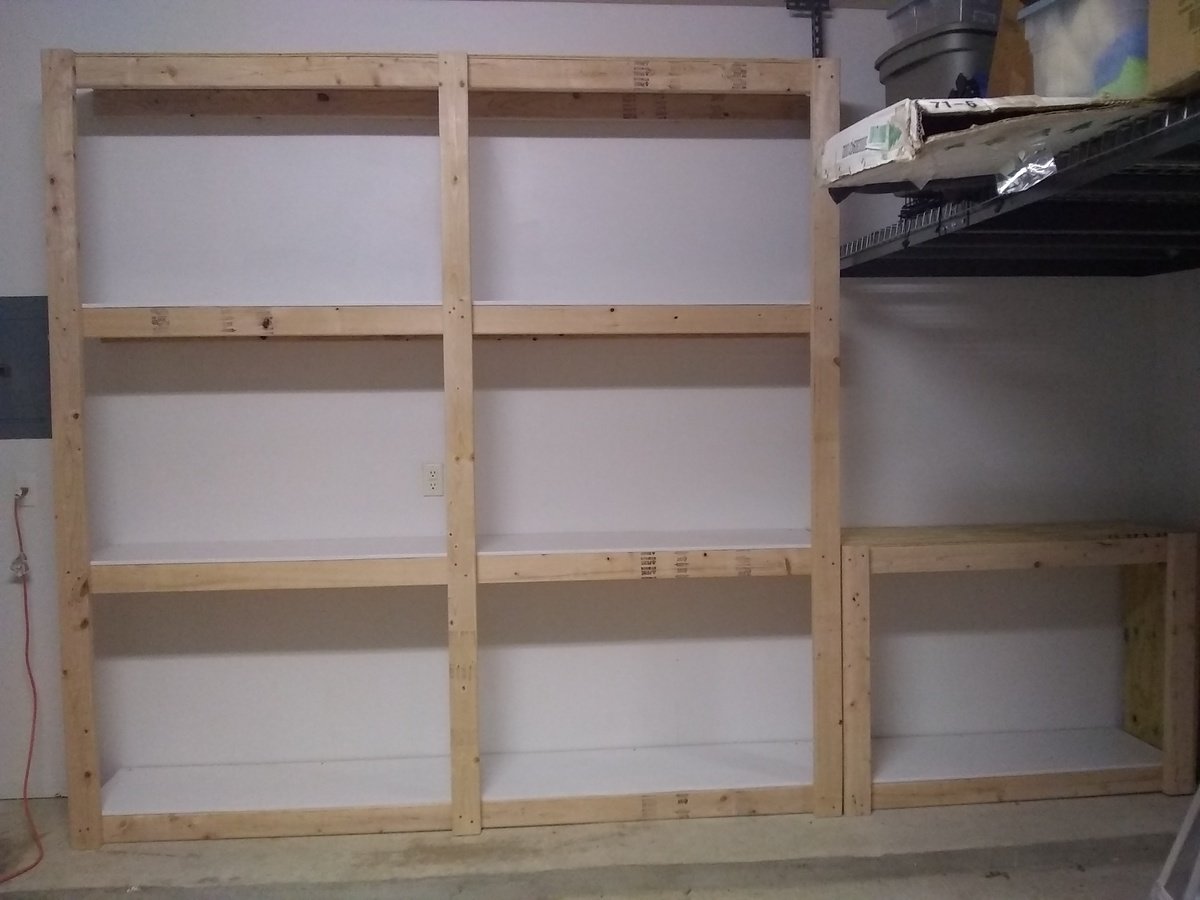
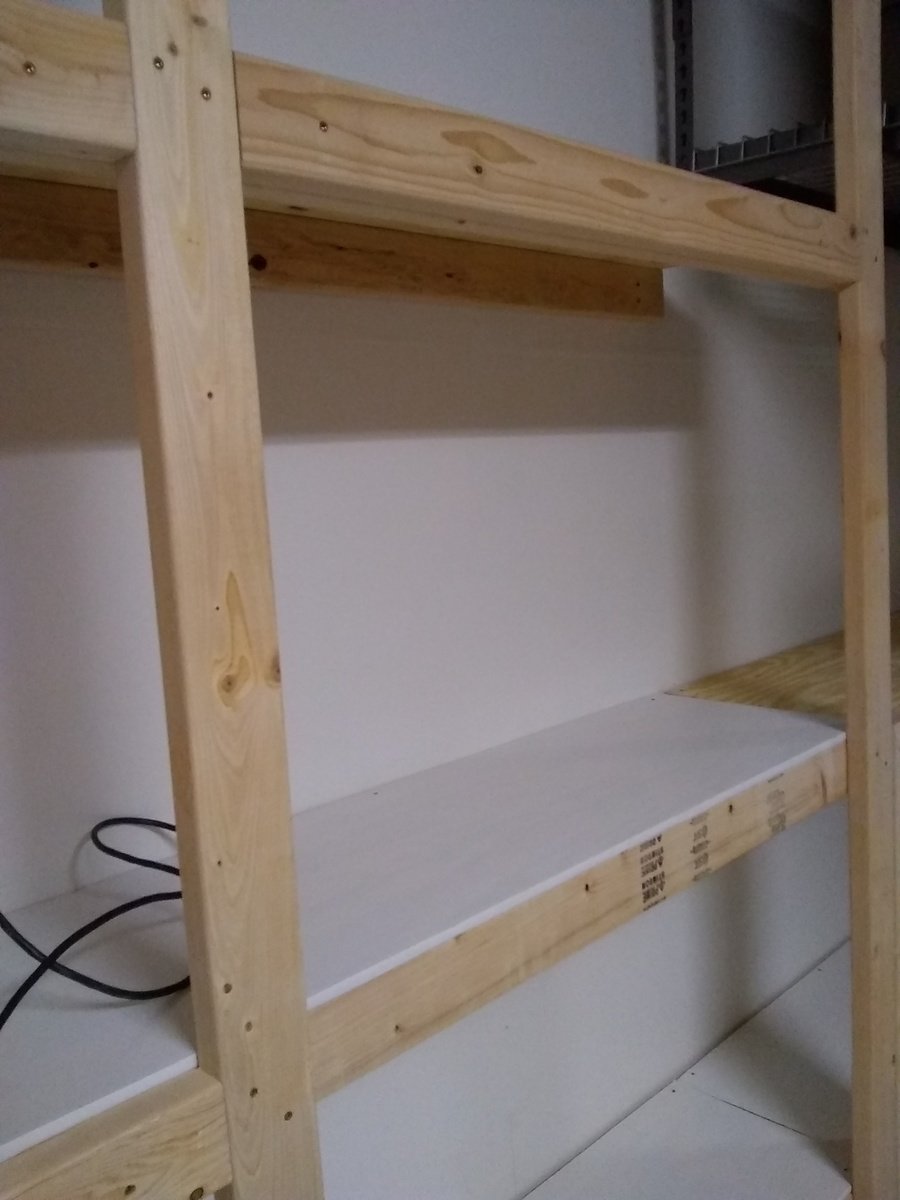
Garage shelves with doors
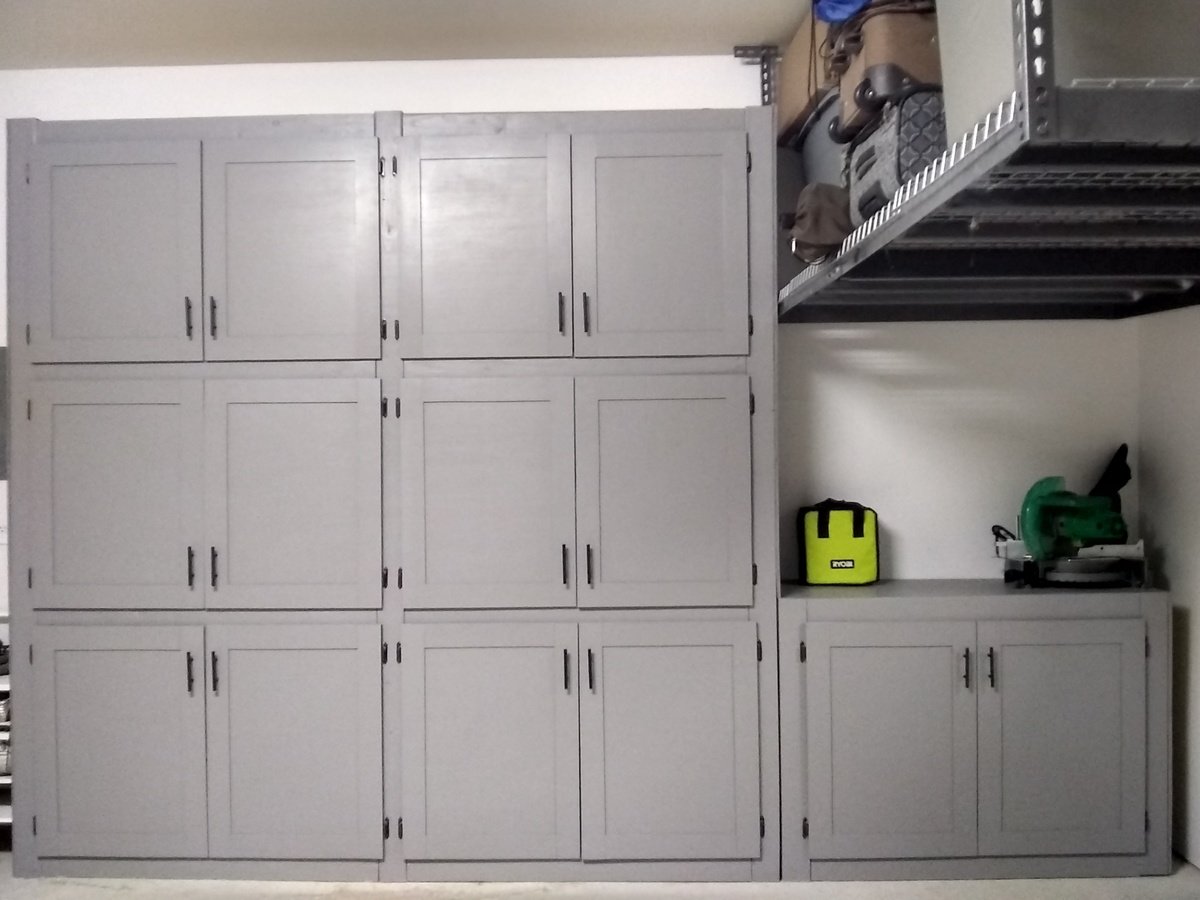
I have been wanting garage cabinets for a long time but couldn't afford them. When I saw these shelves I knew it would be easy to add side panels and create doors for the sections. The size is 8'x8' with the 4'x3' under the ceiling rack. I put a 2"x4" in the middle to divide each section, measured and cut doors from 5mm lauran plywood. I also cut the stiles and rails from the same material to give it interest but mainly to make it thicker to avoid warping as much as possible. I added 2"x4" to create a facing for the doors to rest on. Also used overlay hinges to simplify the hanging as much as possible. I was able to follow the design plan and the only thing I did was add a shelf at the bottom. The cleats were definitely not necessary, it's very sturdy.
Making the doors
The first thing is to learn how to measure for cabinet doors. There are plenty of sites and YouTube videos showing how to correctly measure. If you are doing the same type of doors like I have, with no middle divider, then be sure to pay attention how to correctly measure for those instead of a single door.
The easiest way to make the doors will be getting 1/2 in sanded plywood and use a table saw to cut each door to size. Skip the shaker style trim and put the hardware on and be done. Make sure the hinges will be able to hold the weight of the door.
Unfortunately, I didn't have a table saw but I did have a router and a jig saw, and found a great video on YouTube on how to use a router to cut straight edges without a table saw. I measured out one door and used that outline to cut two identical doors. It turned out that each section was slightly a different width so I had to do two at a time. However, if you have a circular saw you can rig it to make a table saw and make a guide to rip the doors. It all depends on what tools you have available to you.
I have a compact plunge saw and was able to cut the 3 inch strips for the shaker style with it. Honestly, that was the most tedious part and most time consuming by far. That also had to do with the fact that because the plywood is only 5mm thick I cut strips for both the front and the back to make it over 1/2 inch thick to help minimize warping and give the hinges something to grab.
I used the miter saw to cut the stiles and rails to size and a 23 gauge nailer with 1/2 nails and glue to get them on the door. I glued and nailed the front and the back of each side at the same time because the nails are a bit longer than two pieces of plywood. I then turned it over and nailed the other side. The great thing about using a 23 gauge is that I didn't have to fill any holes because they are so small you can hardly see them at all.
The last thing is to use your sander to ensure all of the pieces are even. I used a 60 grit and then followed it with a 220 where needed.
If you want to avoid cutting the strips but still want to have the shaker style, Home Depot sells 1/4 thick Polystyrene flat moulding that will add vertially no weight to the door but the cost can easily add up if you have a lot of doors.
Lastly, if you are wondering why I got such thin plywood that ended up creating more work. The reason is because I wanted to save money on hardware and I didn't trust the inexpensive hinges I got off eBay would hold a heavy door for many years.
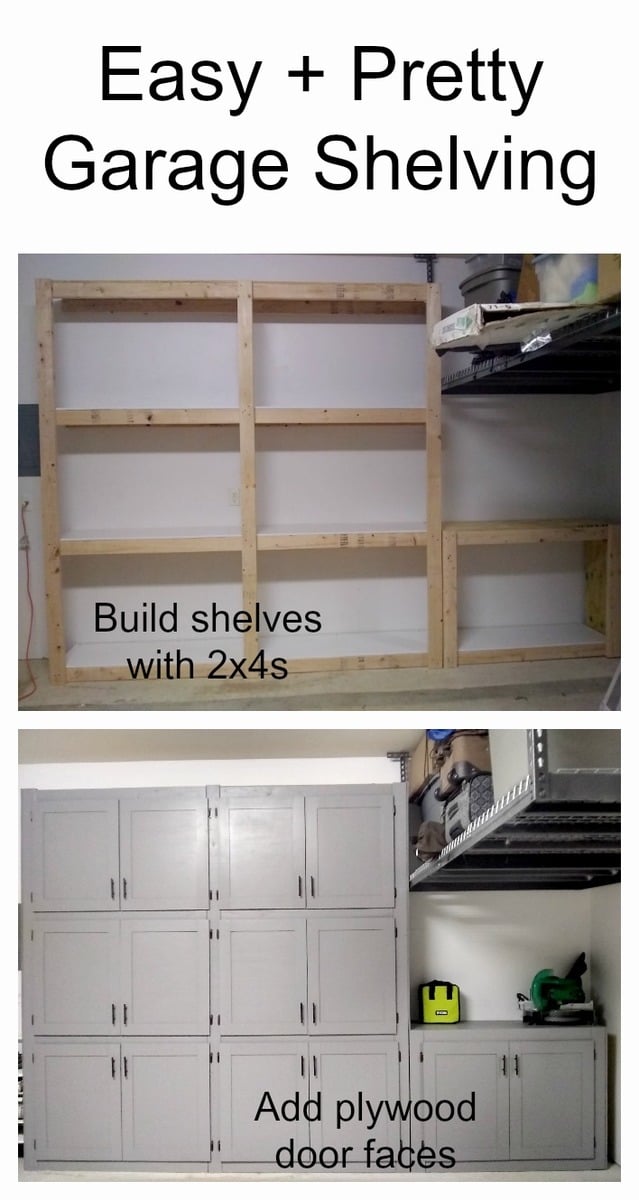
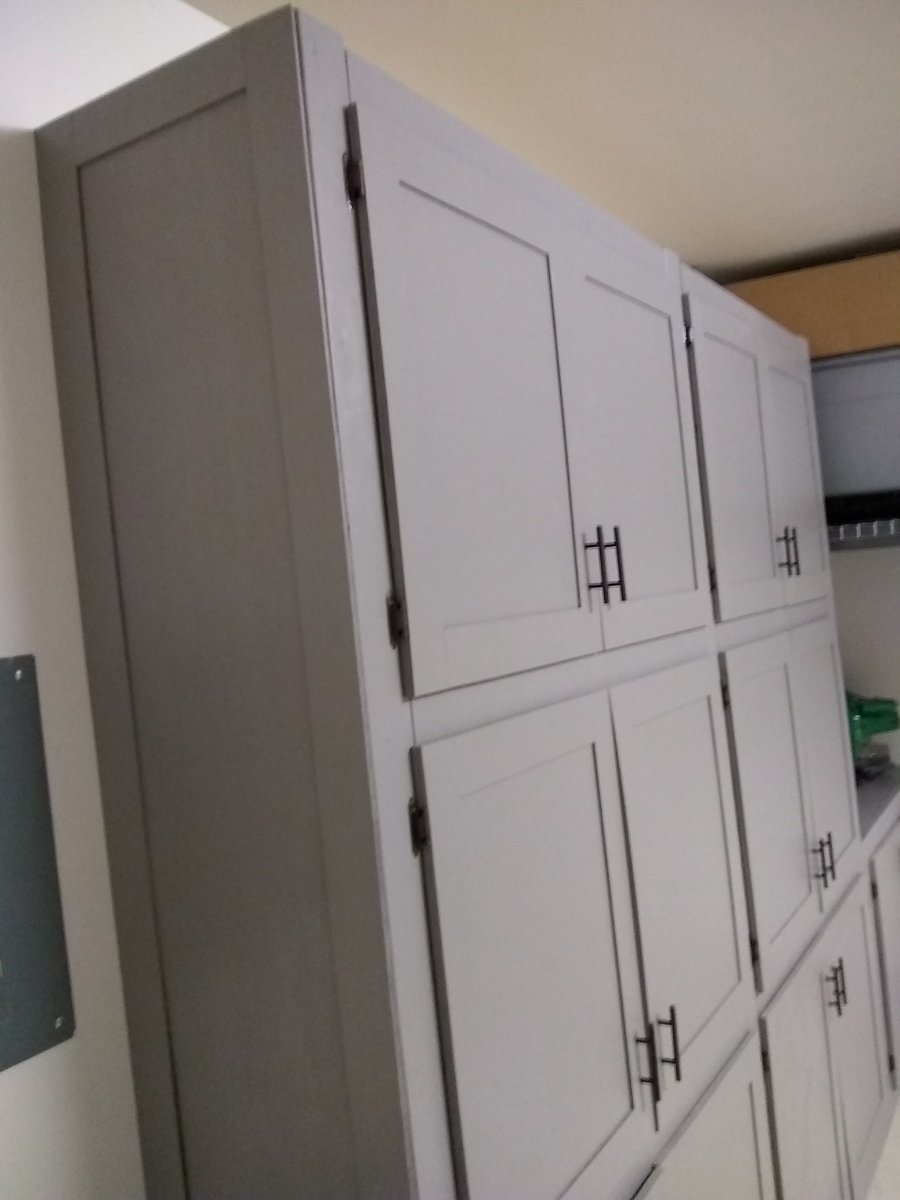
Built from Plan(s)
Estimated Cost
About $300 not including some tools I needed to buy anyway.
Estimated Time Investment
Week Long Project (20 Hours or More)
Finish Used
Interior satin
Recommended Skill Level
Beginner
Comments
Wed, 06/19/2019 - 13:20
What kind of paint did you…
What kind of paint did you use? Looks really nice, the whole thing!

Thu, 07/18/2019 - 10:28
This is amazing! Thank you…
This is amazing! Thank you for sharing so much detail on your project too.
Wed, 06/10/2020 - 13:14
measurements
Can we get detailed plan of how you made this from the start to end like a material list and cut list.
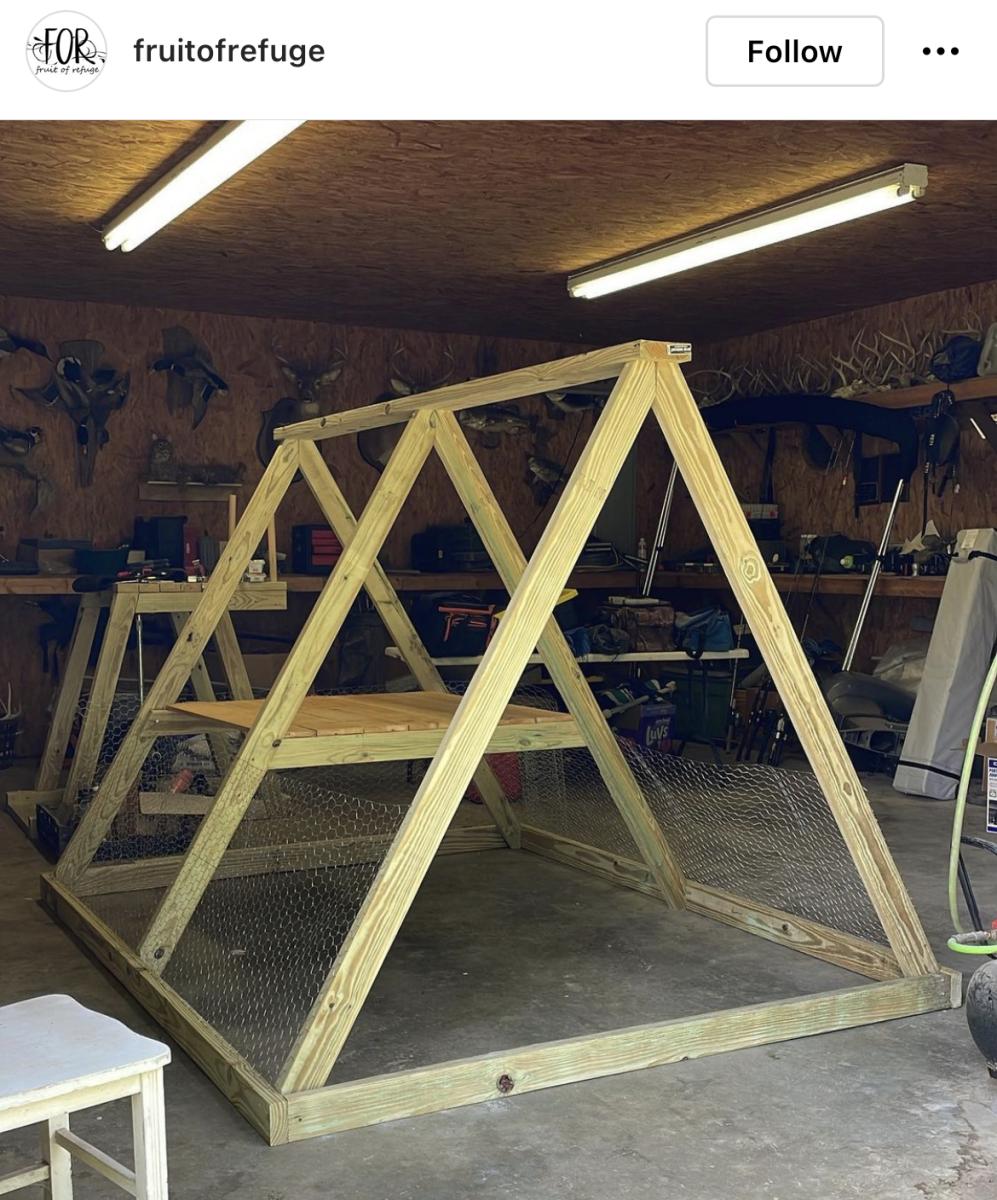
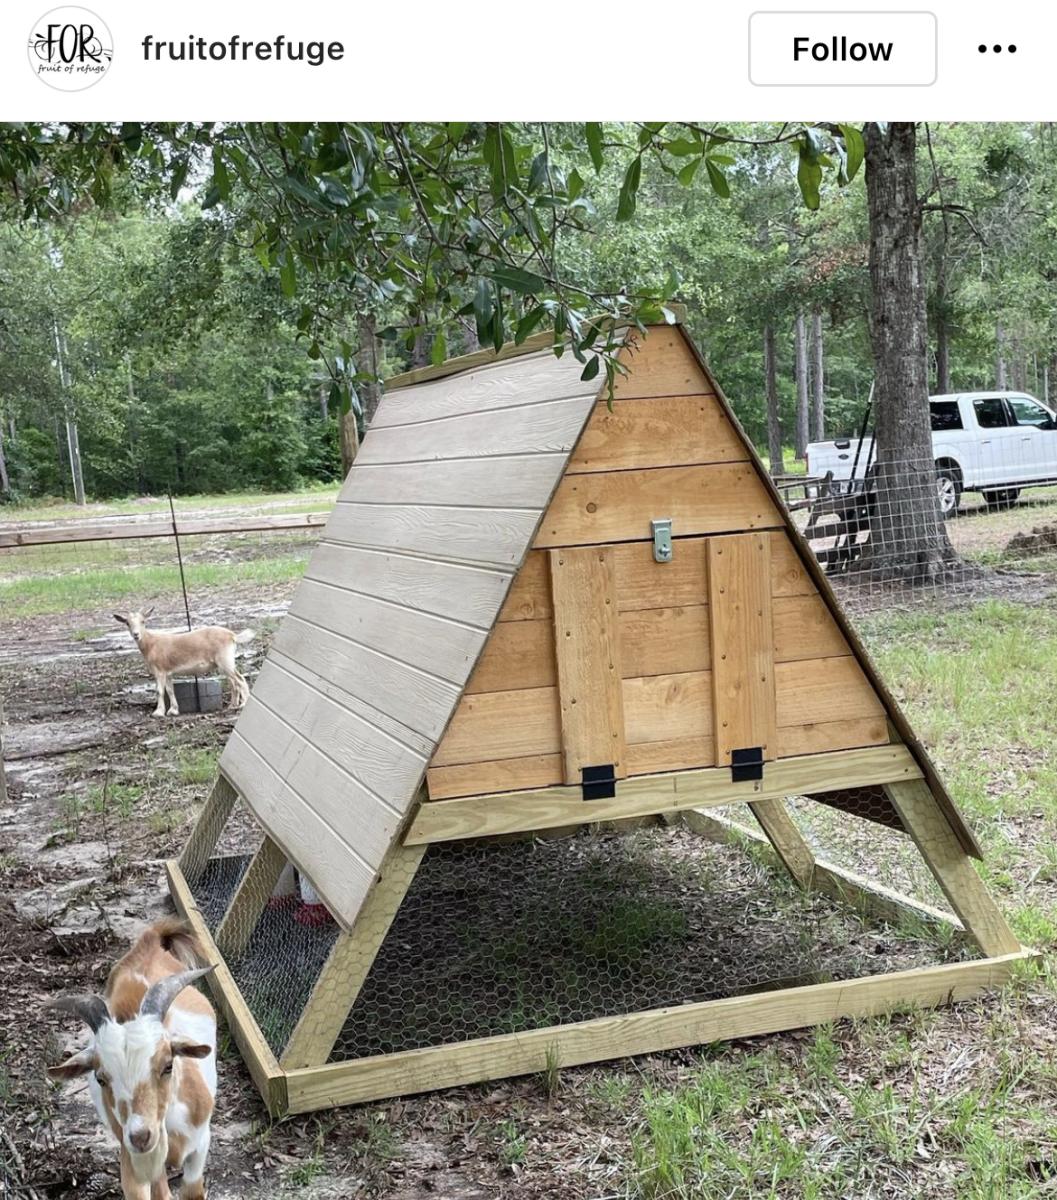
Chicken Coop
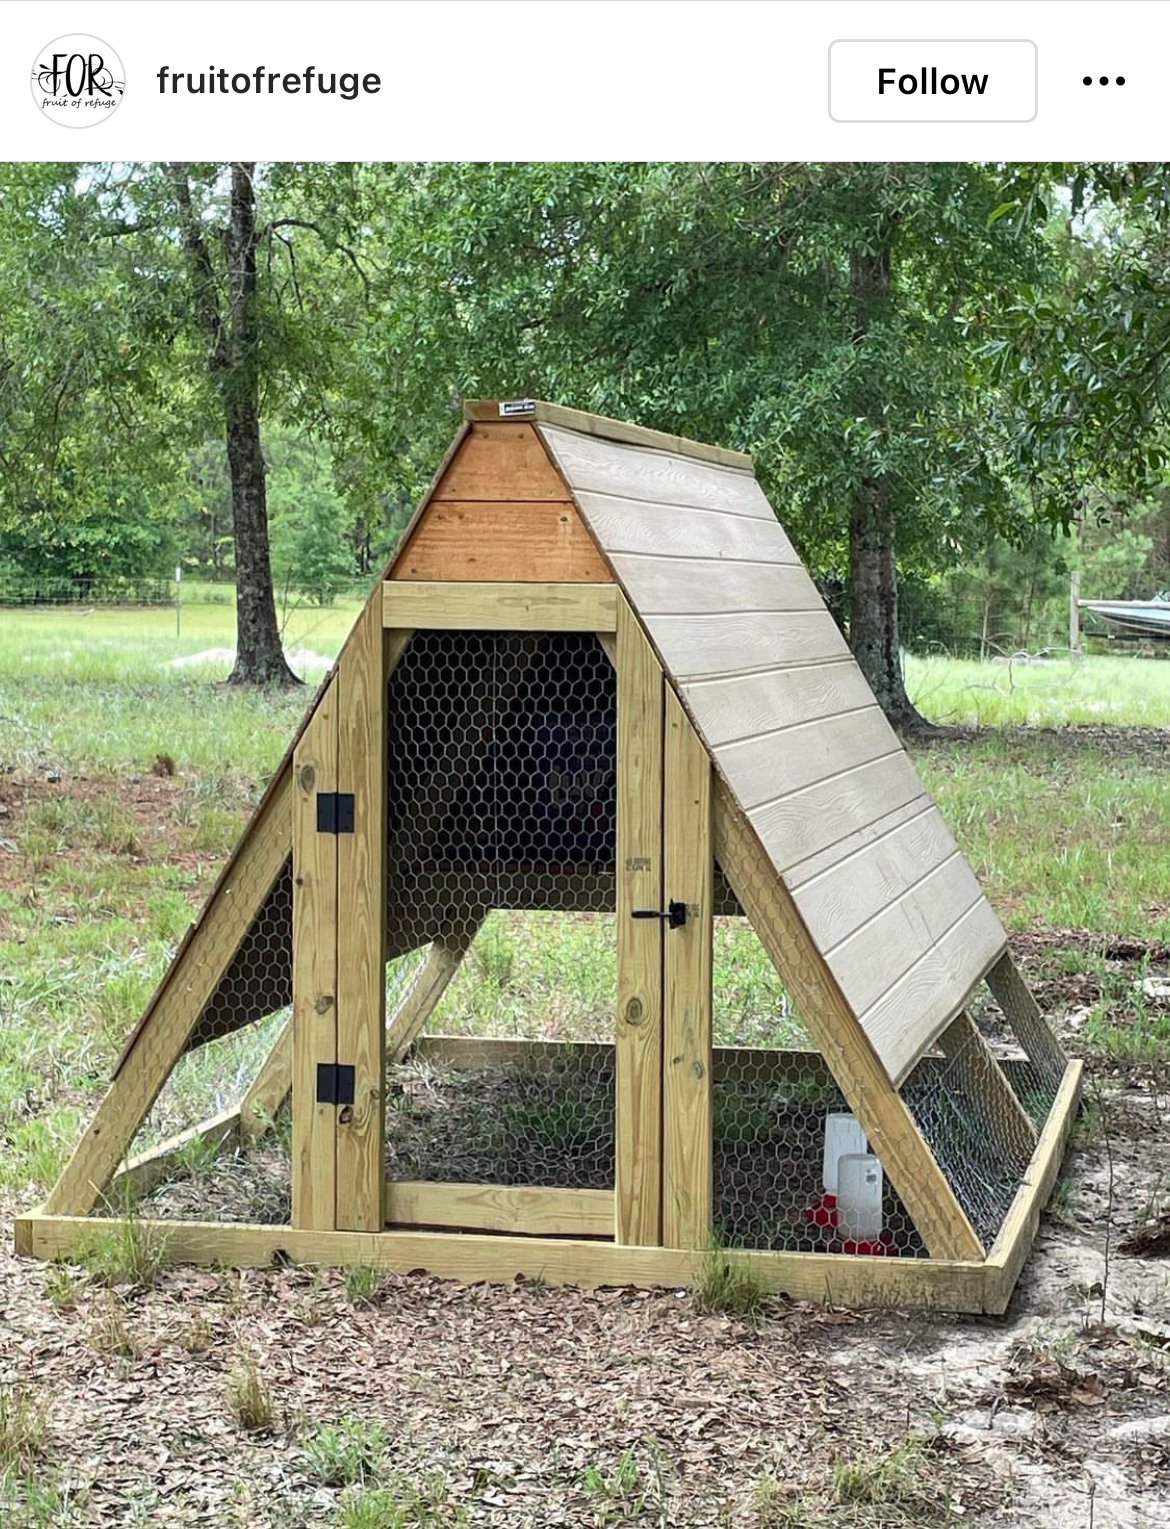
Great for a small flock of 5 or less.

Built from Plan(s)
Comments
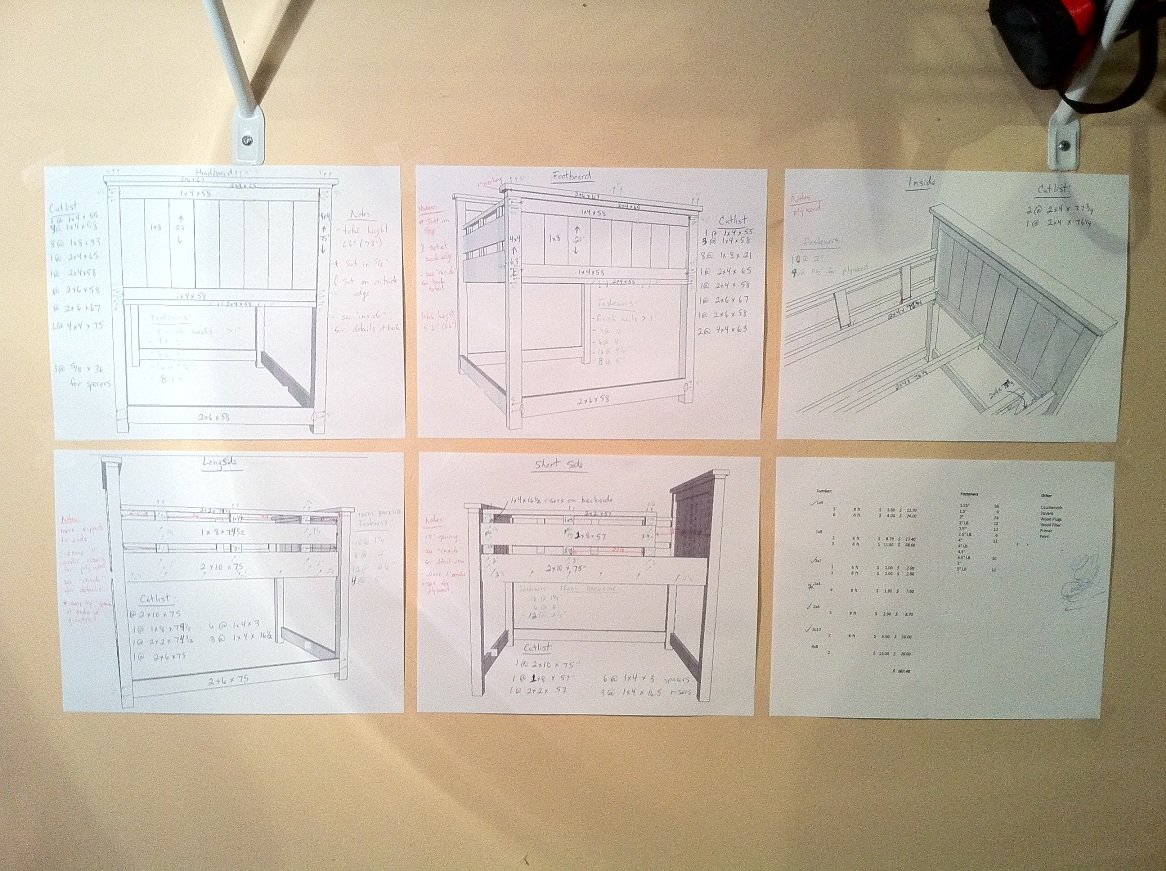
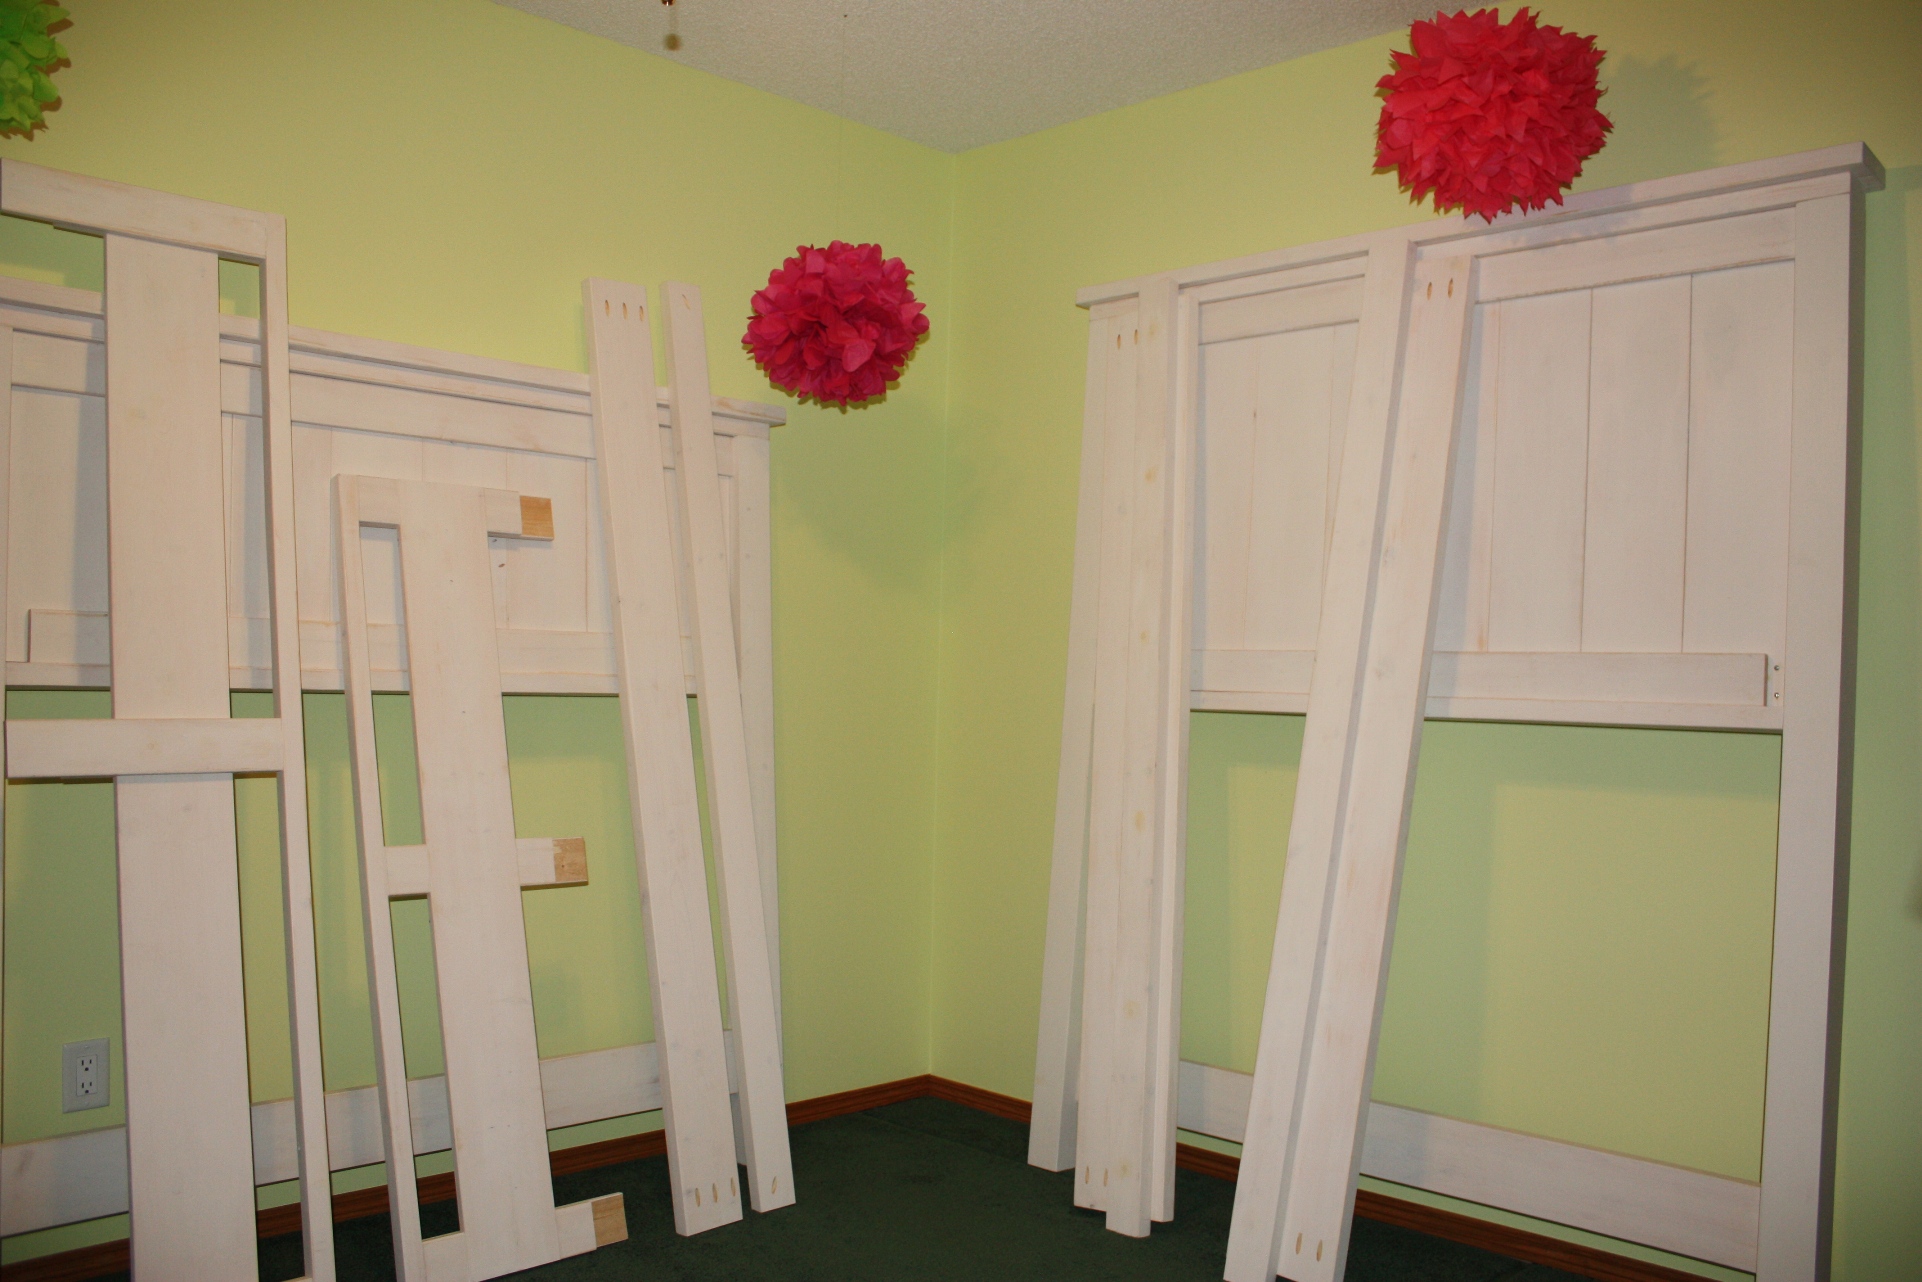
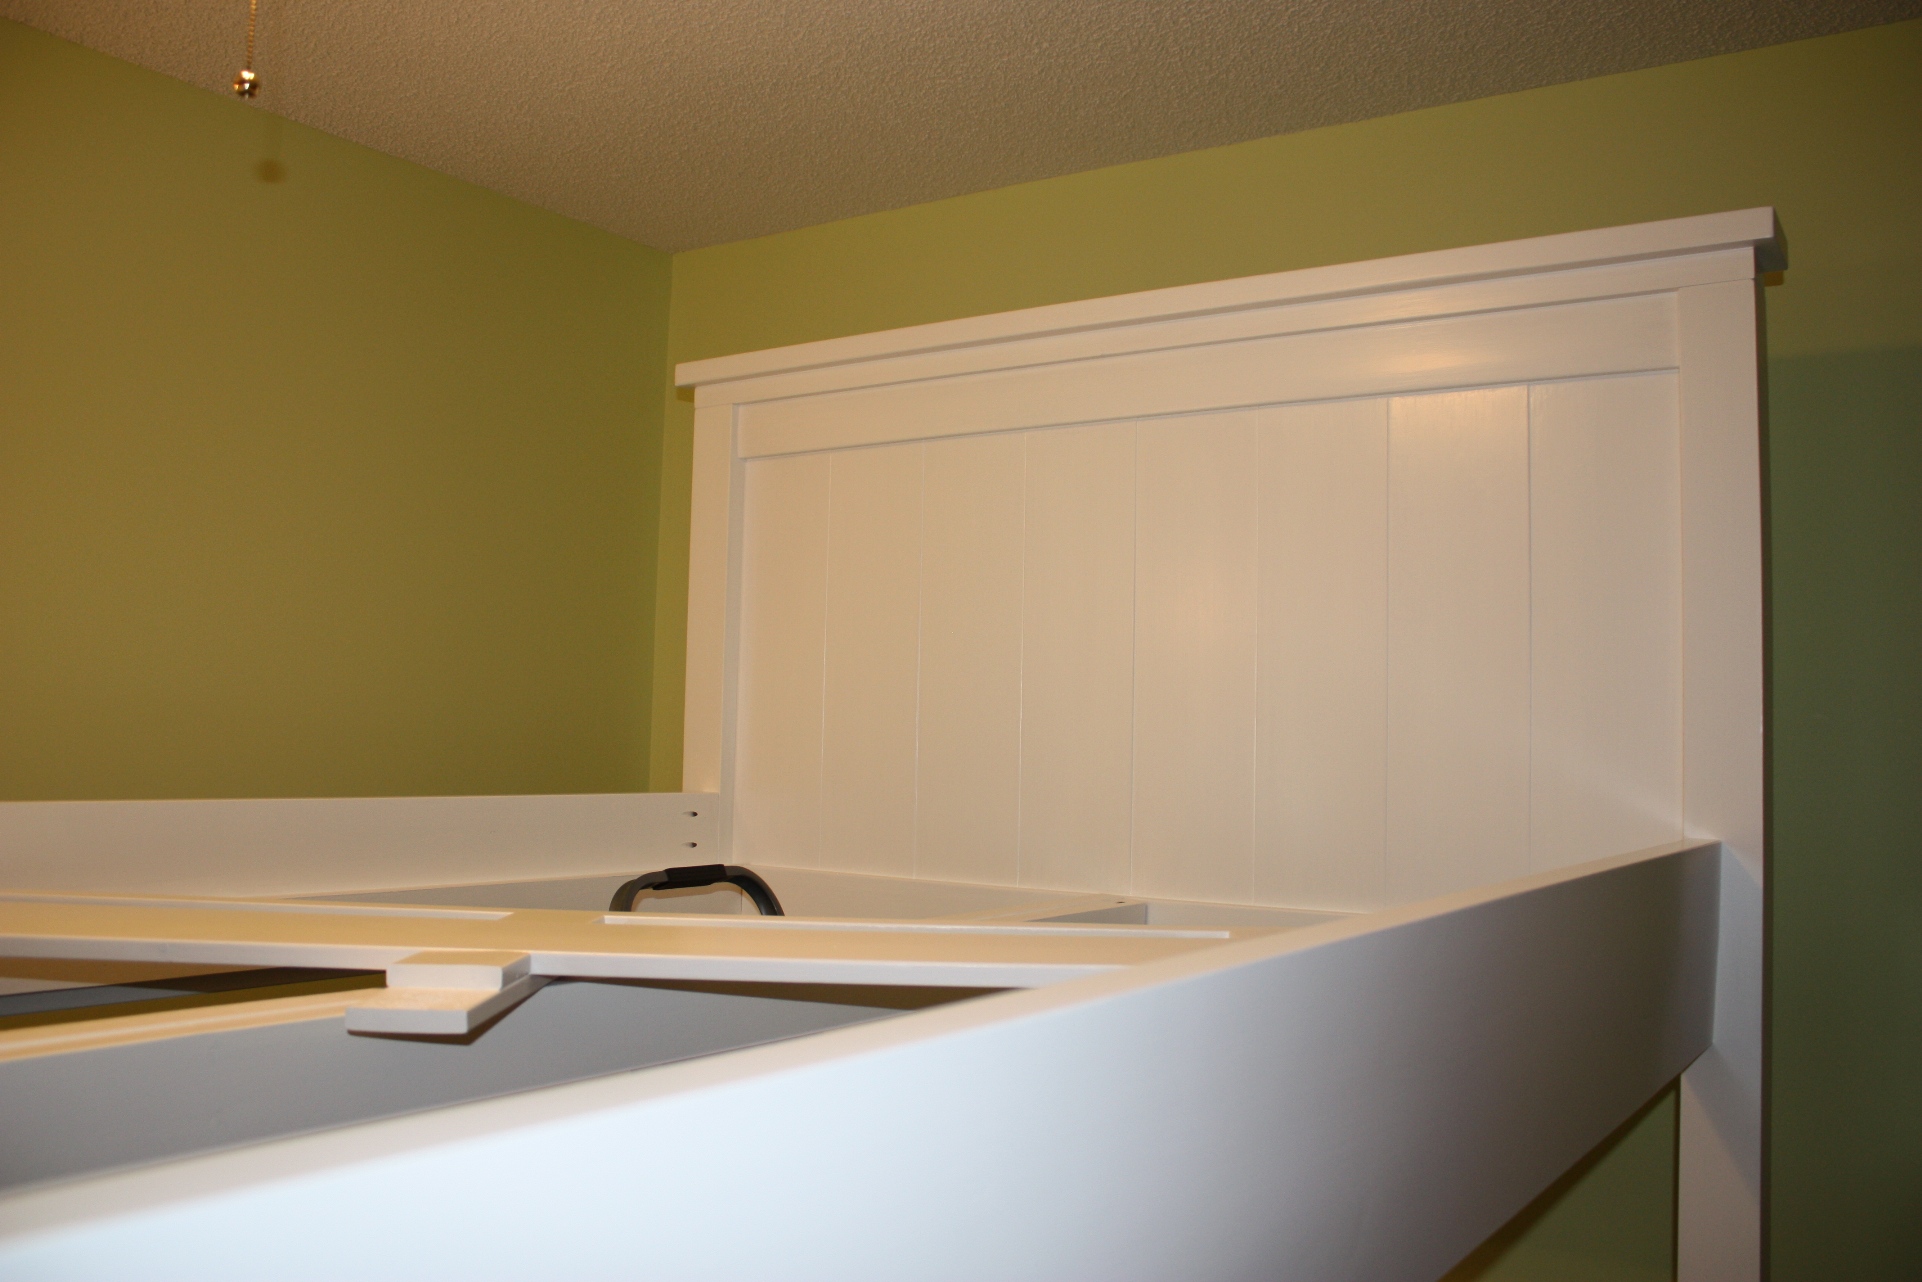
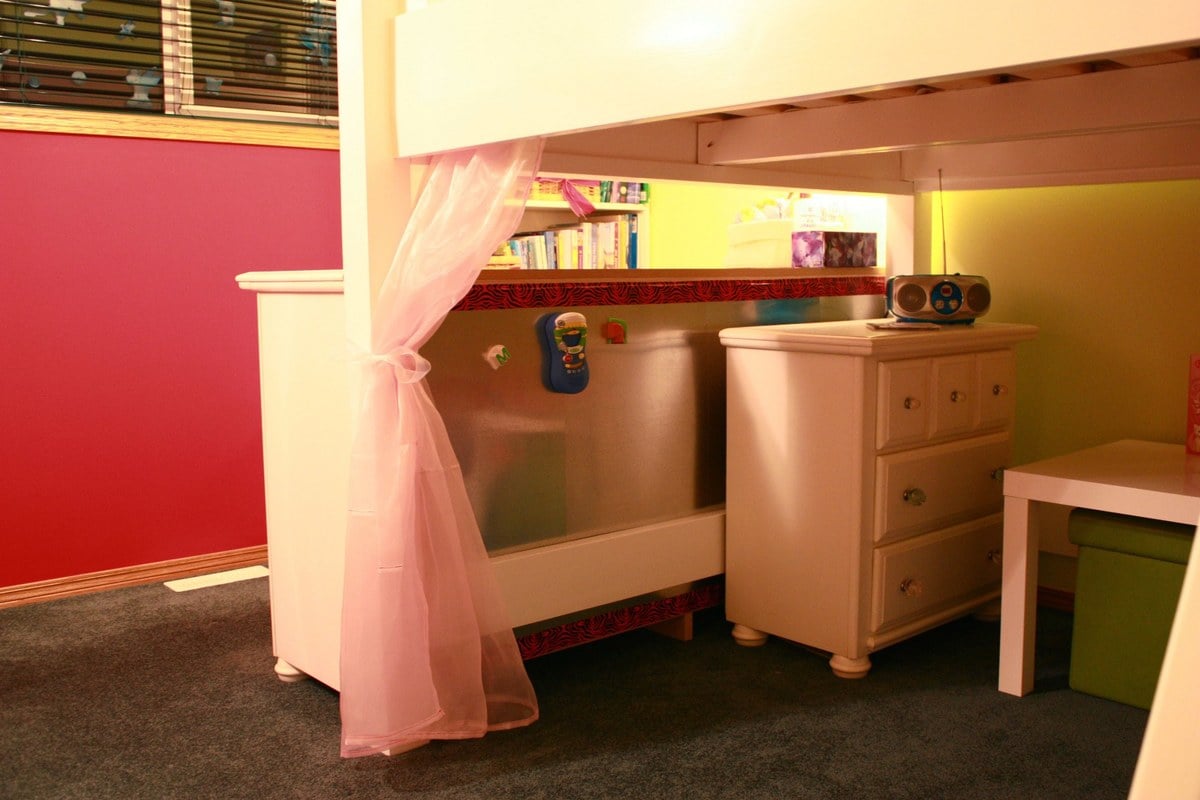
Farmhouse Loft Bed for Double Mattress, Not too low, not too tall!

We couldn't find a mid-height, double loft bed for our daughter that we liked that wasn't ridiculously expensive, so we decided to build one ourselves! I found some awesome plans on this website and played around with a few until I created exactly what we wanted. I mostly used the Full Size Farmhouse Bed plan but also used some aspects from the loft bed plan for the guardrails and the bottom rails. Then we went out and bought the wood and started building! This is really the first thing that I have ever built (my husband has never built anything either) and it turned out so well. I think it is gorgeous and I am so proud of it! This is my first brag post so forgive me if I am doing it wrong! Lots of instructions on how I built it below, so scroll down if you just want to see the pictures.
I used Google Sketch-Up to build the bed first and to tweak the plans. Below I will explain some of the changes that I made.
- I actually did not trim anything off of the ends of the head board or foot board as shown in the Full sized bed plans. I just built the bed to be as wide as 8 x 1x8s and adjusted the plan accordingly. I figured that if I had to climb up there to change the sheets, the extra room around the mattress would be appreciated. The 1x8s that I used were 7 1/4" wide.
- I bolted a 2x4 to the 4x4 posts right under the foot board and headboard panels for the side rail supports to sit on. I wanted it to be extra strong as the bed was going to be up high and I figured the bed would take a lot of abuse from the kids.
- The siderails were made from a 2x10 glued and screwed to a 2x4. The 2x4 sits on top of the 2x4s at the bottom of the headboard and footboard panels and is screwed into the 4x4 posts. The 2x10s are also screwed into the 4x4 posts.
- Since the mattress would be sitting up higher on the headboard and footboard than in the original plans, I added 3" to the length of the 1x8s used in the panels.
- I had planned to make a slatted base out of 1x4s to support the mattress so I also placed 2 x 2x4s on edge lengthwise down the middle of the bed to support the slats. Those 2x4s are also supported on top of the 2x4s at the bottom of the head and foot boards. The inexpensive 1x4s here are very rough on the one side which I did not want touching the mattress or for the kids to get splinters from while playing under the bed. The nice ones were super expensive at around $18 for a 14' board. It turned out to be less expensive and much less work to buy a queen sized slatted bed base from the big Blue and Yellow inexpensive furniture store here and trim the ends of the boards to length with my mitre saw. n even bigger bonus is that the wood is already finished and didn't require anything further than screwing it down to the supports.
- I made the height of the area under the bed 45" (just tall enough for DD to stand under for now) and adjusted the length of the 4x4 posts accordingly.
- I assembled the bed into different large pieces before bringing it inside. The headboard and footboard are 2 solid sections that cannot be taken apart. The side pieces are made to be able to come off if we ever need to move the bed.
- I couldn't find any really good instructions anywhere on how to build a ladder or to change ladder plans to suit our needs so I built it after the bed was built. I found it easier to envision this way and to figure out the angles. I build the ladder out of 2x3s.
I have the Google Sketch-Up plans for the bed (minus the ladder) if anyone is interested, but as I said before, I am not an experienced builder so I do not think I should post them here. Maybe someone can use them as a base to create their own plan with though. I found Sketch-up to be a very valuable tool as I actually "built" the bed virtually before ever touching the wood. It helped me figure out what order to put things together in and also allowed me to perfect my design before making any cuts. It still took many trips to and discussions with people at my local Orange store to figure out what kind of fasteners to use and where to use each type. I brought printouts of my plans so that they would be able to help me better.
A couple of finishing touches that I did:
- I sewed some pretty curtains and hung them from aircraft cable and eye hooks under the bed.
- The back of her dresser was exposed under the bed and did not look very nice so I created a magnetic wall by screwing some inexpensive metal sheets meant for ducts to the back of it. I have temporarily covered all of the exposed edges with pink patterned duct tape but plan to trim it out at some point.
Hope you like it!

Built from Plan(s)
Estimated Cost
$500 - $600
Estimated Time Investment
Week Long Project (20 Hours or More)
Finish Used
I sanded every piece of lumber starting with 50 grit sand paper down to 120 grit until each one was smooth. Then I filled in any large knots with wood filler, sanded and then primed. I sanded the primer down again to get rid of the brush marks and make it smooth. I did all of this before cutting the boards to length as I figured it was easier to work on fewer long boards than on more short boards. This prep work definitely took the majority of the project time.
After the bed was assembled, I put the first coat of paint on the back of the headboard (to test it out where no one will see), I found I didn't like how the paint was sitting in the gaps and seams so we went around the entire bed and used Dap Alex Paintable Caulk to fill them in. We didn't fill the gaps in entirely as we wanted to keep the texture, we just filled them in enough so that the paint would sit on top of the Dap instead of flowing right through in some places. Then I painted the entire bed. I left the side guardrails off and painted them separately before installing.
The paint used was Benjamin Moore's Advance in Pearl finish. The colour is a warmish white called Polar Bear. BM's Advance paint is a water-borne alkyd paint so (from what I was told) it acts like an oil paint but cleans up like a latex paint. I do not have any experience painting with oil-based paints. I originally tried to roll the paint on with a foam roller as advised at the paint store but I did not like how the finish looked. Again, it was just the first coat on the back of the headboard that no one will see. It left lots of tiny little bubbles in the paint. I eventually settled on rolling the paint on with a microfibre roller and then brushing it out with a natural bristle brush. You can see still the brush strokes, but they are fairly subtle and I actually like how they look. It only took two coats and I love how the finish looks. Painting with this paint probably took a little longer than if I had used another type of paint as you need at least 16 hours between coats and then 3-5 days for it to cure. Hopefully it turns out to be as durable as advertised and it was worth it. It was also quite pricey at $70/gallon here in Alberta but I only used just over half of the can so I will be able to use the rest for the next project.
Recommended Skill Level
Beginner
Comments

Thu, 12/01/2011 - 05:27
I am so impressed!
I can not believe you tackled this for your very first project! You should be so proud as it came out beautiful! Your daughter must be thrilled!!!
Fri, 05/03/2019 - 04:15
Loft Plans
Hello DirtSquirt,
My granddaughter just asked me to loft her queen bed and loves your plan. Is it still possible to get the plans you made up so I can modify for queen. Thank you
tomjnc5
Sun, 12/11/2011 - 01:34
Love this Bed Plan
I have been googling some many website for a full size loft bed and came across this one at 4am Sunday. Can you please send me the mesurements and plan for this bed. I would love to build it just the way you did.
Fri, 01/05/2018 - 21:53
Plans for full loft bed
hi I know this is a old post but can I get the plans? My husband needs the direct directions. farraha97@hotmail.com also look into we transfer, you can upload big documents up there and just post the link then people don’t have to bug you all the time they can just download it. Hope that helps you.
thanks for your time.
Thu, 12/29/2011 - 14:34
Google Sketch-up plans
I LOVE this bed. I do not know how to use google sketch-up but we are wanting to build the farmhouse into a twin loft bed and the plans you used would definitely help us figure out how. If you could send me your plans Id really appreciate it and Ill somehow figure out how google sketch-up works. Thank you so much for sharing!
Fri, 05/11/2012 - 15:04
LOVE IT!!!!
Can you please send me your plans we are trying to do almost this exact thing for our twins!!!
Thu, 05/24/2012 - 16:22
Just what my son needs
Could I get a copy of the plans. This will give him more space without having to get a smaller bed. shannonreneesimpson@gmail.com
Fri, 12/30/2011 - 06:44
King
Will you please send me a copy of the plans as well? email is mockdaddy78@yahoo.com. Thanks
Fri, 12/30/2011 - 11:48
Gorgeous! Would love to use your plans!
This is wonderful! Can you send me the plans? Thank you sooo much!
Wed, 01/04/2012 - 13:15
Plans pretty please!
I love your project!! Could I get a copy of the plans as well? Thanks!
Wed, 01/04/2012 - 13:17
PLANS PRETTY PLEASE (w/ EMAIL ADDY)
Could I get a copy of the plans as well? Thanks! Sorry forgot to include email address it's: on3003in2002yahoo.com

Thu, 01/05/2012 - 21:53
Plans Sent
I did send plans to those who included an address, but I'm not sure how to get them to the rest of you!
Fri, 03/02/2012 - 21:15
Can I get a copy of your plans?
Sun, 03/25/2012 - 18:28
Please send me the plans
Hi,
Could you please send me the google sketch up plans? I.m looking to build a loft bed for my 11 year old daughter. Please email it to hnguyen1981@gmail.com.
Tue, 06/26/2012 - 11:10
Google Sketch Plans - Farmhouse Bed
Hi DirtSquirt,
I'm digging your bed and would like the plans if you would be willing to send them.
Thank you in advance!

In reply to Plans Sent by DirtSquirt
Wed, 05/20/2015 - 00:18
plans
Please send the plans i am dying to try this bed.
Thu, 01/19/2012 - 10:27
PERFECT loft bed
Any chance I could get your Google Sketchup plans too? We are moving soon and want to do something like this for both of our kids. Thank you! jennyphillips421@yahoo.com
Wed, 01/25/2012 - 08:22
plans
I LOVE THIS!! Can i please get the plans sent to me as well?
lchavez28@gmail.com
Thank goodness for your post on here, we are planning to start building on Friday and I couldnt have found it at a better time! =)
Sat, 02/04/2012 - 17:36
Please! You've done awesome!
Could you please send us your plans? Our email is heathermthomas@ymail.com
You did amazing, thank you for sharing what you've done! Our daughter is SO excited!! :)
Sat, 02/04/2012 - 17:37
Please! You've done awesome!
Could you please send us your plans? Our email is heathermthomas@ymail.com
You did amazing, thank you for sharing what you've done! Our daughter is SO excited!! :)
Sat, 02/04/2012 - 17:49
Could you please send us your
Could you please send us your plans? Our email is heathermthomas@ymail.com
You did amazing, thank you for sharing what you've done! Our daughter is SO excited!! :)
Sat, 02/04/2012 - 20:05
awesome bed!!
What an awesome bed! I am trying to build something like this for my 8 year old. Could you sen d me the plans? Allyson211@verizon.net Thanks,
Mon, 02/06/2012 - 06:50
Please Send Plans
Could you please send these plans to
megryan1@frontier.com ?
I love it!. I have been looking for loft bed plans that are of mid height for a while.
Thanks!
Mon, 02/06/2012 - 21:15
Farmhouse Loft Bed Plans
Congrats on your project! It looks like something that would cost $1000 ++ at any store. I too would like a copy of the plans. I'm envisioning a distressed and stained version for my son. Thanks! quintilio@shaw.ca
Wed, 02/15/2012 - 16:19
Would love the plans too!
Actually just purchased a floor sample loft bed for our son today...having 2nd thoughts because it seems cheap...so I browsed Ana's site...and WOW! This is WAY better - love the design. Am hoping you could please send the plans our way too...we are all so envious! Thanks! thelussos@gmail.com
Mon, 03/26/2012 - 16:16
THX!!!!!!
THANK YOU SO MUCH for sending the plans so quick. We ended up building the bed, but in twin size for our son....took us about 3 weekends to finish....and it's incredible! I don't know how to post a pic here, but thx so much Marcie....we ended up building a forward facing bookshelf too bc once we got this huge bed in, there was not enough room for his standard bookshelf
Wed, 06/27/2012 - 07:44
Do you have the Farmhouse Loft Bed Plans?
I'd like to get the plans for this bed, but DirtSquirt seems to have closed their account or something. I'd appreciate it! kevin@borschels.com
Mon, 01/26/2015 - 08:28
plans
im trying to get the plans for this bed, but I guess since this post is so old.. she is no longer looking at the comments!! can you email them to me?? carlye.Hopkins@gmail.com
Mon, 01/26/2015 - 08:28
plans
im trying to get the plans for this bed, but I guess since this post is so old.. she is no longer looking at the comments!! can you email them to me?? carlye.Hopkins@gmail.com
Mon, 01/26/2015 - 08:28
plans
im trying to get the plans for this bed, but I guess since this post is so old.. she is no longer looking at the comments!! can you email them to me?? carlye.Hopkins@gmail.com
Mon, 01/26/2015 - 08:28
plans
im trying to get the plans for this bed, but I guess since this post is so old.. she is no longer looking at the comments!! can you email them to me?? carlye.Hopkins@gmail.com
Mon, 12/03/2018 - 08:02
If anyone has these plans,
If anyone has these plans, can you please, PLEASE, please message me to email them?! I desperately need these plans for my daughter. Thank You!
Wed, 02/15/2012 - 20:09
PLEASE...OH, PLEASE... SEND ME THE PLANS TOO!
This is so beautiful! Can you please send me a copy of the plans? a.jimenez.grande@gmail.com
Thanks!
Fri, 02/17/2012 - 10:10
Nothing short of AMAZING. True talent.
Holy crap! Could I please get the plans sent to me? The bed is nothing short of AMAZING.
Mon, 02/20/2012 - 15:40
Farmhouse loft bed
This bed is so beautiful, it is exactly what I was looking for. My husband and I have never built anything before, but with the right directions I think that we could totally manage this project. Could I please get a copy of your plans so that we can make this bed for our 13 year old for her birthday. Thank you so much.
Brandi
Mon, 02/20/2012 - 15:46
So beautiful
I would love to have a copy of your plans. This bed would be perfect for my daughter. Thanks so much
Brandi
Mon, 02/20/2012 - 19:47
I have sent the Sketch-Up
I have sent the Sketch-Up files to all those who have supplied some way to contact them. I'm sorry that I can't send them to those with no contact info. :( I feel badly if you are waiting for them...
In reply to I have sent the Sketch-Up by Guest (not verified)
Tue, 05/19/2015 - 01:40
plans
Hello,
I am looking for the plans to this bed as well. I created a comment on your post but i am not sure if you received it as the post seems quite old.
I am new to this and there is no way I could build that bed without the plans and instructions.
I am also new to google sketchup I am shocked that you were able to do this plan up in it. I downloaded it and couldn't even draw a line never mind a 3d bed plan?
In reply to I have sent the Sketch-Up by Guest (not verified)
Wed, 05/20/2015 - 00:21
plans
Please send the google sketch plans for the farmhouse loft plans I understand dirt squirt is no longer replying and I desperately want to build the bed for my son
Tue, 02/21/2012 - 07:17
Plans?
HI-
Your bed is beautiful. If you don't mind, could you send me a copy of your plans? My email address is ericamatt@msn.com.
Thanks!
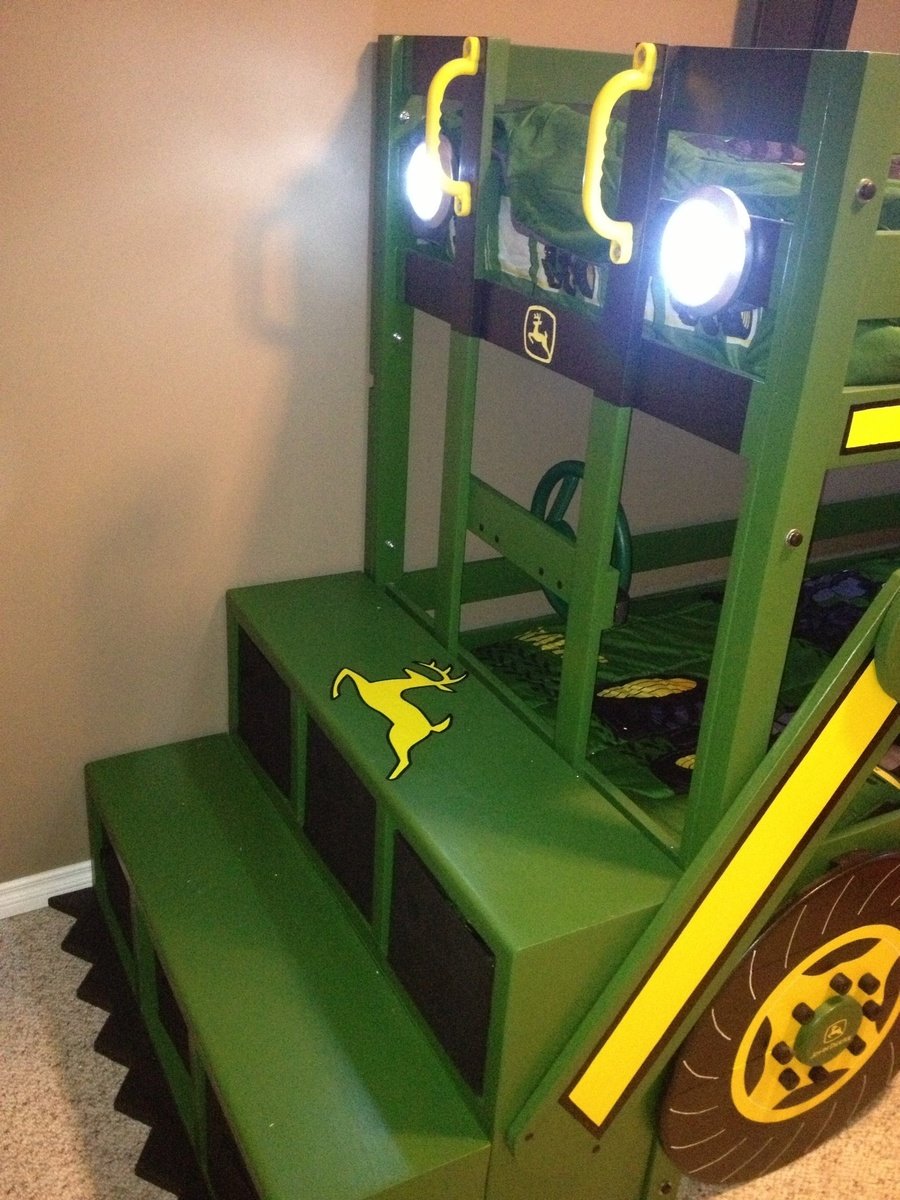
John Deere Tractor Bunk Bed
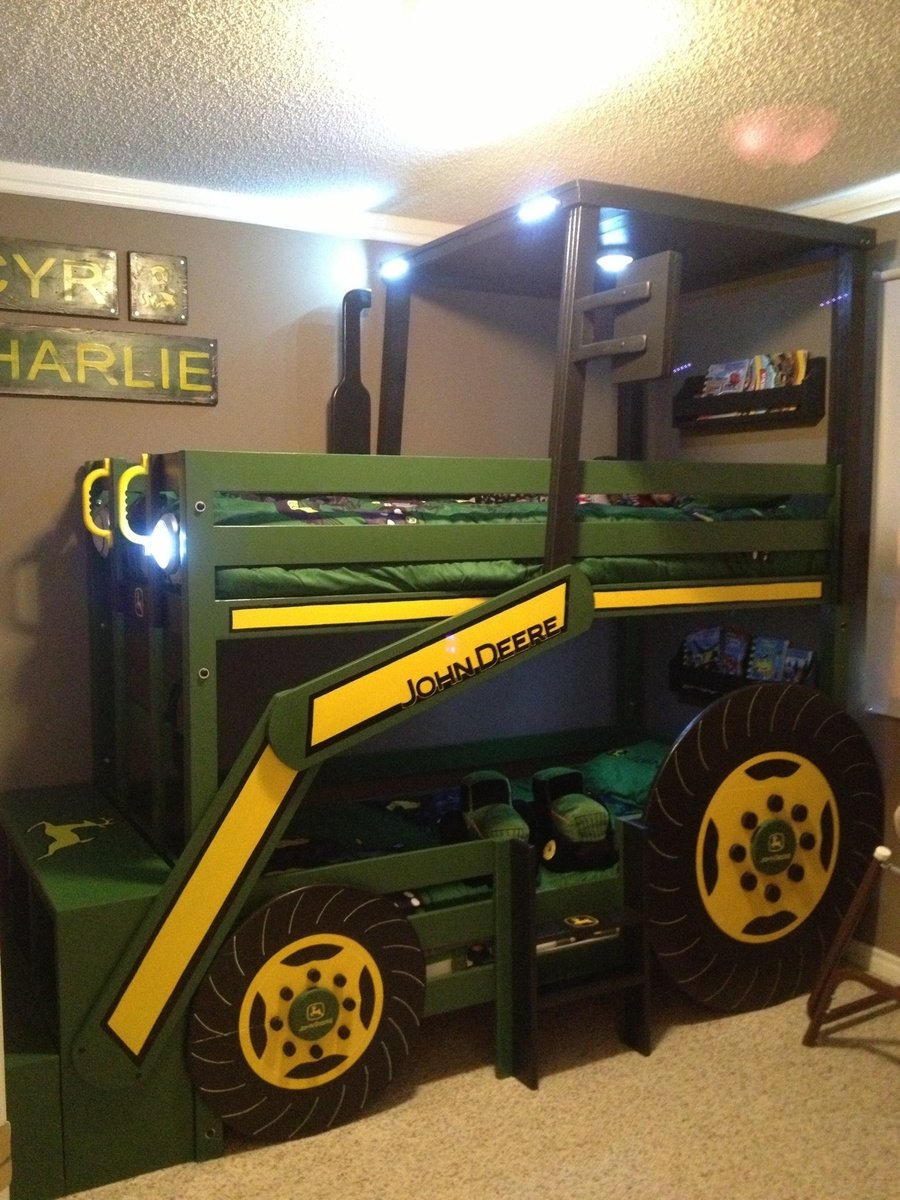
With another baby boy arriving in August, my one and three year olds are moving to a "big boy" room. My oldest decided he wanted a bunk bed and as they both are obsessed with tractors, when I saw the "John Deere Tractor Bunk Bed" plan, I was sold.
We would be needing a twin sized bunk bed though not a toddler. I used the classic bunk bed plans and simply modified them to suit our needs. I moved the ladder to the front, added a rail on the bottom bunk and added a small ladder to the side for my one year old to climb into the bottom bunk.
Once the the frame of the bed was complete, I added the tractor accessories. A couple of storage cubby shelves with fabric baskets for toy tractors which act as stairs up to the ladder and make the tractor bucket at the front. Also, the wheels which are made from joined 1x6s as I find plywood hard to sand and paint to the quality of finish I like. A cab & roof from 1x4s framed together. A side mirror that I decoupaged a picture of another tractor on. I used push lights for the headlights as well as a reading light above each bed (they're on timers so they'll turn themselves off). A steering wheel (play equipment access from toys r us). Also, I built and mounted by the head of both beds a "flat wall book holder" so they would have somewhere to store a few books.
My boys and I are fairly new to building so I spent a lot of time planning and measuring to ensure it would all come together in the end. It paid off because it all went smoothly (even with "help" from my boys). It's not perfect but they're very happy with the result. We also built a John Deere themed "Just my size closet" and even finished with over a month to spare before the new baby arrives! :)
Just want to say a quick thank you to Ana both for the amazing plans and also the inspiration to take on these projects. The time spent with my boys building as well as the resulting treasures are priceless and I would have never realized what we were capable of had I not stumbled upon your website and been so inspired by you and everything you've accomplished. Thank you!
Built from Plan(s)
Estimated Cost
$550.00
Estimated Time Investment
Week Long Project (20 Hours or More)
Finish Used
John Deere Green paint (home depot was able to color match a toy tractor), marigold yellow and black and polyurethane.
Recommended Skill Level
Beginner
Comments
Thu, 10/09/2014 - 14:12
This is amazing!!
I am new to this and I was wondering were to find the measurements for the twin size bed? I would love to make this for my boys!!
Mon, 10/20/2014 - 13:10
Plans Please
HI! You did an amazing job with this! Is there any way you can post the plans or send them to me? Thanks in advance.
Mon, 11/03/2014 - 07:48
Plan Request
Sorry for the slow response to those requesting plans. For main structure of the bunk bed, I used Ana's "Classic Bunk Bed" plans. For all of the add-ons, I made up my own plans. I'm pretty low tech so unfortunately they're just pencil & paper plans but I'd be happy to scan and email them to you if you're interested. Just message me and I'll send them your way. :)
Fri, 11/21/2014 - 13:26
Love your plan
Can you please email me your plans? AaronTKesler@gmail.com. Thanks!
Thu, 07/09/2015 - 19:48
Did you get tree bunk bed plan?
I was just wondering if you by chance got three bunk bed plans?? If so would you be willing too send them my way??? lilbgirl_11@hotmail.com thanks so much
Thu, 05/26/2016 - 14:54
Plans please!
I know that it has been a while, but did you ever get plans for this bed? If so, will you please forward them to me at kerrilux@gmail.com? Thank you!

In reply to Plans please! by kerrihicken
Sun, 02/12/2017 - 07:36
plans
if you recieved plans for this can you please forward them to me timburke40@gmail.com
Fri, 01/02/2015 - 12:36
If you wouldn't mind sharing
If you wouldn't mind sharing with me also I would love a copy. Email ... brenneman826@aol.com This is by far the BEST tractor bed I have seen online! You did an awesome job!!!!! Hopefully I can recreate!!!!
Mon, 01/05/2015 - 08:44
AWESOME!!!!
I love this! You did an amazing job! Could you please send the plans to ericaelijah08@yahoo.com
Thank you so much!!
Wed, 01/28/2015 - 14:08
Plans Please
Hi Veronica, Well done fantastic job! Two little men who want to move in together because of a new addition on the way. Their request though is a John Deere Bunk Bed! would be grateful if you could forward on your plans if you have time, Kindest regards.

In reply to Plan Request by Veronica P
Thu, 01/29/2015 - 07:18
Plans for making this John Deere Bunk Bed
Hi, I would love to get a copy of the plans used to make this bunk bed for my grand kids. Have two grandkids and a third one due the middle of February so got to get a bed made quickly for them to have a great bed to sleep in when staying with nana and pa. Plans can be emailed to me at dianaspetsnoopy@yahoo.com 731-415-9666. Thanks Diana
Mon, 02/02/2015 - 07:31
This looks so great. Could I
This looks so great. Could I get a copy of your plans? Thanks frank-scott@roadrunner.com
Mon, 02/09/2015 - 21:06
John Deere bunk bed plans
I would love to receive a copy of of the Plans for the John Deere bunk bed. My email is inspiration120708@yahoo.com
Tue, 03/03/2015 - 10:43
Tracktor Bunk Bed
Can you please email me the plans. I have a 4yr old that is obsessed with John Deere. We would like to make this for his birthday. efuglsang@auspecialists.com
Thu, 03/05/2015 - 22:31
Love the jd bed
Just love the whole thing very beautiful & I was wondering if you could send me the plans for the whole set up. My email is lilmiscena@yahoo.com thanks
Mon, 04/06/2015 - 21:04
Bunk Bed
Hi Veronica, like everyone else i love your plans, could you possibly email them to me? Thanks in advance.
Thu, 05/28/2015 - 10:35
John deere bunk
Please send me the plans for the John Deere Bunk Bed. I love it.
Fri, 05/29/2015 - 09:06
Plans
Please send me your plans for the John Deere Bunk Bed in the twin size. neeley-hobbs@cherokee.org
Sun, 05/31/2015 - 23:36
plan request
Will you please email me the plans for the John Deere tractor bunk bed? Thank you. You did awesome
Tue, 06/09/2015 - 08:06
Plans for tractor bed
Hi! Can you please forward me your plans for the john deere tractor bed to linzst3@gmail.com?
Thank you so much and awesome idea!

In reply to Plan Request by Veronica P
Fri, 06/12/2015 - 19:31
John Deere Bunk Bed Plans
Please, please email these plans to me! My son will love this!!!! Email is aprilnave@hotmail.com. Thank you!!!
Thu, 06/18/2015 - 14:04
Tractor Bunk Bed Plans
Thanks for being willing to share your plans. Your tractor bed is amazing. I have 2 boys who would LOVE a bed like this. Could you please send your plans to mdemary22@gmail.com?
Thank you so much
Thu, 07/09/2015 - 19:22
please asap
could i plans get your plan emailed to me lilbgirl_11@hotmail.com
Sun, 09/06/2015 - 10:06
John Deere bunk bed plans
Dear Veronica,
Our grandson, 6 years old, will absolutely adore this bed. He loved riding on Grandpa's real JD tractor. Please send me your plans for the attachments. They are just darling and I could not do any better. Thanks for your generosity!
Fri, 01/15/2016 - 10:52
Can you please send me your
Can you please send me your plans? i am stumped on the arms of the tractor
Wed, 07/13/2016 - 12:12
Plans
Veronica P this bunk bed is amazing! Could you email me your low tech paper and pencil plans please? :) kallierae@live.com
Fri, 09/13/2019 - 21:11
Tractor bunk beds
Hi Veronica. My 3 year old just loves the tractor bunk bed. I was wondering if you would mind sending me the plans you have. It would be greatly appreciated. My email is Blake.meche@yahoo.com
Thanks in advance
Wed, 10/16/2019 - 17:56
Plan Request
If you're still sharing, we would love a copy of your add-ons plans.
Thanks,
MyMaw and PawPaw
Sun, 08/23/2020 - 11:32
tractor bunk bed
What an awesome build! We would love a copy of your plans if you could please share. Thanks!
thosedarnluedemans@yahoo.com
Thu, 09/05/2024 - 04:37
Do you still have the plans…
Do you still have the plans for the pieces you added on?
Mon, 12/15/2014 - 20:19
would love to have this plan
Would you please email me these plans for your bunk bed? Thanks A lot!!! email to austinholscher@hotmail.com
Thu, 05/26/2016 - 15:00
Tractor Bunk Bed Plans
Hi! I know that it has been a while, but I see a message where Veronica says she emailed you the plans. If you still have them, will you please send them to kerrilux@gmail.com. Thank you!
Tue, 12/16/2014 - 19:22
Is there any way I could have
Is there any way I could have email plans? L.o.outdoors@live.com . Thank you.
Sun, 12/21/2014 - 00:35
Plans
Please email the plans for this to davevisentin@hotmail.com
Thank you in advance!
Tue, 12/23/2014 - 07:33
Bunk Bed Plans Request
Hi Veronica! I would love an email of the plans to make this bed. My sons thinks it is out of this world!!! Thanks for all you effort and wonderful job.
Sat, 12/27/2014 - 15:12
Would you please consider
Would you please consider emailing the plans to me? We have started this for my son today and would love your insight on some measurements. Such a wonderful idea, thank you for sharing! alwardt_farms@yahoo.com
Tue, 01/06/2015 - 08:21
Plans Emailed
Hello all. I've tried emailing plans to all those who've requested them. I had some trouble attaching the files as they were large so if you didn't receive them, please let me know and I can resend. Thanks
Tue, 01/06/2015 - 11:53
Hi Veronica. I did not
Hi Veronica. I did not receive an email. Woul you have time to try again? If you email me your address I can send you my fax number if that's easier too. Thank you so much! I can not tell you how much I appreciate your dedication to this! alwardt_farms@yahoo.com
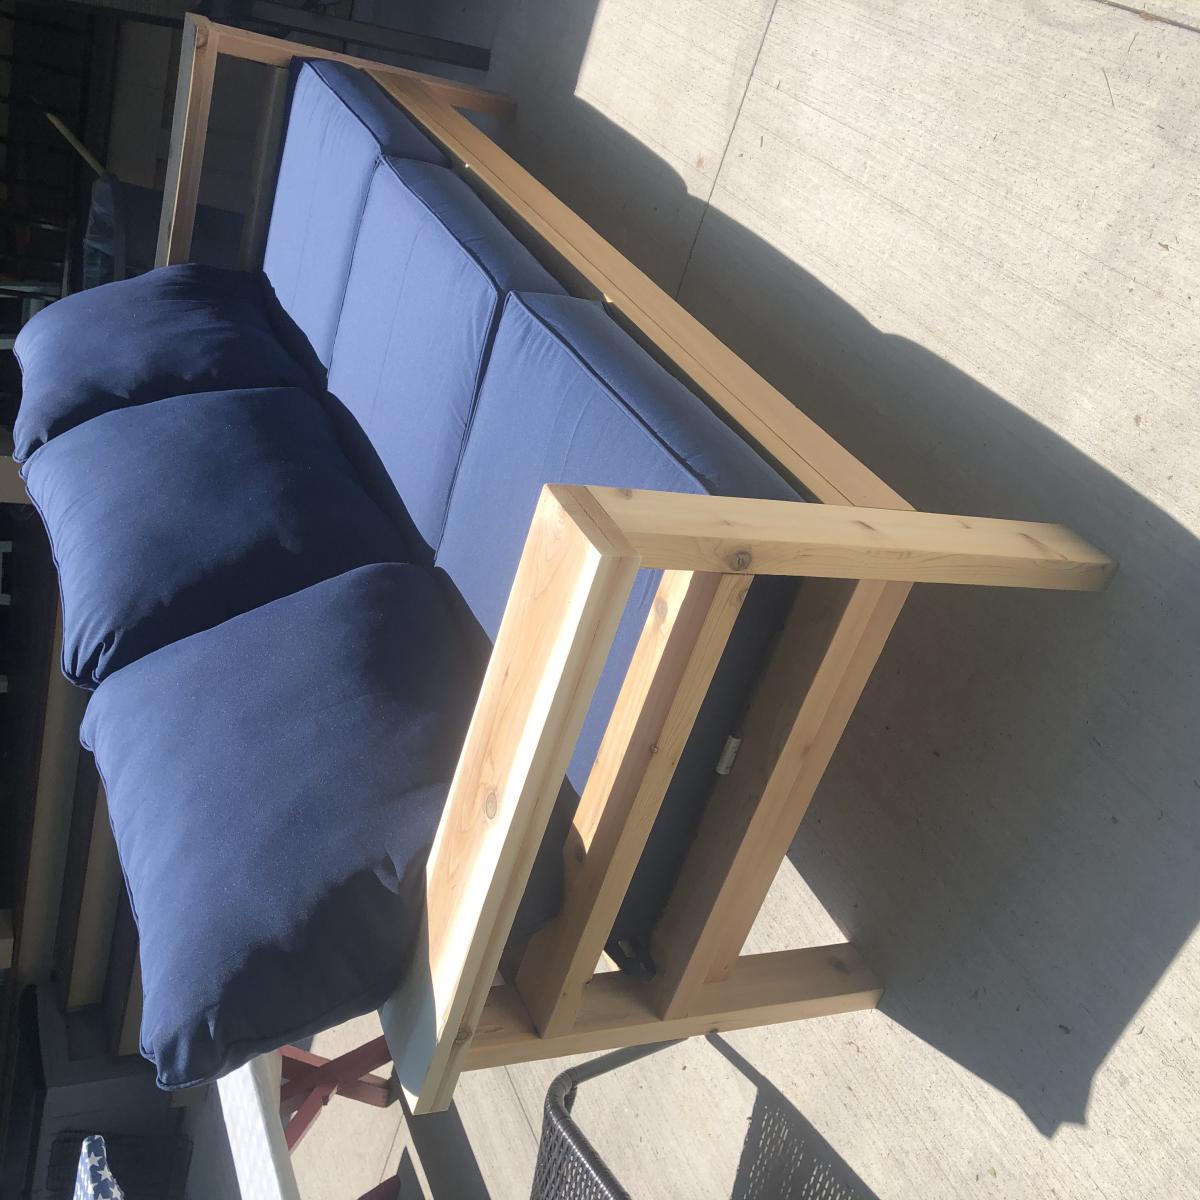
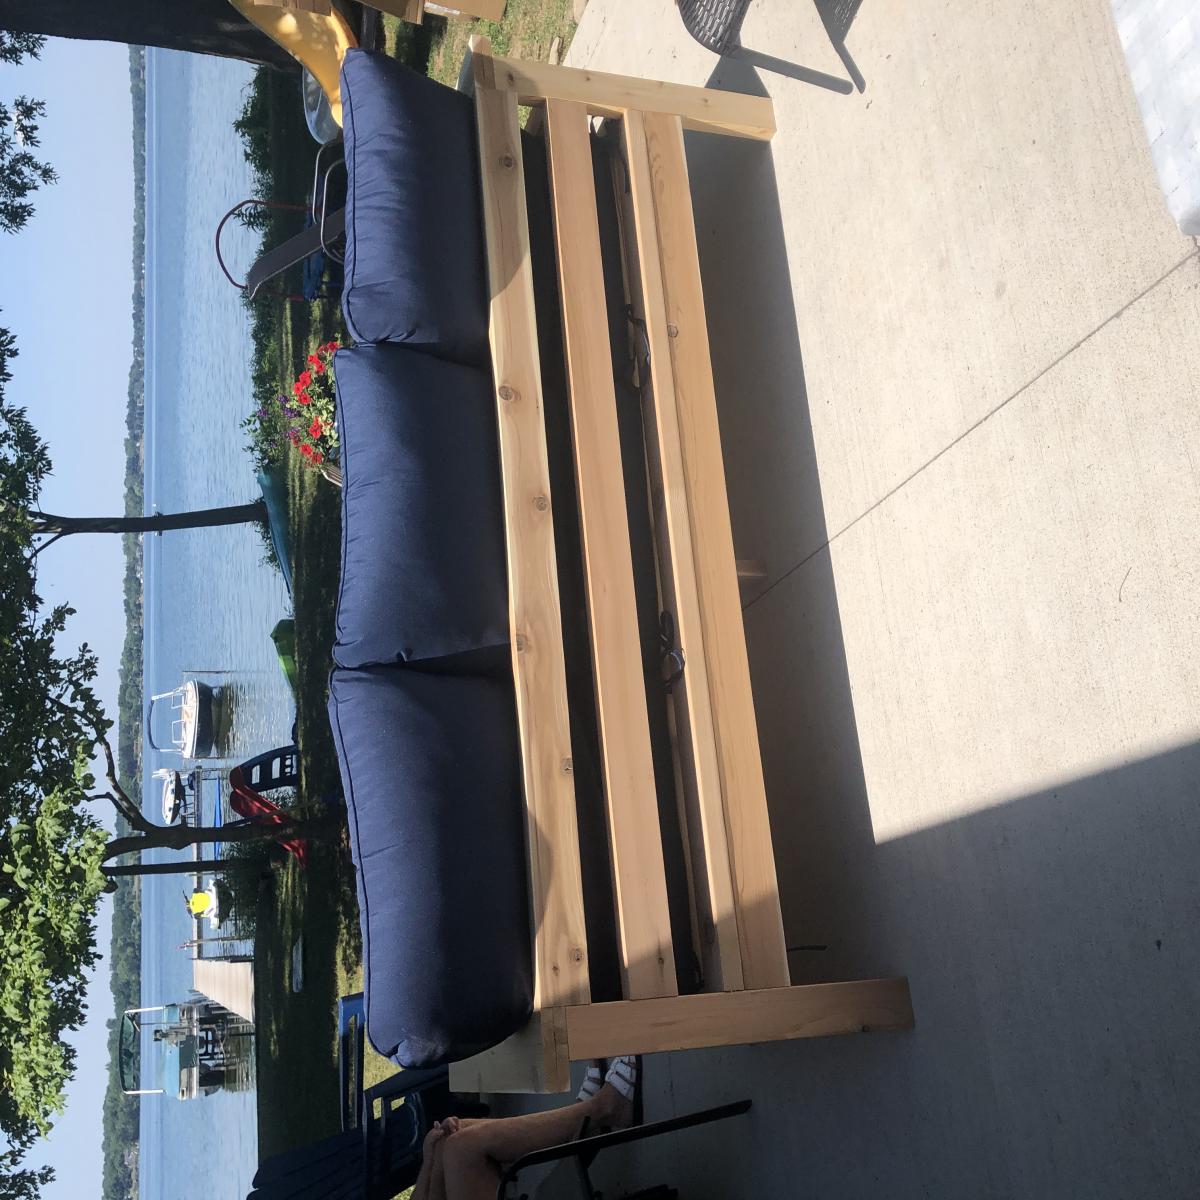
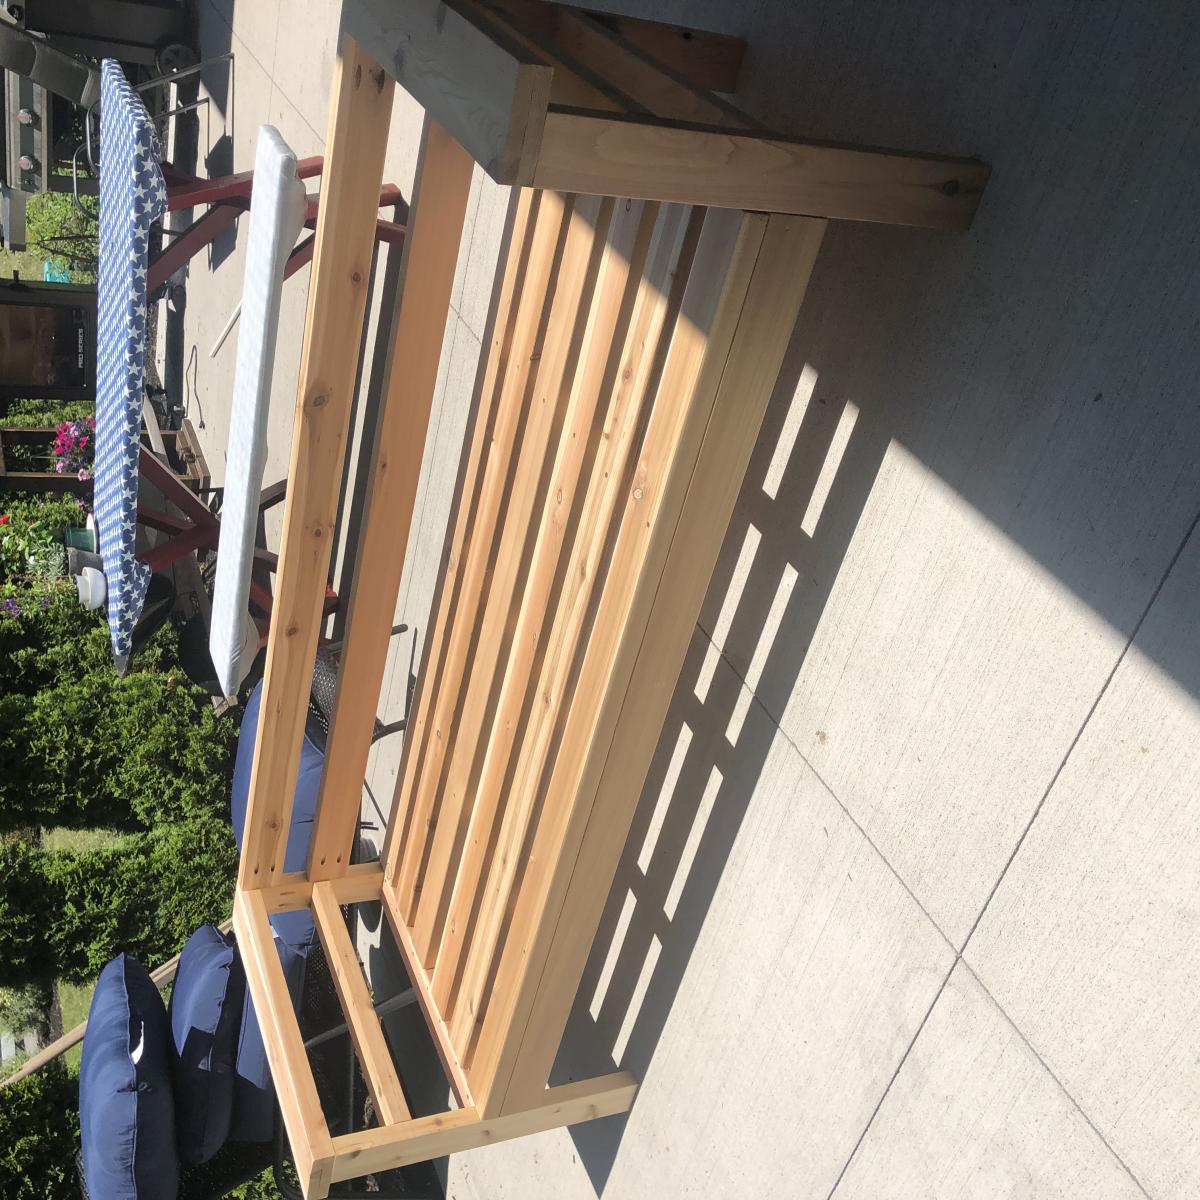
2x4 outdoor couch
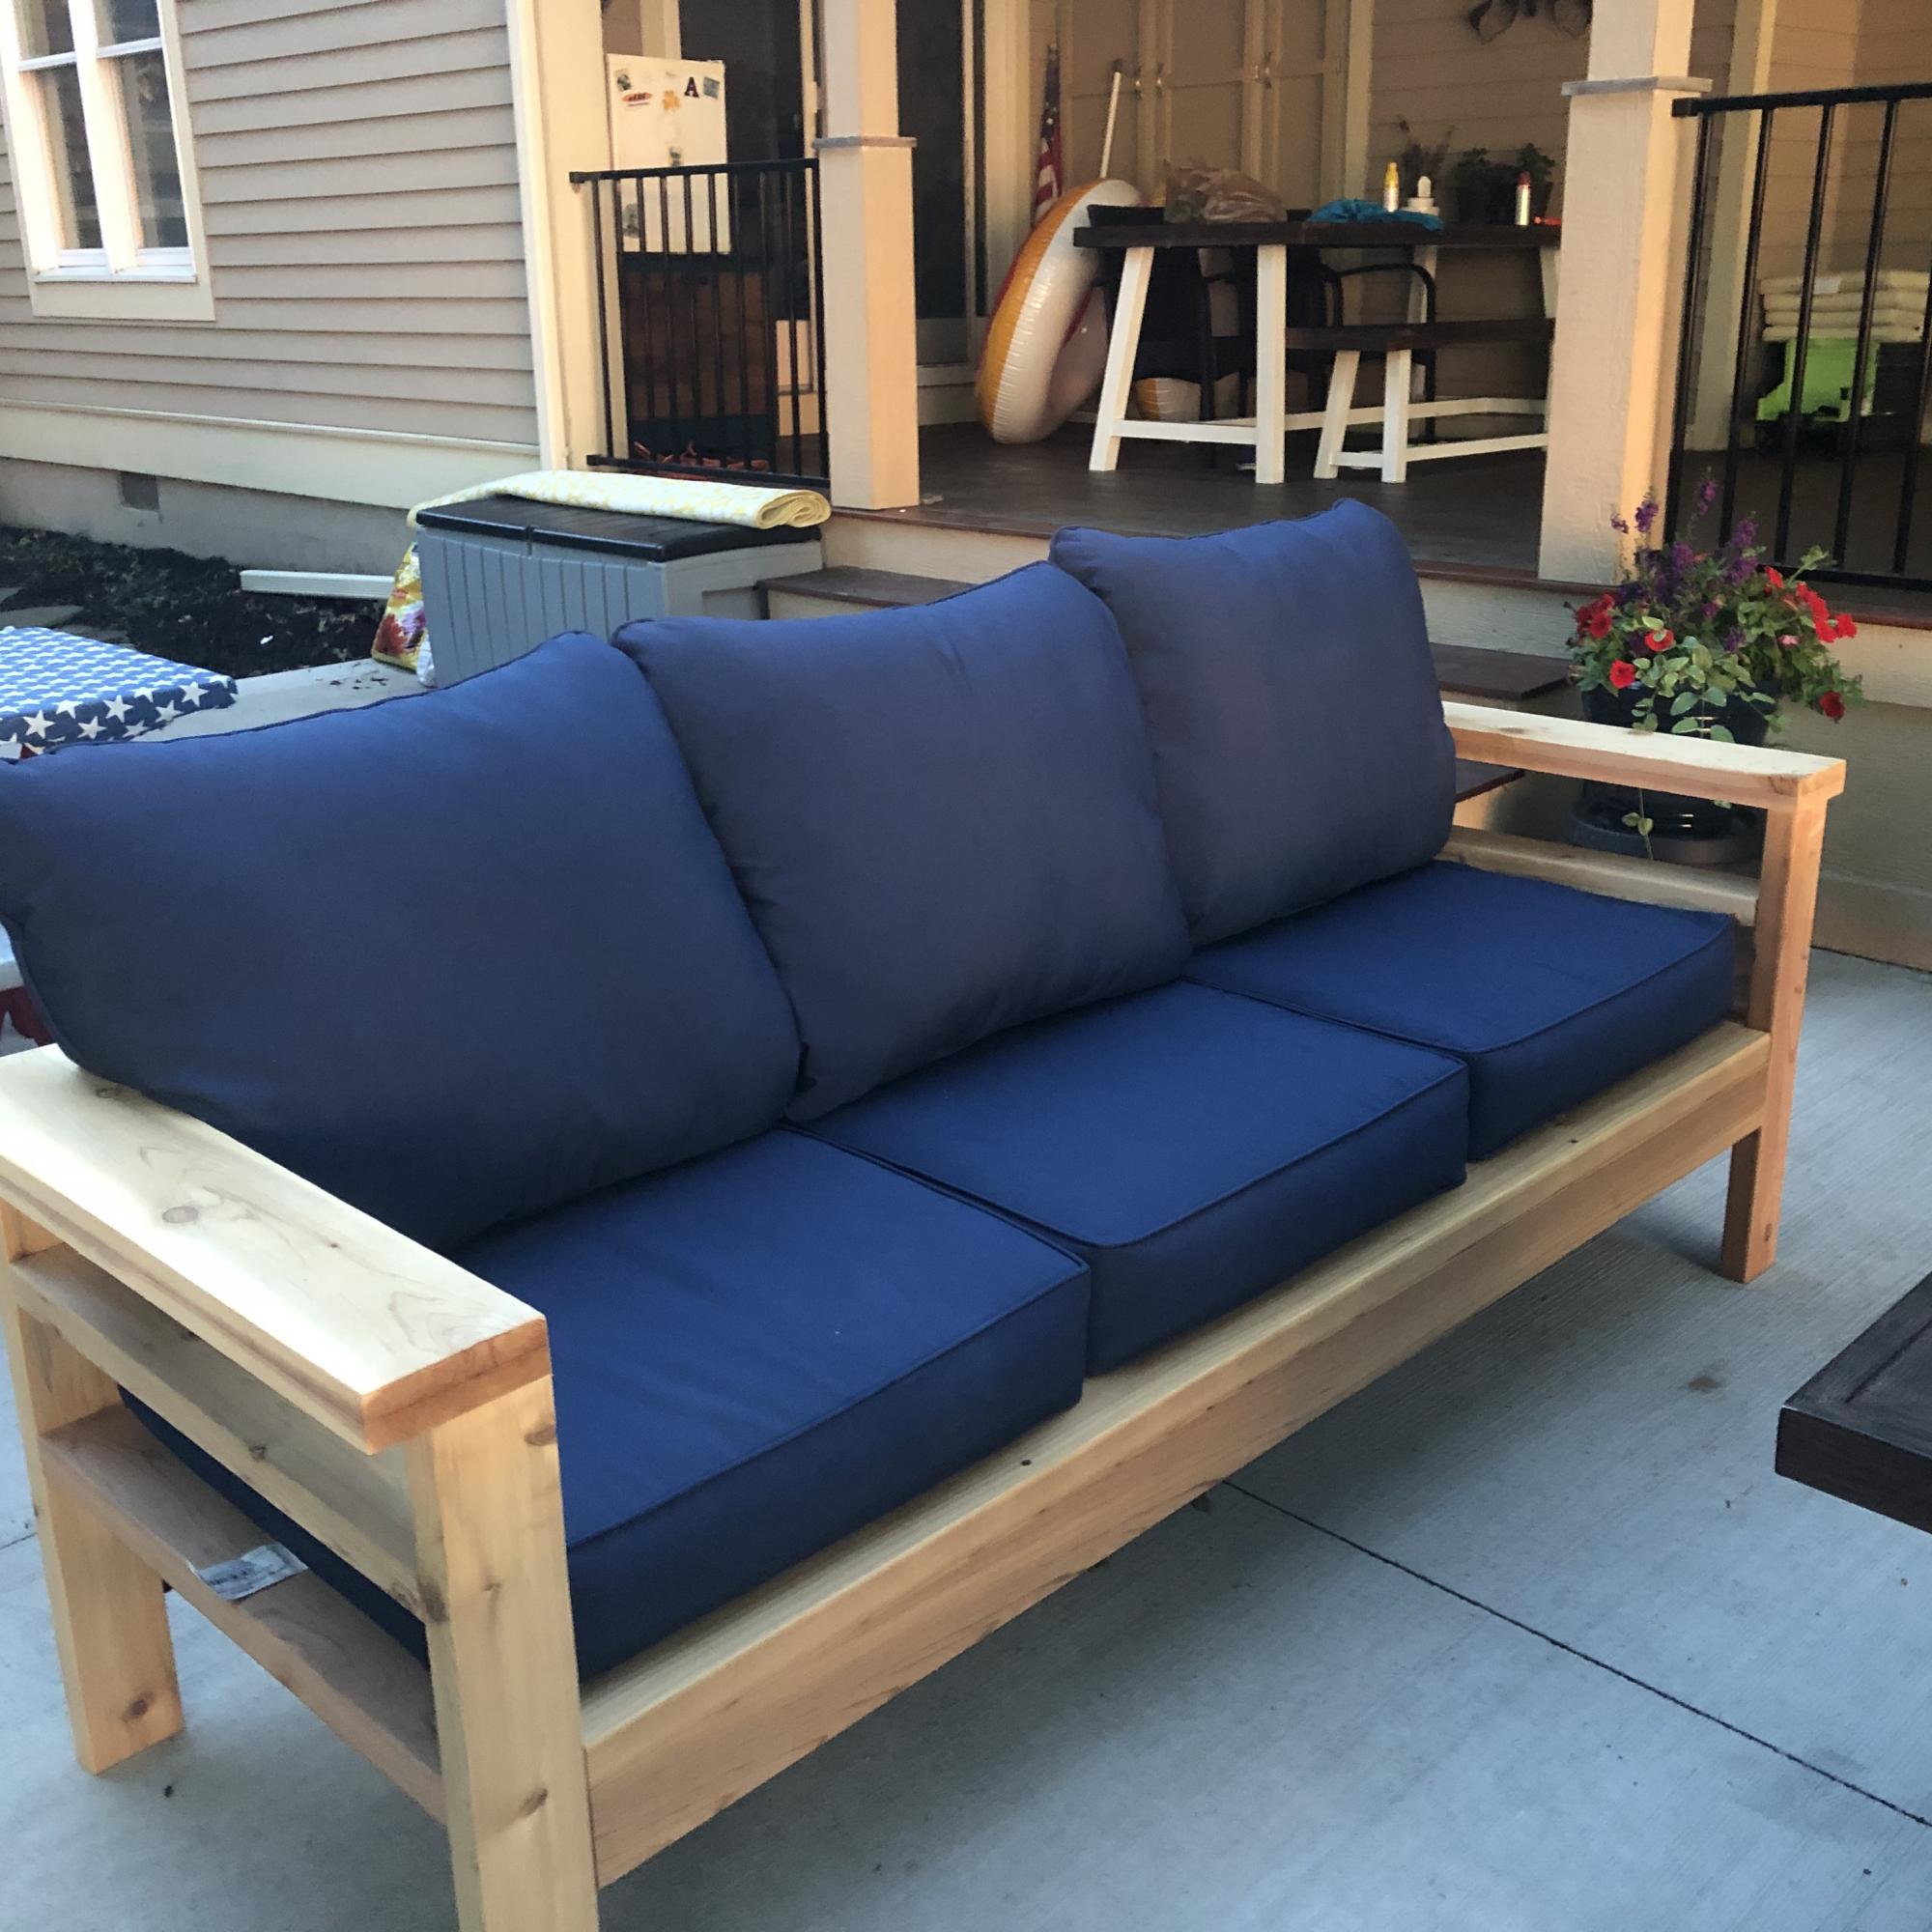
I used cedar and added the extra boards so the cushions would stay put. We also made the arms 2x6 boards so we wouldn’t need end tables for the couch. The plans were super easy to follow. I mostly used pocket holes so the screws wouldn’t be visible. Love how it came out! Thank you for the plans, Ana!!
Built from Plan(s)
Estimated Time Investment
Day Project (6-9 Hours)
Finish Used
Nothing yet. Deciding on whether to let it grey on its own
Recommended Skill Level
Beginner
Poolside Towel Cabinet from Benchmark Cabinet Plan

My father and I made this awesome poolside towel cabinet using the Benchmark Cabinet plans. A super easy 1 day build and it looks amazing on the patio. Bring on the pool weather!

Built from Plan(s)
Estimated Cost
$60
Estimated Time Investment
Day Project (6-9 Hours)
Finish Used
Chalk paint/Poly topcoat
Recommended Skill Level
Beginner
My laundry basket dresser with doors
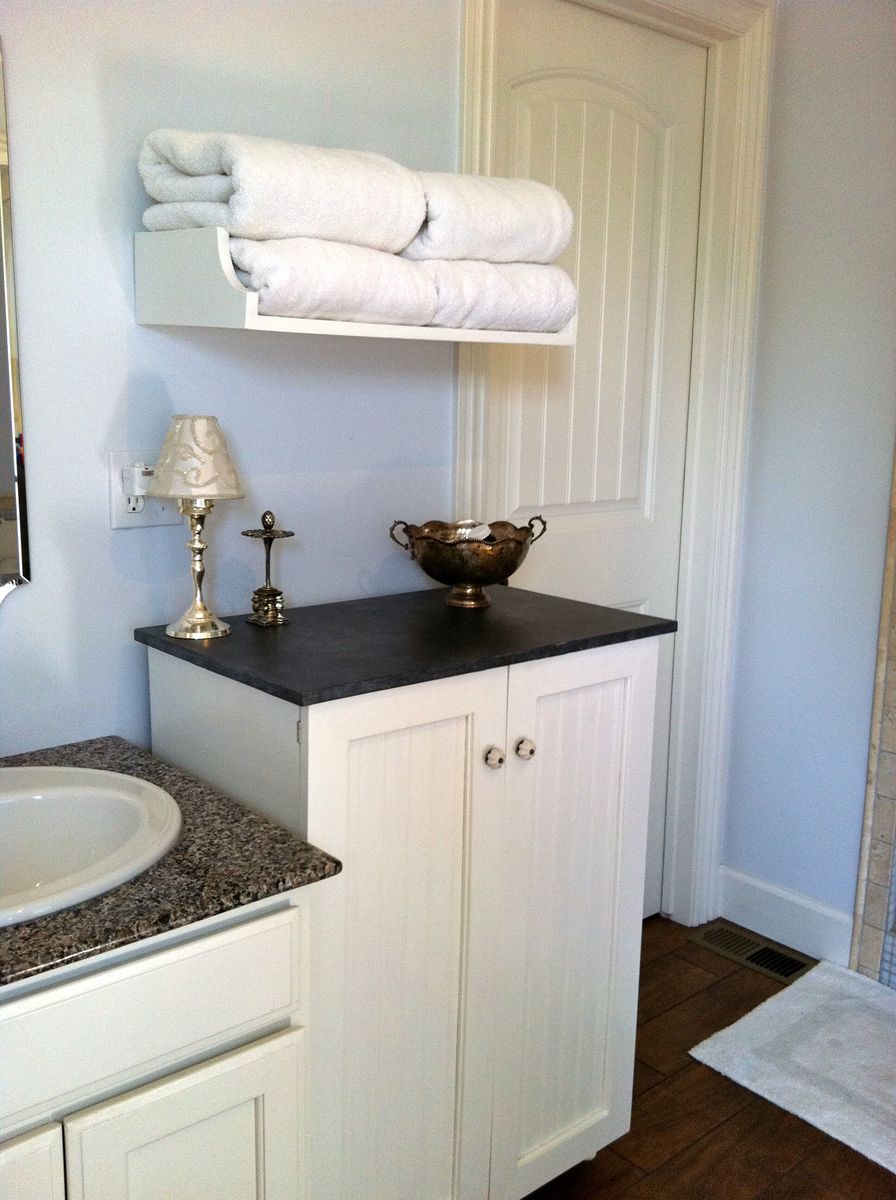
I wanted to use our laundry basket dresser as a collector for dirty laundry in our bathroom, and wanted it to have doors so it would blend in better. I also made the shelf above for our towels. It is painted white with a faux-zinc finish on the top. I made the top slightly larger so it would overhang and added cute little bun feet. My talented friend Carli helped me build the doors (and by helped I mean I handed her things while she impressed me with all her tools and skills!) and frame.
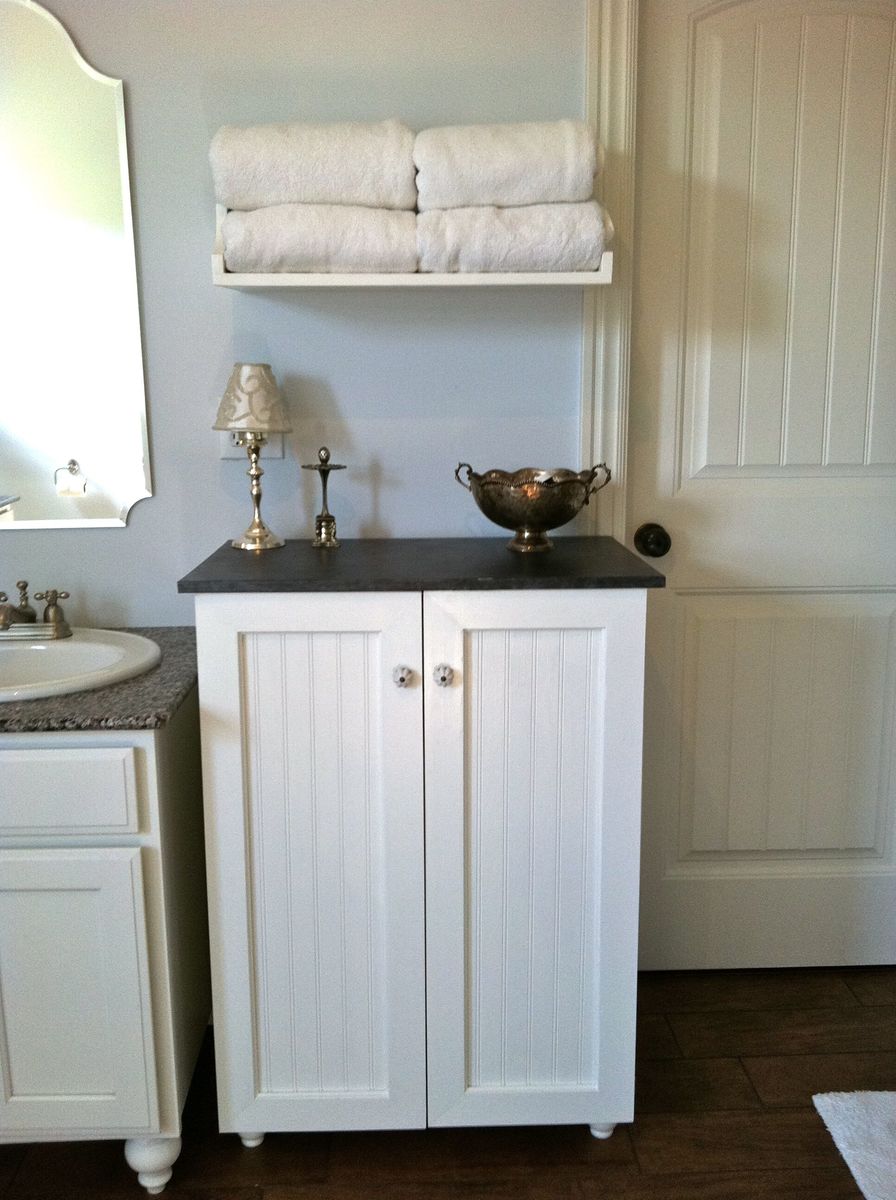
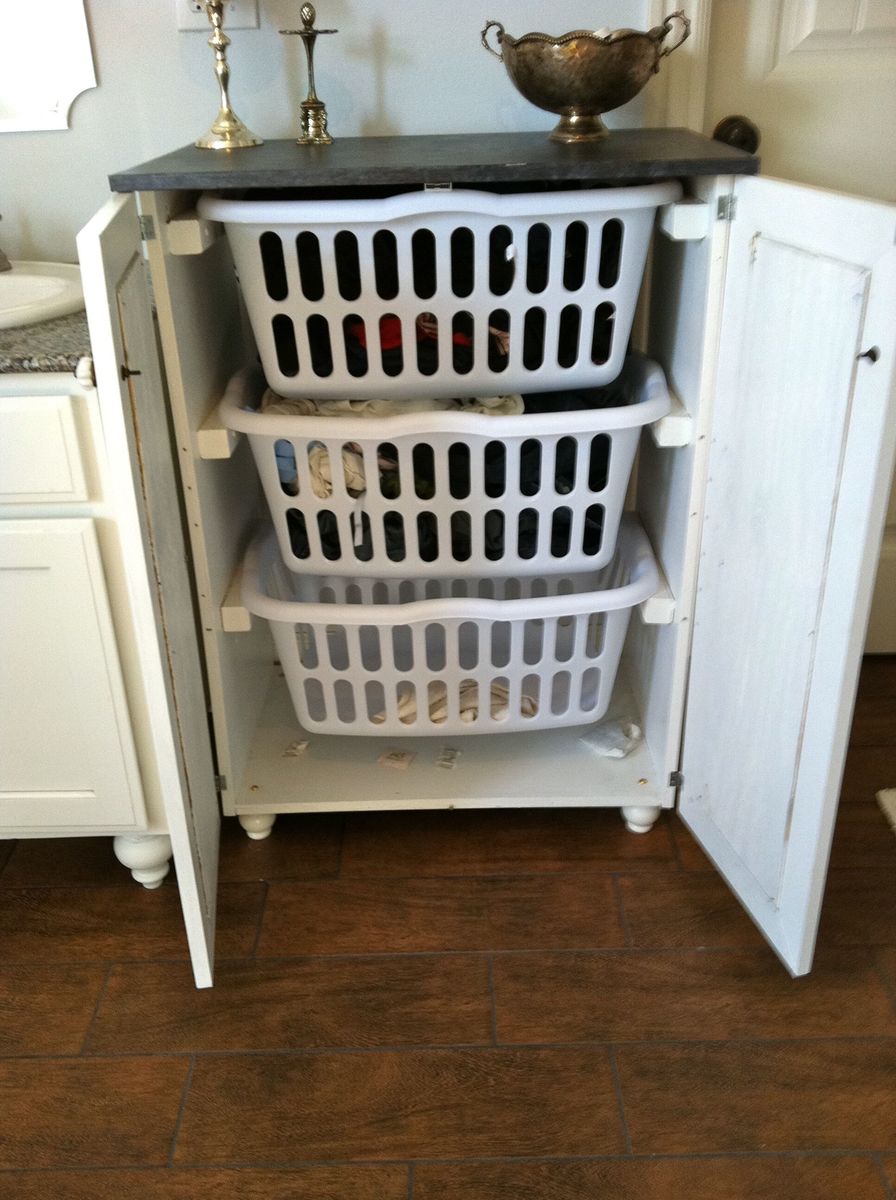
Built from Plan(s)
Estimated Cost
$75-100 (can't remember exactly)
Estimated Time Investment
Weekend Project (10-20 Hours)
Finish Used
white semi-gloss paint, zinc faux finish: layer 1 dark charcoal paint, layer 2 dark pewter metallic glaze, layer 3 white paint thinned with water & rubbed on/off.
Recommended Skill Level
Intermediate
Comments


Fri, 07/29/2011 - 23:37
BEAUTIFUL!!
this is perfect! i totally need a bunch just like this! I love the added doors!
Tue, 10/11/2011 - 20:42
Would you mind sharing the
Would you mind sharing the dimensions for this cabinet? Love this idea!!!! Great job!
Wed, 01/11/2012 - 08:29
I love this idea! I will have
I love this idea! I will have a new bathroom soon and I think this will get used! What are the dimensions, or what style cabinet would you suggest to look for? TIA!
Fri, 02/17/2012 - 05:57
The dimensions are the same
The dimensions are the same as Ana's plan: http://ana-white.com/2010/11/laundry-basket-dresser except that the top is slightly bigger (3/4" overhang on front/sides) to look more like a countertop. On the doors we just made a frame w/ angled pieces, routed a notched line on the back & glued/nailed some beadboard in from the back. Sorry I can't be much more detailed on that, a friend did most of the doors for me!
Sun, 02/19/2012 - 07:42
Baskets Used?
I actually got the plywood to do this project and I was going to add doors. I looked at the baskets suggested but it seems they would stick out the front. I was just curious, did you use different baskets that would fit inside the cabinet or did you make the cabinet slightly deeper?
Sat, 02/25/2012 - 05:36
depth/baskets
Actually I discovered the same problem after it was built. I just didn't put a back on and they stick out a tiny bit in the back. I actually kind of like it that way because it lets some air in (being in the bathroom and putting towels in I could see it getting mildewy without much circulation). But if I had gotten the baskets first I probably would have made it about 2" deeper, then leave some open space, but not all, on the back.
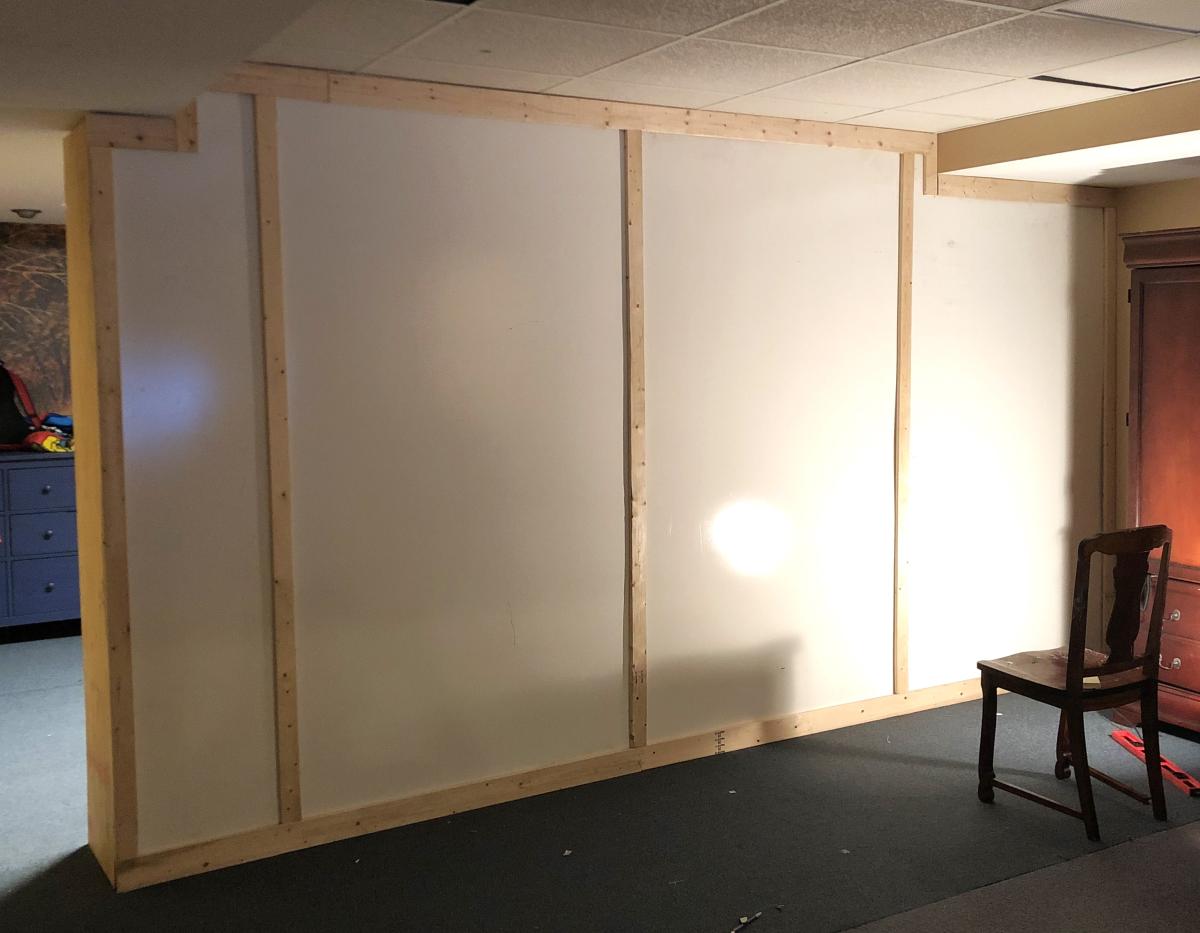
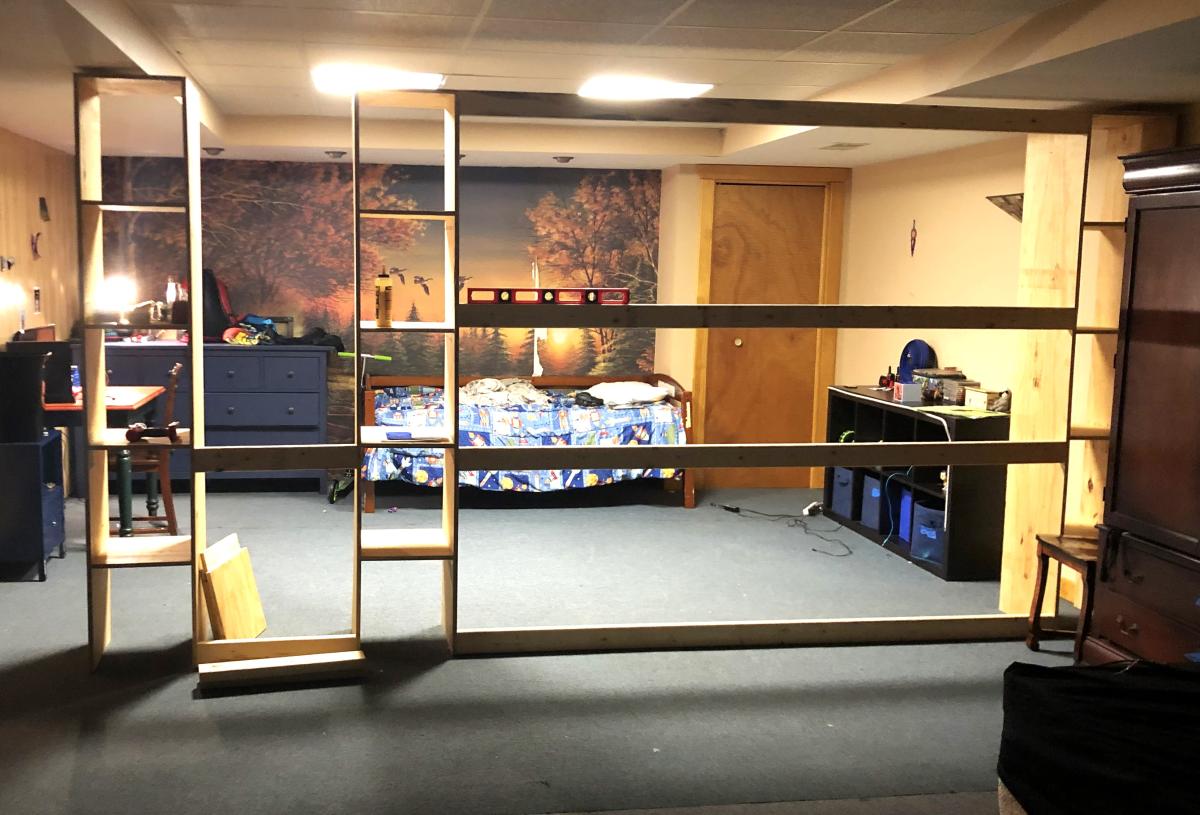
Room Divider Wall with Built-in Storage
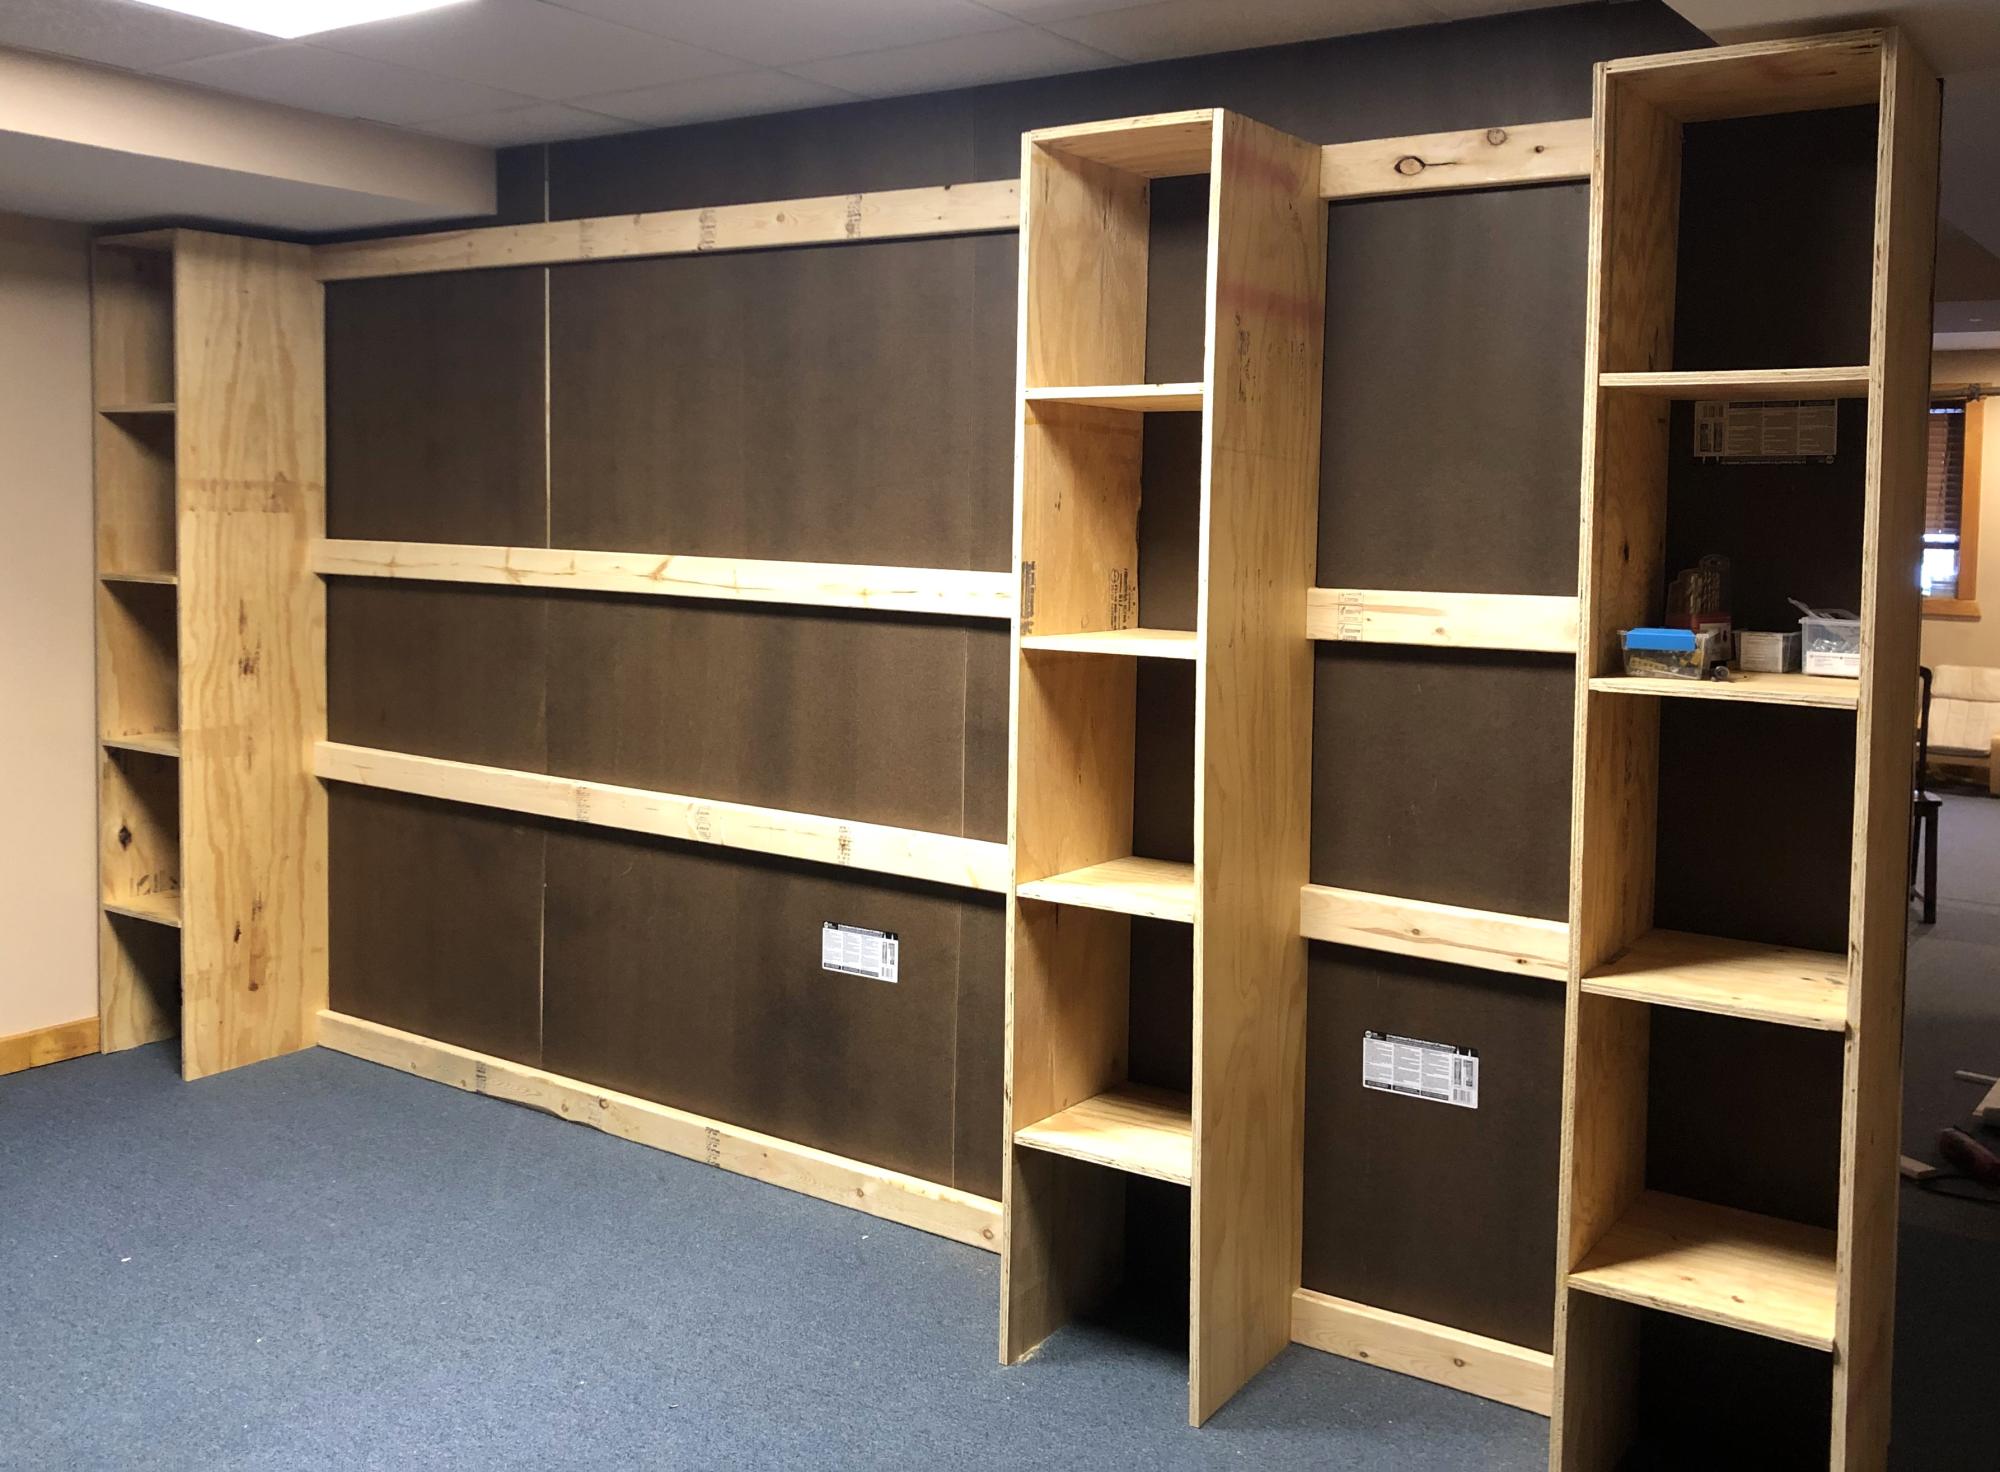
Modified the wall divider closet plan into a wall to serve as an extra bedroom in my basement. The inner wall was subsequently painted.
Grace LeBlanc
Built from Plan(s)
Comments
Rustic Planter

I made you planter. Thanks very much. Unfortunately they don't sell in the UK. I enjoyed making them though.
Karen K UK
Built from Plan(s)
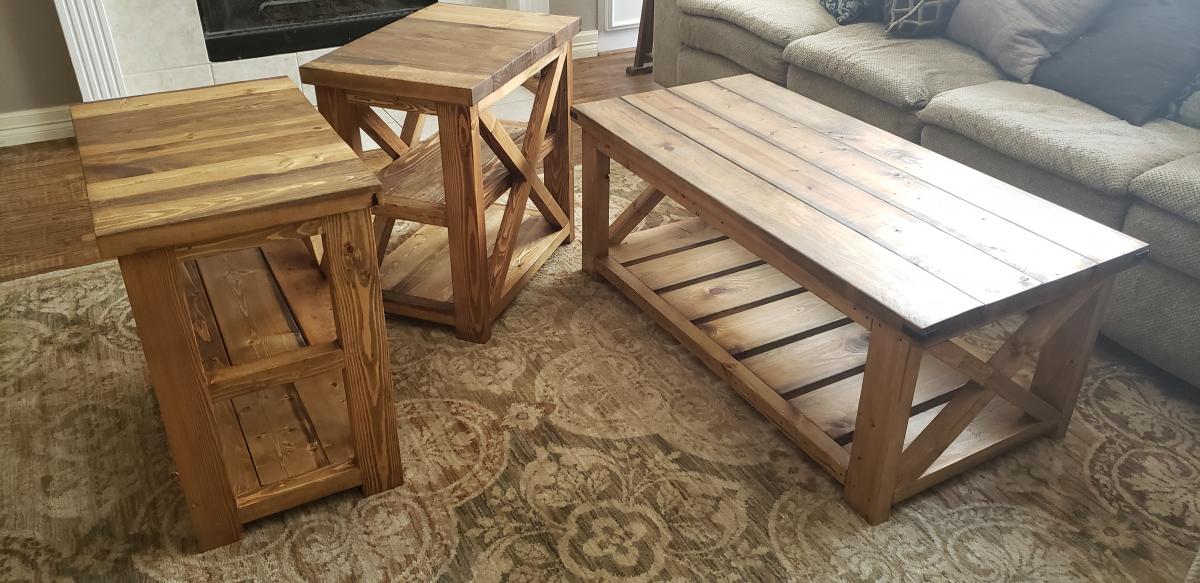
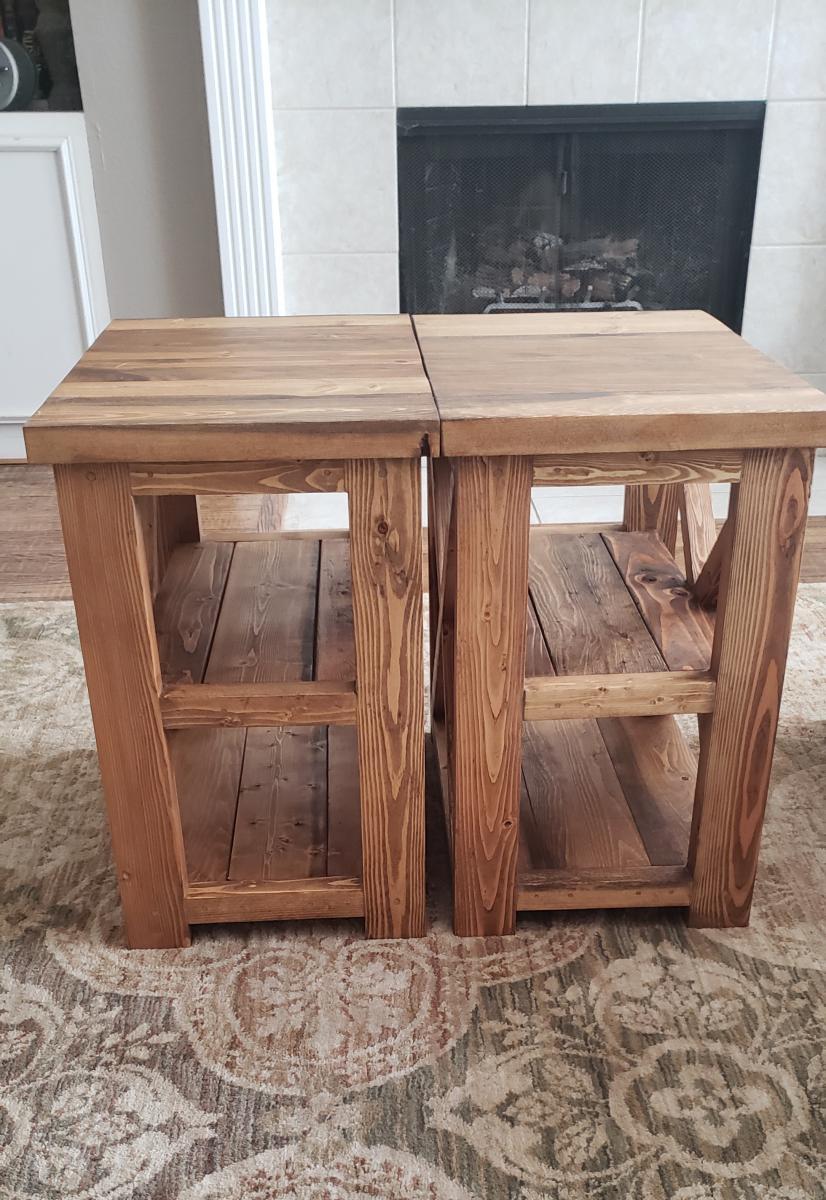
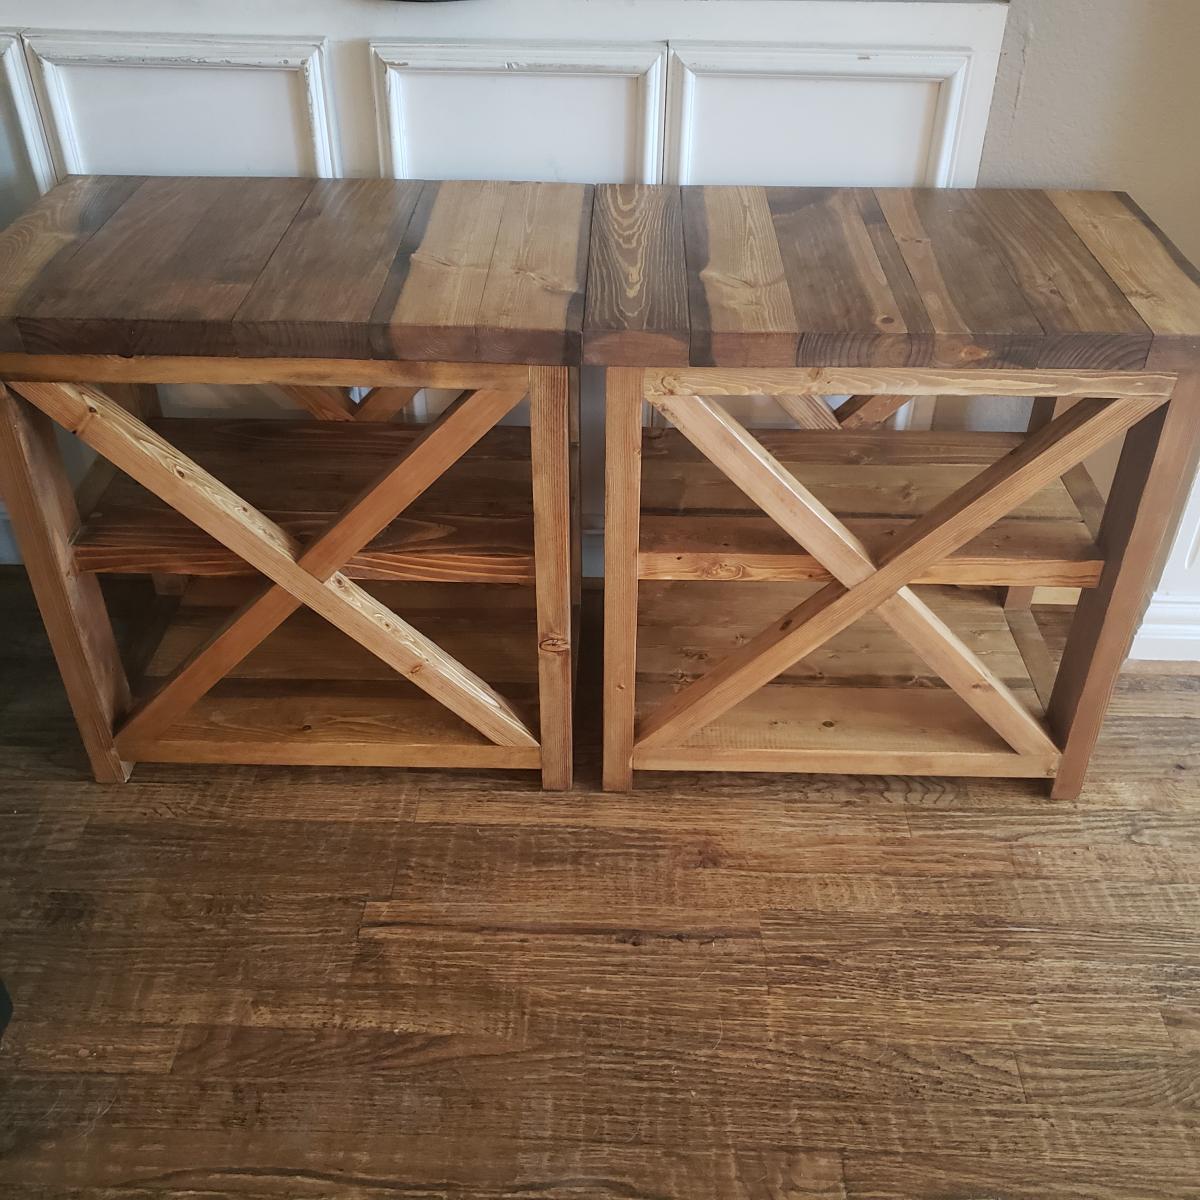
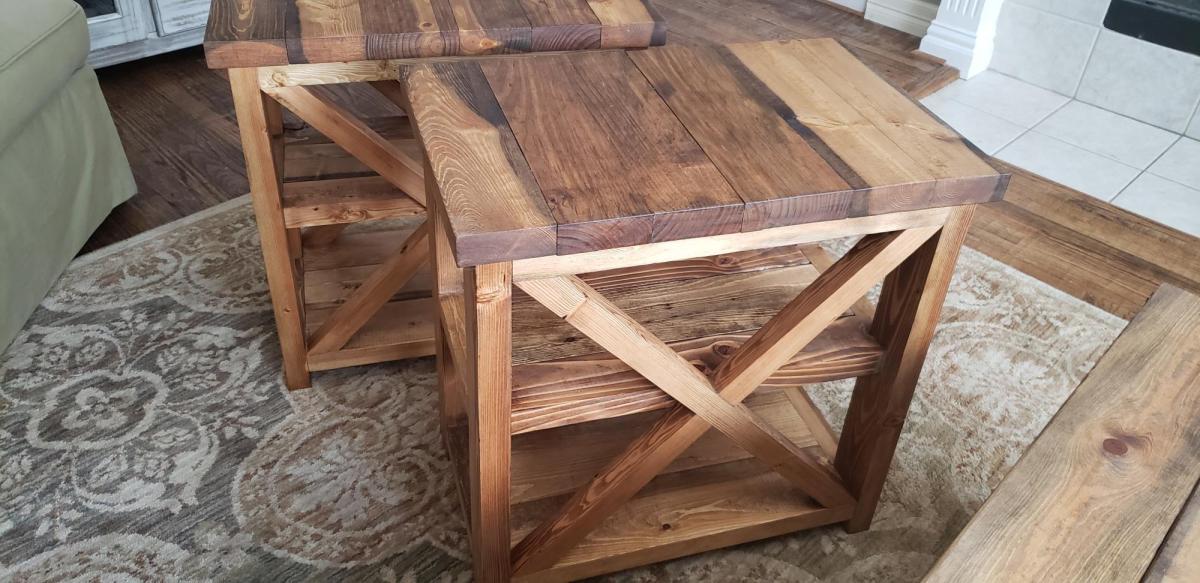
Rustic X Side Tables - Added Shelf
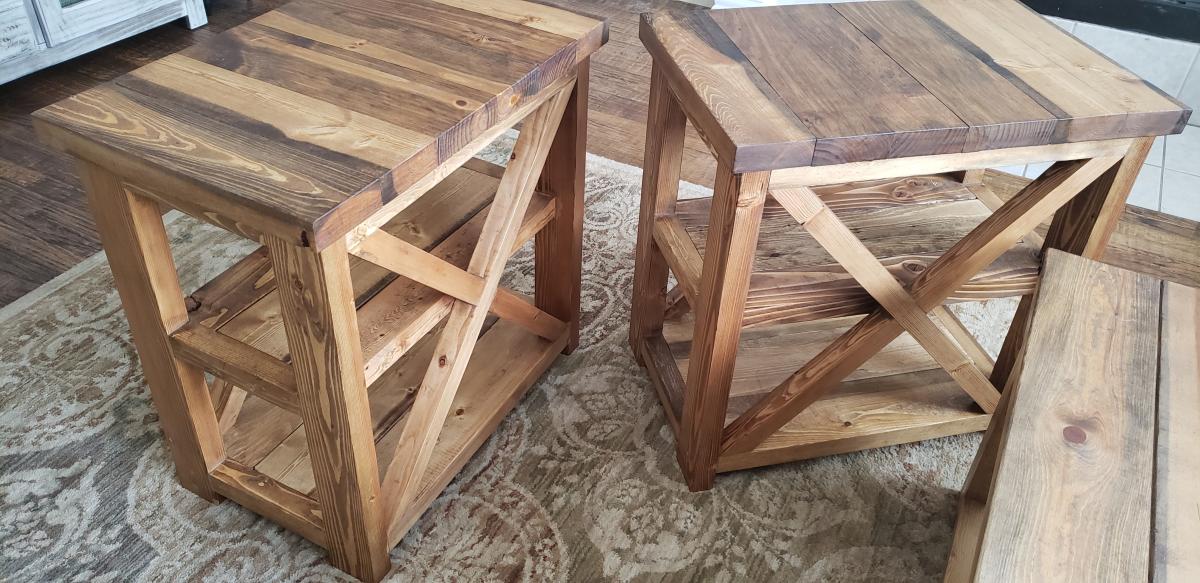
This was a fun project! We had already made the coffee table and someone wanted side tables. We assisted the plans for the side table to make these 16w x 25h x 25d and added a center shelf. After getting our cut list the build was easy and quick. It took about 6-9 hours to cut, build, sand, stain, apply finish, and finish sand.
Built from Plan(s)
Estimated Cost
$60
Estimated Time Investment
Day Project (6-9 Hours)
Finish Used
Dark Walnut Stain with rubbed matte finish
Recommended Skill Level
Beginner
Comments
Leaning Bathroom Ladder
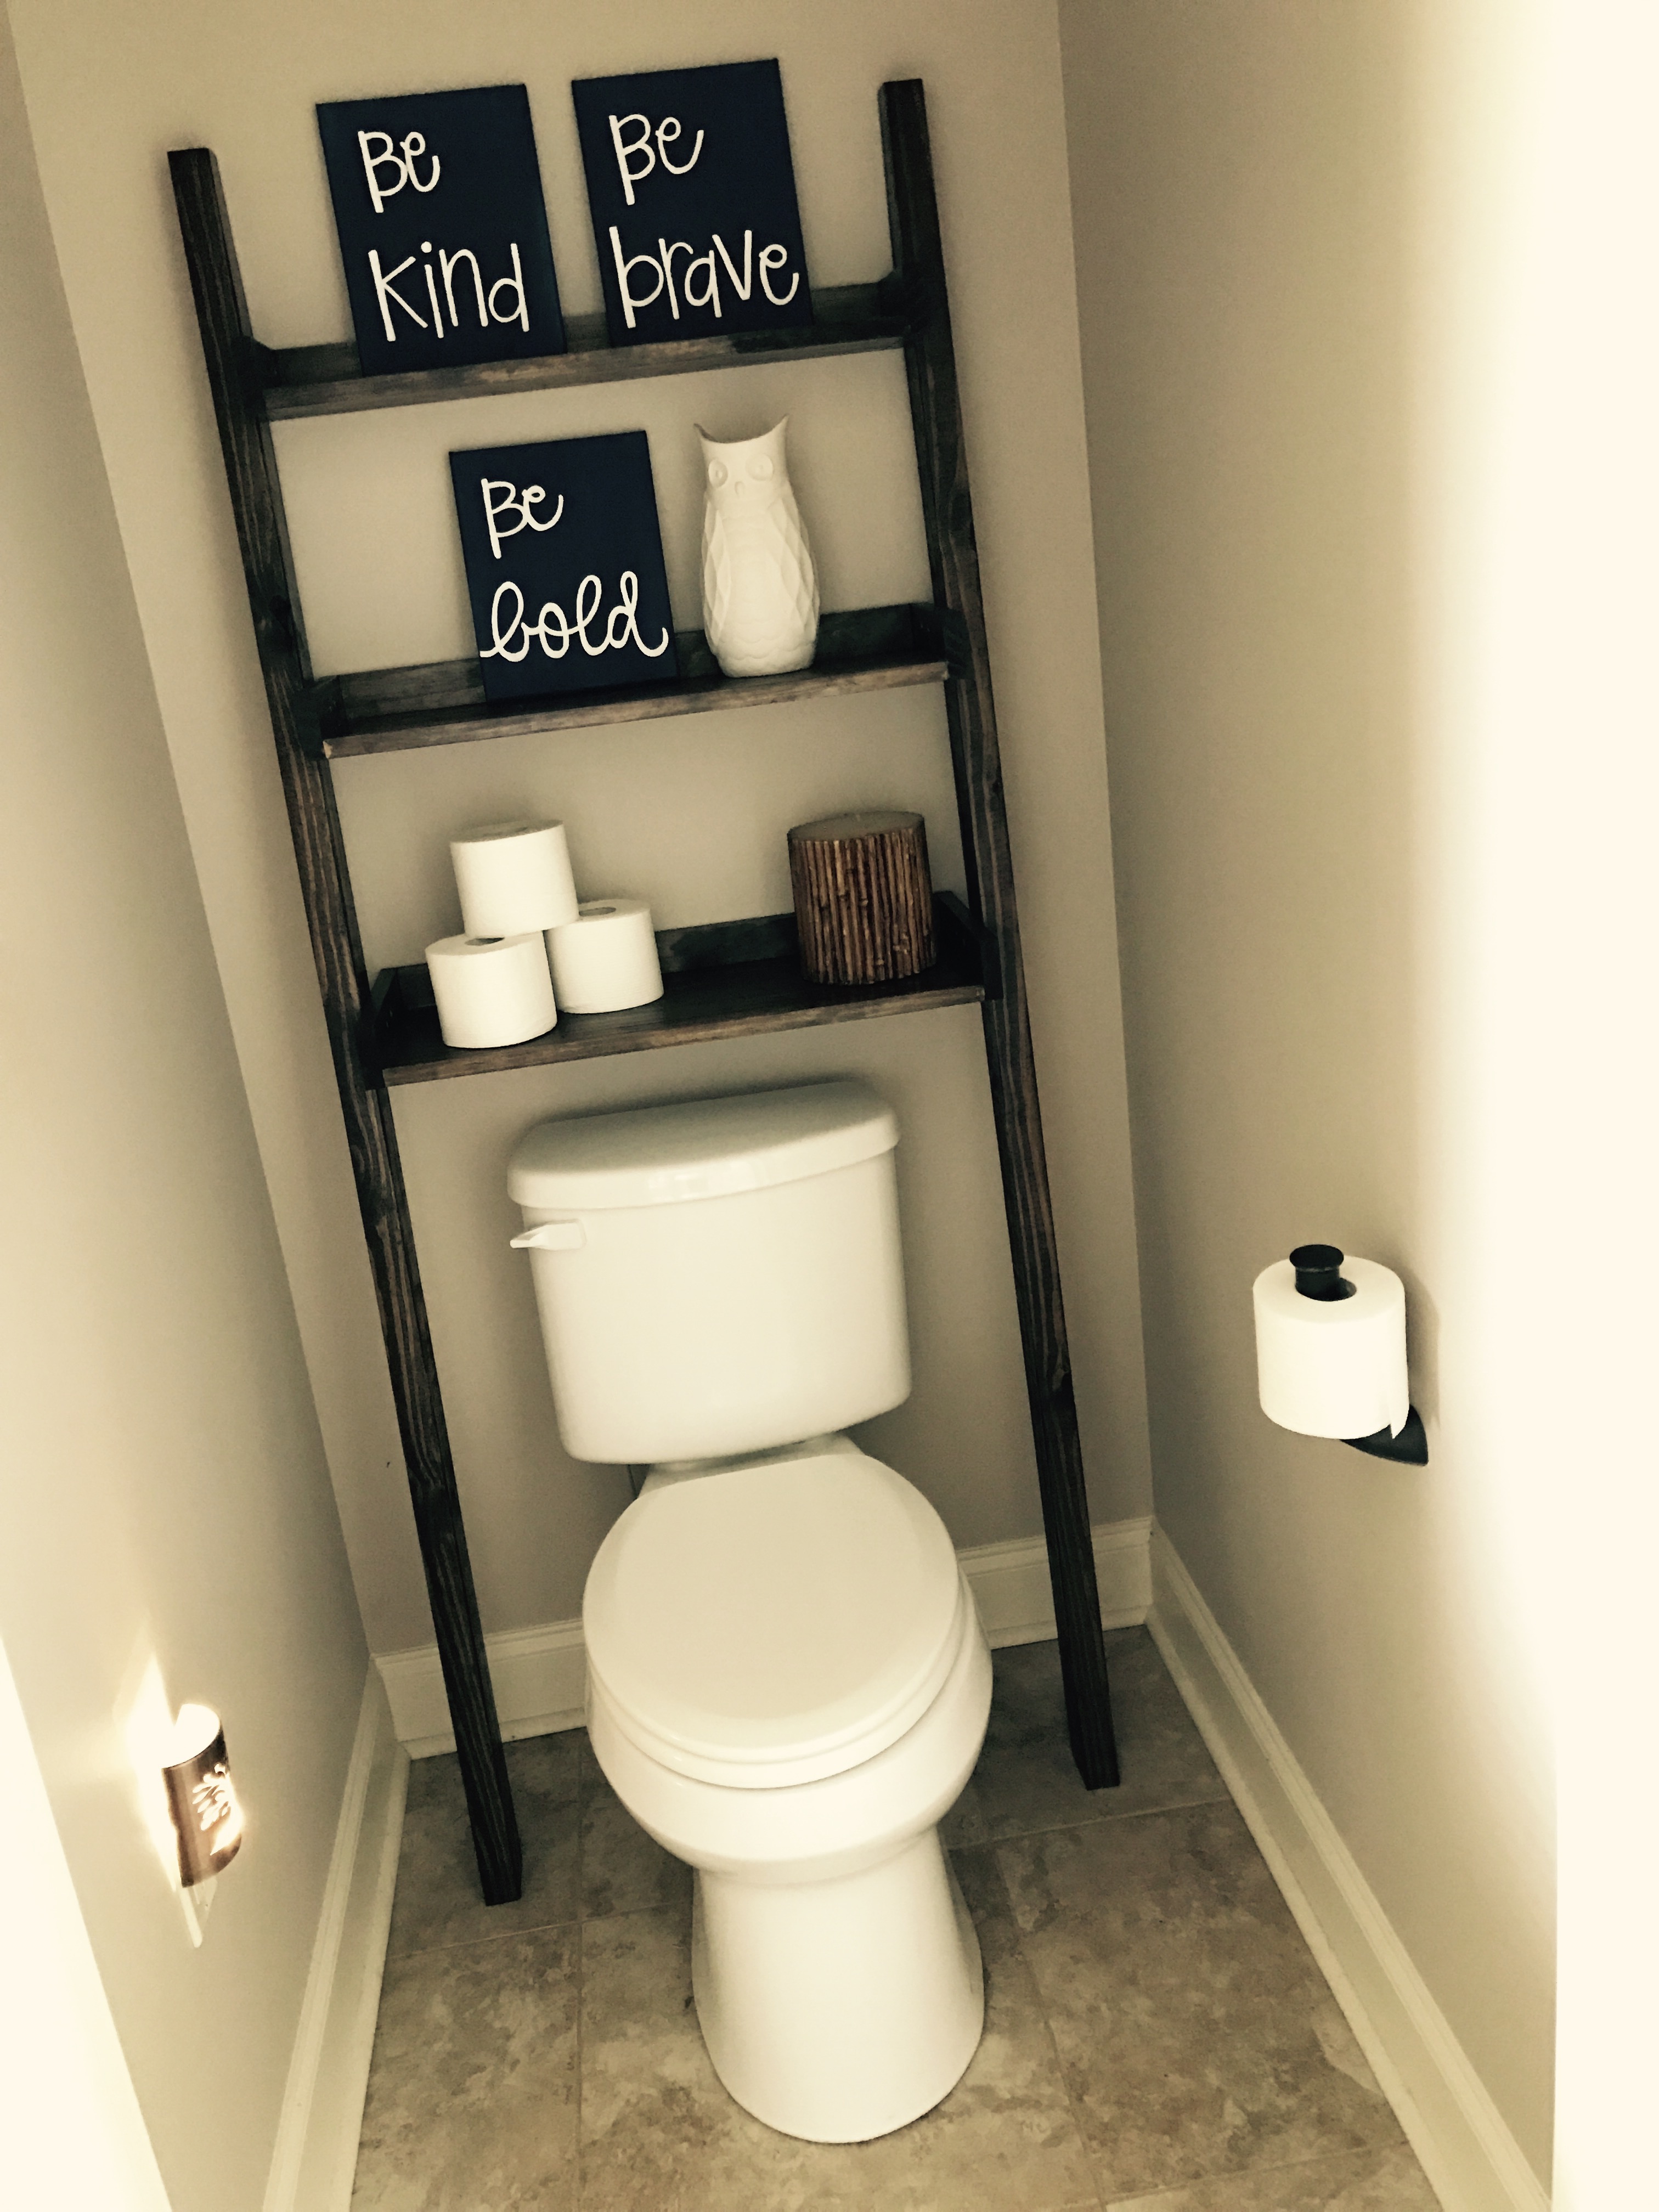
Finally, after 21 months of having no place for extra rolls of toilet paper in the toilet area of our new home, I convinced my husband to make this for us. Now he wants one in his workshop bathroom! I've had the plans printed for almost a year!
We couldn't find a 1x10, so we used the table saw to cut down a 1x12 into a 1x10, 1x8 and a 1x6 for the shelves. Also, couldn't find 2x3s for the legs and ended up buying a 2x6 and ripping it in half.
It came out more beautiful than I imagined. Almost done with the Squatty Potty, that we also found on Ana's site, to complete the room :)
Built from Plan(s)
Estimated Cost
$40
Estimated Time Investment
Afternoon Project (3-6 Hours)
Finish Used
Minwax Wood Finish in Espresso
Recommended Skill Level
Beginner
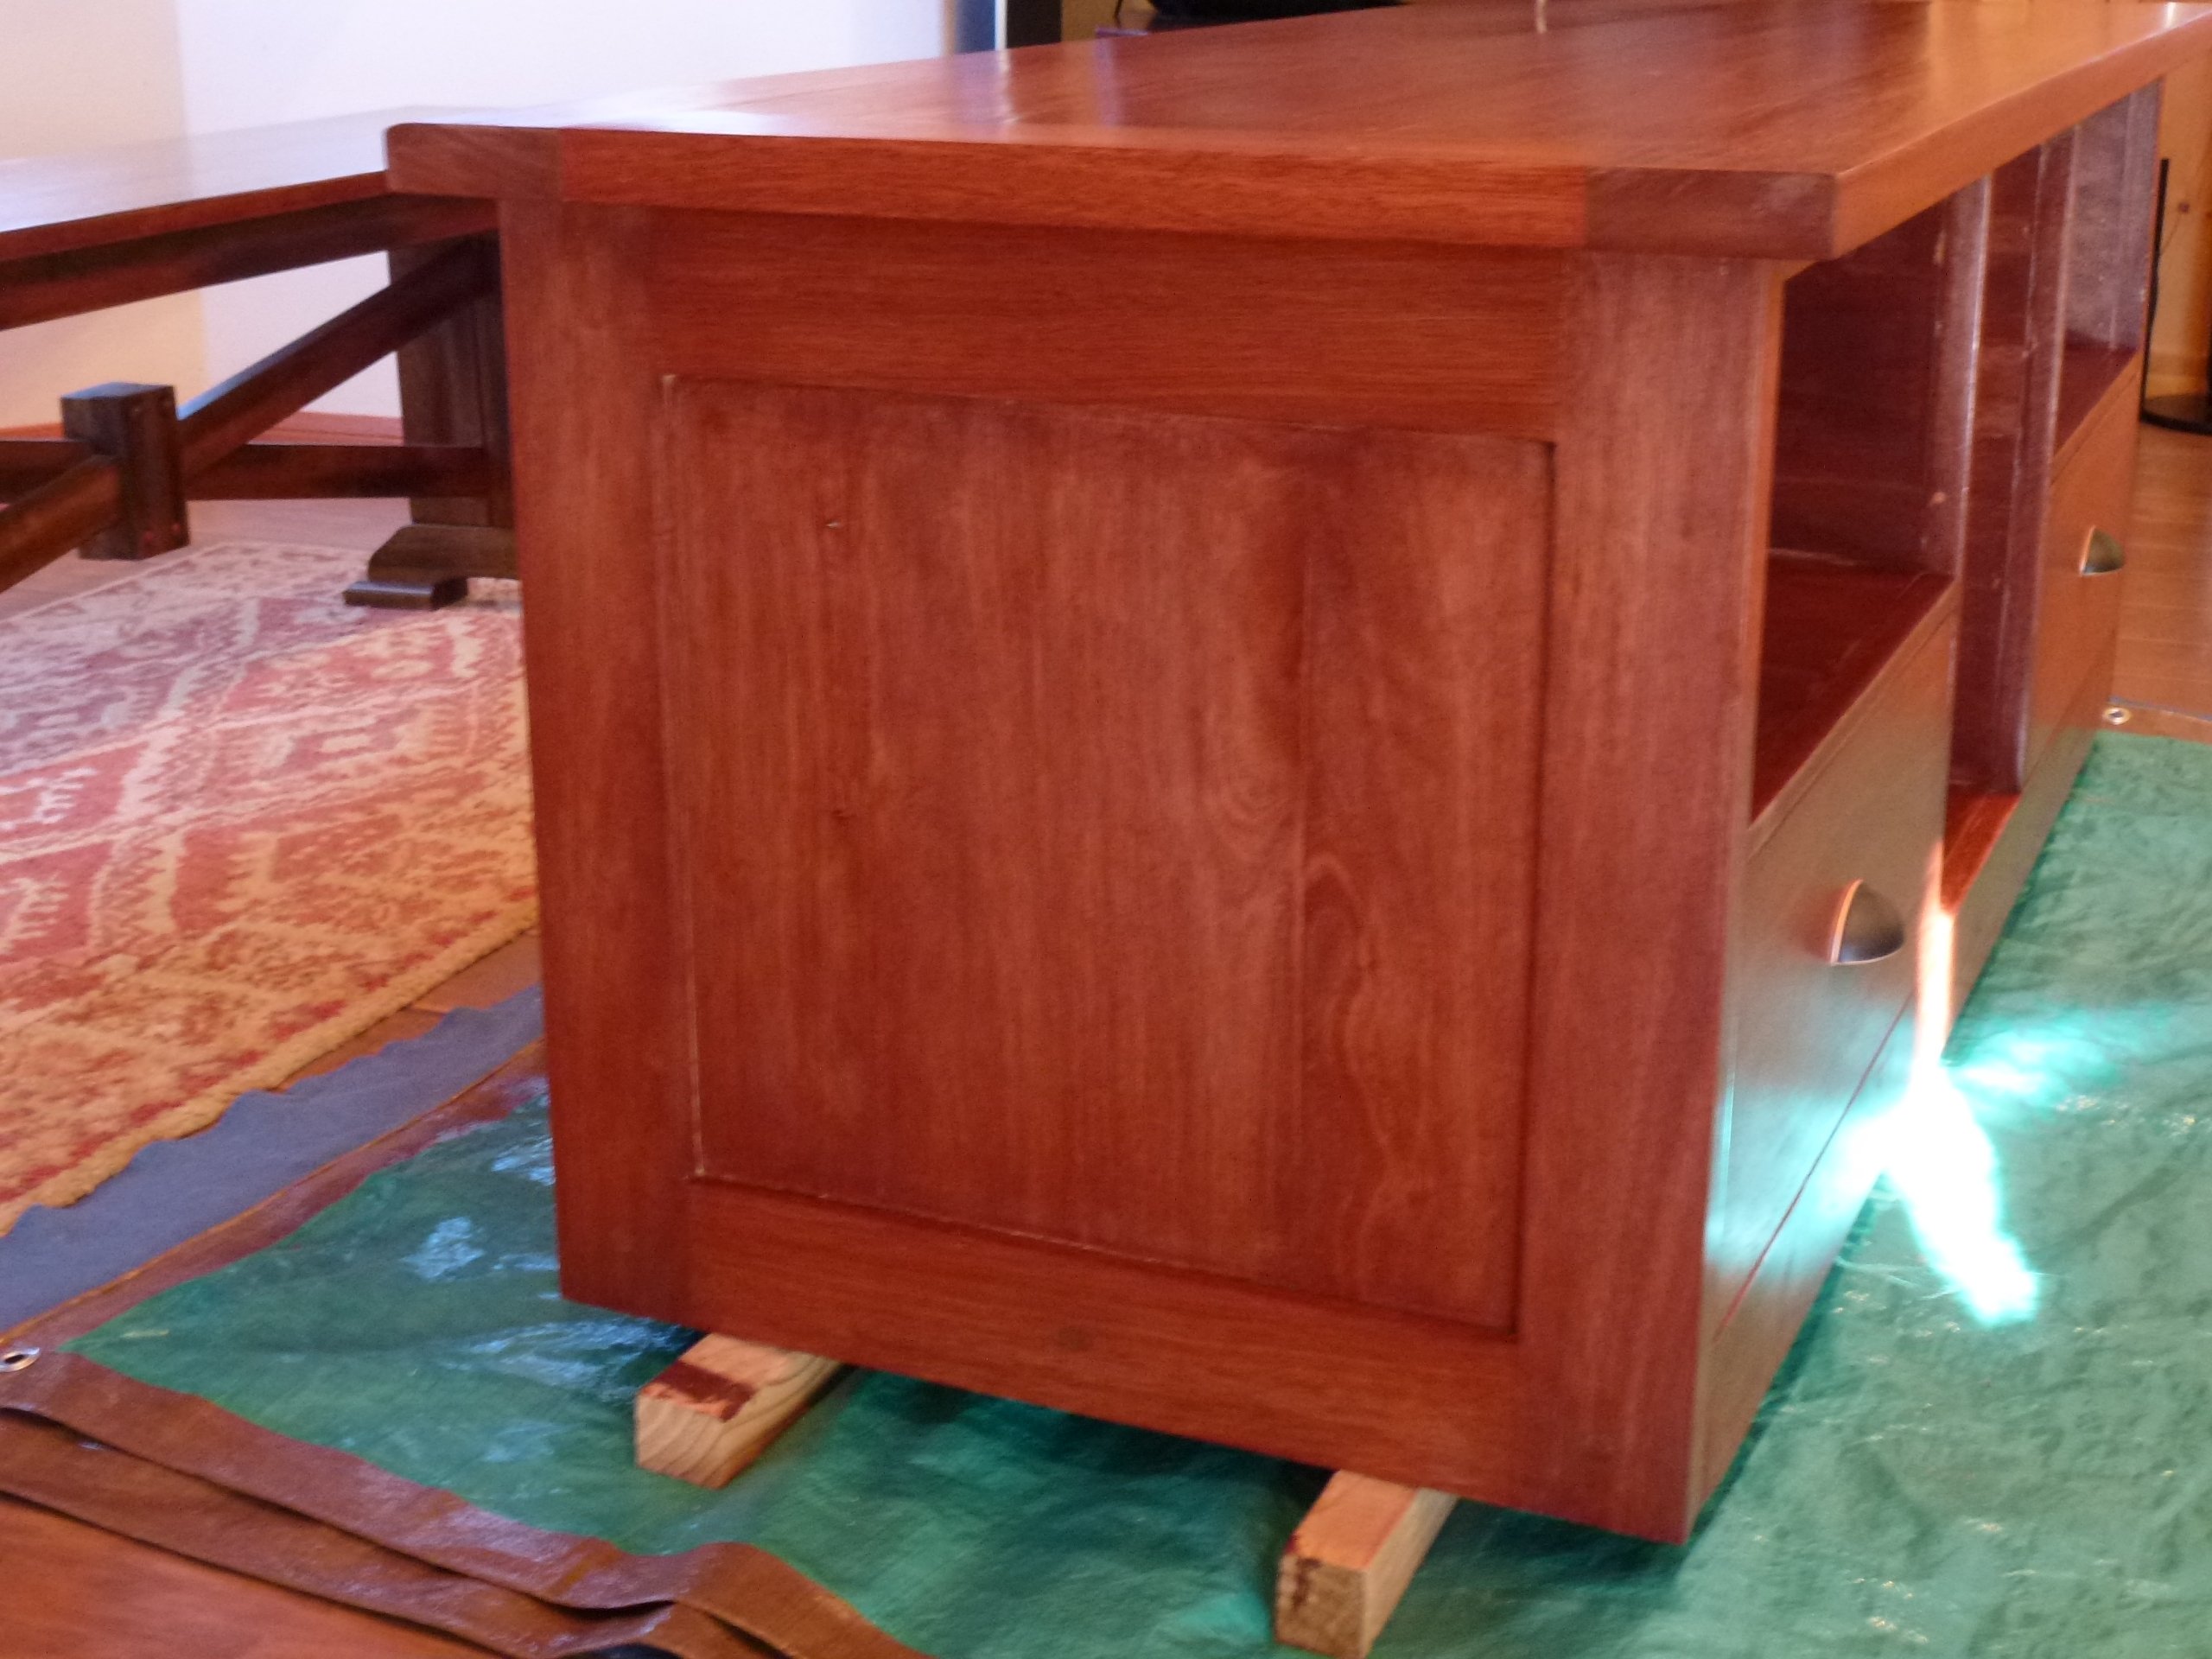
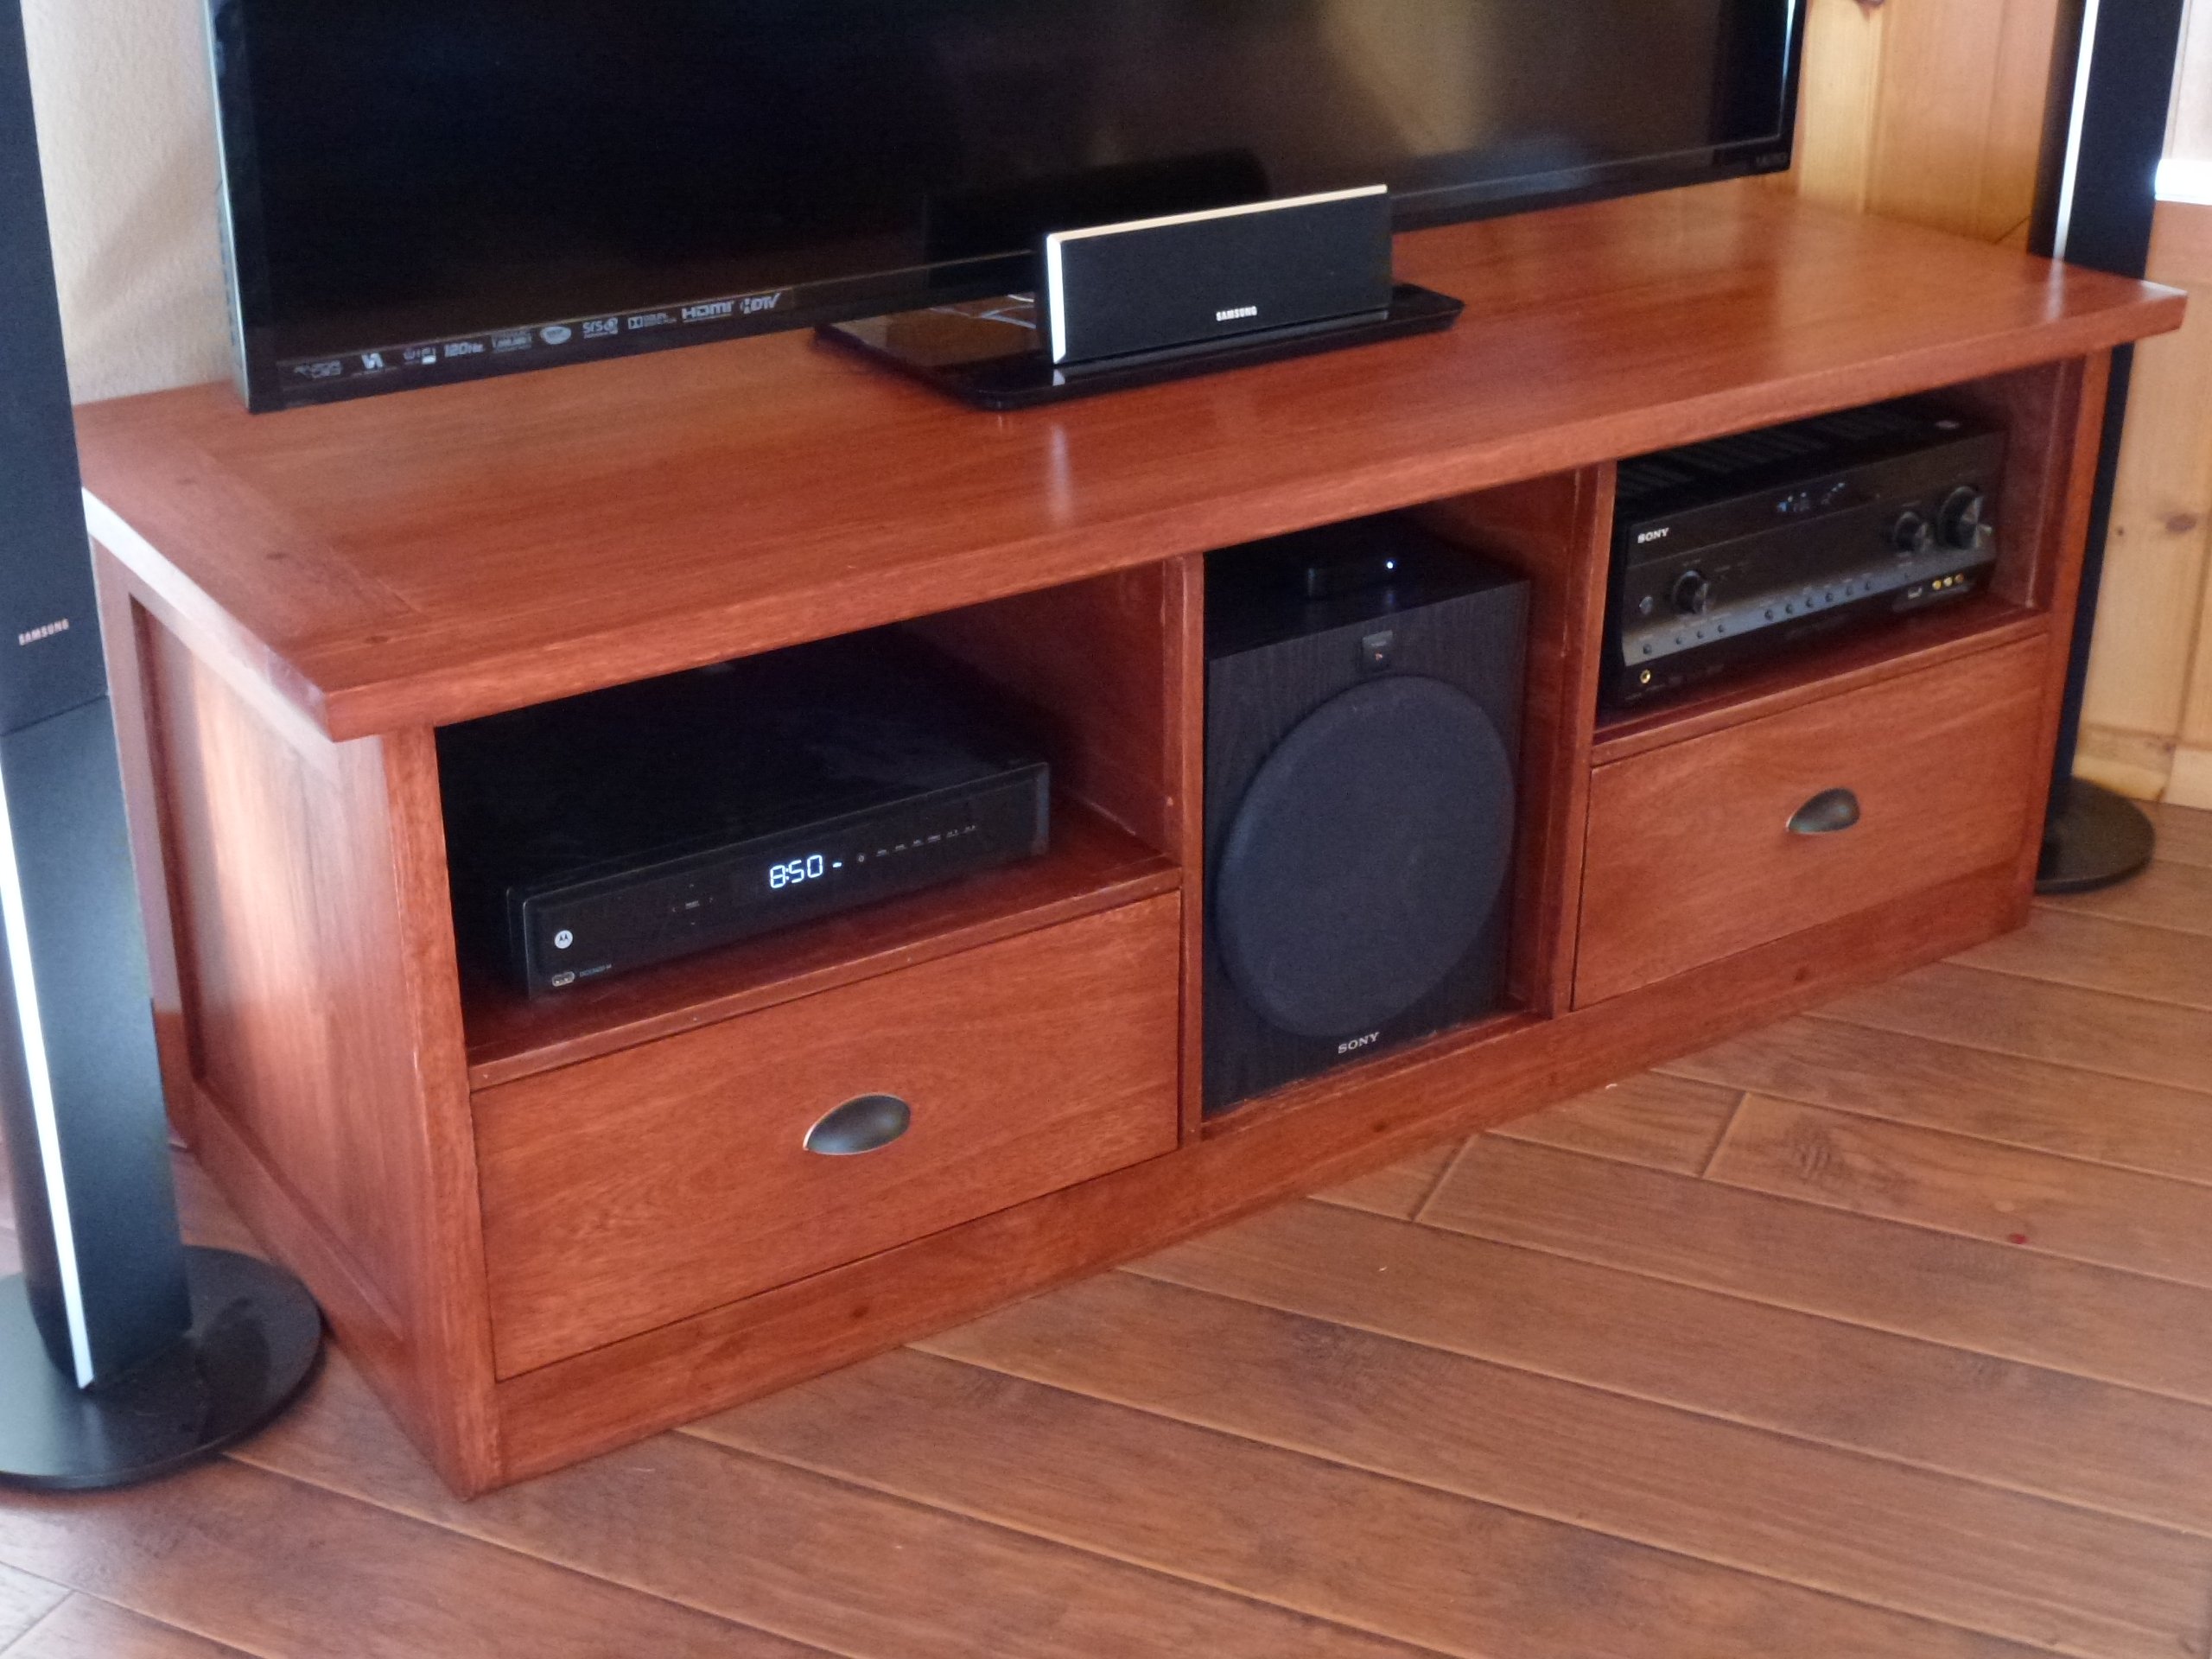
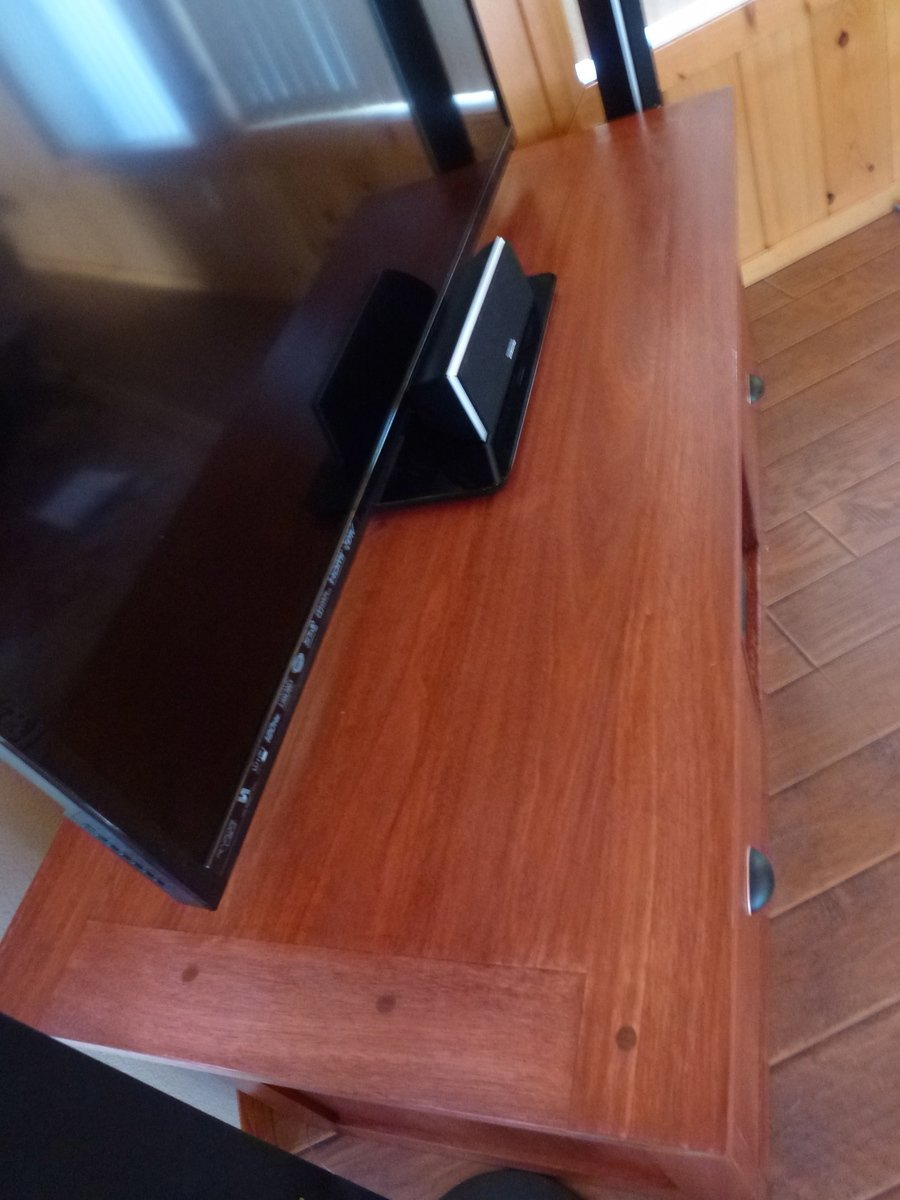
Planked Sideboard Entertainment Center
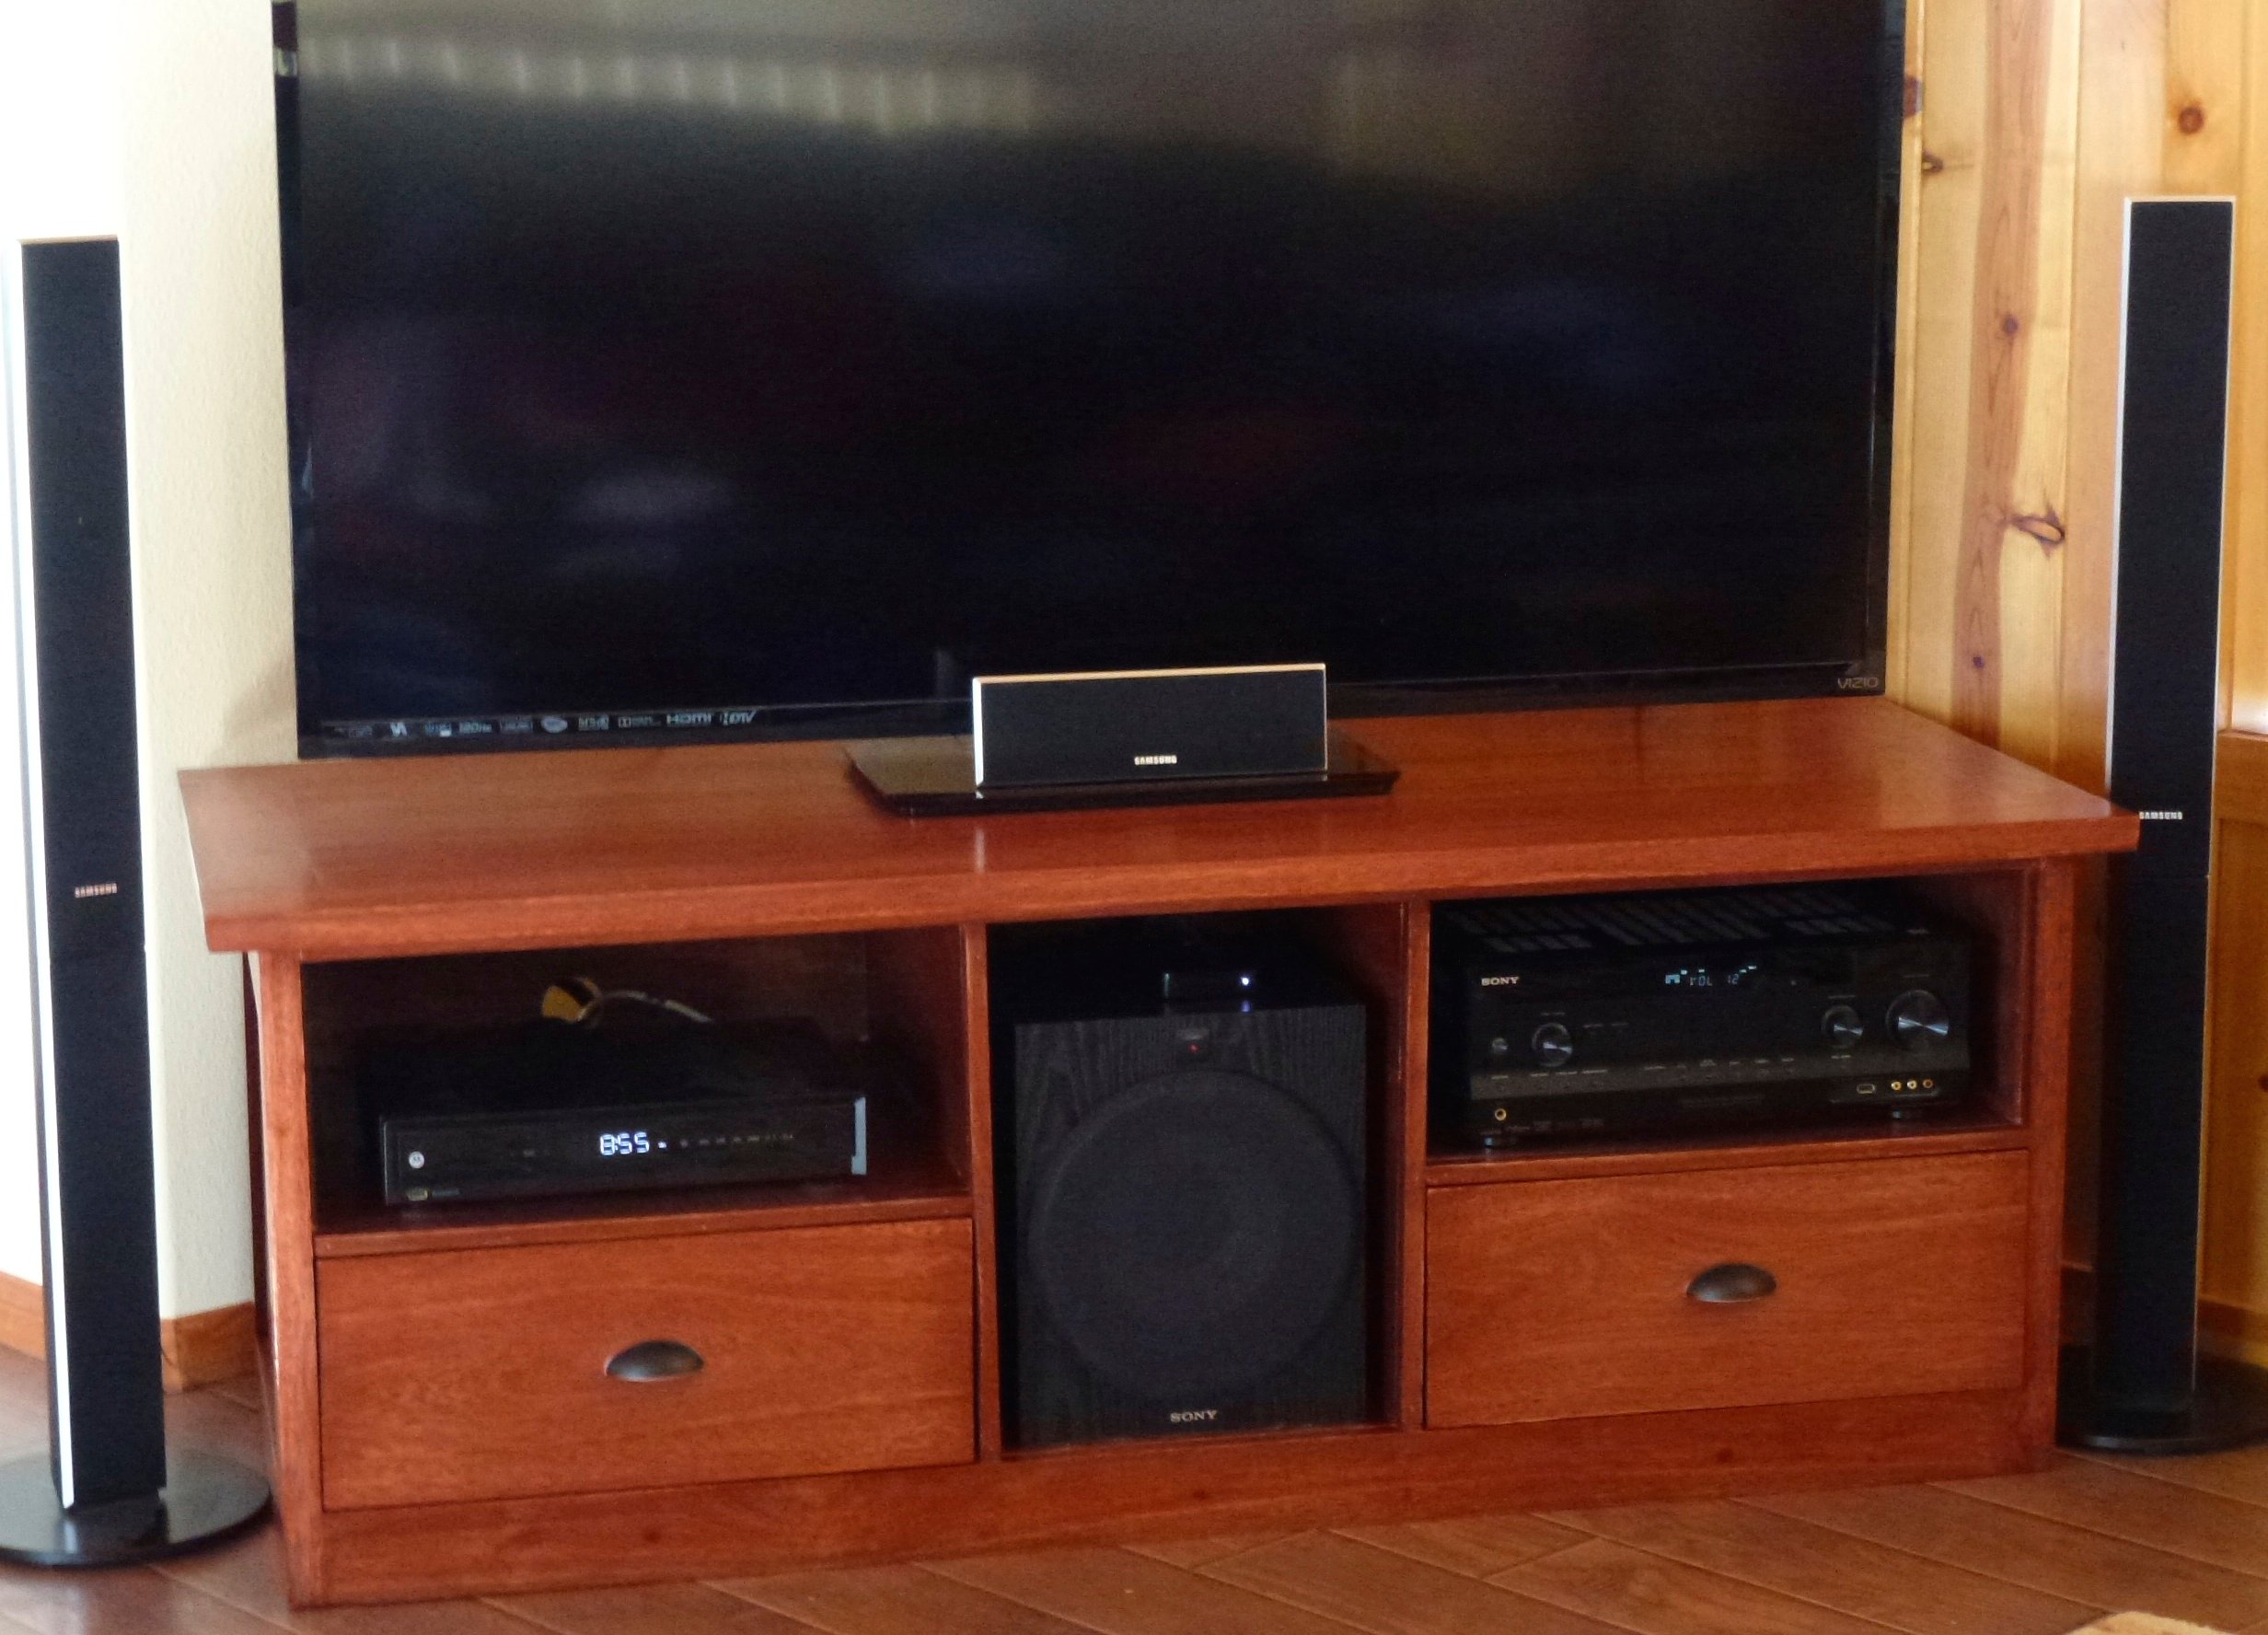
The design of our planked entertainment center is a compilation from various designs offered on Ana White; Planked Sideboard http://ana-white.com/node/4682 & Media Center http://ana-white.com/2012/04/plans/rebecca-media-center-console-piece. This is the 1st piece in our collection of 6 being made in the Farm House style for our Great Room and Dining Room. We considered this to be our “practice piece” in preparation for the remainder of the collection with many important lessons learned.
The wood used was Red Grandis, which is plantation Eucalyptus and has just recently been made available in the U.S. Red Grandis is being sold in California to replace Mahogany due to the environmentally unfriendly agriculture practices of many Mahogany producers. While highly recommended by our local hard-wood retailer, we were reticent as we couldn’t find much information about Red Grandis on the internet. And, while we don’t completely know how it will stand the test of time, we found it to be very user friendly, and it cut, machined, drilled & stained very well.
This was our first attempt at making drawers. While it took some re-cutting / re-routering, we are pleased with the final result and have gained some cautious confidence for the next pieces. We did learn, in our hands at least, that the Rockler 45° Lock Miter Router Bits provided a much more reproducible drawer corner than the Rockler Drawer Lock Router Bit - 1" Dia x 1/2" H x 1/2" Shank .
This was also the first time that we have used Miller Dowels and we were very impressed with their ease of use and outstanding fixation. Additionally, I called the Miller Dowel company a couple of times for information and found them to be very accommodating and informative. Based on our experience, we would recommend that you consider them for your next project. One tip that we learned along the way was to put shipping tape around ( 5”strip above, below and each side) the dowel before you cut off the tip as it, apparently, lubricates the flex saw and protects the finished surface from being damaged while removing the tip.
Built from Plan(s)
Estimated Cost
$300
Estimated Time Investment
Week Long Project (20 Hours or More)
Finish Used
Minwax stain Red Chestnut
Minwax Satin finish Hand-rubbed Varnish
Minwax Satin finish Hand-rubbed Varnish
Recommended Skill Level
Intermediate
Comments

Mon, 02/16/2015 - 10:08
This is the first of six
This is the first of six pieces that we plan to build using the planked/farmhouse style design.
Tue, 02/17/2015 - 14:27
Wow! This is really nice! I
Wow! This is really nice! I love the stain that you chose!
Playhouse Loft Bed with Stairs
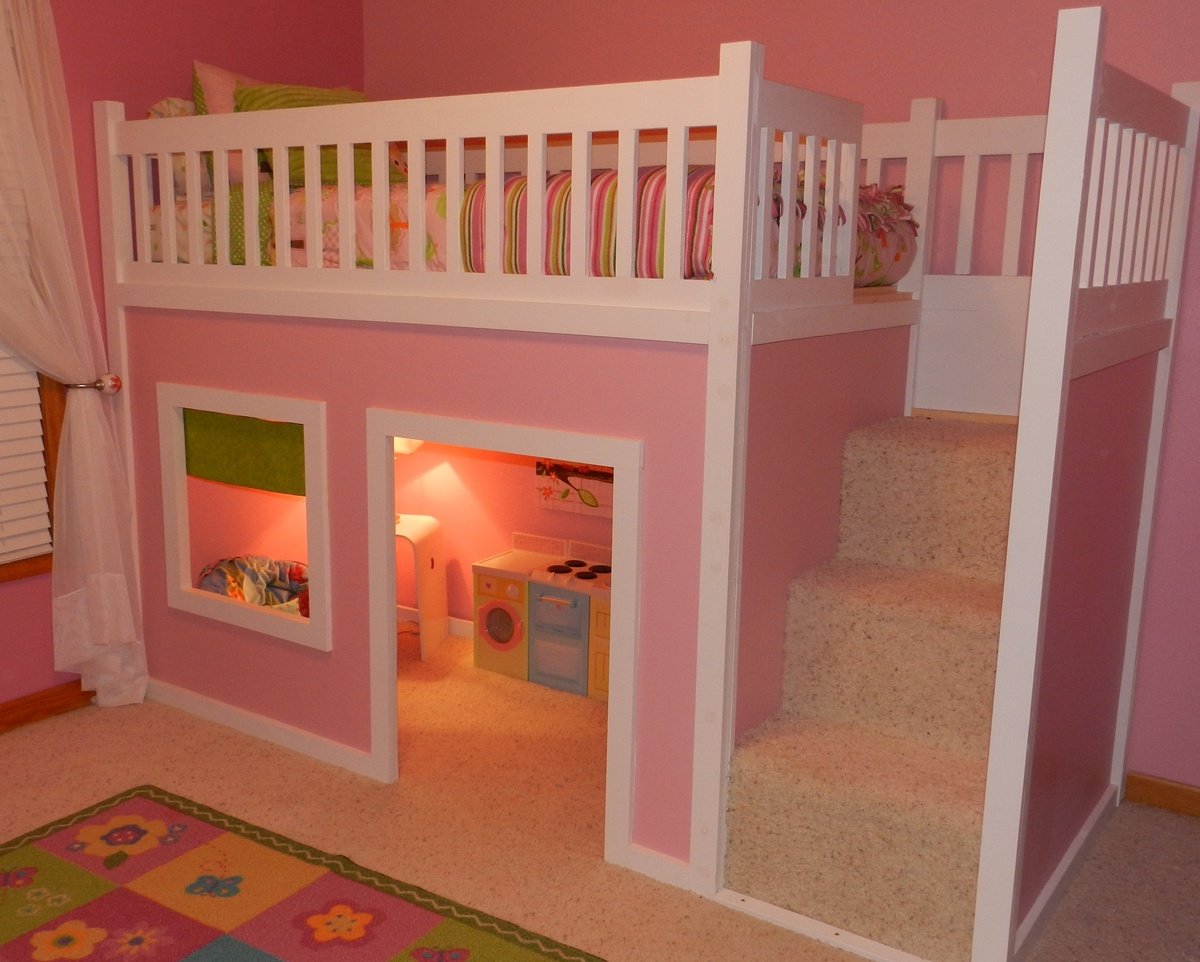
When I showed my husband the plans for this playhouse loft bed on Ana's site, he decided that we needed to build it for our daughter for Christmas. We combined the two plans for the Playhouse & the stairs and modified it slightly to fit our space. We had left-over carpet which we used on the stairs. She absolutely LOVES it!! And secretly, I think her 3 older brothers do, too. Thanks SO much, Ana!!
Built from Plan(s)
Estimated Cost
350
Estimated Time Investment
Weekend Project (10-20 Hours)
Finish Used
Paint is BHG Pink Carnation.
Recommended Skill Level
Beginner
Comments
Sat, 01/12/2013 - 19:47
Loft bed with stairs...plans
Omg....I love this I need to know how to do out....so I can make my husband build it..
Thu, 01/05/2012 - 06:34
are the plans free, and if so
are the plans free, and if so can I get a copy?
Thu, 01/05/2012 - 07:16
Philip and Guest - The plans
Philip and Guest -
The plans are free, and click on the links in the post
From Plan: (plans are linked here)
Sun, 01/15/2012 - 17:58
Playhouse Loft Bed Stairs Plans
RE: http://ana-white.com/2012/01/playhouse-loft-bed-stairs
Would you please send me the plans for the Playhouse Loft Bed with Stairs?
Thank you.
Tue, 01/17/2012 - 09:20
Playhouse Loft Bed Plans
I would like to know how to get a copy of the plans for this bed. This is exactly what I want to do in my little girls room but I have not beed able to find plans. Thanks!
In reply to Playhouse Loft Bed Plans by Guest (not verified)
Fri, 01/27/2012 - 21:44
links
If you look in the section above, you'll see "From Plan:" There are two links (they're black and don't look like links. You'll need to hover over them). One for the basic bed and one for the stairs.
Tue, 01/17/2012 - 18:38
Loft Bed..
I do not see the plans for the playhouse loft bed. Where is it located? Can you email it to me or post the link?
Thu, 01/19/2012 - 21:42
LInk to the plans
In reply to Age by Guest (not verified)
Fri, 01/27/2012 - 21:38
Age appropriate
I would say your 2 year old daughter is a little young for a bed this high. I think general guidelines would suggest waiting until age 6 for lofted and bunked beds, but I think that's being very cautious. Our daughter is just about to turn 4 and she does fine in it.
Wed, 01/25/2012 - 11:29
Looks fantastic!
You did a great job! That looks fantastic!
I'm going to be making this bed within the next month or two for my daughter. She's 4 (will be 5 in April). I know the overall design isn't *that* high off the floor, but my daugter has a tendency to roll out of bed...often. LOL
Do you find the guardrail/slats are high enough to prevent roll offs, or should I add some height to them when I build?
Yours turned out awesome! I can see why your daughter (and sons) love the bed!
Cindy
In reply to Looks fantastic! by Cindy from Indiana (not verified)
Fri, 01/27/2012 - 21:34
Guard rails
Hi Cindy.
Thanks for your kind words.
We had the same concerns about our daughter rolling or falling out. She is almost 4, but still had rails on her previous bed. We put the slats that the mattress sits on in the very lowest possible position and actually traded twin mattresses with her brother who had a thinner mattress. Her's had a pillow-top and even the extra 2 inches made quite a difference.
There are nearly 9 inches between the top of her mattress and the top of the rails which is plenty to prevent accidental roll-outs, but it certainly wouldn't hurt to add extra if it would make you more comfortable.
Now if we could just keep her from standing up there, I'd feel a whole lot better. lol
Good luck with yours.
Kara
Sat, 01/28/2012 - 07:27
Thank you!
Hey Kara,
Thank you so much for replying! That does make me feel more comfortable that there will be around 9" between the mattress top and the rail top. Not sure yet if I'll add a bit more or not, but it's good to hear how it worked out for you guys. Now I'll be hoping to keep my little dare devil from trying to 'fly' off the top of it and we'll be good to go. LOL
Thanks, again! That was really helpful.
Cindy
Thu, 01/26/2012 - 12:59
Hi! LOVE THIS!!! Am planing
Hi! LOVE THIS!!! Am planing on making for my daughter. Any chance there are plans for this in a Full Size bed?
In reply to Hi! LOVE THIS!!! Am planing by Guest (not verified)
Fri, 01/27/2012 - 21:48
Full Size
I've seen some posts on Ana's Brag Boards of these lofts with full sized mattresses on top. Ana's original plan is a twin bed, but others have modified it to suit their needs. You may just want to search and see if anyone has included their plans for a full. Sorry I can't be more help. Good luck!
Tue, 01/31/2012 - 18:32
Very Nice...
That is very nice if you dont mind me asking how long did you make that one... I am wanting to make one for my daughter but I dont have 103 inches that called for in the one plan...
In reply to Very Nice... by JessiW (not verified)
Sat, 02/04/2012 - 16:10
Length of bed
We made our bed to the exact specifications that Ana gave (103"), however, if you need to save space, you could leave the stairs off and opt for the ladder.
In reply to Bed Plans by Kelly Kelley (not verified)
Wed, 02/15/2012 - 18:34
Plans
Hi Kelly,
There are links to the 2 plans in the "ABOUT THIS PROJECT" section above. Just hover your cursor over the "From Plans:" and the links will change color. They appear black and therefore, don't look like they're linked to anything. They're both there. Good luck!!
Sat, 02/11/2012 - 09:30
I need the plans for this can
I need the plans for this can someone please send me them :) casslynne@gmail.com
Wed, 02/15/2012 - 18:40
Where to find the plans...
There are links to the 2 plans in the "ABOUT THIS PROJECT" section above. Just hover your cursor over the "From Plans:" and the links will change color. They appear black and therefore, don't look like they're linked to anything.
Or...I've added them here.
http://ana-white.com/2010/09/playhouse-loft-bed
http://ana-white.com/2010/09/easy-playhouse-loft-bed-with-storage-stairs
Mon, 03/05/2012 - 20:01
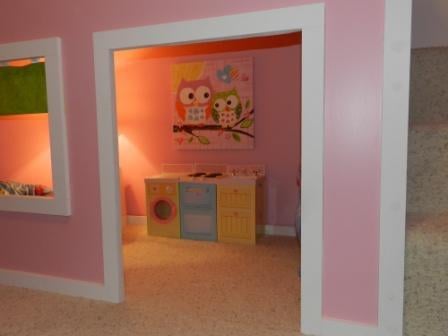
Decor
Hi there, I was wondering if you could tell me where you got the fabulous little washer and dryer combo that I see in the photo. I know the sweet owl painting is from target, but I love the little play space you seem to have created! :)
Sat, 03/17/2012 - 22:52
Cute Decorations!
I LOVE this so much! I love the color scheme as well, we decided to copy the scheme in my daughter's room. I was wondering where you got the curtain from? Did you buy it or make it yourself? It's almost exactly the color of the green paint we bought so I would love to know. Also, I love the washer and dryer too, also curious about that. Thanks!
In reply to Cute Decorations! by Kirstie (not verified)
Mon, 03/19/2012 - 19:40
Decorations
Hi Kristie.
I made the little curtain and the little washer/stove/sink set are from the Playskool Rose Petal Cottage collection. Good luck building your playhouse. It's a little girl's dream!!
Wed, 03/21/2012 - 20:27
Changing sheet?
Hi Kara,
I'm really interested in building two of these for my girls... they caught my attention because they've been asking for a bunk bed and I don't want to do a bunk bed because I hate the idea of struggling to change the bedsheets. Just wondering if it's a hassle with a bed this height.
Yours looks amazing, btw!
Thanks,
Sarah
Tue, 04/10/2012 - 11:18
playhouse with loft bed
oh my god i love this it would be awesome for my daughter also. were you able to stay in your budget???? do you think is a safe style for a 3 year old? she would go absolutely nuts!
Fri, 04/13/2012 - 20:17
so beautiful! if i wanted to
so beautiful! if i wanted to do this with a full mattress how would i tweak the measurements? i want to do this with a full with the stairs... just so she can be in the bed for a longer period and also the space underneath to be a bit bigger... also if i wanted to make the stairs have a drawer? i really would appreciate alll the feedback if possible because im so far from handy... :-/ and 1 more thing how did u get a light down there?
Fri, 05/11/2012 - 18:27
I was wondering if once put
I was wondering if once put together is it easy to take apart? My dad builds houses for a living and was going to make it for my daughter at his house then bring it to mine to set it up
Sun, 06/10/2012 - 14:40
My husband and I just
My husband and I just finished making this bed with stairs for our 3 year old and he loves it.
Tue, 06/12/2012 - 06:41
up to??
what age would you reccommend this for?? my son is 3 n a half and i woant to attempt to make this bed, but dont want to spend time and money if i will have to buy him a new bed in a couple of years. i would like it to last a good while. also, like veahava, i was wondering if this was easy to dismantle once put together as i am planning a move in the future, thankyou
Tue, 10/02/2012 - 02:14
This is absolutely divine -
This is absolutely divine - you are so talented! I have just found this website and can't imagine I'd ever be able to make something so beautiful. Putting up a shelf is beyond me. Your daughter must be so proud of her little nighttime palace!
Sun, 10/21/2012 - 20:01
Playhouse Loft Bed with Stairs
I am trying to get the plans for this bed with the stairs but when I click on the link it doesn't give me the plans. Help, my granddaughter would love love love this. Thank you so much.
Wed, 01/16/2013 - 06:05
hi! Someoneo to tell me how
hi!
Someoneo to tell me how many hours spent on it?
Mon, 02/04/2013 - 20:53
PLEASE, PLEASE, PLEASE,
PLEASE, PLEASE, PLEASE, SOMEONE TELL ME HOW TO GET THE PLANS, I REALLY WANT THIS BED FOR MY LITTLE GIRL!!!!

In reply to PLEASE, PLEASE, PLEASE, by ochoa
Mon, 05/25/2015 - 22:12
You can download more plans
You can download more plans from these resources:
Thu, 02/14/2013 - 12:36
Playhouse loft bed with stairs
This is awesome, how do I get a copy of the plans for this bed? I would love to do this for my grand daughter as a birthday gift
Thu, 02/14/2013 - 12:48
Playhouse loft bed with stairs
found the link, here is it for those wo are also looking I can't wait to start this project THANKS
http://ana-white.com/2010/09/easy-playhouse-loft-bed-with-storage-stairs
Wed, 09/11/2013 - 05:11
Absolutely Love this Bed!
We made this bed for our daughter and now my son and daughter play with her kitchen and table underneath in the playhouse. Your instructions were so easy to follow and everything matched up perfectly. We did do the ladder due to space but the bed is beautiful. We get so may compliments when people come over and I always tell them about your website. You truly have awesome ideas! I can not wait for the next project and I am sure it will be off your site :-)
Mon, 10/07/2013 - 17:26
playhouse with loft bed and stairs
I love your playhouse with loft bed! How tall is the underneath part? Would you be able to fit a desk underneath? Also, could the plans be adjusted to accommodate a double bed?
THANK YOU!!
Comments
Janettx
Mon, 09/20/2021 - 13:24
Nice job!!! I'm still using…
Nice job!!! I'm still using mine. I ended up putting 12"x12" pavers under each leg to extend their life. After the 2nd year now we get bumper crop out of ours each season.