Bench Planter

This build was also a lot of fun! I made an extra brace to hold the wait of two sitting on the bench. Thanks again Ana for your plans!
David Marks
Built from Plan(s)
This build was also a lot of fun! I made an extra brace to hold the wait of two sitting on the bench. Thanks again Ana for your plans!
David Marks
This is my first project ever built. I can't thank you enough for this site. I already have several other projects I want to build around the house because of this site. Thank you so much!

This is a wishing well I made for my sister for her wedding. It will be used during the wedding for people to drop "wish you well" cards into and afterward she can use it as a planter in her yard.
I followed ideas from multiple plans here on Ana-White.com, but I didn't follow any specific plan. Mostly I followed tips and instructions for cutting angles, drilling pocket holes and some finishing tips. This is the first "big" project I've done and I"m quite proud of it.
With everything, it measures 44.5 inches high. The well measures 21 inches across and 15 inches high. The roof measures 22.75 inches by 23.75 inches.
I hope y'all like it. I worked hard on this! :)
Thank you, Ana and everyone who contributes to this site. It's been so much fun and I've got lots of ideas for more stuff. If I was any good at all at Google Sketchup I'd put up the plans but I'm not. If anyone could help me with that, that would great. :)
Have a great day!


Mon, 07/21/2014 - 20:04
Anyway you can please tell me the angle for the boards ont the walls. I reallly like your well, and would like to build this for my wife but im not sure on what angles to use thank you

In reply to wishing well by bellows86
Sun, 07/10/2016 - 17:10
The 8 sided wishing well is going to be 22.5 degrees all the way around. hopes this helps

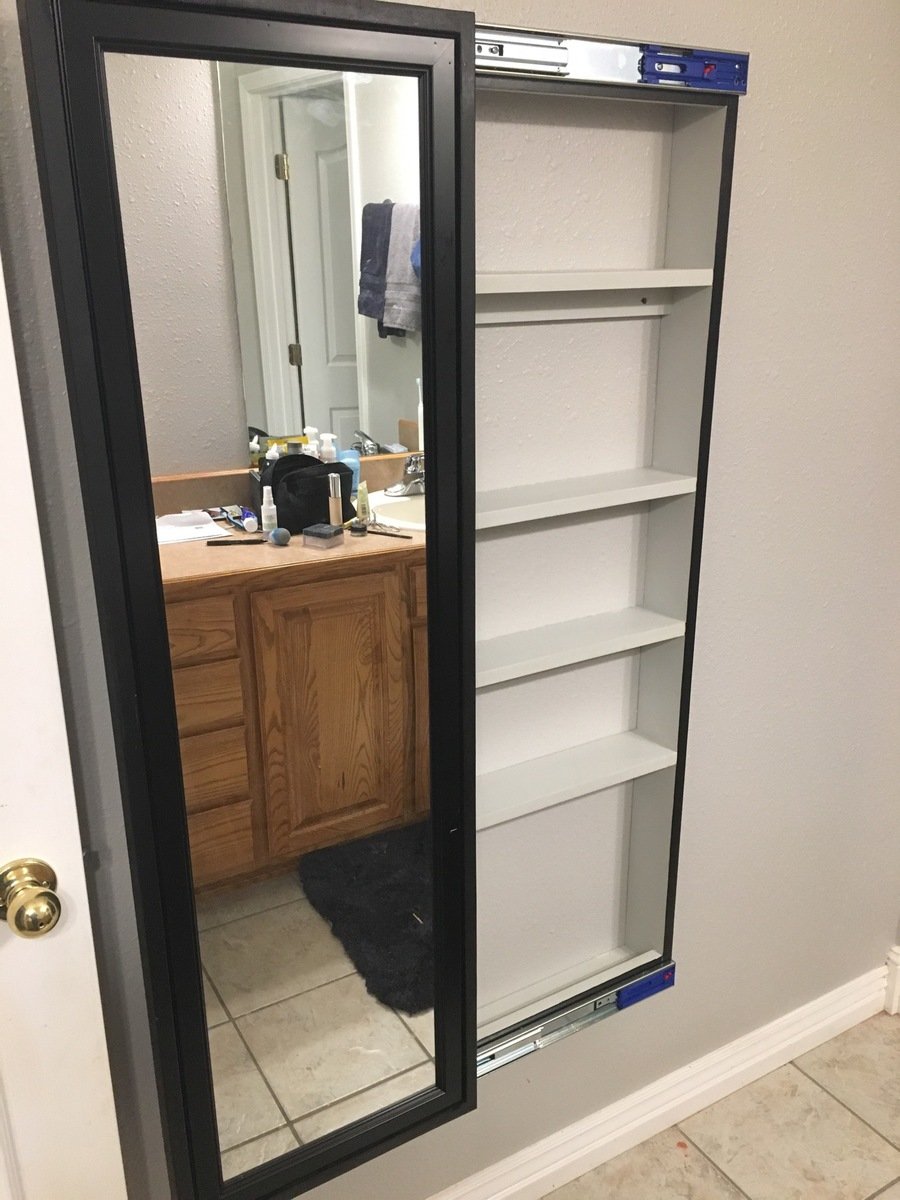
I built this for my daughter after building a ladder shelf for my kids bathroom. It took more time to install and adjust the drawer slides and paint the project.
Sat, 09/07/2019 - 03:32
Hi mltdblack
Really nice finish on the cabinet.
It looks like there’s molding on top of your mirror.
Did you buy a mirror with a frame or buy molding and put it on over the mirror?
What molding did you use an how did you secure it?
What size mirror did you use? Thanks
Fri, 01/07/2022 - 14:14
I am so sorry. This is the first I am seeing your question. The mirror came with a frame and I carefully nailed thru the frame to attach with my 18 gauge nailer. I bought the mirror at Lowe’s and I believe it was 15.5” x 50”. Also, I used full extension soft close drawer slides.
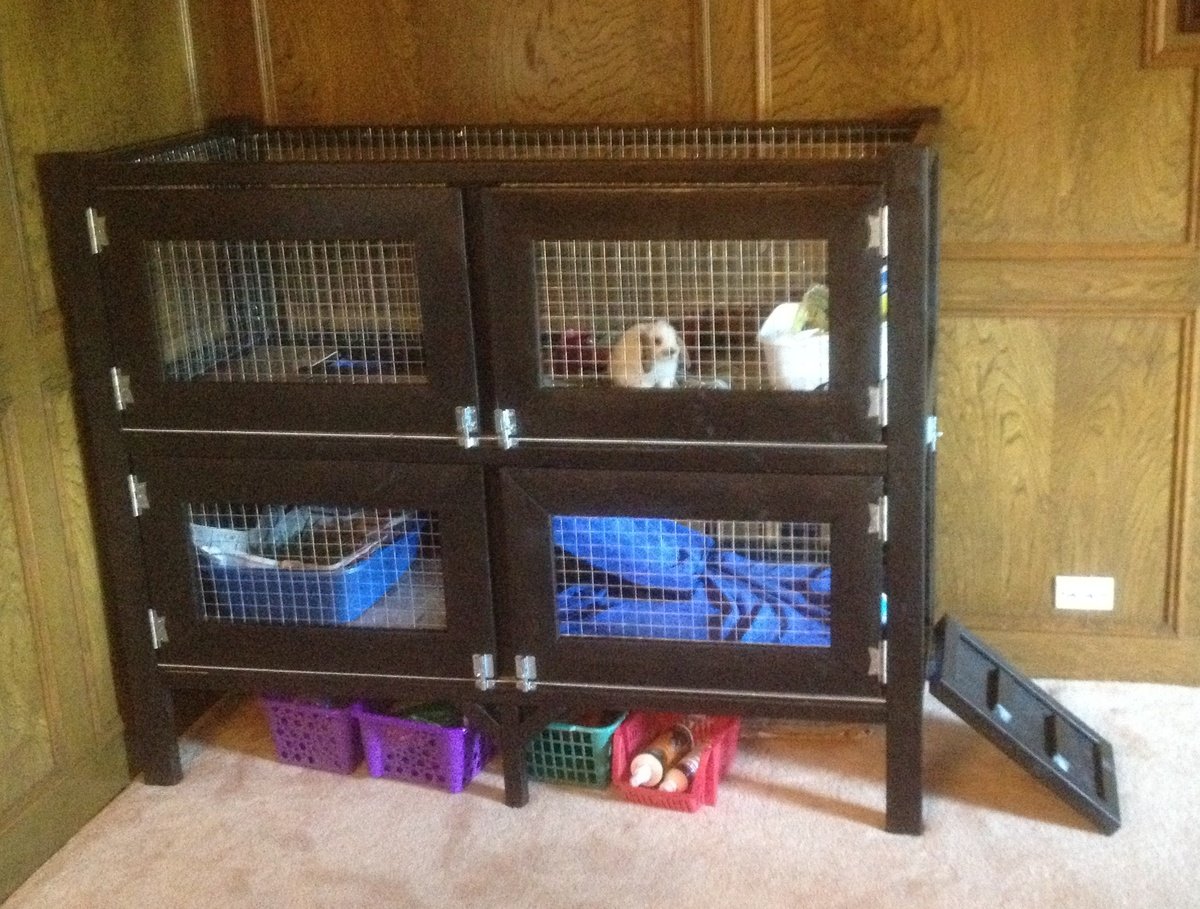
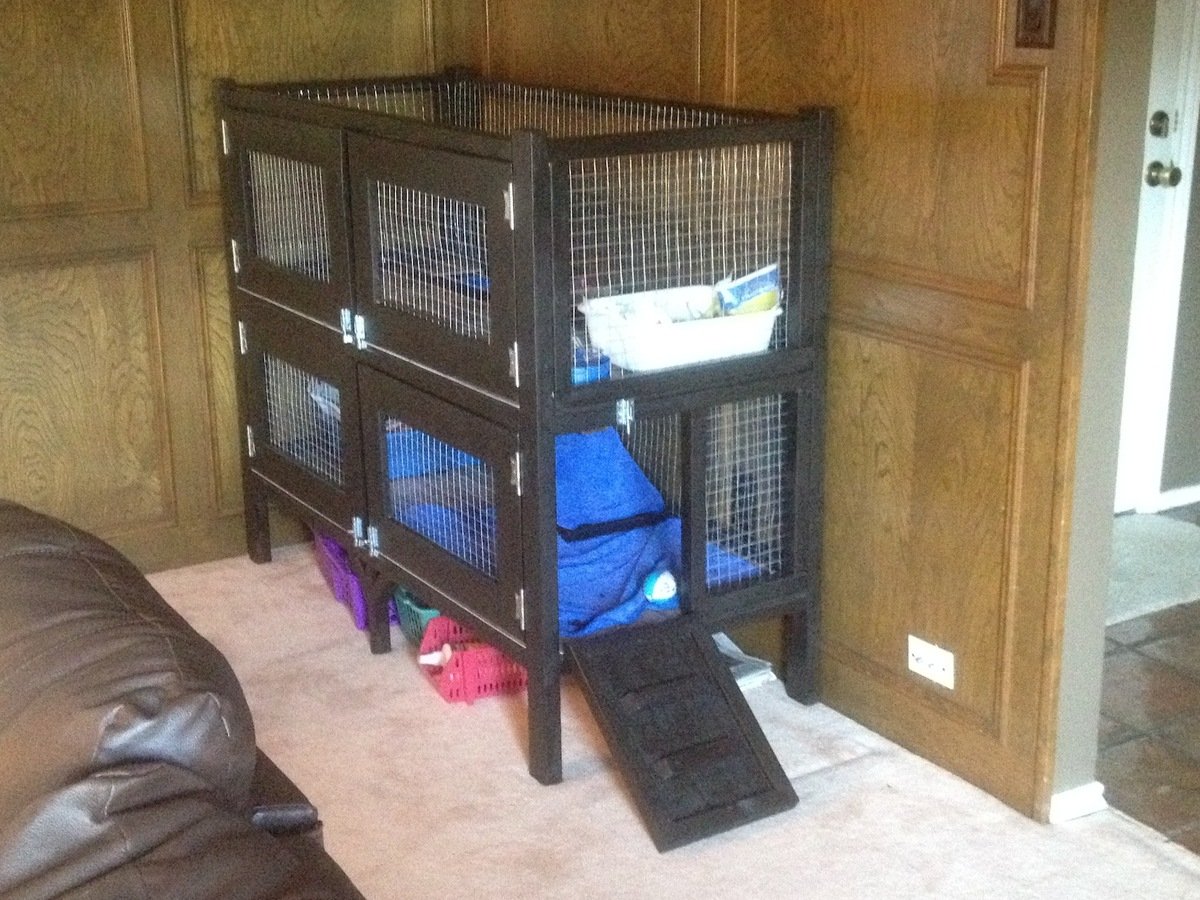
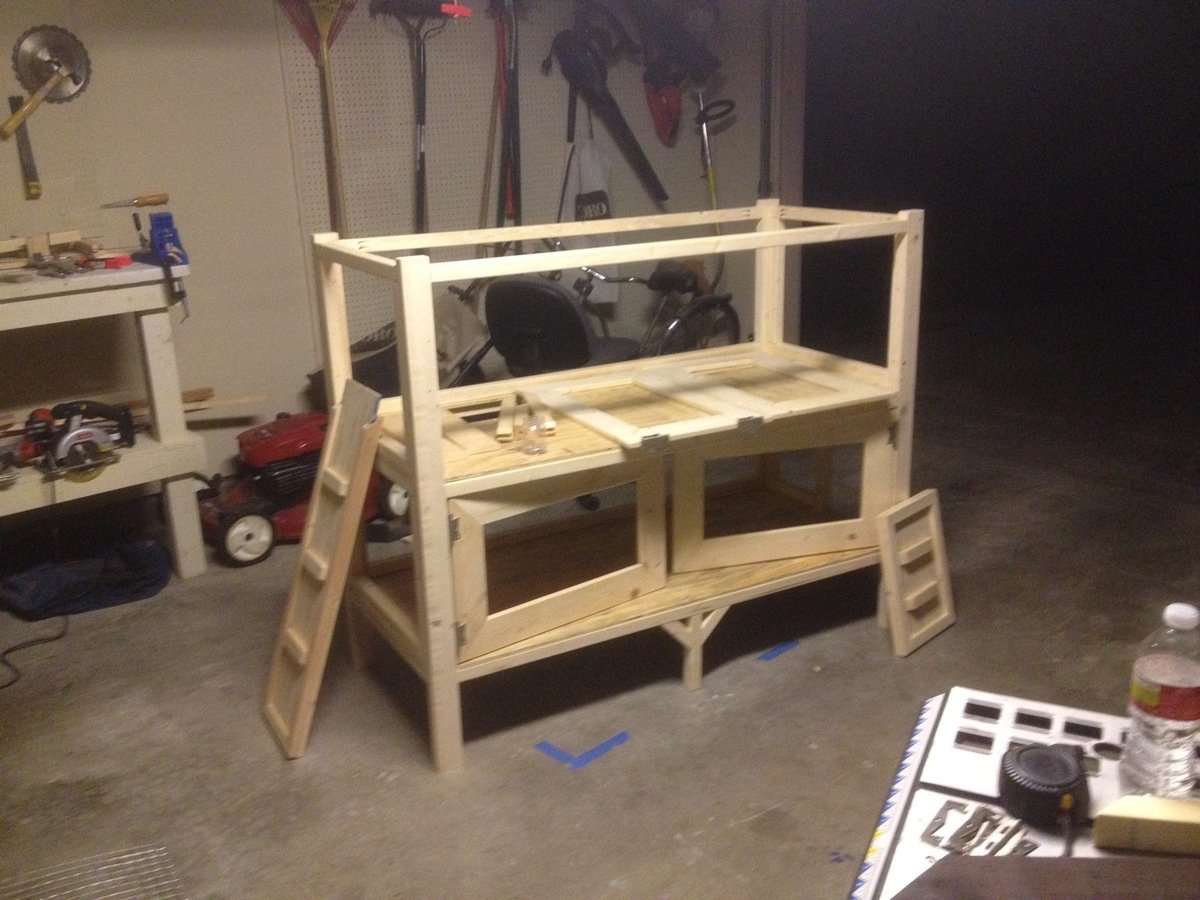
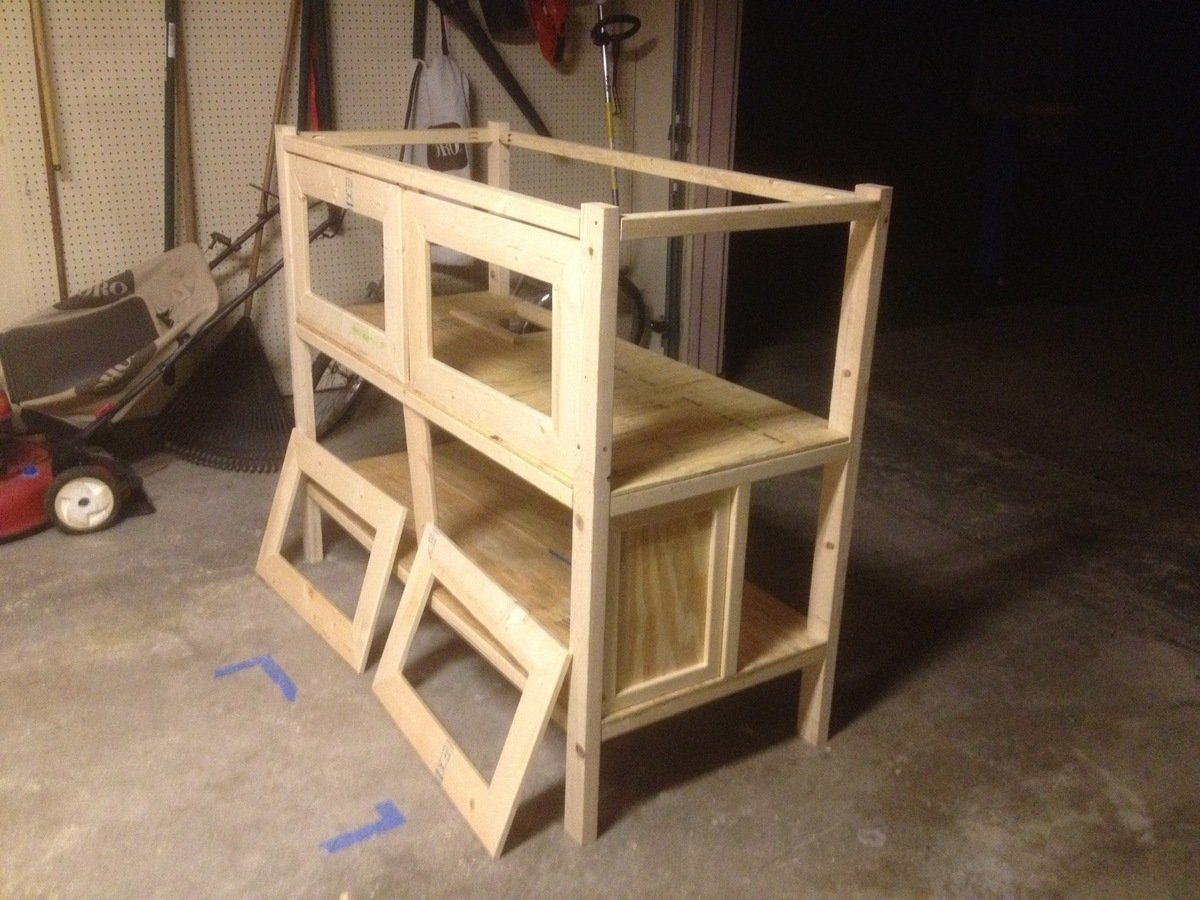
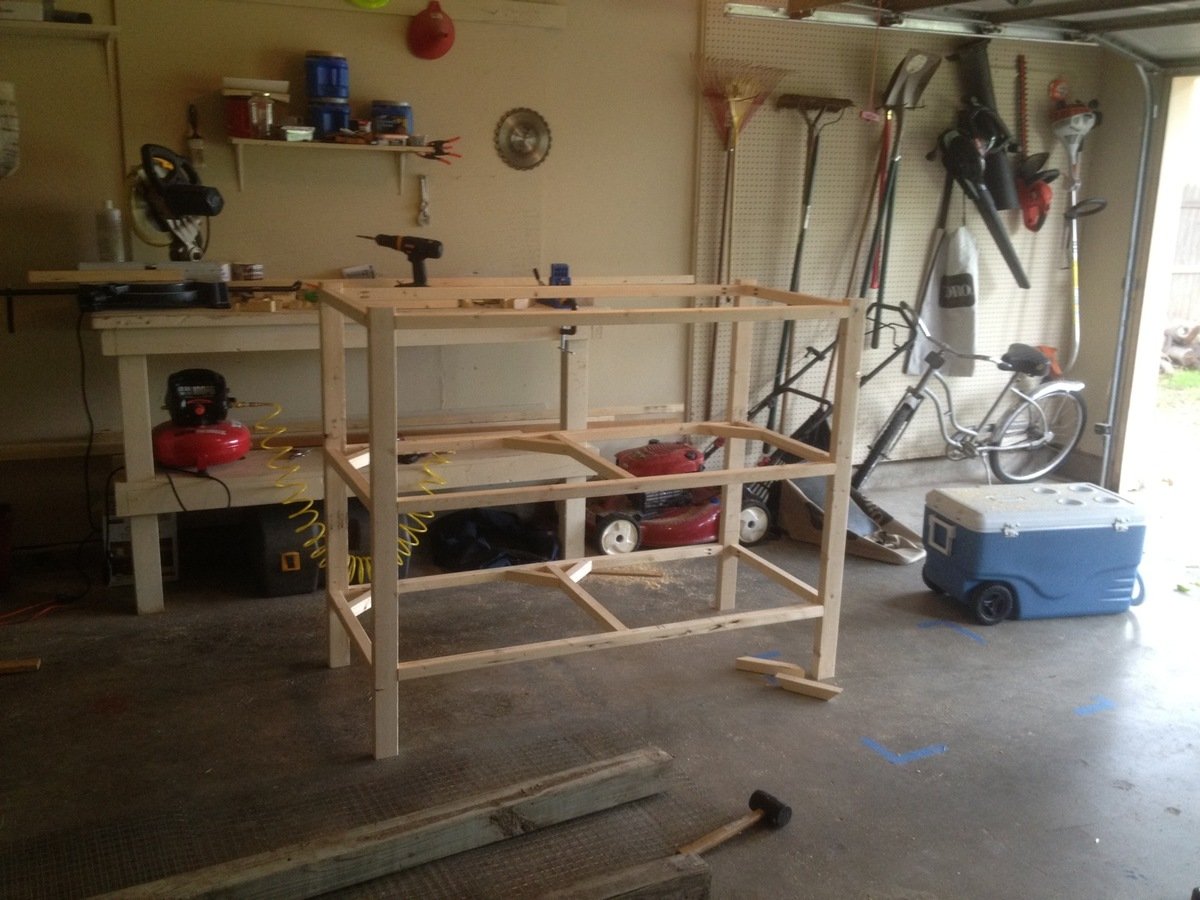
For my first woodworking project, I foolishly decided to build a rabbit hutch without plans for my daughters new Easter Bunny. So I literally scratched some ideas on my wood working bench and started going to work. I did some construction over a decade ago, but never attempted to build any furniture before, so I'm pretty happy with how this came out.
I spent a few days researching various rabbit cages and for our place we needed something that was ascetically pleasing and functional as it was going in our living room. I got some ideas from the web and decided the best thing for us would be to have an entry ramp, 2 sets of barn doors for each level (for easy cleaning) and an open roof. We went with linoleum floors since she's already litter trained. The floors could easily be modified to add 1/2" wire mesh if we decide to change things down the line. Also, we chose an espresso finish with silver hardware to accent the wire mesh
I pretty much crashed and burned on the staining as I've never done that before, but it ended up looking ok after all. I did a light sanding, but will probably invest in a planer and jointer to get my wood in better shape before assembling in the future. Also, I'll probably lightly dab some stain on ends of wood before final assembly as it made it difficulty trying to hide the white pine with the dark stain.
Other cages I saw ran around $200-$350.00 so i don't feel so bad about the cost. It's really the time that it took learning and making mistakes. I'm sure if I had plans I could of cut my time in 1/2.
Total Cost came out to around $150.00 but probably would of been cheaper if I had some plans to go by. I probably wasted a few 2x2s and accidentally mis-cut a scrap piece of 1/4"plywood which added another $16.00 to the bottom line.
Here's a breakdown of my total cost.
Hardware - $30.00
Includes 5 latches, 4 sets of hinges (8 total) and a 3' piano hinge
Stain - $8.00
Linoleum Tile @ ¢.69 sq ft - $16
Brushes, Stain Rags - $5.00
Screws - $6.00
Wire Mesh Roll $30.00
Needed 2 rolls at $15.00 each. I used 1" Wire Mesh measuring 2'x15'
Total Wood $50.00-$60
I used 2x3's for the legs - 2 @ 8' - $2.00 each ($4.00)
probably 15-20 2x2's - $1.52 each - can't remember how many I used to be honest ($30.00)
and a few 1x6's for the Doors - $2.00 each ($6.00)
Sheet of 1/4 plywood - $12.00

Thu, 05/03/2012 - 06:24
I bet your rabbit is pumped! What a nice house. Good Job.

In reply to I bet your rabbit is pumped! by Aargh (not verified)
Thu, 05/03/2012 - 06:57
Thanks! The rabbit definitely seems happy.
Thu, 05/03/2012 - 08:09
I also have been thinking with the idea of building a two story hutch for our rabbit. I love your ideas so now i have a new project to work on. Thanks for sharing!
Mon, 10/08/2012 - 12:46
I LOVE your cage! We have 2 rabbits and 2 Guinea pigs which means we have 2 ugly cages in our living room. We are planning something similar, but a bit bigger (but lower if that makes sense). And we'll put a 3rd story on for our Guinea pigs. So we have everyone on the same patch of real estate so to speak. I was going to do 3 solid walls with wire "windows" too keep all the hay, poops and such contained. I am also going to put lockable wheels underneath, so I can move it to my office if I ever need to (parties and renovations).
Is there anything that you can now think of that you would like to change on yours? R my research purposes.. :) It looks awesome, I'm just picking your brain for "hindsight" tips.
My very first project using the Compound Miter Saw. Easy Cuts. Easy assembly. Cost was about $1.50. I think I am going to make kits (as suggested in the sister plan) for a couple of birthdays coming up!


We did some conversions to the smokehouse plans to make a locker for all of my horse tack! :)

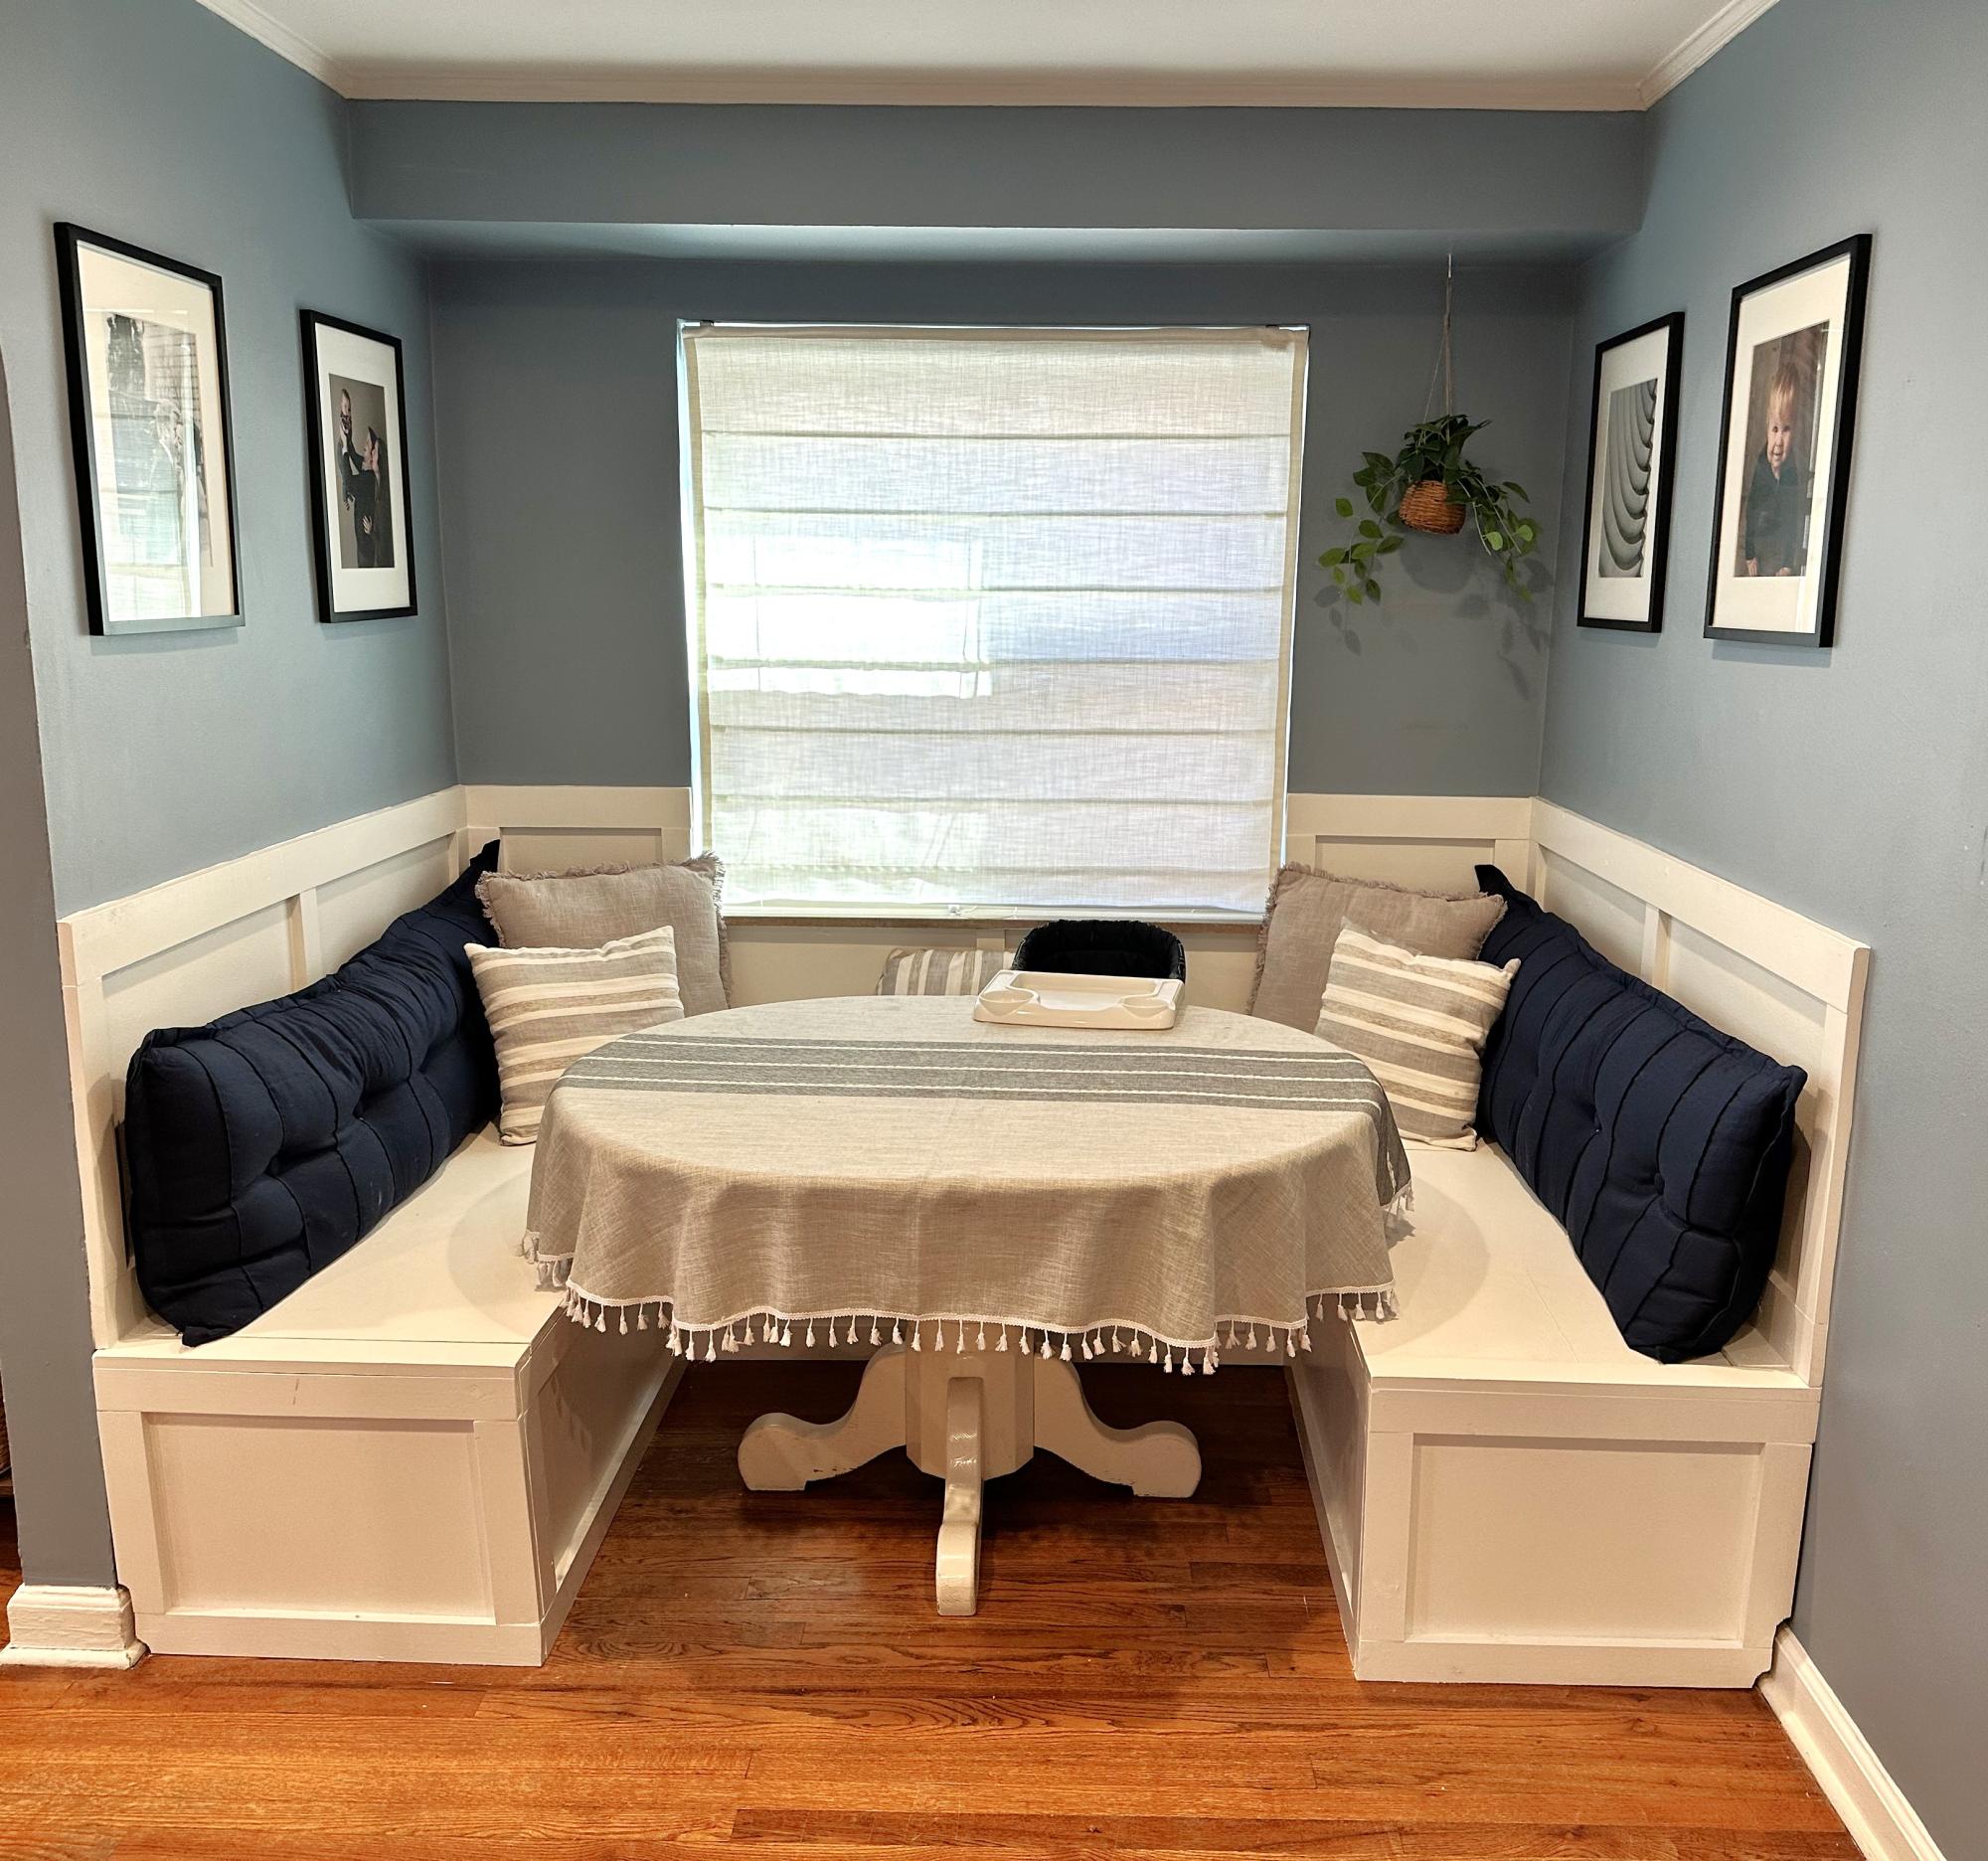
We love our new banquette so much! Thanks for the plans!!
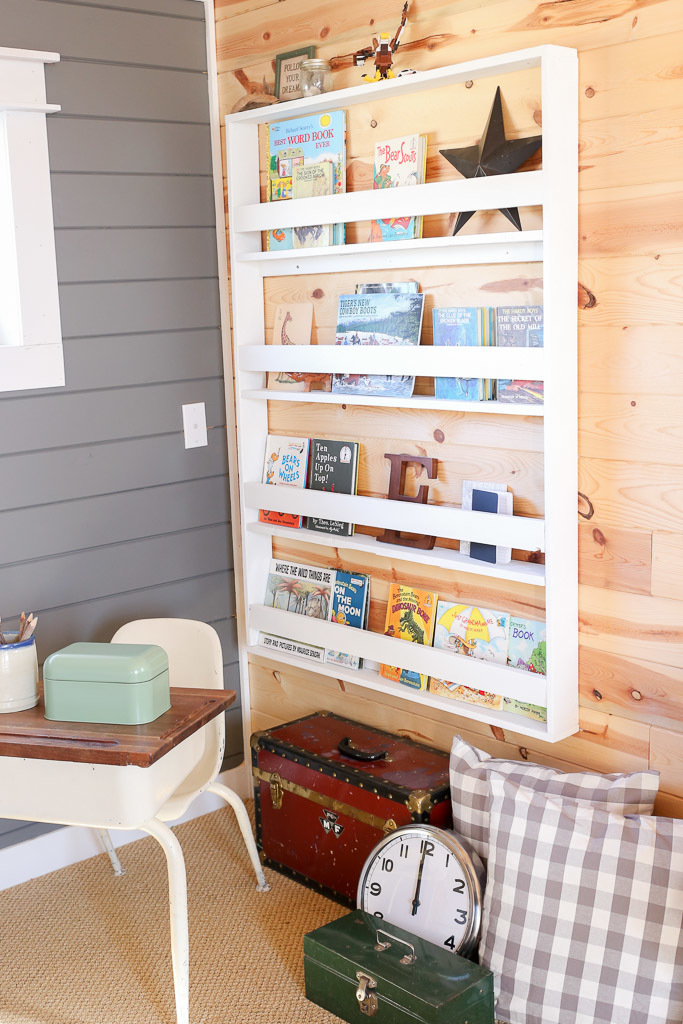
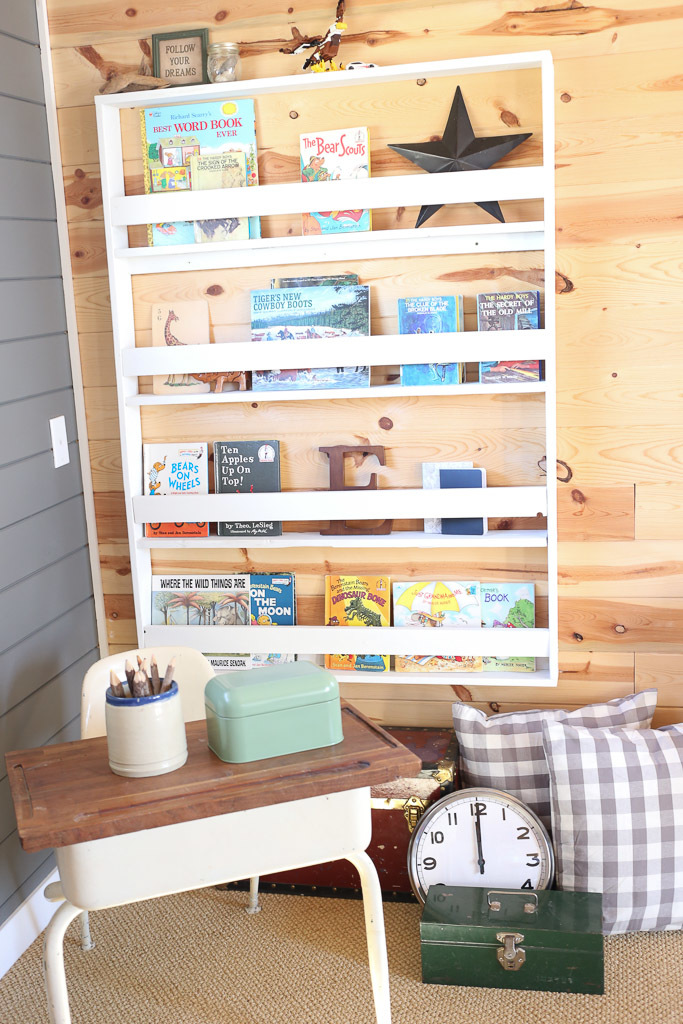
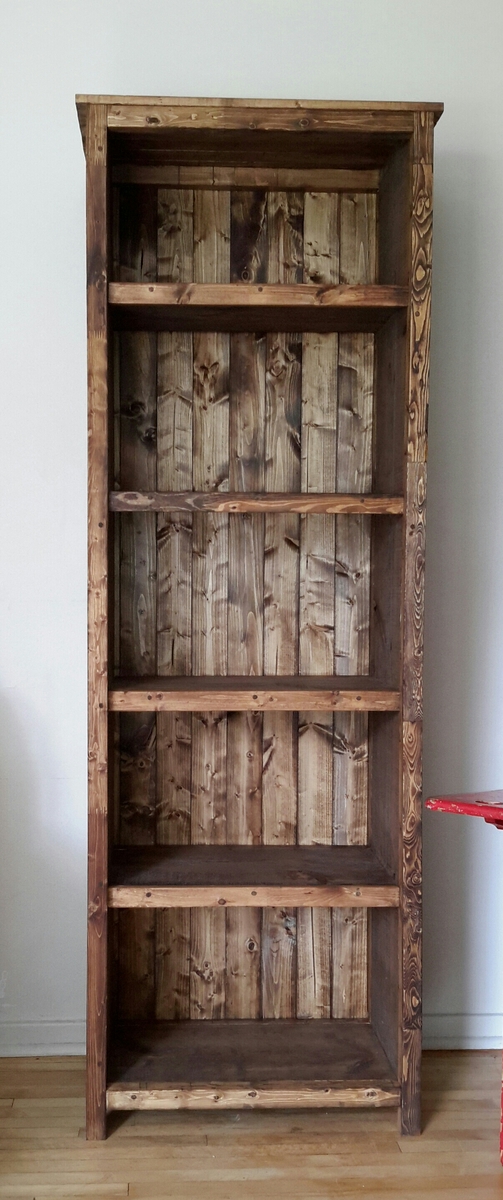
I built this book rack using scrap wood and modified plans from the Full Length Plate Rack. It was a really straightforward build, and functions very well as vertical storage that takes up little space. I predrilled, screwed and glued all of the joints, vs. stapling.
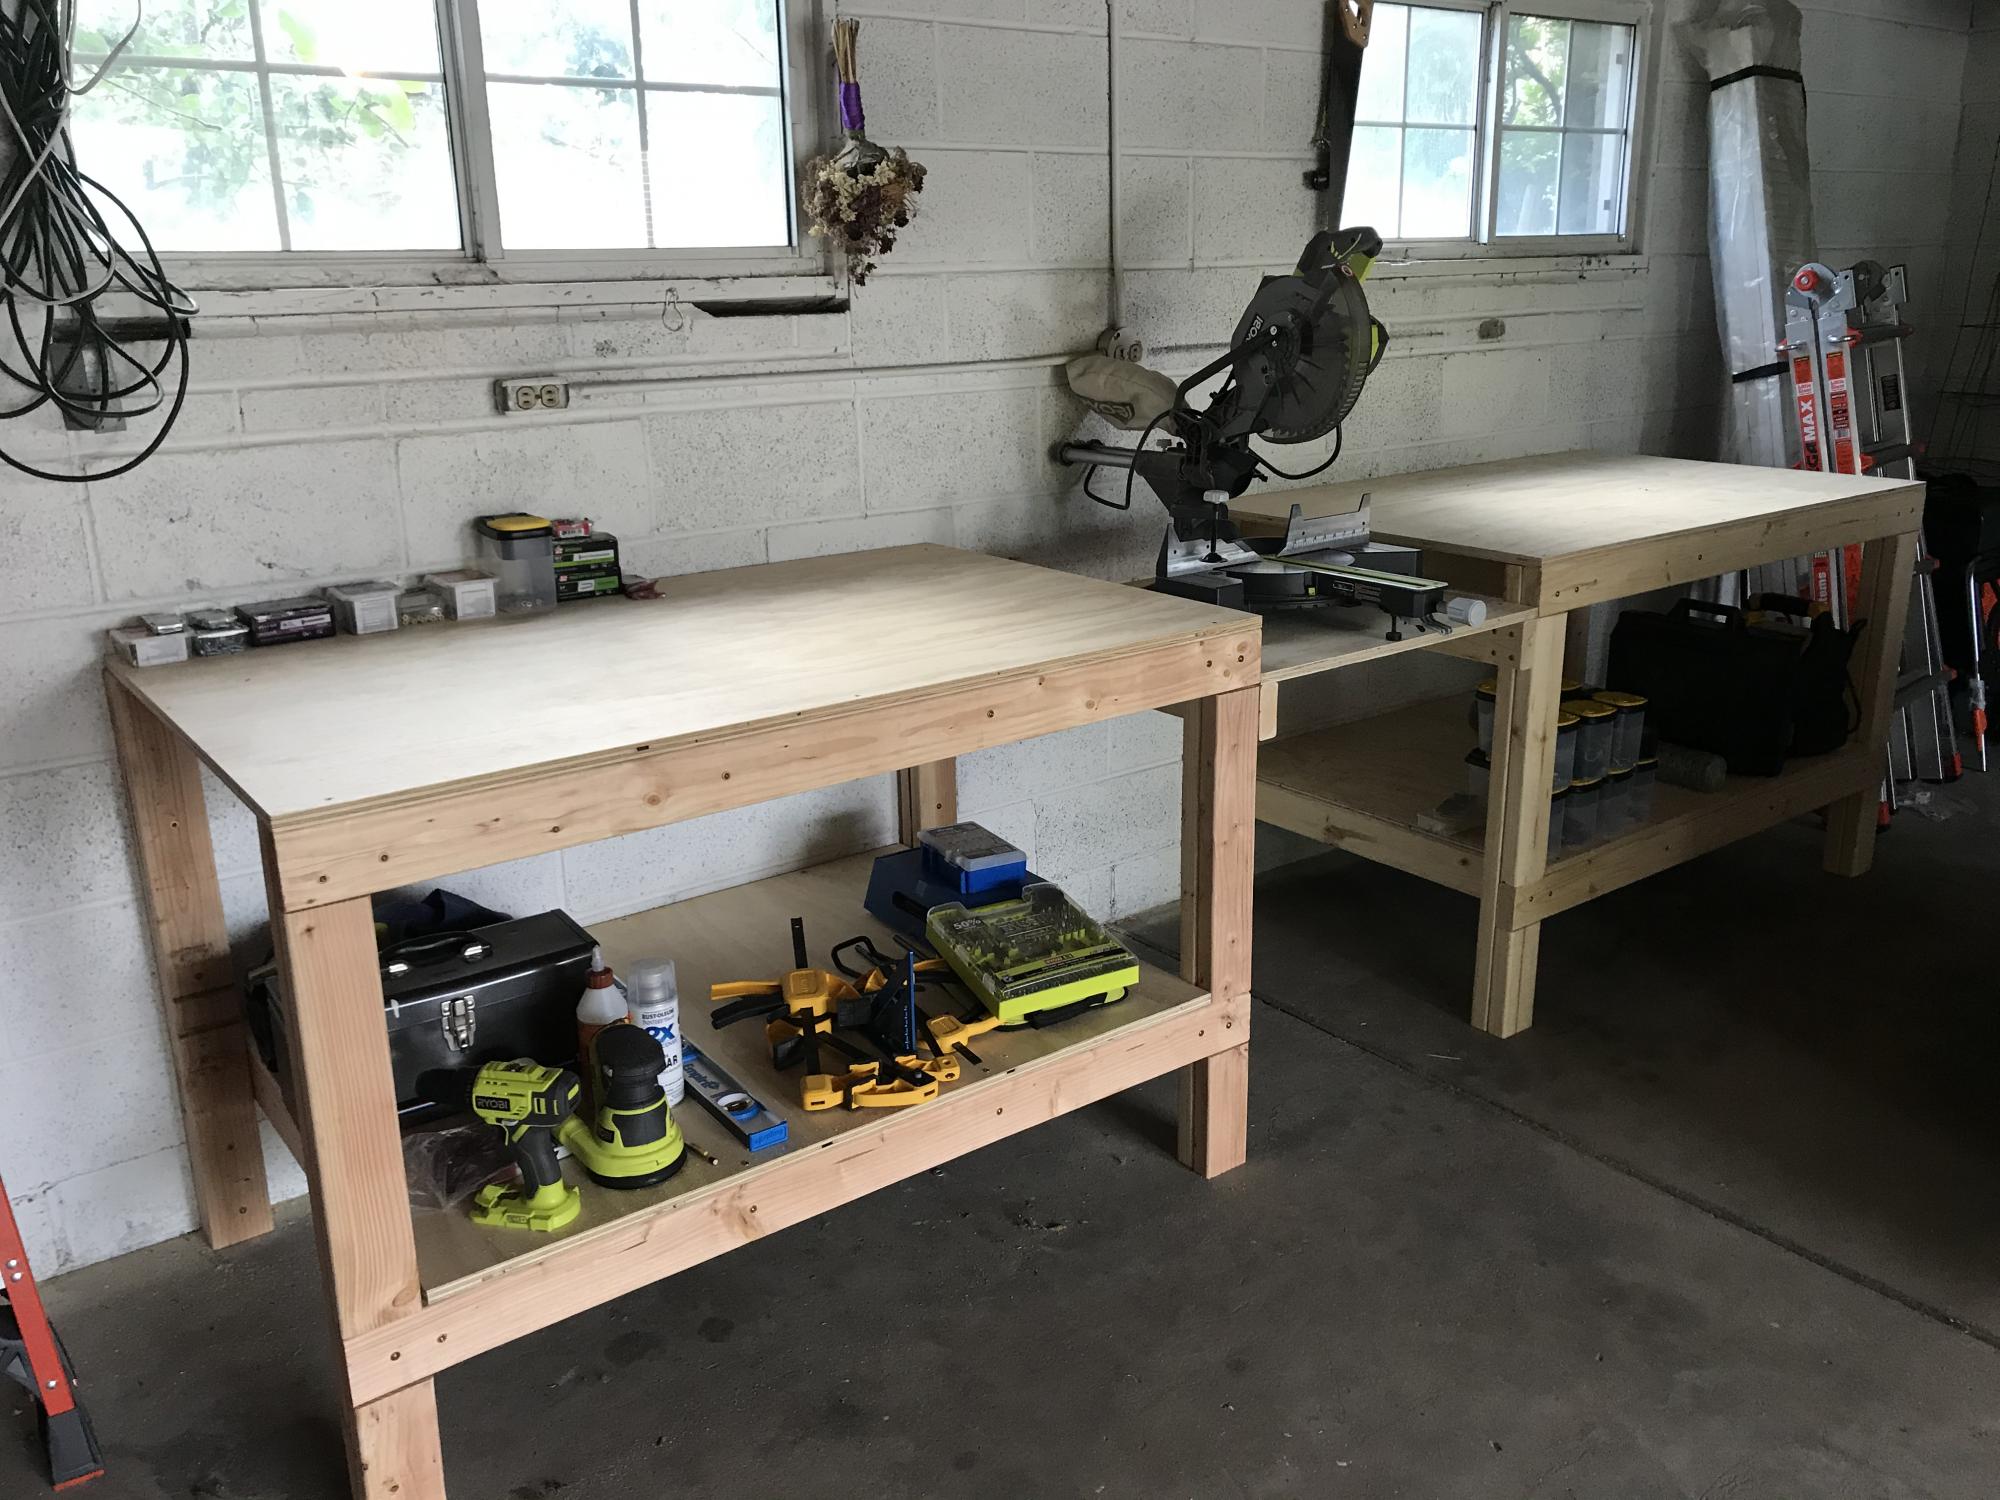
Built 2 of the workbenches for our garage. The plans made assembly very easy and quick. We had Home Depot cut the plywood to size.

We had some leftover granite from an outdoor kitchen build and wanted to maximize the use of it. We loved the look of a rustic table from Pottery Barn and set out to find something that was asking the same aesthetic. I came across the Jilly and Mia workbench console and thought it would work great with some minor modifications. I shortened the overall length and height, went with some heavy duty casters to support the weight of the granite, and reinforced the cross beams that would support the 3/4" plywood sheet and granite. I went with cedar for this build since it was outdoors and I'll finish it with a clear sealant.


Modified the design to allow me to roll lawnmower directly in the end. Fun project.
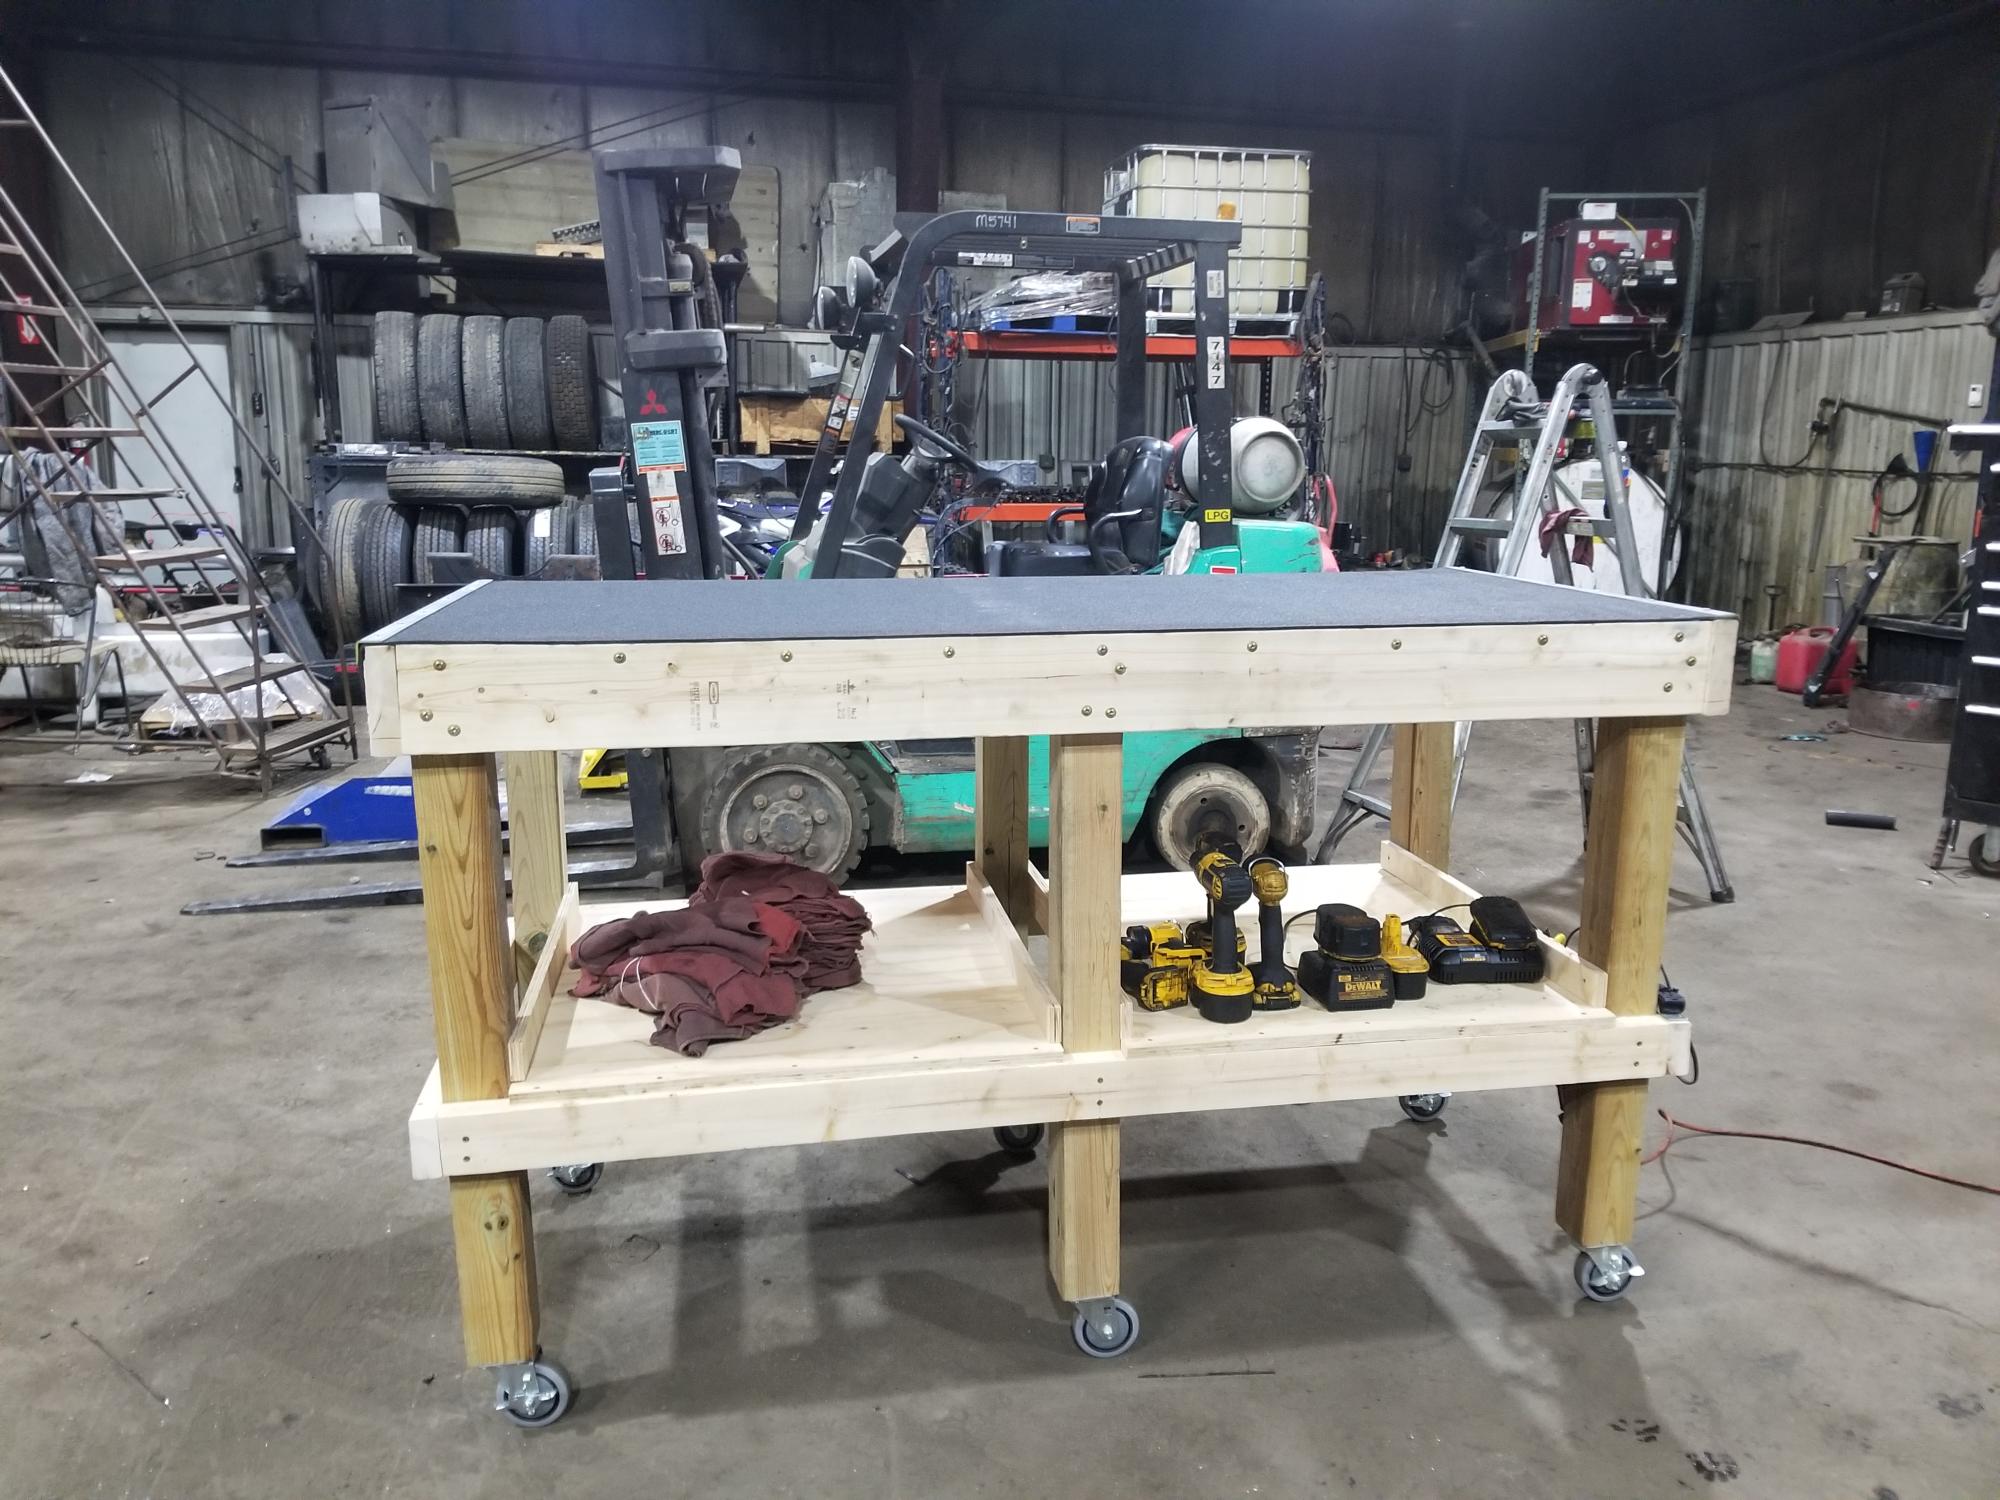
Awesome mechanic's workbench with sweet mods!
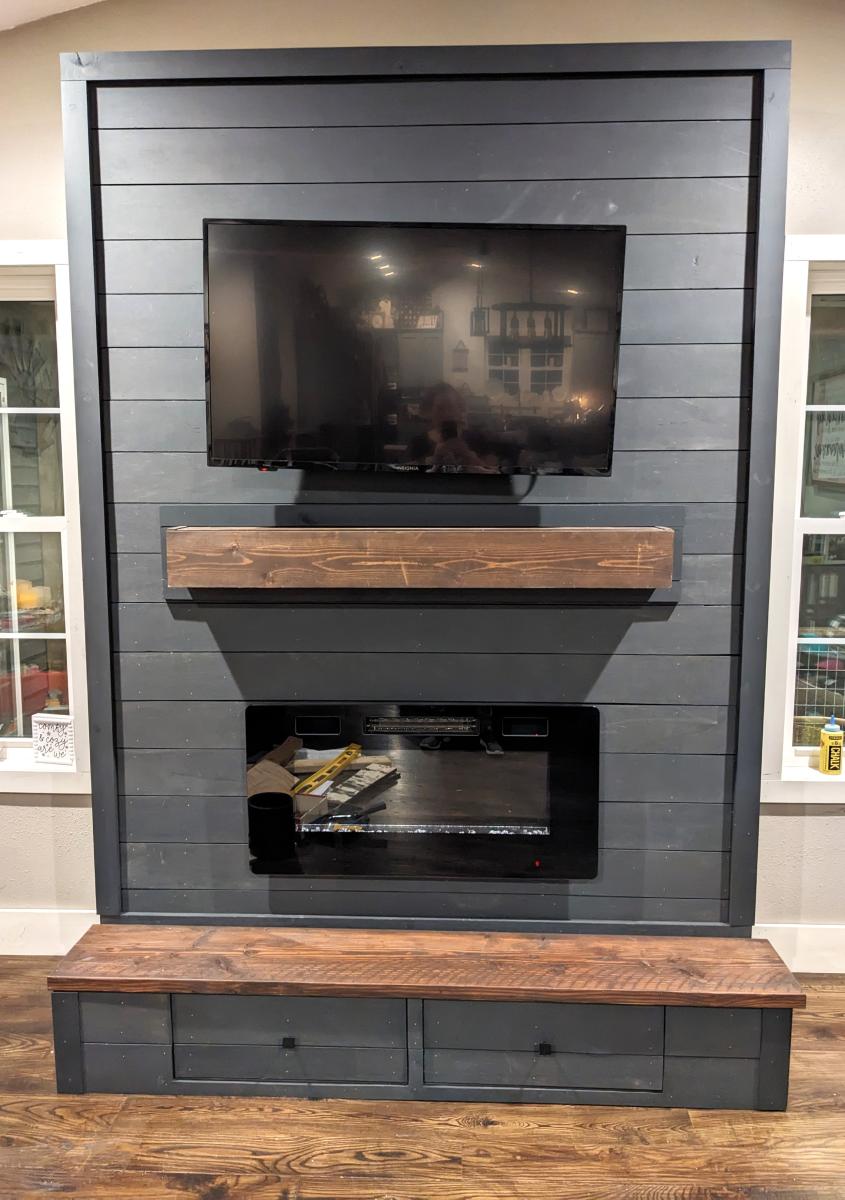
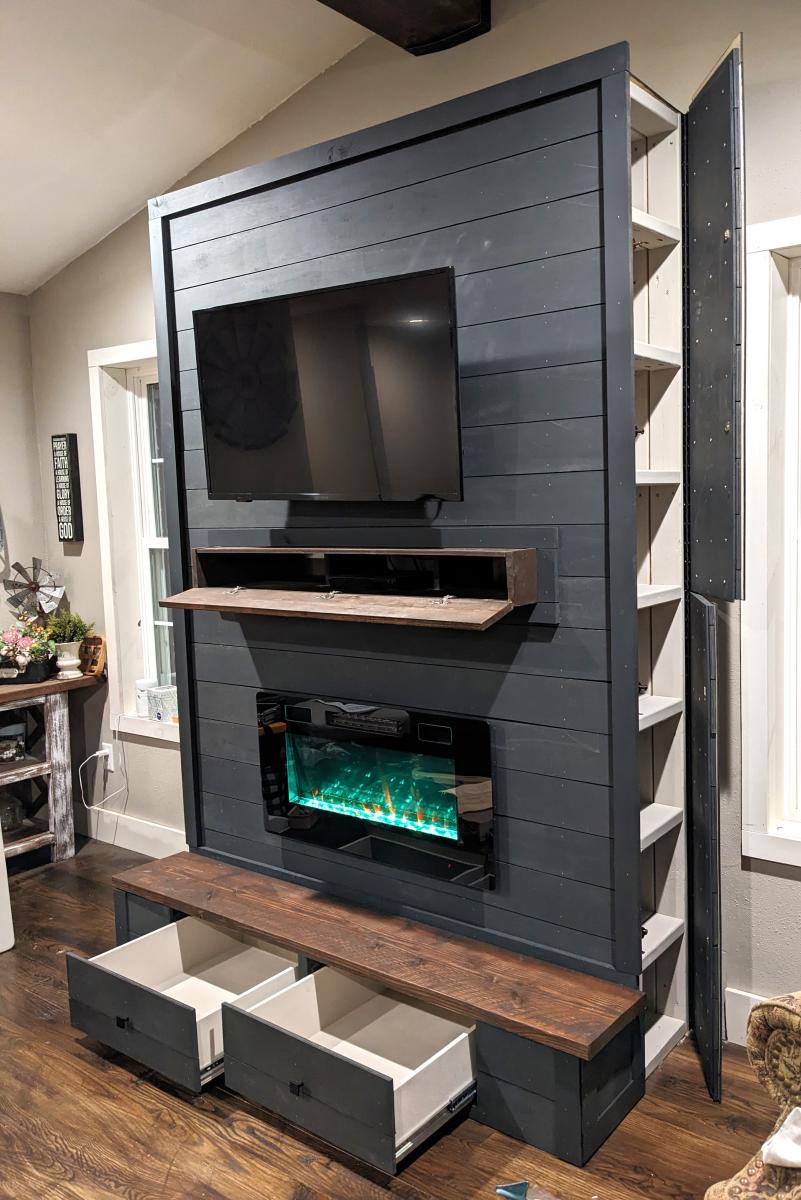
Modified plans to include game storage drawers, a flip open mantle for DVD player and hidden charging port, and hidden cupboards on both sides for DVD storage. I scoured the Internet for months before drawing this up to fit my space and tackling all on my own! I love it and all of my other Ana White inspired projects!
Casey O.
My first wood project.........
I loved this from Ana's site so much we tacked one. Please note I glued, screwed and dowel ed the holes. I hate kreg jigs. We also made ours taller to add an extra shelf.
Wed, 09/02/2015 - 06:33
Can you tell me the length of your 1x12 sides to make it a 5 shelve case? Thank you and your's looks great!
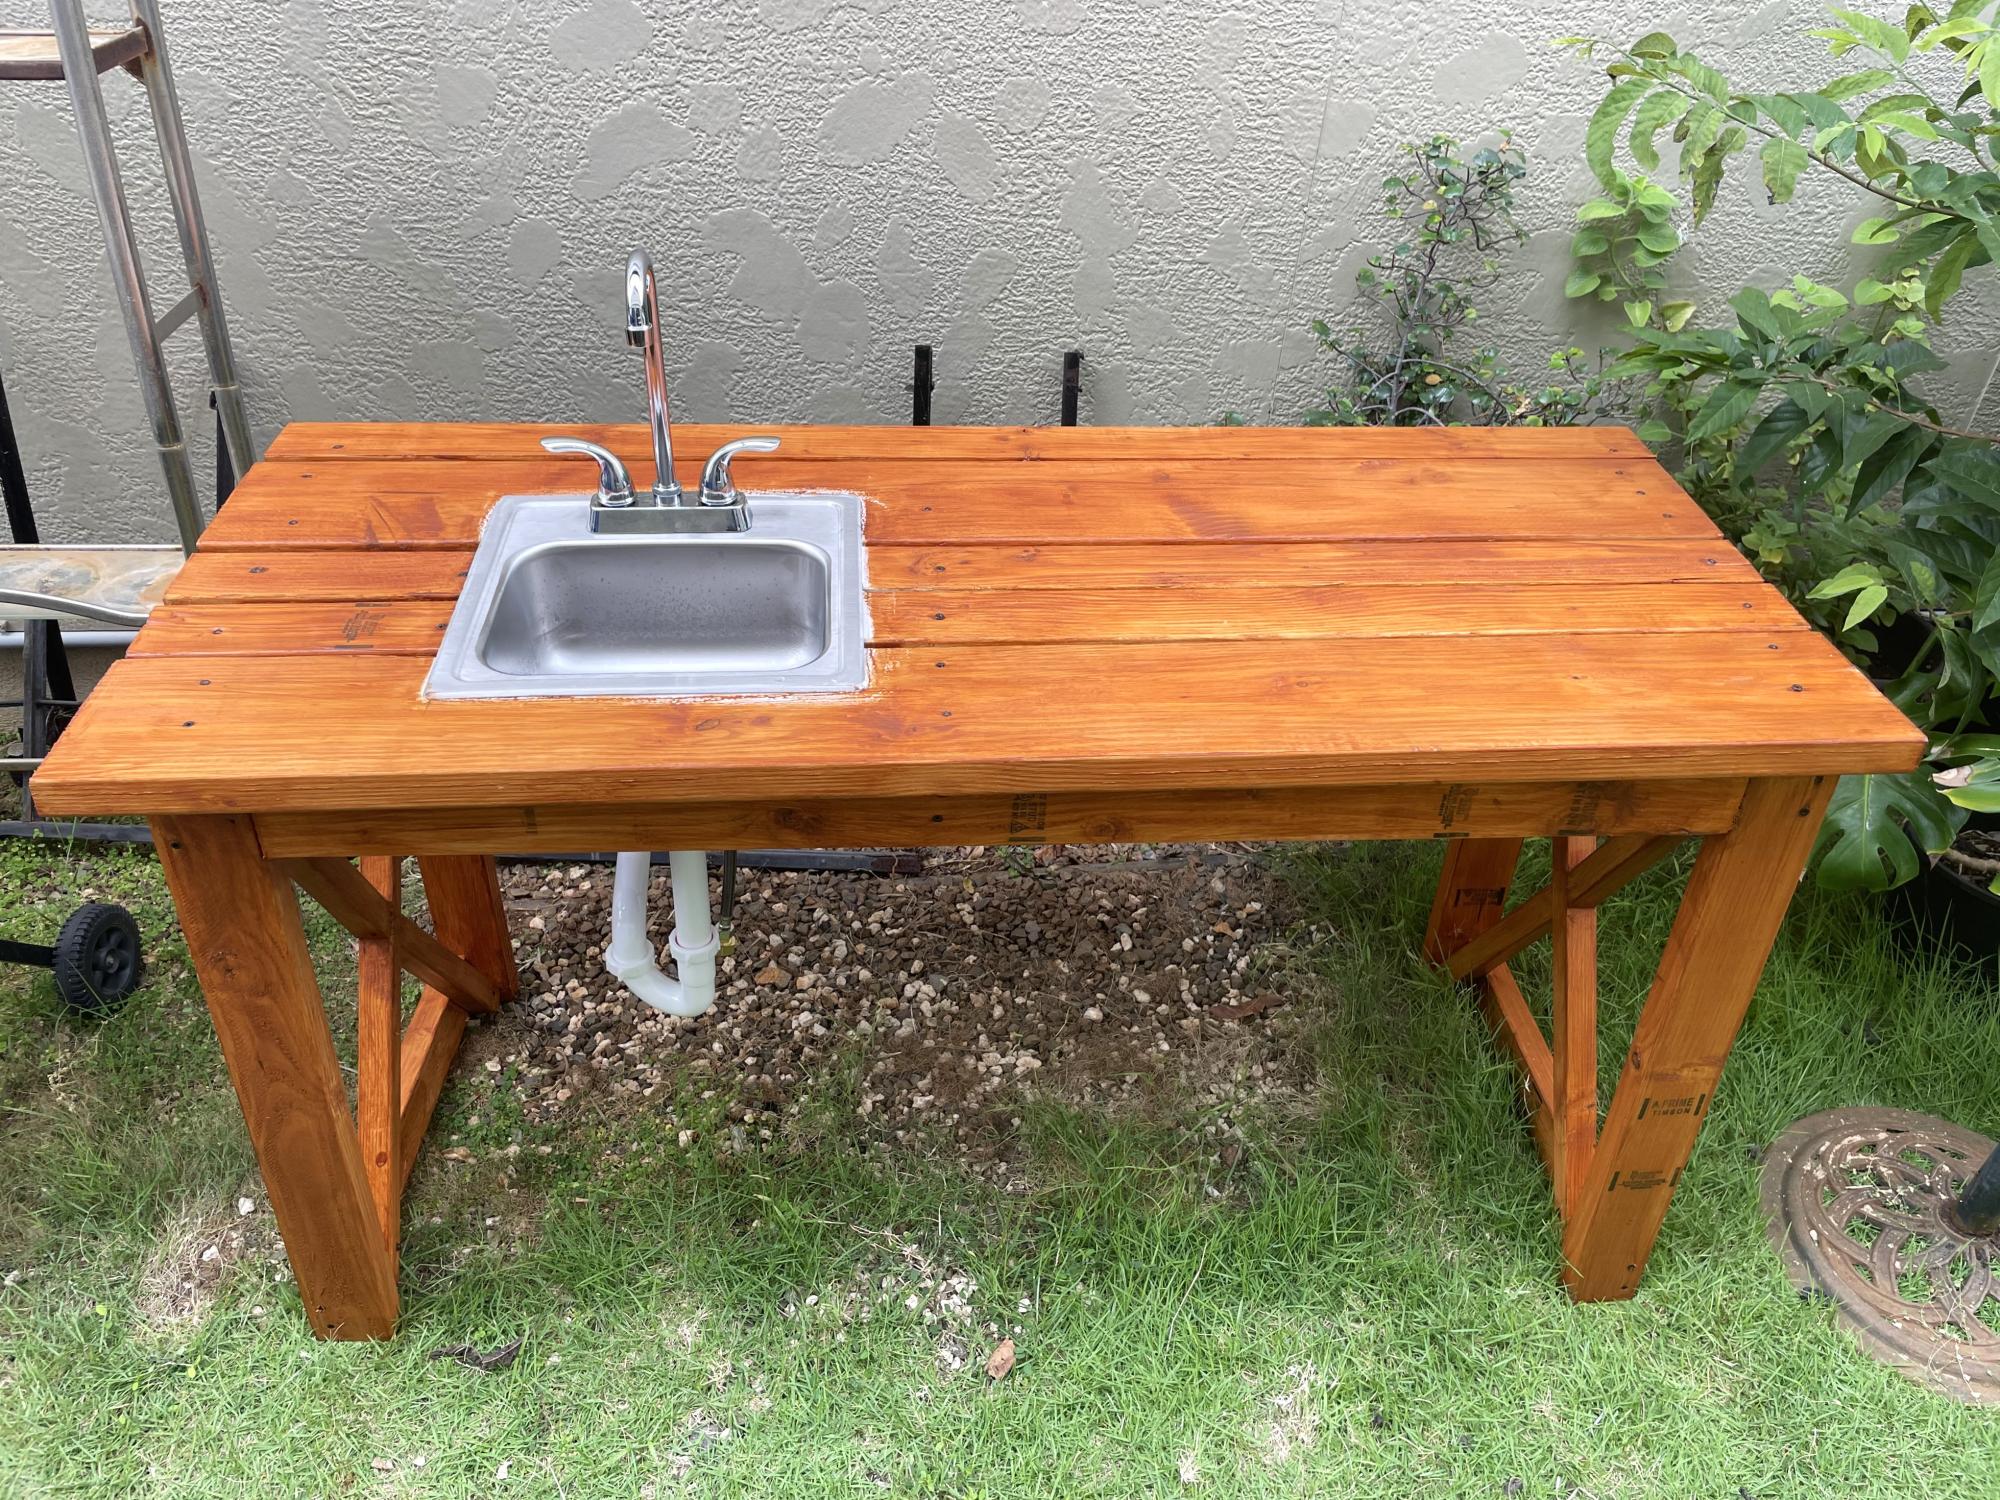
I built this outdoor table with sink, with a hand saw, a speed square and a screw gun. I used Ana’s portable grill plan. I did have my strong nephew help and my niece finished the table.
John Thompson
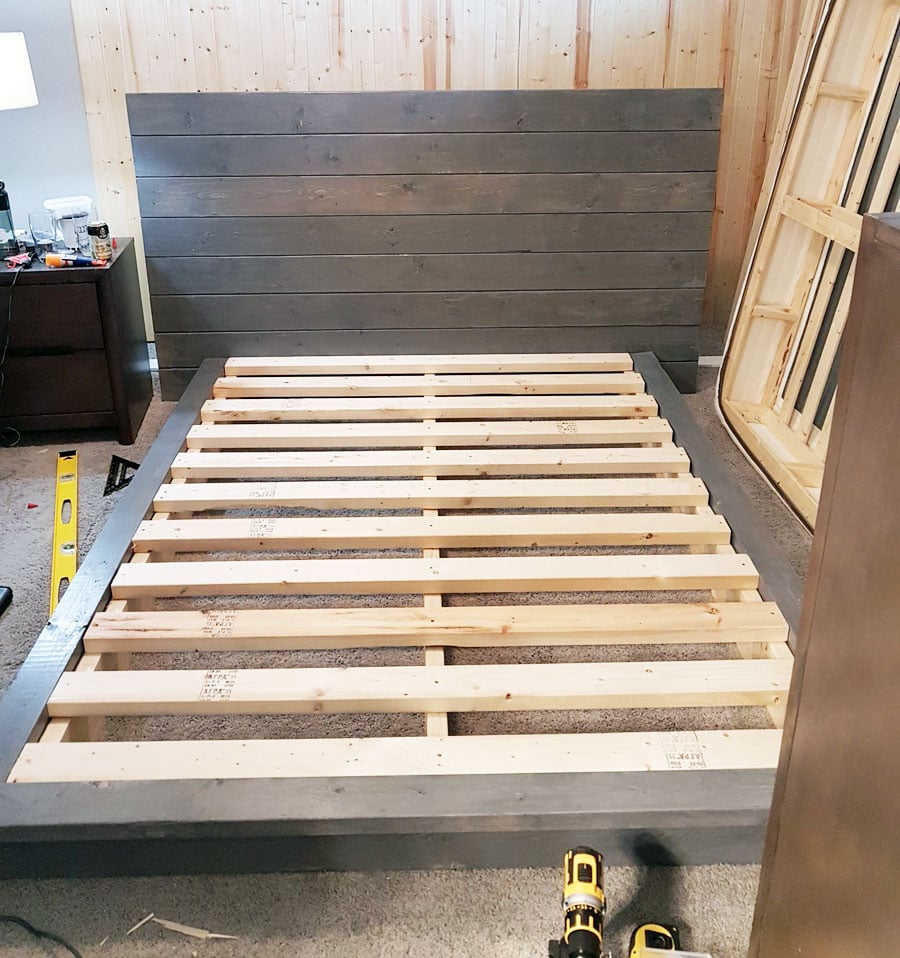
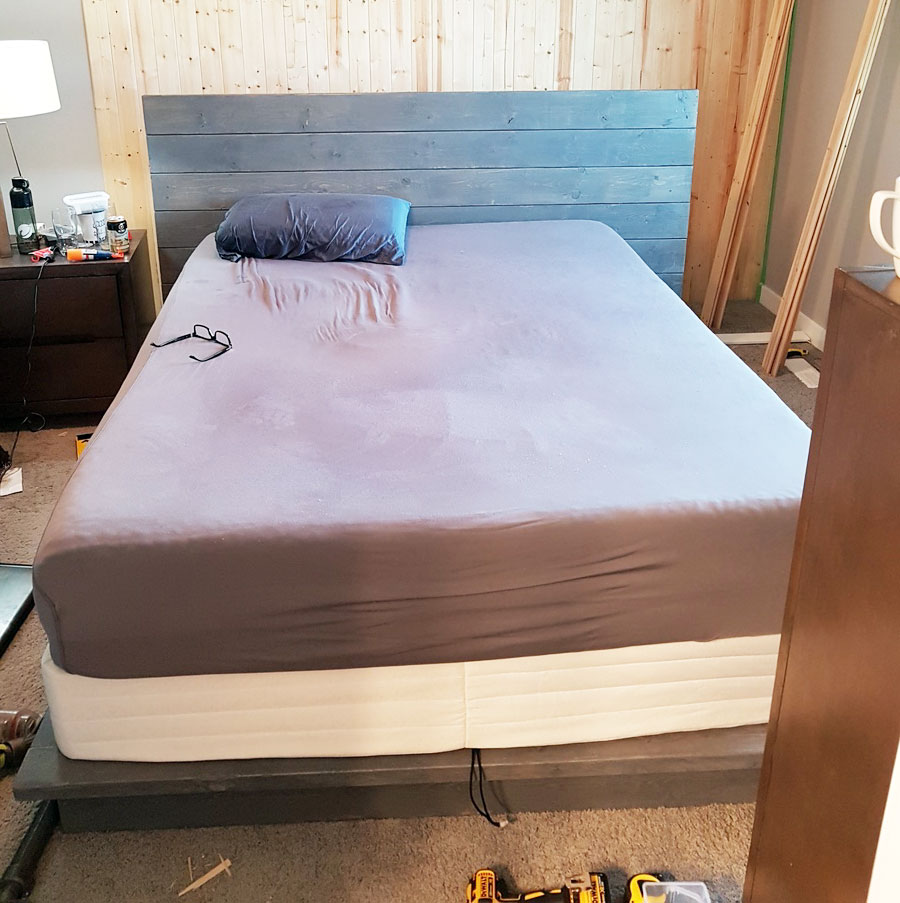
The bed in grey, also made the backboard taller (and doubled support on back) because the bed will have a box spring (photo 2). Awesome plans, love the look already. Excuse the background mess. The back wall is part of the same project! Thanks again for the plans!!
Note to future builders, learn from my one fatal mistake, be really picky on your quality of wood. I had some slight frame issues because on a bad board that resulted in about a 1/4 inch bow on one side. My slats are all use rival but you can see some done touch both sides...that is the bow. Still no one will likely notice but me.
Second, there was no info on spacing along the frame for attaching the 2x4 to the 2x6. I used 12", maybe overkill.
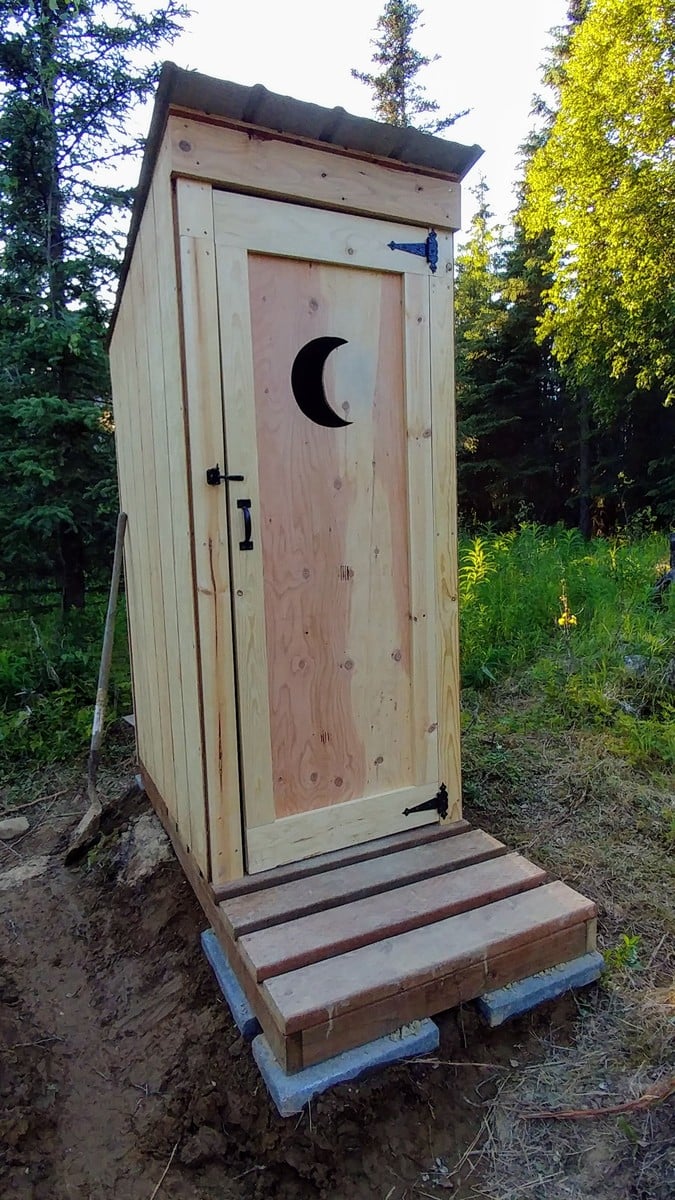
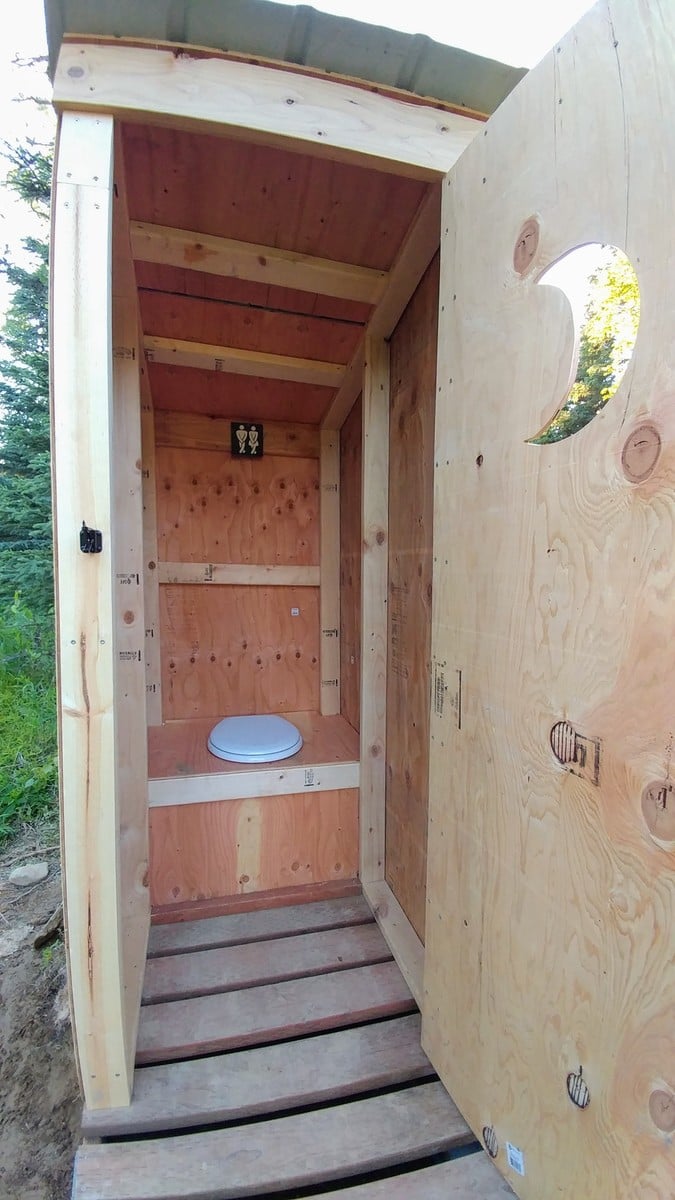
I built this outhouse to go with a dry cabin I'm working on, and also as an emergency backup for my house. I used treated lumber on the base/deck and splurged on T-111 for the siding. I wanted to use greenhouse polycarbonate for the roof, but found a piece of metal roofing in my shed that was exactly the right size so I used that instead. I thought about doing a fancy cutout on the door but ended up going with a half moon because it was easy. I'm thinking about cutting out stars of different sizes all over the rest of the door to let in more light. I'll trim and stain it next summer.
My first real project, can't wait to do another one.
Mon, 06/01/2015 - 20:57
Thanks! Yeah the finish was a bit difficult but finally came out nice.
Thu, 06/02/2016 - 11:00
I know this is an old post. But just wondering about your finish as well. So when u say white wash what did you use?
Beautiful by the way!
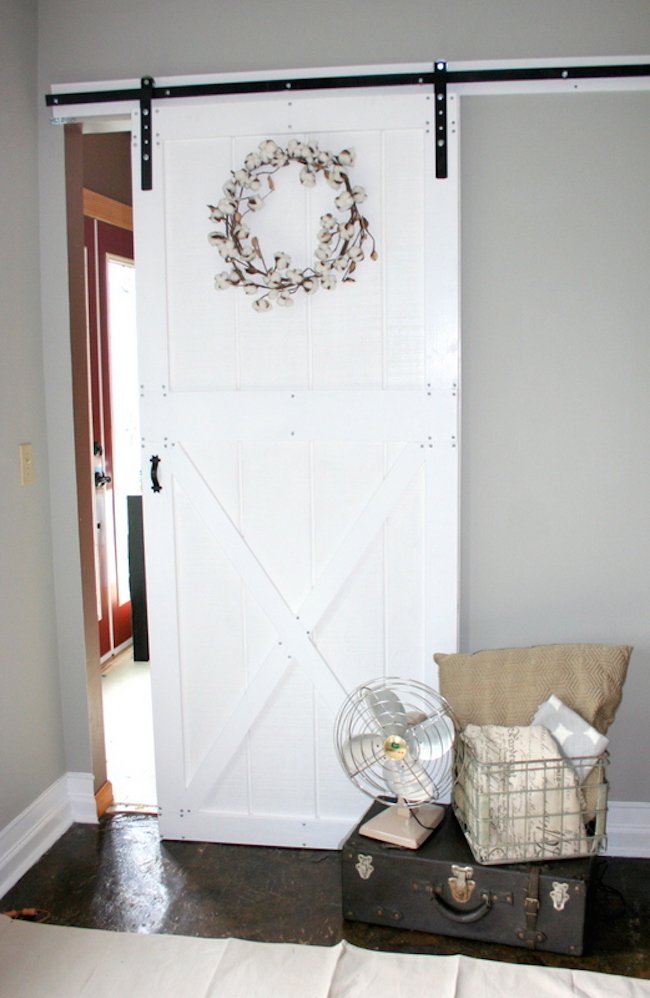
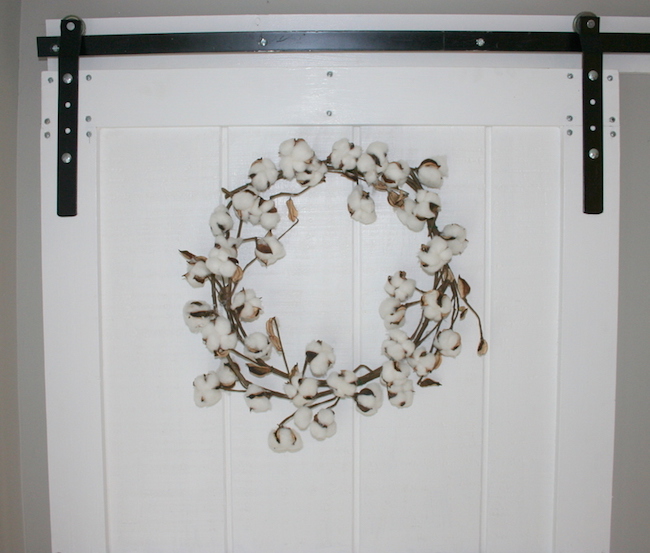
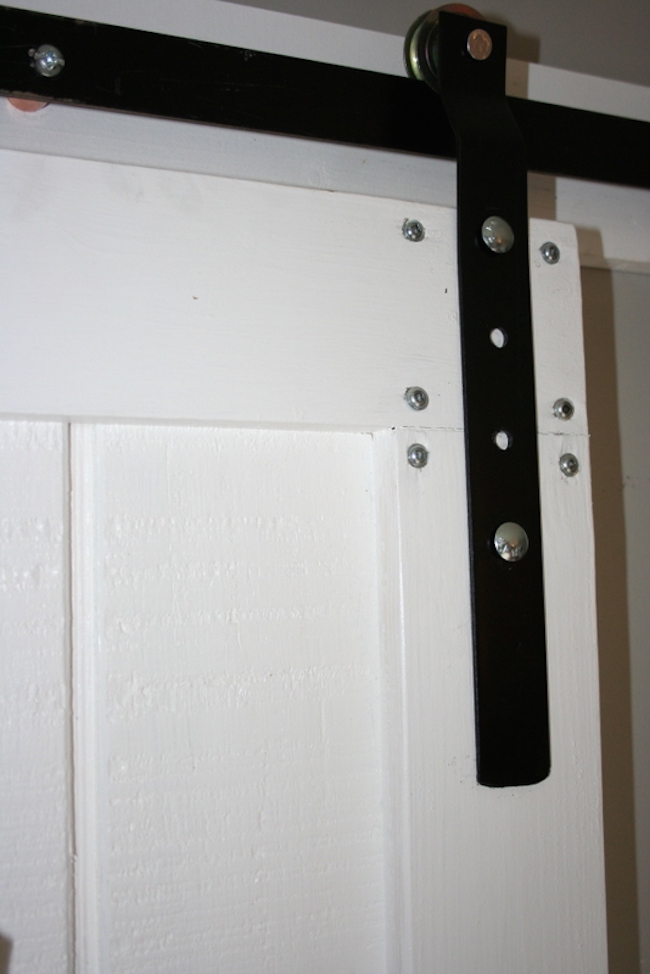
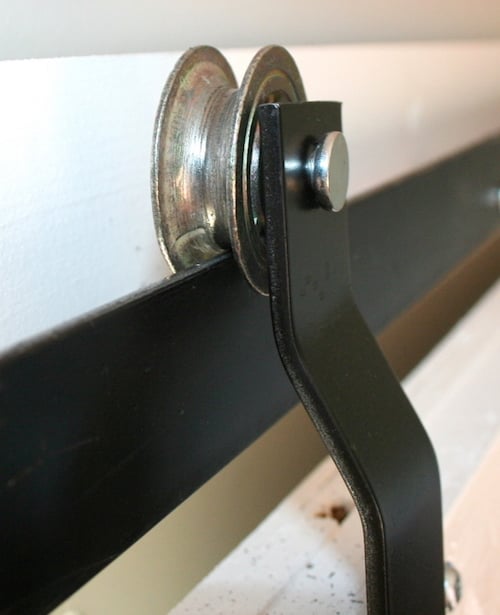
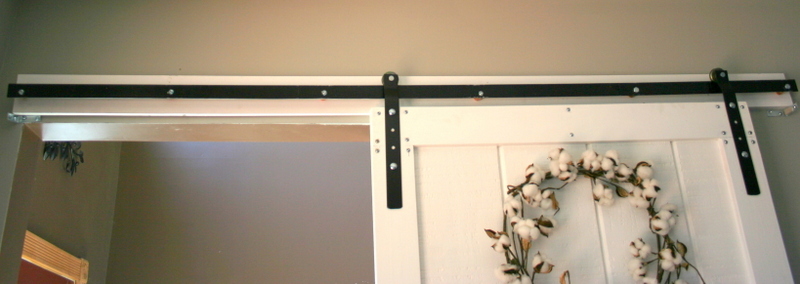
I really wanted to put a barn door in my husband's home office, but have you looked at the prices of the kits? No way was I going to spend that for a door. So I decided to fabricate it myself. For the rail hardware- I used a 72" steel rod, copper pipe fittings, and lag screws. For the door hardware, I used 12"ish, long pieces of steel, pulleys, and carriage bolts.
The door itself is made from plywood siding, 1 x 4's, 1 x 6's, and 1 x 3's. The entire door and hardware cost around $80 to make myself. It's functional and looks amazing! The entire tutorial is up on my blog!