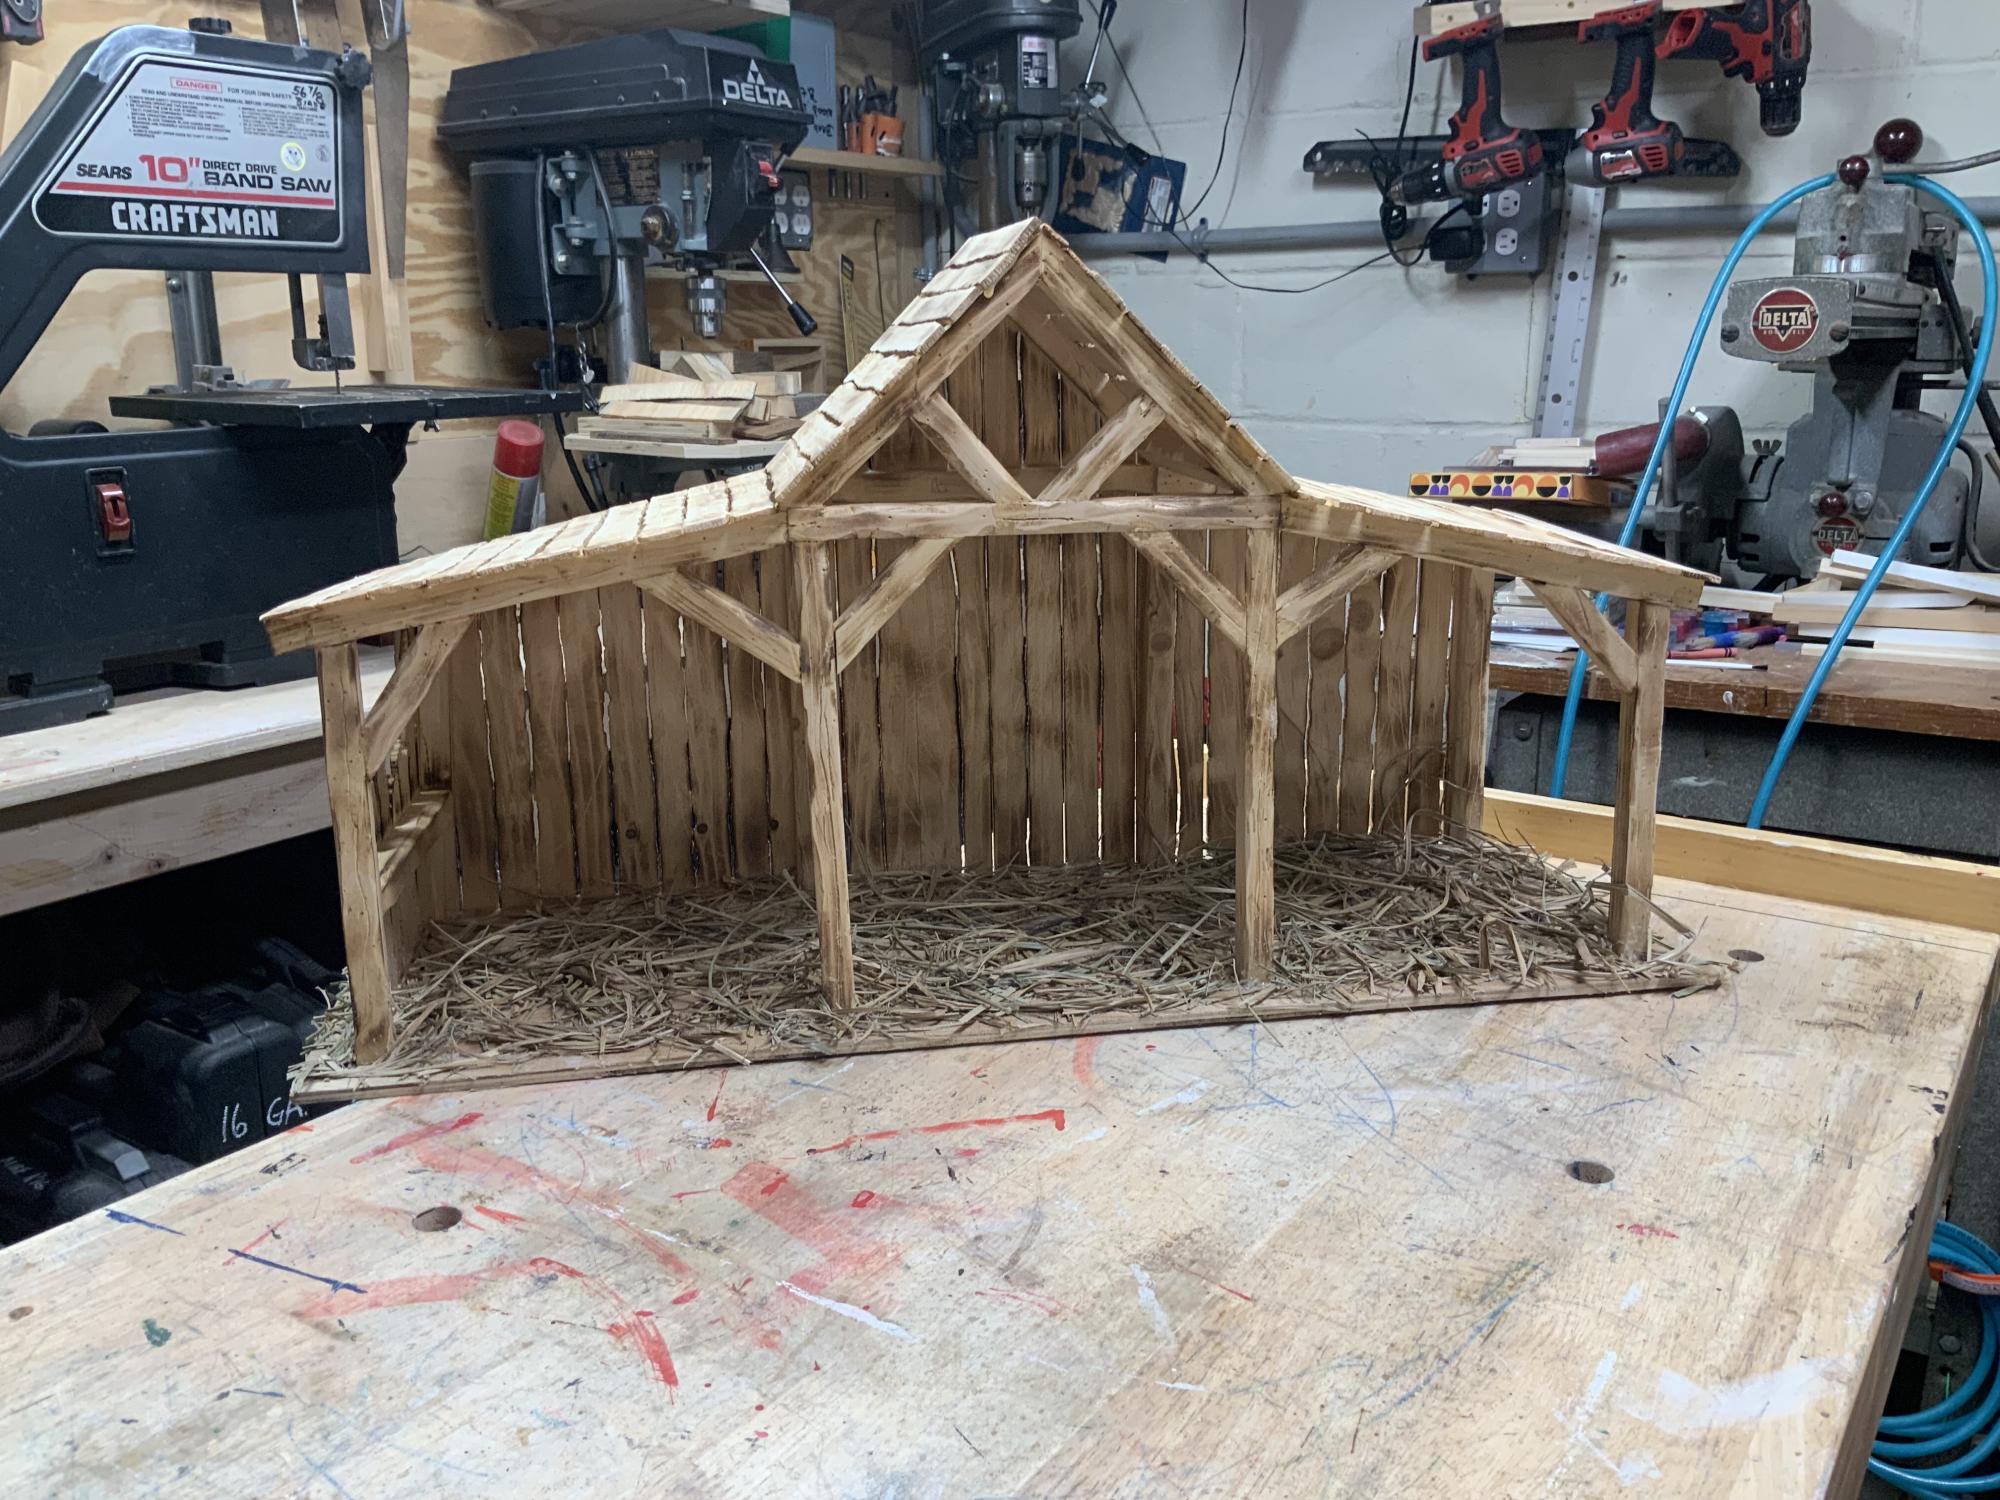
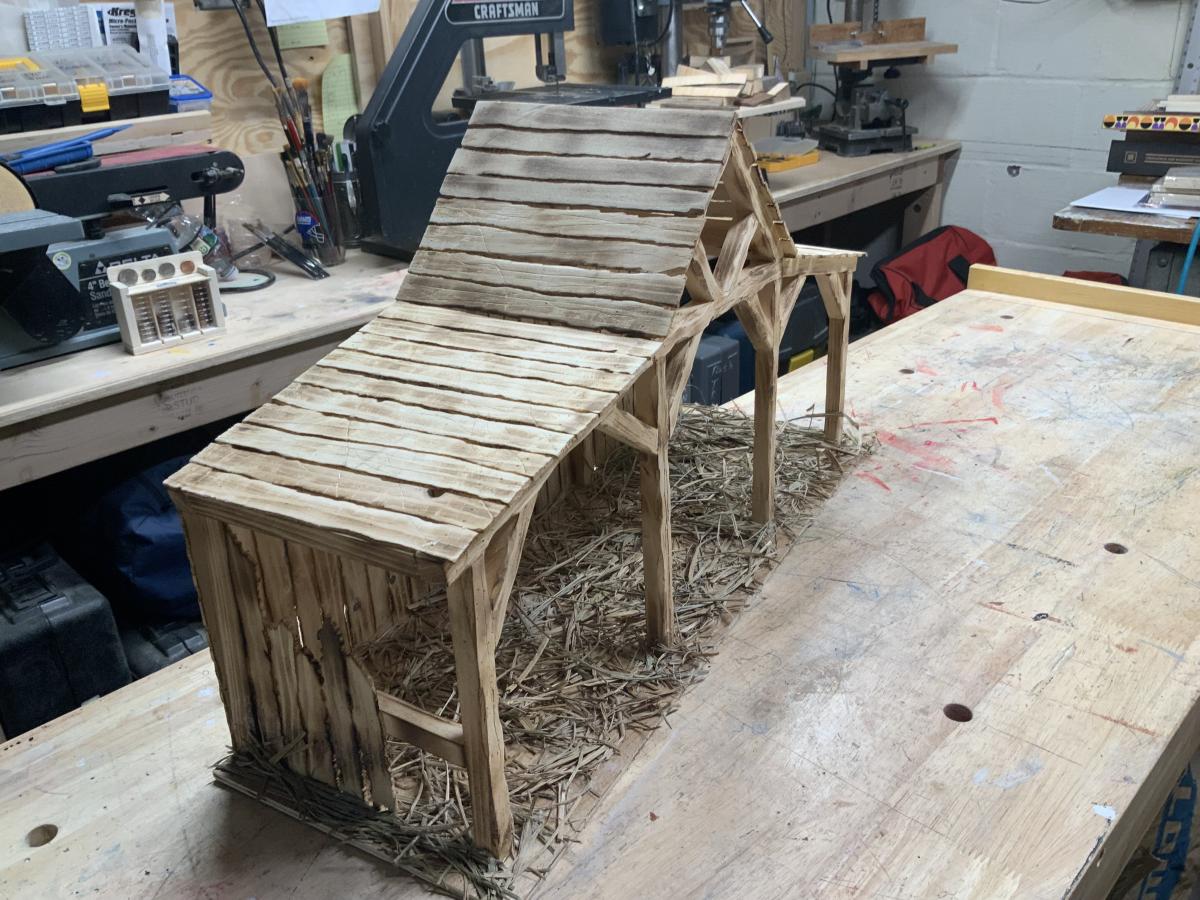
Community Brag Posts
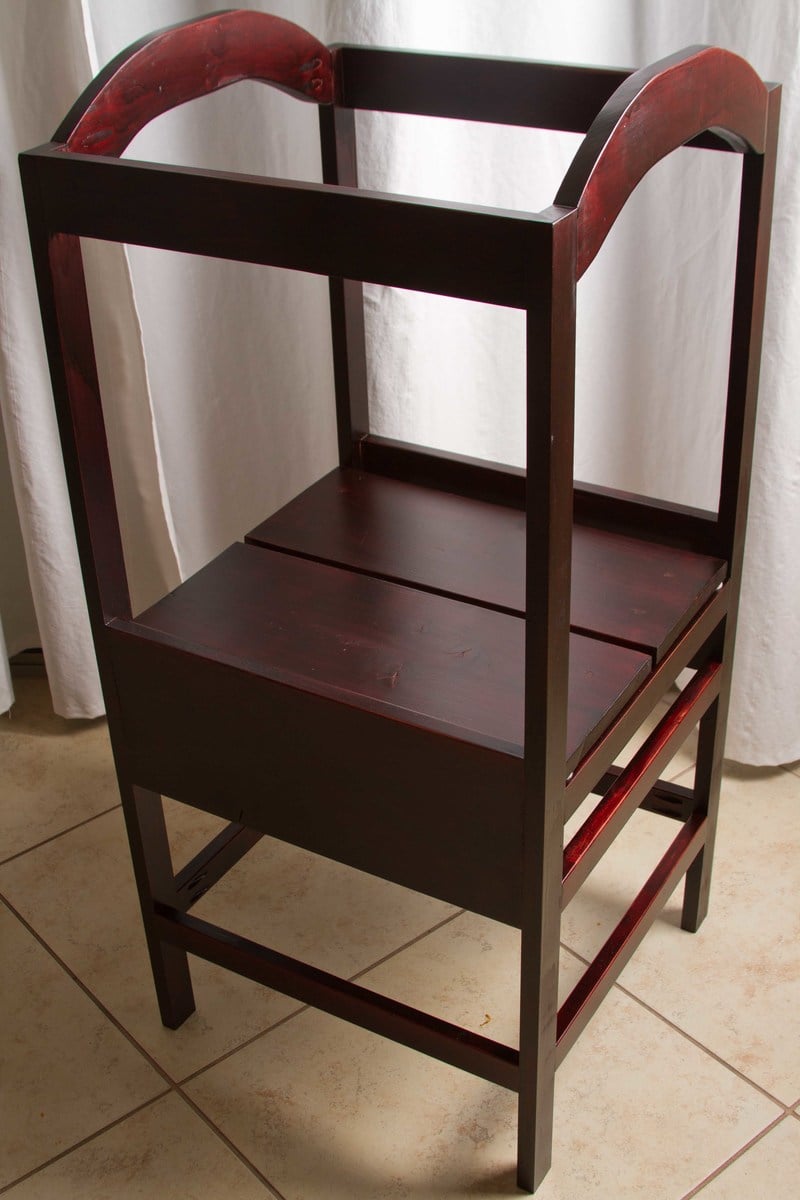
Pretend Play High Chair
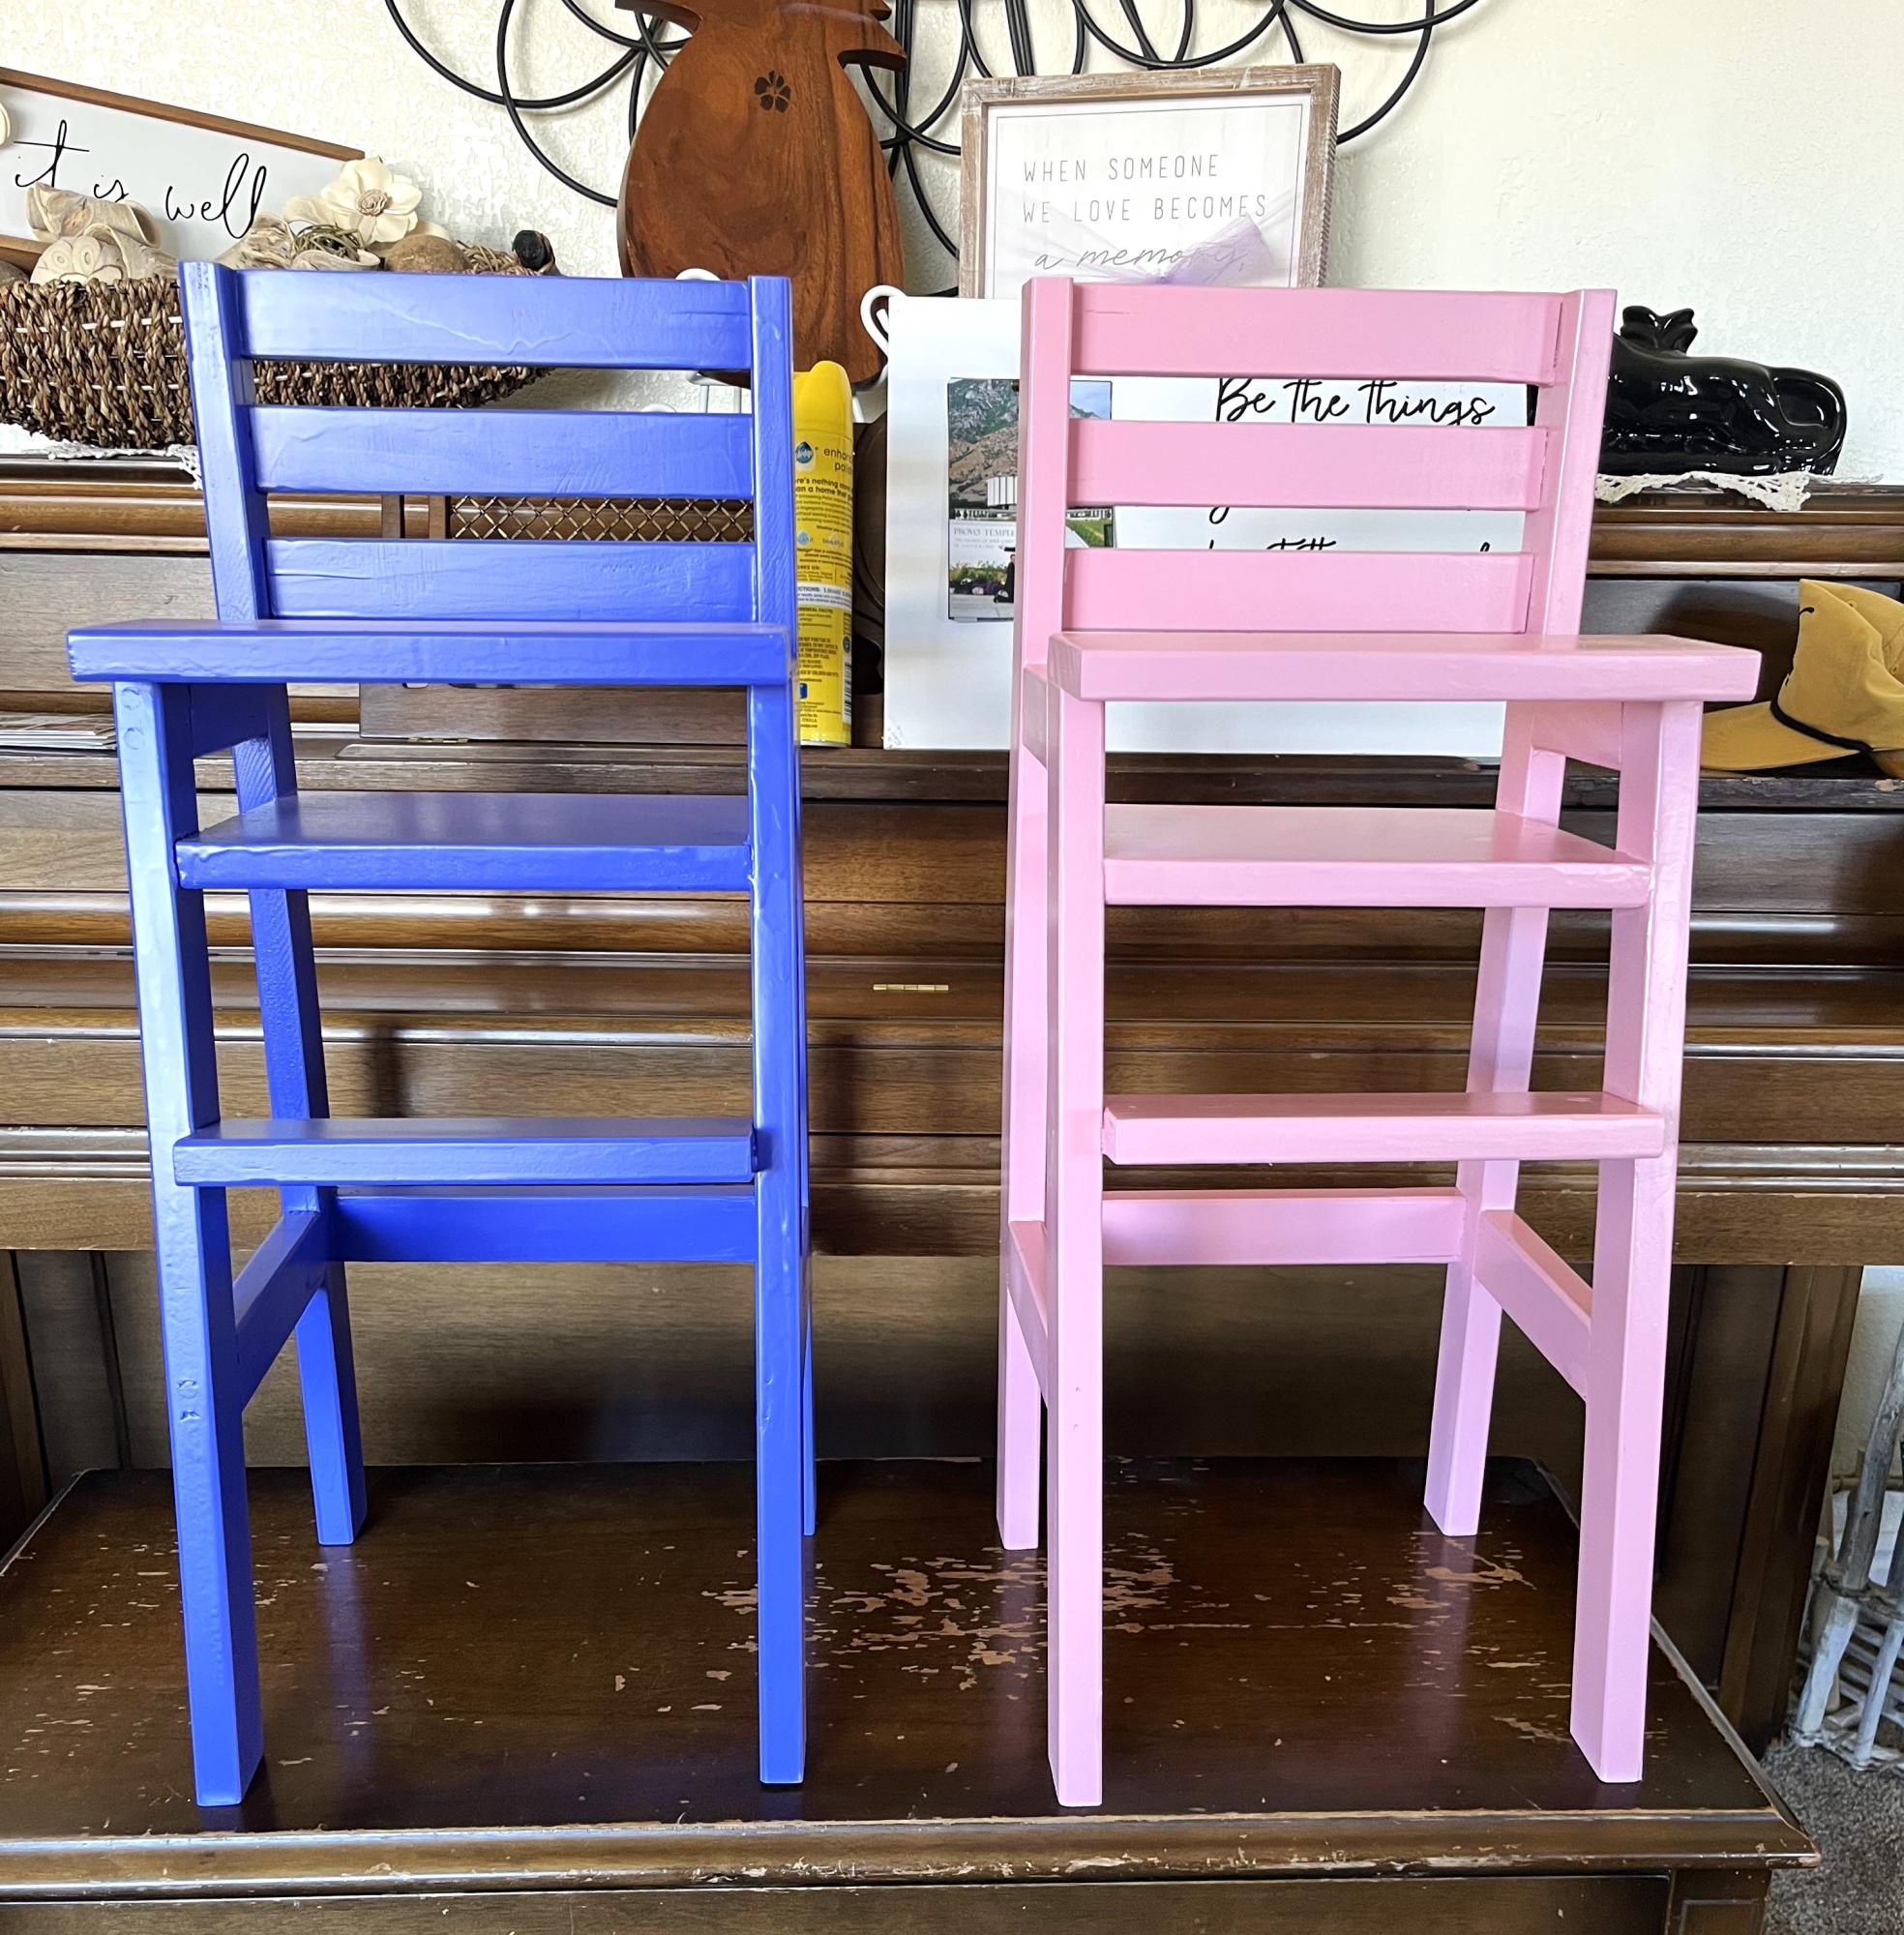
I have 4 young Granddaughter's. They each got a chair from Grampa.
mtnmike
Built from Plan(s)
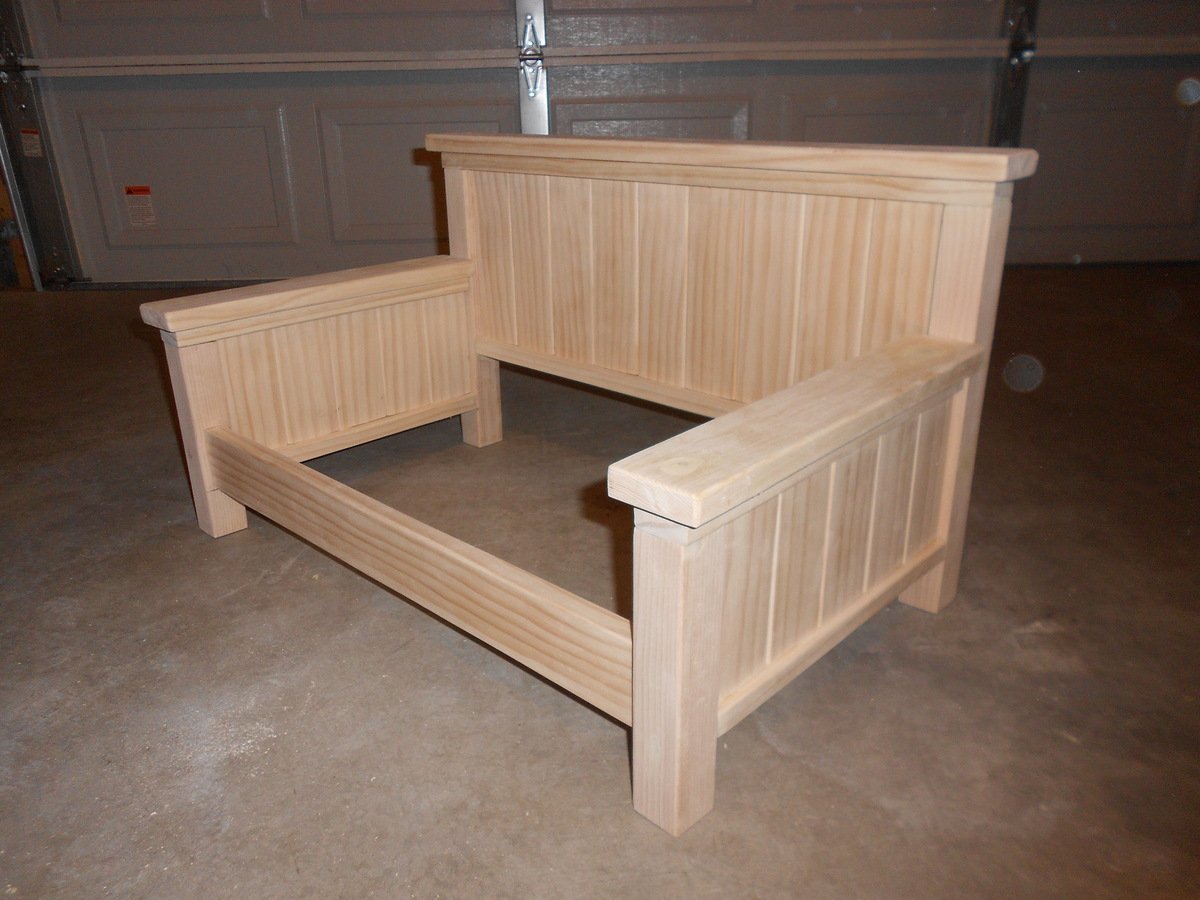
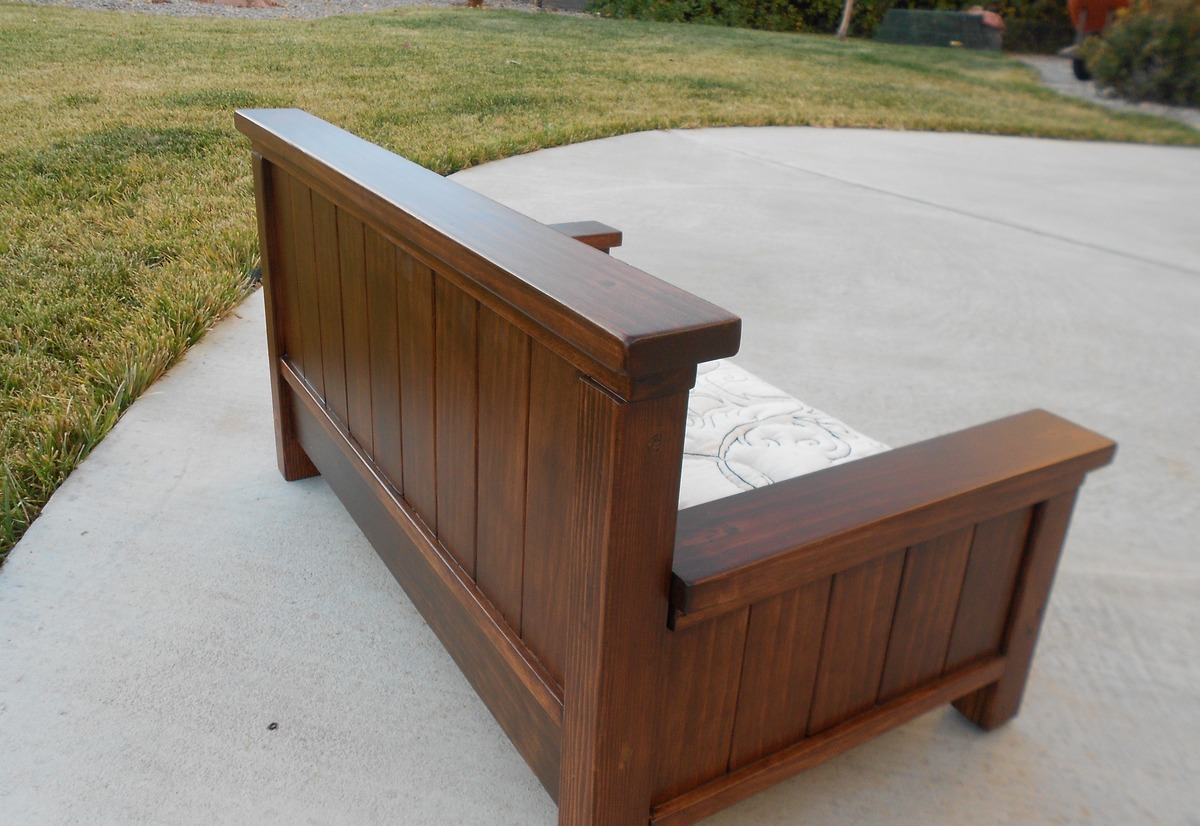
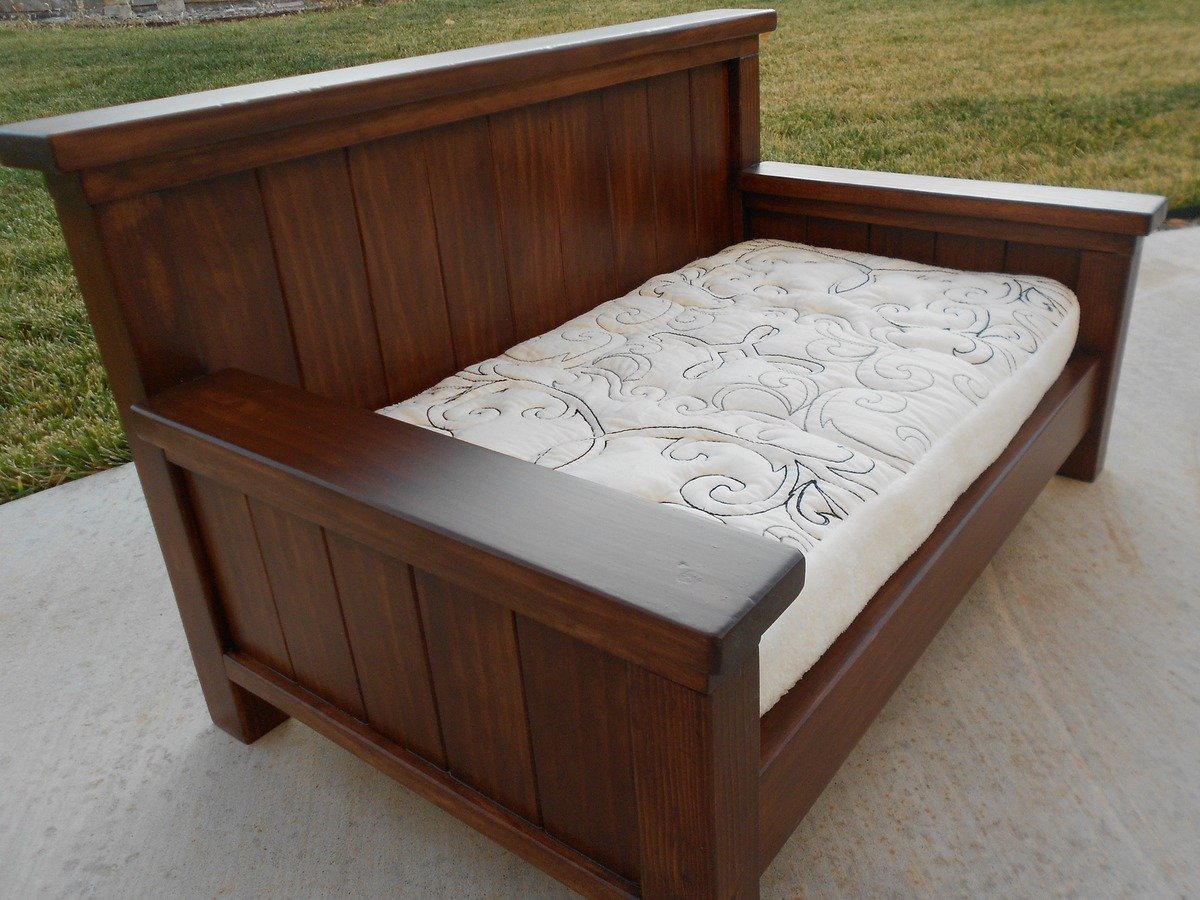
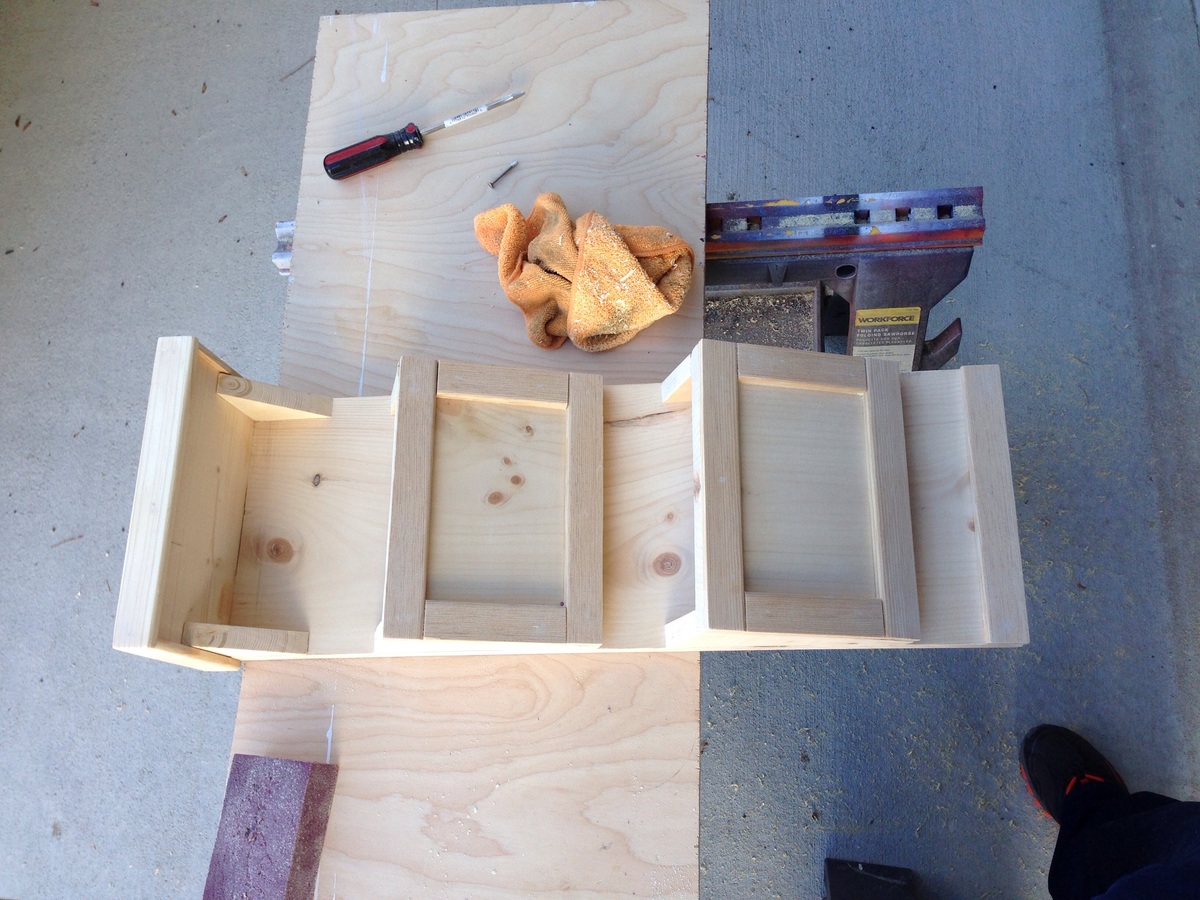
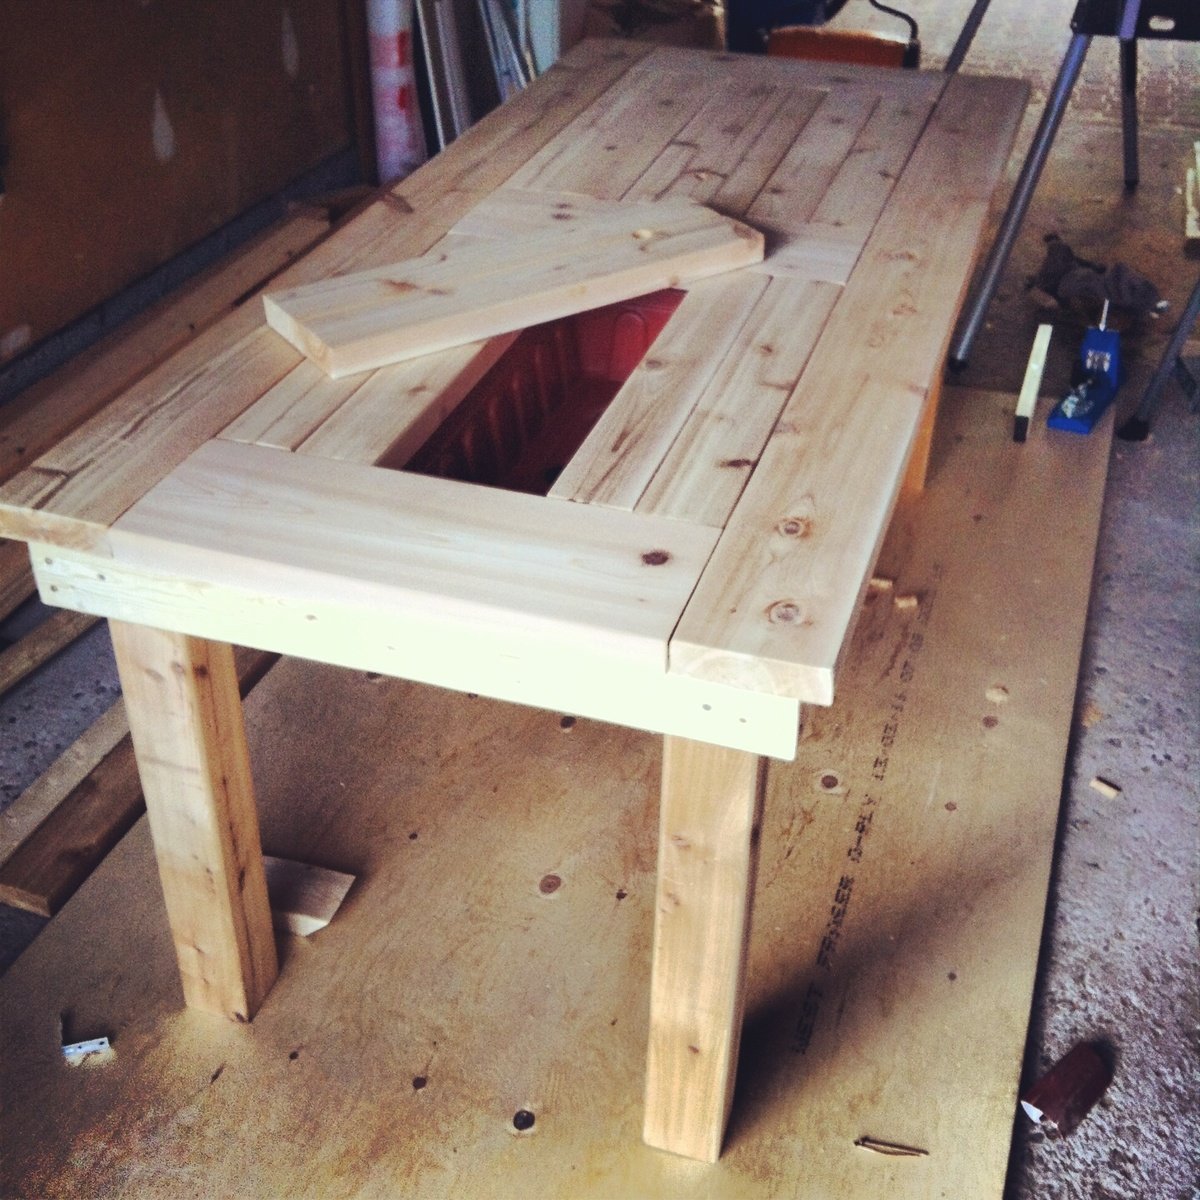
Doggie Daybed
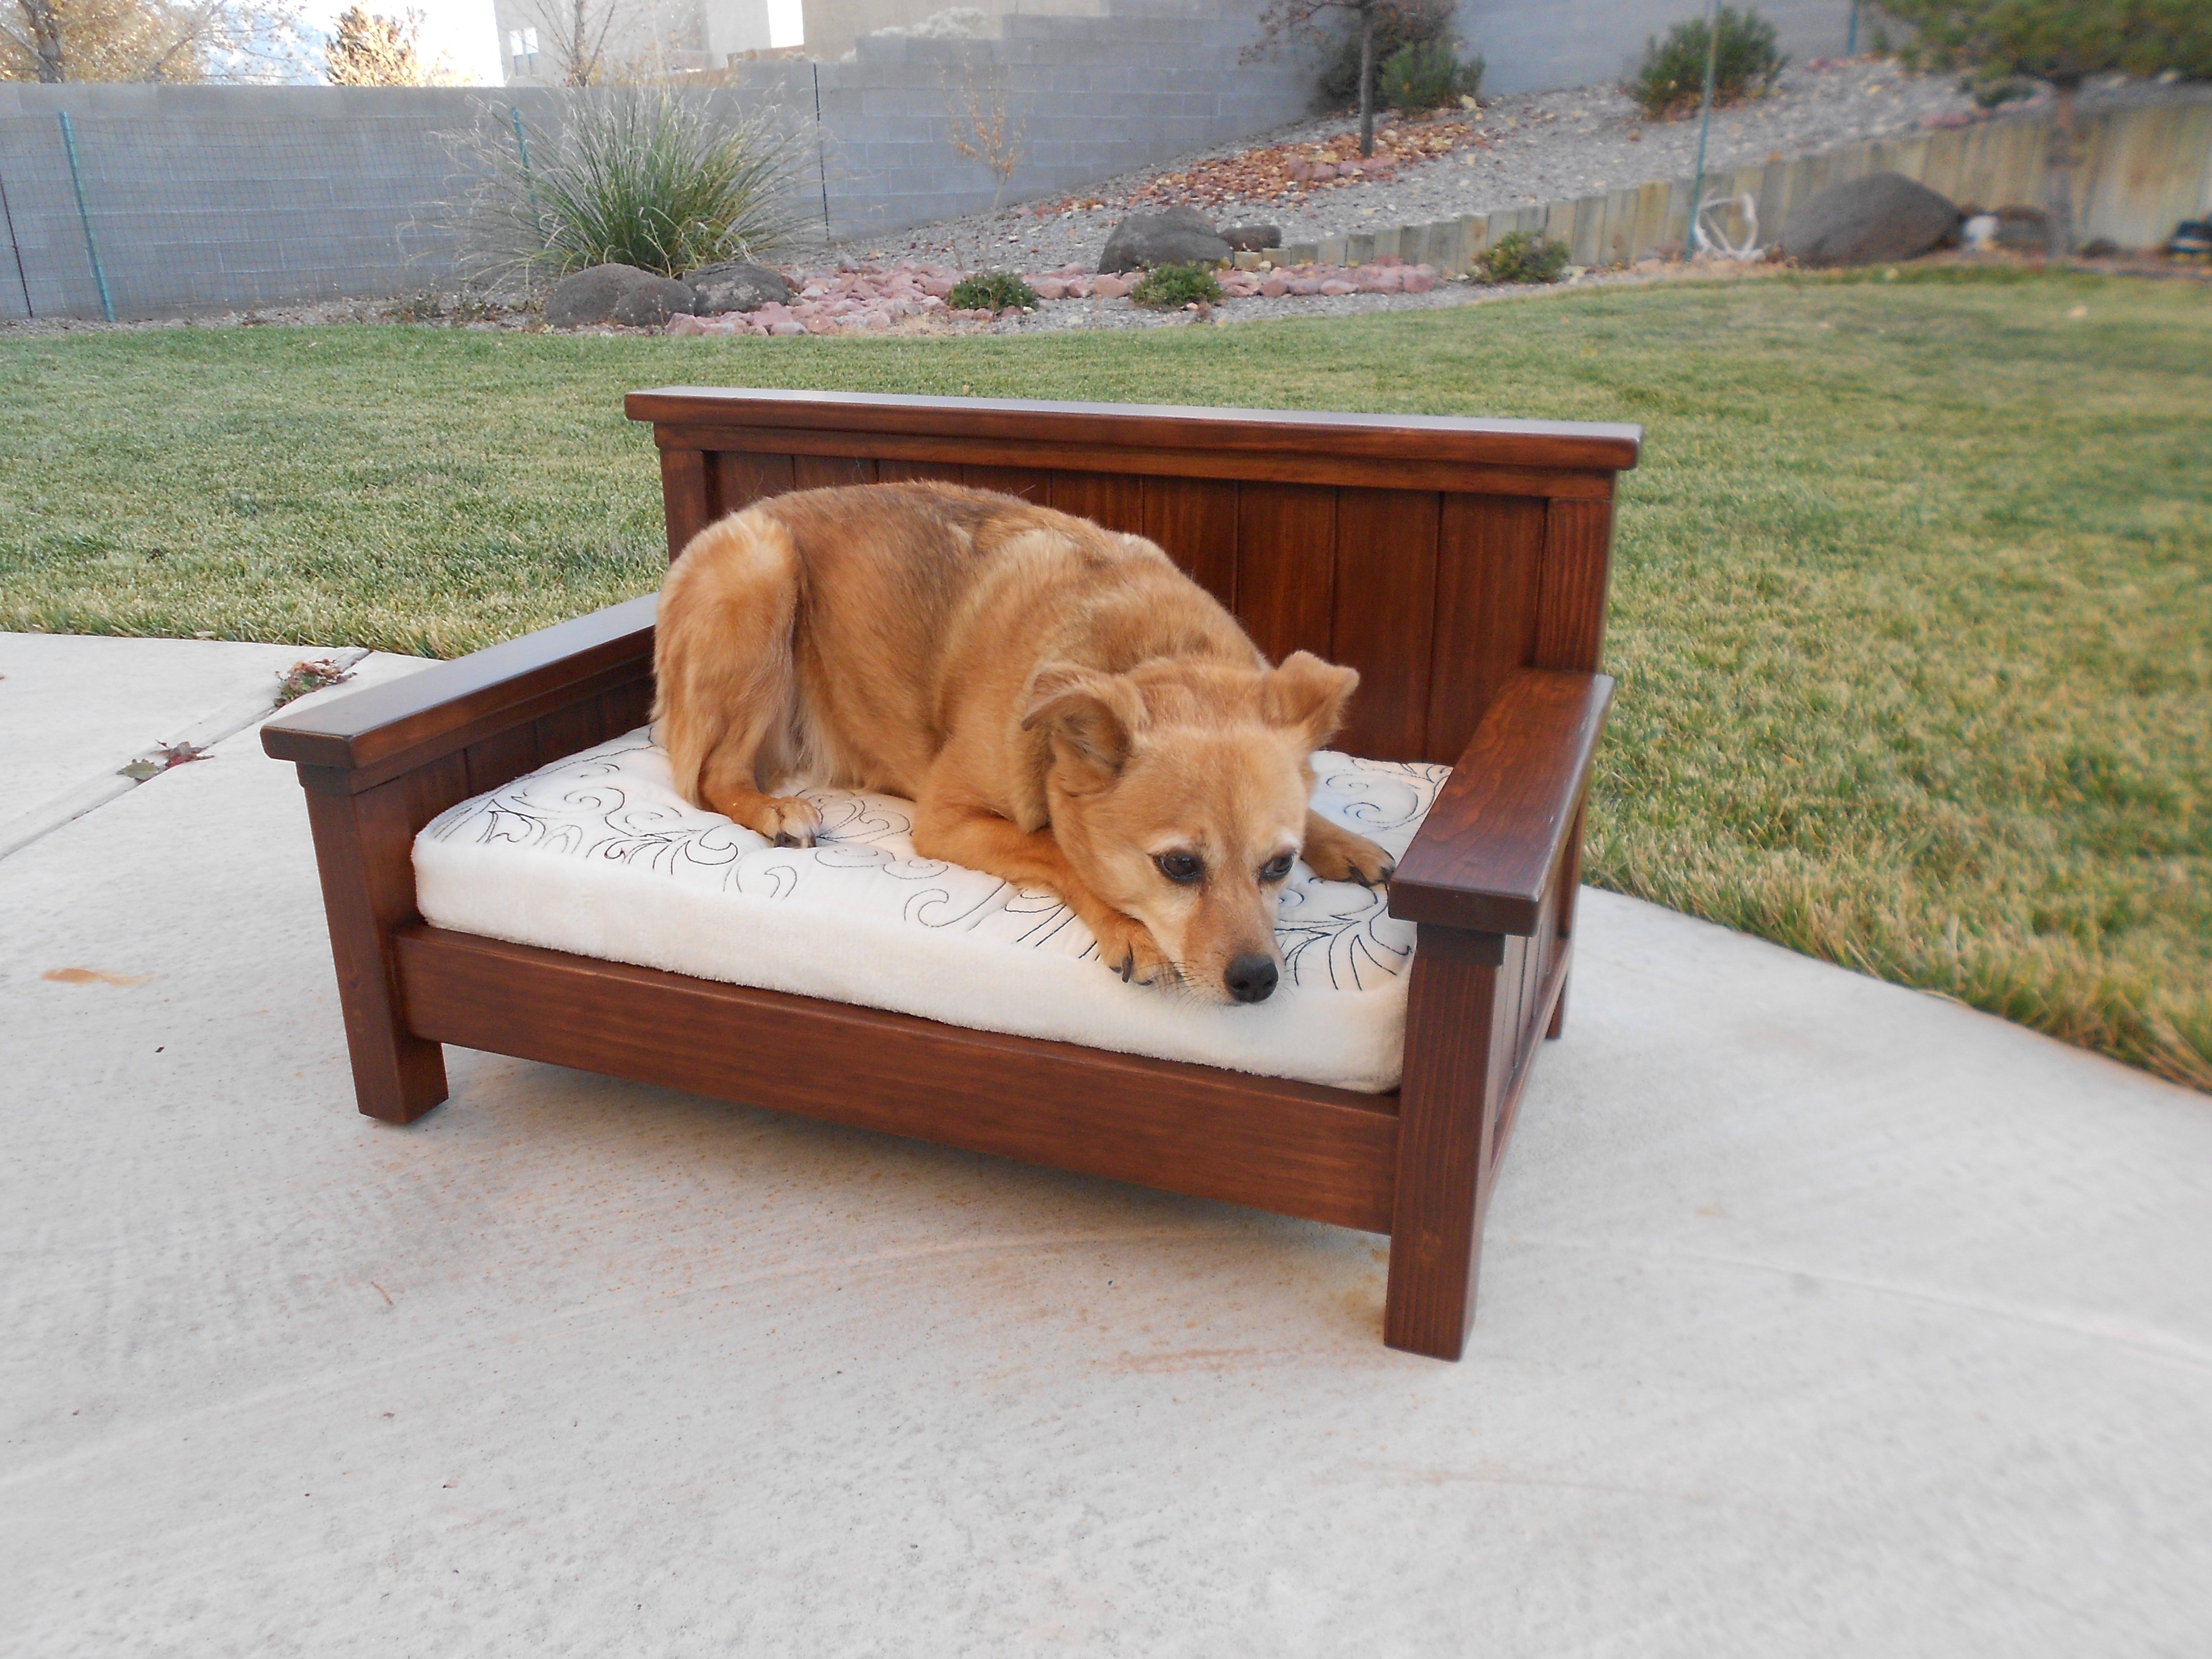
Since making a twin size daybed still seems intimidating to me, I decided to get some practice by making a small version for our dog. I modified the doll farmhouse bed making it a bit larger and in daybed style. We'll see if our doggie takes to it. If not, it will be a toddler couch!

Built from Plan(s)
Estimated Time Investment
Weekend Project (10-20 Hours)
Finish Used
Poly Shades
Recommended Skill Level
Beginner
Comments


Wed, 12/05/2012 - 07:07
Love this!
I built the big farmhouse storage bed and nightstands in my bedroom and my dog needs her own little farmhouse bed now. I've been trying to decide how I want to do it... You've just decided for me. Thanks!
Wed, 12/05/2012 - 09:00
I love this!!! I think I
I love this!!! I think I might steal this idea and make one of these for my nephews as a little couch. About how much did you spend on lumber?
Wed, 12/05/2012 - 21:10
Thank you! I believe I spent
Thank you everyone! I believe I spent about $25 to $30 on lumber. I have the lumber receipt and it came to $44 but I had a lot left over.
Wed, 12/05/2012 - 20:52
I pretty much just followed
I pretty much just followed the plans, except making it taller and wider by adding more slats and making everything taller. The finished dimensions turned out to be approximately 26 ½” x 16 ½”. I kind of made it up as I went, but I did take some notes. Here is the first part of my altered cut list:
9 ea – 1x3 @ 8” tall (headboard panel slats)
10 ea (5 for each side) – 1x3 @ 5 ¼” tall (side arm panels slats)
2 ea – 2x2 @ 8” tall (side arm legs)
2 ea – 2x2 @ 13 ½” tall (headboard legs)
For the rest of the cut list, I didn’t take notes. I just cut the lengths to fit my new dimensions. I hope this helps. If you’d like more measurements just let me know and I can measure the actual bed.
Wed, 12/05/2012 - 10:07
This looks beautiful. Where
This looks beautiful. Where did you get the cushion from? How big is the cushion?
Wed, 12/05/2012 - 20:21
Thank you! I made the
Thank you! I made the cushion with foam and batting. I got the foam piece from the fabric store. It was 2" thick, 22"x22" square. It was on sale, but I don't remember how much I paid. I cut it down to 22" x 12” to fit the inside of the bed. A regular handsaw worked great for cutting the foam. Super easy, but messy. I wrapped it in batting so it finished a little bigger, 23” x 13”. I bought one pillow sham from Walmart because I liked the design and cut it apart to make the cushion top. The rest is from one of those cheap fuzzy blankets.
Wed, 12/05/2012 - 10:30
That finish is beautiful!
That finish is beautiful! Can you tell me how you did it?
Wed, 12/05/2012 - 21:08
Thank you! I have much to
Thank you! I have much to learn about finishing. I first used regular stain. I think the color was gunstock. It turned out so not what I was going for. It was too orange. So then I stained it again with Minwax Hickory Gel Stain. Better, but the wood putty still showed and looked terrible. So I resorted to Minwax Bombay Mahogany Poly Shades which I found difficult to work with, but it did a fantastic job of covering over the wood putty filled holes. I think I used either 2 or 3 coats of the Poly Shades. I’m sure I could have skipped the first two stains and could have had the same result!
Mon, 12/17/2012 - 19:30
Fantastic bed!! I've been
Fantastic bed!! I've been shopping for a dog bed. This is 100 times better than anything in the store. I may have to borrow you're idea :)
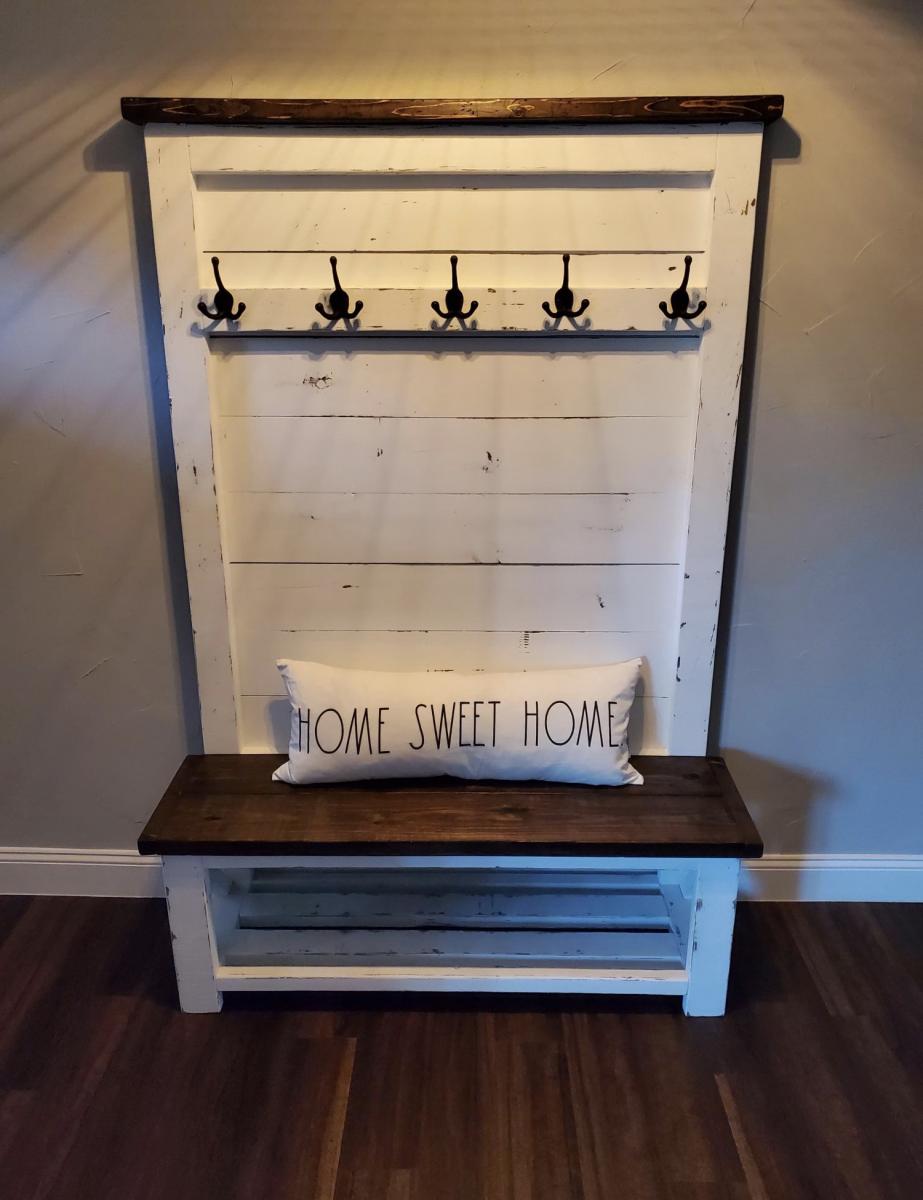
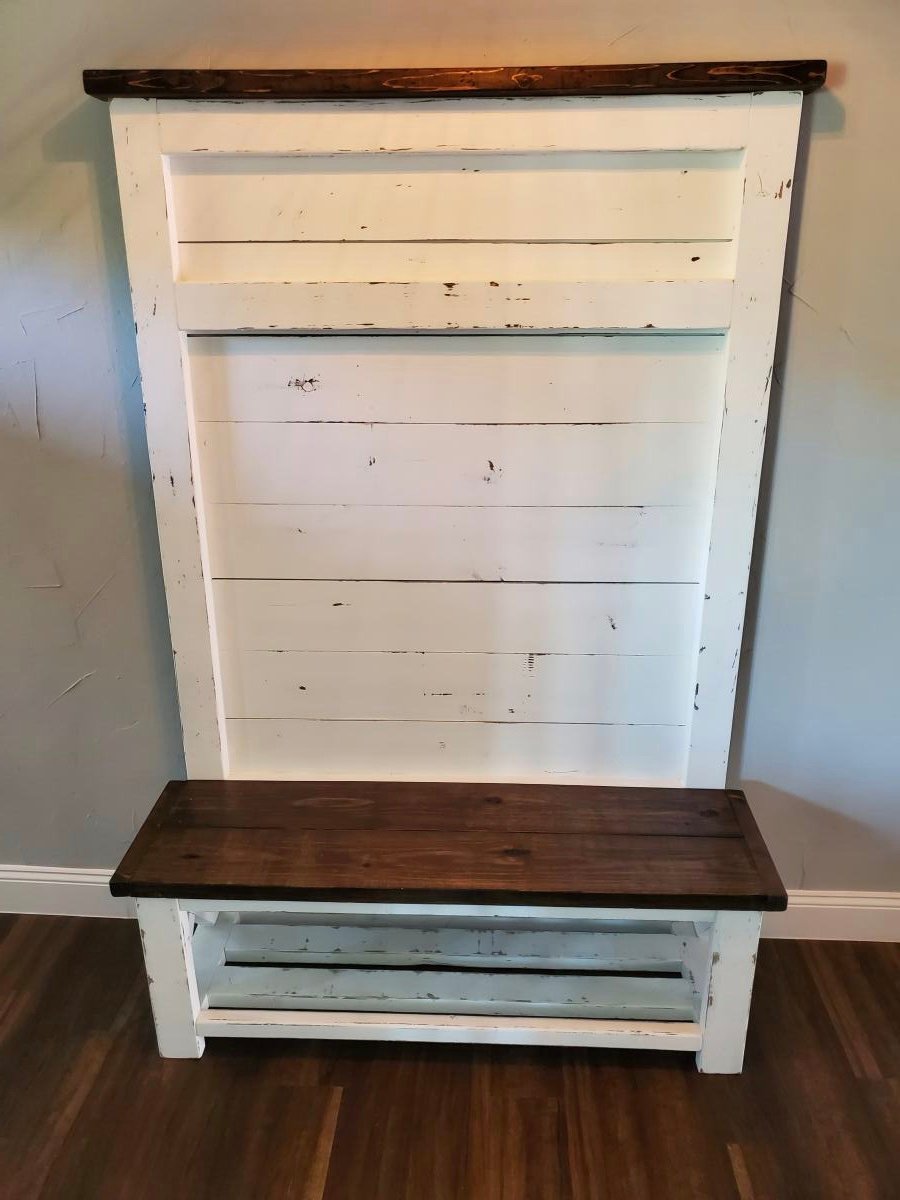
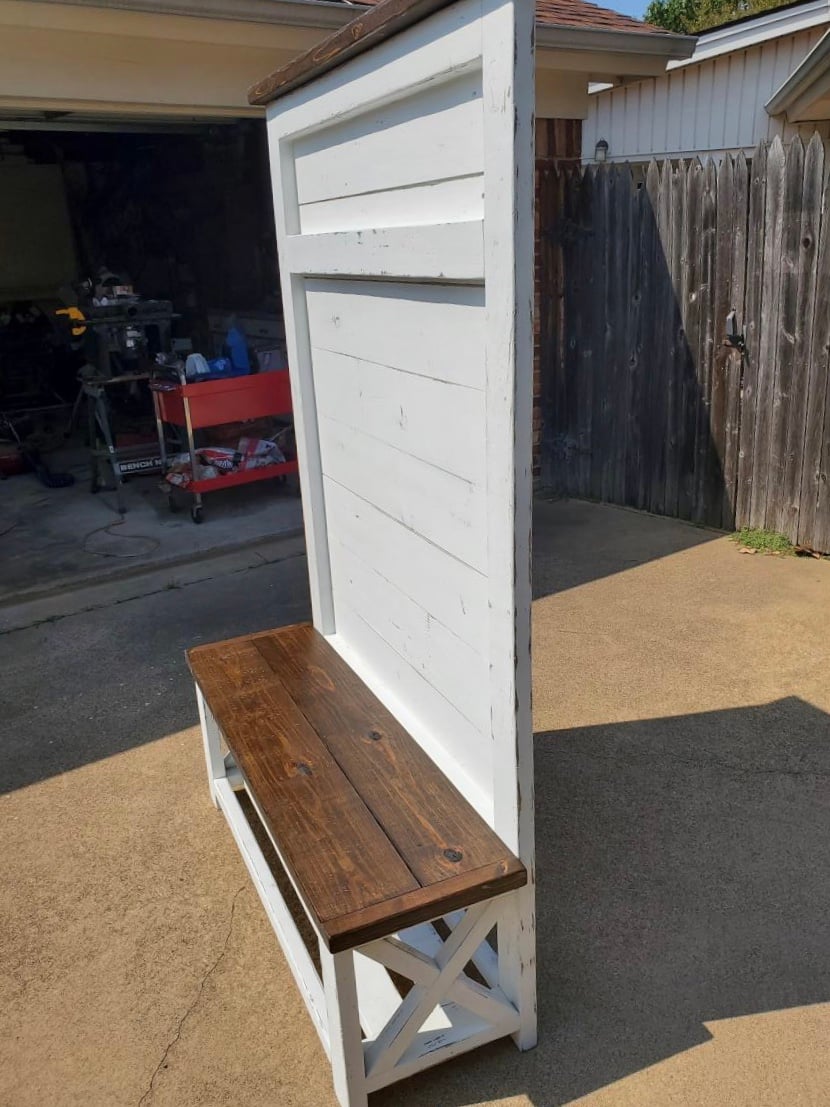
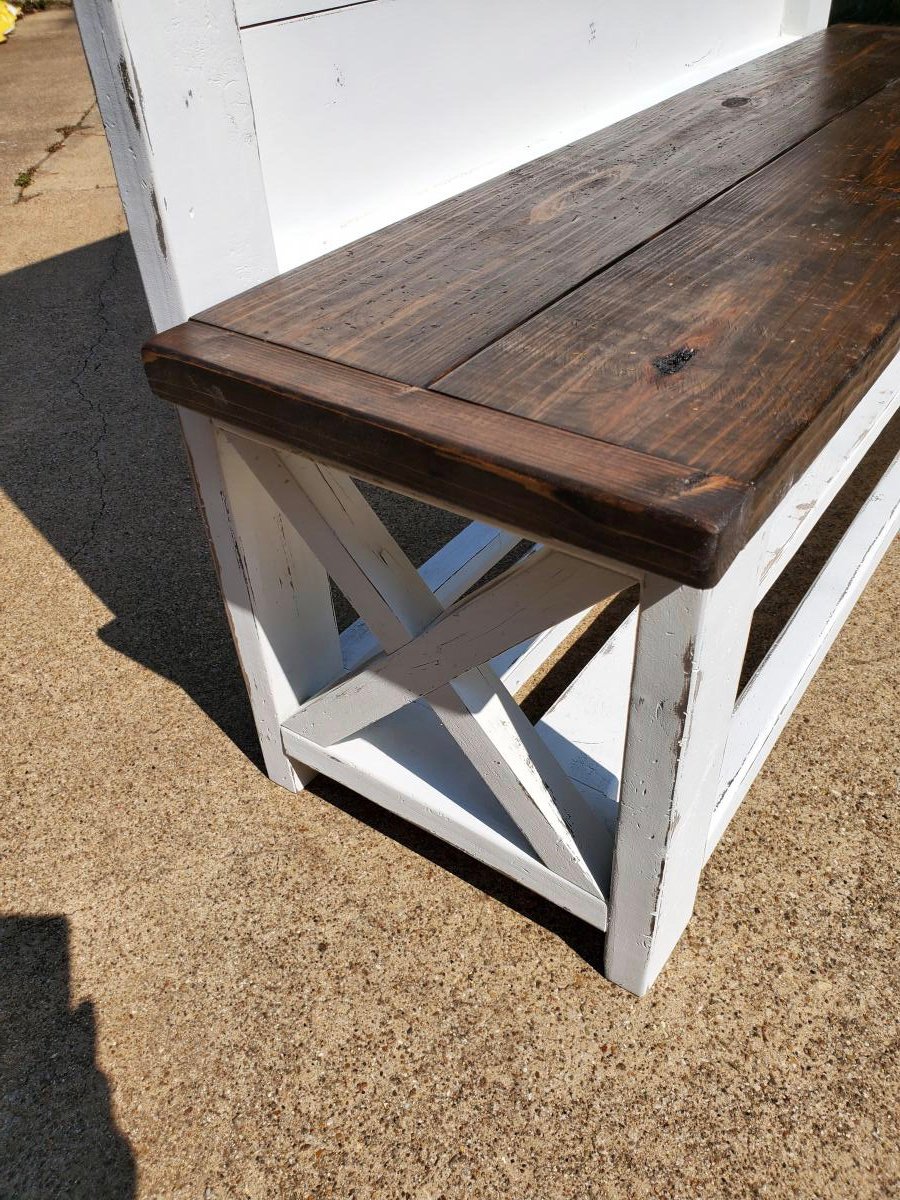
Rustic x hall tree

first furniture build from scratch. A few minor differences. I decided to distress by staining entire piece with minwax espresso stain, then painting over with white chalk paint and sanding through. Decided to leave bench and to molding stained for effect. Love the piece and so does my wife.
Built from Plan(s)
Comments
Wooden Mail Sorter With Key Rings
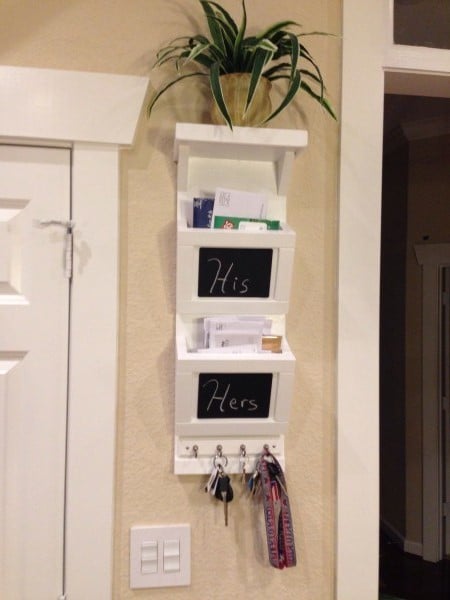
Built in a few hours and cleaned up seams with caulk. Finished it off with standard trim paint.

Built from Plan(s)
Estimated Time Investment
An Hour or Two (0-2 Hours)
Recommended Skill Level
Beginner
Laundry Orgainized
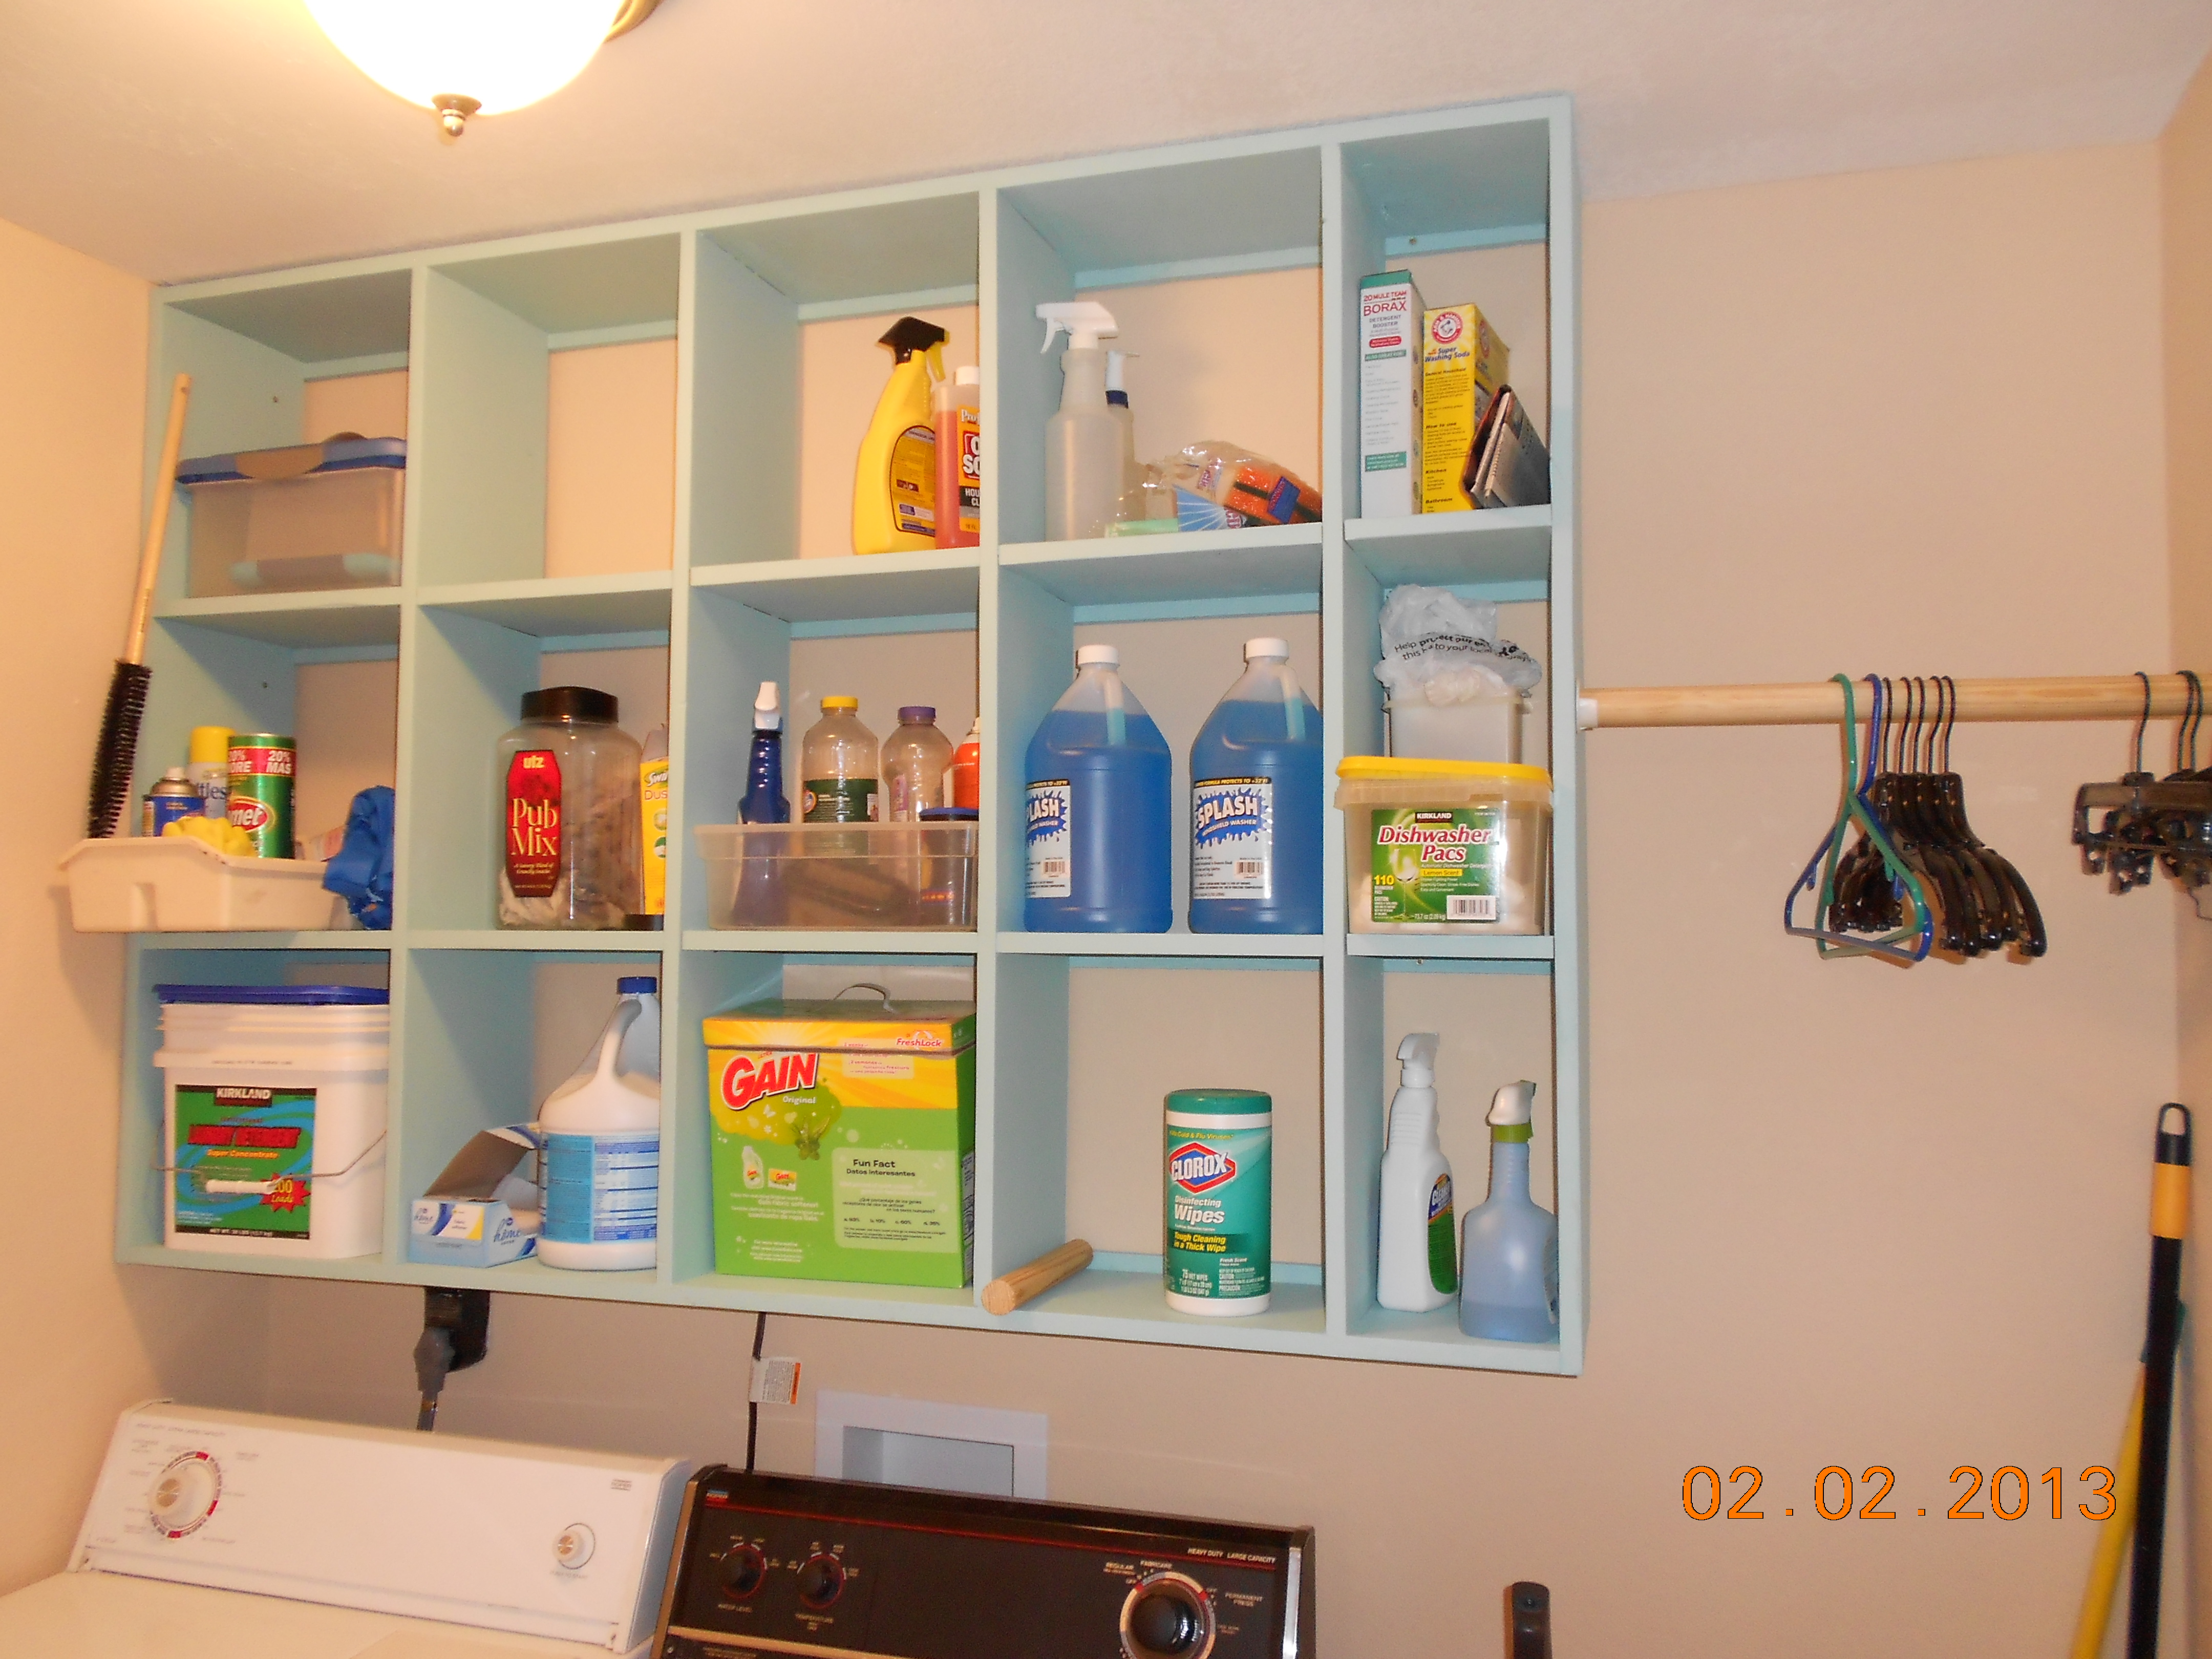
We needed to organize in the laundry room. This was the perfect idea.
Estimated Time Investment
Weekend Project (10-20 Hours)
Finish Used
This was easy and fun to do. My husband and I worked on it together and we are both alive to brag about it.
Recommended Skill Level
Beginner
Comments

Sun, 02/03/2013 - 18:50
Nicely done! Makes me wish I
Nicely done! Makes me wish I had room in my laundry area for one like it.
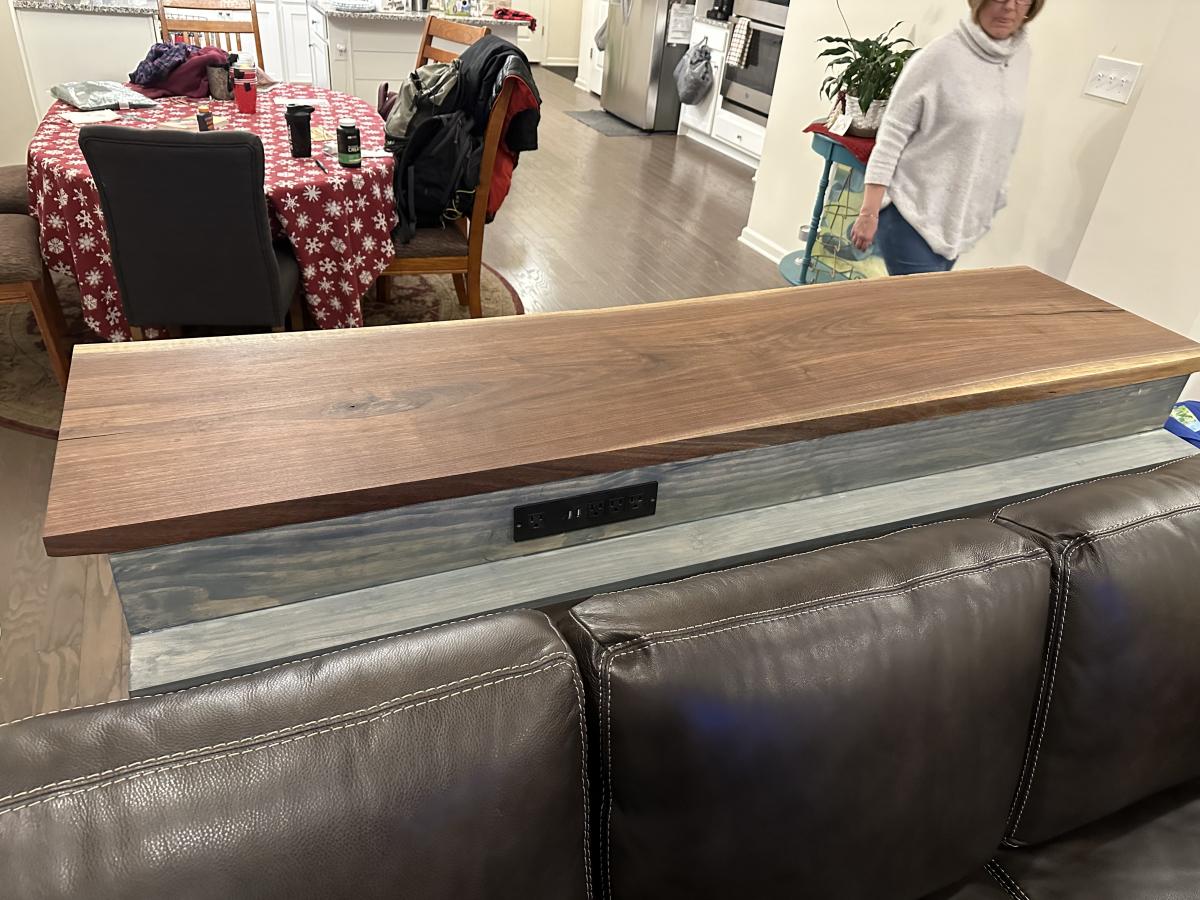
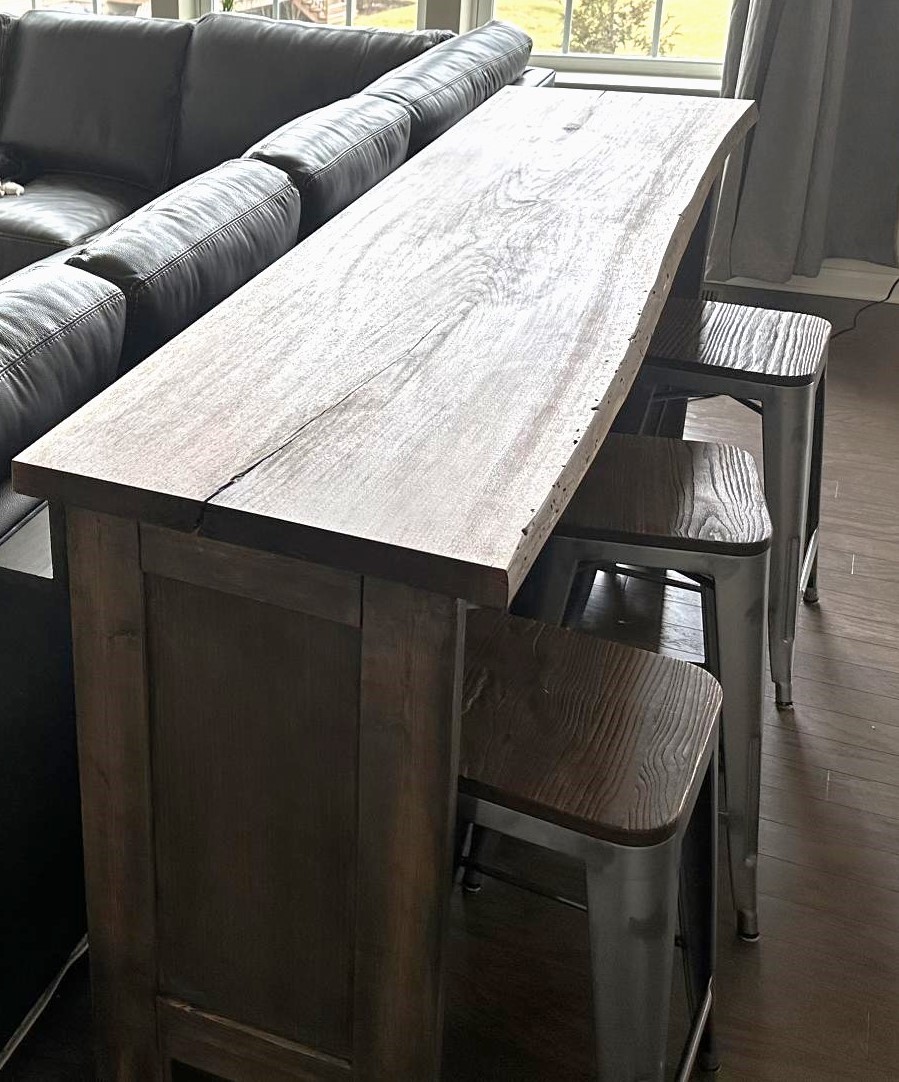
Sofa Console Table Bar Height for Dining
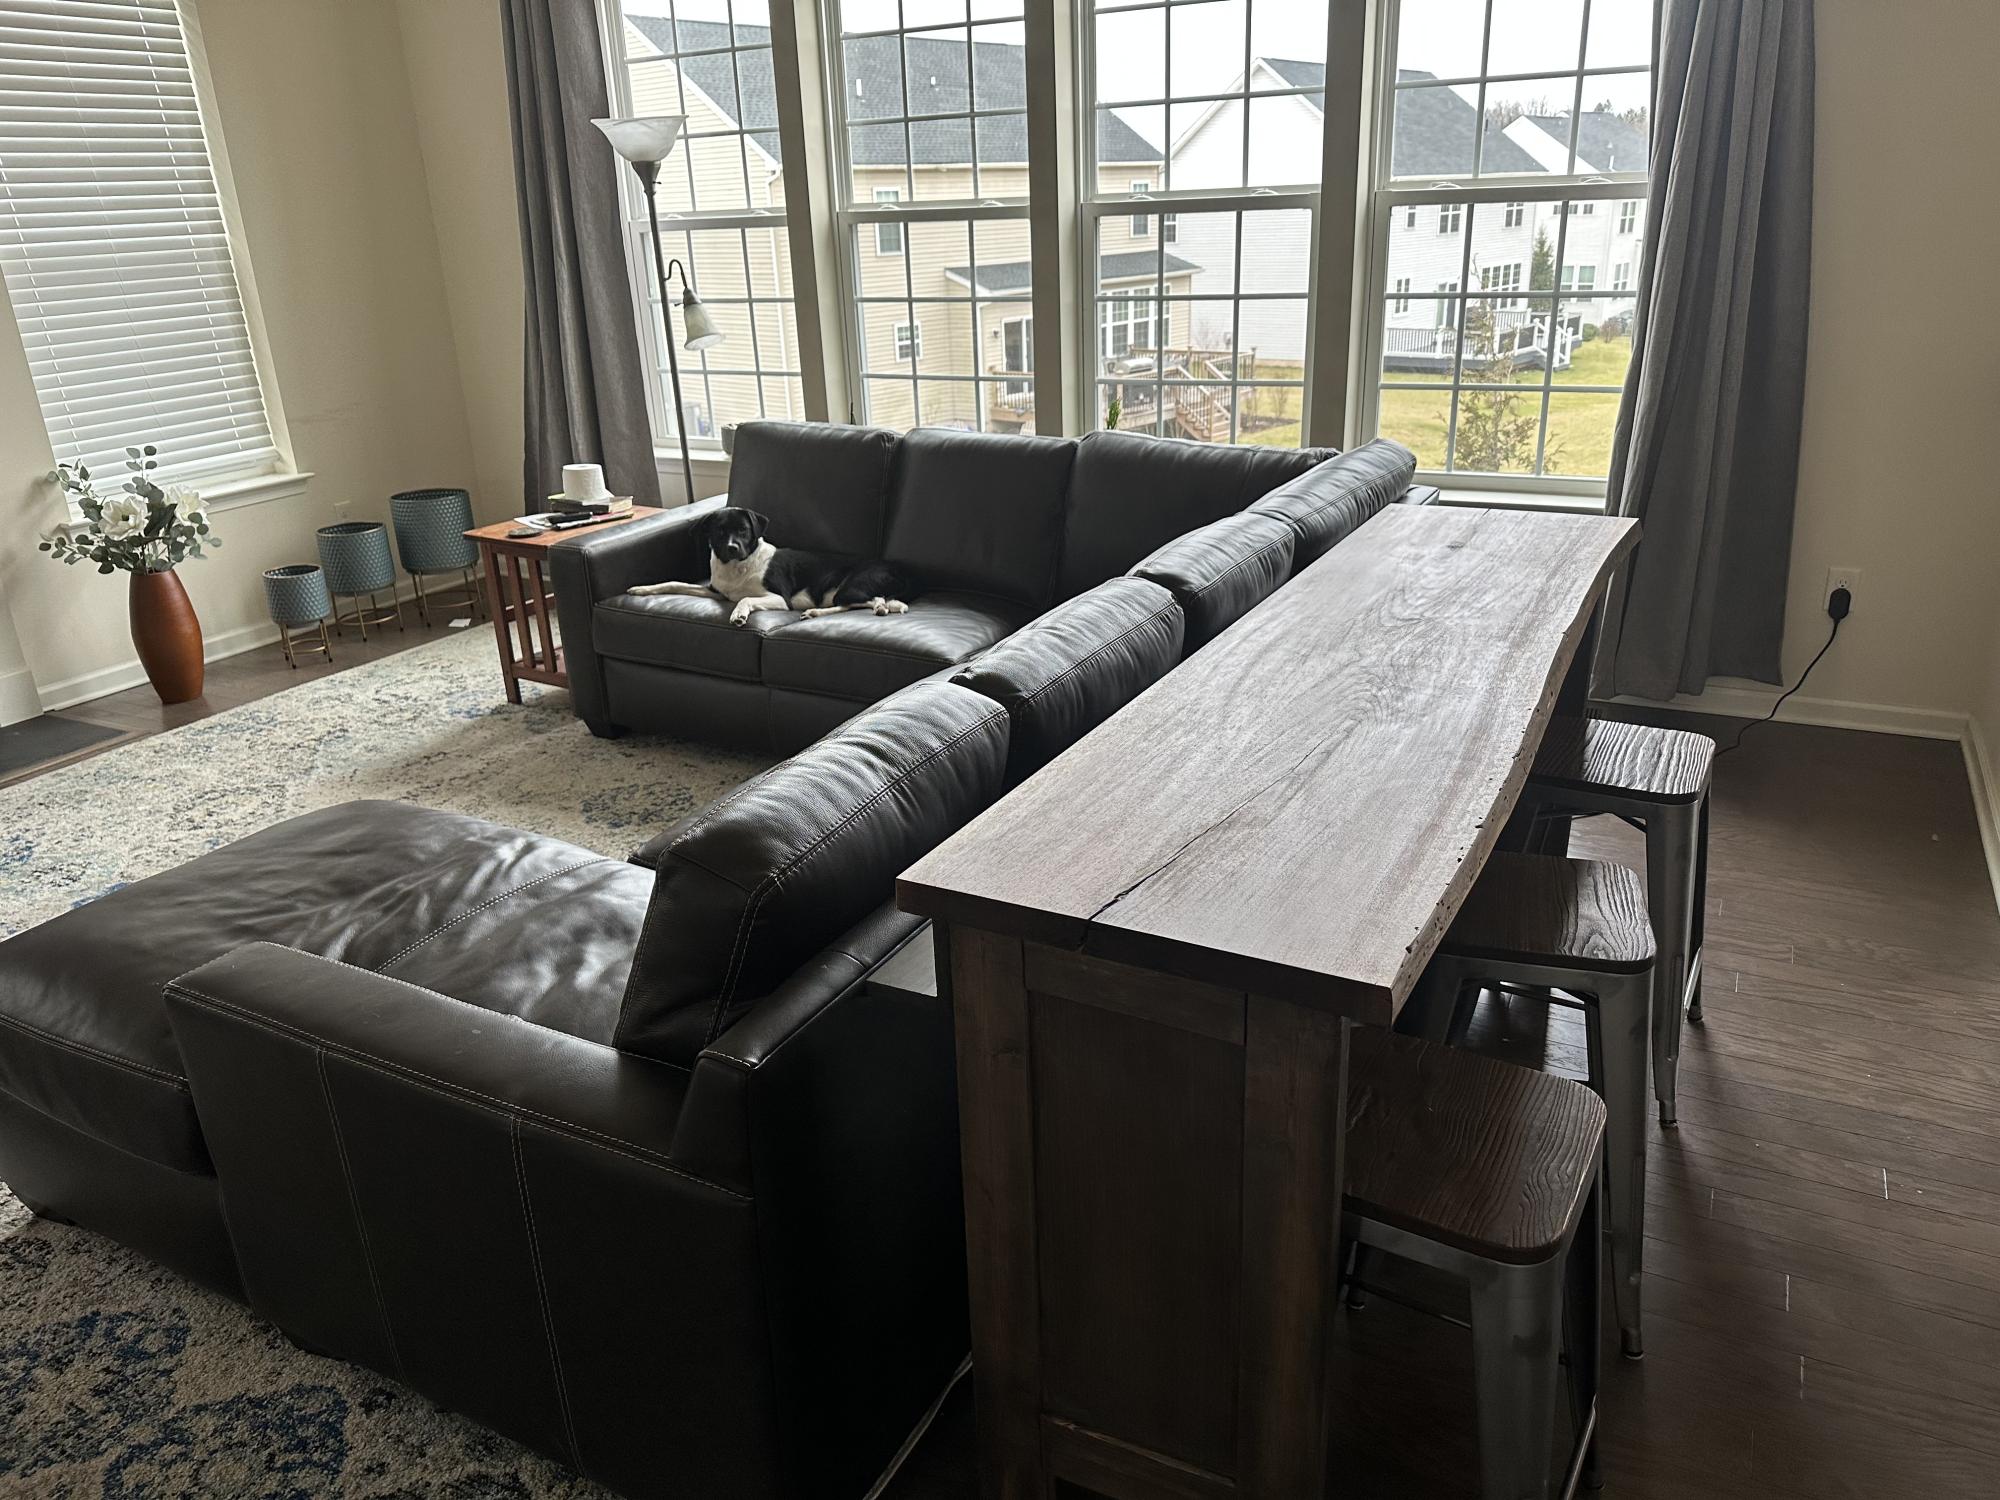
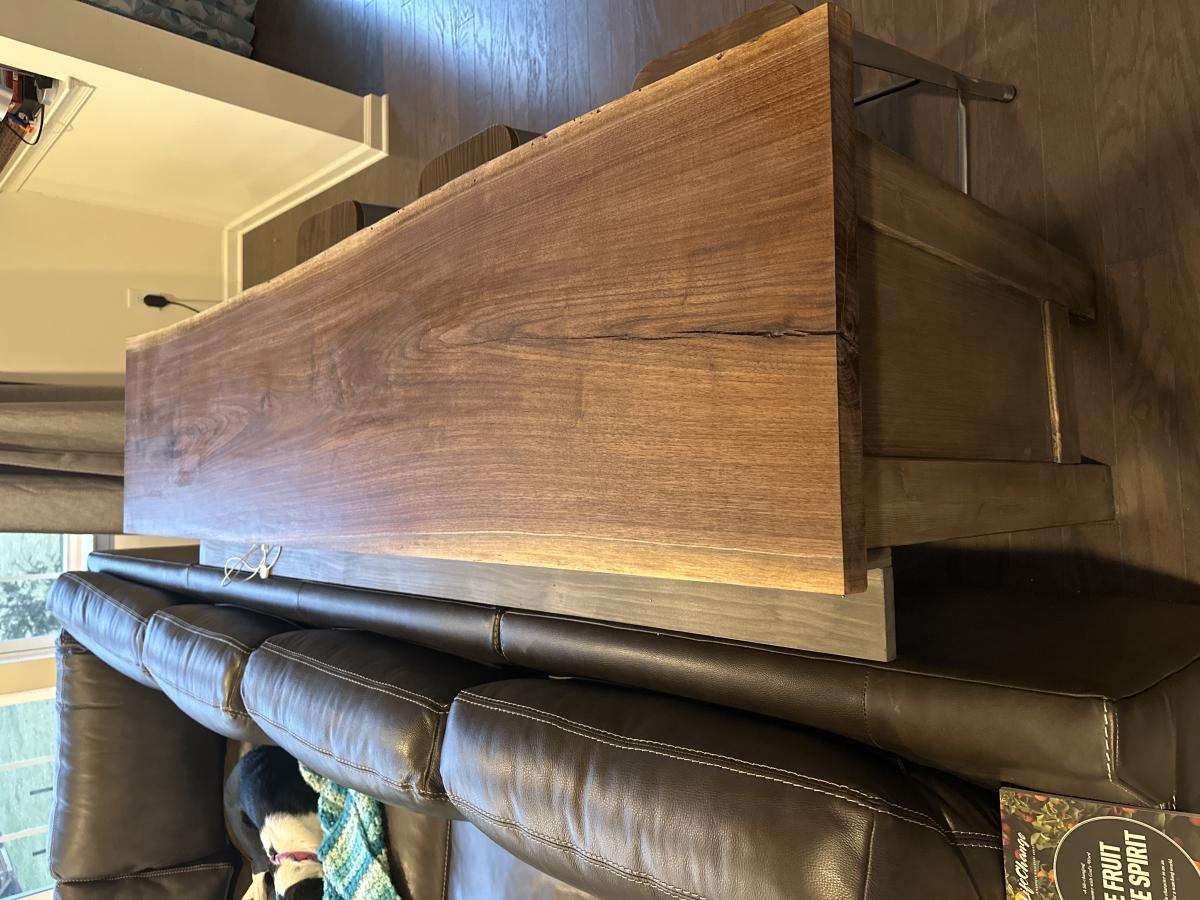
I took the basic idea of the Rustic X Console. Raised it to countertop height so I could use it for three stools. I also added a shelf so people sitting on the sectional could put drinks right behind them. Added a charging station to that shelf as well. Topped it with a live edge black walnut slab. Finally, I didn't use the X because the table was too high and the base was too narrow to make the X work. I used a tablesaw to cut a grove in the legs and then put a 1/4 plywood panel.
Built from Plan(s)
Comments
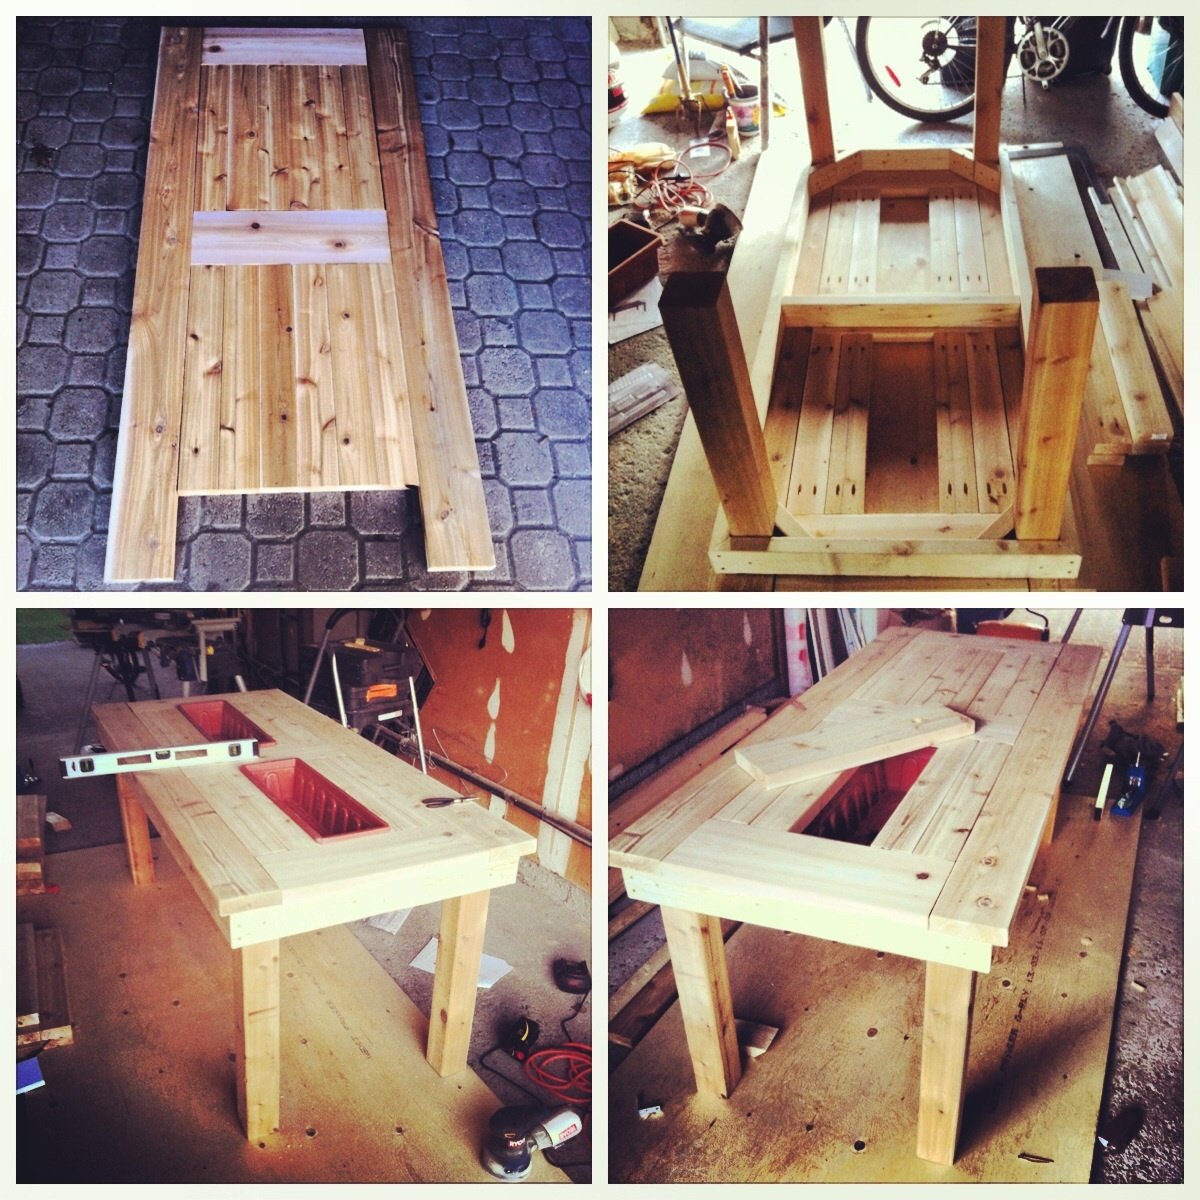
DIY Patio Table & Bench
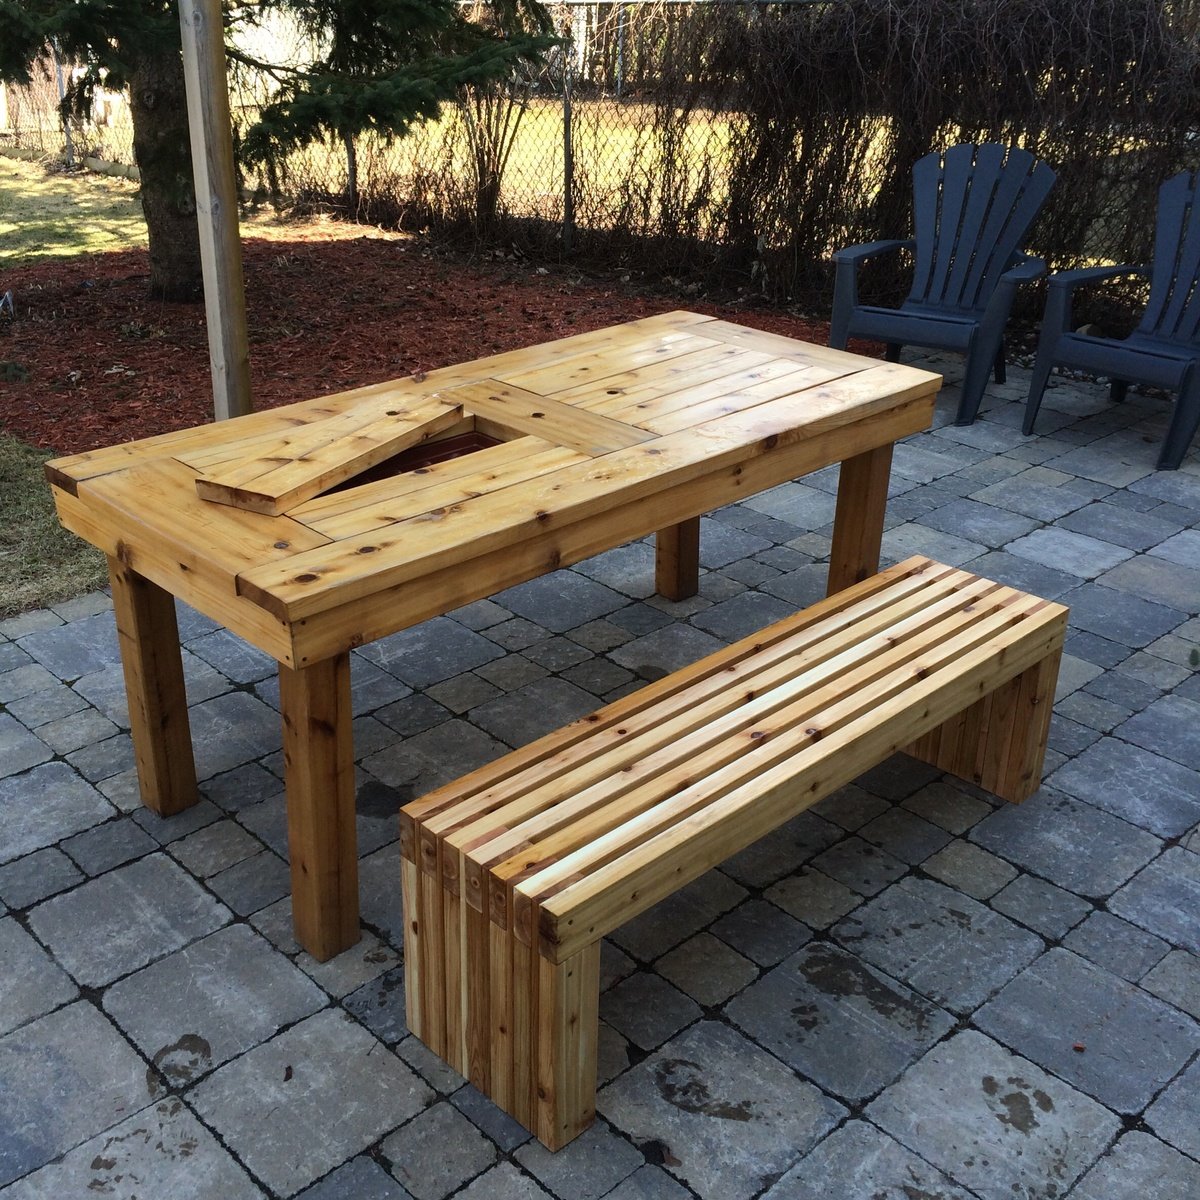
Great projects for any beginner. Make sure you're working on a level surface for the table. I purchased simple planter boxes from a local hardware store, and worked around those. For the bench, my only suggestion is to verify you are square at each step- other than that it's pretty straightforward.
Built from Plan(s)
Estimated Cost
350
Estimated Time Investment
Weekend Project (10-20 Hours)
Finish Used
Teak Oil
Recommended Skill Level
Beginner
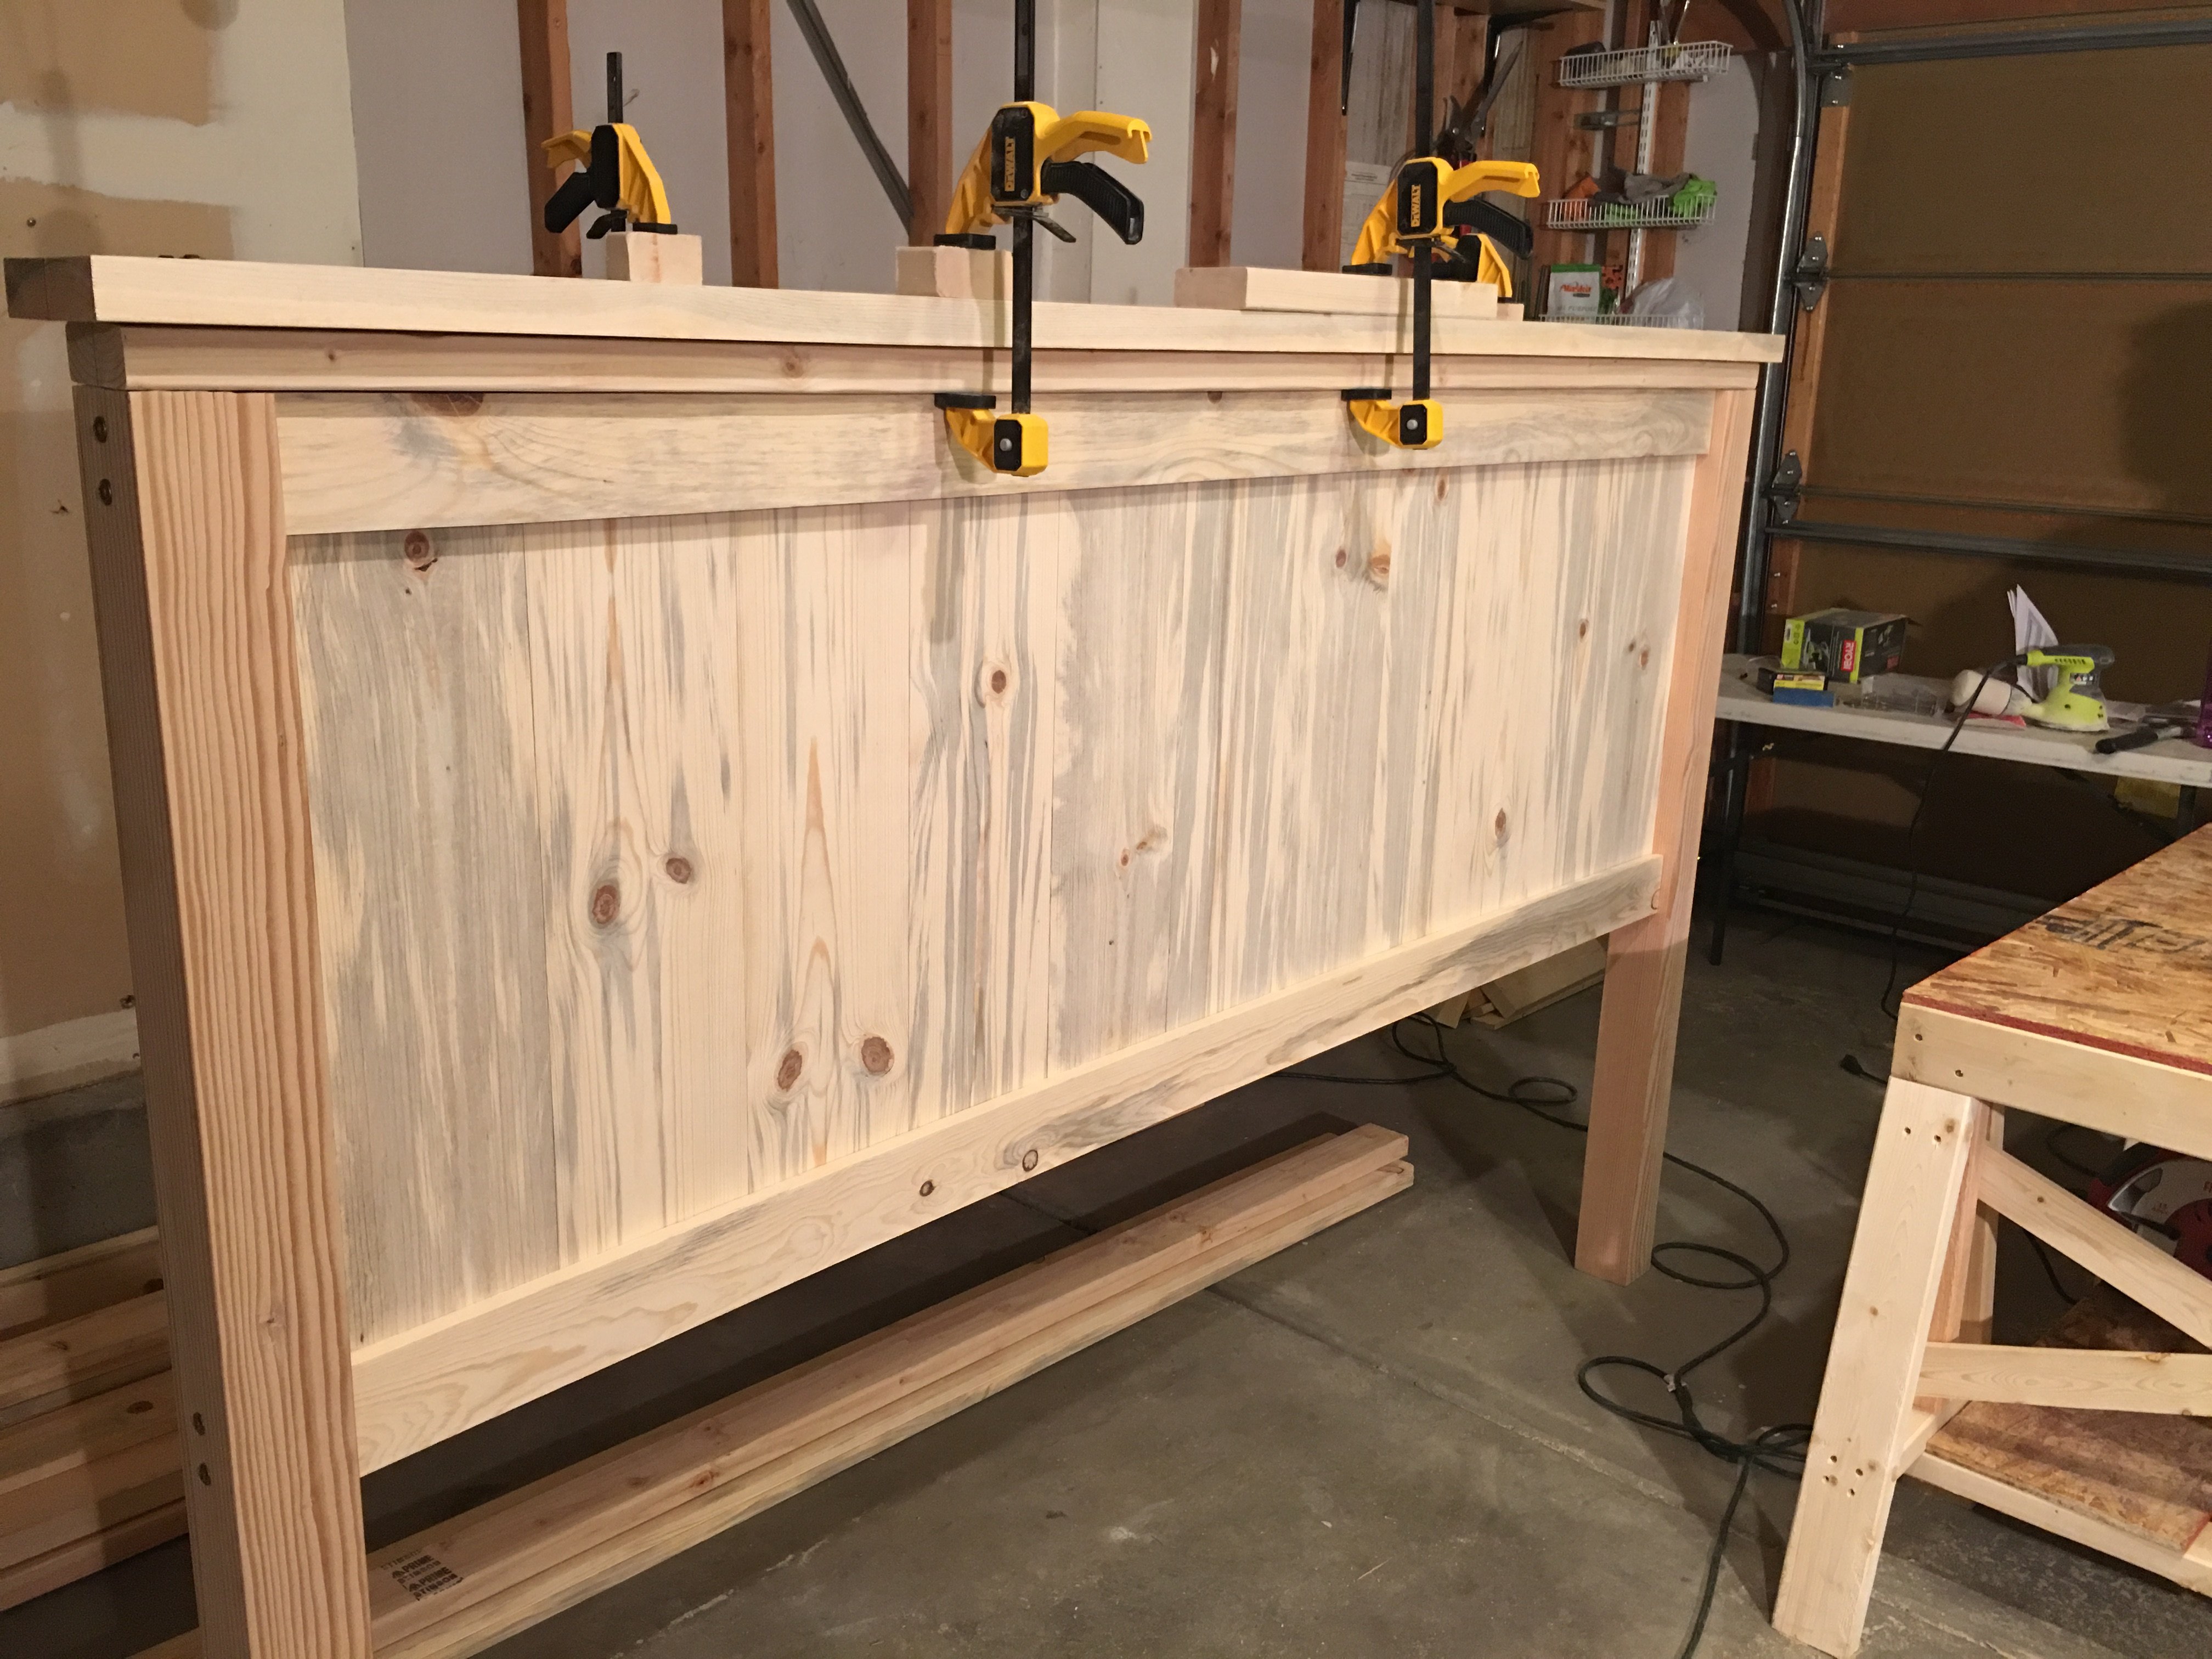
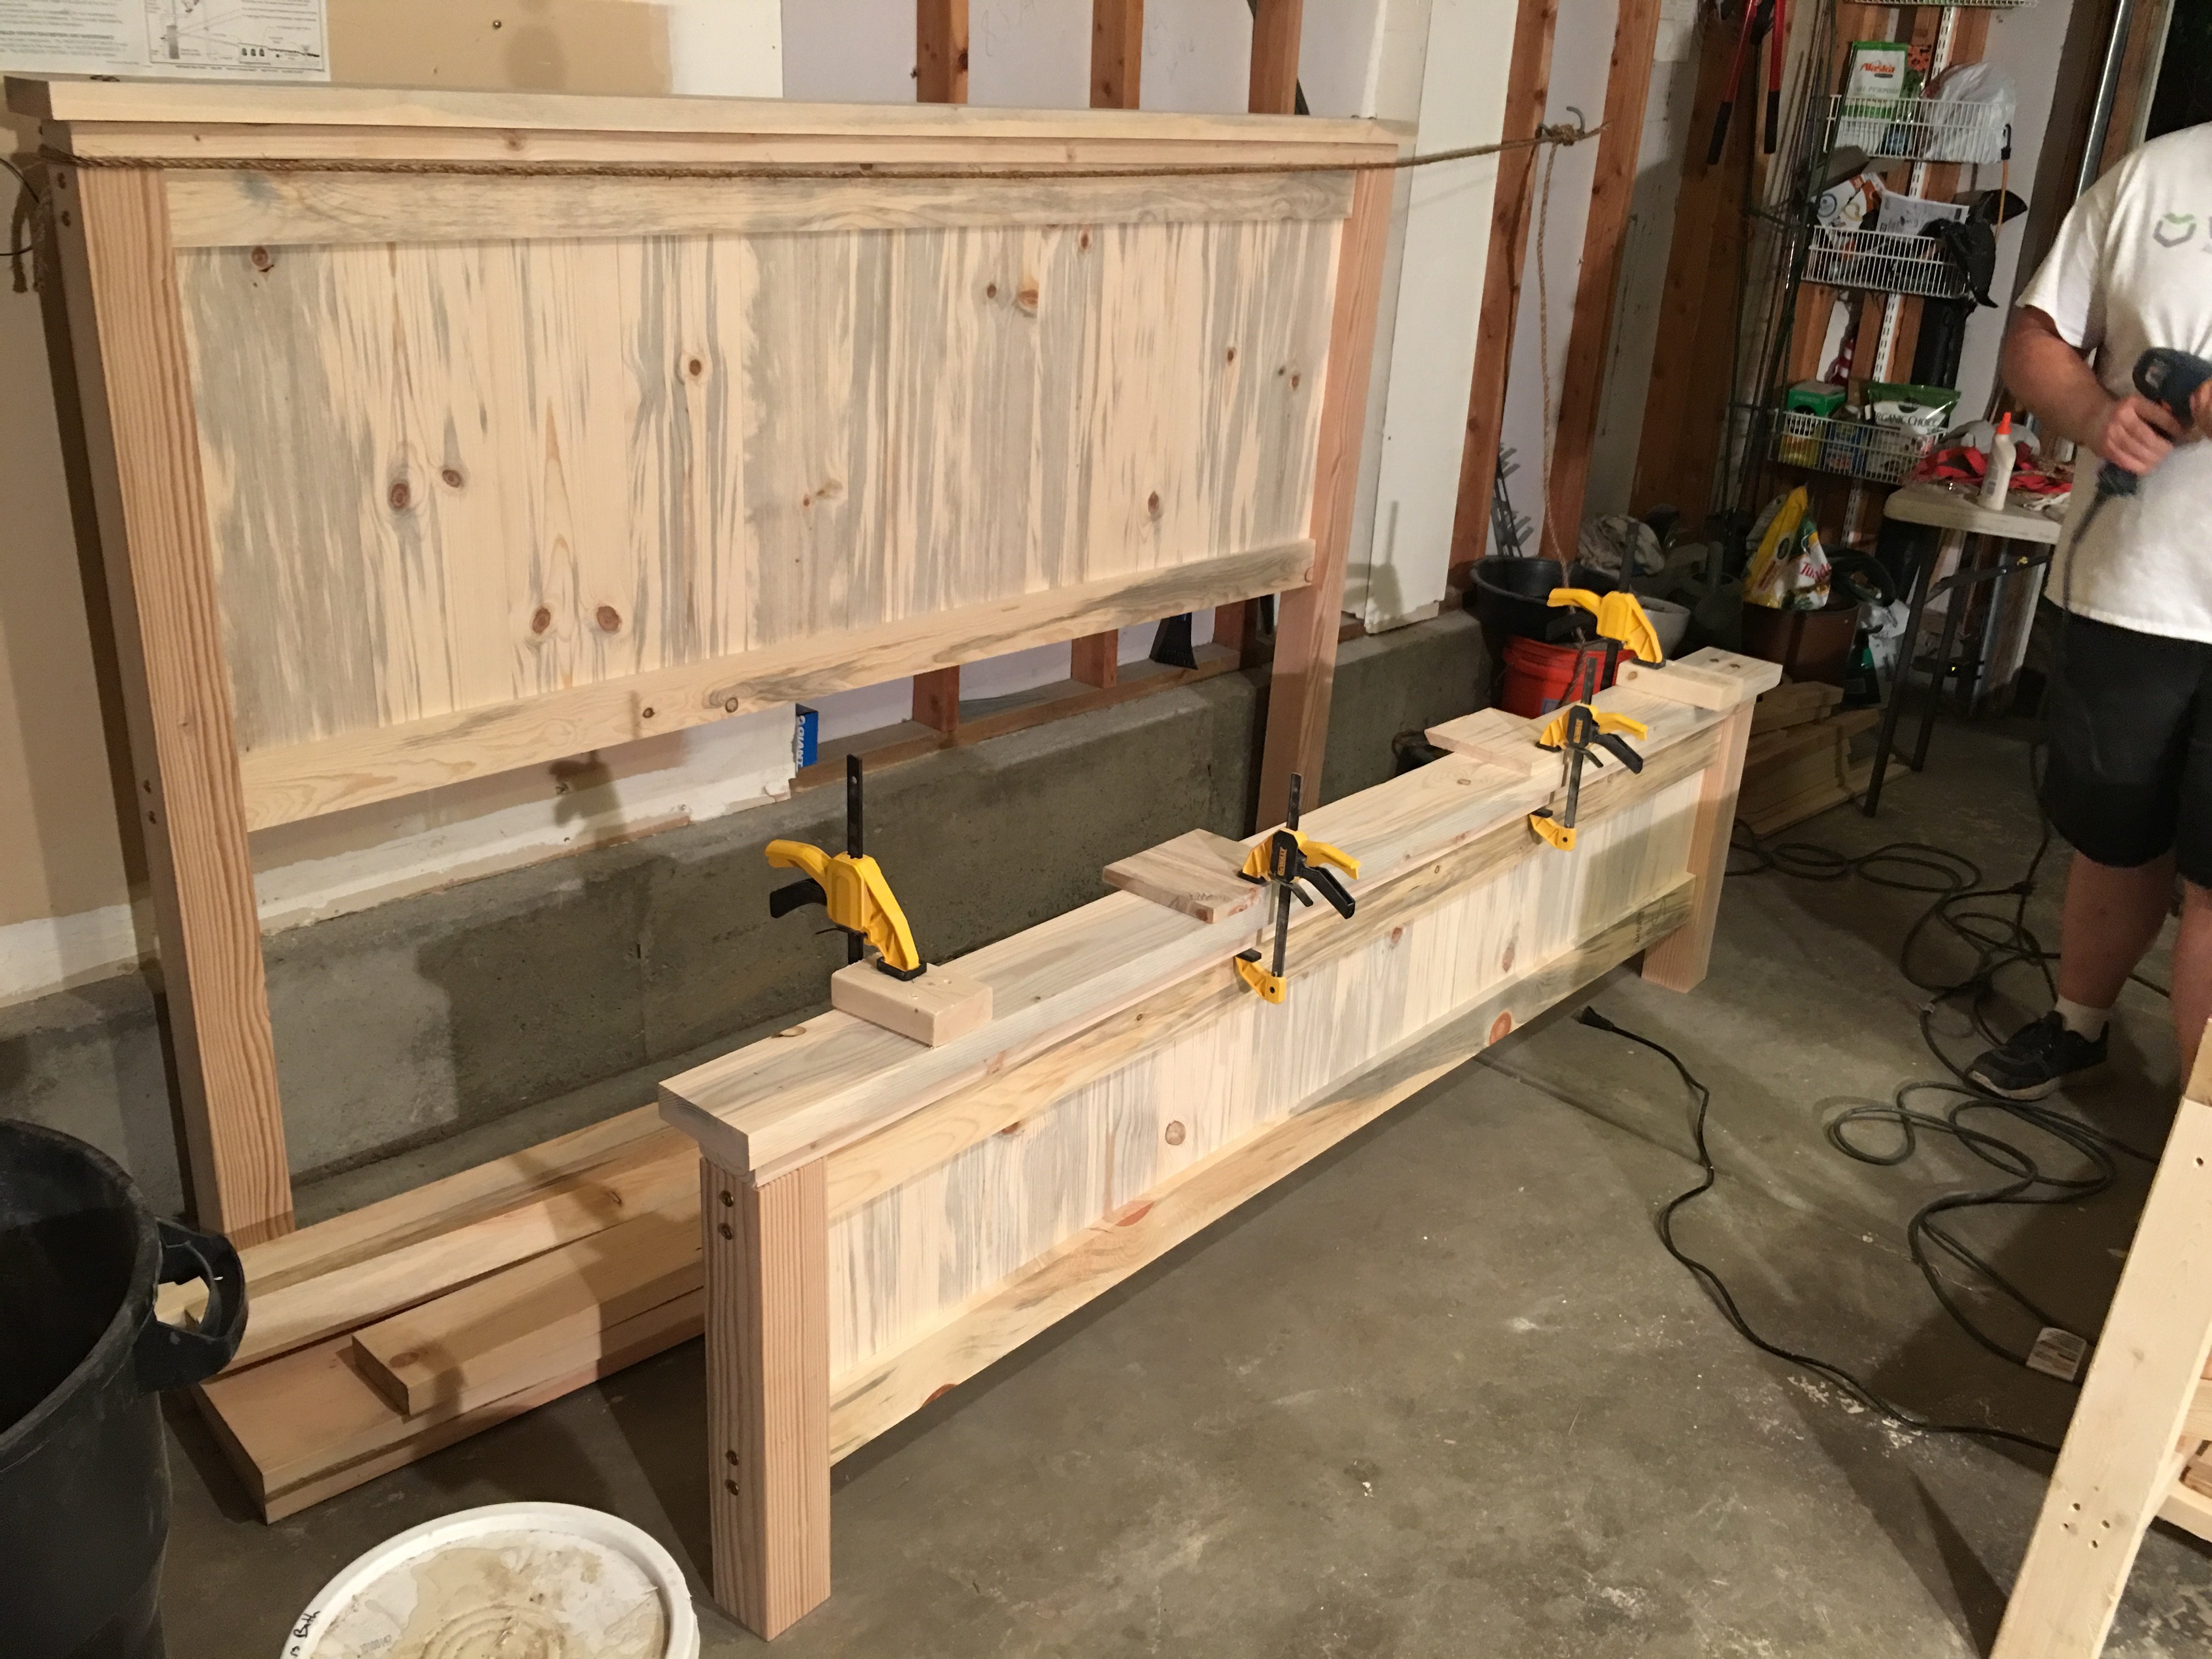
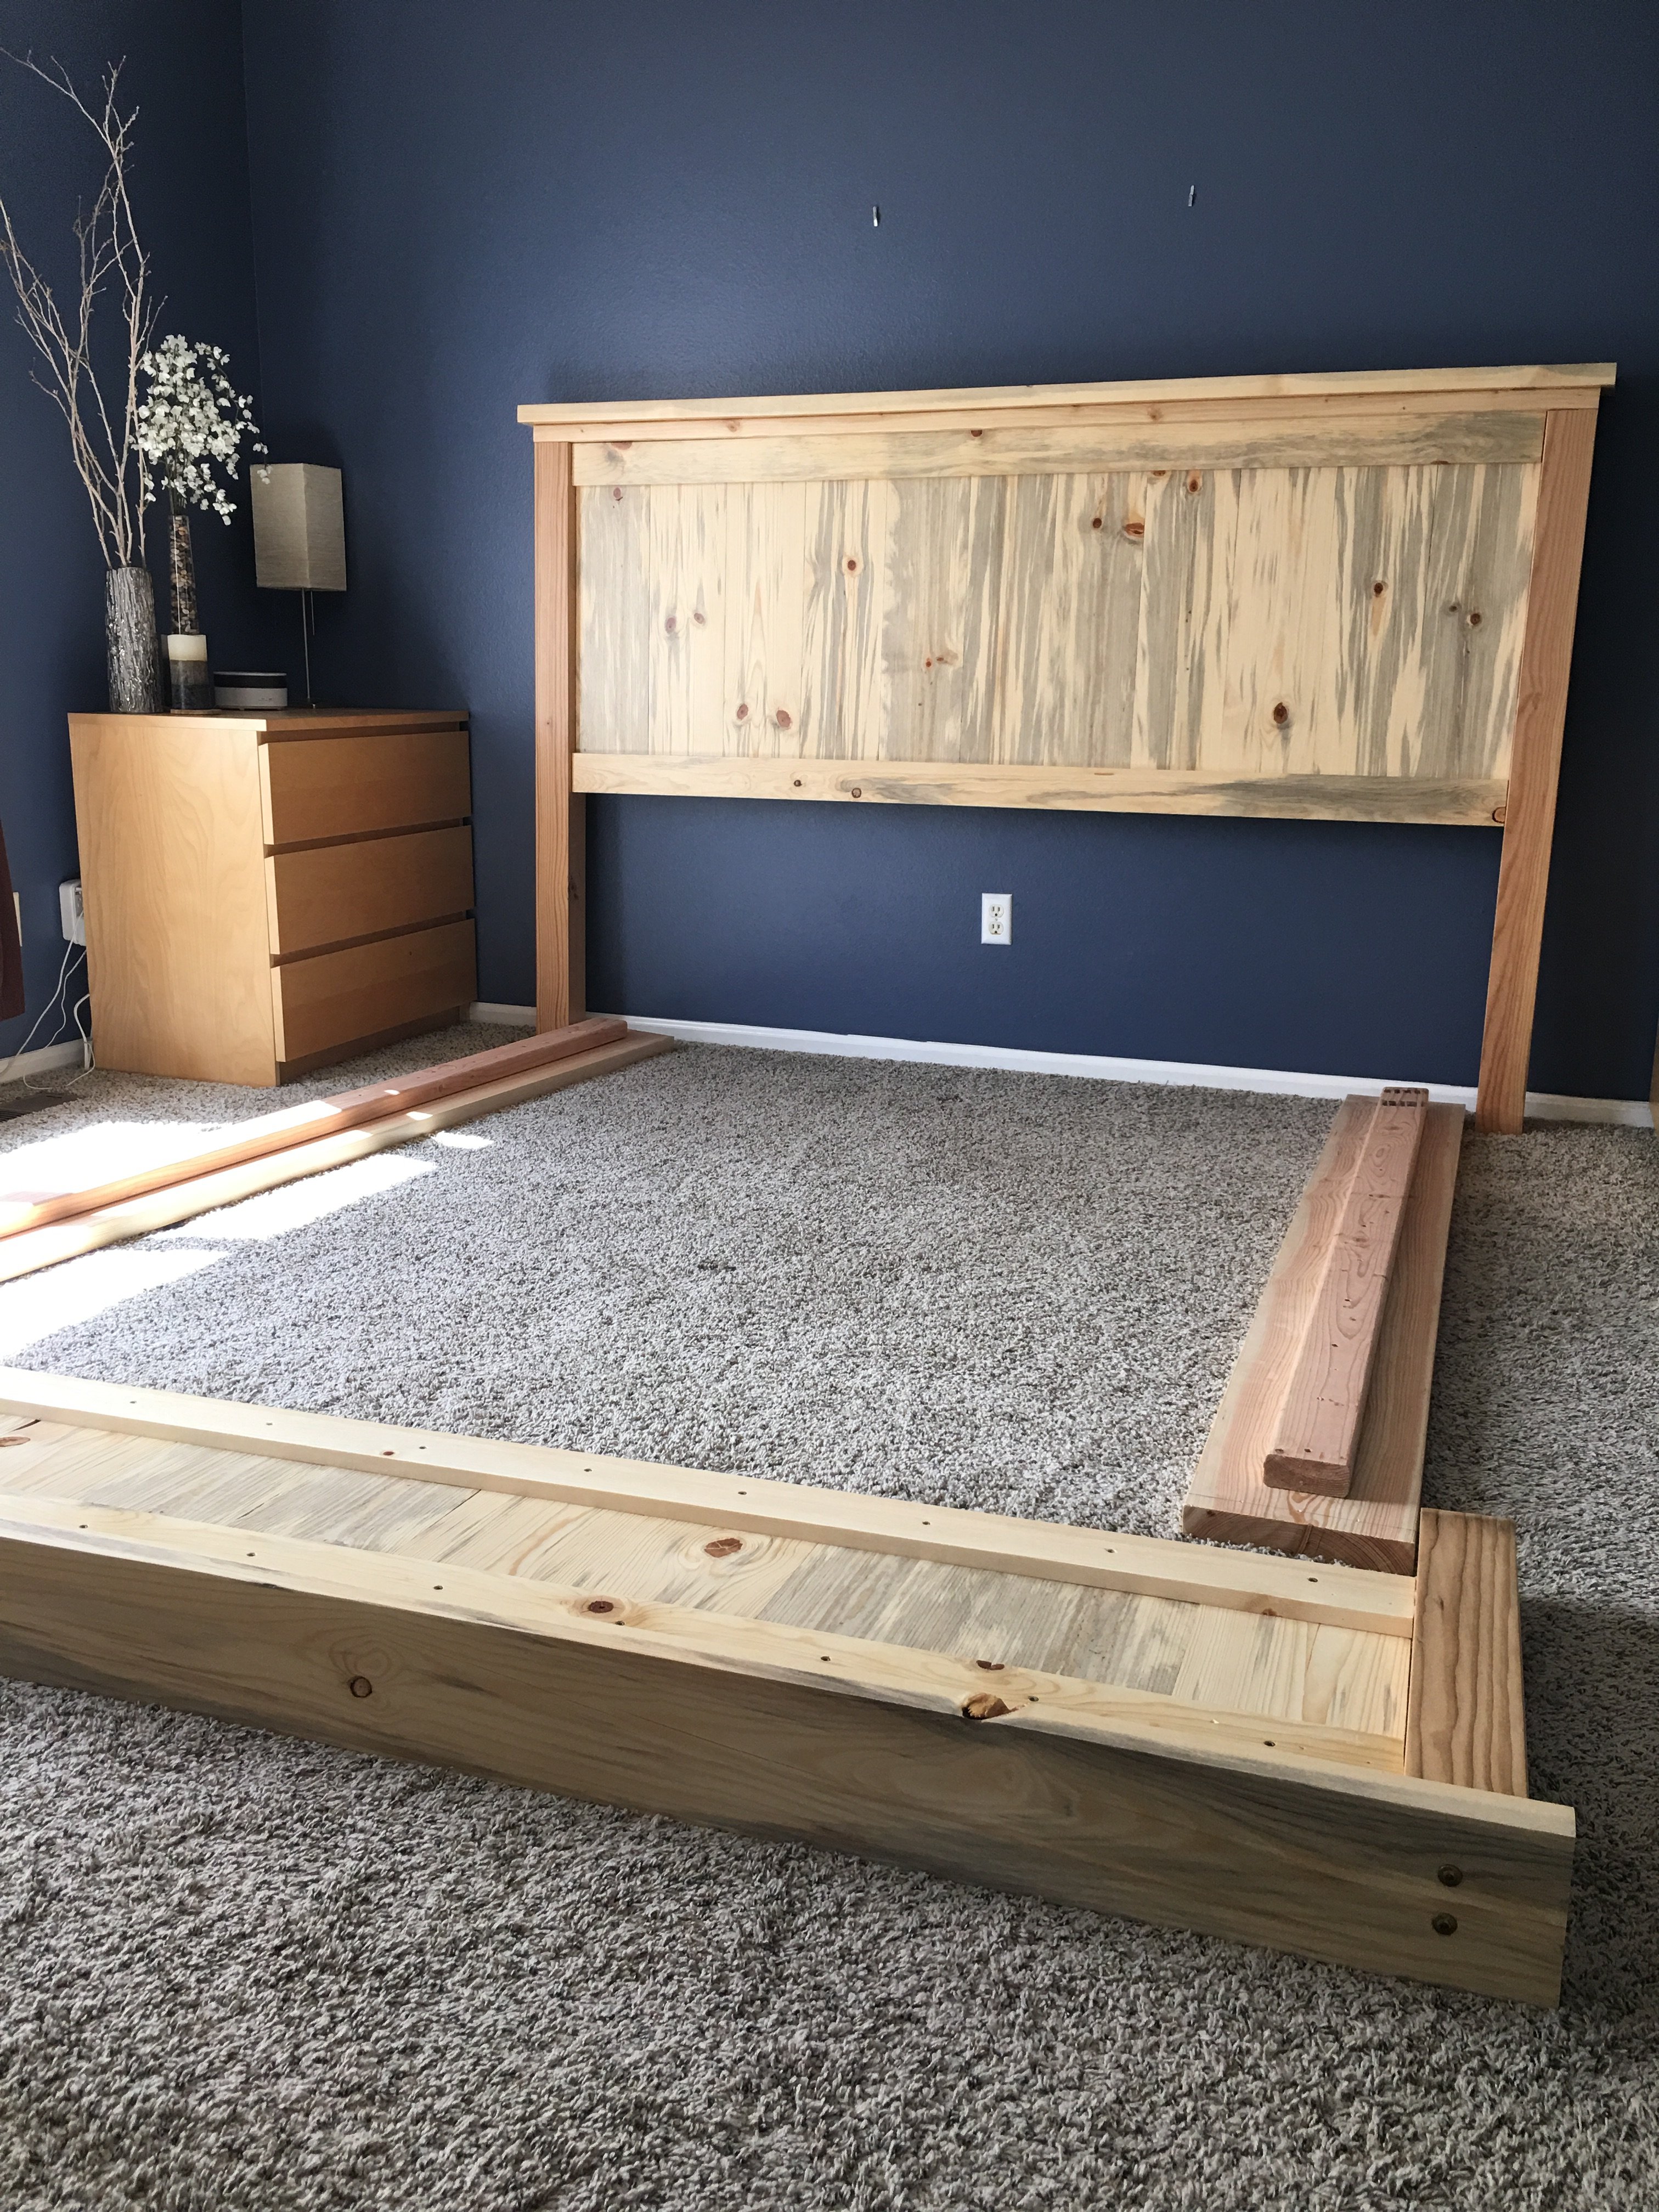
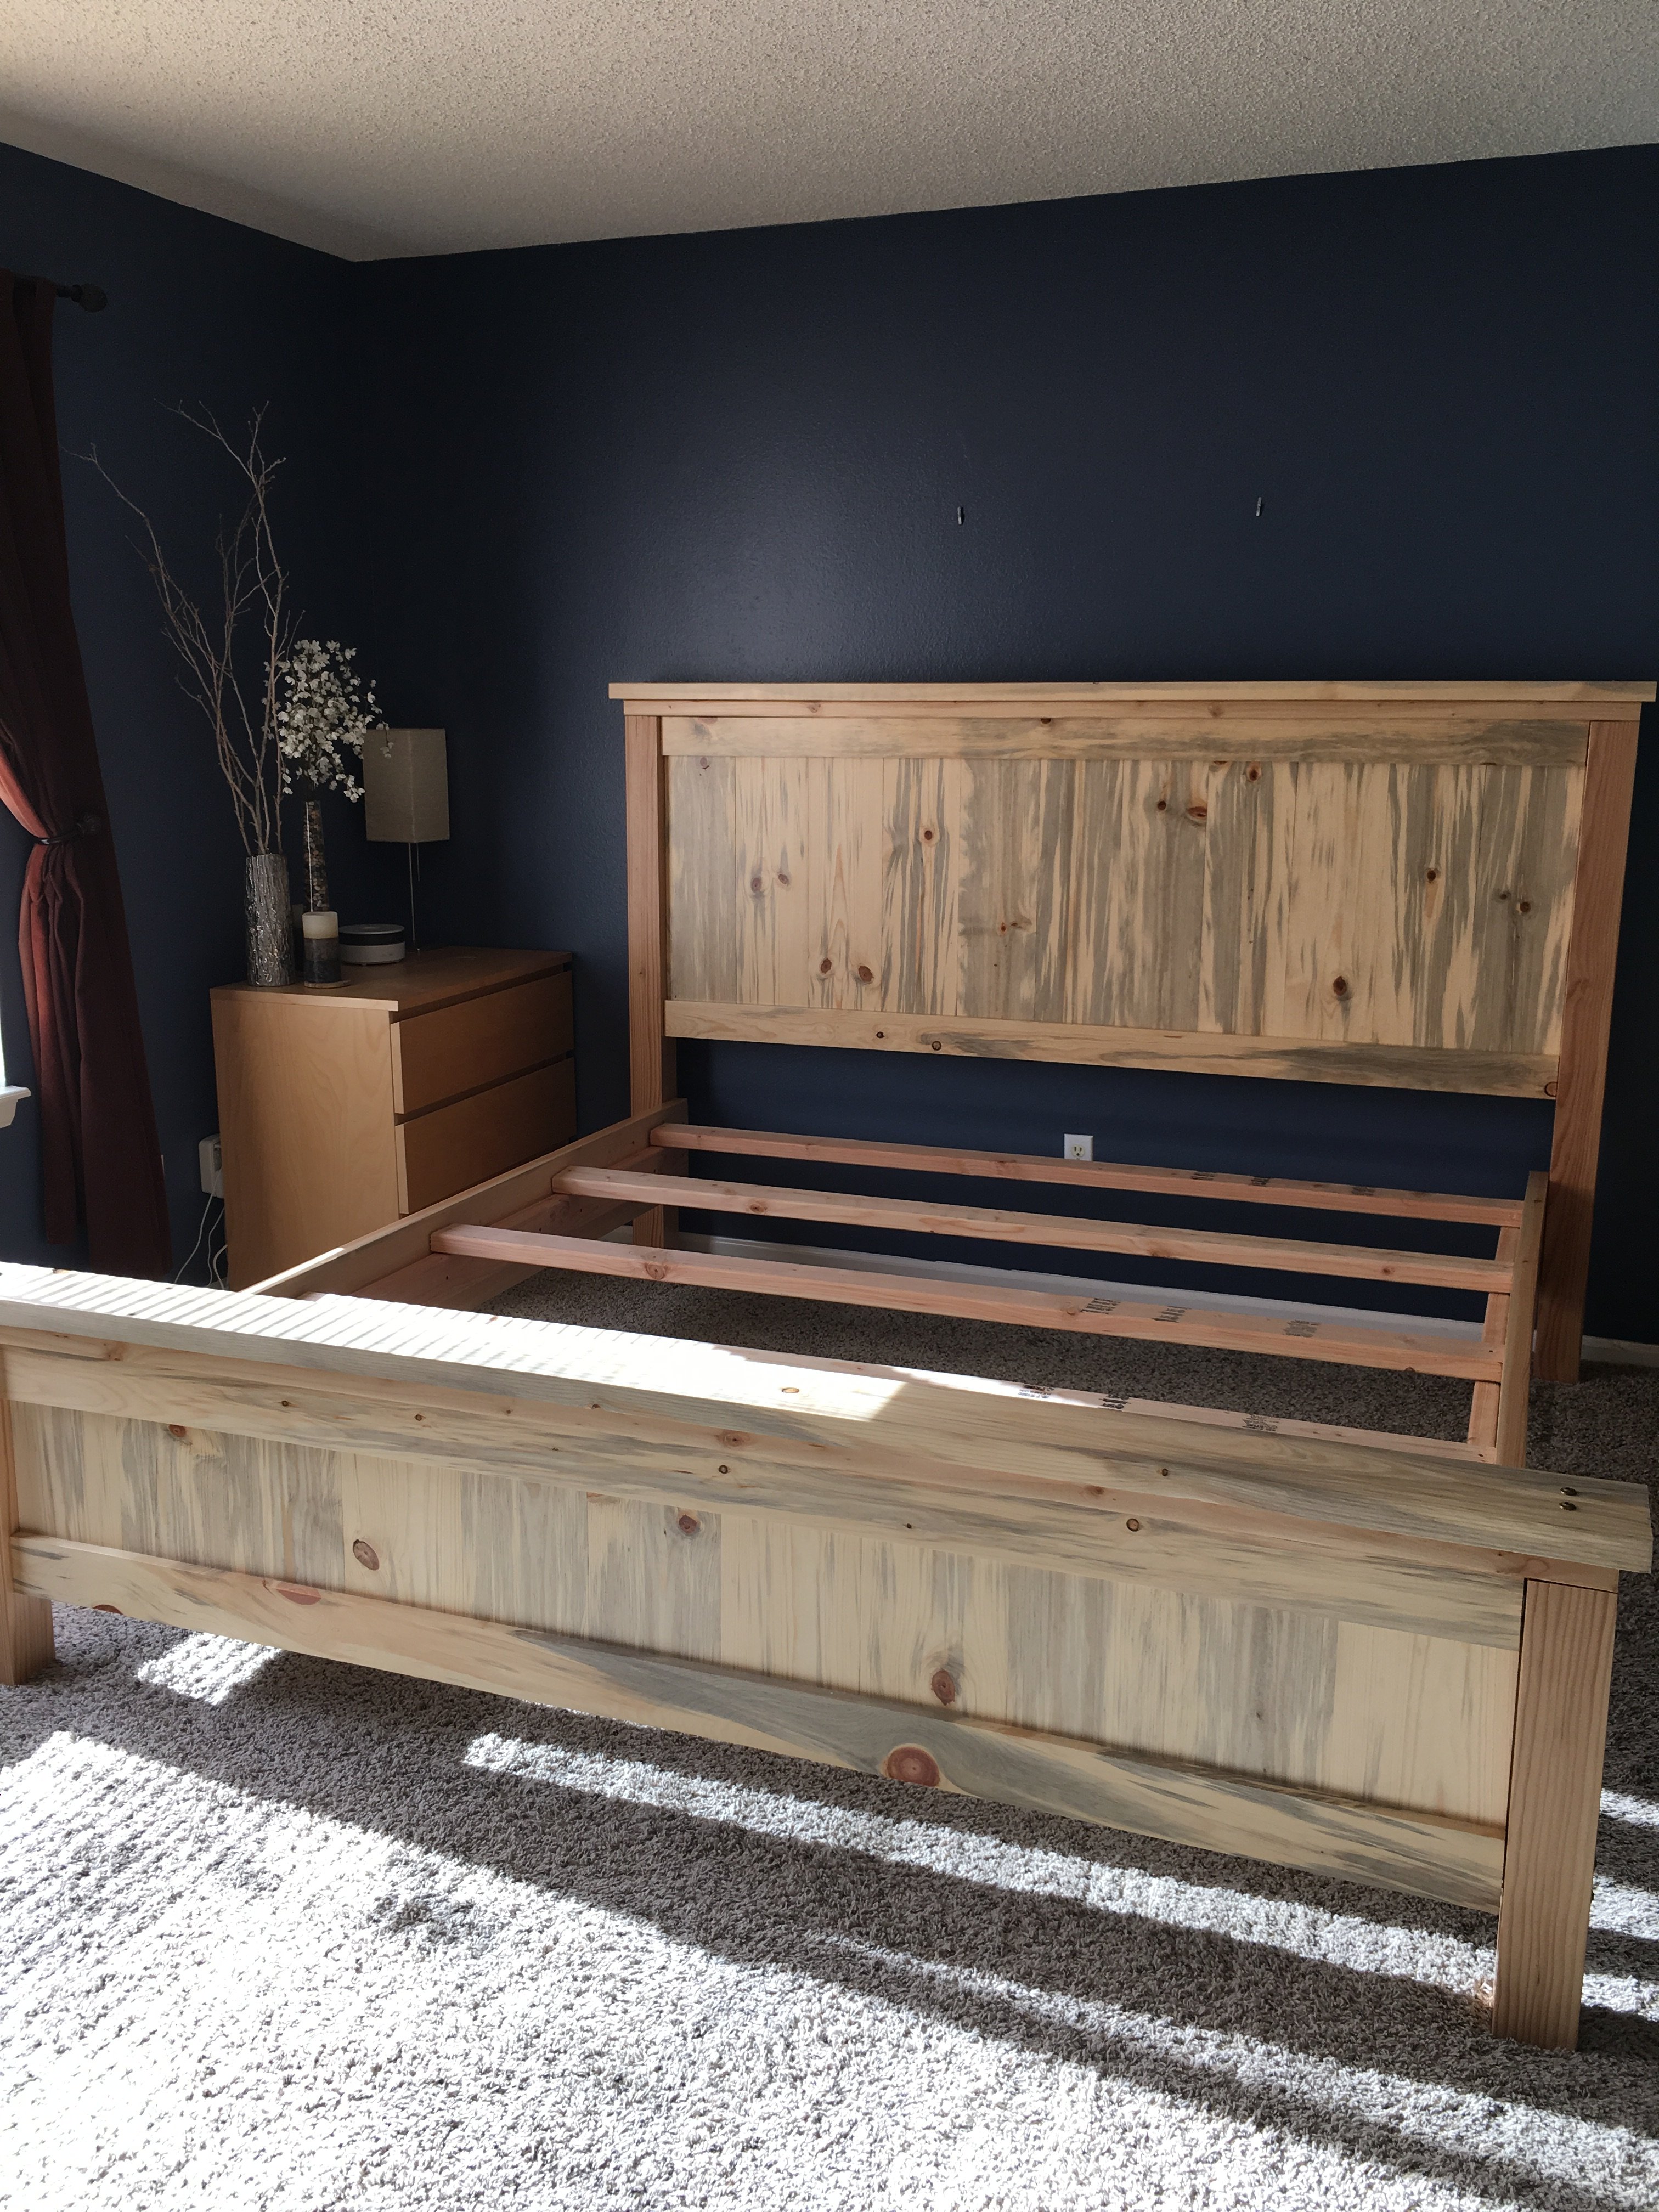
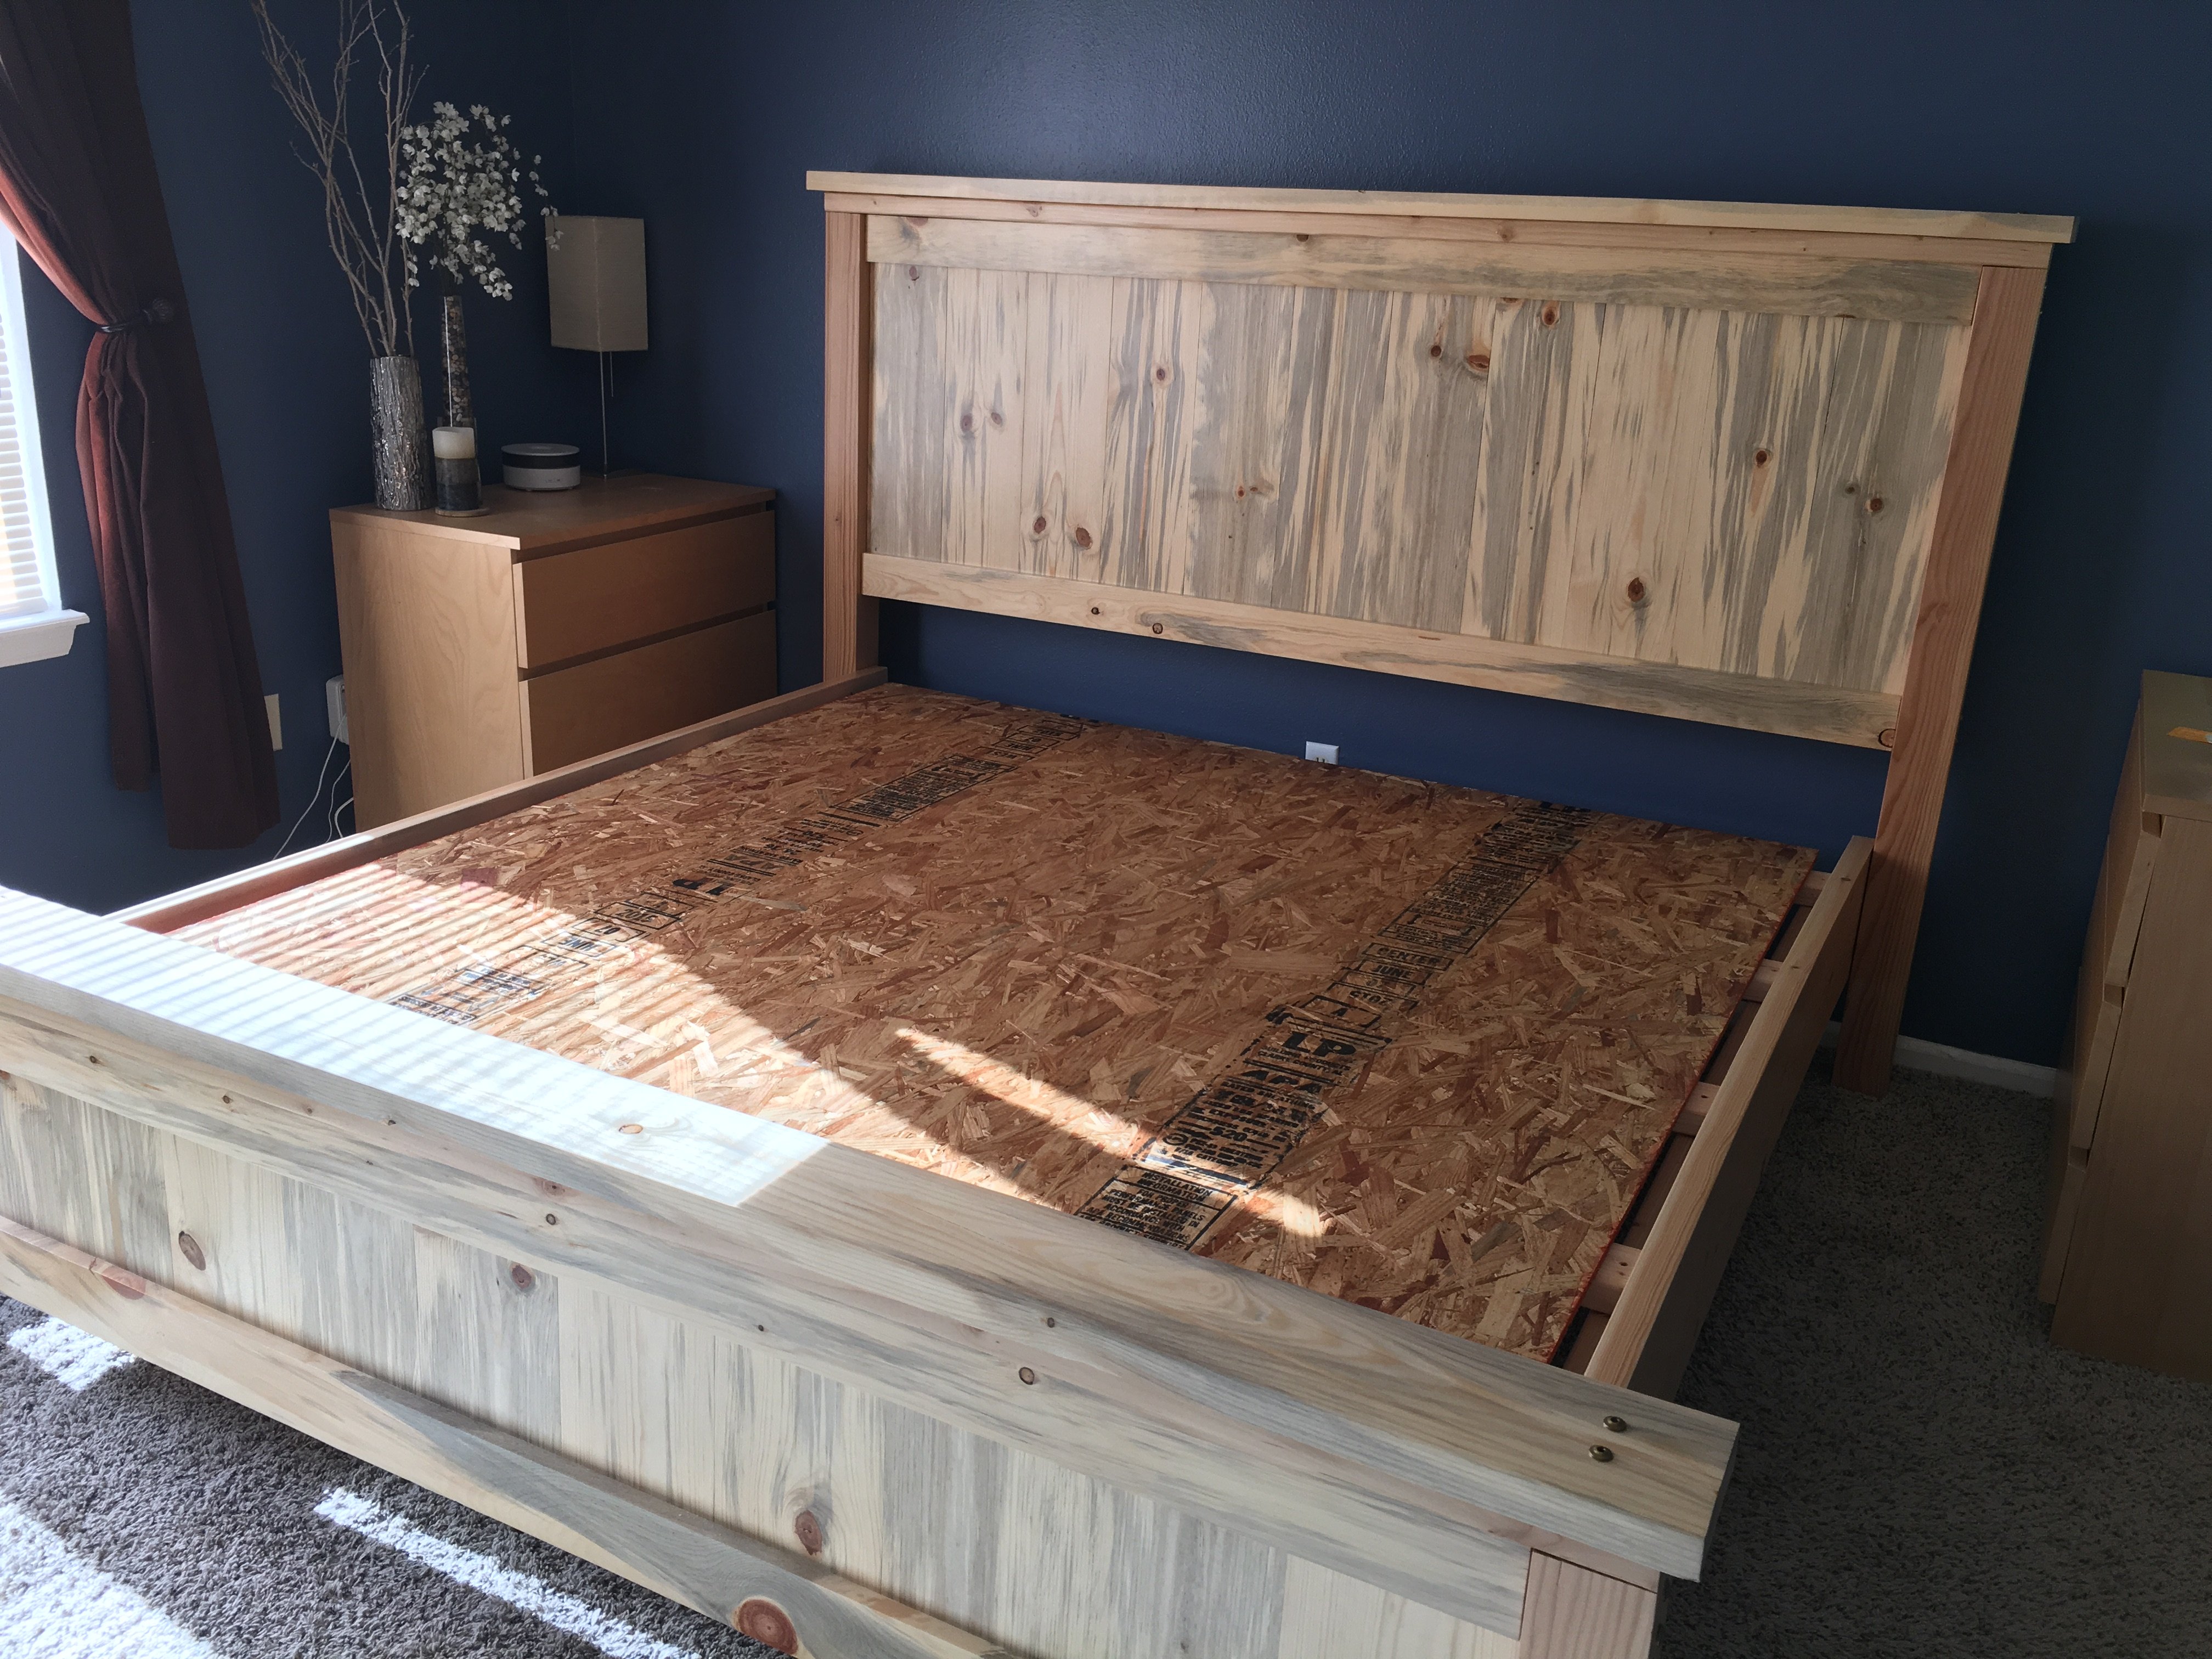
Farmhouse King Bed- Beetle Kill Pine
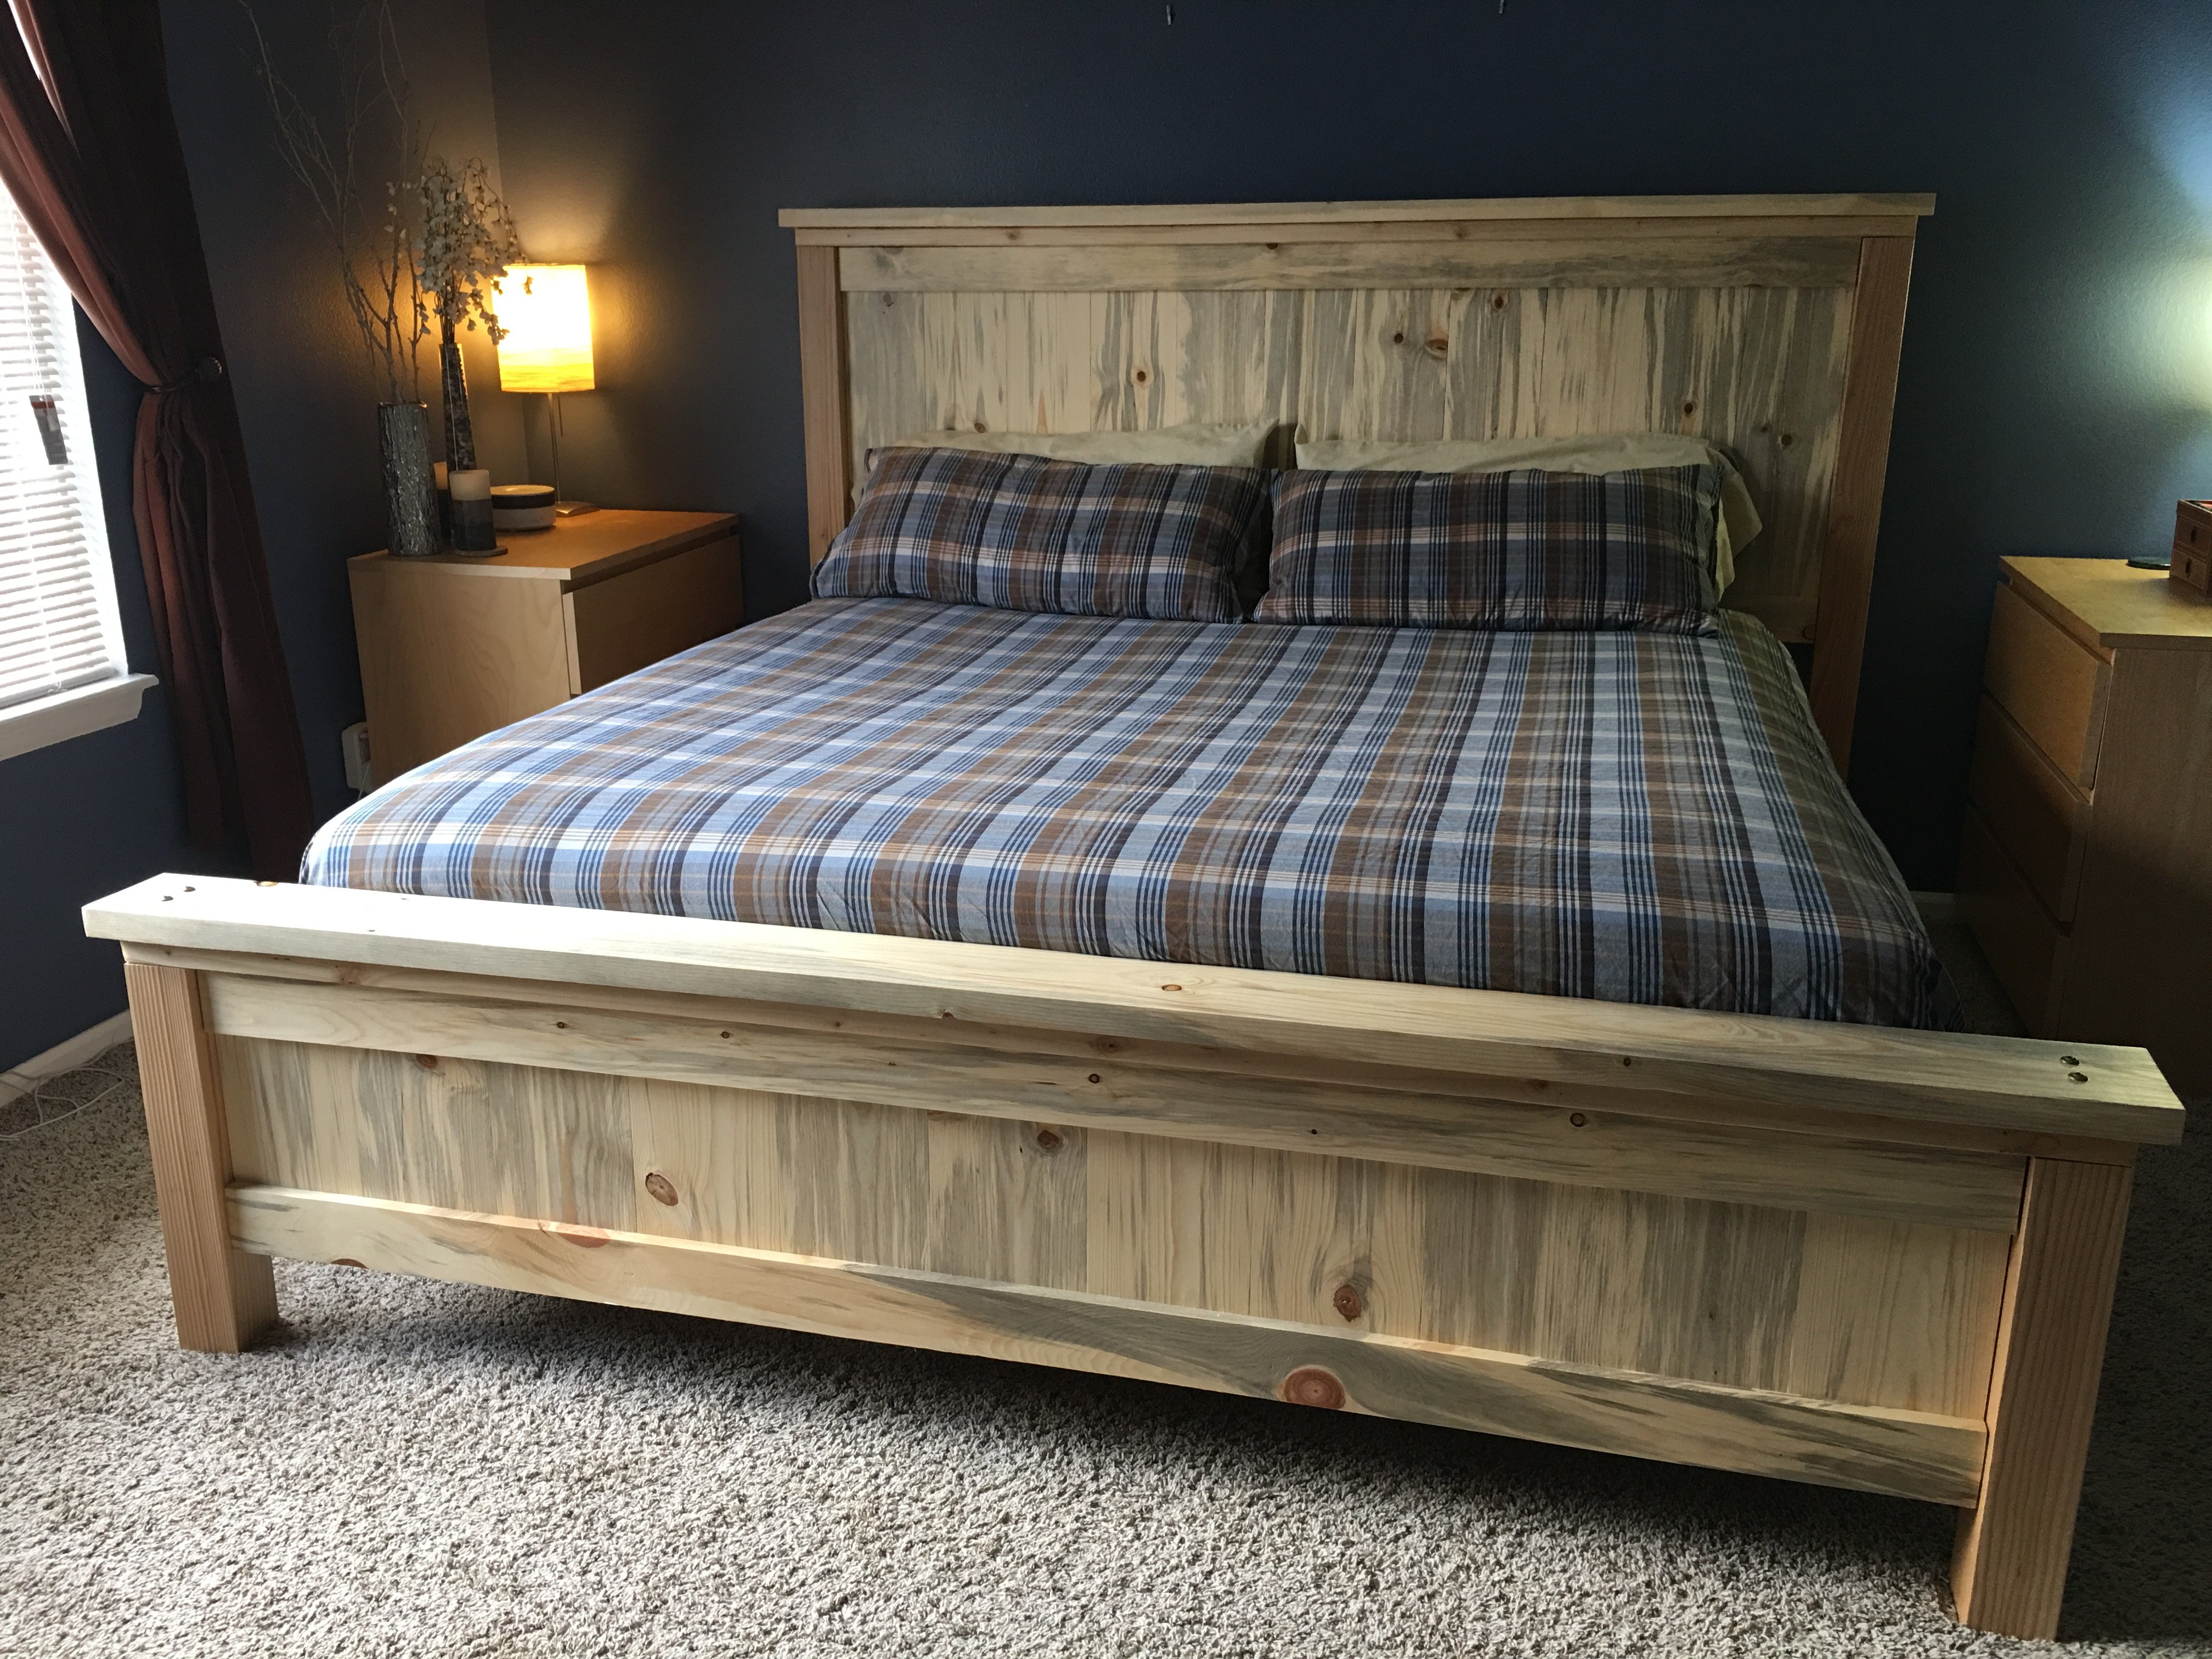
This was our first build and it was quite a big project to take on to start with. We had so much fun and learned so much along the way.
Our biggest lessons were to hand pick our wood and make sure we get the straightest pieces possible. We had to wrestle some wood to make this bed work! Clamp everything especially when using large bolts as the pieces would pull apart from each other. We even used a ratchet strap at one point becuase our small clamps weren't cutting it. I'm sure there's a better way and we'd love to hear about it but we made what we had work. We also had to figure out how to attach the side rails and at what height. We ended up using 3 4-inch screws on each end to screw them into the posts.
We love this bed not only because it was a labor of love but because its such a solid beautiful piece.
Built from Plan(s)
Estimated Cost
$200
Estimated Time Investment
Week Long Project (20 Hours or More)
Finish Used
Minwax Polycrylic Water based - 4 coats, sanded using a 220 grit sanding block in-between each coat.
Recommended Skill Level
Intermediate
Comments

Sun, 03/01/2020 - 11:29
What about the red tendencies of 4*4 lumber?
Very nice! I love the lighter wood too, but my wife likes the darker stain, so we compromised in the middle for the finish. Why arethe post always so red? I can appreciate the natural tendency of nature to add color, but the 4*4's are always red-er in color. Do they always use a different pine or certain part of the tree for those?
Mon, 01/18/2021 - 11:27
I believe the posts are…
I believe the posts are actually Douglas fir and not pine judging by the look and color of the grains.
Picnic table
Got the plans on here had a little trouble with the angles on the seat but overall looks good and was easy to follow the plans
Built from Plan(s)
Estimated Cost
Free wood just time invested and $10
in screws
in screws
Estimated Time Investment
Afternoon Project (3-6 Hours)
Finish Used
None yet
Recommended Skill Level
Advanced
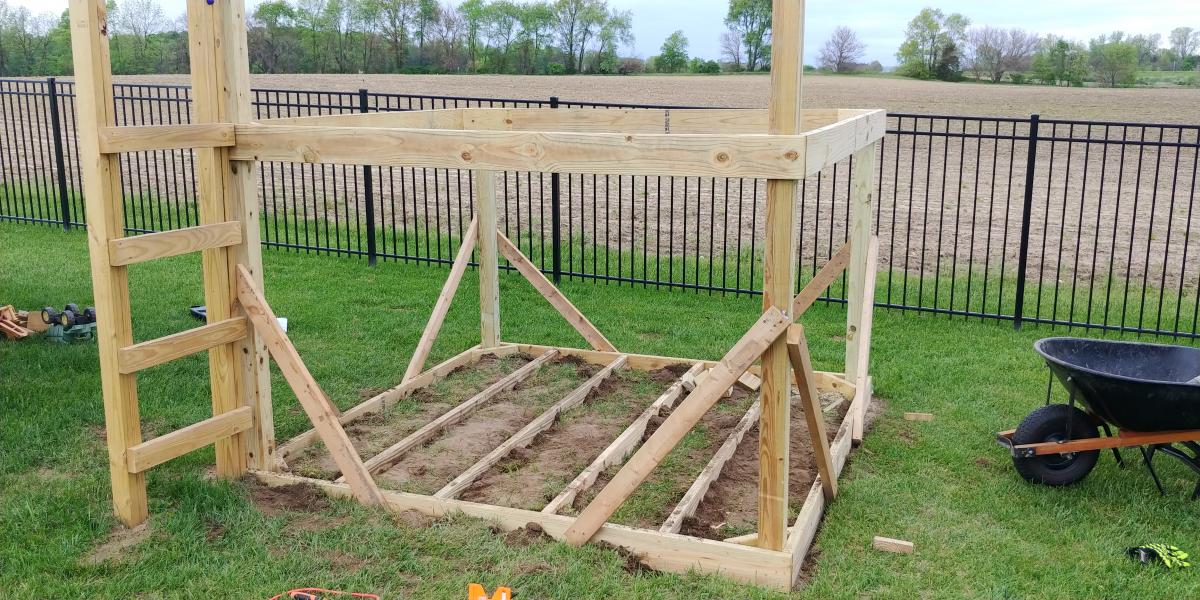
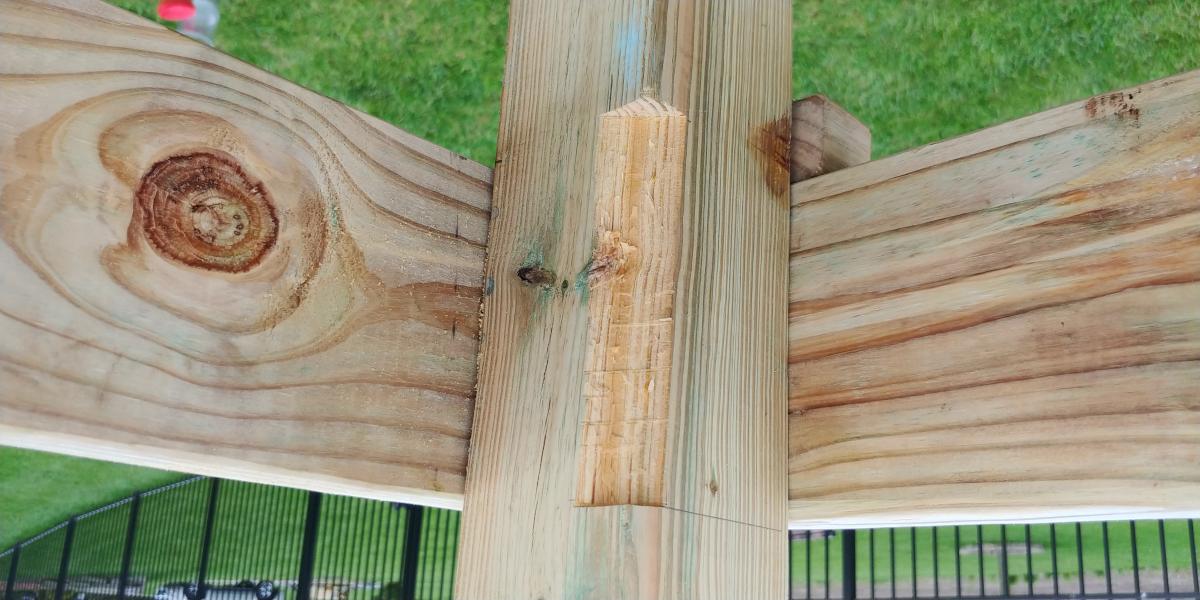
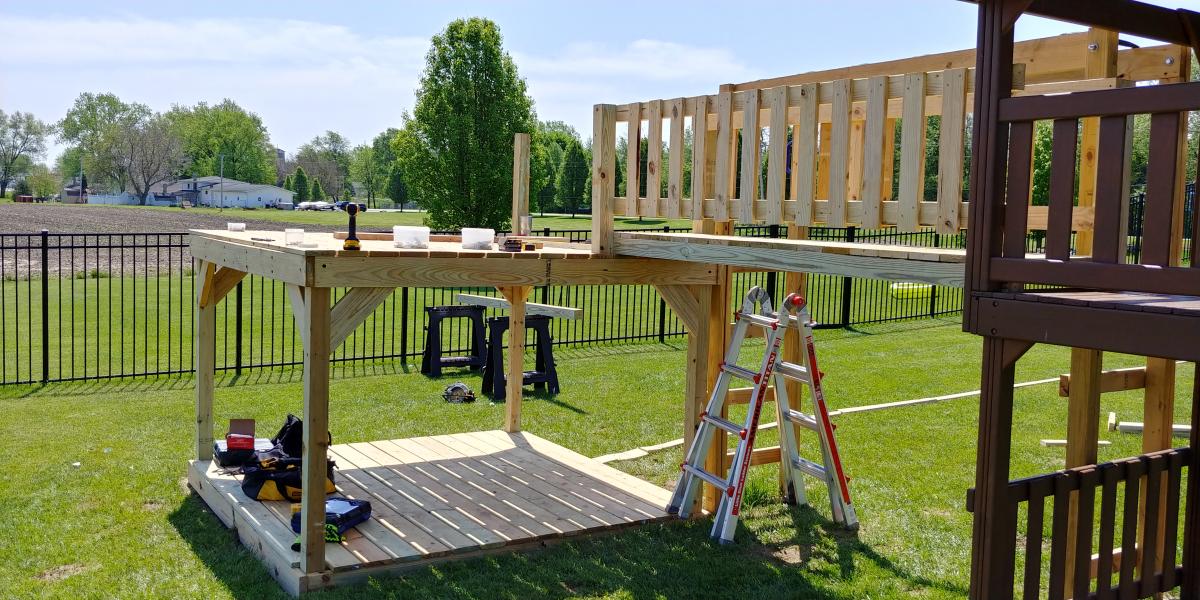
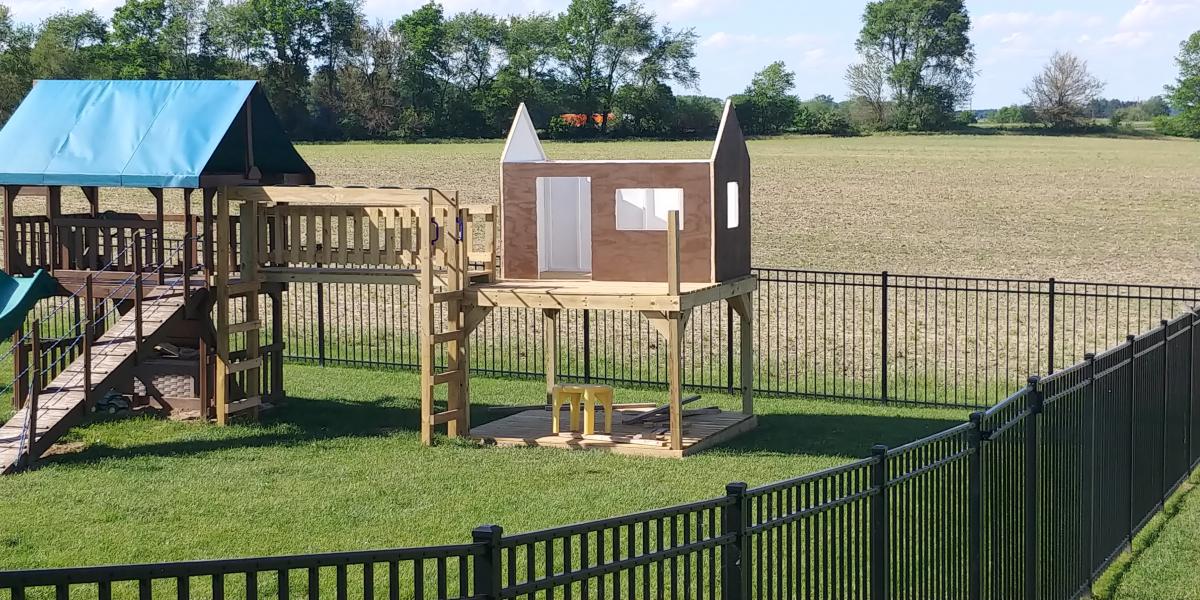
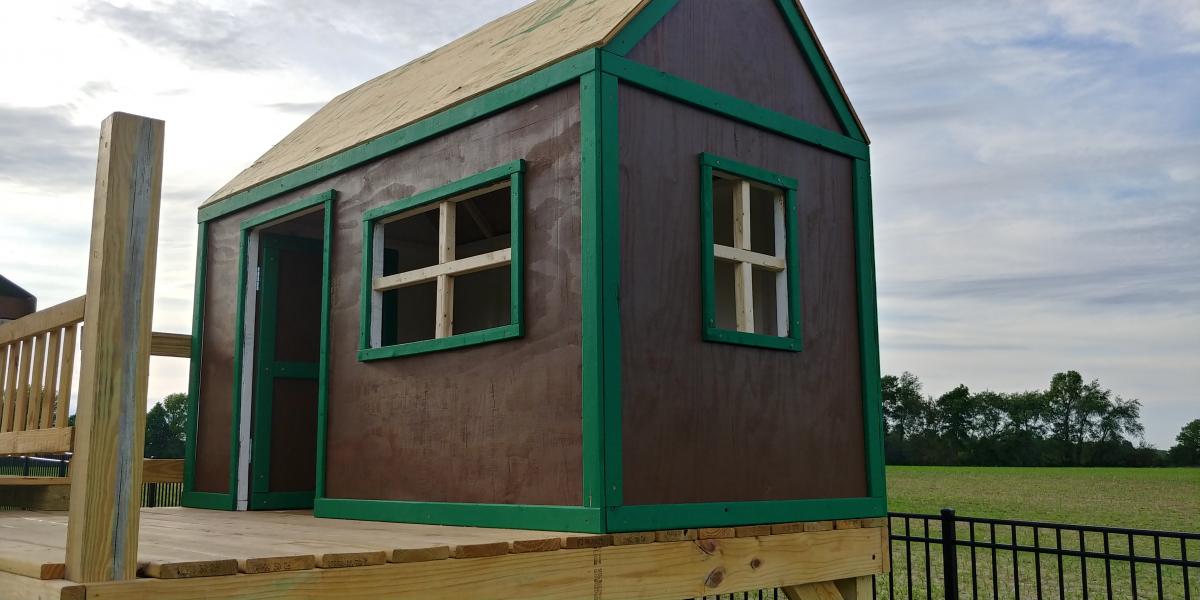
Playset Addition
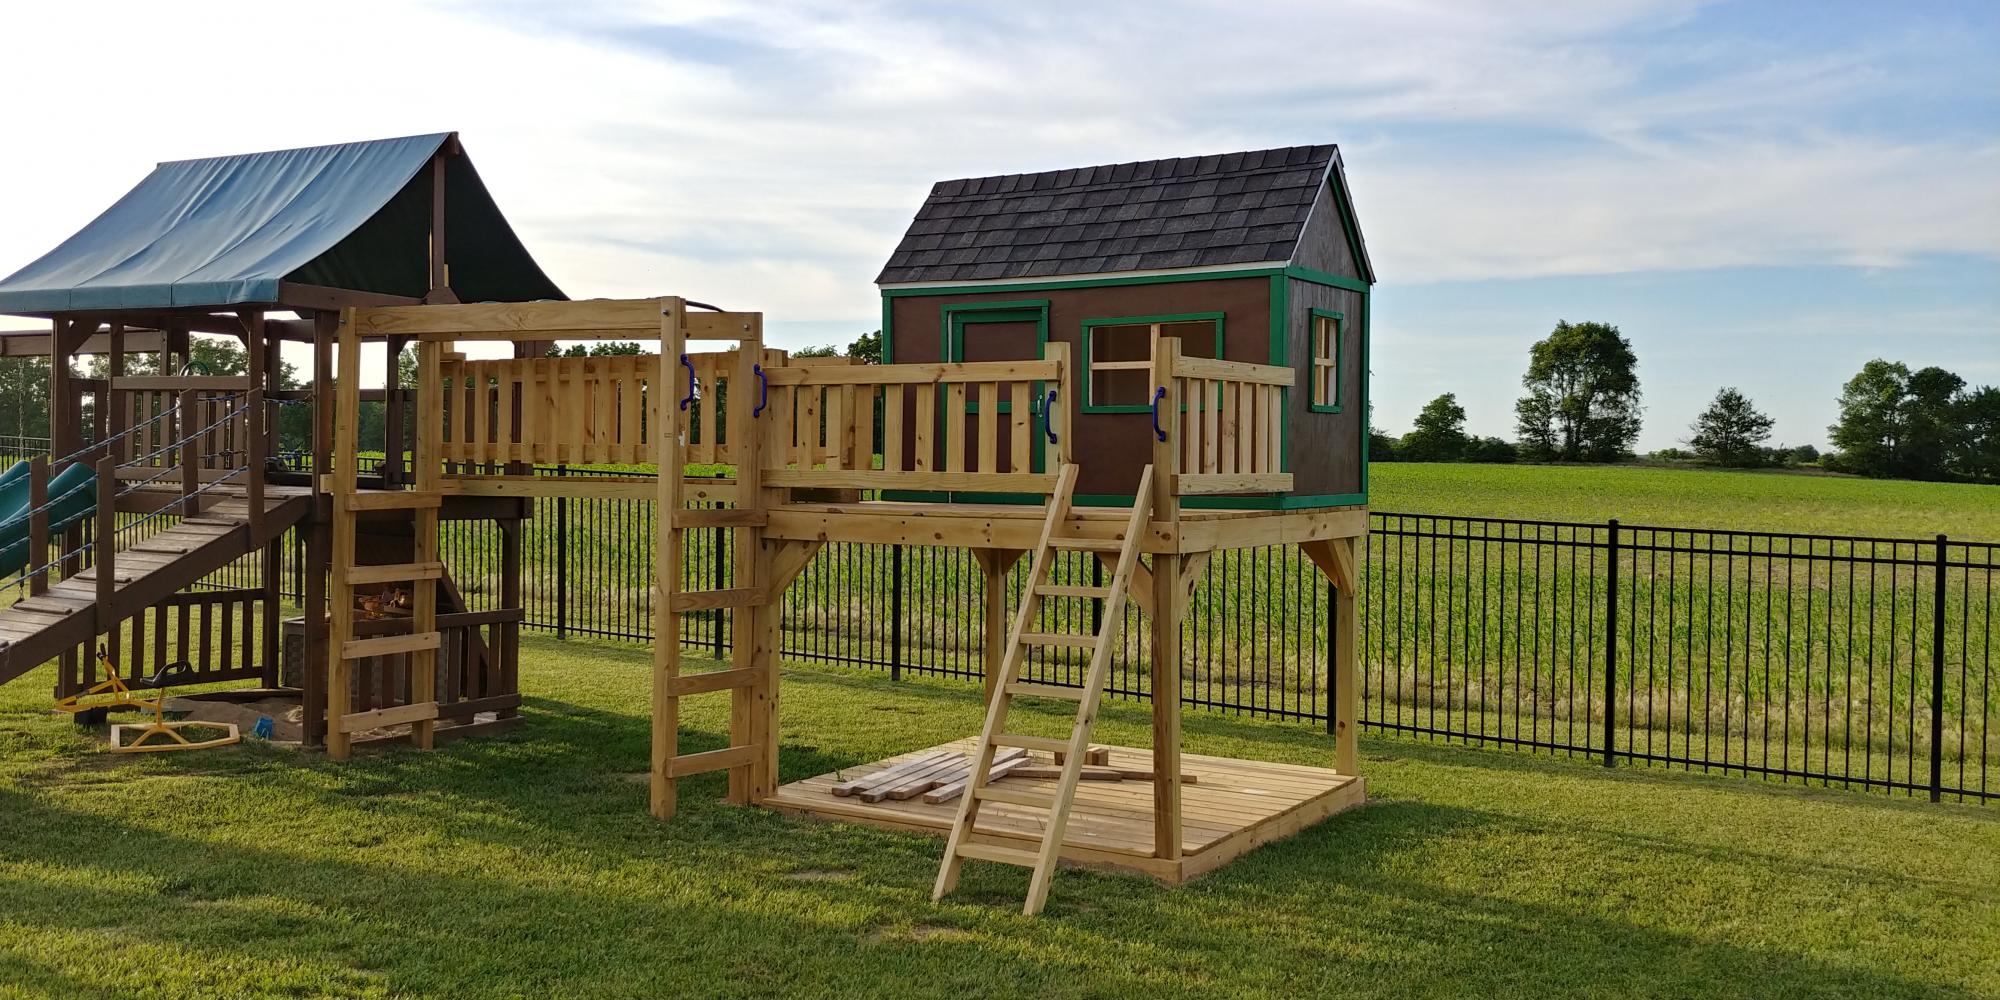
Decided our old play set needed an addition, landed on these plans of Ana's. Sat on them and mulled them over for months. Once the wife said something about adding on to it I made the purchases needed. Connected the two platforms with a bridge. I used 4"x4"x10' for the runners, same boards as the decking for the platform of the bridge(5/4"x6"), 2x4's and 1x4's for the railing. If you look at the 3rd photo, I had to chisel out the 4x4 post to get the 2"x6"x12" support to fit correctly. This should measure 2"x6"x13". Another change I made was to cut the bottom and top trim pieces longer on the front and back sections so that the trim would cover the framing of the gable end walls (see last photo). my son wanted windows so I faked in some windows with scrap 2x2's. I used 2x6's as supports from the 4x4's to the 2x6 framing (see photo 3) I added the monkey bars about a month before deciding to do the platform/deck and playhouse. The ladder is based loosely off of a couple of plans I found online. I was able to do all of this work myself except for the roof. Need my dads help to lift the plywood, he then helped me with the rest of the roof.
Built from Plan(s)
Estimated Cost
$1000
Estimated Time Investment
Week Long Project (20 Hours or More)
Finish Used
I used a dark wood stain fore the house, green exterior paint for the trim and white exterior paint for the interior of the house.
Recommended Skill Level
Intermediate
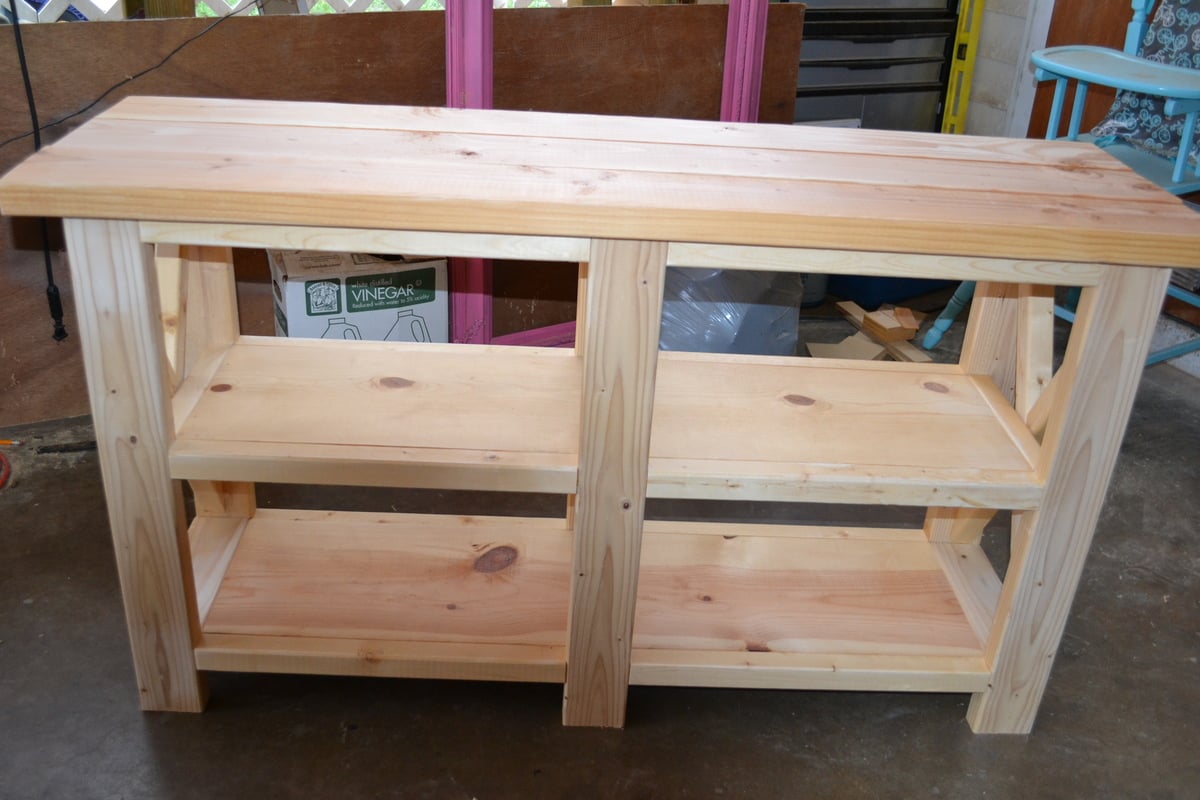
X Console Table

I built this a couple feet shorter than in the plans because it is for my neighbor's fish tank! It was fun to build and I'm in love with the finished product. She's going to paint or stain it herself. The pics were taken in my messy, projects-everywhere carport right before the neighbor hauled it off! Her son-in-law wants one now, and I will be building one for MYSELF right away as well! Thank you Ana!!!
Built from Plan(s)
Estimated Cost
75
Estimated Time Investment
Day Project (6-9 Hours)
Recommended Skill Level
Intermediate
Comments
Tue, 09/08/2020 - 16:56
looks great I'm hoping to…
looks great I'm hoping to build one myself this week =)
Saddle Seat Stools

After a lot of cutting, screwing, chiseling and sanding... oh and a lick of paint! My new little Saddle Seat Stools are complete. Time will only tell whether they will hold up to the abuse the boys give them especially Brodie! These new stools only cost me $48 to make the pair and I got all the timber from Bunnings
Built from Plan(s)
Estimated Cost
$48
Estimated Time Investment
Weekend Project (10-20 Hours)
Finish Used
Teak and White Enamel Paint
Recommended Skill Level
Beginner
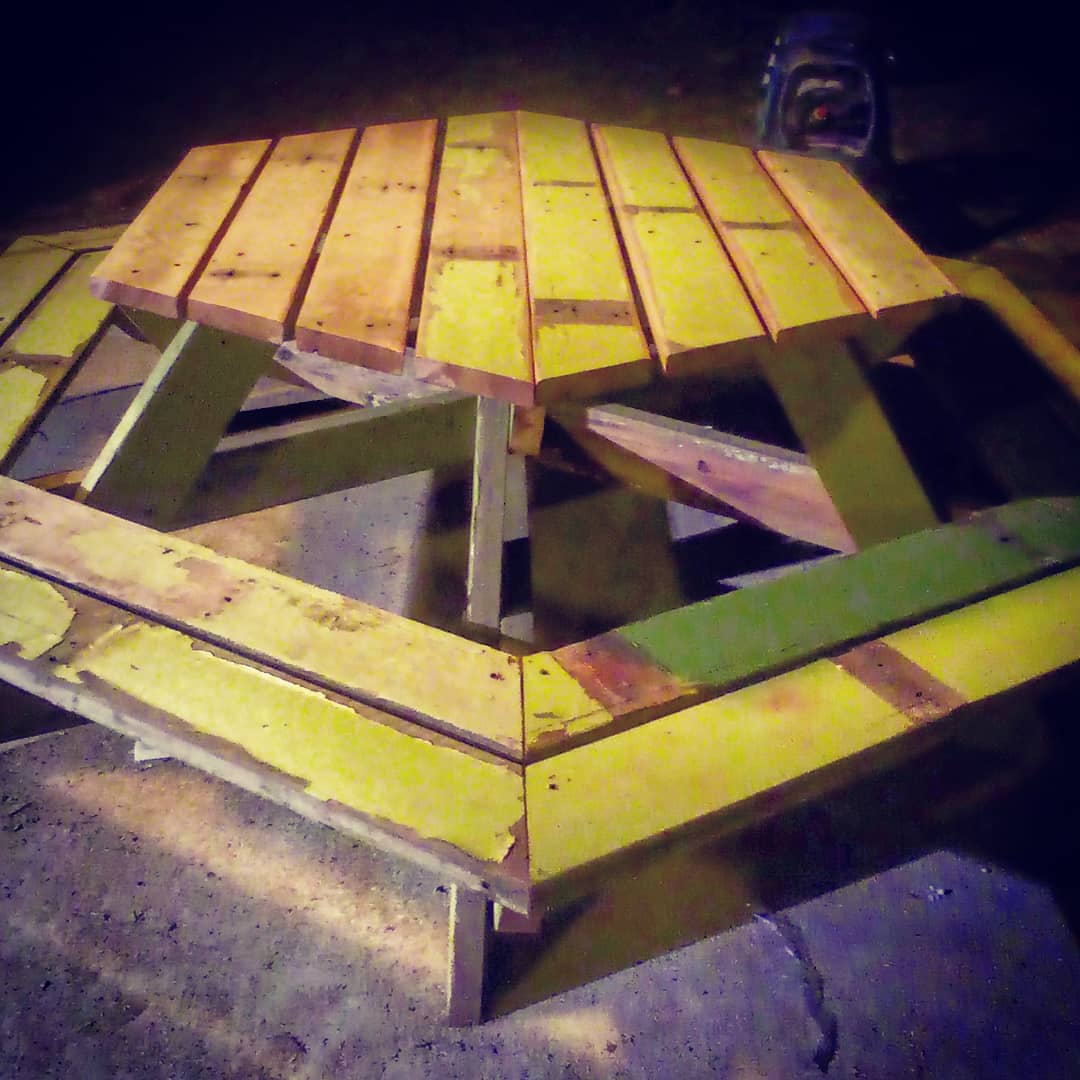
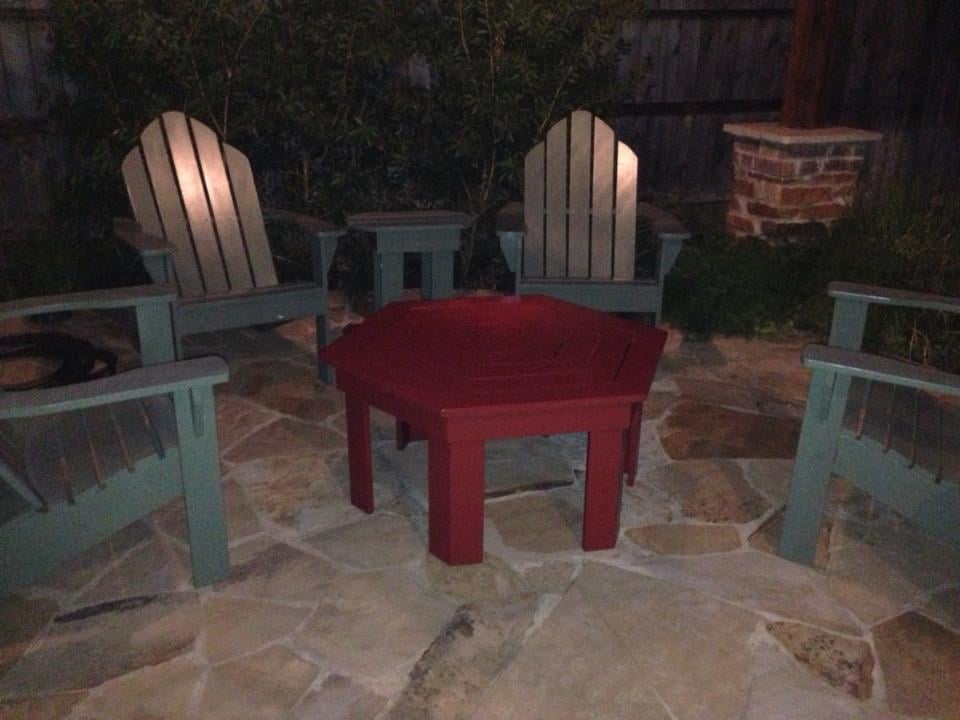
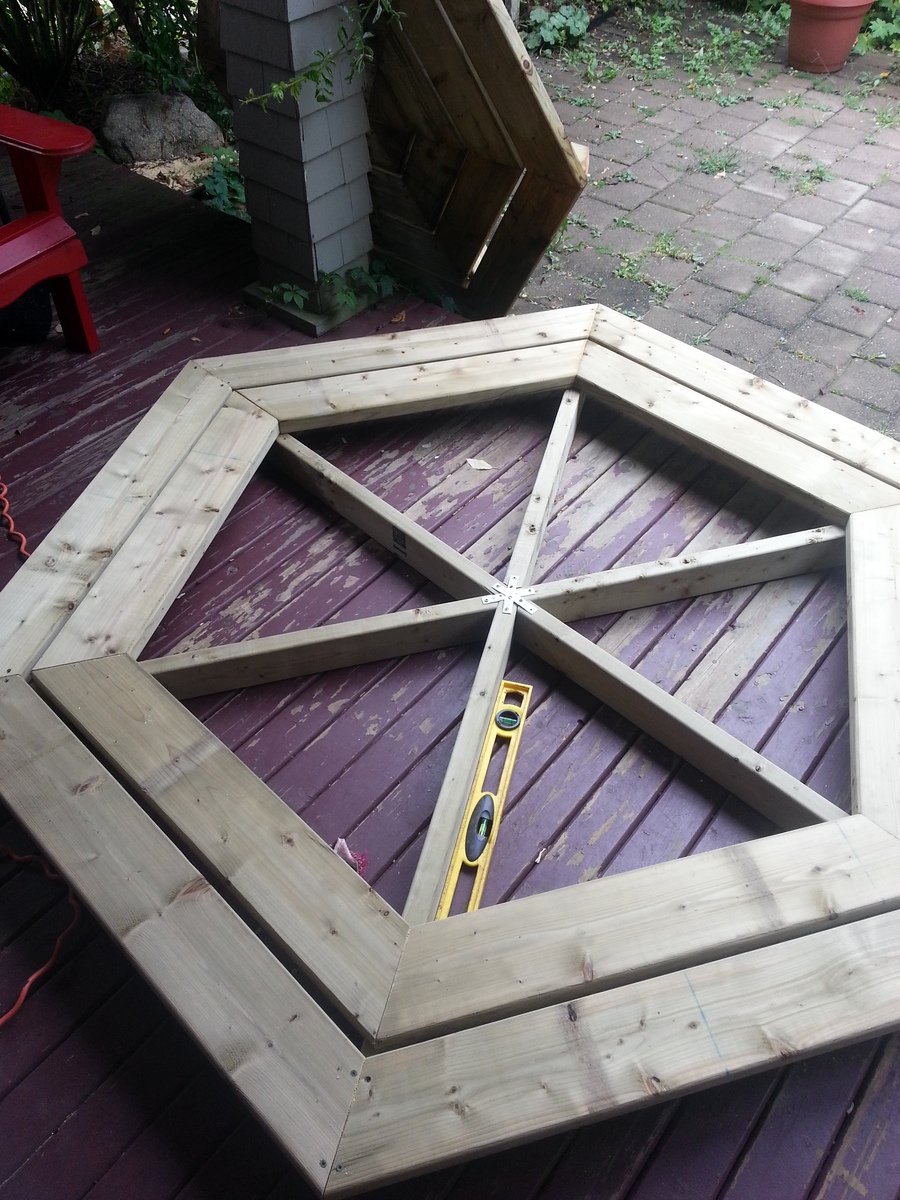
Hexagon Coffee Table for the patio
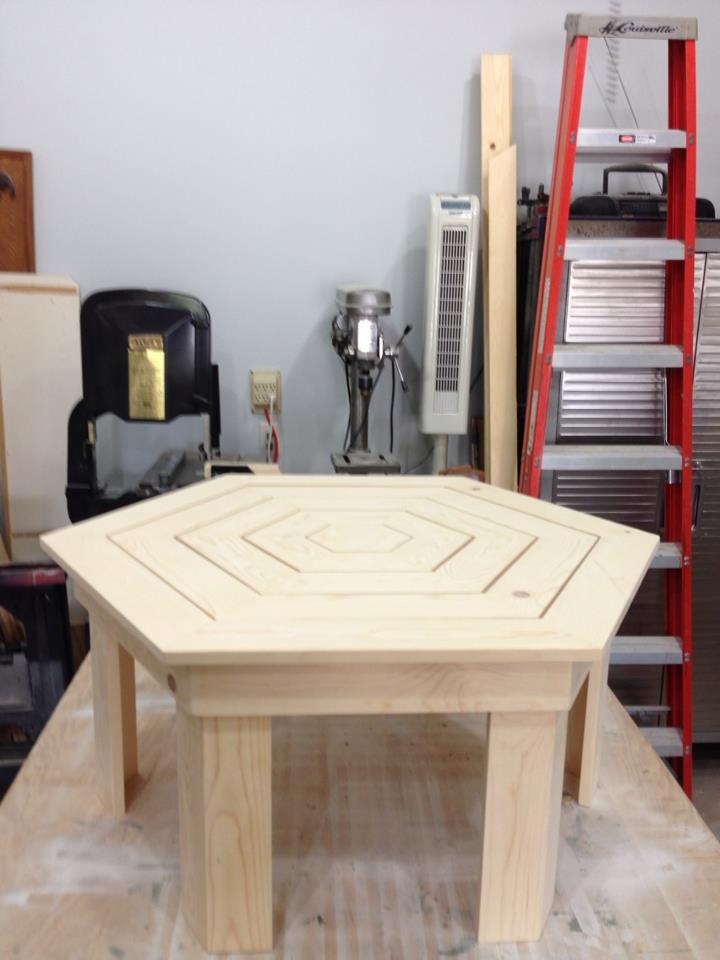
Ana, I borrowed the structure of your hexagon picnic table and created a coffee table to compliment my collection of Adirondack chairs on our patio. The rib structure using 30 degree angles is surperb, and with pocket screws on the joints plus Gorilla Glue, it is far stronger than I anticipated.
The table is first shown unpainted, then again on the patio in poor light (sorry for that.) I primed and then painted it brick red and am in the process of updating the paint on all of the chairs to match.
The 30 degree angles are probably the trickiest part. If your saw is off by even a tiny bit, the tolerance buildup will come back to bite you. For example, if each cut is off by 1/2 a degree, you have six cuts, which equals 3 degrees of error. My mistake was not calibrating the cuts made on my table saw or mitre saw. A professional woodworker buddy of mine suggested buying a cross-cut sled for my table saw. That's my next purchase.
Overall I am very happy with the final outcome despite the slight imperfections in the spacing between the slats. A little wood filler covers a multitude of sins!
Built from Plan(s)
Estimated Time Investment
Weekend Project (10-20 Hours)
Finish Used
water-based primer, then water-based semi-gloss latex enamel (three coats)
Recommended Skill Level
Advanced
Comments

Wed, 05/15/2013 - 16:21
coffee table
Really like this table. Besides a coffee table I think it would make a great picnic table for the little kids, where they could pull up their small chairs and I also think I might try building this out and up a little and use it as an addition table for dining on the deck. Now I just have to decide what kind of chairs to build to go with it. Thanks for all the additional ideas.
Tue, 05/21/2013 - 03:19
The best way to use folders
The best way to use folders for advertising is to modify them. They are rather simple to be modified and they have many variety to meet a variety of needs in style. Wholesale Pocket Folders Printing
Indoor Playground Set
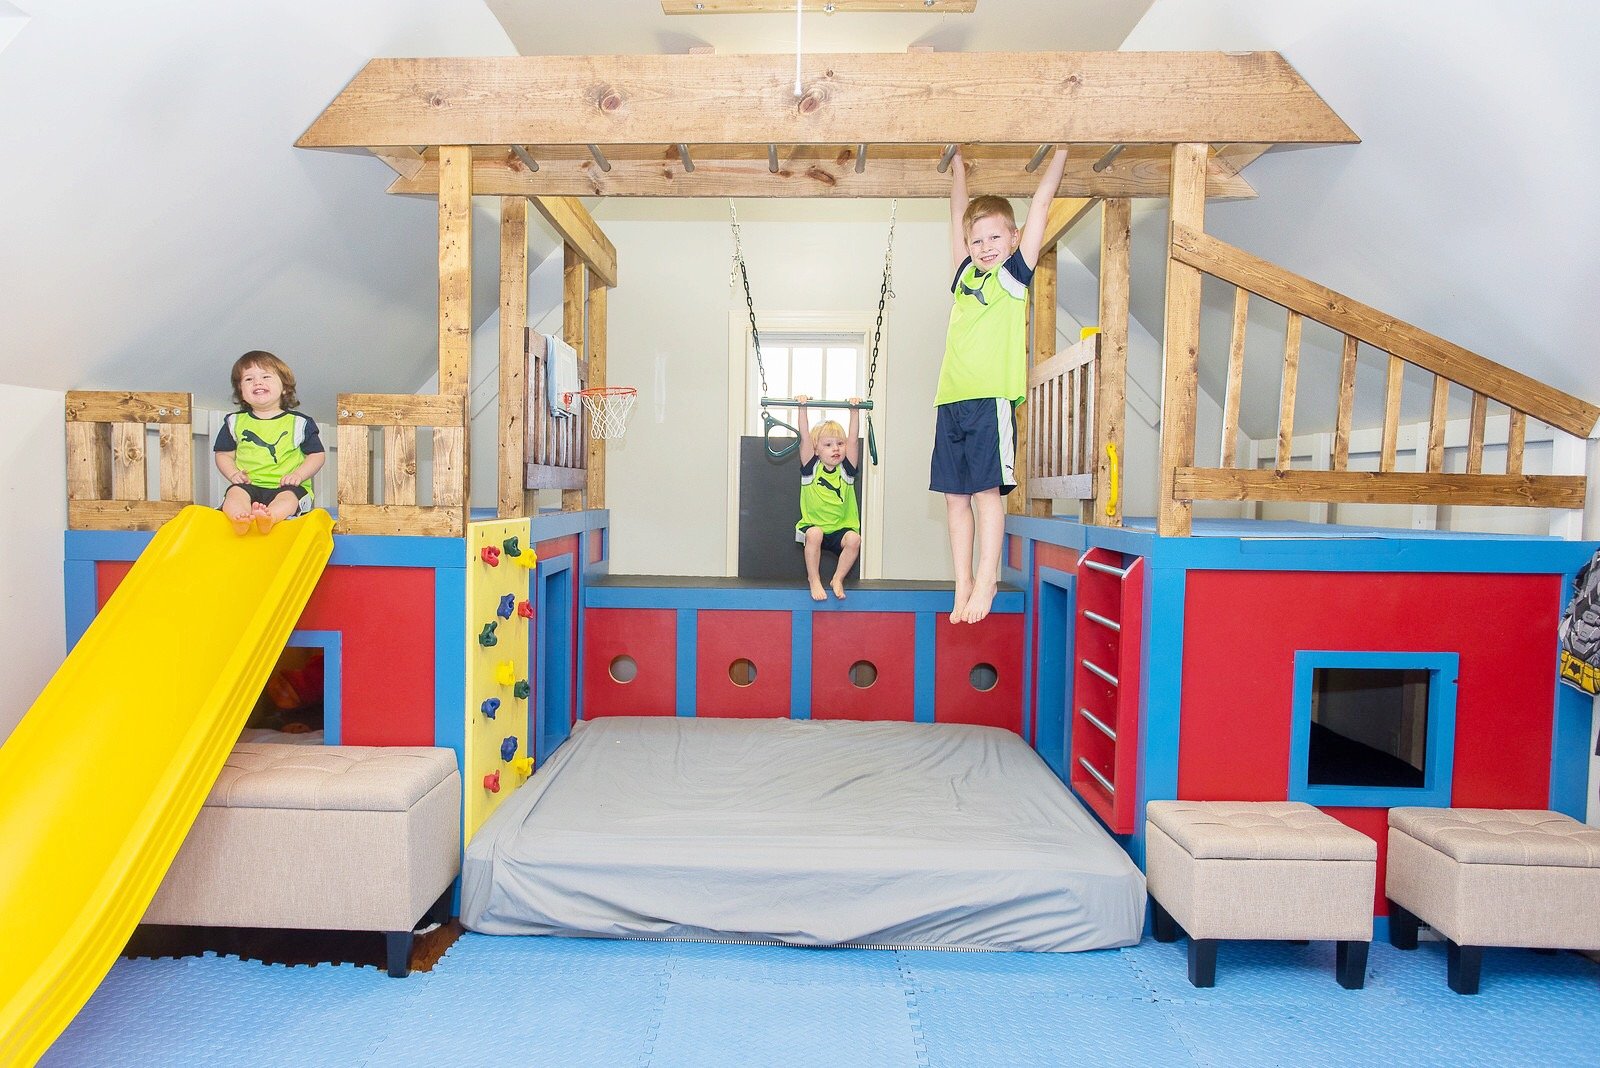
This playroom set was inspired by the plans you posted. I was forced to make some significant modifications due to the fact that our bonus/playroom has angled ceilings. We have a rock climbing wall, ladder, crawl tunnel with windows, trapeze bar, monkey bars, miniature baskeball goal and a slide. My boys are 6, 3 and 19 months and they love it! Thanks for the inspiration.
Jim and Caroline Sparrow
Built from Plan(s)
Estimated Cost
$1250
Estimated Time Investment
Week Long Project (20 Hours or More)
Finish Used
Behr Paint on bottom and Minwax Stain on top
Recommended Skill Level
Advanced
Comments
Sun, 01/05/2020 - 10:03
Hi - Would you be able to…
Hi -
Would you be able to share your modified plans with me , please ?
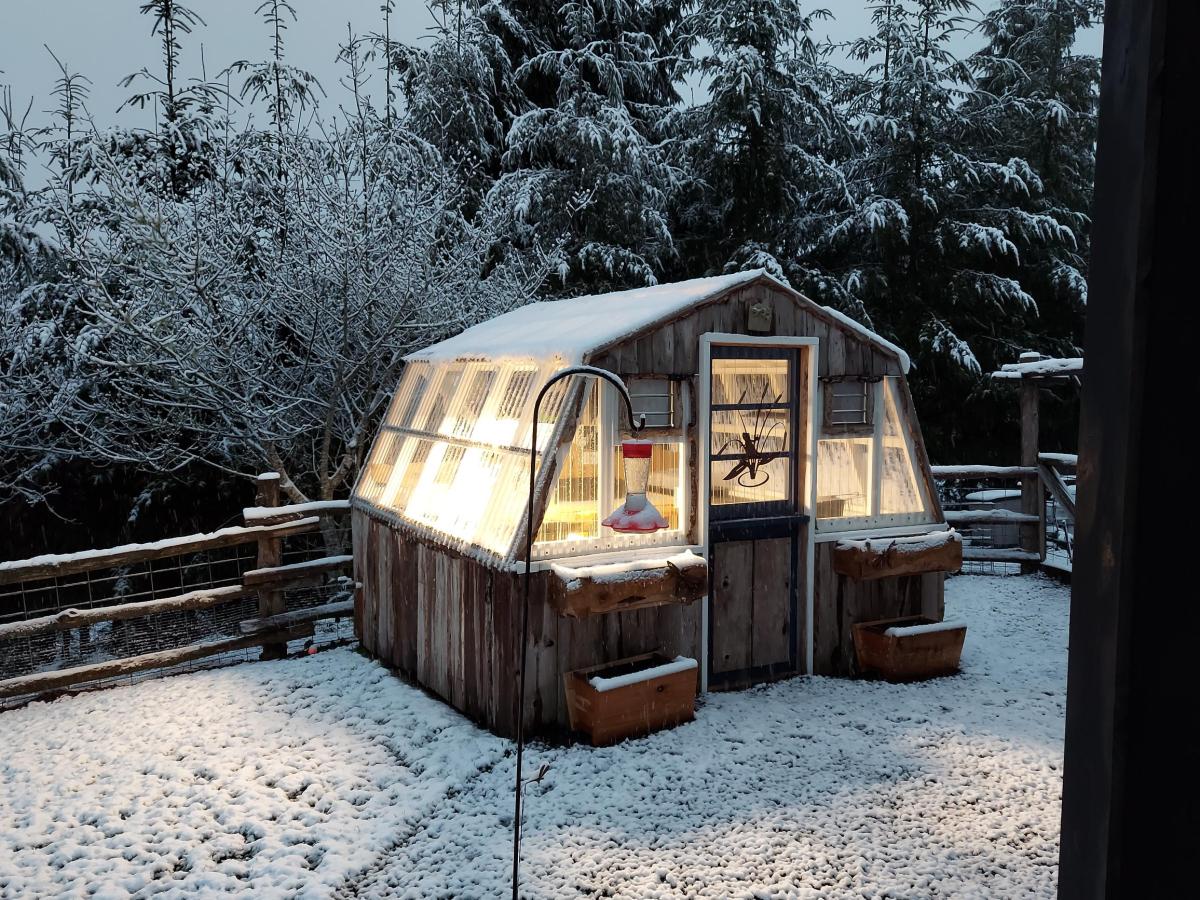
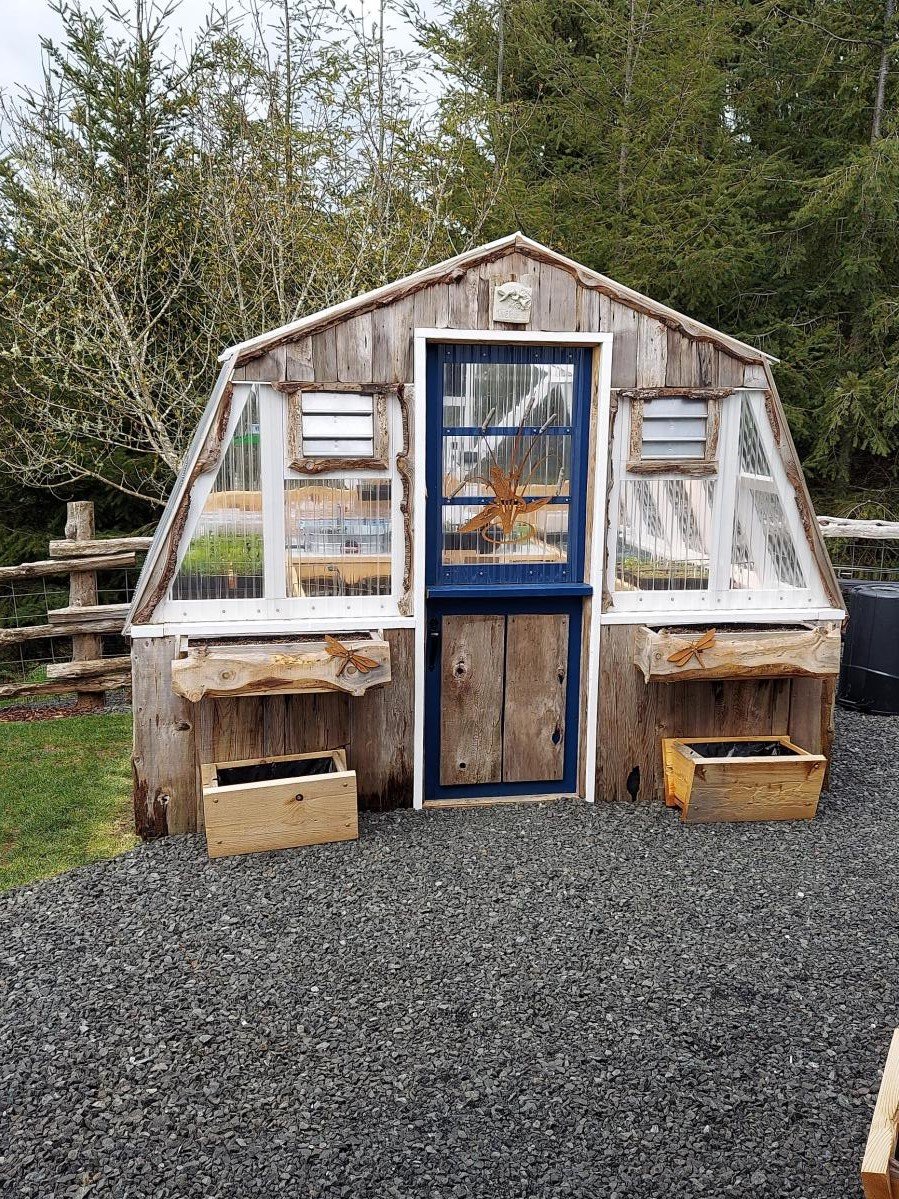
Reclaimed Cedar Board 10x 10 Barn Greenhouse
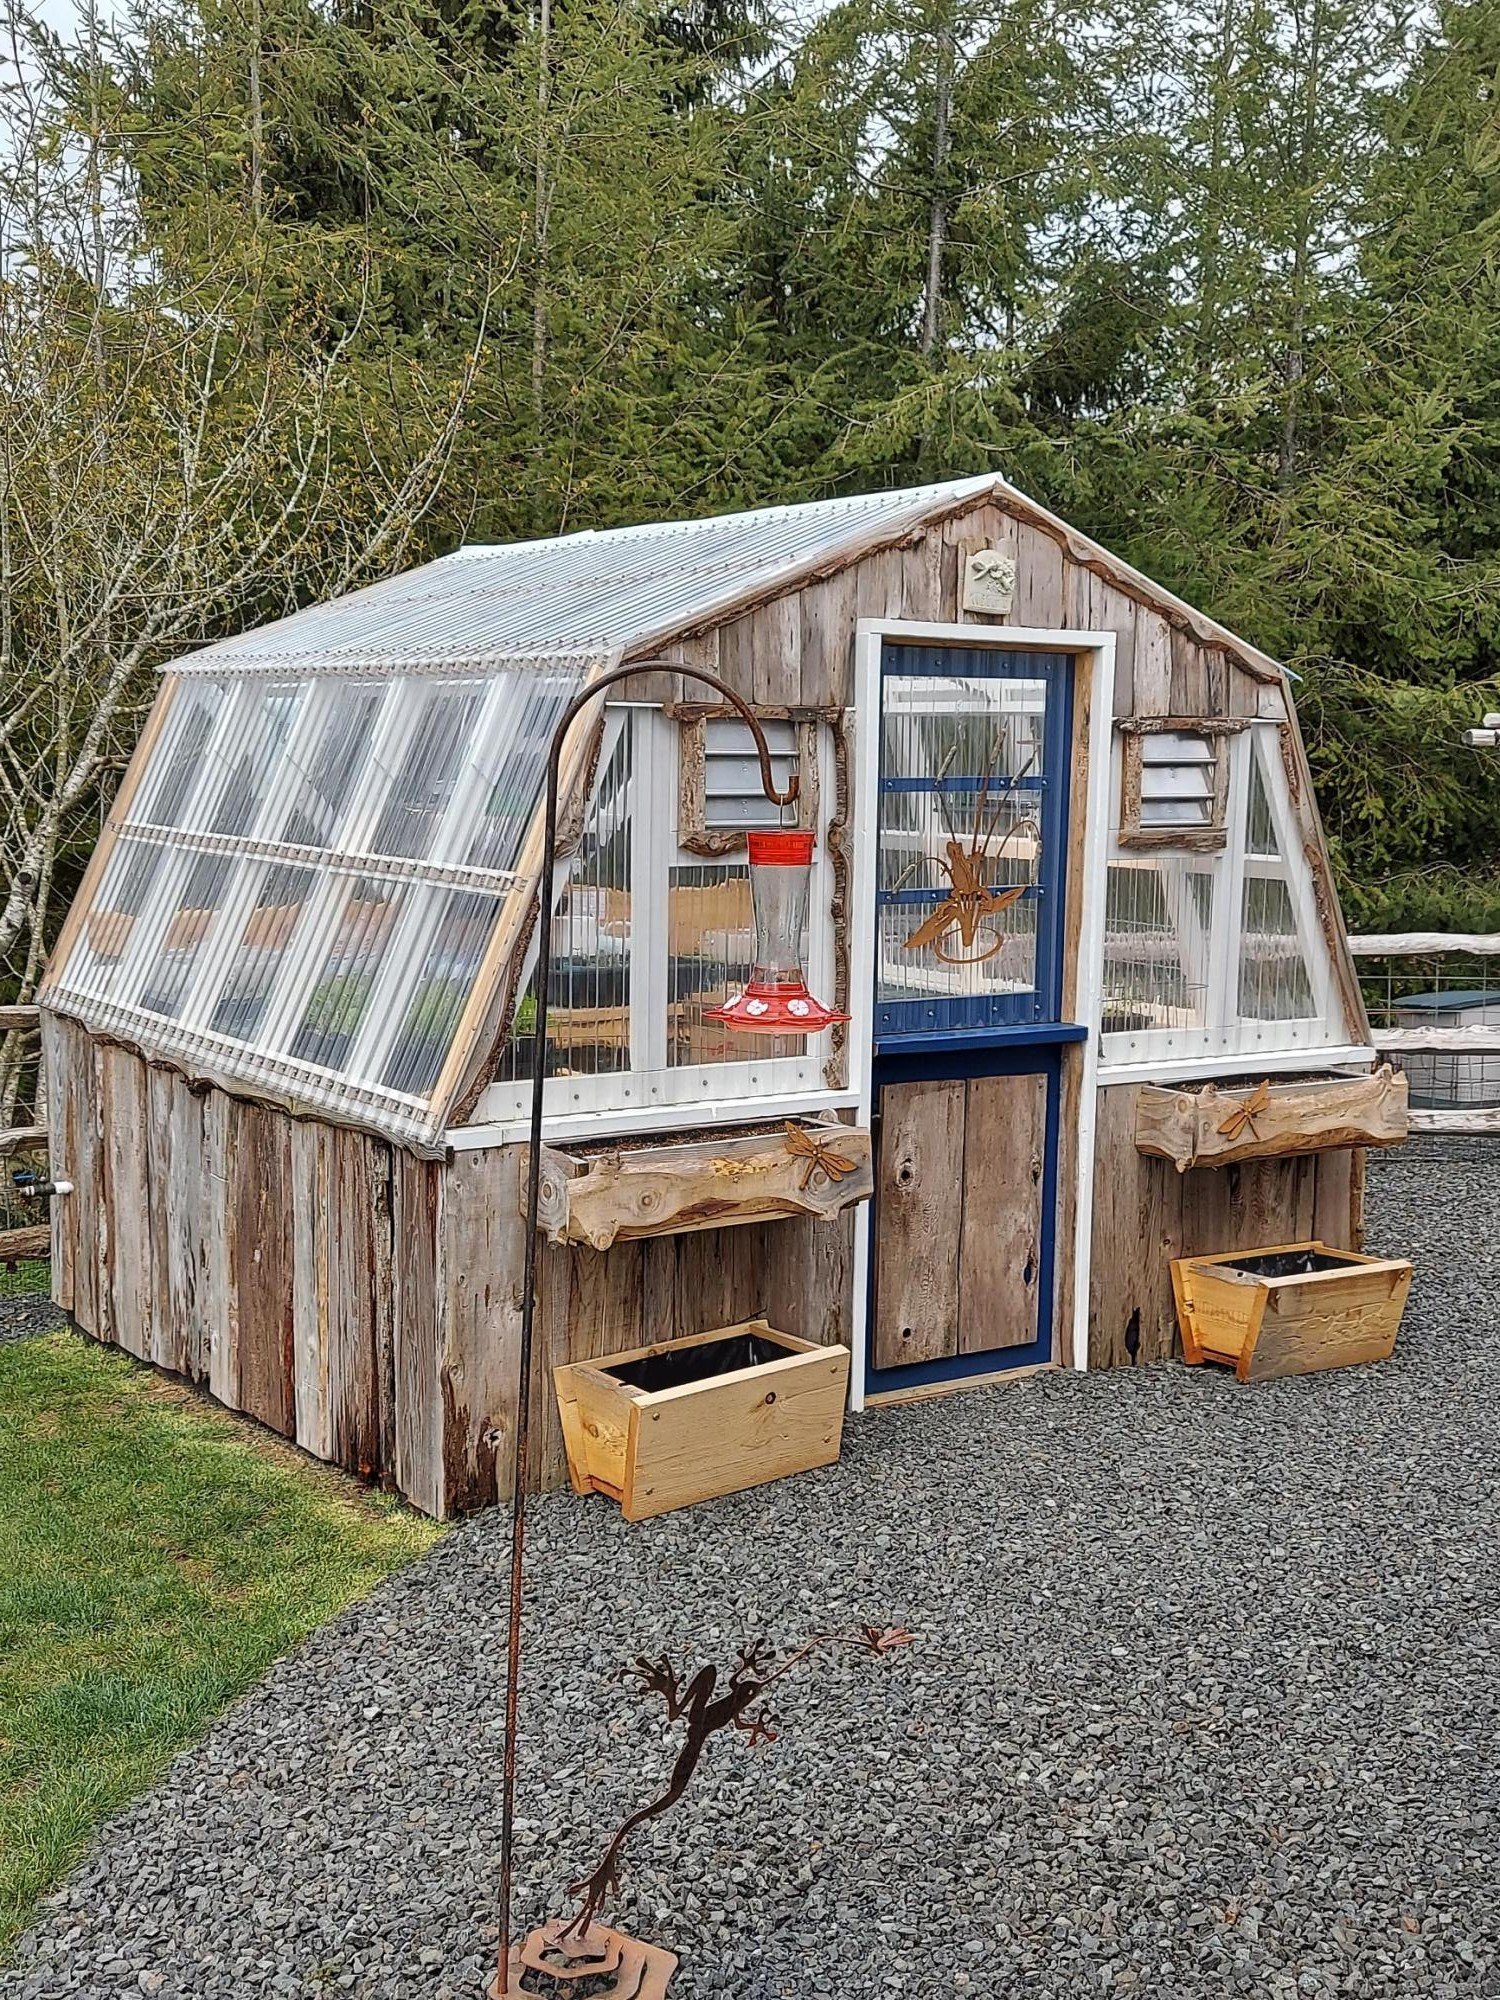
Thank you for sharing your plan!
10×10 greenhouse made with re-claimed cedar boards from old barn on Menlo, WA
Built from Plan(s)
Comments
Wed, 06/08/2022 - 05:52
I love your design changes! Trade? ;-)
Beautiful! I like the fact that you bucked the trend and turned your clear panels for Washington rainwater runoff. There are good and bad with both directions, vertical makes the most sense. I can see myself re-doing ours at some point to change the panel direction. At least they're pointing the right direction on my skylights.
Great design, and of course, I love the 'live edge' details you added throughout!
Hexagon Picnic Table
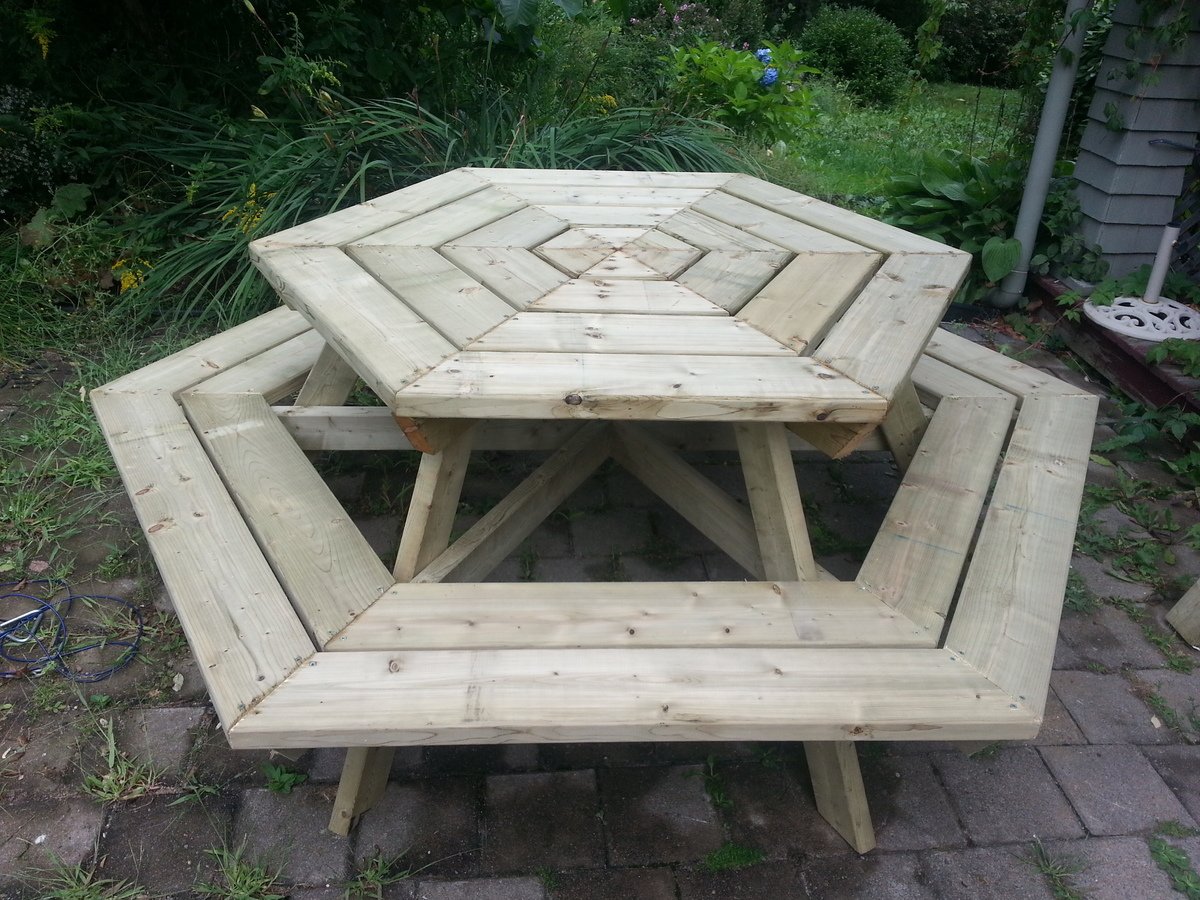
Very finicky to assemble, but love the finished product!
Built from Plan(s)
Estimated Time Investment
Day Project (6-9 Hours)
Finish Used
Haven't stained it yet, will add photos when stained.
Recommended Skill Level
Intermediate
Little Helper Tower

Love this site! I stumbled on Ana's site via Pinterest and have been hooked ever since! I used pocket screws to attach everything (the Kreg Jig is AWESOME!) Thanks for the great plans, and my daughter loves her tower! I stained it to match the cabinets in our kitchen and so our soon-to-be baby boy can use it in the future. The wood is just some cheaper pine from the local HIW.
Built from Plan(s)
Estimated Time Investment
Weekend Project (10-20 Hours)
Finish Used
Bombay Mahogany Minwax Polyshades
Recommended Skill Level
Beginner
Scrap Wood Barn
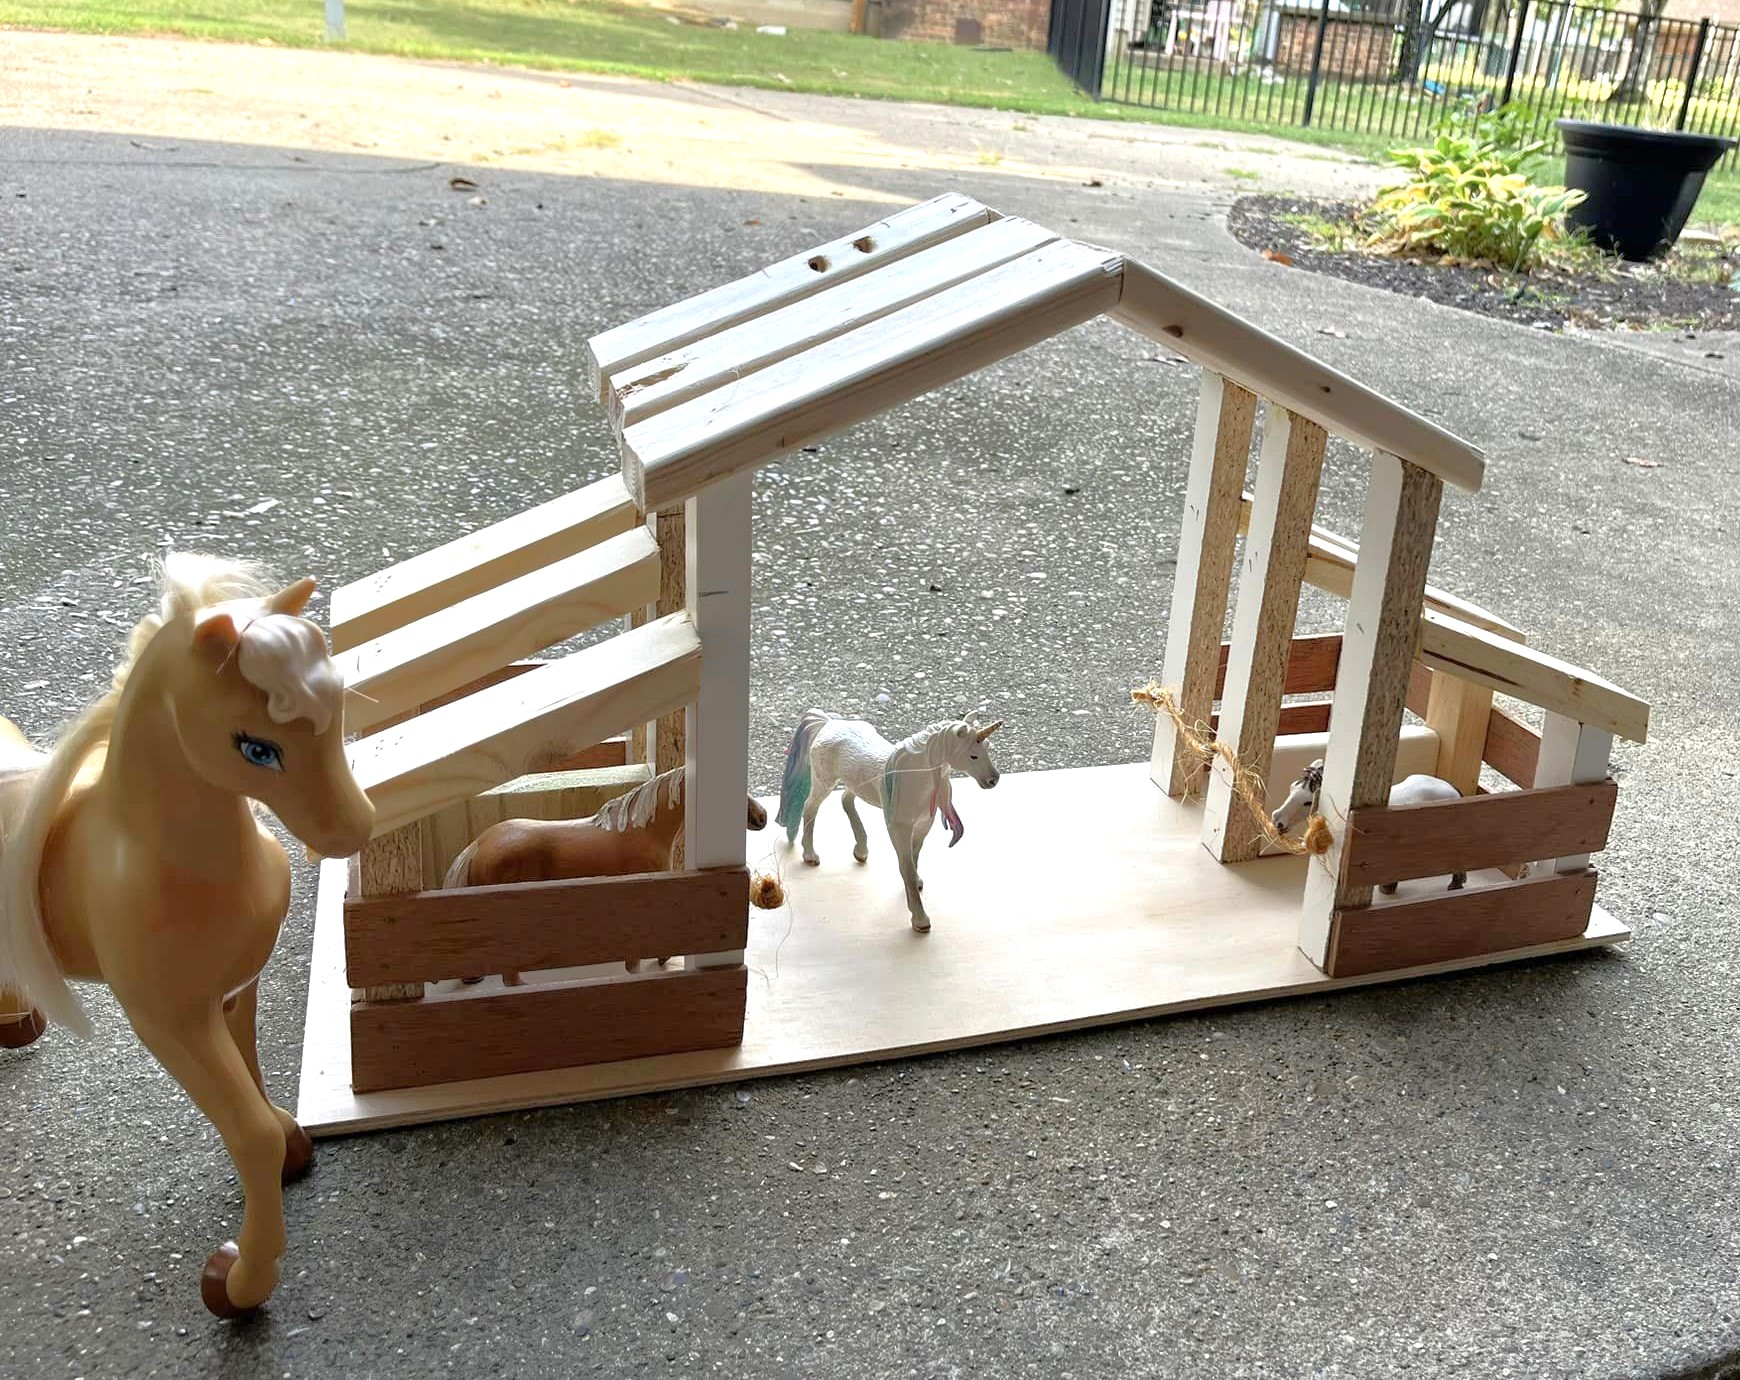
My daughter watched me do another build project and wanted something for herself. We built the Toy Barn from Ana White's plans using only scraps around the garage!
Laura Thompson
Built from Plan(s)
Comments
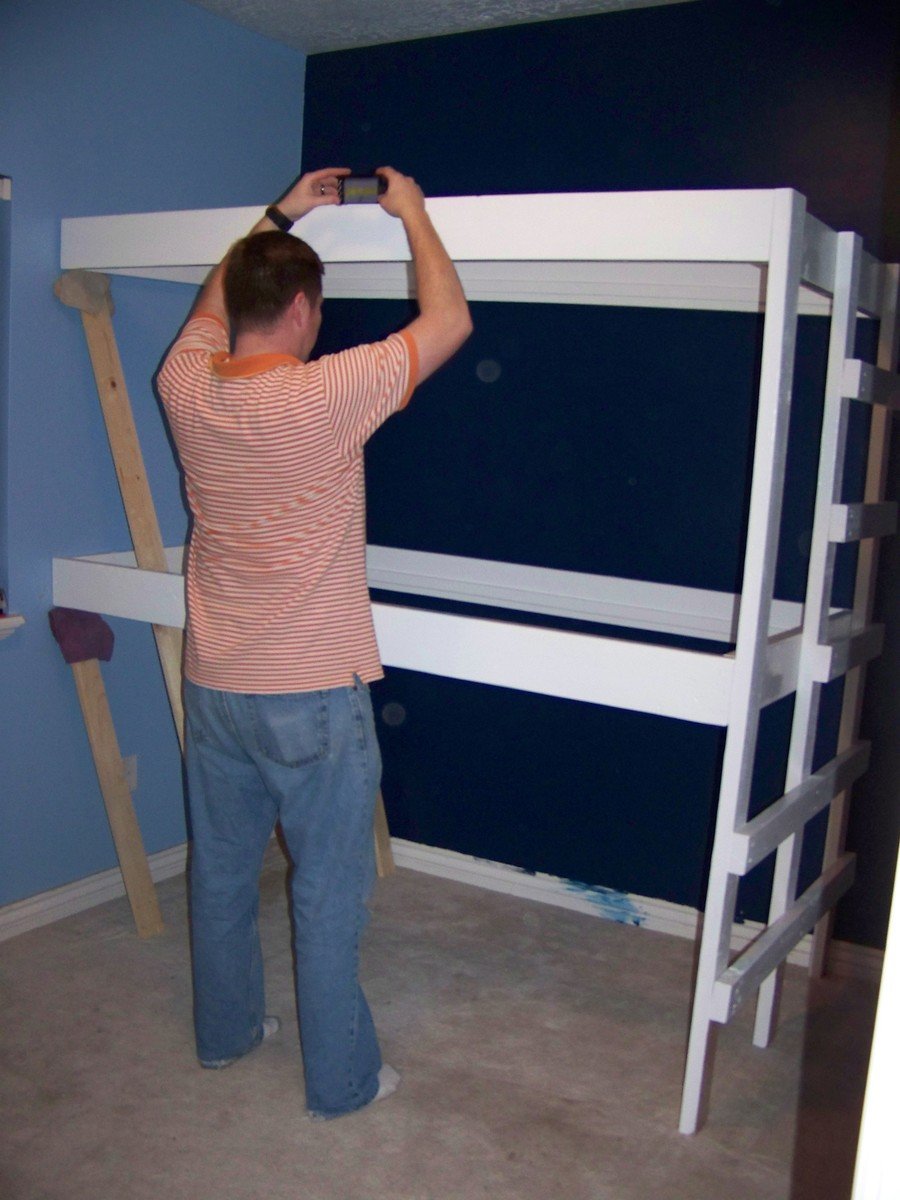
Queen Loft Bed

I made this bed for my 6 year old daughter. I loved Anna's Loft Bed plans, but she wanted a bigger play area underneath. So I modified the twin loft bed plans to fit a queen mattress. I also added extra supports for the mattress, and I used PureBond plywood on top of the supports for the mattress to sit on.
That's the Farmhouse Toddler Bed underneath. My younger daughter inherited her big sister's twin bed, so the toddler bed was put to use in the new "playhouse."

Built from Plan(s)
Estimated Time Investment
Week Long Project (20 Hours or More)
Finish Used
I sanded the wood and primed it. Then I sanded (lightly) again and painted it with Valspar latex enamel in Gloss Almond.
Recommended Skill Level
Intermediate
Comments
Wed, 02/09/2022 - 15:31
We’ve been looking for…
We’ve been looking for exactly this!! Can you share your modified plans and the list of lumber and supplies needed?
Sun, 09/02/2012 - 12:45
Modified Queen Size
I think it's great that you modified it to a queen! I live a studio and NEED something like this. Could you share the modifications? It looks beautiful = )
Sun, 09/02/2012 - 20:58
The changes I made were: End
The changes I made were:
End planks cut to 63"
Top back guard and front and back rails cut to 87"
The top guard rails on ends cut to 66"
I measured for the mattress supports and the front guard rail after the rest was completed.
You should also measure for the bookcases after the rest is completed, but each of mine wound up being about 31" wide.
Everything else was pretty much the same.
Hope that helps.
Thu, 11/01/2012 - 08:24
Thank you!
This is wonderful - I've been looking to make something like this for an urban efficiency (adult) apartment! Thanks so much for sharing your modifications!
Mon, 07/29/2013 - 14:08
queen loft for adults
Will the height of the bed allow for adults to stand under it? If not what modifications should be made to make the height fit a standing adult? (the highest being 6'1" male) Thanks! =D

Easy Built in Triple Bunk Bed Plans
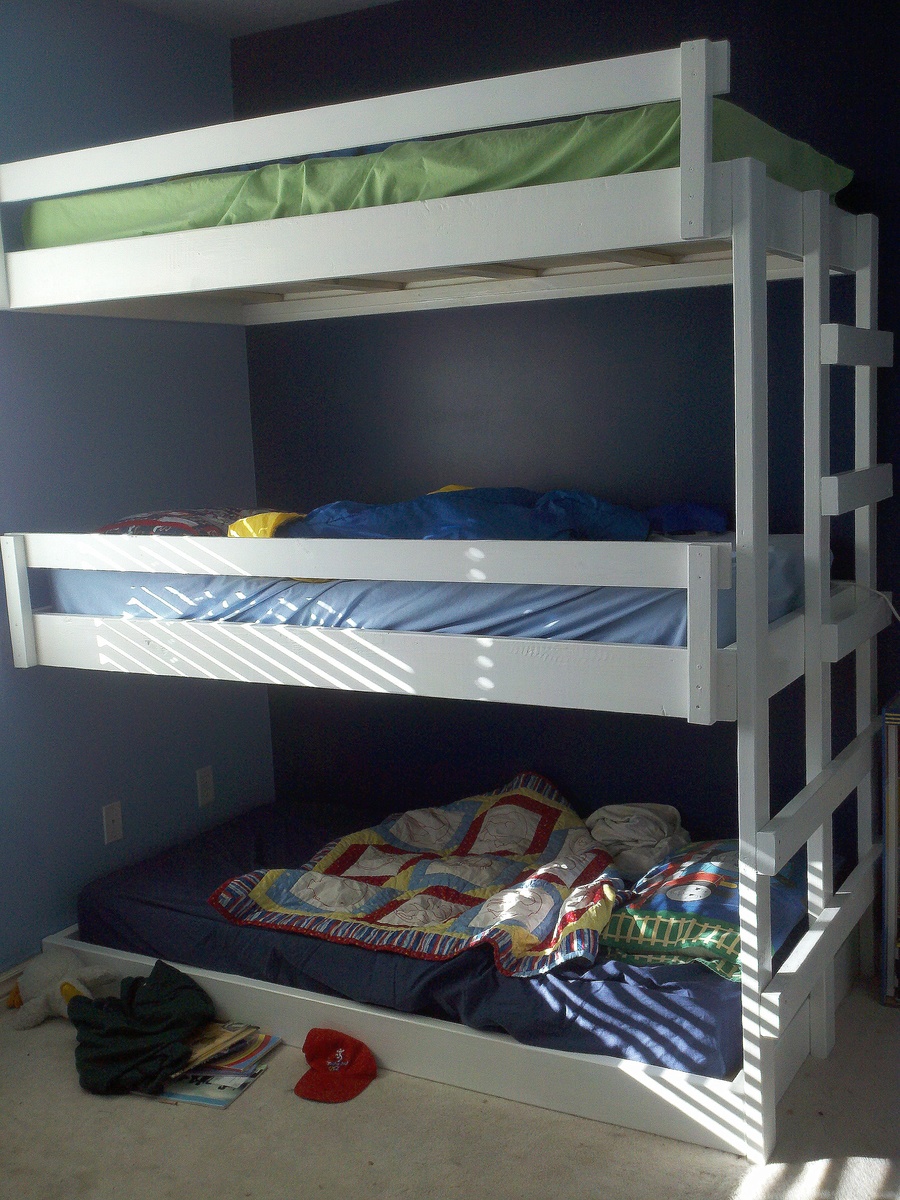
The Basic Process - Triple Bunk Bed Plans
More info on these Triple Bunk Bed Plans on my blog: http://myhomedonemyway.blogspot.com/2013/03/triple-bunk-bed-finished.ht…)
1. Build the Bed Frames: (I will explain the process for one bed...do it three times if you want three beds)
2. Add Side Supports: ( Also do this step three times for three beds. We did it later but would be easier to do now)
3. Add Roll Guard: (do twice...once for each top bunk. We did this later but can be done now)
4. Build Ladder:
5. Paint desired color (you don't have to paint the sides that will be screwed into the wall).
6. Install into the wall in desired bedroom
7. Add Supports (do three times for three beds)
8. Add Plywood (do three times for three beds) 9. Finish

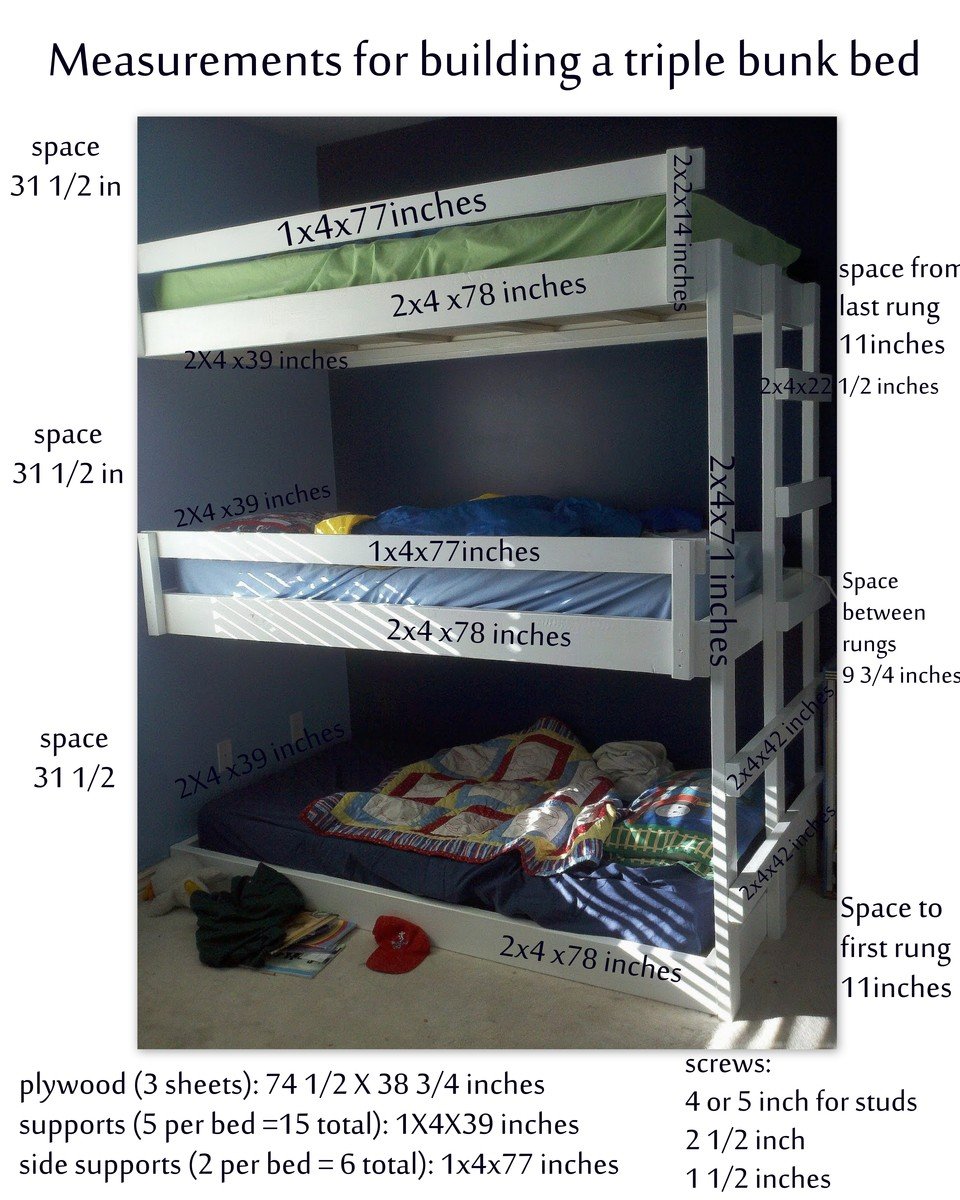
Estimated Cost
$150
Estimated Time Investment
Day Project (6-9 Hours)
Finish Used
White Paint
Recommended Skill Level
Starter Project
Comments

Mon, 04/28/2014 - 13:28
Easy Built in Triple Bunk Bed Plans
I hope you all enjoy these triple bunk bed plans. The instructions should be easy to follow to make your own!

In reply to Easy Built in Triple Bunk Bed Plans by myhomedonemyway
Sun, 01/22/2017 - 11:06
Great Triple Bunk Bed Plans!
Thank you so much for sharing your plans! This is great, well built, but still easy to do!