DIY Stocking Stand

No fireplace yet and needed a place for the stockings. Made this for my daughter and her family. -
Built from Plan(s)
Seasonal And Holiday
No fireplace yet and needed a place for the stockings. Made this for my daughter and her family. -
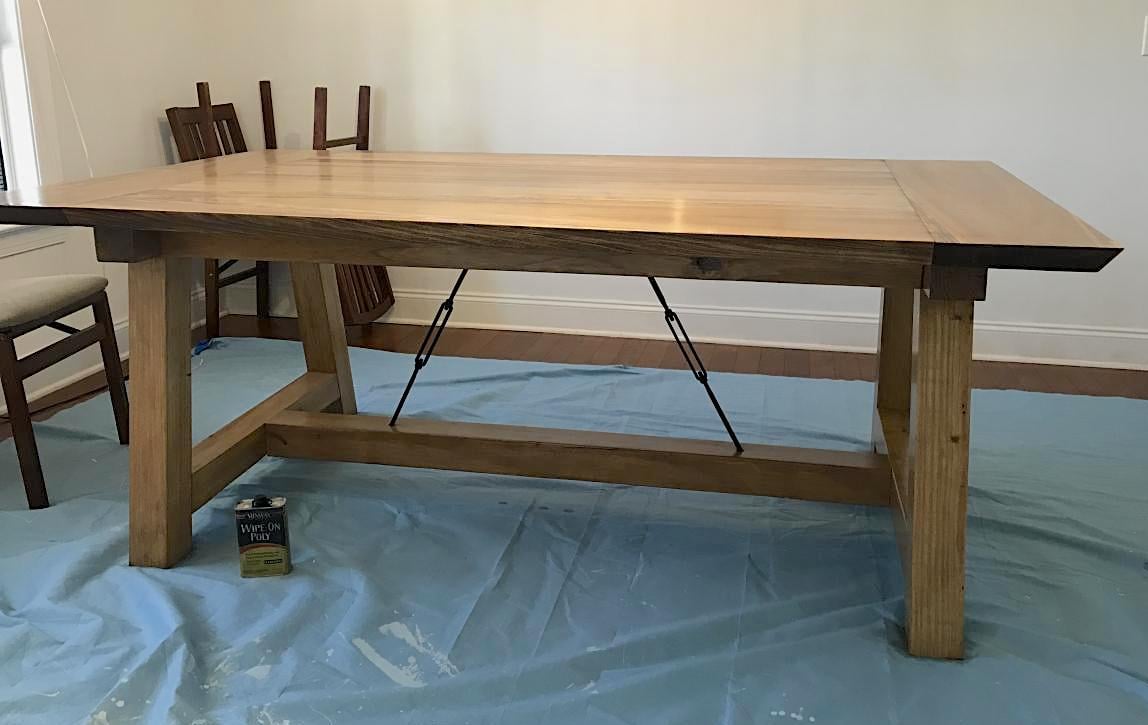
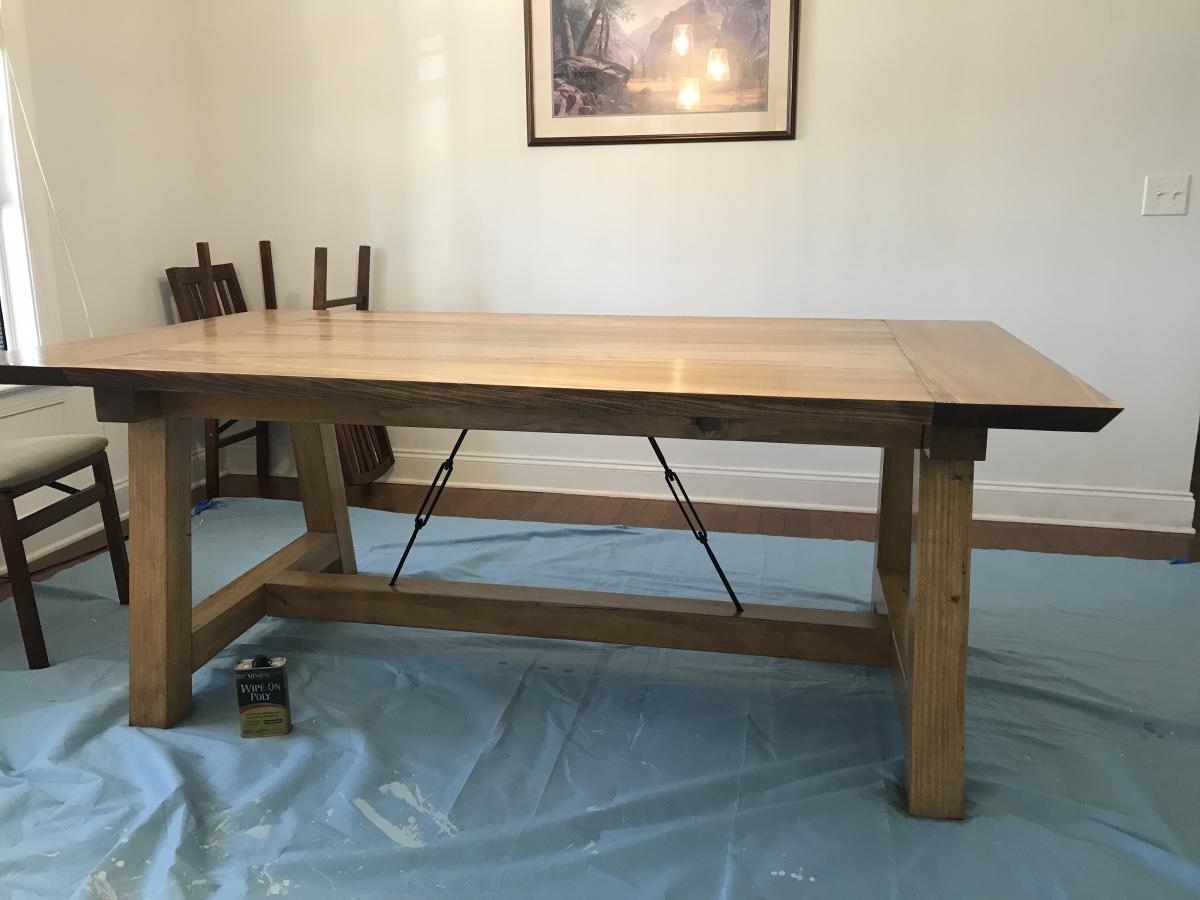
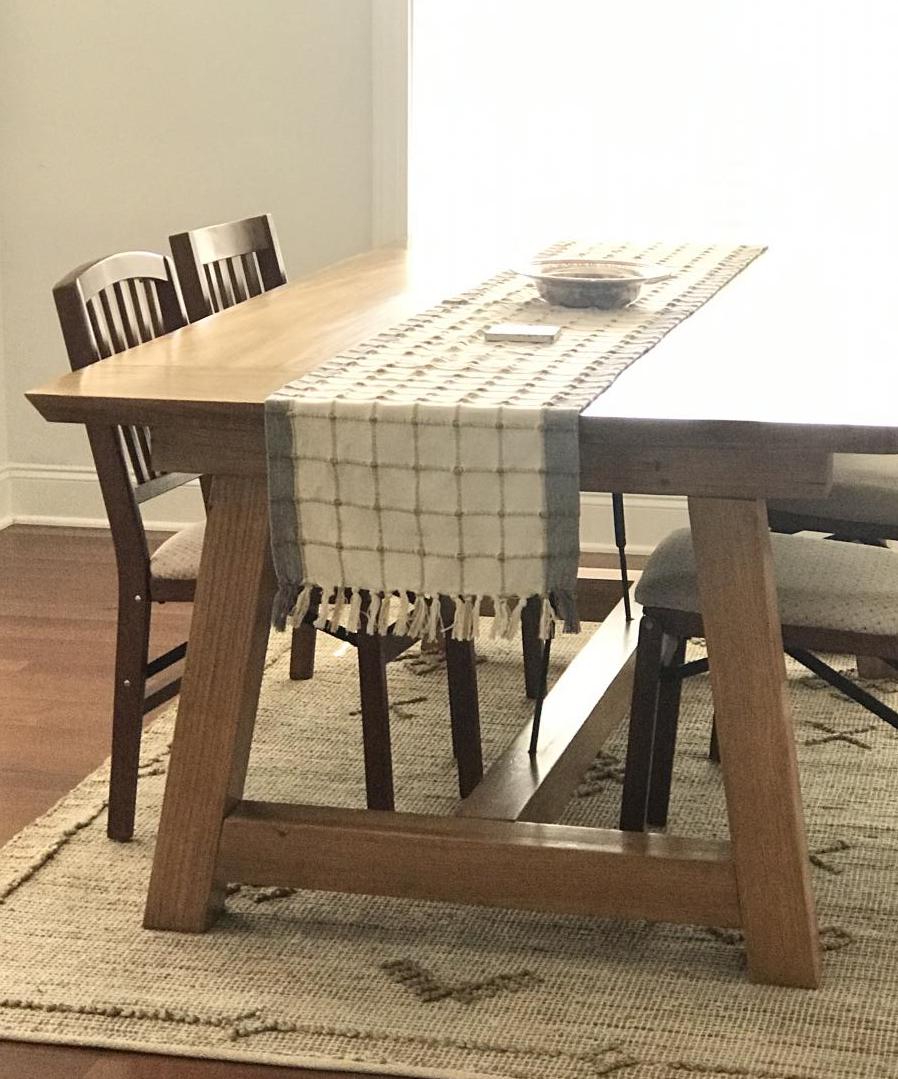
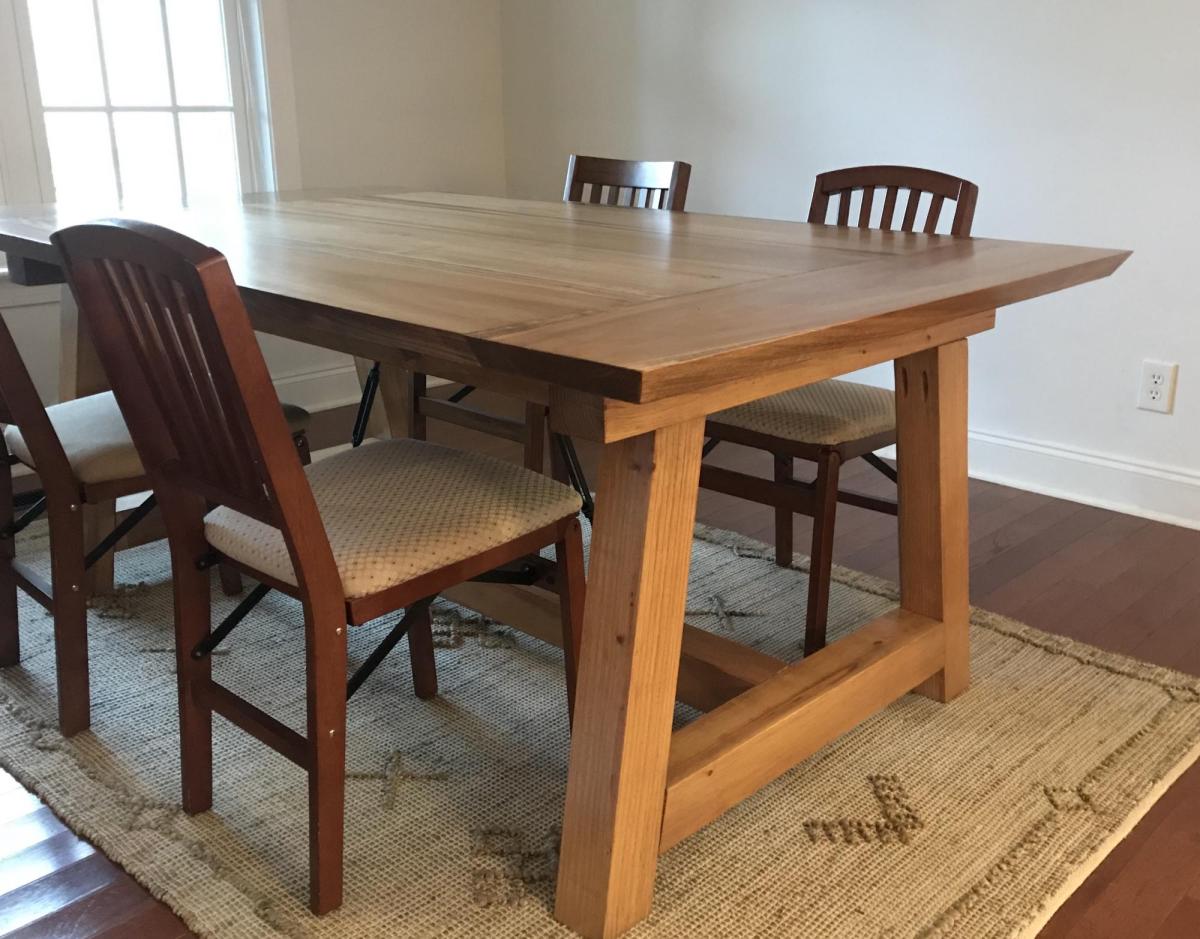
My hubby and I used the tressle table plans to make this awesome table. We changed it up, adding the turnbuckles like a Pottery Barn table that we wanted. I think this turned out way better!
We used yellow pine for the lower portion and poplar for the top.
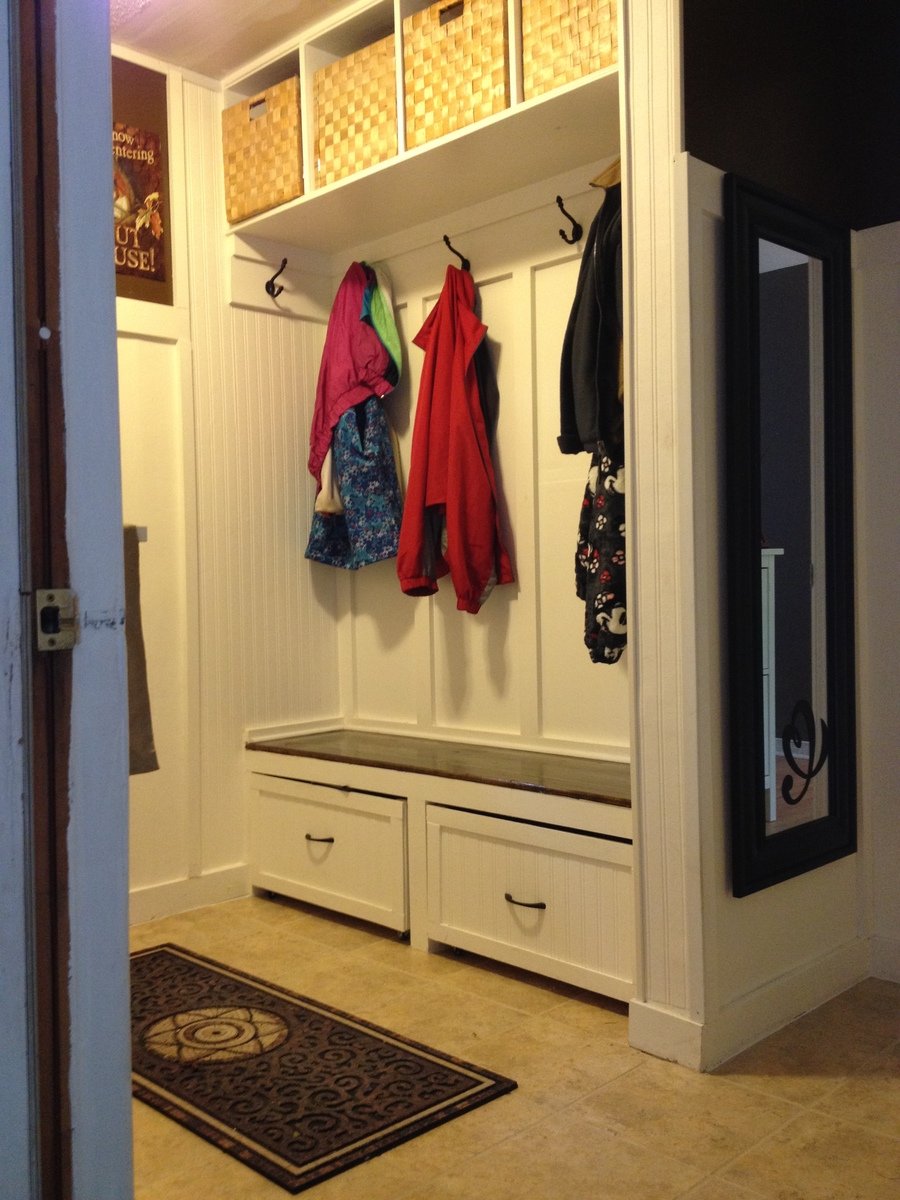
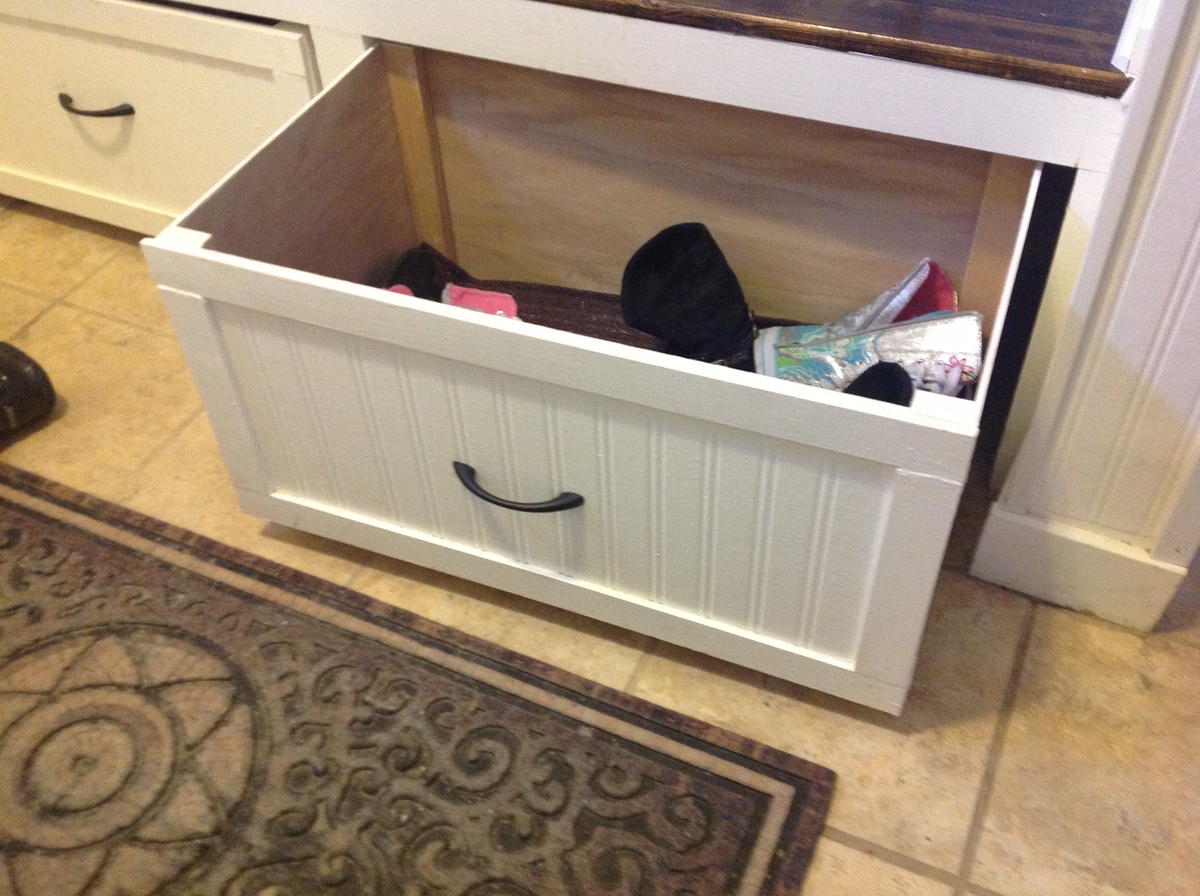
This is a twist on the Modular Family Entryway Mudroom System - Pullout Rolling Bench Cart . There have been many posts on the net for a mudroom locker set such as the one I have. In our case we had a mudroom with a closet, not much room to move when sliding the doors open, and as well we have kids that need a place to sit in order to put boots/shoes etc on. I took advantage of my husband's work assignment out of the country to rip back the closet,to 20 inches deep and open it up and added a bench for seating, baskets above for out of season/rarely used stuff, and used rolling cubbies below, but in my case I wanted storage bins instead. My thinking was so that I could make it look clean pretty quickly by just chucking every thing in to the bin... These are tall enough for our boots. In the bottom of the bins I put a piece of outdoor carpeting, then a plastic grid, and over that another layer of outdoor carpeting so if the footwear is wet it will drain and dry-no biggie to vacume or sweep out. Best deal: I can simply roll them out of the way when I want to sweep underneath! I measured cubby space to basket size above, and made the bins below after doing the bench and middle supports, to ensure a good fit. The bench top is an old piece of pine board I sanded, stained and used 4 coats of marine varnish so it would take lots of wear and tear.
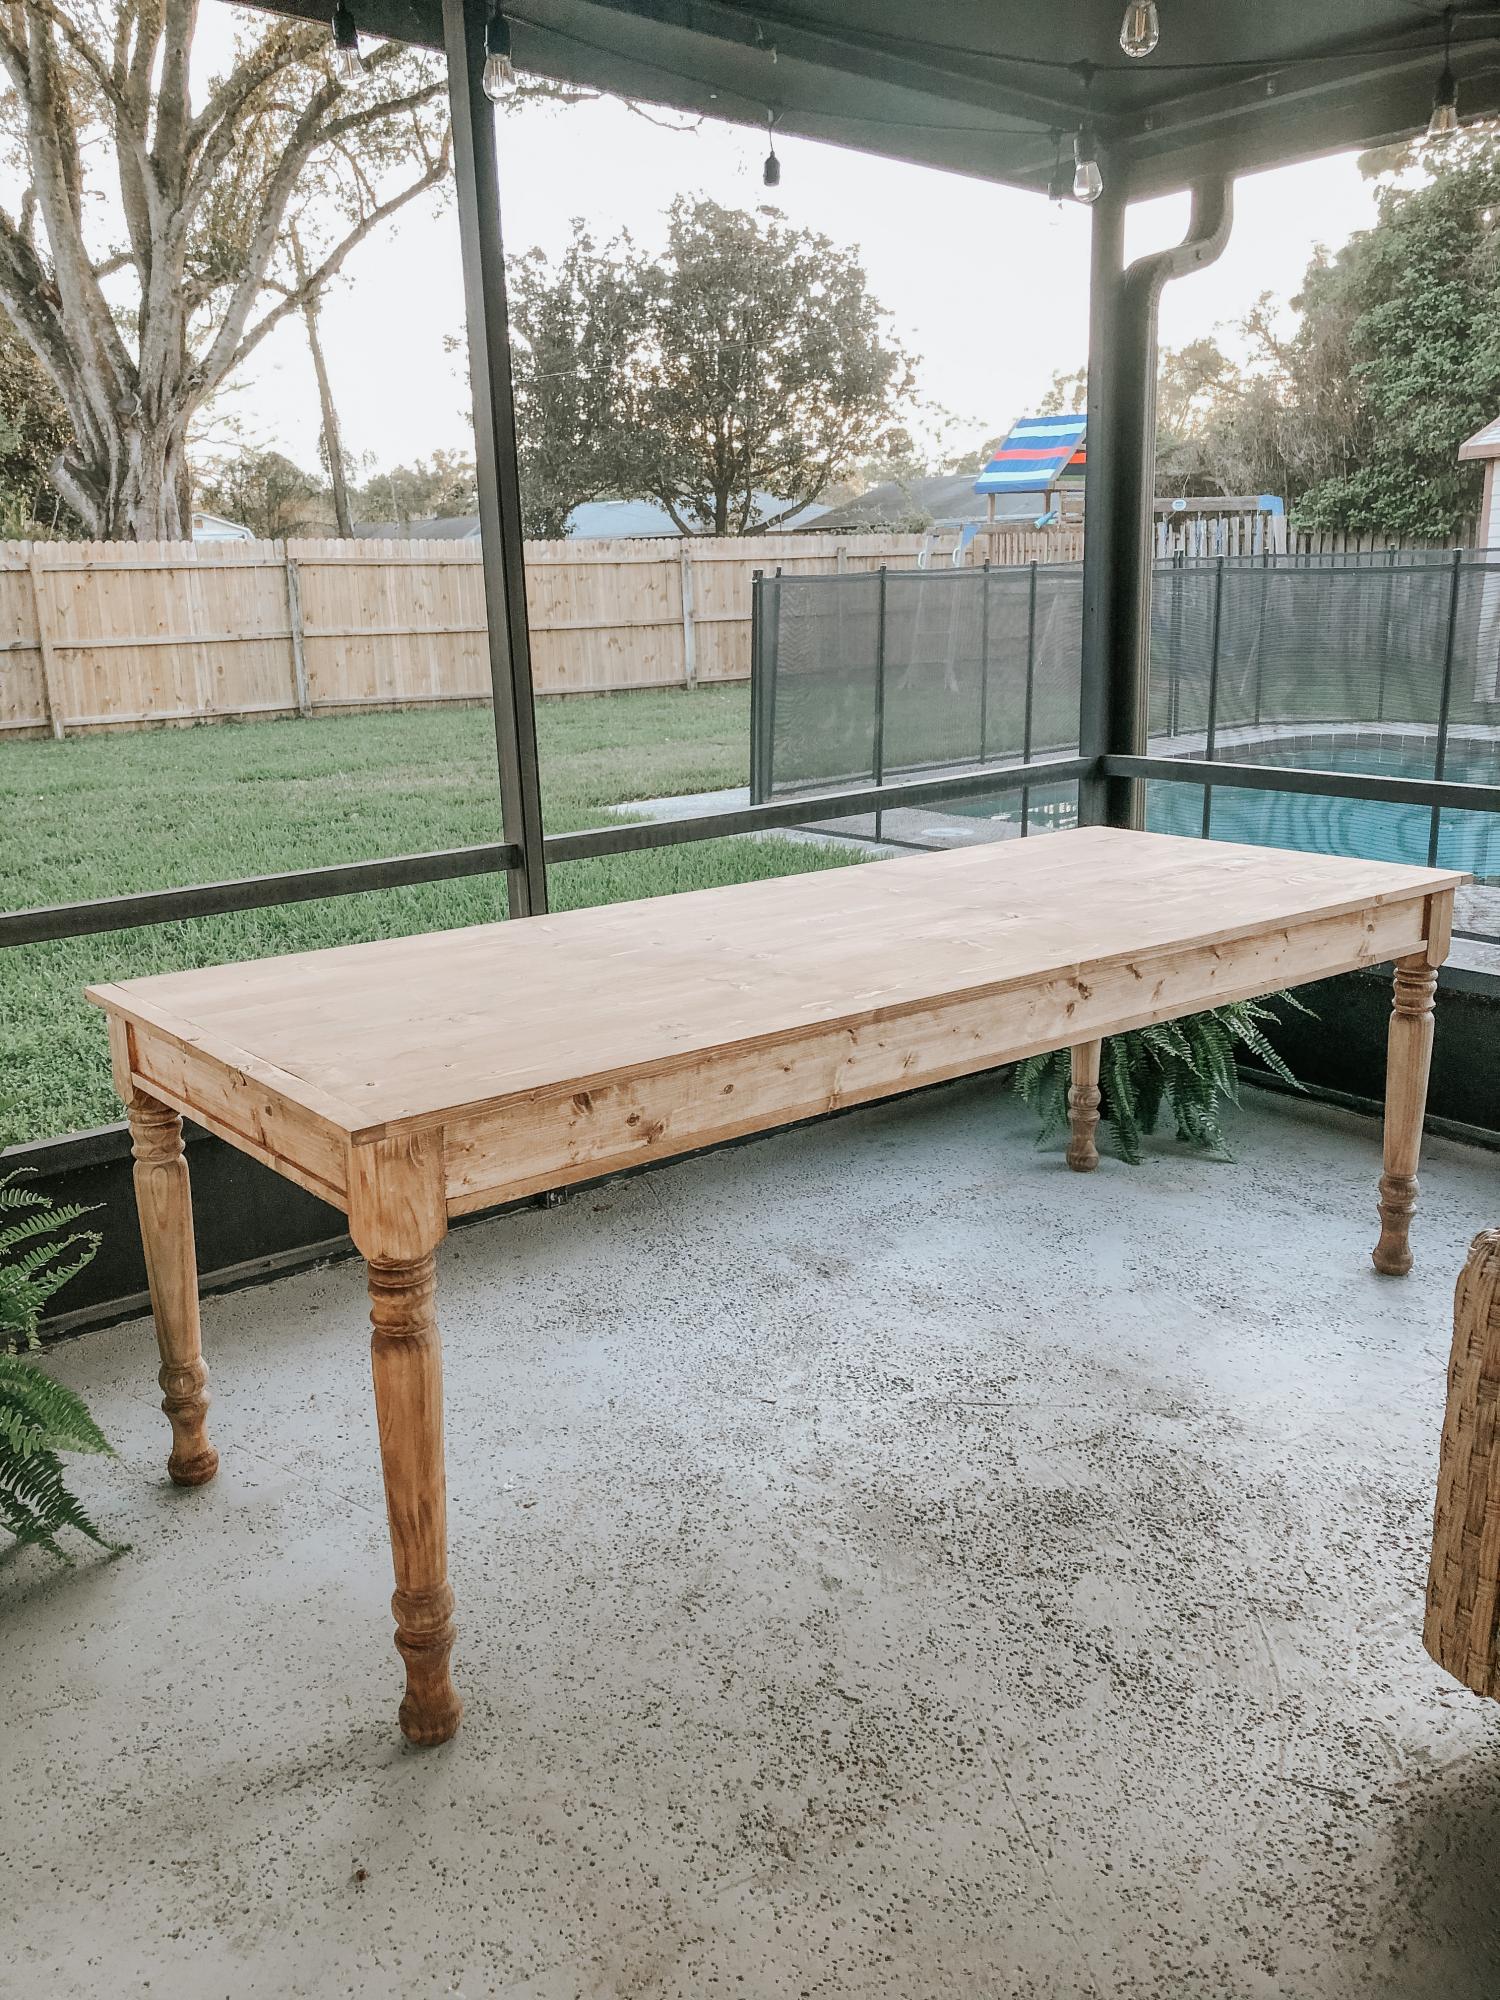
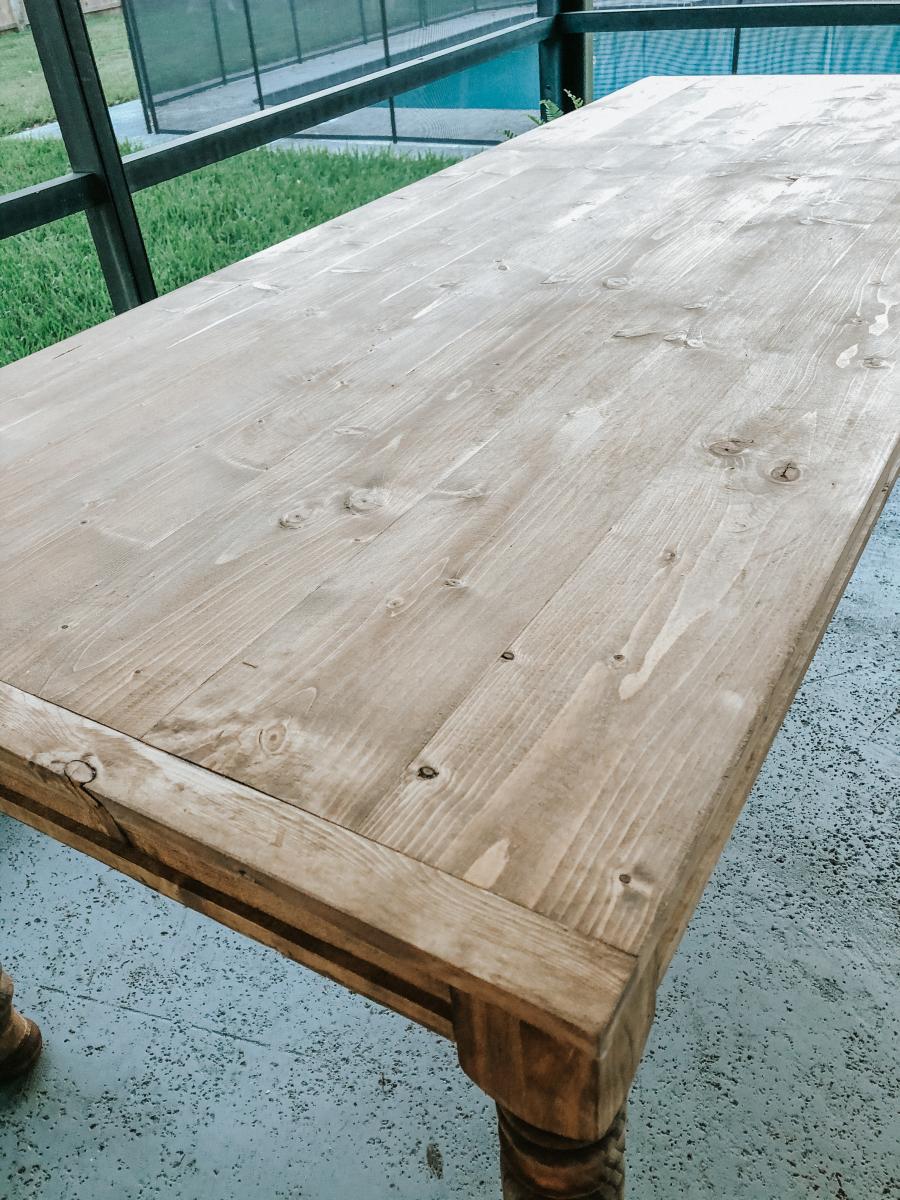
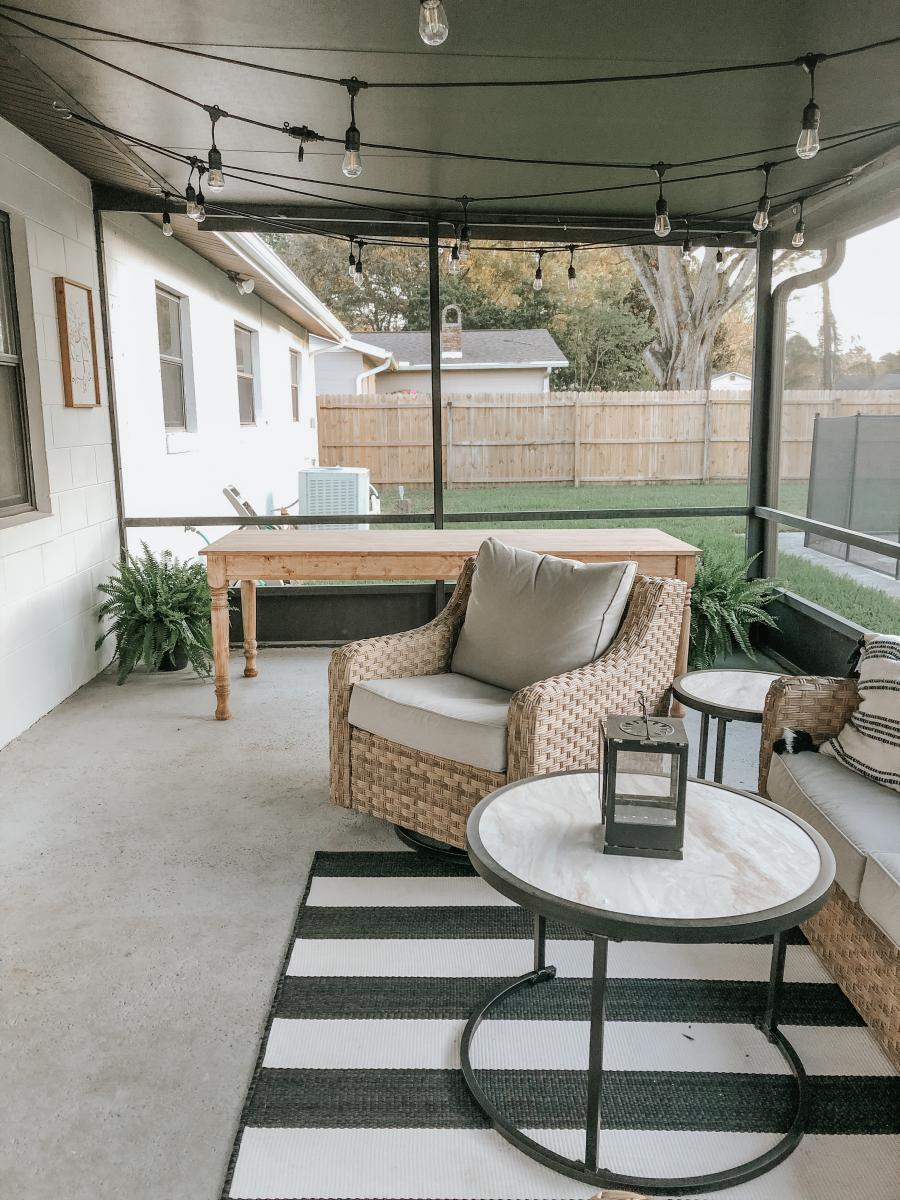
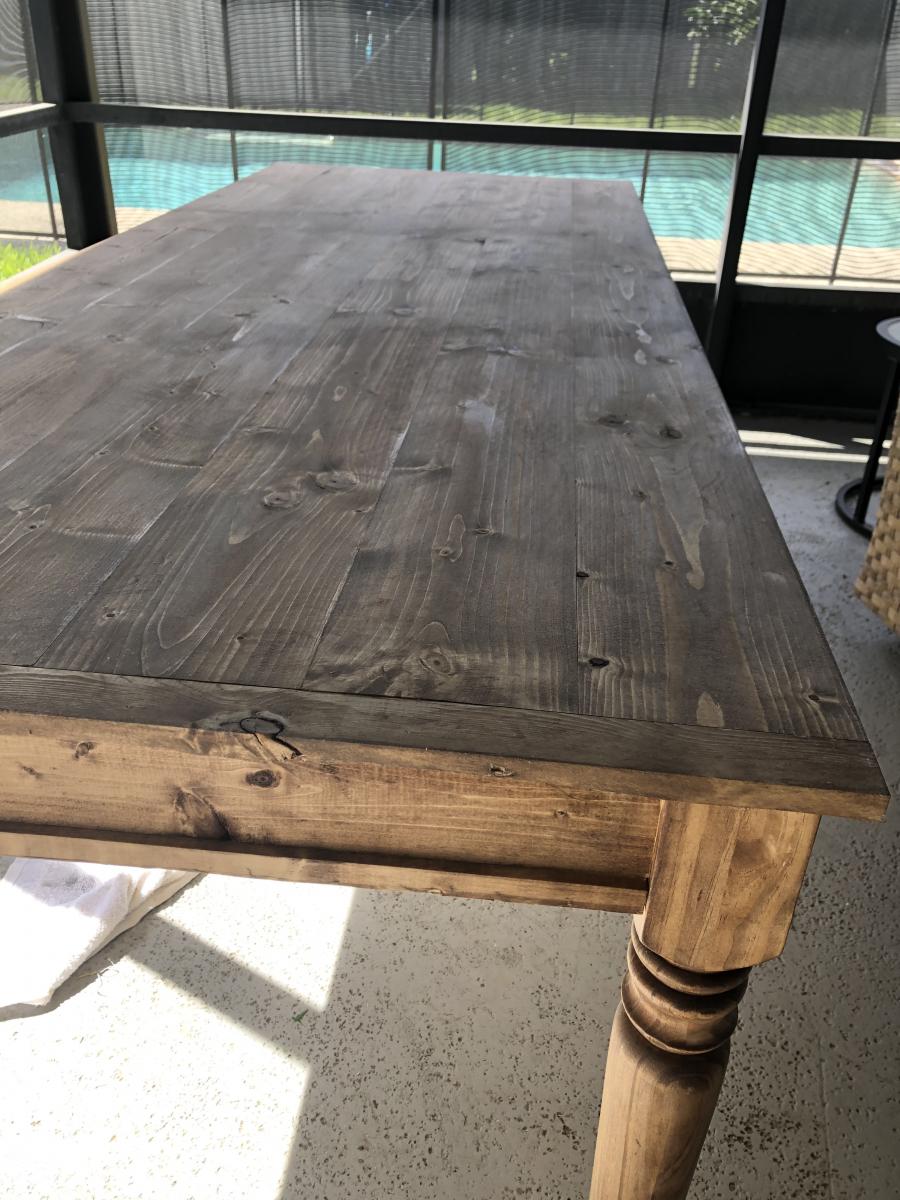
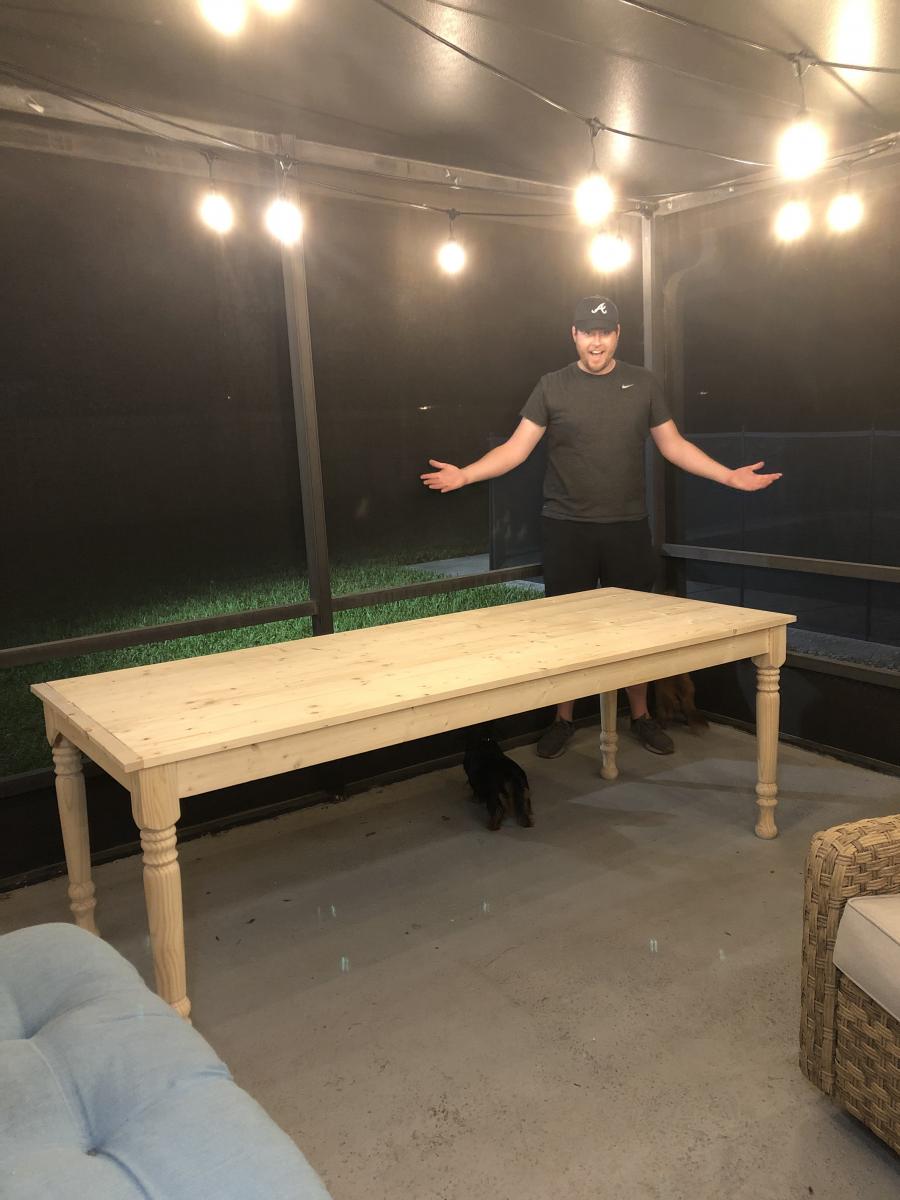
My wife and I were wanting a large outdoor farmhouse table that looked stylish, and like it could have been bought at Pottery Barn or another high-end furniture store. We found this plan that Ana white had made "Small Old English Style Farmhouse Dining Table". We often host groups from our church and will have 15-20 people on our patio or around our pool area, so we needed a bigger table... I just made some modifications to make it longer (7ft) in length to better fit our space and allow for more people to sit.
To make this plan longer, I simply adjusted the cut-list on the long 1x2s, 1x4s, and 1x6; and added a crossbar to prevent the longer tabletop from sagging. I also added the diagonal corner struts to make the table a little sturdier.
Adjusted Shopping List:
4 - 1x2 @ 8ft
5 - 1x4 @ 8 ft
6 - 1x6 @ 8ft
Waterproof 1 1/4" Kreg screws (for outdoor use)
Minwax Weathered Oak
Minwax Vintage Grey
Adjusted Cut-List
• 2 - 1x2 @ 26.5"
• 2 - 1x2 @ 76.5"
• 2 - 1x2 @ ~33.25"
• 2 - 1x4 @ 26.5"
• 2 - 1x4 @ 76.5"
• 4 - 1x4 @ 7.25" w/ 45º miter (diagonal corner supports)
• 1 - 1x4 @ ~28" (Crossbar - I forget the exact measurement)
• 6 - 1x6 @ 82"
For seating we just bought some inexpensive farmhouse weather resistant chairs from Walmart:
https://www.walmart.com/ip/Yaheetech-Metal-Dinning-Chairs-Stackable-Cof…
Tue, 03/02/2021 - 08:46
Love the to see the increased length on this plan. thanks for sharing!
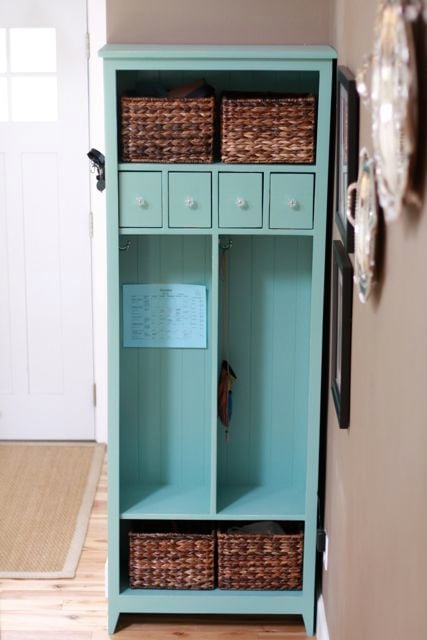
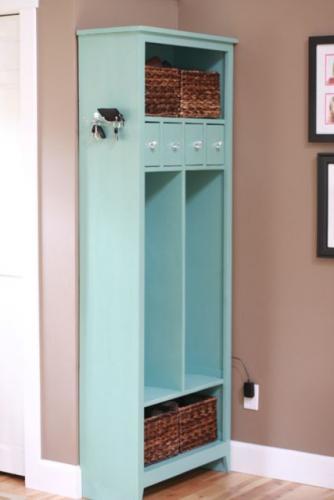
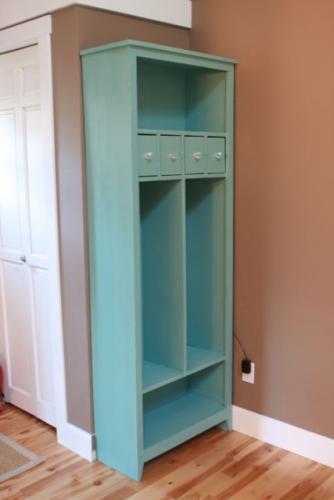
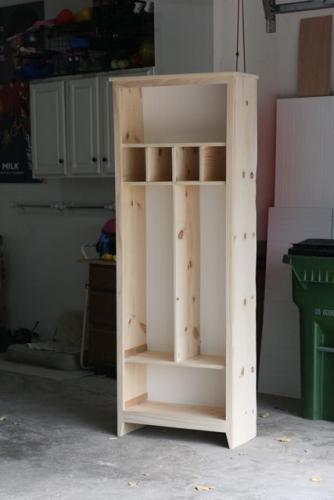
This locker cabinet was my first build and I learned a ton. For example:
1. Use the Kreg face clamps while drilling into the Kreg Jr.
2. Buy straight wood.
3. Buy wood that is not warped.
4. Do not try to buy wood with grouchy kids in tow.
Are you seeing a theme? Yep, your project will only be as square and perfect as the wood you buy.
I modified the locker plan to include apothecary-style drawers for our cell phones, sunglasses and chapstick. I also drilled through the back of one of the drawers to turn it into a charging station for our cell phones.
The locker has been super useful so far and is such a great way to keep my kids' backpacks and lunchboxes organized. The baskets are designated for my purse, stuff I need to return to stores, the dog's leashes, and library books. It's so nice to have all this stuff near the front door and never wonder where any of it is!

I built a set of chairs and a coffee table for our newly designed outdoor area. These look amazing and people love sitting on them and hanging out outside our house.


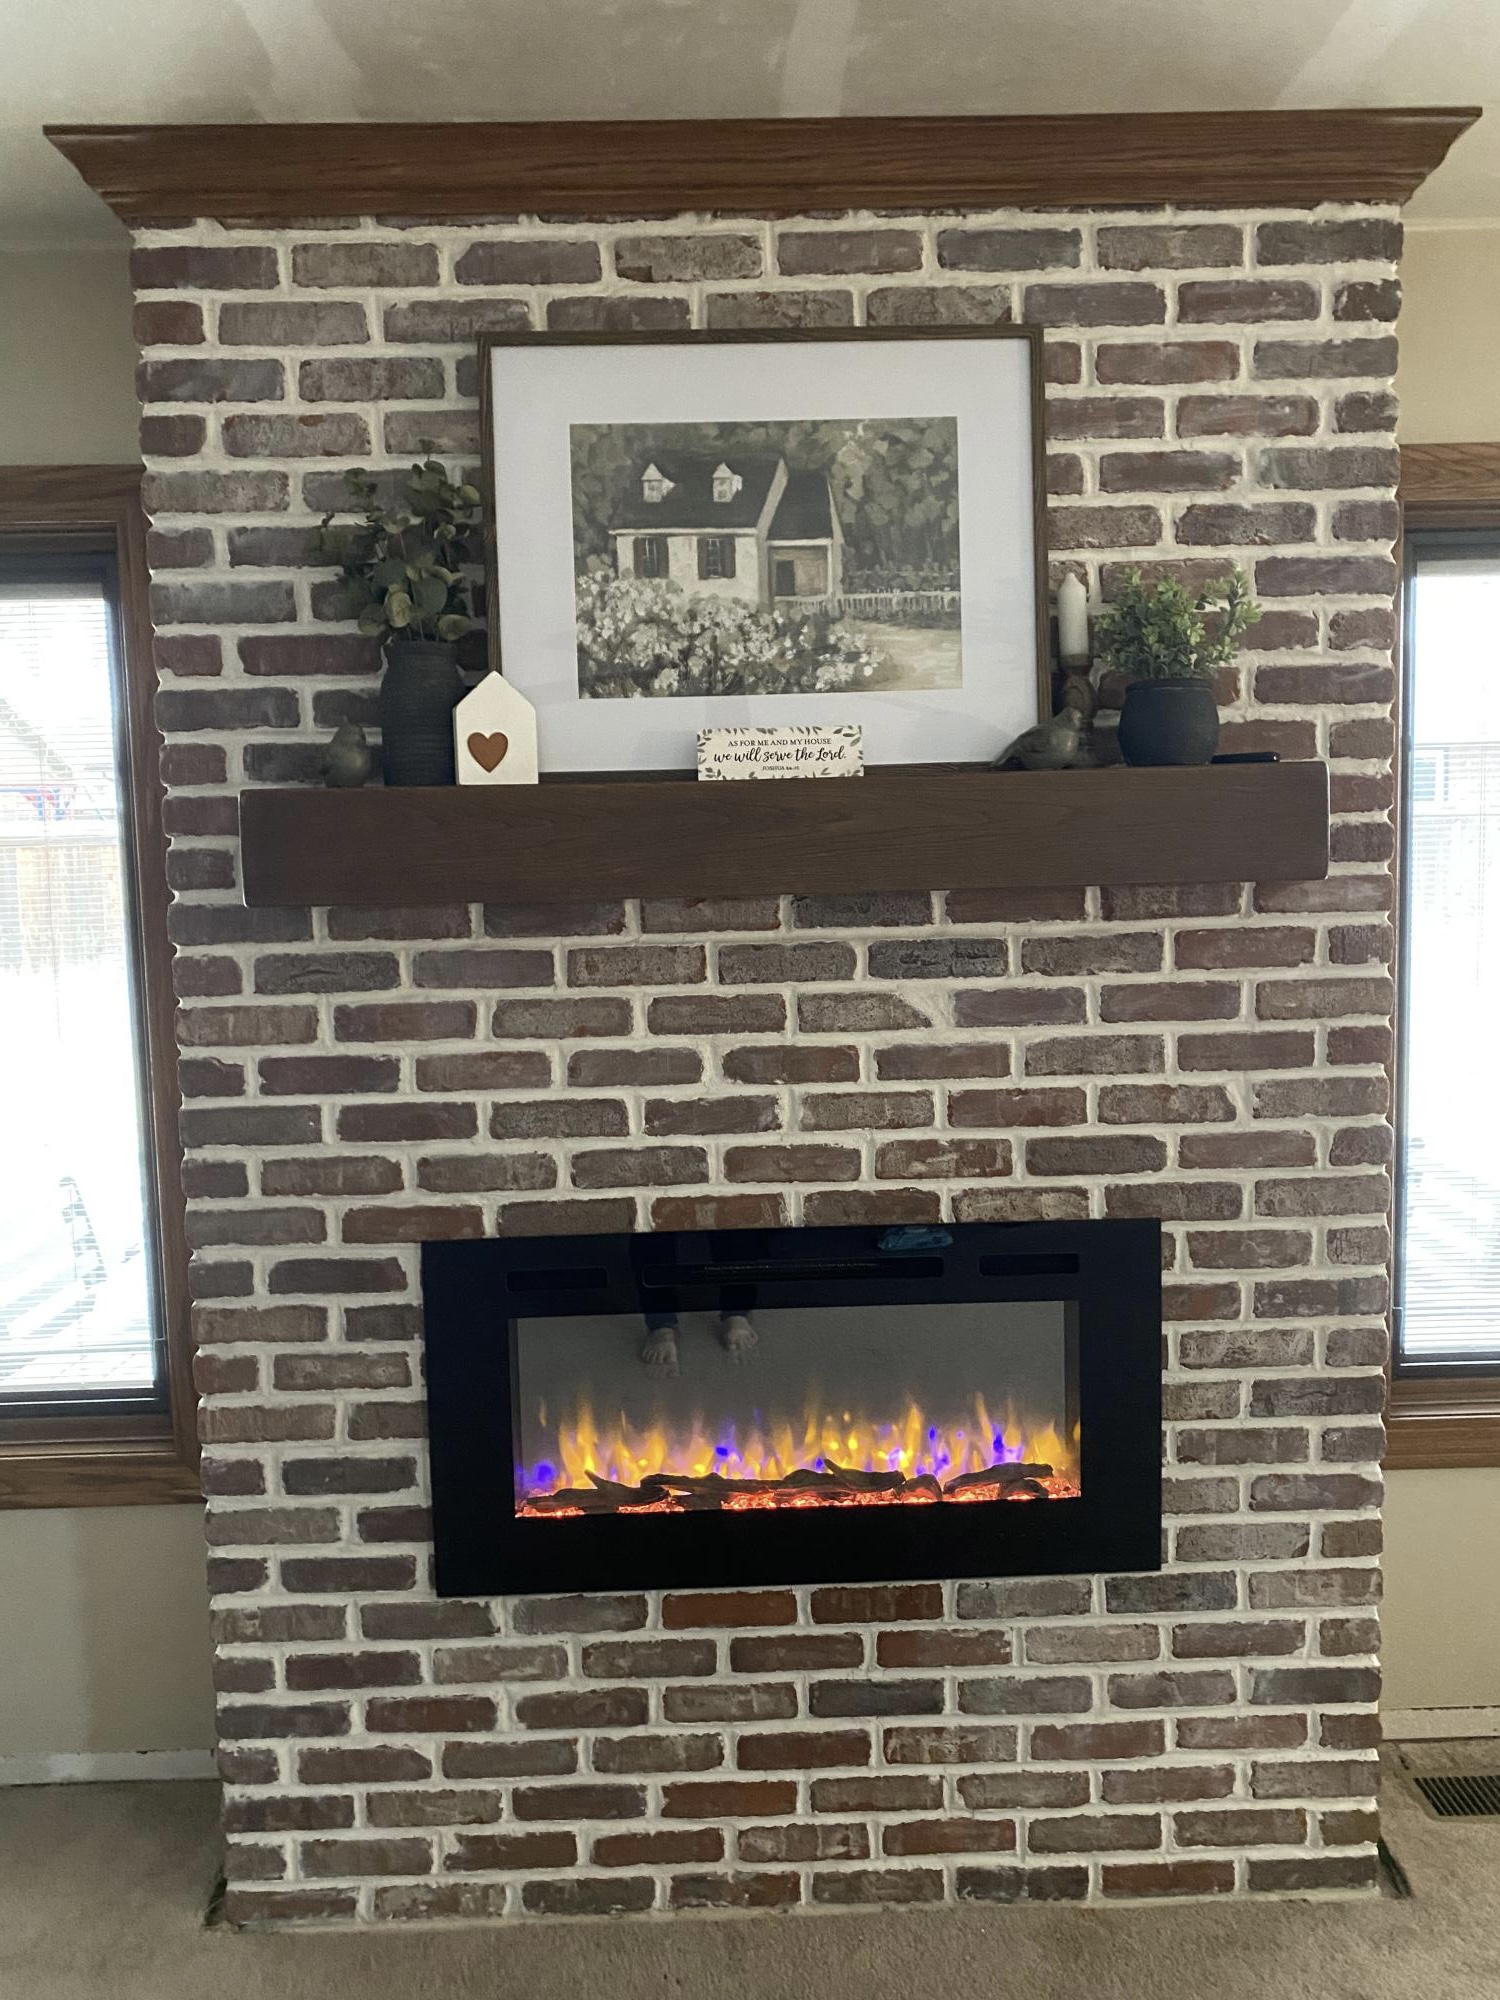
We used Ana White shiplap fireplace tutorial to build the structure and then followed her advice for brick installation instead of shiplap. It all turned out so great. The fireplace has changed the entire feel of our house now. Thank you Ana!
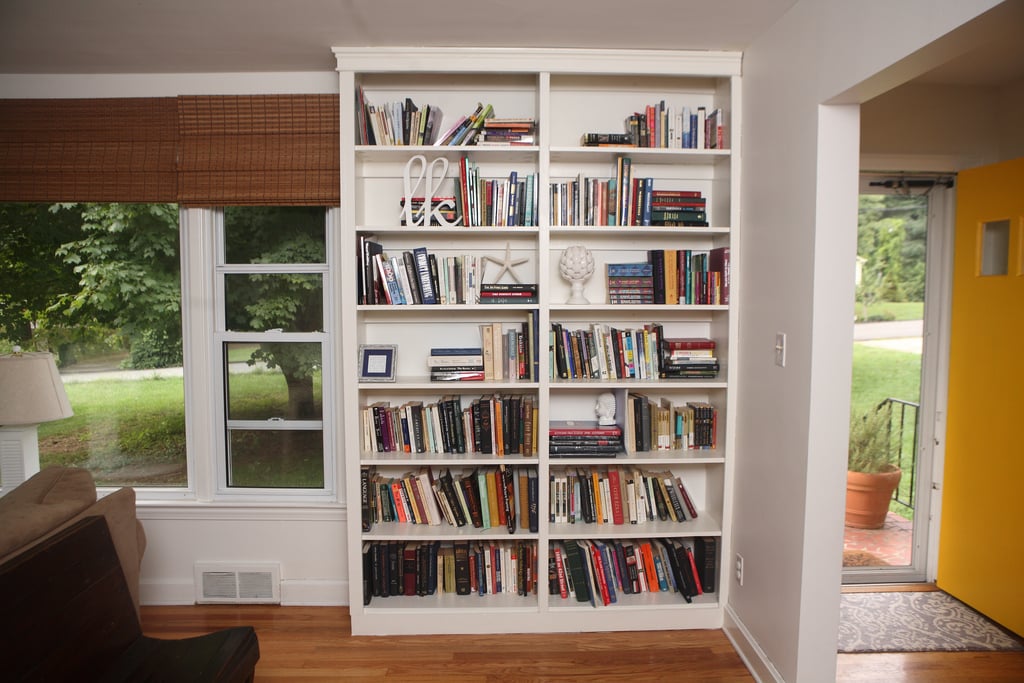
These built-in bookshelves were my first project, and were loosely based on the Willy bookshelf plans, although I changed the dimensions, set them on a 2x4 base, and added trim to the sides and molding on top.
Sat, 08/11/2012 - 05:58
hello,
Just wondering how the sides and middle part are built. They look like thicker than 1/2 in.Is it a trim or a 1x2? or did you use some 2x4 too?
I am looking at building a bookcase too but i wanted something more massive than 1/2 in. like yours.
Thanks
Great job!! looks awesome
Tue, 08/21/2012 - 05:31
I made the two bookshelves separately so I could move them in my house easier. Each has 1x12 sides (so 3/4" thick), and and that's 1x2 trim over the side and middle.
Thanks!

My kids needed a step stool and I had some scrap wood (2x10) left over from a previous project
Thu, 08/18/2016 - 20:12
Thank you! The dimensions are the same as the Ana White "Simple 1x10 Single Step Stool" except I used 2x10's instead of 1x10's like the plans called for. I also used some scrap pallet wood to make a design on the top of the stool.
- Stool height: 7 1/2" for legs, 1 1/2" for top, and 1/2" for scrap pallet wood; which gives a total height of 9"
- Stool width: 9 1/4" x 16"
- 5 degree angle cuts were made on the legs
Wed, 04/17/2024 - 09:21
Are the rails a 2x10 cut in half.? Or is it pallet wood?
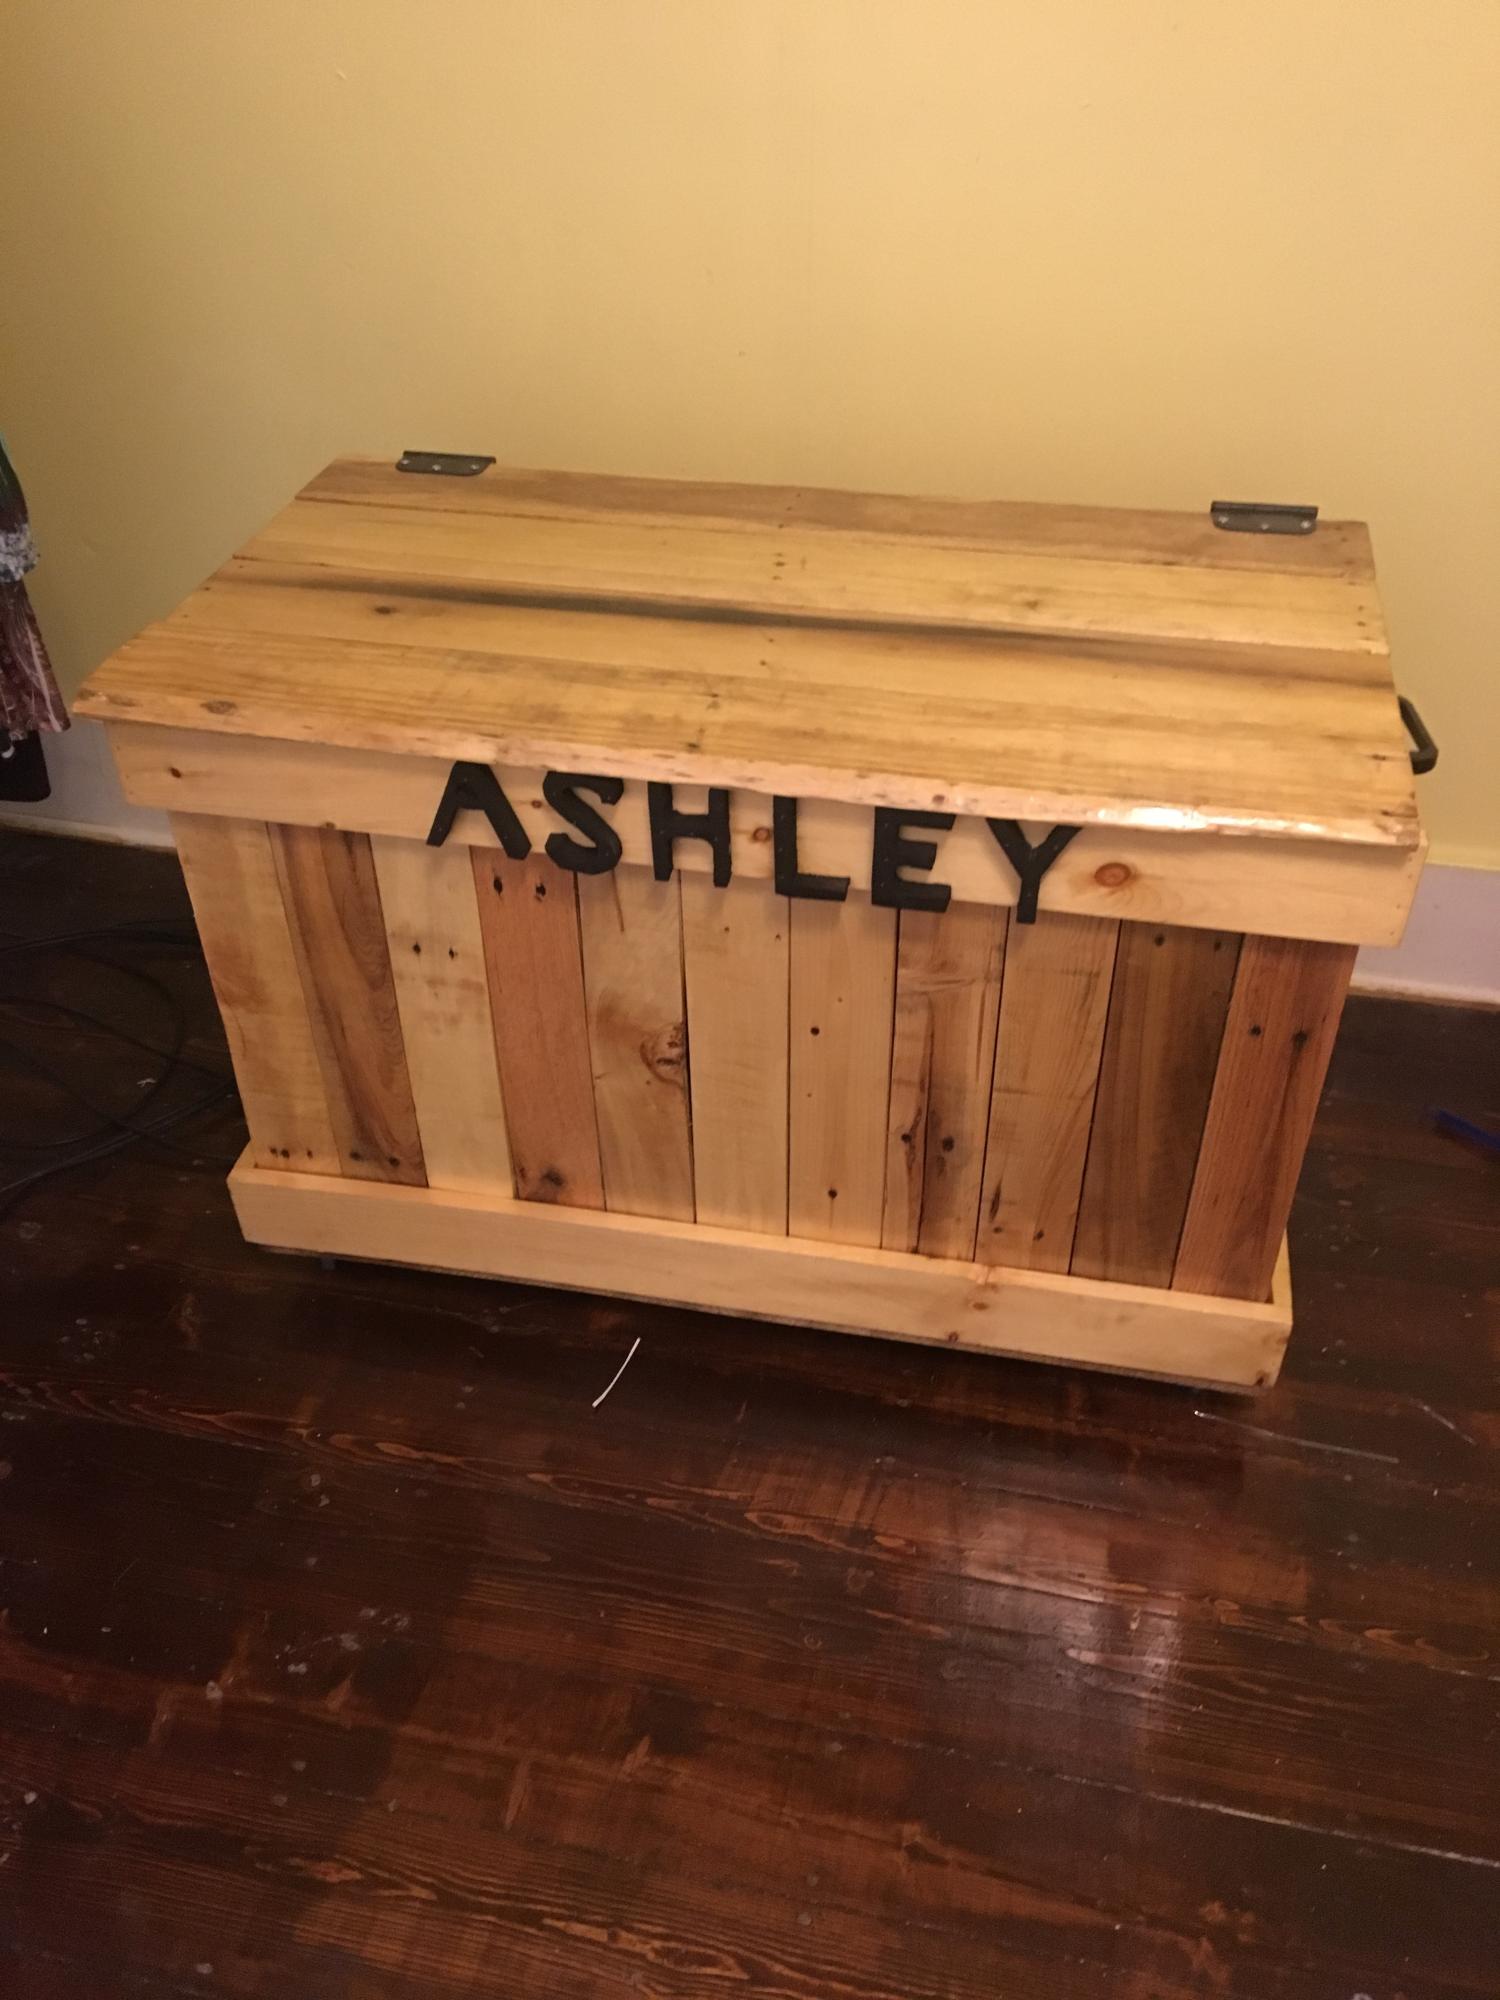
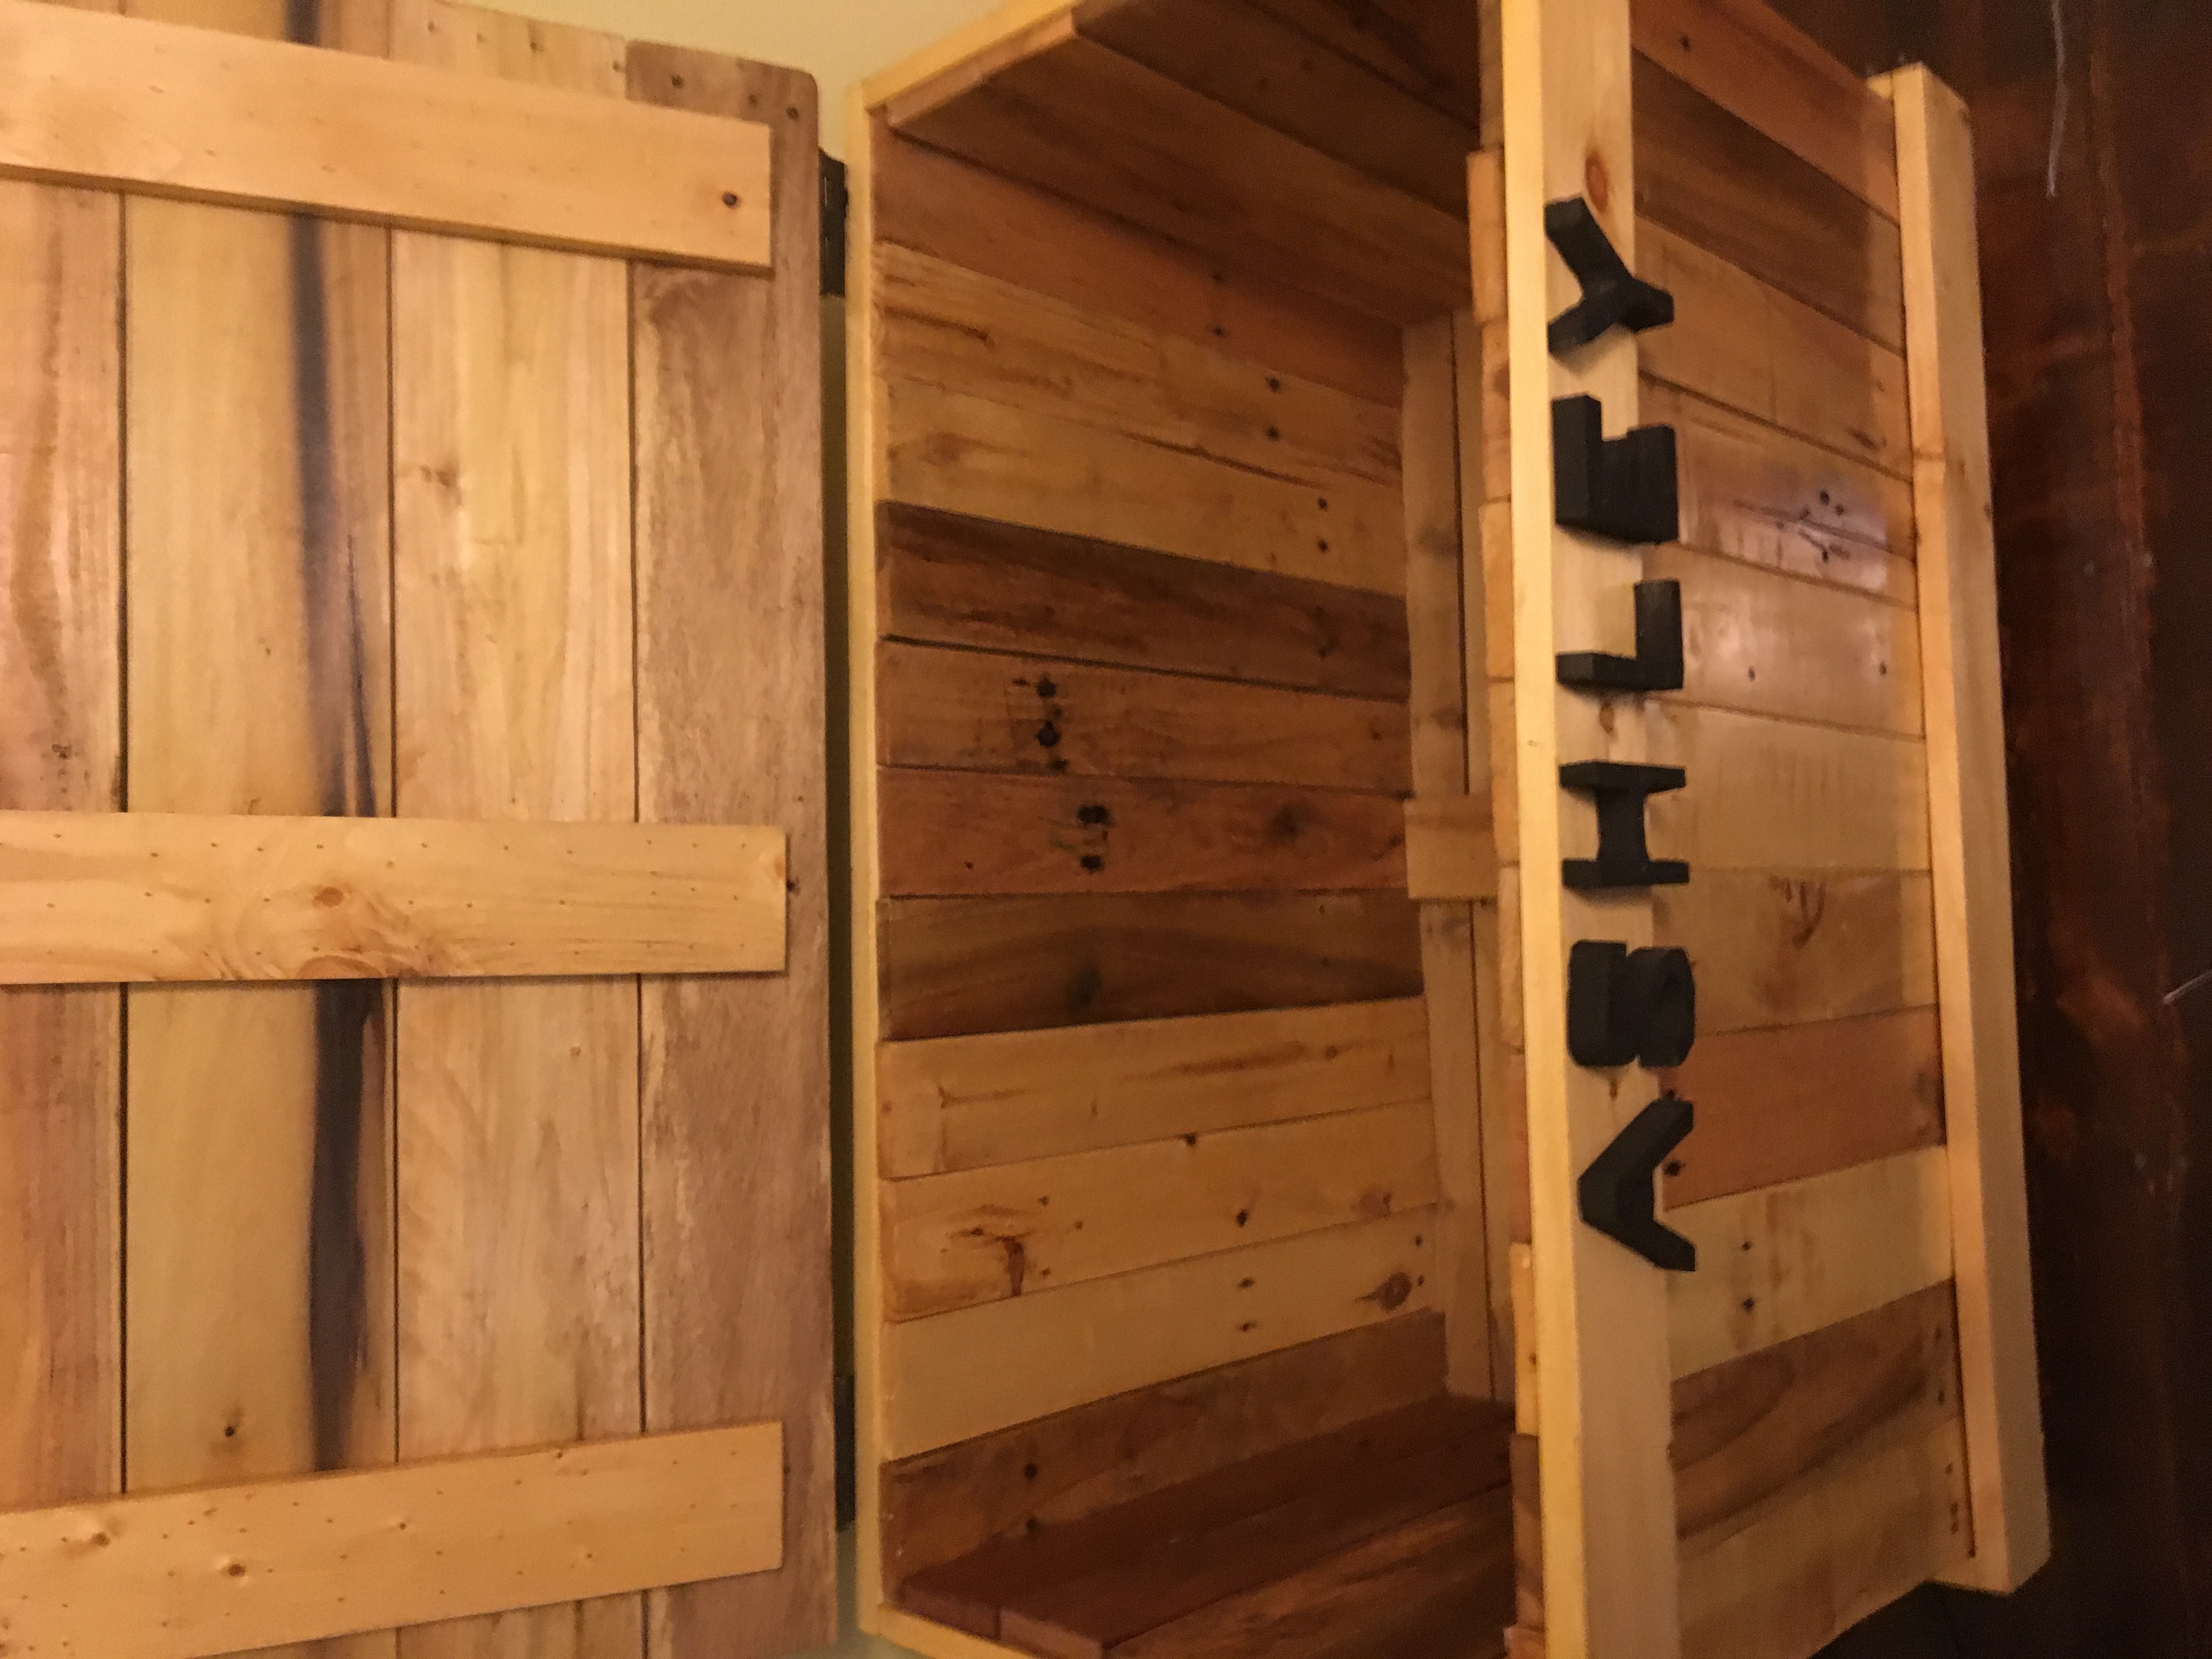
This is a hope chest I made for my step daughter this Christmas it is made intirely out of pallet wood except for the frame which I used 1by4 by 8 pine board
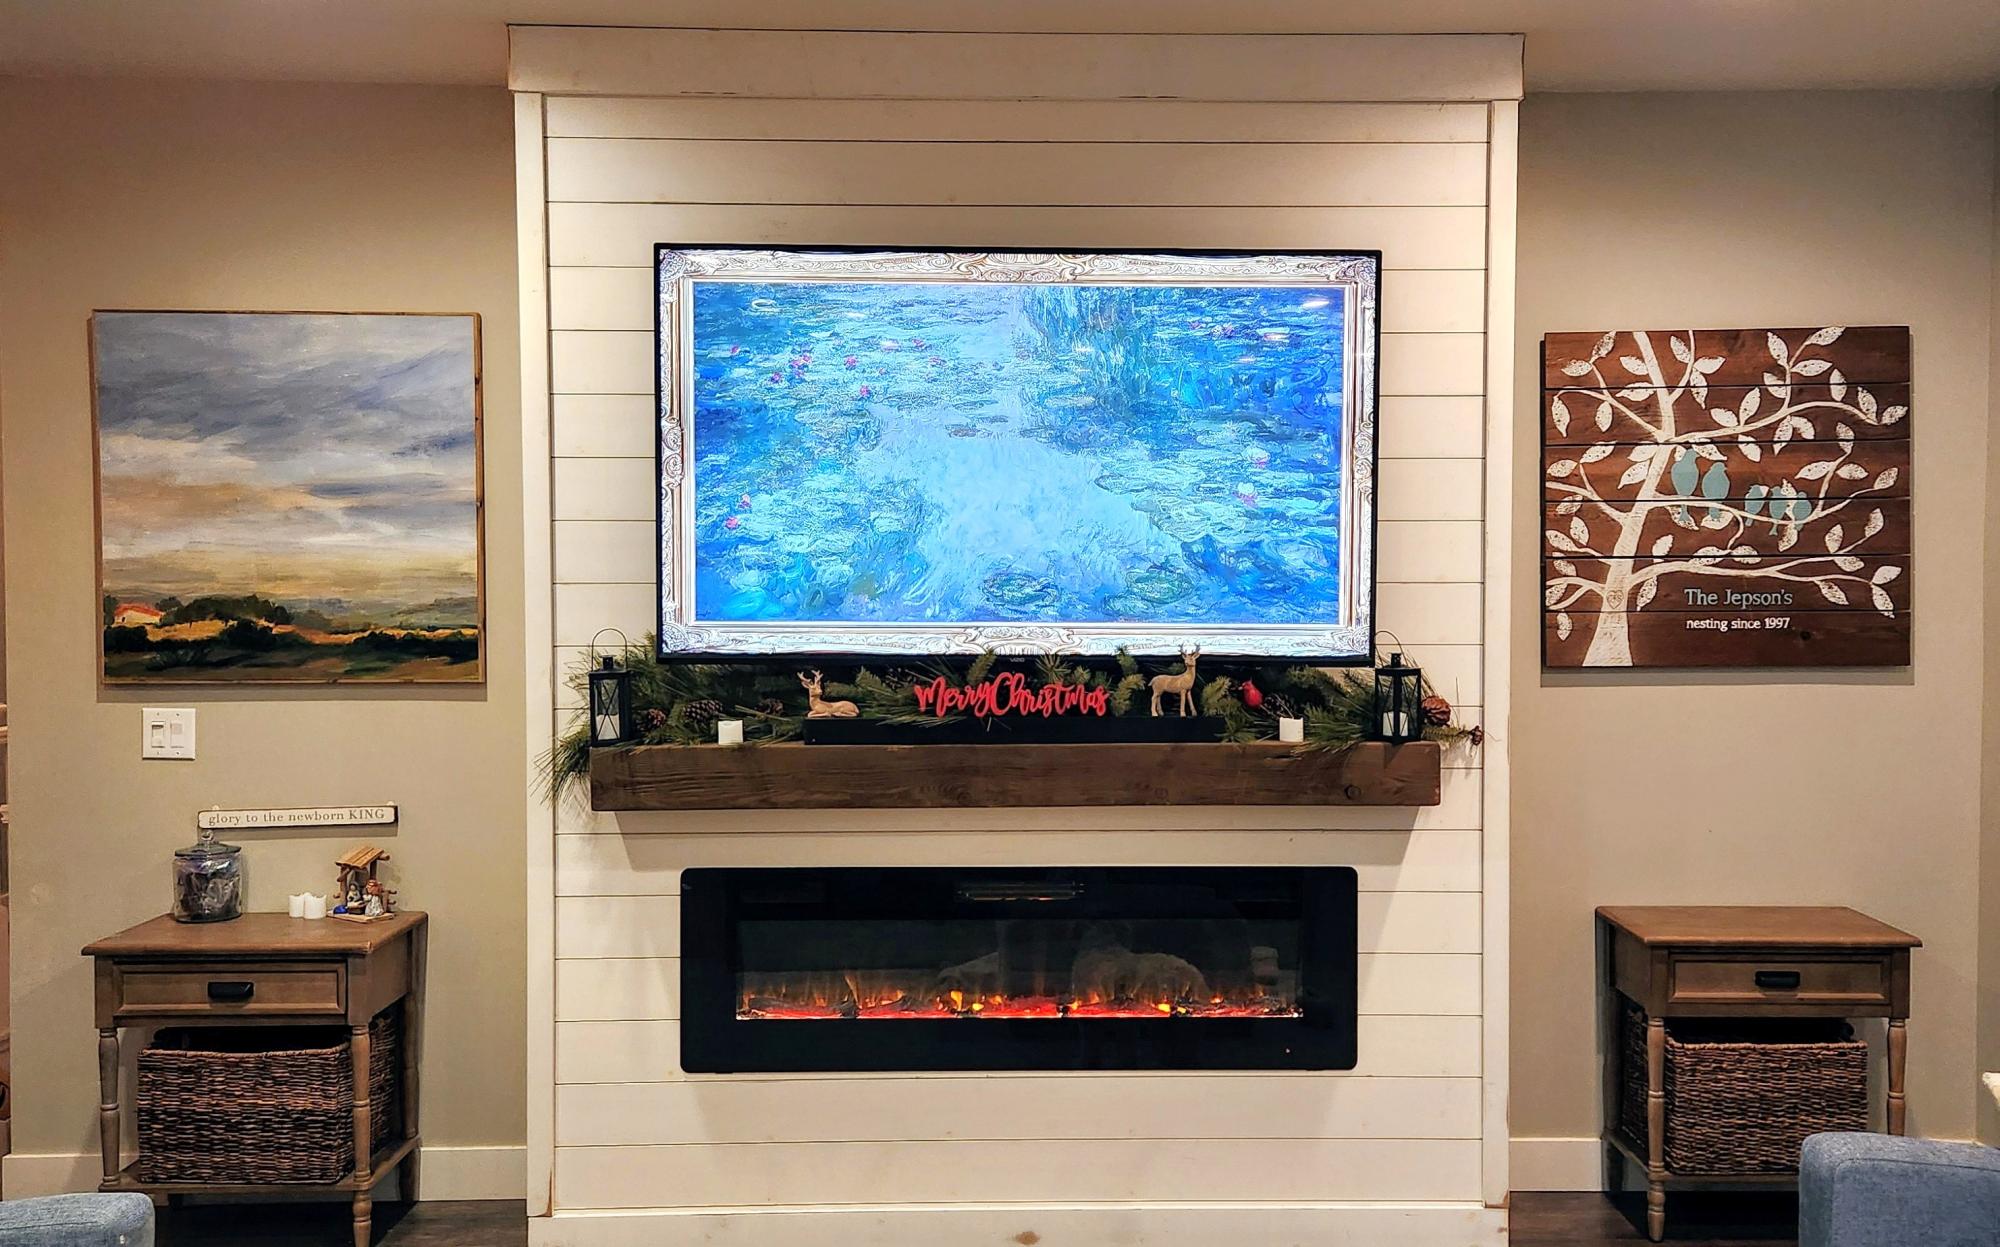
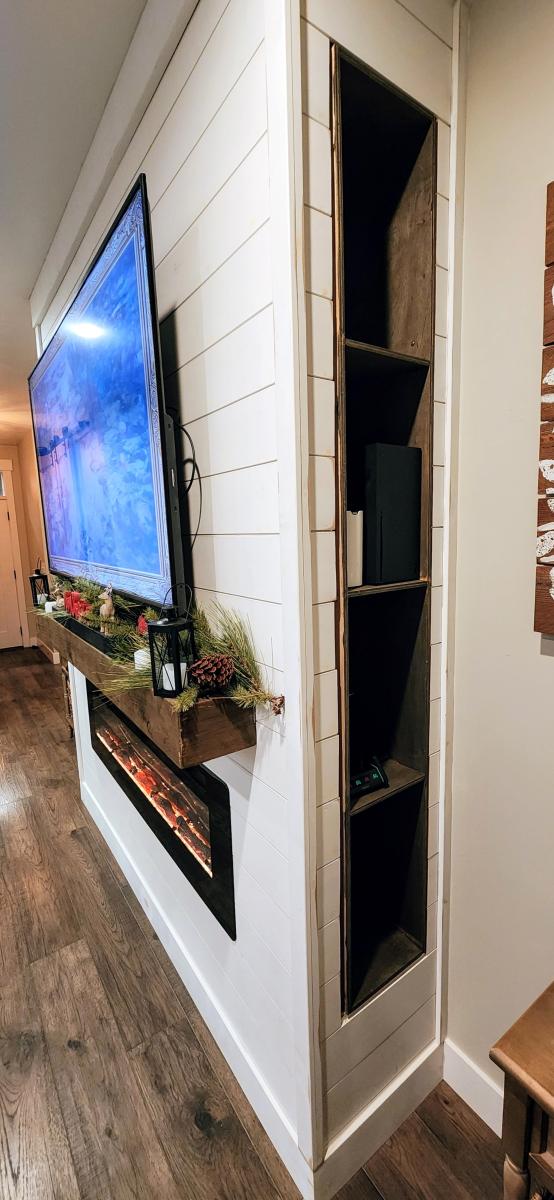
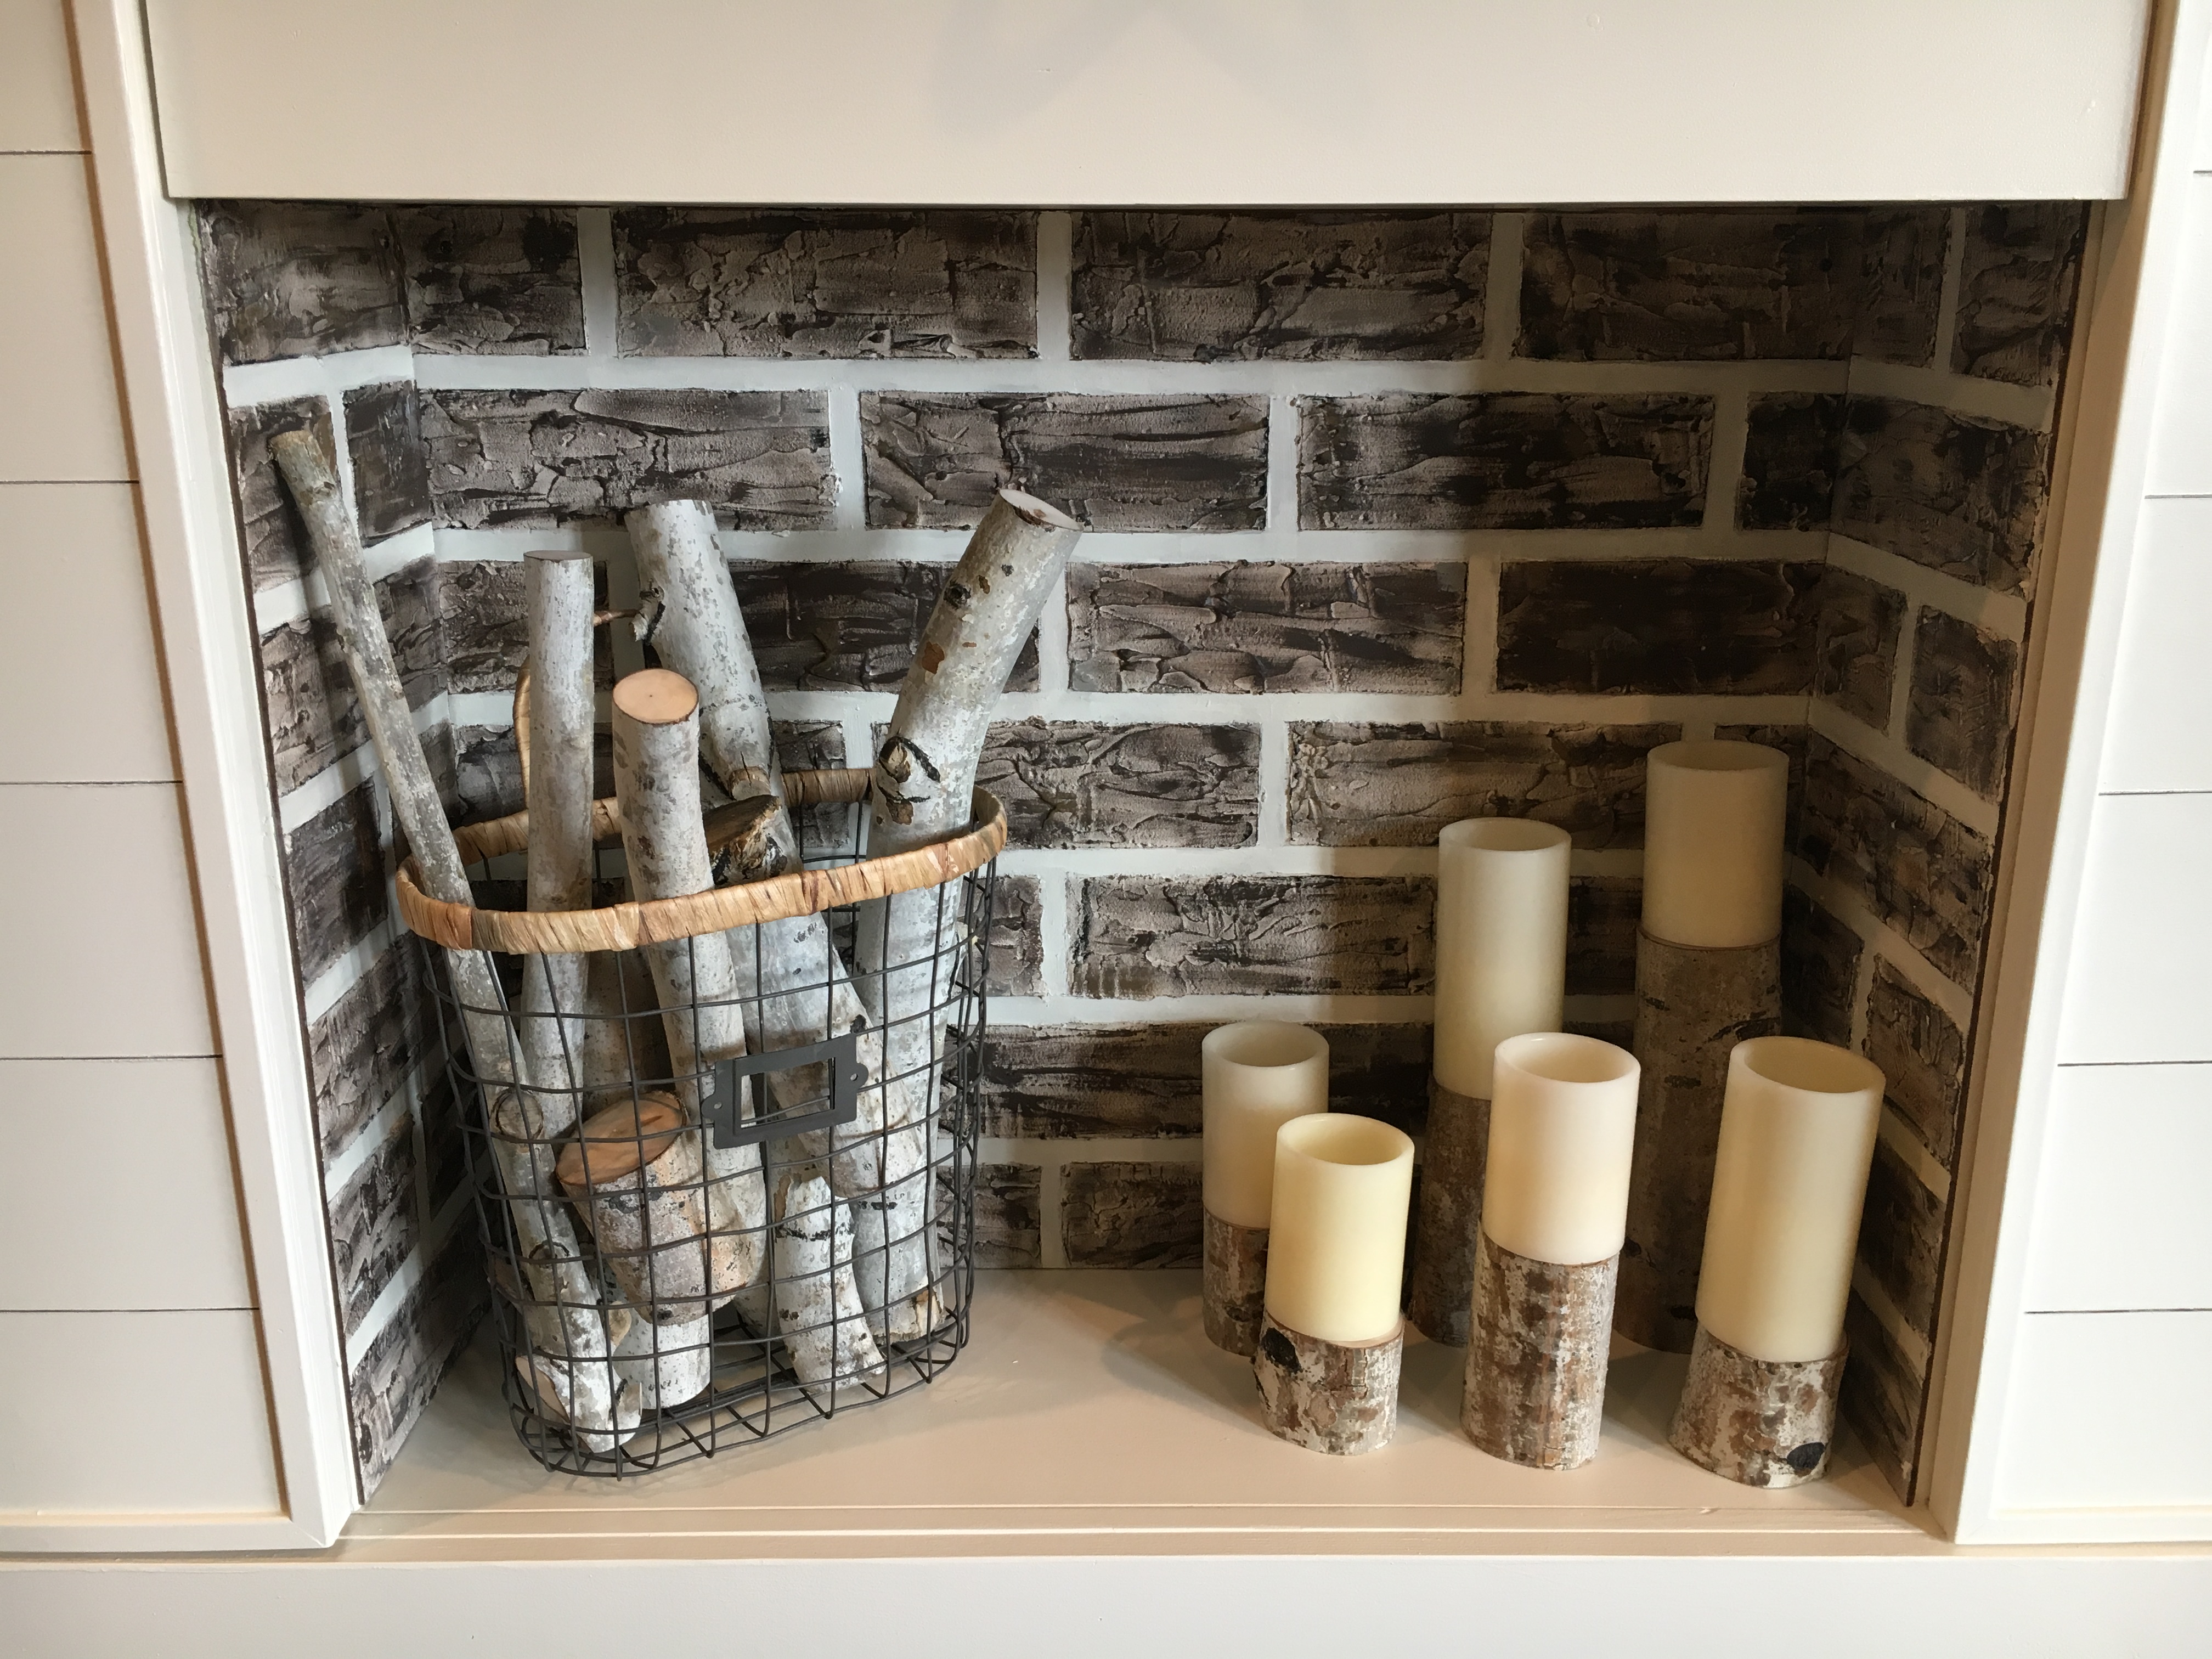
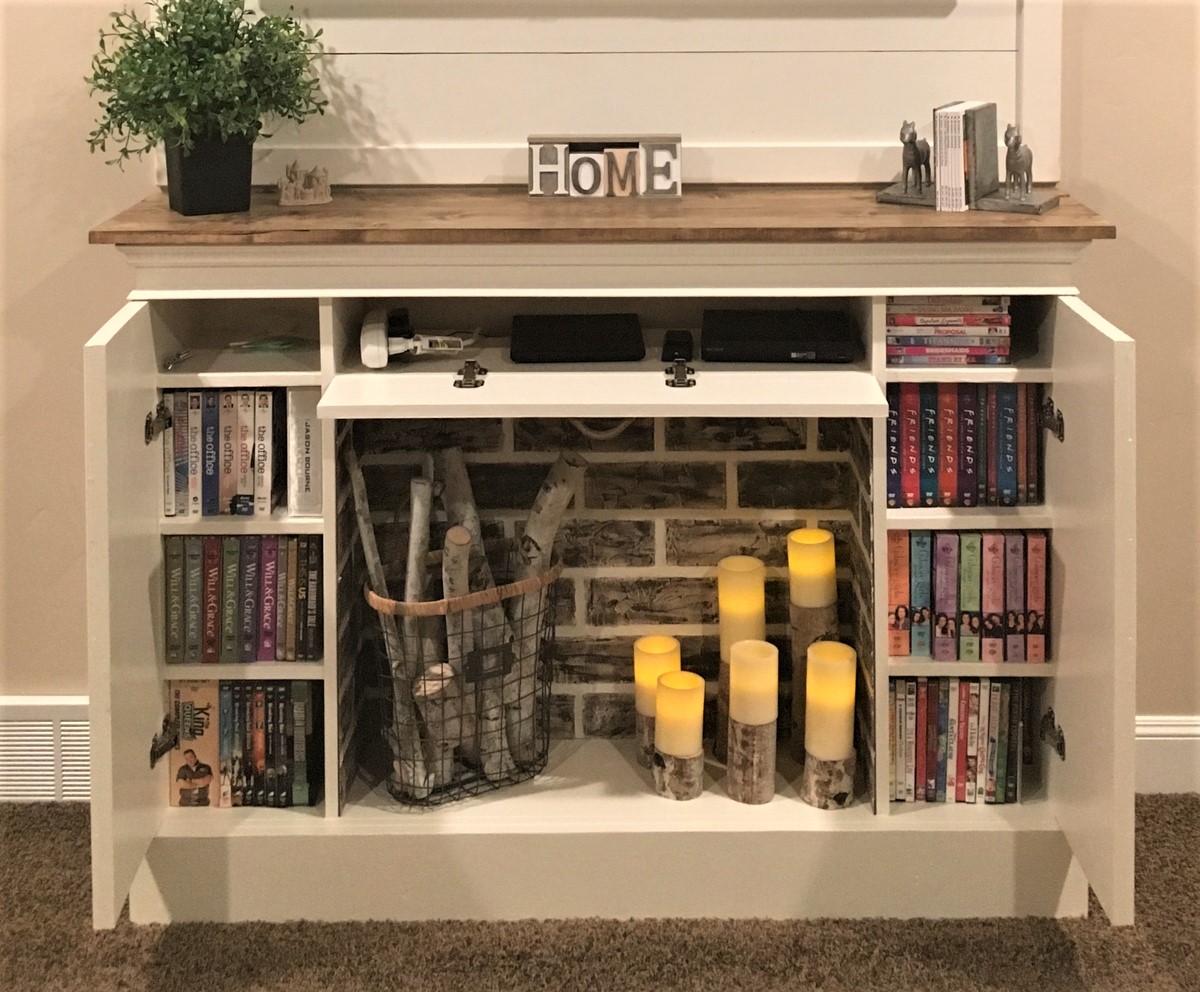
We wanted a electric fireplace with mantle and TV home above but needed storage shelves on the side for all of our electronics and blankets. Came up with this plan. Need to add trim around the shells still and can't decide what color to paint the fireplace. Other than that we are in love with it.

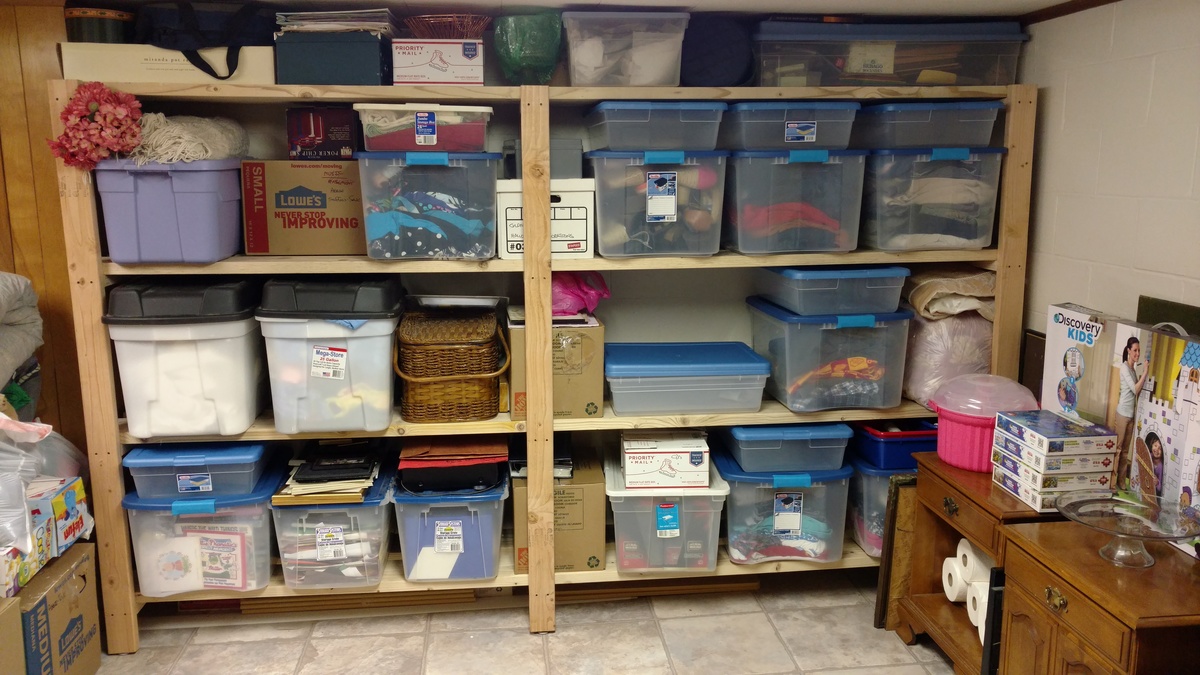
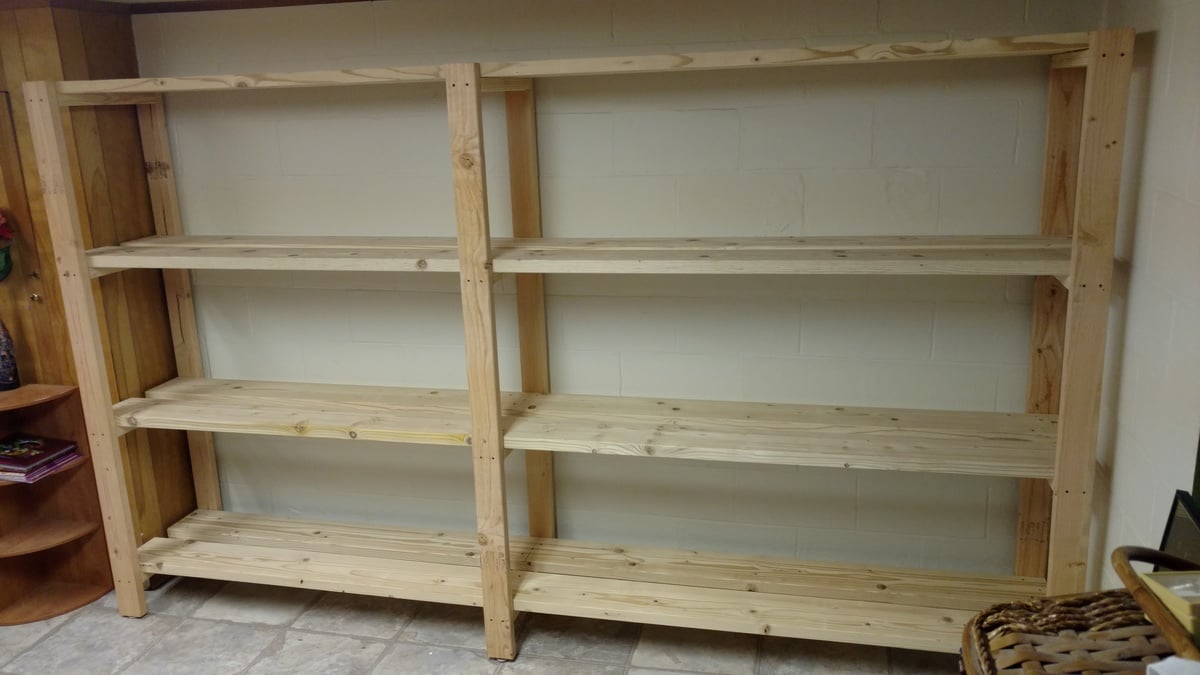
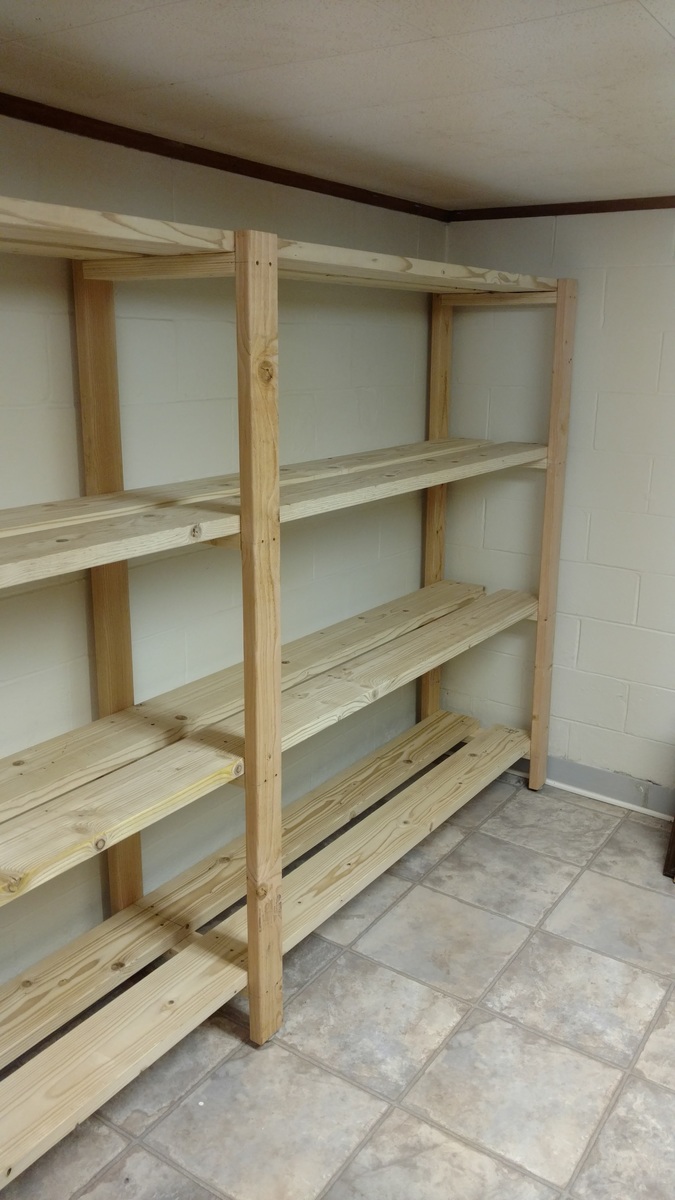
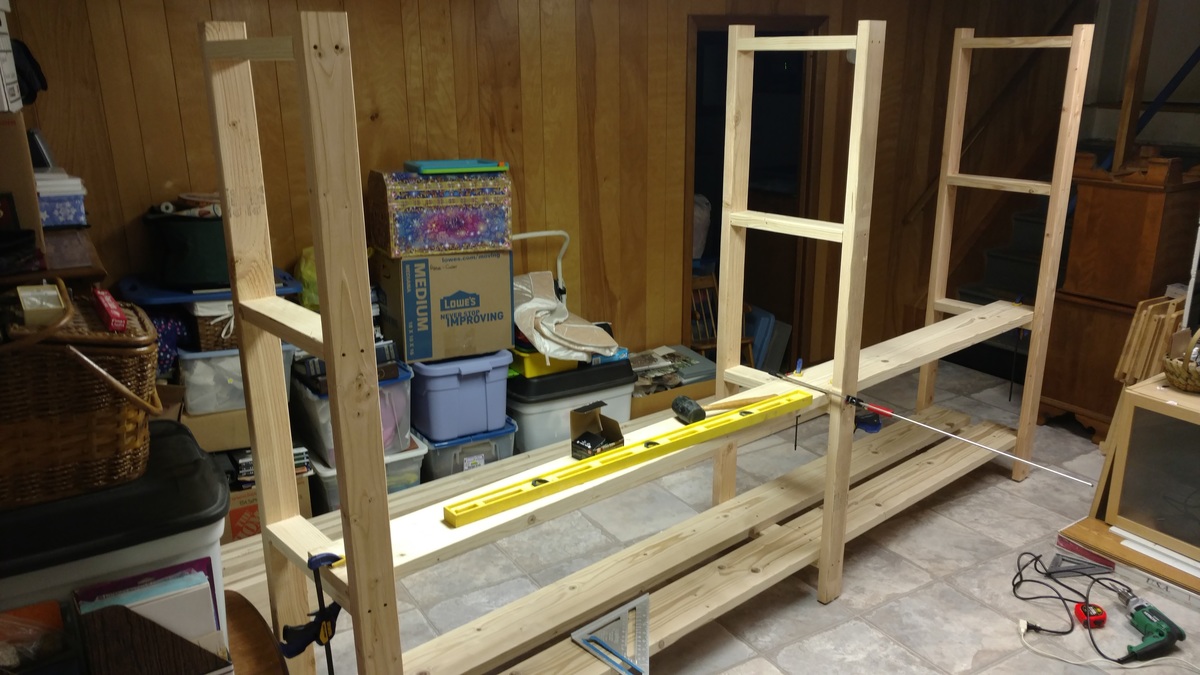
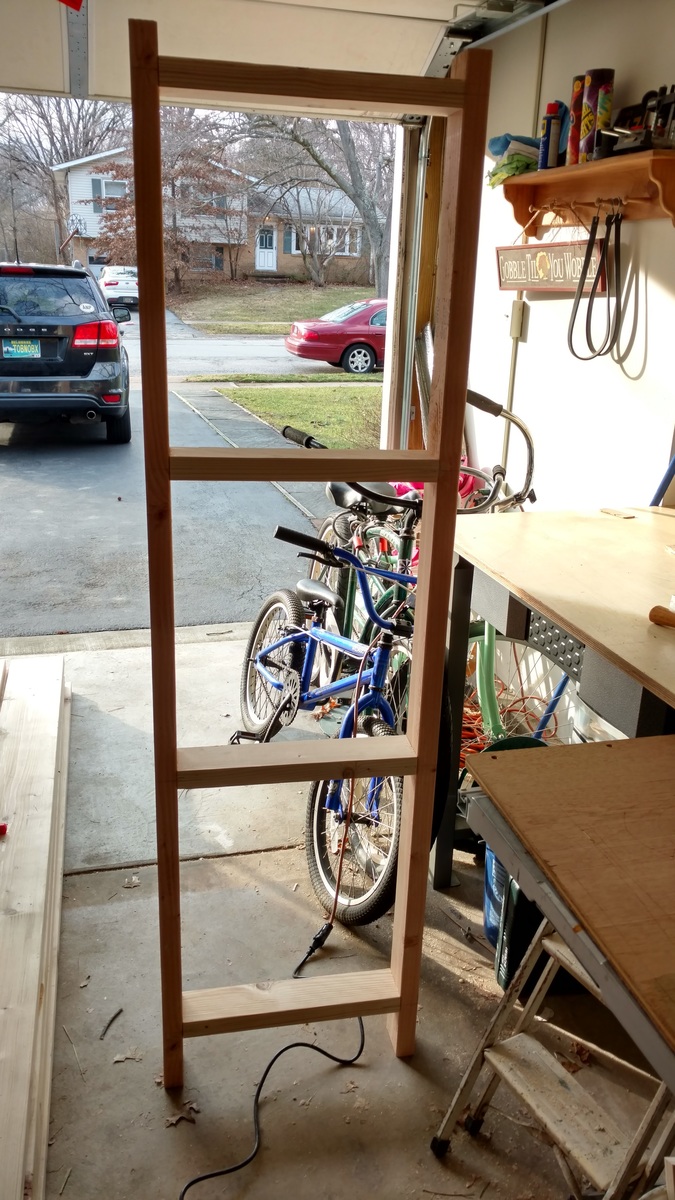
Time to get organized in 2017....and what better way than with some custom shelving. This was not too bad of a project to complete. It only took about 6-8 hours to cut, frame, and assemble everything together (thanks to an interruption or two). 'Twas nice to have a project for once that I didn't have to care about finishing the project with wood filler, sanding, painting. I am sure my wife thanks me more as I would have been another week getting things just right!
A few changes that I made from the original plans:
- used 2x8 for the shelving runs as I only was dealing with a 10ft run and was a few bucks cheaper to buy 8 boards vs 16 boards. Plus less cuts!!!
-installed adjustable furniture feet in the supports to deal with sloping basement floor. Unexpected side effect was it was easier to slide the unit around in the basement as I assembled it.
Outside of those changes I remained faithful to the original design. I didn't bother filling the screw holes as we will be hiding the shelving unit with a curtain once we turn the room into a TV/Office area.
Also as it wasn't 100% clear from the original plans, but the height measurements for the shelf supports are to center... not sure why it didn't register with me right away... but just in case anyone else didn't realize that as well.
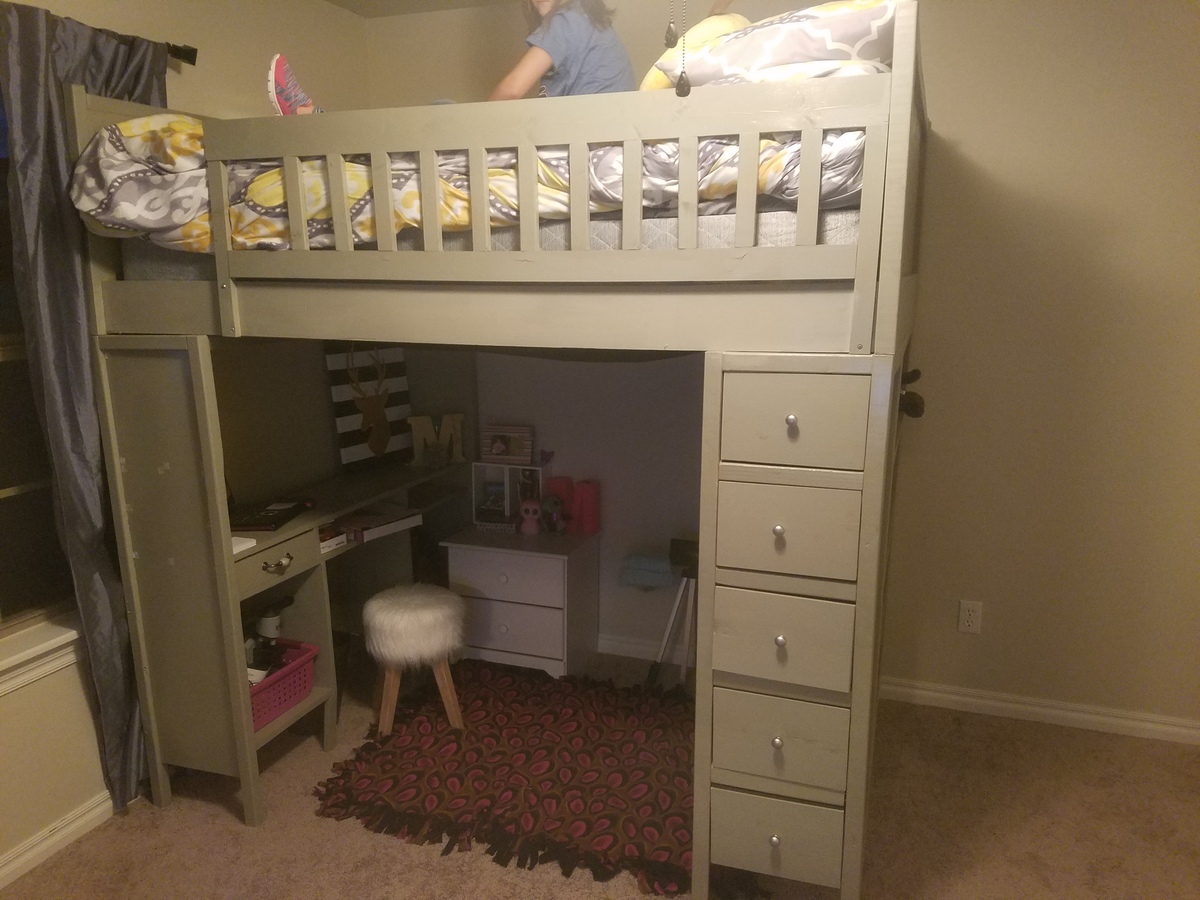
this project was pretty easy over all, I had a little trouble getting the drawers level, but that was about it. I did have to change the measurements to make it a full size bed but it came out fitting perfectly!!
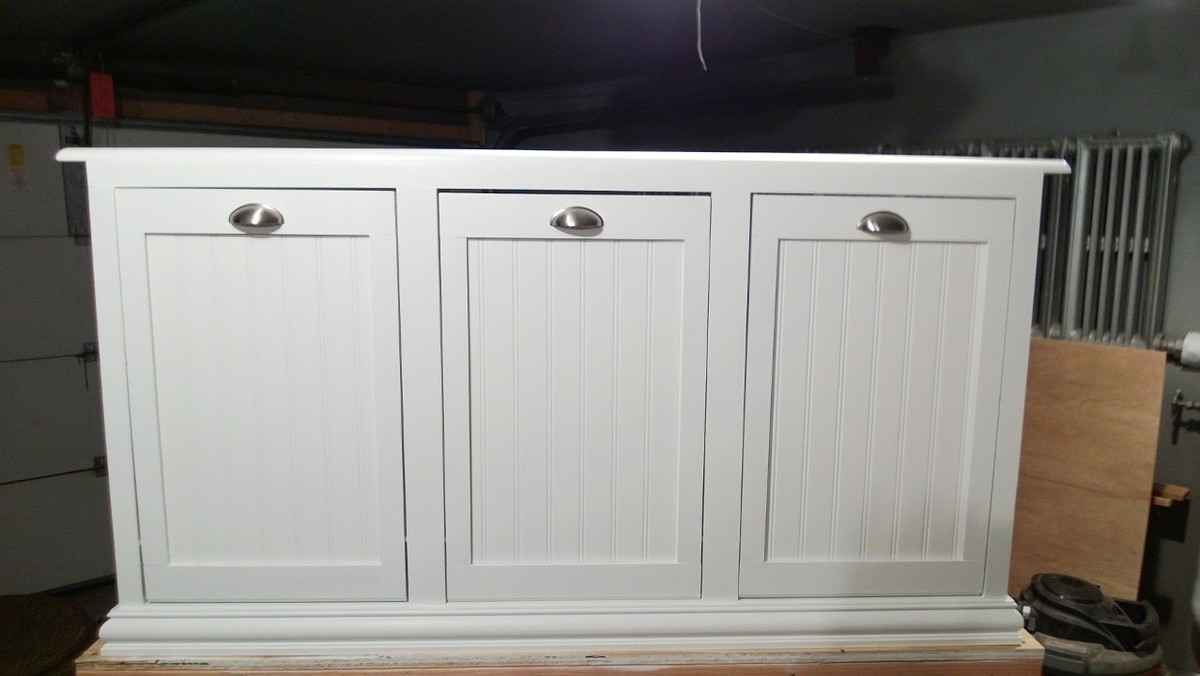
Modified the original plan to meet our needs of a laundry sorter. Had problems with the hinges so ditched them. I used dowels with a combination of a chamfer cut on the bottom of the door. Dado-ed the trim on the doors and slide the bead board panels in. The face frame is all held together with pocket hole screws, which I highly recommend because it eliminates nail holes and keeps the face frame square. This was my first wood working project, took me a little long to get it done. Thanks for looking.
Modified January 28
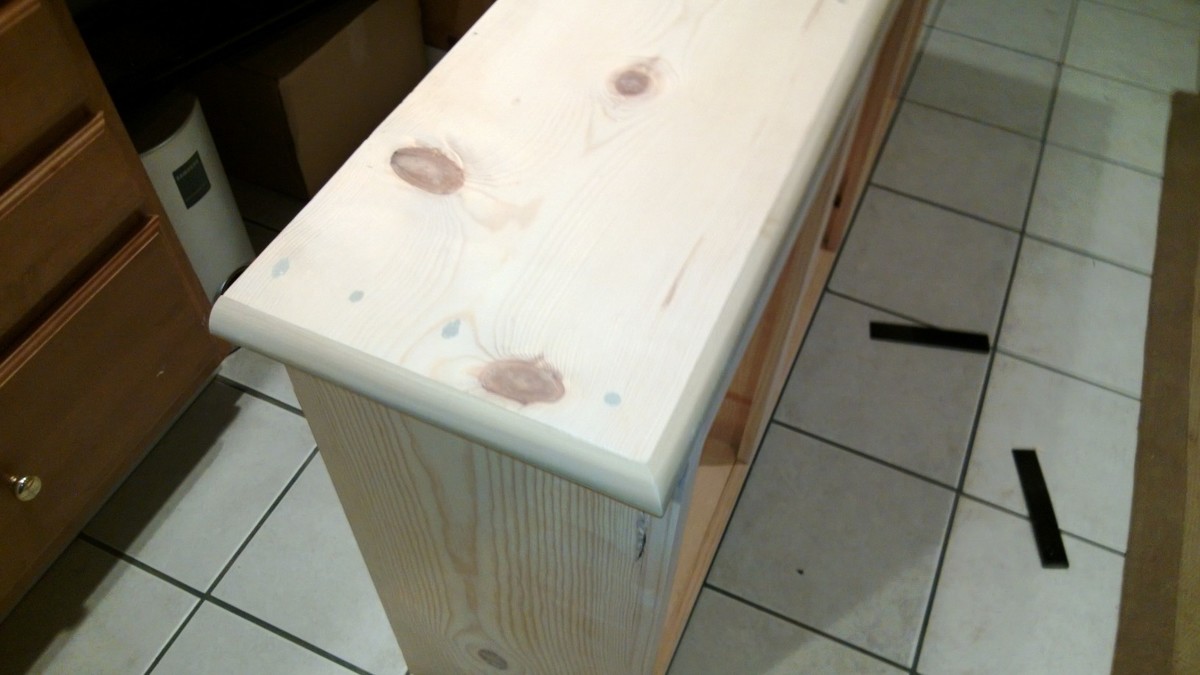
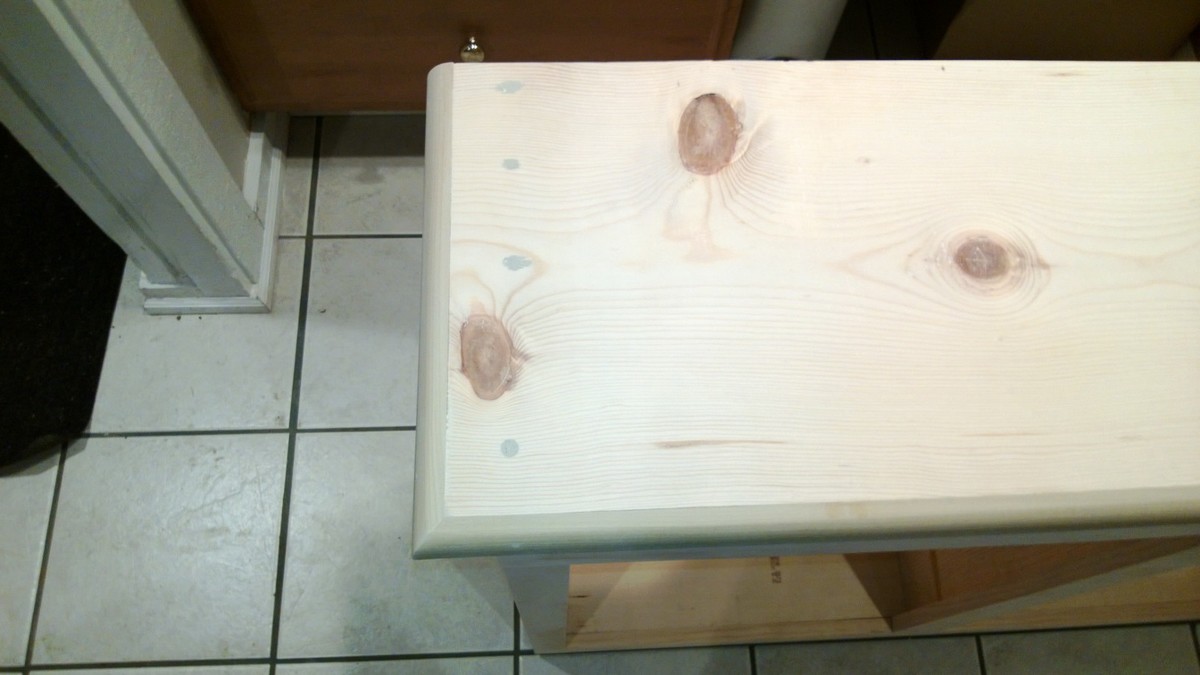
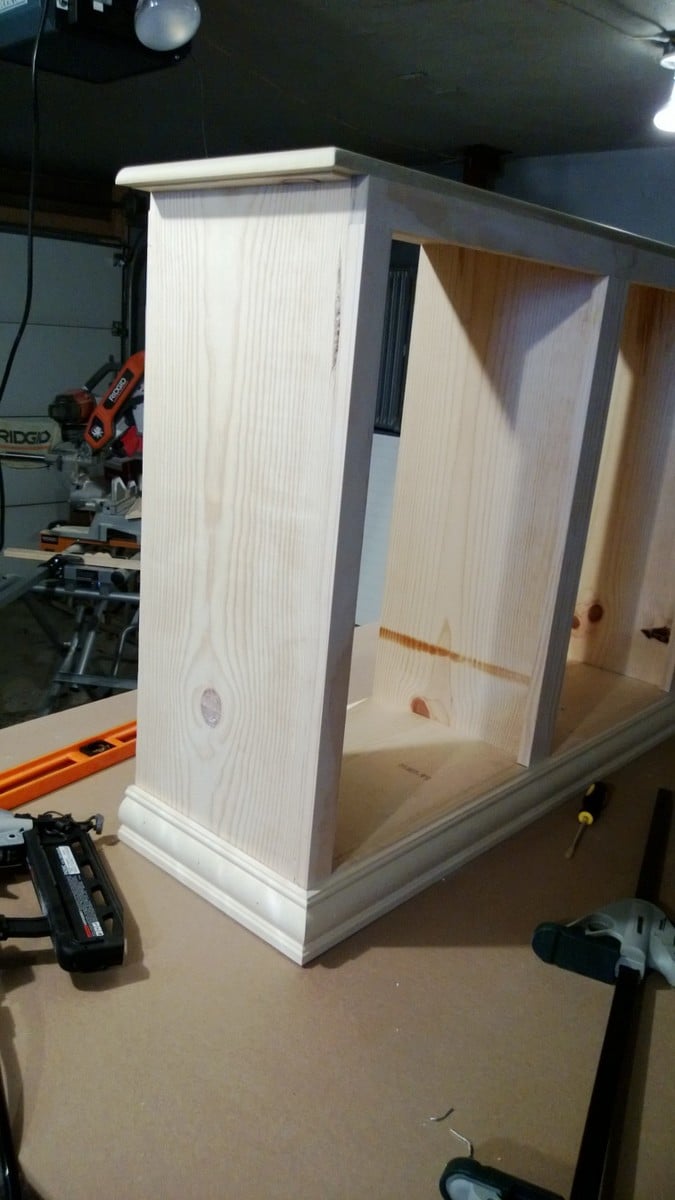
So here are some more pictures of my project. I don't really have any good pictures of the dowels. But what I can tell you is, I drilled holes through the sides of the face frame and the trim pieces and then measured where the holes would be in relation to the "drawer". I then drilled holes in the drawers at those measurements, I was careful to not go to deep. I think I went in half an inch. After that I started at one end and placed the dowels in, then put each drawer in. It wasn't easy but with a little patience it worked. The key is to wax the dowels so they will last longer as well. I also am including pictures of the top and bottom trim. On the top the original plans called for an overhang piece and I didn't like the way that looked. I ran the top board an inch long on each side and then wrapped it in quarter round trim. I did this because I plan on adding the Mimi Hutch Top. The bottom was built per the plan, but I ran into a problem with my bottom trim not being level and you could tell. So I raised the whole unit on 1 1/2 legs then placed it on a level surface and again wrapped it in a decorative trim. The key on both trims was a nice miter joint. Last picture I added was of my stoppers. I took scrap from the 1x2 trim and cut them to an inch and a half or two (can't really remember), then using the Kreg Jig drill bit drilled recessed holes. I then opened the doors until the side 45s were level then mounted the blocks on each side. I feel that it is better than a chain or string catch. Again thanks for looking and I hope I answered all of your questions.

Tue, 01/22/2013 - 11:29
Dowels! What a great idea! Would you mind sharing how you did it? Could you possibly add some pictures showing the dowels? You did a great job. It looks beautiful.
In reply to Dowels! What a great idea! by moosmani
Tue, 01/22/2013 - 20:11
Yes I will send you the info you requested, I'll try to get it out to you tomorrow or Thursday.
Wed, 02/15/2017 - 11:05
Can you send the plans to me?!?! I need this for my new home! [email protected]
Thu, 01/24/2013 - 09:27
I love what you have made! Could you post pictures of the top and the bottom trim? I'm very impressed that this is your first project!
Sat, 11/16/2013 - 18:23
I am a little confused. I love the three bin laundry sorter, but everyone is mentioning plans. I am not finding plans for it on the site. Also, what goes in to hold the clothes? There may be obvious answers, but I am not seeing them. I'd appreciate any help you could give.
Tue, 12/02/2014 - 02:58
I've been thinking of working up one very similar to this, also with 3 bins, but I didn't want to use chain either. Those stoppers will be ideal - do you put them on both sides or is one enough? Thanks for the share!
Sat, 01/24/2015 - 11:29
Hi-
Im not sure if you still have the plans to this awesome project, but if you do, would you be able to share them with me? Ive been looking to make something like this forever, but just couldnt find any help!
thanks,
karah
[email protected]
Wed, 02/25/2015 - 12:35
If you still have these plans, could you please send them to me? [email protected]
THANK YOU!
Wed, 02/25/2015 - 16:45
I am searching for the plans for the gray corner entertainment center. Does anyone still have them that could email it to me….
Tue, 01/19/2016 - 17:43
Hi there! If you still have the plans for this I would love to have them! Thanks a lot
Tue, 04/12/2016 - 18:51
I would love to have the plans for the laundry bin if they are still available, Thank you!
Wed, 02/15/2017 - 07:16
Can i also have the plans! This is perfect for what we want to do in our laundry room
Wed, 02/15/2017 - 11:24
Can you please send me the plans! [email protected]
Mon, 07/10/2017 - 04:19
I absolutely LOVE your laundry sorter!!!! You did a fabulous job and the TRIM, WOW amazing!!!! I've searched Ana's website and cant find the plans' could you please email me the plans to [email protected]. I started building my own furinture back in October 2016 and the reward is amazing... Keep up the good work.
Happy Building,
Lisa
Tue, 01/16/2018 - 19:55
Love this! Can you email the plans to [email protected] please?
Thank you
Tue, 01/16/2018 - 22:18
I'm too new at woodworking to be able to tackle this right now, but would love to download the plans for future. My most successful project so far is a pretty standard bookshelf. I got a free plan, with lots of guidelines and explanations, at https://tinyurl.com/ydeup8lo -- it came with a 440 page guide, "The Art of Woodworking" that has tips and techniques, and am plowing through that right now.
Wed, 02/28/2018 - 12:53
This is amazing. I am very new to woodworking. Could you send me the plans please? I would be most appreciatative
Wed, 03/11/2020 - 23:27
I would love to have the plans for the three bin laundry sorter to build for my laundry room. Are the plans available? Awesome work!
Thu, 07/16/2020 - 14:14
Looks amazing!! I want to build one just like that, can you please email me the plans, thanks!! [email protected]

Tue, 01/12/2021 - 06:26
This looks like something I can build. Would you please e-mail me the plans? The address is [email protected]
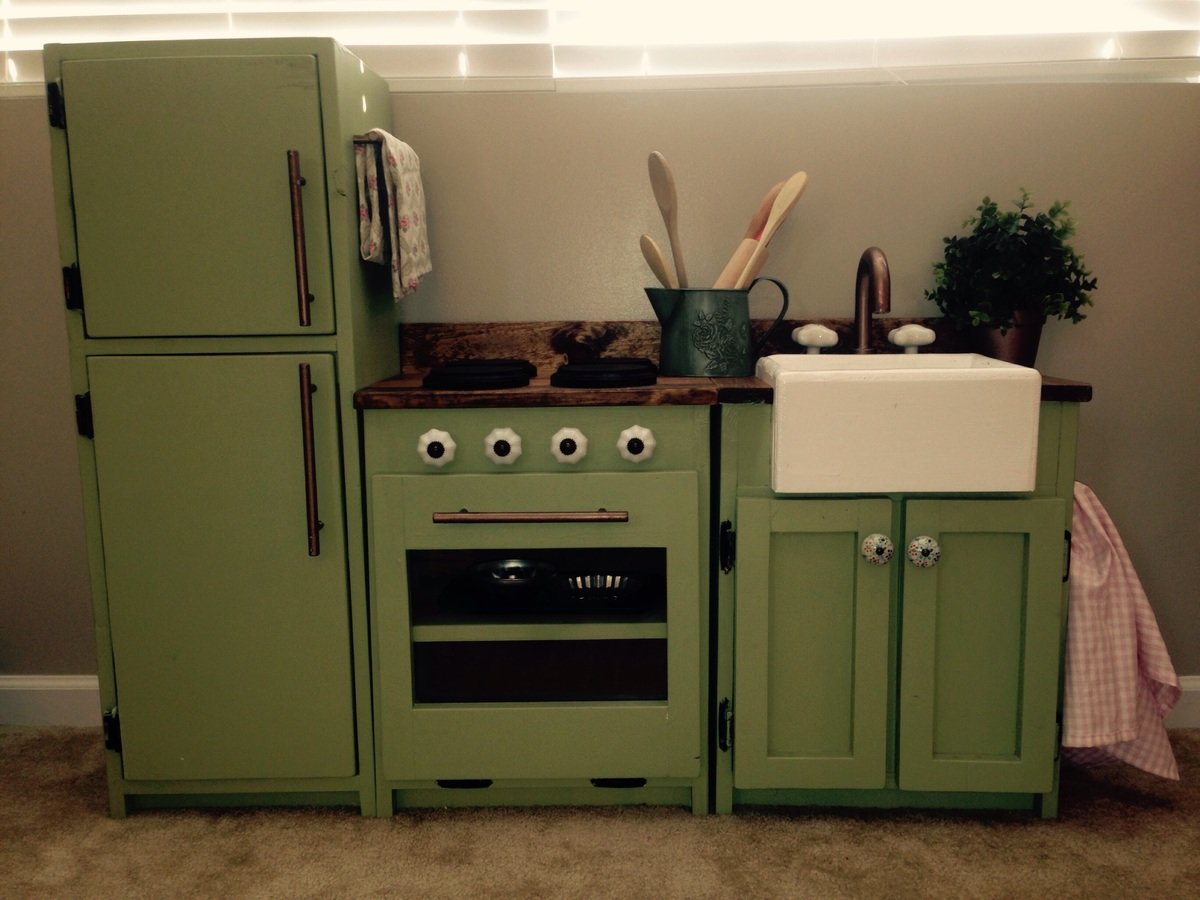
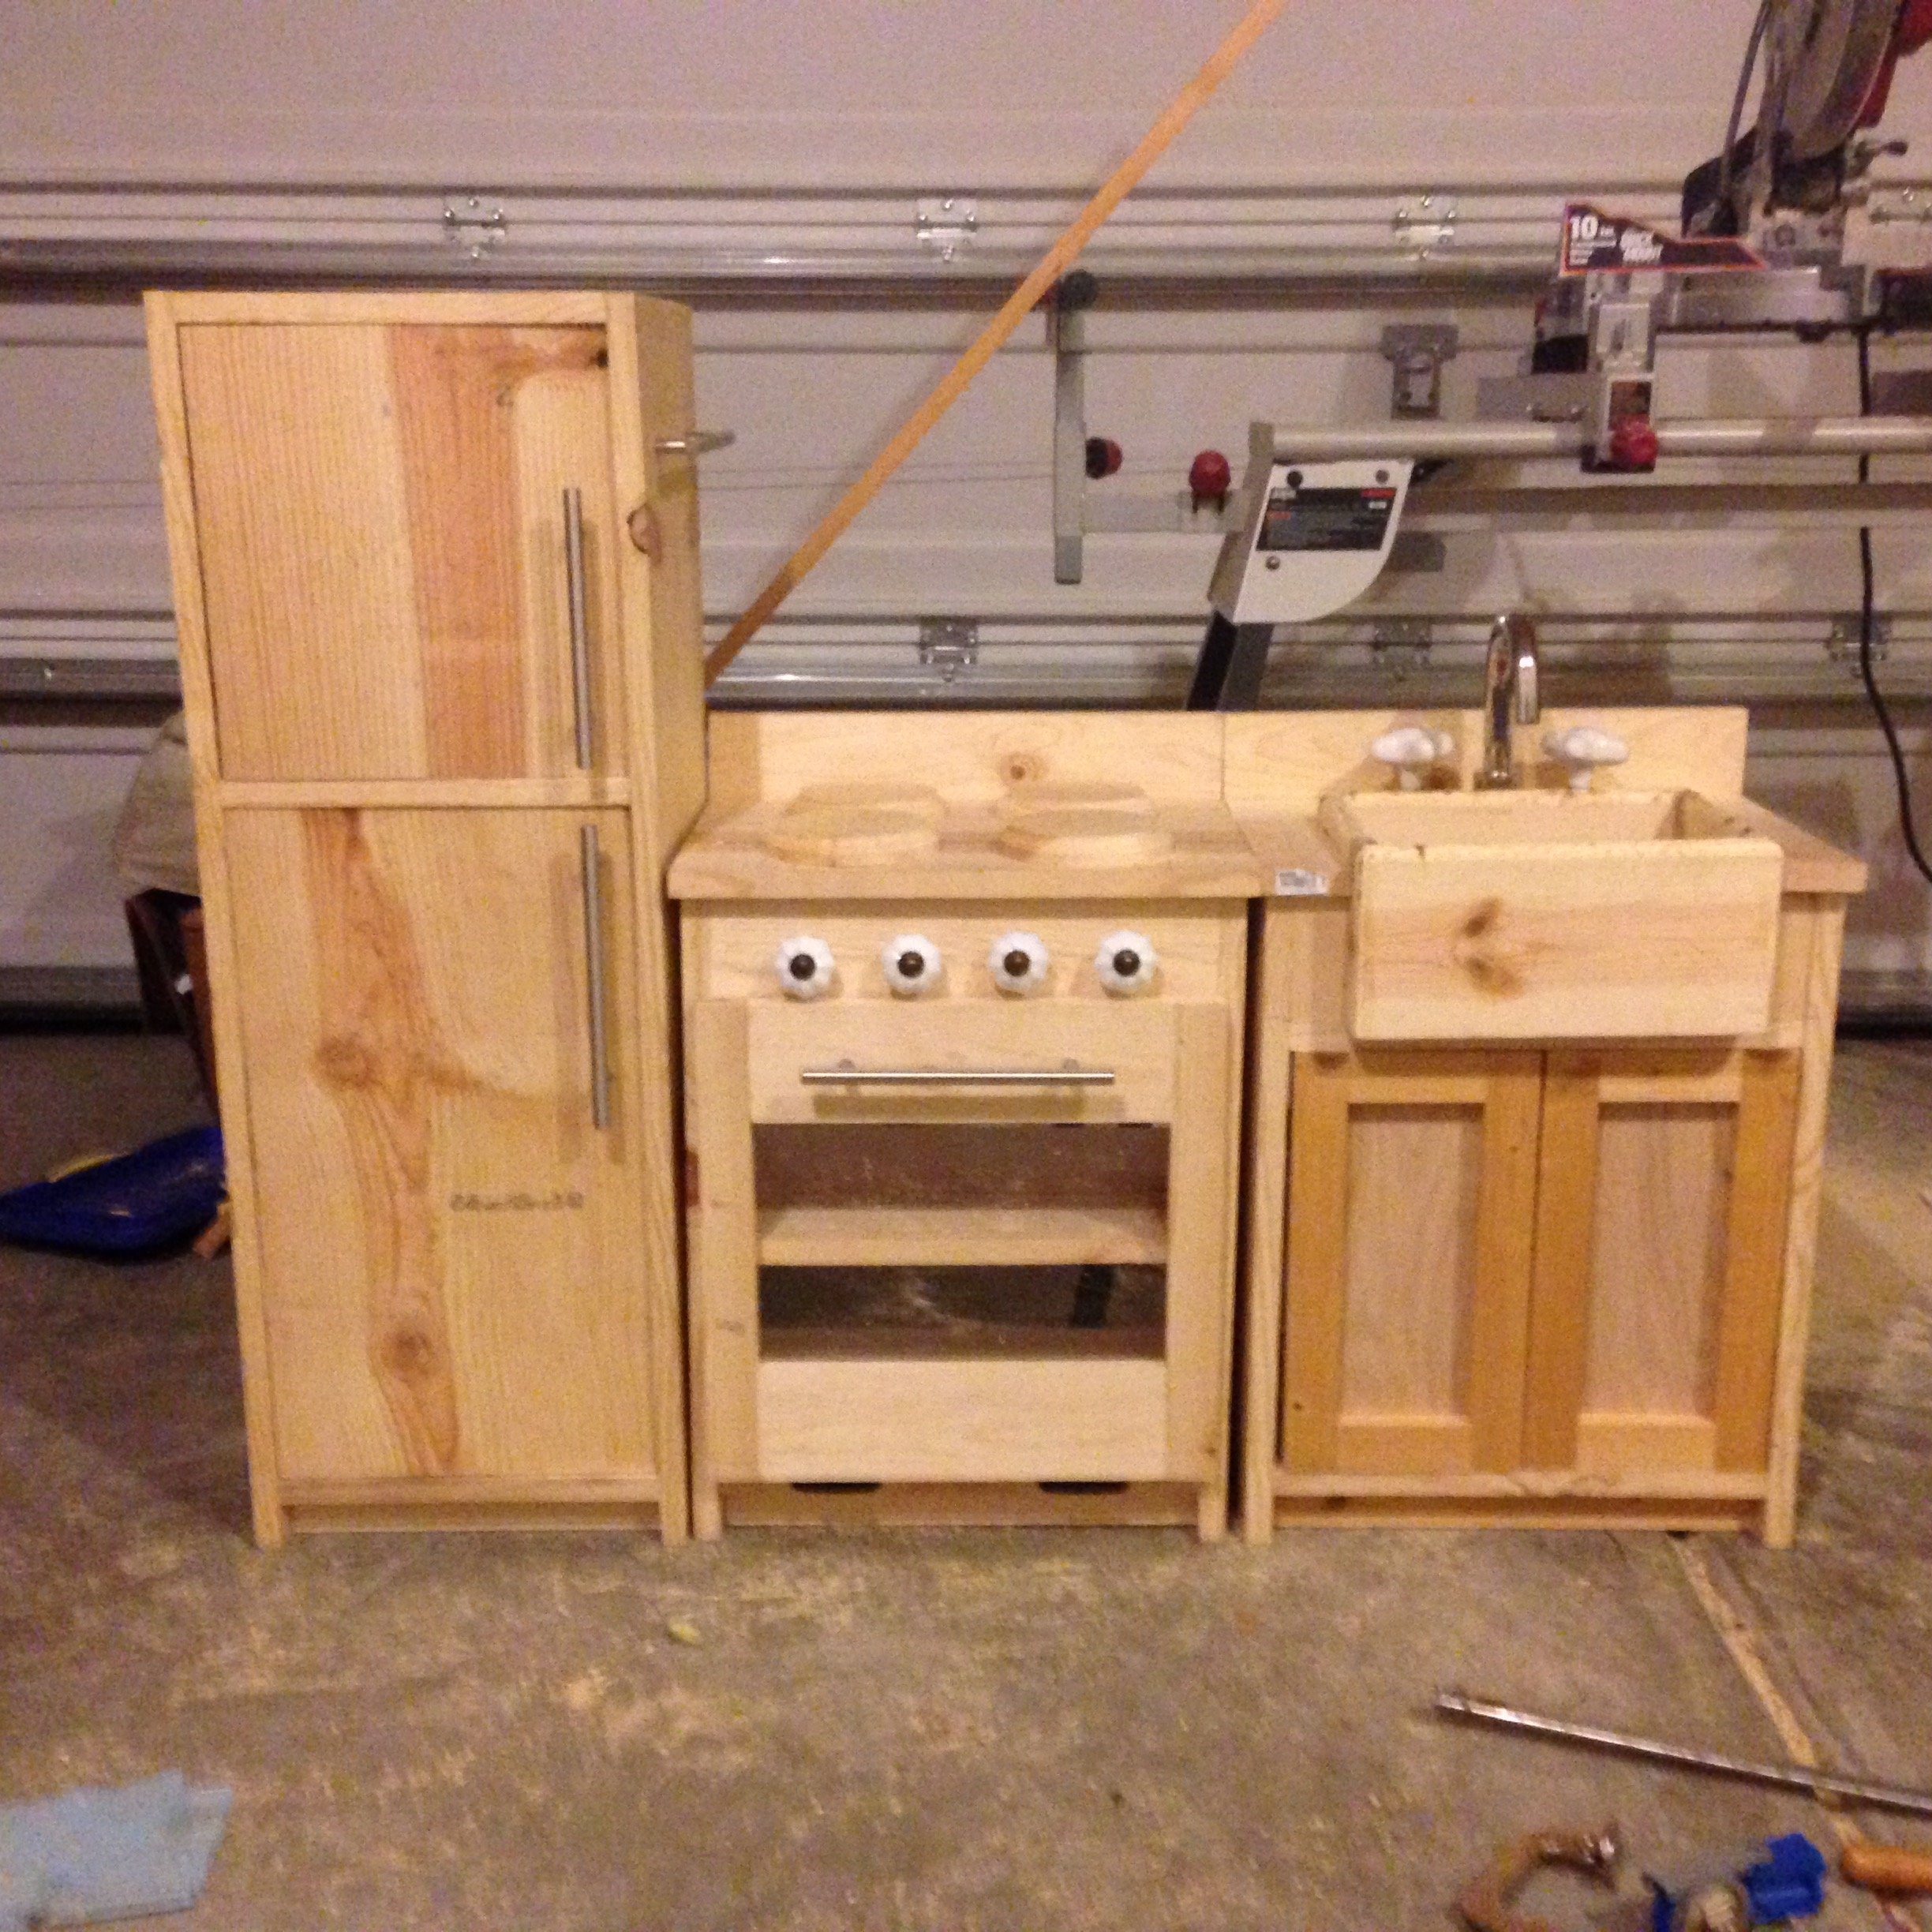
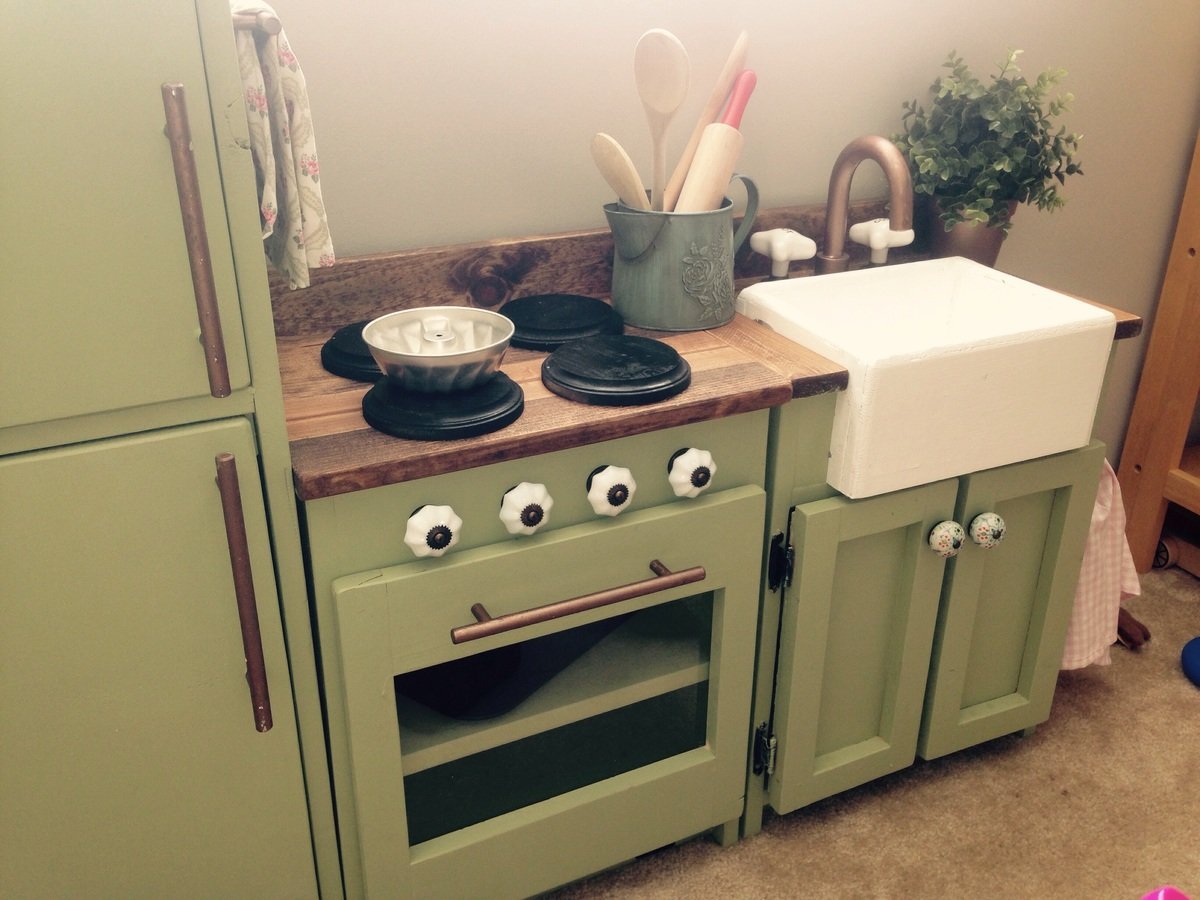
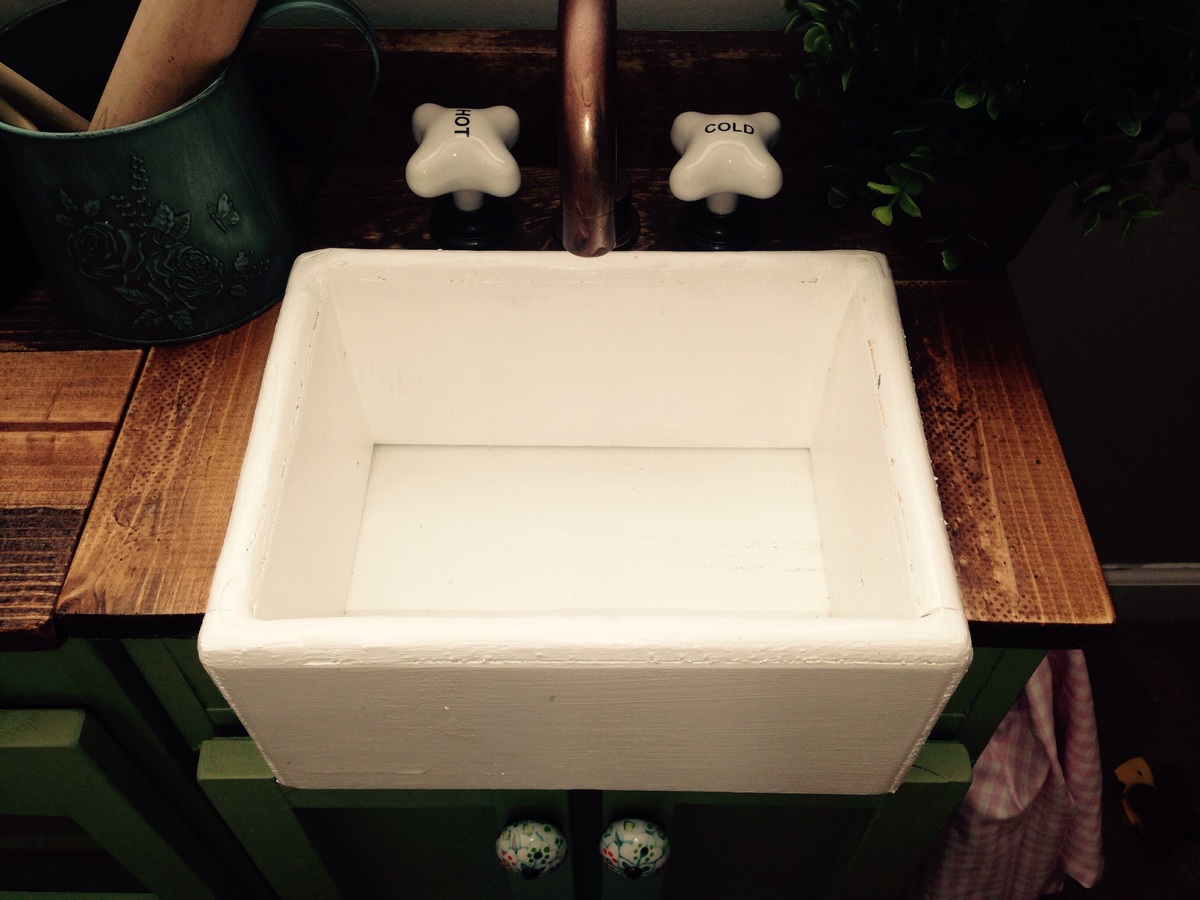
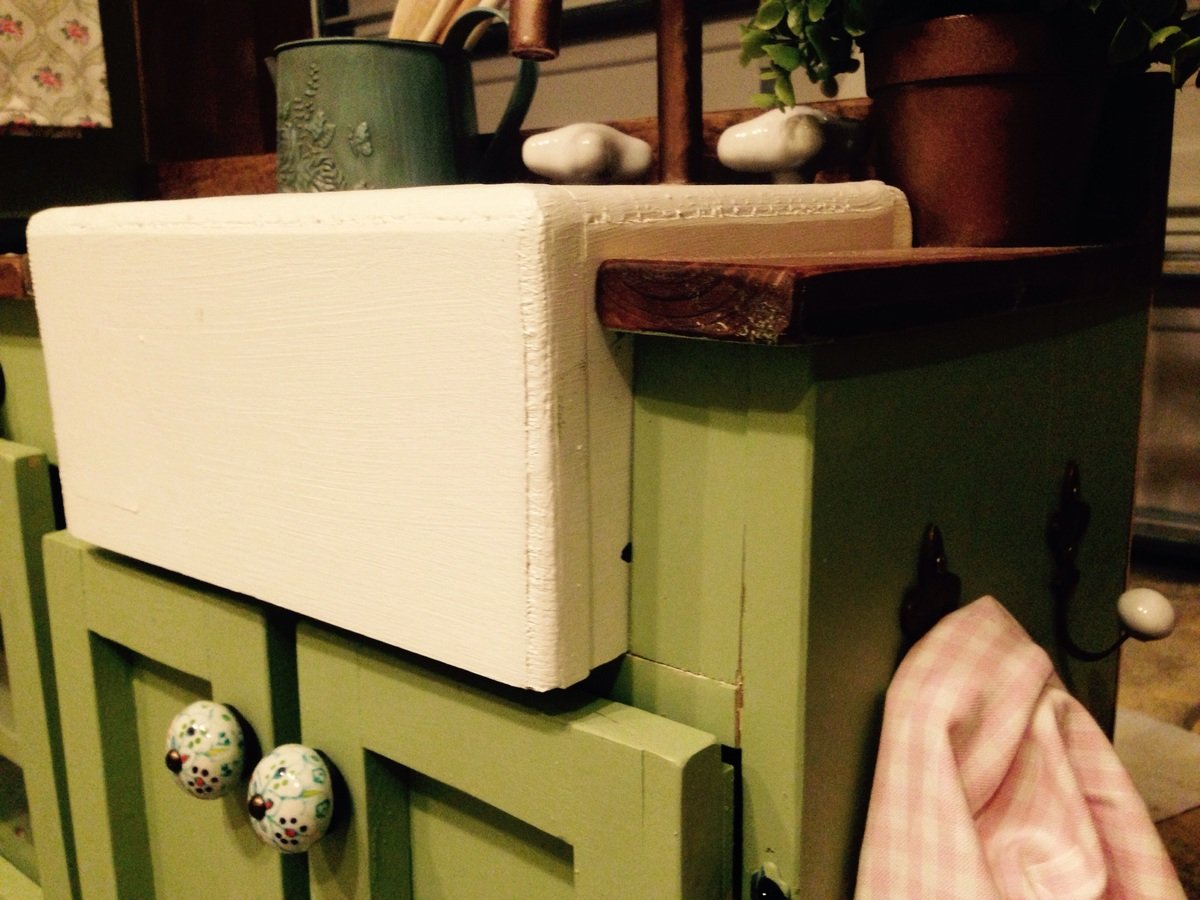
We really wanted to give our 2 year old a play kitchen for Christmas. We also didn't want to spend the money on the likes of the Pottery Barn set, and weweren't sold on the lesser-expensive options. Fortunately, a quick internet search led me to Ana White's website and plans for this play kitchen. As someone who has never built anything before, the plans seemed very doable. All of the brag posts were also inspirational and sold me on starting this project. I worked on this an hour or so after work for a couple of weeks, and then a few longer nights running up to Christmas Eve (always a bit of a procrastinator!). As neither my wife or I know how to sew, we decided to turn the space underneath the sink into a cabinet. The paint color was left over from painting our kitchen and family room, and we decided to stain the stove and counter tops. Overall, we are very pleased and proud with how this turned out, and our 2 year old loves playing with the set!

Wed, 12/31/2014 - 13:15
This looks awesome! Love all the details and the green color with the stained counter. Great job!

Wed, 12/31/2014 - 15:17
This is so adorable. I especially love the little sink.
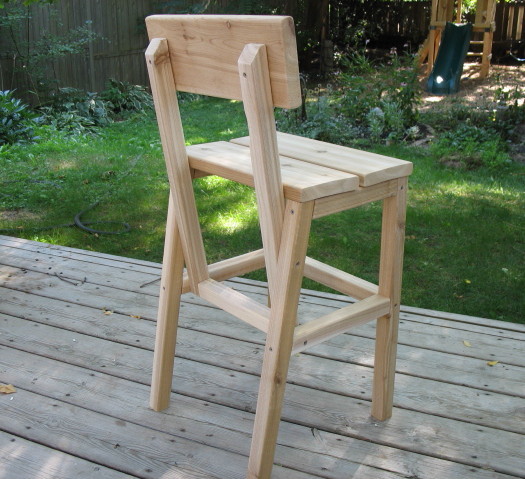
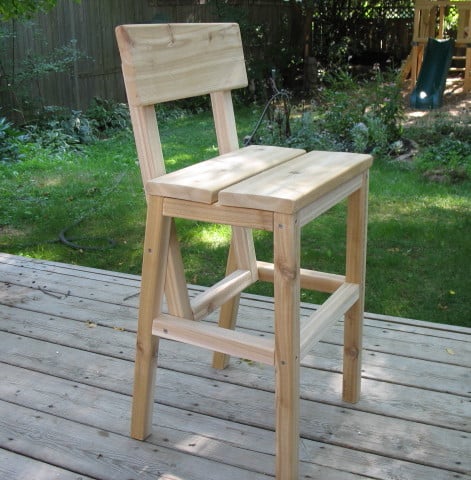
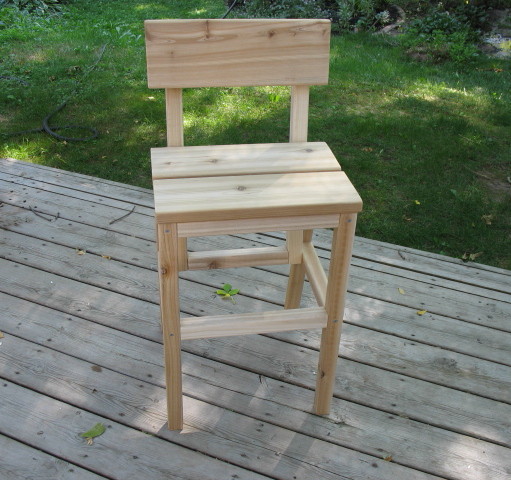
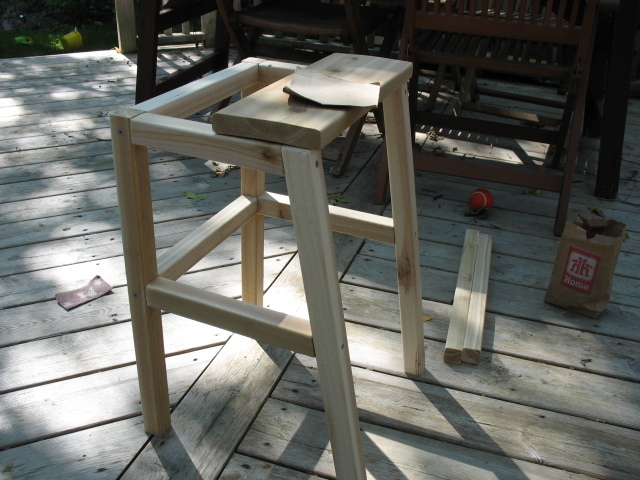
I used cedar deck boards and rails to make this chair - A little more costly, but definitely worth it!
The seat and back rest were made using 5/4 x 6" boards. I cut them 1/2" to 3/4" longer so that they would overhang the supports - for a more finished look. The 2x2 rails came with an angled cut, so I decided to use that to my advantage on the back supports - I made them a bit longer so they would sit higher on the back rest, and I think the angled cut looks a little more "friendly". All screws were left exposed, since this is an outdoor cedar chair.
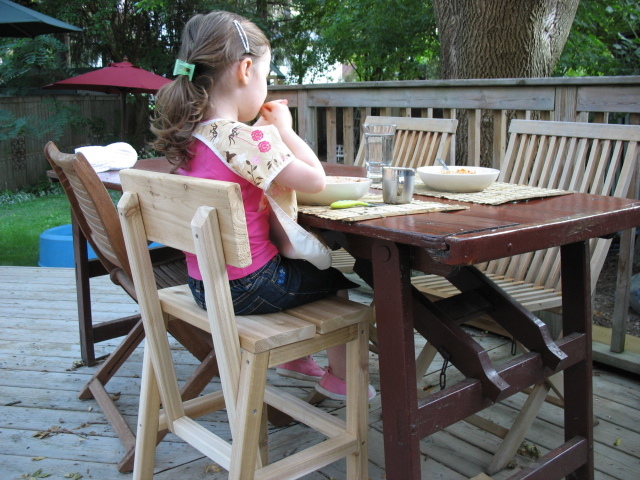
The table in the photo is an original picnic table from the 1920's, complete with the original paint. It folds flat for storage. I hope to measure it someday and make a plan to build a reproduction - If that ever happens, I will post it on Ana's site.
Thanks Ana for the great plans!

In reply to Just beautiful! by dananryan
Wed, 03/06/2013 - 11:48
Thanks So Much! :)
In reply to Thanks So Much! :) by Tea Granny
Wed, 03/06/2013 - 11:50
Thanks So Much! :)

Fri, 03/08/2013 - 19:43
The chair looks beautiful! You did a great job! I love the contrast of the outdoor table and this chair! Thanks for your post!
In reply to The chair looks beautiful! by Ana White
Sun, 03/10/2013 - 14:48
Oh My Goodness!! Thank you, Ana!! I'm sure you're very busy and I'm honoured by the fact that you took the time to comment on my chair! You've made my day!
Fri, 05/17/2013 - 00:48
Hey,Wow the chair structure is so cool .Really good work done .
unique wedding favors
In reply to Hey,Wow the chair structure by EdmonsonWilliam
Mon, 05/20/2013 - 10:06
Ana has the greatest plans, doesn't she?

Steps:
1) Cut the boards to the specs below or adjust to your space
2) Kreg Jig the cut boards along each of the sides (length wise and on the ends) for attaching and making a box.
3) Make 3 separate boxes, don't assemble until you move to location. I used 4x4 cedar posts in the corners of the base box to add stability. I used 2x2 pine in the front corners of boxes 2 and 3 for stability. Install these after the dirt has been added so you can hammer in as a stake, attach with screws on front and sides. I created 2 stakes for boxes 2 and 3 and added to the front to prevent bowing when the dirt is added.
Box Dimensions:
1) (base) 70.5" L x 46 W x 4 cedar boards high
2) 70.5" L x 32 W x 2 cedar boards high
3) 70.5" L x 16 W x 2 cedar boards high


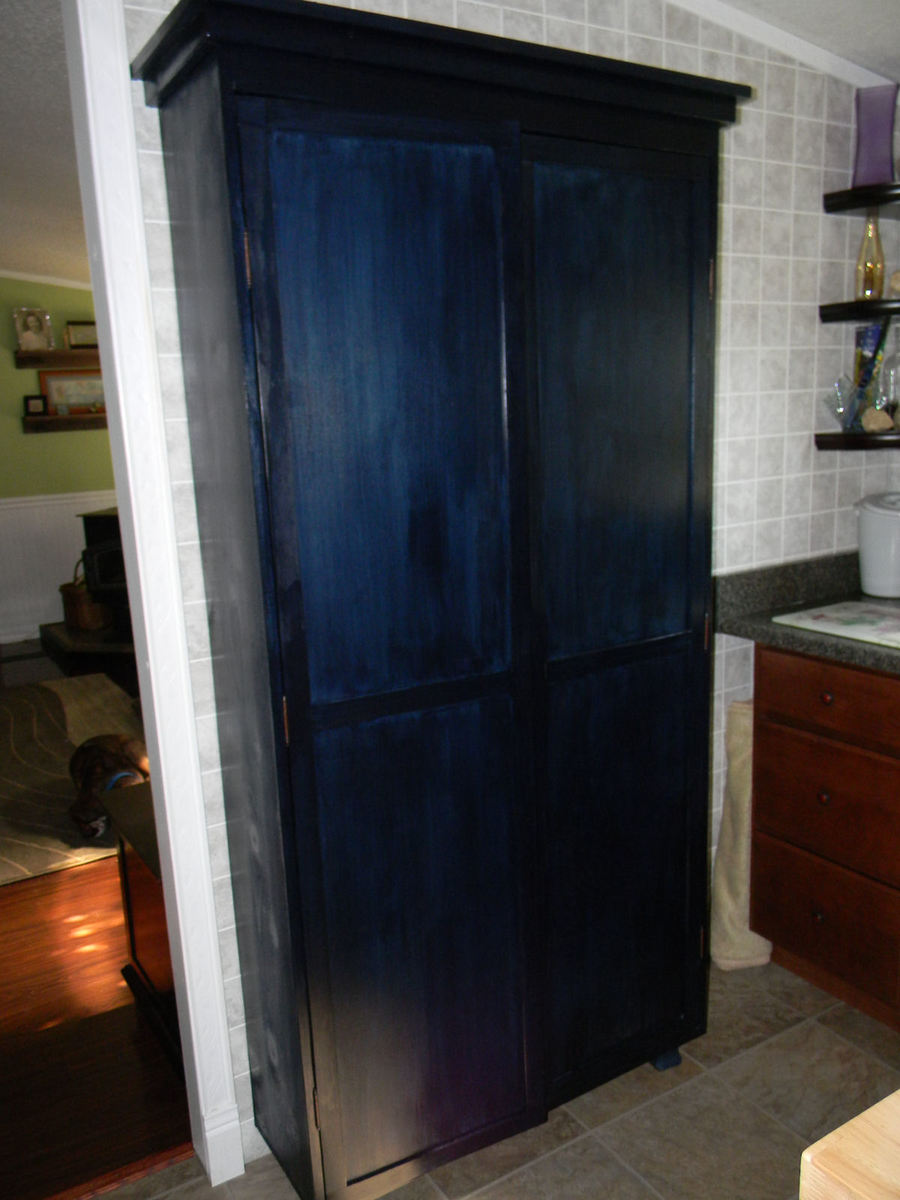
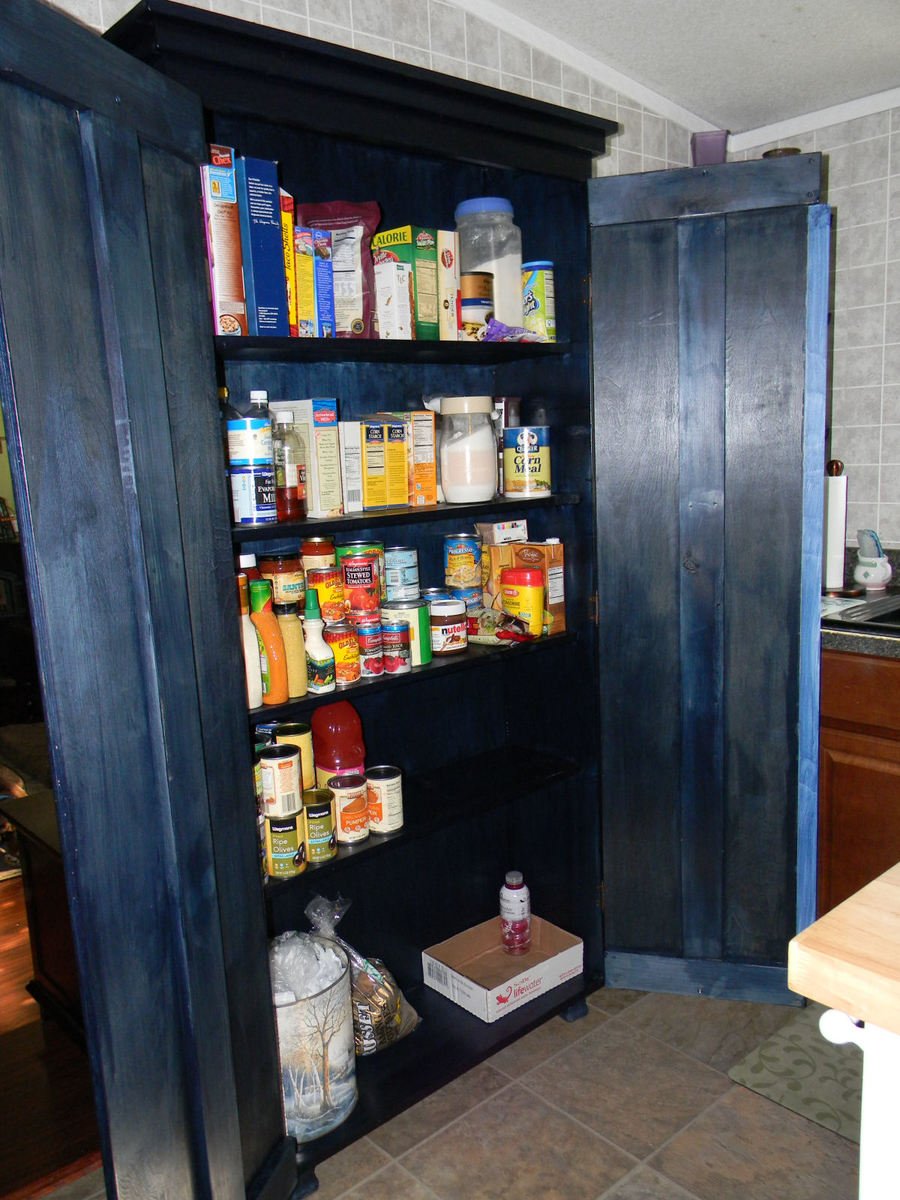
I ABSOLUTELY LOVE THIS CABINET! It's the perfect finishing touch to our kitchen remodel. We are still waiting on the finishing touch; a hand-polished Hoosier style latch for the doors. We found them at House of Antique Hardware. I will say that this cabinet required "non-mortising" hinges, ones that don't require you to dig out anything in the wood and that don't bulge up together in the space behind the door. These were nearly impossible to find in our town in a small enough size, even with the two big box stores and smaller hardware shops. We had to order them online HardwareSource. These were cheap at this source and we even ordered two styles in case we didn't like one of them. A local shop could order them for us @ 6 hinges for 48$!! The ones we found online came to $17 with shipping.
We modified our cabinet a bit because we wanted it to have feet that were different than the original plan. I have a thing about cabinetry that I can't see under! So, we just made the cabinet flat bottomed instead of having the bottom shelf sit higher and the facade on the bottom front. We also added I-frames to the interior of the doors because we have high humidity where we are and we thought it might help keep the doors keep their shape over time.
After building just the bookshelf part, we kept looking at it like we couldn't believe we built it. It's really beautiful. We do a lot of remodeling, demolition, and rebuilding in our home, but have always been intimidated by building furniture until finding this site.
My husband was so jazzed by our newfound furniture building skills that he built the planter/trellis for his mother last weekend for her birthday right after we finished this project. Pictures of that will be forthcoming as soon as we plant the rosebush in it. Thank you Ana White!!!!
Wed, 06/29/2011 - 10:19
We are moving into a home that doesn't have alot of storage so I'm looking into building this. But depends on the cost. About how much would you estimate that this armoire pantry cost to build? PS- I love the look and color of yours! Awesome job!
In reply to We are moving into a home by Nicole S (not verified)
Thu, 12/29/2011 - 20:14
Wow. Sorry I just realized your question was here! I would say we spent about 120$ on wood and finish products.
It was much less than buying the perfect piece of furniture somewhere else. For us, this piece, in this finish was THE perfect piece of furniture. I still love just looking at it in our space.
Tue, 07/12/2011 - 03:55
We used birch plywood for the back and the doors so it was a bit pricier because we wanted something that was already a smooth finish without much sanding. I would say all together with the stain and the Hoosier latch we ordered for it the cost totaled almost $150. The wood cost was about $90, plus we purchased feet, stain, hinges, and a latch.
We LOVE this pantry in our kitchen and although it took a week to build this and have it ready for use, it was worth it to take our time and put care into building something we love. It was our first project and it has inspired us to build a ton of stuff in just a few weeks since.
Good luck!
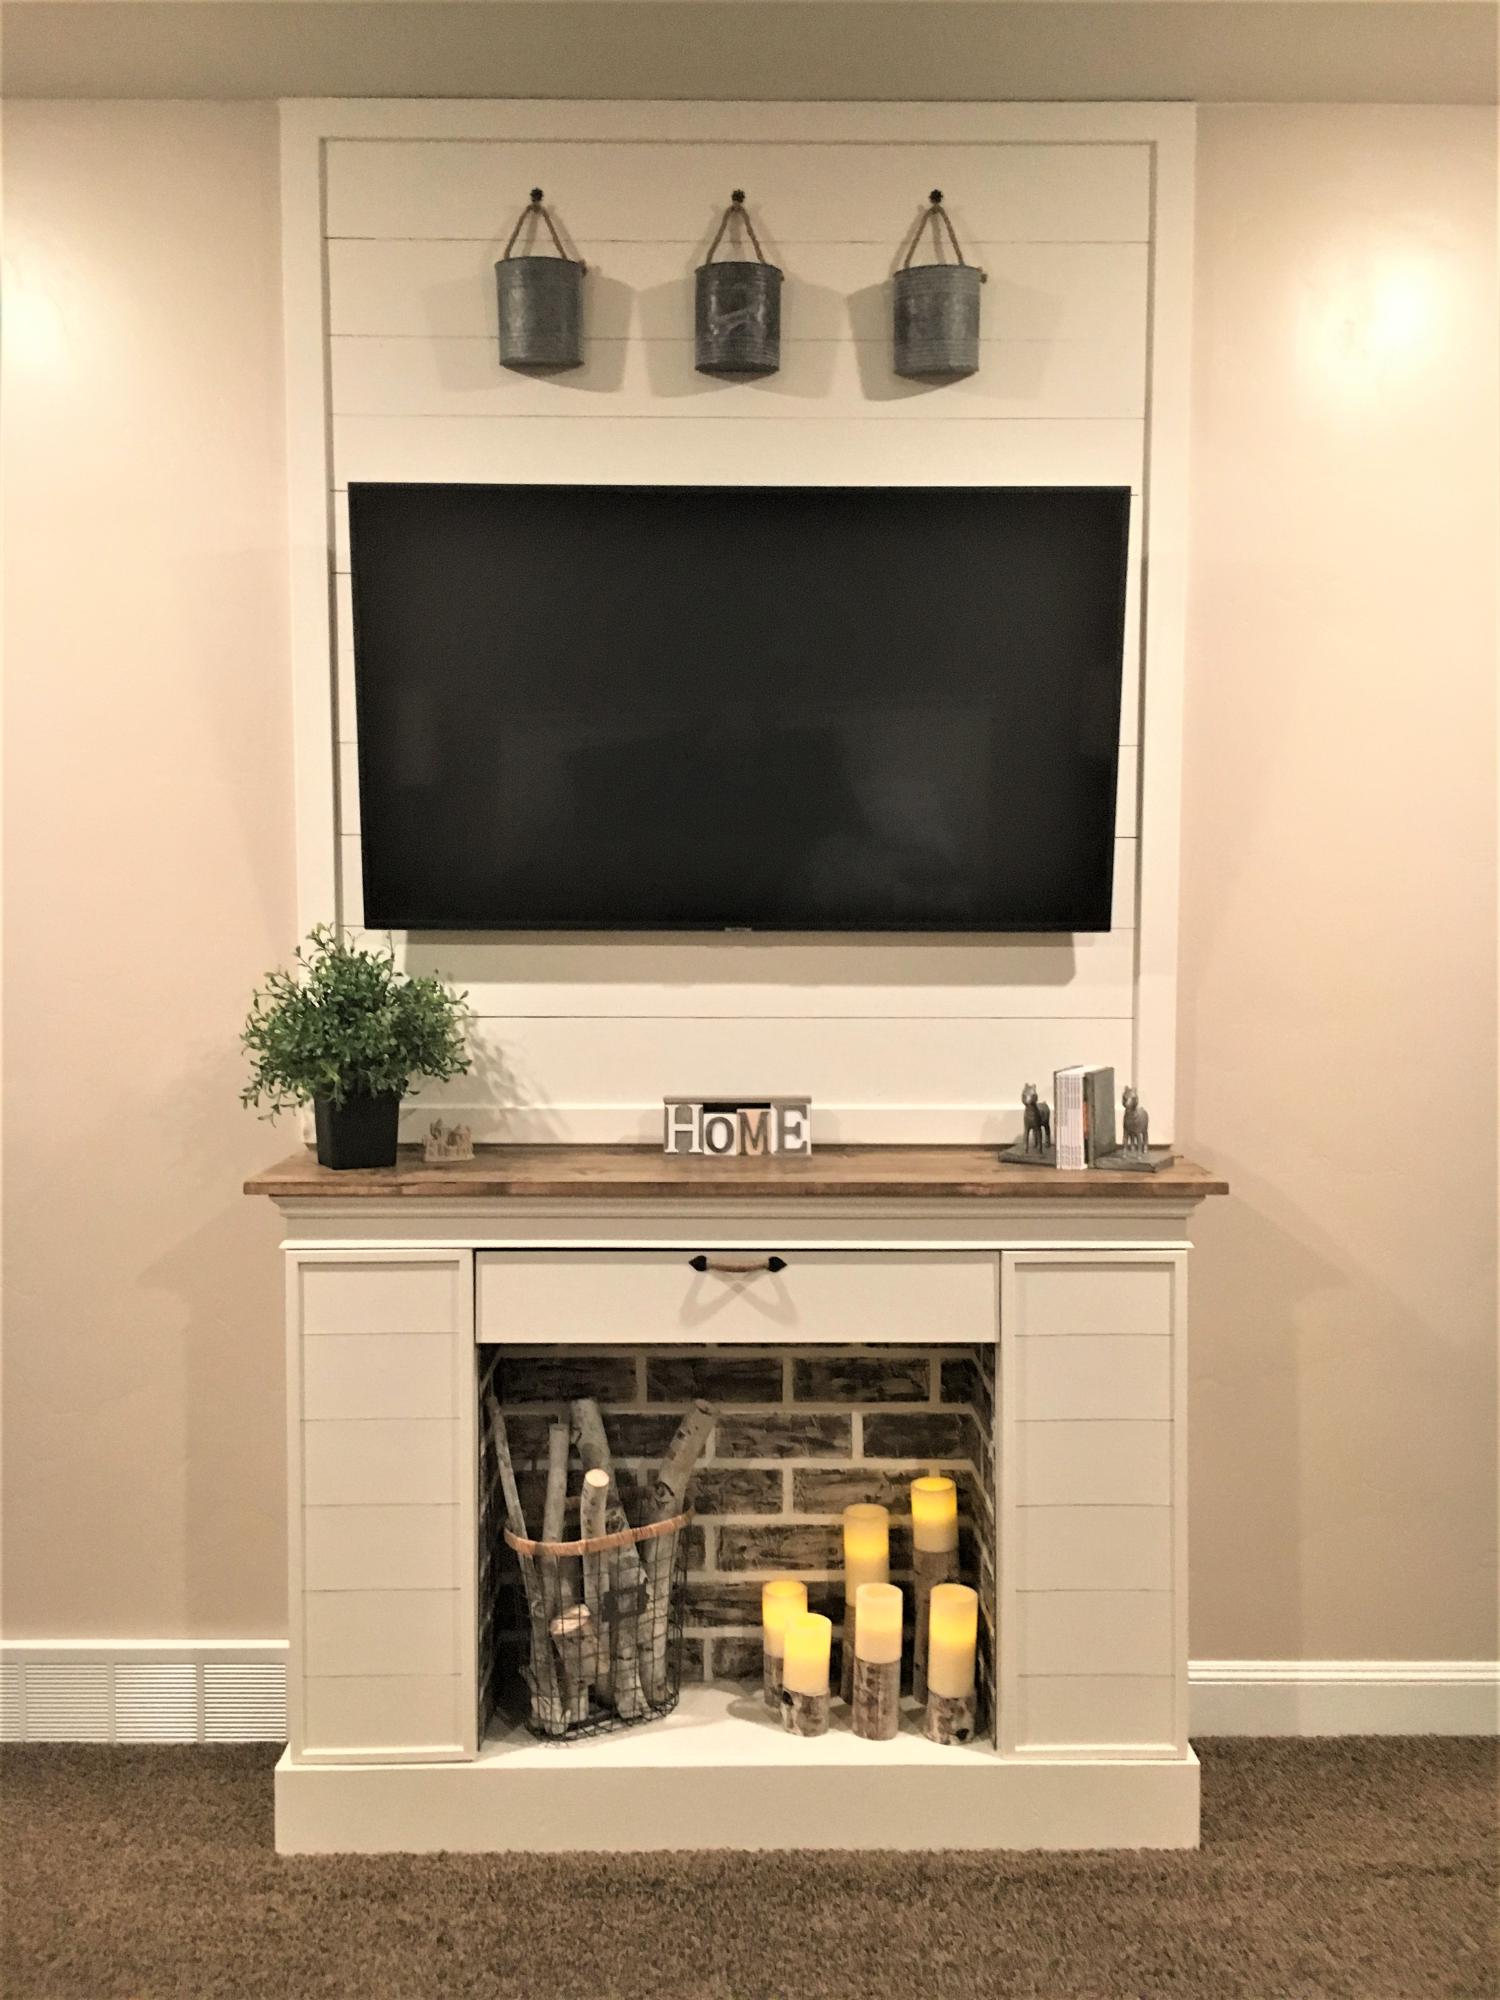
I slightly modified my build. I kept the same dimensions as the plans, but made the top shelf 7” from the top to allow for a bigger firebox. I added faux brick made from masking tape, joint compound and chalk paint. I changed the molding a bit and used 3” pine slats for the top. Inside I added 3 shelves, attached with pocket hole screws, to fit in as many DVD’s as possible. Overall this was an easy build. It took me almost as long to paint it, as to build it. Thank you Ana for the plans!
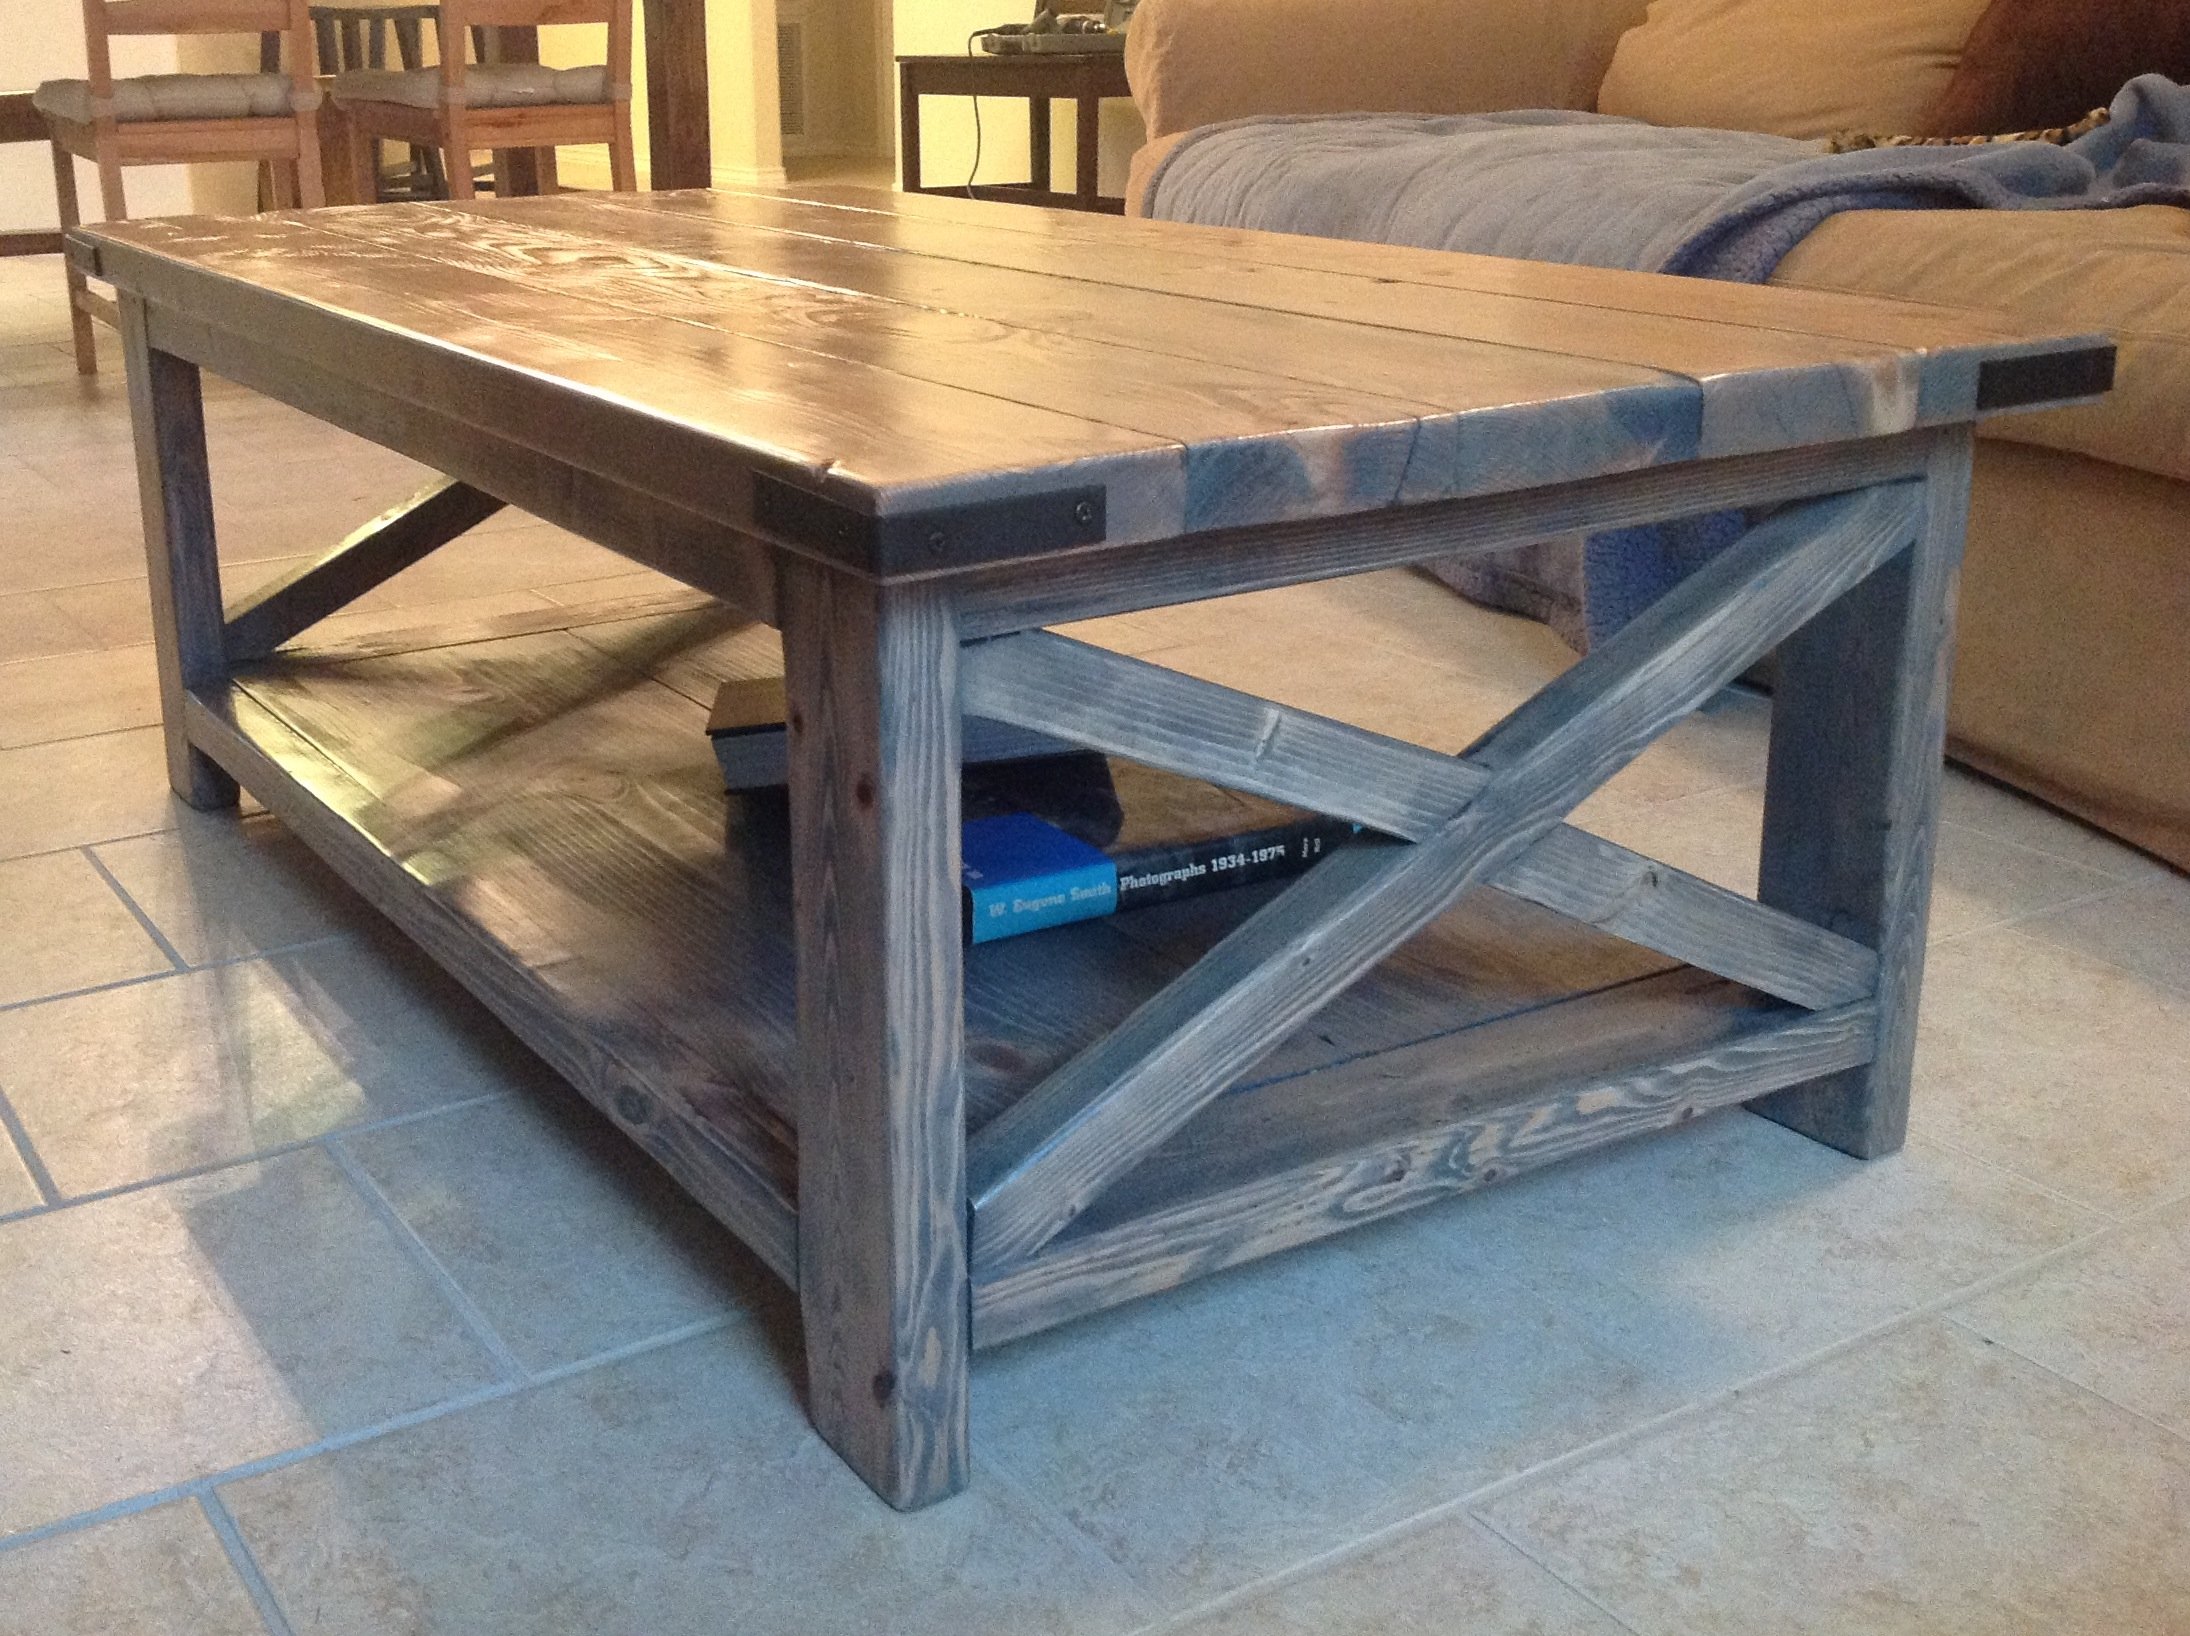
This project was quick and painless. I recommend for a beginners project (but expect to get frustrated over building the x's into the side though). I stained our table with the Minwax Classic Gray stain and used the Minwax water-based polyurethane to seal it. I realize that the stain is difficult to see but it is a beautiful stain that has turned into my go-to stain. The stain is not too gray and you can see the natural color of the wood through it. The photo gives the impression a glossy finish. In reality, it is more matte.
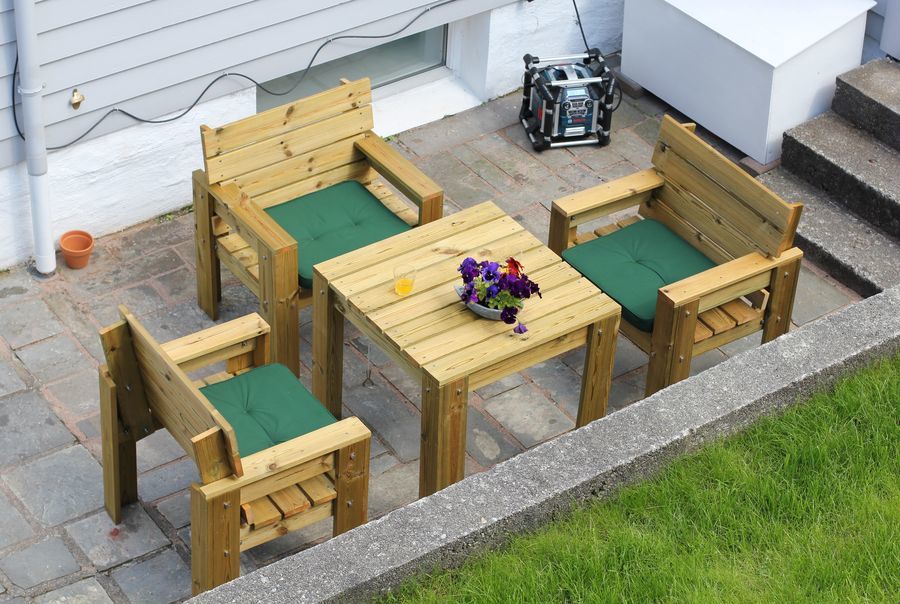
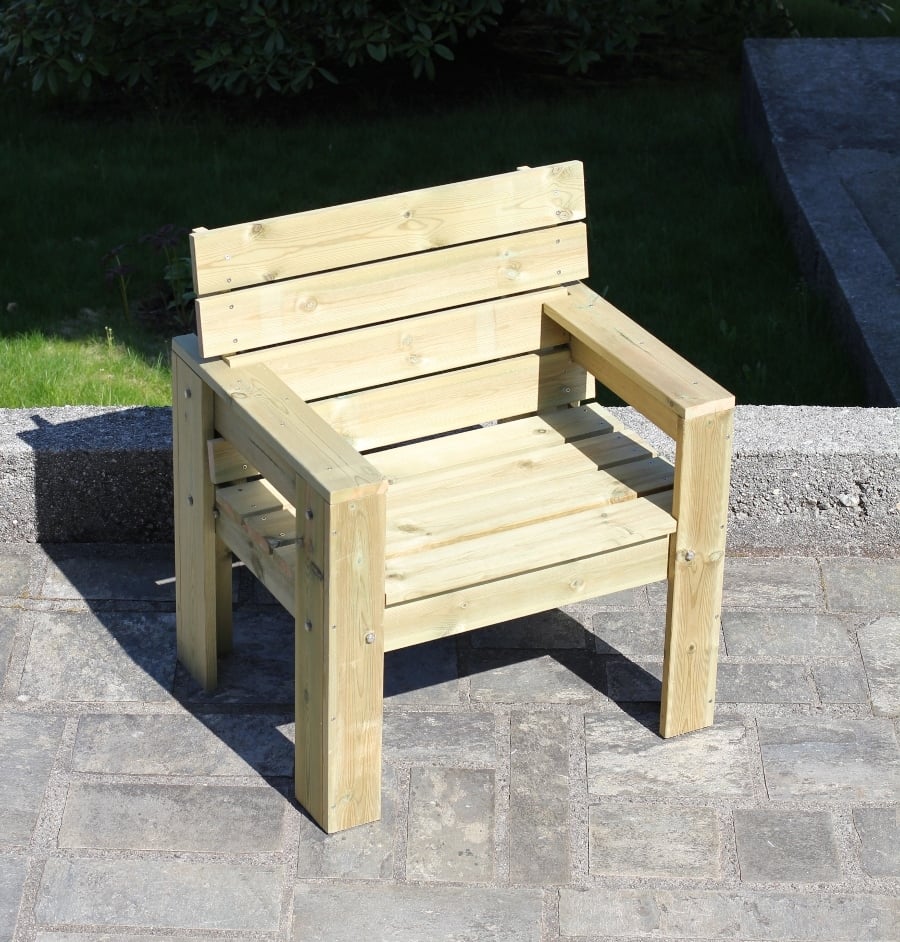
It was after getting to know your website and seeing all your nice craftsgirlship we decided to make our own garden furniture.
We are wery satisfied with the results, thanks a lot for the inspiration!
PS) Time investment = per item.